

Page 1

Register your product and get support at
www.philips.com/welcome
ID555
EN Telephone Answering Machine
!
Warning
Use only rechargeable batteries.
Charge the handset for 24 hours before use.
Page 2

Page 3

Table of contents
1Important 3
1.1 Power requirements 3
1.2 Safety Information 3
1.3 Conformity 4
1.4 Using GAP standard
compliance 4
1.5 Recycling and disposal 4
1.6 Electric, Magnetic and
Electromagnetic Fields
(“EMF”) 5
2 Your phone 6
2.1 What’s in the box 6
2.2 Overview of your phone 7
2.3 Display icons 9
2.4 Overview of the base
station 10
3 Getting started 11
3.1 Connect the base station 11
3.2 Install your phone 11
3.3 Welcome mode 12
3.4 Menu structure 14
4 Using your phone 17
4.1 Make a call 17
4.2 Answer a call 18
4.3 End a call 18
5Use more of your
phone 19
5.1 Switch the handset on/off 19
5.2 Keypad lock/unlock 19
5.3 Text or number entry 19
5.4 Call in progress 19
5.5 Call waiting 20
5.6 Caller Line Indentification 20
5.7 Using your Phonebook 21
5.8 Using the Redial list 23
5.9 Using the Call log 24
5.10 Using the Intercom 25
5.11 Paging 26
6 Personal settings 27
6.1 Change the Handset
Name 27
6.2 Handset Tones 27
6.3 Change the Display
Language 28
6.4 Set Contrast Level 28
6.5 Activate/Deactivate Auto
Hang-up 28
7 Clock and Alarm
settings 29
7.1 Set date and time 29
7.2 Set date/time format 29
Table of contents 1
Page 4

7.3 Set alarm 30
7.4 Set alarm tone 30
8Advanced settings 31
8.1 Easy Call 31
8.2 Activate/Deactivate
Conference mode 31
8.3 Call Barring 32
8.4 Change master PIN 32
8.5 Registration 33
8.6 Unregister a handset 34
8.7 Country Selection 34
8.8 Reset Unit 34
8.9 Default settings 35
8.10 Set Auto Prefix 35
8.11 Change Recall time 36
8.12 Change the Dial Mode
(country-dependent) 36
8.13 Set first ring 36
9 Network Services 38
9.1 Call Forward 38
9.2 Voice Mail 39
9.3 Info Service 39
9.4 Call Return 39
9.5 Cancel Call Back 40
9.6 Withhold ID 40
10 Telephone answering
machine (TAM) 41
10.1 Play 41
10.2 Delete all messages 43
10.3 Set the Answer mode 43
10.4 Personalised Outgoing
Message 43
10.5 Switch the Answering
Machine On/Off via
handset 44
10.6 Answering Machine
settings 45
10.7 Call Screening 46
11 Technical data 48
12 Frequently asked
questions 49
13 Index 52
2Table of contents
Page 5

• Use only with provided batteries:
1Important
Take time to read this user manual
before you use your phone. It
contains important information and
notes regarding your phone.
1.1 Power requirements
• This product requires an electrical
supply of 100-240 volts AC. In
case of power failure, the
communication can be lost.
• The Electrical network is classified
as hazardous. The only way to
power down the charger is to
unplug the power supply from the
electrical outlet. Ensure that the
electrical outlet is always easily
accessible.
• The voltage on the network is
classified as TNV-3
(Telecommunication Network
Voltages), as defined in the
standard EN 60-950.
!
Warning
To avoid damage or malfunction:
• Do not allow the charging
contacts or the battery to come
into contact with metal objects.
• Do not open it as you could be
exposed to high voltages.
• Never use any other battery than
the one delivered with the
product or recommended by
Philips: risk of explosion.
• Always use the cables provided
with the product.
Important 3
a) TCL, PL-043043, Li-ion
polymer battery, 3.7V 500mAH
b) Mcnair, MC-163-500, Li-ion
polymer battery, 3.7V 500mAH
• Use only with provided adaptor:
Base Station
a) Electronic Sales Ltd, IW507,
7.5V 500mA
b) Electronic Sales Ltd, TR5075G,
7.5V 500mA
Charger pod
a) Electonic Sales Ltd, TR1575G,
7.5V 150mA
b) Electonic Sales Ltd, IW157,
7.5V 150mA
1.2 Safety Information
• Handsfree activation could
suddenly increase the volume in
the earpiece to a very high level:
make sure the handset is not too
close to your ear.
• This equipment is not designed to
make emergency calls when the
power fails. An alternative has to
be made available to allow
emergency calls.
• Do not expose the phone to
excessive heat caused by heating
equipment or direct sunlight.
• Do not drop your phone or allow
objects to fall on your phone.
• Do not use any cleaning agents
containing alcohol, ammonia,
benzene, or abrasives as these may
harm the set.
Page 6

• Do not use the product in places
where there are explosive hazards.
• Do not let small metal objects
come into contact with the
product. This can deteriorate audio
quality and damage the product.
• Do not allow the charger to come
into contact with liquids.
• Active mobile phones in the
vicinity may cause interference.
About operating and storage
temperatures:
• Operate in a place where
temperature is always between 0
and 35º C (32 to 95º F).
• Store in a place where
temperature is always between 20 and 45º C (-4 to 113º F).
• Battery life may be shortened in
low temperature conditions.
1.3 Conformity
We, Philips declare that the product is
in compliance with the essential
requirements and other relevant
provisions of Directive 1999/5/EC.
This product can only be connected to
the analogue telephone networks of
the countries mentioned on the
packaging.
You can find the Declaration of
Conformity on www.p4c.philips.com.
1.4 Using GAP standard
compliance
The GAP standard guarantees that all
TM
GAP handsets and base
DECT
stations comply with a minimum
operating standard irrespective of
their make. Your handset and base
station are GAP compliant, which
means the minimum guaranteed
functions are: register a handset, take
the line, receive a call and dial. The
advanced features may not be
available if you use another handset
than an ID555 with your base station.
To register and use your ID555
handset with a GAP standard base
station of a different make, first
follow the procedure described in the
manufacturer’s instructions, then
follow the procedure described on
page 33.
To register a handset of another make
to the ID555 base station, place the
base station into registration mode
(page 33), then follow the procedure in
the manufacturer’s instructions.
1.5 Recycling and disposal
Disposal instructions for old
products:
The WEEE directive (Waste
Electrical and Electronic Equipment
Directive ; 2002/96/EC) has been put
in place to ensure that products are
recycled using best available
treatment, recovery and recycling
techniques to ensure human health
and high environmental protection.
Your product is designed and
manufactured with high quality
materials and components, which can
be recycled and reused.
Do not dispose of your old product
in your general household waste bin.
4Important
Page 7
Inform yourself about the local
separate collection system for
electrical and electronic products
marked by this symbol.
Use one of the following disposal
options:
• Dispose of the complete product
(including its cables, plugs and
accessories) in the designated
WEEE collection facilities.
• If you purchase a replacement
product, hand your complete old
product back to the retailer. He
should accept it as required by the
WEEE directive.
Disposal instructions for
batteries:
Batteries should not be
disposed of with general
household waste.
Packaging information:
Philips has marked the packaging with
standard symbols designed to
promote the recycling and appropriate
disposal of your eventual waste.
A financial contribution has been
paid to the associated national
recovery & recycling system.
The labelled packaging
material is recyclable.
1.6 Electric, Magnetic and Electromagnetic Fields (“EMF”)
1. Philips Royal Electronics
manufactures and sells many
consumer oriented products
which usually, as with any
electronic apparatus, have the
ability to emit and receive
electro magnetic signals.
2. One of Philips' leading Business
Principles is to take all necessary
health and safety precautions for
our products, to comply with all
applicable legal requirements
and to stay well within the EMF
standards applicable at the time
of producing the products.
3. Philips is committed to develop,
produce and market products
that cause no adverse health
effects.
4. Philips confirms that if its
products are handled properly
for their intended use, they are
safe to use according to
scientific evidence available
today.
5. Philips plays an active role in the
development of international
EMF and safety standards,
enabling Philips to anticipate
further developments in
standardisation for early
integration in its products.
Important 5
Page 8

2Your phone
Congratulations on your purchase and welcome to Philips!
To fully benefit from the support that Philips offers, register your product at
www.philips.com/welcome.
2.1 What’s in the box
Handset Base station Battery door
1 Li-ion
rechargeable battery
User manual Guarantee Quick Start Guide
Note
*You may find in the box the line adaptor delivered separately from the line
cable. In this case, you have to connect the line adaptor to the line cord first
before plugging the line cord to the line socket.
In multihandset packs, you will find one or more additional handsets, chargers
with power supply units and additional rechargeable batteries.
6Your phone
Power supply Line cord*
Page 9
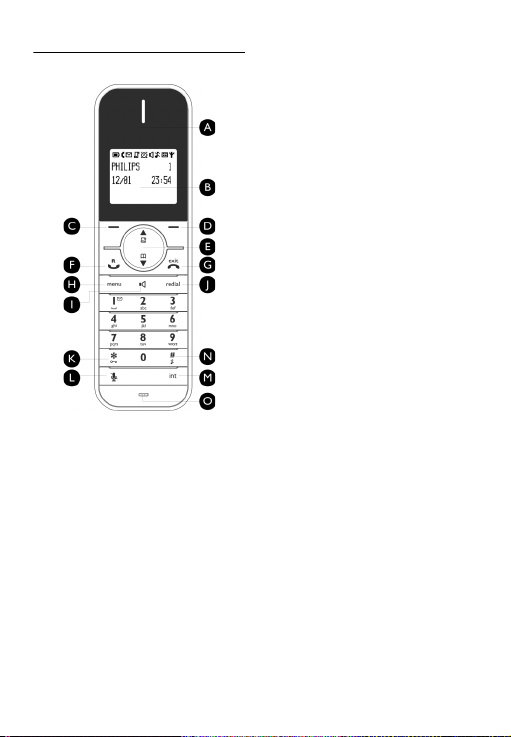
2.2 Overview of your phone
AEarpiece
BDisplay
See page 9 for an overview of the
display icons.
C Left Softkey
Select the function displayed on the
handset screen directly above it.
During a call: Initiate a second call,
consult phonebook or transfer a call.
Switch on the backlight.
D Right Softkey
Select the function displayed on the
handset screen directly above it.
Switch on the backlight.
m
>
E Navigation keys
In idle mode: Scroll up to access the
Call log and scroll down to access the
Phonebook.
During a call: Scroll up/down to
increase or decrease earpiece and
speaker volume.
In editing mode: Scroll up/down to go
to the previous character or next
character.
In other modes: Scroll up/down a
menu list or go to the previous or
next record in the Phonebook, Redial
list or Call log.
F Talk key
In idle mode: Answer an incoming
external or internal call.
During a call: Activate the recall
function.
In other modes: Dial the selected
number in the Phonebook, Redial list
or Call log.
G Hang-up key
In idle mode: Long press to switch on/
off the handset.
During a call: Hang up a call.
In other modes: Return to the idle
mode.
H Menu key
In idle mode: Go to the main menu.
I Loudspeaker key
In idle mode: Turn on the
loudspeaker and dial the number.
Answer an incoming call using
handsfree mode.
During a call: Toggle the loudspeaker
on/off.
:
r
e
M
v
Your phone 7
Page 10

J Redial key
In idle mode: Access the Redial list.
K Keypad lock key
In idle mode: Insert *. Long press to
lock/unlock the keypad.
During a call: Insert *.
L Mute key
During a call: Mute/Unmute the
handset microphone.
M Call transfer key & Intercom/
Conference key
In idle mode: Initiate an internal call.
During a call: Hold the line and page
another handset. Long press to start a
conference between internal and
external calls.
8Your phone
a
*
[
c
NRinger on/off key &
Pause key
In idle mode: Insert #. Long press to
turn the ringer on/off.
During a call: Insert #.
When predialling: Long press to insert
a pause marked “P”.
In editing mode: Long press to switch
between upper and lower case.
OMicrophone
P Loudspeaker
Q Battery door
Danger
Handsfree activation can suddenly
increase the volume in the earpiece
to a very high level. Make sure the
handset is not too close to your ear.
#
Page 11
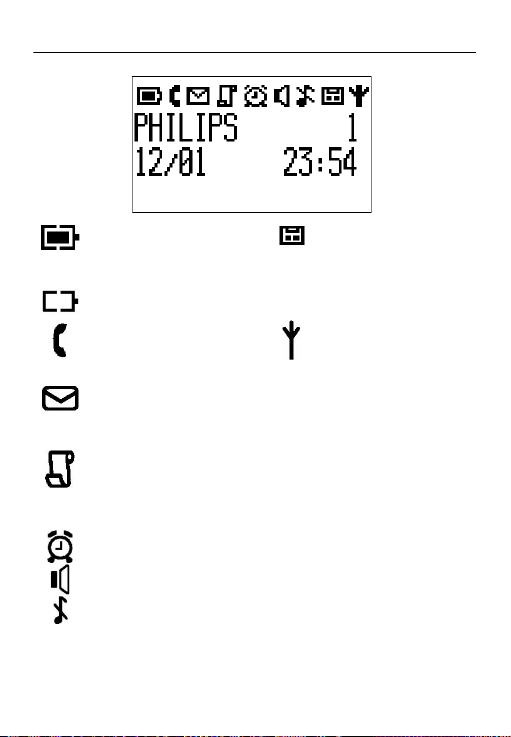
2.3 Display icons
Indicates that the battery
is fully charged. Icon blinks
during charge and when
the battery is low.
Indicates that the battery
is fully discharged.
Indicates that an external
call is connected or held.
Icon blinks when receiving
an incoming call.
Indicates new voice
messages are received.
Icon blinks when there are
unread messages.
Displays when there are
existing call log records or
when call log is accessed.
Icon blinks when there are
new missed calls.
Displays when the alarm
clock is activated.
Disp lays when the
loudspeaker is activated.
Disp lays when ringer off is
activated.
Your phone 9
Indicates that the
telephone answering
machine is activated. Icon
blinks when the memory
for answering machine
messages is full.
Indicates that the handset
is registered and within
range of the base station.
Icon blinks when the
handset is out of range or
is searching for a base.
Page 12
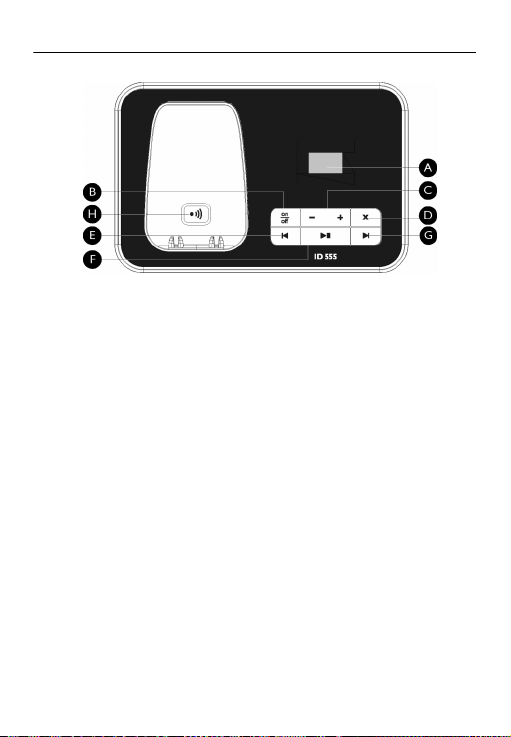
2.4 Overview of the base station
AMessage Counter
Blinking
: Indicates number of new
messages.
Steady
: Indicates number of old
messages.
2 bars flashing
no more memory left.
Indicates the volume level (L0 - L5)
when
Indicates the current message
number during playback.
B On/Off key
In idle mode, short press to switch on/
off the answering machine.
C Volume keys
Increase/Decrease speaker volume
during message playback.
There are 5 volume levels.
The call screening is activated if the
speaker volume is not set to off.
10 Your phone
: Indicates that there is
V is pressed.
o
V
D Delete key
Delete current message during
message playback.
Long press to delete all messages
when the answering machine is in idle
mode (unread messages will not be
deleted).
EPrevious message/
Replay message key
Go to previous message if pressed
twice during message playback.
Replay current message if pressed
once during message playback.
F Play/Stop key
Play phone messages (the first
recorded will be played first).
Stop message playback.
G Next message key
Skip to the next message during
message playback.
H Paging key
Page handset.
Long press to start registration
procedure.
x
l
P
R
C
Page 13
3 Getting started
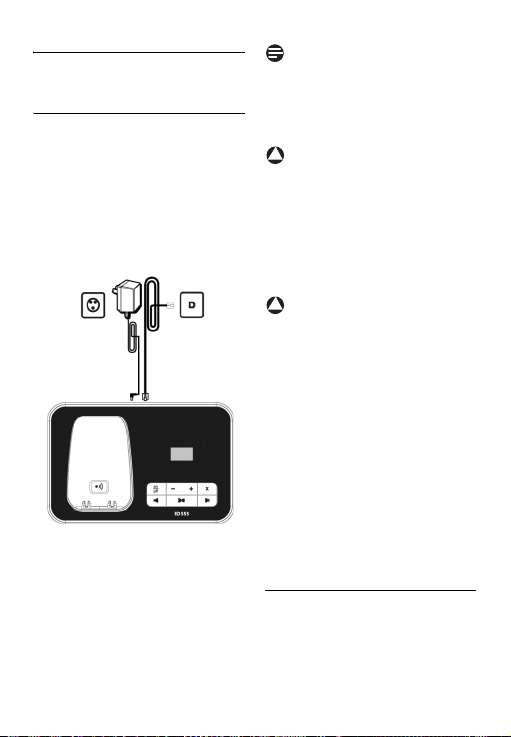
3.1 Connect the base station
Place the
1
2
3
base station in a central
location near the telephone line
socket and electricity socket.
Connect the line cord and the
power cable to their
corresponding connectors at
the bottom of the base station
as shown.
Connect the other end of the
line cord to the telephone line
socket and the other end of the
power cable to the electricity
socket.
Note
The line adaptor may not be attached
to the line cord. In this case, you have
to connect the line adaptor to the line
cord first before plugging the line
cord to the line socket.
!
Warning
Avoid placing the base station too
close to large metal objects such as
filing cabinets, radiators or electrical
appliances. This can impair the range
and sound quality. Buildings with thick
internal and external walls may impair
transmission of signals to and from
the base.
!
Warning
The base station does not have an
ON/OFF switch. Power is applied
when the power adaptor is plugged
into the unit and connected to the
electricity socket. The only way to
power down the unit is to unplug the
power adaptor from the electricity
socket. Therefore, ensure that the
electricity socket is easily accessible.
The power adaptor and telephone
line cord have to be connected
correctly, as incorrect connection
could damage the unit.
Always use the telephone line cord
supplied with the unit. Otherwise,
you may not get a dial tone.
3.2 Install your phone
Before using the handset, the
batteries have to be installed and fully
charged.
Getting started 11
Page 14

Place the handset on the charging
3.2.1 Install battery
!
Warning
Always use Li-ion rechargeable
battery supplied with your unit.
There could be risk of battery leakage
if you use other battery types.
Slide out the battery cover.
1
Place the batteries and replace
2
the cover.
3.2.2 Charge battery
!
Warning
The handset must be charged for at
least 24 hours before using it for the
first time.
When the battery level becomes low,
the low battery sensor alerts you by
sounding an audible tone and blinking
the battery icon.
If the battery level becomes
exceedingly low, the phone
automatically switches off and any
function in progress will not be saved.
12 Getting started
1
cradle of the base station. A
melody is emitted if the handset is
placed correctly.
The battery icon on the
2
display blinks during charge.
The battery icon becomes
3
steady when the handset is fully
charged.
Note
Optimal battery life is reached after 3
cycles of complete charging (over 15
hours) and discharging, allowing
approximately 12 hours of talk-time
and 150 hours of stand-by time.
3.3 Welcome mode
Note
Depending on your country, the
WELCOME
In this case, you are not required to
select your country/operator/
language settings.
In the case when
on the screen before you first use
your handset, you need to configure
it according to the country of use.
After charging it for a few minutes,
the word
various languages. Follow these steps
to configure your phone:
1
2
3
screen may not appear.
WELCOME
WELCOME
Press
WELCOME
screen.
Scroll
the associated language.
Press
your selection.
appears in
m
SELECT
when
appears on the
: to your country and
m
SELECT
to confirm
appears
Page 15

• The default line settings and
menu language for the selected
country will be automatically
configured.
• To set date/time, see “Set date
and time” on page 29.
Your phone is now ready for use.
Note
You can still make outgoing calls or
receive incoming calls without first
defining your country selection. The
welcome mode will display again after
the call.
Tip
You may change your country
settings anytime after the first
configuration. (see “Country
selection” in chapter 8.7)
If there are no key presses for 15
seconds, the handset will
automatically return to idle mode. It
will also return to idle mode
automatically when you place the
handset back on the base station.
Getting started 13
Page 16

3.4 Menu structure
The table below describes the menu tree of your phone. Press
mode to enter the main menu. Use navigation keys
menus and press left softkey
PHONEBOOK
PERSONAL SET
CLOCK & ALARM
m to enter each option.
NEW ENTRY
LIST
EDIT ENTRY
SELECT MELODY
DELETE ENTRY
DELETE ALL
DIRECT MEMORY KEY 1
HANDSET NAME
HANDSET TONES RING VOLUME
LANGUAGE
CONTRAST LEVEL 1/2/3/4/5
AUTO HANG-UP ON/OFF
SET DATE/TIME
SET FORMAT TIME FORMAT 12 HOURS/24 HOURS
ALARM OFF/ON ONCE/ON DAILY
ALAR M TONE MELODY 1/MELODY 2/MELODY 3
: to navigate within the
...
KEY 9
RING TONES
KEY BEEP ON/OFF
List of languages
DATE FORMAT DD/MM / MM/DD
M in idle
List of melodies
14 Getting started
Page 17
ADVANCED SET
NETW. SERVICES
EASY CALL MODE O N/OFF
NUMBER
CONFERENCE ON/OFF
CALL BARRING MODE ON/OFF
NUMBER NUMBER 1/NUMBER 2/
CHANGE PIN
REGISTRATION
UNREGISTER
COUNTRY
RESET
AUTO PREFIX DETECT DIGIT
PREFIX
RECALL TIME SHORT/MEDIUM/LONG
DIAL MODE TONE/PULSE
FIRST RING ON/OFF
CALL F ORWARD ACTIVATE/DEACTIVAT E/
CALL FWD BUSY ACTIVATE/DEACTIVATE/
CALL F WD UNANS ACTIVATE/DEACTIVATE/
VOICEMAIL/VOICEMAIL 2 CALL/SETTINGS
INFO 1/INFO 2 CALL/SETTINGS
CALL RETURN CALL/SETTINGS
CANCEL CALL BK CALL/ SETTINGS
WITHHOLD ID ACTIVATE/SETTINGS
CHANGE CODE
CHANGE CODE
CHANGE CODE
NUMBER 3/NUMBER 4
Getting started 15
Page 18

ANSWER MACHINE
PLAY
DELETE ALL
ANSWER ON/OFF
RECORD OGM ANSWER & REC.
ANSWER MODE ANSWER & REC.
SETTING S RING DELAY 3 RINGS/4 RINGS/5 RINGS/
During playback
ANSWER ONLY PLAY/RECORD OGM/
ANSWER ONLY
REMOTE ACCESS ACTIVATE/DEACTIV ATE
HS SCREENING ON/OFF
VOICE LANGUAGE
REPEAT/PREVIOUS/NEXT/
DELETE
PLAY/RECORD OGM/
DELETE
DELETE
6 RINGS/7 RINGS/8 RINGS/
ECONOMY
List of languages
16 Getting started
Page 19

4 Using your phone
4.1 Make a call
4.1.1 Predialling
Dial the number (maximum 24
1
digits).
r or v key.
Press
2
• The call is initiated.
Tip
You may insert a prefix number to
the beginning of your predial number,
see “Set Auto Prefix” on page 35 for
more information.
4.1.2 Direct dialling
Press
1
2
4.1.3 Call from redial list
1
2
3
The handset stores the last 20
numbers dialled. The last number
dialled will appear first in the redial
list. If the redial number matches a
phonebook entry, the name will be
displayed instead.
r or v key to take
the line.
Dial the number.
• The call is initiated.
Press
a key in idle mode.
Scroll
: to an entry in the
redial list.
r or v key.
Press
• The call is initiated.
Tip
4.1.4 Call from the call log
Press
1
2
3
4
You need to subscribe to Caller Line
Identification service to be able to see
the caller’s number or name in the
call log (see “Access Call log” on
page 24).
4.1.5 Call from the phonebook
1
2
3
Instead of scrolling
phonebook entries, you can press the
numeric key corresponding to the
first letter of the entry you wish to
locate. For example, pressing
will show the entries starting with A.
Pressing
entries starting with B, etc...
u in idle mode.
: to
Scroll
ANSWER MACHINE
m
respective sub-menus.
Scroll
Press
• The call is initiated.
Note
Press
Scroll
Press
• The call is initiated.
Tip
CALL LIST
SELECT
to enter the
: to an entry.
r or v key.
d in idle mode.
: to a phonebook entry.
r or v key.
: to browse the
2 again will show the
or
and press
2
Using your phone 17
Page 20

4.2 Answer a call
When the phone rings, press
• The call is established.
Note
Incoming call has priority over other
events. Whenever there is an
incoming call, other status in progress
such as phone setting, menu
navigation, etc will be aborted.
Danger
When the handset rings during an
incoming call, please do not hold the
handset too close to your ear, as the
volume of the ringing tone may
damage your hearing.
4.2.1 Handsfree answering
When the phone rings, press
• The handset loudspeaker is
activated.
Danger
Handsfree activation can suddenly
increase the volume in the earpiece
to a very high level. Make sure the
handset is not too close to your ear.
4.3 End a call
To end a conversation, press
Tip
AUTO HANG-UP
If
(see “Activate/Deactivate Auto
Hang-up” on page 28), you can simply
place the handset back to its base
station to end the call. This feature is
activated by default.
r key.
v key.
e key.
mode is activated
Note
The call duration will be displayed on
the handset screen for about 5
seconds.
18 Using your phone
Page 21

j k l 5 Λ
5 Use more of your
phone
5.1 Switch the handset on/off
Press and hold
to switch on/off the handset in idle
mode.
5.2 Keypad lock/unlock
Press and hold
to lock/unlock the keypad in idle mode.
5.3 Text or number entry
When you select a field in which you
can enter text, you can enter the
letters that are printed on the keys by
pressing the relevant key once or
several times. For example, to enter
the name “
1
2
3
4
The table below gives you the
character assignment during text or
number entry:
Keys Assigned characters
1
2
3
4
Use more of your phone 19
e key for 3 seconds
* key for 2 seconds
PAUL
”:
7 once:
Press
Press 2 once:
Press 8 twice:
Press 5 three times:
space 1 @ _ # = < > ( )
& £ $ ¥ [ ] { } ¤ §
a b c 2 à ä ç å æ
d e f 3 è é ∆ Φ
g h i 4 ì Γ
P
PA
PAU
€
PAUL
5
m n o 6 ñ ò ö
6
p q r s 7 β Π Θ Σ
7
t u v 8 ù ü
8
w x y z 9 ø Ω Ξ Ψ
9
. 0 , / : ; " ’ ! ¡ ? ¿ * + - % \
0
^ ~ |
Long press to switch
between upper and
#
lower case.
*
*
Tip
>
BACK
Press
digit or character entered.
5.4 Call in progress
Some options are available to you
during a call. The available options are:
5.4.1 Adjust earpiece volume
During a call, press
VOLUME 1
5.4.2 Mute/Unmute
When the microphone is muted, your
correspondent cannot hear you.
During a call, press
1
off the microphone.
Press
2
microphone.
to delete the last
: to se le ct fr om
to
VOLUME 3
microphone
.
[ to turn
[ again to turn on the
Page 22

5.4.3 Activate/Deactivate
loudspeaker mode
Danger
Handsfree activation can suddenly
increase the volume in the earpiece
to a very high level. Make sure the
handset is not too close to your ear.
During a call, press
1
activate the loudspeaker mode.
v key again to return
Press
2
to normal mode.
5.4.4 Adjust loudspeaker
volume
During a call in handsfree mode,
: to select from
press
VOLUME 5
to
5.4.5 Initiate a second call
During a call, press
select
current call on hold and initiate a
second external call. Then enter the
phone number of the second call.
5.4.6 Consult phonebook
During a call, press
select
review phonebook entries.
5.5 Call waiting
If you have subscribed to Call Waiting
service, the earpiece will emit a beep
tone to inform you that there is a
second incoming call. The number or
name of the second caller will also be
20 Use more of your phone
.
(subscription dependent)
START 2ND CALL
PHONEBOOK
v key to
VOLUME 1
>
OPTION
to put the
>
OPTION
to access and
displayed on your phone if you have
subscribed to Caller Line Identification
service (CLI). Please contact your
network provider for more
information on this service
• When you receive a second
incoming call while on the phone,
press
r + 2 to put the
current call on hold and answer
the second call
OR
r + 1 to end the
• Press
current call and answer the
second call.
r + 2 subsequently to
• Press
toggle between these 2 calls.
The above operations may be
different according to your network.
Note
The call waiting indicator displays
during 40 seconds. The missed call
information will be displayed in the
and
call log. (see “Access Call log” on
page 24)
5.6 Caller Line Identification
Caller Line Identification (CLI) is a
special service that you may subscribe
from your network operator. If you
and
have subscribed to CLI service, the
identity of the caller (caller’s number
or name) will be displayed on your
handset during an incoming call. If you
have not subscribed to this service,
or if the ca lle r h as cho se n to wi thho ld
the number, the identity of the caller
will not be displayed. Please contact
your network provider for more
information on this service.
.
Page 23

5.7 Using your Phonebook
Your phone can store up to 200
phonebook memories, including 10
direct access memories
9). Depending on your country,
Key 1 and Key 2 may be preset to the
voice mail number and information
service number of your network
operator respectively. Each
phonebook entry can have a
maximum of 24 digits for the phone
number and 14 characters for name.
5.7.1 Access phonebook
Press
1
2
3
Instead of scrolling
phonebook entries, you can press the
numeric key corresponding to the
first letter of the entry you wish to
locate. For example, pressing
will show the entries starting with A.
Pressing
entries starting with B, etc...
d in idle mode and scroll
: to browse the phonebook.
• The phonebook entries are
listed in alphabetical order.
To view the details of a
phonebook entry, scroll
the phonebook entry and press
m
SELECT
To dial a number from the
phonebook, scroll
phonebook entry and press
Tip
2 again will show the
(1 to
: to
.
: to the
r.
: to browse the
2
5.7.2 Store a contact in the
phonebook
Press
1
2
3
You cannot store a new phonebook
entry when the memory is full. In this
case, you have to delete existing entries
to make space for new entries.
5.7.3 Edit a phonebook entry
1
2
3
4
M in idle mode, press
m
SELECT
PHONEBOOK
m
NEW ENTRY
Enter the name of the contact
(maximum 14 characters) and
press
Enter the phone number
(maximum 24 digits) and press
m
• A validation tone is emitted.
Tip
Press
m
PHONEBOOK
EDIT ENTRY
m
Scroll
wish to edit and press
m
Press
letters one by one, enter the
name and press
Press
digits one by one, enter the phone
number and press
• A validation tone is emitted.
to enter
, press
SELECT
to enter
.
m
OK
.
OK
.
M in idle mode, press
SELECT
to enter
, scroll : to
and press
SELECT
.
: to select an entry you
SELECT
.
>
CLEAR
to erase the
m
OK
>
CLEAR
.
to erase the
m
OK
.
Use more of your phone 21
Page 24

5.7.4 Set melody
With this function you can
personalize the melody played when
someone in the phonebook calls you.
Note
You need to subscribe to Caller Line
Identification service to be able to
benefit from this feature.
M in idle mode, press
Press
1
m
SELECT
PHONEBOOK
SELECT MELODY
m
Scroll
2
wish to set the melody for and
press
Press
3
the melody for the contact.
Scroll
4
press
• A validation tone is emitted.
5.7.5 Delete a phonebook entry
Press
1
m
PHONEBOOK
DELETE ENTRY
m
Scroll
2
wish to delete and press
m
DELETE?
3
screen.
Press
• A validation tone is emitted.
22 Use more of your phone
to enter
, scroll : to
SELECT
: to select an entry you
m
m
: to the melody list and
m
M in idle mode, press
SELECT
SELECT
: to select an entry you
SELECT
m
and press
.
SELECT
.
EDIT
to set or change
SELECT
to confirm.
to enter
, scroll : to
and press
.
.
is displayed on the
OK
to confirm deletion.
5.7.6 Delete the phonebook list
Press
1
2
5.7.7 Direct Access Memory
You can store up to 9 direct access
memories (Keys
press on the keys in idle mode will
automatically dial the stored phone
number. Depending on your country,
Key 1 and Key 2 may be preset to the
voice mail number and information
service number of your network
operator respectively.
5.7.7.1 Store Direct Access
1
2
3
4
M in idle mode, press
m
SELECT
SELECT
m
OK
to enter
, scroll : to
and press
.
is displayed on the
to confirm
PHONEBOOK
DELETE ALL
m
DELETE ALL?
screen.
Press
deletion.
• A validation tone is emitted.
1 to 9). A long
Memory
Press
M in idle mode, press
m
SELECT
PHONEBOOK
DIRECT MEMORY
m
Scroll
to 9) and press
• The stored number is displayed
Press
menu options.
Press
EDIT
to enter
, scroll : to
SELECT
: to select a key (Keys 1
(if any).
m
m
.
and press
.
m
OK
to display the
SELECT
to select
SELECT
.
Page 25

: to the entry you wish
Scroll
5
to store as direct access
memory and press
to view the details.
Press
6
5.7.7.2 Delete Direct Access
1
2
3
4
5.8 Using the Redial list
The redial list stores the last 20
numbers dialled. A maximum of 24
digits can be displayed for each entry.
5.8.1 Access Redial list
1
m
• A validation tone is emitted.
Memory
Press
M in idle mode, press
m
SELECT
PHONEBOOK
DIRECT MEMORY
m
SELECT
: to select a key (Keys 1
Scroll
to 9) and press
• The stored number is displayed
(if any).
m
Press
menu options.
: to
Scroll
m
SELECT
• A validation tone is emitted.
Press
a in idle mode and scroll
: to browse the redial list.
• The last number dialled will
appear first in the redial list. If
the redial number matches a
phonebook entry, the name will
be displayed instead.
SELECT
to enter
, scroll : to
.
m
SELECT
DELETE
.
m
SELECT
to confirm.
and press
SELECT
.
to display the
and press
Note
To return to idle mode, press
5.8.2 Save a redial number
into the phonebook
Press
1
2
3
4
Press
digit or character entered.
5.8.3 Delete a redial number
1
2
3
5.8.4 Delete the redial list
1
2
a in idle mode and
: to select an entry.
scroll
Press
m
SELECT
details.
a and press
Press
m
SELECT
SAVE NUMBER
Enter the name of the contact
(maximum 14 characters) and
m
press
Edit the number if necessary and
m
press
• A validation tone is emitted.
Note
>
CLEAR
Press
a in idle mode and
: to select an entry.
scroll
a, scroll : to
Press
and press
DELETE?
screen.
Press
m
deletion.
• A validation tone is emitted.
Press
a in idle mode.
a, scroll : to
Press
and press mOK.
ALL
to select
.
OK
.
OK
.
to delete the last
m
OK
.
is displayed on the
OK
again to confirm
e key.
to view the
DELETE
DELETE
Use more of your phone 23
Page 26

DELETE ALL?
3
screen.
Press
deletion.
• A validation tone is emitted.
5.9 Using the Call log
The call log offers quick access to the
CALL LIST
events. If you have subscribed to
Caller Line Identification service, the
identity of the caller (caller’s number
or name) will be displayed together
with the date and time of the call*.
CALL LIST
The
entries of the incoming calls. The calls
(missed and received) are displayed in
chronological order with the most
recent call at the top of the list. When
the call list is empty, the screen
displays
Note
* If the identity of the caller is
withheld or the network does not
provide the date and time
information, then only the date and
time of the call will be displayed.
If you have not subscribed to Caller
Line Identification service, there will
not be any information displayed in
the call log.
5.9.1 Access Call log
Press
1
CALL LIST
to
MACHINE
m
respective sub-menus.
is displayed on the
m
OK
again to confirm
and
ANSWER MACHINE
records the last 50
LIST EMPTY
.
u in idle mode, scroll :
and
ANSWER
and press
SELECT
to enter the
5.9.2 Save a call list entry into
the phonebook
Press
1
2
3
4
5.9.3 Delete a call list entry
1
2
3
5.9.4 Delete the call list
1
2
3
u in idle mode and scroll
: to select an entry. Press
m
SELECT
Press
m
SAVE NUMBER
Enter the name of the contact
(maximum 14 characters) and
press
Edit the number (if necessary)
and press
• A validation tone is emitted.
Press
m
LIST
call list and press
Scroll
and press
Press
• A validation tone is emitted.
Press
m
LIST
call list and press
Scroll
press
DELETE ALL?
screen.
Press
• A validation tone is emitted.
to view the details.
a and press
SELECT
to select
.
m
OK
.
m
OK
.
u in idle mode, press
SELECT
to enter
, scroll : to an entry in the
: to
m
u in idle mode, press
SELECT
, scroll : to an entry in the
: to
m
m
m
DELETE ENTRY
m
SELECT
OK
to confirm deletion.
to enter
m
DELETE ALL
SELECT
.
is displayed on the
OK
to confirm deletion.
CALL
OPTION
.
CALL
OPTION
and
.
.
24 Use more of your phone
Page 27

5.10 Using the Intercom
!
Warning
Intercom and call transfer is only
possible with handsets registered to
the same base station.
This feature is only available when
there are at least 2 registered
handsets. It allows you to make free
internal calls, transfer external calls
from one handset to another and use
the conference option.
5.10.1 Intercom another
handset
Note
If the handset does not belong to
ID555 range, this function may not be
available.
1
2
5.10.2 Transfer an external call
1
c key in idle mode.
Press
• Intercom is established
immediately if there are only 2
registered handsets.
If there are more than 2
registered handsets, the handset
numbers which are available for
intercom will be displayed.
: to the specific handset
Scroll
you want to call and press
m
SELECT
.
to another handset
During the call, press and hold
c key to put the external call
on hold (the caller can no longer
hear you).
• Intercom is established
immediately if there are only 2
registered handsets.
If there are more than 2
2
registered handsets, the handset
numbers which are available for
intercom will be displayed.
: to the specific handset
Scroll
you want to call and press
m
SELECT
• The called handset rings.
Press
3
handset to answer the internal
call, where both internal callers
can talk.
• Intercom is established.
Press
4
handset to transfer the external
call to the called handset.
• The external call is transferred.
Note
If there is no answer from the called
handset, press
the external call.
5.10.3 Answer an external call
When there is an incoming
1
external call during an intercom,
a new call tone is emitted.
To end the intercom and answer
2
the external call, press
handset will ring. Press
answer the external call.
• Connection with the external
.
r key on the called
e key on the first
c key to resume
during intercom
e. The
r to
call is established.
Use more of your phone 25
Page 28

Tip
To put the internal call on hold and
answer the incoming external call,
r key.
press
5.10.4 Switch between an
internal and external call
To switch between an internal or
external call, press
5.10.5 Establish a three-party
conference call
The conference call feature allows
one external call to be shared with
two handsets (in intercom). The
three parties can share the
conversation and no network
subscription is required.
During the call, press
1
put the external call on hold (the
caller can no longer hear you).
• Intercom is established
immediately if there are only 2
registered handsets.
If there are more than 2
2
registered handsets, the handset
numbers which are available for
intercom will be displayed.
Scroll
you want to call and press
m
• The called handset rings.
Press
3
handset to answer the internal
call, where both internal callers
can talk.
• Intercom is established.
26 Use more of your phone
c key.
c key to
: to the specific handset
SELECT
.
r key on the called
Press and hold
4
seconds on the first handset to
start the three-party
conference.
•
CONFERENCE
displayed on the screen once
the conference call is
established.
Tip
If
CONFERENCE
(see “Activate/Deactivate
Conference mode” on page 31), a
three-party conference call is
automatically established if the
second handset takes the line when
there is already an external call in
progress.
5.11 Paging
The paging feature enables you to
locate a missing handset if the handset
is in range and contains charged
batteries.
Press
1
station.
• All the registered handsets start
to ring.
Once retrieved, press any key
2
on the handset to end the
paging.
Note
If there are no key presses within 30
seconds, the handset and base station
will automatically return to idle
mode.
Tip
To stop paging, press
base station again.
c key for 2
will be
mode is activated
p key on the base
p key on the
Page 29

HANDSET TONES
m
6 Personal settings
6.1 Change the Handset Name
You can name the handset and display
the handset name in idle mode. The
default handset name of your handset
is
PHILIPS
.
M in idle mode, scroll
Press
1
: to
PERSONAL SET
m
SELECT
press
m
SELECT
HANDSET NAME
Edit the handset name
2
(maximum 12 characters) and
press
• A validation tone is emitted and
6.2 Handset Tones
6.2.1 Set the Ring Volume
Danger
When setting the ring volume of your
phone or when the handset rings
during an incoming call, please do not
hold the handset too close to your
ear as the volume of the ringing tone
may damage your hearing.
There are 5 levels of ring volume,
including progressive volume.
Press M in idle mode, scroll
1
: to
press
Personal settings 27
to enter
m
OK
the screen returns to previous
menu.
PERSONAL SET
m
SELECT
, press
.
to confirm.
, scroll : to
and
and
SELECT
again to enter
Scroll : to your desired
2
volume level
to confirm.
• A validation tone is emitted and
the screen returns to previous
menu.
Note
When the volume is set to off, the icon
will be displayed on the screen.
6.2.2 Set the Ring Melody
There are 15 polyphonic ring
melodies available on your handset.
1
2
3
6.2.3 Activate/Deactivate Key
A single beep is emitted when a key is
pressed. You can enable or disable
the key beep. By default, the key beep
is
1
M in idle mode, scroll
Press
: to
PERSONAL SET
m
press
HANDSET TONES
m
SELECT
and press m
TONES
: to your desired
Scroll
melody to play the melody.
m
Press
melody.
• A validation tone is emitted and
the screen returns to previous
menu.
Beep
ON
.
Press
M in idle mode, scroll
: to
PERSONAL SET
and press
. Press m
RING VOLUME
and press mOK
SELECT
, scroll : to
and press
. Scroll : to
SELECT
OK
to set the ring
SELECT
and
RING
and
.
Page 30

m
SELECT
press
HANDSET TONES
m
SELECT
BEEP
and press m
: to
Scroll
2
press
m
• A validation tone is emitted and
the screen returns to previous
menu.
6.3 Change the Display Language
Your handset can support different
display languages, depending on your
country selection during the
WELCOME mode.
1
2
Once the display language is set, the
option menus on the handset will
switch to display in the selected
language immediately. However, it
will not change the language of the
predefined outgoing message of your
answering machine.
M in idle mode, scroll
Press
: to
PERSONAL SET
m
press
LANGUAGE
m
SELECT
: to your desired
Scroll
language and press
to confirm.
• A validation tone is emitted and
the screen returns to previous
menu.
Tip
, scroll : to
and press
. Scroll : to
ON or OFF
OK
to confirm.
SELECT
, scroll : to
and press
.
m
SELECT
and
and
SELECT
KEY
.
6.4 Set Contrast Level
There are 5 contrast level options
LEVEL 1, LEVEL 2, LEVEL 3, LEVEL 4
(
LEVEL 5
or
level is
1
2
6.5 Activate/Deactivate Auto
This function enables you to end a call
automatically by simply replacing the
handset on the base station. By
default, the Auto Hang-up feature is
ON
1
2
). The default contrast
LEVEL 2
.
M in idle mode, scroll
Press
: to
PERSONAL SET
m
SELECT
press
CONTRAST
m
SELECT
: to your desired
Scroll
contrast level (
2
,
LEVEL 3, LEVEL 4
and press
confirm.
• A validation tone is emitted and
the screen returns to previous
menu.
Hang-up
.
M in idle mode, scroll
Press
: to
PERSONAL SET
m
press
AUTO HANG-UP
m
SELECT
: to
Scroll
press
m
• A validation tone is emitted and
the screen returns to previous
menu.
, scroll : to
and press
.
LEVEL 1, LEVEL
m
SELECT
SELECT
, scroll : to
and press
.
ON or OFF
SELECT
to confirm.
or
and
LEVEL 5
to
and
and
)
28 Personal settings
Page 31

Please check the date & time settings
7 Clock and Alarm
settings
This feature allows you to set the
date, time and alarm settings for your
phone. The default date and time is
01/01
and
00:00
respectively.
7.1 Set date and time
Press
1
2
3
An error tone will be emitted if an
invalid digit is entered in the date/
time fields.
Hour: 00 to 12; Minute: 00 to 59
Date: 01 to 31; Month: 01 to 12
If your phone is connected to an ISDN
line through an adaptor, the date &
time may be updated after each call.
The availability of date & time update is
dependent on your network provider.
Clock and Alarm settings 29
M in idle mode, scroll
: to
CLOCK & ALARM
m
OK
SELECT
to enter
.
m
2 to select
OK
to confirm.
, press
SET
OK
.
A
P
(pm) if the time
press
m
DATE/TIME
The last stored date is displayed.
Enter the current date (DD/MM)
and press
The last stored time is displayed.
Enter the current time (HH:MM).
Press
7 to select
is in 12 hours format. Press
m
• A validation tone is emitted.
Note
!
Warning
and
(am) or
in your ISDN system or contact your
network provider.
7.2 Set date/time format
You can set your preferred date/time
format for your phone. The default
DD/MM
and
format is
7.2.1 Set time format
Press
1
2
3
7.2.2 Set date format
1
2
3
M in idle mode, scroll
: to
m
press
FORMAT
m
SELECT
m
Press
FORMAT
• The current setting is displayed.
: to select time format
Scroll
display (
and press
• A validation tone is emitted and
the screen returns to previous
menu.
Press
M in idle mode, scroll
: to
m
press
FORMAT
m
SELECT
: to enter
Scroll
FORMAT
• The current setting is displayed.
: to select date format
Scroll
display (
m
press
• A validation tone is emitted and
the screen returns to previous
menu.
24 HOURS
CLOCK & ALARM
OK
, scroll : to
and press
.
OK
to enter
.
12 HOURS
m
OK
to confirm.
CLOCK & ALARM
OK
, scroll : to
and press
.
and press mOK.
DD/MM
or MM/DD) and
OK
to confirm.
or
24 HOURS
DATE
and
TIME
and
.
SET
SET
)
Page 32

7.3 Set alarm
Press
1
2
3
The alarm tone and alarm icon
will only sound/blink for 1 minute
when the alarm time is reached. To
mute the alarm tone, simply press any
key on the handset.
7.4 Set alarm tone
1
2
M in idle mode, scroll
: to
CLOCK & ALARM
m
OK
press
ALARM
Scroll
ON DAILY
m
If you select
DAILY
for the alarm and press
select
(pm) if the time is in 12 hours
format. Press
confirm.
• A validation tone is emitted and
the screen returns to previous
menu.
Note
Press
: to
press
ALARM TONE
m
Scroll
MELODY 2
press
• A validation tone is emitted and
the screen returns to previous
menu.
, scroll : to
and press m
: to
OFF, ON ONCE
and press
SELECT
.
ON ONCE
, enter the time (HH:MM)
A
(am) or 7 to select P
M in idle mode, scroll
CLOCK & ALARM
m
OK
, scroll : to
SELECT
.
: to
MELODY 1
or
m
SELECT
m
OK
to
and press
MELODY 3
to confirm.
and
SELECT
or
or
ON
2 to
and
,
and
.
30 Clock and Alarm settings
Page 33

8.1.3 To change Easy Call
8 Advanced
settings
8.1 Easy Call
When activated, the Easy Call feature
enables you to dial a number by
pressing any key on your handset.
This feature is very useful for direct
access to emergency services.
You can enter up to 24 digits for easy
call number.
8.1.1 To activate Easy Call
mode
Press
1
2
3
4
8.1.2 To deactivate Easy Call
1
2
Advanced settings 31
M in idle mode, scroll
: to
ADVANCED SET
press
m
SELECT
m
SELECT
CALL
Press
MODE
Scroll
m
Enter the Easy Call number and
press
• A validation tone is emitted.
Long press
mode has been activated
before).
Scroll
m
to enter
.
m
SELECT
.
: to
ON
SELECT
to confirm.
m
OK
mode
M (when Easy Call
: to
OFF
SELECT
to confirm.
, press
EASY
to enter
and press
to confirm.
and press
and
number
Press
1
2
3
8.2 Activate/Deactivate
When conference mode is activated,
you can initiate a three-party
conference call with a second handset
registered to your base station
automatically if the second handset
takes the line when there is already an
external call in progress.
The default setting for this mode is
1
2
M in idle mode, scroll
: to
ADVANCED SET
m
SELECT
press
m
SELECT
to enter
.
CALL
: to
Scroll
m
• The last stored Easy Call
Enter the easy call number
(maximum 24 digits) and press
m
• A validation tone is emitted and
Press
: to
press
CONFERENCE
m
Scroll
press
• A validation tone is emitted and
NUMBER
SELECT
.
number is displayed (if any).
OK
to confirm.
the screen returns to previous
menu.
Conference mode
M in idle mode, scroll
ADVANCED SET
m
SELECT
SELECT
.
: to
ON
m
SELECT
the screen returns to previous
menu.
and
, press
EASY
and press
and
, scroll : to
and press
or
OFF
to confirm.
ON
and
.
Page 34

8.3 Call Barring
Call barring enables you to restrict
selected handsets from dialling a phone
number beginning with certain digits.
You can set up to 4 different barring
numbers, with each number containing
up to 4 digits.
8.3.1 To activate/deactivate
Call Barring
Press
1
2
By default, the master PIN is 0000.
3
4
8.3.2 To modify Call Barring
1
2
32 Advanced settings
M in idle mode, scroll
: to
ADVANCED SET
m
SELECT
press
CALL BARRING
m
SELECT
Enter the master PIN when
prompted and press
confirm.
Note
Press
MODE
Scroll
press
• A validation tone is emitted and
Press
: to
press
CALL BARRING
m
Enter the master PIN when
prompted and press
confirm.
.
m
SELECT
.
: to
ON
m
SELECT
the screen returns to previous
menu.
number
M in idle mode, scroll
ADVANCED SET
m
SELECT
SELECT
.
and
, scroll : to
and press
m
OK
to enter
or
OFF
and
to confirm.
and
, scroll : to
and press
m
OK
to
to
Note
By default, the master PIN is 0000.
3
4
5
If a restricted number is dialled, the
call will not be connected. When this
happens, the phone emits an error
tone and returns to idle mode.
8.4 Change master PIN
The master PIN is used for setting call
barring, registration/unregistration of
handsets and for accessing the
answering machine remotely. The
default master PIN number is 0000.
The maximum length of the master PIN
is 4 digits. Your handset will prompt
you whenever the PIN is required.
The default PIN code is preset to
0000. If you change this PIN code,
keep the PIN details in a safe place
where you have easy access to them.
Do not lose the PIN code.
1
: to
NUMBER
Scroll
m
SELECT
: to
Scroll
NUMBER 2, NUMBER 3
NUMBER 4
m
Enter the barring number
(maximum 4 digits) and press
m
• A validation tone is emitted and
Note
Note
Press
: to
and press
SELECT
OK
to confirm.
the screen returns to previous
menu.
M in idle mode, scroll
ADVANCED SET
.
NUMBER 1
.
and press
,
or
and
Page 35

m
SELECT
press
CHANGE PIN
m
SELECT
Enter the current master PIN
2
when prompted and press
m
OK
to confirm.
• The PIN entered will be shown
as asterisks (*) on the screen.
Enter the new PIN and press
3
m
OK
.
Enter the new PIN again and
4
If you forget your PIN, you will need to
reset your phone to its default settings.
See next section “Reset Unit” for more
details.
8.5 Registration
If you wish to register an additional
handset or if you have inadvertently
unregistered your phone handset and
want to re-register it, follow the
procedure described below. This is the
procedure for registering ID555
handsets.The procedures may vary
according to the handset you want to
register. In this case, please refer to the
manufacturer of the additional handset.
Additional handsets must be
registered to the base unit before you
can use them. Up to 5 handsets can
be registered to one base station.
m
press
change.
• A validation tone is emitted and
the screen returns to previous
menu.
Note
, scroll : to
and press
.
OK
to confirm PIN
The master PIN is required before you
can register or unregister handsets.
Note
By default, the master PIN is 0000.
To register your handset
manually:
The Master PIN is required before you
can register or unregister handsets.
Note
By default, the Master PIN is 0000.
On the base station, press and
1
p for approximately 5
hold
seconds. The base station emits
a beep when it is ready to accept
registration.
On the handset, press
2
If no action is taken on the handset
within 10 seconds, the registration
procedure will be aborted. If this
happens, repeat Step 1.
3
By default, the Master PIN is 0000.
4
If no base is found within a certain
period, the handset returns to idle
mode.
: to
scroll
m
and press
: to
REGISTRATION
m
SELECT
press
Note
Enter the Master PIN when
prompted and press
confirm.
Note
WAITING_ _
screen.
Note
M key,
ADVANCED SET
SELECT
, scroll
and
.
m
OK
to
is displayed on the
Advanced settings 33
Page 36

8.6 Unregister a handset
Press
1
2
By default, the master PIN is 0000.
3
If no action is taken on the handset
within 15 seconds, the unregistration
procedure will be aborted and the
handset returns to idle mode.
To unregister a handset that does not
belong to the ID555 range, you can
only use the ID555 handset to
unregister it.
8.7 Country Selection
The availability of this menu is
dependent on your country.
You can select another country
different from the one chosen during
WELCOME mode.
1
34 Advanced settings
M in idle mode, scroll
: to
ADVANCED SET
m
SELECT
press
UNREGISTER
m
SELECT
Enter the master PIN when
prompted and press
confirm.
Note
Scroll
number to unregister and press
m
• A validation tone is emitted to
Note
Press
: to
press
.
: to select the handset
SELECT
.
indicate successful unregistration
and the screen shows
UNREGISTERED
M in idle mode, scroll
ADVANCED SET
m
SELECT
, scroll : to
and press
m
.
, scroll : to
and
OK
and
to
COUNTRY
m
Scroll
2
choice and press
confirm.
• A validation tone is emitted and
Note
Once the country is selected, the
default line settings for the selected
country will be applied to the phone
automatically (e.g. Recall time, Dial
mode, Language, etc).
8.8 Reset Unit
You can reset your phone to its
default settings with this feature.
!
Warning
Upon reset, all your personal settings,
call log and redial list entries will be
deleted and the phone will return to
its default settings. However, your
phonebook as well as the unread
messages of your answering machine
will remain unchanged after reset.
Note
You may have to configure your
phone once again. In this case the
WELCOME mode will appear again
after the reset. (go to chapter 3.3)
Press
1
: to
press
RESET
RESET?
2
screen. Press
confirm.
and press
SELECT
.
: to the country of your
the screen returns to previous
menu.
m
OK
to
M in idle mode, scroll
ADVANCED SET
m
SELECT
and press m
is displayed on the
, scroll : to
m
OK
and
SELECT
to
.
Page 37

• A validation tone is emitted.
• The unit is reset to its default
settings (see “Default settings”
on page 35).
8.9 Default settings
Ringer Volume LEVEL 2
Ringer Melody FLICK
Earpiece
Volume
Speaker
Volume
Key Beep ON
Contrast LEVEL 2
Auto Hang-up ON
Alarm clock OFF
Barring mode OFF
Easy call OFF
Handset Name PHILIPS
Date/Time 01/01/2008;
Master PIN 0000
Conference OFF
Answering Machine
Answer Mode ANSWER &
Number of
rings before
answer
Outgoing
Messages
Handset
screening
Base speaker LEVEL 5
VOLUME 3
VOLUME 3
00:00
REC.
5
Predefined for
ANSWER &
REC. mode
OFF
Remote access DEACTIVATED
8.10 Set Auto Prefix
This feature allows you to define a prefix
number to be added to the beginning of
a number during predialling (see
“Predialling” on page 17). You can also
use this feature to add a detect string to
match and replace the first few digits of
the number during predialling.
You can enter up to a maximum of 5
digits for the detect string and 14 digits
for the auto prefix number.
Note
The use of your ID555 cannot be
guaranteed with all types of PABX.
1
2
3
4
M in idle mode, scroll
Press
: to
ADVANCED SET
m
SELECT
press
AUTO PREFIX
m
SELECT
DETECT DIGIT
the screen.
• The last stored detect string is
Enter a detect string number
(maximum 5 digits) and press
m
PREFIX
screen.
• The last stored prefix number is
.
displayed (if any).
OK
to confirm.
is displayed on the
displayed (if any).
and
, scroll : to
and press
is displayed on
Advanced settings 35
Page 38

Enter the prefix number
5 1
(maximum 14 digits) and press
m
OK
to confirm.
• A validation tone is emitted and
the screen returns to previous
menu.
Note
If no detect string (blank) is entered,
the prefix number will be
automatically added to the predial
number after
For numbers starting with *, # or a
pause (P), the prefix number will not
be added to the predial number after
r key is pressed.
8.11 Change Recall time
Recall time (or dial delay) is the time
delay by which the line will be
disconnected after you press
key. It can be set to short, medium
or long.
The default value of recall time that
is preset in your handset should be
the best suited for your country
network and therefore you should
not need to change it.
This setting is useful when using
network services. The use of some
services accessed with [
r + 2] (call waiting, call
[
forward...) will depend on your recall
time setting. Please contact your
network provider for more details on
this feature.
36 Advanced settings
r key is pressed.
Note
r + 1],
2
8.12 Change the Dial Mode
The default value for dial mode that is
preset in your handset should be the
best suited for your country network
and therefore you should not need to
change it.
1
r
2
8.13 Set first ring
When this function is set to Off, the
first ring from a voice call will not
sound. This is particularly useful in
countries where calling line identity is
sent after the first ring. Consequently,
the phones in the house will not ring
when a message arrives.
M in idle mode, scroll
Press
: to
ADVANCED SET
m
SELECT
press
RECALL TIME
m
SELECT
Scroll
or
to confirm.
• A validation tone is emitted and
Press
: to
press
DIAL MODE
m
Scroll
and press m
confirm.
• A validation tone is emitted and
.
: to
SHORT, MEDIUM
LONG
and press m
the screen returns to previous
menu.
(country-dependent)
M in idle mode, scroll
ADVANCED SET
m
SELECT
and press
SELECT
.
: to
TONE or PULSE
the screen returns to previous
menu.
, scroll : to
and press
, scroll : to
SELECT
and
SELECT
and
to
Page 39

M in idle mode, scroll
Press
1
: to
ADVANCED SET
m
SELECT
press
FIRST RING
m
SELECT
Scroll
2
: to
m
press
• A validation tone is emitted and
the screen returns to previous
menu.
and press
.
ON
OK
to confirm.
, scroll : to
or
OFF
and
and
Advanced settings 37
Page 40

9 Network Services
This menu provides a convenient
means for you to access, activate or
deactivate some network services
that are country/subscription
dependent. Contact your network
provider for more information about
these services.
The default numbers and values that
are preset in your phone should be
the best suited for your country
network and therefore you should
not need to change them.
9.1 Call Forward
There are 3 call forwarding options
available: Unconditional Call
Forwarding, When Busy and When
Unanswered.
9.1.1 Activate Call Forward
Note
When this feature is activated,
depending on the call forwarding
option you have set, your incoming
calls will be forwarded to the number
of your choice.
1
2
M in idle mode, scroll
Press
: to
NETW. SERVICES
press
m
SELECT
: to the type of call
Scroll
forwarding option you wish to
CALL FORWARD
set (
FWD BUSY
UNANS
/
CALL FWD
) and press m
.
and
/
CALL
SELECT
Enter the number that you wish
3
the call to be forwarded to and
press
m
OK
• The number for that selected
When the number has been
4
dialled, press
idle mode.
9.1.2 Deactivate Call Forward
Press
1
: to
press
Scroll
2
forwarding option you wish to
set (
FWD BUSY
UNANS
Scroll
3
press
• The number for that selected
When the number has been
4
dialled, press
idle mode.
9.1.3 Change codes
Press
1
: to
press
Scroll
2
forwarding option you wish to
set (
FWD BUSY
UNANS
Scroll
3
and press
.
the number for forwarding.
.
service will be dialled.
e to return to
M in idle mode, scroll
NETW. SERVICES
m
SELECT
.
: to the type of call
CALL FORWARD
/
CALL FWD
) and press m
: to
DEACTIVATE
m
SELECT
to confirm.
service will be dialled.
e to return to
M in idle mode, scroll
NETW. SERVICES
m
SELECT
: to the type of call
CALL FORWARD
: to
.
/
CALL FWD
) and press m
CHANGE CODE
m
SELECT
and
/
CALL
SELECT
and
and
/
CALL
SELECT
to enter
.
.
38 Network Services
Page 41

m
OK
Press
4
9.2 Voice Mail
This feature allows the caller to leave
a voice message when you are unable,
or do not wish to take a call yourself.
The availability of this feature is
dependent on your country and your
subscription with your network
provider. Charges often apply for you
to retrieve messages, as these are
stored by the network rather than on
the handset itself. Contact your
network provider for more
information about this feature.
9.2.1 Set up Voice Mail
Press
1
: to
press
VOICEMAIL
and press m
Scroll
2
press
Modify the voice mail number
3
and press
9.2.2 Activate Voice Mail
Press
1
: to
press
VOICEMAIL
and press m
Press
2
• The number for that selected
service will be dialled.
to confirm.
number
M in idle mode, scroll
NETW. SERVICES
m
SELECT
, scroll : to
or
VOICEMAIL 2
SELECT
SETTINGS
.
OK
.
.
: to
m
SELECT
m
M in idle mode, scroll
NETW. SERVICES
m
SELECT
, scroll : to
or
VOICEMAIL 2
SELECT
m
SELECT
to
.
CALL
and
and
and
.
When the number has been
3
dialled, press
idle mode.
9.3 Info Service
9.3.1 Activate Info Service
Press
1
: to
press
INFO 1
m
Press
2
• The number for that selected
When the number has been
3
dialled, press
idle mode.
9.4 Call Return
9.4.1 Set up Call Return
Press
1
: to
press
CALL RETURN
m
Scroll
2
press
Enter the required number for
3
call back and press
e to return to
M in idle mode, scroll
NETW. SERVICES
m
SELECT
INFO 2
.
SELECT
, scroll : to
and press
to
CALL
or
SELECT
m
service will be dialled.
e to return to
M in idle mode, scroll
NETW. SERVICES
m
SELECT
, scroll : to
: to
m
and press
.
SETTINGS
SELECT
.
SELECT
m
and
and
and
OK
.
.
Network Services 39
Page 42

9.4.2 Activate Call Return
Press
1
2
3
9.5 Cancel Call Back
9.5.1 Set up Cancel Call Back
1
2
3
9.5.2 Activate Cancel Call
1
2
M in idle mode, scroll
: to
NETW. SERVICES
m
SELECT
press
CALL RETURN
m
SELECT
.
m
SELECT
Press
• The number for that selected
service will be dialled.
When the number has been
dialled, press
idle mode.
Press
: to
press
CANCEL CALL BK
m
Scroll
press
Enter the required number for
cancelling of call back and press
m
Press
: to
press
CANCEL CALL BK
m
Press
• The number for that selected
service will be dialled.
e to return to
M in idle mode, scroll
NETW. SERVICES
m
SELECT
SELECT
.
: to
SETTINGS
m
SELECT
OK
.
Back
M in idle mode, scroll
NETW. SERVICES
m
SELECT
SELECT
.
m
SELECT
and
, scroll : to
and press
to
CALL
and
, scroll : to
and press
and
.
and
, scroll : to
and press
to
CALL
.
.
When the number has been
3
dialled, press e to return to
idle mode.
9.6 Withhold ID
9.6.1 Set up Withhold ID
Press
1
2
3
9.6.2 Activate Withhold ID
1
2
3
M in idle mode, scroll
: to
NETW. SERVICES
m
SELECT
press
WITHHOLD ID
m
SELECT
.
: to
Scroll
press
Enter the required number for
withholding ID and press
m
Press
: to
press
WITHHOLD ID
m
Press
ACTIVATE
• The number for that selected
When the number has been
dialled, press
idle mode.
SETTINGS
m
SELECT
OK
.
M in idle mode, scroll
NETW. SERVICES
m
SELECT
SELECT
.
m
SELECT
.
service will be dialled.
e to return to
, scroll : to
and press
and
.
, scroll : to
and press
to
and
and
40 Network Services
Page 43

10 Telephone answering machine (TAM)
Your phone features an answering machine that records unanswered calls
when it is activated. The answering machine can store up to 99 messages. The
maximum recording time is 30 minutes (including all your personalised
outgoing messages).
You can use the control keys on the base station to perform the basic functions
of the answering machine such as message playback, deleting messages and
adjustment of volume on the base station. For a description of each function of
the control keys on the base station, please see “Overview of the base station”
on page 10 for more details.
You can also use the answer machine menu on the handset to access the
answering machine functions. There is also a menu to set the answering
machine options.
To begin, press
machine (if it is switched off). Alternatively, you may switch on the answering
machine via your handset (see “Switch the Answering Machine On/Off via
handset” on page 44).
10.1 Play
10.1.1 Answering machine control keys on the base station
Buttons on the
base station
o
P
x
l
R
o key on your base station to switch on the answering
Description
Press to turn on/off the answering machine
Press to play the message or stop the message playback
Press to delete the current message
Press and hold for two seconds to delete all the old
messages in idle mode
Press once to replay current message during message
playback
Press twice to go back to previous message during
message playback
Press to skip the current message and play the next
message
Telephone answering machine (TAM) 41
Page 44

V
C
10.1.2 Playback of new messages via handset
The last recorded message is played first via the loudspeaker. When all new
messages have been played, the answering machine will stop and the icon
stops blinking.
Press
1
m
SELECT
During playback, you can:
2
Adjust volume Press
Stop playback Press
Repeat Press
Next message Press
Previous message Press
Delete message Press
Switch the playback
to earpiece
Tip
You can also playback messages by
u key in idle mode, scroll :
pressing
to
ANSWER MACHINE
m
SELECT
PLAY
to enter
Decrease (-) or increase (+) speaker volume during
message playback
Press to page the handset
Press and hold for more than three seconds to start
registration procedure
M in idle mode, scroll : to
, press m
SELECT
ANSWER MACHINE
again to enter
: key.
>
STOP
to end the message.
m
OPTION
, scroll : to
to play the message again.
OPTION
, scroll : to
.
OPTION
, scroll : to
SELECT
.
OPTION
, scroll : to
.
10.1.3 Playback of old messages
via handset
Old messages can only be played if
there are no new messages. The first
recorded message will be played first
and the next message will be played
automatically until there are no more
messages.
, press m
menu.
m
SELECT
m
m
SELECT
m
m
press
m
m
SELECT
Press
v key.
and press
SELECT
again
PLAY
and press
menu.
REPEAT
and press
NEXT
and press
PREVIOUS
DELETE
and press
and
42 Telephone answering machine (TAM)
Page 45

M in idle mode, scroll
Press
1
: to
ANSWER MACHINE
m
SELECT
press
m
SELECT
PLAY
menu.
Press
2
3
10.2 Delete all messages
Unread messages will not be deleted.
Messages deleted cannot be
recovered.
1
2
10.3 Set the Answer mode
There are 2 answer modes available:
Answer only, and Answer & record.
Telephone answering machine (TAM) 43
m
• The first recorded message will
start to play until the last
recorded message.
During message playback, you
can press m to select the
available options (see options
available under “Playback of new
messages via handset” on
page 42).
Note
!
Warning
M in idle mode, scroll
Press
: to
ANSWER MACHINE
m
press
DELETE ALL
m
SELECT
DELETE ALL?
screen. Press
deletion of all your messages.
• A validation tone is emitted and
the screen returns to previous
menu.
, press
again to enter
SELECT
.
SELECT
, scroll : to
and press
.
is displayed on the
m
OK
to confirm
By default, the answer mode is
and
ANSWER & REC.
correspondent can leave a message
on the answering machine.
This can be changed to
mode, by which your
ONLY
correspond cannot leave any
messages on the answering machine.
Press
1
: to
press
ANSWER MODE
m
Scroll
2
ANSWER ONLY
m
• The answer mode is set.
Note
Depending on the answer mode you
have selected, the appropriate default
outgoing message is played once the
answering machine picks up an
incoming call. The language of the
default outgoing message depends on
the country selected in Welcome
and
mode (see page 12).
10.4 Personalised Outgoing
10.4.1 Record your Personalised
This personal outgoing message
replaces the default ones. To revert to
the default outgoing message, simply
delete the personal outgoing message
you have recorded. If you are not
satisfied with the recorded outgoing
, by which your
M in idle mode, scroll
ANSWER MACHINE
m
SELECT
SELECT
.
: to
ANSWER & REC.
SELECT
.
Message
Outgoing Message
ANSWER
, scroll : to
and press
and press
and
or
Page 46

message, simply record a new message
to overwrite the old one.
1
2
3
4
The maximum length of an outgoing
message is 2 minutes.
10.4.2 Playback your
1
2
3
M in idle mode, scroll
Press
: to
ANSWER MACHINE
m
SELECT
press
RECORD OGM
m
SELECT
Scroll
ANSWER ONLY
m
SELECT
Scroll
press
• The recording starts.
Press
recording.
• The recorded message will be
played and the screen returns to
previous menu once it has
finished playing. To stop the
playback, press
Note
Personalised Outgoing
Message
Press
: to
press
RECORD OGM
m
SELECT
Scroll
ANSWER ONLY
or
m
SELECT
Press
PLAY
and press
.
: to
ANSWER & REC.
and press
.
: to
RECORD OGM
m
SELECT
m
SAVE
to save your
M in idle mode, scroll
ANSWER MACHINE
m
SELECT
and press
.
: to
ANSWER & REC.
.
m
SELECT
.
and
, scroll : to
and
.
m
OK
.
and
, scroll : to
and press
to enter
or
• The previously recorded
outgoing message (if any) is
played, and then the screen
returns to previous menu.
10.4.3 Delete your Personalised
Outgoing Message
M in idle mode, scroll
Press
1
: to
ANSWER MACHINE
m
SELECT
press
RECORD OGM
m
SELECT
Scroll
2
ANSWER ONLY
or
m
SELECT
Scroll
3
m
SELECT
• The recorded message is
deleted.
10.5 Switch the Answering Machine On/Off via handset
Press
1
: to
press
ANSWER ON/OFF
m
SELECT
Scroll
2
press
• A validation tone is emitted and
the screen returns to previous
menu.
and press
.
: to
ANSWER & REC.
.
: to
DELETE
.
M in idle mode, scroll
ANSWER MACHINE
m
SELECT
.
: to
ON
or
m
SELECT
and
, scroll : to
and press
and press
and
, scroll : to
and press
OFF
and
to confirm.
44 Telephone answering machine (TAM)
Page 47

10.6 Answering Machine settings
10.6.1 Ring Delay
This is the number of rings before the
answering machine answers and
starts playing your greeting message.
You can set the answering machine to
start playing your greeting message
3
to 8 rings or
after
default ring delay is
Press
1
: to
press
SETTINGS
m
SELECT
to enter
Scroll
2
delay setting (
ECONOMY
m
SELECT
• A validation tone is emitted and
the screen returns to previous
menu.
Tip
Economy mode can save you the cost
of a long-distance call when you
check your messages remotely. If
there are new messages in your
answering machine, the outgoing
message will start playing after 3
rings. If there are no new messages,
the outgoing message will be played
after 5 rings. Hence, if you want to
check if you have any messages
without incurring call charges, you
can hang up the call after the 4th ring.
ECONOMY
5
M in idle mode, scroll
ANSWER MACHINE
m
SELECT
and press
, press m
RING DELAY
: to your desired ring
3
to 8 rings or
) and press
to confirm.
. The
.
and
, scroll : to
SELECT
.
10.6.2 Remote Control Access
If you are far away from home and
want to check the messages on your
answering machine, you can make use
of the remote access feature to check
your messages using another phone.
Once you dial your home number
from any other phone and enter the
remote access code*, you will be able
to obtain the messages on your
answering machine. The keyp ad on the
phone you use to dial acts like the
functions on your answering machine
where you can play or delete
messages, turn your answering
machine on or off, etc.
Note
This feature is deactivated by default.
* Remote access code (which is the
same as your master PIN code)
prevents any unauthorised remote
access of your answering machine.
See chapter 10.6.2.2 for more
information.
10.6.2.1 Activate/Deactivate
1
2
Remote Access
Press
M in idle mode, scroll
: to
ANSWER MACHINE
press
m
SELECT
SETTINGS
m
REMOTE ACCESS
m
Scroll
DEACTIVATE
m
SELECT
SELECT
: to
SELECT
and press
, scroll : to
.
ACTIVATE
and press
to confirm.
, scroll : to
and press
and
or
Telephone answering machine (TAM) 45
Page 48

• A validation tone is emitted and
the screen returns to previous
menu.
10.6.2.2 Controlling the
1
2
If there are no new messages, the
answering machine will not play any
messages.
Answering Machine
from an external call
From another phone, dial home.
• The answering machine answers
and starts playing your greeting
message.
Within 8 seconds, press # key on
the phone you use to dial and
enter the remote access code
(same as your master PIN code).
• If the remote access code is
incorrect, an error tone is
emitted. Enter the access code
again until you get the correct
number.
• If you did not enter the remote
access code within 10 seconds,
the answering machine will drop
the line immediately.
• If the remote access code (same
as your master PIN code) is
correct, you will hear a
validation tone.
• New messages (if any), will be
played automatically and stop
when there are no more new
messages.
Note
The following table indicates how to
access the below features during
remote access procedure:
Press To
Press once to replay the
1
current message or twice
to go to previous
message
Play old messages
2
Go to next message
3
Delete current message
6
Turn on the answering
7
machine
Stop current message
8
playback
Turn off the answering
9
machine
Enter the remote access
#
code if the answering
machine is on and
outgoing message is
playing
10.7 Call Screening
10.7.1 Call screening on
handset
If Handset call screening is set to
you can hear incoming messages via
the handset speaker and decide
whether or not to take the call. To
take the call, press
This feature is deactivated by default.
r.
ON
,
46 Telephone answering machine (TAM)
Page 49

M in idle mode, scroll
Press
1
: to
ANSWER MACHINE
m
SELECT
press
SETTINGS
m
SCREENING
m
Scroll
2
press
• A validation tone is emitted and
10.7.2 Call screening on base
You can use
adjust the speaker's volume during
call screening. The lowest volume
level turns call screening off.
10.7.3 Set Voice Language
This menu allows you to change the
language of the predefined outgoing
message. The availability of this menu
and the language options available are
country dependent.
Press
1
: to
press
SETTINGS
m
VOICE LANGUAGE
m
• The current selected language is
and press
SELECT
, scroll : to
and press
SELECT
.
: to
ON
or
m
SELECT
the screen returns to previous
menu.
+ and - to
M in idle mode, scroll
ANSWER MACHINE
m
SELECT
and press
SELECT
, scroll : to
SELECT
.
highlighted.
and
, scroll : to
HS
OFF
and
.
and
, scroll : to
and press
: to
Scroll
2
language and press
to confirm.
• A validation tone is emitted and
the screen returns to previous
menu.
your preferred
m
SELECT
Telephone answering machine (TAM) 47
Page 50

11 Technical data
Display
• Progressive LCD backlight
General telephone features
• Dual mode caller name & number
identification
• 15 polyphonic ringer melodies
Phonebook list, Redial list and
Call log
• Phonebook list with 200 entries
• Redial list with 20 entries
• Call log with 50 entries
Battery
• 1 Li-ion polymer 500mAh battery
Radio specifications
• Frequence Band: 1880 - 1900 MHz
• Maximum output power: 250 mW
Power Consumption
• Power consumption at idle mode:
around 800mW
Weight and dimensions
• Handset: 74 grams
• 144 x 13 x 43 mm (H x D x W)
• Base: 143 grams
• 70 x 85 x 128 mm (H x D x W)
Temperature range
• Operation: Between 0 and 35º C
(32 to 95º F).
• Storage: Between -20 and 45º C (4 to 113º F).
48 Technical data
Relative humidity
• Operation: Up to 95% at 40°C
• Storage: Up to 95% at 40°C
Page 51

12 Frequently asked
questions
www.philips.com/support
In this chapter, you will find the most
frequently asked questions and
answers about your phone.
Connection
The handset does not switch on!
• Charge the battery: Put the handset
on the base station to charge. After
a few moments, the phone will
switch on.
The handset does not charge!
• Check charger connections.
icon is not blinking during
charge!
• Battery is full: There is no need to
charge the battery.
• Bad battery contact: Adjust the
handset slightly.
• Dirty contact: Clean the battery
contact with a dry cloth.
• Wrong batteries installed: Use
only Li-ion rechargeable battery
supplied with your unit There
could be risk of battery leakage if
you use alkaline batteries or other
battery types.
Communication is lost during a
call!
• Charge the battery
• Move closer to the base station.
The phone is "Out of range"!
• Move closer to the base station.
WARNING BATT.
handset!
• Use only Li-ion rechargeable
battery supplied with your unit.
There could be risk of battery
leakage if you use alkaline batteries
or other battery types.
Set-up
SEARCHING...
handset and icon is blinking!
• Move closer to the base station.
• Make sure that your base station is
on.
• Reset your unit and restart
handset registration (see
“Registration” on page 33).
Sound
Handset does not ring!
Check that the
off, and make sure icon is
set to
not displayed on the screen (see “Set
the Ring Volume” in chapter 6.2.1).
is displayed on
is displayed on
RING VOLUME
is not
Frequently asked questions 49
Page 52

Caller cannot hear me at all!
Microphone may be muted: During a
call, press
b.
There’s no dialling tone!
• No power: Check the
connections.
• Battery is empty: Charge the
battery.
• Move closer to the base station.
• Wrong line cable used: Use the
line cable provided.
• Line adaptor is required: Connect
the line adaptor to the line cord.
Caller cannot hear me clearly!
• Move closer to the base station.
• Move the base station at least one
metre away from any electronic
appliances.
Frequent noise interference on
my radio or television!
• Move the base station as far away
as possible from the electrical
appliances.
Product behaviour
Keypad does not work!
• Unlock your keypad: Long press
* in idle mode.
The handset warms up when
making a long call!
• This is a normal behavior. The
handset consumes energy while
calling.
The handset cannot be
registered to the base station!
• Maximum number of handsets (5)
has been reached. To register a
new handset, unregister an
existing handset.
• Remove and replace the handset
battery.
• Try again by disconnecting and
connecting the base station power
supply and follow the procedure
to register a handset.
• Make sure that you have entered
the correct PIN code. If you have
not changed it, by default it is 0000.
Caller’s number is not displayed!
• Service is not activated: Check
your subscription with your
network operator.
I cannot change the settings of
my voice mail
• Operator voice mail is managed by
your operator and not the phone
itself. Please contact your
operator should you want to
change the settings.
Poor audio quality and the
antenna icon is blinking!
• The indoor and outdoor range of
the phone is up to 50 metres and
300 metres respectively. When
the handset moves beyond the
operation range, the antenna icon
will blink.
50 Frequently asked questions
Page 53

My handset keeps going into idle
mode!
• If there are no key presses for 30
seconds, the handset will
automatically return to idle mode.
It will also return to idle mode
automatically when you place the
handset back on the base station.
Phonebook entry cannot be
stored and
displayed!
• Delete an entry to free memory
The Master PIN code is wrong!
• The default master PIN is 0000.
• If it has been changed before, and
MEMORY FULL
is
before saving your contact again.
you cannot remember the new
one, reset the handset to revert to
the default master PIN code (see
“Reset Unit” in chapter 8.8).
The answering machine does
not record messages!
• Memory is full: Delete your old
messages.
ANSWER ONLY
•The
been activated. Deactivate
ANSWER ONLY
ANSWER & REC.
the Answer mode” in chapter
10.3).
Remote control access does not
work!
• Activate Remote Control Access
(see “Remote Control Access” in
chapter 10.6.2).
mode has
and activate
mode (see “Set
The phone hangs up during
remote access!
• You have taken more than 8
seconds to enter the Master PIN
code. Enter the code again within
8 seconds.
Answering machine stops before
the recording is finished!
• Memory is full: Delete your old
messages.
Frequently asked questions 51
Page 54

13 Index
A
Accessories 6
30
Alarm
Alarm tone
Answer a call
Answer an external call
Answering Machine mode
Auto Answer
30
18
28
25
43
C
Call Barring 32
Call Forward
Call in progress
Call log
Call Return
Call Screening
Call waiting
Cancel Call Back
Charge battery
Clock and Alarm
Conference call
Connect base station
Contrast
Country Selection
17, 24
39
20
28
38
46
19
12
26
40
29
11
34
D
Date and time 29
Default settings
Delete a call list entry
Delete a phonebook entry
Delete a redial number
Delete call list
Delete redial list
Dial Mode
Direct dialling
Display icons
52 Index
36
37
24
22
23
24
23
17
9
E
Edit a phonebook entry 21
18
End a call
F
First ring 36
H
Handset Name 27
Handset Tones
Handsfree answering
27
18
I
Install battery 12
Install phone
Intercom
25
11
K
Key Tone 27
Keypad lock/unlock
19
L
Language 28
LED indicator
Loudspeaker mode
Loudspeaker volume
10
20
20
M
Make a call 17
Master PIN
Menu structure
Mute
19
32
14
O
Overview of the base station 10
Overview of your phone
7
Page 55

P
Page 42
26
Paging
Personalised Outgoing Message
Phonebook
Predialling
17, 21
17
R
Recall time 36
Recycling and disposal
17, 23
Redial list
Registration
Remote Control Access
34
Reset Unit
45
Ring Delay
Ring Melody
Ring Volume
33
27
4
45
27
S
Save a redial number 23
Store a contact
Switch calls
Switch handset on/off
26
21
19
T
Telephone answering machine 41
Text or number entry
19
U
Unmute 19
34
Unregister
V
Voice Language 47
39
Voice Mail
21, 22
Voice mail
19
Volume
W
Withhold ID 40
43
Index 53
Page 56

© 2008 Koninklijke Philips Electronics N.V.
All rights reserved
Reproduction in whole or in part is prohibited
without the written consent of the copyright owner
Document number: 3111 285 48571
Printed in China
 Loading...