

Page 1

FlexCare Platinum
Page 2
Page 3
1
2
3
4
5
6
7
8
9
10
11
1
12
13
Page 4

Page 5

ENGLISH 6
FRANÇAIS 18
42
53
Sonicare FlexCare Platinum
Page 6

6
ENGLISH
Introduction
Congratulations on your purchase and welcome to Philips! To fully
benet from the support that Philips offers, register your product at
www.philips.com/welcome.
Important
Read this user manual carefully before you use the appliance and save it
for future reference.
Danger
- Keep the charger and/or sanitiser away from water. Do not place or
store it over or near water contained in a bathtub, washbasin, sink etc.
Do not immerse the charger and/or sanitiser in water or any other
liquid. After cleaning, make sure the charger and/or sanitiser is
completely dry before you connect it to the mains.
Warning
- The mains cord cannot be replaced. If the mains cord is damaged,
discard the charger and/or sanitiser.
- Always have the charger and/or sanitiser replaced with one of the
original type in order to avoid a hazard.
- Do not use the charger and/or sanitiser outdoors or near heated
surfaces. Do not operate the sanitiser where aerosol (spray) products
are being used or where oxygen is being administered.
- The appliance is suitable for mains voltages ranging from 100 to
240 volts.
- If the appliance is damaged in any way (brush head, toothbrush handle,
charger and/or sanitiser), stop using it. This appliance contains no
serviceable par ts. If the appliance is damaged, contact the Consumer
Care Centre in your country (see chapter ‘Guarantee and support’).
- This appliance is not intended for use by persons (including children)
with reduced physical, sensor y or mental capabilities, or lack of
experience and knowledge, unless they have been given super vision
or instruction concerning use of the appliance by a person
responsible for their safety.
Page 7

ENGLISH 7
- Children should be supervised to ensure that they do not play with
the appliance.
- Discontinue use of the sanitiser if the UV light bulb remains on when
the door is open. UV light can be harmful to the human eye and skin.
Keep the sanitiser out of the reach of children at all times.
Caution
- Do not clean the brush head, the handle, the charger and/or the
sanitiser in the dishwasher.
- If you have had oral or gum surgery in the previous 2 months,
consult your dentist before you use the toothbrush.
- Consult your dentist if excessive bleeding occurs after using this
toothbrush or if bleeding continues to occur after 1 week of use.
Also consult your dentist if you experience discomfort or pain when
you use the Sonicare.
- The Sonicare toothbrush complies with the safety standards for
electromagnetic devices. If you have a pacemaker or other implanted
device, contact your physician or the device manufacturer of the
implanted device prior to use.
- If you have medical concerns, consult your doctor before you use the
Sonicare.
- This appliance has only been designed for cleaning teeth, gums and
tongue. Do not use it for any other purpose. Stop using the appliance
and contact your doctor if you experience any discomfort or pain.
- The Sonicare toothbrush is a personal care device and is not intended
for use on multiple patients in a dental practice or institution.
- Stop using a brush head with crushed or bent bristles. Replace the
brush head every 3 months or sooner if signs of wear appear.
- Do not use other brush heads than the ones recommended by the
manufacturer.
- If your toothpaste contains peroxide, baking soda or bicarbonate
(common in whitening toothpastes), thoroughly clean the brush head
with soap and water after each use. This prevents possible cracking of
the plastic.
Page 8

ENGLISH8
- Do not insert objects into the air openings of the sanitiser or block
these air openings by placing it on a soft surface or in a position or
location where objects will block these openings (examples of
objects: magazine, tissue paper and hair).
- The UV light bulb is hot during and immediately after the sanitising
cycle. Do not touch the UV light bulb when it is hot.
- Do not operate the sanitiser without the protective screen in place
to avoid contact with a hot bulb.
- If the sanitiser has been used for 3 consecutive UV clean cycles
(i.e. 3 times in a row), switch it off for at least 30 minutes before you
start another UV clean cycle.
Electromagnetic elds (EMF)
This Philips appliance complies with all applicable standards and
regulations regarding exposure to electromagnetic elds.
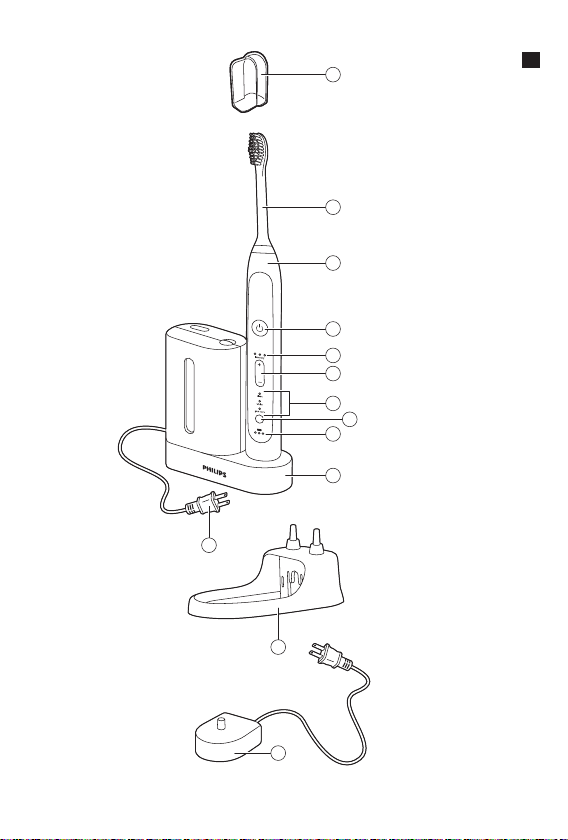
General description (Fig. 1)
1 Hygienic travel cap
2 Brush head with unique identier
3 Handle
4 Power on/off button
5 Intensity level indicator
6 Intensity level button (+ and -)
7 Brushing modes
8 Mode button
9 Battery level indicator
10 UV sanitiser and base with integrated charger and cord wrap
(specic types only)
- Not shown: UV light bulb
- Not shown: Sanitiser drip tray
- Not shown: Protective screen for UV light bulb
11 Mains cord with plug
12 Charger cover with brush head holders (specic types only)
13 Travel charger
- Not shown: Travel case
Note: The contents of the box may vary based on the type purchased.
Page 9
ENGLISH 9
Preparing for use
Attaching the brush head
1 Align the brush head so the bristles face the front of the handle.
(Fig. 2)
2 Firmly press the brush head down on the metal shaft until it stops.
Note: Sonicare Platinum brush heads come with easily identiable icons to
identify your brush head.
Charging the appliance
1 Put the plug of the charger or sanitiser in a wall socket.
2 Place the handle on the charger (Fig. 3).
, The ashing light of the battery level indicator shows that the
toothbrush is charging.
Note: It takes at least 24 hours to fully charge the battery.
Using the appliance
Brushing instructions
1 Wet the bristles (Fig. 4).
2 Apply a small amount of toothpaste on the bristles. (Fig. 5)
3 Place the toothbrush bristles against the teeth at a slight angle
(45 degrees), pressing rmly to make the bristles reach the gumline
or slightly beneath the gumline. A change in vibration (and a slight
change in sound) alerts you when you apply too much pressure
while brushing (Fig. 6).
Note: Keep the centre of the brush in contact with the teeth at all times.
4 Press the power on/off button to switch on the Sonicare (Fig. 7).
5 Gently keep the bristles placed on the teeth and in the gumline.
Brush your teeth with small back and forth motions so the bristles
reach between the teeth (Fig. 8).
Note: The bristles should are slightly. Do not scrub.
Page 10

ENGLISH10
6 To clean the inside surfaces of the front teeth, tilt the brush handle
semi-upright and make several vertical overlapping brushing strokes
on each tooth (Fig. 9).
7 Begin brushing in section 1 (outside top teeth) and brush for
30 seconds (45 seconds in Deep Clean mode) before you move to
section 2 (inside top teeth). Continue brushing in section 3 (outside
bottom teeth) and brush for 30 seconds (45 seconds in Deep
Clean mode) before you move to section 4 (inside bottom teeth).
Brush section 4 for 30 seconds until the toothbrush switches
off (Fig. 10).
Note: To make sure you brush evenly throughout the mouth, divide the mouth
into 4 sections using the Quadpacer feature (see chapter ‘Features’).
Note: After you have completed the brushing cycle, you can spend additional
time brushing the chewing surfaces of your teeth and areas where staining
occurs. You may also brush your tongue, with the toothbrush switched on or
off, as you prefer (Fig. 11).
Your Sonicare is safe to use on:
- Braces (brush heads may wear out more quickly when used on braces).
- Dental restorations (llings, crowns, veneers, implants).
Brushing modes
1 Clean: For an exceptional everyday clean (default mode).
2 White: 2 minutes to remove surface stains and 30 seconds to
brighten and polish your front teeth.
3 Deep Clean: Provides an invigorating 3 minutes of alternating
cleaning and massaging to deliver an exceptionally clean experience.
Your Sonicare comes with the Clean mode activated.
Note: When the toothbrush is switched on, you cannot toggle between modes.
1 Before you switch on the Sonicare, press the mode button to
toggle between modes.
, The selected brushing mode lights up.
, Once a brushing mode has been selected, it remains active until
you select another brushing mode.
Page 11

ENGLISH 11
Note: When the Sonicare is used in clinical studies, it must be used in the
default 2-minute Clean mode at high intensity or in the Deep Clean mode
at high intensity.
Intensity levels per mode
- Low: 1 LED indicator light.
- Medium: 2 LED indicator lights.
- High: 3 LED indicator lights.
Note: to adjust the intensity level to the next higher or lower level, you can
press the + button to increase intensity or the - button to decrease intensity
at any time during the brushing cycle.
Pressure Sensor
A change in vibration (and a slight change in sound) alerts you when you
apply too much pressure while brushing. See chapter ‘Features’.
Battery status (when handle is not on charger)
- 1 yellow LED indicates a low charge.
- 3 green LEDs indicate a full charge.
Note: If you hear a long beep and the yellow LED of the battery level
indicator ashes, your toothbrush is completely empty and switches off.
Place the toothbrush on the charger to recharge it.
Note: To keep the battery fully charged at all times, you may keep your
Sonicare on the charger when not in use.
Page 12

ENGLISH12
Features
Pressure Sensor
This Sonicare type comes with the Pressure Sensor feature activated.
The Pressure Sensor works in all 3 modes and at all 3 intensity levels.
To deactivate or reactivate the Pressure Sensor feature:
1 Place the handle with a brush head attached on the plugged-in
charger or sanitiser.
2 Press and hold the power on/off button and the mode button for
2 seconds.
, You hear 1 beep to indicate that the Pressure Sensor has been
deactivated.
, You hear 2 beeps to indicate that the Pressure Sensor has been
activated.
Quadpacer
- The Quadpacer is an interval timer that has a shor t beep and pause
to remind you to brush the 4 sections of your mouth. Depending on
the brushing mode you have selected, the Quadpacer beeps at
different intervals during the brushing cycle. The Quadpacer works in
all 3 modes and at all 3 intensity levels (Fig. 10).
The Quadpacer feature on this type has been activated. To deactivate or
reactivate the Quadpacer feature:
1 Place the handle with a brush head attached on the plugged-in
charger or sanitiser.
2 Press and hold the mode button for 2 seconds.
, You hear 1 beep to indicate the Quadpacer has been deactivated.
, You hear 2 beeps to indicate the Quadpacer has been activated.
Smartimer
The Smartimer indicates that your brushing cycle is complete when
it automatically switches off the toothbrush at the end of the brushing
cycle.
Dental professionals recommend brushing at least 2 minutes twice a day.
Page 13

ENGLISH 13
Easy-start
The Easy-start feature gently increases power over the rst 14 brushings
to ease into the Sonicare experience. The Easy-start feature only works in
the Clean mode and at the High intensity level.
This Sonicare type comes with the Easy-start feature deactivated.
To activate or deactivate the Easy-start feature:
1 Attach your brush head to the handle.
2 Place the handle on the plugged-in charger or sanitiser.
3 Activate or deactivate Easy-start:
, To activate Easy-start: Press and hold the power on/off button for
2 seconds. You hear 2 beeps to indicate that the Easy-start feature
has been activated.
, To deactivate Easy-start: Press and hold the power on/off button
for 2 seconds. You hear 1 beep to indicate that the Easy-start
feature has been deactivated.
Note: Each of the rst 14 brushings must be at least 1 minute in length to
properly move through the Easy-start ramp-up cycle.
Note: Using the Easy-start feature beyond the initial ramp-up period is not
recommended and reduces Sonicare’s effectiveness in removing plaque.
Sanitising (specic types only)
- With the UV sanitiser you can clean your brush head after every use
(Fig. 12).
Unplug the sanitiser, discontinue use and call Consumer Care if:
- The UV light bulb remains on when the door is open.
- The window is broken or missing from the sanitiser.
- The sanitiser gives off smoke or a burning smell while it is operating.
Note: UV light can be harmful to the human eye and skin. Keep the sanitiser
out of the reach of children at all times.
1 After brushing, rinse the brush head for 15 seconds and shake off
excess water.
Do not place the travel cap on the brush head during sanitisation.
Page 14

ENGLISH14
2 Let the brush head to dry in open air for 2 minutes.
3 Place your nger in the door recess on top of the sanitiser and pull
open the door (Fig. 13).
4 Place the brush head on one of the 2 pegs in the sanitiser with the
bristles facing the light bulb. (Fig. 14)
Note: Only clean Sonicare snap-on brush heads in the sanitiser.
Note: Do not clean Sonicare for Kids brush heads in the sanitiser.
5 Put the plug of the sanitiser in the wall socket.
6 Close the door and press the green power on/off button once to
select the UV clean cycle.
Note: You can only switch on the sanitiser if the door is closed properly.
Note: The sanitiser stops if you open the door during the sanitising cycle.
Note: The sanitiser cycle runs for 10 minutes and then shuts off
automatically.
, The sanitiser is in operation when the light glows through the
window.
Cleaning
Do not clean the brush head, the handle, the travel charger, the charger
cover and the UV sanitiser in the dishwasher.
Toothbrush handle
1 Remove the brush head and rinse the metal shaft area with warm
water (Fig. 15).
Do not push on the rubber seal on the metal shaft with sharp objects,
as this may cause damage.
2 Use a damp cloth to wipe the entire surface of the handle.
Do not use isopropyl rubbing alcohol, vinegar, or essential oil based
products to clean the handle or the brush head.
Page 15

ENGLISH 15
Brush head
1 Rinse the brush head and bristles after each use (Fig. 16).
2 Remove the brush head from the handle and rinse the brush head
connection at least once a week with warm water.
UV sanitiser (specic types only)
Do not immerse the sanitiser in water or rinse it under the tap.
Do not clean the sanitiser when the UV light bulb is hot.
For optimal effectiveness, it is recommended to clean your sanitiser weekly.
1 Unplug the sanitiser.
2 Pull the drip tray straight out of the sanitiser. Rinse the drip tray
and wipe it clean with a damp cloth (Fig. 17).
3 Clean all interior surfaces with a damp cloth.
4 Remove the protective screen in front of the UV light bulb. (Fig. 18)
To remove the screen, grasp the edges next to the snaps, gently squeeze
and pull out the protective screen.
5 Remove the UV light bulb.
To remove the light bulb, grasp it and pull it out of the metal clasp.
Clean the protective screen and the UV light bulb with a damp cloth.
6
7 Reinsert the UV light bulb.
To reinsert the light bulb, align the bottom of the light bulb with the metal
clasp and push the bulb into the clasp.
8 Reinsert the protective screen.
To reinsert the screen, align the pegs on the screen with the slots on the
reective surface near the UV light bulb. Push the screen straight into the
slots on the sanitiser.
Page 16

ENGLISH16
Storage
If you are not going to use the appliance for an extended period of time,
remove the mains plug from the wall socket. Then clean the appliance and
store it in a cool and dry place away from direct sunlight. You can use the
cord wrap feature to store the mains cord neatly.
Replacement
Brush head
Replace Sonicare brush heads every 3 months to achieve optimal results.
Only use genuine Philips Sonicare replacement brush heads.
Ordering accessories
To buy accessories or spare parts, visit www.shop.philips.com/service
or go to your Philips dealer. You can also contact the Philips Consumer
Care Centre in your country (see the worldwide guarantee leaet for
contact details).
Recycling
Do not throw away the appliance with the normal household waste at
the end of its life, but hand it in at an ofcial collection point for recycling.
By doing this, you help to preserve the environment.
Removing the rechargeable battery
Only remove the rechargeable battery when you discard the appliance.
Make sure the battery is completely empty when you remove it.
To remove the rechargeable battery, you need a at-head (standard)
screwdriver. Observe basic safety precautions when you follow the
procedure described below. Be sure to protect your eyes, hands, ngers,
and the surface on which you work.
1 Remove the toothbrush from the charger, switch it on and let it
operate until it stops. Continue to switch on the Sonicare until the
battery is completely empty.
Page 17

ENGLISH 17
2 Insert a athead (standard) screwdriver into the slot located at the
bottom of the handle. Turn the screwdriver anticlockwise to release
the bottom cap. (Fig. 19)
3 Place the handle on a solid surface with the buttons facing up and
lightly tap the housing 2.5cm from the bottom edge with a hammer.
4 Hold the handle upside down and push down on the shaft to
release the internal components of the handle (Fig. 20).
5 Insert the screwdriver under the circuit board, next to the battery
connections, and twist to break the connections. Remove the
circuit board and pry the battery from the plastic carrier (Fig. 21).
Guarantee and support
If you need information or support, please visit www.philips.com/
support or read the separate worldwide guarantee leaet.
Guarantee restrictions
The terms of the international guarantee do not cover the following:
- Brush heads.
- Damage caused by use of unauthorised replacement parts.
- Damage caused by misuse, abuse, neglect, alterations or unauthorised
repair.
- Normal wear and tear, including chips, scratches, abrasions,
discolouration or fading.
- UV light bulb.
Page 18

18
FRANÇAIS
Introduction
Félicitations pour votre achat et bienvenue dans l’univers Philips !
Pour proter pleinement de l’assistance Philips, enregistrez votre produit
sur le site à l’adresse suivante : www.philips.com/welcome.
Important
Lisez attentivement ce mode d’emploi avant d’utiliser l’appareil et
conservez-le pour un usage ultérieur.
Danger
- Évitez tout contact du chargeur et/ou de l’assainisseur avec l’eau.
Ne les placez pas et ne les rangez pas sur ou près d’une baignoire,
d’un lavabo ou d’un évier. Ne les plongez pas dans l’eau ni dans tout
autre liquide. Après le nettoyage, assurez-vous que le chargeur et/ou
l’assainisseur sont parfaitement secs avant de les brancher sur le
secteur.
Avertissement
- Il est impossible de remplacer le cordon d’alimentation. En cas de
dommages, le chargeur et/ou l’assainisseur devra/devront être mis au
rebut.
- Remplacez systématiquement le chargeur et/ou l’assainisseur par un
chargeur/assainisseur de même type pour éviter tout accident.
- N’utilisez pas le chargeur et/ou l’assainisseur en extérieur ou à
proximité d’une surface chauffée. Ne faites jamais fonctionner
l’assainisseur dans des endroits où des produits aérosols (en spray)
sont utilisés ou dans des lieux où de l’oxygène est administré.
- L’appareil est conçu pour une tension secteur comprise entre
100 V et 240 V.
- Si l’appareil (tête de brosse, manche de la brosse, chargeur et/ou
assainisseur) est endommagé, cessez de l’utiliser. L’appareil ne contient
aucune pièce réparable. S’il est endommagé, contactez le Ser-
vice Consommateurs de votre pays (voir le chapitre « Garantie et
assistance »).
Page 19

FRANÇAIS 19
- Cet appareil n’est pas destiné à être utilisé par des personnes
(notamment des enfants) dont les capacités physiques, sensorielles ou
intellectuelles sont réduites, ou par des personnes manquant
d’expérience ou de connaissances, à moins que celles-ci ne soient
sous surveillance ou qu’elles n’aient reçu des instructions quant à
l’utilisation de l’appareil par une personne responsable de leur
sécurité.
- Veillez à ce que les enfants ne puissent pas jouer avec l’appareil.
- Cessez d’utiliser l’assainisseur si la lampe UV reste allumée alors que
l’appareil est ouvert. Les UV peuvent être dangereux pour les yeux et
la peau. Tenez toujours l’assainisseur hors de portée des enfants.
Attention
- Ne mettez pas la tête de brosse, le manche, le chargeur et/ou
l’assainisseur au lave-vaisselle.
- Si vous avez reçu des soins bucco-dentaires, notamment au niveau
des gencives, au cours des deux derniers mois, consultez votre
dentiste avant d’utiliser cette brosse à dents.
- Consultez votre dentiste si vos gencives saignent de manière
excessive après utilisation de cette brosse à dents ou si le saignement
persiste après une semaine d’utilisation. Consultez également votre
dentiste si l’utilisation de Sonicare entraîne des douleurs ou un
inconfort.
- La brosse à dents Sonicare est conforme aux normes de sécurité
relatives aux appareils électromagnétiques. Si vous avez des questions
concernant l’utilisation de la brosse à dents Sonicare avec un
stimulateur cardiaque ou tout autre dispositif implanté, contactez
votre médecin traitant ou le fabricant de ce dispositif avant utilisation.
- Si vous avez des problèmes de santé, consultez votre médecin avant
d’utiliser la brosse à dents Sonicare.
- Cet appareil a été conçu exclusivement pour le brossage des dents,
des gencives et de la langue. Ne l’utilisez jamais à d’autres ns.
Si son utilisation devait s’avérer inconfortable ou douloureuse, cessez
d’utiliser l’appareil et consultez votre médecin.
Page 20

FRANÇAIS20
- La brosse à dents Sonicare est un appareil de soins personnel et n’est
pas destinée à être utilisée sur plusieurs patients dans les cabinets ou
établissements dentaires.
- Cessez d’utiliser une tête de brosse dont les poils sont écrasés ou
tordus. Remplacez la tête de brosse tous les 3 mois ou plus tôt si
vous constatez des signes d’usure.
- N’utilisez pas d’autres têtes de brosse que celles recommandées par
le fabricant.
- Si votre dentifrice contient du peroxyde, du bicarbonate de soude ou
du bicarbonate (couramment utilisés dans les dentifrices éclaicissants),
nettoyez bien la tête de brosse avec de l’eau et du savon après chaque
utilisation an de prévenir toute ssure éventuelle du plastique.
- N’insérez pas d’objets dans les orices d’entrée et de sortie d’air de
l’assainisseur ou ne bloquez pas ceux-ci en plaçant l’appareil sur une
surface molle ou dans une position ou un endroit où des objets
pourraient bloquer ces orices (exemples d’objets : magazines, papier
de soie et cheveux).
- Ne touchez pas la lampe UV pendant et juste après le cycle
d’assainissement, lorsqu’elle est chaude.
- N’utilisez pas l’assainisseur sans l’écran de protection pour éviter tout
contact avec la lampe, car elle peut être chaude.
- Si l’assainisseur a été utilisé pour 3 cycles de nettoyage UV consécutifs
(c’est-à-dire 3 fois à la suite), éteignez-le au moins pendant
30 minutes avant de lancer un nouveau cycle de nettoyage UV.
Champs électromagnétiques (CEM)
Cet appareil Philips est conforme à toutes les normes et à tous les
règlements applicables relatifs à l’exposition aux champs
électromagnétiques.
Page 21

FRANÇAIS 21
Description générale (g. 1)
1 Capuchon de protection hygiénique
2 Tête de brosse avec identiant unique
3 Poignée
4 Bouton marche/arrêt
5 Indicateur de niveau d’intensité
6 Bouton de niveau d’intensité (+ et -)
7 Modes de brossage
8 Bouton de mode
9 Voyant de niveau de charge
10 Assainisseur UV et base avec chargeur intégré et range-cordon
(sur certains modèles uniquement)
- Non illustré : lampe UV
- Non illustré : plateau égouttoir de l’assainisseur
- Non illustré : écran de protection pour lampe UV
11 Cordon d’alimentation avec che secteur
12 Couvercle du chargeur avec supports pour tête de brosse
(certains modèles uniquement)
13 Chargeur de voyage
- Non illustré : étui de transport
Remarque : Le contenu de la boîte peut varier selon le modèle acheté.
Avant utilisation
Fixation de la tête de brosse
1 Orientez la tête de brosse de sorte que les poils soient alignés avec
l’avant du manche. (g. 2)
2 Insérez le manche métallique au maximum dans la tête de brosse.
Remarque : Des images facilement identiables sont présentes sur les têtes
de brosse Sonicare Platinum an que vous reconnaissiez rapidement votre
tête de brosse.
Page 22

FRANÇAIS22
Charge de l’appareil
1 Branchez l’assainisseur ou le chargeur sur la prise secteur.
2 Placez le manche sur le chargeur (g. 3).
, Le voyant clignotant de l’indicateur de charge de la batterie indique
que la brosse à dents est en charge.
Remarque : Il faut au moins 24 heures pour charger entièrement la batterie.
Utilisation de l’appareil
Instructions de brossage
1 Humidiez les poils (g. 4).
2 Appliquez une petite quantité de dentifrice sur les poils. (g. 5)
3 Placez les poils de la brosse sur les dents, en les inclinant
légèrement (45 degrés), en appuyant fermement pour que les poils
atteignent le sillon gingival ou légèrement en-dessous.
Une modication de la vibration (et une modication mineure du
son) vous alerte lorsque vous appliquez trop de pression en vous
brossant les dents (g. 6).
Remarque : Maintenez le centre de la brosse en contact permanent avec les
dents.
4 Allumez la brosse à dents Sonicare en appuyant sur le bouton
marche/arrêt (g. 7).
5 Maintenez les poils sur les dents et dans le sillon gingival. Brossez-
vous les dents en faisant un léger mouvement de va-et-vient, de
sorte que les poils atteignent les espaces interdentaires (g. 8).
Remarque : Les poils doivent légèrement s’évaser. Ne frottez pas.
6 Pour nettoyer les surfaces intérieures des dents de devant, inclinez
le manche de la brosse en position semi-verticale et effectuez
plusieurs passages verticaux se chevauchant sur chacune des
dents (g. 9).
Page 23

FRANÇAIS 23
7 Commencez le brossage par la section 1 (dents de la mâchoire
supérieure, à l’extérieur) pendant 30 secondes (45 secondes en
mode de nettoyage en profondeur) avant de passer à la section
2 (dents de la mâchoire supérieure, à l’intérieur). Poursuivez le
brossage à la section 3 (dents de la mâchoire inférieure,
à l’extérieur) pendant 30 secondes (45 secondes en mode de
nettoyage en profondeur) avant de passer à la section 4 (dents de
la mâchoire inférieure, à l’intérieur). Brossez la section 4 pendant
30 secondes jusqu’à ce que la brosse à dents s’éteigne (g. 10).
Remarque : Pour assurer un brossage uniforme, divisez la bouche en
4 sections à l’aide de la fonction Quadpacer (voir le chapitre
« Caractéristiques »).
Remarque : Une fois le cycle de brossage terminé, vous pouvez consacrer du
temps supplémentaire au brossage de la surface de mastication des dents et
insister sur les zones propices aux taches. Vous pouvez également brosser
votre langue avec la brosse à dents en marche ou arrêtée (g. 11).
La brosse à dents Sonicare est compatible avec :
- Appareil dentaire (les têtes de brosse peuvent s’user plus rapidement
lorsqu’elles sont utilisées sur des appareils dentaires).
- Problèmes dentaires (plombages, couronnes, bridges).
Modes de brossage
1 Propreté : pour un nettoyage quotidien exceptionnel (mode par
défaut).
2 Blancheur : 2 minutes pour enlever les taches supercielles et
30 secondes pour polir et faire briller vos dents de devant.
3 Nettoyage en profondeur : offre 3 minutes revigorantes de
nettoyage et de massage en alternance pour une propreté
exceptionnelle.
Votre brosse à dents Sonicare est fournie avec le mode Propreté activé.
Remarque : Lorsque la brosse à dents est allumée, vous ne pouvez pas
changer de mode de brossage.
Page 24

FRANÇAIS24
1 Avant d’allumer la brosse à dents Sonicare, appuyez sur le bouton
Mode pour passer d’un mode à l’autre.
, Le mode de brossage sélectionné s’allume.
, Une fois le mode de brossage sélectionné, celui-ci reste actif jusqu’à
ce que vous sélectionniez un autre mode de brossage.
Remarque : Lorsque la brosse à dents Sonicare est utilisée dans le cadre
d’études cliniques, elle doit être utilisée en mode Propreté par défaut de
2 minutes à haute intensité ou en mode Nettoyage en profondeur à haute
intensité.
Niveaux d’intensité par mode
- Bas : 1 voyant.
- Moyen : 2 voyants.
- Élevé : 3 voyants.
Remarque : pour régler le niveau d’intensité, appuyez sur le bouton + pour
augmenter l’intensité ou sur le bouton - pour diminuer l’intensité à tout
moment pendant le cycle de brossage.
Capteur de pression
Une modication de la vibration (et une modication mineure du son)
vous alerte lorsque vous appliquez trop de pression en vous brossant les
dents. Repor tez-vous au chapitre « Fonctionnalités ».
État de la batterie (lorsque le manche n’est pas en charge)
- 1 voyant jaune indique un niveau de charge faible.
- 3 voyants verts indiquent un niveau de charge complet.
Remarque : Si vous entendez un signal sonore prolongé et si le voyant jaune
indiquant l’état de la batterie clignote, cela signie que votre brosse à dents
est entièrement déchargée et elle s’éteint. Placez la brosse à dents sur le
chargeur pour la recharger.
Remarque : Pour que la batterie reste chargée en permanence, vous pouvez
garder votre brosse à dents Sonicare sur le chargeur lorsque vous ne l’utilisez
pas.
Page 25

FRANÇAIS 25
Caractéristiques
Capteur de pression
Cette brosse à dents Sonicare est fournie avec la fonctionnalité de
capteur de pression activée. Le capteur de pression fonctionne dans les
3 modes et aux 3 niveaux d’intensité.
Pour désactiver ou réactiver la fonctionnalité de capteur de pression :
1 Placez le manche, auquel vous aurez xé une tête de brosse,
sur le chargeur ou l’assainisseur préalablement branché.
2 Maintenez enfoncés les boutons marche/arrêt et mode pendant
2 secondes.
, Lorsque le capteur de pression est désactivé, vous entendez 1 bip.
, Lorsque le capteur de pression est activé, vous entendez 2 bips.
Fonction Quadpacer
- La fonction Quadpacer est un minuteur à intervalles qui émet un bref
signal sonore et suspend le cycle pour vous rappeler de brosser les
quatre sections de votre bouche. Selon le mode de brossage choisi,
les signaux sont émis à différents intervalles au cours du cycle de
brossage. La fonction Quadpacer est active dans tous les modes et
aux 3 niveaux d’intensité (g. 10).
La fonction Quadpacer est activée sur ce modèle. Pour la désactiver ou la
réactiver :
1 Placez le manche, auquel vous aurez xé une tête de brosse,
sur le chargeur ou l’assainisseur préalablement branché.
2 Appuyez sur le bouton marche/arrêt et maintenez-le enfoncé
pendant deux secondes.
, Lorsque la fonction Quadpacer est désactivée, vous entendez 1 bip.
, Lorsque la fonction Quadpacer est activée, vous entendez 2 bips.
Page 26

FRANÇAIS26
Fonction Smartimer
La fonction Smartimer indique que le cycle de brossage est terminé en
éteignant automatiquement la brosse à dents à la n du cycle de brossage.
Les professionnels de la santé bucco-dentaire recommandent de se
brosser les dents deux fois par jour pendant au moins 2 minutes.
Fonction Easy-start
La fonction Easy-start augmente progressivement la puissance au cours
des 14 premiers brossages pour vous permettre de vous habituer au
brossage avec Sonicare. La fonction Easy-start fonctionne uniquement en
mode Propreté et au niveau d’intensité le plus élevé.
Cette brosse à dents Sonicare est fournie avec la fonction Easy-start
désactivée. Pour activer ou désactiver la fonction Easy-start :
1 Fixez la tête de brosse au manche.
2 Placez le manche sur le chargeur ou l’assainisseur préalablement
branché.
3 Activer ou désactiver la fonction Easy-start :
, Pour activer Easy-start : appuyez sur le bouton marche/arrêt et
maintenez-le enfoncé pendant deux secondes. Deux signaux
sonores vous indiquent que la fonction Easy-start est activée.
, Pour désactiver Easy-start : appuyez sur le bouton marche/arrêt et
maintenez-le enfoncé pendant deux secondes. Un signal sonore
vous indique que la fonction Easy-start est désactivée.
Remarque : Au cours des 14 premières utilisations, chaque cycle de brossage
doit durer au moins une minute pour que la fonction Easy-start se déroule
correctement.
Remarque : Il est recommandé de ne pas dépasser la période initiale
d’utilisation de la fonction Easy-start, sous peine de réduire l’efcacité de la
brosse à dents Sonicare dans l’élimination de la plaque dentaire.
Page 27

FRANÇAIS 27
Assainisseur (sur certains modèles uniquement)
- L’assainisseur UV permet de nettoyer les têtes de brosse après
chaque utilisation (g. 12).
Débranchez l’assainisseur, cessez de l’utiliser et appelez le
Service Consommateurs si :
- La lampe UV reste allumée alors que l’appareil est ouvert.
- La vitre est cassée ou n’a pas été fournie avec l’assainisseur.
- De la fumée ou une odeur de brûlé s’échappe de l’assainisseur en
fonctionnement.
Remarque : Les UV peuvent être dangereux pour les yeux et la peau.
Tenez toujours l’assainisseur hors de portée des enfants.
1 Après chaque brossage, rincez la tête de brosse pendant
15 secondes et secouez-la pour en retirer l’eau.
Ne mettez pas le capuchon de protection sur la tête de brosse lors de
l’assainissement.
2 Laissez sécher la tête de brosse à l’air libre pendant 2 minutes.
3 Insérez un doigt dans le logement du portillon, en haut de
l’assainisseur, puis tirez pour ouvrir (g. 13).
4 Placez la tête de brosse sur l’un des 2 supports de l’assainisseur de
sorte que les poils soient face à la lampe. (g. 14)
Remarque : Nettoyez uniquement les têtes de brosse à clipser Sonicare dans
l’assainisseur.
Remarque : Ne nettoyez pas les têtes de brosse Sonicare for Kids (Pour
Enfants) dans l’assainisseur.
5 Branchez la che de l’assainisseur sur la prise secteur.
6 Fermez l’appareil et appuyez une fois sur le bouton vert marche/
arrêt pour sélectionner le cycle de nettoyage UV.
Remarque : Vous ne pouvez allumer l’assainisseur qu’une fois le portillon
correctement fermé.
Page 28

FRANÇAIS28
Remarque : L’assainisseur cesse de fonctionner si vous ouvrez l’appareil
pendant le cycle d’assainissement.
Remarque : Le cycle de l’assainisseur dure 10 minutes, après quoi l’appareil
s’éteint automatiquement.
, L’assainisseur est en cours de fonctionnement lorsque le voyant au
niveau de la fenêtre est allumé.
Nettoyage
Ne mettez pas la tête de brosse, le manche, le chargeur de voyage,
le couvercle du chargeur ou l’assainisseur UV au lave-vaisselle.
Manche de la brosse à dents
1 Retirez la tête de brosse et rincez le manche métallique à l’eau
chaude (g. 15).
N’appuyez pas sur l’anneau en caoutchouc du manche métallique avec
des objets pointus, sous peine de l’endommager.
2 Essuyez la surface du manche à l’aide d’un chiffon humide.
N’utilisez pas d’isopropanol, de vinaigre ni de produits à base d’huile
essentielle pour nettoyer le manche ou la tête de brosse.
Tête de brosse
1 Rincez la tête de brosse et les poils après chaque utilisation (g. 16).
2 Retirez la tête de brosse du manche et rincez la base de la tête de
brosse au moins une fois par semaine à l’eau chaude.
Assainisseur UV (sur certains modèles uniquement)
Ne plongez jamais l’assainisseur dans l’eau et ne le rincez pas sous le
robinet.
Ne nettoyez pas l’assainisseur lorsque la lampe UV est chaude.
Pour une efcacité optimale, il est recommandé de nettoyer l’assainisseur
une fois par semaine.
Page 29

FRANÇAIS 29
1 Débranchez l’assainisseur.
2 Retirez le plateau égouttoir de l’assainisseur et rincez-le à l’aide
d’un chiffon humide (g. 17).
3 Nettoyez toutes les surfaces intérieures à l’aide d’un chiffon
humide.
4 Retirez l’écran de protection placé devant la lampe UV. (g. 18)
Pour retirer l’écran, saisissez les bords situés près des fermoirs, appuyez
légèrement et tirez l’écran de protection.
5 Retirez la lampe UV.
Pour retirer la lampe, saisissez-la et sor tez-la de sa xation métallique.
6 Nettoyez l’écran de protection et la lampe UV à l’aide d’un chiffon
humide.
7 Réinsérez la lampe UV.
Pour réinsérer la lampe, alignez le bas de l’ampoule avec la xation
métallique et enfoncez l’ampoule dans la xation.
8 Réinsérez l’écran de protection.
Pour réinsérer l’écran, alignez les taquets de xation de l’écran avec les
fentes de la surface du réecteur située près de la lampe UV. Appuyez sur
l’écran de sorte qu’il s’enclenche dans les fentes de l’assainisseur.
Rangement
Si vous ne comptez pas utiliser l’appareil pendant une période prolongée,
débranchez le cordon d’alimentation de la prise secteur, nettoyez l’appareil
et rangez-le dans un endroit frais et sec, à l’abri de la lumière. Utilisez le
range-cordon pour ranger correctement le cordon d’alimentation.
Remplacement
Tête de brosse
Pour obtenir des résultats optimaux, remplacez les têtes de
brosse Sonicare au moins tous les 3 mois.
Utilisez exclusivement des têtes de brosse de rechange Philips Sonicare.
Page 30

FRANÇAIS30
Commande d’accessoires
Pour acheter des accessoires ou des pièces de rechange, visitez le site
Web www.shop.philips.com/service ou rendez-vous chez votre
revendeur Philips. Vous pouvez également contacter le Service
Consommateurs Philips de votre pays (voir le dépliant de garantie
internationale pour les coordonnées).
Recyclage
Lorsqu’il ne fonctionnera plus, ne jetez pas l’appareil avec les ordures
ménagères, mais déposez-le à un endroit assigné à cet effet, où il pourra
être recyclé. Vous contribuerez ainsi à la protection de l’environnement.
Retrait de la batterie rechargeable
Retirez la batterie rechargeable uniquement lorsque vous mettez
l’appareil au rebut. Assurez-vous que la batterie est complètement
déchargée lorsque vous la retirez.
Pour retirer la batterie rechargeable, munissez-vous d’un tournevis à tête
plate (standard). Respectez les mesures de sécurité élémentaires lorsque
vous suivez la procédure ci-dessous. Veillez à vous protéger les yeux,
les mains et les doigts, ainsi que la surface sur laquelle vous travaillez.
1 Retirez la brosse à dents du chargeur, mettez-la sous tension et
laissez-la fonctionner jusqu’à son arrêt complet. Renouvelez
l’opération jusqu’à ce que la batterie soit complètement déchargée.
2 Insérez un tournevis plat (standard) dans la fente située en bas du
manche. Tournez dans le sens inverse des aiguilles d’une montre
pour desserrer le couvercle inférieur. (g. 19)
3 Placez le manche sur une surface solide et tapez légèrement sur le
compartiment à environ 2,5 cm du bord inférieur avec un marteau.
4 Tenez le manche à l’envers et tirez sur l’axe pour retirer les
composants internes du manche (g. 20).
Page 31

FRANÇAIS 31
5 Insérez le tournevis sous le circuit imprimé, à proximité des
connexions de la batterie, et tournez pour rompre ces connexions.
Retirez le circuit imprimé et séparez la batterie du boîtier en
plastique (g. 21).
Garantie et assistance
Si vous avez besoin d’une assistance ou d’informations supplémentaires,
consultez le site Web www.philips.com/support ou lisez le dépliant
séparé sur la garantie internationale.
Limites de la garantie
La garantie internationale ne couvre pas les éléments suivants :
- les têtes de brosse ;
- les dommages causés par l’utilisation de pièces de rechange non
autorisées ;
- les dommages causés par une mauvaise utilisation, une négligence ou
des altérations ;
- les marques d’usure dues à un usage normal, comme les rayures,
abrasions et décolorations ;
- la lampe UV.
Page 32

323334353637383940414243444546474849505152
Page 33

Page 34

Page 35

Page 36

Page 37

Page 38

Page 39

Page 40

Page 41

Page 42

Page 43

Page 44

Page 45

Page 46

Page 47

Page 48

Page 49

Page 50

Page 51

Page 52

Page 53

53
Page 54

2 3 4 5
6
1
3
10 11 12 13
2
4
7 8 9
14 15 16 17
18 19 20 21
Page 55

Page 56

www.philips.com/Sonicare
©2015 Koni nklijk e Philip s N.V. ( KPNV ). All rights re served .
Philip s and the Philip s shield a re trade marks of KPN V.
Sonic are and th e Sonic are logo ar e trade marks
of Phili ps Oral Healt hcare, Inc. a nd/or KPN V.
4235.020.9773.1
 Loading...