

Page 1
5series_GumHealth_4235_021_1610_1_A6_bl.pdf 1 08-02-16 12:20
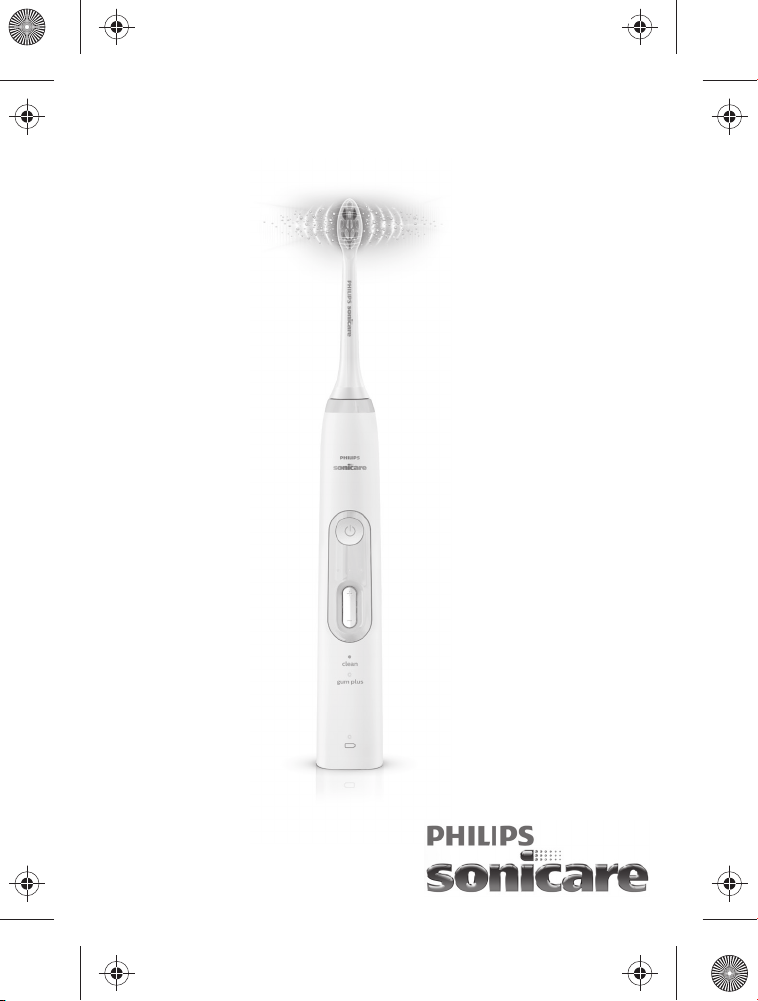
5 Series gum health
Rechargeable Sonic Toothbrush
Page 2
Page 3
1
2
3
4
5
6
7
8
9
1
Page 4

Page 5

English 5
Deutsch 18
Español 33
Français 47
Italiano 62
Nederlands 76
Português 90
Ελληνικα
105
Page 6

English
Introduction
Congratulations on your purchase and welcome to Philips! To fully
benefit from the support that Philips offers, register your product at
www.philips.com/welcome.
Important
Read this user manual carefully before you
use the appliance and save it for future
reference.
Danger
-
Keep the charger away from water. Do not
place or store it over or near water
contained in a bathtub, washbasin, sink etc.
Do not immerse the charger in water or any
other liquid. After cleaning, make sure the
charger is completely dry before you
connect it to the mains.
5
Warning
-
The mains cord cannot be replaced. If the
mains cord is damaged, discard the charger.
-
Always have the charger replaced with one
of the original type in order to avoid a
hazard.
English
Page 7

English
6
-
Do not use the charger outdoors or near
heated surfaces.
-
If the appliance is damaged in any way
(brush head, toothbrush handle or charger),
stop using it. This appliance contains no
serviceable parts. If the appliance is
damaged, contact the Consumer Care
Centre in your country (see chapter
‘Guarantee and support').
-
This appliance can be used by children
aged from 8 years and above and by
persons with reduced physical, sensory or
mental capabilities or lack of experience
and knowledge if they have been given
supervision or instruction concerning use of
the appliance in a safe way and if they
understand the hazards involved.Children
shall not play with the appliance. Cleaning
and user maintenance shall not be made by
children unless they are older than 8 and
supervised.
Page 8

English
Caution
-
Do not clean the brush head, the handle or
the charger in the dishwasher.
-
If you have had oral or gum surgery in the
previous 2 months, consult your dentist
before you use the toothbrush.
-
Consult your dentist if excessive bleeding
occurs after using this toothbrush or if
bleeding continues to occur after 1 week of
use. Also consult your dentist if you
experience discomfort or pain when you use
the Philips Sonicare.
-
The Philips Sonicare toothbrush complies
with the safety standards for
electromagnetic devices. If you have a
pacemaker or other implanted device,
contact your physician or the device
manufacturer of the implanted device prior
to use.
-
If you have medical concerns, consult your
doctor before you use the Philips Sonicare.
7
Page 9

English
8
-
This appliance has only been designed for
cleaning teeth, gums and tongue. Do not
use it for any other purpose. Stop using the
appliance and contact your doctor if you
experience any discomfort or pain.
-
The Philips Sonicare toothbrush is a
personal care device and is not intended for
use on multiple patients in a dental practice
or institution.
-
Stop using a brush head with crushed or
bent bristles. Replace the brush head every
3 months or sooner if signs of wear appear.
Do not use other brush heads than the ones
recommended by the manufacturer.
-
If your toothpaste contains peroxide, baking
soda or bicarbonate (common in whitening
toothpastes), thoroughly clean the brush
head with soap and water after each use.
This prevents possible cracking of the
plastic.
Page 10

English
-
Avoid contact with liquids that contain
essential oils (common in strong
mouthwashes) as damage to hard and soft
plastic may occur.
Electromagnetic fields (EMF)
This Philips appliance complies with all
applicable standards and regulations
regarding exposure to electromagnetic fields.
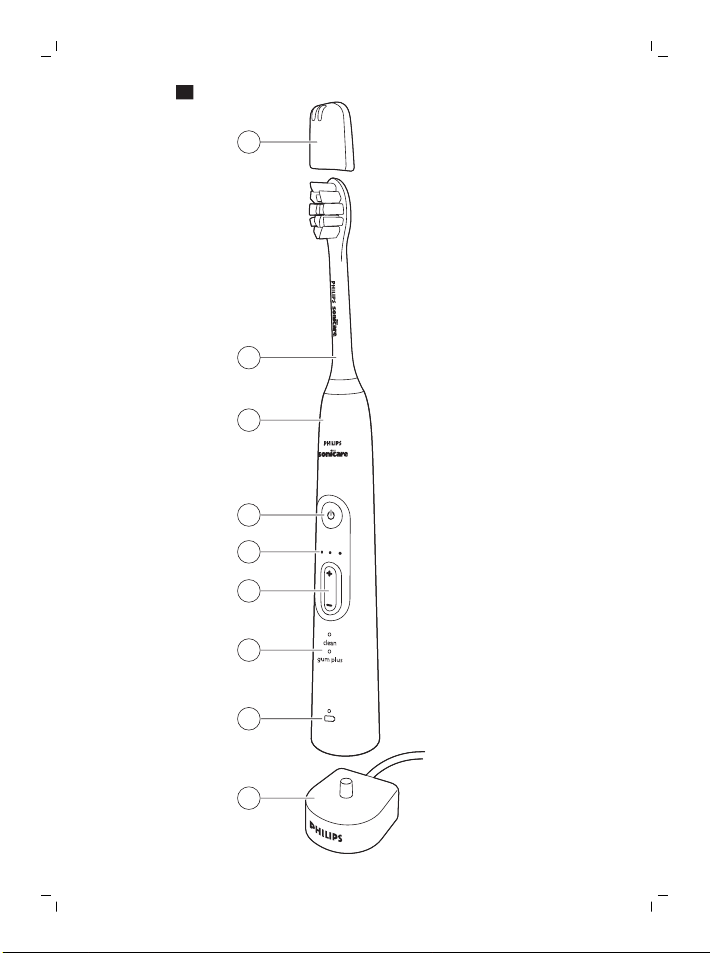
General description (Fig. 1)
1 Hygienic travel cap
2 Brush head
3 Handle
4 Power on/off and mode button
5 Intensity level indicator
6 Intensity level button (+ and -)
7 Mode indicator
8 Battery level indicator
9 Charger
Note: The content of the box may vary based on the model
purchased.
Preparing for use
Attaching the brush head
1 Align the brush head so the bristles point in the same direction as
the front of the handle (Fig. 2).
2 Firmly press the brush head down onto the metal shaft until it
stops (Fig. 3).
Note: Philips Sonicare brush heads are imprinted with icons to easily
identify your brush head (Fig. 4).
9
Page 11

English
10
Charging your Philips Sonicare
1 Plug the charger into an electrical outlet.
2 Place the handle on the charger (Fig. 5).
-
The flashing light of the battery level indicator indicates that the
toothbrush is charging.
-
When the battery is fully charged, the battery level indicator
lights up solid green for 10 seconds before it turns off.
Note: It can take up to 48 hours to fully charge the battery, but the
Philips Sonicare may be used before it is fully charged.
Using the appliance
Brushing instructions
1 Wet the bristles and apply a small amount of toothpaste.
2 Place the toothbrush bristles against the teeth at a slight angle (45
degrees), pressing firmly to make the bristles reach the gumline or
slightly beneath the gumline (Fig. 7).
Note: Keep the center of the brush in contact with the teeth at all
times.
3 Press the power on/off and mode button to turn on the Philips
Sonicare.
4 Apply light pressure to maximize Philips Sonicare’s effectiveness
and let the Philips Sonicare toothbrush do the brushing for you. Do
not scrub.
5 Gently move the brush head slowly across the teeth in a small
back and forth motion so the longer bristles reach between your
teeth. Continue this motion throughout the brushing cycle.
6 To clean the inside surfaces of the front teeth, tilt the brush handle
semi-upright and make several vertical overlapping brushing
strokes on each tooth (Fig. 8).
Note: To make sure you brush evenly throughout the mouth,
divide your mouth into 4 sections using the Quadpacer feature
(see chapter ‘Features’).
Page 12

English
7 Begin brushing in section 1 (outside upper teeth) and brush for 30
seconds before you move to section 2 (inside upper teeth).
Continue brushing in section 3 (outside lower teeth) and brush for
30 seconds before you move to section 4 (inside lower teeth (Fig.
9)).
8 After you have completed the brushing cycle, you can spend
additional time brushing the chewing surfaces of your teeth and
areas where staining occurs. You can also brush your tongue, with
the toothbrush turned on or off, as you prefer (Fig. 10).
Your Philips Sonicare is safe to use on:
- Braces (brush heads wear out sooner when used on braces).
- Dental restorations (fillings, crowns, veneers).
Note: Ensure that braces or dental restorations are properly adhered
and not compromised. If not, braces or dental restorations may be
damaged when they come into contact with the brush head.
Note: When the Philips Sonicare is used in clinical studies, the default
2-minute Clean mode with high intensity must be selected. The
handle should be fully charged and the Easy-start feature
deactivated.
Brushing modes
Clean mode
The ultimate in plaque removal (default mode). Clean mode lasts for
2 minutes and includes four 30 second Quadpacer intervals.
Gum Plus mode
To gently stimulate your gums. Gum Plus mode lasts for 2 minutes
and includes four 30 second Quadpacer intervals.
1 Press the power on/off and mode button to turn on your Philips
Sonicare.
2 Press the power on/off and mode button again within 2.5 seconds
to switch to Gum Plus mode.
3 Press the power on/off and mode button after 2.5 seconds to
pause your Philips Sonicare
11
Page 13

English
12
Intensity levels
- Low: 1 LED indicator light
- Medium: 2 LED indicator lights
- High: 3 LED indicator lights
Note: To adjust the intensity level to the next higher or lower level,
press the + intensity level button to increase intensity or the intensity level button to decrease intensity at any time during the
brushing cycle
Battery status (when handle is not on charger)
- A flashing yellow battery level indicator indicates a low charge.
- A flashing green battery level indicator indicates a moderate
charge.
- A solid green battery level indicator indicates a full charge (Fig. 6).
Note: If you hear 5 beeps and the battery level indicator flashes
yellow, this means that you have to recharge the battery. When the
battery is completely empty, the Philips Sonicare turns off. Place the
Philips Sonicare on the charger to charge it.
To keep the battery fully charged at all times, you may keep your
Sonicare on the charger when not in use.
Features
Smartimer
The Smartimer indicates that your brushing cycle is complete by
automatically turning off the toothbrush at the end of the brushing
cycle.
Dental professionals recommend brushing no less than 2 minutes
twice a day.
Easy-start
The Easy-start feature gently increases the power over the first 14
brushings to help you get used to the brushing with the Philips
Sonicare.This Philips Sonicare comes with the Easy-start feature
deactivated.
Activating or deactivating the Easy-start feature
1 Attach the brush head to the handle.
Page 14

English
2 Place the handle in the plugged-in charger.
To activate Easy-start:
Press and hold the power on/off and mode button for 2 seconds. You
hear 2 beeps and the battery level indicator lights up green to
indicate that the Easy-start feature has been activated.
To deactivate Easy-start:
Press and hold the power on/off and mode button for 2 seconds. You
hear 1 beep and the battery level indicator lights up yellow to indicate
that the Easy-start feature has been deactivated.
Note: Using the Easy-start feature beyond the initial ramp-up period
is not recommended and reduces Philips Sonicare effectiveness in
removing plaque.
13
Quadpacer
The Quadpacer is an interval timer that has a short beep and pause to
remind you to brush the 4 sections of your mouth evenly and
thoroughly (Fig. 11).
Depending on the brushing mode you have selected, the Quadpacer
beeps at different intervals during the brushing cycle. See the
"brushing modes" section for more details.
Activating or deactivating the Quadpacer feature:
Place the handle in the plugged-in charger.
- To activate Quadpacer:
Press and hold the intensity level button down (-) for 2 seconds.
You hear 2 beeps and the battery level indicator lights up green to
indicate that the Quadpacer feature has been activated.
- To deactivate Quadpacer:
Press and hold the intensity level button down (-) for 2 seconds.
You hear 1 beep and the battery level indicator lights up yellow to
indicate that the Quadpacer feature has been deactivated.
Charger confirmation
When the charger confirmation feature is activated, the handle beeps
and vibrates briefly when it is placed on the charger base. This Philips
Page 15

English
14
Sonicare model comes with the charger confirmation feature
deactivated.
Activating or deactivating the charger confirmation feature:
Place the handle on the charger.
- To activate charger confirmation:
Press and hold the intensity level button up (+) for 2 seconds. You
hear 2 beeps and the battery level indicator lights up green twice
to indicate that the charger confirmation feature has been
activated.
- To deactivate charger confirmation:
Press and hold the intensity level button up (+) for 2 seconds. You
hear 1 beep and the battery level indicator lights up yellow once to
indicate that the charger confirmation feature has been
deactivated.
Cleaning
Toothbrush handle
1 Remove the brush head and rinse the metal shaft area with warm
water. Make sure you remove any residual toothpaste (Fig. 12).
Caution: Do not push on the rubber seal on the metal shaft with
sharp objects, as this may cause damage.
2 Wipe the entire surface of the handle with a damp cloth.
Brush head
1 Rinse the brush head and bristles after each use (Fig. 13).
2 Remove the brush head from the handle and rinse the brush head
connection with warm water at least once a week.
Charger
1 Unplug the charger before you clean it.
2 Wipe the surface of the charger with a damp cloth. Make sure you
remove any toothpaste or other residue from the charger surfaces.
Page 16

English
15
Storage
If you are not going to use the Sonicare for an extended period of
time, unplug the charger from the electrical outlet, clean it and store it
in a cool and dry place away from direct sunlight.
Replacement
Brush head
Replace Philips Sonicare brush heads every 3 months to achieve
optimal results. Use only Philips Sonicare replacement brush heads.
Recycling
- This symbol means that this product shall not be disposed of with
normal household waste (2012/19/EU) (Fig. 23).
- This symbol means that this product contains a built-in
rechargeable battery which shall not be disposed of with normal
household waste (Fig. 24) (2006/66/EC). We strongly advise you
to take your product to an official collection point or a Philips
service centre to have a professional remove the rechargeable
battery.
- Follow your country’s rules for the separate collection of electrical
and electronic products and rechargeable batteries. Correct
disposal helps prevent negative consequences for the
environment and human health.
Removing the rechargeable battery
Warning: Only remove the rechargeable battery when you discard the
appliance. Make sure the battery is completely empty when you
remove it.
To remove the rechargeable battery, you need a towel or cloth, a
hammer and a flat-head (standard) screwdriver. Observe basic safety
precautions when you follow the procedure outlined below. Be sure
to protect your eyes, hands, fingers, and the surface on which you
work.
Page 17

English
16
1 To deplete the rechargeable battery of any charge, remove the
handle from the charger, turn on the Philips Sonicare and let it run
until it stops. Repeat this step until you can no longer turn on the
Philips Sonicare.
2 Remove and discard the brush head. Cover the entire handle with
a towel or cloth (Fig. 14).
3 Hold the top of the handle with one hand and strike the handle
housing 0.5 inch above the bottom end. Strike firmly with a
hammer on all 4 sides to eject the end cap (Fig. 15).
Note: You may have to hit on the end several times to break the
internal snap connections.
4 Remove the end cap from the toothbrush handle. If the end cap
does not release easily from the housing, repeat step 3 until the
end cap is released (Fig. 16).
5 Holding the handle upside down, press the shaft down on a hard
surface. If the internal components do not easily release from the
housing, repeat step 3 until the internal components are released
(Fig. 17).
6 Remove the rubber battery cover.
7 Wedge the screwdriver between the battery and the black frame
at the bottom of the internal components. Then pry the
screwdriver away from the battery to break the bottom of the
black frame (Fig. 20).
8 Insert the screwdriver between the bottom of the battery and the
black frame to break the metal tab connecting the battery to the
green printed circuit board. This will release the bottom end of the
battery from the frame (Fig. 21).
9 Grab the battery and pull it away from the internal components to
break the second metal battery tab (Fig. 22).
Caution: Be aware of the sharp edges of the battery tabs so as
to avoid injury to your fingers.
10 Cover the battery contacts with tape to prevent any electrical short
from residual battery charge. The rechargeable battery can now be
recycled and the rest of the product discarded appropriately.
Page 18

English
Guarantee and support
If you need information or support, please visit
www.philips.com/support or read the separate worldwide guarantee
leaflet.
Guarantee restrictions
The terms of the international guarantee do not cover the following:
- Brush heads.
- Damage caused by use of unauthorised replacement parts.
- Damage caused by misuse, abuse, neglect, alterations or
unauthorised repair.
- Normal wear and tear, including chips, scratches, abrasions,
discolouration or fading.
17
Page 19

Deutsch
18
Einführung
Herzlichen Glückwunsch zu Ihrem Kauf und willkommen bei Philips!
Um die Unterstützung von Philips optimal nutzen zu können, sollten
Sie Ihr Produkt unter www.philips.com/welcome registrieren.
Wichtig
Lesen Sie diese Bedienungsanleitung vor dem
Gebrauch des Geräts aufmerksam durch, und
bewahren Sie sie für eine spätere
Verwendung auf.
Gefahr
-
Halten Sie das Ladegerät von Wasser fern.
Stellen Sie es nicht über oder direkt bei
einer mit Wasser gefüllten Badewanne bzw.
einem Waschbecken ab. Tauchen Sie das
Ladegerät nicht in Wasser oder andere
Flüssigkeiten. Nach der Reinigung, achten
Sie darauf, dass das Ladegerät völlig trocken
ist, bevor Sie es wieder an die Steckdose
anschließen.
Warnhinweis
-
Das Netzkabel kann nicht ersetzt werden. Ist
das Netzkabel beschädigt, müssen Sie das
Ladegerät entsorgen.
Deutsch
Page 20

Deutsch
-
Tauschen Sie das Ladegerät immer durch
ein Original-Ersatzgerät aus, um
Gefährdungen zu vermeiden.
-
Benutzen Sie das Ladegerät nicht im Freien
oder in der Nähe von heißen Oberflächen.
-
Benutzen Sie das Gerät nicht, wenn es
beschädigt ist (Bürstenkopf, Handstück oder
Ladegerät). Dieses Gerät enthält keine Teile,
die vom Benutzer repariert werden können.
Wenn das Gerät beschädigt ist, wenden Sie
sich bitte an das Service-Center in Ihrem
Land (siehe 'Garantie und Kundendienst').
19
Page 21

Deutsch
20
-
Dieses Gerät kann von Kindern ab 8 Jahren
und Personen mit verringerten physischen,
sensorischen oder psychischen Fähigkeiten
oder Mangel an Erfahrung und Kenntnis
verwendet werden, wenn sie bei der
Verwendung beaufsichtigt wurden oder
Anweisung zum sicheren Gebrauch des
Geräts erhalten und die Gefahren
verstanden haben. Kinder dürfen nicht mit
dem Gerät spielen. Reinigung und Pflege
dürfen nicht von Kindern durchgeführt
werden, außer sie sind älter als 8 Jahre und
werden beaufsichtigt.
Achtung
-
Reinigen Sie Bürstenkopf, Handstück und
Ladegerät nicht im Geschirrspüler.
-
Wenn in den vergangenen 2 Monaten ein
chirurgischer Eingriff an Ihren Zähnen oder
am Zahnfleisch vorgenommen wurde,
sollten Sie vor Benutzung der Zahnbürste
Ihren Zahnarzt konsultieren.
Page 22

Deutsch
-
Konsultieren Sie Ihren Zahnarzt, wenn nach
Benutzung dieses Geräts übermäßiges
Zahnfleischbluten auftritt oder
Zahnfleischbluten länger als eine Woche
anhält. Konsultieren Sie außerdem Ihren
Zahnarzt, wenn bei der Benutzung der
Philips Sonicare Unbehagen oder
Schmerzen auftreten.
-
Die Philips Sonicare Zahnbürste erfüllt die
Sicherheitsstandards für elektromagnetische
Geräte. Wenden Sie sich als Träger eines
Herzschrittmachers oder eines anderen
Implantats vor der Verwendung dieses
Geräts an Ihren Arzt oder den Hersteller des
implantierten Gerätes.
-
Sollten Sie Bedenken wegen Ihrer
Gesundheit haben, konsultieren Sie vor
Benutzung der Philips Sonicare Ihren Arzt.
21
Page 23

Deutsch
22
-
Dieses Gerät ist ausschließlich zum Reinigen
von Zähnen, Zahnfleisch und Zunge
gedacht. Benutzen Sie es nicht für andere
Zwecke. Falls Beschwerden oder
Schmerzen auftreten, verwenden Sie das
Gerät nicht mehr, und wenden Sie sich an
Ihren Arzt.
-
Die Philips Sonicare Zahnbürste ist ein Gerät
zur individuellen Mundpflege und nicht für
die Verwendung von mehreren Patienten in
einer Zahnarztpraxis oder Zahnklinik
vorgesehen.
-
Unterlassen Sie es, einen Bürstenkopf mit
abgeknickten oder zerdrückten Borsten zu
verwenden. Ersetzen Sie den Bürstenkopf
alle 3 Monate oder früher, falls Anzeichen
von Abnutzung auftreten. Benutzen Sie nur
die vom Hersteller für diese Zahnbürste
empfohlenen Bürstenköpfe.
Page 24

Deutsch
-
Bei Verwendung peroxid-, natron- oder
bikarbonathaltiger Zahnpasta (üblich in
Weißmacher-Zahnpasta) sollten Sie den
Bürstenkopf nach jedem Gebrauch
gründlich mit einem milden Reinigungsmittel
und Wasser reinigen. Dies verhindert ein
mögliches Brechen des Plastiks.
-
Vermeiden Sie Kontakt mit Flüssigkeiten, die
Essenzöle enthalten (häufiger Bestandteil
von starken Mundspülungen), da dies den
Hart- und Weichkunststoff beschädigen
kann.
Elektromagnetische Felder
Dieses Philips Gerät erfüllt sämtliche Normen
und Regelungen bezüglich der Exposition in
elektromagnetischen Feldern.
Allgemeine Beschreibung (Abb. 1)
1 Hygienische Schutzkappe
2 Bürstenkopf
3 Griff
4 Ein-/Ausschalter und Modus-Taste
5 Anzeige der Intensitätsstufe
6 Einstelltaste für Intensitätsstufe (+ und -)
7 Modusanzeige
8 Akkustandanzeige
9 Ladegerät
23
Page 25

Deutsch
24
Hinweis: Abhängig vom gekauften Modell kann der Packungsinhalt
variieren.
Vorbereiten für den Gebrauch
Den Bürstenkopf befestigen
1 Richten Sie den Bürstenkopf so aus, dass die Borsten in die gleiche
Richtung wie die Vorderseite des Handstücks (Abb. 2) zeigen.
2 Drücken Sie den Bürstenkopf auf den Metallschaft, bis er fest sitzt
(Abb. 3).
Hinweis: Philips Sonicare Bürstenköpfe sind mit aufgedruckten
Symbolen versehen, damit Sie Ihren Bürstenkopf (Abb. 4) ganz
einfach identifizieren können.
Die Philips Sonicare Zahnbürste laden
1 Schließen Sie das Ladegerät an eine funktionierende Steckdose
an.
2 Stellen Sie das Handstück in das Ladegerät (Abb. 5).
-
Die blinkende Akkustandsanzeige zeigt an, dass die Zahnbürste
geladen wird.
-
Ist der Akku vollständig geladen, leuchtet die Akkustandanzeige
10 Sekunden lang dauerhaft grün und erlischt dann.
Hinweis: Es kann bis zu 48 Stunden dauern, bis der Akku vollständig
aufgeladen ist, aber die Philips Sonicare kann bereits verwendet
werden, bevor sie vollständig geladen ist.
Das Gerät benutzen
Putzanleitung
1 Befeuchten Sie die Borsten, und tragen Sie etwas Zahnpasta auf.
2 Setzen Sie die Borsten der Zahnbürste in einem Winkel von ca.
45 Grad auf die Zähne, und wenden Sie etwas Druck an, sodass
die Borsten den Zahnfleischrand (Abb. 7) erreichen oder leicht
darüber hinaus reichen.
Hinweis: Halten Sie die Mitte der Bürste jederzeit im Kontakt mit
den Zähnen.
Page 26

Deutsch
3 Drücken Sie den Ein-/Ausschalter bzw. die Modus-Taste, um die
Philips Sonicare einzuschalten.
4 Für eine optimale Zahnpflege putzen Sie die Zähne nur mit
leichtem Druck und überlassen der Philips Sonicare die eigentliche
Arbeit. Nicht schrubben.
5 Führen Sie den Bürstenkopf langsam in kleinen Vorwärts- und
Rückwärtsbewegungen so über die Zähne, dass die längeren
Borsten in die Zahnzwischenräume gelangen. Verfahren Sie auf
diese Weise bis zum Ende des Putzvorgangs.
6 Zum Reinigen der Innenseite der Frontzähne kippen Sie das
Handstück halb aufrecht, und führen Sie an jedem Zahn (Abb. 8)
mehrere vertikale, überlappende Bürstenkopfbewegungen aus.
Hinweis: Damit alle Zähne gleichmäßig geputzt werden, teilen Sie
Ihren Mund mit der Quadpacer-Funktion in vier Abschnitte auf
(siehe 'Produktmerkmale').
7 Beginnen Sie mit dem Putzen des 1. Abschnittes (äußere obere
Zähne) und putzen Sie für 30 Sekunden, bevor Sie zum 2.
Abschnitt (innere obere Zähne) übergehen. Fahren Sie mit dem
Putzen des 3. Abschnitts (äußere untere Zähne) fort und putzen
Sie für 30 Sekunden, bevor Sie zum 4. Abschnitt (innere untere
Zähne (Abb. 9)) übergehen.
8 Nachdem Sie den Putzzyklus beendet haben, können Sie
zusätzliche Zeit mit dem Putzen der Kauoberflächen und
Bereichen, wo Abfärbungen auftreten, verbringen. Sie können
auch die Zunge ganz nach Belieben (Abb. 10) mit ein- oder
ausgeschalteter Zahnbürste putzen.
Die Philips Sonicare ist sicher für den Gebrauch bei:
- Zahnspangen (die Bürstenköpfe nutzen sich beim Putzen von
Zahnspangen schneller ab)
- Zahnersatz (Füllungen, Kronen, Verblendschalen).
Hinweis: Stellen Sie sicher, dass Zahnspangen oder Zahnersatz sicher
sitzen. Andernfalls können Zahnspangen oder Zahnersatz beschädigt
werden, wenn sie in Kontakt mit dem Bürstenkopf kommen.
Hinweis: Wenn die Philips Sonicare in klinischen Studien eingesetzt
wird, muss der standardmäßig eingestellte 2-minütige Clean-Modus
25
Page 27

Deutsch
26
mit höchster Intensitätsstufe ausgewählt werden. Das Handstück
muss vollständig geladen sein, und die Easy-Start-Funktion muss
deaktiviert sein.
Putzmodi
Clean-Modus
Optimal zur Plaque-Entfernung (Standardmodus). Der Clean-Modus
dauert 2 Minuten und umfasst vier 30-sekündige QuadpacerIntervalle ein.
Gum Plus-Modus
Zur sanften Stimulation Ihres Zahnfleischs. Der Gum Plus-Modus
dauert 2 Minuten und umfasst vier 30-sekündige QuadpacerIntervalle.
1 Drücken Sie den Ein-/Ausschalter bzw. die Modus-Taste, um die
Philips Sonicare einzuschalten.
2 Drücken Sie den Ein-/Ausschalter bzw. die Modus-Taste innerhalb
von 2,5 Sekunden erneut, um in den Gum Plus-Modus zu
wechseln.
3 Drücken Sie nach 2,5 Sekunden den Ein-/Ausschalter bzw. die
Modus-Taste, um die Philips Sonicare anzuhalten.
Intensitätsstufen
- Niedrig: 1 LED-Anzeige
- Mittel: 2 LED-Anzeigen
- Hoch: 3 LED-Anzeigen
Hinweis: Um die Intensität auf die nächsthöhere oder niedrigere Stufe
einzustellen, können Sie jederzeit während des Putzzyklus die Taste
"+" zum Erhöhen der Intensität oder die Taste "-" zum Verringern der
Intensität drücken.
Akkustatus (wenn sich das Handstück nicht im Ladegerät befindet)
- Eine gelb blinkende Akkustandsanzeige zeigt einen niedrigen
Akkuladestand an.
- Eine grün blinkende Akkustandsanzeige zeigt einen mittleren
Akkuladestand an.
Page 28

Deutsch
- Eine dauerhaft grün leuchtende Akkustandsanzeige zeigt eine
volle Ladung (Abb. 6) an.
Hinweis: Wenn Sie 5 Signaltöne hören und die Akkustandsanzeige
gelb blinkt, bedeutet dies, dass Sie den Akku aufladen müssen. Wenn
der Akku ganz leer ist, schaltet sich die Philips Sonicare aus. Stecken
Sie die Philips Sonicare auf das Ladegerät, um sie zu laden.
Sie können die Zahnbürste bei Nichtgebrauch im Ladegerät
aufbewahren, damit die Akkus geladen bleiben.
Produktmerkmale
Smartimer
Der Smartimer zeigt an, dass der Putzzyklus beendet ist, indem die
Zahnbürste nach beendetem Putzzyklus automatisch ausgeschaltet
wird.
Zahnärzte empfehlen, die Zähne zweimal täglich mindestens
2 Minuten lang zu putzen.
Easy-Start
Mit der Easy-Start-Funktion wird die Intensität über die ersten
14 Anwendungen schrittweise erhöht, damit Sie sich leichter an das
Putzen mit der Philips Sonicare gewöhnen.Bei diesem Philips
Sonicare-Modell ist die Easy-Start-Funktion anfangs deaktiviert.
Aktivieren oder Deaktivieren der Easy-Start-Funktion
1 Bringen Sie den Bürstenkopf am Handstück an.
2 Stellen Sie das Handstück in das angeschlossene Ladegerät.
So aktivieren Sie Easy-Start:
Halten Sie den Ein-/Ausschalter und die Modus-Taste 2 Sekunden
lang gedrückt. Sie hören 2 Signaltöne, und die Akkustandanzeige
leuchtet grün, sobald die Easy-Start-Funktion aktiviert ist.
So deaktivieren Sie Easy-Start:
Halten Sie den Ein-/Ausschalter und die Modus-Taste 2 Sekunden
lang gedrückt. Sie hören 1 Signalton und die Akkustandanzeige
leuchtet gelb, sobald die Easy-Start-Funktion deaktiviert ist.
27
Page 29

Deutsch
28
Hinweis: Die Easy-Start-Funktion sollte nur in der ersten
Gewöhnungsphase genutzt werden, da sie die Effizienz der PlaqueEntfernung mit der Philips Sonicare reduziert.
Quadpacer
Der Quadpacer ist ein Intervalltimer mit einem kurzen akustischen
Signal gefolgt von einer Pause, damit die 4 Abschnitte des Mundes
gleichmäßig und gründlich (Abb. 11) geputzt werden.
Je nach gewähltem Putzmodus ertönt das Signal nach
unterschiedlichen Intervallen des Putzzyklus. Weitere Hinweise finden
Sie im Abschnitt "Putzmodi".
Aktivieren oder Deaktivieren der Quadpacer-Funktion:
Stellen Sie das Handstück in das angeschlossene Ladegerät.
- So aktivieren Sie den Quadpacer:
Halten Sie die Taste zum Reduzieren der Intensitätsstufe (-)
2 Sekunden lang gedrückt. Sie hören zwei Signaltöne, und die
Akkustandsanzeige leuchtet grün, um anzuzeigen, dass die
Quadpacer-Funktion aktiviert wurde.
- So deaktivieren Sie den Quadpacer:
Halten Sie die Taste zum Reduzieren der Intensitätsstufe (-)
2 Sekunden lang gedrückt. Sie hören einen Signalton, und die
Akkustandanzeige leuchtet gelb, um anzuzeigen, dass die
Quadpacer-Funktion deaktiviert wurde.
Ladebestätigung
Wenn die Funktion zur Ladebestätigung aktiviert ist, ertönt ein
Signalton, und das Handstück vibriert kurz, wenn es in die Ladestation
gestellt wird. Bei diesem Philips Sonicare-Modell ist die
Ladebestätigung anfangs deaktiviert.
Aktivieren oder Deaktivieren der Ladebestätigung:
Stellen Sie das Handstück in das Ladegerät.
- So aktivieren Sie die Ladebestätigung:
Halten Sie die Taste zum Erhöhen der Intensitätsstufe (+)
2 Sekunden lang gedrückt. Sie hören zwei Signaltöne, und die
Page 30

Deutsch
Akkustandsanzeige leuchtet zweimal grün auf, um anzuzeigen,
dass die Funktion zur Ladebestätigung aktiviert wurde.
- So deaktivieren Sie die Ladebestätigung:
Halten Sie die Taste zum Erhöhen der Intensitätsstufe (+)
2 Sekunden lang gedrückt. Sie hören einen Signalton, und die
Akkustandsanzeige leuchtet einmal gelb auf, um anzuzeigen, dass
die Funktion zur Ladebestätigung deaktiviert wurde.
Pflege
Handstück der Zahnbürste
1 Nehmen Sie den Bürstenkopf ab, und spülen Sie den Metallschaft
mit warmem Wasser ab. Vergewissern Sie sich, dass alle
Zahnpastarückstände (Abb. 12) entfernt sind.
Achtung: Drücken Sie nicht mit scharfkantigen Gegenständen auf
die Gummidichtung um den Metallschaft, da diese dadurch
beschädigt werden kann.
2 Wischen Sie das gesamte Handstück mit einem feuchten Tuch ab.
Bürstenkopf
1 Spülen Sie Bürstenkopf und Borsten nach jedem Gebrauch (Abb.
13) unter fließendem Wasser ab.
2 Nehmen Sie mindestens einmal pro Woche den Bürstenkopf vom
Handstück, und spülen Sie die Verbindung zwischen Bürstenkopf
und Handstück mit warmem Wasser ab.
Ladegerät
1 Ziehen Sie vor dem Reinigen des Ladegeräts den Netzstecker aus
der Steckdose.
2 Wischen Sie das Ladegerät mit einem feuchten Tuch ab. Stellen
Sie sicher, dass Sie Zahnpasta und andere Rückstände vom
Ladegerät entfernen.
29
Lagerräume
Wenn Sie die Sonicare über einen längeren Zeitraum nicht
verwenden, ziehen Sie die Ladestation aus der Steckdose, reinigen
Page 31

Deutsch
30
Sie sie, und bewahren Sie sie an einem kühlen, trockenen Ort ohne
direkte Sonneneinstrahlung auf.
Austausch
Bürstenkopf
Um optimale Ergebnisse zu erzielen, tauschen Sie Philips Sonicare
Bürstenköpfe spätestens nach 3 Monaten aus. Benutzen Sie
ausschließlich entsprechende Philips Sonicare Ersatzbürstenköpfe.
Recycling
- Dieses Symbol bedeutet, dass das Produkt nicht mit dem
normalen Hausmüll entsorgt werden kann (2012/19/EU) (Abb. 23).
- Dieses Symbol bedeutet, dass das Produkt einen Akku enthält, der
nicht mit dem normalen Hausmüll (Abb. 24) entsorgt werden darf
(2006/66/EG). Wir empfehlen dringend, das Produkt bei einer
offiziellen Sammelstelle oder einem Philips Service-Center
abzugeben, um den Akku fachgerecht ausbauen zu lassen.
- Beachten Sie die örtlichen Vorschriften zur getrennten Entsorgung
von elektrischen und elektronischen Produkten, Akkus und
Batterien. Die ordnungsgemäße Entsorgung dient dem Schutz von
Umwelt und Gesundheit.
Den Akku entfernen
Warnhinweis: Bauen Sie den wiederaufladbaren Akku nur zur
Entsorgung des Geräts aus. Vergewissern Sie sich, dass der Akku ganz
leer ist, bevor Sie ihn ausbauen.
Zum Entfernen des aufladbaren Akkus benötigen Sie ein Handtuch
oder Lappen sowie einen Hammer und einen Schlitzschraubendreher
(Standardschraubendreher). Beachten Sie grundlegende
Sicherheitsmaßnahmen, wenn Sie die unten angeführten Schritte
ausführen. Schützen Sie Ihre Augen, Hände und Finger sowie die
Oberfläche, auf der Sie arbeiten.
Page 32

Deutsch
1 Um den Akku komplett zu entladen, nehmen Sie das Handstück
aus dem Ladegerät, schalten die Philips Sonicare ein und lassen
sie laufen, bis sie zum Stillstand kommt. Wiederholen Sie diesen
Vorgang, bis Sie die Philips Sonicare nicht mehr einschalten
können.
2 Nehmen Sie den Bürstenkopf vom Gerät ab und entsorgen Sie ihn.
Decken Sie das Handstück völlig mit einem Handtuch oder einem
Lappen (Abb. ) ab.
3 Halten Sie den oberen Teil des Handstücks mit einer Hand fest,
und schlagen Sie auf den unteren Teil des Handstückgehäuses, ca.
1 cm vom Ende entfernt. Klopfen Sie mit einem Hammer fest auf
alle 4 Seiten, um die Abdeckkappe (Abb. 15) zu lösen.
Hinweis: Möglicherweise müssen Sie mehrmals auf das Ende
klopfen, bis die Schnappverbindungen im Inneren brechen.
4 Entfernen Sie die Abdeckkappe vom Handstück der Zahnbürste.
Wenn die Abdeckkappe sich nicht leicht vom Gehäuse lösen lässt,
wiederholen Sie Schritt 3, bis sich die Abdeckkappe löst (Abb. 16).
5 Drehen Sie das Handstück auf dem Kopf, und drücken Sie den
Schaft fest auf eine harte Unterlage. Wenn die Innenteile sich nicht
leicht vom Gehäuse lösen lassen, wiederholen Sie Schritt 3, bis
sich die Innenteile lösen (Abb. 17).
6 Entfernen Sie die Gummiabdeckung des Akkufachs.
7 Stecken Sie den Schraubendreher zwischen den Akku und den
schwarzen Rahmen der internen Komponenten. Drücken Sie den
Schraubendreher dann vom Akku weg, um die Unterseite des
schwarzen Rahmens (Abb. 20) abzulösen.
8 Stecken Sie den Schraubendreher zwischen die Unterseite des
Akkus und den schwarzen Rahmen, um die Metalllasche
aufzubrechen, die den Akku mit der grünen Platine verbindet.
Dadurch löst sich die Unterseite des Akkus vom Rahmen (Abb. 21).
9 Fassen Sie den Akku, und ziehen Sie ihn von der internen
Komponente weg, um die zweite Metalllasche (Abb. 22) am Akku
aufzubrechen.
Achtung: Beachten Sie, dass die Kanten der Akkulaschen scharf
sind, um Verletzungen der Finger zu vermeiden.
31
Page 33

Deutsch
32
10 Decken Sie die Akkukontakte mit Klebeband ab, um Kurzschlüsse
durch eine möglicherweise verbleibende Akkuladung zu
verhindern. Der wiederaufladbaren Akku können jetzt recycelt und
der Rest des Produkts kann ordnungsgemäß entsorgt werden.
Garantie und Support
Wenn Sie Hilfe oder Informationen benötigen, besuchen Sie bitte
www.philips.com/support, oder lesen Sie die internationale
Garantieschrift.
Garantieeinschränkungen
Die folgenden Geräteteile/Schäden unterliegen nicht den
Bedingungen der internationalen Garantie:
- Bürstenköpfe.
- Schäden, die durch den Gebrauch von nicht zugelassenen
Ersatzteilen verursacht werden.
- Schäden durch Missbrauch, falsche Benutzung, Fahrlässigkeit,
Manipulation oder Reparatur durch Unbefugte.
- Normale Abnutzungserscheinungen wie abgeschlagene Stellen,
Kratzer, Abschürfungen, Verfärbungen oder Verblassen.
Page 34

Español
5 Series gum health
Introducción
Enhorabuena por la adquisición de este producto, y bienvenido a
Philips Para sacar el mayor partido a la asistencia que Philips le
ofrece, registre el producto en www.philips.com/welcome.
Importante
Antes de usar el aparato, lea atentamente
este manual de usuario y consérvelo por si
necesitase consultarlo en el futuro.
Peligro
-
Mantenga el cargador alejado del agua. No
coloque ni guarde el cargador cerca o sobre
el agua contenida en bañeras, lavabos,
fregaderos, etc. No sumerja el cargador en
agua ni en otros líquidos. Después de
limpiarlo, asegúrese de que el cargador esté
completamente seco antes de enchufarlo a
la red eléctrica.
33
Advertencia
-
El cable de alimentación no se puede
sustituir. Deseche el aparato si el cable de
alimentación está dañado.
Español
Page 35

Español
34
-
Sustituya siempre el cargador por otros del
modelo original para evitar situaciones de
peligro.
-
No utilice el cargador al aire libre ni cerca de
superficies calientes.
-
Deje de utilizar el aparato si tiene algún
daño (en el cabezal del cepillo, en el mango
o en el cargador). Este producto contiene
piezas que no se pueden reparar. Si el
aparato está dañado, póngase en contacto
con el Servicio de Atención al Cliente de su
país (consulte el capítulo "Garantía y
asistencia").
Page 36

Español
-
Este aparato puede ser usado por niños a
partir de 8 años y por personas con su
capacidad física, psíquica o sensorial
reducida y por quienes no tengan los
conocimientos y la experiencia necesarios,
si han sido supervisados o instruidos acerca
del uso del aparato de forma segura y
siempre que sepan los riesgos que conlleva
su uso. Los niños no deben jugar con el
dispositivo. Los niños no deben limpiar el
aparato ni realizar tareas de mantenimiento
a menos que sean mayores de 8 años y
cuenten con supervisión.
Precaución
-
No lave el cabezal de cepillado, el mango ni
el cargador en el lavavajillas.
-
Consulte a su dentista antes de utilizar este
cepillo dental si se ha sometido a cirugía
oral o de las encías en los dos últimos
meses.
35
Page 37

Español
36
-
Consulte a su dentista si se produce un
sangrado excesivo después de usar este
cepillo dental, o si el sangrado continúa
produciéndose después de una semana de
uso. Consulte también a su dentista si
experimenta molestias o dolor al utilizar el
Sonicare.
-
El cepillo Philip Sonicare cumple las normas
de seguridad para dispositivos
electromagnéticos. Si tiene un marcapasos
o cualquier otro dispositivo implantado,
consulte a su médico o al fabricante del
dispositivo antes de utilizar el aparato.
-
Si tiene alguna duda médica, consulte a su
médico antes de utilizar su Sonicare.
-
Este aparato ha sido diseñado únicamente
para limpiar los dientes, las encías y la
lengua. No lo utilice con ninguna otra
finalidad. Deje de utilizar el dispositivo o
consulte a su médico si experimenta
molestias o dolor.
Page 38

Español
-
El cepillo dental Philips Sonicare es un
aparato de higiene personal y no ha sido
concebido para su uso en múltiples
pacientes de clínicas o instituciones.
-
No utilice un cabezal de cepillo si tiene las
cerdas aplastadas o curvadas. Sustituya el
cabezal del cepillo cada tres meses o antes
si aparecen signos de desgaste. No utilice
otros cabezales que no sean los
recomendados por el fabricante.
-
Si el dentífrico que utiliza contiene peróxido,
bicarbonato sódico u otro bicarbonato
(frecuentes en los dentífricos
blanqueadores), limpie bien el cabezal con
agua y jabón después de cada uso. Esto
evitará la aparición de posibles grietas en el
plástico.
-
Evite el contacto con líquidos que
contengan aceites esenciales (habituales en
enjuagues bucales fuertes), ya que podrían
ocasionar daños en plástico duro y flexible.
37
Page 39

Español
38
Campos electromagnéticos (CEM)
Este aparato de Philips cumple los estándares
y las normativas aplicables sobre exposición a
campos electromagnéticos.
Descripción general (Fig. 1)
1 Capuchón higiénico
2 Cabezal de cepillado
3 Mango
4 Botón de encendido/apagado y modo
5 Indicador de nivel de intensidad
6 Botón de nivel de intensidad (+ y -)
7 Indicador de modo
8 Indicador de nivel de batería
9 Cargador
Nota: El contenido de la caja puede variar en función del modelo que
adquiera.
Preparación para su uso
Cómo fijar el cabezal del cepillo
1 Alinee el cabezal del cepillo de manera que las cerdas apunten en
la misma dirección que la parte frontal del mango (Fig. 2).
2 Presione firmemente hacia abajo el cabezal del cepillo sobre el
eje metálico hasta que encaje (Fig. 3).
Nota: Los cabezales del cepillo Sonicare de Philips disponen de
iconos impresos para que identifique fácilmente su cabezal (Fig. 4).
Carga de su cepillo Sonicare de Philips
1 Enchufe el cargador a una toma de corriente eléctrica.
2 Coloque el mango en el cargador (Fig. 5).
-
El piloto del indicador de nivel de batería parpadea para indicar
que el cepillo dental se está cargando.
Page 40

Español
-
Cuando su batería está totalmente cargada, el indicador de
nivel de carga de la batería parpadea en verde sólido durante
10 segundos antes de apagarse.
Nota: La batería puede tardar hasta 48 horas en cargarse, pero el
cepillo Sonicare de Philips se puede utilizar antes de que se haya
cargado por completo.
39
Uso del aparato
Instrucciones de cepillado
1 Moje las cerdas y aplique una pequeña cantidad de pasta de
dientes.
2 Coloque las cerdas del cepillo sobre los dientes formando un
ángulo de 45 grados y presione firmemente para que las cerdas
alcancen la línea de la encía o se queden ligeramente por debajo
de la encía (Fig. 7).
Nota: Mantenga la parte central del cepillo en contacto con los
dientes en todo momento.
3 Pulse el botón de encendido/apagado para encender su Sonicare.
4 Ejerza una ligera presión para maximizar la eficacia del cepillo
dental Philips Sonicare y deje que este se encargue del cepillado.
No frote.
5 Desplace suavemente el cabezal del cepillo por todos los dientes
con un pequeño movimiento hacia delante y hacia atrás, de forma
que las cerdas más largas lleguen a los espacios interdentales.
Continúe con este movimiento durante el ciclo de cepillado.
6 Para limpiar la superficie interior de los dientes anteriores, incline
el mango del cepillo y colóquelo en posición semivertical. Realice
varias pasadas superpuestas en vertical en cada diente (Fig. 8).
Nota: Para asegurar el cepillado uniforme de toda la boca, divida
la cavidad bucal en cuatro secciones mediante la función
Quadpacer (consulte el capítulo "Características").
Page 41

Español
40
7 Comience el cepillado en la sección 1 (cara exterior de los dientes
superiores) y cepille durante 30 segundos antes de pasar a la
sección 2 (cara interna de los dientes superiores). Continúe con la
sección 3 (cara externa dientes inferiores) y cepíllela durante
30 segundos antes de pasar a la sección 4 (cara interna de los
dientes (Fig. 9) inferiores).
8 Tras completar el ciclo de cepillado, emplee un tiempo adicional
para cepillar la superficie de masticación de los dientes y las zonas
donde se formen manchas. También puede cepillarse la lengua,
con el cepillo encendido o apagado, como prefiera (Fig. 10).
Puede utilizar Philips Sonicare de forma segura en:
- Aparatos correctores (los cabezales se gastan antes cuando se
utilizan sobre aparatos correctores).
- Restauraciones dentales (empastes, coronas, carillas).
Nota: Asegúrese de que los aparatos correctores o las restauraciones
dentales estén correctamente fijados y de que no haya riesgo de
estropearlos. De no ser así, podrían resultar dañados al ponerse en
contacto con el cabezal del cepillo.
Nota: Cuando se utiliza el cepillo Sonicare de Philips en estudios
clínicos, se debe seleccionar el modo Clean (Limpieza) de 2 minutos
predeterminado con alta intensidad. El mango debe estar
completamente cargado y la función Easy-start debe estar
desactivada.
Modos de cepillado
Modo Clean (Limpieza)
Lo último en eliminación de la placa (modo predeterminado) El
modo Clean (Limpieza) dura 2 minutos e incluye cuatro intervalos de
Quadpacer de 30 segundos.
Gum Plus mode
Para estimular suavemente las encías. El modo Gum Plus (Encía Plus)
dura 2 minutos e incluye cuatro intervalos de Quadpacer de 30
segundos.
1 Pulse el botón de encendido/apagado y modo para encender el
cepillo Sonicare de Philips.
Page 42

Español
2 Vuelva a pulsar el botón de encendido/apagado y modo en un
máximo de 2,5 segundos para cambiar al modo Gum Plus (Encía
Plus).
3 Pulse el botón de encendido/apagado y modo después de
2,5 segundos para poner en pausa el cepillo Sonicare de Philips.
41
Niveles de intensidad
- Bajo 1 piloto indicador LED
- Medio: 2 pilotos indicadores LED
- Alto 3 pilotos indicadores LED
Nota: Para ajustar el nivel de intensidad al siguiente nivel superior o
inferior, pulse el botón de nivel de intensidad + para aumentar la
intensidad o el botón - para reducirla en cualquier momento durante
el ciclo de cepillado
Estado de la batería (cuando el mango no está en el cargador)
- El indicador de nivel de batería parpadea en amarillo para indicar
un nivel de carga bajo.
- El indicador de nivel de batería parpadea en verde para indicar un
nivel de carga moderado.
- El indicador de nivel de batería se ilumina en verde de forma
permanente para indicar un nivel de carga (Fig. 6) completo.
Nota: Si oye 5 pitidos y el indicador de nivel de batería parpadea en
amarillo, significa que debe recargar la batería. Cuando la batería esté
completamente agotada, el cepillo Sonicare de Philips se apagará.
Coloque el cepillo Sonicare de Philips en el cargador para cargarlo.
Para mantener la batería totalmente cargada en todo momento,
puede mantener el Sonicare en el cargador cuando no lo utilice.
Funciones
Smartimer
Después de completar el ciclo de cepillado, puede dedicar un tiempo
adicional al cepillado de la superficie de masticación de los dientes y
las zonas donde se forman manchas. También puede cepillarse la
lengua, con el cepillo encendido o apagado, como prefiera.
Page 43

Español
42
Easy-start
La función Easy-start aumenta paulatinamente la potencia a lo largo
de los primeros 14 cepillados para ayudarle a acostumbrarse al
cepillado con Philips Sonicare.Este modelo de cepillo Sonicare de
Philips se suministra con la función Easy-start desactivada.
Para activar o desactivar la función Easy-start
1 Fije el cabezal del cepillo al mango.
2 Coloque el mango en el cargador enchufado.
Para activar la función Easy-start:
Mantenga pulsado el botón de encendido y modo durante
2 segundos. Escuchará dos pitidos y el indicador de nivel de batería
se iluminará en verde para indicar que se ha activado la función
Easy-start.
Para desactivar la función Easy-start:
Mantenga pulsado el botón de encendido y modo durante
2 segundos. Escuchará un pitido y el indicador de nivel de batería se
iluminará en amarillo para indicar que se ha desactivado la función
Easy-start.
Nota: No se recomienda utilizar la función Easy-start más allá del
periodo inicial de regulación, ya que reduce la eficacia de Philips
Sonicare en la eliminación de la placa.
Quadpacer
Quadpacer es un temporizador de intervalos que utiliza un pitido
corto y una pausa para ayudarle a cepillarse las cuatro secciones de
la boca uniformemente y en profundidad (Fig. 11).
Dependiendo del modo de cepillado que haya seleccionado, el
temporizador Quadpacer emitirá pitidos en diferentes intervalos
durante el ciclo de cepillado. Consulte la sección acerca de los
"modos de cepillado" para obtener detalles adicionales.
Para activar o desactivar la función Quadpacer:
Coloque el mango en el cargador enchufado.
- Para activar la función Quadpacer:
Page 44

Español
Mantenga pulsado el botón de reducción de nivel de intensidad () durante dos segundos. Escuchará dos pitidos y el indicador de
nivel de batería se iluminará en verde para indicar que se ha
activado la función Quadpacer.
- Para desactivar la función Quadpacer:
Mantenga pulsado el botón de reducción de nivel de intensidad (-
) durante dos segundos. Escuchará un pitido y el indicador de
nivel de batería se iluminará en amarillo para indicar que se ha
desactivado la función Quadpacer.
Confirmación del cargador
Al activar la función de confirmación del cargador, el mango emite un
pitido y vibra brevemente cuando se coloca en la base del cargador.
Este modelo de cepillo Sonicare de Philips se suministra con la
función de confirmación del cargador desactivada.
Para activar o desactivar la función de confirmación del cargador:
Coloque el mango en el cargador.
- Para activar la confirmación del cargador:
Mantenga pulsado el botón de aumento de nivel de intensidad (+)
durante dos segundos. Escuchará dos pitidos y el indicador de
nivel de batería se iluminará en verde dos veces para indicar que
se ha activado la función de confirmación del cargador.
- Para desactivar la confirmación del cargador:
Mantenga pulsado el botón de aumento de nivel de intensidad (+)
durante dos segundos. Escuchará un pitido y el indicador de nivel
de batería se iluminará en amarillo una vez para indicar que se ha
desactivado la función de confirmación del cargador.
43
Limpieza
Mango del cepillo
1 Quite el cabezal del cepillo y enjuague la zona del eje metálico
con agua caliente. Asegúrese de eliminar todos los restos de pasta
de dientes (Fig. 12).
Page 45

Español
44
Precaución: No empuje la junta de goma del eje metálico con
ningún objeto afilado, ya que podría dañarla.
2 Utilice un paño húmedo para limpiar la superficie del mango.
Cabezal de cepillado
1 Enjuague siempre el cabezal y las cerdas después de cada uso
(Fig. 13).
2 Extraiga el cabezal del cepillo del mango y enjuague la conexión
del cabezal al menos una vez a la semana con agua tibia.
Cargador
1 Desenchufe el cargador antes de limpiarlo.
2 Limpie la superficie del cargador con un paño húmedo. Asegúrese
de eliminar los restos de pasta de dientes o cualquier otro residuo
de la superficie del cargador.
Almacenamiento
Si no va a utilizar su Sonicare durante un período prolongado,
desenchufe el cargador de la toma de corriente, límpielo y guárdelo
en un lugar fresco, seco y alejado de la luz directa del sol.
Sustitución
Cabezal de cepillado
Sustituya los cabezales de Sonicare cada 3 meses para conseguir
unos resultados óptimos. Utilice solo los cabezales de recambio
originales de Philips Sonicare.
Reciclaje
- Al final de su vida útil, no tire el producto junto con la basura
normal del hogar. Llévelo a un punto de recogida oficial para su
reciclado. De esta manera, ayudará a conservar el medio
ambiente.
Page 46

Español
Cómo extraer la batería recargable
Advertencia: No quite la batería recargable hasta que deseche el
aparato. Asegúrese de que la batería está completamente agotada
cuando la quite.
Para extraer la batería recargable, utilice una toalla o un paño, un
martillo y un destornillador plano normal. Tenga en cuenta las
medidas de seguridad básicas cuando siga los procedimientos
descritos a continuación. Asegúrese de proteger sus ojos, manos,
dedos y la superficie en la que trabaja.
1 Para agotar la carga de la batería recargable, quite el mango del
cargador, encienda su cepillo Sonicare de Philips y déjelo
funcionar hasta que se pare. Repita esto hasta que ya no pueda
encender el cepillo Sonicare de Philips.
2 Retire y deseche el cabezal de cepillado. Cubra todo el mango
con una toalla o un paño (Fig. ).
3 Sujete la parte superior del mango con una mano y golpee la
carcasa del mango a 1,27 cm por encima del extremo inferior.
Golpee firmemente con un martillo los cuatro lados para expulsar
la tapa (Fig. 15).
Nota: Es posible que tenga que golpear el extremo varias veces
para romper las conexiones internas.
4 Retire la tapa del mango del cepillo. Si la tapa no se libera
fácilmente de la carcasa, repita el paso 3 hasta que la tapa se
suelte (Fig. 16).
5 Sujete el mango boca abajo, presione el eje hacia abajo sobre una
superficie dura. Si los componentes internos no se sueltan de la
carcasa con facilidad, repita el paso 3 hasta que lo hagan (Fig. 17).
6 Extraiga la cubierta de goma de la batería.
7 Introduzca el destornillador entre la batería y el marco negro de la
parte inferior de los componentes internos. A continuación haga
palanca con el destornillador hacia el exterior de la batería para
romper la parte inferior del marco (Fig. 20) negro.
45
Page 47

Español
46
8 Inserte el destornillador entre la parte inferior de la batería y el
marco negro para romper la pestaña metálica que conecta la
batería con la placa de circuito impreso de color verde. Esto
separará el extremo inferior de la batería del marco (Fig. 21) negro.
9 Agarre la batería y tire de ella separándola de los componentes
internos para romper la segunda pestaña (Fig. 22) metálica de la
batería.
Precaución: Tenga cuidado con los bordes afilados de las
pestañas de la batería para evitar lesiones en los dedos.
10 Cubra los contactos de la batería con cinta aislante para evitar
cualquier cortocircuito eléctrico provocado por la carga residual de
la batería. La batería recargable ya se puede reciclar y el resto de
materiales se pueden desechar de manera adecuada.
Garantía y asistencia
Si necesita asistencia o información, visite www.philips.com/support
o lea el folleto de garantía mundial independiente.
Restricciones de la garantía
La garantía internacional no cubre lo siguiente:
- Cabezales del cepillo.
- Deterioros causados por el uso de piezas de repuesto no
autorizadas.
- Deterioros causados por el uso inapropiado, abusos, negligencias,
alteraciones o reparaciones no autorizadas.
- Desgaste normal, incluidos arañazos, astillas, abrasiones,
desteñidos o pérdida de color.
Page 48

Français
Série 5 santé des gencives
Introduction
Félicitations pour votre achat et bienvenue dans l'univers Philips !
Pour profiter pleinement de l'assistance offerte par Philips,
enregistrez votre produit à l'adresse suivante :
www.philips.com/welcome.
Important
Lisez attentivement ce mode d’emploi avant
d’utiliser l’appareil et conservez-le pour un
usage ultérieur.
Danger
-
Évitez tout contact de l'appareil avec de
l'eau. Ne le placez pas et ne le rangez pas
près d'une baignoire, d'un lavabo ou d'un
évier. N'immergez en aucun cas le chargeur
dans l'eau ou dans tout autre liquide. Après
l'avoir nettoyé, assurez-vous qu'il est
complètement sec avant de le brancher sur
le secteur.
47
Français
Page 49

Français
48
Avertissement
-
Il est impossible de remplacer le cordon
d'alimentation. Si le cordon d'alimentation
est endommagé, vous devez mettre le
chargeur au rebut.
-
Remplacez systématiquement le chargeur
par un chargeur de même type pour éviter
tout accident.
-
N'utilisez pas le chargeur à l'extérieur ou
près de surfaces chauffantes.
-
Si l'appareil (tête de brosse, manche de la
brosse à dents ou chargeur) est
endommagé, cessez de l'utiliser. L'appareil
ne contient aucune pièce réparable. S'il est
endommagé, contactez le
Service Consommateurs de votre pays (voir
le chapitre « Garantie et assistance »).
Page 50

Français
-
Cet appareil peut être utilisé par des enfants
âgés de 8 ans ou plus, des personnes dont
les capacités physiques, sensorielles ou
intellectuelles sont réduites ou des
personnes manquant d’expérience et de
connaissances, à condition que ces enfants
ou personnes soient sous surveillance ou
qu'ils aient reçu des instructions quant à
l’utilisation sécurisée de l’appareil et qu'ils
aient pris connaissance des dangers
encourus. Ne laissez pas les enfants jouer
avec l'appareil. Le nettoyage et l'entretien
ne peuvent pas être réalisés par des enfants
sauf s'ils sont âgés de plus de 8 ans et sous
surveillance.
Attention
-
Ne mettez pas la tête de brosse, le manche
ou le chargeur au lave-vaisselle.
-
Si vous avez reçu des soins buccodentaires, notamment au niveau des
gencives, au cours des deux derniers mois,
consultez votre dentiste avant d'utiliser
cette brosse à dents.
49
Page 51

Français
50
-
Consultez votre dentiste si vos gencives
saignent de manière excessive après
utilisation de cette brosse à dents ou si le
saignement persiste après une semaine
d'utilisation. Consultez également votre
dentiste si vous éprouvez une gène ou une
douleur lorsque vous utilisez la Philips
Sonicare.
-
La brosse à dents Philips Sonicare est
conforme aux normes de sécurité relatives
aux appareils électromagnétiques. Si vous
portez un stimulateur cardiaque ou tout
autre dispositif implanté, consultez votre
médecin ou le fabricant du dispositif
implanté avant d'utiliser cet appareil.
-
Si vous avez des problèmes de santé,
consultez votre médecin avant d'utiliser la
brosse à dents Philips Sonicare.
Page 52

Français
-
Cet appareil a été conçu uniquement pour
le brossage des dents, des gencives et de la
langue. Ne l'utilisez jamais à d'autres fins. Si
son utilisation devait s'avérer inconfortable
ou douloureuse, cessez d'utiliser l'appareil
et consultez votre médecin.
-
La brosse à dents Philips Sonicare est un
appareil de soins personnel et n'est pas
destinée à être utilisée sur plusieurs patients
dans les cabinets ou établissements
dentaires.
-
Cessez d'utiliser une tête de brosse dont les
poils sont écrasés ou tordus. Remplacez la
tête de brosse tous les 3 mois ou plus tôt si
vous constatez des signes d'usure. N'utilisez
pas d'autres têtes de brosse que celles
recommandées par le fabricant.
51
Page 53

Français
52
-
Si votre dentifrice contient du peroxyde, du
bicarbonate de soude ou du bicarbonate
(couramment utilisés dans les dentifrices
blanchissants), veillez à bien nettoyer la tête
de brosse avec de l'eau savonneuse après
chaque utilisation. Cela permet de prévenir
toute fissure éventuelle du plastique.
-
Évitez tout contact avec des liquides
contenant des huiles essentielles (ce qui est
courant dans les bains de bouche forts) car
cela peut endommager les plastiques durs
et souples.
Champs électromagnétiques (CEM)
Cet appareil Philips est conforme à toutes les
normes et à tous les règlements applicables
relatifs à l'exposition aux champs
électromagnétiques.
Description générale (fig. 1)
1 Capuchon de protection hygiénique
2 Tête de brosse
3 Manche
4 Bouton marche/arrêt et mode
5 Indicateur de niveau d'intensité
6 Bouton de niveau d'intensité (+ et -)
7 Voyant de mode
8 Témoin de niveau de batterie
Page 54

Français
9 Chargeur
Remarque : Le contenu de la boîte peut varier selon le modèle
acheté.
53
Avant utilisation
Fixation de la tête de brosse
1 Alignez la tête de brosse afin que les poils soient dans le même
axe que l'avant du manche (Fig. 2).
2 Pressez fermement la tête de brosse sur la tige de métal jusqu'à ce
qu'elle s'arrête (Fig. 3).
Remarque : Les têtes (Fig. 4) de brosse Philips Sonicare comportent
des icônes pour une identification facile.
Chargement de votre brosse à dents Philips Sonicare
1 Branchez le chargeur sur une prise électrique.
2 Placez le manche sur le chargeur (Fig. 5).
-
Le voyant clignotant du témoin de niveau de batterie indique
que la brosse à dents est en charge.
-
Lorsque la batterie est complètement chargée, le voyant de
niveau de batterie passe au vert et reste allumé 10 secondes
avant de s'éteindre.
Remarque : Une charge complète peut prendre jusqu'à 48 heures,
mais la brosse à dents Philips Sonicare peut être utilisée avant d'être
complètement chargée.
Utilisation de l'appareil
Directives de brossage
1 Mouillez les poils et appliquez une petite quantité de dentifrice
dessus.
2 Placez les soies de la tête de brosse sur les dents, légèrement de
biais (45 degrés), en appuyant fermement pour qu'elles touchent
les gencives ou se placent légèrement sous les gencives (Fig. 7).
Remarque : Maintenez le centre de la brosse en contact avec les
dents en tout temps.
Page 55

Français
54
3 Allumez la brosse à dents Philips Sonicare en appuyant sur le
bouton marche/arrêt et mode.
4 Exercez une légère pression pour optimiser l'efficacité de la brosse
à dents Philips Sonicare et laissez l'appareil brosser vos dents. Ne
frottez pas.
5 Déplacez lentement la tête de brosse entre vos dents avec un
léger mouvement de va-et-vient, de sorte que les poils les plus
longs atteignent les espaces interdentaires. Continuez ce
mouvement pendant tout le cycle de brossage.
6 Pour nettoyer la surface intérieure des dents avant, inclinez le
manche de la brosse à dents en position intermédiaire et effectuez
plusieurs mouvements de brosse verticaux sur chaque dent (Fig. 8)
en prenant soin de les faire se chevaucher.
Remarque : Pour assurer un brossage uniforme, divisez votre
bouche en 4 sections à l'aide de la fonction Quadpacer (voir le
chapitre « Caractéristiques »).
7 Brossez chaque section pendant 30 secondes : commencez par la
section 1 (dents de la mâchoire supérieure, à l'extérieur), suivie de
la section 2 (dents de la mâchoire supérieure, à l'intérieur), puis de
la section 3 (dents de la mâchoire inférieure, à l'extérieur) et enfin
de la section 4 (dents de la mâchoire inférieure, (Fig. 9)à
l'intérieur).
8 Une fois le cycle de brossage terminé, vous pouvez consacrer du
temps supplémentaire au brossage de la surface de mastication
des dents et insister sur les zones propices aux taches. Vous
pouvez également brosser votre langue avec la brosse à dents en
marche ou arrêtée.
Votre Philips Sonicare est sans danger pour :
- les appareils orthodontiques (les têtes de brosse s'useront plus
rapidement dans ce cas),
- les restaurations dentaires (obturations, couronnes, facettes).
Remarque : Assurez-vous que les appareils orthodontiques ou les
restaurations dentaires sont correctement collés et non fragilisés. Si
ce n'est pas le cas, les appareils orthodontiques ou les restaurations
dentaires peuvent être endommagés lorsqu'ils entrent en contact
avec la tête de brosse.
Page 56

Français
Remarque : Lorsque la brosse à dents Philips Sonicare est utilisée lors
d'essais cliniques, le mode Propreté de 2 minutes à haute intensité,
par défaut, doit être sélectionné. Le manche doit être complètement
chargé et la fonction Easy-start désactivée.
55
Modes de brossage
Mode Propreté
Une élimination optimale de la plaque (mode par défaut). Le mode
Propreté dure 2 minutes et comprend quatre intervalles Quadpacer
de 30 secondes.
Mode Gencives Plus
Pour stimuler vos gencives en douceur. Le mode Gencives Plus dure
2 minutes et comprend quatre intervalles Quadpacer de 30 secondes.
1 Allumez votre brosse à dents Philips Sonicare en appuyant sur le
bouton marche/arrêt et mode.
2 Appuyez à nouveau sur le bouton marche/arrêt et mode dans les
2,5 secondes suivantes, pour passer en mode Gencives Plus.
3 Appuyez sur le bouton marche/arrêt et mode après 2,5 secondes
pour arrêter la Philips Sonicare.
Niveaux d'intensité
- Faible : 1 Voyant lumineux LED
- Moyen : 2 Voyants lumineux LED
- Fort : 3 Voyants lumineux LED
Remarque : Pour régler le niveau d'intensité, appuyez sur le bouton
d'intensité + pour augmenter l'intensité ou sur le bouton d'intensité pour diminuer l'intensité à tout moment pendant le cycle de brossage
Niveau de la batterie (lorsque le manche n'est pas placé sur le chargeur)
- Un voyant de niveau de charge jaune clignotant indique un niveau
de charge faible.
- Un voyant de niveau de charge vert clignotant indique un niveau
de charge moyen.
- Un voyant de niveau de charge vert continu indique un niveau de
charge (Fig. 6) maximale.
Page 57

Français
56
Remarque : Si 5 signaux sonores sont émis et que le voyant de niveau
de charge clignote en jaune, vous devez recharger la batterie.
Lorsque la batterie est complètement vide, la Philips Sonicare
s'éteint. Placez la Philips Sonicare sur le chargeur pour la charger.
Pour que la batterie reste chargée en permanence, vous pouvez
garder votre brosse à dents Sonicare sur le chargeur lorsque vous ne
l'utilisez pas.
Caractéristiques
Fonction Smartimer
La fonction Smartimer indique que le cycle de brossage est terminé
en arrêtant automatiquement la brosse à dents à la fin du cycle.
Les dentistes recommandent un brossage d'au moins 2 minutes deux
fois par jour.
Fonction Easy-start
La fonction Easy-start augmente progressivement la puissance lors
des 14 premiers brossages pour vous permettre de vous habituer à la
Philips Sonicare.La fonction Easy-start est désactivée par défaut sur
la brosse à dents Philips Sonicare.
Activation ou désactivation de la fonction Easy-start
1 Fixez la tête de brosse au manche.
2 Placez le manche sur le chargeur branché.
Pour activer la fonction Easy-start :
Maintenez enfoncés les boutons marche/arrêt et mode pendant
2 secondes. 2 signaux sonores sont émis et le voyant de niveau de
charge s'allume en vert pour vous indiquer que la fonction Easy-start
a été activée.
Pour désactiver la fonction Easy-start :
Maintenez enfoncés les boutons marche/arrêt et mode pendant
2 secondes. 1 signal sonore est émis et le voyant de niveau de charge
s'allume en jaune pour indiquer que la fonction Easy-start a été
désactivée.
Page 58

Français
Remarque : Il est recommandé de ne pas dépasser la période initiale
d'utilisation de la fonction Easy-start, sous peine de réduire
l'efficacité de la brosse à dents Philips Sonicare dans l'élimination de
la plaque dentaire.
Fonction Quadpacer
La fonction Quadpacer est un minuteur à intervalles qui émet un bref
signal sonore et suspend le cycle pour vous rappeler de brosser les
4 sections de votre bouche de manière uniforme et efficace (Fig. 11).
Les signaux sont émis à différents intervalles au cours du cycle de
brossage, en fonction du mode sélectionné. Consultez la section de
« modes de brossage » pour plus d'informations.
Pour activer ou désactiver la fonction Quadpacer :
Placez le manche sur le chargeur branché.
- Pour activer la fonction Quadpacer :
Appuyez sur le bouton chargé de baisser le niveau d'intensité (-)
et maintenez-le enfoncé 2 secondes. 2 signaux sonores sont émis
et le voyant de niveau de charge s'allume en vert pour vous
indiquer que la fonction Quadpacer a été activée.
- Pour désactiver la fonction Quadpacer :
Appuyez sur le bouton chargé de baisser le niveau d'intensité (-)
et maintenez-le enfoncé 2 secondes. 1 signal sonore est émis et le
voyant de niveau de charge s'allume en jaune pour indiquer que la
fonction Quadpacer a été désactivée.
Confirmation du chargeur
Lorsque la fonction de confirmation de charge est activée, le manche
émet un signal sonore et vibre brièvement lorsqu'il est placé sur le
chargeur. Sur ce modèle Philips Sonicare, la fonction de confirmation
de charge est désactivée par défaut.
Activation ou désactivation de la fonction de confirmation de charge :
Placez le manche sur le chargeur.
- Pour activer la confirmation du chargeur :
57
Page 59

Français
58
Appuyez sur le bouton chargé d'augmenter le niveau d'intensité
(+) et maintenez-le enfoncé 2 secondes. 2 signaux sonores sont
émis et le voyant de niveau de charge clignote deux fois en vert
pour vous indiquer que la fonction de confirmation de charge a
été activée.
- Pour désactiver la confirmation du chargeur :
Appuyez sur le bouton chargé d'augmenter le niveau d'intensité
(+) et maintenez-le enfoncé 2 secondes. 1 signal sonore est émis
et le voyant de niveau de charge clignote deux fois en jaune pour
vous indiquer que la fonction de confirmation de charge a été
désactivée.
Nettoyage
Manche de la brosse à dents
1 Retirez la tête de brosse et rincez la zone de la tige en métal avec
de l'eau tiède. Veillez à éliminer tous les résidus de dentifrice (Fig.
12).
Attention : Ne poussez pas sur le joint d'étanchéité en caoutchouc
de la tige en métal avec un objet pointu, car vous pourriez
l'endommager.
2 Nettoyez tout le manche à l'aide d'un chiffon humide.
Tête de brosse
1 Rincez la tête de brosse et les poils après chaque utilisation (Fig.
13).
2 Retirez la tête de brosse du manche et rincez la base de la tête de
brosse à l'eau chaude au moins une fois par semaine.
Chargeur
1 Débranchez le chargeur avant de le nettoyer.
2 Nettoyez la surface du chargeur à l'aide d'un chiffon humide.
Veillez à éliminer toute trace de dentifrice ou autres résidus des
surfaces du chargeur.
Page 60

Français
59
Rangement
Si vous ne comptez pas utiliser la brosse à dents Sonicare pendant
une période prolongée, débranchez le chargeur de la prise électrique,
nettoyez-le et rangez-le dans un endroit frais et sec, à l'abri de la
lumière.
Remplacement
Tête de brosse
Pour obtenir des résultats optimaux, remplacez les têtes de brosse
Philips Sonicare au moins tous les 3 mois. Utilisez exclusivement des
têtes de brosse de rechange Philips Sonicare.
Recyclage
- Lorsqu'il ne fonctionnera plus, ne jetez pas l'appareil avec les
ordures ménagères. Déposez-le dans un endroit prévu à cet effet,
où il pourra être recyclé. Vous contribuerez ainsi à la protection de
l'environnement.
Retrait de la pile rechargeable
Avertissement : Ne retirez la pile rechargeable que lorsque vous
mettez l'appareil au rebut. Veillez à ce que la pile soit totalement
déchargée avant de la retirer.
Pour retirer la batterie rechargeable, munissez-vous d'une serviette
ou d'un tissu, d'un marteau et d'un tournevis à tête plate (standard).
Respectez les mesures de sécurité élémentaires lorsque vous suivez
la procédure ci-dessous. Veillez à protéger vos yeux, vos mains et vos
doigts, ainsi que la surface sur laquelle vous travaillez.
1 Pour décharger la batterie rechargeable, retirez le manche du
chargeur ou de l'assainisseur, allumez la Philips Sonicare et
laissez-la fonctionner jusqu'à ce qu'elle s'éteigne. Répétez cette
opération jusqu'à ce que la brosse à dents Philips Sonicare ne
s'allume plus.
2 Retirez et jetez la tête de brosse. Recouvrez l'ensemble du
manche avec une serviette ou un tissu (Fig. ).
Page 61

Français
60
3 Tenez le haut du manche d'une main et frappez le boîtier du
manche 1 cm au-dessus de l'extrémité basse. Frappez fermement
avec un marteau sur les 4 côtés pour éjecter le capuchon (Fig. 15).
Remarque : Il sera peut-être nécessaire de frapper la partie
inférieure à plusieurs reprises pour libérer les fermoirs internes.
4 Retirez le capuchon du manche de la brosse à dents. Si le
capuchon ne se détache pas facilement du boîtier, répétez
l'étape 3 jusqu'à ce que le capuchon soit libéré (Fig. 16).
5 En tenant le manche à l'envers, appuyez l'axe contre une surface
rigide. Si les composants internes ne se détachent pas facilement
du boîtier, répétez l'étape 3 jusqu'à ce qu'ils soient libérés (Fig. 17).
6 Retirez le couvercle en caoutchouc de la batterie.
7 Insérez le tournevis entre la batterie et le cadre noir en bas des
composants internes. Puis, faites levier sous la batterie avec le
tournevis pour retirer le dessus du cadre (Fig. 20) noir.
8 Insérez le tournevis entre l'extrémité inférieure de la batterie et le
cadre noir pour rompre la languette métallique reliant la batterie
au circuit imprimé. Ceci libèrera du cadre (Fig. 21) l'extrémité
inférieure de la batterie.
9 Saisissez la batterie et retirez-la des composants internes pour
rompre la deuxième languette (Fig. 22) métallique de la batterie.
Attention : Prenez garde de ne pas vous blesser aux doigts avec
les bords tranchants des languettes de la batterie.
10 Couvrez les contacts de la batterie avec de l'adhésif pour éviter
tout court-circuit électrique par la charge résiduelle de la batterie.
La batterie rechargeable peut maintenant être recyclée et le reste
du produit peut être mis au rebut.
Garantie et assistance
Si vous avez besoin d'aide ou d’informations supplémentaires,
consultez le site www.philips.com/support ou lisez le dépliant
séparé sur la garantie internationale.
Restrictions de garantie
La garantie internationale ne couvre pas les éléments suivants :
Page 62

Français
- Têtes de brosse.
- les dommages causés par l'utilisation de pièces de rechange non
autorisées ;
- les dommages causés par une mauvaise utilisation, une
négligence ou des altérations ;
- les marques d'usure dues à un usage normal, comme les rayures,
abrasions et décolorations ;
61
Page 63

Italiano
62
Serie 5 salute gengive
Introduzione
Congratulazioni per l'acquisto e benvenuti in Philips! Per trarre il
massimo vantaggio dall'assistenza fornita da Philips, registrate il
vostro prodotto sul sito www.philips.com/welcome.
Importante
Prima di utilizzare l'apparecchio, leggete
attentamente il presente manuale e
conservatelo per eventuali riferimenti futuri.
Pericolo
-
Tenete il caricabatterie lontano dall'acqua.
Non appoggiatelo o riponetelo vicino
all'acqua contenuta in vasche, lavandini ecc.
Non immergete il caricabatterie in acqua o
in altre sostanze liquide. Dopo la
pulizia, accertatevi che il caricabatterie sia
completamente asciutto prima di inserirlo
nella presa di corrente.
Avvertenza
-
Il cavo di alimentazione non può essere
sostituito. Nel caso fosse danneggiato,
gettate il caricabatterie.
Italiano
Page 64

Italiano
-
Sostituite il caricabatterie esclusivamente
con uno originale al fine di evitare situazioni
pericolose.
-
Non utilizzate il caricabatterie in esterno o in
prossimità di superfici calde.
-
Se una qualsiasi parte dell'apparecchio
risulta danneggiata (testina dello spazzolino,
impugnatura o caricabatterie), non
utilizzatelo. Questo apparecchio non
contiene parti sostituibili. Se l'apparecchio è
danneggiato, contattate il Centro Assistenza
Clienti del vostro Paese (vedere il capitolo
"Garanzia e assistenza").
63
Page 65

Italiano
64
-
Questo apparecchio può essere usato da
bambini di età superiore a 8 anni e da
persone con capacità mentali, fisiche o
sensoriali ridotte, prive di esperienza o
conoscenze adatte, a condizione che tali
persone abbiano ricevuto assistenza o
formazione per utilizzare l'apparecchio in
maniera sicura e capiscano i potenziali
pericoli associati a tale uso. Evitate che i
bambini giochino con l'apparecchio. La
manutenzione e la pulizia possono essere
eseguite da bambini purché di età superiore
agli 8 anni e in presenza di un adulto.
Attenzione
-
Non lavate la testina dello spazzolino,
l'impugnatura o il caricabatterie in
lavastoviglie.
-
Se nel corso degli ultimi 2 mesi vi siete
sottoposti a interventi su denti o gengive,
chiedete il parere del vostro dentista prima
di utilizzare lo spazzolino.
Page 66

Italiano
-
Rivolgetevi al vostro dentista nel caso di
eccessivo sanguinamento dopo l'uso
dell'apparecchio o qualora tale
sanguinamento continui per più di una
settimana. Rivolgetevi al vostro dentista
anche se avvertite disagio o dolore quando
usate Philips Sonicare.
-
Lo spazzolino Philips Sonicare è conforme
agli standard di sicurezza sui dispositivi
elettromagnetici. In caso di portatori di
pacemaker o di altro dispositivo impiantato,
consultate il vostro medico o il produttore
del dispositivo prima dell'uso.
-
Per dubbi di natura medica, consultate il
medico prima di utilizzare Philips Sonicare.
-
Questo apparecchio è destinato
esclusivamente alla pulizia di denti, gengive
e lingua. Non utilizzatelo per scopi diversi.
Interrompete l'uso del dispositivo e
consultate il vostro medico qualora
avvertiate disagio o dolore.
65
Page 67

Italiano
66
-
Lo spazzolino Philips Sonicare è un
apparecchio assolutamente personale e
non deve essere utilizzato da più persone o
presso studi dentistici.
-
Non utilizzate l'apparecchio in presenza di
setole rovinate o piegate. Sostituite la
testina dello spazzolino ogni 3 mesi o prima
in presenza di segni di usura. Utilizzate
esclusivamente le testine consigliate dal
produttore.
-
Se il dentifricio utilizzato contiene perossido,
bicarbonato di sodio o bicarbonato
(impiegati di solito per i dentifrici sbiancanti),
pulite accuratamente la testina dello
spazzolino con acqua e sapone dopo ogni
uso, onde evitare di danneggiare la parte in
plastica.
-
Evitare il contatto con liquidi che
contengono oli essenziali (comuni nei
collutori forti) e che potrebbero danneggiare
le parti in plastica morbida e dura.
Page 68

Italiano
Campi elettromagnetici (EMF)
Questo apparecchio Philips è conforme a tutti
gli standard e alle norme relativi
all'esposizione ai campi elettromagnetici.
Descrizione generale (fig. 1)
1 Cappuccio igienico da viaggio
2 Testina dello spazzolino
3 Impugnatura
4 Pulsante della modalità e di on/off
5 Indicatore livello intensità
6 Pulsante del livello di intensità (+ e -)
7 Indicatore della modalità
8 Indicatore del livello batteria
9 Caricabatterie
Nota: il contenuto della confezione potrebbe variare a seconda al
modello acquistato.
Predisposizione del dispositivo
Inserimento della testina
1 Allineate la testina dello spazzolino in modo che le setole siano
orientate verso il lato anteriore dell'impugnatura (fig. 2).
2 Premete saldamente la testina dello spazzolino sulla parte
metallica fino all'arresto (fig. 3).
Nota: sulle testine dello spazzolino Philips Sonicare sono impresse
delle icone per riconoscere facilmente la propria testina (fig. 4).
Come ricaricare Philips Sonicare
1 Inserite il caricabatterie in una presa di corrente.
2 Posizionate l'impugnatura sul caricabatterie (fig. 5).
-
Quando lo spazzolino è in carica, l'indicatore del livello batteria
inizia a lampeggiare.
-
Quando la batteria è completamente carica, l'indicatore di stato
della batteria emette una luce verde fissa per 10 secondi.
67
Page 69

Italiano
68
Nota: Per caricare completamente la batteria potrebbero essere
necessarie fino a 48 ore. Tuttavia, lo spazzolino Philips Sonicare può
essere utilizzato prima del completo caricamento della batteria.
Modalità d'uso dell'apparecchio
Istruzioni d'uso
1 Bagnate le setole e applicate una piccola quantità di dentifricio.
2 Posizionate le setole dello spazzolino sui denti con una leggera
angolazione (45°), premendo con forza affinché raggiungano le
gengive o il bordo gengivale (fig. 7).
Nota: Mantenete sempre il centro dello spazzolino a contatto con i
denti.
3 Premete il pulsante on/off e della modalità per accendere lo
spazzolino Philips Sonicare.
4 Per ottimizzare l'efficacia di Philips Sonicare, esercitate solo una
leggera pressione e lasciate che lo spazzolino lavori per voi senza
dover spazzolare. Non spazzolate con forza.
5 Muovete delicatamente lo spazzolino avanti e indietro, in modo
che le setole più lunghe raggiungano lo spazio interdentale.
Procedete in questo modo per tutto il ciclo di pulizia.
6 Per pulire le superfici interne degli incisivi centrali, inclinate
l'impugnatura dello spazzolino in posizione semiverticale e
spazzolate varie volte ogni dente (fig. 8).
Nota: per assicurare una corretta pulizia di tutti i denti, dividete la
bocca in 4 sezioni utilizzando la funzione Quadpacer (vedere
capitolo "Caratteristiche").
7 Iniziate a spazzolare la sezione 1 (parte superiore esterna) per 30
secondi prima di passare alla sezione successiva 2 (parte superiore
interna). Procedete quindi con la sezione 3 (parte inferiore
esterna) e continuate per 30 secondi prima di passare alla sezione
4 (parte inferiore interna (fig. 9)).
8 Al termine del ciclo di pulizia, potete dedicare alcuni secondi alla
superficie orizzontale dei denti e alle zone che tendono a
macchiarsi. Potete inoltre spazzolare la lingua con lo spazzolino
acceso o spento, a seconda delle vostre preferenze (fig. 10).
Page 70

Italiano
Philips Sonicare può essere utilizzato su:
- Apparecchi dentali (le testine si consumano più rapidamente).
- Impianti odontoiatrici (otturazioni, corone, coperture).
Nota: Verificate che apparecchi dentali e impianti odontoiatrici siano
correttamente aderenti e non compromessi. In caso contrario questi,
entrando in contatto con la testina dello spazzolino, potrebbero
danneggiarsi.
Nota: Se Philips Sonicare viene utilizzato per studi clinici, è necessario
selezionare la modalità pulizia di 2 minuti all'intensità più elevata.
L'impugnatura deve essere completamente carica e la funzione
Easy-start deve essere disattivata.
Modalità di utilizzo
Modalità pulizia
La migliore modalità per la rimozione della placca (modalità
predefinita). La modalità pulizia dura 2 minuti e include quattro
intervalli Quadpacer da 30 secondi.
Modalità Gum Plus
Per stimolare delicatamente le gengive. La modalità gengive Plus
dura 2 minuti e include quattro intervalli Quadpacer da 30 secondi.
1 Premete il pulsante on/off e della modalità per accendere lo
spazzolino Philips Sonicare.
2 Premete nuovamente il pulsante on/off e della modalità entro 2,5
secondi per passare alla modalità gengive Plus.
3 Premete nuovamente il pulsante on/off e della modalità dopo 2,5
secondi per mettere in pausa lo spazzolino Philips Sonicare.
Livelli d'intensità
- Basso: 1 spia LED
- Medio: 2 spie LED
- Alto: 3 spie LED
Nota: per regolare il livello di intensità al livello superiore o inferiore,
premete il pulsante + per aumentare l'intensità o il pulsante - per
diminuire l'intensità in qualunque momento durante il ciclo di pulizia
69
Page 71

Italiano
70
Stato della batteria (quando l'impugnatura non è sul caricabatterie)
- L'indicatore di livello batteria giallo lampeggiante indica che la
batteria è scarica.
- L'indicatore di livello batteria verde lampeggiante indica che la
batteria è quasi completamente carica.
- L'indicatore di livello batteria verde fisso indica che la batteria è
completamente carica (fig. 6).
Nota: Se vengono emessi 5 segnali acustici e l'indicatore del livello
batteria lampeggia in giallo, significa che dovete ricaricare la batteria.
Quando la batteria è completamente scarica, Philips Sonicare si
spegne. Posizionate Philips Sonicare sul caricabatterie per ricaricarlo.
per mantenere la batteria sempre completamente carica, vi
consigliamo di tenere lo spazzolino Sonicare sul caricatore quando
non viene utilizzato.
Caratteristiche
Smartimer
La funzione Smartimer spegne automaticamente lo spazzolino per
indicare che il ciclo di pulizia è completo.
I dentisti consigliano di utilizzare lo spazzolino almeno 2 volte al
giorno per 2 minuti.
Easy-start
La funzione Easy-start aumenta leggermente la potenza per i primi 14
cicli di pulizia per agevolare la familiarizzazione con l'uso dello
spazzolino Philips Sonicare.Per questo modello Philips Sonicare, la
funzione Easy-start è disattivata.
Attivazione o disattivazione della funzione Easy-start
1 Inserite la testina nell'impugnatura.
2 Inserite l'impugnatura nel caricabatterie collegato alla presa di
corrente.
Per attivare la funzione Easy-Start:
Page 72

Italiano
Tenete premuto il pulsante on/off e della modalità per 2 secondi. La
funzione Easy-start è attivata non appena vengono emessi 2 segnali
acustici e l'indicatore del livello batteria si accende in verde.
Per disattivare la funzione Easy-Start:
Tenete premuto il pulsante on/off e della modalità per 2 secondi. La
funzione Easy-start è disattivata non appena viene emesso 1 segnale
acustico e l'indicatore del livello batteria si illumina in giallo.
Nota: si sconsiglia di utilizzare la funzione Easy-start dopo il periodo
iniziale in quanto potrebbe ridurre l'efficacia dello spazzolino Philips
Sonicare nella difesa contro la placca.
Quadpacer
La funzione Quadpacer è un timer a intervalli che emette un breve
segnale acustico e interrompe il funzionamento per indicare di pulire
le 4 sezioni della bocca in modo preciso e accurato (fig. 11).
A seconda della modalità di pulizia selezionata, Quadpacer emette
dei segnali acustici a intervalli diversi durante il ciclo di pulizia.
Consultate la sezione "Modalità di utilizzo" per ulteriori dettagli.
Attivazione o disattivazione della funzione Quadpacer:
Inserite l'impugnatura nel caricabatterie collegato alla presa di
corrente.
- Per attivare la funzione Quadpacer:
Tenete premuto il pulsante del livello di intensità (-) per 2 secondi.
La funzione Quadpacer è attivata non appena vengono emessi 2
segnali acustici e l'indicatore del livello batteria si accende in
verde.
- Per disattivare la funzione Quadpacer:
Tenete premuto il pulsante del livello di intensità (-) per 2 secondi.
La funzione Quadpacer è disattivata non appena viene emesso 1
segnale acustico e l'indicatore del livello batteria si illumina in
giallo.
Conferma caricabatterie
Se la conferma del caricabatterie è attiva, l'impugnatura emette un
segnale acustico e vibra brevemente non appena la posizionate sulla
71
Page 73

Italiano
72
base di ricarica. Per questo modello Philips Sonicare, la funzione di
conferma del caricabatterie è disattivata.
Attivazione o disattivazione della funzione di conferma del caricabatterie:
Posizionate l'impugnatura sul caricabatterie.
- Per attivare la funzione di conferma del caricabatterie:
Tenete premuto il pulsante del livello di intensità (+) per 2 secondi.
La funzione di conferma del caricabatterie è attivata non appena
vengono emessi 2 segnali acustici e l'indicatore del livello batteria
si accende due volte in verde.
- Per disattivare la funzione di conferma del caricabatterie:
Tenete premuto il pulsante del livello di intensità (+) per 2 secondi.
La funzione di conferma del caricabatterie è disattivata non
appena viene emesso 1 segnale acustico e l'indicatore del livello
batteria si accende una volta in giallo.
Pulizia
Impugnatura dello spazzolino
1 Rimuovete la testina dello spazzolino e sciacquate la parte
metallica con acqua calda. Controllate di aver rimosso eventuali
residui di dentifricio (fig. 12).
Attenzione: non utilizzate oggetti appuntiti sulla guarnizione in
gomma intorno alla parte metallica onde evitare danneggiamenti.
2 Pulite l'intera superficie dell'impugnatura con un panno umido.
Testina dello spazzolino
1 Sciacquate la testina e le setole dopo ogni utilizzo (fig. 13).
2 Rimuovete la testina dall'impugnatura e sciacquate in acqua calda
l'attacco almeno una volta a settimana.
Caricabatterie
1 Togliete sempre la spina dalla presa di corrente prima di pulire
l'apparecchio.
Page 74

Italiano
2 Pulite l'intera superficie del caricabatterie con un panno umido.
Controllate di aver rimosso residui di dentifricio o di altro tipo dalla
superficie del caricabatterie.
Conservazione
Se pensate di non utilizzare Sonicare per un lungo periodo di tempo,
disinserite il caricabatterie dalla presa di corrente, pulitelo e
riponetelo in un luogo fresco e asciutto lontano dalla luce diretta del
sole.
Sostituzione
Testina dello spazzolino
Per ottenere risultati ottimali, sostituite le testine Philips Sonicare ogni
3 mesi. Utilizzate solo testine Philips Sonicare sostitutive originali.
Riciclaggio
- Questo simbolo indica che il prodotto non può essere smaltito con
i normali rifiuti domestici (2012/19/UE) (fig. 23).
- Questo simbolo indica che il prodotto contiene una batteria
ricaricabile integrata conforme alla direttiva europea 2006/66/CE
e che quindi non può essere smaltita con i normali rifiuti domestici
(fig. 24). Vi consigliamo di portare il prodotto presso un punto di
raccolta ufficiale o un centro assistenza Philips, dove un tecnico
provvederà alla rimozione della batteria ricaricabile.
- Ci sono due situazioni in cui potete restituire gratuitamente il
prodotto vecchio a un rivenditore:
1 Quando acquistate un prodotto nuovo, potete restituire un
prodotto simile al rivenditore.
2 Se non acquistate un prodotto nuovo, potete restituire prodotti
con dimensioni inferiori a 25 cm (lunghezza, altezza e larghezza) ai
rivenditori con superficie dedicata alla vendita di prodotti elettrici
ed elettronici superiore ai 400 m2.
73
Page 75

Italiano
74
- In tutti gli altri casi, attenetevi alle normative di raccolta
differenziata dei prodotti elettrici, elettronici e delle batterie
ricaricabili in vigore nel vostro paese: un corretto smaltimento
consente di evitare conseguenze negative per l’ambiente e la
salute.
Rimozione della batteria ricaricabile
Avvertenza: prima di provvedere allo smaltimento dell'apparecchio,
rimuovete la batteria ricaricabile. Prima di rimuovere la batteria
accertatevi che sia completamente scarica.
Per rimuovere la batteria ricaricabile, sono necessari un asciugamano
o un panno, un martello e un cacciavite a testa piatta (standard).
Osservate le precauzioni di sicurezza di base per eseguire la
procedura descritta di seguito. Proteggete gli occhi, le mani, le dita e
la superficie su cui lavorate.
1 Per scaricare completamente la batteria ricaricabile, rimuovete
l'impugnatura dal caricabatterie, accendete Philips Sonicare e
lasciatelo in funzione fino all'arresto. Ripetete questo passaggio
finché Philips Sonicare non si accende più.
2 Rimuovete la testina dello spazzolino. Coprite l'intera impugnatura
con un asciugamano o un panno (fig. ).
3 Tenete la parte superiore dell'impugnatura con una mano e
colpite l'alloggiamento dell'impugnatura 1 cm circa sopra
l'estremità inferiore. Colpite fermamente con un martello tutti e 4 i
lati per espellere il cappuccio (fig. 15).
Nota: potrebbero essere necessari più colpi per rompere le
connessioni interne.
4 Rimuovete il cappuccio dall'impugnatura dello spazzolino. Se non
riuscite ad estrarre facilmente il cappuccio dall'alloggiamento,
ripetete il passaggio 3 fino a quando il cappuccio non viene
rilasciato (fig. 16).
5 Tenendo l'impugnatura al contrario, premete la parte metallica
verso il basso su una superficie rigida. Se i componenti interni non
escono facilmente dall'alloggiamento, ripetete il passaggio 3 fino a
quando non vengono rilasciati (fig. 17).
Page 76

Italiano
6 Rimuovete il coperchio in gomma del vano batteria.
7 Inserite il cacciavite tra la batteria e la cornice nera presente nella
parte inferiore dei componenti interni. Quindi, estraete il cacciavite
dalla batteria per rompere la parte inferiore della cornice nera (fig.
20).
8 Inserite il cacciavite tra il fondo della batteria e il riquadro nero per
rompere la linguetta metallica che collega la batteria alla scheda a
circuiti stampati verde. Questo consentirà il rilascio dell'estremità
inferiore della batteria dalla cornice (fig. 21).
9 Afferrate la batteria ed estraetela dai componenti interni per
rompere la seconda linguetta della batteria in metallo (fig. 22).
Attenzione: i bordi delle linguette della batteria sono taglienti,
quindi occorre prestare attenzione in modo da evitare lesioni
alle dita.
10 Coprite i contatti della batteria con del nastro adesivo per evitare
un potenziale corto circuito dovuto alla carica residua. La batteria
ricaricabile ora può essere riciclata e il resto del prodotto può
essere smaltito nel modo corretto.
75
Garanzia e assistenza
Per assistenza o informazioni, visitate il sito
www.philips.com/support oppure leggete l'opuscolo della garanzia
internazionale.
Limitazioni della garanzia
I seguenti componenti sono esclusi dalla garanzia internazionale:
- Testine.
- Danni causati dall'uso di parti di ricambio non autorizzate.
- Danni dovuti a un uso improprio, abuso, trascuratezza, alterazioni
o riparazioni non autorizzate.
- La normale usura, incluso scheggiature, graffi, abrasioni, scoloritura
o alterazione dei colori.
Page 77

Nederlands
76
Introductie
Gefeliciteerd met uw aankoop en welkom bij Philips! Registreer uw
product op www.philips.com/welcome om optimaal gebruik te
kunnen maken van de door Philips geboden ondersteuning.
Belangrijk
Lees deze gebruiksaanwijzing zorgvuldig door
voordat u het apparaat in gebruik neemt.
Bewaar de gebruiksaanwijzing om deze zo
nodig later te kunnen raadplegen.
Gevaar
-
Houd de oplader uit de buurt van water.
Plaats de oplader niet in de buurt van of
boven een bad, wasbak, gootsteen
enzovoort. Dompel de oplader nooit in
water of een andere vloeistof. Controleer na
het schoonmaken of de oplader helemaal
droog is, voordat u deze weer aansluit op
het stopcontact.
Waarschuwing
-
Het netsnoer kan niet worden vervangen.
Als het netsnoer beschadigd is, dankt u de
oplader af.
Nederlands
Page 78

Nederlands
-
Vervang de oplader altijd door een origineel
exemplaar van hetzelfde type om gevaar te
voorkomen.
-
Gebruik de oplader niet buitenshuis of in de
buurt van hete oppervlakken.
-
Stop het gebruik van het apparaat als het op
enige wijze beschadigd is (de opzetborstel,
het handvat van de tandenborstel of de
oplader). Dit apparaat bevat geen
repareerbare onderdelen. Als het apparaat
beschadigd is, neemt u contact op met het
Consumer Care Centre in uw land (zie
hoofdstuk 'Garantie en ondersteuning').
77
Page 79

Nederlands
78
-
Dit apparaat kan worden gebruikt door
kinderen vanaf 8 jaar en door personen met
verminderde lichamelijke, zintuiglijke of
geestelijke capaciteiten of weinig ervaring
en kennis als er toezicht op hen wordt
gehouden of als zij instructies hebben
ontvangen aangaande veilig gebruik van het
apparaat en zij de gevaren van het gebruik
begrijpen. Kinderen mogen niet met het
apparaat spelen. Reiniging en onderhoud
mogen alleen door kinderen worden
uitgevoerd die ouder zijn dan 8 en alleen
onder toezicht.
Let op
-
Plaats de opzetborstel, het handvat of de
oplader niet in de vaatwasmachine.
-
Raadpleeg uw tandarts voordat u de
tandenborstel gebruikt als u in de afgelopen
2 maanden een chirurgische behandeling
aan uw mond of uw tandvlees hebt
ondergaan.
Page 80

Nederlands
-
Raadpleeg uw tandarts als uw tandvlees na
het gebruik van deze tandenborstel ernstig
gaat bloeden of als het nog steeds gaat
bloeden nadat u het apparaat 1 week hebt
gebruikt. Raadpleeg uw tandarts ook als u
ongemak of pijn ondervindt tijdens gebruik
van de Philips Sonicare.
-
De Philips Sonicare-tandenborstel voldoet
aan de veiligheidseisen voor
elektromagnetische apparaten. Als u een
pacemaker of ander geïmplanteerd
apparaat hebt, neemt u vóór gebruik van de
tandenborstel contact op met uw arts of de
fabrikant van het geïmplanteerde apparaat.
-
Raadpleeg uw arts voordat u de Philips
Sonicare gebruikt als u medische klachten
hebt.
-
Dit apparaat is alleen bedoeld voor de
reiniging van tanden, tandvlees en de tong.
Gebruik het niet voor andere doeleinden.
Stop met het gebruik van het apparaat en
neem contact op met uw arts als u ongemak
of pijn ondervindt.
79
Page 81

Nederlands
80
-
De Philips Sonicare-tandenborstel is
bedoeld voor thuisgebruik en is niet
bedoeld om door meerdere personen te
worden gebruikt in een tandheelkundige
praktijk of instelling.
-
Gebruik een opzetborstel niet als de
borstelharen verbogen of geknakt zijn.
Vervang de opzetborstel elke 3 maanden of
eerder indien deze tekenen van slijtage
vertoont. Gebruik dit apparaat uitsluitend
met de door de fabrikant aanbevolen
opzetborstels.
-
Als uw tandpasta peroxide dan wel
zuiveringszout of natriumbicarbonaat bevat
(veelvoorkomend in witmakende
tandpasta's), dient u de opzetborstel na
ieder gebruik grondig schoon te maken met
zeep en water. Hiermee voorkomt u
mogelijke barsten in het plastic.
-
Vermijd contact met vloeistoffen die
essentiële oliën bevatten (komen veel voor
in sterke mondspoeling), aangezien deze
hard en zacht plastic kunnen aantasten.
Page 82

Nederlands
Elektromagnetische velden (EMV)
Dit Philips-apparaat voldoet aan alle
toepasselijke richtlijnen en voorschriften met
betrekking tot blootstelling aan
elektromagnetische velden.
Algemene beschrijving (fig. 1)
1 Hygiënisch beschermkapje
2 Opzetborstel
3 Handvat
4 Knop voor aan/uit en modus
5 Intensiteitsniveau-indicator
6 Intensiteitsniveauknop (+ en -)
7 Modusindicator
8 Batterijniveau-indicator
9 Oplader
Opmerking: De inhoud van de doos kan variëren, afhankelijk van het
model.
Klaarmaken voor gebruik
De opzetborstel bevestigen
1 Plaats de opzetborstel zo op het handvat dat de borstelharen in
dezelfde richting wijzen als de voorzijde van het handvat (Fig. 2).
2 Druk de opzetborstel stevig op de metalen aandrijfas totdat deze
stopt (Fig. 3).
Opmerking: De opzetborstels van Philips Sonicare zijn voorzien van
pictogrammen, zodat u uw opzetborstel (Fig. 4) eenvoudig kunt
herkennen.
Uw Philips Sonicare opladen
1 Steek de stekker van de oplader in een stopcontact.
2 Plaats het handvat op de oplader (Fig. 5).
-
Het knipperende lampje van de batterijniveau-indicator geeft
aan dat de tandenborstel wordt opgeladen.
81
Page 83

Nederlands
82
-
Wanneer de batterij volledig is opgeladen, brandt de
batterijniveau-indicator 10 seconden groen en gaat dan weer
uit.
Opmerking: Het kan maximaal 48 uur duren voordat de batterij
helemaal is opgeladen, maar u kunt de Philips Sonicare gebruiken
voordat deze helemaal is opgeladen.
Het apparaat gebruiken
Poetsinstructies
1 Maak de borstelharen nat en doe er een kleine hoeveelheid
tandpasta op.
2 Plaats de haren van de tandenborstel onder een lichte hoek (45
graden) tegen de tanden en duw stevig, zodat de haren tegen de
tandvleesrand (Fig. 7) of vlak daaronder komen.
Opmerking: Zorg dat het midden van de borstel altijd in contact is
met de tanden.
3 Druk op de knop voor aan/uit en modus om de Philips Sonicare in
te schakelen.
4 U krijgt de beste poetsresultaten met de Philips Sonicare als u
slechts lichte druk uitoefent en niet schrobt. Laat de Philips
Sonicare het werk doen. Schrob niet.
5 Beweeg de opzetborstel voorzichtig kleine stukjes heen en weer
over de tanden zodat de langere haren tussen de tanden komen.
Ga de volledige poetsbeurt zo door.
6 Houd voor het poetsen van de binnenkant van de voortanden het
handvat van de tandenborstel iets meer rechtop en maak op elke
tand (Fig. 8) een paar overlappende verticale poetsbewegingen.
Opmerking: Om ervoor te zorgen dat u overal even goed poetst,
verdeelt u uw mond in 4 kwadranten met behulp van de
Quadpacer (zie hoofdstuk 'Functies').
7 Begin met het poetsen van kwadrant 1 (buitenkant boventanden)
en poets 30 seconden voordat u naar kwadrant 2 (binnenkant
boventanden) gaat. Poets vervolgens kwadrant 3 (buitenkant
ondertanden) en poets 30 seconden voordat u naar kwadrant 4
(binnenkant ondertanden (Fig. 9)) gaat.
Page 84

Nederlands
8 Nadat u de poetsbeurt hebt voltooid, kunt u extra tijd besteden
aan het poetsen van de kauwvlakken van uw kiezen en plaatsen
met verkleuring. U kunt ook uw tong poetsen met de
tandenborstel in- of uitgeschakeld, afhankelijk van uw voorkeur
(Fig. 10).
De Philips Sonicare is veilig te gebruiken op:
- Beugels (opzetborstels slijten sneller als deze op een gebit met
een beugel worden gebruikt).
- Tandheelkundige restauraties (vullingen, kronen, facings).
Opmerking: Zorg dat eventuele beugels of tandheelkundige
reparaties goed vastzitten. Zo niet, dan kunnen de beschadigd raken
wanneer ze in contact komen met de opzetborstel.
Opmerking: Wanneer de Philips Sonicare wordt gebruikt voor klinisch
onderzoek, moet de standaard Clean-modus van 2 minuten met
hoge intensiteit worden geselecteerd. De batterij moet volledig zijn
opgeladen en de Easy-start-functie moet zijn uitgeschakeld.
83
Poetsstanden
Clean-modus
Superieure tandplakverwijdering (standaardmodus). De Clean-modus
duurt 2 minuten en omvat vier Quadpacer-intervallen van 30
seconden.
Gum Plus-modus
Voor een zachte stimulatie van uw tandvlees. De Gum Plus-modus
duurt 2 minuten en bestaat uit vier Quadpacer-intervallen van 30
seconden.
1 Druk op de knop voor aan/uit en modus om uw Philips Sonicare in
te schakelen.
2 Druk binnen 2,5 seconden opnieuw op de knop voor aan/uit en
modus om over te schakelen naar de Gum Plus-modus.
3 Druk na 2,5 seconden opnieuw op de knop voor aan/uit en modus
om uw Philips Sonicare te pauzeren.
Intensiteitsniveaus
- Laag 1 LED-indicatielampje
- Normaal: 2 LED-indicatielampjes
Page 85

Nederlands
84
- Hoog: 3 LED-indicatielampjes
Opmerking: Als u het intensiteitsniveau wilt verhogen of verlagen,
kunt u op elk moment tijdens de poetsbeurt op de knop + drukken
om de intensiteit te verhogen of op de knop - om de intensiteit te
verlagen.
Batterijstatus (wanneer handvat niet op oplader is geplaatst)
- Een knipperend gele batterijniveau-indicator geeft aan dat de
batterij bijna leeg is.
- Een knipperend groene batterijniveau-indicator geeft aan dat de
batterij deels is opgeladen.
- Een continu brandende batterijniveau-indicator geeft aan dat de
batterij volledig is opgeladen (Fig. 6).
Opmerking: Als u 5 piepjes hoort en de batterijniveau-indicator
knippert geel, geeft dit aan dat u de batterij weer moet opladen.
Wanneer de batterij helemaal leeg is, wordt de Philips Sonicare
uitgeschakeld. Plaats de Philips Sonicare op de oplader om deze
weer op te laden.
Als u de batterij altijd volledig opgeladen wilt houden, kunt u uw
Sonicare op de oplader plaatsen wanneer u deze niet gebruikt.
Eigenschappen
Smartimer
De Smartimer geeft aan dat de poetsbeurt is voltooid door de
tandenborstel aan het eind van de poetsbeurt automatisch uit te
schakelen.
Tandartsen adviseren minimaal twee keer per dag 2 minuten te
poetsen.
Easy-start
Tijdens de eerste 14 poetsbeurten voert de Easy-start-functie de
poetskracht geleidelijk op om u te laten wennen aan het poetsen met
de Philips Sonicare.Bij dit Philips Sonicare-model is de Easy-startfunctie standaard uitgeschakeld.
Page 86

Nederlands
85
De Easy-start-functie in- of uitschakelen
1 Bevestig de opzetborstel op het handvat.
2 Plaats het handvat op de oplader en steek de stekker van de
oplader in het stopcontact.
Easy-start inschakelen:
Houd de knop voor aan/uit en modus 2 seconden ingedrukt. U hoort
2 piepjes en de batterijniveau-indicator licht groen op om aan te
geven dat de Easy-start-functie is ingeschakeld.
Easy-start uitschakelen:
Houd de knop voor aan/uit en modus 2 seconden ingedrukt. U hoort 1
piepje en de batterijniveau-indicator licht geel op om aan te geven
dat de Easy-start-functie is uitgeschakeld.
Opmerking: Gebruik van de Easy-start-functie na de eerste
gewenningsperiode wordt afgeraden, omdat de Philips Sonicare
hierdoor minder effectief plak zal verwijderen.
Quadpacer
De Quadpacer is een timer die een kort piepje laat horen en de
poetsbeurt kort onderbreekt om u eraan te herinneren elk van de 4
kwadranten in uw mond even lang en grondig (Fig. 11) te poetsen.
Afhankelijk van de gekozen poetsmodus laat de Quadpacer tijdens
de poetsbeurt na een bepaald aantal seconden een piepje horen. Zie
de sectie "Poetsstanden" voor meer informatie.
De Quadpacer-functie in- of uitschakelen:
Plaats het handvat op de oplader en steek de stekker van de oplader
in het stopcontact.
- De Quadpacer inschakelen:
Houd de knop voor een lagere intensiteit (-) 2 seconden ingedrukt.
U hoort 2 piepjes en de batterijniveau-indicator licht groen op om
aan te geven dat de Quadpacer-functie is ingeschakeld.
- De Quadpacer uitschakelen:
Houd de knop voor een lagere intensiteit (-) 2 seconden ingedrukt.
U hoort 1 piepje en de batterijniveau-indicator licht geel op om
aan te geven dat de Quadpacer-functie is uitgeschakeld.
Page 87

Nederlands
86
Oplaadbevestiging
Als de oplaadbevestigingsfunctie is ingeschakeld, piept en trilt het
handvat kort wanneer deze op de oplader wordt geplaatst. Bij dit
Philips Sonicare-model is de bevestigingsfunctie van de oplader
standaard uitgeschakeld.
De oplaadbevestigingsfunctie in- of uitschakelen:
Plaats het handvat op de oplader.
- De oplaadbevestiging inschakelen:
Houd de knop voor een hogere intensiteit (+) 2 seconden
ingedrukt. U hoort 2 piepjes en de batterijniveau-indicator licht
twee keer groen op om aan te geven dat de
oplaadbevestigingsfunctie is ingeschakeld.
- De oplaadbevestiging uitschakelen:
Houd de knop voor een hogere intensiteit (+) 2 seconden
ingedrukt. U hoort 1 piepje en de batterijniveau-indicator licht één
keer geel op om aan te geven dat de oplaadbevestigingsfunctie is
uitgeschakeld.
Schoonmaken
Handvat van tandenborstel
1 Verwijder de opzetborstel en spoel de metalen aandrijfas af met
warm water. Verwijder eventuele tandpastaresten (Fig. 12).
Let op: Gebruik geen scherpe voorwerpen om de rubberen
afdichting op de metalen aandrijfas te duwen; dit kan schade
veroorzaken.
2 Veeg het handvat helemaal schoon met een vochtige doek.
Opzetborstel
1 Spoel de borstel en de borstelharen na iedere poetsbeurt (Fig. 13)
onder de kraan af.
2 Verwijder minimaal één keer per week de opzetborstel van het
handvat en spoel het aansluitpunt van de borstel schoon met
warm water.
Page 88

Nederlands
87
Oplader
1 Haal de stekker uit het stopcontact voordat u de oplader
schoonmaakt.
2 Veeg de oplader schoon met een vochtige doek. Zorg ervoor dat u
tandpasta en andere verontreinigingen van de oplader verwijdert.
Opbergen
Als u de Sonicare gedurende langere tijd niet gebruikt, haal de stekker
van het oplaadstation dan uit het stopcontact, reinig de oplader en
bewaar deze op een koele, droge plaats buiten bereik van direct
zonlicht.
Vervanging
Opzetborstel
Vervang de Philips Sonicare-opzetborstel om de 3 maanden voor
een optimaal resultaat. Gebruik alleen opzetborstels van Philips
Sonicare.
Recyclen
- Dit symbool betekent dat dit product niet samen met het gewone
huishoudelijke afval mag worden weggegooid (2012/19/EU) (Fig.
23).
- Dit symbool betekent dat dit product een ingebouwde oplaadbare
batterij bevat die niet samen met het gewone huishoudelijke afval
mag worden weggegooid (2006/66/EC) (Fig. 24). Wij raden u aan
om uw product in te leveren bij een officieel inzamelpunt of een
Philips servicecentrum zodat een professional de oplaadbare
batterij kan verwijderen.
- Volg de in uw land geldende regels voor de gescheiden
inzameling van elektrische en elektronische producten en accu’s.
Als u oude producten correct verwijdert, voorkomt u negatieve
gevolgen voor het milieu en de volksgezondheid.
Page 89

Nederlands
88
De oplaadbare batterij verwijderen
Waarschuwing: Verwijder de accu alleen wanneer u het apparaat
weggooit. Zorg ervoor dat de accu helemaal leeg is wanneer u deze
verwijdert.
Om de accu zelf te verwijderen, hebt u een handdoek of doek, een
hamer en een gewone schroevendraaier nodig. Neem elementaire
veiligheidsmaatregelen in acht wanneer u de hierna beschreven
procedure uitvoert. Bescherm uw ogen, handen, vingers en het
werkoppervlak.
1 Als u de oplaadbare batterij volledig wilt ontladen, neemt u het
handvat van de oplader, schakelt u de Philips Sonicare in en laat u
deze aan staan tot deze stopt. Herhaal deze stap totdat u de
Philips Sonicare niet meer kunt inschakelen.
2 Verwijder de opzetborstel en gooi deze weg. Wikkel het hele
handvat in een handdoek of doek (Fig. ).
3 Houd de bovenkant van het handvat met één hand vast en sla met
de hamer op de andere kant van het handvat, iets meer dan 1 cm
boven de onderkant. Sla met de hamer hard op alle vier de zijden,
zodat de eindkap (Fig. 15) van het handvat loskomt.
Opmerking: Mogelijk moet u meerdere keren op de onderkant
slaan om de interne klikverbindingen te breken.
4 Verwijder de eindkap van het handvat van de tandenborstel. Als
de eindkap niet gemakkelijk loskomt van de behuizing, herhaalt u
stap 3 totdat de eindkap loslaat (Fig. 16).
5 Houd het handvat ondersteboven en duw met de aandrijfas op
een hard oppervlak. Als de interne onderdelen niet gemakkelijk
loskomen van de behuizing, herhaalt u stap 3 totdat de interne
onderdelen loslaten (Fig. 17).
6 Verwijder de rubberen afdekking van de batterij.
7 Klem een schroevendraaier tussen de batterij en het zwarte frame
aan de onderkant van de interne onderdelen. Beweeg de
schroevendraaier naar beneden van de batterij af om de
onderkant van het zwarte frame (Fig. 20) te breken.
Page 90

Nederlands
8 Plaats de schroevendraaier tussen de onderkant van de batterij en
het zwarte frame om het metalen lipje waarmee de batterij op de
groene printplaat is bevestigd, te breken. Hierdoor komt de
onderkant van de batterij los van het frame (Fig. 21).
9 Pak de batterij vast en trek deze weg van de interne onderdelen
om het tweede metalen lipje (Fig. 22) te breken.
Let op: Wees voorzichtig met de scherpe randen van de metalen
lipjes om verwondingen aan uw vingers te voorkomen.
10 Bedek de contactpunten van de batterij met tape om kortsluiting
door eventuele restlading van de batterij te voorkomen. De batterij
kan nu worden gerecycled en de rest van het product kan op de
juiste manier worden weggegooid.
Garantie en ondersteuning
Ga voor informatie of ondersteuning naar www.philips.com/support
of lees het afzonderlijke 'Worldwide guarantee'-vouwblad.
Garantiebeperkingen
De volgende zaken vallen niet onder de voorwaarden van de
internationale garantie:
- Opzetborstels
- Beschadiging veroorzaakt door gebruik van niet-goedgekeurde
vervangende onderdelen
- Beschadiging als gevolg van verkeerd gebruik, misbruik,
onachtzaamheid, wijzigingen of ongeautoriseerde reparaties
- Gewone slijtage, inclusief kerfjes, krasjes, schuurplekken,
verkleuring of verbleking
89
Page 91

Português
90
Série 5 saúde das gengivas
Introdução
Parabéns pela sua compra e seja bem-vindo à Philips! Para
beneficiar na totalidade da assistência que a Philips oferece, registe o
seu produto em www.philips.com/welcome.
Importante
Leia cuidadosamente este manual do
utilizador antes de utilizar o aparelho e
guarde-o para consultas futuras.
Perigo
-
Mantenha o carregador afastado da água.
Não o coloque nem o guarde sobre ou
próximo de banheiras, lavatórios, lavaloiças, etc. com água. Nunca mergulhe o
carregador em água ou em qualquer outro
líquido. Após a limpeza, certifique-se de
que o carregador está completamente seco
antes de o voltar a ligar à rede.
Aviso
-
O fio de alimentação não pode ser
substituído. Se o fio de alimentação estiver
danificado, deverá desfazer-se do
carregador.
Português
Page 92

Português
-
Solicite sempre a substituição do carregador
por equipamentos originais para evitar
perigos.
-
Não utilize o carregador no exterior ou
próximo de superfícies aquecidas.
-
Se o aparelho apresentar quaisquer danos
(cabeça da escova, punho da escova de
dentes ou carregador), pare de o utilizar. O
aparelho não contém peças que possam ser
reparadas. Se o aparelho estiver danificado,
contacte o Centro de Apoio ao Cliente no
seu país (consulte o capítulo "Garantia e
assistência").
91
Page 93

Português
92
-
Este aparelho pode ser utilizado por
crianças com idade igual ou superior a 8
anos e por pessoas com capacidades
físicas, sensoriais ou mentais reduzidas, ou
com falta de experiência e conhecimento,
caso tenham sido supervisionadas ou lhes
tenham sido dadas instruções relativas à
utilização segura do aparelho e se forem
alertadas para os perigos envolvidos. As
crianças não devem brincar com o aparelho.
A limpeza e manutenção não devem ser
efetuadas por crianças, a não ser que
tenham idade superior a 8 anos e sejam
supervisionadas.
Cuidado
-
Não lave a cabeça da escova, a pega e o
carregador na máquina de lavar a loiça.
-
Se tiver sido submetido a uma cirurgia da
boca ou das gengivas nos últimos 2 meses,
consulte o seu dentista antes de utilizar a
escova de dentes.
Page 94

Português
-
Consulte o seu dentista se sangrar
excessivamente depois de utilizar a escova
ou se a perda de sangue persistir passada 1
semana de utilização. Consulte também o
seu dentista se sentir desconforto ou dor
quando utiliza a Philips Sonicare.
-
As escovas de dentes Philips Sonicare estão
em conformidade com todas as normas de
segurança para dispositivos
eletromagnéticos. Se tiver um pacemaker ou
outro dispositivo implantado, consulte o seu
médico ou o fabricante do dispositivo antes
da utilização.
-
Se tiver preocupações médicas, consulte o
seu médico antes de utilizar a Philips
Sonicare.
-
Este aparelho destina-se unicamente à
lavagem dos dentes, gengivas e língua. Não
o utilize para qualquer outro fim. Interrompa
a utilização do aparelho e contacte o seu
médico caso sinta algum desconforto ou
dor.
93
Page 95

Português
94
-
A escova de dentes Philips Sonicare é um
aparelho de uso pessoal, pelo que não
deve ser usada em vários pacientes em
consultórios ou clínicas dentárias.
-
Interrompa a utilização da cabeça da
escova se esta apresentar cerdas
esmagadas ou dobradas. Substitua a
cabeça da escova de 3 em 3 meses ou mais
cedo no caso de aparecerem sinais de
desgaste. Não utilize outras cabeças a não
ser as que são recomendadas pelo
fabricante.
-
Se a sua pasta de dentes contiver peróxido
ou bicarbonato de sódio (comum nas
pastas de dentes branqueadoras), limpe
cuidadosamente a cabeça da escova com
sabão e água após cada utilização. Assim,
previne possíveis fendas no plástico.
-
Evite o contacto com líquidos que
contenham óleos essenciais (comuns em
elixires fortes) para não danificar os
componentes de plástico rígido e mole.
Page 96

Português
Campos eletromagnéticos (CEM)
Este aparelho Philips cumpre todas as normas
e regulamentos aplicáveis à exposição a
campos eletromagnéticos.
Descrição geral (fig. 1)
1 Tampa de proteção
2 Cabeça da escova
3 Pega
4 Botão ligar/desligar e de modo
5 Indicador do nível de intensidade
6 Botão do nível de intensidade (+ e -)
7 Indicador do modo
8 Indicador do nível da bateria
9 Carregador
Nota: O conteúdo da caixa pode variar com base no modelo
adquirido.
Preparar para a utilização
Colocação da cabeça da escova
1 Alinhe a cabeça da escova de forma a que as cerdas estejam
viradas para o lado da frente da pega (Fig. 2).
2 Pressione firmemente a cabeça da escova contra a ponta metálica
até a encaixar (Fig. 3).
Nota: As cabeças da escova Philips Sonicare têm ícones impressos
para identificar facilmente a sua cabeça (Fig. 4) da escova.
Carregar a Philips Sonicare
1 Ligue o carregador a uma tomada elétrica.
2 Coloque a pega no carregador (Fig. 5).
-
A luz intermitente do indicador da bateria indica que a escova
está a carregar.
95
Page 97

Português
96
-
Quando a bateria estiver totalmente carregada, o indicador do
nível de bateria acende-se fixamente a verde durante 10
segundos antes de se desligar.
Nota: Pode demorar até 48 horas para carregar a bateria
completamente, mas a Philips Sonicare pode ser utilizada antes de
estar completamente carregada.
Utilizar o aparelho
Instruções de escovagem
1 Molhe as cerdas e aplique uma pequena quantidade de pasta dos
dentes.
2 Coloque as cerdas da escova encostadas aos dentes a um ângulo
ligeiramente inclinado (45 graus), pressionando firmemente para
que as cerdas alcancem a linha das gengivas ou ligeiramente
abaixo da linha das gengivas (Fig. 7).
Nota: Mantenha sempre o centro da escova em contacto com os
dentes.
3 Prima o botão ligar/desligar e de modo para ligar a Philips
Sonicare.
4 Aplique uma ligeira pressão para maximizar a eficácia da Philips
Sonicare e deixe que esta faça as escovagens por si. Não esfregue.
5 Desloque suavemente a cabeça da escova pelos dentes num
pequeno movimento para trás e para a frente, de modo a que as
cerdas mais compridas alcancem os espaços interdentários.
Continue este movimento durante o ciclo de escovagem.
6 Para limpar as superfícies interiores dos dentes da frente, incline a
pega da escova quase na vertical e faça várias rotações verticais
de escovagem sobrepostas em cada dente (Fig. 8).
Nota: Para se certificar de que escova toda a boca uniformemente,
divida a boca em 4 secções, utilizando a função Quadpacer
(consulte o capítulo 'Caraterísticas').
Page 98

Português
7 Inicie a escovagem na primeira secção (parte exterior dos dentes
superiores) e escove durante 30 segundos antes de passar para a
segunda secção (parte interior dos dentes superiores). Prossiga a
escovagem na terceira secção (parte exterior dos dentes
inferiores) e escove durante 30 segundos antes de passar para a
quarta secção (parte interior dos dentes (Fig. 9) inferiores).
8 Depois de ter concluído o ciclo de escovagem, pode passar mais
algum tempo a escovar a superfície dos dentes usadas para
mastigar e as áreas onde ocorrem manchas. Também pode
escovar a língua, com a escova ligada ou desligada, como preferir
(Fig. 10).
Pode utilizar a Philips Sonicare de forma segura em:
- Aparelhos dentários (as cabeças da escova desgastam-se mais
depressa quando utilizadas em aparelhos dentários).
- Restaurações dentárias (chumbos, coroas, revestimentos).
Nota: Certifique-se de que os aparelhos dentários ou as restaurações
dentárias estão devidamente fixos e não comprometidos. Se não for
este o caso, os aparelhos dentários ou as restaurações dentárias
podem ser danificados quando entrarem em contacto com a cabeça
da escova.
Nota: Quando a Philips Sonicare é utilizada em estudos clínicos, é
necessário selecionar o modo Clean (Limpar) predefinido de 2
minutos a uma alta intensidade. A pega deve estar totalmente
carregada e a funcionalidade Easy-start desativada.
Modos de escovagem
Modo Clean (Limpar)
O melhor em remoção da placa dentária (modo predefinido). O
modo Clean (Limpar) dura 2 minutos e inclui quatro intervalos de 30
segundos de Quadpacer.
Modo Gum Plus
Para estimular suavemente as gengivas. O modo Gum Plus dura 2
minutos e inclui quatro intervalos de 30 segundos de Quadpacer.
1 Prima o botão ligar/desligar e de modo para ligar a Philips
Sonicare.
97
Page 99

Português
98
2 Prima o botão ligar/desligar e de modo novamente antes de
decorrerem 2,5 segundos para mudar para o modo Gum Plus.
3 Prima o botão ligar/desligar e de modo depois de decorrerem 2,5
segundos para colocar a Philips Sonicare em pausa.
Níveis de intensidade
- Baixo: 1 indicador LED
- Médio: 2 indicadores LED
- Elevado: 3 indicadores LED
Nota: Para ajustar o nível de intensidade para o próximo nível
superior ou inferior, prima o botão do nível de intensidade + para
aumentar a intensidade ou o botão do nível de intensidade - para
diminuir a intensidade a qualquer altura durante o ciclo de
escovagem.
Estado da bateria (quando a pega não está no carregador)
- Um indicador do nível da bateria intermitente a amarelo indica
pouca carga.
- Um indicador do nível da bateria intermitente a verde indica uma
carga moderada.
- Um indicador do nível da bateria continuamente aceso a verde
indica uma carga (Fig. 6) completa.
Nota: Se ouvir 5 sinais sonoros e o indicador do nível da bateria ficar
intermitente a amarelo, isto significa que tem de recarregar a bateria.
Quando a bateria está completamente vazia, a Philips Sonicare
desliga-se. Coloque a Philips Sonicare no carregador para a carregar.
Para manter a bateria sempre completamente carregada, pode deixar
a sua Sonicare no carregador quando esta não está a ser utilizada.
Caraterísticas
Smartimer
O Smartimer indica que o ciclo de escovagem está completo,
desligando automaticamente a escova de dentes no final do ciclo de
escovagem.
Page 100

Português
Os profissionais dentários recomendam uma escovagem de pelo
menos dois minutos, duas vezes por dia.
Easy-start
A funcionalidade Easy-start aumenta gradualmente a potência
durante as 14 primeiras escovagens para o ajudar a habituar-se à
escovagem com a Philips Sonicare.Esta Philips Sonicare é fornecida
com a função Easy-start desativada.
Para ativar ou desativar a funcionalidade Easy-start:
1 Coloque a cabeça da escova na pega.
2 Coloque a pega no carregador ligado à corrente.
Para ativar a função Easy-start:
Mantenha o botão ligar/desligar e de modo premido durante 2
segundos. Irá ouvir 2 bips e o indicador de nível de bateria acende-se
a verde para indicar que a função Easy-start foi ativada.
Para desativar a função Easy-start:
Mantenha o botão ligar/desligar e de modo premido durante 2
segundos. Irá ouvir 1 bip e o indicador de nível de bateria acende-se
a amarelo para indicar que a função Easy-start foi desativada.
Nota: Não se aconselha a utilização da função Easy-start para além
do período de arranque inicial porque isso reduz a eficácia da Philips
Sonicare na remoção da placa bacteriana.
Quadpacer
O Quadpacer é um temporizador de intervalo que inclui um breve
sinal sonoro e uma pausa para o relembrar de que deve escovar as 4
secções da boca de forma uniforme e cuidadosa (Fig. 11).
Dependendo do modo de escovagem que tiver selecionado, o
Quadpacer emite um sinal sonoro em intervalos diferentes durante o
ciclo de escovagem. Consulte a secção "modos de escovagem" para
obter mais detalhes.
Para ativar ou desativar a função Quadpacer:
Coloque a pega no carregador ligado à corrente.
- Para ativar o Quadpacer:
99
 Loading...