

Page 1
HealthyWhite+
Page 2
Page 3
1
1
2
3
4
5
6
7
8
9
Page 4

Page 5

ENGLISH 6
DANSK 18
SUOMI 30
NORSK 42
SVENSKA 54
HealthyWhite+
Page 6

6
ENGLISH
Introduction
Congratulations on your purchase and welcome to Philips!
To fully benet from the support that Philips offers, register your product
at www.philips.com/welcome.
Important
Read this user manual carefully before you use the
appliance and save it for future reference.
Danger
- Keep the charger away from water.
Do not place or store it over or near water
contained in a bathtub, washbasin, sink etc.
Do not immerse the charger in water or any other
liquid. After cleaning, make sure the charger is
completely dry before you connect it to the mains.
Warning
- The mains cord cannot be replaced. If the mains
cord is damaged, discard the charger.
- Always have the charger replaced with one of the
original type in order to avoid a hazard.
- Do not use the charger outdoors or near
heated surfaces.
- If the appliance is damaged in any way
(brush head, toothbrush handle or charger),
stop using it. This appliance contains no
serviceable parts. If the appliance is damaged,
contact the Consumer Care Centre in your
country (see chapter ‘Guarantee and support’).
Page 7

ENGLISH 7
- This appliance can be used by children aged from
8 years and above and persons with reduced
physical, sensory or mental capabilities or lack of
experience and knowledge if they have been
given supervision or instruction concerning use of
the appliance in a safe way and understand the
hazards involved. Children shall not play with the
appliance. Cleaning and user maintenance shall
not be made by children unless they are older
than 8 and supervised.
Caution
- Do not clean the brush head, the handle or the
charger in the dishwasher.
- If you have had oral or gum surgery in the
previous 2 months, consult your dentist before
you use the toothbrush.
- Consult your dentist if excessive bleeding occurs
after using this toothbrush or if bleeding continues
to occur after 1 week of use. Also consult your
dentist if you experience discomfort or pain when
you use the Sonicare.
- The Sonicare toothbrush complies with the safety
standards for electromagnetic devices. If you have
a pacemaker or other implanted device, contact
your physician or the device manufacturer of the
implanted device prior to use.
- If you have medical concerns, consult your doctor
before you use the Sonicare.
Page 8

ENGLISH8
- This appliance has only been designed for cleaning
teeth, gums and tongue. Do not use it for any
other purpose. Stop using the appliance and
contact your doctor if you experience any
discomfort or pain.
- The Sonicare toothbrush is a personal care device
and is not intended for use on multiple patients in
a dental practice or institution.
- Stop using a brush head with crushed or bent
bristles. Replace the brush head every 3 months
or sooner if signs of wear appear. Do not use
other brush heads than the ones recommended
by the manufacturer.
- If your toothpaste contains peroxide, baking
soda or bicarbonate (common in whitening
toothpastes), thoroughly clean the brush head
with soap and water after each use.
This prevents possible cracking of the plastic.
Electromagnetic elds (EMF)
This Philips appliance complies with all applicable standards and
regulations regarding exposure to electromagnetic elds.
Page 9

ENGLISH 9
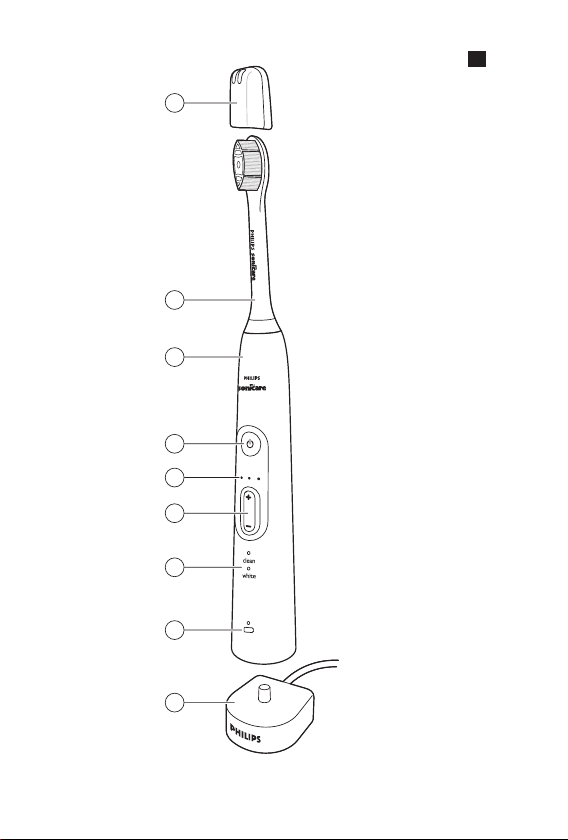
General description (Fig. 1)
1 Hygienic travel cap
2 Brush head
3 Handle
4 Power on/off and mode button
5 Intensity level indicator
6 Intensity level button (+ and -)
7 Mode indicator
8 Battery level indicator
9 Charger
Note: The content of the box may vary based on the model purchased.
Preparing for use
Attaching the brush head
1 Align the brush head so the bristles face the front of the
handle. (Fig. 2)
2 Firmly press the brush head down onto the metal shaft
until it stops.
Note: Philips Sonicare brush heads are imprinted with icons to easily
identify your brush head.
Charging the appliance
1 Put the plug of the charger in a wall socket.
2 Place the handle on the charger (Fig. 3).
, The ashing light of the battery level indicator indicates that the
toothbrush is charging.
Note: It can take up to 48 hours to fully charge the battery,
but the Philips Sonicare may be used before it is fully charged.
Page 10

ENGLISH10
Using the appliance
Brushing instructions
1 Wet the bristles and apply a small amount of toothpaste.
2 Place the toothbrush bristles against the teeth at a slight angle
(45 degrees), pressing rmly to make the bristles reach the gumline
or slightly beneath the gumline. (Fig. 4)
Note: Keep the center of the brush in contact with the teeth at all times.
3 Press the power on/off and mode button to switch on the
Philips Sonicare.
4 Apply light pressure to maximise Philips Sonicare’s effectiveness
and let the Philips Sonicare toothbrush do the brushing for you.
Do not scrub.
5 Gently move the brush head slowly across the teeth in a small back
and forth motion so the longer bristles reach between your teeth.
Continue this motion throughout the brushing cycle.
6 To clean the inside surfaces of the front teeth, tilt the brush handle
semi-upright and make several vertical overlapping brushing strokes
on each tooth (Fig. 5).
Note: To make sure you brush evenly throughout the mouth, divide your
mouth into 4 sections using the Quadpacer feature (see chapter ‘Features’).
7 Brush each section for 30 seconds for a total brushing time of
2 minutes. Start with section 1 (outside top teeth) and then brush
section 2 (inside top teeth). Continue with section 3
(outside bottom teeth) and nally brush section 4
(inside bottom teeth) (Fig. 6).
8 After you have completed the brushing cycle, you can spend
additional time brushing the chewing surfaces of your teeth and
areas where staining occurs. You can also brush your tongue, with
the toothbrush switched on or off, as you prefer (Fig. 7).
Page 11

ENGLISH 11
The Philips Sonicare is safe to use on:
- Braces (brush heads wear out sooner when used on braces).
- Dental restorations (llings, crowns, veneers)
Note: Ensure that braces or dental restorations are properly adhered and not
compromised. If not, braces or dental restorations may be damaged when
they come into contact with the brush head.
Note: When the Philips Sonicare is used in clinical studies, the default
2-minute Clean mode with high intensity must be selected. The handle should
be fully charged and the Easy-start feature deactivated.
Brushing modes
Clean mode
The ultimate in plaque removal (default mode).
White mode
To brighten and polish your front teeth.
1 Press the power on/off and mode button to switch on the
Philips Sonicare.
2 Press the power on/off and mode button again before
2.5 seconds to switch to White mode.
3 Press the power on/off and mode button after 2.5 seconds to
pause the Philips Sonicare.
Intensity levels
- Low: 1 LED indicator light
- Medium: 2 LED indicator lights
- High: 3 LED indicator lights
Note: To adjust the intensity level to the next higher or lower level, press the
+ intensity level button to increase intensity or the - intensity level button to
decrease intensity at any time during the brushing cycle.
Page 12

ENGLISH12
Battery status (when handle is not on charger)
- A ashing yellow battery level indicator indicates a low charge.
- A ashing green batter y level indicator indicates a moderate charge.
- A solid green batter y level indicator indicates a full charge.
Note: If you hear 5 beeps and the battery level indicator ashes yellow,
this means that you have to recharge the battery. When the battery is
completely empty, the Philips Sonicare switches off. Place the Philips Sonicare
on the charger to charge it (Fig. 3).
Note: To keep the battery fully charged at all times, you may keep the
Philips Sonicare on the charger when not in use.
Features
Smartimer
The Smartimer indicates that your brushing cycle is complete when it
automatically switches off the toothbrush at the end of the brushing
cycle. Dental professionals recommend brushing no less than 2 minutes
twice a day.
Easy-start
- The Easy-start feature gently increases power over the rst
14 brushings to help you get used to brushing with the Philips Sonicare.
- This Philips Sonicare comes with the Easy-star t feature deactivated.
Activating or deactivating the Easy-start feature:
Place the handle in the plugged-in charger.
- To activate Easy-start:
Press and hold the power on/off and mode button for 2 seconds.
You hear 2 beeps and the battery level indicator lights up green to
indicate that the Easy-start feature has been activated.
- To deactivate Easy-start:
Press and hold the power on/off and mode button for 2 seconds.
You hear 1 beep and the battery level indicator lights up yellow to
indicate that the Easy-start feature has been deactivated.
Page 13

ENGLISH 13
Note: Each of the rst 14 brushings must last at least 1 minute to move
through the Easy-start ramp-up cycle properly.
Note: Use of the Easy-start feature beyond the initial ramp-up period is not
recommended and reduces the effectiveness of the Philips Sonicare
toothbrush in removing plaque.
Quadpacer
- The Quadpacer is an inter val timer that has a shor t beep and
pause to remind you to brush the 4 sections of your mouth evenly
and thoroughly. Depending on the brushing mode you have selected,
the Quadpacer beeps at different intervals during the brushing
cycle (Fig. 6).
Activating or deactivating the Quadpacer feature:
Place the handle in the plugged-in charger.
- To activate Quadpacer: Press and hold the intensity level button
down (-) for 2 seconds. You hear 2 beeps and the battery level
indicator lights up green to indicate that the Quadpacer feature has
been activated.
- To deactivate Quadpacer: Press and hold the intensity level button
down (-) for 2 seconds. You hear 1 beep and the battery level
indicator lights up yellow to indicate that the Quadpacer feature has
been deactivated.
Charger conrmation
When the charger conrmation feature is activated, the handle beeps and
vibrates briey when it is placed on the charger base. This Philips Sonicare
model comes with the charger conrmation feature deactivated.
Activating or deactivating the charger conrmation
feature:
Place the handle on the charger.
- To activate charger conrmation: Press and hold the intensity level
button up (+) for 2 seconds. You hear 2 beeps and the battery level
indicator lights up green twice to indicate that the charger
conrmation feature has been activated.
Page 14

ENGLISH14
- To deactivate charger conrmation: Press and hold the intensity level
button up (+) for 2 seconds. You hear 1 beep and the battery level
indicator lights up yellow once to indicate that the charger
conrmation feature has been deactivated.
Cleaning
The Philips Sonicare should be cleaned regularly to remove toothpaste
and other residue. Failure to clean the Philips Sonicare may result in an
unhygienic product and damage to it may occur.
Do not clean brush heads, the handle or the charger in the dishwasher.
Toothbrush handle
1 Remove the brush head and rinse the metal shaft area with warm
water. Make sure you remove any residual toothpaste (Fig. 8).
Do not push on the rubber seal on the metal shaft with sharp objects,
as this may cause damage.
2 Wipe the entire surface of the handle with a damp cloth.
Brush head
1 Rinse the brush head and bristles after each use (Fig. 9).
2 Remove the brush head from the handle and rinse the brush head
connection with warm water at least once a week.
Charger
1 Unplug the charger before you clean it.
2 Wipe the surface of the charger with a damp cloth. Make sure you
remove any toothpaste or other residue from the charger surfaces.
Page 15

ENGLISH 15
Storage
If you are not going to use the product for a long time, unplug it, clean it
(see chapter ‘Cleaning’) and store it in a cool and dry place away from
direct sunlight.
Replacement
Brush head
- Replace Philips Sonicare brush heads every 3 months to achieve
optimal results.
- Use only Philips Sonicare replacement brush heads.
Recycling
- This symbol on a product means that the product is covered by
European Directive 2012/19/EU (Fig. 10).
- This symbol means that the product contains a built-in rechargeable
battery covered by European Directive 2006/66/EC which cannot be
disposed of with normal household waste. Follow the instructions in
section ‘Removing the rechargeable battery’ to remove the
battery (Fig. 11).
- Inform yourself about the local separate collection system for
electrical and electronic products and rechargeable batteries.
Follow local rules and never dispose of the product and rechargeable
batteries with normal household waste. Correct disposal of old
products and rechargeable batteries helps prevent negative
consequences for the environment and human health.
Page 16
ENGLISH16
Removing the rechargeable battery
Only remove the rechargeable battery when you discard the appliance.
Make sure the battery is completely empty when you remove it.
To remove the rechargeable battery, you need a towel or cloth, a
hammer and a at-head (standard) screwdriver. Observe basic safety
precautions when you follow the procedure outlined below. Be sure to
protect your eyes, hands, ngers, and the surface on which you work.
1 To deplete the rechargeable battery of any charge, remove the
handle from the charger, switch on the Philips Sonicare and
let it run until it stops. Repeat this step until you can no longer
switch on the Philips Sonicare.
2 Remove and discard the brush head. Cover the entire handle
with a towel or cloth (Fig. 12).
3 Hold the top of the handle with one hand and strike the handle
housing 1 cm above the bottom end. Strike rmly with a hammer
on all 4 sides to eject the end cap (Fig. 13).
You may have to hit on the end several times to break the
internal snap connections.
4 Remove the end cap from the toothbrush handle. If the end cap
does not release easily from the housing, repeat step 3 until the
end cap is released (Fig. 14).
5 Holding the handle upside down, press the shaft down on a hard
surface. If the internal components do not easily release from the
housing, repeat step 3 until the internal components are
released. (Fig. 15)
6 Remove the rubber battery cover (Fig. 16).
7 Wedge the screwdriver between the battery and the black frame at
the bottom of the internal components. Then pry the screwdriver
away from the battery to break the bottom of the black
frame (Fig. 17).
Page 17
ENGLISH 17
8 Insert the screwdriver between the bottom of the battery and the
black frame to break the metal tab connecting the battery to the
green printed circuit board. This will release the bottom end of the
battery from the frame (Fig. 18).
9 Grab the battery and pull it away from the internal components to
break the second metal battery tab (Fig. 19).
Be aware of the sharp edges of the battery tabs so as to avoid
injury to your ngers.
10
Cover the battery contacts with tape to prevent any electrical short
from residual battery charge. The rechargeable battery can now be
recycled and the rest of the product discarded appropriately.
Guarantee and support
If you need information or support, please visit www.philips.com/
support or read the separate worldwide guarantee leaet.
Guarantee restrictions
The terms of the international guarantee do not cover the following:
- Brush heads.
- Damage caused by use of unauthorised replacement parts.
- Damage caused by misuse, abuse, neglect, alterations or unauthorised
repair.
- Normal wear and tear, including chips, scratches, abrasions,
discolouration or fading.
Page 18

DANSK18
Introduktion
Tillykke med dit køb og velkommen til Philips!
For at få fuldt udbytte af den support, Philips tilbyder, skal du registrere dit
produkt på www.philips.com/welcome.
Vigtigt
Læs denne brugsvejledning omhyggeligt igennem,
inden apparatet tages i brug, og gem den til eventuelt
senere brug.
Fare
- Hold opladeren væk fra vand, og undlad at
placere eller opbevare den over eller tæt på vand
i badekar, håndvask og lign. Opladeren må aldrig
kommes ned i vand eller anden væske.
Efter rengøringen skal du sørge for, at opladeren
er helt tør, inden du tilslutter strømmen.
Advarsel
- Netledningen kan ikke udskiftes. Hvis netledningen
bliver beskadiget, skal opladeren kasseres.
- Opladeren skal udskiftes med en original type for
at undgå fare.
- Opladeren må ikke bruges udendørs eller tæt på
varme ader.
- Hvis apparatet har en defekt (børstehoved,
håndgreb eller oplader), må det ikke anvendes.
Dette apparat har ingen udskiftelige reservedele.
Hvis apparatet beskadiges, skal du kontakte dit
lokale Philips Kundecenter (se afsnittet
“Reklamationsret og support”).
Page 19

DANSK 19
-
Dette apparat må bruges af børn fra 8 år og
opefter samt af personer med nedsatte fysiske,
sensoriske eller mentale evner eller manglende
viden eller erfaring, hvis de er blevet vejledt eller
instrueret i brug af apparatet på en sikker måde og
forstår de involverede risici. Børn må ikke lege med
apparatet. Rengøring og brugervedligeholdelse må
ikke foretages af børn, medmindre de er over 8 år
og under opsyn.
Forsigtig
- Kom aldrig børstehoved, håndgreb eller oplader
i opvaskemaskinen.
- Hvis du er blevet opereret i mund eller tandkød
inden for de seneste 2 måneder, skal du spørge
din tandlæge til råds, før du bruger tandbørsten.
- Kontakt din tandlæge, hvis tandkødet bløder
voldsomt efter brug af tandbørsten, eller hvis der
stadig forekommer blødninger efter 1 uges brug.
Kontakt også din tandlæge, hvis du oplever ubehag
eller smerte, når du anvender Sonicare.
- Sonicare-tandbørsten overholder de gældende
sikkerhedsregler for elektromagnetisk udstyr.
Hvis du har en pacemaker eller andre implantater,
skal du kontakte din læge eller producenten af
implantatet inden brug.
- Hvis du har helbredsproblemer, skal du spørge din
læge til råds, før du begynder at bruge Sonicare.
Page 20

DANSK20
- Dette apparat er kun beregnet til rensning af
tænder, tandkød og tunge. Det må ikke anvendes
til andre formål. Hold op med at bruge apparatet
og søg læge, hvis du oplever ubehag eller smerte.
- Sonicare-tandbørsten er beregnet til personligt
hjemmebrug og ikke til brug af et større antal
patienter på tandlægeklinikker eller institutioner.
- Stop brug af børstehovedet, hvis børsterne er
beskadigede eller bøjede. Udskift børstehovedet
hver 3. måned eller oftere, hvis der er tegn på slid.
Brug ikke andre børstehoveder end dem, der er
anbefalet af producenten.
- Hvis din tandpasta indeholder peroxid, natron
eller bikarbonat (almindeligt i blegende
tandpastaer), skal børstehovedet renses grundigt
med vand og sæbe, hver gang tandbørsten har
været i brug, for at forebygge revner i
plastmaterialet.
Elektromagnetiske felter (EMF)
Dette Philips-apparat overholder alle branchens gældende standarder og
regler angående eksponering for elektromagnetiske felter.
Page 21

DANSK 21
Generel beskrivelse (g. 1)
1 Hygiejnisk beskyttelseshætte
2 Børstehoved
3 Håndgreb
4 On/off- og indstillingsknap
5 Indikatorens intensitetsniveau
6 Intensitetsniveauknap (+ og -)
7 Indikator for tilstand
8 Indikator for batteriniveau
9 Oplader
Bemærk: Indholdet af æsken kan variere alt efter den købte model.
Klargøring
Montering af børstehovedet
1 Placér børstehovedet således, at børstehårene vender mod
håndtagets front. (g. 2)
2 Tryk børstehovedet fast ned på metalskaftet, indtil det ikke kan
komme længere.
Bemærk: Philips Sonicare-børstehoveder har påtrykte ikoner,
så du nemt kan identicere dit børstehoved.
Opladning
1 Sæt stikket til opladeren i en stikkontakt.
2 Sæt håndgrebet i opladeren (g. 3).
, Det blinkende lys på batteriniveauindikatoren viser,
at tandbørsten oplades.
Bemærk: Det kan tage op til 48 timer at oplade batteriet helt,
men Philips Sonicare kan bruges, før den er fuldt opladet.
Page 22

DANSK22
Sådan bruges apparatet
Børstevejledning
1 Fugt børstehårene og kom lidt tandpasta på.
2 Placer børstehårene mod tænderne i en lille vinkel (45 grader),
idet du trykker ind, så børstehårene rammer tandkødsranden eller
lige under tandkødsranden. (g. 4)
Bemærk: Sørg for, at børsten hele tiden har kontakt med tænderne.
3 Tænd Philips Sonicare ved trykke på on/off- og indstillingsknappen.
4 Brug et let tryk for at maksimere Philips Sonicares effektivitet og
lade Philips Sonicare-tandbørsten klare børstningen for dig.
Tænderne skal ikke skrubbes.
5 Bevæg børstehovedet langsomt og nænsomt hen over tænderne,
så de længere børstehår trænger ind mellem tænderne.
Fortsæt med denne bevægelse under hele børstningen.
6 Når du skal børste bagsiden af fortænderne, skal du vippe
børstehåndtaget til halvvejs lodret position og foretage ere
lodrette, overlappende børstebevægelser på hver tand (g. 5).
Bemærk: For at sikre en ensartet børstning i hele munden kan du inddele
munden i 4 sektioner og bruge Quadpacer-funktionen (se afsnittet
“Funktioner”).
7 Børst hver sektion i 30 sekunder, så den samlede børstetid bliver
på 2 minutter. Start med sektion 1 (ydersiden i overmunden),
og børst derefter sektion 2 (indersiden i overmunden).
Fortsæt med sektion 3 (ydersiden i undermunden) og til sidst
sektion 4 (indersiden i undermunden) (g. 6).
8 Når du har børstet alle 4 sektioner, kan du bruge lidt mere tid på at
børste tyggeaderne og områder, hvor der opstår misfarvning.
Du kan også børste tungen med enten tændt eller slukket
tandbørste, alt efter hvad du foretrækker (g. 7).
Page 23

DANSK 23
Det er sikkert at bruge Philips Sonicare på:
- Bøjler (børstehovedet slides hurtigere, når det bruges på tandbøjler).
- Tandrekonstruktioner (plomber, kroner, lakeringer)
Bemærk: Kontroller, at bøjler eller tandrekonstruktioner sidder korrekt fast.
Hvis det ikke er tilfældet, kan bøjler eller tandrekonstruktioner blive
beskadiget, når de kommer i kontakt med børstehovedet.
Bemærk: Når Philips Sonicare anvendes til kliniske undersøgelser,
skal 2-minutters standardindstillingen med høj intensitet være valgt.
Håndtaget skal være fuldt opladet, og Easy-start-funktionen skal være
deaktiveret.
Børsteindstillinger
Clean-indstilling
Den ultimative fjernelse af plak (standardindstilling).
White-indstilling
Lysner og polerer dine fortænder.
1 Tænd Philips Sonicare ved trykke på on/off- og indstillingsknappen.
2 Tryk på on/off og indstillingsknappen igen inden for 2,5 sekunder
for at skifte til White-indstillingen.
3 Tryk på on/off- og indstillingsknappen efter 2,5 sekunder for at
sætte Philips Sonicare på pause.
Intensitetsniveauer
- Low: 1 LED-indikator
- Medium: 2 LED-indikatorer
- High: 3 LED-indikatorer
Bemærk: For at justere intensitetsniveau til det næste højere eller lavere
niveau kan du trykke på intensitetsniveauknappen + for at øge intensiteten
eller intensitetsniveauknappen - for at sænke intensiteten på et hvilket som
helst tidspunkt under børstningen.
Page 24

DANSK24
Batteristatus (når håndgrebet ikke er på opladeren)
- En blinkende gul batteriniveauindikator angiver et lavt batteriniveau.
- En blinkende grøn batteriniveauindikator angiver et moderat
batteriniveau.
- En konstant grøn batteriniveauindikator angiver et fuldt opladet
batteri.
Bemærk: Hvis du hører 5 bip, og batteriniveauindikatoren blinker gult, betyder
det, at du skal genoplade batteriet. Når batteriet er løbet helt tør for strøm,
slukkes Philips Sonicare. Sæt Philips Sonicare i opladeren for at oplade
den (g. 3).
Bemærk: For altid at holde batteriet fuldt opladet kan du opbevare Philips
Sonicare i opladeren, når du ikke bruger den.
Funktioner
Smartimer
Smartimer-funktionen angiver, at børstningen er fuldført ved automatisk at
slukke tandbørsten efter endt børstecyklus.
Tandlæger og tandplejere anbefaler mindst 2 minutters børstetid
2 gange dagligt.
Easy-start
- Easy-star t funktionen øger langsomt styrken i løbet af de første
14 børstninger for at hjælpe med tilvænningen til Philips Sonicare.
- Denne Philips Sonicare leveres med Easy-star t funktionen deaktiveret.
Sådan aktiveres eller deaktiveres Easy-start-funktionen:
Anbring håndgrebet i den tilsluttede oplader.
- Aktivering af Easy-start:
Hold on/off- og indstillingsknappen nede i 2 sekunder.
Du hører 2 bip, og batteriniveauindikatoren lyser grønt, hvilket angiver,
at Easy-start-funktionen er aktiveret.
- Deaktivering af Easy-start:
Hold on/off- og indstillingsknappen nede i 2 sekunder.
Du hører 1 bip, og batteriniveauindikatoren lyser gult, hvilket angiver,
at Easy-start-funktionen er deaktiveret.
Page 25

DANSK 25
Bemærk: Hver af de første 14 børstninger skal være af mindst 1 minuts
varighed, for at Easy-start-børstestyrken tiltager.
Bemærk: Brug af Easy-start-funktionen efter opstartsperioden kan ikke
anbefales, da det medfører en mindre effektiv plakfjernelse med Philips
Sonicare.
Quadpacer
- Quadpacer er en inter valtimer, der med et kort bip og en pause
minder dig om at børste de 4 sektioner i munden grundigt og i lige
lang tid. Afhængigt af den valgte børsteindstilling bipper Quadpacer
med forskellige intervaller under børstningen (g. 6).
Sådan aktiveres eller deaktiveres Quadpacer-funktionen:
Anbring håndgrebet i den tilsluttede oplader.
- Sådan aktiveres Quadpacer : Hold intensitetsniveau ned-knappen
(-) nede i 2 sekunder. Du hører 2 bip, og batteriniveauindikatoren
lyser grønt, hvilket angiver, at Quadpacer-funktionen er aktiveret.
- Sådan deaktiveres Quadpacer : Hold intensitetsniveau ned-knappen
(-) nede i 2 sekunder. Du hører 1 bip, og batteriniveauindikatoren
lyser gult, hvilket angiver, at Quadpacer-funktionen er deaktiveret.
Opladerbekræftelse
Når opladerbekræftelsesfunktionen er aktiveret, bipper og vibrerer
håndtaget kortvarigt, når det sættes i opladeren. Denne Philips Sonicaremodel leveres med opladerbekræftelsesfunktionen deaktiveret.
Sådan aktiveres eller deaktiveres
opladerbekræftelsesfunktionen:
Sæt håndgrebet i opladeren.
- Sådan aktiveres opladerbekræftelse: Hold intensitetsniveau
op-knappen (+) nede i 2 sekunder. Du hører 2 bip,
og batteriniveauindikatoren lyser grønt to gange, hvilket betyder,
at opladerbekræftelsesfunktionen er aktiveret.
- Sådan deaktiveres opladerbekræftelse: Hold intensitetsniveau
op-knappen (+) nede i 2 sekunder. Du hører 1 bip,
og batteriniveauindikatoren lyser gult en gang, hvilket betyder,
at opladerbekræftelsesfunktionen er deaktiveret.
Page 26

DANSK26
Rengøring
Philips Sonicare bør rengøres regelmæssigt for at fjerne rester af
tandpasta m.m. Manglende rengøring af Philips Sonicare kan resultere i et
uhygiejnisk produkt, og der kan forekomme skader på det.
Kom aldrig børstehoveder, håndtag eller oplader i opvaskemaskinen.
Tandbørstens håndgreb
1 Tag børstehovedet af, og skyl metalskaftet i varmt vand.
Sørg for at fjerne eventuelle rester af tandpasta (g. 8).
Tryk aldrig skarpe genstande mod gummiforseglingen om metalskaftet,
da dette kan beskadige den.
2 Brug en fugtig klud til at tørre hele håndtagets overade.
Børstehoved
1 Skyl børstehoved og børstehår, hver gang tandbørsten har været
brugt (g. 9).
2 Tag børstehovedet af håndtaget, og skyl børstehovedets
forbindelsesstykke mindst én gang om ugen i varmt vand.
Oplader
1 Tag stikket ud af stikkontakten, inden opladeren rengøres.
2 Brug en fugtig klud til at tørre opladerens overade. Sørg for at
fjerne alle rester af tandpasta eller andet fra opladerens overader.
Opbevaring
Hvis du ikke skal bruge produktet i en længere periode, skal du tage
stikket ud af stikkontakten, rengøre det (se afsnittet “Rengøring”)
og opbevare det et køligt og tørt sted væk fra direkte sollys.
Page 27

DANSK 27
Udskiftning
Børstehoved
- Udskift Philips Sonicare-børstehovederne hver 3. måned for at opnå
det bedste resultat.
- Brug kun Philips Sonicare-børstehoveder.
Genanvendelse
- Dette symbol på et produkt betyder, at produktet er omfattet af
EU-direktivet 2012/19/EU (g. 10).
- Dette symbol betyder, at produktet indeholder et indbygget,
genopladeligt batteri omfattet af EU-direktivet 2006/66/EC som ikke
må bortskaffes sammen med almindeligt husholdningsaffald.
Følg instruktionerne i afsnittet “Udtagning af det genopladelige
batteri” for at fjerne batteriet (g. 11).
- Hold dig orienteret om systemet for særskilt indsamling af elektriske
og elektroniske produkter og genopladelige batterier. Følg lokale
regler, og bortskaf aldrig produktet og de genopladelige batterier med
almindeligt husholdningsaffald. Korrekt bortskaffelse af udtjente
produkter og genopladelige batterier er med til at forhindre negativ
påvirkning af miljøet og menneskers helbred.
Udtagning af det genopladelige batteri
Tag kun det genopladelige batteri ud, når du kasserer apparatet. Sørg
for, at batteriet er fuldstændigt aadet, inden det tages ud.
For at fjerne det opladelige batteri skal du bruge et håndklæde eller en
klud, en hammer og en almindelig skruetrækker. Overhold de
grundlæggende sikkerhedsforanstaltninger, når du følger nedenstående
procedure. Sørg for at beskytte øjne, hænder, ngre og den overade, du
arbejder på.
1 Det genopladelige batteri tømmes for strøm ved at tage
håndtaget af opladeren, tænde Philips Sonicare og lade den køre,
til den stopper. Gentag dette, indtil du ikke længere kan tænde
Philips Sonicare.
Page 28

DANSK28
2 Fjern og kasser børstehovedet. Dæk hele håndtaget med et
håndklæde eller en klud (g. 12).
3 Hold fast i den øverste del af håndtaget med den ene hånd, og slå
på håndtagets kabinet 1 cm over bunden. Slå hårdt med en hammer
på alle 4 sider for at slå endedækslet af (g. 13).
Du skal muligvis slå ere gange på den nederste del for at
knække de indvendige låseforbindelser.
4 Fjern endedækslet fra tandbørstens håndtag.
Hvis endedækslet ikke nemt løsnes fra kabinettet, skal du gentage
trin 3, indtil endedækslet er løsnet (g. 14).
5 Hold håndtaget med bunden i vejret, og tryk skaftet ned på en hård
overade. Hvis de interne komponenter ikke nemt løsnes fra
kabinettet, skal du gentage trin 3, indtil komponenterne er
løsnet. (g. 15)
6 Fjern gummidækslet til batterirummet (g. 16).
7 Tving skruetrækkeren ind mellem batteriet og den sorte ramme
i bunden af de interne komponenter. Lirk derefter skruetrækkeren
væk fra batteriet for at knække bunden af den sorte ramme (g. 17).
8 Stik skruetrækkeren ind mellem batteriets bund og den sorte
ramme for at ødelægge metaltappen, der forbinder batteriet til den
grønne printplade. Herved frigør du batteriets bund fra
rammen (g. 18).
9 Tag fat i batteriet, og træk det væk fra de interne komponenter
for at knække batteriets anden metaltap (g. 19).
Pas på, at de skarpe kanter på batteritapperne ikke
beskadiger dine ngre.
10 Dæk batterikontakterne med tape for at forhindre elektrisk
kortslutning med den resterende batteristrøm. Det genopladelige
batteri kan nu sendes til genbrug, og resten af produktet kan
bortskaffes korrekt.
Page 29

DANSK 29
Reklamationsret og support
Hvis du har brug for hjælp eller support, bedes du besøge
www.philips.com/support eller læse i den separate folder
“World-Wide Guarantee”.
Gældende forbehold i reklamationsretten
Betingelserne i den internationale garanti dækker ikke følgende:
- Børstehoveder
- Skader, der opstår som følge af brug af uautoriserede reservedele.
- Skader, der opstår som følge af misbrug, manglende vedligeholdelse
eller ændringer.
- Normal slitage, inkl. ridser, skrammer, afslidning, misfarvning og
falmning.
Page 30

30 SUOMI
Johdanto
Onnittelut ostoksestasi ja tervetuloa Philips-tuotteiden käyttäjäksi!
Hyödynnä Philipsin tuki ja rekisteröi tuotteesi osoitteessa
www.philips.com/welcome.
Tärkeää
Lue tämä käyttöopas huolellisesti ennen käyttöä ja
säilytä se myöhempää tarvetta varten.
Vaara
- Älä kastele laturia. Älä säilytä laturia lähellä
kylpyammetta tai pesuallasta, jossa on vettä.
Älä upota laturia veteen tai muuhun nesteeseen.
Varmista puhdistamisen jälkeen, että laturi on
kunnolla kuivunut, ennen kuin liität sen verkkovirtaan.
Varoitus
- Virtajohtoa ei voi vaihtaa. Jos se on vahingoittunut,
hävitä laturi.
- Vaihda laturi aina vaaratilanteiden välttämiseksi
alkuperäisen tyyppiseen laitteeseen.
- Älä käytä laturia ulkona tai lämmönlähteiden
lähellä.
- Älä käytä laitetta, jos se on jollain tavalla
vahingoittunut (esimerkiksi harjaspää, runko tai laturi).
Laitteessa ei ole huollettavissa olevia osia. Jos laite on
vahingoittunut, ota yhteys kuluttajapalvelukeskukseen
(katso luku Takuu ja tuki).
Page 31

SUOMI 31
- Laitetta voivat käyttää yli 8-vuotiaat lapset ja
henkilöt, joiden fyysinen tai henkinen toimintakyky
on rajoittunut tai joilla ei ole kokemusta tai tietoa
laitteen käytöstä, jos heitä on neuvottu laitteen
turvallisesta käytöstä tai tarjolla on turvallisen
käytön edellyttämä valvonta ja jos he ymmärtävät
laitteeseen liittyvät vaarat. Lapset eivät saa leikkiä
laitteella. Yli 8-vuotiaat lapset voivat puhdistaa tai
huoltaa laitetta valvonnan alaisena.
Varoitus
- Älä puhdista harjaspäätä, runkoa tai laturia
astianpesukoneessa.
- Jos olet ollut hammas- tai ienleikkauksessa
viimeisten kahden kuukauden aikana, kysy neuvoa
hammaslääkäriltä tai hammashoitajalta ennen
laitteen käyttöä.
- Kysy neuvoa hammaslääkäriltä, jos hammasharjan
käytön jälkeen ilmenee runsasta verenvuotoa tai
jos verenvuoto jatkuu viikon käytön jälkeen.
Ota myös yhteyttä hammaslääkäriin,
mikäli Sonicare-hammasharjan käyttö tuntuu
epämukavalta tai aiheuttaa kipua.
- Sonicare-hammasharja täyttää sähkömagneettisten
laitteiden turvastandardit. Jos sinulla on
sydämentahdistin tai muu kehonsisäinen laite,
kysy neuvoa lääkäriltä tai kyseisen laitteen
valmistajalta ennen käyttöä.
Page 32

SUOMI32
- Jos epäröit käyttää laitetta terveydellisistä syistä,
neuvottele laitteen käytöstä ensin lääkärin kanssa.
- Tämä laite on tarkoitettu vain hampaiden, ikenien
ja kielen puhdistamiseen. Älä käytä sitä muuhun
tarkoitukseen. Jos laitteen käyttö tuntuu
epämukavalta tai kivuliaalta, lopeta käyttö ja ota
yhteys lääkäriin.
- Sonicare-hammasharja on tarkoitettu
henkilökohtaiseen käyttöön eikä sitä ole
tarkoitettu potilaiden yleiseen käyttöön
hammashoitoloissa tai sairaaloissa.
- Lopeta harjaspään käyttö ja vaihda harjaspää
kolmen kuukauden välein tai useammin, jos siinä
ilmenee merkkejä kulumisesta, esimerkiksi
katkenneita tai taipuneita harjaksia. Käytä vain
laitteen valmistajan suosittelemia harjaspäitä.
- Jos käyttämäsi hammastahna sisältää peroksidia,
ruokasoodaa tai bikarbonaattia (yleisiä etenkin
valkaisevissa hammastahnoissa), puhdista harjaspää
huolellisesti saippualla jokaisen käytön jälkeen.
Tämä estää muovin halkeamisen.
Sähkömagneettiset kentät (EMF)
Tämä Philips-laite vastaa kaikkia sähkömagneettisia kenttiä (EMF)
koskevia standardeja ja säännöksiä.
Page 33

SUOMI 33
Yleiskuvaus (Kuva 1)
1 Hygieeninen suojus
2 Harjaspää
3 Runko
4 Virta- ja tilapainike
5 Tehotason ilmaisin
6 Tehotason painike (+ ja -)
7 Tilanvalinnan ilmaisin
8 Akun tason ilmaisin
9 Laturi
Huomautus: Pakkauksen sisältö saattaa vaihdella malleittain.
Käyttöönoton valmistelu
Harjaspään kiinnittäminen
1 Aseta harjaspää harjakset ja rungon etuosa samaan
suuntaan. (Kuva 2)
2 Paina harjaspäätä metallivarteen, kunnes se pysähtyy.
Huomautus: Philips Sonicare -harjaspäihin on painettu kuvat,
jotta harjaspään tunnistaminen on helppoa.
Lataaminen
1 Kytke laturin pistoke pistorasiaan.
2 Aseta runko laturiin (Kuva 3).
, Akun virtatason ilmaisimessa vilkkuva punainen valo osoittaa,
että hammasharja latautuu.
Huomautus: Akun lataaminen täyteen voi kestää jopa 48 tuntia,
mutta Philips Sonicare -hammasharjaa voi käyttää, vaikka akku ei olisi
täyteen ladattu.
Page 34

SUOMI34
Käyttö
Harjausohjeet
1 Kastele harjakset ja pursota niille pieni määrä hammastahnaa.
2 Aseta hammasharjan harjakset hampaita vasten loivassa kulmassa
(45 astetta) ja paina lujasti niin, että harjakset ulottuvat ienrajaan tai
hieman ienrajan alapuolelle. (Kuva 4)
Huomautus: Pitele harjaa niin, että harjan keskiosa on koko ajan
kosketuksissa hampaisiin.
3 Käynnistä Philips Sonicare -hammasharja painamalla
virta- ja tilapainiketta.
4 Voit tehostaa harjaamista painamalla Philips Sonicare -hammasharjaa
kevyesti ja antamalla harjan harjata puolestasi. Älä hankaa.
Liikuta harjaa pyöreällä liikkeellä siten, että pitkien harjasten päät
5
ulottuvat hammasväleihin. Toimi samalla tavalla koko harjausjakson ajan.
6 Jos haluat puhdistaa etuhampaiden sisäpinnat, kallista runkoa niin,
että se on puoliksi pystyasennossa. Harjaa tämän jälkeen jokainen
hammas erikseen pystysuorin liikkein (Kuva 5).
Huomautus: Jos haluat varmistaa, että saat harjattua kaikki hampaat
harjatessa, jaa suu neljään osaan Quadpacer-toiminnolla (katso luku
Toiminnot).
7 Harjaa jokaista osaa puoli minuuttia, jolloin kokonaisharjausajaksi
tulee kaksi minuuttia. Aloita osasta 1 (ylähampaiden ulkopinta) ja
siirry sitten osaan 2 (ylähampaiden sisäpinta), osaan 3 (alahampaiden
ulkopinta) ja lopuksi osaan 4 (alahampaiden sisäpinta) (Kuva 6).
8 Harjausjakson jälkeen voit käyttää hieman enemmän aikaa
tummentumien puhdistamiseen purupinnoilta. Voit harjata myös
kielen joko hammasharja käynnistettynä tai sammutettuna (Kuva 7).
Page 35

SUOMI 35
Philips Sonicare -hammasharjan käyttö on turvallista myös
- hammasrautojen kanssa (harjakset kuluvat tavallista nopeammin,
jos käytät hammasrautoja)
- korjattuja hampaita puhdistettaessa (paikat, kruunut, pinnoitukset, sillat).
Huomautus: Varmista, että hammasraudat tai korjatut hampaat on kiinnitetty
kunnolla. Muuten ne voivat vaurioitua, kun harjaspää koskettaa niitä.
Huomautus: Kun Philips Sonicare -hammasharjaa käytetään kliinisissä
tutkimuksissa, valitaan oletusarvoinen 2 minuutin Clean (Puhdistava) -tila.
Rungon on oltava täyteen ladattu ja Easy-start-toiminnon pois käytöstä.
Harjaustilat
Clean (Puhdistava) -tila
Erinomainen plakin poisto (oletustila).
White (Valkaiseva) -tila
Etuhampaiden kiillottamiseen ja värin kirkastamiseen.
1 Käynnistä Philips Sonicare -hammasharja painamalla
virta- ja tilapainiketta.
2 Siirry White (Valkaiseva) -tilaan painamalla virta- ja tilapainiketta
uudelleen 2,5 sekunnin kuluessa.
3 Keskeytä Philips Sonicare -hammasharjalla harjaus painamalla
virta- ja tilapainiketta 2,5 sekunnin kuluttua.
Tehotasot
- Alhainen: 1 LED-merkkivalo
- Keskitaso: 2 LED-merkkivaloa
- Korkea: 3 LED-merkkivaloa
Huomautus: Voit lisätä harjaustehoa tehotason (+)-painikkeella tai vähentää
sitä tehotason (–)-painikkeella milloin tahansa harjausjakson aikana.
Page 36

SUOMI36
Akun tila (kun runko ei ole latauksessa)
- Keltainen vilkkuva merkkivalo ilmaisee, että lataustaso on alhainen.
- Vihreä vilkkuva merkkivalo ilmaisee, että akku on noin puolillaan.
- Vihreä merkkivalo ilmaisee, että akku on täynnä.
Huomautus: Jos kuulet 5 äänimerkkiä ja akun lataustason
merkkivalo vilkkuu keltaisena, on akku ladattava. Kun akku on täysin tyhjä,
Philips Sonicare -hammasharja sammuu. Aseta Philips Sonicare -hammasharja
lataukseen laturiin (Kuva 3).
Huomautus: Jotta akku olisi aina täyteen ladattu, voit pitää Philips
Sonicare -hammasharjaa laturissa, kun sitä ei käytetä.
Ominaisuudet
Smartimer
Smartimer ilmoittaa harjausjakson päättymisestä katkaisemalla virran
hammasharjasta harjausjakson päätyttyä.
Hammaslääkärit suosittelevat, että hampaita harjattaisiin vähintään kaksi
minuuttia kahdesti päivässä.
Easy-start
- Easy-star t-toiminto lisää harjauksen tehoa 14 ensimmäisen harjauksen
aikana totuttaen käyttäjän Philips Sonicare -hammasharjan käyttöön.
- Easy-star t-toimintoa ei ole otettu valmiiksi käyttöön tässä Philips
Sonicare -hammasharjassa.
Easy-start-toiminnon ottaminen käyttöön tai poistaminen
käytöstä:
Aseta harjan runko pistorasiaan liitettyyn latauslaitteeseen.
- Easy-star t-toiminnon ottaminen käyttöön:
Paina virta- ja tilapainiketta 2 sekunnin ajan.
Kuulet kaksi äänimerkkiä ja varaustason merkkivalo syttyy vihreänä,
kun Easy-start-toiminto on otettu käyttöön.
- Easy-star t-toiminnon poistaminen käytöstä:
Paina virta- ja tilapainiketta 2 sekunnin ajan.
Kuulet äänimerkin ja varaustason merkkivalo syttyy keltaisena,
kun Easy-start-toiminto on poistettu käytöstä.
Page 37

SUOMI 37
Huomautus: Näistä 14 ensimmäisestä harjauskerrasta jokaisen on kestettävä
vähintään minuutin, jotta Easy-start-toiminto etenee asianmukaisesti.
Huomautus: Easy-start-toiminnon käyttämistä ensimmäisten kertojen jälkeen
ei suositella, koska se heikentää Philips Sonicare -hammasharjan plakin
poistokykyä.
Quadpacer (intervalliajastin)
- Quadpacer on inter valliajastin, joka antaa lyhyen äänimerkin ja
pysäyttää käytön hetkeksi, jotta muistat harjata perusteellisesti kaikki
suun 4 osaa. Valitsemasi harjaustilan perusteella Quadpacer antaa
äänimerkin tietyin väliajoin harjauksen aikana (Kuva 6).
Quadpacer-toiminnon ottaminen käyttöön tai
poistaminen käytöstä:
Aseta harjan runko pistorasiaan liitettyyn latauslaitteeseen.
- Quadpacer-toiminnon ottaminen käyttöön: paina tehotason
vähennyspainiketta (–) 2 sekunnin ajan. Kuulet kaksi äänimerkkiä ja
varaustason merkkivalo syttyy vihreänä, kun Quadpacer-toiminto on
otettu käyttöön.
- Quadpacer-toiminnon poistaminen käytöstä: paina tehotason
vähennyspainiketta (–) 2 sekunnin ajan. Kuulet äänimerkin ja
varaustason merkkivalo syttyy keltaisena, kun Quadpacer-toiminto
on poistettu käytöstä.
Latauksen vahvistus
Kun latauksen vahvistustoiminto on otettu käyttöön, harjan runko antaa
äänimerkin ja värisee hetken, kun se asetetaan lataustelineeseen.
Latauksen vahvistustoimintoa ei ole otettu valmiiksi käyttöön tässä Philips
Sonicare -mallissa.
Page 38

SUOMI38
Latauksen vahvistuksen ottaminen käyttöön tai
poistaminen käytöstä:
Aseta runko laturiin.
- Latauksen vahvistuksen ottaminen käyttöön: paina tehotason
lisäyspainiketta (+) 2 sekunnin ajan. Kuulet kaksi äänimerkkiä ja
varaustason merkkivalo välähtää kaksi kertaa vihreänä, kun latauksen
vahvistus on otettu käyttöön.
- Latauksen vahvistuksen poistaminen käytöstä: paina tehotason
lisäyspainiketta (+) 2 sekunnin ajan. Kuulet äänimerkin ja varaustason
merkkivalo välähtää yhden kerran keltaisena, kun latauksen vahvistus
on poistettu käytöstä.
Puhdistaminen
Philips Sonicare -hammasharjasta on puhdistettava säännöllisesti
hammastahna ja muut jäämät. Jos näin ei tehdä, Philips Sonicaren käyttö ei
ole hygieenistä ja laite voi vaurioitua.
Älä puhdista harjaspäitä, runkoa tai laturia astianpesukoneessa.
Hammasharjan runko
1 Poista harjaspää ja huuhtele metallivarren alue lämpimällä vedellä.
Varmista, että kaikki hammastahnajäämät on poistettu (Kuva 8).
Älä paina metallivarren kumitiivistettä terävillä esineillä,
ettei tiiviste vahingoitu.
2 Pyyhi koko runko kostealla liinalla.
Harjaspää
1 Huuhtele harjaspää ja harjakset aina käytön jälkeen (Kuva 9).
2 Irrota harjaspää rungosta ja huuhtele harjaspään liitäntä vähintään
kerran viikossa lämpimällä vedellä.
Laturi
1 Irrota laturi aina pistorasiasta ennen laitteen puhdistamista.
2 Pyyhi laturin pinta kostealla liinalla. Varmista, että kaikki
hammastahna ja muut jäämät on poistettu laturin pinnoilta.
Page 39

SUOMI 39
Säilytys
Jos et käytä laitetta pitkään aikaan, irrota laitteen pistoke pistorasiasta,
puhdista laite (katso kappale Puhdistus) ja säilytä sitä viileässä ja kuivassa
paikassa sekä poissa suorasta auringonvalosta.
Varaosat
Harjaspää
- Vaihda Philips Sonicare -harjaspää kolmen kuukauden välein,
jotta harjaustulos säilyy hyvänä.
- Käytä vain Philips Sonicare -vaihtoharjaspäitä.
Kierrätys
- Tämä merkki tarkoittaa, että tuote kuuluu Euroopan parlamentin ja
neuvoston direktiivin 2012/19/EU soveltamisalaan (Kuva 10).
- Tämä merkki tarkoittaa, että tuote sisältää kiinteän ladattavan akun,
joka kuuluu Euroopan parlamentin ja neuvoston direktiivin
2006/66/EY soveltamisalaan ja jota ei saa hävittää tavallisen
kotitalousjätteen mukana. Poista akku tuotteesta noudattamalla
kohdassa Akun poistaminen annettuja ohjeita (Kuva 11).
- Tutustu paikalliseen sähkö- ja elektroniikkalaitteiden sekä akkujen
keräysjärjestelmään. Noudata paikallisia säädöksiä äläkä hävitä tuotetta
tai akkuja tavallisen kotitalousjätteen mukana. Vanhojen tuotteiden ja
akkujen asianmukainen hävittäminen auttaa ehkäisemään ympäristölle
ja ihmisille koituvia haittavaikutuksia.
Page 40

SUOMI40
Akun poistaminen
Poista ladattavat akut ennen laitteen hävittämistä. Varmista, että akut
ovat täysin tyhjät, kun poistat ne.
Jos poistat ladattavan akun itse, tarvitset pyyhkeen tai liinan, vasaran ja
tasakantaisen ruuvitaltan. Noudata perusturvallisuusohjeita, kun toimit
seuraavien ohjeiden mukaisesti. Suojaa silmäsi, kätesi, sormesi ja
työskentelyalusta.
1 Voit purkaa akun varauksen, kun poistat rungon laturista.
Käynnistä Sonicare -hammasharja ja käytä laitetta pysähtymiseen
saakka. Toista, kunnes Philips Sonicare ei enää käynnisty.
2 Irrota ja hävitä harjaspää. Peitä runko kauttaaltaan pyyhkeellä tai
liinalla (Kuva 12).
3 Pitele rungon yläosaa yhdellä kädellä ja lyö rungon koteloa 1 cm:n
päästä rungon pohjasta. Iske vasaralla laitteen kaikille 4 puolelle,
jotta päätykansi irtoaa (Kuva 13).
Laitteen päätä on ehkä iskettävä useita kertoja,
jotta sisäiset liitokset katkeavat.
4 Irrota hammasharjan rungon päätykansi. Jos päätykansi ei irtoa
helposti kotelosta, toista vaihetta 3, kunnes päätykansi
irtoaa (Kuva 14).
5 Pidä runkoa ylösalaisin ja paina vartta kovaa alustaa vasten.
Jos laitteen sisäosat eivät irtoa helposti kotelosta, toista vaiheen
3 toimenpiteitä niin kauan, kunnes sisäosat irtoavat. (Kuva 15)
6 Irrota kuminen akkukotelon kansi (Kuva 16).
Page 41

SUOMI 41
7 Aseta ruuvitaltta akun ja sisäosien pohjassa olevan mustan kehyksen
väliin. Väännä sitten ruuvitalttaa akusta poispäin, jotta mustan
kehyksen pohja katkeaa (Kuva 17).
8 Katkaise akun ja vihreän piirilevyn välinen metallikieleke asettamalla
ruuvitaltta akun pohjan ja mustan kehyksen väliin. Näin akun pohja
irtoaa kehyksestä (Kuva 18).
9 Katkaise toinen akun metallikieleke tarttumalla akkuun ja vetämällä
se ulos tuotteen sisäosista (Kuva 19).
Varo akun kielekkeiden teräviä reunoja, jotta et vahingoita
sormiasi.
10 Peitä akun koskettimet teipillä, ettei akun jäännösvaraus aiheuta
oikosulkua. Ladattava akku on nyt valmis kierrätettäväksi.
Laitteen muut osat voidaan hävittää asianmukaisesti.
Takuu ja tuki
Jos haluat tukea tai lisätietoja, käy Philipsin verkkosivuilla osoitteessa
www.philips.com/support tai lue erillinen kansainvälinen takuulehtinen.
Takuun rajoitukset
Kansainvälinen takuu ei kata seuraavia tapauksia:
- Harjaspäät.
- Luvattomien vaihto-osien käytöstä aiheutuneet vahingot.
- Väärinkäytöstä, huolimattomuudesta, laitteen muokkaamisesta tai
luvattomasta korjaamisesta johtuvat vahingot.
- Normaalista käytöstä ja kulumisesta aiheutunutta huonontumista,
mukaan lukien halkeaminen, naarmuuntuminen, kuluminen,
likaantuminen tai värien haalistuminen.
Page 42

42 NORSK
Innledning
Gratulerer med kjøpet og velkommen til Philips!
Du får best mulig nytte av støtten som Philips tilbyr, hvis du registrerer
produktet ditt på www.philips.com/welcome.
Viktig
Les denne brukerveiledningen nøye før du bruker
apparatet, og ta vare på den for senere referanse.
Fare
- Hold laderen unna vann. Ikke plasser eller
oppbevar den i nærheten av eller over badekar,
vask, oppvaskkum, e.l. fylt med vann. Laderen må
ikke senkes ned i vann eller annen væske.
Etter rengjøring må du kontrollere at laderen er
helt tørr før du setter støpselet i stikkontakten.
Advarsel
- Nettledningen kan ikke byttes. Hvis ledningen blir
ødelagt, må du kaste laderen.
- Erstatt alltid laderen med en original type for
å unngå farlige situasjoner.
- Ikke bruk laderen utendørs eller i nærheten av
oppvarmede overater.
- Hvis apparatet er skadet på noen måte
(børstehode, tannbørstehåndtak eller lader),
må du slutte å bruke det. Dette apparatet
inneholder ingen utskiftbare deler. Hvis apparatet
er ødelagt, må du ta kontakt med forbrukerstøtte
der du bor (se avsnittet Garanti og service).
Page 43

NORSK 43
- Dette apparatet kan brukes av barn over åtte år.
Personer med nedsatt synsevne, fysisk eller psykisk
funksjonsevne eller personer med manglende
erfaring og kunnskap må kun bruke apparatet
dersom de får tilsyn eller instruksjoner om bruk
av apparatet på en sikker måte og forstår risikoen.
Barn skal ikke leke med apparatet. Rengjøring og
brukervedlikehold skal kun utføres av barn hvis de
er over åtte år og har tilsyn av voksne.
Forsiktig
- Ikke rengjør børstehodet, håndtaket eller laderen
i oppvaskmaskinen.
- Ta kontakt med tannlegen før du bruker
tannbørsten hvis du har hatt operasjoner
i tannkjøttet eller andre deler av munnen i løpet
av de siste to månedene.
- Ta kontakt med tannlegen din hvis du blør når du
bruker tannbørsten, eller hvis blødningen
fortsetter etter bruk i én uke. Ta også kontakt med
tannlegen din hvis du opplever ubehag eller
smerte når du bruker Sonicare-tannbørsten.
- Sonicare-tannbørsten oppfyller sikkerhetskravene
for elektromagnetiske enheter. Hvis du har
pacemaker eller en annen implantert enhet, bør
du ta kontakt med lege eller produsenten av den
implanterte enheten før bruk.
- Ta kontakt med lege før du bruker Sonicaretannbørsten hvis du har medisinske bekymringer.
Page 44

NORSK44
- Dette apparatet er utformet for rengjøring av
tenner, tannkjøtt og tunge. Ikke bruk apparatet til
noe annet formål. Slutt å bruke apparatet og
kontakt lege hvis du opplever ubehag eller smerte.
- Sonicare-tannbørsten er beregnet på personlig
tannhygiene. Den er ikke laget for bruk på ere
pasienter på et tannlegekontor eller institusjon.
- Slutt å bruke børstehodet med bøyde eller
knekte børstehår. Bytt ut børstehodet hver
tredje måned, eller oftere ved tegn på slitasje.
Ikke bruk andre børstehoder enn de som
anbefales av produsenten.
- Hvis tannkremen inneholder peroksid,
natriumkarbonat eller bikarbonat (vanlig i tannkrem
for hvitere tenner), må du rengjøre børstehodet
ordentlig med såpe og vann hver gang du har brukt
det. Slik unngår du at plasten sprekker.
Elektromagnetiske felt (EMF)
Dette Philips apparatet overholder alle aktuelle standarder og forskrifter
for eksponering for elektromagnetiske felt.
Page 45

NORSK 45
Generell beskrivelse (g. 1)
1 Hygienisk reisedeksel
2 Børstehode
3 Håndtak
4 Av/på- og modusknapp
5 Indikator for intensitetsnivå
6 Knapp for intensitetsnivå (+ og -)
7 Modusindikator
8 Batterinivåindikator
9 Lader
Merk: Innholdet i esken kan variere basert på modellen du kjøper.
Før bruk
Sette på børstehodet
1 Sett fronten på børstehodet slik at børstehårene vender mot
fronten på håndtaket. (g. 2)
2 Trykk børstehodet hardt ned på metallstangen til det stopper.
Merk: Philips Sonicare-børstehodene har påtrykte ikoner, slik at det blir
enklere å identisere børstehodet ditt.
Lade apparatet
1 Sett støpselet på laderen inn i en stikkontakt.
2 Plasser håndtaket på laderen (g. 3)
, Det blinkende lyset på batteriindikatoren viser at tannbørsten
lades opp.
Merk: Det kan ta opptil 48 timer å lade batteriet helt opp, men Philips
Sonicare-tannbørsten kan brukes før den er fulladet.
Page 46

NORSK46
Bruke apparatet
Pusseinstruksjoner
1 Skyll børstehårene og ta på litt tannkrem.
2 Plasser tannbørstehårene mot tennene med en liten vinkel
(45 grader), og trykk godt slik at børstehårene kommer mot
tannkjøttet eller litt under tannkjøttet. (g. 4)
Merk: Hold midten av børsten inntil tennene til enhver tid.
3 Trykk på av/på- og modusknappen for å slå på
Philips Sonicare-tannbørsten.
4 For best mulig resultat trykker du lett og lar Philips
Sonicare-tannbørsten gjøre jobben for deg. Ikke skrubb.
5 Beveg børstehodet sakte og forsiktig over tennene med små
frem-og-tilbake-bevegelser, slik at de lengre børstehårene kommer
til mellom tennene. Fortsett denne bevegelsen gjennom hele
pusseøkten.
6 For å rengjøre baksiden av fortennene må du vippe
børstehåndtaket nesten helt opp og børste hver tann ere ganger
vertikalt (g. 5).
Merk: Del munnen inn i re soner for å være sikker på at du pusser jevnt
i hele munnen, ved å bruke Quadpacer-funksjonen (se avsnittet Funksjoner).
7 Puss hver del i 30 sekunder slik at du har en total pussetid på to
minutter. Begynn med del 1 (utsiden av tennene oppe), og puss
deretter del 2 (innsiden av tennene oppe). Fortsett med del
3 (utsiden av tennene nede), og avslutt med del 4 (innsiden av
tennene nede) (g. 6).
8 Når du har fullført pusseøkten, kan du bruke litt ekstra tid på
å pusse tyggeatene på tennene og områder hvor det forekommer
ekker på tennene. Du kan også pusse tungen med tannbørsten av
eller på etter hva du foretrekker (g. 7).
Page 47

NORSK 47
Philips Sonicare-tannbørsten er trygg å bruke på:
- tannregulering (børstehodene slites fortere ut når de brukes
på regulering)
- rekonstruerte tenner (fyllinger, kroner, skallfasetter)
Merk: Pass på at tannregulering eller rekonstruerte tenner er riktig påsatt og
uten feil. Hvis ikke kan tannregulering eller rekonstruerte tenner skades når
de kommer i kontakt med børstehodet.
Merk: Når du bruker Philips Sonicare-tannbørsten i kliniske studier,
må den 2 minutter lange standardmodusen Clean med høy intensitet velges.
Håndtaket bør være fulladet, og Easy-start-funksjonen må være deaktivert.
Pussemodi
Rengjøringsmodus
Det ultimate innen fjerning av plakk (standardmodus).
Hvit-modus
Til å gjøre tennene hvitere og polerere fortennene.
1 Trykk på av/på- og modusknappen for å slå på Philips
Sonicare-tannbørsten.
2 Trykk på av/på- og modusknappen igjen før det har gått
2,5 sekunder, for å bytte til hvit-modus.
3 Trykk på av/på- og modusknappen etter 2,5 sekunder for
å midlertidig stoppe Philips Sonicare-tannbørsten.
Intensitetsnivåer
- Lav: 1 lampe lyser
- Middels: 2 lamper lyser
- Høy: 3 lamper lyser
Merk: For å justere intensitetsnivået til det neste høyere eller lavere nivået
kan du trykke på plussknappen for intensitetsnivå for å øke intensiteten eller
minusknappen for intensitetsnivå for å redusere intensiteten når som helst
under økten.
Page 48

NORSK48
Batteristatus (når håndtaket ikke er på laderen)
- En blinkende gul indikator for batterinivå viser lavt batterinivå.
- En blinkende grønn indikator for batterinivå viser middels batterinivå.
- En lysende grønn indikator for batterinivå viser høyt batterinivå.
Merk: Hvis du hører fem pip og indikatoren for batterinivå blinker gult, må du
lade batteriet. Når batteriet er helt tomt, blir Philips Sonicare-tannbørsten
slått av. Sett Philips Sonicare-tannbørsten i laderen for å lade den (g. 3).
Merk: Hvis du vil holde batteriet fulladet til enhver tid, kan du ha Philips
Sonicare-tannbørsten på laderen når du ikke bruker den.
Funksjoner
Smartimer
Smartimer indikerer at pusseøkten er fullført ved at den automatisk slår
av tannbørsten mot slutten av økten.
Tannspesialister anbefaler å pusse tennene minimum to minutter to
ganger daglig.
Easy-start
- Easy-star t-funksjonen øker gradvis børstekraften i løpet av de første
14 pusseøktene, slik at du skal bli vant til å pusse tennene med Philips
Sonicare-tannbørsten.
- Denne Philips Sonicare-tannbørsten leveres med
Easy-start-funksjonen deaktivert.
Slik aktiverer eller deaktiverer du Easy-start-funksjonen:
Sett håndtaket i en tilkoblet lader.
- Aktivere Easy-star t:
Hold av/på- og modusknappen inne i to sekunder. Du vil høre to pip,
og indikatoren for batterinivå lyser grønt. Dette indikerer at
Easy-start-funksjonen er aktivert.
- Deaktivere Easy-star t:
Hold av/på- og modusknappen inne i to sekunder. Du vil høre ett pip,
og indikatoren for batterinivå lyser gult. Dette indikerer at
Easy-start-funksjonen er deaktivert.
Page 49

NORSK 49
Merk: Hver av de 14 første pusseøktene må vare i minst ett minutt for at
Easy-start-syklusen skal trappe opp økten på riktig måte.
Merk: Det anbefales ikke å bruke Easy-start-funksjonen utover de første
pusseøktene, da det kan redusere Philips Sonicare-tannbørstens evne til
å fjerne plakk.
Quadpacer
- Quadpacer er en inter valltimer som bruker et kort pip og pause til
å minne deg på å pusse de re sonene i munnen grundig. Quadpacer
piper ved forskjellige intervaller i løpet av pussesyklusen avhengig av
pussemodusen du har valgt (g. 6).
Slik aktiverer eller deaktiverer du Quadpacer-funksjonen:
Sett håndtaket i en tilkoblet lader.
- For å aktivere Quadpacer : Hold minusknappen for intensitetsnivå inne
i to sekunder. Du vil høre to pip, og indikatoren for batterinivå lyser
grønt. Dette indikerer at Quadpacer-funksjonen er aktivert.
- For å deaktivere Quadpacer : Hold minusknappen for intensitetsnivå
inne i to sekunder. Du vil høre ett pip, og indikatoren for batterinivå
lyser gult. Dette indikerer at Quadpacer-funksjonen er deaktivert.
Ladebekreftelse
Når funksjonen for ladebekreftelse er aktivert, piper og vibrerer håndtaket
raskt når det plasseres på ladebasen. Denne Philips Sonicare-modellen
leveres med funksjonen for ladebekreftelse deaktivert.
Slik aktiverer eller deaktiverer du funksjonen for
ladebekreftelse:
Plasser håndtaket på laderen
- For å aktivere ladebekreftelse: Hold plussknappen for intensitetsnivå
inne i to sekunder. Du vil høre to pip, og indikatoren for batterinivå
lyser grønt to ganger. Dette indikerer at funksjonen for ladebekreftelse
er aktivert.
- For å deaktivere ladebekreftelse: Hold plussknappen for intensitetsnivå
inne i to sekunder. Du vil høre ett pip, og indikatoren for batterinivå
lyser gult én gang. Dette indikerer at funksjonen for ladebekreftelse er
deaktivert.
Page 50

NORSK50
Rengjøring
Philips Sonicare-tannbørsten bør rengjøres regelmessig for å fjerne
tannkrem og andre rester. Hvis du ikke rengjør Philips Sonicaretannbørsten, kan den være uhygienisk å bruke, og den kan bli skadet.
Ikke rengjør børstehodene, håndtaket eller laderen i oppvaskmaskinen.
Tannbørstehåndtak
1 Ta av børstehodet, og skyll metallstangen i varmt vann.
Pass på å fjerne tannkremrester (g. 8).
Ikke bruk skarpe gjenstander mot gummiforseglingen på metallstangen.
Den kan bli ødelagt.
2 Tørk hele overaten på håndtaket med en fuktig klut.
Børstehode
1 Skyll børstehodet og -hårene hver gang du har brukt
apparatet (g. 9).
2 Fjern børstehodet fra håndtaket, og skyll koblingen mellom
børstehodet og håndtaket med varmt vann minst én gang i uken.
Lader
1 Trekk ut støpslet før du rengjør laderen.
2 Tørk hele overaten på laderen med en fuktig klut.
Pass på å fjerne tannkrem eller andre rester fra laderen.
Oppbevaring
Hvis du ikke skal bruke produktet på en stund, kan du dra ut støpselet,
rengjøre det (se avsnittet Rengjøring), og oppbevare det på et kaldt,
tørt sted utenfor direkte sollys.
Page 51

NORSK 51
Utskiftning
Børstehode
- Bytt Philips Sonicare-børstehoder hver tredje måned for å få
optimale resultater.
- Bruk kun Philips Sonicare utskiftbare børstehoder.
Resirkulering
- Dette symbolet på et produkt betyr at produktet omfattes av
EU-direktiv 2012/19/EU (g. 10).
- Dette symbolet betyr at produktet inneholder et innebygd
oppladbart batteri som omfattes av EU-direktiv 2006/66/EF og som
ikke kan deponeres i vanlig husholdningsavfall. Følg instruksjonene i
avsnittet Fjerne det oppladbare batteriet for å fjerne batteriet (g. 11).
- Gjør deg kjent med lokale innsamlingsordninger for elektriske
og elektroniske produkter og oppladbare batterier. Følg lokale
bestemmelser, og kast aldri produktet og de oppladbare batteriene
som vanlig restavfall. Riktig deponering av gamle produkter og
oppladbare batterier bidrar til å forhindre negative konsekvenser for
helse og miljø.
Fjerne det oppladbare batteriet
Det oppladbare batteriet skal bare tas ut når du kaster apparatet.
Kontroller at batteriet er helt utladet når du fjerner det.
Hvis du vil fjerne det oppladbare batteriet, trenger du et håndkle eller et
tøystykke, en hammer og en at (vanlig) skrutrekker. Følg
sikkerhetsreglene når du følger fremgangsmåten nedenfor. Husk å
beskytte øynene, hendene, ngrene og overaten som du arbeider på.
1 Hvis du vil tømme det oppladbare batteriet for strøm, tar du
håndtaket ut av laderen, slår på Philips Sonicare-tannbørsten og lar
den gå til den stopper. Gjenta dette trinnet til du ikke lenger kan slå
på Philips Sonicare-tannbørsten.
2 Fjern og kast børstehodet. Dekk til hele håndtaket med et håndkle
eller en klut (g. 12).
Page 52

NORSK52
3 Hold øverst på håndtaket med én hånd, og slå mot håndtaket
1 cm over den nederste enden. Slå med en hammer mot alle re
sider for å løse endedekslet (g. 13).
Det kan hende at du må slå mot enden ere ganger for
å løsne festene på innsiden.
4 Ta av endedekslet på tannbørstehåndtaket. Hvis endedekslet ikke
løsner, gjentar du trinn 3 helt til du får det av (g. 14).
5 Hold håndtaket opp ned, og trykk stangen ned mot en hard
overate. Hvis de indre komponentene ikke løsner, gjentar du trinn
3 helt til du får dem ut. (g. 15)
6 Fjern gummidekselet på batterirommet (g. 16).
7 Kil fast skrutrekkeren mellom batteriet og den svarte rammen
nederst i komponentene. Deretter presser du skrutrekkeren unna
batteriet for å bryte den nederste delen av den svarte
rammen (g. 17).
8 Sett skrutrekkeren inn mellom den nederste delen av batteriet og
den svarte rammen for å bryte metallkoblingen mellom batteriet og
det grønne kretskortet. Da løsner den nederste delen av batteriet
fra rammen (g. 18).
9 Ta tak i batteriet, og dra det unna de indre komponentene for
å bryte den andre metallkoblingen til batteriet (g. 19).
Pass på at du ikke skader ngrene dine på de skarpe kantene
på batteritappene.
10 Dekk til batterikontaktene med teip for å unngå elektrisk
kortslutning fra gjenværende batteristrøm. Det oppladbare batteriet
kan nå bli resirkulert, og resten av produktet kan bli kastet.
Page 53

NORSK 53
Garanti og støtte
Hvis du trenger kundestøtte eller informasjon, kan du gå til
www.philips.com/support eller lese i garantiheftet.
Begrensninger i garantien
Følgende dekkes ikke av vilkårene i den internasjonale garantien:
- Børstehoder.
- Skader som følge av bruk av uautorisert reser vedeler.
- Skade forårsaket av misbruk, mislighold, forsømmelse, endringer eller
uautorisert reparasjon.
- Normal slitasje, inkludert avskalling, riper, avsliping, misfarging eller
falming.
Page 54

SVENSKA54
Introduktion
Grattis till inköpet och välkommen till Philips!
För att dra maximal nytta av den support som Philips erbjuder kan du
registrera din produkt på www.philips.com/welcome.
Viktigt
Läs användarhandboken noggrant innan du använder
apparaten och spara den för framtida bruk.
Fara
- Låt inte laddaren komma i kontakt med vatten.
Placera eller förvara den inte över eller nära
vatten i badkar, handfat, vask eller dylikt.
Sänk inte ned laddaren i vatten eller någon annan
vätska. Kontrollera att laddaren är helt torr efter
rengöring innan du ansluter den till elnätet.
Varning
- Nätsladden får inte bytas ut.
Om nätsladden skadas ska du kassera laddaren.
- Laddaren ska alltid ersättas med en
originalprodukt för att farliga situationer inte ska
uppstå.
- Använd inte laddaren utomhus eller i närheten
av uppvärmda ytor.
- Om apparaten är skadad (borsthuvudet,
tandborsthandtaget eller laddaren) ska du inte
använda den. Den här apparaten består inte av
några delar som kan repareras.
Om apparaten är skadad kontaktar du kundtjänst i
ditt land (se kapitlet ”Garanti och service”).
Page 55

SVENSKA 55
- Den här apparaten kan användas av barn från
8 års ålder, personer med nedsatt fysisk, sensorisk
och psykisk förmåga, samt av personer som inte
har kunskap om apparaten såvida det sker under
tillsyn eller om de har informerats om hur
apparaten används på ett säkert sätt och förstår
eventuella risker. Barn får inte leka med apparaten.
Barn under 8 år får inte rengöra eller underhålla
apparaten utan överinseende av en vuxen.
Försiktighet
- Diska inte borsthuvudet, handtaget eller laddaren
i diskmaskin.
- Om du har genomgått operation i munnen eller
tandköttet de senaste två månaderna ska du
rådgöra med din tandläkare innan du använder
tandborsten.
- Rådfråga tandläkaren om överdriven blödning
förekommer efter användning av den här
tandborsten eller om blödning fortsätter att
uppkomma efter 1 veckas användning.
Rådfråga också tandläkaren om du upplever
obehag eller smärta när du använder Sonicare.
- Sonicare-tandborsten uppfyller
säkerhetsstandarderna för elektromagnetiska
enheter. Om du har en pacemaker eller någon
annan implanterad enhet bör du rådgöra med din
läkare eller tillverkaren av den implanterade
enheten före användning.
Page 56

SVENSKA56
- Om du genomgår medicinsk behandling bör du
rådfråga läkare innan du använder Sonicare.
- Den här tandborsten är endast avsedd för
rengöring av tänder, tandkött och tunga.
Använd den inte till något annat ändamål.
Sluta använda produkten och kontakta läkare om
du upplever obehag eller smärta.
- Tandborsten Sonicare är avsedd för egenvård och
inte för att användas på era patienter på en
tandläkarmottagning eller -klinik.
- Sluta använda ett borsthuvud som har skadade
eller böjda borst. Byt ut borsthuvudet var tredje
månad eller oftare om det ser slitet ut.
Använd inga borsthuvuden som inte har
rekommenderats av tillverkaren.
- Om tandkrämen innehåller peroxid,
natriumbikarbonat eller bikarbonat
(vanligt i blekande tandkrämer) rengör du
borsthuvudet noggrant med tvål och vatten efter
varje användning. På så sätt förhindrar du att
sprickor uppstår i plasten.
Elektromagnetiska fält (EMF)
Den här Philips-produkten uppfyller alla tillämpliga standarder och regler
gällande exponering av elektromagnetiska fält.
Page 57

SVENSKA 57
Allmän beskrivning (Bild 1)
1 Hygieniskt reseskydd
2 Borsthuvud
3 Handtag
4 På/av- och lägesknapp
5 Intensitetsnivåindikator
6 Intensitetsnivåknapp (+ och -)
7 Lägesindikator
8 Indikator för batterinivå
9 Laddare
Obs! Innehållet i förpackningen kan variera beroende på modellen.
Förberedelser inför användning
Sätta fast borsthuvudet
1 Rikta in borsthuvudet så att borsten är vända mot handtagets
framsida. (Bild 2)
2 Tryck sedan ned borsthuvudet ordentligt på metallskaftet tills det
tar stopp.
Obs! Philips Sonicare-borsthuvuden är märkta med ikoner för att det ska
vara lätt att identiera borsthuvudet.
Ladda apparaten
1 Sätt laddarens kontakt i ett vägguttag.
2 Placera handtaget i laddaren (Bild 3).
, Den blinkande lampan på batterinivåindikatorn anger att
tandborsten laddas.
Obs! Det kan ta upp till 48 timmar att ladda batteriet helt, men du kan
använda Philips Sonicare innan batteriet är fulladdat.
Page 58

SVENSKA58
Använda apparaten
Borstningsanvisningar
1 Fukta borsten och applicera en liten mängd tandkräm.
2 Placera tandborsten mot tänderna i en liten vinkel (45 grader) och
tryck ordentligt så att borsten kommer åt tandköttskanten eller
precis under tandköttskanten. (Bild 4)
Obs! Låt tandborstens mittdel vara i kontakt med tänderna hela tiden.
3 Slå på Philips Sonicare genom att trycka på på/av- och lägesknappen.
4 För att uppnå maximal effekt bör du endast trycka lätt och låta
Philips Sonicare-tandborsten utföra jobbet. Gnugga inte.
5 För borsthuvudet försiktigt fram och tillbaka över tänderna så att
de längre borsten kommer åt mellan tänderna. Fortsätt den här
rörelsen under hela borstningen.
6 För att rengöra framtändernas insida vinklar du borsthandtaget
halvt upprätt och tar era vertikala överlappande borstdrag på
varje tand (Bild 5).
Obs! Försäkra dig om att du borstar jämnt i hela munnen genom att
dela in munnen i fyra delar med hjälp av Quadpacer-funktionen
(se kapitlet Funktioner).
7 Borsta varje del i 30 sekunder vilket blir totalt två minuter.
Börja med del 1 (överkäkens utsida), borsta sedan del 2
(överkäkens insida). Fortsätt med del 3 (underkäkens utsida) och
borsta slutligen del 4 (underkäkens insida) (Bild 6).
8 När du har avslutat borstningen kan du lägga till ytterligare tid och
borsta tändernas tuggytor och områden med äckar. Du kan även
borsta tungan med tandborsten på- eller avslagen (Bild 7).
Page 59
SVENSKA 59
Det går bra att använda Philips Sonicare på:
- Tandställning (borsthuvuden slits ut snabbare när de används
på tandställning).
- Lagningar (fyllningar, kronor, skalfasader)
Obs! Följ alltid anvisningarna för tandställningar och lagningar.
Annars kan tandställningar och lagningar skadas när de kommer i kontakt
med borsthuvudet.
Obs! När Philips Sonicare används i kliniska studier måste läget för
standardrengöring med hög intensitet på 2 minuter väljas. Handtaget
behöver vara helt laddat och Easy Start-funktionen måste avaktiveras.
Borstningslägen
Rengöringsläge (Clean)
Det ultimata sättet att ta bort plack (standardläge).
Vitt läge
För att bleka och polera framtänderna.
1 Slå på Philips Sonicare genom att trycka på på/av- och lägesknappen.
2 Tryck på på/av- och lägesknappen igen inom 2,5 sekunder för att
växla till vitt läge.
3 Tryck på på/av- och lägesknappen efter 2,5 sekunder för att göra en
paus i Philips Sonicare.
Intensitetsnivåer
- Låg: 1 LED-lampa
- Medel: 2 LED-lampor
- Hög: 3 LED-lampor
Obs! För att justera intensitetsnivån till en högre eller lägre nivå kan du
trycka på knappen + för att öka intensiteten eller på knappen – för att
minska intensiteten under borstningen.
Page 60

SVENSKA60
Batteristatus (när handtaget inte är i laddaren)
- Den blinkande gula batterinivåindikatorn anger att batteriet har
laddats till en låg nivå.
- Den blinkande gröna batterinivåindikatorn anger att batteriet har
laddats till medelnivå.
-
Den fasta gröna batterinivåindikatorn anger att batteriet har laddats helt.
Obs! Om du hör fem pip och batterinivåindikatorn blinkar gult innebär det
att du måste ladda batteriet. När batteriet är helt tomt stängs Philips
Sonicare av. Placera Philips Sonicare i laddaren för att ladda den (Bild 3).
Obs! För att batteriet alltid ska vara fulladdat, kan du låta Philips Sonicare
stå i laddaren när du inte använder den.
Funktioner
Smartimer
Smartimer-funktionen anger att borstningsperioden är slut genom att
automatiskt stänga av tandborsten i slutet av perioden.
Tandspecialister rekommenderar att tänderna borstas minst två minuter
två gånger dagligen.
Easy-start
- Med Easy-star t-funktionen ökas borstningskraften långsamt under de
14 första borstningstillfällena så att du vänjer dig vid att använda
Philips Sonicare.
- Den här Philips Sonicare-modellen levereras med Easy-start-
funktionen avaktiverad.
Page 61

SVENSKA 61
Aktivera eller avaktivera Easy-start-funktionen:
Placera handtaget i den anslutna laddaren.
- Aktivera Easy-start:
Håll ned på/av- och lägesknappen i två sekunder.
Då hörs två pip och batterinivåindikatorn blinkar grönt.
Det innebär att Easy-start-funktionen har aktiverats.
- Avaktivera Easy-start:
Håll ned på/av- och lägesknappen i två sekunder.
Då hörs ett pip och batterinivåindikatorn blinkar gult.
Det innebär att Easy-start-funktionen har avaktiverats.
Obs! De 14 första borstningarna måste vara i minst en minut vardera för att
stegringen av borstningskraften vid Easy-start ska kunna genomföras.
Obs! Vi rekommenderar att du bara använder Easy-start-funktionen under
den inledande stegringsperioden. Annars minskas Philips Sonicaretandborstens förmåga att effektivt avlägsna plack.
quadpacer
- Quadpacer är en inter valltimer med ett kort pipljud och en paus som
påminner dig om att borsta alla de fyra delarna av munnen noggrant.
Beroende på vilket borstningsläge du har valt piper Quadpacer vid
olika intervaller under borstningen (Bild 6).
Aktivera eller avaktivera Quadpacer-funktionen:
Placera handtaget i den anslutna laddaren.
- Aktivera Quadpacer: Håll ned intensitetsnivåknappen ned (-) i två
sekunder. Då hörs två pip och batterinivåindikatorn blinkar grönt.
Det innebär att Quadpacer-funktionen har aktiverats.
- Avaktivera Quadpacer : Håll ned intensitetsnivåknappen ned (-) i två
sekunder. Då hörs ett pip och batterinivåindikatorn blinkar gult.
Det innebär att Quadpacer-funktionen har avaktiverats.
Laddningsbekräftelse
När laddningsbekräftelsefunktionen är aktiverad piper handtaget och
vibrerar kort när den ställs på laddarens basenhet. Philips Sonicaremodellen levereras med laddningsbekräftelsefunktionen avaktiverad.
Page 62

SVENSKA62
Aktivera eller avaktivera laddningsbekräftelsefunktionen:
Placera handtaget i laddaren.
- Aktivera laddningsbekräftelse: Håll ned intensitetsnivåknappen upp
(+) i två sekunder. Då hörs två pip och batterinivåindikatorn blinkar
grönt två gånger. Det innebär att laddningsbekräftelsefunktionen har
aktiverats.
- Avaktivera laddningsbekräftelse: Håll ned intensitetsnivåknappen upp
(+) i två sekunder. Då hörs ett pip och batterinivåindikatorn blinkar
gult en gång. Det innebär att laddningsbekräftelsefunktionen har
avaktiverats.
Rengöring
Philips Sonicare bör rengöras regelbundet för att ta bort tandkräm och
andra rester. Om Philips Sonicare inte rengörs kan det resultera i en
ohygienisk produkt och skada kan uppstå.
Diska inte borsthuvudena, handtaget eller laddaren i diskmaskin.
Tandborsthandtag
1 Ta loss borsthuvudet och skölj metallskaftet med varmt vatten.
Se till att du tar bort eventuella tandkrämsrester (Bild 8).
Tryck inte vassa föremål mot gummiförslutningen på metallskaftet,
eftersom det kan orsaka skada.
2 Torka av hela handtagets yta med en fuktig trasa.
Borsthuvud
1 Skölj borsthuvudet och borsten efter varje användning (Bild 9).
2 Ta loss borsthuvudet från handtaget och skölj
borsthuvudanslutningen med varmt vatten minst en gång i veckan.
Page 63

SVENSKA 63
Laddare
1 Dra ur nätsladden innan du rengör laddaren.
2 Torka av laddaren med en fuktig trasa. Ta bort tandkräm och andra
rester från laddaren.
Förvaring
Om du inte ska använda produkten under en längre tid kopplar du från
den, rengör den (se kapitlet “Rengöring”) och förvarar den på en sval och
torr plats där den inte utsätts för direkt solljus.
Byten
Borsthuvud
- Bäst resultat får du om du byter ut borsthuvudet på Philips Sonicare
var tredje månad.
- Använd bara Philips Sonicare-borsthuvuden.
Återvinning
- Den här symbolen innebär att produkten omfattas av
EU-direktivet 2012/19/EU (Bild 10).
- Den här symbolen innebär att produkten innehåller ett inbyggt
laddningsbart batteri som omfattas av EU-direktivet 2006/66/EG och
inte får slängas bland hushållssoporna. Ta ut batteriet enligt
instruktionerna i avsnittet ”Ta ut det laddningsbara batteriet” (Bild 11).
- Hitta närmaste återvinningsstation för elektriska och elektroniska
produkter och laddningsbara batterier. Följ de lokala bestämmelserna
och släng aldrig produkten eller de laddningsbara batterierna bland
normalt hushållsavfall. Korrekt kassering av gamla produkter och
laddningsbara batterier bidrar till att förhindra negativ påverkan på
miljö och hälsa.
Page 64

SVENSKA64
Ta ut det laddningsbara batteriet
Ta endast ur det laddningsbara batteriet när du ska slänga apparaten. Se
till att batteriet är helt urladdat när du tar ur det.
Du behöver en handduk eller trasa, en hammare och en platt skruvmejsel
(standard) för att ta ur det laddningsbara batteriet. Vidta allmänna
säkerhetsåtgärder när du följer anvisningarna nedan. Se till att skydda
ögon, händer, ngrar och det underlag som du använder.
1 L
adda ur batteriet genom att ta loss handtaget från laddaren,
slå på Philips Sonicare och låt den vara igång tills den stannar.
Gör om samma sak tills det inte längre går att slå på Philips Sonicare.
2 Ta bort och kasta borsthuvudet. Täck hela handtaget med en
handduk eller trasa (Bild 12).
3 Håll i den övre delen av handtaget med en hand och slå på
handtagets hölje ungefär 1 cm ovanför den nedre änden. Slå hårt
med en hammare på alla fyra sidor för att lossa ändlocket (Bild 13).
Du kan behöva slå mot den nedre änden era gånger för att
få loss snäpphållarna inuti.
4 Ta bort ändskyddet från tandborstens handtag. Om ändlocket inte
släpper lätt från höljet upprepar du steg 3 tills ändlocket
lossar (Bild 14).
5 Håll handtaget upp och ned och tryck skaftet mot en hård yta.
Om de interna komponenterna inte släpper från höljet upprepar du
steg 3 tills de inre komponenterna lossar. (Bild 15)
6 Ta bort batteriluckan i gummi (Bild 16).
7 För in skruvmejseln mellan batteriet och den svarta ramen längst
ned i de inre komponenterna. Sedan pillar du med skruvmejseln i
riktningen bort från batteriet för att ta loss botten i den svarta
ramen (Bild 17).
Page 65

SVENSKA 65
8 För in skruvmejseln mellan botten av batteriet och den svarta
ramen för att bryta metalliken som ansluter batteriet till det gröna
kretskortet. Då lossar du botten av batteriet från ramen (Bild 18).
9 Ta tag i batteriet och dra det bort från de inbyggda komponenterna
för att bryta batteriets andra metallik (Bild 19).
Var medveten om de vassa kanterna på batteriikarna så att
du inte gör illa ngrarna.
10 Täck batterikontakterna med tejp för att förhindra eventuell
elektrisk kortslutning i återstående laddning. Det laddningsbara
batteriet kan nu återvinnas, och resten av produkten kan slängas på
lämpligt sätt.
Garanti och support
Om du behöver information eller support kan du gå till
www.philips.com/support eller läsa garantibroschyren.
Garantibegränsningar
De internationella garantivillkoren omfattar inte följande:
- Borsthuvudena.
- Skada som orsakas av användning av reservdelar som inte har
godkänts.
- Skador orsakade av felaktig användning, vanskötsel, ändringar eller
obehörig reparation.
- Normalt slitage, inklusive hack, repor, avskavning, missfärgning och
blekning.
Page 66
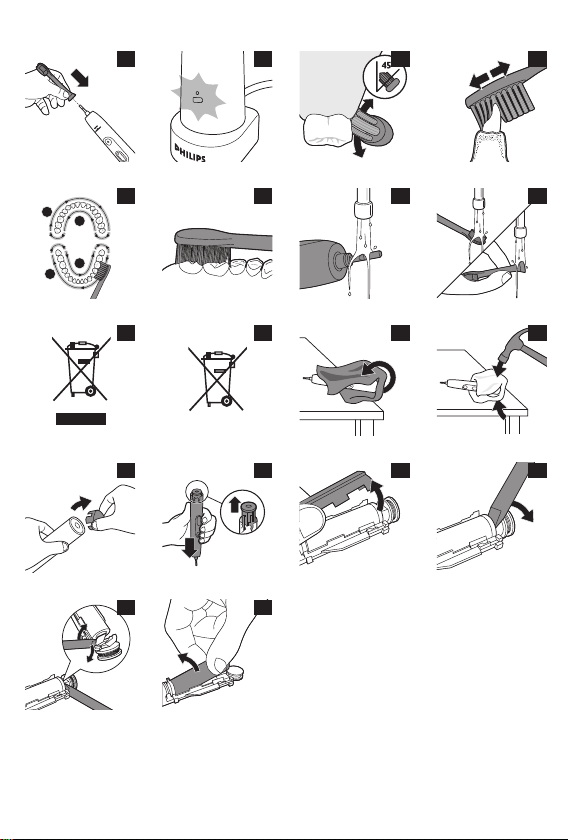
2 3 4 5
1
3
6
2
4
7 8 9
10 11 12 13
14 15 16 17
18 19
Page 67

Page 68

www.philips.com/Sonicare
©2015 Koni nklijke P hilips N .V. (KPNV). Al l rights reser ved.
Philip s and the Philip s shield are t rademarks o f KPNV.
Sonic are and the S onicare logo are t rademarks
of Phili ps Oral Healt hcare, Inc. a nd/or KPN V.
4235.020.9632.1
 Loading...