

Philips HX8424 User Manual [ru]
ProtectiveClean
6100
1
2
11
12
4
3
5
6
7
8
9
10
1


English 6
Русский 24
Қазақша
43

English
6
Important
Read this user manual carefully before you use the appliance and
save it for future reference.
Danger
-
Keep the charger away from water. Do not
place or store it over or near water
contained in a bathtub, washbasin, sink etc.
Do not immerse the charger in water or any
other liquid. After cleaning, make sure the
charger is completely dry before you
connect it to the wall socket.
Warning
-
The mains cord cannot be replaced. If the
mains cord is damaged, discard the charger.
-
Always have the charger replaced with one
of the original type in order to avoid a
hazard.
-
Do not use the charger or sanitizer outdoors
or near heated surfaces.
-
Do not operate the sanitizer where aerosol
(spray) products are being used or where
oxygen is being administered.
English

English
-
If the appliance is damaged in any way
(brush head, toothbrush handle or charger),
stop using it. This appliance contains no
serviceable parts. If the appliance is
damaged, contact the Consumer Care
Center in your country (see chapter
'Warranty and support').
-
This appliance can be used by children and
persons with reduced physical, sensory or
mental capabilities or lack of experience
and knowledge if they have been given
supervision or instruction concerning use of
the appliance in a safe way and understand
the hazards involved. Cleaning and user
maintenance shall not be made by children
without supervision.
-
Children shall not play with the appliance.
7
Caution
-
Do not clean the brush head, the handle,
the charger, the charger cover and/or the
sanitizer in the dishwasher.

English
8
-
If you have had oral or gum surgery in the
previous 2 months, consult your dentist
before you use the toothbrush.
-
Consult your dentist if excessive bleeding
occurs after using this toothbrush or if
bleeding continues to occur after 1 week of
use.Also consult your dentist if you
experience discomfort or pain when you use
the Philips Sonicare.
-
The Philips Sonicare toothbrush complies
with the safety standards for
electromagnetic devices. If you have a
pacemaker or other implanted device,
contact your physician or the device
manufacturer of the implanted device prior
to use.
-
If you have medical concerns, consult your
doctor before you use the Philips Sonicare.
-
This appliance has only been designed for
cleaning teeth, gums and tongue. Do not
use it for any other purpose. Stop using the
appliance and contact your doctor if you
experience any discomfort or pain.

English
-
The Philips Sonicare toothbrush is a
personal care device and is not intended for
use on multiple patients in a dental practice
or institution.
-
Stop using a brush head with crushed or
bent bristles. Replace the brush head every
3 months or sooner if signs of wear appear.
-
Do not use other brush heads than the ones
recommended by the manufacturer.
-
If your toothpaste contains peroxide, baking
soda or bicarbonate (common in whitening
toothpastes), thoroughly clean the brush
head with soap and water after each
use.This prevents possible cracking of the
plastic.
-
Do not insert objects into the air openings of
the sanitizer or block these air openings by
placing it on a soft surface or in a position or
location where objects will block these
openings (examples of objects: magazine,
tissue paper and hair).
9

English
10
-
The UV light bulb is hot during and
immediately after the sanitizing cycle. Do
not touch the UV light bulb when it is hot.
-
Do not operate the sanitizer without the
protective screen in place to avoid contact
with a hot bulb.
-
If the sanitizer has been used for 3
consecutive UV clean cycles (i.e. 3 times in a
row), switch it off for at least 30 minutes
before you start another UV clean cycle.
-
Discontinue use of the sanitizer if the UV
light bulb remains on when the door is
open. UV light can be harmful to the human
eye and skin. Keep the sanitizer out of the
reach of children at all times.
Electromagnetic fields (EMF)
This Philips appliance complies with all applicable standards and
regulations regarding exposure to electromagnetic fields.
Radio Equipment Directive
- Radio Equipment in this product operates at 13.56 MHz
- Maximum RF power transmitted by the Radio Equipment is
30.16dBm
- Hereby Philips declares that this appliance is in compliance with
the essential requirements and other relevant provisions of
Directive 2014/53/EU. The declaration of conformity may be
consulted at www.philips.com/support.

English
Introduction
Congratulations on your purchase and welcome to Philips! To fully
benefit from the support that Philips offers, register your product at
www.philips.com/welcome.
Intended use
Intended use
ProtectiveClean series power toothbrushes are intended to remove
adherent plaque and food debris from the teeth to reduce tooth
decay and improve and maintain oral health. ProtectiveClean series
power toothbrushes are intended for consumer home use. Use by
children should be with adult supervision.
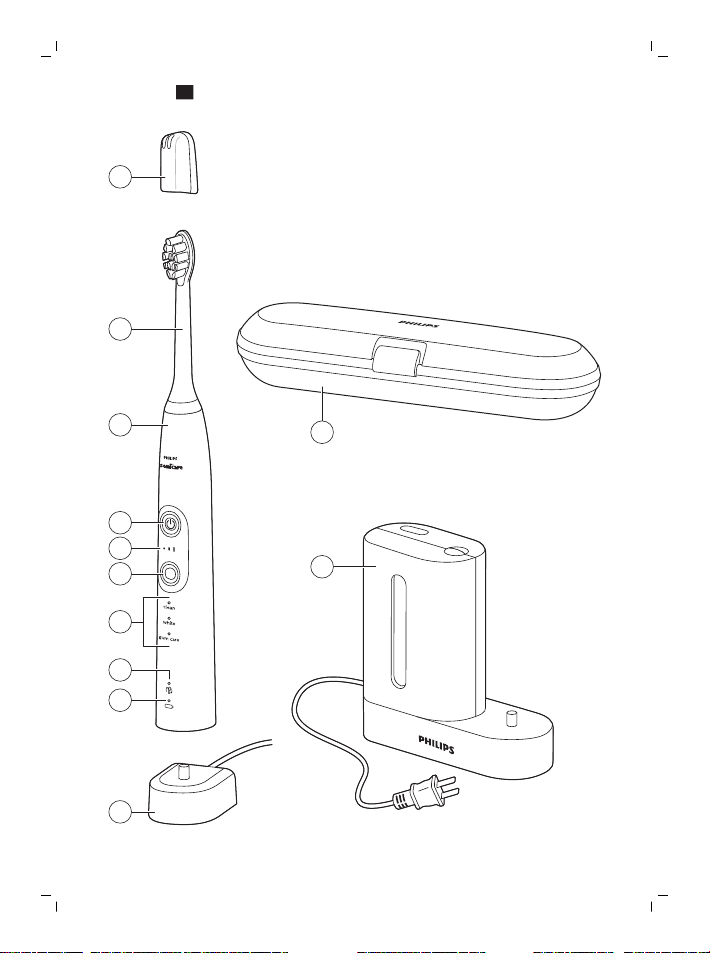
Your Philips Sonicare (Fig. 1)
1 Hygienic travel cap
2 Smart brush head(s)*
3 Handle
4 Power on/off button
5 Intensity light
6 Mode/intensity button
7 Mode light
8 Brush head replacement reminder light
9 Battery indication
10 Charging base
11 UV sanitizer with integrated charger and cord wrap (specific types
only)*
-
Not shown: UV light bulb
-
Not shown: Sanitizer drip tray
-
Not shown: Protective screen for UV light bulb
12 Travel case (specific types only)*
*Note: The content of the box may vary based on the model
purchased.
11

English
12
Brush heads
Your Philips Sonicare comes with one or more brush heads which are
designed to deliver superior results for your oral care needs.
Philips Sonicare BrushSync Technology
Your brush head(s) are enabled with BrushSync technology. This
technology enables 2 features with this toothbrush:
1 Brush head mode pairing (see 'Features and Accessories')
2 Brush head replacement reminder (see 'Features and Accessories')
This symbol indicates the brush head is equipped with BrushSync
technology. (Fig. 2)
Brushing modes
Your power toothbrush is equipped with 3 different modes to
accommodate all your oral care needs.
To change modes, press the mode/intensity button while the
toothbrush is off.
The following modes are available:
Clean mode
Clean is a 2-minute mode, recommended to be used with intensity
level 3. It gives you a thorough and complete clean and is
recommended to be used with the C2 Optimal Plaque Control brush
head.
White mode
White is a 2-minute 30-seconds mode, recommended to be used
with intensity level 3 and the W2 Optimal White brush head.
Gum Care mode
Gum Care is a 3-minute mode, recommended to be used with
intensity level 3 and the G2 Optimal Gum Care brush head.
Intensity settings
Your power toothbrush gives you the option to choose between 3
different intensity levels: low, medium and high. (Fig. 3) Based on the

English
brush head you attach, the intensity will be selected. The intensity
can be changed by pressing the mode/intensity button while
brushing. For optimal results it is recommended to use the
automatically selected intensity. The intensity cannot be changed as
long as the handle is powered off or paused.
Using your Philips Sonicare
Brushing instructions
1 Press the brush head onto the handle in such a way that the
bristles will face the front of the handle. (Fig. 4)
2 Firmly press the brush head down onto the metal shaft until it
stops.
Note: It is normal to see a slight gap between the brush head and
the handle.
3 Wet the bristles. (Fig. 5)
4 Apply a small amount of toothpaste on the bristles. (Fig. 6)
5 Place the toothbrush bristles against the teeth at a slight angle (45
degrees), pressing firmly to make the bristles reach the gumline or
slightly beneath the gumline. (Fig. 7) A change in vibration (and a
slight change in sound) alerts you when you apply too much
pressure while brushing.
Note: Keep the center of the brush in contact with the teeth at all
times.
6 Press the power on/off button to turn on the Philips Sonicare. (Fig.
8)
7 Gently keep the bristles placed on the teeth and in the gumline.
Brush your teeth with small back and forth motion so the bristles
reach between the teeth. (Fig. 9)
Note: The bristles should slightly flare. Do not scrub.
8 To clean the inside surfaces of the front teeth, tilt the brush handle
semi-upright and make several vertical overlapping brushing
strokes on each tooth. (Fig. 10)
13

English
14
9 To make sure you brush evenly throughout the mouth, divide the
mouth into 4 sections using the Quadpacer feature. (Fig. 11) The
quadpacer feature beeps after 30 seconds.
10 Brush for the full 2 minutes following the Quadpacer. (Fig. 12) After
2 minutes, the toothbrush will automatically shut off.
In white mode, after 2 minutes the handle will continue to brush
for 30 seconds so that you can brighten and polish your front
teeth.
In gum care mode, after 2 minutes the handle will continue to
brush for an additional minute so you can gently stimulate and
massage your gums.
- After you have completed the brushing cycle, you can spend
additional time brushing the chewing surfaces of your teeth and
areas where staining occurs. (Fig. 13)
Your Philips Sonicare toothbrush is safe to use on:
- Braces (brush heads wear out sooner when used on braces)
- Dental restorations (fillings, crowns, veneers)
Note: When the Philips Sonicare toothbrush is used in clinical studies,
it must be used in the Clean mode (for plaque and gum health claims)
or in White mode (for whitening claims) at high intensity with
EasyStart turned off.
Features
- EasyStart
- Brush head replacement reminder
- Pressure sensor
- Brush head mode pairing
- Quadpacer
EasyStart
This Philips Sonicare model comes with the EasyStart feature
deactivated. The EasyStart feature gently increases the power over
the first 14 brushings to help you get used to the brushing with the
Philips Sonicare. The EasyStart feature works in all modes.

English
To activate EasyStart see 'Activating or deactivating features'.
15
Brush head replacement reminder
Your Philips Sonicare is equipped with BrushSync technology that
tracks the wear of your brush head. (Fig. 14)
1 When attaching a new smart brush head for the first time the
brush head replacement reminder light blinks green three times.
This confirms you have a Philips brush head with BrushSync
technology.
2 Over time, based on the pressure you apply and the amount of
time used, the handle will track brush head wear in order to
determine the optimal time to change your brush head. This
feature gives you the guarantee for the best cleaning and care of
your teeth.
3 When the brush head replacement reminder light lights up amber,
you should replace your brush head.
To deactivate the brush head replacement reminder see 'Activating or
deactivating features'.
Pressure sensor
Your Philips Sonicare is equipped with an advanced sensor that
measures the pressure you apply while brushing. If you apply too
much pressure, the toothbrush will provide immediate feedback to
indicate that you need to reduce the pressure. This feedback is given
by a change in vibration and therefore brushing sensation.
To deactivate the pressure sensor see 'Activating or deactivating
features'.
Brush head mode pairing
An RFID chip inside the brush head communicates with the
toothbrush handle. When you attach a brush head, the handle
automatically recognizes the brush head and selects the right mode
and intensity level to optimize your brushing performance.
Quadpacer
The Quadpacer is an interval timer that has a short beep and pause
to remind you to brush the different sections of your mouth.

English
16
Depending on the brushing mode you have selected (see 'Brushing
modes'), the Quadpacer beeps at different intervals during the
brushing cycle.
Activating or deactivating features
You can activate or deactivate the following features of your
toothbrush:
- EasyStart
- Brush head replacement reminder
- Pressure sensor
To activate or deactivate these features, follow the instructions
below:
EasyStart
1 Put the handle on the plugged-in charger.
2 Press and hold the power on/off button while the handle remains
on the charger.
3 Keep the power on/off button pressed until you hear a single
short beep (after 2 seconds).
4 Release the power on/off button.
-
Triple tone of low-med-high means the EasyStart feature has
been activated. The brush head replacement light and battery
light will also blink green 2 times in unison to confirm activation.
-
Triple tone of high-med-low means the EasyStart feature has
been deactivated. The brush head replacement light and
battery light will also blink amber 2 times in unison to confirm
deactivation.
Note: To achieve clinical efficacy, EasyStart needs to be deactivated.
Brush head replacement reminder
1 Put the handle on the plugged-in charger.
2 Press and hold the power on/off button while the handle remains
on the charger.
3 Keep the power on/off button pressed until you hear a series of
two short beeps (after 4-5 seconds).

English
4 Release the power on/off button.
-
Triple tone of low-med-high means the Brush head
replacement reminder feature has been activated. The brush
head replacement light and battery light will also blink green 2
times in unison to confirm activation.
-
Triple tone of high-med-low means the Brush head
replacement reminder feature has been deactivated. The brush
head replacement light and battery light will also blink amber 2
times in unison to confirm deactivation.
Pressure sensor
1 Put the handle on the plugged-in charger.
2 Press and hold the power on/off button while the handle remains
on the charger.
3 Keep the power on/off button pressed until you hear a series of
three short beeps (after 6-7 seconds).
4 Release the power on/off button.
-
Triple tone of low-med-high means the pressure sensor feature
has been activated. The brush head replacement light and
battery light will also blink green 2 times in unison to confirm
activation.
-
Triple tone of high-med-low means the pressure sensor feature
has been deactivated. The brush head replacement light and
battery light will also blink amber 1 time in unison to confirm
deactivation.
17
If you continue holding the power on/off button after the three short
beeps, the activate/deactivate sequence repeats.
Battery status and charging
1 Put the plug of the charger in an electrical outlet.
2 Place the handle on the charger.
-
The charger will emit 2 short beeps to confirm that the handle is
placed properly.

English
18
-
The flashing light of the battery level indicator shows that the
toothbrush is charging.
-
When handle is fully charged on the charger, the battery light
shows solid green for 30 seconds and switches off.
Note: Your toothbrush comes pre-charged for first use. After first use,
charge for at least 24 hours.
Battery status (when handle is not on charger)
When removing the Philips Sonicare from the charger, the battery
light at the bottom of the toothbrush will indicate the status of the
battery life.
- Solid green LED: full battery
- Flashing green LED: medium battery
- Flashing amber LED and three beeps: low battery
- Flashing amber LED and two sets of five beeps: No brushing
sessions left (charge toothbrush)
Sanitizing
- With the UV sanitizer you can clean your brush head after every
use (Fig. 15).
Unplug the sanitizer, discontinue use and call Consumer Care if:
- The UV light bulb remains on when the door is open.
- The window is broken or missing from the sanitizer.
- The sanitizer gives off smoke or a burning smell while it is
operating.
Note: UV light can be harmful to the human eye and skin. This device
should be kept out of reach of children at all times.
1 After brushing, rinse the brush head and shake off excess water.
Warning: Do not place the travel cap on the brush head
during sanitization.
2 Place your finger in the door recess on top of the sanitizer and pull
open the door (Fig. 16).
3 Place the brush head on one of the 2 pegs in the sanitizer with the
bristles facing the light bulb (Fig. 17).

English
Note: Only clean Philips Sonicare snap-on brush heads in the
sanitizer.
Note: The Philips Sonicare for Kids brush head wears and
degrades in the UV sanitizer. You have to check and replace your
child's brush more frequently than regular Philips Sonicare brush
heads (See chapter 'Replacement').
4 Make sure the sanitizer is plugged into a live outlet of appropriate
voltage.
5 Close the door and press the green power on/off button once to
select the UV clean cycle.
Note: You can only turn on the sanitizer if the door is properly
closed.
Note: The sanitizer stops if you open the door during the sanitizing
cycle.
Note: The sanitizer cycle runs for 10 minutes and then
automatically shuts off.
-
The sanitizer is in operation when the light glows through the
window.
Cleaning
Note: Do not clean the brush head, handle or travel case in the
dishwasher.
Toothbrush handle
1 Remove the brush head and rinse the metal shaft area with warm
water. Make sure you remove any residual toothpaste (Fig. 18).
Note: Do not push on the rubber seal on the metal shaft with
sharp objects, as this may cause damage.
2 Wipe the entire surface of the handle with a damp cloth.
Note: Do not use isopropyl rubbing alcohol, vinegar or bleach to
clean handle as this may cause discoloration.
Brush head
1 Rinse the brush head and bristles after each use (Fig. 19).
2 Remove the brush head from the handle and rinse the brush head
connection with warm water at least once a week.
19

English
20
Charger
1 Unplug the charger before you clean it.
2 Wipe the surface of the charger with a damp cloth. (Fig. 20)
Sanitizer
Warning: Do not immerse the sanitizer in water or rinse it
under the faucet.
Warning: Do not clean the sanitizer when the UV light bulb is
hot.
For optimal effectiveness, it is recommended to clean your sanitizer
weekly.
1 Unplug the sanitizer.
2 Pull the drip tray straight out. Rinse the drip tray and wipe it clean
with a damp cloth (Fig. 21).
3 Clean all interior surfaces with a damp cloth.
4 Remove the protective screen in front of the UV light bulb (Fig. 22).
To remove the screen, grasp the edges next to the snaps, gently
squeeze and pull out the protective screen.
5 Remove the UV light bulb.
To remove the light bulb, grasp it and pull it out of the metal clasp.
6 Clean the protective screen and the UV light bulb with a damp
cloth.
7 Reinsert the UV light bulb.
To reinsert the light bulb, align the bottom of the light bulb with
the metal clasp and push the bulb into the clasp.
8 Reinsert the protective screen.
To reinsert the screen, align the pegs on the screen with the slots
on the reflective surface near the UV light bulb. Push the screen
straight into the slots on the sanitizer.

English
21
Storage
If you are not going to use the product for a long time, unplug it, clean
it (see chapter 'Cleaning') and store it in a cool and dry place away
from direct sunlight. You can use the integrated cord wrap to store
excess cord of the UV sanitizer in an organized manner.
Replacement
Brush head
- Replace Philips Sonicare brush heads every 3 months to achieve
optimal results.
- Use only Philips Sonicare replacement brush heads.
UV light bulb
- Replacement UV bulbs are available through your Philips Sonicare
Consumer Service Center in North America by calling
1-800-682-7664. Outside North America, contact your local Philips
Consumer Care Center.
Locating the model number
Look on the bottom of the Philips Sonicare toothbrush handle for the
model number (HX685x).
Recycling
- This symbol means that this product shall not be disposed of with
normal household waste (2012/19/EU) (Fig. 31).
- This symbol means that this product contains a built-in
rechargeable battery which shall not be disposed of with normal
household waste (Fig. 32) (2006/66/EC). Please take your product
to an official collection point or a Philips service center to have a
professional remove the rechargeable battery.
- Follow your country’s rules for the separate collection of electrical
and electronic products and rechargeable batteries. Correct
disposal helps prevent negative consequences for the
environment and human health.

English
22
Removing the rechargeable battery
Warning: Only remove the rechargeable battery when you discard the
appliance. Make sure the battery is completely empty when you
remove it.
To remove the rechargeable battery, you need a towel or cloth, a
hammer and a flat-head (standard) screwdriver. Observe basic safety
precautions when you follow the procedure outlined below. Be sure
to protect your eyes, hands, fingers, and the surface on which you
work.
1 To deplete the rechargeable battery of any charge, remove the
handle from the charger, turn on the Philips Sonicare and let it run
until it stops. Repeat this step until you can no longer turn on the
Philips Sonicare.
2 Remove and discard the brush head. Cover the entire handle with
a towel or cloth (Fig. 23).
3 Hold the top of the handle with one hand and strike the handle
housing 0.5 inch above the bottom end. Strike firmly with a
hammer on all 4 sides to eject the end cap (Fig. 24).
Note: You may have to hit on the end several times to break the
internal snap connections.
4 Remove the end cap from the toothbrush handle. If the end cap
does not release easily from the housing, repeat step 3 until the
end cap is released (Fig. 25).
5 Holding the handle upside down, press the shaft down on a hard
surface. If the internal components do not easily release from the
housing, repeat step 3 until the internal components are released
(Fig. 26).
6 Remove the rubber battery cover.
7 Wedge the screwdriver between the battery and the black frame
at the bottom of the internal components. Then pry the
screwdriver away from the battery to break the bottom of the
black frame (Fig. 27).

English
8 Insert the screwdriver between the bottom of the battery and the
black frame to break the metal tab connecting the battery to the
green printed circuit board. This will release the bottom end of the
battery from the frame (Fig. 28).
9 Grab the battery and pull it away from the internal components to
break the second metal battery tab (Fig. 29).
Caution: Be aware of the sharp edges of the battery tabs so as to
avoid injury to your fingers.
10 Cover the battery contacts with tape to prevent any electrical short
from residual battery charge. The rechargeable battery can now be
recycled and the rest of the product discarded appropriately (Fig.
30).
23
Warranty and support
If you need information or support, please visit
www.philips.com/support or read the international warranty leaflet.
Warranty restrictions
The terms of the international warranty do not cover the following:
- Brush heads.
- Damage caused by use of unauthorised replacement parts.
- Damage caused by misuse, abuse, neglect, alterations or
unauthorised repair.
- Normal wear and tear, including chips, scratches, abrasions,
discolouration or fading.
- UV light bulb.

Русский
24
Важная информация
Перед использованием прибора внимательно ознакомьтесь с
руководством пользователя и сохраните его для дальнейшего
использования в качестве справочного материала.
Опасно!
- Храните зарядное устройство вдали от воды! Не помещайте и
не оставляйте зарядное устройство над водой или поблизости
от воды, налитой в ванну, раковину ит.д. Не опускайте
зарядное устройство в воду или другие жидкости. После
чистки проверяйте, что зарядное устройство полностью
высохло, прежде чем подключать его к сетевой розетке.
Предупреждение
- Сетевой шнур заменить нельзя. Если он поврежден, зарядное
устройство необходимо заменить полностью.
- Всегда заменяйте зарядное устройство только оригинальным
устройством, чтобы обеспечить безопасную эксплуатацию
прибора.
- Не используйте зарядное устройство или дезинфектор вне
помещений или рядом с нагреваемыми поверхностями.
- Не используйте дезинфектор в местах распыления аэрозолей
(спреев) или в местах применения кислорода.
- При повреждении любой части прибора (чистящая насадкащетка (далее - насадка), электрическая зубная щетка (далее щетка или ручка) или зарядное устройство) не пользуйтесь им.
Данное устройство не содержит деталей, замена и ремонт
которых может выполняться пользователем. Если прибор
поврежден, обратитесь в центр поддержки потребителей в
вашей стране (см. главу «Гарантия и поддержка»).
- Дети и лица с ограниченными физическими или умственными
возможностями, а также лица с недостаточным опытом и
знаниями могут пользоваться этим прибором только под
присмотром или после получения инструкций по безопасному
использованию прибора. Дети могут осуществлять очистку и
уход за прибором только под присмотром взрослых.
- Не позволяйте детям играть с прибором.
Русский

Русский
Внимание!
- Насадку,зарядное устройство, крышку зарядного устройства
и дезинфектор нельзя мыть в посудомоечной машине.
- Если за последние 2 месяца вы перенесли операцию ротовой
полости или десен, перед использованием зубной щетки
проконсультируйтесь со стоматологом.
- Если после использования зубной щетки наблюдается
повышенная кровоточивость десен или кровоточивость десен
не проходит после одной недели применения,
проконсультируйтесь со стоматологом. Также обратитесь к
стоматологу при появлении неприятных или болевых
ощущений во время использования щетки Philips Sonicare.
- Зубная щетка Philips Sonicare соответствует стандартам
безопасности для электромагнитных приборов. Если у вас
установлен кардиостимулятор или другой имплантированный
прибор, проконсультируйтесь с врачом или производителем
имплантированного прибора перед использованием.
- При необходимости, перед использованием Philips Sonicare
проконсультируйтесь у врача.
- Данное устройство предназначено для чистки зубов, десен и
языка. Не используйте его для других целей. При появлении
ощущения дискомфорта или боли прекратите пользоваться
прибором и обратитесь к врачу.
- Зубная щетка Philips Sonicare — устройство для личной
гигиены, которое не предназначено для коллективного
использования несколькими пациентами стоматологической
клиники или учреждения.
- Не пользуйтесь насадкой-щеткой со смятыми или загнутыми
щетинками. Заменяйте насадку-щетку каждые три месяца или
чаще, если появились признаки износа.
- Используйте только насадки-щетки, рекомендованные
производителем.
- Если зубная паста содержит пероксид, питьевую соду или
другие бикарбонаты (часто используемые в отбеливающих
зубных пастах), тщательно мойте чистящую насадку водой с
мылом после каждого использования. Это предотвратит
возможное появление трещин.
25

Русский
26
- Не вставляйте посторонние предметы в отверстия
дезинфектора для выхода воздуха и не устанавливайте
дезинфектор на мягкую поверхность или в местах, где
отверстия могут быть перекрыты посторонними предметами
(например, журналами, бумажными полотенцами и волосами).
- Во время или сразу после работы ультрафиолетовая лампа
сильно нагревается. Не прикасайтесь к ультрафиолетовой
лампе, когда она накалена.
- Не пользуйтесь дезинфектором без установленного
защитного экрана, во избежание прикосновения к горячей
лампе.
- Если с помощью ультрафиолетового дезинфектора было
выполнено подряд трицикла очистки, перед следующим
циклом очистки его необходимо выключить как минимум на
30минут.
- Использование дезинфектора следует прекратить, если
ультрафиолетовая лампа продолжает гореть при открытой
дверце. Ультрафиолетовое излучение может быть вредно для
глаз и кожи. Всегда храните дезинфектор в недоступном для
детей месте.
Электромагнитные поля (ЭМП)
Этот прибор Philips Sonicare соответствует всем применимым
стандартам и нормам по воздействию электромагнитных полей.
Директива о радиотехническом оборудовании
- Радиотехническое оборудование в данном изделии работает
в частотном диапазоне 13,56МГц
- Максимальная мощность РЧ-энергии, передаваемой этим
радиотехническим оборудованием, составляет 30,16дБм
- Настоящим компания Philips заявляет, что этот прибор
соответствует основным требованиям и другим применимым
положениям директивы 2014/53/ЕС. С заявлением о
соответствии можно ознакомиться на веб-сайте
www.philips.com/support.

Русский
Введение
Поздравляем с покупкой продукции Philips! Чтобы
воспользоваться всеми преимуществами поддержки Philips,
зарегистрируйте изделие на веб-сайте
www.philips.com/welcome.
Назначение
Назначение
Электрические зубные щетки серии ProtectiveClean
предназначены для удаления зубного налета и остатков пищи с
зубов с целью снижения риска образования кариеса и
улучшения здоровья зубов и ротовой полости. Электрические
зубные щетки серии ProtectiveClean предназначены
исключительно для домашнего использования. Использование
детьми допускается только под присмотром взрослых.
Щетка Philips Sonicare (рис. 1)
1 Гигиенический защитный колпачок
2 Интеллектуальная насадка или насадки*
3 Ручка
4 Кнопка включения/выключения
5 Индикатор интенсивности
6 Кнопка режима/интенсивности
7 Индикатор режима
8 Индикатор напоминания о замене насадки
9 Индикатор состояния аккумулятора
10 Зарядная база
11 УФ-очиститель с встроенным зарядным устройством и
креплением шнура питания (только у некоторых моделей)*
-
Нет на иллюстрации: Ультрафиолетовая лампа
-
Нет на иллюстрации: Поддон дезинфектора
-
Нет на иллюстрации: Защитный экран для УФ-лампы
12 Дорожный чехол (только для некоторых моделей)*
*Примечание. Комплектации различных моделей (типов)
зубных щеток
27

Русский
28
смотри «Дополнение к руководству пользователя».
Чистящие насадки
В комплект поставки зубной щетки Philips Sonicare может
входить одна или несколько насадок, позволяющих обеспечить
максимально эффективный уход за полостью рта.
Технология Philips Sonicare BrushSync
Насадки щетки поддерживают технологию BrushSync. Эта
технология используется в двух функциях зубной щетки:
1 Сопоставление режимов насадки (см. раздел «Функции и
аксессуары»)
2 Напоминание о замене насадки (см. раздел «Функции и
аксессуары»)
Этот символ означает, что насадка поддерживает технологию
BrushSync. (Рис. 2)
Режимы чистки
Эта электрическая зубная щетка поддерживает 3различных
режима ухода за полостью рта.
Чтобы изменить режим, нажмите кнопку режима/интенсивности,
когда щетка выключена.
Доступны следующие режимы:
Режим Clean (Чистка)
Режим Clean (Чистка) продолжительностью 2минуты
обеспечивает тщательную полную чистку и рекомендуется к
использованию с 3уровнем интенсивности и насадкой C2
Optimal Plaque Control.
Режим White (Отбеливание)
Режим White (Отбеливание) продолжительностью 2минуты
30секунд рекомендуется использовать с 3уровнем
интенсивности и насадкой W2 Optimal White.

Русский
Режим Gum Care
Режим Gum Care (Уход за деснами) продолжительностью
3минуты рекомендуется использовать с 3уровнем
интенсивности и насадкой G2 Optimal Gum Care.
Настройки интенсивности
Эта электрическая зубная щетка поддерживает 3уровня
интенсивности: низкий, средний и высокий. (Рис. 3) Режим чистки
выбирается в зависимости от типа установленной насадки.
Чтобы изменить уровень интенсивности, нажмите кнопку
режима/интенсивности во время чистки. Для получения
оптимальных результатов рекомендуется использовать
автоматически выбираемый уровень интенсивности. Уровень
интенсивности нельзя изменить, если ручка отключена или
находится в состоянии приостановки.
Использование щетки Philips Sonicare
Рекомендации по чистке
1 Установите насадку на ручку таким образом, чтобы щетинки
были направлена к передней стороне ручки. (Рис. 4)
2 Прижмите насадку-щетку к металлическому валу до упора.
Примечание. Между насадкой и ручкой находится небольшой
зазор. Это нормально.
3 Намочите щетинки. (Рис. 5)
4 Нанесите небольшое количество зубной пасты на щетинки.
(Рис. 6)
5 Поднесите чистящую насадку к зубам под углом 45градусов и
прижмите щетинки так, чтобы они касались линии десен или
области под линией десен (Рис. 7). Изменение вибрации (и
небольшое изменение звука) предупреждает о слишком
сильном давлении во время чистки зубов.
Примечание. Щетинки в середине насадки должны всегда
соприкасаться с зубами.
29

Русский
30
6 Нажмите кнопку включения/выключения для включения
Philips Sonicare. (Рис. 8)
7 Аккуратно прижмите щетинки к зубам и к линии десен.
Передвигайте щетку вперед и назад так, чтобы щетинки
очищали межзубные промежутки. (Рис. 9)
Примечание. Щетинки должны свободно перемещаться. Не
применяйте излишнее усилие во время чистки.
8 Для очистки внутренней поверхности передних зубов
наклоните ручку щетки немного вперед. Очищайте каждый
зуб (Рис. 10), перемещая устройство вверх и вниз.
9 Чтобы обеспечить равномерную чистку зубов, условно
разделите полость рта на 4участка и используйте функцию
(Рис. 11) Quadpacer. Функция Quadpacer издает звуковой
сигнал каждые 30секунд.
10 Чистите зубы в течение 2минут в соответствии с сигналами
функции Quadpacer. (Рис. 12) Через две минуты зубная щетка
автоматически выключится.
В режиме White через 2минуты ручка продолжит чистку в
течение 30секунд, чтобы вы могли отбелить и
отполировать передние зубы.
В режиме Gum Care через 2минуты ручка продолжит
чистку в течение еще одной минуты, чтобы вы могли
выполнить аккуратную стимуляцию и массирование десен.
После завершения цикла чистки можно потратить немного
времени на очистку жевательной поверхности зубов и
труднодоступных мест. (Рис. 13)
Щетка Philips Sonicare безопасна для:
- ортодонтических конструкций (при чистке конструкций
насадка изнашивается быстрее);
- пломб, коронок, коронок с покровными фасетками.
Примечание. Во время клинических исследований щетки Philips
Sonicare необходимо использовать режим Clean (Чистка)
(заявления об эффективности щетки при удалении зубного
 Loading...