

Philips HX8424 User Manual [ru]

ProtectiveClean
4500/5100
EN: User manual
RU: Руководство пользователя
KZ: Пайдаланушы нұсқаулығы
1
2
10
4
3
5
6
7
8
9
1


English 6
Čeština 20
Eesti 34
Hrvatski 47
Latviešu 61
Lietuviškai 74
Magyar 88
Polski 103
Română 119
Slovenščina 134
Slovensky 148
Srpski 163
Български 175
Русский 191
Українська 205
Қазақша
218

English
6
Important
Read this user manual carefully before you use the appliance and
save it for future reference.
Danger
-
Keep the charger away from water. Do not
place or store it over or near water
contained in a bathtub, washbasin, sink etc.
Do not immerse the charger in water or any
other liquid. After cleaning, make sure the
charger is completely dry before you
connect it to the mains.
Warning
-
The mains cord cannot be replaced. If the
mains cord is damaged, discard the charger.
-
Always have the charger replaced with one
of the original type in order to avoid a
hazard.
-
Do not use the charger outdoors or near
heated surfaces.
English

English
-
If the appliance is damaged in any way
(brush head, toothbrush handle or charger),
stop using it. This appliance contains no
serviceable parts. If the appliance is
damaged, contact the Consumer Care
Center in your country (see chapter
'Warranty and support').
-
This appliance can be used by children and
persons with reduced physical, sensory or
mental capabilities or lack of experience
and knowledge if they have been given
supervision or instruction concerning use of
the appliance in a safe way and understand
the hazards involved. Cleaning and user
maintenance shall not be made by children
without supervision.
-
Children shall not play with the appliance.
7
Caution
-
Do not clean the brush head, the handle or
the charger in the dishwasher.
-
If you have had oral or gum surgery in the
previous 2 months, consult your dentist
before you use the toothbrush.

English
8
-
Consult your dentist if excessive bleeding
occurs after using this toothbrush or if
bleeding continues to occur after 1 week of
use. Also consult your dentist if you
experience discomfort or pain when you use
the Philips Sonicare.
-
The Philips Sonicare toothbrush complies
with the safety standards for
electromagnetic devices. If you have a
pacemaker or other implanted device,
contact your physician or the device
manufacturer of the implanted device prior
to use.
-
If you have medical concerns, consult your
doctor before you use the Philips Sonicare.
-
This appliance has only been designed for
cleaning teeth, gums and tongue. Do not
use it for any other purpose. Stop using the
appliance and contact your doctor if you
experience any discomfort or pain.

English
-
The Philips Sonicare toothbrush is a
personal care device and is not intended for
use on multiple patients in a dental practice
or institution.
-
Stop using a brush head with crushed or
bent bristles. Replace the brush head every
3 months or sooner if signs of wear appear.
Do not use other brush heads than the ones
recommended by the manufacturer.
-
If your toothpaste contains peroxide, baking
soda or bicarbonate (common in whitening
toothpastes), thoroughly clean the brush
head with soap and water after each use.
This prevents possible cracking of the
plastic.
Electromagnetic fields (EMF)
This Philips appliance complies with all applicable standards and
regulations regarding exposure to electromagnetic fields.
Radio Equipment Directive
- Radio Equipment in this product operates at 13.56 MHz
- Maximum RF power transmitted by the Radio Equipment is
30.16dBm
9
Introduction
Congratulations on your purchase and welcome to Philips! To fully
benefit from the support that Philips offers, register your product at
www.philips.com/welcome.

English
10
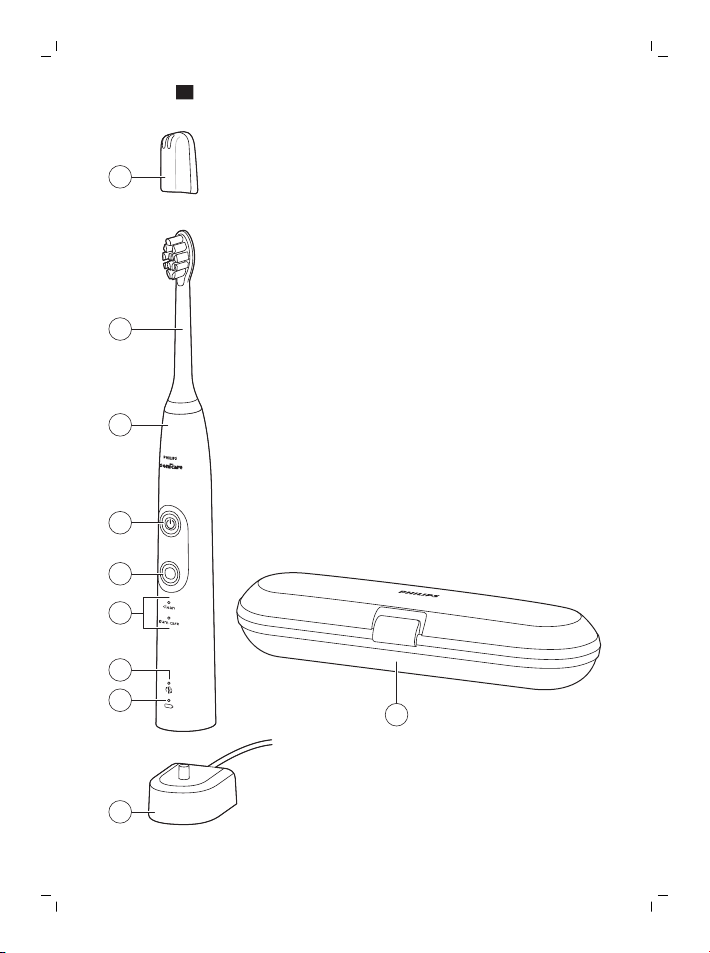
Your Philips Sonicare (Fig. 1)
1 Hygienic travel cap
2 Smart brush head(s)*
3 Handle
4 Power on/off button
5 Mode/intensity button
6 Mode light
7 Brush head replacement reminder light
8 Battery indication
9 Charging base
10 Travel case (specific types only)*
*Note: The content of the box may vary based on the model
purchased.
Brush heads
Your Philips Sonicare comes with one or more brush heads which are
designed to deliver superior results for your oral care needs.
Philips Sonicare BrushSync Technology
Your smart brush heads use a microchip to sync with your handle,
enabling brush head replacement reminder. For more information
regarding the brush head replacement reminder, see 'Features'.
This symbol indicates the brush head is equipped with BrushSync
technology. (Fig. 2)
Brushing modes
To toggle between modes press the mode button located below the
on/off button.
Your power toothbrush is equipped with either 2 or 3 brushing
modes, depending on your model.The following modes are available:
Clean mode
Clean is a 2-minute mode. It gives you a thorough and complete
clean and is recommended to be used with the C2 Optimal Plaque
Control brush head.

English
White mode
White is a 2-minute 30-seconds mode, recommended to be used
with the W2 Optimal White brush head.
Gum Care mode
Gum Care is a 3-minute mode, recommended to be used with the G2
Optimal Gum Care brush head.
Using your Philips Sonicare
Brushing instructions
1 Press the brush head onto the handle in such a way that the
bristles will face the front of the handle. (Fig. 3)
2 Firmly press the brush head down onto the metal shaft until it
stops.
Note: It is normal to see a slight gap between the brush head and
the handle.
3 Wet the bristles. (Fig. 4)
4 Apply a small amount of toothpaste on the bristles. (Fig. 5)
5 Place the toothbrush bristles against the teeth at a slight angle (45
degrees), pressing firmly to make the bristles reach the gumline or
slightly beneath the gumline. (Fig. 6) A change in vibration (and a
slight change in sound) alerts you when you apply too much
pressure while brushing.
Note: Keep the center of the brush in contact with the teeth at all
times.
6 Press the power on/off button to turn on the Philips Sonicare. (Fig.
7)
7 Gently keep the bristles placed on the teeth and in the gumline.
Brush your teeth with small back and forth motion so the bristles
reach between the teeth. (Fig. 8)
Note: The bristles should slightly flare. Do not scrub.
8 To clean the inside surfaces of the front teeth, tilt the brush handle
semi-upright and make several vertical overlapping brushing
strokes on each tooth. (Fig. 9)
11

English
12
9 To make sure you brush evenly throughout the mouth, divide the
mouth into 4 sections using the Quadpacer feature. (Fig. 10) The
quadpacer feature beeps after 30 seconds.
10 Brush for the full 2 minutes following the Quadpacer. (Fig. 11) After
2 minutes, the toothbrush will automatically shut off.
In white mode, after 2 minutes the handle will continue to brush
for 30 seconds so that you can brighten and polish your front
teeth.
In gum care mode, after 2 minutes the handle will continue to
brush for an additional minute so you can gently stimulate and
massage your gums.
- After you have completed the brushing cycle, you can spend
additional time brushing the chewing surfaces of your teeth and
areas where staining occurs. (Fig. 12)
Your Philips Sonicare toothbrush is safe to use on:
- Braces (brush heads wear out sooner when used on braces)
- Dental restorations (fillings, crowns, veneers)
Note: When the Philips Sonicare toothbrush is used in clinical studies,
it must be used in the Clean mode (for plaque and gum health claims)
or in White mode (for whitening claims) at high intensity with
EasyStart turned off.
Features
- EasyStart
- Brush head replacement reminder
- Pressure sensor
- Quadpacer
EasyStart
This Philips Sonicare model comes with the EasyStart feature
activated. The EasyStart feature gently increases the power over the
first 14 brushings to help you get used to the brushing with the Philips
Sonicare. The EasyStart feature works in all modes.
To deactivate EasyStart see 'Activating or deactivating features'.

English
13
Brush head replacement reminder
Your Philips Sonicare is equipped with BrushSync technology that
tracks the wear of your brush head. (Fig. 13)
1 When attaching a new smart brush head for the first time the
brush head replacement reminder light blinks green three times.
This confirms you have a Philips brush head with BrushSync
technology.
2 Over time, based on the pressure you apply and the amount of
time used, the handle will track brush head wear in order to
determine the optimal time to change your brush head. This
feature gives you the guarantee for the best cleaning and care of
your teeth.
3 When the brush head replacement reminder light lights up amber,
you should replace your brush head.
To deactivate the brush head replacement reminder see 'Activating or
deactivating features'.
Pressure sensor
Your Philips Sonicare is equipped with an advanced sensor that
measures the pressure you apply while brushing. If you apply too
much pressure, the toothbrush will provide immediate feedback to
indicate that you need to reduce the pressure. This feedback is given
by a change in vibration and therefore brushing sensation.
To deactivate the pressure sensor see 'Activating or deactivating
features'.
Quadpacer
The Quadpacer is an interval timer that has a short beep and pause
to remind you to brush the different sections of your mouth.
Depending on the brushing mode you have selected (see 'Brushing
modes'), the Quadpacer beeps at different intervals during the
brushing cycle.
Activating or deactivating features
You can activate or deactivate the following features of your
toothbrush:

English
14
- EasyStart
- Brush head replacement reminder
- Pressure sensor
To activate or deactivate these features, follow the instructions
below:
EasyStart
1 Put the handle on the plugged-in charger.
2 Press and hold the power on/off button while the handle remains
on the charger.
3 Keep the power on/off button pressed until you hear a single
short beep (after 2 seconds).
4 Release the power on/off button.
-
Triple tone of low-med-high means the EasyStart feature has
been activated. The brush head replacement light and battery
light will also blink green 3 times in unison to confirm activation.
-
Triple tone of high-med-low means the EasyStart feature has
been deactivated. The brush head replacement light and
battery light will also blink amber 3 times in unison to confirm
deactivation.
Note: To achieve clinical efficacy, EasyStart needs to be deactivated.
Brush head replacement reminder
1 Put the handle on the plugged-in charger.
2 Press and hold the power on/off button while the handle remains
on the charger.
3 Keep the power on/off button pressed until you hear a series of
two short beeps (after 4-5 seconds).
4 Release the power on/off button.
-
Triple tone of low-med-high means the Brush head
replacement reminder feature has been activated. The brush
head replacement light and battery light will also blink green 3
times in unison to confirm activation.

English
-
Triple tone of high-med-low means the Brush head
replacement reminder feature has been deactivated. The brush
head replacement light and battery light will also blink amber 3
times in unison to confirm deactivation.
Pressure sensor
1 Put the handle on the plugged-in charger.
2 Press and hold the power on/off button while the handle remains
on the charger.
3 Keep the power on/off button pressed until you hear a series of
three short beeps (after 6-7 seconds).
4 Release the power on/off button.
-
Triple tone of low-med-high means the pressure sensor feature
has been activated. The brush head replacement light and
battery light will also blink green 3 times in unison to confirm
activation.
-
Triple tone of high-med-low means the pressure sensor feature
has been deactivated. The brush head replacement light and
battery light will also blink amber 3 times in unison to confirm
deactivation.
If you continue holding the power on/off button after the three short
beeps, the activate/deactivate sequence repeats.
Battery status and charging
1 Put the plug of the charger in an electrical outlet.
2 Place the handle on the charger.
-
The charger will emit 2 short beeps to confirm that the handle is
placed properly.
-
The flashing light of the battery level indicator shows that the
toothbrush is charging.
-
When handle is fully charged on the charger, the battery light
shows solid green for 30 seconds and switches off.
Note: Your toothbrush comes pre-charged for first use. After first use,
charge for at least 24 hours.
15

English
16
Battery status (when handle is not on charger)
When removing the Philips Sonicare from the charger, the battery
light at the bottom of the toothbrush will indicate the status of the
battery life.
- Solid green LED: full battery
- Flashing green LED: medium battery
- Flashing amber LED and three beeps: low battery
- Flashing amber LED and two sets of five beeps: No brushing
sessions left (charge toothbrush)
Cleaning
Note: Do not clean the brush head, handle or travel case in the
dishwasher.
Toothbrush handle
1 Remove the brush head and rinse the metal shaft area with warm
water. Make sure you remove any residual toothpaste (Fig. 14).
Note: Do not push on the rubber seal on the metal shaft with
sharp objects, as this may cause damage.
2 Wipe the entire surface of the handle with a damp cloth.
Note: Do not use isopropyl rubbing alcohol, vinegar or bleach to
clean handle as this may cause discoloration.
Brush head
1 Rinse the brush head and bristles after each use (Fig. 15).
2 Remove the brush head from the handle and rinse the brush head
connection with warm water at least once a week.
Charger
1 Unplug the charger before you clean it.
2 Wipe the surface of the charger with a damp cloth.
Storage
If you are not going to use your Philips Sonicare for an extended
period of time, unplug the charger from the wall socket, clean it and
store it in a cool and dry place away from direct sunlight.

English
Locating the model number
Look on the bottom of the Philips Sonicare toothbrush handle for the
model number (HX682x/HX683x).
Recycling
- This symbol means that this product shall not be disposed of with
normal household waste (2012/19/EU) (Fig. 24).
- This symbol means that this product contains a built-in
rechargeable battery which shall not be disposed of with normal
household waste (Fig. 25) (2006/66/EC). Please take your product
to an official collection point or a Philips service center to have a
professional remove the rechargeable battery.
- Follow your country’s rules for the separate collection of electrical
and electronic products and rechargeable batteries. Correct
disposal helps prevent negative consequences for the
environment and human health.
Removing the rechargeable battery
Warning: Only remove the rechargeable battery when you discard the
appliance. Make sure the battery is completely empty when you
remove it.
To remove the rechargeable battery, you need a towel or cloth, a
hammer and a flat-head (standard) screwdriver. Observe basic safety
precautions when you follow the procedure outlined below. Be sure
to protect your eyes, hands, fingers, and the surface on which you
work.
1 To deplete the rechargeable battery of any charge, remove the
handle from the charger, turn on the Philips Sonicare and let it run
until it stops. Repeat this step until you can no longer turn on the
Philips Sonicare.
2 Remove and discard the brush head. Cover the entire handle with
a towel or cloth (Fig. 16).
3 Hold the top of the handle with one hand and strike the handle
housing 0.5 inch above the bottom end. Strike firmly with a
hammer on all 4 sides to eject the end cap (Fig. 17).
17

English
18
Note: You may have to hit on the end several times to break the
internal snap connections.
4 Remove the end cap from the toothbrush handle. If the end cap
does not release easily from the housing, repeat step 3 until the
end cap is released (Fig. 18).
5 Holding the handle upside down, press the shaft down on a hard
surface. If the internal components do not easily release from the
housing, repeat step 3 until the internal components are released
(Fig. 19).
6 Remove the rubber battery cover.
7 Wedge the screwdriver between the battery and the black frame
at the bottom of the internal components. Then pry the
screwdriver away from the battery to break the bottom of the
black frame (Fig. 20).
8 Insert the screwdriver between the bottom of the battery and the
black frame to break the metal tab connecting the battery to the
green printed circuit board. This will release the bottom end of the
battery from the frame (Fig. 21).
9 Grab the battery and pull it away from the internal components to
break the second metal battery tab (Fig. 22).
Caution: Be aware of the sharp edges of the battery tabs so as to
avoid injury to your fingers.
10 Cover the battery contacts with tape to prevent any electrical short
from residual battery charge. The rechargeable battery can now be
recycled and the rest of the product discarded appropriately (Fig.
23).
Warranty and support
If you need information or support, please visit
www.philips.com/support or read the international warranty leaflet.
Warranty restrictions
The terms of the international warranty do not cover the following:
- Brush heads.
- Damage caused by use of unauthorized replacement parts.

English
- Damage caused by misuse, abuse, neglect, alterations or
unauthorized repair.
- Normal wear and tear, including chips, scratches, abrasions,
discoloration or fading.
19

Čeština
20
Důležité
Před použitím přístroje si pečlivě přečtěte tuto uživatelskou příručku a
uschovejte ji pro budoucí použití.
Nebezpečí
-
Chraňte nabíječku před kontaktem svodou.
Nepokládejte a neuskladňujte nabíječku
vblízkosti vody, například u vany
snapuštěnou vodou, umyvadla, dřezu apod.
Neponořujte nabíječku do vody ani jiné
kapaliny. Před připojením nabíječky
knapájení se ujistěte, že je po čištění zcela
suchá.
Varování
-
Napájecí kabel nelze vyměnit. Pokud je
napájecí kabel poškozen, je nutné vyřadit
nabíječku zprovozu.
-
Nabíječku nechte vždy vyměnit za originální
typ, aby nevzniklo žádné riziko.
-
Nepoužívejte nabíječku venku aniblízko
horkých povrchů.
Čeština

Čeština
-
Pokud dojde kjakémukoli poškození
přístroje (hlavice, rukojeť nebo nabíječka),
přestaňte jejpoužívat. Tento přístroj
neobsahuje žádné opravitelné součásti.
Pokud dojde kjeho poškození, obraťtese
nastředisko péče ozákazníky vevaší zemi
(viz „Záruka a podpora“).
-
Přístroj mohou používat děti a osoby se
sníženými fyzickými, smyslovými nebo
duševními schopnostmi nebo nedostatkem
zkušeností a znalostí, pokud jsou pod
dohledem nebo byly poučeny obezpečném
používání přístroje a rozumí všem rizikům
spojeným spoužíváním přístroje. Děti nesmí
provádět bez dozoru čištění auživatelskou
údržbu.
-
Děti si spřístrojem nesmí hrát.
21
Upozornění
-
Nemyjte hlavici kartáčku, rukojeť ani
nabíječku vmyčce nádobí.

Čeština
22
-
Pokud jste vposledních 2 měsících
podstoupili operaci zubu či dásní, poraďte
se před použitím zubního kartáčku se svým
zubním lékařem.
-
Pokud po použití kartáčku dochází
kvýraznému krvácení nebo pokud krvácení
neustává po 1týdnu používání, obraťte se
na svého zubního lékaře. Se zubním lékařem
se poraďte také vpřípadě, že se při
používání zubního kartáčku Sonicare cítíte
nepříjemně nebo pociťujete bolest.
-
Zubní kartáček Philips Sonicare splňuje
bezpečnostní standardy pro
elektromagnetická zařízení. Pokud máte
kardiostimulátor nebo jiné implantované
zařízení, před použitím se poraďte slékařem
nebo svýrobcem implantovaného zařízení.
-
Máte-li zdravotní pochybnosti, obraťte se
před použitím kartáčku Philips Sonicare na
svého lékaře.

Čeština
-
Tento přístroj je určen pouze kčištění zubů,
dásní a jazyka. Nepoužívejte jej kžádnému
jinému účelu. Pokud je vám používání
nepříjemné nebo máte pocity bolesti, ihned
přístroj přestaňte používat a obraťte se na
svého lékaře.
-
Zubní kartáček Philips Sonicare je přístroj
určený kosobní péči a není určen pro
použitíuvíce pacientů ve stomatologické
ordinaci nebo instituci.
-
Jsou-li vlákna na hlavě kartáčku poškozená
nebo ohnutá, přestaňte hlavu kartáčku
používat. Výměnu hlavy kartáčku provádějte
každé 3 měsíce nebo častěji, pokud se
objeví známky opotřebení. Nepoužívejte jiné
hlavice kartáčku než ty, které jsou
doporučeny výrobcem.
-
Pokud používáte zubní pastu sobsahem
peroxidu, jedlé sody nebo bikarbonátu
(běžně se vyskytují vbělicích zubních
pastách), po každém použití důkladně
očistěte hlavici kartáčku mýdlem a vodou.
Tím předejdete praskání plastu.
23

Čeština
24
Elektromagnetická pole (EMP)
Tento přístroj Philips odpovídá všem platným normám a předpisům
týkajícím se elektromagnetických polí.
Směrnice o rádiových zařízeních
- Rádiové zařízení vtomto výrobku pracuje na frekvenci 13,56MHz.
- Maximální radiofrekvenční výkon přenášený rádiovým zařízením je
30,16dBm.
Úvod
Společnost Philips Vám gratuluje ke koupi a vítá Vás! Chcete-li
využívat všech výhod podpory nabízené společností Philips,
zaregistrujte svůj výrobek na stránkách www.philips.com/welcome.
Váš kartáček Philips Sonicare (obr. 1)
1 Hygienická cestovní krytka
2 Inteligentní hlav(y)* kartáčku
3 Rukojeť
4 Vypínač
5 Přepínač režimů/intenzity
6 Kontrolka režimu
7 Kontrolka připomenutí výměny hlavy kartáčku
8 Indikátor baterie
9 Nabíjecí základna
10 Cestovní pouzdro (pouze některé typy)*
*Poznámka: Obsah balení se může lišit vzávislosti na zakoupeném
modelu.
Hlavy kartáčků
Kartáček Philips Sonicare je dodáván sjednou nebo více hlavami
kartáčků navržených tak, aby zajistily vynikající výsledky při péči
oústa.
Technologie Philips Sonicare BrushSync
Vaše inteligentní hlavy kartáčku využívají mikročip ksynchronizaci
srukojetí, čímž umožňují připomenutí výměny hlavy kartáčku. Další
informace ovýměně hlavy kartáčku najdete vkapitole „Funkce“.

Čeština
Tento symbol indikuje, že hlava kartáčku je vybavena technologií
BrushSync. (obr. 2)
Režimy čištění
Režim přepnete stisknutím tlačítka režimů, který je umístěn pod
vypínačem.
Vzávislosti na modelu je zubní kartáček vybaven buď 2 nebo 3
různými režimy. Kdispozici jsou následující režimy:
Režim Clean
Režim Clean je 2minutový. Zajistí vám důkladně aúplné vyčištění
zubů adoporučuje se používat shlavou kartáčku C2 Optimal Plaque
Control.
Režim White
Režim White je nastaven na 2minuty a30sekund adoporučuje se
používat shlavou kartáčku W2 Optimal White.
Režim Gum Care
Režim Gum Care je nastaven na 3minuty adoporučuje se používat
shlavou kartáčku G2 Optimal Gum Care.
Použití kartáčku Philips Sonicare
Pokyny kčištění zubů
1 Nasaďte hlavu kartáčku přitlačením na rukojeť tak, aby vlákna
směřovala kpřední straně rukojeti (obr. 3).
2 Hlavici kartáčku pevně zasuňte na kovovou hřídel, dokud se
nezarazí.
Poznámka: Malá mezera patrná mezi hlavou kartáčku a rukojetí je
normální.
3 Navlhčete štětiny (obr. 4).
4 Naneste na štětiny malé množství zubní pasty. (obr. 5)
5 Přiložte štětiny kartáčku kzubům podmírným úhlem (45stupňů)
apevně přitiskněte. Štětiny se díky tomu dostanou kokraji dásní,
nebo mírně podněj. (obr. 6) Změna vibrací (a malá změna zvuku)
vás při čištění upozorní, že vyvíjíte přílišný tlak.
25

Čeština
26
Poznámka: Udržujte střed kartáčku ve stálém kontaktu se zuby.
6 Zapněte kartáček Philips Sonicare stisknutím tlačítka pro
zapnutí/vypnutí. (obr. 7)
7 Držte kartáček tak, abyse štětiny jemně dotýkaly zubů aokrajů
dásní. Čistěte si zuby krátkými pohyby sem atam, aby se štětiny
dostaly mezi zuby. (obr. 8)
Poznámka: Štětiny by se měly jemně rozestupovat. Zuby
nedrhněte.
8 Chcete-li vyčistit vnitřní plochu předních zubů, nakloňte rukojeť
kartáčku napůl svisle anakaždém zubu proveďte několik svislých
překrývajících se tahů kartáčkem. (obr. 9)
9 Abyste rovnoměrně vyčistili všechny zuby, rozdělte ústa na 4části
pomocí funkce Quadpacer. (obr. 10) Funkce Quadpacer bude pípat
po 30sekundách.
10 Podle funkce Quadpacer si čistěte zuby celé 2minuty. (obr. 11) Po
2minutách se zubní kartáček automaticky vypne.
Vrežimu bělení bude rukojeť po 2minutách pokračovat
včištění po dobu 30sekund, abyste si mohli zesvětlit avyleštit
přední zuby.
Vrežimu péče odásně bude rukojeť po 2minutách pokračovat
včištění další minutu, abyste si mohli jemně stimulovat
amasírovat dásně.
- Po dokončení cyklu čištění můžete strávit chvíli čištěním žvýkacích
ploch zubů amíst, kde se vyskytují skvrny. (obr. 12)
Zubní kartáček Philips Sonicare lze bezpečně používat kčištění:
- Rovnátek (při použití kčištění rovnátek se hlavice kartáčků rychleji
opotřebovávají)
- Opravných dentálních materiálů (výplní, korunek, fazet)
Poznámka: Při použití zubního kartáčku Philips Sonicare vklinických
studiích je potřeba používat vrežimu Clean (kodstranění plaku
azlepšování zdraví dásní) nebo vrežimu White (kvybělení zubů)
vysokou intenzitu. Funkce EasyStart přitom musí být vypnutá.

Čeština
27
Funkce
- EasyStart
- Připomenutí výměny hlavy kartáčku
- Snímač tlaku
- Quadpacer
EasyStart
Model kartáčku Philips Sonicare se dodává saktivovanou funkcí
EasyStart. Funkce EasyStart jemně zvyšuje sílu prvních 14čištění,
abyste si zvykli na čištění skartáčkem Philips Sonicare. Funkce
EasyStart funguje ve všech režimech.
Chcete-li deaktivovat funkci EasyStart, viz kapitolu „Aktivace nebo
deaktivace funkcí“.
Připomenutí výměny hlavy kartáčku
Kartáček Philips Sonicare je vybaven technologií BrushSync, která
sleduje opotřebení hlavy kartáčku. (obr. 13)
1 Při prvním nasazování nové inteligentní hlavy kartáčku zabliká
kontrolka připomenutí výměny hlavy kartáčku třikrát zeleně. To je
potvrzení, že máte hlavu kartáčku Philips stechnologií BrushSync.
2 Rukojeť bude průběžně sledovat opotřebení hlavy kartáčku
vzávislosti na tlaku vyvíjeném při čištění adélce čištění, aby určila
optimální čas pro její výměnu. Tato funkce vám dá záruku
nejlepšího čištění apéče ozuby.
3 Hlavu kartáčku byste měli vyměnit vokamžiku, kdy se rozsvítí
oranžová kontrolka připomenutí výměny hlavy kartáčku.
Chcete-li deaktivovat připomenutí výměny hlavy kartáčku, viz kapitolu
„Aktivace nebo deaktivace funkcí“.
Snímač tlaku
Kartáček Philips Sonicare je vybaven vyspělým snímačem, který měří
tlak vyvíjený při čištění zubů. Pokud použijete příliš velký tlak, zubní
kartáček vás okamžitě upozorní, že je potřeba tlak snížit. Tato zpětná
vazba bude předána změnou vibrace, která způsobí změnu pocitu při
čištění.

Čeština
28
Chcete-li deaktivovat snímač tlaku, viz kapitolu „Aktivace nebo
deaktivace funkcí“.
Quadpacer
Quadpacer je intervalový časovač, který vám pomocí krátkého pípnutí
apozastavení pomůže zvládnout vyčistit všechny části ústní dutiny.
Vzávislosti na zvoleném režimu (viz kapitolu „Režimy čištění“) vydává
funkce Quadpacer během čištění zvukové signály vrůzných
intervalech.
Aktivace nebo deaktivace funkcí
Následující funkce zubního kartáčku můžete aktivovat nebo
deaktivovat:
- EasyStart
- Připomenutí výměny hlavy kartáčku
- Snímač tlaku
Chcete-li aktivovat nebo deaktivovat tyto funkce, postupujte podle
následujících pokynů:
EasyStart
1 Nasaďte rukojeť na zapojenou nabíječku.
2 Ponechte rukojeť na nabíječce astiskněte apodržte tlačítko pro
vypnutí/zapnutí.
3 Držte tlačítko pro zapnutí/vypnutí stisknuté, dokud neuslyšíte
jedno krátké pípnutí (po 2sekundách).
4 Uvolněte tlačítko pro zapnutí/vypnutí.
-
Trojitý vzrůstající tón znamená, že funkce EasyStart byla
aktivována. Aktivaci potvrdí také kontrolka připomenutí výměny
hlavy kartáčku akontrolka baterie, které společně třikrát zeleně
zablikají.
-
Trojitý klesající tón znamená, že funkce EasyStart byla
deaktivována. Deaktivaci potvrdí také kontrolka připomenutí
výměny hlavy kartáčku akontrolka baterie, které společně
třikrát oranžově zablikají.
Poznámka: Pro dosažení klinické účinnosti musí být funkce EasyStart
deaktivována.

Čeština
Připomenutí výměny hlavy kartáčku
1 Nasaďte rukojeť na zapojenou nabíječku.
2 Ponechte rukojeť na nabíječce astiskněte apodržte tlačítko pro
vypnutí/zapnutí.
3 Držte tlačítko pro zapnutí/vypnutí stisknuté, dokud neuslyšíte sérii
dvou krátkých pípnutí (po 4–5sekundách).
4 Uvolněte tlačítko pro zapnutí/vypnutí.
-
Trojitý vzrůstající tón znamená, že funkce připomenutí výměny
hlavy kartáčku byla aktivována. Aktivaci potvrdí také kontrolka
připomenutí výměny hlavy kartáčku akontrolka baterie, které
společně třikrát zeleně zablikají.
-
Trojitý klesající tón znamená, že funkce připomenutí výměny
hlavy kartáčku byla deaktivována. Deaktivaci potvrdí také
kontrolka připomenutí výměny hlavy kartáčku akontrolka
baterie, které společně třikrát oranžově zablikají.
Snímač tlaku
1 Nasaďte rukojeť na zapojenou nabíječku.
2 Ponechte rukojeť na nabíječce astiskněte apodržte tlačítko pro
vypnutí/zapnutí.
3 Držte tlačítko pro zapnutí/vypnutí stisknuté, dokud neuslyšíte sérii
tří krátkých pípnutí (po 6–7sekundách).
4 Uvolněte tlačítko pro zapnutí/vypnutí.
-
Trojitý vzrůstající tón znamená, že funkce snímače tlaku byla
aktivována. Aktivaci potvrdí také kontrolka připomenutí výměny
hlavy kartáčku akontrolka baterie, které společně třikrát zeleně
zablikají.
-
Trojitý klesající tón znamená, že funkce snímače tlaku byla
deaktivována. Deaktivaci potvrdí také kontrolka připomenutí
výměny hlavy kartáčku akontrolka baterie, které společně
třikrát oranžově zablikají.
29
Pokud budete tlačítko pro zapnutí/vypnutí držet stisknuté ipo třech
krátkých pípnutích, zopakuje se sekvence aktivace/deaktivace.

Čeština
30
Stav baterie a nabíjení
1 Zapojte zástrčku nabíječky do elektrické zásuvky.
2 Postavte rukojeť na nabíječku.
-
Nabíječka vydá 2krátká pípnutí na potvrzení, že rukojeť je
umístěna správně.
-
Blikající světlo indikátoru stavu baterie ukazuje, že se zubní
kartáček nabíjí.
-
Když je rukojeť na nabíječce plně nabitá, indikátor stavu baterie
svítí nepřerušovaně zeleně po dobu 30sekund apotom se
vypne.
Poznámka: Zubní kartáček se dodává předem nabitý pro první použití.
Po prvním použití přístroj nabíjejte alespoň 24hodin.
Stav baterie (když rukojeť není vnabíječce)
Při snímání zubního kartáčku Philips Sonicare znabíječky bude
kontrolka baterie na spodní části zubního kartáčku udávat stav
odpovídající životnosti baterie.
- Nepřerušovaně svítící zelená LED: plně nabitá baterie
- Blikající zelená LED: středně nabitá baterie
- Blikající oranžová LED atři pípnutí: vybitá baterie
- Blikající oranžová LED advě sady pěti pípnutí: Zbývající životnost
již není dostačující ani pro jedno vyčištění zubů (zubní kartáček je
třeba nabít).
Čištění
Poznámka: Nemyjte hlavu kartáčku, rukojeť ani cestovní pouzdro
vmyčce.
Rukojeť kartáčku
1 Sundejte hlavu kartáčku akovovou hřídel opláchněte teplou
vodou. Důsledně odstraňte zbytky zubní pasty (obr. 14).
Poznámka: Na gumové těsnění na kovové hřídeli netlačte ostrými
předměty. Mohli byste ho poškodit.
2 Utřete celý povrch rukojeti vlhkým hadříkem.
 Loading...