

Page 1
AirFloss Pro
Page 2

Page 3
1
Page 4

Page 5

ENGLISH 6
Philips Sonicare AirFloss Pro - HX8331, HX8341, HX8381
Page 6

6
ENGLISH
Introduction
Congratulations on your purchase and welcome to Philips! To fully benet
from the support that Philips offers, register your product at
www.philips.com/welcome.
Use AirFloss Pro as part of your oral care routine. In addition to brushing,
it helps reduce plaque.
Use AirFloss Pro with your favorite mouthwash as par t of your oral care
routine. In addition to brushing, AirFloss Pro helps reduce the plaque in
between teeth in order to improve your gum health.
IMPORTANT
SAFEGUARDS
READ ALL INSTRUCTIONS BEFORE USE
DANGERS
To reduce the risk of electrocution:
- Do not place or store product where it can fall or be pulled
into water.
- Do not place or drop charger into water or other liquids,
unplug the charger immediately if this should occur.
- After cleaning, make sure the charger is completely dry before
you connect it to an electrical outlet.
WARNINGS
To reduce the risk of burns, electrocution, re, or physical
injury:
- Do not use isopropyl alcohol or other cleaning uids in the reservoir
as it may be an ingestion hazard.
- Do not use attachments other than those recommended by
the manufacturer.
- Do not use hot water in the reservoir to avoid physical injury.
- Do not use the charger outdoors.
- Do not drop or insert any foreign objects into the reservoir.
Page 7

ENGLISH 7
- Use only charger type HX6100 provided with the AirFloss Pro
to recharge the battery.
- Never force the plug into an electrical outlet; if the plug does not
easily t into the electrical outlet, discontinue use.
- Keep the cord away from heated surfaces.
- Discontinue use if the nozzle, handle, or charger body/cord appears
damaged in any way.
- The mains cord cannot be replaced. If the mains cord is
damaged, discard the charger.
- This product contains no user-serviceable par ts. Refer to chapter
‘Warranty and support’ if the product no longer works properly or
needs repair.
- Use this product only for its intended use as described in this
document or as recommended by your dental professional.
- This product is not intended for use by persons (including children)
with reduced physical, sensor y, or mental capabilities, or lack of
experience and knowledge, unless they have been given super vision
or instruction concerning use of the product by a person responsible
for their safety.
- Children should be supervised to ensure that they do not play with
the product.
- AirFloss Pro is a personal care device and is not intended for use on
multiple patients in a dental ofce or institution.
- Do not direct the spray under the tongue or into the ear, nose, eye,
or other sensitive areas. This product may cause serious damage to
these areas. See chapter ‘Using your AirFloss Pro’ for correct usage.
- Avoid applying excessive pressure on the guidance tip of the nozzle.
MEDICAL WARNINGS
- Consult your dentist before you use this product if you have had
recent oral or gum surgery, suffer from an ongoing dental condition,
had extensive dental work in the previous two (2) months, or have
suspected issues with your dental work (lings, crowns, etc.).
- Contact your dental professional if excessive bleeding occurs after
using this product or bleeding continues to occur after one (1)
week of use.
Page 8

ENGLISH8
- Discontinue use of this product and contact a physician/dentist
if discomfort or pain is experienced.
- This product complies with the safety standards for electromagnetic
devices. If you have a pacemaker or other implanted device,
contact your physician or the device manufacturer prior to use.
- Consult your physician if you have other medical concerns.
Electromagnetic elds (EMF)
This Philips product complies with all applicable standards and regulations
regarding exposure to electromagnetic elds.
SAVE THESE
INSTRUCTIONS
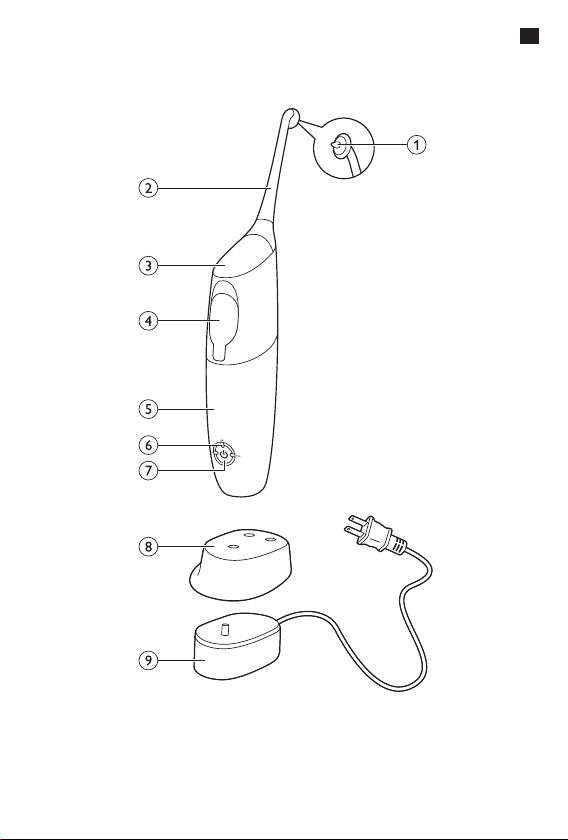
Your Sonicare AirFloss Pro (Fig. 1)
1 Guidance tip
2 AirFloss Pro nozzle
3 Activation button
4 Reservoir and reser voir cover
5 Handle
6 Charge & burst mode indicators
- Single burst: 1 LED
- Double burst: 2 LEDs
- Triple burst: 3 LEDs
7 Power on/off button
8 Removable nozzle holder (select models)
9 Charger
Note: The contents of the box may vary based on the model purchased.
Page 9

ENGLISH 9
Charging
Charge AirFloss Pro for 24 hours before rst use.
1 Put the plug of the charger in the electrical outlet (Fig. 2).
2 Place the handle on the charger (Fig. 3).
, The charge indicators ash green to indicate that your AirFloss Pro
is charging (Fig. 4).
Note: When it is fully charged, AirFloss Pro has an operating time of up to
11 days when it is used in triple burst mode, and up to 33 days when it is
used in single burst mode.
Note: When the charge indicators ash yellow, the battery is low and needs to
be recharged (fewer than 3 uses left).
Getting started
1 Align the nozzle so the tip faces the front of the handle and press
the nozzle down onto the handle (‘click’) (Fig. 5).
Note: Replace the nozzle every 6 months for optimal results. Also replace
the nozzle if it becomes loose or no longer ‘clicks’ onto the handle.
Note: The AirFloss Pro only supports AirFloss Pro nozzles. Do not attempt to
use non-AirFloss Pro nozzles tips on the AirFloss Pro handle.
2 Open the cover of the reservoir (‘click’) (Fig. 6).
3 Fill the reservoir with mouthwash or water (Fig. 7).
Tip: For the best result and a fresher experience, we advise you to use
mouthwash with your AirFloss Pro.
Note: Do not use mouthwash that contains isopropyl myristate (e.g. Dentyl Active)
or high concentrations of essential oils, as it may damage the product.
4 Close the cover of the reservoir by pressing (‘click’) (Fig. 8).
5 Press the power on/off button to turn on the product. (Fig. 9)
, The LEDs illuminate.
6 Press and hold the activation button until spray comes out of
the tip of the nozzle (Fig. 10).
Page 10

ENGLISH10
Using your AirFloss Pro
1 Make sure the AirFloss Pro is turned on. If it is off, press and release
the power on/off button to turn on the product. (Fig. 9)
, You can change the modes to have the desired amounts of bursts
each time you press the activation button. For optimal results,
use the triple burst mode (the default setting).
, To change modes, press the power on/off button to cycle through
the modes until you reach your desired mode. The LEDs show
the selected mode:
- Single burst: 1 LED (Fig. 11)
- Double burst: 2 LEDs (Fig. 12)
- Triple burst: 3 LEDs (Fig. 13)
Note: The AirFloss Pro remembers what mode was selected last and it is
ready for the next use. If your AirFloss Pro becomes fully drained of power,
it will go back to the triple burst default mode once it has been recharged.
2 Place the guidance tip between two teeth at your gum line.
Slightly close your lips over the nozzle when it is in place, to avoid
splashing (Fig. 14).
3 Press the activation button to deliver 1-3 bursts (depending on
the selected mode) of air and micro-droplets of mouthwash or
water between the teeth. (Fig. 15)
4 Slide the guidance tip along the gum line until you feel it settle
between the next two teeth.
5 Continue this procedure for all spaces between your teeth,
including behind your back teeth (Fig. 16).
Note: Rell the reservoir as needed.
Page 11

ENGLISH 11
Auto-burst function
Hold the activation button to deliver bursts continuously,
approximately one burst every second.
1 To turn off AirFloss Pro, press and hold the power on/off button
for one second.
Automatic shut-off function
The AirFloss Pro automatically turns off if it has not been used for
one minute.
Cleaning
Do not clean the nozzle, handle or charger in the dishwasher.
Do not use cleaning agents to clean the appliance.
Handle and nozzle
1 Remove the nozzle from the handle. Rinse the nozzle after each
use (Fig. 17).
2 Open the reservoir and rinse it under a faucet to eliminate
residue (Fig. 18).
Tip: You can also use a cotton swab to wipe the reservoir.
Note: Do not immerse the handle in water.
3 Wipe the entire surface of the handle with a damp cloth (Fig. 19).
Charger
1 Unplug the charger before you clean it (Fig. 20).
2 Wipe the surface of the charger with a damp cloth (Fig. 21).
Page 12

ENGLISH12
Storage
If you are not going to use AirFloss Pro for an extended period of time,
follow the steps below.
1 Open the cover of the reservoir and empty it.
2 Press the activation button until no more spray comes out of the
nozzle.
3 Unplug the charger (Fig. 20).
4 Clean AirFloss Pro nozzle, handle and charger. Refer to chapter
‘Cleaning’.
5 Store AirFloss Pro in a cool, dry place away from direct sunlight.
Disposal
This product may contain lead and mercury. Disposal of these materials
may be regulated due to environmental considerations. For disposal or
recycling information, please contact your local authorities or visit
www.recycle.philips.com.
This product contains batteries:
- Dispose of batteries properly. Do not incinerate. Batteries may
explode if overheated.
- Do not wrap in metal or aluminum foil. Tape the waste battery
terminals before discarding.
- It is suggested that you contact your local town or city to determine
proper battery redemption site(s) in your area.
- Please visit www.call2recycle.org for additional information on a
recycling center in your area for rechargeable batteries.
Page 13

ENGLISH 13
Removing the rechargeable battery
Please note that this process is not reversible.
1 To deplete the battery, repeatedly press the activation button until
the AirFloss no longer produces any bursts of air (Fig. 22).
2 Remove the nozzle from the handle. (Fig. 23)
3 Firmly grab the handle with one hand at the top and one hand on
the bottom (Fig. 24).
4 Snap the handle into two parts. (Fig. 25)
Note: This step requires a good amount of physical force. The top and bottom
half of the handle should be separated once you snap the handle.
5 Remove the bottom half of the handle (Fig. 26).
6 Cut all 6 wires on the internal component with scissors (Fig. 27).
7 Completely pull apart the internal component from the top part of
the handle (Fig. 28).
8 The battery is located inside the top half of the handle. Remove the
battery and dispose of it properly (not in household waste) (Fig. 29).
Warranty and support
Philips warrants its products for two years after the date of purchase.
Defects due to faulty materials and workmanship will be replaced at
Philips expense provided that convincing proof of purchase in the
qualifying period is provided. Use of unauthorized replacement parts will
void this warranty.
Contact our Consumer Care Center at 1-800-682-7664
(North America), outside North America contact your local
Philips Consumer Care Center.
Internet information: www.sonicare.com (North America)
or www.philips.com/support (outside North America).
Page 14

ENGLISH14
WARRANTY EXCLUSIONS
What is not covered under warranty:
- AirFloss Pro nozzle.
- Damage caused by misuse, abuse, neglect, alterations or unauthorized
replacement.
- Normal wear and tear, including chips, scratches, abrasions,
discoloration or fading.
IMPLIED WARRANTIES
ANY IMPLIED WARRANTIES, INCLUDING IMPLIED WARRANTIES OF
MERCHANTABILITY AND FITNESS FOR A PARTICULAR PURPOSE,
SHALL BE LIMITED TO THE DURATION OF THE EXPRESS
WARRANTIES SET FORTH ABOVE. IN SOME STATES LIMITATIOINS
ON DURATION OF IMPLIED WARRANTIES DO NOT APPLY.
LIMITATION OF REMEDIES
IN NO EVENT SHALL PHILIPS OR ANY OF ITS AFFILIATED OR
SUBSIDIARY COMPANIES BE LIABLE FOR ANY SPECIAL,
INCIDENTAL OR CONSEQUENTIAL DAMAGES BASED UPON
BREACH OF WARRANTY, BREACH OF CONTRACT, NEGLIGENCE,
TORT, OR ANY OTHER LEGAL THEORY. SUCH DAMAGES INCLUDE,
WITHOUT LIMITATION, LOSS OF SAVINGS OR REVENUE; LOSS OF
PROFIT; LOSS OF USE; THE CLAIMS OF THIRD PARTIES INCLUDING,
WITHOUT LIMITATION, DENTISTS AND DENTAL HYGIENISTS; AND
COST OF ANY SUBSTITUTE EQUIPMENT OR SERVICES. SOME
STATES DO NOT ALLOW THE EXCLUSION OR LIMITATION OF
INCIDENTAL OR CONSEQUENTIAL DAMAGES.
Page 15

Page 16

Page 17

2 3 4 5
6
10 11 12 13
14 15 16 17
18 19 20 21
7 8 9
Page 18

22 23 24 25
26
27 28 29
Page 19

Page 20

www.philips.com/Sonicare
©2014 Koni nklijke P hilips N.V. (KPNV ). All rights re serve d.
Philip s and the Philip s shield a re trade marks of KPNV.
AirFlo ss, Sonicare a nd the Sonicare l ogo are tradem arks
of Phili ps Oral Healt hcare, Inc. a nd/or KPN V.
4235.020.9019.1
 Loading...