

Page 1

FlexCare
Rechargeable
Sonic Toothbrush
Page 2

1
Page 3

ENGLISH 4
ESPAÑOL 21
FRANÇAIS (CANADA) 39
FlexCare Rechargeable Sonic Toothbrush
Page 4

4
ENGLISH
IMPORTANT SAFEGUARDS
READ ALL INSTRUCTIONS BEFORE USE
When using electrical products, especially when
children are present, basic safety precautions
should always be followed, including the following:
DANGERS
To reduce the risk of electrocution:
1 Do not place or store the charger or sanitizer
where it can fall or be pulled into a tub or sink, or
where it will sit or drop into water or other liquid.
2 Do not reach for a charger or sanitizer that has
fallen into water. Unplug immediately.
3
Never use a charger with a damaged cord or plug.
WARNINGS
To reduce the risk of burns, electrocution, re or
physical injury:
1 Do not use attachments other than those
recommended by the manufacturer.
2
Do not plug the charger into an outlet with a
voltage other than specied on the bottom of the
charger. This product is designed to operate within
a range of 100 to 240 volts. Voltage converters
DO NOT warrant voltage compatibility.
3
Do not insert objects into the air openings of the
sanitizer or block these air openings by placing it
on a soft surface or in a position or location where
objects will block these openings (examples of
objects: magazine, tissue paper, hair, and the like).
4 Never force the plug into an outlet; if the plug
does not easily t into the outlet, discontinue use.
5 Discontinue use if the product appears
damaged in any way (brush head, handle,
charger, sanitizer).
Page 5

ENGLISH 5
6 The power cord cannot be replaced. If the
power cord is damaged, discard the charger
and/or sanitizer.
7 Keep cord away from heated surfaces.
8 Do not use the charger or sanitizer outdoors
or operate the sanitizer where aerosol (spray)
products are being used or where oxygen is
being administered.
9
Never use the toothbrush while sleepy or drowsy.
10 This product contains no user-serviceable parts.
Refer to “Guarantee and Service” if the appliance
no longer works properly or needs repair.
11 Use this appliance only for its intended
use as described in this document or as
recommended by your dental professional.
12 This appliance is not intended for use by persons
(including children) with reduced physical, sensory
or mental capabilities, or lack of experience
and knowledge, unless they have been given
supervision or instruction concerning use of the
appliance by a person responsible for their safety.
13 Children should be supervised to ensure that
they do not play with the appliance.
14 Sonicare is a personal care device for household
use and is not intended for use on multiple
patients in a dental ofce or institution.
15
Discontinue use of the sanitizer if the UV light bulb
remains on when the door is open. UV light can
be harmful to the human eye and skin. Keep the
sanitizer out of the reach of children at all times.
16 Do not operate the UV sanitizer without the
protective screen in place to avoid contact
with hot bulb.
17 If the sanitizer is used for 3 consecutive UV
clean cycles (i.e., 3 times in a row) a minimum
of 30 minutes “Off Time” is required before
you start another UV clean cycle.
Page 6

ENGLISH6
MEDICAL WARNINGS
1 Consult your dental professional before you
use this product if you have had oral or gum
surgery in the previous 2 months.
2 Contact your dental professional if excessive
bleeding occurs after using this product or
bleeding continues to occur after 1 week of use.
3 Discontinue use of this product and contact
a physician/dentist if discomfor t or pain is
experienced.
4 This product complies with the safety
standards for electromagnetic devices. If
you have a pacemaker or other implanted
device, contact your physician or the device
manufacturer prior to use.
5 Consult your physician if you have other
medical concerns.
Electromagnetic elds (EMF)
This Philips appliance complies with all applicable
standards and regulations regarding exposure to
electromagnetic elds.
SAVE THESE INSTRUCTIONS
Page 7

ENGLISH 7
Your Sonicare (Fig. 1)
A Hygienic travel cap
B Brush head
C Handle with soft grip
D Power on/off button
E Personalized brushing button
F Brushing modes (select models)
G Brushing routines (select models)
H Deluxe recharge gauge
I Travel charger
J UV sanitizer with integrated charger and cord
wrap
- Not shown: UV light bulb
- Not shown: Sanitizer drip tray
- Not shown: Protective screen for UV light bulb
Note: The contents of the box will vary based on
model purchased
Getting started
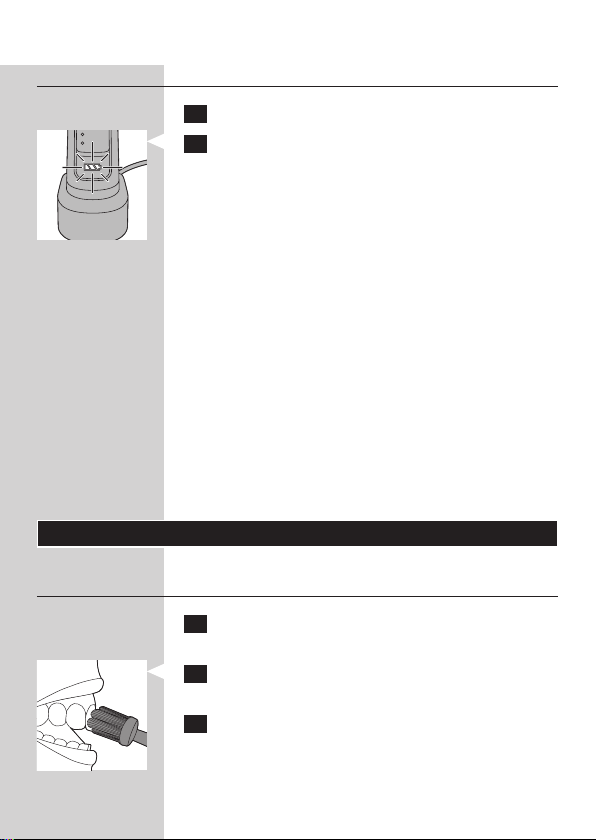
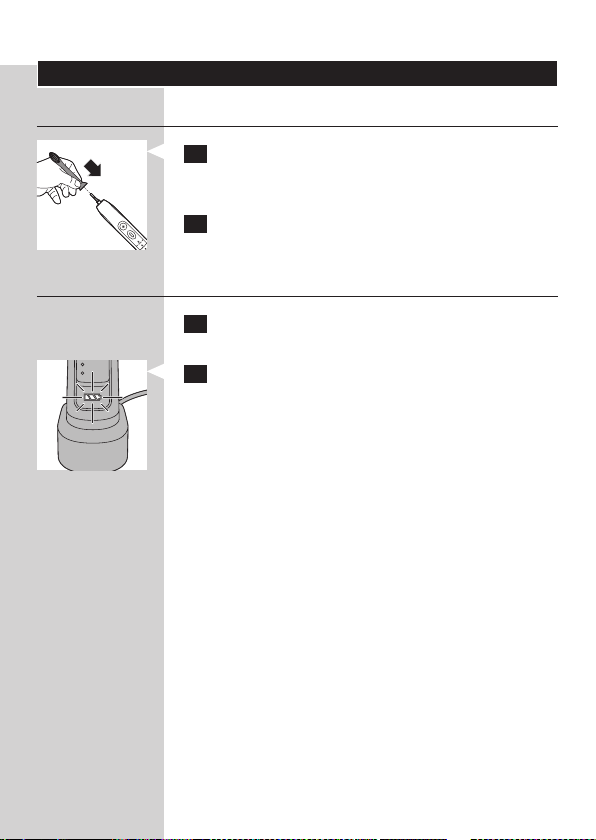
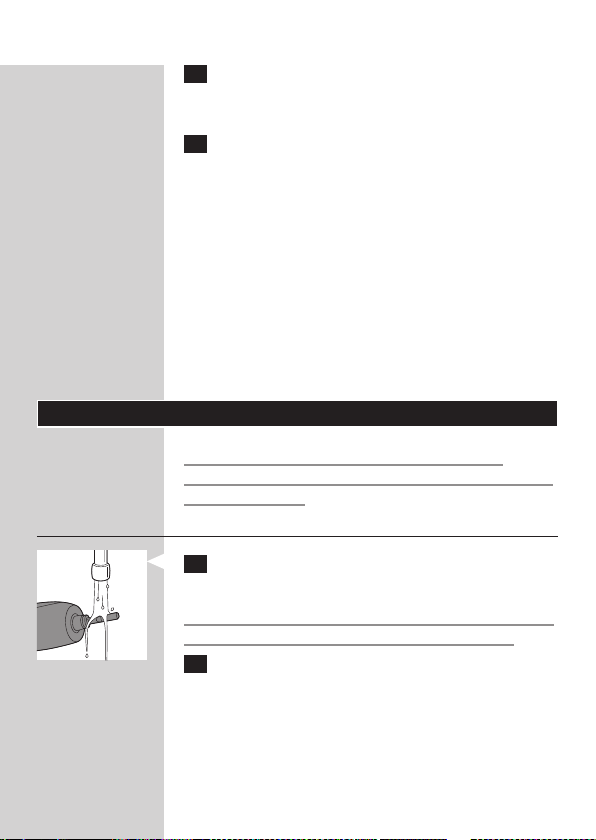
Attaching the brush head
1 Align the brush head so the bristles face the
front of the handle.
2 Firmly press the brush head down on the
metal shaft until it stops.
Page 8
ENGLISH8
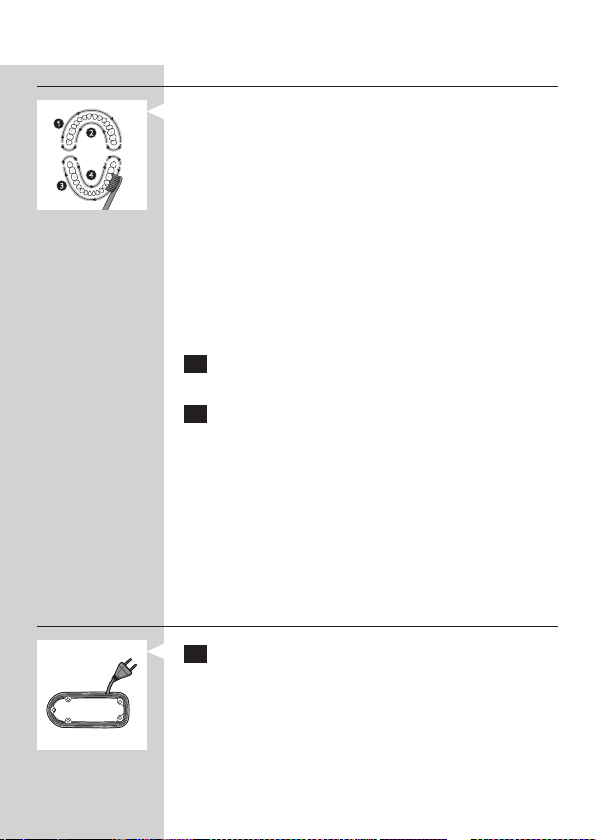
Charging your Sonicare
1 Plug the charger into a live outlet.
2 Place the handle on the charger.
, The ashing light on the battery gauge indicates
that the toothbrush is charging.
Deluxe recharge gauge:
Indicates amount of charge left in battery
- 3 green LEDs: 75-100%
- 2 green LEDs: 50-74%
- 1 green LED: 25-49%
- 1 ashing yellow LED: less than 25%
Note: If the battery charge of your Sonicare is low,
you hear 3 beeps and 1 LED on the recharge gauge
ashes yellow for 30 seconds after the 2-minute
brushing cycle.
Note: To keep the battery fully charged at all times,
you may keep your Sonicare on the charger when not
in use. It takes at least 24 hours to fully charge the
battery.
Using your Sonicare
Brushing instructions
1 Wet the bristles and apply a small amount of
toothpaste.
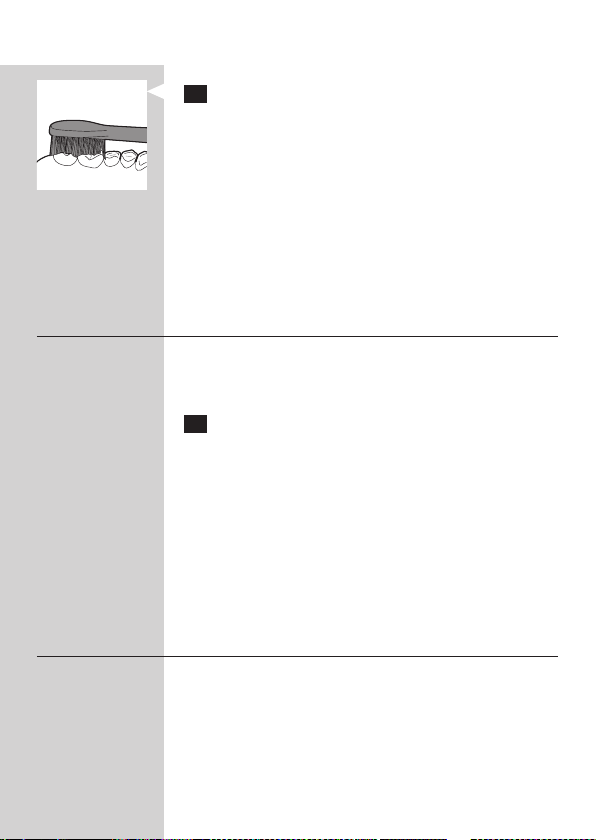
2 Place the toothbrush bristles against the teeth
at a slight angle towards the gumline.
3 Press the power on/off button to turn on the
Sonicare.
Page 9
ENGLISH 9
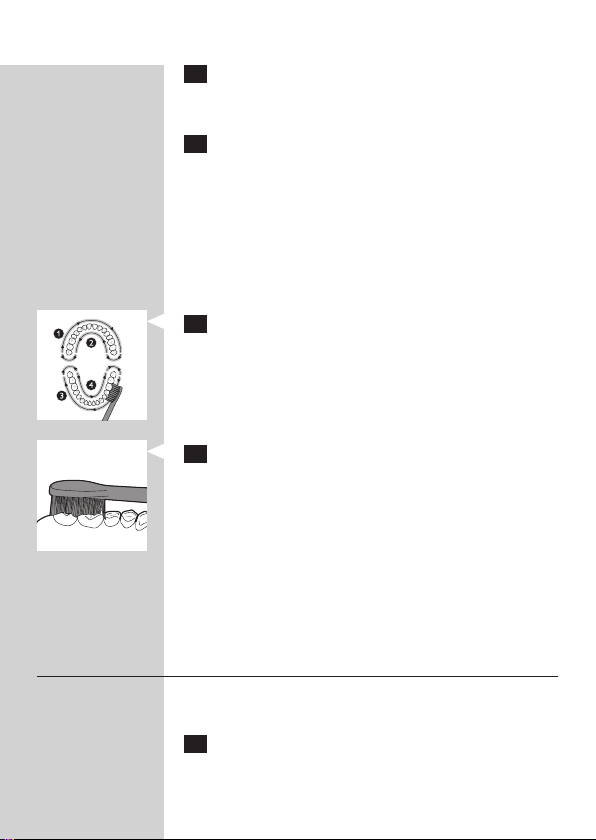
4 Apply light pressure to maximize Sonicare’s
effectiveness and let the Sonicare toothbrush
do the brushing for you.
5 Gently move the brush head slowly across
the teeth in a small back and forth motion
so the longer bristles reach between your
teeth. Continue this motion throughout
your brushing cycle.
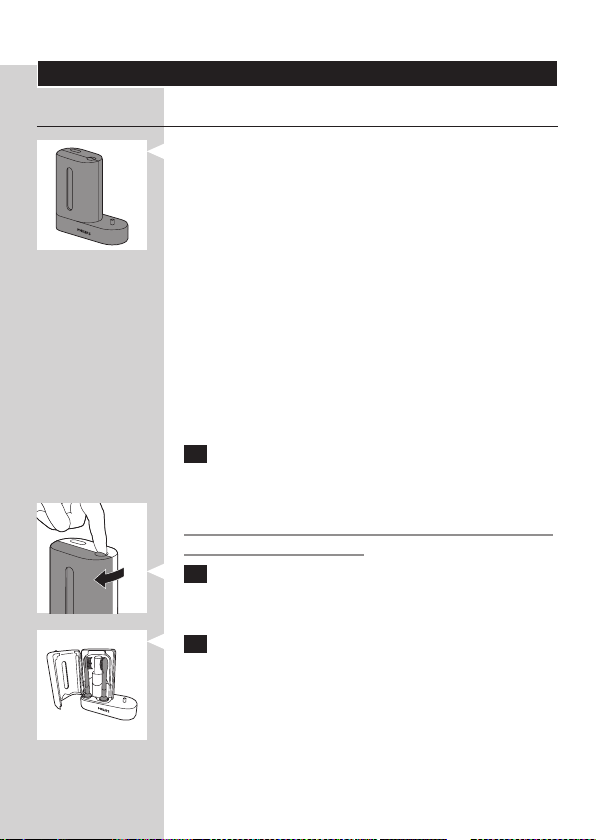
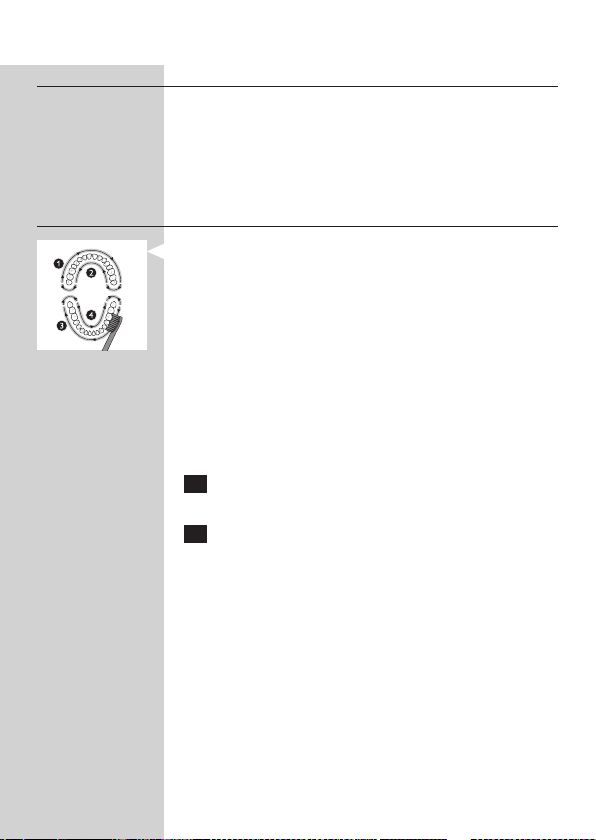
Note: To make sure you brush evenly throughout the
mouth, divide your mouth into 4 sections using the
Quadpacer
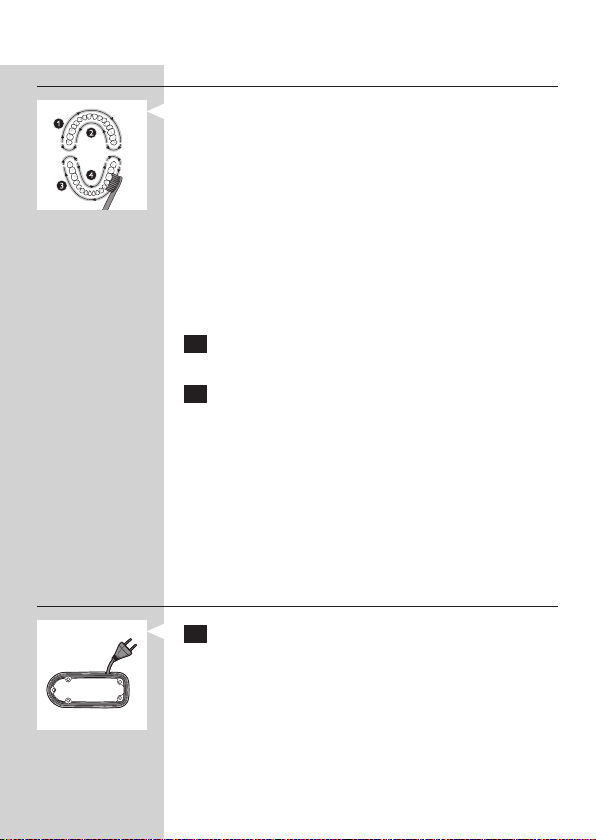
6 Begin brushing in section 1 (outside top teeth)
7 After you have completed the brushing
Your Sonicare is safe to use on:
- Braces (brush heads wear out sooner when used
on braces)
- Dental restorations (llings, crowns, veneers)
Personalizing your brushing experience
Sonicare automatically starts in the default Clean
mode. To personalize your brushing:
1 Prior to turning on the Sonicare, press the
®
feature (see chapter “Features”).
and brush for 30 seconds before moving
to section 2 (inside top teeth). Continue
brushing in section 3 (outside bottom teeth)
and brush for 30 seconds before moving to
section 4 (inside bottom teeth).
cycle, you can spend additional time brushing
the chewing surfaces of your teeth and areas
where staining occurs. You may also brush
your tongue, with the toothbrush turned on
or off, as you prefer.
Personalized Brushing button to toggle
between modes and routines.
Page 10

ENGLISH10
,
The green LED indicates selected mode or routine.
Note: When the toothbrush is turned on, you can
switch between modes but not between routines.
Routines should be selected prior to brushing.
Brushing modes
Clean mode
Standard mode for superior teeth cleaning.
Sensitive mode
Gentle, yet thorough cleaning for sensitive gums
and teeth.
Massage mode
Gentle gum stimulation.
Brushing routines
Go Care routine
1-minute brushing cycle in the Clean mode, for
a quick clean. You hear the Quadpacer signal at
15-second intervals.
Max Care routine
3-minute brushing cycle that combines the Clean
and Massage modes in one routine for a thorough
mouth clean. There are 30 seconds of Clean
mode and 15 seconds of Massage mode for each
of the 4 sections of your mouth. You will hear the
Quadpacer signal at 45 second intervals.
Note: When Sonicare is used in clinical
studies, the default 2-minute Clean mode
must be selected. The handle should be fully
charged. Deactivate the Easy-start feature
and for areas where excess staining occurs,
an additional 30 seconds of brushing time
can be spent to assist with stain removal.
Page 11

Features
ENGLISH 11
Easy-start
®
- This Sonicare model comes with the Easy-start®
feature activated.
- The Easy-start feature gently increases power
over the rst 14 brushings to ease into the
Sonicare experience.
Note: Each of the rst 14 brushings must be at least
1 minute in length to properly move through the
Easy-start ramp-up cycle.
Deactivating or activating the Easy-start
feature
1 Attach your brush head to the handle.
2 Place the handle in the plugged-in charger.
- To deactivate Easy-start:
Press and hold the power button for 5 seconds.
You hear 1 beep to indicate that the Easy-start
feature has been deactivated.
- To activate Easy-start:
Press and hold the power button for 5 seconds.
You hear 2 beeps to indicate that the Easy-start
feature has been activated.
Note: Using the Easy-start feature beyond the initial
ramp-up period is not recommended and reduces
Sonicare’s effectiveness in removing plaque.
Smartimer
The Smartimer
®
®
indicates that your brushing
cycle is complete by automatically turning off the
toothbrush at the end of the brushing cycle.
Dental professionals recommend brushing no less
than 2 minutes twice a day.
Page 12
ENGLISH12
Quadpacer®
- The Quadpacer
®
is an interval timer that has a
short beep and pause to remind you to brush
the 4 sections of your mouth. Depending on
the brushing mode or brushing routine you
have selected, the Quadpacer beeps at different
intervals during the brushing cycle. See the
“Brushing instructions” and “Personalizing your
brushing experience” sections.
The Quadpacer feature on this model has
been activated. To deactivate or reactivate the
Quadpacer feature:
1 Place the handle with a brush head attached
in the plugged-in charger.
2 Press and hold the Personalized brushing
button until:
A You hear 1 beep to indicate the Quadpacer has
been deactivated.
B You hear 2 beeps to indicate the Quadpacer
has been activated.
Note: The Quadpacer feature cannot be deactivated
on the pre-programmed Go Care and Max Care
brushing routines.
Cord wrap with integrated charger
1 You can store excess cord using the cord
wrap feature built into the bottom of the
sanitizer.
Page 13
ENGLISH 13
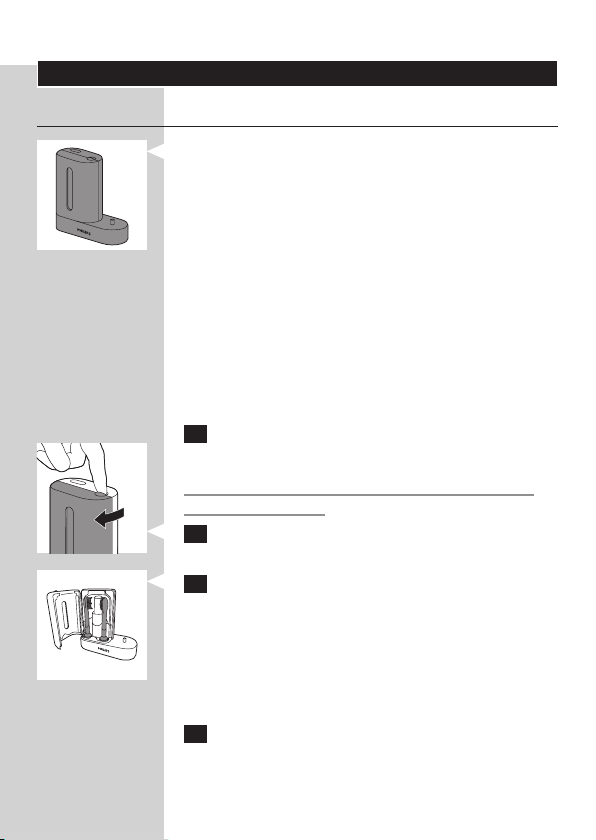
Sanitizing
Sanitizing
- With the UV sanitizer you can clean your brush
head after every use.
Unplug the sanitizer, discontinue use and
call Consumer Care if:
- The UV light bulb remains on when the door is
open.
- The window is broken or missing from the
sanitizer.
- The sanitizer gives off smoke or a burning smell
while it is operating.
Note: UV light can be harmful to the human eye
and skin. This device should be kept out of reach of
children at all times.
1 After brushing, rinse the brush head and
shake off excess water.
Do not place the travel cap on the brush head
during sanitization.
2 Place your nger in the door recess on top of
the sanitizer and pull open the door.
3 Place the brush head on one of the 2 pegs in the
sanitizer with the bristles facing the light bulb.
Note: Only clean Sonicare snap-on brush heads in the
sanitizer.
Note: Do not clean Sonicare for Kids brush heads in
the sanitizer.
4 Make sure the sanitizer is plugged into a live
outlet of appropriate voltage.
Page 14

ENGLISH14
5 Close the door and press the green power on/
off button once to select the UV clean cycle.
Note: You can only turn on the sanitizer if the door is
properly closed.
Note: The sanitizer stops if you open the door during
the sanitizing cycle.
Note: The sanitizer cycle runs for 10 minutes and
then automatically shuts off.
, The sanitizer is in operation when the light
glows through the window.
Cleaning
Do not clean the brush head, handle, travel
charger or the UV sanitizer in the dishwasher.
Toothbrush handle
1 Remove the brush head and rinse the metal
shaft area with warm water.
Do not push on the rubber seal on the metal shaft
with sharp objects, as this may cause damage.
2 Use a damp cloth to wipe the entire surface
of the handle.
Brush head
1 Rinse the brush head and bristles after each
use.
2 Remove the brush head from the handle and
rinse the brush head connection at least once
a week with warm water.
Page 15

ENGLISH 15
Charger
1 Unplug the charger.
2 Use a damp cloth to wipe the surface of the
char g e r.
Sanitizer
Do not immerse the sanitizer in water or rinse it
under the faucet.
Do not clean the sanitizer when the UV light bulb
is hot.
For optimal effectiveness, it is recommended to
clean your sanitizer weekly.
1 Unplug the sanitizer.
2 Pull the drip tray straight out. Rinse the drip
tray and wipe it clean with a damp cloth.
3 Clean all interior surfaces with a damp cloth.
4 Remove the protective screen in front of the
UV light bulb.
To remove the screen, grasp the edges next to the
snaps, gently squeeze and pull out the protective
screen.
5 Remove the UV light bulb.
To remove the light bulb, grasp it and pull it out of
the metal clasp.
6 Clean the protective screen and the UV light
bulb with a damp cloth.
7 Reinsert the UV light bulb.
To reinsert the light bulb, align the bottom of the
light bulb with the metal clasp and push the bulb
into the clasp.
Page 16

ENGLISH16
8 Reinsert the protective screen.
To reinsert the screen, align the pegs on the screen
with the slots on the reective surface near the UV
light bulb. Push the screen straight into the slots on
the sanitizer.
Storage
- If you are not going to use the product for an
extended period of time, unplug it from the
electrical outlet, clean it and store it in a cool
and dry place away from direct sunlight. You can
use the cord wrap to store the power cord in an
organized manner.
Replacement
Brush head
- Replace Sonicare brush heads every 3 months to
achieve optimal results.
- Use only genuine Philips Sonicare replacement
brush heads.
UV light bulb
- Replacement UV bulbs are available through
your Sonicare Consumer Service Center in
North America by calling 1-800-682-7664.
Outside North America, contact your local
Philips Consumer Care Center.
Page 17
ENGLISH 17
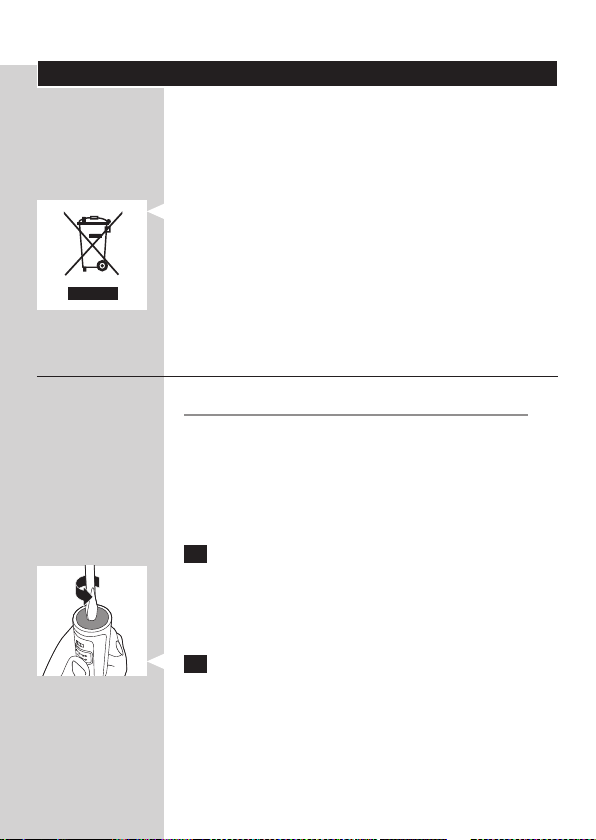
Disposal
The rechargeable battery inside your Sonicare
cannot be replaced, but is easy to remove for
recycling. At the end of product life and prior to
disposal, please remove the rechargeable battery
from the handle by following the instructions below.
- Do not throw away the appliance or the UV light
bulb (bulb contains mercury) with the normal
household waste at the end of its life, but hand
it in at an ofcial collection point for recycling. By
doing this, you help to preserve the environment.
- If you have any recycling questions, contact your
local waste management ofce.
Removing the rechargeable battery
Please note that this process is not reversible.
- To remove the rechargeable battery, you need
a at-head (standard) screwdriver. Observe
basic safety precautions when you follow the
procedure outlined below. Be sure to protect
your eyes, hands, ngers, and the surface on
which you work.
1 To deplete the rechargeable battery of any
charge, remove the handle from the charger,
turn on the Sonicare and let it run until it
stops. Repeat this step until you can no longer
switch on the Sonicare.
2 Insert a screwdriver into the slot located
at the bottom of the handle and turn
counterclockwise to release the bottom cap.
Page 18

ENGLISH18
3 Hold the handle upside down and push
down on the shaft to release the internal
components of the handle.
4 Insert the screwdriver under the circuit
board, next to the battery connections, and
twist to break the connections. Remove the
circuit board and pry the battery from the
plastic carrier.
The rechargeable battery can now be recycled and
the rest of the product discarded appropriately.
Guarantee and service
Philips warrants its products for two years after the
date of purchase. Defects due to faulty materials and
workmanship will be repaired or replaced at Philips
expense provided that convincing proof of purchase in
the qualifying period is provided. Use of unauthorized
replacement parts will void this warranty.
Contact our Consumer Center at 1-800-682-7664
(North America), outside North America contact
your local Philips Consumer Care Center.
Internet information: www.sonicare.com (North
America) or www.philips.com (outside North
America).
Page 19

ENGLISH 19
WARRANTY EXCLUSIONS
What is not covered under warranty:
- Brush heads
- Damage caused by use of unauthorized
replacement parts.
- Damage caused by misuse, abuse, neglect,
alterations or unauthorized repair.
- Normal wear and tear, including chips, scratches,
abrasions, discoloration or fading.
- UV light bulb.
IMPLIED WARRANTIES
ANY IMPLIED WARRANTIES, INCLUDING
IMPLIED WARRANTIES OF MERCHANTABILITY
AND FITNESS FOR A PARTICULAR PURPOSE,
SHALL BE LIMITED TO THE DURATION OF
THE EXPRESS WARRANTIES SET FORTH
ABOVE. IN SOME STATES LIMITATIONS ON
DURATION OF IMPLIED WARRANTIES DO
NOT APPLY.
Page 20

ENGLISH20
LIMITATION OF REMEDIES
IN NO EVENT SHALL PHILIPS OR ANY OF
ITS AFFILIATED OR SUBSIDIARY COMPANIES
BE LIABLE FOR ANY SPECIAL, INCIDENTAL
OR CONSEQUENTIAL DAMAGES BASED
UPON BREACH OF WARRANTY, BREACH OF
CONTRACT, NEGLIGENCE, TORT, OR ANY
OTHER LEGAL THEORY. SUCH DAMAGES
INCLUDE, WITHOUT LIMITATION, LOSS OF
SAVINGS OR REVENUE; LOSS OF PROFIT;
LOSS OF USE; THE CLAIMS OF THIRD
PARTIES INCLUDING, WITHOUT LIMITATION,
DENTISTS AND DENTAL HYGIENISTS; AND
COST OF ANY SUBSTITUTE EQUIPMENT OR
SERVICES. SOME STATES DO NOT ALLOW THE
EXCLUSION OR LIMITATION OF INCIDENTAL
OR CONSEQUENTIAL DAMAGES.
Page 21

ESPAÑOL
PRECAUCIONES IMPORTANTES
LEA TODAS LAS INSTRUCCIONES ANTES DE
USARLO
Cuando utilice productos eléctricos, especialmente
cuando haya niños, debe seguir siempre las medidas
de seguridad básicas, entre las que se incluyen:
PELIGROS
Para reducir el riesgo de electrocución:
1 No coloque ni guarde el cargador o
higienizador en un lugar desde donde pueda
caerse a una bañera o lavabo., o donde pueda
caerse al agua u otro líquido.
2 No intente coger un cargador o higienizador
que se haya caído al agua; desenchúfelo
inmediatamente.
3 No utilice nunca un cargador con el cable o la
clavija dañados.
ADVERTENCIAS
Para reducir el riesgo de quemaduras,
electrocución, incendio o lesiones:
1 No utilice accesorios distintos a los
recomendados por el fabricante.
2 No enchufe el cargador a una toma de corriente
con voltaje distinto al que se especica en la
parte inferior del cargador. Este producto ha sido
diseñado para funcionar con voltajes de 100 a
240 voltios. Los transformadores de tensión NO
garantizan la compatibilidad de voltaje.
3 No introduzca objetos en las rejillas de aire
del higienizador ni las bloquee colocando el
higienizador en una supercie blanda o en una
posición en la que haya objetos que bloqueen
estas rejillas (ejemplos de objetos: revistas,
papel de cocina, pelo y similares).
21
Page 22

ESPAÑOL22
4 No fuerce nunca la clavija para que entre en la
toma de corriente; si no entra fácilmente, no la
utilice.
5 Deje de utilizar este producto si tiene algún
fallo o deterioro (cabezal del cepillo, mango,
cargador e higienizador).
6 El cable de alimentación no se puede sustituir.
Si está dañado, deseche el cargador y/o el
higienizador.
7 Mantenga el cable lejos de supercies calientes.
8 No utilice el cargador o higienizador al aire
libre ni utilice el higienizador donde se utilicen
aerosoles (spray) o donde se administre oxígeno.
9 Nunca utilice el cepillo dental si siente
somnolencia.
10 Este producto contiene piezas que el usuario
no puede sustituir. Si el aparato no funciona
correctamente o necesita reparación, consulte
el capítulo “Garantía y servicio”.
11
Utilice este aparato sólo para el uso al que está
destinado tal como se describe en este documento
o según las recomendaciones de su dentista.
12 Este aparato no debe ser usado por personas
(adultos o niños) con su capacidad física,
psíquica o sensorial reducida, ni por quienes
no tengan los conocimientos y la experiencia
necesarios, a menos que sean supervisados o
instruidos acerca del uso del aparato por una
persona responsable de su seguridad.
13 Asegúrese de que los niños no jueguen con
este aparato.
14 Sonicare es un dispositivo de higiene personal
para uso doméstico y no ha sido concebido
para su uso en múltiples pacientes de clínicas o
instituciones.
Page 23

ESPAÑOL 23
15 Deje de utilizar el higienizador si la lámpara de
rayos ultravioleta (UV) permanece encendida
cuando la puerta está abierta. La luz UV puede
ser perjudicial para los ojos y la piel de las
personas. Mantenga el higienizador fuera del
alcance de los niños en todo momento.
16 Para evitar el contacto con la lámpara
caliente, no utilice el higienizador si la pantalla
protectora no está colocada en su sitio.
17 Si el higienizador se utiliza para realizar tres
ciclos de limpieza por rayos UV consecutivos
(es decir, tres veces seguidas), se debe esperar
al menos 30 minutos antes de comenzar un
nuevo ciclo de limpieza por rayos UV.
ADVERTENCIAS MÉDICAS
1 Consulte a su dentista o higienista dental antes de
utilizar este producto si le han practicado cirugía
oral o de las encías en los 2 últimos meses.
2 Consulte a su dentista o higienista dental si
se produce un sangrado excesivo después de
usar este producto o si el sangrado continúa
produciéndose después de 1 semana de uso.
3 Deje de utilizar este producto y consulte a un
médico o dentista si experimenta algún tipo de
dolor o molestia.
4 Este producto cumple las normas de seguridad
para dispositivos electromagnéticos. Si tiene
un marcapasos o cualquier otro dispositivo
implantado, consulte a su médico o al fabricante
del dispositivo antes de utilizar el aparato.
5
Consulte a su médico si tiene otras dudas médicas.
Page 24

ESPAÑOL24
Campos electromagnéticos (CEM)
Este aparato de Philips cumple los estándares y las
normativas aplicables sobre exposición a campos
electromagnéticos.
CONSERVE ESTAS INSTRUCCIONES
Su Sonicare (g. 1)
A Capuchón higiénico
B Cabezal del cepillo
C Mango con empuñadura suave
D Botón de encendido/apagado
E Botón de Cepillado Personalizado
F Modos de cepillado (en algunos modelos)
G Hábitos de cepillado (en algunos modelos)
H Indicador de recarga de lujo
I Cargador de viaje
J Higienizador por rayos UV con cargador y
recogecable incorporados
- No se muestra: lámpara de rayos UV
- No se muestra: bandeja antigoteo del
higienizador
- No se muestra: pantalla protectora para la
lámpara de rayos UV
Nota: El contenido de la caja variará en función del
modelo que adquiera
Page 25
ESPAÑOL 25
Antes de empezar
Cómo jar el cabezal del cepillo
1 Alinee el cabezal del cepillo de manera que las
cerdas queden mirando hacia la parte frontal
del mango.
2 Presione rmemente hacia abajo el cabezal del
cepillo sobre el eje metálico hasta que encaje.
Carga de Sonicare
1 Enchufe el cargador a una toma de corriente
activa.
2 Coloque el mango en el cargador.
, El piloto del indicador de batería parpadea para
indicar que el cepillo se está cargando.
Indicador de recarga de lujo:
Indica la carga disponible en la batería
- 3 pilotos LED verdes: 75-100%
- 2 pilotos LED verdes: 50-74%
- 1 piloto LED verde: 25-49%
- 1 piloto LED amarillo parpadeando: menos del 25%
Nota: Si la carga de la batería de su Sonicare está
baja, oirá 3 pitidos y 1 piloto LED del indicador de
carga parpadeará en amarillo durante 30 segundos
después de un ciclo de cepillado de 2 minutos.
Nota: Para mantener la batería completamente
cargada en todo momento, puede dejar su Sonicare
en el cargador cuando no lo esté utilizando. Se
necesitan al menos 24 horas para cargar totalmente
la batería.
Page 26

ESPAÑOL26
Uso del Sonicare
Instrucciones de cepillado
1 Moje las cerdas y aplique una pequeña
cantidad de pasta de dientes.
2 Coloque las cerdas del cepillo sobre los
dientes, formando un ligero ángulo con la
línea de las encías.
3 Pulse el botón de encendido/apagado para
encender su Sonicare.
4 Ejerza una ligera presión para maximizar
la ecacia de Sonicare y deje que éste se
encargue del cepillado.
5 Desplace suavemente el cabezal del cepillo
por todos los dientes con un pequeño
movimiento hacia delante y hacia atrás, de
forma que las cerdas más largas lleguen a los
espacios interdentales. Continúe con este
movimiento durante el ciclo de cepillado.
Nota: Para asegurar el cepillado uniforme de toda
la boca, divida la cavidad bucal en 4 secciones
mediante la función Quadpacer
“Características”).
6 Comience el cepillado por la sección 1 (cara
externa dientes superiores) y cepille durante
30 segundos antes de pasar a la sección 2
(cara interna dientes superiores). Continúe
con la sección 3 (cara externa dientes
inferiores) y cepíllela durante 30 segundos
antes de pasar a la sección 4 (cara interna
dientes inferiores).
®
(consulte el capítulo
Page 27

ESPAÑOL 27
7 Después de completar el ciclo de cepillado,
puede dedicar un tiempo adicional al cepillado
de la supercie de masticación de los dientes
y las zonas donde se forman manchas.
También puede cepillarse la lengua, con el
cepillo encendido o apagado, como preera.
Puede utilizar Sonicare de forma segura en:
-
Aparatos correctores (los cabezales se gastan antes
cuando se utilizan sobre aparatos correctores)
-
Restauraciones dentales (empastes, coronas, carillas)
Personalización del cepillado
Al encender su Sonicare éste se posiciona
automáticamente en el modo Limpieza (Clean mode)
predeterminado. Para personalizar su cepillado:
1 Antes de encender su Sonicare, pulse el
botón de Cepillado Personalizado para
alternar entre los distintos modos y hábitos.
, El piloto LED verde indica el modo o hábito
seleccionado.
Nota: Una vez encendido el cepillo dental, podrá
cambiar los modos, pero no los hábitos. Éstos se
deben seleccionar antes del cepillado.
Modos de cepillado
Modo Clean (Limpieza)
Modo estándar para una limpieza superior de los
dientes.
Modo Sensitive (Suave)
Limpieza suave y en profundidad para dientes y
encías sensibles.
Modo Massage (Masaje)
Suave estimulación de las encías
Page 28

ESPAÑOL28
Hábitos de cepillado
Hábito Go Care (cepillado Rápido)
Ciclo de cepillado de 1 minuto en modo Clean,
para una limpieza rápida. Oirá la señal del
Quadpacer a intervalos de 15 segundos.
Hábito Max Care (cepillado Integral)
Ciclo de cepillado de 3 minutos que combina los
modos Limpieza y Masaje en un solo hábito, para
una limpieza completa de la boca. Hay 30 segundos
de modo Limpieza y 15 segundos de modo Masaje
para cada una de las 4 secciones de la boca. Oirá la
señal del Quadpacer en intervalos de 45 segundos.
Nota: Cuando se utiliza Sonicare en
estudios clínicos, se debe seleccionar
el modo Limpieza predeterminado de
2 minutos. El mango debe estar totalmente
cargado. Desactive la función Easy-start
y, en zonas con muchas manchas, cepille
durante 30 segundos más para ayudar a
eliminarlas.
Características
Easy-start
- Este modelo de Sonicare viene con la función
Easy-start
®
®
activada.
- La función Easy-start aumenta paulatinamente la
potencia a lo largo de los primeros 14 cepillados,
para acostumbrarse fácilmente al uso de
Sonicare.
Nota: Los 14 primeros cepillados deben tener
una duración de al menos 1 minuto para realizar
adecuadamente el ciclo ascendente de Easy-start.
Page 29

ESPAÑOL 29
Cómo desactivar o activar la función
Easy-start
1 Fije el cabezal del cepillo al mango.
2 Coloque el mango en el cargador enchufado.
- Para desactivar la función Easy-star t:
Mantenga pulsado el botón de encendido/apagado
durante 5 segundos. Oirá 1 pitido que indica que
se ha desactivado la función Easy-start.
- Para activar la función Easy-start:
Mantenga pulsado el botón de encendido/apagado
durante 5 segundos. Oirá 2 pitidos que indican que
se ha activado la función Easy-start.
Nota: No se recomienda utilizar la función Easy-start
más allá del periodo inicial de regulación, ya que reduce
la ecacia de Sonicare en la eliminación de la placa.
Smartimer
El temporizador Smartimer
ciclo de cepillado se ha completado, apagando
automáticamente el cepillo dental al nalizar el
ciclo de cepillado.
Los profesionales dentales recomiendan cepillarse
al menos durante 2 minutos 2 veces al día.
®
®
indica que el
Page 30
ESPAÑOL30
Quadpacer®
- Quadpacer
®
es un temporizador de intervalos
que utiliza un pitido corto y una pausa para
ayudarle a cepillarse las 4 secciones de la boca.
Dependiendo del modo o hábito de cepillado
que haya seleccionado, el temporizador
Quadpacer emitirá pitidos en diferentes
intervalos durante el ciclo de cepillado. Consulte
las secciones “Instrucciones de cepillado” y
“Personalización del cepillado”.
La función Quadpacer de este modelo ha sido
activada. Para desactivar o volver a activar la
función Quadpacer:
1 Coloque el mango, con el cabezal del cepillo
puesto, en el cargador enchufado.
2 Mantenga pulsado el botón de Cepillado
Personalizado hasta:
A Oír 1 pitido, que indica que la función
Quadpacer se ha desactivado.
B Oír 2 pitidos, que indican que la función
Quadpacer se ha activado.
Nota: La función Quadpacer no se puede desactivar
en los hábitos de cepillado preprogramados Go Care
y Max Care.
Recogecable con cargador integrado
1 Puede guardar el cable sobrante en el
recogecable situado en su parte inferior del
higienizador.
Page 31
ESPAÑOL 31
Higienización
Higienización
- Con el higienizador por rayos UV puede limpiar
el cabezal del cepillo después de cada uso.
Desenchufe el higienizador, deje de
utilizarlo y llame al Servicio de Atención al
Cliente si:
- La lámpara de rayos UV permanece encendida
cuando la puerta está abierta.
- La ventana está rota o se ha desprendido del
higienizador.
- El higienizador desprende humo o si hay un olor
a quemado mientras está en funcionamiento.
Nota: La luz UV puede ser perjudicial para los ojos y
la piel de las personas. Mantenga el aparato fuera del
alcance de los niños en todo momento.
1 Después del cepillado, enjuague el cabezal del
cepillo y sacúdalo para eliminar el exceso de
agua.
No coloque el capuchón en el cabezal del cepillo
durante la higienización.
2 Coloque el dedo en el oricio de la puerta
situado en la parte superior del higienizador y
tire para abrir la puerta.
3 Coloque el cabezal del cepillo en uno de los
2 soportes del higienizador con las cerdas
orientadas hacia la lámpara.
Nota: Limpie en el higienizador únicamente cabezales
de cepillo fáciles de encajar Sonicare.
Nota: No limpie cabezales de cepillo Sonicare For
Kids en el higienizador.
Page 32
ESPAÑOL32
4 Asegúrese de que el higienizador esté
enchufado a una toma de corriente activa con
el voltaje adecuado.
5 Cierre la puerta y pulse el botón verde de
encendido/apagado una vez para seleccionar
el ciclo de limpieza de rayos UV.
Nota: El higienizador sólo se puede encender si la
puerta está bien cerrada.
Nota: El higienizador se apaga si se abre la puerta
durante el ciclo de higienización.
Nota: El ciclo de higienización dura 10 minutos y
luego se apaga automáticamente.
, Cuando el higienizador está en funcionamiento,
se ve una luz a través de la ventana.
Limpieza
No lave el cabezal del cepillo, el mango, el
cargador de viaje ni el higienizador por rayos UV
en el lavavajillas.
Mango del cepillo
1 Quite el cabezal del cepillo y enjuague la zona
del eje metálico con agua caliente.
No empuje la junta de goma del eje metálico con
ningún objeto alado, ya que podría dañarla.
2 Utilice un paño húmedo para limpiar la
supercie del mango.
Page 33

ESPAÑOL 33
Cabezal del cepillo
1 Enjuague siempre el cabezal y las cerdas
después de cada uso.
2 Quite el cabezal del cepillo del mango y
enjuague la conexión del cabezal del cepillo al
menos una vez a la semana con agua caliente.
Cargador
1 Desenchufe el cargador.
2 Utilice un paño húmedo para limpiar la
supercie del cargador.
Higienizador
No sumerja el higienizador en agua ni lo enjuague
bajo el grifo.
No limpie el higienizador si la lámpara de rayos
UV está caliente.
Para una mayor ecacia, le aconsejamos que limpie
el higienizador una vez a la semana.
1 Desenchufe el higienizador.
2 Extraiga la bandeja antigoteo. Enjuáguela y
límpiela con un paño húmedo.
3 Limpie todas las supercies interiores con un
paño húmedo.
4 Extraiga la pantalla protectora situada delante
de la lámpara de rayos UV.
Para quitar la pantalla protectora, agarre los
bordes cerca de los botones de presión, apriete
suavemente y extráigala.
Page 34

ESPAÑOL34
5 Quite la lámpara de rayos UV.
Para quitar la lámpara de rayos UV, agárrela y
sáquela del casquillo metálico.
6 Limpie la pantalla protectora y la lámpara de
rayos UV con un paño húmedo.
7 Vuelva a colocar la lámpara de rayos UV.
Para volver a colocar la lámpara, alinee la parte
inferior de la misma con el casquillo metálico y
empújela para introducirla en el mismo.
8 Vuelva a colocar la pantalla protectora.
Para volver a colocar la pantalla, alinee los salientes
de la pantalla con las ranuras de la supercie
reectora junto a la lámpara de rayos UV. Presione
la pantalla en las ranuras del higienizador.
Almacenamiento
- Si no va a utilizar el producto durante un largo
período de tiempo, desenchúfelo de la toma
de corriente, límpielo y guárdelo en un lugar
fresco y seco, alejado de la luz directa del sol.
Puede utilizar el recogecables para guardar
cómodamente el cable de alimentación.
Sustitución
Cabezal del cepillo
- Sustituya los cabezales de Sonicare cada 3 meses
para conseguir unos resultados óptimos.
- Utilice solo cabezales del cepillo de repuesto
Sonicare originales de Philips.
Page 35

ESPAÑOL 35
Lámpara de rayos UV
- Las lámparas de rayos UV de repuesto están
disponibles en el Servicio de Atención al Cliente
Sonicare de Norteamérica, llamando al número
1-800-682-7664. Si se encuentra fuera de
Norteamérica, póngase en contacto con el Servicio
de Atención al Cliente de Philips de su país.
Cómo deshacerse del aparato
- La batería recargable de Sonicare no es
reemplazable, pero se puede quitar fácilmente
para reciclarla. Al nal de la vida útil del aparato,
y antes de deshacerse de él, quite la batería
recargable del mango siguiendo las instrucciones
que se detallan a continuación.
- Al nal de su vida útil, no tire el aparato ni la
lámpara de rayos UV (contiene mercurio) junto
con la basura normal del hogar. Llévelo a un
punto de recogida ocial para su reciclado. De
esta manera, ayudará a conservar el medio
ambiente.
- Si tiene cualquier duda sobre el reciclado,
póngase en contacto con la ocina local de
tratamiento de residuos.
Cómo extraer la batería recargable
Tenga en cuenta que este proceso no es
reversible.
- Para extraer la batería recargable se necesita un
destornillador plano normal. Tenga en cuenta
las medidas de seguridad básicas cuando siga
los procedimientos descritos a continuación.
Asegúrese de proteger sus ojos, manos, dedos y
la supercie en la que trabaja.
Page 36

ESPAÑOL36
1 Para agotar la carga de la batería recargable,
quite el mango del cargador, encienda el
cepillo Sonicare y déjelo funcionar hasta que
se pare. Repita esto hasta que ya no pueda
encender el cepillo.
2 Introduzca un destornillador en la ranura
situada en la parte inferior del mango y gírelo
en sentido contrario al de las agujas del reloj
para liberar la tapa inferior.
3 Sujete el mango boca abajo y presione en el
eje para sacar los componentes del mango.
4 Introduzca el destornillador debajo del
circuito, junto a las conexiones de la batería
y gírelo para romper las conexiones. Quite
el circuito y separe la batería de la carcasa de
plástico.
La batería recargable ya se puede reciclar y el
resto de materiales se pueden desechar de manera
adecuada.
Page 37

ESPAÑOL 37
Garantía y servicio
Philips garantiza su producto por un periodo de
dos años después de la fecha de compra. Philips
se hará cargo de la reparación o sustitución de
los defectos debidos a materiales defectuosos
o de fabricación, siempre y cuando se presente
una prueba convincente de compra en el plazo
estipulado. El uso de piezas de repuesto no
autorizadas anulará esta garantía.
Póngase en contacto con nuestro Servicio
de Atención al Cliente 1-800-682-7664 (en
Norteamérica). Fuera de Norteamérica, póngase
en contacto con el Centro de Atención al Cliente
de Philips en su país.
Información en Internet: www.sonicare.com
(Norteamérica) o www.philips.com (fuera de
Norteamérica).
EXCLUSIONES DE LA GARANTÍA
No están cubiertos por la garantía:
- Cabezales del cepillo
- Deterioros causados por el uso de piezas de
repuesto no autorizadas.
- Deterioros causados por el uso inapropiado,
abusos, negligencias, alteraciones o reparaciones
no autorizadas.
- Desgaste normal, incluyendo arañazos,
desportilladuras, abrasiones, decoloraciones o
perdida gradual del color.
- Lámpara de rayos UV.
Page 38

ESPAÑOL38
GARANTÍAS IMPLÍCITAS
TODA GARANTÍA IMPLÍCITA, INCLUÍDAS
LAS GARANTÍAS IMPLÍCITAS DE
COMERCIALIZACIÓN Y APTITUD PARA UN
FIN PARTICULAR, ESTARÁN LIMITADAS A LA
DURACIÓN DE LAS GARANTÍAS EXPRESAS
ESTABLECIDAS ANTERIORMENTE. EN
ALGUNOS ESTADOS NO SE APLICAN LÍMITES
EN LA DURACIÓN DE LA GARANTÍA.
LIMITACIÓN DE RECURSOS
EN NINGÚN CASO PHILIPS O CUALQUIER A
DE SUS EMPRESAS AFILIADAS O SUBSIDIARIAS
SERÁ RESPONSABLE DE DAÑOS ESPECIALES,
ACCIDENTALES O DERIVADOS DEL
INCUMPLIMIENTO DE LA GARANTÍA O
DEL CONTRATO, NEGLIGENCIA, AGRAVIO
O CUALQUIER OTRA BASE LEGAL. ESTOS
DAÑOS INCLUYEN, SIN LÍMITE, PÉRDIDA DE
AHORROS O INGRESOS; LUCRO CESANTE;
PÉRDIDA DE USO; RECLAMACIONES DE
TERCEROS, INCLUYENDO, SIN LÍMITE,
DENTISTAS E HIGIENISTAS DENTALES;
Y COSTE DE EQUIPO O SERVICIOS
SUSTITUTIVOS. EN ALGUNOS ESTADOS NO
SE ADMITE LA EXCLUSIÓN O LIMITACIÓN DE
DAÑOS ACCIDENTALES O DERIVADOS.
Page 39

FRANÇAIS (CANADA)
MISES EN GARDE IMPORTANTES
LISEZ TOUTES LES INSTRUCTIONS AVANT
D’UTILISER L’APPAREIL
Lorsque vous utilisez des appareils électriques,
surtout en présence d’enfants, suivez toujours les
mesures de sécurité fondamentales, notamment :
DANGER
Pour éviter tout risque d’électrocution :
1 Ne placez pas le chargeur ou l’assainisseur près
d’une baignoire ou d’un lavabo où il risquerait
de tomber ou d’entrer en contact avec de l’eau
ou tout autre liquide.
2 Ne touchez pas le chargeur ou l’assainisseur
s’il est tombé dans l’eau. Débranchez-le
immédiatement.
3 N’utilisez jamais un chargeur dont le cordon ou
la prise est endommagé.
AVERTISSEMENTS
Pour diminuer tout risque de brûlure,
d’électrocution, d’incendie ou de blessure :
1 N’utilisez pas d’autres accessoires que ceux
recommandés par le fabricant.
2 Ne branchez pas le chargeur sur une prise de
courant dont la tension est autre que celle
indiquée sous l’appareil. Ce produit est conçu
pour fonctionner à des tensions se situant
entre 100 et 240 V. Les convertisseurs de tension
NE garantissent PAS la compatibilité de tension.
3 N’insérez pas d’objets dans les orices d’aération
de l’assainisseur et veillez à ne pas obstruer ces
ouver tures en plaçant l’appareil sur une surface
molle ou à tout autre endroit où des objets
(journaux, mouchoirs en papier, cheveux, etc.)
pourraient bloquer la circulation de l’air.
39
Page 40

FRANÇAIS (CANADA)40
4 Ne branchez jamais de force la che sur une
prise de courant. Si la che ne s’insère pas
facilement dans la prise, n’utilisez pas l’appareil.
5 Cessez d’utiliser le produit si vous constatez
que l’un de ses composants (tête de
brosse, manche, chargeur, assainisseur) est
endommagé de quelle que façon que ce soit.
6 Le cordon d’alimentation de cet appareil
ne peut pas être remplacé. Si celui-ci est
endommagé, le chargeur/l’assainisseur devra
être mis au rebut.
7 Tenez le cordon d’alimentation à l’écar t des
surfaces chauffantes.
8 N’utilisez pas le chargeur ou l’assainisseur
à l’extérieur et ne faites pas fonctionner
l’assainisseur là où des produits en aérosol
(vaporisateur) sont utilisés ou dans un endroit
où l’on administre de l’oxygène.
9 N’utilisez pas la brosse à dent en état de
fatigue ou de somnolence.
10 Cet appareil ne contient aucune pièce pouvant
être réparée par l’utilisateur. S’il ne fonctionne
plus correctement et doit être réparé, repor tezvous à la section «GAR ANTIE ET SERVICE».
11 Cet appareil doit être utilisé uniquement aux
ns décrites dans le présent document ou
conformément aux recommandations de votre
dentiste.
12 Cet appareil ne doit pas être utilisé par des
personnes (incluant des enfants) avec des
capacités physiques, sensorielles ou mentales
réduites, ou qui n’ont pas l’expérience et les
connaissances nécessaires, à moins qu’elles
ne soient sous la surveillance d’une personne
responsable de leur sécurité ou qu’elles
aient reçu de cette personne des directives
concernant l’utilisation de l’appareil.
Page 41

FRANÇAIS (CANADA) 41
13 Les enfants doivent être surveillés pour
s’assurer qu’ils ne s’amusent pas avec l’appareil.
14 Sonicare est un appareil conçu pour un usage
domestique et qui n’est pas destiné à un usage
par plusieurs patients dans un cabinet ou une
clinique dentaire.
15
Cessez l’utilisation de l’assainisseur si l’ampoule UV
reste allumée quand le compartiment est ouvert.
La lumière ultraviolette peut être dangereuse
pour les yeux et la peau. Gardez l’assainisseur hors
de la portée des enfants en tout temps.
16 Ne faites jamais fonctionner l’assainisseur
UV sans l’écran protecteur pour éviter tout
contact avec l’ampoule chaude.
17 Si l’assainisseur est utilisé pendant 3 cycles de
nettoyage UV consécutifs (c.-à-d. 3 fois de
suite), un arrêt de 30 minutes au moins est
nécessaire avant de commencer un autre cycle
de nettoyage UV.
MISES EN GARDE D’ORDRE MÉDICAL
1 Consultez votre dentiste avant d’utiliser ce
produit si vous avez subi une chirurgie buccale
ou gingivale au cours des 2 derniers mois.
2 Consultez votre dentiste si vos gencives
saignent anormalement après vous être brossé
les dents avec cet appareil ou si le saignement
persiste après une semaine d’utilisation.
3 Si vous ressentez de la douleur en utilisant cet
appareil, consultez votre dentiste.
4 Ce produit est conforme aux normes régissant
l’exposition aux champs électromagnétiques. Si
vous portez un stimulateur cardiaque ou un autre
appareil implanté dans l’organisme, consultez
votre médecin ou le fabricant avant de l’utiliser.
5 Pour toute autre question d’ordre médical,
consultez votre médecin.
Page 42

FRANÇAIS (CANADA)42
Champs électromagnétiques (CEM)
Cet appareil Philips est conforme à toutes les
normes et réglementations relatives à l’exposition
aux champs électromagnétiques.
CONSERVEZ CES CONSIGNES
Votre brosse à dents Sonicare (g. 1)
A Capuchon de voyage hygiénique
B Tête de brosse
C Manche facile à tenir
D Bouton marche/arrêt
E Bouton de brossage personnalisé
F Modes de brossage (modèles sélectionnés)
G Routines de brossage (modèles sélectionnés)
H Jauge de recharge de luxe
I Chargeur de voyage
J Assainisseur UV avec chargeur et cordon
d’alimentation intégrés
- Non illustrée : ampoule UV
- Non illustré : plateau égouttoir pour assainisseur
- Non illustré : écran protecteur pour ampoule
UV
Remarque : Le contenu de la boîte variera selon le
modèle acheté
Page 43

FRANÇAIS (CANADA) 43
Préparation
Fixation de la tête de brosse
1 Alignez la tête de brosse de manière à ce que
les soies se retrouvent à l’avant du manche.
2 Pressez fermement la tête de brosse sur la
tige de métal jusqu’à ce qu’elle s’arrête.
Charge de la brosse à dents Sonicare
1 Branchez le chargeur sur une prise sous
tension.
2 Placez le manche dans le chargeur.
, Le témoin clignotant de la jauge de recharge
indique que la brosse à dents est en cours de
charge.
Jauge de recharge de luxe
Indique le niveau de charge qui reste dans la pile
- 3 témoins DEL ver ts : de 75 à 100 %
- 2 témoins DEL ver ts : de 50 à 74 %
- 1 témoin DEL vert : de 25 à 49 %
- 1 témoin DEL clignotant jaune : moins de 25 %
Remarque : Si la pile de la brosse à dents Sonicare
est faible, vous entendrez 3 bips et un témoin DEL
jaune clignotera pendant 30 secondes sur la jauge de
recharge après le cycle de brossage de 2 minutes.
Remarque : Pour conserver la pile complètement
chargée en tout temps, nous vous conseillons de
garder votre appareil Sonicare dans le chargeur
quand vous ne l’utilisez pas. Cela prend au moins
24 heures pour charger la pile complètement.
Page 44

FRANÇAIS (CANADA)44
Utilisation de la brosse à dents Sonicare
Directives de brossage
1 Mouillez les poils et appliquez une petite
quantité de dentifrice dessus.
2 Placez les poils de la tête de brosse sur les
dents, légèrement de biais vers la gencive.
3 Appuyez sur le bouton marche/arrêt pour
mettre l’appareil Sonicare en marche.
4 Appliquez une légère pression pour
maximiser l’efcacité de la brosse à dents
Sonicare et laissez-la faire le brossage pour
vous.
5 Faites un doux mouvement d’avant en arrière
sur les dents avec la tête de brosse de façon
que les soies plus longues nettoient entre les
dents. Continuez ce mouvement pendant la
durée de votre cycle de brossage.
Remarque : Pour assurer que vous brossez
uniformément toutes les dents, divisez votre
bouche en quatre sections en vous servant de
la fonction Quadpacer. (Consultez le chapitre
«Caractéristiques».)
6 Commencez par la section 1 (haut à
l’extérieur) et brossez pendant 30 secondes
avant de passer à la section 2 (haut à
l’intérieur). Brossez ensuite les dents de
la section 3 (bas à l’extérieur) pendant
30 secondes avant de passer à la section
4 (bas à l’intérieur).
Page 45
FRANÇAIS (CANADA) 45
7 À la n du cycle de brossage, vous pouvez
brosser la surface des molaires et les endroits
qui sont portés à devenir tachés. Vous pouvez
aussi brosser votre langue, la brosse à dents
en marche ou non, au choix.
La brosse à dents Sonicare est sans danger pour :
- les appareils orthodontiques (les têtes de brosse
s’useront plus rapidement dans ce cas),
- les restaurations dentaires (obturations,
couronnes, facettes).
Personnalisez votre expérience de
brossage
Quand vous mettez en marche la brosse à dents
Sonicare, elle est réglée par défaut au mode
nettoyage. Pour personnaliser votre brossage :
1 Avant de mettre en marche votre brosse à
dents Sonicare, appuyez sur le bouton de
brossage personnalisé pour alterner entre
modes et routines.
, Le voyant DEL vert indique le mode ou la
routine sélectionné.
Remarque : Quand la brosse à dents est en marche,
vous pouvez alterner entre les modes mais pas entre
les routines. Celles-ci devraient être sélectionnées
avant le brossage.
Modes de brossage
Mode nettoyage
Mode standard pour un nettoyage des dents
supérieur.
Page 46

FRANÇAIS (CANADA)46
Mode zones sensibles
Nettoyage doux et en profondeur des gencives et
des dents sensibles.
Mode massage
Stimulation des gencives toute en douceur.
Routines de brossage
Routine rapide
Cycle de brossage de 1 minute en mode nettoyage,
pour un nettoyage rapide. Vous entendrez le signal
Quadpacer aux 15 secondes.
Routine maximale
Cycle de brossage de 3 minutes combinant les
modes nettoyage et massage en une seule routine
pour un nettoyage de la bouche en profondeur.
Mode nettoyage de 30 secondes et mode massage
de 15 secondes pour chacune des 4 sections de la
bouche. Vous entendrez le signal Quadpacer aux
45 secondes.
Remarque : Lors de l’utilisation de la
brosse à dents Sonicare dans le cadre de
recherches cliniques, le mode nettoyage de
2 minutes doit être sélectionné. Le manche
doit être complètement chargé. Désactivez
la fonction Easy-start et pour les zones
très tachées, un brossage additionnel de
30 secondes peut être fait pour aider au
nettoyage des taches.
Page 47

FRANÇAIS (CANADA) 47
Caractéristiques
Easy-start
®
- La fonction Easy-start est activée sur ce modèle
Sonicare.
- La fonction Easy-start augmente
progressivement la puissance de brossage
pendant les 14 premiers brossages an de
faciliter l’expérience Sonicare.
Remarque : Chacun des 14 premiers cycles de
brossage doit durer au moins 1 minute pour que la
fonction Easy-start se déroule correctement.
Désactivation ou activation de la fonction
Easy-start
1 Fixez la tête de brosse à la poignée.
2 Placez le manche sur le chargeur branché.
- Pour désactiver la fonction Easy-start :
Appuyez sur le bouton marche et maintenez-le
enfoncé pendant 5 secondes. Vous entendrez un
bip qui vous indiquera que la fonction Easy-start
est désactivée.
- Pour réactiver la fonction Easy-start :
Appuyez sur le bouton marche et maintenez-le
enfoncé pendant 5 secondes. Vous entendrez
2 bips qui vous indiqueront que la fonction Easystart est réactivée.
Remarque : Il est recommandé de ne pas dépasser la
période initiale d’utilisation de la fonction Easy-start,
au risque de réduire l’efcacité de la brosse à dents
Sonicare à éliminer la plaque dentaire.
Page 48
FRANÇAIS (CANADA)48
Smartimer®
®
La fonction Smartimer
la brosse à dents à la n du cycle de brossage pour
indiquer que le cycle de brossage est terminé.
Les dentistes recommandent un brossage d’au
moins 2 minutes deux fois par jour.
Quadpacer
®
arrête automatiquement
- La fonction Quadpacer
®
est une minuterie qui
émet un court bip suivi d’une pause pour vous
rappeler de brosser les 4 sections de votre
bouche. Selon le mode ou la routine de brossage
que vous avez sélectionné, le bip du Quadpacer
retentit à différents intervalles pendant le cycle
de brossage. Consultez les sections «Directives
de brossage» et «Personnalisez votre expérience
de brossage».
La fonction Quadpacer a été activée sur ce
modèle. Pour la désactiver ou la réactiver :
1 Fixez une tête de brosse sur le manche et
placez ce dernier dans le chargeur branché.
2 Appuyez sur le bouton de brossage
personnalisé et maintenez-le enfoncé jusqu’à
ce que :
A vous entendiez 1 bip qui vous indique que la
fonction Quadpacer a été désactivée.
B vous entendiez 2 bips qui vous indiquent que la
fonction Quadpacer a été activée.
Remarque : La fonction Quadpacer ne peut être
désactivée lors des routines de brossage rapide et
maximale préprogrammées.
Page 49

FRANÇAIS (CANADA) 49
Cordon d’alimentation avec chargeur
intégré
1 Vous pouvez ranger la portion de cordon en
excédent dans l’espace prévu à cet effet dans
la partie inférieure de l’assainisseur.
Assainissement
Assainissement
- L’assainisseur UV vous permet de nettoyer votre
tête de brosse après chaque utilisation.
Débranchez l’assainisseur, cessez d’utiliser
l’appareil et appelez le service à la clientèle si :
- L’ampoule UV reste allumée lorsque le
compartiment est ouvert.
- La fenêtre de l’assainisseur est brisée ou
manquante.
- L’assainisseur dégage de la fumée et une odeur
de brûlé pendant son utilisation.
Remarque : La lumière ultraviolette peut être
dangereuse pour les yeux et la peau. Veillez à toujours
garder cet appareil hors de portée des enfants.
1 Après le brossage, rincez la tête de brosse et
égouttez-la bien pour éliminer l’excès d’eau.
Ne mettez pas le capuchon de voyage sur la tête
de brosse pendant l’assainissement.
2 Insérez un doigt dans le logement du
portillon, en haut de l’assainisseur, puis tirez
pour ouvrir.
Page 50

FRANÇAIS (CANADA)50
3 Placez la tête de brosse sur l’une des
2 chevilles à l’intérieur de l’assainisseur en
vous assurant que les soies sont orientées
vers l’ampoule UV.
Remarque : Nettoyez les têtes de brosse Sonicare
uniquement dans l’assainisseur.
Remarque : Ne nettoyez pas les têtes de brosse
Sonicare for Kids dans l’assainisseur.
4 Veillez à ce que l’assainisseur soit branché sur
une prise sous tension d’un voltage approprié.
5 Fermez le compartiment et appuyez sur
le bouton marche/arrêt vert une fois pour
sélectionner le cycle de nettoyage UV.
Remarque : Vous ne pouvez mettre en marche
l’assainisseur que si le compartiment est correctement
fermé.
Remarque : L’assainisseur s’arrête si vous ouvrez le
compartiment pendant un cycle d’assainissement.
Remarque : Le cycle d’assainissement dure
10 minutes puis s’arrête automatiquement.
, L’assainisseur est en cours de fonctionnement
lorsque le voyant au niveau de la fenêtre est
allumé.
Nettoyage
Ne lavez jamais la tête de brosse, la poignée, le
chargeur de voyage ou l’assainisseur UV au lavevaisselle.
Page 51

FRANÇAIS (CANADA) 51
Manche de la brosse à dents
1 Retirez la tête de brosse et rincez la zone de
la tige en métal avec de l’eau tiède.
Ne poussez pas sur le joint d’étanchéité en
caoutchouc de la tige en métal avec un objet
pointu, car vous pourriez l’endommager.
2 Utilisez un chiffon humide pour essuyer la
surface du manche.
Tête de brosse
1 Rincez la tête de brosse et les soies après
chaque utilisation.
2 Retirez la tête de brosse du manche et rincez
le raccord de la tête de brosse au moins une
fois par semaine avec de l’eau tiède.
Chargeur
1 Débranchez le chargeur.
2 Utilisez un chiffon humide pour essuyer la
surface du chargeur.
Assainisseur
Ne plongez pas l’assainisseur dans l’eau et ne le
rincer pas sous le robinet.
Ne nettoyez pas l’assainisseur quand l’ampoule
UV est chaude.
Pour une efcacité optimale, il est recommandé de
nettoyer l’assainisseur une fois par semaine.
1 Débranchez l’assainisseur.
Page 52

FRANÇAIS (CANADA)52
2 Retirez le plateau égouttoir et rincez-le à
l’aide d’un chiffon humide.
3 Nettoyez l’intérieur avec un chiffon humide.
4 Retirez l’écran protecteur devant l’ampoule
UV.
Pour retirer l’écran, saisissez les bords situés près
des fermoirs, appuyez légèrement et tirez.
5 Retirez l’ampoule UV.
Pour retirer l’ampoule UV, saisissez-la et tirez-la
hors de l’attache métallique.
6 Nettoyez l’écran protecteur et l’ampoule UV
avec un chiffon humide.
7 Remettre l’ampoule UV en place.
Pour remettre l’ampoule UV en place, alignez
la partie inférieure de l’ampoule avec l’attache
métallique et poussez l’ampoule à l’intérieur de
l’attache.
8 Remettre l’écran protecteur en place.
Pour réinsérer l’écran, alignez les taquets de xation
de l’écran avec les fentes de la surface du réecteur
située près de l’ampoule UV. Appuyez sur l’écran
pour qu’il s’enclenche dans les fentes de l’assainisseur.
Entreposage
- Si vous prévoyez ne pas utiliser l’appareil pour
une période de temps prolongée, il devrait être
débranché, nettoyé et rangé dans un endroit
frais et sec, à l’abri des rayons du soleil. Servezvous de l’espace de rangement prévu à cet effet
pour ranger le cordon d’alimentation.
Page 53
FRANÇAIS (CANADA) 53
Remplacement
Tête de brosse
- Pour un résultat optimal, remplacez les têtes de
brosse Sonicare tous les 3 mois.
- Utilisez uniquement des têtes de brosse de
rechange Philips Sonicare.
Ampoule UV
- Vous pouvez vous procurer des ampoules
UV de rechange auprès du centre de service
Sonicare en Amérique du Nord en appelant au
1 800 682-7664. Si vous appelez de l’extérieur
de l’Amérique du Nord, communiquez avec le
Service à la clientèle Philips de votre pays.
Mise aux rebuts
- La pile rechargeable de votre Sonicare ne
peut pas être remplacée, mais peut être
facilement retirée pour être recyclée. À la n
de la durée utile du produit et avant de le jeter,
veuillez retirer la pile du manche en suivant les
instructions ci-dessous.
- Si vous n’avez plus besoin de l’appareil ou
de l’ampoule UV (cette ampoule contient
du mercure) et désirez les mettre au rebut,
ne les jetez pas avec les ordures ménagères,
mais déposez-les dans un point de collecte de
recyclage. Vous contribuerez ainsi à la protection
de l’environnement.
- Si vous avez des questions concernant le
recyclage, adressez-les à votre bureau local de
gestion des déchets.
Page 54

FRANÇAIS (CANADA)54
Pour retirer la batterie rechargeable
Veuillez noter que ce processus n’est pas
réversible.
- Pour retirer les piles rechargeables, vous aurez
besoin d’un tournevis (standard) à tête plate. Il
est essentiel d’observer les mesures de sécurité
fondamentales quand vous effectuez le procédé
décrit ci-dessous. Assurez-vous de protéger vos
yeux, mains et doigts ainsi que la surface sur
laquelle vous travaillez.
1 Pour vider complètement la pile, retirez le
manche du chargeur, mettez l’appareil en
marche et laissez-le fonctionner jusqu’à ce
qu’il s’arrête. Répétez cette étape jusqu’à ce
que vous ne puissiez plus allumer l’appareil.
2 Insérez le tournevis dans la fente située sur la
partie inférieure du manche et tourner dans
le sens contraire des aiguilles d’une montre
pour libérer le bouchon inférieur.
3 Tenez le manche sens dessus-dessous
et poussez sur la tige pour libérer les
composantes internes du manche.
4 Insérez le tournevis sous la carte de circuit,
à côté des connexions de la pile, et effectuez
une torsion pour briser les connexions.
Retirez la carte de circuit et dégagez la pile de
son support en plastique.
La pile rechargeable peut maintenant être recyclée
et le reste du produit peut être jeté au rebut.
Page 55

FRANÇAIS (CANADA) 55
Garantie et services
Philips garantit ses produits pour une période
de deux ans après la date d’achat. Si un produit
présente des défauts de matériaux ou de
fabrication, Philips le réparera ou le remplacera
à ses frais si une preuve sufsante est fournie,
un reçu par exemple, et qui atteste que la date à
laquelle le service est demandé est comprise dans
la période de garantie. L’utilisation de pièces de
rechange non autorisées annulera cette garantie.
Si vous êtes en Amérique du Nord, appelez le
centre de service à la clientèle au 1 800 682-7664.
Sinon, communiquez avec le centre de service à la
clientèle Philips de votre pays.
Site Web : www.sonicare.com (Amérique du
Nord) ou www.philips.com (à l’extérieur de
l’Amérique du Nord).
EXCLUSIONS
Ce qui n’est pas couvert par la garantie :
- Les têtes de brosse;
- Les dommages causés par l’utilisation de pièces
de rechange non autorisées;
- Les dommages causés par une mauvaise
utilisation, un usage abusif, de la négligence ou
encore des modications ou réparations non
autorisées;
- L’usure normale, incluant les ébréchures, les
égratignures, les abrasions, la décoloration ou
l’affadissement des couleurs.
- Ampoule UV
Page 56

FRANÇAIS (CANADA)56
GARANTIES IMPLICITES
TOUTES LES GARANTIES IMPLICITES, Y
COMPRIS LES GARANTIES DE QUALITÉ
MARCHANDE ET D’ADAPTATION À UN
USAGE PARTICULIER, SONT LIMITÉES À
LA DURÉE DES GARANTIES EXPRESSES
ÉNONCÉES CI-DESSUS. DANS CERTAINS
ÉTATS, OU CERTAINES PROVINCES, LES
LIMITATIONS DE DURÉE DE GARANTIES
IMPLICITES NE S’APPLIQUENT PAS.
RESTRICTION DES RECOURS
NI LA SOCIÉTÉ PHILIPS ORAL HEALTHCARE,
INC. NI AUCUNE DE SES SOCIÉTÉS ASSOCIÉES
OU FILIALES NE POURRONT EN AUCUN CAS
ÊTRE TENUES RESPONSABLES POUR DES
DOMMAGES SPÉCIFIQUES, ACCESSOIRES OU
CORRÉLATIFS, À LA SUITE D’UNE RUPTURE
DE LA GARANTIE, D’UNE RUPTURE DE
CONTRAT, D’UNE NÉGLIGENCE, D’UNE
FAUTE DÉLICTUELLE OU DE TOUTE AUTRE
THÉORIE LÉGALE. DE TELS DOMMAGES
COMPRENNENT, SANS S’Y LIMITER, UNE
PERTE D’ÉCONOMIES OU DE REVENUS;
UNE PERTE DE PROFITS; UNE PERTE DE
JOUISSANCE; LES REVENDICATIONS DE TIERS,
Y COMPRIS, SANS S’Y LIMITER, LES DENTISTES
ET HYGIÉNISTES DENTAIRES; AINSI QUE LE
COÛT D’ÉQUIPEMENTS OU DE SERVICES
DE REMPLACEMENT. CERTAINS ÉTATS NE
RECONNAISSENT PAS L’EXCLUSION OU LA
LIMITATION DES DOMMAGES ACCESSOIRES
OU CORRÉLATIFS.
Page 57

Page 58

Page 59

Page 60

www.philips.com/support
For support call 1-800-682-7664
www.philips.com/Sonicare
©2013 Konin klijke Philip s N.V. (KP NV). A ll right s reserved. PH ILIPS and
the Phi lips shi eld are reg istered trad emarks of KPN V. Son icare an d the
Sonic are logo ar e trade marks of Phili ps Oral Healt hcare, Inc. a nd/or KPN V.
© 2013 Konink lijke Philips N .V. (KPN V). Tous droits rés ervés . PHILIPS et
l’écusson Philip s sont des marque s déposées de KP NV. Sonicare et le lo go Sonicare
sont des m arques de comme rce de Philips Or al Healthca re, Inc. et / ou KP NV.
Protec ted by U.S. and i ntern ational pate nts.
Other patents pending.
Protég é par des brevets in ternationa ux et des É .-U.
Autres b revets en inst ance.
Reg. U.S . Pat. & Tm. Off
4235.020.8001.1
 Loading...