

Philips HX6932, HX6933, HX6902, HX6942, HX6982 User Manual
...
FlexCare
900 series
Rechargeable
sonic toothbrush
J
A
B
C
D
E
F
G
H
I
K
L
M
N
2
1

ENGLISH 4
DEUTSCH
FRANÇAIS 27
ITALIANO
NEDERLANDS
15
40
51
HX6985, HX6983, HX6982, HX6942, HX6933, HX6932, HX6902,

4
ENGLISH
Important
Read this user manual carefully before you use the appliance and save it for
future reference.
Danger
Keep the charger and/or sanitiser away from water. Do not place or
store it over or near water contained in a bathtub, washbasin, sink
etc. Do not immerse the charger and/or sanitiser in water or any
other liquid. After cleaning, make sure the charger and/or sanitiser is
completely dry before you connect it to the mains.
Warning
Check if the voltage indicated on the bottom of the charger and/or
sanitiser corresponds to the local mains voltage before you connect
the appliance.
The mains cord cannot be replaced. If the mains cord is damaged,
discard the charger and/or sanitiser.
Always have the charger and/or sanitiser replaced with one of the
original type in order to avoid a hazard.
Do not use the charger and/or sanitiser outdoors or near heated
surfaces.
If the appliance is damaged in any way (brush head, toothbrush handle,
charger and/or sanitiser), stop using it. This appliance contains no
serviceable parts. If the appliance is damaged, contact the Customer
Care Centre in your country (see chapter ‘Guarantee & service’).
This appliance is not intended for use by persons (including children)
with reduced physical, sensory or mental capabilities, or lack of
experience and knowledge, unless they have been given supervision or
instruction concerning use of the appliance by a person responsible for
their safety.
Children should be supervised to ensure that they do not play with the
appliance.
Discontinue use of the sanitiser if the UV light bulb remains on when
the door is open. UV light can be harmful to the human eye and skin.
Keep the sanitiser out of the reach of children at all times.
Caution
-
Do not clean the brush head, the handle, the charger, the charger cover
and/or the sanitiser in the dishwasher.
If you have had oral or gum surgery in the previous 2 months, consult
your dentist before you use the toothbrush.
Consult your dentist if excessive bleeding occurs after using this
toothbrush or if bleeding continues to occur after 1 week of use.
The Sonicare toothbrush complies with the safety standards for
electromagnetic devices. If you have a pacemaker or other implanted
device, contact your physician or the device manufacturer of the
implanted device prior to use.
If you have medical concerns, consult your doctor before you use the
Sonicare.
This appliance has only been designed for cleaning teeth, gums and
tongue. Do not use it for any other purpose. Stop using the appliance
and contact your doctor if you experience any discomfort or pain.
The Sonicare toothbrush is a personal care device and is not intended
for use on multiple patients in a dental practice or institution.

ENGLISH 5
Stop using a brush head with crushed or bent bristles. Replace the
brush head every 3 months or sooner if signs of wear appear.
Do not use other brush heads than the ones recommended by the
manufacturer.
If your toothpaste contains peroxide, baking soda or bicarbonate
(common in whitening toothpastes), thoroughly clean the brush head
with soap and water after each use. This prevents possible cracking of
the plastic.
The UV light bulb is hot during and immediately after the sanitising
cycle. Do not touch the UV light bulb when it is hot.
Do not operate the sanitiser without the protective screen in place to
avoid contact with a hot bulb.
Electromagnetic elds (EMF)
This Philips appliance complies with all standards regarding electromagnetic
elds (EMF). If handled properly and according to the instructions in this
user manual, the appliance is safe to use based on scientic evidence
available today.
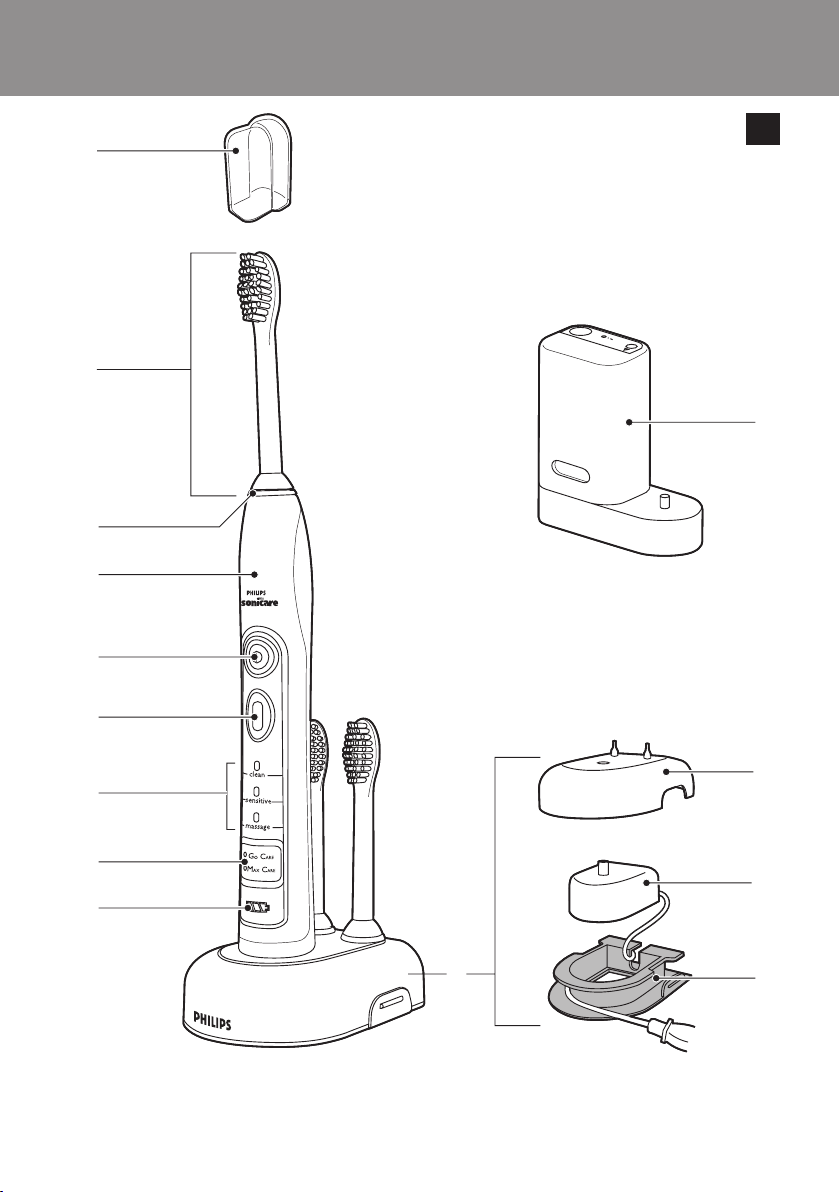
The Sonicare (Fig. 1)
A Hygienic travel cap
B Brush head
C Interchangeable colour code ring
D Handle with soft grip
E Power on/off button
F Personalised Brushing button
G Brushing modes
H Brushing routines
I Deluxe recharge gauge
J Deluxe charger (specic types only)
K Charger cover with brush head holder (specic types only)
L Travel charger
M Charger base with cord wrap
N UV sanitiser with integrated charger and cord wrap (specic types
only)
Not shown: UV light bulb
Not shown: Sanitiser drip tray
Not shown: Protective screen for UV light bulb
-
Getting started
Changing the colour code ring
Sonicare brush heads come with interchangeable colour code rings to
identify your brush head.
To change the colour code ring:

clean
sensiti
ve
clean
sensiti
ve
ENGLISH6
1 Pull the colour code ring from the bottom of the brush head.
2 Slip one edge of the new ring over the bottom of the brush head.
Then press down on the other side to snap the ring in place.
Attaching the brush head
1 Align the brush head so the bristles face the front of the handle.
2 Firmly press the brush head down on the metal shaft until it stops.
Note: There is a small gap between the colour code ring and the handle.
Charging your Sonicare
1 Plug the charger or sanitiser into a wall socket.
2 Place the handle on the charger or sanitiser.
The ashing light on the battery gauge indicates that the toothbrush
,
is charging.
Deluxe recharge gauge:
Indicates the amount of charge left in the battery
3 green LEDs: 75-100%
-
2 green LEDs: 50-74%
-
1 green LED: 25-49%
-
1 ashing yellow LED: less than 25%
-
Note: If the battery charge of your Sonicare is low, you hear 3 beeps and 1
LED on the recharge gauge ashes yellow for 30 seconds.
Note: To keep the battery fully charged, we recommend that you keep your
Sonicare on the charger or sanitiser when not in use. It takes at least 24 hours
to charge the battery fully.
1
2
4
3
1
2
4
3
ENGLISH 7
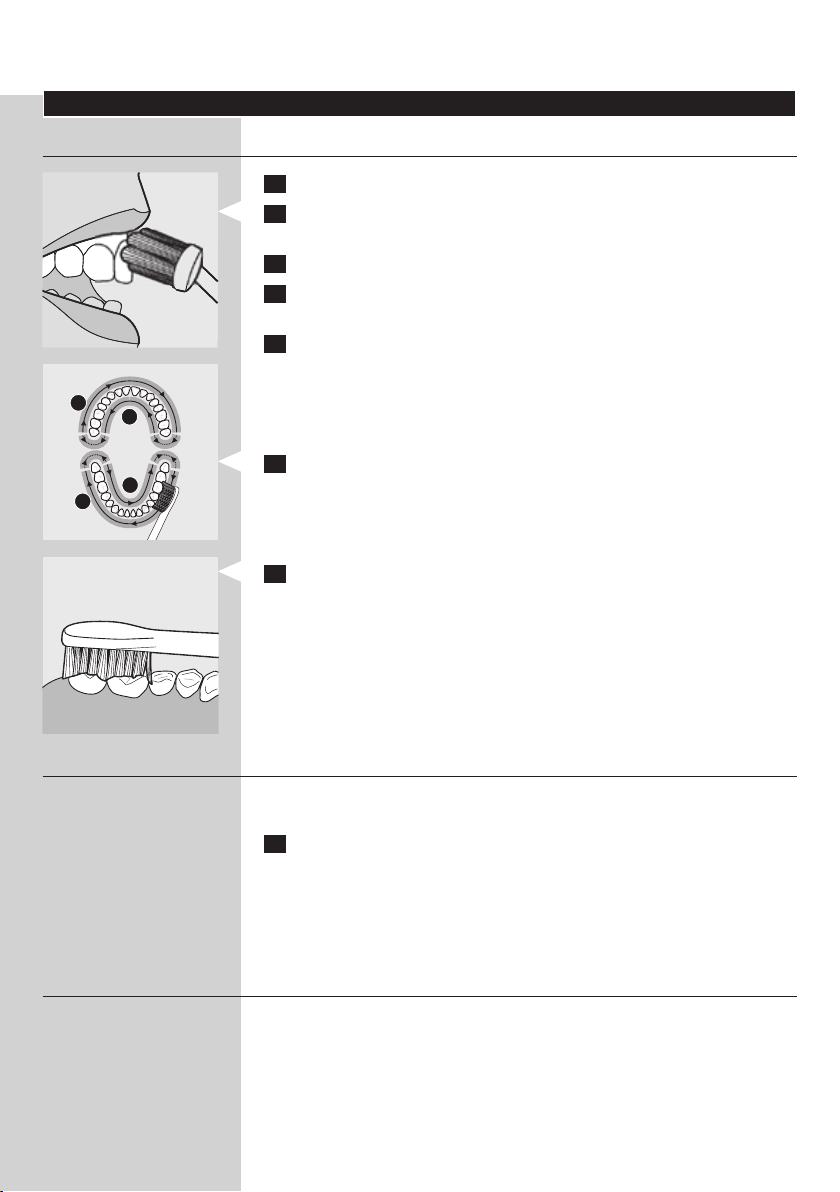
Using the Sonicare
Brushing instructions
1 Wet the bristles and apply a small amount of toothpaste.
2 Place the toothbrush bristles against the teeth at a slight angle
towards the gumline.
3 Press the power on/off button to switch on the Sonicare.
4 Apply light pressure to maximise the Sonicare’s effectiveness and let
the Sonicare toothbrush do the brushing for you.
5 Gently move the brush head slowly across the teeth in a small back
and forth motion so the longer bristles reach between your teeth.
Continue this motion throughout your brushing cycle.
Note: To make sure you brush evenly throughout the mouth, divide your mouth
into 4 sections using the Quadpacer (see chapter ‘Features’).
6 Begin brushing in section 1 (outside of upper teeth) and brush for 30
seconds before moving to section 2 (inside of upper teeth). Continue
brushing in section 3 (outside of lower teeth) and brush for 30
seconds before moving to section 4 (inside of lower teeth).
7 After you have completed the brushing cycle, you can
spend additional time brushing the chewing surfaces of your teeth
and areas where staining occurs. You may also brush your tongue,
with the toothbrush switched on or off, as you prefer.
Your Sonicare is safe to use on:
Braces (brush heads wear out sooner when used on braces)
-
Dental restorations (llings, crowns, veneers)
-
Personalising your brushing experience
The Sonicare automatically starts in the default Clean mode. To personalise
your brushing:
1 Before you switch on the Sonicare, press the Personalised Brushing
button to toggle between modes and routines.
The green LED indicates the selected mode or routine.
,
Note: When the toothbrush is switched on, you can switch between modes but
not between routines. Routines have to be selected before you switch on the
appliance.
Brushing modes
Clean mode
Standard mode for superior teeth cleaning.
Sensitive mode
Gentle, yet thorough cleaning for sensitive gums and teeth.
Massage mode
Gentle gum stimulation.

ENGLISH8
Brushing routines
Go Care routine
1-minute brushing cycle in the Clean mode, for a quick clean. You hear the
Quadpacer signal at 15-second intervals.
Max Care routine
3-minute brushing cycle that combines the Clean and Massage modes in
one routine for a thorough mouth clean. There are 30 seconds of Clean
mode and 15 seconds of Massage mode for each of the 4 sections of your
mouth. You hear the Quadpacer signal at 45 second intervals.
Note: When the Sonicare is used in clinical studies, the default
2-minute Clean mode must be selected. The handle has to
be fully charged. Deactivate the Easy-start feature. For areas
where excess staining occurs, an additional 30 seconds of
brushing time can be spent to help remove stains.
Features
Easy-start
This Sonicare model comes with the Easy-start feature activated.
-
The Easy-start feature gently increases power over the rst 14
brushings to ease into the Sonicare experience.
Note: Each of the rst 14 brushings must last at least 1 minute to properly
move through the Easy-start ramp-up cycle.
Deactivating or activating the Easy-start feature
1 Attach your brush head to the handle.
2 Place the handle on the plugged-in charger or sanitiser.
To deactivate Easy-star t:
-
Press and hold the on/off button for 5 seconds. You hear 1 beep to indicate
that the Easy-start feature has been deactivated.
To activate Easy-star t:
-
Press and hold the on/off button for 5 seconds. You hear 2 beeps to
indicate that the Easy-start feature has been activated.
Note: Using the Easy-start feature beyond the initial ramp-up period is not
recommended and reduces the Sonicare’s effectiveness in removing plaque.
Smartimer
The Smartimer indicates that your brushing cycle is complete by
automatically switching off the toothbrush at the end of the brushing cycle.
Dental professionals recommend brushing no less than 2 minutes twice a
day.
1
2
4
3
1
2
4
3
ENGLISH 9
Quadpacer
The Quadpacer is an interval timer that has a shor t beep and pause to
-
remind you to brush the 4 sections of your mouth. Depending on the
brushing mode or brushing routine you have selected, the Quadpacer
beeps at different intervals during the brushing cycle. See the ‘Brushing
instructions’ and ‘Personalising your brushing experience’ sections.
The Quadpacer on this model has been activated. To deactivate or
reactivate the Quadpacer:
1 Place the handle with a brush head attached on the plugged-in
charger or sanitiser
2 To deactivate the Quadpacer: press and hold the Personalised
Brushing button for 5 seconds. You hear 1 beep to indicate that the
Quadpacer has been deactivated.
To reactivate the Quadpacer: press and hold the Personalised
,
Brushing button for 5 seconds until you hear 2 beeps. This indicates
that the Quadpacer is active again.
Note: The Quadpacer cannot be deactivated on the pre-programmed Go Care
and Max Care brushing routines.
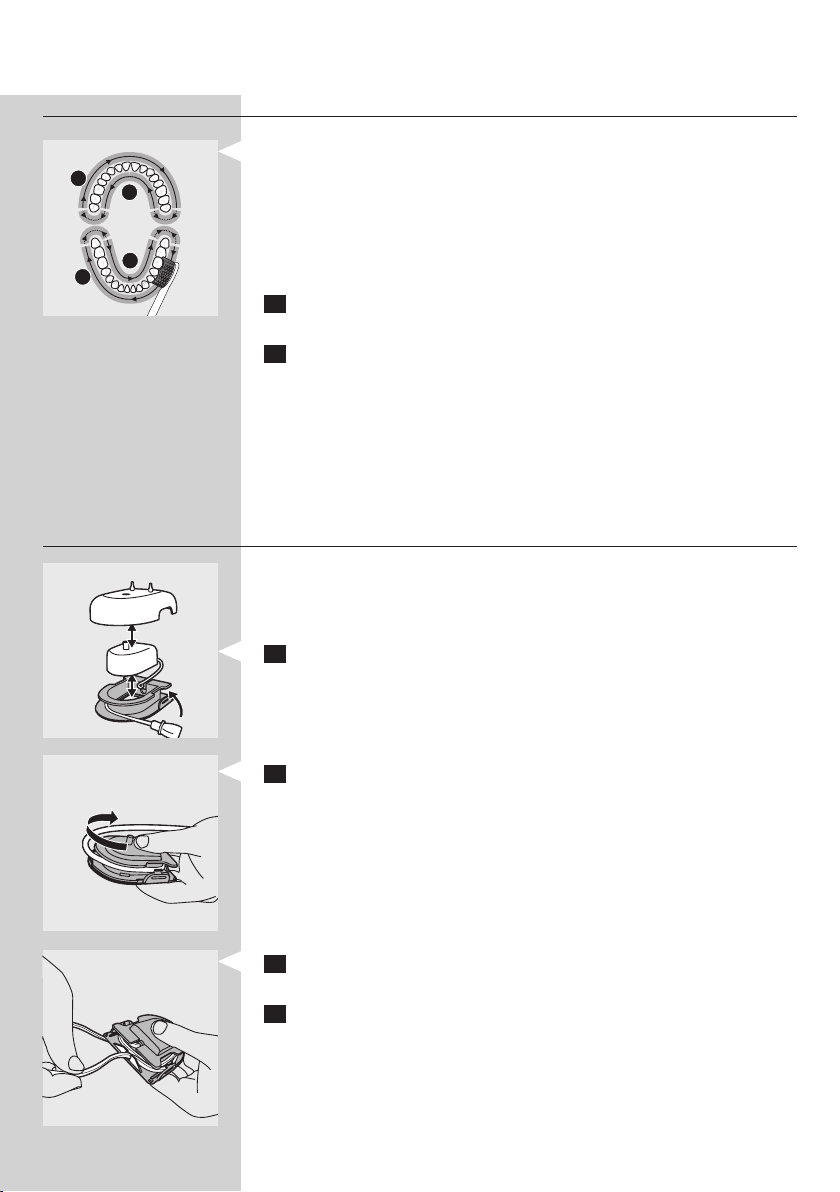
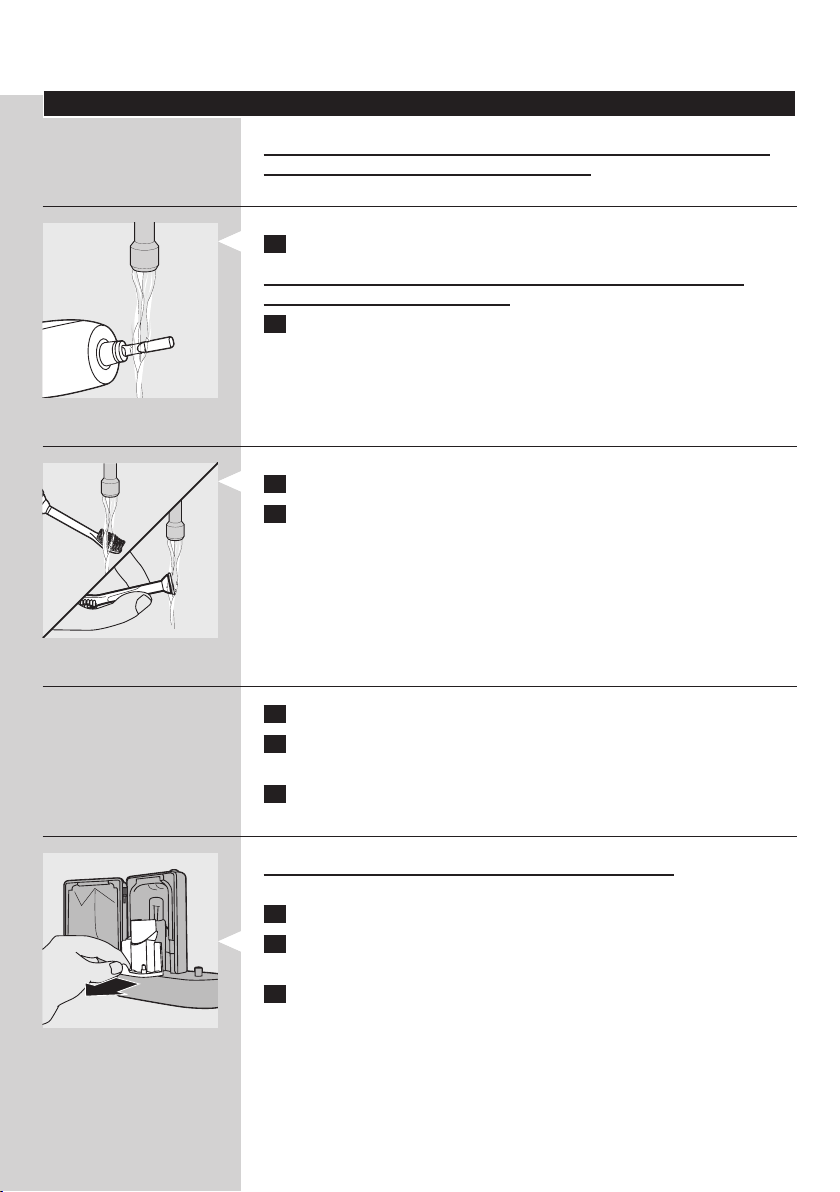
Cord wrap on deluxe charger (specic types only)
If your model includes the deluxe charger cover and base, the travel
charger is pre-installed inside the cover. If you want to shorten the mains
cord, you can store excess cord in the cord-wrap feature built into the
charger base.
1 To separate the charger cover from the charger base, press the two
grey snap bars on the charger base and pull the white charger cover
upwards.
2 Wrap excess cord around the grey charger base as shown in the
picture. Be sure to wrap the cord on the inside of the two snap
levers.
3 When you have stored the excess cord, guide the cord through the
small groove in the rear of the grey charger base.
4 Reattach the charger cover by pressing it down over the charger
base until it snaps into place.
Tip: For extra convenience during travel, you can remove the travel charger and
use it without the charger cover and charger base.

ENGLISH10
Cord wrap on sanitiser (specic types only)
If your model includes the sanitiser, you can store excess cord with the
cord-wrap feature built into the bottom of the sanitiser.
Sanitising (specic types only)
With the sanitiser, you can clean your brush head after every use.
-
Discontinue use of the sanitiser if the UV light bulb remains on when the
door is open or if the Philips logo is broken or missing from the sanitiser.
UV light can be harmful to the human eye and skin. Keep the sanitiser
out of the reach of children at all times.
Unplug the sanitiser and call Customer Service if the sanitiser gives off
smoke or a burning smell while it is operating.
1 After brushing, rinse the brush head and shake off excess water.
Do not place the travel cap on the brush head during sanitisation.
2 To open the sanitiser door, press the door release button.
3 Place the brush head on one of the 2 pegs in the sanitiser.
Make sure the bristles of the brush head directly face the light bulb.
-
Note: Only clean Sonicare ProResults brush heads in the sanitiser.
4 Make sure the sanitiser is plugged into wall socket.
5 Close the door and press the green power on/off button once to
select the UV clean cycle.
Note: You can only switch on the sanitiser when the door is properly closed.
Note: If you open the door during the sanitising cycle, the sanitiser stops.
Note: The sanitiser cycle runs for 10 minutes and then automatically switches
off.
The sanitiser is in operation when the blue light glows through the
,
Philips logo and the UV clean LED ashes slowly.
When the sanitising cycle is complete, the UV clean LED lights up
,
green continuously and the sanitiser automatically switches off.
ENGLISH 11
Cleaning
Do not clean brush heads, the handle, the travel charger, the charger
cover and the UV sanitiser in the dishwasher.
Toothbrush handle
1 Remove the brush head and rinse the metal shaft with warm water.
Do not push on the rubber seal round the metal shaft with sharp
objects, as this may cause damage.
2 Use a damp cloth to wipe the entire surface of the handle.
Brush head
1 Rinse the brush head and bristles after each use.
2 Remove the brush head from the handle and rinse the brush head
connection at least once a week with warm water.
Travel charger and deluxe charger (specic types only)
1 Unplug the charger.
2 Specic types only: Disassemble the deluxe charger and take out the
travel charger.
3 Use a damp cloth to wipe the surface of the charger.
Sanitiser (specic types only)
Do not clean the sanitiser when the UV light bulb is hot.
For optimal effectiveness, it is recommended to clean the sanitiser weekly.
1 Unplug the sanitiser.
2 Slightly lift the drip tray and pull it out. Rinse the drip tray and wipe it
clean with a damp cloth.
3 Clean all reector surfaces with a damp cloth.

ENGLISH12
4 Remove the protective screen in front of the UV light bulb.
To remove the screen, gently lift it up (1) and pull it out (2).
5 Remove the UV light bulb.
To remove the light bulb, grasp it and pull it out of the metal clasp.
6 Clean the protective screen and the UV light bulb with a damp cloth.
7 Reinsert the UV light bulb.
To reinser t the light bulb, align the bottom of the light bulb with the metal
clasp and push the bulb into the clasp.
8 Reinsert the protective screen.
To reinser t the screen, align the pegs on the screen with the slots on the
reective surface near the UV light bulb. Then inser t the pegs into the slots
and slide down the screen to secure it in the sanitiser.
Storage
If you are not going to use the appliance for a long time, remove the
mains plug from the wall socket. Then clean the appliance and store it
in a cool and dry place away from direct sunlight. You can use the cord
wrap to store the mains cord neatly.
You can store brush heads on the pegs at the back of the deluxe
-
charger (specic types only).
Replacement
Brush head
-
Replace Sonicare brush heads every 3 months to achieve optimal
results.
Use only Sonicare ProResults replacement brush heads.
-
UV light bulb
You can order replacement UV light bulbs from the Customer Care
Centre in your country or an authorised Philips ser vice centre.
Disposal
Do not throw away the appliance with the normal household waste
-
at the end of its life, but hand it in at an ofcial collection point for
recycling. By doing this, you help to preserve the environment.
The lamp of the sanitiser contains mercury, which is a substance that
can be harmful to the environment. When you discard the lamp, do not
throw it away with the normal household waste but hand it in at an
ofcial collection point.
The built-in rechargeable battery contains substances that may pollute
the environment. Always remove the battery before you discard and
hand in the appliance at an ofcial collection point. Dispose of the
battery at an ofcial collection point for batteries. If you have trouble
removing the battery, you can also take the appliance to a Philips
service centre. The staff of this centre will remove the battery for you
and will dispose of it in an environmentally safe way.

ENGLISH 13
Removing the rechargeable battery
Please note that this process is not reversible.
1 To deplete the rechargeable battery of any charge, remove the
handle from the charger or sanitiser, switch on the Sonicare and let it
run until it stops.
Repeat this step until you can no longer switch on the Sonicare.
2 Insert a at-head (standard) screwdriver into the slot located at the
bottom of the handle. Turn the screwdriver anticlockwise to release
the bottom cap.
3 Hold the handle upside down and push down on the shaft to release
the internal components of the handle.
4 Insert the screwdriver under the circuit board, next to the battery
connections, and twist to break the connections. Remove the circuit
board and pry the battery from the plastic carrier.
Do not connect the appliance to the mains again after you have removed
the battery.
Guarantee & service
If you need information or if you have a problem, please visit the Philips
website at www.philips.com or contact the Philips Customer Care Centre
in your country (you nd its phone number in the worldwide guarantee
leaet). If there is no Customer Care Centre in your country, go to your
local Philips dealer or contact the Service Depar tment of Philips Domestic
Appliances and Personal Care BV.
Guarantee restrictions
The terms of the international guarantee do not cover the following:
Brush heads
Damage caused by misuse, abuse, neglect or alterations
Normal wear and tear, including chips, scratches, abrasions,
discolouration or fading
UV light bulb
-
Frequently asked questions
This chapter lists the questions most frequently asked about the appliance.
If you cannot nd the answer to your question, contact the Customer Care
Centre in your country.

ENGLISH14
Question Answer
Why doesn’t the Sonicare
toothbrush work?
Why do I feel a tickling sensation
when I use the Sonicare?
The brush head chatters against
my teeth. What can I do about
this?
Why does the toothbrush seem
less powerful?
Why doesn’t the Personalised
Brushing button work during
brushing?
Why doesn’t the sanitiser
light go on?
Why does the toothbrush seem
to lose power during brushing?
Do I need a special charger if I
travel with my Sonicare?
You may need to recharge the Sonicare. Charge the Sonicare for at
least 24 hours.
The socket may not be live. The electricity supply to sockets in mirror
cabinets over washbasins or shaver sockets in bathrooms may be cut
off when the light is switched off.
You may need to reattach or replace the brush head.
You may experience a slight tickling/tingling sensation when you use
Sonicare for the rst time. As you become accustomed to brushing
with the Sonicare, this sensation diminishes.
To avoid this, keep the brush head properly oriented, with the bristles
placed on the gumline at a slight angle.
You may need to charge the Sonicare.
The Easy-start feature may be on. Deactivate the Easy-start feature
(See chapter ‘Features’).
You may need to replace the brush head.
You may have selected a brushing routine. If this is the case, the
Personalised Brushing button is not active (See chapter ‘Using the
Sonicare’).
The socket may not be live. The electricity supply to sockets in mirror
cabinets over washbasins or shaver sockets in bathrooms may be cut
off when the light is switched off.
You may need to shut the sanitiser door.
You may need to replace the UV light bulb (see chapter
‘Replacement’).
You may be in the Max Care brushing routine. If this is the case,
the routine alternates between the Clean and Massage modes
throughout the 3-minute brushing cycle. The Clean and Massage
modes have a different sound and brush movement.
Travel tip: the travel charger, the deluxe charger and the sanitiser can
be used at common worldwide voltages between 100-240V AC, at
either 50 or 60Hz. All you need is a simple plug adapter.

DEUTSCH
Wichtig
Lesen Sie diese Bedienungsanleitung vor dem Gebrauch des Geräts
aufmerksam durch und bewahren Sie sie für eine spätere Verwendung auf.
Gefahr
Halten Sie Ladegerät und/oder den UV Cleaner von Wasser fern.
Stellen Sie sie nicht über oder nahe einer mit Wasser gefüllten
Badewanne bzw. einem Waschbecken ab. Tauchen Sie Ladegerät
und/oder den UV Cleaner nicht in Wasser oder andere Flüssigkeiten.
Schließen Sie das Ladegerät und/oder den UV Cleaner nach dem
Reinigen erst wieder an das Stromnetz an, wenn es vollkommen
trocken ist.
Warnhinweis
Prüfen Sie vor Inbetriebnahme, ob die Spannungsangaben auf der
Unterseite des Ladegeräts bzw. UV Cleaners mit der ör tlichen
Netzspannung übereinstimmen.
Das Netzkabel kann nicht ausgetauscht werden. Wenn das Netzkabel
beschädigt ist, entsorgen Sie das Ladegerät und/oder den UV Cleaner.
Tauschen Sie das Ladegerät bzw. den UV Cleaner immer durch ein
-
Original-Ersatzgerät aus, um Gefährdungen zu vermeiden.
Verwenden Sie das Ladegerät und/oder den UV Cleaner nie im Freien
-
oder in der Nähe von heißen Oberächen.
Benutzen Sie das Gerät nicht, wenn es beschädigt ist (Bürstenkopf,
Handstück, Ladegerät und/oder UV Cleaner). Die Geräteteile lassen
sich nicht vom Benutzer warten/reparieren. Ist das Gerät defekt,
wenden Sie sich bitte an das Philips Service-Center in Ihrem Land
(siehe “Garantie und Kundendienst”).
Dieses Gerät ist für Benutzer (einschl. Kinder) mit eingeschränkten
-
physischen, sensorischen oder psychischen Fähigkeiten bzw. ohne
jegliche Erfahrung oder Vorwissen nur dann geeignet, wenn eine
angemessene Aufsicht oder ausführliche Anleitung zur Benutzung des
Geräts durch eine verantwortliche Person sichergestellt ist.
Achten Sie darauf, dass Kinder nicht mit dem Gerät spielen.
Benutzen Sie den UV Cleaner nicht, wenn die UV-Lampe bei offener
Klappe noch leuchtet. UV-Licht kann schädlich für das menschliche
Auge und die Haut sein. Halten Sie den UV Cleaner immer von
Kindern fern.
Achtung
Reinigen Sie den Bürstenkopf, das Handstück, das Reise-Ladegerät,
die Hülle für das Ladegerät und/oder das UV Cleaner nicht in der
Spülmaschine.
Wenn in den vergangenen 2 Monaten ein chirurgischer Eingriff an Ihren
-
Zähnen oder am Zahneisch vorgenommen wurde, sollten Sie vor
Benutzung der Zahnbürste Ihren Zahnarzt konsultieren.
Konsultieren Sie Ihren Zahnarzt, wenn nach Benutzung dieses Geräts
-
übermäßiges Zahneischbluten auftritt oder Zahneischbluten länger
als eine Woche anhält.
Die Sonicare-Zahnbürste entspricht den Sicherheitsstandards
für elektromagnetische Geräte. Wenn Sie als Träger eines
Herzschrittmachers oder eines anderen Implantats Fragen zur
Verwendung des Geräts haben, setzen Sie sich bitte mit Ihrem Arzt
oder dem Hersteller des Schrittmachers oder Implantats in Verbindung.
15

DEUTSCH16
Sollten Sie Bedenken wegen Ihrer Gesundheit haben, konsultieren Sie
vor Benutzung der Sonicare Ihren Arzt.
Dieses Gerät ist ausschließlich zum Reinigen von Zähnen, Zahneisch
und Zunge vorgesehen und sollte nicht für andere Zwecke benutzt
werden. Sollten Sie bei Gebrauch des Geräts Unbehagen oder
Schmerzen verspüren, benutzen Sie es nicht weiter und konsultieren
Sie Ihren Arzt.
Die Sonicare-Zahnbürste ist ein Gerät zur individuellen Mundpege
und nicht für die Verwendung von mehreren Patienten in einer
Zahnarztpraxis oder Zahnklinik geeignet.
Benutzen Sie keinen Bürstenkopf mit abgeknickten oder zerdrückten
-
Borsten. Tauschen Sie den Bürstenkopf spätestens nach 3 Monaten aus
oder sobald Abnutzungserscheinungen zu erkennen sind.
Benutzen Sie nur die vom Hersteller für diese Zahnbürste
empfohlenen Bürstenköpfe.
Bei Verwendung peroxid-, natron- oder bikarbonathaltiger Zahnpasta
(üblich in Weißmacher-Zahnpasta) sollten Sie den Bürstenkopf nach
jedem Gebrauch gründlich mit einem milden Reinigungsmittel und
Wasser reinigen. Dadurch werden Risse im Kunststoff verhindert.
Während und direkt nach dem Reinigungsvorgang ist die UV-Lampe
heiß. Berühren Sie die heiße UV-Lampe nicht.
Verwenden Sie den UV Cleaner nicht ohne den aufgesetzten
Schutzschirm, um einen Kontakt mit der heißen Lampe zu vermeiden.
Elektromagnetische Felder (EMF; Electro Magnetic Fields)
Dieses Philips Gerät erfüllt sämtliche Normen bezüglich
elektromagnetischer Felder (EMF). Nach aktuellen wissenschaftlichen
Erkenntnissen ist das Gerät sicher im Gebrauch, sofern es ordnungsgemäß
und entsprechend den Anweisungen in dieser Bedienungsanleitung
gehandhabt wird.
Sonicare (Abb. 1)
A Hygienische Schutzkappe
B Bürstenkopf
C Auswechselbarer Farbring
D Handstück mit weicher Griffäche
E Ein-/Ausschalter
F Taste für individuelles Putzen
G Putzmodi
H Putzeinstellungen
I Deluxe-Ladestandsanzeige
J Deluxe -Ladegerät (nur bestimmte Typen)
K Abdeckung für Ladegerät mit Bürstenkopfhalter (nur bestimmte
Gerätetypen)
L Reiseladegerät
M Ladestation mit Kabelaufwicklung
N UV Cleaner mit integrier tem Ladegerät und Kabelaufwicklung (nur
bestimmte Gerätetypen)
Nicht abgebildet: UV-Lampe
Nicht abgebildet: Abtropfschale des UV Cleaners
Nicht abgebildet: Schutzschirm für UV-Lampe
-

clean
sensiti
ve
clean
sensiti
ve
DEUTSCH 17
Vorbereitungen
Den Farbring auswechseln
Sonicare-Bürstenköpfe haben auswechselbare Farbringe, mit denen Sie
Ihren Bürstenkopf eindeutig kennzeichnen können.
So wechseln Sie den Farbring aus:
1 Ziehen Sie den Farbring unten am Bürstenkopf ab.
2 Schieben Sie eine Seite des neuen Rings unten über den Bürstenkopf.
Drücken Sie dann die andere Seite fest, bis der Ring einrastet.
Den Bürstenkopf befestigen
1 Richten Sie den Bürstenkopf so aus, dass die Borsten zur Vorderseite
des Handstücks zeigen.
2 Drücken Sie den Bürstenkopf auf den Metallschaft, bis er fest sitzt.
Hinweis: Zwischen dem Farbring und dem Handstück bleibt eine kleine Lücke.
Die Sonicare-Zahnbürste laden
1 Schließen Sie das Ladegerät oder den UV Cleaner an eine Steckdose
an.
2 Stellen Sie das Handstück auf das Ladegerät oder den UV Cleaner.
Die blinkende Batterieladeanzeige zeigt an, dass die Zahnbürste
,
geladen wird.
Deluxe-Ladestandsanzeige:
Gibt an, über wie viel Energie der Akku noch verfügt
3 grüne LEDs: 75-100 %
-
2 grüne LEDs: 50-74 %
-
1 grüne LED: 25-49 %
-
1 blinkende gelbe LED: weniger als 25 %
-
Hinweis: Ist der Ladestand Ihrer Sonicare niedrig, ertönen nach dem 2minütigen Putzzyklus drei Signaltöne und die Ladestandsanzeige blinkt
30 Sekunden lang gelb.

1
2
4
3
1
2
4
3
DEUTSCH18
Hinweis: Es empehlt sich, die Sonicare bei Nichtgebrauch im Ladegerät oder
UV Cleaner aufzubewahren, damit der Akku geladen bleibt. Ein vollständiges
Auaden des Akkus dauert mindestens 24 Stunden.
Die Sonicare-Zahnbürste benutzen
Putzanleitung
1 Befeuchten Sie die Borsten und tragen Sie etwas Zahnpasta auf.
2 Setzen Sie die Borsten der Zahnbürste in einem leichten Winkel zum
Zahneischsaum auf die Zähne.
3 Drücken Sie zum Einschalten der Sonicare den Ein-/Ausschalter.
4 Für eine optimale Zahnpege putzen Sie die Zähne nur mit leichtem
Druck und überlassen der Zahnbürste die eigentliche Arbeit.
5 Führen Sie den Bürstenkopf langsam in kleinen Vorwärts- und
Rückwärtsbewegungen so über die Zähne, dass die längeren Borsten
in die Zahnzwischenräume gelangen. Verfahren Sie auf diese Weise bis
zum Ende des Putzvorgangs.
Hinweis: Damit alle Zähne gleichmäßig geputzt werden, teilen Sie Ihren Mund
mit der Quadpacer-Funktion in vier Abschnitte auf (siehe “Produktmerkmale”).
6 Beginnen Sie mit Abschnitt 1 (Außenseite Oberkiefer), und putzen
Sie 30 Sekunden lang. Fahren Sie danach mit Abschnitt 2 (Innenseite
Oberkiefer), Abschnitt 3 (Außenseite Unterkiefer) und Abschnitt 4
(Innenseite Unterkiefer) für jeweils 30 Sekunden fort.
7 Nach Ablauf des Putzzyklus können Sie zusätzlich die Kauächen der
Zähne und Bereiche mit Verfärbungen putzen. Sie können auch die
Zunge ganz nach Belieben mit ein- oder ausgeschalteter Zahnbürste
putzen.
Ihre Sonicare ist sicher für den Gebrauch bei:
Zahnspangen (die Bürstenköpfe nutzen sich beim Putzen von
Zahnspangen schneller ab)
Zahnersatz (Füllungen, Kronen, Veneers)
-
Den Putzvorgang individuell gestalten
Die Sonicare beginnt automatisch im standardmäßig eingestellten Clean-
Modus. So gestalten Sie den Putzvorgang individuell:
1 Drücken Sie vor dem Einschalten der Sonicare die Taste für
individuelles Putzen, um zwischen den Modi und Einstellungen zu
wechseln.
Die grüne LED-Anzeige gibt den ausgewählten Modus bzw. die
,
gewählte Einstellung an.
Hinweis: Bei eingeschalteter Zahnbürste können Sie zwischen den Modi
wechseln, aber nicht zwischen den Einstellungen. Diese müssen vor Einschalten
des Geräts gewählt werden.

DEUTSCH 19
Putzmodi
Clean-Modus
Standardmodus für überragende Zahnreinigung.
Sensitive-Modus
Sanfte und doch gründliche Reinigung für empndliches Zahneisch und
Zähne.
Massage-Modus
Sanft anregende Zahneischmassage.
Putzeinstellungen
Go Care-Einstellung
1-minütiger Putzzyklus im Clean-Modus - für eine schnelle Reinigung. Das
Quadpacer-Signal ertönt alle 15 Sekunden.
Max Care-Einstellung
3-minütiger Putzzyklus, der Clean- und Massage-Modus für eine besonders
gründliche Mundreinigung kombiniert. Für jeden der vier Abschnitte stehen
30 Sekunden im Clean-Modus und 15 Sekunden im Massage-Modus zur
Verfügung. Das Quadpacer-Signal ertönt alle 45 Sekunden.
Hinweis: Wird die Sonicare in klinischen Studien eingesetzt,
muss der standardmäßig eingestellte 2-minütige Clean-Modus
ausgewählt werden. Das Handstück muss vollständig geladen
sein. Deaktivieren Sie die Easy-Start-Funktion. Bereiche mit
starken Verfärbungen können zusätzlich 30 Sekunden geputzt
werden, um die Verfärbungen zu entfernen.
Produktmerkmale
Easy-Start
Bei diesem Sonicare-Modell ist die Easy-Start-Funktion aktiviert.
-
Mit der Easy-Start-Funktion wird die Intensität über die ersten
-
14 Anwendungen langsam erhöht, damit Sie sich leichter an das Putzen
mit der Sonicare gewöhnen.
Hinweis: Jeder der ersten 14 Putzzyklen muss mindestens eine Minute dauern,
damit der jeweilige Zyklus von der Easy-Start-Funktion berücksichtigt wird.
Die Easy-Start-Funktion deaktivieren bzw. aktivieren
1 Setzen Sie den Bürstenkopf auf das Handstück.
2 Stellen Sie das Handstück in das an das Stromnetz angeschlossene
Ladegerät oder UV Cleaner.
So deaktivieren Sie Easy-Start:
-
Halten Sie den Ein-/Ausschalter 5 Sekunden gedrückt. Sie hören einen
Signalton, sobald die Easy-Start-Funktion deaktiviert wurde.
So aktivieren Sie Easy-Start:
-
Halten Sie den Ein-/Ausschalter 5 Sekunden gedrückt. Sie hören zwei
Signaltöne, sobald die Easy-Start-Funktion aktiviert wurde.
Hinweis: Die Funktion Easy-start sollte nur in der ersten Gewöhnungsphase
genutzt werden, da sie die Efzienz der Plaque-Entfernung mit der Sonicare

1
2
4
3
1
2
4
3
DEUTSCH20
reduziert.
Smartimer
Der Smartimer zeigt an, dass der Putzzyklus beendet ist, indem die
Zahnbürste nach beendetem Putzzyklus automatisch ausgeschaltet wird.
Zahnärzte empfehlen, die Zähne zweimal täglich mindestens 2 Minuten
lang zu putzen.
Quadpacer
Der Quadpacer ist ein Intervalltimer mit einem kurzen akustischen
-
Signal und einer Pause, damit die vier Abschnitte des Mundes
gleichmäßig geputzt werden. Je nach gewähltem Putzmodus oder
gewählter Putzeinstellung ertönt das Signal nach unterschiedlichen
Intervallen des Putzzyklus. Siehe dazu die Abschnitte “Putzanleitung”
und “Den Putzvorgang individuell gestalten”.
Die Quadpacer-Funktion wurde bei diesem Modell aktiviert. So
deaktivieren bzw. reaktivieren Sie die Quadpacer-Funktion:
1 Stellen Sie das Handstück mit einem aufgesetzten Bürstenkopf in das
ans Stromnetz angeschlossene Ladegerät oder UV Cleaner.
2 Zum Deaktivieren des Quadpacer: Halten Sie die Taste für
individuelles Putzen 5 Sekunden gedrückt. Sie hören einen Signalton,
sobald der Quadpacer deaktiviert wurde.
Zum Reaktivieren des Quadpacer: Halten Sie die Taste für
,
individuelles Putzen 5 Sekunden gedrückt, bis Sie zwei Signaltöne
hören. Dies bedeutet, dass die Quadpacer-Funktion wieder
eingeschaltet ist.
Hinweis: Bei den vorprogrammierten Go Care- und Max Care-Einstellungen
kann die Quadpacer-Funktion nicht deaktiviert werden.
Kabelaufwicklung des Deluxe-Ladegeräts (nur bestimmte Gerätetypen)
Umfasst Ihr Modell eine Abdeckung und Basis des Deluxe-Ladegeräts,
ist das Reiseladegerät in der Abdeckung vorinstalliert. Ist Ihnen das Kabel
zu lang, können Sie das überschüssige Kabel in der Kabelaufwicklung der
Ladestation verstauen.
1 Um die Abdeckung von der Basis des Ladegeräts zu trennen, drücken
Sie auf die beiden grauen Entriegelungsleisten an der Basis und
ziehen die weiße Abdeckung des Ladegeräts nach oben.
 Loading...