

Philips HX6932/02, HX6932/10, HX6911/02, FlexCare HX6982, FlexCare HX6942 User Manual
...
FlexCare
900 series
Rechargeable
sonic toothbrush
4235.020.2278.2.indd 14235.020.2278.2.indd 1 17-04-2008 14:52:3517-04-2008 14:52:35
2
J
A
B
C
D
E
F
G
H
I
K
L
M
N
1
4235.020.2278.2.indd 24235.020.2278.2.indd 2 17-04-2008 14:52:5017-04-2008 14:52:50

HX6982, HX6942, HX6932, HX6902
ENGLISH 4
DANSK 15
ESPAÑOL 26
SUOMI 38
NORSK 49
PORTUGUÊS 60
РУССКИЙ 72
SVENSKA 85
4235.020.2278.2.indd 34235.020.2278.2.indd 3 17-04-2008 14:52:5117-04-2008 14:52:51
4
Important
Read this user manual carefully before you use the appliance and save it for
future reference.
Danger
Keep the charger and/or sanitiser away from water. Do not place or
store it over or near water contained in a bathtub, washbasin, sink
etc. Do not immerse the charger and/or sanitiser in water or any
other liquid. After cleaning, make sure the charger and/or sanitiser is
completely dry before you connect it to the mains.
Warning
Check if the voltage indicated on the bottom of the charger and/or
sanitiser corresponds to the local mains voltage before you connect
the appliance.
The mains cord cannot be replaced. If the mains cord is damaged,
discard the charger and/or sanitiser.
Always have the charger and/or sanitiser replaced with one of the
original type in order to avoid a hazard.
Do not use the charger and/or sanitiser outdoors or near heated
surfaces.
If the appliance is damaged in any way (brush head, toothbrush handle,
charger and/or sanitiser), stop using it. This appliance contains no
serviceable parts. If the appliance is damaged, contact the Customer
Care Centre in your country (see chapter ‘Guarantee & service’).
This appliance is not intended for use by persons (including children)
with reduced physical, sensory or mental capabilities, or lack of
experience and knowledge, unless they have been given supervision or
instruction concerning use of the appliance by a person responsible for
their safety.
Children should be supervised to ensure that they do not play with the
appliance.
Discontinue use of the sanitiser if the UV light bulb remains on when
the door is open. UV light can be harmful to the human eye and skin.
Keep the sanitiser out of the reach of children at all times.
Caution
Do not clean the brush head, the handle, the charger, the charger cover
and/or the sanitiser in the dishwasher.
If you have had oral or gum surgery in the previous 2 months, consult
your dentist before you use the toothbrush.
Consult your dentist if excessive bleeding occurs after using this
toothbrush or if bleeding continues to occur after 1 week of use.
The Sonicare toothbrush complies with the safety standards for
electromagnetic devices. If you have a pacemaker or other implanted
device, contact your physician or the device manufacturer of the
implanted device prior to use.
If you have medical concerns, consult your doctor before you use the
Sonicare.
This appliance has only been designed for cleaning teeth, gums and
tongue. Do not use it for any other purpose. Stop using the appliance
and contact your doctor if you experience any discomfort or pain.
The Sonicare toothbrush is a personal care device and is not intended
for use on multiple patients in a dental practice or institution.
-
-
-
-
-
-
-
-
-
-
-
-
-
-
-
-
ENGLISH
4235.020.2278.2.indd 44235.020.2278.2.indd 4 17-04-2008 14:52:5117-04-2008 14:52:51

Stop using a brush head with crushed or bent bristles. Replace the
brush head every 3 months or sooner if signs of wear appear.
Do not use other brush heads than the ones recommended by the
manufacturer.
If your toothpaste contains peroxide, baking soda or bicarbonate
(common in whitening toothpastes), thoroughly clean the brush head
with soap and water after each use. This prevents possible cracking of
the plastic.
The UV light bulb is hot during and immediately after the sanitising
cycle. Do not touch the UV light bulb when it is hot.
Do not operate the sanitiser without the protective screen in place to
avoid contact with a hot bulb.
Electromagnetic fi elds (EMF)
This Philips appliance complies with all standards regarding electromagnetic
fi elds (EMF). If handled properly and according to the instructions in this
user manual, the appliance is safe to use based on scientifi c evidence
available today.
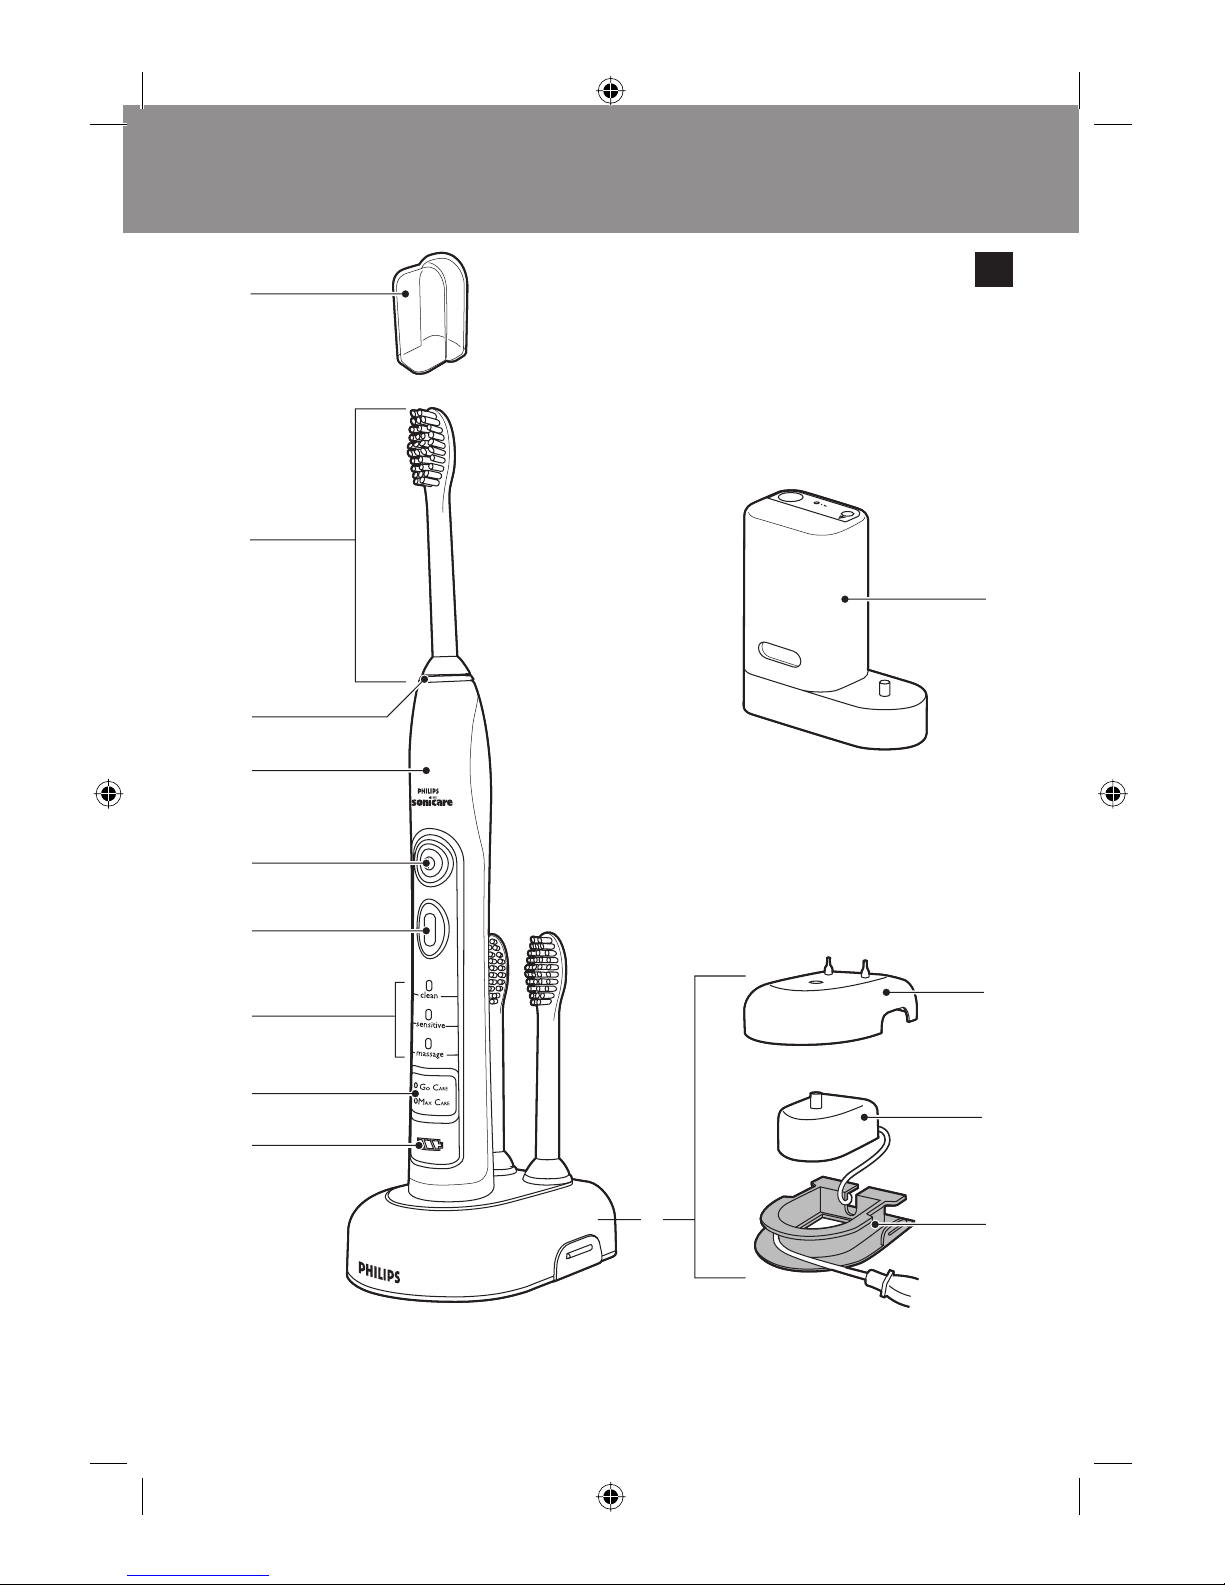
The Sonicare (Fig. 1)
A Hygienic travel cap
B Brush head
C Interchangeable colour code ring
D Handle with soft grip
E Power on/off button
F Personalised Brushing button
G Brushing modes
H Brushing routines
I Deluxe recharge gauge
J Deluxe charger (specifi c types only)
K Charger cover with brush head holder (specifi c types only)
L Travel charger
M Charger base with cord wrap
N UV sanitiser with integrated charger and cord wrap (specifi c types
only)
Not shown: UV light bulb
Not shown: Sanitiser drip tray
Not shown: Protective screen for UV light bulb
Getting started
Changing the colour code ring
Sonicare brush heads come with interchangeable colour code rings to
identify your brush head.
To change the colour code ring:
-
-
-
-
-
-
-
-
ENGLISH 5
4235.020.2278.2.indd 54235.020.2278.2.indd 5 17-04-2008 14:52:5117-04-2008 14:52:51
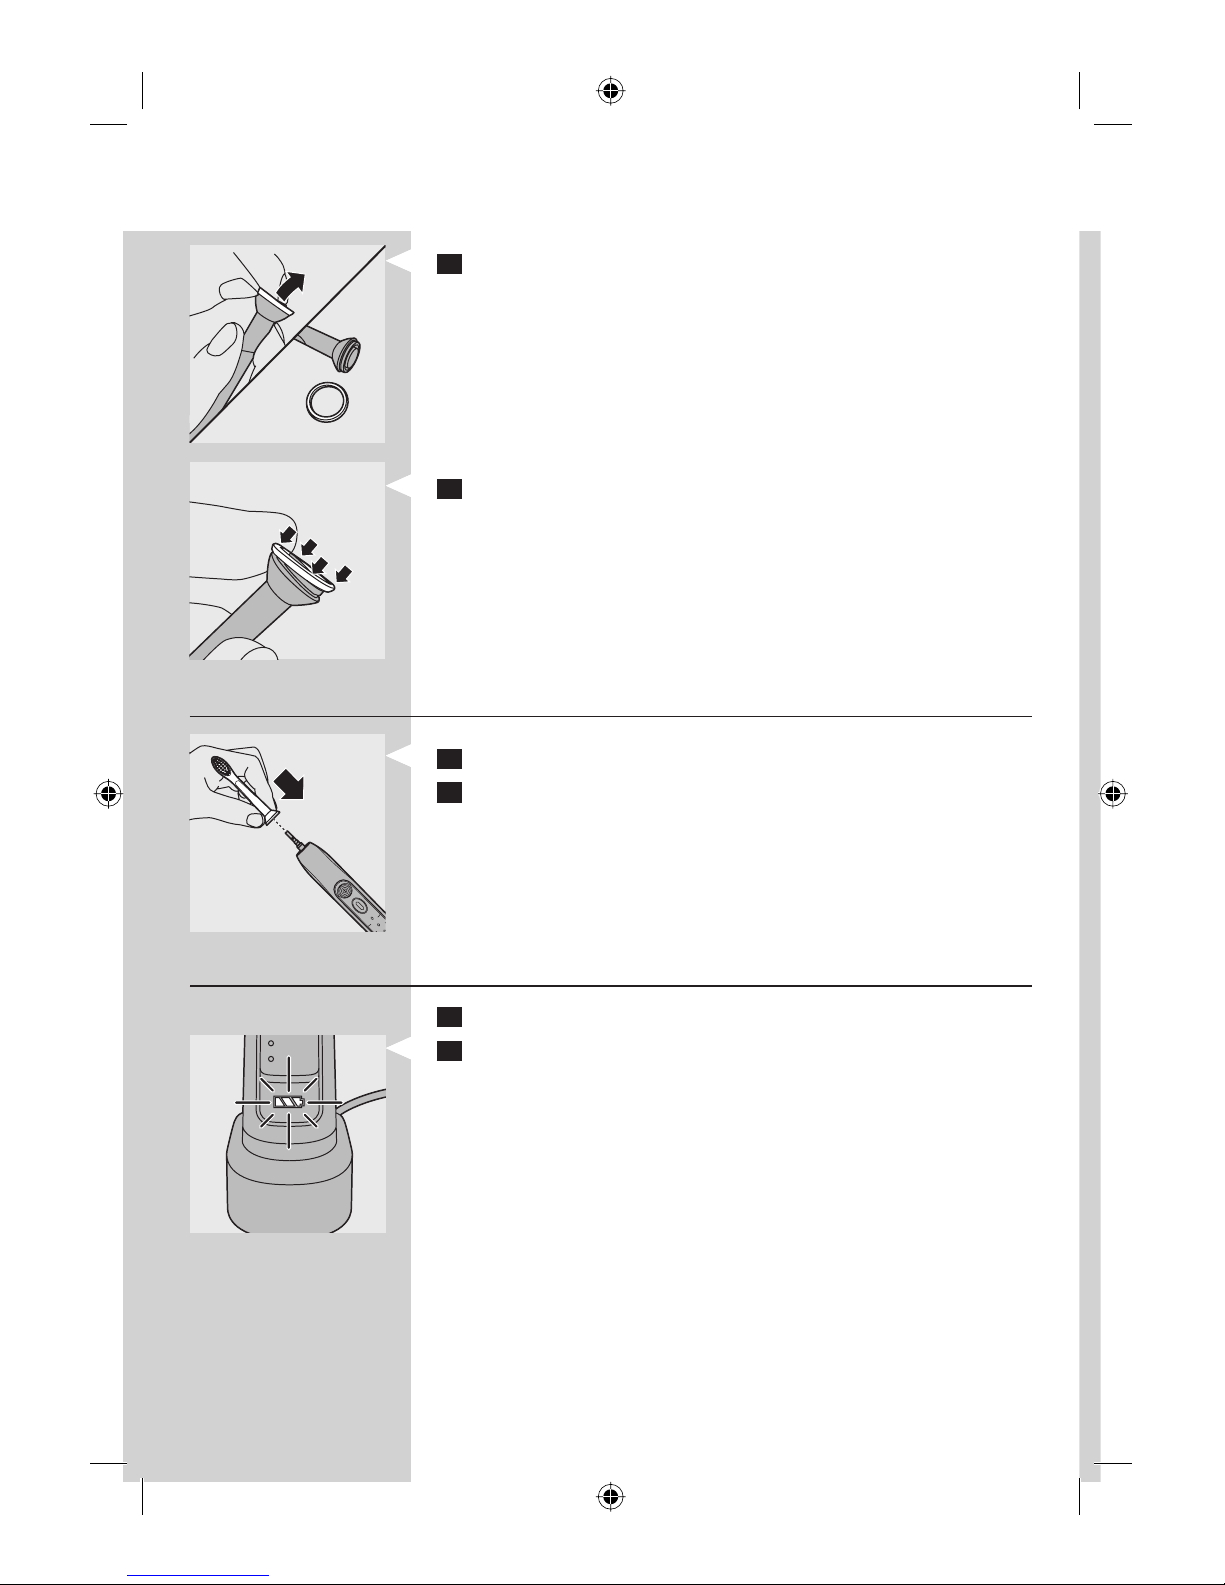
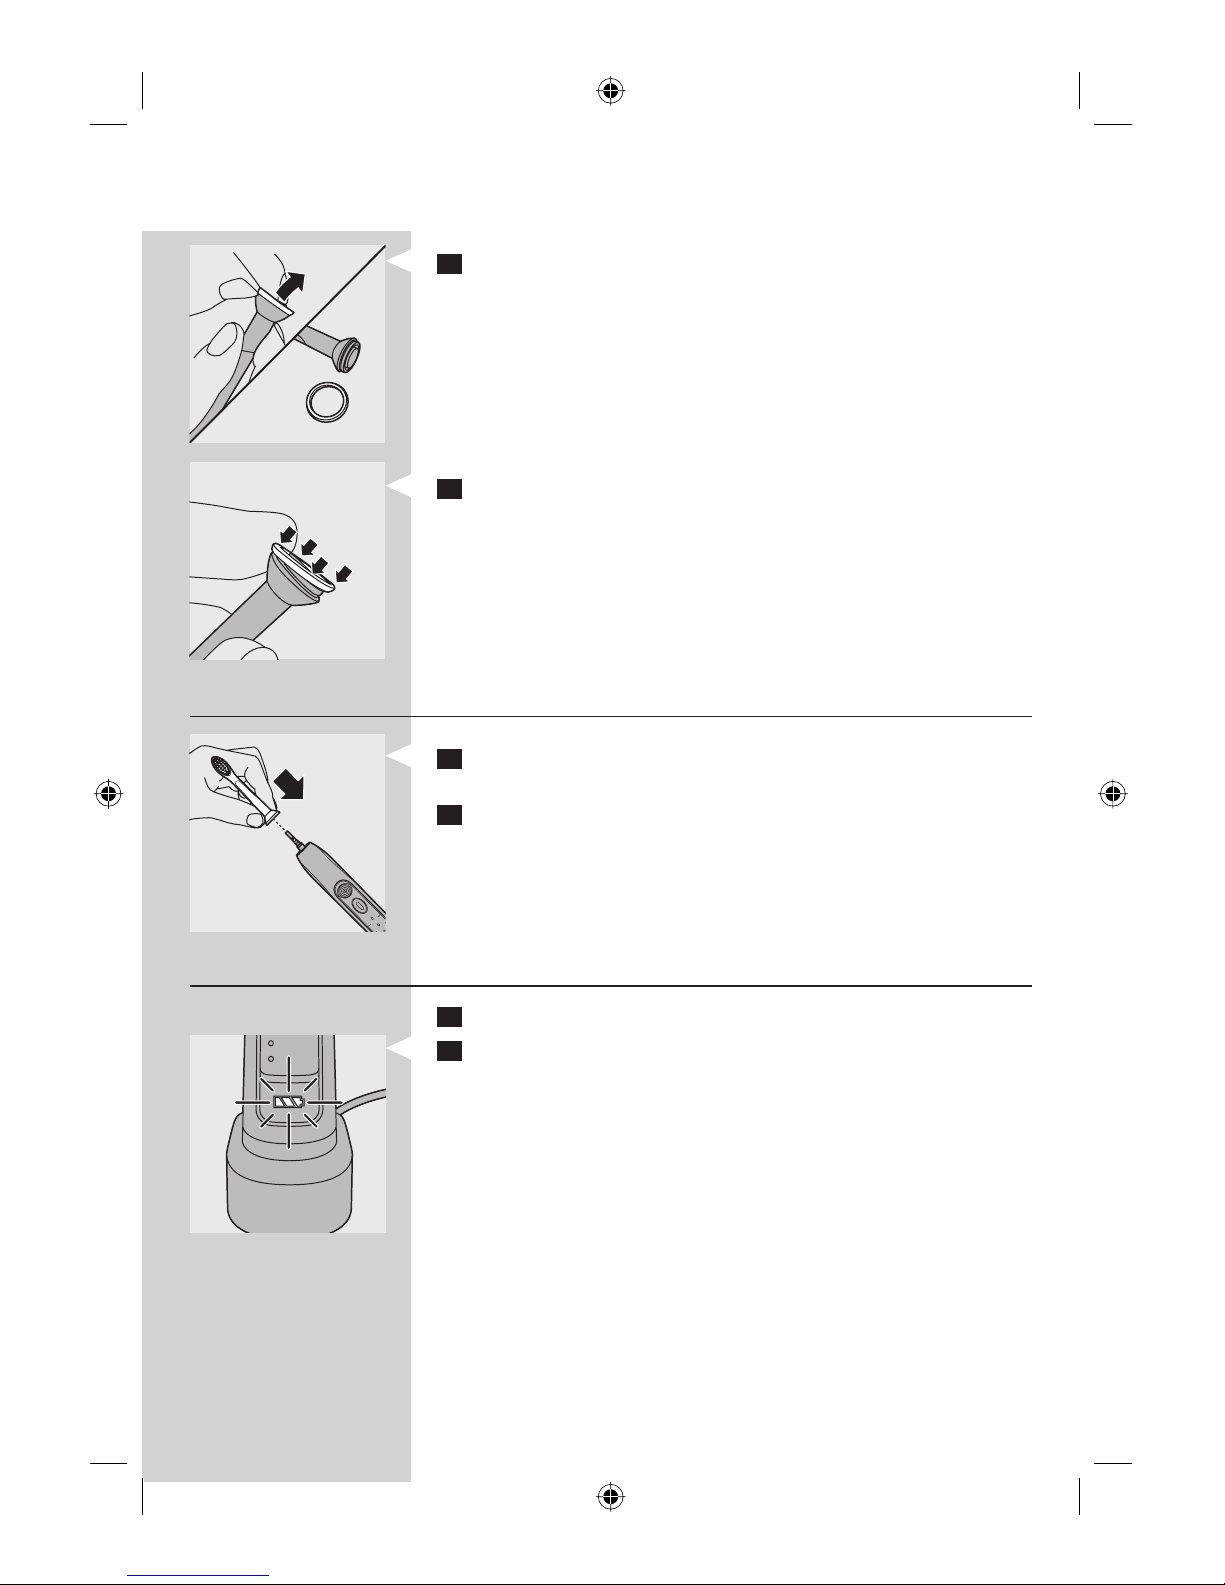
1 Pull the colour code ring from the bottom of the brush head.
2 Slip one edge of the new ring over the bottom of the brush head.
Then press down on the other side to snap the ring in place.
Attaching the brush head
1 Align the brush head so the bristles face the front of the handle.
2 Firmly press the brush head down on the metal shaft until it stops.
Note: There is a small gap between the colour code ring and the handle.
Charging your Sonicare
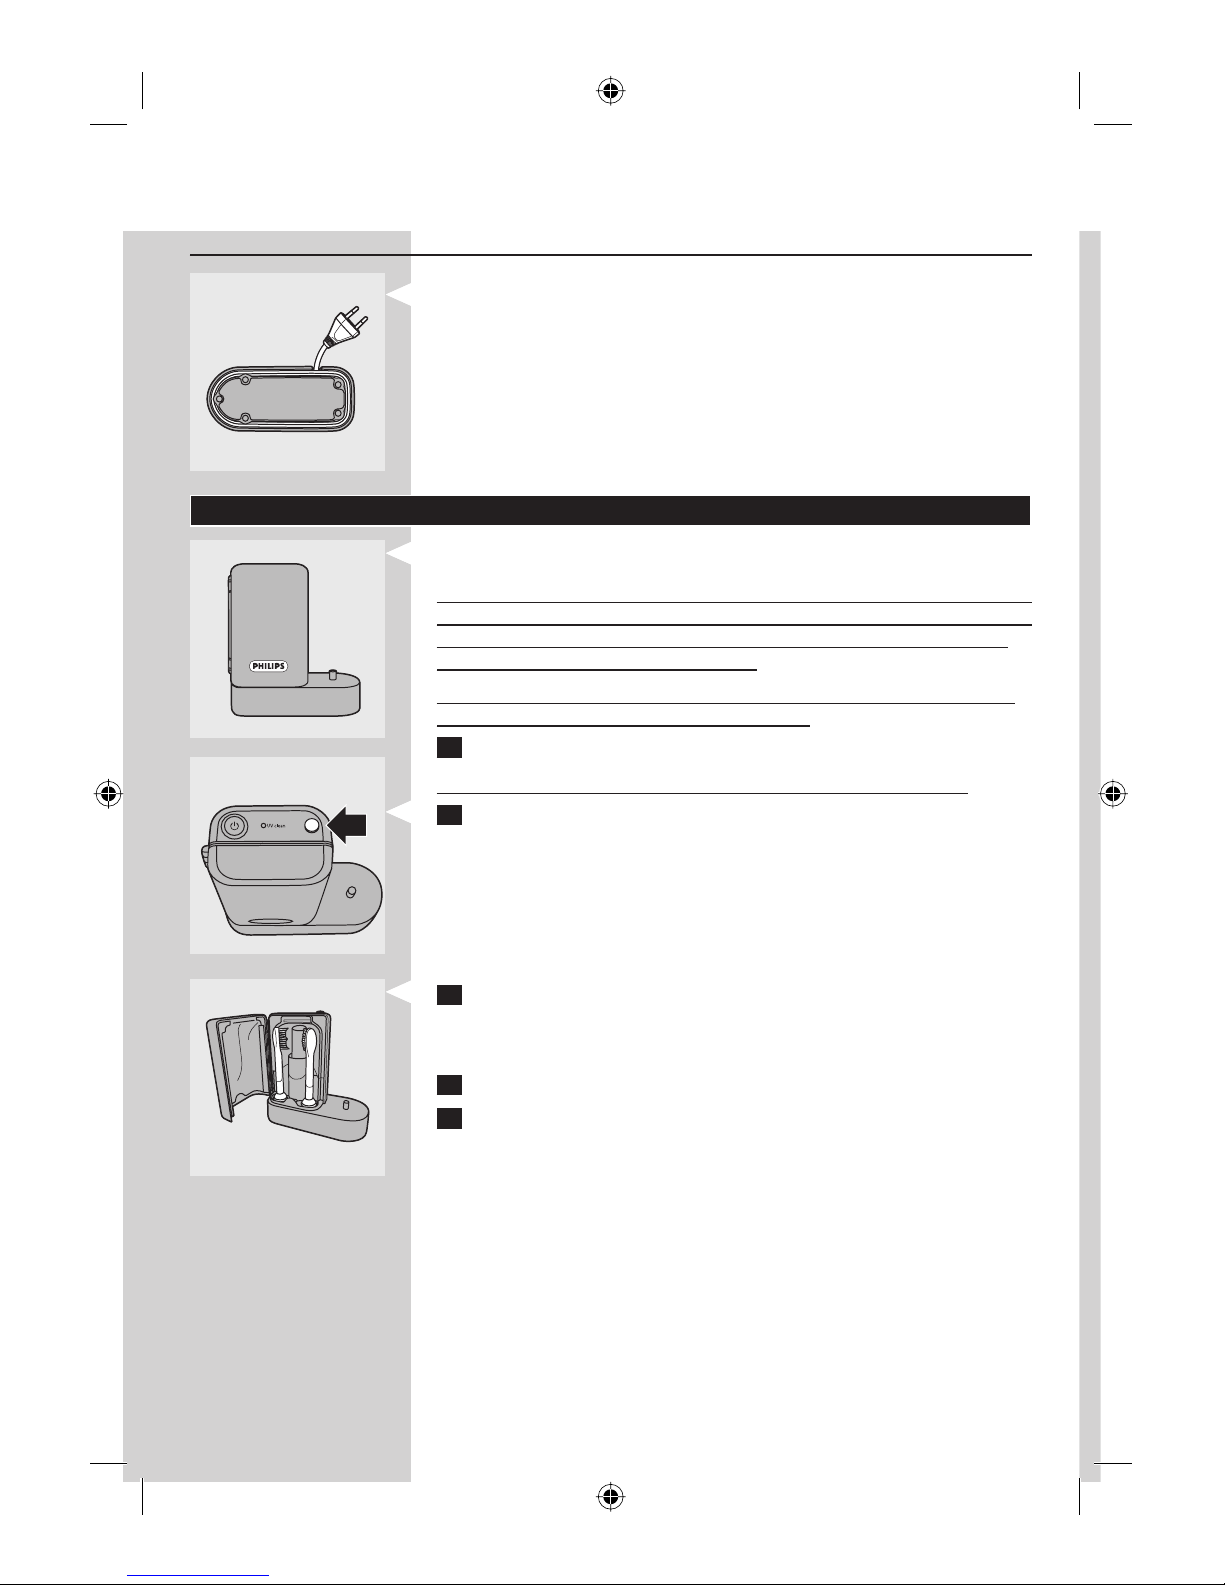
1 Plug the charger or sanitiser into a wall socket.
2 Place the handle on the charger or sanitiser.
The fl ashing light on the battery gauge indicates that the toothbrush
is charging.
Deluxe recharge gauge:
Indicates the amount of charge left in the battery
3 green LEDs: 75-100%
2 green LEDs: 50-74%
1 green LED: 25-49%
1 fl ashing yellow LED: less than 25%
Note: If the battery charge of your Sonicare is low, you hear 3 beeps and 1
LED on the recharge gauge fl ashes yellow for 30 seconds.
Note: To keep the battery fully charged, we recommend that you keep your
Sonicare on the charger or sanitiser when not in use. It takes at least 24 hours
to charge the battery fully.
,
-
-
-
-
clean
sensitive
clean
sensitive
ENGLISH6
4235.020.2278.2.indd 64235.020.2278.2.indd 6 17-04-2008 14:52:5217-04-2008 14:52:52

Using the Sonicare
Brushing instructions
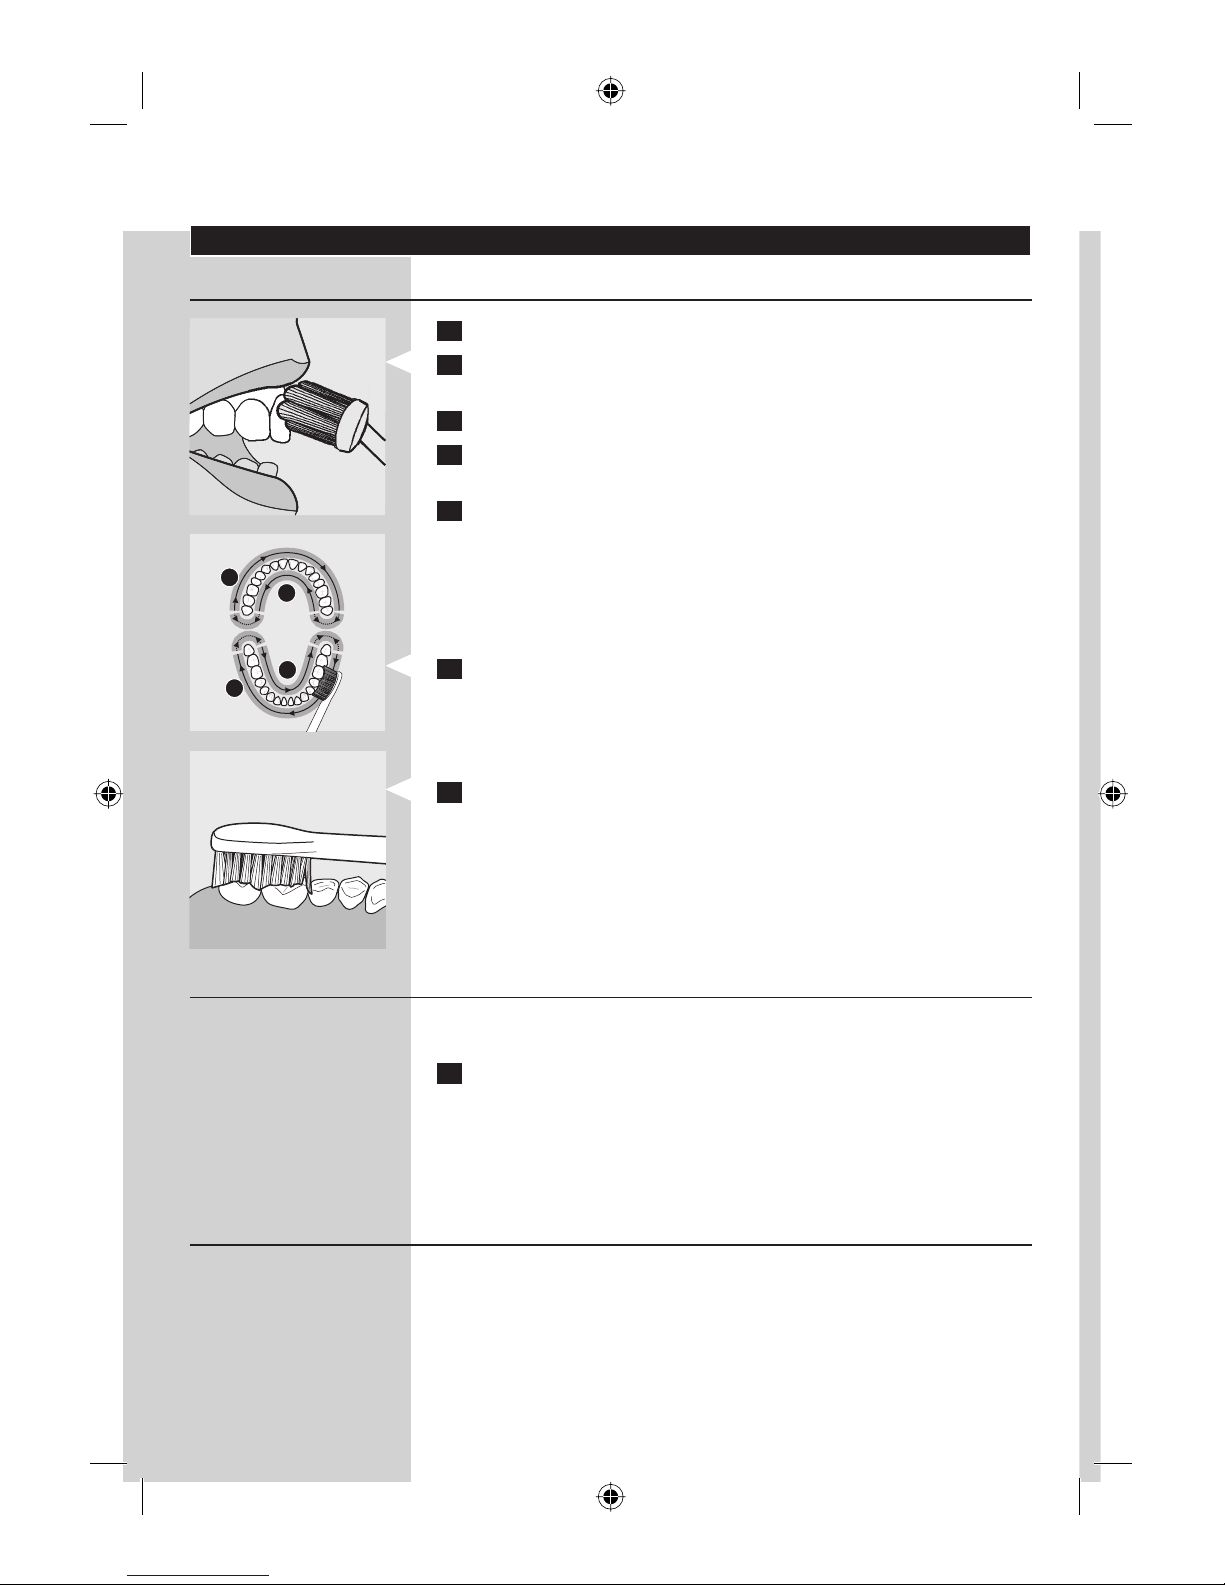
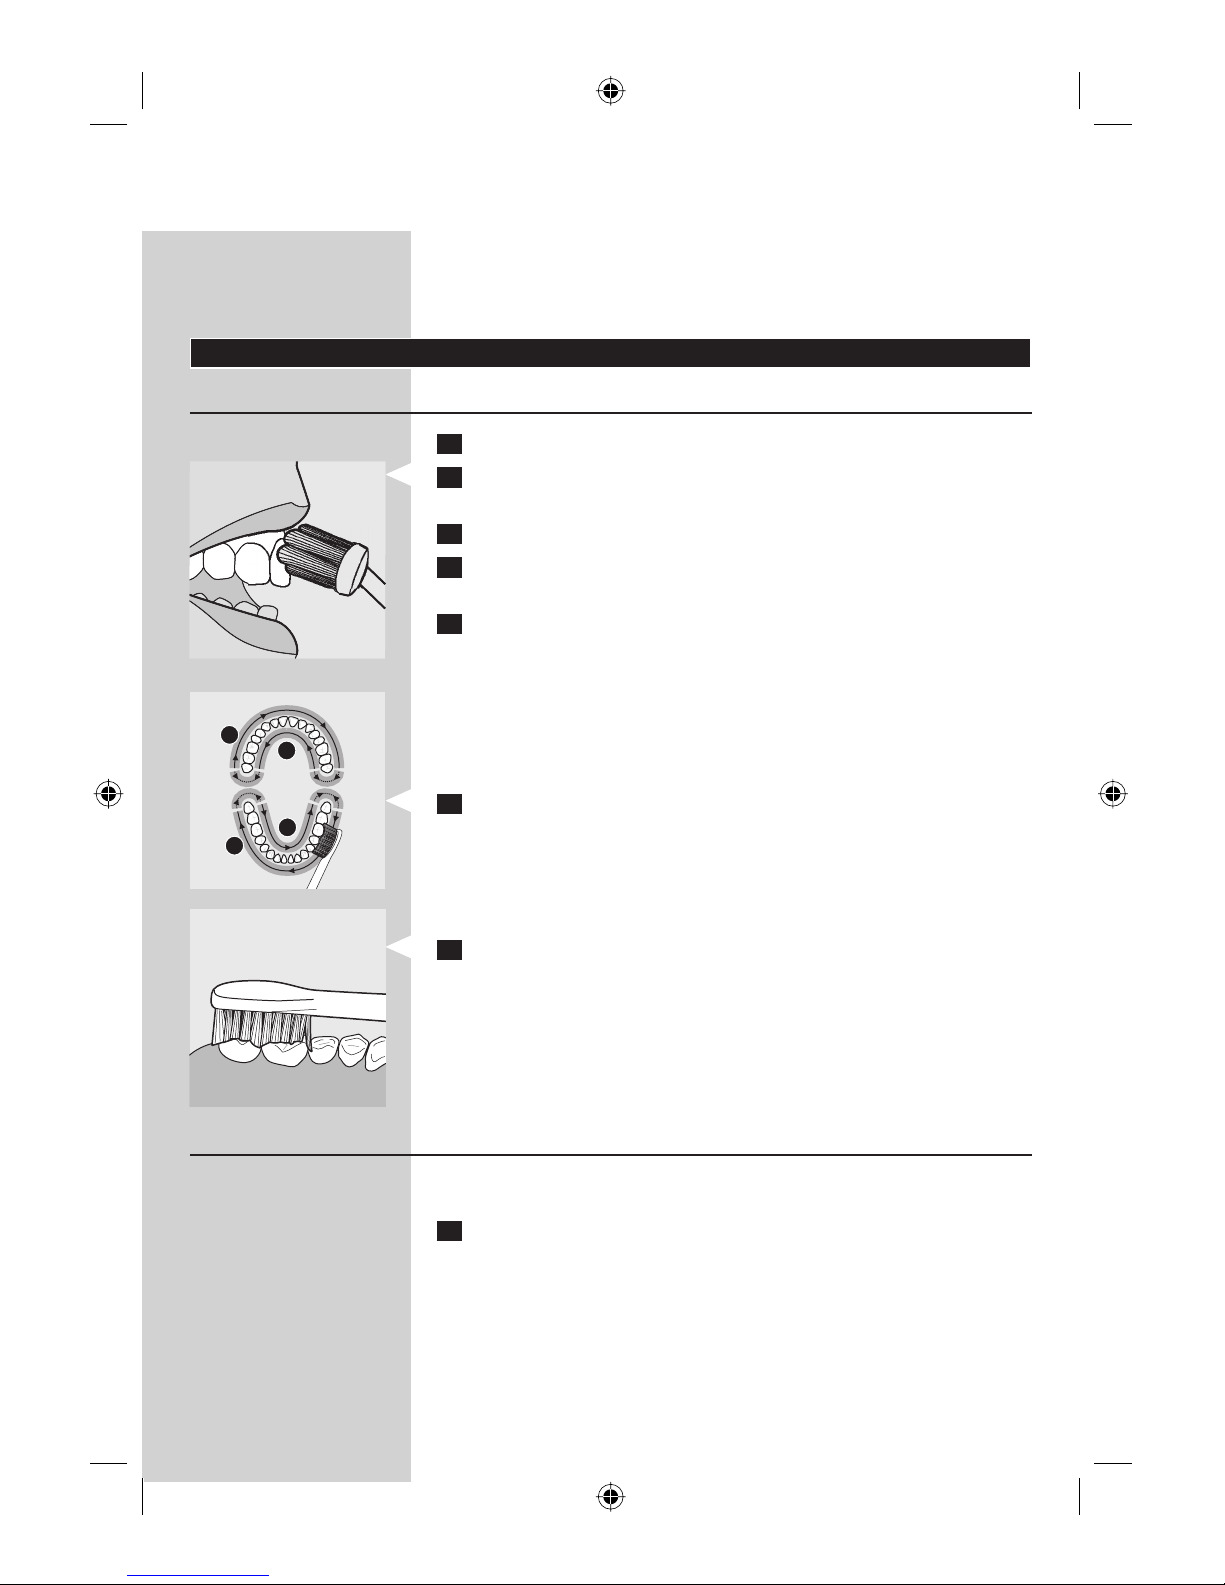
1 Wet the bristles and apply a small amount of toothpaste.
2 Place the toothbrush bristles against the teeth at a slight angle
towards the gumline.
3 Press the power on/off button to switch on the Sonicare.
4 Apply light pressure to maximise the Sonicare’s effectiveness and let
the Sonicare toothbrush do the brushing for you.
5 Gently move the brush head slowly across the teeth in a small back
and forth motion so the longer bristles reach between your teeth.
Continue this motion throughout your brushing cycle.
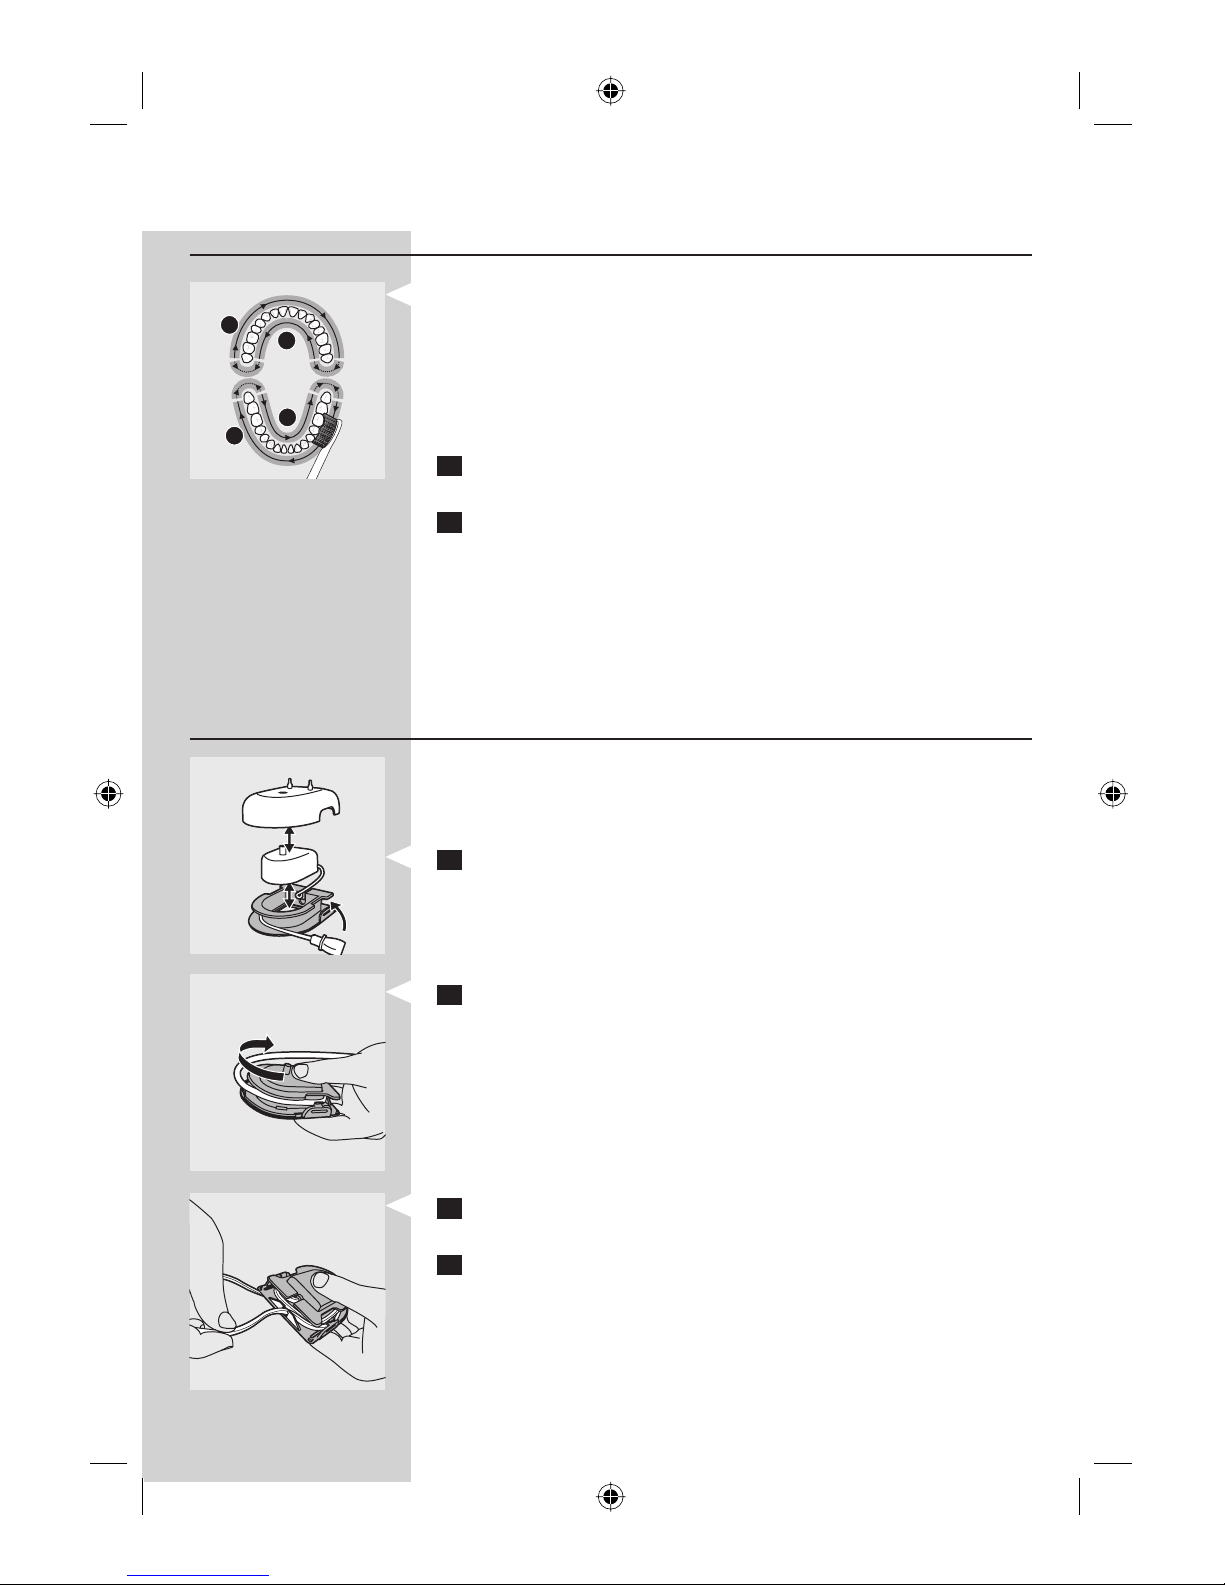
Note: To make sure you brush evenly throughout the mouth, divide your mouth
into 4 sections using the Quadpacer (see chapter ‘Features’).
6 Begin brushing in section 1 (outside of upper teeth) and brush for 30
seconds before moving to section 2 (inside of upper teeth). Continue
brushing in section 3 (outside of lower teeth) and brush for 30
seconds before moving to section 4 (inside of lower teeth).
7 After you have completed the brushing cycle, you can
spend additional time brushing the chewing surfaces of your teeth
and areas where staining occurs. You may also brush your tongue,
with the toothbrush switched on or off, as you prefer.
Your Sonicare is safe to use on:
Braces (brush heads wear out sooner when used on braces)
Dental restorations (fi llings, crowns, veneers)
Personalising your brushing experience
The Sonicare automatically starts in the default Clean mode. To personalise
your brushing:
1 Before you switch on the Sonicare, press the Personalised Brushing
button to toggle between modes and routines.
The green LED indicates the selected mode or routine.
Note: When the toothbrush is switched on, you can switch between modes but
not between routines. Routines have to be selected before you switch on the
appliance.
Brushing modes
Clean mode
Standard mode for superior teeth cleaning.
Sensitive mode
Gentle, yet thorough cleaning for sensitive gums and teeth.
Massage mode
Gentle gum stimulation.
-
-
,
1
2
4
3
1
2
4
3
ENGLISH 7
4235.020.2278.2.indd 74235.020.2278.2.indd 7 17-04-2008 14:52:5317-04-2008 14:52:53
Brushing routines
Go Care routine
1-minute brushing cycle in the Clean mode, for a quick clean. You hear the
Quadpacer signal at 15-second intervals.
Max Care routine
3-minute brushing cycle that combines the Clean and Massage modes in
one routine for a thorough mouth clean. There are 30 seconds of Clean
mode and 15 seconds of Massage mode for each of the 4 sections of your
mouth. You hear the Quadpacer signal at 45 second intervals.
Note: When the Sonicare is used in clinical studies, the default
2-minute Clean mode must be selected. The handle has to
be fully charged. Deactivate the Easy-start feature. For areas
where excess staining occurs, an additional 30 seconds of
brushing time can be spent to help remove stains.
Features
Easy-start
This Sonicare model comes with the Easy-start feature activated.
The Easy-start feature gently increases power over the fi rst 14
brushings to ease into the Sonicare experience.
Note: Each of the fi rst 14 brushings must last at least 1 minute to properly
move through the Easy-start ramp-up cycle.
Deactivating or activating the Easy-start feature
1 Attach your brush head to the handle.
2 Place the handle on the plugged-in charger or sanitiser.
To deactivate Easy-start:
Press and hold the on/off button for 5 seconds. You hear 1 beep to indicate
that the Easy-start feature has been deactivated.
To activate Easy-start:
Press and hold the on/off button for 5 seconds. You hear 2 beeps to
indicate that the Easy-start feature has been activated.
Note: Using the Easy-start feature beyond the initial ramp-up period is not
recommended and reduces the Sonicare’s effectiveness in removing plaque.
Smartimer
The Smar timer indicates that your brushing cycle is complete by
automatically switching off the toothbrush at the end of the brushing cycle.
Dental professionals recommend brushing no less than 2 minutes twice a
day.
-
-
-
-
ENGLISH8
4235.020.2278.2.indd 84235.020.2278.2.indd 8 17-04-2008 14:52:5417-04-2008 14:52:54
Quadpacer
The Quadpacer is an interval timer that has a short beep and pause to
remind you to brush the 4 sections of your mouth. Depending on the
brushing mode or brushing routine you have selected, the Quadpacer
beeps at different intervals during the brushing cycle. See the ‘Brushing
instructions’ and ‘Personalising your brushing experience’ sections.
The Quadpacer on this model has been activated. To deactivate or
reactivate the Quadpacer:
1 Place the handle with a brush head attached on the plugged-in
charger or sanitiser
2 To deactivate the Quadpacer: press and hold the Personalised
Brushing button for 5 seconds. You hear 1 beep to indicate that the
Quadpacer has been deactivated.
To reactivate the Quadpacer: press and hold the Personalised
Brushing button for 5 seconds until you hear 2 beeps. This indicates
that the Quadpacer is active again.
Note: The Quadpacer cannot be deactivated on the pre-programmed Go Care
and Max Care brushing routines.
Cord wrap on deluxe charger (specifi c types only)
If your model includes the deluxe charger cover and base, the travel
charger is pre-installed inside the cover. If you want to shorten the mains
cord, you can store excess cord in the cord-wrap feature built into the
charger base.
1 To separate the charger cover from the charger base, press the two
grey snap bars on the charger base and pull the white charger cover
upwards.
2 Wrap excess cord around the grey charger base as shown in the
picture. Be sure to wrap the cord on the inside of the two snap
levers.
3 When you have stored the excess cord, guide the cord through the
small groove in the rear of the grey charger base.
4 Reattach the charger cover by pressing it down over the charger
base until it snaps into place.
Tip: For extra convenience during travel, you can remove the travel charger and
use it without the charger cover and charger base.
-
,
1
2
4
3
1
2
4
3
ENGLISH 9
4235.020.2278.2.indd 94235.020.2278.2.indd 9 17-04-2008 14:52:5417-04-2008 14:52:54
Cord wrap on sanitiser (specifi c types only)
If your model includes the sanitiser, you can store excess cord with the
cord-wrap feature built into the bottom of the sanitiser.
Sanitising (specifi c types only)
With the sanitiser, you can clean your brush head after every use.
Discontinue use of the sanitiser if the UV light bulb remains on when the
door is open or if the Philips logo is broken or missing from the sanitiser.
UV light can be harmful to the human eye and skin. Keep the sanitiser
out of the reach of children at all times.
Unplug the sanitiser and call Customer Service if the sanitiser gives off
smoke or a burning smell while it is operating.
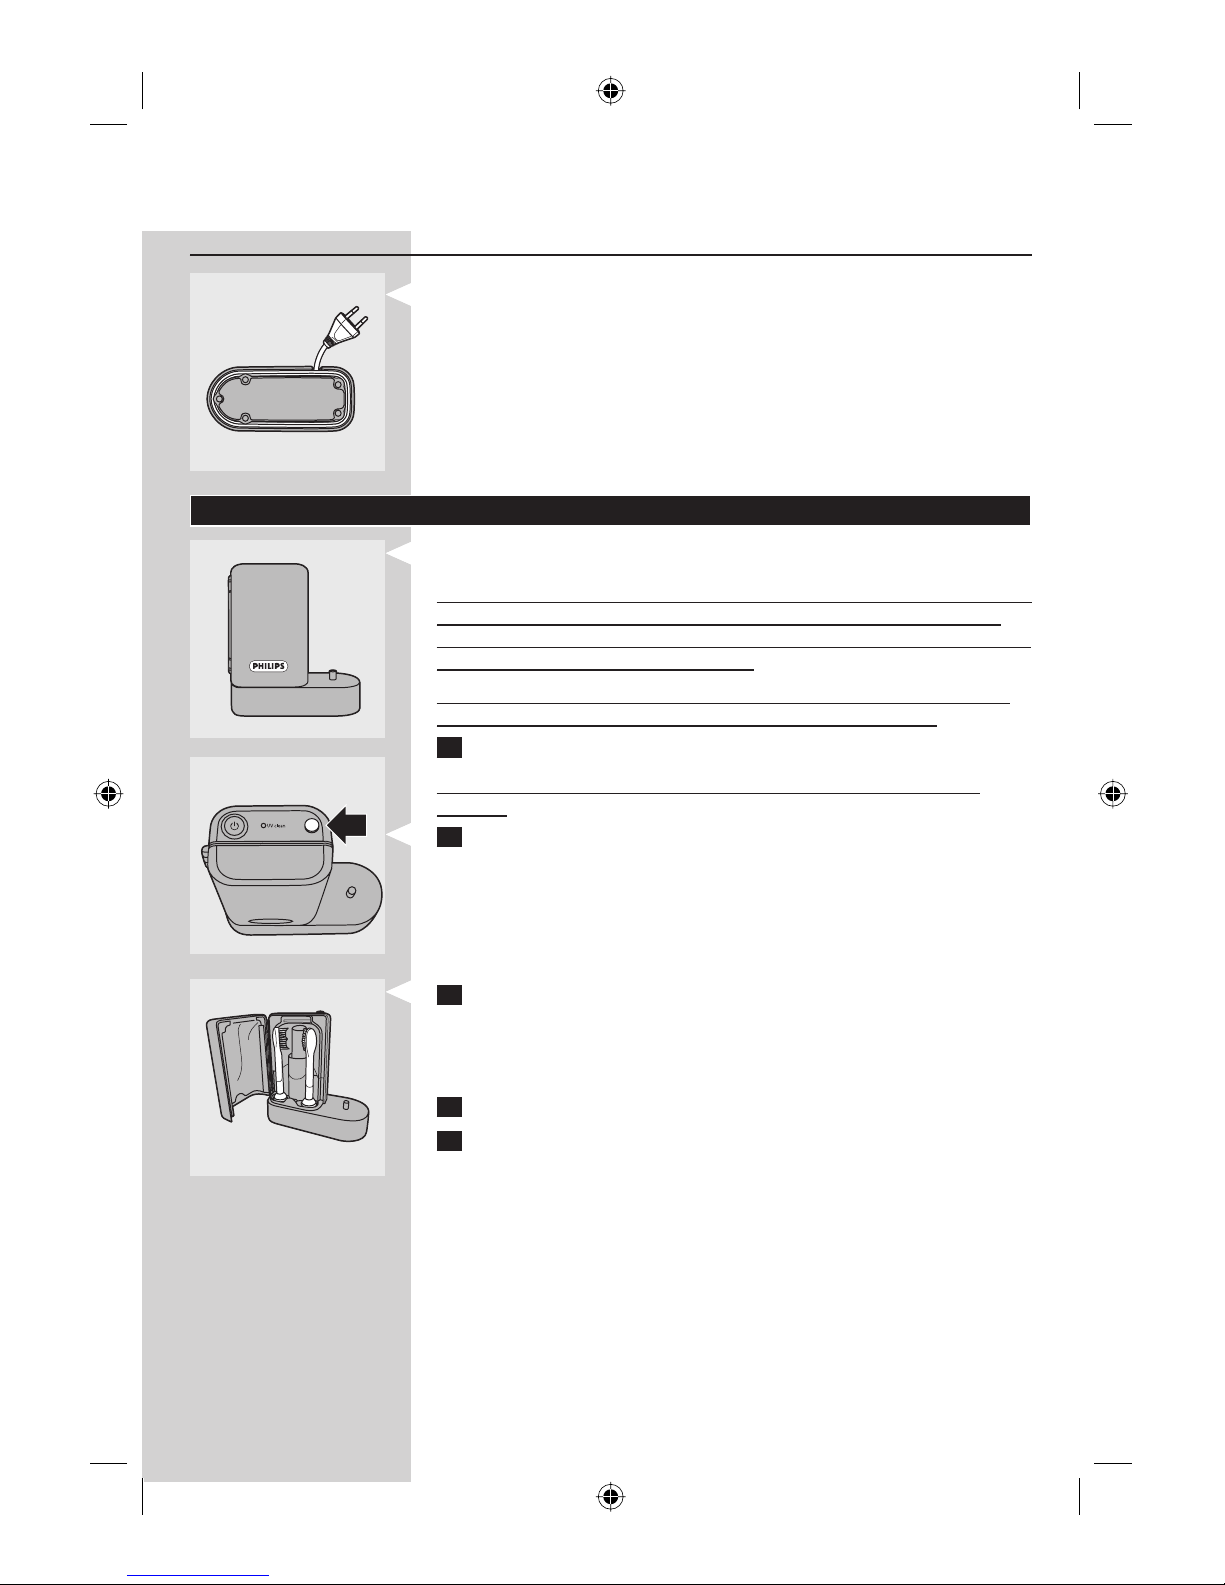
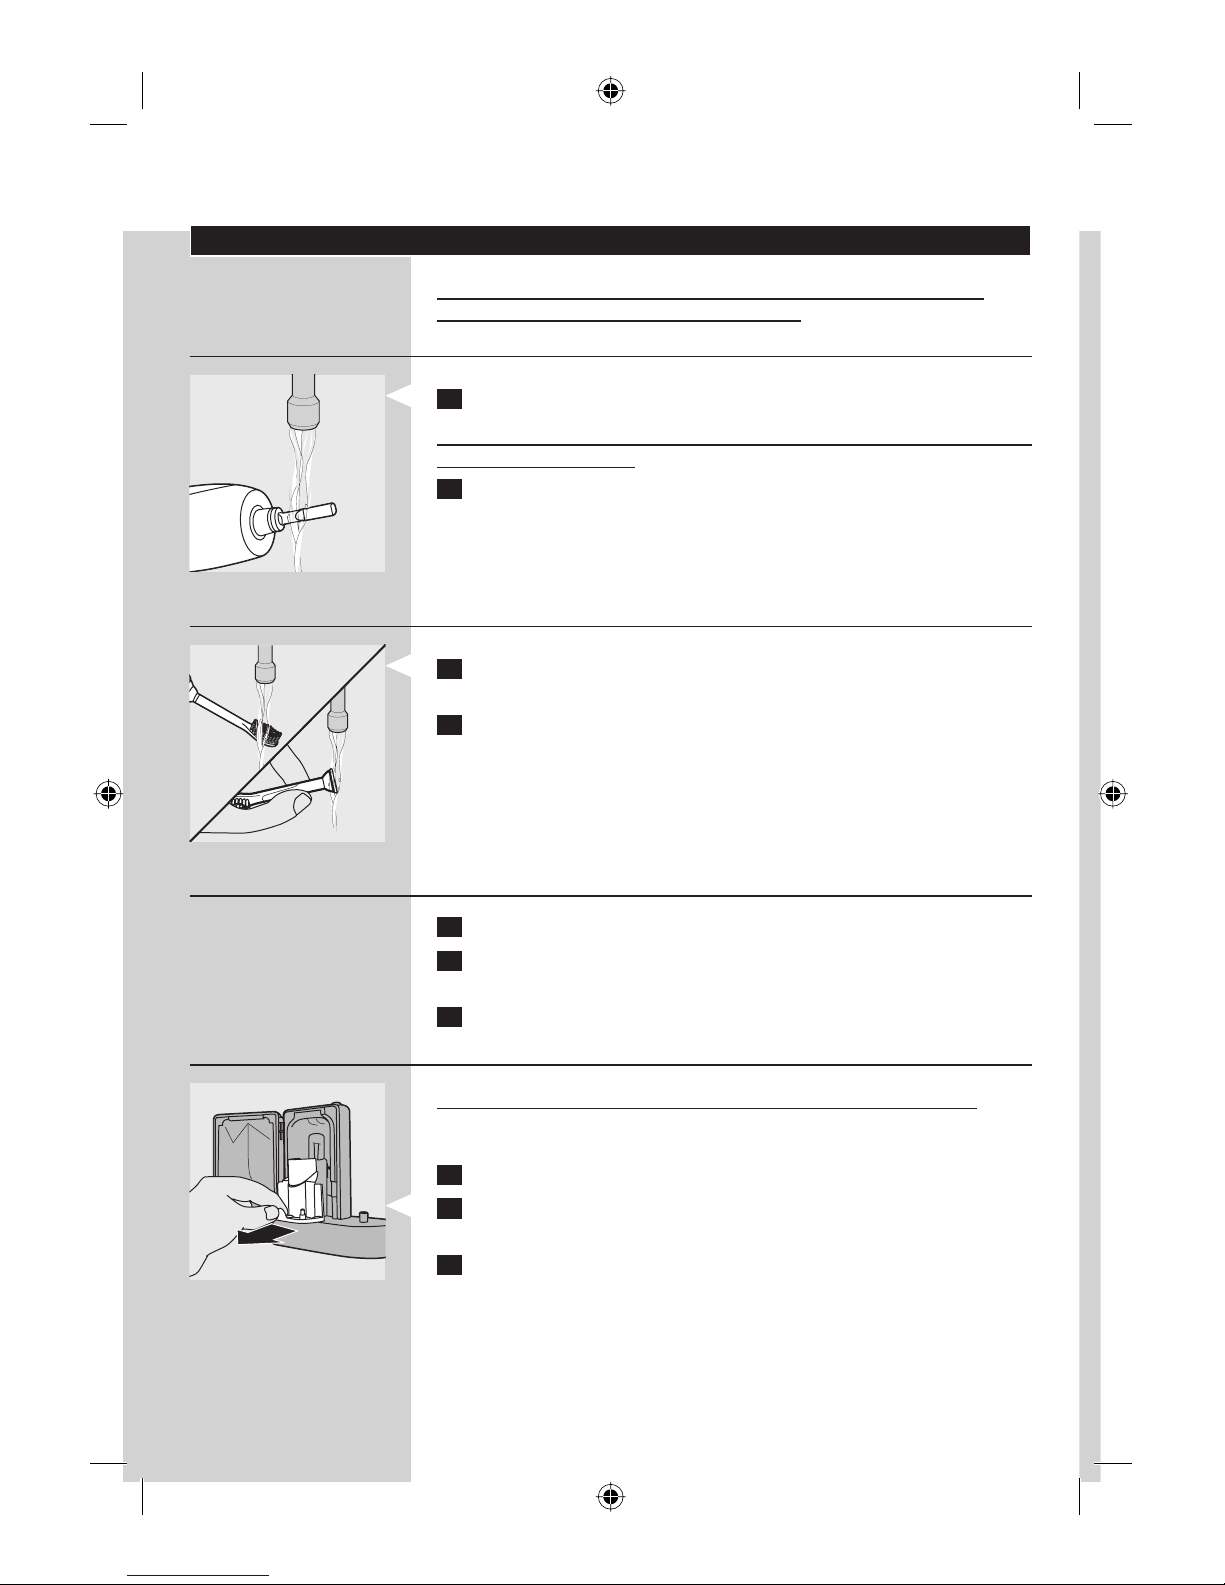
1 After brushing, rinse the brush head and shake off excess water.
Do not place the travel cap on the brush head during sanitisation.
2 To open the sanitiser door, press the door release button.
3 Place the brush head on one of the 2 pegs in the sanitiser.
Make sure the bristles of the brush head directly face the light bulb.
Note: Only clean Sonicare ProResults brush heads in the sanitiser.
4 Make sure the sanitiser is plugged into wall socket.
5 Close the door and press the green power on/off button once to
select the UV clean cycle.
Note: You can only switch on the sanitiser when the door is properly closed.
Note: If you open the door during the sanitising cycle, the sanitiser stops.
Note: The sanitiser cycle runs for 10 minutes and then automatically switches
off.
The sanitiser is in operation when the blue light glows through the
Philips logo and the UV clean LED fl ashes slowly.
When the sanitising cycle is complete, the UV clean LED lights up
green continuously and the sanitiser automatically switches off.
-
-
-
,
,
ENGLISH10
4235.020.2278.2.indd 104235.020.2278.2.indd 10 17-04-2008 14:52:5517-04-2008 14:52:55
Cleaning
Do not clean brush heads, the handle, the travel charger, the charger
cover and the UV sanitiser in the dishwasher.
Toothbrush handle
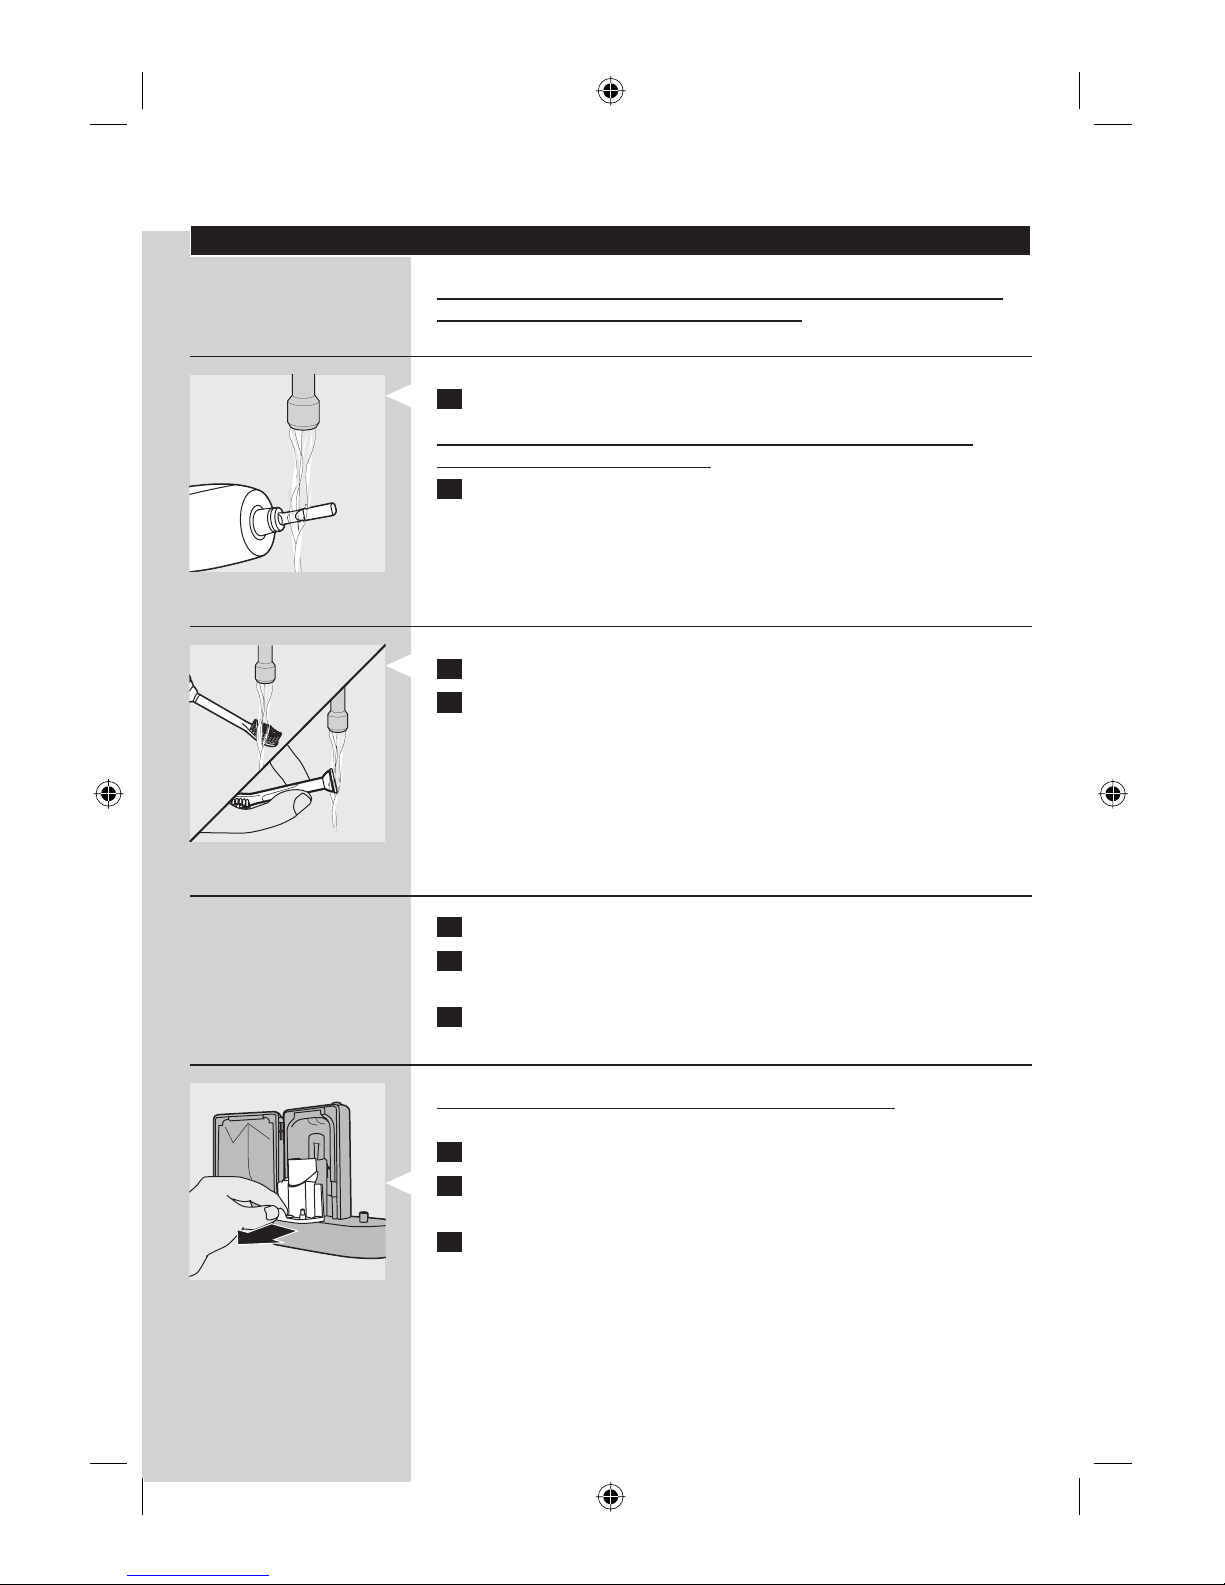
1 Remove the brush head and rinse the metal shaft with warm water.
Do not push on the rubber seal round the metal shaft with sharp
objects, as this may cause damage.
2 Use a damp cloth to wipe the entire surface of the handle.
Brush head
1 Rinse the brush head and bristles after each use.
2 Remove the brush head from the handle and rinse the brush head
connection at least once a week with warm water.
Travel charger and deluxe charger (specifi c types only)
1 Unplug the charger.
2 Specifi c types only: Disassemble the deluxe charger and take out the
travel charger.
3 Use a damp cloth to wipe the surface of the charger.
Sanitiser (specifi c types only)
Do not clean the sanitiser when the UV light bulb is hot.
For optimal effectiveness, it is recommended to clean the sanitiser weekly.
1 Unplug the sanitiser.
2 Slightly lift the drip tray and pull it out. Rinse the drip tray and wipe it
clean with a damp cloth.
3 Clean all refl ector surfaces with a damp cloth.
ENGLISH 11
4235.020.2278.2.indd 114235.020.2278.2.indd 11 17-04-2008 14:52:5617-04-2008 14:52:56
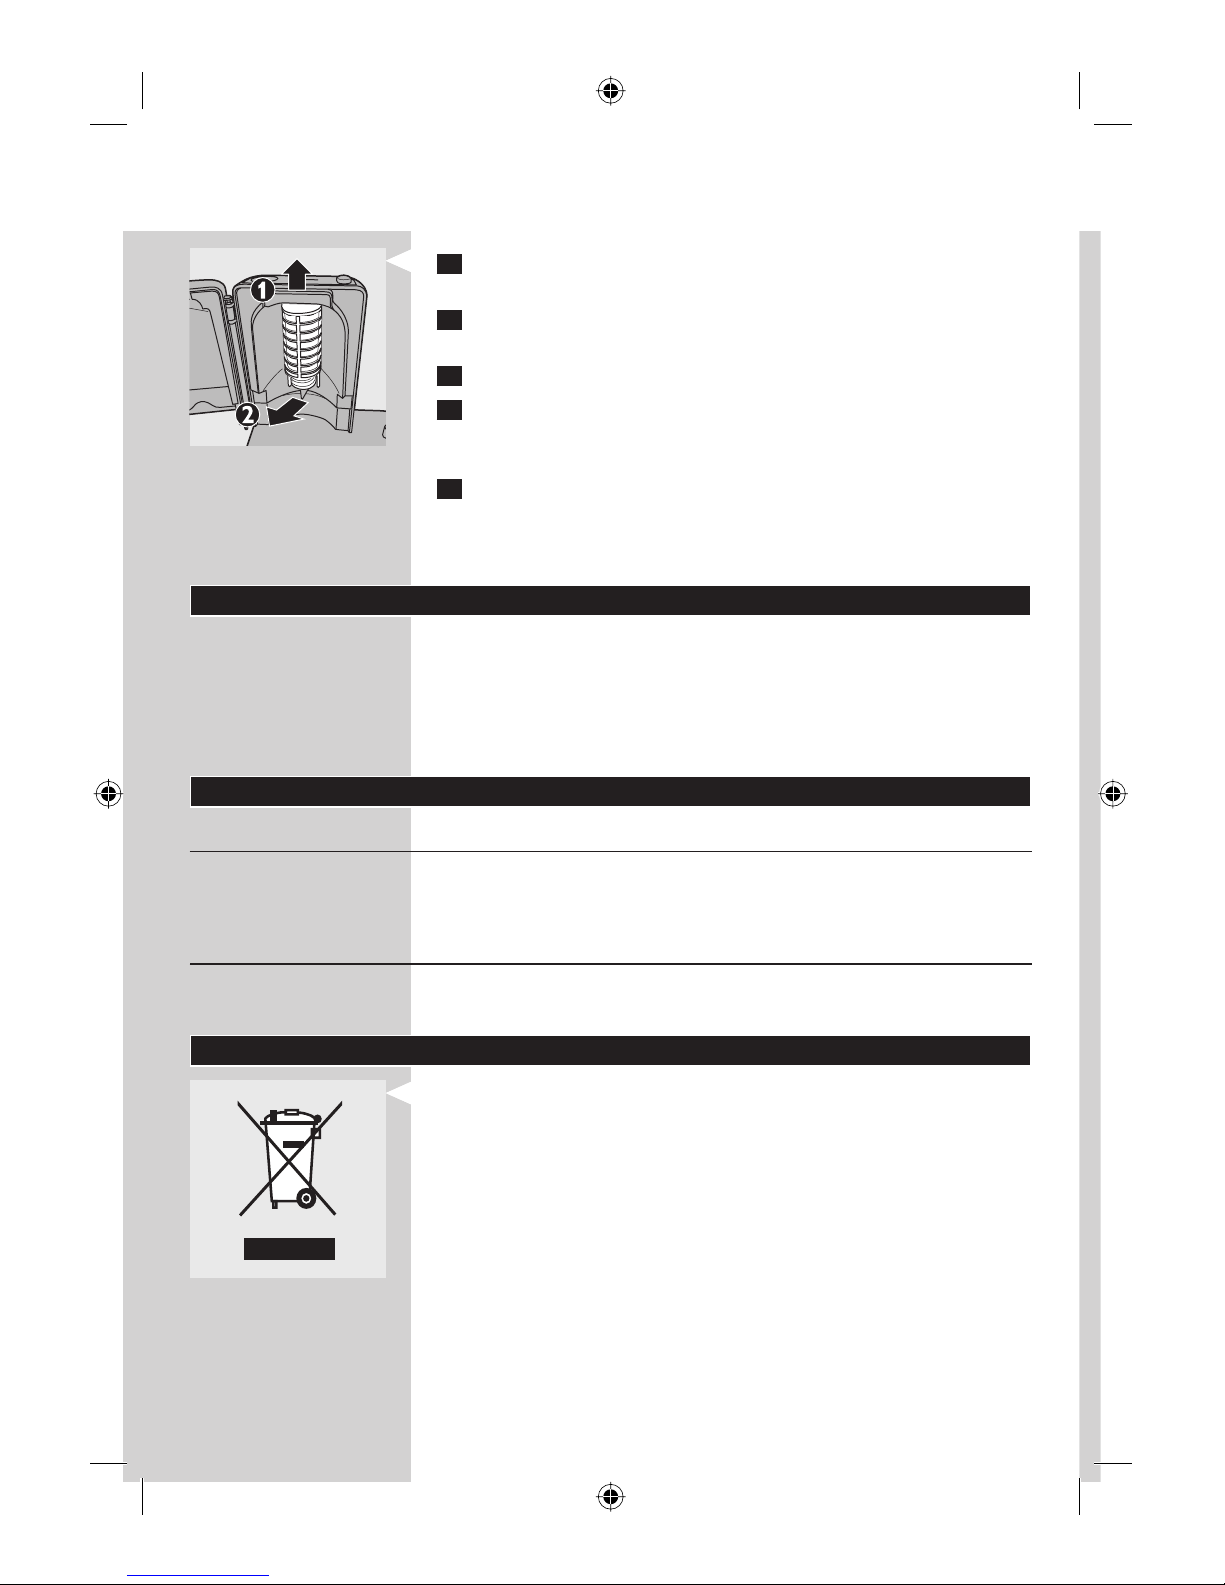
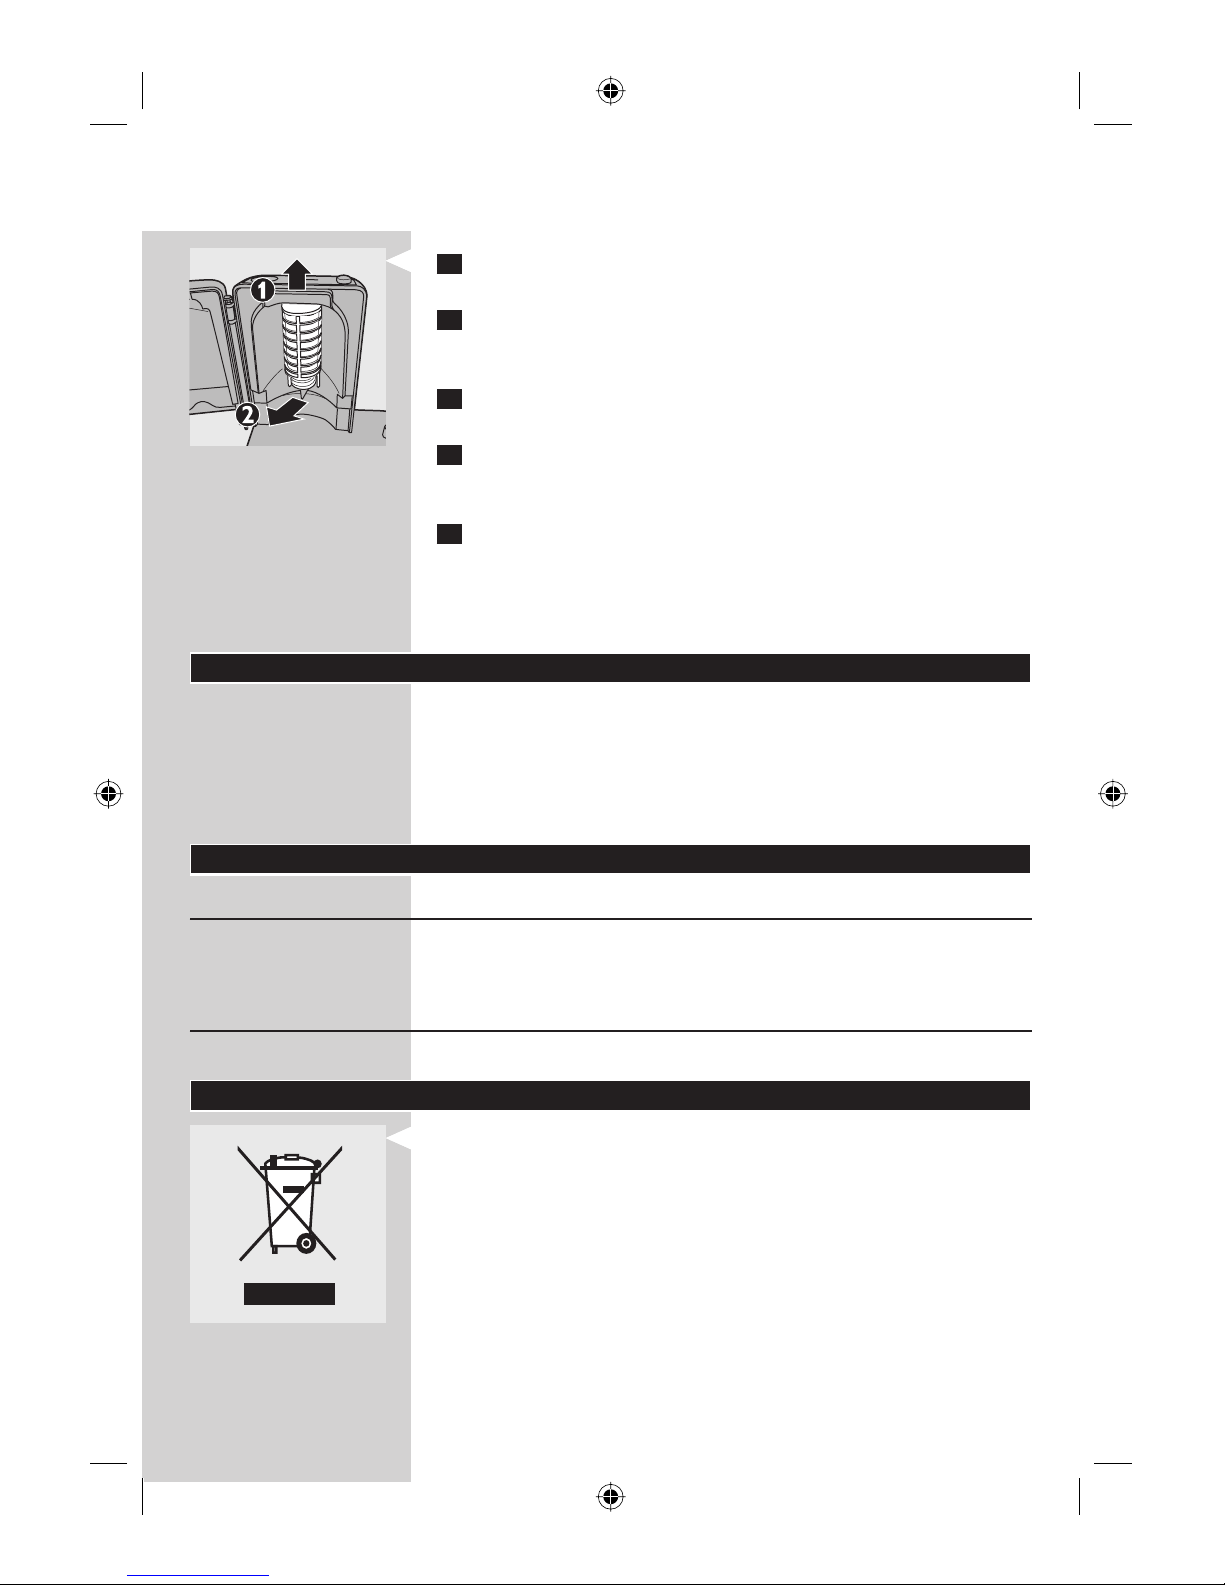
4 Remove the protective screen in front of the UV light bulb.
To remove the screen, gently lift it up (1) and pull it out (2).
5 Remove the UV light bulb.
To remove the light bulb, grasp it and pull it out of the metal clasp.
6 Clean the protective screen and the UV light bulb with a damp cloth.
7 Reinsert the UV light bulb.
To reinsert the light bulb, align the bottom of the light bulb with the metal
clasp and push the bulb into the clasp.
8 Reinsert the protective screen.
To reinsert the screen, align the pegs on the screen with the slots on the
refl ective surface near the UV light bulb. Then insert the pegs into the slots
and slide down the screen to secure it in the sanitiser.
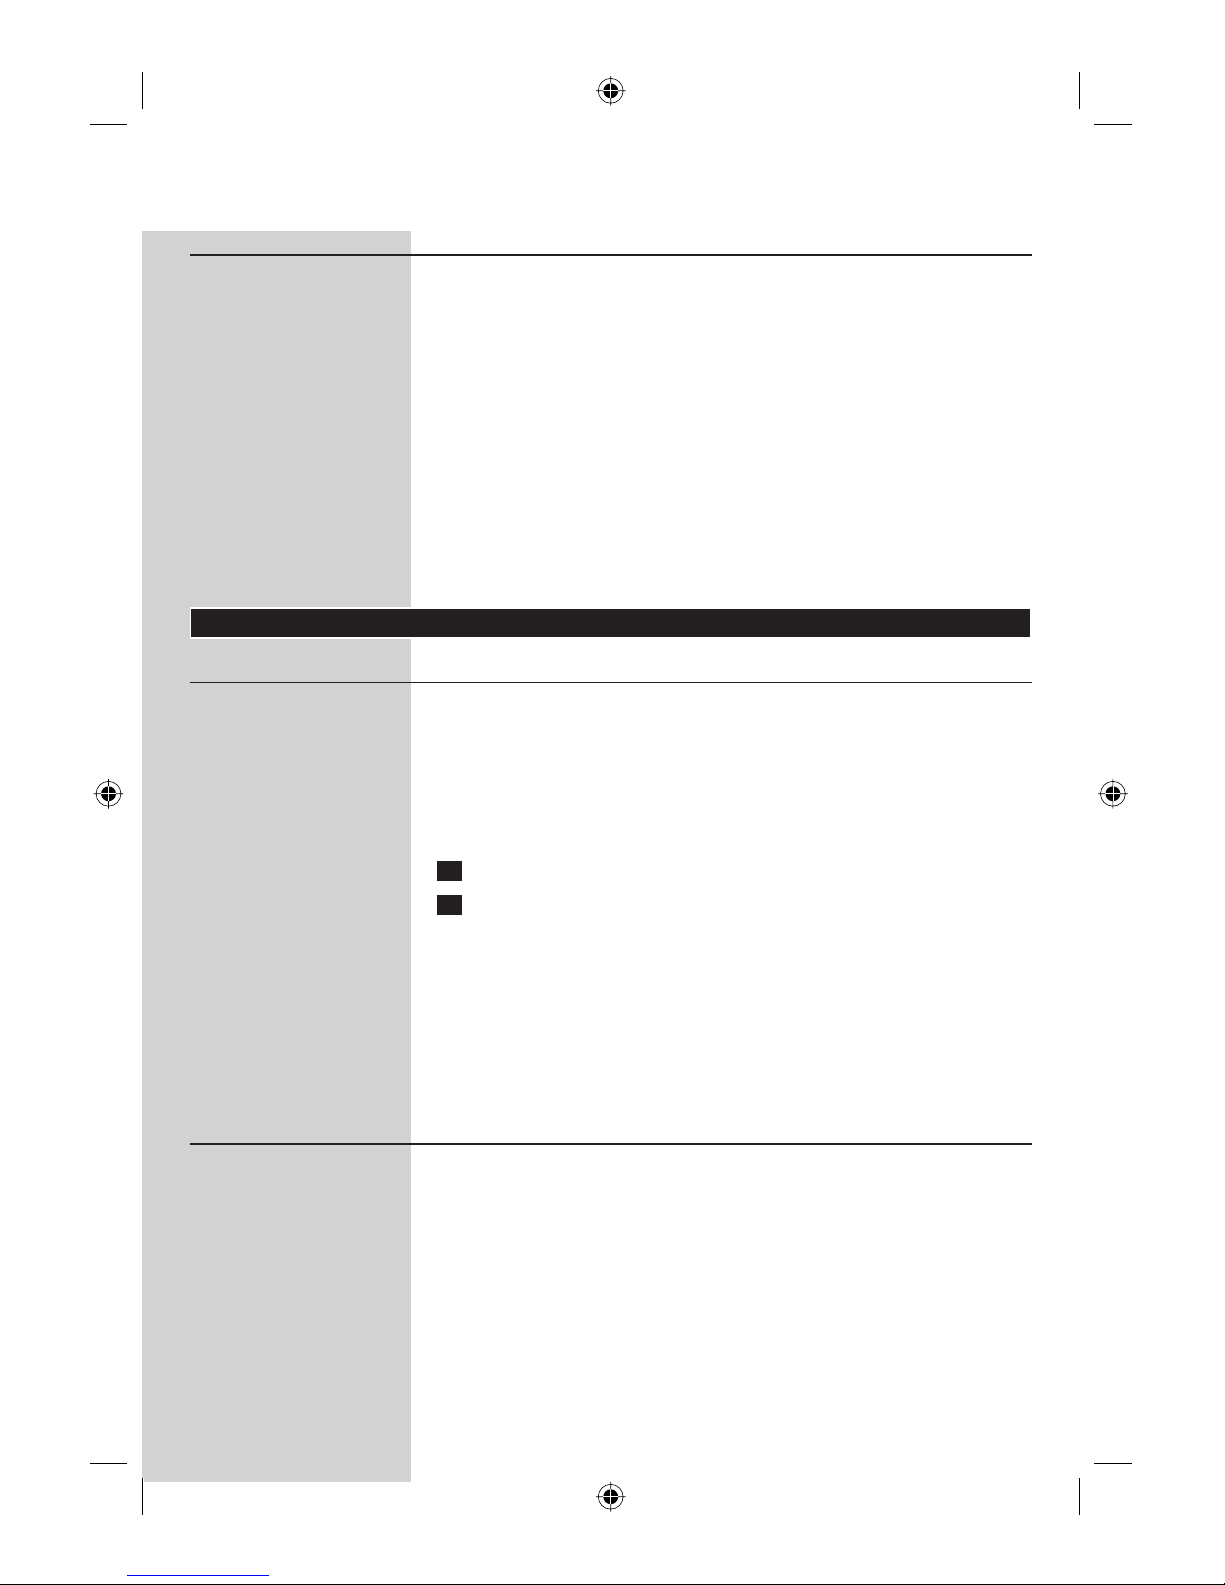
Storage
If you are not going to use the appliance for a long time, remove the
mains plug from the wall socket. Then clean the appliance and store it
in a cool and dry place away from direct sunlight. You can use the cord
wrap to store the mains cord neatly.
You can store brush heads on the pegs at the back of the deluxe
charger (specifi c types only).
Replacement
Brush head
Replace Sonicare brush heads every 3 months to achieve optimal
results.
Use only Sonicare ProResults replacement brush heads.
UV light bulb
You can order replacement UV light bulbs from the Customer Care
Centre in your country or an authorised Philips service centre.
Disposal
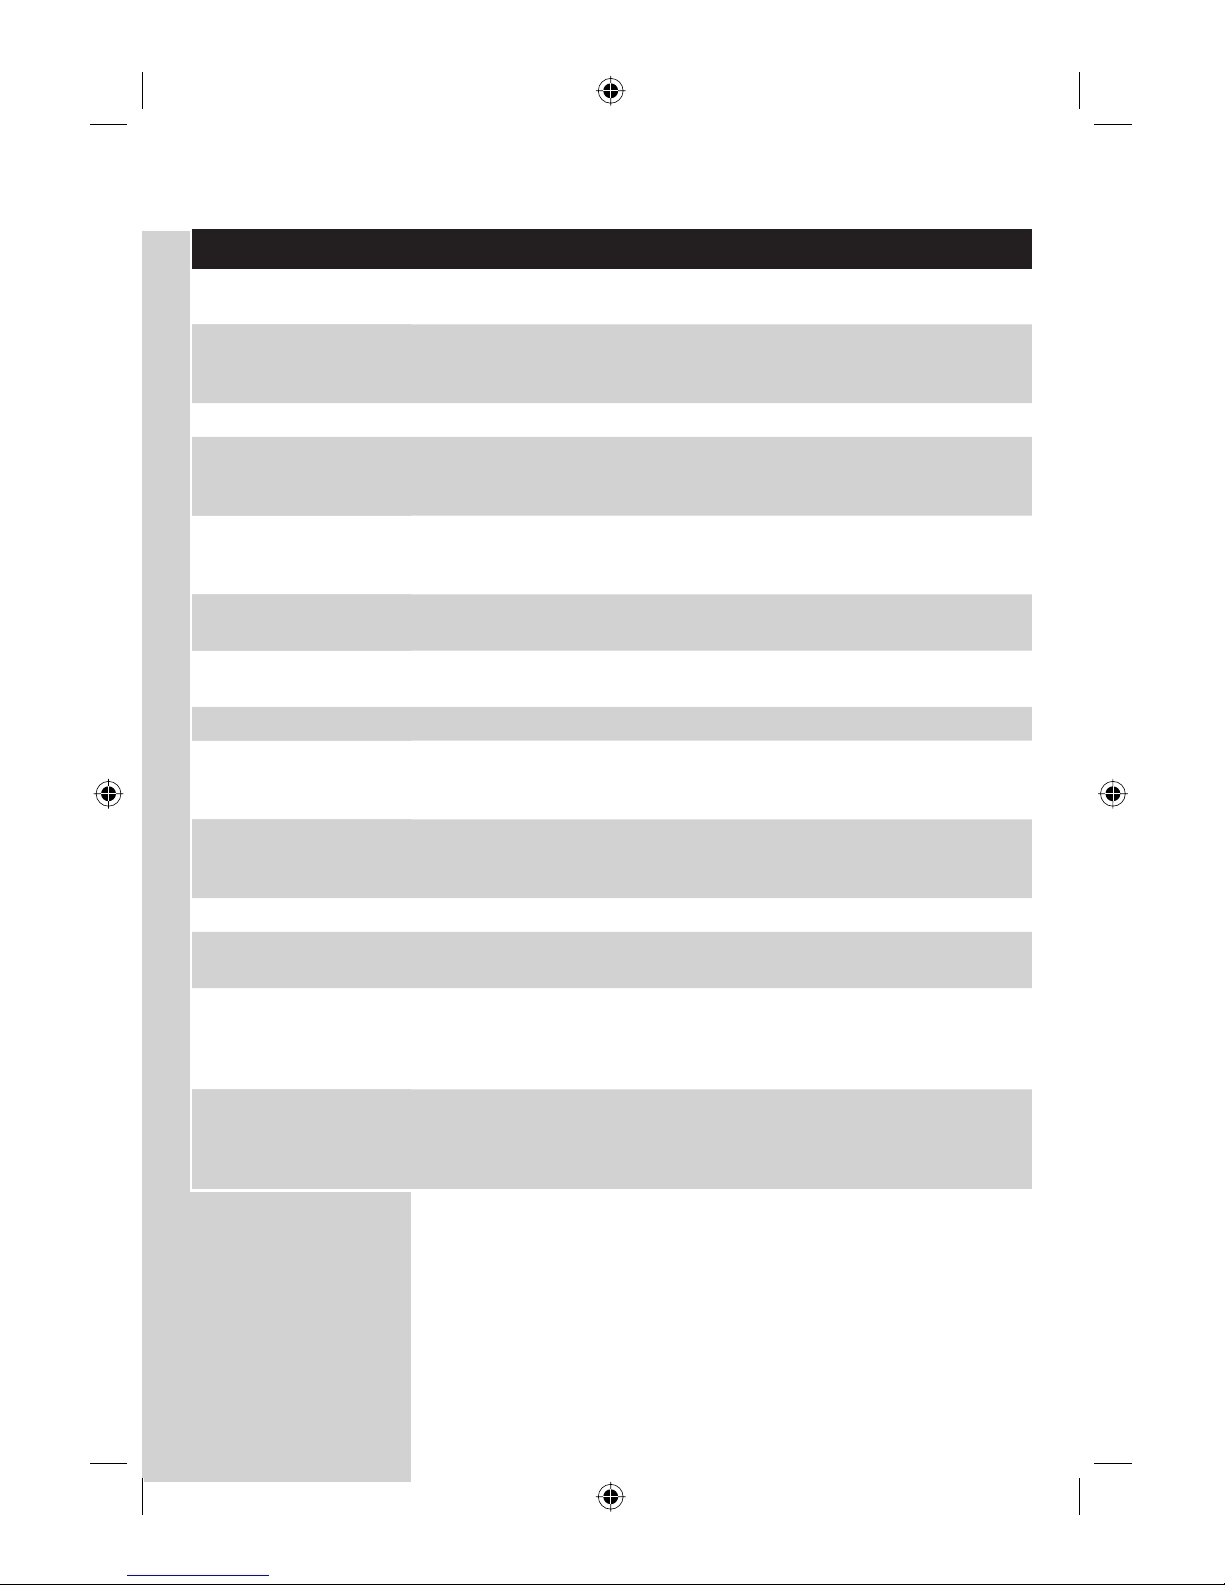
Do not throw away the appliance with the normal household waste
at the end of its life, but hand it in at an offi cial collection point for
recycling. By doing this, you help to preserve the environment.
The lamp of the sanitiser contains mercury, which is a substance that
can be harmful to the environment. When you discard the lamp, do not
throw it away with the normal household waste but hand it in at an
offi cial collection point.
The built-in rechargeable battery contains substances that may pollute
the environment. Always remove the battery before you discard and
hand in the appliance at an offi cial collection point. Dispose of the
battery at an offi cial collection point for batteries. If you have trouble
removing the battery, you can also take the appliance to a Philips
service centre. The staff of this centre will remove the battery for you
and will dispose of it in an environmentally safe way.
-
-
-
-
-
-
-
-
ENGLISH12
4235.020.2278.2.indd 124235.020.2278.2.indd 12 17-04-2008 14:52:5717-04-2008 14:52:57
Removing the rechargeable battery
Please note that this process is not reversible.
1 To deplete the rechargeable battery of any charge, remove the
handle from the charger or sanitiser, switch on the Sonicare and let it
run until it stops.
Repeat this step until you can no longer switch on the Sonicare.
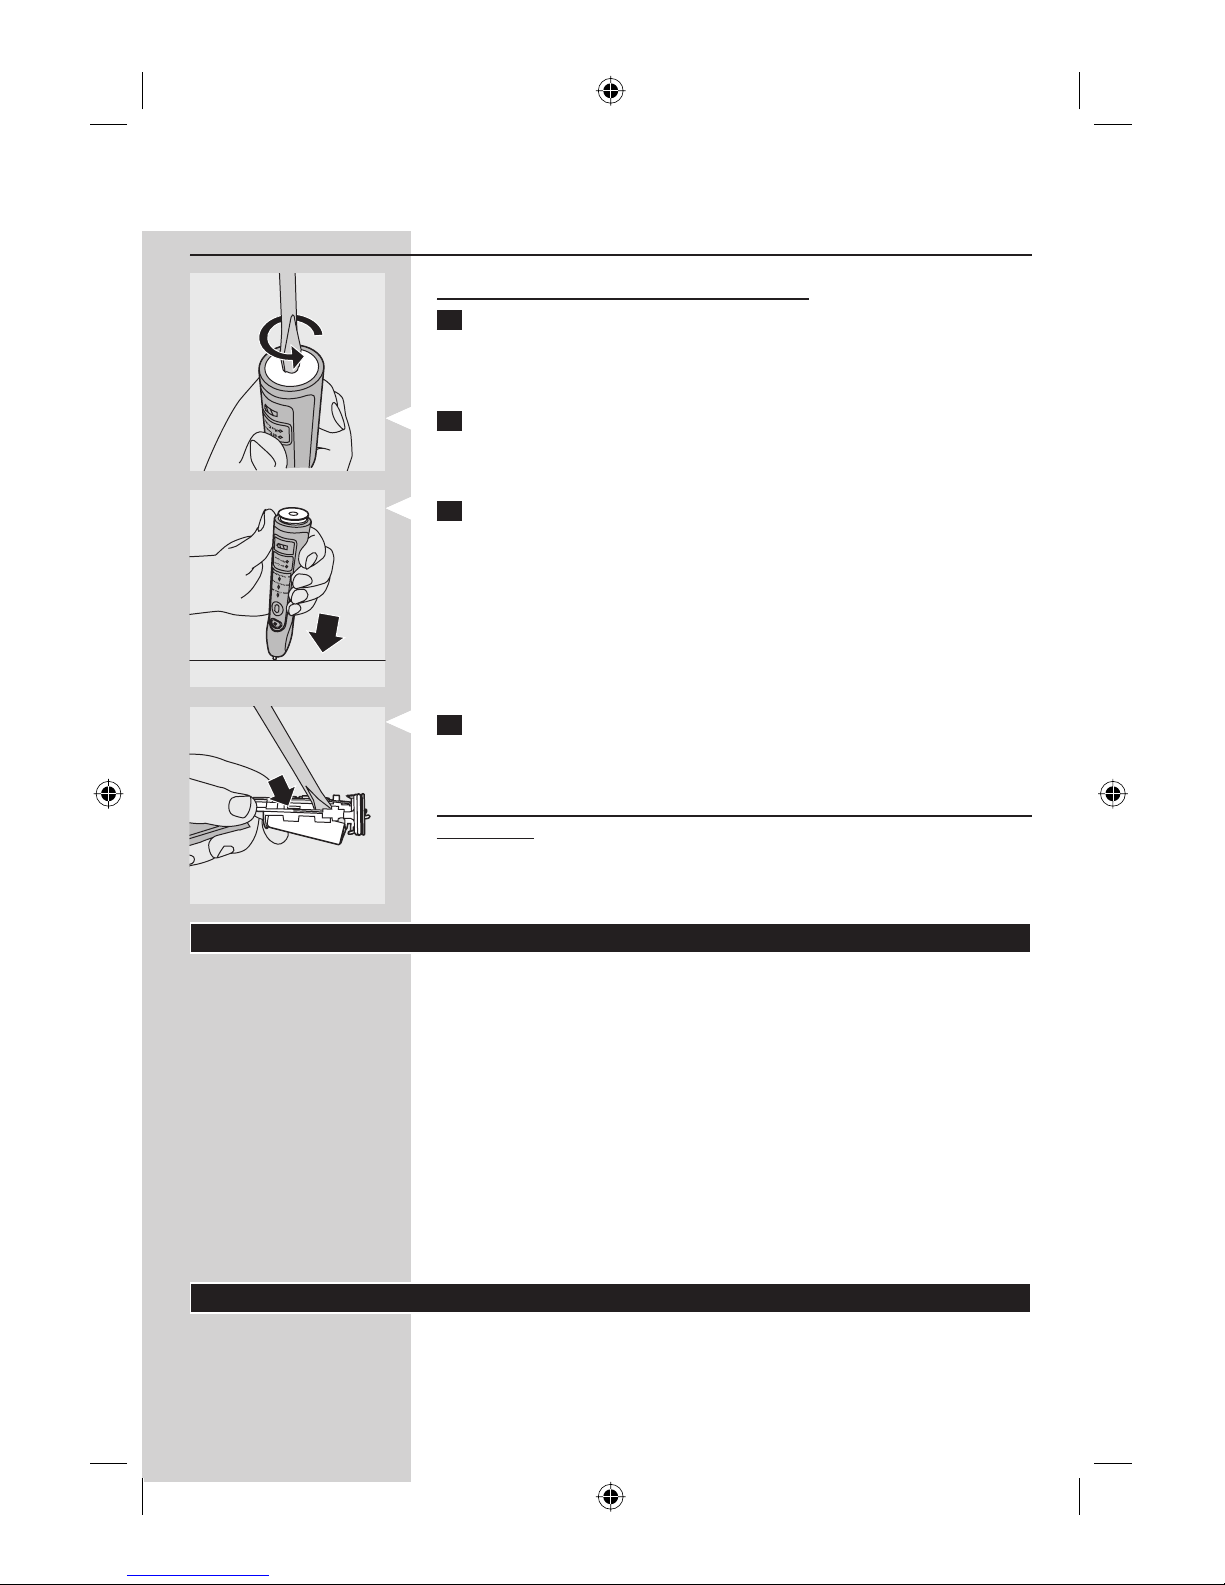
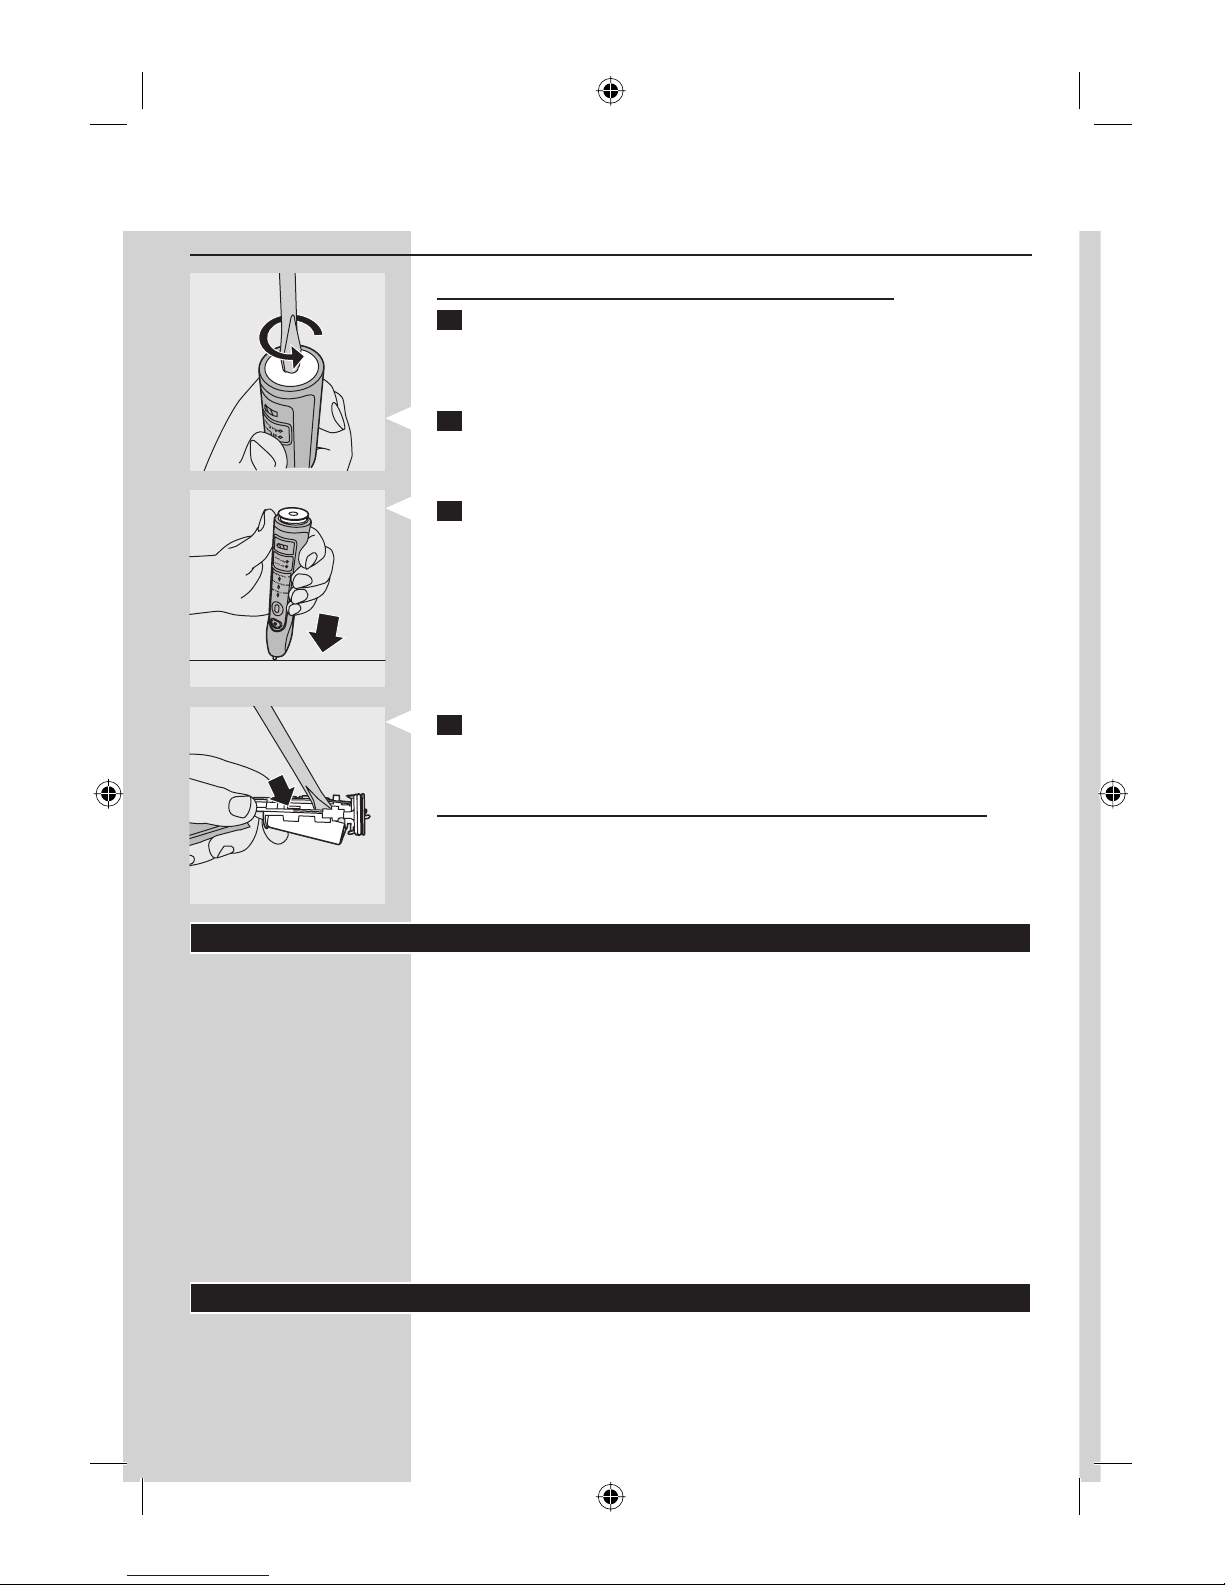
2 Insert a fl at-head (standard) screwdriver into the slot located at the
bottom of the handle. Turn the screwdriver anticlockwise to release
the bottom cap.
3 Hold the handle upside down and push down on the shaft to release
the internal components of the handle.
4 Insert the screwdriver under the circuit board, next to the battery
connections, and twist to break the connections. Remove the circuit
board and pry the battery from the plastic carrier.
Do not connect the appliance to the mains again after you have removed
the battery.
Guarantee & service
If you need information or if you have a problem, please visit the Philips
website at www.philips.com or contact the Philips Customer Care Centre
in your country (you fi nd its phone number in the worldwide guarantee
leafl et). If there is no Customer Care Centre in your country, go to your
local Philips dealer or contact the Service Department of Philips Domestic
Appliances and Personal Care BV.
Guarantee restrictions
The terms of the international guarantee do not cover the following:
Brush heads
Damage caused by misuse, abuse, neglect or alterations
Normal wear and tear, including chips, scratches, abrasions,
discolouration or fading
UV light bulb
Frequently asked questions
This chapter lists the questions most frequently asked about the appliance.
If you cannot fi nd the answer to your question, contact the Customer Care
Centre in your country.
-
-
-
-
ENGLISH 13
4235.020.2278.2.indd 134235.020.2278.2.indd 13 17-04-2008 14:52:5717-04-2008 14:52:57
Question Answer
Why doesn’t the Sonicare
toothbrush work?
You may need to recharge the Sonicare. Charge the Sonicare for at
least 24 hours.
The socket may not be live. The electricity supply to sockets in mirror
cabinets over washbasins or shaver sockets in bathrooms may be cut
off when the light is switched off.
You may need to reattach or replace the brush head.
Why do I feel a tickling sensation
when I use the Sonicare?
You may experience a slight tickling/tingling sensation when you use
Sonicare for the fi rst time. As you become accustomed to brushing
with the Sonicare, this sensation diminishes.
The brush head chatters against
my teeth. What can I do about
this?
To avoid this, keep the brush head properly oriented, with the bristles
placed on the gumline at a slight angle.
Why does the toothbrush seem
less powerful?
You may need to charge the Sonicare.
The Easy-start feature may be on. Deactivate the Easy-start feature
(See chapter ‘Features’).
You may need to replace the brush head.
Why doesn’t the Personalised
Brushing button work during
brushing?
You may have selected a brushing routine. If this is the case, the
Personalised Brushing button is not active (See chapter ‘Using the
Sonicare’).
Why doesn’t the sanitiser
light go on?
The socket may not be live. The electricity supply to sockets in mirror
cabinets over washbasins or shaver sockets in bathrooms may be cut
off when the light is switched off.
You may need to shut the sanitiser door.
You may need to replace the UV light bulb (see chapter
‘Replacement’).
Why does the toothbrush seem
to lose power during brushing?
You may be in the Max Care brushing routine. If this is the case,
the routine alternates between the Clean and Massage modes
throughout the 3-minute brushing cycle. The Clean and Massage
modes have a different sound and brush movement.
Do I need a special charger if I
travel with my Sonicare?
Travel tip: the travel charger, the deluxe charger and the sanitiser can
be used at common worldwide voltages between 100-240V AC, at
either 50 or 60Hz. All you need is a simple plug adapter.
ENGLISH14
4235.020.2278.2.indd 144235.020.2278.2.indd 14 17-04-2008 14:52:5817-04-2008 14:52:58

15
Vigtigt
Læs denne brugsvejledning omhyggeligt igennem, inden apparatet tages i
brug, og gem den til eventuelt senere brug.
Fare
Hold opladeren og/eller UV-renseren væk fra vand, og undlad at
placere eller opbevare disse over eller tæt på vand i badekar, håndvask
og lign. Opladeren og UV-renseren må aldrig kommes i vand eller
anden væske. Efter rengøringen skal oplader og/eller UV-renser være
helt tørre, inden de tilsluttes strøm.
Advarsel
Kontrollér, om spændingsangivelsen i bunden af opladeren eller UVrenseren svarer til den lokale netspænding, før du tilslutter apparatet.
Netledningen kan ikke udskiftes. Hvis netledningen bliver
beskadiget, skal opladeren og/eller UV-renseren kasseres.
Opladeren og/eller UV-renseren skal udskiftes med en original type for
at undgå fare.
Opladeren og/eller UV-renseren må ikke bruges udendørs eller tæt på
varme overfl ader
Hvis apparatet beskadiges (børstehoved, håndtag, oplader og/eller
UV-renser), må det ikke anvendes. Dette apparat har ingen udskiftelige
reservedele. Hvis apparatet beskadiges, skal du kontakte dit lokale
Philips Kundecenter (se afsnittet “Reklamationsret og service”).
Dette apparat er ikke beregnet til at blive brugt af personer (herunder
børn) med nedsatte fysiske og mentale evner, nedsat følesans eller
manglende erfaring og viden, medmindre de er blevet vejledt eller
instrueret i apparatets anvendelse af en person, der er ansvarlig for
deres sikkerhed.
Apparatet bør holdes uden for børns rækkevidde for at sikre, at de ikke
kan komme til at lege med det.
Hold op med at bruge sanitiseren, hvis det ultraviolette lys stadig er
tændt, når lågen er åben. Det ultraviolette lys kan være skadeligt for
øjne og hud. Sanitiseren skal holdes uden for børns rækkevidde.
Forsigtig
Børstehovedet, håndtaget, opladeren, opladedækslet og UV-renseren
må ikke komme i opvaskemaskinen.
Hvis du er blevet opereret i mund eller tandkød inden for de
seneste 2 måneder, skal du spørge din tandlæge til råds, før du bruger
tandbørsten.
Kontakt din tandlæge, hvis tandkødet bløder voldsomt efter brug af
tandbørsten, eller hvis der stadig forekommer blødninger efter 1 uges
brug.
Sonicare-tandbørsten overholder de gældende sikkerhedsregler
for elektromagnetisk udstyr. Hvis du har en pacemaker eller andre
implantater, skal du kontakte din læge eller producenten af implantatet
inden brug.
Hvis du har helbredsproblemer, skal du spørge din læge til råds, før du
begynder at bruge Sonicare.
Dette apparat er kun beregnet til rensning af tænder, tandkød og
tunge. Det må ikke anvendes til andre formål. Hold op med at bruge
apparatet og søg læge, hvis du oplever ubehag eller smerte.
-
-
-
-
-
-
-
-
-
-
-
-
-
-
-
DANSK
4235.020.2278.2.indd 154235.020.2278.2.indd 15 17-04-2008 14:52:5917-04-2008 14:52:59
Sonicare-tandbørsten er beregnet til personligt hjemmebrug og ikke til
brug af et større antal patienter på tandlægeklinikker eller institutioner.
Brug ikke et børstehoved med slidte eller bøjede børstehår. Udskift
børstehovedet hver 3. måned eller før, hvis det er slidt.
Brug ikke andre børstehoveder end dem, producenten anbefaler.
Hvis din tandpasta indeholder peroxid, natron eller bikarbonat
(almindeligt i blegende tandpastaer), skal børstehovedet renses grundigt
med vand og sæbe, hver gang tandbørsten har været i brug, for at
forebygge revner i plastmaterialet.
Den ultraviolette pære er varm under og lige efter en saniteringscyklus.
Undlad berøring af den ultraviolette pære, så længe den er varm.
Brug ikke UV-renseren, uden at beskyttelsesskærmen er på plads for at
undgå kontakt med den varme pære.
Elektromagnetiske felter (EMF)
Dette Philips-apparat overholder alle standarder for elektromagnetiske
felter (EMF). Ved korrekt anvendelse i overensstemmelse med
instruktionerne i denne brugsvejleding, er apparatet sikkert at anvende,
ifølge den videnskabelige viden, der er tilgængelig i dag.
Sonicare (fi g. 1)
A Hygiejnisk beskyttelseshætte
B Børstehoved
C Udskiftelig farvekodet ring
D Håndtag med soft grip
E On/off-knap
F Knap til Personlig børsteindstilling
G Børsteindstillinger
H Børsterutiner
I Deluxe-oplademåler
J Deluxe-oplader (kun bestemte typer)
K Oplade-dæksel med børstehovedholder (kun bestemte typer)
L Rejseoplader
M Oplader med ledningsoprul
N UV-renser med integreret oplader og ledningsoprul (kun bestemte
typer)
Ikke vist: Ultraviolet lyspære
Ikke vist: Drypbakke til UV-renser
Ikke vist: Beskyttelsesskærm til ultraviolet pære
Kom godt i gang
Udskiftning af farvekode-ring
Sonicare-børstehoveder leveres med udskiftelige farvekode-ringe, der
identifi cerer børstehovederne.
Udskiftning af den farvekodede ring:
-
-
-
-
-
-
-
-
-
DANSK16
4235.020.2278.2.indd 164235.020.2278.2.indd 16 17-04-2008 14:52:5917-04-2008 14:52:59
1 Træk den farvekodede ring af børstehovedets bund.
2 Sæt den ene side af den nye ring mod børstehovedets bund.
Tryk derefter den anden side ned for at skubbe ringen på plads.
Montering af børstehovedet
1 Placér børstehovedet således, at børstehårene vender mod
håndtagets front.
2 Tryk børstehovedet fast ned på metalskaftet, indtil det ikke kan
komme længere.
Bemærk: Der er et lille mellemrum mellem den farvekodede ring og håndtaget.
Opladning af Sonicare
1 Sæt opladeren eller UV-renseren i stikkontakten.
2 Sæt håndtaget i opladeren eller UV-renseren.
Det blinkende lys i batteriopladeren indikerer, at tandbørsten
oplades.
Deluxe-oplademåler
Indikerer den nuværende batterikapacitet
3 grønne LED-lysdioder: 75-100%
2 grønne LED-lysdioder: 50-74%
1 grøn LED-lysdiode: 25-49%
1 gul blinkende LED-lysdiode: under 25%
Bemærk: Når batteristanden på din Sonicare er lav, hører du 3 bip, og 1 LEDlysdiode på oplademåleren blinker gult i 30 sekunder.
Bemærk: For at holde batteriet fuldt opladet anbefaler vi, at du opbevarer din
Sonicare i opladeren eller UV-renseren, når du ikke anvender den. Det tager
mindst 24 timer at oplade batteriet helt.
,
-
-
-
-
clean
sensitive
clean
sensitive
DANSK 17
4235.020.2278.2.indd 174235.020.2278.2.indd 17 17-04-2008 14:53:0017-04-2008 14:53:00
Brug af Sonicare
Børstevejledning
1 Fugt børstehårene og kom lidt tandpasta på.
2 Placér børstehårene mod tænderne i en lille vinkel mod
tandkødslinjen.
3 Tænd Sonicare ved tryk på on/off-knappen.
4 Tryk let for at maksimere Sonicares effektivitet, og lad Sonicare-
tandbørsten klare børstningen for dig.
5 Bevæg børstehovedet langsomt hen over tænderne, så de længere
børstehår trænger ind mellem tænderne. Fortsæt med denne
bevægelse under hele børstningen.
Bemærk: For at sikre en ensartet børstning i hele munden kan du inddele
munden i 4 områder og bruge Quadpacer®-funktionen (se afsnittet
“Funktioner”).
6 Start med at børste sektion 1 (ydersiden af overmunden), og
børst i 30 sekunder, før du fortsætter til sektion 2 (indersiden
af overmunden). Fortsæt børstningen i sektion 3 (ydersiden af
undermunden), og børst i 30 sekunder, før du går til sektion 4
(indersiden af undermunden).
7 Når du har børstet alle 4 sektioner, kan du bruge lidt mere tid på at
børste tyggefl aderne og de områder, hvor der opstår misfarvning. Du
kan også børste tungen med enten tændt eller slukket tandbørste, alt
efter hvad du foretrækker.
Det er sikkert at bruge Sonicare på:
Bøjler (børstehovedet slides hurtigere, når det bruges på tandbøjler)
Tandrekonstruktioner (plomber, kroner, lakeringer)
Personlig børsteindstilling
Sonicare star ter automatisk ved standardinstillingen men kan tilpasses efter
personligt behov som følger:
1 Inden du tænder Sonicare, skal du trykke på knappen til personlig
børsteindstilling for at skifte mellem forskellige indstillinger og
rutiner.
Den grønne LED-lysdiode angiver den valgte indstilling eller rutine.
Bemærk: Når tandbørsten er tændt, kan du skifte mellem indstillingerne, men
ikke rutinerne. Rutiner skal være valgt, før tandbørsten tændes.
Børsteindstillinger
Clean-indstilling
Standardindstilling for ekstra effektiv tandbørstning.
Sensitiv indstilling
Nænsom, men alligevel grundig børstning af følsomt tandkød og tænder.
Massageindstilling
Nænsom tandkødsstimulering.
-
-
,
1
2
4
3
1
2
4
3
DANSK18
4235.020.2278.2.indd 184235.020.2278.2.indd 18 17-04-2008 14:53:0017-04-2008 14:53:00
Børsterutiner
Go Care-rutine
1-minuts børsteprogram til hurtig tandbørstning. Du hører Quadpacer®signalet efter intervaller af 15 sekunders.
Max Care-rutine
3-minutters børsteprogram, der kombinerer børste- og massage
indstillingerne i én rutine for grundig rensning med 30 sekunders
tandbørstning og 15 sekunders massage for hver af de 4 sektioner i
munden. Du hører Quadpacer-signalet med 45 sekunders intervaller.
Bemærk: Når Sonicare anvendes til kliniske undersøgelser,
skal den 2-minutters standardindstilling være valgt.
Håndtaget skal være fuldt opladet og Easy-start funktionen
deaktiveret. Områder med omfattende misfarvning skal have
30 sekunders ekstra børstetid for at fjerne belægninger.
Funktioner
Easy-start
Denne Sonicare-model leveres med Easy-start funktionen aktiveret.
Easy-start funktionen øger langsomt styrken i løbet af de første 14
børstninger for at gøre tilvænningen til Sonicare mere behagelig.
Bemærk: Hver af de første 14 børstninger skal være af mindst 1 minuts
varighed, for at Easy-start-børstestyrken tiltager.
Deaktivering eller aktivering af Easy-start
1 Sæt børstehovedet på håndtaget.
2 Anbring håndtaget i den tilsluttede oplader eller UV-renser.
Deaktivering af Easy-start:
Tryk på on/off-knappen og hold den inde i 5 sekunder. Når du hører 1 bip,
betyder det, at Easy-start-funktionen er deaktiveret.
Aktivering af Easy-start:
Tryk på on/off-knappen, og hold den inde i 5 sekunder. Når du hører 2 bip,
betyder det, at Easy-start-funktionen er aktiveret.
Bemærk: Brug af Easy-start-funktionen efter opstartsperioden kan ikke
anbefales, da det medfører en mindre effektiv fjernelse af plak.
Smartimer
Smar timer-funktionen indikerer, at børstningen er fuldført ved automatisk
at slukke tandbørsten efter endt børstecyklus.
Tandlæger og tandplejere anbefaler mindst 2 minutters børstetid 2 gange
dagligt.
-
-
-
-
DANSK 19
4235.020.2278.2.indd 194235.020.2278.2.indd 19 17-04-2008 14:53:0117-04-2008 14:53:01

Quadpacer
Quadpacer® er en intervaltimer, der med et kort bip og en pause
minder dig om at børste de 4 sektioner i munden. Quadpacer® bipper
med forskellige intervaller under børstningen afhængig af den valgte
børsteindstilling/rutine. Se afsnittene “Børstevejledning” og “Personlig
børsteindstilling”.
Quadpacer®-funktionen er aktiveret på denne model. Sådan deaktiveres
eller aktiveres Quadpacer®-funktionen:
1 Anbring håndtaget med påsat børstehoved i den tilsluttede oplader
eller UV-renser.
2 Deaktivering af Quadpacer®-funktion: Hold knappen til Personlig
børsteindstilling inde i 5 sekunder. Når du hører 1 bip, betyder det, at
Quadpacer®-funktionen er deaktiveret.
Aktivering af Quadpacer®-funktion: Hold knappen til Personlig
børsteindstilling inde i 5 sekunder, indtil du hører 2 bip. Det betyder,
at Quadpacer®-funktionen er aktiv igen.
Bemærk: Quadpacer®-funktionen kan ikke deaktiveres i de forprogrammerede
Go Care og Max Care-børsterutiner.
Ledningsoprul i deluxe-oplader (kun bestemte typer)
Har din model deluxe-opladedæksel og -bund, er rejseopladeren
forudinstalleret inde i dækslet. Ønsker du en kortere netledning, kan
overskydende ledning opbevares i ledningsoprul-funktionen i opladerens
bund.
1 Opladerens dæksel og bund adskilles ved at trykke på de to grå
låsestænger på opladerens bund og trække det hvide opladedæksel
opad.
2 Rul den overskydende ledning rundt om den grå opladeenhed som
vist på billedet. Sørg for, at ledningen oprulles på indersiden af de to
låseklemmer.
3 Når den overskydende ledning er rullet op, føres ledningen ud
gennem den lille rille på bagsiden af den grå opladeenhed.
4 Sæt opladedækslet på igen ved at trykke det ned over
opladeenheden, til det klikker på plads.
Tip: For at gøre det ekstra praktisk, når du er ude og rejse, kan du tage
rejseopladeren af og bruge den uden oplader og basisenhed.
-
,
1
2
4
3
1
2
4
3
DANSK20
4235.020.2278.2.indd 204235.020.2278.2.indd 20 17-04-2008 14:53:0117-04-2008 14:53:01
Ledningsoprul på UV-renser (kun bestemte typer)
Hvis din model inkluderer en UV-renser, kan du opbevare
overskydende ledning i ledningsoprullet i UV-renserens bund.
UV-rensning (kun bestemte typer)
Med UV-renseren kan du rengøre børstehovedet efter hver brug.
Stop brugen af UV-renseren, hvis det ultraviolette lys stadig er tændt, når
lågen er åben, eller hvis Philips-logoet er ødelagt eller mangler på UVrenseren. Ultraviolet lys kan være skadeligt for øjne og hud. UV-renseren
skal holdes uden for børns rækkevidde.
Tag UV-renseren ud af stikket og kontakt Philips Kundecenter, hvis UVrenseren udsender røg eller en brændt lugt, når den er i brug.
1 Efter børstning skal du skylle børstehovedet og ryste vandet af.
Beskyttelseshætten må ikke være anbragt på børstehovedet under
rensning.
2 Åbn UV-renserens låge ved at trykke på udløserknappen.
3 Anbring børstehovedet på et af de 2 ben i UV-renseren.
Sørg for, at hårene på børstehovedet vender direkte mod lyspæren.
Bemærk: UV-renseren må kun anvendes til rengøring af Sonicare ProResultsbørstehoveder.
4 Sørg for, at UV-renseren er tilsluttet stikkontakten.
5 Luk lågen, og tryk på den grønne on/off-knap for at vælge UV-
rengøringscyklus.
Bemærk: UV-renseren kan kun tændes, når lågen er korrekt lukket.
Bemærk: Hvis du åbner lågen midt i processen, standser UV-renseren.
Bemærk: En rense-cyklus tager 10 minutter, hvorefter den slukker automatisk.
Rengøringen er i gang, når det blå lys skinner gennem Philips-logoet,
og UV-rengøringens LED-lysdiode blinker langsomt.
Når en rensecyklus er færdig, lyser UV-rengørings LED-dioden
konstant grønt, og UV-renseren slukker automatisk.
-
-
-
,
,
DANSK 21
4235.020.2278.2.indd 214235.020.2278.2.indd 21 17-04-2008 14:53:0217-04-2008 14:53:02
Rensning
Børstehovederne, håndtaget, rejseopladeren, opladedækslet og UVrenseren må ikke komme i opvaskemaskinen.
Tandbørstens håndtag
1 Tag børstehovedet af, og skyl metalskaftet i varmt vand.
Tryk aldrig skarpe genstande mod gummiforseglingen om metalskaftet, da
dette kan beskadige den.
2 Brug en fugtig klud til at tørre hele håndtaget.
Børstehoved
1 Skyl børstehoved og børstehår, hver gang tandbørsten har været
brugt.
2 Tag børstehovedet af håndtaget, og skyl børstehovedets
forbindelsesstykke mindst én gang om ugen i varmt vand.
Rejseoplader og deluxe-oplader (kun bestemte typer)
1 Tag opladeren ud af stikket.
2 Kun bestemte typer: Skil deluxe-opladeren ad, og tag rejseopladeren
ud.
3 Brug en fugtig klud til at rengøre opladerens overfl ade.
UV-renser (kun bestemte typer)
UV-renseren må ikke rengøres, når den ultraviolette pære er varm.
For at få den bedste virkning, anbefales det at rengøre UV-renseren en
gang om ugen.
1 Tag UV-renseren ud af stikkontakten.
2 Løft drypbakken lidt op, og træk den ud. Skyl drypbakken, og tør den
med en fugtig klud.
3 Rengør alle refl ektorfl ader med en fugtig klud.
DANSK22
4235.020.2278.2.indd 224235.020.2278.2.indd 22 17-04-2008 14:53:0317-04-2008 14:53:03
4 Fjern beskyttelsesskærmen foran den ultraviolette pære.
Tag skærmen af ved at løfte den forsigtigt op (1) og trække den ud (2).
5 Fjern den ultraviolette lyspære.
Den ultraviolette lyspære fjernes ved at tage fat om den og trække den ud
af metalfatningen.
6 Rengør beskyttelsesskærmen og den ultraviolette lyspære med en
fugtig klud.
7 Sæt den ultraviolette lyspære i igen.
Lyspæren sættes i ved at placere pærens bund i metalfatningen og skubbe
den på plads i fatningen.
8 Sæt beskyttelsesskærmen på igen.
Sæt beskyttelsesskærmen på ved at anbringe skærmens ben mod
indgangene på refl eksionsfl aden tæt på den ultraviolette pære. Stik derefter
benene ind i indgangene, og skub skærmen nedad, indtil den sidder fast i
UV-renseren.
Opbevaring
Hvis du ikke skal bruge apparatet i en længere periode, skal stikket
tages ud af stikkontakten. Rengør derefter apparatet, og opbevar det
et køligt og tørt sted uden direkte sollys. Brug eventuelt funktionen til
ledningsoprul til praktisk opbevaring af netledningen.
Børstehovederne kan opbevares på benene på bagsiden af deluxe-
opladeren (kun bestemte typer).
Udskiftning
Børstehoved
Udskift Sonicare-børstehovederne hver 3. måned for at opnå det
bedste resultat.
Brug kun Sonicare ProResults-børstehoveder.
Ultraviolet lyspære
Du kan bestille nye ultraviolette lyspærer hos din Philips-forhandler.
Bortskaffelse
Apparatet må ikke smides ud sammen med det almindelige
husholdningsaffald, når det til sin tid kasseres. Afl evér det i stedet på
en kommunal genbrugsstation. På den måde er du med til at beskytte
miljøet.
Lampen i UV-renseren indeholder kviksølv, som kan være miljøskadeligt.
Du må derfor ikke bortskaffe lampen sammen med det almindelige
husholdningsaffald, men skal afl evere den på et offi cielt indsamlingssted.
Det indbyggede genopladelige batteri indeholder stoffer, der kan
forurene miljøet. Fjern altid batteriet, før du kasserer apparatet, og
afl everer det på en genbrugsstation. Afl evér batteriet på et offi cielt
indsamlingssted for brugte batterier. Kan du ikke få batteriet ud, kan du
afl evere apparatet til Philips, som vil sørge for at tage batteriet ud og
bortskaffe det på en miljømæssig forsvarlig måde.
-
-
-
-
-
-
-
-
DANSK 23
4235.020.2278.2.indd 234235.020.2278.2.indd 23 17-04-2008 14:53:0417-04-2008 14:53:04
Udtagning af det genopladelige batteri
Batteriet kan ikke sættes i igen, når det først er taget ud.
1 Det genopladelige batteri tømmes for strøm ved at tage håndtaget
ud af opladeren eller UV-renseren, tænde Sonicare og lade den køre,
til den stopper.
Gentag dette, indtil du ikke længere kan tænde Sonicare.
2 Stik en almindelig skruetrækker med fl adt hoved ind i rillen i
bunden af håndtaget. Drej skruetrækkeren venstre om for at løsne
bundkapslen.
3 Vend håndtaget på hovedet og skub skaftet nedad for at frigøre
komponenterne i håndtaget.
4 Stik skruetrækkeren ind under printpladen ved siden af
batteriforbindelserne, og drej den rundt for at bryde forbindelserne.
Tag printpladen ud, og tag batteriet ud af plastholderen.
Apparatet må ikke tilsluttes lysnettet igen, efter batteriet er fjernet.
Reklamationsret og service
For alle yderligere oplysninger eller ved eventuelle problemer med
apparatet henvises til Philips’ hjemmeside på adressen www.philips.com
eller det lokale Philips Kundecenter (telefonnumre fi ndes i vedlagte
“World-Wide Guarantee”-folder). Hvis der ikke fi ndes et kundecenter
i dit land, bedes du venligst kontakte din lokale Philips-forhandler eller
Serviceafdelingen i Philips Domestic Appliances and Personal Care BV.
Gældende forbehold i reklamationsretten
Betingelserne i den internationale garanti dækker ikke følgende:
Børstehoveder
Skader, der opstår som følge af misbrug, manglende vedligeholdelse
eller ændringer
Normal slitage, inkl. ridser, skrammer, afslidning, misfarvning og falmning
Ultraviolet lyspære
Ofte stillede spørgsmål
Dette kapitel indeholder de mest almindeligt forekommende spørgsmål om
apparatet. Hvis du ikke kan fi nde svar på dit spørgsmål, bedes du kontakte
dit lokale Philips Kundecenter.
-
-
-
-
DANSK24
4235.020.2278.2.indd 244235.020.2278.2.indd 24 17-04-2008 14:53:0417-04-2008 14:53:04
Spørgsmål Svar
Hvorfor virker Sonicaretandbørsten ikke?
Du skal muligvis genoplade Sonicare. Oplad Sonicare i mindst 24
timer.
Der er måske ikke strøm i stikkontakten. Strømforsyningen til
stikkontakter i spejlskabe eller til barbermaskiner på badeværelser
afbrydes ofte, når lyset slukkes.
Det kan være nødvendigt at udskifte børstehovedet.
Hvorfor kan jeg mærke en
kildende fornemmelse, når
jeg bruger Sonicare?
Du kan eventuelt mærke en let kildende/prikkende fornemmelse,
første gang du bruger Sonicare. Efterhånden som du vænner dig til at
børste tænder med Sonicare, mindskes denne følelse.
Børstehovedet ryster mod
tænderne. Hvad kan jeg gøre
ved det?
Du kan undgå dette ved at vende børstehovedet korrekt med
børstehårene placeret mod tandlinjen i en lille vinkel.
Hvorfor virker
tandbørsten mindre kraftfuld?
Det kan være nødvendigt at oplade Sonicare.
Easy-start-funktionen kan være aktiveret. Deaktivér Easy-start-
funktionen (se afsnittet “Funktioner”).
Det kan være nødvendigt at udskifte børstehovedet.
Hvorfor virker knappen til
Personlig børsteindstilling ikke
under tandbørstningen?
Du kan have valgt en børsterutine. I så fald er knappen til Personlig
børsteindstilling ikke aktiv (se kapitlet “Brug af Sonicare”).
Hvorfor tænder lyset i UVrenseren ikke?
Der er måske ikke strøm i stikkontakten. Strømforsyningen til
stikkontakter i spejlskabe eller til barbermaskiner på badeværelser
afbrydes ofte, når lyset slukkes.
UV-renserens låge er måske ikke lukket.
Du skal måske udskifte den ultraviolette lyspære (se afsnittet
“Udskiftning”).
Hvorfor mister tandbørsten
styrke under børstningen?
Du bruger måske Max Care-børsterutine. I så fald skifter rutinen
mellem børste- og massageindstilling i den 3 minutter lange
børstecyklus. Tandbørstnings- og massageindstillingerne har forskellige
lyde og børstebevægelser.
Skal jeg bruge en særlig oplader,
hvis jeg tager Sonicare med på
rejse?
Rejsetip: Rejseopladeren, deluxe-opladeren og UV-renseren kan
bruges ved almindelige netspændinger fra 100-240 V AC ved enten
50 eller 60 Hz i det meste af verden. Du behøver blot en almindelig
stikadapter.
DANSK 25
4235.020.2278.2.indd 254235.020.2278.2.indd 25 17-04-2008 14:53:0517-04-2008 14:53:05

26
Importante
Antes de usar el aparato, lea atentamente este manual de usuario y
consérvelo por si necesitara consultarlo en el futuro.
Peligro
Mantenga el cargador y/o el higienizador alejados del agua. No los
coloque ni guarde por encima o cerca del agua contenida en bañeras,
lavabos, fregaderos, etc. No sumerja el cargador ni el higienizador en
agua ni en otros líquidos. Después de limpiarlos, asegúrese de que
el cargador y/o el higienizador estén completamente secos antes de
enchufarlos a la red eléctrica.
Advertencia
Antes de enchufar el aparato, compruebe si el voltaje indicado en la
parte inferior del cargador y/o del higienizador se corresponde con el
voltaje de red local.
El cable de alimentación no se puede sustituir. Si está dañado, deseche
el cargador y/o el higienizador.
Sustituya siempre el cargador y/o el higienizador por otros del modelo
original para evitar situaciones de peligro.
No utilice el cargador ni el higienizador al aire libre ni cerca de
superfi cies calientes.
Deje de utilizar el aparato si tiene algún daño (en el cabezal del cepillo,
en el mango, en el cargador o en el higienizador). Este aparato contiene
piezas que no son reemplazables. Si el aparato está dañado, póngase
en contacto con el Servicio de Atención al Cliente de Philips en su país
(consulte el capítulo “Garantía y servicio”).
Este aparato no debe ser usado por personas (adultos o niños) con su
capacidad física, psíquica o sensorial reducida, ni por quienes no tengan
los conocimientos y la experiencia necesarios, a menos que sean
supervisados o instruidos acerca del uso del aparato por una persona
responsable de su seguridad.
Asegúrese de que los niños no jueguen con este aparato.
Deje de utilizar el higienizador si la lámpara de rayos UV permanece
encendida cuando la puerta está abierta. La luz UV puede ser
perjudicial para los ojos y la piel de las personas. Mantenga el
higienizador fuera del alcance de los niños en todo momento.
Precaución
No lave el cabezal del cepillo, el mango, el cargador, la cubierta del
cargador ni el higienizador en el lavavajillas.
Consulte a su dentista antes de utilizar este cepillo dental si ha sufrido
cirugía oral o de las encías en los 2 últimos meses.
Consulte a su dentista si se produce un sangrado excesivo después
de usar este cepillo dental, o si el sangrado continúa produciéndose
después de 1 semana de uso.
El cepillo dental Sonicare cumple las normas de seguridad para
dispositivos electromagnéticos. Si tiene un marcapasos u otro
dispositivo implantado, consulte a su médico o al fabricante de dichos
dispositivos antes de utilizar el aparato.
Si tiene alguna duda médica, consulte a su médico antes de utilizar su
Sonicare.
-
-
-
-
-
-
-
-
-
-
-
-
-
-
ESPAÑOL
4235.020.2278.2.indd 264235.020.2278.2.indd 26 17-04-2008 14:53:0617-04-2008 14:53:06

Este aparato está diseñado para limpiar sólo los dientes, las encías y la
lengua. No lo utilice con otra fi nalidad. Deje de utilizar este aparato y
consulte a su médico si experimenta algún tipo de dolor o molestia.
El cepillo dental Sonicare es un aparato de higiene personal y no
ha sido concebido para su uso en múltiples pacientes de clínicas o
instituciones.
No utilice un cabezal de cepillo si tiene las cerdas aplastadas o
curvadas. Sustituya el cabezal del cepillo cada 3 meses o antes si
aparecen signos de desgaste.
No utilice otros cabezales que no sean los recomendados por el
fabricante.
Si su dentífrico contiene peróxido, bicarbonato sódico u otro
bicarbonato (frecuentes en los dentífricos blanqueadores), limpie
bien el cabezal con agua y jabón después de cada uso. Esto evitará la
aparición de posibles grietas en el plástico.
La lámpara de rayos UV está caliente durante e inmediatamente
después del ciclo de higienización. No toque la lámpara de rayos UV
cuando esté caliente.
Para evitar el contacto con la lámpara caliente, no utilice el higienizador
si la pantalla protectora no está colocada en su sitio.
Campos electromagnéticos (CEM)
Este aparato Philips cumple todos los estándares sobre campos
electromagnéticos (CEM). Si se utiliza correctamente y de acuerdo con las
instrucciones de este manual, el aparato se puede usar de forma segura
según los conocimientos científi cos disponibles hoy en día.
El cepillo Sonicare (fi g. 1)
A Capuchón higiénico
B Cabezal del cepillo
C Aro de código de color intercambiable
D Mango con empuñadura suave
E Botón de encendido/apagado
F Botón de Cepillado Personalizado
G Modos de cepillado
H Hábitos de cepillado
I Indicador de recarga de lujo
J Cargador de lujo (sólo en modelos específi cos)
K Cubier ta del cargador con soporte para cabezales del cepillo (sólo en
modelos específi cos)
L Cargador de viaje
M Base de carga con recogecable
N Higienizador por rayos UV con cargador y recogecable incorporados
(sólo en modelos específi cos)
No se muestra: lámpara de rayos UV
No se muestra: bandeja antigoteo del higienizador
No se muestra: pantalla protectora para la lámpara de rayos UV
-
-
-
-
-
-
-
-
-
-
ESPAÑOL 27
4235.020.2278.2.indd 274235.020.2278.2.indd 27 17-04-2008 14:53:0617-04-2008 14:53:06

Antes de empezar
Cómo cambiar el aro de código de color
Los cabezales de Sonicare disponen de aros de código de color
intercambiables para identifi car su cabezal del cepillo.
Para cambiar el aro de código de color:
1 Quite el aro de código de color de la parte inferior del cabezal del
cepillo.
2 Coloque un nuevo aro deslizándolo hasta la parte inferior del cabezal
del cepillo. Coloque primero un lado y luego presione en el otro
para encajarlo en su sitio.
Cómo fi jar el cabezal del cepillo
1 Alinee el cabezal del cepillo de manera que las cerdas queden
mirando hacia la parte frontal del mango.
2 Presione fi rmemente hacia abajo el cabezal del cepillo sobre el eje
metálico hasta que encaje.
Nota: Hay un pequeño espacio entre el aro de código de color y el mango.
Carga de Sonicare
1 Enchufe el cargador o el higienizador a la toma de corriente.
2 Coloque el mango en el cargador o en el higienizador.
El piloto del indicador de batería parpadea para indicar que el cepillo
se está cargando.
Indicador de recarga de lujo:
Indica la carga disponible en la batería
3 pilotos LED verdes: 75-100%
2 pilotos LED verdes: 50-74%
1 piloto LED verde: 25-49%
1 piloto LED amarillo parpadeando: menos del 25%
Nota: Si la carga de la batería de su Sonicare está baja, oirá 3 pitidos
y 1 piloto LED del indicador de carga parpadeará en amarillo durante
30 segundos.
,
-
-
-
-
clean
sensitive
clean
sensitive
ESPAÑOL28
4235.020.2278.2.indd 284235.020.2278.2.indd 28 17-04-2008 14:53:0717-04-2008 14:53:07
Nota: Para mantener la batería completamente cargada, le aconsejamos
que deje su Sonicare en el cargador o en el higienizador cuando no lo esté
utilizando. Se necesitan al menos 24 horas para cargar completamente la
batería.
Uso del cepillo Sonicare
Instrucciones de cepillado
1 Moje las cerdas y aplique una pequeña cantidad de pasta de dientes.
2 Coloque las cerdas del cepillo sobre los dientes, formando un ligero
ángulo con la línea de las encías.
3 Pulse el botón de encendido/apagado para encender su Sonicare.
4 Ejerza una ligera presión para maximizar la efi cacia de Sonicare y
deje que éste se encargue del cepillado.
5 Desplace suavemente el cabezal del cepillo por todos los dientes con
un pequeño movimiento hacia delante y hacia atrás, de forma que las
cerdas más largas lleguen a los espacios interdentales. Continúe con
este movimiento durante el ciclo de cepillado.
Nota: Para asegurar el cepillado uniforme de toda la boca, divida la cavidad
bucal en 4 secciones mediante la función Quadpacer (consulte el capítulo
“Características”).
6 Comience el cepillado por la sección 1 (parte externa dientes
superiores) y cepille durante 30 segundos antes de pasar a la
sección 2 (parte interna dientes superiores). Continúe con la
sección 3 (parte externa dientes inferiores) y cepíllela durante
30 segundos antes de pasar a la sección 4 (parte interna dientes
inferiores).
7 Después de completar el ciclo de cepillado, puede dedicar un tiempo
adicional al cepillado de la superfi cie de masticación de los dientes
y las zonas donde se forman manchas. También puede cepillarse la
lengua con el cepillo encendido o apagado, como prefi era.
Puede utilizar Sonicare de forma segura en:
Aparatos correctores (los cabezales se gastan antes cuando se utilizan
sobre aparatos correctores)
Restauraciones dentales (empastes, coronas, carillas)
Personalización del cepillado
Al encender su Sonicare, éste se posiciona automáticamente en el modo
Clean predeterminado. Para personalizar su cepillado:
1 Antes de encender su Sonicare, pulse el botón de Cepillado
Personalizado para alternar entre los distintos modos y hábitos.
El piloto LED verde indica el modo o hábito seleccionado.
Nota: Una vez encendido el cepillo dental, podrá cambiar los modos, pero no
los hábitos. Éstos se deben seleccionar antes del cepillado.
-
-
,
1
2
4
3
1
2
4
3
ESPAÑOL 29
4235.020.2278.2.indd 294235.020.2278.2.indd 29 17-04-2008 14:53:0717-04-2008 14:53:07
 Loading...