

Page 1
sensiflex
Page 2

Page 3

ENGLISH 4
DEUTSCH 13
FRANÇAIS 23
NEDERLANDS 32
ESPAÑOL 41
ITALIANO 51
PORTUGUÊS 60
NORSK 70
SVENSKA 79
SUOMI 88
DANSK 97
Sensiflex
3
Page 4
Introduction
This unique, electric toothbrush removes plaque
better than a normal, manual toothbrush. It also
helps to protect your gums.When you exert too
much pressure while brushing, the brush head will
automatically flex back.Because of this clear signal
you will quickly adopt the right brushing force.
Clinical tests have shown that,thanks to this
system,brushing with the Philips Sensiflex results
in a better and safer brushing technique.
Important
◗ The cord of the charging unit cannot be
replaced.If the cord is damaged,the charging
unit must be discarded.
◗ Make sure the socket is live when you
recharge the toothbrush.The electricity
supply to sockets in mirror cabinets over
washbasins or shaver sockets in bathrooms
may be cut off when the light is turned off.
Preparing the appliance for use
Mounting the appliance to the wall
C
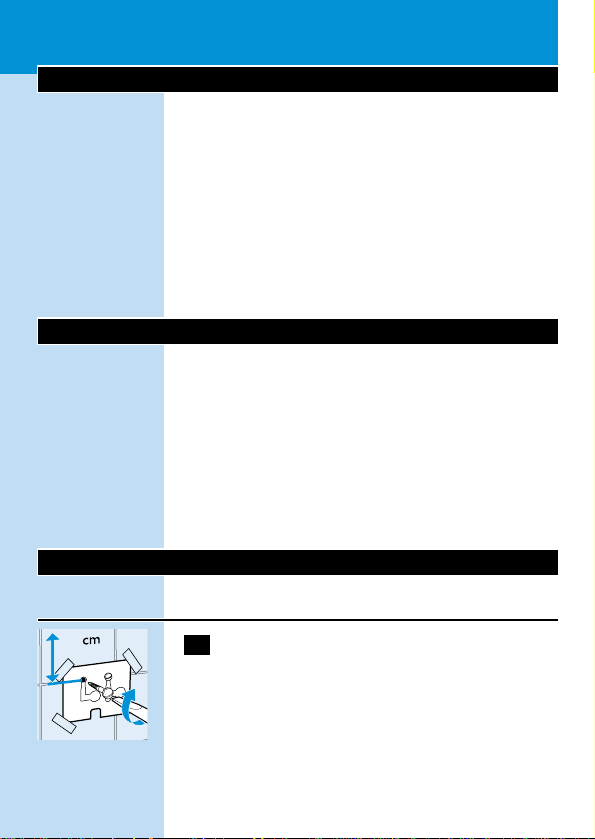
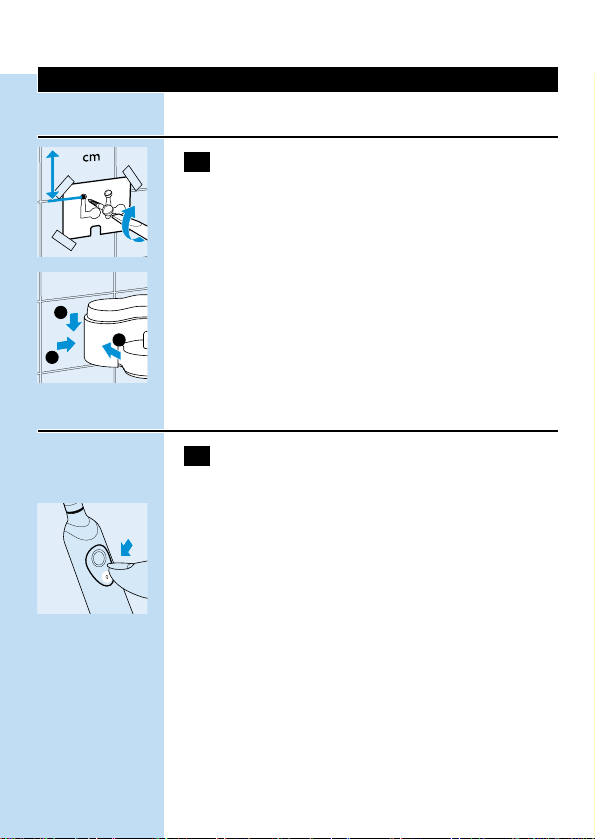
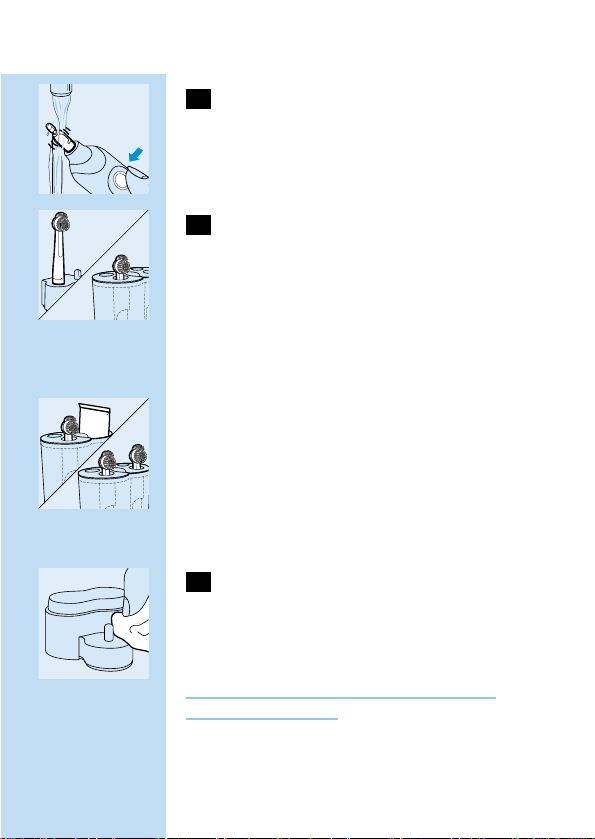
1 Mount the charging unit to the wall,using
2 screws (3.0x30mm) and 2 wall plugs (S5)
(not included).
ENGLISH4
15,6
Page 5

C
◗ To drill the holes in the right places,you can
use the drilling stencil on the last page of
these directions for use.
Charging the appliance
1 Charge the appliance for at least 16 hours
before using it for the first time.
C
◗ Make sure the appliance is switched off when
you start charging it.
◗ You can put the toothbrush in the stand and
let it charge continuously.
However,when you first start using the appliance,
it is recommended that you use it until the
battery is empty.To do so,use the appliance in the
normal way without recharging it between the
brushing sessions. Recharge the appliance when
the motor almost stops running. Repeat this
procedure 3 times in a row.
To extend the lifetime of the battery,repeat this
procedure every 6 months.
C
◗ Types HX2645,HX2545,HX2537P and
HX2530 only:When the battery is being
charged,the green pilot light is on.
◗ You can put the toothbrush in the stand and
let it charge continuously.
ENGLISH 5
3
1
2
16 hrs
Page 6
Using the appliance
C
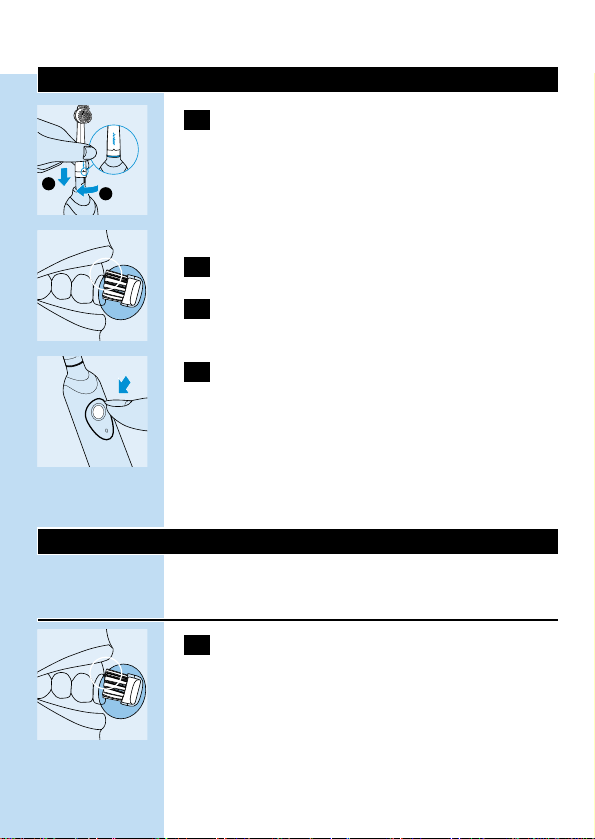
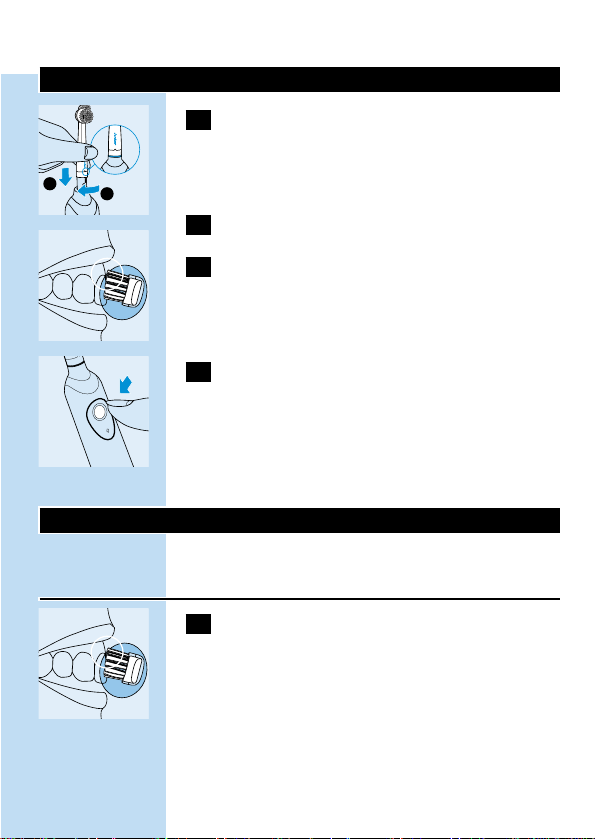
1 Mount the brush attachment onto the
toothbrush by inserting it into the bayonet
catch and turning it clockwise a quarter of
a turn.
This will make it impossible for the brush
attachment to become detached due to vibration.
2 Put toothpaste on the brush.
C
3 Place the brush head in your mouth.
C
4 Press the on button and start brushing
your teeth.
◗ For the best brushing method,minimal
brushing time and brushing functions of the
appliance,see the 'Brushing tips' section
below.
Brushing Tips
Brushing
C
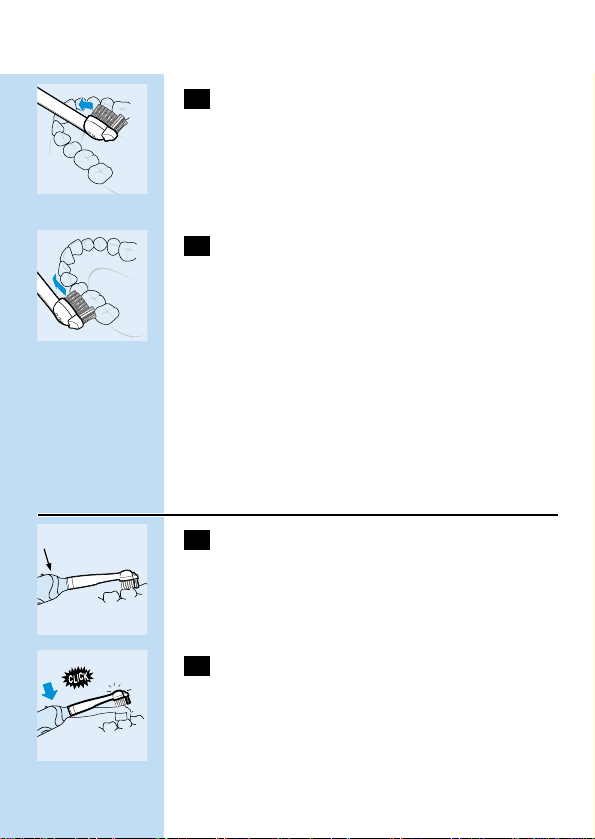
1 Place the brush head against the tooth in
such a way that it covers the surface of the
tooth as well as the gum line.
ENGLISH6
1
2
Page 7
C
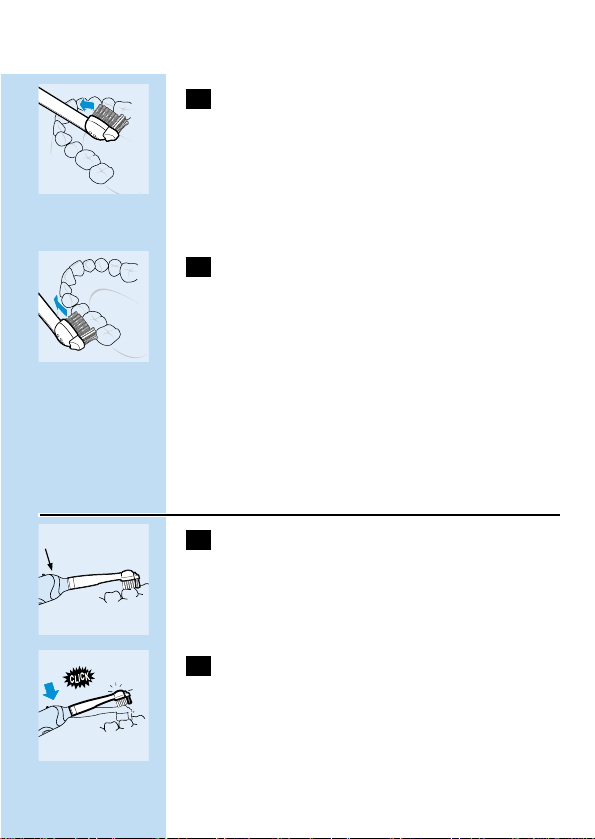
2 Hold the brush head in this position for a
few seconds and then move on to the next
tooth.
The round brush head removes plaque from the
teeth and beneath the gum line.
The individually moving Active Tip cleans between
the teeth.
C
3 Guide the brush head carefully along the
teeth and molars.
◗ Make sure you clean all surfaces of the teeth
(inside,outside and chewing surface) as well
as the gum line properly.A fixed brushing
pattern will prevent you from skipping certain
areas.
◗ See also the brushing instructions on our
Internet site:www.homeandbody.philips.com.
Gum Protection
C
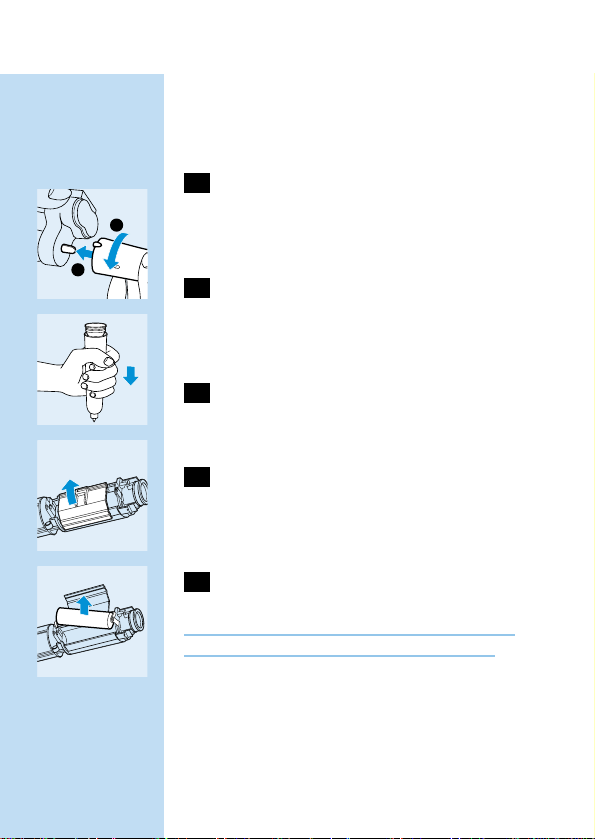
1 The Gum Protection system guarantees
that you will not exert too much pressure
on the teeth and gums.
C
2 If you exert too much pressure on the
toothbrush,you will feel and hear a click
when the brush head flexes backwards.As
soon as you reduce the pressure, the
brush head will return to its normal
position.This will protect your gums.
ENGLISH 7
Page 8
This will probably happen a few times when you
first start using the brush.After some time you
will have discovered the optimal brushing
pressure and the brush head will flex backwards
less often.
Tip:If plaque is removed properly,the gums will
have a pink colour and will firmly surround the
teeth.Healthy gums do not bleed when you eat
or brush your teeth (see also the section
'Optimal dental hygiene').If,nevertheless, your
gums bleed slightly the first few times you use the
brush, this bleeding will generally stop after a few
days.If it does not, consult your dentist or dental
hygienist.
Minimum brushing time:2 minutes
In general, 2 minutes will be enough to clean your
teeth properly.Naturally, you can also brush
longer than 2 minutes.
C
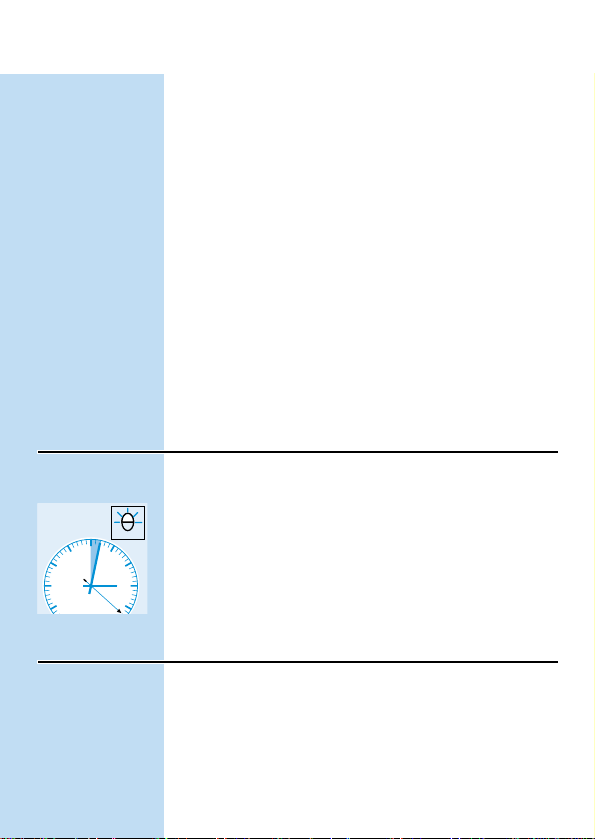
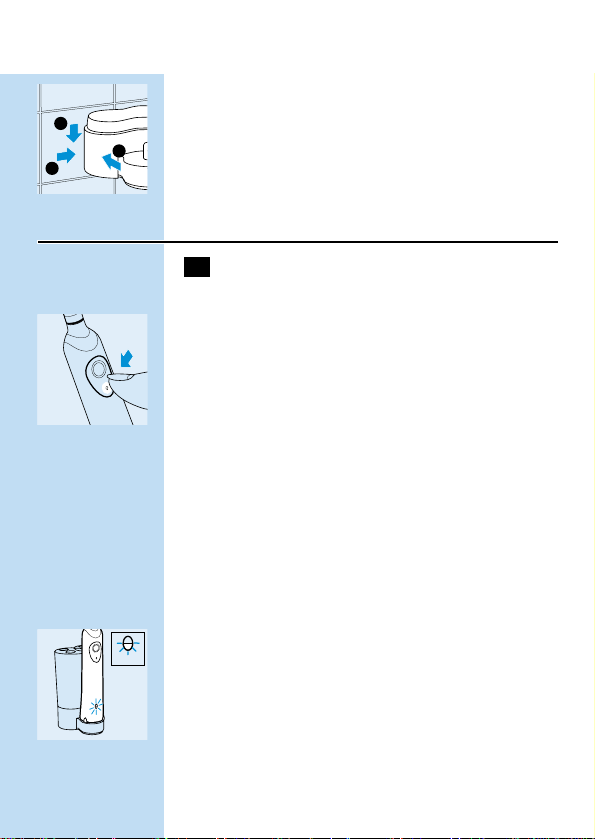
◗ A red pilot light will blink to indicate that
2 minutes have passed (types HX2645,
HX2545,HX2537P and HX2530 only).
Optimal dental hygiene
For optimal dental hygiene, it is recommended to
use dental floss and toothpicks in addition to the
electric toothbrush.
ENGLISH8
Page 9

You will find more information about Philips
Dental Care and other Philips products on our
Internet site: www.homeandbody.philips.com.
Cleaning and storing the appliance
C
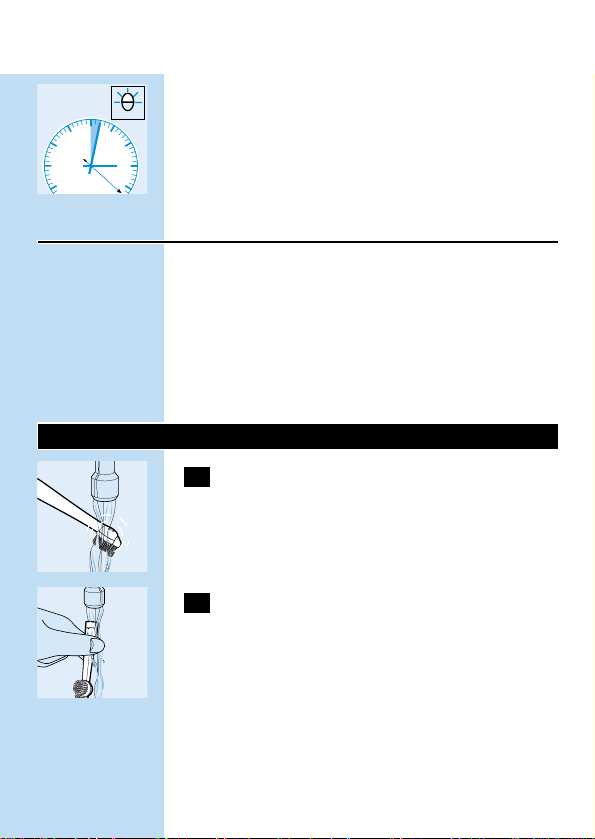
1 Switch the toothbrush on and rinse the
brush attachment under the tap with
lukewarm water (max.60cC).
C
2 Switch the toothbrush off.Detach the
brush attachment and rinse the inside.
C
3 Switch the toothbrush on again to rinse
toothpaste residues from the drive shaft.
C
4 Types HX2537P,HX2530, HX2510,
HX1611,HX1511 and HX1510 only:store
the brush attachment on the pin on the
charging unit.
Types HX2645,HX2545,HX2535,
HX1615 and HX1535 only:store up to
4 brush attachments in the storage
container.
ENGLISH 9
Page 10

C
◗ Types HX2645,HX2545,HX2535, HX1615
and HX1535 only:instead of 2 brush
attachments,you can also store a toothpaste
tube in the storage container.
The storage container and the inserts can be
removed from the charging unit and cleaned in
the dishwasher.
C
5 Clean the charging unit with a moist cloth.
Unplug the charging unit before you start cleaning
it.
Replacement
1 Replace the brush attachment every
3 months for the best brushing results.
◗ The brush attachment should also be replaced
when the bristles start to bend outwards.
You can obtain new brush attachments from the
shop in which you purchased the toothbrush.
All-round PHILIPS replacement brush
attachments can be used.
Environment
When you discard the appliance in due course,
remove the battery and dispose of it in an
environmentally safe way.
ENGLISH10
Page 11
◗ NB:You can also hand the appliance in at a
Philips Service Centre,which will dispose of
the battery for you.
1 The battery must be completely empty
when you remove it.You should therefore
let the appliance run until it stops before
removing the battery.
C
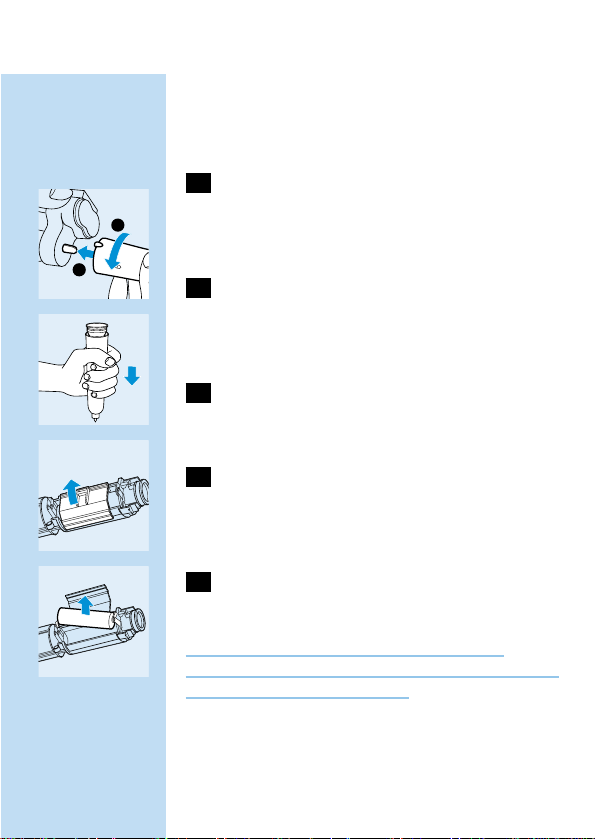
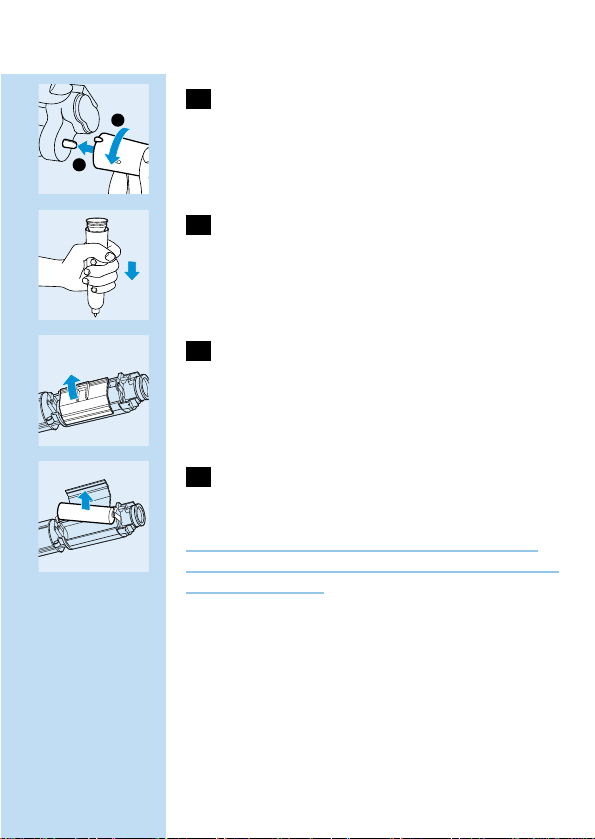
2 Pick up the charging unit and place the
toothbrush on the pin.Turn the
toothbrush anti-clockwise to unscrew the
bottom of the toothbrush.
C
3 Turn the toothbrush upside down and
press it down on a hard surface to remove
the battery holder.
C
4 Open the lid of the battery holder by hand
or by means of a screwdriver.
C
5 Lift the battery out of the battery holder
by means of a screwdriver.
After the bottom has been unscrewed,the
appliance may not be watertight anymore and the
guarantee will become invalid.
ENGLISH 11
2
1
Page 12

Troubleshooting
If you are unable to solve your problem by
means of the troubleshooting guide below, please
contact the nearest Philips service centre, the
Philips Customer Care Centre in your country or
contact us online at www.philips.co.
ENGLISH12
Solution
Make sure that the plug of the charging unit is
properly connected to the mains.
Make sure the socket is live (see also the section
'Important').
Make sure the toothbrush is switched off and
recharge it for at least 16 hours.
Check if the brush attachment has been properly
connected to appliance (see also the section 'Using
the appliance').
The toothbrush must be recharged. If you normally
leave the toothbrush in the charging unit
continuously, you may have to revive the battery as
described in the 'Charging' section.
Remove the brush attachment and start using a
new one.
Problem
The toothbrush does not
work at all, although it has
been in the charging unit
overnight.
The motor of the
toothbrush works, but the
brush head doesn't.
The brushing power of the
appliance has greatly
decreased.
The teeth-cleaning
performance of the
toothbrush is not optimal
anymore.
Page 13

Einleitung
Diese einzigartige elektrische Zahnbürste entfernt
Plaque besser als eine übliche manuelle
Zahnbürste. Sie trägt auch zum Schutz Ihres
Zahnfleiches bei.Wenn Sie dIe Bürste zu stark
andrücken,schnellt der Bürstenkopf automatisch
zurück.Mit Hilfe dieses deutlichen Signals werden
Sie rasch den richtigen Bürstendruck
übernehmen. Klinische Tests haben bewiesen, dass
sich durch dieses System das Zähneputzen mit
Philips Sensiflex eine bessere und schonendere
Zahnputz-Technik einstellt.
Wichtig
◗ Das Netzkabel an diesem Gerät kann nicht
ersetzt werden.Bei einer Beschädigung oder
einem Defekt des Kabels kann das Gerät nicht
repariert,sondern muss entsorgt werden.
◗ Prüfen Sie vor dem Aufladen des Akkus,ob die
Steckdose kontinuierlich Strom führt.Manche
Steckdosen in Nassräumen,über
Waschbecken und Rasierer-Steckdosen
werden nämlich zusammen mit der
Raumbeleuchtung ausgeschaltet.
◗ Achten Sie drauf,dass das Gerät ausgeschaltet
ist,bevor Sie damit beginnen,den Akku
aufzuladen.
DEUTSCH 13
Page 14
Vor dem Gebrauch
Die Ladeeinheit an der Wand anbringen
C
1 Sie können die Ladeeinheit mit Hilfe von
2 Schrauben (3,0 x 30 mm) und zwei
Dübeln (S 5) an einer Wand anbringen.
Schrauben und Dübel sind nicht im
Lieferumfang enthalten.
C
◗ Auf der letzten Seite dieser
Gebrauchsanweisung finden Sie eine
Schablone zur Platzierung der Löcher für die
Dübel.
Den Akku aufladen
1 Laden Sie vor dem ersten Gebrauch den
Akku mindestens 16 Stunden lang auf.
C
◗ Achten Sie darauf,dass das Gerät
ausgeschaltet ist,bevor Sie mit dem Laden
beginnen.
◗ Sie können die Zahnbürste zum
kontinuierlichen Nachladen im Ladegerät
belassen.
Es empfiehlt sich aber,die Zahnbürste nach dem
ersten Laden solange ohne Nachladen zu
benutzen,bis der Akku leer ist.Benutzen Sie dann
die Zahnbürste in gewohnter Weise,ohne sie
zwischen den einzelnen Putzvorgängen
nachzuladen.Laden Sie den Akku auf,wenn der
Motor beinahe aufgehört hat zu arbeiten.
Wiederholen Sie diesen Vorgang dreimal
nacheinander.
DEUTSCH14
15,6
3
1
2
Page 15

Die Nutzungsdauer des Geräts erhöht sich,wenn
Sie alle 6 Monate so verfahren.
C
◗ (Nur Typen HX2645,HX2545,HX2537P und
HX2535:) Die grüne Kontroll-Lampe leuchtet,
solange der Akku geladen wird.
◗ Sie können die Zahnbürste zum
kontinuierlichen Nachladen im Ladegerät
belassen.
Der Gebrauch des Geräts
C
1 Bringen Sie den Bürstenaufsatz auf dem
Grundgerät an,indem Sie ihn auf die
Antriebwelle mit dem Bajonettverschluss
setzen und mit einer Vierteldrehung im
Uhrzeigersinn sichern.
Danach kann der Bürstenaufsatz nicht mehr durch
die Vibrationen gelockert werden.
2 Tragen Sie etwas Zahncreme auf den
Bürstenkopf auf.
C
3 Halten Sie die Bürste an Ihre Zähne.
C
4 Drücken Sie den Ein-/Ausschalter und
putzen Sie Ihre Zähne.
◗ In dem folgenden Abschnitt "Hinweise zur
Zahnpflege" erhalten Sie Informationen
darüber,wie Sie am besten vorgehen,sowie
über die Pflegezeit und die Funktionen des
Geräts.
DEUTSCH 15
16 hrs
1
2
Page 16

Hinweise zur Zahnpflege
Die Zähne bürsten
C
1 Setzen Sie den Bürstenkopf in einem
Mundwinkel so an Ihre Zähne,dass er
sowohl die Oberfläche der Zähne als auch
einen Teil des Zahnfleisches bedeckt.
C
2 Halten Sie den Bürstenkopf einige
Sekunden in dieser Position,und führen Sie
ihn dann zum nächsten Zahn.
Der runde Bürstenkopf entfernt die Plaque vom
Zahn und vom Zahnhals in der Nähe des
Zahnfleisches.
Die Interdentalbürste, die sich unabhängig von der
runden Bürste bewegt,reinigt die
Zahnzwischenräume.
C
3 Führen Sie die Bürste sorgfältig an allen
Zähnen vorbei.
◗ Achten Sie darauf,dass alle Zahnflächen - d.h.
innen,außen und die Kaufläche, sowie die
Zahnhälse am Zahnfleischrand - gereinigt
werden.Ein festes Pflegeschema verhindert,
dass Sie gewisse Bereiche vernachlässigen.
◗ Vgl.die Hinweise zum Zähneputzen auf
unserer Internet-Site:
www.homeandbody.philips.com.
DEUTSCH16
Page 17

Schutz des Zahnfleisches
C
1 Die Druckkontrolle (das Gum Protection
Sytem) verhindert,dass Sie bei der
Zahnpflege mit der Bürste einen zu
starken Druck auf Zähne und Zahnfleisch
ausüben.
C
2 Drücken Sie den Bürstenkopf zu stark an,
schnellt der Bürstenaufsatz hörbar
("Klick") und spürbar zurück.So wird Ihr
Zahnfleisch vor Beschädigungen geschützt.
Während der Eingewöhnungsphase wird Ihnen
das häufiger passieren.Bald aber finden Sie
automatisch den richtigen Andruck,und der
Bürstenaufsatz wird nur noch selten
zurückschnellen.
Hinweis:Haben Sie die Plaque korrekt entfernt,
hat das umgebende Zahnfleich eine rötliche
Färbung und liegt fest am Zahn an.Gesundes
Zahnfleisch blutet nicht beim Essen oder beim
Zähneputzen.- Vgl.den Abschnitt "Die optimale
Zahnpflege".- Ähnliche leichte Blutungen
unterbleiben nach einigen Tagen.Sollte das nicht
der Falle sein,so konsultieren Sie bitte Ihren
Zahnarzt.
Mindestens 2 Minuten die Zähne putzen
Im Allgemeinen sind 2 Minuten ausreichend,um
die Zähne korrekt zu putzen.Sie können die
Zähne selbstverständlich auch länger putzen.
DEUTSCH 17
Page 18
C
◗ (Nur T ypen HX2545, HX2537P ,HX2535b.l.
und HX2535:) Eine rote Kontroll-Lampe
leuchtet auf,wenn 2 Minuten vergangen sind.
Die optimale Zahnpflege
Zur optimalen Zahnpflege wird als Ergänzung zur
elektrischen Zahnbürste die Verwendung von
Zahnseide und von Zahnstochern empfohlen
Weitere Informationen über Philips Mund- und
Zahnpflegeprodukte finden Sie auf unserer
Internet-Site www.homeandbody.philips.com.
Reinigung und Aufbewahrung
C
1 Schalten Sie die Zahnbürste ein,und
spülen Sie den Bürstenaufsatz unter
fließend lauwarmem Wasser von max.
60cC ab.
C
2 Schalten Sie die Zahnbürste aus.Nehmen
Sie den Bürstenaufsatz ab,und spülen Sie
das Innere des Bürstenaufsatzes aus.
DEUTSCH18
Page 19
C
3 Schalten Sie die Zahnbürste erneut ein,
und wischen Sie die Reste der Zahncreme
vom Grundgerät ab.
C
4 (Nur T ypen HX2537P ,HX2535, HX2510,
HX1611,HX1511 und HX1510:) Setzen
Sie den Bürstenaufsatz auf den Stift der
Ladeeinheit.
(Nur T ypen HX2645, HX2545,HX2530,
HX1615 und HX1515:) Sie können bis zu
vier Bürstenaufsätze in dem Behälter
unterbringen.
C
◗ (Nur T ypen HX2645, HX2545,HX2530,
HX1615 und HX1515:) An Stelle von
2 Bürstenaufsätzen können Sie auch eine Tube
Zahncreme im Behälter unterbringen.
Der Behälter und die Einsätze können von der
Ladeeinheit abgenommen und im Geschirrspüler
gereinigt werden.
C
5 Die Ladeeinheit können Sie mit einem
feuchten Tuch reinigen,auf das Sie bei
Bedarf ein wenig Spülmittel aufgetragen
haben.
Ziehen Sie den Netzstecker, bevor Sie die
Ladeeinheit reinigen.
DEUTSCH 19
Page 20

Ersatz
1 Das beste Ergebnis erhalten Sie,wenn Sie
den Bürstenaufsatz alle 3 Monate ersetzen.
◗ Ersetzen Sie die Bürstenaufsätze auch dann,
wenn sich die Borsten nach außen verbiegen.
Neue Bürstenaufsätze erhalten Sie dort, wo das
Gerät gekauft wurde.
Sie können All-Round PHILIPS Bürstenaufsätze
verwenden.
Umweltschutz
Wenn Sie das Gerät zu gegebener Zeit außer
Betrieb nehmen, so entnehmen Sie bitte den
Akku,und entsorgen Sie ihn in der
vorgeschriebenen Weise.- Batterien und Akkus
gehören nicht zum Hausmüll! Sie sind als
Verbraucher verpflichtet,gebrauchte Batterien
und Akkus der Wiederverwertung zuzuführen.
Geben Sie sie bei einer öffentlichen Sammelstelle
Ihrer Gemeinde ab,oder bei einer Verkaufsstelle
für entsprechende Geräte bzw.für Batterien und
Akkus.
◗ Sie können den Akku auch dem Philips Sevice
Center zustellen.Wir kümmern uns dann um
eine ordnungsgemäße Entsorgung.
1 Der Akku muss leer sein,wenn Sie ihn aus
dem Gerät entnehmen.Lassen Sie darum
den Motor laufen,bis er stillsteht.
DEUTSCH20
Page 21
C
2 Nehmen Sie den Bürstenaufsatz ab,und
setzen Sie ihn auf die Ladeeinheit.
Schrauben Sie die Unterseite des
Grundgeräts gegen den Uhrzeigersinn ab.
C
3 Drehen Sie das Grundgerät herum,und
drücken Sie es fest auf eine harte
Unterlage,um den Akkuhalter entnehmen
zu können.
C
4 Öffnen Sie den Akkuhalter mit Hilfe eines
Schraubendrehers.
C
5 Nehmen Sie den Akku mit einem
Schraubendreher aus dem Akkuhalter
Wenn die Unterseite des Grundgeräts geöffnet
wurde, ist es nicht mehr wasserdicht.Die Garantie
ist dann erloschen.
DEUTSCH 21
2
1
Page 22

Verhalten bei Problemen
Sollten Sie eventuell auftretende Probleme
anhand der folgenden Liste nicht lösen können,so
wenden Sie sich bitte an das Philips Service
Center in Ihrem Lande, oder nehmen Sie online
über www.philips.com mit uns Kontakt auf.
DEUTSCH22
Lösung
Prüfen Sie, ob der Stecker der Ladeeinheit fest in
der Steckdose steckt.
Prüfen Sie, ob die Steckdose Strom führt. - Vgl. den
Abschnitt "Wichtig".
Achten Sie darauf, dass das Gerät ausgeschaltet ist,
und laden Sie es mindestens 16 Stunden lang auf.
Prüfen Sie, ob der Bürstenkopf korrekt auf dem
Grundgerät angebracht ist.- Vgl.den Abschnitt "Der
Gebrauch des Geräts".
Der Akku muss aufgeladen werden.Wenn Sie die
Zahnbürste normalerweise in der Ladeeinheit
aufbewahren,ist es notwendig,den Akku der
Zahnbürste leerlaufen zu lassen. Laden Sie ihn dann
wieder auf,und benutyen Sie die Zahnbürste wie
empfohlen,d.h.ohne den Akku ywischen den
einzelen Putzvorgängen nachzuladen.- Vgl.den
Abschnitt "Den Akku aufladen".
Nehmen Sie den Bürstenaufsatz ab, und ersetzen
Sie ihn durch einen neuen.
Problem
Die Zahnbürste
funktioniert nicht, obwohl
Sie über Nacht aufgeladen
wurde.
Der Motor läuft,aber der
Bürstenkopf funktioniert
nicht.
Die Putzleistung ist spürbar
schwächer geworden.
Die Pflegeleistung des
Bürstenaufsatzes ist nicht
mehr zufriedenstellend.
Page 23

Introduction
Cette brosse à dents électrique enlève la plaque
dentaire mieux qu'une brosse à dents normale.
Elle vous aide à protéger vos gencives.Si vous
pressez la brosse trop fortement sur vos gencives,
vous entendrez un déclic lorsque la brosse
basculera en arrière. Réduisez la pression et
adoptez une pression correcte. Les tests cliniques
ont montrés que, grâce à ce système, le brossage
avec Philips Sensiflex mène à une technique de
brossage plus sûre.
Important
◗ Le cordon d'alimentation du chargeur ne peut
être remplacé.Si le cordon est endommagé, il
convient de remplacer le chargeur.
◗ Assurez-vous que la prise murale est bien
alimentée quand vous chargez la brosse à
dents.Dans certaines salles de bains, les prises
ne sont alimentées en électricité que si la
lumière est allumée.
Préparation à l'emploi
Fixation de l'appareil au mur
C
1 Fixez le chargeur au mur,à l'aide de 2 vis
(3,0x30mm) et deux fiches (S5) (non
fournies).
FRANÇAIS 23
15,6
Page 24
C
◗ Pour perçer les trous correctement, vous
pouvez utiliser le pochoir de la dernière page
du mode d'emploi.
Charge de l'appareil
1 Lors de la première charge mettez
l'appareil en charge pendant 16 heures.
C
◗ Assurez-vous que l'appareil est arrêté quand
vous le chargez.
◗ La brosse peut être replacée sur le chargeur
et laissée en charge continuellement.
Lors de la première utilisation de l'appareil, nous
vous recommandons de l'utiliser jusqu'à ce que
l'accumulateur soit complètement déchargé.Vous
pourrez le faire en utilisant l'appareil
normalement sans le recharger entre les périodes
de brossage. Rechargez l'appareil lorsque le
moteur cesse de fonctionner. Procédez de cette
façon trois fois de suite.
Pour prolonger la vie de votre accumulateur,
répétez cette opération tous les six mois.
C
◗ Pour les modèles HX2645,HX2545,
HX2537P et HX2535 uniquement:Lorsque
l'accumulateur est en charge le témoin
lumineux vert est allumé.
◗ La brosse peut être replacée sur le chargeur
et laissée en charge continuellement.
FRANÇAIS24
3
1
2
16 hrs
Page 25
Utilisation de l'appareil
C
1 Fixez la brossette sur le corps de l'appareil
en l'insérant dans la baïonnette,puis
vissez-la.
Ainsi,la brossette ne pourra pas se dévisser.
2 Mettez du dentifrice sur la brossette.
C
3 Placez la brossette dans votre bouche.
C
4 Appuyez sur le bouton marche.
◗ Pour la meilleure méthode de brossage,la
durée minimale de brossage et d'autres
fonctions de l'appareil,voir le chapitre intitulé
"Suggestions de brossage".
Suggestions de brossage
Le brossage
C
1 Placez la brossette contre vos dents,de
telle sorte qu'elle couvre aussi bien la
surface des dents que celle des gencives.
FRANÇAIS 25
1
2
Page 26
C
2 Maintenez-la dans cette position quelques
secondes puis passez à la dent suivante.
La tête ronde de la brossette ôte la plaque
dentaire située sur les dents et sous les gencives.
La tête Active Tip individuelle permet de brosser
les espaces interdentaires.
C
3 Dirigez la brosse soigneusement le long
des dents et des molaires.
◗ Assurez-vous que vous atteignez
correctement toute la surface de vos dents
(interne et externe) et de vos gencives.Une
méthode de brossage immuable vous
empêchera d'oublier cetaines zones.
◗ Voir aussi les instructions de brossage sur
notre site d'Internet:
www.homeandbody.philips.com.
Protection des gencives
C
1 Le système de Protection des Gencives
vérifie la pression que vous exercez sur les
dents et les gencives.
C
2 Si vous pressez la brosse trop fortement
sur vos gencives,vous entendrez un déclic
lorsque la brosse basculera en arrière.Dés
que vous réduisez la pression,la brosse
reprend sa position normale.Cette
opération protégera vos gencives.
FRANÇAIS26
Page 27

Ceci se produira probablement souvent lorsque
vous utiliserez la brosse pour la première fois.
Avec le temps vous découvrirez la pression de
brossage optimale.
Suggestion:Si la plaque est éliminée
correctement, vos gencives seront d'une couleur
rose et plus fermes autour des dents.Des
gencives saines ne doivent pas saigner pendant le
repas ou lors du brossage (voir aussi le
paragraphe intitulé "Hygiène dentaire optimale").
Si néamoins,vos gencives saignent légèrement
lors des premières utilisations, ce saignement
s'arrête généralement après quelques jours
d'utilisation.Dans le cas contraire, consultez votre
médecin.
Durée minimale du brossage:2 minutes
En général, 2 minutes suffisent à nettoyer les
dents correctement. Naturellement, vous pouvez
vous brosser les dents pendant plus de 2 minutes.
C
◗ Un témoin lumineux rouge clignote pour
indiquer que les 2 minutes se sont écoulés
(modèles HX2545,HX2537P,HX2535b.l.et
HX2535 uniquement).
Hygiène dentaire optimale
Pour une hygiène dentaire optimale,il est
recommandé d'utiliser du fil dentaire et des curedents en plus de la brosse à dents électrique.
FRANÇAIS 27
Page 28

Vous trouverez plus d'informations sur le Soin
Dentaire Philips et d'autres produits Philips sur le
site Internet: www.homeandbody.philips.com.
Nettoyage et rangement de l'appareil
C
1 Mettez la brosse en marche et rincez la
tête de la brosse à l'eau tiède (max.60cC).
C
2 Arrêtez la brosse.Détachez la tête et
rincez l'intérieur.
C
3 Remettez la brosse en marche pour rincer
les résidus de dentifrice collés sur l'arbre
d'entraînement.
C
4 Pour les modèles HX2537P,HX2535,
HX2510,HX1611,HX1511 et HX1510
uniquement:rangez la brossette sur le
chargeur.
Pour les modèles HX2645,HX2545,
HX2530,HX1615 et HX1515 uniquement:
vous pouvez rangez jusqu'à 4 têtes de
brossage dans le compartiment de
rangement.
FRANÇAIS28
Page 29

C
◗ Pour les modèles HX2645,HX2545,HX2530,
HX1615 et HX1515 uniquement:à la place de
2 têtes,vous pouvez ranger un tube dentifrice.
Le compartiment de rangement et les inserts
peuvent être retirés du chargeur et nettoyés dans
le lave-vaisselle.
C
5 Nettoyez le chargeur à l'aide un chiffon
humide.
Mettez le chargeur hors tension avant de le
nettoyer.
Remplacement
1 Remplacez la brossette tous les 3 mois
pour de meilleurs résultats de brossage.
◗ La brossette doit être changée dès que les
poils se replient vers l'extérieur.
De nouvelles brossettes sont disponibles chez
votre revendeur ou Centre Service Agéé.
Vous pouvez utiliser des brossettes Philips aux
poils arrondis.
Environnement
En fin de vie ou si vous désirez vous débarasser
de votre appareil,retirez l'accumulateur et
déposez-le dans un endroit assigné à cet effet.
FRANÇAIS 29
Page 30
◗ NB:Vous pouvez aussi apporter l'appareil à un
Centre Service Agréé Philips qui s'en
chargera.
1 Avant d'ôter l'accumulateur;assurez-vous
qu'il est totalement déchargé.Laissez
donc l'appareil en marche jusqu'à l'arrêt
total.
C
2 Prenez le chargeur et mettez la brosse sur
le support.Tournez la brosse dans le sens
inverse des aiguilles d'une montre pour
dévisser la base de l'appareil.
C
3 Tenez la brosse à l'envers et pressez-la
contre une surface dure pour retirer le
compartiment à accumulateur.
C
4 Ouvrez le couvercle du compartiment à
accumulateur à l'aide d'un tournevis.
C
5 Retirez l'accumulateur du compartiment.
La garantie n'est plus valable une fois la base
dévissée et l'appareil perd son étanchéité.
FRANÇAIS30
2
1
Page 31

En cas de problème
Si vous ne pouvez pas resoudre le problème à
l'aide du petit guide, addressez-vous à un Centre
Service Agréé,au Service Consommateurs Philips
de votre pays ou contactez-nous en ligne à
www.philips.com.
FRANÇAIS 31
Solution
Assurez-vous que le chargeur est correctement
branché.
Assurez-vous que la prise de courant est alimentée,
même lorsque la lumière est éteinte (voir le
chapitre 'Important').
Assurez-vous que la brosse à dents est arrêtée et
rechargez-la pendant au moins 16 heures.
Vérifiez que la brossette soit correctement
connectée à l'appareil (voir également le chapitre
'Utilisation de l'appareil').
La brosse à dents doit être rechargée. Si vous laissez
la brosse dans le chargeur continuellement, vous
devrez effectuer une recharge complète comme
décrit dans le chapitre "Charge".
Remplacez la brossette.
Problème
La brosse à dents ne
fonctionne pas,bien qu'elle
ait été chargée pendant la
nuit.
Le moteur de l'appareil
fonctionne, mais la tête de
brossage ne fonctionne
pas.
La puissance de brossage a
diminuée
considérablement.
La performance de
nettoyage des dents n'est
plus optimale.
Page 32

Introductie
Deze unieke elektrische tandenborstel verwijdert
plak beter dan een gewone handtandenborstel en
helpt tevens uw tandvlees te beschermen.Als u
tijdens het poetsen te veel druk uitoefent,klikt de
borstelkop vanzelf naar achteren. Door dit
duidelijke signaal zult u al snel de juiste poetsdruk
gaan gebruiken. Uit klinische tests blijkt dat,dankzij
dit systeem,poetsen met de Philips Sensiflex tot
een betere en veiligere poetsmethode leidt.
Belangrijk
◗ Het snoer van de oplader kan niet vervangen
worden.Indien het snoer beschadigd is, dient
de oplader afgedankt te worden.
◗ Zorg ervoor dat er stroom op het
stopcontact staat wanneer u de tandenborstel
gaat opladen.Het is mogelijk dat de
stroomtoevoer naar stopcontacten in
spiegelkastjes boven wastafels wordt
afgebroken wanneer het licht in de badkamer
wordt uitgedaan.
Klaarmaken voor gebruik
Het apparaat aan de muur bevestigen
C
1 Bevestig de oplader aan de muur met
behulp van twee schroeven (3,0x30 mm)
en twee muurpluggen (S5) (niet
bijgesloten).
NEDERLANDS32
15,6
Page 33

C
◗ Om er zeker van te zijn dat u op de juiste
plaatsen gaatjes boort,kunt u gebruik maken
van de boormal op de laatste pagina van deze
gebruiksaanwijzing.
Het apparaat opladen
1 Laad het apparaat ten minste 16 uur op
voordat u het voor de eerste keer
gebruikt.
C
◗ Zorg ervoor dat het apparaat uitgeschakeld is
wanneer u het gaat opladen.
◗ U kunt de tandenborstel continu in de
oplader laten opladen.
Echter, wanneer u het apparaat voor het eerst
gaat gebruiken, raden we u aan het niet tussen de
poetsbeurten op te laden,maar te wachten met
opladen totdat de motor bijna ophoudt met
draaien. Herhaal dit 3 keer achter elkaar.
Herhaal deze procedure elk half jaar om de
levensduur van het apparaat te verlengen.
C
◗ Alleen types HX2645,HX2545,HX2537P en
HX2535:tijdens het opladen brandt het
groene lampje.
◗ U kunt de tandenborstel continu in de
oplader laten opladen.
NEDERLANDS 33
3
1
2
16 hrs
Page 34

Gebruik van het apparaat
C
1 Bevestig de opzetborstel op de
tandenborstel door deze in de
bajonetsluiting te plaatsen en een
kwartslag rechtsom te draaien.
Hierdoor kan de opzetborstel niet van de
tandenborstel af trillen.
2 Doe tandpasta op de borstelkop.
C
3 Plaats de borstelkop in uw mond.
C
4 Druk op de aan/uitknop en begin te
poetsen.
◗ Zie het hoofdstukje 'Poetstips' voor de beste
poetsmethode,de minimale poetstijd en de
functies van het apparaat.
Poetstips
Poetsen
C
1 Plaats de borstelkop zo tegen de tand dat
deze zowel het tandoppervlak als de rand
van het tandvlees bedekt.
NEDERLANDS34
1
2
Page 35

C
2 Houd de borstelkop enkele seconden in
deze positie en ga dan verder met de
volgende tand.
De ronde borstelkop verwijdert plak van de
tanden en onder de rand van het tandvlees.
De onafhankelijk bewegende Active Tip reinigt
tussen de tanden.
C
3 Beweeg de borstelkop voorzichtig langs
alle tanden en kiezen.
◗ Zorg ervoor dat u alle oppervlakken van uw
tanden en kiezen (binnenkant,buitenkant en
kauwvlak) en de tandvleesrand goed reinigt.
Door een vast poetspatroon te volgen
voorkomt u dat u bepaalde gebieden
overslaat.
◗ U kunt ook de poetsinstructies op onze
Internet site raadplegen:
www.homeandbody.philips.com
Tandvleesbescherming
C
1 Het tandvleesbeschermingssysteem
voorkomt dat u te veel druk uitoefent op
uw tanden en tandvlees.
C
2 Als u te veel druk uitoefent op de
tandenborstel,hoort en voelt u de
borstelkop naar achteren klikken. Zodra u
de druk vermindert,keert de borstelkop
terug naar zijn normale positie.Hierdoor
wordt uw tandvlees beschermd.
NEDERLANDS 35
Page 36

Dit zal waarschijnlijk in het begin enkele keren
gebeuren.Na een tijdje zult u echter vanzelf de
optimale poetsdruk ontdekt hebben, en zal de
borstelkop dus minder vaak naar achteren klikken.
Tip:als plak goed verwijderd wordt, heeft het
tandvlees een roze kleur en zit het stevig om de
tanden.Gezond tandvlees bloedt niet wanneer u
eet of uw tanden poetst (zie ook het hoofdstukje
'Optimale gebitsverzorging').Mocht uw tandvlees
de eerste keren licht bloeden tijdens het gebruik
van de tandenborstel, dan zal dit over het
algemeen na enkele dagen ophouden.Zo niet,
raadpleeg dan uw tandarts of mondhygiënist.
Minimale poetstijd:2 minuten
Over het algemeen zal 2 minuten poetsen
voldoende zijn om uw tanden goed te reinigen.U
kunt natuurlijk ook langer dan 2 minuten poetsen.
C
◗ Een rood lampje gaat knipperen om aan te
geven dat er 2 minuten verstreken zijn (alleen
types HX2545,HX2537P,HX2535b.l.en
HX2535).
Optimale gebitsverzorging
Voor optimale gebitsverzorging is het aan te
raden om naast de elektrische tandenborstel ook
tandenstokers te gebruiken en te flossen.
NEDERLANDS36
Page 37

U vindt meer informatie over Philips
tandenborstels en andere Philips producten op
onze Internet site:www.homeandbody.philips.com
Het apparaat schoonmaken en
opbergen
C
1 Schakel de tandenborstel in en spoel de
opzetborstel af onder de warme kraan
(max.60cC).
C
2 Schakel de tandenborstel uit.Haal de
opzetborstel eraf en spoel de binnenkant
van de opzetborstel schoon.
C
3 Schakel de tandenborstel nogmaals in om
restjes tandpasta van de aandrijfas af te
spoelen.
C
4 Alleen types HX2537P,HX2535, HX2510,
HX1611,HX1511 en HX1510:bewaar de
opzetborstel door hem op de pin op de
oplader te plaatsen.
Alleen types HX2645,HX2545,HX2530,
HX1615 en HX1515:bewaar de
opzetborstel in de opbergcontainer.Deze
biedt ruimte voor 4 opzetborstels.
NEDERLANDS 37
Page 38

C
◗ Alleen types types HX2645,HX2545,
HX2530,HX1615 en HX1515:in plaats van
2 opzetborstels kunt u ook een tube
tandpasta in de opbergcontainer bewaren.
De opbergcontainer en de inzetstukken kunnen
van de oplader verwijderd worden en in de
afwasmachine worden schoongemaakt.
C
5 Maak de oplader schoon met een vochtige
doek.
Haal de stekker van de oplader uit het
stopcontact voordat u de oplader gaat
schoonmaken.
Vervanging
1 Vervang de opzetborstel elke 3 maanden
voor het beste poetsresultaat.
◗ Vervang de opzetborstel ook als de haren
naar buiten beginnen te buigen.
Nieuwe opzetborstels zijn verkrijgbaar bij de
winkel waar u de tandenborstel gekocht heeft.
Alle Philips opzetborstels kunnen gebruikt
worden in combinatie met dit apparaat.
Milieu
Verwijder de accu wanneer u het apparaat
afdankt.Gooi de accu niet bij het normale
NEDERLANDS38
Page 39

huisvuil,maar lever deze apart in op een door de
overheid daartoe aangewezen plaats.
◗ NB:U kunt het apparaat ook inleveren bij een
Philips Service Centrum,waar men ervoor zal
zorgen dat de accu milieuvriendelijk wordt
verwerkt.
1 De accu mag alleen verwijderd worden als
deze volledig leeg is.Laat het apparaat
daarom lopen totdat de motor stopt
voordat u de accu verwijdert.
C
2 Pak de oplader op en plaats de
tandenborstel op de pin.Draai de
tandenborstel linksom om de bodem los
te schroeven.
C
3 Houd de tandenborstel op de kop en duw
er mee op een hard oppervlak om de
accuhouder te verwijderen.
C
4 Open het deksel van de accuhouder met
behulp van een schroevendraaier.
C
5 Licht de accu uit de accuhouder met
behulp van een schroevendraaier.
Het is apparaat is waarschijnlijk niet meer
waterdicht nadat de onderzijde is losgeschroefd
Uw garantie vervalt dan ook wanneer u de
onderzijde heeft geopend.
NEDERLANDS 39
º
2
1
Page 40

Problemen oplossen
Als u er niet in slaagt uw probleem op te lossen
met behulp van de onderstaande tabel, neem dan
contact op met het dichtstbijzijnde Philips Service
Centrum of met het Philips Customer Care
Centre in uw land,of bezoek onze Website
(www.philips.com).
NEDERLANDS40
Oplossing
Zorg ervoor dat de stekker van de oplader goed in
het stopcontact zit.
Controleer of er stroom op het stopcontact staat
(zie ook het hoofdstukje 'Belangrijk').
Zorg ervoor dat de tandenborstel uitgeschakeld is
en laad het apparaat ten minste 16 uur achter elkaar
op.
Controleer of de borstelkop goed op het apparaat
bevestigd is (zie ook het hoofdstukje 'Gebruik van
het apparaat').
De tandenborstel moet opgeladen worden.Als u de
tandenborstel normaal altijd continu in de oplader
laat opladen,kan het nodig zijn dat u de capaciteit
van de accu weer op peil brengt zoals beschreven in
het hoofdstukje 'Opladen'.
Gooi de opzetborstel weg en neem een nieuwe in
gebruik.
Probleem
De tandenborstel werkt
helemaal niet,ondanks het
feit dat deze de hele nacht
in de oplader heeft
gestaan.
De motor van de
tandenborstel werkt wel,
maar de borstelkop werkt
niet.
De poetskracht van de
tandenborstel is sterk
afgenomen.
De tandenborstel maakt
mijn tanden niet meer
optimaal schoon.
Page 41

Introducción
Este exclusivo cepillo dental eléctrico elimina la
placa mejor que un cepillo normal manual.
También ayuda a proteger sus encías.Cuando
ejerzan demasiada presión mientras cepillan, el
cabezal del cepillo se flexionará automáticamente
hacia atrás.Debido a esta clara señal, adoptarán
rápidamente la adecuada presión de cepillado.
Pruebas clínicas han demostrado que, gracias a
este sistema,el cepillado con el cepillo dental
Philips Sensiflex da como resultado una mejor y
más segura técnica de cepillado.
Importante
◗ El cable de red de la unidad de carga no
puede ser sustituido.Si el cable de red se
deteriora,la unidad de carga debe ser
desechada.
◗ Asegúrense de que el enchufe tenga corriente
cuando carguen el cepillo dental.El suministro
de corriente a enchufes de espejos o
armarios situados sobre lavabos,o a enchufes
para afeitadoras en los cuartos de baño,puede
cortarse al apagar la luz.
ESPAÑOL 41
Page 42

Cómo preparar el aparato para usarlo
Cómo montar el aparato en la pared
C
1 Monten la unidad de carga en la pared
usando 2 tornillos (3'0 x 30 mm) y 2 tacos
(S5) (no incluidos).
C
◗ Para taladrar los agujeros en los lugares
correctos,pueden usar la plantilla de taladro
de la última página de estas instrucciones de
uso.
Cómo cargar el aparato
1 Carguen el aparato durante por lo menos
16 horas antes de usarlo por vez primera.
C
◗ Asegúrense de que el aparato esté apagado
cuando empiecen a cargarlo.
◗ Pueden poner el cepillo dental en el soporte y
dejarlo cargando continuamente.
Sin embargo,cuando empiecen a usar el aparato,
les recomendamos que lo usen hasta que la
batería se descargue del todo.Para ello, usen el
aparato de modo normal sin recargarlo entre
sesiones de cepillado.Recarguen el aparato
cuando el motor casi deje de funcionar. Repitan
este procedimiento hasta 3 veces seguidas.
Para alargar la vida útil de la batería, repita este
procedimiento cada 6 meses.
ESPAÑOL42
15,6
3
1
2
Page 43

C
◗ Sólo modelos HX2645,HX2545,HX2537P y
HX2535:Cuando la batería esté cargándose,
la lámpara piloto verde estará encendida.
◗ Pueden poner el cepillo dental en el soporte y
dejarlo cargando continuamente.
Cómo usar el aparato
C
1 Monten el cabezal del cepillo en el cepillo
dental insertándolo en el eje con enganche
de bayoneta y girándolo un cuarto de
vuelta en sentido horario.
Ello hará imposible que el cabezal del cepillo se
suelte debido a la vibración.
2 Pongan pasta dentífrica en el cepillo.
C
3 Pongan el cabezal del cepillo en su boca.
C
4 Presionen el botón de encendido y
empiecen a cepillar sus dientes.
◗ Para el mejor método de cepillado,el tiempo
mínimo de cepillado y las funciones de
cepillado del aparato,vean a continuación la
sección "Consejos de cepillado".
ESPAÑOL 43
16 hrs
1
2
Page 44

Consejos de cepillado
Cómo cepillar
C
1 Coloquen el cabezal del cepillo contra el
diente de modo que cubra la superficie del
mismo así como la línea de la encía.
C
2 Mantengan el cabezal del cepillo en esa
posición durante unos pocos segundos y
después pasen al diente siguiente.
La cabeza redonda del cepillo elimina la placa de
los dientes y de debajo de la línea de las encías.
La Punta Interdental,moviéndose
independientemente, limpia entre los dientes.
C
3 Guíen el cabezal del cepillo
cuidadosamente a lo largo de los dientes y
molares.
◗ Asegúrense de limpiar adecuadamente todas
las superficies de los dientes (interior,exterior
y superficie de masticación) así como la línea
de las encías. Una rutina fija de cepillado les
evitará la omisión de ciertas zonas.
◗ Vean también las instrucciones de cepillado en
nuestra página de Internet :
www.homeandbody.philips.com.
ESPAÑOL44
Page 45

Protección de encías
C
1 El sistema de Protección de Encías
garantiza que no ejerzan demasiada
presión sobre los dientes y las encías.
C
2 Si ejercen demasiada presión sobre el
cepillo dental,notarán y oirán un "click"
cuando el cabezal del cepillo se flexione
hacia atrás.Tan pronto como reduzcan la
presión,el cabezal del cepillo volverá a su
posición normal. Esto protegerá sus
encías.
Probablemente esto sucederá unas cuantas veces
cuando empiecen a usar el aparato. Después de
algún tiempo habrán descubierto la óptima
presión de cepillado y el cabezal del cepillo se
flexionará menos a menudo hacia atrás.
Consejo: Si la placa se elimina adecuadamente,
las encías tendrán un color rosado y rodearán
firmemente los dientes.Unas encías sanas no
sangrarán al comer o al cepillar sus dientes (ver
también la sección "Optima higiene dental"). Si, a
pesar de ello,sus encías sangran ligeramente las
primeras veces que usen el cepillo, este sangrado
cesará generalmente después de unos pocos días.
Si no es así,consulten a su dentista o a su
higienista dental.
ESPAÑOL 45
Page 46

Tiempo mínimo de cepillado:2 minutos
En general, 2 minutos serán suficientes para
limpiar bien sus dientes. Naturalmente,también
pueden cepillarse durante más de 2 minutos.
C
◗ Una lámpara piloto roja parpadeará para
indicar que han transcurrido 2 minutos (sólo
modelos HX2545,HX2537P,HX2535b.l.y
HX2535).
Optima higiene dental
Para una higiene dental óptima,es recomendable
usar hilo dental además del cepillo dental
eléctrico.
Hallarán más información sobre Philips Cuidado
Dental y sobre otros productos Philips en nuestra
página de Internet :
www.homeandbody.philips.com.
Cómo limpiar y guardar el aparato
C
1 Pongan en marcha el cepillo dental y
enjuaguen el cabezal del cepillo bajo el
grifo con agua tibia (máximo 60cC).
ESPAÑOL46
Page 47

C
2 Apaguen el cepillo dental. Desmonten el
cabezal del cepillo y enjuaguen su interior.
C
3 Vuelvan a poner en marcha el cepillo
dental para enjuagar los restos de pasta
dentífrica del eje.
C
4 Sólo modelos HX2537P,HX2535,
HX2510,HX1611,HX1511 y HX1510:
guarden el cabezal del cepillo en la espiga
de la unidad de carga.
Sólo modelos HX2645,HX2545,HX2530,
HX1615 y HX1515: guarden los
4 cabezales del cepillo en el contenedor.
C
◗ Sólo modelos HX2645,HX2545,HX2530,
HX1615 y HX1515:en lugar de 2 cabezales,
también pueden guardar un tubo de pasta
dentífrica en el contenedor.
El contenedor y su pieza desmontable pueden
sacarse de la unidad de carga y lavarlos en el
lavavajillas.
C
5 Limpien la unidad de carga con un paño
húmedo.
Desenchufen la unidad de carga antes de
empezar a limpiarla.
ESPAÑOL 47
Page 48

Sustitución
1 Para obtener los mejores resultados en el
cepillado,sustituyan el cabezal del cepillo
cada 3 meses.
◗ El cabezal del cepillo también debe ser
sustituido cuando las cerdas empiecen a
doblarse hacia fuera.
Pueden obtener nuevos cabezales del cepillo en
la tienda donde hayan comprado su cepillo
dental.
Pueden usar cualquier cabezal Philips de cabeza
redonda.
Medio ambiente.
Cuando desechen el aparato,quiten la batería y
desháganse de ella de un modo seguro para el
medio ambiente.
◗ Nota: También pueden llevar el aparato a un
Servicio de Asistencia Técnica de Philips,
donde se desharán de la batería por Ud.
1 La batería debe estar completamente
descargada al desmontarla. Por ello,antes
de desmontar la batería deben dejar que el
aparato funcione hasta que se pare.
C
2 Cojan la unidad de carga y coloquen el
cepillo dental en la espiga. Giren el cepillo
dental en sentido antihorario para
desenroscar el fondo del cepillo dental.
ESPAÑOL48
2
1
Page 49

C
3 Inviertan el cepillo dental y presiónenlo
hacia abajo sobre una superficie dura para
sacar el soporte de la batería.
C
4 Utilizando un destornillador,abran la tapa
del soporte de la batería.
C
5 Utilizando un destornillador,saquen la
batería del soporte.
Después de que el fondo haya sido
desatornillado,el aparato puede que ya no sea
estanco y la garantía quedará invalidada.
ESPAÑOL 49
Page 50

Guía de solución de problemas
Si no pueden solucionar su problema utilizando la
siguiente Guía de solución de problemas,
contacten con el Servicio de Asistencia Técnica de
Philips más cercano,con el Servicio Philips de
Atención al Cliente de su país,o con
www.philips.com.
ESPAÑOL50
Solución
Asegúrense de que la clavija de la unidad de carga
esté adecuadamente enchufada a la red.
Asegúrense de que haya corriente en el enchufe
(ver también la sección "Importante").
Asegúrense de que el cepillo dental esté apagado y
recárguenlo durante por lo menos 16 horas.
Comprueben si el cabezal del cepillo ha sido
conectado adecuadamente al aparato (ver también
la sección "Cómo usar el aparato").
El cepillo dental debe ser recargado.Si dejan de
forma habitual el cepilllo dental continuamente en la
unidad de carga, puede que tengan que reactivar la
batería tal como se describe en la sección "Cómo
cargar el aparato".
Quiten el cabezal del cepillo y empiecen a usar uno
nuevo.
Problema
El cepillo dental no
funciona a pesar de haber
estado en la unidad de
carga durante toda la
noche.
El motor del cepillo dental
funciona,pero el cabezal
del cepillo no.
El poder de cepillado del
aparato ha disminuido
considerablemente.
La capacidad de limpieza
del cepillo dental ya no es
óptima.
Page 51

Introduzione
Questo rivoluzionario spazzolino elettrico
rimuove la placca in modo molto più efficace
rispetto ad uno spazzolino manuale, e in più vi
aiuta a proteggere le gengive. Quando viene
esercitata una pressione eccessiva,infatti, la testina
scatta automaticamente indietro.Grazie a questo
chiaro segnale, imparerete rapidamente ad
applicare la giusta pressione.Test clinici hanno
dimostrato che grazie a questo sistema, lavarsi i
denti con Philips Sensiflex risulta più efficace e più
sicuro.
Importante
◗ Il cavo dell'unità di carica non può essere
sostituito.Nel caso il cavo risultasse
danneggiato,l'intera unità di carica dovrà
essere gettata.
◗ Controllate che la presa di corrente funzioni
durante la ricarica dello spazzolino.Spesso
l'erogazione di corrente alle prese dei bagni,
vicino ai lavandini,viene interrotta quando si
spegne la luce.
Messa a punto dell'apparecchio prima
dell'uso
Come montare l'apparecchio a muro
C
1 Montate l'unità di carica a muro,usando
2 viti (3,0x30 mm) e due tasselli da muro
(S5) (non inclusi)
ITALIANO 51
15,6
Page 52

C
◗ Per effettuare i fori nella giusta posizione,
potete usare la dima fornita nell'ultima pagina
delle istruzioni.
Come caricare l'apparecchio
1 Caricate l'apparecchio per almeno 16 ore
prima di usarlo per la prima volta.
C
◗ Controllate hce l'apparecchio sia spento
durante la ricarica.
◗ Potete riporre lo spazzolino nell'apposito
supporto e lasciarlo continuamente sotto
carica.
La prima volta che usare lo spazzolino,vi
consigliamo di lasciarlo in funzione fino a quando
la batteria è scarica.A tale proposito, usate
l'apparecchio come al solito senza ricaricarlo fra
un uso e l'altro.Ricaricate l'apparecchio solo
quando il motore è quasi fermo.Ripetete questa
operazione per 3 volte di fila.
Per garantire una maggior durata della batteria,
ripetete questa operazione ogni 6 mesi.
C
◗ Solo per i modelli HX2645,HX2545,
HX2537P e HX2535:la spia verde si accende
quando la batteria è sotto carica.
◗ Potete riporre lo spazzolino nell'apposito
supporto e lasciarlo continuamente sotto
carica.
ITALIANO52
3
1
2
16 hrs
Page 53

Come usare l'apparecchio
C
1 Inserite la testina sullo spazzolino
infilandola nella presa a baionetta e
ruotatela in senso orario.
In questo modo la testina non potrà staccarsi per
effetto delle vibrazioni.
2 Mettete un po' di dentifricio sullo
spazzolino.
C
3 Mettete lo spazzolino all'interno della
bocca.
C
4 Premete il pulsante e iniziate a lavarvi i
denti.
◗ Per lavarvi i denti in modo ottimale,per
conoscere la durata ideale della pulizia e le
diverse funzioni applicabili,vedere il capitolo
"Consigli per la Pulizia" riportati qui di
seguito.
Consigli per la pulizia
Come lavare i denti
C
1 Appoggiate la testina al dente in modo tale
da coprire la superficie del dente e il
bordo gengivale.
ITALIANO 53
1
2
Page 54

C
2 Tenete lo spazzolino in questa posizione
per alcuni secondi prima di passare al
dente successivo.
La testina rotonda rimuove la placca dai denti e al
di sotto del bordo gengivale.
La punta attiva si muove in modo indipendente,
per una migliore pulizia interdentale.
C
3 Guidate delicatamente lo spazzolino fra i
denti,fino in fondo alla bocca.
◗ Controllate di pulire correttamente tutte le
superfici dei denti (all'interno,all'esterno e
sopra) e lungo il bordo gengivale.Provate a
seguire sempre lo stesso ordine di pulizia,per
evitare di saltare qualche zona.
◗ Vedere anche le istruzioni riportate sul
nostro sito Internet:
www.homeandbody.philips.com
Protezione delle gengive
C
1 Il Sistema Protezione Gengive fa in modo
che non venga esercitata una pressione
eccessiva su denti e gengive.
C
2 Quando verrà esercitata una pressione
eccessiva,sentirete un "click" nel momento
in cui la testina scatterà all'indietro.Non
appena ridurrete la pressione,la testina
ritornerà nella posizione normale.Tutto
questo per proteggere le vostre gengive.
ITALIANO54
Page 55

Probabilmente questo si verificherà alcune volte
quando inizierete ad usare lo spazzolino.Con un
po' di pratica imparerete ad applicare la pressione
ottimale e la testina scatterà indietro spesso.
Consiglio:se la placca viene rimossa in modo
corretto,le gengive sono di colore rosa e
circondano fermamente i denti.Le gengive sane
non sanguinano quando mangiate o vi lavate i
denti (vedere anche il capitolo "Igiene dentale
ottimale").Non preoccupatevi, comunque, nel
caso le gengive dovessero sanguinare leggermente
le prime volte che usate lo spazzolino:il
fenomeno scomparirà nel giro di alcuni giorni. In
caso contrario, consultate il dentista o l'igienista
dentale.
Durata minima della pulizia:2 minuti
In linea generale, 2 minuti sono sufficienti per
pulire correttamente i denti. Naturalmente,
potete anche lavarli per più di 2 minuti.
C
◗ La spia rossa lampeggia per indicare che sono
trascorsi i due minuti (solo per i mod.
HX2545,HX2537P, HX2535b.l.e HX2535).
Igiene dentale ottimale
Per un'igiene dentale ottimale,vi consigliamo di
usare il filo interdentale e lo scovolino in aggiunta
allo spazzolino elettrico.
ITALIANO 55
Page 56

Per ulteriori informazioni sui prodotti Dental Care
e sugli altri prodotti Philips, vi preghiamo di
visitare il nostro sito Internet:
www.homeandbody.philips.com
Come pulire e riporre l'apparecchio
C
1 Accendete lo spazzolino e risciacquate la
testina sotto l'acqua tiepida (max 60cC).
C
2 Spegnete lo spazzolino.Staccate la testina
e risciacquatela anche all'interno.
C
3 Accendete nuovamente lo spazzolino per
eliminare i residui di dentifricio dall'albero
motore.
C
4 Solo per i modelli HX2537P, HX2535,
HX2510,HX1611,HX1511 e HX1510:
riponete lo spazzolino sul perno dell'unità
di carica.
Solo per i modelli HX2645,HX2545,
HX2530,HX1615 e HX1515:è possibile
riporre fino a 4 spazzolini nel contenitore.
ITALIANO56
Page 57

C
◗ Solo per i modelli HX2645,HX2545,HX2530,
HX1615 e HX1515:al posto di 2 spazzolini,
potete riporre anche un tubetto di dentifricio
nell'apposito scomparto.
Lo scomparto per riporre gli spazzolini e gli
inserti possono essere tolti e lavati in lavastoviglie.
C
5 Pulite l'unità di carica con un panno umido.
Durante le operazioni di pulizia, staccate la presa
di corrente.
Sostituzione
1 Per ottenere i migliori risultati,sostituite la
testina ogni 3 mesi.
◗ La testina deve essere sostituita anche nel
caso in cui le setole inizino a piegarsi verso
l'esterno.
Potete acquistare le testine di ricambio nei negozi
dove avete comperato l'apparecchio.
È possibile utilizzare qualsiasi testina di ricambio
PHILIPS.
Come proteggere l'ambiente
Prima di gettare l'apparecchio,ricordate di
togliere la batteria e di buttarla in modo da non
danneggiare l'ambiente.
◗ NB.Potete anche portare l'apparecchio
presso un Centro di Assistenza Philips: il
personale provvederà a gettare la batteria per
voi!
ITALIANO 57
Page 58

1 Prima di togliere la batteria,controllate
che sia completamente scarica.A tale
scopo,prima di togliere la batteria, lasciate
in funzione l'apparecchio fino a quando
non si fermerà il motore.
C
2 Prendete l'unità di carica e mettete lo
spazzolino sul perno.Ruotate lo spazzolino
in senso antiorario per svitare la parte
inferiore dello spazzolino.
C
3 Capovolgete lo spazzolino e premetelo su
una superficie dura per togliere il
portabatteria.
C
4 Aprite il coperchio del portabatteria
usando un cacciavite.
C
5 Estraete la batteria dal portabatteria
usando un cacciavite.
Dopo aver svitato la parte inferiore,l'apparecchio
non sarà più impermeabile e la garanzia non sarà
quindi più valida.
ITALIANO58
2
1
Page 59

Localizzazione guasti
Nel caso non riusciste a risolvere il vostro
problema mediante la tabella di localizzazione
guasti riportata qui sotto,vi preghiamo di
contattare il Centro Assistenza Philips più vicino, il
Customer Care Centre del vostro paese oppure
il nostro sito www.philips.com.
ITALIANO 59
Soluzione
Make sure that the plug of the charging unit is
properly connected to the mains.
Make sure the socket is live (see also the section
'Important').
Make sure the toothbrush is switched off and
recharge it for at least 16 hours.
Check if the brush attachment has been properly
connected to appliance (see also the section 'Using
the appliance').
The toothbrush must be recharged. If you normally
leave the toothbrush in the charging unit
continuously, you may have to revive the battery as
described in the 'Charging' section.
Remove the brush attachment and start using a
new one.
Problema
Lo spazzolino non funziona
anche se è rimasto
nell'unità di carica per tutta
la notte.
Il motore dello spazzolino
funziona,ma la testina no.
La potenza
dell'apparecchio si è
ridotta notevolmente.
Le prestazioni dello
spazzolino non risultano
più ottimali.
Page 60

Introdução
Esta escova eléctrica única remove a placa
bacteriana com muito mais eficácia do que as
escovas de dentes manuais.Além disso,ajuda a
proteger as gengivas.Quando se exerce
demasiada força na escovagem,a cabeça da
escova recua automaticamente.Graças a este
sinal evidente, rapidamente se adaptará à força de
escovagem correcta.Testes clínicos comprovam
que, devido a este sistema,a escovagem dos
dentes com a escova eléctrica Philips Sensiflex
resulta numa técnica melhor e mais segura de
escovar os dentes.
Importante
◗ O fio do carregador não pode ser substituído.
Se o fio se estragar,o carregador deve ser
deitado fora.
◗ Certifique-se que a tomada tem corrente
quando proceder à carga da escova.Algumas
tomadas eléctricas colocadas nas armações
dos espelhos das casas de banho e algumas
tomadas para máquinas de barbear ficam sem
corrente quando se apagam as luzes.
PORTUGUÊS60
Page 61

Preparação para utilização
Montagem na parede
C
1 Coloque o carregador na parede,
utilizando 2 parafusos (3.0x30mm) e
2 buchas (S5) (não incluídos).
C
◗ Para fazer os buracos para os parafusos nos
sítios certos,poderá usar o esquema
fornecido na última página deste modo de
emprego.
Carga
1 Antes da primeira utilização,coloque o
aparelho em carga durante pelo menos
16 horas.
C
◗ Quando começar a carga,certifique-se que a
escova está desligada.
◗ A escova pode ser colocada no suporte e
ficar continuamente em carga.
Contudo,nas primeiras utilizações,é aconselhável
deixá-la funcionar até esvaziar a bateria. Para isso,
utilize a escova normalmente sem a recarregar
entre as várias sessões. Coloque a escova em
carga apenas quando o motor estiver quase a
parar.Repita este procedimento 3 vezes seguidas.
Para prolongar a duração da bateria, repita este
procedimento de 6 em 6 meses.
PORTUGUÊS 61
15,6
3
1
2
Page 62

C
◗ Apenas para os modelos HX2645,HX2545,
HX2537P e HX2535.Quando a bateria está
em carga,a lâmpada piloto verde permanece
acesa.
◗ A escova pode ser colocada no suporte e
ficar continuamente em carga.
Utilização da escova
C
1 Coloque a escova na máquina,
introduzindo-a na baioneta e rodando um
quarto de volta para a direita.
Deste modo evitará que a escova se solte devido
à vibração.
2 Coloque a pasta de dentes sobre a escova.
C
3 Coloque a escova na boca.
C
4 Prima o interruptor e comece a escovar
os dentes.
◗ Para saber qual o melhor método de
escovagem,o tempo de escovagem mínimo e
as funções da escova,por favor consulte o
capítulo 'Sugestões de escovagem'.
PORTUGUÊS62
16 hrs
1
2
Page 63

Sugestões de escovagem
Escovagem
C
1 Encoste a cabeça da escova aos dentes de
modo que a superfície dos dentes e a linha
das gengivas fica tapada.
C
2 Mantenha a cabeça da escova nessa
posição durante alguns segundos e depois
passe para o dente seguinte.
A cabeça redonda da escova retira a placa dos
dentes e abaixo da linha das gengivas.
A Ponta Activa,que se movimenta
separadamente, limpa os espaços interdentários.
C
3 Guie a cabeça da escova com cuidado ao
longo dos dentes e dos molares.
◗ Limpe bem toda a superfície dos dentes
(interior,exterior e zona de mastigação), bem
como as gengivas.Siga um esquema de
escovagem fixo para evitar que fiquem
algumas zonas por escovar.
◗ Consulte,ainda, as instruções de escovagem
dadas no nosso site da Internet:
www.homeandbody.philips.com.
PORTUGUÊS 63
Page 64

Protecção das gengivas
C
1 O sistema de Protecção das Gengivas
garante que não será exercida demasiada
pressão sobre os dentes e as gengivas.
C
2 Se fizer demasiada pressão sobre a escova,
sentirá e ouvirá um clique quando a cabeça
da escova flectir para trás.Logo que
reduzir a pressão,a cabeça da escova
retornará à sua posição normal.Deste
modo,estará a proteger as suas gengivas.
Isto irá,muito provavelmente,acontecer algumas
vezes nas primeiras utilizações da escova.Passado
algum tempo,porém, já saberá qual a força de
escovagem ideal e a cabeça da escova recuará
com muito menos frequência.
Sugestão:Se a placa for removida correctamente,
as gengivas terão uma cor rosa e rodearão os
seus dentes com firmeza.Umas gengivas
saudáveis não sangram quando comemos ou
quando escovamos os dentes (vidé capítulo 'Uma
higiene oral perfeita').Se,apesar de tudo, as suas
gengivas sangrarem ligeiramente nas primeiras
utilizações da escova eléctrica,não se preocupe
porque o sangramento normalmente pára após
alguns dias.Se tal não acontecer,consulte o seu
dentista ou higienista oral.
PORTUGUÊS64
Page 65

Tempo de escovagem mínimo:2 minutos
Regra geral, 2 minutos são suficientes para limpar
os dentes convenientemente.É claro que poderá
escová-los por mais de 2 minutos.
C
◗ Uma luz encarnada começará a piscar para
indicar que decorreram 2 minutos (apenas
nos modelos HX2545,HX2537P, HX2535b.l.e
HX2535).
Uma higiene oral perfeita
Para obter uma higiene oral perfeita, recomendase a utilização de fio dental e de palitos orais para
além da escova eléctrica.
Encontrará mais informação sobre a linha Philips
Dental Care bem como sobre outros produtos
Philips no nosso site da Internet:
www.homeandbody.philips.com.
Limpeza e arrumação do aparelho
C
1 Ligue a máquina e enxague a escova à
torneira com água morna (máx.60cC).
PORTUGUÊS 65
Page 66

C
2 Desligue a máquina.Retire a escova e lave
o interior.
C
3 Volte a ligar a máquina para retirar todos
os resíduos da pasta de dentes do veio
motor.
C
4 Apenas nos modelos HX2537P, HX2535,
HX2510,HX1611,HX1511 e HX1510:
arrume a escova colocando-a no pino do
carregador
Apenas nos modelos HX2645,HX2545,
HX2530,HX1615 e HX1515:pode
guardar até 4 escovas no contentor.
C
◗ Apenas nos modelos HX2645,HX2545,
HX2530,HX1615 e HX1515:em vez de
2 escovas,também pode guardar uma pasta
de dentes no contentor.
O contentor e os encaixes podem ser retirados
do carregador para serem lavados na máquina da
loiça.
C
5 Limpe o carregador com um pano húmido.
Desligue o carregador da corrente antes de
proceder à sua limpeza.
PORTUGUÊS66
Page 67

Substituição
1 Substitua as escovas de 3 em 3 meses e
obterá sempre os melhores resultados.
◗ As escovas também devem ser substituídas
quando os filamentos começam a ficar virados
para fora.
Poderá adquirir novas escovas na mesma loja
onde comprou a sua escova de dentes eléctrica.
Podem ser utilizadas todas as escovas PHILIPS
redondas.
Meio ambiente
Quando,em devido tempo,se desfizer da sua
escova de dentes eléctrica,retire-lhe a bateria e
deite-a fora de modo a proteger o meio
ambiente.
◗ NOTA:Se quiser,também poderá levá-la a um
Centro de Assistência Philips que se
encarregará de se desfazer da bateria.
1 A bateria deve estar totalmente vazia
quando a retirar da máquina.Por isso,
ponha a escova a trabalhar até parar
completamente antes de retirar a bateria.
C
2 Segure no carregador e coloque a escova
sobre o pino.Rode a escova para a
esquerda para desaparafusar a parte de
baixo.
PORTUGUÊS 67
2
1
Page 68

C
3 Vire a escova para baixo e pressione-a
com força sobre uma superfície rija para
retirar o suporte da bateria.
C
4 Com uma chave de parafusos,abra a
tampa do suporte da bateria.
C
5 Servindo-se da chave de parafusos,levante
a bateria do respectivo suporte.
Depois de desaparafusar a parte de baixo,a
máquina perde a sua estanquicidade à água e a
garantia torna-se nula.
PORTUGUÊS68
Page 69

Detecção de problemas
Se não conseguir resolver algum eventual
problema através deste manual,por favor
contacte o Centro de Assistência Philips mais
próximo,o Centro de Informação ao
Consumidor do seu país ou contacte-nos 'online'
em www.philips.com.
PORTUGUÊS 69
Solução
Certifique-se que a ficha do carregador está
correctamente ligada na tomada de corrente.
Verifique se a tomada tem corrente (consulte o
capítulo 'Importante').
Verifique se a escova está desligada e deixe-a a
carregar durante um mínimo de 16 horas.
Verifique se a escova está colocada correctamente
na máquina (vidé o capítulo 'Utilização da escova').
A escova precisa de ser recarregada.Se, por norma,
deixa a escova continuamente colocada sobre o
carregador,talvez seja necessário reavivar a bateria,
conforme se descreve no capítulo 'Carga'.
Retire a escova e coloque uma nova.
Problema
A escova não trabalha
apesar de ter ficado toda a
noite colocada no
carregador.
O motor da escova
funciona,mas a escova não.
O poder de escovagem da
máquina diminuiu
consideravelmente.
A escova já não tem o
mesmo poder de limpeza
dos dentes que tinha
dantes.
Page 70

Innledning
Denne unike elektriske tannbørsten fjerner plakk
bedre enn en vanlig,manuell tannbørste. Den gir
også bedre beskyttelse av tannkjøttet.Hvis De
bruker for mye kraft under tannpussen,vil
børstehodet automatisk bøye seg bakover.De vil
da ikke kunne unngå å bruke riktig kraft under
børstingen. Kliniske tester har vist at børsting med
Philips Sensiflex takket være denne funksjonen gir
en bedre og tryggere børsteteknikk.
Viktig
◗ Ledningen til ladeenheten kan ikke skiftes ut.
Hvis ledningen skades,må ladeenheten kastes.
◗ Pass på at det er strøm i kontakten som skal
brukes til å lade tannbørsten.Strømtilførselen
til speillys over vaskeservanter eller
barbermaskinkontakter i bad kan bli brutt hvis
lyset slås av.
Klargjøring før bruk
Montere apparatet på veggen
C
1 Monter ladeenheten på veggen ved hjelp av
2 skruer (3,0 x 30 mm) og 2 veggplugger
(S5) (ikke inkludert).
NORSK70
15,6
Page 71

C
◗ For å sikre at De borer hullene på riktig sted,
kan De bruke boresjablongen på siste side i
denne brukerveiledningen.
Lading av apparatet
1 Lad apparatet i minst 16 timer før det
brukes for første gang.
C
◗ Se til at apparatet er slått av når det lades.
◗ De kan la tannbørsten stå i stativet og bli
ladet kontinuerlig.
Når De begynner å bruke apparatet, anbefales
det imidlertid at De bruker det til batteriet er
tomt før det lades igjen.Dette gjøres ved å bruke
apparatet på vanlig måte, uten å lade det mellom
hver gang.Lad apparatet igjen når det er like før
motoren stanser. Gjenta denne fremgangsmåten
tre ganger på rad.
Batteriets levetid økes hvis De gjentar denne
fremgangsmåten hver sjette måned.
C
◗ Gjelder bare type HX2645,HX2545,
HX2537P og HX2535:Når batteriet lades,
lyser den grønne lampen.
◗ De kan la tannbørsten stå i stativet og bli
ladet kontinuerlig.
NORSK 71
3
1
2
16 hrs
Page 72

Bruke apparatet
C
1 Monter børstedelen på tannbørsten ved å
sette den ned i bajonettlåsen og dreie den
med klokken en kvart omdreining.
Børstedelen vil da ikke kunne løsne på grunn av
vibrasjon under bruk.
2 Påfør tannkrem på børsten.
C
3 Stikk børstehodet inn i munnen.
C
4 Trykk på på-knappen,og start tannpussen.
◗ Hvis De vil vite mer om beste børstemetode,
minste børstetid og apparatets
børstefunksjoner,se "Børstetips" nedenfor.
Børstetips
Børsting
C
1 Plasser børstehodet mot hver enkelt tann
på en slik måte at det dekker tannens
overflate og tannkjøttkanten.
NORSK72
1
2
Page 73

C
2 Hold børstehodet i denne stillingen i noen
sekunder,og gå videre til neste tann.
Det runde børstehodet fjerner plakk fra tennene
og under tannkjøttkanten.
Active Tip, som beveger seg uavhengig, renser
mellom tennene.
C
3 Før børstehodet forsiktig langs for- og
hjørnetennene og jekslene.
◗ Pass på at De rengjør alle overflater på
tennene (innside,utside og tyggeflater) og
tannkjøttkanten skikkelig.Et fast
børstemønster vil være til hjelp for at De skal
unngå å glemme noen steder.
◗ Se også børsteveiledningen på vårt Web-
område:www.homeandbody.philips.com.
Beskyttelse av tannkjøttet
C
1 Tannkjøttbeskyttelsessystemet garanterer
at De ikke utsetter tennene og tannkjøttet
for unødig slitasje.
C
2 Hvis De bruker for mye kraft på
tannbørsten,vil De føle og høre et klikk
når børstehodet bøyes bakover.Med en
gang De reduserer trykket,vil børstehodet
gå tilbake til vanlig stilling.På denne måten
beskyttes tannkjøttet.
Dette vil sannsynligvis skje noen ganger de første
gangene De bruker børsten.Etter en stund vil De
NORSK 73
Page 74

ha funnet ut hva som er optimalt børstetrykk, og
børstehodet vil ikke bli bøyd bakover så ofte.
Tips:Hvis plakket fjernes skikkelig, vil tannkjøttet
være rosa og ligge stramt inntil tennene. Sunt
tannkjøtt blør ikke når De spiser eller børster
tennene (se også "Optimal tannhygiene").Det er
imidlertid ingen grunn til bekymring hvis
tannkjøttet blør litt de første gangene De bruker
børsten, da denne typen blødning vanligvis vil
stanse ganske fort. Hvis den ikke gjør det, bør De
konsultere tannlege eller tannpleier.
Minste børstetid:to minutter
Vanligvis vil to minutter være nok til å rengjøre
tennene ordentlig.Det er imidlertid naturligvis
ingenting i veien for å børste i mer enn to
minutter.
C
◗ Den røde lampen blinker når to minutter er
gått (gjelder bare type HX2545,HX2537P,
HX2535b.l.og HX2535).
Optimal tannhygiene
For å sikre optimal tannhygiene anbefales det at
man bruker tanntråd og tannpirkere i tillegg til
den elektriske tannbørsten.
De finner mer informasjon om Philips Dental
Care og andre Philips-produkter på vårt Webområde:www.homeandbody.philips.com.
NORSK74
Page 75

Rengjøring og oppbevaring av
apparatet
C
1 Slå tannbørsten på,og skyll børstedelen
under springen i lunkent vann (maks.
60cC).
C
2 Slå tannbørsten av.Ta av børstedelen,og
skyll den innvendig.
C
3 Slå tannbørsten på igjen,og skyll av
tannkremrester fra drivakselen.
C
4 Gjelder bare type HX2537P,HX2535,
HX2510,HX1611,HX1511 og HX1510:
Oppbevar børstedelen på pinnen på
ladeenheten
Gjelder bare type HX2645,HX2545,
HX2530,HX1615 og HX1515:Oppbevar
opptil 4 børstedeler i oppbevaringsesken.
C
◗ Gjelder bare type HX2645,HX2545,HX2530,
HX1615 og HX1515:I stedet for to
børstedeler kan De også oppbevare en
tannkremtube i oppbevaringsesken.
Oppbevaringsesken og innerbeholderne kan tas
av ladeenheten og vaskes i oppvaskmaskin.
NORSK 75
Page 76

C
5 Rengjør ladeenheten med en fuktig klut.
Koble ladeenheten fra strømuttaket før De
begynner å rengjøre den.
Utskiftning
1 Skift ut børstedelen hver tredje måned,og
De vil oppnå optimale børsteresultater.
◗ Børstedelen bør skiftes ut når busten bøyer
seg utover.
Nye børstedeler kan anskaffes fra butikken som
tannbørsten ble kjøpt i.
Vanlige PHILIPS-børstedeler kan brukes.
Miljø
Når De skal kassere apparatet, må De først ta ut
batteriet og kassere det på en miljøvennlig måte.
◗ NB:De kan også levere apparatet inn til et
Philips servicesenter,som vil kassere batteriet
for Dem.
1 Batteriet må være helt tomt når De tar
det ut.De må derfor la apparatet gå helt til
det stopper,før De tar ut batteriet.
NORSK76
Page 77

C
2 Ta tak i ladeenheten, og sett tannbørsten
på pinnen.Drei tannbørsten mot klokken
for å skru løs nederste del av tannbørsten.
C
3 Snu tannbørsten opp ned,og press
drivakselen ned mot en hard overflate for
å fjerne batteriholderen.
C
4 Åpne lokket på batteriholderen ved hjelp
av et skrujern.
C
5 Vipp batteriet ut av batteriholderen ved
hjelp av et skrujern.
Når nederste del er skrudd løs,kan det hende at
apparatet ikke lenger er vanntett, og garantien vil
derfor ikke være gyldig.
NORSK 77
2
1
Page 78

Feilsøking
Hvis De ikke får løst eventuelle problemer ved å
lese feilsøkingsveiledningen nedenfor, kan De
kontakte nærmeste Philips servicesenter, Philips
Kundetjeneste i landet De befinner Dem,eller se
Web-området vårt på adressen www.philips.com.
NORSK78
Løsning
Kontroller at ledningen til ladeenheten er ordentlig
koblet til strømuttaket.
Kontroller at det er strøm i strømuttaket (se også
"Viktig").
Kontroller at tannbørsten er slått av,og lad den på
nytt i minst 16 timer.
Kontroller at børstedelen er festet skikkelig på
apparatet (se også "Bruke apparatet").
Tannbørsten må lades på nytt. Hvis De vanligvis lar
tannbørsten stå i ladeenheten til kontinuerlig lading,
kan det hende at De må gjenoppfriske batteriet
som beskrevet i avsnittet om lading.
Skift ut børstedelen.
Problem
Tannbørsten virker ikke i
det hele tatt,selv om den
har stått i ladeenheten
natten over.
Motoren på tannbørsten
virker,men børstehodet
gjør det ikke.
Apparatets børstekraft er
betydelig redusert.
Tannbørstens
rengjøringsytelse er ikke
lenger optimal.
Page 79

Introduktion
Denna unika,elektriska tandborste avlägsnar plack
bättre än vanlig manuel tandborstning. Den
hjälper även till att skydda tandköttet.Trycker du
för hårt på tandborsten när du borstar, kommer
borstskaftet automatiskt att fjädra tillbaka. Genom
denna tydliga signal kommer du snabbt att
använda rätt borsttryck. Kliniska tester har visat att
borstning med Philips Sensiflex system resulterar i
en bättre och säkrare borstteknik.
Viktigt
◗ Sladden till stativ/laddare kan inte bytas.Om
sladden blir skadad,måste stativ/laddare
ersättas.
◗ Förvissa dig om att vägguttaget som du
anslutit stativ/laddare till är spänningsförande.
I vissa badrumsskåp kopplas spänningen bort
när belysningen släcks i badrummet.
Förberedelser
Montering av apparaten på en vägg
C
1 För att montera stativ/laddare på väggen
behöver du 2 st träskruvar (3,0x30 mm)
och 2 st pluggar (S5) (dessa ingår ej).
SVENSKA 79
15,6
Page 80

C
◗ För att borra hålen korrekt använd
borrmallen på sista sidan i bruksanvisningen.
Laddning av apparaten
1 Låt tandborsten ladda minst 16 timmar
innan du använder den för första gången.
C
◗ Se till att tandborsten är avstängd innan du
börjar att ladda den.
◗ Du kan sätta tandborsten i stativ/laddare och
låta den ladda oavbrutet.
När du börjar använda tandborsten efter första
laddningen rekommenderar vi att du använder
den ända tills batteriet blir tomt innan du laddar
igen.Använd tandborsten på vanligt sätt utan
uppladdning mellan tandbortningarna. Ladda upp
igen när motorn nästan slutar gå. Upprepa detta
tillvägagångssätt 3 gånger efter varandra.
För att förlänga batteriets livslängd upprepa detta
förfarande var sjätte månad.
C
◗ Bara för typerna HX2645,HX2545,HX2537P
och HX2535.När batteriet laddas lyser
signallampan grön.
◗ Du kan sätta tandborsten i stativ/laddare och
låta den ladda oavbrutet.
SVENSKA80
3
1
2
16 hrs
Page 81

Användning
C
1 Sätt borsthuvudet på tandborsten genom
att sticka in det i bajonettfattningen och
vrida den medurs ett kvarts varv.
Det blir nu omöjligt för borsten att lossna genom
vibrationer.
2 Sätt tandkräm på borsten.
C
3 För in tandborsten i munnen.
C
4 Tryck på startknappen och börja borsta
tänderna.
◗ För bästa borstningsmetod,kortaste
borstningstid och apparatens funktioner,se
avsnittet nedan om 'Borstningstips'.
Borstningstips
Borstning
C
1 Sätt borsten mot en tand så att den täcker
både hela tandytan och övergången till
tandköttet.
SVENSKA 81
1
2
Page 82

C
2 Håll kvar borsten så här under några
sekunder och flytta den sen till nästa tand.
Den runda borsten avlägsnar plack från tanden
och under tandköttets kanter.
Den separat rörliga Active Tipen borstar rent
mellan tänderna.
C
3 För borsten noggrant utmed alla tänder
(både framtänder och kindtänder).
◗ Var noga med att borsta tandens alla ytor
(insida,utsida,tuggyta) och övergången till
tandköttet ordentligt.Ett fast
borstningsmönster förebygger att vissa ytor
hoppas över.
◗ Studera även borstningsanvisningarna på vår
Internetsida:www.homeandbody.philips.com.
Borsttryckskontroll
C
1 Systemet med borsttryckskontroll
garanterar att du inte applicerar för
mycket tryck på tänder och tandkött.
C
2 Vid för hårt tryck varnar tandborsten
direkt med ett klick,som du både hör och
känner.Samtidigt fjädrar borsthuvudet
tillbaka.Så fort du minskar på trycket
återgår borsten till sitt normala läge.
Därmed skyddas tandköttet.
Den här situationen kommer antagligen att uppstå
då och då under den första tiden. Men efter ett
tag kommer du att lära dig vilket tryck du bör ha
SVENSKA82
Page 83

och borsten kommer att fjädra tillbaka mer och
mer sällan.
Tips.Om du får bort placken ordentligt, kommer
tandköttet att anta en ljusröd,frisk färg och
ansluta mot tänderna. Friskt tandkött blöder inte
så lätt när du äter eller borstar tänderna (se även
avsnittet 'Optimal tandhygien').Om dina tänder
skulle blöda en aning de första gångerna du
använder borsten, kommer blödningarna vanligen
att avta efter några dagar.Tycker du att det blöder
för mycket eller att blödningen inte vill avta,bör
du ta kontakt med din tandläkare eller din
tandhygienist.
Minimum borstningstid:två minuter
I allmänhet räcker det med två minuter för att
borsta tänderna riktigt.Men naturligtvis kan du
borsta tänderna längre tid än två minuter.
C
◗ En röd signallampa blinkar för att ange att två
minuter har gått (bara för typerna HX2545,
HX2537P, HX2535b.l. och HX2535).
Optimal tandhygien
För optimal tandhygien,rekommenderar vi
användning av tandtråd och tandpetare förutom
elektrisk tandborste.
Du hittar information om Philips Dental Care
(tandvård) och andra Philips-produkter på vår
Internet-sida: www.homeandbody.philips.com.
SVENSKA 83
Page 84

Rengöring och förvaring av apparaten
C
1 Starta tandborsten och skölj av
borsthuvudet under kranen med ljummet
vatten (max.60cC).
C
2 Stäng av tandborsten.Tag av borsthuvudet
och spola inuti borsthuvudet.
C
3 Starta tandborsten igen för att skölja bort
rester av tandkräm på drivaxeln.
C
4 Bara för typerna HX2537P, HX2535,
HX2510,HX1611,HX1511 och HX1510:
förvara borsthuvudet på pinnen på
stativ/laddare
Bara för typerna HX2645,HX2545,
HX2530,HX1615 och HX1515:förvara
upp till 4 borsthuvuden i
förvaringsbehållaren.
C
◗ Bara för typerna HX2645,HX2545,HX2530,
HX1615 och HX1515:i stället för 2 av
borsthuvudena kan du förvara en tub
tandkräm i förvaringsbehållaren.
Förvaringsbehållaren och insatserna kan tas av
stativ/laddare och rengöras i diskmaskinen.
SVENSKA84
Page 85

C
5 Rengör stativ/laddare med en fuktig trasa.
Dra ut stickproppen till stativ/laddare innan du
börjar rengöra den.
Byte
1 Byt borsthuvud var tredje månad för att få
optimalt borstresultat.
◗ Borsthuvudet ska även bytas när borststråna
börjar att spreta ut.
Borsthuvuden finns att köpa i den affär där du
köpt tandborsten.
All-round PHILIPS utbytes-borsthuvuden kan
användas.
Miljön
När du en gång kasserar apparaten, tar du ut
batteriet och avyttrar det på ett för miljön säkert
sätt.
◗ Obs.Du kan också ta med apparaten till
någon av Philips serviceombud som hjälper dig
att ta hand om apparaten och avlägsna
batteriet.
1 Batteriet ska vara helt tomt när du tar ut
det.Låt därför apparaten gå tills den
stannar,innan du tar ut batteriet.
SVENSKA 85
Page 86

C
2 Ta upp stativ/laddare och sätt tandborsten
på pinnen.Vrid tandborsten moturs för att
skruva loss botten på den.
C
3 Vänd upp och ned på tandborsten och
tryck den mot en hård yta för att få ut
batterihållaren.
C
4 Öppna locket till batterihållaren med hjälp
av en skruvmejsel.
C
5 Lyft ut batteriet ur hållaren med hjälp av
en skruvmejsel.
När bottnen har skruvats loss, är apparaten
troligen inte längre vattentät.Därför gäller inte
garantin om ingrepp gjorts i apparaten.
SVENSKA86
2
1
Page 87

Felsökning
Om du inte kan lösa problem med hjälp av
felsökningsguiden nedan,kontakta närmaste
Philips serviceombud, Philips kundtjänst i ditt land
eller Philips på Internet www.philips.com.
SVENSKA 87
Åtgärd
Förvissa dig om att stickproppen till stativ/laddare är
ordentligt ansluten till vägguttaget.
Förvissa dig om att eluttaget har ström (se avsnitt
'Viktigt').
Förvissa dig om att tandborsten är frånkopplad och
ladda den i minst 16 timmar.
Kontrollera så att borsthuvudet är riktigt fastsatt på
apparaten (se avsnitt 'Användning').
Tandborsten måste laddas. Om du har för vana att
sätta tandborsten i laddningsenheten, kan du nu
behöva ge nytt liv åt batteriet såsom beskrivs i
avsnittet 'Laddning'.
Ta av borsthuvudet och ersätt med ett nytt.
Problem
Tandborsten går inte alls
trots att den suttit i
stativ/laddare under natten.
Tandborstens motor går,
men inte själva borsten.
Borstkraften på apparaten
har minskat avsevärt.
Tandborstens borstresultat
är inte så bra längre.
Page 88

Johdanto
Sähköhammasharja poistaa plakin paremmin kuin
tavallinen käsihammasharja.Se auttaa myös
suojaamaan ikeniä.Kun harjaat hampaita liian
kovaa painaen,harjan pää taipuu automaattisesti
taakse.Tämän selkeän merkin avulla opit pian
sopivan harjausvoimakkuuden.Kliinisissä kokeissa
on todettu,että tästä syystä Philips Sensiflex hammasharjalla opitaan parempi ja turvallisempi
harjaustekniikka.
Tärkeää
◗ Latauslaitteen liitosjohtoa ei voi vaihtaa.Jos
liitosjohto vahingoittuu,latauslaite on
poistettava käytöstä.
◗ Varmista että pistorasiaan tulee jännite,kun
lataat hammasharjaa.Peilikaappien ja muiden
kylpyhuonekalusteiden pistorasioiden jännite
katkeaa usein,kun valo sammutetaan.
◗ Ennen kuin yhdistät laitteen pistorasiaan,
tarkasta että latauslaitteen jännitemerkintä
vastaa paikallista verkkojännitettä.
◗ Pistotulppaa ei saa irrottaa pistorasiasta
johdosta vetämällä.
◗ Älä koskaan kanna latauslaitetta johdosta.
◗ Pidä huoli,etteivät terävät kulmat,kuumuus tai
kemikaalit pääse vahingoittamaan liitosjohtoa.
◗ Varo taivuttamasta liitosjohtoa tiukalle
mutkalle.
◗ Tarkasta latauslaitteen liitosjohton kunto
säännöllisesti
◗ Latauslaitetta ei saa upottaa veteen.
◗ Jos latauslaite on pudonnut veteen,irrota
SUOMI88
Page 89

ensin pistotulppa pistorasiasta,ennen kuin
nostat laitteen vedestä
◗ Tarkastuta veteen pudonnut latauslaite
huollossa ennen käyttöönottoa.
Käyttöönotto
Laitteen asentaminen seinälle
C
1 Kiinnitä latauslaite seinään 2 ruuvilla
(3,0x30 mm) ja 2 muovitulpalla (S5) (ei ole
mukana).
C
◗ Reikien poraamisessa voit käyttää
porausmallina tämän käyttöohjeen viimeisellä
sivulla olevaa kuvaa.
Lataus
1 Lataa laitetta vähintään 16 tuntia ennen
ensimmäistä käyttökertaa.
C
◗ Varmista että laitteesta on katkaistu virta,kun
aloitat lataamisen.
◗ Voit säilyttää hammasharjaa latauslaitteessa
jatkuvasti.
Silti ensimmäisen latauksen jälkeen kannattaa
käyttää laitetta niin kauan kunnes akku on tyhjä.
SUOMI 89
15,6
3
1
2
Page 90

Käytä laitetta aivan normaalilla tavalla lataamatta
sitä harjauskertojen välillä.Lataa laite uudelleen
vasta kun moottori melkein pysähtyy.Toista sama
3 kertaa peräkkäin.
Tee tämä sama aina 6 kuukauden välein, niin akku
kestää käyttökunnossa pidempään.
C
◗ Vain mallit HX2645,HX2545, HX2537P ja
HX2535:Vihreä merkkivalo palaa latauksen
aikana.
◗ Voit säilyttää hammasharjaa latauslaitteessa
jatkuvasti.
Laitteen käyttö
C
1 Asenna harja hammasharjaan työntämällä
se pikaliittimeen ja kääntämällä
myötäpäivään neljänneskierros.
Näin tärinä ei pääse irrottamaan harjaa.
2 Laita harjaan hammastahnaa.
C
3 Laita harja suuhun.
C
4 Paina painiketta ja ala harjata hampaita.
◗ Katso kohdasta Harjausvinkkejä,mikä on
paras harjaustapa ja lyhin harjausaika ja mitkä
ovat laitteen harjausominaisuudet.
SUOMI90
16 hrs
1
2
Page 91

Harjausvinkkejä
Harjaus
C
1 Aseta harja hammasta vasten siten että
hammaspinta ja ienraja peittyvät.
C
2 Pidä harjaa tässä asennossa muutama
sekunti ja siirrä sitten seuraavan hampaan
kohdalle.
Pyöreä harja poistaa plakin hampaista ja ienreunan
alta.
Itsenäisesti liikkuva Active Tip -kärki puhdistaa
hammasvälit.
C
3 Ohjaa harjaa varovasti hampaita pitkin.
◗ Pidä huoli,että käyt läpi tarkkaan hampaiden
kaikki pinnat (sisä-,ulko- ja purupinnat) sekä
ienrajat.Kun harjaat hampaat aina samassa
järjestyksessä,vältät hyppäämästä vahingossa
jonkin pinnan yli.
◗ Katso myös harjausohjeet Internet-
sivultamme www.homeandbody.philips.com.
SUOMI 91
Page 92

Gum Protection -turvamekanismi
C
1 Gum Protection -turvamekanismi pitää
huolen siitä että et paina liian kovaa
hampaita ja ikeniä.
C
2 Jos painat harjalla liian kovaa,tunnet ja
kuulet napsahduksen,kun harjan pää taipuu
taaksepäin.Heti kun vähennät painamista,
harja palautuu normaaliin asentoon.Tämä
suojaa ikeniä.
Näin tapahtuu todennäköisesti muutaman kerran,
kun vasta aloittelet harjan käyttämistä.Jonkin ajan
kuluttua olet löytänyt oikean voiman ja harja
taipuu taaksepäin yhä harvemmin.
Vinkki:Jos plakki poistetaan kunnolla, ikenet ovat
vaaleanpunaiset ja ympäröivät hampaita tukevasti.
Terveet ikenet eivät vuoda verta syötäessä eivätkä
hampaita harjattaessa (katso myös kohtaa
Hampaiden hyvä hoito).Jos kaikesta huolimatta
ikenesi vuotavat jonkin verran muutamalla
ensimmäisellä harjauskerralla, vuotaminen yleensä
lakkaa muutamassa päivässä.Jos näin ei tapahdu,
neuvottele hammaslääkän tai hammashoitajan
kanssa.
Harjausaika:vähintään 2 minuuttia
Yleensä 2 minuuttia riittää puhdistamaan hampaat
kunnolla.Tietenkin voit harjata pidempään kuin
2 minuuttia.
SUOMI92
Page 93

C
◗ Punainen merkkivalo alkaa vilkkua kun
2 minuuttia on kulunut (vain mallit HX2545,
HX2537P, HX2535b.l. ja HX2535).
Hampaiden hyvä hoito
Hyvään hampaiden hoitoon suosittelemme
käytettäväksi sähköhammasharjan lisäksi
hammaslankaa ja hammastikkuja.
Lisää tietoa Philips Dental Care -laitteista ja muista
Philips-tuotteista Internet-sivuiltamme
www.homeandbody.philips.com.
Laitteen puhdistus ja säilytys
C
1 Käynnistä hammasharja ja huuhtele harja
lämpimällä vedellä (enintään 60cC).
C
2 Katkaise hammasharjan toiminta.Irrota
harja ja huuhtele sisäpuolelta.
C
3 Käynnistä hammasharja uudelleen ja
huuhtele hammastahnan jäänteet pois
akselitapista.
SUOMI 93
Page 94

C
4 Vain mallit HX2537P,HX2535,HX2510,
HX1611,HX1511 ja HX1510:säilytä harja
latauslaitteen tapissa.
Vain mallit HX2645,HX2545, HX2530,
HX1615 ja HX1515:säilytyskotelossa
mahtuu pitämään neljää harjaa.
C
◗ Vain mallit HX2645,HX2545, HX2530,
HX1615 ja HX1515:säilytyskotelossa voi
2 harjan paikalla säilyttää
hammastahnaputkiloa.
Säilytyskotelo sisäosineen voidaan irrottaa
latauslaitteesta ja pestä astianpesukoneessa.
C
5 Pyyhi latauslaite puhtaaksi kostealla liinalla.
Irrota latauslaite pistorasiasta ennen puhdistuksen
aloittamista.
Varaosat
1 Vaihda harja kolmen kuukauden välein,niin
harjaustulos pysyy hyvänä.
◗ Harja tulisi vaihtaa myös silloin,kun harjakset
alkavat taipua ulospäin.
Uusia harjoja on saatavissa samasta liikkeestä,josta
hammasharja on hankittu.
Voit käyttää täyspyöreää PHILIPS-harjaa.
SUOMI94
Page 95

Ympäristöasiaa
Kun aikanaan poistat laitteen käytöstä,irrota akku
ja hävitä se ympäristön kannalta turvallisesti.
◗ Huomaa:Voit myös toimittaa laitteen Philips
Kodinkoneiden valtuuttamaan
huoltoliikkeeseen,joka hävittää akun
puolestasi.
1 Akun on irrotettaessa oltava aivan tyhjä.
Anna laitteen käydä siihen asti kunnes se
pysähtyy,ennen kuin poistat akun.
C
2 Ota latauslaite käteen ja aseta
hammasharja tappiin.Kierrä hammasharjaa
vastapäivään niin että hammasharjan pohja
aukeaa.
C
3 Käännä hammasharja ylösalaisin ja paina
sitä kovaa alustaa vasten,niin että
akkukotelo irtoaa.
C
4 Avaa akkukotelon kansi ruuvitaltalla.
C
5 Nosta akku pois akkukotelosta ruuvitaltan
avulla.
Pohjan avaamisen jälkeen laite ei ehkä enää ole
vesitiivis eikä sen takuu ole enää voimassa.
SUOMI 95
2
1
Page 96

Tarkistusluettelo
Ellet pysty itse selvittämään ongelmaa alla olevan
tarkistusluettelon avulla, ota yhteys Philipsin
asiakaspalveluun tai Philips Kodinkoneiden
valtuuttamaan huoltoliikkeeseen tai käy wwwsivuillamme osoitteessa www.philips.com.
SUOMI96
Ratkaisu
Varmista että latauslaitteen pistotulppa on liitetty
kunnolla pistorasiaan.
Varmista että pistorasiaan tulee virta (ks. kohtaa
Tärkeää).
Varmista että hammasharjan virta on katkaistu ja
lataa uudelleen vähintään 16 tuntia.
Varmista että harja on kiinnitetty kunnolla
laitteeseen (ks.myös kohtaa Laitteen käyttö).
Hammasharja on ladattava uudelleen.Jos yleensä
pidät hammasharjaa jatkuvasti latauslaitteessa,voi
olla syytä elvyttää akku kohdassa Lataus neuvotulla
tavalla.
Irrota harja ja ota käyttöön uusi harja.
Ongelma
Hammasharja ei toimi
olleenkaan,vaikka se on
ollut latauslaitteessa yön yli.
Hammasharjan moottori
käy, mutta harja ei liiku.
Laitteen harjausteho on
selvästi huonontunut.
Hammasharja ei enää
puhdista hampaita yhtä
hyvin.
Page 97

Introduktion
Denne unikke, elektriske tandbørste fjerner plak
mere effektivt end en almindelig,manuel
tandbørste. Samtidig hjælper den dig med at
beskytte dit tandkød. Hvis du børster for hårdt,
"klikker" børsten automatisk bagover, og dette
øjeblikkelige signal gør,at du lynhurtigt lærer at
anvende det korrekte børstetryk. Takket være
Philips Sensiflex systemet opnår man en bedre og
mere sikker børsteteknik.
Vigtigt
◗ Ledningen på opladeenheden kan ikke
udskiftes.Hvis ledningen beskadiges,skal
opladeren kasseres.
◗ Vær sikker på,at stikket der anvendes til
opladningen er tændt.Vær særlig opmærksom
på,at stik i toiletskabe eller stik til
barbermaskiner kan være afbrudt,selvom
lyset er tændt.
Klargøring af apparatet
Montering på væg
C
1 Opladeenheden kan fastgøres på en væg
ved hjælp af 2 skruer (3,0 x 30 mm) og
2 rawlplugs (S5)(medfølger ikke).
DANSK 97
15,6
Page 98

C
◗ Brug skabelonen på sidste side i
brugsanvisningen,når hullerne skal bores.
Opladning
1 Inden apparatet tages i brug første gang,
skal det oplades i mindst 16 timer.
C
◗ Kontrollér,at apparatet er slukket,når
opladningen påbegyndes.
◗ Tandbørsten kan stå i opladeren til konstant
opladning.
Når apparatet tages i brug første gang, anbefales
det imidlertid at bruge apparatet til batteriet er
helt brugt op. Dette gøres ved at bruge
apparatet på normal vis uden at genoplade det
mellem hver tandbørstning. Oplad apparatet, når
motoren næsten stopper. Gentag denne
procedure 3 gange i træk.
For at forlænge batteriets levetid, gentages
ovennævnte procedure hver 6.måned.
C
◗ Følgende er kun gældende for type nr.
HX2645,HX2545,HX2537P og HX2535:
Når batteriet er under opladning lyser den
grønne kontrollampe.
◗ Tandbørsten kan stå i opladeren til konstant
opladning.
DANSK98
3
1
2
16 hrs
Page 99

Sådan bruges apparatet
C
1 Sæt børsten på motordelen ved at sætte
den ind i bajonetfatningen og dreje den en
kvart omgang højre om.
Dette sikrer, at børsten ikke falder af under brug.
2 Kom tandpasta på børsten.
C
3 Sæt børsten ind i munden.
C
4 Tryk på ON-knappen og begynd
tandbørstningen.
◗ Se afsnittet "Gode råd om tandbørstning",
som omhandler børstemetoder,anbefalet
minimum børstetid og apparatets forskellige
funktioner.
Gode råd om tandbørstning
Tandbørstning
C
1 Placér børstehovedet mod tanden sådan at
det både dækker tandens overflade og
tandlinien mellem tand og tandkød.
DANSK 99
1
2
Page 100

C
2 Hold børsten i denne stilling et par
sekunder og fortsæt derefter til næste
tand.
Det runde børstehoved fjerner plak fra tænderne
og under tandlinien.
Den individuelt bevægelige Active Tip børste
rengør mellem tænderne.
C
3 Før omhyggeligt børsten langs med alle
tænderne incl.kindtænderne.
◗ Sørg for,at alle tandoverflader (forside,
bagside og tyggeflade) samt tandlinien renses
grundigt.Bruger man altid en bestemt
børstevane,undgår man bedst at komme til at
springe nogle områder over.
◗ Se også børsteinstruktionerne på vor
Internet-adresse:
www.homeandbody.philips.com.
Beskyttelse af tandkødet
C
1 Dette børstetryk-system garanterer,at du
ikke kommer til at trykke for hårdt mod
tænder og tandkød.
C
2 Hvis du trykker for hårdt med
tandbørsten,både hører og mærker du et
"klik",idet børstehovedet vipper bagover.
Så snart trykket lettes igen,vipper
børstehovedet tilbage til sin normale
position.Derved sikres en optimal
beskyttelse af tandkødet.
DANSK100
 Loading...