

Philips HX-2565 User Manual

sensiflex


ENGLISH 4
FRANÇAIS 12
DEUTSCH 21
NEDERLANDS 29
ITALIANO 37
ESPAÑOL 45
PORTUGUÈS 54
3
HX2565

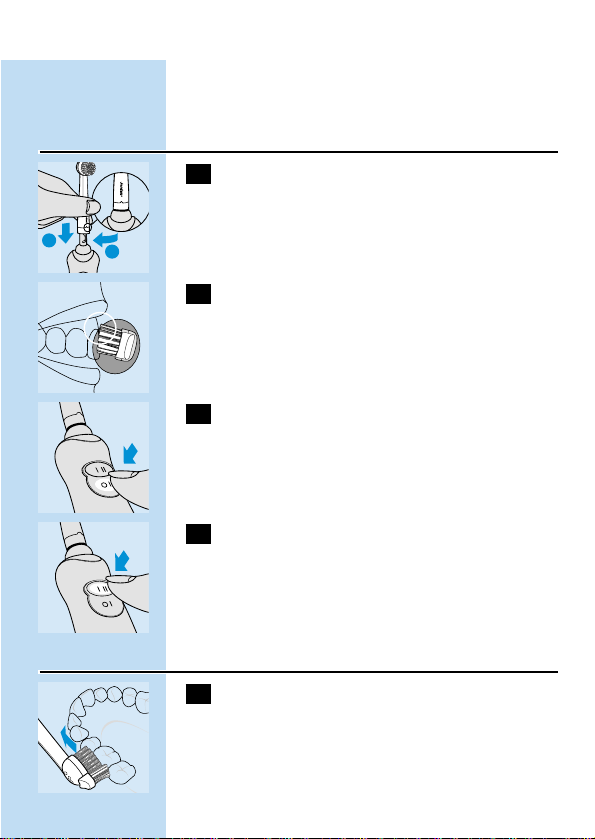
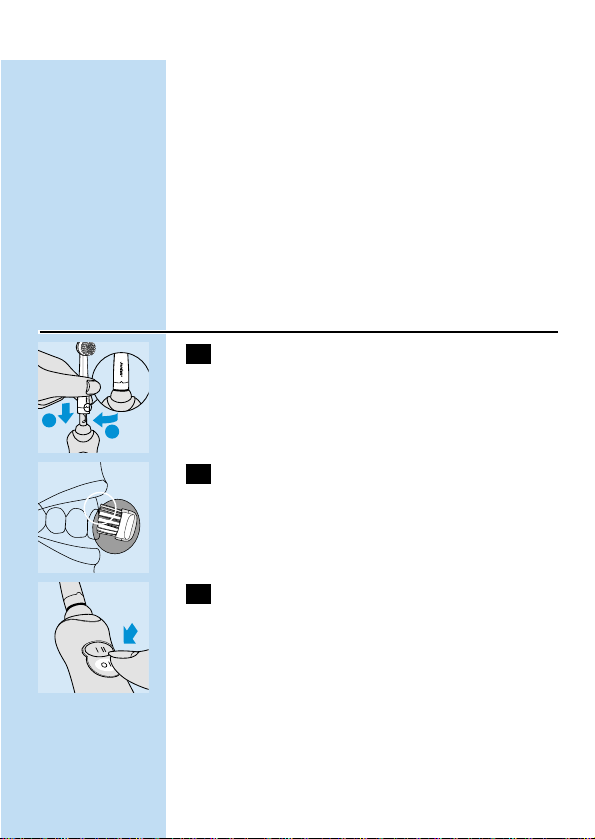
First use
1 Put the plug in the wall socket.
C
2 Place the toothbrush in the charging unit.
The brush will now be charged automatically.
Let the appliance charge for at least 16 hours before
you use it for the first time.
C
3 Mount the brush head on the toothbrush by
inserting it into the bayonet catch and
turning it.
◗ Put some toothpaste on the brush.
4 Place the brush against your teeth and press
the on/off button.
C
5 Brush one tooth at a time,until you have
cleaned all teeth completely (minimum 2
minutes,see also the brushing instructions).
◗ As a result of the Gum Protection System,you will
hear and feel the brush flexing backwards when
too much pressure is applied.
C
6 After use,always clean the inside and the
outside of the brush head as well as the
toothbrush itself.
◗ You can put the toothbrush back in the charging
unit after use.
For more information on how to use the appliance,
read the section ‘instructions for use’.
4 ENGLISH
1
2

ENGLISH 5
Important
◗ Be sure to check if the wall socket to which you
connect the charging unit is live. In some
bathroom cabinets,the electricity supply to the
built-in socket may be interrupted as soon as the
light is switched off.
◗ Charge the appliance for at least 16 hours before
you use it for the first time.
◗ The mains cord of the charging unit cannot be
replaced.If the cord is damaged,the unit should
be discarded.Please apply to your Philips dealer or
to the Philips organisation in your country (refer
to the World Wide Guarantee leaflet).
◗ The built-in battery contains substances that can
be harmful to the environment.If you discard the
appliance in due course, remove the built-in
battery and hand it in at an official collection point
or dispose of it in accordance with the regulations.
See section ‘Environmental aspects’.
◗ If your appliance is marked with
t the following
text applies:
The built-in rechargeable (NiCd) battery
contains substances which may pollute the
environment.
When you discard your appliance in due course,
please ensure that the battery is kept separate
from normal household refuse and disposed of at
an officially assigned collection point.Please refer
to section ‘Environmental aspects’.

6 ENGLISH
Instructions for use
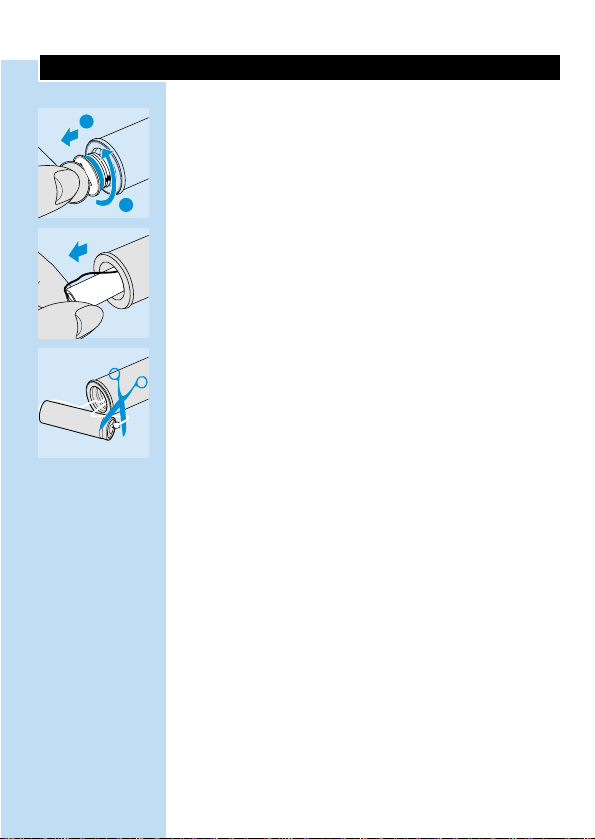
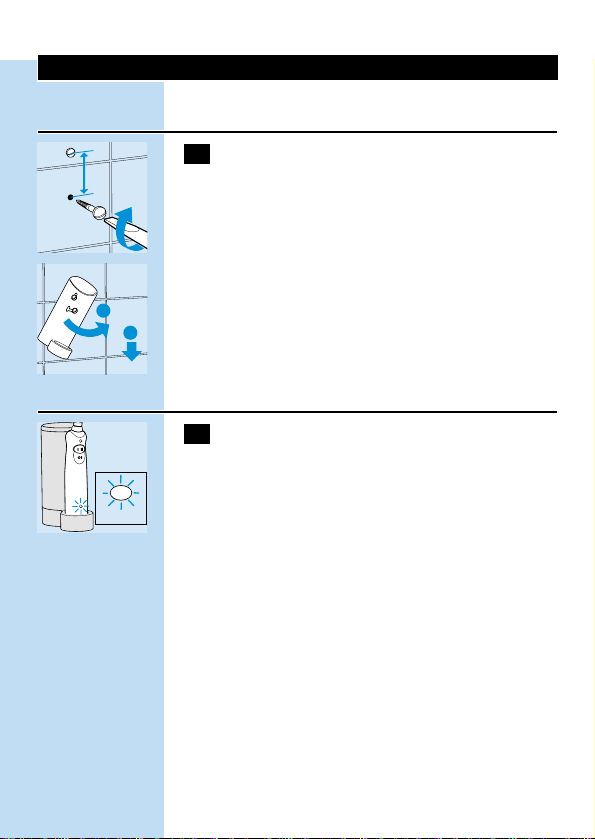
Mounting the appliance on the wall
C
1 Mount the charging unit to the wall.
◗ Do not allow the charging unit to come into
contact with water.The toothbrush, however,is
watertight and can therefore be used safely
anywhere.
◗ To mount the charger to the wall, you will need
2 wood screws (3,5 x 25 mm) and two wall
plugs (S5).They are available in any home centre.
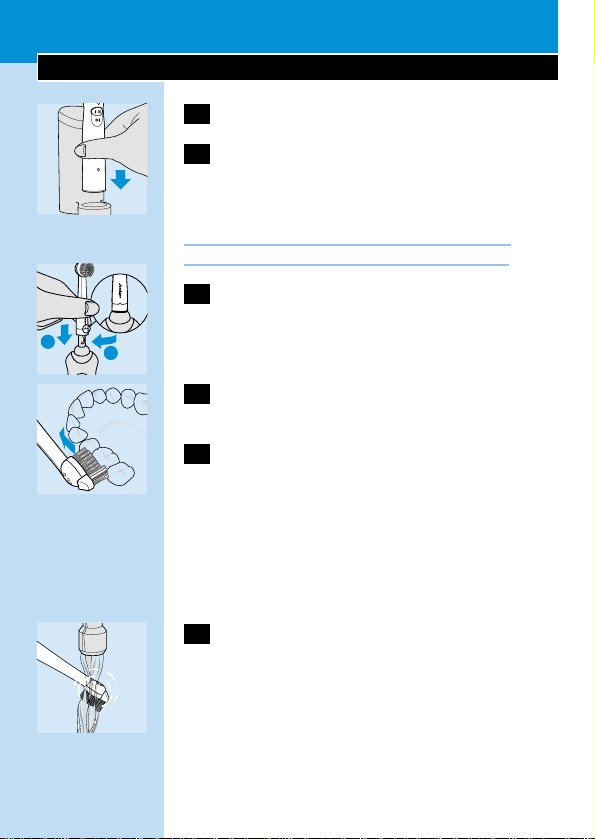
Charging
C
1 Leave the appliance to charge for at least
16 hours before you use it for the first time.
◗ The toothbrush can be put back in the charging
unit after use.
◗ Only type HX2565: If the battery in the
toothbrush is being charged, the pilot light is green
and blinks.If the battery has been fully charged,
the pilot light burns continuously.
◗ If the battery is almost empty,the pilot light is red
and blinks for 10 seconds after the toothbrush has
been switched off.
Tip:The toothbrush can be left to charge continuously .
When you start using the appliance,we recommend
you to use it until the battery is empty and do so three
times in a row.You can do this by using the appliance in
the normal way without recharging it between brushing
session until the motor almost stops running.To extend
21 mm
1
16 hrs
2
ENGLISH 7
the life time of the battery,reapeat this procedure
every six months.
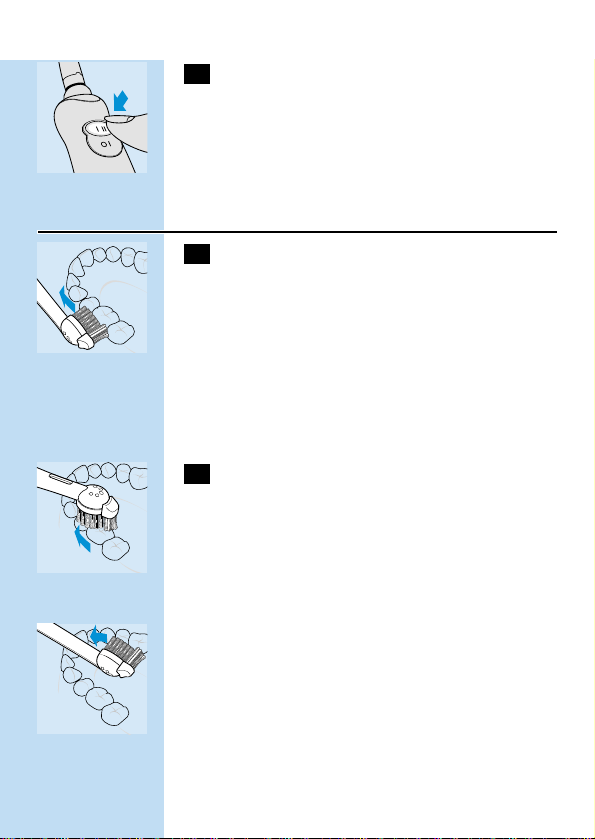
How to use
C
1 Mount the brush head onto the toothbrush
by inserting it into the bayonet catch and
turning it.This will make it impossible for the
brush head to become detached due to
vibration.
C
2 Place the brush in your mouth.
C
3 Press the on/off button to switch the
toothbrush on.
C
4 The toothbrush will start rotating at the
highest speed.To switch to a lower speed,
press the 2-speeds button.
Brushing
C
1 Place the brush against the tooth at an angle,
in such a way that it covers the surface of the
tooth as well as the gum line.Hold the brush
in that position for a few seconds and then
move on to the next tooth.
1
2

◗ The round brush head removes plaque from the
teeth and beneath the gum margin.
◗ The individual moving Active Tip cleans between
the teeth.
C
2 The brush will do the work for you.All you
have to do is guide the brush carefully along
the teeth and molars.
◗ Make sure that you reach all surfaces of the teeth
(inside, outside and chewing surface) as well as the
gums properly.A fixed brushing pattern will
prevent you from skipping certain areas.
Safe brushing
C
1 The Gum Protection System will keep a
check on the pressure you exert on the
brush.
C
2 If you press the brush too hard against your
gums,you will feel and hear a click when the
brush head flexes backwards.As soon as you
reduce the pressure,the brush will return to
its normal position.
◗ This will probably happen regularly when you first
start using the brush, but after some time you will
have discov ered the optimal brushing pressure,
and the brush will flex backwards less often.
8 ENGLISH

Tip: If plaque is removed properly, the gums will
have a pink colour and firmly surround the teeth.
Healthy gums do not bleed when you eat or brush
your teeth (see also the section ‘taking optimal care
of your teeth’).
If,nevertheless, your gums bleed slightly the first few
times you use the brush, this bleeding will generally
stop after a few days.If it does not,consult your
dentist or dental hygienist.
Minimum brushing time: 2 minutes
◗ In general, 2 minutes will be enough to clean your
teeth properly.Therefore the brush is equipped
with a red pilot light that will blink for 40 seconds
when you have been brushing for 2 minutes.
◗ Naturally, you can also brush longer than
2 minutes.
After brushing
C
1 Let the toothbrush run while you rinse the
brush head under the tap.Use lukewarm
water (max.60°C).
C
2 Also rinse the inside of the brush head.
ENGLISH 9

C
3 Switch the toothbrush on again to rinse
toothpaste residues from the drive shaft.
C
4 Store the brush head upside down in the
storage compartment,with the coloured ring
visible on top.
5 You can clean the charging unit with a moist
cloth.
◗ First unplug the charging unit!
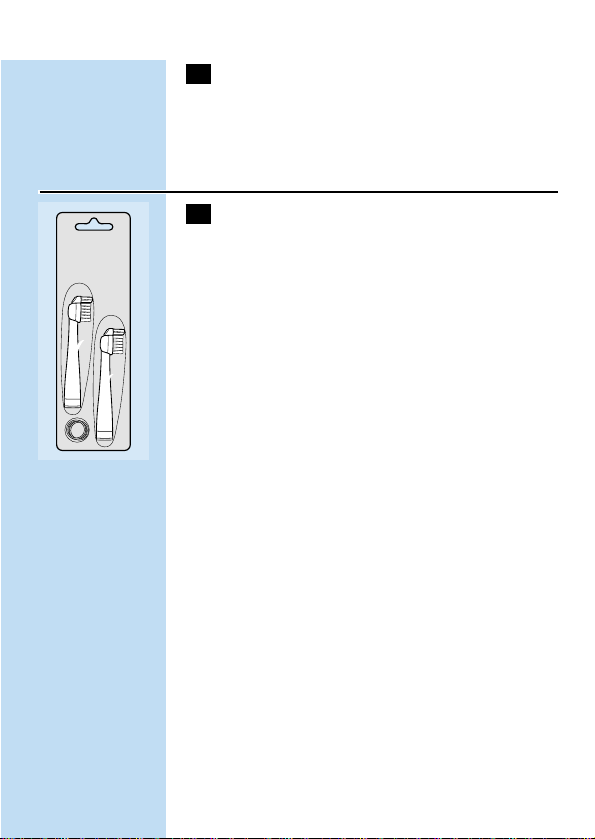
Brush head replacement
C
1 Replace the brush head every three months
for the best brushing results.
◗ The brush head should also be replaced when the
bristles start to bend outwards.
◗ New brush heads are available from the shop in
which you have purchased your Philips Jordan
toothbrush.
Tip:Worn bristles will move plaque around rather
than remove it.They may also damage the gums.It is
therefore important that you replace the brush head
every three months.
10 ENGLISH
CLICK
Environmental aspects
If you discard the appliance in due course, remove
the battery and dispose of it in an environmentally
safe way.
◗ NB:You can also hand the appliance in at a Philips
Service Centre, which will dispose of the battery
for you.
◗ Before you remove the battery, it must be
completely empty. Let the appliance run until is
stops before removing the battery.
◗ NB:Only unscrew the bottom of the appliance if
you want to remove the battery.
After the bottom has been unscrewed,the
appliance may not be watertight anymore.
Therefore the guarantee will become invalid if the
bottom of the appliance has been unscrewed.
If undamaged,the sticker on the bottom of the
appliance will prove that the appliance has not
been opened.
ENGLISH 11
2
1
Première utilisation
1 Placez la fiche dans la prise de courant.
C
2 Placez la brosse à dents dans le chargeur.
La brosse sera maintenant automatiquement
chargée.
Laissez charger l’appareil pendant au moins 16
heures avant de l’utiliser pour la première fois.
C
3 Placez la tête de brosse sur la brosse à dents
en l’insérant dans le raccord à baïonnette et
en la faisant tourner.
◗ Placez du dentifrice sur la brosse.
4 Placez la brosse contre les dents et appuyez
sur le bouton marche/arrêt.
C
5 Brossez une dent à la fois jusqu’à ce que vous
ayez nettoyé complètement toutes les dents
(minimum 2 minutes,voir également
instructions de brossage).
◗ Du fait du système de Protection des Gencives,
vous sentirez et entendrez la tête de la brosse
basculer en arrière si vous appuyez trop
fortement.
C
6 Après usage,nettoyez toujours l’intérieur et
l’extérieur de la tête de brosse ainsi que la
brosse elle-même.
◗ Vous pouvez replacer la brosse à dents dans le
chargeur après usage .
Pour plus d’informations sur l’utilisation de l’appareil,
lisez le chapitre ‘Instructions d’emploi’.
12 FRANÇAIS
1
2

FRANÇAIS 13
Important
◗ Assurez vous que la prise de courant murale sur
laquelle est branché l’appareil reste bien sous
tension même lorsque la lumière de la salle de
bain est éteinte.
◗ Charger l’appareil pendant au moins 16 heures
avant de l’utiliser pour la première fois.
◗ Le cordon d’alimentation du chargeur ne peut pas
être remplacé.Si le cordon est endommagé,le
chargeur doit être mis au rebut.Veuillez consulter
votre revendeur Philips ou le réseau Philips dans
votre pays (voir le dépliant de garantie mondiale).
◗ L’accu incorporé contient certaines substances qui
peuvent nuire à l’environnement.Si vous mettez
l’appareil au rebut,enlevez l’accu incorporé et
remettez-le à un point de collecte officiel ou
éliminez-le en conformité avec la réglementation.
Voir chapitre ‘Aspects concernant
l’environnement’.
◗ Si votre appareil porte la marque
t le texte
suivant est d’application :
L’accu incorporé contient certaines substances
qui peuvent polluer l’environnement.
Lorsque vous mettez l’appareil au rebut en temps
voulu,veillez à séparer l’accu des déchets
ménagers et à vous en débarrasser en un point de
collecte officiel.Veuillez consulter le chapitre
‘Aspects concernant l’environnement’.
14 FRANÇAIS
Instructions d’emploi
Montage de l’appareil sur le mur
C
1 Fixer le chargeur au mur.
◗ Ne laissez pas le chargeur entrer en contact avec
l’eau.La brosse à dents,cependant,est étanche à
l’eau et peut dès lors être utilisée partout en
toute sécurité.
◗ Our fixer le chargeur au mur, vous devez utiliser
2 vis (3,5 x 25 mm) et 2 chevilles (S5).
Chargement
C
1 Laissez l’appareil charger pendant au moins
16 heures avant de l’utiliser pour la première
fois.
◗ La brosse à dents peut être remise dans le
chargeur après usage.
◗ Uniquement modèle HX2565 : lorsque l’accu de la
brosse à dents est en cours de chargement, la
lampe témoin est verte et clignote. Lorsque l’accu
est entièrement chargé, la lampe témoin reste
allumée en permanence.
◗ Lorsque l’accu est presque complètement
déchargé, la lampe témoin est rouge et clignote
pendant 10 secondes après que la brosse à dents
a été mise hors service.
21 mm
1
16 hrs
2
Conseil : L’accumulateur peut être laissé en charge
continuellement.Lors de la première utilisation de
l’appareil,nous vous recommandons d’utiliser votre
brosse à dents jusqu’à ce que l’accumulateur soit
complètement déchargé.Procédez de cette façon trois
fois de suite.Vous pourrez le faire tout en utilisant
l’appareil normalement sans le recharger entre les
périodes de brossage jusqu’à ce que le moteur ait
pratiquement cessé de fonctionner.Pour prolonger la
vie de votre accumulateur répétez cette opération tous
les six mois.
Comment l’utiliser
C
1 Placez la tête de brosse sur la brosse à dents
en l’insérant dans le raccord à baïonnette et
en la faisant tourner.De ce fait,il sera
impossible pour la tête de brosse de se
détacher sous l’effet des vibrations.
C
2 Placez la brosse dans la bouche.
C
3 Appuyez sur le bouton marche/arrêt pour
enclencher la brosse à dents.
FRANÇAIS 15
1
2
C
4 En général,2 minutes suffisent pour vous
nettoyer correctement les dents.Dès lors, la
brosse est équipée d’une lampe témoin
rouge,qui clignotera pendant 40 secondes
lorsque vous vous êtes brossé les dents
pendant 2 minutes.
Brossage
C
1 Placez la brosse contre la dent avec un
certain angle, de telle manière qu’elle couvre
la surface de la dent ainsi que la ligne de la
gencive.Maintenez la brosse dans cette
position pendant quelques secondes et
déplacez-la ensuite vers la dent suivante.
◗ La tête de brosse ronde enlève la plaque dentaire
des dents et en dessous de la ligne de la gencive.
◗ L’extrémité Active Tip à mouvement individuel
nettoie entre les dents.
C
2 La brosse fera le travail pour vous.Tout ce
que vous devez faire est de guider la brosse
doucement le long des dents et des molaires.
◗ Veillez à atteindre convenablement toutes les
surfaces des dents (intérieures, extérieures et
surfaces de mastication) ainsi que la gencive.
Suivre un ordre fixe de brossage vous évitera de
sauter certaines zones.
16 FRANÇAIS

Brossage en sécurité
C
1 Le système de Protection des Gencives
garde le contrôle de la pression que vous
exercez avec la brosse.
C
2 Si vous appuyez la brosse trop fortement sur
la gencive,vous sentirez et entendrez un clic
lorsque la tête de la brosse bascule en
arrière.Dès que vous réduisez la pression,la
brosse revient en position normale.
◗ Ceci se produira probablement régulièrement la
première fois que vous utilisez la brosse,mais,
après un certain temps,vous aurez trouvé la
pression de brossage optimale et la brosse
basculera moins souvent en arrière.
Conseil : si la plaque dentaire est correctement
éliminée, les gencives auront une couleur rose et
entoureront fermement les dents.Les gencives
saines ne saignent pas lorsqu’on mange ou qu’on se
brosse les dents.
Si,néanmoins,vos gencives saignent légèrement les
premières fois que vous utilisez la brosse,ce
saignement cessera généralement après quelques
jours. Si ce n’est pas le cas, consultez votre dentiste
ou votre hygiéniste dentaire.
FRANÇAIS 17

Temps minimum de brossage : 2 minutes
◗ En général, 2 minutes suffisent pour vous nettoyer
correctement les dents. Dès lors, la brosse est
équipée d’une lampe témoin rouge, qui clignotera
pendant 40 secondes lorsque vous vous êtes
brossé les dents pendant 2 minutes.
◗ Vous pouvez naturellement vous brosser les dents
plus longtemps que 2 minutes.
Après le brossage
C
1 Laissez la brosse tourner pendant que vous
rincez la tête de la brosse sous le robinet.
Utilisez de l’eau tiède (max.60°C).
C
2 Rincez également l’intérieur de la tête de
brosse.
C
3 Enclenchez à nouveau la brosse pour rincer
les résidus de pâte dentifrice du mandrin
d’entraînement.
C
4 Rangez la tête de la brosse en la plaçant sur
le chargeur.
18 FRANÇAIS
CLICK
5 Vous pouvez nettoyer le chargeur avec un
chiffon humide.
◗ Tirez d’abord la fiche le cordon d’alimentation du
chargeur de la prise de courant !
Tête de brosse et remplacement
C
1 Remplacez la tête de brosse tous les trois
mois pour obtenir de meilleurs résultats de
brossage.
◗ La tête de brosse devrait également être
remplacée lorsque les soies commencent à se
plier vers l’extérieur.
◗ Des têtes de brosse neuves sont disponibles au
magasin où vous avez acheté votre brosse à dents
Philips Jordan.
Conseil : Les soies usées déplaceront la plaque
dentaire plutôt que de l’enlever. Elles peuvent
également endommager les gencives.Il est dès lors
important de remplacer la tête de brosse tous les
trois mois.
FRANÇAIS 19

Aspects concernant l’environnement
Lorsque vous mettez l’appareil au rebut en temps
voulu,enlevez l’accu incorporé et éliminez-le de
manière sauvegardant l’environnement.
◗ NB:Vous pouvez également remettre l’appareil à
un Centre de service après vente Philips, qui
éliminera l’accu pour vous.
◗ Avant d’enlever l’accu,il doit être complètement
déchargé. Laissez tourner l’appareil jusqu’à l’arrêt
de l’appareil avant d’enlever l’accu.
◗ NB:Dévissez uniquement le fond de l’appareil
lorsque vous désirez enlever l’accu.
Lorsque le fond de l’appareil a été dévissé,
l’appareil peut ne plus être étanche à l’eau.Dès
lors, la garantie deviendra caduque si l’appareil a
été dévissé.Lorsqu’il est intact, l’autocollant sur le
fond de l’appareil est la preuve que l’appareil n’a
pas été ouvert.
20 FRANÇAIS
2
1
 Loading...