

Page 1

ENGLISH 4
FRANÇAIS 16
DEUTSCH 28
NEDERLANDS 40
ITALIANO 52
ESPAÑOL 64
PORTUGUÊS 76
TÜRKÇE 88
3
Page 2
4 ENGLISH
First use
1 Put the plug in the wall socket.
C
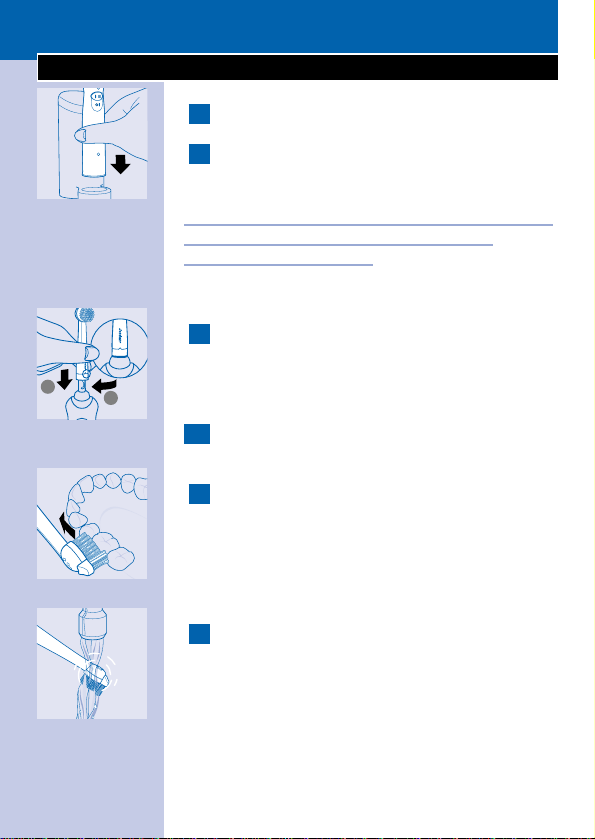
2 Place the toothbrush in the charging unit.
The brush will now be charged automatically.
Charge the applance for 6 hours (NiMH version) or
3 hours (NiCD version) before you use the
appliance for the first time.
(Check the symbol on your appliance to determine
which type you have).
C
3 Mount the brush head on the toothbrush by
inserting it into the bayonet catch and
turning it.
◗ Put some toothpaste on the brush.
4 Place the brush against your teeth and press
the on/off button.
C
5 Brush one tooth at a time,until you have
cleaned all teeth completely (minimum 2
minutes,see also the brushing instructions).
◗ As a result of the Controlled Pressure system,you
will hear and feel the brush flexing backwards
when too much pressure is applied.
C
6 After use,always clean the inside and the
outside of the brush head as well as the
toothbrush itself.
◗ You can put the toothbrush back in the charging
unit after use.
For more information on how to use the appliance,
read the section ‘instructions for use’.
1
2
Page 3

Important
◗ Be sure to check if the wall socket to which you
connect the charging unit is live. In some
bathroom cabinets,the electricity supply to the
built-in socket may be interrupted as soon as the
light is switched off.
◗ Charge the applance for 6 hours (NiMH version)
or 3 hours (NiCD version) before you use the
appliance for the first time.
◗ The mains cord of the charging unit cannot be
replaced.If the cord is damaged,the unit should
be discarded.Please apply to your Philips dealer or
to the Philips organisation in your country (refer
to the World Wide Guarantee leaflet).
◗ If your appliance is marked with the
following text applies:
To protect the environment, this appliance has
been equipped with a nickel-hydride (NiMH)
battery which contains less than 0.01% cadmium.
Still we advise you to make sure sure that,when
you discard the appliance,you keep the battery
separate from normal household refuse and
dispose of it at an officialy assigned collection
point.Please refer to section "Environmental
aspects".
◗ If your appliance is marked with the
following text applies:
The built-in rechargeable (NiCd) battery
contains substances which may pollute the
environment.
When you discard your appliance in due course,
please ensure that the battery is kept separate
from normal household refuse and disposed of at
an officially assigned collection point.Please refer
to section "Environmental aspects".
ENGLISH 5
Page 4

6 ENGLISH
Healthy teeth are to
be treasured,which is
logical,for we want
them to last a
lifetime.As plaque is
the major cause of
tooth decay,proper
dental care is
essential.By brushing
carefully every day
you will remove
plaque and keep
your teeth and gums
healthy longer.
What is plaque?
Plaque is a soft,sticky layer on
our teeth.It forms mainly on
hard-to-reach areas such as
interdental spaces and along the
gum line.Plaque mainly consists
of bacteria that turn the sugars in
our food into harmful acids.Due
to its yellowy white colour,
plaque is hard to detect on the
teeth.Fortunately,as long as the
plaque is still soft,it can easily be
removed by means of careful and
correct brushing.
What are the
consequences of plaque?
The acids in plaque dissolve the
enamel on our teeth and molars,
which may lead to the develop-
ment of cavities.The bacteria
produce toxins which may cause
the gums to become inflamed
(gingivitis).Inflamed gums are
often red and swollen and may
start bleeding during brushing or
eating.Moreover,the
inflammation may spread from
the gum line to the jaw bone
beneath,which may eventually
cause the teeth and molars to fall
out.If plaque is not removed
daily, it may calcify into tartar
adhering strongly to the teeth.
Tartar,in its turn,provides an
excellent platform for new plaque
growth,thus further increasing
the risk of caries and
inflammation.
Taking optimal care of your teeth
Page 5

ENGLISH 7
What is the best
toothbrushing method?
Toothbrushing is an activity that
needs to be carried out with
care.Therefore,take your time to
reach all areas.Electric
toothbrushes have been proven
to be more effective than manual
toothbrushes when it comes to
removing plaque.With the Philips
Jordan Sensiflex,brushing each
side of the tooth for a few
seconds is enough to clean both
the tooth and the surrounding
gums.In this way,you can clean all
your teeth in a few minutes (see
also the brushing instructions).If
you like,you can ask your dentist
or dental hygienist for a personal
brushing advice.
Correct positioning of the
toothbrush
The Philips Jordan Sensiflex has
been designed to make that type
of movement that best removes
plaque.As there is no need for
you to move the brush to and
fro,you can focus on placing the
brush on your teeth correctly.
The quickly oscillating bristles of
the brush first detach and then
wipe away the plaque.The extra
long and soft bristles of the
Active Tip ensure thorough and
effective cleaning between the
teeth and at the back of the
mouth.
Page 6

8 ENGLISH
Enough time
By guiding the brush slowly along
the insides,outsides and chewing
surfaces of all teeth and molars,
you will clean all areas in which
plaque is likely to develop.Hardto-reach areas such as behind the
molars,along the gum line and
behind the front teeth,require
extra attention.It is therefore
important that you take enough
time to brush for your daily oral
hygiene.
Optimal pressure
Brushing too hard may cause
damage to your teeth and gums.
And,contrary to what you might
expect,it removes plaque less
effectively than gentle brushing.
The unique Controlled Pressure
system will help you keep a check
on your brushing pressure.If too
much pressure is applied on the
brush,the appliance will warn you
immediately by producing a click
which you will both hear and feel.
Subsequently, the brush head will
flex back.Clinical tests have
shown that,thanks to this
Controlled Pressure system,
brushing with the Philips Jordan
Sensiflex results in better and
safer brushing techniques.
Page 7
ENGLISH 9
Directions for use
Mounting the appliance on the wall
C
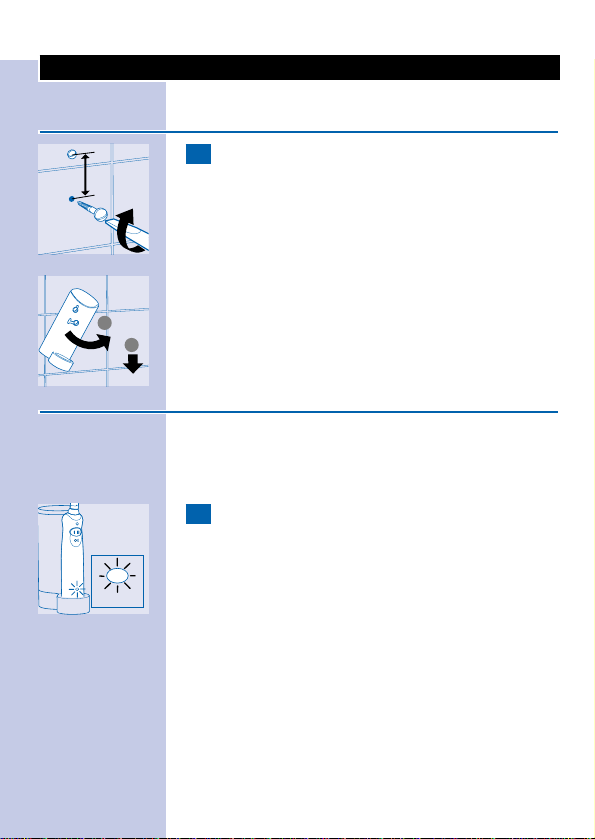
1 Mount the charging unit to the wall.
◗ Do not allow the charging unit to come into
contact with water.The toothbrush, however,is
watertight and can therefore be used safely
anywhere.
◗ To mount the charger to the wall, you will need 2
wood screws (3,5 x 25 mm) and two wall plugs
(S5).They are available in any home centre.
Charging
1 The charging unit can be connected to mains voltages
between 100 and 240 Volts (alternating current) (only
type HX 2575).
C
1 Charge the appliance for 6 hours (NiMH
version) or 3 hours (NiCd version) before
you use it for the first time.
- ◗ The toothbrush can be put back in the charging
unit after use.
◗ If the battery in the toothbrush is being charged,
the pilot light is green and blinks.If the battery has
been fully charged, the pilot light is burns
continuously.
◗
If the battery is almost empty,the pilot light is red and
blinks for 10 seconds after the toothbrush has been
switched off.
21 mm
1
2
3 hrs
Page 8
10 ENGLISH
Tip:The toothbrush can be left to charge
continuously.When you start using the appliance, we
recommend you to use it until the battery is empty
and to do so three times in a row.You can do this by
using the appliance in the normal way without
recharging it between brushing sessions until the
motor almost stops running.To extend the lifetime
of the battery,repeat this procedure every six
months.
How to use
C
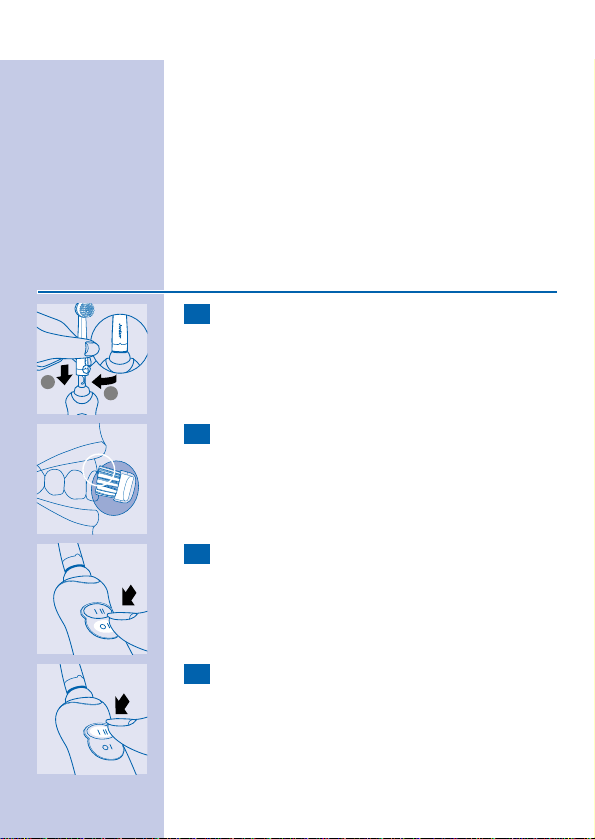
1 Mount the brush head onto the toothbrush
by inserting it into the bayonet catch and
turning it.This will make it impossible for the
brush head to become detached due to
vibration.
C
2 Place the brush in your mouth.
C
3 Press the on/off button to switch the
toothbrush on.
C
4 The toothbrush will start rotating at the
highest speed.To switch to a lower speed,
press the 2-speed button.
1
2
Page 9
ENGLISH 11
Brushing
C
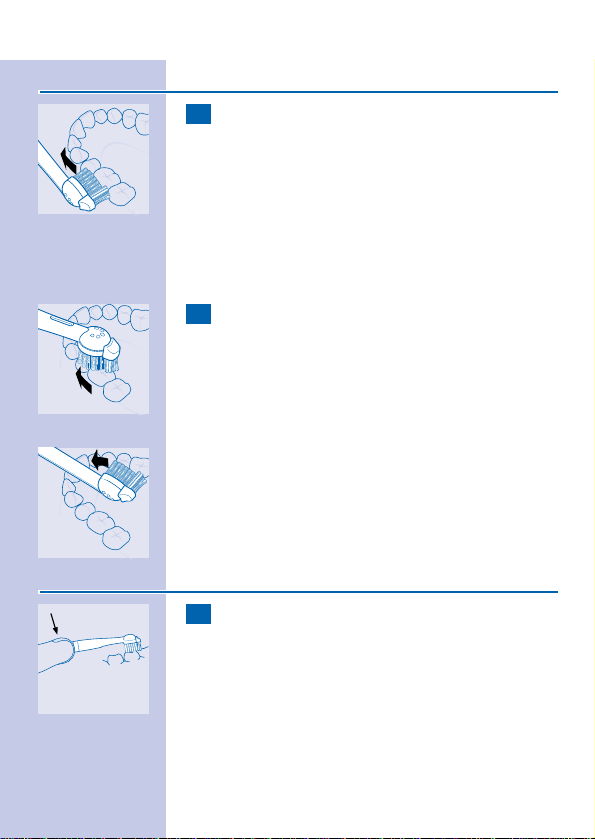
1 Place the brush against the tooth at an angle,
in such a way that it covers the surface of the
tooth as well as the gum line.Hold the brush
in that position for a few seconds and then
move on to the next tooth.
◗ The round brush head removes plaque from the
teeth and beneath the gum margin.
◗ The individual moving Active Tip cleans between
the teeth.
C
2 The brush will do the work for you.All you
have to do is guide the brush carefully along
the teeth and molars.
◗ Make sure that you reach all surfaces of the teeth
(inside, outside and chewing surface) as well as the
gums properly.A fixed brushing pattern will
prevent you from skipping certain areas.
◗ See also the brushing instructions coming with the
appliance and the section ‘taking optimal care of
your teeth’.
Safe brushing
C
1 The Controlled Pressure system will keep a
check on the pressure you exert on the
brush.
Page 10

C
2 If you press the brush too hard against your
gums,you will feel and hear a click when the
brush head flexes backwards.As soon as you
reduce the pressure,the brush will return to
its normal position.
◗ This will probably happen regularly when you first
start using the brush, but after some time you will
have discov ered the optimal brushing pressure,
and the brush will flex backwards less often.
Tip:If plaque is removed properly, the gums will
have a pink colour and firmly surround the teeth.
Healthy gums do not bleed when you eat or brush
your teeth (see also the section ‘taking optimal care
of your teeth’) If,nevertheless, your gums bleed
slightly the first few times you use the brush, this
bleeding will generally stop after a few days.If it does
not,consult your dentist or dental hygienist.
Minimum brushing time: 2 minutes
◗ In general, 2 minutes will be enough to clean your
teeth properly.Naturally, you can also brush
longer than 2 minutes.
To indicate when 2 minutes are over,the brush is
equipped with a DuoTimer.The first 2 minutes of
the brushing process, the green pilot light of the
DuoTimer blinks.After these two minutes, the
brushing proces is briefly interrupted and the
green pilot light burns continuously.This
interruption will occur every two minutes.
The DuoTimer measures the actual brushing time,
even if you switch the appliance off during the
brushing process (for max. 10 seconds).
12 ENGLISH
Page 11

After brushing
C
1 Let the toothbrush run while you rinse the
brush head under the tap.Use lukewarm
water (max.60°C).
C
2 Also rinse the inside of the brush head.
C
3 Switch the toothbrush on again to rinse
toothpaste residues from the drive shaft.
C
4 Store the brush head upside down in the
storage compartment,with the coloured ring
visible on top.
5 You can clean the charging unit with a moist
cloth.
◗ First unplug the charging unit!
CLICK
ENGLISH 13
Page 12

Brush head replacement
C
1 Replace the brush head every three months
for the best brushing results.
◗ The brush head should also be replaced when the
bristles start to bend outwards.
◗ New brush heads are available from the shop in
which you have purchased your Philips Jordan
toothbrush.
Tip:Worn bristles will move plaque around rather
than remove it.They may also damage the gums.It is
therefore important that you replace the brush head
every three months.
Travel box
(HX 2575)
◗ You can store the toothbrush and the brush
attachments hygienically and safely in the travel
box when you are travelling.
14 ENGLISH
Page 13
Environmental aspects
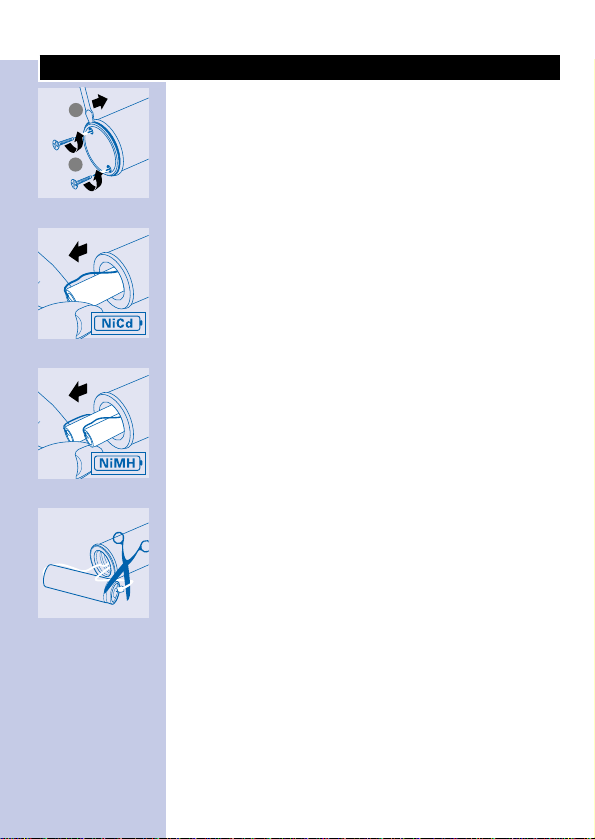
If you discard the appliance in due course, remove
the battery and dispose of it in an environmentally
safe way.
◗ NB:You can also hand the appliance in at a Philips
Service Centre, which will dispose of the battery
for you.
◗ Before you remove the battery, it must be
completely empty. Let the appliance run until is
stops before removing the battery.
◗ NB:Only unscrew the bottom of the appliance if
you want to remove the battery.
After the bottom has been unscrewed,the
appliance may not be watertight anymore.
Therefore the guarantee will become invalid if the
bottom of the appliance has been unscrewed.If
undamaged,the sticker on the bottom of the
appliance will prove that the appliance has not
been opened.
ENGLISH 15
2
1
Page 14

16 FRANÇAIS
Première utilisation
1 Branchez la fiche d’alimentation sur la prise
secteur.
C
2 Placez la brosse à dents sur le chargeur.
La brosse à dents se mettra en charge
automatiquement.
Lors de la première utilisation, rechargez l’appareil
pendant 6 heures pour la version NiMh ou 3 heures
pour la version NiCd.
(Pour déterminer le modèle de votre appareil,
identifiez le sigle inscrit sur votre appareil).
C
3 Fixez la tête de la brosse à dents sur le corps
de l’appareil en l’insérant dans l’encoche en
forme de baïonnette,puis vissez-la.
◗ Mettez du dentifrice sur la brosse.
4 Positionnez la brosse contre vos dents et
appuyez sur le bouton de mise en marche.
C
5 Brossez-vous les dents l’une après l’autre,
jusqu’au nettoyage complet de toute votre
dentition (minimum 2 minutes,consultez
également les instructions de brossage).
◗ Grâce au Système Pression Contrôlée, vous
entendez et sentez la brosse pivoter vers l’arrière
lorsque la pression est trop forte.
C
6 Après chaque utilisation,lavez l’intérieur et
l’extérieur de la tête de la brosse ainsi que la
brosse à dents elle-même.
◗ Vous pouvez replacer l’appareil dans son chargeur.
Pour plus d’informations sur l’utilisation de l’appareil,
lisez le paragraphe intitulé “instructions d’utilisation”.
1
2
Page 15

Important
◗ Assurez vous que la prise de courant murale sur
laquelle est branché l’appareil reste bien sous tension
même lorsque la lumière de la salle de bain est
éteinte.
◗ Lors de la première charge ou après une longue
période sans utilisation, mettez l’appareil en charge
pendant 6 heures (pour la version NIMH) ou 3
heures (pour la version NICD).
◗ Le cordon d’alimentation du chargeur ne peut être
remplacé.Si le cordon est endommagé le chargeur
devra être remplacé.Adressez-vous à votre
revendeur Philips ou à un Centre Service Agréé.
◗ Si le sigle figure sur votre appareil,lisez
soigneusement les instructions suivantes :
Pour aider à la protection de l’environnement,
cet appareil est équipé d’un accumulateur de
nickel-hydride (NIMH) contenant moins de
0.01% de cadmium.
Toutefois,nous vous conseillons de bien séparer
l’accumulateur des ordures ménagères lorsque vous
jetez votre appareil,déposez-la dans un point de
collecte officiel destiné à cet effet.Veuillez vous
référer au paragraphe intitulé “Protection de
l’environnement”.
◗ Si le sigle figure sur votre appareil,lisez
soigneusement les instructions suivantes :
Cet appareil est muni d’un accumulateur nikelcadnium NICD composée de substances
pouvant nuire à l’environnement.
Lorsque vous jetterez votre appareil,veillez à ce que
l’accumulateur soit séparée des ordures ménagères
et déposez-la dans un point de collecte officiel
destiné à cet effet.Veuillez vous référer au
paragraphe intitulé “Protection de l’environnement”.
FRANÇAIS 17
Page 16

18 FRANÇAIS
Il est nécessaire
d’entretenir une
dentition saine, si
nous voulons que
cela dure toute une
vie. La plaque
dentaire est la cause
principale des caries.
Il est donc essentiel
de prodiguer des
soins appropriés à
votre dentition.En se
brossant
soigneusement les
dents tous les jours, vous ferez
reculer la plaque dentaire et
garderez vos dents et gencives
saines plus longtemps.
La plaque dentaire ?
La plaque dentaire est un film qui
adhère à vos dents.Elle se forme
essentiellement en des endroits
difficiles d’accès comme sous les
gencives ou entre les dents.La
plaque est constituée de
bactéries qui transforment le
sucre de notre nourriture en
acide.Heureusement,aussi
longtemps qu’elle reste souple,la
plaque peut être éliminée par un
brossage soigné et approprié.
Quelles sont les effets de
la plaque sur les dents ?
L’acide de la plaque dissout
l’émail de vos dents et molaires.
Cette érosion favorise le
développement de caries.Les
toxines produites par les
bactéries peuvent causer
l’inflammation des gencives
(gingivite).Des gencives
enflammées sont souvent rouges
et gonflées et peuvent saigner
pendant le brossage ou pendant
le repas.De plus,l’inflammation
peut se propager dans la gencive
et atteindre l’os de la mâchoire
ce qui éventuellement peut
provoquer le déchaussement des
dents.
Prendre soin de ses dents dans les meilleures
conditions
Page 17

FRANÇAIS 19
Si un brossage quotidien n’enlève
pas la plaque régulièrement,elle
durcit et se transforme en tartre.
Le tartre adhère fortement aux
dents et constitue une excellente
plate-forme pour la formation de
nouvelles plaques.Cet entartrage
accroît les risques de caries et
d’inflammation.
Quelle est la meilleure
méthode de brossage ?
Le brossage est un exercice qui
doit être accompli avec soin.Tout
d’abord,prenez le temps
d’atteindre toutes les zones à
brosser.Il a été prouvé que les
brosses à dents électriques sont
plus efficaces que les brosses à
dents traditionnelles en ce qui
concerne l’élimination des
plaques dentaires.Avec la
Sensiflex de Philips Jordan,un
brossage complet (de chaque
côté des dents) pendant quelques
secondes est suffisant pour le
nettoyage des dents et des
gencives.De cette manière vous
pourrez brosser vos dents en
quelques minutes (voir aussi les
instructions de brossage).Si vous
le désirez,vous pouvez consulter
votre dentiste pour avoir un
conseil personnalisé adapté à
votre cas.
Positionnement correct
de la brosse
La Sensiflex de Philips Jordan a
été conçue de façon à ce que son
mouvement spécifique élimine au
mieux les plaques.Comme vous
n’avez plus besoin de faire de
grands mouvements,vous pouvez
vous concentrer sur le bon
positionnement de la brosse sur
vos dents.Les oscillations rapides
des poils de la brosse détachent
et enlèvent la plaque.Les poils
supplémentaires doux et allongés
de la brosse de la Tête Active
assurent un parfait nettoyage
derrière les dents et sur celles du
fond.
Page 18

20 FRANÇAIS
Suffisamment de temps
En guidant la brosse lentement le
long des zones internes,externes
et de mâche de toutes les dents
et molaires vous nettoierez les
zones où la plaque a tendance à
se développer.Les zones difficiles
d’accès comme derrière les
molaires,le long des gencives et
derrière les dents de devant,
requièrent une attention
particulière.Il est important
néanmoins de prendre le temps
nécessaire à un bon brossage afin
d’obtenir une parfaite hygiène
buccale.
Une pression optimale
Un brossage trop intensif peut
endommager vos dents et vos
gencives.Et contrairement à ce
que vous imaginez,il élimine
moins bien la plaque qu’un
brossage plus doux.Le Système
Pression Contrôlée unique en
son genre,vous permet de
vérifier la pression sur votre
brosse.S'il a y trop de pression
sur la brosse,vous en êtes tout
de suite averti grâce au click que
vous entendez et sentez.Alors la
tête de la brosse pivote vers
l’arrière.Des tests cliniques ont
prouvé que le brossage avec la
brosse Sensiflex de Philips Jordan
conduisait à des habitudes de
brossage plus efficaces et plus
saines pour les dents.
Page 19

FRANÇAIS 21
instructions d’utilisation
Fixation de l’appareil au mur
C
1 Fixer l’appareil au mur.
◗ Veillez à ce que le chargeur ne soit en contact
avec aucune source d’eau.La brosse à dents par
contre est étanche et peut donc être utilisée
partout.
◗ Pour fixer le chargeur au mur,vous devez utiliser 2
vis (3,5 x 25 mm) et 2 chevilles (S5).
La charge
Le chargeur peut être branché sur n’importe quelle
tension entre 100 et 240 Volts (seulement pour le
modèle HX 2575).
C
1 Lors de la première charge ou après une
longue période sans utilisation,mettez
l’appareil en charge pendant 6 heures (pour
la version NIMH) ou 3 heures (pour la
version NICD).
- ◗ La brosse peut être replacée sur le chargeur après
chaque utilisation.
◗ Lorsque l’accumulateur est en charge un témoin
lumineux vert clignote. Lorsque l’accumulateur est
complètement rechargé le témoin lumineux reste
allumé sans clignoter.
◗
Lorsque la charge de l’accumulateur commence à
baisser, le témoin lumineux passe au rouge et clignote
pendant 10 secondes après l’arrêt de la brosse.
21 mm
1
2
3 hrs
Page 20

22 FRANÇAIS
Conseil :L’accumulateur peut être laissé en charge
continuellement.Lors de la première utilisation de
l’appareil,nous vous recommandons d’utiliser votre
brosse à dents jusqu’à ce que l’accumulateur soit
complètement déchargé. Procédez de cette façon
trois fois de suite.Vous pourrez le faire tout en
utilisant l’appareil normalement sans le recharger
entre les périodes de brossage jusqu’à ce que le
moteur ait pratiquement cessé de fonctionner .Pour
prolonger la vie de votre accumulateur répétez cette
opération tous les six mois.
Mode d’utilisation
C
1 Fixez la tête de la brosse à dents sur le corps
de l’appareil en l’insérant dans l’encoche en
forme de baïonnette,puis vissez-la.Ainsi la
tête ne pourra pas se dévisser à cause des
vibrations dues au fonctionnement de la
brosse.
C
2 Placez la brosse dans votre bouche.
C
3 Pressez sur le bouton de mise en marche
(Marche/Arrêt).
C
4 La brosse commencera sa rotation en
puissance maximale.Pour enclencher une
vitesse moins rapide,appuyez sur le bouton
de sélection de vitesse 2.
1
2
Page 21

FRANÇAIS 23
Le brossage
C
1 Placez la brosse contre vos dents,de telle
sorte qu’elle couvre aussi bien la surface des
dents que celle des gencives.Maintenez-la
dans cette même position quelques secondes
puis passez à la dent suivante.
◗ La tête ronde de la brosse ôte la plaque dentaire
située sur les dents et sous les gencives.
◗ La Tête Active individuelle permet de brosser
entre les dents.
C
2 La brosse travaillera pour vous.Tout ce que
vous avez à faire, c’est de la diriger
soigneusement le long des dents et des
molaires.
◗ Assurez-vous que vous atteignez correctement
toute la surface de vos dents (interne, externe et
de la zone de mâche) et de vos gencives.Une
méthode de brossage immuable vous empêchera
d’oublier certaines zones
◗ Voir aussi les instructions de brossage livrées avec
l’appareil et le paragraphe intitulé ‘Prendre soin de
ses dents dans les meilleures conditions’.
Pour un brossage en toute sécurité
C
1 Le Système de Pression Contrôlée vérifie la
pression que vous exercez sur la brosse.
Page 22

C
2 Si vous pressez la brosse trop fortement sur
vos gencives,vous sentirez et entendrez un
déclic lorsque la brosse pivotera vers
l’arrière.Aussitôt que vous réduisez la
pression,la brosse reprend une position
normale.
◗ Lorsque vous utiliserez la brosse pour la première
fois ceci se produira probablement souvent,mais
avec le temps vous découvrirez la pression de
brossage adaptée, et la brosse pivotera moins.
Conseil:Si la plaque est éliminée correctement,vos
gencives seront d’une couleur rose et plus fermes
autour des dents.Des gencives saines ne devraient
pas saigner pendant le repas ou lors du brossage
(voir aussi le paragraphe intitulé “Prendre soin de ses
dents dans les meilleures conditions”).Si néanmoins,
vos gencives saignent légèrement lors des premières
utilisations,ce saignement s’arrête généralement
après quelques jours. Dans le cas contraire, consultez
votre dentiste.
Durée minimale du brossage :2 minutes
◗ En général, deux minutes suffisent à nettoyer les
dents correctement. Naturellement, vous pouvez
vous brosser les dents pendant plus de deux
minutes.
Le témoin lumineux vert clignote après 2 minutes
de fonctionnement et le processus de brossage est
stoppé.Cette interruption interviendra toutes les 2
minutes de fonctionnement même si l’appareil est
arrêté manuellement (max.10sec).
24 FRANÇAIS
Page 23

Après le brossage
C
1 Laissez la brosse en marche pendant que
vous la rincez à l’eau tiède ou chaude.
C
2 Rincez aussi l’intérieur de la tête de la
brosse.
C
3 Remettez la brosse en marche pour rincer
les résidus de dentifrice collés sur l’arbre
d’entraînement.
C
4 Rangez la tête de la brosse à l’envers dans le
compartiment de rangement,avec les bagues
colorées visibles sur le dessus.
5 Vous pouvez nettoyer le chargeur avec un
chiffon humide.
◗ Pour ce faire,mettez le chargeur hors tension!
CLICK
FRANÇAIS 25
Page 24

Changement des têtes de la brosse
C
1 Remplacez la tête de la brosse tous les trois
mois pour de meilleurs résultats de brossage.
◗ La tête de la brosse devrait être changée dès que
les poils se replient vers l’extérieur.
◗ De nouvelles têtes sont disponibles chez votre
revendeur Philips ou dans le magasin où vous avez
acheté votre brosse Sensiflex de Philips Jordan.
Conseil :Des poils usés déplaceront les plaques
sans les enlever. Ils peuvent aussi blesser les gencives.
Il est donc important de remplacer la tête de la
brosse tous les trois mois.
La trousse de voyage
(HX 2575)
◗ Lors de vos déplacements, vous pouvez
transporter votre brosse dans la trousse de
voyage en toute hygiène et sécurité.
26 FRANÇAIS
Page 25

Protection de l’environnement
Si vous désirez vous débarrasser de votre appareil,
séparez l’accumulateur des déchets domestiques
habituels et déposez-le dans à un emplacement
désigné à cet effet.
◗ NB:Vous pouvez aussi rendre l’appareil chez un
revendeur Philips ou dans un Centre Service
Agréé,qui s’occupera de l’accumulateur pour
vous.
◗ Avant d’ôter l’accumulateur assurez-vous qu’il est
totalement déchargé. Pour ce faire,laissez
l’appareil en marche jusqu’à l’arrêt total.
◗ NB:Dévissez la base de l’appareil seulement si
vous désirez ôter l’accumulateur.
Une fois sa base dévissée, l’appareil perd son
étanchéité.La garantie ne sera plus valable si la
base de l’appareil a été dévissée. L’étiquette non
endommagée prouvera que la base de l’appareil
n’a pas été dévissée.
FRANÇAIS 27
2
1
Page 26

28 DEUTSCH
Der erste Gebrauch
1 Stecken Sie den Stecker in die Steckdose.
C
2 Stellen Sie die Zahnbürste in die Ladeeinheit.
Der Akku in der Zahnbürste wird jetzt automatisch
aufgeladen.
Laden Sie das Gerät bei der Ausführung mit NiMHAkkus 6 Stunden auf,bei der Ausführung mit NiCdAkkus 3 Stunden lang.
(An dem Symbol auf Ihrem Gerät können Sie
erkennen, welche Ausführung Sie besitzen.)
C
3 Setzen Sie den Bürstenaufsatz auf die
Zahnbürste,so wie in der Abbildung gezeigt
(Bajonettverschluß).
◗ Tragen Sie etwas Zahncreme auf dem
Bürstenkopf auf.
4 Setzen Sie die Bürste an Ihre Zähne und
drücken Sie den Ein-/Ausschalter.
C
5 Reinigen Sie nacheinander jeweils einen Zahn
ohne die üblichen Scheuerbewegungen.
Gesamtzeit min.2 Minuten;vgl. den Abschnitt
„Der Gebrauch des Geräts“.
◗ Wenn Sie die Bürste zu stark andrücken,federt
der Bürstenkopf zurück. Nehmen Sie dann den
Druck zurück.
C
6 Reinigen Sie nach jedem Gebrauch den
Bürstenaufsatz von außen und von innen
sowie den Bürstenkopf.
◗ Sie können den Bürstenaufsatz nach jedem
Gebrauch in den Behälter zurücksetzen.
Beachten Sie bitte die näheren Informationen im
Kapitel „Gebrauchsanweisung“.
1
2
Page 27

Wichtig
◗ Prüfen Sie zunächst,ob die Steckdose, an welche
Sie das Gerät anschließen wollen,Strom führt. In
einigen Badezimmern werden die Steckdosen
abgeschaltet,sobald das Licht abgeschaltet wird.
◗ Laden Sie das Gerät vor Gebrauch die Ausführung
mit NiMH 6 Stunden auf,die Ausführung mit
NiCd 3 Stunden lang.
◗ Das Netzkabel der Ladeeinheit kann nicht
ausgewechselt werden.Bei einer Beschädigung
oder einem Defekt des Kabels kann das Gerät
nicht repariert werden,sondern ist zu entsorgen.
Wenden Sie sich an Ihren Händler oder an das
Philips Service Center in Ihrem Lande.
◗ Wenn Ihr Gerät mit gekennzeichnet ist, so
trifft der folgende Text zu:
Als Beitrag zum Umweltschutz wurde diese
Zahn-bürste mit einer Nickel-Hydrid (NiMH)
Batterie ausgestattet,deren Kadmiumgehalt
unter 0,01% liegt.
Sorgen Sie bitte trotzdem dafür,daß dieser Akku
nicht in den normalen Hausmüll gelangt. Beachten
Sie den Abschnitt „Umweltschutz“.
◗ Wenn Ihr Gerät mit gekennzeichnet ist, so
trifft der folgende Text zu:
Der integrierte Nickel-Cadmium-Akku enthält
Substanzen,welche die Umwelt gefährden
können.
Sorgen Sie dafür,daß der Akku nicht in den
normalen Hausmüll gelangt. Beachten Sie den
Abschnitt „Umweltschutz“.
DEUTSCH 29
Page 28

30 DEUTSCH
Gesunde Zähne sind
wertvoll für unsere
Gesundheit und für
gutes Aussehen.
Darum ist es
selbstverständlich,sie
durch richtige Pflege
lebenslang zu
erhalten.Da Plaque
die Hauptursache für
Zahnverfall ist,muß
vor allem verhütet
werden,daß sich
Plaque bildet,um
Zähne und
Zahnfleisch durch tägliche
Pflege zu kräftigen.
Was ist „Plaque“?
Plaque entsteht als zunächst
weicher Zahnbelag,der nach und
nach an den Zähnen haftet.
Besonders betroffen sind die
schwer zugänglichen Bereiche
zwischen den Zähnen und am
Zahnsaum.Plaque besteht zur
Hauptsache aus Bakterien,die
den Zucker der Nahrung in
schädliche Säuren verwandeln.Er
hat fast die gleiche Farbe wie die
Zähne und ist deshalb zunächst
nicht leicht sichtbar.Solange die
Plaque weich ist,kann sie zum
Glück durch sorgfältige und
korrekte Zahnpflege beseitigt
werden.
Die Folgen der
Plaquebildung
Die von den Bakterien
produzierten Säuren greifen den
Zahnschmelz und das Zahnbein
an,so daß sich durch Karies
Löcher in den Zähnen bilden.Die
Bakterien können noch weitere
schädliche Stoff absondern,die zu
einer Entzündung des
Zahnfleisches (Gingivitis) führen.
Das Zahnfleisch ist dann gerötet,
geschwollen und blutet beim
Essen und beim Zähneputzen.
Schließlich kann die Entzündung
fortschreiten,Wurzelhaut und
Kieferknochen befallen,wodurch
sich die Zähne lockern und
ausfallen können.
DIE OPTIMALE PFLEGE IHRER ZÄHNE
Page 29

DEUTSCH 31
Wird die Plaque nicht täglich
entfernt,verkalkt die Plaque,wird
hart und läßt sich nur noch
schwer entfernen.Dieser
Zahnstein ist wiederum eine
günstige Grundlage für die
Bildung weiterer Plaque,wodurch
sich das Risiko von Karies und
Entzündungen erhöht.
Die beste ZahnpflegeMethode
Die Zähne müssen mit aller
Sorgfalt gebürstet werden.
Nehmen Sie sich hierzu Zeit,und
sorgen Sie dafür,daß jede Stelle
von der Zahnbürste erreicht
wird.Es ist erwiesen,daß der
Gebrauch elektrischer
Zahnbürsten zur Entfernung von
Plaque wirksamer ist als das
Bürsten mit herkömmlichen
Zahnbürsten.Es ist ausreichend,
Ihre Zähne mit der Philips/Jordan
Sensiflex nur einige Sekunden von
jeder Seite zu bürsten,um die
Zähne und das angrenzende
Zahnfleisch zu reinigen.Halten
Sie sich an die
Gebrauchsanweisung,und Sie
haben Ihre Zähne in wenigen
Minuten gründlich geputzt.Fragen
Sie Ihren Zahnarzt nach
Ratschlägen für Ihre individuelle
Zahn- und Mundpflege.
Die korrekte Führung
Ihrer Zahnbürste
Der Bürstenkopf der
Philips/Jordan Sensiflex vollzieht
die Bewegungen,die eine
optimale Plaquebeseitigung
garantieren.Sie können sich voll
auf die Reinigung des einzelnen
Zahnes konzentrieren,ohne die
Zähne mit der Bürste zu
scheuern.Die schnell
oszillierenden Bürsten lösen die
Plaque und wischen sie
anschließend fort.Die besonders
langen und weichen Borsten der
Interdentalbürste sorgen für eine
gründliche Reinigung der
Zahnzwischenräume und der
endständigen Backenzähne.
Page 30

32 DEUTSCH
Nehmen Sie sich Zeit
Sie entfernen jeden Ansatz von
Plaque,indem Sie die Bürsten
langsam an den Innen- und
Außenseiten der Zähne vorbei
und über die Kauflächen hinweg
führen.Schwer erreichbare
Stellen,z.B.hinter dem letzten
Backenzahn,die Rückseite der
Schneide- und Backenzähne
verdienen besondere
Aufmerksamkeit.Nehmen Sie
sich darum genügend Zeit für
Ihre tägliche Zahnpflege.
Der richtige Andruck der
Bürste
Ein zu starker Druck mit der
Bürste kann den Zähnen und
dem Zahnfleisch schaden.Er kann
sogar die Wirkung auf die Plaque
beeinträchtigen.Die einzigartige
Druckkontrolle im Philips/Jordan
Sensiflex verhilft Ihnen zum
richtigen Andruck der Bürste.
Sobald Sie den Bürstenkopf zu
stark andrücken,schnellt er mit
einem Ruck zurück,den Sie
hören und fühlen können.
Nehmen Sie den Druck zurück,
paßt sich die Bürste wieder an.
Klinische Untersuchungen haben
erwiesen,daß die Druckkontrolle
zu einer erfolgreicheren
Zahnputztechnik führt.
Page 31

DEUTSCH 33
Gebrauchsanweisung
Wandmontage des Geräts
C
1 Die Ladeeinheit an der Wand anbringen.
◗ Achten Sie darauf, daß die Ladeeinheit nicht mit
Wasser in Berührung kommen kann.Die
elektrische Zahnbürste ist hingegen wasserdicht
und kann überall gefahrlos verwendet werden.
◗ Falls Sie Ihr Ladegerät an der Wand befestigen
wollen,benötigen Sie dazu 2 Stück Holzschrauben
3,5x25mm und 2 Stück Dübbel Größe S5.Diese
bekommen Sie in jedem Baumarkt.
Aufladen des integrierten Akkus
(Nur Type HX 2575:) Die Ladeeinheit läßt sich an jeder
Netzspannung zwischen 100 und 240 V Wechselstrom
betreiben.
C
1 Laden Sie vor dem ersten Gebrauch die
Ausführung mit NiMH 6 Stunden,die
Ausführung mit NiCd 3 Stunden lang auf
- ◗ Die Zahnbürste kann nach jedem Gebrauch in die
Ladeeinheit zurückgestellt werden.
◗ Während der Akku aufgeladen wird,blinkt die
grüne Kontrollampe. Sie leuchtet kontinuierlich,
wenn der Akku voll aufgeladen ist.
◗
Blinkt die Kontrollampe nach dem Gebrauch ca. 10
Sekunden lang rot,so muß der Akku nachgeladen
werden.
21 mm
1
2
3 hrs
Page 32

34 DEUTSCH
Hinweis:Sie können die Zahnbürste in der
Ladeeinheit stehen lassen.Nachdem Sie das Gerät
zum ersten Mal benutzt haben, sollten Sie mit dem
Nachladen dreimal nach einander warten,bis der
Akku leer ist und das Gerät anhält.Es empfiehlt sich,
dieses Vorgehen alle 6 Monate zu wiederholen
Der Gebrauch des Geräts
C
1 Setzen Sie den Bürstenaufsatz,seitlich nach
rechts versetzt,fest auf die Zahnbürste, und
schwenken Sie den Bürstenkopf nach links.
Der Bajonettverschluß sorgt dafür,daß sich
der Bürstenkopf nicht durch die Vibrationen
lösen kann.
C
2 Tragen Sie etwas Zahncreme auf den
Bürstenkopf auf,und setzen Sie die Borsten
an die Zähne.
C
3 Drücken Sie den Ein-/Ausschalter,um die
Zahnbürste einzuschalten.
C
4 Die Zahnbürste beginnt,mit der höchsten
Geschwindigkeit zu arbeiten.Drücken Sie
den Umschalter am Ein-/Ausschalter,um die
Geschwindigkeit herabzusetzen.
1
2
Page 33

DEUTSCH 35
Das Zähneputzen
C
1 Setzen Sie den Bürstenkopf in einem
Mundwinkel so an einen Zahn,daß die Bürste
sowohl den Zahn wie das angrenzende
Zahnfleisch berührt.Halten Sie die Bürste
einige Sekunden gegen den Zahn,bevor Sie
sie zum nächsten Zahn führen.
◗ Die runde Bürste löst die Plaque vom Zahn und
vom Zahnfleisch am Zahnsaum.
◗ Die Interdentalbürste reinigt davon unabhängig die
Zahnzwischenräume.
C
2 Der Bürstenkopf nimmt Ihnen die Arbeit des
Scheuerns ab.Führen Sie die Bürste nur
langsam und sorgfältig an allen Zähnen
vorbei.
◗ Achten Sie darauf, daß Sie alle Zahnflächen
erreichen: innen, außen, die Kauflächen – auch das
angrenzende Zahnfleisch.Am besten gehen Sie
täglich auf die gleiche Weise vor; dann lassen Sie
nichts aus.
◗ Lesen Sie auch die Anweisungen zum
Zähneputzen und die Hinweise im Abschnitt „Die
optimale Pflege Ihrer Zähne“.
Die Druckkontrolle
C
1 Die Druckkontrolle prüft kontinuierlich den
Druck der Bürste auf Zähne und Zahnfleisch.
Page 34

C
2 Drücken Sie den Bürstenkopf zu stark an,
schnellt der Bürstenaufsatz hörbar („“Klick“)
und spürbar zurück.Wenn Sie den Druck
reduzieren,rückt der Bürstenaufsatz in die
Ausgangsposition.
◗ Während der Eingewöhnungsphase wird Ihnen
das häufiger passieren.Bald aber finden Sie
automatisch den richtigen Andruck,und der
Bürstenaufsatz wird nur noch selten
zurückschnellen.
Hinweis:Ist die Plaque korrekt entfernt,hat das
umgebende Zahnfleisch eine rötliche Färbung und
liegt fest am Zahn an.Gesundes Zahnfleisch blutet
nicht beim Essen oder beim Zähneputzen.Vgl. das
Kapitel „Die optimale Pflege Ihrer Zähne“.
Es kann allerdings vorkommen, daß das Zahnfleisch
bei der neuen Methode der Zahnpflege anfangs ein
wenig blutet.Wenn das nach wenigen Tagen nicht
vergeht,sollten Sie Ihren Zahnarzt aufsuchen.
Mindestens 2 Minuten Zähneputzen
◗ Im allgemeinen reichen 2 Minuten zum korrekten
Zähneputzen,jeweils 30 Sekunden für Ober- und
Unterkiefer,immer rechts und links. Sie können die
Zähne selbstverständlich länger als 2 Minuten
putzen.
Einige Geräte sind mit einem Duo-Timer
ausgerüstet,der während der ersten 2 Minuten
eine grüne Kontrollampe blinken läßt.Danach wird
der Putzvorgang kurz unterbrochen,und die grüne
Kontrollampe leuchtet kontinuierlich. Dies
geschieht alle 2 Minuten.Der Duo-Timer mißt die
36 DEUTSCH
Page 35

tatsächliche Zahnputzzeit,auch wenn Sie das
Zähneputzen bis zu 10 Sekunden unterbrechen.
Nach dem Zähneputzen
C
1 Lassen Sie die Zahnbürste weiter laufen,und
spülen Sie sie unter fließendem,lauwarmem
Wasser (max.60° C) ab.
C
2 Schalten Sie die Zahnbürste aus,nehmen Sie
den Bürstenaufsatz ab und spülen Sie auch
die Innenseite des Bürstenaufsatzes aus.
C
3 Schalten Sie die Zahnbürste wieder ein,und
entfernen Sie Zahncremereste von der
Antriebswelle,auf welcher der
Bürstenaufsatz saß.
C
4 Bringen Sie den Bürstenaufsatz in dem
Behälter so unter,daß der Ring mit der
Farbmarkierung nach oben weist.
5 Die Ladeeinheit können Sie mit einem
feuchten Tuch abwischen,auf das Sie bei
Bedarf etwas Spülmittel auftragen können.
◗ Ziehen Sie zuvor den Stecker aus der Steckdose!
CLICK
DEUTSCH 37
Page 36

Ersatzbürsten
C
1 Die besten Ergebnisse erzielen Sie,wenn Sie
alle 3 Monate einen neuen Bürstenaufsatz
verwenden.
◗ Neue Bürstenaufsätze sind auch erforderlich,
wenn sich die Borsten nach außen verbiegen.
◗ Neue Bürstenaufsätze erhalten Sie dort, wo Sie
Ihr Philips/Jordan-Gerät gekauft haben.
Hinweis:Verschlissene Borsten verteilen die
Plaque, anstatt sie zu entfernen. Sie können auch das
Zahnfleisch verletzen.Darum ist es wichtig, die
Bürstenaufsätze alle 3 Monate gegen neue
auszutauschen.
Reisekassette
(HX 2575)
◗ Sie können Ihre elektrische Zahnbürste mit
Bürstenaufsätzen unterwegs in der Reisekassette
unterbringen.
38 DEUTSCH
Page 37

Umweltschutz
Wenn Sie das Gerät zu gegebener Zeit außer
Betrieb nehmen, so entnehmen Sie bitte den Akku
und entsorgen Sie ihn in der vorgeschriebenen
Weise.
Wichtiger Hinweis zum Schutz der Umwelt:
Batterien und Akkus gehören nicht zum Hausmüll!
Sie sind als Verbraucher gesetzlich dazu verpflichtet,
gebrauchte Batterien und Akkus aus den Geräten
der Wiederverwertung zuzuführen. Geben Sie sie
bei den öffentlichen Sammelstellen Ihrer Gemeinde
oder an Verkaufsstellen für entsprechende Geräte
oder für Batterien und Akkus ab.
Sie können das Gerät auch dem Philips Service
Center zustellen.Wir kümmern uns dann gern um
eine ordnungsgemäße Entsorgung. Siehe hierzu die
beiliegende „Weltweite Garantie“.
◗ Lassen Sie zuerst den Motor solange laufen, bis
der Akku leer ist und der Motor stillsteht.
◗ Lösen Sie die Schrauben am hinteren Ende der
Zahnbürste, um den Akku zu entnehmen.
Wenn diese Schrauben gelöst wurden,ist die
Zahnbürste möglicherweise nicht mehr wasserdicht.
Darum erlischt die Garantie, sobald diese Schraube
gelockert oder entfernt wurde. Zur Beweissicherung
sind die Schrauben versiegelt.
DEUTSCH 39
2
1
Page 38

40 NEDERLANDS
De eerste keer poetsen
1 Steek de stekker in het stopcontact.
C
2 Plaats de tandenborstel in de oplaadunit.
De borstel laadt nu automatisch op.
Laad het apparaat voor het eerste gebruik in 6 uur
(NiMH versie) of 3 uur (NiCd versie) geheel op.
(zie het symbool op uw apparaat.)
C
3 Plaats de borstelkop op de tandenborstel
door deze te draaien in de bajonetsluiting.
◗ Breng wat tandpasta aan op de borstel.
4 Plaats de borstel in de mond en druk op de
aan/uit knop.
C
5 Poets tand voor tand,op alle plaatsen in de
mond,gedurende minimaal 2 minuten (zie
ook de poetsinstructie).
◗ Wanneer u te hard poetst,waarschuwt het
Controlled Pressure syteem met een duidelijk
hoor- en voelbare klik.
C
6 Maak altijd na gebruik de borstelkop van
buiten en van binnen schoon,evenals de
tandenborstel zelf.
◗ U kunt de tandenborstel na elk gebruik
terugzetten in de oplaadunit.
Uitgebreide informatie over het gebruik is te vinden in
de sectie “Gebruiksaanwijzing”.
1
2
Page 39

Belangrijk
◗ Overtuig u ervan dat er stroom staat op het
stopcontact waarop u de oplader aansluit.Bij
badkamerkastjes met een ingebouwd stopcontact
kan het gebeuren dat de stroomtoevoer wordt
onderbroken zodra het licht wordt aangeschakeld.
◗ Laad het apparaat voor het eerste gebruik in 6
uur (NiMH versie) of 3 uur (NiCd versie) geheel
op.
◗ Het snoer van de oplaadunit kan niet worden
vervangen.Als het snoer is beschadigd,kan de
oplaadunit niet meer worden gebruikt. Neem
contact op met uw Philips leverancier of met de
Philips organisatie in uw land (zie het World Wide
Guarantee vouwblad).
◗ Als de verpakking voorzien is van geldt de
volgende tekst:
Om het milieu zoveel mogelijk te ontzien,is uw
apparaat voorzien van nikkel-hydride (NiMH)
batterijen.Deze bevatten minder dan 0.01%
cadmium.
Toch adviseren wij u om,als u te zijner tijd het
apparaat afdankt, ervoor te zorgen dat de
batterijen niet in het normale huisvuil
terechtkomen,maar ingeleverd worden op een
door de overheid daartoe aangewezen plaats. Zie
het hoofdstuk “Milieu”.
◗ Als de verpakking voorzien is van geldt de
volgende tekst:
De ingebouwde oplaadbare (NiCd) batterijen
bevatten stoffen die schadelijk kunnen zijn voor
het milieu.
Als u te zijner tijd het apparaat afdankt, zorgt u er
dan voor dat de batterijen niet in het normale
huisvuil terechtkomen,maar ingeleverd worden op
een door de overheid daartoe aangewezen plaats.
Zie het hoofdstuk “Milieu”.
NEDERLANDS 41
Page 40

42 NEDERLANDS
Een gezond gebit is
een sieraad,waar we
erg zuinig op zijn.
Logisch,want we
willen er graag ons
levenlang mee doen.
Omdat tandplak de
belangrijkste oorzaak
is van tandbederf,is
goede
mondverzorging
noodzakelijk.Door
dagelijks zorgvuldig
te poetsen kunnen
we tandplak
verwijderen en blijven onze
tanden,kiezen en het
tandvlees langer gezond.
Wat is tandplak?
Tandplak is een zacht kleverig
laagje op ons gebit.Het zet zich
vooral af op moeilijk bereikbare
gedeelten,zoals tussen tanden en
kiezen en langs de randen van het
tandvlees.Tandplak bestaat voor
het grootste gedeelte uit
bacteriën die de suikers uit
voedsel omzetten in schadelijke
zuren.Door de wit-gele kleur is
tandplak moeilijk zichtbaar op het
gebit.Gelukkig kan de plak,zolang
het nog zacht is,makkelijk
worden verwijderd door goed en
zorgvuldig te poetsen.
Wat zijn de gevolgen van
tandplak?
De zuren in tandplak lossen het
glazuur van de tanden en kiezen
op,waardoor gaatjes (cariës)
kunnen ontstaan.De bacteriën
scheiden giftige stoffen uit,
waardoor het tandvlees
ontstoken kan raken (gingivitis).
Ontstoken tandvlees is vaak rood
en gezwollen en kan gaan
bloeden bij het poetsen of het
eten.Bovendien kan de
ontsteking zich uitbreiden van de
tandvleesrand naar het daaronder
gelegen kaakbot,waardoor
tanden en kiezen uiteindelijk zelfs
kunnen uitvallen.Als tandplak niet
dagelijks wordt verwijderd kan
het verkalken tot tandsteen dat
Optimale zorg voor je gebit
Page 41

NEDERLANDS 43
stevig vastzit aan tanden en
kiezen.Tandsteen is weer een
optimale bodem voor nieuwe
plak,waardoor de kans op gaatjes
en ontstekingen alleen maar
groter wordt.
Hoe kun je je tanden het
beste poetsen?
Tandenpoetsen moet zorgvuldig
gebeuren.Neem daarom rustig
de tijd om alle plekken te
bereiken.Elektrische
tandenborstels blijken beter te
zijn in plakverwijdering dan
handtandenborstels.
Met de Philips Jordan Sensiflex is
een paar seconden per tandvlak
voldoende om zowel tand als
tandvlees te reinigen.In een paar
minuten reinig je je hele gebit (zie
ook de poetsinstructie).Vraag
eventueel een persoonlijk
poetsadvies bij je tandarts of
mondhygiënist.
Welke beweging moet je
maken?
De Philips Jordan Sensiflex maakt
automatisch de goede beweging
om de plak te verwijderen.Je
hoeft de borstel daarom zelf niet
heen en weer te bewegen,maar
je kunt je volledig richten op de
juiste plaatsing van de borstel op
het gebit.De snel draaiende
borstelharen maken de tandplak
eerst los en vegen het daarna
weg.De extra lange en zachte
borstelharen van de Active Tip
zorgen voor een grondige en
effectieve reiniging tussen de
tanden en achter in de mond.
Page 42

44 NEDERLANDS
Neem dagelijks voldoende
tijd
Door de borstel langzaam langs
de binnenzijden,de buitenzijden
en de kauwvlakken van alle
tanden en kiezen te leiden,reinig
je de plekken waar plak kan
ontstaan.Moeilijk bereikbare
plaatsen,zoals achter de kiezen,
langs de randen van het tandvlees
en achter de voortanden hebben
extra aandacht nodig.Het is dus
belangrijk om dagelijks voldoende
tijd te nemen voor de verzorging
van je gebit.
Optimale druk
Te hard poetsen kan beschadiging
van tanden en tandvlees
veroorzaken.Bovendien wordt de
tandplak dan juist minder goed
verwijderd.Het unieke
Controlled Pressure systeem
helpt je de poetskracht onder
controle te houden.Als je de
borstel te hard tegen je tandvlees
duwt waarschuwt het apparaat
direct met een klik,die je
duidelijk hoort en voelt.
Tegelijkertijd knikt de borstel
naar achteren.Uit klinische tests
blijkt,dat poetsen met de Philips
Jordan Sensiflex,dankzij dit
Controlled Pressure systeem,
leidt tot een veiligere en betere
manier van poetsen.
Page 43

NEDERLANDS 45
Gebruiksaanwijzing
Bevestigen aan de wand
C
1 Monteer de oplaadunit aan de wand.
◗ Voorkom dat de oplaadunit in contact komt met
water. De tandenborstel is echter volledig
waterdicht en kan dus overal veilig gebruikt
worden.
◗ Om de oplaadunit aan de wand te bevestigen
heeft u twee houtschroeven (3,5 x 25 mm) en
twee muurpluggen (S5) nodig.Deze zijn
verkrijgbaar in elke doe-het-zelf winkel.
Opladen
De oplader kan worden aangesloten op spanningen tussen
100 en 240 V (wisselstroom) (alleen type HX 2575).
C
1 Laad het apparaat vóór het eerste gebruik in
6 uur (NiMH versie) of 3 uur (NiCd versie)
op.
- ◗ De tandenborstel kan na gebruik teruggezet
worden in de oplaadunit.
◗ Als de batterij in de borstel wordt opgeladen,
knippert een groen controlelampje.Als de batterij
vol is,brandt het controlelampje continu groen.
◗
Als de batterij bijna leeg is, knippert een rood
controlelampje, 10 seconden na uitschakeling van de
tandenborstel .
21 mm
1
2
3 hrs
Page 44

46 NEDERLANDS
Tip:De tandenborstel kan continu worden
opgeladen.Wanneer u het apparaat in gebruik
neemt,raden wij u aan het te gebruiken totdat de
batterij leeg is en dit nog twee keer te herhalen.U
kunt dit doen door het apparaat op de normale
manier te gebruiken, zonder het tussen de
poetsbeurten door op te laden,totdat de motor
bijna stilstaat.Herhaal deze procedure iedere zes
maanden om de levensduur van de batterij te
verlengen.
Gebruik
C
1 Plaats de borstelkop op de tandenborstel
door deze in de bajonetsluiting te draaien.
De borstelkop kan hierdoor niet van de
tandenborstel af trillen.
C
2 Plaats de borstel in de mond.
C
3 Druk op de aan/uit knop om de
tandenborstel in te schakelen.
C
4 De tandenborstel begint op de hoogste
snelheid te werken.Als u de snelheid wilt
verlagen,drukt u op de 2-snelheden knop.
1
2
Page 45

NEDERLANDS 47
Poetsen
C
1 Plaats de borstelkop een paar seconden
schuin op de tand en op de rand van het
tandvlees,voordat u naar de volgende tand
gaat.
◗ De ronde borstelkop verwijdert tandplak van de
tand en onder de tandvleesrand.
◗ De individueel bewegende Active Tip reinigt
tussen de tanden.
C
2 De borstel doet het poetswerk voor u.Leid
het borsteltje zorgvuldig langs tanden en
kiezen.
◗ Let bij het poetsen op het tandvlees en de
oppervlakken van de tanden: binnen- en
buitenkant en de kauwvlakken.Een vaste volgorde
hierin zorgt ervoor dat u geen stukken overslaat
◗ Zie ook de meegeleverde poetsintructie en de
sectie “Optimale zorg voor uw gebit”.
Veilig poetsen
C
1 Het Controlled Pressure systeem zorgt
ervoor dat de drukkracht tijdens het poetsen
onder controle wordt gehouden.
C
2 Als u te hard tegen het tandvlees duwt,klikt
de borstelkop vanzelf naar achteren.Dit
hoort en voelt u duidelijk.Zodra u de druk
vermindert,springt de borstelkop
automatisch terug in de goede positie.
Page 46

◗ Dit zal de eerste paar keer waarschijnlijk
regelmatig gebeuren.Daarna zult u vanzelf de
optimale poetsdruk ontdekken, waardoor de
borstelkop steeds minder zal klikken.
Tip:Bij een goede plakverwijdering zal het tandvlees
een roze kleur hebben en stevig om uw tanden en
kiezen zitten.Gezond tandvlees bloedt niet bij het
poetsen of het eten (zie ook sectie “Optimale zorg
voor uw gebit”). Mocht uw tandvlees de eerste
paar keer wel licht bloeden,dan zal dit in het
algemeen na een paar dagen ophouden.Zo niet,
raadpleeg dan uw tandarts of mondhygiënist.
Minimale poetstijd: 2 minuten
◗ Gemiddeld geldt 2 minuten poetsen als
voldoende voor de reiniging van uw gebit.
Uiteraard is het ook mogelijk om langer dan 2
minuten te poetsen.
Om aan te geven dat de 2 minuten voorbij zijn,is
de borstel voorzien van een DuoTimer.De eerste
2 minuten knippert het groene controlelampje
van de DuoTimer.Wanneer de 2 minuten voorbij
zijn vindt er een korte poetsonderbreking plaats
en brandt het groene controlelampje continu.
Deze poetsonderbreking herhaalt zich elke 2
minuten.De DuoTimer meet de werkelijke
poetstijd,ook wanneer u het apparaat tijdens het
poetsen uitschakelt (max.10 seconden).
48 NEDERLANDS
Page 47

Na het tandenpoetsen
C
1 Zet de tandenborstel aan terwijl u de
borstelkop schoon spoelt onder de kraan.
Gebruik lauwwarm water (max.60 C˚).
C
2 Spoel daarna de borstelkop ook van binnen
schoon.
C
3 Zet de tandenborstel weer aan om resten
tandpasta uit de opsteek-as te spoelen.
C
4 Bewaar de borstelkop omgekeerd in de
opbergunit,met het gekleurde ringetje
zichtbaar aan de bovenzijde.
5 U kunt de oplaadunit schoonmaken met een
vochtige doek.
◗ Neem eerst de stekker uit het stopcontact!
CLICK
NEDERLANDS 49
Page 48

Vervanging borstelkop
C
1 Vervang de borstelkop elke 3 maanden,voor
het beste resultaat.
◗ De borstelkop is tevens aan vervanging toe als de
haartjes uit elkaar gaan staan.
◗ Nieuwe borstelkopjes zijn verkrijgbaar in de
winkel waar u de Philips/Jordan tandenborstel
gekocht heeft.
Tip:Versleten borstelharen verplaatsen de plak
zonder deze te verwijderen.Bovendien kan het
tandvlees beschadigd worden.Vervang de borstelkop
daarom elke 3 maanden.
Reiscassette
(HX 2575)
◗ Wanneer u op reis gaat kunt u de tandenborstel
en de opzetborstels hygienisch en veilig in de
reiscassette vervoeren.
50 NEDERLANDS
Page 49

Milieu
Wanneer u het apparaat te zijner tijd afdankt,
verwijder dan de ingebouwde oplaadbare batterij
op een milieuvriendelijke manier.
◗ N.B.: U kunt het apparaat ook naar een Philips
Service Centrum brengen: daar verzorgt men dit
graag voor u.
◗ Vóórdat u de batterij verwijdert,dient deze
geheel leeg te zijn.Laat het apparaat werken
totdat de motor stopt.
◗ N.B.: Schroef de onderzijde van het apparaat
alleen los wanneer u de batterij wilt verwijderen.
Het is mogelijk dat het apparaat niet meer
waterdicht is nadat u de onderzijde heeft
losgeschroefd.De garantie vervalt dan ook
wanneer de onderzijde wordt losgeschroefd.
Als de sticker aan de onderzijde onbeschadigd is,
toont dit aan dat het apparaat niet is geopend.
NEDERLANDS 51
2
1
Page 50

52 ITALIANO
La prima volta che utilizzate lo spazzoli
1 Inserite la spina nella presa di corrente.
C
2 Infilate lo spazzolino nell’unità di carica.
Lo spazzolino verrà ricaricato automaticamente.
Prima di usare lo spazzolino per la prima volta,
lasciatelo sotto carica per almeno 6 ore (versione
NiMH) oppure 3 ore (versione NiCD)
(Controllate il simbolo sull'apparecchio per stabilire
la vostra versione).
C
3 Montate la testina dello spazzolino
inserendola nell’apposito attacco a baionetta
e ruotandola.
◗ Mettete un po’di dentifricio sulla testina.
4 Appoggiate lo spazzolino sui denti e premete
il pulsante on/off.
C
5 Spazzolate un dente alla volta,fino a quando
non avrete completato tutti i denti
(occorreranno almeno 2 minuti – vedere
anche le istruzioni).
◗ Grazie allo speciale sistema a Pressione
Controllata,sentirete lo spazzolino che scatta
all’indietro non appena viene esercitata una
pressione eccessiva.
C
6 Al termine dell’uso,pulite sempre la parte
interna ed esterna della testina e lo
spazzolino prima di riporlo.
◗ Dopo l’uso,potete rimettere lo spazzolino
nell’unità di carica.
Per ulteriori informazioni sull’uso dell’apparecchio,
vedere anche la sezione “Istruzioni per l’uso”
1
2
Page 51

Importante
◗ Verificate che la presa di corrente alla quale avete
collegato lo spazzolino sia sotto tensione. In alcuni
bagni,l'erogazione di corrente alla presa può
essere interrotta non appena viene accesa la luce
◗ Prima di usare l’apparecchio per la prima volta,
lasciatelo sotto carica per almeno 6 ore (versione
NiMH) oppure 3 ore (versione NiCD).
◗ Il cavo di alimentazione dell’unità di carica non
può essere sostituito.Nel caso fosse danneggiato,
l’apparecchio dovrà quindi essere gettato.
Rivolgetevi al vostro rivenditore Philips (vedere
l’opuscolo di garanzia).
◗ Se il vostro apparecchio riporta il marchio
Per una maggiore protezione dell’ambiente,
l’apparecchio è provvisto di una batteria
all’idrossido di nickel (NiMH),con un contenuto
di cadmio inferiore a 0,01%.
Ciononostante, quando verrà il momento di
gettare l’apparecchio,ricordate di tenere la
batteria separata dai normali rifiuti domestici e di
depositarla presso un centro di raccolta
differenziata.Vedere anche il paragrafo “Proteggere
l’ambiente”.
◗ Se il vostro apparecchio riporta il marchio
La batteria ricaricabile (NiCd) contiene sostanze
che potrebbero inquinare l’ambiente.
Quando dovrete gettare l’apparecchio,ricordate
di tenere la batteria separata dai normali rifiuti
domestici e di depositarla presso un centro di
raccolta differenziata.Vedere anche il paragrafo
“Proteggere l’ambiente”.
ITALIANO 53
Page 52

54 ITALIANO
Una dentatura sana
è un bene prezioso,
che vorremmo
potesse durare per
tutta la vita.Dal
momento che la
placca è la principale
causa della caduta
dei denti,è
fondamentale una
corretta igiene
dentale. Lavarsi i
denti tutti i giorni,in
modo adeguato,
permette di
rimuovere la placca e di
mantenere sani denti e gengive
più a lungo.
Che cos’è la placca?
La placca è una sostanza morbida
e appiccicosa che si deposita sui
denti,soprattutto nelle zone più
difficili da raggiungere come gli
interstizi fra dente e dente e
lungo il bordo gengivale.La
placca è composta principalmente
da batteri che trasformano in
pericolosi acidi gli zuccheri
contenuti nel cibo.A causa del
suo colore bianco-giallastro, è
difficile notare la placca sui denti.
Per fortuna,quando è ancora
morbida,la placca può essere
facilmente rimossa mediante un
uso corretto dello spazzolino.
Quali sono le
conseguenze della placca?
Gli acidi contenuti nella placca
sciolgono lo smalto dei denti e
possono quindi causare la carie.I
batteri producono tossine che
possono infiammare le gengive
(gengiviti).Le gengive infiammate
sono spesso rosse e gonfie e
possono sanguinare quando si
mangia o ci si lava i denti.
L’infiammazione può inoltre
estendersi dal bordo gengivale
all’osso sottostante,causando a
lungo andare la caduta dei denti.
Se la placca non viene rimossa
giorno per giorno,può
trasformarsi in tartaro,che si
attacca con forza ai denti.Il
tartaro,dal canto suo,
Il modo migliore di prendersi cura dei propri denti
Page 53

ITALIANO 55
rappresenta un’ottima base per la
formazione di nuova placca,
rendendo ancora più grave il
rischio di carie e infiammazioni.
Qual è il modo migliore di
lavarsi i denti?
I denti vanno lavati con la
massima attenzione e con grande
cura,quindi fate in modo di
dedicare tutto il tempo
necessario a questa attività.Con
il nuovo Sensiflex Philips Jordan,
basterà spazzolare ogni dente su
ciascun lato per alcuni secondi
per pulire efficacemente i denti e
le gengive.E il tutto in pochissimi
minuti (leggere le istruzioni).Se
volete,potete anche chiedere il
parere del vostro dentista, per
una pulizia ancora più mirata.
La corretta posizione
dello spazzolino
Sensiflex Philips Jordan è stato
realizzato in modo tale da
effettuare il movimento più
adatto alla rimozione della placca.
Visto che non dovrete più
muovere lo spazzolino avanti e
indietro,potrete concentrarvi
sulla sua corretta posizione e
inclinazione.Oscillando
rapidamente,le setole dello
spazzolino dapprima staccano e
poi eliminano la placca.Le setole
più lunghe e morbide della Punta
Attiva assicurano una perfetta
pulizia anche negli interstizi fra
dente e dente e nel fondo della
bocca.
Page 54

56 ITALIANO
Dedicate ai vostri denti il
tempo necessario
Guidando lo spazzolino lungo le
pareti interne,esterne e occlusali
dei denti,riuscirete a pulire tutte
le zone nelle quali si deposita
normalmente la placca.Le zone
difficili da raggiungere,come la
zona dietro i molari,il bordo
gengivale e la parte posteriore
dei denti richiedono
un’attenzione particolare.È
quindi importante dedicare il
giusto tempo ad una corretta
igiene dentale quotidiana.
La pressione ottimale
Una pressione eccessiva durante
la pulizia può danneggiare denti e
gengive e,contrariamente a
quanto ci si potrebbe aspettare,si
rivela anche meno efficace nella
rimozione della placca.L’esclusivo
Sistema a Pressione Controllata
vi aiuterà a tenere sotto
controllo la pressione esercitata:
non appena viene superato il
livello di pressione pre visto,
l’apparecchio vi avviserà
producendo un “click!” che
udirete e insieme avvertirete.A
questo punto la testina dello
spazzolino scatterà all’indietro.I
test clinici hanno dimostrato che
grazie al sistema a Pressione
Controllata,Sensiflex Philips
Jordan garantisce una tecnica di
pulizia estremamente sicura ed
efficace.
Page 55

ITALIANO 57
Istruzioni per l’uso
Come montare l’apparecchio a muro
C
1 Montaggio dell’unità di carica a parete.
◗ Fate in modo che l’unità di carica non venga a
contatto con l’acqua.Lo spazzolino,invece,è
perfettamente impermeabile e può essere usato
con tranquillità ovunque.
◗ Per montare la ricarica a parete sono necessarie 2
viti (3 X 25mm) e 2 prese muro (S5).Potrete
trovare entrambe in qualsiasi negozio di bricolage.
Carica
L'unità di carica può essere collegato a tensioni comprese
fra 100 e 240 V (corrente alternata) (solo mod.HX 2575).
C
1 Prima di usare lo spazzolino per la prima
volta,lasciatelo sotto carica per almeno 6
ore (versione NiMH) oppure 3 ore (versione
NiCD).
- ◗ Dopo l’uso,lo spazzolino può essere riposto
nell’unità di carica.
◗ Se la batteria dello spazzolino è sotto carica, la
spia verde lampeggia.Se la batteria è
completamente carica, la spia rimane accesa.
◗
Se la batteria è quasi scarica, la spia rossa lampeggia per
10 secondi dopo lo spegnimento dello spazzolino.
21 mm
1
2
3 hrs
Page 56

58 ITALIANO
Consiglio:Lo spazzolino può essere lasciato
costantemente sotto carica. La prima volta che usate
lo spazzolino,vi consigliamo di scaricare
completamente la batteria per tre volte di fila.Per
fare questo,basterà usare normalmente lo
spazzolino,senza ricaricarlo fra un utilizzo e l'altro,
fino a quando il motore smette quasi di funzionare.
Per aumentare la durata della batteria,si consiglia di
ripetere questa operazione ogni sei mesi.
Come usare l’apparecchio
C
1 Montate la testina sullo spazzolino
inserendola nell’apposito attacco a baionetta
e ruotandola.In questo modo la testina non
potrà staccarsi a causa delle vibrazioni.
C
2 Appoggiate lo spazzolino sui denti.
C
3 Premete il pulsante on/off per accendere lo
spazzolino.
C
4 Lo spazzolino inizierà a ruotare alla massima
velocità.Per selezionare una velocità più
bassa,premete il pulsante 2-velocità.
1
2
Page 57

ITALIANO 59
Come lavarsi i denti
C
1 Appoggiate lo spazzolino sui denti formando
un angolo,in modo da coprire sia la
superficie del dente che il bordo gengivale.
Tenete lo spazzolino in questa posizione per
alcuni secondi prima di passare al dente
successivo.
◗ La testina rotonda rimuove la placca dai denti e
dalla zona sotto il bordo gengivale.
◗ La speciale Punta Attiva provvede invece alla
pulizia negli spazi interdentali.
C
2 Lo spazzolino eseguirà il lavoro per voi: non
dovrete far altro che guidare lo spazzolino
con cura lungo i denti.
◗ Fate in modo di raggiungere tutte le superfici del
dente (interna, esterna e occlusale) come pure le
gengive. Cercate di seguire un vostro schema,in
modo da non tralasciare nessuna zona.
◗ Vedere anche le istruzioni fornite con
l’apparecchio e la sezione “Il modo migliore di
prendersi cura dei propri denti”
Come lavarsi i denti in modo sicuro
C
1 Il sistema a Pressione Controllata tiene sotto
controllo la pressione esercitata dallo
spazzolino.
Page 58

C
2 Se premete con troppa forza contro le
gengive,sentirete un “click” e
contemporaneamente la testina scatterà
all’indietro. Non appena ridurrete la
pressione,lo spazzolino ritornerà in
posizione normale.
◗ Questo fenomeno si verificherà molto
probabilmente le prime volte che userete lo
spazzolino,fino a quando non scoprirete qual è la
pressione ottimale.Vedrete allora che la testina
scatterà all’indietro con molta meno frequenza.
Consiglio:se la placca viene rimossa
correttamente, le gengive saranno di colore rosa e
circonderanno saldamente i denti. Le gengive in
buona salute non sanguinano quando mangiate o vi
lavate i denti (vedere anche la sezione “Il modo
migliore di prendersi cura dei propri denti”).
Non preoccupatevi,comunque, nel caso le gengive
dovessero sanguinare le prime volte che userete lo
spazzolino:tale inconveniente è destinato a
scomparire dopo alcuni giorni. In caso contrario,
rivolgetevi al vostro dentista.
Durata minima della pulizia: 2 minuti
◗ In linea di massima sono sufficienti 2 minuti per
una corretta pulizia. Naturalmente,potete
continuare a spazzolare i denti anche oltre i due
minuti.
Per indicare che i due minuti sono passati,lo
spazzolino è provvisto di uno speciale DuoTimer.
Durante i primi due minuti, la spia verde del
DuoTimer lampeggerà.Trascorsi i primi due minuti,
lo spazzolino smetterà per un attimo di funzionare e
60 ITALIANO
Page 59

la spia verde rimarrà accesa. Questa stessa, breve
interruzione si ripeterà ogni due minuti.Il DuoTimer
misura l'effettiva durata della pulizia, anche se
spegnete l'apparecchio durante la pulizia (per
massimo 10 secondi).
Dopo aver lavato i denti
C
1 Lasciate in funzione lo spazzolino mentre
sciacquate la testina sotto l’acqua corrente.
Utilizzate acqua preferibilmente tiepida (max.
60°).
C
2 Risciacquate anche la parte interna della
testina.
C
3 Accendete di nuovo lo spazzolino per
eliminare eventuali residui di dentifricio
dall’albero motore.
C
4 Rimettete a posto la testina,in posizione
capovolta,in modo che l’anello colorato sia
visibile in alto.
5 Per pulire l’unità di carica,utilizzate un panno
umido.
◗ Ricordate per prima cosa di togliere la spina dalla
presa!
CLICK
ITALIANO 61
Page 60

Come sostituire la testina
C
1 Per ottenere risultati ottimali,sostituite la
testina ogni tre mesi.
◗ La testina dovrebbe essere sostituita anche ogni
volta che le setole iniziano a piegarsi verso
l’esterno.
◗ Le nuove testine sono disponibili presso i negozi
che vendono gli spazzolini Philips Jordan.
Consiglio:Le setole usurate tendono a spostare
solo la placca invece che ad eliminarla e rischiano
anche di danneggiare le gengive. È quindi importante
sostituire la testina ogni tre mesi.
Custodia da viaggio
(HX 2575)
◗ Per riporre lo spazzolino e le testine in modo
comodo e igienico,potete usare la pratica
custodia da viaggio.
62 ITALIANO
Page 61

Proteggere l’ambiente
Quando dovrete gettare l’apparecchio,ricordate
di togliere la batteria e di depositarla presso un
centro di raccolta differenziata.
◗ NB. Potete anche decidere di portare
l’apparecchio presso un Centro Assistenza Philips,
che provvederà a gettare la batteria.
◗ Prima di togliere la batteria, assicuratevi che sia
completamente scarica. Lasciate funzionare
l’apparecchio fino a quando si ferma prima di
togliere la batteria.
◗ NB:Svitate la parte inferiore dell’apparecchio
soltanto quando dovete togliere la batteria.
Dopo aver svitato la parte inferiore,l’apparecchio
non è più a tenuta stagna:in questo caso la
garanzia non sarà più valida. Se integro,l’adesivo
posto nella parte inferiore dell’apparecchio indica
che lo stesso non è stato aperto.
ITALIANO 63
2
1
Page 62

64 ESPAÑOL
Primer uso
1 Enchufen el aparato a la red.
C
2 Coloquen el Cepillo Dental en la unidad de
carga.
Con ello,el Cepillo Dental se cargará
automáticamente.
Antes de usarlo por primera vez,carguen el aparato
durante 6 horas (versión NiMH) o 3 horas (versión
NiCd).
(Comprueben el símbolo de su aparato para
determinar que modelo tienen)
C
3 Monten la cabeza del cepillo en el Cepillo
Dental insertándola en el eje y girándola
ligeramente hasta que se encaje
(acoplamiento tipo bayoneta).
◗ Pongan un poco de pasta dentífrica en el cepillo.
4 Apoyen el cepillo en sus dientes y presionen
el botón de Marcha/Parada (On/Off).
C
5 Cepillen los dientes uno por uno hasta
limpiarlos todos completamente (2 minutos,
vean también las Instrucciones de Cepillado)
◗ Si aplican demasiada presión,y debido a su
sistema de Presión Controlada,oirán y notarán
que el cepillo se flexiona hacia atrás.
C
6 Después del uso,limpien siempre el interior
y el exterior de la cabeza del cepillo,así
como el propio Cepillo Dental.
◗ Después de usarlo pueden volver a poner el
Cepillo Dental en su unidad de carga.
Para más información sobre cómo usar el aparato, lean
la sección “Instrucciones de uso”.
1
2
Page 63

Importante
◗ Asegúrense de que el enchufe al cual vayan a
conectar la unidad de carga tenga corriente. En
algunos cuartos de baño la corriente del enchufe
se interrumpe al apagar la luz.
◗ Antes de usarlo por primera vez,carguen el
aparato durante 6 horas (versión NiMH) o 3
horas (versión NiCd).
◗ El cable de red de la unidad de carga no puede
ser sustituido.Si el cable de red se deteriora, la
unidad deberá ser desechada.Diríjanse a su
distribuidor Philips o a la Organización Philips de
su país (consulten el folleto de Garantía Mundial
(World Wide Guarantee)).
◗ Si su aparato lleva el símbolo el siguiente
texto le es aplicable:
Para proteger el Medio Ambiente,este aparato
ha sido equipado con una batería de hidruro de
níquel (NiMH) que contiene menos del 0’01 %
de cadmio.
No obstante, les aconsejamos que se aseguren de
que, cuando se desprendan del aparato, la batería
sea separada de la basura normal y depositada en
un lugar de recogida oficial.Consulten la sección “
Aspectos Medioambientales”.
◗ Si su aparato lleva el símbolo el siguiente
texto le es aplicable:
La batería recargable incorporada (NiCd)
contiene sustancias que pueden polucionar el
Medio Ambiente.
Cuando,con el tiempo,tengan que desprenderse
del aparato,asegúrense de que la batería sea
separada de la basura normal y depositada en un
lugar de recogida oficial.Consulten la sección
"Aspectos Medioambientales".
ESPAÑOL 65
Page 64

66 ESPAÑOL
Lógicamente, la
dentadura sana es un
tesoro que queremos
que dure toda la
vida.Dado que la
placa es la principal
causa del deterioro
de los dientes, un
adecuado cuidado
dental es esencial.
Cepillándolos
cuidadosamente
cada día,eliminarán
la placa y
mantendrán sus
dientes y encías saludables
durante más tiempo.
¿ Qué es la placa ?
La placa es una película blanda y
pegajosa que se forma sobre los
dientes,principalmente en zonas
difíciles de alcanzar,como los
espacios interdentales,y a lo
largo del borde de las encías.La
placa está formada
principalmente por bacterias que
transforman los azúcares de
nuestros alimentos en ácidos
nocivos.Debido a su color blanco
amarillento,es difícil detectar la
placa sobre los dientes.
Afortunadamente,mientras la
placa está todavía blanda,puede
ser fácilmente eliminada mediante
un cepillado correcto y
cuidadoso.
¿ Cuales son las
consecuencias de la placa?
Los ácidos de la placa disuelven el
esmalte de nuestros dientes y
muelas,lo cual conduce al
desarrollo de la caries.
Las bacterias producen toxinas
que pueden causar la inflamación
de las encías (gingivitis).
Generalmente,las encías
inflamadas están rojas e
hinchadas y, a menudo,sangran al
cepillarse los dientes o al comer.
Además,la inflamación puede
extenderse por el borde de las
encías hacia el hueso de la
mandíbula,lo cual puede hacer
Como proporcionar un cuidado optimo a sus
dientes
Page 65

ESPAÑOL 67
que se caigan los dientes y las
muelas.
Si no se elimina diariamente,la
placa puede calcificarse formando
sarro que se adherirá
fuertemente al diente. El sarro es,
a su vez,una excelente
plataforma para nuevos
crecimientos de la placa,lo cual
incrementará el riesgo de caries y
de inflamación.
¿ Cuál es el mejor método
de cepillado dental ?
El cepillado dental es una
actividad que necesita ser llevada
a cabo con cuidado.Por ello,
tomen su tiempo para alcanzar
todas las zonas.Se ha
comprobado que los Cepillos
Dentales eléctricos son más
efectivos que los manuales al
utilizarlos para eliminar la placa.
Con el Cepillo Dental Philips
Jordan Sensiflex,el cepillado de
cada lado del diente durante
unos pocos segundos es
suficiente para limpiar tanto el
diente como las encías cercanas.
De este modo pueden limpiar
todos sus dientes en unos pocos
minutos (vean la sección
“Instrucciones de cepillado”).Si
lo desean,pueden consultar a su
dentista o higienista dental para
que les aconseje sobre la forma
de cepillarse.
Correcto posicionamiento
del Cepillo Dental
El Cepillo Dental Philips Jordan
Sensiflex ha sido diseñado para
hacer el tipo de movimiento que
mejor elimina la placa.Como no
hay necesidad de que muevan el
Cepillo Dental de un lado a otro,
pueden concentrase en colocar
correctamente el cepillo sobre
sus dientes.Las rápidas
oscilaciones de la cerdas del
cepillo primero desprenden y
después eliminan la placa.Las
cerdas extralargas y suaves de la
Punta Interdental aseguran una
limpieza cuidadosa y efectiva
entre los dientes y en el fondo de
la boca.
Page 66

68 ESPAÑOL
Suficiente tiempo
Guiando lentamente el Cepillo
Dental a lo largo de las
superficies interiores,exteriores
y de masticación de todos los
dientes y muelas,podrán limpiar
todas las zonas en las que es
posible que se forme la placa.Las
zonas difíciles de alcanzar,como
detrás de las muelas,a lo largo
del borde de las encías y detrás
de los dientes delanteros,
requieren una atención extra.Por
lo tanto,es importante dedicar
un tiempo suficiente al cepillado
con el fin de conseguir una buena
higiene bucal.
Presión óptima
Un cepillado demasiado fuerte
puede dañar tanto las encías
como los dientes.Y,
contrariamente a lo que se pueda
esperar,ello eliminará la placa
menos eficazmente que un
cepillado suave.
El sistema exclusivo de Presión
Controlada les ayudará a
mantener bajo control su presión
de cepillado.
Si aplican demasiada presión con
el cepillo,el aparato les avisará
inmediatamente mediante un
“click” que podrán oír y notar,y
la cabeza del cepillo se flexionará
hacia atrás.Pruebas clínicas han
mostrado que,gracias a este
sistema de Presión Controlada,el
Cepillo Dental Philips Jordan
Sensiflex les proporciona las
mejores y más seguras técnicas
de cepillado.
Page 67

ESPAÑOL 69
Instrucciones de uso
Montaje del aparato a la pared
C
1 Montaje de la unidad de carga a la pared.
◗ No permitan que la unidad de carga entre en
contacto con el agua.Sin embargo,el Cepillo
Dental es estanco y, por ello, puede usarse en
cualquier sitio con seguridad.
◗ Para montar el cargador a la pared, necesitarán 2
tornillos de madera (3'5 x 25 mm) y 2 tacos (S5)
que podrán hallar en cualquier ferreteria.
Cómo cargar el aparato
La unidad de carga puede conectarse a cualquier voltaje
entre 100 y 240 V (corriente alterna)(sólo modelo
HX 2575).
C
1 Antes de usarlo por primera vez,carguen el
aparato durante 6 horas (versión NiMH) o 3
horas (versión NiCd).
- ◗ Después de cada uso,el Cepillo Dental puede ser
colocado de nuevo en la unidad de carga.
◗ Si la batería del Cepillo Dental está siendo
cargada, la lámpara piloto será verde y parpadeará.
Si la batería ha sido completamente cargada, la
lámpara piloto estará encendida
permanentemente.
◗
Si la batería está casi descargada, la lámpara piloto será
roja y parpadeará durante 10 segundos después de
parar el Cepillo Dental.
21 mm
1
2
3 hrs
Page 68

70 ESPAÑOL
Consejo :El Cepillo Dental puede dejarse
cargando continuamente. Cuando empiecen a usar
el aparato,les recomendamos usarlo hasta que la
batería esté descargada y hacerlo así 3 veces
seguidas.Pueden hacerlo usando el aparato de
modo normal sin recargarlo entre sesiones de
cepillado hasta que el motor casi deje de funcionar.
Para alargar la vida útil de la batería, repitan este
procedimiento cada 6 meses.
Cómo usar el aparato
C
1 Monten la cabeza del cepillo en el Cepillo
Dental insertándola en el eje y girándola
ligeramente hasta que se encaje.Ello
impedirá que la cabeza del cepillo se suelte
debido a la vibración.
C
2 Colóquense el cepillo en la boca.
C
3 Presionen el botón de Marcha/Parada
(On/Off) para poner en marcha el Cepillo
Dental.
C
4 El Cepillo Dental empezará a girar a la
velocidad más alta.Para cambiarlo a una
velocidad más baja,presionen el botón de
velocidad 2.
1
2
Page 69

ESPAÑOL 71
Cepillado
C
1 Coloquen el cepillo apoyado sobre el diente
con un ángulo tal que cubra la superficie
tanto del diente como del borde de la encía.
Sostengan el cepillo en esa posición durante
unos pocos segundos y luego muévanlo hacia
el siguiente diente.
◗ La cabeza redonda del cepillo elimina la placa de
los dientes y bajo el borde de las encías.
◗ El movimiento individual de la Punta Interdental
limpia entre los dientes.
C
2 El Cepillo Dental hará el trabajo por Vdes.
Todo lo que tienen que hacer es guiar
cuidadosamente el cepillo a lo largo de los
dientes y las muelas.
◗ Asegúrense de que alcanzan adecuadamente
todas las superficies del diente (interior, exterior y
de masticación) así como de las encías.Una pauta
fija de cepillado evitará que omitan ciertas zonas.
◗ Vean también las instrucciones de cepillado que
acompañan al aparato y la sección “Cómo
proporcionar un cuidado óptimo a sus dientes”
Cepillado seguro
C
1 El sistema de Presión Controlada comprueba
constantemente la presión que ejercen sobre
el Cepillo Dental.
Page 70

C
2 Si presionan demasiado fuertemente el
Cepillo Dental contra sus encías,notarán y
oirán un “click” cuando la cabeza del Cepillo
Dental se flexione hacia atrás.Tan pronto
como reduzcan la presión,el Cepillo Dental
volverá a su posición normal.
◗ Probablemente esto sucederá regularmente
cuando empiecen a usar el Cepillo Dental pero,
después de algún tiempo,habrán descubierto la
óptima presión de cepillado y el Cepillo Dental se
flexionará menos a menudo hacia atrás.
Consejo :Si la placa es eliminada adecuadamente,
las encías tendrán un color rosado y estarán firmes
alrededor del diente. Unas encías sanas no sangran al
comer o al cepillar sus dientes (vean también la
sección “Cómo proporcionar un cuidado óptimo a
sus dientes”).Si,a pesar de ello,sus encías sangran
ligeramente las primeras veces que usen el Cepillo
Dental,esto cesará generalmente después de unos
pocos días.Si no es así,consulten a su dentista o
higienista dental.
Tiempo mínimo de cepillado : 2 minutos
◗ En general, 2 minutos serán suficientes para
limpiar adecuadamente sus dientes.Por supuesto,
pueden cepillarse durante más de 2 minutos.
Para indicar cuando hayan pasado los 2 minutos,el
Cepillo Dental está equipado con el Temporizador
Duo.Durante los primeros 2 minutos del proceso
de cepillado,la lámpara piloto verde del
Temporizador Duo parpadeará. Después de esos 2
minutos,el proceso de cepillado es interrumpido
brevemente y la lámpara piloto verde permanece
72 ESPAÑOL
Page 71

encendida continuamente. Esta interrupción se
producirá cada 2 minutos.
El Temporizador Duo mide el tiempo real de
cepillado incluso si paran el aparato durante el
proceso de cepillado (durante un máximo de 10
segundos).
Después del cepillado
C
1 Dejen que el Cepillo Dental funcione
mientras limpian la cabeza del cepillo bajo el
grifo.Usen agua tibia (máximo 60ºC).
C
2 Limpien también el interior de la cabeza del
cepillo.
C
3 Vuelvan a poner en marcha el Cepillo Dental
para limpiar los residuos de dentífrico del
eje.
C
4 Guarden la cabeza del cepillo (en posición
invertida) en su compartimento de
almacenamiento y con la arandela coloreada
visible por arriba.
5 Pueden limpiar la unidad de carga con un
paño húmedo.
◗ ¡ Desenchúfenla de la red antes de limpiarla !
CLICK
ESPAÑOL 73
Page 72

Recambio de las cabezas de cepillo
C
1 Para los mejores resultados en el cepillado,
sustituyan la cabeza del cepillo cada tres
meses .
◗ La cabeza del cepillo también deben sustituirse
cuando las cerdas empiecen a doblarse hacia
fuera.
◗ Podrán conseguir nuevas cabezas de cepillo en la
tienda donde hayan comprado su Cepillo Dental
Philips Jordan .
Consejo :Las cerdas gastadas moverán la placa de
un lado a otro en vez de eliminarla.También pueden
dañar las encías.Por ello,es importante que
sustituyan la cabeza del cepillo cada tres meses.
Bolsa de viaje
(HX 2575)
◗ Cuando vayan de viaje,pueden guardar
higiénicamente y con seguridad el Cepillo Dental
y los cepillos en la bolsa de viaje.
74 ESPAÑOL
Page 73

Aspectos Medioambientales
Cuando,a su debido tiempo,tengan que
desprenderse del aparato, quiten la batería y
deséchenla de un modo seguro para el Medio
Ambiente.
◗ Nota :También pueden llevar el aparato a un
Servicio de Asistencia Técnica Philips,en el cual se
desharán de la batería por Udes.
◗ La batería debe estar completamente descargada
antes de desmontarla.Antes de desmontar la
batería,dejen que el aparato funcione hasta que
se pare.
◗ Nota :Desatornillen el fondo del aparato sólo si
desean quitar la batería.
Después de que el fondo haya sido desatornillado,
el Cepillo Dental no será impermeable nunca más.
Por esa razón,la garantía queda anulada si el
fondo del aparato ha sido desatornillado. Si no
está deteriorada, la etiqueta que hay en el fondo
probará que el aparato no ha sido abierto.
ESPAÑOL 75
2
1
Page 74

76 PORTUGUÊS
Primeira utilização
1 Ligue a ficha na tomada de corrente.
C
2 Coloque a escova no carregador.
A escova entra automaticamente em carga.
Antes de utilizar pela primeira vez, deixe a escova a
carregar durante um período de 6 horas (versão
NiMH) ou de 3 horas (versão NiCd).
(Verifique o símbolo inscrito no aparelho para saber
qual o tipo de bateria).
C
3 Introduza a cabeça da escova no respectivo
encaixe e rode-a até prender.
◗ Coloque a pasta de dentes na escova.
4 Encoste a escova aos dentes e prima o botão
“on/off”.
C
5 Escove um dente de cada vez,até limpar toda
a cavidade bocal (mínimo 2 minutos – leia as
instruções sobre o modo de escovagem
correcto).
◗ Devido ao sistema de Pressão Controlada,se a
escova fizer demasiada pressão sobre as gengivas,
sentirá e ouvirá um clique e a cabeça da escova
retrocederá ligeiramente.
C
6 Quando terminar,limpe o interior e o
exterior da cabeça da escova,bem como a
própria escova.
◗ Após a utilização,volte a colocar a escova no
carregador.
Para mais informações sobre a forma de utilização da
sua escova eléctrica,leia atentamente o capítulo
“Instruções de utilização”.
1
2
Page 75

Importante
◗ Verifique se a tomada onde vai ligar a unidade de
carga tem corrente.Nalgumas casas de banho,a
passagem de electricidade para a tomada é
interrompida quando se acende a luz.
◗ Antes da primeira utilização, deixe o aparelho em
carga durante 6 horas (versão NiMH) ou 3 horas
(versão NiCd).
◗ O cabo de alimentação do carregador não pode
ser substituído.Se o fio se estragar, deverá deitar o
carregador fora. Queira dirigir-se ao seu
distribuidor Philips ou à Organização Philips local
(consulte o Certificado de Garantia Mundial).
◗ Se a sua escova estiver marcada com o símbolo
leia o texto que se segue:
Como forma de proteger o meio ambiente,esta
escova está equipada com uma bateria níquelhidrida (NiMH) que contém menos de 0.01% de
cádmio.
Não obstante, quando se desfizer da escova,
deverá ter o cuidado de separar a bateria do
restante lixo doméstico e de a colocar nos
contentores ecológicos próprios. Consulte o
capítulo “Aspectos ambientais”.
◗ Se a sua escova estiver marcada com o símbolo
leia o texto que se segue:
A bateria incorporada (NiCd) contém
substâncias susceptíveis de poluirem o meio
ambiente.
Quando chegar a hora de se desfazer da escova
eléctrica, retire a bateria e entregue-a num ponto
de recolha próprio ou desfaça-se dela seguindo as
disposições legais sobre esse tipo de desperdícios.
Consulte o capítulo “Aspectos ambientais”.
PORTUGUÊS 77
Page 76

78 PORTUGUÊS
Uns dentes saudáveis
devem ser
preservados, tanto
mais que precisamos
deles para toda a
vida.Sendo a placa
bacteriana a
principal causa dos
problemas nos
dentes, uma boa
higiene oral torna-se
essencial.A
escovagem adequada
e diária dos dentes
ajuda a remover a
placa bacteriana e contribui
para a saúde e longa duração
dos dentes e das gengivas.
O que é a placa
bacteriana?
A placa bacteriana é uma camada
macia e pegajosa que se forma
sobre os dentes.Forma-se,
sobretudo,nas zonas de acesso
mais difícil,nos espaços
interdentários e na linha das
gengivas.A placa bacteriana é
formada,essencialmente,por
bactérias que transformam os
açúcares existentes nos
alimentos em ácidos prejudiciais.
Devido à sua cor branca
amarelada,a placa não se detecta
facilmente.Felizmente,enquanto
a placa bacteriana estiver macia,
pode ser removida facilmente
através de uma escovagem
correcta e cuidadosa.
Quais são as
consequências da placa
bacteriana?
Os ácidos da placa bacteriana
dissolvem o esmalte dos dentes e
das coroas,podendo dar origem
às cáries dentárias.As bactérias
produzem toxinas que poderão
causar inflamações nas gengivas
(gengivites).As gengivas
inflamadas ficam vermelhas e
inchadas e poderão sangrar
durante a escovagem ou quando
se come.Além disso,a inflamação
pode espalhar-se para os ossos
Cuidados a ter com os seus dentes
Page 77

PORTUGUÊS 79
do maxilar e dar origem à queda
dos dentes.Se a placa não for
removida diariamente,poderá
calcificar e degenerar em tártaro,
aderindo fortemente aos dentes.
O tártaro,por sua vez, é uma
excelente plataforma para o
crescimento de nova placa,
aumentando o risco de cáries e
de inflamações.
Qual é o melhor método
de escovagem dos dentes?
A escovagem dos dentes é uma
actividade que deve ser
executada com cuidado.Por isso,
não deve ser feita à pressa para
atingir todas as zonas da boca.As
escovas de dentes eléctricas
provaram ser mais eficazes na
remoção da placa bacteriana do
que as escovas manuais.Com a
Philips Jordan Sensiflex basta
escovar os dentes de ambos os
lados durante alguns segundos
para limpar eficazmente os
dentes e as gengivas que os
circundam.Desta forma, toda a
boca ficará limpa em poucos
minutos (consulte o capítulo
“Instruções”).Se quiser,poderá
aconselhar-se com o seu dentista
ou higienista oral sobre a melhor
forma de escovar os seus dentes.
Posição correcta da
escova
A escova Philips Jordan Sensiflex
foi concebida para executar os
movimentos mais adequados para
a remoção eficaz da placa
bacteriana.Como não é
necessário deslocar a escova de
um lado para o outro da boca,só
tem de se preocupar em colocar
a escova correctamente.As
cerdas oscilantes e rápidas da
escova soltam e limpam a placa
bacteriana.As escovas mais
compridas e suaves da Ponta
Activa garantem uma limpeza
profunda e eficaz dos espaços
interdentários e da zona mais
recuada da boca.
Page 78

80 PORTUGUÊS
Tempo de escovagem
Guiando a escova lentamente
pelo interior,pelo exterior e pela
coroa de todos os dentes e
molares,estará a proceder à
limpeza de todas as zonas onde a
placa tem tendência a instalar-se.
As zonas de acesso mais difícil,
como o espaço atrás dos
molares,a linha das gengivas e
atrás dos dentes da frente,
requerem maior atenção.Assim,é
importante que dispense tempo
suficiente à sua higiene oral
diária.
Pressão ideal
Se exercer muita pressão,poderá
causar lesões nos dentes e nas
gengivas.E,contrariamente ao
que se poderia pensar,a placa
não é removida com a mesma
eficácia do que com uma
escovagem mais suave.O sistema
único de Pressão Controlada
ajuda a conhecer e verificar a
pressão exer cida.Se aplicar
demasiada pressão,a escova
emitirá imediatamente um aviso,
através de um clique audível e a
cabeça da escova retrocederá
ligeiramente.Testes clínicos
comprovam que,graças a este
sistema de Pressão Controlada,a
escovagem com a Philips Jordan
Sensiflex resulta em técnicas de
escovagem melhores e mais
seguras.
Page 79

PORTUGUÊS 81
Instruções de utilização
Montagem na parede
C
1 Montagem do carregador na parede.
◗ O carregador não deve entrar em contacto com
água.A escova, contudo, é à prova de água e pode
ser usada em todo o lado com toda a segurança.
◗ Para montar o carregador na parede irá precisar
de 2 parafusos para madeira (3,5 x 25 mm) e de
2 buchas (S5) que encontrará em qualquer casa
da especialidade.
Carga
A unidade de carga pode ser ligada a uma corrente entre
100 e 240 Volts (corrente alterna) (apenas no modelo
HX 2575).
C
1 Ponha a escova em carga durante um
período de 6 horas (versão NiMH) ou 3
horas (versão NiCd) antes de se servir dela
pela primeira vez.
- ◗ Após a utilização,a escova pode ser guardada no
carregador.
◗ Se a bateria da escova estiver em carga, a lâmpada
piloto ficará verde e a piscar.Se a bateria tiver sido
totalmente carregada, a lâmpada piloto estará
sempre acesa.
◗
Se a bateria estiver quase vazia,a lâmpada piloto estará
encarnada e a piscar durante 10 segundos depois de se
ter desligado a escova.
21 mm
1
2
3 hrs
Page 80

82 PORTUGUÊS
Sugestão:A escova pode estar sempre em carga.
Quando começar a utilizar o aparelho,recomendase a sua utilização até a bateria estar vazia. Proceda
desta forma três vezes seguidas.Faça isto com a
escova na posição normal,sem a recarregar entre as
escovagens até o motor quase parar. Para assegurar
a longa duração da bateria, repita este procedimento
de seis em seis meses.
Utilização
C
1 Introduza a cabeça da escova no respectivo
encaixe e rode-a até prender. Deste modo,a
cabeça da escova não se soltará por efeito da
vibração produzida quando em
funcionamento.
C
2 Coloque a escova na boca.
C
3 Prima o botão ‘on/off’ para ligar a escova.
C
4 A escova começará a girar na velocidade
máxima.Para mudar para uma velocidade
mais baixa,prima o botão da velocidade 2.
1
2
Page 81

PORTUGUÊS 83
Escovagem
C
1 Encoste a escova em ângulo com o dente,de
forma a cobrir a superfície do dente e a linha
das gengivas.Mantenha a escova nessa
posição durante alguns segundos e passe
para o dente seguinte.
◗ A cabeça redonda da escova remove a placa
bacteriana dos dentes e das gengivas.
◗ O movimento independente da Ponta Activa
limpa os espaços interdentários.
C
2 A escova faz o trabalho todo sozinha.Basta
apenas que a guie cuidadosamente ao longo
dos dentes e das respectivas coroas.
◗ Deverá cobrir toda a superfície dos dentes
(interior,exterior e coroas),bem como as
gengivas.Se utilizar sempre o mesmo método,não
correrá o risco de falhar algumas zonas
◗ Consulte as instruções de escovagem que
acompanham o aparelho,assim como o capítulo
“Cuidados a ter com os seus dentes”.
Escovagem segura
C
1 O sistema de Pressão Controlada verifica a
pressão exercida pela escova.
Page 82

C
2 Se a escova fizer demasiada pressão sobre as
gengivas,sentirá e ouvirá um clique e a
cabeça da escova retrocederá ligeiramente.
Logo que se alivia a pressão,a escova retoma
a sua posição normal.
◗ Nas primeiras utilizações é natural que isto
aconteça com alguma frequência mas,com a
continuação,descobrirá qual a pressão certa e a
escova retrocederá muito menos vezes.
Sugestão:Se a placa bacteriana ficar bem limpa,as
gengivas terão um tom rosado à volta dos dentes.
Gengivas saudáveis não sangram quando se come
ou se escovam os dentes (consulte o capítulo
“Cuidados a ter com os seus dentes”).
Se, não obstante, as suas gengivas sangrarem
ligeiramente nas primeiras utilizações da escova
eléctrica, não se preocupe porque o sangramento
parará ao fim de alguns dias.Porém,se isso não
acontecer, aconselhamos uma visita ao seu dentista
ou higienista oral.
Tempo de escovagem mínimo:2 minutos
◗ Regra geral, 2 minutos são suficientes para limpar
os dentes convenientemente.Naturalmente, nada
impede que o tempo de escovagem seja superior
a 2 minutos.
Para indicar que os 2 minutos foram atingidos,a
escova está equipada com um Temporizador Duplo.
Nos primeiros 2 minutos de escovagem,a lâmpada
piloto verde do Temporizador Duplo fica a piscar.
Passados esses dois minutos,o processo de
escovagem é momentanemanete interrompido e a
lâmpada verde fica acesa.Esta interrupção ocorre de
2 em 2 minutos.
84 PORTUGUÊS
Page 83

O Temporizador Duplo mede o tempo de
escovagem actual,mesmo que desligue a escova
durante a escovagem (num máximo de 10
segundos).
Após a escovagem
C
1 Deixe a escova a trabalhar enquanto enxagua
a cabeça à torneira.A água deve estar tépida
(máx.60ºC).
C
2 Enxague também o interior da cabeça da
escova.
C
3 SVolte a ligar a escova para lhe retirar os
restos de pasta de dentes que tenham ficado
no veio do motor.
C
4 Guarde a cabeça da escova no respectivo
compartimento,virada de cabeça para baixo,
ficando o anel colorido para cima.
5 O carregador pode ser limpo com um pano
húmido.
◗ Não se esqueça de desligar o carregador da
corrente!
CLICK
PORTUGUÊS 85
Page 84

Substituição da cabeça da escova
C
1 Para obter sempre os melhores resultados,
substitua a cabeça da escova de três em três
meses.
◗ A cabeça da escova também deve ser substituída
quando as cerdas começarem a ficar viradas para
fora.
◗ Poderá adquirir novas cabeças na mesma loja
onde comprou a sua escova de dentes eléctrica
Philips-Jordan.
Sugestão:Se as cerdas estiverem gastas,espalharão
a placa bacteriana em vez de a removerem.Além
disso,poderão lesar as gengivas.Por isso, é
importante que as substitua sempre de três em três
meses.
Bolsa de transporte
(HX 2575)
◗ Quando viaja,pode guardar a escova e seus
acessórios, com toda a higiene e segurança, na
bolsa de viagem fornecida.
86 PORTUGUÊS
Page 85

Aspectos ambientais
Quando,em devido tempo,se desfizer da sua
escova de dentes eléctrica,retire-lhe a bateria e
deite-a nos contentores próprios.
◗ Nota:Também poderá dirigir-se a um Centro de
Serviço Autorizado Philips que se encarregará
desse serviço.
◗ A bateria não deve ser retirada antes de estar
totalmente vazia.Antes de retirar a bateria, deixe
a escova a trabalhar até parar por completo.
◗ Nota:A base do aparelho só deverá ser
desaparafusada se pretender retirar a
bateria.
Uma vez desaparafusada,a base da escova deixará
de ser resistente à água.
Por conseguinte,também a garantia perderá a sua
validade. O selo existente na base é prova da
inviolabilidade do aparelho.
PORTUGUÊS 87
2
1
Page 86

88 TÜRKÇE
İlk kullanım
1 Fişi prize sokunuz.
C
2 Diş fırçasını şarj ünitesine yerleştiriniz.
Fırça şimdi otomatik olarak şarj edilir.
Cihazı ilk kullanımdan önce (NiMh çeşidi) 6 veya
(NiCD çeşidi) 3 saat şarj ettiriniz.
(Cihazınızın çeşidini tespit etmek üzere cihazdaki
simgeye bakınız!)
C
3 Diş fırçasının başını, süngü takma yöntemiyle,
fırça sapına takınız ve döndürünüz.
◗ Fırçaya biraz diş macunu koyunuz.
4 Fırçayı dişlerinize dayanınız ve açma/kapama
düğmesine basınız.
C
5 Tüm dişlerinizi tamamen temizleyinceye
kadar tek tek fırçalayınız.(en az 2 dakika,
fırçalama talimatlarına bakınız!)
◗ Kontrollü Basınç sistemi sonucu fazla basınç
kullanıldışında fırçanın arkaya eğildiğini duyacak ve
hissedeceksiniz.
C
6 Kullanımdan sonra fırçanın başının iç ve dış
taraflarını ve fırçanın sapını temizleyiniz.
◗ Kullandıktan sonra dış fırçasını yine şarj ünitesine
koyabilirsiniz.
Cihazın kullanılması konusunda daha fazla bilgi
edinmek üzere kullanım talimatı bölümüne bakınız!
1
2
Page 87

Önemli
◗ Şarj ünitesini bağladığınız prizde akım olmasına
dikkat ediniz. Bazı banyolarda, ışık kapatıldığında,
prizdeki akım da kesilir.
◗ Cihazı ilk kullanımdan önce (NiMh çeşidi) 6 veya
(NiCD çeşidi) 3 saat şarj ettiriniz.
◗ Şarj ünitesinin akım kordonu, yenilenemez. Şayet
bu kordon hasar görmüşse üniteyi atmanız gerekir.
Yardım veya tavsiye için ülkenizdeki Philips bayine
veya Philips organizasyonuna başvurunuz. (World
Wide Guarantee -Dünya çapındaki garanti
kağıdına bakınız!)
◗ Diş fırçanızda simgesi bulunduğunda,
aşağıdaki metin geçerlidir:
Bu diş fırçası çevre koruma açısından, %0.01’den
daha az kadmiyum içeren nikel-hibrid (NIMH)
pille donatılmıştır.
Yine de, diş fırçanızı atmaya karar verdiğinizde,
pilini normal ev çöplerinden ayrı tutmanız ve bunu
resmi olarak tanınmış toplama yerine getirmeniz
tavsiye edilir. Bunun için lütfen ‘Çevre koruma’
bölümüne bakınız!
◗ Diş fırçanızda simgesi bulunduğunda,
aşağıdaki metin geçerlidir:
İçinde bulunan şarj edilebilen (NICd) pil çevreyi
kirletici madde içermektedir.
Diş fırçanızı ileride attığınızda, pilinin normal ev
çöplerinden ayrı tutulmasını sağlayınız ve bunu
resmi olarak tanınmış toplama yerine getiriniz.
Bunun için lütfen ‘Çevre koruma’ bölümüne
bakınız!
TÜRKÇE 89
Page 88

90 TÜRKÇE
Sağlıklı dişler özenle
korunmalıdır. Bu
görüş mantıklıdır,
çünkü dişlerimizi
ömür boyu
kullanmak isteriz.
Plak denilen yemek
birikintilerinin, diş
çürümesinde büyük
etken
oluşturmasından
dolayı, doğru diş
bakımı esastır. Her
gün titiz bir şekilde
dişlerinizi
fırçalamakla bu plak
katmanını ortadan kaldırmış
ve dişlerinizi ve dişetlerinizi
daha uzun bir süre sağlıklı
korumuş olursunuz.
Plak nedir?
Plak dişlerimizde bulunan
yumaşak, yapışkan,sağlığa zararlı
bir katmandır. Genellikle diş
araları ve dişetlerinin kenarı gibi
fırçanın zor ulaştığı yerlerde
oluşur. Plak genellikle gıdamızdaki
şekerleri, zararlı aside dönüşen
mikropları içerir. Sarımsı beyaz
renkli olması nedeniyle bunu
dişlerimizde zor farkederiz.
Ancak, plak henüz yumuşakken
dikkatli ve doğru fırçalamayla
kolayca kaldırılır.
Plakın etkileri nelerdir?
Plaktaki asit, diş minesini eritir ve
bu da çürümeye yol açabilir.
Mikroplar, dişetlerinde iltihap
(gingivit) yapabilen toksin
üretirler. İltihaplı dişetleri
genellikle kırmızı ve şişkin olur ve
yemek yerken yada fırçalarken
kanamaya başlayabilirler.Ayrıca,
iltihap dişetinden alttaki çene
kemiğine geçebilir ve bu da
dişlerin dökülmesine neden
olabilir. Plak katmanı her gün
kaldırılmazsa dişlere sımsıkı
yapışan diş taşına dönüşebilir. Diş
taşı da, yeni bir plak katmanı
oluşmasına daha iyi bir ortam
hazırlar. Böylece diş çürümesi ve
iltihap riski daha da artar.
Dişlerinize en iyi şekilde bakmak
Page 89

TÜRKÇE 91
En uygun diş fırçalama
yöntemi hangisidir?
Diş fırçalamak, itinalı yapılması
gereken bir iştir. Bu nedenle ağzın
tüm alanlarına ulaşmak için
yeterince zaman ayırınız.Plak
kaldırma konusunda elektrikli diş
fırçalarının, normal diş
fırçalarından daha etkili olduğu
ispat edilmiştir. Philips Jordan
Sensiflex ile dişlerin tüm yanlarını
bir iki saniye firçalamak, hem
dişleri hem de etraftaki dişetlerini
temizlemek için yeterlidir. Buş
ekilde tüm di_lerinizi bir iki
dakikada temizleyebilirsiniz.
(fırçalama talimatına da bakınız!)
İsterseniz diş doktorunuzdan
veya diş temizliği uzmanından
şahsi fırçalama tavsiyesi de
alabilirsiniz.
Diş fırçasının doğru
yerleştirilmesi
Philips Jordan Sensoflex, plak
katmanını en iyi şekilde kaldıran
hareketi yapmak üzere
tasarlanmıştır. Bununla, fırçayı
sağa sola hareket ettirme gereği
olmadığından tüm dikkatinizi
fırçayı dişlerinize doğru
yerleştirmeye verebilirsiniz.
Fırçanın hızla titreşen kılları önce
plak katmanını çıkarır, daha sonra
ise silip yok eder.Aktif ucun uzun
ve yumuşak kıllar, dişlerin
arasında ve arkasında derin ve
etkili bir temizleme sağlar.
Page 90

92 TÜRKÇE
Yeterli zaman
Fırçayı yavaşça tüm dişlerin iç, dış
ve çiğneme yanlarında
gezdirirken, plak oluşabilecek tüm
alanları temizlemiş olursunuz.Azı
dişlerinin arkaları, dişetlerinin
kenarları ve ön dişlerin arka tarafı
gibi zor ulaşılabilen yerler
fazladan dikkat ister. Bu nedenle
günlük ağız bakımına yeterli
zaman ayırmanız önemlidir.
En uygun basınç
Fazla sert fırçalamak da diş ve
dişetlerinize zarar verebilir.
Ayrıca,düşündüğünüzün tam
tersi, dişleri hafifçe fırçalamakla
plak daha az bir etkiyle kaldırılır.
Cihazdaki özel kontrollü basınç
sistemi, fırçalama basıncını
kontrol etmenize yardımcınız
olur. Fırçaya fazla basınç
yapıldığında,fırça sizi hem
duyduğunuz hem de hissettiğiniz
bir tik sesiyle uyarır. Bundan
sonra fırçanın başı geriye düşer.
Yapılan klinik testlerinden, Philips
Jordan Sensıflex ile diş fırçalamak,
bu Kontrollü Basınç sistemi
sayesinde daha iyi ve daha
emniyetli diş fırçalama tekniği
oluşturduğunu göstermektedir.
Page 91

TÜRKÇE 93
Directions for use
Cihazı duvara asmak
C
1 Şarj ünitesini duvara asınız.
◗ Şarj ünitesini suya temas ettirmeyiniz. Diş fırçası ise
suya dayanıklı olduğundan bunu her yerde
emniyetli olarak kullanabilirsiniz.
◗ Şarj cihazını duvara monte etmek için, 2 ahşap
vidası (3.5 x 25mm) ve 2 duvar prizine (S5)
ihtiyacınzıiz vardır. Gerekli olan malzemeleri
nalburlardan temin edelbilirsiniz.
Şarj etme
Şarj ünitesi 100 ile 240 Voltluk arasında olan (dalgalı) akıma
bağlanabilir.(sadece tip HX 2575).
C
1 Cihazı ilk kullanımdan önce (NiMh çeşidi) 6
veya (NiCD çeşidi) 3 saat şarj ettiriniz.
- ◗ Diş fırçası kullanımından sonra şarj ünitesine geri
konulabilir.
◗ Diş fırçasındaki pil şarj yapılırken, kontrol lambası
yeşil renkte yanıp sönmektedir. Pil tamamen
dolduğunda aralıksız yanar.
◗
Pil bitmeye yakın, kontrol lambası kırmızıya dönüşür ve
diş fırçası kapatıldıktan sonra 10 saniye yanıp söner.
21 mm
1
2
3 hrs
Page 92

94 TÜRKÇE
Tavsiye: Diş fırçası sürekli olarak şarjda bırakılabilir.
Cihazı kullanmaya başladığınızda pil boşalıncaya
kadar kullanmanızı ve bunu üst üste üç kez
yapmanızı tavsiye ederiz. Bunu, cihazı normal şekilde
kullanarak, ancak fırçalamaların arasında şarj
yapmadan, motor hemen hemen duruncaya kadar
uygulayabilirsiniz. Pilin ömrünü uzatmak açısından, bu
işlemi altı ayda bir tekrarlayınız.
Diş fırçası nasıl kullanılır?
C
1 Diş fırçasının başını, süngü takma yöntemiyle,
fırça sapına takınız ve döndürünüz.Böylece
fırçanın başının titreşim nedeniyle yerinden
çıkması önlenmiş olur.
C
2 Fırçayı ağzınıza koyunuz.
C
3 Diş fırçasını çalıştırmak için açma/kapama
düğmesine basınız.
C
4 Diş fırçası en yüksek hızla titremeye başlar.
Titreşimi daha düşük hıza ayarlamak için 2
hız düğmesine basınız.
1
2
Page 93

TÜRKÇE 95
Fırçalamak
C
1 Fırçayı dişe uygun bir açıda yerleştirerek hem
diş yüzeylerini hem de dişetlerinin kenarlarını
fırçayla kaplayınız. Fırçayı bu vaziyette bir iki
saniyeyi tutunuz ve daha sonra sırayla yandaki
dişe devam ediniz.
◗ Yuvarlak fırça başı, hem dişlerin hem de dişeti
kenarlarının altındaki plak katmanını söküp
çıkartır.
◗ Ayrı hareket eden Aktif Uç ise dişlerin arasını
temizler.
C
2 Sizin yapacağınız sadece, fırçayı tüm dişlerin
yüzeylerinde gezdirmektir. Dişer işi fırçanın
kendisi yapar.
◗ Fırçanın dişlerin tüm yüzlerine (iç, diş ve çiğneme
yüzleri) ve diş etlerine ulaşmasına dikkat ediniz.
Sabit fırçalama rotası, belli yerleri atlamanızı
önleyebilir.
◗ Ayrıca cihazla birlikte gelen fırçalama talimatlarına
ve ‘dişlerinize en iyi şekilde bakmak bölümüne de
bakınız.
Güvenle diş fırçalamak.
C
1 Kontrollü Basınç sistemi, fırçaya verdiğiniz
basıncı kontrol eder.
Page 94

C
2 Fırçayı dişetlerinize fazla sert bastığınızda,
fırçanın başı geriye düşer ve hem uyarıcı bir
tik sesi duyar hem de bunu hissedersiniz.
Basınç azaldığı anda fırça normal pozisyona
dönmüş olacaktır.
◗ Bu durum, fırçayı ilk kullanmaya başladığınızda sık
sık olur. Ancak zaman geçtikçe en uygun fırça
basıncını öğrenmiş olursunuz ve dolayısıyla da
fırça da daha az arkaya düşecektir
Tavsiye: Plak katmanı doğru bir şekilde
kaldırıldığında, dişetleri pembe renk alır ve dişlerin
etrafını sıkı bir şekilde sarar. Sağlıklı dişetleri,
dişlerinizi fırçalarken veya yemek yerken kanamaz.
(dişlerinize en iyi şekilde bakmak bölümüne de
bakınız!) Buna rağmen, fırçayı ilk kez kullandığınızda
dişetleriniz biraz kanarsa, bu kanama birkaç gün
sonra duracaktır.Kanama durmazsa diş doktorunuza
veya diş temizliği uzmanına gidiniz.
Asgari di_ fırçalama süresi: 2 dakika
◗ Dişlerinizi uygun bir şekilde fırçalamak için
genellikle 2 dakika yeterlidir.Tabi ki isterseniz
dişlerinizi 2 dakikadan daha uzun bir süre de
fırçalayabilirsiniz.
Fırça, iki dakikalık sürenin dolduğunu göstermek
için, DuoTimer ile donatılmıştır. Fırçalamanın ilk iki
dakikasında DuoTimer’in yeşil kontrol lambası
yanıp söner. Bu iki dakikadan sonra fırçalamaya
kısa bir ara verilir ve yeşil kontrol lambası sürekli
yanar. Bu ara verme her iki dakikada bir tekrarlanır.
Cihazı fırçalama sırasında kapatırsanız bile
DouTimer (en fazla 10 saniye için), asıl fırçalama
süresini ölçer.
96 TÜRKÇE
Page 95

Dış fırçasını kullandıktan sonra
C
1 Dış fırçasının başını musluğun altında suyla
durularken diş fırçası çalışmaya devam etsin.
Bunun için ılık su kullanınız. (azami olarak
60°C)
C
2 Fırçanın başının iç tarafını da durulayınız.
C
3 Fırçanın sapından diş macunu artıklarını
durularken fırçayı yine çalıştırınız.
C
4 Fırçanın başını ters vaziyette, renkli yüzük
üstte görülecek şekilde, kullanımdan sonra
saklama bölümüne koyunuz.
5 Şarj ünitesi ıslak bezle silinebilir.
◗ Önce şarj ünitesini akımdan çıkartınız.
CLICK
TÜRKÇE 97
Page 96

Fırça başının yenilenmesi
C
1 En iyi sonuç için diş fırçasının başını her üç
ayda bir değiştiriniz.
◗ Kıllar dışarı yayıldı_ında da fırçanın başını
değiştiriniz.
◗ Yeni fırça başları, Philips Jordan diş fırçasını
aldığınız dükkandan temin edilir.
Tavsiye: Eskimiş fırçalar, plak katmanlarını
kaldırmaktan ziyade bunların yerlerini değiştirir ve
ayrıca dişetlerine de zarar verebilir. Bu nedenle
fırçanın başını her üç ayda bir değiştirmeniz çok
önemlidir.
Yolculuk kutusu
(HX 2575)
◗ Diş fırçası ve aksesuarlarını, yolculuk yaparken,
temiz ve emniyetli bir şekilde, yolculuk kutusunda
saklayabilirsiniz.
98 TÜRKÇE
Page 97

Çevre koruma
İleride cihazı atacağınızda, pilini çıkartarak bunu
çevre dostu bir yöntemle atınız.
◗ Not: Atacağınız diş fırçasını Philips Servis
Merkezine de verebilirsiniz. Burada çevreye zarar
vermeksizin içindeki pil çıkartılarak atılır.
◗ Pil cihazdan çıkartılmadan önce tamamen boş
olmalıdır. Bunun için diş fırçasını duruncaya kadar
çalı_tırınız ve daha sonra pili çıkartınız.
◗ Not: Diş fırçasının taban vidalarını sadece pili
çıkartmak istediğinizde açınız.
Taban vidaları açıldıktan sonra, dış fırçası suya
dayanıklılığını kaybedebilir. Bu nedenle diş
fırçasının tabanı açıldıktan sonra garanti geçersiz
olur.Tabandaki etiket zarar görmediği sürece, diş
fırçası gereksiz açılmamış demektir.
TÜRKÇE 99
2
1
Page 98

Page 99

Page 100

4203 000 45981
 Loading...