

Page 1
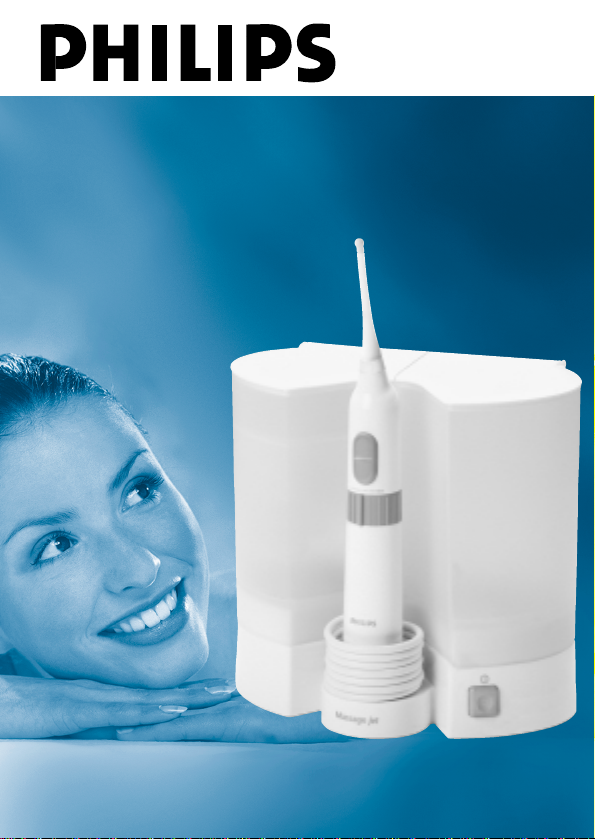
sensiflex
dental center HX2225
Page 2

2
Page 3
ENGLISH 4
BAHASA MELAYU 10
BAHASA INDONESIA 16
23
29
HX2225
3
Page 4

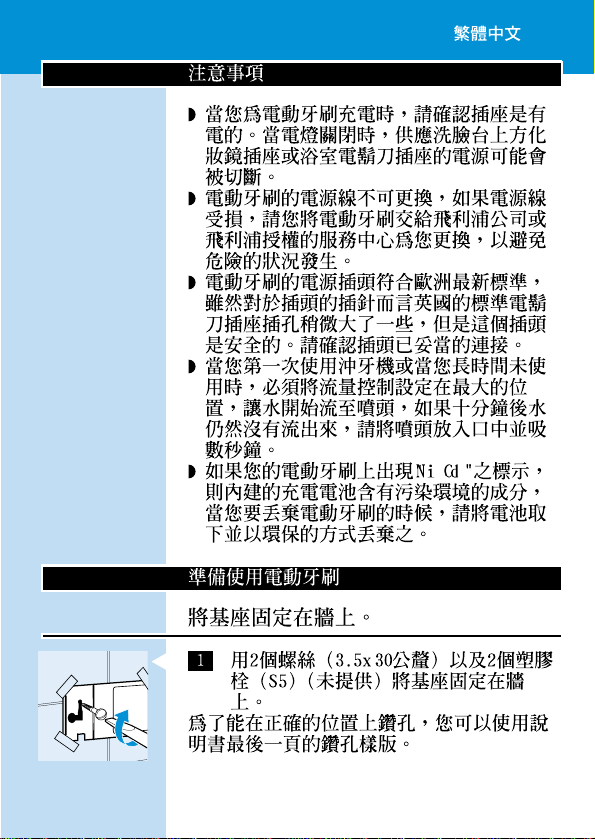
Important
◗ If the mains cord of this appliance is damaged,
it must always be replaced by Philips or a
service centre authorised by Philips,in order
to avoid hazardous situations.
◗ The mains plug of the charging unit meets the
latest European standards.The plug is safe,
although the standard UK shaver socket holes
may be slightly too wide for the pins of the
plug.Make sure a proper connection is made.
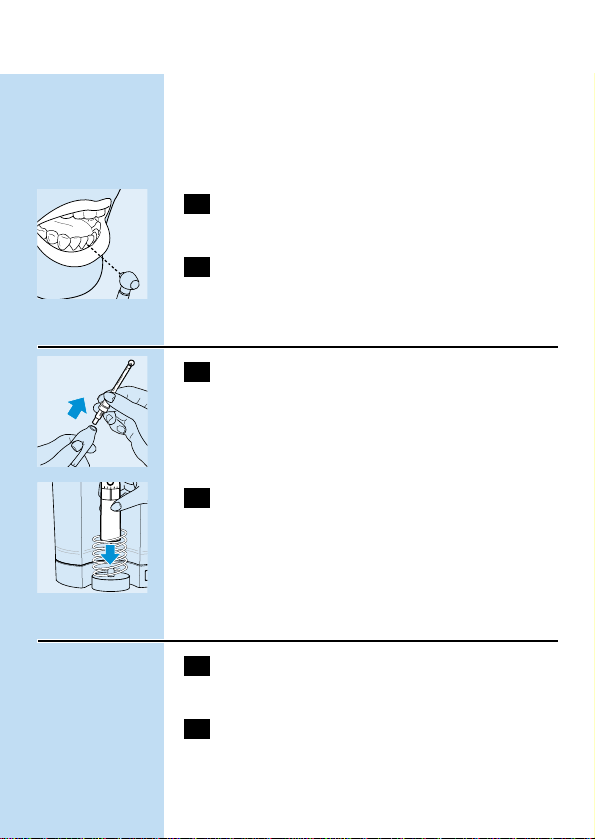
◗ When you use the Massage Jet for the first
time or when you have not been using it for a
long time,it is necessary to set the volume
control to its maximum setting to start the
water flowing to the jet tip.If the water
doesn't flow out after 10 seconds,put the jet
tip nozzle in your mouth and suck it shortly.
Taking optimal care of your teeth
Healthy teeth are to be treasured,which is logical,
for we want them to last a lifetime.Healthy gums
play an important role.By massaging with the
Massage Jet you keep your gums healthy.
Proper dental care is essential.By brushing only,
you may not remove all remaining food particles.
This may cause caries.By using the Massage Jet,
you are able to remove all remaining food
particles.Even hard to reach places,such as
between your teeth,can be cleaned.
ENGLISH4
Page 5

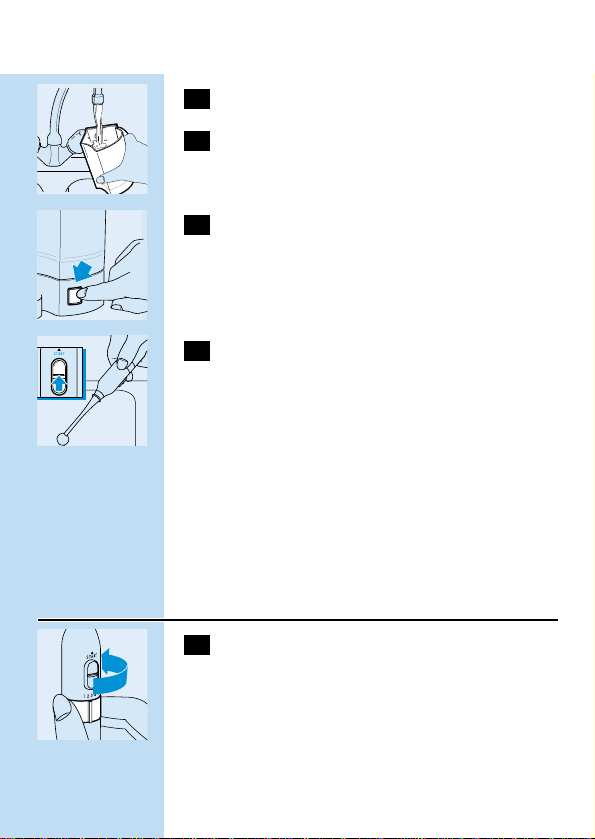
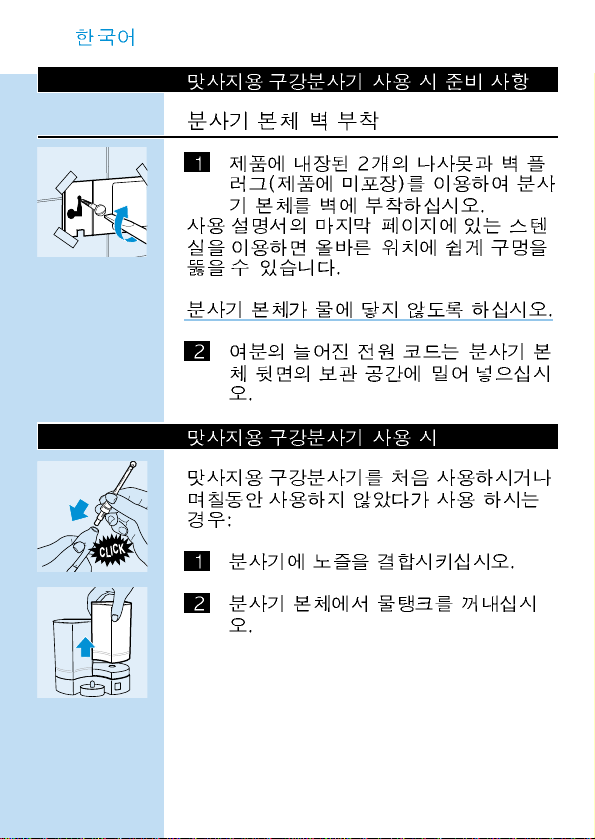
Preparing the Massage Jet for use
Mounting the base unit to the wall
C
1 Mount the base unit to the wall,using 2
screws (3.5x30mm) and 2 wall plugs (S5)
(not included).
To drill the holes in the right places, you can use
the drilling stencil on the last page of these
directions for use.
Do not allow the base unit to come into contact
with water.
2 Push excess mains cord into the storage
space in the back of the base unit.
Using the Massage Jet
When you use the Massage Jet for the first time
or when you have not been using it for a couple
of days:
C
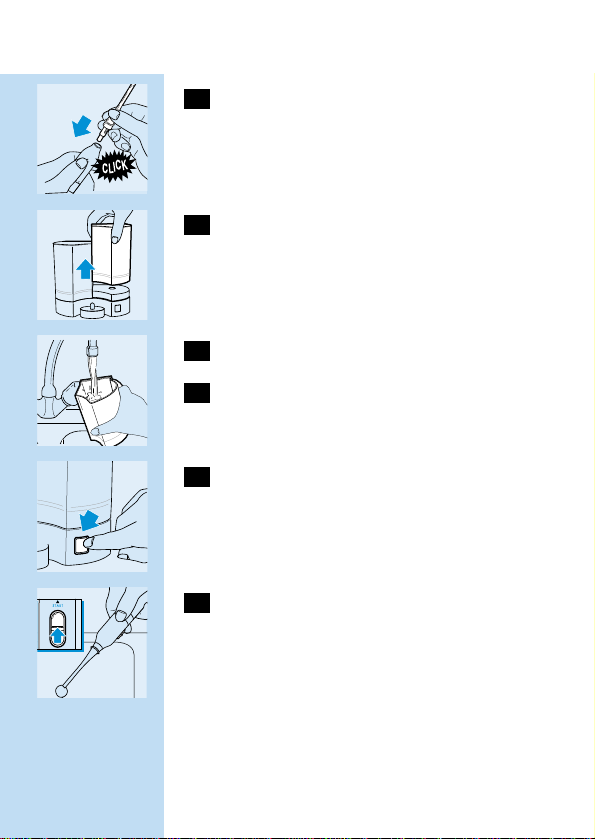
1 Click the jet tip onto the appliance.
C
2 Remove the water reservoir from the base
unit.
ENGLISH 5
Page 6
C
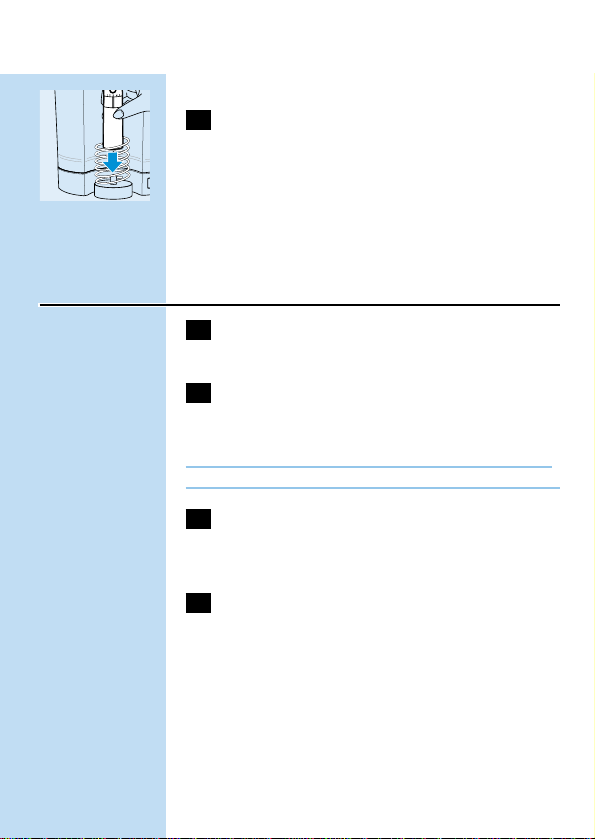
3 Fill the water reservoir with water.
4 Put the water reservoir back onto the
base unit.Press it home properly.
C
5 Press the power button to switch the
Massage Jet on.
C
6 Push the slide on the handgrip upwards to
make the water start running.
When you use the Massage Jet for the first time,
let the appliance run until the water reservoir is
completely empty. Refill the water reservoir.
Tip:You may add mouthwash for extra freshness
to the water.After using mouthwash, fill the water
reservoir with clean, unmixed water and pump all
the water out of the appliance and into the
washbasin.
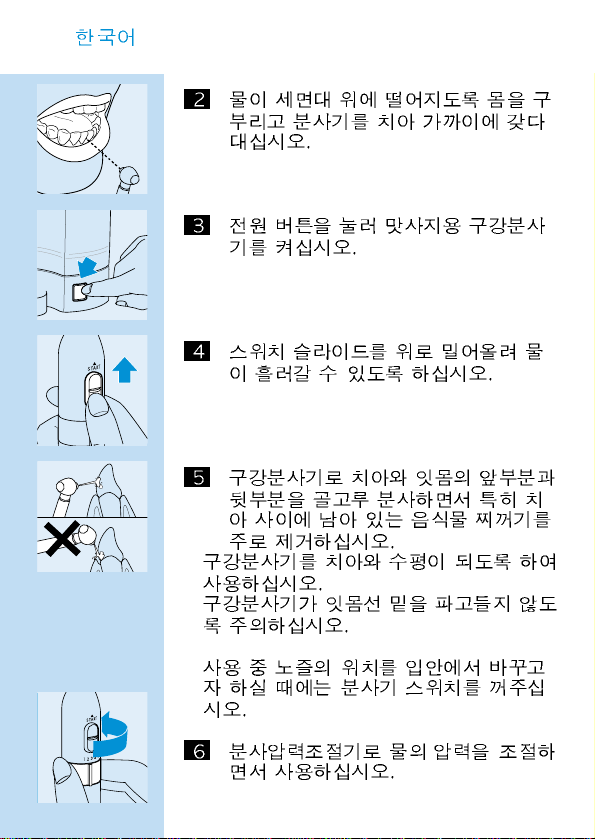
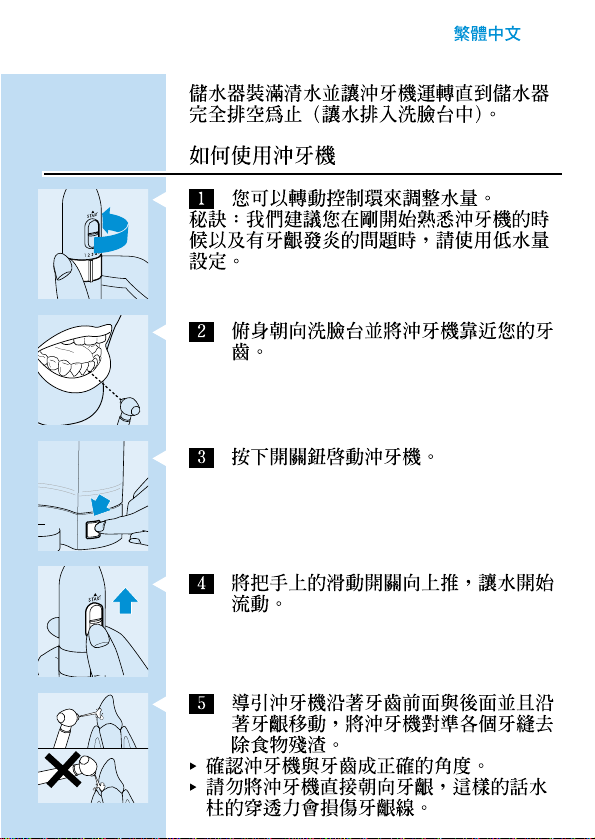
How to use the Massage Jet
C
1 Select position xfor cleaning.
ENGLISH6
Page 7
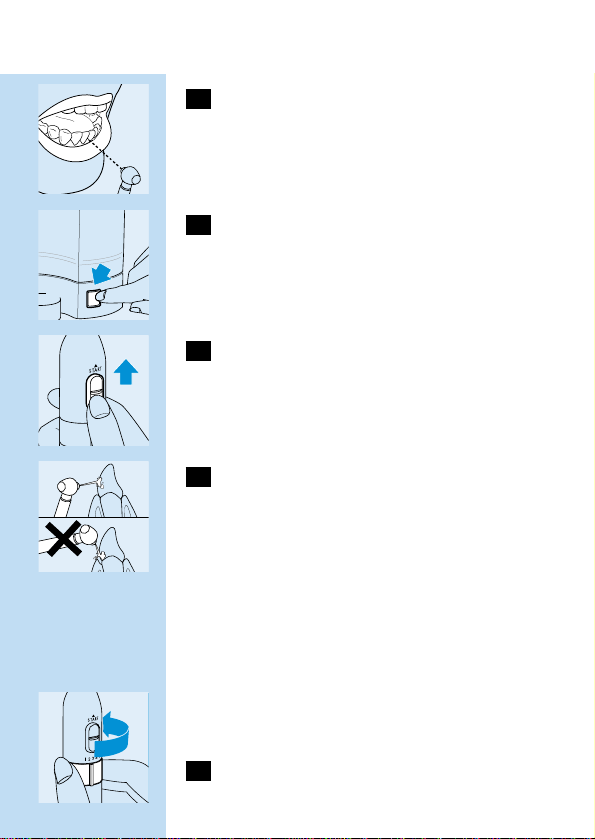
C
2 Bend over the washbasin and hold the jet
tip close to your teeth.
C
3 Press the power button to switch the
Massage Jet on.
C
4 Push the switch slide upwards to start the
water running.
C
5 Guide the water jet along the front and
the back sides of the teeth and along the
gums,and direct it especially at the spaces
between the teeth to remove any
remaining food particles.
B
Make sure the water jet is at straight angles to
the teeth.
B
Do not direct the water jet at the gums in such
way that the jet penetrates beneath the gum line.
◗ You can switch the water supply off with the
switch slide before changing the position of
the jet tip in your mouth.
C
6 Adjust the water volume by turning the
control ring.
ENGLISH 7
Page 8
◗ Tip:We advise you to use a low water volume
setting while you are getting accustomed to
the Massage Jet and when you are troubled by
gum inflammation.
7 After cleaning,lower the water volume for
gum massage.
C
8 Guide the water over your teeth and
gums.
After using the Massage Jet
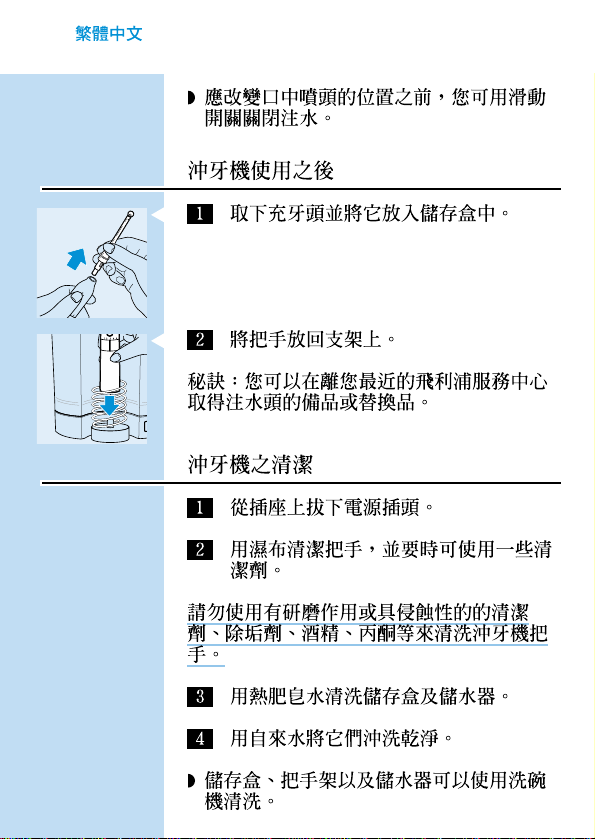
C
1 Remove the jet tip and put it in the
storage compartment.
C
2 Put the handgrip back into its holder.
Tip:You can obtain extra or replacement jet tips
at your nearest Philips Service Centre.
Cleaning the Massage Jet
1 Remove the mains plug from the wall
socket.
2 Clean the appliance with a damp cloth (if
necessary with some detergent).
ENGLISH8
Page 9

Do not use abrasive or aggressive cleaners
scourers, alcohol, acetone, etc.
3 Clean the storage compartment,the
handgrip holder,the insert container and
the water reservoir in hot soapy water.
4 Rinse them under a running tap.
◗ The storage compartment,the handgrip
holder and the water reservoir can also be
cleaned in a dishwasher.
Guarantee & service
If you need information or if you have a problem,
please visit the Philips Web site at
www.philips.com or contact the Philips Customer
Care Centre in your country (you will find its
phone number in the worldwide guarantee
leaflet).If there is no Customer Care Centre in
your country,turn to your local Philips dealer or
contact the Service Department of Philips
Domestic Appliances and Personal Care BV.
Extra tips about the Massage Jet (for replacement
or extension) are available as an option at Philips
Service Centres.
ENGLISH 9
Page 10

Penting
◗ Jika kord utama peralatan ini rosak,ia mestilah
sentiasa digantikan oleh Philips atau pusat
perkhidmatan yang dibenarkan oleh Philips
untuk mengelakkan keadaan berbahaya.
◗ Plag utama unit mengecas ini menepati piawai
Eropah mutakhir.Plag ini selamat, walaupun
soket pencukur UK adalah lebih sedikit lebar
untuk pin-pin plag ini.Pastikan sambungan
dibuat dengan sempurna.
◗ Apabila anda menggunakan Jet Pengurut buat
pertama kali atau apabila anda tidak
menggunakannya setelah beberapa lama,
adalah perlu untuk tetapkan kawalan volume
kepada ketetapan maksimum untuk
memulakan air mengalir ke hujung jet.Jika air
tidak mengalir keluar selepas 10 saat,
masukkan hujung muncung jet ke dalam mulut
anda dan hisapnya sekejap.
Menjaga gigi anda secara optimal
Gigi yang sihat adalah sangat bernilai, ianya logik,
kerana kita mahu ianya kekal sepanjang hayat.Gusi
yang sihat memainkan peranan yang penting.
Dengan mengurut dengan Jet Pengurut, ia akan
menjaga gusi anda supaya sihat.
Penjagaan gigi yang sempurna adalah penting.
Hanya dengan memberus tidak akan
mengeluarkan semua partikel makanan.Ini akan
menyebabkan karies.Dengan menggunakan Jet
Pengurut,anda akan dapat menanggalkan kesemua
partikel makanan.Walaupun tempat-tempat yang
BAHASA MELAYU10
Page 11

sukar dicapai seperti di antara gigi,ia boleh
dibersihkan.
Menyediakan Jet Pengurut untuk
menggunakannya
Memasangkan unit dasar pada dinding.
C
1 Pasangkan unit dasar pada dinding,
menggunakan 2 skru (3.5x30mm) dan 2
plag dinding (S5) (tidak termasuk).
Untuk dril lubang pada tempat-tempat yang betul,
anda boleh menggunakan stensil dril pada muka
surat terakhir arahan ini.
Jangan biarkan unit base dari tersentuh dengan air.
2 Tolak kord utama yang berlebihan ke dalam
ruang storan pada bahagian belakang unit
asas.
Untuk menggunakan Jet Pengurut
Apabila anda menggunakan Jet Pengurut buat
pertama kali atau apabila anda telah tidak
menggunakannya setelah beberapa hari:
C
1 Klik muncung jet pada peralatan.
C
2 Tanggalkan takung air dari unit dasar.
BAHASA MELAYU 11
Page 12

C
3 Isikan takung air dengan air.
4 Letakkan takung air semula pada unit dasar.
Tekannya supaya masuk dengan baik.
C
5 Tekan butang kuasa untuk menghidupkan
Jet Pengurut.
C
6 Tolak luncuran pada tempat cengkaman
tangan ke atas untuk mengalirkan air.
Apabila anda menggunakan Jet Pengurut buat
pertama kali,biarkan peralatan berjalan sehingga
takung air betul-betul kering. Isikan semula takung
air.
Petua:Anda boleh tambah pembersih mulut
kepada air untuk kesegaran tambahan.Selepas
menggunakan pembersih mulut, isikan takung air
dengan air bersih tanpa campuran dan pamkan
semua air keluar dari peralatan ke dalam sinki.
Bagaimana menggunakan Jet Pengurut
C
1 Pilih kedudukan xuntuk pembersihan.
BAHASA MELAYU12
Page 13

C
2 Bongkok ke atas sinki dan pegang muncung
jet dekat dengan gigi anda.
C
3 Tekan butang kuasa untuk menghidupkan
Jet Pengurut.
C
4 Tolak suis luncuran ke atas untuk
memulakan pengaliran air.
C
5 Pandu jet air pada sepanjang depan dan
tepi belakang gigi dan pada sepanjang gusi,
dan halakannya terutamanya pada ruang di
antara gigi untuk menanggalkan partikel
makanan yang tertinggal.
B
Pastikan jet air dihalakan bersudut tepat dengan
gigi.
B
Jangan halakan jet air kepada gusi dengan cara
jet air memasuki barisan gusi.
◗ Anda boleh matikan bekalan air dengan suis
luncuran sebelum menukar kedudukan tip jet
dalam mulut anda.
C
6 Laraskan volume air dengan memusing
cincin kawalan.
BAHASA MELAYU 13
Page 14

◗ Petua:Kami nasihatkan anda untuk
menggunakan ketetapan air rendah semasa
anda menyesuaikan diri dengan Jet Pengurut
dan apabila anda ada masalah dengan gusi yang
bengkak.
7 Selepas membersih,rendahkan volume air
untuk mengurut gusi.
C
8 Pandu air di atas gigi dan gusi anda.
Selepas menggunakan Jet Pengurut
C
1 Tanggalkan muncung jet dan masukkannya
ke dalam bahagian stor.
C
2 Masukkan pencengkam tangan ke dalam
pemegangnya.
Petua:Anda boleh mendapatkan muncung jet
tambahan atau gantian dari Pusat Perkhidmatan
Philips anda yang terdekat.
Membersihkan Jet Pengurut
1 Tanggalkan plag utama dari soket dinding.
2 Bersihkan peralatan dengan kain lembap
(jika perlu dengan sedikit bahan pencuci).
BAHASA MELAYU14
Page 15

Jangan gunakan pencuci kasar, tajam, penggosok
alkohol,aseton dll.
3 Bersihkan bahagian penyimpanan,
pemegang tangan,bekas masukan dan
takung air dalam air panas bersabun.
4 Bilaskannya di bawah air pili.
◗ Bahagian penyimpanan,pemegang cengkaman
tangan dan takung air boleh dibersihkan dalam
mesin basuh pinggan mangkuk.
Jaminan & servis
Jika anda perlukan maklumat atau jika anda ada
masalah,silakan lawat Web site Philips pada
www.philips.com atau berhubungan dengan Pusat
Penjagaan Pengguna Philips di negeri ada (anda
boleh dapati nombor telefonnya dalam buku
panduan jaminan seluruh dunia). Jika tiada Pusat
Penjagaan Pengguna di negeri anda, pergi ke
pembekal Philips tempatan anda atau
berhubungan dengan Bahagian Servis Peralatan
Rumah Philips dan Penjagaan Peribadi BV.
Petua tambahan mengenai Jet Pengurut (untuk
gantian atau sambungan) boleh didapati sebagai
satu pilihan di Pusat Perkhidmatan Philips.
BAHASA MELAYU 15
Page 16

Penting
◗ Jika kabel penghubung listrik alat ini rusak,
kabel tersebut harus diganti oleh Philips atau
pusat pelayanan yang ditunjuk secara resmi
oleh Philips,untuk menghindari situasi yang
berbahaya.
◗ Steker penghubung listrik dari unit pengisi
baterai sesuai dengan standar Eropa yang
mutakhir.Steker tersebut dijamin aman,
walaupun lubang stop kontak standar Inggris
agak terlalu besar untuk besi pencocok steker
tersebut.Pastikan bahwa penyambungan daya
dilakukan dengan benar.
◗ Ketika anda menggunakan Jet Pemijat untuk
pertama kali atau setelah untuk waktu yang
lama jet tersebut tidak pernah digunakan,
kendali volume-nya perlu disetel pada
penyetelan maksimum untuk memulai
mengalirkan air ke ujung jet.Jika air tidak
keluar setelah 10 detik,hisaplah penyemprot
di ujung jet tersebut dengan mulut anda.
Merawat gigi anda secara optimal
Gigi yang sehat merupakan kekayaan,yang
memang logis,karena kita ingin agar gigi kita awet
sepanjang usia.Gusi yang sehat memegang
peranan penting. Dengan memijatnya dengan Jet
Pemijat anda akan menjaga agar gusi anda tetap
sehat.
Perawatan gigi yang sempurna adalah penting.
Dengan hanya menyikatnya,anda tidak dapat
menghilangkan semua sisa-sisa makanan yang
BAHASA INDONESIA16
Page 17
tertinggal.Ini bisa menyebabkan kebusukan pada
gigi.Dengan menggunakan Jet Pemijat,anda dapat
menghilangkan semua partikel makanan yang
tertinggal.Tempat-tempat yang sulit dijangkau
sekalipun,seperti sela-sela gigi anda,dapat
dibersihkan.
Mempersiapkan Jet Pemijat sebelum
digunakan
Menempelkan unit alas di dinding
C
1 Tempelkan unit alas alat di dinding dengan
menggunakan 2 sekrup (3,5x30mm) dan 2
steker dinding (S5) (tidak termasuk dalam
bagian alat yang anda beli).
Untuk membuat lobang di tempat yang benar,
anda dapat menggunakan petunjuk pengeboran
yang terdapat pada halaman terakhir petunjuk
pemakaian alat ini.
Jagalah agar jangan sampai unit alas alat ini terkena
air.
2 Doronglah kelebihan panjang kabel ke
dalam tempat penyimpanan di bagian
belakang unit alas.
Menggunakan Jet pemijat
Ketika anda menggunakan Jet Pemijat ini untuk
pertama kali atau setelah untuk beberapa hari jet
ini tidak pernah digunakan:
BAHASA INDONESIA 17
Page 18
C
1 Pasang ujung jet pada alat ini.
C
2 Lepaskan tempat air dari unit alas.
C
3 Isi tempat air dengan air.
4 Pasang kembali tempat air tersebut pada
unit alas.Tekanlah hingga terpasang dengan
sempurna.
C
5 Tekan tombol daya untuk menghidupkan
Jet Pemijat.
C
6 Dorong alat sorong pada pegangan alat ke
atas untuk mengalirkan air.
Ketika anda menggunakan Jet Pemijat untuk
pertama kali,biarkan dulu alat bekerja sampai
tempat airnya betul-betul kosong.
Tip:Anda dapat menambahkan cairan pencuci
mulut untuk menambah kesegaran pada air yang
digunakan.Setelah menggunakan cairan pencuci
mulut,isilah tempat air dengan air yang bersih dan
BAHASA INDONESIA18
Page 19

tidak bercampur apapun dan pompalah semua air
yang ada keluar dari alat dan kedalam wastafel.
Bagaimana menggunakan Jet Pemijat
C
1 Pilih posisi xuntuk membersihkan.
C
2 Membungkuklah di atas wastafel dan
pegang serta dekatkan ujung jet ke gigi
anda.
C
3 Tekan tombol daya untuk menghidupkan
Jet Pemijat.
C
4 Dorong sakelar sorongnya ke atas untuk
mengalirkan air.
C
5 Arahkan semburan air ke sepanjang sisi
depan dan sisi belakang gigi dan ke
sepanjang gusi,dan arahkan semburan
tersebut khususnya pada sela-sela gigi
untuk menghilangkan partikel makanan apa
saa yang tertinggal.
BAHASA INDONESIA 19
Page 20

B
Pastikan bahwa semburan air berada pada sudut
lurus ke arah gigi.
B
Jangan mengarahkan semburan air pada gusi
sedemikian rupa sehingga semburan tersebut
merasuk ke bagian di bawah garis gusi.
◗ Anda dapat mematikan pemasokan airnya
dengan sakelar sorong yang ada sebelum
mengganti posisi ujung jet di dalam mulut
anda.
C
6 Atur volume airnya dengan memutar cincin
pengendalinya.
◗ Tip:Kami sarankan agar anda menggunakan
volume air yang rendah sebelum anda terbiasa
dengan Jet Pemijat ini dan bila anda
mempunyai masalah dengan radang gusi.
7 Setelah selesai membersihkan,turunkan
volume airnya untuk melakukan pemijatan
gusi.
C
8 Arahkan air pada gigi dan gusi anda.
Setelah menggunakan Jet Pemijat
C
1 Lepaskan ujung jet dan letakkan di dalam
tempat penyimpanan alat.
BAHASA INDONESIA20
Page 21
C
2 Letakkan kembali pegangan alat pada
tempatnya.
Tip:Anda dapat memperoleh saran-saran
tambahan mengenai jet ekstra atau pengganti di
Pusat Layanan Philips terdekat.
Membersihkan Jet Pemijat
1 Lepaskan kabel penghubung listrik dari
stopkontak di dinding.
2 Bersihkan alat dengan kain lembab (bila
perlu dengan deterjen).
Jangan menggunakan ampelas atau zat pembersih
yang agresif,bahan penggosok,alkohol, acetone dll.
3 Cucilah tempat penyimpanan alat,tempat
pegangan,wadah sisip dan tempat air dalam
air panas yang diberi sabun.
4 Bilaslah semua bagian alat tersebut dengan
air keran yang mengalir.
◗ Tempat penyimpanan alat,tempat pegangan
dan tempat air juga dapat dibersihkan di dalam
mesin pencuci piring.
BAHASA INDONESIA 21
Page 22

Garansi dan servis
Jika anda membutuhkan informasi atau jika anda
mempunyai masalah,harap mengunjungi situs
Web Philips pada www.philips.com atau
menghubungi Pusat Pelayanan Pelanggan Philips di
negara anda (anda akan menemukan nomor
tilpunnya di dalam brosur yang berlaku di seluruh
dunia).Jika tidak ada Pusat Pelayanan Pelanggan di
negara anda, harap pergi ke penyalur Philips
setempat atau menghubungi Service Department
dari Philips Domestic Appliances and Personal
Care BV.
Saran-saran mengenai ujung Jet Pemijat (untuk
pengganti atau penambahan panjang) tersedia di
Pusat Layanan Philips.
BAHASA INDONESIA22
Page 23

◗
◗
◗
23
Page 24
C
C
C
24
Page 25

25
C
C
C
C
Page 26
26
C
C
C
C
B
B
◗
C
Page 27

27
◗
C
C
C
Page 28

28
◗
Page 29
293031323334353637
Page 30

Page 31
Page 32
Page 33

Page 34

Page 35

Page 36

Page 37

Page 38

www.philips.com
u
4203 000 51321
 Loading...