

Page 1
Question?
Contact
Philips
Always there to help you
Register your product and get support at
www.philips.com/welcome
HU4902
HU4903
User manual 3
Қолданушының нұсқасы 24
Руководство пользователя 46
Page 2

Page 3

Contents
1 Important 4
Safety 4
2 Your humidier 7
What’s in the box 7
3 Getting started 8
Prepare for humidication 8
4 Using the humidier 9
Understand the humidity indicator light 9
Understand the healthy air protect alert 9
Understand the healthy air protect lock 9
Switch the humidier on and off 9
Change the fan speed 10
Auto 10
Manual 11
Turbo 11
Set the timer 11
Set the humidity level 12
Water level 12
Rell the water 13
Normal rell 13
Rell without removing the water
tank 14
Easy rell 14
7 Replacing the lters 18
Replace the humidication lter 18
Replace the anti-bacterial lter 19
8 Troubleshooting 20
9 Guarantee and service 22
Order parts or accessories 22
10 Notices 23
Electromagnetic elds (EMF) 23
Compliance with EMF 23
Recycling 23
English
5 Cleaning your humidier 15
Clean the body of the humidier 15
Clean the water tank 15
6 Cleaning the humidication lter 16
Rinse the humidication lter 16
3EN
Page 4

1 Important
Safety
Read this user manual carefully
before you use the humidier, and
save it for future reference.
Danger
• Do not spray any ammable
materials such as insecticides or
fragrance around the humidier.
• The water in the water tank
is not suitable for drinking. Do
not drink this water and do
not use it to feed animals or to
water plants. When you empty
the water tank, pour the water
down the drain.
Warning
• Check if the voltage indicated
on the bottom of the humidier
corresponds to the local power
voltage before you connect the
humidier.
• If the power cord is damaged,
you must have it replaced
by Philips, a service center
authorized by Philips, or similarly
qualied persons in order to
avoid a hazard.
• Do not use the humidier if the
plug, the power cord, or the
humidier itself is damaged.
• This appliance can be used by
children aged from 8 years and
above and persons with reduced
physical, sensory or mental
capabilities or lack of experience
and knowledge if they have been
given supervision or instruction
concerning use of the appliance
in a safe way and understand the
hazards involved. Cleaning and
maintenance shall not be made
by children without supervision.
• This appliance is not a toy.
Children should be supervised
to ensure that they do not play
with the humidier.
• Do not block the air inlet and
outlet, e.g. by placing items on
the air outlet or in front of the
air inlet.
Caution
• If the power socket used to
power the humidier has poor
connections, the plug of the
humidier becomes hot. Make
sure that you plug the humidier
into a properly connected
power socket.
4 EN
Page 5

• Always place and use the
humidier on a dry, stable, level,
and horizontal surface.
• Do not place anything on top of
the humidier and do not sit on
the humidier.
• Make sure that the humidier is
well assembled/connected every
time after you clean it or after
you remove the upper cover
and/or water tank for relling.
The humidier must be properly
assembled to deliver a good and
safe performance.
• Only use the original Philips
lter specially intended for this
humidier. Do not use any other
lter.
• Avoid knocking against the
humidier (the air inlet and
outlet in particular) with hard
objects.
• Do not insert your ngers or
objects into the air outlet or
the air inlet to prevent physical
injury or malfunctioning of the
humidier.
• Do not use this humidier when
you have used indoor smoketype insect repellents or in
places with oily residues, burning
incense, or chemical fumes.
• Do not use the humidier near
gas appliances, heating devices
or replaces.
• Always unplug the humidier
after use and before you clean it.
• Do not use the humidier in a
room with major temperature
changes, as this may cause
condensation inside the
humidier.
• When the humidier is not used
for a long time, bacteria and
mold may grow on the lters.
Check the lters before you
start using the humidier again. If
the lter is very dirty with dark
spots, replace it (see chapter
‘Replacing the humidication
lter’).
• The humidier is only intended
for household use under normal
operating conditions.
• Clean the water tank and
humication lter every week to
keep it clean.
• Only ll the water tank with cold
tap water. Do not use ground
water or hot water.
• Do not put any substance other
than water in the water tank.
Do not put fragrance in the
water tank. Use only water (tap,
puried, mineral, any sort of
potable water).
English
5EN
Page 6

• If you do not use the humidier
for a long time, clean the water
tank and dry the humidication
lter..
• If you need to move the
humidier, disconnect the
humidier from the power
supply rst. Then empty the
water tank, and carry the
humidier horizontally.
6 EN
Page 7
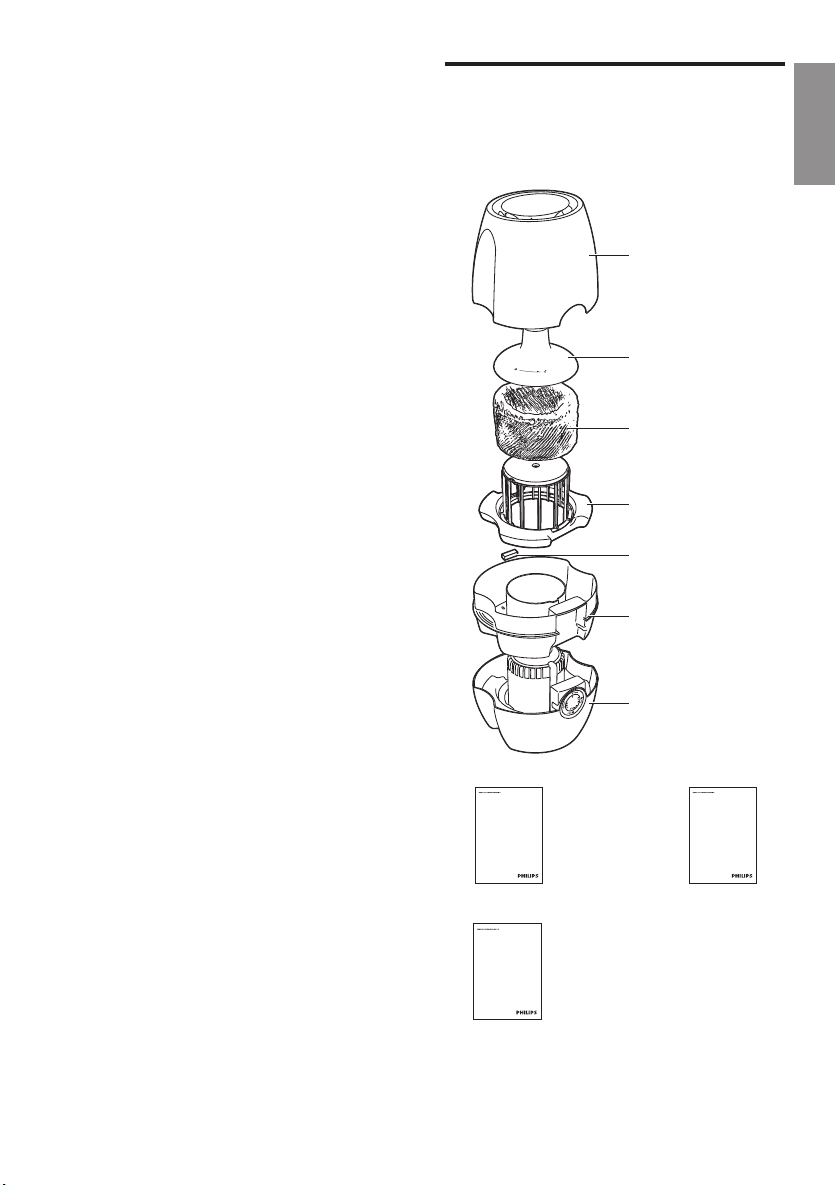
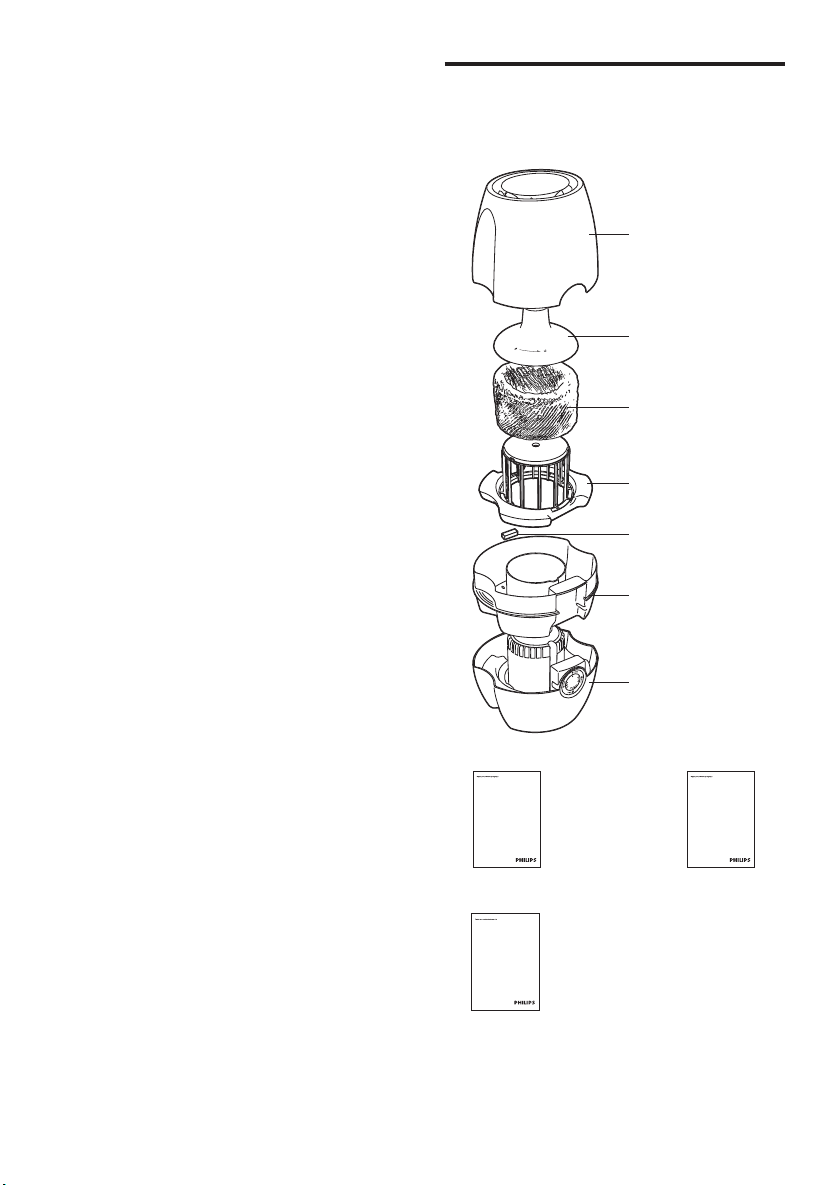
2 Your humidifier
What’s in the box
Congratulations on your purchase, and
welcome to Philips!
To fully benet from the support that Philips
offers, register your product at
www.philips.com/welcome.
The Philips humidier brings fresh, humidied
air to your house for the health of your family.
It offers you advanced evaporation system
with NanoCloud technology, using a special
humidication lter which adds H2O molecules
to the dry air, and produces healthy humid
air without formation of water mist. Its
humidication lter retains bacteria, calcium and
other particles from the water. It delivers only
pure humidied air in your home. No more
dry air in the winter season or from the air
conditioning.
Read this user manual carefully before you
install and use the humidier. Save it for future
reference.
Check and identify the contents of your
package:
Upper cover
Float cover
Humidication lter
HU4101
Float
Anti-bacterial lter
HU4111 (only
available for HU4903)
Water tank
Base
English
www.philips.com/welcome
User manual
User manual
www.philips.com/welcome
Quick start guide
Quick start guide
www.philips.com/welcome
Warranty
Warranty
7EN
Page 8
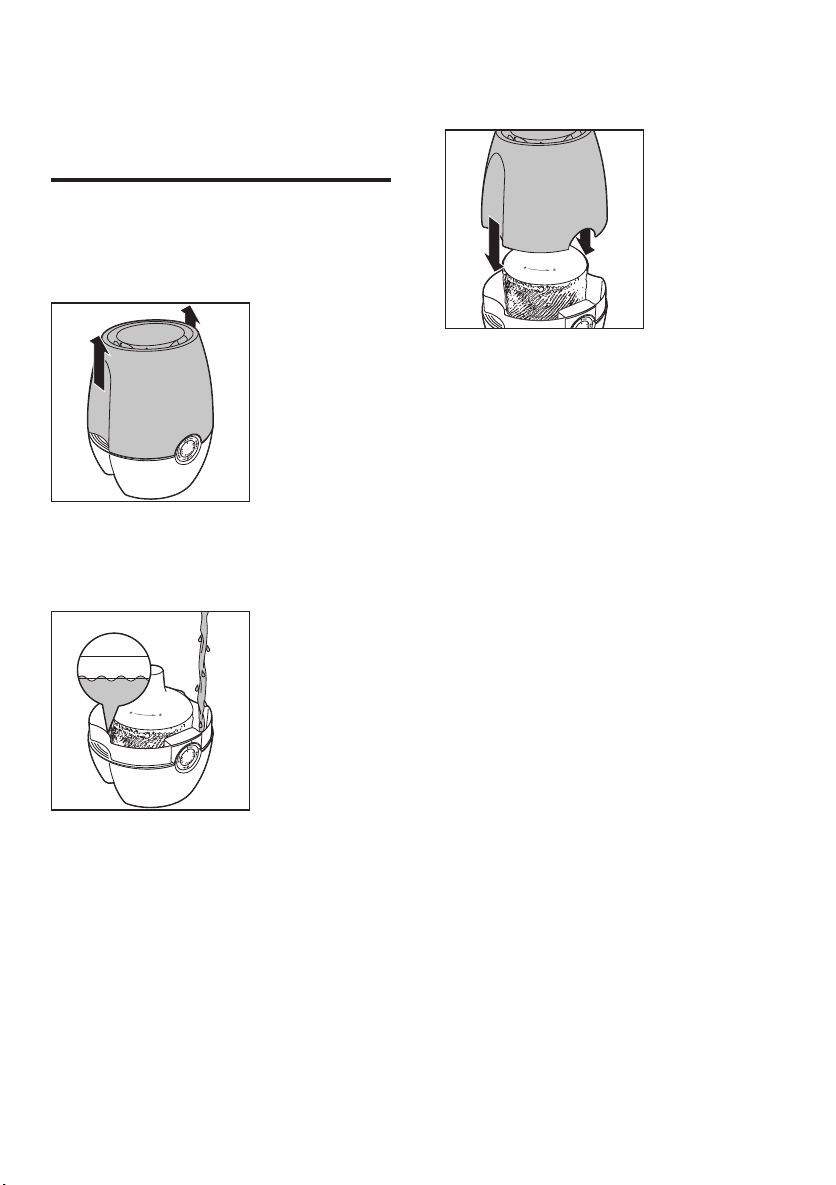
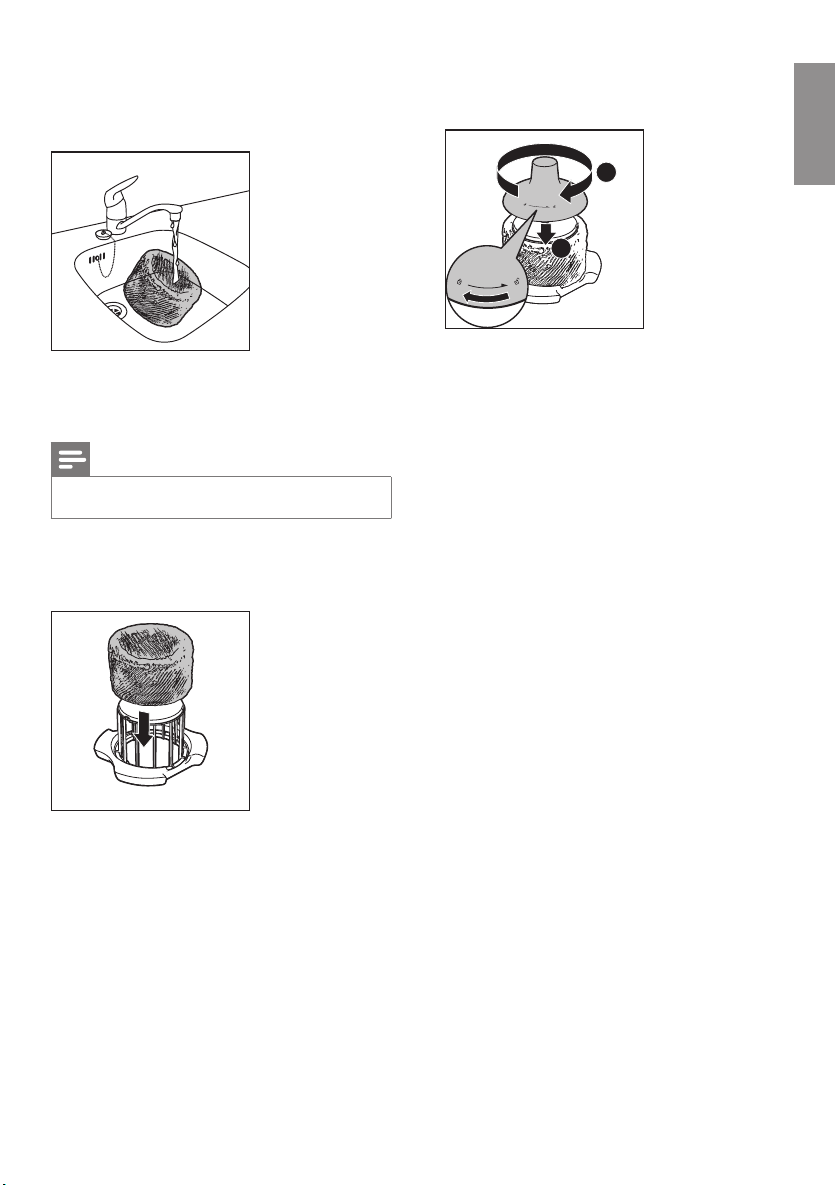
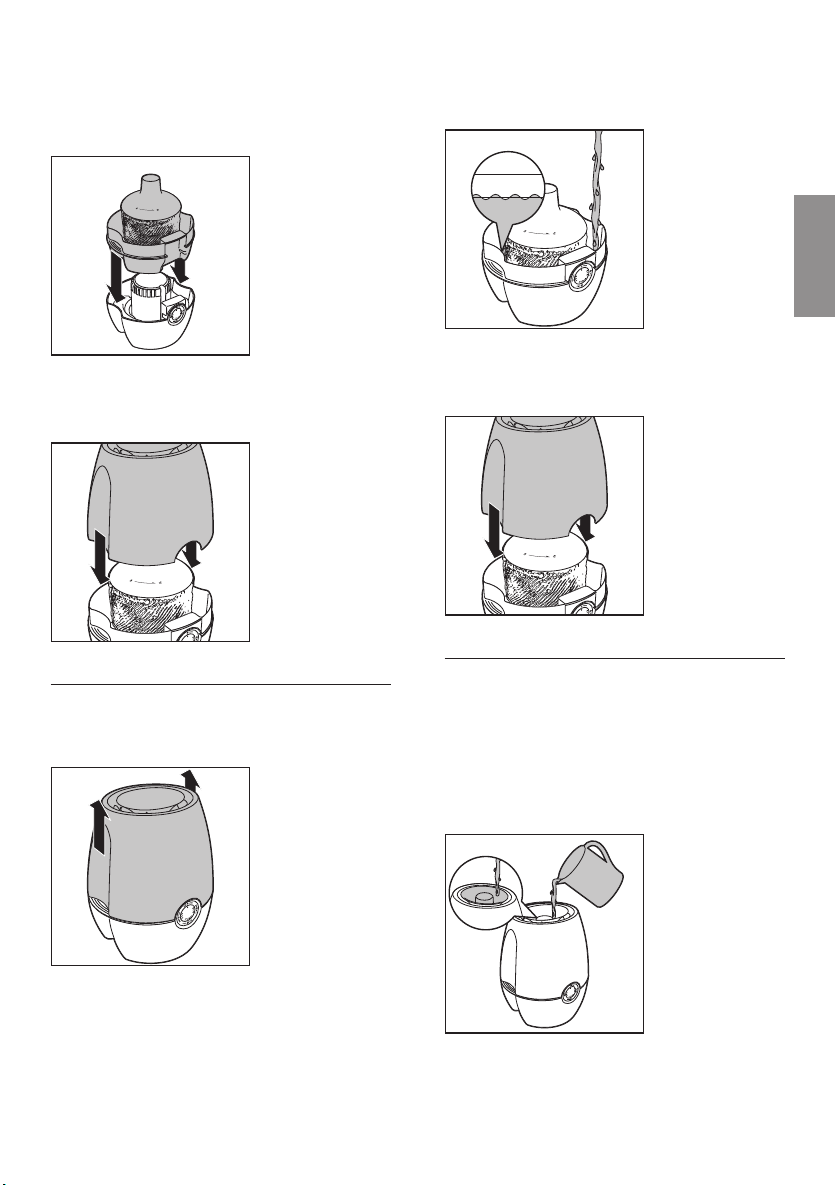
3 Getting started
MAX
Prepare for humidication
1 Hold by both sides of the upper cover to
lift it up.
2 Fill the water tank with cold tap water until
the water reaches the maximum water
indication level.
3 Place the upper cover back onto the
humidier.
8 EN
» The oat begins to oat.
Page 9
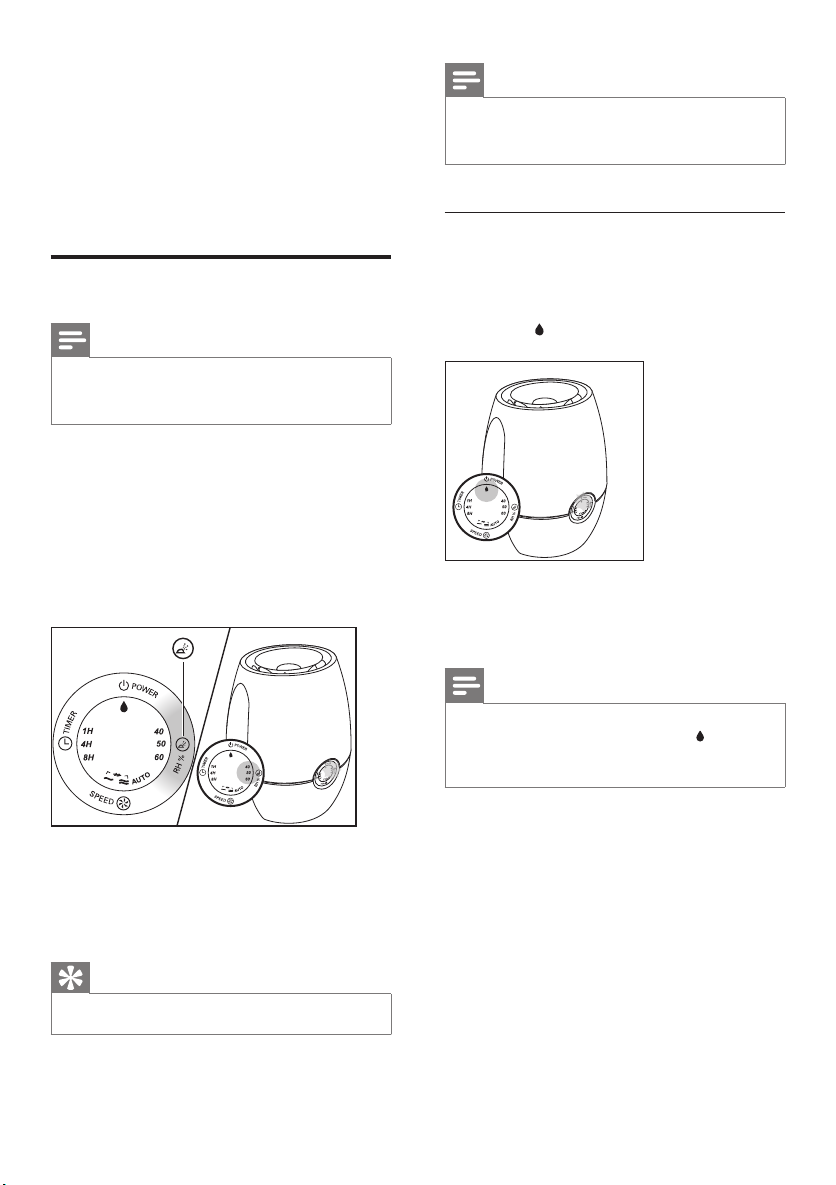
4 Using the
humidifier
Understand the humidity
indicator light
Understand the healthy air
protect alert
English
The healthy air protect alert gives you a timely
warning when the water tank needs relling.
When the water in the tank starts getting low, a
red indicator on the control panel starts blinking
to tell you that it is time to rell the tank.
The humidier is equipped with a built-in
humidity sensor. The current humidity level is
shown on the display (40, 50 or 60 percent).
Note
• The accuracy of the humidity indication is
approximately plus or minus 5%.
• It takes some time to measure the humidity level in
the room..
Color of the humidity
indicator light
Blue target achieved
Red below target
The humidity indicator light automatically goes
on when the humidier is switched on.
Note
• The built-in humidity sensor measures the humidity
level and automatically selects the appropriate color of
the humidity sensor light. When the desired humidity
level is reached, the color of the humidity sensor light
is in blue. When the humidity level is not reached, the
color of the humidity sensor light becomes red.
Humidity level
Understand the healthy air
protect lock
The healthy air protect lock always ensures that
your humidier does not work without water
in the tank. When the water tank is empty and
needs to be relled, the healthy air protect lock
shuts off the humidier and a red indicator
lights up. When you rell the water tank
properly, the humidier is turned on again.
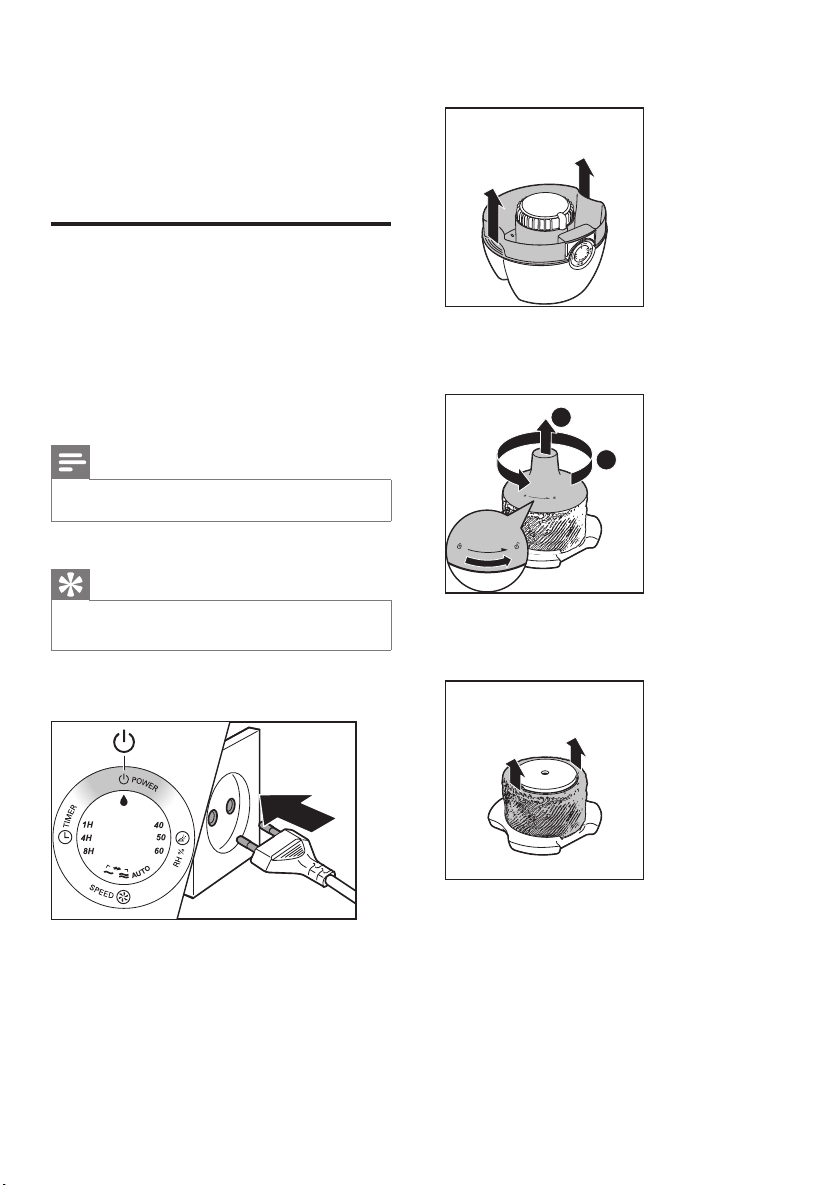
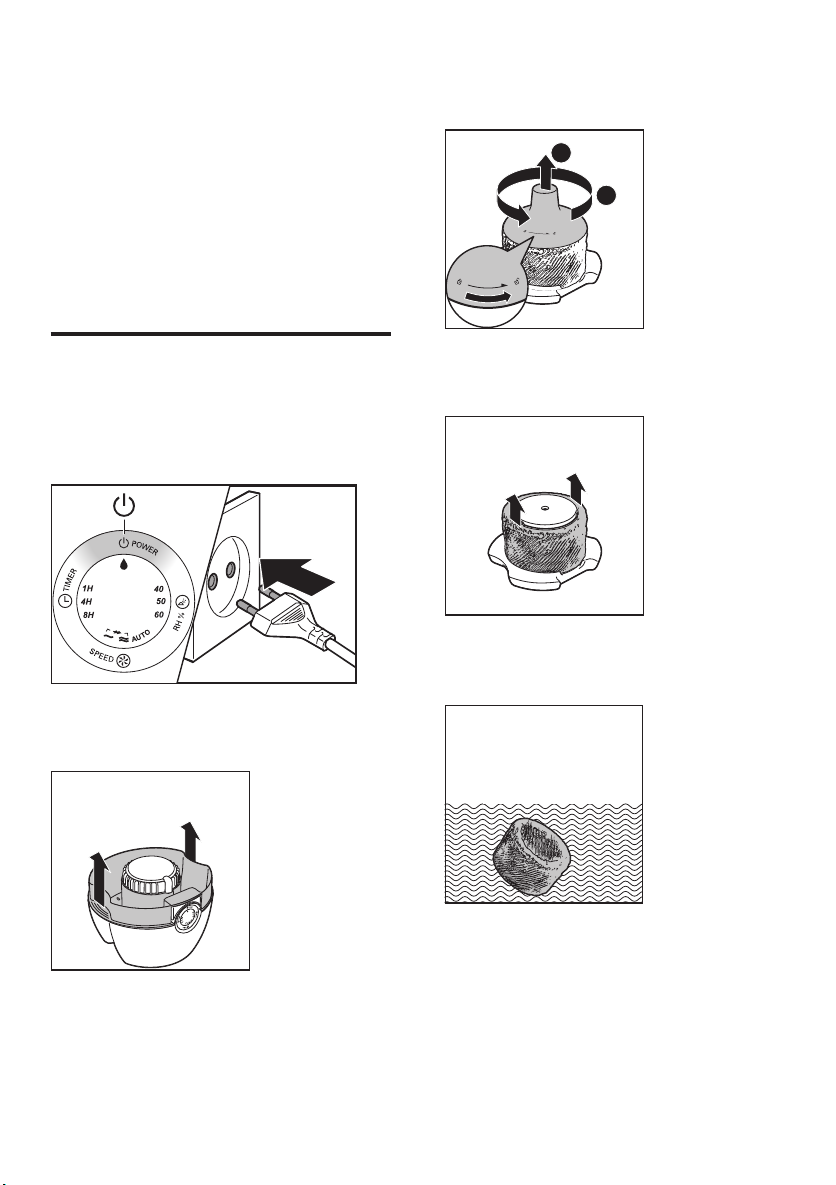
Switch the humidier on and
off
1 Put the plug in the wall socket.
9EN
Page 10

2 Press the button to switch on the
humidier.
» The humidity sensor light is on.
» The humidier releases ver y ne
invisible mist.
3 Press the button to switch off the
humidier.
Note
• If the water in the tank is getting very low, the
humidier stops humidifying. The red indicator light
remains on.
• It is normal that you cannot see the mist.
» The current fan speed is shown.
» The current humidity level is shown.
10 EN
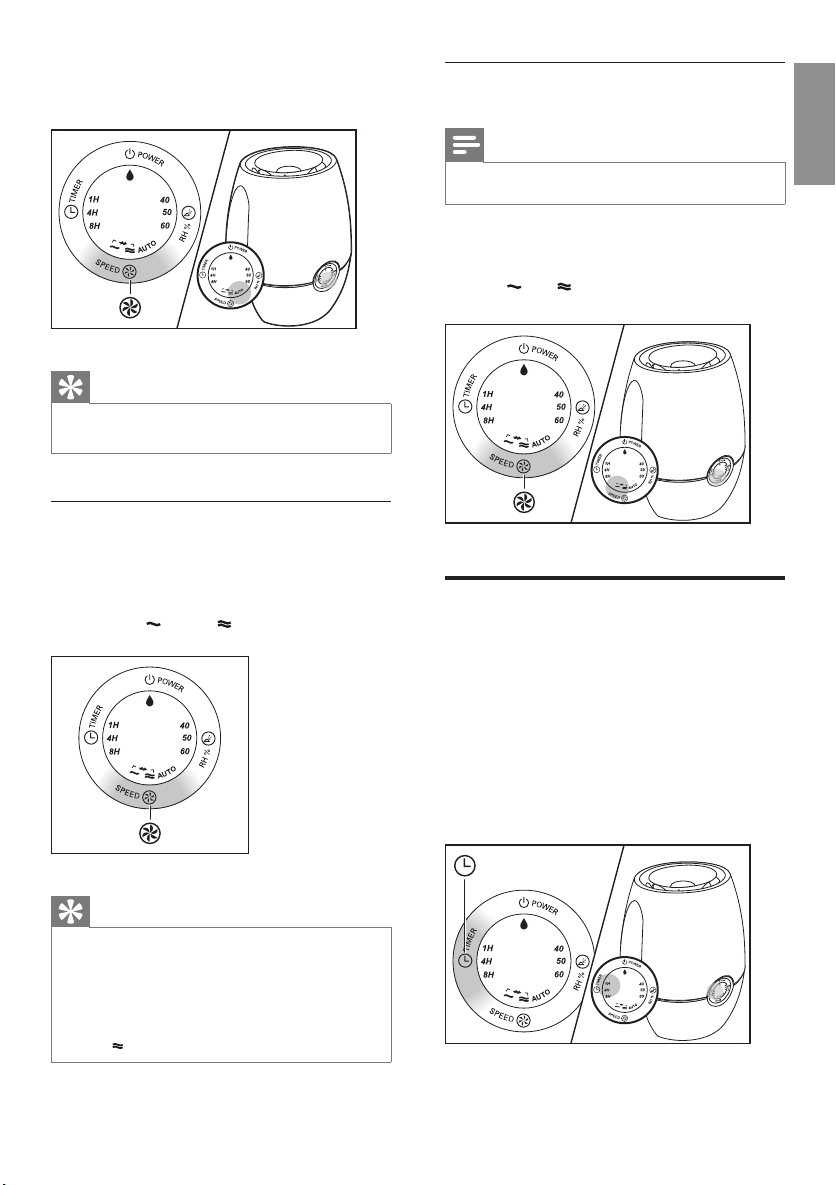
Change the fan speed
Auto
Note
• A UTO mode is only available for HU4903.
The automatic mode uses the digital sensor
to constantly monitor the air quality. It turns
your humidier on and off whenever needed
to ensure the humidity level is constantly at
the right level. The default humidity level of
the automatic mode is set at 50%, but you can
change it to your desired humidity level for the
automatic mode. Next time when you switch
on the humidier, it will remember your last
set humidity level, unless you have unplugged
the wall socket. In this case the default humidity
level of 50% is set again.
Page 11
1 Press the SPEED button to select the
AUTO mode.
Turbo
Tip
• If the desired humidity level is reached, the humidier
changes to a lower fan speed automatically.
Manual
You can manually select the desired fan speed.
1 Press the SPEED button once or more
times to select the desired fan speed
(AUTO, and/or ).
Note
• Turbo mode is only available for HU4903.
1 Press the SPEED button once or more
times to select the Turbo mode.
» and are on.
Set the timer
With the timer function, you can let the
humidier operate for a set number of hours.
When the set time has elapsed, the humidier
automatically switches off.
1 Press the TIMER button to activate the
timer.
» The TIMER light (1H, 4H or 8H) goes
on.
English
Tip
• A UTO and Turbo modes are only available for
HU4903.
• For HU4902 and non-auto mode of HU4903: if the
desired humidity level is reached, you can change to
a lower fan speed. On the other hand, if the desired
humidity level is not reached, you can select the fan
speed to humidify the air quickly.
11EN
Page 12
2 Press the TIMER button repeatedly to
choose the number of hours you want the
humidier to operate. The corresponding
TIMER light goes on.
To deactivate the timer function, press the
TIMER button repeatedly until the TIMER light
(1H, 4H or 8H) is out.
Set the humidity level
Note
• Make sure that the water tank is lled with water
before the humidier can function (see the chapter
‘Getting started’, section ‘Prepare for humidication’).
• Press the HUMI button once or more
times to set the desired air humidity to 40,
50, 60 percent or no preset level.
» The humidity light (40, 50 or 60) of
the set humidity level ashes, then
it changes and stays at the current
humidity level.
Note
• If you set the humidity level to no preset level,
the humidity indicator is off but the humidier still
humidies the air.
Water level
When there is not enough water in the water
tank,
• the oat sinks.
• the red indicator light starts blinking.
• the humidier continues to work for one
more hour.
You have to rell the water into the water tank.
» The humidity sensor light is in red
if the desired humidity level is not
reached. It turns blue when the desired
humidity level is reached.
Tip
• A comfor table humidity level is between 40% and 60%.
12 EN
Note
• The humidier stops humidifying if you do not rell the
water after more than one hour. The red indicator
light is on.
• It is normal to nd some water left in the tank.
Page 13
Rell the water
MAX
There are three ways to rell the water into the
water tank: Normal rell, rell without removing
the water tank and easy rell.
Normal rell
1 Remove upper cover by lifting it at both
sides.
2 Remove the water tank from the
humidier base by lifting it at both sides.
3 Fill the water tank with cold tap water until
the water reaches the maximum water
indication level.
English
» The oat begins to oat.
4 Place the water tank back on the
humidier base.
5 Place the upper cover back at the
humidier.
13EN
Page 14
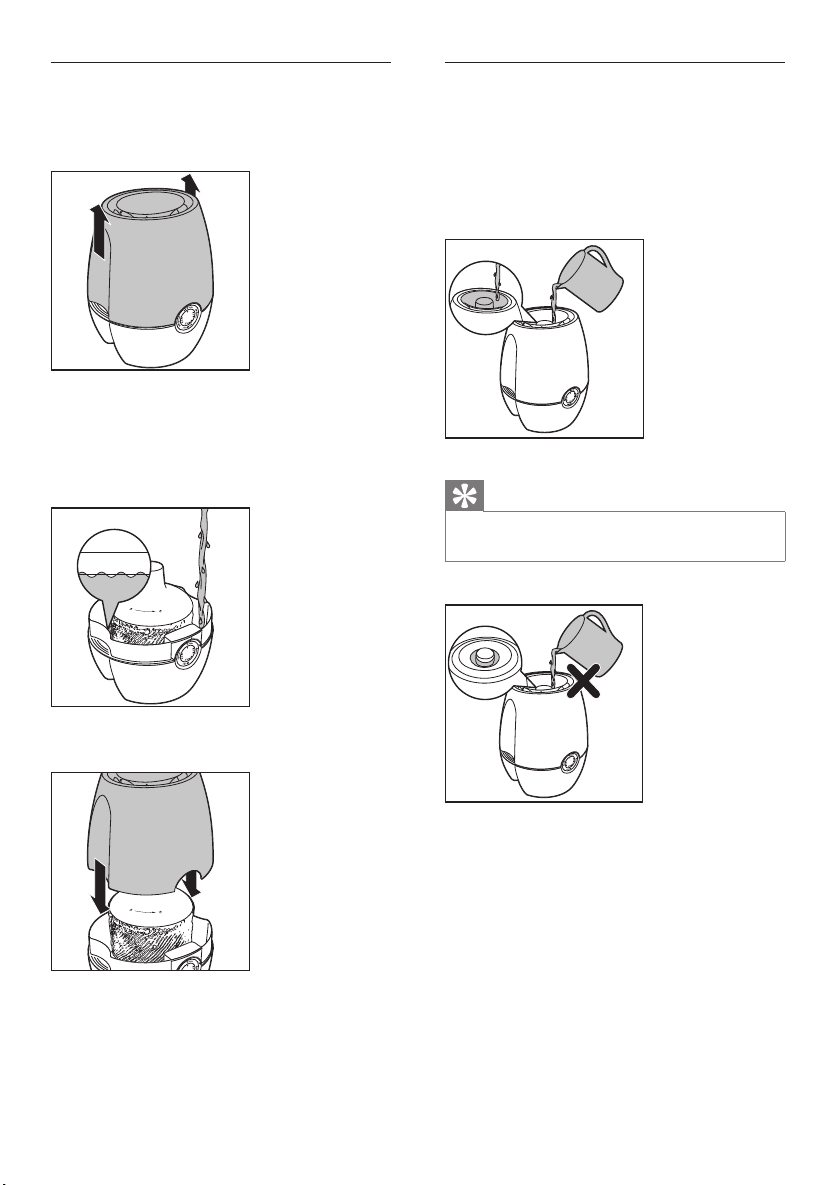
Rell without removing the water
MAX
tank
1 Remove the upper cover.
2 Fill a jar with water.
3 Pour the water into the water tank until
it reaches the the maximum water level
indication.
Easy rell
1 Fill a jar with water.
2 Pour the water to the water tank from
the top central opening until the top of
the oat cover emerges and closes the
opening completely.
Tip
• If you see the water star ts accumulating, this means the
water tank is full. Stop pouring water.
4 Put the upper cover back to the appliance.
14 EN
Page 15
5 Cleaning your
humidifier
Note
• Always unplug the humidier before you clean it.
• Never use abrasive, aggressive, or ammable cleaning
agents such as bleach or alcohol to clean any part of
the humidier.
Clean the body of the
humidier
Regularly clean the inside and outside of the
humidier to prevent dust from collecting.
1 Wipe away dust with a soft dry cloth from
the body of the humidier.
2 Clean the air inlet and the air outlet with a
soft dry cloth.
Clean the water tank
Clean the water tank every week to keep it
hygienic.
1 Fill the water tank for 1/3 with water.
2 Add some mild washing-up liquid to the
water in the water tank.
3 Clean the inside of the water tank with
both hands.
4 Empty the water tank into a sink.
English
15EN
Page 16

6 Cleaning the
humidification
filter
Clean the humidication lter every week to
keep it hygienic.
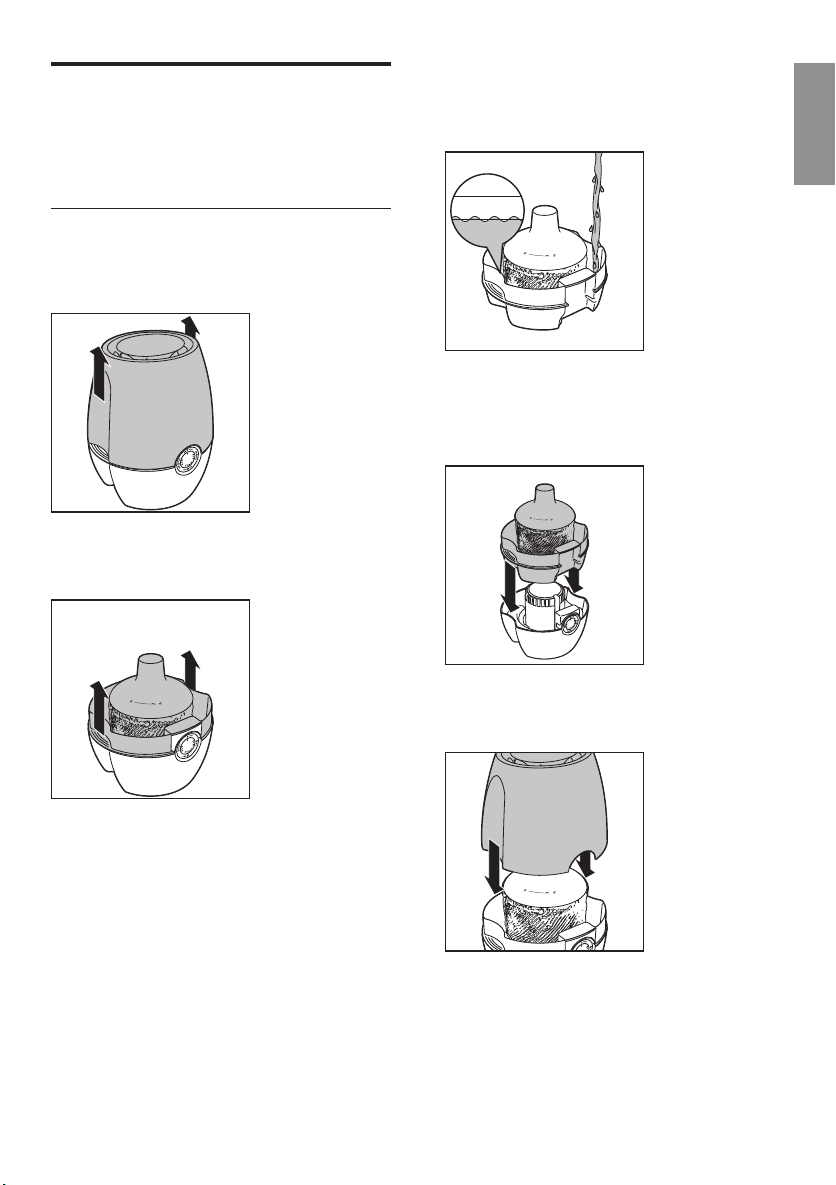
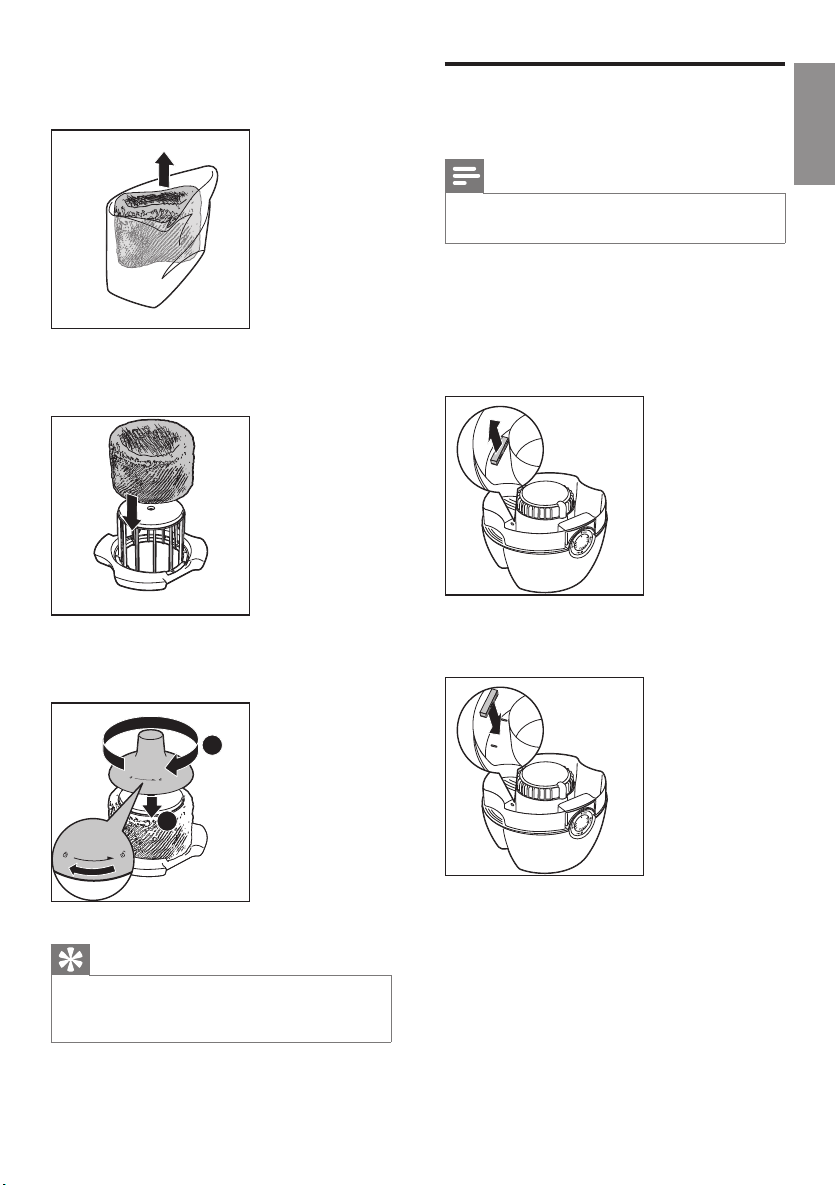
Rinse the humidication lter
1 Switch off the humidier and unplug it.
3 Turn the cover of the oat counter
clockwise to remove it.
2
1
4 Remove the humidication lter from the
oat.
2 Remove the water tank from the
humidier.
16 EN
5 Soak the humidication lter in tap water
for one hour.
Tap Water
1 hour
Page 17
6 Rinse the humidication lter under a
slowly running tap. Do not squeeze or
wring the lter when cleaning.
7 Let excess water drip off the
humidication lter.
Note
• Do not put the humidication under direct sunlight.
8 Assemble the humidication lter round
the oat.
9 Turn the cover of the cover of the oat
clockwise to put it back in place.
English
2
1
17EN
Page 18
7 Replacing the
filters
Replace the humidication
lter
2 Remove the water tank from the appliance.
Replace the humidication lter every three
months for optimal performance. If the lter
is in good condition, you could use it for a
longer period of time. Make sure to replace the
humidication lter at least once a year.
Note
• Use only Philips original humidication lter, HU4101.
Tip
• Register your product at www.Philips.com for further
information on how to replace your lter.
1 Switch off the humidier and unplug it.
3 Turn the cover of the oat counter
clockwise to remove it.
2
1
4 Remove the old humidication lter from
the humidier.
18 EN
Page 19
5 Remove the packaging material from the
new humidication lter.
6 Assemble the new humidication lter
round the oat
7 Turn the cover of the oat clockwise to
put it back in place.
Replace the anti-bacterial
lter
English
Note
• The anti-bacterial lter is only available for HU4903.
• Use only Philips original anti-bacterial lter, HU4111
Replace the anti-bacterial lter at least once a
year to prevent the bacteria from growing in
the water tank.
• Pull and remove the old anti-bacterial lter.
Then, discard it.
• Push the new anti-bacterial lter down to
replace.
2
1
Tip
• You can easily nd more information about how to
replace the lter in our web page or by calling our
Consumer Care Center.
19EN
Page 20

8 Troubleshooting
This chapter summarizes the most common problems you could encounter with the humidier. If you
are unable to solve the problem with the information below, contact the Consumer Care Center in
your country.
Problem Possible solution
The humidier does
not work.
There is no air
humidication.
The water tank
leaks.
I do not see the
current humidity
indication change.
There are some
white deposits on
the humidication
lter.
• Make sure that there is power supply to the humidier.
• Make sure that the water tank is lled with water and placed properly
onto the humidier.
Make sure that the water tank is lled with water and placed properly into the
humidier.
• Make sure that the humidier is not overlled with water.
• Make sure that the humidier is well assembled/connected ever y time
after you clean it or after you remove the upper cover and/or water tank
for relling.
• Make sure that water tank is placed properly. If the problem persists,
contact the Consumer Care Center in your country.
• Make sure that you have wrapped the humidication lter round the oat.
• The humidication lter is dirty. Rinse and/or descale the humidication
lter (see the chapter ‘Clean the humidication lter’).
• Your room might have too much ventilation. Please close doors and
windows.
• Your room size is too big. The recommended room size is 50m² for both
HU4902 and HU4903.
The white deposits are called scale and they consist of minerals from the water.
Scale on the humidication lter affects the humidifying performance, however
it does not harm your health. Please follow the cleaning instructions in the user
manual.
The lter turns
yellowish after
some time.
There is unpleasant
smell coming out
from the humidier.
20 EN
The yellow deposits is a natural effect of the wick material, and it has no impact
on humidication performance. Clean the humidication lter frequently to
remove the scale, and replace the humidication lter every three month.
• Make sure that the water tank is lled with water.
• Clean the humidication lter (see the chapter ‘Clean the humidication
lter’).
Page 21

Problem Possible solution
No air comes out
of the air outlet.
I do not see visible
mist coming out of
the humidier. Is it
working?
I want to check
whether the
humidity sensor
works or not.
Put the plug of the humidier into the wall socket and switch on the humidier.
When mist is very ne, it is invisible. This humidier has a NanoCloud
humidication technology, which produces healthy humid air from the outlet
area without formation of water mist.Therefore, you cannot see the mist.
Gently blow moist air into the humidity sensor. After a while, the humidity
indication changes. Note that if the initial humidity indication is already 60
percent, the indication cannot show an even higher humidity when you blow
moist air towards the sensor.
English
21EN
Page 22

9 Guarantee and
service
If you need information or if you have a
problem, please visit the Philips website at
www.philips.com or contact the Philips
Consumer Care Center in your country (you
nd its phone number in the worldwide
guarantee leaet). If there is no Consumer Care
Centre in your country, go to your local Philips
dealer.
Order parts or accessories
If you have to replace a part or want to
purchase an additional part, go to your Philips
dealer or visit www.philips.com/support.
If you have problems obtaining the parts, please
contact the Philips Consumer Care Center in
your country (you will nd its phone number in
the worldwide guarantee leaet).
22 EN
Page 23

10 Notices
Electromagnetic elds (EMF)
This Philips appliance complies with all
applicable standards and regulations regarding
exposure to electromagnetic elds.
Compliance with EMF
Koninklijke Philips N.V. manufactures and sells
many products targeted at consumers, which,
like any electronic apparatus, in general have
the ability to emit and receive electromagnetic
signals.
One of Philips’ leading Business Principles is to
take all necessary health and safety measures
for our products, to comply with all applicable
legal requirements and to stay well within
the EMF standards applicable at the time of
producing the products.
Philips is committed to develop, produce and
market products that cause no adverse health
effects. Philips conrms that if its products are
handled properly for their intended use, they
are safe to use according to scientic evidence
available today.
Philips plays an active role in the development
of international EMF and safety standards,
enabling Philips to anticipate further
developments in standardization for early
integration in its products.
Recycling
English
Never dispose your product with other
household waste. Please inform yourself about
the local rules on the separate collection of
electrical and electronic products. The correct
disposal of your old product helps prevent
potentially negative consequences on the
environment and human health.
23EN
Page 24

Мазмұны
1 Маңызды ақпарат 25
Қауіпсіздік 25
2 Ылғалдандырғыш 28
Қораптың құрамы 28
3 Іске қосу 29
Ылғалдандыру үшін дайындау 29
4 Ылғалдандырғышты пайдалану 30
Ылғалдылық көрсеткіші шамының
мағынасы 30
Таза ауаны сақтау сигналының
мағынасы 30
Таза ауаны сақтау құлпының мағынасы 30
Ылғалдандырғышты қосып-өшіру 30
Желдеткіш жылдамдығын өзгерту 32
Авто 32
Қолмен 32
Турбо 33
Таймерді орнату 33
Ылғалдылық деңгейін орнату 33
Су деңгейі 34
Су толтыру 34
Қалыпты толтыру 34
Су ыдысын алмай толтыру 35
Оңай толтыру 35
7 Сүзгілерді алмастыру 40
Ылғалдандыру сүзгісін ауыстыру 40
Бактерияға қарсы сүзгіні ауыстыру 41
8 Ақауларды жою 42
9 Кепілдік және қызмет көрсету 44
Бөлшектерге және қосалқы
құралдарға тапсырыс беру 44
10 Ескертулер 45
Электромагниттік өрістер (ЭМӨ) 45
Электромагниттік өріспен
(ЭМӨ) сәйкестік 45
Өңдеу 45
5 Ылғалдандырғышты тазарту 37
Ылғалдандырғыштың корпусын
тазарту 37
Су ыдысын тазарту 37
6 Ылғалдандыру сүзгісін тазарту 38
Ылғалдандыру сүзгісін шаю 38
24 ҚҚ
Page 25

1 Маңызды
ақпарат
Қауіпсіздік
Ылғалдандырғышты
пайдаланбастан бұрын осы
пайдаланушы нұсқаулығын
мұқият оқып шығыңыз да, оны
келешекте анықтама алу үшін
сақтап қойыңыз.
Қауіпті
• Ылғалдандырғыш айналасында
инсектицидтер немесе әтір
сияқты ешбір тұтанғыш
материалдарды бүркемеңіз.
• Су ыдысындағы су ішуге
жарамсыз. Бұл суды ішпеңіз
және оны жануарларға беру
немесе өсімдіктерді суғару
үшін пайдаланбаңыз. Су
ыдысын босатқанда суды
құбырға төгіңіз.
Ескерту
• Ылғалдандырғышты қосар
алдында, ылғалдандырғыштың
төменгі жағында көрсетілген
кернеу жергілікті қуат
кернеуіне сәйкес келетінін
тексеріңіз.
• Егер қуат сымы зақымдалған
болса, қауіптің алдын алу үшін,
оны тек Philips компаниясына,
Philips рұқсат берген қызмет
көрсету орталығына немесе
басқа білікті мамандарға
ауыстыртыңыз.
• Аша, қуат сымы немесе
ылғалдандырғыштың
зақымданған болса,
ылғалдандырғышты
пайдаланбаңыз.
• Бақылау астында болса
немесе құралды қауіпсіз түрде
пайдалану туралы нұсқаулар
алған болса және байланысты
қауіптерді түсінсе, бұл құралды
8 және одан жоғары жастағы
балалар және дене, сезу
немесе ақыл-ой қабілеттері
кем я болмаса тәжірибесі мен
білімі жоқ адамдар пайдалана
алады. Тазалау және қызмет
көрсету жұмысын балалар
бақылаусыз орындамауы керек.
• Бұл құрылғы ойыншық
емес. Балаларды бақылап,
олардың ылғалдандырғышпен
ойнамауын қадағалау керек.
• Ауа кіріс жері мен ауа шығыс
жерін бітеп тастамаңыз,
мәселен ауа шығатын жерге
немесе ауа кіретін жердің
алдына зат қоймаңыз.
Қазақша
ҚҚ
Page 26

Абайлаңыз
• Егер ылғалдандырғышқа
қуат беру үшін
пайдаланылатын розетканың
қосылымдары нашар болса,
ылғалдандырғыштың ашасы
қызады. Ылғалдандырғышты
дұрыстап қосылған розеткаға
қосыңыз.
• Әрқашан ылғалдандырғышты
құрғақ, тұрақты, тегіс және
көлденең бетке қойыңыз және
пайдаланыңыз.
• Ылғалдандырғыш үстіне
ештеңе қоймаңыз және оның
үстіне отырмаңыз.
• Әр тазалаудан кейін немесе
толтыру үшін жоғарғы
бөлікті және/немесе су
ыдысын алғаннан кейін
ылғалдандырғыш дұрыс
жиналғанын/қосылғанын
тексеріңіз. Жақсы және
қауіпсіз жұмыс істеуі үшін
ылғалдандырғышты дұрыстап
жинау керек.
• Тек осы ылғалдандырғышқа
арналған түпнұсқалық Philips
сүзгісін пайдаланыңыз. Басқа
ешбір сүзгіні пайдаланбаңыз.
• Ылғалдандырғышқа қатты
заттарды соғып алудан
сақтаңыз (әсіресе ауа кірісін
және ауа шығысын).
• Жарақат алуды немесе
ылғалдандырғыштың дұрыс
емес жұмыс істеуін болдырмау
үшін ауа шығысына немесе ауа
кірісіне саусақтарды немесе
заттарды салмаңыз.
• Үй ішінде жәндіктерге қарсы
қолданатын түтін шығаратын
репелленттер қолданған
жерде немесе майлы
қалдықтар, жанып жатқан
фимиам, не болмаса химиялық
түтіндер бар орындарда
бұл ылғалдандырғышты
пайдалануға болмайды.
• Бұл ылғалдандырғышты
газ құралдары, жылыту
құрылғылары немесе камин
жанында пайдалануға
болмайды.
• Ылғалдандырғышты
пайдаланудан кейін және
тазалау алдында міндетті
түрде әрқашан розеткадан
суырыңыз.
• Ылғалдандырғышты
температурасы тым тұрақсыз
бөлмеде қолдануға болмайды,
себебі мұның нәтижесінде
ылғалдандырғыш ішінде
конденсат түзілуі мүмкін.
26 ҚҚ
Page 27

• Ылғалдандырғыш ұзақ уақыт
бойы пайдаланылмаса,
сүзгілерде бактериялар мен
зең пайда болуы мүмкін.
Ылғалдандырғышты қайта
пайдаланбас бұрын, сүзгілерді
тексеріңіз. Егер сүзгі тым лас
және онда қара дақтар пайда
болған болса, оны ауыстыру
қажет («Ылғалдандыру сүзгісін
ауыстыру» тарауын қараңыз).
• Ылғалдандырғыш тек
тұрмыстық қолданыста
қалыпты жұмыс жағдайларында
ғана пайдалануға арналған.
• Таза ұстау үшін апта сайын
су ыдысы мен ылғалдандыру
сүзгісін тазартыңыз.
• Су ыдысына тек салқын ағын
суын құйыңыз. Жерден алынған
суды немесе ыстық суды
пайдаланбаңыз.
• Су ыдысына судан басқа
ешбір затты құймаңыз.
Су ыдысына иістендіргіш
салмаңыз. Тек суды (ағын,
тазартылған, минералдық, кез
келген бөтелкедегі су түрі)
пайдаланыңыз.
• Ылғалдандырғыш ұзақ уақыт
бойы пайдаланылмаса, су
ыдысын тазалап, ылғалдандыру
сүзгісін кептіру керек.
• Ылғалдандырғышты жылжыту
керек болса, алдымен қуат
көзінен ылғалдандырғышты
ажыратыңыз. Одан кейін су
ыдысын босатыңыз және
ылғалдандырғышты көлденең
күйде алып жүріңіз.
Қазақша
ҚҚ
Page 28
2 Ылғалданды-
Қораптың құрамы
рғыш
Сатып алғаныңыз құтты болсын және Philips
компаниясына қош келдіңіз!
Philips ұсынатын қолдауды толық пайдалану
үшін өнімді www.philips.com/welcome
торабында тіркеңіз.
Philips ылғалдандырғышы сіздің және
отбасыңыздың денсаулығы үшін таза,
ылғалдандырылған ауаны береді.
Ол NanoCloud технологиясы қолданылған
булануды бақылаудың үздік жүйесін
ұсынады. Құрылғыда құрғақ ауаға H2O
молекулаларын қосып, таза ылғал ауа түзетін
және суды буландырмайтын сүзгі орнатылған.
Ылғалдандыру сүзгісі бактериялар, кальций
және басқа да ұсақ бөлшектерді судан
сүзіп алады. Ол сіздің үйіңізге тек таза,
ылғалдандырылған ауа жеткізеді. Қысқы
маусымда немесе желдеткіштен келетін
құрғақ ауа енді болмайды.
Ылғалдандырғышты орнату және пайдалану
алдында осы пайдаланушы нұсқаулығын
мұқият оқып шығыңыз. Оны болашақта
анықтама алу үшін сақтаңыз.
Қораптың ішіндегілерді тексеріп, түгендеңіз.
Жоғарғы қақпақ
Қалқыма қақпағы
HU4101
ылғалдандыру сүзгісі
Қалқыма
HU4111 бактерияға
қарсы сүзгісі (тек
HU4903 үлгісі үшін)
Су ыдысы
Тұғыр
28 ҚҚ
www.philips.com/welcome
User manual
Пайдаланушы
нұсқаулығы
www.philips.com/welcome
Quick start guide
Қысқаша жұмысты
бастау нұсқаулығы
www.philips.com/welcome
Warranty
Кепілдік
Page 29

3 Іске қосу
MAX
Ылғалдандыру үшін
дайындау
3 Үстіңгі қақпақты ылғалдандырғышқа
қайта орнатыңыз.
1 Жоғарғы қақпақты екі жағынан ұстап
көтеріңіз.
2 Су ыдысын ең жоғары деңгей белгісіне
дейін салқын сумен толтырыңыз.
» Қалқыма қалқып көтеріле бастайды.
Қазақша
ҚҚ
Page 30

4 Ылғалданды-
рғышты пайда-
лану
Ылғалдылық көрсеткіші
шамының мағынасы
Ылғалдандырғыш бекітілген ылғалдылық
сенсорымен жабдықталған. Ағымдағы
ылғалдылық деңгейі дисплейде көрсетіледі
(40, 50 немесе 60 пайыз).
Есте сақтаңыз
• Ылғалдылық көрсеткішінің дәлдігі шамамен ±5%.
• Бөлме ішіндегі ылғалдық деңгейін өлшеуге біраз
уақыт кетеді.
Таза ауаны сақтау
сигналының мағынасы
Таза ауаны сақтау сигналы су ыдысын
толтыру қажет болған жағдайда уақтылы
белгі береді. Су ыдысындағы су деңгейі
төмендесе, басқару панеліндегі қызыл түсті
көрсеткіші ыдысты толтыру керек екені
туралы белгі беру үшін жыпылықтайды.
Таза ауаны сақтау құлпының
мағынасы
Таза ауаны сақтау құлпы ылғалдандырғыштың
сусыз жұмыс істемеуін қадағалайды. Су
ыдысы бос болса, таза ауаны сақтау құлпы
ылғалдандырғышты өшіріп, қызыл түсті
көрсеткішті іске қосады. Су ыдысы тиісінше
толтырылған соң ылғалдандырғыш қайта іске
қосылады.
Ылғалдылық көрсеткіші
шамының түсі
Көк мақсатты
Қызыл мақсатты
Ылғалдандырғыш іске қосылған кезде
ылғалдылық көрсеткішінің шамы автоматты
түрде жанады.
Есте сақтаңыз
• Бекітілген ылғалдылық сенсоры ылғалдылық деңгейін
өлшейді және ылғалдылық сенсоры үшін автоматты
түрде тиісті түсті таңдайды. Ылғалдық деңгейі
қажетті дәрежеге жеткенде ылғалдық көрсеткішінің
шамы көк түске енеді. Ылғалдық деңгейі қажетті
дәрежеге жетпесе, ылғалдық көрсеткішінің шамы
қызыл түске ауысады.
30 ҚҚ
Ылғалдылық
деңгейі
деңгейге жетті
деңгейден төмен
Page 31

Ылғалдандырғышты қосыпөшіру
1 Ашаны қабырға розеткасына қосыңыз.
2 Ылғалдандырғышты қосу үшін түймесін
басыңыз.
» Ылғалдылық сенсорының шамы
жанады.
» Ағымдағы ылғалдылық деңгейі
көрсетіледі.
» Ылғалдандырғыш өте таза, көзге
көрінбейтін бу шығарады.
3 Ылғалдандырғышты өшіру үшін
түймесін басыңыз.
Есте сақтаңыз
• Су ыдысындағы су деңгейі өте төмен болса,
ылғалдандырғыш жұмысы тоқтатылады. Қызыл түсті
көрсеткіш шамы жанып тұрады.
• Будың көзге көрінбеуі қалыпты жағдай.
Қазақша
» Желдеткіштің ағымдағы жылдамдығы
көрсетіледі.
ҚҚ
Page 32

Желдеткіш жылдамдығын
өзгерту
Авто
Есте сақтаңыз
• AUTO (АВТО) режимі тек HU4903 үлгісінде
орнатылған.
Автоматты режимінде ауа ылғалдылығын
үздіксіз бақылау үшін сандық сенсор
пайдаланылады. Ауадағы ылғалдылық
деңгейі тұрақты сақталуы үшін, бұл сенсор
ылғалдандырғышты қажетінше қосып-өшіреді.
Әдепкі бойынша, автоматты режимде ауаның
салыстырмалы ылғалдылық деңгейі 50% деп
орнатылады, дегенмен бұл режимдегі қалаулы
ылғалдылық деңгейін реттеуге болады.
Ылғалдандырғыш розеткадан ажыратылмаған
болса, келесі рет қосқан кезде құрылғы
жадында бұрын орнатылған мәндер сақталып
қалады. Ал олай болмаған жағдайда, әдепкі
ылғалдылық деңгейі 50% күйіне қайтарылады.
1 АUTO (АВТО) режимін таңдау үшін
SPEED (ЖЫЛДАМДЫҚ) түймесін
басыңыз.
Қолмен
Керекті желдеткіш жылдамдығын
таңдауыңызға болады.
1 Желдеткіштің қажетті жылдамдығын
таңдау үшін SPEED (ЖЫЛДАМДЫҚ)
түймесін бір немесе бірнеше рет
басыңыз (AUTO (АВТО), және/
немесе ).
Кеңес
• AUTO (АВТО) және Turbo (Турбо) режимдері тек
HU4903 үлгісінде орнатылған.
• HU4902 үлгісі мен HU4903 үлгісінің автоматты
емес режимдері үшін: ауадағы ылғалдық деңгейі
қажетті дәрежеге жетсе, желдеткіш жылдамдығын
бәсеңдетуге болады. Ал егер ылғалдылық деңгейі
қажетті дәрежеге жетпеген болса, ауаны жылдам
ылғалдандыру үшін желдеткіштің жылдамдығын
таңдауға болады.
Кеңес
• Бөлмедегі ылғалдылық деңгейді қалаулы дәрежеге
жеткен соң, ылғалдандырғыш жылдамдығы
автоматты түрде бәсеңдейді.
32 ҚҚ
Page 33

Турбо
Есте сақтаңыз
• Turbo (Турбо) режимі тек HU4903 үлгісінде
орнатылған.
1 Turbo (Турбо) режимін таңдау үшін
SPEED (ЖЫЛДАМДЫҚ) түймесін бір
немесе бірнеше рет басыңыз.
» жанады.
Таймерді орнату
Таймер функциясы арқылы ылғалдатқышты
бірнеше сағат бойы жұмыс істетуге болады.
Орнатылған уақыт өткенде, тазартқыш
автоматты түрде өшеді.
1 Таймерді қосу үшін TIMER (ТАЙМЕР)
түймесін басыңыз.
» TIMER (ТАЙМЕР) шамы (1H, 4H
немесе 8H) жанады.
2 Құрылғы жұмыс істейтін сағат санын
таңдау үшін TIMER (ТАЙМЕР) түймесін
бірнеше рет басыңыз. Тиісті TIMER
(ТАЙМЕР) шамы жанады.
Таймер функциясын ажырату үшін, TIMER
(ТАЙМЕР) түймесін TIMER (ТАЙМЕР)
көрсеткіші (1H, 4H немесе 8H) өшкенше
бірнеше рет басыңыз.
Қазақша
Ылғалдылық деңгейін
орнату
Есте сақтаңыз
• Ылғалдандырғышты іске қоспас бұрын, су ыдысының
толтырылғанына көз жеткізіңіз («Іске қосу»
тарауының «Ылғалдандыруға дайындау» бөлімін
қараңыз).
• Ауа ылғалдылығын 40, 50, 60 пайыз етіп
орнату үшін немесе ағымдағыдан басқа
деңгейге өзгерту үшін HUMI түймесін
бір немесе бірнеше рет басыңыз.
» Орнатылған ылғалдылық
деңгейінің шамы (40, 50 немесе
60) жыпылықтайды, осыдан кейін
ол өзгеріп, ағымдағы ылғалдылық
деңгейінде сақталады.
» Ауа ылғалдылығы қажетті деңгейге
жетпесе ылғалдылық көрсеткішінің
шамы қызыл түсте жанады. Қажетті
деңгейге жеткен соң ол көк түске
ауысады.
ҚҚ
Page 34

Кеңес
MAX
• Ылғалдылықтың жайлы деңгейі 40%-60% арасында.
Есте сақтаңыз
• Егер ылғалдылық деңгейі құрылғыда берілмеген
мәнге орнатылса, ылғалдылық көрсеткішінің шамы
өшеді, бірақ ылғалдандырғыш жұмысы тоқтамайды.
Су деңгейі
Су ыдысындағы су жеткіліксіз болса,
• қалқыма төмен түседі.
• қызыл түсті көрсеткіш шамы
жыпылықтайды.
Су толтыру
Су ыдысына су толтырудың үш әдісі бар:
қалыпты толтыру, су ыдысын алмай толтыру
және оңай толтыру.
Қалыпты толтыру
1 Жоғарғы бөлікті екі жағынан ұстап алып
тастаңыз.
2 Су ыдысын екі жағынан ұстап
ылғалдандырғыш негізінен алып тастаңыз.
• осыдан кейін ылғалдандырғыш жұмысы
бір сағат жалғасады.
Су ыдысына су толтыру қажет.
Есте сақтаңыз
• Бір сағат ішінде су ыдысына су құйылмаса,
ылғалдандырғыш жұмысы тоқтатылады. Қызыл түсті
көрсеткіш шамы жанып тұрады.
• Ыдыста судың біраз мөлшерінің қалып қоюы
қалыпты жағдай.
34 ҚҚ
3 Су ыдысын ең жоғары деңгей белгісіне
дейін салқын сумен толтырыңыз.
Page 35
» Қалқыма қалқып көтеріле бастайды.
MAX
4 Су ыдысын ылғалдандырғыш негізіне
қайта орнатыңыз.
5 Жоғарғы бөлікті ылғалдандырғышқа
қайта орнатыңыз.
3 Стакандағы суды ең жоғары деңгей
белгісіне дейін су ыдысына құйыңыз.
Қазақша
4 Жоғарғы қақпақты құрылғыға қайта
орнатыңыз.
Су ыдысын алмай толтыру
1 Жоғарғы қақпақты алып тастаңыз.
2 Стаканға су құйыңыз.
Оңай толтыру
1 Стаканға су құйыңыз.
2 Стакандағы суды қалқыма көтеріліп,
ыдыс аузын толықтай жауып қалғанша
ыдыстың үстіңгі жақ орталығындағы
аузына құйыңыз.
ҚҚ
Page 36

Кеңес
• Судың жиналып қалуы су ыдысының толғанын
білдіреді. Су құюды тоқтату керек.
36 ҚҚ
Page 37

5 Ылғалданды-
рғышты тазарту
Есте сақтаңыз
• Тазарту алдында ылғалдандырғышты міндетті түрде
розеткадан ажырату керек.
• Ылғалдандырғыштың кез келген бөлігін тазалау
үшін ағартқыш немесе алкоголь сияқты абразивті,
агрессивті немесе тұтанғыш тазалағыш заттарды
ешқашан пайдаланбаңыз.
Ылғалдандырғыштың
корпусын тазарту
Шаңның жиналуын болдырмау үшін
ылғалдандырғыштың ішін және сыртын
жүйелі түрде тазалаңыз.
1 Ылғалдандырғыш корпусының шаңын
жұмсақ құрғақ шүберекпен сүртіп
алыңыз.
2 Ауа кірісін және шығысын құрғақ, жұмсақ
шүберекпен тазалаңыз.
Қазақша
Су ыдысын тазарту
Таза ұстау үшін, су ыдысын апта сайын
тазалаңыз.
1 Су ыдысының 1/3 бөлігін сумен
толтырыңыз.
2 Су ыдысындағы суға жұмсақ тазартқыш
сұйықтық қосыңыз.
3 Су ыдысының ішкі жағын қос қолмен
тазартыңыз.
4 Су ыдысындағы суды раковинаға төгіңіз.
ҚҚ
Page 38

6 Ылғалдандыру
сүзгісін тазарту
Таза ұстау үшін, ылғалдандыру сүзгісін апта
сайын тазалаңыз.
Ылғалдандыру сүзгісін шаю
1 Ылғалдандырғышты өшіріп, қуат көзінен
ажыратыңыз.
2 Су ыдысын ылғалдандырғыштан шығарып
алыңыз.
3 Қалқымалы санағыш қақпағын алып
тастау үшін оны сағат тілінің бағытында
бұраңыз.
2
1
4 Ылғалдандыру сүзгісін қалқымадан алып
тастаңыз.
5 Ылғалдандыру сүзгісін бір сағат бойы
суға салып қойыңыз.
38 ҚҚ
Ағын су
1 сағат
Page 39

6 Ылғалдандыру сүзгісін баяу ағып тұрған
сумен шайыңыз. Тазалаған кезде сүзгіні
қыспаңыз немесе сықпаңыз.
7 Ылғалдандыру сүзгісіндегі артық суды
төгіңіз.
Есте сақтаңыз
• Ылғалдандыру сүзгісін тікелей күн сәулесінің астына
қоюға болмайды.
8 Ылғалдандыру сүзгісін қалқыманы орай
құрастырыңыз.
9 Қалқыма қақпағын сағат тілінің бағыты
бойынша бұрап, орнына қойыңыз.
2
1
Қазақша
ҚҚ
Page 40

7 Сүзгілерді
алмастыру
Ылғалдандыру сүзгісін
ауыстыру
2 Су ыдысын құрылғыдан шығарып алыңыз.
оңтайлы өнімділік үшін ылғалдандыру сүзгісін
үш ай сайын ауыстырыңыз. Егер сүзгі жақсы
күйде болса, оны ұзағырақ уақыт пайдалана
аласыз. Ылғалдандыру сүзгісін кемінде
жылына бір рет ауыстырыңыз.
Есте сақтаңыз
• HU4101 сүзгісінің тек Phillips өндірген түпнұсқа
үлгілерін пайдалану керек.
Кеңес
• Сүзгіні ауыстыру туралы қосымша ақпарат алу үшін
өнімді www.Philips.com сайтына тіркеу қажет.
1 Ылғалдандырғышты өшіріп, қуат көзінен
ажыратыңыз.
3 Қалқымалы санағыш қақпағын алып
тастау үшін оны сағат тілінің бағытында
бұраңыз.
2
1
4 Ылғалдандырғыштан ескі ылғалдандыру
сүзгісін алып тастаңыз.
40 ҚҚ
Page 41

5 Жаңа ылғалдандыру сүзгісіндегі орауыш
материалдарын алып тастаңыз.
6 Жаңа ылғалдандыру сүзгісін қалқыма
сыртына орнатыңыз.
7 Қалқыма қақпағын сағат тілінің бағыты
бойынша бұрап, орнына қойыңыз.
Бактерияға қарсы сүзгіні
ауыстыру
Есте сақтаңыз
• Бактерияға қарсы сүзгі тек HU4903 үлгісі үшін
шығарылған.
• Тек HU4111 Phillips түпнұсқа бактерияға қарсы
сүзгісін пайдаланыңыз.
Қазақша
Су ыдысында бактериялар пайда болуының
алдын алу үшін, бактерияға қарсы сүзгіні
кемінде жылына бір рет ауыстырып тұру
керек.
• Бактерияға қарсы ескі сүзгіні шығарып
тастаңыз. Ескі сүзгіден арылыңыз.
• Ауыстыру үшін, бактерияға қарсы жаңа
сүзгіні итеріп салыңыз.
2
1
Кеңес
• Сүзгіні ауыстыру туралы толық ақпаратты веб-
сайтқа кіру арқылы немесе тұтынушыларды қолдау
орталығына қоңырау шалу арқылы алуға болады.
ҚҚ
Page 42

8 Ақауларды жою
Бұл тарауда ылғалдандырғышта орын алуы мүмкін ең көп кездесетін ақаулықтар жинақталған.
Егер төменде берілген ақпарат көмегімен ақаулық жойылмаса, еліңіздегі тұтынушыларды қолдау
орталығына хабарласыңыз.
Ақаулық Мүмкін шешімі
Ылғалдандырғыш
жұмыс істемейді.
Ауаны ылғалдандырмайды.
Су ыдысынан су
ағады.
Ағымдағы
ылғалдылық
көрсеткішінің
өзгергені
көрінбейді.
Ылғалдандыру
сүзгісінде біраз
жиналған ақ зат
бар.
• Ылғалдандырғышқа ток келіп тұрғанын тексеріңіз.
• Су ыдысы сумен толтырылғанына және ылғалдандырғышқа тиісінше
орнатылғанына көз жеткізіңіз.
Су ыдысы сумен толтырылғанына және ылғалдандырғышқа тиісінше
орнатылғанына көз жеткізіңіз.
• Ылғалдандырғышқа артық су құйылмағанын тексеріңіз.
• Әр тазалаудан кейін немесе толтыру үшін жоғарғы бөлікті және/
немесе су ыдысын алғаннан кейін ылғалдандырғыш дұрыс жиналғанын/
қосылғанын тексеріңіз.
• Су ыдысының дұрыс орнатылғанына көз жеткізіңіз. Егер мәселе
шешілмесе, еліңіздегі тұтынушыларды қолдау орталығына
хабарласыңыз.
• Ылғалдандыру сүзгісінің қалқыма сыртына орнатылғанына көз
жеткізіңіз.
• Сүзгі ластанған. Ылғалдандыру сүзгісін шайыңыз немесе қағын кетіріңіз
(«Ылғалдандыру сүзгісін тазалау» тарауын қараңыз).
• Бөлме тым көп желдетілуі мүмкін. Есіктерді және терезелерді
жабыңыз.
• Бөлме тым үлкен. HU4902 және HU4903 үлгілері үшін оңтайлы бөлме
ауданы 50м².
Жиналған ақ зат қақ деп аталады және судағы минералдардан тұрады.
Ылғалдандыру сүзгісіне жиналған қақ ылғалдандыру сапасына әсер
еткенімен, денсаулыққа зиян тигізбейді. Пайдалану жөніндегі нұсқаулықта
берілген тазарту бойынша нұсқауларды орындаңыз.
Біраз уақыттан
кейін сүзгі
сарғыштау түске
боялады.
42 ҚҚ
Сары түсті қалдықтар тампон материалының табиғи ізі болып табылады,
олар ылғалдандыру сапасына әсер етпейді. Қақты жою үшін ылғалдандыру
сүзгісін жиі тазарту керек және ылғалдандыру сүзгісін үш ай сайын
ауыстыру керек.
Page 43

Ақаулық Мүмкін шешімі
Ылғалдандырғыштан жағымсыз
иіс шығады.
Ауа шығысынан
ауа шықпайды.
Ылғалдандырғыштан бу шығып
жатқанын көрмеймін. Ол жұмыс
істеп жатыр ма?
Ауа ылғалдылығы
сенсорының
жұмыс істейтінін
тексергім келеді.
• Су ыдысы сумен толтырылғанын тексеріңіз.
• Ылғалдандыру сүзгісін тазалаңыз («Ылғалдандыру сүзгісін тазалау»
тарауын қараңыз).
Ылғалдандырғыш ашасын қабырға розеткасына қосып, ылғалдандырғышты
іске қосыңыз.
Бу өте таза болса, ол көзге көрінбейді. Ылғалдандырғышқа NanoCloud
ылғалдандыру технологиясы орнатылған, ол шығару аймағынан таза, ылғал
ауа шығарады және бу шығармайды. Сондықтан да, бу көзге көрінбейді.
Ылғалдылық сенсорына дымқыл ауа жіберіңіз. Біраз уақыт өткен соң
ылғалдылық көрсеткіші өзгереді. Бастапқы ылғалдылық көрсеткіші 60%
болса, сенсорға қарай ылғал ауа соққан кезде көрсеткіш жоғарырақ
ылғалдылықты көрсете алмайтынын ескеріңіз.
Қазақша
ҚҚ
Page 44

9 Кепілдік және
қызмет көрсету
Егер ақпарат қажет болса немесе мәселеңіз
болса, www.philips.com мекенжайындағы
Philips веб-сайтына кіріңіз, не болмаса
еліңіздегі Philips тұтынушыларды қолдау
орталығына (оның телефон нөмірін
дүниежүзілік кепілдік парақшасынан
таба аласыз) хабарласыңыз. Егер
еліңізде тұтынушыларға қолдау көрсету
орталығы болмаса, онда жергілікті Philips
компаниясының дилеріне барыңыз.
Бөлшектерге және қосалқы
құралдарға тапсырыс беру
Егер бөлшекті ауыстырғыңыз келсе не
қосалқы бөлшекті сатып алғыңыз келсе, Philips
сатушысына барыңыз не
www.philips.com/support сайтына кіріңіз.
Егер бөлшектерді сатып алуда мәселелер
болса, сіздің елдегі Philips тұтынушыларды
қолдау орталығына (оның телефон нөмірі
дүниежүзілік кепілдік парақшасында берілген)
хабарласыңыз.
44 ҚҚ
Page 45

10 Ескертулер
Өңдеу
Электромагниттік өрістер
(ЭМӨ)
Осы Philips құралы электромагниттік
өрістерге қатысты барлық қолданыстағы
стандарттар мен ережелерге сәйкес келеді.
Электромагниттік өріспен (ЭМӨ)
сәйкестік
Koninklijke Philips N.V. тұтынушыларға
арналған, басқа электрондық құрылғылар
сияқты, негізінде, электр магнитті сигналдар
шығаратын және қабылдайтын қабілеті бар
көп өнімдер жасайды және сатады.
Philips компаниясының негізгі жұмыс
ұстанымдарының бірі өнімдер үшін бүкіл
қажетті денсаулық және қауіпсіздік
шараларын сақтау, қолданыстағы барлық заң
талаптарына сәйкес болу және өнімді жасау
кезінде қолданылатын ЭМӨ стандарттарын
ұстану болып табылады.
Philips компаниясы денсаулыққа кері
әсерлері жоқ өнімдерді дамыту, жасау және
сату бағытын ұстанады. Өнімдер арналған
мақсаты бойынша дұрыс қолданылғанда,
Philips компаниясы олардың қазіргі таңдағы
ғылыми дәлелдерге сәйкес пайдалануға
қауіпсіз екенін растайды.
Philips компаниясы халықаралық ЭМӨ және
қауіпсіздік стандарттарын дамытуда белсенді
рөл атқарады, сондықтан өз өнімдеріне
бірінші болып енгізу үшін стандартизациядағы
болашақ жетілдірулерді болжауға мүмкіндік
береді.
Ешқашан өніміңізді басқа тұрмыстық
қалдықтармен бірге тастамаңыз. Электр
және электрондық өнімдерді бөлек жинау
туралы жергілікті ережелермен танысыңыз.
Ескі өнімді қоқысқа дұрыс тастау қоршаған
ортаға және адам денсаулығына ықтималды
кері әсерін тигізудің алдын алады.
Қазақша
ҚҚ
Page 46

Содержание
1 Внимание 47
6 Очистка увлажняющего фильтра 60
Промывание увлажняющего фильтра 60
Безопасность 47
2 Ваш увлажнитель воздуха 50
Что входит в комплект поставки 50
3 Начало работы 51
Подготовка к увлажнению воздуха 51
4 Использование увлажнителя
воздуха 52
Значение сигналов индикатора
влажности 52
Значение сигналов оповещения
системы контроля качества воздуха 52
Значение сигналов блокировки
системы контроля качества воздуха 52
Включение и выключение
увлажнителя воздуха 52
Изменение скорости работы
вентилятора 53
Автоматические режимы 53
Ручной 54
Turbo 55
Установка таймера 55
Настройка уровня влажности 55
Уровень воды 56
Наполнение резервуара водой 56
Обычное наполнение 56
Наполнение без снятия
резервуара для воды 57
Упрощенное наполнение 58
7 Замена фильтров 62
Замена увлажняющего фильтра 62
Замена антибактериального фильтра 63
8 Устранение неисправностей 64
9 Гарантия и обслуживание 66
Заказ запчастей и аксессуаров 66
10 Примечания 67
Электромагнитные поля (ЭМП) 67
Соответствие стандартам ЭМП 67
Утилизация 67
5 Очистка увлажнителя воздуха 59
Очистка корпуса увлажнителя
воздуха 59
Очистка резервуара для воды 59
46 RU
Page 47

1 Внимание
Безопасность
Перед эксплуатацией
увлажнителя воздуха
внимательно ознакомьтесь с
настоящим руководством и
сохраните его для дальнейшего
использования в качестве
справочного материала.
Опасно!
• Запрещается распылять
легковоспламеняющиеся
вещества, такие как
инсектициды или духи, вблизи
увлажнителя воздуха.
• Вода в резервуаре для воды
не пригодна для питья.
Запрещается пить эту воду,
а также добавлять ее в корм
животным и использовать
для полива растений. Для
слива воды из резервуара
используйте сливное
отверстие.
Предупреждение
• Перед подключением прибора
убедитесь, что напряжение,
указанное на нижней панели
увлажнителя воздуха,
соответствует напряжению
местной электросети.
• В случае повреждения шнура
питания его необходимо
заменить. Чтобы обеспечить
безопасную эксплуатацию
прибора, заменяйте шнур
только в авторизованном
сервисном центре Philips
или в сервисном центре с
персоналом аналогичной
квалификации.
• Запрещено пользоваться
увлажнителем воздуха, если
сетевая вилка, сетевой шнур
или сам прибор повреждены.
• Дети старше 8 лет и
лица с ограниченными
возможностями сенсорной
системы или ограниченными
умственными или физическими
способностями, а также
лица с недостаточным
опытом и знаниями могут
пользоваться этим прибором
под присмотром или после
получения инструкций о
безопасном использовании
прибора и потенциальных
опасностях. Дети могут
осуществлять очистку и уход
за прибором только под
присмотром взрослых.
Русский
47RU
Page 48

• Этот прибор — не игрушка!
Не позволяйте детям играть с
увлажнителем воздуха.
• Не блокируйте отверстия
для входа и выхода воздуха,
то есть не ставьте предметы
перед этими отверстиями.
Внимание!
• В случае если подключение
сетевой розетки проведено
неправильно, сетевая вилка
увлажнителя воздуха будет
нагреваться. Увлажнитель
воздуха следует подключать к
исправной сетевой розетке.
• Используйте и устанавливайте
увлажнитель воздуха на сухой,
горизонтальной, ровной и
устойчивой поверхности.
• Не ставьте на увлажнитель
воздуха посторонние
предметы и не садитесь на
него.
• Каждый раз после проведения
очистки, а также после
снятия верхней крышки и/
или наполнения резервуара
для воды проверяйте сборку/
подключение увлажнителя
воздуха. Непременным
условием эффективной
и безопасной работы
увлажнителя воздуха является
правильная сборка всех
деталей.
• Используйте только
оригинальные фильтры Philips,
разработанные для данной
модели увлажнителя воздуха.
Использование других
фильтров запрещено.
• Оберегайте увлажнитель
воздуха (в частности
отверстия для входа и выхода
воздуха) от ударов твердыми
предметами.
• Во избежание травм и
повреждения увлажнителя
воздуха не вставляйте
пальцы и другие предметы в
отверстия для выхода и входа
воздуха.
• Не используйте увлажнитель
воздуха, если в помещении
применялся дымовой
инсектицид, а также в местах,
где присутствуют масляный
туман, горящие курильницы
и газообразные химические
отходы.
• Не используйте увлажнитель
воздуха рядом с
газовым оборудованием,
нагревательными
устройствами или каминами.
48 RU
Page 49

• Обязательно отключайте
увлажнитель воздуха
от электросети после
использования и перед
очисткой.
• Не используйте увлажнитель
воздуха в помещениях
с резкими перепадами
температуры, так как это
может вызвать конденсацию
влаги внутри прибора.
• Если увлажнитель воздуха
не используется в течение
длительного периода
времени, на фильтрах могут
скопиться бактерии и плесень.
Проверьте фильтры перед
тем, как снова использовать
увлажнитель воздуха. Если
фильтр очень грязный и
на нем имеются черные
пятна, замените его (см.
главу "Замена увлажняющего
фильтра").
• Увлажнитель воздуха
предназначен исключительно
для домашнего применения
при нормальных условиях
эксплуатации.
• Еженедельно очищайте
резервуар для воды и
промывайте увлажняющий
фильтр.
• Наполняйте резервуар для
воды только холодной
водопроводной водой. Не
используйте грунтовые воды
или горячую воду.
• Не наливайте в резервуар
для воды ничего кроме
чистой воды. Не добавляйте
в резервуар для воды духи.
Используйте исключительно
воду (водопроводную,
очищенную, минеральную,
любую питьевую воду).
• Если увлажнитель воздуха не
использовался долгое время,
очистите резервуар для воды
и увлажняющий фильтр.
• Если увлажнитель воздуха
необходимо переместить,
сначала отключите его от
источника питания. Слейте
воду из резервуара для воды,
переносите увлажнитель в
горизонтальном положении.
Русский
49RU
Page 50

2 Ваш
увлажнитель
воздуха
Что входит в комплект
поставки
Проверьте комплектацию упаковки:
Поздравляем с покупкой и приветствуем вас
в клубе Philips!
Чтобы получить полную поддержку Philips,
зарегистрируйте свое изделие на вебстранице www.philips.com/welcome.
Увлажнитель воздуха Philips освежает и
увлажняет воздух, заботясь о здоровье
вашей семьи.
В нем используется безопасная для здоровья
современная система испарения воды
с технологией NanoCloud: специальный
увлажняющий фильтр насыщает сухой воздух
молекулами воды, не создавая влажного пара.
Увлажняющий фильтр также очищает воду
от бактерий, известкового налета и других
загрязняющих частиц. Прибор наполняет
дом свежим увлажненным воздухом.
Проблема сухого воздуха в зимнее время
или в помещении, где работает кондиционер,
теперь решена.
Перед установкой и использованием
увлажнителя воздуха внимательно
прочитайте данное руководство
пользователя. Сохраните его для
дальнейшего использования.
Верхняя крышка
Крышка поплавка
Увлажняющий
фильтр HU4101
www.philips.com/welcome
Поплавок
Антибактериальный
фильтр HU4111
(только для модели
HU4903)
Емкость для воды
База
www.philips.com/welcome
50 RU
User manual
Руководство
пользователя
www.philips.com/welcome
Quick start guide
Краткое руководство
Warranty
Гарантия
Page 51

3 Начало работы
MAX
Подготовка к увлажнению
воздуха
1 Снимите верхнюю крышку, удерживая
ее с двух сторон.
2 Наполните резервуар для воды
холодной водопроводной водой до
максимального уровня.
3 Установите верхнюю крышку на место.
Русский
» Поплавок всплывет на поверхность
воды.
51RU
Page 52

4 Использование
увлажнителя
воздуха
Значение сигналов
индикатора влажности
Увлажнитель оснащен встроенным датчиком
влажности. Текущий уровень влажности
отображается на дисплее (40%, 50% или
60%).
Примечание
• Погрешность в показаниях уровня влажности
составляет примерно +/- 5 %.
• Для оценки уровня влажности в помещении
требуется некоторое время.
Цвет индикатора
влажности
Синие заданный уровень
Красные ниже заданного
Уровень
влажности
достигнут
уровня
Значение сигналов
оповещения системы
контроля качества воздуха
Система контроля качества воздуха
заблаговременно предупреждает о
необходимости наполнения резервуара
водой. Когда уровень воды в резервуаре
падает, на панели управления начинает
мигать красный индикатор, напоминая о
необходимости наполнения резервуара для
воды.
Значение сигналов
блокировки системы
контроля качества воздуха
Блокировка системы контроля качества
воздуха предотвращает работу увлажнителя
воздуха с пустым резервуаром для воды.
Когда в резервуаре заканчивает вода,
система контроля качества воздуха
отключает увлажнитель воздуха, и загорается
красный индикатор. После наполнения
резервуара для воды увлажнитель воздуха
снова включается.
Индикатор влажности загорается
автоматически после включения увлажнителя
воздуха.
Примечание
• Встроенный датчик влажности оценивает уровень
влажности, после чего загорается соответствующий
цвет индикатора. По достижении заданного уровня
влажности индикатор датчика влажности загорается
синим цветом. Если заданный уровень влажности
не достигнут, цвет индикатора датчика влажности
становится красным.
52 RU
Page 53

Включение и выключение
увлажнителя воздуха
1 Вставьте сетевую вилку в розетку.
» Отображается текущий уровень
влажности.
2 Чтобы включить увлажнитель воздуха,
нажмите кнопку .
» Загорится индикатор датчика
влажности.
Русский
» Из увлажнителя воздуха поступает
тонкодисперсный пар, невидимый
глазу.
3 Чтобы выключить увлажнитель воздуха,
нажмите кнопку .
Примечание
• Если в резервуаре остается слишком мало воды,
увлажнитель воздуха отключается. Продолжает
гореть красный индикатор .
• Пар не должен быть виден.
» Отображается текущая скорость
работы вентилятора.
53RU
Page 54

Изменение скорости
работы вентилятора
Автоматические режимы
Примечание
• Режим AUTO имеется только у модели HU4903.
В автоматическом режиме используется
цифровой датчик, который постоянно
контролирует качество воздуха. Он
автоматически включает и выключает
увлажнитель воздуха, постоянно
поддерживая заданный уровень влажности.
В автоматическом режиме по умолчанию
установлен уровень влажности 50 %, однако
заданный уровень влажности можно
изменить. Если увлажнитель воздуха не
был отключен от сети, при следующем
включении сохраняется последний
выбранный уровень влажности. В этом случае
снова будет установлен уровень влажности
по умолчанию — 50 %.
1 Нажмите кнопку SPEED, чтобы выбрать
режим AUTO.
Ручной
Скорость работы вентилятора можно задать
вручную.
1 Последовательно нажимайте кнопку
SPEED, чтобы выбрать режим
вентилятора (AUTO, и/или ).
Совет
• Режимы AUTO и Turbo имеются только у модели
HU4903.
• Для модели HU4902 и неавтоматического режима
модели HU4903: по достижении указанного уровня
влажности можно выбрать меньшую скорость
работы вентилятора. С другой стороны, если
указанный уровень влажности не достигнут, для
быстрого увлажнения воздуха можно выбрать
скорость работы вентилятора .
Совет
• По достижении заданного уровня влажности
скорость работы вентилятора автоматически
снижается.
54 RU
Page 55

Turbo
Примечание
• Режим Turbo имеется только у модели HU4903.
1 Последовательно нажимая кнопку
SPEED, выберите режим Turbo.
» и начнут светиться.
Установка таймера
С помощью таймера можно задать
длительность работы увлажнителя воздуха
в часах. По истечении установленного
периода времени увлажнитель воздуха
выключится автоматически.
1 Для включения таймера нажмите кнопку
TIMER.
» Загорится индикатор со значением
времени TIMER (1H, 4H или 8H).
2 Выберите время работы увлажнителя
воздуха (в часах), последовательно
нажимая кнопку TIMER. Загорится
соответствующий индикатор TIMER.
Чтобы отключить таймер, нажимайте
кнопку TIMER до тех пор, пока не погаснет
индикатор TIMER (1H, 4H или 8H).
Настройка уровня
влажности
Примечание
• Перед включением прибора наполните резервуар
водой (см. главу "Начало работы", раздел
"Подготовка к увлажнению воздуха").
• С помощью кнопки HUMI выберите
уровень влажности (40, 50,
60 процентов). Определенное значение
указывать не обязательно.
» Начнет мигать индикатор
установленного уровня влажности
(40, 50 или 60 процентов), а
затем загорится текущий уровень
влажности.
Русский
» Пока заданный уровень влажности
не достигнут, индикатор датчика
влажности горит красным цветом.
По достижении заданного уровня
влажности индикатор загорается
синим.
55RU
Page 56

Совет
• Комфортный уровень влажности составляет
40–60 %.
Примечание
• Если для уровня влажности не установлено
определенное значение, индикатор влажности
отключается, увлажнитель продолжает работать.
Уровень воды
Когда в резервуаре недостаточно воды,
• поплавок тонет;
• начинает мигать красный индикатор ;
Наполнение резервуара
водой
Существует три способа наполнения
резервуара для воды: обычное наполнение,
наполнение без снятия резервуара для воды
и упрощенное наполнение.
Обычное наполнение
1 Снимите верхнюю крышку, удерживая
ее с двух сторон.
2 Снимите резервуар для воды с
основания, удерживая его с двух сторон.
• увлажнитель воздуха будет работать
еще в течение часа.
В резервуар для воды необходимо залить
воду.
Примечание
• Если по истечении часа в резервуар не будет налита
вода, увлажнитель воздуха выключится. Горит
красный индикатор .
• В резервуаре может оставаться какое-то
количество воды.
56 RU
Page 57

3 Наполните резервуар для воды
MAX
MAX
холодной водопроводной водой до
максимального уровня.
» Поплавок всплывет на поверхность
воды.
4 Поставьте резервуар для воды на
основание увлажнителя воздуха.
Наполнение без снятия резервуара
для воды
1 Снимите верхнюю крышку.
2 Налейте воду в емкость.
3 Наполните резервуар водой до
максимальной отметки.
Русский
5 Установите верхнюю крышку на место.
4 Установите верхнюю крышку на место.
57RU
Page 58

Упрощенное наполнение
1 Налейте воду в емкость.
2 Налейте воду в резервуар через
центральное отверстие в верхней части
прибора. Уровень воды должен быть
таким, чтобы крышка поплавка появилась
на поверхности и полностью закрыла
наливное отверстие.
Совет
• Когда поднимающуюся воду станет видно,
резервуар заполнен. Прекратите наполнение
резервуара.
58 RU
Page 59

5 Очистка
увлажнителя
воздуха
Примечание
• Перед очисткой увлажнителя воздуха всегда
отсоединяйте его от электросети.
• Запрещается использовать для очистки деталей
увлажнителя воздуха губки с абразивным
покрытием, абразивные чистящие средства или
легковоспламеняющиеся жидкости типа хлора или
спирта.
Очистка корпуса
увлажнителя воздуха
Во избежание скопления пыли регулярно
проводите очистку внутренних и внешних
поверхностей увлажнителя воздуха.
1 Стирайте пыль с корпуса увлажнителя
воздуха сухой мягкой тканью.
2 Отверстия для входа и выхода воздуха
очищайте сухой мягкой тканью.
Русский
Очистка резервуара для
воды
Для поддержания гигиеничности прибора
резервуар для воды необходимо очищать
еженедельно.
1 Заполните резервуар на треть.
2 Добавьте немного мягкого моющего
средства в резервуар с водой.
3 Руками промойте внутреннюю
поверхность резервуара.
4 Слейте жидкость из резервуара в
раковину.
59RU
Page 60
6 Очистка
увлажняющего
фильтра
Для поддержания гигиеничности
увлажняющий фильтр следует промывать
каждую неделю.
3 Поверните крышку поплавка против
часовой стрелки и снимите ее.
2
1
Промывание увлажняющего
фильтра
1 Выключите увлажнитель воздуха и
отключите его от сети.
2 Снимите резервуар для воды с
увлажнителя воздуха.
4 Снимите увлажняющий фильтр с
поплавка.
5 Оставьте увлажняющий фильтр в
водопроводной воде на один час.
Водопроводная
вода
1 час
60 RU
Page 61

6 Промойте увлажняющий фильтр под
медленной струей водопроводной
воды. Не сжимайте и не перекручивайте
фильтр во время чистки.
9 Поверните крышку поплавка по часовой
стрелке и установите на место.
2
1
7 Дождитесь, пока остатки воды стекут с
увлажняющего фильтра.
Примечание
• Не подвергайте увлажняющий фильтр воздействию
прямых солнечных лучей.
8 Установите увлажняющий фильтр на
поплавок.
Русский
61RU
Page 62

7 Замена
фильтров
Замена увлажняющего
фильтра
2 Снимите резервуар для воды с прибора.
Для оптимальной производительности
заменяйте увлажняющий фильтр
через каждые три месяца. Если фильтр
находится в хорошем состоянии, его
можно использовать дольше. Заменяйте
увлажняющий фильтр не реже одного раза
в год.
Примечание
• Используйте только оригинальный увлажняющий
фильтр Philips HU4101.
Совет
• Для получения более подробной информации о
замене фильтра зарегистрируйте изделие на сайте
www.Philips.com.
1 Выключите увлажнитель воздуха и
отключите его от сети.
3 Поверните крышку поплавка против
часовой стрелки и снимите ее.
2
1
4 Извлеките старый увлажняющий фильтр
из увлажнителя воздуха.
62 RU
Page 63

5 Снимите с нового увлажняющего
фильтра упаковочный материал.
6 Установите новый увлажняющий фильтр
на поплавок.
7 Поверните крышку поплавка по часовой
стрелке.
Замена антибактериального
фильтра
Примечание
• Антибактериальный фильтр имеется только у
модели HU4903.
• Используйте только оригинальный
антибактериальный фильтр Philips HU4111
Во избежание скопления бактерий
в резервуаре для воды заменяйте
антибактериальный фильтр не реже, чем раз
в год.
• Извлеките антибактериальный фильтр.
Выбросьте его.
• Вставьте в прибор новый
антибактериальный фильтр.
Русский
2
1
Совет
• Более подробную информацию о замене фильтра
можно получить на сайте или по телефону в центре
поддержки потребителей.
63RU
Page 64

8 Устранение неисправностей
В данной главе описаны наиболее распространенные проблемы, которые могут возникнуть при
эксплуатации увлажнителя воздуха. Если приведенные ниже сведения не помогают устранить
проблему, обратитесь в центр поддержки покупателей в вашей стране.
Проблема Возможное решение
Увлажнитель
воздуха не
работает.
Увлажнение
воздуха не
производится.
Резервуар для
воды протекает.
Индикация
текущего уровня
влажности не
меняется.
• Убедитесь, что увлажнитель воздуха подключен к источнику питания.
• Убедитесь, что резервуар наполнен водой и правильно установлен в
увлажнитель воздуха.
Убедитесь, что резервуар наполнен водой и правильно установлен в
увлажнитель воздуха.
• Убедитесь, что увлажнитель воздуха не переполнен водой.
• Каждый раз после проведения очистки, а также после снятия верхней
крышки и/или наполнения резервуара для воды проверяйте сборку/
подключение увлажнителя воздуха.
• Убедитесь, что резервуар для воды установлен правильно. Если
проблему решить не удалось, обратитесь в центр поддержки
потребителей в вашей стране.
• Убедитесь, что увлажняющий фильтр установлен на поплавок.
• Увлажняющий фильтр загрязнен. Промойте и/или очистите
увлажняющий фильтр от минеральных отложений (см. главу "Очистка
увлажняющего фильтра").
• Возможно, в помещении повышена циркуляция воздуха. Закройте окна
и двери.
• Площадь помещения слишком большая. Для эффективной работы
моделей HU4902 и HU4903 рекомендуемая площадь помещения
составляет 50 м².
На увлажняющем
фильтре
присутствует
белый налет.
Через некоторое
время фильтр
приобретает
желтоватый
оттенок.
64 RU
Белый налет — это минеральные отложения, которые оседают из воды и
скапливаются на поверхности. Минеральные отложения на увлажняющем
фильтре влияют на качество увлажнения, но безопасны для здоровья.
Следуйте приведенным в руководстве инструкциям по очистке.
Желтый осадок появляется из-за материала фильтра. Это нормально.
Такой осадок никак не влияет на качество увлажнения воздуха. Регулярно
очищайте увлажняющий фильтр от минеральных отложений и заменяйте
его каждые три месяца.
Page 65

Проблема Возможное решение
Увлажнитель
воздуха издает
неприятный запах.
Из отверстия для
выхода воздуха не
поступает воздух.
Не видно, чтобы
из увлажнителя
воздуха поступал
пар. Он работает?
Как проверить,
работает ли
датчик влажности.
• Убедитесь, что резервуар для воды наполнен водой.
• Проведите очистку увлажняющего фильтра (см. главу "Очистка
увлажняющего фильтра").
Подключите увлажнитель к розетке электросети и включите его.
Тонкодисперсный пар невидим глазу. В этом увлажнителе воздуха
используется технология NanoCloud: из прибора поступает здоровый
увлажненный воздух, но водяного пара при этом не образуется.
Русский
Осторожно направьте поток влажного воздуха на датчик влажности.
Через какое-то время индикация влажности изменится. Обратите
внимание, что если индикация влажности уже достигла 60 процентов, она
не изменится даже при направлении потока влажного воздуха на датчик.
65RU
Page 66

9 Гарантия и
обслуживание
При возникновении проблемы, а также при
необходимости получения информации
зайдите на веб-сайт компании Philips
www.philips.com или обратитесь в центр
поддержки потребителей в вашей стране
(номер телефона центра указан на
гарантийном талоне). Если в вашей стране
нет центра поддержки потребителей Philips,
обратитесь по месту приобретения изделия.
Заказ запчастей и
аксессуаров
При необходимости замены старой или
приобретения дополнительной детали
посетите торговую организацию Philips или
зайдите на веб-сайт www.philips.com/support.
Если при заказе запасных частей возникли
проблемы, обратитесь в центр поддержки
потребителей Philips в вашей стране (номер
телефона центра указан на гарантийном
талоне).
66 RU
Page 67

10 Примечания
Утилизация
Электромагнитные поля
(ЭМП)
Этот прибор Philips соответствует всем
применимым стандартам и нормам по
воздействию электромагнитных полей.
Соответствие стандартам ЭМП
Koninklijke Philips N.V. производит и продает
различные изделия потребительского
назначения, которые, как и любые
электронные устройства, способны излучать
и принимать электромагнитные сигналы.
Одним из ведущих деловых принципов
компании Philips является применение всех
мер безопасности для соответствия всем
действующим правовым требованиям и
стандартам ЭМП, действующим на момент
производства изделия.
Philips стремится разрабатывать,
производить и распространять на
рынке продукцию, которая не оказывает
вредного влияния на здоровье людей.
Philips подтверждает, что при правильной
эксплуатации продукция является
безопасной, согласно проведенным на
сегодняшний день научным исследованиям.
Philips принимает активное участие в
развитии международных стандартов ЭМП
и стандартов безопасности, что позволяет
планировать дальнейшие шаги по развитию
стандартизации и интеграции продукции
Philips.
Не утилизируйте продукт вместе с
бытовыми отходами. Для утилизации
электрических и электронных изделий
необходимы сведения о местной системе
отдельной утилизации отходов. Правильная
утилизация отработавшего изделия поможет
предотвратить возможные негативные
последствия для окружающей среды и
здоровья человека.
Русский
67RU
Page 68

Page 69

Page 70

Page 71

увлажнитель воздуха
ауа ылғалдандырғыш
HU4902/01 HU4903/01
220-240 V, 50/60 Hz, 25 W 220-240 V, 50/60 Hz, 30 W
Изготовитель:
“Филипс Консьюмер Лайфстайл Б.В.”, Туссендиепен 4,
9206 АД, Драхтен, Нидерланды
Импортер на территорию России и Таможенного
Союза:
ООО "Филипс", Российская Федерация, 123022 г.
Москва, ул. Сергея Макеева, д.13, тел. +7 495 961-1111
Для бытовых нужд
Дата изготовления указана на изделии.
Өндіруші:
“Филипс Консьюмер Лайфстайл Б.В.”, Туссендиепен 4,
9206 АД, Драхтен, Нидерланды
Ресей және Кедендік Одақ территориясына
импорттаушы:
"Филипс" ЖШҚ, Ресей Федерациясы, 123022 Мәскеу
қаласы, Сергей Макеев көшесі, 13-үй,
тел. +7 495 961-1111
Тұрмыстық қажеттіліктерге арналған
Құрылғының жасалған күнін өнімнен табуға болады.
Page 72

Specifications are subject to change without notice
© 2014 Koninklijke Philips N.V.
All rights reserved.
4241 210 70173
 Loading...