

Page 1

Always there to help you
Question?
Contact
Philips
Register your product and get support at
www.philips.com/welcome
HU4803
Specifications are subject to change without notice
© 2016 Koninklijke Philips N.V.
All rights reserved.
4241 210 70684
EN User manual 1
KK Қолданушының нұсқасы 14
RU Руководство пользователя 29
UK Посібник користувача 44
Page 2
MAX
2
3
4
5
1
A
увлажнитель воздуха
ауа ылғалдандырғыш
HU4803/01
220-240 V, 50 Hz, 17 W
Изготовитель:
“Филипс Консьюмер Лайфстайл Б.В.”, Туссендиепен
4, 9206 АД, Драхтен, Нидерланды
Импортер на территорию России и Таможенного
Союза:
ООО "Филипс", Российская Федерация, 123022 г.
Москва, ул. Сергея Макеева, д.13,
тел. +7 495 961-1111
Для бытовых нужд
Дата изготовления указана на изделии.
C
D
E
6
7
8
9
B
10
11
12
13
14
F
Tap water
1 hour
18
G H
15
16
17
Өндіруші:
“Филипс Консьюмер Лайфстайл Б.В.”, Туссендиепен 4,
9206 АД, Драхтен, Нидерланды
Ресей және Кедендік Одақ территориясына
импорттаушы:
"Филипс" ЖШҚ, Ресей Федерациясы, 123022 Мәскеу
қаласы, Сергей Макеев көшесі, 13-үй,
тел. +7 495 961-1111
Тұрмыстық қажеттіліктерге арналған
Құрылғының жасалған күнін өнімнен табуға болады.
Page 3

Contents
1 Important 2
Safety 2
2 Yourhumidier 4
What's in the box 4
3 Getting started 5
Prepare for humidication 5
4 Usingthehumidier 5
Understand the humidity indication 5
Understand the healthy air protect
alert and lock 5
Switch the humidier on and off 6
Change the fan speed 6
Auto 6
Manual 6
Sleep mode 6
Set the timer 7
Set the humidity level 7
Water level 7
Rell water 7
5 Cleanyourhumidier 8
Clean the body of the humidier 8
Clean the water tank 8
Clean the humidication lter 8
9 Notices 13
English
Electromagnetic elds (EMF) 13
Compliance with EMF 13
Recycling 13
6 Replacingthehumidicationlter 9
Replace the anti-bacterial lter 9
7 Troubleshooting 11
8 Guarantee and service 13
Order parts or accessories 13
1EN
Page 4

1 Important
Safety
Read this user manual carefully
before you use the humidier, and
save it for future reference.
Danger
• Do not spray any ammable
materials such as insecticides or
fragrance around the humidier.
• The water in the water tank
is not suitable for drinking. Do
not drink this water and do
not use it to feed animals or to
water plants. When you empty
the water tank, pour the water
down the drain.
• Do not use the humidier if the
plug, the power cord, or the
humidier itself is damaged.
• This humidier is not intended
for use by persons (including
children) with reduced physical
sensory or mental capabilities,
or lack of experience and
knowledge, unless they have
been given supervision or
instruction concerning use of
the humidier by a person
responsible for their safety.
• This appliance is not a toy.
Children should be supervised
to ensure that they do not play
with the humidier.
• Do not block the air inlet and
outlet, e.g. by placing items on
the air outlet or in front of the
air inlet.
Warning
• Check if the voltage indicated
on the bottom of the humidier
corresponds to the local power
voltage before you connect the
humidier.
• If the power cord is damaged,
you must have it replaced
by Philips, a service center
authorized by Philips, or similarly
qualied persons in order to
avoid a hazard.
2 EN
Caution
• If the power socket used to
power the humidier has poor
connections, the plug of the
humidier becomes hot. Make
sure that you put the plug of
the humidier into a properly
connected power socket.
• Always place and use the
humidier on a dry, stable, level,
and horizontal surface.
Page 5

• Do not place anything on top of
the humidier and do not sit on
the humidier.
• Make sure that the humidier is
well assembled/connected every
time after you clean it or after
you remove the upper cover
and/or water tank for relling.
The humidier must be properly
assembled to deliver a good and
safe performance.
• Only use the original Philips
lter specially intended for this
humidier. Do not use any other
lter.
• Avoid knocking against the
humidier (the air inlet and
outlet in particular) with hard
objects.
• Do not insert your ngers or
objects into the air outlet or
the air inlet to prevent physical
injury or malfunctioning of the
humidier.
• Do not use this humidier when
you have used indoor smoketype insect repellents or in
places with oily residues, burning
incense, or chemical fumes.
• Do not use the humidier near
gas appliances, heating devices
or replaces.
• Always unplug the humidier
after use and before you clean it.
• Do not ll water from the air
outlets on top of the humidier.
• Place the humidier properly to
prevent children from knocking
it over.
• Do not use the humidier in a
room with major temperature
changes, as this may cause
condensation inside the
humidier.
• When the humidier is not used
for a long time, bacteria and
mold may grow on the lters.
Check the lters before you
start using the humidier again. If
the lter is very dirty with dark
spots, replace it (see chapter
‘Replacing the humidication
lter’).
• Do not wash the lter in a
washing machine or dish washer,
otherwise the lter will be
deformed.
• The humidier is only intended
for household use under normal
operating conditions.
• Clean the water tank and
humidication lter every week
to keep it clean.
• Only ll the water tank with cold
tap water. Do not use ground
water or hot water.
English
3EN
Page 6

• Do not put any substance other
than water in the water tank. Do
not add fragrance or chemical
substance into the water. Use
only water (tap, puried, mineral,
any sort of potable water).
• If you do not use the humidier
for a long time, clean the water
tank and dry the humidication
lter..
• If you need to move the
humidier, disconnect the
humidier from the power
supply rst. Then empty the
water tank, and carry the
humidier horizontally.
• Keep the humidity sensor dry.
If the sensor gets wet, it could
miscalculate the humidity level,
and the humidier could stop
working due to miscalculated
humidity level.
2 Your humidifier
Congratulations on your purchase, and
welcome to Philips!
To fully benet from the support that Philips
offers, register your product at
www.philips.com/welcome.
The Philips humidier brings fresh, humidied
air to your house for the health of your family.
It offers you advanced evaporation system
with NanoCloud technology, using a special
humidication lter which adds H2O molecules
to the dry air, and produces healthy humid
air without formation of water mist. Its
humidication lter retains bacteria, calcium and
other particles from the water. It delivers only
pure humidied air in your home. No more
dry air in the winter season or from the air
conditioning.
Read this user manual carefully before you
install and use the humidier. Save it for future
reference.
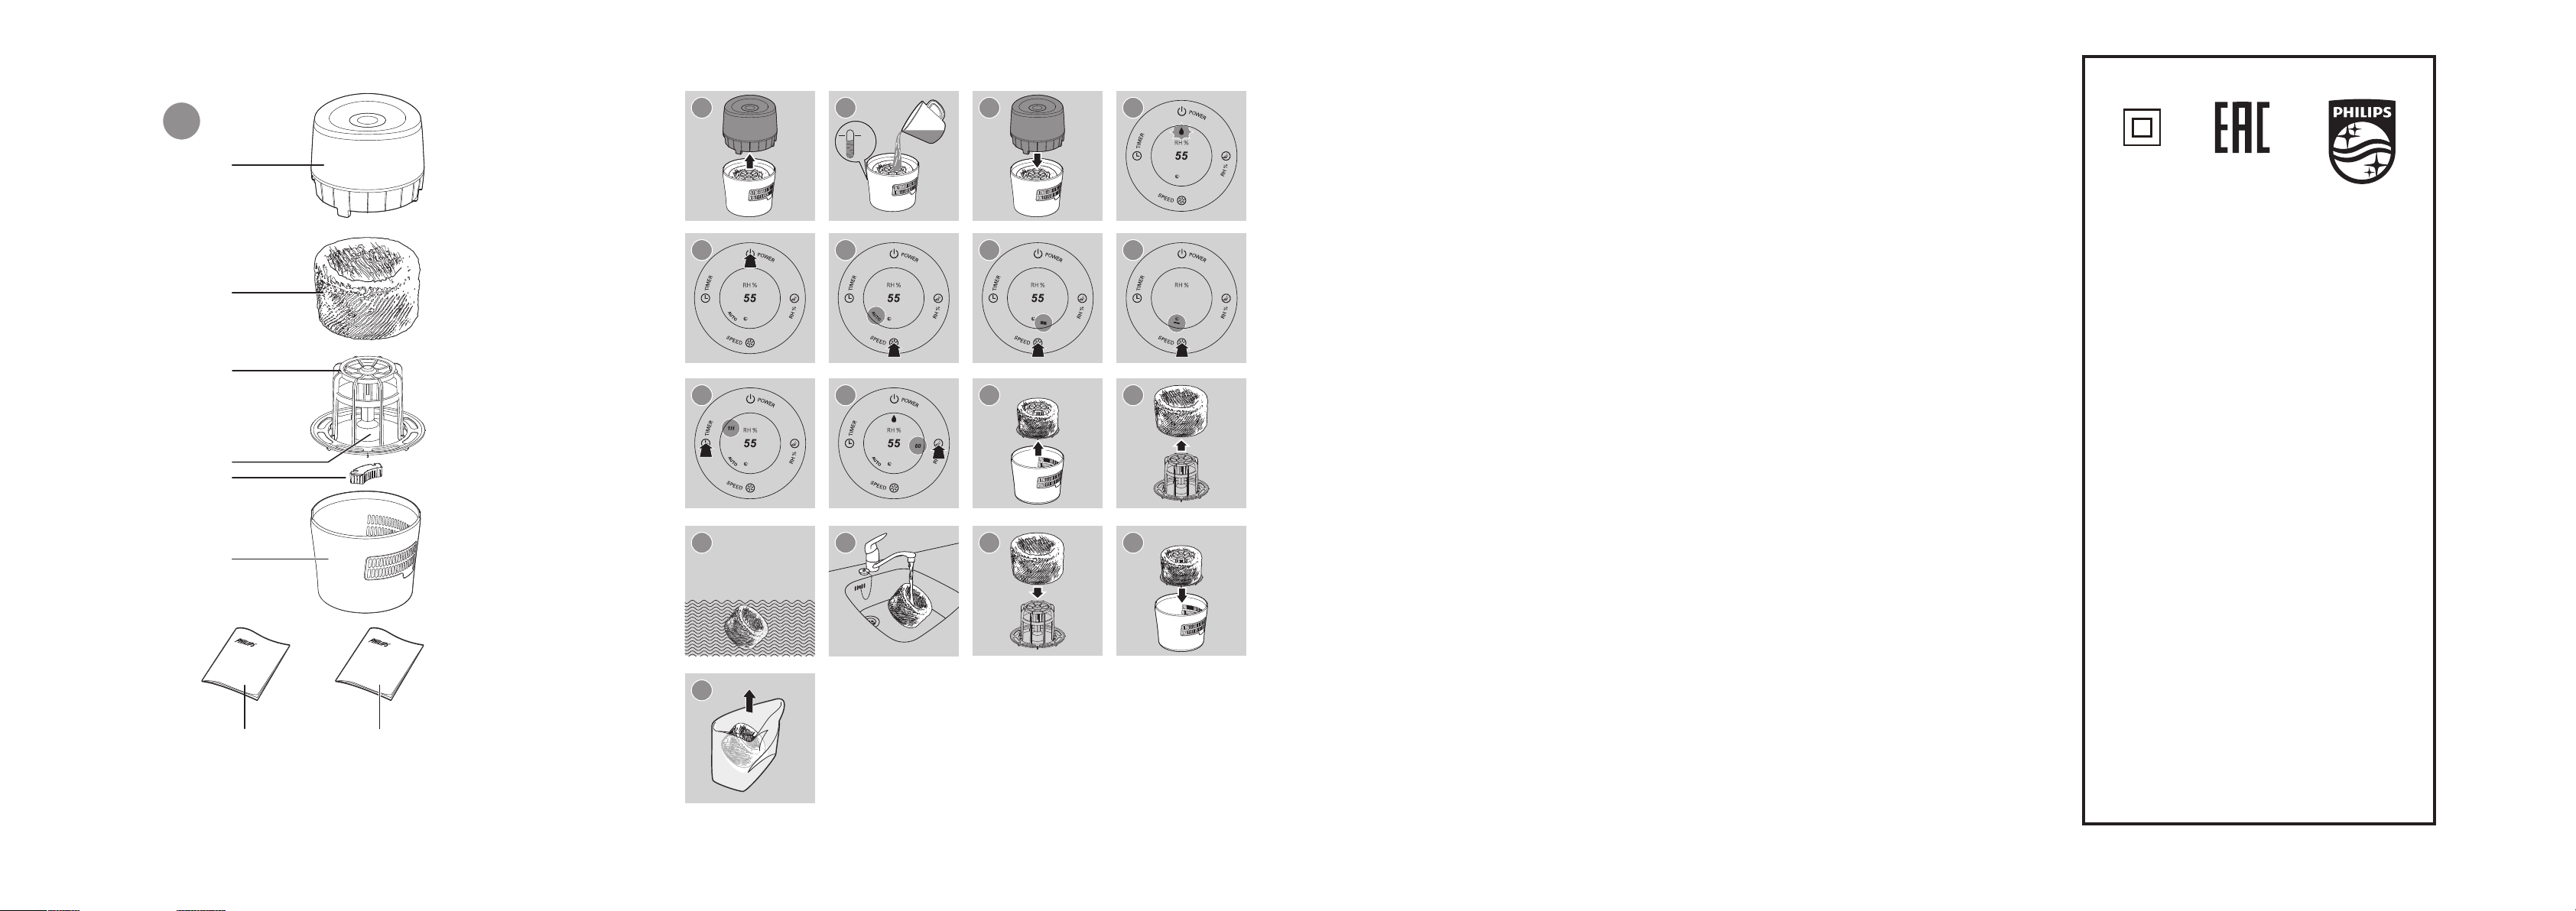
What's in the box
Check and identify the contents of your package
(g. a):
A Upper unit
B Humidication lter (HU4102)
C Filter support
D Float
E Anti-bacterial lter - HU4112
F Water tank
G User manual
H Warranty
4 EN
Page 7

3 Getting started
4 Using the humidifier
English
Prepareforhumidication
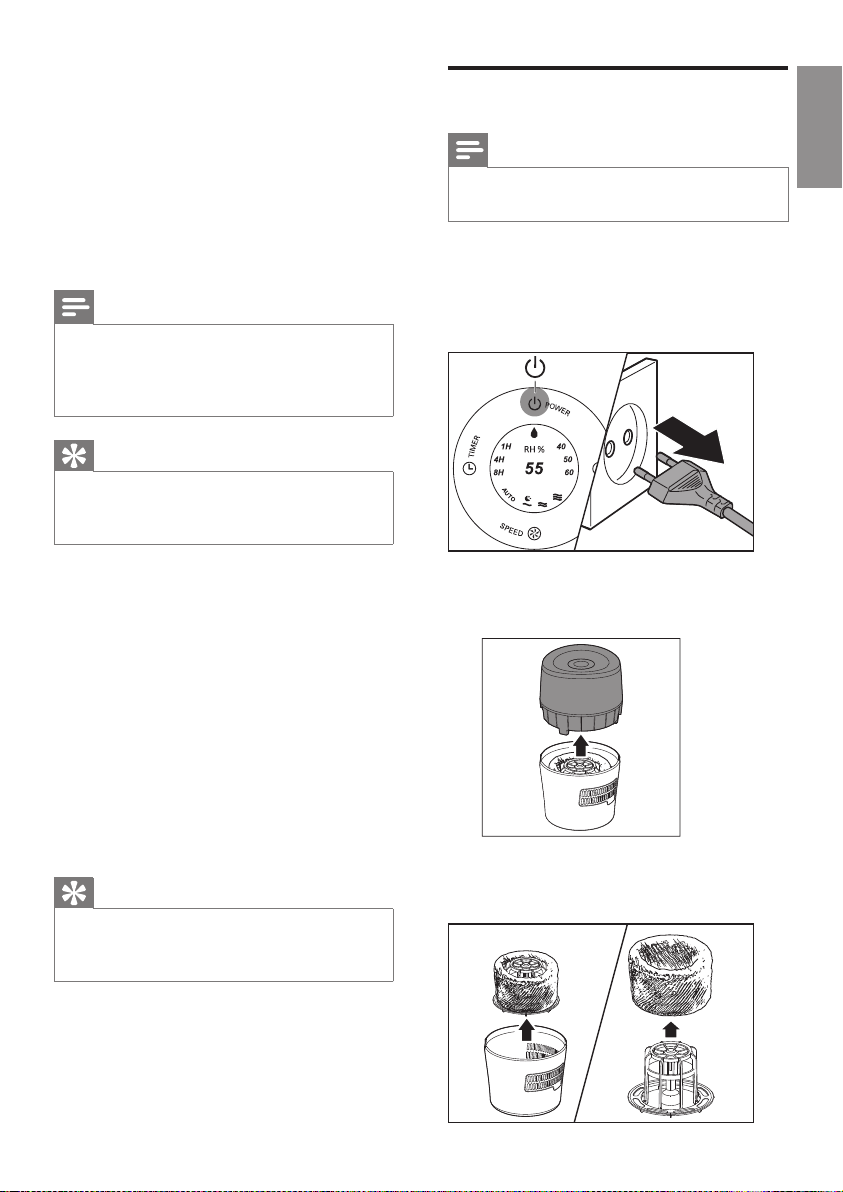
1 Hold by both sides of the upper unit to lift
it up (g. b).
2 Fill the water tank with cold tap water until
water reaches the maximum water level
indication (g. c).
3 Place the upper unit back onto the water
tank (g. d).
Understand the humidity
indication
The humidier is equipped with a built-in
humidity sensor. You can set the target humidity
level at 40%RH, 50%RH and 60%RH. The
ambient humidity level displays on the center of
the control panel from 20%RH to 95%RH.
Note
• A comfortable humidity level is from 40RH% to
60RH%.
• The accuracy of the humidity indication is
approximately ±10%.
• It takes some time to measure the humidity
level in the room.
Understand the healthy air
protect alert and lock
The healthy air protect alert gives you a timely
warning when the water tank needs relling.
When the water in the tank starts getting low,
a red indicator on the control panel starts
blinking to tell you that it is time to rell the
tank (g. e). It blinks for 30 minutes. After that,
the indicator remains on before the water tank
is relled with water.
The healthy air protect lock always ensures that
your humidier does not work without water
in the tank. When the water tank is empty and
needs to be relled, the healthy air protect lock
shuts off the humidier after 30 minutes and a
red indicator lights up. When you rell the water
tank properly, the humidier is turned on again.
Note
• In sleep mode, the red indicator does not blink,
it turns on when the water level is low.
5EN
Page 8
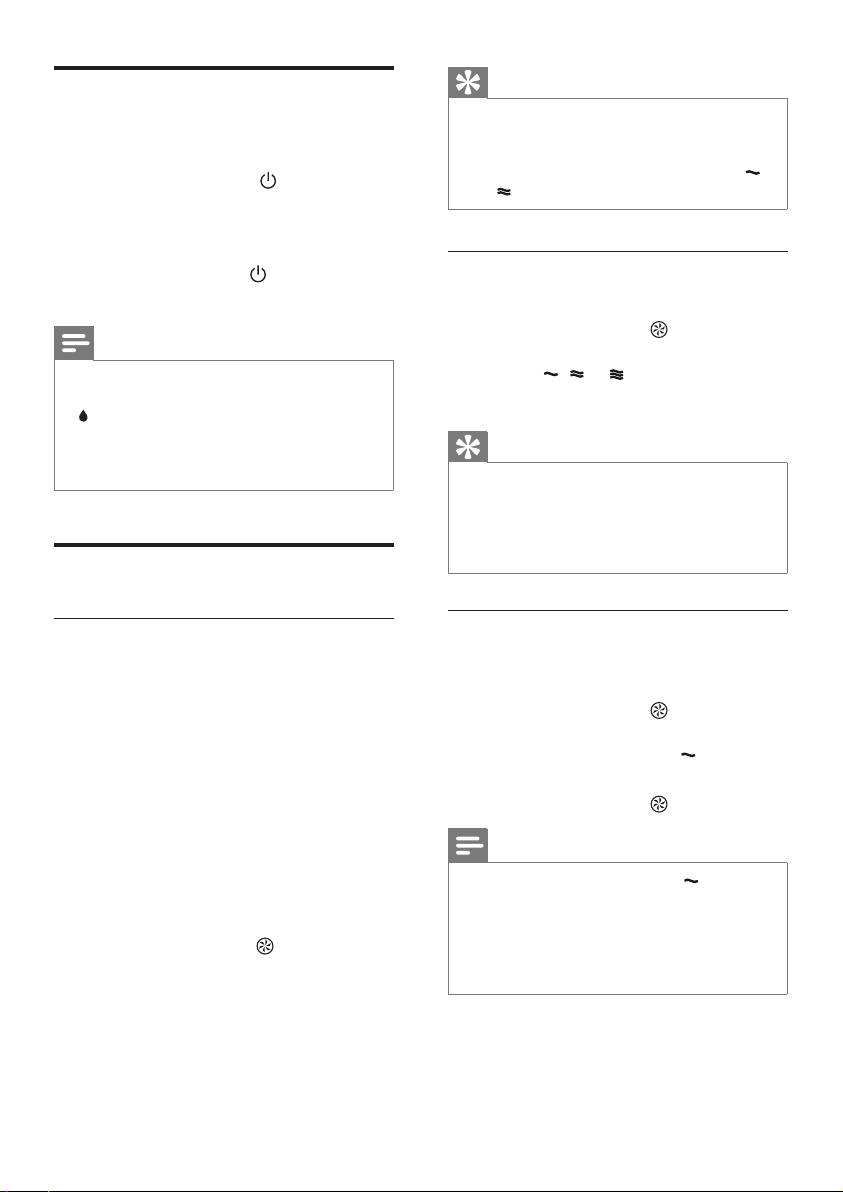
Switchthehumidieronandoff
1 Put the plug of the humidier into the wall
socket.
2 Press the power button to switch on
the humidier (g. f).
» The current humidity level and fan
speed display on the screen.
3 Press the power button to switch off the
humidier.
Note
• If the water level in the tank is getting very
low, the humidier stops humidifying. The red
indicator light rst starts blinking and then
remains on.
• The humidier releases very ne invisible mist,
so it is normal that you cannot see the mist.
Change the fan speed
Tip
• If the desired humidity level is reached, the
humidier changes to a lower fan speed
automatically.
• In AU TO mode, the fan speed changes between
and .
Manual
You can manually select the desired fan speed.
1 Press the speed button once or more
times to select the desired fan speed
(AUTO, , or ) (g. h).
» The selected fan speed light goes on.
Tip
• If the desired humidity level is reached, you can
select a lower fan speed. However, if the desired
humidity level is not reached, you can select
a higher fan speed to humidify the air more
quickly.
Auto
The auto mode uses the digital sensor to constantly monitor the air humidity. It turns your humidier on and off whenever needed to ensure
the humidity level is constantly at the right level.
The default humidity level of the auto mode
is set at 50RH%, but you can change it to the
humidity level you need under the auto mode.
Next time when you switch on the humidier, it
will remember your last set humidity level, unless
you have removed the plug from the wall socket.
In this case the default humidity level is set at
50RH% again.
1 Press the speed button to select the
auto mode (g. g).
» The AUTO speed light goes on.
6 EN
Sleep mode
In sleep mode, the humidier operates quietly
with dimmed light for your undisturbed sleep.
1 Press the speed button once or more
times to select sleep mode (g. i). In
sleep mode, only the speed light is on.
2 To change to another fan speed, simply
press the speed button again.
Note
• Sleep mode only works at speed .
• In sleep mode, the red indicator does not blink,
but remains on when the water level gets low.
• In sleep mode, you can only set the timer; the
humidity level cannot be set, and the humidity
light is off.
Page 9
Set the timer
With the timer function, you can let the
humidier operate for a set number of hours.
When the set time has elapsed, the humidier
automatically switches off.
1 Press the timer button once or more
times to choose the number of hours you
want the humidier to operate (g. j).
» The corresponding timer light (1H, 4H
or 8H) goes on.
To deactivate the timer function, press the timer
button repeatedly until the timer light turns
off.
Set the humidity level
Note
• Make sure that the water tank is lled with
water before the humidier can function (see
the chapter 'Get started', section 'Prepare for
humidication').
1 Press the humidity button once or
more times to set the desired air humidity
to 40RH%, 50RH% or 60RH% (g. k).
» The humidity light (40, 50 or 60) of the
humidity level goes on.
» The ambient humidity level displays on
the center of the control panel.
Tip
• A comfortable humidity level is from 40RH% to
60RH%. You can choose the preferred humidity
level at 40%RH, 50%RH or 60%RH..
Note
• If no preset humidity level is selected, the
humidier will stop working when the humidity
level reaches 50RH% in the auto mode and
70RH% in other modes.
Water level
When there is not enough water in the water
tank, the appliance will work in the following
ways.
• The water level drops and the red
indicator light starts blinking (g. e).
• The humidier continues to work for 30
minutes and then stops working, the red
indicator light remains on.
The appliance will resume work when you rell
water into the water tank.
Note
• If the water tank is empty when the humidier is
plugged in and switched on, the red indicator
light blinks for 2 minutes and then remains on
before the water tank is relled with water.
• It is normal to nd some water left in the tank.
Rellwater
Water level can be observed through the
transparent water tank window.
1 Switch off the humidier and unplug it.
2 Remove the upper unit by holding it at
both sides (g. b).
3 Fill the water tank with cold tap water
until water reaches the maximum water
indication level (g. c).
Note
• When lling water, do not exceed the maximum
water level, or water might leak from the drain
hole and air inlets.
• Do not shake the water tank when moving it,
or water might leak from the drain hole and air
inlets.
• Do not ll water through the air outlets on top
of the humidier.
4 Place the upper unit back onto the water
tank.
English
7EN
Page 10

5 Clean your
humidifier
Note
• Always unplug the humidier before you clean it.
• When pouring water from the water tank, make
sure to pour water from the opposite side of
the drain hole and air inlets.
• Never use abrasive, aggressive, or ammable
cleaning agents such as bleach or alcohol to
clean any part of the humidier.
Clean the body of the
humidier
Regularly clean the inside and outside of the
humidier to prevent dust from collecting.
1 Wipe away dust with a soft dry cloth from
the body of the humidier.
2 Clean the air inlet and the air outlet with a
soft dry cloth.
Clean the water tank
Clean the water tank every week to keep it
hygienic.
1 Take out the humidication lter and the
lter support.
2 Fill the water tank for 1/3 with water.
3 Add some mild washing-up liquid to the
water in the water tank.
4 Clean the inside of the water tank with a
soft clean cloth.
5 Empty the water tank into a sink.
6 Put the humidication lter and the lter
support back into the water tank.
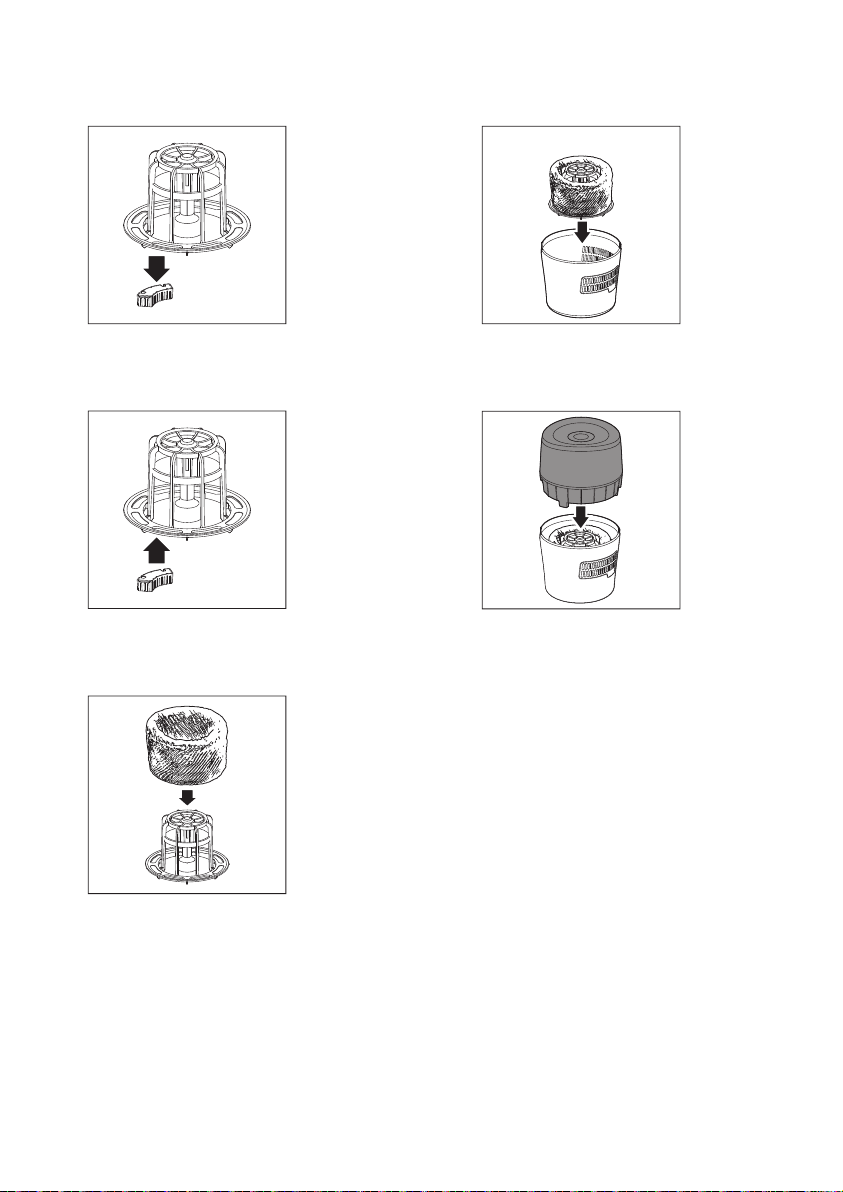
Cleanthehumidicationlter
Clean the humidication lter every week to
keep it hygienic.
1 Take out the humidication lter and the
lter support from the water tank (g. l).
2 Remove the humidication lter from the
lter support (g. m).
3 Soak the humidication lter in tap water
for one hour (g. n).
4 Rinse the humidication lter under a
slowly running tap. Do not squeeze or
wring the lter when cleaning (g. o).
5 Let excess water drip off the
humidication lter.
6 Assemble the humidication lter round
the lter support (g. p).
7 Put the humidication lter and the lter
support back into the water tank (g. q).
8 Put the upper unit back onto the water
tank (g. d).
Note
• Do not squeeze or wring the lter. This might
damage the lter and impact humidication
performance.
• Do not dry the lter under direct sunlight, unless
it is assembled back onto the lter support
8 EN
Page 11
6 Replacing the
Replacetheanti-bacteriallter
humidification filter
Replace the humidication lter every three
months for optimal performance. If the lter
is in good condition, you could use it for a
longer period of time. Make sure to replace the
humidication lter at least once a year.
Note
• Use only Philips original humidication lter
HU4102.
• Always unplug the humidier before you replace
the humidication lter.
Tip
• Register your product at www.philips.com for
further information on how to replace your
lter.
1 Take out the humidication lter and the
lter support from the water tank (g. m).
2 Remove the humidication lter from the
lter support (g. n).
3 Remove the packaging material from the
new humidication lter (g. r).
4 Assemble the new humidication lter
around the lter support (g. p).
5 Put the lter and the lter support back
into the water tank (g. q).
6 Put the upper unit back onto the water
tank (g. d).
Tip
• You can easily nd more information about
how to replace the lter in our web page or by
calling our Consumer Care Center.
Note
• Use only Philips original anti-bacterial lter
HU4112.
Replace the anti-bacterial lter at least once a
year to prevent the bacteria from growing in
the water tank.
1 Switch off the humidier and unplug it.
2 Remove the upper unit by holding it at
both sides.
3 Take out the lter support from the water
tank and remove the lter.
English
9EN
Page 12
4 Pull and remove the old anti-bacterial lter
from the lter support. Then, discard it.
7 Put the lter and the lter support back
into the water tank.
5 Push the new anti-bacterial lter to the
lter support.
6 Assemble the lter around the lter
support.
8 Put the upper unit back onto the water
tank.
10 EN
Page 13

7 Troubleshooting
This chapter summarizes the most common problems you could encounter with the humidier. If you are
unable to solve the problem with the information below, contact the Consumer Care Center in your country.
Problem Possible solution
The humidier does not
work.
There is no air
humidication.
The water tank leaks. • Make sure that the humidier is not overlled with water.
I do not see the current
humidity indication change.
• Make sure that there is power supply to the humidier.
• Make sure that the water tank is lled with water and the upper unit
is placed properly onto the water tank.
• Make sure that the water tank is lled with water and the upper unit
is placed properly onto the water tank.
• The humidier will stop working if the current humidity level reaches
70%RH. Humidity level above 70%RH does not make users feel
comfortable, so the humidier automatically turns off to ensure
optimal humidication performance.
• Make sure that the humidier is well assembled/connected every time
after you clean it or after you remove the upper unit and/or water
tank for relling.
• Make sure that the water tank is properly placed. If the problem
persists, contact the Consumer Care Center in your country.
• Make sure that you have assembled the humidication lter round the
lter support.
• The humidication lter is dirty. Rinse and/or descale the
humidication lter (see the chapter ‘Clean the humidication lter’).
• Your room might have too much ventilation. Please close doors and
windows.
• Your room size is too big. The recommended room size is 25m2.
English
There are some
white deposits on the
humidication lter.
The lter turns yellowish
after some time.
There is unpleasant smell
coming out from the
humidier.
The white deposits are called scale and they consist of minerals from
the water. Scale on the humidication lter affects the humidifying
performance, however it does not harm your health. Please follow the
cleaning instructions in the user manual.
The yellow deposits is a natural effect of the wick material, and it has no
impact on humidication performance. Clean the humidication lter
frequently to remove the scale, and replace the humidication lter every
three month.
• Make sure that the water tank is lled with water.
• Clean the humidication lter (see the chapter ‘Clean the
humidication lter’).
11EN
Page 14

Problem Possible solution
No air comes out of the
air outlet.
I do not see visible
mist coming out of the
humidier. Is it working?
I want to check whether
the humidity sensor works
or not.
Put the plug of the humidier into the wall socket and switch on the
humidier.
When mist is very ne, it is invisible. This humidier has a NanoCloud
humidication technology, which produces healthy humid air from the
outlet area without formation of water mist. Therefore, you cannot see
the mist.
Gently blow moist air into the humidity sensor. After a while, the humidity
indication changes. The indication can show the ambient humidity level
from 20%RH to 95%RH.
12 EN
Page 15
8 Guarantee and
9 Notices
service
If you need information or if you have a
problem, please visit the Philips website at
www.philips.com or contact the Philips
Consumer Care Center in your country (you
will nd its phone number in the worldwide
guarantee leaet). If there is no Consumer Care
Centre in your country, go to your local Philips
dealer.
Order parts or accessories
If you have to replace a part or want to
purchase an additional part, go to your Philips
dealer or visit www.philips.com/support.
If you have problems obtaining the par ts, please
contact the Philips Consumer Care Center in
your country (you will nd its phone number in
the worldwide guarantee leaet).
English
Electromagneticelds(EMF)
This Philips appliance complies with all
applicable standards and regulations regarding
exposure to electromagnetic elds.
Compliance with EMF
Koninklijke Philips N.V. manufactures and sells
many products targeted at consumers, which,
like any electronic apparatus, in general have
the ability to emit and receive electromagnetic
signals.
One of Philips’ leading Business Principles is to
take all necessary health and safety measures
for our products, to comply with all applicable
legal requirements and to stay well within
the EMF standards applicable at the time of
producing the products.
Philips is committed to develop, produce and
market products that cause no adverse health
effects. Philips conrms that if its products are
handled properly for their intended use, they
are safe to use according to scientic evidence
available today.
Philips plays an active role in the development
of international EMF and safety standards,
enabling Philips to anticipate further
developments in standardization for early
integration in its products.
Recycling
This symbol means that this product
shall not be disposed of with normal
household waste (2012/19/EU).
Follow your country’s rules for the separate
collection of electrical and electronic products.
Correct disposal helps prevent negative
consequences for the environment and human
health.
13EN
Page 16

Мазмұны
1 Маңыздыақпарат 15
Қауіпсіздік 15
2 Ылғалдандырғыш 18
Қорап ішіндегі заттар 18
3 Іскеқосу 18
Ылғалдандыру үшін дайындау 18
4 Ылғалдандырғыштыпайдалану 19
Ылғалдылық көрсеткішінің мағынасы 19
Таза ауаны сақтау сигналы мен құлпы 19
Ылғалдандырғышты қосу және өшіру 19
Желдеткіш жылдамдығын өзгерту 20
Авто 20
Қолмен 20
Дем алу режимі 20
Таймерді орнату 21
Ылғалдылық деңгейін орнату 21
Су деңгейі 21
Суды толтыру 22
5 Ылғалдандырғыштытазарту 22
Ылғалдандырғыштың корпусын
тазарту 22
Су ыдысын тазарту 22
Ылғалдандыру сүзгісін тазалау 23
9 Ескертулер 28
Электромагниттік өрістер (ЭМӨ) 28
Электромагниттік өріспен
(ЭМӨ) сәйкестік 28
Өңдеу 28
6 Ылғалдандырусүзгісінауыстыру 23
Бактерияға қарсы сүзгіні ауыстыру 24
7 Ақаулықтардыжою 26
8 Кепілдікжәнеқызметкөрсету 28
Бөлшектерге және қосалқы
құралдарға тапсырыс беру 28
14 KK
Page 17

1 Маңызды
ақпарат
Қауіпсіздік
Ылғалдандырғышты
пайдаланбастан бұрын осы
пайдаланушы нұсқаулығын
мұқият оқып шығыңыз да, оны
келешекте анықтама алу үшін
сақтап қойыңыз.
Қауіпті
• Ылғалдандырғыш айналасында
инсектицидтер немесе әтір
сияқты ешбір тұтанғыш
материалдарды бүркемеңіз.
• Су ыдысындағы су ішуге
жарамсыз. Бұл суды ішпеңіз
және оны жануарларға беру
немесе өсімдіктерді суғару
үшін пайдаланбаңыз. Су
ыдысын босатқанда суды
құбырға төгіңіз.
Ескерту
• Ылғалдандырғышты қосар
алдында, ылғалдандырғыштың
төменгі жағында көрсетілген
кернеу жергілікті қуат
кернеуіне сәйкес келетінін
тексеріңіз.
• Егер қуат сымы зақымдалған
болса, қауіптің алдын алу үшін,
оны тек Philips компаниясына,
Philips рұқсат берген қызмет
көрсету орталығына немесе
басқа білікті мамандарға
ауыстыртыңыз.
• Аша, қуат сымы немесе
ылғалдандырғыштың
зақымданған болса,
ылғалдандырғышты
пайдаланбаңыз.
• Бұл ылғалдандырғыш
физикалық, сезімталдық
немесе ақыл-ой қабілеттері
төмен адамдардың (оның
ішінде балалар), тәжірибесі
және білімі жоқ адамдардың
қолдануына арналмаған,
олардың қауіпсіздігіне
жауап беретін адам
оларға жетекшілік етіп,
ылғалдандырғышты қалай
қолдану керектігін түсіндіруі
тиіс.
• Бұл құрылғы ойыншық
емес. Балаларды бақылап,
олардың ылғалдандырғышпен
ойнамауын қадағалау керек.
• Ауа кіріс жері мен ауа шығыс
жерін бітеп тастамаңыз,
мәселен ауа шығатын жерге
немесе ауа кіретін жердің
алдына зат қоймаңыз.
Қазақша
15KK
Page 18

Абайлаңыз
• Егер ылғалдандырғышқа
қуат беру үшін
пайдаланылатын розетканың
қосылымдары нашар болса,
ылғалдандырғыштың ашасы
қызады. Ылғалдандырғышты
дұрыстап қосылған розеткаға
қосыңыз.
• Әрқашан ылғалдандырғышты
құрғақ, тұрақты, тегіс және
көлденең бетке қойыңыз және
пайдаланыңыз.
• Ылғалдандырғыш үстіне
ештеңе қоймаңыз және оның
үстіне отырмаңыз.
• Әр тазалаудан кейін немесе
толтыру үшін жоғарғы
бөлікті және/немесе су
ыдысын алғаннан кейін
ылғалдандырғыш дұрыс
жиналғанын/қосылғанын
тексеріңіз. Жақсы және
қауіпсіз жұмыс істеуі үшін
ылғалдандырғышты дұрыстап
жинау керек.
• Тек осы ылғалдандырғышқа
арналған түпнұсқалық Philips
сүзгісін пайдаланыңыз. Басқа
ешбір сүзгіні пайдаланбаңыз.
• Ылғалдандырғышқа қатты
заттарды соғып алудан
сақтаңыз (әсіресе ауа кірісін
және ауа шығысын).
• Жарақат алуды немесе
ылғалдандырғыштың дұрыс
емес жұмыс істеуін болдырмау
үшін ауа шығысына немесе ауа
кірісіне саусақтарды немесе
заттарды салмаңыз.
• Үй ішінде жәндіктерге қарсы
қолданатын түтін шығаратын
репелленттер қолданған
жерде немесе майлы
қалдықтар, жанып жатқан
фимиам, не болмаса химиялық
түтіндер бар орындарда
бұл ылғалдандырғышты
пайдалануға болмайды.
• Бұл ылғалдандырғышты
газ құралдары, жылыту
құрылғылары немесе камин
жанында пайдалануға
болмайды.
• Ылғалдандырғышты
пайдаланудан кейін және
тазалау алдында міндетті
түрде әрқашан розеткадан
суырыңыз.
• Ылғалдандырғыштың жоғарғы
жағындағы ауа шығыстары
арқылы су толтырмаңыз.
• Балалардың аударып
жіберуін болдырмау үшін
ылғалдандырғышты дұрыстап
қойыңыз.
16 KK
Page 19

• Ылғалдандырғышты
температурасы тым тұрақсыз
бөлмеде қолдануға болмайды,
себебі мұның нәтижесінде
ылғалдандырғыш ішінде
конденсат түзілуі мүмкін.
• Ылғалдандырғыш ұзақ уақыт
бойы пайдаланылмаса,
сүзгілерде бактериялар мен
зең пайда болуы мүмкін.
Ылғалдандырғышты қайта
пайдаланбас бұрын, сүзгілерді
тексеріңіз. Егер сүзгі тым лас
және онда қара дақтар пайда
болған болса, оны ауыстыру
қажет («Ылғалдандыру сүзгісін
ауыстыру» тарауын қараңыз).
• Сүзгіні кір жуғыш машинада
немесе ыдыс-аяқ жуу
машинасында жумаңыз, сүзгінің
пішіні өзгеруі мүмкін.
• Ылғалдандырғыш тек
тұрмыстық қолданыста
қалыпты жұмыс жағдайларында
ғана пайдалануға арналған.
• Таза ұстау үшін апта сайын
су ыдысын тазалаңыз және
ылғалдандыру сүзгісін шайыңыз.
• Су ыдысына тек салқын ағын
суын құйыңыз. Жерден алынған
суды немесе ыстық суды
пайдаланбаңыз.
• Су ыдысына судан басқа
ешбір затты құймаңыз. Суға
әтір немесе химиялық зат
қоспаңыз. Тек суды (ағын,
тазартылған, минералдық, кез
келген бөтелкедегі су түрі)
пайдаланыңыз.
• Ылғалдандырғыш ұзақ уақыт
бойы пайдаланылмаса, су
ыдысын тазалап, ылғалдандыру
сүзгісін кептіру керек.
• Ылғалдандырғышты жылжыту
керек болса, алдымен қуат
көзінен ылғалдандырғышты
ажыратыңыз. Одан кейін су
ыдысын босатыңыз және
ылғалдандырғышты көлденең
күйде алып жүріңіз.
• Ылғалдылық сенсорын
құрғақ ұстаңыз. Сенсордың
ылғалдануы нәтижесінде
ылғалдылық деңгейі қате
есептелуі мүмкін және бұл
ылғалдандырғыш жұмысының
тоқтауына себеп болуы мүмкін.
Қазақша
17KK
Page 20

2 Ылғалдандырғыш
Сатып алғаныңыз құтты болсын және Philips
компаниясына қош келдіңіз!
Philips ұсынатын қолдауды толық пайдалану
үшін өнімді
www.philips.com/welcome торабында тіркеңіз.
Philips ылғалдандырғышы сіздің және
отбасыңыздың денсаулығы үшін таза,
ылғалдандырылған ауаны береді.
Ол NanoCloud технологиясы қолданылған
булануды бақылаудың үздік жүйесін
ұсынады. Құрылғыда құрғақ ауаға H2O
молекулаларын қосып, таза ылғал ауа түзетін
және суды буландырмайтын сүзгі орнатылған.
Ылғалдандыру сүзгісі бактериялар, кальций
және басқа да ұсақ бөлшектерді судан
сүзіп алады. Ол сіздің үйіңізге тек таза,
ылғалдандырылған ауа жеткізеді. Қысқы
маусымда немесе желдеткіштен келетін
құрғақ ауа енді болмайды.
Ылғалдандырғышты орнату және пайдалану
алдында осы пайдаланушы нұсқаулығын
мұқият оқып шығыңыз. Оны болашақта
анықтама алу үшін сақтаңыз.
3 Іскеқосу
Ылғалдандыруүшіндайындау
1 Жоғарғы бөлікті екі жағынан ұстап
көтеріңіз (b суреті).
2 Су ыдысын ең жоғары деңгей
белгісіне дейін салқын сумен
толтырыңыз (c суреті).
3 Жоғарғы бөлікті су ыдысына қайта
қойыңыз (d суреті).
Қорапішіндегізаттар
Қораптың ішіндегілерді тексеріп, түгендеңіз
(a суреті):
A Жоғарғы бөлік
B Ылғалдандыру сүзгісі (HU4102)
C Сүзгі тірегі
D Қалтқы
E Бактерияға қарсы сүзгі
F Су ыдысы
G Пайдаланушы нұсқаулығы
H Кепілдік
18 KK
Page 21

4 Ылғалдандырғышты
пайдалану
Ылғалдылықкөрсеткішінің
мағынасы
Ылғалдандырғыш бекітілген ылғалдылық
сенсорымен жабдықталған. Мақсатты
салыстырмалы ылғалдылық деңгейін 40%, 50%
және 60% мәніне орнатуға болады. Сары
түсті салыстырмалы ылғалдылық деңгейі
басқару панелінің ортасында 20% және 95%
аралығындағы мәнді көрсетеді.
Естесақтаңыз
• Ылғалдылықтың ең ыңғайлы деңгейі: 40%-60%
аралығында.
• Ылғалдылық көрсеткішінің дәлдігі шамамен
±10%.
• Бөлме ішіндегі ылғалдылық деңгейін өлшеуге
біраз уақыт кетеді.
Тазаауанысақтаусигналымен
құлпы
Таза ауаны сақтау сигналы су ыдысын
толтыру қажет болған жағдайда уақтылы
белгі береді. Су ыдысындағы су деңгейі
төмендесе, басқару панеліндегі қызыл түсті
көрсеткіші ыдысты толтыру керек екені
туралы белгі беру үшін жыпылықтайды. (e
суреті). Ол 30 минут бойы жыпылықтап
тұрады. Осыдан кейін, ыдыс сумен
толтырылғанша көрсеткіш жанып тұрады.
Таза ауаны сақтау құлпы ылғалдандырғыштың
сусыз жұмыс істемеуін қадағалайды. Су
ыдысы босаған соң 30 минуттан кейін таза
ауаны сақтау құлпы ылғалдандырғышты
өшіріп, қызыл түсті көрсеткішті іске қосады.
Су ыдысы тиісінше толтырылған соң
ылғалдандырғыш қайта іске қосылады.
Естесақтаңыз
• Ұйқы режимде қызыл түсті көрсеткіш
жыпылықтамайды, ол су деңгейі төмендеген
кезде жанады.
Ылғалдандырғыштықосу
жәнеөшіру
1 Ылғалдандырғыштың ашасын қабырға
розеткасына жалғаңыз.
2 Ылғалдандырғышты қосу үшін, қуат
түймесін басыңыз. (f суреті).
» Ағымдағы ылғалдылық деңгейі мен
желдеткіш жылдамдығы экранда
көрсетіледі.
3 Ылғалдандырғышты өшіру үшін, қуат
түймесін басыңыз.
Естесақтаңыз
• Су ыдысындағы су деңгейі өте төмен болса,
ылғалдандырғыш жұмысы тоқтатылады. Қызыл
түсті көрсеткіші алдымен жыпылықтап,
кейіннен жанып тұрады.
• Ылғалдандырғыш өте таза, көзге көрінбейтін
бу шығарады, сондықтан да будың көзге
көрінбеуі қалыпты жағдай болып табылады.
Қазақша
19KK
Page 22

Желдеткішжылдамдығын
өзгерту
Авто
Авто режимінде ауа ылғалдылығын үздіксіз
бақылау үшін сандық сенсор пайдаланылады.
Ауадағы ылғалдылық деңгейі тұрақты
сақталуы үшін, бұл сенсор ылғалдандырғышты
қажетінше қосады және өшіреді. Авто
режиміндегі әдепкі ылғалдылық деңгейі 50%
етіп орнатылады, бірақ оны авто режимінде
қажетті ылғалдылық деңгейіне өзгертуге
болады. Ылғалдандырғыш розеткадан
ажыратылмаған болса, келесі рет қосқан
кезде құрылғы жадында бұрын орнатылған
мәндер сақталып қалады. Ал олай болмаған
жағдайда, әдепкі ылғалдылық деңгейі 50%
күйіне қайтарылады.
1 Авто режимін таңдау үшін жылдамдық
түймесін басыңыз (g суреті).
» AUTO (АВТО) жылдамдығының
шамы жанады.
Кеңес
• Бөлмедегі ылғалдылық деңгейі қажетті
дәрежеге жеткен соң, ылғалдандырғыш
жылдамдығы автоматты түрде бәсеңдейді.
• AU TO (АВТО) режимінде желдеткіш
жылдамдығы тек - аралығында өзгереді.
Кеңес
• Егер ылғалдылық деңгейі қажетті дәрежеге
жеткенде төменгі желдеткіш жылдамдығын
таңдауға болады. Ал егер ылғалдылық деңгейі
қажетті дәрежеге жетпеген болса, ауаны
тезірек ылғалдандыру үшін ең жоғарғы
желдеткіш жылдамдығын таңдауға болады.
Демалурежимі
Сіздің ұйқыңызға кедергі жасамас үшін,
түнгі режимде ылғалдандырғыш шамдары
күңгірттеледі және құрылғының даусы
бәсеңдейді.
1 Түнгі режимді таңдау үшін жылдамдық
түймесін бір немесе бірнеше рет
басыңыз (i суреті). Түнгі режимде тек
жылдамдық шамы жанып тұрады.
2 Басқа желдеткіш жылдамдығын таңдау
үшін, жылдамдық түймесін қайта
басыңыз.
Естесақтаңыз
• Түнгі режим тек жылдамдығында
қосылады.
• Түнгі режимде қызыл түсті көрсеткіш
жыпылықтамайды, ол су деңгейі төмендеген
кезде жанады.
• Түнгі режимде тек таймер орнатуға болады;
ылғалдылық деңгейін орнатуға болмайды
және ылғалдылық шамдары сөнеді.
Қолмен
Қажетті желдеткіш жылдамдығын таңдауға
болады.
1 Желдеткіштің қажетті жылдамдығын
таңдау үшін жылдамдық түймесін бір
немесе бірнеше рет басыңыз (мысалы,
AUTO (АВТО), , немесе ) (h
суреті).
» Таңдалған желдеткіш
жылдамдығының шамы жанады.
20 KK
Page 23

Таймердіорнату
Таймер функциясы арқылы
ылғалдандырғышты бірнеше сағат бойы
жұмыс істетуге болады. Орнатылған уақыт
аяқталған соң ылғалдандырғыш автоматты
түрде өшеді.
1 Ылғалдандырғыштың неше сағат жұмыс
істейтіндігін таңдау үшін таймер
түймесін бір немесе бірнеше рет
басыңыз (j суреті).
» Тиісті таймер көрсеткіші (1H, 4H
немесе 8H) жанады.
Таймер функциясын ажырату үшін, таймер
шамы сөнгенше таймер түймесін қайталап
басыңыз.
Ылғалдылықдеңгейінорнату
Естесақтаңыз
Естесақтаңыз
• Егер алдын ала орнатылған ылғалдылық
деңгейі таңдалмаса, ылғалдылық деңгейі авто
режимінде 50% және басқа режимдерде
70% дәрежесіне жеткенде ылғалдандырғыш
жұмысын тоқтатады.
Судеңгейі
Су ыдысында су жеткілікті болмағанда
құрылғы келесі әдіспен жұмыс істейді.
• Су деңгейі төмендейді және қызыл түсті
көрсеткіші жыпылықтай бастайды (e
суреті).
• Одан кейін ылғалдандырғыш 30 минут
жұмыс істейді де тоқтайды, қызыл түсті
көрсеткіш жанып тұра береді.
Су ыдысына су құйғанда құрылғы жұмысын
жалғастырады.
Қазақша
• Ылғалдандырғышты іске қоспас бұрын, су
ыдысының толтырылғанына көз жеткізіңіз
(«Іске қосу» тарауының «Ылғалдандыруға
дайындау» бөліміне қараңыз).
1 Қажет ауа ылғалдылығын 40%,
50% немесе 60% деп орнату үшін,
ылғалдылық түймесін бір немесе
бірнеше рет басыңыз (k суреті).
» Ылғалдылық деңгейінің шамы (40, 50
немесе 60) жанады.
» Сары түсті ылғалдылық деңгейі
басқару панелінің ортасында
көрсетіледі.
Кеңес
• Ылғалдылықтың ең ыңғайлы деңгейі: 40%-60%
аралығында. Ылғалдылықтың қажетті деңгейін
(40%, 50% немесе 60%) таңдауға болады.
Естесақтаңыз
• Егер ылғалдандырғыш электр желісіне
жалғанып, қуат қосылған кезде су ыдысы бос
болса, қызыл түсті көрсеткіш шамы 2 минут
бойы жыпылықтаған соң су ыдысы сумен
толтырылғанша жанып тұрады.
• Ыдыста судың біраз мөлшерінің қалып қоюы
қалыпты жағдай.
21KK
Page 24

Судытолтыру
Су деңгейін су ыдысындағы мөлдір терезе
арқылы бақылап отыруға болады.
1 Ылғалдандырғышты өшіріп, қуат көзінен
ажыратыңыз.
2 Жоғарғы бөлікті екі жағынан ұстап алып
тастаңыз (b суреті).
3 Су ыдысын ең жоғары деңгей белгісіне
дейін салқын сумен толтырыңыз (c
суреті).
Естесақтаңыз
• Су ыдысын толтырған кезде ең жоғары
деңгей белгісінен асуға болмайды, әйтпесе
шығару жолы мен ауа кіру жолдарына су
төгіліп кетуі мүмкін.
• Жылжытқан кезде су ыдысын шайқамаңыз,
әйтпесе шығару жолы мен ауа кірістерінен су
ағуы мүмкін.
• Ылғалдандырғыштың жоғарғы жағындағы ауа
шығару жолдары арқылы су толтырмаңыз.
4 Жоғарғы бөлікті су ыдысына қайта
қойыңыз.
5 Ылғалдандырғышты
тазарту
Естесақтаңыз
• Тазарту алдында ылғалдандырғышты міндетті
түрде розеткадан ажырату керек.
• Су ыдысындағы суды шығару жолы мен ауа
кіру жолдарына қарама-қарсы жақтан төгу
керек.
• Ылғалдандырғыштың кез келген бөлігін
тазалау үшін ағартқыш немесе алкоголь
сияқты абразивті, агрессивті немесе тұтанғыш
тазалағыш заттарды ешқашан пайдаланбаңыз.
Ылғалдандырғыштың
корпусынтазарту
Шаңның жиналуын болдырмау үшін
ылғалдандырғыштың ішін және сыртын
жүйелі түрде тазалаңыз.
1 Ылғалдандырғыш корпусының шаңын
жұмсақ, құрғақ шүберекпен сүртіп
алыңыз.
2 Ауа кірісін және шығысын құрғақ, жұмсақ
шүберекпен тазалаңыз.
22 KK
Суыдысынтазарту
Таза ұстау үшін, су ыдысын апта сайын
тазалаңыз.
1 Ылғалдандыру сүзгісі мен сүзгі тірегін
шығарып алыңыз.
2 Су ыдысының 1/3 бөлігін сумен
толтырыңыз.
3 Су ыдысындағы суға жұмсақ тазартқыш
сұйықтық қосыңыз.
4 Су ыдысының ішкі бөлігін жұмсақ әрі
таза шүберекпен тазартыңыз.
5 Су ыдысындағы суды раковинаға төгіңіз.
Page 25

6 Ылғалдандыру сүзгісін және сүзгі
ұстағышын су ыдысына қайта қойыңыз.
6 Ылғалдандыру
сүзгісінауыстыру
Ылғалдандырусүзгісінтазалау
Таза ұстау үшін, ылғалдандыру сүзгісін апта
сайын тазалаңыз.
1 Су ыдысынан ылғалдандыру сүзгісі мен
сүзгі тірегін шығарып тастаңыз (l
суреті).
2 Сүзгі тірегінен ылғалдандыру сүзгісін
алып тастаңыз (m суреті).
3 Ылғалдандыру сүзгісін бір сағат бойы
суға салып қойыңыз (n суреті).
4 Ылғалдандыру сүзгісін баяу ағып тұрған
сумен шайыңыз. Тазалаған кезде сүзгіні
қыспаңыз немесе сықпаңыз (o суреті).
5 Артық суды ылғалдандыру сүзгісіне
ағызыңыз.
6 Ылғалдандыру сүзгісін сүзгі тірегіне
жинаңыз. (p суреті).
7 Ылғалдандыру сүзгісін және сүзгі тірегін
су ыдысына қайта қойыңыз (q суреті).
8 Жоғарғы бөлікті су ыдысына қайта
қойыңыз (d суреті).
Естесақтаңыз
• Сүзгіні қыспаңыз немесе сықпаңыз. Бұл сүзгіні
зақымдауы және ылғалдандыру сапасына әсер
етуі мүмкін.
• Сүзгі тірегіне қайта жиналмаған болса, сүзгіні
тікелей күн сәулесімен кептіруге болмайды.
Оңтайлы өнімділік үшін ылғалдандыру сүзгісін
үш ай сайын ауыстырыңыз. Егер сүзгі жақсы
күйде болса, оны ұзағырақ уақыт пайдалана
аласыз. Ылғалдандыру сүзгісін кемінде
жылына бір рет ауыстырыңыз.
Қазақша
Естесақтаңыз
• ТекHU4102 Philips түпнұсқа ылғалдандыру
сүзгісін пайдаланыңыз.
• Ылғалдандыру сүзгісін ауыстырмай тұрып
ылғалдандырғышты розеткадан ажыратыңыз.
Кеңес
• Сүзгіні ауыстыру туралы қосымша ақпарат алу
үшін өнімді www.philips.com сайтына тіркеу
қажет.
1 Су ыдысынан ылғалдандыру сүзгісі мен
сүзгі тірегін шығарып тастаңыз (m
суреті).
2 Сүзгі тірегінен ылғалдандыру сүзгісін
алып тастаңыз (n суреті).
3 Жаңа ылғалдандыру сүзгісіндегі орауыш
материалдарын алып тастаңыз (r
суреті).
4 Ылғалдандыру сүзгісін сүзгі тірегіне
орнатыңыз (p суреті).
5 Сүзгіні және сүзгі тірегін су ыдысына
қайта қойыңыз (q суреті).
6 Жоғарғы бөлікті су ыдысына қайта
қойыңыз (d суреті).
Кеңес
• Сүзгіні ауыстыру туралы толық ақпаратты
веб-сайтқа кіру арқылы немесе
тұтынушыларды қолдау орталығына қоңырау
шалу арқылы алуға болады.
23KK
Page 26

Бактерияғақарсысүзгіні
ауыстыру
Естесақтаңыз
• HU4112 бактерияға қарсы сүзгісінің тек
Phillips өндірген түпнұсқа үлгілерін пайдалану
керек.
Су ыдысында бактериялар пайда болуының
алдын алу үшін, бактерияға қарсы сүзгіні
кемінде жылына бір рет ауыстырып тұру
керек.
1 Ылғалдандырғышты өшіріп, қуат көзінен
ажыратыңыз.
3 Сүзгі тірегін су ыдысынан шығарып,
сүзгіні алып тастаңыз.
4 Сүзгі тірегінен бактерияға қарсы ескі
сүзгіні тартып алыңыз. Ескі сүзгіден
арылыңыз.
2 Жоғарғы бөлікті екі жағынан ұстап алып
тастаңыз.
24 KK
5 Бактерияға қарсы жаңа сүзгіні сүзгі
тірегіне итеріп салыңыз.
Page 27

6 Сүзгіні сүзгі тірегіне орнатыңыз.
7 Сүзгі мен сүзгі ұстағышын су ыдысына
қайта қойыңыз.
8 Жоғарғы блокты су ыдысына қайта
қойыңыз.
Қазақша
25KK
Page 28

7 Ақаулықтардыжою
Бұл тарауда ылғалдандырғышта орын алуы мүмкін ең көп кездесетін ақаулықтар жинақталған.
Егер төменде берілген ақпарат көмегімен ақаулық жойылмаса, еліңіздегі тұтынушыларды қолдау
орталығына хабарласыңыз.
Ақаулық Мүмкіншешімі
Ылғалдандырғыш жұмыс
істемейді.
Ауаны
ылғалдандырмайды.
Су ыдысынан су ағады. • Ылғалдандырғышқа артық су құйылмағанын тексеріңіз.
Ағымдағы ылғалдылық
көрсеткішінің өзгергені
көрінбейді.
• Ылғалдандырғышқа ток келіп тұрғанын тексеріңіз.
• Су ыдысы сумен толтырылғанын және жоғарғы блок су ыдысына
дұрыстап қойылғанын тексеріңіз.
• Су ыдысы сумен толтырылғанын және жоғарғы блок су ыдысына
дұрыстап қойылғанын тексеріңіз.
• Ағымдағы ылғалдылық деңгейі 70% көрсеткішке жеткен соң
ылғалдандырғыш жұмысы тоқтайды. Ауадағы ылғалдылық деңгейі
70%-дан артып кетсе, пайдаланушылар өздерін жайсыз сезінуі
мүмкін, сондықтан, ылғалдылықтың оңтайлы деңгейін сақтау үшін,
ылғалдандырғыш автоматты түрде жұмысын тоқтатады.
• Әр тазалаудан кейін, не болмаса толтыру үшін жоғарғы блокты
және/немесе су ыдысын алғаннан кейін ылғалдандырғыш дұрыс
жиналғанын/қосылғанын тексеріңіз.
• Су ыдысы дұрыс орналастырылғанын тексеріңіз. Егер мәселе
шешілмесе, еліңіздегі тұтынушыларды қолдау орталығына
хабарласыңыз.
• Ылғалдандыру сүзгісінің сүзгі тірегіне орнатылғанына көз
жеткізіңіз.
• Ылғалдандыру сүзгісі ластанған. Ылғалдандыру сүзгісін шайыңыз
немесе қағын кетіріңіз («Ылғалдандыру сүзгісін тазалау» тарауына
қараңыз).
• Бөлме тым көп желдетілуі мүмкін. Есіктерді және терезелерді
жабыңыз.
• Бөлме тым үлкен. Ұсынылған бөлме өлшемі: 25 м2.
Ылғалдандыру сүзгісінде
біраз жиналған ақ зат
бар.
Біраз уақыттан кейін сүзгі
сарғыштау түске боялады.
26 KK
Жиналған ақ зат қақ деп аталады және судағы минералдардан
тұрады. Ылғалдандыру сүзгісіне жиналған қақ ылғалдандыру
сапасына әсер еткенімен, денсаулыққа зиян тигізбейді. Пайдаланушы
нұсқаулығында берілген тазарту бойынша нұсқауларды орындаңыз.
Сары түсті қалдықтар тампон материалының табиғи ізі болып
табылады, олар ылғалдандыру сапасына әсер етпейді. Қақты жою үшін
ылғалдандыру сүзгісін жиі тазарту керек және ылғалдандыру сүзгісін
үш ай сайын ауыстыру керек.
Page 29

Ақаулық Мүмкіншешімі
Ылғалдандырғыштан
жағымсыз иіс шығады.
Ауа шығысынан ауа
шықпайды.
Ылғалдандырғыштан
бу шығып жатқанын
көрмеймін. Ол жұмыс
істеп жатыр ма?
Ылғалдылық сенсорының
жұмыс істейтінін
тексергім келеді.
• Су ыдысы сумен толтырылғанын тексеріңіз.
• Ылғалдандыру сүзгісін тазалаңыз («Ылғалдандыру сүзгісін тазалау»
тарауын қараңыз).
Ылғалдандырғыш ашасын қабырға розеткасына жалғап,
ылғалдандырғышты іске қосыңыз.
Бу өте таза болса, ол көзге көрінбейді. Ылғалдандырғышта су
буын түзбей шығатын саңылау аумағынан пайдалы ылғалды ауаны
шығаратын NanoCloud ылғалдандыру технологиясы бар. Сол себепті,
ылғалды көру мүмкін емес.
Ылғалдылық сенсорына дымқыл ауа жіберіңіз. Біраз уақыт өткен
соң ылғалдылық көрсеткіші өзгереді. Көрсеткіш 20% және 95%
аралығындағы сары ылғалдылық деңгейін көрсете алады.
Қазақша
27KK
Page 30

8 Кепілдікжәне
қызметкөрсету
Егер ақпарат қажет болса немесе сұрақтар
болса, www.philips.com мекенжайындағы
Philips веб-сайтына кіріңіз, не болмаса
еліңіздегі Philips тұтынушыларды қолдау
орталығына (оның телефон нөмірін
дүниежүзілік кепілдік парақшасынан
таба аласыз) хабарласыңыз. Егер
еліңізде тұтынушыларға қолдау көрсету
орталығы болмаса, онда жергілікті Philips
компаниясының дилеріне барыңыз.
Бөлшектергежәнеқосалқы
құралдарғатапсырысберу
Егер бөлшекті ауыстырғыңыз келсе не
қосалқы бөлшекті сатып алғыңыз келсе, Philips
сатушысына барыңыз не www.philips.com/
support сайтына кіріңіз.
Егер бөлшектерді сатып алуда мәселелер
болса, сіздің елдегі Philips тұтынушыларды
қолдау орталығына (оның телефон нөмірі
дүниежүзілік кепілдік парақшасында берілген)
хабарласыңыз.
Электромагниттікөріспен(ЭМӨ)
сәйкестік
Koninklijke Philips N.V. тұтынушыларға
арналған, басқа электрондық құрылғылар
сияқты, негізінде, электр магнитті сигналдар
шығаратын және қабылдайтын қабілеті бар
көп өнімдер жасайды және сатады.
Philips компаниясының негізгі жұмыс
ұстанымдарының бірі өнімдер үшін бүкіл
қажетті денсаулық және қауіпсіздік
шараларын сақтау, қолданыстағы барлық заң
талаптарына сәйкес болу және өнімді жасау
кезінде қолданылатын ЭМӨ стандарттарын
ұстану болып табылады.
Philips денсаулыққа кері әсерлерді тигізбейтін
өнімдерді әзірлеуге, жасауға және нарыққа
шығаруға міндетті. Өнімдер арналған мақсаты
бойынша дұрыс қолданылғанда, Philips
компаниясы олардың қазіргі таңдағы ғылыми
дәлелдерге сәйкес пайдалануға қауіпсіз
екенін растайды.
Philips компаниясы халықаралық ЭМӨ және
қауіпсіздік стандарттарын дамытуда белсенді
рөл атқарады, сондықтан өз өнімдеріне
бірінші болып енгізу үшін стандартизациядағы
болашақ жетілдірулерді болжауға мүмкіндік
береді.
9 Ескертулер
Электромагниттікөрістер
(ЭМӨ)
Осы Philips құрылғысы электромагниттік
өрістерге қатысты барлық қолданыстағы
стандарттар мен ережелерге сәйкес келеді.
28 KK
Өңдеу
Бұл таңба осы өнімді қалыпты тұрмыстық
қалдықпен тастауға болмайтынын білдіреді
(2012/19/EU).
Электр және электрондық өнімдердің
қалдықтарын бөлек жинау жөніндегі еліңіздің
ережелерін сақтаңыз. Қоқысқа дұрыс тастау
қоршаған ортаға және адам денсаулығына
тиетін зиянды әсерлердің алдын алуға
көмектеседі.
Page 31

Содержание
1 Внимание 30
Безопасность 30
2 Вашувлажнительвоздуха 33
Комплект поставки 33
3 Началоработы 33
Подготовка к увлажнению воздуха 33
4 Использованиеувлажнителя
воздуха 34
Значение сигналов индикатора
влажности 34
Значение сигналов оповещения и
блокировки системы контроля
качества воздуха 34
Включение и выключение
увлажнителя воздуха 34
Изменение скорости работы
вентилятора 35
Автоматические режимы 35
Ручной 35
Режим "Сон" 35
Установка таймера 36
Настройка уровня влажности 36
Уровень воды 36
Наполнение водой 37
8 Гарантияиобслуживание 43
Заказ запчастей и аксессуаров 43
9 Примечания 43
Электромагнитные поля (ЭМП) 43
Соответствие стандартам ЭМП 43
Утилизация 43
Русский
5 Очисткаувлажнителявоздуха 37
Очистка корпуса увлажнителя
воздуха 37
Очистка резервуара для воды 38
Очистка увлажняющего фильтра 38
6 Заменаувлажняющегофильтра 39
Замена антибактериального фильтра 39
7 Устранениенеисправностей 41
29RU
Page 32

1 Внимание
Безопасность
Перед эксплуатацией
увлажнителя воздуха
внимательно ознакомьтесь с
настоящим руководством и
сохраните его для дальнейшего
использования в качестве
справочного материала.
Опасно!
• Запрещается распылять
легковоспламеняющиеся
вещества, такие как
инсектициды или духи, вблизи
увлажнителя воздуха.
• Вода в резервуаре для воды
не пригодна для питья.
Запрещается пить эту воду,
а также добавлять ее в корм
животным и использовать
для полива растений. Для
слива воды из резервуара
используйте сливное
отверстие.
Предупреждение
• Перед подключением прибора
убедитесь, что напряжение,
указанное на нижней панели
увлажнителя воздуха,
соответствует напряжению
местной электросети.
• В случае повреждения шнура
питания его необходимо
заменить. Чтобы обеспечить
безопасную эксплуатацию
прибора, заменяйте шнур
только в авторизованном
сервисном центре Philips
или в сервисном центре с
персоналом аналогичной
квалификации.
• Запрещено пользоваться
увлажнителем воздуха, если
сетевая вилка, сетевой шнур
или сам прибор повреждены.
• Увлажнитель воздуха
не предназначен для
использования лицами
(включая детей)
с ограниченными
возможностями сенсорной
системы или ограниченными
интеллектуальными
возможностями, а так же
лицами с недостаточным
опытом и знаниями,
кроме случаев контроля
или инструктирования по
вопросам использования
прибора со стороны лиц,
30 RU
Page 33

ответственных за их
безопасность.
• Этот прибор — не игрушка!
Не позволяйте детям играть с
увлажнителем воздуха.
• Не блокируйте отверстия
для входа и выхода воздуха,
то есть не ставьте предметы
перед этими отверстиями.
Внимание!
• В случае если подключение
сетевой розетки проведено
неправильно, сетевая вилка
увлажнителя воздуха будет
нагреваться. Увлажнитель
следует подключать к
исправной сетевой розетке.
• Используйте и устанавливайте
увлажнитель воздуха на сухой,
горизонтальной, ровной и
устойчивой поверхности.
• Не ставьте на увлажнитель
воздуха посторонние
предметы и не садитесь на
него.
• Каждый раз после проведения
очистки, а также после
снятия верхней крышки и/
или наполнения резервуара
для воды проверяйте сборку/
подключение увлажнителя
воздуха. Непременным
условием эффективной
и безопасной работы
увлажнителя воздуха является
правильная сборка всех
деталей.
• Используйте только
оригинальные фильтры Philips,
разработанные для данной
модели увлажнителя воздуха.
Использование других
фильтров запрещено.
• Оберегайте увлажнитель
воздуха (в частности
отверстия для входа и выхода
воздуха) от ударов твердыми
предметами.
• Во избежание травм и
повреждения увлажнителя
воздуха не вставляйте
пальцы и другие предметы в
отверстия для выхода и входа
воздуха.
• Не используйте увлажнитель
воздуха, если в помещении
применялся дымовой
инсектицид, а также в местах,
где присутствуют масляный
туман, горящие курильницы
и газообразные химические
отходы.
• Не используйте увлажнитель
воздуха рядом с
газовым оборудованием,
нагревательными
устройствами или каминами.
• Обязательно отключайте
увлажнитель воздуха
от электросети после
использования и перед
очисткой.
Русский
31RU
Page 34

• Не наливайте воду через
отверстия для выхода
воздуха на верхней панели
увлажнителя.
• Расположите увлажнитель
воздуха должным образом,
чтобы дети не могли
перевернуть его.
• Не используйте увлажнитель
воздуха в помещениях
с резкими перепадами
температуры, так как это
может вызвать конденсацию
влаги внутри прибора.
• Если увлажнитель воздуха
не используется в течение
длительного периода
времени, на фильтрах могут
скопиться бактерии и плесень.
Проверьте фильтры перед
тем, как снова использовать
увлажнитель воздуха. Если
фильтр очень грязный и
на нем имеются черные
пятна, замените его (см.
главу "Замена увлажняющего
фильтра").
• Не очищайте фильтр
в посудомоечной или
стиральной машине, чтобы не
деформировать его.
• Увлажнитель воздуха
предназначен исключительно
для домашнего применения
при нормальных условиях
эксплуатации.
• Еженедельно очищайте
резервуар для воды и
промывайте увлажняющий
фильтр.
• Наполняйте резервуар для
воды только холодной
водопроводной водой. Не
используйте грунтовые воды
или горячую воду.
• Не наливайте в резервуар для
воды ничего кроме чистой
воды. Не добавляйте в воду
духи или химические средства.
Используйте исключительно
воду (водопроводную,
очищенную, минеральную,
любую питьевую воду).
• Если увлажнитель воздуха не
использовался долгое время,
очистите резервуар для воды
и увлажняющий фильтр.
• Если увлажнитель воздуха
необходимо переместить,
сначала отключите его от
источника питания. Слейте
воду из резервуара для воды,
переносите увлажнитель в
горизонтальном положении.
• Датчик влажности должен
оставаться сухим. Если на
датчик попала влага, он может
неверно определить уровень
влажности, в результате
чего перестанет работать
увлажнитель воздуха.
32 RU
Page 35

2 Вашувлажнитель
воздуха
3 Началоработы
Поздравляем с покупкой и приветствуем вас
в клубе Philips!
Чтобы получить полную поддержку Philips,
зарегистрируйте свое изделие на вебстранице
www.philips.com/welcome.
Увлажнитель воздуха Philips освежает и
увлажняет воздух, заботясь о здоровье
вашей семьи.
В нем используется безопасная для здоровья
современная система испарения воды
с технологией NanoCloud: специальный
увлажняющий фильтр насыщает сухой воздух
молекулами воды, не создавая влажного пара.
Увлажняющий фильтр также очищает воду
от бактерий, известкового налета и других
загрязняющих частиц. Прибор наполняет
дом свежим увлажненным воздухом.
Проблема сухого воздуха в зимнее время
или в помещении, где работает кондиционер,
теперь решена.
Перед установкой и использованием
увлажнителя воздуха внимательно
прочитайте данное руководство
пользователя. Сохраните его для
дальнейшего использования.
Подготовкакувлажнению
воздуха
1 Снимите верхний блок, удерживая его с
двух сторон (рис. b).
2 Наполните резервуар для воды
холодной водопроводной водой
до отметки максимального уровня
(рис. c).
3 Снова установите верхний блок на
резервуар для воды (рис. d).
Русский
Комплектпоставки
Проверьте комплектацию устройства
(рис. a):
A Верхний блок
B Увлажняющий фильтр (HU4102)
C Держатель фильтра
D Поплавок
E Антибактериальный фильтр HU4112
F Резервуар для воды
G Руководство пользователя
H Гарантийный талон
33RU
Page 36

4 Использование
увлажнителя
воздуха
Значениесигналов
индикаторавлажности
Увлажнитель оснащен встроенным датчиком
влажности. Можно выбрать уровень
относительной влажности: 40 %, 50 % или
60 %. Уровень относительной влажности (от
20 % до 95 %) отображается в центральной
части панели управления.
Блокировка системы контроля качества
воздуха предотвращает работу увлажнителя
воздуха с пустым резервуаром для воды.
Когда в резервуаре заканчивается вода,
блокировка системы контроля качества
воздуха отключает увлажнитель воздуха
через 30 минут, и загорается красный
индикатор. После наполнения резервуара
для воды увлажнитель воздуха снова
включается.
Примечание
• В режиме "Сон" красный индикатор не
мигает. Он начинает светиться при низком
уровне воды.
Примечание
• Комфортный уровень относительной
влажности составляет от 40 % до 60 %.
• Погрешность в показаниях уровня влажности
составляет примерно ±10 %.
• Для оценки уровня влажности в помещении
требуется некоторое время.
Значениесигналов
оповещенияиблокировки
системыконтролякачества
воздуха
Система контроля качества воздуха
заблаговременно предупреждает о
необходимости наполнения резервуара
водой. Когда уровень воды в резервуаре
падает, на панели управления начинает
мигать красный индикатор , напоминая
о необходимости наполнения резервуара
для воды (рис. e). Он мигает в течение
30 минут. После этого индикатор будет
светиться, пока не будет наполнен резервуар
для воды.
Включениеивыключение
увлажнителявоздуха
1 Подключите увлажнитель к розетке
электросети.
2 Нажмите кнопку питания , чтобы
включить увлажнитель (рис. f).
» На дисплее появится индикация
текущего уровня влажности и
скорости вентилятора.
3 Нажмите кнопку питания , чтобы
выключить увлажнитель.
Примечание
• Если в резервуаре остается слишком мало
воды, увлажнитель воздуха отключается.
Красный индикатор сначала мигает, потом
светится непрерывно.
• Из увлажнителя воздуха поступает
тонкодисперсный пар, невидимый глазу. Пар
не должен быть виден.
34 RU
Page 37

Изменениескоростиработы
вентилятора
Автоматическиережимы
В автоматическом режиме используется
цифровой датчик, который постоянно
контролирует влажность воздуха. Он
автоматически включает и выключает
увлажнитель воздуха, постоянно
поддерживая заданный уровень влажности.
В автоматическом режиме по умолчанию
установлен уровень относительной
влажности 50 %, однако заданный
уровень влажности можно изменить. Если
увлажнитель воздуха не был отключен от
сети, при следующем включении сохраняется
последний выбранный уровень влажности. В
этом случае снова будет установлен уровень
влажности по умолчанию — 50 %.
1 Нажмите кнопку скорости , чтобы
выбрать автоматический режим
(рис. g).
» Загорится индикатор режима
скорости AUTO.
Совет
• По достижении заданного уровня влажности
скорость работы вентилятора автоматически
снижается.
• В режиме AU TO используются следующие
параметры скорости вентилятора: и .
Совет
• По достижении нужного уровня влажности
можно выбрать меньшую скорость работы
вентилятора. Однако если заданный уровень
влажности не достигнут, для быстрого
увлажнения воздуха можно выбрать более
высокую скорость работы вентилятора.
Режим"Сон"
В режиме "Сон" увлажнитель воздуха
работает тихо и яркость всех индикаторов
снижена, чтобы не мешать вам во время сна.
1 Нажмите кнопку скорости один или
несколько раз, чтобы выбрать режим
сна (рис. i). В режиме "Сон" активна
подсветка только режима скорости .
2 Чтобы изменить скорость работы
вентилятора, снова нажмите кнопку
скорости .
Примечание
• Режим "Сон" доступен только при выборе
режима скорости .
• В режиме "Сон" красный индикатор не
мигает, но светится непрерывно при низком
уровне воды.
• В режиме "Сон" можно настроить только
таймер; настройка уровня влажности
недоступна и индикатор влажности не
светится.
Русский
Ручной
Скорость работы вентилятора можно задать
вручную.
1 Нажмите кнопку скорости один
или несколько раз и выберите нужный
режим работы вентилятора (AUTO, ,
или ) (рис. h).
» Загорится индикатор выбранной
скорости работы вентилятора.
35RU
Page 38

Установкатаймера
С помощью таймера можно задать
длительность работы увлажнителя воздуха
в часах. По истечении установленного
периода времени увлажнитель воздуха
выключится автоматически.
1 Нажмите кнопку таймера один или
несколько раз, чтобы выбрать время
работы увлажнителя воздуха в часах
(рис. j).
» Загорится соответствующий
индикатор таймера: 1H (1 час), 4H
(4 часа) или 8H (8 часов).
Для отключения функции таймера
нажимайте кнопку до тех пор, пока не
погаснет индикатор таймера.
Настройкауровнявлажности
Примечание
• Перед началом работы наполните резервуар
для воды (см. главу "Начало работы", раздел
"Подготовка к увлажнению воздуха").
1 Нажмите кнопку увлажнения один
или несколько раз, чтобы установить
нужный уровень относительной
влажности: 40 %, 50 % или 60 % (рис.
k).
» Загорится индикатор уровня
влажности (40, 50 или 60).
» Текущий уровень влажности
отображается в центральной части
панели управления.
Примечание
• Если предустановленный уровень влажности
не выбран, увлажнитель воздуха перестанет
работать, когда уровень относительной
влажности достигнет значения 50 % (в
автоматическом режиме) или 70 % (в другом
режиме).
Уровеньводы
Если в резервуаре недостаточно воды,
прибор будет работать следующим образом.
• Когда уровень воды снизится, начнет
мигать красный индикатор (рис. e).
• Увлажнитель воздуха будет работать в
течение 30 минут, а затем выключится;
красный индикатор продолжит гореть.
Прибор возобновит работу, как только
будет наполнен резервуар для воды.
Примечание
• Если при подключении увлажнителя воздуха
к электросети и включении резервуар для
воды пуст, красный индикатор будет мигать
2 минуты, затем будет светиться непрерывно,
пока не будет наполнен резервуар для воды.
• В резервуаре может оставаться какое-то
количество воды.
Совет
• Комфортный уровень относительной
влажности составляет от 40 % до 60 %.
Можно выбрать предпочитаемое значение
уровня относительной влажности: 40 %, 50 %
или 60 %.
36 RU
Page 39

Наполнениеводой
Уровень воды можно посмотреть через
прозрачное окошко резервуара для воды.
1 Выключите увлажнитель воздуха и
отключите его от электросети.
2 Снимите верхний блок, удерживая его с
двух сторон (рис. b).
3 Наполните резервуар холодной
водопроводной водой до отметки
максимального уровня (рис. c).
Примечание
• При добавлении воды не превышайте
отметку максимального уровня. В противном
случае вода вытечет через дренажное
отверстие и отверстия для входа воздуха.
• Не раскачивайте резервуар для воды при
перемещении. В противном случае вода
вытечет через дренажное отверстие и
отверстия для входа воздуха.
• Не наливайте воду через отверстия
для выхода воздуха на верхней панели
увлажнителя.
4 Снова установите верхний блок на
резервуар для воды.
5 Очистка
увлажнителя
воздуха
Примечание
• Перед очисткой увлажнителя воздуха всегда
отсоединяйте его от электросети.
• Наливая воду из резервуара для воды,
убедитесь, что вы наливаете воду с обратной
стороны дренажного отверстия и отверстий
для входа воздуха.
• Запрещается использовать для очистки
деталей увлажнителя воздуха губки с
абразивным покрытием, абразивные чистящие
средства или легковоспламеняющиеся
жидкости типа хлора или спирта.
Очисткакорпусаувлажнителя
воздуха
Во избежание скопления пыли регулярно
проводите очистку внутренних и внешних
поверхностей увлажнителя воздуха.
1 Стирайте пыль с корпуса увлажнителя
воздуха сухой, мягкой тканью.
2 Отверстия для входа и выхода воздуха
очищайте сухой мягкой тканью.
Русский
37RU
Page 40

Очисткарезервуарадляводы
Для поддержания гигиеничности прибора
резервуар для воды необходимо очищать
еженедельно.
1 Извлеките увлажняющий фильтр и
держатель фильтра.
2 Наполните резервуар для воды чистой
водой на 1/3.
3 Добавьте немного мягкого моющего
средства в резервуар с водой.
4 Очистите внутреннюю поверхность
резервуара для воды чистой мягкой
тканью.
5 Слейте жидкость из резервуара в
раковину.
6 Установите увлажняющий фильтр и
держатель фильтра обратно в резервуар
для воды.
Очисткаувлажняющего
фильтра
Для поддержания гигиеничности
увлажняющий фильтр следует промывать
каждую неделю.
1 Извлеките увлажняющий фильтр и
держатель фильтра из резервуара для
воды (рис. l).
2 Извлеките увлажняющий фильтр из
держателя фильтра (рис. m).
3 Оставьте увлажняющий фильтр в
водопроводной воде на один час (рис.
n).
4 Промойте увлажняющий фильтр под
струей водопроводной воды. Не
выжимайте и не перекручивайте фильтр
во время чистки (рис. o).
5 Дождитесь, пока остатки воды стекут с
увлажняющего фильтра.
6 Соедините увлажняющий фильтр и
держатель фильтра (рис. p).
7 Установите увлажняющий фильтр и
держатель фильтра обратно в резервуар
для воды (рис. q).
8 Снова установите верхний блок на
резервуар для воды (рис. d).
Примечание
• Не сжимайте и не перекручивайте фильтр. В
противном случае фильтр будет поврежден,
что отразится на работе прибора.
• Не сушите фильтр под прямыми солнечными
лучами, если он не установлен на держатель
фильтра.
38 RU
Page 41

6 Замена
увлажняющего
фильтра
Для оптимальной производительности
заменяйте увлажняющий фильтр
через каждые три месяца. Если фильтр
находится в хорошем состоянии, его
можно использовать дольше. Заменяйте
увлажняющий фильтр не реже одного раза
в год.
6 Снова установите верхний блок на
резервуар для воды (рис. d).
Совет
• Более подробную информацию о замене
фильтра можно получить на сайте или по
телефону в центре поддержки потребителей.
Заменаантибактериального
фильтра
Примечание
• Используйте только оригинальный
увлажняющий фильтр Philips HU4102.
• Перед заменой увлажняющего фильтра
всегда отключайте увлажнитель от источника
питания.
Совет
• Для получения более подробной
информации о замене фильтра
зарегистрируйте изделие на веб-сайте www.
philips.com.
1 Извлеките увлажняющий фильтр и
держатель фильтра из резервуара для
воды (рис. m).
2 Извлеките увлажняющий фильтр из
держателя фильтра (рис. n).
3 Снимите с нового увлажняющего
фильтра упаковочный материал
(рис. r).
4 Соедините новый увлажняющий фильтр
и держатель фильтра (рис. p).
5 Установите фильтр и держатель фильтра
обратно в резервуар для воды (рис. q).
Примечание
• Используйте только оригинальный
антибактериальный фильтр Philips HU4112.
Во избежание скопления бактерий
в резервуаре для воды заменяйте
антибактериальный фильтр не реже, чем
раз в год.
1 Выключите увлажнитель воздуха и
отключите его от электросети.
Русский
39RU
Page 42

2 Снимите верхний блок, удерживая его с
двух сторон.
3 Извлеките держатель фильтра из
резервуара для воды и извлеките
фильтр.
6 Соберите фильтр и держатель фильтра.
7 Установите фильтр и держатель фильтра
обратно в резервуар для воды.
4 Извлеките антибактериальный фильтр из
держателя фильтра. Выбросьте его.
5 Вставьте в держатель фильтра новый
антибактериальный фильтр.
40 RU
8 Установите верхний блок на резервуар
для воды.
Page 43

7 Устранениенеисправностей
В данной главе описаны наиболее распространенные проблемы, которые могут возникнуть при
эксплуатации увлажнителя воздуха. Если приведенные ниже сведения не помогают устранить
проблему, обратитесь в центр поддержки покупателей в вашей стране.
Проблема Возможноерешение
Увлажнитель воздуха не
работает.
Увлажнение воздуха не
производится.
Резервуар для воды
протекает.
Индикация текущего
уровня влажности не
меняется.
• Убедитесь, что увлажнитель воздуха подключен к источнику
питания.
• Убедитесь, что резервуар для воды наполнен водой и верхний
блок установлен на резервуар для воды должным образом.
• Убедитесь, что резервуар для воды наполнен водой и верхний
блок установлен на резервуар для воды должным образом.
• Если текущий уровень относительной влажности составляет
70 %, увлажнитель воздуха отключится. Уровень относительной
влажности выше 70 % не является комфортным для
пользователей, поэтому увлажнитель воздуха автоматически
отключается для обеспечения оптимального качества работы.
• Убедитесь, что увлажнитель воздуха не переполнен водой.
• Каждый раз после проведения очистки, а также после снятия
верхнего блока и/или наполнения резервуара для воды
проверяйте сборку/подключение увлажнителя воздуха.
• Убедитесь, что резервуар для воды установлен должным образом.
Если проблему решить не удалось, обратитесь в центр поддержки
потребителей в вашей стране.
• Убедитесь, что увлажняющий фильтр установлен на держатель
фильтра.
• Увлажняющий фильтр загрязнен. Промойте и/или очистите
увлажняющий фильтр от минеральных отложений (см. главу
"Очистка увлажняющего фильтра").
• Возможно, в помещении повышена циркуляция воздуха. Закройте
окна и двери.
• Площадь помещения слишком большая. Рекомендуемая площадь
помещения — 25 м2.
Русский
На увлажняющем
фильтре присутствует
белый налет.
Белый налет — это минеральные отложения, которые оседают из
воды и скапливаются на поверхности. Минеральные отложения на
увлажняющем фильтре влияют на качество увлажнения, но безопасны
для здоровья. Следуйте приведенным в руководстве инструкциям по
очистке.
41RU
Page 44

Проблема Возможноерешение
Через некоторое время
фильтр приобретает
желтоватый оттенок.
Увлажнитель воздуха
издает неприятный
запах.
Из отверстия для выхода
воздуха не поступает
воздух.
Не видно, чтобы из
увлажнителя воздуха
поступал пар. Он
работает?
Как проверить, работает
ли датчик влажности.
Желтый осадок появляется из-за материала фильтра. Это нормально.
Такой осадок никак не влияет на качество увлажнения воздуха.
Регулярно очищайте увлажняющий фильтр от минеральных
отложений и заменяйте его каждые три месяца.
• Убедитесь, что резервуар для воды наполнен водой.
• Проведите очистку увлажняющего фильтра (см. главу "Очистка
увлажняющего фильтра").
Подключите увлажнитель к розетке электросети и включите его.
Тонкодисперсный пар невидим глазу. Благодаря технологии
увлажнения NanoCloud из увлажнителя поступает чистый
увлажненный воздух без образования водяного пара. Поэтому пар
невидим.
Осторожно направьте поток влажного воздуха на датчик влажности.
Через какое-то время индикация влажности изменится. Индикация
уровня относительной влажности может изменяться в диапазоне от
20 % до 95 %.
42 RU
Page 45

8 Гарантияи
обслуживание
При возникновении проблем и для
получения информации посетите веб-сайт
Philips www.philips.com или обратитесь в
центр поддержки потребителей в вашей
стране (номер телефона центра указан на
гарантийном талоне). Если в вашей стране
нет центра поддержки потребителей Philips,
обратитесь по месту приобретения изделия.
Заказзапчастейиаксессуаров
При необходимости замены старой или
приобретения дополнительной детали
посетите торговую организацию Philips или
зайдите на веб-сайт www.philips.com/support.
Если при заказе запасных частей возникли
проблемы, обратитесь в центр поддержки
потребителей Philips в вашей стране (номер
телефона центра указан на гарантийном
талоне).
СоответствиестандартамЭМП
Koninklijke Philips N.V. производит и продает
различные изделия потребительского
назначения, которые, как и любые
электронные устройства, способны излучать
и принимать электромагнитные сигналы.
Одним из ведущих деловых принципов
компании Philips является применение всех
мер безопасности для соответствия всем
действующим правовым требованиям и
стандартам ЭМП, действующим на момент
производства изделия.
Компания Philips стремится разрабатывать,
производить и распространять на
рынке продукцию, которая не оказывает
вредного влияния на здоровье людей.
Philips подтверждает, что при правильной
эксплуатации продукция является
безопасной, согласно проведенным на
сегодняшний день научным исследованиям.
Philips принимает активное участие в
развитии международных стандартов ЭМП
и стандартов безопасности, что позволяет
планировать дальнейшие шаги по развитию
стандартизации и интеграции продукции
Philips.
Русский
9 Примечания
Электромагнитныеполя
(ЭМП)
Этот прибор Philips соответствует всем
применимым стандартам и нормам по
воздействию электромагнитных полей.
Утилизация
Этот символ означает, что продукт
не может быть утилизирован вместе с
бытовыми отходами (2012/19/ЕС).
Выполняйте раздельную утилизацию
электрических и электронных изделий
в соответствии с правилами, принятыми
в вашей стране. Правильная утилизация
поможет предотвратить негативное
воздействие на окружающую среду и
здоровье человека.
43RU
Page 46

Зміст
1 Важливо 45
Безпека 45
2 Зволожувач 48
Комплектація упаковки 48
3 Початокроботи 48
Підготовка до зволоження 48
4 Використаннязволожувача 49
Пояснення щодо індикації вологості 49
Пояснення щодо попередження
про збереження повітря здоровим
та блокування 49
Увімкнення та вимкнення
зволожувача 49
Зміна швидкості вентилятора 50
Автоматично 50
Вручну 50
Сплячий режим 50
Налаштування таймера 51
Налаштування рівня вологості 51
Рівень води 51
Наповнення водою 52
9 Повідомлення 58
Електромагнітні поля (ЕМП) 58
Відповідність стандартам щодо
електромагнітних полів (ЕМП) 58
Утилізація 58
5 Чищеннязволожувача 52
Чищення корпуса зволожувача 52
Чищення резервуара для води 52
Чищення фільтра для зволоження 53
6 Замінафільтрадлязволоження 53
Заміна антибактеріального фільтра 54
7 Усуненнянесправностей 56
8 Гарантіятаобслуговування 58
Замовлення частин та аксесуарів 58
44 UK
Page 47

1 Важливо
Безпека
Перед тим як користуватися
зволожувачем, уважно
прочитайте цей посібник
користувача та зберігайте його
для майбутньої довідки.
Небезпечно
• Не розпилюйте навколо
зволожувача жодних
займистих матеріалів,
наприклад засобів від комах чи
пахучих речовин.
• Вода в резервуарі для води не
підходить для пиття. Не пийте
цю воду та не використовуйте
її для годування тварин чи
поливання рослин. Коли
спорожняєте резервуар
для води, виливайте воду в
каналізацію.
Попередження
• Перед тим як під’єднувати
зволожувач до мережі,
перевірте, чи збігається
напруга, вказана на дні
зволожувача, з напругою у
мережі.
• Якщо шнур живлення
пошкоджено, для уникнення
небезпеки його необхідно
замінити, звернувшись
до сервісного центру,
уповноваженого Philips,
або фахівців із належною
кваліфікацією.
• Не використовуйте
зволожувач, якщо штекер, шнур
живлення чи сам зволожувач
пошкоджено.
• Цей зволожувач не
призначено для користування
особами (включаючи дітей)
з послабленими фізичними
відчуттями чи розумовими
здібностями, або без
належного досвіду та знань,
крім випадків користування
під наглядом чи за вказівками
особи, яка відповідає за
безпеку їх життя.
• Цей пристрій – не іграшка.
Дорослі повинні стежити,
щоб діти не бавилися
зволожувачем.
• Не блокуйте вхідний та
вихідний отвори для повітря,
наприклад, розмістивши
предмети на вихідному отворі
чи перед вхідним отвором.
Українська
45UK
Page 48

Увага!
• У разі ненадійного з’єднання
розетки, яка використовується
для живлення зволожувача,
штекер зволожувача
нагрівається. Вставляйте
штекер зволожувача у
правильно під’єднану розетку.
• Ставте і використовуйте
зволожувач на сухій, стійкій,
рівній і горизонтальній
поверхні.
• Не ставте нічого на
зволожувач і не сідайте на
нього.
• Щоразу після чищення
зволожувача або після
знімання верхньої кришки та/
або резервуара для води для
наповнення перевіряйте, чи
зволожувач добре зібрано/
під’єднано. Для хорошої та
безпечної роботи зволожувач
має бути зібрано належним
чином.
• Використовуйте лише
оригінальний фільтр
Philips, призначений для
цього зволожувача. Не
використовуйте інший фільтр.
• Оберігайте зволожувач
(зокрема, вхідний та вихідний
отвори) від ударів важкими
предметами.
• Для запобігання травмуванню
чи збою у роботі зволожувача
не вставляйте пальці чи
предмети у вихідний отвір для
повітря чи вхідний отвір для
повітря.
• Не використовуйте цей
зволожувач у приміщенні після
застосування димових засобів
від комах, а також у місцях із
залишками мастила, запахами
від кадіння чи хімічними
випарами.
• Не використовуйте
зволожувач біля камінів,
обігрівачів чи газових
пристроїв.
• Завжди від’єднуйте зволожувач
від мережі після використання
або перед чищенням.
• Не наливайте воду через
отвори виходу повітря вгорі
зволожувача.
• Розташуйте зволожувач
належним чином, щоб діти не
перекинули його.
• Не використовуйте
зволожувач у кімнаті із
сильними перепадами
температури, оскільки це
може спричинити утворення
конденсату всередині
зволожувача.
46 UK
Page 49

• Якщо зволожувач не
використовувати тривалий
час, на фільтрах можуть
розмножитися бактерії.
Перш ніж використовувати
зволожувач знову, перевірте
фільтри. Якщо фільтр
дуже брудний і має темні
плями, замініть його (див.
розділ "Заміна фільтра для
зволоження").
• Не мийте фільтр у пральній
чи посудомийній машинах.
В іншому випадку він
деформується.
• Зволожувач призначено
виключно для побутового
використання за нормальних
умов експлуатації.
• Чистіть резервуар для води
та фільтр для зволоження
щотижня, що він був чистий.
• Наповнюйте резервуар для
води лише холодною водою
з-під крана. Не використовуйте
ґрунтову чи гарячу воду.
• Не наповнюйте резервуар
для води жодними іншими
речовинами, ніж вода.
Не додавайте до води
ароматизуючі засоби
або хімічні речовини.
Використовуйте лише
воду (з-під крана, очищену,
мінеральну, будь-яку питну
воду).
• Якщо Ви не плануєте
користуватися зволожувачем
тривалий час, почистіть
резервуар для води
та висушіть фільтр для
зволоження.
• Якщо потрібно перемістити
зволожувач, спочатку
від’єднайте його від мережі.
Потім спорожніть резервуар
для води та перенесіть
зволожувач горизонтально.
• Зберігайте датчик вологості
сухим. Якщо датчик намокне,
він може неправильно
визначати рівень вологості, а
зволожувач може перестати
працювати через неправильно
визначений рівень вологості.
Українська
47UK
Page 50

2 Зволожувач
Вітаємо Вас із покупкою та ласкаво просимо
до клубу Philips!
Щоб вповні користатися підтримкою, яку
пропонує компанія Philips, зареєструйте виріб
за адресою
www.philips.com/welcome.
Зволожувач Philips освіжає та зволожує
повітря у будинку для здоров’я Вашої сім’ї.
Він пропонує вдосконалену систему
випаровування з технологією NanoCloud,
використовуючи спеціальний фільтр для
зволоження, який додає молекули H2O до
сухого повітря і робить його здоровим та
вологим без утворення водяного пилу. Його
фільтр для зволоження затримує бактерії,
кальцій та інші частинки з води. Він робить
повітря у домі чистим та зволоженим. Більше
жодного сухого повітря взимку або через
кондиціонер.
Перед тим як встановлювати і
використовувати зволожувач, уважно
прочитайте цей посібник користувача.
Зберігайте його для майбутньої довідки.
3 Початокроботи
Підготовкадозволоження
1 Тримаючи верхній блок з двох боків,
підніміть його (мал. b).
2 Наповніть резервуар для води
холодною водою з-під крана до
максимального рівня (мал. c).
3 Встановіть верхній блок назад на
резервуар для води (мал. d).
Комплектаціяупаковки
Перевірте вміст упакування (мал. a):
A Верхній блок
B Фільтр для зволоження (HU4102)
C Тримач фільтра
D Поплавець
E Антибактеріальний фільтр – HU4112
F Резервуар для води
G Посібник користувача
H Гарантія
48 UK
Page 51

4 Використання
зволожувача
Поясненнящодоіндикації
вологості
Зволожувач обладнано вбудованим
сенсором вологості. Можна налаштувати
цільовий рівень відносної вологості – 40%,
50% та 60%. Рівень відносної вологості
зовнішнього середовища відображається
посередині панелі керування від 20% до 95%.
Примітка
Завдяки функції блокування для збереження
повітря здоровим зволожувач не працює
без води в резервуарі. Коли резервуар для
води порожній і його потрібно наповнити,
функція блокування для збереження повітря
здоровим вимикає зволожувач через
30 хвилин і засвічується червоний індикатор.
Після наповнення резервуара для води
належним чином зволожувач вмикається
знову.
Примітка
• У сплячому режимі червоний індикатор не
блимає. Він вмикається, коли рівень води стає
низьким.
• Комфортний рівень відносної вологості – від
40% до 60%.
• Точність індикації рівня вологості становить
приблизно ±10%.
• Для визначення рівня вологості в кімнаті
потрібно трохи часу.
Поясненнящодо
попередженняпро
збереженняповітряздоровим
таблокування
Попередження про збереження повітря
здоровим дозволяє вчасно дізнатися
про необхідність наповнення резервуара
для води. Коли вода в резервуарі
починає закінчуватися, починає блимати
червоний індикатор на панелі керування,
повідомляючи про необхідність наповнення
резервуара (мал. e). Він блимає 30 хвилин.
Після цього індикатор продовжує світитися,
поки не буде наповнено резервуара для
води.
Увімкненнятавимкнення
зволожувача
1 Вставте штекер зволожувача в розетку.
2 Щоб увімкнути зволожувач, натисніть
кнопку живлення (мал. f).
» На екрані відобразиться поточний
рівень вологості та швидкість
вентилятора.
3 Щоб вимкнути зволожувач, натисніть
кнопку живлення .
Примітка
• У разі значного зниження рівня води в
резервуарі зволожувач перестає зволожувати.
Червоний індикатор спочатку починає
блимати, а потім продовжує світитися.
• Зволожувач утворює дуже дрібні краплі
водяної пари, тому їх не видно.
Українська
49UK
Page 52

Змінашвидкостівентилятора
Автоматично
Автоматичний режим використовує
цифровий датчик для постійного контролю за вологістю повітря. Він вмикає та
вимикає зволожувач, коли це потрібно, для
забезпечення відповідного рівня вологості.
Стандартний рівень відносної вологості в автоматичному режимі – 50%, але його можна
змінити на інший бажаний рівень вологості в
автоматичному режимі. Під час наступного
ввімкнення зволожувач пам’ятатиме останній
встановлений рівень вологості, поки не буде
вийнято штекер із розетки. У такому разі для
стандартного рівня відносної вологості знову
встановлюється значення 50%.
1 Натисніть кнопку швидкості , щоб
вибрати автоматичний режим (мал. g).
» Засвітиться індикатор швидкості
AUTO.
Порада
• Якщо буде досягнуто потрібного рівня
вологості, зволожувач автоматично знизить
швидкість вентилятора.
• У режимі AU TO швидкість вентилятора
змінюється між та .
Вручну
Можна вибрати потрібну швидкість
вентилятора вручну.
1 Натисніть кнопку швидкості один
або кілька разів, щоб вибрати потрібну
швидкість вентилятора (AUTO, ,
або ) (мал. h).
» Засвітиться індикатор вибраної
швидкості вентилятора.
Порада
• Якщо буде досягнуто потрібного рівня
вологості, можна вибрати меншу швидкість
вентилятора. Однак, якщо не буде досягнуто
потрібного рівня вологості, можна вибрати
вищу швидкість вентилятора для швидшого
зволоження повітря.
Сплячийрежим
У сплячому режимі зволожувач працює
тихо з тьмяним підсвічуванням, щоб не
переривати сну.
1 Натисніть кнопку швидкості один або
кілька разів, щоб вибрати сплячий режим
(мал. i). У сплячому режимі світиться
лише індикатор швидкості .
2 Щоб вибрати іншу швидкість
вентилятора, просто знову натисніть
кнопку швидкості .
50 UK
Примітка
• Сплячий режим працює лише за швидкості .
• У сплячому режимі червоний індикатор не
блимає, але продовжує світитися, коли рівень
води стає низьким.
• У сплячому режимі можна налаштувати
лише таймер; налаштувати рівень вологості
неможливо, а індикатор вологості вимкнено.
Page 53

Налаштуваннятаймера
За допомогою функції таймера зволожувач
можна налаштувати на роботу протягом
встановленого часу. Коли встановлений
час закінчиться, зволожувач автоматично
вимкнеться.
1 Натисніть кнопку таймера один або
кілька разів, щоб вибрати кількість годин
роботи зволожувача (мал. j).
» Засвітиться відповідний індикатор
таймера (1H, 4H або 8H).
Щоб вимкнути функцію таймера, кілька разів
натискайте кнопку таймера , поки не
вимкнеться індикатор таймера.
Налаштуваннярівнявологості
Примітка
• Перед роботою зволожувача перевірте,
чи резервуар для води наповнено водою
(див. розділ "Початок роботи", підрозділ
"Підготовка до зволоження").
1 Щоб налаштувати відносну вологість
повітря на 40%, 50% або 60%, натисніть
кнопку вологості один або кілька
разів (мал. k).
» Засвітиться індикатор (40, 50 або 60)
рівня вологості.
» Рівень вологості зовнішнього
середовища відображається
посередині панелі керування.
Примітка
• Якщо не вибрати жодного попередньо
встановленого рівня вологості, зволожувач
перестане працювати, коли рівень відносної
вологості досягне 50% в автоматичному
режимі та 70% в інших режимах.
Рівеньводи
Коли в резервуарі буде недостатньо води,
пристрій працюватиме поданими далі
способами.
• Рівень води падає і починає блимати
червоний індикатор (мал. e).
• Зволожувач продовжує працювати
протягом 30 хвилин, після чого
припиняє роботу; червоний індикатор
продовжує світитися.
Пристрій продовжить роботу після
наповнення резервуара для води.
Примітка
• Якщо резервуар для води порожній, коли
зволожувач під’єднано до мережі та
ввімкнено, червоний індикатор блимає
протягом 2 хвилин і продовжує світитися,
поки резервуар для води не буде наповнено.
• Наявність невеликої кількості води в
резервуарі є нормальним явищем.
Українська
Порада
• Комфортний рівень відносної вологості –
від 40% до 60%. Можна вибрати потрібний
рівень відносної вологості: 40%, 50% або 60%.
51UK
Page 54

Наповненняводою
Рівень води можна побачити через прозоре
віконце резервуара для води.
1 Вимкніть зволожувач і від’єднайте його
від мережі.
2 Вийміть верхній блок, тримаючи його з
обох боків (мал. b).
3 Наповніть резервуар для води
холодною водою з-під крана до
максимального рівня (мал. c).
Примітка
• Наливаючи воду, не наливайте вище
максимального рівня, інакше зі зливного
отвору та вхідних отворів для повітря може
витікати вода.
• Не трусіть резервуаром для води,
переміщаючи його, інакше зі зливного отвору
та вхідних отворів для повітря може витікати
вода.
• Не наливайте воду через отвори виходу
повітря вгорі зволожувача.
4 Встановіть верхній блок назад на
резервуар для води.
5 Чищення
зволожувача
Примітка
• Перед чищенням завжди виймайте штекер
зволожувача з розетки.
• Виливаючи воду з резервуара для води,
виливайте її з протилежної сторони зливного
отвору та вхідних отворів для повітря.
• Не чистіть жодну частину зволожувача
абразивними, їдкими чи займистими засобами
для чищення, наприклад відбілювачем чи
спиртом.
Чищеннякорпуса
зволожувача
Регулярно чистіть внутрішню й зовнішню
частини корпуса зволожувача для
запобігання накопиченню пилу.
1 М’якою сухою ганчіркою витріть пил на
корпусі зволожувача.
2 М’якою сухою ганчіркою почистіть
вхідний отвір для повітря і вихідний
отвір для повітря.
52 UK
Чищеннярезервуарадляводи
Чистіть резервуар для води щотижня для
належного гігієнічного стану.
1 Вийміть фільтр для зволоження і тримач
фільтра.
2 Наповніть резервуар для води водою
на 1/3.
3 Додайте трохи легкого миючого засобу
до води в резервуарі для води.
4 Почистіть резервуар для води всередині
м’якою чистою ганчіркою.
Page 55

5 Вилийте вміст резервуара для води в
раковину.
6 Встановіть фільтр для зволоження і
тримач фільтра назад у резервуар для
води.
Чищенняфільтрадля
зволоження
Чистіть фільтр для зволоження щотижня для
належного гігієнічного стану.
1 Вийміть фільтр для зволоження і тримач
фільтра з резервуара для води (мал. l).
2 Зніміть фільтр для зволоження із
тримача фільтра (мал. m).
3 Замочіть фільтр для зволоження у воді
з-під крана на одну годину (мал. n).
4 Сполощіть фільтр для зволоження під
слабким струменем води з-під крана. Не
стискайте та не скручуйте фільтр під час
чищення (мал. o).
5 Дайте зайвій воді стекти з фільтра для
зволоження.
6 Встановіть фільтр для зволоження на
тримача фільтра (мал. p).
7 Встановіть фільтр для зволоження і
тримач фільтра назад у резервуар для
води (мал. q).
8 Встановіть верхній блок назад на
резервуар для води (мал. d).
Примітка
• Не стискайте та не скручуйте фільтр. Це
може пошкодити фільтр і вплинути на
ефективність зволоження.
• Не висушуйте фільтр під прямим сонячним
промінням, поки його не буде встановлено
назад на тримач фільтра.
6 Замінафільтрадля
зволоження
Заміняйте фільтр для зволоження кожні
три місяці для оптимальної роботи. Якщо
фільтр у хорошому стані, його можна
використовувати довше. Заміняйте фільтр
для зволоження щонайменше один раз на
рік.
Примітка
• Використовуйте лише оригінальний фільтр
для зволоження Philips HU4102.
• Перед тим як заміняти фільтр для
зволоження, від’єднуйте зволожувач від
електромережі.
Порада
• Для отримання детальнішої інформації про
заміну фільтра зареєструйте виріб на вебсайті www.philips.com.
1 Вийміть фільтр для зволоження і тримач
фільтра з резервуара для води (мал. m).
2 Зніміть фільтр для зволоження із
тримача фільтра (мал. n).
3 Зніміть з нового фільтра для зволоження
пакувальний матеріал (мал. r).
4 Встановіть новий фільтр для зволоження
на тримача фільтра (мал. p).
5 Встановіть фільтр і тримач фільтра назад
у резервуар для води (мал. q).
6 Встановіть верхній блок назад на
резервуар для води (мал. d).
Порада
• Більше інформації про заміну фільтра
можна легко знайти на нашій веб-сторінці
або зателефонувавши до нашого Центру
обслуговування клієнтів.
Українська
53UK
Page 56

Замінаантибактеріального
фільтра
Примітка
• Використовуйтелишеоригінальний
антибактеріальнийфільтрPhilipsHU4112.
Для запобігання розвитку бактерій
у резервуарі для води заміняйте
антибактеріальний фільтр щонайменше раз
на рік.
1 Вимкніть зволожувач і від’єднайте його
від мережі.
3 Витягніть тримач фільтра з резервуара
для води та вийміть фільтр.
4 Потягніть і вийміть старий
антибактеріальний фільтр із тримача.
Потім утилізуйте його.
2 Вийміть верхній блок, тримаючи його з
обох боків.
54 UK
5 Вставте новий антибактеріальний фільтр
у тримач.
Page 57

6 Встановіть фільтр навколо тримача.
7 Встановіть фільтр і тримач фільтра назад
у резервуар для води.
8 Встановіть верхній блок назад на
резервуар для води.
Українська
55UK
Page 58

7 Усуненнянесправностей
У цьому розділі подано основні проблеми, які можуть виникнути під час використання
зволожувача. Якщо проблему не вдається вирішити за допомогою інформації, поданої нижче,
зверніться до Центру обслуговування клієнтів у своїй країні.
Проблема Можливерішення
Зволожувач не працює. • Перевірте, чи подається живлення до зволожувача.
• Перевірте, чи резервуар для води наповнено водою, а верхній
блок належним чином встановлено на резервуар для води.
Повітря не зволожується. • Перевірте, чи резервуар для води наповнено водою, а верхній
блок належним чином встановлено на резервуар для води.
• Зволожувач перестане працювати, якщо поточний рівень
відносної вологості досягне 70%. Рівень відносної вологості вище
70% не є комфортним, тому зволожувач автоматично вимикається
для забезпечення оптимального зволоження.
Резервуар для води
протікає.
Поточна індикація рівня
вологості не змінюється.
На фільтрі для
зволоження є білі
відкладення.
Через деякий час фільтр
стає жовтуватим.
• Перевірте, чи зволожувач не переповнено водою.
• Щоразу після чищення зволожувача або після знімання верхнього
блока та/або резервуара для води для наповнення перевіряйте, чи
зволожувач добре зібрано/під’єднано.
• Перевірте, чи резервуар для води встановлено належним
чином. Якщо проблема виникає й надалі, зверніться до Центру
обслуговування клієнтів у своїй країні.
• Перевірте, чи фільтр для зволоження зібрано навколо тримача
фільтра.
• Фільтр для зволоження брудний. Сполосніть та/або видаліть
накип із фільтра для зволоження (див. розділ "Чищення фільтра
для зволоження").
• Можливо, кімната надто сильно провітрюється. Закрийте двері та
вікна.
• Кімната надто велика. Рекомендована площа кімнати становить
25 м2.
Білі відкладення – це накип, який являє собою мінерали, які містяться
у воді. Накип на фільтрі для зволоження впливає на ефективність
зволоження, однак не впливає на здоров’я. Дотримуйтеся інструкцій
з чищення у посібнику користувача.
Жовті відкладення – це природній ефект вбираючого матеріалу, що
не впливає на зволоження. Часто чистіть фільтр для зволоження для
видалення накипу та заміняйте його кожні три місяці.
56 UK
Page 59

Проблема Можливерішення
Зі зволожувача виходить
неприємний запах.
З вихідного отвору для
повітря не виходить
повітря.
Не видно, щоб зі
зволожувача виходили
краплі водяної пари. Чи
він працює?
Я хочу перевірити, чи
працює сенсор вологості.
• Перевірте, чи є вода в резервуарі для води.
• Почистіть фільтр для зволоження (див. розділ "Чищення фільтра
для зволоження").
Вставте штекер зволожувача в розетку та ввімкніть зволожувач.
Коли краплі водяної пари дуже дрібні, їх не видно. Зволожувач
оснащено технологією зволоження NanoCloud, що забезпечує вихід
здорового вологого повітря з вихідного отвору без утворення
водяного туману. Тому краплі водяної пари побачити неможливо.
Легенько подуйте вологе повітря у датчик вологості. Згодом
індикація вологості зміниться. Індикація може показувати рівень
вологості зовнішнього середовища від 20% до 95%.
Українська
57UK
Page 60

8 Гарантіята
обслуговування
Якщо Вам необхідна інформація чи виникла
проблема, відвідайте веб-сайт компанії
Philips www.philips.com чи зверніться до
Центру обслуговування клієнтів Philips у
своїй країні (номер телефону можна знайти
в гарантійному талоні). Якщо у Вашій країні
немає Центру обслуговування клієнтів,
зверніться до місцевого дилера Philips.
Замовленнячастинта
аксесуарів
Якщо потрібно замінити чи придбати
частини до пристрою, зверніться до дилера
Philips або відвідайте веб-сайт www.philips.
com/support.
Якщо виникають проблеми з придбанням
частин, зверніться до Центру обслуговування
клієнтів Philips у своїй країні (номер телефону
можна знайти на гарантійному талоні).
9 Повідомлення
Відповідністьстандартамщодо
електромагнітнихполів(ЕМП)
Koninklijke Philips N.V. виробляє та продає
широкий асортимент споживчих товарів,
які, як усі електронні пристрої, здебільшого
мають здатність випромінювати та приймати
електромагнітні сигнали.
Одним із основних ділових принципів
компанії Philips є вживання всіх необхідних
заходів з охорони здоров’я та техніки
безпеки для відповідності наших виробів усім
вимогам законодавства та стандартам щодо
ЕМП, які є чинними на момент виготовлення
виробів.
Компанія Philips ставить собі за мету
розробляти, виготовляти та постачати на
ринок вироби, які не спричиняють шкоди
здоров’ю людей. Компанія Philips стверджує,
що у разі застосування її виробів належним
чином і за призначенням, вони є безпечними
для використання, що сьогодні доведено
науково.
Компанія Philips бере активну участь у
розвитку міжнародних стандартів ЕМП
та безпеки, попереджуючи таким чином
подальшу розробку стандартизації для
попередньої запровадження її у своїх
виробах.
Електромагнітніполя(ЕМП)
Цей пристрій Philips відповідає усім чинним
стандартам та правовим нормам, що
стосуються впливу електромагнітних полів.
58 UK
Утилізація
Цей символ означає, що цей виріб не
підлягає утилізації зі звичайними побутовими
відходами (2012/19/EU).
Дотримуйтесь правил розділеного збору
електричних та електронних пристроїв у
Вашій країні. Належна утилізація допоможе
запобігти негативному впливу на навколишнє
середовище та здоров’я людей.
Page 61

Page 62

 Loading...