

Page 1
Always there to help you
Question?
Contact
Philips
Register your product and get support at
www.philips.com/welcome
HU4801
User manual 3
Benutzerhandbuch 19
Mode d’emploi 35
Manuale utente 51
Қолданушының нұсқасы 67
Gebruiksaanwijzing 83
Руководство пользователя 99
Page 2

Page 3

Contents
1 Important 4
Safety 4
2 Your humidier 7
What's in the box 7
3 Getting started 8
Prepare for humidication 8
4 Using the humidier 9
Switch the humidier on and off 9
Water level 9
Rell water 10
5 Cleaning your humidier 11
Clean the body of the humidier 11
Clean the water tank 11
6 Cleaning the humidication lter 12
English
7 Replacing the humidication lter 14
8 Troubleshooting 16
9 Guarantee and service 17
Order parts or accessories 17
10 Notices 18
Electromagnetic elds (EMF) 18
Compliance with EMF 18
Recycling 18
EN
3
Page 4

1 Important
Safety
Read this user manual carefully
before you use the humidier, and
save it for future reference.
Danger
• Do not spray any ammable
materials such as insecticides or
fragrance around the humidier.
• The water in the water tank
is not suitable for drinking. Do
not drink this water and do
not use it to feed animals or to
water plants. When you empty
the water tank, pour the water
down the drain.
Warning
• Do not use the humidier if the
plug, the power cord, or the
humidier itself is damaged.
• This appliance can be used by
children aged from 8 years and
above and persons with reduced
physical, sensory or mental
capabilities or lack of experience
and knowledge if they have been
given supervision or instruction
concerning use of the appliance
in a safe way and understand the
hazards involved. Cleaning and
maintenance shall not be made
by children without supervision.
• This appliance is not a toy.
Children should be supervised
to ensure that they do not play
with the humidier.
• Do not block the air inlet and
outlet, e.g. by placing items on
the air outlet or in front of the
air inlet.
• Check if the voltage indicated
on the bottom of the humidier
corresponds to the local power
voltage before you connect the
humidier.
• If the power cord is damaged,
you must have it replaced
by Philips, a service center
authorized by Philips, or similarly
qualied persons in order to
avoid a hazard.
4
EN
Caution
• If the power socket used to
power the humidier has poor
connections, the plug of the
humidier becomes hot. Make
sure that you plug the humidier
into a properly connected
power socket.
Page 5

• Always place and use the
humidier on a dry, stable, level,
and horizontal surface.
• Do not place anything on top of
the humidier and do not sit on
the humidier.
• Make sure that the humidier is
well assembled/connected every
time after you clean it or after
you remove the upper cover
and/or water tank for relling.
The humidier must be properly
assembled to deliver a good and
safe performance.
• Only use the original Philips
lter specially intended for this
humidier. Do not use any other
lter.
• Avoid knocking against the
humidier (the air inlet and
outlet in particular) with hard
objects.
• Do not insert your ngers or
objects into the air outlet or
the air inlet to prevent physical
injury or malfunctioning of the
humidier.
• Do not use this humidier when
you have used indoor smoke-
type insect repellents or in
places with oily residues, burning
incense, or chemical fumes.
• Do not use the humidier near
gas appliances, heating devices
or replaces.
• Always unplug the humidier
after use and before you clean it.
• Do not ll water from the air
outlets on top of the humidier.
• Place the humidier properly to
prevent children from knocking
it over.
• When the humidier is not used
for a long time, bacteria and
mold may grow on the lters.
Check the lters before you
start using the humidier again. If
the lter is very dirty with dark
spots, replace it (see chapter
‘Replacing the humidication
lter’).
• Do not wash the lter in a
washing machine or dish washer,
otherwise the lter will be
deformed.
• The humidier is only intended
for household use under normal
operating conditions.
• Clean the water tank and
humidication lter every week
to keep it clean.
• Only ll the water tank with cold
tap water. Do not use ground
water or hot water.
English
EN
5
Page 6

• Do not put any substance other
than water in the water tank. Do
not add fragrance or chemical
substance into the water. Use
only water (tap, puried, mineral,
any sort of potable water).
• If you do not use the humidier
for a long time, clean the water
tank and dry the humidication
lter.
• If you need to move the
humidier, disconnect the
humidier from the power
supply rst. Then empty the
water tank, and carry the
humidier horizontally.
6
EN
Page 7

2 Your humidifier
What's in the box
Congratulations on your purchase, and
welcome to Philips!
To fully benet from the support that Philips
offers, register your product at
www.philips.com/welcome.
The Philips humidier brings fresh, humidied
air to your house for the health of your family.
It offers you advanced evaporation system
with NanoCloud technology, using a special
humidication lter which adds H2O molecules
to the dry air, and produces healthy humid
air without formation of water mist. Its
humidication lter retains bacteria, calcium and
other particles from the water. It delivers only
pure humidied air in your home. No more
dry air in the winter season or from the air
conditioning.
Read this user manual carefully before you
install and use the humidier. Save it for future
reference.
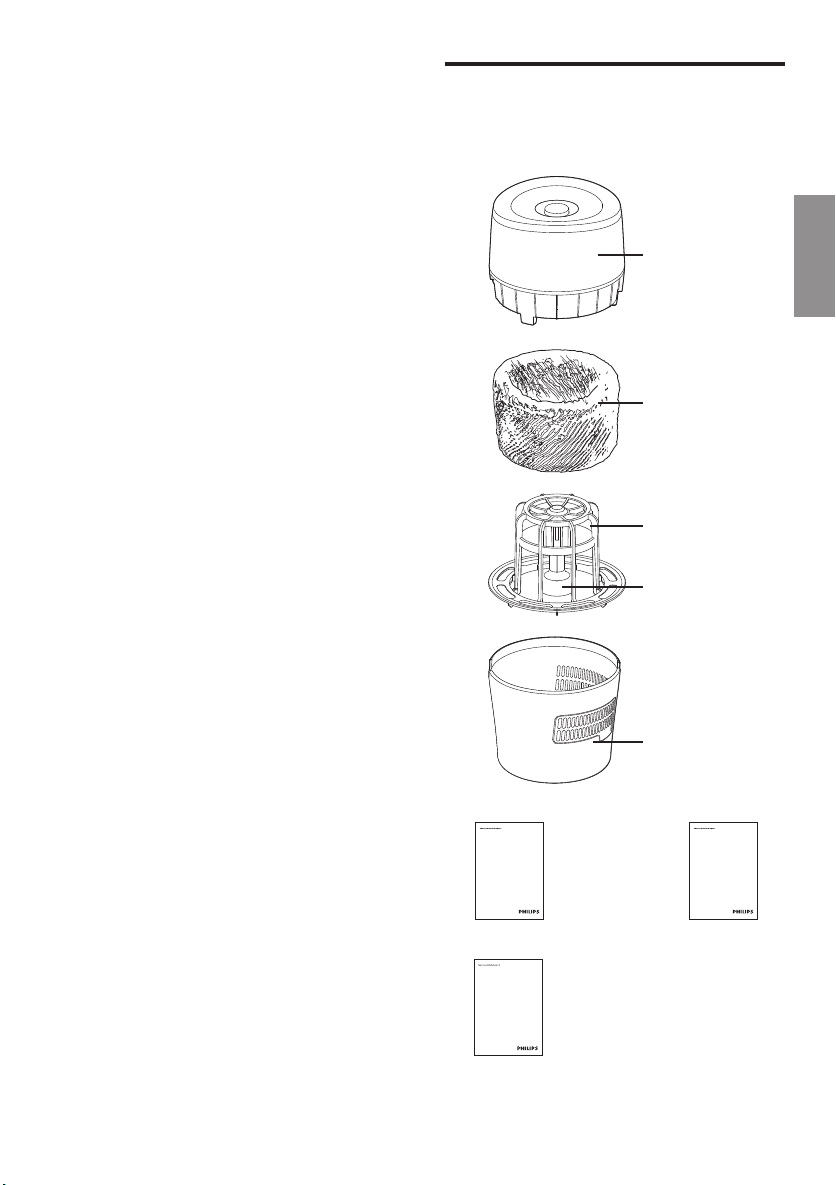
Check and identify the contents of your package:
Upper unit
Humidication
lter(HU4102)
Filter support
Float
English
www.philips.com/welcome
User manual
User manual
www.philips.com/welcome
Quick start guide
Quick start guide
Water tank
www.philips.com/welcome
Warranty
Warranty
EN
7
Page 8
3 Getting started
MAX
Prepare for humidication
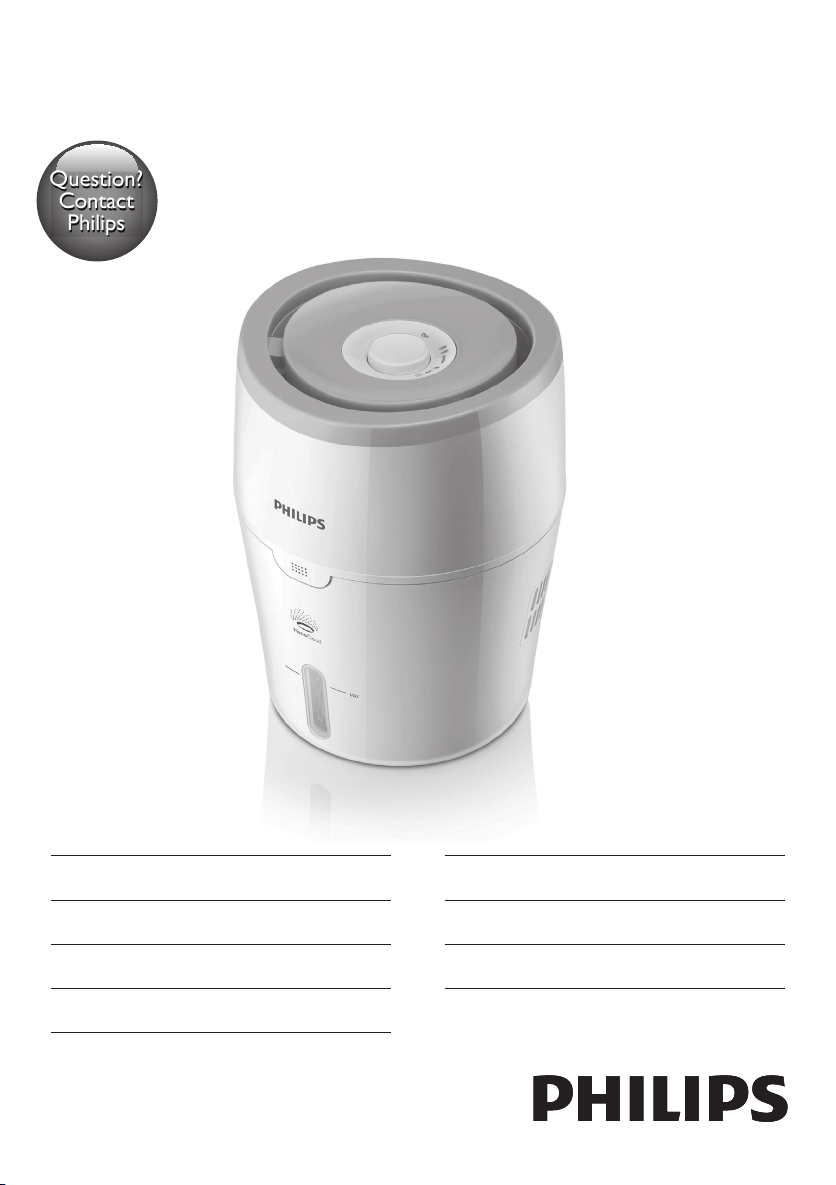
1
Hold by both sides of the upper unit to
lift it up.
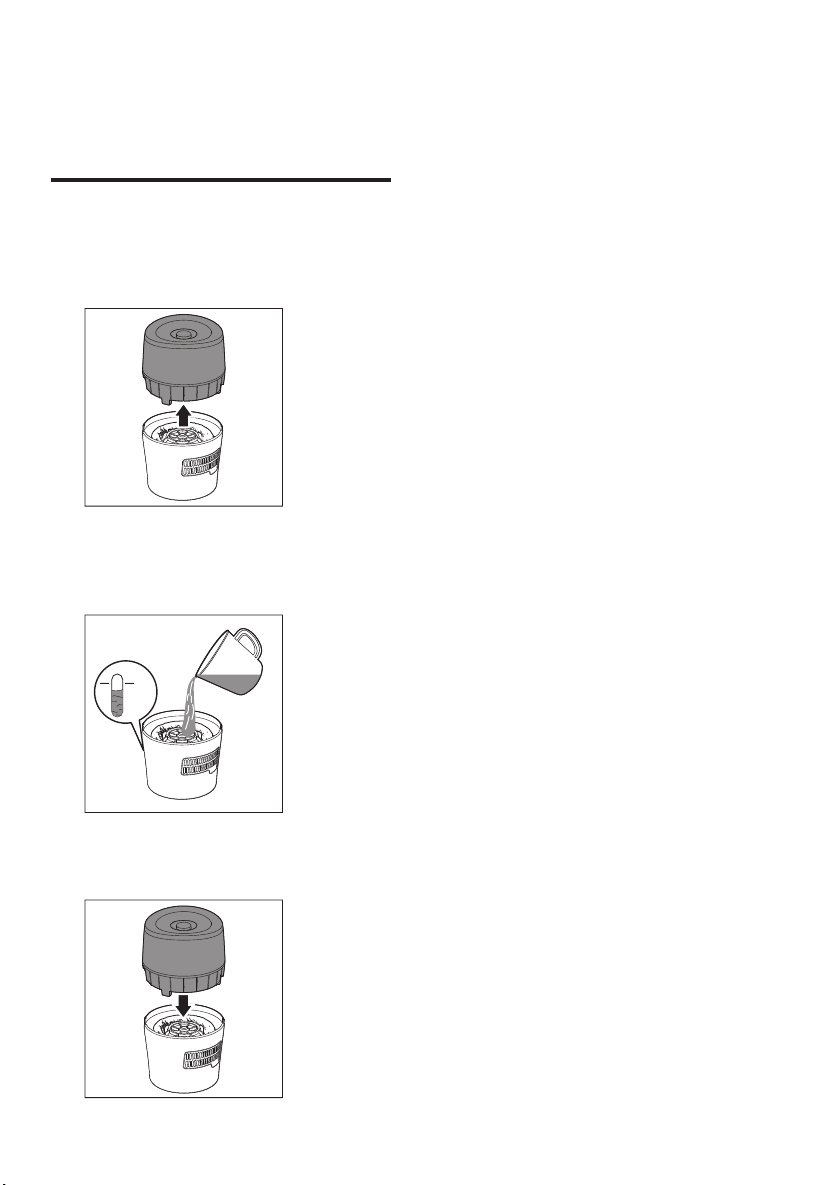
2 Fill the water tank with cold tap water until
water reaches the maximum water level
indication.
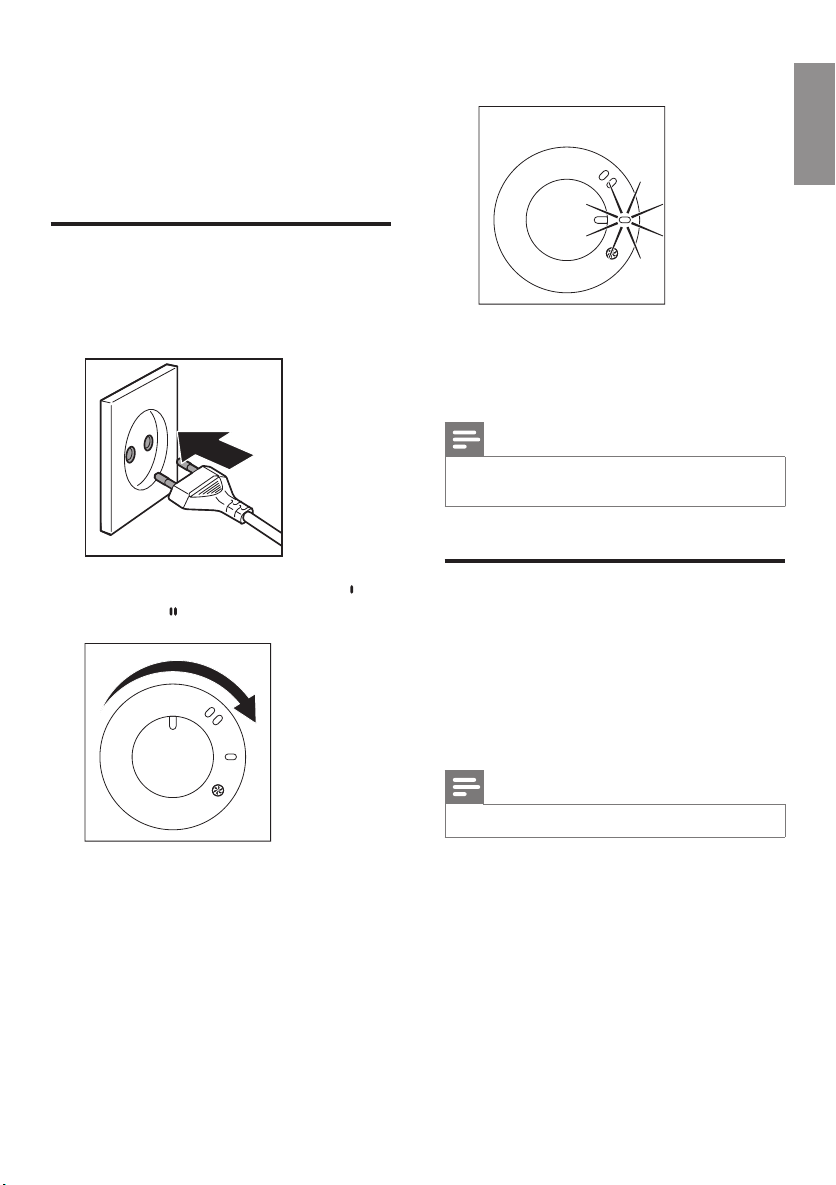
3 Place the upper unit back onto the water
tank.
8
EN
Page 9
4 Using the
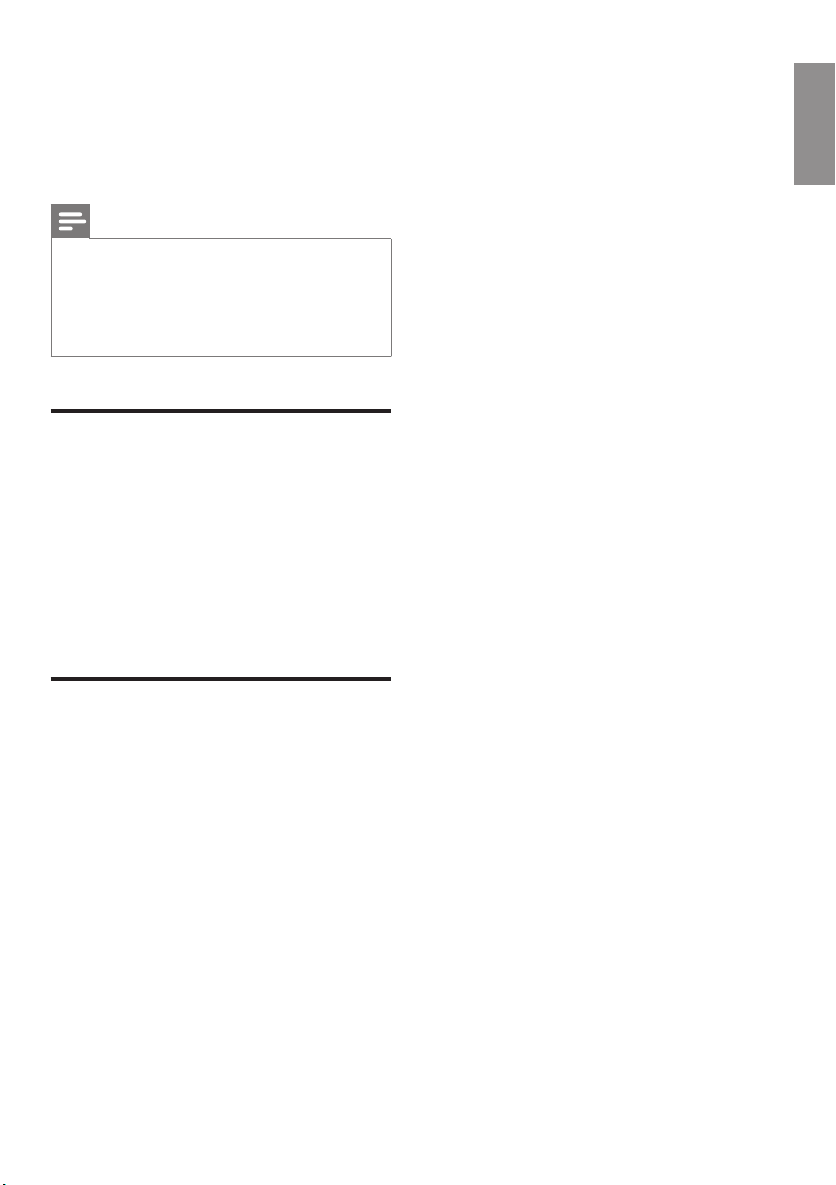
» The speed light and the humidier are on.
humidifier
Switch the humidier on and
off
1
Put the plug in the wall socket.
2 Turn the control knob to low speed or
high speed
.
F
F
O
H
I
G
H
L
O
W
F
F
O
H
I
G
H
L
O
W
3 Turn the control knob to OFF.
» The speed light is off.
» The humidier is off.
Note
The humidier releases very ne invisible mist, so it is
•
normal that you cannot see the mist.
Water level
When there is not enough water in the
water tank, the speed light will be off and the
humidier stops working. The control knob stays
at the chosen speed.
When you rell water, the humidier will
resume work at the chosen speed.
Note
It is normal to nd some water left in the tank.
•
English
EN
9
Page 10

Rell water
O
F
F
H
I
G
H
L
O
W
MAX
Water level can be observed through the
transparent water tank window.
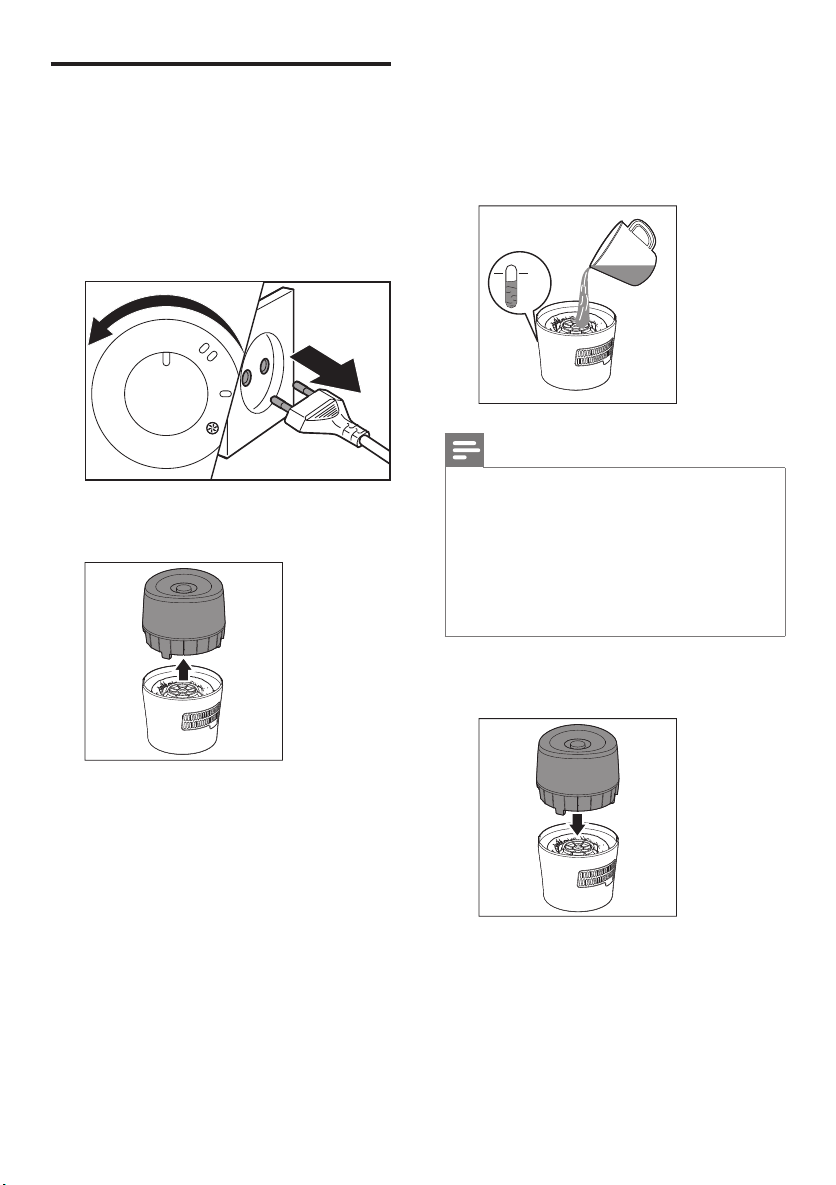
1 Switch off the humidier and unplug it.
2 Remove the upper unit by holding it at
both sides.
Note
When lling water, do not exceed the maximum water
•
level, or water might leak from the drain hole and air inlets.
• Do not shake the water tank when moving it, or water
might leak from the drain hole and air inlets.
• Do not ll water through the air outlets on top of the
humidier.
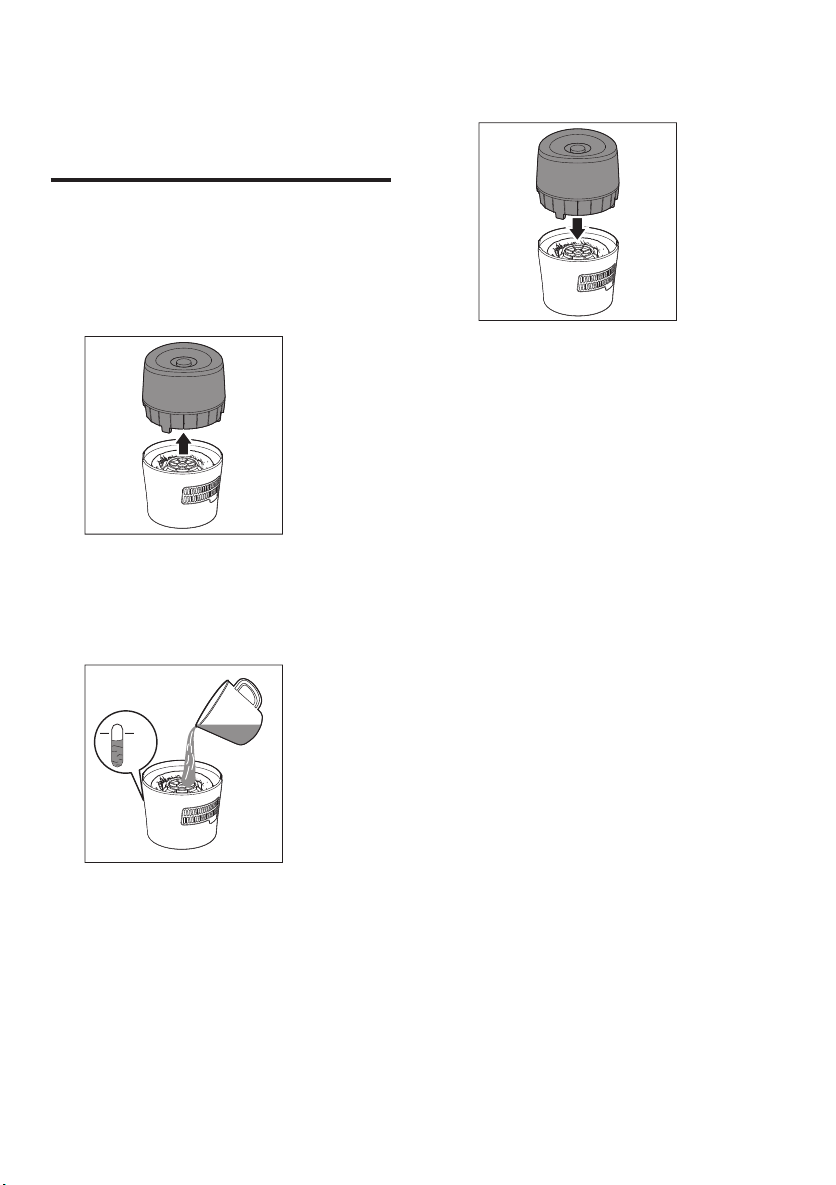
4 Place the upper unit back onto the water tank.
3 You can observe the water level through
the transparent water tank window. Fill
the water tank with cold tap water until
the water reaches the maximum water
indication level.
10
EN
Page 11
5 Cleaning your
humidifier
Note
Always unplug the humidier before you clean it.
•
• When pouring water from the water tank, make sure
to pour water from the opposite side of the drain hole
and air inlets.
• Never use abrasive, aggressive, or ammable cleaning agents
such as bleach or alcohol to clean any part of the humidier.
Clean the body of the
humidier
Regularly clean the inside and outside of the
humidier to prevent dust from collecting.
1 Wipe away dust with a soft dry cloth from
the body of the humidier.
2 Clean the air inlet and the air outlet with a
soft dry cloth.
Clean the water tank
English
Clean the water tank every week to keep it hygienic.
1 Take out the humidication lter and the
lter support.
2 Fill the water tank for 1/3 with water.
3 Add some mild washing-up liquid to the
water in the water tank.
4 Clean the inside of the water tank with a
soft clean cloth.
5 Empty the water tank into a sink.
6 Put the humidication lter and the lter
support back into the water tank.
EN
11
Page 12

6 Cleaning the
O
F
F
H
I
G
H
L
O
W
humidification
filter
Clean the humidication lter every week to
keep it hygienic.
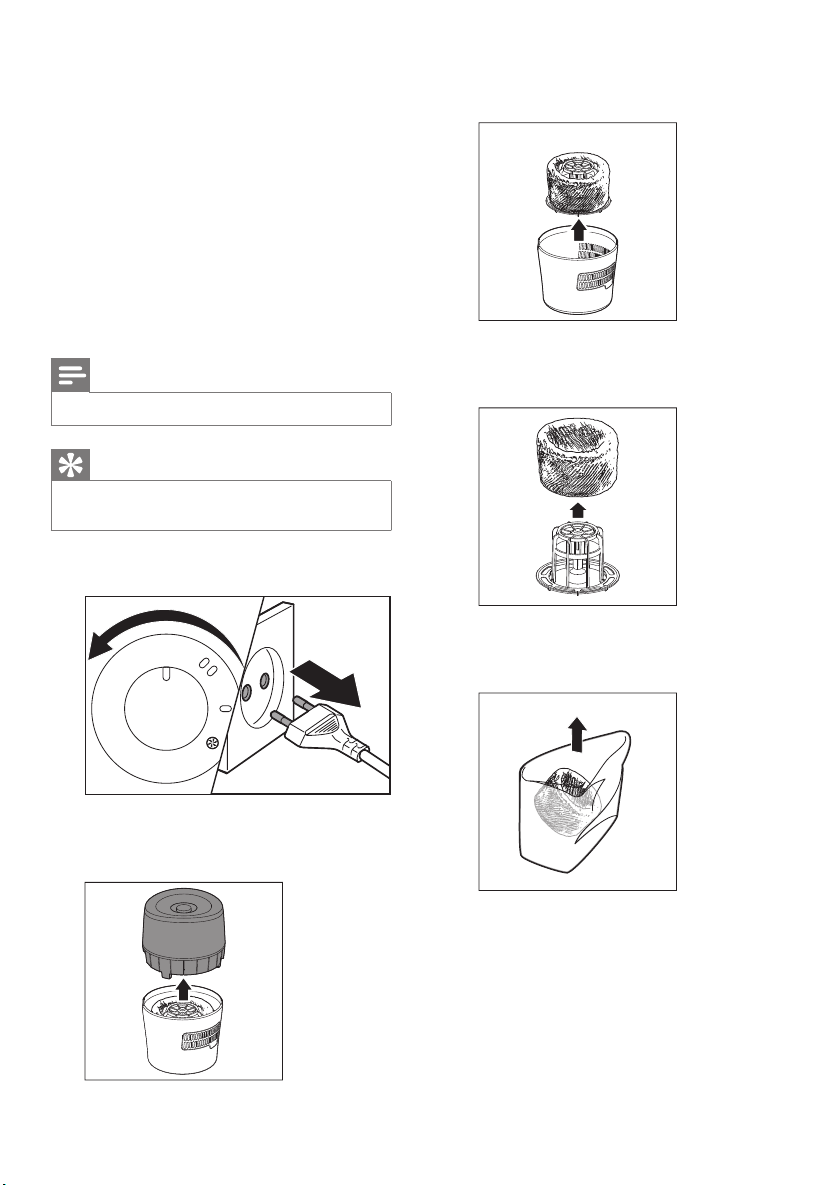
1 Switch off the humidier and unplug it.
2 Remove the upper unit by holding it at
both sides.
4 Remove the humidication lter from the
lter support.
5 Soak the humidication lter in tap water
for one hour.
Tap Water
1 Hour
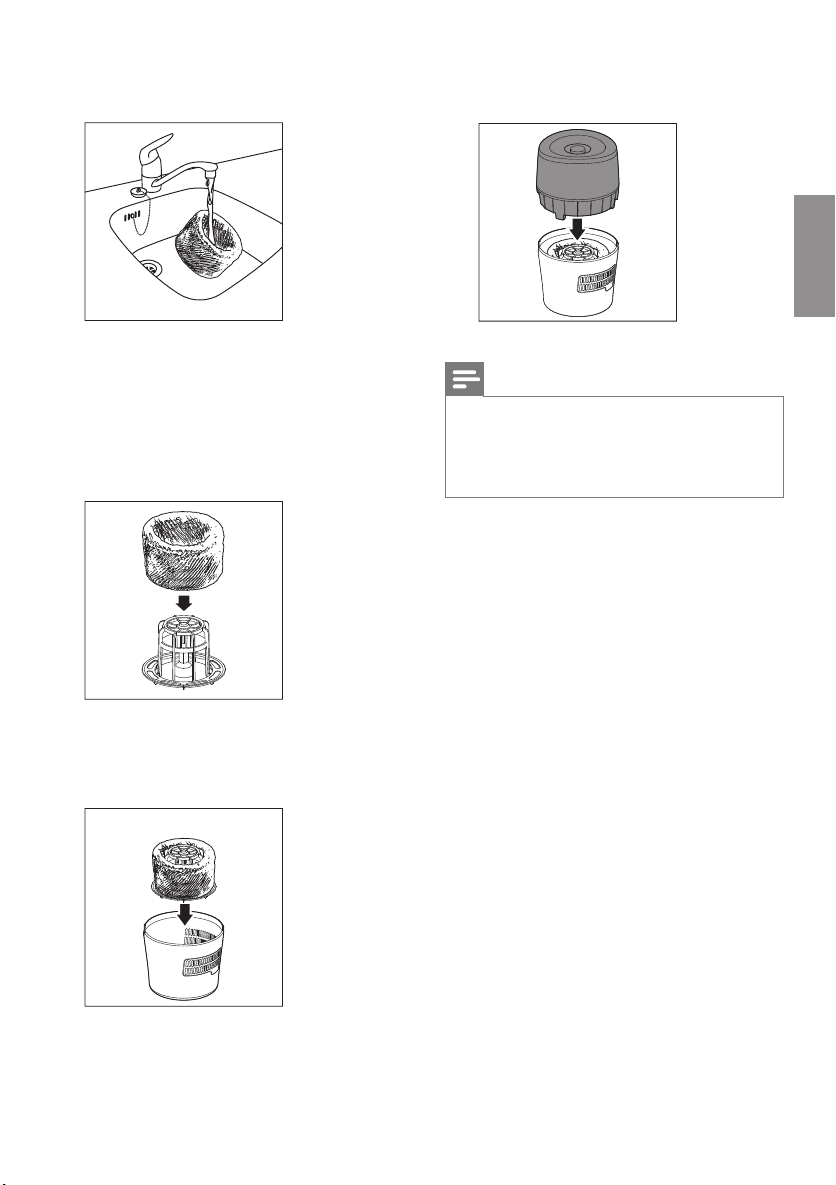
6 Rinse the humidication lter under a
slowly running tap.
3 Take out the humidication lter and the
lter support from the water tank.
12
EN
7 Let excess water drip off the
humidication lter.
Page 13
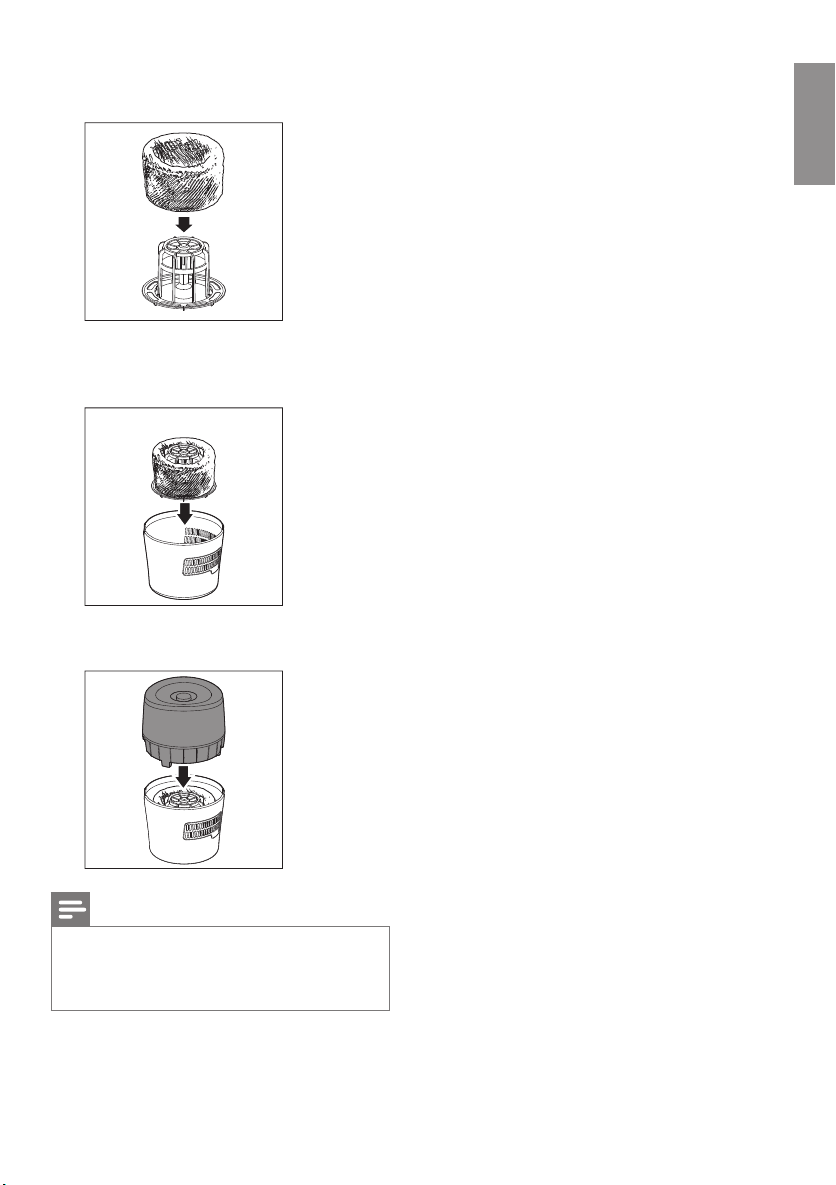
8 Assemble the humidication lter round
the lter support.
9 Put the humidication lter and the lter
support back into the water tank.
10 Put the upper unit back onto the water tank.
English
Note
Do not squeeze or wring the lter. This might damage
•
the lter and impact humidication performance.
• Do not dry the lter under direct sunlight, unless it is
assembled back onto the lter support
EN
13
Page 14
7 Replacing the
O
F
F
H
I
G
H
L
O
W
humidification
filter
Replace the humidication lter every three
months for optimal performance. If the lter
is in good condition, you could use it for a
longer period of time. Make sure to replace the
humidication lter at least once a year.
Note
Use only Philips original humidication lter HU4102.
•
Tip
Register your product at www.philips.com for further
•
information on how to replace your lter.
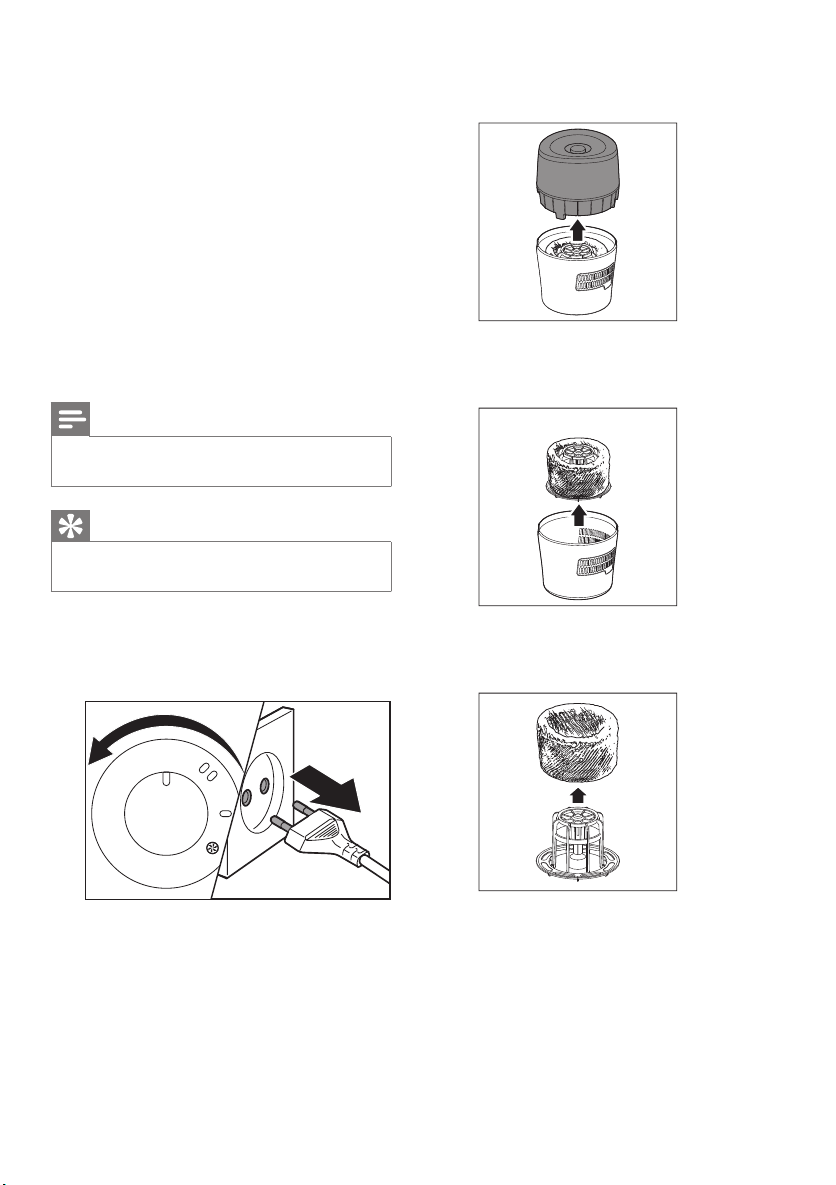
1 Switch off the humidier and unplug it.
3 Take out the humidication lter and the
lter support from the water tank.
4 Remove the humidication lter from the
lter support.
5 Remove the packaging material from the
new humidication lter.
2 Remove the upper unit by holding it at
both sides.
14
EN
Page 15
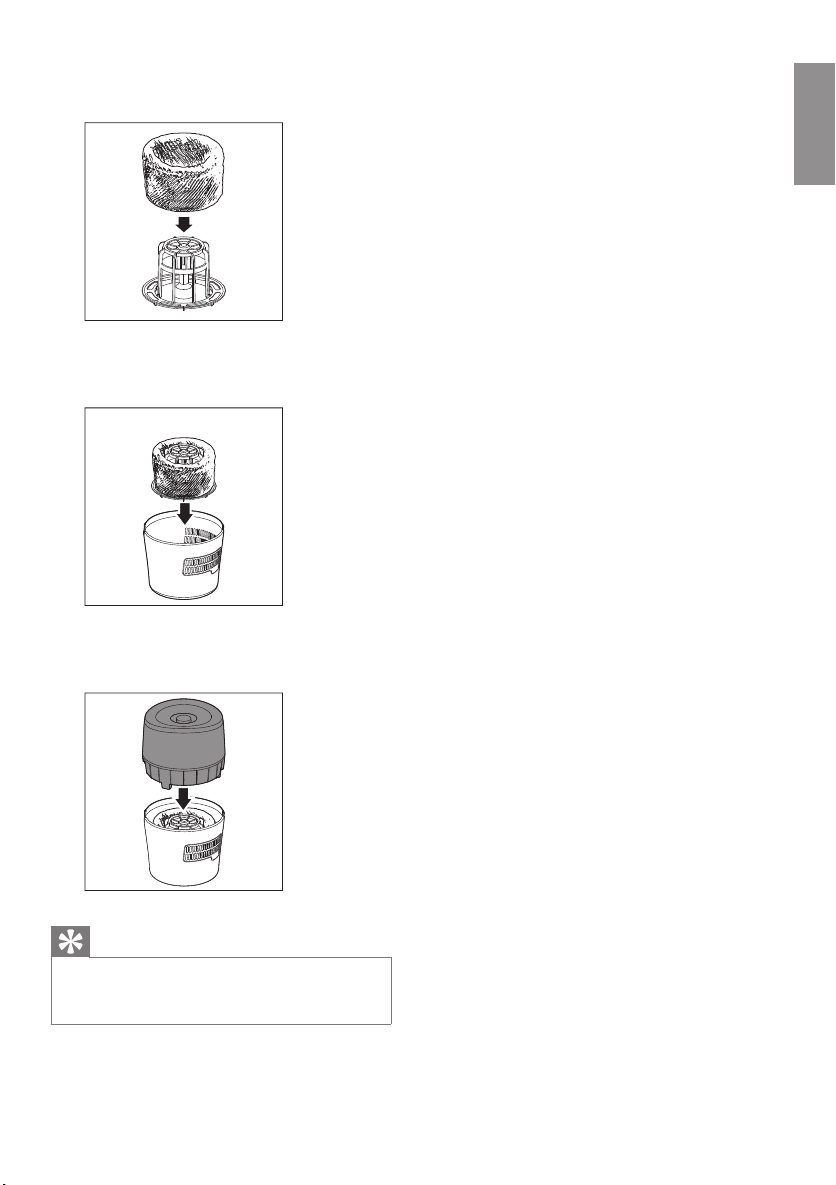
6 Assemble the new humidication lter
around the lter support.
7 Put the lter and the lter suppor t back
into the water tank.
8 Put the upper unit back onto the water
tank.
English
Tip
You can easily nd more information about how to
•
replace the lter in our web page or by calling our
Consumer Care Center.
EN
15
Page 16

8 Troubleshooting
This chapter summarizes the most common problems you could encounter with the humidier. If you
are unable to solve the problem with the information below, contact the Consumer Care Center in
your country.
Problem Possible solution
The humidier does not
work.
There is no air
humidication.
The water tank leaks. • Make sure that the humidier is not overlled with water.
There are some
white deposits on the
humidication lter.
The lter turns
yellowish after some
time.
There is unpleasant
smell coming out from
the humidier.
No air comes out of the
air outlet.
I do not see visible
mist coming out of the
humidier. Is it working?
• Make sure that there is power supply to the humidier.
• Make sure that the water tank is lled with water and the upper unit is
placed properly onto the water tank.
• Make sure that the water tank is lled with water and the upper unit is
placed properly onto the water tank.
• Your room might have too much ventilation. Please close doors and
windows.
• Your room size is too big. The recommended room size is 25m² for
HU4801.
• Make sure that the humidier is well assembled/connected every time
after you clean it or after you remove the upper unit and/or water tank
for relling.
• Make sure that the water tank is properly placed. If the problem persists,
contact the Consumer Care Center in your country.
The white deposits are called scale and they consist of minerals from the
water. Scale on the humidication lter affects the humidifying performance,
however it does not harm your health. Please follow the cleaning
instructions in the user manual.
The yellow deposits is a natural effect of the wick material, and it has no
impact on humidication performance. Clean the humidication lter
frequently to remove the scale, and replace the humidication lter every
three month.
• Make sure that the water tank is lled with water.
• Clean the humidication lter (see chapter ‘Cleaning the humidication
lter’).
Plug the humidier into the power supply and switch on.
When mist is very ne, it is invisible. This humidier has a NanoCloud
humidication technology, which produces healthy humid air from the
outlet area without formation of water mist.Therefore, you cannot see the
mist.
16
EN
Page 17

9 Guarantee and
service
If you need information or if you have a
problem, please visit the Philips website at
www.philips.com or contact the Philips
Consumer Care Center in your country
(you nd its phone number in the worldwide
guarantee leaet). If there is no Consumer Care
Centre in your country, go to your local Philips
dealer.
Order parts or accessories
If you have to replace a part or want to
purchase an additional part, go to your Philips
dealer or visit www.philips.com/support.
If you have problems obtaining the parts, please
contact the Philips Consumer Care Center in
your country (you will nd its phone number in
the worldwide guarantee leaet).
English
EN
17
Page 18

10 Notices
Electromagnetic elds (EMF)
This Philips appliance complies with all
applicable standards and regulations regarding
exposure to electromagnetic elds.
Compliance with EMF
Koninklijke Philips Electronics N.V. manufactures
and sells many products targeted at consumers,
which, like any electronic apparatus, in
general have the ability to emit and receive
electromagnetic signals.
One of Philips’ leading Business Principles is to
take all necessary health and safety measures
for our products, to comply with all applicable
legal requirements and to stay well within
the EMF standards applicable at the time of
producing the products.
Philips is committed to develop, produce and
market products that cause no adverse health
effects. Philips conrms that if its products are
handled properly for their intended use, they
are safe to use according to scientic evidence
available today.
Philips plays an active role in the development
of international EMF and safety standards,
enabling Philips to anticipate further
developments in standardization for early
integration in its products.
Recycling
Never dispose your product with other
household waste. Please inform yourself about
the local rules on the separate collection of
electrical and electronic products. The correct
disposal of your old product helps prevent
potentially negative consequences on the
environment and human health.
18
EN
Page 19

Inhalt
1 Wichtige Hinweise 20
Sicherheit 20
2 Der Luftbefeuchter 23
Was ist in der Verpackung? 23
3 Erste Schritte 24
Vorbereitungen zur Luftbefeuchtung 24
4 Verwenden des Luftbefeuchters 25
Ein-/Ausschalten des Luftbefeuchters 25
Wasserstand 25
Wasser nachfüllen 26
5 Reinigen des Luftbefeuchters 27
Reinigen des Luftbefeuchtergehäuses 27
Reinigen des Wasserbehälters 27
Deutsch
6 Reinigen des Luftbefeuchterlters 28
7 Auswechseln des
Luftbefeuchterlters 30
8 Fehlerbehebung 32
9 Garantie und Kundendienst 33
Bestellen von Ersatz- oder
Zubehörteilen 33
10 Hinweise 34
Elektromagnetische Felder 34
Elektromagnetische Verträglichkeit 34
Recycling 34
DE
19
Page 20

1 Wichtige
Hinweise
Sicherheit
Lesen Sie diese
Bedienungsanleitung vor dem
Gebrauch des Luftbefeuchters
aufmerksam durch, und
bewahren Sie sie für eine spätere
Verwendung auf.
Achtung!
• Sprühen Sie keine brennbaren
Materialien wie zum Beispiel
Insektengifte oder Duftstoffe um
den Luftbefeuchter.
• Das Wasser im Wasserbehälter
ist kein Trinkwasser. Trinken
Sie dieses Wasser nicht, und
verwenden Sie es nicht zur
Versorgung von Tieren oder
Panzen. Gießen Sie das
Wasser beim Entleeren des
Wasserbehälters in den Abuss.
Warnung
• Prüfen Sie vor Inbetriebnahme,
ob die Spannungsangabe auf der
Unterseite des Luftbefeuchters
mit der örtlichen Netzspannung
übereinstimmt.
• Ist das Netzkabel defekt, darf
es nur von einem Philips
Service-Center, einer von Philips
autorisierten Werkstatt oder
einer ähnlich qualizierten
Person durch ein OriginalErsatzkabel ausgetauscht
werden, um Gefährdungen zu
vermeiden.
• Verwenden Sie den
Luftbefeuchter nicht, wenn der
Netzstecker, das Netzkabel oder
der Luftbefeuchter selbst defekt
oder beschädigt sind.
• Dieses Gerät kann von Kindern
ab 8 Jahren und Personen
mit verringerten physischen,
sensorischen oder psychischen
Fähigkeiten oder Mangel
an Erfahrung und Kenntnis
verwendet werden, wenn sie bei
der Verwendung beaufsichtigt
wurden oder Anweisung zum
sicheren Gebrauch des Geräts
erhalten und die Gefahren
verstanden haben. Die Reinigung
und Wartung darf nicht
von Kindern ohne Aufsicht
durchgeführt werden.
• Dieses Gerät ist kein Spielzeug.
Achten Sie darauf, dass Kinder
nicht mit dem Luftbefeuchter
spielen.
20
DE
Page 21

• Achten Sie darauf, dass Luftein-
und -auslass nicht verdeckt
werden. Legen Sie deshalb keine
Gegenstände auf den Luftausoder vor den Lufteinlass.
Vorsicht
• Wenn die zum Betrieb des
Luftbefeuchters verwendete
Steckdose nicht ordnungsgemäß
angeschlossen ist, wird der
Stecker des Luftbefeuchters
heiß. Vergewissern Sie sich, dass
Sie für den Luftbefeuchter eine
ordnungsgemäß angeschlossene
Steckdose verwenden.
• Verwenden Sie den
Luftbefeuchter immer auf einer
trockenen, stabilen, ebenen und
waagerechten Unterlage.
• Stellen Sie keine Gegenstände
auf den Luftbefeuchter, und
setzen Sie sich nicht darauf.
• Vergewissern Sie sich, dass
der Luftbefeuchter nach dem
Reinigen oder dem Entfernen
der oberen Abdeckung und/
oder des Wasserbehälters
zum Nachfüllen von Wasser
ordnungsgemäß zusammensetzt
und angeschlossen ist. Für
eine gute und sichere Leistung
ist es wichtig, dass der
Luftbefeuchter ordnungsgemäß
zusammengesetzt ist.
• Verwenden Sie nur den
Originallter von Philips, der
speziell für diesen Luftbefeuchter
geeignet ist. Verwenden Sie keine
anderen Filter.
• Vermeiden Sie es, mit harten
Gegenständen gegen den
Luftbefeuchter (insbesondere
den Lufteinlass und -auslass) zu
stoßen.
• Achten Sie darauf, dass weder
Ihre Finger noch andere Objekte
in den Luftauslass oder -einlass
gelangen, um Verletzungen
oder Beschädigungen des
Luftbefeuchters zu verhindern.
• Benutzen Sie den Luftbefeuchter
nicht nach dem Gebrauch
von Räuchermitteln zum
Insektenschutz oder an Orten,
an denen Ölrückstände oder
chemische Dämpfe vorhanden
sind bzw. Räucherstäbchen
verbrannt werden.
• Verwenden Sie den
Luftbefeuchter nicht in der
Nähe von gasbetriebenen
Vorrichtungen, Heizungen oder
offenen Kaminen.
Deutsch
DE
21
Page 22

• Ziehen Sie nach jedem
Gebrauch und vor der Reinigung
des Luftbefeuchters den
Netzstecker aus der Steckdose.
• Füllen Sie kein Wasser aus den
Luftauslässen an der Oberseite
des Luftbefeuchters.
• Stellen Sie den Luftbefeuchter
ordnungsgemäß auf, sodass
Kinder ihn nicht umwerfen
können.
• Wenn der Luftbefeuchter lange
Zeit nicht verwendet wird,
können sich Bakterien und
Schimmelpilze auf den Filtern
bilden. Überprüfen Sie die Filter,
bevor Sie den Luftbefeuchter
erneut verwenden. Wenn der
Filter sehr schmutzig ist und
dunkle Flecken aufweist, sollte
er ausgewechselt werden
(siehe Kapitel "Auswechseln des
Luftbefeuchterlters").
• Waschen Sie den Filter nicht in
der Waschmaschine oder dem
Geschirrspüler, da sich der Filter
sonst verformt.
• Der Luftbefeuchter ist
ausschließlich für den
Hausgebrauch bei normalen
Betriebsbedingungen
vorgesehen.
• Reinigen Sie den Wasserbehälter
und den Luftbefeuchterlter jede
Woche, um optimale Hygiene
sicherzustellen.
• Füllen Sie den Wasserbehälter
nur mit kaltem Leitungswasser.
Verwenden Sie kein
Grundwasser oder heißes
Wasser.
• Geben Sie außer Wasser
keine anderen Stoffe in den
Wasserbehälter. Geben Sie
keine Duft- oder chemischen
Stoffe ins Wasser. Verwenden
Sie nur Wasser (Leitungswasser,
destilliertes Wasser,
Mineralwasser oder anderes
Trinkwasser).
• Wenn Sie den Luftbefeuchter
lange Zeit nicht verwenden,
reinigen Sie den Wasserbehälter,
und trocknen Sie den
Luftbefeuchterlter.
• Wenn Sie den Luftbefeuchter
bewegen müssen, trennen
Sie das Gerät zuerst von der
Stromversorgung. Entleeren Sie
dann den Wasserbehälter, und
tragen Sie den Luftbefeuchter
waagerecht.
22
DE
Page 23
2 Der Luftbe-
Was ist in der Verpackung?
feuchter
Herzlichen Glückwunsch zu Ihrem Kauf und
willkommen bei Philips!
Um das Kundendienstangebot von Philips
vollständig nutzen zu können, sollten Sie Ihr
Produkt unter www.philips.com/welcome
registrieren.
Der Philips Luftbefeuchter versorgt Ihr
Zuhause mit frischer, befeuchteter Luft für die
Gesundheit Ihrer Familie.
Er bietet ein fortschrittliches
Verdunstungssystem mit NanoCloudTechnologie, wobei ein spezieller
Luftbefeuchtungslter verwendet wird, der
H2O-Moleküle an die trockene Luft abgibt.
Außerdem wird gesunde, befeuchtete Luft ohne
Bildung von Sprühnebel erzeugt. Durch seinen
Luftbefeuchtungslter werden Bakterien sowie
Kalk- und andere Partikel aus dem Wasser
zurückgehalten. Er stellt ausschließlich reine,
befeuchtete Luft für Ihre Räume bereit. Nie
wieder trockene Luft im Winter oder durch die
Verwendung einer Klimaanlage.
Lesen Sie diese Bedienungsanleitung sorgfältig
durch, bevor Sie den Luftbefeuchter aufstellen
und verwenden. Bewahren Sie es zur späteren
Verwendung auf.
Prüfen Sie zunächst den Verpackungsinhalt:
Obere Einheit
Deutsch
Luftbefeuchterlter
(HU4102)
Filterhalterung
Schwimmer
Wasserbehälter
www.philips.com/welcome
User manual
Bedienungsanleitung
www.philips.com/welcome
Quick start guide
Kurzanleitung
www.philips.com/welcome
Warranty
Garantie
DE
23
Page 24
3 Erste Schritte
MAX
Vorbereitungen zur
Luftbefeuchtung
1
Fassen Sie die obere Einheit an beiden
Seiten an, und heben Sie sie hoch.
2 Füllen Sie den Wasserbehälter mit
kaltem Leitungswasser, bis das Wasser
die maximale Wasserstandsmarkierung
erreicht.
3 Platzieren Sie die obere Einheit wieder auf
dem Wasserbehälter.
24
DE
Page 25

4 Verwenden des
Luftbefeuchters
Ein-/Ausschalten des
Luftbefeuchters
1
Stecken Sie den Stecker in die Steckdose.
2 Drehen Sie den Regler auf niedrige
Geschwindigkeit
Geschwindigkeit
oder hohe
.
» Die Geschwindigkeitsanzeige und der
Luftbefeuchter sind an.
F
F
O
H
I
G
H
L
O
W
3 Drehen Sie den Regler in die Position OFF.
» Die Geschwindigkeitsanzeige ist aus.
» Der Luftbefeuchter ist aus.
Anmerkung
Der Luftbefeuchter gibt einen sehr feinen, unsichtbaren
•
Nebel ab. Es ist daher normal, dass Sie den Nebel nicht
sehen.
Wasserstand
Deutsch
Wenn sich nicht genug Wasser im
Wasserbehälter bendet, ist die
F
F
O
H
I
G
H
L
O
W
Geschwindigkeitsanzeige aus, und der
Luftbefeuchter stellt den Betrieb ein. Der
Drehschalter bleibt auf der ausgewählten
Geschwindigkeit.
Wenn Sie Wasser nachfüllen, nimmt
der Luftbefeuchter den Betrieb mit der
ausgewählten Geschwindigkeit wieder auf.
Anmerkung
Es ist normal, dass etwas Restwasser im Behälter
•
vorhanden ist.
25
DE
Page 26
Wasser nachfüllen
O
F
F
H
I
G
H
L
O
W
MAX
Der Wasserstand kann durch das transparente
Fenster des Wasserbehälters eingesehen
werden.
1 Schalten Sie den Luftbefeuchter aus,
und ziehen Sie den Netzstecker aus der
Steckdose.
2 Entfernen Sie die obere Einheit, indem Sie
sie an beiden Seiten festhalten.
3 Sie können den Wasserstand durch das
transparente Fenster im Wasserbehälter
überprüfen. Füllen Sie den Wasserbehälter
mit kaltem Leitungswasser, bis das Wasser
die maximale Wasserstandsmarkierung
erreicht.
Anmerkung
Beim Nachfüllen von Wasser sollten Sie nicht den
•
maximalen Wasserstand überschreiten, andernfalls
kann Wasser durch den Ausgießer und die Lufteinlässe
austreten.
• Schütteln Sie den Wasserbehälter nicht, wenn Sie ihn
bewegen, andernfalls kann Wasser durch den Ausgießer
und die Lufteinlässe austreten.
• Füllen Sie kein Wasser durch die Luftauslässe an der
Oberseite des Luftbefeuchters ein.
4 Platzieren Sie die obere Einheit wieder auf
dem Wasserbehälter.
26
DE
Page 27

5 Reinigen des
Luftbefeuchters
Anmerkung
Ziehen Sie vor dem Reinigen des Luftbefeuchters stets
•
den Netzstecker aus der Steckdose.
• Wenn Sie Wasser aus dem Wasserbehälter gießen,
vergewissern Sie sich, dass Sie es auf der Seite
ausgießen, die dem Ausgießer und den Lufteinlässen
gegenüberliegt.
• Verwenden Sie keine Scheuermittel oder aggressive
bzw. brennbare Reinigungsmittel wie zum Beispiel
Bleiche oder Alkohol, um die Teile des Luftbefeuchters
zu reinigen.
Reinigen des
Luftbefeuchtergehäuses
Reinigen Sie den Luftbefeuchter regelmäßig
innen und außen, damit sich kein Staub
ansammelt.
1 Wischen Sie Staub mit einem trockenen
weichen Tuch vom Luftbefeuchtergehäuse
ab.
2 Reinigen Sie den Lufteinlass und -auslass
mit einem trockenen weichen Tuch.
4 Reinigen Sie die Innenseite des
Wasserbehälters mit einem weichen
sauberen Tuch.
5 Entleeren Sie den Wasserbehälter in einen
Ausguss.
6 Setzen Sie den Luftbefeuchterlter
und die Filterhalterung wieder in den
Wasserbehälter ein.
Deutsch
Reinigen des Wasserbehälters
Reinigen Sie den Wasserbehälter aus
Hygienegründen wöchentlich.
1 Nehmen Sie den Luftbefeuchterlter und
die Filterhalterung heraus.
2 Füllen Sie den Wasserbehälter zu einem
Drittel mit Wasser.
3 Fügen Sie dem Wasser etwas mildes
Spülmittel hinzu.
DE
27
Page 28

6 Reinigen des
O
F
F
H
I
G
H
L
O
W
Luftbefeuchterfilters
Reinigen Sie den Filter des Luftbefeuchters aus
Hygienegründen einmal wöchentlich.
1 Schalten Sie den Luftbefeuchter aus,
und ziehen Sie den Netzstecker aus der
Steckdose.
2 Entfernen Sie die obere Einheit, indem Sie
sie an beiden Seiten festhalten.
3 Nehmen Sie den Luftbefeuchterlter und
die Filterhalterung aus dem Wasserbehälter.
4 Nehmen Sie den Luftbefeuchterlter aus
der Filterhalterung.
5 Weichen Sie den Luftbefeuchterlter eine
Stunde in Leitungswasser ein.
Leitungswasser
1 Stunde
28
DE
Page 29
6 Spülen Sie den Luftbefeuchterlter unter
ießendem Wasser ab.
7 Lassen Sie überschüssiges Wasser vom
Luftbefeuchterlter abtropfen.
8 Wenn Sie den Luftbefeuchter lange
Zeit nicht verwenden, reinigen Sie den
Wasserbehälter, und trocknen Sie den
Luftbefeuchterlter.
10 Setzen Sie die obere Einheit wieder auf
den Wasserbehälter.
Anmerkung
Drücken Sie den Filter nicht zusammen, und wringen
•
Sie ihn nicht aus. Dies kann den Filter beschädigen und
die Leistung des Luftbefeuchters beeinträchtigen.
• Trocknen Sie den Filter nicht in direktem Sonnenlicht,
wenn er nicht in der Filterhalterung befestigt ist.
Deutsch
9 Setzen Sie den Luftbefeuchterlter
und die Filterhalterung wieder in den
Wasserbehälter ein.
DE
29
Page 30
7 Auswechseln
O
F
F
H
I
G
H
L
O
W
des Luftbefeuchterfilters
Wechseln Sie den Luftbefeuchterlter für
optimale Leistung alle drei Monate aus.
Wenn der Filter in gutem Zustand ist, können
Sie ihn auch für eine längere Zeitspanne
verwenden. Stellen Sie sicher, dass Sie den
Luftbefeuchterlter mindestens einmal pro Jahr
auswechseln.
Anmerkung
Verwenden Sie nur Original-Luftbefeuchterlter von
•
Philips, HU4102
Tipp
Registrieren Sie Ihr Produkt unter www.philips.com, um
•
weitere Informationen zum Filterwechsel zu erhalten.
2 Entfernen Sie die obere Einheit, indem Sie
sie an beiden Seiten festhalten.
3 Nehmen Sie den Luftbefeuchterlter und
die Filterhalterung aus dem Wasserbehälter.
1 Schalten Sie den Luftbefeuchter aus,
und ziehen Sie den Netzstecker aus der
Steckdose.
30
DE
4 Nehmen Sie den Luftbefeuchterlter aus
der Filterhalterung.
Page 31

5 Entfernen Sie das Verpackungsmaterial vom
neuen Luftbefeuchterlter.
8 Setzen Sie die obere Einheit wieder auf
den Wasserbehälter.
Deutsch
6 Befestigen Sie den neuen
Luftbefeuchterlter in der Filterhalterung.
7 Setzen Sie den Filter und die Filterhalterung
wieder in den Wasserbehälter.
Tipp
Weitere Informationen zum Auswechseln des Filters
•
erhalten Sie auf unserer Webseite oder von unserem
Philips Service-Center.
DE
31
Page 32

8 Fehlerbehebung
In diesem Kapitel sind die häugsten Probleme aufgeführt, die beim Gebrauch des Luftbefeuchters
auftreten können. Sollten Sie ein Problem mithilfe der nachstehenden Informationen nicht beheben
können, wenden Sie sich bitte an das Philips Service-Center in Ihrem Land.
Problem Mögliche Lösung
Der Luftbefeuchter
funktioniert nicht.
Es ndet keine
Luftbefeuchtung statt.
Vom Wasserbehälter
tritt Wasser aus.
Auf dem
Luftbefeuchterlter
benden sich einige
weiße Ablagerungen.
Der Filter verfärbt
sich nach einiger Zeit
gelblich.
Der Luftbefeuchter
verströmt einen
unangenehmen Geruch.
Aus dem Luftauslass
kommt keine Luft.
Ich kann nicht erkennen,
dass Sprühnebel aus
dem Luftbefeuchter
austritt. Funktioniert das
Gerät?
• Vergewissern Sie sich, dass der Luftbefeuchter an die Stromversorgung
angeschlossen ist.
• Vergewissern Sie sich, dass der Wasserbehälter mit Wasser gefüllt ist
und dass die obere Einheit ordnungsgemäß auf den Wasserbehälter
gesetzt wurde.
• Vergewissern Sie sich, dass der Wasserbehälter mit Wasser gefüllt ist
und dass die obere Einheit ordnungsgemäß auf den Wasserbehälter
gesetzt wurde.
• Ihr Raum ist möglicherweise zu stark belüftet. Bitte schließen Sie Türen
und Fenster.
• Ihr Raum ist zu groß. Die empfohlene Raumgröße beträgt 25 m² für
HU4801.
• Vergewissern Sie sich, dass sich im Luftbefeuchter nicht zu viel Wasser
bendet.
• Vergewissern Sie sich, dass der Luftbefeuchter nach dem Reinigen oder
dem Entfernen der oberen Einheit und/oder des Wasserbehälters
zum Nachfüllen von Wasser ordnungsgemäß zusammensetzt und
angeschlossen ist.
• Vergewissern Sie sich, dass der Wasserbehälter ordnungsgemäß
aufgestellt ist. Wenn das Problem weiterhin auftritt, setzen Sie sich bitte
mit einem Philips Service-Center in Ihrem Land in Verbindung.
Bei den weißen Ablagerungen handelt es sich um Kalkpartikel, die sich
aus Mineralien aus dem Wasser zusammensetzen. Kalkablagerungen
am Luftbefeuchterlter beeinträchtigen zwar die Leistungsfähigkeit des
Luftbefeuchters, stellen jedoch kein Risiko für die Gesundheit dar. Bitte
lesen Sie die Reinigungsanweisungen in der Bedienungsanleitung.
Die gelben Ablagerungen sind natürliche Verwendungsspuren des
Dochtmaterials, die keinen Einuss auf die Leistungsfähigkeit des
Luftbefeuchters haben. Reinigen Sie den Luftbefeuchterlter regelmäßig, um
Kalk zu entfernen, und tauschen Sie den Filter alle drei Monate aus.
• Vergewissern Sie sich, dass der Wasserbehälter mit Wasser gefüllt ist.
• Reinigen Sie den Luftbefeuchterlter (siehe Kapitel "Reinigen des
Luftbefeuchterlters").
Schließen Sie den Luftbefeuchter an die Stromversorgung an, und schalten
Sie ihn ein.
Sehr feiner Sprühnebel ist unsichtbar. Dieser Luftbefeuchter verfügt über
eine NanoCloud-Luftbefeuchtungstechnologie, die gesunde, befeuchtete
Luft über den Auslassbereich erzeugt und dabei keine Wassertropfen bildet.
Der Sprühnebel ist daher unsichtbar.
32
DE
Page 33

9 Garantie und
Kundendienst
Benötigen Sie weitere Informationen oder
treten Probleme auf, besuchen Sie die Philips
Website (www.philips.com), oder setzen Sie
sich mit einem Philips Service-Center in Ihrem
Land in Verbindung (Telefonnummer siehe
Garantieschrift). Sollte es in Ihrem Land kein
Service-Center geben, wenden Sie sich bitte an
Ihren lokalen Philips Händler.
Bestellen von Ersatz- oder
Zubehörteilen
Wenn Sie ein Teil ersetzen müssen oder ein
zusätzliches Teil kaufen möchten, wenden Sie
sich an Ihren Philips Händler, oder besuchen Sie
www.philips.com/support.
Wenn Sie Probleme bei der Beschaffung der
Teile haben, wenden Sie sich bitte an ein Philips
Service-Center in Ihrem Land (Telefonnummer
siehe Garantieschrift).
Deutsch
DE
33
Page 34

10 Hinweise
Elektromagnetische Felder
Dieses Philips Gerät erfüllt sämtliche Normen
und Regelungen bezüglich der Exposition in
elektromagnetischen Feldern.
Elektromagnetische Verträglichkeit
Koninklijke Philips N.V. produziert und
vertreibt viele Endkundenprodukte, die, wie
jedes elektronische Gerät im Allgemeinen,
elektromagnetische Signale aussenden und
empfangen können.
Eines der grundsätzlichen
Unternehmensprinzipien von Philips ist es, für
unsere Produkte alle notwendigen Gesundheitsund Sicherheitsmaßnahmen zu ergreifen, um
allen anwendbaren rechtlichen Anforderungen
zu entsprechen und die zum Zeitpunkt der
Herstellung des Produkts anwendbaren EMVNormen in vollem Maße einzuhalten.
Philips hat sich dazu verpichtet, Produkte
zu entwickeln, herzustellen und zu verkaufen,
die sich nicht nachteilig auf die Gesundheit
auswirken. Philips bestätigt, dass seine
Produkte gemäß aktuellen wissenschaftlichen
Erkenntnissen sicher sind, wenn die Produkte für
ihren bestimmungsgemäßen Zweck verwendet
werden.
Philips spielt eine aktive Rolle in der
Entwicklung der internationalen EMF- und
Sicherheitsstandards, sodass Philips auch
weiterhin die neuesten Entwicklungen der
Standardisierung so früh wie möglich in seine
Produkte integrieren kann.
Recycling
Entsorgen Sie dieses Produkt nie mit dem
restlichen Hausmüll. Bitte informieren Sie
sich über die örtlichen Bestimmungen zur
getrennten Entsorgung von elektrischen
und elektronischen Produkten. Die korrekte
Entsorgung des nicht mehr benötigten Produkts
hilft, negative Auswirkungen auf Umwelt und
Gesundheit zu vermeiden.
34
DE
Page 35

Contenu
1 Important 36
Sécurité 36
2 Votre humidicateur 39
Contenu de l'emballage 39
3 Guide de démarrage 40
Préparation de l'humidication 40
4 Utilisation de l'humidicateur 41
Mise sous et hors tension de
l'humidicateur 41
Niveau d'eau 41
Remplissage d'eau 42
5 Nettoyage de votre humidicateur 43
Nettoyage du corps de l'humidicateur 43
Nettoyage du réservoir d'eau 43
10 Mentions légales 50
Champs électromagnétiques (CEM) 50
Conformité aux normes sur les
champs électriques, magnétiques
et électromagnétiques 50
Recyclage 50
Français
6 Nettoyage du ltre
d'humidication 44
7 Remplacement du ltre
d'humidication 46
8 Dépannage 48
9 Garantie et service 49
Commande de pièces ou d'accessoires 49
FR
35
Page 36

1 Important
Sécurité
Lisez attentivement ce mode
d'emploi avant d'utiliser
l'humidicateur et conservez-le
pour un usage ultérieur.
Danger
• Ne vaporisez pas de produits
inammables tels que de
l'insecticide ou du parfum autour
de l'humidicateur.
• L'eau du réservoir d'eau n'est
pas potable. Ne buvez pas cette
eau, ne la donnez pas à boire
à des animaux et ne l'utilisez
pas pour arroser des plantes.
Lorsque vous videz le réservoir
d'eau, versez l'eau dans l'évier.
Avertissement
• Avant de brancher
l'humidicateur, vériez que la
tension indiquée sur sa base
correspond à la tension secteur
locale.
• Si le cordon d'alimentation
est endommagé, il doit être
remplacé par Philips, par un
Centre Service Agréé Philips ou
par un technicien qualié an
d'éviter tout accident.
• N'utilisez jamais
l'humidicateur si la prise,
le cordon d'alimentation ou
l'humidicateur lui-même est
endommagé.
• Cet appareil peut être utilisé
par des enfants âgés de
8 ans ou plus, des personnes
dont les capacités physiques,
sensorielles ou intellectuelles
sont réduites ou des personnes
manquant d'expérience et de
connaissances, à condition que
ces enfants ou personnes soient
sous surveillance ou qu'ils aient
reçu des instructions quant à
l'utilisation sécurisée de l'appareil
et qu'ils aient pris connaissance
des dangers encourus. Le
nettoyage et l'entretien ne
doivent pas être réalisés par des
enfants sans surveillance.
• Cet appareil n'est pas un jouet.
Veillez à ce que les enfants
ne puissent pas jouer avec
l'humidicateur.
• Ne bloquez pas l'entrée et la
sortie d'air (par exemple, en
plaçant des objets sur la sortie
d'air ou devant l'entrée d'air).
36
FR
Page 37

Attention
• Si la prise secteur utilisée pour
alimenter l'humidicateur est
mal connectée, la che de
l'humidicateur chauffe. Veillez
à brancher l'humidicateur sur
une prise secteur correctement
connectée.
• Placez et utilisez toujours
l'humidicateur sur une
surface sèche, stable, plane et
horizontale.
• Ne déposez aucun objet sur
l'humidicateur et ne vous
asseyez pas sur celui-ci.
• Assurez-vous que
l'humidicateur est bien
assemblé/connecté après chaque
nettoyage ou après avoir enlevé
le couvercle supérieur et/ou le
réservoir d'eau pour le remplir.
L'humidicateur doit être
assemblé correctement pour
fournir des performances ables
et de qualité.
• Utilisez exclusivement le ltre
d'origine Philips spécialement
conçu pour cet humidicateur.
N'utilisez aucun autre ltre.
• Évitez de heurter
l'humidicateur (l'entrée et la
sortie d'air en particulier) avec
des objets durs.
• N'insérez pas vos doigts ou
des objets dans la sortie d'air
ou l'entrée d'air an d'éviter
tout risque de blessure ou
de dysfonctionnement de
l'humidicateur.
• N'utilisez pas l'humidicateur
après avoir utilisé un insecticide
ou à proximité de résidus
huileux, d'encens se consumant
ou de fumées chimiques.
• N'utilisez pas l'humidicateur
à proximité d'un appareil
fonctionnant au gaz, d'une
installation de chauffage ou
d'une cheminée.
• Débranchez toujours
l'humidicateur après utilisation
et avant de le nettoyer.
• Ne versez pas l'eau dans les
sorties d'air situées sur le dessus
de l'humidicateur.
Français
FR
37
Page 38

• Placez l'humidicateur
correctement an d'éviter que
les enfants le renversent.
• Lorsque l'humidicateur n'est
pas utilisé pendant une longue
période, des bactéries et des
moisissures peuvent se former
sur les ltres. Vériez les ltres
avant de commencer à utiliser
à nouveau l'humidicateur.
Si le ltre est très sale et
comporte des zones sombres,
remplacez-le (voir le chapitre
« Remplacement du ltre
d'humidication »).
• Ne lavez pas le ltre dans une
machine à laver ou au lavevaisselle car il serait déformé.
• Cet humidicateur est destiné
uniquement à un usage
domestique dans des conditions
de fonctionnement normales.
• Nettoyez le réservoir d'eau et
le ltre d'humidication toutes
les semaines pour les garder
propres.
• Remplissez uniquement le
réservoir d'eau avec de l'eau
froide du robinet. N'utilisez pas
de l'eau des nappes phréatiques,
ni de l'eau chaude.
• Ne mettez aucune autre
substance hormis de l'eau dans
le réservoir d'eau. N'ajoutez
pas de parfum ni de substance
chimique dans l'eau. Utilisez
uniquement de l'eau (du robinet,
puriée, minérale, n'importe
quelle sorte d'eau potable).
• Si vous n'utilisez pas
l'humidicateur pendant une
longue période, nettoyez le
réservoir d'eau et séchez le ltre
d'humidication.
• Si vous avez besoin de déplacer
l'humidicateur, commencez
par le débrancher. Ensuite, videz
le réservoir d'eau et portez
l'humidicateur horizontalement.
38
FR
Page 39

2 Votre
Contenu de l'emballage
humidificateur
Félicitations pour votre achat et bienvenue dans
le monde de Philips !
Pour proter pleinement de l'assistance offerte
par Philips, enregistrez votre produit à l'adresse
suivante : www.philips.com/welcome.
L’humidicateur Philips fournit de l’air frais et
humidié à votre maison pour la santé de votre
famille.
Il vous offre un système d’évaporation avancé
disposant de la technologie NanoCloud, utilisant
un ltre d’humidication spécial qui ajoute des
molécules H2O à l’air sec et produit de l’air
pur humide, sans former de brouillard d’eau.
Son ltre d’humidication retient les bactéries,
le calcium et d’autres particules de l’eau. Il
diffuse uniquement un air pur humidié dans
votre maison. Plus d’air sec en hiver ni issu de la
climatisation.
Lisez ce manuel d'utilisation attentivement
avant d'installer et d'utiliser l'humidicateur.
Conservez-le pour un usage ultérieur.
Vériez et identiez les différentes pièces
contenues dans l'emballage :
Unité supérieure
Filtre
d'humidication
(HU4102)
Support du ltre
Flotteur
Français
www.philips.com/welcome
User manual
Mode d'emploi
www.philips.com/welcome
Quick start guide
Guide de mise
en route
Réservoir d'eau
www.philips.com/welcome
Warranty
Garantie
FR
39
Page 40

3 Guide de
MAX
démarrage
Préparation de
l'humidication
1
Pour soulever l'unité supérieure, tenez-la
par ses deux côtés.
2 Remplissez le réser voir d'eau avec de l'eau
froide du robinet jusqu'à ce que l'eau ait
atteint l'indication maximale d'eau.
3 Replacez l'unité supérieure sur le réservoir
d'eau.
40
FR
Page 41

4 Utilisation de
l'humidificateur
Mise sous et hors tension de
l'humidicateur
1
Branchez le cordon d'alimentation sur la
prise secteur.
» Le voyant de vitesse et l'humidicateur
sont allumés.
F
F
O
H
I
G
H
L
O
W
3 Tournez le bouton de la vapeur sur OFF.
» Le voyant de vitesse est éteint.
» L'humidicateur est éteint.
Remarque
L'humidicateur diffuse une vapeur très ne invisible. Il
•
est donc normal que vous ne puissiez pas voir la vapeur.
Français
2 Réglez le bouton de commande sur la
vitesse basse
ou haute .
F
F
O
H
I
G
H
L
O
W
Niveau d'eau
Lorsqu'il n'y a pas assez d'eau dans le
réservoir d'eau, le voyant de vitesse s'éteint et
l'humidicateur cesse de fonctionner. Le bouton
de commande reste sur la vitesse choisie.
Lorsque vous remplissez le réservoir d'eau,
l'humidicateur recommence à fonctionner à la
vitesse choisie.
Remarque
Il est normal que le réservoir contienne encore un peu
•
d'eau.
41
FR
Page 42

Remplissage d'eau
O
F
F
H
I
G
H
L
O
W
MAX
Vous pouvez voir le niveau d'eau par la fenêtre
transparente du réservoir d'eau.
1 Arrêtez l'humidicateur et débranchez-le.
2 Retirez l'unité supérieure en la tenant par
les deux côtés.
Remarque
Lors du remplissage d'eau, ne dépassez pas le niveau
•
d'eau maximal car de l'eau pourrait s'écouler par le
trou d'évacuation et les entrées d'air.
• Ne secouez pas le réservoir d'eau lorsque vous le
déplacez car de l'eau pourrait s'écouler par le trou
d'évacuation et les entrées d'air.
• Ne versez pas l'eau dans les sorties d'air situées sur le
dessus de l'humidicateur.
4 Replacez l'unité supérieure sur le réservoir
d'eau.
3 Vous pouvez voir le niveau d'eau par la
fenêtre transparente du réservoir d'eau.
Remplissez le réservoir d'eau avec de l'eau
froide du robinet jusqu'à ce que l'eau ait
atteint l'indication maximale d'eau.
42
FR
Page 43

5 Nettoyage
de votre
humidificateur
Remarque
Débranchez toujours l'humidicateur avant de le
•
nettoyer.
• Lorsque vous videz l'eau du réservoir d'eau, veillez à le
faire dans le sens opposé au trou d'évacuation et aux
entrées d'air.
• N'utilisez jamais de détergents abrasifs, agressifs ou
inammables (eau de javel, alcool, etc.) pour nettoyer
les différentes parties de l'humidicateur.
Nettoyage du corps de
l'humidicateur
Nettoyez régulièrement l'intérieur et l'extérieur
de l'humidicateur pour empêcher que de la
poussière ne s'accumule.
1 Essuyez la poussière sur le corps de
l'humidicateur à l'aide d'un chiffon doux
et sec.
2 Nettoyez la sortie et l'entrée d'air à l'aide
d'un chiffon doux et sec.
4 Nettoyez l'intérieur du réservoir d'eau
avec un chiffon propre et doux.
5 Videz le réser voir d'eau dans l'évier.
6 Replacez le ltre d'humidication et le
support du ltre dans le réservoir d'eau.
Français
Nettoyage du réservoir d'eau
Nettoyez le réservoir d'eau toutes les semaines
pour le garder propre.
1 Retirez le ltre d'humidication et le
support du ltre.
2 Remplissez 1/3 du réser voir d'eau avec de
l'eau.
3 Ajoutez un peu de liquide vaisselle doux à
l'eau du réservoir d'eau.
FR
43
Page 44

6 Nettoyage
O
F
F
H
I
G
H
L
O
W
du filtre
d'humidification
Nettoyez le ltre d'humidication une fois par
semaine pour le garder propre.
1 Arrêtez l'humidicateur et débranchez-le.
2 Retirez l'unité supérieure en la tenant par
les deux côtés.
4 Retirez le ltre d'humidication du suppor t
du ltre.
5 Faites tremper le ltre d'humidication
dans de l'eau du robinet pendant une
heure.
Eau du robinet
1 heure
3 Retirez le ltre d'humidication et le
support du ltre du réservoir d'eau.
44
FR
6 Rincez le ltre d'humidication sous un
petit let d'eau du robinet.
7 Laissez l'excès d'eau s'égoutter du ltre
d'humidication.
Page 45

8 Assemblez le ltre d'humidication autour
du support du ltre.
9 Replacez le ltre d'humidication et le
support du ltre dans le réservoir d'eau.
10 Replacez l'unité supérieure sur le réservoir
d'eau.
Français
Remarque
Ne pressez pas et ne tordez pas le ltre. Cela pourrait
•
endommager le ltre et affecter les performances
d'humidication.
• Ne séchez pas le ltre à la lumière directe du soleil,
sauf s'il est assemblé sur le support du ltre.
FR
45
Page 46

7 Remplacement
O
F
F
H
I
G
H
L
O
W
du filtre
d'humidification
Pour des performances optimales, remplacez
le ltre d'humidication tous les trois mois. Si
le ltre est en bon état, vous pouvez l'utiliser
pendant une période plus longue. Veillez à
remplacer le ltre d'humidication au moins
une fois par an.
Remarque
Utilisez exclusivement le ltre d'humidication Philips
•
d'origine HU4102.
Conseil
Enregistrez votre produit sur www.philips.com pour
•
obtenir de plus amples informations sur comment
remplacer votre ltre.
2 Retirez l'unité supérieure en la tenant par
les deux côtés.
3 Retirez le ltre d'humidication et le
support du ltre du réservoir d'eau.
1 Arrêtez l'humidicateur et débranchez-le.
46
FR
4 Retirez le ltre d'humidication du suppor t
du ltre.
Page 47

5 Retirez le nouveau ltre d'humidication
de son emballage.
8 Replacez l'unité supérieure sur le réservoir
d'eau.
6 Assemblez le nouveau ltre
d'humidication autour du support du
ltre.
7 Replacez le ltre et le suppor t du ltre
dans le réservoir d'eau.
Conseil
Vous trouverez facilement de plus amples informations
•
sur comment remplacer le ltre sur notre page Web ou
en appelant notre Service Consommateurs.
Français
FR
47
Page 48

8 Dépannage
Cette rubrique présente les problèmes les plus courants que vous pouvez rencontrer avec votre
humidicateur. Si vous ne parvenez pas à résoudre le problème à l'aide des informations ci-dessous,
contactez le Service Consommateurs de votre pays.
Problème Solution possible
L'humidicateur ne
fonctionne pas.
L'air n'est pas humidié. • Assurez-vous que le réservoir d'eau est rempli d'eau et que l'unité
Le réservoir d'eau fuit. • Assurez-vous que l'humidicateur ne contient pas trop d'eau.
Il y a des dépôts
blancs sur le ltre
d'humidication.
Le ltre devient jaunâtre
après un certain temps.
Une odeur désagréable
se dégage de
l'humidicateur.
Aucun air ne s'échappe
de la sortie d'air.
Je ne vois aucune vapeur
visible s'échappant
de l'humidicateur.
Fonctionne-t-il ?
• Assurez-vous que l'humidicateur est alimenté.
• Assurez-vous que le réservoir d'eau est rempli d'eau et que l'unité
supérieure est correctement placée sur le réservoir d'eau.
supérieure est correctement placée sur le réservoir d'eau.
• Votre pièce est peut-être trop ventilée. Fermez por tes et fenêtres.
• La supercie de votre pièce est trop grande. La supercie
recommandée est de 25 m² pour le modèle HU4801.
• Assurez-vous que l'humidicateur est bien assemblé/connecté après
chaque nettoyage ou après avoir enlevé l'unité supérieure et/ou le
réservoir d'eau pour le remplir.
• Assurez-vous que le réservoir d'eau est correctement placé. Si le
problème persiste, contactez le Service Consommateurs de votre pays.
Les dépôts blancs sont du calcaire et sont constitués par les minéraux
de l'eau. Les dépôts de calcaire sur le ltre d'humidication affectent les
performances d'humidication, mais ils ne sont pas dangereux pour votre
santé. Suivez les instructions de nettoyage dans le manuel d'utilisation.
Les dépôts jaunes sont un effet naturel de la mèche, qui n'ont aucun
impact sur les performances d'humidication. Nettoyez fréquemment
le ltre d'humidication pour retirer le calcaire et remplacez le ltre
d'humidication tous les trois mois.
• Assurez-vous que le réservoir d'eau est rempli d'eau.
• Nettoyez le ltre d'humidication (voir le chapitre « Nettoyage du ltre
d'humidication »).
Branchez l'humidicateur, puis allumez-le.
Lorsque la vapeur est très ne, elle est invisible. Cet humidicateur dispose
de la technologie d'humidication NanoCloud, qui produit de l'air humide
pur depuis la zone de sortie sans former de brouillard d'eau. Vous ne
pouvez donc pas voir la vapeur.
48
FR
Page 49

9 Garantie et
service
Si vous souhaitez obtenir des informations
supplémentaires ou si vous rencontrez un
problème, visitez le site Web de Philips à
l'adresse www.philips.com ou contactez
le Service Consommateurs Philips de
votre pays (vous trouverez le numéro de
téléphone correspondant sur le dépliant de
garantie internationale). S'il n'existe pas de
Service Consommateurs dans votre pays,
adressez-vous à votre revendeur Philips.
Commande de pièces ou
d'accessoires
Si vous devez remplacer une pièce ou tout
simplement en acheter une supplémentaire,
contactez votre revendeur Philips ou rendezvous sur www.philips.com/support.
Si vous avez des problèmes pour obtenir des
pièces, contactez le Service Consommateurs
Philips de votre pays (vous trouverez son
numéro de téléphone dans le dépliant de
garantie internationale).
Français
FR
49
Page 50

10 Mentions légales
Champs électromagnétiques
(CEM)
Cet appareil Philips est conforme à toutes
les normes et à tous les règlements
applicables relatifs à l'exposition aux champs
électromagnétiques.
Conformité aux normes sur les
champs électriques, magnétiques et
électromagnétiques
Koninklijke Philips N.V. fabrique et vend de
nombreux produits de consommation qui
ont, comme tous les appareils électriques, la
capacité d'émettre et de recevoir des signaux
électromagnétiques.
L'un des principes fondamentaux adoptés par
la société Philips consiste à prendre toutes les
mesures qui s'imposent en matière de sécurité
et de santé, conformément aux dispositions
légales en cours, pour respecter les normes
sur les champs électriques, magnétiques et
électromagnétiques en vigueur au moment de
la fabrication de ses produits.
Philips s'est engagé à développer, produire et
commercialiser des produits ne présentant
aucun effet nocif sur la santé. Philips conrme
qu'un maniement correct de ses produits
et leur usage en adéquation avec la raison
pour laquelle ils ont été conçus garantissent
une utilisation sûre et dèle aux informations
scientiques disponibles à l'heure actuelle.
Philips joue un rôle majeur dans le
développement de normes CEM et de sécurité
internationales, ce qui lui permet d'anticiper
leur évolution de les appliquer au plus tôt à ses
produits.
Recyclage
Ne jetez pas ce produit avec les ordures
ménagères ordinaires. Renseignez-vous sur
les dispositions en vigueur dans votre région
concernant la collecte séparée des appareils
électriques et électroniques. La mise au rebut
citoyenne de votre ancien produit permet de
protéger l'environnement et la santé.
50
FR
Page 51

Contenuto
1 Importante 52
Sicurezza 52
2 Umidicatore 55
Contenuto della confezione 55
3 Guida introduttiva 56
Preparazione per l'umidicazione 56
4 Utilizzo dell'umidicatore 57
Accensione e spegnimento
dell'umidicatore 57
Livello dell'acqua 57
Riempimento del serbatoio 58
5 Pulizia dell'umidicatore 59
Pulizia del corpo dell'umidicatore 59
Pulizia del serbatoio dell'acqua. 59
Italiano
6 Pulizia del ltro di umidicazione 60
7 Sostituzione del ltro di
umidicazione 62
8 Risoluzione dei problemi 64
9 Garanzia e assistenza 65
Come ordinare parti o accessori 65
10 Note 66
Campi elettromagnetici (EMF) 66
Conformità ai requisiti EMF 66
Riciclaggio 66
51
IT
Page 52

1 Importante
Sicurezza
Prima di utilizzare l'umidicatore,
leggere attentamente il presente
manuale dell'utente e conservarlo
per eventuali riferimenti futuri.
Pericolo
• Non spruzzare sostanze
inammabili, quali insetticidi
o profumo, in prossimità
dell'umidicatore.
• L'acqua del serbatoio non è
potabile. Non berla né utilizzarla
per dare da bere agli animali o
per innafare le piante. Durante
lo svuotamento, versare l'acqua
del serbatoio nello scarico.
Avviso
• Prima di collegare l'apparecchio,
controllare che la tensione
indicata sulla parte inferiore
dell'umidicatore corrisponda a
quella locale.
• Se il cavo di alimentazione
è danneggiato deve essere
sostituito da Philips, da un centro
di assistenza autorizzato Philips o
da persone qualicate al ne di
evitare possibili danni.
• Non utilizzare l'umidicatore se
la spina, il cavo di alimentazione
o l'umidicatore stesso sono
danneggiati.
• Quest'apparecchio può
essere usato da bambini di
età superiore agli 8 anni e da
persone con capacità mentali,
siche o sensoriali ridotte, prive
di esperienza o conoscenze
adatte a condizione che tali
persone abbiano ricevuto
assistenza o formazione per
utilizzare l'apparecchio in
maniera sicura e capiscano i
potenziali pericoli associati a
tale uso. Le operazioni di pulizia
e manutenzione non devono
essere eseguite da bambini senza
la supervisione di un adulto.
• Questo apparecchio non è
un giocattolo. Adottare le
dovute precauzioni per evitare
che i bambini giochino con
l'umidicatore.
• Non ostruite l'ingresso e
l'uscita dell'aria, ad esempio
posizionando oggetti sull'uscita
dell'aria o davanti all'ingresso
dell'aria.
52
IT
Page 53

Attenzione
• Se la presa utilizzata per
alimentare l'umidicatore
presenta connessioni
non ottimali, la spina
dell'umidicatore si surriscalda.
Assicurarsi di collegare
l'umidicatore a una presa
intatta.
• Posizionare e utilizzare sempre
l'umidicatore su una supercie
piana, stabile e orizzontale.
• Non posizionare nulla e non
sedersi sull'umidicatore.
• Vericare il corretto
assemblaggio e la corretta
connessione dell'umidicatore
dopo ogni pulizia o dopo aver
rimosso il coperchio superiore
e/o il serbatoio dell'acqua per
il riempimento. L'umidicatore
deve essere assemblato in modo
corretto per offrire prestazioni
sicure e ottimali.
• Utilizzare solo il ltro originale
Philips studiato appositamente
per questo umidicatore. Non
utilizzare altri ltri.
• Non urtare l'umidicatore con
oggetti duri (in particolare le
prese dell'aria).
• Non inserire le dita o
altri oggetti nelle prese
dell'aria per evitare danni
sici o il malfunzionamento
dell'umidicatore.
• Non utilizzare questo
umidicatore se è stato
spruzzato insetticida a gas per
uso domestico o in luoghi in
cui siano presenti residui oleosi,
incensi accesi o vapori chimici.
• Non utilizzare l'umidicatore
nelle vicinanze di apparecchi a
gas, dispositivi di riscaldamento o
caminetti.
• Scollegare sempre la spina
dell'umidicatore dopo l'uso e
prima di pulirlo.
• Non versare acqua tramite
le prese d'aria nella parte
superiore dell'umidicatore.
• Posizionare l'umidicatore in
modo che non possa essere
rovesciato.
• Se non si utilizza l'umidicatore
per un lungo periodo, è possibile
che nei ltri si sviluppino batteri
e muffe. Controllare i ltri
prima di utilizzare nuovamente
l'umidicatore. Sostituire il ltro
se è molto sporco e presenta
macchie nere (vedere il capitolo
"Sostituzione del ltro di
umidicazione").
• Non lavare il ltro in lavatrice
o in lavastoviglie per non
deformarlo.
Italiano
53
IT
Page 54

• Questo umidicatore è
destinato esclusivamente a uso
domestico in normali condizioni
operative.
• Per garantire la massima igiene,
pulire il serbatoio dell'acqua e il
ltro di umidicazione tutte le
settimane.
• Riempire il serbatoio solo con
acqua fredda. Non utilizzare
acqua di pozzi o acqua calda.
• Non versare sostanze diverse
dall'acqua nel serbatoio. Non
aggiungere profumo o sostanze
chimiche all'acqua. Utilizzare
solo acqua (di rubinetto, ltrata,
minerale, qualunque tipo di
acqua potabile).
• Pulire il serbatoio dell'acqua e
il ltro di umidicazione se non
si utilizza l'umidicatore per un
lungo periodo.
• Se è necessario spostare
l'umidicatore, scollegarlo prima
dall'alimentazione. Svuotare
quindi il serbatoio dell'acqua e
trasportare l'umidicatore in
orizzontale.
54
IT
Page 55

2 Umidificatore
Contenuto della confezione
Congratulazioni per l’acquisto e benvenuti in
Philips!
Per usufruire di tutti i vantaggi offerti dal
supporto Philips, effettuare la registrazione del
prodotto presso il sito Web
www.philips.com/welcome.
L’umidicatore Philips rinfresca e umidica l’aria
della casa per il benessere di tutta la famiglia.
Offre un sistema avanzato di evaporazione con
tecnologia NanoCloud, che utilizza uno speciale
ltro di umidicazione che aggiunge molecole
di H2O all’aria secca e produce aria umida e
salutare senza la formazione di vapore acqueo.
Il ltro di umidicazione trattiene batteri, calcio
e altre particelle presenti nell’acqua. Emette
solo aria pura e umidicata. Basta con l’aria
troppo secca durante i mesi invernali o dovuta
ai condizionatori.
Leggere attentamente il presente manuale
dell’utente prima di installare e utilizzare
l’umidicatore. Conservarlo per eventuali
riferimenti futuri.
Controllare e identicare i seguenti contenuti
della confezione:
Unità
superiore
Filtro di
umidicazione
(HU4102)
Supporto per il
ltro
Galleggiante
Italiano
www.philips.com/welcome
User manual
Manuale di istruzioni
www.philips.com/welcome
Quick start guide
Guida rapida
Serbatoio
acqua
www.philips.com/welcome
Warranty
Garanzia
55
IT
Page 56

3 Guida
MAX
introduttiva
Preparazione per
l'umidicazione
1
Sollevare l'unità superiore afferrandola per
entrambi i lati.
2 Riempire il serbatoio con acqua fredda no
a raggiungere il livello massimo indicato.
3 Posizionare nuovamente l'unità superiore
sul serbatoio dell'acqua.
56
IT
Page 57

4 Utilizzo dell'u-
midificatore
Accensione e spegnimento
dell'umidicatore
1
Inserite la spina nella presa di corrente a
muro.
» Le spie della velocità e
dell'umidicatore sono accese.
F
F
O
H
I
G
H
L
O
W
3 Ruotate la manopola di controllo su OFF.
» La spia della velocità è spenta.
» L'umidicatore è spento.
Nota
L'umidicatore rilascia un vapore acqueo molto ne e
•
invisibile, ed è perfettamente normale non vederlo.
Italiano
2 Ruotare la manopola di comando su
velocità bassa
o velocità elevata .
F
F
O
H
I
G
H
L
O
W
Livello dell'acqua
Quando nel serbatoio non c'è abbastanza
acqua, la spia della velocità e l'umidicatore si
spengono. La manopola di comando rimane
ssa sulla velocità prescelta.
Se si aggiunge nuovamente acqua,
l'umidicatore riprende a funzionare alla
velocità prescelta.
Nota
È normale che nel serbatoio rimanga un po' d'acqua.
•
IT
57
Page 58

Riempimento del serbatoio
O
F
F
H
I
G
H
L
O
W
MAX
È possibile osservare il livello dell'acqua
attraverso la nestrella trasparente del
serbatoio.
1 Spegnere l'umidicatore e staccare la spina.
2 Rimuovere l'unità superiore afferrandola su
entrambi i lati.
Nota
Durante l'operazione di riempimento, non superare il
•
livello massimo indicato, per evitare eventuali perdite di
acqua dal foro di drenaggio e dalle prese d'aria.
• Non scuotere il serbatoio dell'acqua durante gli
spostamenti per evitare che l'acqua fuoriesca dal foro di
drenaggio e dalle prese d'aria.
• Non versare acqua tramite le prese d'aria poste nella
parte superiore dell'umidicatore.
4 Posizionare nuovamente l'unità superiore
sul serbatoio dell'acqua.
3 È possibile osser vare il livello dell'acqua
attraverso la nestrella trasparente del
serbatoio. Riempire il serbatoio con acqua
fredda no a raggiungere il livello massimo
indicato.
58
IT
Page 59

5 Pulizia dell'umi-
dificatore
Nota
Scollegare sempre la spina dell'umidicatore prima di
•
pulirlo.
• Assicurarsi di versare l'acqua dal lato opposto del
foro di drenaggio e delle prese di aria quando si versa
l'acqua del serbatoio.
• Non utilizzare mai detergenti abrasivi, aggressivi o
inammabili quali candeggina o alcol per pulire le parti
dell'umidicatore.
Pulizia del corpo
dell'umidicatore
6 Riposizionare il ltro di umidicazione e il
supporto del ltro nel serbatoio dell'acqua.
Pulire regolarmente l'interno e l'esterno
dell'umidicatore per impedire l'accumulo di
polvere.
1 Utilizzare un panno morbido e asciutto
per eliminare la polvere dal corpo
dell'umidicatore.
2 Pulire le prese d'aria con un panno
morbido e asciutto.
Pulizia del serbatoio
dell'acqua.
Per garantire la massima igiene, pulire il
serbatoio dell'acqua tutte le settimane.
1 Estrarre il ltro di umidicazione e il
supporto del ltro.
2 Riempire il serbatoio per 1/3 con acqua.
3 Aggiungere un detergente liquido delicato
all'acqua nel serbatoio.
4 Pulire la par te interna del serbatoio
dell'acqua con un panno morbido e pulito.
5 Svuotare il serbatoio nel lavandino.
Italiano
59
IT
Page 60

6 Pulizia del filtro
O
F
F
H
I
G
H
L
O
W
di umidificazione
Per garantire la massima igiene, pulire il ltro di
umidicazione tutte le settimane.
1 Spegnere l'umidicatore e staccare la spina.
2 Rimuovere l'unità superiore afferrandola su
entrambi i lati.
4 Rimuovere il ltro di umidicazione dal
supporto del ltro.
5 Lasciare immerso il ltro di umidicazione
in acqua per un'ora.
Acqua di rubinetto
1 ora
6 Risciacquare il ltro di umidicazione sotto
l'acqua corrente.
3 Estrarre il ltro di umidicazione e il
supporto del ltro dal serbatoio dell'acqua.
60
IT
7 Lasciare scolare l'acqua in eccesso dal ltro
di umidicazione.
Page 61

8 Assemblare il ltro di umidicazione sul
supporto del ltro.
9 Riposizionare il ltro di umidicazione e il
supporto del ltro nel serbatoio dell'acqua.
10 Posizionare nuovamente l'unità superiore
sul serbatoio dell'acqua.
Italiano
Nota
Non schiacciare né piegare il ltro. In questo modo si
•
potrebbe danneggiare il ltro e ridurre la capacità di
umidicazione.
• Non lasciare asciugare il ltro direttamente al sole, a
meno che non sia stato riassemblato sul supporto del
ltro
61
IT
Page 62

7 Sostituzione
O
F
F
H
I
G
H
L
O
W
del filtro di
umidificazione
Per ottenere prestazioni ottimali, sostituire il
ltro di umidicazione ogni tre mesi. Se il ltro è
in buone condizioni, è possibile utilizzarlo più a
lungo. Sostituire il ltro di umidicazione almeno
una volta all'anno.
Nota
Utilizzare solo il ltro di umidicazione originale Philips
•
HU4102.
Suggerimento
Registrare il prodotto sul sito www.philips.com per
•
avere maggiori informazioni su come sostituire il ltro.
1 Spegnere l'umidicatore e staccare la spina.
2 Rimuovere l'unità superiore afferrandola su
entrambi i lati.
3 Estrarre il ltro di umidicazione e il
supporto del ltro dal serbatoio dell'acqua.
4 Rimuovere il ltro di umidicazione dal
supporto del ltro.
62
IT
Page 63

5 Rimuovere il nuovo ltro di umidicazione
dal materiale di imballaggio.
8 Posizionare nuovamente l'unità superiore
sul serbatoio dell'acqua.
6 Assemblare il nuovo ltro di umidicazione
sul supporto del ltro.
7 Riposizionare il ltro e il suppor to del ltro
nel serbatoio dell'acqua.
Suggerimento
Per ulteriori informazioni su come sostituire il ltro
•
consultare la nostra pagina Web o contattare il centro
assistenza clienti.
Italiano
63
IT
Page 64

8 Risoluzione dei problemi
In questo capitolo vengono riportati i problemi più comuni legati all'uso dell'umidicatore. Se non è
possibile risolvere il problema con le informazioni fornite di seguito, contattare il centro assistenza clienti
del proprio paese.
Problema Possibile soluzione
L'umidicatore non
funziona.
L'aria non è umidicata. • Assicurarsi che il serbatoio sia pieno d'acqua e che l'unità superiore sia
Il serbatoio dell'acqua
perde.
Nel ltro di
umidicazione sono
presenti dei depositi
bianchi.
Dopo un po' di tempo il
ltro diventa giallastro.
L'umidicatore emana
un odore sgradevole.
L'aria non fuoriesce
dalle prese.
Dall'umidicatore
non fuoriesce vapore
acqueo. Funziona?
• Assicurarsi che l'umidicatore sia collegato all'alimentazione.
• Assicurarsi che il serbatoio sia pieno d'acqua e che l'unità superiore sia
posizionata correttamente sul serbatoio dell'acqua.
posizionata correttamente sul serbatoio dell'acqua.
• La stanza potrebbe essere troppo ventilata. Chiudere porte e nestre.
• La stanza è troppo grande. Le dimensioni della stanza consigliate sono
di 25 m² per entrambi i modelli HU4801.
• Assicurarsi che il livello dell'acqua nell'umidicatore non sia troppo
elevato.
• Assicurarsi che l'umidicatore sia sempre assemblato/collegato in modo
corretto dopo ogni pulizia o dopo aver rimosso l'unità superiore e/o il
serbatoio dell'acqua per il riempimento.
• Assicurarsi che il serbatoio dell'acqua sia posizionato in modo corretto.
Se il problema persiste, contattare il centro assistenza clienti di zona.
I depositi bianchi sono dovuti al calcare e sono formati da minerali
presenti nell'acqua. Il calcare sul ltro di umidicazione riduce la capacità
di umidicazione, ma non è dannoso per la salute. Seguire le istruzioni di
pulizia nel manuale dell'utente.
Il deposito giallo è un effetto naturale del materiale con cui è realizzato il
ltro e non ha alcun impatto sulla capacità di umidicazione. Pulire spesso il
ltro per rimuovere il calcare e sostituirlo ogni tre mesi.
• Assicurarsi che il serbatoio sia riempito con acqua.
• Pulire il ltro di umidicazione (vedere il capitolo "Pulizia del ltro di
umidicazione").
Collegare l'umidicatore all'alimentazione e accenderlo.
Il vapore acqueo è invisibile quando è molto ne. Questo umidicatore è
dotato di tecnologia di umidicazione NanoCloud, che produce aria umida
e salutare senza la formazione di vapore acqueo. Per questo il vapore non
è visibile.
64
IT
Page 65

9 Garanzia e
assistenza
Per ricevere ulteriori informazioni o per
risolvere eventuali problemi, visitare il sito Web
Philips all'indirizzo www.philips.com oppure
contattare il centro assistenza clienti Philips
di zona (il numero di telefono è riportato
nell'opuscolo della garanzia). Se nel proprio
paese non è presente alcun centro di assistenza
clienti, rivolgersi al proprio rivenditore Philips.
Come ordinare parti o
accessori
Se è necessario sostituire una parte o si
desidera acquistare un accessorio aggiuntivo,
rivolgersi al proprio rivenditore Philips o visitare
il sito www.philips.com/support.
In caso di problemi a reperire le parti,
contattare il centro assistenza clienti Philips
di zona (il numero di telefono è riportato
nell'opuscolo della garanzia).
Italiano
65
IT
Page 66

10 Note
Campi elettromagnetici (EMF)
Questo apparecchio Philips è conforme a tutti
gli standard e alle norme relativi all'esposizione
ai campi elettromagnetici.
Conformità ai requisiti EMF
Koninklijke Philips Electronics N.V. produce
e commercializza numerosi prodotti per
il mercato consumer che, come tutti gli
apparecchi elettronici, possono emettere e
ricevere segnali elettromagnetici.
Uno dei principali principi aziendali applicati da
Philips prevede l'adozione di tutte le misure
sanitarie e di sicurezza volte a rendere i propri
prodotti conformi a tutte le regolamentazioni
e a tutti gli standard EMF applicabili alla data di
produzione dell'apparecchio.
Philips si impegna a sviluppare, produrre e
distribuire prodotti che non causano effetti
nocivi per la salute. Sulla base delle ricerche
attualmente disponibili, Philips garantisce la
sicurezza dei propri prodotti, purché siano
utilizzati in modo conforme allo scopo.
Philips si impegna attivamente nello sviluppo
di standard EMF e di sicurezza internazionali. In
questo modo, è in grado di integrare i risultati
della standardizzazione nei propri prodotti, al
ne di garantirne la conformità anticipata.
Riciclaggio
Non smaltire questo prodotto con i riuti
domestici. Informarsi sui regolamenti locali per
la raccolta differenziata dei prodotti elettrici
ed elettronici. Il corretto smaltimento dei
prodotti usati aiuta a prevenire l'inquinamento
ambientale e possibili danni alla salute.
66
IT
Page 67

Мазмұны
1 Маңызды ақпарат 68
Қауіпсіздік 68
2 Ылғалдандырғыш 71
Қорап ішіндегі заттар 71
3 Іске қосу 72
Ылғалдандыру үшін дайындау 72
4 Ылғалдандырғышты пайдалану 73
Ылғалдандырғышты қосу және өшіру 73
Су деңгейі 73
Суды толтыру 74
5 Ылғалдандырғышты тазарту 75
Ылғалдандырғыштың корпусын
тазарту 75
Су ыдысын тазарту 75
10 Ескертулер 82
Электромагниттік өрістер (ЭМӨ) 82
Электромагниттік өріспен
(ЭМӨ) сәйкестік 82
Өңдеу 82
6 Ылғалдандыру сүзгісін тазарту 76
7 Ылғалдандыру сүзгісін ауыстыру 78
8 Ақауларды жою 80
9 Кепілдік және қызмет көрсету 81
Бөлшектерге және қосалқы
құралдарға тапсырыс беру 81
ҚҚ
Қазақша
67
Page 68

1 Маңызды
ақпарат
Қауіпсіздік
Ылғалдандырғышты
пайдаланбастан бұрын осы
пайдаланушы нұсқаулығын
мұқият оқып шығыңыз да, оны
келешекте анықтама алу үшін
сақтап қойыңыз.
Қауіпті
• Ылғалдандырғыш айналасында
инсектицидтер немесе әтір
сияқты ешбір тұтанғыш
материалдарды бүркемеңіз.
• Су ыдысындағы су ішуге
жарамсыз. Бұл суды ішпеңіз
және оны жануарларға беру
немесе өсімдіктерді суғару
үшін пайдаланбаңыз. Су
ыдысын босатқанда суды
құбырға төгіңіз.
Ескерту
• Ылғалдандырғышты қосар
алдында, ылғалдандырғыштың
төменгі жағында көрсетілген
кернеу жергілікті қуат
кернеуіне сәйкес келетінін
тексеріңіз.
• Егер қуат сымы зақымдалған
болса, қауіптің алдын алу үшін,
оны тек Philips компаниясына,
Philips рұқсат берген қызмет
көрсету орталығына немесе
соған ұқсас біліктілігі бар
мамандарға алмастыртыңыз.
• Аша, қуат сымы немесе
ылғалдандырғыштың
зақымданған болса,
ылғалдандырғышты
пайдаланбаңыз.
• Бақылау астында болса
немесе құралды қауіпсіз түрде
пайдалану туралы нұсқаулар
алған болса және байланысты
қауіптерді түсінсе, бұл құралды
8 және одан жоғары жастағы
балалар және дене, сезу
немесе ақыл-ой қабілеттері
кем я болмаса тәжірибесі мен
білімі жоқ адамдар пайдалана
алады. Тазалау және қызмет
көрсету жұмысын балалар
бақылаусыз орындамауы керек.
• Бұл құрылғы ойыншық
емес. Балаларды бақылап,
олардың ылғалдандырғышпен
ойнамауын қадағалау керек.
68
ҚҚ
Page 69

• Ауа кіріс жері мен ауа шығыс
жерін бітеп тастамаңыз,
мәселен ауа шығатын жерге
немесе ауа кіретін жердің
алдына зат қоймаңыз.
Абайлаңыз
• Егер ылғалдандырғышқа
қуат беру үшін
пайдаланылатын розетканың
қосылымдары нашар болса,
ылғалдандырғыштың ашасы
қызады. Ылғалдандырғышты
дұрыстап қосылған розеткаға
қосыңыз.
• Әрқашан ылғалдандырғышты
құрғақ, тұрақты, тегіс және
көлденең бетке қойыңыз және
пайдаланыңыз.
• Ылғалдандырғыш үстіне
ештеңе қоймаңыз және оның
үстіне отырмаңыз.
• Әр тазалаудан кейін немесе
толтыру үшін жоғарғы
бөлікті және/немесе су
ыдысын алғаннан кейін
ылғалдандырғыш дұрыс
жиналғанын/қосылғанын
тексеріңіз. Жақсы және
қауіпсіз жұмыс істеуі үшін
ылғалдандырғышты дұрыстап
жинау керек.
• Тек осы ылғалдандырғышқа
арналған түпнұсқалық Philips
сүзгісін пайдаланыңыз. Басқа
ешбір сүзгіні пайдаланбаңыз.
• Ылғалдандырғышқа қатты
заттарды соғып алудан
сақтаңыз (әсіресе ауа кірісін
және ауа шығысын).
• Жарақат алуды немесе
ылғалдандырғыштың дұрыс
емес жұмыс істеуін болдырмау
үшін ауа шығысына немесе ауа
кірісіне саусақтарды немесе
заттарды салмаңыз.
• Үй ішінде жәндіктерге қарсы
қолданатын түтін шығаратын
репелленттер қолданған
жерде немесе майлы
қалдықтар, жанып жатқан
фимиам, не болмаса химиялық
түтіндер бар орындарда
бұл ылғалдандырғышты
пайдалануға болмайды.
• Бұл ылғалдандырғышты
газ құралдары, жылыту
құрылғылары немесе камин
жанында пайдалануға
болмайды.
• Ылғалдандырғышты
пайдаланудан кейін және
тазалау алдында міндетті
түрде әрқашан розеткадан
суырыңыз.
Қазақша
ҚҚ
69
Page 70

• Ылғалдандырғыштың жоғарғы
жағындағы ауа шығыстары
арқылы су толтырмаңыз.
• Балалардың аударып
жіберуін болдырмау үшін
ылғалдандырғышты дұрыстап
қойыңыз.
• Ылғалдандырғыш ұзақ уақыт
бойы пайдаланылмаса,
сүзгілерде бактериялар мен
зең пайда болуы мүмкін.
Ылғалдандырғышты қайта
пайдаланбас бұрын, сүзгілерді
тексеріңіз. Егер сүзгі тым лас
және онда қара дақтар пайда
болған болса, оны ауыстыру
қажет («Ылғалдандыру сүзгісін
ауыстыру» тарауын қараңыз).
• Сүзгіні кір жуғыш машинада
немесе ыдыс-аяқ жуу
машинасында жумаңыз, сүзгінің
пішіні өзгеруі мүмкін.
• Ылғалдандырғыш тек
тұрмыстық қолданыста
қалыпты жұмыс жағдайларында
ғана пайдалануға арналған.
• Таза ұстау үшін апта сайын
су ыдысын тазалаңыз және
ылғалдандыру сүзгісін шайыңыз.
• Су ыдысына тек салқын ағын
суын құйыңыз. Жерден алынған
суды немесе ыстық суды
пайдаланбаңыз.
• Су ыдысына судан басқа
ешбір затты құймаңыз. Суға
әтір немесе химиялық зат
қоспаңыз. Тек суды (ағын,
тазартылған, минералдық, кез
келген бөтелкедегі су түрі)
пайдаланыңыз.
• Ылғалдандырғышты ұзақ
уақыт бойы пайдаланбасаңыз,
су ыдысын тазалаңыз және
ылғалдандыру сүзгісін
кептіріңіз.
• Ылғалдандырғышты жылжыту
керек болса, алдымен қуат
көзінен ылғалдандырғышты
ажыратыңыз. Одан кейін су
ыдысын босатыңыз және
ылғалдандырғышты көлденең
күйде алып жүріңіз.
70
ҚҚ
Page 71

2 Ылғалданды-
Қорап ішіндегі заттар
рғыш
Сатып алғаныңыз құтты болсын және Philips
компаниясына қош келдіңіз!
Philips ұсынатын қолдауды толық пайдалану
үшін, өнімді www.philips.com/welcome
сайтына тіркеңіз.
Philips ылғалдандырғышы сіздің және
отбасыңыздың денсаулығы үшін таза,
ылғалдандырылған ауаны береді.
Ол NanoCloud технологиясы қолданылған
булануды бақылаудың үздік жүйесін
ұсынады. Құрылғыда құрғақ ауаға H2O
молекулаларын қосып, таза ылғал ауа түзетін
және суды буландырмайтын сүзгі орнатылған.
Ылғалдандыру сүзгісі бактериялар, кальций
және басқа да ұсақ бөлшектерді судан
сүзіп алады. Ол сіздің үйіңізге тек таза,
ылғалдандырылған ауа жеткізеді. Қысқы
маусымда немесе желдеткіштен келетін
құрғақ ауа енді болмайды.
Ылғалдандырғышты орнату және пайдалану
алдында осы пайдаланушы нұсқаулығын
мұқият оқып шығыңыз. Оны болашақта
анықтама алу үшін сақтаңыз.
Қораптың ішіндегілерді тексеріп, түгендеңіз.
Жоғарғы
бөлік
Ылғалдандыру
сүзгісі
(HU4102)
Сүзгі ұстағышы
Қалқыма
Қазақша
www.philips.com/welcome
User manual
Пайдаланушы
нұсқаулығы
www.philips.com/welcome
Quick start guide
Қысқаша жұмысты
бастау нұсқаулығы
Су ыдысы
www.philips.com/welcome
Warranty
Кепілдік
ҚҚ
71
Page 72

3 Іске қосу
MAX
Ылғалдандыру үшін
дайындау
1
Жоғарғы бөлікті екі жағынан ұстап
көтеріңіз.
2 Су ыдысын ең жоғары деңгей белгісіне
дейін салқын сумен толтырыңыз.
3 Жоғарғы бөлікті су ыдысына қайта
қойыңыз.
72
ҚҚ
Page 73

4 Ылғалданды-
рғышты пайда-
» Жылдамдық шамы мен
ылғалдандырғыш қосылады.
лану
Ылғалдандырғышты қосу
және өшіру
1
Штепсельдік ұшты қабырға розеткасына
қосыңыз.
2 Басқару тетігін төмен жылдамдыққа
немесе жоғары жылдамдыққа
орнатыңыз.
F
F
O
H
I
G
H
L
O
W
F
F
O
H
I
G
H
L
O
W
3 Басқару тетігін OFF (ӨШІРУ) күйіне
ауыстырыңыз.
» Жылдамдық шамы өшеді.
» Ылғалдандырғыш өшеді.
Есте сақтаңыз
Ылғалдандырғыш өте таза, көзге көрінбейтін бу
•
шығарады, сондықтан да будың көзге көрінбеуі
қалыпты жағдай болып табылады.
Су деңгейі
Су ыдысындағы су мөлшері жеткіліксіз болса,
жылдамдық шамы сөніп, ылғалдандырғыш
жұмысы тоқтатылады. Басқару тетігін
таңдалған жылдамдықта қалады.
Суды қайта толтырған соң, ылғалдандырғыш
таңдалған жылдамдықта өз жұмысын
жалғастырады.
Есте сақтаңыз
Ыдыста судың біраз мөлшерінің қалып қоюы
•
қалыпты жағдай.
Қазақша
ҚҚ
73
Page 74

Суды толтыру
O
F
F
H
I
G
H
L
O
W
MAX
Су деңгейін су ыдысындағы мөлдір терезе
арқылы бақылап отыруға болады.
1 Ылғалдандырғышты өшіріп, қуат көзінен
ажыратыңыз.
2 Жоғарғы бөлікті екі жағынан ұстап алып
тастаңыз.
Есте сақтаңыз
Су ыдысын толтырған кезде ең жоғары деңгей
•
белгісінен асуға болмайды, әйтпесе шығару жолы
мен ауа кіру жолдарына су төгіліп кетуі мүмкін.
• Жылжытқан кезде су ыдысын шайқамаңыз, әйтпесе
шығару жолы мен ауа кірістерінен су ағуы мүмкін.
• Ылғалдандырғыштың жоғарғы жағындағы ауа шығару
жолдары арқылы су толтырмаңыз.
4 Жоғарғы бөлікті су ыдысына қайта
қойыңыз.
3 Су деңгейін су ыдысындағы мөлдір
терезе арқылы бақылауға болады. Су
ыдысын ең жоғары деңгей белгісіне
дейін салқын сумен толтырыңыз.
74
ҚҚ
Page 75

5 Ылғалданды-
рғышты тазарту
Есте сақтаңыз
Тазарту алдында ылғалдандырғышты міндетті түрде
•
розеткадан ажырату керек.
• Су ыдысындағы суды шығару жолы мен ауа кіру
жолдарына қарама-қарсы жақтан төгу керек.
• Ылғалдандырғыштың кез келген бөлігін тазалау
үшін ағартқыш немесе алкоголь сияқты абразивті,
агрессивті немесе тұтанғыш тазалағыш заттарды
ешқашан пайдаланбаңыз.
Ылғалдандырғыштың
корпусын тазарту
Шаңның жиналуын болдырмау үшін
ылғалдандырғыштың ішін және сыртын
жүйелі түрде тазалаңыз.
1 Ылғалдандырғыш корпусының шаңын
жұмсақ, құрғақ шүберекпен сүртіп
алыңыз.
2 Ауа кірісін және шығысын құрғақ, жұмсақ
шүберекпен тазалаңыз.
6 Ылғалдандыру сүзгісін және сүзгі
ұстағышын су ыдысына қайта қойыңыз.
Қазақша
Су ыдысын тазарту
Таза ұстау үшін, су ыдысын апта сайын
тазалаңыз.
1 Ылғалдандыру сүзгісі мен сүзгі тірегін
шығарып алыңыз.
2 Су ыдысының 1/3 бөлігін сумен
толтырыңыз.
3 Су ыдысындағы суға жұмсақ тазартқыш
сұйықтық қосыңыз.
4 Су ыдысының ішкі бөлігін жұмсақ әрі
таза шүберекпен тазартыңыз.
5 Су ыдысындағы суды раковинаға төгіңіз.
ҚҚ
75
Page 76

6 Ылғалдандыру
O
F
F
H
I
G
H
L
O
W
сүзгісін тазарту
Таза ұстау үшін, ылғалдандыру сүзгісін апта
сайын тазалаңыз.
1 Ылғалдандырғышты өшіріп, қуат көзінен
ажыратыңыз.
2 Жоғарғы бөлікті екі жағынан ұстап алып
тастаңыз.
4 Сүзгі тірегінен ылғалдандыру сүзгісін
алып тастаңыз.
5 Ылғалдандыру сүзгісін бір сағат бойы
суға салып қойыңыз.
Ағын су
1 сағат
3 Су ыдысынан ылғалдандыру сүзгісі мен
сүзгі тірегін шығарып тастаңыз.
76
ҚҚ
6 Ылғалдандыру сүзгісін баяу ағып тұрған
сумен шайыңыз.
7 Артық суды ылғалдандыру сүзгісіне
ағызыңыз.
Page 77

8 Ылғалдандыру сүзгісін сүзгі ұстағышында
жинаңыз.
9 Ылғалдандыру сүзгісін және сүзгі
ұстағышын су ыдысына қайта қойыңыз.
10 Жоғарғы блокты су ыдысына қайта
қойыңыз.
Қазақша
Есте сақтаңыз
Сүзгіні қыспаңыз немесе сықпаңыз. Бұл сүзгіні
•
зақымдауы және ылғалдандыру сапасына әсер етуі
мүмкін.
• Сүзгі тірегіне қайта жиналмаған болса, сүзгіні тікелей
күн сәулесімен кептіруге болмайды.
ҚҚ
77
Page 78

7 Ылғалдандыру
O
F
F
H
I
G
H
L
O
W
сүзгісін
ауыстыру
оңтайлы өнімділік үшін ылғалдандыру сүзгісін
үш ай сайын ауыстырыңыз. Егер сүзгі жақсы
күйде болса, оны ұзағырақ уақыт пайдалана
аласыз. Ылғалдандыру сүзгісін кемінде жылына
бір рет ауыстырыңыз.
Есте сақтаңыз
HU4102 сүзгісінің тек Phillips өндірген түпнұсқа
•
үлгілерін пайдалану керек.
Кеңес
Сүзгіні ауыстыру туралы қосымша ақпарат алу үшін
•
өнімді www.philips.com сайтына тіркеу қажет.
1 Ылғалдандырғышты өшіріп, қуат көзінен
ажыратыңыз.
2 Жоғарғы бөлікті екі жағынан ұстап алып
тастаңыз.
3 Су ыдысынан ылғалдандыру сүзгісі мен
сүзгі тірегін шығарып тастаңыз.
4 Сүзгі тірегінен ылғалдандыру сүзгісін
алып тастаңыз.
78
ҚҚ
Page 79

5 Жаңа ылғалдандыру сүзгісіндегі орауыш
материалдарын алып тастаңыз.
8 Жоғарғы блокты су ыдысына қайта
қойыңыз.
6 Ылғалдандыру сүзгісін сүзгі тірегіне
орнатыңыз.
7 Сүзгі мен сүзгі ұстағышын су ыдысына
қайта қойыңыз.
Кеңес
Сүзгіні ауыстыру туралы толық ақпаратты веб-
•
сайтқа кіру арқылы немесе тұтынушыларды қолдау
орталығына қоңырау шалу арқылы алуға болады.
Қазақша
ҚҚ
79
Page 80

8 Ақауларды жою
Бұл тарауда ылғалдандырғышта орын алуы мүмкін ең көп кездесетін ақаулықтар жинақталған.
Егер төменде берілген ақпарат көмегімен ақаулық жойылмаса, еліңіздегі тұтынушыларды қолдау
орталығына хабарласыңыз.
Ақаулық Мүмкін шешімі
Ылғалдандырғыш
жұмыс істемейді.
Ауаны
ылғалдандырмайды.
Су ыдысынан су ағады. • Ылғалдандырғышқа артық су құйылмағанын тексеріңіз.
Ылғалдандыру
сүзгісінде біраз
жиналған ақ зат бар.
Біраз уақыттан кейін
сүзгі сарғыштау түске
боялады.
Ылғалдандырғыштан
жағымсыз иіс шығады.
Ауа шығысынан ауа
шықпайды.
Ылғалдандырғыштан
бу шығып жатқанын
көрмеймін. Ол жұмыс
істеп жатыр ма?
• Ылғалдандырғышқа ток келіп тұрғанын тексеріңіз.
• Су ыдысы сумен толтырылғанын және жоғарғы блок су ыдысына
дұрыстап қойылғанын тексеріңіз.
• Су ыдысы сумен толтырылғанын және жоғарғы блок су ыдысына
дұрыстап қойылғанын тексеріңіз.
• Бөлме тым көп желдетілуі мүмкін. Есіктерді және терезелерді
жабыңыз.
• Бөлме тым үлкен. HU4801 үлгісі үшін оңтайлы бөлме ауданы 25м².
• Әр тазалаудан кейін, не болмаса толтыру үшін жоғарғы блокты
және/немесе су ыдысын алғаннан кейін ылғалдандырғыш дұрыс
жиналғанын/қосылғанын тексеріңіз.
• Су ыдысы дұрыс орналастырылғанын тексеріңіз. Егер мәселе
шешілмесе, еліңіздегі тұтынушыларды қолдау орталығына
хабарласыңыз.
Жиналған ақ зат қақ деп аталады және судағы минералдардан
тұрады. Ылғалдандыру сүзгісіне жиналған қақ ылғалдандыру сапасына
әсер еткенімен, денсаулыққа зиян тигізбейді. Пайдалану жөніндегі
нұсқаулықта берілген тазарту бойынша нұсқауларды орындаңыз.
Сары түсті қалдықтар тампон материалының табиғи ізі болып
табылады, олар ылғалдандыру сапасына әсер етпейді. Қақты жою үшін
ылғалдандыру сүзгісін жиі тазарту керек және ылғалдандыру сүзгісін үш
ай сайын ауыстыру керек.
• Су ыдысы сумен толтырылғанын тексеріңіз.
• Ылғалдандыру сүзгісін тазартыңыз («Ылғалдандыру сүзгісін тазалау»
тарауын қараңыз).
Ылғалдандырғышты қуат көзіне жалғап, қосыңыз.
Бу өте таза болса, ол көзге көрінбейді. Ылғалдандырғышқа NanoCloud
ылғалдандыру технологиясы орнатылған, ол шығару аймағынан таза,
ылғал ауа шығарады және бу шығармайды. Сондықтан да, бу көзге
көрінбейді.
80
ҚҚ
Page 81

9 Кепілдік және
қызмет көрсету
Егер ақпарат қажет болса немесе мәселеңіз
болса, www.philips.com мекенжайындағы
Philips веб-сайтына кіріңіз, не болмаса
еліңіздегі Philips тұтынушыларды қолдау
орталығына (оның телефон нөмірін
дүниежүзілік кепілдік парақшасынан
таба аласыз) хабарласыңыз. Егер
еліңізде тұтынушыларға қолдау көрсету
орталығы болмаса, онда жергілікті Philips
компаниясының дилеріне барыңыз.
Бөлшектерге және қосалқы
құралдарға тапсырыс беру
Егер бөлшекті ауыстырғыңыз келсе не
қосалқы бөлшекті сатып алғыңыз келсе, Philips
сатушысына барыңыз не
www.philips.com/support сайтына кіріңіз.
Егер бөлшектерді сатып алуда мәселелер
болса, сіздің елдегі Philips тұтынушыларды
қолдау орталығына (оның телефон нөмірі
дүниежүзілік кепілдік парақшасында берілген)
хабарласыңыз.
Қазақша
ҚҚ
81
Page 82

10 Ескертулер
Электромагниттік өрістер
(ЭМӨ)
Осы Philips құралы электромагниттік
өрістерге қатысты барлық қолданыстағы
стандарттар мен ережелерге сәйкес келеді.
Электромагниттік өріспен (ЭМӨ)
сәйкестік
Koninklijke Philips N.V. тұтынушыларға
арналған, басқа электрондық құрылғылар
сияқты, негізінде, электр магнитті сигналдар
шығаратын және қабылдайтын қабілеті бар
көп өнімдер жасайды және сатады.
Philips компаниясының негізгі жұмыс
ұстанымдарының бірі өнімдер үшін бүкіл
қажетті денсаулық және қауіпсіздік
шараларын сақтау, қолданыстағы барлық заң
талаптарына сәйкес болу және өнімді жасау
кезінде қолданылатын ЭМӨ стандарттарын
ұстану болып табылады.
Philips компаниясы денсаулыққа кері
әсерлері жоқ өнімдерді дамыту, жасау және
сату бағытын ұстанады. Өнімдер арналған
мақсаты бойынша дұрыс қолданылғанда,
Philips компаниясы олардың қазіргі таңдағы
ғылыми дәлелдерге сәйкес пайдалануға
қауіпсіз екенін растайды.
Philips компаниясы халықаралық ЭМӨ және
қауіпсіздік стандарттарын дамытуда белсенді
рөл атқарады, сондықтан өз өнімдеріне
бірінші болып енгізу үшін стандартизациядағы
болашақ жетілдірулерді болжауға мүмкіндік
береді.
Өңдеу
Ешқашан өніміңізді басқа тұрмыстық
қалдықтармен бірге тастамаңыз. Электр
және электрондық өнімдерді бөлек жинау
туралы жергілікті ережелермен танысыңыз.
Ескі өнімді қоқысқа дұрыс тастау қоршаған
ортаға және адам денсаулығына ықтималды
кері әсерін тигізудің алдын алады.
82
ҚҚ
Page 83

Inhoud
1 Belangrijk 84
Veiligheid 84
2 Uw luchtbevochtiger 87
Inhoud van de doos 87
3 Aan de slag 88
Bevochtiging voorbereiden 88
4 De luchtbevochtiger gebruiken 89
De luchtbevochtiger in- en uitschakelen 89
Waterniveau 89
Water bijvullen 90
5 De luchtbevochtiger reinigen 91
De behuizing van de luchtbevochtiger
schoonmaken 91
Het waterreservoir schoonmaken 91
6 Het bevochtigingslter reinigen 92
7 Het bevochtigingslter vervangen 94
8 Problemen oplossen 96
9 Garantie en service 97
Onderdelen of accessoires bestellen 97
10 Kennisgevingen 98
Elektromagnetische velden (EMV) 98
Naleving van norm voor
elektromagnetische velden (EMF) 98
Recycling 98
NL
Nederlands
83
Page 84

1 Belangrijk
Veiligheid
Lees deze gebruiksaanwijzing
zorgvuldig door voordat u de
luchtbevochtiger gaat gebruiken.
Bewaar de gebruiksaanwijzing om
deze zo nodig later te kunnen
raadplegen.
Gevaar
• Spuit geen brandbare materialen
zoals insecticiden of parfum rond
de luchtbevochtiger.
• Het water in het waterreservoir
is niet drinkbaar. Drink dit water
niet en gebruik het ook niet
voor dieren of planten. Giet het
water uit het waterreservoir in
de afvoer.
Waarschuwing
• Controleer of het voltage
aangegeven op de onderkant
van de luchtbevochtiger
overeenkomt met de plaatselijke
netspanning voordat u de
luchtbevochtiger aansluit.
• Indien het netsnoer beschadigd
is, moet het worden vervangen
door Philips, een door Philips
geautoriseerd servicecentrum
of personen met vergelijkbare
kwalicaties om gevaar te
voorkomen.
• Gebruik de luchtbevochtiger niet
indien de stekker, het netsnoer
of de luchtbevochtiger zelf
beschadigd is.
• Dit apparaat kan worden
gebruikt door kinderen vanaf
8 jaar en door personen met
verminderde lichamelijke,
zintuiglijke of geestelijke
capaciteiten of weinig ervaring
en kennis, mits zij toezicht of
instructie hebben ontvangen
aangaande veilig gebruik van het
apparaat, en zij de gevaren van
het gebruik begrijpen. Reiniging
en onderhoud mogen niet
zonder toezicht door kinderen
worden uitgevoerd.
• Dit apparaat is geen speelgoed.
Houd toezicht op jonge
kinderen om te voorkomen dat
ze met de luchtbevochtiger gaan
spelen.
• De luchtinlaat en -uitlaat mogen
niet worden geblokkeerd. Leg
dus geen voorwerpen boven
op de luchtuitlaat of voor de
luchtinlaat.
84
NL
Page 85

Let op
• Als het stopcontact slechte
aansluitingen heeft, wordt de
stekker van de luchtbevochtiger
warm. Steek de stekker van
de luchtbevochtiger in een
stopcontact met goede
aansluitingen.
• Plaats en gebruik de
luchtbevochtiger altijd op
een droge, stabiele, vlakke en
horizontale ondergrond.
• Plaats geen voorwerpen op de
luchtbevochtiger en ga er niet
op zitten.
• Zorg dat de luchtbevochtiger
goed is gemonteerd/aangesloten
nadat u deze hebt gereinigd,
de bovenkant hebt verwijderd
of het waterreservoir hebt
bijgevuld. De luchtbevochtiger
moet goed zijn gemonteerd om
goede en veilige prestaties te
leveren.
• Gebruik alleen het originele
Philips-lter dat voor deze
luchtbevochtiger is bedoeld.
Gebruik geen andere lters.
• Stoot niet met harde
voorwerpen tegen de
luchtbevochtiger (dit geldt in het
bijzonder voor de luchtinlaat en
-uitlaat).
• Steek geen vingers of objecten
in de luchtinlaat of -uitlaat om
lichamelijk letsel of schade
aan de luchtbevochtiger te
voorkomen.
• Gebruik deze luchtbevochtiger
niet als u insectenwerende
middelen hebt gebruikt die rook
verspreiden of in ruimten waar
zich olieresten bevinden, waar
wierook wordt gebrand of waar
chemische dampen hangen.
• Gebruik de luchtbevochtiger niet
in de buurt van gasapparaten,
verwarmingsapparatuur of open
haarden.
• Haal altijd de stekker uit
het stopcontact als u de
luchtbevochtiger niet meer
gebruikt en voordat u deze gaat
schoonmaken.
• Vul het waterreservoir
niet bij via de luchtuitlaat
aan de bovenkant van de
luchtbevochtiger.
• Plaats de luchtbevochtiger
op een veilige plek om te
voorkomen dat deze wordt
omgestoten.
Nederlands
NL
85
Page 86

• Als de luchtbevochtiger lange
tijd niet wordt gebruikt, kunnen
bacteriën en schimmels op
de lters groeien. Controleer
de lters voordat u de
luchtbevochtiger opnieuw
gebruikt. Als het lter erg vuil
is en donkere vlekken heeft,
dient u het te vervangen
(zie het hoofdstuk 'Het
bevochtigingslter vervangen').
• Was het lter niet in een
wasmachine of vaatwasser om
vervorming van het lter te
voorkomen.
• De luchtbevochtiger
is uitsluitend bedoeld
voor huishoudelijk
gebruik onder normale
gebruiksomstandigheden.
• Reinig het waterreservoir en het
bevochtigingslter wekelijks om
deze schoon te houden.
• Vul het waterreservoir alleen
met koud kraanwater. Gebruik
geen grondwater of heet water.
• Vul het waterreservoir niet
met andere stoffen dan water.
Voeg geen parfum of chemische
stoffen toe aan het water.
Gebruik alleen drinkbaar water,
zoals kraan-, mineraal- en
gezuiverd water.
• Reinig het waterreservoir en
droog het bevochtigingslter als
u de luchtbevochtiger lange tijd
niet hebt gebruikt.
• Verwijder eerst de stekker uit
het stopcontact wanneer u de
luchtbevochtiger verplaatst. Leeg
vervolgens het waterreservoir
en houd de luchtbevochtiger
horizontaal tijdens het
verplaatsen.
86
NL
Page 87

2 Uw
Inhoud van de doos
luchtbevochtiger
Gefeliciteerd met uw aankoop en welkom bij
Philips!
Als u volledig wilt proteren van de
ondersteuning die Philips biedt, kunt u uw
product registreren op
www.philips.com/welcome.
De Philips-luchtbevochtiger brengt frisse,
bevochtigde lucht in uw woning voor een
gezonde omgeving voor uw gezin.
Het geavanceerde verdampingssysteem is
voorzien van NanoCloud-technologie en maakt
gebruik van een speciaal bevochtigingslter dat
H2O-moleculen toevoegt aan de droge lucht
en gezonde vochtige lucht produceert zonder
vorming van waternevel. Het bevochtigingslter
houdt bacteriën, calcium en andere deeltjes in
het water vast. Het produceert alleen zuivere
bevochtigde lucht in uw woning. Geen droge
lucht meer tijdens de winter of door de
airconditioning.
Lees deze gebruiksaanwijzing zorgvuldig door
voordat u de luchtbevochtiger plaatst en
gebruikt. Bewaar de gebruiksaanwijzing om deze
zo nodig later te kunnen raadplegen.
Controleer de inhoud van het pakket:
Bovenkant
Bevochtigingslter
(HU4102)
Filterhouder
Waterniveau-
indicator
www.philips.com/welcome
User manual
Gebruiksaanwijzing
www.philips.com/welcome
Quick start guide
Snelstartgids
Waterreservoir
www.philips.com/welcome
Warranty
Garantie
NL
Nederlands
87
Page 88

3 Aan de slag
MAX
Bevochtiging voorbereiden
1
Houd het apparaat aan beide zijden van de
bovenkant vast om deze omhoog te tillen.
2 Vul het waterreservoir met koud water
totdat de bovenste waterniveau-aanduiding
is bereikt.
3 Plaats de bovenkant weer op het
waterreservoir.
88
NL
Page 89

4 De
luchtbevochtiger
» Het lampje en de luchtbevochtiger zijn
aan.
gebruiken
De luchtbevochtiger in- en
uitschakelen
1
Steek de stekker in het stopcontact.
2 Draai de bedieningsknop naar lage snelheid
of hoge snelheid .
F
F
O
H
I
G
H
L
O
W
F
F
O
H
I
G
H
L
O
W
3 Draai de bedieningsknop naar OFF (UIT).
» Het lampje voor de snelheid is uit.
» De luchtbevochtiger is uit.
Opmerking
De luchtbevochtiger produceert zeer jne onzichtbare
•
nevel, dus het is normaal dat u de nevel niet ziet.
Waterniveau
Als er niet genoeg water in het waterreservoir
is, gaat het lampje uit en werkt de
luchtbevochtiger niet meer. De bedieningsknop
blijft in de gekozen snelheid.
Wanneer u water bijvult, wordt de
luchtbevochtiger weer ingeschakeld in de
gekozen snelheid.
Opmerking
Het is normaal dat er wat water in het reservoir
•
achterblijft.
Nederlands
NL
89
Page 90

Water bijvullen
O
F
F
H
I
G
H
L
O
W
MAX
Het waterniveau kan worden bekeken door het
transparante waterreser voirvenster.
1 Schakel de luchtbevochtiger uit en haal de
stekker uit het stopcontact.
2 Verwijder de bovenkant door deze aan
beide zijden vast te houden.
Opmerking
Vul niet meer water bij dan tot het maximale
•
waterniveau, want anders kan er water lekken uit de
aftapopening en luchtinlaten.
• Schud het waterreservoir niet wanneer u het verplaatst.
Hierdoor kan er water uit de aftapopening en
luchtinlaten lekken.
• Vul het waterreservoir niet bij via de luchtinlaten aan
de bovenkant van de luchtbevochtiger.
4 Plaats de bovenkant weer op het
waterreservoir.
3 U kunt het waterniveau bekijken door het
transparante waterreser voirvenster. Vul het
waterreservoir met koud water tot het
water de bovenste waterniveau-aanduiding
heeft bereikt.
90
NL
Page 91

5 De
luchtbevochtiger
reinigen
Opmerking
Haal altijd de stekker uit het stopcontact voordat u de
•
luchtbevochtiger schoonmaakt.
• Als u het water uit het waterreservoir giet, zorg dan
dat u dit niet aan de kant van de aftapopening en
luchtinlaten doet.
• Reinig de luchtbevochtiger nooit met schurende,
agressieve of brandbare schoonmaakmiddelen zoals
bleek of alcohol.
De behuizing van
de luchtbevochtiger
schoonmaken
Reinig regelmatig de binnen- en buitenkant van
de luchtbevochtiger om ophoping van stof te
voorkomen.
1 Stof de behuizing van de luchtbevochtiger
af met een zachte, droge doek.
2 Gebruik een zachte, droge doek om de
luchtinlaat en -uitlaat schoon te maken.
4 Reinig de binnenkant van het
waterreservoir met een zachte, schone
doek.
5 Leeg het waterreservoir in de gootsteen.
6 Plaats het bevochtigingslter en de
lterhouder terug in het waterreservoir.
Het waterreservoir
schoonmaken
Reinig het waterreservoir elke week om het
hygiënisch te houden.
1 Demonteer het bevochtigingslter en de
lterhouder.
2 Vul het waterreservoir voor 1/3 met water.
3 Voeg een mild afwasmiddel aan het water
in het waterreservoir toe.
NL
Nederlands
91
Page 92

6 Het bevochtig-
O
F
F
H
I
G
H
L
O
W
ingsfilter reinigen
Reinig het bevochtigingslter wekelijks om het
hygiënisch te houden.
1 Schakel de luchtbevochtiger uit en haal de
stekker uit het stopcontact.
2 Verwijder de bovenkant door deze aan
beide zijden vast te houden.
3 Haal het bevochtigingslter en de
lterhouder uit het waterreservoir.
4 Verwijder het bevochtigingslter uit de
lterhouder.
5 Laat het bevochtigingslter gedurende één
uur in kraanwater weken.
Kraanwater
1 uur
92
NL
Page 93

6 Spoel het bevochtigingslter af onder een
langzaam lopende kraan.
10 Plaats de bovenkant weer op het
waterreservoir.
7 Laat het bevochtigingslter uitlekken.
8 Plaats het bevochtigingslter om de
lterhouder.
9 Plaats het bevochtigingslter en de
lterhouder terug in het waterreservoir.
Opmerking
Knijp of wring het lter niet uit. Dit kan het lter
•
beschadigen en de bevochtigingsprestaties beïnvloeden.
• Droog het lter niet in direct zonlicht tenzij het terug
op de lterhouder is geplaatst
Nederlands
NL
93
Page 94

7 Het bevochtig-
O
F
F
H
I
G
H
L
O
W
ingsfilter vervangen
Vervang het bevochtigingslter om de drie
maanden voor optimale prestaties. Als het
lter nog in goede staat is, kunt u het langer
gebruiken. Vervang het lter ten minste één keer
per jaar.
Opmerking
Gebruik alleen het originele bevochtigingslter HU4102
•
van Philips.
Tip
Registreer uw product op www.philips.com voor meer
•
informatie over vervanging van uw lter.
1 Schakel de luchtbevochtiger uit en haal de
stekker uit het stopcontact.
2 Verwijder de bovenkant door deze aan
beide zijden vast te houden.
3 Haal het bevochtigingslter en de
lterhouder uit het waterreservoir.
4 Verwijder het bevochtigingslter uit de
lterhouder.
94
NL
Page 95

5 Verwijder het verpakkingsmateriaal van het
nieuwe bevochtigingslter.
8 Plaats de bovenkant weer op het
waterreservoir.
6 Plaats het nieuwe bevochtigingslter om de
lterhouder.
7 Plaats het lter en de lterhouder terug in
het waterreservoir.
Tip
U vindt meer informatie over het vervangen van het
•
lter op onze webpagina of door te bellen naar ons
Consumer Care Center.
Nederlands
NL
95
Page 96

8 Problemen oplossen
Dit hoofdstuk behandelt in het kort de problemen die u kunt tegenkomen tijdens het gebruik van uw
luchtbevochtiger. Als u er niet in slaagt het probleem op te lossen met behulp van de onderstaande
informatie, neem dan contact op met het Consumer Care Centre in uw land.
Probleem Mogelijke oplossing
De luchtbevochtiger
werkt niet.
De lucht wordt niet
bevochtigd.
Het waterreservoir lekt. • Zorg dat er niet te veel water in de luchtbevochtiger zit.
Er zit witte aanslag op
het bevochtigingslter.
Het lter wordt na
verloop van tijd geel.
Er komt een
onaangename geur uit
de luchtbevochtiger.
Er komt geen lucht uit
de luchtuitlaat.
Ik zie geen nevel uit
de luchtbevochtiger
komen. Werkt de
luchtbevochtiger wel?
• Controleer of de luchtbevochtiger op netspanning is aangesloten.
• Zorg dat het waterreservoir is gevuld met water en dat de bovenkant
goed is bevestigd op het waterreservoir.
• Zorg dat het waterreservoir is gevuld met water en dat de bovenkant
goed is bevestigd op het waterreservoir.
• De ruimte wordt mogelijk te goed geventileerd. Sluit deuren en ramen.
• De ruimte is te groot. De aanbevolen grootte van de ruimte is 25 m²
voor beide HU4801.
• Zorg dat de luchtbevochtiger goed is gemonteerd/aangesloten
nadat u deze hebt gereinigd, de bovenkant hebt verwijderd of het
waterreservoir hebt bijgevuld.
• Controleer of het waterreservoir goed is geplaatst. Als het probleem
zich blijft voordoen, neem dan contact op met het Consumer Care
Centre in uw land.
De witte aanslag is kalk en bestaat uit mineralen uit het water. Kalk op
het bevochtigingslter beïnvloedt de bevochtigingsprestaties, maar is niet
schadelijk voor uw gezondheid. Volg de instructies voor het schoonmaken
in de gebruiksaanwijzing.
De gele aanslag is een natuurlijk gevolg van het katoenen materiaal en
heeft geen gevolgen voor bevochtiging. Reinig het bevochtigingslter
regelmatig om de kalk te verwijderen en vervang het bevochtigingslter
elke drie maanden.
• Zorg ervoor dat het waterreservoir is gevuld met water.
• Maak het bevochtigingslter schoon (zie het hoofdstuk 'Het
bevochtigingslter reinigen').
Steek de stekker van de luchtbevochtiger in het stopcontact en schakel de
luchtbevochtiger in.
Als nevel erg jn is, is deze onzichtbaar. Deze luchtbevochtiger is voorzien
van een NanoCloud-bevochtigingstechnologie en produceert gezonde
vochtige lucht uit het uitlaatgebied zonder vorming van waternevel.
Daarom kunt u de nevel niet zien.
96
NL
Page 97

9 Garantie en
service
Als u informatie nodig hebt of als u een
probleem hebt, gaat u naar de Philips-website
(www.philips.com) of neemt u contact op met
het Philips Consumer Care Centre in uw land
(u vindt het telefoonnummer in het 'worldwide
guarantee'-vouwblad). Als er geen Consumer
Care Centre in uw land is, ga dan naar uw
Philips-dealer.
Onderdelen of accessoires
bestellen
Als u een onderdeel moet vervangen of als u
een extra onderdeel wilt kopen, kunt u contact
opnemen met uw Philips-dealer of gaat u naar
www.philips.com/support.
Als u problemen hebt bij het bestellen van
onderdelen, neem dan contact op met het
Philips Consumer Care Centre in uw land
(u vindt het telefoonnummer in het 'worldwide
guarantee'-vouwblad).
NL
Nederlands
97
Page 98

10 Kennisgevingen
Elektromagnetische velden
(EMV)
Dit Philips-apparaat voldoet aan alle toepasbare
richtlijnen en voorschriften met betrekking tot
blootstelling aan elektromagnetische velden.
Naleving van norm voor
elektromagnetische velden (EMF)
Koninklijke Philips Electronics N.V. maakt
en verkoopt vele consumentenproducten
die net als andere elektronische apparaten
elektromagnetische signalen kunnen uitstralen
en ontvangen.
Een van de belangrijkste zakelijke principes
van Philips is ervoor te zorgen dat al onze
producten voldoen aan alle geldende vereisten
inzake gezondheid en veiligheid en ervoor
te zorgen dat onze producten ruimschoots
voldoen aan de EMF-normen die gelden op
het ogenblik dat onze producten worden
vervaardigd.
Philips streeft ernaar geen producten te
ontwikkelen, te maken en op de markt te
brengen die schadelijk kunnen zijn voor
de gezondheid. Philips bevestigt dat als zijn
producten correct voor het daartoe bestemde
gebruik worden aangewend, deze volgens
de nieuwste wetenschappelijke onderzoeken
op het moment van de publicatie van deze
handleiding veilig zijn om te gebruiken.
Philips speelt een actieve rol in de ontwikkeling
van internationale EMV- en veiligheidsnormen,
wat Philips in staat stelt in te spelen op
toekomstige normen en deze tijdig te
integreren in zijn producten.
Recycling
Gooi het product nooit weg met ander
huishoudelijk afval. Win informatie in over
de lokale wetgeving omtrent de gescheiden
inzameling van elektrische en elektronische
producten. Door u op de juiste wijze van
oude producten te ontdoen, voorkomt u
negatieve gevolgen voor het milieu en de
volksgezondheid.
98
NL
Page 99

Содержание
1 Внимание 100
Безопасность 100
2 Ваш увлажнитель воздуха 103
Комплект поставки 103
3 Начало работы 104
Подготовка к увлажнению воздуха 104
4 Использование увлажнителя
воздуха 105
Включение и выключение
увлажнителя воздуха 105
Уровень воды 105
Наполнение водой 106
5 Очистка увлажнителя воздуха 107
Очистка корпуса увлажнителя
воздуха 107
Очистка резервуара для воды 107
10 Примечания 114
Электромагнитные поля (ЭМП) 114
Соответствие стандартам ЭМП 114
Утилизация 114
6 Очистка увлажняющего
фильтра 108
7 Замена увлажняющего фильтра 110
8 Устранение неисправностей 112
9 Гарантия и обслуживание 113
Заказ запчастей и аксессуаров 113
RU
Русский
99
Page 100

1 Внимание
Безопасность
Перед эксплуатацией
увлажнителя воздуха
внимательно ознакомьтесь с
настоящим руководством и
сохраните его для дальнейшего
использования в качестве
справочного материала.
Опасно!
• Запрещается распылять
легковоспламеняющиеся
вещества, такие как
инсектициды или духи, вблизи
увлажнителя воздуха.
• Вода в резервуаре для воды
не пригодна для питья.
Запрещается пить эту воду,
а также добавлять ее в корм
животным и использовать
для полива растений. Для
слива воды из резервуара
используйте сливное
отверстие.
Предупреждение
• Перед подключением прибора
убедитесь, что напряжение,
указанное на нижней панели
увлажнителя воздуха,
соответствует напряжению
местной электросети.
• В случае повреждения шнура
питания его необходимо
заменить. Чтобы обеспечить
безопасную эксплуатацию
прибора, заменяйте шнур
только в авторизованном
сервисном центре Philips
или в сервисном центре с
персоналом аналогичной
квалификации.
• Запрещено пользоваться
увлажнителем воздуха, если
сетевая вилка, сетевой шнур
или сам прибор повреждены.
• Дети старше 8 лет и
лица с ограниченными
возможностями сенсорной
системы или ограниченными
умственными или физическими
способностями, а также
лица с недостаточным
опытом и знаниями могут
пользоваться этим прибором
под присмотром или после
получения инструкций о
безопасном использовании
прибора и потенциальных
опасностях. Дети могут
осуществлять очистку и уход
за прибором только под
присмотром взрослых.
100
RU
 Loading...