


Quick Start Guide
Connect
Set up
Enjoy
1
2
3
What’s in the box?
2006 © Koninklijke Philips N.V.
All rights reserved.
12 NC 3139 246 19053
www.philips.com
Need help?
User Manual
See the user manual that came with your Philips DVD/SACD Home Theater System.
Online
Go to www.philips.com/support.
3
Enjoy
Start disc playback Listen to radio
Front speakers
(left & right)
Rear speakers
(left & right)
Centre speakers
(front & rear)
DVD system
AV subwoofer Remote Control
and 2 batteries
User manual
Junction Box
AV Wireless
Receiver Box
A Press SOURCE
on the remote control
repeatedly to select the TUNER mode.
The display panel will show “AUTO INSTALL
PRESS PLAY”.
B
Press and hold
(PLAY) on the remote
control until “INSTALL TUNER” appears on
the display panel.
All the available radio stations with strong
signal strength will be stored automatically.
Once complete, the last tuned radio
station will be played back.
C
Once complete, use WXkeys to select a
preset radio station.
D
To delete a preset radio station, press and
hold
(STOP)
until “PRESET DELETED”
appears.
DVD/ SACD Home Theater System HTS9800W
A
Insert a disc into the disc slot.
Make sure the disc label is facing out.
B
Playback will start automatically.
C If the disc menu appears, use
ST keys to
select an option in the menu and press
(PLAY) on the remote to start playback.
D Press (STOP) to stop playback.
Note When you press the
(PLAY)
button again, the playback will resume from
where it last stopped. To start playback from
the beginning, press the
(STOP)
button
twice to cancel the resume mode. Press
(PLAY) to start playback.
E To eject the disc, press and hold (STOP)
or press ç (EJECT) on the DVD system
panel.
Note You may also access the same
functions by using the corresponding touch
screen buttons on the DVD system panel.
DVD system’s
display panel
VGA cable
(use this cable to connect the
Junction Box to AV subwoofer)
Speaker cables
Power cable
x 2
Micro bre
cleaning cloth
(for DVD system)
AUTO INSTALL ....
(EJECT)
DVD/ SACD HOME THEATER SYSTEM
User Manual
HTS9800W
h
s
i
lg
nE
1
Connect
2
Set up
TV (rear)
Junction box
General Setup Page
Disc Lock
OSD Language
Screen Saver
DivX(R) VOD Code
English
Espanõl
Français
Português
Junction box
DVD system
FRONT
RIGHT
FRONT
LEFT
FRONT CENTER
To AC
power
AV
subwoofer
Extend the FM
pigtail antenna and
place it where the
reception
is best
received.
REAR CENTER
REAR
LEFT
REAR
RIGHT
To AC
power
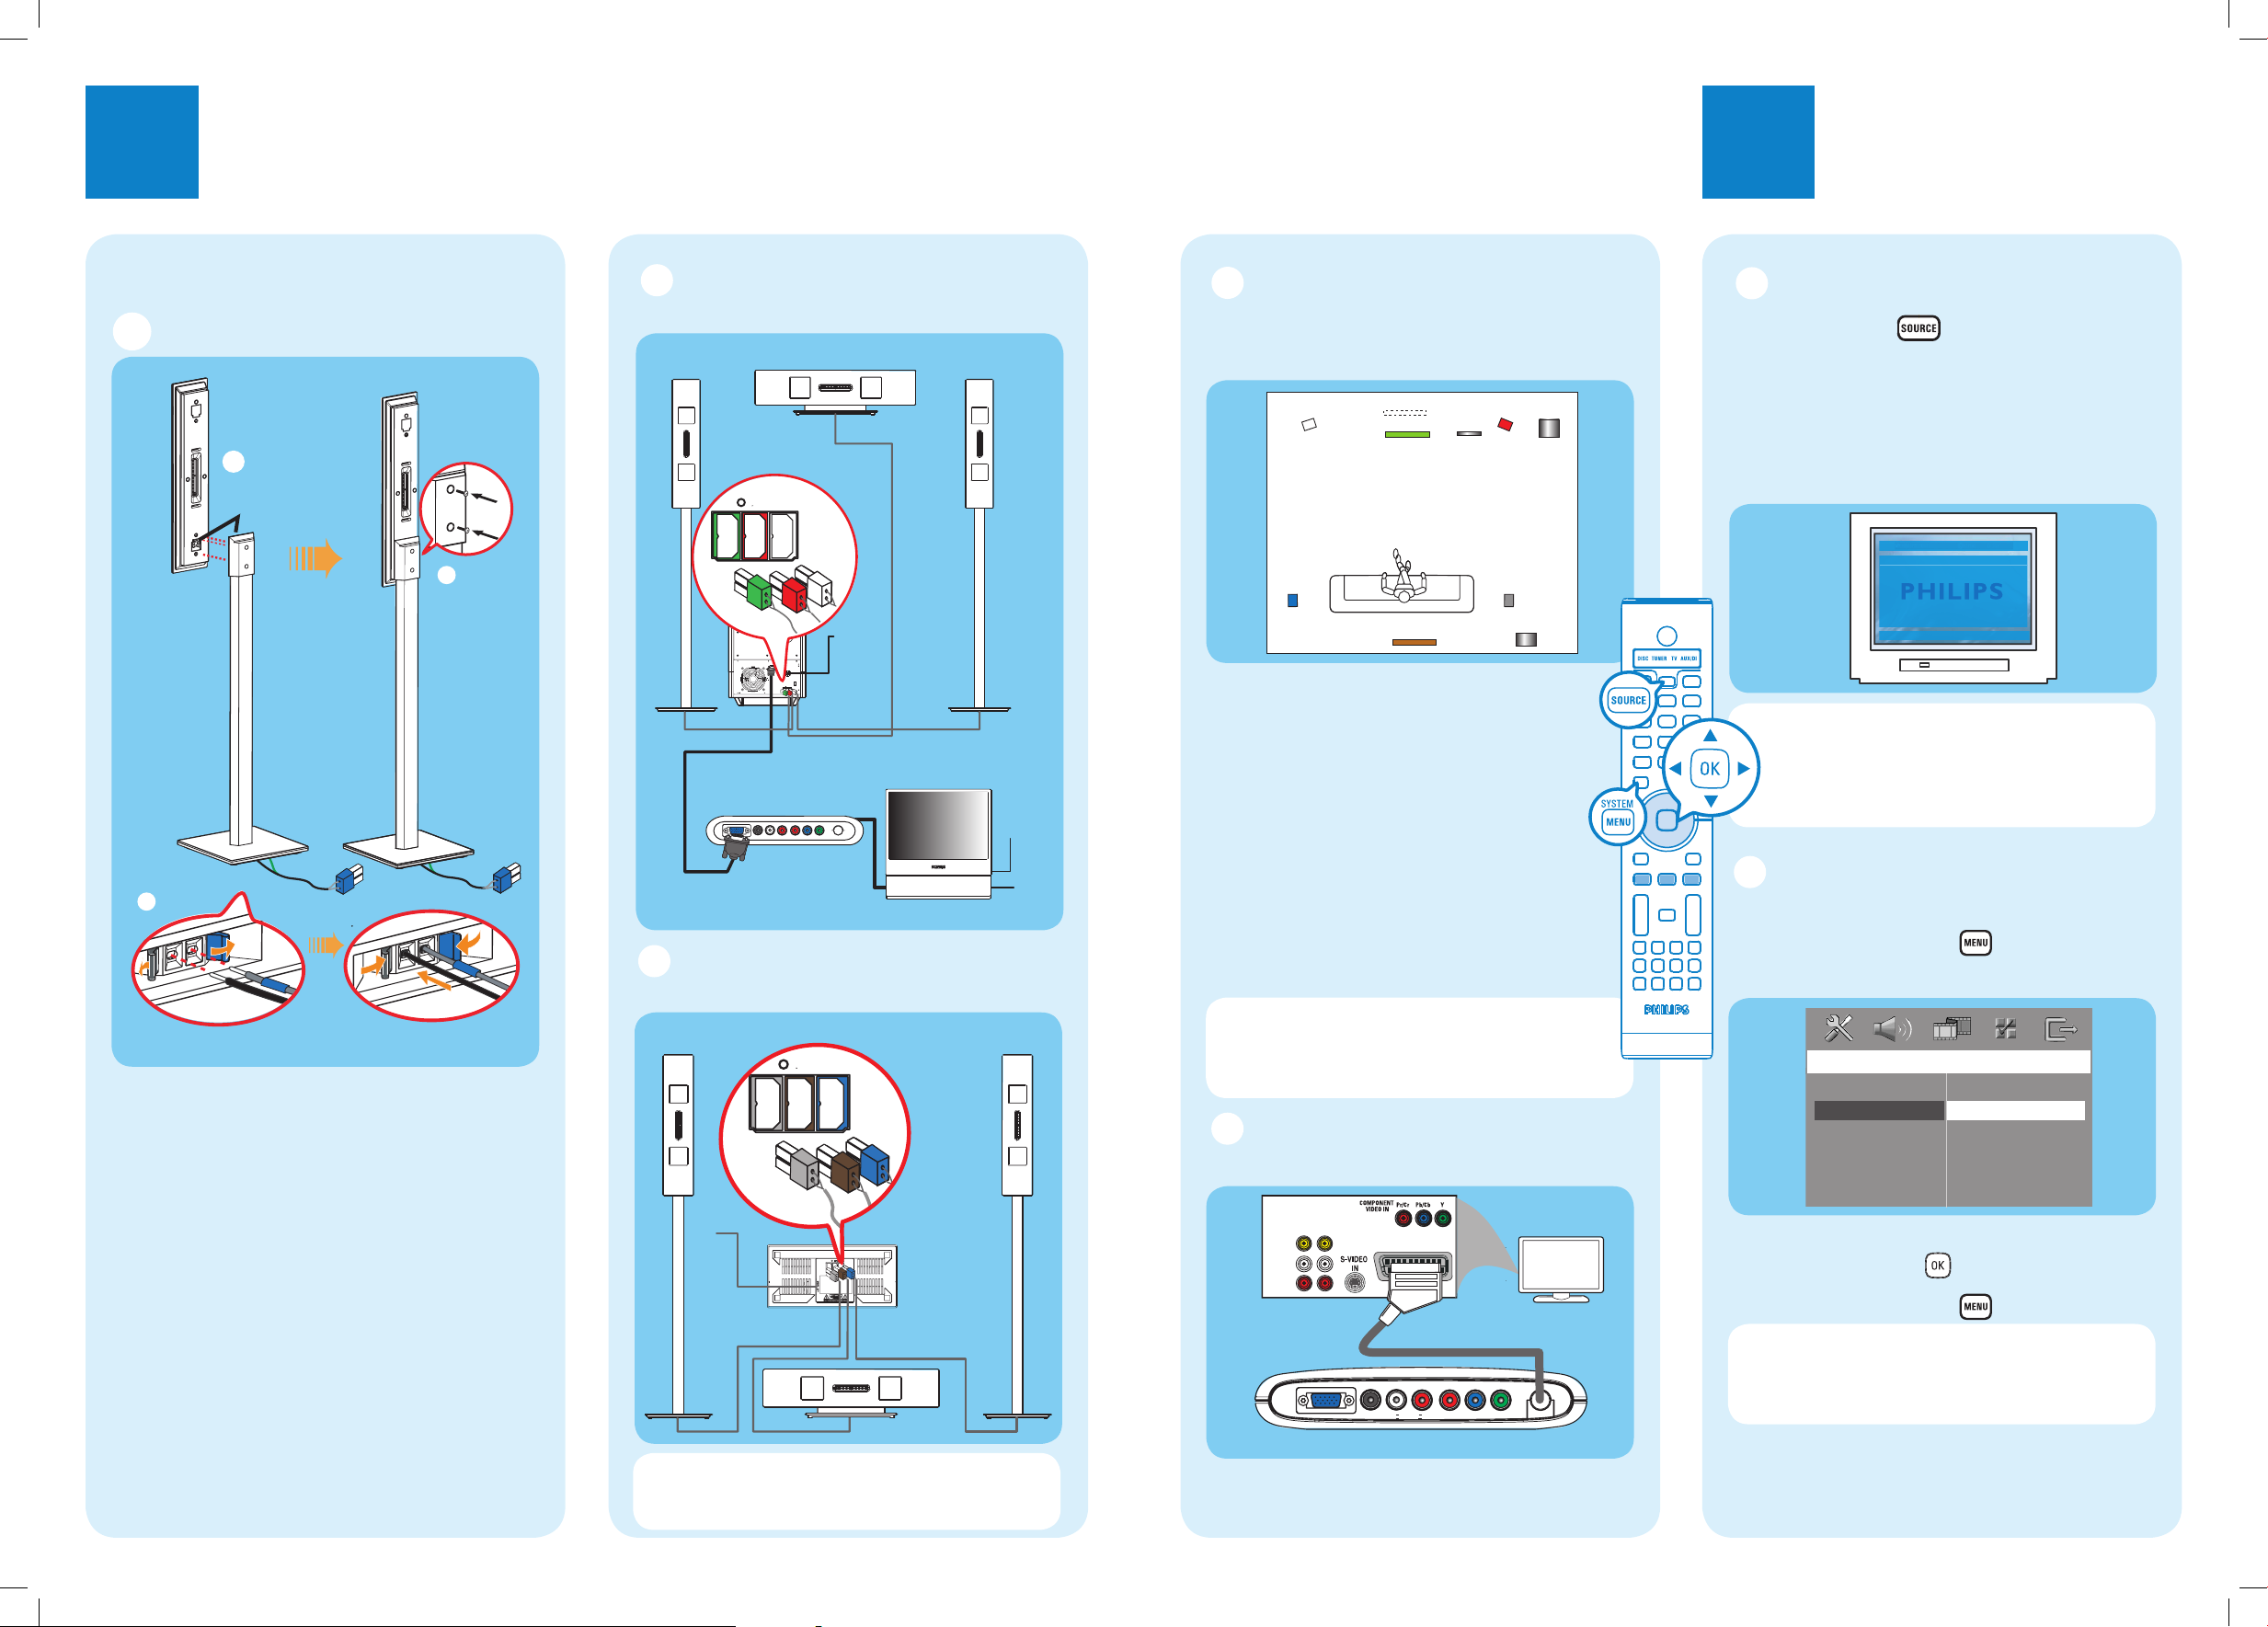
E Connect the Junction Box to the
TV
Connect the scart cable from the Junction box to
the SCART IN socket on your TV.
To AC
power
Base view of AV
Wireless
receiver box
B Connect the front speakers and
subwoofer
C Connect the rear speakers and
AV wireless receiver box
A Finding the viewing channel
A Press SOURCE on the remote control
until “DISC” appears on the display panel.
B Turn on the TV. Use the TV’s remote control
to select the correct viewing channel for the
DVD system.
You should see the blue DVD background on
the TV.
Note
To search for the correct viewing
channel, press the CHANNEL DOWN button
on the TV’s remote control repeatedly (or AV,
SELECT button) until you see the blue DVD
background.
B Select the display language on
the screen
A
Press SYSTEM MENU
on the remote.
B Press É to select { General Setup Page }.
C Use
ST keys to select a language option in the
menu and press OK
to con rm.
D Press SYSTEM MENU
to exit.
Note The language selected here is only for
the system menus that are shown on the TV
while operating this DVD system, not for the
DVD disc menu.
There are various system setup options (Audio
Setup, Video Setup, Preference Setup) available on
this DVD system. Refer to the accompanying user
manual for more information.
VGA cable
D Position the speakers and
subwoofer
Proper speakers and system placement is
important to ensure optimum sound performance.
A
Place the FRONT CENTER speaker above
or close to the TV.
B
Place the SUBWOOFER on the oor, at least
one metre away from the TV.
C
Place the FRONT LEFT/RIGHT speakers at
equal distances from the TV.
D
Place the REAR CENTER speaker at normal
listening ear level.
E
Ensure the front of the AV Wireless Receiver
box (with Philips logo) is facing towards the
DVD system.
Note If there is an interference on your
HTS9800W speakers or existing wireless
network in your home, see the User Manual
– “Troubleshooting”.
Note For optimal wireless performance, ensure
that the AV wireless receiver box is not placed in
an enclosed area.
B
Base view of the speaker stand
Both the
coloured
stickers must
match
A
C
Placement and Connections
A Assemble the speakers
A
Connect the speaker stand with the supplied
speaker wire. Match the colour of the speaker
wire to the colour of the socket on the base of
the speaker stand.
Hold down the socket tab while inserting the
stripped portion of the speaker wire into the tab.
Then, release the socket tab to lock the wire into
position.
B
Match the coloured stickers on the rear of the
speaker and the inside of the speaker stand.
Position the speakers as shown and ensure the
connectors t. See the above illustration.
C
Secure the speaker stand with the supplied
screws.
SPEAKERS
RIGHTCENTER LEFT
SPEAKERS
RIGHT CENTER LEFT
FRONT
LEFT
REAR
LEFT
TV
FRONT CENTER
REAR CENTER
DVD
SYSTEM
FRONT
RIGHT
REAR
RIGHT
SUB
WOOFER
AV
WIRELESS
RECEIVER
BOX
OUT IN
VIDEO
AUDIO
TO SUBWOOFER
SCART IN
TV
Pr Pb Y
DIGITAL IN L AUX IN R COMPONENT VIDEO
 Loading...