

Philips HTS8161B/12, HTS8160B/12, HTS8160B, HTS8161B User Manual
Register your product and get support at
www.philips.com/welcome
HTS8160B
HTS8161B
EN User manual


1
6 Change settings 24
Access the settings menu 24
Change video settings 24
Change audio settings 26
Change preferences 27
Set up EasyLink 28
Change advance settings 30
Change BD-Live settings 30
7 Update software 31
Check software version 31
Update software from the network 31
Update software from a USB device 31
8 Wall mount the home theater 32
9 Product speci cations
33
10 Troubleshooting
35
11 Index
37
Contents
1 Notice 2
Copyright 2
Compliance 2
Trademarks 2
Mains fuse (UK only) 3
2 Important 4
Safety 4
Product care 5
User Manual CD 6
3 Your home theater 7
Main unit 7
Remote control 8
4 Connect your home theater 10
Connectors 10
Connect to the TV, subwoofer and
power 11
Connect audio from TV or other
devices 12
Connect and install radio 14
Connect a USB device 15
Connect an MP3 player 15
Connect and install a Philips iPod dock 15
Connect to the internet 16
5 Use your home theater 17
Before you start 17
Switch on or to standby 17
Choose your sound 17
Play a disc 19
Play from radio 20
Play audio from TV or other devices 21
Play from a USB device 21
Play from an iPod 21
Play from an MP3 player 22
More play features 22
English
EN
2
Trademarks
‘AVCHD’ and ‘AVCHD’ logo are trademarks
of Matsushita Electric Industrial Co., Ltd and
Sony Corporation.
BONUSVIEW™
‘BD LIVE’ and ‘BONUSVIEW’ are trademarks
of Blu-ray Disc Association.
‘Blu-ray Disc’ and ‘Blu-ray Disc’ logo are
trademarks.
DivX, DivX Ultra Certi ed, and associated
logos are trademarks of DivX, Inc. and are
used under license.
Of cial DivX® Ultra Certi ed product.
Plays all versions of DivX ® video (including
DivX ® 6) with enhanced playback of DivX®
media les and the DivX® Media Format.
Plays DivX® video with menus, subtitles and
audio tracks.
Note
DivX® is a digital video format created by •
DivX, Inc. This is an of cial DivX Certi ed
device that plays DivX video. Visit www.divx.
com for more information and software tools
to convert your les into DivX video.
This DivX Certi ed ® device must be
•
registered in order to play DivX Video-onDemand (VOD) content. To generate the
registration code, locate the DivX VOD
section in your device setup menu. Go to
vod.divx.com with this code to complete the
registration process and learn more about
DivX video.
1 Notice
Copyright
The making of unauthorized copies of copyprotected material, including computer
programmes, les, broadcasts and sound
recordings, may be an infringement of
copyrights and constitute a criminal offence.
This equipment should not be used for such
purposes.
Macrovision Copyright
This product incorporates copyright protection
technology that is protected by method claims
of certain U.S. patents and other intellectual
property rights owned by Macrovision
Corporation and other rights owners. Use of
this copyright protection technology must be
authorized by Macrovision Corporation, and is
intended for home and other limited viewing
uses only unless otherwise authorized by
Macrovision Corporation. Reverse engineering
or disassembly is prohibited.
Copyright in the UK
Recording and playback of material may
require consent. See Copyright Act 1956 and
The Performers Protection Acts 1958 to 1972.
Compliance
This product is in compliance with the
essential requirements and other relevant
provisions of Directives 2006/95/EC (Low
Voltage), 2004/108/EC (EMC).
EN
3
“Made for iPod” means that an electronic
accessory has been designed to connect
speci cally to iPod and has been certi ed by
the developer to meet Apple performance
standards.
Apple is not responsible for the operation of
this device or its compliance with safety and
regulatory standards.
The USB-IF Logos are trademarks of Universal
Serial Bus Implementers Forum, inc.
Windows Media and the Windows logo are
trademarks, or registered trademarks of
Microsoft Corporation in the United States
and/or other countries.
‘x.v.Colour’ is a trademark of Sony Corporation.
Mains fuse (UK only)
This product is tted with an approved
moulded plug. Should it become necessary to
replace the mains fuse, this must be replaced
with a fuse of the same value as indicated on
the plug (example 10A).
1 Remove fuse cover and fuse.
2 The replacement fuse must comply with
BS 1362 and have the ASTA approval
mark. If the fuse is lost, contact your
dealer in order to verify the correct type.
3 Re t the fuse cover.
Note
To conform with the EMC directive •
(2004/108/EC), the mains plug on this product
must not be detached from the mains cord.
CLASS 1
LASER PRODUCT
Manufactured under license from Dolby
Laboratories. Dolby, Pro Logic and the double-D
symbol are trademarks of Dolby Laboratories.
‘DVD Video’ is a trademark of DVD Format/
Logo Licensing Corporation.
Manufactured under license under U.S. Patent
#’s: 5,451,942; 5,956,674; 5,974,380; 5,978,762;
6,487,535; & other U.S. and worldwide
patents issued & pending. DTS is a registered
trademark and the DTS logos, Symbol, DTSHD and DTS-HD Advanced Digital Out are
trademarks of DTS, Inc. © 1996-2008 DTS,
Inc. All Rights Reserved.
ENERGY STAR and the ENERGY STAR mark
are registered U.S. marks.
HDMI, and HDMI logo and High-De nition
Multimedia Interface are trademarks or
registered trademarks of HDMI licensing LLC.
Java and all other Java trademarks and logos
are trademarks or registered trademarks of
Sun Microsystems, Inc. in the United States
and/or other countries.
iPod is a trademark of Apple Inc., registered in
the U.S. and other countries.
Made for
iPod
English
EN

4
Risk of short circuit or re!
Never expose the remote control or •
batteries to rain, water or excessive heat.
Avoid force coming onto power plugs. •
Loose power plugs can cause arcing or
re.
Before you connect the home theater to •
the power outlet, ensure that the power
voltage matches the value printed on
the back or rear of the product. Never
connect the home theater to the power
outlet if the voltage is different.
Risk of injury or damage to the home theater!
When wall mounting the home theater, •
use only the supplied wall mount bracket.
Secure the wall mount to a wall that
can support the combined weight of
the home theater and the wall mount.
Koninklijke Philips Electronics N.V. bears
no responsibility for improper wall
mounting that results in accident, injury
or damage.
Never place the home theater or any •
objects on power cords or on other
electrical equipment.
If the home theater is transported in •
temperatures below 5°C, unpack the
product and wait until its temperature
matches room temperature before
connecting it to the power outlet.
Visible and invisible laser radiation when •
open. Avoid exposure to beam.
Do not place any objects other than discs •
into the disc compartment.
Do not touch the disc optical lens inside •
the disc compar tment.
Risk of injury to children!
Follow these precautions to prevent the home
theater from toppling over and causing injury to
children:
Never place the home theater on a •
surface covered by a cloth or other
material that can be pulled away.
Ensure that no part of the home theater •
hangs over the edge of the surface.
Never place the home theater on tall •
furniture (such as a bookcase) without
2 Important
Read and understand all instructions before you
use your home theater. If damage is caused by
failure to follow instructions, the warranty does
not apply.
Safety
Risk of electric shock or re!
Never expose the product to rain or •
water. Never place liquid containers, such
as vases, near the home theater. If liquids
are spilt on or into the home theater,
disconnect it from the power outlet
immediately. Contact Philips Consumer
Care to have the home theater checked
before use.
Never place the home theater, remote •
control or batteries near naked ames
or other heat sources, including direct
sunlight.
Never insert objects into the ventilation •
slots or other openings on the home
theater.
If the home theater is moved, ensure that •
no strain is exerted on the power cord.
Strain on the power cord can loosen
connections and cause arcing.
To easily disconnect the home theater •
power cord from the power outlet,
ensure that you have full access to the
power cord at all times.
Where the mains plug or an appliance •
coupler is used as the disconnect device,
the disconnect device shall remain readily
operable.
Disconnect the home theater from the •
power outlet before lightning storms.
Keep away from the home theater during
lightning storms. Never touch any part of
the product or its power cord.
When you disconnect the power cord, •
always pull the plug, never the cable.
EN
5
Do not store the disc under direct •
sunlight.
When wiping the disc with an •
appropriate cloth, always wipe in a
straight line from the center to the edge
of the disc.
Do not use chemicals such as benzene, •
thinner or anti-static sprays on the disc.
Do not apply labels or stickers on the disc.•
Disposal of your old product and
batteries
Your product is designed and manufactured
with high quality materials and components,
which can be recycled and reused.
When this crossed-out wheeled bin symbol
is attached to a product it means that the
product is covered by the European Directive
2002/96/EC. Please inform yourself about the
local separate collection system for electrical
and electronic products.
Please act according to your local rules and
do not dispose of your old products with your
normal household waste.
Correct disposal of your old product helps to
prevent potential negative consequences for
the environment and human health.
Your product contains batteries covered by
the European Directive 2006/66/EC, which
cannot be disposed with normal household
waste.
Please inform yourself about the local rules
on separate collection of batteries because
correct disposal helps to prevent negative
consequences for the environmental and
human health.
anchoring both the furniture and home
theater to the wall or on a suitable
support.
Place the home theater where it cannot •
be pushed, pulled over or knocked down.
Educate children about the dangers of •
climbing on furniture to reach the home
theater.
Risk of overheating!
Never install this home theater in a •
con ned space. Always leave a space of
at least four inches around the home
theater for ventilation. Ensure curtains or
other objects never cover the ventilation
slots on the home theater.
Risk of hearing damage!
Avoid using earphones or headphones at •
high volumes or for prolonged periods of
time.
Risk of contamination!
Do not mix batteries (old and new or •
carbon and alkaline, etc.).
Remove batteries if they are exhausted •
or if the remote control is not to be used
for a long time.
Batteries contain chemical substances, •
they should be disposed of properly.
Product care
Do not insert any objects other than discs •
into the disc compartment.
Do not insert warped or cracked discs •
into the disc compartment.
Remove discs from the disc compartment •
if you are not using the product for an
extended period of time.
Only use micro ber cloth to clean the •
product.
Avoid touching the surface of the disc •
where data is stored.
Avoid leaving ngerprints or scratches on •
the disc surface.
Do not use ball-point pens or pencils to •
write on the disc.
English
EN

6
User Manual CD
To read the complete User Manual, which
includes information on advanced features, use
the CD supplied with your home theater. For
a printed copy of the complete User Manual,
contact Philips Consumer Care in your country.
To access the User Manual
Caution
The User Manual CD is for PC or Mac only. •
Do not insert the User Manual CD into the
disc compartment of the home theater.
Requirements:
A PC (Microsoft Windows •
compatible) or Mac (OS X) with
CD-ROM
Adobe Reader•
1 Insert the User Manual CD into the CD-
ROM tray.
2 Close the CD-ROM tray.
The User Manual screen appears. If the »
User Manual screen does not appear,
skip Step 3 and navigate to the ‘pdf’
folder in the CD-ROM, double-clicking
the PDF of your choice.
3 Click a User Manual language.
Acrobat Reader launches, displaying »
the complete User Manual in the
language of your choice.
EN
7
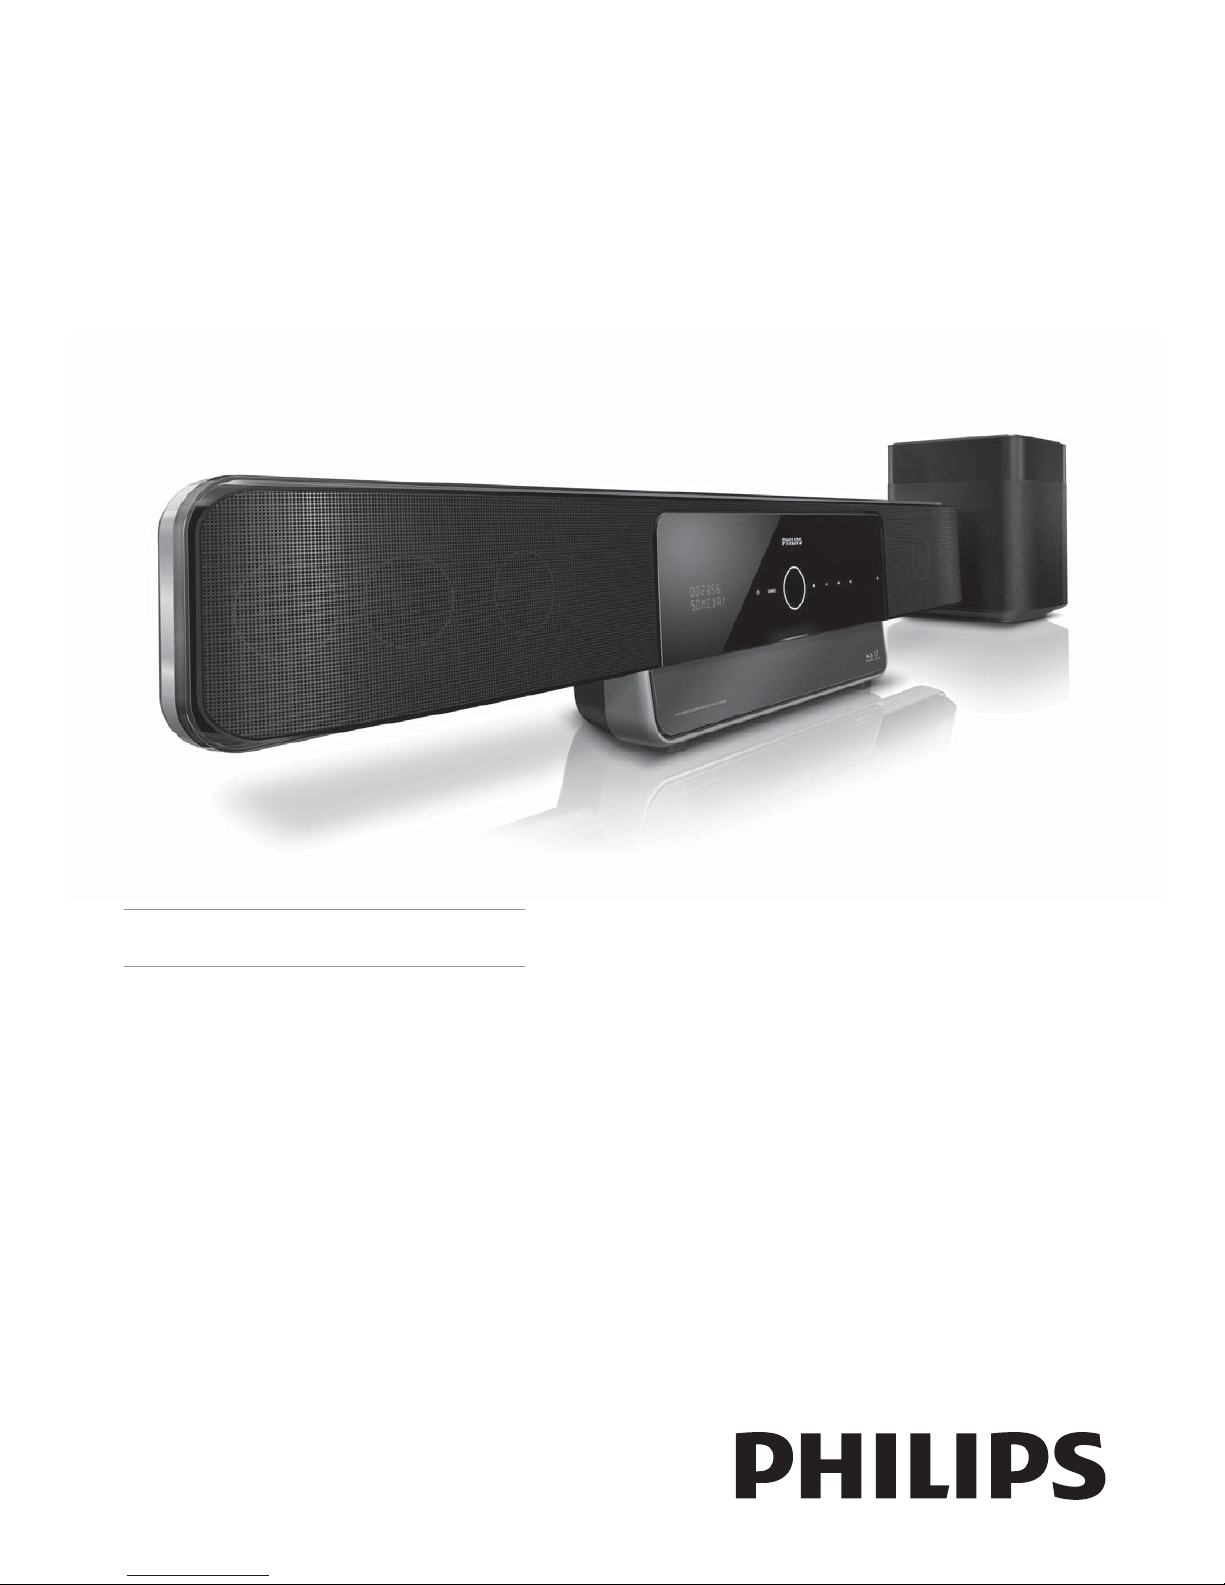
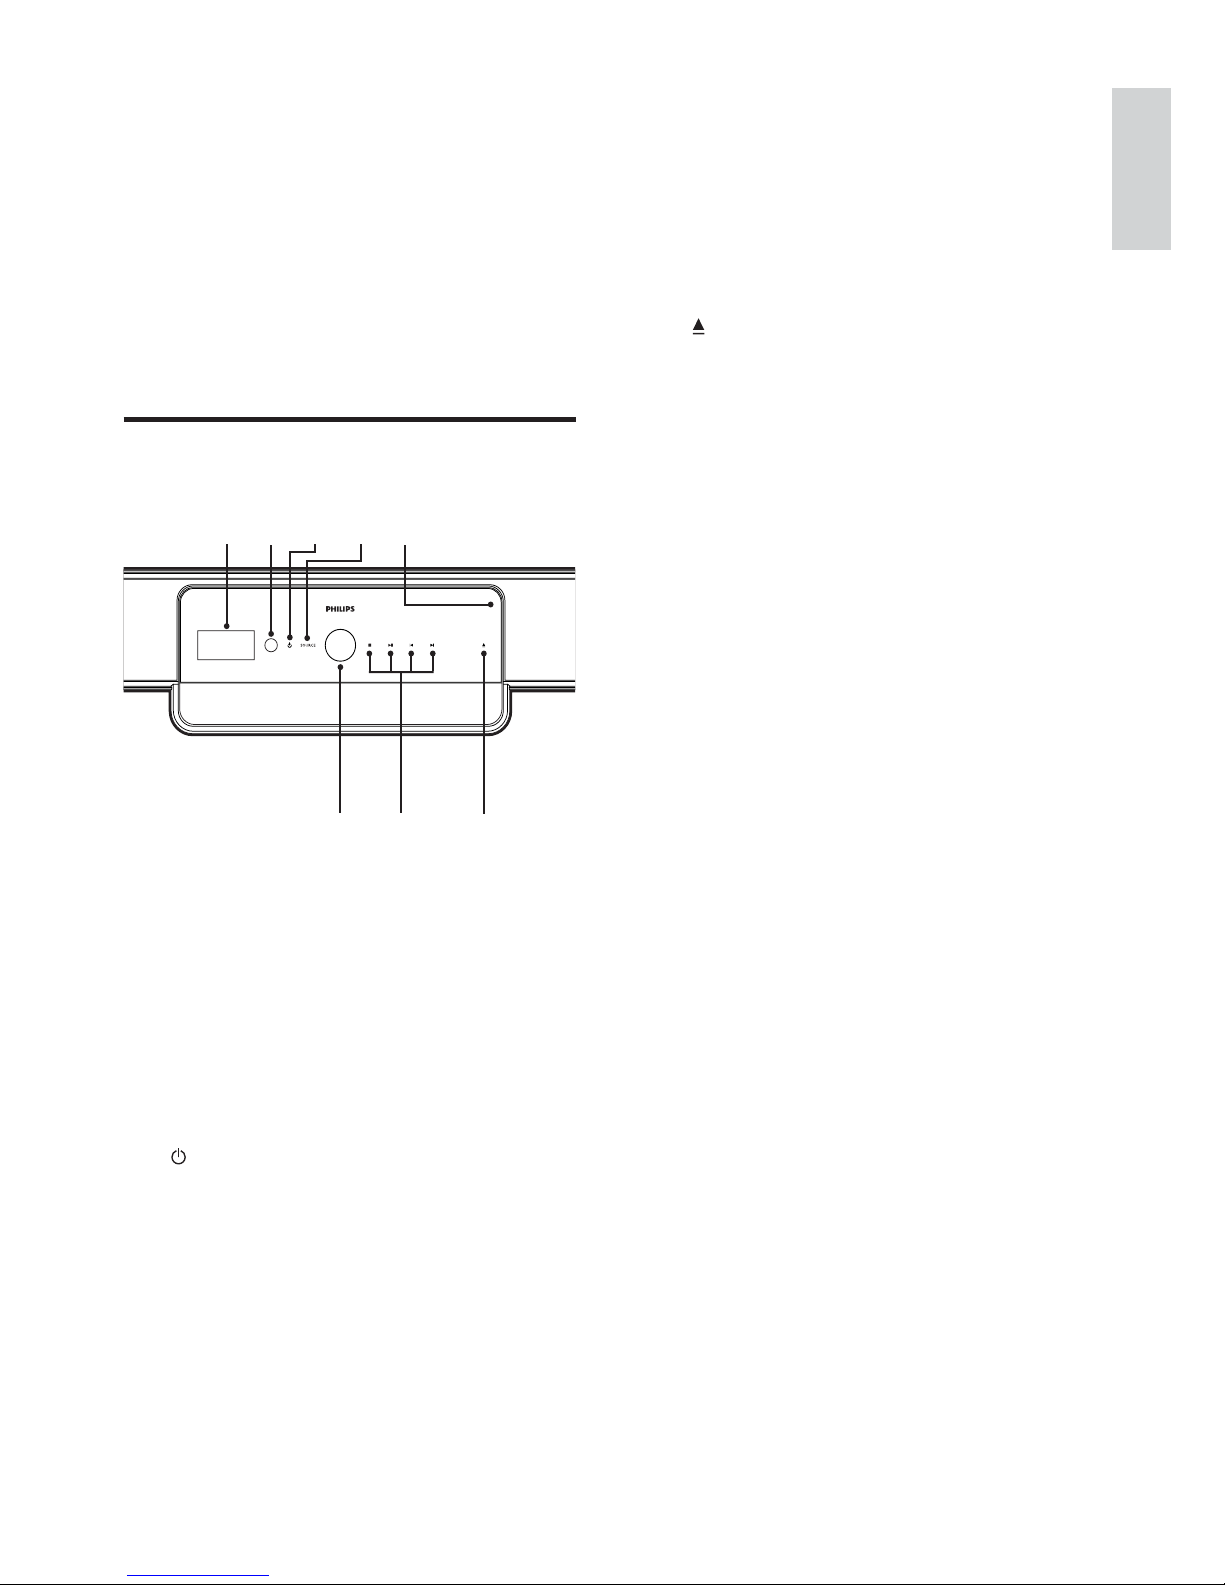
e Disc compartment
f Volume control wheel
Rotate clockwise to increase volume or
anti-clockwise to decrease volume.
g Playback buttons
Control playback.
h
( Open/Close )
Open or close the disc compar tment.
3 Your home
theater
Congratulations on your purchase, and
welcome to Philips! To fully bene t from the
support that Philips offers, register your home
theater at www.philips.com/welcome.
Main unit
a Display panel
Display the current status of the home
theater or disc information.
b IR sensor
Detect signals from the remote control.
Point the remote control directly at the
sensor.
c
( Standby-On / Power indicator )
Switch the home theater on (power •
indicator turns white).
Switch the home theater to standby •
(power indicator turns red).
d SOURCE
Select an audio source for the home
theater.
abcde
f
g
h
English
EN
8
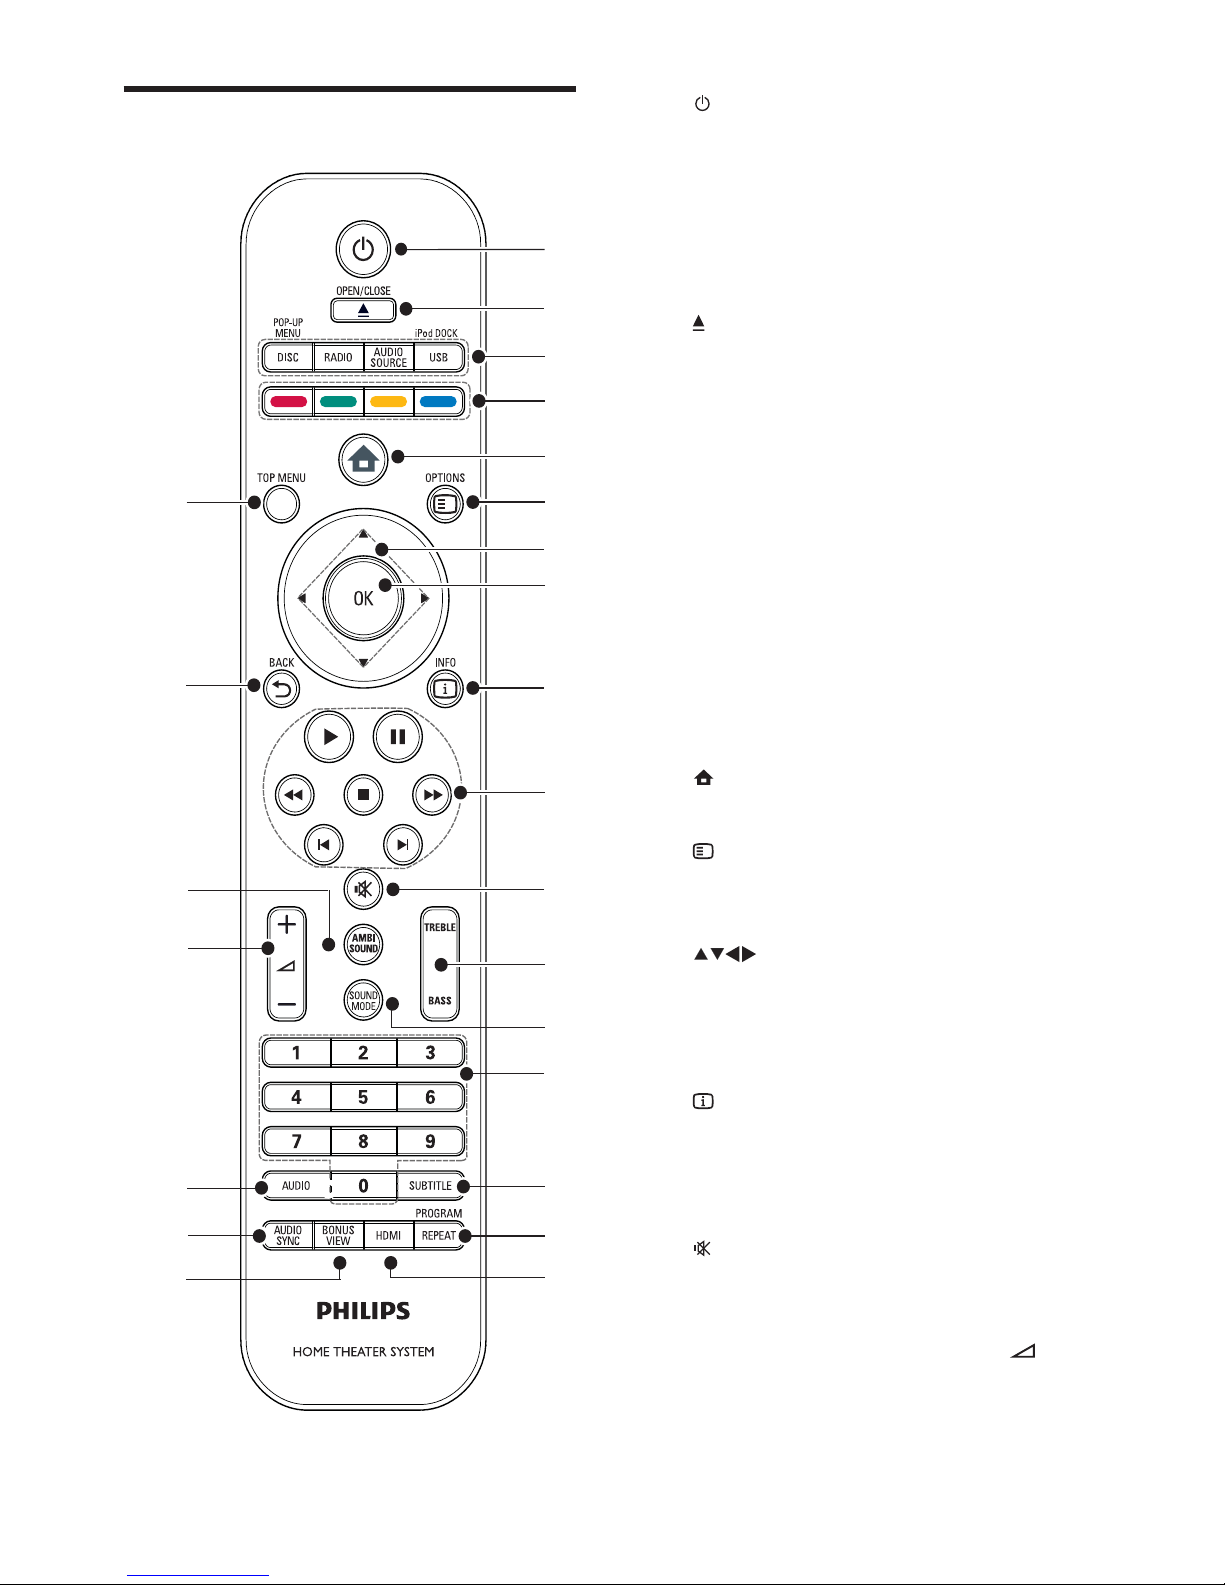
a ( Standby-On )
Turn on or switch the home theater •
to standby mode.
When EasyLink is enabled, press •
and hold for at least three seconds
to turn all connected HDMI CEC
compliant devices to standby.
b
( Open/Close )
Open or close the disc compar tment.
c Source buttons
• DISC / POP-UP MENU : Switch to
disc source. Access the disc menu of
a DVD disc or the pop-up menu of a
Blu-ray disc.
• RADIO : Switch to FM radio.
• AUDIO SOURCE : Select an audio
input.
• USB / iPod DOCK : Select Philips
iPod Dock or a USB storage device.
d Color buttons
Blu-ray discs only: Select a task or option.
e
( Home menu )
Access the home menu.
f
OPTIONS
Access options for the current activity or
selection.
g
( Navigation buttons )
Navigate menus.
h OK
Con rm an entry or selection.
i
INFO
Display information about what is playing.
j Playback buttons
Control playback.
k
( Mute )
Mute or restore audio output.
l TREBLE / BASS
Change treble or bass. Use with
+/- .
m SOUND MODE
Select a sound mode.
Remote control
b
d
c
e
f
g
h
k
l
m
n
o
p
q
r
i
j
s
t
u
v
w
x
a
EN

9
n Numeric buttons
Select an item or setting.
o SUBTITLE
Select a subtitle language for video.
p REPEAT / PROGRAM
Select or turn off repeat mode.•
In radio mode, program radio •
stations.
q HDMI
Select the video resolution of HDMI
output from the home theater.
r BONUS VIEW
Blu-ray discs only: Enable or disable the
Bonus View/Picture-In-Picture feature.
s AUDIO SYNC
Synchronise audio with video. Use with
+/- .
t AUDIO
In video mode, toggle between audio •
languages.
In radio mode, toggle between •
stereo and mono.
u
+/- ( Volume +/- )
Increase or decrease volume.
v AMBISOUND
Select an Ambisound mode.
w
BACK
Return to a previous menu screen.
x TOP MENU
Access the main menu of a Blu-ray or the
title menu of a DVD disc.
English
EN

10
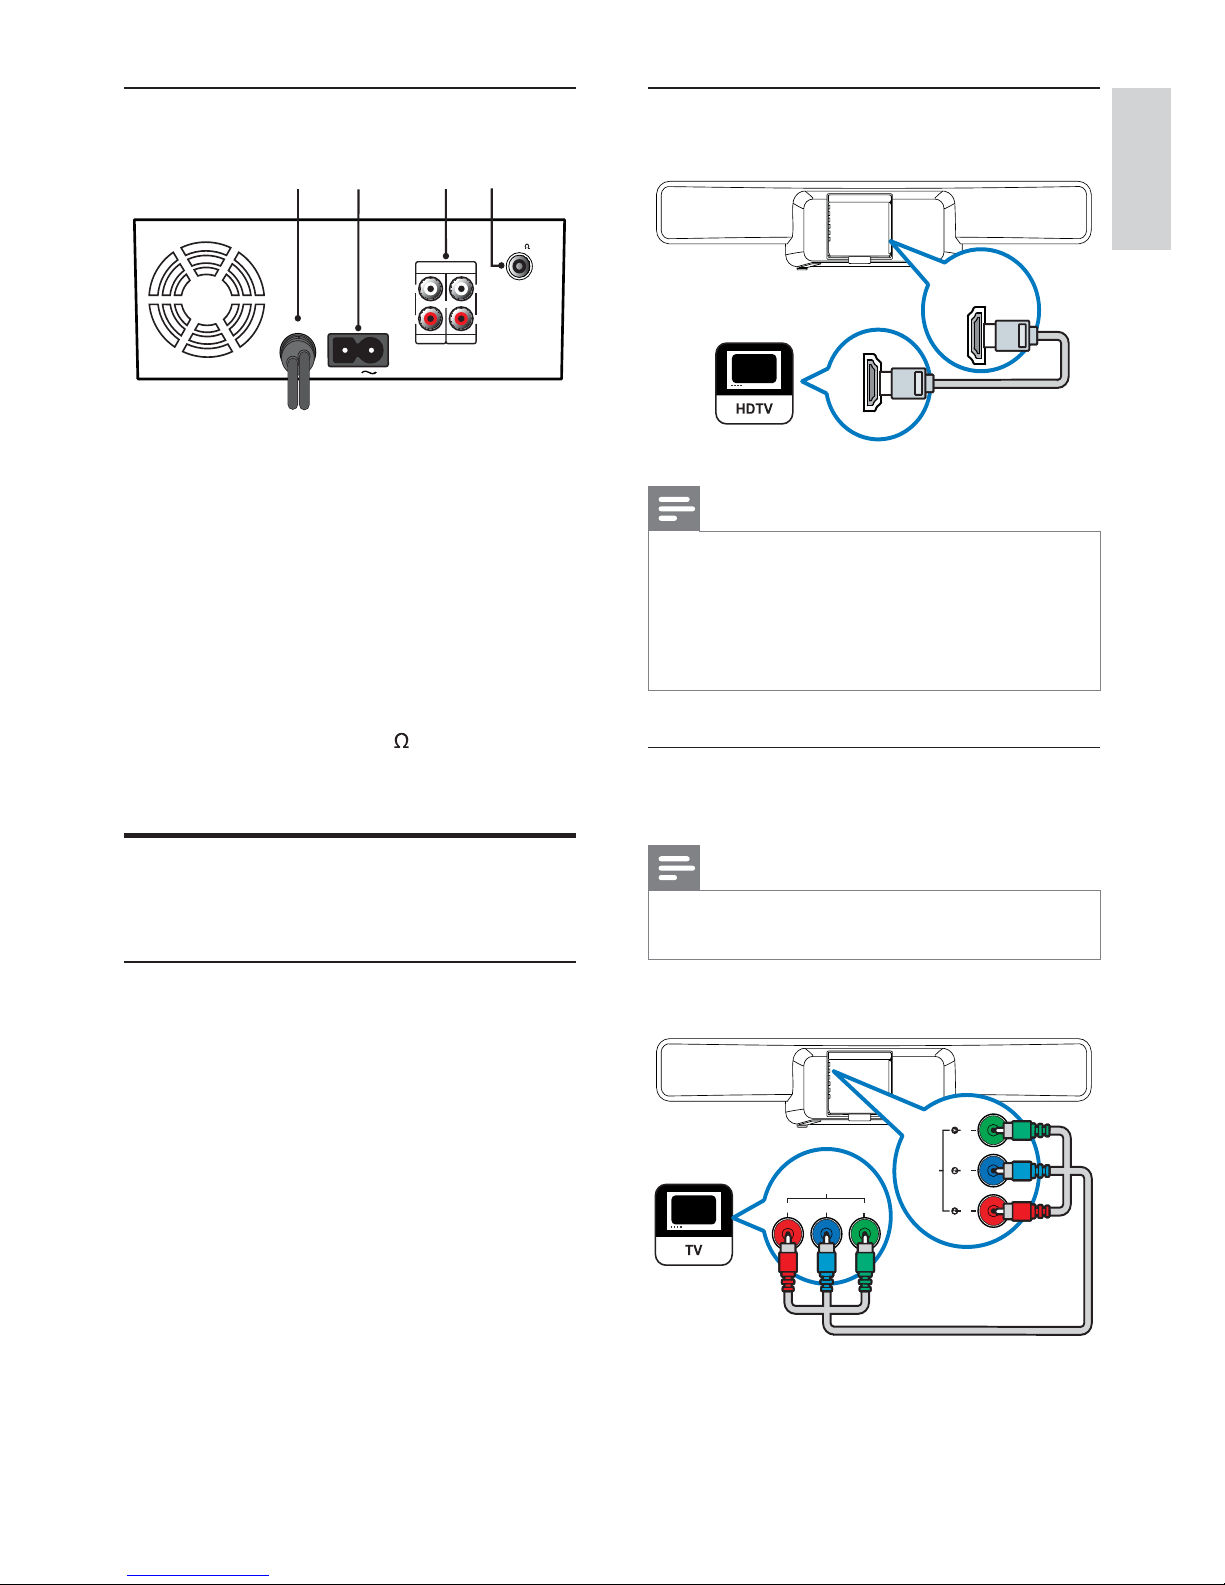
Back connectors
a iPod DOCK
Connect to Philips iPod dock.
b DIGITAL AUDIO IN
Connect to digital audio output on the
TV.
c OPTICAL IN
Connect to optical audio output on the
TV.
d HDMI OUT
Connect to HDMI input on the TV.
e LAN
Connect to internet. Use for software
upgrade and BD-Live.
f COMPONENT VIDEO OUT
Connect to component video input on
the TV.
g VIDEO OUT (CVBS)
Connect to video input on the TV.
h AUX 1
Connect to analog audio output on the
TV.
i TO SUBWOOFER
Connect to audio output on the
subwoofer speakers.
e
a
b
d
f
g
h
i
c
4 Connect your
home theater
This section helps you connect your
home theater to a TV and other devices. It
supplements examples provided in the Quick
Start. For a comprehensive interactive guide,
see www.connectivityguide.philips.com.
Note
Refer to the type plate at the back or bottom •
of the product for identi cation and supply
ratings.
Before you make or change any connections,
•
ensure that all devices are disconnected from
the power outlet.
Connectors
Front connectors
Note
Press the catch on the left of the panel to •
access the front connectors.
a MP3 LINK
Audio input from an MP3 player.
b
( USB )
Audio, video or picture input from a USB
device.
a
b
EN
11
Option 1: Connect to the TV through
HDMI
Note
If your HDTV has a DVI connector, connect •
using an HDMI/DVI adaptor.
If your TV supports EasyLink HDMI CEC,
•
control the home theater and TV with one
remote control (see ‘Set up EasyLink’ on page
28 ) .
Option 2: Connect to the TV through
YPbPr (component video)
Note
The component video cable or connector •
might be labeled Y Cb Cr or YUV .
(Cable not supplied)
HDMI IN
HDMI OUT
COMPONENT VIDEO OUT
(GREEN)(BLUE)(RED)
COMPONENT VIDEO IN
Pr Pb Y
Subwoofer connectors
a TO MAIN UNIT
Connect to the TO SUBWOOFER
connector on the main unit.
b MAINS
Connect to the power supply.
c AUDIO IN AUX 2/AUX3
Connect to analog audio output on an
analog device.
d FM ANTENNA FM 75
Connect for FM radio signal.
Connect to the TV, subwoofer
and power
Connect to the TV
Connect your home theater directly to a TV
through one of the following connectors (from
highest quality to basic quality):
a HDMI
b Component video ( Y Pb Pr ) (not
supplied)
c Composite video ( CVBS ) (not supplied)
MAINS
AUDIO IN
AUX 2
AUX 3
L
R
L
R
FM ANTENNA
FM 75
TO MAIN UNIT
a b cd
English
EN
 Loading...