

Page 1
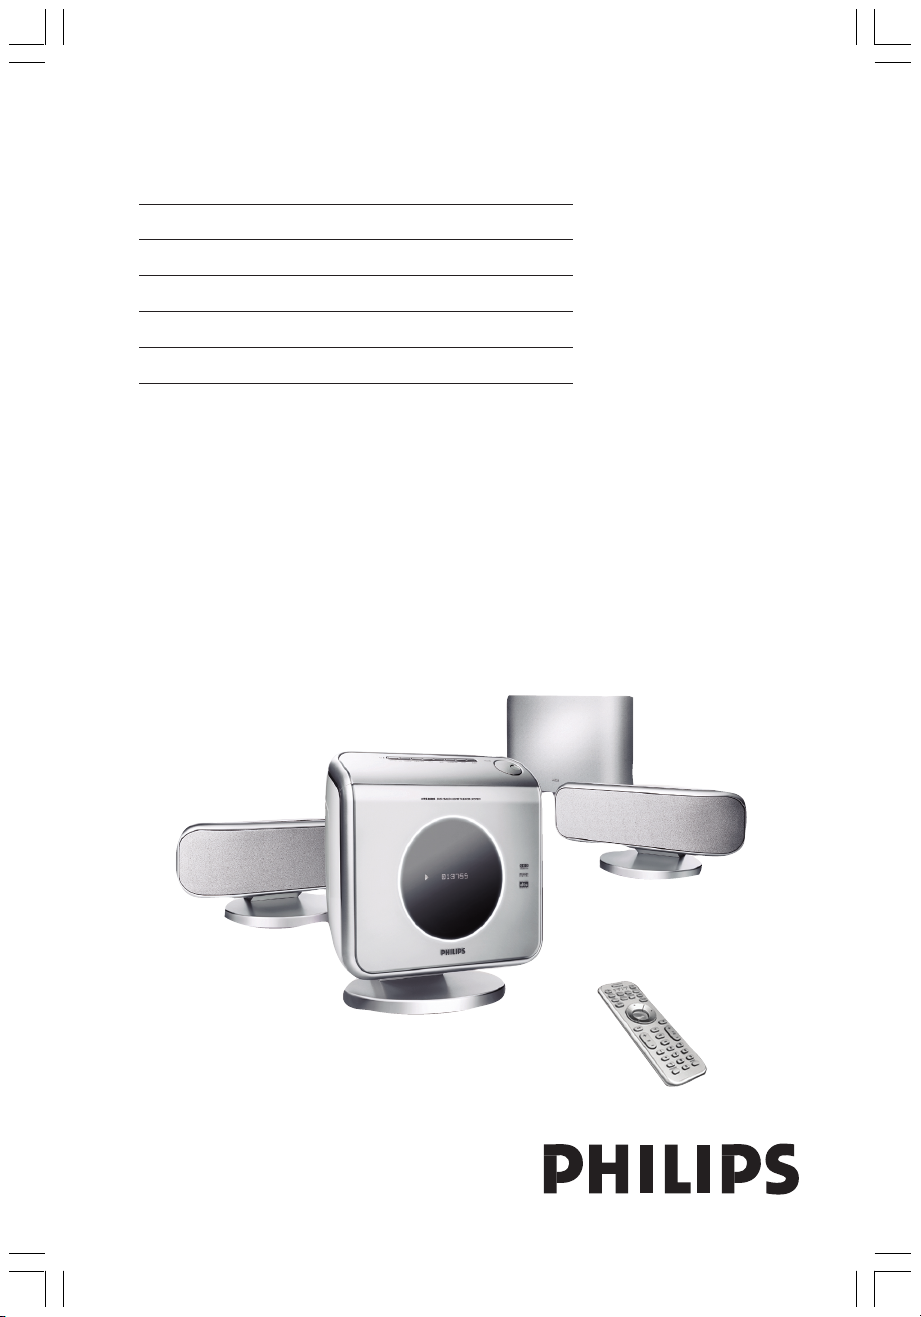
DVD/SACD HOME THEATER SYSTEM
User Manual 6
Manuel D’utilisation 50
Manual de Instrucciones 94
Bedienungsanleitung 138
Gerbruiksaanwijzing 182
Thank you for choosing Philips.
Need help fast?
Read your Quick Use/Start Guide and/or User Manual first for quick
tips that make using your Philips product more enjoyable.
If you have read your instructions and still need assistance,
you may access our online help at www.philips.com/support
HTS8000S
001-049 HTS8000S-00-eng2 06/05/2005, 04:53 PM1
1
3139 115 2xxx1
Page 2

Important notes for users in the
U.K.
Mains plug
This apparatus is fitted with an approved 13
Amp plug. To change a fuse in this type of plug
proceed as follows:
1 Remove fuse cover and fuse.
2 Fix new fuse which should be a BS1362 5 Amp,
A.S.T.A. or BSI approved type.
3 Refit the fuse cover.
If the fitted plug is not suitable for your socket
outlets, it should be cut off and an appropriate
plug fitted in its place.
If the mains plug contains a fuse, this should
have a value of 5 Amp. If a plug without a fuse
is used, the fuse at the distribution board
should not be greater than 5 Amp.
Note: The severed plug must be disposed of to
avoid a possible shock hazard should it be
inserted into a 13 Amp socket elsewhere.
How to connect a plug
The wires in the mains lead are coloured with
the following code: blue = neutral (N),
brown = live (L).
¶ As these colours may not correspond with the
colour markings identifying the terminals in
your plug, proceed as follows:
– Connect the blue wire to the terminal
marked N or coloured black.
– Connect the brown wire to the terminal
marked L or coloured red.
– Do not connect either wire to the earth
terminal in the plug, marked E (or e) or
coloured green (or green and yellow).
Before replacing the plug cover, make cer tain
that the cord grip is clamped over the sheath
of the lead - not simply over the two wires.
Copyright in the U.K.
Recording and playback of material may
require consent. See Copyright Act 1956 and
The Performer’s Protection Acts 1958 to 1972.
Italia
DICHIARAZIONE DI CONFORMITA’
Si dichiara che l’apparecchio HTS8000S,
Philips risponde alle prescrizioni dell’ar t. 2
comma 1 del D.M. 28 Agosto 1995 n. 548.
Fatto a Eindhoven
Philips Consumer Electronics
Philips, Glaslaan 2
5616 JB Eindhoven, The Netherlands
Norge
Typeskilt finnes på apparatens underside.
Observer: Nettbryteren er sekundert
innkoplet. Den innebygde netdelen er
derfor ikke frakoplet nettet så lenge
apparatet er tilsluttet nettkontakten.
For å redusere faren for brann eller elektrisk
støt, skal apparatet ikke utsettes for regn eller
fuktighet.
CAUTION
Use of controls or adjustments or
performance of procedures other than
herein may result in hazardous
radiation exposure or other unsafe
operation.
VAROITUS
Muiden kuin tässä esitettyjen
toimintojen säädön tai asetusten
muutto saattaa altistaa vaaralliselle
säteilylle tai muille vaarallisille
toiminnoille.
2
001-049 HTS8000S-00-Eng 22/04/2005, 04:04 PM2
3139 115 2xxx1
Page 3
DK
Advarsel: Usynlig laserstråling ved åbning
når sikkerhedsafbrydere er ude af funktion.
Undgå utsættelse for stråling.
Bemærk: Netafbryderen er sekundært
indkoblet og ofbryder ikke strømmen fra
nettet. Den indbyggede netdel er derfor
tilsluttet til lysnettet så længe netstikket
sidder i stikkontakten.
S
Klass 1 laseraparat
Varning! Om apparaten används på annat
sätt än i denna bruksanvisning specificerats,
kan användaren utsättas för osynlig
laserstrålning, som överskrider gränsen för
laserklass 1.
Observera! Stömbrytaren är sekundärt
kopplad och bryter inte strömmen från
nätet. Den inbyggda nätdelen är därför
ansluten till elnätet så länge stickproppen
sitter i vägguttaget.
SF
Luokan 1 laserlaite
Varoitus! Laitteen käyttäminen muulla kuin
tässä käyttöohjeessa mainitulla tavalla
saattaa altistaa käyttäjän
turvallisuusluokan 1 ylittävälle
näkymättömälle lasersäteilylle.
Oikeus muutoksiin varataan. Laite ei saa
olla alttiina tippu-ja roiskevedelle.
Huom. Toiminnanvalitsin on kytketty
toisiopuolelle, eikä se kytke laitetta irti
sähköverkosta. Sisäänrakennettu verkkoosa on kytkettynä sähköverkkoon aina
silloin, kun pistoke on pistorasiassa.
Index
English ----------------------------------------- 6
English
Français-------------------------------------- 50
Français
Español -------------------------------------- 94
Español
Deutsch ------------------------------------- 138
Nederlands -------------------------------- 182
Nederlands Deutsch
001-049 HTS8000S-00-Eng 22/04/2005, 04:04 PM3
3
Page 4

LASER
Type Semiconductor laser
GaAlAs
Wave length 650~660 nm (DVD)
784~796 nm (CD)
Output Power 7 mW (DVD)
10 mW (VCD/CD)
Beam divergence 60 degree
This product complies with the radio
interference requirements of the
European Community.
Manufactured under license from Dolby
Laboratories. “Dolby”, “Pro Logic” and
the double-D symbol are trademarks of
Dolby Laboratories.
Manufactured under license from
Digital Theater Systems, Inc. U.S. Pat.
Noís. 5,451,942; 5,956,674; 5,974,380;
5,978,762; 6,226,616; 6,487,535 and
other U.S. and world-wide patents
issued and pending. “DTS” and “DTS
Digital Surround” are registered
trademarks of Digital Theater Systems,
Inc. Copyright 1996, 2003 Digital Inc.
All Rights Reserved.
DivX®, DivX Certified, and
associated logos are
trademarks of
DivXNetworks, Inc and are
used under license.
CAUTION
VISIBLE AND INVISIBLE LASER
RADIATION WHEN OPEN AVOID
EXPOSURE TO BEAM
ADVARSEL
SYNLIG OG USYNLIG
LASERSTRÅLING VED ÅBNING
UNDGÅ UDSÆTTELSE FOR STRÅLING
VARNING
SYNLIG OCH OSYNLIG
LASERSTRÅLNING NÄR DENNA DEL
ÄR ÖPPNAD BETRAKTA EJ STRÅLEN
VARO!
AVATTAESSA OLET ALTTIINA
NÄKYVÄLLE JA NÄKYMÄTTÖMÄLLE
LASER SÄTEILYLLE. ÄLÄ KATSO
SÄTEESEEN
VORSICHT
SICHTBARE UND UNSICHTBARE
LASERSTRAHLUNG WENN
ABDECKUNG GEÖFFNET NICHT DEM
STRAHL AUSSETSEN
ATTENTION
RAYONNEMENT LASER VISIBLE ET
INVISIBLE EN CAS D’OUVERTURE
EXPOSITION DANGEREUSE AU
FAISCEAU
This DVD Home Theatre
System is in conformity with
the EMC directive and lowvoltage directive.
ATTENTION!
For Customer Use:
Read carefully the information located at
the bottom of your main DVD system
and enter below the Serial No. Retain this
information for future reference.
Model No. HTS8000S
Serial No. _______________
4
001-049 HTS8000S-00-Eng 22/04/2005, 04:04 PM4
‘CONSUMERS SHOULD NOTE THAT NOT ALL HIGH
DEFINITION TELEVISION SETS ARE FULLY
COMPATIBLE WITH THIS PRODUCT AND MAY CAUSE
ARTIFACTS TO BE DISPLAYED IN THE PICTURE. IN
CASE OF 525 OR 625 PROGRESSIVE SCAN PICTURE
PROBLEMS, IT IS RECOMMENDED THAT THE USER
SWITCH THE CONNECTION TO THE ‘STANDARD
DEFINITION’ OUTPUT. IF THERE ARE QUESTIONS
REGARDING OUR TV SET COMPATIBILITY WITH THIS
MODEL 525p AND 625p DVD PLAYER, PLEASE
CONTACT OUR CUSTOMER SERVICE CENTRE’.
3139 115 2xxx1
Page 5
Language Code
Abkhazian 6566
Afar 6565
Afrikaans 6570
Amharic 6577
Arabic 6582
Armenian 7289
Assamese 6583
Avestan 6569
Aymara 6589
Azerhaijani 6590
Bahasa Melayu 7783
Bashkir 6665
Belarusian 6669
Bengali 6678
Bihari 6672
Bislama 6673
Bokmål, Norwegian 7866
Bosanski 6683
Brezhoneg 6682
Bulgarian 6671
Burmese 7789
Castellano, Español 6983
Catalán 6765
Chamorro 6772
Chechen 6769
Chewa; Chichewa; Nyanja 7889
9072
Chuang; Zhuang 9065
Church Slavic; Slavonic 6785
Chuvash 6786
Corsican 6779
Česky 6783
Dansk 6865
Deutsch 6869
Dzongkha 6890
English 6978
Esperanto 6979
Estonian 6984
Euskara 6985
6976
Faroese 7079
Français 7082
Frysk 7089
Fijian 7074
Gaelic; Scottish Gaelic 7168
Gallegan 7176
Georgian 7565
Gikuyu; Kikuyu 7573
Guarani 7178
Gujarati 7185
Hausa 7265
Herero 7290
Hindi 7273
Hiri Motu 7279
Hrwatski 6779
Ido 7379
Interlingua (International)7365
Interlingue 7365
Inuktitut 7385
Inupiaq 7375
Irish 7165
Íslenska 7383
Italiano 7384
Ivrit 7269
Japanese 7465
Javanese 7486
Kalaallisut 7576
Kannada 7578
Kashmiri 7583
Kazakh 7575
Kernewek 7587
Khmer 7577
Kinyarwanda 8287
Kirghiz 7589
Komi 7586
Korean 7579
Kuanyama; Kwanyama 7574
Kurdish 7585
Lao 7679
Latina 7665
Latvian 7686
Letzeburgesch; 7666
Limburgan; Limburger 7673
Lingala 7678
Lithuanian 7684
Luxembourgish; 7666
Macedonian 7775
Malagasy 7771
Magyar 7285
Malayalam 7776
Maltese 7784
Manx 7186
Maori 7773
Marathi 7782
Marshallese 7772
Moldavian 7779
Mongolian 7778
Nauru 7865
Navaho; Navajo 7886
Ndebele, North 7868
Ndebele, South 7882
Ndonga 7871
Nederlands 7876
Nepali 7869
Norsk 7879
Northern Sami 8369
North Ndebele 7868
Norwegian Nynorsk; 7878
Occitan; Provencal 7967
Old Bulgarian; Old Slavonic 6785
Oriya 7982
Oromo 7977
Ossetian; Ossetic 7983
Pali 8073
Panjabi 8065
Persian 7065
Polski 8076
Português 8084
Pushto 8083
Russian 8285
Quechua 8185
Raeto-Romance 8277
Romanian 8279
Rundi 8278
Samoan 8377
Sango 8371
Sanskrit 8365
Sardinian 8367
Serbian 8382
Shona 8378
Shqip 8381
Sindhi 8368
Sinhalese 8373
Slovensky 8373
Slovenian 8376
Somali 8379
Sotho; Southern 8384
South Ndebele 7882
Sundanese 8385
Suomi 7073
Swahili 8387
Swati 8383
Svenska 8386
Tagalog 8476
Tahitian 8489
Tajik 8471
Tamil 8465
Tatar 8484
Telugu 8469
Thai 8472
Tibetan 6679
Tigrinya 8473
Tonga (Tonga Islands) 8479
Tsonga 8483
Tswana 8478
Türkçe 8482
Turkmen 8475
Twi 8487
Uighur 8571
Ukrainian 8575
Urdu 8582
Uzbek 8590
Vietnamese 8673
Volapuk 8679
Walloon 8765
Welsh 6789
Wolof 8779
Xhosa 8872
Yiddish 8973
Yoruba 8979
Zulu 9085
001-049 HTS8000S-00-Eng 22/04/2005, 04:04 PM5
5
3139 115 2xxx1
Page 6

Contents
English
Language Code ......................................5
General Information
Setup .............................................................. 8
Supplied accessories ................................... 8
Cleaning discs............................................... 8
System Placement
Positioning for best effect ......................... 9
Placing the SonoWave speakers ......... 9
Placing the AV subwoofer ................... 10
Placing the main DVD system ........... 10
Placing the junction box ..................... 10
Overall Connection Overview 11
Optional Setup
Mounting the main DVD system on
the wall ........................................................12
Mounting the SonoWave speakers
system on the wall ....................................13
Optional Connections
Connecting to a Progressive Scan TV ... 14
Connecting to outdoor FM antenna
terminal ....................................................... 14
Connecting to an analogue audio/video
device ........................................................... 15
Connecting to a digital audio device .... 15
Remote Control......................... 16–17
Main Unit ............................................... 18
Getting Started
Step 1: Preparing the remote control... 19
Using the remote control to
operate the system .............................. 19
Step 2: Switching on the DVD system.. 19
Switching to Eco Power standby
mode .......................................................19
Step 3: Setting the TV ............................... 20
Setting up Progressive Scan feature
(for Progressive Scan TV only) .... 20-21
Selecting the matching colour
system ..................................................... 22
Setting the TV Display ......................... 22
Step 4: Setting language preferences ..... 23
On-Screen Display (OSD) language. 23
Audio, Subtitle and Disc menu
languages ................................................ 23
Disc Operations
Playable discs .............................................. 24
Playing a disc............................................... 25
Auto Eco Power standby mode........ 25
Basic playback controls............................ 25
Selecting various repeat/shuffle
functions ...................................................... 26
Other operations for video playback
(DVD/ VCD/SVCD) .................................26
Using the Disc Menu ...........................26
Viewing playback information............ 27
Resuming playback from the last
stopped point ........................................ 27
Zooming in ............................................ 27
Changing sound track language......... 28
Changing subtitle language
(DVD only) ............................................ 28
Preview Function (VCD only) ........... 28
Playing MP3/JPEG /MPEG-4 disc ............ 29
Playing MP3 music and JPEG
picture simultaneously ........................ 29
Playing a picture disc (slide show)......... 30
Preview Function.................................. 30
Zoom picture........................................ 30
Rotating/Flipping the picture ............. 30
Supported JPEG picture formats ......30
Playing a Super Audio CD (SACD) ....... 31
Playing a DivX disc.................................... 31
6
001-049 HTS8000S-00-Eng 22/04/2005, 04:04 PM6
3139 115 2xxx1
Page 7

Contents
DVD Setup Menu Options
Accessing General Setup Page ............... 32
Locking/Unlocking the disc
for viewing .............................................32
Programming disc tracks (not
for Picture CD/ MP3/SACD) ...... 32–33
OSD language ....................................... 33
Screen Saver – turning on / off ...........33
DivX(R) VOD registration code .......33
Accessing Audio Setup Page ................... 34
Setting the analogue output............... 34
Night mode – turning on/off ............ 34
CD Upsampling .................................... 34
Accessing Video Setup Page .................... 35
TV Type ................................................... 35
TV Display ............................................. 35
Progressive function-turning on/off . 35
Picture Setting....................................... 36
Setting the Video Output ................... 36
Accessing Preference Setup Page .......... 37
Audio, Subtitle, Disc Menu ................. 37
Restricting playback by Parental
Control............................................ 37–38
PBC (Playback Control)...................... 38
MP3/JPEG menu– turning on/ off .....38
Changing the Password....................... 39
Setting the DivX Subtitle font ........... 39
Restoring to original settings ............ 39
Sound and Volume Controls
Speakers (SonoWave) adjustment......... 42
AV subwoofer adjustment....................... 43
Selecting surround sound........................ 43
Selecting digital sound effects ................. 43
Volume control ..........................................43
Other Functions
Setting the Sleep timer ............................ 44
Dimming system’s display screen........... 44
Using the remote to operate your
‘Philips’ television ...................................... 44
Specifications ......................................45
Troubleshooting ......................... 46–47
Glossary ............................................. 48–49
English
Tuner Operations
Tuning to radio stations ........................... 40
Presetting radio stations.......................... 40
Using the Plug and Play ....................... 40
Automatic presetting .......................... 41
Manual presetting ................................. 41
Selecting a preset radio station ............. 41
Deleting a preset radio station ..............41
001-049 HTS8000S-00-Eng 22/04/2005, 04:04 PM7
7
3139 115 2xxx1
Page 8

General Information
English
CAUTION!
The machine does not contain any
user-serviceable parts. Please leave
all maintenance work to qualified
personnel.
Setup
Finding a suitable location
– Place the set on a flat, hard and stable
surface. Do not place the set on a carpet.
– Do not position the set on top of
other equipment that might heat it up
(e.g., receiver or amplifier).
– Do not put anything under the set (e.g.,
CDs, magazines).
Space for ventilation
– Place the apparatus in a location with
adequate ventilation to prevent internal
heat build up. Allow at least 10 cm (4.5”)
clearance from the rear and the top of
the set and 5cm (2.3”) from the left and
right to prevent overheating.
Avoid high temperatures, moisture,
water and dust
– Apparatus shall not be exposed to
dripping or splashing.
– Do not place any sources of danger on
the apparatus (e.g., liquid filled objects,
lighted candles).
Accessories supplied
– 1 Junction Box with velcro strip pad
– 1 AV subwoofer with 4 rubber feet
– 2 SonoWave speakers with 2 sets of wall
mounting brackets, screws and wall plugs
– 1 set of wall mounting bracket, screws
and wall plugs for main DVD system
– 1 remote control with battery inserted
– 1 VGA cable (for connecting between the
AV subwoofer and Junction Box).
– 1 AC power cable for the AV subwoofer
– Quick Use Guide
Cleaning discs
Some problems occur because the disc
inside the player is dirty (frozen picture,
sound disruptions, picture distortions).
To avoid these problems, discs should be
cleaned on a regular basis.
To clean a disc, use a micro fibre cleaning
cloth and wipe the disc from the center
to the edge in a straight line.
8
001-049 HTS8000S-00-Eng 22/04/2005, 04:04 PM8
CAUTION!
Do not use solvents such as benzene,
thinner, commercially available cleaners,
or anti-static sprays intended for discs.
Since the optical unit (laser) of the DVD
system operates at a higher power than
regular DVD or CD players, cleaning CDs
intended for DVD or CD players may
damage the optical unit (laser). Therefore,
refrain from using a cleaning CD.
3139 115 2xxx1
Page 9
FRONT L FRONT RTV
System Placement
Positioning for best effect
The Philips HTS8000S Home Theatre
System, with its proprietary 2-speaker
SonoWave system, is simple to install
compared to other regular home theatre
systems. However, proper system
placement is critical to ensure the most
immersive sound experience.
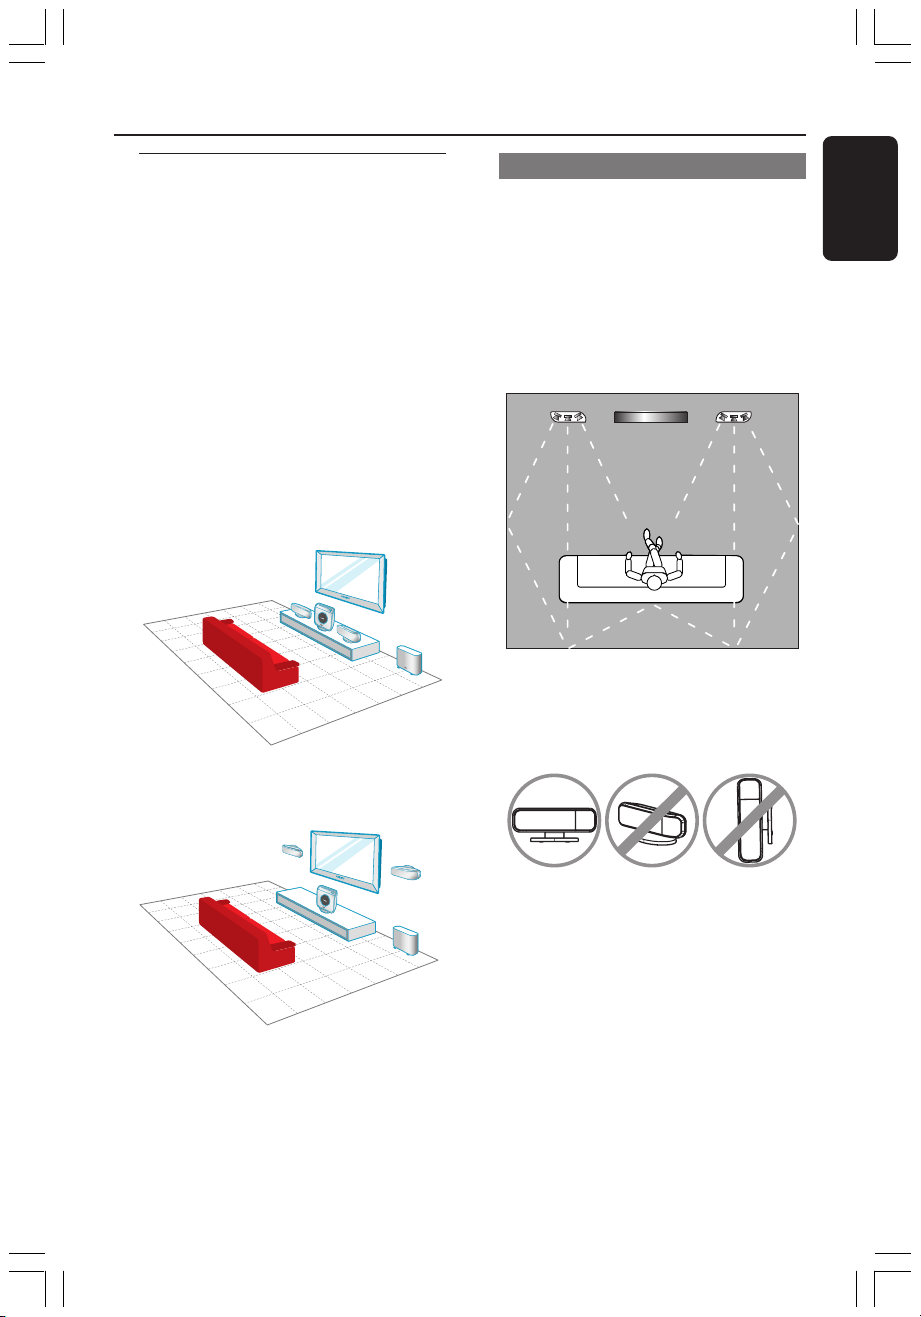
The placement diagrams shown here are
only guidelines that provide great system
performance, you may find other
placement choices that are more suitable
for your room layout and provide the
sound you enjoy.
Figure A : Example of placement on the
flat surface
Figure B : Example of wall mounting
placement
Placing the SonoWave speakers
When placing the SonoWave speakers,
ensure that:
– It should be placed at the same height
and at the normal listening ear level for
the best sound performance.
– It should be placed at equal distance from
the TV, the FRONT R at the right hand
side and FRONT L at the left hand side
(as shown below).
– It should be faced straight ahead towards
the listening area. Do not place at an
angle as it would reduce the system
performance.
English
Helpful Hints:
– To avoid magnetic interference, do not
position the SonoWave speakers too close to
your TV.
– Allow adequate ventilation around the AV
subwoofer and DVD system.
001-049 HTS8000S-00-Eng 22/04/2005, 04:04 PM9
For SonoWave speakers setting, see
page 42.
9
3139 115 2xxx1
Page 10
3
System Placement (continued)
English
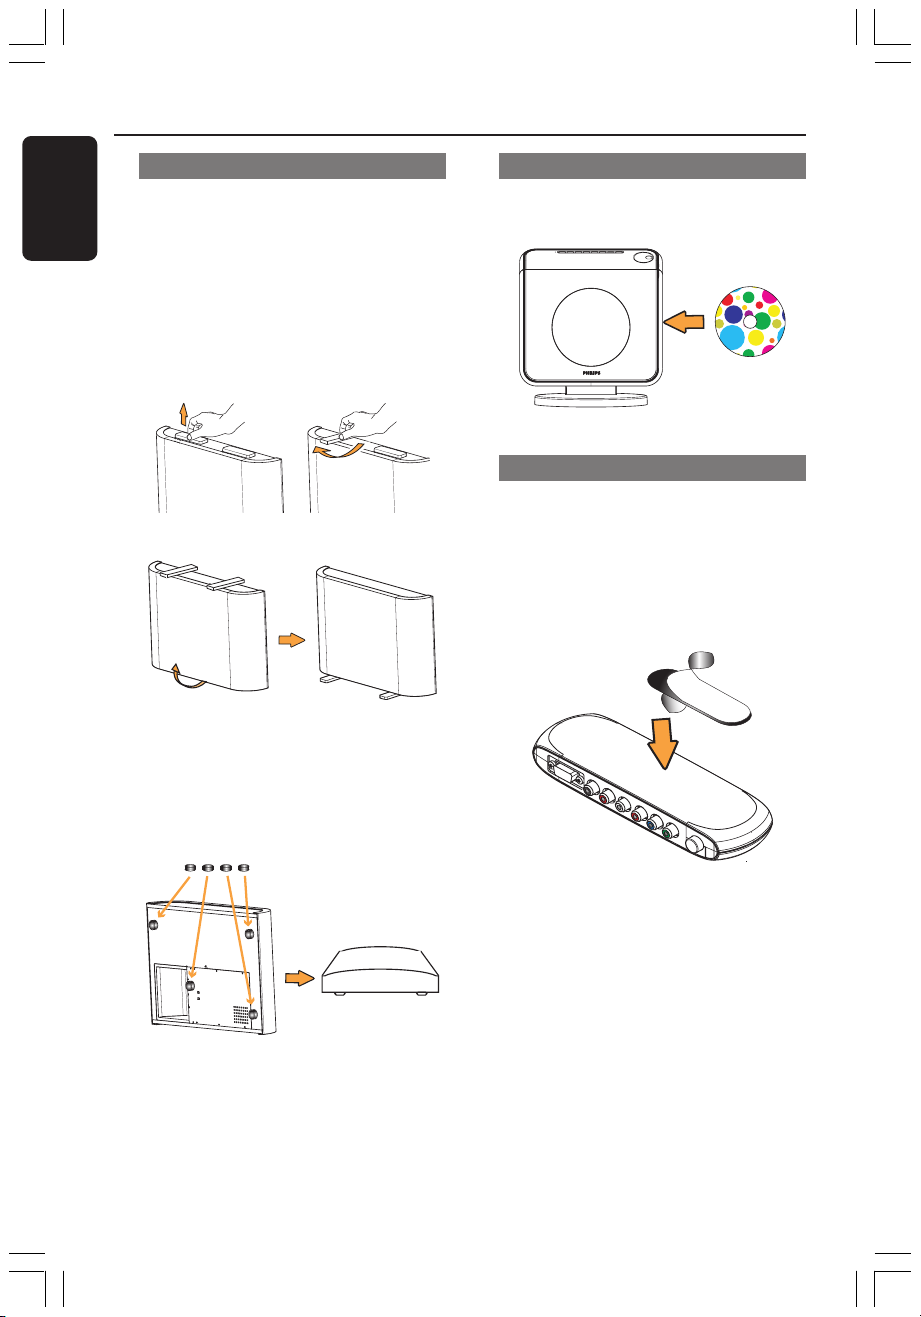
Placing the AV subwoofer
For optimum performance, place the AV
subwoofer at the corner of the room,
kept at least one metre away from the TV.
You can choose to place the AV
subwoofer upright (see figure A) or lay it
flat under the table or shelf (see figure B).
● To place the AV subwoofer upright,
slightly pull up the feet and rotate
clockwise to increase stability.
1
2
figure
A
Placing the main DVD system
Ensure ample space at the right hand side
for ease of disc handling.
Placing the Junction Box
You may place it behind the TV/shelf/table
to hide away the cable connection.
For fixing purpose, attach one side of the
supplied velcro strip on the junction box
and another at the place you wish to fix
the Junction box.
● To lay the AV subwoofer flat
(horizontally) on the floor, attach the
supplied rubber feet on the bottom
surface to allow sufficient ventilation and
prevent scratches.
rubber feet
To adjust the volume level of AV
subwoofer, see page 43.
10
001-049 HTS8000S-00-Eng 22/04/2005, 04:05 PM10
figure
B
3139 115 2xxx1
Page 11

Overall Connection Overview
IMPORTANT!
If you wish to mount the main DVD
system and the SonoWave speakers on
the wall, see next page before you make
any connections.
Extend the FM antenna and
place its end on the wall where
the reception is best
To AC power outlet
TO
JUN
CT
IO
N BO
X
SPEAKERS
F
R
O
N
T
R
I
G
H
T
A
C
M
A
I
N
S
F
R
O
N
T
L
E
F
T
English
red label
white label
Ensure this portion is fully
inserted into the socket
To AC power outlet
To disconnect the cable,
press down the catch
FRONT L FRONT R
001-049 HTS8000S-00-Eng 22/04/2005, 04:05 PM11
and pull out.
To T V
Example of TV back panel
OUT IN
VIDEO
AUDIO
3139 115 2xxx1
11
Page 12
Optional Setup
English
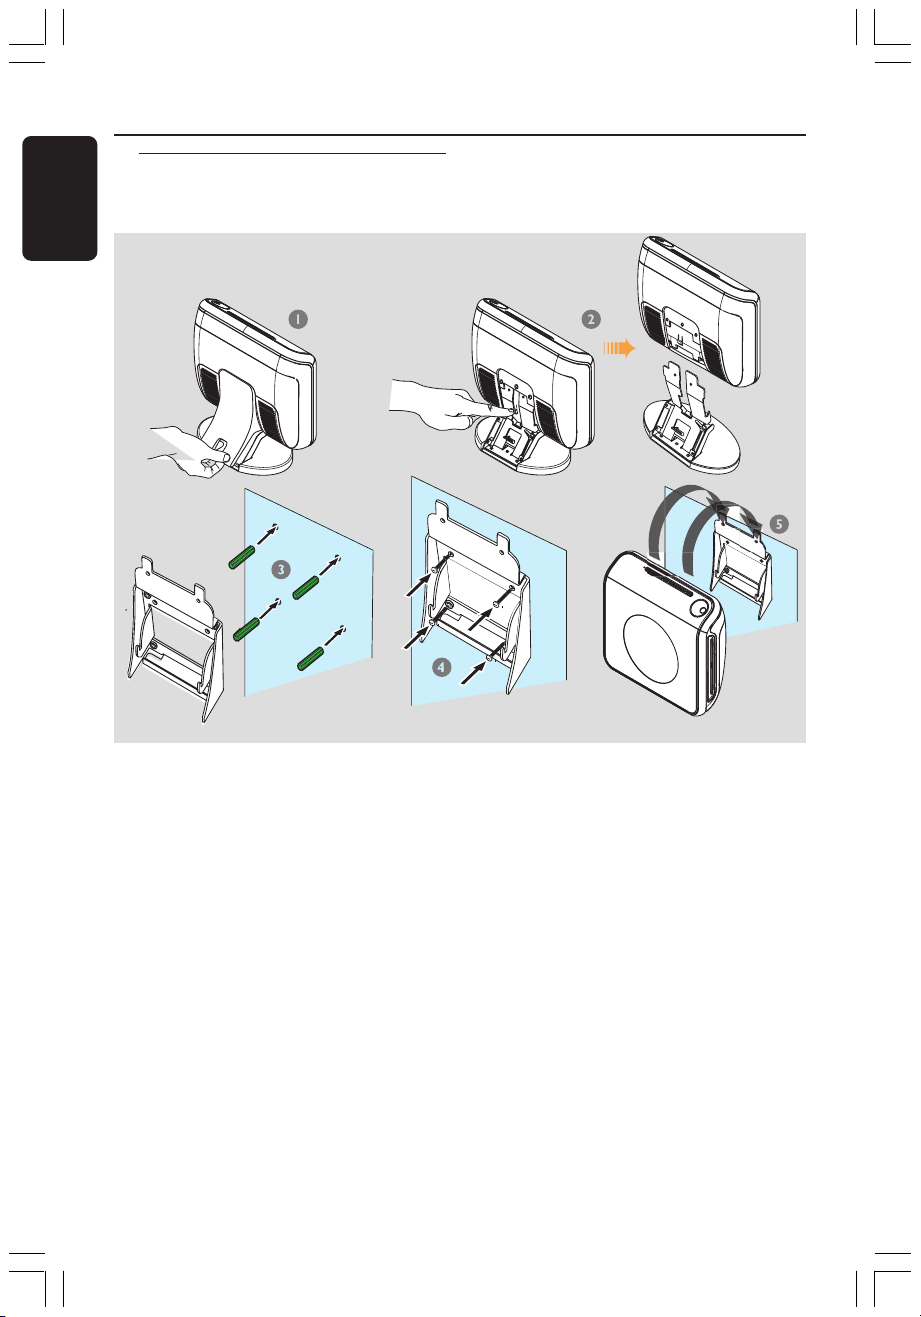
Mounting the main DVD
system on the wall
You can choose to wall mount the main
DVD system on the wall. Select a
position where nothing obstructs the
disc slot on its right hand side.
CAUTION!
You should get a qualified person to
attach the brackets to the wall. DO
NOT do it by yourself in order to
avoid unexpected damage to the
equipment or injury to personnel.
Helpful Hint:
– Philips accepts absolutely no liability for
any accidents or damage resulting from
inadequate assembly or mounting, misuse or
abuse, or natural disasters.
12
001-049 HTS8000S-00-Eng 22/04/2005, 04:05 PM12
1 Remove the back cover from the main
DVD system.
2 Press on the catch at the centre while
detaching the main DVD system from its
stand.
3 Hold the supplied bracket (white colour)
in position and mark holes on the wall for
the screws. Drill holes (around 6.5mm
diametre) and insert the rubber wall
plugs (green colour) into the holes.
4 Use the supplied screws to secure the
bracket onto the wall.
5 Hook the main DVD system firmly onto
the mounted bracket by sliding through
the bracket to lock into position.
3139 115 2xxx1
Page 13

Mounting the SonoWave
speakers on the wall
Optional Setup (continued)
English
You can choose to hang the SonoWave
speakers on the wall. It should be
positioned at the normal listening ear
level, at the same height and equal
distance from the TV.
CAUTION!
You should get a qualified person to
attach the brackets to the wall. DO
NOT do it by yourself in order to
avoid unexpected damage to the
equipment or injury to personnel.
Helpful Hint:
– Philips accepts absolutely no liability for
any accidents or damage resulting from
inadequate assembly or mounting, misuse or
abuse, or natural disasters.
001-049 HTS8000S-00-Eng 22/04/2005, 04:05 PM13
Remove the base of the SonoWave
1
speakers by loosening the two screws at
the bottom.
2 Rotate the stand at 180
tighten the screws.
degrees and
3 Hold the supplied bracket (black colour)
in position and mark holes on the wall for
the screws. Drill holes (around 6.5mm
diametre) and insert the rubber wall
plugs (green colour) into the holes.
4 Use the supplied screws to secure the
bracket onto the wall.
5 Hook the SonoWave speakers onto the
mounted brackets by sliding through the
bracket to lock into position.
3139 115 2xxx1
13
Page 14

Optional Connections (continued)
English
Connecting to a Progressive
Scan TV
OUT IN
VIDEO
AUDIO
2
TO SUBWOOFER
Junction box
DIGITAL IN L AUX IN R COMPONENT VIDEO
1
Pr Pb Y
IMPORTANT!
– The progressive scan video quality
is only possible when using Y Pb Pr
and a progressive scan TV is required.
– DO NOT connect both SCART
and Y Pb Pr to a TV, it may affect the
picture quality.
1 Use the component video cables (red/
blue/green - not supplied) to connect the
Junction Box’s Y Pb Pr sockets to the
corresponding component video input
sockets (or labelled as Y Pb/Cb Pr/Cr or
YUV) on the TV.
● Do not connect the SCART from
Junction Box to your TV.
2 To hear the TV channels through this
DVD system, use an audio cables (white /
red - not supplied) to connect AUX IN
sockets to the corresponding AUDIO
OUT sockets on the TV.
3 Proceed to pages 20~21 for detailed
Progressive Scan set up.
Connecting to outdoor FM
antenna terminal
TV
1
3
2
FM Antenna
FM pigtail
cable
If the FM reception is poor, you can use
an FM coaxial cable (not supplied) to
connect the FM 75Ω coaxial cable hidden
inside the back cover directly to the
outdoor FM antenna terminal.
1 Open the main DVD system’s back cover
by lifting up the cover from the bottom.
2 Unplug the FM pigtail antenna from the
FM 75Ω coaxial cable.
3 Connect the FM 75Ω coaxial cable to
one end of the FM coaxial cable which is
connected to the outdoor FM antenna
terminal.
Helpful Hint:
– Position the antennas as far as possible
from your TV, VCR or other radiation source
to prevent unwanted interference.
14
001-049 HTS8000S-00-Eng 22/04/2005, 04:05 PM14
3139 115 2xxx1
Page 15

Optional Connections (continued)
Connecting to an analogue
audio/video device
AUDIO OUT
RL
VCR, Cable/Satellite
Box, TV or cassette
recorder
TO SUBWOOFER
DIGITAL IN L AUX IN R COMPONENT VIDEO
Junction box
You can connect an analogue audio/video
device (e.g. VCR, Cable/Satellite Box, TV
or cassette recorder) to the Junction Box
in order to use the Home Theatre Audio
System’s surround sound capabilities.
● Connect the Junction Box’s AUX IN
(R/L) sockets to the AUDIO OUT
sockets on an analogue audio/video
device.
To listen to the sound, press SOURCE
repeatedly to select “AUX” as the source
to play.
Helpful Hints:
– Recording from this DVD system to your
VCR is not possible.
– To see the picture of the connected video
device (e.g. VCR), connect the VIDEO OUT
socket of the device to the VIDEO IN socket
of the TV, and select the correct input
channel on the TV.
Pr Pb Y
Connecting to a digital audio
device
Games Console,
CD Recorder
(for example)
TO SUBWOOFER
DIGITAL IN L AUX IN R COMPONENT VIDEO
Junction box
You can connect a digital audio device
(e.g. CD recorder) to the Junction Box in
order to use the Home Theatre Audio
System’s surround sound capabilities.
● Connect the Junction Box’s DIGITAL
IN socket to the DIGITAL OUT socket
on a digital audio device.
To listen to the sound, press SOURCE
repeatedly to select “DI” as the source
to play.
Helpful Hints:
– You cannot hear or record the SACD or
MP3-CD playback if you use the digital
connection.
– For your playback through DIGITAL IN
connection, set the digital output of that
player to PCM format.
– Always refer to the user manual of the
other equipment for complete connection
and usage details.
Pr Pb Y
English
001-049 HTS8000S-00-Eng 22/04/2005, 04:05 PM15
15
3139 115 2xxx1
Page 16
Remote Control
English
SUBWOOFER
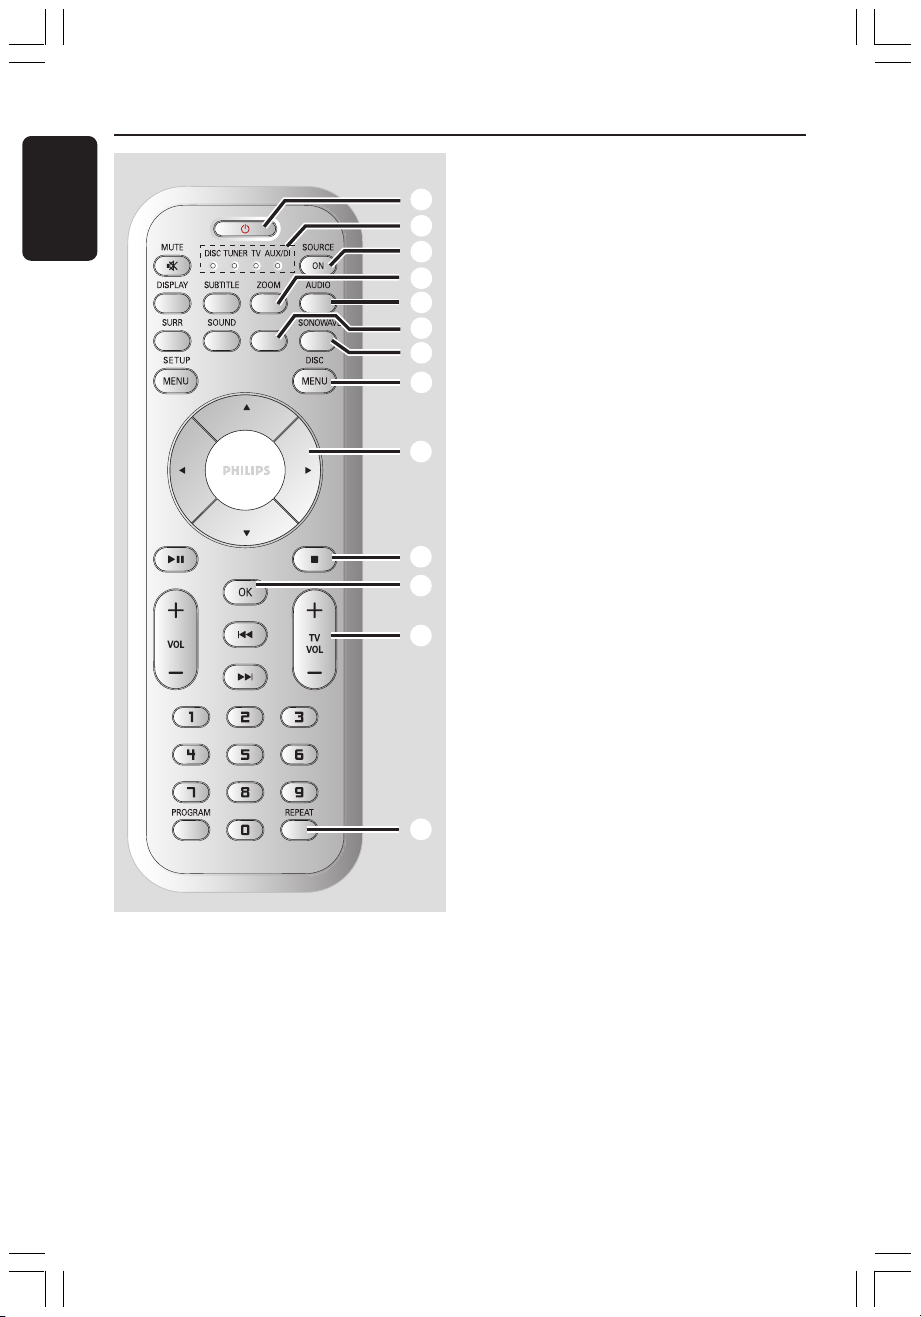
1 B
– Switches to Eco Power standby mode.
– In TV mode, hold down this button to
switch Philips TV off/on.
2 SOURCE indicator
– Indicates the active source.
3 SOURCE ON
– Selects the relevant active source mode:
DISC, TUNER FM, TV or AUX/DI.
1
2
3
4
5
6
7
8
9
0
!
@
#
4 ZOOM
– DISC: enlarges a picture on the TV screen.
5 AUDIO
– DISC: selects an audio language (DVD/
VCD) or an audio channel (CD).
– TUNER: toggles between stereo and
mono mode.
6 SUBWOOFER
– Activates the AV subwoofer setting, then
use the VOL +- on the remote to
adjust the output level.
7 SONOWAVE
– Activates the SonoWave Speakers
settings. Refer to page 42 for detailed
adjustment.
8 DISC MENU
– DISC: enters or exits disc contents menu.
– For VCD version 2.0 only;
In stop mode, turns on/off playback
control (PBC) mode.
During playback, returns to main menu.
9 1 2 3 4
– DISC: selects movement direction in the
menu.
– TUNER: use 3 4 to start auto tuning.
– TUNER: use 1 2 to select a preset radio
station.
0 Ç
– Exits an operation.
– DISC: stops playback. Hold down this
button to eject the disc.
– TUNER: hold down this button to erase
the current preset radio station.
! OK
– Confirms a selection.
– Hold down this button to set the sleep
timer function.
@ TV VOL +-
– Adjusts TV volume (Philips TV only).
# REPEAT
– DISC: selects various repeat modes;
switches repeat mode off.
16
001-049 HTS8000S-00-Eng 22/04/2005, 04:05 PM16
3139 115 2xxx1
Page 17
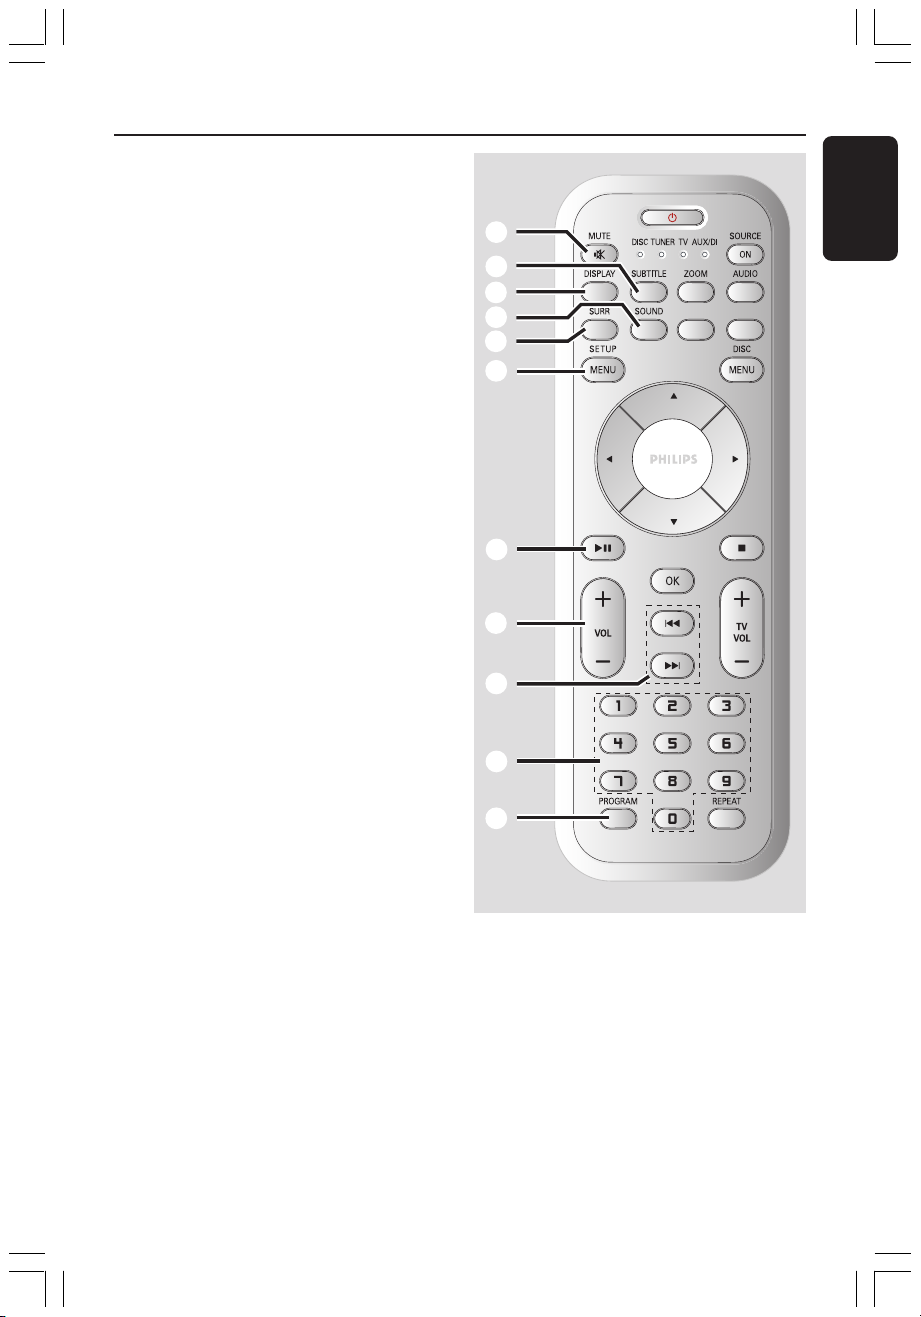
$ MUTE
– Mutes or restores the volume.
% SUBTITLE
– DISC: selects a subtitle language.
^ DISPLAY
– Hold down this button to change the
brightness of the display panel.
– DISC: displays the current status or disc
information.
& SOUND
– Selects a sound effect.
– Hold down this button to turn on/off
night mode (optimise the dynamic of the
sound output).
* SURR
– Selects multichannel surround or stereo
mode.
( SETUP MENU
– DISC: enters or exits system setup menu.
) ÉÅ
– DISC: starts/pauses playback.
– TUNER: starts storing radio stations in
Plug & Play mode.
¡ VOL +-
– Adjusts the volume level.
™ S / T
– DISC: select a track or hold down this
button to search backward/forward.
– TV: selects previous/next channel (Philips
TV only).
– TUNER: tunes the radio frequency up/
down.
£ Numeric Keypad (0-9)
– DISC: enters a track/title number.
– TUNER: enters the preset radio station
number.
≤ PROGRAM
– DISC: starts programming.
– TUNER: starts *automatic/ manual preset
programming.
Remote Control (continued)
$
%
^
&
*
(
)
¡
™
£
≤
SUBWOOFER SONOWAVE
English
001-049 HTS8000S-00-Eng 22/04/2005, 04:05 PM17
17
3139 115 2xxx1
Page 18
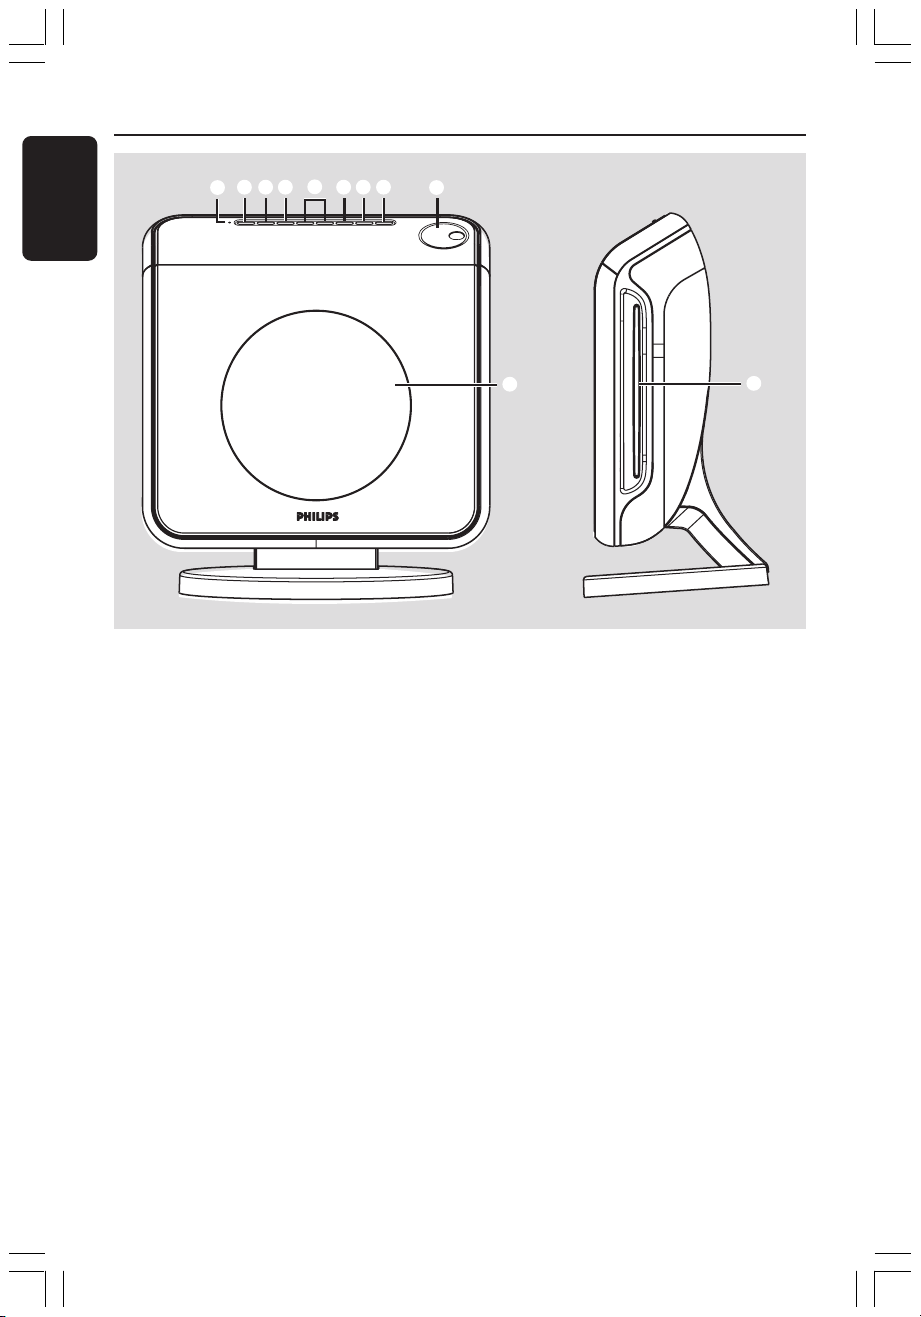
Main Unit
English
2 3 4 8
1
5
6
7
9
1 ECO POWER indicator
– Lights up when in Eco Power standby
mode.
2 STANDBY ON B
– Switches to Eco Power standby mode, or
turns on the system.
3 SOURCE
– Selects the relevant active source mode:
DISC, TUNER FM, TV or AUX/DI.
4 SURROUND
– Selects multichannel surround or stereo
mode.
5 PREV / NEXT
– DISC: select a track or hold down this
button to search backward/forward.
– TUNER: tunes the radio frequency up/
down.
!
0
6 PLAY PAUSE
– DISC: starts/pauses playback.
– TUNER: starts preset radio station
installation in Plug & Play mode.
7 STOP
– Exits an operation.
– DISC: stops playback.
– TUNER: hold down this button to erase
the current preset radio station.
8 EJECT
– DISC: ejects the disc.
9 VOLUME
– Adjusts the volume level.
0 Disc slot
! System display panel
18
001-049 HTS8000S-00-Eng 22/04/2005, 04:05 PM18
3139 115 2xxx1
Page 19
Getting Started
Step 1: Preparing the remote
control
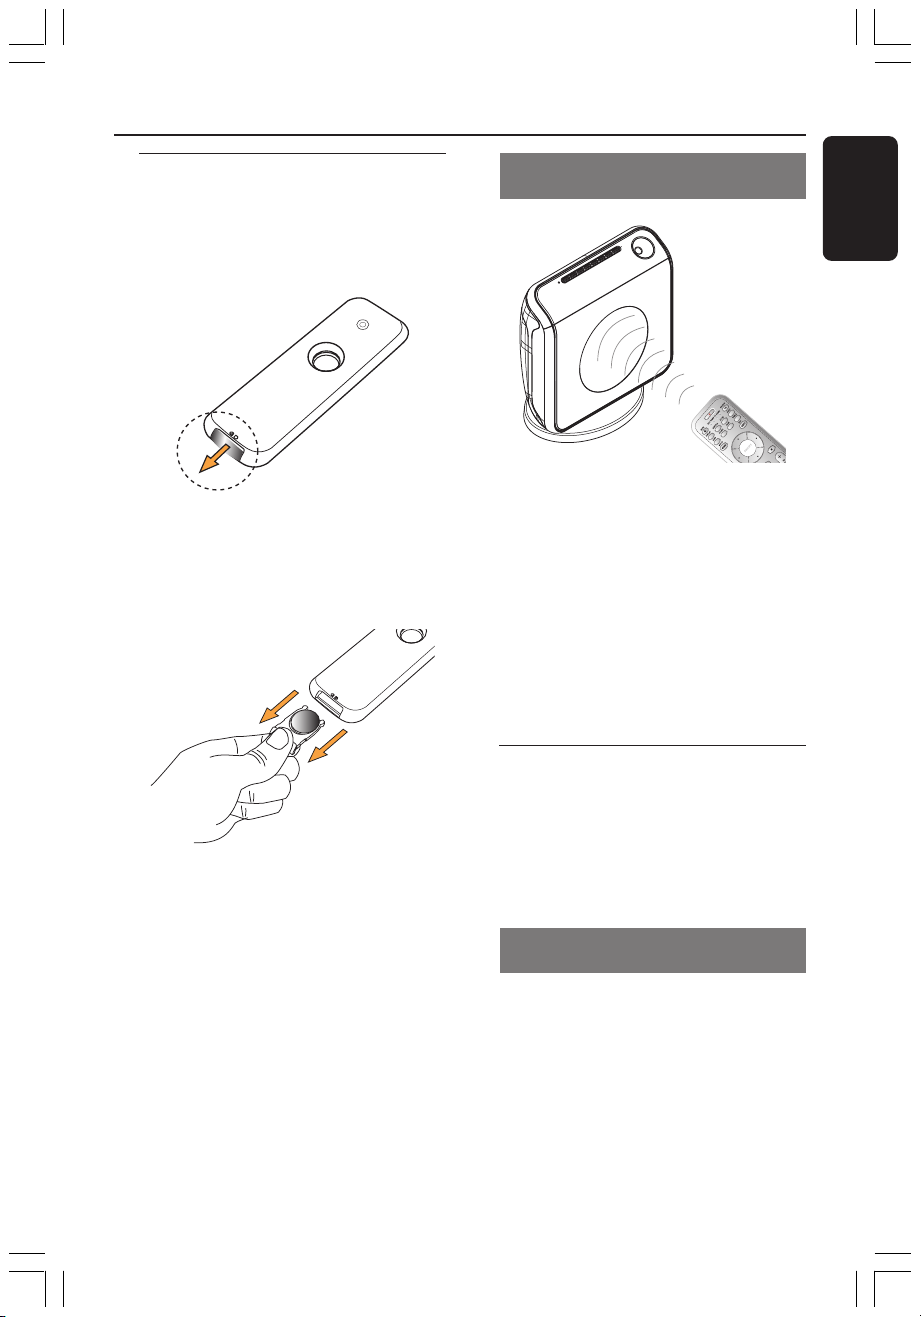
Before you start using the remote
control, pull out the plastic protective
sheet.
To change the battery
● Pull out the battery compartment and
replace with the battery type LITHIUM
CR2025.
Using the remote control to
operate the system
English
1 Aim the remote control directly at the
remote sensor (iR) on the front panel.
2 Press SOURCE button on the remote
to select the mode you wish to control
(for example TV, DISC). The selected
source mode will light up on the LED
panel for a few seconds.
3 Then select the desired function (for
example É, S, T).
CAUTION!
– Remove battery if it is exhausted
or if the remote control is not to be
used for a long time.
– Batteries contain hazardous
chemical substances, so they should
be disposed of properly.
001-049 HTS8000S-00-Eng 22/04/2005, 04:05 PM19
Step 2: Switching on the
DVD system
● Press SOURCE button repeatedly to
select :
DISC ™ TUNER FM ™ TV ™ AUX
™ DI ™ DISC ....
Switching to Eco Power standby
mode
● Press STANDBY ON (B).
➜ The display screen will go blank.
➜ The Eco Power indicator will light up
in red.
19
3139 115 2xxx1
Page 20

Video Setup Page
TV Type
TV Display
Progressive
Picture Setting
Component
YUV
RGB
Getting Started (continued)
English
Step 3: Setting the TV
After connecting the DVD system to
your TV, you have to switch the TV to the
correct programme number for the input
socket (e.g. ‘EXT’, ‘0’, ‘AV’) in order to
view the playback from the DVD system.
1 Press SOURCE button until “DISC”
appears on the display panel.
2 Turn on the TV and set it to the correct
video-in channel. You should see the blue
DVD background screen on the TV.
➜ Usually this channel is between the
lowest and highest channels and may be
called FRONT, A/V IN, VIDEO. See your
TV manual for more details.
➜ Or, you may go to channel 1 on your
TV, then press the Channel down button
repeatedly until you see the Video In
channel.
➜ Or, the TV remote control may have a
button or switch that chooses between
different video modes.
Setting up Progressive Scan feature
(for Progressive Scan TV only)
The progressive scan display twice the
number of frames per seconds than
interlaced scanning (ordinary normal TV
system). With nearly double the number
of lines, progressive scan offers higher
picture resolution and quality.
IMPORTANT!
Before enabling the progressive scan
feature, you must ensure :
1) Your TV can accept progressive signals,
a progressive scan TV is required.
2) You have connected the DVD system
to your TV using Y Pb Pr (see page 14).
1 Turn off your TV progressive scan mode
or turn on interlaced mode (refer to
your TV user manual).
2 Press SOURCE button until “DISC”
appears on the display panel.
3 Turn on your TV and select the correct
Video Input channel (see page 20).
➜ The blue DVD background screen will
appear on the TV.
4 Press SETUP MENU on the remote.
5 Press 2 to select ‘Video Setup Page’.
6 Select { Component } > { YUV }, then
press OK to confirm.
001-049 HTS8000S-00-Eng 22/04/2005, 04:05 PM20
TIPS: The underlined option is the factory default setting.
To return to the previous menu, press 1. To remove the menu, press SETUP MENU.
20
3139 115 2xxx1
Page 21
Getting Started (continued)
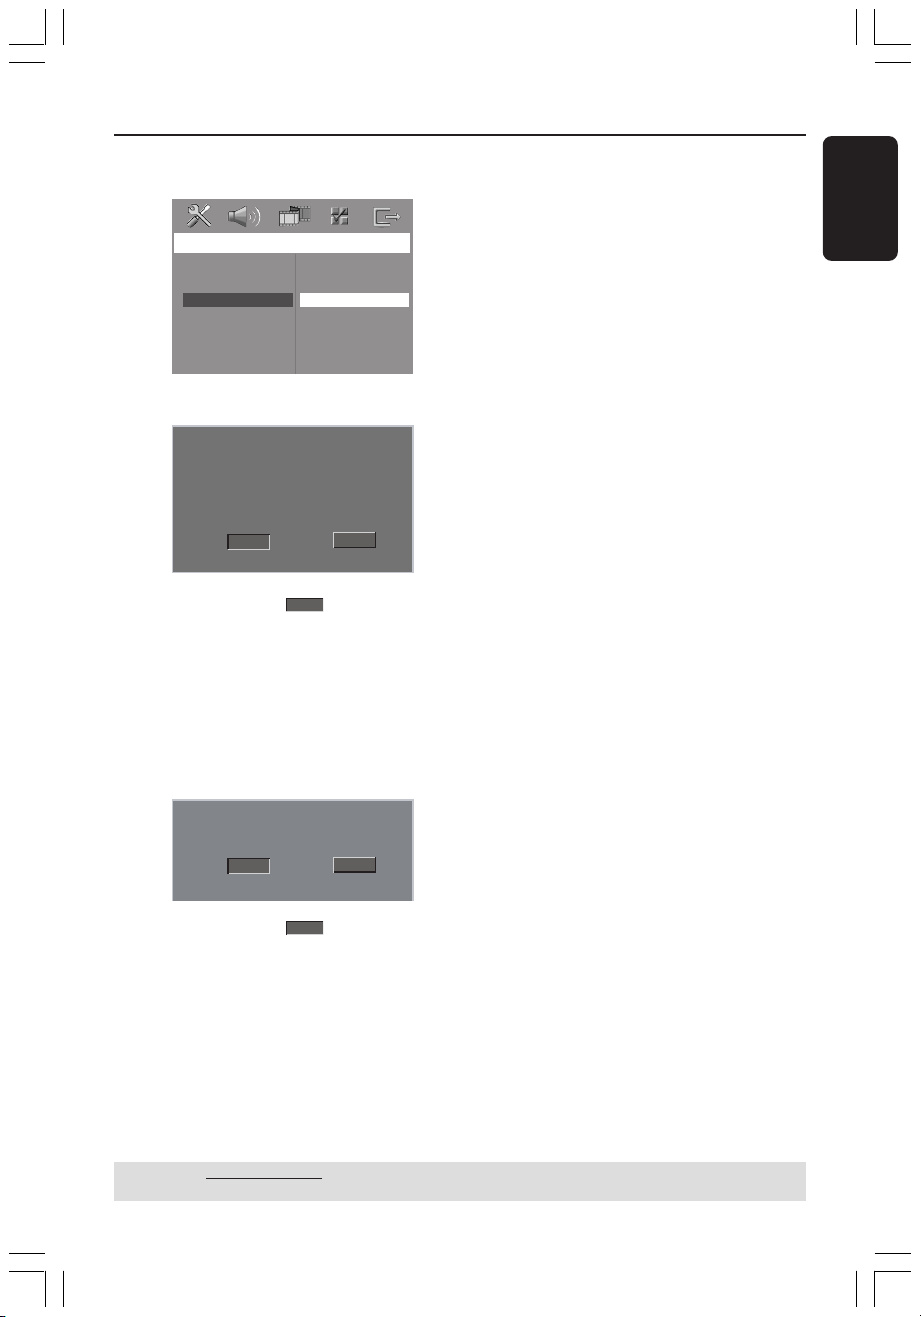
7 Select { Progressive } > { On }, then
press OK to confirm.
Video Setup Page
TV Type
TV Display
Progressive
Picture Setting
Component
On
Off
8 The below menu will appear on the TV.
HINTS:(refer to the owner's manual)
ACTIVATING PROGRESSIVE:
1. Ensure your TV has progressive scan.
2. Connect with YPbPr(GBR) video cable.
3. If there is a blank screen on normal TV,
wait 15 seconds for auto recover.
OK
9 Press 1 to highlight
Cancel
OK
in the menu
and press OK to confirm.
There will be no picture on your TV
at this state until you turn on the
progressive scan mode on your TV.
0 Turn on your TV progressive scan mode
(refer to your TV user manual).
➜ The below menu will appear on the TV.
Confirm again to use progressive scan
If picture is good press OK on remote
If no picture:
● Wait for 15 seconds for the auto recovery.
OR
1 Deactivate Progressive Scan feature by
pressing the EJECT on the DVD system.
2 Press 1 on the remote.
3 Press SUBTITLE on the remote.
➜ The blue DVD background screen will
appear on the TV.
Helpful Hint:
– There are some progressive scan TV and
High-Definition TV sets that are not fully
compatible with this DVD system, resulting in
the unnatural picture when playing back a
DVD VIDEO disc in the progressive scan
mode. In such a case, turn off the
progressive scan feature on both the DVD
system and your TV set.
English
OK
! Press 1 to highlight
Cancel
OK
in the menu
and press OK to confirm.
➜ The set up is complete now and you
can start enjoy the high quality picture.
TIPS: The underlined option is the factory default setting.
001-049 HTS8000S-00-Eng 22/04/2005, 04:05 PM21
To return to the previous menu, press 1. To remove the menu, press SETUP MENU.
21
3139 115 2xxx1
Page 22
Getting Started (continued)
Video Setup Page
TV Type
TV Display
Progressive
Picture Setting
Component
4:3 Pan Scan
4:3 Letter Box
16:9 Wide Screen
English
Selecting the matching colour
system
The colour system of the DVD system,
DVD and TV should match. Only then will
it be possible to play a DVD on this
system. Before changing the TV system,
determine the colour system of your TV.
1 In disc mode, press SETUP MENU.
2 Press 2 repeatedly to select { Video Setup
Page }.
3 Use 34 keys to highlight { TV Type },
then press 2.
Video Setup Page
TV Type
TV Display
Progressive
Picture Setting
Component
PAL
NTSC
Multi
4 Use 34 keys to highlight one of the
options below:
PAL }
{
Select this if the connected TV has the PAL
colour system. It will change the video signal of
an NTSC disc and output it to PAL format.
{ NTSC }
Select this if the connected TV has the NTSC
colour system. It will change the video signal of
a PAL disc and output it to NTSC format.
{ Multi }
Select this if the connected TV is compatible
with both NTSC and PAL (multi-system).
The output format will be in accordance with
the video signal of the disc.
5 Select a setting and press OK.
➜ Follow the instructions shown on the
TV to confirm the selection (if any).
➜ If a blank/distorted TV screen appears,
wait for 15 seconds for the auto
recovery.
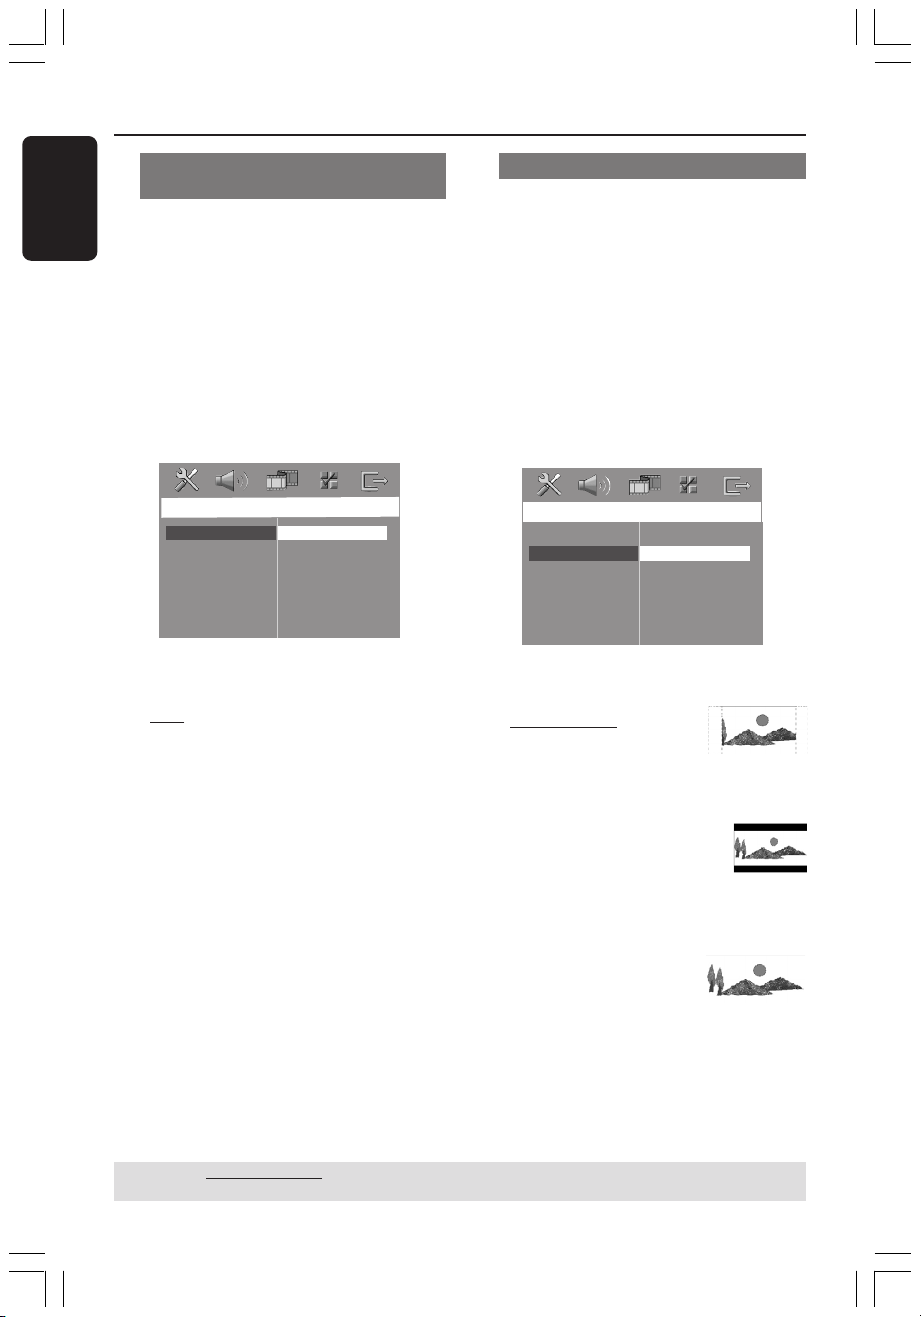
Setting the TV Display
Set the aspect ratio of the DVD system
according to the TV you have connected.
The format you select must be available
on the disc. If it is not, the setting for TV
display will not affect the picture during
playback.
1 In disc mode, press SETUP MENU.
2 Press 2 repeatedly to select { Video Setup
Page }.
3 Use 34 keys to highlight { TV Display },
then press 2.
4 Use 34 keys sto highlight one of the
options below:
4:3 Pan Scan }
{
Select this if you have a
conventional TV and want
both sides of the picture to be trimmed or
formatted to fit your TV screen.
{ 4:3 Letter Box }
Select this if you have a
conventional TV. In this case, a
wide picture with black bands on the upper
and lower portions of the TV screen will be
displayed.
{ 16:9 Wide Screen }
Select this if you have a widescreen TV.
5 Select a setting and press OK.
001-049 HTS8000S-00-Eng 22/04/2005, 04:05 PM22
TIPS: The underlined option is the factory default setting.
22
To return to the previous menu, press 1. To remove the menu, press SETUP MENU.
3139 115 2xxx1
Page 23
Getting Started (continued)
Step 4: Setting language
preferences
You can select your preferred language
settings so that this DVD system will
automatically switch to the language for
you whenever you load a disc. If the
language selected is not available on the
disc, the disc’s default language will be
used instead.
The OSD (On-Screen Display) language
for the system menu will remain as you
set it, regardless of the default and
optional disc languages.
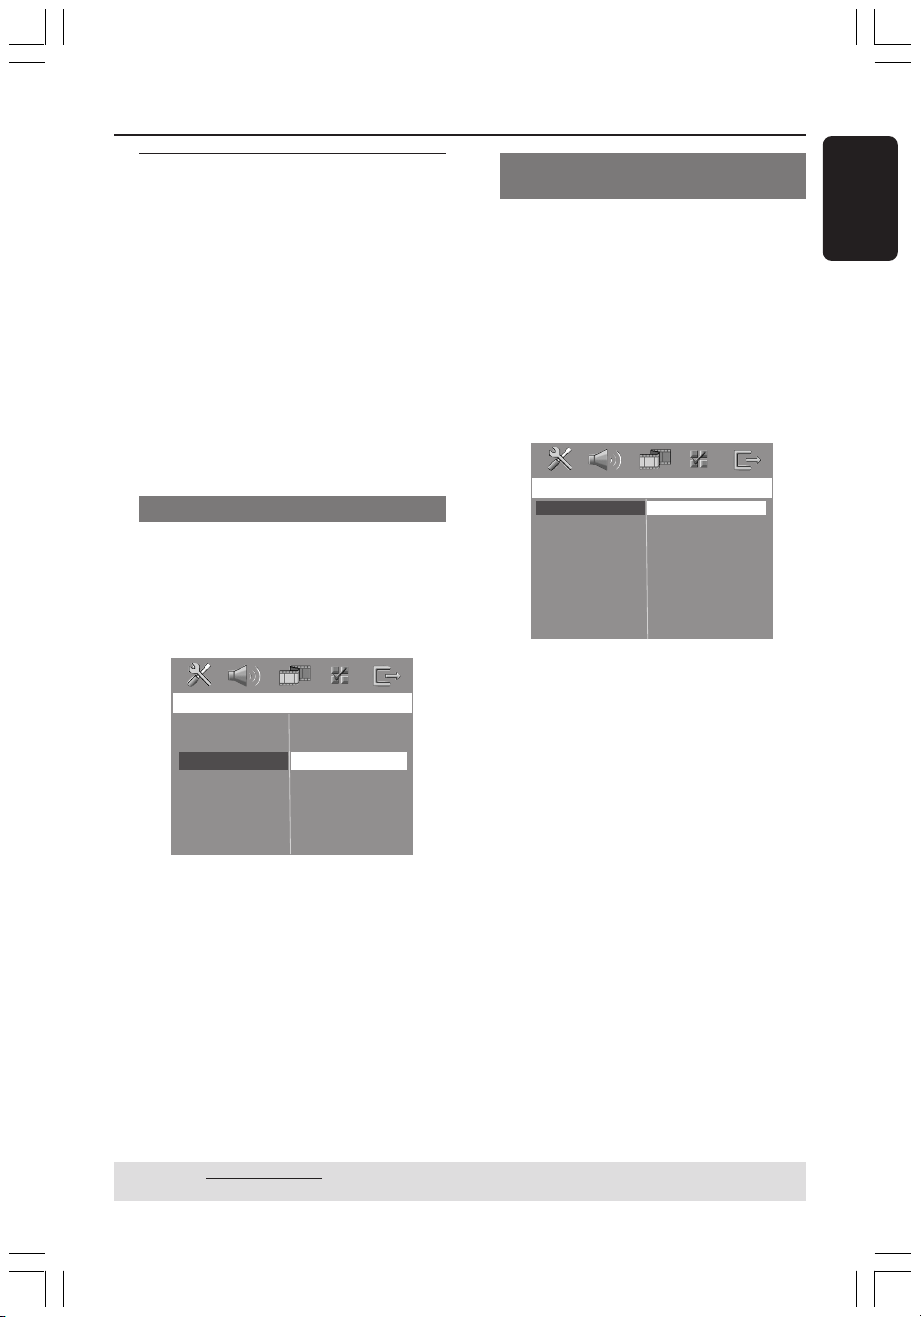
On-screen display (OSD) language
1 In disc mode, press SETUP MENU.
2 Press 2 to select { General Setup Page }.
3 Use 34 keys to highlight { OSD
Language }, then press 2.
General Setup Page
Disc Lock
Program
OSD Language
Screen Saver
DivX(R) VOD Code
English
Espanõl
Français
Português
Audio, Subtitle and Disc menu
languages
1 Press Ç twice to stop playback (if any),
then press SETUP MENU.
2 Press 2 repeatedly to select
{ Preference Page }.
3 Use 34 keys to highlight one of the
options below, then press 2.
– { Audio } (disc’s soundtrack)
– { Subtitle } (disc’s subtitles)
– { Disc Menu } (disc’s menu)
P
reference
P
age
E
nglis
A
udio
S
ubtitl
e
D
isc
M
e
P
arental
PBC
MP3/JPEG
P
asswor
D
i
v
X S
ubtitl
D
efaul
t
nu
N
a
v
d
e
E
spa
F
rançais
P
ort
S
uomi
h
nõl
uguês
4 Use 34 keys to select a language and
press OK to confirm.
If the language you want is not in
the list, then select { Others }.
Use the numeric keypad (0-9) on the
remote to enter the 4-digit language code
‘XXXX’ (see page 5) and press OK to
confirm.
English
4 Use 34 keys to select a language and
press OK to confirm.
TIPS: The underlined option is the factory default setting.
To return to the previous menu, press 1. To remove the menu, press SETUP MENU.
001-049 HTS8000S-00-Eng 22/04/2005, 04:06 PM23
5 Repeat steps 3~4 for other settings.
23
3139 115 2xxx1
Page 24
Disc Operations
English
IMPORTANT!
– If the inhibit icon (ø or X) appears
on the TV screen when a button is
pressed, it means the function is not
available on the current disc or at
the current time.
– DVD discs and players are designed
with regional restrictions. Before
playing a disc, make sure the disc is
for the same zone as your player.
– Do not put any objects other than
discs on the disc slot. Doing so may
cause the disc player to malfunction.
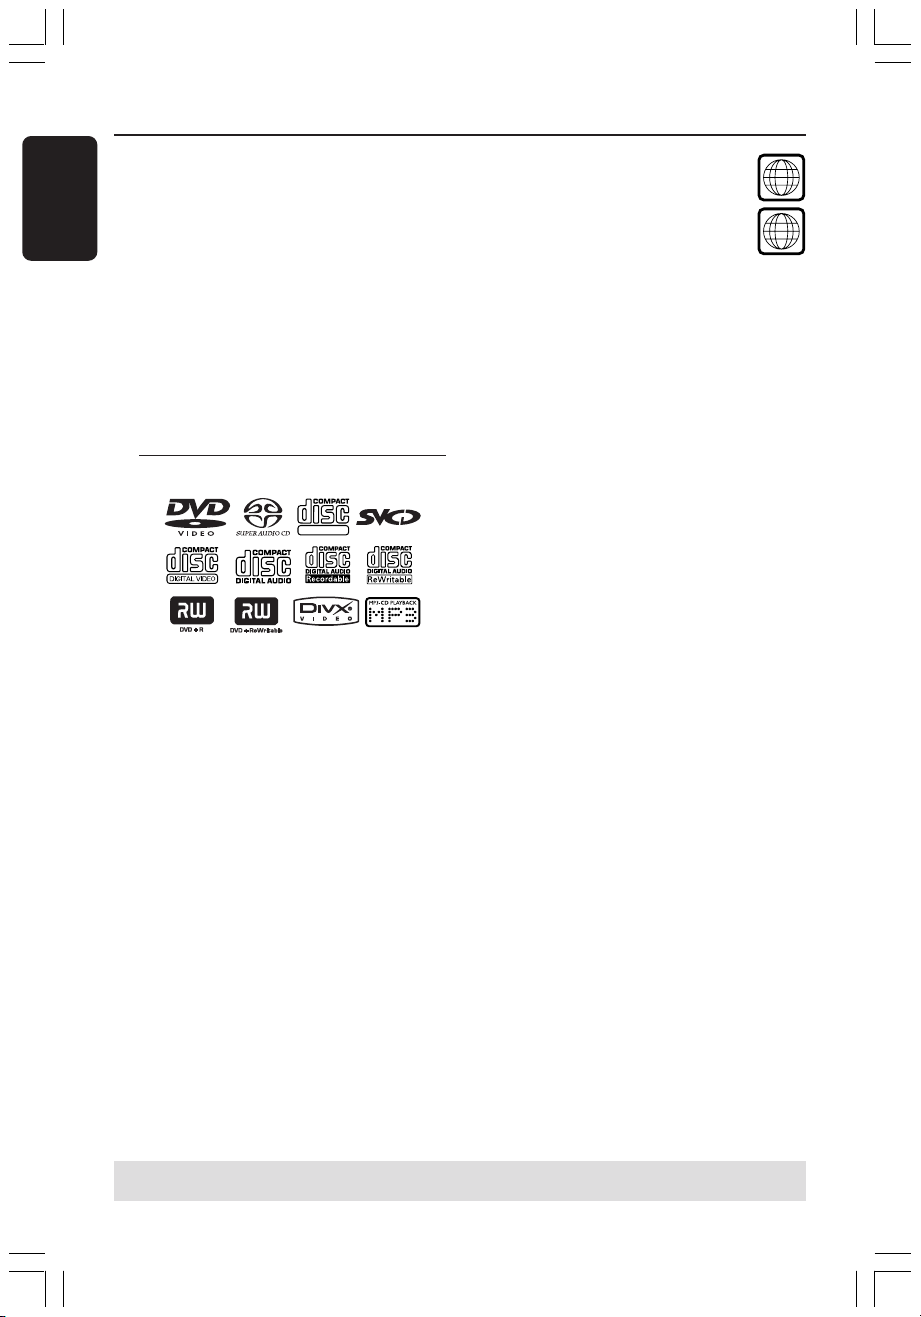
Playable discs
SUPER VIDEO
Your DVD home theatre system will
play:
– Digital Versatile Discs (DVDs)
– Video CDs (VCDs)
– Super Video CDs (SVCDs)
– Super Audio CDs (SACDs)
– Finalised DVD+Recordable[Rewritable]
(DVD+R[W])
– Audio Compact Discs (CDs)
– MP3 discs, picture (Kodak, JPEG) files
on CD-R(W).
– JPEG/ISO 9660/UDF format
– JPEG resolution support up to
3072 x 2048
– Supported sampling frequencies :
32 kHz, 44.1 kHz, 48 kHz
– Supported Bit-rates : 32~256 (kbps),
variable bit rates
– MPEG-4 files on CD-R[W]:
– Simple profile
– Advanced simple profile (640-480)
– DivX disc on CD-R[W]/DVD+R[W]:
– DivX 3.11, 4.x and 5.x
– GMC (Global Motion Compensation)
and QP (Quarter Pixel) not supported.
Region Codes
The regional code ‘X’ (denotes the
ALL
number) of this device is shown at
the back panel of this device. If
the DVD is marked with a
X
different region code, it cannot be played
on this device.
Helpful Hints:
– It may not be possible to play CD-R/RW or
DVD-R/RW in all cases due to the type of
disc or condition of the recording.
– If you are having trouble playing a certain
disc, remove the disc and try a different one.
Improperly formatted discs will not play on
this DVD system.
TIPS: Some discs cannot be played on this DVD system due to the configuration and characteristics
of the disc, or due to the condition of recording and authoring software that was used.
24
001-049 HTS8000S-00-Eng 22/04/2005, 04:06 PM24
3139 115 2xxx1
Page 25
Disc Operations (continued)
Playing a disc
Press SOURCE button until “DISC”
1
appears on the display panel.
2 Turn on the TV power and set to the
correct Video In channel. (See page 20
“Setting the TV”).
➜ You should see the blue DVD
background screen on the TV.
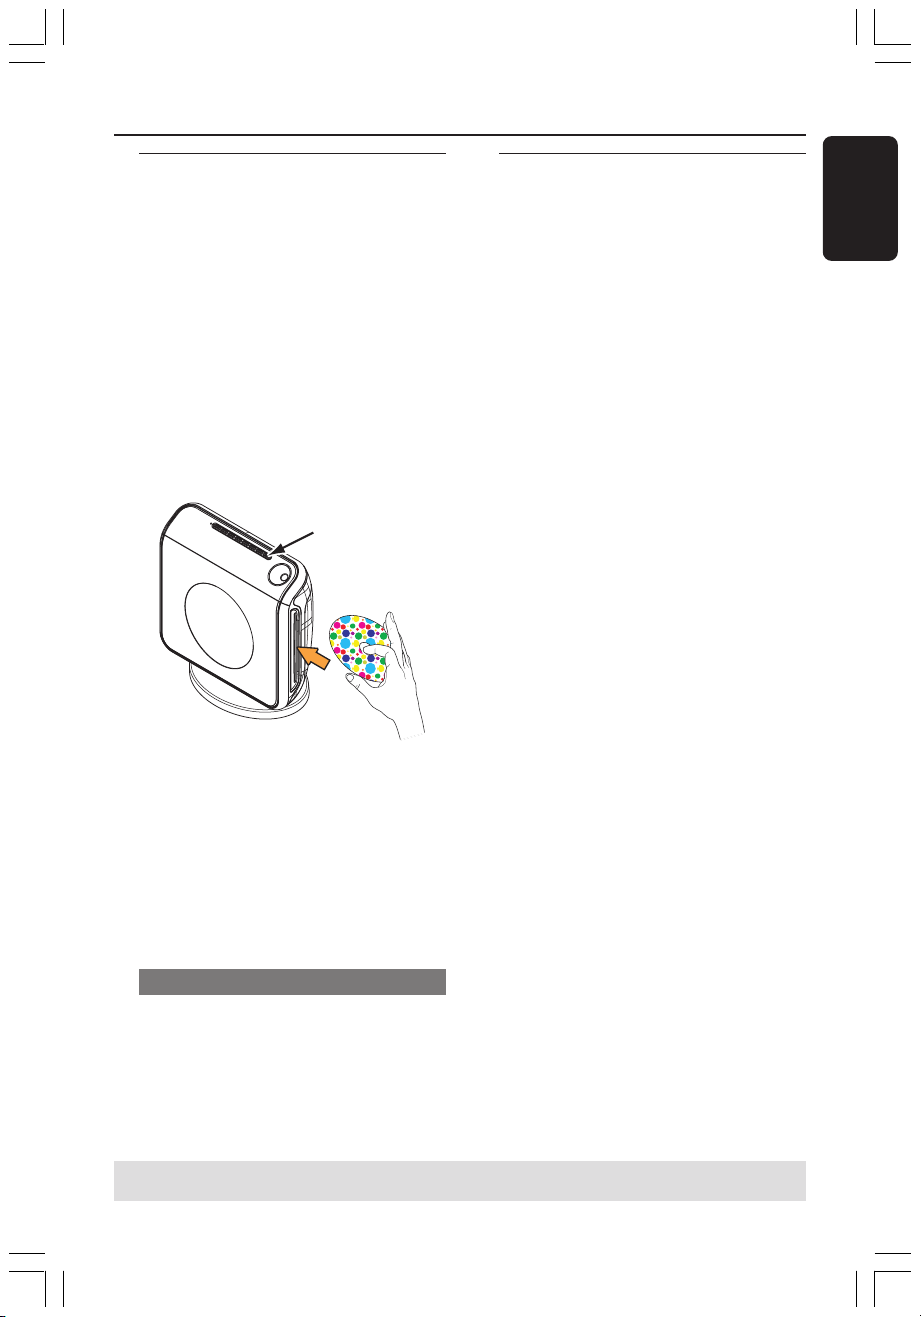
3 Insert a disc into the disc slot.
➜ Make sure the disc label is facing out.
For double-sided discs, load the side you
want to play facing out.
➜ When loading an 8cm disc, slot into
the middle of the disc loader.
EJECT
Basic playback controls
Pausing playback
● During playback, press 2;
(PLAY PAUSE).
➜ To resume normal playback, press the
same button again.
Selecting another track/chapter
● Press S / T (PREV / NEXT) or
use the numeric keypad (0-9) to key in
a track/chapter number.
➜ If repeat track mode is active, pressing
S / T will replay the same track/
chapter.
Searching backward/forward
● Press and hold S / T (PREV /
NEXT).
➜ While searching, pressing S / T
again will decrease/increase the search
speed.
➜ To resume normal playback, press 2;
(PLAY PAUSE).
Stopping playback
● Press Ç (STOP).
English
4 Playback will start automatically.
➜ If a disc menu shows on the TV, see
page 26 “Using the Disc Menu”.
➜ If the disc is locked by parental control,
you must enter your six-digit password.
(see pages 37~38).
5 To remove the disc, press EJECT (or hold
down the Ç button on the remote).
Auto Eco Power standby mode
This is a power-saving feature, the system
will automatically switch to Eco Power
standby mode if you do not press any
buttons within 30 minutes after a disc has
stopped playing.
TIPS: The operating features described here might not be possible for certain discs.
Always refer to the instructions supplied with the discs.
001-049 HTS8000S-00-Eng 22/04/2005, 04:06 PM25
25
3139 115 2xxx1
Page 26
Disc Operations (continued)
English
Selecting various repeat/
shuffle functions
● While playing a disc, press REPEAT on
the remote repeatedly to choose a repeat
play mode.
DVD
™ RPT ONE (repeat chapter)
™ RPT TT (repeat title)
™ SHUFFLE (random play)
™ RPT SHF (repeat random play)
™ RPT OFF (exit repeat mode)
VCD/SVCD/CD
™ RPT ONE (repeat track)
™ RPT ALL (repeat disc)
™ SHUFFLE (random play)
™ RPT SHF (repeat random play)
™ RPT OFF (exit repeat mode)
MP3/SACD/DivX
™ RPT ONE (repeat track)
™ RPT ALL/FLD (repeat folder)
™ SHUFFLE (random play)
™ RPT OFF (exit repeat mode)
Helpful Hint:
– VCDs do not allow repeat playback as
long as the PBC mode is switched on.
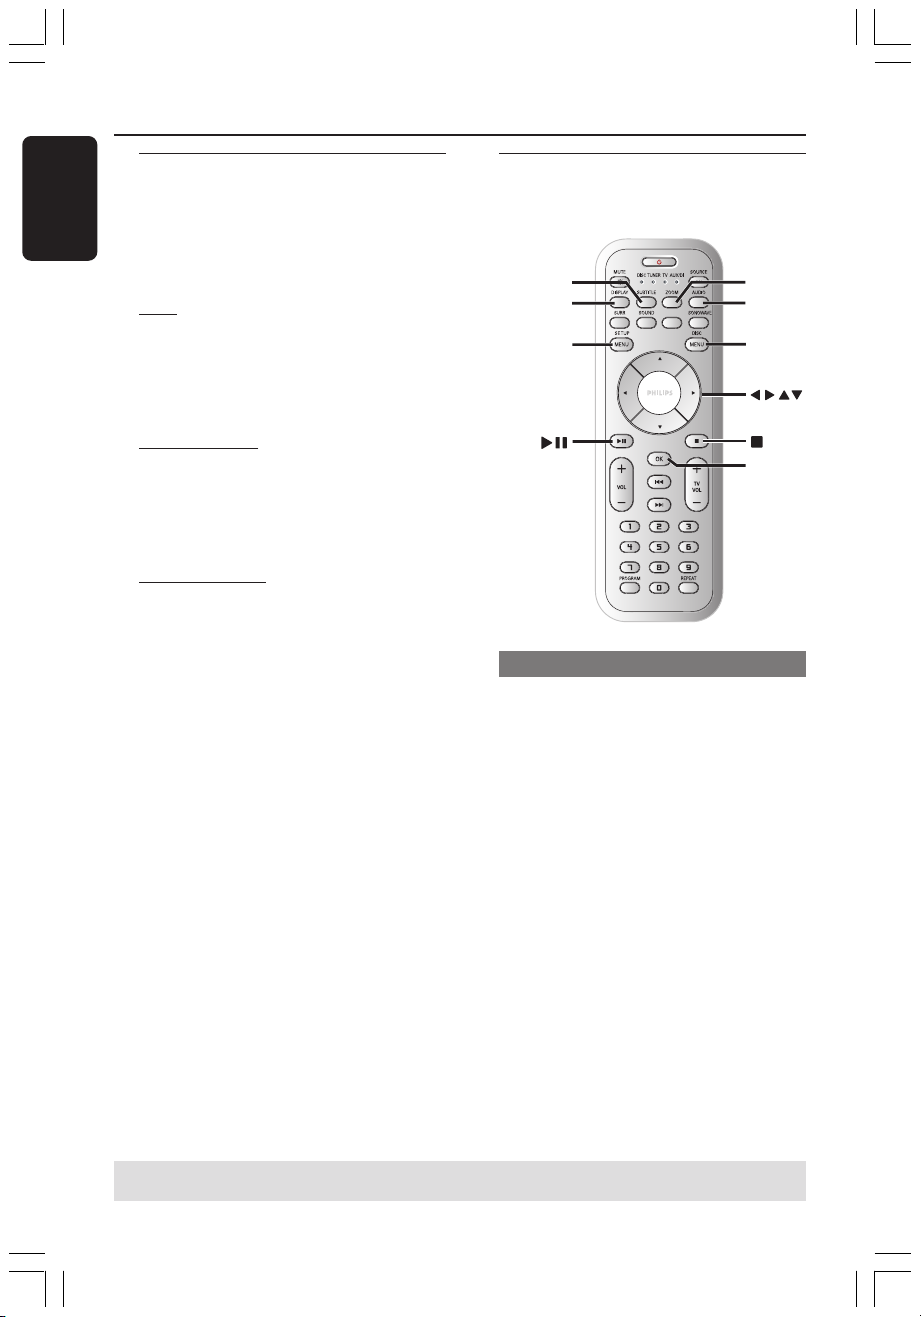
Other operations for video
playback (DVD/VCD/SVCD)
SUBTITLE
DISPLAY
SETUP
MENU
SUBWOOFER
Using the Disc Menu
A menu may appear on the TV screen
once you load in the disc, depending on
the disc format.
To select a playback feature or item
● Use 1 2 3 4 keys or numeric keypad
(0-9) on the remote, then press OK to
start playback.
ZOOM
AUDIO
DISC
MENU
OK
To access or remove the menu
● Press DISC MENU on the remote.
TIPS: The operating features described here might not be possible for certain discs.
Always refer to the instructions supplied with the discs.
26
001-049 HTS8000S-00-Eng 22/04/2005, 04:06 PM26
3139 115 2xxx1
Page 27
Disc Operations (continued)
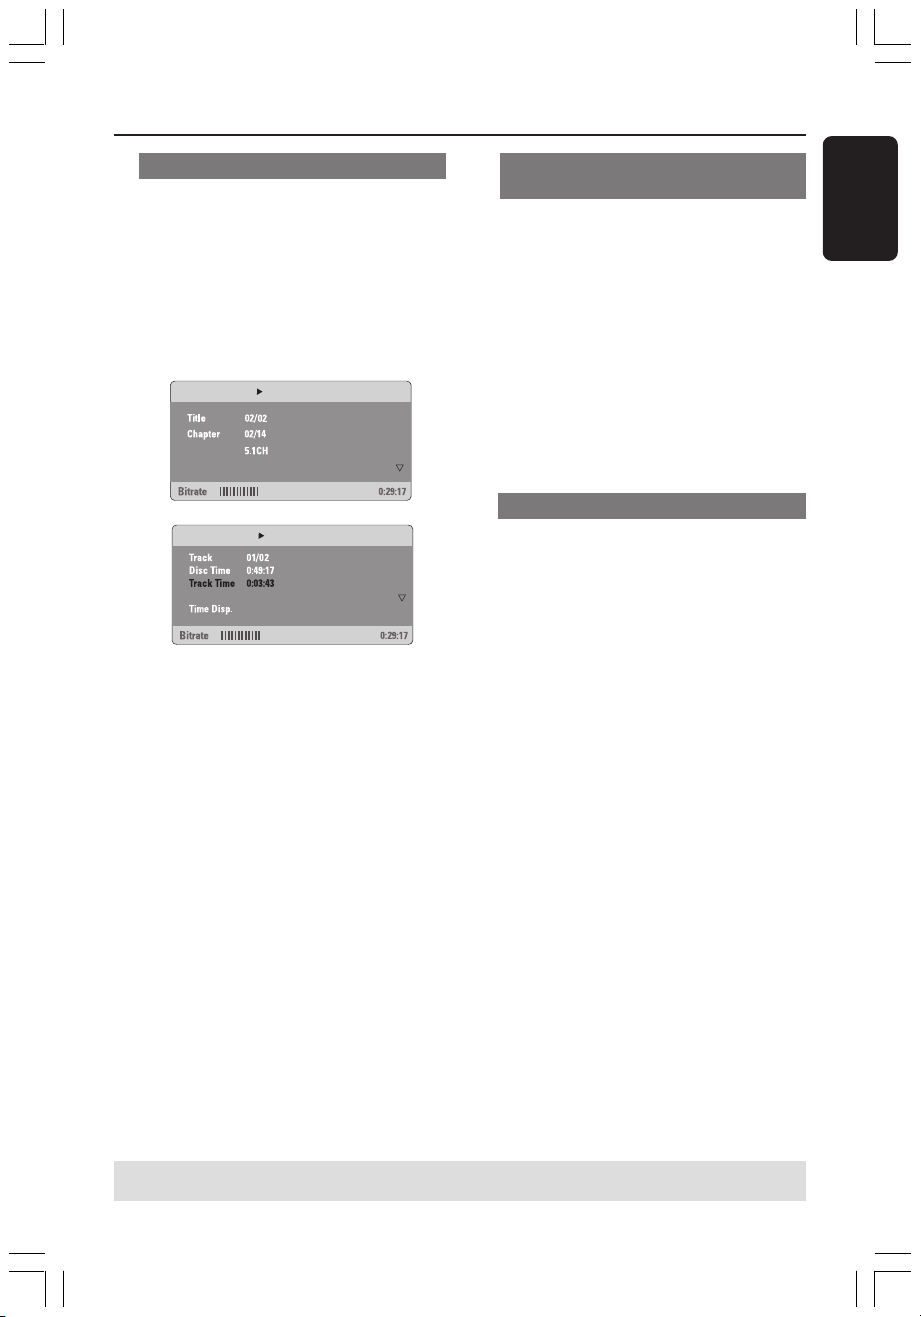
Viewing playback information
It will show the disc playback information
(for example, title or chapter number,
elapsed playing time, audio/subtitle
language), a number of operations can be
done without interrupting disc playback.
1 During playback, press DISPLAY.
➜ A list of available disc information
appears on the TV screen.
Menu
Audio
Subtitle
Off
Title Elapsed
Menu
Repeat
Off
Total Elapsed
Total Elapsed
2 Use 34 keys to view the information and
press OK to access.
3 Use the numeric keypad (0-9) to input
the number/time or use 34 keys to make
the selection, then press OK to confirm.
➜ Playback will change to the chosen
time or to the selected title/chapter/
track.
Resuming playback from the last
stopped point
This DVD system able to resume disc
playback from its last stopped point (only
possible for the last 10 discs that
recorded without a menu).
1 Load one of the last played 10 discs.
2 While “LOADING” appears on the display
panel, press 2; (PLAY PAUSE) to start
playback from the last stop point.
To cancel the resume mode
● In stop mode, press Ç(STOP) again.
Zooming in
This function allows you to enlarge the
picture on the TV screen and to pan
through the enlarged picture.
1 During playback, press ZOOM
repeatedly to select a different zoom
factor.
➜ Use 1 2 3 4 keys to move through
the zoomed image.
➜ Playback will continue.
2 Press ZOOM repeatedly to return to
the original size.
English
TIPS: The operating features described here might not be possible for certain discs.
Always refer to the instructions supplied with the discs.
001-049 HTS8000S-00-Eng 22/04/2005, 04:06 PM27
27
3139 115 2xxx1
Page 28

Disc Operations (continued)
English
Changing sound track language
This operation works only on DVDs with
multiple soundtrack languages, you can
change the language you want while
playing a DVD.
● Press AUDIO repeatedly to select the
available audio languages.
For VCD - changing the audio
channel
● Press AUDIO repeatedly to select the
available audio channels provided by the
disc (STEREO, MONO LEFT, MONO
RIGHT or MIX MONO).
Changing subtitle language (DVD
only)
This operation works only on DVDs with
multiple subtitle languages, you can
change the language you want while
playing a DVD.
● Press SUBTITLE repeatedly to select
different subtitle languages.
Playback Control (PBC) (VCD only)
PBC playback allows you to play Video
CDs interactively, following the menu on
the display. This function can also be
accessed via the ‘Preference Page’ menu
(see page 38).
For VCDs with Playback Control
(PBC) feature (version 2.0 only)
● When play is stopped, press DISC
MENU to toggle between ‘PBC ON’ and
‘PBC OFF’.
➜ If you select ‘PBC ON’, the disc menu
(if available) will appear on the TV.
Use 3 4 keys or numeric keypad (0-9) to
select a play option and press OK to
confirm.
➜ If you select ‘PBC OFF’, the VCD will
skip the index menu and playback directly
from the beginning.
TIPS: The operating features described here might not be possible for certain discs.
Always refer to the instructions supplied with the discs.
28
001-049 HTS8000S-00-Eng 22/04/2005, 04:06 PM28
3139 115 2xxx1
Page 29
Disc Operations (continued)
Playing an MP3/JPEG/MPEG-4
disc
This DVD system can playback MPEG-4,
MP3, JPEG, VCD & SVCD files on a
personally recorded CD-R/RW disc or
commercial CD.
IMPORTANT!
You have to turn on your TV and set to
the correct Video In channel. (See page
20 “Setting the TV”).
1 Insert a disc.
➜ The disc reading time may exceed 30
seconds due to the complexity of the
directory/file configuration.
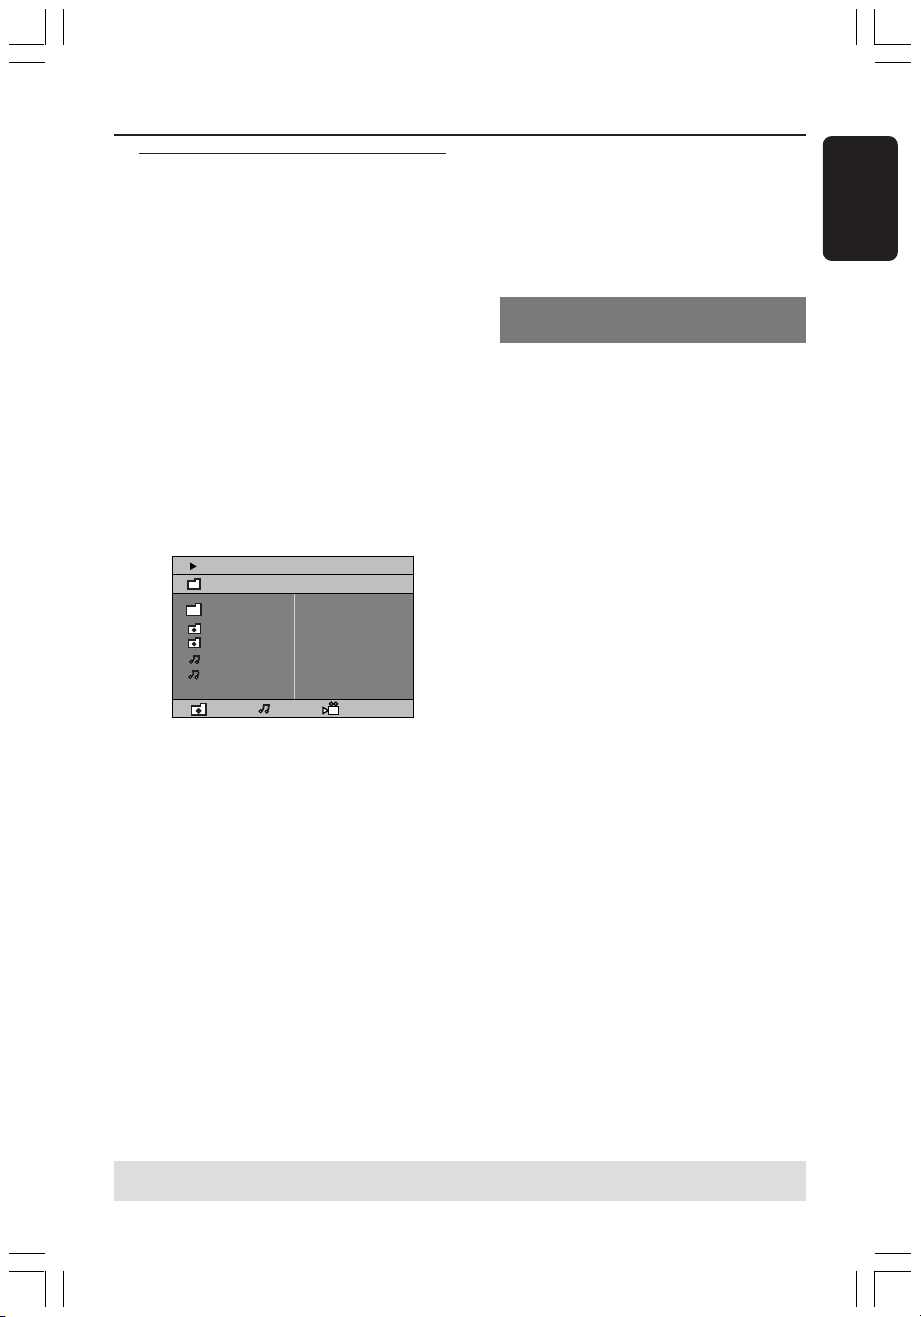
➜ The disc menu appears on the TV
screen.
00:19 04:39 001/003
\MP3_files_128kbs
Previous
Picture 1
Picture 2
MP3 Music 1
MP3 Music 2
050 003 000
2 If the disc main menu contains various
folders, use 34 keys to select a desired
folder and press OK to open the folder.
3 Use 3 4 keys to select a track/file and
press OK to start playback.
➜ Playback will start from the selected
file and continue to the end of the folder.
During playback, you can;
● Press S / T to select another
track/file in the current folder.
● Press and hold S / T to fast
reverse/forward search a music track.
● To select another folder from the current
disc, press 3 to return to the root menu,
then use 34 keys to make your selection
and press OK to confirm.
● Press REPEAT continuously to access
various play mode.
● Press 2; (PLAY PAUSE) to interrupt
playback and press the same button again
to resume playback.
Playing MP3 music and JPEG
picture simultaneously
1 Insert an MP3 disc that contains music
and pictures.
➜ The disc menu appears on the TV
screen.
2 Select an MP3 track and press 2; (PLAY
PAUSE) to start playback.
3 During MP3 music playback, use 1 2 3 4
keys to select a picture folder from the
disc menu and press 2; (PLAY PAUSE).
➜ The picture files will be played back
until the end of the folder.
4 To quit simultaneous playback, press
DISC MENU and followed by
Ç(STOP).
Helpful Hints:
– It may not be possible to play certain
MP3/JPEG/DivX/MPEG-4 disc due to the
configuration and characteristics of the disc
or condition of the recording.
– It is normal to experience an occasional
“skip” while listening to your MP3 disc.
– It is normal to experience an occasional
pixelation during MPEG-4/DivX playback
due to poor clarity of digital contents during
internet downloading.
– For multi-session discs with different
formats, only the first session will be available.
English
TIPS: Some discs cannot be played on this DVD system due to the configuration and characteristics
001-049 HTS8000S-00-Eng 22/04/2005, 04:06 PM29
of the disc, or due to the condition of recording and authoring software that was used.
3139 115 2xxx1
29
Page 30
Disc Operations (continued)
English
Playing a picture disc (slide
show)
IMPORTANT!
You have to turn on your TV and set to
the correct Video In channel. (See page
20 “Setting the TV”).
● Insert a Picture disc (Kodak Picture CD,
JPEG).
➜ For a Kodak disc, the slide show will
begin automatically.
➜ For a JPEG disc, the picture menu will
appear on the TV screen. Press 2;
(PLAY PAUSE) to start the slide-show
playback.
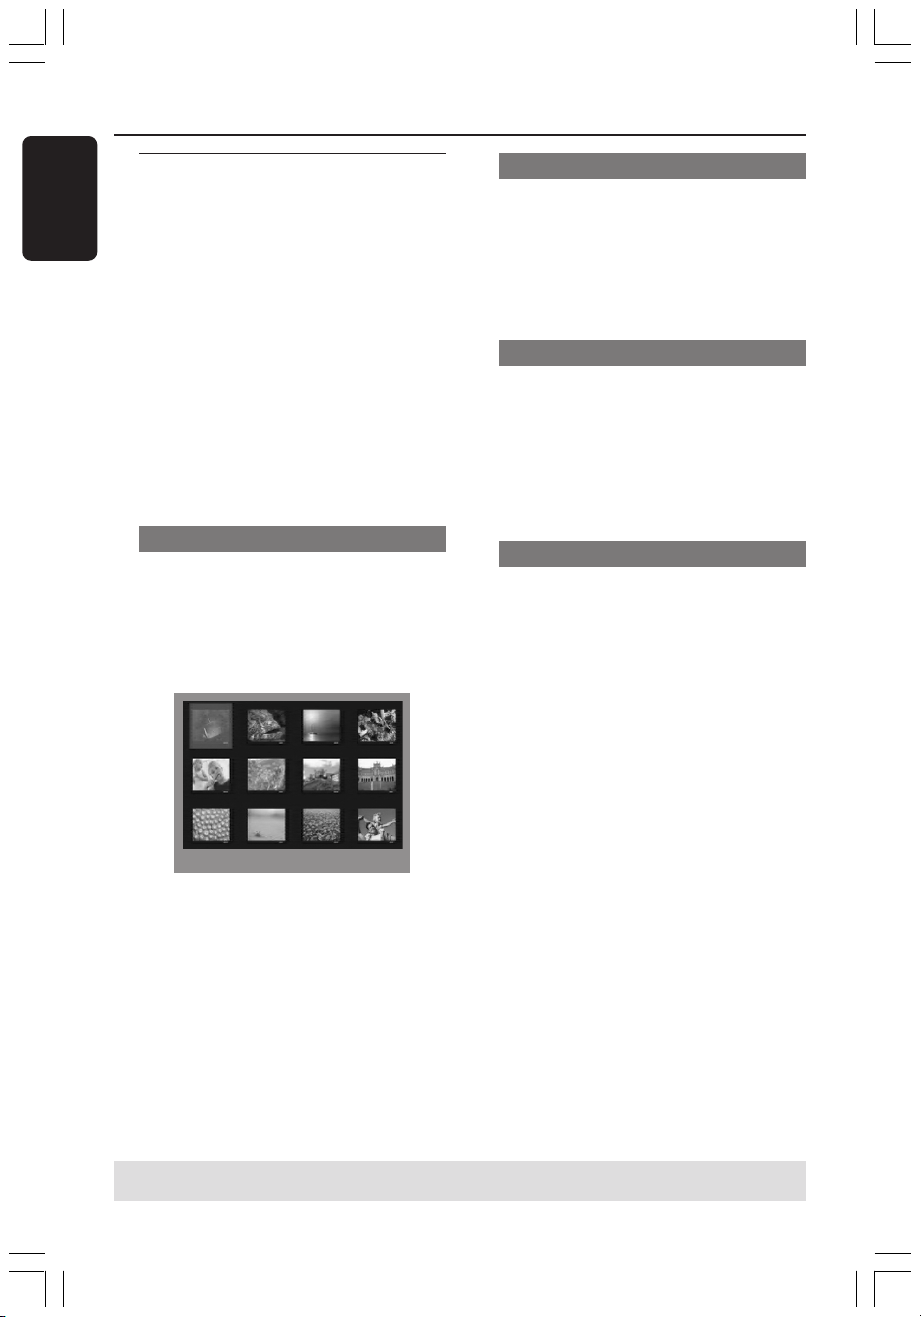
Preview Function
This function shows the content of the
current folder or the whole disc.
1 During playback, press Ç(STOP).
➜ 12 thumbnail pictures will appear on
the TV screen.
2 S T
Zoom picture
1 During playback, press ZOOM
repeatedly to select different zoom
factor.
2 Use 1 2 3 4 keys to move through the
zoomed image.
Rotating/Flipping the picture
● During playback, use 1 2 3 4 keys to
rotate/flip the picture on the TV screen.
: flip the picture vertically
3
4
: flip the picture horizontally
1 : rotate the picture anti-clockwise
2
: rotate the picture clockwise
Supported JPEG picture formats
File format:
– The file extension has to be '*.JPG' and
not '*.JPEG'.
– It can only display DCF-standard still
pictures or JPEG pictures e.g. TIFF. It
cannot play back moving pictures, Motion
JPEG, progressive JPEG and other
formats, or pictures in formats other than
JPEG, or pictures associated with sound.
– It may require longer time for the
DVD system to display the disc content
on the TV due to the large number of
songs/pictures compiled into one disc.
2 Press S / T to display the other
pictures on the previous/next page.
3 Use 1 2 3 4 keys to highlight one of the
picture and press OK to start playback.
4 Press DISC MENU to return to Picture
CD menu.
TIPS: Some discs cannot be played on this DVD system due to the configuration and characteristics
30
001-049 HTS8000S-00-Eng 22/04/2005, 04:06 PM30
of the disc, or due to the condition of recording and authoring software that was used.
3139 115 2xxx1
Page 31

Disc Operations (continued)
Playing a Super Audio CD
(SACD)
There are three types of SACD discs :
single layer, double layer or hybrid discs.
The hybrid disc contains both Super
Audio CD and standard audio CD layers,
only the SACD layer can be played back
on this DVD system.
1 Insert a SACD.
➜ The disc menu appears on the TV
screen.
2 Playback will start automatically.
➜ If the SACD consists of multi-channel
and stereo tracks, multi-channel tracks
will have the priority for playback.
➜ To playback stereo tracks, use 3 4
keys to make your selection from the disc
menu, then press 2; (PLAY PAUSE).
Helpful Hint
– It is not possible to programme SACD
tracks.
Playing a DivX disc
This DVD system supports the playback
of DivX movie which you download from
your computer onto a CD-R/RW (see
page 33 for more information).
1 Insert a DivX disc.
2 If the DivX movie contains external
subtitles, the subtitle menu will appear on
the TV for your selection.
● In this case, pressing SUBTITLE on the
remote will turn on or off the subtitle
display.
3 Press 2; (PLAY PAUSE) to start
playback.
● If multilingual subtitles are embedded on
the DivX disc, you can press SUBTITLE
to change the subtitle language while
playing.
Helpful Hints:
– Subtitle files with the following filename
extensions (.srt, .smi, .sub, .ssa, .ass) are
supported but do not appear on the file
navigation menu.
– The subtitle filename has to be the same
as the filename of the movie.
– The subtitle can only be displayed up to
maximum of 35 characters.
English
TIPS: Some discs cannot be played on this DVD system due to the configuration and characteristics
001-049 HTS8000S-00-Eng 22/04/2005, 04:06 PM31
of the disc, or due to the condition of recording and authoring software that was used.
3139 115 2xxx1
31
Page 32
DVD Setup Menu Options
2
6
7
8
9
10
Exit Start Next
English
This DVD system setup is carried out via
the TV, enabling you to customise the
DVD system to suit your particular
requirements.
Accessing General Setup
Page
In disc mode, press SETUP MENU.
1
2 Press 1 2 to select ‘General Setup Page’.
3 Press OK to confirm.
General Setup Page
Disc Lock
Program
OSD Language
Screen Saver
DIVX(R) VOD Code
Locking/Unlocking the disc for
viewing
Not all discs are rated or coded by the
disc maker. You can prevent a specific
disc from playing by locking the disc. Up
to 40 discs can be locked.
1 In ‘General Setup Page’, use 34 keys to
highlight { Disc Lock }, then press 2.
{ Lock }
Select this to block the playback of the current
disc. Subsequent access to a locked disc
requires six-digit password. The default
password is ‘136900’ (see page 39 “Changing
the password”).
{ Unlock }
Select this to unlock the disc and allow future
playback.
Programming disc tracks (not for
Picture CD/MP3/SACD)
You can play the contents of the disc in
the order you want by programming the
playing order of the tracks. Up to 20
tracks can be stored.
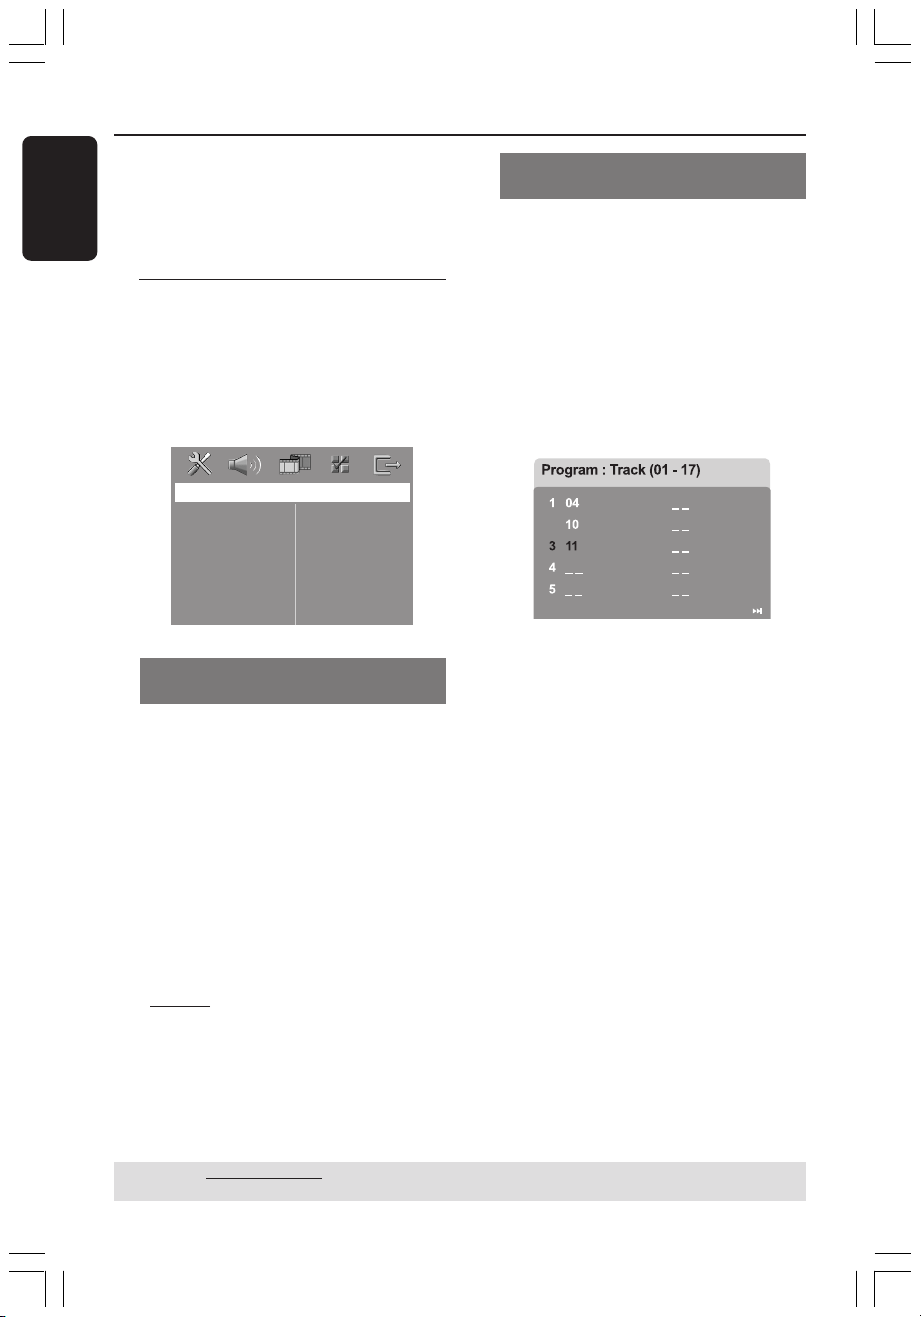
1 Press PROGRAM on the remote.
OR
In ‘General Setup Page’, use 34 keys to
highlight { Program }, then press 2 to
select { Input Menu }.
2 Press OK to confirm.
To programme your favourite tracks/
chapter
3 Use the numeric keypad (0-9) to enter
a valid track/chapter number.
4 Use 1 2 3 4 keys to move the cursor to
the next position.
➜ If the total programme tracks are
more than ten, press T to open the
next page and proceed with programming
or,
➜ Use 1 2 3 4 keys to highlight
{ Next } on the programme menu, then
press OK.
5 Repeat steps 3~4 to input another
track/chapter number.
2 Use 34 keys to select a setting and press
OK to confirm.
TIPS: The underlined option is the factory default setting.
32
001-049 HTS8000S-00-Eng 22/04/2005, 04:06 PM32
To return to the previous menu, press 1. To remove the menu, press SETUP MENU.
3139 115 2xxx1
Page 33

DVD Setup Menu Options (continued)
If you want to remove a track
6 Use 1 2 3 4 keys to move the cursor to
the track you want to remove.
7 Press OK to remove this track from the
programme menu.
To start programme playback
8 Use 1 2 3 4 keys to highlight { Start }
on the programme menu, then press OK.
➜ Playback will start with the selected
tracks under the programmed sequence.
To exit programme playback
9 Use 1 2 3 4 keys to highlight { Exit } on
the programme menu, then press OK.
OSD Language
This menu contains various language
options for the language displayed on the
screen. For details, see page 23.
Screen Saver - turning on/off
The screen saver will help to prevent
your TV display device from getting
damaged.
®
DivX
VOD registration code
Philips provide you the DivX
®
VOD
(Video On Demand) registration code
that allows you to rent and purchase
videos using the DivX
®
VOD service.
For more information, visit us at
www.divx.com/vod.
1 In ‘General Setup Page’, use 34 keys to
highlight { DIVX(R) VOD Code }, then
press 2.
➜ The registration code will appear.
2 Press OK to exit.
3 Use the registration code to purchase or
rent the videos from DivX
at www.divx.com/vod. Follow the
instructions and download the video
from your computer onto a CD-R/RW
for playback on this DVD system.
Helpful Hint:
– All the downloaded videos from DivX
VOD can only be played back on this DVD
system.
®
VOD service
®
English
1 In ‘General Setup Page’, use 34 keys to
highlight { Screen Saver }, then press 2.
{ On }
Select this if you wish to turn off the TV screen
when play is stopped or paused for more than
15 minutes.
{ Off }
Select this to disable the screen saver function.
2 Use 34 keys to select a setting and press
OK to confirm.
TIPS: The underlined option is the factory default setting.
To return to the previous menu, press 1. To remove the menu, press SETUP MENU.
001-049 HTS8000S-00-Eng 22/04/2005, 04:06 PM33
33
3139 115 2xxx1
Page 34

DVD Setup Menu Options (continued)
English
Accessing Audio Setup Page
In disc mode, press SETUP MENU.
1
2 Press 1 2 to select ‘Audio Setup Page’.
3 Press OK to confirm.
Audio Setup Page
Analog Output
Night Mode
CD Upsampling
Setting the analogue output
Set Analogue Output to match your DVD
home theatre system’s playback capability.
This function can also be accessed via the
SURR. button on the remote.
1 In ‘Audio Setup Page’, press 34 to
highlight { Analog Output }, then press
2.
{ Stereo }
Select this to change channel output to stereo
that delivers sound from only the two front
speakers and subwoofer.
{ Multi-channel }
Select this to enable Multi-channel output.
2 Use 34 keys to select a setting and press
OK to confirm.
Helpful Hint:
– This feature is not available for SACD
playback.
Night Mode - turning on/off
When the night mode is activated, the
high volume outputs are softened and
low volume outputs are brought upward
to an audible level (for DVD only). It is
useful for watching action movies without
disturbing others at night.
1 In ‘Audio Setup Page’, use 34 keys to
highlight { Night Mode }, then press 2.
{ On }
Select this to level out the volume.
{ Off }
Select this when you want to enjoy the
surround sound with its full dynamic range.
2 Use 34 keys to select a setting and press
OK to confirm.
CD Upsampling
This feature allows you to convert your
music CD to a higher sampling rate using
sophisticated digital signal processing for
better sound quality.
If you have activated the CD
upsampling, the system will
automatically switch to stereo mode.
1 In ‘Audio Setup Page’, use 34 keys to
highlight { CD Upsampling }, then press
2.
{ Off }
Select this to disable CD-upsampling.
{ 88.2 kHz (X2) }
Select this to convert the sampling rate of the
CDs twice higher than the original.
2 Use 34 keys to select a setting and press
OK to confirm.
TIPS: The underlined option is the factory default setting.
To return to the previous menu, press 1. To remove the menu, press SETUP MENU.
34
001-049 HTS8000S-00-Eng 22/04/2005, 04:06 PM34
Helpful Hint:
– If you press SURR button on the remote
control to select “Multi-Channel” mode, it will
disable the CD upsampling feature.
3139 115 2xxx1
Page 35

DVD Setup Menu Options (continued)
Accessing Video Setup Page
In disc mode, press SETUP MENU.
1
2 Press 1 2 to select ‘Video Setup Page’.
3 Press OK to confirm.
Video Setup Page
TV Type
TV Display
Progressive
Picture Setting
Component
TV Type
This menu contains the options for
selecting the colour system that matches
the connected TV. For details, see page
22.
TV Display
This menu contains the options for
setting the aspect ratio of the DVD
system according to the connected TV.
For details, see page 22.
Progressive function - turning on/off
In the progressive scan mode, you can
enjoy the high quality picture with less
flickers. It only works when you have
connected the DVD system’s Y Pb Pr
sockets to your TV that supports the
progressive video input. Otherwise, the
image may not appear or will be
distorted. For proper progressive scan
set up, see pages 20~21.
IMPORTANT!
Before enabling the progressive scan
function, you must ensure :
1) Turn on your TV progressive scan
function (refer to your TV owner’s
manual).
2) You have connected the DVD system
to your TV using Y Pb Pr (see page 14).
1 In ‘Video Setup Page’, use 34 keys to
highlight { Progressive }, then press 2.
Off }
{
Select this to disable progressive scan function.
{ On }
Select this to enable progressive scan function.
2 Use 34 keys to select a setting and press
OK to confirm.
➜ Follow the instructions shown on the
TV to confirm the selection (if any).
➜ If a blank/distorted TV screen appears,
wait for 15 seconds for the auto
recovery.
English
TIPS: The underlined option is the factory default setting.
To return to the previous menu, press 1. To remove the menu, press SETUP MENU.
001-049 HTS8000S-00-Eng 22/04/2005, 04:07 PM35
35
3139 115 2xxx1
Page 36
DVD Setup Menu Options (continued)
English
Picture Setting
This DVD system provides three
predefined sets of picture colour settings
and one personal setting which you can
define yourself.
1 In ‘Video Setup Page’, use 34 keys to
highlight { Picture Setting }, then press
2.
{ Standard }
Select this for original colour setting.
{ Bright }
Select this for vibrant colour setting.
{ Soft }
Select this for warm colour setting.
{ Personal }
Select this to personalise your picture colour
by adjusting the brightness, contrast, tint and
colour (saturation).
2 Use 34 keys to select a setting and press
OK to confirm.
3 If you select { Personal }, then proceed
to steps 4~7.
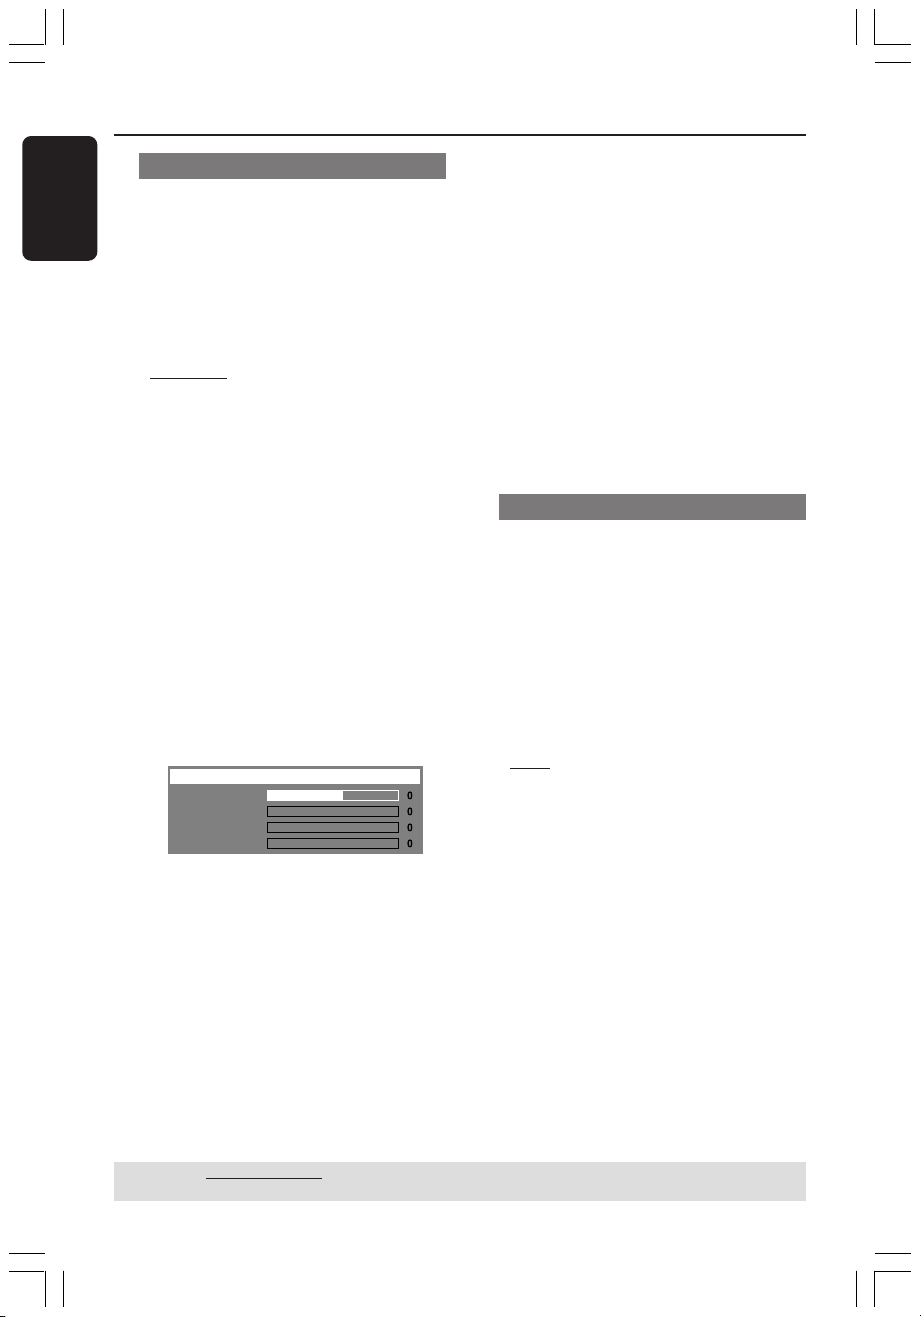
➜ The ‘Personal picture setup’ menu
appears.
Personal Picture Setup
Brightness
Contrast
Tint
Color
4 Use 34 keys to highlight one of the
following options.
{ Tint }
Increase or decrease this value to change the
colour phase of the picture. Choose zero (0)
for the average setting.
{ Color }
Increase this value to enhance the picture
colour or vice versa. Choose zero (0) to
balance the colour.
5 Press 1 2 to adjust the setting that best
suit your personal preference.
6 Repeat steps 4~5 to adjust other
settings.
7 Press OK to confirm.
Setting the Video Output
Choose the type of video output that
matches the video connection between
the DVD system and your TV.
1 In ‘Video Setup Page’, use 34 keys to
highlight { Component }, then press 2.
{ YUV }
Select this if you have connected the DVD
system to your TV using component video
sockets (Y Pb Pr).
{ RGB }
Select this if you have connected the DVD
system to your TV using scart socket. The
factory default setting is RGB.
2 Use 34 keys to select a setting and press
OK to confirm.
{ Brightness }
Increase this value to brighten the picture
colour or vice versa. Choose zero (0) for the
average setting.
{ Contrast }
Increase this value to sharpen the picture
colour or vice versa. Choose zero (0) to
balance the contrast.
TIPS: The underlined option is the factory default setting.
To return to the previous menu, press 1. To remove the menu, press SETUP MENU.
36
001-049 HTS8000S-00-Eng 22/04/2005, 04:07 PM36
3139 115 2xxx1
Page 37
DVD Setup Menu Options (continued)
Accessing Preference Setup
Page
1
Press Ç twice to stop playback (if any),
then press SETUP MENU.
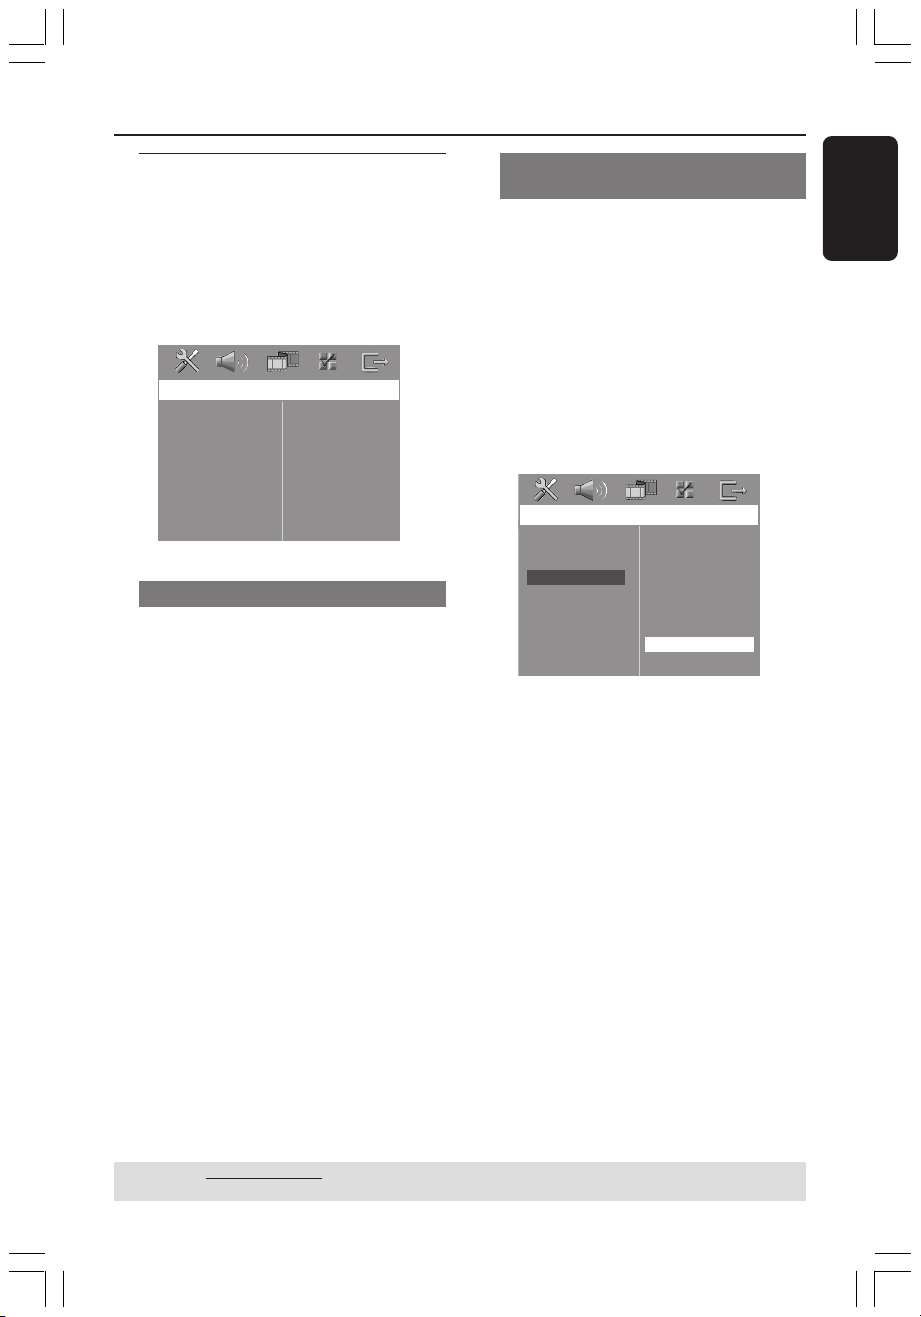
2 Press 1 2 to select the ‘Preference Page’.
3 Press OK to confirm.
Preference Page
Audio
Subtitle
Disc Menu
Parental
PBC
MP3/JPEG Nav
Password
DivX Subtitle
Default
Audio, Subtitle, Disc Menu
These menus contain various language
options for audio, subtitle and disc menu
that may be recorded on the DVD. For
details, see page 23.
Restricting playback by Parental
Control
Some DVDs may have a parental level
assigned to the complete disc or to
certain scenes on the disc. This feature
lets you set a playback limitation level.
The rating levels are from 1 to 8 and are
country dependent. You can prohibit the
playback of certain discs that are not
suitable for your children, or have certain
discs played with alternative scenes.
1 In ‘Preference Page’, use 34 keys to
highlight { Parental }, then press 2.
Preference Page
Audio
Subtitle
Disc Menu
Parental
PBC
MP3/JPEG Nav
Password
DivX Subtitle
Default
1 Kid Safe
2 G
3 PG
4 PG 13
5 PGR
6 R
7 NC 17
8 Adult
2 Use 34 keys to highlight a rating level for
the disc inserted and press OK.
3 Use the numeric keypad (0-9) to enter
the six-digit password (see page 39
“Changing the password”).
➜ DVDs that are rated above the level
you selected will not play unless you
enter your six-digit password.
English
TIPS: The underlined option is the factory default setting.
To return to the previous menu, press 1. To remove the menu, press SETUP MENU.
001-049 HTS8000S-00-Eng 22/04/2005, 04:07 PM37
37
3139 115 2xxx1
Page 38

DVD Setup Menu Options (continued)
English
Rating explanations
1KID SAFE – 2 G
– General Audience; recommended as
acceptable for viewers of all ages.
3 PG
– Parental Guidance suggested.
4 PG13
– Material is unsuitable for children under the
age of 13.
5 PGR – 6 R
– Parental Guidance - Restricted;
recommended that parents restrict children
under the age of 17 from viewing or allow
them to view only when supervised by a
parent or adult guardian.
7 NC-17
– No children under the age of 17; not
recommended viewing for children under the
age of 17.
8 ADULT
– Mature material; should be viewed only by
adults due to graphic sexual material, violence
or language.
Helpful Hints:
– VCD, SVCD, CD have no level indication, so
parental control has no effect on these type
of discs. This also applies to most illegal
DVDs.
– Some DVDs are not encoded with a rating
though the movie rating may be printed on
the Disc cover. The rating level feature does
not prohibit playback of such Discs.
PBC (Playback Control)
PBC (Playback Control) allows you to
play Video CDs interactively, following the
menu on the display. This feature is
available only on Video CD 2.0 with
playback control (PBC) feature.
1 In ‘Preference Page’, use 34 keys to
highlight { PBC }, then press 2.
On }
{
Select this if you wish to display the index
menu once you load in the VCD.
{ Off }
Select this to skip the index menu and start
playback directly.
2 Use 34 keys to select a setting and press
OK to confirm.
MP3/JPEG Menu - turning on/off
MP3/JPEG Navigator can be set only if the
disc is recorded with a menu. It allows
you to select different display menus for
easy navigation.
1 In ‘Preference Page’, use 34 keys to
highlight { MP3/JPEG Nav }, then press
2.
{ Without Menu }
Select this to display all the files contained in
the MP3/Picture CD.
TIPS: The underlined option is the factory default setting.
To return to the previous menu, press 1. To remove the menu, press SETUP MENU.
38
001-049 HTS8000S-00-Eng 22/04/2005, 04:07 PM38
{ With Menu }
Select this to display only the folder menu of
the MP3/Picture CD.
2 Use 34 keys to select a setting and press
OK to confirm.
3139 115 2xxx1
Page 39
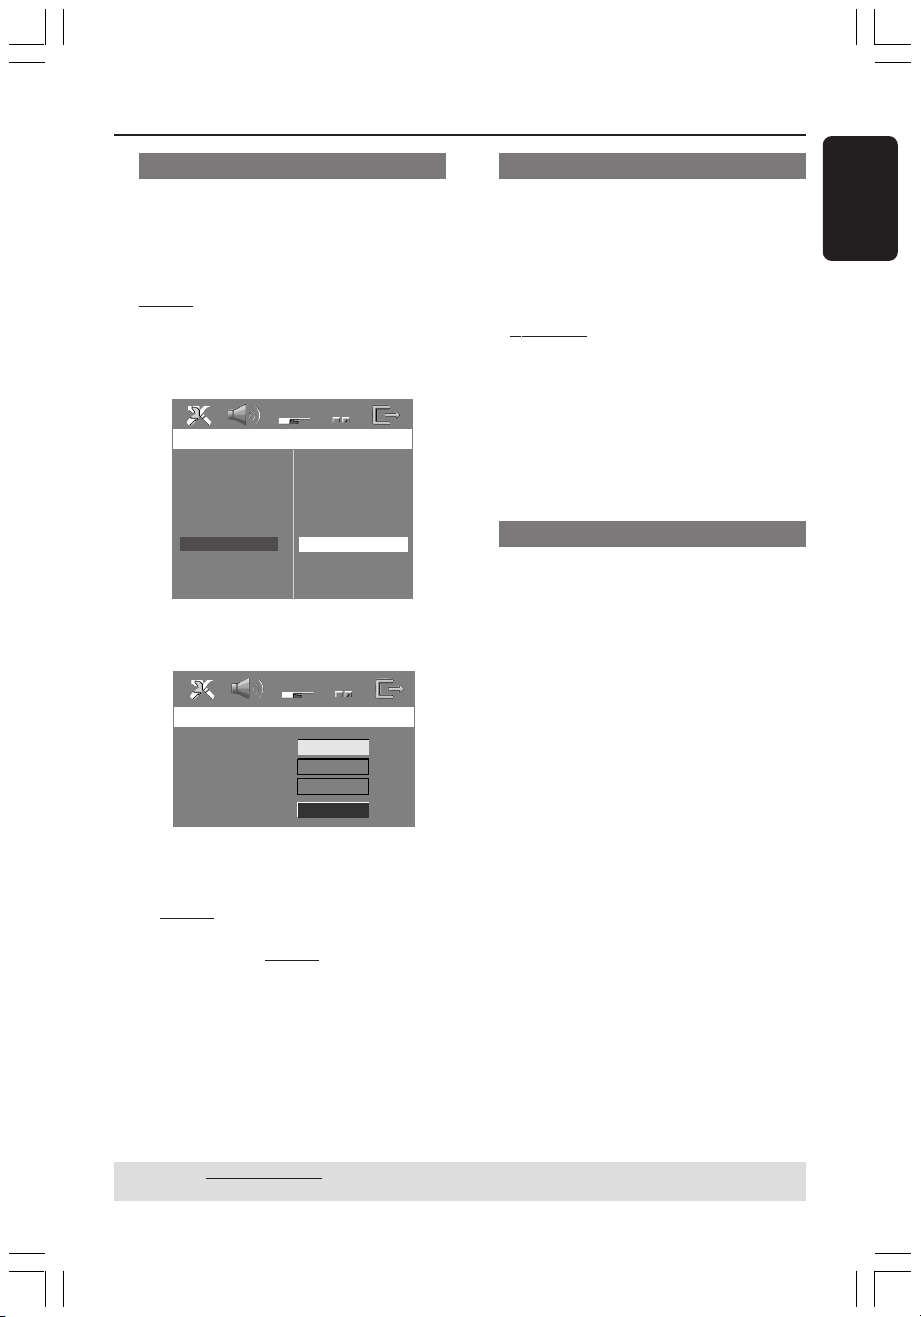
DVD Setup Menu Options (continued)
Changing the Password
The same password is used for both
Parental Control and Disc Lock. Enter
your six-digit password to play a
prohibited disc or if prompted for a
password. The default password is
136900.
1 In ‘Preference Page’, use 34 keys to
highlight { Password }, then press 2 to
select { Change }.
Preference Page
Audio
Subtitle
Disc Menu
Parental
PBC
MP3/JPEG Nav
Password
DIVX Subtitle
Default
Change
2 Press OK to enter the ‘Password Change
Page’.
Change Password
Old Password
New Password
Confirm PWD
OK
Setting the DivX Subtitle font
You can set the font type that supports
the recorded DivX subtitle.
1 In ‘Preference Page’, use 34 keys to
highlight { DIVX Subtitle }, then press
2.
{ Standard }
Select this to display a standard list of Roman
subtitle fonts provided by this DVD system.
{ Others }
Select this to display other subtitle fonts.
2 Use 34 keys to select a setting and press
OK to confirm.
Restoring to original settings
You can reset all the system menu
options and your personal settings to the
factory defaults, except your password
for Parental Control and Disc Lock.
1 In ‘Preference Page’, use 34 keys to
highlight { Default }, then press 2 to
select { Reset }.
2 Press OK to confirm.
➜ All settings will now reset to factory
defaults.
English
3 Use the numeric keypad (0-9) to enter
your old six-digit password.
➜ When doing this for the first time, key
in ‘
136900’.
➜ If you forget your old six-digit
password, key in ‘
136900’.
4 Enter the new six-digit password.
5 Enter the new six-digit password a
second time to confirm.
➜ The new six-digit password will now
take effect.
6 Press OK to confirm.
TIPS: The underlined option is the factory default setting.
001-049 HTS8000S-00-Eng 22/04/2005, 04:07 PM39
To return to the previous menu, press 1. To remove the menu, press SETUP MENU.
39
3139 115 2xxx1
Page 40
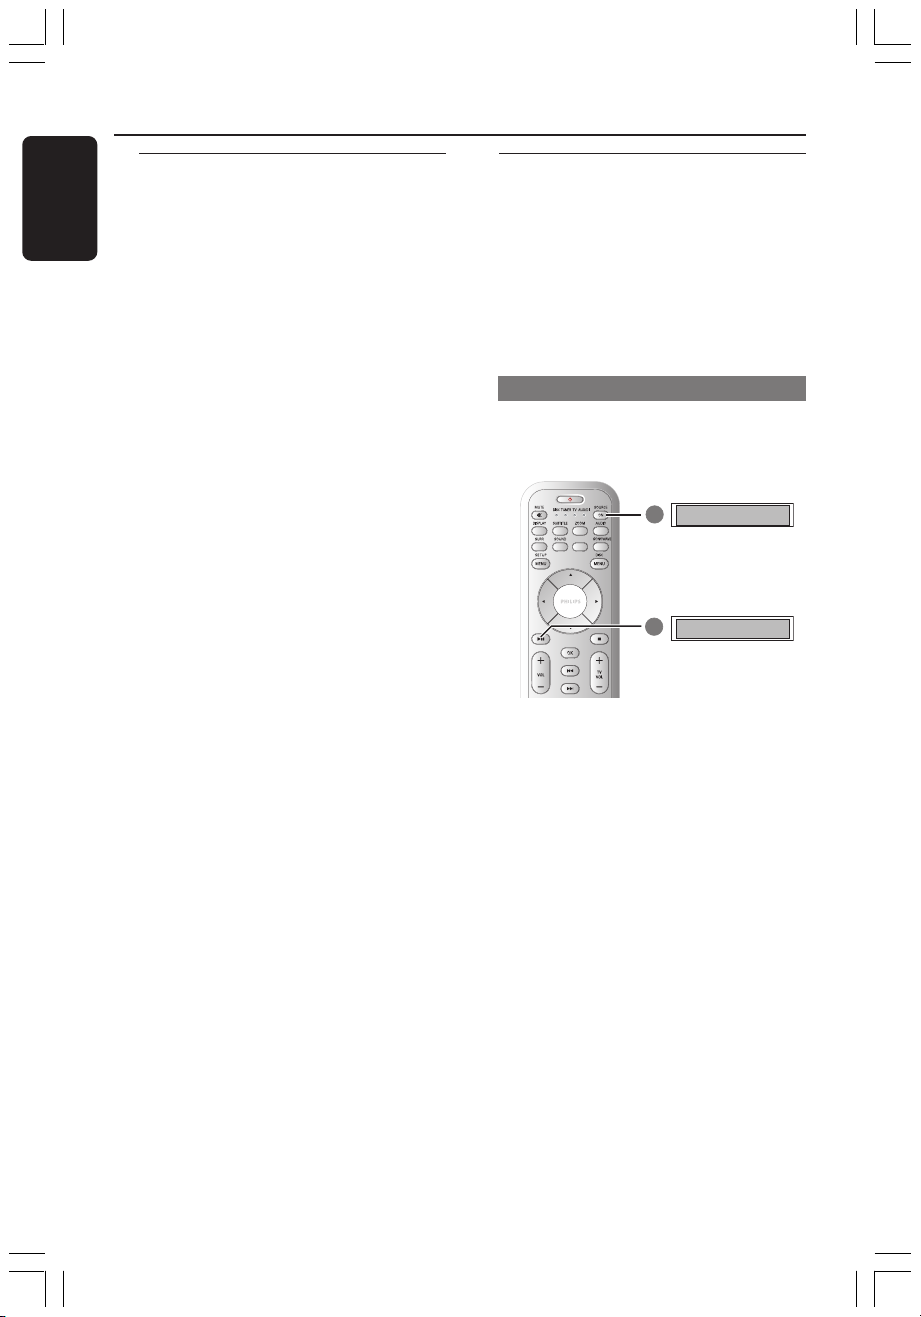
SUBWOOFER
1
AUTO INSTALL..
INSTALL TUNER
2
Tuner Operations
English
Tuning to radio stations
Press SOURCE button until
1
“TUNER FM” appears on the display
panel.
2 Press 3 / 4 briefly on the remote.
➜ The display panel will show "SEARCH"
until a radio station with sufficient signal
strength is found.
3 Repeat step 2 if necessary until you find
the desired radio station.
4 To tune to a weak station, press S /
T briefly and repeatedly until an
optimal reception is found.
● If the FM station reception is weak, press
AUDIO to switch the FM mode from
stereo to mono.
Helpful Hint:
– If the FM radio station is transmitting RDS
(Radio Data System) data, the RDS name
will be displayed and stored.
Presetting radio stations
You can store up to 40 FM preset radio
stations in the memory.
Helpful Hints:
– The system will exit presetting mode if no
button is pressed within 20 seconds.
– If no valid frequency is detected during
Plug and Play,"CHECK ANTENNA" appears.
Using the Plug and Play
Plug and Play allows you to store all
available radio stations automatically.
DVD system’s
display panel
1 For first time setup, press SOURCE
to select TUNER mode.
➜ "AUTO INSTALL PRESS PLAY"
appears.
2 Press and hold 2; (PLAY PAUSE) until
"INSTALL TUNER" appears on the
display panel.
➜ All the available radio stations with
strong signal strength will be stored
automatically.
➜ Once complete, the last tuned radio
station will play.
40
001-049 HTS8000S-00-Eng 22/04/2005, 04:07 PM40
3139 115 2xxx1
Page 41
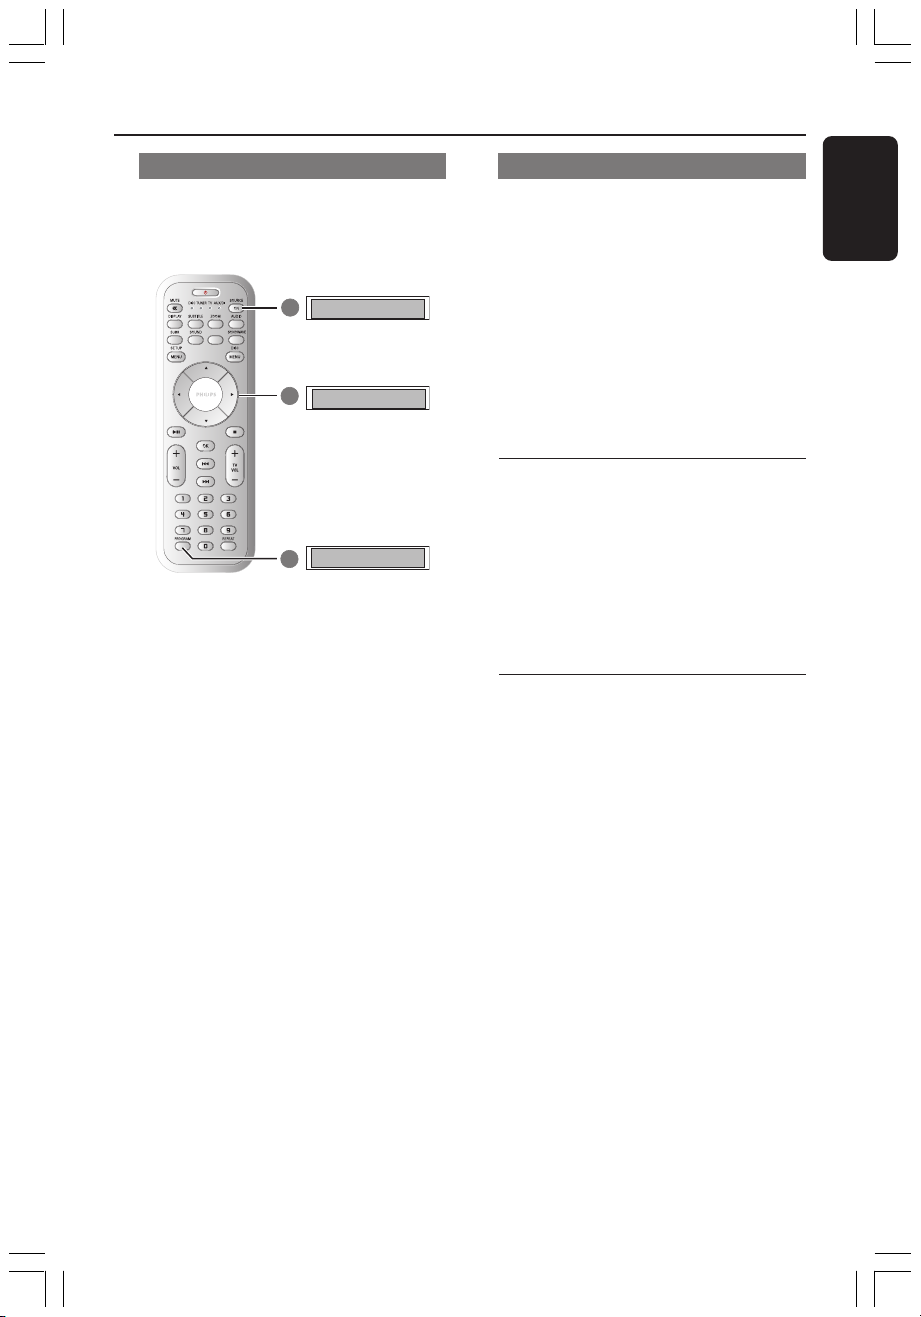
Tuner Operations (continued)
Automatic presetting
Use automatic presetting to store or
reinstall all the preset radio stations.
DVD system’s
display panel
1
TUNER FM
SUBWOOFER
2
02
START..
3
1 Press SOURCE button until
“TUNER FM” appears on the display
panel.
2 Press 1 2 or use the numeric keypad
(0-9) to select a preset number to begin.
3 Press and hold PROGRAM until "AUTO"
appears.
➜ If a radio station is stored in one of the
earlier presets, the same radio station will
not store under another preset number.
➜ If no preset number is selected,
automatic preset will begin from preset
(1) and all your former presets will be
overridden.
Manual presetting
Use manual presetting to store only your
favourite radio stations.
1 Tune to your desired radio station (see
“Tuning to radio stations”).
2 Press PROGRAM.
3 Use 1 2 keys to select a preset number
that you want to store the current radio
station.
4 Press PROGRAM again to store.
Selecting a preset radio
station
● Use 1 2 keys to select a preset number
(or use the numeric keypad on the
remote).
➜ The preset number followed by radio
frequency will appear.
Deleting a preset radio
station
In tuner mode, use 1 2 keys on the
1
remote to select a preset radio station.
2 Press and hold 9 until “PRESET
DELETED” appears.
➜ The radio station continues to play but
has been deleted from the preset list.
English
001-049 HTS8000S-00-Eng 22/04/2005, 04:07 PM41
41
3139 115 2xxx1
Page 42
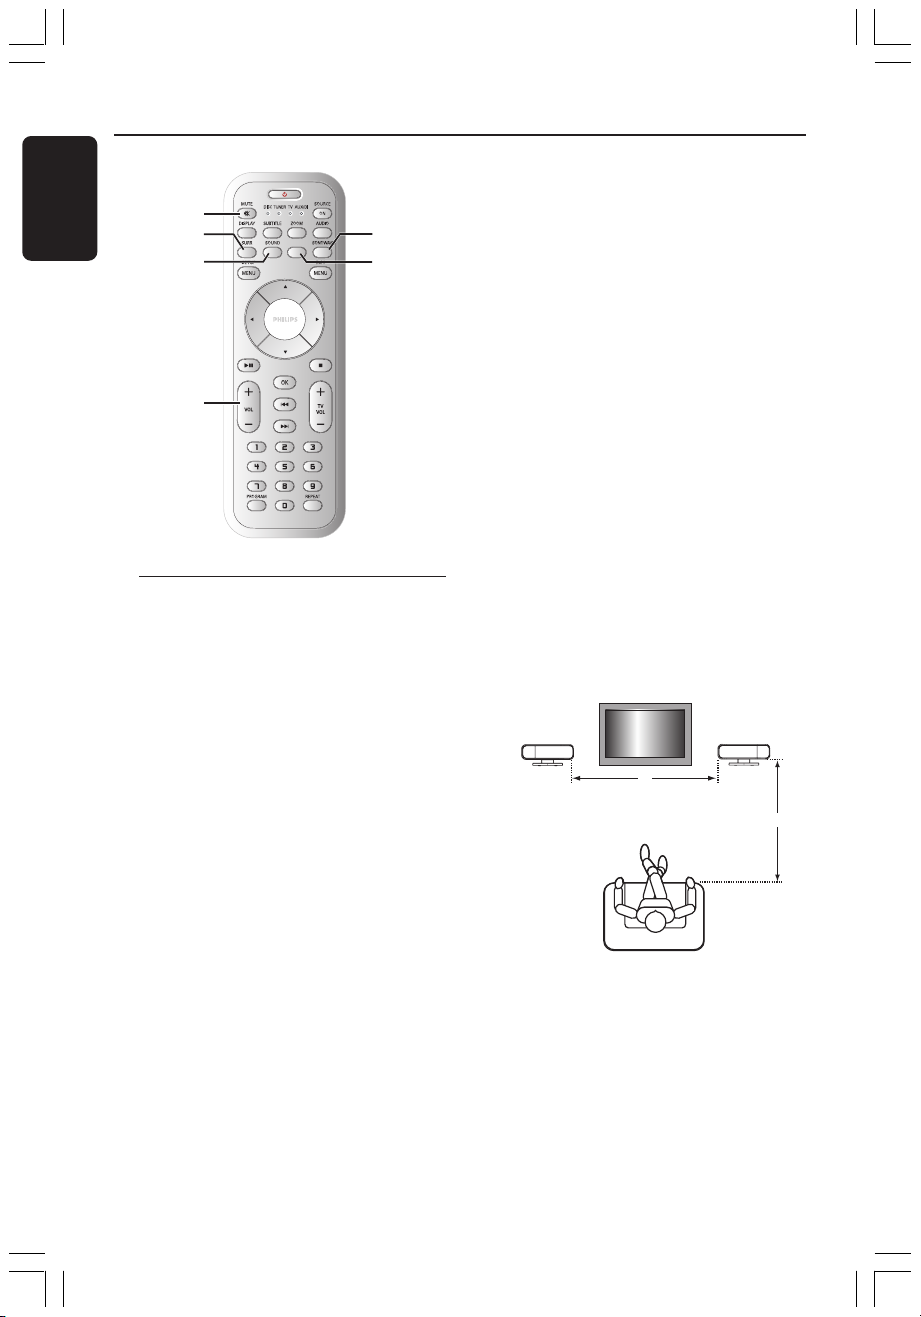
Sound and Volume Controls
English
MUTE
SURR
SOUND
VOL +-
SUBWOOFER
Speakers (SonoWave)
adjustment
You can adjust the SonoWave speakers
setting according to your room
environment and setup for optimum
performance.
IMPORTANT!
The SonoWave speakers must be
placed at equal distance from the
TV.
1 Press SONOWAVE on the remote.
➜ There are three parameters to adjust
the SonoWave speakers : “ROOM
ACOUSTICS”, “SPEAKER DISTANCE”
and “LISTENING POSITION”.
2 Use 3 4 keys to select one of the
options and press OK to adjust the
setting.
SONOWAVE
SUBW
{ ROOM ACOUSTICS }
● Use 3 4 keys to select the condition of
the room and press OK to confirm.
➜ “HARD” for concrete/glass walls.
➜ “SOFT” for wooden walls.
{ SPEAKER DISTANCE }
● Use 3 4 keys to select the distance
(refer to ‘X’ in the below diagram)
between the two SonoWave speakers
and press OK to confirm.
➜ “NEAR” – ‘X’ is less than 1m
➜ “DEFAULT” – ‘X’ is between 1m to
2.5m.
➜ “FAR” – ‘X’ is more than 2.5m.
{ LISTENING POSITION }
● Use 3 4 keys to select the distance
(refer to ‘Z’ in the below diagram) from
the listening position and press OK to
confirm.
➜ “NEAR” – ‘Z’ is less than 1.5m
➜ “DEFAULT” – ‘Z’ is between 1.5m to
2.5m.
➜ “FAR” – ‘Z’ is more than 2.5m.
TV
X
FRONT RFRONT L
Z
3 Press SONOWAVE again to exit the
setting or it will exit automatically if you
do not press any buttons within 10
seconds.
42
001-049 HTS8000S-00-Eng 22/04/2005, 04:07 PM42
3139 115 2xxx1
Page 43

Sound and Volume Controls (continued)
AV subwoofer adjustment
You can adjust the AV subwoofer output
level to enhance the bass output.
1 Start playing a music disc that has lots of
mid-bass sounds, then press
SUBWOOFER on the remote.
2 Press VO L +/- to select the desired
bass level.
➜ If the volume control is not used
within five seconds, it will resume its
normal volume control function.
Selecting surround sound
● Press SURR (SURROUND) to select :
MULTI-CHANNEL or STEREO.
➜ The availability of the various surround
sound modes depends on the sound
available on the disc.
➜ The available output modes for Multi-
channel include: Dolby Digital, DTS
(Digital Theatre Systems) Surround and
Dolby Pro Logic II.
➜ Stereo broadcasts or recordings will
produce some surround channel effects
when played in a surround mode.
However, mono (single channel sound)
sources will not produce any sound from
the surround speakers.
Helpful Hint:
– You are not able to select the surround
sound mode if the system setup menu is
turned on.
Selecting digital sound effects
Select a preset digital sound effects that
matches your disc’s content or that
optimises the sound of the musical style
you are playing.
● Press SOUND to select the available
sound effect.
When playing movie discs or in TV mode,
you can select :
CONCERT, DRAMA, ACTION or SCI-FI.
When playing music discs or while in
TUNER or AUX/DI mode, you can select :
ROCK, DIGITAL, CLASSIC or JAZZ.
Helpful Hint:
– For flat sound output, select CONCERT or
CLASSIC.
Volume control
● Adjust VOLUME control (or press
VOL +/- on the remote) to increase
or decrease the volume level.
➜ "VOL MIN" is the minimum volume
level and “VOL MAX” is the maximum
volume level.
To turn off the volume temporarily
● Press MUTE on the remote.
➜ Playback will continue without sound
and "MUTE" appears.
➜ To restore the volume, press MUTE
again, or increase the volume level.
English
001-049 HTS8000S-00-Eng 22/04/2005, 04:07 PM43
43
3139 115 2xxx1
Page 44
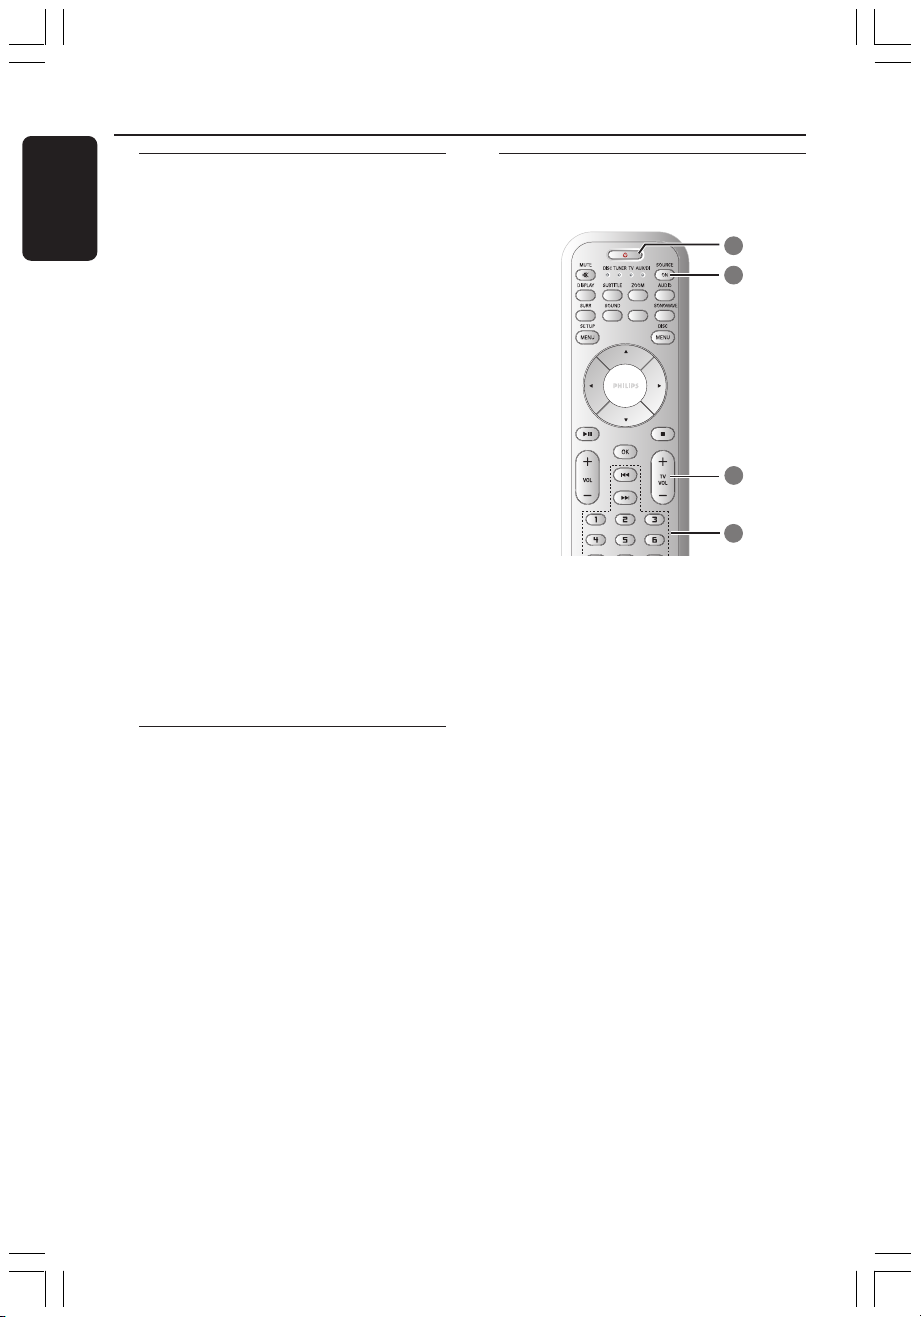
Other Functions
SUBWOOFER
4
1
2
3
English
Setting the Sleep timer
The sleep timer enables the system to
switch to Eco Power standby mode
automatically at a preset time.
1 Press and hold OK on the remote until
“SLEEP XX” appear on the display panel
(XX = 15, 30, 45, 60 or OFF).
2 To select the next sleep timer value, press
OK button again while in sleep timer
mode until it reaches the desired preset
turn-off time.
➜ ‘
SLEEP’ will be showed on the display
panel, except if "OFF" is selected.
➜ Before the system switches to Eco
Power standby mode, a countdown of 10
seconds is displayed.
"SLEEP10" ™ "SLEEP 9".... ™
"SLEEP1" ™ "SLEEP"
To cancel the sleep timer
● Press and hold OK until "OFF" appears
or press the STANDBY ON (B)
button.
Dimming system’s display
screen
Using the remote to operate
your ‘Philips’ television
1 Press SOURCE button until “TV”
appears on the display panel.
2 Press ¡1 / 2™ or use the numeric
keypad (0-9) to select the TV’s channel.
3 Press TV VOL +/- to adjust the TV’s
volume level.
4 Press and hold B to turn off your TV.
● In any active mode, press and hold
DISPLAY on the remote to select the
desired brightness :
DIM 1 : 70% brightness
DIM 2 : 50% brightness
DIM 3 : 25% brightness
DIM OFF : normal brightness
44
001-049 HTS8000S-00-Eng 22/04/2005, 04:07 PM44
3139 115 2xxx1
Page 45

Specifications
AMPLIFIER SECTION
Output power 550 W RMS
Frequency Response 20 Hz – 6 kHz / –3 dB
Signal-to-Noise Ratio > 65 dB (CCIR)
Input Sensitivity
- AUX In 1000 mV
- DIGITAL In 1 Vpp
TUNER SECTION
Tuning Range FM 87.5 – 108 MHz (50 kHz)
26 dB Quieting Sensitivity FM 20 dB
Image Rejection Radio FM 25 dB
IF Rejection Ratio FM 60 dB
Signal-to-Noise Ratio FM 60 dB
AM Suppression Ratio FM 30 dB
Harmonic Distortion FM Mono 3%
FM Stereo 3%
Frequency Response FM 180 Hz – 10 kHz / ±6 dB
Stereo Separation FM 26 dB (1 kHz)
Stereo Threshold FM 23.5 dB
DISC SECTION
Laser Type Semiconductor
Disc Diametre 12cm / 8cm
Video Decoding MPEG-1 / MPEG-2 / MPEG-4
/ DivX 3.11, 4.x & 5.x
Video DAC 12 Bits / 108 MHz
Signal System PAL / NTSC
Video Format 4:3 / 16:9
Video S/N 56 dB (minimum)
Composite Video Output 1.0 Vp-p, 75 Ω
Audio DAC 24 Bits / 96 kHz
Frequency Response 4 Hz – 20 kHz (44.1 kHz)
4 Hz – 22 kHz (48 kHz)
4 Hz – 44 kHz (96 kHz)
PCM IEC 60958
Dolby Digital IEC 60958, IEC 61937
DTS IEC 60958, IEC 61937
SACD D/A converter PCM
SACD cut-off frequency 50 kHz
MAIN UNIT
Power Supply Rating 110 – 240 V; 50 – 60 Hz
Power Consumption 14 W
Dimensions (w x h x d) 251 mm x 277 mm x 134 mm
Weight 2.8 kg
SONOWAVE SPEAKERS
System 2-way, closed box system
Impedance 6 Ω
Speaker drivers 3 x 76mm (3”) woofer +
3 x 18mm (1 3/4”) dome
tweeter
Frequency response 120 Hz – 20 kHz
Dimensions (w x h x d) 350 mm x 140 mm x 134 mm
Weight 1.15 kg/each
AV SUBWOOFER
Power Supply Rating 110 – 240 V; 50 – 60 Hz
Power Consumption 110 W
Output Power 110 W RMS
System Bass Reflex System
Impedance 3 Ω
Speaker drivers 165mm (6.5”) woofer
Frequency response 30 Hz – 120 Hz
Dimensions (w x h x d) 600 mm x 411 mm x 216 mm
Weight 9 kg
JUNCTION BOX
Dimensions (w x h x d) 182 mm x 35 mm x 62 mm
Weight 0.27 kg
Specifications subject to change without prior
notice
English
001-049 HTS8000S-00-Eng 22/04/2005, 04:07 PM45
45
3139 115 2xxx1
Page 46

Troubleshooting
English
WARNING
Under no circumstances should you try to repair the system yourself, as this will
invalidate the warranty. Do not open the system as there is a risk of electric shock.
If a fault occurs, first check the points listed below before taking the system for repair. If
you are unable to remedy a problem by following these hints, consult your dealer or
Philips for help.
Problem Solution
No power.
No picture.
Completely distorted picture
or black/white picture.
– Check if the AC power cord is properly connected.
– Press the STANDBY ON on the front of the DVD system to
turn on the power.
– Refer to your TV’s manual for correct Video In channel selection.
Change the TV channel until you see the DVD screen.
– Press SOURCE to select disc mode.
– If the progressive scan feature is activated but the connected TV
does not support progressive signals or the cables are not
connected accordingly, see pages 20~21 for proper progressive
scan set up or deactivate the progressive scan feature as below:
1) Turn off your TV progressive scan mode or turn on to
interlaced mode.
2) Press EJECT on the main DVD system.
3) Press 1 on the remote control.
4) Press SUBTITLE on the remote control.
– If this happens when you are changing the setting of the ‘TV
TYPE’, wait for 15 seconds for the auto recovery.
– If this happens when you are turning on the progressive scan
feature, wait for 15 seconds for the auto recovery.
– Check the video connection.
– Sometimes a small amount of picture distortion may appear.
This is not a malfunction.
– Clean the disc.
The aspect ratio of the screen
cannot be changed even though
you have set the TV display.
No sound or distorted sound.
Cannot activate some features
such as Angles, Subtitles, or
multi-language Audio.
Need Help? Visit us at www.philips.com/support
46
001-049 HTS8000S-00-Eng 22/04/2005, 04:07 PM46
– The aspect ratio is fixed on the DVD disc.
– Depending on the TV, it may not be possible to change the
aspect ratio.
– Adjust the volume.
– Check the speaker connections and settings.
– Make sure that the audio cables are connected and press the
SOURCE button to select the correct input source (TV or
AUX/DI, for example) to choose the equipment that you want
to hear through the DVD system.
– The features may not be available on the DVD.
– Changing the language for the sound or subtitle is prohibited
on this DVD.
3139 115 2xxx1
Page 47

Problem Solution
Not able to select some Items
in the setup/system menu.
– Press STOP button twice before selecting the setup/system
menu.
– Depending on the disc availability, some menu items cannot be
selected.
Troubleshooting (continued)
English
The DVD system does not
start playback.
No surround sound effect
from the SonoWave Speakers.
Radio reception is poor.
The remote control does not
function properly.
Unable to play DivX movies.
– Insert a readable disc with the playback side facing down. The
DVD+R/CD-R must be finalised.
– Check the disc type, colour system (PAL or NTSC) and region
code.
– Check for any scratches or smudges on the disc.
– Press SETUP MENU to turn off the setup menu screen.
– You may need to enter the password in order to change the
parental control rating level or to unlock the disc for playback.
– Moisture may have condensed inside the system. Remove the
disc and leave the system turned on for about an hour.
– Press SURR button to select a correct surround sound setting.
– Make sure the source you are playing is recorded or broadcast
in surround sound (DTS, Dolby Digital, etc.).
– If the signal is too weak, adjust the antenna or connect an
external antenna for better reception.
– Increase the distance between the system and your TV or VCR.
– Tune in to the correct frequency.
– Place the antenna further away from any equipment that may be
causing the interference.
– Select the source (DISC or TUNER, for example) before
pressing the function button (É, S , T).
– Reduce the distance between the remote control and the
system.
– Replace the batteries with new ones.
– Point the remote control directly toward the IR sensor.
– Check that the batteries are loaded correctly.
– Check that the DivX file is encoded in ‘Home Theatre’ mode
with DivX 5.x encoder.
The DVD system does not
work.
The disc in the disc slot
cannot be ejected.
Need Help? Visit us at www.philips.com/support
001-049 HTS8000S-00-Eng 22/04/2005, 04:08 PM47
– Disconnect the power cord from the power outlet for a few
minutes. Reconnect the power cord and try to operate again as
usual.
– Hold down the STOP button on the remote, followed by
pressing number button “2”, “5” and “9”.
47
3139 115 2xxx1
Page 48

Glossary
English
Analogue: Sound that has not been turned into
numbers. Analogue sound varies, while digital
sound has specific numerical values. These sockets
send audio through two channels, the left and
right.
Aspect ratio: The ratio of vertical and horizontal
sizes of a displayed image. The horizontal vs.
vertical ratio of conventional TVs. is 4:3, and that of
wide-screens is 16:9.
AUDIO OUT Sockets: Red and white sockets
on the back of the DVD System that send audio to
another system (TV, Stereo, etc.).
Bit Rate: The amount of data used to hold a
given length of music; measured in kilobits per
second, or kbps. Or, the speed at which you
record. Generally, the higher the bit rate, or the
higher the recording speed, the better the sound
quality. However, higher bit rates use more space
on a Disc.
Chapter: Sections of a picture or a music piece
on a DVD that are smaller than titles. A title is
composed of several chapters. Each chapter is
assigned a chapter number enabling you to locate
the chapter you want.
Component Video Out Sockets: Sockets on
the back of the DVD System that send high-quality
video to a TV that has Component Video In
sockets (R/G/B, Y/Pb/Pr, etc.).
Disc menu: A screen display prepared for
allowing selection of images, sounds, subtitles,
multi-angles, etc recorded on a DVD.
DivX 3.11/4.x/5.x: The DivX code is a patentpending, MPEG-4 based video compression
technology, developed by DivXNetworks, Inc., that
can shrink digital video to sizes small enough to be
transported over the internet, while maintaining
high visual quality.
Dolby Digital: A surround sound system
developed by Dolby Laboratories containing up to
six channels of digital audio (front left and right,
surround left and right, centre and subwoofer).
Dolby Surround Pro Logic II: It is an improved
matrix decoding technology that provides better
spatiality and directionality on Dolby Surround
programme material; provides a convincing threedimensional soundfield on convertional stereo
music recordings; and is ideally suited to bring the
surround experience to automotive sound. While
conventional surround programming is fully
campatible with Dolby Surround Pro Logic II
decoders, soundtracks will be able to be encoded
specifically to take full advantage of Pro Logic II
playback, including separate left and right surround
channels. (Such material also compatible with
conventional Pro Logic decoders).
DTS: Digital Theatre Systems. This is a surround
sound system, but it is different from Dolby Digital.
The formats were developed by different
companies.
JPEG: A very common digital still picture format. A
still-picture data compression system proposed by
the Joint Photographic Expert Group, which
features small decrease in image quality in spite of
its high compression ratio.
MP3: A file format with a sound data compression
system. “MP3” is the abbreviation of Motion
Picture Experts Group 1 (or MPEG-1) Audio Layer
3. By using the MP3 format. One CD-R or CD-RW
can contain about 10 times more data then a
regular CD.
Multichannel: DVDs are formatted to have each
sound track constitute one sound field.
Multichannel refers to a structure of sound tracks
having three or more channels.
Parental control: Limits Disc play according to
the age of the users or the limitation level in each
country. The limitation varies from disc to disc;
when it is activated, playback will be prohibited if
the software’s level is higher than the user-set
level.
Playback control (PBC): Refers to the signal
recorded on video CDs or SVCDs for controlling
playback. By using menu screens recorded on a
Video CD or SVCD that supports PBC, you can
enjoy interactive playback and searching.
48
001-049 HTS8000S-00-Eng 22/04/2005, 04:08 PM48
3139 115 2xxx1
Page 49

Progressive Scan: It displays all the horizontal
lines of a picture at one time, as a signal frame.
This system can convert the interlaced video from
DVD into progressive format for connection to a
progressive display. It dramatically increases the
vertical resolution.
Region code: A system allowing discs to be
played only in the region designated. This unit will
only play discs that have compatible region codes.
You can find the region code of your unit by
looking on the product label. Some discs are
compatible with more than one region (or ALL
regions).
Super Audio CD (SACD): This audio format is
based upon the current CD standards but includes
a greater amount of information that provides
higher quality sound. There are three types of
discs: single layer, double layer and hybrid discs.
The hybrid disc contains both standard audio CD
and Super Audio CD information.
Surround: A system for creating realistic threedimensional sound fields full of realism by
arranging multiple speakers around the listener.
Title: The longest section of a movie or music
feature on DVD. Each title is assigned a title
number, enabling you to locate the title you want.
VIDEO OUT socket: Yellow socket on the back
of the DVD system that sends the DVD picture
video to a TV.
Glossary (continued)
English
001-049 HTS8000S-00-Eng 22/04/2005, 04:08 PM49
49
3139 115 2xxx1
 Loading...