

Page 1
Register your product and get support at
STO
P
A
R
RÊT
ALTO
www.philips.com/welcome
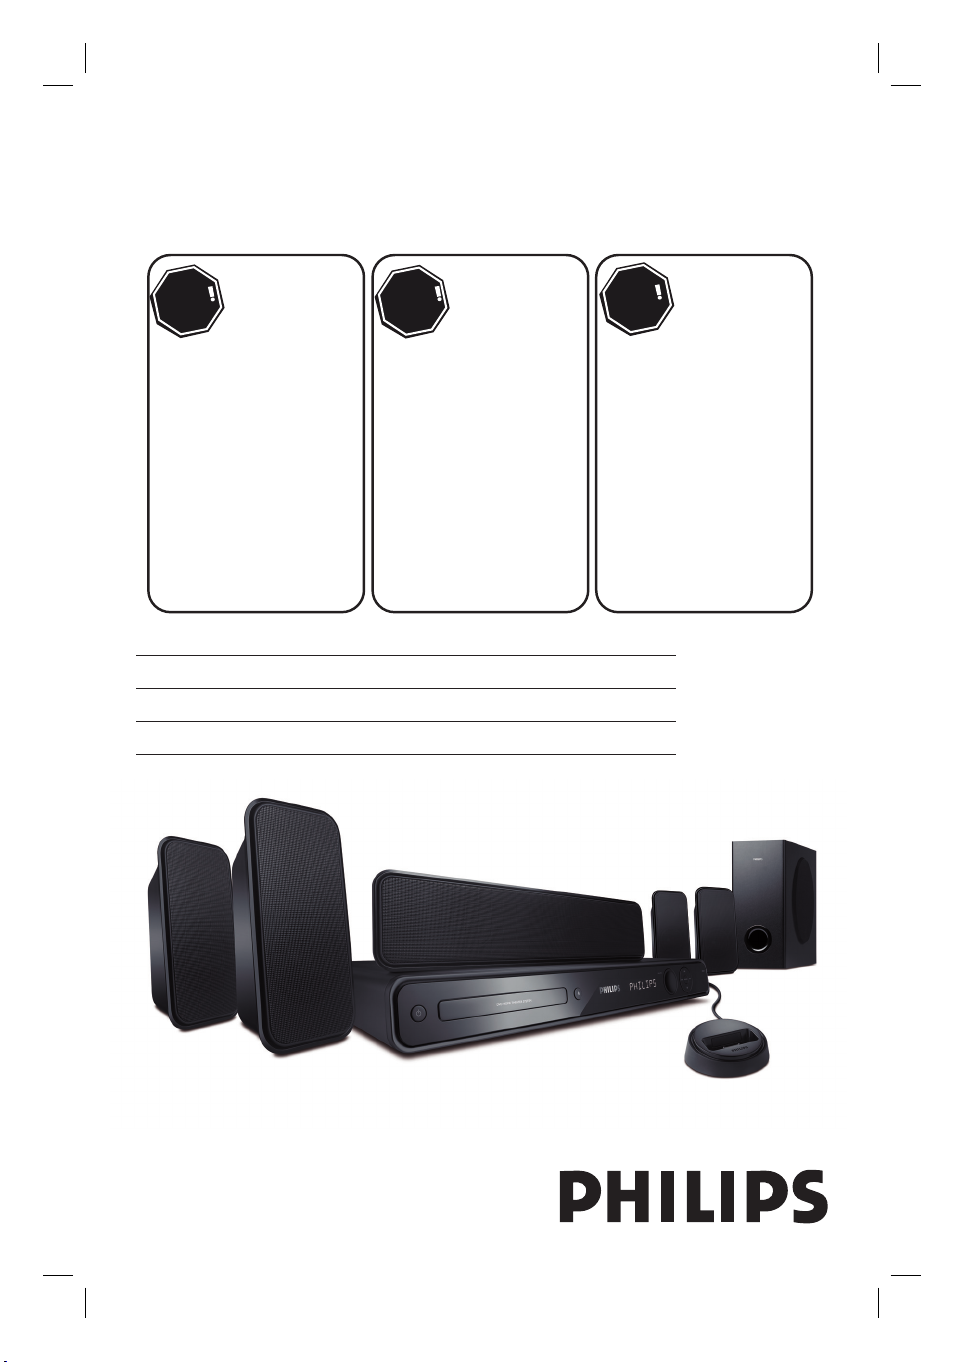
HTS3565D
HTS3566D
Thank you for choosing Philips.
Need help fast?
Philips vous remercie de
votre confiance.
Besoin d'une aide
rapide?
Read your Quick Start Guide and/or
User Manual first for quick tips
that make using your Philips product
more enjoyable.
Register your product and
get support at
www.philips.com/welcome
or call
1-888-PHILIPS (744-5477)
while with your product
(and Model / Serial number)
Le Guide rapide de début et
Manuel de l'utilisateur regorgent
d'astuces destinées à simplifier
l'utilisation de votre produit Philips.
Enregistrez votre produit et
accédez à l'assistance sur
www.philips.com/welcome
ou formez le
1-800-661-6162 (Francophone)
1-888-PHILIPS (744-5477)
(English speaking)
Veillez à avoir votre produit à
portée de main
(et model / serial nombre)
Lea primero la Guía rápida del
comienzo o el Manual del usuario,
en donde encontrará consejos que
le ayudarán a disfrutar plenamente
de su producto Philips.
www.philips.com/welcome
para registrar su producto y
obtener información de
contacto y asistencia.
o llame al teléfono
1-888-PHILIPS (744-5477)
y tenga a mano el producto
(y número de model / serial)
EN DVD Home Theater System 6
FR_CA Système Home Cinéma DVD 60
ES_LA Sistema de Home Theater con DVD 116
Gracias por escoger Philips
Necesita ayuda
inmediata?
Visite
1_hts3565-66D_37_eng2_final813.i1 11_hts3565-66D_37_eng2_final813.i1 1 2008-03-27 3:11:49 PM2008-03-27 3:11:49 PM
Page 2

Registering your model with PHILIPS makes you eligible for all of the valuable benefits listed below, so don't miss out.
Complete and return your Product Registration Card at once, or register online at www.philips.com/welcome to
ensure:
Return your Product Registration Card or register online at
www.philips.com/welcome today to get the very most from your purchase.
Visit our World Wide Web Site at http://www.philips.com/welcome
Congratulations on your purchase,
and welcome to the “family!”
Dear PHILIPS product owner:
Thank you for your confidence in PHILIPS.You’ve selected one of
the best-built, best-backed products available today.We’ll do everything in our power to keep you happy with your purchase for many
years to come.
As a member of the PHILIPS “family,” you’re entitled to protection
by one of the most comprehensive warranties and outstanding
service networks in the industry.What’s more, your purchase guarantees you’ll receive all the information and special offers for which
you qualify, plus easy access to accessories from our convenient
home shopping network.
Most importantly, you can count on our uncompromising commitment to your total satisfaction.
All of this is our way of saying welcome - and thanks for investing
in a PHILIPS product.
P.S. To get the most from your PHILIPS purchase, be
sure to complete and return your Product Registration
Card at once, or register online at:
www.philips.com/welcome
For Customer Use
Enter below the Serial No. which is located on the rear of the cabinet. Retain this
information for future reference.
Model No.__________________________
Serial No. ________________________
Know these
safetysymbols
This “bolt of lightning” indicates unin-
sulated material within your unit may
cause an electrical shock. For the safety of
everyone in your household, please do not
remove product covering.
The “exclamation point” calls atten-
tion to features for which you should
read the enclosed literature closely to prevent operating and maintenance problems.
WARNING:To reduce the risk of fire or
electric shock, this apparatus should not be
exposed to rain or moisture and objects
filled with liquids, such as vases,should not
be placed on this apparatus.
CAUTION: To prevent electric shock,
match wide blade of plug to wide slot, fully
insert.
ATTENTION: Pour éviter les choc électriques, introduire la lame la plus large de la
fiche dans la borne correspondante de la
prise et pousser jusqu’au fond.
CAUTION
RISK OF ELECTRIC SHOCK
DO NOT OPEN
CAUTION: TO REDUCE THE RISK OF ELECTRIC SHOCK, DO NOT
REMOVE COVER (OR BACK). NO USER-SERVICEABLE PARTS
INSIDE. REFER SERVICING TO QUALIFIED SERVICE PERSONNEL.
*Proof of
Purchase
Returning the enclosed card guarantees
that your date of purchase will be on file,
so no additional paperwork will be
required from you to obtain warranty
service.
*Product Safety
Notification
By registering your product, you'll receive
notification - directly from the manufacturer - in the rare case of a product
recall or safety defect.
*Additional Benefits
Registering your product guarantees that
you'll receive all of the privileges to
which you're entitled, including special
money-saving offers.
Ensure that the power outlet is always within reach. If abnormal situations occur, fully
disconnect power: unplug the power cord from the power outlet.
2
1_hts3565-66D_37_eng2_final813.i2 21_hts3565-66D_37_eng2_final813.i2 2 2008-03-27 3:11:53 PM2008-03-27 3:11:53 PM
Page 3

IMPORTANT SAFETY INSTRUCTIONS
1. Read these instructions.
2. Kee p these instructions.
3. Heed all warnings.
4. Follow all instructions.
5. Do not use this apparatus near
water.
6. Clean only with dry cloth.
7. Do not block any ventilation
openings. Install in accordance with
the manufacturer´s instructions.
8. Do not install near any heat sources
such as radiators, heat registers, stoves, or
other apparatus (including amplifiers) that
produce heat.
9. Do not defeat the
safety purpose of the
polarized or
grounding-type plug.
A polarized plug has two blades with one
wider than the other. A grounding type plug
has two blades and a third grounding prong.
The wide blade or the third prong are
provided for your safety. If the provided plug
does not fit into your outlet, consult an
electrician for replacement of the obsolete
outlet.
10.
Protect the power cord from being
walked on or pinched, particularly at plugs,
convenience receptacles, and the point
where they exit from the apparatus.
11.
Only use attachments/accessories
specified by the manufacturer.
‘CONSUMERS SHOULD NOTE THAT NOT ALL HIGH
DEFINITION TELEVISION SETS ARE FULLY
COMPATI BLE WITH THIS PRODUCT AND MAY CAUSE
ARTIFACTS TO BE DISPLAYED IN THE PICTURE. IN
CASE OF 525 OR 625 PROGRESSIVE SCAN PICTURE
PROBLEMS, IT IS RECOMMENDED THAT THE USER
SWITCH THE CONNECTION TO THE ‘STANDARD
DEFINITION’ OUTPUT. IF THERE ARE QUESTIONS
REGARDING OUR TV SET COMPATI BILITY WITH THIS
MODEL 525p AND 625p DVD PLAYER, PLEASE
CONTACT OUR CUSTOMER SERVICE CENTER.’
AC Polarized
Plug
12 .
13 .
Unplug this apparatus during lightning
storms or when unused for long periods of
time.
14 .
Refer all servicing to qualified service
personnel. Servicing is required when the
apparatus has been damaged in any way,
such as power-supply cord or plug is
damaged, liquid has been spilled or objects
have fallen into the apparatus, the apparatus
has been exposed to rain or moisture, does
not operate normally, or has been dropped.
15.
Battery usage CAUTION – To
prevent battery leakage which may result in
bodily injury, property damage, or damage
to the unit:
● Install all batteries correctly, + and - as
marked on the unit.
● Do not mix batteries (old and new or
carbon and alkaline, etc.).
● Remove batteries when the unit is not used
for a long time.
Use only with the cart, stand,
tripod, bracket, or table specified
by the manufacturer or sold with
the apparatus. When a cart is
used, use caution when moving
the cart/apparatus combination
to avoid injury from tip-over.
16. Apparatus shall n ot be exposed to
dripping or splashing.
17. Do not place any sources of danger
on the apparatus (e.g. liquid filled
objects, lighted candles).
18. This product may contain lead and mercury.
Disposal of these materials may be regulated
due to environmental considerations.
For disposal or recycling information,
please contact your local authorities
or the Electronic Industries Alliance :
www.eiae.org.
EL 6475-E005: 04/01
Class II equipment symbol
This symbol indicates that the unit has
a double insulation system
3
1_hts3565-66D_37_eng2_final813.i3 31_hts3565-66D_37_eng2_final813.i3 3 2008-03-27 3:11:54 PM2008-03-27 3:11:54 PM
Page 4
LASER
Type Semiconductor laser
GaAIAs
Wave length 645 - 660 nm (DVD)
770 - 800 nm (CD)
Output Power 6 mW (DVD)
7 mW (VCD/CD)
Beam divergence 60 degrees
Canada
English:
This digital apparatus does not exceed
the Class B limits for radio noise
emissions from digital apparatus as set
out in the Radio Interference
Regulations of the Canadian
Department of Communications.
This Class B digital apparatus complies
with Canadian ICES-003.
Français:
Cet appareil numérique n’emet pas de
bruits radioélectriques dépassant les
limites applicables aux appareils
numériques de Class B prescrites dans
le Règlement sur le Brouillage
Radioélectrique édicté par le Ministère
des Communications du Canada.
Cet appareil numérique de la classe B est
conforme à la norme NMB-003 du Canada.
CAUTION
Use of controls or adjustments or
performance of procedures other than
herein may result in hazardous radiation
exposure or other unsafe operation.
ATTENTION
L’utilisation des commandes ou réglages
ou le non-respect des procédures ciincluses
peuvent se traduire par une
exposition dangereuse à l’irradiation.
ATENCIÓN
El uso de mando o ajustes o la ejecucción
de métodos que no sean los aquí descritos
puede ocasionar peligro de exposición a
radiación.
Declaration of Conformity
Model number: HTS3565D, HTS3566D
Trade Name: Philips
Responsible Party: Philips Consumer Electronics
A Division of Philips Electronics
North America Corp.
P. O. Box 671539
Marietta, GA 30006-0026
1-800-PHILIPS (744-5477)
This warning label is located on the rearside
and inside this laser product.
INVISIBLE
:
CAUTION
LASER RADIATION
WHEN OPEN. DO NOT STARE INTO BEAM.
INVISIBLE LASER RADIATION WHEN OPEN.
:
DANGER
AVOID DIRECT EXPOSURE TO BEAM.
AVATTAESSA JA SUOJALUKITUS OHITETTAESSA OLET
VARO !
ALTTIINANAKYMATTOMAALLE LASERSATEILYLLE.ALA
KATSO SATEESEEN.
OSYNLIG LASERSTRÅLNING NÄR DENNA DEL ÄR ÖPPNAD.
VARNING!
OCH SPARREN AR URKOPPLAD.BETRAKTA EJ STRÅLEN.
or
DANGER - Invisible laser radiation when open.
AVOID DIRECT EXPOSURE TO BEAM.
Environmental information
All unnecessary packaging has been omitted.
We have tried to make the packaging easy to
separate into three materials: cardboard
(box), polystyrene foam (buffer) and
polyethylene (bags, protective foam sheet.)
Your system consists of materials which can
be recycled and reused if disassembled by a
specialized company. Please observe the local
regulations regarding the disposal of
packaging materials, exhausted batteries and
old equipment.
4
1_hts3565-66D_37_eng2_final813.i4 41_hts3565-66D_37_eng2_final813.i4 4 2008-03-27 3:11:54 PM2008-03-27 3:11:54 PM
Page 5
Index
Manufactured under license from Dolby
Laboratories. Dolby, Pro Logic and the
double-D symbol are trademarks of Dolby
Laboratories.
DivX, DivX Ultra Certi ed, and associated
logos are trademarks of DivX, Inc. and are
used under license.
Of cial DivX® Ultra Certi ed product.
Plays all versions of DivX® video (including
DivX® 6) with enhanced playback of DivX®
media les and the DivX® Media Format.
Windows Media and the Windows logo are
trademarks, or registered trademarks of
Microsoft Corporation in the United States
and/or other countries.
HDMI, and HDMI logo and High-De nition
Multimedia Interface are trademarks or
registered trademarks of HDMI licensing LLC.
The USB-IF Logos are trademarks of
Universal Serial Bus Implementers Forum,
Inc.
English ------------------------------------ 6
EnglishFrançaisEspañol
Français ----------------------------------60
Español -------------------------------- 116
NOTE: This equipment has been tested and found to
comply with the limits for a Class B digital device, pursuant
to Part 15 of the FCC Rules. These limits are designed to
provide reasonable protection against harmful interference
in a residential installation. This equipment generates, uses
and can radiate radio frequency energy and, if not installed
and used in accordance with the instructions, may cause
harmful interference to radio communications. However,
there is no guarantee that interference will not occur in a
particular installation.
If this equipment does cause harmful interference to radio
or television reception, which can be determined by turning
the equipment off and on, the user is encouraged to try to
correct the interference by one or more of the following
measures:
- Reorient or relocate the receiving antenna.
- Increase the separation between the equipment and
receiver.
- Connect the equipment into an outlet on a circuit different
from that to which the receiver is connected.
- Consult the dealer or an experienced radio/TV technician
for help.
This product incorporates copyright protection
technology that is protected by method claims of
certain U.S. patents and other intellectual property
ENERGY STAR and the ENERGY STAR mark
are registered U.S. marks
rights owned by Macrovision Corporation and
other rights owners. Use of this copyright
protection technology must be authorized by
Macrovision Corporation, and is intended for
home and other limited viewing uses only unless
otherwise authorized by Macrovision Corporation.
Reserve engineering or disassembly is prohibited.
iPod is a trademark of Apple Computer, Inc.,
registered in the U.S. and other countries.
5
1_hts3565-66D_37_eng2_final813.i5 51_hts3565-66D_37_eng2_final813.i5 5 2008-03-27 3:11:55 PM2008-03-27 3:11:55 PM
Page 6

Table of contents
English
General
General Information ........................................................................................................8
Setup precautions .................................................................................................................................................8
Accessories supplied ...........................................................................................................................................8
Cleaning discs ........................................................................................................................................................8
About recycling ..................................................................................................................................................... 8
Product Overview
Main Unit ........................................................................................................................... 9
Remote Control .........................................................................................................10-12
Using the remote control ................................................................................................................................12
Connections
Basic Connections .....................................................................................................13-18
Step 1: Placing the speakers .............................................................................................................................13
Step 2: Connecting to TV ..........................................................................................................................14-16
Option 1: Using the Video jack ...............................................................................................................14
Option 2: Using the S-Video jack ...........................................................................................................14
Option 3: Connecting to a Progressive Scan TV or component video input ............................15
Option 4: Connecting to a HDMI-compatible TV ............................................................................15
Option 5: Using an accessory RF modulator ......................................................................................16
Step 3: Connecting speakers and subwoofer .............................................................................................17
Step 4: Connecting the power cord ..............................................................................................................18
Optional Connections .................................................................................................... 19
Connecting audio from cable box /recorder/game console or TV .......................................................19
Basic Setup
Getting Started ......................................................................................................... 20-25
Finding the correct viewing channel ............................................................................................................ 20
Switching to different play source ................................................................................................................ 20
Setting language preferences .....................................................................................................................21-22
On-screen display (OSD) language ........................................................................................................21
Audio, Subtitle and Disc Menu language for DVD playback .....................................................21-22
Setting up Progressive Scan feature ..............................................................................................................23
Setting the speakers’ channels ........................................................................................................................24
Setting the EasyLink control .......................................................................................................................... 25
One touch control ..................................................................................................................................... 25
Disc Playback
Disc Operations ........................................................................................................ 26-34
Playable discs .......................................................................................................................................................26
Playing a disc ........................................................................................................................................................26
Basic playback controls .....................................................................................................................................27
Selecting various repeat /shuf e functions ...................................................................................................27
Repeating a speci c section (A-B) ................................................................................................................ 28
Other playback features for video discs (DVD/ VCD/SVCD) ......................................................... 28-31
Using the Disc Menu ................................................................................................................................. 28
Viewing playback information ..................................................................................................................29
Zooming.........................................................................................................................................................29
Changing subtitle language .......................................................................................................................29
Switching camera angles ............................................................................................................................29
Changing sound track language .............................................................................................................. 30
Setting the delay times for audio playback .......................................................................................... 30
Playback Control ........................................................................................................................................ 30
Preview function ..........................................................................................................................................31
6
1_hts3565-66D_37_eng2_final813.i6 61_hts3565-66D_37_eng2_final813.i6 6 2008-03-27 3:11:56 PM2008-03-27 3:11:56 PM
Page 7

Table of contents
Playing a MP3/ WMA disc ................................................................................................................................32
Playing a JPEG photo le (slide show) ...........................................................................................................33
Preview function ..........................................................................................................................................33
Zooming.........................................................................................................................................................33
Skip/Rotate picture .....................................................................................................................................33
Playing music and photo les simultaneously ............................................................................................ 34
Playing a DivX® disc ......................................................................................................................................... 34
Playback other supported devices
Playback - iPod ................................................................................................................35
Playing music from compatible iPod device ................................................................................................35
Preparing the docking station ..................................................................................................................35
Playing from iPod .........................................................................................................................................35
Playback - USB Device ...................................................................................................36
Playing from USB device ...................................................................................................................................36
Playback - Other Audio Player ..................................................................................... 37
Playing from other portable audio player ....................................................................................................37
Setup Options
Setup Menu Options ................................................................................................. 38- 48
Accessing the setup menu ............................................................................................................................... 38
General Setup ..............................................................................................................................................39
Audio Setup ...........................................................................................................................................40-41
Video Setup ............................................................................................................................................ 42- 45
Prefe rences ............................................................................................................................................46- 48
Radio Tuning
Radio Operations ...................................................................................................... 49-50
Tuning to radio stations ....................................................................................................................................49
Preset ting radio stations ..................................................................................................................................49
Using auto inst all .........................................................................................................................................49
Using automatic preset ..............................................................................................................................50
Using manual preset ...................................................................................................................................50
Selecting a preset radio station ......................................................................................................................50
Deleting a preset radio station .......................................................................................................................50
Others
Sound and Volume Controls ......................................................................................... 51
Volume control ...................................................................................................................................................51
Selecting surround sound .................................................................................................................................51
Selecting digital sound ef fects .........................................................................................................................51
Other Features................................................................................................................ 52
Turning on the sleep timer ..............................................................................................................................52
Installing the latest software ...........................................................................................................................52
Troublesho oting ........................................................................................................ 53-55
Glossary...................................................................................................................... 56-57
Speci cations .................................................................................................................. 58
English
7
1_hts3565-66D_37_eng2_final813.i7 71_hts3565-66D_37_eng2_final813.i7 7 2008-03-27 3:11:56 PM2008-03-27 3:11:56 PM
Page 8

General Information
English
WARNING!
This unit does not contain any userserviceable parts. Please leave all
maintenance work to quali ed
personnel.
Setup precautions
Finding a suitable location
– Place this unit on a at, hard and
stable surface. Never place the unit on a
carpet.
– Never place this unit on top of other
equipment that might heat it up (e.g.,
receiver or ampli er.)
– Never put anything under this unit
(such as, CDs, magazines.)
– Install this unit near the AC outlet
where the AC power plug can be easily
reached.
Space for ventilation
– Place this unit in a location with
adequate ventilation to prevent internal
heat build up. Allow at least 10 cm (4”)
clearance from the rear and the top of
this unit and 5cm (2”) from the left and
right to prevent overheating.
Accessories supplied
– 1 subwoofer
– 1 center speaker
– 2 front and 2 rear speakers
– 1 remote control with batteries
– 1 composite video cable (yellow)
– 1 docking station for Apple iPod
– 1 FM wire antenna
– Speaker cables (for HTS3566D tallboy
speakers)
– 2 screws (for tallboy speakers
connection)
– Quick Start Guide
Cleaning discs
To clean a disc, use a micro ber cleaning
cloth and wipe the disc from the center
to the edge in a straight line.
CAUTION!
Never use solvents such as benzene,
thinner, commercially available cleaners,
or anti-static sprays intended for discs.
Avoid high temperature, moisture,
About recycling
water and dust
– This unit must not be exposed to
dripping or splashing.
– Never place any object or items that
can damage this unit (e.g., liquid lled
objects, lighted candles.)
8
1_hts3565-66D_37_eng2_final813.i8 81_hts3565-66D_37_eng2_final813.i8 8 2008-03-27 3:11:56 PM2008-03-27 3:11:56 PM
These operating instructions have been
printed on non-polluting paper. The
electronic equipment contains a large
number of materials that can be recycled.
If you are disposing of an old machine,
please take it to a recycling center.
Please observe the local regulations
regarding disposal of packaging materials,
exhausted batteries and old equipment.
Page 9
Main Unit
English
1
2
3 4
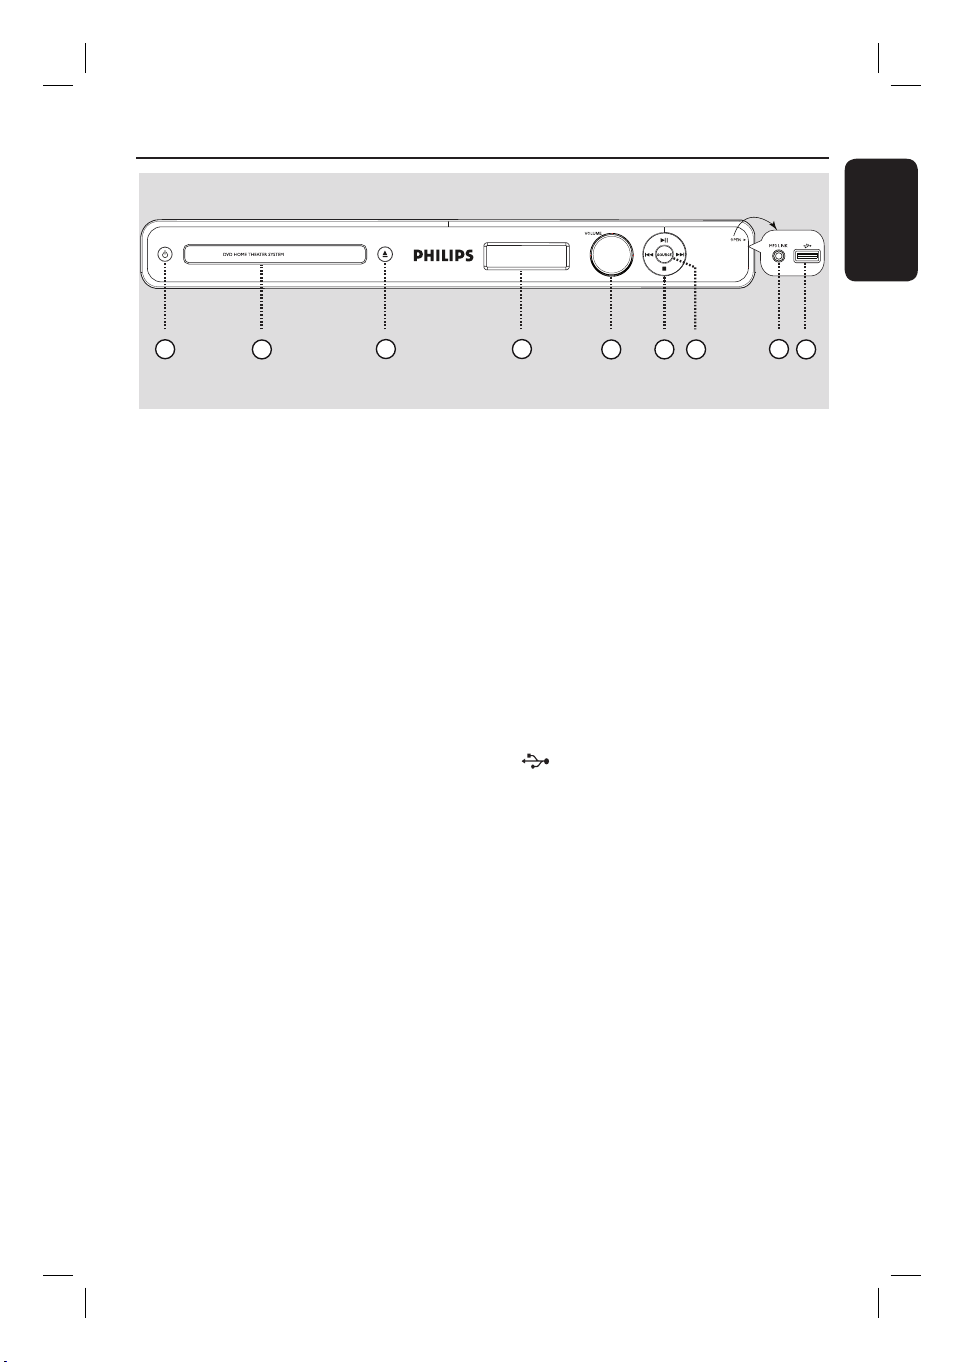
a 2 (Standby-On)
– Turns on this unit or turns off to standby
mode.
b Disc tray
c ç (Open/Close)
– Opens/closes the disc tray.
d Display panel
– Shows information about the current
status of the unit.
e VOLUME
– Adjusts the volume level.
f ./ M= (Previous/Next)
– DISC: skips to the previous or next title/
chapter/track.
– DISC: press and hold this button for fast
forward and backward search.
– RADIO: selects a preset radio station.
5 687 9
g SOURCE
– Selects the relevant active source mode:
DISC, USB, FM, AUX1, AUX2,
DI (DIGITAL IN), MP3 LINK or DOCK.
Note:
The following jacks are under the ap at
the right corner of the front pa
OPEN .
nel,
h MP3 LINK jack
– Phono input for connecting to the
headphone out jack on your portable
audio player.
i (USB) jack
– Input for USB ash drive or USB memory
card reader.
u (Play/Pause)
– DISC: starts/pauses playback.
– RADIO: starts auto radio installation for
rst time setup.
x (Stop)
– Exits an operation.
– DISC: stops playback.
– RADIO: press and hold this button to
erase the current preset radio station.
9
1_hts3565-66D_37_eng2_final813.i9 91_hts3565-66D_37_eng2_final813.i9 9 2008-03-27 3:11:57 PM2008-03-27 3:11:57 PM
Page 10
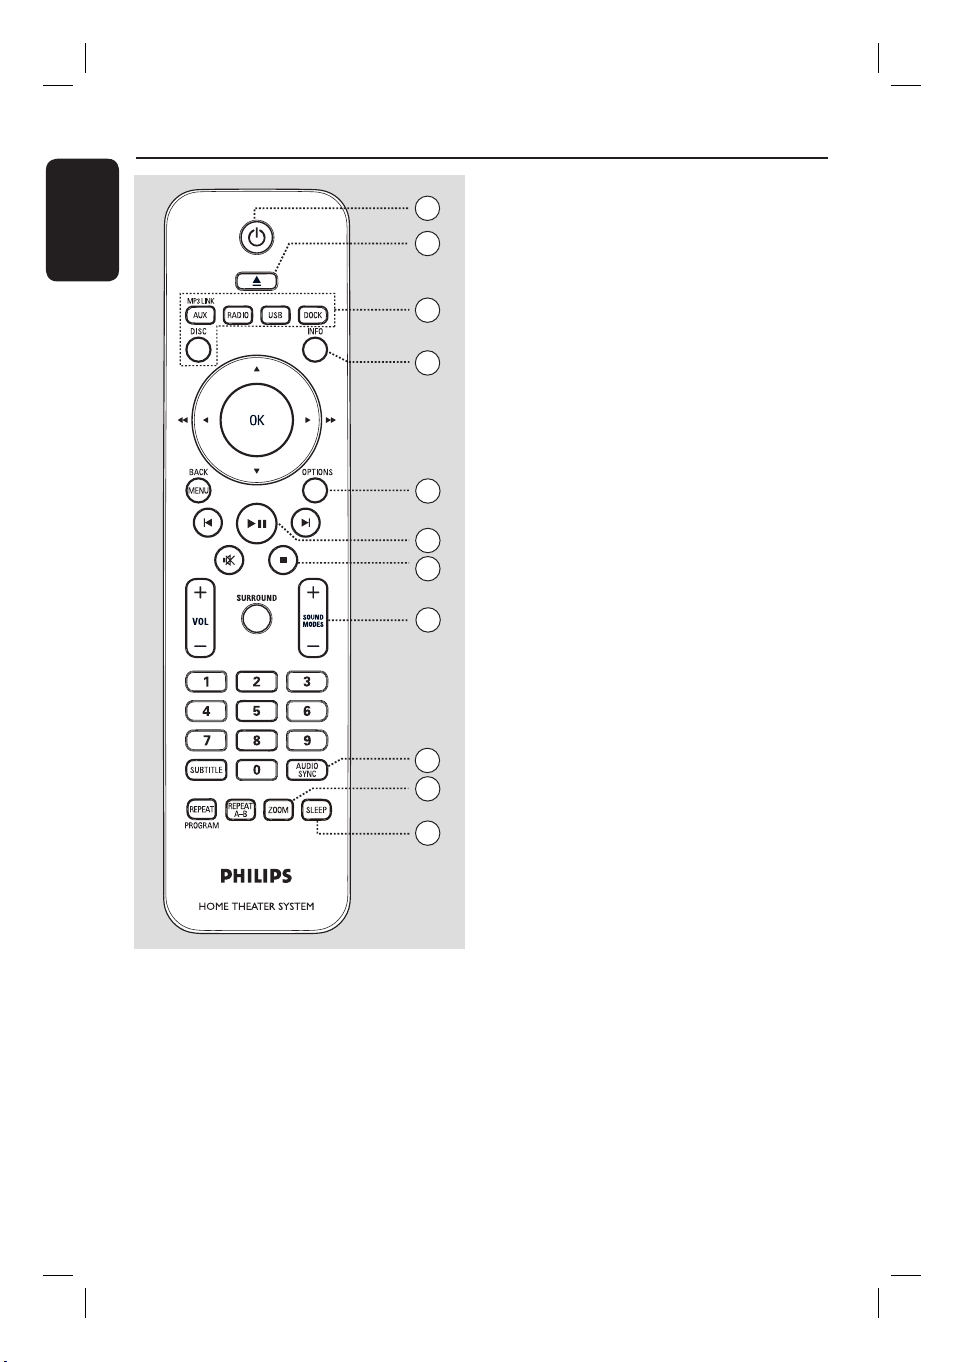
Remote Control
English
c Source buttons
1
2
3
4
– AUX (MP3 LINK): switches to AUX1,
AUX2, DI (DIGITAL IN) or MP3 LINK
external source mode.
– RADIO: switches to FM band.
– USB: switches to USB mode.
– DISC: switches to DISC mode.
– DOCK: switches to the iPod that is
connected to the docking station.
d INFO
– Displays the current status or disc
information.
5
6
7
8
e OPTIONS
– Enters or exits the system setup menu.
f u (Play/Pause)
– DISC: starts/pauses playback.
– RADIO: starts auto radio installation for
rst time setup.
g Ç (Stop)
– Exits an operation.
– DISC: stops playback.
9
10
– RADIO: press and hold this button to
erase the current preset radio station.
h SOUND MODES +/-
11
– Selects a prede ned sound effect.
i AUDIO SYNC
– DISC: selects an audio language/channel.
– Sets the audio output delay times if the
video playback is slower than the audio
output.
a 2 (Standby-On)
– Turns on this unit or turns off to standby
mode.
b ç (Open/Close)
– Opens/closes the disc tray.
10
1_hts3565-66D_37_eng2_final813.i10 101_hts3565-66D_37_eng2_final813.i10 10 2008-03-27 3:11:57 PM2008-03-27 3:11:57 PM
j ZOOM
– Zoom in or out the picture on the TV.
k SLEEP
– Sets the sleep timer.
Page 11
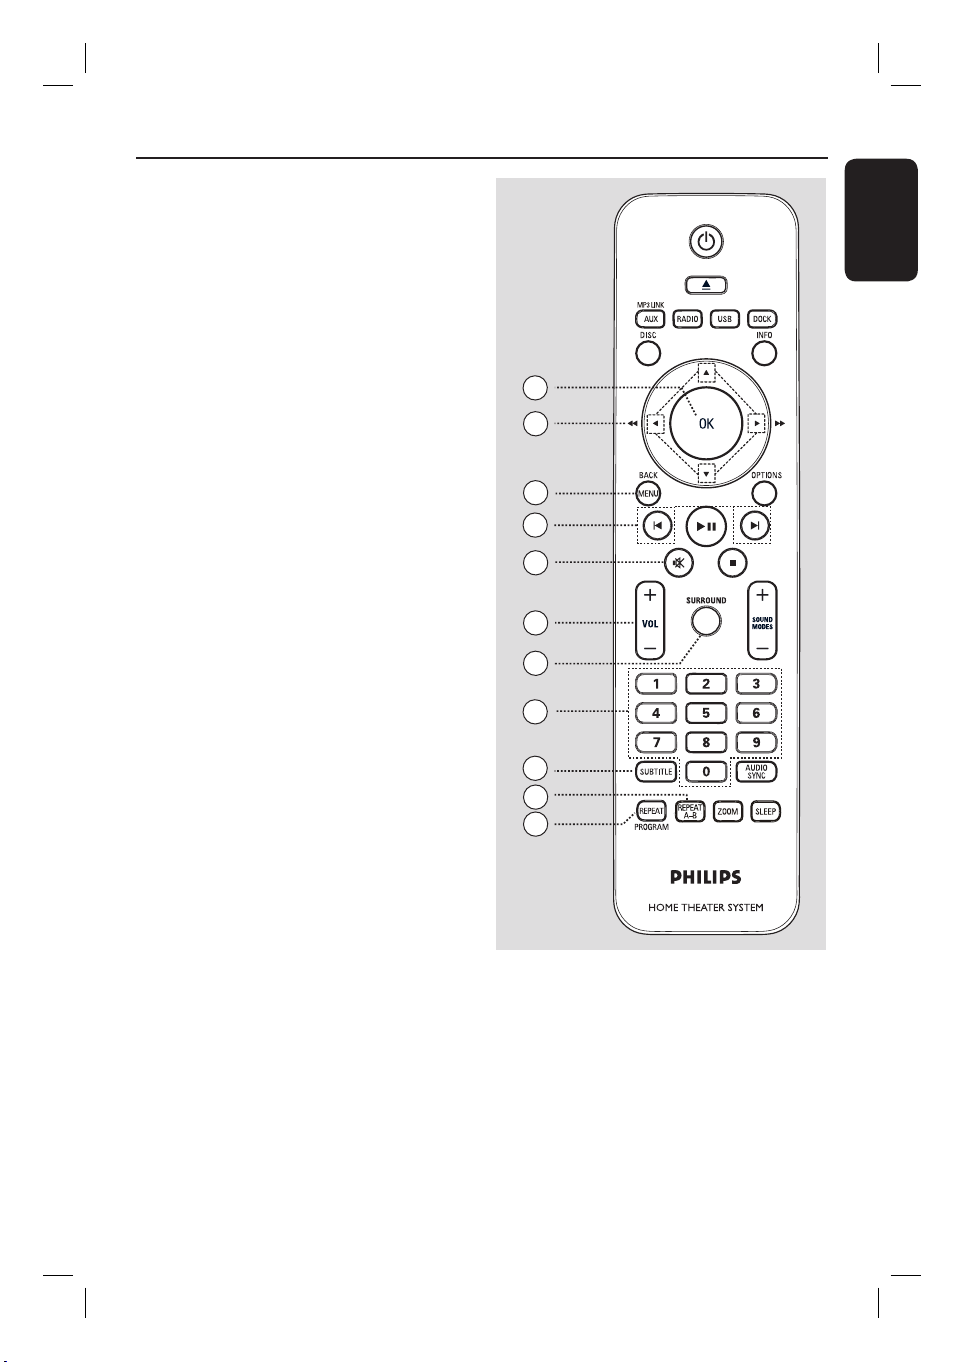
l OK
– Con rms an entry or selection.
Remote Control (continued)
m b B v V
– DISC: selects movement direction in the
menu.
– DISC: press left or right for fast forward
and backward search.
– RADIO: press up or down to tune the
radio frequency.
– RADIO: press left or right to start auto
search.
n MENU (BACK)
– DVD: go back to title menu.
– VCD/SVCD:
During playback (PBC ON mode only)
return to the PBC menu.
o í / ë (Previous/Next)
– DISC: skips to the previous or next title/
chapter/track.
– RADIO: selects a preset radio station.
p % (Mute)
– Mutes or restores the volume.
q VOL +/-
– Adjusts the volume level.
r SURROUND
– Selects multi-channel surround, stereo or
party mode.
English
12
13
14
15
16
17
18
19
20
21
22
s Numeric keypad 0-9
– Enters a track/title/chapter number of the
disc.
– Enters a number of a preset radio station.
t SUBTITLE
– Selects a DVD subtitle language.
u REPEAT A-B
– Repeat playback a speci c section on a
disc.
1_hts3565-66D_37_eng2_final813.i11 111_hts3565-66D_37_eng2_final813.i11 11 2008-03-27 3:11:57 PM2008-03-27 3:11:57 PM
v REPEAT (PROGRAM)
– DISC: selects various repeat or shuf e
modes; turns off repeat or shuf e mode.
– RADIO: press this button to start manual
preset programming.
– RADIO: press and hold this button to
start automatic preset programming.
11
Page 12
Remote Control (continued)
English
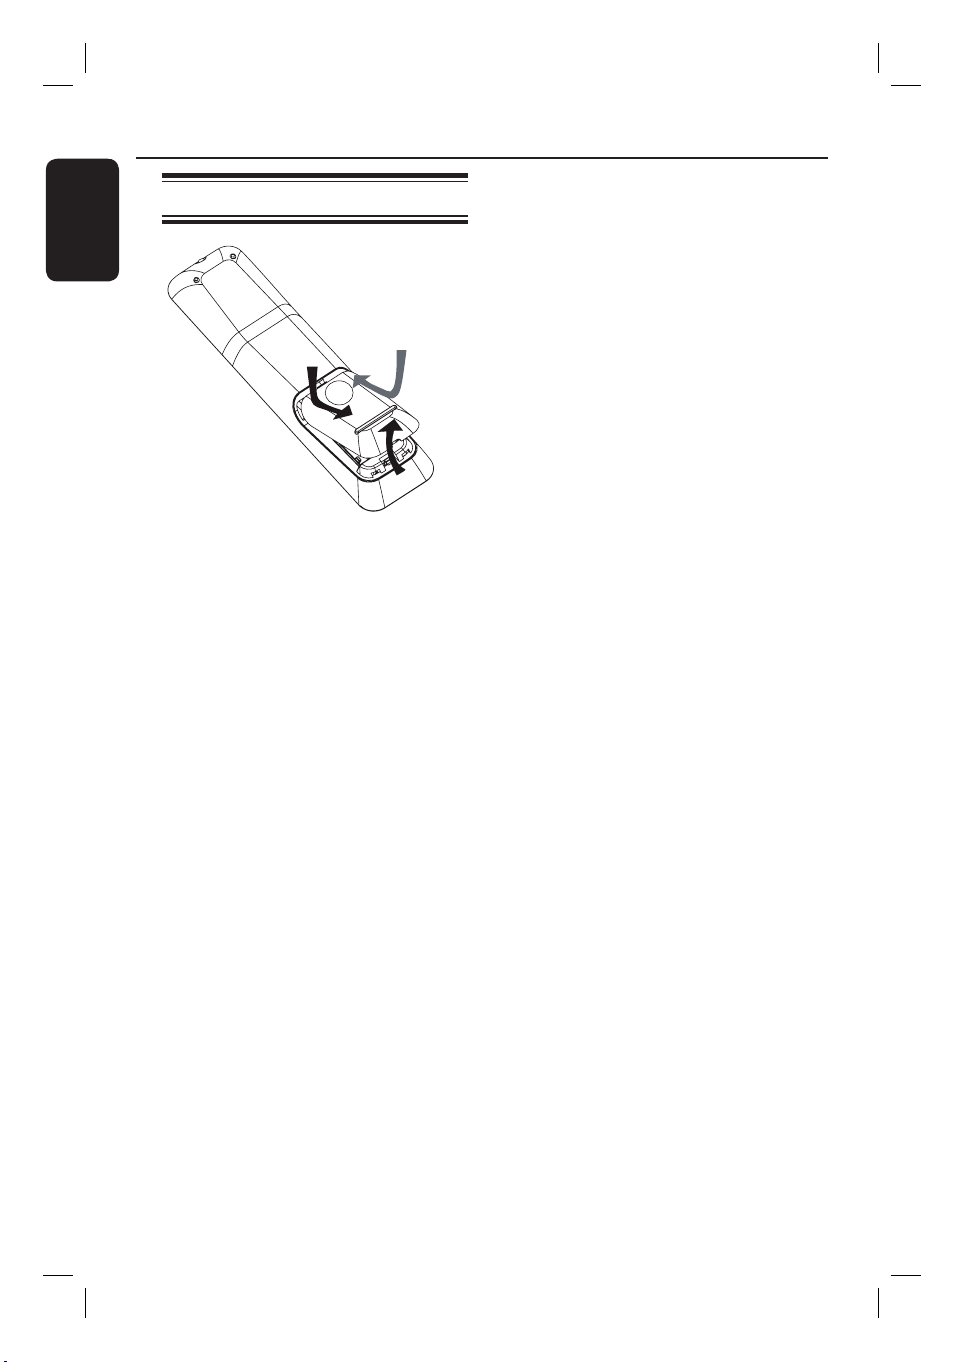
Using the remote control
A Push to open the battery compartment.
B Insert two batteries type R03 or AAA,
following the indications (+-) inside
the compartment.
C Close the cover.
D Point the remote control directly at the
remote sensor (iR) on the front panel.
E Select the source you wish to control by
pressing the AUX (MP3 LINK), RADIO,
USB, DOCK or DISC button on the
remote control.
F Then select the desired function (for
example í, ë.)
CAUTION!
– Remove batteries if they are
exhausted or if the remote control
is not to be used for a long time.
– Never mix batteries (old and new
or carbon and alkaline, etc.).
– Batteries contain chemical
substances, they should be disposed
of properly.
12
1_hts3565-66D_37_eng2_final813.i12 121_hts3565-66D_37_eng2_final813.i12 12 2008-03-27 3:11:57 PM2008-03-27 3:11:57 PM
Page 13
Basic Connections
English
REAR
LEFT
FRONT
LEFT
REAR
RIGHT
* Tallboy rear speakers for HTS3566D model.
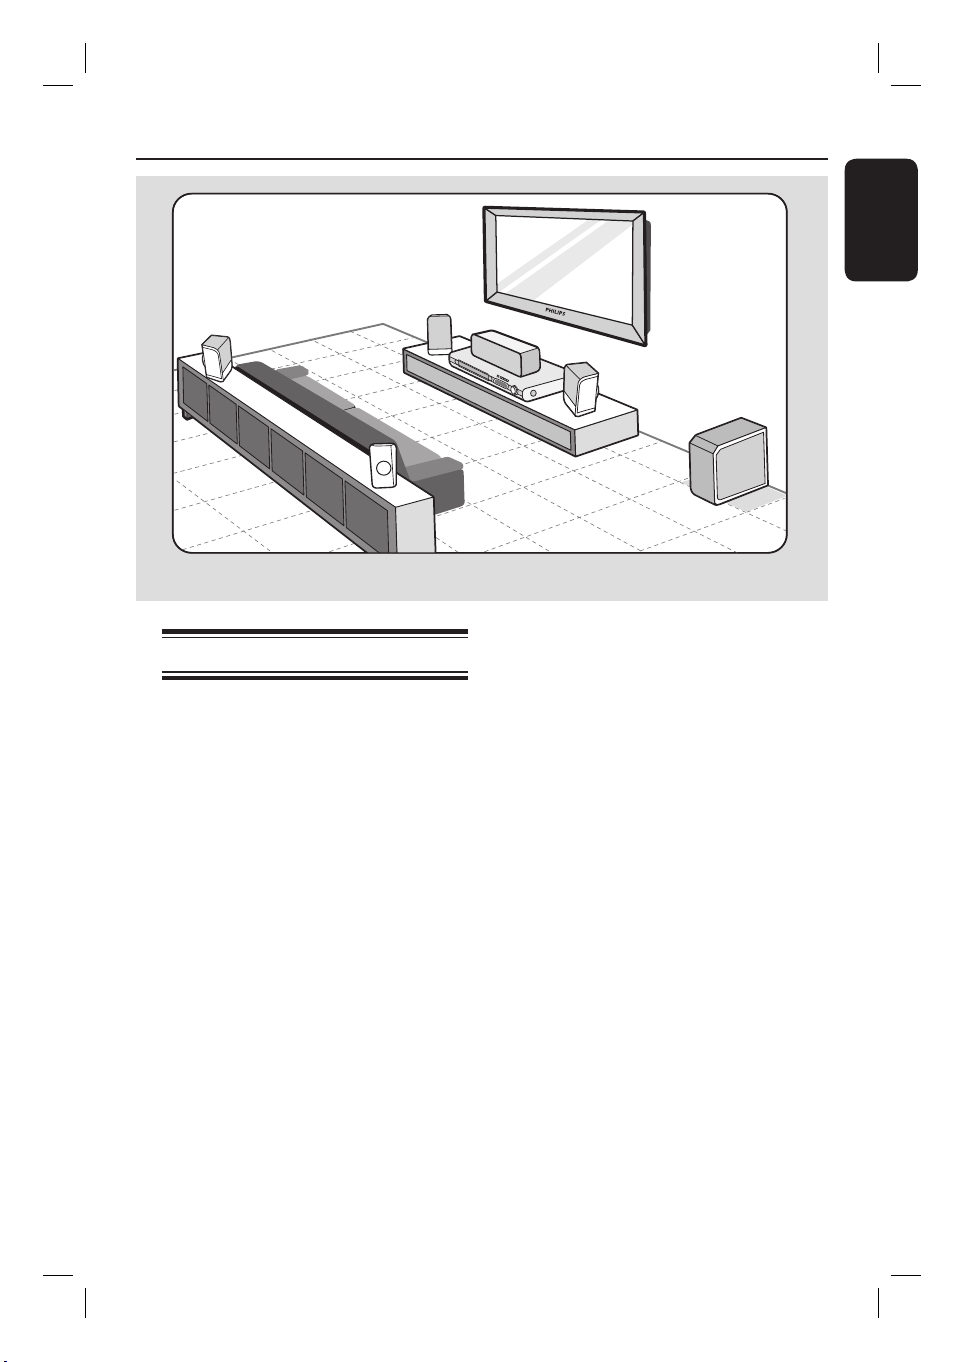
Step 1: Placing the speakers
The Philips Home Theater System is
simple to install. However, proper
system placement is critical to ensure an
optimum sound experience.
A Place the front left and right speakers at
equal distances from the TV and at an
angle of approximately 45 degrees from
the listening position.
B Place the center speaker above the TV or
the main unit so that the center channel’s
sound is localized.
C Place the rear speakers at normal
listening ear level facing each other or
hang on the wall.
D Place the subwoofer at the corner of the
room. Otherwise, keep it at least one
meter away from the TV.
CENTER
FRONT
RIGHT
SUBWOOFER
Helpful Hints:
– The placement diagram shown here is only
a guideline that provides great system
performance. You may nd other placement
choices that are more suitable for your room
layout that provide the sound experience you
enjoy.
– To avoid magnetic interference, never
position the front speakers too close to your
TV.
– The rear speakers are labeled as REAR
LEFT or REAR RIGHT.
– The front speakers are labeled as
FRONT LEFT or FRONT RIGHT.
– For speaker setting, see ‘Getting Started Setting the speakers’ channels.’
13
1_hts3565-66D_37_eng2_final813.i13 131_hts3565-66D_37_eng2_final813.i13 13 2008-03-27 3:11:58 PM2008-03-27 3:11:58 PM
Page 14
Basic Connections (continued)
English
Option 1
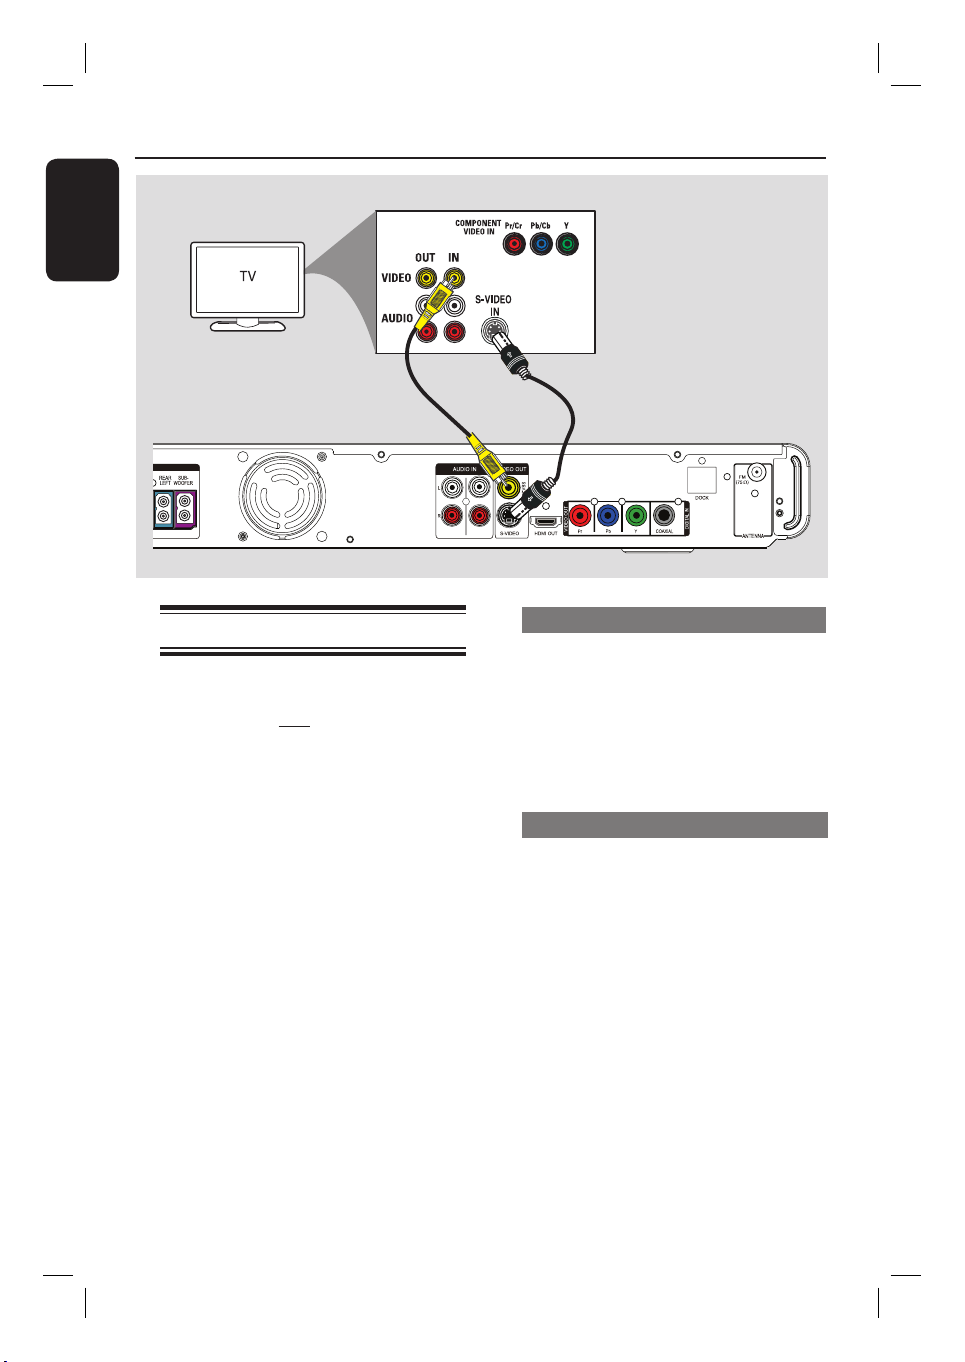
Step 2: Connecting to TV
This connection enables you to view the
video playback from this unit. You only
need to choose one of the options
below to make the video connection.
– For a standard TV, follow option 1 or
2.
– For a progressive scan TV, follow
option 3.
– For a HDMI TV, follow option 4.
– For TV with only a single antenna
input jack, follow option 5.
Helpful Hints:
– It is important to connect this unit directly
to the TV in order to enjoy optimum video
quality.
– To hear the TV audio through this unit,
see chapter ‘Optional Connection Connecting audio from cable box/recorder/
game console or TV’ for details.
Option 2
AUX 1AUX 2
Option 1: Using the Video jack
Use the supplied composite video cable
(yellow) to connect the CVBS jack on
the main unit to the video input jack (or
labeled as A/V In, Video In, Composite or
Baseband) on the TV.
It provides good picture quality.
Option 2: Using the S-Video jack
Use an S-video cable (not supplied) to
connect the S-VIDEO jack on the main
unit to the S-Video input jack (or labeled
as Y/C or S-VHS) on the TV.
It provides good picture quality.
14
1_hts3565-66D_37_eng2_final813.i14 141_hts3565-66D_37_eng2_final813.i14 14 2008-03-27 3:11:58 PM2008-03-27 3:11:58 PM
Page 15
Basic Connections (continued)
English
Option 3
AUX 1
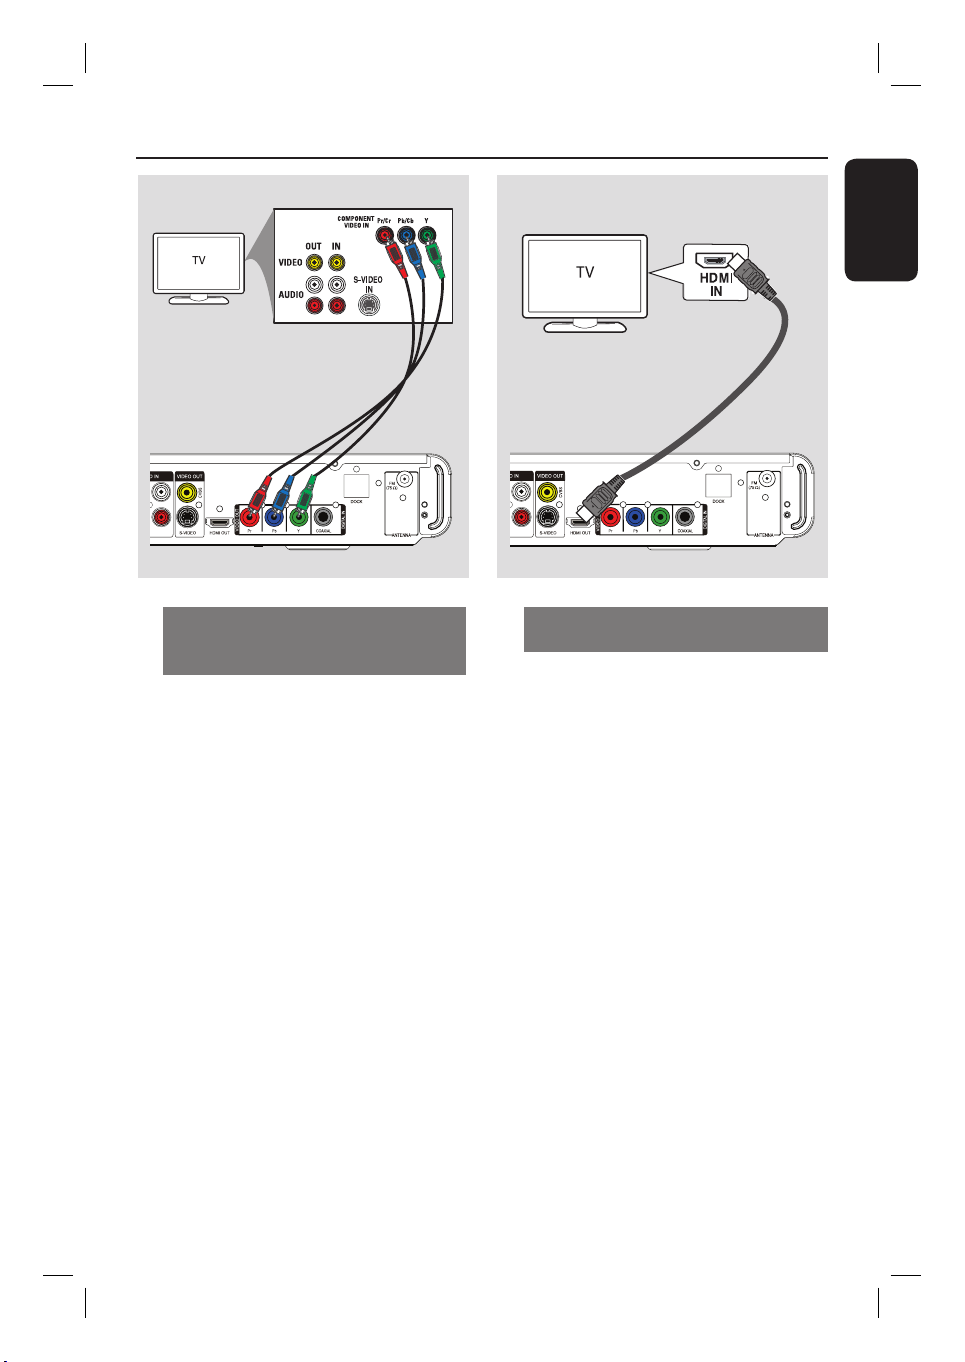
Option 3: Connecting to a
Progressive Scan TV or component
video input
The progressive scan video quality is only
available when using Y Pb Pr connection
and a progressive scan TV is required. It
provides superior picture quality when
watching DVD movies.
A Use the component video cables (red/
blue/green - not supplied) to connect the
Y Pb Pr jacks on the main unit to the
corresponding component video input
jacks (or labeled as Y Pb/Cb Pr/Cr or
YUV) on the TV.
It provides better picture quality.
B If your TV accepts progressive signals,
proceed to chapter ‘Getting Started Setting up Progressive Scan feature’ for
detailed progressive feature setup.
Option 4
AUX 1
Option 4: Connecting to a HDMI-
compatible TV
HDMI (High De nition Multimedia
Interface) is a digital interface that allows
pure digital video transmission without
the loss of image quality.
Use the HDMI cable (not supplied) to
connect the HDMI OUT on the main
unit to the HDMI IN on a HDMIcompatible device (e.g., HDMI TV, HDCP
compliant DVI TV.)
It provides best picture quality.
Note:
This unit is HDMI CEC compatible.
It enables connected devices to control
each other over HDMI, see ‘Setup Menu
Options - { Video Setup > HDMI Setup >
EasyLink }’ for details.
Helpful Hints:
– The HDMI is backward compatible with
some DVI devices using an appropriate
adaptor plug.
– If a DVI device is connected, an additional
audio cable is required for audio transmission.
15
1_hts3565-66D_37_eng2_final813.i15 151_hts3565-66D_37_eng2_final813.i15 15 2008-03-27 3:11:58 PM2008-03-27 3:11:58 PM
Page 16
Basic Connections (continued)
English
Antenna
Back of RF Modulator
(example only)
AUX 1AUX 2
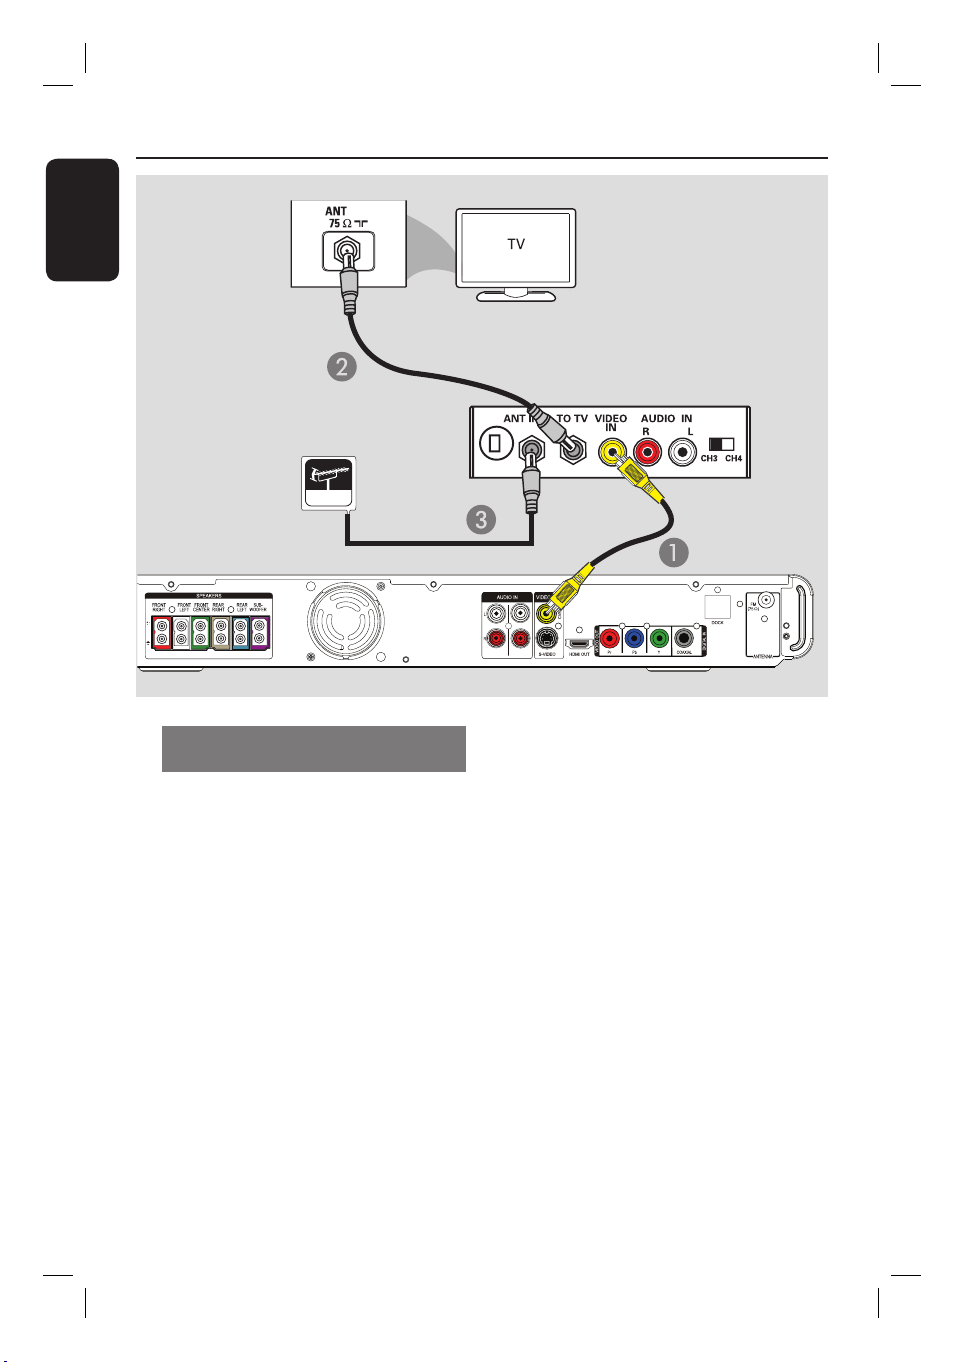
Option 5: Using an accessory RF
modulator
If your TV has only a single Antenna
Input jack (labeled as 75 ohm or RF In,)
you need an RF modulator in order to
C Connect the Antenna or Cable TV
service signal to the ANTENNA IN or
RF IN jack on the RF modulator. (It may
have been connected to your TV
previously. Disconnect it from the TV.)
view the DVD playback on the TV. See
your electronics retailer or contact
Philips for details about RF modulator
availability and operations.
A Use the supplied composite video cable
(yellow) to connect the CVBS jack on
the main unit to the video input jack on
the RF modulator.
B Use an RF coaxial cable (not supplied) to
connect ANTENNA OUT or TO TV
jack on the RF modulator to the
ANTENNA IN jack on the TV.
16
1_hts3565-66D_37_eng2_final813.i16 161_hts3565-66D_37_eng2_final813.i16 16 2008-03-27 3:11:59 PM2008-03-27 3:11:59 PM
Page 17

Basic Connections (continued)
FRONT
LEFT
* Tallboy rear speakers for HTS3566D model.
FRONT
RIGHT
SUBWOOFER
Step 3: Connecting speakers
and subwoofer
FRONT CENTER
REAR LEFT
AUX 1AUX 2
English
REAR RIGHT
Before you start...
For Tallboy speakers (HTS3566D):
– Connect the speaker cables to the
speakers.
– Assemble the rear speakers to the
proper position.
A Connect the speaker cables to the
matching colour sockets on the speakers
or speaker stands.
1_hts3565-66D_37_eng2_final813.i17 171_hts3565-66D_37_eng2_final813.i17 17 2008-03-27 3:11:59 PM2008-03-27 3:11:59 PM
B Attach the speakers to the speaker
stands and secure the position with the
supplied screws.
C
Connect all the speakers and subwoofer
to the matching sockets at the rear of the
main unit. Make sure that the colours of
the cables and sockets are matched.
Helpful Hint:
– To prevent unwanted noise, never place
the speakers too close to the main unit,
subwoofer, AC power adapter, TV or any
other radiation sources.
17
Page 18
Basic Connections (continued)
English
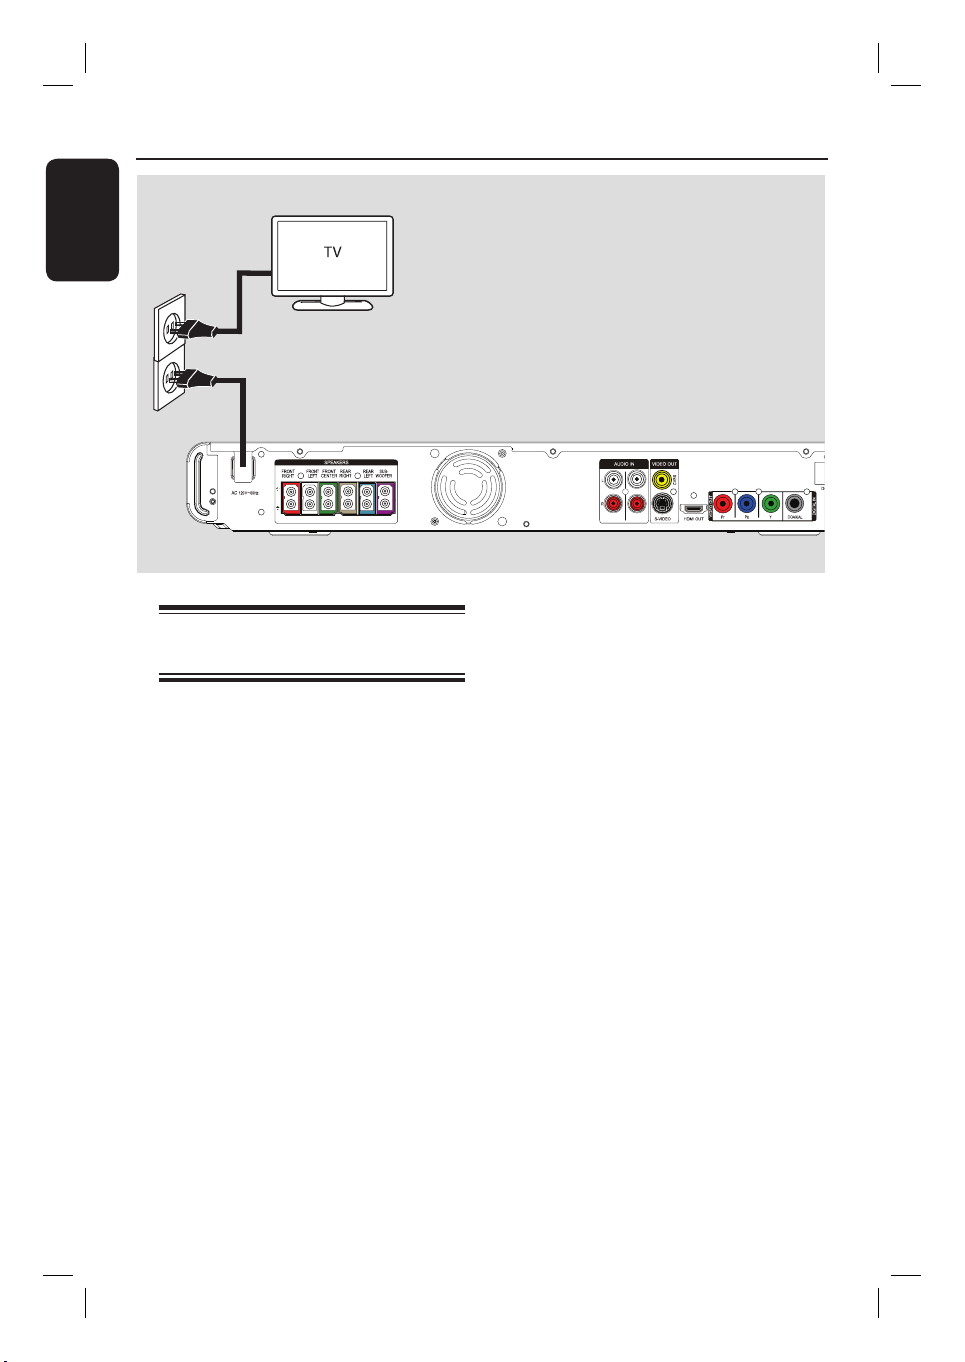
Step 4: Connecting the
power cord
After everything is connected
properly, connect the AC power
cord into the power outlet.
The standby LED on the main unit lights
up.
AUX 1AUX 2
Helpful Hints:
– Refer to the type plate at the rear or
bottom of the product for identi cation and
supply ratings.
– Before making or changing any
connections, make sure that all the devices
are disconnected from the power outlet.
18
1_hts3565-66D_37_eng2_final813.i18 181_hts3565-66D_37_eng2_final813.i18 18 2008-03-27 3:12:00 PM2008-03-27 3:12:00 PM
Page 19

Optional Connections
Cable/Satellite Box
DIGITAL
DVD Recorder/VCR
OUT
Connecting audio from cable
box/recorder/game console
or TV
This unit provides analog and digital audio
connection. You can connect the audio
output from an audio/video device (e.g.
DVD Recorder, VCR, Cable/Satellite
Box, game console or TV) to this Home
Theater System in order to enjoy the
multi-channel surround sound capabilities.
AUDIO OUT
AUX 1
AUX 2
Or
Use a coaxial cable (not supplied) to
connect the DIGITAL IN-COAXIAL
jack on the main unit to the DIGITAL
output jack on the connected device.
To listen to the audio output from this
connection, press AUX (MP3 LINK)
repeatedly until ‘DI’ is displayed on the
front panel.
English
Use an audio cable (not supplied) to
connect the AUDIO IN-AUX1 or
AUDIO IN-AUX2 jacks on the main
unit to the AUDIO OUT jacks on the
connected device.
To listen to the audio output from this
connection, press AUX (MP3 LINK)
repeatedly until ‘AUX1’ or ‘AUX2’ is
displayed on the front panel.
19
1_hts3565-66D_37_eng2_final813.i19 191_hts3565-66D_37_eng2_final813.i19 19 2008-03-27 3:12:00 PM2008-03-27 3:12:00 PM
Page 20

Getting Started
English
Finding the correct viewing
channel
A Press 2 to turn on the unit.
B Press DISC on the remote control.
C Turn on the TV and switch it to the
correct video-in channel.
You may go to the lowest channel on
your TV, then press the Channel Down
button on your TV remote control until
you see the Video In channel.
You may press
on your TV’s remote control.
Usually this channel is between the
lowest and highest channels and may be
called FRONT, A/V IN, VIDEO, etc..
If you are using a RF modulator, set
the TV to channel 3 or 4.
Refer to your TV user manual on how
to select the correct input on your TV.
button repeatedly
°
Switching to different play
source
On the main unit
Press the SOURCE button on the main
unit repeatedly to select:
DISC USB FM AUX1 AUX2
DI MP3 LINK DOCK DISC ...
On the remote control
Press DISC to switch to DISC mode.
Press USB to switch to USB mode.
Press RADIO to switch to FM band.
Press DOCK to switch to iPod mode.
Press AUX (MP3 LINK) repeatedly to
hear the audio output from the external
device.
‘AUX1’ for device connected to
AUDIO IN-AUX1 jacks.
‘AUX2’ for device connected to
AUDIO IN-AUX2 jacks.
‘DI’ for device connected to DIGITAL
IN-COAXIAL jack.
‘MP3 LINK’ for device connected to
MP3 LINK jack.
20
1_hts3565-66D_37_eng2_final813.i20 201_hts3565-66D_37_eng2_final813.i20 20 2008-03-27 3:12:01 PM2008-03-27 3:12:01 PM
Page 21

Getting Started (continued)
Setting language preferences
The language options are different
depending on your country or region.
It may not correspond to the illustrations
shown on the user manual.
On-screen display (OSD) language
The OSD (On-Screen Display) language
for this unit remains as you have set it,
regardless of the changes made to the
DVD disc language.
A In disc mode, press OPTIONS on the
remote control.
{ General Setup } icon appears.
B Press .
C Use keys to select { OSD
Language } in the menu, then press .
General Setup
Disc Lock
Display Dim
OSD Language
Screen Saver
Sleep
DivX(R) VOD Code
Press OPTIONS to exit menu
D Use keys to select a language and
press OK to con rm.
Auto
English
Français
Espanõl
Audio, Subtitle and Disc Menu
language for DVD playback
You can select your preferred language
settings for DVD playback. If the selected
language is recorded on the DVD disc,
this unit automatically plays the disc in
that language. Otherwise, the disc’s
default language will be used instead.
A Press Ç twice to stop playback (if any,)
then press OPTIONS.
B Press repeatedly to select
{ Preferences } icon, then press .
C Use keys to select one of the
options below and press .
Preferences
Audio
Subtitle
Disc Menu
Parental
PBC
MP3/JPEG Nav
Password
DivX Subtitle
Press OPTIONS to exit menu
{ Audio }
Select the preferred audio language for
DVD playback.
{ Subtitle }
Select the preferred subtitle language for
DVD playback.
English
Chinese (Simp)
French
Spanish
Portuguese
Polish
Italian
Turkish
English
{ Disc Menu }
Select the preferred disc menu language
for DVD playback.
D Use keys to select a language and
press OK to con rm.
21
1_hts3565-66D_37_eng2_final813.i21 211_hts3565-66D_37_eng2_final813.i21 21 2008-03-27 3:12:01 PM2008-03-27 3:12:01 PM
Page 22

Getting Started (continued)
English
If the language you want is not
available in the list, select { Others }.
Use the numeric keypad (0-9) on the
remote control to enter the 4-digit
language code ‘XXXX’ (see ‘Language
Code’) and press OK to con rm.
E Repeat steps C ~ D for other settings.
Helpful Hints:
– During DVD playback, you can press the
AUDIO SYNC or SUBTITLE on the remote
control to change the audio or subtitle
language respectively. However, this does
not change the default settings you have
made here.
– For some DVDs, the subtitle/audio/disc
menu language can only be changed via the
DVD disc menu.
22
1_hts3565-66D_37_eng2_final813.i22 221_hts3565-66D_37_eng2_final813.i22 22 2008-03-27 3:12:01 PM2008-03-27 3:12:01 PM
Page 23

Getting Started (continued)
Setting up Progressive Scan
feature
(for Progressive Scan TV only)
The progressive scan displays twice the
number of frames per second than
interlaced scanning (ordinary normal TV
system.) With nearly double the number
of lines, progressive scan offers higher
picture resolution and quality.
Before you start...
Ensure that you have connected this unit
to a progressive scan TV (see ‘Option 3:
Connecting to a Progressive Scan TV or
component video input’.)
A Turn on the TV to the correct viewing
channel for the this unit.
Make sure that the TV progressive
scan mode is turned off (or set to
interlaced mode.) Refer to your TV user
manual.
B Turn on this unit and press DISC on the
remote control.
C Press OPTIONS on the remote control.
D Press repeatedly to select { Video
Setup } icon, then press .
Video Setup
TV Type
TV Display
Progressive
Picture Setting
HDMI Setup
Closed Caption
Off
On
F Read the noti cation message on the TV
and con rm your action by selecting the
{ OK } in the menu and press OK.
There will be no picture on your TV
at this state until you have turned
on the progressive scan mode on
your TV.
G Turn on your TV progressive scan mode,
refer to your TV user manual.
A message appears on the TV.
H Con rm your action by selecting the
{ OK } in the menu and press OK.
The setup is now completed and you
can start to enjoy the high quality picture.
If no picture is displayed
A Press ç on the remote control.
B Press on the remote control.
C Press AUDIO SYNC on the remote
control.
Helpful Hints:
– If a blank/distorted screen appears, wait
for 15 seconds for the auto recovery.
– There are some progressive scan TV that
are not fully compatible with this unit,
resulting in an unnatural picture when
playing back a DVD VIDEO disc in the
progressive scan mode. In such a case, turn
off the progressive scan feature on this unit
and your TV.
English
Press OPTIONS to exit menu
E Move to { Progressive } > { On } in the
menu and press OK to con rm.
23
1_hts3565-66D_37_eng2_final813.i23 231_hts3565-66D_37_eng2_final813.i23 23 2008-03-27 3:12:01 PM2008-03-27 3:12:01 PM
Page 24

Getting Started (continued)
English
Setting the speakers’
channels
You can adjust the delay times (center
and surround only) and volume level for
individual speakers. These adjustments let
you optimize the sound according to
your surroundings and setup.
Before you start...
Stop the disc playback by pressing Ç
twice or remove the disc from the disc
tray. Otherwise, the settings are not
accessible.
A In disc mode, press OPTIONS on the
remote control.
B Press repeatedly to select { Audio
Setup } icon, then press .
C Select { Speakers Volume } and press
.
Audio Setup
VSpeakers olume
Speakers Delay
HDMI Audio
CD Upsampling
Audio Sync
Press OPTIONS to exit menu
Speakers Level Setup
Front Left
Front Right
Center
Subwoofer
Rear Left
Rear Right
E Use keys to highlight { Speakers
Delay } and press .
Audio Setup
VSpeakers olume
Speakers Delay
HDMI Audio
CD Upsampling
Audio Sync
Press OPTIONS to exit menu
Speakers Distance Setup
Center
Rear Left
Rear Right
F Use keys to set the delay times
(0 ms ~ 15 ms) for centre and rear
speakers that best suit your surround
sound needs.
G Press OK to con rm.
Helpful Hints:
– A 1ms increase/decrease of delay time is
equivalent to 30 cm change in distance.
– Use the longer delay time settings when
the rear speakers are closer to the listener
than the front speakers.
– The test tone will be generated to help you
judge the sound level of each speaker.
0dB
0dB
0dB
0dB
0dB
0dB
0ms
0ms
0ms
D Use keys to set the volume level for
each speaker (-6dB ~ +6dB) and press
OK to con rm.
24
1_hts3565-66D_37_eng2_final813.i24 241_hts3565-66D_37_eng2_final813.i24 24 2008-03-27 3:12:01 PM2008-03-27 3:12:01 PM
Page 25

Getting Started (continued)
Setting the EasyLink control
This feature enables HDMI CEC
compliant devices to control each other
with a single remote control. It is only
available if you have connected this
Home Theatre unit to HDMI CEC
compliant TV or device with HDMI cable.
A Turn on the HDMI CEC operations on
your TV and other connected devices.
(Refer to your TV or connected devices
manual for details.)
B Press DISC on the remote control.
C Press OPTIONS.
D Press to select { Video Setup }
icon in the menu, then press .
E Select { HDMI Setup } > { EasyLink }
then press OK.
EasyLink
Auto Wakeup TV
System Standby
System Audio Control
HDMI Input Mapping
Press OPTIONS to exit menu
{ Auto Wakeup TV } and
{ System Standby } functions are
turned on by default in the factory.
F To enable one touch input switching
function, select { System Audio
Control } > { On }, then press OK.
Ensure that your TV/devices audio
outputs are connected to the audio
inputs of this Home Theatre unit.
G Select { HDMI Input Mapping }, then
press OK.
H Select { OK } to con rm scanning of
devices, then press OK.
The mapping menu of your audio
input device is displayed.
I Select the input { AUX /COAXIAL IN/
MP3 LINK } in the menu and press .
Then select the TV/device that matches
the audio input and press OK.
J To exit the menu, press OPTIONS.
One touch control
Notes:
– To enable one touch play function, a
video disc must be placed in the disc
compartment before operation.
– Philips does not guarantee 100%
interoperability with all HDMI CEC
compliant devices.
One touch play
Press u.
,
It turns on this Home Theatre unit
and start disc play.
Your TV automatically turns on and
switches to the correct video channel.
One touch input switching
While this Home Theatre unit and TV
are turned on;
Select a TV channel to watch TV
programme or start play on other
connected device.
This Home Theatre unit automatically
switches to the corresponding audio
input and output the sound from its
speakers system.
One touch power off
Press STANDBY/POWER button to turn
off this unit and all the HDMI CEC
compliant devices.
When using this unit’s remote control,
you have to press and hold 2.
English
25
1_hts3565-66D_37_eng2_final813.i25 251_hts3565-66D_37_eng2_final813.i25 25 2008-03-27 3:12:02 PM2008-03-27 3:12:02 PM
Page 26

Disc Operations
English
Playable discs
Your DVD home theater system
plays:
– Digital Versatile Discs (DVDs)
– Video CDs (VCDs)
– Super Video CDs (SVCDs)
– Finalized DVD Recordable (DVD±R),
DVD Rewritable (DVD±RW)
– Audio Compact Discs (CDs)
– MP3/ Windows Media™ Audio discs,
picture (Kodak, JPEG) les on
CD-R(W)
– ISO 9660/UDF format
– JPEG resolution support up to
3072 x 2048
– Supported sampling frequencies:
32 kHz, 44.1 kHz, 48 kHz
– Supported Bit-rates : 32~256 (kbps),
variable bit rates (average 128 kbps)
– DivX® les on CD-R(W)/
DVD+R(W):
– DivX® 3/4/5/6, DivX® Ultra
Region Codes for DVD discs
DVD discs and players are designed with
regional restrictions. Before playing a disc,
make sure the disc is for the same region
as the unit. The regional code for this unit
is indicated at the rear or bottom panel.
Notes:
– If the inhibit icon (ø or X) appears
on the TV when a button is pressed,
it means the function is not
available on the current disc or at
the current time.
– Never put any objects other than
discs on the disc tray. Doing so may
cause the unit to malfunction.
Playing a disc
A Press SOURCE repeatedly until ‘DISC’
appears on the display panel (or press
DISC on the remote control.)
B Turn on the TV to the correct viewing
channel for this unit.
The blue DVD background screen
appears on the TV.
C Press ç to open the disc tray.
D Load a disc and press ç to close the
disc tray.
Make sure the disc label is facing up.
For double-sided discs, load the side
which you want to play facing up.
E Playback starts automatically.
See the following pages for more
playback options and features.
Helpful Hints:
– If you are having trouble playing a certain
disc, remove the disc and try a different one.
Improperly formatted discs cannot be played
on this unit.
– Some discs cannot be played on this unit
due to the con guration and characteristics
of the disc, or due to the condition of
recording and authoring software that was
used.
26
1_hts3565-66D_37_eng2_final813.i26 261_hts3565-66D_37_eng2_final813.i26 26 2008-03-27 3:12:02 PM2008-03-27 3:12:02 PM
Page 27

Disc Operations (continue d)
Basic playback controls
Pausing playback
During playback, press u.
While in pause mode, you can press
to step forward one frame at each
press.
To resume playback, press u again.
Selecting another track/chapter
Press í / ë or use the numeric
keypad 0-9 to key in a track/chapter
number.
If the repeat track mode is active,
press again to replay the same track/
chapter.
Searching backward/forward
Press m / M on the remote control.
While searching, press m / M
repeatedly to change the search speed.
To resume normal playback, press
u.
Stopping playback
Press Ç.
Helpful Hints:
– If the message ‘Playback from the
beginning, press í’ appears on the TV
while you load in a disc, you can press í
to start playback from the beginning.
– This is a power-saving feature, this unit
automatically switches to standby mode if
you do not press any buttons within 15
minutes after a disc has stopped playing.
– Screen saver starts automatically if the
disc playback is stopped for more than 5
minutes.
Selecting various repeat/
shuf e functions
The available of the repeat play options
and shuf e play mode are vary depending
on the disc type.
While playing a disc, press REPEAT
(PROGRAM) on the remote control
repeatedly to choose a repeat/shuf e play
mode.
DVD
RPT ONE (repeat chapter)
RPT TT (repeat title)
SHUFFLE (random play)
RPT SHF (repeat random play)
RPT OFF (exit repeat mode)
VCD/SVCD/CD
RPT ONE (repeat track)
RPT ALL (repeat disc)
SHUFFLE (random play)
RPT SHF (repeat random play)
RPT OFF (exit repeat mode)
MP3/Windows Media™ Audio/ DivX®
RPT ONE (repeat track)
RPT ALL/FLD (repeat folder)
SHUFFLE (random play)
RPT OFF (exit repeat mode)
Helpful Hint:
– Repeat playback is not possible on VCDs/
SVCDs when the PBC mode is turned on.
English
27
1_hts3565-66D_37_eng2_final813.i27 271_hts3565-66D_37_eng2_final813.i27 27 2008-03-27 3:12:02 PM2008-03-27 3:12:02 PM
Page 28

Disc Operations (continued)
English
Repeating a speci c section
(A-B)
A While playing a disc, press
REPEAT A-B at the start point.
B Press REPEAT A-B again to end the
section.
The section will now repeat
continuously.
C Press REPEAT A-B again to resume
normal playback.
Helpful Hint:
– The marked section for repeat playback is
only possible within the same title/track.
Other playback features
for video discs (DVD/VCD/
SVCD)
Note:
The operating features described here
might not be possible for certain discs.
Always refer to the instructions supplied
with the discs.
Using the Disc Menu
Depending on the disc format, a menu
may appear on the TV screen once you
load the disc.
To select a playback feature or item
Use keys or numeric keypad
0-9 on the remote control, then press
OK to start playback.
To access or remove the menu
Press DISC on the remote control.
28
1_hts3565-66D_37_eng2_final813.i28 281_hts3565-66D_37_eng2_final813.i28 28 2008-03-27 3:12:02 PM2008-03-27 3:12:02 PM
Page 29

Disc Operations (continue d)
Viewing playback information
This unit can display the disc playback
information (for example, title or chapter
number, elapsed playing time, audio/
subtitle language) and a number of
operations can be done without
interrupting disc playback.
A During playback, press INFO.
A list of available disc information
appears on the TV.
DVD
Menu
Title
Chapter
Audio
Subtitle
Bitrate 7
01/01
02/99
2ch Chi
Off
Title Elapsed
VCD/SVCD
Menu
Track
Disc Time
Track Time
Repeat
Bitrate 8
09/16
1:16:05
0:04:32
Off
Total Elapsed
B Use keys to view the information
and press OK to access.
C Use the numeric keypad 0-9 to input
the number/time or use keys to
make the selection.
D Press OK to con rm.
Playback changes according to the
chosen time or to the selected title/
chapter/track.
Zooming
This option allows you to zoom and pan
through the picture on the TV.
A During playback, press ZOOM
repeatedly to select a different zoom
factor.
Playback continues.
B Use keys to pan through the
enlarged image.
C Press ZOOM repeatedly to return to
the original size.
Changing subtitle language
This operation works only on DVDs with
multiple subtitle languages. You can
change the language you want while
playing a DVD.
Press SUBTITLE repeatedly to select
different subtitle languages.
Switching camera angles
This option is only available on DVDs
that contain sequences recorded from
different camera angles. This allows you
to view the picture from different angles.
A During playback, press INFO.
Playback information menu appears.
B Press to highlight ‘ANGLE’ option in
the menu.
C If different camera angles choices are
available, press and use the numeric
keypad 0-9 to select.
English
29
1_hts3565-66D_37_eng2_final813.i29 291_hts3565-66D_37_eng2_final813.i29 29 2008-03-27 3:12:03 PM2008-03-27 3:12:03 PM
Page 30

Disc Operations (continued)
English
Changing sound track language
This operation works only on DVDs with
multiple sound track languages, or VCDs/
SVCDs with multiple audio channels.
For DVD
Press AUDIO SYNC repeatedly to
select the available audio languages.
For VCD and SVCD
Press AUDIO SYNC repeatedly to
select the available audio channels
provided by the disc (STEREO, MONO
LEFT, MONO RIGHT or MIX MONO).
Setting the delay times for audio
playback
This feature allows you to adjust the
audio delay times if the video playback is
slower than the audio output streams,
hence resulting in ‘Lip-sync’. The only
way to correct ‘Lip-sync’ error caused by
delayed video is to delay audio by equal
amount.
A Press and hold AUDIO SYNC until
‘Audio Sync’ appears on the TV.
B Within ve seconds, use the VOL +/-
to set the audio output delay times (0 ~
200 ms).
If the volume control is not used
within ve seconds, it resumes its normal
volume control function.
Playback Control
Playback Control (PBC) playback allows
you to play VCDs/SVCDs interactively,
following the menu on the display. The
PBC feature on this unit is turned on by
default.
For VCDs with PBC feature
(version 2.0 only) and SVCDs
During playback (PBC ON mode only),
press MENU (BACK) to return to PBC
menu.
Helpful Hint:
– Set your preferred default PBC setting in
the setup menu, see ‘Setup Menu Options { Preferences > PBC } for details.’
Helpful Hint:
– Set your preferred default AUDIO SYNC
setting in the setup menu, see ‘Setup Menu
Options - { Audio Setup > Audio Sync }’ for
details.’
30
1_hts3565-66D_37_eng2_final813.i30 301_hts3565-66D_37_eng2_final813.i30 30 2008-03-27 3:12:03 PM2008-03-27 3:12:03 PM
Page 31

Preview function
This function allows you to preview the
contents of a VCD/SVCD.
Press DISC.
A
Select Digest Type:
Track Digest
Disc Interval
Track Interval
B Use keys to select one of the
following options and press OK.
{ Track Digest }
View six different tracks on one screen
each time. It allows you to have a quick
glance at all the tracks on the disc.
{ Disc Interval }
View the whole disc in six thumbnail
pictures. It divides a disc into six portions
at regular intervals and displays them on
one screen.
Disc Operations (continue d)
To go to the previous or next page, press
í / ë.
To return to the main menu, select
{ Menu } on the screen and press OK.
Press OK on the selected thumbnail
picture to start playback from there.
C To exit the preview menu, select
{ Exit } on the screen and press OK.
English
{ Track Interval }
View the content of a single track in six
thumbnail pictures. It divides a single
track into six portions at regular intervals
and displays them on one screen.
This option is only available during
playback mode.
01 02 03
04 05 06
Exit Menu
31
1_hts3565-66D_37_eng2_final813.i31 311_hts3565-66D_37_eng2_final813.i31 31 2008-03-27 3:12:03 PM2008-03-27 3:12:03 PM
Page 32

Disc Operations (continued)
English
Playing a MP3/ WMA disc
This unit can playback most of the MP3
and Windows Media™ Audio les
recorded on a recordable disc or
commercial CD.
Before you start ...
Turn on your TV to the correct Video In
channel. See ‘Finding the correct viewing
channel’ for details.
A Load a MP3/WMA disc.
The disc reading time may exceed 30
seconds due to the complexity of the
directory/ le con guration.
The disc menu appears on the TV.
00:06 04:04 001/036
\UDF_MP3\
Previous
08-AudioTrack
09-AudioTrack
10-AudioTrack
11-AudioTrack
12-AudioTrack
13-AudioTrack
14-AudioTrack
000 018 000
B If the disc main menu contains various
folders, use keys to select a desired
folder and press OK to open the folder.
C Use keys to select a le and press
OK to start playback.
Playback starts from the selected le
and continue through to the end of the
folder.
Disc
During playback;
Press í / ë to playback another le in
the current folder.
Press m / M to fast reverse/forward
search for a track.
To select another folder from the
current disc, press repeatedly to
highlight ‘Previous’ folder and press OK
to return to the root menu.
D To stop playback, press Ç.
Helpful Hints:
– You can set to display or skip the folders
when you load a MP3/JPEG disc. Press
OPTIONS, then go to { Preferences > MP3/
JPEG NAV }.
– Only the rst session of a multi-session CD
will be played back.
– It is normal to experience an occasional
‘skip’ while listening to your MP3/WMA disc
due to poor clarity of digital contents during
internet downloading.
– If any special characters are present in the
MP3/WMA track name (ID3) or album
name, it might not be displayed correctly on
the screen because this unit does not support
the characters.
32
1_hts3565-66D_37_eng2_final813.i32 321_hts3565-66D_37_eng2_final813.i32 32 2008-03-27 3:12:03 PM2008-03-27 3:12:03 PM
Page 33

Disc Operations (continue d)
Playing a JPEG photo le
(slide show)
Before you start ...
Turn on your TV to the correct Video In
channel. See ‘Finding the correct
viewing channel’ for details.
Load a JPEG photo CD (or Kodak
Picture CD.)
For a Kodak disc, the slide show
begins automatically.
For a JPEG disc, the picture menu
appears on the TV. Press u to start
the slide-show playback.
Helpful Hint:
– It may require longer time to display the
disc content due to the large number of
songs/pictures compiled into one disc.
Supported le format:
– The le extension has to be ‘*.JPG’
and not ‘*.JPEG’.
– This unit can only display digital
camera pictures according to the JPEGEXIF format, typically used by almost all
digital cameras. It cannot display
progressive JPEG, Motion JPEG, or
pictures in formats other than JPEG, or
sound clips associated with pictures.
Preview function
A During playback, press INFO.
12 thumbnail pictures will be displayed
on the TV.
B Press í / ë to display the other
pictures on the previous/next page.
C Use keys to select one of the
pictures and press OK to start playback.
D Press MENU (BACK) to return to
Picture CD menu.
Zooming
A During playback, press ZOOM
repeatedly to select a different zoom
factor.
B Use keys to pan through the
enlarged image.
Skip/Rotate picture
English
During playback, use keys to
skip/rotate the picture on the TV.
Action Remote
control
Skip to previous picture.
Skip to next picture.
Rotate the picture clockwise.
Rotate the picture anticlockwise.
1_hts3565-66D_37_eng2_final813.i33 331_hts3565-66D_37_eng2_final813.i33 33 2008-03-27 3:12:04 PM2008-03-27 3:12:04 PM
33
Page 34

Disc Operations (continued)
English
Playing music and photo les
simultaneously
You can create a musical slideshow
playback if the disc contains both the
MP3/WMA music and JPEG photo les.
A Load a disc that contains both MP3/WMA
and JPEG les.
B Use keys to select a MP3/WMA le
from the disc menu and press OK to
start playback.
C During MP3/WMA playback, use
keys to select a JPEG le from
the disc menu and press OK.
Slideshow begins and continues till the
end of the photo folder or album.
To return to the menu, press MENU
(BACK).
D To stop simultaneous playback, press x
twice.
Playing a DivX® disc
You can only play those DivX videos that
were rented or purchased using the DivX
registration code of this unit (see ‘Setup
Menu Options - { General Setup >
DivX(R) VOD Code }’ for details.)
A Load a DivX disc.
B Use keys to navigate to the le
you want to play.
C Press OK to start playback.
During playback;
If the DivX disc has multilingual subtitles,
you can press SUBTITLE on the
remote control to change the subtitle
language.
If the DivX title has different audio
tracks, you can press AUDIO SYNC on
the remote control to change the audio
stream.
Use m / M on the remote control to
perform fast reverse/forward search.
Press INFO repeatedly until the Time
Search menu appears, key in the time
where playback should start.
Playback skips to the time entered.
Helpful Hints:
– Subtitle les with the following le name
extensions (.srt, .smi, .sub, .ssa, .ass) are
supported but do not appear on the le
navigation menu.
– The subtitle le name has to be the same
as the le name of the movie.
– The subtitle can only be displayed up to an
average of 45 characters.
34
1_hts3565-66D_37_eng2_final813.i34 341_hts3565-66D_37_eng2_final813.i34 34 2008-03-27 3:12:04 PM2008-03-27 3:12:04 PM
Page 35

Playback - iPod
Playing music from
compatible iPod device
Music on your Apple iPod can be played
on this unit with the support of the
docking station. It enables you to enjoy
the superior sound output from the
speaker system.
The docking station supports the
following iPod range:
iPod 4th gen iPod Nano 3rd
gen
iPod 5th gen iPod Mini
iPod Nano 1st gen iPod Touch
iPod Nano 2nd
gen
Preparing the docking station
The supplied docking station has an
adjustable support to t varies iPod
range.
support
If your iPod cannot be xed to the
docking station, adjust the support
as below:
A Turn the knob at the bottom of the
docking station anti-clockwise to loosen
the support.
B Adjust the support until it can t your
iPod.
C Turn the knob clockwise to tighten it.
iPod Classic
knob
Playing from iPod
AUX 2
AUX 1
A Connect the docking station to the
DOCK jack on this unit.
B Dock your iPod in the docking station
and turn it on.
C Press DOCK on the remote control.
D Start playback on your iPod.
The music will be heard through the
speakers.
During playback, you can use the remote
control to control the music:
Action Remote
control
Press to display the menu. MENU
(BACK)
Press to play/pause
playback.
Press to go to previous/
next track.
Press and hold to reverse/
forward search.
Helpful Hint:
– Whenever this unit is powered up and the
docking station is connected to it, the battery
of the docked iPod will be charged
automatically.
u
í / ë
m / M
English
35
1_hts3565-66D_37_eng2_final813.i35 351_hts3565-66D_37_eng2_final813.i35 35 2008-03-27 3:12:04 PM2008-03-27 3:12:04 PM
Page 36

Playback - USB Device
English
Playing from USB device
You can play or view the data les (JPEG,
MP3, Windows Media™ Audio or
DivX®) in the USB ash drive or USB
memory card reader. However, editing
or copying the data le is not possible.
A Connect the USB ash drive/USB
memory card reader directly to the
jack on this unit.
B A message appears on the TV for 5 ( ve)
seconds when the device is detected.
D Select the le to play and press u.
For more playback information, see
‘Playing a MP3/WMA disc’, ‘Playing a JPEG
photo le (slide show)’ or ‘Playing a
DivX® disc’ for details.
E Before you remove the USB device, press
Ç to stop playback or press DISC to
switch to disc mode.
Helpful Hints:
– The USB jack does not support the
connection of other USB devices except to a
USB ash drive/USB memory card reader.
– When the USB device does not t into the
USB jack, a USB extension cable (not
supplied) is required.
– This unit can only support up to a
maximum of 300 folders and 648 les.
– You can only read and playback the
content from the USB device.
– Copy-protected contents are not playable.
Press USB to select device
C Press USB
access the data in the drive.
When using multiple drives on a single
card reader, only one of the connected
cards can be accessed.
The device numbers may vary from
different card readers.
36
1_hts3565-66D_37_eng2_final813.i36 361_hts3565-66D_37_eng2_final813.i36 36 2008-03-27 3:12:05 PM2008-03-27 3:12:05 PM
on the remote control to
Page 37

Playback - Other Audio Player
Playing from other portable
audio player
You can connect your portable audio
player to this unit to get the best
immersion sound experience through the
speaker system. However, controlling of
playback is only possible on the portable
audio player.
A Use a 3.5mm stereo audio cable (not
supplied) to connect the MP3 LINK jack
on this unit to the ‘headphone’ output
jack on your portable audio player.
B Press AUX (MP3 LINK) on the
remote control repeatedly until
‘MP3 LINK’ is displayed.
C Start playback on your portable audio
player.
The music will be heard through the
speakers.
English
D To stop playback, press the STOP button
on the portable audio player.
Helpful Hint:
– Stop play on your portable audio player
before you switch this unit to another input
source (e.g. DISC, USB).
37
1_hts3565-66D_37_eng2_final813.i37 371_hts3565-66D_37_eng2_final813.i37 37 2008-03-27 3:12:05 PM2008-03-27 3:12:05 PM
Page 38

Setup Menu Options
English
Accessing the setup menu
You can change the settings in this unit to
suit your particular requirements.
A In disc mode, press OPTIONS on the
remote control.
The setup menu appears.
B Use keys to select one of the setup
menu options, then press .
General Setup
Audio Setup
Video Setup
Preferences
If you are not able to access the
{ Preferences }, press OPTIONS to
exit the menu. Then, press Ç twice
before you press the OPTIONS again.
C Use keys to select an option and
press .
D Select the setting you wish to change and
press OK to con rm and go back to the
previously selected item.
Instructions and explanations of the
options are provided in the following
pages.
If the option in the menu is grayed
out, that means the setting is not
available or cannot be changed in the
current state.
General Setup
Disc Lock
Display Dim
OSD Language
Screen Saver
Sleep
DivX(R) VOD Code
Press OPTIONS to exit menu
See ‘General Setup’ on this Chapter
Audio Setup
V
Speakers olume
Speakers Delay
HDMI Audio
CD Upsampling
Audio Sync
Press OPTIONS to exit menu
See ‘Audio Setup’ on this Chapter
Video Setup
TV Type
TV Display
Progressive
Picture Setting
HDMI Setup
Closed Caption
Press OPTIONS to exit menu
See ‘Video Setup’ on this Chapter
Preferences
Audio
Subtitle
Disc Menu
Parental
PBC
MP3/JPEG Nav
Password
DivX Subtitle
Press OPTIONS to exit menu
See ‘Preferences’ on this Chapter
E To exit, press OPTIONS.
38
1_hts3565-66D_37_eng2_final813.i38 381_hts3565-66D_37_eng2_final813.i38 38 2008-03-27 3:12:05 PM2008-03-27 3:12:05 PM
Page 39

Setup Menu Options (continued)
General Setup (underlined options are the factory default settings)
Disc Lock
Display Dim
OSD Language
Screen Saver
Sleep
Not all discs are rated or coded by the disc maker. You can
prevent play of speci c discs with the disc lock function. Up to 40
discs can be locked.
{ Lock } – To block the playback of the current disc.
Subsequent access to a locked disc requires a
six-digit password. The default password is
‘136900’ (see { Preferences > Password } for
details.)
{ Unlock } – All discs can be played.
Select the brightness of this unit’s display panel.
{ 100% } – Full brightness.
{ 70% } – Medium brightness.
{ 40% } – Dimmest display. This switches off all LEDs and
icons on the front display panel of this unit.
Select the menu language for this unit’s on-screen display.
The screen saver prevents damage to the TV screen by avoiding
exposure to a static image for too long.
{ On } – Switch to TV screen saver mode when
playback has been stopped or paused for
more than 5 minutes.
{ Off } – Disable the screen saver function.
The sleep timer enables the unit to switch to standby mode
automatically after the selected preset time.
{ 15/30/45/60 mins } – Select the preset minutes for switching
the unit to standby mode automatically.
{ Off } – Turn off the sleep mode function.
English
DivX(R) VOD Code
Press
1_hts3565-66D_37_eng2_final813.i39 391_hts3565-66D_37_eng2_final813.i39 39 2008-03-27 3:12:06 PM2008-03-27 3:12:06 PM
Philips provides you with the DivX® VOD (Video On Demand)
registration code that allows you to rent or purchase videos from
DivX® VOD service at www.divx.com/vod. All the downloaded
videos from DivX® VOD can only be played back on this unit.
to see the registration code and press OK to exit.
39
Page 40

Setup Menu Options (continued)
English
Audio Setup (underlined options are the factory default settings)
Speakers Volume
Speakers Delay
HDMI Audio
Access the speaker’s level setup menu. Use keys to adjust
the volume level for each connected speaker between -6dB to
See ‘Getting Started - Setting the speakers’ channels’
+6dB.
for details.
Access the speaker’s distance setup menu. Use keys to set
the delay times for the center and rear speakers based on the
listening position and distance.
the speakers’ channels’ for details.
Note: 1 ms increase/decrease of delay time is equivalent to one
(1) foot change in distance. Use the longer delay time settings
when the rear speakers are closer to the listener than the front
speakers.
This setting is only required if you are using the HDMI
OUT jack to connect your TV or other display device (see
‘Option 4: Connecting to a HDMI-compatible TV’.)
{ Off } – Turn off the HDMI audio output. You
can still enjoy the sound output through
the speaker system.
{ All } – The HDMI audio output will be same as
the audio stream being played back. In
the case when the playback audio format
is not supported, the audio output will be
changed to PCM (Pulse Code Modulation)
automatically.
Notes:
It may take a while for this unit and the input device to
–
communicate and initialize.
It is not possible to listen to SACDs or copy-controlled DVD-
–
Audio CPPM (Content Protection for Playable Media) sources
using the HDMI connection.
See ‘Getting Started - Setting
40
1_hts3565-66D_37_eng2_final813.i40 401_hts3565-66D_37_eng2_final813.i40 40 2008-03-27 3:12:06 PM2008-03-27 3:12:06 PM
Page 41

Setup Menu Options (continued)
Audio Setup (underlined options are the factory default settings)
CD Upsampling
Audio Sync
Use keys to set the delay times for the audio output
This feature enables you to convert the music CD to a
higher sampling rate using sophisticated digital signal
processing for better sound quality.
{ Off } – Turn off CD-upsampling.
{ 88.2 kHz (X2) } – To convert the sampling rate of the CDs
twice as high as the original rate.
Notes:
This function is not available if you switch to Multi-channel
–
mode.
If you press SURROUND on the remote control, it turns off
–
the CD upsampling feature.
This feature allows you to adjust the audio delay times if the video
playback is slower than the audio output streams.
between 0~200ms.
English
41
1_hts3565-66D_37_eng2_final813.i41 411_hts3565-66D_37_eng2_final813.i41 41 2008-03-27 3:12:06 PM2008-03-27 3:12:06 PM
Page 42

Setup Menu Options (continued)
English
Video Setup (underlined options are the factory default settings)
TV Type
TV Display
Progressive
Select the color system that matches the connected TV. It
enables playback of a different type of disc (PAL or NTSC disc)
on this unit.
{ NTSC } – For NTSC-system TV.
{ Multi } – For TV that is compatible with both
PAL and NTSC.
The picture shape can be adjusted to t your TV.
{ 4:3 Pan Scan } – For a full-height picture
with the sides trimmed.
{ 4:3 Letter Box } – For a ‘wide-screen’
display with black bars on
the top and bottom.
{ 16:9 Wide Screen } – For wide-screen TV
(frame ratio 16:9.)
Before enabling the progressive scan feature, you must ensure that
your TV can accept progressive signals (a progressive scan TV is
required) and that you have connected this unit to your TV using
the Y Pb Pr. See ‘Getting Started - Setting up Progressive Scan
feature’ for details.
{ Off } – Turn off the progressive scan mode.
{ On } – Turn on progressive scan mode.
Read the instructions on the TV and con rm
your action by pressing OK on the remote
control.
Picture Setting
This unit provides three prede ned sets of picture color settings
and one personal setting which you can de ne yourself.
{ Standard } – Original color setting.
{ Bright } – Vibrant color setting.
{ Soft } – Warm color setting.
{ Personal } – Select this to personalize the picture color
Personal Picture Setup
Brightness
Contrast
Tint
Color
setting. Use keys to adjust to the setting
that best suits your personal preference and
press OK to con rm. For an average setting,
select { 0 }.
42
1_hts3565-66D_37_eng2_final813.i42 421_hts3565-66D_37_eng2_final813.i42 42 2008-03-27 3:12:06 PM2008-03-27 3:12:06 PM
Page 43

Setup Menu Options (continued)
Video Setup (underlined options are the factory default settings)
HDMI Setup
It provides the picture settings to enhance the appearance and
picture quality for disc playback. This feature is only applicable if
you have connected this unit to a HDMI-compatible TV/device.
{ Wide Screen Format }
– Select a suitable screen display (this option
is only available when { TV Display } is set to
{ 16:9 Wide Screen }).
{ Superwide }
Display the 4:3 picture disc on the widescreen TV with non-linear stretching (center
position of the screen is stretched less than
the side.) The supported video resolution for
this setting is 720p or 1080i.
{ 4:3 Pillar Box }
Display the 4:3 picture disc on the widescreen TV without stretching. Black bars will
be shown on the both sides of the TV screen.
{ Off }
No aspect ratio adjustment is made when
this option is selected.
{ HDMI Video } – Select a suitable video resolution that is
compatible with your TV display capability.
{ Auto }
It detects and selects the best supported
video resolution automatically.
{ 480p, 576p, 720p, 1080i, 1080p }
Manually select a video resolution. ‘p’ for
progressive and ‘i’ for interlaced.
English
Note: If no display appears on the TV due
to unsupported resolution, use the
composite video cable to connect this unit
and your TV. Turn on your TV to the
correct input channel for the composite
video and adjust the resolution setting to
480p/576p.
43
1_hts3565-66D_37_eng2_final813.i43 431_hts3565-66D_37_eng2_final813.i43 43 2008-03-27 3:12:06 PM2008-03-27 3:12:06 PM
Page 44

Setup Menu Options (continued)
English
Video Setup (underlined options are the factory default settings)
HDMI Setup
Continued...
{ EasyLink } – Enable HDMI CEC compliant TV/devices to
control each other with a single remote
control.
Notes:
Your TV and other connected devices must be compliant with
–
HDMI CEC.
You must turn on the HDMI CEC operations on your TV/
–
devices before you can enjoy the EasyLink controls. See your TVs/
devices manual for details.
Philips does not guarantee 100% interoperability with all HDMI
–
CEC compliant devices.
{ Auto Wakeup TV }
Press PLAY button to turn on (both your TV
and this unit) and start video disc play (if a
video disc is found in the disc tray). Your TV
automatically switches to the correct video
channel.
To disable this feature, select { Off }.
{ System Standby }
Press STANDBY/POWER button to turn off
this unit and all the HDMI CEC compliant
devices.
To disable this feature, select { Decline }.
Note: However, press and hold 2 button
on this unit remote control can still turn off
all the HDMI CEC compliant devices.
44
1_hts3565-66D_37_eng2_final813.i44 441_hts3565-66D_37_eng2_final813.i44 44 2008-03-27 3:12:07 PM2008-03-27 3:12:07 PM
Page 45

Setup Menu Options (continued)
Video Setup (underlined options are the factory default settings)
HDMI Setup
Closed Caption
Continued...
{ System Audio Control }
This unit automatically switches to the audio
input of the active device and output the
sound from its speakers system.
To enable this feature, select { On }. Then
proceed to { HDMI Input Mapping } to
scan and map all available devices.
{ HDMI Input Mapping }
Map the correct audio connections from
your TV/devices to this unit to enable
seamless switching of audio input
automatically.
To start, press OK and con rm scanning.
Then select the audio input (e.g. AUX1,
COAXIAL IN) and map to your TV or other
devices accordingly.
This feature is only available if the disc contained of special
video signal data. It shows sound effects on the screen if your TV
supports this feature, such as ‘phone ringing’ and ‘footsteps.’
{ On } – Turn on closed caption feature.
{ Off } – Turn off closed caption feature.
English
45
1_hts3565-66D_37_eng2_final813.i45 451_hts3565-66D_37_eng2_final813.i45 45 2008-03-27 3:12:07 PM2008-03-27 3:12:07 PM
Page 46

Setup Menu Options (continued)
English
Preferences (underlined options are the factory default settings)
Audio
Subtitle
Disc Menu
Parental
Select the preferred audio language for DVDs with multiple
sound tracks.
Select the preferred subtitle language for DVD playback.
Select the preferred disc menu language for DVD playback.
Note: If the selected audio/subtitle/disc menu language is not
available on the DVD, the disc’s default language will be used
instead.
This is to prohibit viewing of discs that had exceeded the limits
you set. It works only on the DVDs with parental level assigned
to the complete disc or to certain scenes on the disc.
1) Use keys to select a rating level from 1 to 8 and press OK.
2) Use the numeric keypad 0-9 on the remote control to enter your
six-digit password.
Notes:
– The ratings are country-dependent (‘1’ is considered material
that is least offensive and ‘8’ is most offensive.) To disable
parental controls and allow all discs to play, select ‘8’.
– Some DVDs are not encoded with a rating though the movie
rating may be printed on the disc cover. The rating level feature
does not prohibit playback of such discs. VCD, SVCD and CD
have no level indication, so parental control has no effect on
these type of discs.
– DVDs that are rated higher than the level you selected will not
be played unless you enter the same six-digit password.
PBC
46
1_hts3565-66D_37_eng2_final813.i46 461_hts3565-66D_37_eng2_final813.i46 46 2008-03-27 3:12:07 PM2008-03-27 3:12:07 PM
Play Back Control feature is applicable for VCD/SVCD only. It
allows you to play Video CDs (2.0) interactively, following the
menu on the display.
{ On } – The index menu (if available) appears on the
TV when you load a VCD/SVCD.
{ Off } – The VCD/SVCD skips the index menu and
playback directly from the beginning.
Page 47

Setup Menu Options (continued)
Preferences (underlined options are the factory default settings)
MP3/JPEG Nav
MP3/JPEG Navigator can only be set if the disc is recorded with a
menu. It allows you to select different display menus for easy
navigation.
{ Without Menu } – Display all the les contained in the MP3/
Picture disc.
{ With Menu } – Display the folder menu of the MP3/Picture
disc.
Note: This unit can only display 648 les in the directory.
Password
The password is used for the Disc Lock and Parental. The default
password is ‘136900.’
To change the password:
1) Press OK to access the change password menu.
Change Password
Old Password
New Password
Confirm PWD
2) Use the numeric keypad 0-9 on the remote control to
enter your existing six-digit password at { Old Password }.
Note: When doing this for the rst time or if you forget your
existing password, key in ‘136900.’
3) Enter the new six-digit password at { New Password }.
4) Enter the new six-digit password again at { Con rm PWD }.
5) Press OK to con rm and exit the menu.
English
OK
47
1_hts3565-66D_37_eng2_final813.i47 471_hts3565-66D_37_eng2_final813.i47 47 2008-03-27 3:12:07 PM2008-03-27 3:12:07 PM
Page 48

Setup Menu Options (continued)
English
Preferences (underlined options are the factory default settings)
DivX Subtitle
Default
Press OK to con rm the default reset.
Version Info
Press OK to display the software version of this unit.
Select the font type that supports the recorded DivX® subtitle.
{ Standard } – Display a standard list of Roman subtitle
fonts provided by this unit.
{ Central Europe }– Display Central Europe fonts.
{ Cyrillic } – Display Cyrillic fonts.
{ Greek } – Display Greek subtitle fonts.
{ Hebrew } – Display Hebrew subtitle fonts.
{ Chinese (Simp) } – Display Simpli ed Chinese fonts.
{ Korean } – Display Korean fonts.
This feature enables you to reset all the setup menu options and
your personal settings to the factory defaults, except your
password for the Disc Lock and Parental.
This shows you informations about the current version of the
software installed in this unit. You may require this information
for future online rmware upgrade.
48
1_hts3565-66D_37_eng2_final813.i48 481_hts3565-66D_37_eng2_final813.i48 48 2008-03-27 3:12:07 PM2008-03-27 3:12:07 PM
Page 49

Radio Operations
Before you start .....
The FM antenna has been connected to
the main unit. Extend the FM antenna and
x its ends to the wall.
Helpful Hints:
– For better FM stereo reception, connect an
external FM antenna (not supplied.)
– Position the antenna as far away as
possible from your TV, VCR or other
radiation source to prevent any unwanted
interference.
Tuning to radio stations
Presetting radio stations
You can store up to 40 FM preset radio
stations in the memory. There are three
different ways to program the radio
stations:
– Using auto install (for rst time setup
only)
– Using automatic preset
– Using manual preset
Helpful Hints:
– This unit exits presetting mode if no
button is pressed within 20 seconds.
– If no stereo signal is detected or less than
5 ( ve) stations are detected during radio
installation, ‘CHECK ANTENNA’ appears.
Using auto install
When you access the ‘RADIO’ mode for
the very rst time, you will be prompted
to install the radio stations. With this
feature, you can install all the available
radio station automatically with one
touch of button.
English
A Press SOURCE repeatedly until ‘FM’
appears on the display panel (or press
RADIO on the remote control.)
B Press / on the remote control to
start tuning.
The frequency indication starts to
change until a radio station with suf cient
signal strength is found.
C Repeat step B if necessary until you nd
the desired radio station.
D To ne-tune the reception of a weak
station, press / brie y and
repeatedly until an optimal reception is
found.
1_hts3565-66D_37_eng2_final813.i49 491_hts3565-66D_37_eng2_final813.i49 49 2008-03-27 3:12:07 PM2008-03-27 3:12:07 PM
A Press RADIO.
‘AUTO INSTALL ... PRESS PLAY’
appears.
B Press u.
All the available radio stations with
strong signal will be stored automatically.
Once complete, the rst tuned radio
station will be played back.
49
Page 50

Radio Operations (continued)
English
Using automatic preset
Use automatic presetting to store or
reinstall all the preset radio stations.
A Press RADIO.
B Press and hold REPEAT (PROGRAM)
until ‘START ...’ appears on the display
panel.
All previously stored radio stations
will be replaced.
Using manual preset
Use manual presetting to store your
favorite radio stations.
Selecting a preset radio
station
A Press RADIO.
B Press í / ë or use the numeric
keypad 0-9 to select a preset radio
stations.
The preset number and radio
frequency appear on the display panel.
Deleting a preset radio
station
A In radio mode, press í / ë to select a
preset radio station.
B Press and hold
appears.
‘X’ is the preset number.
The radio station continues to play
but has been deleted from the preset list.
The rest of the preset radio stations
remain unchanged.
until ‘FM X DELETED’
Ç
A Tune to your desired radio station (see
‘Tuning to radio stations’).
B Press REPEAT (PROGRAM).
C Press í / ë or use the numeric
keypad 0-9 to select a preset number
that you want to store the current radio
station.
D Press REPEAT (PROGRAM) to store.
50
1_hts3565-66D_37_eng2_final813.i50 501_hts3565-66D_37_eng2_final813.i50 50 2008-03-27 3:12:08 PM2008-03-27 3:12:08 PM
Page 51

Sound and Volume Controls
Selecting digital sound effects
Volume control
Press VOL +
decrease the volume level.
To turn off the volume temporarily
Press %.
Playback continues without sound and
‘MUTE’ appears.
To restore the volume, press % again,
or increase the volume level.
/- to increase or
Selecting surround sound
Press SURROUND to select Multi-
Channel, Stereo sound or Party mode.
The availability of the various
surround sound modes depends on the
sound available on the disc.
The available output modes for Multi-
channel include: Dolby Digital and Dolby
Pro Logic II.
Stereo broadcasts or recordings
produce some surround channel effects
when played in a surround mode.
Party mode is ideal for party music. It
enhanced the stereo channels output by
duplicating the sound output to the
center, rear left and rear right speakers.
Select a preset digital sound effect that
matches your disc’s content or that
optimizes the sound of the musical style
you are playing.
Press SOUND MODES +
/- to
select the available sound effect.
Movies Music Description
CONCERT CLASSIC Flat and pure sound
DRAMA LOUNGE Moderate sound
ACTION ROCK Enhanced low and
GAMING SPORTS Moderate mid range
NIGHT NIGHT Dynamically con-
mode. Ideal for
listening to classical
music and watching
live concert DVDs.
mode suitable for
lounge music and
watching dramas.
high range for great
sounding movie
effects and
atmosphere. Great
for action movies
and rock/pop music.
and surround
effects for clear
vocals and the
atmosphere of a live
sports venue. Also
suitable for video
gaming.
trolled sound mode
suitable for watching movies at night
or for non-intrusive
background music.
English
51
1_hts3565-66D_37_eng2_final813.i51 511_hts3565-66D_37_eng2_final813.i51 51 2008-03-27 3:12:08 PM2008-03-27 3:12:08 PM
Page 52

Other Features
English
Turning on the sleep timer
The sleep timer enables the unit to switch
to standby mode automatically after the
selected preset time.
Press SLEEP repeatedly until it reaches
the desired preset turn-off time (in
minutes):
OFF > 60 > 45 > 30 > 15 > OFF...
To check or change the setting
Press SLEEP once to show the
remaining time before switching off. To
change the setting, press SLEEP
repeatedly until the time is displayed.
To cancel the sleep timer
Press SLEEP repeatedly until ‘OFF’ is
displayed or turn off this unit to standby.
Installing the latest software
Philips provides software upgrades to
make sure that this unit is compatible
with the newest formats. To check the
updates, compare the current software
version of this unit with the latest
software version available at the Philips
website.
A Press OPTIONS to check the software
version of this unit.
B Select { Preferences } > { Version
Info }, then press OK.
Preferences
Disc Menu
Parental
PBC
MP3/JPEG Nav
Password
Divx Subtitle
Default
Version Info
Press OPTIONS to exit menu
C Write down the version number, then
press OPTIONS to exit the menu.
D Go to www.philips.com/support to check
the latest software version available for
this unit.
E If the latest software version is higher
than the software version of this unit,
download it and store onto a CD-R or
USB ash drive
F Insert the CD-R or USB ash drive to
this unit and con rm upgrade operation.
Note:
Never unplug or turn off this unit
during the upgrade.
G Once complete, this unit turns off to
standby mode automatically.
52
1_hts3565-66D_37_eng2_final813.i52 521_hts3565-66D_37_eng2_final813.i52 52 2008-03-27 3:12:08 PM2008-03-27 3:12:08 PM
Page 53

Troubleshooting
WARNING
Under no circumstances should you try to repair the system yourself, as this will
invalidate the warranty. Do not open the system as there is a risk of electric shock.
If a fault occurs, rst check the points listed below before taking the system for repair. If
you are unable to solve a problem by following these instructions, consult your dealer or
Philips for help.
Problem (General) Solution
English
No picture.
Completely distorted picture
or black/white picture.
No sound or distorted sound.
No surround sound effect
from the speakers.
– Refer to your TV manual for correct Video In channel
selection. Change the TV channel until you see the
DVD screen.
– Press DISC to select disc mode.
– If this happens when you turn on the progressive scan
feature or change the HDMI video setting, wait for 15
seconds for the auto recover or switch to the default
mode as below:
1) Press ç to open the disc tray.
2) Press on the remote control.
3) Press AUDIO SYNC (for progressive scan)
or ZOOM (for HDMI video) on the remote
control.
– Check the video connection.
– Sometimes a small amount of picture distortion may
appear. This is not a malfunction.
– The disc is dirty. Clean the disc.
– Adjust the volume.
– Check the speaker connections and settings.
– Make sure that the audio cables are connected and
press the correct source button (for example, AUX
(MP3 LINK)) to choose the device that you want to
hear through this unit.
– When playback with DTS track, press AUDIO SYNC
to select other audio track.
– Press SURROUND to select a correct surround
sound setting.
– Make sure that the source you are playing is recorded
or broadcast in surround sound (Dolby Digital, etc.).
The remote control does not
function properly.
1_hts3565-66D_37_eng2_final813.i53 531_hts3565-66D_37_eng2_final813.i53 53 2008-03-27 3:12:08 PM2008-03-27 3:12:08 PM
– Select the source you want to play (for example,
DISC, USB or RADIO) before pressing the function
button (u, í / ë).
– Reduce the distance between the remote control and
this unit.
– Batteries are weak, replace the batteries.
– Point the remote control directly toward the IR sensor.
53
Page 54

Tro uble shooting (continue d)
English
Problem (Playback) Solution
The unit does not start
playback.
The aspect ratio of the screen
cannot be changed even
though you have set the TV
display.
Cannot activate some features
such as Angles, Subtitles, or
multi-language Audio.
Not able to select some items
in the setup/system menu.
Unable to play DivX movies.
– Load a readable disc with the playback side facing
down. The DVD+R/CD-R must be nalized.
– Make sure the disc is not scratched or warped.
– Press OPTIONS to turn off the system setup menu
screen.
– You may need to enter the password in order to
unlock the disc for playback.
– Moisture may have condensed inside this unit.
Remove the disc and leave this unit turned on for
about an hour.
– The aspect ratio is xed on the DVD disc.
– Depending on the TV, it may not be possible to
change the aspect ratio.
– The features may not be available on the DVD.
– Changing the language for the sound or subtitle is
prohibited on this DVD.
– Press Ç twice before selecting the system setup
menu.
– Depending on the disc availability, some menu items
cannot be selected.
– Ensure that the DivX le is encoded according to the
‘Home Theater Pro le’ with the DivX encoder.
– Check that the DivX movie download is a complete
le.
Radio reception is poor.
54
1_hts3565-66D_37_eng2_final813.i54 541_hts3565-66D_37_eng2_final813.i54 54 2008-03-27 3:12:09 PM2008-03-27 3:12:09 PM
– If the signal is too weak, adjust the antenna or
connect an external antenna for better reception.
– Increase the distance between this unit and your TV
or VCR.
– Tune in to the correct frequency.
– Place the antenna further away from any equipment
that may be causing the interference.
Page 55

Tro uble shooting (continue d)
Problem (USB/HDMI/DOCK) Solution
The contents of the USB ash
drive cannot be read.
Slow operation of the USB
ash drive.
No audio output from HDMI
connection.
No video output from HDMI
connection.
No audio from iPod playback.
– The USB ash drive format is not compatible with this
unit.
– Drive is formatted with a different le system which is
not supported by this unit (e.g. NTFS.)
– Large le size or high memory USB ash drive takes
longer time to read and display on the TV.
– You will not hear any sound from the HDMI output if
the source device is only DVI/HDCP (High-bandwidth
Digital Content Protection)-compatible.
– It is not possible to output SACD or copy-controlled
DVD-Audio sources from the HDMI connection.
– Make sure that the audio output setting is not turned
off. See ‘Setup Menu Options - { Audio Setup - HDMI
Audio }’ for details.
– HDMI connection can only be made to HDMI-
equipped devices with HDCP (High Bandwidth Digital
Content Protection.) If you wish to connect to a DVI
connector (equipped with HDCP), you will need a
separate adaptor (DVI to HDMI.)
– Make sure the resolution of this unit matches the
device you have connected using the HDMI. See
‘Setup Menu Options - { Video Setup - HDMI Setup -
HDMI Video }’ for details.
– Make sure the docking station is connected to this
unit.
English
55
1_hts3565-66D_37_eng2_final813.i55 551_hts3565-66D_37_eng2_final813.i55 55 2008-03-27 3:12:09 PM2008-03-27 3:12:09 PM
Page 56

Glossary
English
Analog audio: Sound that has not been
turned into numbers. Analog sound is
available if you use the AUDIO LEFT/RIGHT.
These red and white jacks send audio
through two channels, the left and right.
Aspect ratio: Aspect ratio refers to the
length to height ratio of TV screens. The
ratio of a standard TV is 4:3, while the ratio
of a high-de nition or wide TV is 16:9. The
letter box allows you to enjoy a picture with
a wider perspective on a standard 4:3 screen.
AUDIO IN jacks: Red and white jacks on
the back of the unit that receive audio from
another system (TV, Stereo, etc.).
Bit Rate: The amount of data used to hold
a given length of music; measured in kilobits
per second, or kbps. Or, the speed at which
you record. Generally, the higher the bit
rate, or the higher the recording speed, the
better the sound quality. However, higher bit
rates use more space on a disc.
Chapter: Sections of a picture or a music
piece on a DVD that are smaller than titles.
A title is composed of several chapters. Each
chapter is assigned a chapter number
enabling you to locate the chapter you want.
Composite video (CVBS): A single video
signal commonly used in most consumer
video products.
Disc menu: A screen display prepared for
allowing a selection of images, sounds,
subtitles, multi-angles, etc., recorded on a
DVD.
DivX: The DivX code is a patent-pending,
MPEG-4 based video compression
technology, developed by DivX Networks,
Inc., that can shrink digital video to sizes
small enough to be transported over the
internet, while maintaining high visual quality.
Dolby Digital: A surround sound system
developed by Dolby Laboratories containing
up to six channels of digital audio (front left
and right, surround left and right, center and
subwoofer.)
Dolby Surround Pro Logic II: It is an
improved matrix decoding technology that
provides better spatiality and directionality
on Dolby Surround program material,
provides a convincing three dimensional
sound eld on conventional stereo music
recordings and is ideally suited to bring the
surround experience to automotive sound.
While conventional surround programming
is fully compatible with Dolby Surround Pro
Logic II decoders, soundtracks will be able to
be encoded speci cally to take full advantage
of Pro Logic II playback, including separate
left and right surround channels. (Such
material is also compatible with conventional
Pro Logic decoders.)
EasyLink: Philips EasyLink uses the HDMI
CEC industry standard protocol to share
functionalities between the unit and its
connected devices. This feature is only
available if you connect this unit to a HDMI
CEC compliant TV with a HDMI cable.
HDMI: High-De nition Multimedia
Interface (HDMI) is a high-speed digital
interface that can transmit uncompressed
high de nition video and digital multichannel
audio. It delivers perfect picture and sound
quality, completely free from noise. HDMI is
fully backward-compatible with DVI.
As required by the HDMI standard,
connecting to HDMI or DVI products
without HDCP (High-bandwidth Digital
Content Protection) will result in no Video
or Audio output.
56
1_hts3565-66D_37_eng2_final813.i56 561_hts3565-66D_37_eng2_final813.i56 56 2008-03-27 3:12:09 PM2008-03-27 3:12:09 PM
Page 57

Glossary (cont inued )
HDCP (High-bandwidth Digital Content
Protection) is a speci cation that provides a
secure transmission of digital contents
between different devices (to prevent
unauthorized copyright.)
JPEG: A very common digital still picture
format. A still-picture data compression
system proposed by the Joint Photographic
Expert Group, which features small decrease
in image quality in spite of its high
compression ratio. Files are recognized by
their le extension ‘JPG’ or ‘JPEG.’
MP3: A le format with a sound data
compression system. ‘MP3’ is the
abbreviation of Motion Picture Experts
Group 1 (or MPEG-1) Audio Layer3. By
using the MP3 format, one CD-R or CD-RW
can contain about 10 times more data than a
regular CD.
MPEG: Motion Picture Experts Group. A
collection of compression systems for digital
audio and video.
Multi-channel: DVDs are formatted to
have each sound track constitute one sound
eld. Multi-channel refers to a structure of
sound tracks having three or more channels.
Region code: A system allowing discs to be
played only in the region designated. This
unit will only play discs that have compatible
region codes. You can nd the region code
of your unit by looking at the product label.
Some discs are compatible with more than
one region (or ALL regions.)
Surround: A system for creating realistic
three dimensional sound elds full of realism
by arranging multiple speakers around the
listener.
S-Video: Produces a clear picture by
sending separate signals for the luminance
and the color. You can use S-Video only if
your TV has an S-Video In jack.
Title: The longest section of a movie or
music feature on DVD. Each title is assigned
a title number, enabling you to locate the
title you want.
WMA: Windows Media™ Audio. Refers to
an audio compression technology developed
by Microsoft Corporation. WMA data can be
encoded by using Windows Media Player
version 9 or Windows Media Player for
Windows XP. Files are recognized by their
le extension ‘WMA’.
English
PBC: Playback Control. A system of
navigating a Video CD/Super VCD through
on-screen menus recorded onto the disc.
You can enjoy interactive playback and
searching.
Progressive Scan: The progressive scan
displays twice the number of frames per
second than in an ordinary TV system. It
offers higher picture resolution and quality.
57
1_hts3565-66D_37_eng2_final813.i57 571_hts3565-66D_37_eng2_final813.i57 57 2008-03-27 3:12:09 PM2008-03-27 3:12:09 PM
Page 58

Speci cations
AMPLIFIER
English
Total output power:
- Home Theater mode: 1000 W
- FTC* output power: 640 W
Frequency Response: 180 Hz – 14 kHz / ±3 dB
Signal-to-Noise Ratio: > 60 dB (A-weighted)
Input Sensitivity
- AUX 1: 400 mV
- AUX 2: 400 mV
- MP3 LINK: 400 mV
* (Main Ch @1 kHz Sub Ch 60 Hz within 10% THD)
RADIO
Tuning Range: FM 87.5–108 MHz (100kHz)
26 dB Quieting
Sensitivity: FM 22 dBf
IF Rejection Ratio: FM 60 dB
Signal-to-Noise Ratio: FM 50 dB
Harmonic Distortion: FM Mono 3%
FM Stereo 3%
Frequency Response FM 180 Hz–10 kHz / ±6 dB
Stereo Separation FM 26 dB (1 kHz)
Stereo Threshold FM 29 dB
DISC
Laser Type Semiconductor
Disc Diametre 12cm / 8cm
Video Decoding MPEG-1 / MPEG-2 /
DivX, DivX Ultra
Video DAC 12 Bits
Signal System NTSC / Multi
Video Format 4:3 / 16:9
Video S/N 56 dB
Composite Video
Output 1.0 Vp-p, 75Ω
S-Video Output Y - 1.0 Vp-p, 75Ω
C - 0.286 Vp-p, 75Ω
Audio DAC 24 Bits / 96 kHz
Frequency Response 4 Hz–20 kHz (44.1 kHz)
4 Hz–22 kHz (48 kHz)
4 Hz–44 kHz (96 kHz)
PCM IEC 60958
Dolby Digital IEC 60958, IEC 61937
MAIN UNIT
Power Supply Rating: 120 V; 60 Hz
Power Consumption: 180 W
Dimensions: 435 x 58 x 360 (mm)
(w x h x d)
Weight: 4.04 kg
FRONT AND REAR SPEAKERS
System: Full range satellite
Impedance: 6 Ω
Speaker drivers: 3” full range speaker
Frequency response: 150 Hz – 20 kHz
For HTS3565D:
Dimensions (w x h x d):
Front/Rear: 103 x 203 x 71 (mm)
Weight:
Front/Rear: 0.56 kg/each
For HTS3566D:
Dimensions (w x h x d):
Front: 103 x 203 x 71 (mm)
Rear: 262 x 1199 x 264 (mm)
Weight:
Front: 0.54 kg/each
Rear: 3.53 kg/each
CENTER SPEAKER (HTS3565D)
System: Full range satellite
Impedance: 3 Ω
Speaker drivers: 2 x 2.5” full range woofer,
1 x 2” tweeter
Frequency response: 150 Hz – 20 kHz
Dimensions: 438 x 101 x 73.5 (mm)
(w x h x d)
Weight: 1.43 kg
CENTER SPEAKER (HTS3566D)
System: Full range satellite
Impedance: 6 Ω
Frequency response: 150 Hz – 20 kHz
Dimensions: 244 x 105 x 74mm (mm)
(w x h x d)
Weight: 0.84 kg
USB
Compatibility Hi-Speed USB (2.0)
Class Support UMS (USB Mass
Storage Class),
MTP (Media Transfer
Protocol)
SUBWOOFER
Impedance: 3 Ω
Speaker drivers: 203 mm (8”) woofer
Frequency response: 40 Hz – 150 Hz
Dimensions: 162.5 x 362.5 x 369 (mm)
(w x h x d)
Weight: 4.98 kg
IPOD DOCK
Dimensions (h x d): 34.5 x 10⁴ (mm)
Weight: 163.5 g
Speci cations subject to change without prior
notice.
58
1_hts3565-66D_37_eng2_final813.i58 581_hts3565-66D_37_eng2_final813.i58 58 2008-03-27 3:12:09 PM2008-03-27 3:12:09 PM
Page 59

Philips, P.O. Box 671539, Marietta, GA. 30006-0026
PHILIPS LIMITED WARRANTY
ONE (1) YEAR
WARRANTY COVERAGE:
PHILIPS warranty obligation is limited to the terms set forth
below.
WHO IS COVERED:
Philips warrants the product to the original purchaser or the person receiving the product as a gift against defects in materials and
workmanship as based on the date of original purchase
(“Warranty Period”) from an Authorized Dealer. The original
sales receipt showing the product name and the purchase date
from an authorized retailer is considered such proof.
WHAT IS COVERED:
The Philips warranty covers new products if a defect in material
or workmanship occurs and a valid claim is received by Philips
within the Warranty Period. At its option, Philips will either (1)
repair the product at no charge, using new or refurbished
replacement parts, or (2) exchange the product with a product
that is new or which has been manufactured from new, or serviceable used parts and is at least functionally equivalent or most
comparable to the original product in Philips current inventory,
or (3) refund the original purchase price of the product.
Philips warrants replacement products or parts provided under
this warranty against defects in materials and workmanship from
the date of the replacement or repair for ninety (90) days or for
the remaining portion of the original product’s warranty,
whichever provides longer coverage for you. When a product or
part is exchanged, any replacement item becomes your property
and the replaced item becomes Philips’ property. When a refund
is given, your product becomes Philips’ property.
Note: Any product sold and identified as refurbished or
renewed carries a ninety (90) day limited warranty.
Replacement product can only be sent if all warranty
requirements are met. Failure to follow all requirements
can result in delay.
WHAT IS NOT COVERED - EXCLUSIONS AND LIMITATIONS:
This Limited Warranty applies only to the new products manufactured by or for Philips that can be identified by the trademark,
trade name, or logo affixed to it. This Limited Warranty does not
apply to any non-Philips hardware product or any software, even
if packaged or sold with the product. Non-Philips manufacturers,
suppliers, or publishers may provide a separate warranty for their
own products packaged with the bundled product.
Philips is not liable for any damage to or loss of any programs,
data, or other information stored on any media contained within
the product, or any non-Philips product or part not covered by
this warranty. Recovery or reinstallation of programs, data or
other information is not covered under this Limited Warranty.
This warranty does not apply (a) to damage caused by accident,
abuse, misuse, neglect, misapplication, or non-Philips product, (b)
to damage caused by service performed by anyone other than
Philips or Philips Authorized Service Location, (c) to a product or
a part that has been modified without the written permission of
Philips, or (d) if any Philips serial number has been removed or
defaced, or (e) product, accessories or consumables sold “AS IS”
without warranty of any kind by including refurbished Philips
product sold “AS IS” by some retailers.
This Limited Warranty does not cover:
• Shipping charges to return defective product to Philips.
• Labor charges for installation or setup of the product, adjustment of customer controls on the product, and installation or
repair of antenna/signal source systems outside of the product.
• Product repair and/or part replacement because of improper
installation or maintenance, connections to improper voltage
supply, power line surge, lightning damage, retained images or
screen markings resulting from viewing fixed stationary content for extended periods, product cosmetic appearance items
due to normal wear and tear, unauthorized repair or other
cause not within the control of Philips.
• Damage or claims for products not being available for use, or
for lost data or lost software.
• Damage from mishandled shipments or transit accidents when
returning product to Philips.
• A product that requires modification or adaptation to enable
it to operate in any country other than the country for which
it was designed, manufactured, approved and/or authorized, or
repair of products damaged by these modifications.
• A product used for commercial or institutional purposes
(including but not limited to rental purposes).
• Product lost in shipment and no signature verification receipt
can be provided.
• Failure to operate per Owner’s Manual.
TO OBTAIN ASSISTANCE IN THE U.S.A., PUERTO
RICO, OR U.S. VIRGIN ISLANDS…
Contact Philips Customer Care Center at:
1-888-PHILIPS (1-888-744-5477)
TO OBTAIN ASSISTANCE IN CANADA…
1-800-661-6162 (French Speaking)
1-888-PHILIPS (1-888-744-5477) - (English or Spanish
Speaking)
REPAIR OR REPLACEMENT AS PROVIDED UNDER THIS
WARRANTY IS THE EXCLUSIVE REMEDY FOR THE CONSUMER. PHILIPS SHALL NOT BE LIABLE FOR ANY INCIDENTAL OR CONSEQUENTIAL DAMAGES FOR BREACH OF
ANY EXPRESS OR IMPLIED WARRANTY ON THIS PRODUCT. EXCEPT TO THE EXTENT PROHIBITED BY APPLICABLE
LAW, ANY IMPLIED WARRANTY OF MERCHANTABILITY OR
FITNESS FOR A PARTICULAR PURPOSE ON THIS PRODUCT
IS LIMITED IN DURATION TO THE DURATION OF THIS
WARRANTY.
Some states do not allow the exclusions or limitation of incidental or consequential damages, or allow limitations on how long an
implied warranty lasts, so the above limitations or exclusions may
not apply to you.
This warranty gives you specific legal rights. You may have other rights which vary from state/province to state/province.
3121 233 48802
1_hts3565-66D_37_eng2_final813.i59 591_hts3565-66D_37_eng2_final813.i59 59 2008-03-27 3:12:10 PM2008-03-27 3:12:10 PM
59
 Loading...