

Page 1
DVD HOME THEATRE SYSTEM
User Manual 6
HTS3000
使用手册 (
简体) 48
使用手册 (繁體) 90
Manual Pengguna 132
welcome
1_hts3000_98_eng2.indd 11_hts3000_98_eng2.indd 1 2007-04-26 6:54:03 PM2007-04-26 6:54:03 PM
Page 2

䚼ӊৡ⿄
1DPHRIWKH3DUWV
䪙
3E/HDG
∲+J
0HUFXU\
᳝↦᳝ᆇ⠽䋼ܗ㋴
+D]DUGRXV7R[LF6XEVWDQFH
䬝&G
&DGPLXP
݁Ӌ䫀
&KURPLXP
⒈㘨㣃
3%%
⒈Ѡ㣃䝮
3%'(˅
+RXVLQJ
'9'ORDGHU
'9'ܝⲦ
6XEZRRIHU
䍙䞡Ԣ䷇ㆅ
/RXGVSHDNHUV
ুܗ
3:%V
⬉䏃ᵓ㒘ӊ
$FFHVVRULHV
5HPRWHFRQWURO
FDEOHV
䰘ӊ˄䘹఼ˈ
⬉⑤㒓ˈ䖲㒓˅
%DWWHULHVLQ
5HPRWH&RQWURO
=Q&
䘹఼⬉∴
ƻ˖㸼⼎䆹᳝↦᳝ᆇ⠽䋼䆹䚼ӊ᠔᳝ഛ䋼ᴤ᭭Ёⱘ䞣ഛ6-7ޚ㾘ᅮⱘ䰤䞣㽕∖ҹϟDŽ
O: Indicates that this toxic or hazardous substance contained in all of the homogeneous
materials for this part is below the limit requirement in SJ/T11363 – 2006.
h˖㸼⼎䆹᳝↦᳝ᆇ⠽䋼㟇ᇥ䆹䚼ӊⱘᶤϔഛ䋼ᴤ᭭Ёⱘ䞣䍙ߎ6-7ޚ㾘ᅮⱘ䰤䞣㽕∖DŽ
X: Indicates that this toxic or hazardous substance contained in at least one of the
homogeneous materials used for this part is above the limit requirement in SJ/T11363 - 2006.
OOO O O O
XOO O O O
XOO O O O
OOO O O O
XO
OO OO
XOO O O O
XO
OO OO
10
⦃ֱՓ⫼ᳳ䰤Environmental Protection Use Period
ℸ䆚ᣛᳳ䰤˄ᑈ˅ˈ⬉ᄤֵᙃѻકЁ᳝ⱘ᳝↦᳝ᆇ⠽䋼ܗ㋴ℷᐌՓ⫼ⱘᴵӊϟϡӮথ
⫳⊘さবˈ⫼᠋Փ⫼䆹⬉ᄤֵᙃѻકϡӮᇍ⦃๗䗴៤Ϲ䞡∵ᶧᇍ݊Ҏ䑿ǃ䋶ѻ䗴៤Ϲ䞡ᤳᆇ
ⱘᳳ䰤DŽ
This logo refers to the period ( 10 years ) during which the toxic or hazardous substances or elements
contained in electronic information products will not leak or mutate so that the use of these [substances or
elements] will not result in any severe environmental pollution, any bodily injury or damage to any assets.
⬉∴䆚Battery labeling logo
ℸ䆚ᣛᳳ䰤˄Ѩᑈ˅ˈ⬉∴Ё᳝ⱘ᳝↦᳝ᆇ⠽䋼ܗ㋴ℷᐌՓ⫼ⱘᴵӊϟϡӮথ⫳⊘さ
বˈ⫼᠋Փ⫼䆹⬉∴ѻકϡӮᇍ⦃๗䗴៤Ϲ䞡∵ᶧᇍ݊Ҏ䑿ǃ䋶ѻ䗴៤Ϲ䞡ᤳᆇⱘᳳ䰤DŽ
This logo refers to the period ( 5 years ) during which the toxic or hazardous substances or elements
contained in the battery will not leak or mutate so that the use of these [substances or elements] will not
result in any severe environmental pollution, any bodily injury or damage to any assets.
⦃ֱՓ⫼ᳳ䰤Environmental Protection Use Period
2
Page 3
LASER
Type Semiconductor laser
GaAIAs
Wave length 650 - 660 nm (DVD)
784 - 796 nm (CD)
Output Power 7 mW (DVD)
10 mW (VCD/CD)
Beam divergence 60 degrees
CAUTION
Use of controls or adjustments or performance
of procedures other than herein may result in
hazardous radiation exposure or other unsafe
operation.
ATTENTION!
For Customer Use:
Manufactured under license from Dolby
Laboratories, Dolby, Pro Logic and the
double-D symbol are trademarks of Dolby
Laboratories.
DivX®, DivX UCerti ed, and associated
logos are trademarks of DivX, Inc. and are
used under license.
Windows Media and the Windows logo are
trademarks, or registered trademarks of
Microsoft Corporation in the United States
and/or other countries.
Read carefully the information located at the
bottom or rear of your DVD Home Theater
System and enter below the Serial No. Retain
this information for future reference.
Model No. HTS3000
Serial No. _______________
This product incorporates copyright protection
technology that is protected by method claims of
certain U.S. patents and other intellectual property
rights owned by Macrovision Corporation and
other rights owners. Use of this copyright
protection technology must be authorized by
Macrovision Corporation, and is intended for
home and other limited viewing uses only unless
otherwise authorized by Macrovision Corporation.
Reserve engineering or disassembly is prohibited.
3
Page 4

Language Code
Abkhazian 6566
Afar 6565
Afrikaans 6570
Amharic 6577
Arabic 6582
Armenian 7289
Assamese 6583
Avestan 6569
Aymara 6589
Azerhaijani 6590
Bahasa Melayu 7783
Bashkir 6665
Belarusian 6669
Bengali 6678
Bihari 6672
Bislama 6673
Bokmål, Norwegian 7866
Bosanski 6683
Brezhoneg 6682
Bulgarian 6671
Burmese 7789
Castellano, Español 6983
Catalán 6765
Chamorro 6772
Chechen 6769
Chewa; Chichewa; Nyanja 7889
9072
Chuang; Zhuang 9065
Church Slavic; Slavonic 6785
Chuvash 6786
Corsican 6779
esky 6783
Dansk 6865
Deutsch 6869
Dzongkha 6890
English 6978
Esperanto 6979
Estonian 6984
Euskara 6985
6976
Faroese 7079
Français 7082
Frysk 7089
Fijian 7074
Gaelic; Scottish Gaelic 7168
Gallegan 7176
Georgian 7565
Gikuyu; Kikuyu 7573
Guarani 7178
Gujarati 7185
Hausa 7265
Herero 7290
Hindi 7273
Hiri Motu 7279
Hrwatski 6779
Ido 7379
Interlingua (International)7365
Interlingue 7365
Inuktitut 7385
Inupiaq 7375
Irish 7165
Íslenska 7383
Italiano 7384
Ivrit 7269
Japanese 7465
Javanese 7486
Kalaallisut 7576
Kannada 7578
Kashmiri 7583
Kazakh 7575
Kernewek 7587
Khmer 7577
Kinyarwanda 8287
Kirghiz 7589
Komi 7586
Korean 7579
Kuanyama; Kwanyama 7574
Kurdish 7585
Lao 7679
Latina 7665
Latvian 7686
Letzeburgesch; 7666
Limburgan; Limburger 7673
Lingala 7678
Lithuanian 7684
Luxembourgish; 7666
Macedonian 7775
Malagasy 7771
Magyar 7285
Malayalam 7776
Maltese 7784
Manx 7186
Maori 7773
Marathi 7782
Marshallese 7772
Moldavian 7779
Mongolian 7778
Nauru 7865
Navaho; Navajo 7886
Ndebele, North 7868
Ndebele, South 7882
Ndonga 7871
Nederlands 7876
Nepali 7869
Norsk 7879
Northern Sami 8369
North Ndebele 7868
Norwegian Nynorsk; 7878
Occitan; Provencal 7967
Old Bulgarian; Old Slavonic 6785
Oriya 7982
Oromo 7977
Ossetian; Ossetic 7983
Pali 8073
Panjabi 8065
Persian 7065
Polski 8076
Português 8084
Pushto 8083
Russian 8285
Quechua 8185
Raeto-Romance 8277
Romanian 8279
Rundi 8278
Samoan 8377
Sango 8371
Sanskrit 8365
Sardinian 8367
Serbian 8382
Shona 8378
Shqip 8381
Sindhi 8368
Sinhalese 8373
Slovensky 8373
Slovenian 8376
Somali 8379
Sotho; Southern 8384
South Ndebele 7882
Sundanese 8385
Suomi 7073
Swahili 8387
Swati 8383
Svenska 8386
Tagalog 8476
Tahitian 8489
Tajik 8471
Tamil 8465
Tatar 8484
Telugu 8469
Thai 8472
Tibetan 6679
Tigrinya 8473
Tonga (Tonga Islands) 8479
Tsonga 8483
Tswana 8478
Türkçe 8482
Turkmen 8475
Twi 8487
Uighur 8571
Ukrainian 8575
Urdu 8582
Uzbek 8590
Vietnamese 8673
Volapuk 8679
Walloon 8765
Welsh 6789
Wolof 8779
Xhosa 8872
Yiddish 8973
Yoruba 8979
Zulu 9085
4
Page 5
Index
English ------------------------------------ 6
---------------------------- 48
---------------------------- 90
Bahasa Melayu ------------------------ 132
English
Bahasa Melayu
5
Page 6

Table of contents
English
General
General Information ........................................................................................................ 8
Setup precautions ................................................................................................................................................. 8
Accessories supplied ...........................................................................................................................................8
Cleaning discs ........................................................................................................................................................8
About recycling .....................................................................................................................................................8
Product Overview
Main Unit ...........................................................................................................................9
Remote Control .........................................................................................................10-12
Using the remote control ................................................................................................................................12
Connections
Basic Connections .....................................................................................................13-16
Step 1: Placing the speakers .............................................................................................................................13
Step 2: Connecting to TV ................................................................................................................................14
Option 1: Using the Video socket .........................................................................................................14
Option 2: Connecting to a Progressive Scan TV or component video input ............................14
Step 3: Connecting speakers and subwoofer .............................................................................................15
Step 4: Connecting the FM and AM/MW antennas ..................................................................................16
Step 5: Connecting the power cord ..............................................................................................................16
Optional Connections ....................................................................................................17
Connecting audio from TV .............................................................................................................................17
Connecting to cable box/satellite receiver and recorder/ VCR ............................................................17
Basic Setup
Getting Started ..........................................................................................................18-22
Finding the correct viewing channel .............................................................................................................18
Switching to different play source .................................................................................................................18
Setting language preferences ...........................................................................................................................19
On-screen display (OSD) language ........................................................................................................19
Audio, Subtitle and Menu language for DVD playback ...............................................................19-20
Setting the TV Display ..................................................................................................................................... 20
Setting up Progressive Scan feature ..............................................................................................................21
Setting the speakers’ channels ....................................................................................................................... 22
Disc Playback
Disc Operations .........................................................................................................23-31
Playable discs .......................................................................................................................................................23
Playing a disc ........................................................................................................................................................23
Basic playback controls .....................................................................................................................................24
Selecting various repeat/shuf e functions ...................................................................................................24
Programming disc tracks ................................................................................................................................. 25
Other playback features for video discs (DVD/VCD/SVCD) ......................................................... 25-28
Using the Disc Menu ................................................................................................................................. 25
Viewing playback information ..................................................................................................................26
Zooming in/out ............................................................................................................................................26
Changing subtitle language .......................................................................................................................26
Switching camera angles ............................................................................................................................26
Changing sound track language ...............................................................................................................27
Setting the delay times for audio playback ...........................................................................................27
Playback Control (VCD only) ..................................................................................................................27
Preview function ( VCD/SVCD only) .................................................................................................... 28
6
Page 7

Table of contents
Playing a MP3/ WMA disc ................................................................................................................................29
Playing a JPEG image le (slide show) .......................................................................................................... 30
Preview function ......................................................................................................................................... 30
Zoom picture .............................................................................................................................................. 30
Rotating/ ipping the picture ................................................................................................................... 30
Playing MP3/WMA music and JPEG pictures simultaneously ................................................................31
Playing a DivX disc .............................................................................................................................................31
Setup Options
Setup Menu Options ..................................................................................................32-37
Accessing the setup menu ................................................................................................................................32
General Setup Page ............................................................................................................................................33
Audio Setup Page ............................................................................................................................................... 34
Video Setup Page ................................................................................................................................................35
Preference Page ...........................................................................................................................................36-37
Radio Tuning
Radio Operations ...................................................................................................... 38-39
Tuning to radio stations ................................................................................................................................... 38
Changing tuning grid ......................................................................................................................................... 38
Preset ting radio stations ................................................................................................................................ 38
Using auto install .................................................................................................................................. 38 -39
Using automatic preset ..............................................................................................................................39
Using manual preset ...................................................................................................................................39
Selecting a preset radio st ation ......................................................................................................................39
Deleting a preset radio station .......................................................................................................................39
Others
Sound and Volume Controls .........................................................................................40
Volume control .................................................................................................................................................. 40
Selecting surround sound ................................................................................................................................40
Selecting digital sound effects ........................................................................................................................ 40
Other Features................................................................................................................41
Installing the latest software ...........................................................................................................................41
Setting the Sleep timer .....................................................................................................................................41
Troublesho oting ........................................................................................................ 42- 43
Glossary...................................................................................................................... 44-45
Speci cations ..................................................................................................................46
English
7
Page 8

General Information
English
WARNING!
This unit does not contain any userserviceable parts. Please leave all
maintenance work to quali ed
personnel.
Setup precautions
Finding a suitable location
– Place this unit on a at, hard and
stable surface. Never place the unit on a
carpet.
– Never place this unit on top of other
equipment that might heat it up (e.g.,
receiver or ampli er).
– Never put anything under this unit
(e.g., CDs, magazines).
– Install this unit near the AC outlet
where the AC power plug can be easily
reached.
Space for ventilation
– Place this unit in a location with
adequate ventilation to prevent internal
heat build up. Allow at least 10 cm (4”)
clearance from the rear and the top of
this unit and 5cm (2”) from the left and
right to prevent overheating.
Avoid high temperature, moisture,
water and dust
– This unit must not be exposed to
dripping or splashing.
– Never place any object or items that
can damage this unit (e.g., liquid lled
objects, lighted candles).
Accessories supplied
– 1 subwoofer
– 2 front speakers
– 2 rear speakers
– 1 centre speaker
– 1 remote control with batteries
– 1 composite video cable
– 1 FM wire antenna
– 1 AM/MW loop antenna
– 1 power cable
– Quick Start Guide
Cleaning discs
To clean a disc, use a micro bre cleaning
cloth and wipe the disc from the centre
to the edge in a straight line.
CAUTION!
Never use solvents e.g. benzene, thinner,
commercially available cleaners, or antistatic sprays intended for discs.
About recycling
These operating instructions have been
printed on non-polluting paper. The
electronic equipment contains a large
number of materials that can be recycled.
If you are disposing of an old machine,
please take it to a recycling centre.
Please observe the local regulations
regarding disposal of packaging materials,
exhausted batteries and old equipment.
8
Page 9

Main Unit
English
1
2
a STANDBY-ON
– Turns on this unit or turns off to normal
standby mode.
b Disc Tray
c OPEN/CLOSE ç
– Opens/closes the disc tray.
d Display panel
e PLAY/ PAUSE u
– DISC: starts/pauses playback.
– RADIO: starts auto radio installation for
rst time setup.
f SOURCE
– Selects the relevant active source mode:
DISC, FM, AM/MW, TV or AUX.
g SURROUND
– Selects multi-channel surround or stereo
mode.
7
3
h STOP
– Exits an operation.
– DISC: stops playback.
– RADIO: press and hold this button to
4
erase the current preset radio station.
6
5
8 9
i VOL
– Adjusts the volume level.
9
Page 10

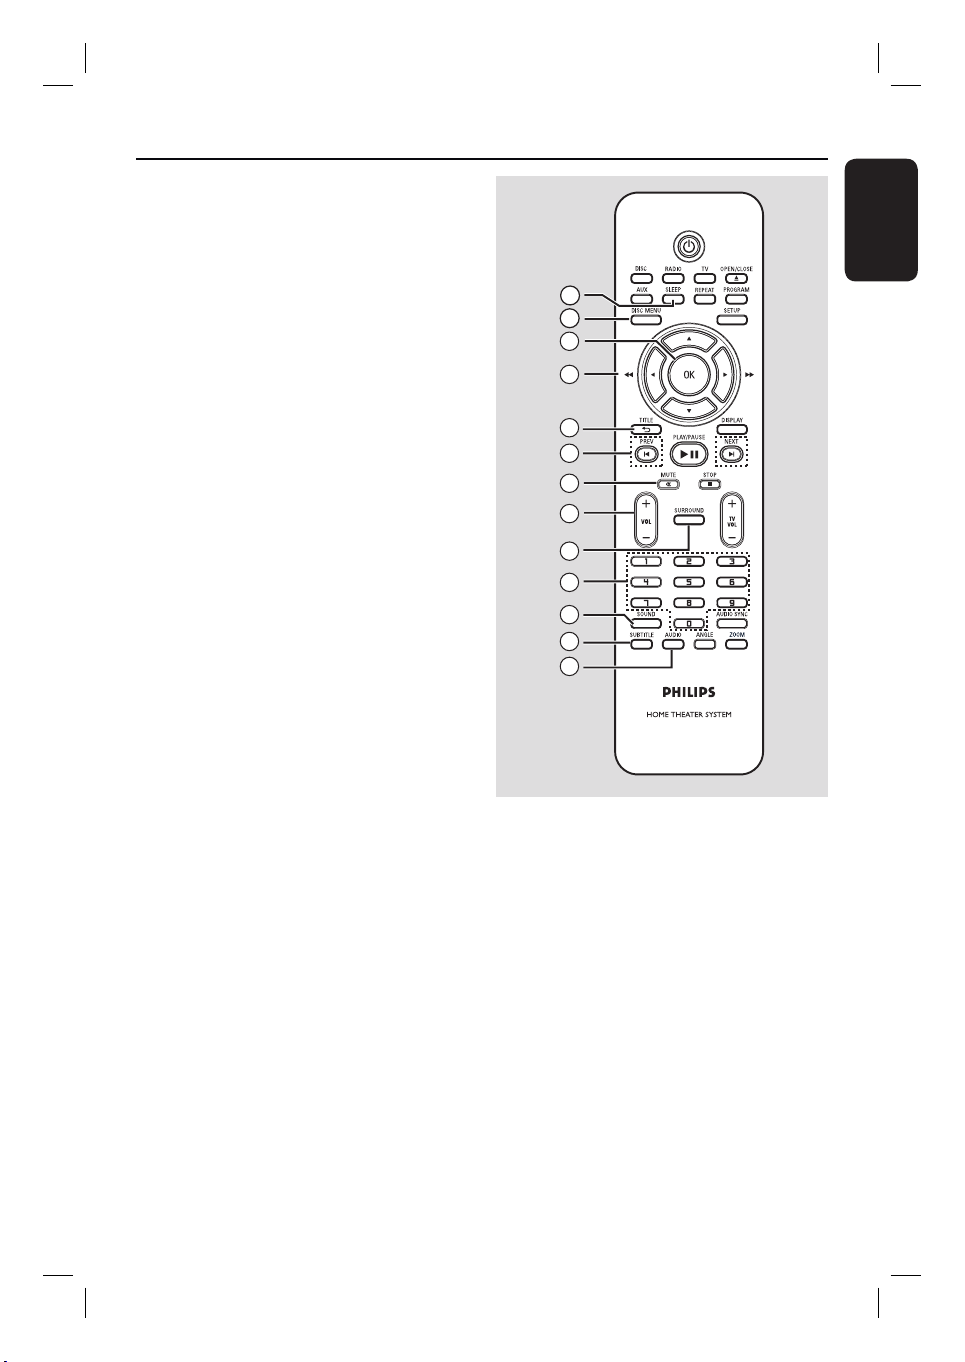
Remote Control
English
a 2
– Turns on this unit or turns off to normal
standby mode.
b Source buttons
– DISC: switches to DISC mode.
RADIO: toggles between FM and AM/
MW band.
TV: switches to TV mode. The sound
from the TV will output through the
connected speaker system.
AUX: switches to the external device
that is connected to the AUDIO IN-AUX
socket.
c OPEN/CLOSE ç
1
2
3
4
65
6
6
– Opens/closes the disc tray.
d PROGRAM
– DISC: starts programming.
– RADIO: press and hold this button to
start automatic/ manual preset
programming.
e REPEAT
– Selects various repeat or shuf e modes;
turns off repeat or shuf e mode.
7
8
9
10
f SETUP
– Enters or exits the system setup menu.
g DISPLAY
– Displays the current status or disc
information.
– Selects a different viewing angle of a DVD
movie (if available).
11
12
13
h PLAY/PAUSE u
– DISC: starts/pauses playback.
– RADIO: starts auto radio installation for
rst time setup.
i STOP x
– Exits an operation.
– DISC: stops playback.
– RADIO: press and hold this button to
erase the current preset radio station.
j TV VOL +/-
– Adjusts the volume of the TV (for Philips
TVs or compatible brands only).
k AUDIO SYNC
– Sets the audio output delay times if the
video playback is slower than the audio
output.
l ZOOM
– Zoom in or out the picture on the TV.
m ANGLE
– Selects a different viewing angle of a DVD
movie (if available).
10
Page 11
n SLEEP
– Sets the sleep timer function.
Remote Control (continued)
o DISC MENU
– For DVD, enters or exits disc contents
menu.
– For VCD/SVCD, enters digest menu.
p OK
– Con rms an entry or selection.
q v V b B
– DISC: selects movement direction in the
menu.
– DISC: press left or right for fast forward
and backward search.
– RADIO: press up or down to tune the
radio frequency.
– RADIO: press left or right to start auto
search.
r TITLE
– For DVD, go back to the previous menu.
– For VCD version 2.0 only;
During playback, display the disc title
menu or return to the main menu.
s PREVí / NEXT ë
– DISC: skips to the previous or next title/
chapter/track.
– RADIO: selects a preset radio station.
English
14
15
16
17
18
19
20
21
22
23
24
25
26
t MUTE %
– Mutes or restores the volume.
u VOL +/-
– Adjusts the volume level.
v SURROUND
– Selects multi-channel surround or
stereo mode.
w Numeric keypad 0-9
– Enters a track/title number of the disc.
– Enters a number of a preset radio station.
x SOUND
– Selects a prede ned sound effect.
y SUBTITLE
– Selects a DVD subtitle language.
z AUDIO
– DISC: selects an audio language/channel.
11
Page 12

Remote Control (continued)
English
Using the remote control
A Open the battery compartment.
B Insert two batteries type R03 or AAA,
following the indications (+-) inside
the compartment.
C Close the cover.
D Point the remote control directly at the
remote sensor (iR) on the front panel.
E Select the source you wish to control by
pressing the DISC, RADIO, TV or AUX
button on the remote control.
F Then select the desired function (for
example í, ë).
CAUTION!
– Remove batteries if they are
exhausted or if the remote control
is not to be used for a long time.
– Never mix batteries (old and new
or carbon and alkaline, etc).
– Batteries contain chemical
substances, they should be disposed
of properly.
12
Page 13
Basic Connections
English
REAR
LEFT
FRONT
LEFT
REAR
RIGHT
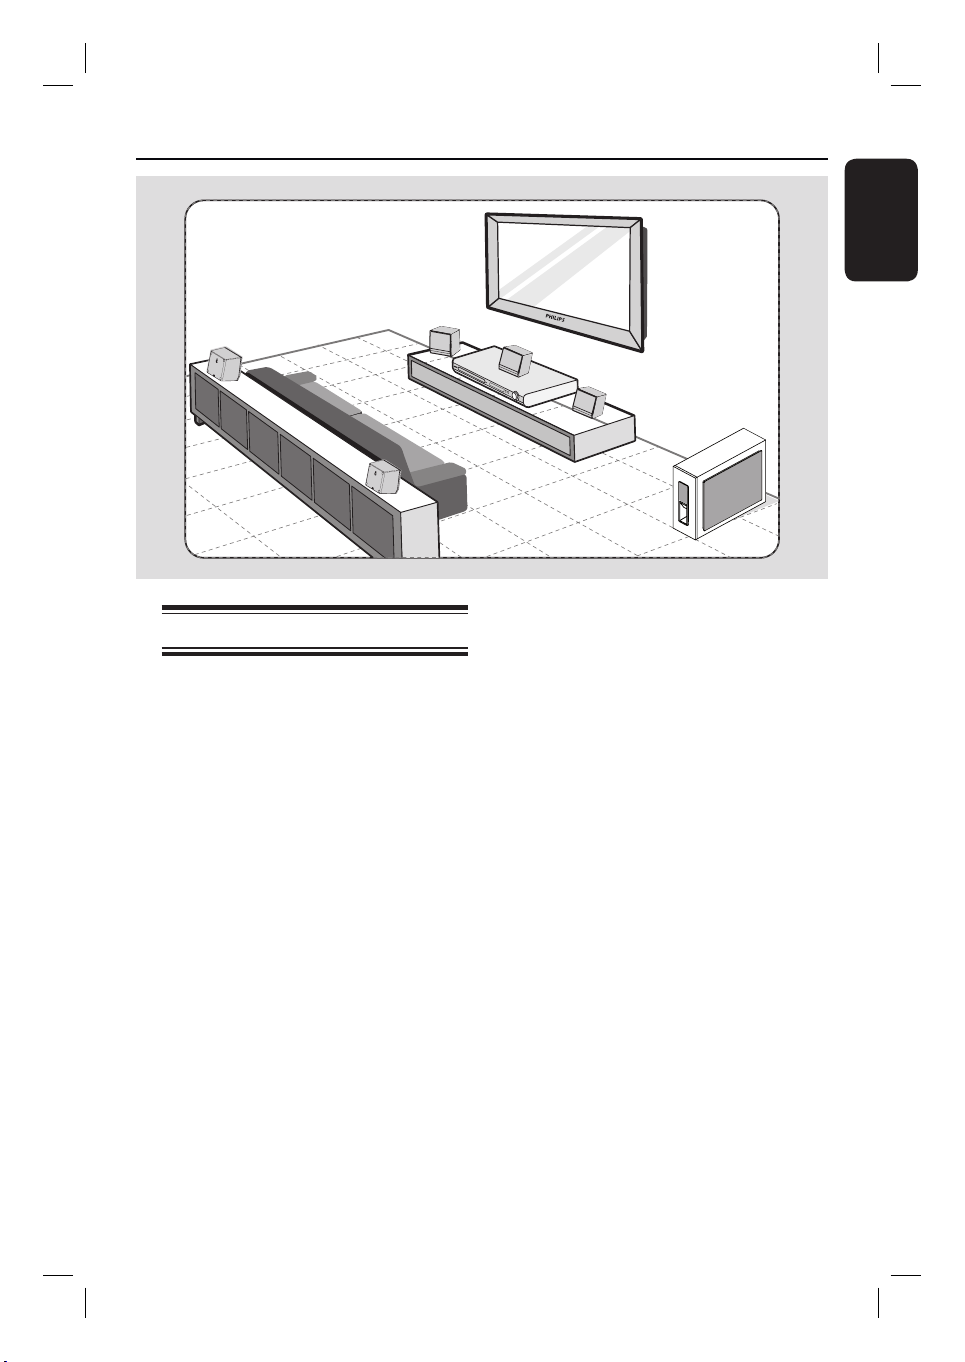
Step 1: Placing the speakers
The Philips Home Theatre System is
simple to install. However, proper system
placement is critical to ensure an
optimum sound experience.
A Place the front left and right speakers at
equal distances from the TV and at an
angle of approximately 45 degrees from
the listening position.
B Place the centre speaker above the TV or
the main unit such that the centre
channel’s sound is localised.
C Place the rear speakers at normal
listening ear level facing each other or
hang on the wall.
D Place the subwoofer at the corner of the
room. Otherwise, keep it at least one
metre away from the TV.
CENTER
FRONT
RIGHT
SUBWOOFER
Helpful Hints:
– The placement diagram shown here is only
a guideline that provides great system
performance. You may nd other placement
choices that are more suitable for your room
layout that provide the sound experience you
enjoy.
– To avoid magnetic interference, never
position the front speakers too close to your
TV.
– The rear speakers are labelled as REAR
LEFT or REAR RIGHT.
– The front speakers are labelled as
FRONT LEFT or FRONT RIGHT.
– For speaker setting, see ‘Getting Started Setting the speakers’ channel’.
13
Page 14

Basic Connections (conti nued)
English
Main Unit (rear)
Option 1
Option 2
SPEAKERS
Step 2: Connecting to TV
This connection enables you to view the
video playback from this unit. You only
need to choose one of the options
below to make the video connection.
– For a standard TV, follow option 1.
– For a progressive scan TV, follow
option 2.
Helpful Hint:
– It is important to connect this unit directly
to the TV in order to enjoy optimum video
quality.
AM/
MW
Option 1: Using the Video socket
Connect a composite video cable
(supplied) from the CVBS socket on the
main unit to the video input socket (or
labelled as A/V In, Video In, Composite
or Baseband) on the TV.
Option 2: Connecting to a
Progressive Scan TV or component
video input
The progressive scan video quality is only
available when using Y Pb Pr connection
and a progressive scan TV is required. It
provides superior picture quality when
watching DVD movies.
A Connect the component video cables
(red/ blue/green - not supplied) from the
Y Pb Pr sockets on the main unit to the
corresponding component video input
sockets (or labelled as Y Pb/Cb Pr/Cr or
YUV) on the TV.
B If your TV accepts progressive signals,
proceed to chapter ‘Getting Started Setting up Progressive Scan feature’ for
detailed progressive feature setup.
14
Page 15

Basic Connections (conti nued)
FRONT
RIGHT
FRONT
LEFT
SPEAKERS
FRONT CENTRE
REAR LEFT
SUBWOOFER
REAR RIGHT
English
AM/
MW
Step 3: Connecting speakers
and subwoofer
Connect all the speakers and subwoofer
to the matching sockets at the rear of the
main unit, Make sure that the colours of
the plugs and sockets are matched.
Helpful Hint:
– To prevent unwanted noise, never place
the speakers too close to the main unit,
subwoofer, AC power adapter, TV or any
other radiation sources.
15
Page 16

Basic Connections (continued)
English
x the claw
into the slot
FM
AM/MW
antenna
1
antenna
2
AM/
MW
SPEAKERS
AM/
MW
Step 4: Connecting the
FM and AM/MW
antennas
A Connect the supplied AM/MW loop
antenna to the AM/MW socket. Place
the AM/MW loop antenna on a shelf, or
attach it to a stand or wall.
B Connect the supplied FM antenna to the
FM 75 Ω socket. Extend the FM antenna
and x its ends to the wall.
For better FM stereo reception, connect
an external FM antenna (not supplied).
Helpful Hints:
– Adjust the position of the antennas for
optimal reception.
– Position the antennas as far away as
possible from your TV, VCR or other
radiation source to prevent any unwanted
interference.
Step 5: Connecting the
power cord
Notes:
– For power supply rating, refer to the
rear or bottom of the main unit.
– Turning off to standby mode does not
disconnect the unit from mains.
Connect the AC power cord to the
power outlet.
The standby LED on the main unit
lights up.
Helpful Hint:
– Before making or changing any
connections, make sure that all the devices
are disconnected from the power outlet.
16
Page 17

Optional Connections
DVD Recorder/VCR/
Cable/Satellite Box
AUDIO OUT
English
L
R
SPEAKERS
Connecting audio from TV
When connecting the audio output from
your TV to this Home Theatre System,
you can have the sound of the TV output
on all the speakers. It enables you to
enjoy the multi-channel surround sound
capabilities.
Connect an audio cable (red/white - not
supplied) from the AUDIO IN-TV
sockets on the main unit to the AUDIO
OUT sockets on the TV.
To listen to the sound, press TV on the
remote control as the sound source that
you want to listen to.
SPEAKERS
Connecting to cable box/
satellite receiver and
recorder/VCR
You can connect the audio output from
an audio/video device (e.g. DVD
Recorder, VCR, Cable/Satellite Box) to
this Home Theatre System in order to
enjoy the multi-channel surround sound
capabilities.
Connect an audio cable (red/white - not
supplied) from the AUDIO IN-AUX
sockets on the main unit to the AUDIO
OUT sockets on the connected device.
To listen to the sound, press AUX as
the sound source that you want to listen
to.
AM/
MW
17
Page 18

Getting Started
English
Finding the correct viewing
channel
A Press SOURCE button on the main unit
until ‘DISC’ appears on the display panel
(or DISC on the remote control).
B Turn on the TV and switch it to the
correct video-in channel.
You may go to the lowest channel on
your TV, then press the Channel Down
button on your TVs remote control until
you see the Video In channel.
You may press ° button repeatedly
on your TV’s remote control.
Usually this channel is between the
lowest and highest channels and may be
called FRONT, A/V IN, VIDEO, etc..
Refer to your TVs user manual on
how to select the correct input on your
TV.
Switching to different play
source
Press the SOURCE button on the front
panel repeatedly to select:
DISC ¤ FM ¤ AM/MW ¤ TV
¤ AUX ¤ DISC ....
Or
Press DISC, RADIO, TV or AUX on
the remote control.
Press DISC to switch to DISC mode.
Press RADIO to toggle between FM
and AM/MW band.
If the audio input on this unit is
connected to your TV, press TV to hear
the TVs sound output through this unit.
Press AUX for switching to the
external device that is connected to the
AUDIO IN-AUX socket on this unit.
18
Page 19

Getting Started (cont inued)
Setting language preferences
The language options are different
depending on your country or region. It
may not correspond to the illustrations
shown on the user manual.
On-screen display (OSD) language
The OSD (On-Screen Display) language
for this unit remains as you have set it,
regardless of the changes made to the
DVD disc language.
A In disc mode, press SETUP on the
remote control.
{ General Setup Page } appears.
B Press to highlight { OSD Language }
in the menu and press .
General Setup Page
Disc Lock
Display Dim
Program
OSD Language
Screen Saver
Sleep
DivX(R) VOD Code
C Use keys to select a language and
press OK to con rm.
English
Melayu
Русский
ไทย
Audio, Subtitle and Menu language
for DVD playback
You can select your preferred language
settings for DVD playback. If the selected
language is recorded on the DVD disc,
this unit automatically plays the disc in
that language. Otherwise, the disc’s
default language will be used instead.
A Press Ç twice to stop playback (if any),
then press SETUP.
B Press repeatedly to select
{ Preference Page }.
C Use keys to select one of the
options below and press .
Preference Page
Audio
Subtitle
Disc Menu
Parental
Surround
PBC
MP3/JPEG Nav
Password
{ Audio }
Selects the preferred audio language for
DVD playback.
{ Subtitle }
Selects the preferred subtitle language for
DVD playback.
English
Chinese (Simp)
French
Spanish
Portuguese
Polish
Italian
Turkish
English
{ Disc Menu }
Selects the preferred disc menu language
for DVD playback.
D Use keys to select a language and
press OK to con rm.
19
1_hts3000_98_eng2.indd 191_hts3000_98_eng2.indd 19 2007-04-26 6:54:07 PM2007-04-26 6:54:07 PM
Page 20

Getting Started (cont inued)
English
If the language you want is not
available in the list, select { Others }.
Use the numeric keypad (0-9) on the
remote control to enter the 4-digit
language code ‘XXXX’ (see page 4) and
press OK to con rm.
E Repeat steps C ~ D for other settings.
Helpful Hints:
– During DVD playback, you can switch the
audio and subtitle languages by pressing the
AUDIO and SUBTITLE buttons on the
remote control. However, this does not
change the default settings you have made
here.
– For some DVDs, the subtitle/audio/menu
language can only be changed via the DVD
disc menu.
Setting the TV Display
Set the aspect ratio of this unit according
to the TV type you have connected. The
format you select must be available on
the disc. If it is not, the setting for TV
display will not affect the picture during
playback.
A In disc mode, press SETUP on the
remote control.
B Press repeatedly to select { Video
Setup Page }.
C Press to highlight { TV Display } in
the menu and press .
Video Setup Page
TV Type
TV Display
Progressive
Picture Setting
{ 4:3 Pan Scan }
Select this if you have a
conventional TV and
want both sides of the
picture to be trimmed or formatted
to t your TV.
4:3 Pan Scan
4:3 Letter Box
16:9 Wide Screen
20
{ 4:3 Letter Box }
Select this if you have a
conventional TV. In this
case, a wide picture with
black bands on the upper and lower
portions of the TV will be displayed.
{ 16:9 Wide Screen }
Select this if you have a
wide-screen TV.
D Select one of the options and press OK
to con rm.
Page 21

Getting Started (cont inued)
Setting up Progressive Scan
feature
(for Progressive Scan TV only)
The progressive scan displays twice the
number of frames per second than
interlaced scanning (ordinary normal TV
system). With nearly double the number
of lines, progressive scan offers higher
picture resolution and quality.
Before you start...
Ensure that you have connected this unit
to a progressive scan TV using the
Y Pb Pr connection (see ‘Option 2:
Connecting to a Progressive Scan TV or
component video input’).
A Turn on the TV to the correct viewing
channel for this unit.
Make sure that the TVs progressive
scan mode is turned off (or set to
interlaced mode). Refer to your TVs user
manual.
B Turn on this unit and press DISC on the
remote control.
C Press SETUP on the remote control.
D Press repeatedly to select { Video
Setup Page }.
Video Setup Page
TV Type
TV Display
Progressive
Picture Setting
Off
On
F Read the noti cation message on the TV
and con rm your action by selecting the
in the menu and press OK.
There will be no picture on your TV
at this state until you have turned
on the progressive scan mode on
your TV.
G Turn on your TV progressive scan mode,
refer to your TVs user manual.
A message appears on the TV.
H Con rm your action by selecting the
in the menu and press OK.
The setup is now completed and you
can start to enjoy the high quality picture.
If no picture is displayed
A Press OPEN/CLOSE ç.
B Press on the remote control.
C Press AUDIO on the remote control.
Helpful Hints:
– If a blank/distorted screen appears, wait
for 15 seconds for the auto recovery.
– There are some progressive scan TVs that
are not fully compatible with this unit,
resulting in an unnatural picture when
playing back a DVD VIDEO disc in the
progressive scan mode. In such a case, turn
off the progressive scan feature on this unit
and your TV
English
E Move to { Progressive } > { On } in the
menu and press OK to con rm.
21
Page 22

Getting Started (cont inued)
English
Setting the speakers’
channels
You can adjust the delay times (centre
and surround only) and volume level for
individual speakers. These adjustments let
you optimise the sound according to
your surroundings and setup.
Before you start...
Stop the disc playback by pressing STOP
button twice or remove the disc from
the disc tray. Otherwise, the settings are
not accessible.
A In disc mode, press SETUP on the
remote control.
B Press
C Press to highlight { Speakers
repeatedly to select { Audio
Setup Page }.
Volume } and press .
Audio Setup Page
Speakers Volume
Speakers Delay
CD Upsampling
Audio Sync
Speakers Level Setup
Front Left
Front Right
Center
Subwoofer
Rear Left
Rear Right
0dB
0dB
0dB
0dB
0dB
0dB
E Use keys to highlight { Speakers
Delay } and press .
Audio Setup Page
Speakers Volume
Speakers Delay
CD Upsampling
Audio Sync
Speakers Distance Setup
Center
Rear Left
Rear Right
0ms
0ms
0ms
F Use keys to set the delay times
(0 ms ~ 15 ms) for centre and rear
speakers that best suit your surround
sound needs.
G Press OK to con rm.
Helpful Hints:
– A 1ms increase/decrease of delay time is
equivalent to 30 cm change in distance.
– Use the longer delay time settings when
the rear speakers are closer to the listener
than the front speakers.
– The test tone will be automatically
generated to help you judge the sound level
of each speaker.
D Use keys to set the volume level for
each speaker (-6dB ~ +6dB) and press
OK to con rm.
22
Page 23

Disc Operations
Playable discs
Your DVD home theatre system
plays:
– Digital Versatile Discs (DVDs)
– Video CDs (VCDs)
– Super Video CDs (SVCDs)
– Finalised DVD Recordable (DVD±R),
DVD Rewritable (DVD±RW)
– Audio Compact Discs (CDs)
– MP3/ Windows Media™ Audio discs,
picture (Kodak, JPEG) les on
CD-R(W)
– ISO 9660/UDF format
– JPEG resolution support up to
3072 x 2048
– Supported sampling frequencies:
32 kHz, 44.1 kHz, 48 kHz
– Supported Bit-rates: 32~256 (kbps),
variable bit rates (average 128 kbps)
– DivX les on CD-R(W)/DVD+R(W):
– DivX 3/4/5/6
Region Codes for DVD discs
DVD discs and players are designed with
regional restrictions. Before playing a disc,
make sure the disc is for the same region
as your player. The regional code for this
unit is indicated at the rear or bottom
panel.
Notes:
– If the inhibit icon (ø or X) appears
on the TV when a button is pressed,
it means the function is not
available on the current disc or at
the current time.
– Never put any objects other than
discs on the disc tray. Doing so may
cause the disc player to malfunction.
Playing a disc
A Press SOURCE repeatedly until ‘DISC’
appears on the display panel (or press
DISC on the remote control).
B Turn on the TV to the correct viewing
channel for this unit.
The blue DVD background screen
appears on the TV.
C Press OPEN/CLOSE ç to open the
disc tray.
D Load a disc and press OPEN/CLOSE ç
to close the disc tray.
Make sure the disc label is facing up.
For double-sided discs, load the side
which you want to play facing up.
E Playback starts automatically.
See the following pages for more
playback options and features.
Helpful Hints:
– If you are having trouble playing a certain
disc, remove the disc and try a different one.
Improperly formatted discs cannot be played
on this unit.
– Some discs cannot be played on this player
due to the con guration and characteristics
of the disc, or due to the condition of
recording and authoring software that was
used.
English
23
Page 24

Disc Operations (continued)
English
Basic playback controls
Pausing playback
During playback, press u.
While in pause mode, you can press
to step forward one frame at each
press.
To resume playback, press u again.
Selecting another track/chapter
Press í / ë or use the numeric
keypad 0-9 to key in a track/chapter
number.
If the repeat track mode is active, press
again to replay the same track/chapter.
Searching backward/forward
Press m / M on the remote control.
While searching, press m / M
repeatedly to decrease/increase the
search speed.
To resume normal playback, press
u.
Stopping playback
Press x.
Helpful Hints:
– If the message ‘To playback from the
beginning, press PREV key’ appears on the
TV while you load in a disc, you can press
í to start playback from the beginning.
– This is a power-saving feature, this unit
automatically switches to standby mode if
you do not press any buttons within 15
minutes after a disc has stopped playing.
Selecting various repeat/
shuf e functions
The available of the repeat play options
and shuf e play mode are vary depending
on the disc type.
While playing a disc, press
REPEAT on the remote control
repeatedly to choose a repeat or shuf e
play mode.
DVD
RPT ONE (repeat chapter)
RPT TT (repeat title)
SHUFFLE (random play)
RPT SHF (repeat random play)
RPT OFF (exit repeat mode)
VCD/SVCD/CD
RPT ONE (repeat track)
RPT ALL (repeat disc)
SHUFFLE (random play)
RPT SHF (repeat random play)
RPT OFF (exit repeat mode)
MP3/ DivX/ Windows Media™ Audio
RPT ONE (repeat track)
RPT ALL/FLD (repeat folder)
SHUFFLE (random play)
RPT OFF (exit repeat mode)
Helpful Hint:
– Repeat playback is not possible on VCDs
when the PBC mode is turned on.
24
Page 25

Disc Operations (continued)
Programming disc tracks
(not for Picture CD/MP3 discs)
You can play the contents of the disc in
the order you want by programming the
playing order of the tracks.
A Press PROGRAM on the remote
control.
The programming menu appears.
Program: Track (01-16)
6
2
12
B Use the numeric keypad (0-9) to
enter a valid track/chapter number.
C Use keys to move the cursor to
the next position.
If there are more than ten total
programme tracks, select { Next } on
the screen and press OK (or press ëon
the remote control) to access the next
programming page.
To remove the track/chapter from the
programming menu, select the track/
chapter and press OK.
D Once complete, select { Start } on the
screen and press OK to start playback.
Playback starts from the selected track
under the programmed sequence.
E To exit the programme menu, select
{ Exit } in the menu and press OK.
7
8
9
10
Exit Start Next
Other playback features
for video discs (DVD/VCD/
SVCD)
DISC MENU
TITLE
SUBTITLE
AUDIO
Note:
The operating features described here
might not be possible for certain discs.
Always refer to the instructions supplied
with the discs.
Using the Disc Menu
Depending on the disc format, a menu
may appear on the TV screen once you
load the disc.
To select a playback feature or item
Use keys or numeric keypad
0-9 on the remote control, then press
OK to start playback.
To access or remove the menu
Press DISC MENU on the remote
control.
DISPLAY
AUDIO SYNC
ZOOM
ANGLE
English
25
Page 26

Disc Operations (continued)
English
Viewing playback information
This unit can display the disc playback
information (for example, title or chapter
number, elapsed playing time, audio/
subtitle language) and a number of
operations can be done without
interrupting disc playback.
A During playback, press DISPLAY.
A list of available disc information
appears on the TV.
DVD
Menu
Title
Chapter
Audio
Subtitle
Bitrate 7
01/01
02/99
2ch Chi
Off
Title Elapsed
VCD/SVCD
Menu
Track
Disc Time
Track Time
Repeat
Bitrate 8
09/16
1:16:05
0:04:32
Off
Total Elapsed
B Use keys to view the information
and press OK to access.
C Use the numeric keypad 0-9 to input
the number/time or use keys to
make the selection.
D Press OK to con rm.
Playback changes according to the
chosen time or to the selected title/
chapter/track.
Zooming in/out
This option allows you to zoom in or out
the picture on the TV and to pan through
the picture.
A During playback, press ZOOM
repeatedly to select a different zoom
factor.
Playback continues.
B Use keys to pan through the
zoomed image.
C Press ZOOM repeatedly to return to
the original size.
Changing subtitle language
This operation works only on DVDs with
multiple subtitle languages. You can
change the language you want while
playing a DVD.
Press SUBTITLE repeatedly to select
different subtitle languages.
Switching camera angles
This option is only available on DVDs
that contain sequences recorded from
different camera angles. This allows you
to view the picture from different angles.
If the camera icon appears on the TV,
press ANGLE repeatedly to select the
available camera angles.
26
Page 27

Disc Operations (continued)
Changing sound track language
This operation works only on DVDs with
multiple sound track languages, or VCDs
with multiple audio channels.
Press AUDIO repeatedly to select the
available audio languages.
For VCD – changing the audio
channel
Press AUDIO repeatedly to select the
available audio channels provided by the
disc (STEREO, MONO LEFT, MONO
RIGHT or MIX MONO).
Setting the delay times for audio
playback
This feature allows you to adjust the
audio delay times if the video playback is
slower than the audio output streams,
hence resulting in ‘Lip-sync’. The only
way to correct ‘Lip-sync’ error caused by
delayed video is to delay audio by an
equal amount.
A Press AUDIO SYNC.
B Within ve seconds, use the VOL +-
to set the audio output delay times
(0 ~ 200 ms).
If the volume control is not used
within ve seconds, it resumes its normal
volume control function.
Playback Control (VCD only)
Playback Control (PBC) playback allows
you to play Video CDs interactively,
following the menu on the display. The
PBC feature on this unit is turned on by
default.
For VCDs with Playback Control
(PBC) feature (version 2.0 only)
During playback, press TITLE to
return to the disc title menu or main
menu.
Helpful Hint:
– Set your preferred default PBC setting in
the setup menu, see ‘Setup Menu Options { Preference Page }’.
English
Helpful Hint:
– Set your preferred default AUDIO SYNC
setting in the setup menu, see ‘Setup Menu
Options - { Audio Setup Page }’.
27
Page 28

Disc Operations (continued)
English
Preview function (VCD/SVCD only)
This function allows you to preview the
contents of a VCD/SVCD.
Press DISC MENU.
A
Select Digest Type:
Track Digest
Disc Interval
Track Interval
B Use keys to select one of the
following options and press OK.
{ Track Digest }
View six different tracks on one screen
each time. It allows you to have a quick
glance at all the tracks on the disc.
{ Disc Interval }
View the whole disc in six thumbnail
pictures. It divides a disc into six portions
at regular intervals and displays them on
one screen.
{ Track Interval }
View the content of a single track in six
thumbnail pictures. It divides a single
track into six portions at regular intervals
and displays them on one screen.
This option is only available during
playback mode.
01 02 03
To go to the previous or next page, press
í / ë.
To return to the main menu, select
{ Menu } on the screen and press OK.
Press OK on the selected thumbnail
picture to start playback from there.
C To exit the preview menu, select
{ Exit } on the screen and press OK.
28
04 05 06
Exit Menu
Page 29

Disc Operations (continued)
Playing a MP3/ WMA disc
This unit can playback most of the MP3
and Windows Media™ Audio les
recorded on a recordable disc or
commercial CD.
Before you start ...
Turn on your TV to the correct Video In
channel. See ‘Finding the correct viewing
channel’ for details.
A Insert a MP3/WMA disc.
The disc reading time may exceed 30
seconds due to the complexity of the
directory/ le con guration.
The disc menu appears on the TV.
00:06 04:04 001/018
\UDF_MP3\
Previous
08-AudioTrack
09-AudioTrack
10-AudioTrack
11-AudioTrack
12-AudioTrack
13-AudioTrack
14-AudioTrack
000 018 000 Disc
B If the disc main menu contains various
folders, use keys to select a desired
folder and press OK to open the folder.
C Use keys to select a track/ le and
press OK to start playback.
Playback starts from the selected le
and continue through to the end of the
folder.
During playback;
Press í / ë to playback another track/
le in the current folder.
Press m / M to fast reverse/forward
search for a music track.
To select another folder from the
current disc, press repeatedly to
highlight ‘Previous’ folder and press OK
to return to the root menu.
Press REPEAT repeatedly to access
various play modes.
D To stop playback, press x.
Helpful Hints:
– To skip the folders menu when you load a
MP3/JPEG disc, set the MP3/JPEG NAV
setting in the Preference Setup Page to
{ Without Menu }.
– Only the rst session of a multi-session CD
will be played back.
– It is normal to experience an occasional
‘skip’ while listening to your MP3/WMA disc
due to poor clarity of digital contents during
internet downloading.
– If any special characters are present in the
MP3/WMA track name (ID3) or album
name, it might not be displayed correctly on
the screen because this unit does not support
the characters.
English
29
Page 30

Disc Operations (continued)
English
Playing a JPEG image le
(slide show)
Before you start ...
Turn on your TV to the correct Video In
channel. See ‘Finding the correct viewing
channel’ for details.
Insert a JPEG photo CD (Kodak Picture
CD, JPEG).
For a Kodak disc, the slide show
begins automatically.
For a JPEG disc, the picture menu
appears on the TV. Press u to start the
slide-show playback.
Helpful Hint:
– It may require longer time for this unit to
display the disc content on the TV due to the
large number of songs/pictures compiled into
one disc.
Supported le format:
– The le extension has to be ‘*.JPG’ and
not ‘*.JPEG’.
– This unit can only display digital camera
pictures according to the JPEG-EXIF
format, typically used by almost all digital
cameras. It cannot display Motion JPEG,
progressive JPEG and other JPEG
formats, or pictures in formats other
than JPEG, or sound clips associated with
pictures.
Preview function
A During playback, press x.
12 thumbnail pictures will be displayed
on the TV.
B Press í / ë to display the other
pictures on the previous/next page.
C Use keys to select one of the
pictures and press OK to start playback.
D Press DISC MENU to return to Picture
CD menu.
Zoom picture
A During playback, press ZOOM
repeatedly to select a different zoom
factor.
B Use keys to pan through the
zoomed image.
Rotating/ ipping the picture
30
During playback, use keys to
rotate/ ip the picture on the TV.
: ip the picture vertically
: ip the picture horizontally
: rotate the picture anti-clockwise
: rotate the picture clockwise
Page 31

Disc Operations (continued)
Playing MP3/WMA music and
JPEG pictures simultaneously
You can create a musical slide show if the
disc contains both the MP3/WMA music
and JPEG picture les.
A Insert a MP3/WMA disc that contains
music and pictures.
B Select a track in the menu and press OK
to start playback.
C During music playback, use keys to
select a picture le from the disc menu
and press OK.
The picture les will be played back
through to the end of the folder.
The music keeps playing back and will
be repeated if reaches the end of the
selected album, playlist or track.
D To stop simultaneous playback, press
DISC MENU followed by x.
Playing a DivX disc
This unit supports the playback of DivX
movies which you can copy from your
computer onto a recordable disc. See
‘Setup Menu Options - { General Setup
Page - DivX(R) VOD code }’ for details.
A Insert a DivX disc.
B Use keys to navigate to the
title you want to play.
C Press OK to start playback.
During playback;
If the DivX disc has multilingual subtitles,
you can press SUBTITLE on the
remote control to change the subtitle
language.
If the DivX title has different audio
tracks, you can press AUDIO on the
remote control to change the audio
stream.
Use m / M keys on the remote
control to perform fast reverse/forward
search.
Press DISPLAY repeatedly until the
Time Search menu appears, key in the
time where playback should start.
Playback skips to the time entered.
English
Helpful Hints:
– Subtitle les with the following le name
extensions (.srt, .smi, .sub, .ssa, .ass) are
supported but do not appear on the le
navigation menu.
– The subtitle le name has to be the same
as the le name of the movie.
– The subtitle can only be displayed up to an
average of 45 characters.
31
1_hts3000_98_eng2.indd 311_hts3000_98_eng2.indd 31 2007-04-26 6:54:07 PM2007-04-26 6:54:07 PM
Page 32

Setup Menu Options
English
Accessing the setup menu
This system setup is carried out via the
TV, enabling you to customise this unit to
suit your particular requirements.
OK
A In disc mode, press SETUP on the
remote control.
The setup menu appears.
B Use keys to select one of the setup
menu options and press OK.
If you are not able to access the
{ Preference Page }, press SETUP to
exit the menu. Then, press STOP x
twice before you press the SETUP
again.
C Use keys to select a setup option
and press to access.
D Select the setting you wish to change and
press OK to con rm and go back to the
previously selected item.
Instructions and explanations of the
options are provided in the following
pages.
If the option in the menu is grayed
out, that means the setting is not
available or cannot be changed in the
current state.
SETUP
General Setup Page
Disc Lock
Display Dim
Program
OSD Language
Screen Saver
Sleep
DivX(R) VOD Code
Audio Setup Page
Speakers Volume
Speakers Delay
CD Upsampling
Audio Sync
Video Setup Page
TV Type
TV Display
Progressive
Picture Setting
Preference Page
Audio
Subtitle
Disc Menu
Parental
Surround
PBC
MP3/JPEG Nav
Password
DivX Subtitle
Default
see page 33
see page 34
see page 35
see pages
36~37
E To exit, press SETUP.
32
Page 33

Setup Menu Options (continued)
General Setup Page (underlined options are the factory default settings)
Disc Lock
Display Dim
Program
OSD Language
Screen Saver
Not all discs are rated or coded by the disc maker. You can
prevent play of speci c discs with the disc lock function. Up to 40
discs can be locked.
{ Lock } – To block the playback of the current disc.
Subsequent access to a locked disc requires a
six-digit password. The default password is
‘136900’ (see ‘Preference Setup Page { Password }).
{ Unlock } – All discs can be played.
Select the brightness of this unit’s display panel.
{ 100% } – Full brightness.
{ 70% } – Medium brightness.
{ 40% } – Dimmest display. This switches off all LEDs
and icons on the front display panel of this
unit
Access the track programming menu. See ‘Programming disc
tracks’ for details.
Select the menu language for this unit’s on-screen display.
The screen saver prevents damage to the TV screen by avoiding
exposure to a static image for too long.
{ On } – Switch to TV screen saver mode when
playback has been stopped or paused for
more than 5 minutes.
{ Off } – Turn off the screen saver function.
English
Sleep
DivX(R) VOD Code
Press
The sleep timer enables the unit to switch to standby mode
automatically after the selected preset time.
{ 15/30/45/60 mins } – Select the preset minutes for switching
the unit to standby mode automatically.
{ Off } – Turn off the sleep mode function.
Philips provides you with the DivX
registration code that allows you to rent or purchase videos from
DivX® VOD service at www.divx.com/vod. All the downloaded
videos from DivX® VOD can only be played back on this unit.
to see the registration code and press OK to exit.
®
VOD (Video On Demand)
33
Page 34

Setup Menu Options (continued)
English
Audio Setup Page (underlined options are the factory default settings)
Speakers Volume
Access the speaker’s level setup menu. Use keys to adjust
the volume level for each connected speaker between -6dB to
+6dB.
See ‘Getting Started - Setting the speakers’ channels’.
Speakers Delay
Access the speaker’s distance setup menu. Use keys to set
the delay times for the centre and rear speakers based on the
listening position and distance.
See ‘Getting Started - Setting
the speakers’ channels’.
Note: 1 ms increase/decrease of delay time is equivalent to one (1) foot
change in distance. Use the longer delay time settings when the rear
speakers are closer to the listener than the front speakers.
CD Upsampling
This feature enables you to convert the music CD to a
higher sampling rate using sophisticated digital signal
processing for better sound quality.
{ Off } – Turn off CD-upsampling.
{ 88.2 kHz (X2) } – To convert the sampling rate of the CDs
twice as high as the original rate.
Notes:
Audio Sync
If you have activated the CD upsampling
–
automatically switches to stereo mode.
If you press the SURROUND button on the remote control to select
–
multi-channel mode, it turns off the CD upsampling feature.
This feature allows you to adjust the audio delay times if the
feature, the audio output
video playback is slower than the audio output streams.
Use keys to set the delay times for the audio output
between 0~200ms.
34
Page 35

Setup Menu Options (continued)
Video Setup Page (underlined options are the factory default settings)
TV Type
TV Display
Progressive
Select the colour system that matches the connected TV. It
enables playback of a different type of disc (PAL or NTSC disc)
on this unit.
{ PAL } – For PAL-system TV.
{ NTSC } – For NTSC-system TV.
{ Multi } – For TV that is compatible with both PAL and
NTSC.
The picture shape can be adjusted to t your TV.
{ 4:3 Pan Scan } – For a full-height picture with
the sides trimmed.
{ 4:3 Letter Box } – For a ‘wide-screen’ display
with black bars on the top and
bottom.
{ 16:9 Wide Screen } – For wide-screen TV
(frame ratio 16:9).
Before enabling the progressive scan feature, you must ensure that
your TV can accept progressive signals (a progressive scan TV is
required) and that you have connected this unit to your TV using
the Y Pb Pr. See ‘Getting Started - Setting up progressive scan
feature’ for details.
{ On } – Turn on progressive scan mode.
Read the instructions on the TV and con rm
your action by pressing OK on the remote
control.
{ Off } – Turn off the progressive scan mode.
English
Picture Setting
Personal Picture Setup
Brightness
Contrast
Tint
Color
This unit provides three prede ned sets of picture colour settings
and one personal setting which you can de ne yourself.
{ Standard } – Original colour setting.
{ Bright } – Vibrant colour setting.
{ Soft } – Warm colour setting.
{ Personal } – Select this to personalise the picture colour
setting. Use keys to adjust to the setting
that best suits your personal preference and
press OK to con rm. For an average setting,
select { 0 }.
35
Page 36

Setup Menu Options (continued)
English
Preference Page (underlined options are the factory default settings)
Audio
Subtitle
Disc Menu
Parental
Surround
Select the preferred audio language for DVDs with multiple
sound tracks.
Select the preferred subtitle language for DVD playback.
Select the preferred disc menu language for DVD playback.
Note: If the selected audio/subtitle/disc menu language is not available on
the DVD, the disc’s default language will be used instead.
This is to prohibit viewing of discs that had exceeded the limits
you set. It works only on the DVDs with parental level assigned
to the complete disc or to certain scenes on the disc.
1) Use keys to select a rating level from 1 to 8 and press OK.
2) Use the numeric keypad 0-9 on the remote control to enter your
six-digit password.
Notes:
– The ratings are country-dependent (‘1’ is considered material that is
least offensive and ‘8’ is most offensive). To disable parental controls and
allow all discs to play, select ‘8’.
– Some DVDs are not encoded with a rating though the movie rating
may be printed on the disc cover. The rating level feature does not
prohibit playback of such discs. VCD, SVCD and CD have no level
indication, so parental control has no effect on these type of discs.
– DVDs that are rated higher than the level you selected will not be
played unless you enter the same six-digit password.
Set the preferred surround setting when the unit is powered up.
{ On } – Turn on to multi-channel surround mode.
{ Last Setting } – Turn on to the last surround setting.
PBC
Play Back Control feature is applicable for VCD/SVCD only. It
allows you to play Video CDs (2.0) interactively, following the
menu on the display.
{ On } – The index menu (if available) appears on the
TV when you load a VCD/SVCD.
{ Off } – The VCD/SVCD skips the index menu and
playback directly from the beginning.
36
1_hts3000_98_eng2.indd 361_hts3000_98_eng2.indd 36 2007-04-26 6:54:07 PM2007-04-26 6:54:07 PM
Page 37

Setup Menu Options (continued)
Preference Page (underlined options are the factory default settings)
MP3/JPEG Nav
Password
MP3/JPEG Navigator can only be set if the disc is recorded with a
menu. It allows you to select different display menus for easy
navigation.
{ Without Menu } – Display all the les contained in the MP3/
Picture disc.
{ With Menu } – Display the folder menu of the MP3/Picture
disc.
Note: This unit can only display 650 les/folder in the directory.
The password is used for the Disc Lock and Parental. The default
password is ‘136900’. To change the password:
1) Press OK to access the change password menu.
Change Password
Old Password
New Password
Confirm PWD
OK
2) Use the numeric keypad 0-9 on the remote control to
enter your existing six-digit password at { Old Password }.
Note: When doing this for the rst time or if you forget your existing
password, key in ‘136900’.
3) Enter the new six-digit password at { New Password }.
4) Enter the new six-digit password again at { Con rm PWD }.
5) Press OK to con rm and exit the menu.
English
DivX Subtitle
Select the font type that supports the recorded DivX subtitle.
{ Central Europe } – Display Central Europe fonts.
{ Cyrillic } – Display Cyrillic fonts.
{ Greek } – Display Greek subtitle fonts.
{ Standard } – Display a standard list of Roman subtitle
fonts provided by this unit.
{ Hebrew } – Display Hebrew subtitle fonts.
{ Chinese (Simp) } – Display Simpli ed Chinese fonts.
{ Korean } – Display Korean fonts.
Default
This feature enables you to reset all the setup menu options and
your personal settings to the factory defaults, except your
password for the Disc Lock and Parental.
Press OK to con rm the default reset.
37
Page 38

Radio Operations
antennas
are connected.
English
Before you start ...
Make sure the FM and AM/MW
are connected.
Tuning to radio stations
A Press SOURCE repeatedly until ‘FM’
appears on the display panel (or press
RADIO on the remote control).
B Press / on the remote control to
start tuning.
The frequency indication starts to
change until a radio station with suf cient
signal strength is found.
C Repeat step B if necessary until you nd
the desired radio station
D To ne-tune the reception of a weak
station, press / brie y and
repeatedly until an optimal reception is
found.
Changing tuning grid
(only applicable for certain regions)
In some countries, the frequency step
between adjacent channels in the (AM/
MW)/ FM band is 9 kHz/ 50 kHz (10 kHz/
100 kHz in some areas).
antennas
Presetting radio stations
You can store up to 40 FM and 20
AM/MW preset radio stations in the
memory. There are three different ways
to program the radio stations:
– Using auto install (for rst time setup
only)
– Using automatic preset
– Using manual preset
Helpful Hints:
– This unit exits presetting mode if no
button is pressed within 20 seconds.
– If no stereo signal is detected or less than
5 ( ve) stations are detected during radio
installation, ‘CHECK ANTENNA’ appears.
Using auto install
When you access the ‘RADIO’ mode for
the very rst time, you will be prompted
to install the radio stations. With this
feature, you can install all the available
radio station automatically with one
touch of button.
RADIO
Note:
Changing the tuning grid erases all
previously stored preset radio stations.
A Press SOURCE repeatedly until ‘FM’ or
‘AM/MW’ appears
B Press x.
C Press and hold u until ‘GRID 9’ or
‘GRID 10’ appears.
38
A Press RADIO.
‘AUTO INSTALL ... PRESS PLAY’
appears.
Page 39

B
Press u.
This unit starts searching from the FM
band followed by the AM/MW band.
All the available radio stations with
strong signal will be stored automatically.
Once complete, the rst tuned radio
station will be played back.
Using automatic preset
Use automatic presetting to store or
reinstall all the preset radio stations.
Radio Operations (continue d)
Selecting a preset radio
station
English
A Press RADIO to select ‘FM’ or
‘AM/MW’ band.
B Use í / ë keys to select a preset radio
stations (or use the numeric keypad on
the remote control).
The preset number and radio
frequency appear on the display panel.
RADIO
PROGRAM
A Press RADIO to select ‘FM’ or ‘AM/
MW’ band.
B Press and hold PROGRAM until
‘START ...’ appears on the display panel.
All previously stored radio stations
will be replaced.
Using manual preset
Use manual presetting to store your
favourite radio stations.
A Tune to your desired radio station (see
‘Tuning to radio stations’).
B Press PROGRAM.
C Use í / ë keys to select a preset
number that you want to store the
current radio station.
D Press PROGRAM to store.
Deleting a preset radio
station
A In radio mode, use í / ë keys to select
a preset radio station.
B Press and hold x until ‘FM/AM/MW X
DELETED’ appears.
‘X’ is the preset number.
The radio station continues to play
but has been deleted from the preset list.
The rest of the preset radio stations
remain unchanged.
39
Page 40

Sound and Volume Controls
English
Volume control
Press VOL +
decrease the volume level.
‘VOL MIN’ is the minimum volume
level and ‘VOL MAX’ is the maximum
volume level.
To turn off the volume temporarily
Press MUTE %.
Playback continues without sound and
‘MUTE’ appears.
To restore the volume, press MUTE
% again, or increase the volume level.
Selecting surround sound
MUTE
VOL+-
SURROUND
SOUND
/- to increase or
Selecting digital sound effects
Select a preset digital sound effect that
matches your disc’s content or that
optimises the sound of the musical style
you are playing.
Press SOUND to select the available
sound effect.
Movies Music Description
CONCERT CLASSIC Flat and pure sound mode.
DRAMA JAZZ Clear mid and high range.
ACTION ROCK Enhanced low and high range
MTV RnB Enhanced low and mid range
GAMING PARTY Slightly enhanced low range
CARTOON LOUNGE Moderate sound mode suitable
SPORTS SPORTS Moderate mid range and
NEWS NEWS Enhanced mid range for clear
NIGHT NIGHT Dynamically controlled sound
Ideal for listening to classical
music and watching live
concert DVDs.
Recreates the atmosphere of a
live club with the artist just in
front of you. Good for Jazz
music and watching dramas.
for great sounding movie
effects and atmosphere. Great
for action movies and rock/pop
music.
for groovy and punchy sounds.
Suitable for R&B, Hip Hop and
MTV videos.
and strong mid range ideal for
party music and video gaming.
for lounge music and watching
cartoons.
surround effects for clear
vocals and the atmosphere of a
live sports venue.
vocals/speech.
mode suitable for watching
movies at night or for nonintrusive background music.
Press SURROUND to select between
Multi-Channel or Stereo sound.
The availability of the various
surround sound modes depends on the
sound available on the disc.
The available output modes for
Multi-channel include: Dolby Digital
Surround and Dolby Pro Logic II.
Stereo broadcasts or recordings will
produce some surround channel effects
when played in a surround mode.
40
Page 41

Other Features
Installing the latest software
Periodically Philips will issue software
upgrades to enhance the user experience.
A Get the software version of this unit by
pressing OPEN/CLOSE ç to open the
disc compartment
B Press DISPLAY on the remote control.
Write down the information for your
current software version.
C Visit the Philips website
‘www.philips.com/support’ to check the
availability of the latest software upgrade
and download the software to a CD-R.
D Insert the CD-R to the disc tray.
The software starts to install on this
unit automatically.
Note:
Never unplug or turn off this unit
during the upgrade.
E When the disc compartment opens,
remove the CD-R.
The software upgrading is in process.
Setting the Sleep timer
The sleep timer enables this unit to
switch to standby mode automatically at
a preset time.
Press SLEEP on the remote control
repeatedly to select a preset switch-off
time. (15, 30, 45, 60 minutes or OFF).
Before this unit switches to the
standby mode, a countdown of 60
seconds is displayed.
‘SLEEP60’ ‘SLEEP 59’....
‘SLEEP1’ ‘SLEEP’
To cancel the sleep timer
Press SLEEP repeatedly to select ‘OFF’
or press the
button.
2 (STANDBY-ON)
English
F Once complete, it turns off to standby
mode automatically.
41
Page 42

Trouble sho oti ng
English
WARNING
Under no circumstances should you try to repair the system yourself, as this will
invalidate the warranty. Never open the system as there is a risk of electric shock.
If a fault occurs, rst check the points listed below before taking the system for repair.
If you are unable to solve a problem by following these instructions, consult your dealer or
Philips for help.
Problem (General) Solution
No power.
No picture.
Completely distorted picture
or black/white picture.
No sound or distorted sound.
– Press STANDBY-ON on the unit to turn on the
power.
– Make sure the mains cord is properly connected and
the AC outlet has power.
– Refer to your TVs manual for correct Video In
channel selection. Change the TV channel until you
see the DVD screen.
– Press DISC to select disc mode.
– Check the video connection.
– Sometimes a small amount of picture distortion may
appear. This is not a malfunction.
– The disc is dirty. Clean the disc.
– Adjust the volume.
– Check the speaker connections and settings.
– Make sure that the audio cables are connected and
press SOURCE to select the correct input source (for
example, TV or AUX) to choose the device that you
want to hear through this unit.
– When playback of DTS audio track, sound will be
muted even though video is playback. In this case,
press AUDIO to select other audio track.
No surround sound effect
from the speakers.
The remote control does not
function properly.
42
– Press SURROUND to select a correct surround
sound setting.
– Make sure that the source you are playing is recorded
or broadcast in surround sound (Dolby Digital, etc).
– Select the source you want to play (for example,
DISC or RADIO) before pressing the function button
(, í / ë).
– Reduce the distance between the remote control and
this unit.
– Batteries are weak, replace the batteries.
– Point the remote control directly toward the IR sensor.
Page 43

Trouble sho oti ng (continued)
Problem (Playback) Solution
The unit does not start
playback.
The aspect ratio of the screen
cannot be changed even
though you have set the TV
display.
Cannot activate some features
e.g. Angles, Subtitles, or
multi-language Audio.
Not able to select some items
in the setup/system menu.
Unable to play DivX movies.
– Insert a readable disc with the playback side facing
down. The DVD+R/CD-R must be Finalised.
– Make sure the disc is not scratched or warped.
– Press SETUP to turn off the system setup menu
screen.
– You may need to enter the password in order to
unlock the disc for playback.
– Moisture may have condensed inside this unit.
Remove the disc and leave this unit turned on for
about an hour.
– The aspect ratio is xed on the DVD disc.
– Depending on the TV, it may not be possible to
change the aspect ratio.
– The features may not be available on the DVD.
– Changing the language for the sound or subtitle is
prohibited on this DVD.
– Press STOP button twice before selecting the system
setup menu.
– Depending on the disc availability, some menu items
cannot be selected.
– Ensure that the DivX le is encoded according to the
‘Home Theatre Pro le’ with the DivX encoder.
– Check that the DivX movie downloaded is a complete
le.
English
Radio reception is poor.
The unit does not work.
– If the signal is too weak, adjust the antenna or
connect an external antenna for better reception.
– Increase the distance between this unit and your TV
or VCR.
– Tune in to the correct frequency.
– Place the antenna further away from any equipment
that may be causing the interference.
– Disconnect the power cord from the power outlet
for a few minutes. Reconnect the power cord and try
to operate again as usual.
43
Page 44

Glossary
English
Analogue audio: Sound that has not been
turned into numbers. Analogue sound is
available with you use the AUDIO LEFT/
RIGHT. These red and white sockets send
audio through two channels, the left and
right.
Aspect ratio: Aspect ratio refers to the
length to height ratio of TV screens. The
ratio of a standard TV is 4:3, while the ratio
of a high-de nition or wide TV is 16:9. The
letter box allows you to enjoy a picture with
a wider perspective on a standard 4:3 screen.
AUDIO OUT sockets: Red and white
sockets on the back of the unit that send
audio to another system (TV, Stereo, etc)..
Bit Rate: The amount of data used to hold
a given length of music; measured in kilobits
per second, or kbps. Or, the speed at which
you record. Generally, the higher the bit
rate, or the higher the recording speed, the
better the sound quality. However, higher bit
rates use more space on a disc.
Chapter: Sections of a picture or a music
piece on a DVD that are smaller than titles.
A title is composed of several chapters. Each
chapter is assigned a chapter number
enabling you to locate the chapter you want.
Composite video (CVBS): A single video
signal commonly used in most consumer
video products.
Disc menu: A screen display prepared for
allowing a selection of images, sounds,
subtitles, multi-angles, etc., recorded on a
DVD.
Dolby Digital: A surround sound system
developed by Dolby Laboratories containing
up to six channels of digital audio (front left
and right, surround left and right, centre and
subwoofer).
Dolby Surround Pro Logic II: It is an
improved matrix decoding technology that
provides better spatiality and directionality
on Dolby Surround programme material,
provides a convincing three dimensional
sound eld on conventional stereo music
recordings and is ideally suited to bring the
surround experience to automotive sound.
While conventional surround programming
is fully compatible with Dolby Surround Pro
Logic II decoders, soundtracks will be able to
be encoded speci cally to take full advantage
of Pro Logic II playback, including separate
left and right surround channels. (Such
material is also compatible with conventional
Pro Logic decoders).
JPEG: A very common digital still picture
format. A still-picture data compression
system proposed by the Joint Photographic
Expert Group, which features small decrease
in image quality in spite of its high
compression ratio. Files are recognised by
their le extension ‘JPG or JPEG’.
MP3: A le format with a sound data
compression system. ‘MP3’ is the
abbreviation of Motion Picture Experts
Group 1 (or MPEG-1) Audio Layer3. By
using the MP3 format, one CD-R or CD-RW
can contain about 10 times more data than a
regular CD.
DivX: The DivX code is a patent-pending,
MPEG-4 based video compression
technology, developed by DivX Networks,
Inc., that can shrink digital video to sizes
small enough to be transported over the
internet, while maintaining high visual quality.
44
Page 45

MPEG: Motion Picture Experts Group. A
collection of compression systems for digital
audio and video.
Multi-channel: DVDs are formatted to
have each sound track constitute one sound
eld. Multi-channel refers to a structure of
sound tracks having three or more channels.
PBC: Playback Control. A system of
navigating a Video CD/Super VCD through
on-screen menus recorded onto the disc.
You can enjoy interactive playback and
searching.
Progressive Scan: The progressive scan
displays twice the number of frames per
second than in an ordinary TV system. It
offers higher picture resolution and quality.
Region code: A system allowing discs to be
played only in the region designated. This
unit will only play discs that have compatible
region codes. You can nd the region code
of your unit by looking at the product label.
Some discs are compatible with more than
one region (or ALL regions).
Glossary (continued)
English
Surround: A system for creating realistic
three dimensional sound elds full of realism
by arranging multiple speakers around the
listener.
Title: The longest section of a movie or
music feature on DVD. Each title is assigned
a title number, enabling you to locate the
title you want.
WMA: Windows Media™ Audio. Refers to
an audio compression technology developed
by Microsoft Corporation. WMA data can be
encoded by using Windows Media Player
version 9 or Windows Media Player for
Windows XP. Files are recognised by their
le extension ‘WMA’.
45
Page 46

Speci cations
English
AMPLIFIER
Total output power
Home Theatre mode: 200 W
Frequency Response: 180 Hz – 18 kHz / ±3 dB
Signal-to-Noise Ratio: > 60 dB (A-weighted)
Input Sensitivity
- AUX In : 500 mV
- TV In: 250 mV
RADIO
Tuning Range: FM 87.5–108 MHz
(50/100kHz)
AM 531–1602 kHz (9kHz)
AM 530–1700 kHz (10kHz)
26 dB Quieting
Sensitivity: FM 22 dBf, AM 5000μV/m
IF Rejection Ratio: FM 60 dB, AM 24 dB
Signal-to-Noise Ratio: FM 50 dB, AM 30 dB
AM Suppression Ratio: FM 30 dB
Harmonic Distortion: FM Mono 3%
FM Stereo 3%
AM 5%
Frequency Response FM 180 Hz–9 kHz / ±6 dB
Stereo Separation FM 26 dB (1 kHz)
Stereo Threshold FM 23.5 dB
DISC
Laser Type Semiconductor
Disc Diametre 12cm / 8cm
Video Decoding MPEG-1 / MPEG-2 /
/ DivX 3/4/5/6
Video DAC 12 Bits
Signal System PAL / NTSC
Video Format 4:3 / 16:9
Video S/N 56 dB (minimum)
Composite Video
Output 1.0 Vp-p, 75Ω
Audio DAC 24 Bits / 96 kHz
Frequency Response 4 Hz–20 kHz (44.1 kHz)
4 Hz–22 kHz (48 kHz)
4 Hz–44 kHz (96 kHz)
PCM IEC 60958
Dolby Digital IEC 60958, IEC 61937
MAIN UNIT
Power Supply Rating: 110~240 V; 50~60 Hz
Power Consumption: 40 W
Dimensions: 360 x 48 x 332 (mm)
(w x h x d)
Weight: 2.58 kg
FRONT AND REAR SPEAKERS
System: Full range satellite
Impedance: 4 Ω
Speaker drivers: 3” full range speaker
Frequency response: 150 Hz – 20 kHz
Dimensions: 100 x 95.5 x 83.5 (mm)
(w x h x d)
Weight: 0.47 kg/each
CENTRE SPEAKER
System: Full range satellite
Impedance: 8 Ω
Speaker drivers: 3” full range speaker
Frequency response: 150 Hz – 20 kHz
Dimensions: 100 x 95.5 x 83.5 (mm)
(w x h x d)
Weight: 0.52 kg
SUBWOOFER
Impedance: 8 Ω
Speaker drivers: 165 mm (6.5”) woofer
Frequency response: 40 Hz – 150 Hz
Dimensions: 131.2 x 315.5 x 386 (mm)
(w x h x d)
Weight: 3.60 kg
Speci cations subject to change without prior
notice.
46
1_hts3000_98_eng2.indd 461_hts3000_98_eng2.indd 46 2007-04-26 6:54:07 PM2007-04-26 6:54:07 PM
Page 47

English
47
 Loading...