

Page 1
Always there to help you
Question?
Contact
Philips
Register your product and get support at
www.philips.com/support
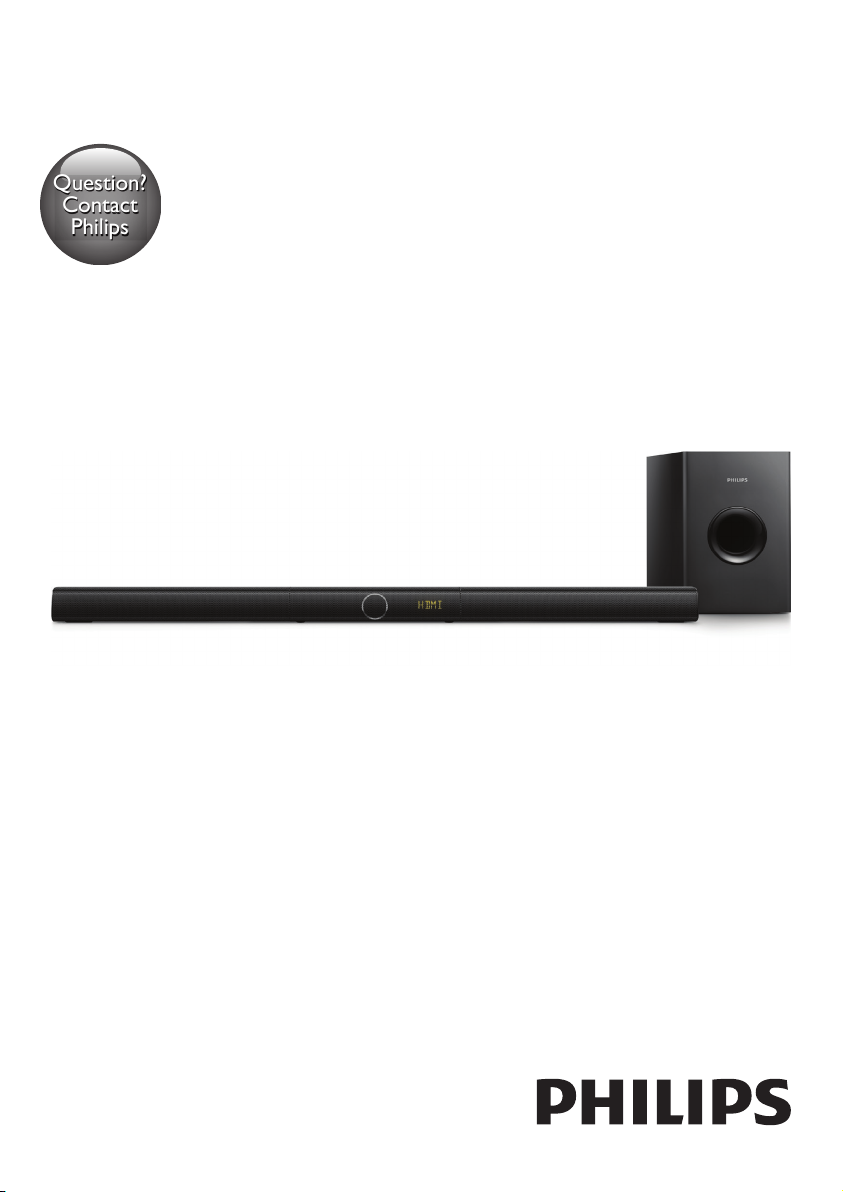
HTL3150B
User manual
Page 2

Page 3

Contents
1 Important 2
Important safety instructions 2
Care for your product 3
Care of the environment 3
Help and support 4
2 Your product 4
Main unit 4
Remote control 5
Connectors 6
Wireless subwoofer 6
3 Connect 7
Placement 7
Pair up with the subwoofer 7
Connect audio from TV 7
Connect audio from other devices 9
4 Use your product 10
Adjust the volume 10
Choose your sound 10
Play audio through Bluetooth 10
MP3 player 11
USB storage devices 11
Auto standby 12
Set display brightness 12
Apply factory settings 12
9 Notice 16
5 Update software 12
Check software version 12
Update software via USB 12
6 Wall mount 13
7 Productspecications 14
8 Troubleshooting 15
1EN
Page 4

1 Important
Read and understand all instructions before you
use your product. If damage is caused by failure to
follow instructions, the warranty does not apply.
Important safety instructions
• Read these instructions.
• Keep these instructions.
• Heed all warnings.
• Follow all instructions.
• Do not use this apparatus near water.
• Clean only with dry cloth.
• Do not block any ventilation openings.
Install in accordance with the
manufacturer’s instructions.
• Do not install near any heat sources such
as radiators, heat registers, stoves, or other
apparatus (including ampliers) that
produce heat.
• Do not defeat the safety
purpose of the polarized
or grounding-type plug.
A polarized plug has two blades with one
wider than the other. A grounding type
plug has two blades and a third grounding
prong. The wide blade or the third prong
are provided for your safety. If the provided
plug does not t into your outlet, consult
an electrician for replacement of the
obsolete outlet.
• Protect the power cord from being
walked on or pinched, particularly at plugs,
convenience receptacles, and the point
where they exit from the apparatus.
• Only use attachments/accessories
specied by the manufacturer.
• Use only with the cart,
stand, tripod, bracket or table
specied by the manufacturer
or sold with the apparatus.
When a cart is used, use caution when
2 EN
moving the cart/apparatus combination to
avoid injury from tip-over.
• Unplug this apparatus during lightning storm
or when unused for long periods of time.
• Refer all servicing to qualied service
personnel. Servicing is required when
the apparatus has been damaged in any
way, such as power-supply cord or plug
is damaged, liquid has been spilled or
objects have fallen into the apparatus, the
apparatus has been exposed to rain or
moisture, does not operate normally, or
has been dropped.
• Battery usage CAUTION - To prevent
battery leakage which may result in bodily
injury, property damage, or damage to the
unit:
• Install all batteries correctly, + and - as
marked on the unit.
• Do not mix batteries (old and new or
carbon and alkaline, etc.).
• Remove batteries when the unit is not
used for a long time.
• The batteries shall not be exposed to
excessive heat such as sunshine, re or
the like.
• Perchlorate Material - special handling
may apply. See www.dtsc.ca.gov/
hazardouswaste/perchlorate.
• The product/remote control may contain
a coin/button type battery, which can be
swallowed. Keep the battery out of reach
of children at all times! If swallowed, the
battery can cause serious injury or death.
Severe internal burns can occur within two
hours of ingestion.
• If you suspect that a battery has been
swallowed or placed inside any part of the
body, seek immediate medical attention.
• When you change the batteries, always
keep all new and used batteries out of
reach of children. Ensure that the battery
compartment is completely secure after
you replace the battery.
• If the battery compar tment cannot be
completely secured, discontinue use of the
product. Keep out of reach of children and
contact the manufacturer.
Page 5
• Apparatus shall not be exposed to
dripping or splashing.
• Do not place any sources of danger on
the apparatus (for example. liquid lled
objects, lighted candles).
• This apparatus may contain lead and
mercury. Dispose according to local,
State or Federal laws. For disposal or
recycling information, please contact
your local authorities. For additional
assistance on recycling options, please
contact www.mygreenelectronics.com or
www.eiae.org or www.recycle.philips.com.
• Where the MAINS plug or an appliance
coupler is used as the disconnect device,
the disconnect device shall remain readily
operable.
• Do not place this apparatus on the
furniture that is capable of being tilted by a
child and an adult leaning, pulling, standing
or climbing on it. A falling apparatus can
cause serious injury or even death.
• This apparatus should not be placed in a
built-in installation such as a bookcase or
rack unless proper ventilation is provided.
Make sure to leave a space of 7.8 inches
(20cm) or more around this apparatus.
Class II equipment symbol
This symbol indicates that the unit has a double
insulation system.
Know these safety symbols
This ‘bolt of lightning’ indicates
uninsulated material within your
unit may cause an electrical shock.
For the safety of everyone in your
household, please do not remove product
covering.
The ‘exclamation point’ calls
attention to features for which you
should read the enclosed literature
closely to prevent operating and
maintenance problems.
WARNING: To reduce the risk of re or
electric shock, this apparatus should not be
exposed to rain or moisture and objects lled
with liquids, such as vases, should not be placed
on this apparatus.
CAUTION: To prevent electric shock, match
wide blade of plug to wide slot, fully insert.
Care for your product
Use only microber cloth to clean the product.
Care of the environment
Disposal of your old product and battery
Your product is designed and manufactured
with high quality materials and components,
which can be recycled and reused.
This product may contain lead and mercury.
Disposal of these materials may be regulated
due to environmental considerations. For
disposal or recycling information, please
contact your local authorities or visit
www.recycle.philips.com.
This product contains batteries:
• Dispose of batteries properly. Do not
incinerate. Batteries may explode if
overheated.
• Do not wrap in metal or aluminum foil.
Wrap in newspaper before discarding.
• It is suggested that you contact your local
town or city to determine proper battery
redemption site(s) in your area.
• Please visit www.call2recycle.org for
additional information on a recycling center
in your area for rechargeable batteries.
3EN
Page 6

Help and support
2 Your product
For extensive online support, visit
www.philips.com/support to:
• download the user manual and the quick
start guide
• watch video tutorials (available only for
selected models)
• nd answers to frequently answered
questions (FAQs)
• email us a question
• chat with our support representative.
Follow the instructions on the website to select
your language, and then enter your product
model number.
Alternatively, you can contact Consumer Care
in your country. Before you contact, note down
the model number and serial number of your
product. You can nd this information on the
back or bottom of your product.
Congratulations on your purchase, and
welcome to Philips! To fully benet from the
support that Philips offers(e.g. notication
of product software upgrade), register your
product at www.philips.com/welcome.
Main unit
This section includes an overview of the main
unit.
a
Switch this product on or to standby.
b SOURCE
Select an input source for this product.
c Volume +/-
Increase or decrease volume.
d Display panel
ca b d
4 EN
Page 7
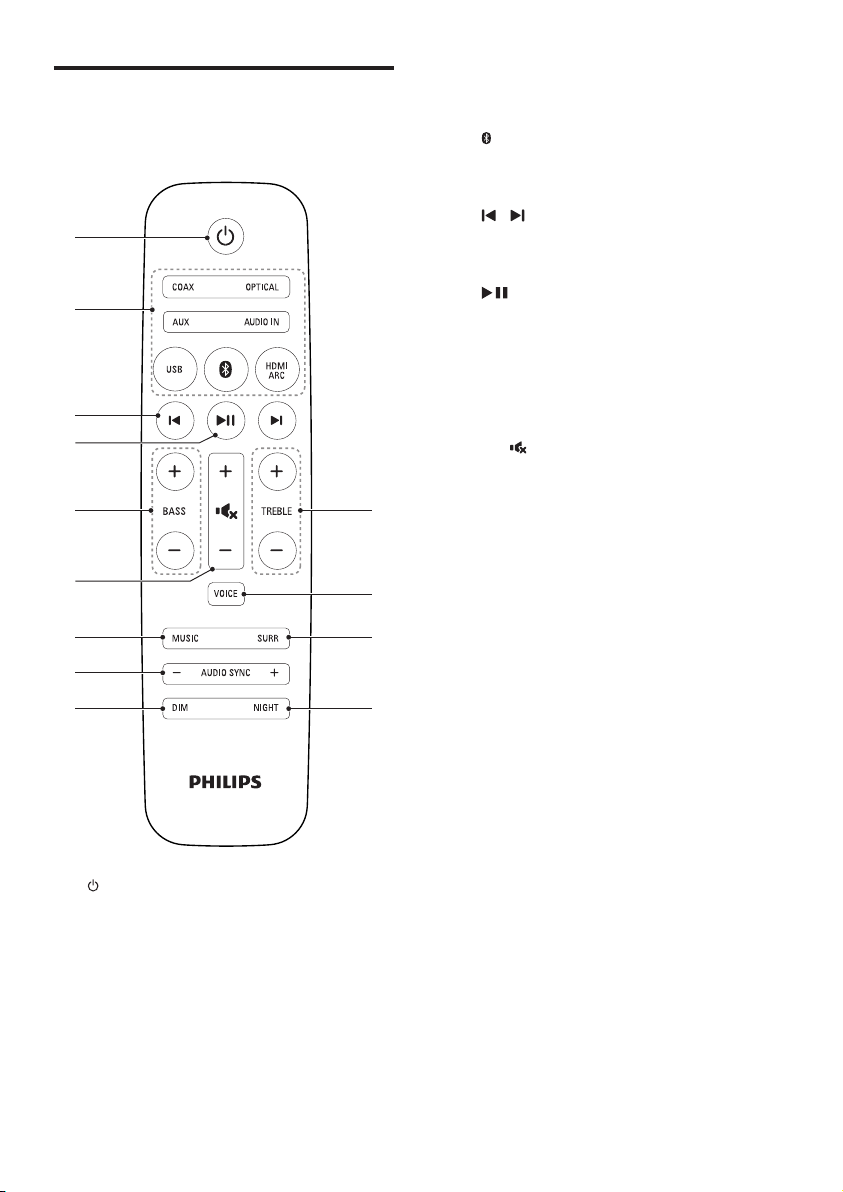
Remote control
b
a
c
d
f
g
h
i
e m
j
k
l
This section includes an overview of the
remote control.
a (Standby-On)
Switch this product on or to standby.
b Source buttons
COAX: Switch your audio source to the
coaxial connection.
OPTICAL: Switch your audio source to
the optical connection.
AUX: Switch your audio source to the
AUX connection.
AUDIO IN: Switch your audio source to
the MP3 connection (3.5mm jack).
USB: Switch to USB mode.
: Switch to Bluetooth mode.
HDMI ARC: Switch your source to HDMI
ARC connection.
c
/ (Previous/Next)
Skip to the previous or next track in USB
mode.
d
(Play/Pause)
Start, pause or resume play in USB mode.
e BASS +/-
Increase or decrease bass.
f Volume control
• +/-: Increase or decrease volume.
•
: Mute or restore volume.
g MUSIC
Select stereo sound mode for the best
music experience.
h AUDIO SYNC +/-
Increase or decrease audio delay.
i DIM
Set the brightness of the display panel for
this product.
j NIGHT
Turn night mode on or off.
k SURR (MOIVE)
Select surround sound mode for the best
movie experience.
l VOICE
Select voice sound mode to enhance voice
clarity.
m TREBLE +/-
Increase or decrease treble.
5EN
Page 8

Connectors
Wireless subwoofer
This section includes an overview of the
connectors available on this product.
g
f
a b
a HDMI OUT (ARC) - TO TV
Connect to the HDMI (ARC) input on the
TV.
b DC IN
Connect to the power supply.
c AUX IN (L/R)
Connect to an analog audio output on the
TV or an analog device.
d DIGITAL IN-COAXIAL
Connect to a coaxial audio output on the
TV or a digital device.
e DIGITAL IN-OPTICAL
Connect to an optical audio output on the
TV or a digital device.
f
g AUDIO IN
(USB)
• Connect to a USB storage device for
audio media play.
• Upgrade software of this product.
• Charge a USB device.
Audio input from, for example, an
MP3 player (3.5mm jack).
This product comes with a wireless subwoofer.
edc
a
b
c
a AC MAINS~
Connect to the power supply.
b Subwoofer indicator
• When the power is turned on, the
indicator lights up.
• During wireless pairing between the
subwoofer and the main unit, the
indicator blinks white quickly.
• When the pairing succeeds, the
indicator lights up white.
• When the pairing fails, the indicator
blinks white slowly.
• When wireless connection is
disconnected for one minute, the
indicator turns off.
c CONNECT (connect)
Press and hold to to enter the pairing
mode for the subwoofer.
6 EN
Page 9

3 Connect
Pair up with the subwoofer
This section helps you connect this product to a
TV and other devices.
For information about the basic connections of
this product and accessories, see the quick start
guide.
Note
For identication and supply ratings, see the type plate
•
at the back or bottom of the product.
• Before you make or change any connections, make sure
that all devices are disconnected from the power outlet.
Placement
Place the subwoofer at least 1 meter (3 feet)
away from the main unit, and 10 centimeters
(4 inches) away from the wall.
For best results, place your subwoofer as shown
below.
The wireless subwoofer automatically pairs up
with the main unit for wireless connection when
you turn on the main unit and the subwoofer.
If no audio from the wireless subwoofer can be
heard, manually pair up the subwoofer.
1 Turn on the main unit and the subwoofer.
» If the connection to the main unit is
lost, the indicator on the subwoofer
blinks white slowly.
2 Press and hold the CONNECT (connect)
button on the subwoofer to enter the
pairing mode.
» The indicator on the subwoofer blinks
white quickly.
3 On the remote control, within six
seconds press
TREBLE - once and then
» If the pairing succeeds, the indicator on
the subwoofer lights up white.
» If the pairing fails, the indicator on the
subwoofer blinks white slowly.
4 If the pairing fails, repeat the steps above.
twice then BASS - once,
.
Connect audio from TV
Connect this product to a TV. You can listen to
audio from TV programs through the speakers
of this product.
Option 1: Connect to TV through
HDMI (ARC)
Best quality audio
This product supports HDMI with Audio
Return Channel (ARC). With the ARC feature,
you can hear the TV audio through this product
by using a single HDMI cable.
7EN
Page 10

What you need
• A High Speed HDMI Cable.
• Your TV supports both HDMI ARC and
HDMI-CEC (see the TV user manual for
details).
• For some TV models, enable the external
speaker output from the TV setting menu
(see the TV user manual for details).
TV
1 Using a High Speed HDMI cable, connect
the HDMI OUT (ARC) connector on this
product to the HDMI ARC connector on
the TV.
• The HDMI ARC connector on the TV
might be labeled differently. For details,
see the TV user manual.
2 On your TV, turn on HDMI-CEC
operations.
• For HDMI-CEC issues on your TV, see
the TV user manual to make sure that
the HDMI-CEC setup is correct, or
contact the TV manufacturer if needed.
3 Press HDMI ARC on the remote control
of this product to enable the HDMI ARC
connection.
Note
100% interoperability with all HDMI-CEC devices is not
•
guaranteed.
• If your TV is not HDMI ARC compliant, connect an
audio cable to hear the TV audio through this product.
Option 2: Connect to TV through
optical cable
Best quality audio
TV
1 Using an optical cable, connect the
OPTICAL connector on this product to
the optical output on the TV.
• The digital optical output on the TV
might be labeled OPTICAL OUT,
SPDIF or SPDIF OUT.
2 Press OPTICAL on the remote control
of this product to enable the optical
connection.
Option 3: Connect to TV through
coaxial cable
Best quality audio
TV
1 Using a coaxial cable, connect the
COAXIAL connector on this product to
the coaxial output on the TV.
• The digital coaxial output on the TV
might be labeled COAXIAL/DIGITAL
OUT or DIGITAL AUDIO OUT.
2 Press COAX on the remote control of this
product to enable the coaxial connection.
8 EN
Page 11

Option 4: Connect to TV through
analog audio cables
Basic quality audio
TV
1 Using an analog audio cable, connect the
AUX connectors on this product to the
analog audio output on the TV.
• The analog audio output on the TV
might be labeled AUDIO OUT.
2 Press AUX on the remote control of
this product to enable the analog audio
connection.
Connect audio from other devices
You may also play audio from other devices
through the speakers of this product.
Option 1: Connect to other device
through optical cable
Best quality audio
2 Press OPTICAL on the remote control of
this product to enable the optical connection.
Option 2: Connect to other device
through coaxial cable
Best quality audio
1 Using a coaxial cable, connect the
COAXIAL connector on this product to
the coaxial output on the external device.
• The digital coaxial output on the
external device might be labeled
COAXIAL/DIGITAL OUT or
DIGITAL AUDIO OUT.
2 Press COAX on the remote control of this
product to enable the coaxial connection.
Option 3: Connect to other device
through analog audio cables
Basic quality audio
1 Using an optical cable, connect the
OPTICAL connector on this product to
the optical output on the external device.
• The digital optical output on the
external device might be labeled
OPTICAL OUT, SPDIF or SPDIF OUT.
1 Using an analog audio cable, connect the
AUX connector on this product to the
analog audio output on the external device.
• The analog audio output on the
external device might be labeled
AUDIO OUT.
2 Press AUX on the remote control of
this product to enable the analog audio
connection.
9EN
Page 12

4 Use your
product
This section helps you use this product to play
media from a wide range of sources.
Before you start
• Make the necessary connections
described in the quick start guide
or download the user manual from
www.philips.com/support.
• Switch this product to the correct source
for other devices.
Equalizer
Change the high frequency (treble) and low
frequency (bass) settings of this product.
1 Press TREBLE +/- or BASS +/- to change
the frequency.
Synchronize video and sound
If the audio and video are not synchronized,
delay the audio to match the video.
1 Press AUDIO SYNC +/- to synchronize
the audio with the video.
• AUDIO SYNC + increases the sound
delay, and AUDIO SYNC - decreases
the sound delay.
Adjust the volume
1
Press Volume +/- to increase or decrease a
volume level.
• To mute sound, press
• To restore the sound, press
press Volume +/-.
.
again or
Choose your sound
This section helps you choose the ideal sound
for your video or music.
Surround sound mode
Experience an immersive audio experience with
surround sound modes.
• Press SURR (MOIVE) to create a surround
listening experience. Ideal for watching
movie.
• Press MUSIC to create stereo sound. Ideal
for listening to music.
• Press VOICE to create sound effect
which makes human voice more clear and
outstanding for listening.
Night mode
For quiet listening, night mode decreases the
volume of loud sounds when audio is played.
Night mode is only available for Dolby Digital
soundtracks.
1 Press NIGHT to turn night mode on or
off.
» When night mode is turned on, ON
NIGHT scrolls twice on the display
panel.
» When night mode is turned off, OFF
NIGHT scrolls twice on the display
panel.
Play audio through Bluetooth
Through Bluetooth, connect this product with
your Bluetooth device (such as an iPad, iPhone,
iPod touch, Android phone, or laptop), and then
you can listen to the audio les stored on the
device through the speakers of this product.
What you need
• A Bluetooth device which supports
Bluetooth prole A2DP, AVRCP and with
Bluetooth version as 4.0 + EDR.
10 EN
Page 13

• The maximum operational range between
the main unit and a Bluetooth device is
approximately 10 meters (30 feet).
1 Press on the remote control to switch
this product to Bluetooth mode.
» BT is displayed on the display panel,
blinking.
2 On the Bluetooth device, switch on
Bluetooth, search for and select Philips
HTL3150 to start connection (see the
user manual of the Bluetooth device on
how to enable Bluetooth).
» During connection, BT on the display
panel blinks.
3 Wait until this product beeps.
» When the Bluetooth connection
succeeds, BT is displayed on the display
panel.
» If the connection fails, BT on the
display panel blinks continuously.
4 Select and play audio les or music on
your Bluetooth device.
• During play, if a call is coming, music
play is paused. Play resumes when the
call ends (this feature is dependent on
the connected mobile phone).
• If your Bluetooth device supports
AVRCP prole, on the remote control
you can press
or press
/ to skip to a track,
to pause/resume play.
5 To exit Bluetooth, select other source.
• When your switch back to Bluetooth
mode, Bluetooth connection remains
active.
Note
The music streaming may be interrupted by obstacles
•
between the device and this product, such as wall,
metallic casing that covers the device, or other devices
nearby that operate in the same frequency.
• If you want to connect this product with another
Bluetooth device, press and hold
control to disconnect the currently connected
Bluetooth device.
on the remote
MP3 player
Connect your MP3 player to play your audio
les or music.
What you need
• An MP3 player.
• A 3.5mm stereo audio cable.
1 Using the 3.5mm stereo audio cable,
connect the MP3 player to the AUDIO IN
connector on this product.
2 Press AUDIO IN on the remote control.
3 Press the buttons on the MP3 player to
select and play audio les or music.
USB storage devices
Enjoy audio on a USB storage device, such as an
MP3 player and USB ash memory, etc.
What you need
• A USB storage device that is formatted for
FAT or NTFS le systems, and complies
with the Mass Storage Class.
• An MP3 le on a USB storage device
1 Connect a USB storage device to this
product.
2 Press USB on the remote control.
3 Use the remote control to control play.
• Press to start, pause or resume play.
• Press / to skip to the previous or
next track.
• During USB play, press and hold USB
to enter repeat mode, then press USB
to select one of the following play
modes.
• ONE RPT: repeat the current track.
• ALL RPT: repeat all the tracks in
one folder.
• SHUFFLE: play randomly in one
folder.
• OFF RPT: exit repeat or shufe
play mode.
11EN
Page 14

Note
This product may not be compatible with certain types
•
of USB storage device.
• If you use a USB extension cable, USB HUB, or USB
multi-reader, the USB storage device may not be
recognized.
• Digital camera PTP and MTP protocols are not
supported.
• Do not remove the USB storage device while it is
being read.
• DRM-protected music les (MP3) are not supported.
• Support a USB por t: 5V , 1A.
Auto standby
When playing media from a connected device,
this product automatically switches to standby
after 15 minutes of button inactivity and no
audio/video play from a connected device.
Set display brightness
You can press DIM repeatedly to select a
different brightness level of the display panel on
this product.
If you select AUTO OFF, LED message is
switched off after 10 seconds of button
inactivity.
5 Update software
To get the best features and support, update
your product with the latest software.
Check software version
In any source mode, on the remote control
press TREBLE -, BASS -, and Volume - in
sequence.
» The software version number is displayed
on the display panel.
Update software via USB
1
Check the latest software version on
www.philips.com/support.
• Search for your model and click on
"Software and drivers".
2 Download the software into a USB storage
device.
a Unzip the download if zipped, and
makesurethattheunzippedleis
named "HTL3150.bin".
b Putthe"HTL3150.bin"leintheroot
directory.
Apply factory settings
You can reset this product to the default
settings programmed at the factory.
1 In any source mode, on the remote control
press Volume -, BASS -, and TREBLE - in
sequence within three seconds.
» When the factory settings restore is
complete, the product automatically
switches off and restarts.
12 EN
3 Connect the USB storage device to the
(USB) connector on this product.
4 Press HDMI ARC to switch this product to
the HDMI ARC source.
5 On the remote control, within six seconds
press
twice then Volume + once, and
then hold down SURR (MOIVE).
» On the display panel, "UPG" (upgrade)
blinks slowly, then blinks quickly.
6 When "UPG" blinks fast, press to start
the update.
» Then "UPG" (upgrade) is displayed on
the display panel.
Page 15

7 Wait until the update is completed.
» If the update is complete, this product
automatically turns off and on again.
6 Wall mount
Caution
Do not turn off the power or remove the USB storage
•
device when the software update is in progress because
you might damage this player.
Note
Before wall mounting, make sure the wall can suppor t
•
the weight of this product.
• For wall mounting, this product must be securely
attached to the wall in accordance with the installation
instructions. Improper wall mounting may result in
accident, injury or damage. If you have any query,
contact Consumer Care in your country.
Screw length/diameter
Depending on the type of wall mounting this
product, make sure that you use screws of a
suitable length and diameter.
3.2-3.6 mm/0.13”-0.14”
≤9 mm/
0.35”
See the illustration in the quick start guide on
how to wall mount this product.
1) Drill two holes on the wall.
2) Secure the dowels and screws in the holes.
3) Hang this product on the fastening screws.
>25 mm/0.98”
3.5-4 mm/
0.14”-0.16”
13EN
Page 16

7 Product
specifications
Note
Specications and design are subject to change without
•
notice.
Amplier
• FTC total output power: 66 W
• Main unit:
60 W (1 % THD, 4 ohm, 400 Hz-20 kHz)
• Subwoofer:
6 W (1 % THD, 3 ohm, 40 Hz-100 Hz)
• Total output power:
150 W RMS (+/- 1 dB, 10 % THD)
• Frequency response:
20 Hz-20 kHz / +/- 3 dB
• Signal-to-noise ratio:
> 65 dB (CCIR) / (A-weighted)
• Input sensitivity:
• AUX: 2 V
• AUDIO IN: 1 V
Audio
• S/PDIF Digital audio input:
• Coaxial: IEC 60958-3
• Optical: TOSLINK
USB
• Compatibility: Hi-Speed USB (2.0)
• Class support: USB Mass Storage Class
(MSC)
• File system: FAT16, FAT32, NTFS
• Supports MP3 le formats
Main unit
• Power supply:
• Model (Philips branded AC power
adapter): NU040A320125
• Input: 100-240 V~, 50/60 Hz 1.5 A
• Output: 32 V
• Standby power consumption: ≤ 0.5 W
• Dimensions (W x H x D):
950 x 51 x 69 mm / 37.4" x 2" x 2.7"
• Weight: 1.7 kg / 3.7 lbs
• Built-in speakers:
• Drivers: 3 x full range
(90mm/3.5” x 34mm/1.3”)
• Impedance: 4 ohm
• Operating temperature and humidity:
0°C to 45°C, 5% to 90% humidity for all
climates
• Storage temperature and humidity:
-40°C to 70°C, 5% to 95%
, 1.25 A
Subwoofer
• Power supply: 120V~, 60Hz
• Power consumption: 30 W
• Standby power consumption: ≤ 0.5 W
• Impedance: 4 ohm
• Speaker driver: 1 x 134 mm (5.25") woofer
• Dimensions (W x H x D):
165 x 240 x 296 mm / 6.5" x 9.4" x 11.7"
• Weight: 3.1 kg / 6.8 lbs
Remote control batteries
• 1 x AAA-R03-1.5 V
Bluetooth
• Bluetooth proles: A2DP, AVRCP
• Bluetooth version: 4.0 + EDR
14 EN
Page 17

8 Troubleshooting
Warning
•
Risk of electric shock. Never remove the casing of the
product.
To keep the warranty valid, never try to repair
the product yourself.
If you have problems using this product, check
the following points before you request service.
If you still have a problem, get support at
www.philips.com/support.
Main unit
The buttons on this proudct do not work.
• Disconnect this product from the power
supply for a few minutes, then reconnect.
Sound
No sound from the speakers of this product.
• Connect the audio cable from this product
to your TV or other devices.
• Make sure that you connect the audio
input on this product to the audio output
on your TV or other devices.
• Reset this product to its factory settings.
• On the remote control, select the correct
audio input.
• Make sure that this product is not muted.
Distorted sound or echo.
• If you play audio from the TV through this
product, make sure that the TV is muted.
Audio and video are not synchronized.
• Press AUDIO SYNC +/- to synchronize
the audio with the video.
Error message is displayed on the display
panel.
• When "ERROR" is displayed, it indicates
that an input audio format is not
supported.
• When "ARC" blinks, it indicates that the
connected TV is not HDMI ARC compliant
or an unsupported audio format is
detected.
Bluetooth
A device cannot connect with this product.
• The device does not support the
compatible proles required for this
product.
• You have not enabled the Bluetooth
function of the device. See the user manual
of the device on how to enable the
function.
• The device is not correctly connected.
Connect the device correctly (see 'Play
audio through Bluetooth' on page 10).
• This product is already connected with
another Bluetooth device. Disconnect the
connected device, then try again.
Quality of audio play from a connected
Bluetooth device is poor.
• The Bluetooth reception is poor. Move the
device closer to this product, or remove
any obstacle between the device and this
product.
The connected Bluetooth device connects and
disconnects constantly.
• The Bluetooth reception is poor. Move the
device closer to this product, or remove
any obstacle between the device and this
product.
• Turn off Wi-Fi function on the Bluetooth
device to avoid interference.
• For some Bluetooth, the Bluetooth
connection can be deactivated
automatically to save power. This does not
indicate any malfunction of this product.
15EN
Page 18

9 Notice
This section contains the legal and trademark
notices.
Notice of compliance
The device complies with the FCC rules, Part
15. Operation is subject to the following two
conditions:
a This device may not cause harmful
interference, and
b This device must accept any interference
received, including interference that may
cause undesired operation.
FCC rules
This equipment has been tested and found
to comply with the limits for a Class B digital
device, pursuant to part 15 of the FCC Rules.
These limits are designed to provide reasonable
protection against harmful interference in a
residential installation. This equipment generates,
uses and can radiate radio frequency energy
and, if not installed and used in accordance
with the instruction manual, may cause harmful
interference to radio communications.
However, there is no guarantee that
interference will not occur in a particular
installation. If this equipment does cause harmful
interference to radio or television reception,
which can be determined by turning the
equipment off and on, the user is encouraged
to try to correct the interference by one or
more of the following measures:
• Relocate the receiving antenna.
• Increase the separation between
equipment and receiver.
• Connect the equipment into an outlet on
a circuit different from that to which the
receiver is connected.
• Consult the dealer or an experienced
radio/TV technician for help.
FCC Radiation Exposure Statement:This
equipment complies with FCC radiation
exposure limits set forth for an uncontrolled
environment. This equipment should be installed
and operated with a minimum distance of
20cm between the radiator and your body.
This transmitter must not be co-located or
operated in conjunction with any other antenna
or transmitter.
Warning: Any changes or modications made
to this device that are not expressly approved
by Gibson Innovations may void the user’s
authority to operate the equipment.
Model number: HTL3150B/37
Trade Name: Philips
Responsible Party: Gibson Innovations USA
Inc. 3070 Windward Plaza Suite F, Box 735,
Alpharetta, GA 30005
Canada:
CAN ICES-3(B)/NMB-3(B)
This device complies with Industry Canada’s
licence-exempt RSSs. Operation is subject to
the following Two conditions: (1) this device
may not cause harmful interference, and (2) this
device must accept any interference received,
including interference that may cause undesired
operation.
The device meets the exemption from the
routine evaluation limits in section 2.5 of RSS
102 and compliance with RSS-102 RF exposure,
users can obtain Canadian information on RF
exposure and compliance.
This transmitter must not be co-located or
operating in conjunction with any other antenna
or transmitter. This equipment should be
installed and operated with a minimum distance
of 20 centimeters between the radiator and
your body.
16 EN
Page 19

Manufactured under license from Dolby
Laboratories. Dolby, Pro Logic, and the
double-D symbol are trademarks of Dolby
Laboratories.
The terms HDMI and HDMI High-Denition
Multimedia Interface, and the HDMI Logo are
trademarks or registered trademarks of HDMI
Licensing LLC in the United States and other
countries.
The Bluetooth® word mark and logos are
registered trademarks owned by Bluetooth
SIG, Inc. and any use of such marks by Gibson
Innovations Limited is under license. Other
trademarks and trade names are those of their
respective owners.
17
Page 20

P&F USA, Inc. PO Box 2248, Alpharetta, GA 30023-2248
18
Page 21

Page 22

Specifications are subject to change without notice
2016 © Gibson Innovations Limited. All rights reserved.
This product has been manufactured by, and is sold under the responsibility of Gibson Innovations Ltd., and
Gibson Innovations Ltd. is the warrantor in relation to this product. Philips and the Philips Shield Emblem are
registered trademarks of Koninklijke Philips N.V. and are used under license.
HTL3150B_37_UM_V2.0
 Loading...