

Page 1
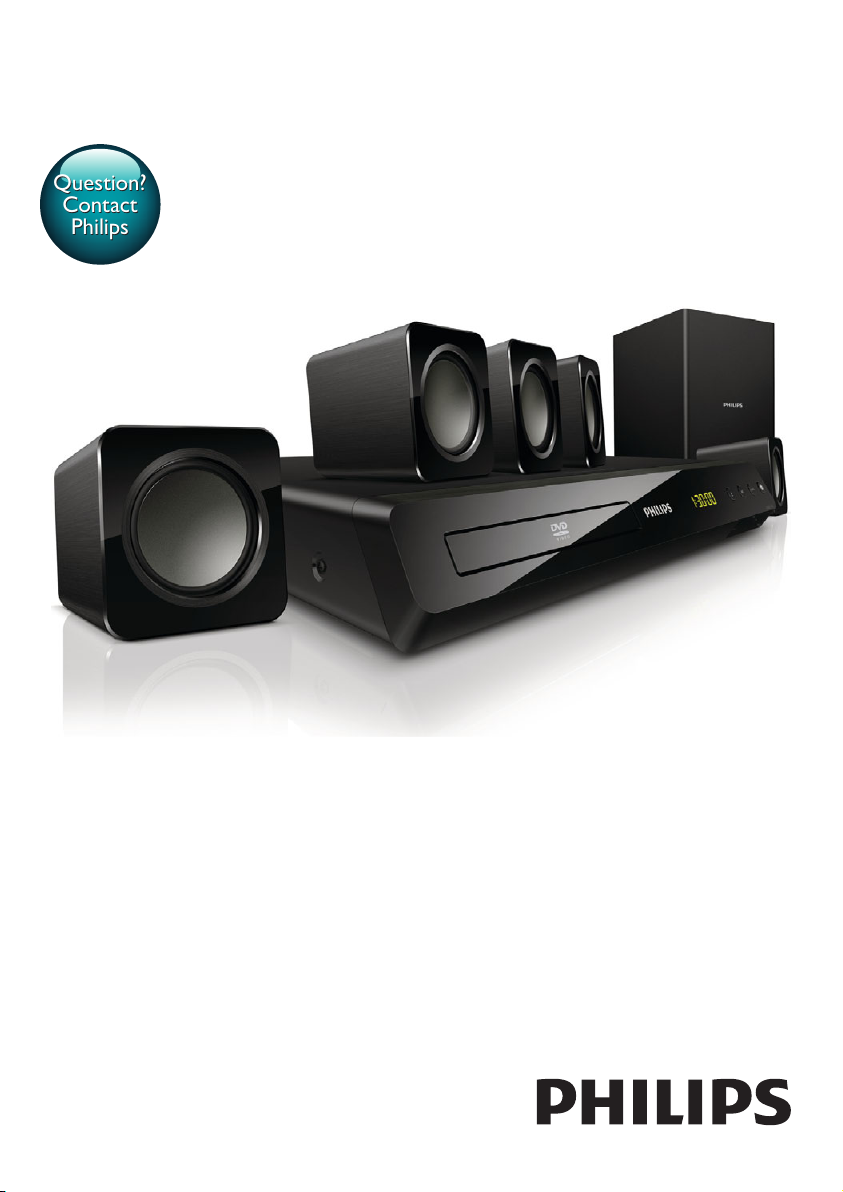
Always there to help you
Question?
Contact
Philips
Question?
Contact
Philips
Register your product and get support at
www.philips.com/welcome
HTD3500
User manual
Page 2

Contents
1 Important 3
Safety 3
Care for your product 4
Care of the environment 4
2 Your home theater 5
Main unit 5
Connectors 5
Remote control 6
3 Connect and set up 8
Connect speakers 8
Connect to TV 9
Connect audio from TV and other
devices 10
Set up speakers 11
Set up EasyLink (HDMI-CEC control) 11
4 Use your home theater 13
Choose sound 13
Discs 13
USB storage devices 14
DivX 15
Audio, video, and picture options 16
Radio 17
MP3 player 17
Create MP3 les 18
8 Troubleshooting 26
9 Notice 28
Copyright 28
Trademarks 28
10 Language code 29
11 Index 30
5 Change settings 19
Picture 19
Sound 19
Language 20
Parental control 20
Energy saving 21
Apply factory settings 22
6 Update software 23
Check software version 23
Update software through USB or CD-R 23
7 Productspecications 24
2EN
Page 3

1 Important
Read and understand all instructions before you
use your home theater. If damage is caused by
failure to follow instructions, the warranty does
not apply.
Safety
Riskofelectricshockorre!
• Never expose the product and accessories
to rain or water. Never place liquid
containers, such as vases, near the product.
If liquids are spilt on or into the product,
disconnect it from the power outlet
immediately. Contact Philips Consumer
Care to have the product checked before
use.
• Never place the product and accessories
near naked ames or other heat sources,
including direct sunlight.
• Never insert objects into the ventilation
slots or other openings on the product.
• Where the mains plug or an appliance
coupler is used as the disconnect device,
the disconnect device shall remain readily
operable.
• Batteries (battery pack or batteries
installed) shall not be exposed to excessive
heat such as sunshine, re or the like.
• Disconnect the product from the power
outlet before lightning storms.
• When you disconnect the power cord,
always pull the plug, never the cable.
Riskofshortcircuitorre!
• Before you connect the product to the
power outlet, ensure that the power
voltage matches the value printed on the
back or bottom of the product. Never
connect the product to the power outlet if
the voltage is different.
Riskofinjuryordamagetothehometheater!
• For wall-mountable products, use only the
supplied wall mount bracket. Secure the
wall mount to a wall that can support the
combined weight of the product and the
wall mount. Koninklijke Philips Electronics
N.V. bears no responsibility for improper
wall mounting that results in accident,
injury or damage.
• For speakers with stands, use only the
supplied stands. Secure the stands to the
speakers tightly. Place the assembled stands
on at, level surfaces that can support the
combined weight of the speaker and stand.
• Never place the product or any objects
on power cords or on other electrical
equipment.
• If the product is transported in
temperatures below 5°C, unpack the
product and wait until its temperature
matches room temperature before
connecting it to the power outlet.
• Visible and invisible laser radiation when
open. Avoid exposure to beam.
• Do not touch the disc optical lens inside
the disc compartment.
• Parts of this product can be made of
glass. Handle with care to avoid injury and
damage.
Riskofoverheating!
• Never install this product in a conned
space. Always leave a space of at least four
inches around the product for ventilation.
Ensure curtains or other objects never
cover the ventilation slots on the product.
Riskofcontamination!
• Do not mix batteries (old and new or
carbon and alkaine, etc.).
• Danger of explosion if batteries are
incorrectly replaced. Replace only with the
same or equivalent type.
• Remove batteries if they are exhausted or
if the remote control is not to be used for
a long time.
• Batteries contain chemical substances, they
should be disposed of properly.
Riskofswallowingbatteries!
• The product/remote control may contain
a coin/button type battery, which can be
swallowed. Keep the battery out of reach
3 EN
Page 4

of children at all times! If swallowed, the
battery can cause serious injury or death.
Severe internal burns can occur within two
hours of ingestion.
• If you suspect that a battery has been
swallowed or placed inside any part of the
body, seek immediate medical attention.
• When you change the batteries, always
keep all new and used batteries out of
reach of children. Ensure that the battery
compartment is completely secure after
you replace the battery.
• If the battery compar tment cannot be
completely secured, discontinue use of the
product. Keep out of reach of children and
contact the manufacturer.
This is CLASS II apparatus with double
insulation, and no protective earth provided.
Care for your product
Never dispose of your product with other
household waste. Please inform yourself about
the local rules on the separate collection of
electrical and electronic products and batteries.
The correct disposal of these products helps
prevent potentially negative consequences on
the environment and human health.
Your product contains batteries, which cannot
be disposed of with normal household waste.
Please inform yourself about the local rules on
separate collection of batteries. The correct
disposal of batteries helps prevent potentially
negative consequences on the environment and
human health.
Please visit www.recycle.philips.com for
additional information on a recycling center in
your area.
• Do not insert any objects other than discs
into the disc compartment.
• Do not insert warped or cracked discs into
the disc compartment.
• Remove discs from the disc compartment
if you are not using the product for an
extended period of time.
• Use only microber cloth to clean the
product.
Care of the environment
Your product is designed and manufactured
with high quality materials and components,
which can be recycled and reused.
4EN
Page 5

2 Your home
theater
Congratulations on your purchase, and
welcome to Philips! To fully benet from the
support that Philips offers, register your home
theater at www.philips.com/welcome.
Main unit
a Disc compartment
b Display panel
c (Open/Close)
Open or close the disc compartment, or
eject the disc.
d (Play/Pause)
Start, pause or resume play.
e SOURCE
Select an audio or video source for the
home theater.
f (Standby-On)
Switch the home theater on or to standby.
Connectors
This section includes an overview of the
connectors available on your home theater.
Front
a (USB)
Audio, video or picture input from a USB
storage device.
b MUSIC iLINK
Audio input from an MP3 player.
Back connectors
a SPEAKERS
Connect to the supplied speakers and
subwoofer.
b HDMI OUT (ARC)
Connect to the HDMI input on the TV.
c OPTICAL
Connect to an optical audio output on the
TV or a digital device.
d VIDEO OUT
Connect to the composite video input on
the TV.
e AUDIO IN-AUX
Connect to an analog audio output on the
TV or an analog device.
f ANTENNA FM
Fixed FM antenna.
5 EN
Page 6
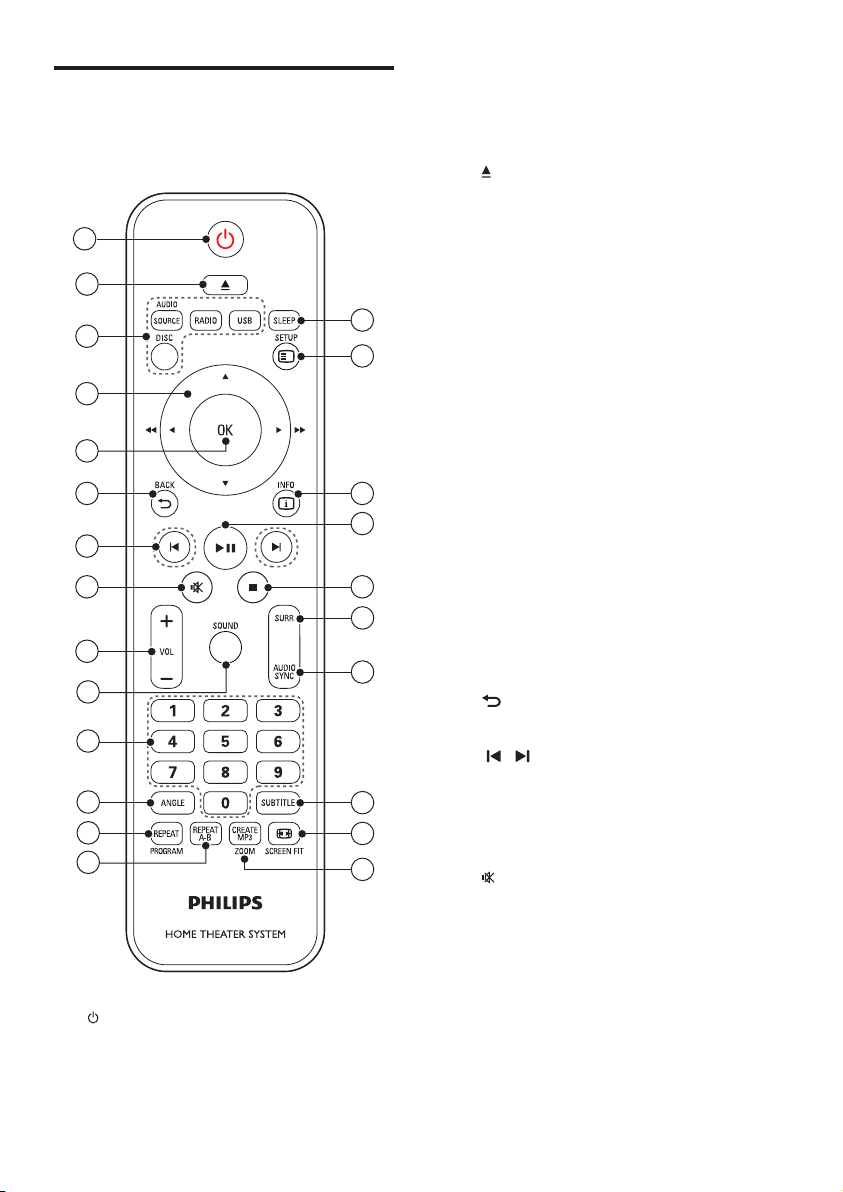
Remote control
This section includes an overview of the
remote control.
1
2
3
4
5
6
7
8
9
10
11
12
13
14
a (Standby-On)
• Switch the home theater on or to
standby.
24
23
22
21
20
19
18
17
16
15
• When EasyLink is enabled, press
and hold for at least three seconds
to switch all connected HDMI CEC
compliant devices to standby.
b (Open/Close)
Open or close the disc compartment, or
eject the disc.
c Source buttons
• DISC: Switch to disc source.Access
or exit the disc menu when you play
a disc.
• AUDIO SOURCE: Select an audio
input source.
• RADIO: Switch to FM radio.
• USB: Switch to USB storage device.
d Navigation buttons
• Navigate menus.
• In video mode, press left or right to
fast backward or fast forward; press
up or down to slow forward or slow
backward.
• In radio mode, press left or right to
search a radio station; press up or
down to ne tune a radio frequency.
e OK
Conrm an entry or selection.
f BACK
Return to a previous menu screen.
g / (Previous/Next)
• Skip to the previous or next track,
chapter or le.
• In radio mode, select a preset radio
station.
h (Mute)
Mute or restore volume.
i VOL +/-
Increase or decrease volume.
j SOUND
Select a sound mode.
k Numeric buttons
Select an item to play.
6EN
Page 7

l ANGLE
Select video scenes recorded in different
camera angels.
m REPEAT / PROGRAM
• Select or turn off repeat mode.
• In radio mode, set a radio station.
n REPEAT A-B
Mark two points within a chapter or track
to repeat play, or turn off the repeat mode.
o CREATE MP3/ZOOM
• Access the create MP3 menu.
• Zoom into a video scene or picture.
Press the Navigation buttons (left/
right) to select a zoom factor.
p SCREEN FIT
Fit the picture format to the TV screen.
q SUBTITLE
Select subtitle language for video.
r AUDIO SYNC
• Select an audio language or channel.
• Press and hold to access audio delay
setting, then press +/- to delay the
audio to match the video.
s SURR
Select surround sound or stereo sound.
t (Stop)
Stop play.
u (Play/Pause)
Start, pause or resume play.
v INFO
Access more play options while playing a
disc or a USB storage device.
w SETUP
Access or exit the setup menu.
x SLEEP
Switch the home theater to standby mode
after the elapsed time.
7 EN
Page 8

3 Connect and set
up
This section helps you connect your home
theater to a TV and other devices, and then set
it up.
For information about the basic connections
of your home theater and accessories, see the
quick start guide.
Note
• For identication and supply ratings, see the type plate
at the back or bottom of the product.
• Before you make or change any connections, make sure
that all devices are disconnected from the power outlet.
Connect speakers
The speaker cables are color-coded for easy
connection. To connect a speaker to your home
theater, match the color on the speaker cable to
the color on the connector.
Speaker position plays a critical role in setting
up a surround sound effect. For best effect,
position all the speakers towards the seating
position and place them close to your ear level
(seated).
Note
• Surround sound depends on factors such as room
shape and size, type of wall and ceiling, windows and
reective surfaces, and speaker acoustics. Experiment
with the speaker positions to nd the optimum setting
for you.
Follow these general guidelines for speakers
placement.
1 Seating position:
This is the center of your listening area.
2 FRONT CENTER (front center) speaker :
Place the center speaker directly in front of
the seating position, either above or below
your TV.
3 FRONT LEFT (front left) and FRONT
RIGHT (front right) speakers:
Place the left and right speakers in the
front, and at equal distance from the center
speaker. Make sure that the left, right, and
the center speakers are at equal distance
from your seating position.
4 REAR LEFT (rear left) and REAR RIGHT
(rear right) speakers:
Place the rear surround speakers to the
left and right side of your seating position,
either in line with it or slightly behind it.
5 SUBWOOFER (subwoofer):
8EN
Page 9
Place the subwoofer at least one meter
to the left or right of the TV. Leave about
10-centimeter clearance from the wall.
Connect to TV
Connect your home theater to a TV to watch
videos. You can listen to the TV audio through
your home theater speakers.
Use the best quality connection available on
your home theater and TV.
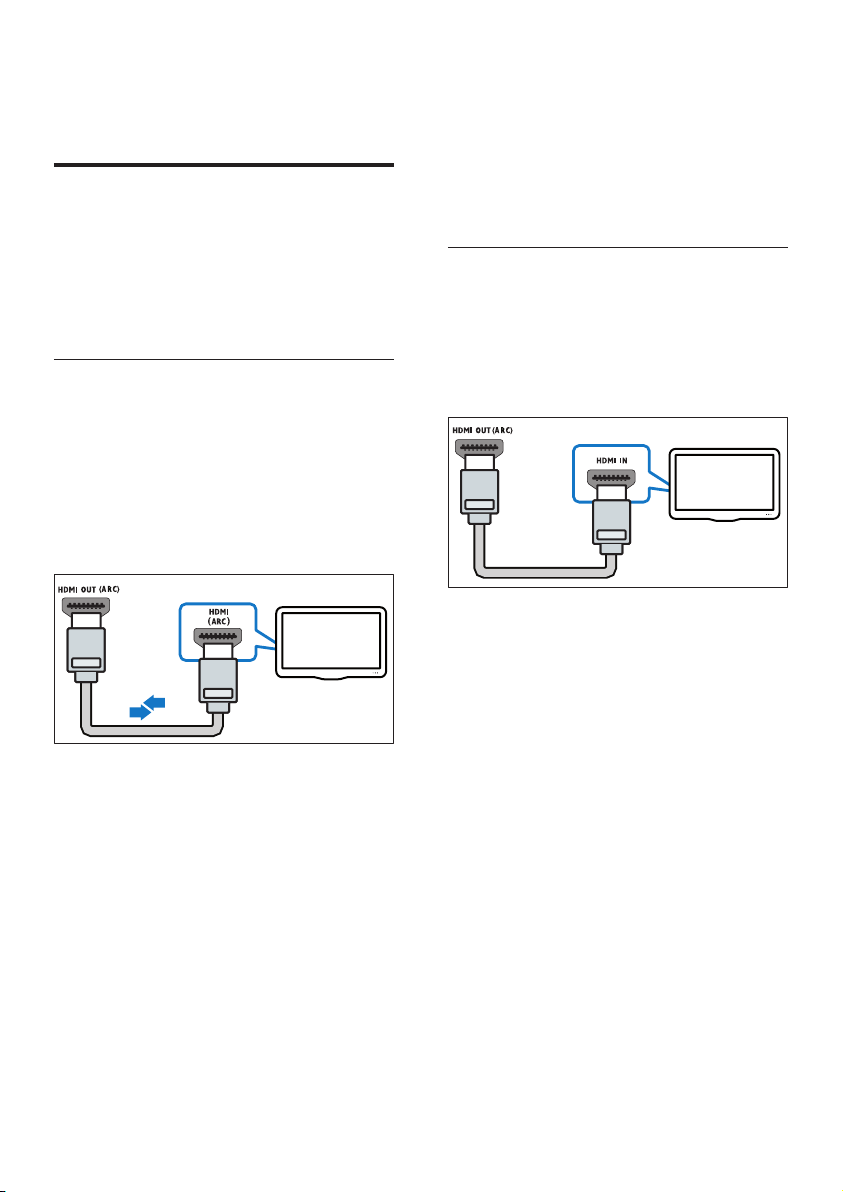
Option 1: Connect to TV through HDMI (ARC)
Best quality video
Your home theater supports HDMI version
with Audio Return Channel (ARC). If your TV
is HDMI ARC compliant, you can hear the TV
audio through your home theater by using a
single HDMI cable.
TV and the home theater. (see 'Set
up EasyLink (HDMI-CEC control)' on
page 11)
3 If you cannot hear the TV audio through
your home theater, set up the audio
manually. (see 'Set up the audio' on page
12)
Option 2: Connect to TV through standard HDMI
Best quality video
If your TV is not HDMI ARC compliant, connect
your home theater to the TV through a
standard HDMI connection.
TV
TV
1 Using a High Speed HDMI cable, connect
the HDMI OUT (ARC) connector on
your home theater to the HDMI ARC
connector on the TV.
• The HDMI ARC connector on the TV
might be labeled differently. For details,
see the TV user manual.
2 On your TV, turn on HDMI-CEC
operations. For details, see the TV user
manual.
• HDMI-CEC is a feature that enables
CEC compliant devices that are
connected through HDMI to be
controlled by a single remote control,
such as volume control for both the
9 EN
1 Using a High Speed HDMI cable, connect
the HDMI OUT (ARC) connector on your
home theater to the HDMI connector on
the TV.
2 Connect an audio cable to hear the TV
audio through your home theater (see
'Connect audio from TV and other devices'
on page 10).
3 On your TV, turn on HDMI-CEC
operations. For details, see the TV user
manual.
• HDMI-CEC is a feature that enables
CEC compliant devices that are
connected through HDMI to be
controlled by a single remote control,
such as volume control for both the
TV and the home theater. (see 'Set
up EasyLink (HDMI-CEC control)' on
page 11)
4 If you cannot hear the TV audio through
your home theater, set up the audio
Page 10

manually. (see 'Set up the audio' on page
12)
Note
• If your TV has a DVI connector, you can use an HDMI/
DVI adapter to connect to TV. However, some of the
features may not be available.
Connect audio from TV and other devices
Play audio from TV or other devices through
your home theater speakers.
Use the best quality connection available on
your TV, home theater, and other devices.
Option 3: Connect to the TV through composite video
Basic quality video
If your TV does not have HDMI connectors, use
a composite video connection. A composite
connection does not support high-denition
video.
TV
1 Using a composite video cable, connect
the VIDEO OUT connector on your
home theater to the VIDEO IN connector
on the TV.
• The composite video connector might
be labeled AV IN, COMPOSITE, or
BASEBAND.
2 Connect an audio cable to hear the TV
audio through your home theater (see
'Connect audio from TV and other devices'
on page 10).
3 When you watch TV programs, press
SOURCE on your home theater
repeatedly to select the correct audio
input.
4 When you watch videos, switch your TV to
the correct video input. For details, see the
TV user manual.
Note
• When your home theater and TV are connected
through HDMI ARC, an audio connection is not
required (see 'Option 1: Connect to TV through HDMI
(ARC)' on page 9).
Option 1: Connect audio through a digital optical cable
Best quality audio
TV
1 Using an optical cable, connect the
OPTICAL connector on your home
theater to the OPTICAL OUT connector
on the TV or other device.
• The digital optical connector might be
labeled SPDIF or SPDIF OUT.
Option 2: Connect audio through analog audio cables
Basic quality audio
10EN
Page 11
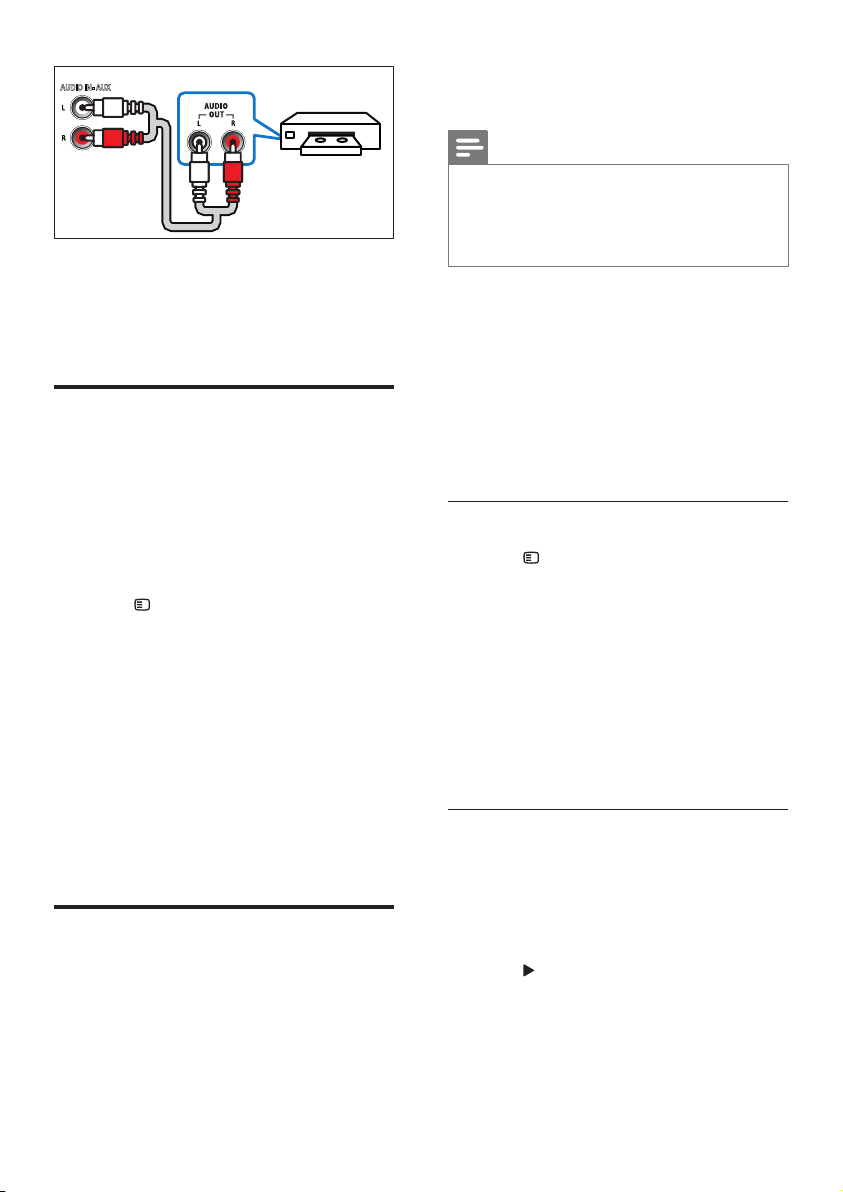
AUDIO IN- AUX
VCR
1 Using an analog cable, connect the AUX
connectors on your home theater to the
AUDIO OUT connectors on the TV or
other device.
Set up speakers
Set up the speakers manually to experience
customized surround sound.
Before you start
Make the necessary connections described in
the quick start guide, and then switch the TV to
the correct source for your home theater.
1 Press SETUP on your home theater
remote control.
2 Select [Audio Setup], and then press OK.
3 Change the following settings, and then
press OK.
• [Speakers Volume]: Set the volume
level of each speaker.
• [Speakers Delay]: Set the delay time
for speakers which are placed closer to
the seating position in order to obtain
equal audio transmission from all the
speakers.
Set up EasyLink (HDMI-CEC control)
This home theater supports Philips EasyLink,
which uses the HDMI-CEC (Consumer
Electronics Control) protocol. EasyLinkcompliant devices that are connected through
HDMI can be controlled by a single remote
control.
Note
• Depending on the manufacturer, HDMI-CEC is known
by many names. For information on your device, see
the user manual of the device.
• Philips does not guarantee 100% interoperability with
all HDMI-CEC devices.
Before you start
• Connect your home theater to the HDMICEC compliant device through HDMI
connection.
• Make the necessary connections described
in the quick start guide, and then switch
the TV to the correct source for your
home theater.
Enable EasyLink
1 Press SETUP.
2 Select [Video Setup], and then press OK.
3 Select [HDMI Setup] > [EasyLink Setup]
> [EasyLink] > [On].
4 On your TV and other connected devices,
turn on HDMI-CEC control. For details, see
the user manual of the TV or other devices.
• On your TV, set the audio output to
'Amplier' (instead of TV speakers).
For details, see the TV user manual.
EasyLink controls
With EasyLink, you can control your home
theater, TV, and other connected HDMI-CEC
compliant devices with a single remote control.
• [One Touch Play] (One-touch play): When
a video disc is in the disc compartment,
press
(Play) to wake up the TV from
standby, and then play a disc.
• [One Touch Standby] (One-touch
standby): If one-touch standby is enabled,
your home theater can switch to standby
11 EN
Page 12
with the remote control of the TV or other
HDMI-CEC devices.
• [System Audio Control] (System audio
control): If system audio control is enabled,
the audio of the connected device is
output through your home theater
speakers automatically when you play the
device.
• [Audio Input Mapping] (Audio input
mapping):If system audio control does not
work, map the connected device to the
correct audio input connector on your
home theater. (see 'Set up the audio' on
page 12)
Note
• To change the EasyLink control settings, press
SETUP, select [Video Setup] > [HDMI Setup] >
[EasyLink Setup] > [EasyLink].
Set up the audio
If you cannot hear the audio output of a
connected device through your home theater
speakers, do the following:
• Check that you have enabled EasyLink
on all the devices, (see 'Set up EasyLink
(HDMI-CEC control)' on page 11) and
• on your TV, set the audio output to
"Amplier" (instead of TV speakers). For
details, see the TV user manual, and
• setup the EasyLink audio control.
1 Press SETUP.
2 Select [Video Setup], and then press OK.
3 Select [HDMI Setup] > [EasyLink Setup]
> [System Audio Control] > [On].
• To play the audio from the TV
speakers, select [Off], and skip the
following steps.
4 Select [HDMI Setup] > [EasyLink Setup]
> [Audio Input Mapping].
5 Follow the onscreen instructions to map
the connected device to the audio inputs
on your home theater.
• If you connect your home theater
to the TV through an HDMI ARC
connection, make sure that the TV
audio is mapped to the ARC input on
your home theater.
12EN
Page 13
4 Use your home
theater
This section helps you use the home theater to
play media from a wide range of sources.
Before you start
• Make the necessary connections described
in the Quick start guide and the user
manual.
• Complete the rst-time setup. First-time
setup appears when you turn on your
home theater for the rst time or if you do
not complete the setup.
• Switch the TV to the correct source for
the home theater.
Surround sound mode
Experience an immersive audio experience with
surround sound modes.
1 Press SURR repeatedly to select a
surround mode.
• MULTI-CH: Traditional 5.1 channel for
a more relaxing cinematic experience.
• STEREO: Two-channel stereo sound.
Ideal for listening to music.
Note
• If the audio source is a 2.1 channel. multi-channel mode
will output 5-channel stereo sound.
Discs
Choose sound
This section helps you choose the ideal sound
for your video or music.
Sound mode
Select predened sound modes to suit your
video or music.
1 Press SOUND repeatedly to select a
sound mode.
• MOVIE: Enjoy a cinematic audio
experience, specially enhanced for
movies.
• MUSIC: Recreate the original recording
environment of your music, in the
studio or at a concert.
• ORIGINAL: Experience the original
sound of your movies and music,
without added sound effects.
• NEWS: Hear every word with
optimized speech and clear vocals.
• GAMING: Enjoy thrilling arcade
sounds, ideal for action-packed video
games or loud parties.
Your home theater can play DVDs, VCDs, and
CDs. It can also play discs that you’ve made at
home, such as CD-R discs of photos and music.
What you need
• Audio and video connection between your
home theater and the TV.
• An audio or a video disc.
Play discs
1 Insert a disc into the home theater.
» Your TV switches to the correct source
and the disc plays automatically. If it
does not, press DISC.
2 Press the play buttons to control play (see
'Play buttons' on page 13).
Play buttons
Button Action
Navigation
buttons
OK Conrm an entry or selection.
(Play/
Pause)
Navigate menus.
Start, pause or resume play.
13 EN
Page 14
Button Action
Stop play.
/ Skip to the previous or next
track, chapter or le.
/ Fast backwards or fast forwards.
Press repeatedly to change the
search speed.
Navigation
buttons
(left/right)
Navigation
buttons
(up/down)
SUBTITLE Select subtitle language for video.
DISC Access or exit the disc menu.
AUDIO
SYNC
SCREEN
FIT
ZOOM Zoom into a video scene or
REPEAT Select or turn off repeat mode.
REPEAT
A-B
ANGLE Select video scenes recorded in
INFO Access the advanced options
Display menu for VCD and SVCD
Display the content menu on VCD and SVCD
discs.
Rotate the picture clockwise or
counter-clockwise.
Flip the picture vertically or
horizontally.
Select an audio language or
channel.
Fit the picture format to the TV
screen.
picture.
Mark two points within a chapter
or track to repeat play, or turn off
the repeat mode.
different camera angels.
when you play your audio, video,
or media les.
1 Press SETUP.
2 Select [Preference Setup], and then press
OK.
3 Select [PBC] > [On], and then press OK.
Note
• To skip the content menu, select [Off].
• While playing a VCD/SVCD, you can press DISC to
turn off or on the PBC (playback control).
Display menu for MP3/JPEG
You can choose how you want the MP3
contents to display.
1 Press SETUP.
2 Select [Preference Setup], and then press
OK.
3 Select [MP3/JPEG Display], and then press
OK.
4 Select the following options, then press
OK.
• [View Folders]: Display the MP3
folders.
• [View Files]: Display the MP3 les.
Synchronize picture and sound
If the audio and video are not synchronized,
delay the audio to match the video.
1 Press SETUP.
2 Select [Audio Setup], and then press OK.
3 Select [Audio Sync], and then press OK.
4 Press the Navigation buttons (left/right) to
synchronize the audio with the video.
5 Press OK to conrm.
Note
• Press and hold AUDIO SYNC on the remote control
for quick access to the audio sync setup menu.
USB storage devices
Enjoy pictures, audio and video on a USB
storage device.
What you need
• A USB storage device that is formatted for
FAT, and complies with the Mass Storage
Class.
• A USB extension cable, if the USB storage
device does not t into the connector.
14EN
Page 15
Note
• You can use digital cameras connected by USB if they
can play the les without using a special computer
program.
Playles
1 Connect the USB storage device to the
home theater.
2 Press USB.
» A content browser is displayed.
3 Select a le, and then press OK.
4 Press the playback buttons to control play
(see 'Play buttons' on page 13).
DivX
Play DivX videos from :
• a disc (see 'Discs' on page 13),
• a USB storage device (see 'USB storage
devices' on page 14).
1 While playing video, press SUBTITLE to
select a language.
Note
• Make sure that the subtitle le has the same name as
the video le. For example, if the video le is named
'movie.avi', save the subtitle le as 'movie.sr t' or 'movie.
sub'.
• Your home theater can play subtitle les in the
following formats: .srt, .sub, .txt, .ssa, .ass, smi, and .sami.
These les do not appear in the le navigation menu.
• If the subtitles do not appear correctly, change the
character set.
Subtitle character set
If the subtitles do not appear correctly, change
the character set that supports the DivX
subtitle.
1 Press SETUP.
2 Select [Preference Setup], and then press
OK.
3 Select [DivX Subtitle], and then press OK.
4 Select a character set, and the press OK.
VOD code for DivX
Before you purchase DivX videos and play
them on your home theater, register the home
theater on www.divx.com using the DivX VOD
code.
1 Press SETUP.
2 Select [General Setup], and then press
OK.
3 Select [DivX(R) VOD Code], and then
press OK.
» The DivX VOD registration code for
your home theater is displayed.
Subtitles
If your video has subtitles in multiple languages,
select a subtitle language.
15 EN
Character Set Language
[Standard] English, Albanian, Danish,
Dutch, Finnish, French,
Gaelic, German, Italian,
Kurdish (Latin), Norwegian,
Portuguese, Spanish,
Swedish and Turkish
[Central Europe] Albanian, Croat, Czech,
Dutch, English, German,
Hungarian, Irish, Polish,
Romanian, Slovak, Slovene
and Sorbian
[Cyrillic] Bulgarian, Belorussian,
English, Macedonian,
Moldavian, Russian, Serbian
and Ukrainian
[Greek] Greek
[Hebrew] Hebrew
[Chinese(Simp)] Simplied Chinese
Page 16
Audio, video, and picture options
Use advanced features when you play audio,
video, or media les from a disc or a USB
storage device.
• [Track Time]: Skip to a specic part of
the video by entering the track time
(for VCD/SVCD only).
• [Preview]: Select a content preview
for disc.
• [Repeat]: Select a repeat mode.
• [Time Disp.]: Select the information of
time display.
Audio options
1 Press INFO repeatedly to cycle through
the following options:
• Show the current track information
and time.
• [Disc Go To:%c%2d:%2d%C]: Skip to a
specic part of the disc by entering the
disc time.
• [Track Go To:%c%2d:%2d%C]: Skip to
a specic part of the track by entering
the track time.
• [Select Track:%c%2d%C/%2d]: Select a
specic track.
Video options
1 Press INFO.
» The video options menu is displayed.
2 Press the Navigation buttons and OK to
select and change:
• [Title]: Select a specic title.
• [Chapter]: Select a specic chapter.
• [Track]: Select a specic track (for
VCD/SVCD only).
• [Audio]: Select audio language for
video.
• [Subtitle]: Select subtitle language for
video.
• [Angle]: Select video scenes recorded
in different camera angels.
• [TT Time]: Skip to a specic part of
the video by entering the title time.
• [Ch Time]: Skip to a specic part of
the video by entering the chapter time.
• [Disc Time]: Skip to a specic part of
the video by entering the disc time (for
VCD/SVCD only).
Picture options
1 Press INFO to access picture preview
mode.
» 12 thumbnail pictures are displayed.
2 Press / to go to previous or next
preview page.
3 Press the Navigation buttons and OK to
select a picture.
Slideshows
While playing audio, access fun features such as
picture and musical slideshows.
Picture slideshows
View a slideshow of your pictures stored in
your disc or a USB storage device.
1 Select a picture from a disc or USB storage
device, and then press
.
2 Press to stop the slideshow.
Musical slideshows
Create a musical slideshow to play music and
pictures at the same time.
1 Select a music track, and then press OK.
2 Press BACK, and go to the picture
folder.
3 Select a picture, and then press OK to
start the slideshow.
4 Press to stop slideshow.
5 Press again to stop music.
16EN
Page 17
Radio
Listen to FM radio on your home theater, and
store up to 40 radio stations.
What you need
• FM antenna.
Note
• AM and digital radio are not supported.
• If no stereo signal is detected, you are prompted to
install the radio stations again.
• For the best reception, place the antenna away from
the TV or other sources of radiation.
Tune stations
1 Connect the FM antenna as described in
the Quick start guide.
2 Press RADIO.
» If you have already installed the radio
stations, the last channel that you
listened to is played.
» If you have not installed any radio
stations, the message AUTO
INSTALL...PRESS PLAY appears on
the display panel. Press
(Play).
3 Press the following buttons to listen or to
change radio stations:
PROGRAM Manual:
1) Press PROGRAM. 2) Press
Numeric buttons to select a
preset number. 3) Press OK to
store the radio station. 4) Repeat
the steps above to store other
radio stations.
Automatic: Press and hold for
three seconds to reinstall the
radio stations
Listen to radio
1 Press RADIO.
• To listen to a preset station, press
or .
• To search for a radio station, and then
listen, press Navigation buttons (left/
right).
2 Press +/- (Volume) to change the volume.
MP3 player
Connect your MP3 player to play your audio
les or music.
What you need
• An MP3 player.
• A 3.5mm stereo audio cable.
Button Action
/ Select a preset radio station.
Navigation
buttons
(left/right)
Navigation
buttons
(up/down)
17 EN
Search for a radio station.
Fine tune a radio frequency.
Press to stop the installation of
radio stations.
Press and hold to erase the
preset radio station.
Play music
1 Connect the MP3 player to the home
theater as described in the Quick start
guide.
2 Press AUDIO SOURCE repeatedly until
'MUSIC I-LINK' appears on the display
panel.
3 Press the buttons on the MP3 player to
select and play audio les or music.
Page 18
CreateMP3les
Use your home theater to convert audio CDs
into MP3 les.
What you need
• An audio disc.
• A USB storage device
1 Connect a USB storage device to the
home theater.
2 Play your audio CD (CDDA/HDCD).
3 Press CREATE MP3.
» The create MP3 screen is displayed.
4 Press the Navigation buttons and OK to
select and change:
• [Speed]: Select the write-to-le speed.
• [Bitrate]: Select the conversion quality.
• [Device]: Select the USB storage
device which you use to store the MP3
les.
5 Navigate to the right panel, and then select
the audio tracks and press OK.
• To select all tracks, navigate to [Select
All], and then press OK.
6 Select [Start], and then press OK to star t
the MP3 conversion.
» A new folder which contains the MP3
les is created in the USB storage
device.
• To exit the menu, select [Exit], and
then press OK.
Note
• When the conversion is in process, do not press any
buttons.
• DTS CDs and copy-protected CDs cannot be
converted.
• Write-protected or password-protected USB storage
device cannot be used to store MP3 les.
18EN
Page 19
5 Change settings
This section helps you to change the settings of
your home theater.
Caution
• Most of the settings are already congured with the
best value for your home theater. Unless you have a
reason to change a setting, it is best to leave it at the
default value.
Note
• You cannot change a setting that is grayed out.
• To return to the previous menu, press BAC K. To
exit the menu, press
Picture
Change the picture settings to suit your
preferences.
SETUP.
Picture resolution
To enjoy high denition HDMI video output,
set the HDMI video settings that best match up
with your TV capability.
1 Press SETUP.
2 Select [Video Setup], and then press OK.
3 Select [HDMI Setup], and then press OK.
4 Change the following settings, and then
press OK:
• [Wide Screen Format]: For 16:9 wide
screen TV display setting.
• [HDMI Video]: HDMI resolution.
Highdenitionpicture
Support high denition JPEG pictures.
1 Press SETUP.
2 Select [Video Setup], and then press OK.
3 Select [HD JPEG] > [On], and then press
OK.
Sound
Note
• The best setting is automatically selected for the TV. If
you change the setting, make sure that the TV suppor ts
the new settings.
Picture settings and format
1 Press SETUP.
2 Select [Video Setup], and then press OK.
3 Change the following settings, and then
press OK:
• [TV System]: For TV supported video
format.
• [TV Display]: For TV picture display
format.
• [Picture Settings]: Predened color
settings.
19 EN
Change the sound settings to suit your
preference.
HDMI audio
HDMI audio is automatically down-mixed to
two channel for TV speakers. If you do not want
to output audio through your TV, disable the
HDMI audio.
1 Press SETUP.
2 Select [Audio Setup], and then press OK.
3 Select [HDMI Audio] > [Off], and then
press OK.
Page 20
Night mode
For quiet listening, decrease the volume of loud
sounds when you play discs. Night mode is only
available for Dolby-encoded DVD and Blu-ray
discs.
1 Press SETUP.
2 Select [Audio Setup], and then press OK.
3 Select [Night Mode] > [On], and then
press OK.
Disc subtitle
1 Press SETUP.
2 Select [Preference Setup], and then press
OK.
3 Select [Subtitle], and then press OK.
4 Select a subtitle language for discs, and
then press OK.
Disc menu
Language
Select a language for the home menu, audio,
and subtitles.
Home menu
1 Press SETUP.
2 Select [General Setup], and then press
OK.
3 Select [OSD Language], and then press
OK.
4 Select a menu language for your home
theater, and then press OK.
Disc audio
1 Press SETUP.
2 Select [Preference Setup], and then press
OK.
3 Select [Audio], and then press OK.
4 Select an audio language for discs, and then
press OK.
Note
• If your preferred disc language is not available, select
[Others] from the list, and enter the 4-digit language
code found at the end of this user manual (see
'Language code' on page 29).
• If you select a language that is not available on a disc,
the home theater uses the default language of the disc.
1 Press SETUP.
2 Select [Preference Setup], and then press
OK.
3 Select [Disc Menu], and then press OK.
4 Select a menu language for discs, and then
press OK.
Note
• If your preferred disc language is not available, select
[Others] from the list, and enter the 4-digit language
code found at the end of this user manual (see
'Language code' on page 29).
• If you select a language that is not available on a disc,
the home theater uses the default language of the disc.
Parental control
Restrict access to discs.
Password
You can set or change your password to play a
restricted disc.
1 Press SETUP.
2 Select [Preference Setup], and then press
OK.
3 Select [Password], and then press OK.
» A change password menu is displayed.
4 Follow the instructions on the TV to set or
change password.
20EN
Page 21

• If you do not have a password or you
have forgotten, enter 0000.
5 Press OK.
Ratings
Some discs are recorded with ratings according
to age. You can set up your home theater to
play only discs with an age rating lower than
your child’s age.
1 Press SETUP.
2 Select [Preference Setup], and then press
OK.
3 Select [Parental], and then press OK.
4 Select an age rating, and then press OK.
• To play all discs irrespective of the
rating, select level 8.
5 Use the Numeric buttons to enter the
password.
Lock disc
To restrict access to discs that are not encoded
with ratings and parental control, lock the disc
manually. You can lock upto 20 discs on your
home theater.
1 While playing a disc, press SETUP.
2 Select [General Setup], and then press
OK.
3 Select [Disc Lock] > [Lock], and then
press OK.
» A message prompts you to enter the
password.
4 Enter the password with the Numeric
buttons.
» The disc is locked.
• To play the locked disc, enter the
password.
Energy saving
Auto standby
When playing a disc or a USB storage device,
automatically switch your home theater to
standby if:
• it is in pause or stop mode, and
• no button is pressed for 30 minutes.
1 Press SETUP.
2 Select [General Setup], and then press
OK.
3 Select [Auto Standby] > [On], and then
press OK.
Sleep timer
Set timers to switch the home theater to
standby after a specied time.
1 Press SETUP.
2 Select [General Setup], and then press
OK.
3 Select [Sleep Timer], and then press OK.
4 Select the duration of the sleep timer.
» The sleep timer can be set up to 60
minutes. If the sleep timer is set to
[Off], it switches off.
5 Press OK to activate.
» The home theater switches to standby
after the specied time.
Screen saver
Automatically switch your home theater to
screen saver mode if:
• it is in pause or stop mode, and
• no button is pressed for 10 minutes.
1 Press SETUP.
2 Select [General Setup], and then press
OK.
3 Select [Screen Saver] > [On], and then
press OK.
Save energy by changing the following settings.
21 EN
Page 22

Display panel
Change the brightness of the home theater
display panel.
1 Press SETUP.
2 Select [General Setup], and then press
OK.
3 Select [Display Dim], and then press OK.
4 Select the brightness, and then press OK.
Apply factory settings
Reset your home theater to the default settings.
You cannot reset the parental control settings.
1 Press SETUP.
2 Select [Preference Setup], and then press
OK.
3 Select [Default], and then press OK.
4 Select [Reset], and then press OK.
22EN
Page 23
6 Update software
To continue to get the best features and
support for your home theater, update the
software regularly. Compare the version of your
current software with the latest version on
www.philips.com/support.
» The software update is available as a
zip le.
4 Save the zip le in the root directory of
your USB ash drive or CD-R.
5 Use the archive utility to extract the
software update le in the root directory.
6 Remove the USB ash drive or CD-R from
your computer.
Check software version
1 Press SETUP.
2 Select [Preference Setup], and then press
OK.
3 Select [Version Info.], and then press OK.
» The software version is displayed.
Update software through USB or CD-R
What you need
• A CD-R or a USB ash drive with at least
75MB of memory. The USB ash drive
must be FAT formatted. Do not use a USB
hard drive.
• A computer with Internet access.
• An archive utility that supports the ZIP
le format (for example, WinZip
Microsoft
Macintosh
®
Windows® or Stuft® for
®
).
Step 1: Download the latest software
®
for
Step 2: Update the software
Warning
• If you use a USB ash drive, make sure that there
is no disc in the disc compartment, and the disc
compartment is closed.
1 Connect the USB ash drive or insert the
CD-R to your home theater.
2 Switch your TV to the correct source for
your home theater.
3 Follow the instructions on the TV to
complete the update.
» When the software update is
complete, the home theater
automatically switches off . If it does
not, disconnect the power cord for a
few seconds, and then reconnect it.
Note
• When the software update is in progress, do not turn
off the power, or remove the USB ash drive or CD-R.
1 Connect a USB ash drive or insert a
CD-R to your computer.
2 In your web browser, go to www.philips.
com/support.
3 At the Philips Support website, nd your
product and locate the Software and
drivers.
23 EN
Page 24
7 Product
• Video: .avi, .divx, .mpg, .mpeg,
• Picture: .jpg, .jpeg
specifications
Note
• Specications and design are subject to change without
notice.
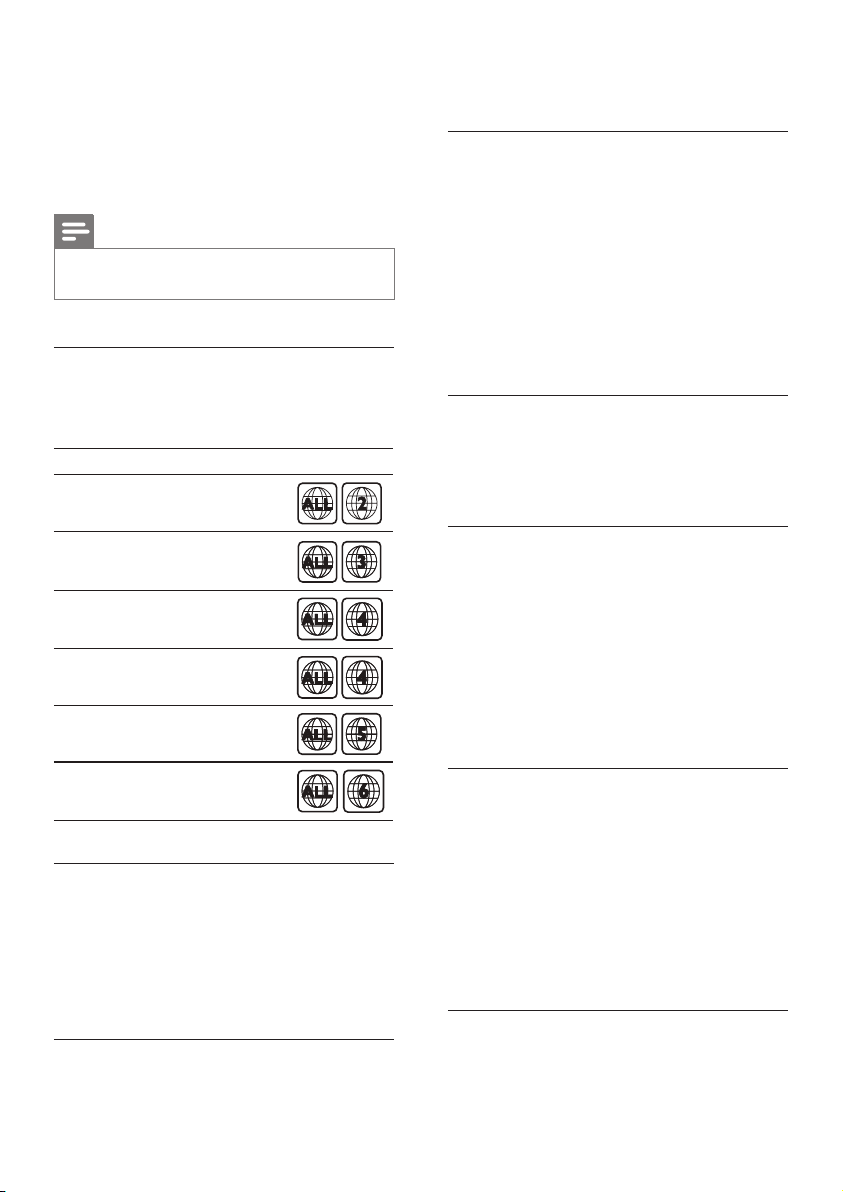
Region codes
The type plate on the back or bottom of the
home theater shows which regions it supports.
Country
DVD
Europe, United Kingdom
Asia Pacific, Taiwan, Korea
Latin America
Australia, New Zealand
Russia, India
Amplier
• Total output power: 300W RMS (30%
THD)
• Frequency response: 20 Hz-20 kHz / ±3
dB
• Signal-to-noise ratio: > 65 dB (CCIR) /
(A-weighted)
• Input sensitivity:
• AUX: 2 V
• Music iLink: 1 V
Video
• Signal system: PAL / NTSC/Multi
• HDMI output: 480i/576i, 480p/576p, 720p,
1080i, 1080p
Audio
• S/PDIF Digital audio input:
• Optical: TOSLINK
• Sampling frequency:
• MP3: 32 kHz, 44.1 kHz, 48 kHz
• WMA: 44.1 kHz, 48 kHz
• Constant bit rate:
• MP3: 32 kbps - 320 kbps
• WMA: 64 kbps - 192 kbps
China
Media formats
• DVD-Video, DVD+R/+RW, DVD-R/-RW,
DVD+R/-R DL, CD-R/CD-RW, Audio CD,
Video CD/SVCD, Picture les, MP3 media,
WMA media, DivX media, USB storage
device
File formats
• Audio: .mp3, .wma
Radio
• Tuning range:
• Europe/Russia/China: FM 87.5-108
MHz (50 kHz)
• Asia Pacic/Latin America: FM 87.5-108
MHz (50/100 kHz)
• Signal-to-noise ratio: FM 50 dB
• Frequency response: FM 200 Hz-12.5 kHz
/ ±6 dB
USB
• Compatibility: Hi-Speed USB (2.0)
24EN
Page 25

• Class support: USB Mass Storage Class
(MSC)
• File system: FAT16, FAT32
• Maximum memory suppor t: < 160 GB
Main unit
• Power supply:
• Europe/China/Russia/India: 220-240V~,
50 Hz
• Latin America/Asia Pacic: 110-240V~,
50-60 Hz
• Power consumption: 55 W
• Standby power consumption: ≤ 0.5 W
• Dimensions (WxHxD): 360 x 58 x 325
mm
• Weight: 2.3 kg
Subwoofer
• Output power: 50 W RMS (30% THD)
• Impedance: 4 ohm
• Speaker drivers: 133 mm (5.25") woofer
• Dimensions (WxHxD): 160 x 265 x 265
mm
• Weight: 2.50 kg
• Cable length: 3 m
• Cable length (rear): 7 m
Remote control batteries
• 2 x AAA-R03-1.5 V
Laser
• Type: Semiconductor laser GaAIAs (CD)
• Wave length: 645 - 665 nm (DVD), 770 -
800 nm (CD)
• Output power: 6 mW (DVD), 7 mW
(VCD/CD)
• Beam divergence: 60 degrees.
Speakers
Center speaker:
• Output power: 50 W RMS (30% THD)
• System: 1 x 63.5 mm (2.5") full range
• Speaker impedance: 4 ohm
• Speaker drivers: 1 x 63.5 mm (2.5") woofer
• Dimensions (WxHxD): 84.5 x 89 x 89 mm
• Weight: 0.27 kg
• Cable length: 2 m
Front/Rear speaker:
• Output power: 4 x 50 W RMS (30% THD)
• Speaker impedance: 4 ohm
• Speaker drivers: 1 x 63.5 mm (2.5") full
range
• Dimensions (WxHxD): 84.5 x89 x 89mm
• Weight (front): 0.27 kg/each
• Weight (rear): 0.27 kg/each
• Cable length (front): 3 m
25 EN
Page 26
8 Troubleshooting
• Make sure that the TV supports high-
denition video.
• Use an HDMI cable to connect to the TV.
Warning
• Risk of electric shock. Never remove the casing of the
product.
To keep the warranty valid, never try to repair
the product yourself.
If you have problems using this product, check
the following points before you request service.
If you still have a problem, get support at www.
philips.com/support.
Main unit
The buttons on the home theater do not
work.
• Disconnect the home theater from the
power supply for a few minutes, then
reconnect.
Picture
No picture.
• Make sure that the TV is switched to the
correct source for the home theater.
No picture on a TV connected through HDMI.
• Make sure that the HDMI cable is not
faulty. If it is faulty, replace it with a new
cable.
• If this happens when you change the HDMI
video resolution, switch to its default mode:
Press
to open the disc compartment, and
then press 304 on the remote control.
• Wait for 10 seconds for auto recovery,
or change the HDMI video setting (see
'Picture resolution' on page 19).
Discdoesnotplayhigh-denitionvideo.
• Make sure that the disc contains high-
denition video.
Sound
No sound from home theater speakers.
• Connect the audio cable from your home
theater to your TV or other devices.
• Reset your home theater to its factory
settings (see 'Apply factory settings' on
page 22), then switch it off and switch on
again.
• On your home theater, press SOURCE
repeatedly to select the correct audio
input.
Distorted sound or echo.
• If you play audio from the TV through the
home theater, make sure that the TV is
muted.
Audio and video are not synchronized.
• 1) Press and hold AUDIO SYNC. 2) Press
+/- within ve seconds to synchronize the
audio with the video.
Play
Cannot play a disc.
• Clean the disc.
• Make sure that the home theater supports
the type of disc (see 'Media formats' on
page 24).
• Make sure that the home theater supports
the region code of the disc (see 'Region
codes' on page 24).
• If the disc is a DVD±RW or DVD±R disc,
make sure that it is nalized.
CannotplayaDivXle.
• Make sure that the DivX le is encoded
according to the 'Home Theater Prole'
with the DivX encoder.
• Make sure that the DivX le is complete.
DivX subtitles do not display correctly.
26EN
Page 27

• Make sure that the subtitle le name is
the same as the movie le name (see
'Subtitles' on page 15).
• Select the correct character set: 1) Press
SETUP. 2) Select [Preference Setup] >
[DivX Subtitle]. 3) Select the supported
character set. 4) Press OK.
Cannot read the contents of a USB storage
device.
• Make sure that the format of the USB
storage device is compatible with the
home theater.
• Make sure that the le system on the USB
storage device is supported by the home
theater.
'input invalid' or 'x' sign appears on the TV.
• The operation is not possible.
EasyLink does not work.
• Make sure that the home theater is
connected to a Philips brand EasyLink TV,
and the EasyLink option is on.
When you switch on the TV, the home theater
automatically switches on.
• This behavior is normal when you are using
Philips EasyLink (HDMI-CEC). To make the
home theater work independently, switch
off EasyLink.
27 EN
Page 28
9 Notice
This section contains the legal and trademark
notices.
Copyright
This item incorporates copy protection
technology that is protected by U.S. patents
and other intellectual property rights of
Rovi Corporation. Reverse engineering and
disassembly are prohibited.
Trademarks
Manufactured under license from Dolby
Laboratories. Dolby and the double-D symbol
are trademarks of Dolby Laboratories.
registration code, locate the DivX VOD section
in your device setup menu. Go to vod.divx.com
for more information on how to complete your
registration.
HDMI, and HDMI logo, and High-Denition
Multimedia Interface are trademarks or
registered trademarks of HDMI licensing LLC in
the United States and other countries.
CLASS 1
LASER PRODUCT
DivX , DivX Ultra , DivX Certied and
associated logos are trademarks of Rovi
Corporation or its subsidiaries and are used
under license.
DivX Ultra
with advanced features and premium content.
ABOUT DIVX VIDEO: DivX
format created by DivX, LLC, a subsidiary
of Rovi Corporation. This is an ofcial DivX
Certied
divx.com for more information and software
tools to convert your les into DivX videos.
ABOUT DIVX VIDEO-ON-DEMAND: This
DivX Certied
in order to play purchased DivX Video-onDemand (VOD) movies. To obtain your
Certied to play DivX video
is a digital video
device that plays DivX video. Visit
device must be registered
28EN
Page 29

10 Language code
Abkhazian 6566
Afar 6565
Afrikaans 6570
Amharic 6577
Arabic 6582
Armenian 7289
Assamese 6583
Avestan 6569
Aymara 6589
Azerhaijani 6590
Bahasa Melayu 7783
Bashkir 6665
Belarusian 6669
Bengali 6678
Bihari 6672
Bislama 6673
Bokmål, Norwegian 7866
Bosanski 6683
Brezhoneg 6682
Bulgarian 6671
Burmese 7789
Castellano, Español 6983
Catalán 6765
Chamorro 6772
Chechen 6769
Chewa; Chichewa; Nyanja 7889
9072
Ё᭛
Chuang; Zhuang 9065
Church Slavic; Slavonic 6785
Chuvash 6786
Corsican 6779
Česky 6783
Dansk 6865
Deutsch 6869
Dzongkha 6890
English 6978
Esperanto 6979
Estonian 6984
Euskara 6985
6976
Faroese 7079
Français 7082
Frysk 7089
Fijian 7074
Gaelic; Scottish Gaelic 7168
Gallegan 7176
Georgian 7565
Gikuyu; Kikuyu 7573
Guarani 7178
Gujarati 7185
Hausa 7265
Herero 7290
Hindi 7273
Hiri Motu 7279
Hrwatski 6779
Ido 7379
Interlingua (International)7365
Interlingue 7365
Inuktitut 7385
Inupiaq 7375
Irish 7165
Íslenska 7383
Italiano 7384
Ivrit 7269
Japanese 7465
Javanese 7486
Kalaallisut 7576
Kannada 7578
Kashmiri 7583
Kazakh 7575
Kernewek 7587
Khmer 7577
Kinyarwanda 8287
Kirghiz 7589
Komi 7586
Korean 7579
Kuanyama; Kwanyama 7574
Kurdish 7585
Lao 7679
Latina 7665
Latvian 7686
Letzeburgesch; 7666
Limburgan; Limburger 7673
Lingala 7678
Lithuanian 7684
Luxembourgish; 7666
Macedonian 7775
Malagasy 7771
Magyar 7285
Malayalam 7776
Maltese 7784
Manx 7186
Maori 7773
Marathi 7782
Marshallese 7772
Moldavian 7779
Mongolian 7778
Nauru 7865
Navaho; Navajo 7886
Ndebele, North 7868
Ndebele, South 7882
Ndonga 7871
Nederlands 7876
Nepali 7869
Norsk 7879
Northern Sami 8369
North Ndebele 7868
Norwegian Nynorsk; 7878
Occitan; Provencal 7967
Old Bulgarian; Old Slavonic 6785
Oriya 7982
Oromo 7977
Ossetian; Ossetic 7983
Pali 8073
Panjabi 8065
Persian 7065
Polski 8076
Português 8084
Pushto 8083
Russian 8285
Quechua 8185
Raeto-Romance 8277
Romanian 8279
Rundi 8278
Samoan 8377
Sango 8371
Sanskrit 8365
Sa
rdinian 8367
Serbian 8382
Shona 8378
Shqip 8381
Sindhi 8368
Sinhalese 8373
Slovensky 8373
Slovenian 8376
Somali 8379
Sotho; Southern 8384
South Ndebele 7882
Sundanese 8385
Suomi 7073
Swahili 8387
Swati 8383
Svenska 8386
Tagalog 8476
Tahitian 8489
Tajik 8471
Tamil 8465
Tatar 8484
Telugu 8469
Thai 8472
Tibetan 6679
Tigrinya 8473
To nga (Tonga Islands) 8479
Tsonga 8483
Tswana 8478
Türkçe 8482
Tu rkmen 8475
Tw i 8487
Uighur 8571
Ukrainian 8575
Urdu 8582
Uzbek 8590
Vietnamese 8673
Volapuk 8679
Walloon 8765
Welsh 6789
Wolof 8779
Xhosa 8872
Yiddish 8973
Yo ruba 8979
Zulu 9085
29 EN
Page 30

11 Index
A
amplier 24
audio
HDMI audio 19
predened modes 13
settings 19
specications 24
audio language 20
audio options 16
auto standby 21
B
brightness 22
display
MP3/JPEG menu 14
VCD/SVCD menu 14
display panel 5
DivX
character set 15
subtitles 15
VOD code 15
E
enable
auto standby 21
screen saver 21
energy
auto standby 21
brightness 22
screen saver 21
sleep timer 21
C
care
product 4
connectors
front connectors 5
control
disc play 13
main unit 5
parental control 20
radio 17
create MP3 18
D
discs
audio language 20
audio options 16
control buttons 13
DivX 15
lock/unlock 21
menu language 20
options 16
picture 16
play 1313
subtitle 20
synchronize picture and sound 14
time search 16
titles 16
F
factory settings 22
FM antenna 5
H
HDMI
audio 19
video settings 19
L
language
audio 20
disc menu 20
language code 29
onscreen menu 20
subtitle 20
M
main unit
overview 5
specications 25
troubleshooting 26
media formats 24
MP3
connector 5
30EN
Page 31

create MP3 18
display contents 14
play 17
O
options
picture 16
overview
main unit 5
remote control 6
settings 19
P
parental control
lock disc 21
password 20
ratings 21
password 20
picture
high resolution JPEG 19
options 16
settings 19
slideshows 16
troubleshooting 26
picture options 16
play
discs 1313
MP3 17
radio 24
slideshows 16
troubleshooting 26
USB 14
preference
audio 19
auto standby 21
change password 20
disc menu 20
display panel 22
menu language 20
screen saver 21
sleep timer 21
subtitle 20
productspecications 24
R
radio
control buttons 17
FM antenna 5
listen to radio 17
specications 24
tune stations 17
ratings 21
region codes 24
remote control
batteries 25
overview 6
repeat 16
S
safety
use of the product 3
screen saver 21
settings
audio 19
auto standby 21
default 22
disc language 20
HDMI audio 19
HDMI video 19
menu language 20
parental rating 21
password 20
picture 19
power 21
restore 22
screen saver 21
sleep timer 21
subtitle language 20
video 19
sleep timer 21
slideshows
musical 16
picture 16
software
check current version 23
update 23
sound
predened sound mode 13
surround sound 13
31 EN
Page 32

synchronize picture and sound 14
troubleshooting 26
sound mode 13
speakers
specications 25
surround sound 13
subtitle
character set 15
language 20
subwoofer
specications 25
synchronize picture and sound 14
T
time search 16
titles 16
trademarks 28
troubleshooting
connection 26
main unit 26
picture 26
play 26
sound 26
U
update software
check current version 23
update 23
USB
format 24
USB storage device
options 16
play 15
specications 24
V
video
picture settings 19
synchronize picture and sound 14
VOD code for DivX 15
video formats 24
video options 16
VOD code for DivX 15
32EN
Page 33

Specifications are subject to change without notice
© 2012 Koninklijke Philips Electronics N.V.
All rights reserved.
HTD3500_77_UM_V1.0
 Loading...