

Philips HR8378/07, HR8376/07, HR8376/05 User Manual [ru]
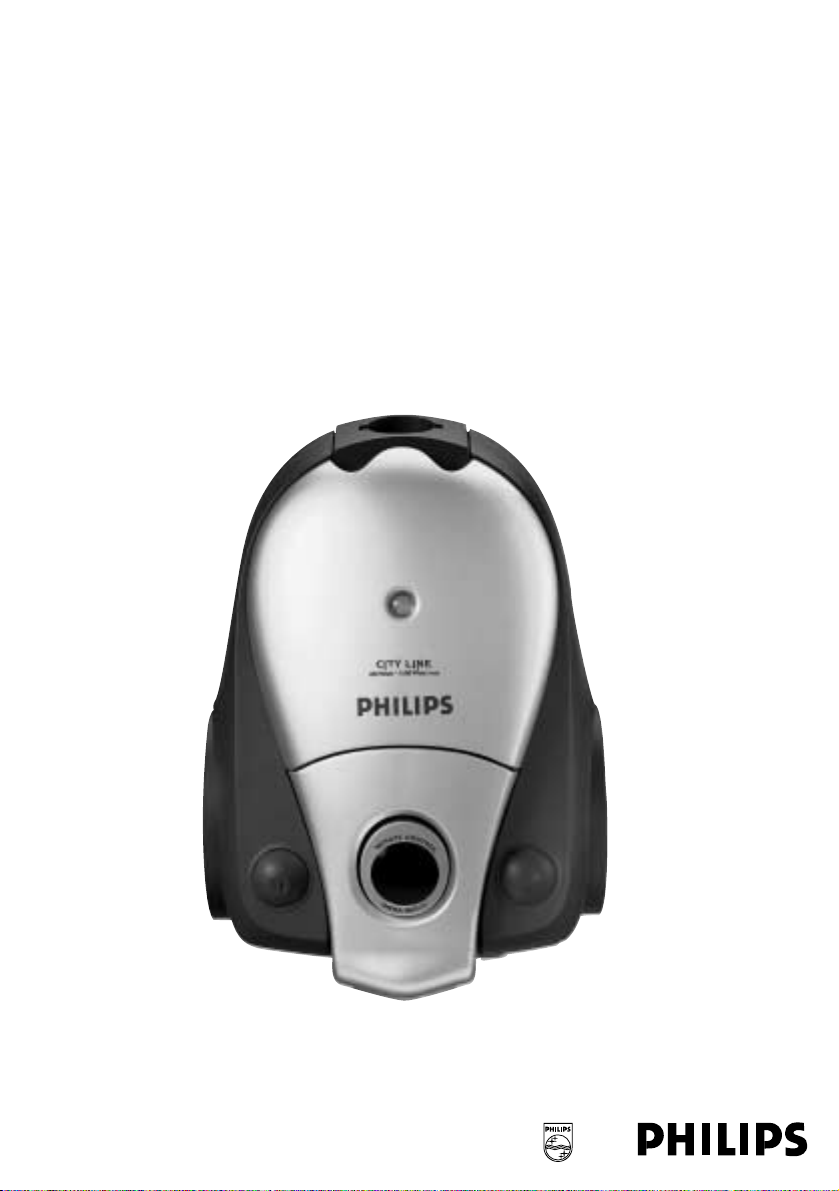
City line Infrared remote control


ENGLISH 4
POLSKI 13
ROMÂNĂ 22
РУССКИЙ 31
ČESKY 40
MAGYAR 49
SLOVENSKY 58
УКРАЇНСЬКА 67
HRVATSKI 76
EESTI 85
LATVISKI 93
LIETUVIŠKAI 102
SLOVENŠČINA 110
HR837XIREE
3
Important
◗ Only use Philips Sydney+ High Filtration dustbags (HR6999/90
Sydney +),Philips Sydney+ double-layer paper dustbags (type
HR6999 Sydney+) or the cotton dustbag provided (some versions
only).
◗ Check if the dustbag has been placed correctly.
◗ Never use the vacuum cleaner to suck up water or any other
liquid.Never pick up ashes until they are cold.
◗ When the vacuum cleaner is used to suck up fine dust,the pores
of the dustbag may become clogged,causing the passage of air
through the dustbag to become obstructed.As a result, the
dustbag-full indicator will indicate that the dustbag needs to be
replaced,even though the dustbag is not full at all.
◗ Never use the appliance without the Motor Protection Filter.This
could damage the motor and shorten the life of the appliance.
◗ The infrared remote control on the handgrip contains electronic
components.
To avoid defects,never clean this part with water.
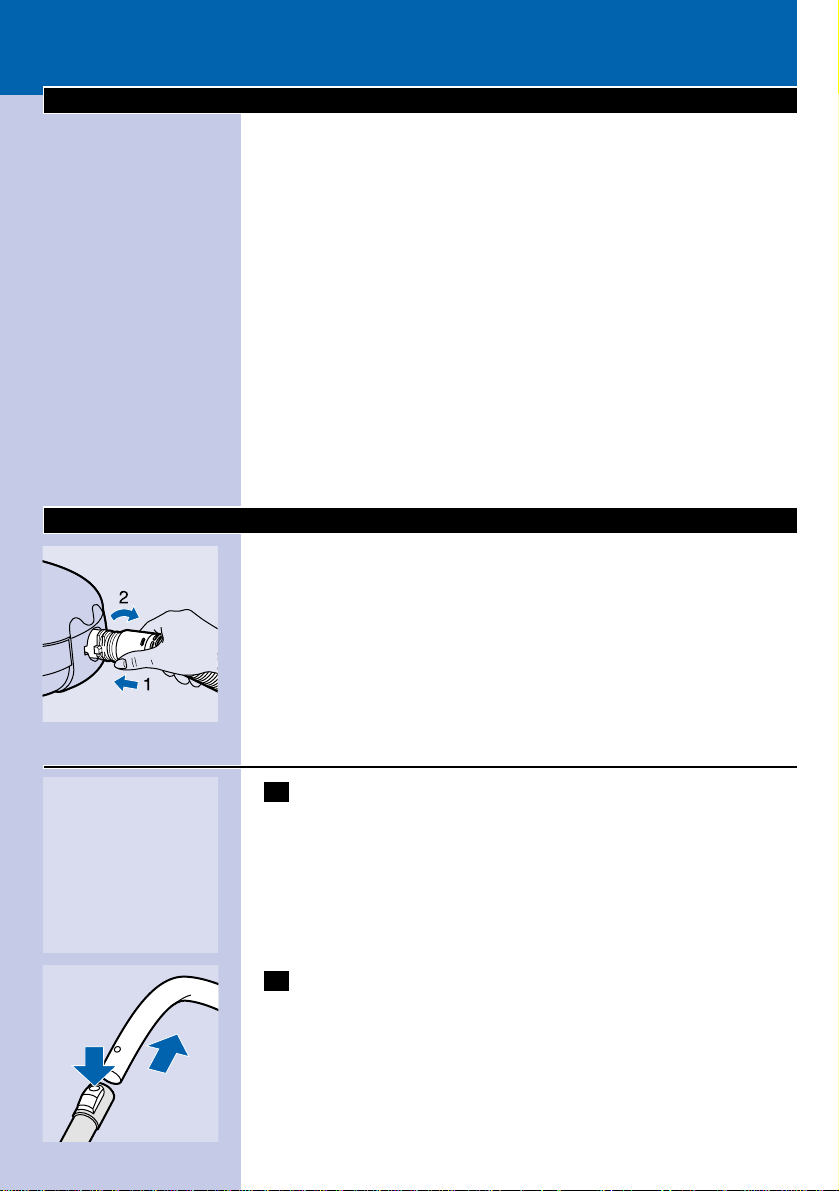
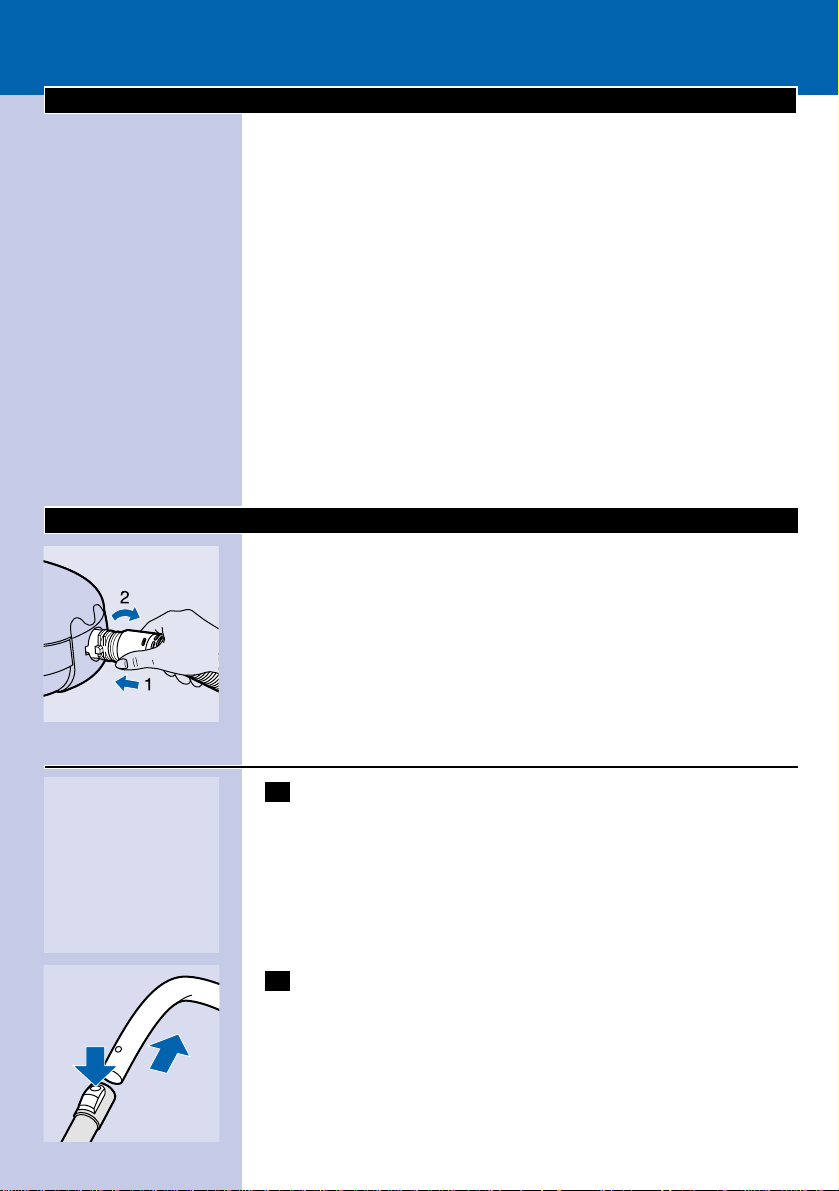
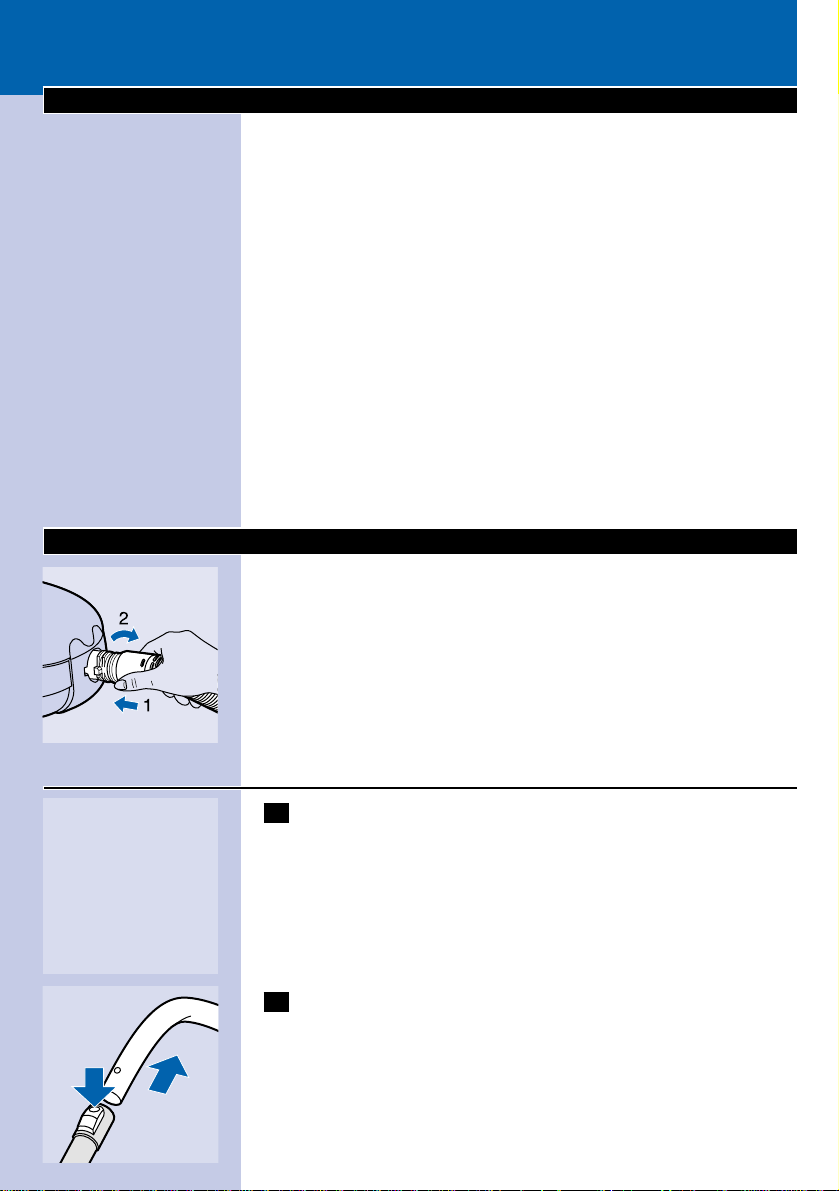
Connecting accessories
C
◗ To connect the hose to the appliance,push it into the appliance
and turn it clockwise.
To disconnect the hose from the appliance, turn it anticlockwise and
pull it out of the appliance.
Active coupling
C
1 Connect the tube to the handgrip ("click").
Use the same method to connect the accessories to the tube.
C
2 To disconnect the tubes from the handgrip,push the switchlock
and pull the tubes out of the handgrip.
ENGLISH4
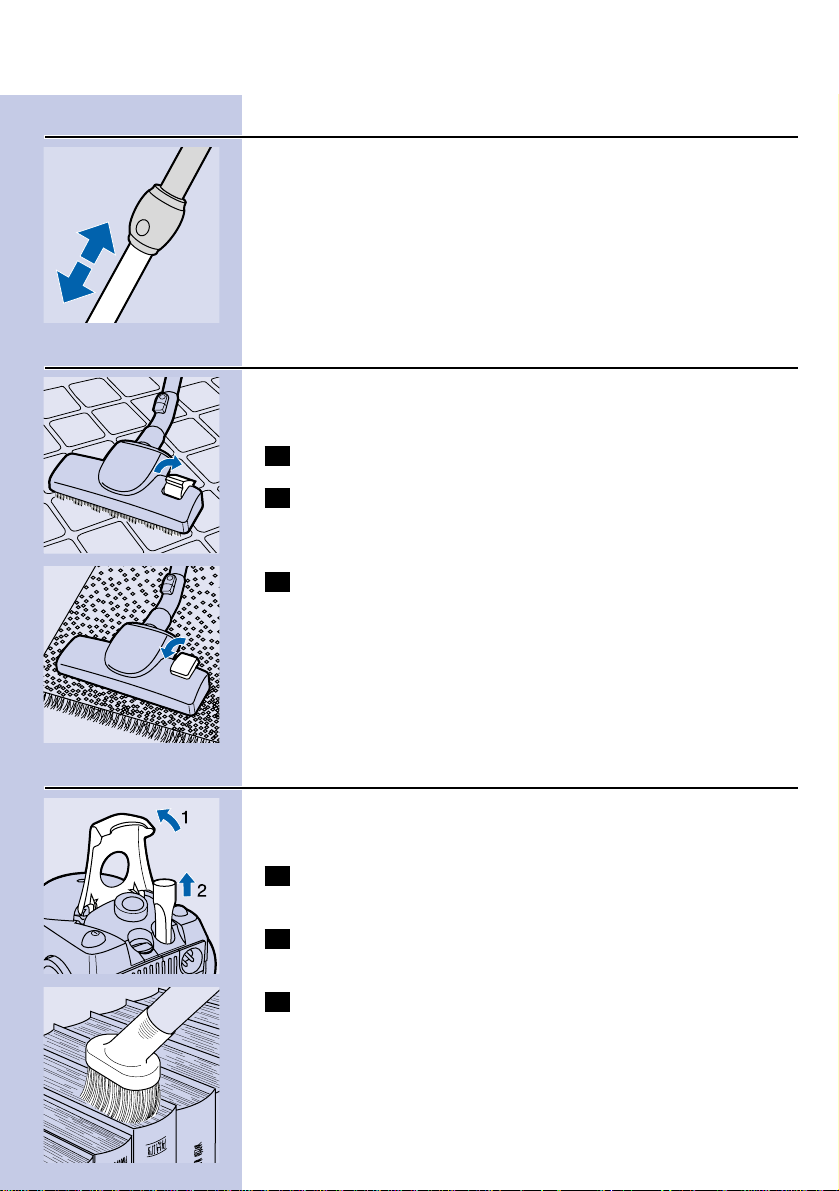
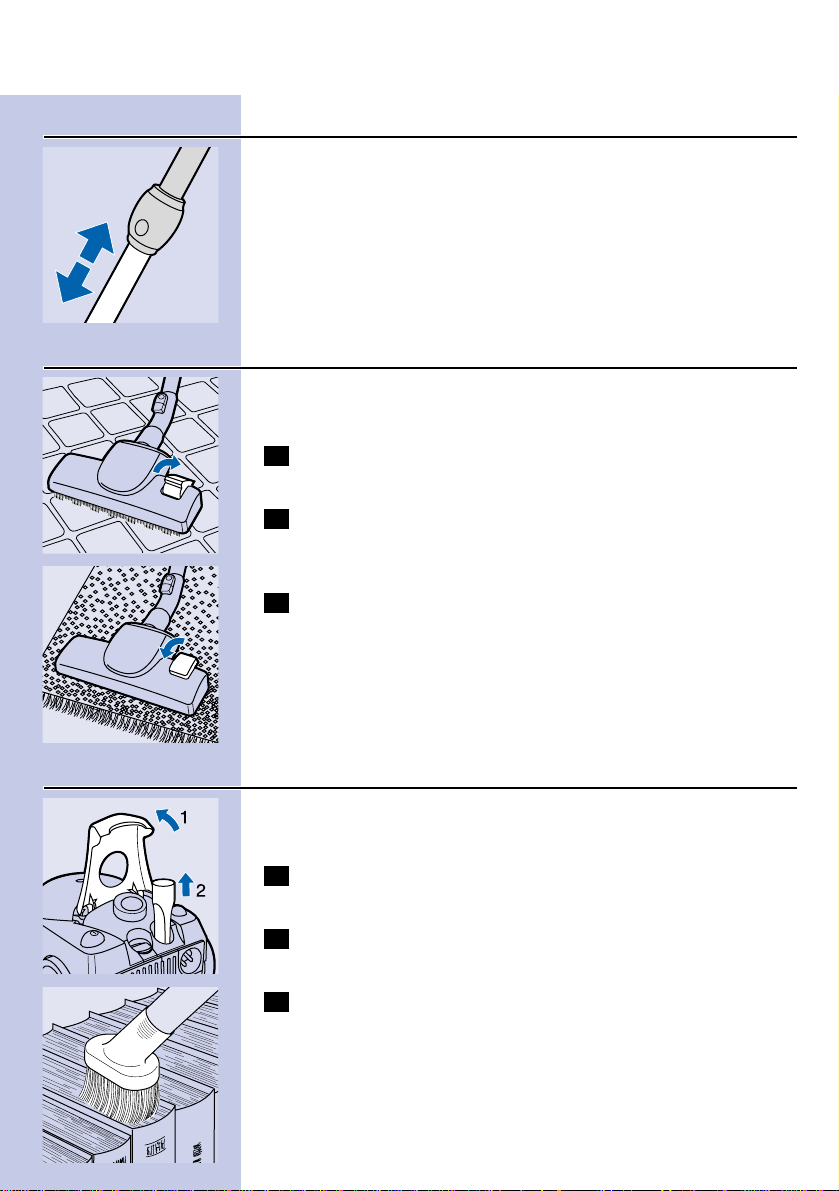
Telescopic tube
C
◗ Adjust the tube to the length you find most comfortable during
vacuum cleaning.
Convertible nozzle
◗ The convertible nozzle can be used on either carpets or hard
floors.
1 Connect the convertible nozzle to the telescopic tube ("click").
C
2 Push the rocker switch on top of the convertible nozzle with
your foot to make the brush strip for cleaning hard floors
come out of the nozzle housing.
C
3 Push the rocker switch again to make brush strip disappear
into the convertible nozzle housing again.
Crevice nozzle,brush nozzle and small nozzle
The crevice nozzle can be used either for cleaning narrow corners or
hard-to-reach places.
C
1 Lift the handle on the vacuum cleaner to gain access to the
accessory storage compartment.
2 Connect the crevice nozzle to the tube or directly to the
handgrip.
C
3 The brush nozzle can be used for cleaning computers,
bookshelves etc.
ENGLISH 5
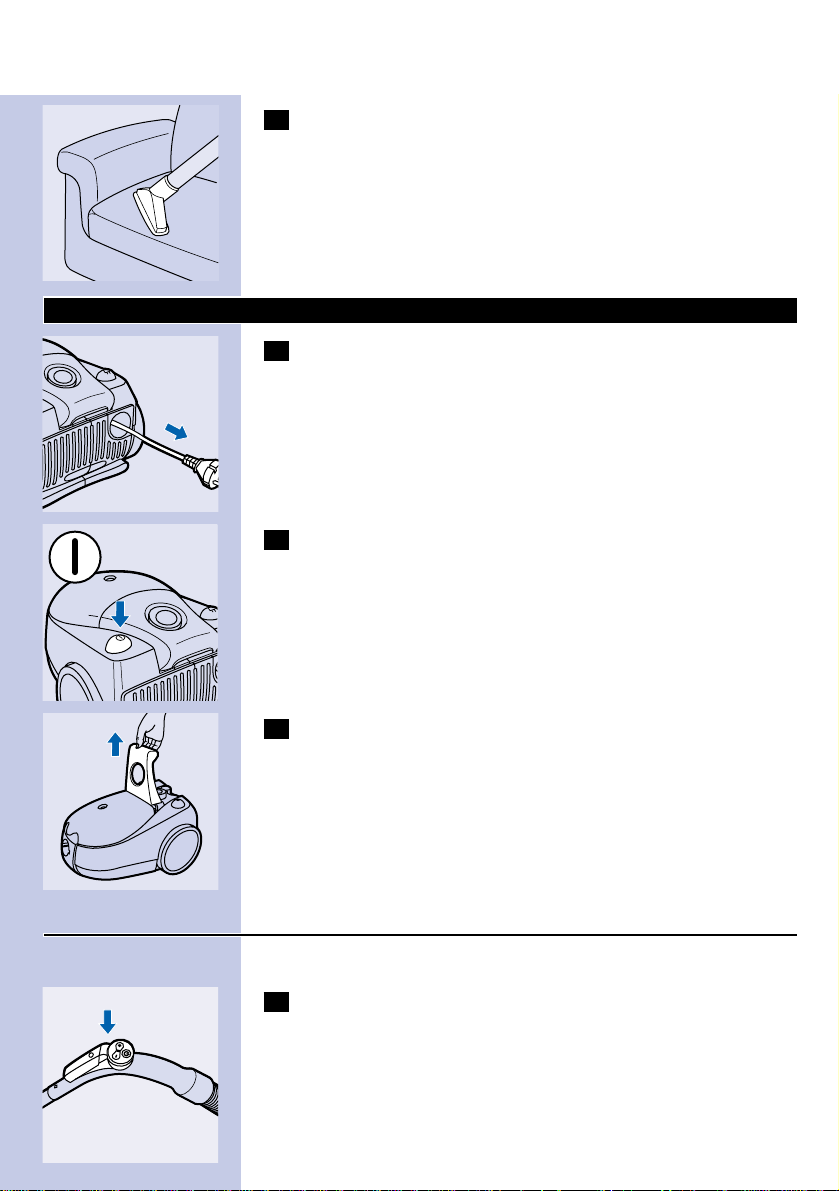
C
4 The small nozzle can be used for vacuum cleaning small areas,
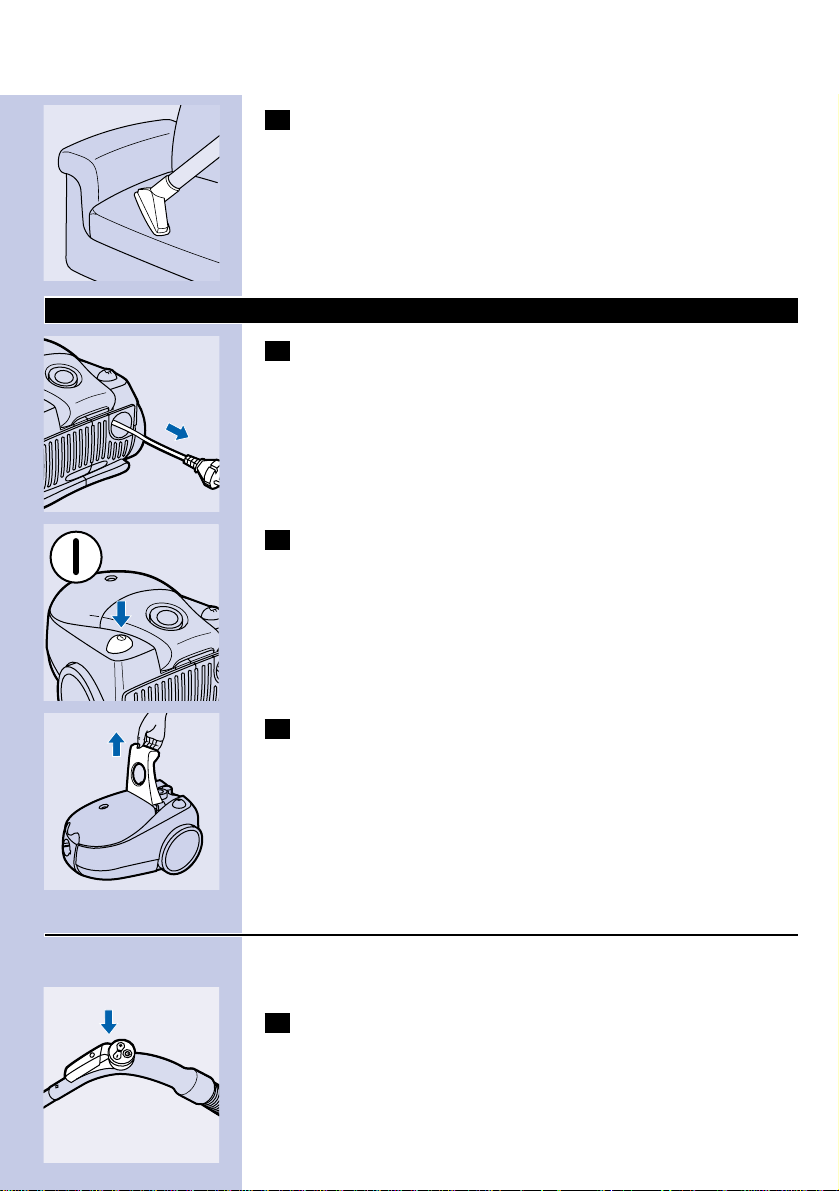
e.g.the seats of chairs and sofas.
Vacuum cleaning
C
1 Pull the cord out of the appliance and put the mains plug in the
wall socket.
C
2 Switch the appliance on by pushing the on/off button on top of
the appliance with your foot.
C
3 To carry the appliance, put the handle in upright position and
lift the appliance by the handle.
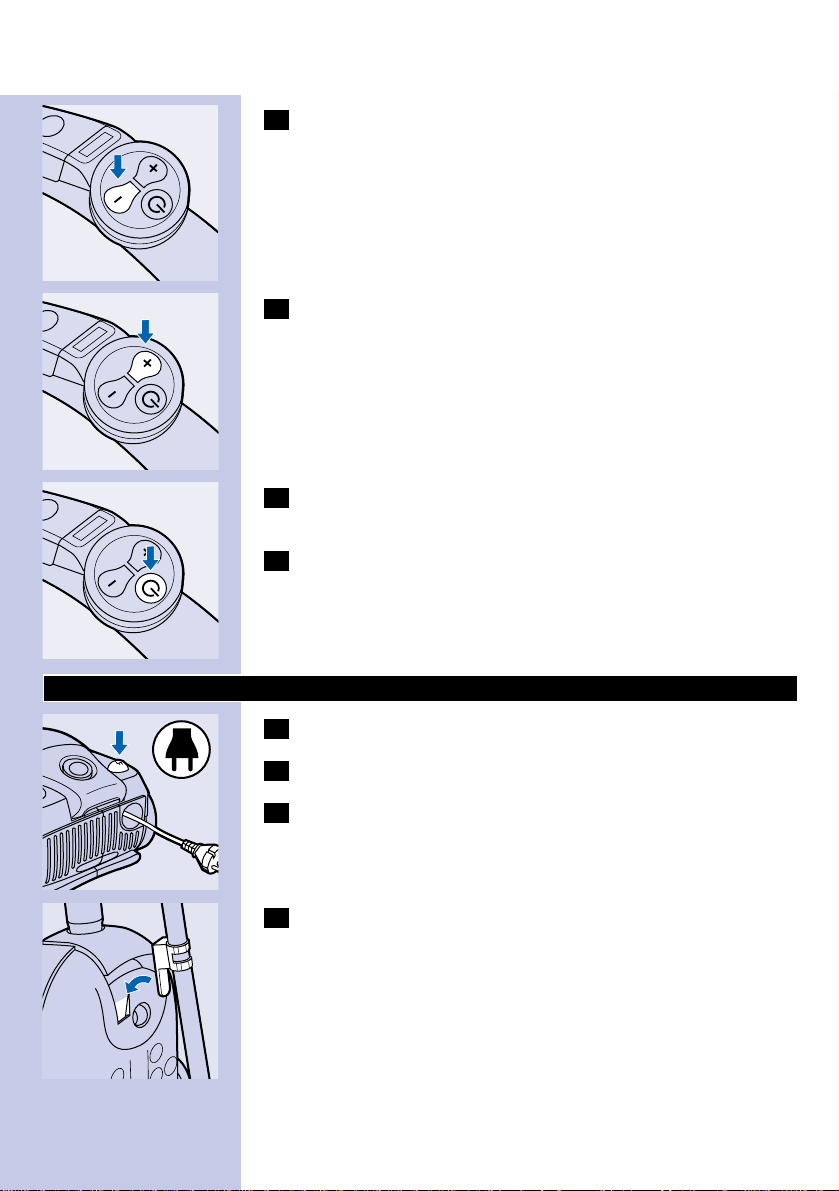
Adjusting suction power
◗ This appliance is equipped with an infrared remote control.
C
1 With the infrared remote control you can set the suction
power to one of 5 different suction power settings.When you
switch the appliance on,it will always start running at the
highest suction power setting.
ENGLISH6
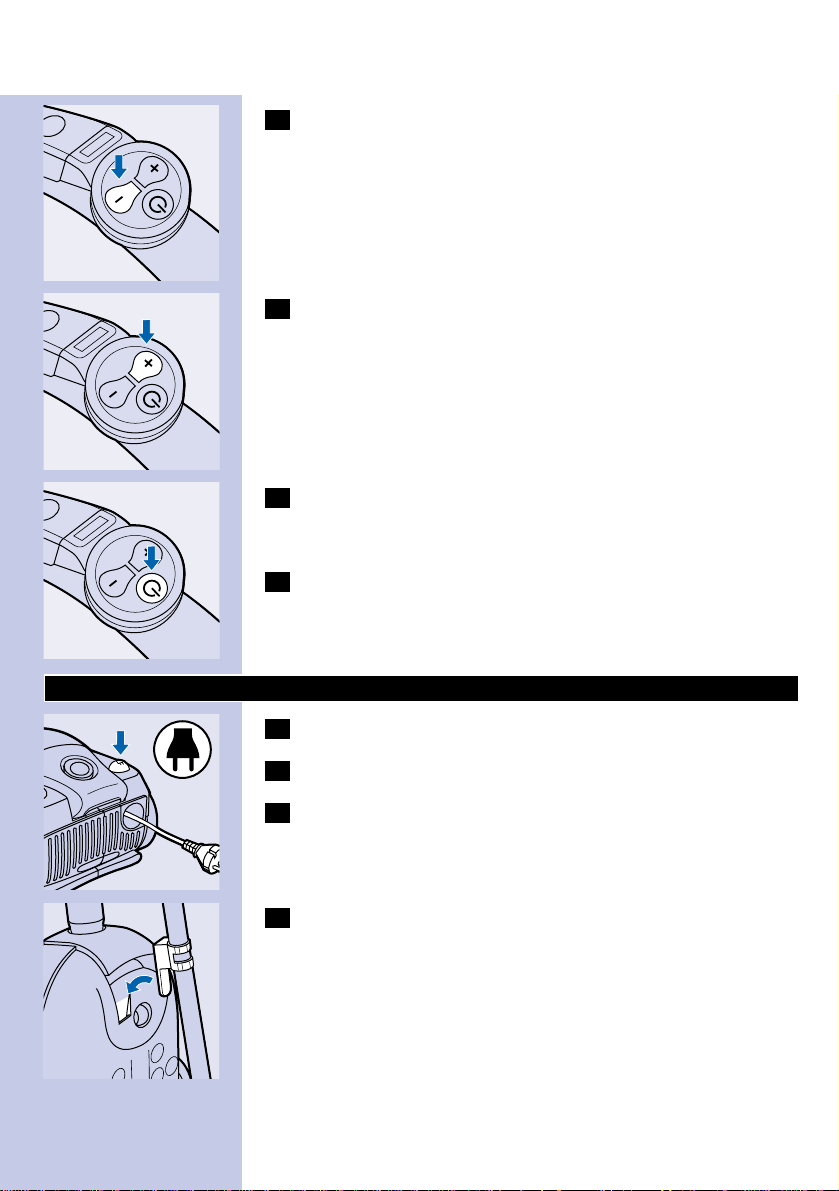
C
2 By pushing the - button,you will reduce the suction power by
one setting.
C
3 By pushing the + button,you will increase the suction power
by one setting.
C
4 Push the standby button to temporarily switch the vacuum
cleaner off,for instance when you have to move some
furniture.
5 To continue vacuum cleaning,simply press the - button or the
+ button.The appliance will start operating at the previously
selected suction power setting again.
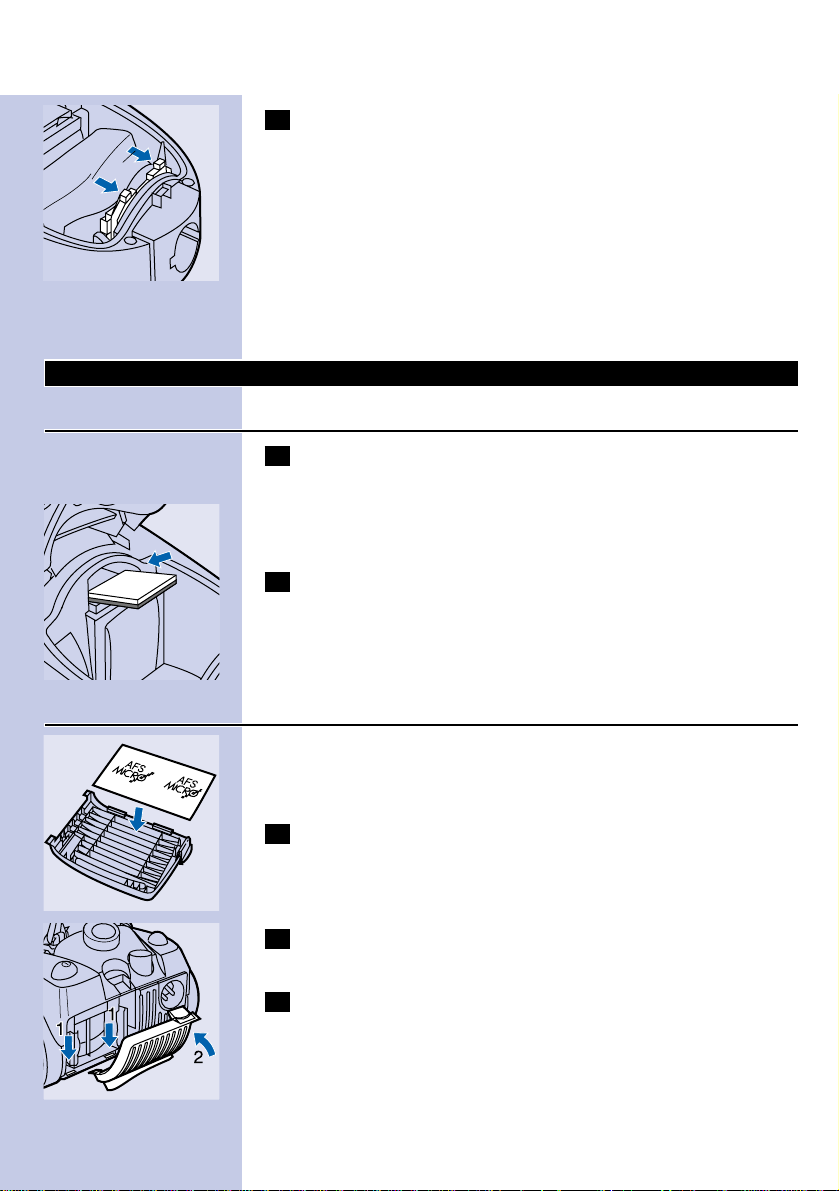
Storage
1 Switch the appliance off.
2 Remove the mains plug from the wall socket.
C
3 Rewind the mains cord by pressing the cord rewind button.
C
4 Put the appliance in upright position and attach the lower tube
to the appliance by means of the clip.
◗ The height of the clip can be adjusted by sliding it along the tube.
ENGLISH 7

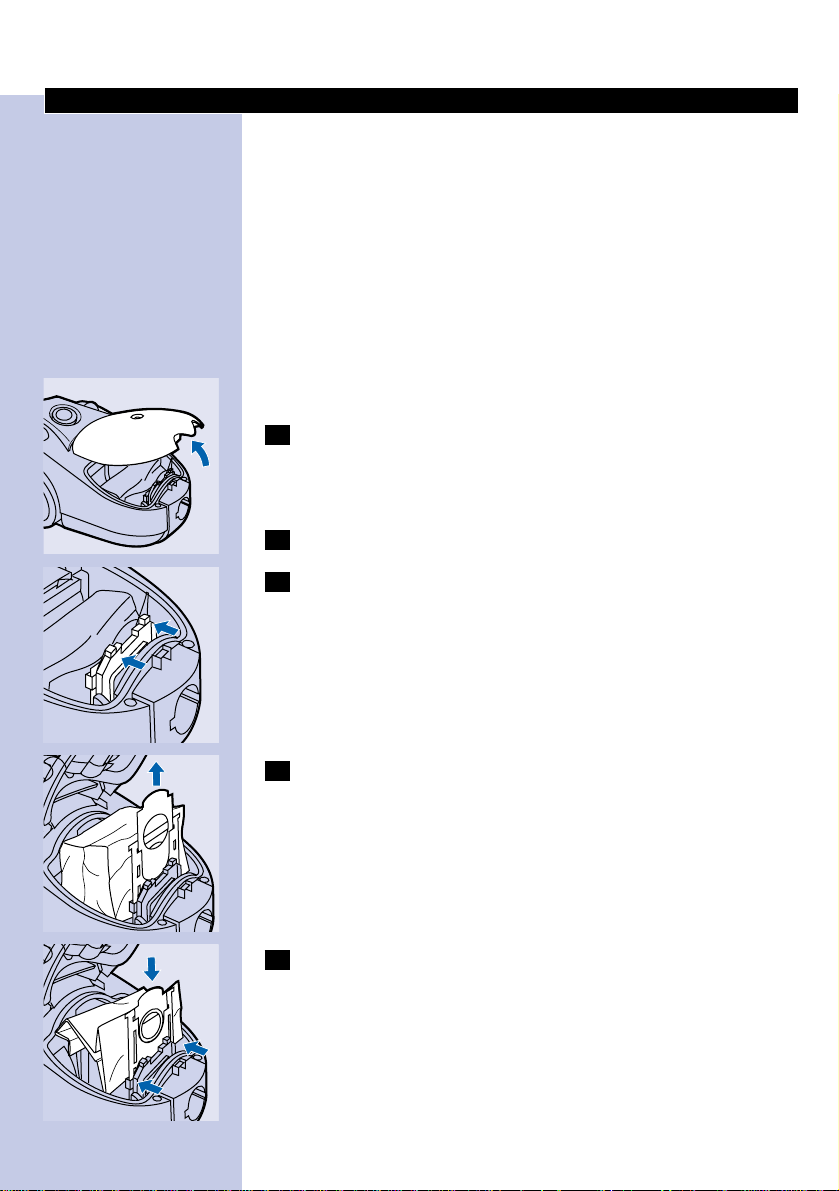
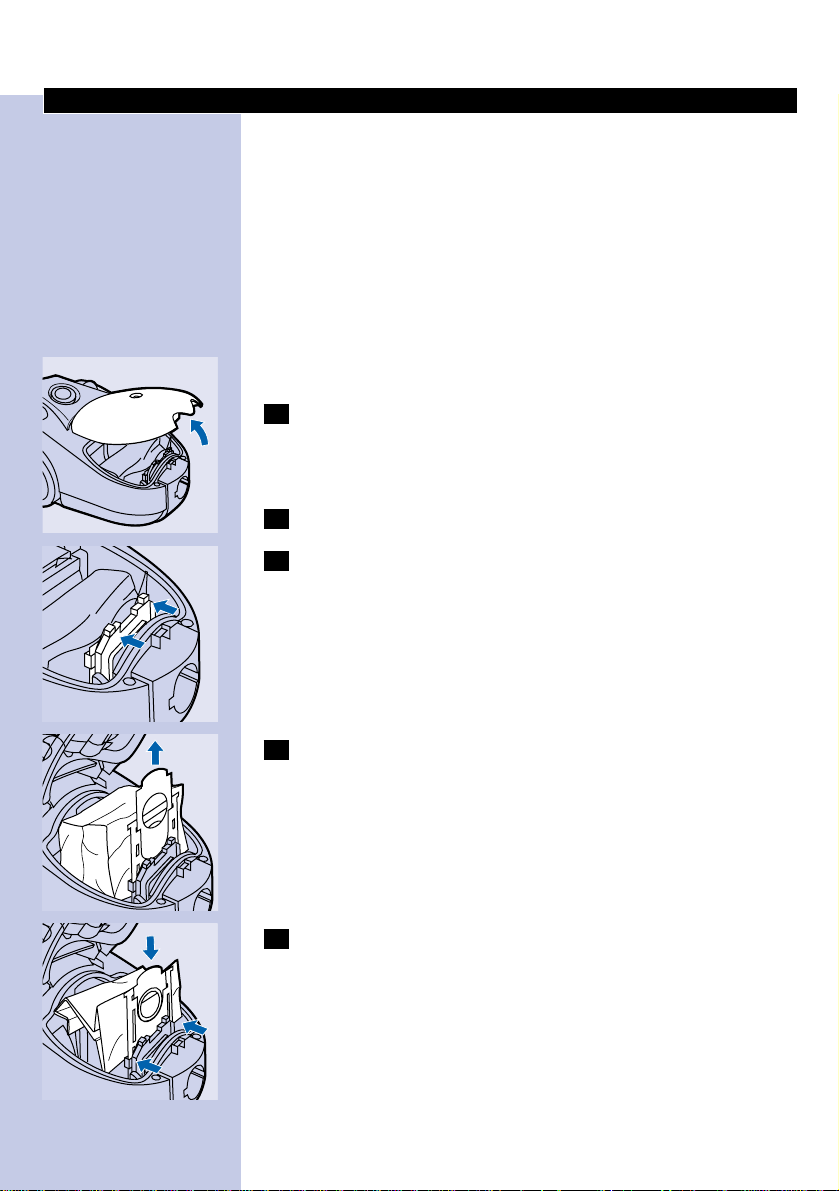
Replacing the dustbag
The new Philips Sydney+ High Filtration dustbag (type HR6999/90) is
made of a special material that enables the highest measures of
filtering.That offers many profits:cleaner outlet air,less replacing of
filters and less dust in the appliance.The dustbag is more hygienic,
stronger (even when wet),contains 25% more dust than other
dustbags and guarantees that the suction power stays on a higher level,
even when the dustbag is getting fuller.The dustbag is even closable so
that if you replace the dustbag,no dust can escape.
◗ Replace the dustbag as soon as the "dustbag-full indicator" changes
colour (when the nozzle is not placed on the floor).
1 Switch the appliance off.
C
2 Open the cover.
C
3 Push the dustbag holder backwards.
C
4 Remove the full dustbag from the holder by pulling the
cardboard tag.
When you do this,the dustbag will be automatically sealed.
C
5 Slide the cardboard front of the new dustbag into the two
grooves of the dustbag holder.Press it down as far as possible.
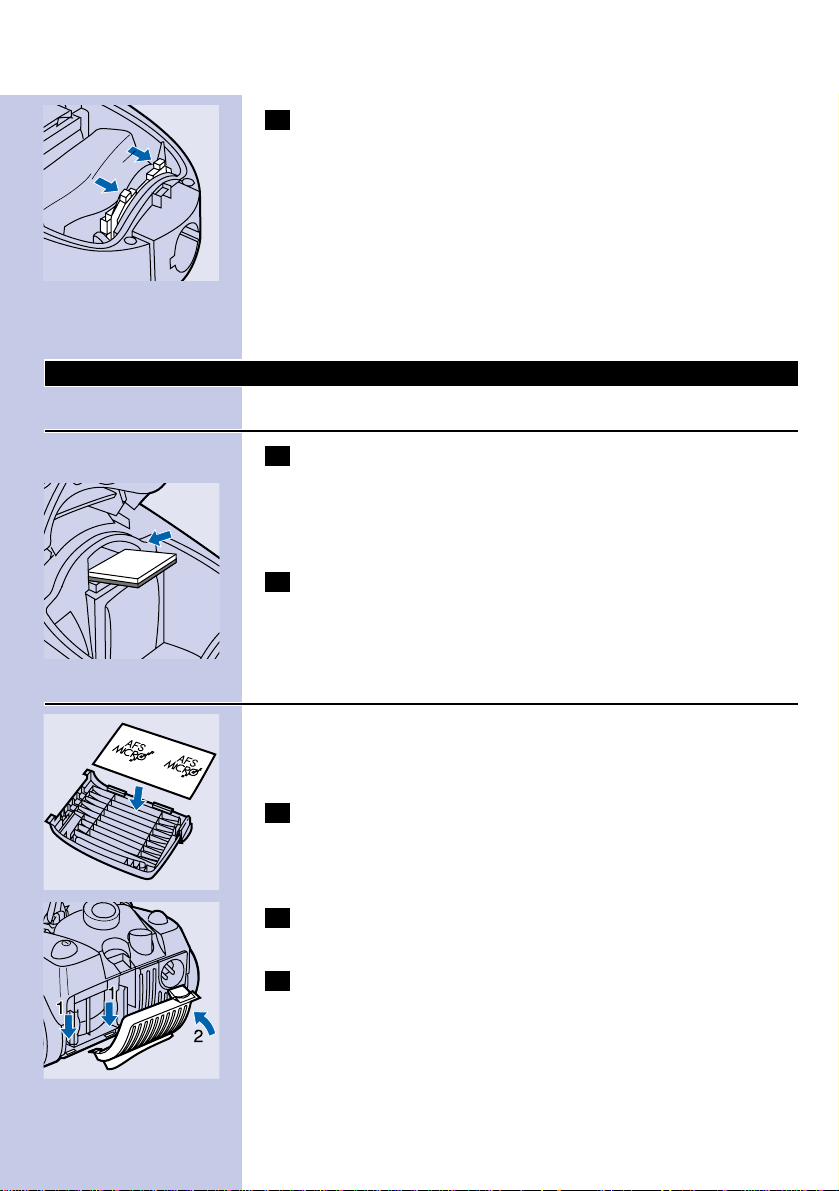
ENGLISH8
C
6 Pull the dustbag holder forwards (you will hear a click).
You cannot close the cover if no dustbag has been inserted.
For removing and inserting the cotton dustbag, simply follow the
instructions above.
To empty the cotton dustbag:
- Hold the dustbag over a dustbin.
- Remove the clip by sliding it off the dustbag sideways.
- Undo the metal hooks.
- Shake out the contents.
- Close the dustbag by fastening the metal hooks and sliding the clip
back onto the bottom edge of the dustbag.
Replacing filters
Motor Protection Filter
1 Replace the Motor Protection Filter when you insert the first
of a new set of dustbags or once a year.
If you are using a cotton dustbag,wash the Motor Protection Filter in
lukewarm water once a year.
C
2 Insert the filter into the appliance with the white side facing
upwards.
Make sure the Motor Protection Filter is completely dry before you
put it back into the appliance.
AFS Micro Filter
The AFS Micro Filter in this appliance will remove a large part of the
smallest particles from the exhaust air by means of its electrostatically
charged fibres.
C
1 Replace the AFS Micro Filter when you insert the first of a new
set of dustbags or once a year.
C
2 Place the sides and the bottom edge of the new filter properly
behind the ridges of the holder.
3 Make sure the filter has been properly inserted into the holder
before you close the filter holder.
ENGLISH 9
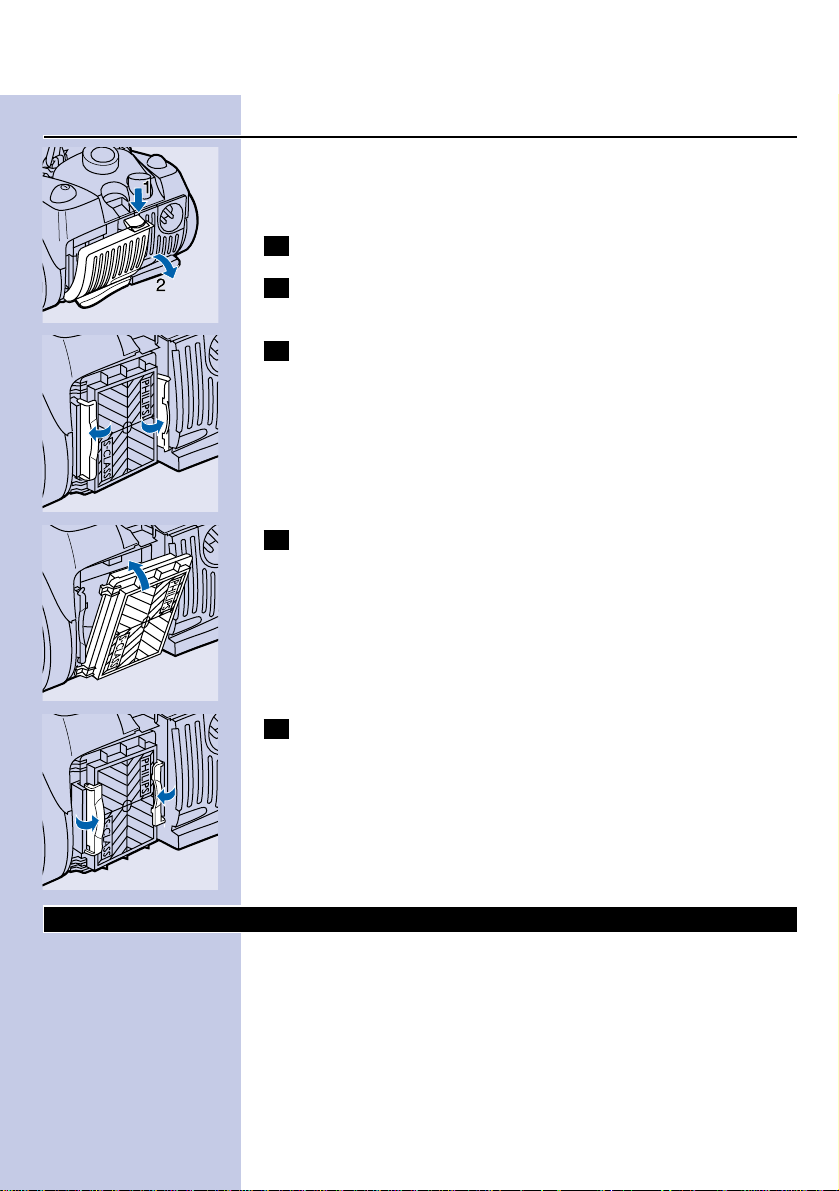
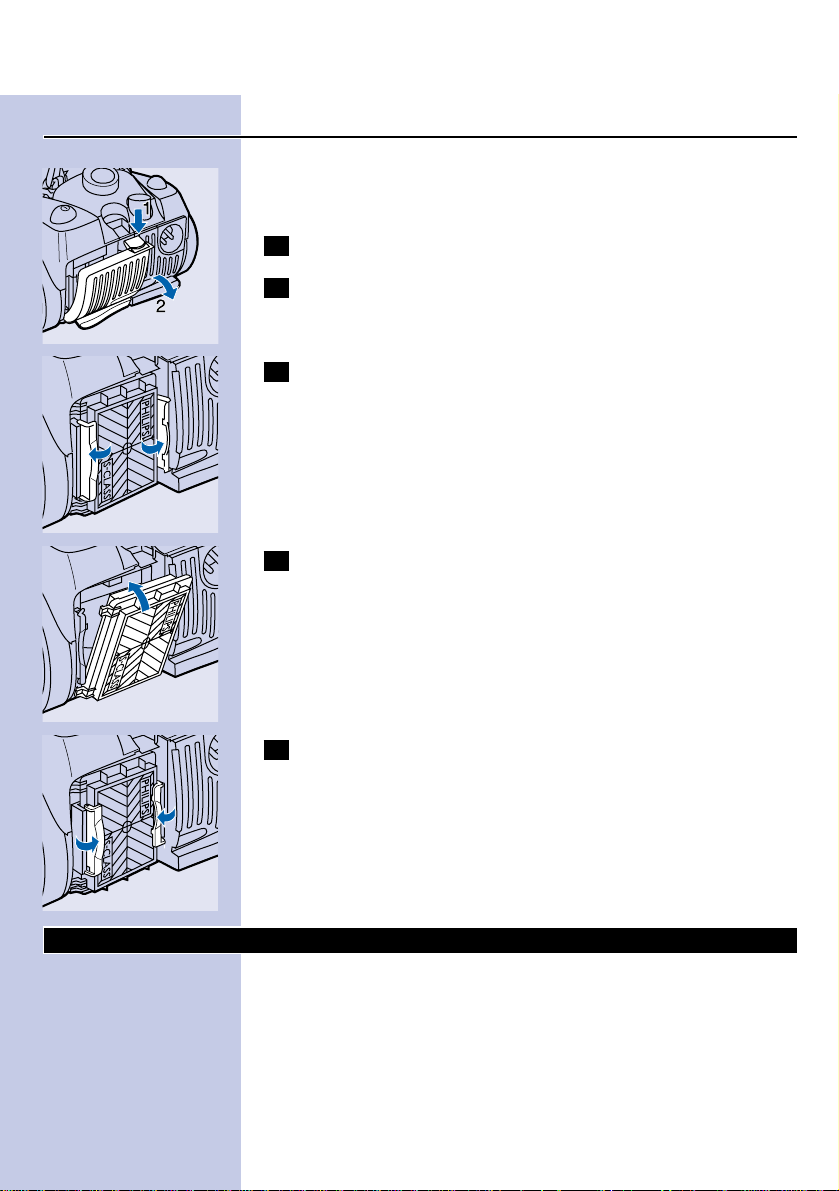
ACF-S Combi Filter (specific types only)
Some appliances are equipped with an ACF-S Combi Filter.This filter
not only removes household dust,but also harmful microscopic vermin.
It also absorbs 80% of all unpleasant smells.
1 Replace the ACF-S Combi Filter at least once a year.
C
2 Open the filter grille.
C
3 Push both catches sideward and remove the filter.
C
4 Place the new filter with its white side pointing towards the
appliance.Make sure that the Philips logo on the filter is visible
and in the upper right-hand corner.
C
5 Secure the filter by pushing the catches home and close the
filter grille.
Ordering dustbags and filters
Philips Sydney+ High Filtration dustbags are available under type
number HR6999/90.
A Philips Sydney+ cotton dustbag is available under type number
HR6997.Philips Sydney+ paper dustbags are available under type
number HR6999
A new Motor Protection Filter and an AFS Micro Filter are provided
free of charge with each set of paper dustbags. Separate AFS Micro
Filters are available under type number HR6932.
ENGLISH10

ACF-S Combi Filters are available under type number HR6998.
If you have any difficulties obtaining dustbags,filters or other accessories
for this appliance, please contact the Philips Helpdesk.
See the worldwide guarantee leaflet for telephone numbers of the
Philips Helpdesk.
Environment
To make recycling possible, the plastics used for this appliance have
been coded.
The cardboard packaging has been made of recycled material and is
fully recyclable.
Replacing the mains cord
If the mains cord of this appliance is damaged,it must always be
replaced by Philips or a service centre authorised by Philips,as special
tools and/or parts are required.
Solving problems
◗ The suction power is insufficient:
C
1 Adjust the suction power by pushing the + button of the
remote control.
2 Check if the dustbag needs to be replaced.
3 Check if the filters need to be replaced.
4 Check if the nozzle,tube or hose is blocked up.
C
5 To remove the obstruction,disconnect the blocked-up item
and connect it (as far as possible) in reverse position.Switch
the vacuum cleaner on to make the airflow suck the
obstructing material out of the blocked-up item.
◗ The infrared remote control does not function:
6 It is possible that the batteries are not making proper contact.
C
7 Remove the lid of the battery compartment and push the
batteries back into place.
8 The batteries are empty.
ENGLISH 11

9 Replace the batteries (make sure the - and the + poles of the
new batteries are pointing in the right direction).Use LR03
batteries,preferably alkaline batteries.
ENGLISH12
Ważne
◗ Używaj wyłącznie worków Philips Sydney High Filtration (typ
HR6999/90 Sydney +) lub podwójnych papierowych worków na
kurz Philips Sydney + (typ HR6999 Sydney +) lub załączonych
worków bawełnianych (tylko w niektórych modelach).
◗ Sprawdź, czy worek na kurz został zamocowany prawidłowo.
◗ Nigdy nie wciągaj odkurzaczem wody ani innych płynów. Nie
wciągaj też gorącego popiołu.
◗ Jeśli wciągasz odkurzaczem bardzo drobny pył,pory worka mogą
się zablokować.To uniemożliwia przepływ powietrza.Wskutek tego
wskaźnik zapełnienia worka będzie sygnalizował,że należy
wymienić worek,nawet jeśli nie jest on całkiem zapełniony.
◗ Nigdy nie włączaj urządzenia bez filtra ochronnego silnika.W ten
sposób możesz bowiem uszkodzić silnik i skrócić żywotność
odkurzacza.
◗ Uchwyt zdalnie sterowany na podczerwień jest wyposażony w
elektroniczne połączenia.
Aby uniknąć uszkodzeń, nigdy nie myj tej części wodą.
Podłączanie akcesoriów
C
◗ Aby podłączyć wąż, wciśnij go do urządzenia i przekręć w
kierunku zgodnym z ruchem wskazówek zegara.
Aby odłączyć wąż od urządzenia, przekręć go w kierunku przeciwnym
do ruchu wskazówek zegara i wyciągnij z odkurzacza.
Aktywna złączka
C
1 Podłącz rury do uchwytu (usłyszysz kliknięcie).
W ten sam sposób podłączaj akcesoria.
C
2 Aby odłączyć rurę od uchwytu, wciśnij przycisk blokady i
wyciągnij rurę z uchwytu.
POLSKI 13
Rura teleskopowa
C
◗ Ustaw rurę na długość, jaka najbardziej Ci odpowiada podczas
odkurzania.
Nasadka uniwersalna
◗ Nasadka uniwersalna może być stosowana zarówno do odkurzania
dywanów,jak i podłóg twardych.
1 Podłącz nasadkę uniwersalną do rury teleskopowej (usłyszysz
kliknięcie).
C
2 Wciśnij stopą przełącznik znajdujący się na nasadce
uniwersalnej, aby wysunąć z obudowy nasadki pasek ze
szczotką do czyszczenia twardych podłóg.
C
3 Wciśnij przełącznik ponownie, by schować szczotkę do
obudowy nasadki uniwersalnej.
Szczelinówka, nasadka ze szczotką i mała nasadka
Szczelinówką możesz czyścić zarówno ciasne kąty, jak trudno dostępne
miejsca.
C
1 Podnieś uchwyt znajdujący się na odkurzaczu, by otworzyć
schowek na akcesoria.
2 Połącz szczelinówkę z rurą lub bezpośrednio z uchwytem.
C
3 Nasadka ze szczotką może służyć do odkurzania komputerów,
półek z książkami, itp.
POLSKI14
C
4 Małą nasadkę można stosować do czyszczenia niewielkich
powierzchni, np. siedzeń krzeseł i kanap.
Odkurzanie
C
1 Wyciągnij przewód zasilający z odkurzacza i włóż wtyczkę do
gniazdka ściennego.
C
2 Włącz urządzenie, wciskając stopą włącznik znajdujący się na
górnej części odkurzacza.
C
3 Aby przenieść odkurzacz, ustaw rączkę w pozycji pionowej i
unieś urządzenie.
Regulacja siły ssania
◗ Urządzenie to zostało wyposażone w system zdalnego sterowania
na podczerwień.
C
1 Dzięki zdalnemu sterowaniu możesz ustawić moc ssania w
pięciu różnych pozycjach. Przy włączeniu odkurzacz zawsze
zaczyna od najwyższego ustawienia siły ssania.
POLSKI 15
C
2 Wciskając guzik, możesz zmniejszać siłę ssania o jedną pozycję.
C
3 Wciskając guzik +, zwiększasz siłę ssania o jeden stopień.
C
4 Wciśnij przycisk oczekiwania w celu przerwania pracy
urządzenia, gdy np. musisz przesunąć mebel.
5 Zwolnij przycisk oczekiwania, by kontynuować odkurzanie,
wcisając przycisk - lub +. Odkurzacz będzie pracował na tym
samym ustawieniu,co przed zatrzymaniem.
Przechowywanie
1 Wyłącz urządzenie
2 Wyjmij wtyczkę z gniazdka ściennego
C
3 Wciskając odpowiedni pedał, zwiń przewód zasilający.
C
4 Ustaw odkurzacz pionowo i przymocuj dolną rurę do zaczepu.
◗ Wysokość zaczepu można dostosować poprzez przesuwanie go
wzdłuż rury.
POLSKI16
Wymiana worka na kurz
Nowe dokładnie filtrujące worki na kurz Philips Sydney + High
Filtration (typ HR6999/90) są wykonane ze specjalnego materiału, który
umożliwia najwyższy stopień filtracji. Mają one wiele zalet:
wydmuchiwane powietrze jest czystsze, filtry wymagają rzadszej
wymiany, a do wnętrza odkurzacza przedostaje się mniej kurzu.Taki
worek na kurz jest bardziej higieniczny, mocniejszy (nawet gdy jest
wilgotny), pochłania o 25% mniej kurzu niż inne worki i zapewnia
niezmienioną najwyższą siłę ssania, nawet kiedy worek jest prawie pełny.
Worek posiada zamknięcie, tak więc podczas wymiany nie wydostaje
się z niego kurz.
◗ Wymień worek,gdy tylko wskaźnik zapełnienia worka zmieni
kolor, nawet wówczas gdy nasadka nie jest przytknięta do podłoża.
1 Wyłącz urządzenie
C
2 Otwórz pokrywę
C
3 Odegnij do tyłu uchwyt przytrzymujący worek na kurz.
C
4 Wyjmij zapełniony worek, pociągając za kartonowy sznurek.
Worek zostanie automatycznie zamknięty.
C
5 Wsuń kartonową płytkę nowego worka w dwa zagłębienia
uchwytu przytrzymującego worek.
POLSKI 17

C
6 Pociągnij do przodu uchwyt worka (usłyszysz
charakterystyczny dźwięk).
Nie zamkniesz pokrywy, jeśli nie włożysz do odkurzacza worka na kurz.
Przy wyjmowaniu i wkładaniu bawełnianego worka postępuj według
powyższych wskazówek.
Aby opróżnić bawełniany worek na kurz:
- Trzymaj worek nad koszem na śmieci
- Zdejmij klips zsuwając go z boków worka
- Odkręć metalowe zaczepy
- Wytrząśnij zawartość worka.
- Zamknij worek mocując metalowe zaczepy i zakładając z powrotem
klips na dolną krawędź worka.
Wymiana filtrów
Filtr ochronny na silnik
1 Wymieniaj filtr ochronny na silnik raz w roku lub gdy wkładasz
pierwszy z nowego zestawu worków na kurz.
Jeśli używasz bawełnianego worka na kurz pierz filtr ochronny silnika w
lekko ciepłej wodzie raz w roku.
C
2 Włóż filtr do odkurzacza białą stroną do góry.
Upewnij się, czy filtr ochronny silnika jest zupełnie suchy zanim włożysz
go ponownie do odkurzacza.
Mikro filtr AFS.
Dzięki naładowanym elektrostatycznie włóknom filtr AFS Micro
znajdujący się w odkurzaczu usuwa z wydmuchiwanego powietrza
większość nawet najmniejszych drobinek.
C
1 Wymieniaj Filtr AFS Micro za każdym razem gdy wkładasz
pierwszy z nowego zestawu worków na kurz.
C
2 Umieść boczne i spodnie krawędzie nowego filtra w
zagłębieniach uchwytu.
3 Przed zamknięciem upewnij się, czy filtr został założony
poprawnie na uchwyt.
POLSKI18

Filtr ACF - S Combi
Niektóre odkurzacze zostały wyposażone w filtr ACF - S Combi.
Pochłania on nie tylko kurz,ale także szkodliwe mikroskopijne bakterie.
Wciąga także 80% nieprzyjemnych zapachów.
1 Wymieniaj filtr ACF - S Combi co najmniej raz do roku.
C
2 Otwórz kratkę filtra.
C
3 Odepchnij oba zaczepy na bok i wyjmij filtr.
C
4 Włóż nowy filtr białą stroną skierowaną ku urządzeniu.
Upewnij się, czy logo Philips umieszczone na filtrze jest
widoczne i czy znajduje sie w górnym prawym rogu.
C
5 Zabezpiecz filtr przesuwając zaczepy z powrotem na miejsce i
zamknij filtr.
Zamawianie worków na kurz i filtrów
Worki na kurz Philips Sydney+ High Filtration są dostępne pod
numerem HR6999/90.
Bawełnianie worki na kurz Philips Sydney + są dostępne pod numerem
HR6997. Papierowe worki na kurz Philips Sydney + są dostępne pod
numerem HR6999.
Nowy filtr ochronny silnika i filtr AFS Micro są dołączane bezpłatnie do
każdego zestawu worków na kurz lub worków papierowych. Osobno
filtr AFS Micro jest dostępny pod numerem HR6932.
POLSKI 19

Filtry ACF - S Combi są dostępne pod numerem HR6998.
W razie jakichkolwiek trudności z nabyciem worków na kurz, filtrów
lub innych akcesoriów do odkurzacza, prosimy o kontakt z infolinią
firmy Philips.
Numery telefonów infolinii znajdziesz w ulotce gwarancyjnej.
Ochrona środowiska
W celu ułatwienia wtórnego przetwarzania, plastykowe części
urządzenia zostały oznakowane.
Kartonowe opakowanie zostało wykonane z makulatury i w pełni
nadaje się do ponownego przetworzenia.
Wymiana przewodu zasilającego
Jesli przewód zasilający zostanie uszkodzony, musi być wymieniony w
autoryzowanycm punkcie serwisowym firmy Philips, ponieważ w tym
celu potrzebne będą specjalne narzędzia i części zamienne.
Rozwiązywanie problemów
◗ Siła ssania jest niedostateczna:
C
1 Zwiększ siłę ssania, wciskając guzik + na pilocie zdalnego
sterowania.
2 Sprawdź, czy worek na kurz nie wymaga wymiany
3 Sprawdź, czy filtry nie wymagają wymiany
4 Sprawdź czy nasadka, rura lub wąż nie są zablokowane.
C
5 Aby usunąć przeszkodę,odłącz zablokowaną część, a następnie
podłącz ją - o ile to możliwe - w przeciwnym kierunku.Włącz
odkurzacz, by wyciągnął blokujący element.
◗ Pilot zdalnego sterowania nie działa:
6 Baterie nie przylegają odpowiednio.
C
7 Zdejmij pokrywę komory na baterie i wciśnij baterie na
miejsce.
8 Baterie są wyczerpane.
POLSKI20

9 wymień baterie (upewnij się, czy bieguny - i + nowych baterii są
umieszczone we właściwej pozycji).Używaj baterii LR03,
najlepiej alkalicznych.
POLSKI 21
Important
◗ Folosiţi doar saci de praf Philips Sydney+ cu filtrare performantă
(HR6999/90 Sydney+, saci de praf dubli Philips Sydney+ (tipul
HR6999 Sydney+) sau sacii de praf din bumbac furnizaţi (doar
unele modele).
◗ Asiguraţi-vă că sacul pentru praf este poziţionat corect.
◗ Nu utilizaţi aparatul pentru a aspira apă sau alte lichide. Nu aspiraţi
cenuşă înainte ca aceasta să se fi răcit.
◗ Când aparatul este folosit pentru a aspira praf, porii sacului se pot
astupa, blocând circulaţia aerului prin sac. Drept urmare,
indicatorul "sac de praf plin" va indica necesitatea schimbării
sacului chiar dacă acesta nu este plin.
◗ Nu folosiţi niciodată aparatul fără filtrul de protecţie a motorului.
Aceasta poate duce la deteriorarea motorului şi poate scurta
durata de funcţionare a aparatului.
◗ Telecomanda cu infraroşii de pe mâner conţine componente
electronice.
Pentru a evite defectarea acesteia, nu curăţaţi această componentă cu
apă.
Conectarea accesoriilor
C
◗ Pentru a conecta furtunul, împingeţi-l în aparat şi răsuciţi-l în
sensul acelor de ceasornic.
Pentru a deconecta furtunul, răsuciţi-l în sens invers acelor de ceasornic
şi trageţi-l din aparat.
Cuplare activă
C
1 Conectaţi tubul la mâner (clic).
Folosiţi aceeaşi metodă pentru a conecta accesoriile la tub.
C
2 Pentru a deconecta tubul de mâner, împingeţi butonul de
siguranţă şi trageţi tuburile din mâner.
ROMÂNĂ22

Tub telescopic
C
◗ Reglaţi tubul la lungimea cea mai confortabilă pentru aspirare.
Duză convertibilă
◗ Duza convertibilă poate fi folosită atât pe covoare, cât şi pe
suprafeţe dure.
1 Conectaţi duza convertibilă la tubul telescopic (clic).
C
2 Apăsaţi cu piciorul comutatorul de deasupra duzei pentru a
scoate perii pentru curăţarea suprafeţelor dure.
C
3 Apăsaţi comutatorul din nou pentru a reintroduce perii în
duză.
Duză cu şanţ, duză cu perie şi duză mică
Duza cu şanţ poate fi folosită pentru a aspira praful din locurile înguste
sau pentru a curăţa locurile greu accesibile.
C
1 Ridicaţi mânerul de pe aspirator pentru a avea acces la
compartimentul de depozitare a accesoriilor.
2 Conectaţi duza la tub sau direct la mâner.
C
3 Duza cu perie poate fi folosită pentru a aspira praful de pe
computere, rafturi de bibliotecă, etc.
ROMÂNĂ 23

C
4 Duza mică poate fi folosită pentru a curăţa suprafeţe mici, de
ex. scaune, canapele.
Aspirarea
C
1 Trageţi cablul din aparat şi introduceţi ştecherul în priză.
C
2 Porniţi aparatul apăsând cu piciorul butonul pornire/oprire de
deasupra aparatului.
C
3 Pentru a transporta aparatul, puneţi mânerul în poziţie verticală
şi ridicaţi aparatul de mâner.
Reglarea puterii de aspirare
◗ Acest aparat este echipat cu o telecomandă cu infraroşii.
C
1 Cu telecomanda cu infraroşii puteţi regla puterea de aspirare
pe unul din cele 5 reglaje ale puterii de aspirare.
ROMÂNĂ24

C
2 Apăsând butonul - veţi reduce puterea de aspirare cu un reglaj.
C
3 Apăsând butonul + veţi mări puterea de aspirare cu un reglaj.
C
4 Apăsaţi butonul "standby" pentru a opri temporar aparatul, de
ex. când trebuie să mutaţi mobila.
5 Pentru a continua aspirarea, nu trebuie decât să apăsaţi butunul
+ sau -.Aparatul va continua să funcţioneze la reglajul setat
anterior.
Depozitare
1 Opriţi aparatul.
2 Scoateţi ştecherul din priză.
C
3 Înfăşuraţi cablul apăsând butonul de înfăşurare a cablului.
C
4 Aşezaţi aparatul în poziţie verticală şi ataşaţi tubul inferior de
aparat cu ajutorul clemei.
◗ Poziţia clemei poate fi reglată culisând-o de-a lungul tubului.
ROMÂNĂ 25
Înlocuirea sacului de praf
Noul sac de praf Philips Sydney+ cu filtrare performantă (tipul
HR6999/90) este fabricat dintr-un material special ce permite cea mai
bună filtrare. Acesta are mai multe avantaje: aerul evacuat este mai
curat, filtrul trebuie înlocuit mai rar şi se acumulează mai puţin praf în
aparat. Sacul este mai igienic, mai rezistent (chiar şi când este ud), are o
capacitate cu 25% mai mare decât alţi saci şi garantează menţinerea
puterii de aspirare la un nivel înalt, chiar şi când sacul este aproape plin.
Sacul se poate închide astfel încât atunci când îl înlocuiţi, praful rămâne
în sac.
◗ Înlocuiţi sacul de praf imediat ce indicatorul de "sac plin" îşi
schimbă culoarea (când duza nu este aşezată pe podea).
1 Opriţi aparatul.
C
2 Deschideţi capacul.
C
3 Împingeţi suportul sacului de praf înapoi.
C
4 Scoateţi sacul de praf plin din suport trăgând de clema din
carton.
Când faceţi acest lucru sacul de praf va fi sigilat automat.
C
5 Poziţionaţi sacul nou cu clema de carton în cele două şanţuri
ale suportului pentru sac.Apăsaţi-l cât mai mult posibil.
ROMÂNĂ26
C
6 Împingeţi suportul înainte (veţi auzi un clic).
Nu puteţi închide capacul dacă nu aţi introdus un sac nou.
Pentru a scoate sau a introduce sacul din bumbac, urmaţi instrucţiunile
de mai sus.
Curăţarea sacului din bumbac:
- Ţineţi sacul pentru praf deasupra coşului de gunoi.
- Scoateţi clema culisând-o în afară.
- Desfaceţi agrafele metalice.
- Scuturaţi sacul.
- Închideţi sacul fixând agrafele metalice şi culisând la loc clema pe
fundul sacului.
Înlocuirea filtrelor
Filtrul de protecţie a motorului
1 Înlocuiţi filtrul de protecţie a motorului când introduceţi primul
sac dintr-un nou set sau o dată pe an.
Dacă folosiţi un sac din bumbac, spălaţi filtrul de protecţie a motorului
cu apă călduţă o dată pe an.
C
2 Introduceţi filtrul în aparat cu porţiunea albă în sus.
Asiguraţi-vă că filtrul de protecţie a motorului este complet uscat
înainte de a-l reintroduce în aparat.
Micro Filtrul AFS
Micro filtrul AFS al aparatului va îndepărta cea mai mare par te a
particulelor din aerul evacuat cu ajutorul fibrelor cu încărcătură
electrostatică.
C
1 Înlocuiţi Micro Filtrul AFS când introduceţi primul sac dintr-un
set nou sau o dată pe an.
C
2 Poziţionaţi corect părţile laterale şi partea inferioară a noului
filtru în spatele marginilor suportului.
3 Asiguraţi-vă că filtrul a fost corect introdus în suport înainte de
a închide suportul.
ROMÂNĂ 27
Filtru Combinat ACF-S (doar anumite tipuri)
Unele aparate sunt dotate cu un Filtru Combinat ACF-S.Acest filtru nu
îndepărtează doar praful ci şi viermii microscopici dăunători. De
asemenea, absoarbe 80% din mirosurile neplăcute.
1 Înlocuiţi Filtrul Combinat ACF-S cel puţin o dată pe an.
C
2 Deschideţi grilajul filtrului.
C
3 Împingeţi ambele cleme de prindere şi scoateţi filtrul.
C
4 Poziţionaţi noul filtru cu porţiunea albă înspre aparat.Asiguraţi-
vă că logo-ul Philips de pe filtru este vizibil şi este poziţionat în
colţul din dreapta sus.
C
5 Fixaţi filtrul împingând clemele de prindere la locul lor şi
închideţi grilajul filtrului.
Comandarea sacilor de praf şi a filtrelor
Sacii de praf Philips Sydney+ cu filtrare performantă sunt disponibili sub
codul HR6999/90.
Un sac din bumbac Philips Sydney+ este disponibil sub codul HR6997.
Sacii de praf din hârtie Philips Sydney+ sunt disponibili sub coudl
HR6999
ROMÂNĂ28

Un nou Filtru de Protecţie a Motorului şi un Micro Filtru AFS sunt
furnizate gratuit împreună cu fiecare set de saci de praf 3 M sau din
hârtie. Micro Filtrele AFS separate sunt disponibile sub codul HR6932.
Filtre Combinate ACF-S sunt disponibile sub codul HR6998.
Dacă aveţi dificultăţi în procurarea sacilor noi, filtrelor sau a altor
accesorii contactaţi biroul de informaţii Philips.
Pentru numerele de telefon ale biroului de informaţii Philips consultaţi
fişa de garanţie.
Protejarea mediului
Pentru a putea fi reciclate, componentele din plastic ale aparatului au
fost codate.
Ambalajul din carton a fost fabricat din materiale reciclate şi este la
rândul lui complet reciclabil.
Înlocuirea cablului
În cazul în care cablul acestui aparat se deteriorează, el poate fi înlocuit
de către Philips sau la un centru autorizat Philips deoarece sunt
necesare unelte şi/sau componente speciale.
Rezolvarea problemelor
◗ Puterea de aspirare nu este suficient de mare.
C
1 Reglaţi puterea de aspirare apăsând butonul + sau - al
telecomenzii.
2 Verificaţi dacă sacul de praf trebuie înlocuit.
3 Verificaţi dacă filtrele trebuie înlocuite.
4 Verificaţi dacă duza, tubul sau furtunul nu sunt înfundate.
C
5 Pentru a îndepărta blocajul, deconectaţi componenta înfundată
şi fixaţi-o (cât mai mult posibil) invers.Porniţi aparatul astfel
încât blocajul să fie suflat în afară.
◗ Telecomanda cu infraroşii nu funcţionează.
6 Este posibil ca bateriile să nu facă contact.
ROMÂNĂ 29

C
7 Scoateţi capacul compartimentului pentru baterii şi apăsaţi-le în
loc.
8 Bateriile sunt goale.
9 Înlocuiţi bateriile (asiguraţi-vă că polii - şi + ai bateriilor noi
sunt în poziţia corectă). Folosiţi baterii LR03, de preferat baterii
alcaline).
ROMÂNĂ30
 Loading...