

Page 1
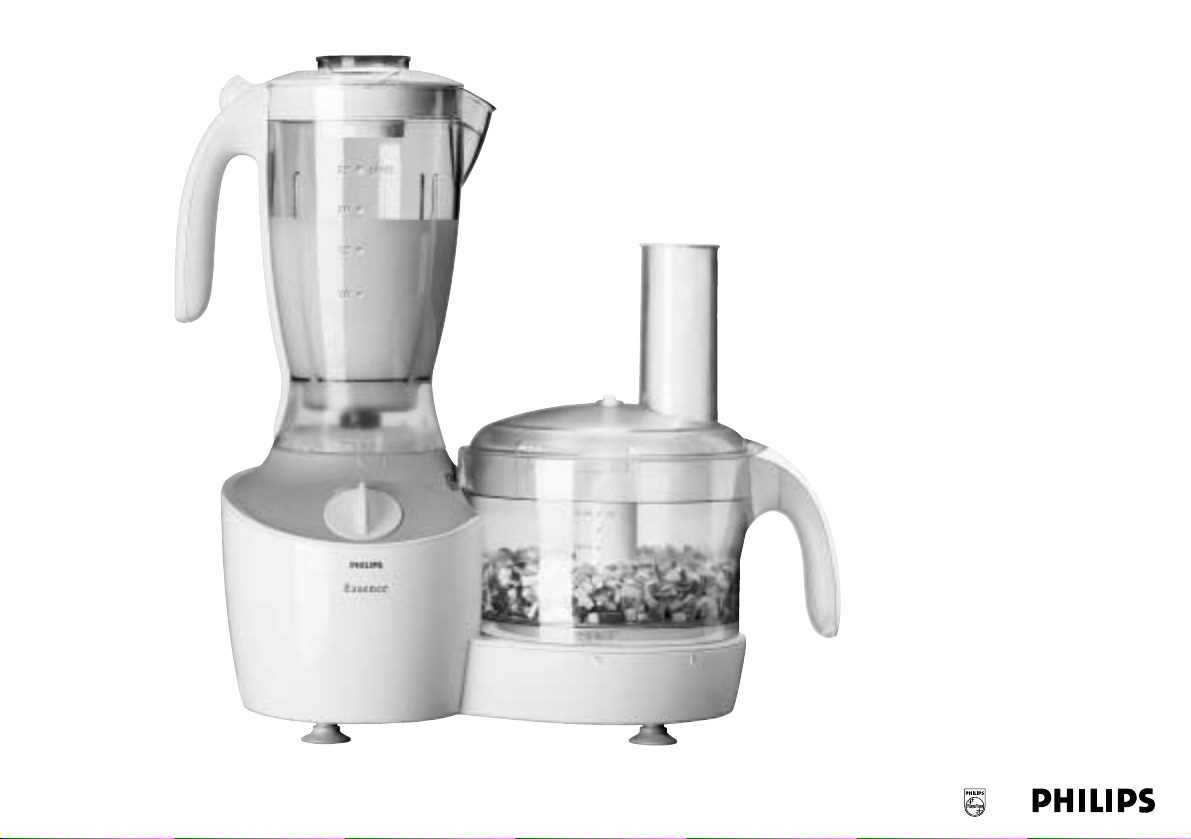
Essence HR7755
Recipes & Directions for use
Przepisy i instrukcja obsługi
Reţete şi Instrucţiuni de utilizare
Рецепты и Инструкции по эксплуатации
Recepty & Návod k použití
Recepti in navodila za uporabo
Рецепти та інструкції з використання приладу
Pечепти и инструкчии за употреба
Recepti i uputstvo za upotrebu
Page 2

2
Page 3
3
L
J
K
I
H
G
D
C
B
A
F
E
M
N
O
P
Q
S
c
R
T
V
U
W
X
Y
b
a
Z
Page 4

4
Page 5

ENGLISH 6
POLSKI 25
ROMÂNĂ 44
РУССКИЙ 62
ČESKY 85
MAGYAR 103
SLOVENSKY 122
УКРАЇНСЬКІЙ 141
БЪЛГАРСКИ 161
SRPSKI 182
HR7755
5
Page 6

ENGLISH6
Introduction
This appliance is equipped with an automatic
thermal cut-out system.This system will
automatically cut off the power supply to the
appliance in case of overheating.
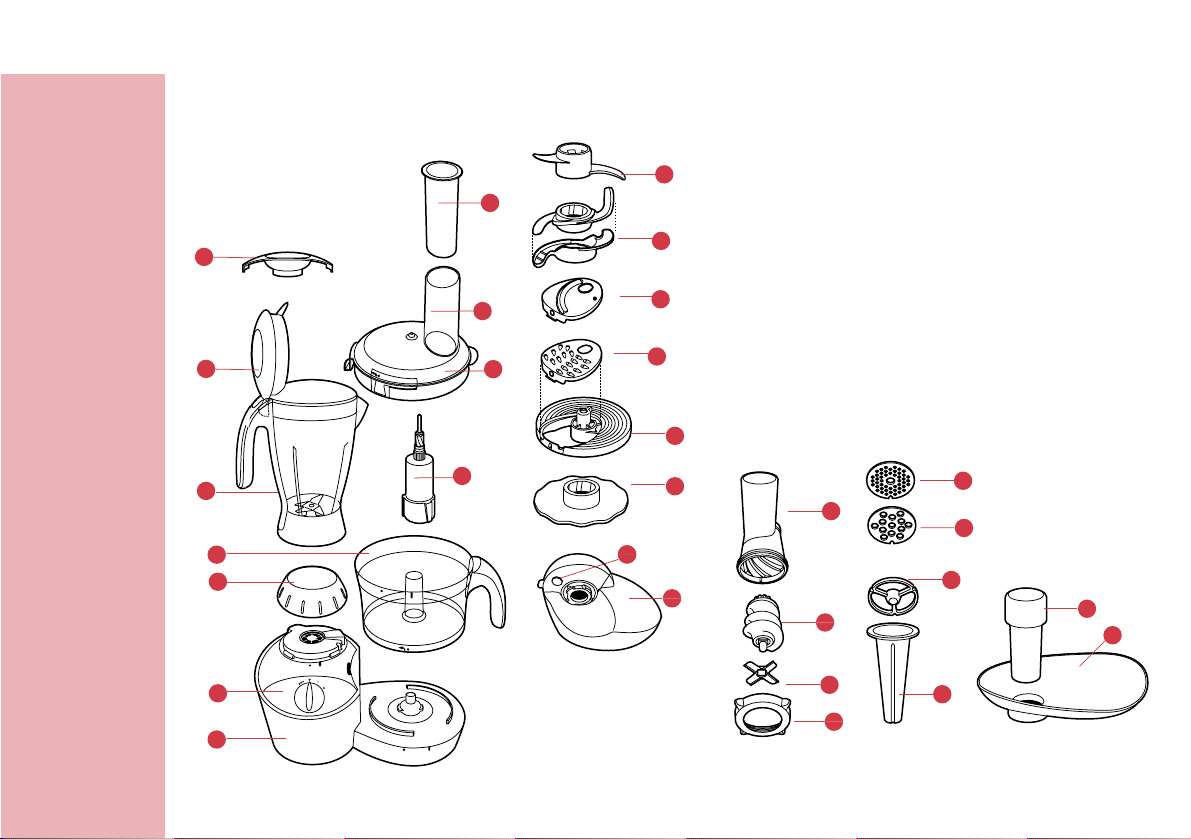
General description
A Motor unit
B Speed control
- P= pulse
- 0 = off
- 1 = lowest speed
- 2 = highest speed
C Screw cap (must be placed to be able to use
food-processing functions)
D Food processing bowl
E Tool holder
F Lid of food processing bowl
G Blender jar
H Blender jar lid
I Feed tube
J Pusher
K Stopper
L Kneading accessory
M Metal blade + protective cover
N Slicing insert medium
O Shredding insert medium
P Insert holder
Q Emulsifying disc
R Gear housing meat mincer
S Cutter housing meat mincer
T Worm shaft
U Screw ring
V Cutter unit
W Medium grinding disc, 4 mm dia.
X Coarse grinding disc, 8 mm dia.
Y Separator
Z Sausage horn
a Tr ay
b Pusher
c Release lever
Important
Read these instructions for use carefully before
using the appliance and save them for future
reference.
◗ Check if the voltage indicated on the
appliance corresponds to the local mains
voltage before you connect the appliance.
◗ Never use any accessories or parts from
other manufacturers or that have not been
specifically advised by Philips.Your guarantee
will become invalid if such accessories or
parts have been used.
◗ In order to avoid a hazardous situation, this
appliance must never be connected to a timer
switch.
◗ Do not use the appliance if the mains cord,
the plug or other parts are damaged.
◗ If the mains cord is damaged, it must be
replaced by Philips, a service centre
authorised by Philips or similarly qualified
persons in order to avoid a hazard.
Page 7

ENGLISH 7
◗ Thoroughly clean the parts that will come
into contact with food before you use the
appliance for the first time.
◗ Do not exceed the quantities and preparation
times indicated in the table.
◗ Do not exceed the maximum content
indicated on the food-processing bowl or
blender jar., i.e. do not fill beyond the top
graduation.
◗ Unplug the appliance immediately after use.
◗ Never use your fingers or an object (e.g. a
spatula) to push ingredients down the feed
tube while the appliance is running. Only the
pusher is to be used for this purpose.
◗ Always unplug the appliance before reaching
into the blender jar with your fingers or an
object (e.g. a spatula).
◗ Keep the appliance out of the reach of
children.
◗ Never let the appliance run unattended.
◗ The food-processing functions only work if
the dot on the screw cap is opposite the dot
on the motor unit, the dot on the bowl is
opposite the dot on the motor unit and the
line on the lid is opposite the line on the
bowl. If this is the case, the built-in safety lock
will be deblocked and the appliance can be
switched on.
◗ Switch the appliance off before detaching any
accessory.
◗ Always switch the appliance off by setting the
speed control to position 0.
◗ Wait until moving parts have stopped running
before you remove the lid of the appliance.
◗ Never immerse the motor unit in water or any
other liquid, nor rinse it under the tap. Use
only a moist cloth to clean the motor unit.
◗ Remove the protective cover from the blade
before use.
◗ Never use the cutter unit in combination with
the separator and sausage horn.
◗ Do not attempt to grind bones, nuts or other
hard items.
◗ Never reach into the tray with your fingers.
Always use the pusher.
◗ Let hot ingredients cool down before
processing them in the blender jar (max.
temperature 80cC/175cF).
◗ If you are processing a liquid that tends to
foam, do not put more than 1 litre in the
blender jar to avoid spillage.
◗ For quantities and preparation times, please
consult the tables in these instructions for
use.
◗ Note that it is not possible to use the food-
processing bowl when the blender jar is
mounted on the motor unit.
◗ Noise level: Lc= 89 dB [A]
Using the appliance
Thermal safety cut-out
In order to avoid a hazardous situation, this
appliance must never be connected to a timer
switch.
If your appliance suddenly stops running:
Page 8
ENGLISH8
1 Pull the mains plug out of the socket.
2 Let the appliance cool down for 60 minutes.
3 Put the mains plug in the socket.
4 Switch the appliance on again.
B
Please contact your Philips dealer or an authorised
Philips service centre if the automatic thermal cutout system is activated very often.
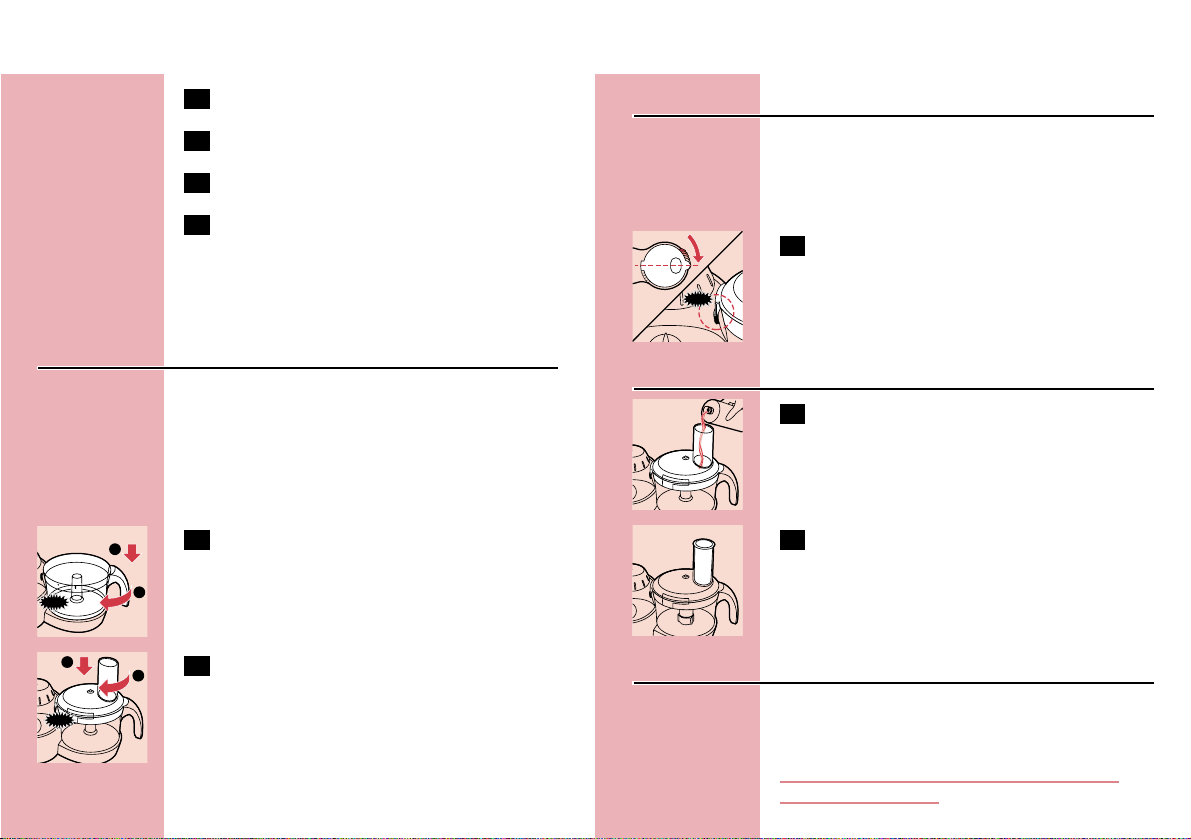
Food-processing bowl
The food-processing bowl only works if the
blender jar is not mounted on the motor unit and
if the screw cap has been screwed onto the
motor unit in such a way that the dot on the
screw cap is directly opposite the dot on the
motor unit.
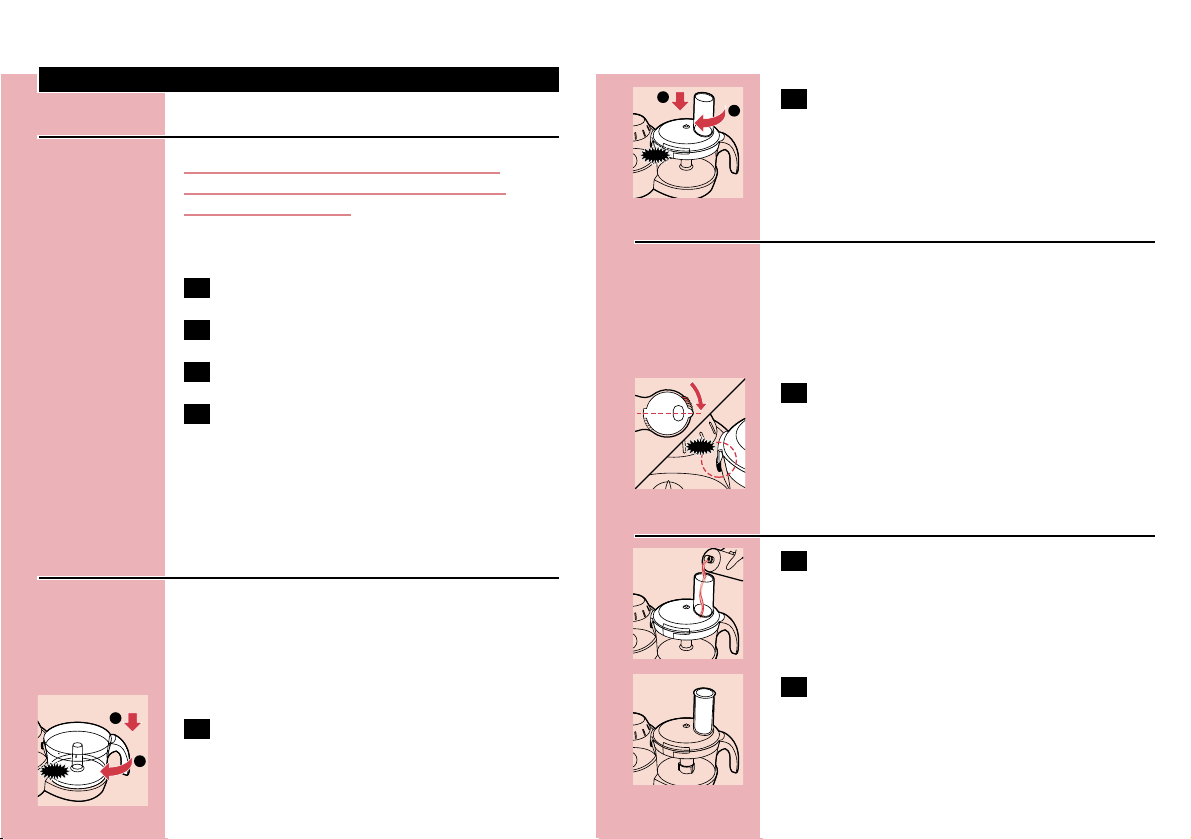
C
1 Mount the bowl on the food processor by
turning the handle in the direction of the
arrow until you hear a click.
C
2 Put the lid on the bowl.Turn the lid in the
direction of the arrow until you hear a
click (this requires some force).
Built-in safety lock
The motor unit, the bowl and the lid have been
provided with marks.The appliance will only
function if the dot on the bowl is directly
opposite the dot on the motor unit.
C
1 Make sure that the line on the lid and the
line on the bowl are directly opposite each
other.When this is the case, the projection
of the lid will complete the shape of the
handgrip.
Feed tube and pusher
C
1 Use the feed tube to add liquid and/or
solid ingredients. Use the pusher to push
solid ingredients through the feed tube.
C
2 You can also use the pusher to close the
feed tube in order to prevent ingredients
from escaping through the feed tube.
Metal blade
The metal blade can be used for chopping, mixing,
blending and pureeing.
The cutting edges of the blade are very sharp
Avoid touching them!
CLICK
CLICK
CLICK
1
2
1
2
Page 9

ENGLISH 9
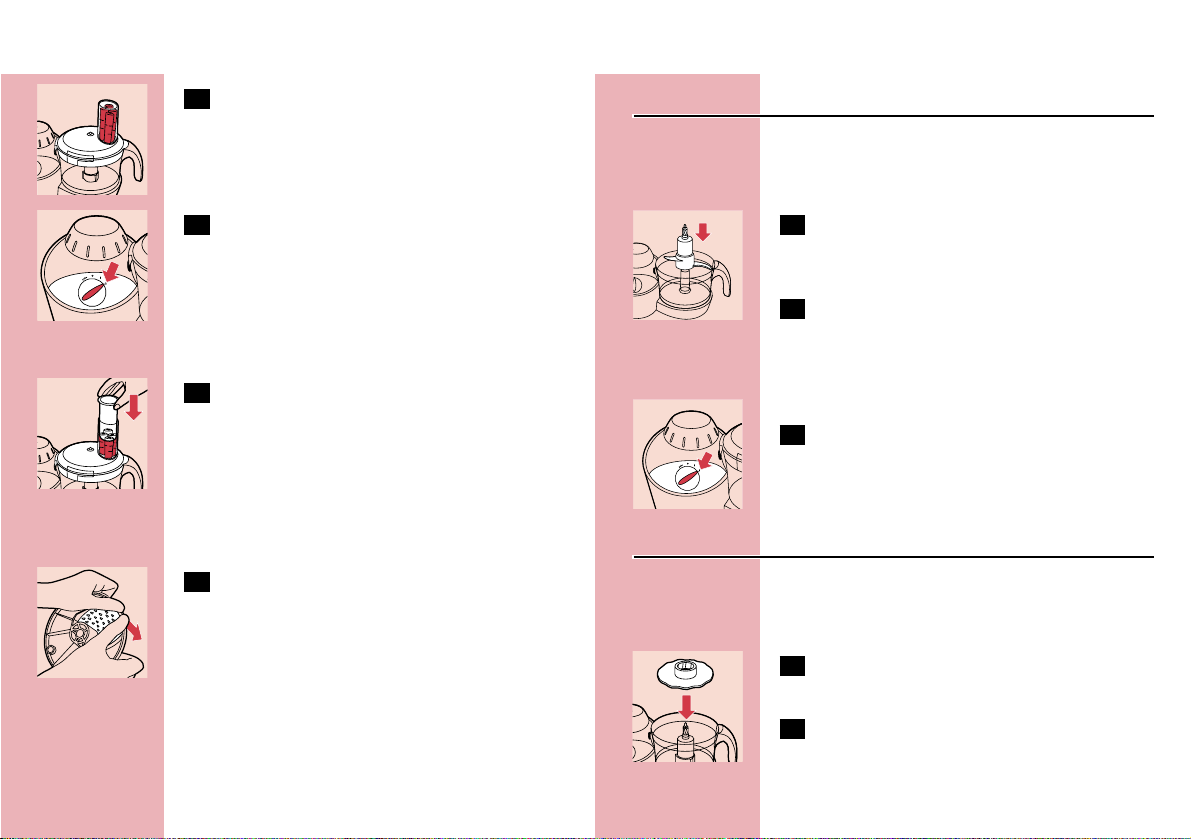
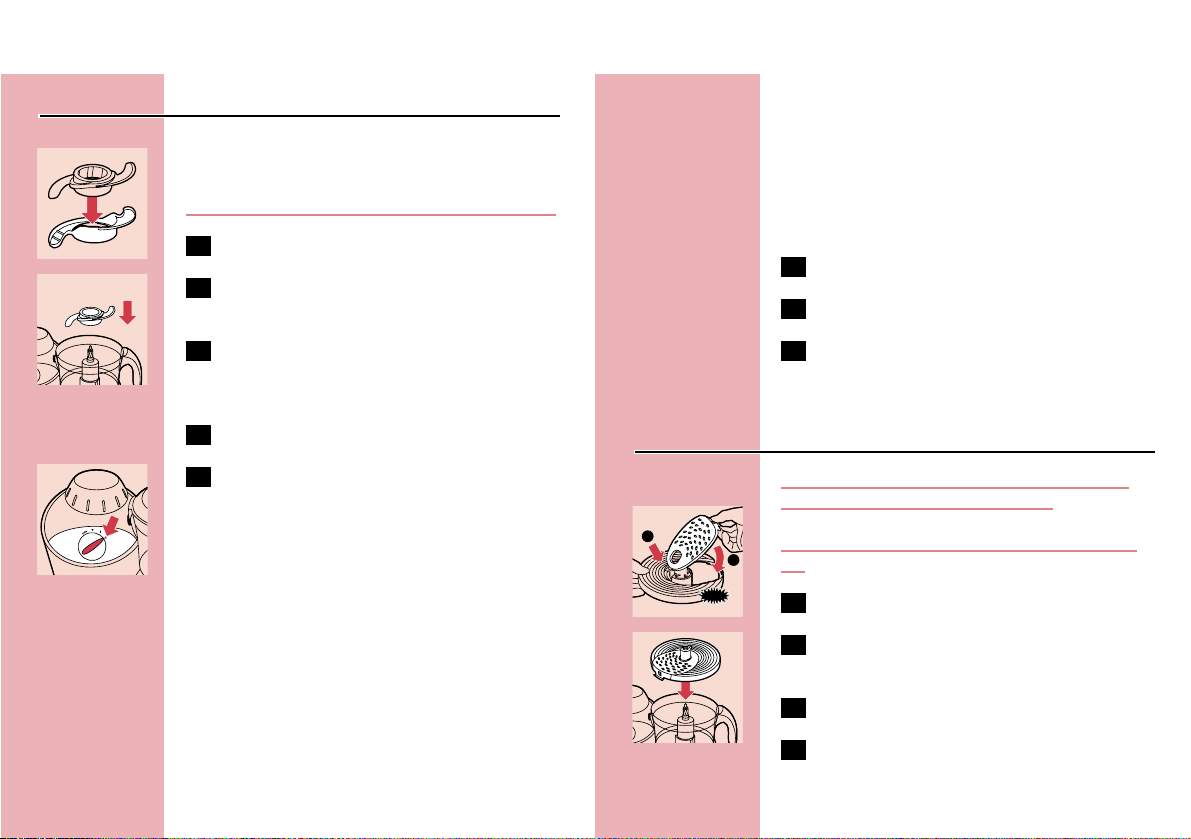
C
1 Remove the protective cover from the
blade.
C
2 Put the tool holder in the bowl and place
the blade on the tool holder that stands in
the bowl.
3 Put the ingredients in the bowl.
B
Pre-cut large pieces of food into pieces of approx.
3 x 3 x 3 cm. Put the lid on the bowl.
4 Put the pusher in the feed tube.
C
5 Set the speed control to maximum speed
(position 2).
- The process continues until the speed control
is set to position 0 (off).
◗ Set the speed control to position 1 to
decrease the speed.
Tips
◗ When you chop onions, use the pulse setting
several times to prevent the onions from
becoming too finely chopped.
◗ Do not let the appliance run too long when
you are chopping (hard) cheese.The cheese
will become too hot, will start to melt and
will turn lumpy.
◗ Do not use the blade to chop very hard
ingredients like coffee beans, nutmeg, turmeric
and ice cubes, as this may cause the blade to
get blunt.
If food sticks to the blade or to the inside of the
bowl:
1 Turn the appliance off.
2 Remove the lid from the bowl.
3 Remove the ingredients from the blade or
from the wall of the bowl with a spatula.
Inserts: slicing and shredding insert
Never process hard ingredients like ice cubes
with the inserts.
The cutting edges of the inserts are very sharp
Avoid touching them!
C
1 Put the desired insert in the insert holder.
C
2 Place the insert holder onto the tool
holder that stands in the bowl.
3 Put the lid on the bowl.
4 Put the ingredients in the feed tube.
B
Cut large ingredients into pieces that fit into the
feed tube.
1
CLICK
2
Page 10
ENGLISH10
C
5 Fill the feed tube evenly for the best
results.
B
When you have to slice or shred large amounts of
food, process only small batches at a time and
empty the bowl regularly between the batches.
C
6 Set the speed control to maximum speed
(position 2).
The process continues until the speed control is
set to position 0 (off).
◗ Set the speed control to position 1 to
decrease the speed.
C
7 Press the pusher lightly onto the
ingredients in the feed tube.
◗ If you are shredding soft vegetables or fruits,
you can decrease the speed by setting the
speed control to position 1 to prevent the
shredded vegetables and fruits from turning
into puree.
C
8 To remove the insert from the insert
holder, take the insert holder in your
hands with its back pointing towards you.
Push the edges of the insert with your
thumbs to make the insert fall out of the
holder.
Kneading accessory
The kneading accessory can be used for kneading
bread dough and for mixing batters and cake
mixtures.
C
1 Put the bowl on the motor unit and place
the kneading accessory onto the tool
holder that stands in the bowl.
2 Put the ingredients in the bowl and fasten
the lid onto the bowl. Place the pusher in
the feed tube to prevent ingredients from
escaping through the feed tube during the
kneading process.
C
3 Set the speed control to maximum speed
(position 2).
See the table for the appropriate processing
times.
Emulsifying disc
You can use the emulsifying disc to prepare
mayonnaise, to whip cream and to whisk egg
whites.
C
1 Put the emulsifying disc onto the tool
holder that stands in the bowl.
2 Put the ingredients in the bowl and put the
lid on the bowl.
Page 11

ENGLISH 11
3 Set the speed control to minimum speed
(position 1) to obtain optimal results.
Tips
◗ When you want to whisk egg whites, make
sure the eggs are at room temperature.
◗ Take the eggs out of the refrigerator at least
half an hour before you are going to use
them.
◗ All the ingredients for making mayonnaise
must be at room temperature.
◗ Oil can be added through the small hole in
the bottom of the pusher.
◗ If you are going to whip cream,the cream
must be taken straight from the refrigerator.
Please observe the preparation time in the
table. Cream should not be whipped too long.
◗ Use the pulse setting to have more control
over the process.
Blender
The blender is intended for:
- Blending fluids, e.g. dairy products, sauces, fruit
juices, soups, mixed drinks, sweat teas and
shakes.
- Mixing soft ingredients, e.g. pancake batter or
mayonnaise.
- Pureeing cooked ingredients, e.g. for making
baby food.
C
1 Remove the screw cap to attach the
blender jar.
C
2 Mount the blender jar on top of the
motor unit by turning it in the direction of
the arrow until it is firmly fixed.The handle
must be pointing to the left.
Do not exert too much pressure on the handle
of the blender jar.
3 Put the ingredients in the blender jar.
C
4 Close the lid.
C
5 Set the speed control to maximum speed
(position 2).The appliance continues to
run at this speed until it is switched off by
setting the speed control to position 0.
See the table for the appropriate processing
times.
Tips
C
◗ Pour liquid ingredients into the blender jar
through the hole in the lid.
◗ The longer you let the appliance run, the finer
the blending result will be.
◗ Pre-cut solid ingredients into smaller pieces
before putting them in the blender. If you
want to prepare a large quantity, process small
batches of ingredients instead of processing a
large quantity at once.
◗ Hard ingredients, e.g. soy beans for soy bean
milk, must be soaked in water before they are
processed.
1
2
1
2
Page 12

ENGLISH12
C
◗ To crush ice cubes, place the ice cubes in the
jar, close the lid and use the pulse setting.
If ingredients stick to the wall of the blender jar:
1 Switch the appliance off and unplug it.
2 Open the lid.
Never open the lid while the appliance is still
running.
3 Use a spatula to remove the ingredients
from the wall of the jar.
Keep the spatula at a safe distance from the
cutting edges of the blade (approx. 2 cm).
B
If you are not satisfied with the results, switch off
the appliance and let it run briefly a number of
times by turning the speed control to pulse
position.You can also try to get a better result by
stirring the ingredients with a spatula (not while
the blender is running!) or by pouring some of the
contents out in order to process a smaller amount.
B
In some cases the ingredients are easier to blend
if you add some liquid, e.g. lemon juice when
blending fruit.
Meat mincer
The meat mincer can be used for mincing meat
and making sausages.
The meat mincer only works if the blender jar is
not mounted on the motor unit and if the screw
cap has been screwed onto the motor unit in
such a way that the dot on the screw cap is
directly opposite the dot on the motor unit.
C
1 Mount the gear housing onto the motor
unit.
You will hear a click when you have assembled
the gear housing correctly.
C
2 Insert the worm shaft into the cutter
housing, the plastic end first.
C
3 Place the cutter unit onto the worm shaft.
The cutting edges should be pointing
forwards.
C
4 Place the medium grinding disc or coarse
grinding disc - depending on the
consistency you prefer - onto the worm
shaft.
Make sure the notch of the grinding disc fits onto
the projection of the mincer head.
C
5 Fasten the screw ring onto the cutter
housing by turning it in the direction of the
arrow until it is properly fastened.
Page 13

13ENGLISH
C
6 Place the tray on the upright part of the
cutter housing.
Mincing meat
1 Cut the meat into 10cm-long, 2cm-thick
strips.
2 Remove bones, pieces of gristle and sinews
as much as possible.
Never use frozen meat!
C
3 Set the speed control to maximum speed
(position 2).
C
4 Put the meat in the tray. Use the pusher to
gently push the meat into the cutter
housing.
◗ You can mince 1.3 kg meat per minute.
If you want to mince pork, use lean pork without
fat and sinews.
◗ For steak tartare, mince the meat with the
medium grinding disc twice.
Making sausages
1 Mince the meat.
2 Unplug the appliance and remove the
screw ring after you have finished mincing.
3 Remove the grinding disc.
4 Remove the cutter unit.
◗ Leave the worm shaft in the cutter housing
when you are going to make sausages.
C
5 Place the separator in the cutter housing.
C
6 Place the sausage horn on the cutter
housing and screw the ring onto the cutter
housing.
The appliance is now ready for making sausages.
Tips
- Put the sausage skin in lukewarm water for
10 minutes.Then slide the wet skin onto the
sausage horn. Push the (seasoned) minced
meat into the cutter housing.
- If the skin gets stuck on the sausage horn, wet it
with some water.
- Set the speed control to position 1 to make
sausages.
Page 14
ENGLISH14
Cleaning
Before you start cleaning the appliance, switch the
appliance off and remove the plug from the wall
socket.
Clean the metal blade, the blade unit of the
blender and the inserts ver y carefully.Their cutting
edges are very sharp!
Make sure that the cutting edges of the blades
and the inserts do not come into contact with
hard objects.This could cause them to become
blunt.
B
Certain ingredients may cause discolourations on
the surface of the accessories.This does not have
a negative effect on the accessories.The
discolourations usually disappear after some time.
C
1 Wind excess mains cord around the reel
on the back of the appliance.
2 Clean the motor unit with a damp cloth.
Do not immerse the motor unit in water
and do not rinse it either.
3 Always clean the parts that have come into
contact with food in hot water with
washing-up liquid immediately after use.
4 The bowl, the lid of the bowl, the pusher
and the accessories (except for the
blender jar) can also be cleaned in a
dishwasher.
These parts have been tested for dishwasher
resistance based on DIN EN 12875.
The blender jar is not dishwasher-proof!
5 To remove the lid, open it and then pull it
upwards.
Only remove the lid for cleaning purposes.
Blender quick-clean operation
C
1 Pour lukewarm water (not more than
0.5 litres) and some washing-up liquid into
the blender jar.
2 Close the lid.
C
3 Let the appliance run for a few moments
by turning the speed control to pulse
position (the appliance stops running when
you release the speed control).
4 Detach the blender jar and rinse it with
clean water.
Meat mincer
Meat left behind in the cutter housing can be
removed from the inside of the appliance by
passing a slice of bread through the cutter
housing.
1 Make sure the appliance is unplugged.
Page 15

ENGLISH 15
2 Press the release lever and turn the whole
cutter housing in the direction of the
arrow.
3 Remove the pusher and the tray.
4 Unscrew the screw ring and remove all
parts of the cutter housing.
Do not clean the parts in the dishwasher!
5 Wash all parts that have come into contact
with meat in hot soapy water
IMMEDIATELY AFTER USE.
6 Rinse them with clear hot water and dry
them IMMEDIATELY.
◗ We advise you to lubricate the cutter unit and
the grinding discs with some vegetable oil.
Storage
MicroStore
C
◗ Put the accessories (blade, insert holder) on
the tool holder and store them in the bowl.
Always end with the insert holder.
C
◗ Wind the mains cord around the reel on the
back of the appliance.
Guarantee & service
If you need information or if you have a problem,
please visit the Philips Web site at
www.philips.com
or contact the Philips Customer Care Centre in
your country (you will find its phone number in
the worldwide guarantee leaflet). If there is no
Customer Care Centre in your country, turn to
your local Philips dealer or contact the Service
Department of Philips Domestic Appliances and
Personal Care BV.
Page 16

ENGLISH16
Solution
Turn the bowl and lid clockwise until you hear a click.
Make sure that the dot on the bowl is directly opposite
the dot on the motor unit and the line on the lid is
directly opposite the line on the bowl.Also make sure
the blender jar is not mounted and the screw cap has
been assembled properly.The dot on the screw cap
must be directly opposite the dot on the motor unit.
The automatic thermal cut-out system has probably cut
off the power supply to the appliance because it has
overheated. 1) Switch the appliance off (position 0).
2) Unplug the appliance. 3) Let the appliance cool down
for 60 minutes. 4) Put the mains plug in the socket.
5) Switch the appliance on again.
Check if you have really turned the bowl and the lid
clockwise as far as the point where you hear a click.
If both the blender and the food-processing bowl have
been mounted correctly, only the blender will function. If
you want to use the food-processing bowl, detach the
blender and close the fixing hole with the screw cap.
Problem
The appliance does
not go on when I turn
the speed control to
pulse or position 1 or
2.
The appliance has
suddenly stopped
running.
The kneading or
mixing accessory does
not turn
Both the blender jar
and the foodprocessing bowl are
mounted on the
motor unit, but only
the blender works.
Troubleshooting
Application
times
10 - 60 sec.
60 - 180 sec.
10 - 60 sec.
10 - 60 sec.
depends on
quantity
10 - 60 sec.
Application
Chopping,
pureeing, mixing
Kneading
Slicing,
shredding,
grating
Blending,
pureeing
Mincing
Whisking,
whipping,
emulsifying
Accessory
P
{
gh k
D
Å
å
Accessories and applications
Page 17

ENGLISH 17
Applications
Salads, raw
vegetables
Salads, raw
vegetables
Pancakes,
waffles
Breadcrumbed
dishes, au
gratin dishes
Deserts,
toppings
Garnishing,
soups, sauces,
au gratin
dishes
Procedure
Cut the vegetables into pieces
that fit into the tube. Fill the
tube with the pieces and shred
them while pressing the pusher
lightly.
Cut the vegetables into pieces
that fit into the tube. Fill the
tube with the pieces and slice
them while pressing the pusher
lightly.
First pour the milk into the
blender jar and then add the
dry ingredients. Mix the
ingredients for approx.
1 minute. If necessary, repeat
this procedure 2 times.Then
stop for a few minutes to allow
the appliance to cool down to
ambient temperature.
Use dry, crispy bread.
Use soft butter for a light
result.
Use a piece of rindless
Parmesan and cut it into pieces
of approx. 3 x 3 cm.
Acces
sory/s
peed
h / 2
g / 2
D / 2
P / 2
D / 2
P / 2
Max.
quanti
ty
500g
500g
750ml
100g
300g
200g
Ingredients &
results
Apples,
carrots,
celeriac shredding
Apples,
carrots,
celeriac slicing
Batter
(pancake) whisking
Breadcrumbs chopping
Butter cream
(creme au
beurre) whisking
Cheese
(Parmesan) chopping
Quantities and preparation times
Applications
Sauces, pizzas,
au gratin
dishes, fondues
Garnishing,
sauces, pastry,
puddings,
mousses
Purees, soups
Baby and
infant food
Salads,
garnishing
Bread
Pizza
Procedure
Cut the cheese into pieces that
fit into the tube. Press carefully
with the pusher.
Use hard, plain chocolate. Break
it into pieces of 2 cm.
Use cooked peas or beans. If
necessary, add some liquid to
improve the consistency of the
mixture.
For a coarse puree, add only a
little liquid. For a fine puree,
keep adding liquid until the
mixture is smooth.
Put the cucumber in the tube
and press it down carefully.
Mix warm water with yeast and
sugar. Add flour, oil and salt and
knead the dough for approx.
90 seconds. Leave to rise for
30 minutes.
Follow the same procedure as
for bread dough. Knead the
dough for 1 minute.
Acces
sory/s
peed
h/ 2
P / 2
PD/
2
PD / 2
g / 1
{ / 2
{ / 2
Max.
quanti
ty
200g
200g
250g
500g
2
cucum
bers
500g
flour
750g
flour
Ingredients &
results
Cheese
(Gouda) shredding
Chocolate chopping
Cooked peas,
beans pureeing
Cooked
vegetables and
meats pureeing
Cucumbers slicing
Dough (for
bread) kneading
Dough (for
pizzas) kneading
Page 18

ENGLISH18
Applications
Apple pies,
sweet biscuits,
open fruit flans
Luxury bread
Puddings,
soufflees,
meringues
Sauces, jams,
puddings, baby
food
Procedure
Use cold margarine. Cut the
margarine into cubes of 2 cm.
Put the flour in the bowl and
add the margarine. Knead until
the dough has become
crumbly.Then add cold water
while kneading. Stop as soon as
the dough starts to turn into a
ball. Allow the dough to cool
before further processing.
First mix yeast, warm water
and some sugar in a separate
bowl. Put all ingredients in the
bowl and knead the dough
until it is smooth and does not
stick to the bowl (takes approx.
1 minute). Leave it to rise for
30 minutes.
Use egg whites at room
temperature. Note: use at least
2 egg whites.
Tip: add a little lemon juice to
prevent the fruit from
discolouring. Add some liquid
to obtain a smooth puree.
Tip: add a little lemon juice to
prevent the fruit from
discolouring.
Acces
sory/s
peed
{ / 2
{ / 2
å / 1
D / 2
P / 2
Max.
quanti
ty
300g
flour
500g
flour
4 egg
whites
500g
500g
Ingredients &
results
Dough
(shortcr ust
pastry) kneading
Dough (yeast)
- kneading
Egg whites whisking
Fruit (e.g.
apples,
bananas) blending
Fruit (e.g.
apples,
bananas) chopping
Applications
Garnishing,
dips
Sauces, soups,
garnishing,
herb butter
Salads,
garnishing and
barbecue
sauces
Steaks tartare,
hamburgers,
meatballs
Steaks tartare,
hamburgers,
meatballs
Various cakes.
Procedure
Peel the garlic.Turn the speed
control to pulse position
several times to avoid chopping
the garlic too fine. Use at least
150g.
Wash and dry the herbs before
chopping.
All the ingredients must be at
room temperature. Note: use
at least one large egg, two small
eggs or two egg yolks. Put the
egg(s) or egg yolks and a little
vinegar in the bowl and add
the oil drop by drop.
First remove any sinews or
bones. Cut the meat into cubes
of 3 cm. Set the speed control
to pulse position to get a
coarser chopping result.
First remove any sinews or
bones. Cut the meat into cubes
of 3 cm. Set the speed control
to pulse position to get a
coarser chopping result.
The ingredients must be at
room temperature. Mix the
softened butter and the sugar
until the mixture is smooth and
creamy.Then add milk, eggs and
flour.
Acces
sory/s
peed
P / 2
P / 2
å / 1
Å / 2
P / 2
{ / 2
Max.
quanti
ty
300g
Min.
50g
3 eggs
1000g
400g
4 eggs
Ingredients &
results
Garlic chopping
Herbs (e.g.
parsley) chopping
Mayonnaise emulsifying
Meats (lean) mincing
Meats, fish,
poultry
(streaky) mincing
Mixture (cake)
- mixing
Page 19

ENGLISH 19
Applications
Salads,
puddings, nut
bread, almond
paste
Salad, cooked
food, stir-fries,
garnishing
Salad, cooked
food, stir-fries,
garnishing
Garnishing,
cream, icecream
mixtures
Milkshake
Soups, sauces
Procedure
Use the pulse setting if you
want a coarse result.
Peel the onions and cut them
into 4 pieces.Turn the speed
control to the pulse position 2
times and then check the
result.
Peel the onions and cut them
into pieces that fit into the
tube. Note: use at least 100g.
Use cream that comes straight
from the refrigerator. Note: use
at least 125ml cream.The
whipped cream is ready after
approx. 2 minutes.
Puree the fruit (e.g. bananas,
strawberries) with sugar, milk
and some ice cream and mix
well.
Use cooked vegetables
Acces
sory/s
peed
P / 2
P / 2
g / 1
å / 1
D / 2
D / 2
Max.
quanti
ty
250g
500g
300g
500ml
500ml
milk
500ml
Ingredients &
results
Nuts chopping
Onions chopping
Onions slicing
Whipping
cream whipping
Milkshakes blending
Soups blending
Recipes
Courgette sandwich spread
Ingredients:
- 2 courgettes
- 3 cooked eggs
- 1 small onion
- 1 tbs vegetable oil
- parsley
- 2-3 tbs sour cream
- lemon juice,Tabasco sauce, salt, pepper, curry
powder, paprika
B
Wash and dry the courgettes and shred them
with the shredding insert in the food-processing
bowl.Transfer the shredded courgette to a dish,
sprinkle salt on it and leave for about 15 minutes
so that the salt extracts the liquid from the
shredded courgette. Cut the onion in 4 pieces and
chop fine together with the garlic clove. Remove
parsley leaves from the stalks and chop them.
B
Then put the shredded courgette on a clean towel
and press the liquid out. Pour some oil into a pan
and fry the chopped onion and garlic lightly, add
the shredded courgettes. All liquids should
evaporate from the ingredients.Allow the fried
ingredients to cool down for a while. Peel the eggs
and chop them in the food processing bowl for a
few seconds.Add the other ingredients to the food
processing bowl, season them and mix them with
the blade. Ser ve on toasted white bread.
Page 20

ENGLISH20
Fruit cake
Ingredients:
- 150g dates
- 225g prunes
- 100g nuts (50g almonds/50g walnuts)
- 50g raisins
- 50g sultanas
- 200g whole rye flour
- 100g wheat flour
- 100g brown crystal sugar
- pinch of salt
- 1 sachet baking powder
- 300ml buttermilk
B
Put the metal blade into the bowl. Put all in the
ingredients into the bowl and mix them for
30 seconds at max. speed. Bake the fruit cake in
a 30 cm long baking tin for 40 minutes at 170cC.
Leek quiche
Ingredients for the dough:
- 250g wheat flour (or wholemeal wheat flour)
- pinch of salt
- 1 tbs honey
- 20g fresh yeast or 1/2 sachet of dry yeast
- 100g butter
- 6 tbs lukewarm water
Ingredients for the filling:
- 500g leeks
- vegetable oil
- 4 eggs
- 500g sour cream
- salt, pepper, 1-2 tbs of flour if needed
B
Put all the ingredients in the bowl and knead into
a consistent dough. Let the dough rise for about
30 min.
B
Slice the leeks with the slicing insert. Put some oil
in a pan and fry the sliced leeks for a few
minutes. Put the rest of the ingredients in the
blender jar and let the blender run until you have
reached a creamy consistency.Add 1-2 tbs of flour
to thicken the mixture.
B
Grease a baking tin with a diameter of 24 cm
and cover the bottom and sides evenly with
dough. Spread the leek mixture onto the dough
and pour the rest of the ingredients over it. Bake
in a preheated oven for about 40 min at 180cC.
Can be served warm or cold.
Hungarian-style goulash
Ingredients:
- 1 tbs oil
- 1 medium onion
- 1 tsp paprika
- 400 g beef or pork
- 1 green pepper
- 1 tomato
-salt
- 200g carrots
- 300g potatoes
- caraway seeds
B
Wash the meat and cut it into cubes of 2 cm. Peel
the onion and chop it in the food processing bowl
using the metal blade. Core the green pepper and
slice it into rings using the slicing insert. Peel the
tomato, remove the pips and cut it into thin strips.
Page 21

21ENGLISH
Fry the chopped onion in the oil until soft. Remove
from the heat and sprinkle the paprika over the
onion, add the meat and fr y over a high heat for a
few minutes while stirring constantly.Add the
green pepper, the tomato and salt to taste, cover
the pan and braise in its own juice over a
moderate heat until almost tender.
B
Meanwhile, peel and slice the carrots using the
slicing insert and peel and dice the potatoes. Add
them to the meat and add enough cold water for
the amount of soup you want to make (approx.
1.2 litres). Season with a pinch of caraway seeds
and simmer until everything is soft as butter,
adding more salt if necessary.
B
Serve hot.You could add a garnish of green
pepper rings and serve cherry peppers on a
separate plate.
Hazelnut bread ring
Ingredients dough:
- 500g sieved flour
- 75g sugar
- 1 tsp salt
- 1 egg
- 250ml milk (at 35cC)
- 100g butter, softened
- 30g fresh yeast (for dry yeast, read the
instructions on the package)
Filling:
- 250g chopped hazelnuts
- 100g sugar
- 2 sachets of vanilla sugar
- 125ml cream
B
Heat oven to 200cC. Mix milk, yeast and sugar in
the bowl for 15 seconds using the kneading tool.
Add flour, salt, butter and egg. Knead the dough
mixture for 2 minutes. Put the dough into a
separate bowl and cover it with a damp cloth and
allow the dough to rise in a lukewarm place for
20 minutes.
B
Chop the hazelnuts using the metal blade. Mix
the ingredients for the filling. Roll the dough out
into a rectangular shape. Spread it with the
hazelnut mixture, then roll it up into a ring. Put the
ring in a buttered spring-release tin. Let the ring
rise for 20 minutes. Brush some whipped egg yolk
onto the top and place the tin on a rack in the
centre of the oven. Bake for 25 - 30 minutes at
200cC.
Chocolate cake
Ingredients:
- 140g butter, softened
- 110g icing sugar
- 140g chocolate
- 6 egg whites
- 6 egg yolks
- 110g granulated sugar
- 140g wheat flour
Filling:
- 200g apricot jam
Icing:
- 125ml water
- 300g sugar
- 250g grated chocolate
Page 22

ENGLISH22
- whipped cream, if desired
B
Heat oven to 160cC. Cream butter with icing
sugar using the metal blade. Melt the chocolate
and mix in. Add egg yolks one by one to the
mixture and mix until creamy.Whip the egg white
with the granulated sugar until stiff and foamy
using the emulsifying disc. Add the egg white foam
to the mixture and stir in gently.Then fold in flour
with a spatula. Put the cake mixture into the
greased baking tin. Bake for one hour at 160cC.
The first 15 minutes the oven door should be kept
slightly ajar.
B
Allow the cake to cool for a while in the baking tin
(24 cm), then turn it onto a wire rack to cool
further. Cut the cake horizontally in half, spread
one half with apricot jam and put the two halves
together again. Heat the rest of the jam until
syrupy and spread it over the top of the cake.
Prepare the icing. Boil water, add sugar and
chocolate and cook over low heat. Stir continuously
until it has a smooth and spreadable consistency.
Put the icing on the cake and allow it to cool.
Serve the cake with some whipped cream.
Broccoli soup (for 4 persons)
Ingredients:
- 50g mature Gouda cheese
- 300g cooked broccoli (stalks and florets)
- cooking liquid of the broccoli
- 2 boiled potatoes in pieces
- 2 stock cubes
- 2 tbs whipping cream
-curry
-salt
- pepper
-nutmeg
B
Shred the cheese. Puree the broccoli with the
boiled potatoes and some of the cooking liquid of
the broccoli. Put the broccoli puree and the
remaining liquid and stock cubes into a measuring
beaker and fill it up to 750ml.Transfer the soup to
a pan and bring it to the boil while stirring. Stir in
the cheese and season with curry, salt, pepper and
nutmeg and add the cream.
Fresh fruit milkshake
Ingredients:
- 100g bananas or strawberries
- 200ml fresh milk
- 50g vanilla ice cream
- granulated sugar to taste
B
Peel the bananas or rinse the strawberries. Cut
fruit into smaller pieces. Put all the ingredients in
the blender jar. Blend until smooth.
B
You can use fruit of your choice to make your
favourite fresh fruit milkshake.
Pizza
Ingredients for the dough:
- 400g flour
- 1/2 tsp salt
- 20g fresh yeast or 1.5 sachets dried yeast
- 2 tbs of cooking oil
- approx. 240ml water (35cC)
Page 23

ENGLISH 23
For the topping:
- 300ml sieved tomatoes (tinned)
- 1 tsp mixed Italian herbs (dried or fresh)
- 1 onion
- 2 cloves garlic
- salt and pepper
- sugar
Ingredients to be spread over the sauce:
- olives, salami, artichokes, mushrooms, anchovies,
Mozzarella cheese, peppers, grated mature
cheese and olive oil according to taste.
B
Place the kneading accessory in the bowl. Put all
the ingredients in the bowl and set the speed
control to maximum speed (position 2). Knead the
dough for approx. 90 seconds until a smooth ball
has formed. Put the dough in a separate bowl,
cover it with a damp cloth and leave it to rise for
about 30 minutes.
B
Chop the onions and garlic with the metal blade
in the food processing bowl and fry them in a pan
until they are transparent.Add the sieved
tomatoes and the herbs and simmer for about
10 minutes. Season to taste with salt, pepper and
sugar.Allow the sauce to cool down.
B
Heat the oven to 250cC.
B
Roll the dough out on a floured worktop and
make two round shapes. Place the dough shapes
on a greased baking tray. Spread the topping on
the pizza, leaving the edges free. Spread with the
desired ingredients, scatter some grated cheese
over the pizza and drip some olive oil over it.
B
Bake the pizzas for 12 to 15 minutes.
Vegetable and potato fry
Ingredients:
- 1 egg
- 50ml milk
- 1 tbs flour
- 1 tsp coriander
- salt and pepper
- 2 large potatoes (about 300g)
- 100g carrots
- 150g celery
- 50g sunflower seeds or 2 tbs corn from the
cob
- oil to fry
B
Using the metal blade, mix the egg, milk, flour,
coriander, salt and pepper.
B
Shred the peeled potatoes, the scraped carrots
and the cleaned celery with the shredding insert
and add to the egg mixture. Stir the vegetables,
the egg mixture and the sunflower seeds or corn
from the cob together in a bowl.
B
Heat the oil in a frying pan and fry 8 flat patties
on both sides until they are golden brown.Allow to
drain on kitchen paper.
B
Cooking time: 3-4 minutes.
Bread (white)
Ingredients:
- 500g bread flour
- 15g soft butter or margarine
- 25g fresh yeast or 20g dried yeast
- 260ml water
- 10g salt
- 10g sugar
Page 24

ENGLISH24
B
Assemble the kneading accessory in the bowl. Put
flour, salt and margarine or butter in the bowl. Add
the fresh or dried yeast and the water. Put the lid
on the bowl and turn it into the direction of the
arrow until you hear a click. Set the speed control
to maximum speed (position 2) and mix the
dough (for the maximum kneading time see the
table Quantities and preparation times).
B
Remove the dough from the bowl, put it in a large
bowl, cover with a damp tea towel and allow to
rise in a warm place for 20 minutes. After rising,
flatten the dough again, and shape into a ball.
B
Return the dough to the bowl, cover with the
damp cloth and leave it to rise for another
20 minutes. Flatten it again, and roll it up.
B
Place the dough in a greased baking tin, and leave
it to rise for another 45 minutes. Bake the bread
in the lower part of a pre-heated oven.
B
Bake the bread at about 225cC in the lower part
of a pre-heated oven in about 35 minutes.
Page 25

POLSKI 25
Wstęp
Urządzenie to zostało wyposażone w
automatyczny termiczny system odcinający
dopływ prądu.W przypadku przegrzania system
ten automatycznie odcina dopływ prądu do
urządzenia.
Opis ogólny
A Część silnikowa
B Regulator obrotów
- P = praca pulsacyjna
- 0 = wyłączone
- 1 = obroty minimalne
- 2 = obroty maksymalne
C Nakrętka (musi być zamontowana, aby
możliwe było używanie funkcji malaksera)
D Miska malaksera
E Uchwyt na akcesoria
F Pokrywka miski malaksera
G Dzbanek blendera
H Pokrywa dzbanka
I Lej wsypowy
J Popychacz
K Zatyczka
L Końcówka do zagniatania ciasta (mieszak)
M Metalowe ostrze + osłonka zabezpieczająca
N Nasadka szatkująca na plastry
O Wkładka ścierająca na wiórki średniej grubości
P Uchwyt wkładek
Q Tarcza emulgująca
R Przekładnia maszynki do mięsa
S Część tnąca maszynki do mięsa
T Ślimak
U Pierścień
V Nożyk
W Sitko z otworami o średnicy 4 mm
X Sitko z otworami o średnicy 4 mm
Y Separator
Z Nasadka masarska do kiełbas
a Taca
b Popychacz
c Dźwignia zwalniająca
Ważne
Przed pierwszym użyciem urządzenia zapoznaj się
dokładnie z instrukcją jego obsługi i zachowaj ją na
przyszłość, do ewentualnej konsultacji.
◗ Zanim podłączysz urządzenie, sprawdź, czy
napięcie wskazane na urządzeniu odpowiada
lokalnemu napięciu sieciowemu.
◗ Nie używaj akcesoriów ani części zamiennych
innych producentów ani takich,które nie są
zalecane przez firmę Philips.W przypadku
użycia takich akcesoriów lub części, gwarancja
traci ważność.
◗ W celu uniknięcia niebezpiecznych sytuacji nie
należy podłączać tego urządzenia do
wyłącznika czasowego.
◗ Nie używaj urządzenia, jeśli przewód
zasilający, wtyczka lub inne części są
uszkodzone.
◗ Jeśli przewód zasilający ulegnie uszkodzeniu,
musi zostać wymieniony w autoryzowanym
punkcie serwisowym firmy Philips,co pozwoli
uniknąć ewentualnego niebezpieczeństwa.
Page 26

POLSKI26
◗ Przed pierwszym użyciem dokładnie umyj
wszystkie części urządzenia stykające się z
żywnością.
◗ Nie przekraczaj ilości składników ani czasu
obróbki wskazanych w tabeli.
◗ Nie przekraczaj maksymalnej zawartości
wskazanej na misce malaksera lub na
blenderze oznaczonej górną kreską podziałki.
◗ Natychmiast po zakończeniu pracy wyłącz
urządzenie z gniazdka ściennego.
◗ Gdy urządzenie jest włączone, nigdy nie
popychaj produktów w leju wsypowym
palcami lub innymi przedmiotami (np.łopatką).
W tym celu używaj wyłącznie popychacza.
◗ Zawsze wyłączaj urządzenie z sieci przed
włożeniem palców albo jakiegoś przedmiotu
(np. łopatki) do blendera.
◗ Przechowuj urządzenie w miejscu
niedostępnym dla dzieci.
◗ Nie pozostawiaj włączonego urządzenia bez
nadzoru.
◗ Funkcje malaksera działają tylko wtedy, gdy
kropka na zatyczce znajduje się naprzeciwko
kropki na części silnikowej, zaś kreska na
pokrywie znajduje się naprzeciwko kreski na
misce.Wbudowany zamek bezpieczeństwa
zostanie wówczas odblokowany i możliwe
będzie włączenie urządzenia.
◗ Wyłączaj urządzenie przez odłączeniem
każdego akcesorium.
◗ Zawsze wyłączaj urządzenie, ustawiając
regulator obrotów w pozycji 0.
◗ Przed zdjęciem pokrywki z urządzenia
odczekaj, aż wszystkie części ruchome się
zatrzymają.
◗ Nigdy nie zanurzaj części silnikowej
urządzenia w wodzie ani innym płynie. Nie
spłukuj jej bieżącą wodą. Do czyszczenia
części silnikowej używaj wyłącznie wilgotnej
ściereczki.
◗ Przed każdym użyciem zdejmuj z ostrza
osłonkę zabezpieczającą.
◗ Nigdy nie używaj nożyka w połączeniu z
separatorem i nasadką masarską.
◗ Nie miel kości, orzechów lub innych twardych
składników.
◗ Nigdy nie dotykaj tacy palcami. Korzystaj
zawsze z popychacza.
◗ Odczekaj do chwili, aż ostygną gorące
składniki, zanim zaczniesz przygotowywać je w
dzbanku blendera (maksymalna temperatura
80cC/175cF).
◗ Jeśli przygotowujesz w urządzeniu pieniący się
płyn, nie nalewaj do blendera więcej niż jeden
litr.
◗ Zalecane ilości składników i czasy stosowania
poszczególnych funkcji znajdziesz w tabelach
w dalszej części niniejszej instrukcji obsługi.
◗ Zwróć uwagę, że nie jest możliwe korzystanie
z miski malaksera i jej funkcji, gdy do części
silnikowej podłączony jest dzban blendera.
◗ Poziom hałasu: L= 89 dB(A)
Page 27
POLSKI 27
Użycie urządzenia
Termiczny wyłącznik bezpieczeństwa
W celu uniknięcia niebezpiecznych sytuacji
urządzenie to nie może być podłączone do
wyłącznika czasowego.
Jeśli urządzenie nagle się zatrzyma:
1 Wyjmij wtyczkę z gniazdka ściennego.
2 Odczekaj 60 minut, aż urządzenie ostygnie.
3 Włóż wtyczkę do gniazdka ściennego.
4 Włącz ponownie urządzenie.
B
Skontaktuj się ze sklepem lub autoryzowanym
punktem serwisowym firmy Philips, jeśli
automatyczny termiczny system odcinający
dopływ prądu włącza się bardzo często.
Misa malaksera
Misa malaksera działa tylko wtedy, gdy dzban
blendera nie jest założony na część silnikową i gdy
zatyczka została wkręcona na nią w taki sposób,
że kropka na zatyczce znajduje się naprzeciwko
kropki na części silnikowej.
C
1 Zamontuj miskę na malakserze,
przekręcając uchwyt w kierunku
wskazanym strzałką, aż usłyszysz
charakterystyczne kliknięcie.
C
2 Umieść pokrywkę na misce. Przekręć
pokrywkę w kierunku wskazanym przez
strzałkę, aż usłyszysz charakterystyczne
kliknięcie (wymaga to użycia nieco siły).
Wbudowany zamek bezpieczeństwa
Na części silnikowej, misce oraz pokrywce
znajdują się specjalne oznaczenia. Urządzenie
może działać tylko wtedy, jeśli kropka na misce
znajduje się dokładnie naprzeciwko kropki na
części silnikowej.
C
1 Upewnij się, czy kreska na pokrywce oraz
kreska na misce znajdują się dokładnie
naprzeciwko siebie.Wypukłość pokrywki
dopasowuje się wówczas do kształtu
uchwytu.
Lej wsypowy i popychacz
C
1 Lej wsypowy służy do dodawania płynnych
i stałych składników.Do przepychania
stałych składników przez lej wsypowy służy
popychacz.
C
2 Można także używać popychacza jako
zatyczki w celu zapobieżenia wypadaniu
produktów z leja.
CLICK
CLICK
1
2
CLICK
1
2
Page 28
POLSKI28
Metalowe ostrze
Metalowe ostrze służy do rozdrabniania,
miksowania, mieszania i ucierania.
Krawędzie ostrza są bardzo ostre. Nie dotykaj ich!
C
1 Zdejmij osłonkę zabezpieczającą z ostrza.
C
2 Umieść uchwyt na akcesoria w misce, a
następnie zamontuj na nim ostrze.
3 Włóż składniki do misy.
B
Duże kawałki pokrój na mniejsze o wymiarach ok.
3 x 3 x 3 cm. Umieść pokr ywkę na misce.
4 Włóż popychacz do leja wsypowego.
C
5 Ustaw regulator obrotów w pozycji 2
(obroty maksymalne).
- Urządzenie działa aż do momentu
przestawienia na pozycję 0 (wyłączone).
◗ Aby zmniejszyć obroty, ustaw regulator
obrotów w pozycji 1.
Porady
◗ Gdy rozdrabniasz cebulę, używaj ustawienia
pulsacyjnego - dzięki temu unikniesz zbyt
drobnego posiekania cebuli.
◗ Uważaj, by urządzenie nie działało zbyt długo
podczas rozdrabniania sera (żółtego).
Wówczas bowiem ser rozgrzewa się za
bardzo oraz zaczyna się topić i kleić.
◗ Nie używaj ostrza do rozdrabniania bardzo
twardych składników, takich jak ziarna kawy,
gałka muszkatołowa, kurkuma czy kostki lodu.
Ostrze może się stępić.
Jeśli produkty przykleją się do ostrza lub do
ścianek miski:
1 Wyłącz urządzenie.
2 Zdejmij pokrywkę z miski.
3 Łopatką usuń rozdrobnione składniki z
ostrza i ścianek miski.
Wkładki: wkładka szatkująca i wkładka
ścierająca
Nigdy nie próbuj rozdrabniać wkładkami takich
twardych produktów, jak kostki lodu.
Krawędzie wkładek są bardzo ostre. Nie dotykaj
ich!
C
1 Umieść w uchwycie żądaną wkładkę.
C
2 Umieść uchwyt wkładki w uchwycie na
akcesoria, który znajduje się w misce.
3 Załóż pokrywkę na miskę.
4 Włóż składniki do leja wsypowego.
B
Pokrój duże składniki na kawałki mieszczące się w
leju wsypowym.
1
CLICK
2
Page 29

POLSKI 29
C
5 Aby osiągnąć najlepsze rezultaty, napełniaj
lej wsypowy równomiernie.
B
Jeśli masz do pocięcia lub starcia duże ilości
składników, poddawaj jednorazowo obróbce małe
porcje i opróżniaj miskę regularnie.
C
6 Ustaw regulator obrotów w pozycji 2
(obroty maksymalne).
Urządzenie działa aż do momentu przestawienia
na pozycję 0 (wyłączone).
◗ Aby zmniejszyć obroty, ustaw regulator
obrotów w pozycji 1.
C
7 Popychaczem lekko popchnij produkty
znajdujące się w leju wsypowym.
◗ Gdy ścierasz miękkie warzywa lub owoce,
możesz zmniejszyć prędkość, ustawiając
regulator obrotów w pozycji 1.Dzięki temu
rozdrabniane warzywa i owoce nie zamienią
się w papkę.
C
8 Aby wyjąć wkładkę z uchwytu, weź w ręce
uchwyt, tylną częścią skierowaną do
siebie. Przyciśnij brzegi wkładki kciukami
tak, aby wkładka wypadła z uchwytu.
Akcesorium do zagniatania ciasta (mieszak)
Akcesorium to służy do wyrabiania ciasta
drożdżowego lub przyrządzania ciast o rzadkiej
konsystencji.
C
1 Ustaw miskę na części silnikowej i
zamontuj mieszak na umieszczonym na
misie uchwycie na akcesoria.
2 Włóż składniki do miski i przykryj miskę
pokrywką. Umieść popychacz w leju
wsypowym, by zapobiec wydostawaniu się
składników podczas mieszania.
C
3 Ustaw regulator obrotów w pozycji 2
(obroty maksymalne).
Odpowiedni czas obróbki znajdziesz w tabeli.
Tarcza emulgująca
Tarcza emulgująca służy do przyrządzania
majonezu, ubijania śmietany i piany z białek.
C
1 Załóż tarczę emulgującą na uchwyt na
akcesoria znajdujący się w misce.
2 Włóż składniki do miski i przykryj miskę
pokrywką.
3 Aby uzyskać optymalne rezultaty, ustaw
regulator obrotów w pozycji 1 (obroty
minimalne).
Porady
◗ Jeśli zamierzasz ubić pianę z białek, upewnij
się, czy jajka mają temperaturę pokojową.
◗ Wyjmij jajka z lodówki co najmniej pół
godziny przed ubijaniem.
Page 30

POLSKI30
◗ Wszystkie składniki przeznaczone do
przyrządzania majonezu powinny mieć
temperaturę pokojową.
◗ Olej można dodawać przez mały otwór na
spodzie popychacza.
◗ Jeśli zamierzasz ubijać śmietanę, śmietana musi
być wyjęta prosto z lodówki. Należy
przestrzegać czasu obróbki podanego w
tabeli. Nie należy ubijać śmietany zbyt długo.
◗ Aby mieć większą kontrolę nad procesem,
używaj ustawienia impulsowego.
Mikser
Blender jest przeznaczony do:
- Mieszania płynów, na przykład produktów
mlecznych, sosów, soków owocowych, zup,
mieszanych napojów,herbat i koktajli.
- Mieszania miękkich składników, np. do
przygotowywania ciasta na naleśniki i majonezu.
- Ucierania gotowanych składników,np. do
przygotowywania potraw dla niemowląt.
C
1 Zdejmij zatyczkę w celu dołączenia dzbana
blendera.
C
2 Zamontuj blender na części silnikowej;
przekręcaj go w kierunku wskazanym
przez strzałkę aż do chwili, gdy będzie
mocno przytwierdzony. Uchwyt musi być
skierowany w lewą stronę.
Nie wywieraj zbyt dużego nacisku na uchwyt
blendera.
3 Włóż składniki do dzbana blendera.
C
4 Zamknij pokrywkę.
C
5 Ustaw regulator obrotów w pozycji 2
(obroty maksymalne). Urządzenie działa
przy tych obrotach aż do momentu
wyłączenia go przez ustawienie regulatora
obrotów w pozycji 0.
Odpowiedni czas obróbki znajdziesz w tabeli.
Porady
C
◗ Wlewaj płynne składniki do dzbanka przez
otwór w pokrywce.
◗ Im dłużej urządzenie działa, tym drobniej będą
zmiksowane składniki.
◗ Przed wrzuceniem składników do blendera
duże kawałki należy pociąć na mniejsze. Jeśli
chcesz przygotować większą ilość potrawy lub
napoju, lepiej jest podzielić je na mniejsze
porcje, niż przetwarzać na raz w całości
zapełniając dzbanek.
◗ Twarde składniki, na przykład ziarna soi, z
których chcesz przygotować mleczko sojowe,
należy przed obróbką namoczyć w wodzie.
C
◗ Aby pokruszyć kostki lodu, należy wrzucić je
do dzbanka, przykryć pokrywką i użyć
ustawienia pulsacyjnego.
Jeśli składniki przykleją się do ścianek blendera:
1
2
2
1
Page 31

POLSKI 31
1 Wyłącz urządzenie i wyjmij wtyczkę z
gniazdka ściennego.
2 Zdejmij pokrywkę.
Nigdy nie zdejmuj pokrywki, gdy urządzenie
jeszcze działa.
3 Usuń składniki ze ścianek blendera za
pomocą łopatki.
Nie zbliżaj łopatki do krawędzi tnących ostrzy zachowaj około 2 cm odległości.
B
Jeśli nie satysfakcjonuje cię efekt, wyłącz
urządzenie i włączaj go ponownie kilkakrotnie,
ustawiając regulator obrotów w pozycji
impulsowej. Lepsze rezultaty można także
osiągnąć, mieszając składniki łopatką (ale
wówczas blender musi być wyłączony!) lub
odlewając z dzbanka część składników,by
przetworzyć mniejszą ich ilość.
B
Niektóre składniki łatwiej jest obrabiać, jeśli
dodasz do nich trochę płynu, na przykład soku z
cytryny podczas obróbki owoców.
Maszynka do mięsa
Maszynkę do mięsa można wykorzystywać do
mielenia mięsa i robienia kiełbas.
Maszynka do mięsa działa tylko wtedy, gdy dzban
blendera nie jest założony na część silnikową i gdy
zatyczka została wkręcona na nią w taki sposób,
że kropka na zatyczce znajduje się naprzeciwko
kropki na części silnikowej.
C
1 Załóż przekładnię na część silnikową.
Gdy poprawnie zainstalujesz przekładnię, usłyszysz
kliknięcie.
C
2 Do części tnącej maszynki włóż ślimak, od
strony końcówki z tworzywa sztucznego.
C
3 Umieść nożyk na ślimaku. Krawędzie tnące
powinny być skierowane do przodu.
C
4 Umieść na ślimaku sitko z mniejszymi lub
większymi otworami - zależnie od
wymaganej konsystencji potrawy.
Sprawdź, czy w nacięcie na sitku wsunięty jest
występ głowicy maszynki.
C
5 Zamontuj pierścień na maszynce;
przekręcaj go w kierunku wskazanym
przez strzałkę aż do chwili, gdy będzie
odpowiednio zamocowany.
Page 32

POLSKI32
C
6 Na górnej części maszynki umieść tacę.
Mielenie mięsa
1 Potnij mięso na paski o długości 10 cm i
grubości 2 cm.
2 Usuń możliwie wszystkie kości, kawałki
chrząstek i ścięgna.
Nigdy nie używaj zamrożonego mięsa!
C
3 Ustaw regulator obrotów w pozycji 2
(obroty maksymalne).
C
4 Włóż mięso do tacy. Stopniowe wsuwanie
mięsa do maszynki wykonuj używając
popychacza.
◗ Możesz zemleć 1,3 kg mięsa na minutę.
Jeśli chcesz zemleć mięso wieprzowe, używaj
mięsa chudego, bez tłuszczu i ścięgien.
◗ Aby zemleć mięso na befsztyk tatarski -
dwukrotnie zmiel mięso używając sitka z
mniejszymi otworami
Przygotowywanie kiełbas
1 Zmiel mięso.
2 Po zmieleniu mięsa wyjmij wtyczkę z
gniazdka ściennego i odkręć pierścień.
3 Wyjmij sitko z mniejszymi otworami
4 Wyjmij nożyk.
◗ Jeśli chcesz robić kiełbasę,pozostaw ślimak w
maszynce.
C
5 Umieść separator w maszynce.
C
6 Załóż na maszynkę nasadkę masarską i
dokręć pierścień.
Urządzenie jest teraz gotowe do robienia kiełbas.
Porady
- Osłonkę (jelito) na kiełbasy włóż na 10 minut
do ciepłej wody. Następnie nasuń mokrą
osłonkę (jelito) na lejek nasadki masarskiej.
Wepchnij (przyprawione) mielone mięso do
maszynki.
- Jeśli jelito przyklei się do nasadki masarskiej,
zwilż je wodą.
- Aby zrobić kiełbaski, ustaw regulator obrotów
w pozycji 1.
Page 33

POLSKI 33
Mycie
Przed przystąpieniem do umycia urządzenia
wyłącz je i wyjmij wtyczkę z gniazdka ściennego.
Bardzo uważaj przy myciu metalowych ostrzy
części tnącej blendera oraz nakładek. Krawędzie
tnące są bardzo ostre!
Upewnij się, czy krawędzie tnące ostrzy oraz
wkładek nie stykają się z twardymi przedmiotami
Mogą one spowodować stępienie ostrzy.
B
Niektóre składniki mogą powodować
przebarwienia na akcesoriach. Nie wpływa to
negatywnie na działanie tych akcesoriów. Po
pewnym czasie przebarwienia na ogół same
znikają.
C
1 Zbędny odcinek przewodu sieciowego
zwiń wokół uchwytów umieszczonych na
tylnej ściance urządzenia.
2 Wytrzyj część silnikową wilgotną
ściereczką. Nie zanurzaj części silnikowej w
wodzie ani jej nie spłukuj.
3 Zawsze bezpośrednio po zakończeniu
obróbki myj części, które kontaktują się z
żywnością. Myj je w gorącej wodzie z
płynem do mycia naczyń.
4 Miskę, pokrywkę miski,popychacz oraz
akcesoria (z wyjątkiem blendera) można
myć w zmywarce.
Części te zostały poddane testom
wytrzymałościowym na zmywanie w zmywarce na
podstawie DIN EN 12875.
Nie należy myć blendera w zmywarce do naczyń!
5 Aby zdjąć pokrywkę, otwórz ją i pociągnij
do góry.
Pokrywkę zdejmuj tylko wtedy, gdy chcesz ją
umyć.
Szybkie mycie blendera
C
1 Wlej letnią wodę (nie więcej niż 0,5 litra)
wraz z płynem do mycia naczyń do
dzbanka blendera.
2 Zamknij pokrywkę.
C
3 Uruchom urządzenie na kilka minut,
ustawiając regulator obrotów w pozycji
pulsacyjnej (urządzenie zatrzyma się, gdy
zwolnisz regulator obrotów).
4 Zdejmij dzbanek blendera i wypłucz go
czystą wodą.
Maszynka do mięsa
Mięso pozostałe wewnątrz maszynki do mielenia
mięsa można usunąć ze środka urządzenia,
przepuszczając przez nią kromkę chleba.
1 Sprawdź, czy urządzenie jest odłączone od
sieci.
Page 34

POLSKI34
2 Wciśnij dźwignię zwalniającą i obróć całą
maszynkę do mięsa w kierunku wskazanym
strzałką.
3 Wyjmij popychacz i tacę.
4 Odkręć pierścień i wyjmij z maszynki
wszystkie części.
Nie myj części maszynki w zmywarce do naczyń!
5 Wszystkie części wchodzące w kontakt z
mięsem umyj w gorącej wodzie z
dodatkiem płynu do mycia naczyń
NATYCHMIAST PO UŻYCIU.
6 Opłucz je czystą gorącą wodą i
NATYCHMIAST je osusz.
◗ Radzimy naoliwić nóż i tarcze tnące niewielką
ilością oleju roślinnego.
Przechowywanie
MicroStore
C
◗ Umieść akcesoria (ostrze, uchwyt wkładek) na
przeznaczonym dla nich uchwycie i i
przechowuj je w misce. Na końcu włóż
uchwyt wkładek.
C
◗ Przewód sieciowy zwiń wokół uchwytów
umieszczonych na tylnej ściance urządzenia.
Gwarancja i serwis
Jeśli potrzebujesz informacji lub jeśli masz jakiś
problem skontaktuj się z Biurem Obsługi Klienta
(numer telefonu znajdziesz w Karcie
Gwarancyjnej) lub też najbliższym punktem
serwisowym sprzętu AGD, autoryzowanym przez
firmę Philips (patrz: wykaz w Karcie
Gwarancyjnej). Możesz także odwiedzić naszą
stronę internetową :
www.philips.pl.
Page 35

POLSKI 35
Rozwiązanie
Przekręć miskę i pokrywkę w kierunku zgodnym z
ruchem wskazówek zegara, aż usłyszysz kliknięcie.
Sprawdź, czy kropka na misce znajduje się dokładnie
naprzeciwko kropki na części silnikowej oraz czy
urządzenie zatrzyma się, gdy zwolnisz regulator obrotów.
Sprawdź również, czy zdjęty jest dzban blendera i czy
została prawidłowo założona zatyczka. Kropka na
zatyczce musi znajdować się dokładnie naprzeciwko
kropki na części silnikowej.
Prawdopodobnie z powodu przegrzania urządzenia
automatyczny system termiczny odciął dopływ prądu.
1) Wyłącz urządzenie (pozycja 0). 2) Wyjmij wtyczkę z
gniazdka ściennego. 3) Odczekaj 60 minut, aż urządzenie
całkowicie ostygnie. 4) Wetknij wtyczkę do gniazdka
ściennego. 5) Włącz ponownie urządzenie.
Sprawdź, czy dobrze przekręciłaś/eś miskę i pokrywkę w
kierunku zgodnym z ruchem wskazówek zegara, aż do
momentu kliknięcia.
Jeśli zarówno blender, jak i miska malaksera są
zamontowane prawidłowo, działał będzie tylko blender.
Jeśli chcesz używać miski, odłącz blender, a przeznaczony
na jego podłączenie otwór zaślep nakrętką.
Problem
Urządzenie nie włącza
się, gdy ustawię
regulator obrotów w
pozycji pulsacyjnej, 1
albo 2.
Urządzenie nagle
zatrzymało się.
Akcesorium do
wyrabiania ciasta lub
do mieszania nie
obraca się.
Zarówno dzbanek
blendera, jak i miska
malaksera
zamocowane są na
części silnikowej
urządzenia, ale pracuje
tylko blender.
Usuwanie usterek
Czas obróbki
10 - 60 sekund
60 - 180 sekund.
10 - 60 sekund
10 - 60 sekund
W zależności od
ilości.
10 - 60 sekund
Zastosowanie
Rozdrabnianie,
ucieranie,
miksowanie
Wyrabianie
ciasta
Krojenie na
plastry, ścieranie,
ucieranie.
Mieszanie,
ucieranie
Mielenie
Ubijanie,
emulgowanie
Akcesoria
P
{
gh k
D
Å
å
Akcesoria i proces obróbki
Page 36

POLSKI36
Zastosowanie
Sałatki, surówki
Sałatki, surówki
Naleśniki,
gofry
Potrawy
obtaczane
bułką tartą,
zapiekanki
Desery,
polewy
Postępowanie
Potnij warzywa na kawałki,
które mieszczą się w leju.
Wypełnij nimi cały lej i ucieraj
warzywa, delikatnie popychając
je popychaczem.
Potnij warzywa na kawałki,
które mieszczą się do leja.
Wypełnij nimi cały lej i tnij
warzywa, delikatnie popychając
je popychaczem.
Do dzbana blendera najpierw
wlej mleko, następnie dodaj
suche składniki. Miksuj całość
przez około 1 minutę.W razie
potrzeby powtórz czynność
dwukrotnie. Potem przez kilka
minut pozwól urządzeniu
ostygnąć do temperatury
otoczenia.
Użyj suchego, chrupiącego
pieczywa.
Aby uzyskać lekki krem, użyj
miękkiego masła
Akces
oria /
prędk
ość
obrot
ów
h / 2
g / 2
D / 2
P / 2
D / 2
Maksy
malna
ilość
500 g
500 g
750
ml
100g
300g
Składniki i
rezultaty
obróbki
Jabłka,
marchew, seler
- ścieranie
Jabłka,
marchew, seler
- cięcie na
plastry
Rzadkie ciasto
(na naleśniki) ubijanie
Bułka tarta rozdrabnianie
Krem maślany
(creme au
beurre) ubijanie
Ilości składników i czas obróbki.
Zastosowanie
Przystrajanie
dań, zupy, sosy,
zapiekanki
Sosy, pizza,
zapiekanki,
fondue
Przystrajanie
dań, sosy,
wypieki,
puddingi, musy.
Puree, zupy
Potrawy dla
dzieci i
niemowląt.
Sałatki,
przystrajanie
dań
Chleb
Postępowanie
Użyj sera bez skórki i potnij go
na kawałki o wielkości ok. 3cm
x 3cm.
Potnij ser na kawałki,które
zmieszczą się do leja
wsypowego. Przyciśnij
delikatnie popychaczem.
Użyj twardej czekolady bez
dodatków. Połam czekoladę na
dwucentymetrowe kawałki.
Użyj gotowanego groszku lub
fasoli.W razie potrzeby, dodaj
nieco płynu, aby poprawić
konsystencję masy.
Aby uzyskać gęste puree dodaj
niewielką ilość płynu.Aby
uzyskać delikatne puree,
dodawaj płynu, aż masa będzie
zupełnie gładka.
Włóż ogórek do leja
wsypowego i delikatnie
przyciśnij.
Wymieszaj ciepłą wodę z
drożdżami i cukrem. Dodaj
mąkę, olej i sól.Wyrabiaj ciasto
przez ok. 90 sekund. Odstaw
do wyrośnięcia na 30 minut.
Akces
oria /
prędk
ość
obrot
ów
P / 2
h/ 2
P / 2
PD/
2
PD/
2
g / 1
{ / 2
Maksy
malna
ilość
200g
200 g
200g
250g
500 g
2
ogórki
500 g
mąki
Składniki i
rezultaty
obróbki
Ser
(parmezan) rozdrabnianie
Ser (gouda) ścieranie
Czekolada rozdrabnianie
Gotowany
groszek, fasola
- ucieranie
Gotowane
warzywa i
mięso ucieranie
Ogórekkrojenie w
plastry
Ciasto (na
chleb) wyrabianie
Page 37

POLSKI 37
Zastosowanie
Pizza
Szarlotka,
herbatniki,
placki z
owocami
Placek
drożdżowy
Pudding, suflet,
beza
Postępowanie
Postępuj tak samo jak przy
cieście na chleb.Wyrabiaj ciasto
przez minutę.
Użyj zimnej margaryny. Potnij
margarynę na kawałki o
wielkości 2 cm.Wsyp mąkę do
miski i dodaj margarynę.
Ugniataj ciasto, aż stanie się
kruche. Dodaj zimną wodę, nie
przerywając ugniatania.
Przestań mieszać, gdy tylko
ciasto zacznie formować się w
kulę. Przed dalszą obróbką
odczekaj, aż ciasto ostygnie.
Najpierw w osobnej misce
wymieszaj drożdże, ciepłą
wodę i trochę cukru.Włóż
wszystkie składniki do miski
malaksera i wyrabiaj ciasto, aż
będzie gładkie i nie będzie
przyklejać się do ścianek
naczynia (około minuty).
Zostaw ciasto do wyrośnięcia
na pół godziny.
Użyj jajek o temperaturze
pokojowej. Uwaga: weź co
najmniej 2 jajka.
Akces
oria /
prędk
ość
obrot
ów
{ / 2
{ / 2
{ / 2
å / 1
Maksy
malna
ilość
750 g
mąki
300 g
mąki
500 g
mąki
4
białka
Składniki i
rezultaty
obróbki
Ciasto (na
pizzę) wyrabianie
Ciasto
(kruche) wyrabianie
Ciasto
(drożdżowe) wyrabianie
Piana z białek ubijanie
Zastosowanie
Sosy, dżemy,
puddingi,
pokarm dla
niemowląt
Przystrajanie
dań, dipy
Sosy, zupy,
przystrajanie
dań, masło
ziołowe
Sałatki,
przystrajanie
dań, sosy
barbecue
Postępowanie
Wskazówka: aby owoce nie
straciły koloru, dodaj trochę
soku z cytryny.Wlej trochę
płynu, aby uzyskać delikatną
masę.
Wskazówka: aby owoce nie
straciły koloru, dodaj trochę
soku z cytryny.
Obierz czosnek.Aby uniknąć
posiekania czosnku zbyt
drobno, ustaw regulator
obrotów w pozycji pulsacyjnej.
Weź co najmniej 150 g
czosnku.
Przed posiekaniem umyj i osusz
zioła.
Wszystkie składniki muszą mieć
temperaturę pokojową. Uwaga:
weź co najmniej jedno duże
jajko, dwa małe jajka lub dwa
żółtka. Umieść jajko(a) lub
żółtka jajek z odrobiną octu w
misce i stopniowo, po kropelce
dodawaj olej.
Akces
oria /
prędk
ość
obrot
ów
D / 2
P / 2
P / 2
P / 2
å / 1
Maksy
malna
ilość
500g
500 g
300 g
Weź
co
najmni
ej 50 g
3 jajka
Składniki i
rezultaty
obróbki
Owoce (np.
jabłka, banany)
- miksowanie
Owoce (np.
jabłka, banany)
rozdrabnianie
Czosnek siekanie
Zioła (np.
pietruszka) siekanie
Majonez emulgowanie
Page 38

POLSKI38
Zastosowanie
Befsztyki
tatarskie,
hamburgery,
klopsy
Befsztyki
tatarskie,
hamburgery,
klopsy
Różne ciastka.
Sałatki,
puddingi, chleb
z orzechami,
pasta
migdałowa.
Sałatki,
potrawy
gotowane,
potrawy
smażone,
przystrajanie
Postępowanie
Najpierw usuń ścięgna i kości.
Potnij mięso na kawałki o
wielkości 3 cm. Jeśli chcesz
zemleć mięso grubiej, ustaw
regulator obrotów w pozycji
pulsacyjnej.
Najpierw usuń ścięgna i kości.
Potnij mięso na kawałki o
wielkości 3 cm. Jeśli chcesz
zemleć mięso grubiej, ustaw
regulator obrotów w pozycji
pulsacyjnej.
Składniki muszą mieć
temperaturę pokojową. Mieszaj
miękkie masło z cukrem, aż
powstanie gładka i lekka masa.
Następnie dodaj mleko, jajka i
mąkę.
Jeśli chcesz zemleć mięso
grubiej, użyj funkcji pulsacyjnej.
Obierz cebule i pokrój je na
ćwiartki. Obróć dwukrotnie
regulatorem obrotów do
pozycji impulsowej, po czym
sprawdź rezultat.
å / 1
Akces
oria /
prędk
ość
obrot
ów
Å / 2
P / 2
{ / 2
P / 2
P / 2
Maksy
malna
ilość
1000
g
400g
4 jajka
250g
500g
Składniki i
rezultaty
obróbki
Mięso (chude)
- mielenie
Mięso, ryba,
drób (filety) mielenie
Masy (do
ciast) miksowanie
Orzechy rozdrabnianie
Cebula siekanie
Zastosowanie
Sałatki,
potrawy
gotowane,
potrawy
smażone,
przystrajanie
Przystrajanie
potraw, kremy,
mieszanki z
lodami.
Koktajl
mleczny
Zupy, sosy
Postępowanie
Obierz cebulę i potnij ją na
kawałki, które zmieszczą się do
leja wsypowego. Uwaga: weź
co najmniej 100g cebuli.
Weź śmietanę prosto z
lodówki. Uwaga:użyj co
najmniej 125ml śmietany. Po ok.
2 minut bita śmietana jest
gotowa.
Utrzyj owoce (np. banany,
truskawki) z cukrem, mlekiem i
odrobiną lodów, zmiksuj
dokładnie.
Użyj gotowanych warzyw
Akces
oria /
prędk
ość
obrot
ów
g / 1
å / 1
D / 2
D / 2
Maksy
malna
ilość
300g
500ml
500
ml
mleka
500ml
Składniki i
rezultaty
obróbki
Cebula krojenie w
plastry
Bita śmietana ubijanie
Koktajle
mleczne miksowanie
Zupy miksowanie
Page 39

POLSKI 39
Przepisy
Kanapkowa pasta z cukinii
Składniki:
- 2 cukinie
- 3 gotowane jajka
- 1 mała cebula
- 1 łyżka stołowa oleju roślinnego
- pietruszka
- 2-3 łyżki stołowe kwaśnej śmietany
- sok z cytryny, sos tabasco, sól,pieprz, proszek
curry, mielona papryka
B
Cukinie umyj i wysusz, a następnie rozdrobnij je w
misce malaksera za pomocą wkładki ścierającej.
Przełóż rozdrobnioną cukinię do naczynia, posyp solą
i zostaw na około 15 minut, aby wydzielił się sok.
Przekrój cebulę na ćwiartki i rozdrobnij ją wraz z
czosnkiem. Posiekaj też liście pietruszki (bez łodyg).
B
Przełóż rozdrobnioną cukinię na czystą ścierkę i
wyciśnij sok. Do rondla wlej odrobinę oleju,
podsmaż posiekaną cebulę i czosnek, następnie
dodaj cukinię. Podgrzewaj do chwili, aż odparuje
cały sok. Odstaw na chwilę do ostygnięcia. Obierz
jajka i przez kilka sekund rozdrabniaj je w misce
malaksera. Do miski włóż pozostałe składniki,
przypraw je i wymieszaj za pomocą ostrza.
Podawaj na opiekanych kromkach białego chleba.
Ciasto z owocami
Składniki:
- 150 g daktyli
- 225 g śliwek suszonych
- 100 g orzechów ( 50 g migdałów i 50 g
orzechów włoskich)
- 50 g rodzynek
- 50 g sułtanek
- 200 g pełnoziarnistej mąki żytniej
- 100 g mąki pszennej
- 100 g brązowego cukru
- szczypta soli
- 1 torebka proszku do pieczenia
- 300 ml maślanki
B
Zamontuj w misce metalowe ostrze.Wrzuć do
miski wszystkie składniki i miksuj przez 30 sekund
na maksymalnych obrotach. Ciasto piecz w
30-centymetrowej brytfannie przez 40 minut w
temperaturze 170cC.
Placek lotaryński z pora
Składniki na ciasto:
- 250 g mąki pszennej (lub razowej mąki
pszennej)
- szczypta soli
- 1 łyżka stołowa miodu
- 20 g świeżych drożdży lub 1/2 paczki drożdży
suszonych
- 100 g masła
- 6 łyżek stołowych letniej wody
Składniki na farsz:
- 500 g pora
- olej roślinny
- 4 jajka
- 500 g kwaśniej śmietany
- sól, pieprz, w zależności od potrzeb 1-2 łyżki
mąki
Page 40

POLSKI40
B
Wrzuć wszystkie składniki do miski i wyrabiaj do
chwili, gdy osiągną konsystencję ciasta. Pozostaw
je na pół godziny do wyrośnięcia.
B
Potnij por na plastry za pomocą nakładki tnącej.
Do rondla wlej nieco oleju i przez kilka minut
podsmażaj posiekany por. Resztę składników
wrzuć do blendera i miksuj, aż będą miały
kremową konsystencję. Dla zagęszczenia dodaj
1-2 łyżki stołowe mąki.
B
Posmaruj tłuszczem brytfannę do pieczenia o
średnicy 24 cm, a następnie na spodzie i
ściankach rozprowadź równomiernie ciasto. Nałóż
farsz na ciasto, dorzucając pozostałe składniki.
Piecz w rozgrzanym piekarniku przez około
40 minut w temperaturze 180cC. Potrawa może
być podawana na zimno lub gorąco.
Gulasz po węgiersku
Składniki:
- 1 łyżka stołowa oleju
- 1 średnia cebula
- 1 łyżeczka papryki
- 400 g wołowiny lub wieprzowiny
- 1 zielona papryka
- 1 pomidor
-sól
- 200 g marchwi
- 300 g ziemniaków
- kminek
B
Umyj mięso i pokrój na 2-centymetrowe kostki.
Obierz cebulę i posiekaj ją w misce malaksera
przy użyciu metalowego ostrza.Wydrąż paprykę i
pokrój ją w pierścienie, używając nakładki tnącej
na plastry. Obierz pomidor, wykrój pestki i pokrój
w cienkie paseczki. Podsmaż na oleju posiekaną
cebulę, aż będzie miękka. Zdejmij z ognia i posyp
papryką w proszku, dodaj mięso i ciągle mieszając
smaż przez kilka minut na dużym ogniu. Dodaj
pokrojoną paprykę, pomidora i sól do smaku,
przykryj rondel i duś we własnym sosie na średnim
ogniu aż do miękkości.
B
Tymczasem obierz marchew i pokrój ją za
pomocą nasadki tnącej na plastry, obierz także
ziemniaki i pokrój je w kostkę. Dodaj je do mięsa i
dodaj tyle zimnej wody, ile chcesz uzyskać zupy
(około 1,2 litra). Dopraw kminkiem i - dodając soli,
jeśli to konieczne - duś do chwili, aż wszystko
będzie miękkie jak masło.
B
Podawaj na gorąco.Potrawę możesz przystroić
krążkami papryki, a na oddzielnym talerzu
podawać czerwoną paprykę.
Rolada z orzechami laskowymi
Składniki na ciasto:
- 500 g przesianej mąki
- 75 g cukru
- 1 łyżeczka soli
- 1 jajko
- 250 ml mleka (35cC)
- 100 g miękkiego masła
- 30 g świeżych drożdży (jeśli używasz drożdży
suszonych, stosuj się do instrukcji na opakowaniu)
Nadzienie:
- 250 g posiekanych orzechów laskowych
- 100 g cukru
- 2 torebki cukru waniliowego
- 125 ml śmietany
Page 41

POLSKI 41
B
Nagrzej piekarnik do 200cC. Mleko, drożdże i
cukier mieszaj w misce przez 15 sekund,
wykorzystując końcówkę do wyrabiania ciasta.
Dodaj mąkę, sól, masło i jajko.Wyrabiaj ciasto
przez 2 minuty. Przełóż ciasto do innej miski,
przykryj wilgotną ścierką i postaw na 20 minut w
ciepłym miejscu, by wyrosło.
B
Posiekaj orzechy laskowe, używając metalowego
ostrza.Wymieszaj składniki na nadzienie.
Rozwałkuj ciasto w prostokątny kształt. Nałóż
masę z orzechów laskowych, a następnie zroluj ją
w pierścień.Włóż pierścień do wysmarowanej
masłem formy do pieczenia. Odstaw, by ciasto
podrosło jeszcze przez 20 minut. Górną część
posmaruj żółtkiem, a następnie wsu¨1 blachę na
ruszt umieszczony pośrodku piekarnika. Piecz
25 - 30 minut w temperaturze 200cC.
Ciasto czekoladowe
Składniki:
- 140 g miękkiego masła
- 110 g cukru lukrowego
- 140 g czekolady
- białko z 6 jajek
- 6 żółtek
- 110 g cukru pudru
- 140 g mąki pszennej
Nadzienie:
- 200 g dżemu morelowego
Lukier:
- 125 ml wody
- 300 g cukru
- 250 g utartej czekolady
- ewentualnie bita śmietana
B
Rozgrzej piekarnik do temperatury 160cC.
Wymieszaj masło z cukrem glazurowym,
wykorzystując metalowe ostrze. Rozpuść i dodaj
czekoladę. Następnie dodaj żółtka jedno po
drugim - i mieszaj do momentu, aż masa będzie
miała kremową konsystencję.Tarczą emulgującą
ubij na sztywno białka z cukrem pudrem. Do masy
dodaj pianę z białek i delikatnie wymieszaj.
Łopatką wmieszaj mąkę. Przełóż ciasto do
natłuszczonej blachy do pieczenia. Piecz przez
godzinę w temperaturze 160cC. Przez pierwsze
15 minut drzwiczki piekarnika powinny być nieco
uchylone.
B
Pozwól ciastu nieco ostygnąć na blasze do
pieczenia (24 cm), a następnie przewróć je na
drucianą kratkę do dalszego wystudzenia. Przekrój
ciasto w poziomie na połowę, na jedną część
nałóż dżem morelowy, a następnie złącz
ponownie obydwie połowy.Resztę dżemu rozgrzej,
a gdy stanie się płynny, polej nim całe ciasto.
Przygotuj glazurę. Zagotuj wodę, dodaj cukier i
czekoladę i gotuj na małym ogniu. Ciągle mieszaj,
aż masa będzie na tyle gładka, że da się
rozsmarować na cieście. Nałóż polewę na ciasto i
poczekaj do wystygnięcia. Podawaj z odrobiną bitej
śmietany.do wyrośnięcia na 30 minut.
Page 42

POLSKI42
Zupa z brokułów (dla 4 osób)
Składniki:
- 50 g dojrzałego sera Gouda
- 300 g gotowanych brokułów (łodygi i kwiaty)
- wywar z gotowania brokułów
- 2 gotowane pokrojone ziemniaki
- 2 kostki rosołowe
- 2 łyżki stołowe bitej śmietany
- curry
-sól
- pieprz
- gałka muszkatołowa
B
Rozdrobnij ser. Utrzyj brokuły z gotowanymi
ziemniakami i odrobiną wywaru z gotowania
brokułów. Przelej masę brokułową, pozostały
wywar oraz kostki rosołowe do pojemnika z
podziałką i dopełnij go do objętości 750 ml. Przelej
zupę do rondla i zagotuj, ciągle mieszając. Dodaj
ser i dopraw curry, solą, pieprzem oraz gałką
muszkatołową, a następnie dodaj śmietanę.
Koktajl mleczny ze świeżych owoców
Składniki:
- 100 g bananów lub truskawek
- 200 ml świeżego mleka
- 50g lodów waniliowych.
- cukru pudru do smaku
B
Obierz banany lub wypłucz truskawki. Posiekaj
owoce na drobne kawałki.Wszystkie składniki włóż
do blendera. Ucieraj, aż otrzymasz delikatny napój.
B
Aby przygotować swój ulubiony koktajl mleczny,
możesz wybrać inne owoce.
Pizza
Składniki na ciasto:
- 400g mąki
- 1/2 łyżeczki soli
- 20 g świeżych drożdży lub półtorej paczki
suszonych
- 2 łyżki stołowe oleju
- około 240 ml wody (35cC)
Sos:
- 300 ml przetartych pomidorów (z puszki)
- 1 łyżeczka włoskiej mieszanki ziołowej (suszonej
lub świeżej)
- 1 cebula
- 2 ząbki czosnku
- sól i pieprz
- cukier
Składniki do rozprowadzenia w sosie:
- oliwki, salami, karczochy, pieczarki, anchovies, ser
mozzarella, papryka, dojrzały ser (starty),
ewentualnie oliwa z oliwek
B
Zamontuj mieszak w misce. Umieść wszystkie
składniki w misce i włącz urządzenie, ustawiając
najwyższe obroty (pozycja 2).Wyrabiaj ciasto
przez około 90 sekund, aż uformuje się gładka
kula. Przełóż ciasto do innego pojemnika.
Pozostaw przykryte wilgotną ściereczką do
wyrośnięcia na 30 minut.
B
Za pomocą metalowego ostrza posiekaj w misce
malaksera cebulę wraz z czosnkiem, a następnie
podsmażaj je w rondlu do chwili, aż będą szkliste.
Dodaj przetarte pomidory oraz zioła i duś je
Page 43

POLSKI 43
przez około 10 minut. Dodaj sól, pieprz i cukier do
smaku. Zostaw sos do ostygnięcia.
B
Rozgrzej piekarnik do 250cC.
B
Na powierzchni posypanej uprzednio mąką
rozwałkuj ciasto na dwa okrągłe placki. Ułóż je na
natłuszczonej brytfannie. Polej sosem. Zostaw
wolne miejsce na brzegach pizzy.Ułóż dowolne
dodatki, zetrzyj trochę sera i pokrop oliwą.
B
Włóż do piecyka i piecz przez 12-15 minut.
Placki warzywno-ziemniaczane
Składniki:
- 1 jajko
- 50 ml mleka
- 1 łyżka stołowa mąki
- 1 łyżeczka kolendry
- sól i pieprz
- 2 duże ziemniaki (około 300 g)
- 100 g marchwi
- 150 g selera
- 50 g ziaren słonecznika lub 2 łyżki stołowe
otrąb
- olej do smażenia
B
Przy użyciu metalowego ostrza wymieszaj jajko,
mleko, mąkę, kolendrę, a także sól i pieprz.
B
Obrane ziemniaki, oskrobaną marchew i umyty
seler rozdrobnij za pomocą nakładki ścierającej, a
następnie dodaj do jajka rozmieszanego z
mlekiem i przyprawami.Wymieszaj razem w
misce warzywa, mleko z jajkiem oraz nasiona
słonecznika lub otręby.
B
Rozgrzej olej na patelni i usmaż 8 placków po
obu stronach na złotobrązowy kolor. Odsącz z
tłuszczu na papierowym ręczniku.
B
Czas smażenia: 3-4 minuty.
Chleb (biały)
Składniki:
- 500 g mąki chlebowej
- 15 g miękkiego masła lub margaryny
- 25 g świeżych lub 20 g suszonych drożdży
- 260 ml wody
- 10 g soli
- 10 g cukru
B
Zamontuj mieszak w misce.Wsyp do miski mąkę,
dodaj sól, margarynę lub masło. Dodaj świeże lub
suszone drożdże oraz wodę. Przykryj miskę
pokrywką i obróć ją w kierunku wskazywanym
przez strzałkę, aż usłyszysz kliknięcie. Ustaw
regulator obrotów w pozycji 2 (obroty
maksymalne) i mieszaj ciasto (maksymalny czas
wyrabiania znajdziesz w tabeli "Ilości składników i
czasy przygotowania").
B
Przełóż ciasto do większej miski, przykryj wilgotną
ścierką i na 20 minut pozostaw w ciepłym miejscu
do wyrośnięcia. Po wyrośnięciu ugnieć ciasto, a
następnie uformuj z niego kulę.
B
Ponownie włóż ciasto do miski, przykryj wilgotną
ścierką i pozwól wyrosnąć przez kolejne 20 minut.
Ugnieć je ponownie i zroluj.
B
Włóż ciasto do natłuszczonej brytfanny i pozwól
rosnąć przez następne 45 minut. Piecz chleb,
ustawiając brytfannę w dolnej części nagrzanego
piekarnika.
B
Chleb wypiekaj w temperaturze 225cC. w dolnej
części nagrzanego piekarnika przez około 35 minut.
Page 44

ROMÂNĂ44
Introducere
Acest aparat este echipat cu o siguranţă termică
automată.Acest sistem va opri automat
alimentarea cu curent a aparatului în cazul
supraîncălzirii.
Descriere generală
A Bloc motor
B Reglaj viteză
- P = impuls
- 0 = oprit
- 1 = viteză minimă
- 2 = viteză maximă
C Capac filetat (trebuie poziţionat pentru a putea
folosi funcţiile robotului)
D Bol pentru prepararea alimentelor
E Ax central
F Capac bol pentru prepararea alimentelor
G Vas blender
H Capac vas blender
I Tub de alimentare
J Împingător
K Opritor
L Accesoriu de frământăre
M Cuţit + teacă de protecţie
N Disc tranşare medie
O Disc radere medie
P Ax pentru discuri
Q Disc de emulsionare
R Carcasă angrenaj pentru tocător de carne
S Carcasă ansamblu cuţit pentru tocător de carne
T Ax al melcului
U Inel filetat
V Ansamblu cuţit
W Disc tocare medie, 4 mm dia.
X Disc tocare mare, 8 mm dia.
Y Separator
Z Pâlnie pentru cârnaţi
a Ta v ă
b Împingător
c Mâner de declanşare
Important
Citiţi instrucţiunile de utilizare cu atenţie şi
consultaţi imaginile înainte de a începe să folosiţi
aparatul.
◗ Verificaţi dacă tensiunea indicată pe aparat
corespunde tensiunii locale înainte de a
conecta aparatul.
◗ Nu folosiţi accesorii sau componente de la alţi
producători sau care nu au fost recomandate
de către firma Philips. În caz contrar, garanţia
nu mai va fi valabilă.
◗ Pentru a evita orice accident, acest aparat nu
trebuie conectat la un întrerupător comandat
de un ceas electronic.
◗ Nu folosiţi aparatul dacă ştecherul, cablul sau
alte componente sunt deteriorate.
◗ În cazul în care cablul de alimentare este
deteriorat, trebuie înlocuit doar de Philips, la
un centru service autorizat Philips sau de
persoane calificate pentru a evita orice
accident.
◗ Curăţaţi foarte bine componentele care vin în
Page 45

ROMÂNĂ 45
contact cu alimentele înainte de a utiliza
aparatul pentru prima oară.
◗ Nu depăşiţi cantităţile şi duratele de
preparare indicate în tabel.
◗ Nu depăşiţi capacitatea maximă indicată pe
bolul pentru prepararea alimentelor sau pe
vasul blenderului, adică nu umpleţi bolul peste
gradaţia cea mai înaltă.
◗ Scoateţi aparatul din priză imediat după
utilizare.
◗ Nu împingeţi ingredientele cu degetele sau cu
alt obiect (cum ar fi o spatulă) în timp ce
aparatul funcţionează. Pentru acest scop aveţi
împingătorul.
◗ Deconectaţi întotdeauna aparatul înainte de a
introduce degetele sau vreun alt obiect (de
ex. o spatulă) în vasul blenderului.
◗ Nu lăsaţi aparatul la îndemâna copiilor.
◗ Nu lăsaţi aparatul să funcţioneze
nesupravegheat.
◗ Robotul va funcţiona doar dacă reperul de pe
capacul filetat este în sens contrar faţă de cel
de pe blocul motor, reperul de pe bol este în
sens contrar celui de pe blocul motor, iar
liniuţa de pe capac este în sens contrar faţă de
cea de pe bol. Doar în acest caz sistemul de
siguranţă încorporat va fi deblocat şi veţi
putea porni aparatul.
◗ Opriţi aparatul înainte de a demonta vreun
accesoriu.
◗ Opriţi întotdeauna aparatul comutând butonul
pe poziţia 0.
◗ Aşteptaţi până ce părţile mobile se opresc
înainte de a scoate capacul.
◗ Nu introduceţi blocul motor în apă sau în alt
lichid, şi nici nu-l clătiţi sub jet de apă. Utilizaţi
o cârpă umedă pentru a curăţa blocul motor.
◗ Îndepărtaţi teaca de protecţie de pe cuţit
înainte de utilizare.
◗ Nu folosiţi niciodată ansamblul cuţitului
împreună cu separatorul şi pâlnia pentru
cârnaţi.
◗ Nu încercaţi să tocaţi oase, nuci sau alte
alimente dure.
◗ Nu introduceţi niciodată degetele în tavă.
Folosiţi mereu împingătorul.
◗ Lăsaţi ingredientele fierbinţi să se răcească
înainte de a le procesa (temperatura max.
80cC/175cF).
◗ Dacă preparaţi un ingredient lichid fierbinte
sau care face spumă, nu adăugaţi mai mult de
1 litru în vasul blenderului pentru a evita
stropirea.
◗ Pentru cantităţi şi durata aplicaţiilor, consultaţi
tabelul de mai jos din acest manual de
utilizare.
◗ Nu uitaţi că nu puteţi folosi funcţiile bolului
dacă blenderul este montat.
◗ Nivel de zgomot: Lc= 89 dB [A]
Utilizarea aparatului
Siguranţă termică
Pentru a evita orice pericol, acest aparat nu
trebuie conectat la un întrerupător comandat de
un ceas electronic.
Page 46

ROMÂNĂ46
Dacă aparatul se opreşte brusc:
1 Scoateţi ştecherul din priză.
2 Lăsaţi aparatul să se răcească 60 de
minute.
3 Introduceţi ştecherul în priză.
4 Porniţi din nou aparatul.
B
Vă rugăm să contactaţi distribuitorul Philips sau
un centru service autorizat dacă siguranţa termică
se activează foarte des.
Bol pentru prepararea alimentelor
Bolul pentru prepararea alimentelor funcţionează
numai dacă vasul blenderului nu este montat pe
blocul motor şi în cazul în care capacul filetat a
fost înşurubat pe blocul motor astfel încât reperul
de pe capac să fie în sens contrar celui de pe
motor.
C
1 Montaţi bolul pe robot răsucind de mâner
în direcţia săgeţii până auziţi clic.
C
2 Puneţi capacul deasupra bolului. Răsuciţi
capacul în direcţia săgeţii până ce auziţi clic
(acest lucru necesită puţin efort).
Dispozitiv de siguranţă încorporat
Blocul motor, bolul şi capacul sunt inscripţionate
cu nişte repere. Aparatul va funcţiona doar dacă
reperul de pe blocul motor este aşezat exact în
sensul opus semnului de pe capacul filetat.
C
1 Asiguraţi-vă că semnul de pe capac şi cel
de pe bol sunt în sens invers. În acest caz,
protuberanţa din capac se va fixa corect
pe mâner.
Tub de alimentare şi împingător
C
1 Folosiţi tubul de alimentare pentru a
adăuga lichide şi/sau alte ingrediente
solide. Folosiţi împingătorul pentru a
împinge ingredientele solide pe tubul de
alimentare.
C
2 Puteţi, de asemenea, folosi tubul de
alimentare pentru a evita ca ingredientele
să dea pe-afară.
Cuţit metalic
Cuţitul metalic poate fi folosit pentru tocare,
mixare, amestecare şi pasare.
Lamele cuţitului sunt foarte ascuţite. Nu le
atingeţi
!
CLICK
CLICK
CLICK
1
1
2
2
Page 47

ROMÂNĂ 47
C
1 Îndepărtaţi teaca de protecţie de pe cuţit.
C
2 Puneţi axul central în bol şi cuţitul pe ax.
3 Puneţi ingredientele în bol.
B
Tăiaţi bucăţile mari de alimente în cubuleţe cu
latura de 3 cm. Puneţi capacul deasupra bolului.
4 Puneţi împingătorul în tubul de alimentare.
C
5 Reglaţi butonul de viteză pe poziţia
maximă (2).
- Procesul continuă până când butonul de viteză
este reglat pe poziţia 0 (oprire).
◗ Reglaţi butonul de viteză pe poziţia 1 pentru a
micşora viteza.
Sugestii
◗ Dacă tocaţi ceapă, folosiţi funcţia impuls de
câteva ori pentru a preveni tocarea prea
măruntă.
◗ Nu lăsaţi aparatul să funcţioneze prea mult
timp când radeţi brânză/caşcaval. Brânza sau
caşcavalul se încălzesc şi încep să se topească,
făcând cocoloaşe.
◗ Nu folosiţi cuţitul pentru tocarea
ingredientelor foarte dure cum ar fi boabe de
cafea, şofran, miez de nucă şi cuburi de gheaţă,
întrucât aţi putea toci cuţitul.
Dacă ingredientele se lipesc de cuţit sau de
interiorul bolului:
1 Opriţi aparatul.
2 Scoateţi capacul de pe bol.
3 Dezlipiţi ingredientele de pe cuţit sau de
pe pereţii bolului cu ajutorul spatulei.
Discuri: disc de tranşare şi radere
Nu procesaţi niciodată ingrediente dure, cum ar fi
cuburile de gheaţă, cu discurile.
Marginile discurilor sunt foarte ascuţite! Evitaţi s
le atingeţi.
C
1 Puneţi discul dorit pe axul pentru discuri.
C
2 Aşezaţi axul pentru discuri peste axul
central din bol.
3 Puneţi capacul peste bol.
4 Puneţi ingredientele în tubul de alimentare.
B
Tăiaţi alimentele mari în bucăţi mai mici care să
intre în tubul de alimentare.
C
5 Pentru cele mai bune rezultate, umpleţi
complet tubul de alimentare.
B
Când trebuie să tăiaţi în felii sau să radeţi cantităţi
mari de alimente, prelucraţi calupuri mici şi goliţi
frecvent bolul.
1
CLICK
2
Page 48

ROMÂNĂ48
C
6 Reglaţi butonul de viteză pe poziţia
maximă (2).
Procesul continuă până când butonul de viteză
este reglat pe poziţia 0 (oprire).
◗ Reglaţi butonul de viteză pe poziţia 1 pentru a
micşora viteza.
C
7 Împingeţi uşor ingredientele cu
împingătorul pe tubul de umplere.
◗ Dacă radeţi legume sau fructe moi, puteţi
micşora viteza reglând butonul de viteză pe
poziţia 1 pentru a evita transformarea
legumelor sau a fructelor rase în piure.
C
8 Pentru a scoate discul de pe axul pentru
discuri, axul în mână şi împingeţi cu
buricele degetelor discul, până îl scoateţi.
Accesoriu de frământare
Accesoriul de frământare poate fi folosit pentru
frământarea aluatului de pâine sau pentru
aluaturile de prăjituri.
C
1 Puneţi bolul pe blocul motor şi poziţionaţi
accesoriul de frământare pe axul central
din bol.
2 Puneţi ingredientele în bol şi fixaţi capacul
pe bol. Poziţionaţi împingătorul pe tubul de
alimentare pentru a evita ca alimentele să
dea pe-afară în timpul frământării.
C
3 Reglaţi butonul de viteză pe poziţia
maximă (2).
Consultaţi tabelul pentru a vedea perioadele de
preparare recomandate.
Disc de emulsionare
Puteţi folosi discul de emulsionare pentru a
prepara maioneză, pentru a bate frişcă sau a bate
albuşuri de ouă.
C
1 Puneţi discul de emulsionare pe axul
central din bol.
2 Puneţi ingredientele în bol şi închideţi
capacul.
3 Reglaţi butonul de viteză pe poziţia minimă
(1) pentru rezultate optime.
Sugestii
◗ Când doriţi să bateţi ouă, aveţi grijă ca acestea
să fie la temperatura camerei.
◗ Scoateţi ingredientele din frigider cu cel puţin
o jumătate de oră înainte de a le folosi.
◗ Pentru prepararea maionezei,toate
ingredientele trebuie să fie la temperatura
camerei.
◗ Uleiul poate fi turnat prin orificiul din
împingător.
◗ Dacă intenţionaţi să faceţi frişcă bătută, luaţi
smântâna direct din frigider.Vă rugăm să
Page 49

ROMÂNĂ 49
consultaţi tabelul pentru durata de preparare.
Frişca nu trebuie bătută prea mult timp.
◗ Folosiţi reglajul impuls pentru a controla mai
bine procesul.
Blender
Blenderul poate fi folosit la:
- Amestecarea unor lichide, cum ar fi produsele
lactate, sosurile, sucurile de fructe, supele,
cocteilurile, shake-urile.
- Mixarea ingredientelor moi, de ex. aluat de
clătite sau maioneză.
- Pasarea ingredientelor gătite, de ex.pentru
prepararea mâncării pentru bebeluşi.
C
1 Scoateţi capacul filetat pentru a monta
vasul blenderului.
C
2 Montaţi vasul blenderului pe blocul motor
răsucindu-l în direcţia săgeţii până se
fixează bine. Mânerul trebuie îndreptat
înspre stânga.
Nu apăsaţi prea tare pe mânerul blenderului.
3 Puneţi ingredientele în vasul blenderului.
C
4 Închideţi capacul.
C
5 Reglaţi butonul de viteză pe poziţia
maximă (2).Aparatul continuă să
funcţioneze la viteza aceasta până este
oprit, atunci când butonul de viteză este
reglat pe poziţia 0.
Consultaţi tabelul pentru a vedea perioadele de
preparare recomandate.
Sugestii
C
◗ Turnaţi lichidele în vasul blenderului prin
orificiul din capac.
◗ Cu cât aparatul va funcţiona mai mult, cu atât
compoziţia rezultată va fi mai fină.
◗ Tăiaţi ingredientele solide în bucăţi mai mici
înainte de a le introduce în blender. Dacă
doriţi să preparaţi o cantitate mare de
alimente mixaţi, pe rând, cantităţi mici.
◗ Ingredientele solide, cum ar fi seminţele de
soia pentru prepararea laptelui de soia,
trebuie lăsate în apă să se înmoaie înainte de a
le mixa.
C
◗ Pentru zdrobirea cuburilor de gheaţă,puneţi
cuburile în vas, închideţi capacul şi folosiţi
funcţia impuls.
Dacă se lipesc ingredientele de vasul blenderului:
1 Opriţi aparatul şi scoateţi-l din priză.
2 Deschideţi capacul.
Nu deschideţi niciodată capacul dacă aparatul înc
mai funcţionează.
1
2
1
2
Page 50

ROMÂNĂ50
3 Folosiţi o spatulă pentru a îndepărta
ingredientele de pe pereţii vasului.
Ţineţi spatula la o distanţă sigură de lamele
ascuţite ale cuţitului (aprox. 2 cm).
B
Dacă nu sunteţi mulţumit de rezultat, lăsaţi
aparatul să funcţioneze scurt de câteva ori
activând funcţia impuls. Puteţi încerca obţinerea
unor rezultate satisfăcătoare amestecând
ingredientele cu o spatulă (nu în timpul
funcţionării blenderului!), sau turnând o parte din
cantitatea în curs de preparare într-un alt vas,
pentru o prelucrare a unei cantităţi mai mici.
B
În unele cazuri, ingredientele se pot mixa mai uşor
dacă adăugaţi puţin lichid, cum ar fi suc de lămâie
atunci când mixaţi fructe.
Tocător de carne
Tocătorul de carne poate fi folosit pentru tocarea
cărnii sau prepararea cârnaţilor.
Tocătorul de carne funcţionează dacă vasul
blenderului nu este montat pe blocul motor şi în
cazul în care capacul filetat a fost înşurubat pe
blocul motor în aşa fel încât reperul de pe capac
să fie în sens contrar celui de pe motor.
C
1 Montaţi carcasa angrenajului pe blocul
motor.
Dacă aţi montat corect carcasa veţi auzi un clic.
C
2 Introduceţi axul melcului în carcasa
ansamblului cuţitului, cu capătul de plastic
înainte.
C
3 Poziţionaţi ansamblul cuţitului pe axul
melcului. Marginile tranşante trebuie
poziţionate în faţă.
C
4 Poziţionaţi discul de tocare medie sau
mare (în funcţie de consistenţa dorită) pe
axul melcului.
Aveţi grijă să fixaţi şanţul discului de tocare în
protuberanţa din capătul tocătorului.
C
5 Fixaţi corect inelul filetat pe carcasa
cuţitului în direcţia săgeţii.
C
6 Poziţionaţi tava în partea superioară a
carcasei cuţitului.
Tocarea cărnii
1 Tăiaţi carnea în bucăţi de 10 cm lungime şi
2 cm lăţime.
Page 51

51ROMÂNĂ
2 Scoateţi oasele, cartilagiile sau zgârciurile
atât cât se poate.
Nu tocaţi carne îngheţată!
C
3 Reglaţi butonul de viteză pe poziţia
maximă (2).
C
4 Introduceţi carnea în tavă.
◗ Puteţi toca 1,3 kg de carne pe minut.
Dacă doriţi să tocaţi carne de porc, folosiţi carne
slabă, fără grăsime şi zgârciuri.
◗ Pentru biftec tartar, tocaţi carnea cu discul de
tocare medie de două ori.
Prepararea cârnaţilor
1 Tocaţi carnea.
2 Scoateţi aparatul din priză şi scoateţi inelul
filetat după ce aţi terminat de tocat.
3 Scoateţi discul de tocare.
4 Demontaţi cuţitul.
◗ Lăsaţi melcul în carcasa cuţitului dacă doriţi că
preparaţi cârnaţi.
C
5 Montaţi separatorul în carcasa cuţitului.
C
6 Poziţionaţi pâlnia pentru cârnaţi pe carcasa
cuţitului şi înşurubaţi inelul filetat.
Aparatul este pregătit pentru prepararea
cârnaţilor.
Sugestii
- Puneţi membrana pentru cârnaţi în apă călduţă
timp de 10 minute. Apoi culisaţi-o pe pâlnie.
Împingeţi carnea tocată (condimentată) în
carcasa cuţitului.
- Dacă membrana rămâne lipită de pâlnie,
umeziţi-o cu puţină apă.
- Reglaţi butonul de viteză pe poziţia 1 pentru
prepararea cârnaţilor.
Curăţare
Înainte de a curăţa aparatul, opriţi-l şi scoateţi
ştecherul din priză.
Curăţaţi cuţitul metalic, unitatea cuţitului din
blender şi discurile cu foarte mare grijă. Lamele
sunt foarte ascuţite!
Aveţi grijă ca marginile ascuţite ale cuţitelor şi
discurilor să nu vină în contact cu obiecte dure
Există riscul tocirii acestora.
B
Anumite ingrediente pot cauza decolorarea
suprafaţei accesoriilor.Acest lucru nu afectează
accesoriile. Decolorarea dispare de obicei după un
anumit timp.
Page 52

ROMÂNĂ52
C
1 Înfăşuraţi surplusul de cablu în jurul
înfăşurătorului din spatele aparatului.
2 Curăţaţi blocul motor cu o cârpă umedă.
Nu introduceţi blocul motor în apă şi nici
nu-l clătiţi.
3 Curăţaţi întotdeauna componentele care
au venit în contact cu alimentele cu apă
caldă şi detergent de vase, imediat după
folosire.
4 Bolul, capacul bolului, împingătorul şi
accesoriile (cu excepţia vasului
blenderului) pot fi curăţate şi în maşina de
spălat vase.
Aceste componente au fost testate pentru
rezistenţă la spălatul în maşina de spălat vase
conform normelor DIN EN 12875.
Vasul blenderului nu este rezistent la curăţare în
maşina de spalat vase!
5 Pentru a scoate capacul, deschideţi-l şi
trageţi în sus.
Scoateţi capacul doar atunci când doriţi să-l
spălaţi.
Operaţia de curăţare rapidă a blenderului
C
1 Turnaţi apă călduţă (nu mai mult de
0,5 litri) şi puţin detergent lichid în vasul
blenderului.
2 Închideţi capacul.
C
3 Lăsaţi aparatul să funcţioneze câteva
secunde activând funcţia impuls (aparatul
se opreşte dacă butonul este decuplat).
4 Demontaţi vasul şi clătiţi-l cu apă curată.
Tocător de carne
Carnea rămasă în interiorul carcasei cuţitului
poate fi îndepărtată tocând o felie de pâine.
1 Asiguraţi-vă că aparatul a fost deconectat.
2 Apăsaţi mânerul de declanşare şi răsuciţi
toată carcasa cuţitului în direcţia săgeţii.
3 Scoateţi împingătorul şi tava.
4 Deşurubaţi inelul filetat şi scoateţi toate
accesoriile din carcasa cuţitului.
Nu spălaţi aceste accesorii în maşina de spălat
vase!
5 Spălaţi toate accesoriile care au venit în
contact cu carnea, cu apă caldă şi
detergent de vase IMEDIAT DUPĂ
UTILIZARE.
6 Clătiţi-le cu apă curată fierbinte şi uscaţi-le
IMEDIAT.
◗ Vă recomandăm să ungeţi ansamblul cuţitului
şi discurile de tocare cu puţin ulei vegetal.
Page 53

ROMÂNĂ 53
Depozitare
MicroDepozitare
C
◗ Puneţi accesoriile (cuţit, ax pentru discuri) pe
axul central şi depozitaţi-le în bol, introducând
axul pentru discuri la sfârşit.
C
◗ Înfăşuraţi cablul în jurul înfăşurătorului din
spatele aparatului.
Garanţie şi service
Pentru informaţii suplimentare sau în cazul altor
probleme, vă rugăm să vizitaţi site-ul Philips
www.philips.com sau să contactaţi Departamentul
Clienţi din ţara dumneavoastră (veţi găsi numărul de
telefon în garanţia internaţională). Dacă în ţara
dumneavoastră nu există un astfel de departament,
contactaţi furnizorul dumneavoastră Philips sau
Departamentul Service pentru Aparate
Electrocasnice şi Produse de Îngrijire Personală
Philips.
Soluţie
Răsuciţi bolul şi capacul în sensul acelor de ceasornic
până auziţi clic. Aveţi grijă ca reperul de pe capac să fie
în sens contrar celui de pe blocul motor,iar liniuţa de pe
capac opusă liniuţei de pe bol.Asiguraţi-vă că nu este
montat vasul blenderului şi că aţi fixat corect capacul
filetat. Reperul de pe capacul filetat trebuie să fie exact
în sens contrar faţă de reperul de pe blocul motor.
Sistemul termic de oprire automată a întrerupt
furnizarea curentului în cazul supraîncălzirii. 1) Opriţi
aparatul (poziţie 0). 2) Scoateţi ştecherul din priză.
3) Lăsaţi aparatul să se răcească 60 de minute. 4)
Introduceţi ştecherul în priză. 5) Porniţi din nou aparatul.
Verificaţi dacă aţi înşurubat bolul şi capacul până când sa auzit clic.
Dacă atât vasul blenderului cât şi bolul pentru
prepararea alimentelor au fost montate corect, doar
blenderul va funcţiona. Dacă doriţi să folosiţi bolul
pentru prepararea alimentelor, demontaţi blenderul şi
închideţi orificiul cu ajutorul capacului filetat.
Problemă
Aparatul nu porneşte
când poziţionez
butonul de viteză pe
poziţia impuls sau pe
poziţia 1 sau 2.
Aparatul s-a oprit
brusc.
Accesoriul de
frământare sau de
mixare nu se învârte.
Atât vasul blenderului
cât şi bolul pentru
prepararea alimentelor
sunt montate, dar nu
funcţionează decât
blenderul.
Depanare
Page 54

ROMÂNĂ54
Durata aplicaţiei
10 - 60 sec.
60 - 180 sec.
10 - 60 sec.
10 - 60 sec.
în funcţie de
cantitate
10 - 60 sec.
Aplicaţie
Tocare, pasare,
mixare
Frământare
Tranşare, radere,
mărunţire
Amestecare,
pasare
Tocare
Batere,
emulsionare
Acceso
riu
P
{
gh k
D
Å
å
Accesorii şi aplicaţii
Aplicaţii
Salate, legume
crude
Salate, legume
crude
Clătite, gaufre
Preparate
pané, gratinate
Deserturi,
garnituri
Garnituri,
supe, sosuri,
mâncăruri
gratinate
Procedură
Tăiaţi legumele în bucăţi astfel
încât să intre pe tubul de
alimentare. Umpleţi tubul şi
radeţi în timp ce apăsaţi uşor
pe împingător.
Tăiaţi legumele în bucăţi astfel
încât să intre pe tubul de
alimentare. Umpleţi tubul şi
tăiaţi în felii în timp ce apăsaţi
uşor împingătorul.
Mai întâi turnaţi laptele în vasul
blenderului şi apoi adăugaţi
ingredientele solide. Mixaţi
ingredientele aprox. 1 minut.
Repetaţi această procedură de
2 ori, dacă este necesar. Opriţi
apoi aparatul câteva minute
pentru a permite acestuia să se
răcească.
Folosiţi pâine uscată, crocantă.
Folosiţi unt moale pentru
reultate uşoare.
Folosiţi o bucată de Parmezan
decojit şi tăiaţi-o în bucăţele de
aprox. 3 x 3 cm.
Acces
oriu/vi
teză
h / 2
g / 2
D / 2
P / 2
D / 2
P / 2
Cantit
ate
max.
500g
500g
750ml
100g
300g
200g
Ingrediente şi
rezultate
Mere, morcovi,
ţelină - radere
Mere, morcovi,
ţelină - tăiere
în felii
Aluat (clătite) batere
Pesmet mărunţire
Cremă cu unt
- batere
Caşcaval
(Parmezan) radere
Cantităţi şi perioade de preparare
Page 55

ROMÂNĂ 55
Aplicaţii
Sosuri, pizza,
mâncăruri
gratinate
Ornamentări,
siropuri,
produse de
patiserie,
budinci, spume
Piureuri, supe
Mâncare
pentru
bebeluşi şi
pentru copii
Salate,
garnituri
Pâine
Pizza
Procedură
Tăiaţi brânza în bucăţele ce pot
intra în tubul de alimentare.
Apăsaţi cu grijă împingătorul.
Folosiţi ciocolată menajeră tare.
Rupeţi-o în bucăţi de 2 cm.
Folosiţi mazăre şi fasole fierte.
Dacă este necesar, adăugaţi
puţin lichid pentru o mai bună
consistenţă a piureului.
Pentru un piure mai consistent,
nu adăugaţi mult lichid. Pentru
un piure moale, adăugaţi lichid
până ce acesta capătă
consistenţa dorită.
Puneţi castravetele în tubul de
alimentare şi apăsaţi-l uşor.
Amestecaţi apă caldă cu
drojdie şi zahăr.Adăugaţi făină,
ulei şi sare şi frământaţi coca
timp de aprox. 90 secunde.
Lăsaţi coca să crească timp de
30 de minute.
Urmaţi aceeaşi procedură ca
pentru coca de pâine.
Frământaţi timp de 1 minut.
Acces
oriu/vi
teză
h/ 2
P / 2
PD/
2
PD / 2
g / 1
{ / 2
{ / 2
Cantit
ate
max.
200g
200g
250g
500g
2
castra
veţi
500 g
făină
750g
făină
Ingrediente şi
rezultate
Brânză
(Gouda) radere
Ciocolată radere
Mazăre sau
fasole fiartă pasare
Carne şi
legume gătite pasare
Castraveţi tăiere în felii
Cocă (pentru
pâine) frământare
Aluat (de
pizza) frământare
Aplicaţii
Plăcinte de
mere, biscuiţi
dulci, tarte cu
fructe
Pâine specială
Budinci,
sufleuri,
meringues
Procedură
Folosiţi margarină rece.Tăiaţi
margarina în cubuleţe cu latura
de 2 cm. Puneţi făina în bol şi
adăugaţi margarina. Mixaţi până
ce aluatul devine fărâmicios,
apoi adăugaţi apă rece în timp
ce mixaţi. Opriţi fământarea
imediat ce aluatul începe să
capete forma unei mingi. Lăsaţi
aluatul să se răcească înainte de
a continua prepararea.
Amestecaţi mai întâi drojdia,
apa călduţă şi puţin zahăr întrun vas separat. Puneţi toate
ingredientele în bolul robotului
şi frământaţi coca până ce se
omogenizează şi nu mai
rămâne lipită pe pereţii vasului
(durează aprox. 1 minut). Lăsaţi
coca să crească timp de 30 de
minute.
Folosiţi albuşuri la temperatura
camerei. Notă:folosiţi cel puţin
2 albuşuri.
Sugestie: adăugaţi puţin suc de
lămâie pentru ca fructele să nu
se oxideze.Adăugaţi puţin
lichid pentru a obţine un piure
fin.
Acces
oriu/vi
teză
{ / 2
{ / 2
å / 1
D / 2
Cantit
ate
max.
300g
făină
500 g
făină
4
albuşu
ri
500g
Ingrediente şi
rezultate
Aluat (fraged)
- frământare
Cocă (drojdie)
- frământare
Albuşuri batere
Fructe (de ex.
mere, banane)
- amestecare
Page 56

ROMÂNĂ56
Aplicaţii
Sosuri, gemuri,
budinci,
mâncare
pentru
bebeluşi
Garnituri,
sosuri
Sosuri, supe,
garnituri, unt
cu verdeaţă
Salate, sosuri
pentru
garnituri şi
friptură
Biftec tartar,
hamburger,
chifteluţe
Biftec tartar,
hamburger,
chifteluţe
Procedură
Sugestie: adăugaţi puţin suc de
lămâie pentru ca fructele să nu
se oxideze.
Curăţaţi usturoiul.Apăsaţi de
câteva ori butonul impuls
pentru a evita pisarea prea fină
a usturoiului. Folosiţi cel puţin
150 g.
Spălaţi şi uscaţi verdeaţa înainte
de a o toca.
Toate ingredientele trebuie să
fie la temperatura camerei.
Notă: folosiţi cel puţin un ou
mare, două ouă mici sau două
gălbenuşuri de ou. Puneţi oul
(ouăle) şi puţin oţet în bol şi
adăugaţi ulei puţin câte puţin.
Mai întâi îndepărtaţi zgârciurile
sau oasele.Tăiaţi carnea în
cubuleţe de 3 cm. Folosiţi
funcţia impuls pentru o carne
tocată mai mare.
Mai întâi îndepărtaţi zgârciurile
sau oasele.Tăiaţi carnea în
cubuleţe de 3 cm. Folosiţi
funcţia impuls pentru o carne
tocată mai mare.
Acces
oriu/vi
teză
P / 2
P / 2
P / 2
å / 1
Å / 2
P / 2
Cantit
ate
max.
500g
300g
Min.
50g
3 ouă
1000g
400g
Ingrediente şi
rezultate
Fructe (de ex.
mere, banane)
- tocare
Usturoi pisare
Verdeaţă
(pătrunjel) tocare
Maioneză emulsionare
Carne (slabă) tocare
Carne de
porc, de vită,
peşte şi de pui
(carne
împănată) tocare
Aplicaţii
Diverse
prăjituri.
Salate, budinci,
pastă de
migdale,
cornuri cu
nucă
Salate,
mâncare gătită,
soté-uri,
garnituri
Salate,
mâncare gătită,
soté-uri,
garnituri
Garnituri,
frişcă,
preparate pe
bază de
îngheţată
Milkshake
Supe, sosuri
Procedură
Ingredientele trebuie să fie la
temperatura camerei. Mixaţi
untul moale cu zahărul până ce
compoziţia devine onctuoasă.
Apoi adăugaţi laptele, ouăle şi
făina.
Folosiţi butonul impuls pentru
o tocare mai mare.
Curăţaţi cepele şi tăiaţi-le în
patru. Poziţionaţi butonul pe
poziţia impuls de 2 ori, apoi
verificaţi rezultatul.
Curăţaţi cepele şi tăiaţi-le în
bucăţi care să încapă pe tubul
de alimentare. Notă: folosiţi cel
puţin 100g.
Folosiţi smântână proaspăt
scoasă din frigider.Notă: folosiţi
cel puţin 125ml de smântână.
Frişca bătută este gata după
aprox. 2 de minute.
Pasaţi fructele (de ex. banane,
căpşuni) împreună cu zahărul,
laptele şi puţină îngheţată şi
mixaţi bine.
Folosiţi legume gătite
Acces
oriu/vi
teză
{ / 2
P / 2
P / 2
g / 1
å / 1
D / 2
D / 2
Cantit
ate
max.
4 ouă
250g
500g
300g
500ml
500
ml
lapte
500ml
Ingrediente şi
rezultate
Aluaturi
(prăjituri) mixare
Nuci - tocare
Cepe - tocare
Cepe -tăiere în
felii
Frişcă bătută batere
Milkshake amestecare
Supe - pasare
Page 57

ROMÂNĂ 57
Reţete
Pastă de dovlecei pentru tartine
Ingrediente:
- 2 dovlecei
- 3 ouă fierte
- 1 ceapă mică
- 1 lingură ulei vegetal
- pătrunjel
- 2-3 linguri smântână
- suc de lămâie, sos Tabasco, sare, piper, curry,
ardei paprika
B
Spălaţi şi ştergeţi dovleceii, apoi radeţi-i cu ajutorul
discului de radere în bolul de preparare a
alimentelor. Puneţi dovleceii raşi într-o farfurie,
presăraţi sare şi lăsaţi aproximativ 15 minute ca
sarea să absoarbă zeama din dovleceii raşi.Tăiaţi
ceapa în 4 şi tocaţi-o mărunt împreună cu
usturoiul. Curăţaţi pătrunjelul şi tocaţi-l.
B
Puneţi apoi dovlecelul ras pe un şervet curat şi
stoarceţi zeama din el. Puneţi puţin ulei într-o
cratiţă şi căliţi ceapa tocată şi usturoiul, adăugaţi
apoi dovleceii. Lăsaţi să se evapore zeama din
ingrediente. Lăsaţi apoi ingredientele să se
răcească puţin. Decojiţi ouăle şi tocaţi-le în bolul
pentru prepararea alimentelor timp de câteva
secunde.Adăugaţi celelalte ingrediente în bol,
condimentaţi şi mixaţi totul cu cuţitul.A se servi
pe pâine albă prăjită.
Prăjitură cu fructe
Ingrediente:
- 150g smochine
- 225g prune
- 100g nuci (50g migdale/50g nuci)
- 50g stafide
- 500g stafide fără sâmburi
- 200g făină de secară integrală
- 100g făină de grâu
- 120g zahăr nerafinat
- un vârf de cuţit sare
- 1 pliculeţ praf de copt
- 300g zer
B
Introduceţi cuţitul în bol. Puneţi ingredientele în bol
şi mixaţi ingredientele 30 de secunde. Coaceţi
prăjitura într-o tavă de copt cu o lungime de
30 cm timp de 40 de minute la 170cC.
Quiche de praz
Ingrediente pentru cocă:
- 250 g făină de grâu (sau făină de grâu
completă)
- un vârf de cuţit sare
- 1 lingură miere
- 20 g drojdie proaspătă sau 1/2 plic de drojdie
uscată
- 100g unt
- 6 linguri apă călduţă
Ingrediente pentru umplutură:
- 500 g praz
- ulei vegetal
- 4 ouă
Page 58

ROMÂNĂ58
- 500 g smântână
- sare, piper, 1-2 linguri făină, dacă e necesar
B
Puneţi toate ingredientele într-un bol şi frământaţi
până obţineţi o cocă consistentă. Lăsaţi coca să
crească timp de 30 de minute.
B
Tăiaţi prazul rondele cu ajutorul discului de feliere.
Puneţi puţin ulei într-o tigaie şi căliţi prazul câteva
minute. Puneţi restul ingredientelor în vasul
blenderului şi lăsaţi blenderul să funcţioneze până
ce amestecul se omogenizează.Adăugaţi 1-2
linguri de făină pentru a îngroşa compoziţia.
B
Ungeţi o tavă de copt cu diametrul de 24 cm şi
întindeţi bine coca pe fundul şi pe marginea tăvii.
Întindeţi compoziţia cu praz deasupra aluatului şi
turnaţi restul ingredientelor peste compoziţie.
Coaceţi în cuptorul încins timp de 40 de minute la
180cC. Poate fi servit rece sau cald.
Gulaş unguresc
Ingrediente:
- 1 lingură ulei
- 1 ceapă mijlocie
- 1 linguriţă paprika
- 400 g carne de vită sau porc
- 1 ardei iute
- 1 roşie
- sare
- 200g morcovi
- 300g cartofi
- chimen
B
Spălaţi carnea şi tăiaţi-o în cubuleţe cu latura de
2 cm. Curăţaţi ceapa şi tocaţi-o în bolul pentru
prepararea alimentelor cu ajutorul cuţitului.
Curăţaţi ardeiul de seminţe şi tăiaţi-l rondele
folosind discul de tranşare. Curăţaţi roşia de coajă,
scoateţi sâmburii şi tăiaţi-o feliuţe. Căliţi ceapa în
ulei până se înmoaie. Luaţi-o de pe aragaz şi
presăraţi paprika, adăugaţi carnea şi lăsaţi să se
prăjească la foc iute câteva minute, amestecând
continuu.Adăugaţi ardeiul iute, roşia şi sare după
gust, acoperiţi tigaia şi lăsaţi să fiarbă înăbuşit la
foc potrivit până se frăgezeşte.
B
Între timp, curăţaţi morcovii şi tăiaţi-i felii cu
ajutorul discului de tranşare, apoi curăţaţi şi tăiaţi
cartofii cubuleţe. Adăugaţi-i peste carne şi turnaţi
o cantitate de apă suficientă pentru supa pe care
doriţi s-o preparaţi (aprox. 1,2 litri). Condimentaţi
cu un vârf de cuţit de chimen şi lăsaţi să fiarbă la
foc mic până se frăgezeşte, adăugând puţină sare,
dacă este necesar.
B
A se servi fierbinte. Puteţi garnisi cu rondele de
ardei iute şi puteţi servi ardei iute roşu pe o
farfurie separată.
Colac cu alune
Ingrediente pentru aluat:
- 500g făină cernută
- 75g zahăr
- 1 linguriţă sare
-1 ou
- 250ml lapte (la 35cC)
- 100g unt, moale
- 30g drojdie proaspătă (pentru drojdia uscată,
citiţi instrucţiunile de pe ambalaj)
Page 59

59ROMÂNĂ
Umplutură:
- 250g alune măcinate
- 100g zahăr
- 2 pliculeţe zahăr vanilat
- 125ml frişcă
B
Încălziţi cuptorul la 200cC. Mixaţi laptele, drojdia
şi zahărul într-un bol timp de 15 secunde cu
ajutorul accesoriului de frământare. Adăugaţi
făina, sarea, untul şi oul. Frământaţi coca 2
minute. Puneţi coca într-un bol separat şi
acoperiţi-o cu o cârpă umedă. Lăsaţi coca să
crească la loc călduţ timp de 20 de minute.
B
Tocaţi alunele cu cuţitul. Mixaţi ingredientele pentru
umplutură. Întindeţi coca cu făcăleţul, în formă
dreptunghiulară. Întindeţi deasupra crema de alune,
apoi rulaţi coca în formă de colac. Puneţi colacul
într-o tavă unsă cu unt. Lăsaţi colacul să crească
timp de 20 de minute. Ungeţi colacul cu gălbenuş
de ou şi poziţionaţi tava pe un grătar în centrul
cuptorului. Coaceţi 25-30 de minute la 200cC.
Tort de ciocolată
Ingrediente:
- 140g unt, moale
- 110g zahăr glazurat
- 140g ciocolată
- 6 albuşuri
- 6 gălbenuşuri
- 110g zahăr tos
- 140g făină de grâu
Umplutură:
- 200g gem de caise
Grazurare:
- 125ml apă
- 300g zahăr
- 250g ciocolată rasă
- frişcă bătută, opţional
B
Încălziţi cuptorul la 160cC. Omogenizaţi untul cu
zahărul glazurat cu ajutorul cuţitului metalic.Topiţi
ciocolata şi încorporaţi-o.Adăugaţi gălbenuşurile
unul câte unul în compoziţie şi amestecaţi până
ce obţineţi o cremă onctuoasă. Bateţi cu ajutorul
cuţitului albuşul cu zahărul tos până se întăreşte
spuma de albuş folosind discul de emulsionare.
Adăugaţi spuma de albuş peste cremă
încorporând-o treptat. Încorporaţi apoi făina cu o
spatulă. Puneţi aluatul într-o tavă unsă cu unt.
Lăsaţi-o la copt o oră la 160cC. Lăsaţi uşa
cuptorului întredeschisă primele 15 minute.
B
Lăsaţi prăjitura să se răcească puţin în tavă
(24 cm), apoi răsturnaţi-o pe un grătar pentru a
se răci complet.Tăiaţi prăjitura în două pe
orizontală, ungeţi jumătate cu gem de caise şi
acoperiţi-o cu cealaltă jumătate. Încălziţi restul
gemului până devine siropos şi ungeţi prăjitura.
Preparaţi glazura. Fierbeţi apă, adăugaţi zahăr şi
ciocolată şi fierbeţi la foc mic. Amestecaţi continuu
până ce capătă o consistenţă omogenă, uşor de
întins. Puneţi glazura peste prăjitură şi lăsaţi-o să
se răcească.A se servi cu frişcă bătută.
Supă de brocoli
Ingrediente:
- 50 g brânză Gouda
- 300 g broccoli fiert
Page 60

ROMÂNĂ60
- supa în care a fiert broccoli
- 2 cartofi fierţi cubuleţe
- 2 cuburi pentru ciorbă tip vegeta
- 2 linguri smântână
- curry
- sare
- piper
- miez de nucă
B
Radeţi brânza. Faceţi un piure din broccoli, cartofii
fierţi şi puţin din supa în care a fiert broccoli.
Puneţi piureul de broccoli, restul supei şi
condimentele tip vegeta într-un vas gradat şi
turnaţi 750 ml.Vărsaţi supa într-o tigaie şi fierbeţio amestecând continuu. Încorporaţi brânza şi
condimentaţi cu curry, sare, piper şi miez de nucă,
adăugând la sfârşit smântâna.
Shake de fructe proaspete
Ingrediente:
- 100 g banane sau căpşuni
- 200 ml lapte proaspăt
- 50g îngheţată de vanilie
- zahăr tos după gust
B
Cojiţi bananele şi spălaţi căpşunile.Tăiaţi fructele
în bucăţi mici. Puneţi toate ingredientele în vasul
blenderului.Amestecaţi până ce se omogenizează
compoziţia.
B
Puteţi folosi orice fructe doriţi pentru a vă prepara
shake-ul dumneavoastră de fructe preferat.
Pizza
Ingrediente pentru cocă:
- 400g făină
- 1/2 linguriţă sare
- 20 g drojdie proaspătă sau 1,5 plic drojdie
uscată
- 2 linguri ulei pentru gătit
- aprox. 240 ml apă (35cC)
Pentru garnitură:
- 300ml pastă de tomate (la conservă)
- 1 linguriţă verdeaţă amestecată (uscată şi
proaspătă)
- 1 ceapă
- 2 căţei de usturoi
- sare şi piper
- zahăr
Ingrediente de presărat peste sos:
- măsline, salam, ciuperci, anşoa,mozzarella, ardei,
caşcaval ras şi ulei de măsline după gust.
B
Introduceţi accesoriul de frământat în bol. Puneţi
toate ingredientele în bol şi selecţionaţi viteza
maximă (poziţia 2). Frământaţi coca aproximativ
90 de secunde până capătă forma unei mingi.
Puneţi coca într-un alt castron, acoperiţi-o cu o
cârpă umedă şi lăsaţi-o la crescut timp de 30 de
minute.
B
Tocaţi ceapa şi usturoiul cu cuţitul metalic în bolul
de preparare, apoi căliţi ceapa într-o tigaie.
Adăugaţi roşiile şi verdeaţa, şi lăsaţi să fiarbă la
foc mic timp de 10 minute. Condimentaţi după
Page 61

ROMÂNĂ 61
gust cu sare, piper şi zahăr. Lăsaţi sosul să se
răcească.
B
Încălziţi cuptorul la 250cC.
B
Întindeţi coca pe masa de lucru pe care aţi
presărat făină şi întindeţi coca în două foi rotunde.
Puneţi cele două foi de cocă pe tava unsă.Turnaţi
garniturile pe blatul de pizza şi adăugaţi câteva
picături de ulei de măsline.
B
Coaceţi pizza 12-15 minute.
Legume şi cartofi soté
Ingrediente:
-1 ou
- 50ml lapte
- 1 lingură făină
- 1 linguriţă coriandru
- sare şi piper
- 2 cartofi mari (aprox. 300g)
- 100g morcovi
- 150g ţelină
- 50g seminţe de floarea soarelui
- ulei pentru prăjit
B
Mixaţi oul, laptele, făina, coriandrul, sarea şi
piperul folosind cuţitul.
B
Radeţi cartofii curăţaţi de coajă, morcovii şi ţelina
spălată cu ajutorul discului de radere mare şi apoi
adăugaţi compoziţia pe bază de ou.Amestecaţi
legumele, compoziţia cu ou şi seminţele de floarea
soarelui în bol.
B
Încălziţi ulei într-o tigaie şi prăjiţi 8 chifteluţe plate
pe ambele părţi până se rumenesc. Lăsaţi să se
scurgă pe o bucată de hârtie de bucătărie.
B
Durata de prăjire: 3-4 minute.
Pâine (albă)
Ingrediente:
- 500g făină
- 15g unt sau margarină moale
- 25g drojdie proaspătă sau 20g drojdie uscată
- 260ml apă
- 10g sare
- 10g zahăr
B
Montaţi accesoriul de frământare în bol. Puneţi
făina, sarea şi margarina sau untul în bol. Adăugaţi
drojdia proaspătă sau uscată şi apa. Puneţi
capacul deasupra bolului şi răsuciţi-l în direcţia
săgeţii până auziţi clic. Selecţionaţi viteza maximă
(poziţia 2) şi frământaţi coca (pentru durata
maximă de frământare, consultaţi capitolul
Cantităţi şi durate de preparare).
B
Scoateţi coca din bol, puneţi-o într-un castron
mare, acoperiţi-o cu un prosop umed de bucătărie
şi lăsaţi-o să crească la loc cald timp de 20 de
minute. După ce a crescut, aplatizaţi coca cu
mâna, apoi frământaţi-o în formă de minge.
B
Răsturnaţi din nou coca în castron, acoperiţi-o cu
un prosop umed şi lăsaţi-o la crescut încă 20 de
minute.Aplatizaţi-o din nou, apoi întindeţi-o cu
făcăleţul.
B
Întindeţi coca într-o tavă unsă, şi lăsaţi-o la crescut
încă 45 de minute. Coaceţi pâinea în partea de
jos a cuptorului încins.
B
Coaceţi pâinea la aproximativ 225cC în partea
de jos a cuptorului încins timp de 35 de minute.
Page 62

РУССКИЙ62
Введение
Данный электроприбор оснащен аварийным
термовыключателем, который отключает
подачу электроэнергии в случае перегревания
прибора.
Общее описание
A Блок электродвигателя
B Регулятор скорости
- P= импульсный режим
- 0 = выкл.
- 1 = минимальная скорость
- 2 = максимальная скорость
C Навинчивающийся колпачок (должен быть
установлен, для того чтобы можно было
использовать функции кухонного комбайна)
D Чаша для обработки продуктов
E Держатель для насадок
F Крышка чаши кухонного комбайна
G Кувшин блендера
H Крышка кувшина блендера
I Загрузочный бункер
J То л к а т е л ь
K Заглушка
L Насадка-тестомешалка
M Металлический нож + защитный чехол
N Ломтерезка для нарезки ломтиками
средней толщины
O Терка для среднего измельчения
P Рамка для ножей-вставок
Q Диск-измельчитель
R Корпус редуктора мясорубки
S Корпус ножевого блока мясорубки
T Червячный вал
U Кольцо с резьбой
V Ножевой блок
W Диск средней степени измельчения
(диаметр 4 мм)
X Диск предварительного измельчения
(диаметр 8 мм)
Y Сепаратор
Z Рожок для приготовления колбасок
a Загрузочный поддон
b То л к а т е л ь
c Ручка выключения
Внимание
Прежде чем начать пользоваться прибором,
внимательно ознакомьтесь с настоящим
руководством и сохраните его в качестве
справочного материала.
◗ Прежде чем подключить прибор к
электросети, убедитесь в том, что
напряжение,указанное на приборе,
соответствует напряжению электросети в
вашем доме.
◗ Запрещается пользоваться какими-либо
принадлежностями или деталями других
производителей, не имеющих специальной
рекомендации компании «Филипс».При
использовании такой принадлежности или
детали вы теряете право на гарантийное
обслуживание.
Page 63

РУССКИЙ 63
◗ Во избежание возникновения опасной
ситуации запрещено соединять
электроприбор с реле времени.
◗ Не пользуйтесь прибором при
поврежденном сетевом шнуре,
штепсельной вилке или других деталях.
◗ В случае повреждения сетевого шнура его
необходимо заменить только в торговой
организации или в уполномоченном
сервисном центре компании «Филипс»,или в
сервисном центре с персоналом аналогичной
квалификации, чтобы обеспечить
безопасную эксплуатацию прибора.
◗ Перед первым применением прибора
тщательно промойте все детали, которые
будут контактировать с пищевыми
продуктами.
◗ Не следует превышать указанные в таблице
норму загрузки блендера ингредиентами, а
также время приготовления.
◗ Не заполняйте чашу для переработки
продуктов или кувшин блендера выше
отметки максимального уровня,т.е. не
заполняйте выше уровня верхней отметки.
◗ Сразу же после окончания работы
вынимайте вилку сетевого шнура из
розетки электросети.
◗ Во время работы электроприбора
запрещается проталкивать продукты в
загрузочный бункер пальцами или какимилибо предметами (например, лопаткой).Для
этой цели пользуйтесь только толкателем.
◗ Если вам все же необходимо
воспользоваться рукой или каким-либо
предметом (например, лопаткой), выньте
вилку сетевого шнура из розетки
электросети.
◗ Храните прибор в недоступном для детей
месте.
◗ Запрещается оставлять включенный
прибор без присмотра.
◗ Режим переработки продуктов будет
действовать только в том случае, когда
точка на навинчивающемся колпачке
находится напротив точки на блоке
электродвигателя, линия на крышке и линия
на чаше находятся точно друг против
друга. В этом случае встроенная блокировка
разблокирована, и вы можете включить
электроприбор.
◗ Выключите электроприбор, прежде чем
снять с него какую-либо насадку.
◗ Всегда выключайте электроприбор, установив
регулятор скорости в положение 0.
◗ Прежде чем снять крышку с
электроприбора, подождите до полной
остановки движущихся деталей.
◗ Запрещается погружать блок
электродвигателя в воду или другие
жидкости, а также промывать этот блок
под струей воды.Для очистки блока
электродвигателя пользуйтесь только
влажной тканью.
◗ Прежде чем пользоваться ножом, снимите
с него защитный колпачок.
◗ Запрещается пользоваться ножевым
блоком вместе с сепаратором и рожком для
приготовления колбасок.
Page 64

РУССКИЙ64
◗ Не рекомендуется размалывать кости,
орехи или какие-либо другие твердые
продукты.
◗ Запрещается опускать пальцы в
загрузочный бункер.Пользуйтесь только
толкателем.
◗ Прежде чем обрабатывать горячие
продукты в кувшине блендера,дайте им
остыть (максимальная температура
80cC/175cF).
◗ При переработке жидкости, образующей
пену, не наливайте в кувшин блендера
более 1 л жидкости во избежание ее
расплескивания.
◗ Количества и время приготовления
продуктов указано в таблице данного
руководства по эксплуатации.
◗ Имейте в виду, что нельзя использовать
чашу для переработки продуктов, если на
блок электродвигателя установлен кувшин
блендера.
◗ Уровень шума Lc= 89 дБ [A]
Как пользоваться электроприбором
Аварийный термовыключатель
Во избежание возникновения опасной
ситуации запрещено соединят
электроприбор с реле времени.
При неожиданной остановке
электродвигателя:
1 Выньте вилку сетевого шнура из
электророзетки.
2 Дайте электроприбору остыть в течение
60 минут.
3 Вставьте вилку сетевого шнура в
розетку электросети.
4 Включите электроприбор повторно.
B
В случае слишком частого срабатывания
аварийного выключателя обратитесь в
торговую организацию или уполномоченный
сервисный центр компании "Филипс".
Чаша для переработки продуктов
Чаша для переработки продуктов будет
работать только в том случае, если на блок
электродвигателя не установлен кувшин
блендера, и если навинчивающийся колпачок
навинчен на блоке электродвигателя таким
образом, что точка на навинчивающемся
колпачке находится напротив точки на блоке
электродвигателя.
C
1 Установите чашу на кухонный
процессор, повернув ручку в
направлении стрелки до щелчка.
C
2 Установите крышку на чашу.Поверните
крышку в направлении стрелки до
CLICK
CLICK
1
1
2
2
Page 65

РУССКИЙ 65
щелчка (для этого потребуется
приложить некоторое усилие).
Встроенная блокировка
На блок электродвигателя, чашу и на крышку
нанесены отметки. Электроприбор будет
работать только в том случае, когда точка на
чаше находится напротив точки на блоке
электродвигателя.
C
1 Убедитесь в том, что линия на крышке и
линия на чаше находятся точно друг
против друга. При этом выступ крышки
будет дополнять форму ручки.
Загрузочный бункер и толкатель
C
1 Для добавления жидких и/или твердых
ингредиентов используйте загрузочный
бункер.Для продвижения твердых
ингредиентов вниз по загрузочному
бункеру пользуйтесь толкателем.
C
2 Вы можете также воспользоваться
толкателем для того,чтобы закрыть
загрузочный бункер,не допуская
выброса продуктов через загрузочный
бункер.
Металлический нож
Металлический нож предназначен для
измельчения, перемешивания, купажирования и
приготовления пюре.
Режущие кромки ножа очень острые. Не
прикасайтесь к ним!
C
1 Снимите с ножа защитный колпачок.
C
2 Установите рамку для ножей-вставок в
чашу, а ножи-вставки установите в рамку,
установленную в чашу.
3 Положите в чашу ингредиенты.
B
Предварительно нарежьте крупные куски
продуктов кубиками размером около 3 х 3 х 3 см.
Закройте чашу крышкой.
4 Поместите толкатель в загрузочный
бункер.
C
5 Установите регулятор скорости на
максимальную скорость (положение 2).
- Процесс обработки будет продолжаться до
переключения регулятора в положение 0
(выкл.).
◗ Для уменьшения скорости переведите
регулятор скорости в положение 1.
CLICK
Page 66

РУССКИЙ66
Полезные советы
◗ При измельчении лука несколько раз
включайте импульсный режим, чтобы не
допустить чрезмерного измельчения лука.
◗ При измельчении твердых сортов сыра не
включайте электродвигатель надолго. Сыр
может нагреться,начнет плавиться и
слипаться в комки.
◗ Не пользуйтесь ножом для измельчения
очень твердых ингредиентов, таких как
кофейные зерна, мускатный орех, куркума и
кубики льда. Нож может затупиться.
В случае налипания продуктов на нож или
внутреннюю поверхность чаши:
1 Выключите прибор.
2 Снимите с чаши крышку.
3 С помощью лопатки очистите
прилипшие продукты с лезвия ножа или
со стенок чаши.
Вставки: ломтерезка и терка
Запрещается пользоваться ножами-вставками
для обработки твердых ингредиенто
например, кубиков льда.
Режущие кромки ножей-вставок очень острые
Не прикасайтесь к ним!
C
1 Установите требуемый нож-вставку в
соответствующий держатель.
C
2 Установите рамку для ножей-вставок на
держатель для насадок, имеющийся в
чаше.
3 Закройте чашу крышкой.
4 Поместите ингредиенты в загрузочный
бункер.
B
Порежьте крупные кускина кусочки такого
размера, чтобы их можно было поместить в
загрузочный бункер.
C
5 Для получения наилучших результатов
заполняйте загрузочный бункер
равномерно.
B
Если вам необходимо нарезать или
натереть большое количество продуктов,
разделите их на небольшие порции и
регулярно освобождайте чашу после
обработки каждой порции.
C
6 Установите регулятор скорости на
максимальную скорость (положение 2).
Процесс обработки будет продолжаться до
переключения регулятора в положение 0
(выкл.).
CLICK
2
1
Page 67

РУССКИЙ 67
◗ Для уменьшения скорости переведите
регулятор скорости в положение 1.
C
7 Слегка нажимайте толкателем на
ингредиенты, находящиеся в
загрузочном бункере.
◗ При измельчении мягких овощей или
фруктов вы можете уменьшить скорость,
переведя переключатель в положение 1,
чтобы не допустить чрезмерного
измельчения овощей и фруктов до
состояния пюре.
C
8 Для того, чтобы извлечь нож-вставку из
рамки, возьмите рамку для ножейвставок в руки так, чтобы ее заднее
ребро было направлено в вашу сторону.
Нажмите на края ножа-вставки
большими пальцами, и он выпадет из
рамки.
Насадка-тестомешалка
Вы можете использовать насадкутестомешалку при замешивании дрожжевого
теста для хлеба и приготовлении смеси для
кексов.
C
1 Установите чашу на блок
электродвигателя и установите насадкутестомешалку на рамку для вставок,
установленную в чашу.
2 Поместите ингредиенты в чашу и
закройте чашу крышкой. Поместите
толкатель в загрузочный бункер, чтобы
избежать выброса продуктов через
загрузочный бункер при замешивании.
C
3 Установите регулятор скорости на
максимальную скорость (положение 2).
Время обработки продуктов представлено в
таблице.
Диск для перемешивания жидкостей
Вы можете пользоваться диском для
эмульгирования для приготовления майонеза,
взбивания сливок и сбивания яичных белков.
C
1 Установите диск для эмульгирования на
держатель для насадок, расположенный
в чаше.
2 Поместите ингредиенты в чашу и
закройте ее крышкой.
3 Установите регулятор скорости на
минимальную скорость (положение 1)
для получения оптимальных результатов.
Полезные советы
◗ Сбивать яичные белки лучше всего,если
они имеют комнатную температуру.
◗ Выньте яйца из холодильника по крайней
мере за полчаса до их обработки.
Page 68

РУССКИЙ68
◗ Все ингредиенты для приготовления
майонеза должны иметь комнатную
температуру.
◗ Вы можете добавлять масло через
небольшое отверстие в днище толкателя.
◗ Если вы собираетесь взбивать сливки,
берите их прямо из холодильника.Время
взбивания должно соответствовать
указанному в таблице. Сливки не надо
взбивать слишком долго.
◗ Используйте импульсный режим для
лучшего контроля за приготовлением.
Блендер
Блендер предназначен для:
- Смешивания жидких ингредиентов,
например, молочных продуктов, соусов,
фруктовых соков, супов, коктейлей и
сладкого чая.
- Перемешивания мягких ингредиентов для
приготовления, например, жидкого теста для
оладьев или майонеза.
- Приготовления пюре из отварных
продуктов, например, для детского питания.
C
1 Для того чтобы установить кувшин
блендера, снимите навинчивающийся
колпачок.
C
2 Прочно зафиксируйте кувшин блендера
на верхней поверхности блока
электродвигателя, поворачивая его по
стрелке. Ручка должна быть направлена
влево.
Не нажимайте слишком сильно на ручку
кувшина блендера.
3 Поместите ингредиенты в кувшин
блендера.
C
4 Закройте крышку.
C
5 Установите регулятор скорости на
максимальную скорость (положение 2).
Электроприбор будет работать, пока вы
не выключите его, установив регулятор
скорости в положение 0.
Время обработки продуктов представлено в
таблице.
Полезные советы
C
◗ Наливайте жидкие ингредиенты в кувшин
блендера через отверстие в крышке.
◗ Чем дольше будет включен
электродвигатель, тем более однородной
будет полученная смесь.
◗ Прежде чем помещать в блендер твердые
ингредиенты, нарезайте их на более мелкие
кусочки. Если вам требуется переработать
большой объем продуктов,разделите его
на небольшие порции, а не старайтесь
переработать все продукты за один прием.
◗ Твердые ингредиенты, например, соевые
бобы для получения соевого молока,
следует перед обработкой замочить в воде.
1
2
2
1
Page 69

69РУССКИЙ
C
◗ Для получения дробленого льда поместите
кубики льда в кувшин, закройте кувшин
крышкой и включите электроприбор в
импульсном режиме.
Если ингредиенты прилипают к стенкам
кувшина блендера:
1 Выключите электроприбор и выньте
вилку сетевого шнура из розетки
электросети.
2 Откройте крышку.
Запрещается открывать крышку кувшина до
полной остановки движущихся деталей
электроприбора.
3 Очищайте налипшие продукты со
стенок кувшина с помощью лопатки.
Удерживайте лопатку на безопасном
расстоянии от режущих кромок
(приблизительно 2 см).
B
Если вы не удовлетворены результатом
обработки ингредиентов, выключите
электроприбор, после чего несколько раз на
короткий промежуток времени включайте
электроприбор, нажимая на кнопку
импульсного режима. Вы можете также
перемешать ингредиенты лопаткой (при
выключенном электроприборе!) или отлить
часть содержимого и обработать меньшую
порцию.
B
В некоторых случаях ингредиенты легче
перемешать, если добавить к ним немного
жидкости, например, лимонного сока, при
смешивании фруктов.
Мясорубка
Мясорубка может применяться для
приготовления мясного фарша и колбасок.
Мясорубка будет работать только в том случае,
если на блок электродвигателя не установлен
кувшин блендера, и если навинчивающийся
колпачок навинчен на блоке электродвигателя
таким образом, что точка на навинчивающемся
колпачке находится напротив точки на блоке
электродвигателя.
C
1 Подсоедините корпус редуктора к
блоку электродвигателя.
Если вы осуществили сборку правильно, вы
услышите щелчок.
C
2 Вставьте червячный вал в корпус
ножевого блока пластиковым концом
вперед.
C
3 Установите ножевой блок на червячный
вал. Режущие кромки должны быть
направлены вперед.
Page 70

РУССКИЙ70
C
4 Поместите диск средней степени
измельчения или диск предварительного
измельчения (в зависимости от
консистенции фарша, которую вы
хотите получить) на червячный вал.
Убедитесь в том, что выступ на головной части
мясорубки вошел в выемку на диске для
измельчения.
C
5 Закрепите кольцо с резьбой на корпусе
ножевого блока,поворачивая его в
направлении, указанном стрелкой, до
упора.
C
6 Установите загрузочный поддон на
вертикальный выступ корпуса ножевого
блока.
Перемалывание мяса
1 Порежьте мясо кусочками длиной 10 см,
толщиной 2 см.
2 Удалите по возможности кости,хрящи
и сухожилия.
Запрещается перемалывать замороженное
мясо!
C
3 Установите регулятор скорости на
максимальную скорость (положение 2).
C
4 Положите мясо в поддон.Аккуратно
проталкивайте мясо толкателем в корпус
ножевого блока.
◗ За минуту можно перемолоть 1,3 кг мяса.
Если вы собираетесь порубить свинину, она
должна быть постной, без жира и сухожилий
◗ Для мяса по-татарски рекомендуем
перемолоть мясо дважды, используя диск
средней степени измельчения.
Приготовление колбасок
1 Сделайте фарш.
2 По окончании перемалывания
отсоедините прибор от сети и снимите
кольцо с резьбой.
3 Снимите диск для измельчения.
4 Снимите ножевой блок.
◗ Если вы хотите готовить колбаски, оставьте
червячный вал в корпусе ножевого блока.
C
5 Поместите сепаратор в корпус
ножевого блока.
C
6 Установите рожок для приготовления
колбасок и наверните кольцо с резьбой
на корпус ножевого блока.
Page 71

РУССКИЙ 71
Прибор готов для приготовления колбасок.
Полезные советы
- Положите оболочку для колбасок на
10 минут в теплую воду. Затем натяните
влажную оболочку для колбасок на рожок.
Поместите мясной фарш (приправленный) в
корпус ножевого блока.
- Если оболочка прилипает к рожку, смочите
ее водой.
- Для приготовления колбасок выберите
скорость 1.
Очистка
Перед очисткой прибора отключите его и
выньте вилку сетевого шнура из розетки
электросети.
Будьте очень осторожны при очистке нож
ножевого блока блендера и ножей-вставок
Режущие кромки этих деталей очень острые!
Убедитесь, что лезвия ножа, ножевого блок
блендера и ножей-вставок не вступают
контакт с твердыми предметами, которые
могут их затупить.
B
Под воздействием определенных продуктов
цвет поверхности деталей может
измениться. Эксплуатационные качества
деталей при этом не ухудшаются. Через
некоторое время цвет деталей, как правило,
восстанавливается.
C
1 Намотайте излишек сетевого шнура
вокруг барабана, расположенного на
задней панели электроприбора.
2 Очищайте блок электродвигателя
влажной тканью. Запрещается погружать
блок электродвигателя в воду или
промывать его под струей воды.
3 Каждый раз сразу же после работы
промывайте горячей водой с моющим
средством детали, контактирующие с
пищей.
4 Чашу, крышку чаши, толкатель и
принадлежности (за исключением
кувшина блендера) можно мыть также в
посудомоечной машине.
Эти детали прошли испытание на
устойчивость к мытью в посудомоечной
машине в соответствии с DIN EN 12875.
Кувшин блендера не имеет защитного
покрытия для очистки в посудомоечной
машине!
5 Чтобы снять крышку, откройте ее и
потяните вверх.
Снимайте крышку только перед очисткой
прибора.
Page 72

РУССКИЙ72
Быстрая очистка блендера
C
1 Налейте в кувшин блендера теплую воду
(не более 0,5 л) и немного моющего
средства.
2 Закройте крышку.
C
3 Дайте прибору поработать некоторое
время, включив импульсный режим (как
только вы отпустите кнопку регулятора
скорости, прибор остановится).
4 Снимите кувшин блендера и сполосните
его чистой водой.
Мясорубка
Мясо, оставшееся в корпусе ножевого блока,
можно удалить из мясорубки, пропустив через
нее кусок хлеба.
1 Убедитесь, что сетевой шнур
электроприбора отключен от розетки
электросети.
2 Нажмите на ручку выключения и
отверните целиком корпус ножевого
блока в направлении стрелки.
3 Уберите толкатель и снимите
загрузочный поддон.
4 Отверните кольцо с резьбой и выньте
все детали из корпуса ножевого блока.
Не рекомендуется мыть детали мясорубки
посудомоечной машине!
5 Промойте все детали,
контактировавшие с мясом, в теплой
мыльной воде СРАЗУ ЖЕ ПОСЛЕ
ИСПОЛЬЗОВАНИЯ МЯСОРУБКИ.
6 Ополосните их в чистой теплой воде и
СРАЗУ ЖЕ высушите.
◗ Рекомендуем смазывать ножевой блок и
диски для измельчения растительным
маслом.
Хранение
Хранение мелких принадлежностей
C
◗ Установите принадлежности (нож и рамку
для ножей-вставок) на держатель для
насадок и храните их в чаше. Последней
всегда устанавливайте рамку для ножейвставок.
C
◗ Намотайте сетевой шнур вокруг барабана,
расположенного на задней панели
электроприбора.
Page 73

РУССКИЙ 73
Гарантия и обслуживание
По поводу дополнительной информации или в
случае возникновения каких-либо проблем
обращайтесь на Web-сайт компании «Филипс»
по адресу: www.philips.com или в центр
компании «Филипс» по обслуживанию
потребителей в вашей стране (вы найдете его
номер телефона на международном
гарантийном талоне). Если подобный центр в
вашей стране отсутствует, обратитесь в вашу
местную торговую организацию компании
«Филипс» или в сервисное отделение
компании Philips Domestic Appliances and
Personal Care BV.
Устранение
Поверните чашу и крышку по часовой стрелке до
щелчка. Убедитесь в том, что точка на чаше
находится точно напротив точки на блоке
электродвигателя, а линия на крышке и линия на чаше
находятся точно друг против друга. Также убедитесь,
что на блок электродвигателя не установлен кувшин
блендера, и что навинчивающийся колпачок
правильно навинчен на блоке электродвигателя.
Точка на навинчивающемся колпачке должна
находиться точно напротив точки на блоке
электродвигателя.
Вероятно, электроприбор был отключен
автоматическим аварийным выключателем из-за
перегревания. 1) Выключите прибор (положение 0)
2) Выньте вилку прибора из розетки электросети.
3) Дайте прибору остыть в течение 60 минут.
4) Вставьте вилку прибора в розетку электросети.
5) Снова включите прибор.
Проверьте, повернули ли вы чашу и крышку по
часовой стрелке до щелчка.
Если кувшин блендера и чаша для переработки
продуктов установлены правильно, будет работать
только блендер. Если вы хотите использовать чашу
для переработки продуктов, отсоедините блендер и
закройте монтажное отверстие, завинтив защитный
колпачок.
Проблема
Прибор не
включается при
установке регулятора
скорости в
импульсный
режимили в
положение 1 или 2.
Электроприбор
неожиданно перестал
работать.
Насадка для
перемешивания или
тестомешалка не
вращаются.
На блок
электродвигателя
установлены и кувшин
блендера, и чаша для
переработки
продуктов, но
работает только
блендер.
Устранение неисправностей
Page 74

РУССКИЙ74
Продолжитель
ность
обработки
10 - 60 сек.
60 - 180 сек.
10 - 60 сек.
10 - 60 сек.
зависит от
количества
10 - 60 сек.
Операция
Измельчение,
приготовление
пюре,
перемешивание
Замешивание
теста
Нарезка,
измельчение,
шинковка
Купажирование,
приготовление
пюре
измельчение
Смешивание,
взбивание,
эмульгирование
Прина
длежн
ость
P
{
gh k
D
Å
å
Принадлежности и операции
Применение
готового
продукта
Салаты, блюда
из сырых
овощей
Салаты, блюда
из сырых
овощей
Блины, вафли
Описание процедуры
Нарежьте овощи на кусочки,
проходящие в загрузочный
бункер. Заполните бункер
кусочками и натрите их,
осторожно проталкивая вниз
толкателем.
Нарежьте овощи на кусочки,
проходящие в загрузочный
бункер. Заполните бункер
кусочками и нарежьте их
ломтиками, осторожно
проталкивая вниз толкателем.
Сначала залейте в кувшин
блендера молоко, затем
добавьте сухие ингредиенты.
Перемешивайте в течение
приблизительно 1 минуты.
При необходимости
повторите эту процедуру.
Затем сделайте перерыв на
несколько минут, для того
чтобы электроприбор остыл
до комнатной
температуры.</
Прин
адлеж
ность
/скор
ость
h / 2
g / 2
D / 2
Макси
мальн
ое
колич
ество
500 г
500 г
750
мл
Ингредиенты
и результат
обработки
Яблоки,
морковь,
корень
сельдерея шинкование
Яблоки,
морковь,
корень
сельдерея нарезка
ломтиками
Жидкое
тесто (для
блинов) взбивание
Норма загрузки блендера ингредиентами и время приготовления
Page 75

РУССКИЙ 75
Применение
готового
продукта
Панированны
е блюда,
блюда,
обжаренные в
сухарях
Десерты,
украшение
кондитерских
изделий
Гарниры, супы,
соусы, блюда,
обжаренные в
сухарях
Соусы, пицца,
блюда,
обжаренные в
сухарях,
фондю
Гарниры,
соусы,
кондитерские
изделия,
пудинги,
муссы
Пюре, супы
Описание процедуры
Обрабатывайте сухой,
хрустящий хлеб
Для получения воздушного
продукта используйте
размягченное масло.
Используйте сыр Пармезан
без корки, нарезав его
кубиками размером 3 х 3 см.
Предварительно нарежьте
сыр на кусочки, проходящие в
загрузочный бункер.
Осторожно проталкивайте
их вниз толкателем.
Используйте твердый
шоколад без добавок.
Предварительно поломайте
его на кусочки размером
2 см.
Используйте вареные фасоль
или горох. При
необходимости для
улучшения консистенции
добавьте немного жидкости.
Прин
адлеж
ность
/скор
ость
P / 2
D / 2
P / 2
h / 2
P / 2
PD/
2
Макси
мальн
ое
колич
ество
100 г
300 г
200 г
200 г
200 г
250 г
Ингредиенты
и результат
обработки
Панировочны
е сухари измельчение
Сливочные
кремы взбивание
Сыр
(Пармезан) измельчение
Сыр (Гауда) тонкое
измельчение
Шоколад измельчение
Вареные
горох, фасоль
приготовлени
е пюре
Применение
готового
продукта
Блюда для
детского
питания
Салаты,
гарниры
Хлеб
Пицца
Описание процедуры
Для приготовления
грубоизмельченного пюре
добавьте небольшое
количество жидкости. Для
приготовления жидкого пюре
продолжайте добавлять
жидкость до тех пор, пока
смесь не станет однородной.
Поместите огурец в
загрузочный бункер и
осторожно протолкните его
вниз.
Смешайте теплую воду с
дрожжами и сахаром.
Добавьте муку, растительное
масло, соль и замешивайте
тесто в течение
приблизительно 90 сек.
Дайте тесту подняться в
течение 30 минут.
Выполните процедуру,
аналогичную процедуре
замешивания теста для
выпечки хлеба. Замешивайте
тесто в течение 1 минуты
Прин
адлеж
ность
/скор
ость
PD / 2
g / 1
{ / 2
{ / 2
Макси
мальн
ое
колич
ество
500 г
2
огурц
а
500 г
муки
750 г
муки
Ингредиенты
и результат
обработки
Вареные
овощи и мясо
приготовлени
е пюре
Огурцы нарезка
ломтиками
Тесто (для
выпечки
хлеба) замешивание
Тесто (для
пиццы) замешивание
Page 76

РУССКИЙ76
Применение
готового
продукта
Пирог с
яблоками,
печенье,
открытые
пироги с
фруктами
Хлеб высшего
качества
Описание процедуры
Используйте холодный
маргарин. Нарежьте
маргарин кусочками
размером 2 см. Всыпьте в
чашу муку и добавьте
маргарин. Замешивайте до
тех пор, пока тесто не станет
рассыпчатым. Затем,
продолжая замешивать тесто,
добавьте холодную воду.
Прекратите замешивать, как
только тесто начнет
принимать форму шара.
Прежде чем обрабатывать
тесто дальше, дайте ему
остыть.
Сначала смешайте в
отдельной емкости теплую
воду с дрожжами и
небольшим количеством
сахара. Поместите все
ингредиенты в чашу для
перемешивания и
замешивайте тесто, пока его
поверхность не станет
гладкой и тесто не
перестанет прилипать к
стенкам чаши
(приблизительно 1 минуту).
Дайте тесту подняться в
течение 30 минут.
Прин
адлеж
ность
/скор
ость
{ / 2
{ / 2
Макси
мальн
ое
колич
ество
300 г
муки
500 г
муки
Ингредиенты
и результат
обработки
Тесто (для
кондитерских
изделий из
песочного
теста) замешивание
Дрожжевое
тесто замешивание
Применение
готового
продукта
Пудинги,
суфле,
меренги
Соусы,
джемы,
пудинги,
детское
питание
Гарниры,
подливы
Соусы, супы,
гарниры,
ароматизиров
анное масло
Описание процедуры
Используйте яичные белки,
имеющие комнатную
температуру. Примечание:
используйте не менее 2-х
яичных белков.
Совет: для того, чтобы цвет
фруктов не изменился,
добавьте немного лимонного
сока. Для получения жидкого
пюре добавьте немного
жидкости.
Совет: для того, чтобы цвет
фруктов не изменился,
добавьте немного лимонного
сока.
Очистите чеснок. Несколько
раз включите импульсный
режим, чтобы не допустить
чрезмерного измельчения
чеснока. Используйте порцию
чеснока не менее 150 г.
Перед измельчением
вымойте и обсушите зелень.
Прин
адлеж
ность
/скор
ость
å / 1
D / 2
P / 2
P / 2
P / 2
Макси
мальн
ое
колич
ество
4
яичны
х
белка
500 г
500 г
300 г
Не
менее
50 г
Ингредиенты
и результат
обработки
Яичные белки
- сбивание
Фрукты
(например,
яблоки,
бананы) купажировани
е
Фрукты
(например,
яблоки,
бананы) измельчение
Чеснок измельчение
Зелень
(например,
петрушка) измельчение
Page 77

77РУССКИЙ
Применение
готового
продукта
Салаты,
гарниры и
соус для
барбекю
Бифштексы,
гамбургеры,
фрикадельки
Бифштексы,
гамбургеры,
фрикадельки
Описание процедуры
Все ингредиенты должны
иметь комнатную
температуру. Примечание:
используйте не менее 1
крупного яйца, или 2 мелких
яиц, или 2 яичных желтков.
Разбейте яйцо (яйца) и
поместите в чашу яйцо
(яйца) или желтки, влейте
немного уксуса и добавляйте
по каплям растительное
масло.
Сначала удалите сухожилия и
кости. Нарежьте мясо
кубиками размером 3 см. Для
получения крупно рубленного
фарша работайте в
импульсном режиме.
Сначала удалите сухожилия и
кости. Нарежьте мясо
кубиками размером 3 см. Для
получения крупно рубленного
фарша работайте в
импульсном режиме.
Прин
адлеж
ность
/скор
ость
å / 1
Å / 2
P / 2
Макси
мальн
ое
колич
ество
3
яйца
1000 г
400 г
Ингредиенты
и результат
обработки
Майонез взбивание
Постное
мясо измельчение
Мясо, рыба,
птица
(грудная
часть) измельчение
Применение
готового
продукта
Различные
виды выпечки
Салаты,
пудинги,
сдобный хлеб
с орехами,
миндальная
масса
Салаты,
готовые
блюда,
гарниры
Салаты,
готовые
блюда,
гарниры
Описание процедуры
Ингредиенты должны иметь
комнатную температуру.
Перемешивайте
размягченное масло и сахар
до тех пор, пока смесь не
станет однородной и
пышной. Затем добавьте
молоко, яйца и муку.
Для грубого измельчения
воспользуйтесь импульсным
режимом.
Очистите головки репчатого
лука и порежьте их на 4
части. Несколько раз
используйте импульсный
режим и проверяйте степень
измельчения.
Очистите лук и нарежьте его
на кусочки, проходящие в
загрузочный бункер.
Примечание: одна порция
должна составлять не менее
100 г.
Прин
адлеж
ность
/скор
ость
{ / 2
P / 2
P / 2
g / 1
Макси
мальн
ое
колич
ество
4
яйца
250 г
500 г
300 г
Ингредиенты
и результат
обработки
Смеси для
приготовлени
я пирожных смешивание
Орехи измельчение
Репчатый лук
- шинкование
Репчатый лук
- нарезка
кусочками
Page 78

РУССКИЙ78
Применение
готового
продукта
Украшение
блюд, кремы,
мороженое
Молочный
коктейль
Супы, соусы
Описание процедуры
Доставайте сливки из
холодильника
непосредственно перед
взбиванием. Примечание:
порция сливок должна
составлять не менее 125 мл.
Для приготовления
требуется около 2 минут.
Приготовьте фруктовое пюре
(из бананов, клубники и т.д.) с
добавлением сахара, молока
и мороженого и тщательно
перемешайте.
Используйте вареные овощи
Прин
адлеж
ность
/скор
ость
å / 1
D / 2
D / 2
Макси
мальн
ое
колич
ество
500
мл
500
мл
молок
а
500
мл
Ингредиенты
и результат
обработки
Взбитые
сливки взбивание
Молочные
коктейли смешивание
Супы перемешиван
ие
Рецепты
Кабачковая паста для сэндвичей
Ингредиенты:
- 2 кабачка
- 3 вареных яйца
- 1 небольшая луковица
- 1 столовая ложка растительного масла
- петрушка
- 2-3 столовые ложки сметаны
- лимонный сок, соус Табаско, соль, перец,
порошок карри, паприка
B
Вымойте и обсушите кабачки, нашинкуйте их
ножом-вставкой для измельчения в чаше для
обработки продуктов. Переложите
нашинкованные кабачки на блюдо, посыпьте
солью и оставьте на 15 минут, для того
чтобы соль впитала в себя сок из
нашинкованных кабачков. Разрежьте луковицу
на 4 части и тонко измельчите ее вместе с
зубком чеснока. Отделите листья петрушки
от стеблей и измельчите их.
B
Затем переложите нашинкованные кабачки
на чистое полотенце и отожмите из них
жидкость. Налейте на сковороду
растительное масло, слегка обжарьте
измельченные лук и чеснок и добавьте
нашинкованные кабачки. Вся жидкость
должна выпариться. Дайте обжаренным
ингредиентам немного остыть. Очистите
яйца и в течение нескольких секунд
измельчите их в чаше для обработки
продуктов. Добавьте в чашу для обработки
Page 79

РУССКИЙ 79
пищи остальные ингредиенты, приправы и
перемешайте ножом. Подавайте на
обжаренных ломтиках хлеба.
Фруктовый пирог
Ингредиенты:
- 150 г фиников
- 225 г чернослива
- 100 г орехов (50 г миндаля/50 г грецких
орехов)
- 50 г изюма
- 50 г кишмиша
- 200 г цельной ржаной муки
- 100 г пшеничной муки
- 100 коричневого сахара
- щепотка соли
- 1 пакетик пекарского порошка
- 300 мл пахты
B
Установите в чаше металлический нож.
Поместите в чашу все ингредиенты и
перемешивайте их в течение 30 секунд на
максимальной скорости. Выпекайте пирог в
форме длиной 30 см в течение 40 минут при
температуре 170cC
Пирог с луком-пореем
Ингредиенты для теста:
- 250 г пшеничной муки (или обойной
пшеничной муки)
- щепотка соли
- 1 столовая ложка меда
- 20 г свежих дрожжей или 1/2 пакета
сушеных дрожжей
- 100 г масла
- 6 столовых ложек теплой воды
Ингредиенты для начинки:
- 500 г лука-порея
- растительное масло
- 4 яйца
- 500 г сметаны
- соль, перец, 1-2 столовые ложки муки, если
требуется
B
Поместите все ингредиенты в чашу и
замешивайте до получения теста плотной
консистенции. Дайте тесту подняться в
течение приблизительно 30 минут.
B
Нашинкуйте лук-порей насадкой для
нарезания. Налейте на сковороду немного
масла и поджаривайте лук в течение
нескольких минут. Поместите оставшиеся
ингредиенты в кувшин блендера и взбивайте
до консистенции сметаны. Добавьте 1-2
столовые ложки муки для того, чтобы смесь
стала более густой.
B
Смажьте жиром форму для выпечки
диаметром 24 см и равномерно покройте
тестом дно и боковые стенки формы.
Распределите луковую смесь на тесте и
залейте ее оставшимися ингредиентами.
Выпекайте в предварительно нагретой
духовке в течение 40 минут при
температуре 180cC. Подавайте в теплом
или холодном виде.
Page 80

РУССКИЙ80
Гуляш по-венгерски
Ингредиенты:
- 1 столовая ложка растительного масла
- 1 луковица среднего размера
- 1 чайная ложка паприки
- 400 г свинины или говядины
- 1 зеленый перец
- 1 помидор
-соль
- 200 г моркови
- 300 г картофеля
- семена тмина
B
Вымойте мясо и нарежьте его кубиками
размером 2 см. Очистите лук и измельчите
его в чаше для обработки продуктов
металлическим ножом. Удалите сердцевину
из зеленого перца и нарежьте его кольцами с
помощью регулируемого диска для нарезки
ломтиков. Снимите кожицу с помидора,
выньте зернышки и нарежьте помидор
тонкими полосками. Обжарьте измельченный
лук в растительном масле до мягкости.
Снимите сковороду с луком с плиты и
посыпьте лук паприкой, добавьте мясо и
обжаривайте на сильном огне при
постоянном перемешивании в течение
нескольких минут. Добавьте зеленый перец,
помидор и соль по вкусу, накройте сковороду
и тушите при умеренном нагревании в
собственном соку, пока мясо не станет
почти мягким.
B
В это время очистите и нашинкуйте
морковь с помощью регулируемого диска для
нарезки ломтиков, очистите и нарежьте
кубиками картофель. Добавьте к мясу
морковь и картофель и влейте холодную воду
для такого количества супа, которое вы
хотите получить (приблизительно 1,2 л).
Приправьте щепоткой семян тмина и
кипятите на медленном огне, пока все
продукты не станут мягкими как масло. При
необходимости добавьте соль.
B
Подавайте горячим. В качестве гарнира вы
можете использовать кольца зеленого перца
и подать на отдельном блюде острый перец.
Кольцо с начинкой из лесных
орехов
Ингредиенты для теста:
- 500 г просеянной муки
- 75 г сахара
- 1 чайная ложка соли
- 1 яйцо
- 250 мл молока (при 35cC)
- 100 г размягченного масла
- 30 г свежих дрожжей (при использовании
сушеных дрожжей см. инструкции на
упаковке).
Начинка:
- 250 г измельченных лесных орехов
- 100 г сахара
- 2 пакетика ванильного сахара
- 125 мл сливок
Page 81

РУССКИЙ 81
B
Нагрейте духовку до 200cС. В течение
15 секунд замешивайте тесто из молока,
дрожжей и сахара с помощью тестомешалки.
Добавьте муку, соль, масло и яйцо.
Замешивайте тесто в течение еще двух
минут. Переложите тесто в отдельную
емкость, накройте его влажной тканью и
дайте подняться в течение 20 минут в
теплом месте.
B
Измельчите лесные орехи металлическим
ножом. Перемешайте ингредиенты начинки.
Раскатайте тесто и придайте ему
прямоугольную форму. Распределите по
поверхности прямоугольника ореховую смесь,
скатайте тесто и придайте ему форму
кольца. Положите кольцо на смазанную
маслом форму для выпечки с пружинным
устройством. Дайте кольцу подняться в
течение 20 минут. Кисточкой смажьте
верхнюю поверхность кольца взбитым
яичным желтком и поместите форму в
центр духовки. Выпекайте 25-30 минут при
200cC.
Шоколадный кекс
Ингредиенты:
- 140 г размягченного масла
- 110 г сахарной пудры
- 140 г шоколада
- 6 яичных белков
- 6 яичных желтков
- 110 г сахара-песка
- 140 г пшеничной муки
Начинка:
- 200 г абрикосового джема
Глазирование:
- 125 мл воды
- 300 г сахара
- 250 г тертого шоколада
- взбитые сливки, по желанию
B
Нагрейте духовку до 160cC. С помощью
насадки для перемешивания взбейте крем из
масла и сахарной пудры. Расплавьте шоколад
и добавьте его при перемешивании.
Добавьте в смесь по одному яичные желтки
и перемешивайте до получения
кремообразной консистенции. С помощью
диска для эмульгирования взбейте яичные
белки с сахаром-песком до состояния густой
пены. Добавьте в смесь взбитые в пену белки
и осторожно перемешайте. Затем
осторожно добавьте лопаткой муку.
Положите полученную смесь в смазанную
жиром форму для выпечки. Выпекайте в
течение 1 часа при 160cC.. В течение
первых 15 минут дверца духовки должна
быть немного приоткрыта.
B
Дайте кексу немного остыть, не вынимая
его из формы (24 см), затем переверните на
проволочную решетку для дальнейшего
остывания. Разрежьте кекс в
горизонтальном направлении на половины,
намажьте на одну из них абрикосовый джем
и снова сложите половины вместе. Нагрейте
Page 82

РУССКИЙ82
оставшийся джем до сиропообразного
состояния и нанесите его на поверхность
кекса. Приготовьте глазурь. Вскипятите
воду, добавьте в нее сахар и шоколад и
кипятите при слабом нагревании. Постоянно
перемешивайте до получения гладкой и
пастообразной консистенции. Нанесите
глазурь на кекс и дайте ей остыть.
Подавайте кекс с взбитыми сливками.
Суп из брокколи (на 4 персоны)
Ингредиенты:
- 50 г выдержанного сыра Гауда.
- 300 г вареной брокколи (стебли и соцветия).
- Отвар от брокколи.
- 2 нарезанных кусочками клубня отварного
картофеля
- 2 бульонных кубика
- 2 столовые ложки сливок для взбивания
- карри
-соль
- перец
- мускатный орех
B
Натрите сыр. Приготовьте пюре из
брокколи, отварного картофеля и некоторого
количества отвара брокколи. Переложите
приготовленное пюре и оставшийся отвар
вместе с бульонными кубиками в мерную
емкость и доведите объем до 750 мл.
Перелейте смесь в кастрюлю и, помешивая,
доведите ее до кипения. Примешайте сыр,
добавьте карри, соль, перец, мускатный орех
и сливки.
Молочный коктейль со свежими
фруктами
Ингредиенты:
- 100 г бананов или клубники
- 200 мл свежего молока
- 50 г ванильного мороженого
- сахар-песок по вкусу
B
Очистите бананы или вымойте клубнику.
Нарежьте фрукты небольшими кусочками.
Поместите все ингредиенты в кувшин
блендера. Перемешивайте до получения
однородной массы.
B
Вы можете сами выбрать фрукты для
приготовления молочного коктейля с вашими
любимыми свежими фруктами.
Пицца
Ингредиенты для теста:
- 400 г муки
- 1/2 столовой ложки соли
- 20 г свежих дрожжей или 1,5 пакета
сушеных дрожжей
- 2 столовые ложки кулинарного жира
- приблизительно 240 мл воды (35cС).
Для начинки пиццы:
- 300 мл консервированных протертых
томатов
- 1 столовая ложка смеси итальянских трав
(сухих или свежих)
- 1 луковица
- 2 зубка чеснока
- соль и перец
Page 83

РУССКИЙ 83
- сахар
Ингредиенты, которыми следует посыпать
соус:
- оливки, салями, артишоки, грибы, анчоусы, сыр
Моззарелла, стручковый перец, тертый
выдержанный сыр и оливковое масло по
вкусу.
B
Установите насадку-тестомешалку в чашу.
Положите в чашу для перемешивания все
ингредиенты и выберите максимальную
скорость (положение 2). Замешивайте тесто
в течение приблизительно 90 секунд до
образования гладко вымешанного шара.
Переложите тесто в другую емкость,
накройте ее влажной тканью и дайте
подняться в течение приблизительно
30 минут.
B
С помощью металлического ножа измельчите
лук и чеснок в чаше для перемешивания и
обжаривайте их до тех пор, пока они не
станут прозрачными. Добавьте протертые
томаты и зелень и кипятите соус на
медленном огне в течение приблизительно
10 минут. Приправьте по вкусу солью,
перцем и сахаром. Дайте соусу остыть.
B
Нагрейте духовку до температуры 250cС.
B
Раскатайте тесто на посыпанной мукой
поверхности и, разделив его на 2 части,
придайте им форму круга. Поместите эти
круги в смазанные жиром формы для выпечки.
Поместите на поверхность пиццы начинку,
оставляя края свободными. Разложите поверх
желаемые ингредиенты, посыпьте пиццу
тертым сыром и сбрызните оливковым
маслом.
B
Выпекайте пиццу в течение 12-15 минут.
Обжаренные овощи и картофель
Ингредиенты:
- 1 яйцо
- 50 мл молока
- 1 столовая ложка муки
- 1 чайная ложка молотого кориандра
- соль и перец
- 2 крупных картофелины (приблизительно
300 г)
- 100 г моркови
- 150 г сельдерея
- 50 г семян подсолнечника или 2 столовые
ложки зерен кукурузы с початка
- подсолнечное масло для жарки
B
Металлическим ножом перемешайте яйцо,
молоко, муку, кориандр, соль и перец.
B
Нашинкуйте очищенный картофель, морковь
и очищенный сельдерей с помощью ножавставки для измельчения и добавьте их к
яичной смеси. Перемешайте вместе овощи,
яичную смесь и семена подсолнечника или
зерна кукурузы в чаше.
B
Разогрейте растительное масло на
сковороде и обжарьте 8 плоских овощных
котлет с обеих сторон до золотистого
цвета. Обсушите их на кулинарной бумаге.
B
Время приготовления: 3-4 минуты.
Page 84

РУССКИЙ84
Хлеб (белый)
Ингредиенты:
- 500 г хлебопекарной муки
- 15 г мягкого масла или маргарина
- 25 г свежих дрожжей или 20 г сушеных
дрожжей
- 260 мл воды
- 10 г соли
- 10 г сахара
B
Установите насадку-тестомешалку в чаше
для перемешивания. Положите в чашу муку,
соль и маргарин или сливочное масло.
Добавьте свежие или сухие дрожжи и воду.
Закройте чашу крышкой и поверните ее в
направлении, указанном стрелкой, до щелчка.
Установите регулятор скорости на
максимальную скорость (положение 2) и
перемешайте тесто (максимальное время, в
течение которого может выполняться
замешивание, см. в разделе «Объемы
продуктов и время обработки»).
B
Выньте тесто из чаши, перенесите его в
большую емкость, накройте влажной тканью
и дайте подняться в теплом месте в
течение 20 минут. Поднявшееся тесто
раскатайте вновь и придайте ему форму
шара.
B
Положите тесто обратно в емкость,
накройте влажной тканью и дайте
подняться в теплом месте в течение
20 минут. Вновь раскатайте и закатайте.
B
Выложите тесто в смазанную жиром
хлебопекарную форму и оставьте еще на
45 минут. Выпекайте хлеб в нижней части
предварительно нагретой духовки.
B
Выпекайте хлеб при температуре около
225cС в течение приблизительно 35 минут
в нижней части предварительно нагретой
духовки.
Page 85

ČESKY 85
Úvod
Tento přístroj je vybaven automatickým teplotním
vypínačem.V případě přehřátí motoru se přístroj
automaticky vypne.
Všeobecný popis
A Motorová jednotka
B Regulace rychlosti
- P= mžiková funkce
- 0 = vypnuto
- 1 = malá rychlost
- 2 = velká rychlost
C Šroubovací uzávěr (pokud není připevněn,
nelze realizovat základní funkci přístroje)
D Nádoba na potraviny
E Držák nástrojů
F Víko nádoby
G Sklenice mixéru
H Víko sklenice mixéru
I Plnicí tubus
J Pěchovač
K Zátka
L Hnětací příslušenství
M Kovové nože + ochranný kryt
N Krájecí vložka
O Strouhací vložka
P Držák vložek
Q Emulgační kotouč
R Převodovka masového mlýnku
S Těleso masového mlýnku
T Šnekový hřídel
U Zajišťovací kroužek
V Nožová jednotka
W Střední mlecí kotouč, otvory o průměru 4 mm
X Hrubý mlecí kotouč, otvory o průměru 8 mm
Y Separátor
Z Nástavec pro výrobu jitrnic nebo uzenek
a Miska
b Pěchovač
c Uvolňovací páčka
Důležité
Dříve než přístroj použijete, přečtete pozorně
návod k jeho použití a návod uschovejte pro
případná pozdější nahlédnutí.
◗ Než přístroj připojíte do sítě zkontrolujte, zda
napětí ve vaší světelné síti souhlasí s údajem
napětí na typovém štítku přístroje.
◗ Ve spojení s přístrojem nikdy nepoužívejte
žádné jiné příslušenství nebo doplňky, pokud
to není firmou Philips výslovně doporučeno.
V takovém případě byste též ztratili garanční
nároky.
◗ Aby se zamezilo vzniku nebezpečných situací,
nesmí být přístroj nikdy připojen k časovému
spínači.
◗ Pokud byste zjistili jakékoli poškození
síťového přívodu nebo jeho zástrčky, ihned
vyřaďte přístroj z provozu.
◗ Pokud by byl poškozen síťový přívod, musí být
jeho výměna svěřena organizaci, autorizované
firmou Philips nebo shodně kvalifikovaným
pracovníkům, abyste předešli možnému
nebezpečí.
Page 86

ČESKY86
◗ Než přístroj poprvé použijete, umyjte pečlivě
všechny jeho díly, které přicházejí do přímého
styku s potravinami.
◗ Nemixujte nadměrná množství potravin a
nepřekračujte dobu mixování, která je
uvedena v tabulce.
◗ Nepřekračujte maximální obsah, který je
naznačen na nádobě přístroje nebo na sklenici
mixéru.
◗ Po použití vždy přístroje vypněte.
◗ Nikdy nestrkejte prsty (ani stěrku) do nádoby
plnicím tubusem pokud je přístroj v chodu.
Smíte použít výhradně pěchovač.
◗ Vždy vypněte přístroj dříve, než strčíte prsty
(nebo stěrku) do sklenice mixéru.
◗ Přístroj uchovávejte vždy mimo dosah dětí.
◗ Nikdy nenechávejte přístroj pracovat bez
dozoru.
◗ Přístroj lze uvést do provozu pouze tehdy,
když bod na šroubovacím uzávěru je přesně
proti bodu na motorové jednotce a linka na
víku je proti lince na nádobě.V takovém
případě je odblokováno bezpečnostní jištění a
přístroj lze zapnout.
◗ Před odejmutím příslušenství musí být přístroj
rovněž ve vypnutém stavu.
◗ Přístroj vždy vypínejte pouze tak, že regulátor
rychlosti nastavíte do polohy 0.
◗ Než odejmete víko,vyčkejte až se motor zcela
zastaví.
◗ Nikdy nesmíte ponořit motorovou jednotku
do vody nebo do jiné kapaliny, ani ji nesmíte
mýt pod tekoucí vodou.Motorovou jednotku
čistěte výhradně vlhkým hadříkem.
◗ Před použitím nožů nejprve sejměte jejich
ochranný obal.
◗ Nikdy nepoužívejte nožovou jednotku ve
spojení se separátorem a plnicím nástavcem.
◗ Nikdy nerozmělňujte kosti,ořechy nebo jiné
tvrdé potraviny.
◗ Do plnicího tubusu nikdy nestrkejte prsty.
Vždy používejte pouze pěchovač.
◗ Potraviny, které si přejete mixovat, nesmějí
mít teplotu vyšší než 80cC.
◗ Pokud mixujete tekutiny které mají tendenci k
pěnění, nesmíte použít větší množství než 1
litr, abyste zabránili vystřikování.
◗ Množství potravin a dobu jejich zpracování
zjistíte z tabulky v tomto návodu.
◗ Pamatujte, že není možné použít základní
přístroj, pokud je na motorové jednotce
upevněna nádoba mixéru.
◗ Hladina hluku: Lc=89 dB (A)
Použití přístroje
Automatický teplotní vypínač
Aby se zamezilo vzniku nebezpečných situací
nesmí být přístroj nikdy připojen k časovému
spínači.
Když přístroj náhle přestane pracovat:
1 Vytáhněte jeho síťovovu zástrčku ze
zásuvky.
2 Nechte přístroj 60 minut vychladnout.
Page 87

ČESKY 87
3 Zasuňte síťovou zástrčku do zásuvky.
4 Znovu zapněte přístroj.
B
Pokud by automatický teplotní vypínač vypínal
přístroj velmi často, obraťte se na servis firmy
Philips nebo na autorizovanou opravnu.
Nádoba přístroje
Přístroj lze uvést do provozu při funkci s nádobou
pouze tehdy, když není připevněna sklenice
mixéru a šroubovací uzávěr je našroubován na
motorovou jednotku tak, že bod na uzávěru je
přesně proti bodu na motorové jednotce.
C
1 Nádobu nasaďte na přístroj a otočte ji
rukojetí ve směru šipky tak daleko až
uslyšíte zaklapnutí.
C
2 Na nádobu nasaďte víko.Víko otočte ve
směru šipky až uslyšíte zaklapnutí (to
vyžaduje trochu síly).
Vestavěné bezpečnostní zajištění
Motorová jednotka, nádoba a její víko jsou
opatřeny značkami. Přístroj lze uvést do chodu jen
když bod na nádobě se nalézá přesně proti bodu
na motorové jednotce.
C
1 Přesvědčte se, že linka na víku a linka na
nádobě jsou přesně proti sobě.
Plnicí tubus a pěchovač
C
1 Tubus pro vkládání potravin používejte pro
nalévání tekutin nebo vkládání tuhých
přísad.Tuhé přísady pak přitlačujte
pěchovačem.
C
2 Pěchovačem můžete též plnicí tubus
uzavřít abyste zabránili případnému
vystřikování tekutých potravin tubusem.
Kovové nože
Kovové nože lze používat k sekání,mixování,
míchání a k výrobě pyré.
Nože jsou velmi ostré. Dbejte náležité opatrnosti!
C
1 Sejměte z nožů ochranný kryt.
C
2 Do nádoby vložte držák nástrojů a na
držák nástrojů v nádobě umístěte nože.
3 Do nádoby vložte potraviny.
B
Větší kusy nařežte na kostky o hranách asi
3 x 3 x 3 cm. Na nádobu položte víko.
4 Do tubusu vložte pěchovač.
C
5 Nastavte regulátor na největší rychlost
(poloha 2).
CLICK
CLICK
1
1
2
2
CLICK
Page 88

ČESKY88
- Přístroj zůstane v chodu dokud regulátor
rychlosti nenastavíte do polohy 0 (vypnuto).
◗ Zmenšete rychlost nastavením regulátoru do
polohy 1.
Praktické rady
◗ Když rozsekáváte cibuli, použijte několikrát po
sobě krátce mžikovou funkci,aby cibule nebyla
rozsekána příliš jemně.
◗ Pokud sekáte například tvrdé sýry, nenechte
přístroj běžet příliš dlouho.Sýr se totiž
sekáním nadměrně ohřeje, začne měknout a
může zhrudkovatět.
◗ Nepoužívejte nože pro drcení nadměrně
tvrdých potravin jako jsou například kávová
zrnka, muškátové ořechy nebo kostky ledu,
aby se ostří nožů přiliš brzy neotupilo.
Pokud by potraviny ulpěly na nožích nebo na
vnitřní stěně nádoby:
1 Vypněte přístroj.
2 Sejměte víko z nádoby.
3 Potraviny odstraňte ze stěn nádoby nebo z
nožů pomocí stěrky.
Vložky: pro krájení a strouhání
Vložky nikdy nepoužívejte pro zpracování tvrdých
potravin jako jsou například kostky ledu.
Hrany vložek jsou velmi ostré. Pozor při dotyku!
C
1 Zvolenou vložku vložte na držák vložek.
C
2 Držák vložek vložte na držák nástrojů,
který je v nádobě.
3 Na nádobu nasaďte víko.
4 Potraviny vkládejte do plnicího tubusu.
B
Větší kusy rozkrájejte na takovou velikost, aby se
do tubusu vešly.
C
5 Potraviny vkládejte postupně a
rovnoměrně.
B
Pokud si přejete krájet nebo strouhat větší
množství potravin, vkládejte do tubusu postupně
jen menší dávky a mezi jednotlivými dávkami
nádobu vždy vyprázdněte.
C
6 Regulátor rychlosti nastavte na maximum
(poloha 2).
Přístroj zůstane v chodu dokud regulátor rychlosti
nenastavíte do polohy 0 (vypnuto).
◗ Přepnutím regulátoru rychlosti do polohy
1 rychlost zmenšíte.
C
7 Potraviny v tubusu jemně přitlačujte
pěchovačem.
1
CLICK
2
Page 89

ČESKY 89
◗ Pokud zpracováváte měkkou zeleninu nebo
ovoce, můžete rychlost zmenšit nastavením
regulátoru do polohy 1 abyste zabránili
rozmělnění zeleniny nebo ovoce tak dalece, že
by se změnilo v pyré.
C
8 Přejete-li si vyjmout vložku z držáku
vezměte držák vložek do rukou aby jeho
zadní část směřovala k vám. Zatlačte hrany
vložky palci tak, aby z držáku vypadla.
Hnětací příslušenství
Hnětací příslušenství můžete použít pro
zpracování různých těst nebo koláčových směsí.
C
1 Na motorovou jednotku upevněte nádobu
a na držák nástrojů v nádobě nasaďte
hnětací příslušenství.
2 Do nádoby vložte přísady a na nádobu
upevněte víko. Pěchovač zasuňte do
plnicího tubusu abyste zabránili
vystřikování obsahu tubusem.
C
3 Zvolte největší rychlost (poloha 2).
Viz tabulku vhodných dob zpracování.
Emulgační kotouč
Emulgační kotouč můžete použít pro přípravu
majonézy, k šlehání krémů nebo vaječných bílků.
C
1 Nasaďte emulgační kotouč na držák
nástrojů v nádobě.
2 Do nádoby vložte potraviny a nasaďte
víko.
3 Zvolte pomalejší rychlost (nastavení 1)
abyste zajistili optimální výsledky.
Praktické rady
◗ Pokud šleháte vaječné bílky, dbejte na to, aby
měly pokojovou teplotu.
◗ Pokud vejce vyjímáte z chladničky, vyjměte je
alespoň půl hodiny před jejich zpracováním.
◗ Také všechny ostatní přísady pro výrobu
majonézy musí mít pokojovou teplotu.
◗ Olej můžete přilévat malým otvorem na dně
pěchovače.
◗ Pokud se chystáte vyrobit šlehaný krém,
vyjměte ho bezprostředně před tím z
chladničky. Dodržujte dobu přípravy, uvedenou
v tabulce. Krém nesmí být šlehán příliš
dlouho.
◗ Použijte mžikovou funkci abyste měli nad prací
lepší kontrolu.
Mixér
Mixér je určen pro:
- Mixování tekutin, například mlékárenských
výrobků, omáček, polévek nápojů apod.
- Mixování měkkých ingrediencí, například
lívancového těsta nebo majonéz.
Page 90

ČESKY90
- Rozšlehání vařených ingrediencí, například
výroba dětské výživy.
C
1 Abyste mohli upevnit sklenici mixéru,
musíte odšroubovat uzávěr.
C
2 Na motorovou jednotku připevněte
sklenici mixéru a otočte ji ve směru
pohybu hodinových ruček až bude pevně
zafixována. Rukojeť musí směřovat doleva.
Na rukojeť sklenice netlačte nadměrnou silou.
3 Do sklenice mixéru vložte potraviny.
C
4 Víko uzavřete.
C
5 Zvolte největší rychlost (poloha 2). Přístroj
zůstane v chodu, dokud nezvolíte polohu 0
(vypnuto).
Viz tabulku vhodných dob zpracování.
Praktické rady
C
◗ Tekuté přísady nalévejte do sklenice otvorem
ve víku.
◗ Čím déle necháte přístroj v chodu, tím
jemnější bude výsledek mixování.
◗ Tuhé přísady před vložením do mixéru
nakrájejte na malé kousky. Pokud budete
mixovat větší množství, doporučujeme raději
mixovat vícekrát po menších dávkách než
větší množství najednou.
◗ Tuhé přísady,jako jsou například sojové boby,
je třeba před mixováním nejprve namočit ve
vodě.
C
◗ Pro drcení kostek ledu vložte kostky ledu do
sklenice, nasaďte víko a použijte mžikovou
funkci.
Pokud by se potraviny přilepily na stěny sklenice:
1 Vypněte přístroj a vytáhněte jeho zástrčku
ze zásuvky.
2 Otevřte víko.
Víko však nikdy neotevírejte pokud je motor ještě
v chodu.
3 Nalepené potraviny odstraňte ze stěn
sklenice stěrkou.
Stěrkou pracujte v bezpečné vzdálenosti od nožů
(asi 2 cm).
B
Pokud byste nebyli s výsledkem plně spokojeni,
nechte přístroj několikrát po sobě pracovat v
mžikové funkci.Také můžete obsah promíchat
stěrkou (samozřejně až po zastavení přístroje),
případně část obsahu odebrat a pracovat s
menším množstvím potravin.
B
V některých případech je výhodné přidat do
mixovaného obsahu trochu tekutiny,při mixování
ovoce například citrónovou šťávu.
1
2
1
2
Page 91

ČESKY 91
Mlýnek na maso
Mlýnek na maso může být použit pro mletí masa
a výrobu omáček.
Mlýnek může pracovat pouze tehdy, když na
motorovou jednotku není připojen mixér a je
našroubován šroubovací uzávěr tak že bod na
uzávěru je přesně proti bodu na motorové
jednotce.
C
1 Připevněte převodovku na motorovou
jednotku.
Pokud jste tuto práci realizovali správně, uslyšíte
zaklapnutí.
C
2 Vložte šnekový hřídel do tělesa mlýnku a
to plastickým koncem dopředu.
C
3 Nožovou jednotku vložte na šnekový
hřídel. Plochá část krájecích břitů musí
směřovat dopředu.
C
4 Na šnekový hřídel nasaďte střední nebo
hrubý kotouč (podle požadované
konzistence).
Přesvědčte se, že zářez na kotouči souhlasí s
výstupkem na hlavě mlýnku.
C
5 Na přední část tělesa mlýnku připevněte
zajišťovací kroužek tak, že jím otáčíte ve
směru pohybu hodinových ruček až je
řádně utažen.
C
6 Umístěte misku na svislou část tělesa
mlýnku.
Masový mlýnek
1 Maso rozřežte na proužky 10 cm dlouhé a
2 cm tlusté.
2 Pokud to bude možné, vyjměte kosti,
kousky chrupavek a šlachy.
Nikdy nepoužívejte zmrzlé maso!
C
3 Používejte největší rychlost (nastavení 2).
C
4 Vložte maso. Pěchovačem ho jemně
přitlačujte do tělesa mlýnku.
◗ Za minutu můžete zpracovat až 1,3 kg masa.
Pokud melete vepřové maso, zbavte ho předem
tuku a šlach.
◗ Pro tatarské bifteky melte maso kotoučem se
středně hrubými otvory dvakrát po sobě.
Page 92

ČESKY92
Výroba uzenek
1 Rozsekejte maso.
2 Když jste hotovi, přístroj odpojte a
odšroubujte zajišťovací kroužek.
3 Odstraňte mlecí kotouč.
4 Odstraňte nožovou jednotku.
◗ Při výrobě uzenek ponechte šnekový hřídel v
tělese mlýnku.
C
5 Do tělesa mlýnku vložte separátor.
C
6 Na těleso mlýnku nasaďte plnicí nástavec a
upevněte ho zajišťovacím kroužkem.
Přístroj je nyní připraven pro výrobu uzenek.
Praktické rady
- Vložte uzenkové střívko asi na 10 minut do
vlažné vody. Pak mokré střívko natáhněte na
plnicí nástavec.Vtlačujte (okořeněné)
zpracované maso do masového mlýnku.
- Pokud lze střívko na plnicí nástavec natáhnout
jen ztuha, můžete je trochu navlhčit vodou.
- K výrobě uzenek použijte rychlostní nastavení 1.
Čištění přístroje
Před čištěním přístroj vždy předem odpojte od
sítě.
Pečlivě vyčistěte kovové nože, nožovou jednotku
mixéru a též její vnitřek. Nože jsou velmi ostré!
Dbejte na to, aby ostří nožů nikdy nepřišlo do
styku s tvrdými předměty, které by je mohly
otupit.
B
Některé druhy potravin mohou způsobit zabarvení
povrchu příslušenství.To nemá na funkci
příslušenství žádný negativní vliv. Po určitém čase
toto zabarvení obvykle zmizí.
C
1 Nadbytečný přívodní kabel naviňte na
kotouč na zadní straně přístroje.
2 Motorovou jednotku čistěte pouze
navlhčeným hadříkem.Nesmíte ji nikdy
ponořit do vody ani mýt pod tekoucí
vodou.
3 Všechny díly, které přicházejí do styku s
potravinami, myjte v horké vodě s
přídáním vhodného mycího prostředku a
to ihned po každém použití.
4 Nádobu, její víko, pěchovač a příslušenství
(vyjma sklenice mixéru) lze mýt v myčce
nádobí.
Tyto díly byly testovány pro pro mytí v myčce
nádobí podle DIN EN 12875.
Page 93

ČESKY 93
Sklenice mixéru není odolná proti mytí v myčce
nádobí.
5 Víko sejmete tak, že ho otevřete a
vysunete směrem nahoru.
Víko snímejte pouze za účelem čištění.
Rychlé vyčištění mixéru
C
1 Do mixérové sklenice nalijte vlažnou vodu
(nejvýše půl litru) s přísadou vhodného
mycího prostředku.
2 Víko uzavřete.
C
3 Nechte přístroj chvíli v provozu při použití
mžikové funkce. Přístroj se zastaví, jakmile
otočíte knoflík zpět do polohy 0.
4 Nádobu sejměte a vypláchněte ji čistou
vodou.
Mlýnek na maso
Zbytky masa, které zůstaly v tělese mlýnku,
můžete odstranit tak, že tímto prostorem
protlačíte plátek chleba.
1 Dbejte na to, aby byl přístroj odpojen od
sítě.
2 Stiskněte uvolňovací páčku a otočte celým
tělesem mlýnku ve směru šipky.
3 Vyjměte pěchovač a misku.
4 Odšroubujte kroužek a odejměte všechny
díly tělesa mlýnku.
Tyto díly nemyjte v myčce nádobí!
5 Všechny díly, které přicházejí do styku a
masem, umyjte v horké mýdlové vodě
IHNED PO POUŽITÍ.
6 Opláchněte tyto díly čistou horkou vodou
rovněž IHNED.
◗ Doporučujeme namazat nožovou jednotku a
mlecí kotouč trochou rostlinného oleje.
Uchovávání
Rychlé uložení
C
◗ Uložte příslušenství (nůž, držák vložek) do
držáku nástrojů a uložte vše do nádoby. Držák
vložek ukládejte vždy nakonec.
C
◗ Přívodní kabel naviňte na kotouč na zadní
stěně přístroje.
Page 94

ČESKY94
Záruka & servis
Pokud byste potřebovali jakoukoli informaci nebo
měli nějaký problém, podívejte se na internetovou
stránku
www.philips.com, případně kontaktujte
Informační středisko firmy Philips, jehož telefonní
číslo naleznete na letáčku s celosvětovou zárukou.
Řešení
Otočte nádobou ve směru pohybu hodinových ruček až
uslyšíte zaklapnutí. Zkontrolujte, zda bod na nádobě je
přesně proti bodu na motorové jednotce. Rovněž se
přesvědčte, že není našroubována sklenice mixéru a že
je řádně přišroubován šroubovací uzávěr. Bod na
uzávěru musí být přesně proti bodu na motorové
jednotce.
Automatický teplotní vypínač pravděpodobě přístroj
vypnul z důvodu přehřátí motoru. 1) Vypněte přístroj
(poloha 0). 2) Odpojte přístroj od sítě.3) Nechte
přístroj asi 60 minut vychladnout. 4) Zasuňte zástrčku do
síťové zásuvky. 5) Opět přístroj zapněte.
Zkontrolujte, zda jste správně nasadili nádobu a její víko
tak, že slyšitelně zaklaplo.
Pokud jsou mixérová sklenice a nádoba na potraviny
řádně nasazeny, bude v činnosti pouze mixér. Přejete-li si
používat nádobu na potraviny, sejměte mixér a
našroubujte krycí uzávěr.
Problém
Přístro nelze zapnout v
polohách 1, 2 nebo v
mžikovém provozu.
Motor se náhle zastavil
Hnětací nebo šlehací
příslušenství se neotáčí
Je nasazena mixérová
sklenice i nádoba na
potraviny, ale pracuje
pouze mixér.
Praktické rady
Aplikační doba
10 až 60 sekund
60 až 180
sekund
10 až 60 sekund
10 až 60 sekund
v závislosti na
kvalitě
10 až 60 sekund
Aplikace
Sekání, výroba
pyré, šlehání
Hnětení
Krájení, drcení,
gratinování
Mixování, výroba
pyré
Drcení
Šlehání,
emulgování
Příslušenství
P
{
gh k
D
Å
å
Příslušenství a aplikace
Page 95

ČESKY 95
Použití
Saláty, syrová
zelenina
Saláty, syrová
zelenina
Lívance, vafle
Příměs do jídel
Dezerty,
polevy
Zdobení,
polévky,
omáčky
Postup
Zeleninu nakrájejte na kousky,
aby se vešly do tubusu.Tubus
naplňte rozkrájenými kousky a
při krájení je lehce přitlačujte
pěchovačem.
Zeleninu nakrájejte na kousky,
aby se vešly do tubusu.Tubus
naplňte rozkrájenými kousky a
při krájení je lehce přitlačujte
pěchovačem.
Do mixéru nalijte nejprve
mléko a pak suché přísady.
Mixujte obsah asi 1 minutu.
Pokud je to třeba, opakujte
tento proces dvakrát. Pak
přístroj zastavte a nechte
vychladnout na teplotu okolí.
Použijte suché a křehké pečivo.
Použijte měkké máslo.
Parmezán bez kůry rozřežte na
kousky o hraně asi 3 cm a ty
pak vkládejte do plnicího
otvoru.
Přisluš
enství/
rychlo
st
h / 2
g / 2
D / 2
P / 2
D / 2
P / 2
Nejvě
tší
množs
tví
500 g
500 g
750
ml
100 g
300 g
200 g
Přísady a
výsledek
Jablka, mrkev,
celer strouhání
Jablka, mrkev,
celer - krájení
Těsto
lívancové šlehání
Strouhanka rozsekání
Máslový krém
- šlehání
Sýr
(parmezán) rozsekání
Množství a čas zpracování
Použití
Omáčky, pizzy,
fondy.
Zdobení,
omáčky,
cukrovinky,
pudinky
Pyré, polévky
Dětská a
kojenecká
výživa
Saláty, zdobení
Chléb
Pizza
Postup
Sýr, rozřezaný na kousky,
vkládejte do plnicího otvoru.
Opatrně přitlačujte
pěchovačem.
Použijte tvrdou a hladkou
čokoládu. Rozlamte ji na kousky
asi 2 cm.
Použijte vařený hrách nebo
fazole. Pokud je to třeba
přidejte trochu tekutiny pro
zjemnění konzistence směsi.
Pro hrubší pyré nepřidávejte
příliš mnoho tekutiny. Pro
jemné pyré přidejte jen tolik
tekutiny až je směs hladká.
Vložte okurky do plnicího
otvoru a opatrně je přitlačujte.
Smíchejte horkou vodu s
kvasniceni a cukrem. Přidejte
mouku a zpracovávejte
výsledné těsto asi 90 sekund.
Nechte ho kynout asi 30 minut.
Realizujte stejný postup jako
pro chlebové těsto. Pracujte asi
1 minutu.
Přisluš
enství/
rychlo
st
h / 2
P / 2
PD/
2
PD / 2
g / 1
{ / 2
{ / 2
Nejvě
tší
množs
tví
200 g
200 g
250 g
500 g
2
okurk
y
500 g
mouky
750 g
mouky
Přísady a
výsledek
Sýr (gouda) strouhání
Čokoláda rozsekání
Vařený hrách,
fazole - výroba
pyré
Vařená
zelenina a
maso - výroba
pyré
Okurky krájení
Těsto (pro
chléb) hnětení
Těsto (pro
pizzu) hnětení
Page 96

ČESKY96
Použití
Jablkový závin,
sladké piškoty,
dorty
Luxusní pečívo
Pudinky, suflé,
sněhové
pusinky
Omáčky,
džemy,
pudinky, dětská
výživa
Postup
Použijte chladný margarin, který
rozřežte na kostky asi 2 cm.
Vložte všechny přísady do
nádoby a zpracovávejte tak
dlouho, až je těsto měkké.
Během zpracovávání přidejte
vodu. Práci ukončete až se z
těsta začne vytvářet koule. Před
dalším zpracováním nechte
těsto vychladnout.
Nejprve zpracujte těsto, teplou
vodu a cukr ve zvláštní nádobě.
Dejte vše do nádoby a
zpracovávejte je až je těsto
hladké a nelepí se na nádobu
(asi 1 minutu). Nechte ho
kynout asi 30 minut.
Bílky mají mít pokojovou
teplotu. Poznámka: použijte
nejméně 2 vejce.
Rada: abyste předešli zabarvení
šťávy, přidejte trochu citrónové
šťávy. Pro zjemnění pyré
můžete přidat trochu tekutiny.
Doporučení: abyste předešli
zabarvení šťávy, přidejte trochu
citrónové šťávy.
Přisluš
enství/
rychlo
st
{ / 2
{ / 2
å / 1
D / 2
P / 2
Nejvě
tší
množs
tví
300 g
mouky
500 g
mouky
4 bílky
500 g
500 g
Přísady a
výsledek
Těsto (pro
cukrářské
pečivo) hnětení
Těsto (kynuté)
- hnětení
Vaječné bílky šlehání
Ovoce (např.
jablka, banány)
- mixování
Ovoce (např.
jablky, banány)
- sekání
Použití
Zdobení
Omáčky,
polévky,
zdobení,
bylinkové
máslo
Saláty, zdobení,
omáčky
barbecue
Tatarské
steaky,
hamburgry,
masové koule
Tatarské
steaky,
hamburgry,
masové koule
Různé pečivo.
Postup
Česnek oloupejte. Použijte
mžikovou funkci, abyste předešli
příliš jemnému rozsekání.Vložte
nejméně 150 g česneku.
Bylinky nejprve omyjte a
usušte.
Všechny přísady mají mít
pokojovou teplotu. Poznámka:
použijte nejméně 1 velké vejce,
dvě malá vejce nebo dva
vaječné žloutky. Do nádoby
vložte vejce, přidejte trochu
octa a přikapávejte olej.
Nejprve odstraňte šlachy a
kosti. Maso nakrájejte na kostky
asi 3 cm. Pro nejlepší výsledek
použijte mžikovou funkci.
Nejprve odstraňte šlachy a
kosti. Maso nakrájejte na kostky
asi 3 cm. Pro nejlepší výsledek
použijte mžikovou funkci.
Přísady mají mít pokojovou
teplotu. Mixujte měkké máslo s
cukrem tak dlouho až vznikne
jemná krémová směs. Pak
přidejte mléko, vejce a mouku.
Přisluš
enství/
rychlo
st
P / 2
P / 2
å / 1
Å / 2
P / 2
{ / 2
Nejvě
tší
množs
tví
300 g
min.
50 g
3
vejce
1000
g
400 g
4
vejce
Přísady a
výsledek
Česnek rozsekání
Bylinky (např.
petržel) rozsekání
Majónéza emulgování
Maso (libové)
- drcení
Masa, ryby,
drůbež drcení
Směsi
(dortové) mixování
Page 97

ČESKY 97
Použití
Saláty, pudinky,
pečivo,
mandlové
těsto
Saláty, vařené
potraviny,
zdobení
Saláty, vařené
potraviny,
zdobení
Zdobení,
krémy,
mražené směsi
Mléčný nápoj
Polévky,
omáčky
Postup
Pokud si přejete hrubší
výsledek, použijte mžikovou
funkci.
Z cibule odstraňte slupku a
cibuli rozdělte na 4 díly.
Zastavte proces po 2
impulsech mžikové funkce,
abyste předešli příliš jemnému
rozsekání.
Z cibule odstraňte slupku a
rozřežte ji tak, aby prošla
plnicím otvorem. Poznámka:
použijte nejméně 100 g.
Použijte krém vyjmutý přímo z
chladničky. Poznámka: použijte
nejméně 125 ml krému. Krém
je ušlehán přibližně za 2 minut.
Z ovoce vyrobte pyré
(banány,jahody). Přidejte cukr,
mléko a trochu zmrzlinového
krému a dobře promixujte.
Použijte vařenou zeleninu.
Přisluš
enství/
rychlo
st
P / 2
P / 2
g / 1
å / 1
D / 2
D / 2
Nejvě
tší
množs
tví
250 g
500 g
300 g
500
ml
500
ml
mléka
500
ml
Přísady a
výsledek
Ořechy rozsekání
Cibule rozsekání
Cibule krájení
Šlehaný krém šlehání
Mléčné nápoje
- mixování
Polévky mixování
Recepty
Courgett-sendvičová pomazánka
Přísady:
- 2 courgetty
- 3 vařená vejce
- 1 malá cibule
- 1 lžíce oleje
- petržel
- 2 až 3 lžíce kyselého krému
- citronová šťáva, tabaco, sůl, pepř, curry, paprika
B
Umyjte a osušte courgetty a nastrouhejte je
strouhací vložkou v nádobě pro potraviny.Obsah
pak přesypte do mísy, posypte solí a nechte asi
15 minut stát, aby sůl extrahovala tekutinu z
nastrouhaných courgett. Rozkrájejte cibuli na 4 díly
a rozsekejte ji spolu se stroužkem česneku.
Otrhejte listy petržele ze stonku a též je
rozsekejte.
B
Pak vložte nastrouhané courgetty na čistou utěrku
a vytlačte z nich tekutinu. Z přísad by měla
zmizet všechna tekutina. Pak nechte přísady chvíli
vychladnout. Oloupejte vejce a krátce je v téže
nádobě rozsekejte. Přidejte další přísady do
nádoby, ochuťte je a vše zamíchejte kovovými
noži. Podávejte na toustovém chlebu.
Ovocný koláč
Přísady:
- 150 g datlí
- 225 g sušených švestek
- 100 g ořechů (50 g mandlí / 50 g vlašských
ořechů)
- 50 g hrozinek
Page 98

ČESKY98
- 50 g sultánek
- 200 g celožitné mouky
- 100 g pšeničné mouky
- 100 g hnědého krystalového cukru
- špetka soli
- 1 sáček prášku do pečiva
- 300 ml podmáslí
B
Do nádoby vložte kovové nože. Pak vložte přísady
a míchejte je maximální rychlostí asi 30 sekund.
Koláč pečte na 30 cm dlouhém plechu asi
40 minut při teplotě 170cC.
Pórkový Quiche
Přísady pro těsto:
- 250 g pšeničné mouky
- špetka soli
- 1 lžíce medu
- 20 g čerstvého droždí nebo 1/2 sáčku sušeného
droždí
- 100 g másla
- 6 lžic vlažné vody
Přísady pro náplň:
- 500 g pórku
- rostlinný olej
-4 vejce
- 500 g kyselé smetany
- sůl, pepř, 1 až 2 lžíce mouky (pokud je třeba)
B
Všechny přísady vložte do nádoby a vytvořte
hnětením kompaktní těsto.Těsto nechte asi 30
minut kynout.
B
Nakrájejte pórek krájecí vložkou. Dejte na pánev
trochu oleje a opékejte nakrájený pórek několik
minut. Zbytek přísad vložte do mixéru a mixujte
až do krémové konzistence. Přidejte 1 až 2 lžíce
mouky k zahuštění.
B
Pečicí plech o průměru 24 cm vymažte tukem a
na dno a na strany neneste těsto. Pórkovou směsí
těsto pokryjte a navrch nasypte zbytek přísad.V
předehřáté troubě na 180cC pečte asi 40 minut.
Podávejte teplé nebo studené.
Guláš na maďarský způsob
Přísady:
- 1 lžíce oleje
- 1 střední cibule
- 1 lžička papriky
- 400 g hovězího nebo vepřového
- 1 zelený pepř
- 1 rajské jablíčko
-sůl
- 200 g mrkve
- 300 g brambor
-kmín
B
Umyjte maso a rozkrájejte je na kostky o hraně
asi 2 cm. Oloupejte cibuli a rozsekejte ji v nádobě
kovovými noži.Vykrájejte zelený pepř a rozřežte jej
na kroužky krájecí vložkou. Oloupejte rajská
jablíčka, vyjměte jádro a nakrájejte je na plátky.
Osmažte nasekanou cibuli na oleji až změkne.
Sejměte ji z ohně a na cibuli nasypte papriku,
přidejte maso a nechte několik minut povařit za
stálého míchání. Přidejte podle chuti zelený pepř,
Page 99

ČESKY 99
rajče a sůl. Pánev přikryjte a obsah poduste při
přiměřené teplotě až změkne.
B
Mezitím oloupejte a rozkrájejte mrkev krájecí
vložkou a oloupejte a nakrájejte na kostičky
brambory.Vše přidejte k masu a přilijte tolik vody,
až získáte potřebné množství polévky (asi
1,2 litru). Ozdobte trochou kmínu a povařte až
bude vše měkké jako máslo. Můžete přidat sůl,
pokud je to třeba.
B
Podávejte teplé. Můžete vše ozdobit kroužky
zeleného pepře.
Koláč s lískovými ořechy
Přísady do těsta:
- 500 g prosáté mouky
- 75g cukru
- 1 lžička soli
-1 vejce
- 250 ml mléka (teplého 35cC)
- 100 g másla, změklého
- 30 g čerstvého droždí (u suchého droždí se
řiďte pokyny na obalu)
Náplň:
- 250 g rozsekaných lískových oříšků
- 100 g cukru
- 2 sáčky vanilkového cukru
- 125 ml krému
B
Předehřejte troubu na 200cC. Smíchejte mléko,
droždí a cukr po dobu 15 sekund s použitím
hnětacího příslušenství. Přidejte mouku, sůl, máslo
a vejce.Těstovou směs zpracovávejte asi 2 minuty.
Pak těsto přemístěte do jiné nádoby, přikryjte ho
mokrým hadříkem a nechte asi 20 minut na
mírně teplém místě kynout.
B
Noži rozsekejte lískové ořechy.Smíchejte s
přísadami pro náplň.Těsto vyválcujte do
pravoúhlého tvaru. Potřete ho připravenou směsí a
pak ho stočte. Položte ho na vymaštěný pečicí
plech a nechte ho asi 20 minut kynout. Povrch
potřete trochou našlehaného vaječného žloutku a
pečte asi 25 až 30 minut při teplotě 200cC.
Čokoládový koláč
Přísady:
- 140 g másla
- 110 g moučkového cukru
- 140 g čokolády
- 6 vaječných bílků
- 6 vaječných žloutků
- 110 g granulovaného cukru
- 140 g pšeničné mouky
Náplň:
- 200 g meruňkového džemu
Poleva:
- 125 ml vody
- 300 g cukru
- 250 g nastrouhané čokolády
- šlehaný krém, pokud je požadován
B
Troubu předehřejte na 160cC. Utřete máslo a
cukr do krémové konzistence. Rozpusťte čokoládu
a přimíchejte ji. Přidejte žloutky, jeden po druhém
až má směs krémovou konzistenci. Emulgačním
kotoučem našlehejte bílek s granulovaým cukrem
Page 100

ČESKY100
až bude tuhý a nakonec vše dobře promíchejte.
Pak přidejte mouku.Vše dejte na vymaštěný plech.
Pečte hodinu při teplotě 160cC. Prvních 15 minut
nechte dvířka trouby pootevřená.
B
Ponechte koláč chvilku vychladnout ještě na
pečicím plechu (24 cm). Koláč rozřízněte
vodorovně na dvě poloviny.Jednu polovinu natřete
merunkovým džemem a obě poloviny přiložte na
sebe. Pak zbytek džemu ohřejte a rozetřete ho na
horní část koláče. Připravte si polevu. Uveďte do
varu vodu, přidejte cukr a čokoládu a za stálého
míchání vytvořte polevu krémové konzistence.Tuto
polevu nalijte na koláč a nechte ji vychladnout.
Koláč můžete podávat se šlehaným krémem.
Polévka z brokolice (pro 4 osoby)
Přísady:
- 50 g zralého sýru Gouda
- 300 g vařené brokolice (stonky a květy)
- voda, v níž se brokolice vařila
- 2 vařené brambory v kusech
- 2 nakrájené stonky
- 1 lžíce našlehaného krému
- curry
-sůl
- pepř
- muškátový ořech
B
Nastrouhejte sýr.Vyrobte pyré z brokolice s
vařenými bramborami a s vodou, v níž se brokolice
vařila. Pyré z brokolice a zbylou vodu nalijte do
odměrné nádoby a doplňte do 750 ml. Přeneste
tuto směs na pánev a přiveďte ji za stálého
míchání do varu.Vmíchejte sýr a ochuťte solí, curry,
pepřem a muškátovým ořechem a přidejte krém.
Čerstvý ovocný mléčný nápoj
Přísady:
- 100 g banánů nebo jahod
- 200 ml čerstvého mléka
- 50g vanilkového mraženého krému
- granulovaný cukr k ozdobení
B
Oloupejte banány nebo opláchněte jahody.
Nakrájejte ovoce na malé kousky.Vše vložte do
mixéru. Mixujte až je obsah jemný.
B
K výrobě mléčného nápoje můžete použít ovoce
podle vaší chuťi.
Pizza
Přísady pro těsto:
- 400 g mouky
- 1/2 lžičky soli
- 20 g čerstvého droždí nebo 1,5 sáčku sušeného
droždí
- 2 lžíce oleje
- asi 240ml vody (teplé 35cC)
Pro potření pizzy:
- 300 ml rajského protlaku
- 1 lžička italských bylinek (sušené nebo čerstvé)
- 1 cibule
- 2 stroužky česneku
- sůl a pepř
- cukr
 Loading...