

Page 1
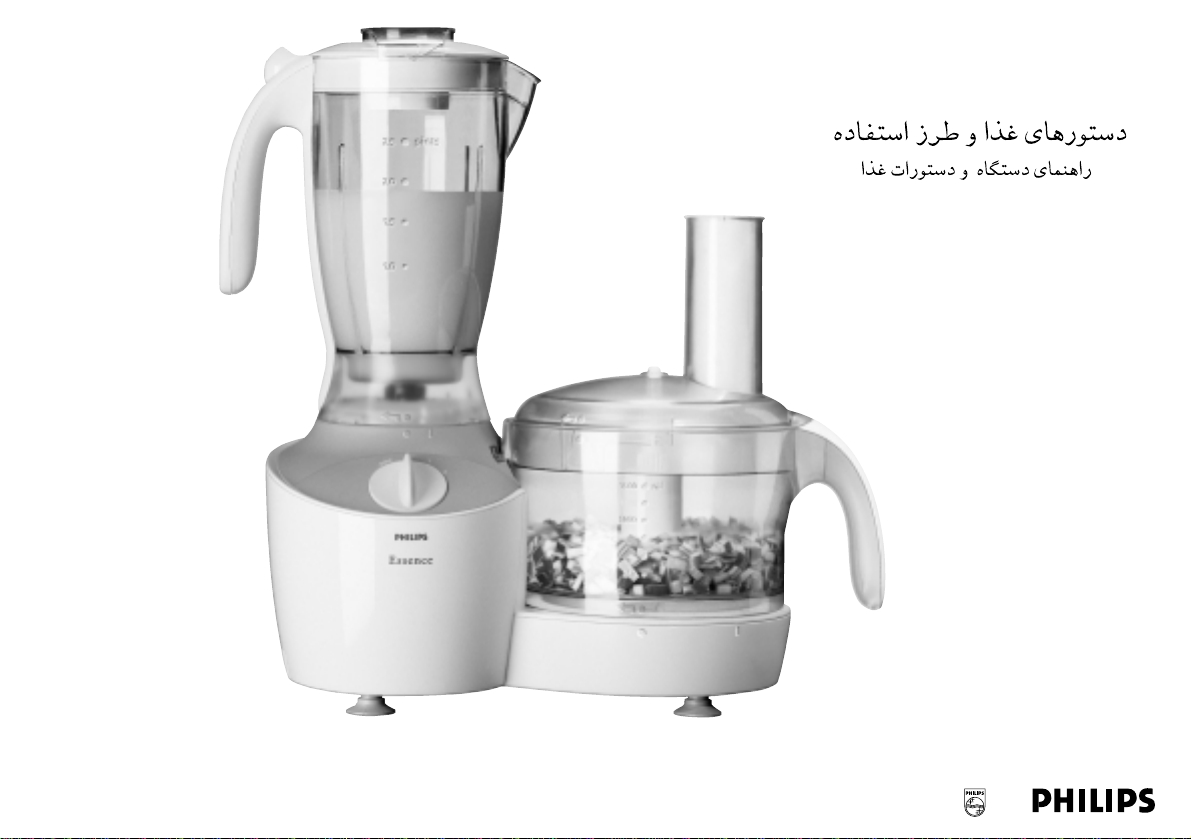
Essence
HR7753
Recipes & Directions for use
Recettes & Mode d'emploi
Recetas & Instrucciones de Uso
Page 2

2
Page 3
0
3
L
K
J
I
H
G
F
E
Z
C
D
B
A
Page 4

4
Page 5

ENGLISH 6
FRANÇAIS 25
ESPAÑOL 45
85
102
HR7753
5
á«Hô©dG
Page 6

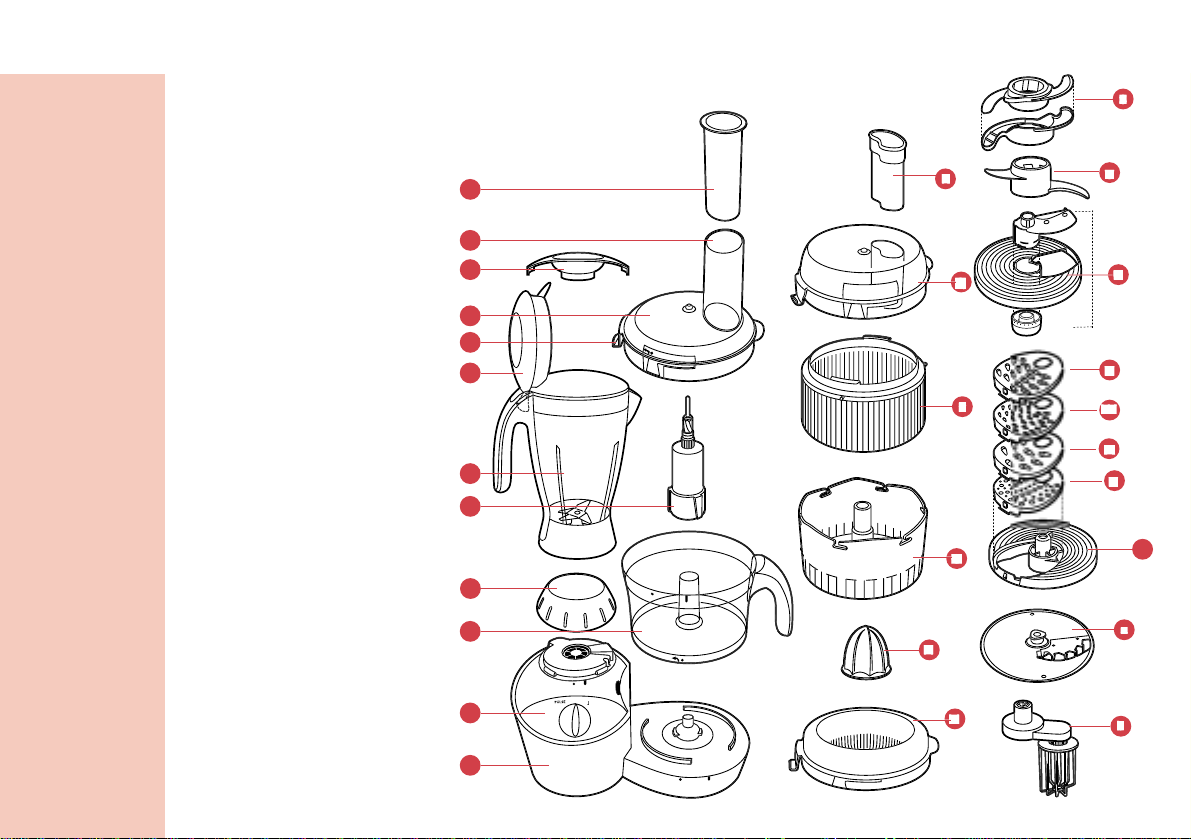
ENGLISH6
Parts and accessories
A Motor unit
B Speed control
P= Pulse
0 = Off
1 = Lowest speed
2 = Highest speed
C Screw cap (must be placed to use bowl
functions)
D Food processing bowl
E Tool holder
F Blender jar
G Lid of blender jar
H Peg of lid (activates and deactivates the safety
switch)
I Lid of food processing bowl
J Safety cover
K Feed tube
L Pusher
M Sieve of citrus press
N Cone of citrus press
O Juice extractor drum
P Juice extractor pulp sieve
Q Lid of juice extractor
R Pusher of juice extractor
S Kneading hook
T Metal blade + protective cover
U Adjustable slicing disc
V Shredding insert medium
W Shredding insert fine
X Shredding insert coarse
Y Granulating insert
Z Insert holder
a Potato knife
b Balloon beater
Introduction
This appliance is equipped with an automatic
thermal cut-out system.This system will
automatically cut off the power supply to the
appliance in case of overheating.
If your appliance suddenly stops
running:
1 Pull the mains plug out of the socket.
2 Turn the knob to position 0 to switch the
appliance off.
3 Let the appliance cool down for
60 minutes.
4 Put the mains plug in the socket.
5 Switch the appliance on again.
Please contact your Philips dealer or an
authorised Philips service centre if the automatic
thermal cut-out system is activated too often.
CAUTION: In order to avoid a hazardous
situation,this appliance must never be connected
to a timer switch.
Page 7

ENGLISH 7
Important
◗ Read these instructions for use carefully and
look at the illustrations before using the
appliance.
◗ Keep these instructions for use for future
reference.
◗ Check if the voltage indicated on the
appliance corresponds to the local mains
voltage before you connect the appliance.
◗ Never use any accessories or parts from
other manufacturers or that have not been
specifically advised by Philips.Your guarantee
will become invalid if such accessories or
parts have been used.
◗ Do not use the appliance if the mains cord,
the plug or other parts are damaged.
◗ If the mains cord of this appliance is damaged,
it must always be replaced by Philips or a
service centre authorised by Philips,in order
to avoid hazardous situations.
◗ Thoroughly clean the parts that will come
into contact with food before you use the
appliance for the first time.
◗ Do not exceed the quantities and preparation
times indicated in the table.
◗ Do not exceed the maximum content
indicated on the bowl,i.e.do not fill beyond
the top graduation.
◗ Unplug the appliance immediately after use.
◗ Never use your fingers or an object (e.g.a
spatula) to push ingredients down the feed
tube while the appliance is running.Only the
pusher is to be used for this purpose.
◗ Always unplug the appliance before reaching
into the blender jar with your fingers or an
object (e.g.a spatula).
◗ Keep the appliance out of the reach of
children.
◗ Never let the appliance run unattended.
◗ Place the lid on the bowl in the right position.
The build-in safety lock will now be deblocked
and you will be able to turn the appliance on.
Both the motor unit and the screw cap have
been provided with marks.The appliance will
only function if the dot on the motor unit is
placed opposite the dot on the screw cap.
◗ Switch the appliance off before detaching any
accessory.
◗ Always switch the appliance off by switching
to speed setting 0.
◗ Wait until moving parts have stopped running
before you remove the lid of the appliance.
◗ The screw cap can only be removed if the lid
is not on the bowl or if the bowl has been
removed altogether.
◗ Never immerse the motor unit in water or
any other fluid,nor rinse it under the tap.Use
only a moist cloth to clean the motor unit.
◗ Remove the protective cover from the blade
before use.
◗ Let hot ingredients cool down before
processing them (max.temperature
80cC/175cF).
◗ If you are processing a liquid that is hot or
tends to foam,do not put more than 1 litre
into the blender jar to avoid spillage.
Page 8
ENGLISH8
◗ For application times,please refer to the
tables further in these instructions for use.
Note that it is not possible to use the
bowlfunctions when the blender is attached.
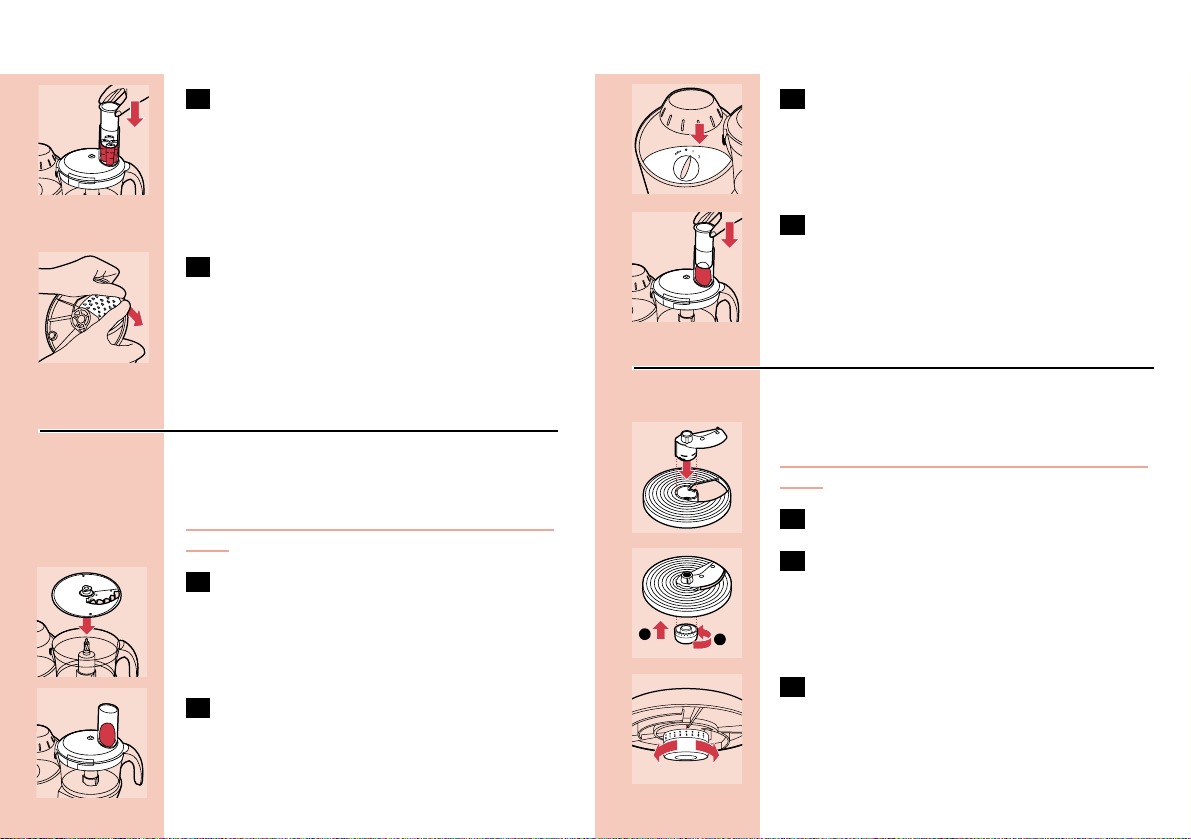
Using the appliance
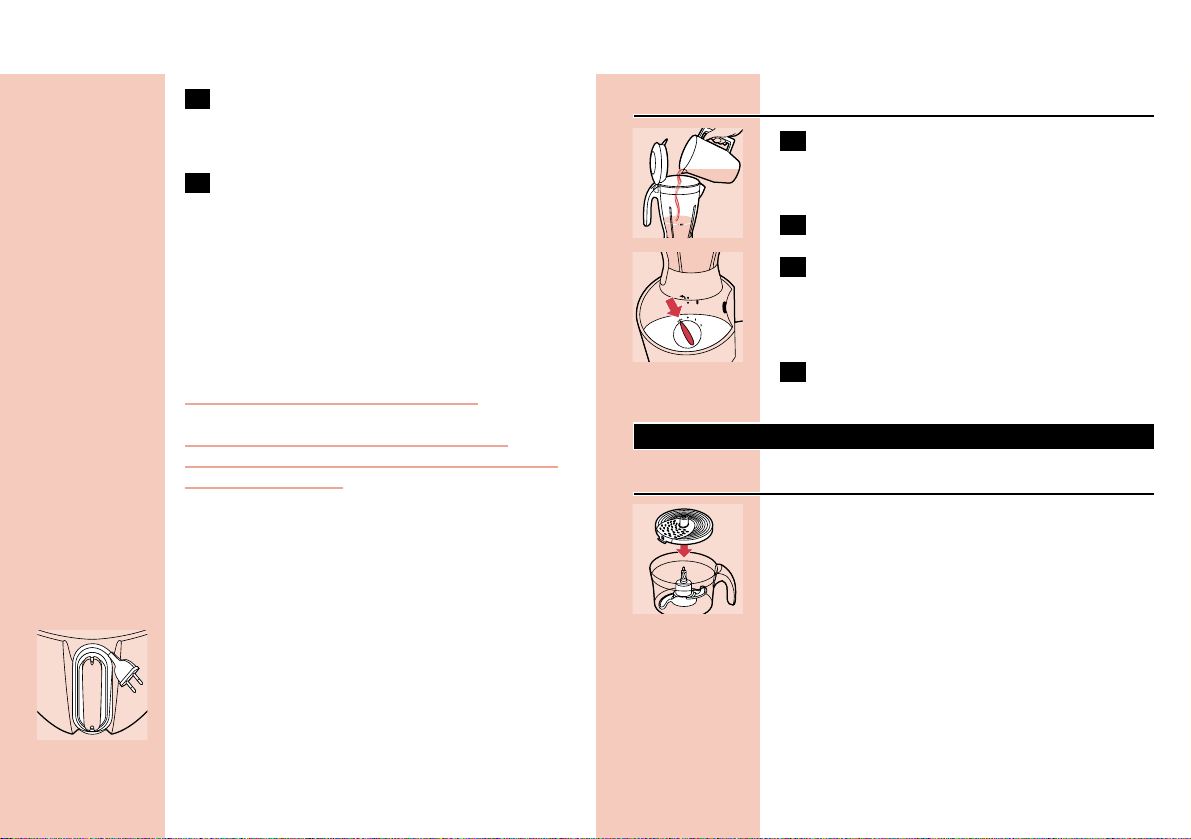
Food processing bowl
C
1 Mount the bowl on the food processor by
turning the handle in the direction of the
arrow until you hear a click.
C
2 Put the lid on the bowl.Turn the lid in the
direction of the arrow until you hear a
click (this requires some force).
Built-in safety lock
The motor unit,the bowl and the lid have been
provided with marks.The appliance will only
function if the dot on the motor unit is placed
directly opposite the dot on the bowl.
C
1 Make sure that the line on the lid and the
line on the bowl are directly opposite each
other.The projection of the lid will
complete the shape of the handgrip.
Feed tube and pusher
C
1 Use the feed tube to add liquid and/or
solid ingredients.Use the pusher to push
solid ingredients through the feed tube.
C
2 You can also use the pusher to close the
feed tube in order to prevent ingredients
from escaping through the feed tube.
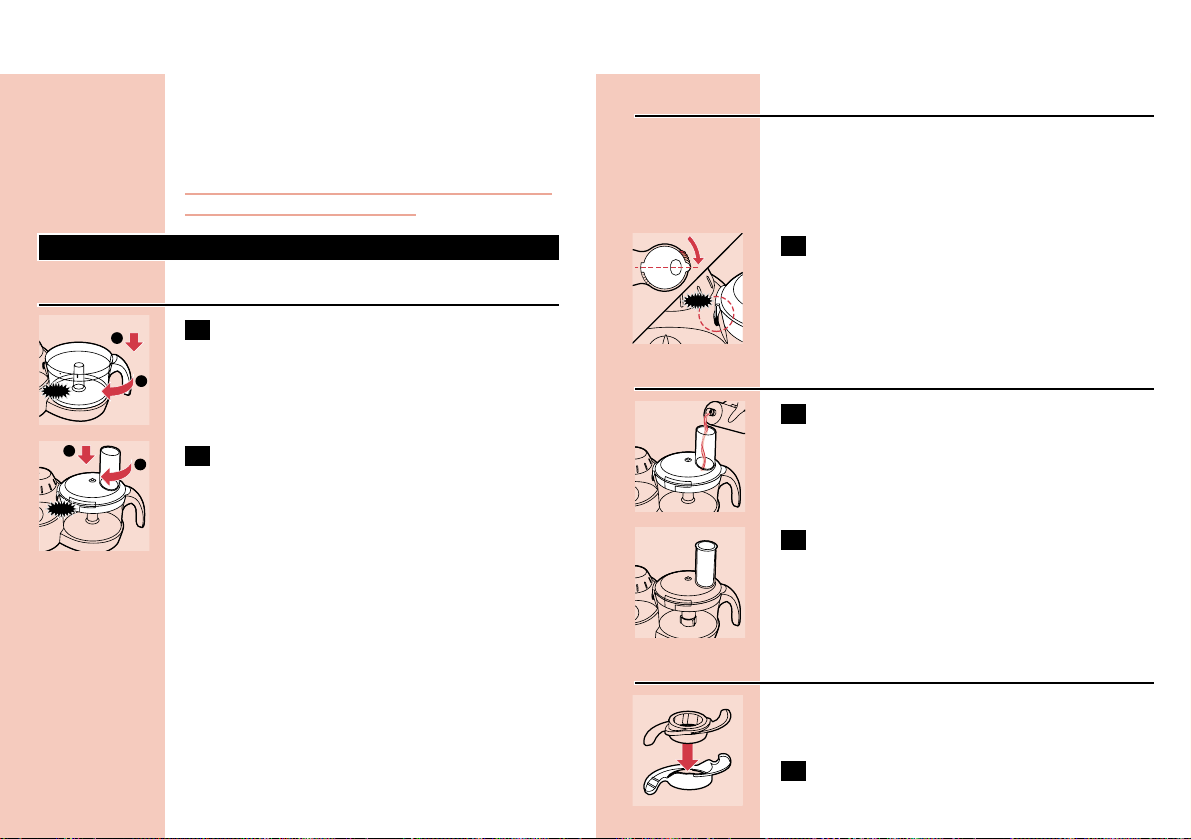
Metal blade
◗ The metal blade can be used for chopping,
mixing,blending and pureeing.
C
1 Remove the protective cover from the
blade.
The cutting edges of the blade are very sharp.
Avoid touching them!
C
2 Put the tool holder in the bowl and the
blade on the tool holder that stands in the
bowl.
3 Put the ingredients in the bowl.Pre-cut
large pieces of food into pieces of approx.
3 x 3 x 3 cm.Put the lid on the bowl.
CLICK
CLICK
1
2
1
2
CLICK
Page 9
ENGLISH 9
4 Put the pusher in the feed tube.
C
5 Select the maximum speed (position 2) on
the speed control.
- The process will continue until switched to
position 0 (off).
◗ Switch to position 1 to decrease the speed.
Tips
◗ If you chop onions,use the pulse function
several times to prevent them from becoming
too finely chopped.
◗ Do not let the appliance run too long when
you are chopping (hard) cheese.The cheese
will become too hot,will start to melt and
will turn lumpy.
◗ Do not use the blade to chop very hard
ingredients like coffee beans,turmeric, nutmeg
and ice cubes,as this may cause the blade to
get blunt.
If food sticks to the blade or to the inside of the
bowl:
1 Turn the appliance off.
2 Remove the lid from the bowl.
3 Remove the ingredients from the blade or
from the wall of the bowl with a spatula.
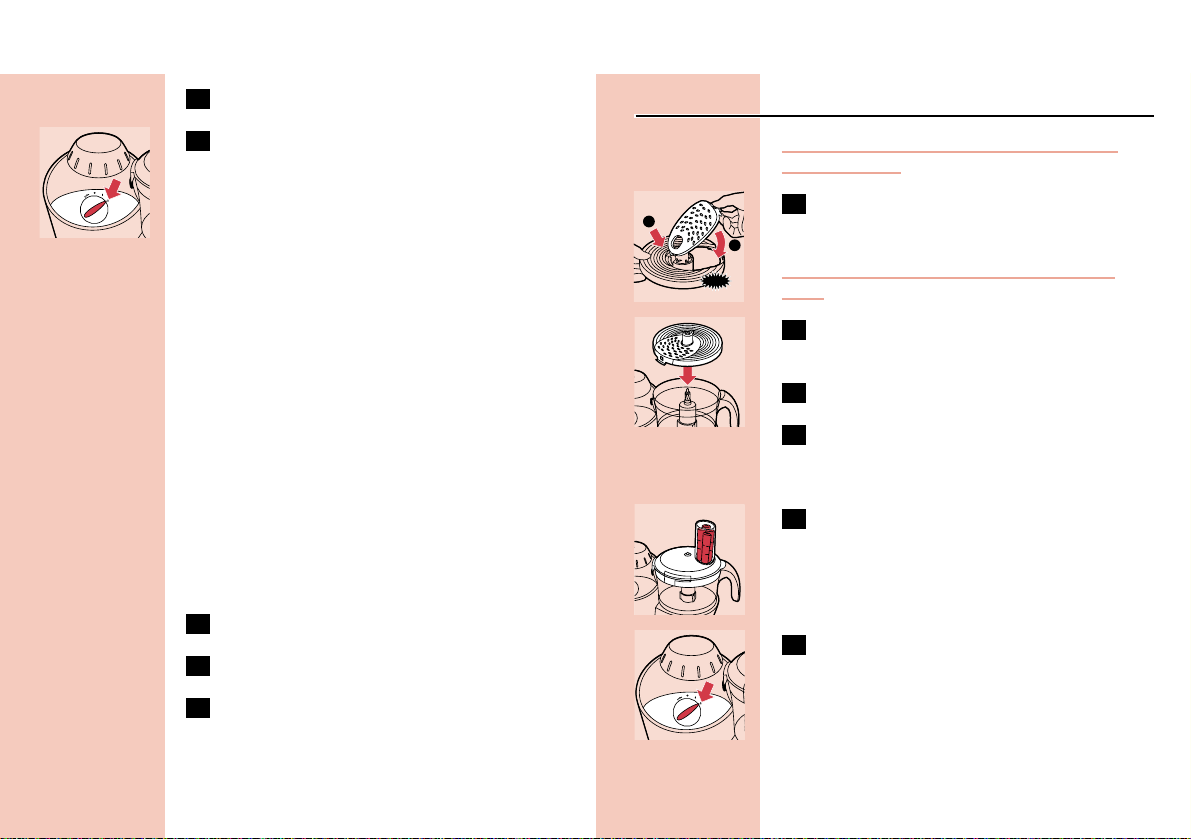
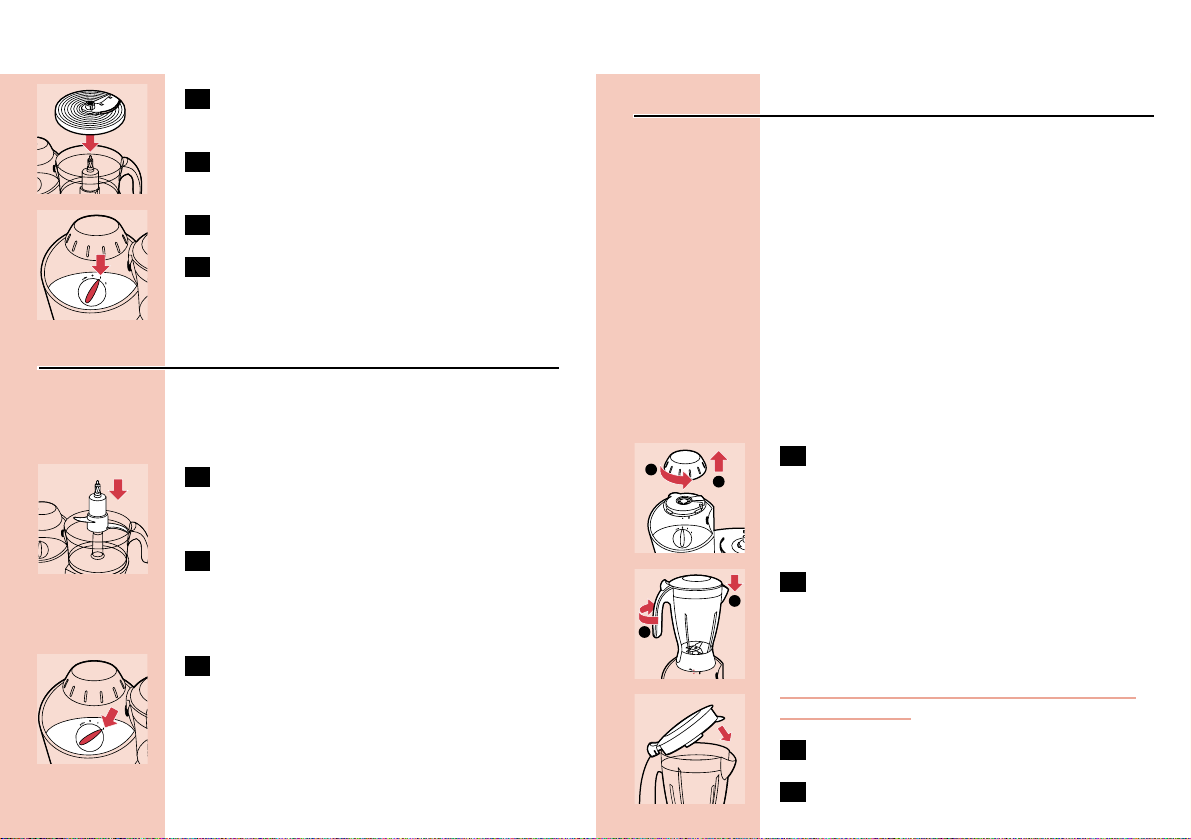
Inserts
Never process hard ingredients like ice cubes
with the inserts.
C
1 Put the selected insert in the insert holder
before you place it onto the toolholder.
Cutting edges are very sharp.Avoid touching
them!
C
2 Place the insert holder onto the tool
holder that stands in the bowl.
3 Put the lid on the bowl.
4 Put the ingredients in the feed tube.Pre-
cut large chunks to make them fit into the
feed tube.
C
5 Fill the feed tube evenly for the best
results.
When you have to cut large amounts of food,
process only small batches at a time and empty
the bowl regularly between the batches.
C
6 For shredding and slicing,select the
maximum speed (position 2) on the speed
control.
The process will continue until switched to
position 0 (off).
◗ Switch to position 1 to decrease the speed.
CLICK
2
1
Page 10
ENGLISH10
C
7 Press the pusher lightly onto the
ingredients in the feed tube.
◗ If you are shredding soft vegetables or fruits,
you can decrease the speed to position 1,to
prevent the shredded vegetables and fruits
from turning into puree.
C
8 To remove the insert from the insert
holder,take the insert holder in your
hands with its back pointing towards you.
Push the edges of the insert with your
thumbs to make the insert fall out of the
holder.
Potato knife
The potato knife allows you to cut ingredients
into rectangular pieces for e.g. French fries.
Be careful:the cutting edges of the blade are very
sharp.
C
1 Place the potato knife on the tool holder.
C
2 Close the lid and put the ingredients in the
feed tube.
C
3 Switch to position 1 to get optimal results.
C
4 Press the ingredients down with the
pusher,if necessary.
Adjustable slicing disc
The adjustable slicing disc allows you to cut
ingredients to any thickness you like.
Be careful:the cutting edges of the blade are very
sharp.
C
1 Insert the blade into the top of the carrier.
C
2 Connect the knob from the bottom side
of the disc and turn it until the lines match.
Now the disc is locked.
C
3 Turn the adjusting knob to adjust the
thickness you prefer.
2
1
2
Page 11
ENGLISH 11
C
4 Place the adjustable slicing disc on the tool
holder.
5 Close the lid and put the ingredients in the
feed tube.
C
6 Switch to position 1 to get optimal results.
7 Press the ingredients slowly down with the
pusher,if necessary.
Kneading hook
The kneading hook can be used for kneading
bread dough and for mixing batters and cake
mixtures.
C
1 Put the bowl on the motor unit and place
the kneading accessory onto the driving
shaft.
2 Put the ingredients in the bowl and fasten
the lid onto the bowl.Place the pusher in
the feed tube to prevent ingredients from
splattering during the kneading process.
C
3 Select the maximum speed (position 2) on
the speed control.
Blender
The blender is intended for:
- Blending fluids,e.g.dairy products, sauces, fruit
juices,soups,mixed drinks,sweat teas, shakes.
- Mixing soft ingredients,e.g.pancake batter or
mayonnaise.
- Pureeing cooked ingredients,e.g.for making
baby food.
◗ The appliance can be used with or without
the blender attached to the motor unit.If you
use the appliance without the blender,the
appliance will not function if the screw cap
has not been screwed properly onto the
motor unit.
C
1 To attach the blender jar,remove the
screw cap which is positioned above the
speed control.
C
2 Mount the blender jar on top of the
motor unit by turning it in the direction of
the arrow until it is firmly fixed.The handle
must be facing to the left!
Do not exert too much pressure on the handle
of the blender jar.
3 Put the ingredients in the blender jar.
C
4 Close the lid.
1
2
2
1
Page 12
ENGLISH12
C
5 Always connect the safety cover onto the
blender lid before you start processing.
C
6 Select the maximum speed (position 2).
The appliance will continue to run at this
speed until switched to position 0 (off).
See the table for the appropriate processing
times.
Tips
C
◗ Pour the liquid ingredients into the blender
jar through the hole in the lid.
◗ The longer you let the appliance run,the finer
the blending result will be.
◗ Pre-cut solid ingredients into smaller pieces
before putting them in the blender.If you
want to prepare a large quantity,process small
batches of ingredients instead of trying to
process a large quantity at once.
◗ Hard ingredients e.g.soy beans for soy bean
milk,must be soaked in water before they are
processed.
◗ Crush ice cubes by placing the ice cubes in
the jar,close the lid and use the pulse
function.
If ingredients stick to the wall of the blender jar:
1 Switch the appliance off and unplug it.
2 Open the lid.
Never open the lid while the appliance is still
running.
3 Use a spatula to remove the ingredients
from the wall of the jar.
Keep the spatula at a safe distance from the
blades (approx.2 cm).
◗ If you are not satisfied with the results,let the
appliance run briefly a number of times by
turning the knob a number of times to the
pulse position (pulse).You can also try to get
a better result by stirring the ingredients with
a spatula (not while the blender is running),or
by pouring some of the contents out in order
to process a smaller amount.
◗ In some cases the ingredients are easier to
blend if you add some liquid e.g.lemon juice
when blending fruits.
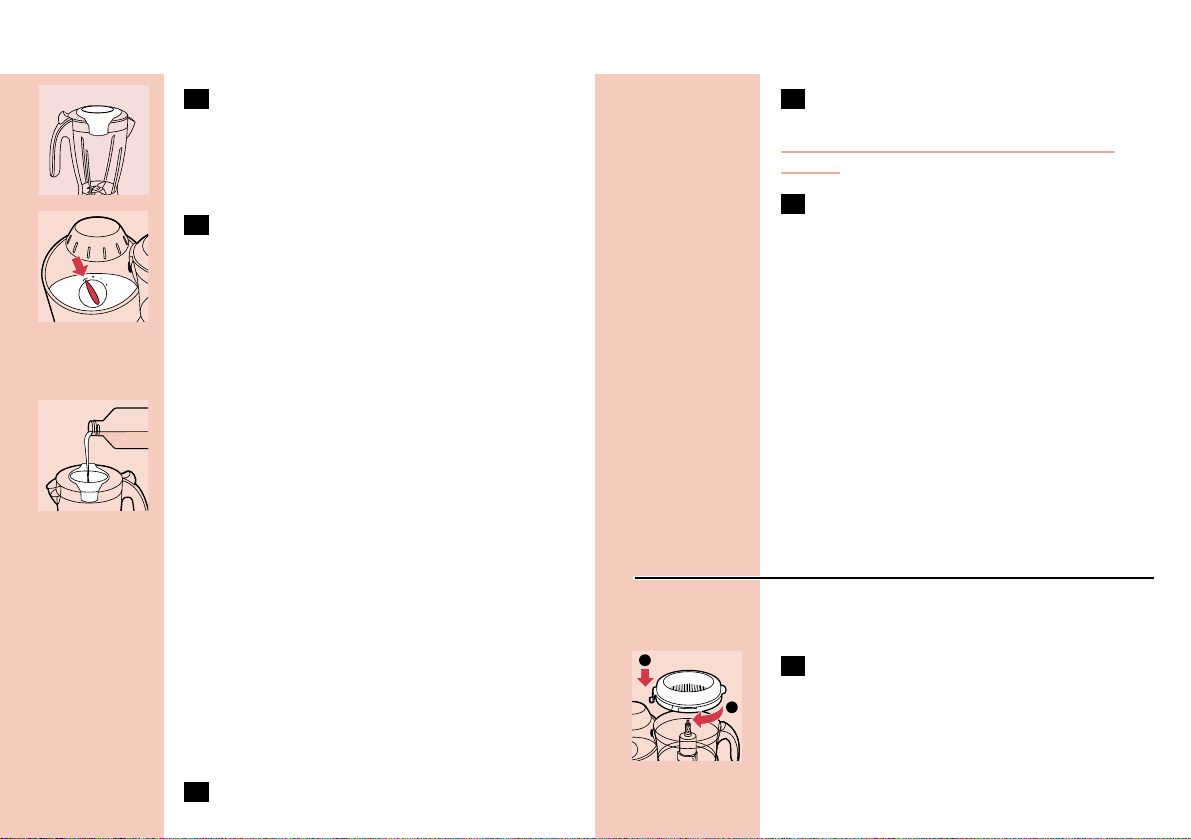
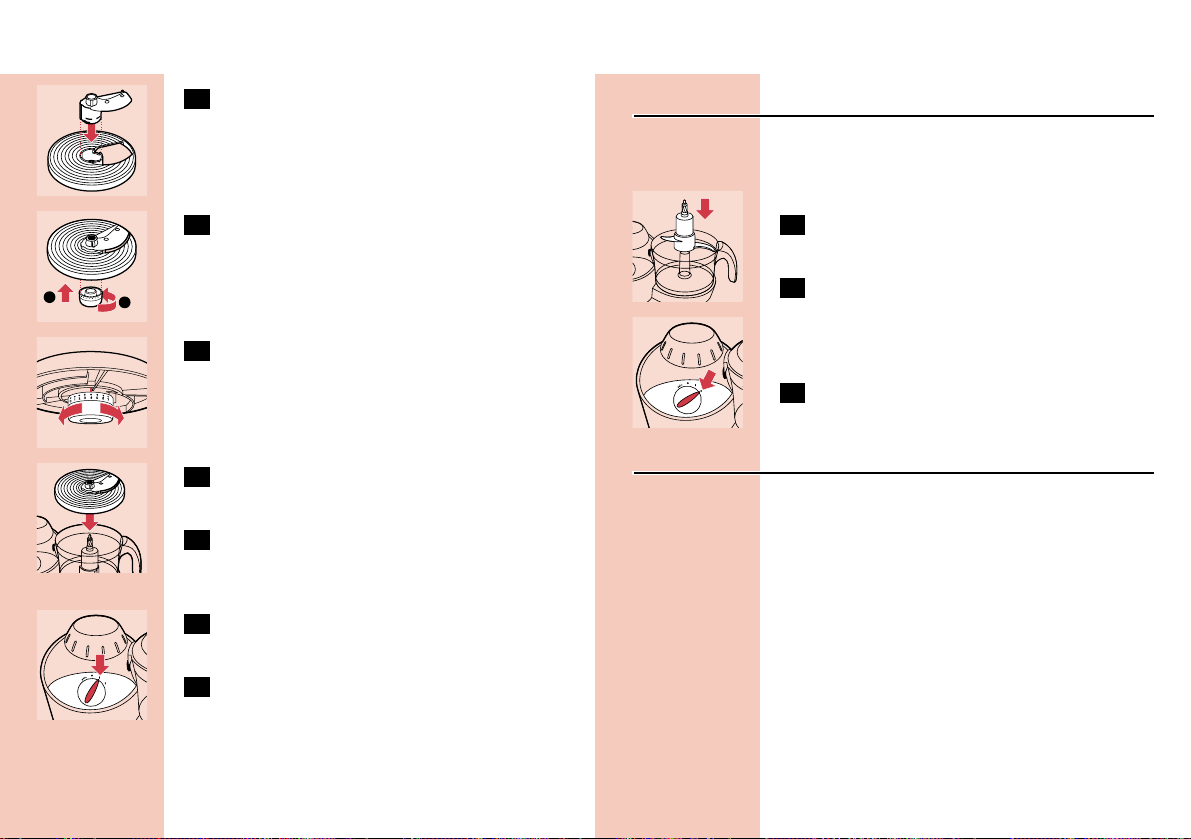
Citrus press
The citrus press can be used for all kinds of citrus
fruit.
C
1 Put the bowl on the motor unit and place
the sieve on the bowl.
1
2
Page 13

ENGLISH 13
C
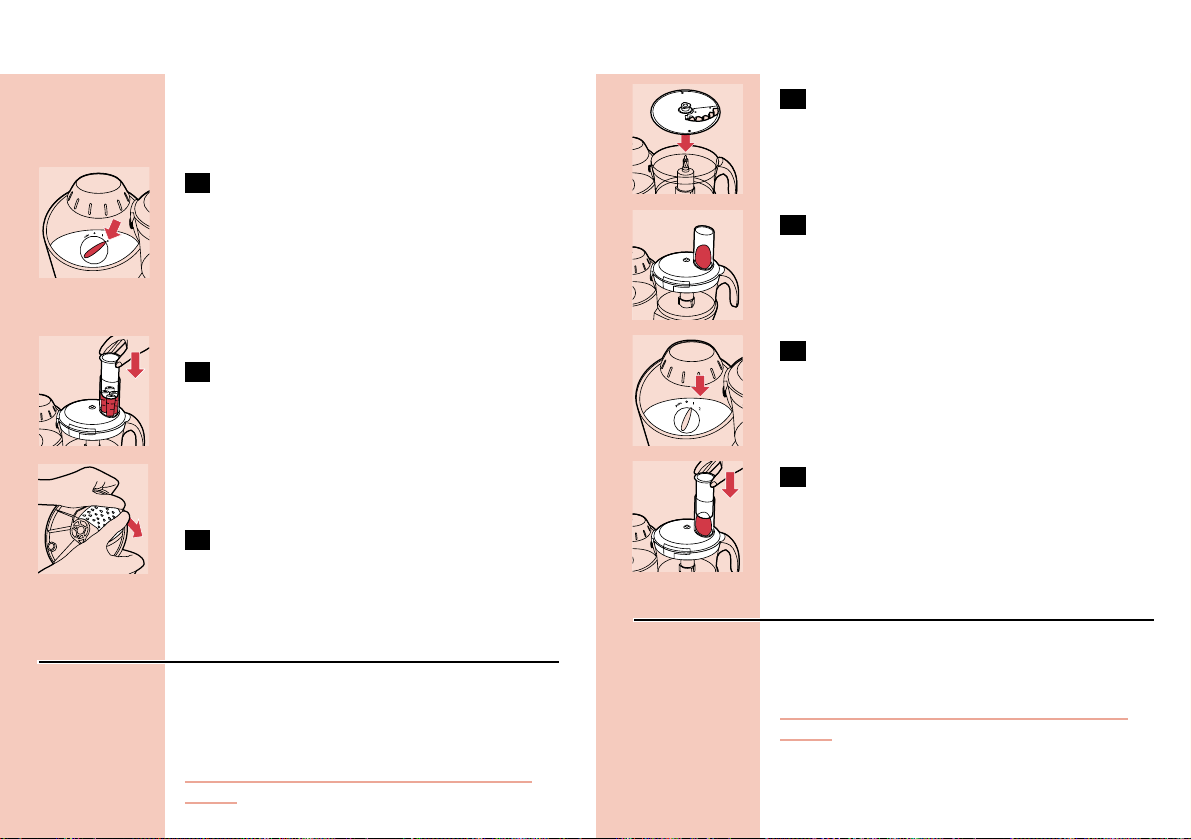
2 Turn the sieve in the direction of the
arrow until the peg of the safety lock
snaps home in the motor unit.
C
3 Place the cone on the sieve by pressing it
lightly down.
C
4 Select the minimum speed (position 1).
The process starts running and stops when
switching to position 0 (off).
C
5 Press half of fruit firmly on the rotating
cone.
Tips
◗ Stop pressing from time to time to remove
the pulp from the sieve.
When you do so,switch off the appliance and
remove the bowl along with the sieve and cone.
C
◗ After use,remove the bowl along with the
Citrus press accessories to prevent juice from
leaking onto the appliance.
Balloon beater
You can use the balloon beater to whis keggs,egg
whites,instant puddings and cream.
1 Put the bowl on the motor unit and turn
it to the left until you hear a ‘click’.
C
2 Put the toolholder in the bowl.
C
3 Place the balloon beater onto the
toolholder.
4 Put the ingredients into the bowl,put the
lid on the bowl and turn it to the right
until you hear a click.
C
5 Select the speed 1 on the speed control to
get optimal results.
Juice extractor
The juice extractor can be used for preparing
fresh fruit and vegetable juices.Pulp,pips and
skins will be separated.
1 Put the bowl on the motor unit.
C
2 Put the toolholder in the bowl.
CLICK
2
1
Page 14
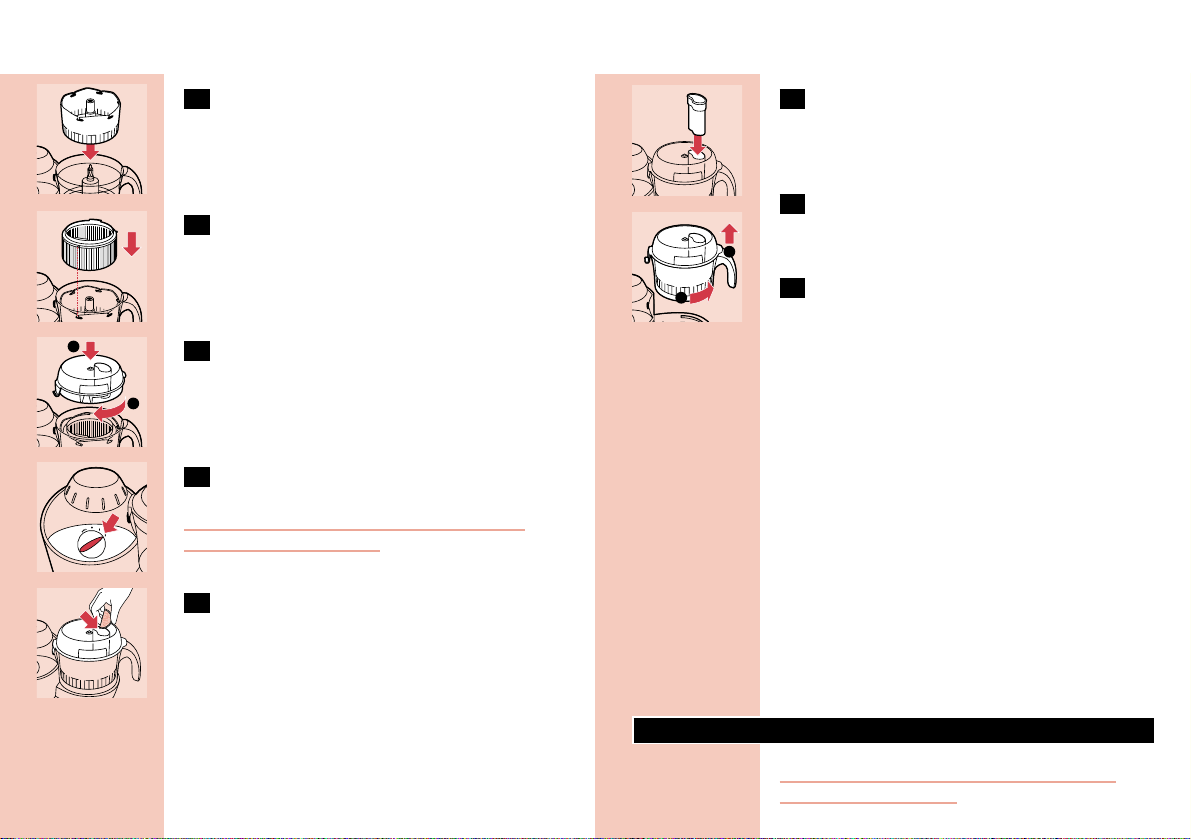
ENGLISH14
C
3 Attach the juicer drum on the toolholder.
C
4 Insert the pulp sieve into the juicer drum
and ensure that all 3 pins fit into the
notches of the juicer drum.
C
5 Put the lid of the juice extractor on the
bowl.
C
6 Select the maximum speed (position 2) to
obtain optimal results.
Never use the juicing accessory if the rotating
sieve or drum is damaged.
C
7 Drop the fruit or vegetables in the juice
extractor through the feed tube.
C
8 Press the ingredients firmly down with the
pusher if necessary.Keep the pusher in the
feed tube as much as possible to avoid
splashing.
9 Let the appliance run for another
20 seconds to obtain any juice still left in
the fruit or vegetables.
C
10 To avoid spilling juice on the appliance,
remove the bowl along with the juice
extractor accessories after use.
Tips
◗ Before you use the juice extractor:
- cut carrots, white radish, etc.
- peel citrus fruits,pineapples,melons,etc
- stone cherries, plums, apricots, peaches,etc.
◗ Always switch on the appliance before you
put the fruit in the juice extractor.
◗ Switch the appliance off from time to time to
remove pulp from the sieve and the juicer
drum.
◗ Do not process large amounts of food at the
same time.
◗ Switch the appliance off if it starts to vibrate
strongly and clean the pulp sieve and the filter
before you switch the appliance on again.
Cleaning
Always unplug the appliance before you start
cleaning the motor unit.
1
2
2
1
Page 15
15ENGLISH
1 Clean the motor unit with a damp cloth.
Do not immerse the motor unit in water
and do not rinse it either.
2 Always clean the parts that have come into
contact with food in hot water with
washing-up liquid immediately after use.
◗ The bowl,the lid of the bowl,the pusher and
the accessories (except for the blender jar)
can also be cleaned in a dishwasher.
These parts have been tested for dishwasher
resistance based on DIN EN 12875.
The blender jar is not dishwasherproof!
Clean the metal blade, the blade unit of the
blender and the inserts very carefully.Their cutting
edges are very sharp!
Make sure that the cutting edges of the blades
and the inserts do not come into contact with
hard objects.This could cause them to become
blunt.
Certain ingredients may cause discolourations on
the surface of the accessories.This does not have
a negative effect on the accessories.The
discolourations usually disappear after some time.
C
◗ Wind the (excess) mains cord around the reel
on the back of the appliance.
Blender quick-clean operation
C
1 Pour lukewarm water (not more than
0.5 litres) and some washing-up liquid into
the blender jar.
2 Close the lid.
C
3 Let the appliance run for a few moments
by turning the knob to the pulse position.
The appliance stops running when you
switch to position 0 (off).
4 Detach the blender jar and rinse it with
clean water.
Storage
MicroStore
C
◗ Put the accessories (blade,insert holder) on
the tool holder and store them in the bowl.
Always end up with the insert holder.
Page 16

ENGLISH16
Information & service
If you need information or if you have a problem,
please visit the Philips Web site at
www.philips.com or contact the Philips Customer
Care Centre in your country (you will find its
phone number in the worldwide guarantee
leaflet).If there is no Customer Care Centre in
your country,turn to your local Philips dealer or
contact the Service Department of Philips
Domestic Appliances and Personal Care BV.
Solution
Turn the bowl/or lid clockwise until you hear a click.
Make sure that the points on the bowl and on the lid
are placed directly opposite each other.
The automatic thermal cut-out system has probably cut
off the power supply to the appliance because it has
overheated.1) Switch the applaince off (position 0).
2) Unplug the appliance. 3) Let the appliance cool down
for 60 minutes.4) Put the mains plug in the socket.
5) Switch the appliance on again.
Check if you have really turned the bowl and the lid
clockwise as far as the point where you hear a click.
If both the blender and the food-processing bowl have
been mounted correctly,only the blender will function.If
you want to use the food-processing bowl,detach the
blender and close the fixing hole with the screw cap.
Problem
The appliance doesn't
switch on.
The appliance has
suddenly stopped
running.
The kneading or
mixing accessory
doesn't turn.
Both the blender jar
and the food
processing bowl are
attached,but only the
blender works.
Troubleshooting guide
Accessories and applications
Application times
10 - 60 sec.
60 - 180 sec.
10 - 60 sec.
10 - 60 sec.
10 - 60 sec.
30 - 180 sec.
depends on quantity
depends on quantity
Application
Chopping,pureeing,
mixing
Kneading
Slicing,shredding,
grating
Slicing
Cutting potatoes,
French fries
Whisking,whipping
Pressing citrus fruits
Extracting of fruit juices
and vegetable juices
Accessory
P
{
ghjk
¬
¥
˚
ƒ
©
Page 17

ENGLISH 15
Applications
Salads,raw
vegetables
Salads,raw
vegetables
Pancakes,
waffles
Breadcrumbed
dishes,au
gratin dishes
Deserts,
toppings
Garnishing,
soups,sauces,
au gratin
dishes
Procedure
Cut the vegetables into pieces
that fit into the tube.Fill the
tube with the pieces and slice
them while pressing the pusher
lightly.
Cut the vegetables into pieces
that fit into the tube.Fill the
tube with the pieces and slice
them while pressing the pusher
lightly.
First pour the milk into the
blender and then add the dry
ingredients.Mix the ingredients
for approx.1 minute.If
necessary,repeat this
procedure 2 times.Then stop
for a few minutes to allow the
appliance to cool down to
ambient temperature.
Use dry,crispy bread.
Use soft butter for a light
result.
Use a piece of rindless
Parmesan and cut it into pieces
of approx.3 x 3 cm.
Acces
sory/s
peed
P / 2
^ / 1
D / 2
P / 2
D / 2
P / 2
Max.
quanti
ty
500g
500g
750ml
milk
100g
300g
200g
Ingredients &
results
Apples,
carrots,
celeriac shredding
Apples,
carrots,
celeriac slicing
Batter
(pancake) whisking
Bread crumbs
- chopping
Butter cream
(creme au
beurre) whisking
Cheese
(Parmesan) chopping
Quantities and preparation times
Applications
Sauces,pizzas,
au gratin
dishes,fondues
Garnishing,
sauces,pastry,
puddings,
mousses
Purees,soups
Baby and
infant food
Salads,
garnishing
Bread
Pizza
Procedure
Cut the cheese into pieces that
fit into the tube.Press carefully
with the pusher.
Use hard,plain chocolate. Break
it into pieces of 2 cm.
Use cooked peas or beans.If
necessary,add some liquid to
improve the consistency of the
mixture.
For a coarse puree, add only a
little liquid.For a fine puree,
keep adding liquid until the
mixture is smooth.
Put the cucumber in the tube
and press it down carefully.
Mix warm water with yeast and
sugar.Add flour,oil and salt and
knead the dough for approx.90
seconds.Leave to rise for 30
minutes.
Follow the same procedure as
for bread dough.Knead the
dough for 1 minute.
Acces
sory/s
peed
k / 2
P / 2
P / D /
2
P / 2
¬ / 1
P / 2
P / 2
Max.
quanti
ty
200g
200g
250g
500g
2
cucum
bers
500g
flour
1000g
flour
Ingredients &
results
Cheese
(Gouda) shredding
Chocolate chopping
Cooked peas,
beans pureeing
Cooked
vegetables and
meats pureeing
Cucumbers slicing
Dough (for
bread) kneading
Dough (for
pizzas) kneading
Page 18

ENGLISH18
Applications
Apple pies,
sweet biscuits,
open fruit flans
Luxury bread
Puddings,
soufflees,
meringues
Sauces,jams,
puddings,baby
food
Sauces,jams,
puddings,baby
food
Procedure
Use cold margarine, cut the
margarine into 2cm cubes. Put
the flour in the bowl and add
the margarine. Mix until the
dough has become crumbly.
Then add cold water while
mixing.Stop as soon as the
dough starts to turn into a ball.
Allow the dough to cool
before further processing.
First mix yeast, warm water
and some sugar in a separate
bowl.Put all ingredients in the
bowl and knead the dough
until it is smooth and does not
stick to the bowl (takes approx.
1 minute).Leave it to rise for
30 minutes.
Use egg whites at room
temperature. Note: use at least
2 egg whites.
Tip:add a little lemon juice to
prevent the fruit from
discolouring.Add some liquid
to obtain a smooth puree.
Tip:add a little lemon juice to
prevent the fruit from
discolouring
Acces
sory/s
peed
P / 2
P / 2
˚ / 1
D / 2
P / 2
Max.
quanti
ty
300g
flour
500g
flour
4 egg
whites
500g
500g
Ingredients &
results
Dough
(shortcrust
pastry) kneading
Dough (yeast)
- kneading
Egg whites whisking
Fruit (e.g.
apples,
bananas,water
chestnut) blending
Fruit (e.g.
apples,
bananas) chopping
Applications
Garnishing,
dips
Sauces,soups,
garnishing,
herb butter
Fruit juices
Salads,
garnishing and
barbecue
sauces
Steaks tartar,
hamburgers,
meat balls
Steaks tartar,
hamburgers,
meat balls
Procedure
Peel the garlic. Press the pulse
button several times to avoid
chopping the garlic too fine.
Use at least 150g.
Wash and dry the herbs
before chopping.
Add water or another liquid
(optional) to obtain a smooth
juice.
All the ingredients must be at
room temperature. Note: use
at least one large egg, two
small eggs or two egg yolks.Put
the egg and a little vinegar in
the bowl and add the oil drop
by drop.
First remove any sinews or
bones.Cut the meat into cubes
of 3cm.Press the pulse button
to get a coarser chopping
result.
First remove any sinews or
bones.Cut the meat into cubes
of 3cm.Press the pulse button
to get a coarser chopping
result.
Acces
sory/s
peed
P / 2
P / 2
D / 2
˚ / 1
P / 2
P / 2
Max.
quanti
ty
300g
Min.
50g
500g
(total
amou
nt)
3 eggs
500g
400g
Ingredients &
results
Garlic chopping
Herbs (e.g.
parsley) chopping
Juices (e.g.
made of
papaya,water
melon,pear,
guava) blending
Mayonnaise emulsifying
Meats (lean) mincing
Meats,fish,
poultry
(streaky) mincing
Page 19

ENGLISH 19
Applications
Milkshakes
Various cakes.
Salads,
puddings,nut
bread,almond
paste
Salad,cooked
food,stir-fries,
garnishing
Salad,cooked
food,stir-fries,
garnishing
Minced meat
Soups,sauces
Garnishing,
cream,icecream
mixtures
Procedure
Puree the fruit (e.g. bananas,
strawberries) with sugar,milk
and some ice cream and mix
well.
The ingredients must be at
room temperature. Mix the
softened butter and the sugar
until the mixture is smooth and
creamy.Then add milk,eggs and
flour.
Use the pulse button for
coarse chopping. Stop the
process if you want a coarse
result.
Peel the onions and cut them
into 4 pieces.Stop the process
after 2 pulses to check the
result.
Peel the onions and cut them
into pieces that fit into the
tube. Note: use at least 100g.
First remove any sinews or
bones.Cut the meat into cubes
of 3cm.Use the pulse button
for a coarser chopping result.
Use cooked vegetables.
Use cream that comes straight
from the refrigerator.Note: use
at least 125ml cream.The
whipped cream is ready after
approx.20 seconds.
Acces
sory/s
peed
D / 2
P / 2
P / 2
P / 2
¬ / 1
P / 2
D / 2
˚ / 1
Max.
quanti
ty
500ml
milk
4 eggs
250g
500g
300g
200g
500ml
500ml
Ingredients &
results
Milkshakes blending
Mixture (cake)
- mixing
Nuts chopping
Onions chopping
Onions slicing
Poultry mincing
Soups blending
Whipping
cream whipping
Recipes
Courgette Sandwich Spread
Ingredients:
- 2 courgettes
- 3 cooked eggs
- 1 small onion
- 1 tbs.vegetable oil
- parsley
- 2-3 tbs.sour cream
- lemon juice,Tabasco sauce, salt,pepper,currypowder,paprika
B
Wash and dry the courgettes and shred them with
the fine shredding insert in the food-processing bowl.
Transfer the shredded courgette to a dish, sprinkle
salt on it and leave for about 15 minutes so that
the salt extracts the liquid from the shredded
courgette. Cut the onion in 4 pieces and chop
them fine together with the garlic clove. Remove
parsley leaves from the stalks and chop them.
B
Then put the shredded courgette on a clean towel
and press the liquid out.Pour some oil into a pan
and fry the chopped onions and garlic lightly,add
the shredded courgettes.All liquids should
evaporate from the ingredients.Allow the fried
ingredients to cool down for a while.Peel the eggs
and chop them in the food processing bowl for a
few seconds.Add the other ingredients to the food
processing bowl,season them and mix them with
the blade.Serve on toasted white bread.
Nourishing vegetable soup a la Budapest
Ingredients:
- 200g kohlrabi
Page 20

ENGLISH20
- 300g potatoes
- 300g celery
- 100g carrots
- 700g water
- 200 g dal (out of can)
- 200g smoked pork meat
- 250 g creme fresh
- 20g parsley
- salt,fresh pepper,2 stock cubes,2 bay leafs
- 400 g water
B
Put the kohlrabi,potatoes, celery,carrots and
water in that order into the blender jar.Blend the
ingredients for 10 seconds. Put the blended
ingredients in a pot and bring it to boil.Add the
water,creme freche,dal, meat and herbs. Let it
cook for 30 minutes.Stirring constantly is necessary.
B
If you prepare this recipe several times,let the
appliance cool down for 60 minutes after every
third application.
Leek Quiche
Ingredients for the dough:
- 250g wheat flour (or wholemeal wheat flour)
- pinch of salt
- 1 tbs honey
- 20g fresh yeast or 1/2 sachet of dry yeast
- 100g butter
- 6 tbs lukewarm water
Ingredients for the filling:
- 500g leeks
- vegetable oil
- 4 eggs
- 500g sour cream
- salt,pepper,1-2 tbs.of flour if needed
B
Put all the ingredients in the bowl and knead into
a consistent dough.Let the dough rise for about
30min.
B
Slice the leeks with the slicing insert. Put some oil
in a pan and fry the sliced leeks for a few
minutes. Put the rest of the ingredients in the
blender jar and let the blender run until you have
reached a creamy consistency.Add 1-2 tbsp of
flour to thicken the mixture.
B
Grease a baking tin with a diameter of 24cm and
cover the bottom and sides evenly with dough.
Spread the leek mixture onto the dough and pour
the rest of the ingredients over it.Bake in a
preheated oven for about 40min at 180cC.
Can be served warm or cold.
Hungarian-style goulash
Ingredients:
- 1 tbsp oil
- 1 medium onion
- 1 tsp paprika
- 400 g beef or pork
- 1 green pepper
- 1 tomato
- salt
- 200 g carrots
- 300 g potatoes
- caraway seeds
B
Wash the meat and cut it into 2 cm cubes.Peel
the onion and chop it in the food processing bowl
using the metal blade.Core the green pepper and
slice it into rings using the slicing insert. Peel the
tomato,remove the pips and cut it into thin strips.
Page 21

ENGLISH 21
Fry the chopped onion in the oil until soft.Remove
from the heat and sprinkle the paprika over the
onion,add the meat and fry over a high heat for a
few minutes while stirring constantly.Add the
green pepper,the tomato and salt to taste, cover
the pan and braise in its own juice over a
moderate heat until almost tender.
B
Meanwhile,peel and slice the carrots using the
slicing insert and peel and dice the potatoes.
Add them to the meat and pour enough cold
water for the amount of soup you want to make
(approx.1,2 litres).Season with a pinch of caraway
seeds and simmer until everything is soft as
butter,adding more salt if necessary.
B
Serve hot.You could add a garnish of green
pepper rings and serve sharp cherry paprika on a
separate plate.
Strawberry tart
Ingredients:
- 100 g margarine
- 100 g sugar
- 3 egg yolks
- 240 g flour
- 100 g coconut
Filling:
- 80 g sugar
- 2 tsp.lemon juice
- 400 g cream cheese
- 500 g strawberries
Glaze:
- 500 g strawberries
- 250 ml water
- 120 g sugar
- 60 g cornstarch
Garnishing:
- 250 g cream
B
Heat oven to 180cC. Cream margarine and sugar
in the bowl with the metal blade.
B
Blend in egg yolk,then stir in flour and flaked
coconut.Put the dough on the baking plate,
flute the edge and prick with a fork. Bake for
15 - 20 minutes until light brown.Let the tart cool
on a rack.Mix sugar,lemon juice and cream
cheese in the bowl until fluffy using the metal
blade.Spread on the cooled tart shell.Arrange a
part of the strawberries (stem side down) on the
tart. Put in the refrigerator.
B
Prepare the glaze.Blend the remaining
strawberries with the water and the sugar in the
blender jar.Dissolve the cornstarch in 125 ml of
the strawberry mixture.Bring the strawberry
mixture to boil.When it is boiling stir in the
dissolved cornstarch. Spoon the hot glaze over the
strawberries and chill for 2 hours.Top with cream
whipped to stiff peaks.
Fresh fruit milkshake
Ingredients:
- 100g bananas or strawberries
- 200ml fresh milk
- 50g vanilla ice cream
- granulated sugar to taste
Page 22

ENGLISH22
B
Peel the bananas or rinse the strawberries. Cut
fruit into smaller pieces. Put all the ingredients in
the blender jar.Blend until smooth.
B
You can use fruit of your choice to make your
favourite fresh fruit milkshake.
Hazelnut Bread Ring
Ingredients dough:
- 500 g sieved flour
- 75 g sugar
- 1 tsp.salt
- 1 egg
- 250 ml milk (at 35cC)
- 100 g butter, softened
- 30 g fresh yeast (for dry yeast, read the
instructions on the package)
Filling:
- 250 g chopped hazelnuts
- 100 g sugar
- 2 sachets of vanilla sugar
- 125 ml cream
B
Heat oven to 200cC. Mix milk,yeast and sugar in
the bowl for 15 seconds using the kneading tool.
Add flour,salt,butter and egg. Knead the dough
mixture for 2 minutes. Put the dough into a
separate bowl and cover it with a damp cloth and
allow the dough to rise in a lukewarm place for
20 minutes.
B
Chop the hazelnuts using the metal blade.Mix
ingredients for the filling.Roll the dough out into a
rectangular shape.Spread it with the hazelnut
mixture,then roll it up into a ring.Put the ring in a
buttered spring-release tin. Let the ring rise for
20 minutes. Brush some whipped egg yolk onto
the top and place the tin on a rack in the centre
of the oven.Bake for 25 - 30 minutes at 200cC.
Chocolate cake
Ingredients:
- 140 g butter, softened
- 110 g icing sugar
- 140 g chocolate
- 6 egg whites
- 6 egg yolks
- 110 g granulated sugar
- 140 g wheat flour
Filling:
- 200 g apricot jam
Glaze:
- 125 ml water
- 300 g sugar
- 250 g grated chocolate
- whipped cream,if desired
B
Heat oven to 160cC. Cream butter with icing
sugar using the metal blade.Melt the chocolate
and mix in.Add egg yolks one by one to the
mixture and mix until creamy.Whip the egg white
with the granulated sugar until stiff and foamy
using the metal blade.Add the egg white foam to
the mixture and stir in gently.Then fold in flour
with a spatula.Put the cake mixture into the
greased baking tin.Bake for one hour at 160cC.
The first 15 minutes the oven door should be kept
slightly ajar.
Page 23

23ENGLISH
B
Allow the cake to cool for a while in the baking tin
(24 cm),then turn it onto a wire rack to cool
further.Cut the cake horizontally in half, spread
one half with apricot jam and put the two halves
together again.Heat the rest of the jam until
syrupy and spread it over the top of the cake.
Prepare the icing.Boil water,add sugar and
chocolate and cook over low heat.Stir continuously
until it has a smooth and of spreadable
consistency.Put the icing on the cake and allow it
to cool.Serve the cake with some whipped cream.
Broccoli soup (for 4 persons)
Ingredients:
- 50g mature Gouda cheese
- 300g cooked broccoli (stalks and florets)
- cooking liquid of the broccoli
- 2 boiled potatoes in pieces
- 2 stock cubes
- 2 tbsp whipping cream
- curry
- salt
- pepper
- nutmeg
B
Shred the cheese.Puree the broccoli with the
boiled potatoes and some of the cooking liquid of
the broccoli.Put the broccoli puree and the
remaining liquid and stock cubes into a measuring
beaker and fill it up to 750ml.Transfer the soup to
a pan and bring it to the boil while stirring.Stir in
the cheese and season with curry,salt, pepper
and nutmeg and add the cream.
Pizza
Ingredients for the dough:
- 400g flour
- 1/2 tsp salt
- 20g fresh yeast or 1.5 sachets dried yeast
- 2 tbsp of cooking oil
- approx.240ml water (35cC)
For the topping:
- 300ml sieved tomatoes (tinned)
- 1 tsp mixed Italian herbs (dried or fresh)
- 1 onion
- 2 cloves garlic
- salt and pepper
- sugar
Ingredients to be spread on the sauce:
- olives,salami, artichokes,mushrooms, anchovies,
Mozzarella cheese, peppers, grated mature
cheese and olive oil according to taste.
B
Place the kneading hook in the bowl.Put all the
ingredients in the bowl and select the maximum
speed (position 2).Knead the dough for approx.
90 seconds until a smooth ball has formed. Put
the dough in a separate bowl,cover it with a
damp cloth and leave it to rise for about
30 minutes.
B
Chop the onions and garlic with the metal blade
in the food processing bowl and fry them in a pan
until they are transparent.Add the sieved
tomatoes and the herbs and simmer for about
10 minutes. Season to taste with salt,pepper and
sugar.Allow the sauce to cool down.
Page 24

ENGLISH24
B
Heat the oven to 250cC.
B
Roll the dough out on a floured worktop and
make two round shapes.Place the dough shapes
on a greased baking tray.Spread the topping on
the pizza,leaving the edges free. Spread with the
desired ingredients, scatter some grated cheese
over the pizza and drip some olive oil over it.
B
Bake the pizzas for 12 to 15 minutes.
Vegetable and potato fry
Ingredients:
- 1 egg
- 50 cc milk
- 1 tbsp flour
- 1 tsp coriander
- salt and pepper
- 2 large potatoes (about 300 g)
- 100 g winter carrots
- 150 g celery
- 50 g sunflower seeds or 2 tbsp corn from the
cob
- oil to fry
B
Using the metal blade,mix the egg, milk,flour,
coriander,salt and pepper.
B
Shred the peeled potatoes, the scraped carrots
and the cleaned celery with the coarse shredding
insert and add to the egg mixture. Stir the
vegetables,the egg mixture and the sunflower
seeds or corn from the cob together in a bowl.
B
Heat the oil in a frying pan and fry 8 flat patties
on both sides until they are golden brown.Allow to
drain on kitchen paper.
B
Cooking time:3-4 minutes.
Bread (white)
Ingredients:
- 500 g bread flour
- 15 g soft butter or margarine
- 25 g fresh yeast or 20 g dried yeast
- 260 ml water
- 10 g salt
- 10 g sugar
B
Assemble the kneading hook in the bowl.Put flour,
salt and margarine or butter in the bowl.Add the
fresh or dried yeast and the water.Put the lid on
the bowl and turn it into the direction of the arrow
until you hear a click.Select the maximum speed
(position 2) and mix the dough (for the maximum
kneading time see the chapter Quantities and
preparation times).
B
Remove the dough from the bowl,put it in a large
bowl,cover with a damp tea towel and allow to
rise in a warm place for 20 minutes.After rising,
flatten the dough again,and shape into a ball.
B
Return the dough to the bowl, cover with the
damp cloth and leave it to rise for another
20 minutes. Flatten it again,and roll it up.
B
Place the dough in a greased baking tin,and leave
it to rise for another 45 minutes. Bake the bread
in the lower part of a pre-heated oven.
B
Bake the bread at about 225cC in the lower part
of a pre-heated oven in about 35 minutes.
Page 25

FRANÇAIS 25
Composants et accessoires
A Bloc moteur
B Bouton vitesse
P = Impulse
0 = Arrêt
1 = Vitesse minimale
2 = Vitesse maximale
C Capuchon de sécurité (doit être fixé pour
pouvoir utiliser les fonctions du bol)
D Bol pour préparer les aliments
E Axe d'entraînement
F Bol mixer
G Couvercle du bol mixer
H Doigt de sécurité du bol (active et désactive
l'interrupteur de sécurité)
I Couvercle du bol pour préparer les aliments
J Bouchon de sécurité
K Cheminée de remplissage
L Poussoir
M Tamis du presse-agrumes
N Cône du presse-agrumes
O Tambour de la centrifugeuse
P Sélecteur de pulpe de la centrifugeuse
Q Couvercle de la centrifugeuse
R Poussoir de la centrifugeuse
S Accessoire de pétrissage
T Ensemble couteau + gaine de protection
U Disque à trancher réglable
V Insert à râper moyen
W Insert à râper fin
X Insert à râper gros
Y Insert pour grainer
Z Axe support
a Couteau pour pommes de terre
b Disque à émulsionner
Introduction
L'appareil est équipé d'une coupure thermique
de sécurité. En cas de surchauffe, ce dispositif
coupe automatiquement l'alimentation électrique
de l'appareil.
Si votre appareil s'arrête
brusquement:
1 Débranchez l'appareil.
2 Tournez le bouton sur la position 0 pour
arrêter l'appareil.
3 Laissez refroidir l'appareil 60 minutes.
4 Branchez l'appareil à nouveau.
5 Remettez l'appareil en marche.
Consultez votre revendeur ou un Centre Service
Agréé Philips si la coupure thermique de sécurité
se déclenche trop fréquemment.
AVERTISSEMENT:Afin d'éviter tout accident
causé par la remise en marche de l'interrupteur
de sécurité thermique,l'appareil ne doit pas être
connecté à un minuteur.
Page 26

FRANÇAIS
Important
◗ Lisez attentivement les instructions ainsi que
les illustrations avant d'utiliser votre appareil.
◗ Conservez ce mode d'emploi pour un usage
ultérieur.
◗ Avant de brancher l'appareil,vérifiez que la
tension indiquée sur l'appareil correspond à la
tension du secteur de votre logement.
◗ N'utilisez jamais des accessoires ou des
composants des autres que ceux d'origine et
recommandés par Philips.Philips décline toute
résponsabilité si ce n'était pas le cas.
◗ N'utilisez pas l'appareil si le cordon
d'alimentation,la fiche ou les autres pièces
sont détériorées.
◗ Si le cordon d'alimentation est endommagé,il
doit être remplacé par Philips ou à un Centre
Service Agréé Philips,afin d'éviter tout
accident.
◗ Avant la première utilisation,nettoyez toutes
les pièces en contact avec les aliments.
◗ Ne dépassez pas les quantités et les temps de
préparation indiqués dans le tableau.
◗ Ne dépassez pas le contenu maximum du bol,
c'est à dire ne dépassez pas le trait supérieur
de graduation du bol.
◗ Débranchez l'appareil immédiatement après
utilisation.
◗ Ne mettez jamais vos doigts ou tout autre
objet,(par ex.la spatule), dans la cheminée de
remplissage pour pousser les ingrédients sans
avoir au préalable arrêté l'appareil.Utilisez
uniquement le poussoir.
◗ Débranchez toujours l'appareil avant mettre
vos doigts ou tout autre objet dans le bol
mixer (par ex.la spatule).
◗ Tenez l'appareil hors de portée des enfants.
◗ Ne laissez jamais l'appareil fonctionner sans
surveillance.
◗ Placez correctement le couvercle sur le bol.
L'interrupteur de sécurité sera maintenant
désactivé et vous pouvez mettre l'appareil en
marche.Le bloc moteur et le capuchon de
sécurité comportent des repères.L'appareil
ne peut fonctionner que si le repère du bloc
moteur coïncide exactement avec le repère
du capuchon.
◗ Arrêtez toujours l'appareil avant de détacher
un accessoire.
◗ Arrêtez toujours l'appareil en tournant le
bouton sur le réglage de vitesse 0.
◗ Avant de retirer le couvercle, attendez que
toutes les pièces mobiles soient à l'arrêt.
◗ Vous ne pouvez pas retirer le capouchon de
sécurité si le couvercle n'est pas positionné
sur le bol ou si le bol a été enlevé avec le
couvercle.
◗ N'immergez jamais le bloc moteur dans l'eau
ni dans aucun autre liquide.Ne le rincez pas
non plus.Nettoyez-le avec un chiffon humide.
◗ Enlevez la gaine de protection du couteau
avant utilisation.
◗ Laissez les aliments cuits refroidir avant de les
hacher (température maximale 80cC/ 175cF).
◗ Si vous préparez un liquide chaud ou qui peut
mousser,n'ajoutez pas plus d'un litre dans le
bol mixer pour éviter tout débordement.
26
Page 27
FRANÇAIS 27
◗ Pour les durées de préparation,veuillez
consulter le tableau du mode d'emploi cidessous.
Notez que si le mixer est monté,vous ne pouvez
pas utiliser les fonctions du bol.
Utilisation de l'appareil
Bol pour préparer les aliments
C
1 Montez le bol sur le robot en tournant la
poignée dans le sens de la flèche jusqu'à ce
que vous entendiez un clic.
C
2 Mettez le couvercle sur le bol.Tournez
fermement le couvercle dans le sens de la
flèche jusqu'à ce que vous entendiez un
clic (cela nécessite un peu de force).
Verrouillage de sécurité incorporé
Le bloc moteur,le bol et le couvercle comportent
des repères.L'appareil ne peut fonctionner que si
la flèche du bloc moteur coïncide exactement
avec le repère du bol.
C
1 Assurez-vous que le repère du couvercle
coïncide exactement avec le repère du bol.
L'ergot du couvercle complètera
l'ouverture de la poignée du bol.
La cheminée de remplissage et le poussoir
C
1 Utilisez la cheminée de remplissage pour
ajouter du liquide et/ou des ingrédients
solides.Utilisez le poussoir pour pousser
les ingrédients dans la cheminée.
C
2 Le poussoir peut également servir à
fermer la cheminée pendant que l'appareil
est en marche,pour empêcher toute
projection.
Couteau métallique
◗ Le couteau peut être utilisé pour hacher,
mélanger,mixer et réduire en purée.
C
1 Enlevez la gaine de protection du couteau.
CLICK
CLICK
1
2
1
2
CLICK
Page 28
FRANÇAIS28
Les lames du couteau sont très aiguisées et
tranchantes. Evitez de les toucher!
C
2 Placez l'axe d'entraînement dans le bol et
le couteau sur l'axe du bol.
3 Mettez les ingrédients dans le bol.
Découpez les ingrédients en dés d'environ
3 cm de côté.Mettez le couvercle sur le
bol.
4 Placez le poussoir dans la cheminée de
remplissage.
C
5 Sélectionnez la vitesse maximum (position
2) du réglage de vitesse.
- L'opération continue jusqu'à ce que le bouton
soit tourné sur la position 0 (arrêt).
◗ Tournez le bouton sur la position 1 pour
diminuer la vitesse.
Suggestions
◗ Si vous hachez des oignons,utilisez la touche
Eclair pour éviter de les hacher trop fin.
◗ Ne laissez pas tourner l'appareil trop
longtemps lorsque vous hachez du fromage (à
pâte dure) :le fromage chaufferait trop,
commencerait à fondre et à devenir pâteux.
◗ Ne hachez pas des ingrédients trop durs tels
que des grains de café,des noix,de muscade
ou des glaçons.Cela pourrait émousser les
lames du couteau.
Si des aliments s'enroulent autour du couteau ou
collent à la paroi du bol :
1 Débranchez d'abord l'appareil.
2 Retirez le couvercle du bol.
3 Enlevez ensuite les aliments collés au
couteau ou à la paroi du bol avec une
spatule.
Inserts
Ne hachez jamais des ingrédients durs tels que les
glaçons avec les inserts.
C
1 Placez l'insert sélectionné sur l'axe support
avant de le placer sur l'axe d'entraînement.
Les lames du couteau sont très aiguisées et
tranchantes. Evitez de les toucher!
C
2 Placez l'axe des inserts sur l'axe
d'entraînement qui se trouve dans le bol.
3 Mettez le couvercle sur le bol.
4 Mettez les ingrédients dans la cheminée.
Coupez les gros morceaux pour pouvoir
les introduire dans la cheminée.
C
5 Pour les meilleurs résultats remplissez la
cheminée de façon régulière.
1
CLICK
2
Page 29
FRANÇAIS 29
Si vous devez traiter d'importantes quantités
d'aliments,ne traitez que des petites portions à la
fois et videz le bol fréquemment.
C
6 Pour râper et trancher,sélectionnez la
vitesse maximum (position 2) du réglage
de vitesse.
L'opération continue jusqu'à ce que le bouton
soit tourné sur la position 0 (arrêt).
◗ Tournez le bouton sur la position 1 pour
diminuer la vitesse.
C
7 Appuyez légèrement sur les ingrédients
avec le poussoir.
◗ Si vous râpez des légumes ou fruits tendres,
vous pouvez diminuer la vitesse sur la position
1,pour ne pas réduire les légumes ou les
fruits râpés en purée.
C
8 Pour retirer l'insert du support,prenez le
support à la main avec la partie arrière
dirigée vers vous.Poussez les ergots pour
faire sortir l'insert du support.
Couteau pour pommes de terre
Avec le couteau pour pommes de terre vous
pouvez couper les ingrédients en morceaux
rectangulaires,par ex. pour faire des frites.
Faites attention:les lames du couteau sont très
affilées.
C
1 Placez le couteau pour pommes de terre
sur l'axe d'entraînement.
C
2 Fermez le couvercle et placez les
ingrédients dans la cheminée de
remplissage.
C
3 Tournez sur la position 1 pour obtenir les
meilleurs résultats.
C
4 Pressez les ingrédients avec le poussoir,si
nécessaire.
Disque à trancher réglable
Le disque à trancher réglable vous permet de
trancher les ingrédients à l'épaisseur voulue.
Faites attention:les lames du couteau sont très
affilées.
2
Page 30
FRANÇAIS30
C
1 Fixez le couteau sur le support.
C
2 Connectez le bouton qui se trouve au fond
du disque et tournez-le jusqu'à ce que les
répères coïncident.Maintenant le disque
est bloqué.
C
3 Tournez le bouton réglable et fixez-le à
l'épaisseur préférée.
C
4 Placez le disque à trancher réglable sur
l'axe d'entraînement.
5 Fermez le couvercle et mettez les
ingrédients dans la cheminée de
remplissage.
C
6 Tournez sur la position 1 pour obtenir les
meilleurs résultats.
7 Pressez les ingrédients avec le poussoir,si
nécessaire.
Accessoire de pétrissage
Le crochet à pétrir sert à pétrir la pâte à pain et à
mélanger d'autres pâtes ou mélanges pour
gâteaux.
C
1 Placez le bol sur le bloc moteur et fixez
l'accessoire de pétrissage sur l'axe.
2 Mettez les ingrédients dans le bol et
fermez le bol avec le couvercle.Mettez le
poussoir dans la cheminée de remplissage
pour éviter tout débordement.
C
3 Sélectionnez la vitesse maximum (position
2) du réglage de vitesse.
Mixer
Le mixer est destiné à:
- Mélanger des ingrédients liquides,tels que les
produits laitiers, les sauces, les jus de fruits, les
soupes,les cocktails, les sweat teas,et les milkshakes.
- Mixer des ingrédients mous comme des pâtes à
crêpes ou de la mayonnaise.
- Réduire en purée des aliments cuits,par ex.
pour les nourrissons.
◗ L'appareil peut être utilisé avec ou sans le
mixer attaché au bloc moteur.Si vous utilisez
l'appareil sans le mixer,l'appareil ne
fonctionnera pas si le capuchon de sécurité
1
2
Page 31

FRANÇAIS 31
n'a pas été correctement visé sur le bloc
moteur.
C
1 Pour attacher le bol mixer,enlevez le
capuchon de sécurité situé au-dessus du
réglage de vitesse.
C
2 Montez le bol mixer sur le bloc moteur en
le tournant dans la direction de la flèche
jusqu'à ce qu'il soit fermement fixé.La
poignée doit être dirigée vers la gauche!
N'exercez trop de pression sur la poignée du bol
mixer.
3 Mettez les ingrédients dans le bol.
C
4 Fermez le couvercle.
C
5 Fixez toujours le bouchon de sécurité sur
le couvercle du mixer avant de
commencer la préparation des aliments.
C
6 Sélectionnez la vitesse maximale (position
2).L'appareil continuera à fonctionner à
cette vitesse jusqu'à ce que l'appareil soit
réglé sur la position 0 (arrêt).
Consultez le tableau pour les temps de
préparation recommandés.
Suggestions
C
◗ Les ingrédients liquides peuvent être versés
dans le bol mixer par l'ouverture du
couvercle.
◗ Plus vous laissez l'appareil tourner longtemps,
plus le mélange que vous obtenez est fin.
◗ Coupez les aliments en morceaux pour les
introduire dans le bol mixer.Si vous devez
traiter d'importantes quantités d'aliments,ne
traitez que des petites portions à la fois.
◗ Faites tremper les ingrédients durs tels que
les germes de soja pour faire le lait de soja
avant de les préparer.
◗ Pour hacher des glaçons,introduisez-les dans
le bol mixer,fermez le couvercle et utilisez la
touche Eclair.
Si des aliments collent à la paroi du bol mixer:
1 Arrêtez l'appareil et débranchez-le.
2 Ouvrez le couvercle.
N'ouvrez jamais le couvercle pendant le
fonctionnement de l'appareil.
3 Enlevez les aliments de la paroi du bol
mixer avec une spatule.
Faites attention à tenir la spatule à une distance
sûre des couteaux (env.2 cm).
◗ Si vous n'êtes pas satisfait des résultats,
appuyez sur la touche éclair plusieurs fois
1
2
2
1
Page 32

FRANÇAIS32
pour un usage momentané.Vous pouvez aussi
mélanger les ingrédients avec une spatule
(uniquement après l'arrêt complet du mixer)
ou verser un peu du contenu dans un autre
bol afin de préparer une quantité plus faible.
◗ Dans certains cas les ingrédients sont plus
facile à traiter si vous ajoutez un peu de
liquide tel que le jus de citron lorsque vous
traitez des fruits.
Presse-agrumes
Le presse-agrumes peut être utilisé avec tous
types d'agrumes.
C
1 Placez le bol sur le bloc moteur et le tamis
sur le bol.
C
2 Tournez le tamis dans la direction de la
flèche jusqu'à ce que le doigt de sécurité
se fixe sur le bloc moteur.
C
3 Pressez doucement le cône sur le tamis
pour le fixer.
C
4 Sélectionnez la vitesse minimum (position
1).
L'opération commence et s'arrête si le bouton
est positionné sur 0 (arrêt).
C
5 Pressez fermement la moitié d'un fruit sur
le cône rotatif.
Suggestions
◗ De temps en temps,arrêtez-vous de presser
les fruits pour enlever la pulpe du tamis.
Lorsque vous enlevez la pulpe, arrêtez l'appareil
et retirez le bol avec le tamis et le cône attachés.
C
◗ Après usage,retirez le bol avec les accessoires
du presse-agrumes pour éviter que le jus
s'écoule sur l'appareil.
Fouet ballon
Vous pouvez utiliser le fouet ballon pour battre
des œufs,fouetter des blancs d’oeufs, des
puddings,faire de la crème fouettée.
C
1 Placez le bol sur le bloc moteur et
tournez-le à gauche jusq’à ce que vous
entendiez un ‘clic’.
2 Placez l'axe d'entraînement dans le bol.
1
CLICK
2
2
1
Page 33

FRANÇAIS 33
C
3 Fixez le fouet sur l’axe d’entrainement.
4 Mettez les ingrédients sur le bol,placez le
couvercle sur le bol et tournez-le à droite
jusqu’à ce que vout entendiez un clic.
C
5 Pour obtenir des résultats optimaux
sélectionnez la vitesse minimum (position 1).
Centrifugeuse
La centrifugeuse peut être utilisée pour préparer
des jus frais de fruits et légumes. La pulpe, les
peaux et les pépins seront séparés.
1 Placez le bol sur le bloc moteur.
C
2 Placez l'axe d'entraînement dans le bol.
C
3 Attachez le tambour de la centrifugeuse à
l'axe.
C
4 Insérez le sélecteur de pulpe dans le
tambour de la centrifugeuse et fixez bien
les 3 picots dans les fentes du tambour.
C
5 Mettez le couvercle de la centrifugeuse sur
le bol.
C
6 Sélectionnez la vitesse maximale (position
2) pour obtenir les meilleurs résultats.
N'utilisez jamais l'accessoire centrifugeuse si le
tamis rotatif ou le tambour sont défecteux.
C
7 Introduisez les fruits ou les légumes dans
la centrifugeuse par la cheminée de
remplissage.
C
8 Si nécessaire,vous pouvez presser les
ingrédients avec le poussoir.Tenez le
poussoir dans la cheminée de remplissage
aussi longtemps que possible pour
empêcher toute projection.
9 Laissez l'appareil fonctionner encore
20 secondes pour extraire tout le jus
restant dans les fruits ou les légumes.
C
10 Pour empêcher toute projection,enlevez
le bol avec les accessoires de la
centrifugeuse après utilisation.
1
2
2
1
Page 34

FRANÇAIS34
Suggestions
◗ Avant d'utiliser la centrifugeuse:
- coupez les carottes,les radis,etc.
- écorcez les agrumes, les ananas, les melons, etc.
- dénoyautez les cerises,prunes,abricots,pêches,
etc.
◗ Mettez toujours l'appareil en marche avant de
mettre les fruits dans la centrifugeuse.
◗ Arrêtez l'appareil de temps en temps pour
retirer la pulpe du tamis ou du tambour de la
centrifugeuse.
◗ Ne préparez pas des quantités importantes
d'aliments en une fois.
◗ Arrêtez l'appareil s'il commence à vibrer
fortement et nettoyez le tamis et le filtre
avant de remettre l'appareil en marche.
Nettoyage
Débranchez toujours l'appareil avant de nettoyer
le bloc moteur.
1 Le bloc moteur peut être nettoyé avec un
chiffon humide.N'immergez jamais le bloc
moteur dans l'eau et ne le rincez pas sous
l'eau non plus.
2 Lavez immédiatement après utilisation les
accessoires en contact avec les aliments, à
l'eau chaude savonneuse.
◗ Le bol,le couvercle du bol,le poussoir et les
accessoires (sauf le bol mixer) peuvent être
lavés dans le lave-vaisselle.
Ces composants ont été testés pour une
résistance au lave-vaisselle conformément à la
norme DIN EN 12875.
Le bol mixer n'est pas résistant au lave-vaisselle!
Faites attention en nettoyant le couteau
l'ensemble couteaux et les inserts. Leurs lames
sont très aiguisées!
Evitez de cogner les lames du couteau et les
inserts contre des objets durs car cela pourrait les
émousser.
Certains aliments peuvent provoquer une
décoloration de la surface des accessoires. Cela
est sans importance sur le bon fonctionnement
de l'appareil.Les décolorations peuvent
disparaitre après quelque de temps.
C
◗ Enroulez le cordon restant au dos de
l'appareil.
Nettoyage rapide du mixer
C
1 Versez de l'eau tiède (pas plus de
0,5 litres) et un peu de produit lavevaisselle dans le bol mixer.
2 Fermez le couvercle.
Page 35

FRANÇAIS 35
C
3 Laissez l'appareil fonctionner quelques
instants en activant la touche Eclair.
L'appareil ne fonctionne plus lorsque vous
tournez le bouton sur la position 0 (arrêt).
4 Détachez le bol mixer et rincez-le à l'eau
claire.
Rangement
MicroRangement
C
◗ Mettez les accessoires (couteau,axe support)
sur l'axe d'entraînement et placez-les dans le
bol.Rangez toujours l'axe d'entraînement en
dernier.
Information et service
Pour toute réparation/information,ou en cas de
problème, visitez notre website: www.philips.com.
Ou veuillez contacter le Service Consommateurs
Philips de votre pays (vous trouverez le numéro
de téléphone dans le dépliant sur la garantie
internationale). S'il n'y a aucun Service
Consommateurs Philips dans votre pays,
contactez votre distributeur ou le Service
Department of Philips Domestic Appliances and
Personal Care BV.
Solution
Tournez le bol et/ou le couvercle dans le sens des
aiguilles d'une montre jusqu'à ce que vous entendiez un
clic.Vérifiez que les répères du bol et du couvercle
coïncident bien.
La coupure thermique de sécurité a probablement
coupé l'alimentation suite à une surchauffe de l'appareil.
1) Mettez l'appareil en marche (position 0).
2) Débranchez l'appareil. 3) Laissez l'appareil refroidir
pendant 60 minutes.4) Branchez à nouveau l'appareil.
5) Remettez l'appareil en marche.
Vérifiez si vous avez tourné le bol et le couvercle dans
le sens des aiguilles d'une montre jusqu'à ce que vous
ayez entendu un clic.
Si le mixer et le bol pour préparer les aliments ont été
correctement attachés, seul le mixer fonctionnera. Si
vous voulez utiliser le bol pour préparer les aliments,
détachez le mixer et fermez l'orifice à l'aide du
capuchon de sécurité.
Problème
L'appareil ne peut pas
être mis en marche.
L'appareil s'est arrêté
brusquement.
L'accessoire de mélange
ou de pétrissage ne
tourne pas.
Le bol mixer et le bol
pour préparer les
aliments sont attachés,
mais le mixer seul
fonctionne.
Guide en cas de problèmes
Accessoires et applications
Temps d'application
10 - 60 sec.
60 - 180 sec.
10 - 60 sec.
10 - 60 sec.
10 - 60 sec.
30 - 180 sec.
selon la quantité
selon la quantité
Application
Hacher, réduire en purée,mélanger
Pétrir
Trancher,hacher,râper
Trancher
Couper pommes de terre, faire
des frites
Fouetter
Presser des agrumes
Extraire des jus de fruits ou de
légumes
Accessoire
P
{
ghjk
¬
¥
˚
ƒ
©
Page 36

FRANÇAIS36
Quantité et temps de préparation
Applications
Salades,
légumes crues
Salades,
légumes crues
Crêpes,
gaufres
Plats panés,
gratins
Desserts,
garnitures
Garnitures,
soupes,sauces,
gratins
Procédure
Coupez les légumes pour les
introduire dans la cheminée.
Remplissez la cheminée et
râpez-les en appuyant
doucement sur le poussoir.
Coupez les légumes pour les
introduire dans la cheminée.
Remplissez la cheminée et
tranchez-les en appuyant
doucement sur le poussoir.
Versez d'abord le lait dans le
mixer, puis ajoutez les
ingrédients secs.Mélangez
pendant 1 minute environ.Si
nécessaire, répétez l'opération
2 fois.Arrêtez pendant
quelques minutes pour laisser
l'appareil refroidir à la
température ambiantale.
Utilisez du pain sec, croustillant.
Prenez du beurre mou pour
obtenir une crème légère.
Utilisez un morceau de
parmesan sans croûte et
coupez-le en morceaux
d'environ 3 x 3 cm.
Acces
soire/
vitess
e
P / 2
^ / 1
D / 2
P / 2
D / 2
P / 2
Quant
ité
max.
500 g
500 g
750
ml lait
100 g
300 g
200 g
Ingrédients et
résultats
Pommes,
carottes,céleri
- râper
Pommes,
carottes,céleri
- trancher
Pâtes à crêpes
(crêpes) fouetter
Chapelure hacher
Crème au
beurre - battre
Fromage
(parmesan) râper
Applications
Sauces,pizzas,
gratins, fondue
Garnitures,
sauces,
pâtisseries,
flans,mousses
Purées,soupes
Aliments pour
bébés
Salades,
garnitures
Pain
Pizza
Procédure
Coupez le fromage en
morceaux pour les introduire
dans la cheminée.Appuyez
doucement sur le poussoir.
Utilisez du chocolat noir, dur.
Cassez en morceaux de 2 cm.
Utilisez les légumes cuits.Si
nécessaire, ajoutez du liquide
pour améliorer la consistance
du mélange.
Pour obtenir une purée
épaisse, ajoutez peu de liquide.
Pour une purée fine,ajoutez du
liquide jusqu'à ce que le
mélange soit suffisamment
onctueux.
Mettez le concombre dans la
cheminée et appuyez
doucement.
Mélangez la levure et le sucre
avec de l'eau chaude.Ajoutez
la farine, l'huile et le sel et
pétrissez pendant 90 sec.
environ.Laissez lever 30
minutes.
Même opération que pour la
pâte à pain.Pétrissez pendant 1
minute environ.
Acces
soire/
vitess
e
k / 2
P / 2
P / D /
2
P / 2
¬ / 1
P / 2
P / 2
Quant
ité
max.
200 g
200 g
250 g
500 g
2
conco
mbres
500 g
flour
1 Kg
farine
Ingrédients et
résultats
Fromage
(Gouda) râper
Chocolat hacher
Petits pois,
haricots cuits réduire en
purée
Légumes et
viandes cuites
- réduire en
purée
Concombres trancher
Pâte (à pain) pétrir
Pâte (à pizza) pétrir
Page 37

FRANÇAIS 37
Applications
Tourtes aux
pommes,
biscuits,tartes
aux fruits
Pain brioché
Entremets,
soufflés,
meringues
Sauces,
soufflés,
meringues,
aliments pour
bébés
Procédure
Utilisez de la margarine froide
et coupez-la en morceaux de 2
cm.Mettez la farine dans le bol
et ajoutez la margarine.
Pétrissez jusqu'à ce que la pâte
devienne friable. Puis ajoutez
de l'eau froide tout en
mélangeant.Arrêtez dès que la
pâte commence à former une
boule. Laissez la pâte refroidir
avant de vous en servir.
Mélangez d'abord la levure, de
l'eau chaude et un peu de
sucre dans un bol séparé.
Ajoutez les ingrédients dans le
bol et pétrissez la pâte jusqu'à
ce qu'elle ne colle plus au bol
(environ 1 minute).Laissez
lever 30 minutes.
Utilisez les œufs à température
ambiante. Note: utilisez au
moins 2 blancs d'œufs.
Suggestion:ajoutez un peu de
jus de citron pour empêcher la
décoloration des fruits.Ajoutez
du liquide pour une purée plus
onctueuse.
Acces
soire/
vitess
e
P / 2
P / 2
˚ / 1
D / 2
Quant
ité
max.
300 g
farine
500 g
farine
4
blancs
d'œufs
500 g
Ingrédients et
résultats
Pâte (brisée) pétrir
Pâte (levure) pétrir
Blancs d'œufs
- fouetter
Fruits (par ex.
pommes,
bananes,
châtaignes
d'eau) mélanger
Applications
Sauces,
soufflés,
meringues,
aliments pour
bébés
Garnitures,
fondues
Sauces,soupes,
garnitures,
beurre aux
herbes
Jus de fruits
Salades,
garnitures et
sauces de
barbecue
Steaks tartare,
hamburgers,
boulettes de
viande
Procédure
Suggestion:ajoutez un peu de
jus de citron pour empêcher la
décoloration des fruits.
Pelez l'ail.Utilisez la touche
Eclair quelques fois pour éviter
un hachage trop fin.Utilisez au
moins 150 g d'ail.
Lavez et séchez les herbes
avant de les hacher.
Ajoutez de l'eau ou un autre
liquide pour obtenir un jus
homogène.
Tous les ingrédients doivent
être à température ambiante.
Note:utilisez au minimum un
gros œuf,deux petits œufs ou
deux gros jaunes d'œufs.
Mettez l'œuf et un peu de
vinaigre dans le bol et ajoutez
l'huile goutte à goutte.
Retirez d'abord les nerfs ou les
os.Coupez la viande en dés de
3 cm.Utilisez la touche Eclair
pour un hachage grossier.
Acces
soire/
vitess
e
P / 2
P / 2
P / 2
D / 2
˚ / 1
P / 2
Quant
ité
max.
500 g
300 g
Min.
50 g
500 g
(quant
ité
totale)
3
œufs
500 g
Ingrédients et
résultats
Fruits (par ex.
pommes,
bananes) hacher
Ail - hacher
Herbes (par
ex.persil) hacher
Jus (par ex.
papaye,melon
d'eau,poires,
goyaves,etc.) mélanger
Mayonnaise émulsionner
Viande
(maigre) hacher
Page 38

FRANÇAIS38
Applications
Steaks tartare,
hamburgers,
boulettes de
viande
Milkshakes
Divers
gâteaux.
Salades,pain,
frangipane,
entremets
Salades,
aliments cuits,
sautés,
garnitures
Salades,
aliments cuits,
sautés,
garnitures
Procédure
Retirez d'abord les nerfs ou les
os.Coupez la viande en dés de
3 cm.Utilisez la touche Eclair
pour un hachage grossier.
Réduisez en purée les fruits
(par ex.bananes, fraises) avec
du sucre, du lait et de la glace
et mélangez bien.
Utilisez des ingrédients à
température ambiante.
Mélangez le beurre ramolli et
le sucre jusqu'à ce que le
mélange soit onctueux et
crémeux.Ajoutez ensuite le lait,
les œufs et la farine.
Utilisez la touche Eclair pour un
hachage grossier.Arrêtez la
procédure de préparation si
vous voulez obtenir un résultat
grossier.
Pelez les oignons et coupez-les
en quatre.Arrêtez après avoir
utilisé la touche éclair 2 fois
pour vérifier le résultat.
Pelez les oignons et coupez-les
en morceaux pour les
introduire dans la cheminée.
Note:utilisez au moins 100 g.
Acces
soire/
vitess
e
P / 2
D / 2
P / 2
P / 2
P / 2
¬ / 1
Quant
ité
max.
400 g
500
ml de
lait
4
œufs
250 g
500 g
300 g
Ingrédients et
résultats
Viande,
poisson,
volaille (pas
trop maigre) hacher
Milkshakes mélanger
Mélange (pour
gâteau) mélanger
Noix - hacher
Oignons hacher
Oignons émincer
Applications
Viande hachée
Soupes,sauces
Garnitures,
crèmes,
mélanges de
crèmes glacées
Procédure
Retirez d'abord les nerfs ou les
os.Coupez la viande en dés de
3 cm.Utilisez la touche éclair
pour un hachage plus grossier.
Utilisez des légumes cuites.
Utilisez de la crème
préalablement refroidie dans le
réfrigérateur.Note: utilisez au
moins 125 ml de crème liquide.
La crème fouettée est prête en
20 sec.
Acces
soire/
vitess
e
P / 2
D / 2
˚ / 1
Quant
ité
max.
200 g
500
ml
500
ml
Ingrédients et
résultats
Volaille hacher
Soupe - mixer
Crème
fouettée fouetter
Page 39

FRANÇAIS 39
Recettes
Pâte à tartiner aux courgettes
Ingrédients:
- 2 courgettes
- 3 oeufs durs
- 1 petit oignon
- 1 c. à s.d'huile végétale
- persil
- 2-3 c. à s.crème
- jus de citron,sauce Tabasco,sel, poivre, curry,
paprika
B
Lavez et séchez les courgettes, et râpez-les à
l'aide de l'insert à râper fin dans le bol.Transférez
les courgettes râpées sur une assiette, saupoudrez
de sel et laissez pendant 15 minutes afin que le
sel absorbe le liquide des courgettes râpées.
Coupez l'oignon en 4 morceaux et hachez-les
menu avec la gousse d'ail.Hachez le persil après
avoir enlevé les tiges.
B
Ensuite mettez la courgette râpée sur une
serviette propre et pressez-la pour extraire le jus.
Versez un peu d'huile dans une poêle et faites
cuire légèrement les oignons et l'ail hachés, et
ajoutez les courgettes râpées. Le jus doit s'évaporer
des ingrédients. Laissez les ingrédients cuits refroidir
quelque temps. Mettez les oeufs et les autres
ingrédients dans le bol,assaisonnez et mixez le
tout à l'aide du couteau.Servez sur pain grillé.
Soupe de légumes nourissante à la
Budapest
Ingrédients:
- 200 g chou-rave
- 300 g pommes de terre
- 300 g céléri
- 100 g carottes
- 700 g eau
- 200 g dhal (en conserve)
- 200 g porc fumé
- 250 g crème fraîche
- 20 g persil
- sel,poivre frais,4 bouillon-cubes, 2 feuilles de
laurier
- 400 g eau
B
Mettez le chou-rave,les pommes de terre,le
céléri, les carottes et l'eau dans cet ordre dans le
bol mixer.Mélangez les ingrédients pendant
10 secondes.Versez les ingrédients mélangés dans
une casserolle et portez-les à ébulition.Ajoutez
l'eau,la crème fraîche, le dhal,la viande et les
herbes. Laissez cuire pendant 30 minutes en
remuant sans cesse.
B
Si vous préparez cette recette plusieurs fois,
laissez l’appareil refroidir pendant 60 minutes
après la troisième application.
Quiche aux poireaux
Ingrédients pour la pâte:
- 250 g farine de blé (ou farine de blé complète)
- une pincée de sel
- 1 c. à s.miel
- 20 g levure fraîche ou 1/2 sachet de levure en
poudre
- 100 g beurre
- 6 c. à s.eau tiède
Ingrédients pour la garniture:
- 500 g poireaux
- huile végétal
- 4 œufs
- 500 g crème aigre
Page 40

FRANÇAIS40
- sel,poivre,1-2 c.à s. de farine, si nécessaire
B
Mettez les ingrédients dans le bol et pétrissez
jusqu'à ce que vous obteniez une pâte homogène.
Laissez la pâte lever pendant 30 min.
B
Tranchez les poireaux avec le disque à trancher.
Versez un peu d'huile dans la poêle et faites cuire
les poireaux tranchés pendant quelques minutes.
Mettez les autres ingrédients dans le bol mixer et
laissez le mixer fonctionner jusqu'à ce que le
mélange devienne crémeux.Ajoutez-y 1-2 c. à s.
de farine pour épaissir le mélange.
B
Graissez un moule de 24 cm de diamètre et
étalez la pâte sur le fond et les côtés du moule.
Puis étalez le mélange à poireaux sur la pâte et
versez le reste des ingrédients au-dessus. Faites
cuire au four chaud pendant environ 40 minutes à
180cC.Vous pouvez servir chaud ou froid.
Goulache hongrois
Ingrédients:
- 1 c. à s.huile
- 1 oignon moyen
- 1 c. à c. paprika
- 400 g boeuf ou porc
- 1 poivron
- 1 tomate
- sel
- 200 g carottes
- 300 g pommes de terre
- graines de cumin
B
Lavez la viande et coupez-la en dès de 2 cm.
Pelez l'oignon et hachez-le dans le bol à l'aide du
couteau métallique.Enlevez le trognon du poivron
et tranchez-le en rondelles à l'aide du disque à
trancher.Pelez la tomate, enlevez les pépins et
coupez-la en bandes minces. Faites revenir
l'oignon haché dans l'huile.Retirez-le du feu et
aspergez l'oignon de paprika, ajoutez-y la viande
et faites frire à feu vif pendant quelques minutes
en remuant sans cesse.Ajoutez le poivron, la
tomate et le sel au goût,couvrez la poêle et
braisez le tout dans son propre jus à feu doux
jusqu'à ce que tous les ingrédients soient presque
tendres.
B
Pendant ce temps,pelez et tranchez les carottes
à l'aide du disque à trancher et épluchez et
coupez en dès les pommes de terre.Ajoutez-les à
la viande et versez une quantité d'eau froide
suffisante pour la soupe que vous voulez préparer
(env.1,2 litres).Assaisonnez de graines de cumin
et faites cuire à feu doux jusqu'à ce que la
préparation soit ramollie comme le beurre,en
ajoutant plus de sel,si nécessaire.
B
Servez chaud.Vous pouvez ajouter une garniture
de rondelles de poivron et servir des poivrons
rouges sur une autre assiette.
Tarte aux fraises
Ingrédients:
- 100 g margarine
- 100 g sucre
- 3 jaunes d'oeufs
- 240 g farine
- 100 g noix de coco
Page 41

FRANÇAIS 41
Garniture:
- 80 g sucre
- 2 c. à c. jus de citron
- 400 g fromage blanc
- 500 g fraises
Glaçage:
- 500 g fraises
- 250 ml eau
- 120 g sucre
- 60 g maizena
Garnissage:
- 250 g crème
B
Chauffez le four à 180cC.Travaillez la margarine
avec le sucre dans le bol en utilisant le couteau
métallique.
B
Incorporez le jaune d'oeuf,la farine et les flocons
de noix de coco.Mettez la pâte dans le moule,
pressez les bords et percez la pâte de quelques
trous avec une fourchette.Faites cuire pendant
15 - 20 minutes jusqu'à ce qu'à ce qu'elle
devienne dorée.Retournez la tarte sur une grille
pour refroidir.Mélangez le sucre, le jus de citron et
le fromage blanc jusqu'à ce qu'ils deviennent
homogènes à l'aide du couteau.Nappez le fond
de la tarte refroidie de la crème obtenue.Arrangez
une partie des fraises (queue en bas) sur la tarte.
Laissez au froid.
B
Préparez le glaçage.Mélangez les fraises
restantes avec de l'eau et sucre dans le bol mixer.
Faites dissoudre la maizena dans 125 ml de la
préparation à fraises.Faites bouillir le mélange à
fraises.Lorsqu'il est amené à ébullition,incorporez
la maizena dissoute.Couvrez les fraises du
glaçage chaud à l'aide d'une cuillère et laissez au
froid pendant 2 heures. Rajoutez la crème fouettée.
Milkshake aux fruits frais
Ingrédients:
- 100 g bananes ou fraises
- 200 ml lait frais
- 50 g glace à la vanille
- sucre semoule au goût
B
Pelez les bananes et rincez les fraises.Coupez-les
en petits morceaux.Mettez tous les ingrédients
dans le bol mixer.Mélangez jusqu'à ce qu'ils
deviennent mousseux.
B
Vous pouvez utiliser votre fruits préférés pour
préparer un milkshake aux fruits frais à votre goût.
Rond de pain aux noisettes
Ingrédients pour la pâte:
- 500 g farine tamisée
- 75 g sucre
- 1 c. à c. de sel
- 1 oeuf
- 250 ml lait (à 35cC)
- 100 g beurre ramolli
- 30 g levure fraîche (pour la levure déshydratée,
voir les instructions sur l'emballage)
Garniture:
- 250 g noisettes hachées
- 100 g sucre
- 2 sachets de sucre vanillé
- 125 ml crème fraîche
Page 42

FRANÇAIS42
B
Chauffez le four à 200cC. Mélangez le lait, la
levure et le sucre à l'aide de l'accessoire à pétrir
dans le bol pendant 15 secondes.Ajoutez-y la
farine, le sel, le beurre et l'oeuf. Pétrissez la pâte
pendant 2 minutes. Mettez la pâte dans un autre
bol et couvrez le bol avec un linge humide et
laissez lever au chaud 20 minutes.
B
Hachez les noisettes avec le couteau métallique.
Mélangez les ingrédients pour la garniture.
Rompez la pâte et étendez-la afin d'obtenir une
couche rectangulaire.Nappez la pâte du mélange
aux noisettes et roulez-la en forme d'anneau.
Mettez-la dans un moule beurré. Laissez lever 20
minutes. Couvrez le dessus d'un peu de jaune
d'oeuf battu et mettez le moule sur une grille au
centre du four.Faites cuire 25 - 30 minutes à
200cC.
Gâteau au chocolat
Ingrédients:
- 140 g beurre ramolli
- 110 g sucre glace
- 140 g chocolat
- 6 blancs d'oeufs
- 6 jaunes d'oeufs
- 110 g sucre semoule
- 140 g farine de blé
Garniture:
- 200 g confiture d'abricots
Glaçage:
- 125 ml d'eau
- 300 g sucre
- 250 g chocolat râpé
- crème fouettée, si vous le souhaitez
B
Chauffez le four à 160cC. Mélangez le beurre
avec le sucre glace à l'aide du couteau.Faites
fondre le chocolat et incorporez-le.Ajoutez-y les
jaunes d'oeufs un à un et fouettez le tout jusqu'à
ce que vous obteniez une pâte crémeuse.
Mélangez les blancs d'oeufs avec le sucre
semoule jusqu'à ce que le mélange devienne
blanc et mousseux à l'aide du couteau.Incorporez
la mousse de blancs d'oeufs au mélange et
remuez doucement.Terminez par incorporer la
farine avec une spatule.Versez la pâte dans le
moule à gâteau beurré. Faites cuire une heure à
160cC. Pendant les premières 15 minutes,il est
conseillé de tenir la porte du four entreouverte.
B
Laissez le gâteau refroidir pendant quelque temps
dans le moule (24 cm),ensuite retournez-le sur
une grille pour refroidir complètement. Coupez le
gâteau en deux dans le sens de la longueur,
nappez une moitié de gâteau de la confiture
d'abricots et recouvrez avec l'autre moitié. Faites
bouillir le reste de la confiture jusqu'à ce que vous
obteniez un sirop et enduisez le gâteau.Préparez
le glaçage.Faites bouillir l'eau, ajoutez le sucre et
le chocolat et laissez cuire à feu doux.Remuez
sans cesse jusqu'à ce que vous obteniez un
glaçage uniforme et consistent. Couvrez le gâteau
du glaçage et laissez-le refroidir.Servez le gâteau
avec un peu de crème fouettée.
Page 43

FRANÇAIS 43
Soupe de brocolis (pour 4 personnes)
Ingrédients:
- 50 g fromage gouda
- 300 g de brocolis cuits
- l'eau où les brocolis ont été préalablement cuits
- 2 pommes de terre bouillies coupées en
morceaux
- 2 bouillon-cubes
- 2 c. à c. crème
- curry
- sel
- poivre
- muscade
B
Râpez le fromage.Réduisez en purée les broccolis
et les pommes de terre cuites, et ajoutez-y un peu
d'eau de cuisson.Mettez la purée de broccolis,le
liquide restant et le bouillon-cubes dans un verre
gradué et remplissez-le jusqu'à 750 ml.Versez le
tout dans une casserole et faites bouillir en
remuant.Ajoutez le fromage en tournant et
assaisonnez de curry,sel, poivre,muscade et
crème.
Pizza
Ingrédients pour la pâte:
- 400 g farine
- 1/2 c. à c. de sel
- 20 g levure fraîche ou 1,5 paquet levure
déshydratée
- 2 c. à s.d'huile
- approx.240 ml d'eau (35cC)
Pour la garniture:
- 300 ml tomates passées (en conserve)
- 1 c. à c. d'herbes mixtes (sèches ou fraîches)
- 1 oignon
- 2 gousses d'ail
- sel et poivre
- sucre
Ingrédients pour assaisonner la sauce:
- olives,salami, artichauts,champignons, anchois,
mozzarella,poivron, fromage râpé et huile
d'olive à volonté.
B
Placez le crochet à pétrir dans le bol. Mettez tous
les ingrédients dans le bol et sélectionnez la
vitesse maximum (position 2).Pétrissez la pâte
pendant 90 secondes jusqu'à ce qu'elle
commence à former une boule. Mettez la pâte
dans un autre bol,couvre-la d'un linge humide et
laissez lever 30 minutes.
B
Utilisez le couteau pour hacher l'oignon et l'ail
dans le bol pour préparer les aliments et faites-les
revenir jusqu'à ce qu'ils deviennent transparents.
Ajoutez les tomates passées et les herbes et
faites cuire la sauce à feu doux pendant 10
minutes.Assaisonnez suivant votre goût avec sel,
poivre et sucre.Laissez refroidir la sauce.
B
Chauffez le four à 250cC.
B
Mélangez la pâte et faites deux abaisses rondes.
Placez-les sur le plateau de cuisson légèrement
graissé au pléalable.Etalez bien les abaisses en
relevant les bords avec les doigts.Etalez les
ingrédients désirés à l'intérieur,saupoudrez de
fromage râpé et ajoutez-y un peu d'huile d'olive.
Page 44

FRANÇAIS44
B
Faites cuire les pizzas au four pendant 12 à 15
minutes.
Légumes et pommes de terre sautées
Ingrédients:
- 1 oeuf
- 50 cl lait
- 1 c. à s.farine
- 1 c. à c. coriandre
- sel et poivre
- 2 grandes pommes de terre (environ 300 g)
- 100 g carottes
- 150 g céleri
- 50 g graines de tournesol ou 2 c.à s. épi de
maïs
- huile à frire
B
Utilisez le couteau pour mixer l'oeuf,le lait,la
farine, la coriandre et le poivre.
B
Râpez les pommes de terre épluchées, les
carottes grattées et le céleri rincé à l'aide de
l'insert à râper grossier et ajoutez-les au mélange
à oeuf.Remuez les légumes, le mélange à ouef et
les graines de tournesol ou l'épi de maïs dans un
bol.
B
Chauffez l'huile dans une poêle et faites frire 8
petits pâtés sur les deux côtés jusqu'à ce qu'ils
deviennent dorés.Laissez-les s'écouler sur un
essuie-tout.
B
Temps de cuisson: 3-4 minutes.
Pain (blanc)
Ingrédients:
- 500 g farine
- 15 g beurre ramolli ou margarine
- 25 g levure fraîche ou 20 g levure en poudre
- 260 ml d'eau
- 10 g sel
- 10 g sucre
B
Fixez le crochet à pétrir.Mettez la farine, le sel et
le beurre ou la margarine dans le bol.Ajoutez-y la
levure fraîche ou en poudre et l'eau.Placez le
couvercle sur le bol et tournez-le dans le sens des
aiguilles d'une montre jusqu'à ce que vous
entendiez un clic. Sélectionnez la vitesse
maximum (position 2) et pétrissez la pâte (pour
la vitesse maximum de pétrissage, réportez-vous
au chapitre Quantités et temps de préparation).
B
Retirez la pâte du bol et mettez-la dans un grand
bol.Recouvrez-la d'un linge humide et laissez lever
la pâte dans un endroit chaud pendant environ
20 minutes. Lorsqu'elle est levée, aplatissez la
pâte et faites-en une boule.
B
Replacez la pâte dans le bol,couvrez-la du linge
humide et laissez-la lever à nouveau pendant
20 minutes.Aplatissez la pâte à nouveau à la
main puis au rouleau à pâtisserie.
B
Mettez la pâte dans un moule graissé et laissez
lever pendant encore 45 minutes.Faites-la cuire
dans le bas du four chauffé.
B
Faites-la cuire à 225cC dans le bas du four
chauffé pendant environ 35 minutes.
Page 45

ESPAÑOL 45
Piezas y accesorios
A Unidad del motor
B Control de velocidades
P = Impulsos
0 = Off (Apagado)
1 = Velocidad mínima
2 = Velocidad máxima
C Tapa de rosca (debe utilizarse cuando se use
el recipiente)
D Recipiente para procesar alimentos
E Soporte para accesorios
F Jarra de la batidora
G Tapa de la jarra de la batidora
H Clavija de la tapa (activa o desactiva el
interruptor de seguridad)
I Tapa del recipiente para procesar alimentos
J Tapa de seguridad
K Tubo de llenado
L Empujador
M Colador del exprimidor
N Cono del exprimidor
O Jarra de la licuadora
P Tamiz de pulpa de la licuadora
Q Tapa de la licuadora
R Empujador de la licuadora
S Ganchos para amasar
T Cuchilla metálica y cubierta protectora
U Disco de corte ajustable
V Disco mediano para rallar
W Disco fino para rallar
X Disco grueso para rallar
Y Disco para granular
Z Soporte de accesorios
a Cuchilla para patatas
b Disco emulsionante
Introducción
Este aparato está equipado con un sistema
automático de desconexión.En caso de
sobrecalentamiento,este sistema cortará
automáticamente la corriente del aparato.
Si el aparato se para de repente:
1 Desenchúfelo de la red.
2 Coloque el botón en la posición 0 para
apagar el aparato
3 Deje que el aparato se enfríe durante
60 minutos.
4 Vuelva a enchufar el aparato.
5 Vuelva a ponerlo en marcha.
Si el sistema automático de desconexión térmica
se activa demasiado a menudo,póngase en
contacto con su distribuidor Philips o con un
Servicio de Asistencia Técnica de Philips.
PRECAUCION:A fin de evitar situaciones de
peligro,este aparato no debe conectarse nunca a
un temporizador.
Page 46

ESPAÑOL46
Importante
◗ Antes de usar el aparato,lea detenidamente
estas instrucciones de uso y compruebe las
ilustraciones.
◗ Guarde las instrucciones de uso para futuras
consultas.
◗ Compruebe que el voltaje indicado en el
aparato coincide con el voltaje de la red local
antes de conectar el aparato.
◗ No utilice nunca accesorios o piezas de otros
fabricantes o que no hayan sido aconsejados
específicamente por Philips.La garantía no
será válida si se utilizan dichos accesorios o
piezas.
◗ No use el aparato si el cable de red,la clavija
u otras piezas están deteriorados.
◗ A fin de evitar situaciones peligrosas,si el
cable de red del aparato se deteriora,siempre
debe ser sustituido por Philips o por un
Servicio de Asistencia Técnica de Philips
◗ Antes de usar el aparato por vez primera,
limpie bien las piezas que vayan a entrar en
contacto con los alimentos.
◗ No supere las cantidades y el tiempo de
preparación indicados en la tabla.
◗ No exceda el contenido máximo indicado en
el recipiente,es decir, no lo llene por encima
de la marca superior.
◗ Desenchufe el aparato de la red
inmediatamente después de usarlo.
◗ No utilice nunca los dedos o un objeto (por
ejemplo,una espátula) para presionar los
ingredientes dentro del tubo de llenado
mientras el aparato esté en marcha.Para ese
propósito sólo debe usarse el empujador.
◗ Desenchufe siempre el aparato de la red antes
de introducir los dedos o un objeto (por
ejemplo,una espátula) en la jarra de la
batidora.
◗ Mantenga el aparato fuera del alcance de los
niños.
◗ No deje nunca que el aparato funcione sin
vigilancia.
◗ Coloque la tapa sobre el recipiente en la
posición correcta.Se desbloqueará el
dispositivo de seguridad incorporado y podrá
conectar el aparato.Tanto la unidad del motor
como la tapa de rosca poseen marcas.El
aparato funcionará únicamente si la marca de
la unidad del motor se corresponde con la
marca de la tapa de rosca.
◗ Pare el aparato antes de desmontar un
accesorio.
◗ Para desconectar el aparato,coloque siempre
el control de velocidades en la posición 0.
◗ Espere a que se detengan las piezas móviles
antes de retirar la tapa del aparato.
◗ La tapa de rosca sólo se podrá retirar si la
tapa no está colocada sobre el recipiente o si
el recipiente se ha retirado en bloque.
◗ No sumerja nunca la unidad del motor en
agua o en cualquier otro fluído ni la enjuague
bajo el grifo.Para limpiar la unidad del motor,
use únicamente un paño húmedo.
Page 47

ESPAÑOL 47
◗ Quite la cubierta protectora de la cuchilla
antes de usarla.
◗ Deje que los ingredientes calientes se enfríen
antes de procesarlos (Temperatura máxima
80cC/175cF).
◗ Si va a procesar un líquido que está caliente o
tiende a hacer espuma,no vierta más de un
litro en la jarra de la batidora para evitar que
se derrame.
◗ Para obtener información sobre los tiempos
de aplicación,consulte las tablas incluidas en
estas instrucciones.
Tenga en cuenta que no se pueden utilizar las
funciones de recipiente mientras esté montada la
batidora.
Cómo usar el aparato
Recipiente para procesar alimentos
C
1 Monte el recipiente sobre el robot de
cocina y gire el asa en la dirección que
indica la flecha hasta que oiga un clic.
C
2 Coloque la tapa sobre el recipiente.Gire la
tapa en el sentido que indica la flecha hasta
que oiga un clic (tendrá que hacer algo de
fuerza).
Dispositivo de seguridad incorporado
La unidad del motor, el recipiente y la tapa
poseen marcas.El aparato sólo se pondrá en
marcha si la marca de la unidad del motor se
corresponde con la marca del recipiente.
C
1 Asegúrese de que la línea de la tapa y la
línea del recipiente se corresponden.El
saliente de la tapa continúa la forma del
mango.
CLICK
CLICK
1
2
1
2
CLICK
Page 48

ESPAÑOL48
Tubo de llenado y empujador
C
1 Para añadir líquidos y/o ingredientes
sólidos,use el tubo de llenado.Utilice el
empujador para presionar los ingredientes
sólidos a través del tubo de llenado.
C
2 También puede usar el empujador para
cerrar el tubo de llenado y evitar que los
ingredientes se salgan a través de él.
Cuchilla metálica
◗ Se puede utilizar la cuchilla metálica para
trocear,mezclar, licuar y hacer puré.
C
1 Quite la cubierta protectora de la cuchilla.
Los filos cortantes de la cuchilla están muy
afilados ¡Evite tocarlos!
C
2 Coloque el soporte para accesorios en el
recipiente y la cuchilla en el soporte.
3 Introduzca los ingredientes en el
recipiente.Corte antes los trozos grandes
de alimentos en trozos de 3 x 3 x 3 cm
aproximadamente.Coloque la tapa sobre
el recipiente.
4 Meta el empujador en el tubo de llenado.
C
5 Seleccione la velocidad máxima (posición
2) del control de velocidades.
- El proceso continuará hasta que se desconecte
el aparato en la posición 0 (apagado).
◗ Pase a la posición 1 para reducir la velocidad.
Consejos
◗ Si va a trocear cebollas,utilice la función de
impulsos varias veces para evitar que los
trozos sean demasiado finos.
◗ No deje que el aparato funcione demasiado
tiempo cuando esté picando queso (duro).El
queso puede calentarse demasiado,empezar a
fundirse y formar una masa.
◗ No utilice la cuchilla para trocear ingredientes
muy duros como granos de café,cúrcuma,
nueces o cubitos de hielo,ya que la cuchilla se
podría mellar.
Si la comida se pega a la cuchilla o al interior del
recipiente :
1 Desconecte el aparato.
2 Quite la tapa del recipiente.
3 Retire los ingredientes de la cuchilla o de
las paredes del recipiente utilizando una
espátula.
Page 49

ESPAÑOL 49
Discos
No procese ingredientes duros como cubitos de
hielo con los discos.
C
1 Coloque el disco seleccionado en el
soporte de discos antes de colocarlo en el
soporte para herramientas.
Los filos cortantes están muy afilados ¡Evite
tocarlos!
C
2 Coloque el soporte de discos sobre el
soporte del accesorio que esté en el
recipiente.
3 Ponga la tapa sobre el recipiente.
4 Ponga los ingredientes en el tubo de
llenado.Antes corte los trozos grandes
para que puedan pasar por el tubo de
llenado.
C
5 Para obtener mejores resultados,llene
uniformemente el tubo de llenado.
Si necesita cortar grandes cantidades de
alimentos,procese sólo una pequeña cantidad
cada vez y vacíe regularmente el recipiente entre
cantidades.
C
6 Si desea cortar o rallar, coloque el control
de velocidades en la posición de velocidad
máxima (posición 2).
El proceso continuará hasta que se desconecte el
aparato en la posición 0 (apagado).
◗ Pase a la posición 1 para reducir la velocidad.
C
7 Utilice el empujador con suavidad para
introducir los alimentos en el tubo de
llenado.
◗ Si va a rallar verduras o frutas blandas,puede
reducir la velocidad a la posición 1 y así evitar
que éstas queden convertidas en puré.
C
8 Para retirar el disco del soporte,sujete el
soporte con las manos de forma que la
parte inferior esté mirando hacia usted.
Empuje con los dedos los bordes del disco
para que éste salga del soporte.
Cuchilla para patatas
La cuchilla para patatas permite cortar alimentos
en trozos rectangulares,por ejemplo,patatas
fritas.
Cuidado:los bordes de la cuchilla están muy
afilados.
C
1 Coloque la cuchilla para patatas en el
soporte para accesorios.
CLICK
2
1
Page 50

ESPAÑOL50
C
2 Cierre la tapa e introduzca los alimentos
en el tubo de llenado.
C
3 Seleccione la posición 1 para obtener
mejores resultados.
C
4 Utilice el empujador para introducir los
ingredientes,si fuera necesario.
Disco de corte ajustable
El disco de corte ajustable le permite cortar
alimentos con el grosor que desee.
Cuidado:los bordes de la cuchilla están muy
afilados.
C
1 Introduzca la cuchilla en la parte superior
del portador.
C
2 Monte la pieza de la parte inferior del
disco y gírela hasta que las líneas
coincidan.El disco estará bloqueado.
C
3 Gire la pieza de ajuste para regular el
grosor deseado.
C
4 Coloque el disco de corte ajustable en el
soporte para accesorios.
5 Cierre la tapa e introduzca los alimentos
en el tubo de llenado.
C
6 Seleccione la posición 1 para obtener
mejores resultados.
7 Si fuera necesario,utilice el empujador
para introducir los alimentos lentamente.
Ganchos para amasar
Los ganchos para amasar pueden utilizarse para
amasar masa de pan,tortitas y tartas.
C
1 Coloque el recipiente en la unidad del
motor e introduzca el accesorio para
amasar en el eje motor.
2 Introduzca los alimentos en el recipiente y
cierre bien la tapa del recipiente.Coloque
el empujador en el tubo de llenado para
evitar que los alimentos salpiquen durante
el proceso de amasado.
2
1
2
Page 51

51ESPAÑOL
C
3 Seleccione la velocidad máxima (posición
2) del control de velocidades.
Batidora
La batidora sirve para:
- Licuar fluidos como productos lácteos,salsas,
zumos,sopas, bebidas combinadas, batidos,etc.
- Mezclar alimentos suaves como mayonesa o
masa para tortitas.
- Hacer puré con alimentos cocinados como,por
ejemplo,para preparar papillas.
◗ El aparato se puede utilizar con o sin la
batidora montada sobre la unidad del motor.
Si lo utiliza sin la batidora,el aparato no
funcionará hasta que no se haya colocado
correctamente la tapa de rosca en la unidad
del motor.
C
1 Para montar la jarra de la batidora,retire
la tapa de rosca situada encima del control
de velocidades.
C
2 Coloque la jarra de la batidora sobre la
unidad del motor girándola en el sentido
indicado por la flecha hasta que esté
firmemente sujeta.El mango debe quedar
mirando a la izquierda.
No ejerza demasiada presión sobre el mango de
la jarra de la batidora.
3 Introduzca los ingredientes en la jarra.
C
4 Cierre la tapa.
C
5 Antes de iniciar el proceso,conecte
siempre la tapa de seguridad en la tapa de
la batidora.
C
6 Seleccione la velocidad máxima (posición
2).El aparato seguirá funcionando con esta
velocidad hasta que se desconecte en la
posición 0 (off).
Consulte la tabla para comprobar el tiempo de
proceso adecuado.
Consejos
C
◗ Vierta los ingredientes líquidos en la jarra de
la batidora a través del agujero de la tapa.
◗ Cuanto más tiempo deje funcionar el aparato,
más fino será el resultado.
◗ Corte previamente los alimentos sólidos en
trozos más pequeños antes de ponerlos en la
batidora.Si desea preparar una gran cantidad,
procese pequeñas tandas de ingredientes en
lugar de tratar de procesar una gran cantidad
de una sola vez.
1
2
2
1
Page 52

ESPAÑOL52
◗ Antes de procesar alimentos duros deberá
ponerlos en remojo,por ejemplo,soja para
elaborar leche de soja.
◗ Pique cubitos de hielo colocándolos dentro
de la jarra,cerrando la tapa y usando la
función de impulsos.
Si los alimentos se quedan pegados en la pared
de la jarra:
1 Desconecte el aparato y desenchúfelo.
2 Abra la tapa.
No abra nunca la tapa mientras el aparato esté
en funcionamiento.
3 Utilice una espátula para retirar los
alimentos de la pared de la jarra.
Mantenga la espátula a una distancia segura de las
cuchillas (aproximadamente 2 cm).
◗ Si no está satisfecho con los resultados,deje
funcionar el aparato brevemente varias veces
girando el botón repetidamente a la posición
de impulsos.También puede intentar obtener
un mejor resultado dando vueltas a los
alimentos con una espátula (mientras la
batidora no esté funcionando) o sacando
parte del contenido para procesar una menor
cantidad de alimentos.
◗ En algunos casos,es más fácil batir los
ingredientes si se añade líquido;por ejemplo,
zumo de limón al licuar frutas.
Exprimidor
El exprimidor se puede utilizar con todos los
tipos de frutas cítricas.
C
1 Coloque el recipiente sobre la unidad del
motor y ponga el colador encima.
C
2 Gire el colador en el sentido indicado por
la flecha hasta que la clavija del dispositivo
de seguridad encaje en la unidad del
motor.
C
3 Coloque el cono sobre el colador
presionando ligeramente hacia abajo.
C
4 Seleccione la velocidad mínima (posición
1).
El proceso comenzará a funcionar y se detendrá
cuando se desconecte en la posición 0 (apagado).
C
5 Presione la mitad de la fruta en el cono
giratorio.
1
CLICK
2
Page 53

ESPAÑOL 53
Consejos
◗ Deje de presionar de vez en cuando para
retirar la pulpa del colador.
Cuando vaya a hacerlo,apague el aparato y retire
el recipiente junto con el colador y el cono.
C
◗ Después de utilizarlo,quite el recipiente y los
accesorios del exprimidor para evitar que se
derrame zumo sobre el aparato.
Batidor para montar
Puede usar el batidor montar huevos,claras de
huevo,pudings instantáneos,nata.
C
1 Pongan el recipiente en la unidad motora y
girenlo hacia la izquierda hasta que oigan
un ‘click’.
C
2 Pongan el soporte para herramientas en el
recipiente.
3 Fijen el batidor para montar en el soporte
para herramientas.
4 Pongan los ingredientes en el recipiente,
coloquen la tapa en el recipiente y girenlo
hacia la derecha hasta que oigan un ‘click’.
C
5 Seleccione la velocidad mínima (posición
1) para obtener mejores resultados.
Licuadora
La licuadora se puede utilizar para preparar
zumos de verdura y fruta fresca. La pulpa, las
pepitas y la piel se quedarán aparte.
1 Coloque el recipiente sobre la unidad del
motor.
C
2 Introduzca el soporte para accesorios en
el recipiente.
C
3 Coloque el tambor de la licuadora en el
soporte para accesorios.
C
4 Introduzca el tamiz de pulpa en el tambor
y asegúrese de que las tres clavijas se
insertan en las ranuras del tambor.
C
5 Coloque la tapa de la licuadora en el
recipiente.
C
6 Seleccione la velocidad máxima (posición
2) para obtener un mejor resultado.
No utilice nunca el accesorio de la licuadora si el
tamiz giratorio o el tambor están dañados.
2
1
1
2
Page 54

54 ESPAÑOL
C
7 Introduzca las frutas o verduras en la
licuadora a través del tubo de llenado.
C
8 Si fuera necesario,presione los alimentos
con el empujador.Manténgalo en el tubo
de llenado todo lo que pueda para evitar
que salpique.
9 Deje que el aparato funcione durante
otros 20 segundos para obtener zumo de
lo que queda de fruta o verdura.
C
10 Para evitar que se derrame zumo sobre el
aparato,retire el recipiente con los accesorios
de la licuadora después de su uso.
Consejos
◗ Antes de utilizar la licuadora:
- corte las zanahorias, los rábanos blancos,etc.
- pele los cítricos, las piñas,los melones, etc.
- deshuese las cerezas,las ciruelas,los
albaricoques, los melocotones,etc.
◗ Desconecte siempre el aparato antes de
introducir la fruta en la licuadora.
◗ Desconecte el aparato de vez en cuando para
retirar la pulpa almacenada en el tamiz y en el
tambor.
◗ No procese grandes cantidades de alimentos
a la vez.
◗ Desconecte el aparato si empieza a vibrar con
fuerza y limpie el tamiz de la pulpa y el filtro
antes de volver a conectar el aparato.
Limpieza
Antes de empezar a limpiar la unidad del motor
desenchufe siempre el aparato de la red.
1 Limpie la unidad del motor con un paño
húmedo.No sumerja la unidad en agua ni
la enjuague bajo el grifo.
2 Limpie,siempre e inmediatamente después
del uso,las piezas que hayan estado en
contacto con los alimentos con agua
caliente con un líquido limpiador.
◗ Se pueden lavar en el lavavajillas el recipiente,
la tapa del recipiente,el empujador y los
accesorios (a excepción de la jarra de la
batidora).
Siguiendo la norma DIN EN 12875, se han
probado las piezas para comprobar su resistencia
al lavavajillas.
¡No se puede introducir la jarra de la batidora en
el lavavajillas!
Limpie con mucho cuidado la cuchilla metálica,la
unidad de cuchilla de la batidora y los discos. Sus
bordes están muy afilados.
2
1
Page 55

ESPAÑOL 55
Asegúrese de que los bordes de las cuchillas y
discos no entran en contacto con objetos duros.
Si fuera así, podrían mellarse.
Ciertos ingredientes pueden causar
decoloraciones de la superficie de los accesorios.
Ello no tiene efectos negativos sobre los
accesorios. Estas decoloraciones desaparecen,
normalmente, después de algún tiempo.
C
◗ Recoja el cable que sobre en el carril de la
parte trasera del aparato.
Limpieza rápida de la batidora
C
1 Vierta agua tibia (no más de medio litro) y
un poco de líquido limpiador en la jarra de
la batidora.
2 Cierre la tapa.
C
3 Deje funcionar el aparato un rato girando
el botón a la posición de impulsos.El
aparato se detendrá cuando coloque el
botón en la posición 0 (apagado).
4 Desmonte la jarra de la batidora y
enjuáguela con agua limpia.
Almacenamiento
MicroStore
C
◗ Coloque los accesorios (cuchilla y soporte de
discos) en el soporte para accesorios y
guárdelos dentro del recipiente.Coloque
siempre en último lugar el soporte de discos.
Información y servicio
Si necesita información o si tiene algún problema,
visite la página Web de Philips en
www.philips.com o póngase en contacto con el
Servicio Philips de Atención al Cliente de su país
(hallará el número de teléfono en el folleto de la
Garantía Mundial). Si en su país no hay Servicio
Philips de Atención al Cliente,diríjase a su
distribuidor local Philips o póngase en contacto
con el Service Department of Philips Domestic
Appliances and Personal Care BV.
Page 56

56 ESPAÑOL56
Guía de solución de problemas
Accesorios y tareas
Tiempo de tarea
10 - 60 seg.
60 - 180 seg.
10 - 60 seg.
10 - 60 seg.
10 - 60 seg.
30 - 180 seg.
depende de la cantidad
depende de la cantidad
Tarea
Trocear,hacer puré, mezclar
Amasar
Cortar en rebanadas, cortar
en tiras, rallar
Cortar
Cortar alimientos en trozos
rectangulares
Batidor para montar
Exprimir cítricos
Licuar zumos de frutas y de
verduras
Accesorio
P
{
ghjk
¬
¥
˚
ƒ
©
Solución
Gire el recipiente o la tapadera en sentido de las agujas
del reloj hasta que oiga un clic.Asegúrese de que los
puntos del recipiente coinciden con los de la tapadera.
El sistema del cortacircuitos termal automático ha
producido un corte en el suministro eléctrico del
aparato debido a un sobrecalentamiento.1) Desconecte
el aparato (posición 0). 2) Desenchufe el aparato. 3)
Deje enfriar el aparato 60 minutos. 4) Enchufe el
aparato.5) Vuelva a conectar el aparato.
Compruebe si ha girado el recipiente y la tapadera en el
sentido de las agujas del reloj hasta oir un clic.
Si se han colocado correctamente la batidora y la jarra
mezcladora, sólo funcionará la batidora. Si desea utilizar
la jarra mezcladora, quite la batidora y enrosque en su
lugar la tapadera.
Problema
El aparato no está
conectado.
El aparato ha dejado
de funcionar
repentinamente.
El accesorio mezclador
o accesorio para
amasar no gira.
Están colocados la
jarra de la batidora y el
recipiente para
procesar alimentos,
pero sólo funciona la
batidora.
Page 57

ESPAÑOL 57
Cantidades y tiempos de preparación
Tareas
Ensaladas,
verduras
crudas
Ensaladas,
verduras
crudas
Tartas,gofres
Platos con pan
rallado,
gratinados
Postres,
toppings
Procedimiento
Corte las verduras en trozos
que quepan en el tubo.Llene el
tubo de trocitos y trocéelos a
la vez que presiona el
empujador con suavidad.
Corte las verduras en trozos
que quepan en el tubo.Llene el
tubo de trocitos y trocéelos a
la vez que presiona el
empujador con suavidad.
Primero eche la leche en la
batidora y añada los
ingredientes secos.Mezcle los
ingredientes durante aprox.1
minuto.Si fuera necesario,
repita el proceso 2 veces.
Después pare unos minutos
para que el aparato se enfríe y
se ponga a temperatura
ambiental.
Utilice pan seco y crujiente
Utilice mantequilla suave para
conseguir un resultado ligero.
Acces
orio/v
elocid
ad
P / 2
^ / 1
D / 2
P / 2
D / 2
Canti
dad
máx.
500g
500g
750ml
de
leche
100g
300g
Ingredientes y
resultados
Manzanas,
zanahorias,
apio - rallar
Manzanas,
zanahorias,
apio - rallar
Masa (tarta) batir
Migas de pan trocear
Mantequilla
(creme au
beurre) - batir
Tareas
Guarniciones,
sopas,salsas,
platos
gratinados
Salsas,pizzas,
platos
gratinados,
fondues
Adornos,
salsas,masa,
puddings,
mousses
Purés,sopas
Comida para
bebés y niños
Ensaladas,
guarniciones
Pan
Procedimiento
Coja un trozo de queso
parmesano sin cáscara y
córtelo en trozos de aprox. 3 x
3 cm.
Corte el queso en trozos que
quepan en el tubo.Presione
con cuidado con el empujador.
Utilice chocolate sin leche
duro.Pártalo en trozos de 2cm.
Utilice guisantes cocidos o
judías.Si fuese necesario, añada
líquido para mejorar la
consistencia de la mezcla.
Para conseguir un puré más
espeso,añada poco líquido. Si
desea un puré más fino,eche
líquido hasta que la mezcla
quede sin grumos.
Coloque los pepinos en el
tubo y presione con cuidado.
Mezcle agua templada con
levadura y azúcar.Añada harina,
aceite y sal y amase la mezcla
durante aprox.90 segundos.
Déjelo 30 minutos hasta que
suba.
Acces
orio/v
elocid
ad
P / 2
k / 2
P / 2
P / D /
2
P / 2
¬ / 1
P / 2
Canti
dad
máx.
200g
200g
200g
250g
500g
2
pepin
os
500g
de
harina
Ingredientes y
resultados
Queso
(Parmesano) trocear
Queso
(Gouda) rallar
Chocolate picar
Guisantes
cocidos,judías
- hacer puré
Verduras
cocidas y
carne - hacer
puré
Pepinos cortar
Masa (para el
pan) - amasar
Page 58

58 ESPAÑOL
Tareas
Pizza
Tartas de
manzana,
galletas dulces,
tarta de frutas
Pan de lujo
Puddings,
suflés,
merengue
Salsas,
mermeladas,
puddings,
comida para
bebés
Procedimiento
Siga el mismo proceso que
para hacer masa de pan.Amase
la mezcla durante 1 minuto.
Use margarina fría. Córtela en
dados de 2cm.Eche la harina
en el recipiente y añada la
margarina. Mézclelo hasta que
la masa se desmigaje. Después
añada agua fría mientras lo
mezcla.Pare en cuanto la masa
empiece a convertirse en una
bola.
Primero mezcle la levadura, el
agua templada y el azúcar en
un recipiente. Eche los
ingredientes en el recipiente y
amase la mezcla hasta que no
queden grumos y no se pegue
al recipiente (durante aprox.1
minuto).Déjelo 30 minutos
hasta que suba.
Utilice claras de huevo que
estén a temperatura ambiente.
Nota:eche al menos 2 claras
de huevo.
Consejo:añada un poco de
zumo de limón para evitar que
la fruta se decolore.Añada
líquido para conseguir un puré
fino.
Acces
orio/v
elocid
ad
P / 2
P / 2
P / 2
˚ / 1
D / 2
Canti
dad
máx.
1000g
de
harina
300g
de
harina
500g
de
harina
4
claras
de
huevo
500g
Ingredientes y
resultados
Masa (para
pizzas) amasar
Masa (masa
crujiente fina)
- amasar
Masa
(levadura) amasar
Claras de
huevo - batir
Fruta (p.ej.
manzanas,
plátanos,
castaña de
agua) - licuar
Tareas
Salsas,
mermelada,
puddings,
comida para
bebés
Guarnición,
salsa para
acompañar los
aperitivos
Salsas,sopas,
guarnición,
mantequilla de
hierbas
Zumos de
frutas
Ensaladas,
guarnición y
salsas
barbacoa
Procedimiento
Consejo:añada un poco de
zumo de limón para evitar que
la fruta se decolore.
Pele el ajo.Presione el pulsador
intermitente varias veces para
evitar trocear el ajo demasiado
fino.Utilice al menos 150g.
Lave y seque las hierbas antes
de trocear.
Añada agua u otro líquido
(opcional) para conseguir un
zumo sin grumos.
Todos los ingredientes deben
estar a temperatura ambiente.
Nota:utilice al menos un huevo
grande, dos huevos pequeños y
dos yemas de huevo.Eche el
huevo y un poco de vinagre en
el recipiente y añada aceite
poco a poco.
Acces
orio/v
elocid
ad
P / 2
P / 2
P / 2
D / 2
˚ / 1
Canti
dad
máx.
500g
300g
Min.
50g
500g
(canti
dad
total)
3
huevo
s
Ingredientes y
resultados
Fruta (p.ej.
manzanas,
plátanos) trocear
Ajo - trocear
Hierbas (p.ej.
perejil) trocear
Zumos (p.ej.
de papaya,
sandía,pera,
guayabo) licuar
Mayonesa emulsionar
Page 59

59ESPAÑOL
Tareas
Steaks tartar,
hamburguesas
Steaks tartar,
hamburguesas
Batidos
Diferentes
pasteles.
Ensaladas,
puddings,pan
de frutos
secos,pasta de
almendra
Procedimiento
Primero quite los nervios y los
huesos.Corte la carne en
dados de 3cm.Presione el
pulsador intermitente para
conseguir un troceado más
grueso.
Primero quite los nervios y los
huesos.Corte la carte en
trozos de 3cm.Presione el
pulsador intermitente para
conseguir un troceado más
grueso.
Haga puré de frutas (p. ej.
plátanos,fresas) con azúcar,
leche y un poco de helado y
mézclelo bien.
Los ingredientes deben estar a
temperatura ambiente. Mezcle
la mantequilla blanda con el
azúcar hasta que la mezcla
quede sin grumos y cremosa.
Después añada leche, huevos y
harina.
Utilice el pulsador intermitente
para conseguir un troceado
más grueso. Pare el proceso si
quiere conseguir un resultado
grueso.
Acces
orio/v
elocid
ad
P / 2
P / 2
D / 2
P / 2
P / 2
Canti
dad
máx.
500g
400g
500ml
de
leche
4
huevo
s
250g
Ingredientes y
resultados
Carnes
(magro) - picar
Carnes,
pescado,carne
de ave
(tocino) - picar
Batidos - batir
Mezcla (tarta)
- mezclar
Frutos secos trocear
Tareas
Ensaladas,
comida cocida,
revueltos,
guarnición
Ensalada,
comida
cocinada,
revueltos,
guarnición
Carne picada
Sopas,salsas
Guarnición,
crema,mezclas
de helados
Procedimiento
Pele las cebollas y pártalas en 4
trozos.Pare el proceso después
de 2 pulsos para comprobar el
resultado.
Pele las cebollas y córtela en
trozos para que quepan en el
tubo.Nota: utilice al menos
100g.
Primero quite los nervios y los
huesos.Corte la carne en
dados de 3 cm.Utilice el
pulsador intermitente para
conseguir un troceado más
grueso.
Utilice verduras cocidas.
Use nata sacada directamente
del frigorífico.Nota:use al
menos 125ml de nata.La nata
montada está lista en aprox.20
segundos.
Acces
orio/v
elocid
ad
P / 2
¬ / 1
P / 2
D / 2
˚ / 1
Canti
dad
máx.
500g
300g
200g
500ml
500ml
Ingredientes y
resultados
Cebollas trocear
Cebollas cortar
Carne de ave picar
Sopas - licuar
Montar nata -
batir
Page 60

60 ESPAÑOL
Recetas
Tostada de calabacín
Ingredientes:
- 2 calabacines
- 3 huevos cocidos
- 1 cebolla pequeña
- 1 cucharada grande de aceite vegetal
- perejil
- 2-3 cucharadas grandes de nata agria
- zumo de limón,salsa de tabasco, sal,pimienta,
curry, paprika
B
Lave y seque los calabacines y rállelos con el disco
fino para rallar de la jarra mezcladora.Pase el
calabacín rallado a un plato,espolvoréelo con sal y
déjelo unos 15 minutos de forma que la sal
absorba el líquido del calabacín rallado.Corte la
cebolla en 4 trozos y píquela finita junto con el
diente de ajo.Quite las hojas de perejil del tallo y
píquelas.
B
Luego coloque el calabacín rallado sobre un paño
limpio y presione para que suelte el líquido.Eche
un poco de aceite en la sartén y fría las cebollas
picadas y el ajo a fuego lento.Añada los
calabacines rallados.Todos los líquidos deben
evaporarse de los ingredientes.Deje enfriar un
rato los ingredientes fritos. Pele los huevos y
trocéelos en la jarra mezcladora durante unos
segundos.Añada los demás ingredientes a la jarra
mezcladora,sazónelo y mézclelo con la batidora.
Sírvalo sobre pan blanco tostado.
Sopa de verduras nutritiva a la
Budapest
Ingredientes
- 200g de colinabo
- 300g de patatas
- 300g de apio
- 100g de zanahorias
- 700g de agua
- 200g de dal (lentejas nepalíes)
- 200g carne de cerdo ahumada
- 250g de creme fresh
- 20g de perejil
- sal,pimienta, 2 cubitos de caldo,2 hojas de
laurel
- 400g de agua
B
Eche el colinabo,las patatas, el apio, las
zanahorias y el agua en este orden en la jarra
mezcladora.Bata los ingredientes durante
10 segundos.Vierta los ingredientes ya mezclados
en una cacerola y hiérvalo.Eche agua,la creme
fresh,el dal, la carne y las hierbas.Déjelo cocer
durante 30 minutos.Muévalo constantemente si
fuese necesario.
B
Si va a preparar esta receta varias veces,deje
enfriar el aparato durante una hora tras la tercera
vez.
Quiche de puerros
Ingredientes para la masa:
- 250g de harina de trigo (o harina de trigo
integral)
- una pizca de sal
- 1 cucharada grande de miel
- 20g de levadura fresca o 1/2 sobrecito de
levadura seca
Page 61

61ESPAÑOL
- 100g de mantequilla
- 6 cucharadas grandes de agua tibia
Ingredientes para el relleno:
- 500g de puerros
- aceite vegetal
- 4 huevos
- 500g de nata agria
- sal,pimienta, 1-2 cucharadas grandes de harina
si fuese necesario
B
Eche todos los ingredientes en un recipiente y
amáselos hasta conseguir una masa consistente.
Deje que la masa suba durante 30 minutos.
B
Corte los puerros con el disco cortador.Eche un
poco de aceite en la sartén y fría los trocitos de
puerro durante unos minutos. Coloque el resto de
los ingredientes en la jarra mezcladora y bata
hasta que la masa alcance una consistencia
cremosa.Añada 1-2 cucharadas grandes de
harina para espesar la mezcla.
B
Eche aceite en un molde de 24cm de diámetro y
cubra la base y los laterales de forma uniforme
con masa.Extienda la mezcla de puerros sobre la
masa y vierta el resto de los ingredientes encima.
Hornéelo en un horno precalentado durante unos
40 minutos a 180 cC. Puede servirse caliente o
frío.
Goulash al estilo húngaro
Ingredientes:
- 1 cucharada grande de aceite
- 1 cebolla normal
- 1 cucharada pequeña de paprika
- 400g de carne de ternera o cerdo
- 1 pimiento verde
- 1 tomate
- sal
- 200g de zanahorias
- 300g de patatas
- carvi
B
Lave la carne y córtela en dados de 2cm. Pele la
cebolla y píquela utilizando la jarra mezcladora
con la cuchilla metálica.Vacíe el interior del
pimiento verde y córtelo en aritos con el disco
cortador.Pele el tomate,quite las pipas y córtelo
en tiras.Fría la cebolla picada con un poco de
aceita hasta que se ablande.Apártelo del fuego y
espolvorée la paprika sobre la cebolla, añada
carne y fríalo a fuego normal durante unos
minutos sin dejar de remover.Eche el pimiento
verde,el tomate y la sal a su gusto, tape la sartén
y déjelo cocer en su jugo a fuego medio hasta que
quede tierna.
B
Mientras tanto,pele las zanahorias y córtelas con
el disco cortador,pele las patatas y cortelas en
trozos.Añada esto a la carne y eche la cantidad
de agua fría que necesite para hacer la cantidad
de sopa que desee (aprox.1,2 litros). Sazónelo
con una pizca de carvi y hiérvalo a fuego lento
hasta que todo quede tan blando como la
mantequillla.Eche un poquito de sal si fuera
necesario.
B
Sírvalo caliente.Puede echar guarnición de aritos
de pimientos verdes y servir paprika picante en
un plato aparte.
Page 62

62 ESPAÑOL
Tarta de fresas
Ingredientes:
- 100 g de margarina
- 100 g de azúcar
- 3 yemas de huevo
- 240 g de harina
- 100 g de coco
Relleno:
- 80 g de azúcar
- 2 cucharadas pequeñas de zumo de limón
- 400 g de queso cremoso
- 500 g de fresas
Glaseado:
- 500 g de fresas
- 250 ml de agua
- 120 g de azúcar
- 60 g de maicena
Adorno:
- 250 g de nata
B
Caliente el horno hasta 180cC.Bata la margarina
y el azúcar en el recipiente con la cuchilla
metálica.
B
Mézclelo con las yemas de huevo,después eche
harina y copos de coco y remuévalo.Coloque la
masa en la fuente para el horno,ondule el borde
y pIanche con un tenedor.Hornee durante
15 - 20 minutos hasta que se dore un poquito.
Deje enfriar la tarta en una encimera. Mezcle el
azúcar,el zumo de limón y el queso cremoso en el
recipiente hasta que quede suave y esponjoso
utilizando la cuchilla metálica.Extiéndalo sobre la
masa de la tarta ya fría.Coloque unas cuantas
fresas (sólo en la superficie) sobre la tarta.
Colóquela dentro del frigorífico.
B
Prepare el glaseado.Bata las fresas que quedan
con el agua y el azúcar en la jarra mezcladora.
Disuelva la maicena en 125 ml de mezcla de
fresas. Ponga a hervir la mezcla de fresas. Cuando
esté hirviendo,échelo a la maicena disuelta y
remuévalo.Vierta el glaseado caliente sobre las
fresas y déjelo enfriar durante dos horas.Cúbralo
con nata batida a punto de nieve.
Batido de frutas frescas
Ingredientes:
- 100 g de plátanos o fresas
- 200 ml de leche fresca
- 50 g de helado de vainilla
- azúcar granulado al gusto
B
Pele los plátanos y enjuague las fresas.Corte la
fruta en trozos pequeños. Eche todos los
ingredientes en la jarra mezcladora.Bátalo hasta
que quede sin grumos.
B
Puede echar la fruta que desee para hacer su
batido de frutas frescas preferido.
Anillo de pan de avellana
Ingredientes para la masa:
- 500 g de harina tamizada
- 75 g de azúcar
- 1 cucharada pequeña de sal
- 1 huevo
Page 63

63ESPAÑOL
- 250 ml de leche (a 35cC)
- 100 g de mantequilla,ablandada
- 30 g de levadura fresca (para levadura seca,lea
las instrucciones que contiene el paquete)
Relleno:
- 250 g de avellanas picadas
- 100 g de azúcar
- 2 sobrecitos de azúcar de vainilla
- 125 ml de nata
B
Caliente el horno hasta 200cC.Mezcle leche,
levadura y azúcar en un recipiente durante
15 segundos utilizando el accesorio para amasar.
Añada harina, sal,mantequilla y huevo.Amase la
mezcla durante 2 minutos.Coloque la masa en
un recipiente aparte y cúbralo con un paño
húmedo y deje que la masa suba en un sitio a
temperatura ambiente durante 20 minutos.
B
Pique las avellanas con la cuchilla metálica.
Mezcle los ingredientes para el relleno.Estire la
masa en forma de triángulo. Extienda por encima
la mezcla de avellanas y enróllelo.Coloque el
rollito en un molde untado de mantequilla.Deje
que el rollito suba durante unos 20 minutos.
Extienda la yema de huevo batida sobre la
superficie y coloque el molde sobre una rejilla
en el centro del horno. Hornéelo durante
25 - 30 minutos a 200 cC.
Tarta de chocolate
Ingredientes:
- 140 g de mantequilla,ablandada
- 110 g de azúcar glas
- 140 g de chocolate
- 6 claras de huevo
- 6 yemas de huevo
- 110 g de azúcar granulado
- 140 g de harina de trigo
Relleno:
- 200 g de mermelada de albaricoque
Glaseado:
- 125 ml de agua
- 300 g de azúcar
- 250 g de chocolate rallado
- nata batida,si lo desea
B
Caliente el horno hasta 160cC.Bata la
mantequilla con el azúcar glas utilizando la
cuchilla metálica.Derrita el chocolate y échelo.
Añada las yemas de huevo una a una a la mezcla
y bátalo hasta que quede cremoso.Bata las claras
de huevo junto con el azúcar granulado hasta que
estén firmes y espumosas utilizando la cuchilla
metálica.Añada la espuma de las claras de huevo
a la mezcla y remuévalo con suavidad.Después
añada harina con una espátula. Coloque la
mezcla de la tarta en el molde untado con
mantequilla.Hornéelo durante una hora a 160cC.
Durante los primeros 15 minutos la puerta del
horno debe permanecer ligeramente entreabierta.
B
Deje enfriar la tarta durante un rato en el molde
(24 cm).Luego échela sobre una rejilla de
alambre para que se enfríe más rápido.Corte la
tarta por la mitad de forma horizontal, unte una
Page 64

64 ESPAÑOL
mitad con mermelada de albaricoque y vuelva a
juntar de nuevo las dos mitades.Caliente el resto
de mermelada hasta que quede espesa y
extiéndala sobre la cubierta de la tarta. Prepare el
glaseado.Hierva agua,añada azúcar y chocolate
y cuézalo a fuego lento.Remueva constantemente
hasta que no queden grumos y pueda esparcirse
fácilmente.Eche el gratinado sobre la tarta y
déjela enfriar.Sirva la tarta con nata montada.
Sopa de brócoli (para 4 personas)
Ingredientes:
- 50 g de queso Gouda curado
- 300 g de brócoli cocido (tallos y cogollos)
- líquido de cocción del brócoli
- 2 patatas cocidas en trocitos
- 2 cubitos de caldo
- 2 cucharadas grandes de nata montada
- curry
- sal
- pimienta
- nuez moscada
B
Ralle el queso.Haga puré de brócoli con las
patatas cocidas y el líquido de cocción del brócoli.
Eche el puré de brócoli y el liquido sobrante y los
cubitos de caldo en una taza y llénela hasta los
750 ml.Pase la sopa a una cacerola y déjelo
hervir mientras remueve.Eche el queso y
remuévalo,y sazónelo con curry,sal, pimienta y
nuez moscada y añada la nata.
Pizza
Ingredientes para la masa:
- 400 g de harina
- 1/2 cucharada pequeña de sal
- 20 g de levadura fresca o 1,5 sobrecitos de
levadura seca
- 2 cucharadas grandes de aceite para cocinar
- aprox.240ml de agua (35cC)
Para cubrirla:
- 300ml de tomates tamizados (enlatados)
- 1 cucharada pequeña de hierbas italianas (secas
o frescas)
- 1 cebolla
- 2 dientes de ajo
- sal y pimienta
- azúcar
Ingredientes para echar en la salsa:
- aceitunas,salami, alcachofas, champiñones,
anchoas,queso Mozzarella, pimientos, queso
curado rallado y aceite de oliva al gusto.
B
Monte los ganchos para amasar en el recipiente.
Eche todos los ingredientes en el recipiente y
seleccione la velocidad máxima (posición 2).
Amase la mezcla durante aprox.90 segundos
hasta que se forme una bola sin grumos.Coloque
la masa en una recipiente aparte, cúbralo con un
paño húmedo y deje que la masa suba durante
30 minutos.
Page 65

ESPAÑOL 65
B
Pique las cebollas y el ajo con la cuchilla metálica
de la jarra mezcladora y fríalos en una sartén
hasta que se vean transparentes.Añada el tomate
tamizado y las hiervas y hiérvalo a feugo lento
durante 10 minutos.Sazone al gusto con sal,
pimienta y azúcar.Deje que se enfríe la salsa.
B
Caliente el horno hasta 250cC.
B
Estire la masa sobre una superficie cubierta de
harina y haga dos formas redondas. Coloque las
figuras de masa sobre una bandeja para horno
cubierta de aceite. Extienda los ingredientes sobre
la pizza,dejando los bordes libres.Eche los
ingredientes que desee,esparza un poco de queso
rallado sobre la pizza y eche unas gotitas de
aceite de oliva por encima.
B
Hornee la pizza durante 12 - 15 minutos.
Fritura de verduras y patatas
Ingredientes:
- 1 huevo
- 50 cc de leche
- 1 cucharada grande de harina
- 1 cucharada pequeña de cilantro
- sal y pimienta
- 2 patatas grandes (sobre 300 g)
- 100 g de zanahorias
- 150 g de apio
- 50 g de semillas de girasol o 2 cucharadas
grandes de maíz dulce
- aceite para freír
B
Utilizando la cuchilla metálica,mezcle los huevos,
la leche,la harina,el ciantro, la sal y la pimienta.
B
Ralle las patatas peladas, las zanahorias y el apio
limpios con el disco grueso para rallar y añádalo a
la mezcla de huevos.Remueva las verduras, la
mezcla de huevos y las semillas de girasol o el
maíz dulce todo junto en un recipiente.
B
Caliente el aceite en una sartén y fría 8
empanadillas por los dos lados hasta que queden
doraditas.Déjelas escurrir sobre papel de cocina.
B
Tiempo de cocción:3-4 minutos.
Pan (blanco)
Ingredientes:
- 500 g de harina de pan
- 15 g de mantequilla suave o margarina
- 25 g de levadura fresca o 20 g de levadura seca
- 260ml de agua
- 10 g de sal
- 10 g de azúcar
B
Coloque los ganchos para amasar en el recipiente.
Eche harina, sal y margarina o mantequilla en el
recipiente.Añada la levadura fresca o seca y el
agua.Ponga la tapadera sobre el recipiente y
gírela en la dirección de la flecha hasta que oiga
un clic. Seleccione la velocidad máxima (posición
2) y mezcle la masa (consulte el tiempo máximo
para amasar en el capítulo "Cantidades y tiempo
de preparación".
B
Retire la masa del recipiente y échela en otro
recipiente grande,cúbrala con una toalla
humedecida con té y deje que suba la masa en
un sitio a temperatura ambiente durante 20
minutos. Después de que suba la masa,vuelva a
aplastar la masa,y hágala una bola.
Page 66

ESPAÑOL66
B
Vuelva a poner la masa en el primer recipiente,
cúbralo con un paño húmedo y déjelo hasta que
suba durante 20 minutos.Aplástela de nuevo y
extiéndala.
B
Coloque la masa en un molde para horno con
aceite,y déjela subir durante otros 45 minutos.
Hornee el pan en una parte inferior del horno
precalentado.
B
Hornee el pan a 225cC en la parte inferior del
horno precalentado durante unos 35 minutos.
Page 67

67
É¡«YO h á∏∏Ñe ¢Tɪb á©£≤H É¡«£Z h OôØæe AÉYh ‘ áæ«é©dG »©°V -
.á≤«bO 30 IóŸ ƒ∏©J
h ΩÉ©£dG Ωôa AÉYh ‘ á«fó©ŸG IôØ°ûdG ᣰSGƒH ΩƒãdG h π°üÑdG »©£b -
ºWɪ£dG »Ø«°VCG .¿ƒ∏dG ‘ÉØ°T GƒëÑ°üj ¿CG ¤G IÓ≤e ‘ º¡«∏≤H »eƒb
É≤ah ᫪µH …ô¡H .≥FÉbO 10 IóŸ ƒ¡£J É¡«YO h ÜÉ°ûYC’G h ádƒîæŸG
.OÈJ á°ü∏°üdG »YO .ôµ°ùdG h QÉ¡ÑdG h í∏ŸÉH áÑZô∏d
.ájƒÄe áLQO 250 äGP IQGôM ¤G ¿ôØdG Úî°ùàH »eƒb -
.¿ÉjôFGO ¿Óµ°T …ô°†M h ≥«bódÉH ¢Tƒ°Tôe í£°S ≈∏Y áæ«é©dG »Ød -
äÉaÉ°V’G »YRh h âjõdÉH áfƒgóe õÑN á«æ«°U ≈∏Y áæ«é©dG Éà©£b »©°V
IQÉàıG äÉfƒµŸG ™jRƒàH »eƒb .á«dÉN ±GôWC’G ácQÉJ Gõà«ÑdG áæ«éY ≈∏Y
¿ƒàjõdG âjR ¢†©H »Ø«°VCG h Gõà«ÑdG ≈∏Y IQƒ°ûÑŸG áæÑ÷G ¢†©H …ÌfG h
.É¡bƒa
.á≤«bO 15 ¤G 12 IóŸ Gõà«ÑdG …õÑNG -
ÉWÉ£ÑdG h äGhGô°†ÿG ≈∏≤e
:äÉfƒµŸG
IóMGh á°†«H -
Ö«∏◊G øe πe 50 ≥«bódG øe IóMGh ΩÉ©W á≤©∏e IôHõµdG øe IóMGh …É°T á≤©∏e -
QÉ¡H h í∏e -
ÉWÉ£H 2 - -(ΩGôZ 300 ‹GƒM
Qõ÷G øe ΩGôZ 100 -
¢ùaôµdG øe ΩGôZ 150 -
RƒµdG øe IQòdG øe ΩÉ©W á≤©∏e 2 hCG ¢ùª°ûdG OÉÑY ܃ÑM øe ΩGôZ 50 -
»∏≤∏d âjR -
IôHõµdG h ≥«bódG h Ö«∏◊G h ¢†«ÑdG »£∏NG ,á«fó©ŸG IôØ°ûdG ΩGóîà°SÉH -
.QÉ¡ÑdG h í∏ŸG h
∞¶æŸG ¢ùaôµdG h ô°û≤ŸG Qõ÷G h Iô°û≤ŸG ÉWÉ£ÑdG ™«£≤àH »eƒb .¢†«ÑdG §«∏N »Ø«°VCG h Ò¨°üdG ™«£≤à∏d á°ü°üıG ∫ÉNO’G IGOCG ᣰSGƒH
øe IQòdG hCG ¢ùª°ûdG OÉÑY ܃ÑM h ¢†«ÑdG §«∏N h QÉ°†ÿG ∂jôëàH »eƒb
.AÉYh ‘ Éjƒ°S RƒµdG
≈∏Y á룰ùe IÒ¨°U ôFÉ£a 8 »∏bG h IÓ≤e ‘ âjõdG Úî°ùàH »eƒb -
.ïÑ£ŸG ¥Qh ≈∏Y É¡à«Ø°üàH »eƒb .¿ƒ∏dG á«ÑgP íÑ°üJ ¿CG ¤G Úà¡÷G
.≥FÉbO 4- 3 :ƒ¡£dG âbh -
(¢†«HC’G) õÑÿG
:äÉfƒµŸG
õÑÿG ≥«bO øe ΩGôZ 500 -
øjQÉLQÉŸG hCG áªYÉædG IóHõdG øe ΩGôZ 15 -
áaÉ÷G IÒªÿG øe ΩGôZ 02 hCG áLRÉ£dG IÒªÿG øe ΩGôZ 25 -
AÉŸG øe πe 260 -
í∏ŸG øe ΩGôZ 10 -
ôµ°ùdG øe ΩGôZ 10 -
hCG øjQÉLQÉŸG h í∏ŸG h ≥«bódG »©°V .AÉYƒdG ‘ øé©dG IGOCG »ÑcQ -
AÉ£¨dG »©°V .AÉŸG h áaÉ÷G hCG áLRÉ£dG IÒªÿG »Ø«°VCG .AÉYƒdG ‘ IóHõdG
…QÉàNG .''∂«∏c'' 䃰U »©ª°ùJ ¤G º¡°ùdG √ÉŒÉH ¬jôjOCG h AÉYƒdG ≈∏Y
»©LGQ ,øé©∏d âbh ∫ƒWC’) áæ«é©dG »£∏NG h (2 á«©°Vh) iƒ°ü≤dG áYô°ùdG
.(Ò°†ëàdG äÉbhCG h äÉ«ªµdG Iô≤a
É¡à«£¨àH »eƒb h ÒÑc AÉYh ‘ É¡«©°V h AÉYƒdG øe áæ«é©dG »YõfG -
,áæ«é©dG ƒ∏©J ¿CG ó©H .á≤«bO 20 IóŸ ƒ∏©àd É¡«YO h á∏∏Ñe ¢Tɪb á©£≤H
.Iôc πµ°T ¤G É¡∏jƒ– »eƒb h á«fÉK Iôe É¡«ë£°S
h á∏∏Ñe ¢Tɪb á©£≤H É¡à«£¨àH »eƒb h AÉYƒdG ¤G áæ«é©dG …ó«YCG -
É¡«Ød h iôNCG Iôe É¡ë«£°ùàH »eƒb .iôNCG á≤«bO 20 IóŸ ƒ∏©àd É¡«côJG
.∂dP ó©H
45 IóŸ ƒ∏©àd É¡«côJG h âjõdÉH áfƒgóe õÑN á«æ«°U ‘ áæ«é©dG »©°V -
¬æ«î°ùJ ” …òdG ¿ôØdG ‘ πØ°SC’G ±ôdG ‘ õÑÿG …õÑNG .iôNCG á≤«bO
.É≤HÉ°S
πØ°SC’G Aõ÷G ‘ ájƒÄe áLQO 225 IQGôM áLQO ≈∏Y õÑÿG …õÑNG -
.á≤«bO 35 ‹Gƒ◊ É≤HÉ°S øî°ùŸG ¿ôØ∏d
á«Hô©dG
Page 68

68
IƒZQ hP GóeÉL íÑ°üj ¿CG ¤G πZÈŸG ôµ°ùdG ™e ¢†«ÑdG ¢VÉ«H »≤ØNG
h §«∏ÿG ¤G ¢†«ÑdG ¢VÉ«H IƒZQ »Ø«°VCG .á«fó©ŸG IôØ°ûdG ΩGóîà°SÉH
‘ ᵩµdG §«∏N »©°V .¥ƒ∏ŸG ᣰSGƒH ≥«bódG »Ø«°VCG .∞£∏H »côM
IóMGh áYÉ°S IóŸ ÉgõÑîH »eƒb .âjõdG hCG á檰ùdÉH áfƒgóe õÑî∏d á«æ«°U
ÉMƒàØe ¿ôØdG ÜÉH ≈≤Ñj ¿CG Öéj .ájƒÄe áLQO 160 äGP IQGôM ≈∏Y
.¤hC’G áYÉ°S ™HôdG ∫ÓN É«FõL
É¡«©°V ºK ,(º°S 24) õÑÿG á«æ«°U ‘ Iõ«Lh IÎØd OÈJ ᵩµdG »YO -
ºK ∞°üædG ¤G É«≤aCG ᵩµdG ¢ü≤H »eƒb .ÌcCG OÈàd …ójóM ±Q ≈∏Y
º¡°†©H ¤G ÚØ°üædG …ó«YCG h ÚØ°üædG ióMG ≈∏Y ¢ûª°ûŸG ≈Hôe »YRh
≈∏YCG ≈∏Y ¬jôjOCG h ÓFÉ°S íÑ°üj ¿CG ¤G ≈HôŸG »bÉH Úî°ùàH »eƒb .É°†©H
h ôµ°S É¡«dG »Ø«°VCG h AÉe »∏ZG .è∏ãŸG AÉ£¨dG Ò°†ëàH »eƒb .ᵩµdG
¿CG ¤G QGôªà°SÉH §«∏ÿG »côM .áFOÉg QÉf πY º¡«¡£H »eƒb h ¬J’ƒcƒ°T
AÉ£¨dG Gòg »©°V .ᵩµdG ≈∏Y ™jRƒà∏d á∏HÉb h áªYÉf ácɪ°S hP íÑ°üj
.ábƒØıG áÁôµdG ¢†©H ™e ᵩµdG »eób .OÈJ É¡«YO h ᵩµdG ≈∏Y è∏ãŸG
(¢UÉî°TCG á©HQC’) ‹ƒchÈdG AÉ°ùM
:äÉfƒµŸG
GOƒ¨dG á«æÑL øe ΩGôZ 50 -
(OhQƒdG h Qhò÷G ) áNƒÑ£ŸG ‹ƒchÈdG øe ΩGôZ 300 -
√ƒ¡W ó©H »≤H …òdG ‹ƒchÈdG πFÉ°S -
GÒ¨°U á©£≤e ábƒ∏°ùe ÉWÉ£H 2 -
ábôŸG äÉÑ©µe 2 -
ábƒØıG áÁôµdG øe ΩÉ©W á≤©∏e 2 -
…QɵdG QÉ¡H -
í∏e -
QÉ¡H -
Ö«£dG IRƒL -
É¡«dG »Ø«°VCG h ábƒ∏°ùŸG ÉWÉ£ÑdG ™e ‹ƒchÈdG »°SôgG .áæÑ÷G ô°ûÑH »eƒb
h πFÉ°ùdG øe ≈≤ÑJ Ée ™e ¢Shô¡ŸG ‹ƒchÈdG »©°V .‹ƒchÈdG πFÉ°S
AÉ°ù◊G »©°V .πe 750 ájɨd ¬jCÓeG h ¢SÉ«≤∏d AÉYh ‘ ábôŸG äÉÑ©µe
…ô¡H h »Ø«°VCG .∂jôëàdG ‘ øjôªà°ùJ ɪæ«H »∏¨J É¡«YO h IôéæW ‘
.áÁôµdG »Ø«°VCG h Ö«£dG IRƒL h QÉ¡ÑdG h í∏ŸG h …QɵdÉH
Gõà«ÑdG
:áæ«é©∏d äÉfƒµŸG
≥«bódG øe ΩGôZ 400 -
í∏ŸG øe …É°T á≤©∏e ∞°üf -
áaÉ÷G IÒªÿG øe ∞°üf h ∞∏¨e hCG áLRÉ£dG IÒªÿG øe ΩGôZ 20 -
ïÑ£dG âjR øe ΩÉ©W Éà≤©∏e -
(ájƒÄe áLQO 35 IQGôM äGP) AÉŸG øe πe 240 ‹GƒM -
:äÉaÉ°VÓd
(áÑ∏©e) ádƒîæŸG ºWɪ£dG øe πe 300 -
(áLRÉW hCG áaÉL) áWƒ∏ıG á«dÉ£j’G ÜÉ°ûYC’G øe …É°T á≤©∏e -
IóMGh á∏°üH -
ΩƒK ¢üM 2 -
QÉ¡H h í∏e -
ôµ°S -
:á°ü∏°üdG ¤G ±É°†J »àdG äÉfƒµŸG
πØ∏a h ÓjQGRƒŸG áæÑL h ±ƒ°ûfCG h ô£a h ±ƒ°TôN h »e’É°S h ¿ƒàjR -
.áÑZôdG Ö°ùM ¿ƒàjõdG âjR h IQƒ°ûÑe áæÑL h ô°†NCG
…QÉàNG h AÉYh ‘ äÉfƒµŸG πc »©°V .AÉYh ‘ øé©dG IGOCG »ÑcQ -
ÉÑjô≤J á«fÉK 90 IóŸ áæ«é©dG øé©H »eƒb .(2 á«©°Vh) iƒ°ü≤dG áYô°ùdG
.áªYÉf Iôc πµ°T ¤G ∫ƒëàJ ¿CG ¤G
á«Hô©dG
Page 69

69
áLRÉ£dG ¬cGƒØdÉH ∂«°T ∂∏«e
:äÉfƒµŸG
ádhGôØdG hCG RƒŸG øe ΩGôZ 100 -
êRÉ£dG Ö«∏◊G øe πe 200 -
Ó«fÉØdG áXƒH øe ΩGôZ 50 -
¥hòdG Ö°ùM πZÈe ôµ°S -
™£b ¤G ¬cGƒØdG ™«£≤àH »eƒb .ádhGôØdG ∞«¶æJ hCG RƒŸG Ò°û≤àH »eƒb -
èjõŸG íÑ°üj ¿CG ¤G »£∏NG .§∏ÿG AÉYh ‘ äÉfƒµŸG πc »©°V .IÒ¨°U
.ɪYÉf
¥ƒØıG Ühô°ûŸG Ò°†ëàd É¡æ«ÑZôJ á¡cÉa …CG ΩGóîà°SG ∂fɵeÉH -
.∂jód π°†ØŸG
¥óæÑdG õÑN äÉ≤∏M
:áæ«é©dG äÉfƒµe
∫ƒîæŸG ≥«bódG øe ΩGôZ 500 -
ôµ°ùdG øe ΩGôZ 75 -
í∏ŸG øe …É°T á≤©∏e 1 -
á°†«H 1 -
(ájƒÄe áLQO 53 äGP IQGôëH) Ö«∏◊G øe πe 250 -
áªYÉædG IóHõdG øe ΩGôZ 100 -
á©LGôe AÉLôdG ,áaÉ÷G IÒªî∏d) áLRÉ£dG IÒªÿG øe ΩGôZ 30 -
(±Ó¨dG ≈∏Y äɪ«∏©àdG
:Iƒ°û◊G
™£≤ŸG ¥óæÑdG øe ΩGôZ 250 -
ôµ°ùdG øe ΩGôZ 100 -
Ó«fÉØdG ôµ°S øe ¿ÉØ∏¨e -
áÁôµdG øe πe 125 -
Ö«∏◊G »£∏NG .ájƒÄe áLQO 200 äGP IQGôM ¤G ¿ôØdG Úî°ùàH »eƒb »Ø«°VCG .øé©dG IGOCG ΩGóîà°SÉH á«fÉK 15 IóŸ AÉYh ‘ ôµ°ùdG h IÒªÿG h
.Úà≤«bO IóŸ áæ«é©dG øé©H »eƒb .¢†«ÑdG h IóHõdG h í∏ŸG h ≥«bódG
á«Hô©dG
IƒZQ hP GóeÉL íÑ°üj ¿CG ¤G πZÈŸG ôµ°ùdG ™e ¢†«ÑdG ¢VÉ«H »≤ØNG
h §«∏ÿG ¤G ¢†«ÑdG ¢VÉ«H IƒZQ »Ø«°VCG .á«fó©ŸG IôØ°ûdG ΩGóîà°SÉH
‘ ᵩµdG §«∏N »©°V .¥ƒ∏ŸG ᣰSGƒH ≥«bódG »Ø«°VCG .∞£∏H »côM
IóMGh áYÉ°S IóŸ ÉgõÑîH »eƒb .âjõdG hCG á檰ùdÉH áfƒgóe õÑî∏d á«æ«°U
ÉMƒàØe ¿ôØdG ÜÉH ≈≤Ñj ¿CG Öéj .ájƒÄe áLQO 160 äGP IQGôM ≈∏Y
.¤hC’G áYÉ°S ™HôdG ∫ÓN É«FõL
É¡«©°V ºK ,(º°S 24) õÑÿG á«æ«°U ‘ Iõ«Lh IÎØd OÈJ ᵩµdG »YO -
ºK ∞°üædG ¤G É«≤aCG ᵩµdG ¢ü≤H »eƒb .ÌcCG OÈàd …ójóM ±Q ≈∏Y
º¡°†©H ¤G ÚØ°üædG …ó«YCG h ÚØ°üædG ióMG ≈∏Y ¢ûª°ûŸG ≈Hôe »YRh
≈∏YCG ≈∏Y ¬jôjOCG h ÓFÉ°S íÑ°üj ¿CG ¤G ≈HôŸG »bÉH Úî°ùàH »eƒb .É°†©H
h ôµ°S É¡«dG »Ø«°VCG h AÉe »∏ZG .è∏ãŸG AÉ£¨dG Ò°†ëàH »eƒb .ᵩµdG
¿CG ¤G QGôªà°SÉH §«∏ÿG »côM .áFOÉg QÉf πY º¡«¡£H »eƒb h ¬J’ƒcƒ°T
AÉ£¨dG Gòg »©°V .ᵩµdG ≈∏Y ™jRƒà∏d á∏HÉb h áªYÉf ácɪ°S hP íÑ°üj
.ábƒØıG áÁôµdG ¢†©H ™e ᵩµdG »eób .OÈJ É¡«YO h ᵩµdG ≈∏Y è∏ãŸG
(¢UÉî°TCG á©HQC’) ‹ƒchÈdG AÉ°ùM
:äÉfƒµŸG
GOƒ¨dG á«æÑL øe ΩGôZ 50 -
(OhQƒdG h Qhò÷G ) áNƒÑ£ŸG ‹ƒchÈdG øe ΩGôZ 300 -
√ƒ¡W ó©H »≤H …òdG ‹ƒchÈdG πFÉ°S -
GÒ¨°U á©£≤e ábƒ∏°ùe ÉWÉ£H 2 -
ábôŸG äÉÑ©µe 2 -
ábƒØıG áÁôµdG øe ΩÉ©W á≤©∏e 2 -
…QɵdG QÉ¡H -
í∏e -
QÉ¡H -
Ö«£dG IRƒL -
Page 70

70
h π°üÑdG …ô°ûb .º°S 2 ºéM äGP äÉÑ©µe ¤G áªë∏dG ∞«¶æàH »eƒb -
ádGRÉH »eƒb .á«fó©ŸG IôØ°ûdG ΩGóîà°SÉH ΩÉ©£dG Ωôa AÉYh ‘ ¬«©£b
IGOCG ΩGóîà°SÉH ∫ƒ£dÉH íFGô°T ¤G ¬©«£≤J ºK øe h ô°†NC’G πØ∏ØdG iƒàfi
É¡«©£b h QhòÑdG »∏jRCG h ºWɪ£dG Ò°û≤àH »eƒb .∂dòd á°ü°üıG ∫ÉNO’G
.ɪYÉf íÑ°üj ¿CG ¤G âjõdG ‘ ™£≤ŸG π°üÑdG »∏bG .á©«aQ íFGô°T ¤G
É¡«∏bG h áªë∏dG »Ø«°VCG h ɵjôHÉÑdG ¢†©H ¬«dG »Ø«°VCG h QÉædG øY ¬«YõfG
ô°†NC’G πØ∏ØdG »Ø«°VCG .ôªà°ùŸG ∂jôëàdG ™e ≥FÉbO á©°†Ñd á«dÉY QÉf ≈∏Y
»côJG h IÓ≤ŸG á«£¨àH »eƒb ºK øe h áÑZôdG Ö°ùM í∏ŸG h ºWɪ£dG h
.ɪYÉf íÑ°üj ¿CG ¤G ᣰSƒàe QÉf ≈∏Y ¬àbôà ƒ¡£j èjõŸG
h ™«£≤àdG ∫ÉNOG IGOCG ΩGóîà°SÉH Qõ÷G »©£b h …ô°ûb ,AÉæKC’G √òg ‘ -
Ée …ôjOCG h áªë∏dG ¤G º¡«Ø«°VCG .ÉWÉ£ÑdG ™«£≤J h Ò°û≤àH É°†jCG »eƒb
Ϋd 1,2) áHƒZôŸG AÉ°ù◊G ᫪c ≈∏Y ∫ƒ°üë∏d IOQÉÑdG AÉŸG øe »Øµj
èjõŸG »YO h ÉjhGôµdG ܃ÑM øe ¢†©ÑH èjõŸG í«∏ªàH »eƒb .(ÉÑjô≤J
GPG í∏ŸG ¢†©H »Ø«°VCG .IóHõdÉc áªYÉf äÉjƒàÙG πc íÑ°üJ ¿CG ¤G ƒ¡£j
.ôeC’G êÉàMG
πØ∏ØdG äÉ≤∏M øe ¢†©ÑH ¬æ«jõJ ∂fɵeÉH .ÉæNÉ°S ≥Ñ£dG Ëó≤àH »eƒb -
.OôØæe ≥ÑW ≈∏Y IQÉM ɵjôHÉH Ëó≤J h ô°†NC’G
ádhGôØdG IÒ£a
:äÉfƒµŸG
øjQÉLQÉŸG øe ΩGôZ 100 -
ôµ°ùdG øe ΩGôZ 100 -
äÉ°†«H 3 QÉØ°U -
≥«bódG øe ΩGôZ 240 -
óæ¡dG RƒL øe ΩGôZ 100 -
:Iƒ°û◊G
ôµ°ùdG øe ΩGôZ 80 -
¿ƒª«∏dG Ò°üY øe …É°T á≤©∏e 2 -
áÁôµdG áæÑL øe ΩGôZ 400 -
ádhGôØdG øe ΩGôZ 500 -
:áYɪ∏dG Iƒ°ùµdG
ádhGôØdG øe ΩGôZ 500 -
AÉŸG øe πe 250 -
ôµ°ùdG øe ΩGôZ 120 -
É°ûædG øe ΩGôZ 60 -
:ÚjõàdG
áÁôµdG øe ΩGôZ 250 -
h øjQÉLQÉŸG §∏îH »eƒb .ájƒÄe áLQO 180 ¤G ¿ôØdG Úî°ùàH »eƒb -
.á«fó©ŸG IôØ°ûdG ᣰSGƒH AÉYƒdG ‘ ôµ°ùdG
óæ¡dG RƒL h ≥«bódG …ôjOCG ºK øe h ¢†«ÑdG QÉØ°U §«∏ÿG ¤G »Ø«°VCG -
»eƒb h ±GôWC’G õjõëàH »eƒb h õÑÿG á«æ«°U ‘ áæ«é©dG »©°V .ô°û≤ŸG
á≤«bO 20-15 IóŸ áæ«é©dG õÑîH »eƒb .ácƒ°ûdG ᣰSGƒH áæ«é©dG õNƒH
,AÉæKC’G √òg ‘ .OÈJ IÒ£ØdG »YO .—Éa »æH ¿ƒd äGP íÑ°üJ ¿CG ¤G
á≤«bQ íÑ°üJ ≈àM AÉYh ‘ áÁôµdG áæÑL h ¿ƒª«∏dG Ò°üY h ôµ°ùdG »£∏NG
.IOÈŸG IÒ£ØdG ≈∏Y §«∏ÿG …ôjOCG .á«fó©ŸG IôØ°ûdG ΩGóîà°SÉH áØ«ØN h
ºK øe h IÒ£ØdG ≈∏Y (πØ°SC’G ¤G á¡éàe) á©£≤ŸG ádhGôØdG øe GAõL »©°V
.áLÓãdG ‘ É¡«©°V
ôµ°ùdG h AÉŸG ™e ádhGôØdG »bÉH »£∏NG .áYɪ∏dG Iƒ°ùµdG Ò°†ëàH »eƒb -
.§«∏ÿG »∏ZG h ádhGôØdG §«∏N øe πe 125 ‘ É°ûædG »HhP .§∏ÿG AÉYh ‘
ádhGôØdG ≈∏Y áæNÉ°ùdG Iƒ°ùµdG »©°V .ÜhòŸG É°ûædG »Ø«°VCG ,¿É«∏¨dG óæY
≈∏Y ábƒØıG áÁôµdG »Ø«°VCG .ÚàYÉ°S IóŸ OÈJ É«YO h á≤©∏ŸG ᣰSGƒH
.á«°SÉ≤dG ºª≤dG
á«Hô©dG
Page 71

71
â°ùHGOƒH á≤jôW ≈∏Y …ò¨ŸG QÉ°†ÿG AÉ°ùM
:äÉfƒµŸG
»HGô∏¡µdG øe ΩGôZ 200 -
ÉWÉ£ÑdG øe ΩGôZ 300-
¢ùaôµdG øe ΩGôZ 300 -
Qõ÷G øe ΩGôZ 100 -
AÉŸG øe ΩGôZ 700 -
(áÑ∏©dG øe) ∫GódG øe ΩGôZ 200 -
øNóŸG ôjõæÿG º◊ øe ΩGôZ 200 -
áLRÉ£dG áÁôµdG øe ΩGôZ 250 -
¢ùfhó≤ÑdG øe ΩGôZ 20 -
QɨdG ¥GQhCG øe 2 ,QÉ°†ÿG ábôe øe ¿ÉÑ©µe ,êRÉW QÉ¡H ,í∏e -
AÉŸG øe ΩGôZ 400 -
Gòg ‘ AÉYƒdG ‘ AÉŸG h Qõ÷G h ¢ùaôµdG h ÉWÉ£ÑdG h »HGô∏¡µdG »©°V ‘ áWƒ∏ıG äÉfƒµŸG »©°V .¿GƒK 10 IóŸ èjõŸG §∏îH »eƒb .π°ù∏°ùàdG
h ∫GódG h áLRÉ£dG áÁôµdG h AÉŸG »Ø«°VCG .º¡«∏¨H »eƒb h ôNBG AÉYh
.ôªà°ùŸG ∂jôëàdG ™e á≤«bO 30 IóŸ ƒ¡£j èjõŸG »YO .ÜÉ°ûYC’G h áªë∏dG
60 IóŸ OÈj RÉ¡÷G »YO ,äGôe IóY áØ°UƒdG √òg Ò°†ëàH âªb GPG -
.Ò°†– á«∏ªY ådÉK πc ó©H á≤«bO
çGôµdÉH ¢û«µdG ≥ÑW
:áæ«é©∏dG äÉfƒµŸG
íª≤dG ≥«bO øe ΩGôZ 250 -
í∏ŸG øe á°TQ -
π°ù©dG øe ΩÉ©W á≤©∏e 1 -
áaÉ÷G IÒªÿG øe ∞∏¨e ∞°üf hCG áLRÉ£dG IÒªÿG øe ΩGôZ 20 -
IóHõdG øe ΩGôZ 100 -
IôJÉØdG AÉŸG øe ≥YÓe 6 -
:Iƒ°ûë∏d äÉfƒµŸG
çGôµdG øe ΩGôZ 500 -
QÉ°†ÿG âjR -
äÉ°†«H 4 -
IôŸG áÁôµdG øe ΩGôZ 500 -
ôeC’G êÉàMG GPG ≥«bódG øe ¿ÉàæKG hCG ¿É©W á≤©∏e ,QÉ¡H ,í∏e -
≈∏Y »∏°ü– ¿CG ¤G º¡æé©H »eƒb h AÉYh ‘ äÉfƒµŸG πc »©°V -
.á≤«bO 30 IóŸ ƒ∏©J áæ«é©dG »YO .áµ°Sɪàe áæ«éY
¢†©H »©°V .∫ÉNO’G IGOCG ᣰSGƒH íFGô°T ¤G çGôµdG ™«£≤àH »eƒb -
»bÉH »©°V .≥FÉbO á©°†Ñd ™£≤ŸG çGôµdG »∏≤H »eƒb h IÓ≤e ‘ âjõdG
≈∏Y »∏°ü– ¿CG ¤G IóŸ πª©j •ÓÿG »côJG h §∏ÿG AÉYh ‘ äÉfƒµŸG
ácɪ°S IOÉjõd ≥«bódG øe ¿ÉàæKG hCG ΩÉ©W á≤©∏e »Ø«°VCG .á«Áôc áé«àf
.§«∏ÿG
¬«£Z h á檰ùdG hCG âjõdÉH º°S 24 ô£b äGP õÑÿG á«æ«°U øgóH »eƒb -
…ôjOCG ºK øe h áæ«é©dG ≈∏Y çGôµdG ™jRƒàH »eƒb .áæ«é©dÉH IóMƒe ᫪µH
á≤«bO 40 IóŸ ¬æ«î°ùJ ” ¿ôa ‘ √õÑîH »eƒb .º¡bƒa äÉfƒµŸG »bÉH
.GOQÉH hCG ÉæNÉ°S ≥Ñ£dG Ëó≤J øµÁ .ájƒÄe áLQO 180 IQGôM áLQO ≈∏Y
ájóædƒ¡dG á≤jô£dG ≈∏Y ¢T’ƒZ
:äÉfƒµŸG
âjõdG øe ΩÉ©W á≤©∏e 1 -
ºé◊G ᣰSƒàe π°üH 1 -
ɵjôHÉÑdG øe …É°T á≤©∏e 1 -
ôjõæÿG hCG ô≤ÑdG º◊ øe ΩGôZ 400 -
ô°†NCG πØ∏a 1 -
ºWɪW 1 -
í∏e -
Qõ÷G øe ΩGôZ 200 -
ÉWÉ£ÑdG øe ΩGôZ 300 -
ÉjhGôµdG ܃ÑM -
á«Hô©dG
Page 72

72
äÉfƒµŸG
èFÉàædGh
Ö«∏◊G Ühô°ûe
§∏N - ¥ƒØıG
(ᵩµdG) §«∏N
§∏N -
- äGô°ùµe
™«£≤J
™«£≤J - π°üH
™«£≤J - π°üH
íFGô°T ¤G
Ωôa - êÉLO
§∏N - AÉ°ùM
ábƒØfl áÁôc
≥ØN -
᫪µdG
iƒ°ü≤dG
πe 500
Ö«∏M
4
äÉ°†«H
Æ 250
Æ 500
Æ 300
Æ 200
πe 500
πe 500
/≥ë∏ŸG
áYô°ùdG
2
2
2
2
1
2
2
1
äÉ≤«Ñ£àdG
Ö«∏◊G äÉHhô°ûe
¥ƒØıG
.áØ∏àfl äɵ©c
iƒ∏M ,äÉ£∏°S
õÑN ,≠fOƒÑdG
áæ«éY ,äGô°ùµŸG
.RĸdG
ΩÉ©W ,á£∏°S
ΩÉ©W ,ñƒÑ£e
ÚjõJ , »∏≤e
ΩÉ©W ,á£∏°S
ΩÉ©W ,ñƒÑ£e
.ÚjõJ , »∏≤e
áehôØe áª◊
äÉ°ü∏°U ,AÉ°ùM
,áÁôc ,ÚjõJ
áXƒH äÉ£∏N
á≤jô£dG
(ádhGôØdG h RƒŸG πãe) ¬cGƒØdG ¢Sô¡H »eƒb
h áXƒÑdG øe ¢†©ÑdG h Ö«∏◊G h ôµ°ùdG ™e
.Gó«L »£∏NG
IQGôM πãe äÉfƒµŸG IQGôM ¿ƒµJ ¿CG Öéj
ôµ°ùdG h áªYÉædG IóHõdG êõà »eƒb .áaô¨dG
ºK .É«Áôc h ɪYÉf §«∏ÿG íÑ°üj ¿CG ¤G
.≥«bódG h ¢†«ÑdG h Ö«∏◊G »Ø«°VCG
.¢SÉb ™«£≤àd ¢†ÑædG ìÉàØe »eóîà°SG
áé«àæH ÚÑZôJ âæc GPG á«∏ª©dG »ØbhCG
.á«°SÉb
™HQCG ¤G º¡©«£≤J h π°üÑdG Ò°û≤àH »eƒb
…ócCÉJ h Úà°†Ñf ó©H á«∏ª©dG »ØbhCG .™£b
.áé«àædG øe
ΩÉéMCG ¤G º¡©«£≤J h π°üÑdG Ò°û≤àH »eƒb
100 »eóîà°SG :á¶MÓe .܃ÑfC’G ‘ ™°ùJ
.πbC’G ≈∏Y ΩGôZ
»eƒb .ΩɶY hCG •ƒ«N ájCG »∏jRCG ’hCG
3 ºéM äGP äÉÑ©µe ¤G áªë∏dG ™«£≤àH
™«£≤J áé«àæd ¢†ÑædG ìÉàØe »eóîà°SG .º°S
.á«°SÉb
.áNƒÑ£e äGhGô°†N »eóîà°SG
áLÓãdG øe áLôîà°ùe áÁôc »eóîà°SG
øe πe 125 »eóîà°SG :á¶MÓe .GQƒa
ábƒØıG áÁôµdG íÑ°üJ .πbC’G ≈∏Y ËôµdG
.á«fÉK 20 ó©H IõgÉL
äÉØ°UƒdG
≈°SƒµdG §«∏N ¢ûàjhófÉ°S
:äÉfƒµŸG
≈°Sƒc 2 -
äÉbƒ∏°ùe äÉ°†«H 3 -
π°üH 1 -
QÉ°†ÿG âjR øe ΩÉ©W á≤©∏e 1 -
¢ùfhó≤H -
IôŸG áÁôµdG øe ΩÉ©W ≥YÓe 3-2 -
ɵjôHÉH ,…QɵdG IQOƒH ,QÉ¡H ,í∏e ,ƒµ°SÉHƒàdG á°ü∏°U ,¿ƒª«∏dG Ò°üY -
IGOCG ᣰSGƒH ∫ƒ£dÉH É¡©«£≤J h É¡Ø«ØŒ h ≈°SƒµdG π«°ù¨àH »eƒb -
‘ á©£≤ŸG ≈°SƒµdG »©°V .ΩÉ©£dG Ωôa AÉYh ‘ áeƒ©æH á©WÉ≤dG ∫ÉNO’G
É¡æe í∏ŸG ¢üàÁ »µd á≤«bO 15 IóŸ É¡«côJG h í∏ŸG É¡«dG »Ø«°VCG h AÉYh
¤G º¡©«£≤àH »eƒb ºK øe h ™£b 4 ¤G π°üÑdG ™«£≤àH »eƒb .πFGƒ°ùdG πc
»eƒb h º¡YhòL øe ¢ùfhó≤ÑdG ¥GQhCG »YõfG .ΩƒK ¢üM ™e IÒ¨°U ™£b
.º¡eôØH
.πFGƒ°ùdG É¡æe »£¨°VG h áØ«¶f áØ°ûæe ≈∏Y á©£≤ŸG ≈°SƒµdG »©°V -
h Ó«∏b ΩƒãdG h ™£≤ŸG π°üÑdG »∏≤H »eƒb h IÓ≤e ¤G âjõdG ¢†©H …ôjOCG
»YO .äÉfƒµŸG øe πFGƒ°ùdG πc ôîÑàJ ¿CG Öéj .≈°SƒµdG º¡«dG »Ø«°VCG
ΩÉ©£dG Ωôa AÉYh ‘ ¬©«£≤J h ¢†«ÑdG Ò°û≤àH »eƒb .Ó«∏b OÈJ äÉfƒµŸG
»eƒb h ΩÉ©£dG Ωôa AÉYh ¤G äÉfƒµŸG »bÉH »Ø«°VCG .¿GƒK á©°†Ñd
õÑÿG ™e ≥Ñ£dG Ëó≤àH »eƒb .IôØ°ûdÉH º¡£∏N ºK øe h ºgÒ¡ÑàH
.¢üªÙG
á«Hô©dG
Page 73

73
äÉfƒµŸG
èFÉàædGh
äGP) áæ«éY
Iô°û≤dG
- (IÒ°ü≤dG
øéY
(IÒªN) áæ«éY
øéY -
¢†«ÑdG ¢VÉ«H
≥ØN-
πãe) á¡cÉa
h RƒŸG h ìÉØàdG
- (AÉæà°ùµdG
§∏N
πãe) á¡cÉa
(RƒŸG h ìÉØàdG
™«£≤J -
᫪µdG
iƒ°ü≤dG
Æ 300
≥«bO
Æ 500
≥«bO
4 ¢VÉ«H
äÉ°†«H
Æ 500
Æ 500
/≥ë∏ŸG
áYô°ùdG
2
2
1
2
2
äÉ≤«Ñ£àdG
,ìÉØàdG IÒ£a
,ƒ∏M âjƒµ°ùH
¬cGƒØdG ᵩc
»gÉaQ õÑN
,≠fOƒÑdG
,¬«∏aƒ°ùdG
≠fGÒŸG
,äÉ°ü∏°üdG
iƒ∏M ,≈HôŸG
,≠fOƒÑdG
∫ÉØWC’G ΩÉ©W
,äÉ°ü∏°üdG
iƒ∏M ,≈HôŸG
,≠fOƒÑdG
∫ÉØWC’G ΩÉ©W
á≤jô£dG
»eƒb h IOQÉH øjQÉLQÉe »eóîà°SG
2 ºéM äGP äÉÑ©µe ¤G É¡©«£≤àH
h AÉYƒdG ‘ ≥«bódG »©°V .º°S
èjõŸG »£∏NG .øjQÉLQÉŸG »Ø«°VCG
.âàØàdG á∏¡°S áæ«é©dG íÑ°üJ ¿CG ¤G
h Ú£∏îJ ɪæ«H IOQÉH √É«e »Ø«°VCG
¤G áæ«é©dG ∫ƒëàJ Ée ¿ÉYô°S »ØbƒJ
áæ«é©dG »YO .IôµdÉc …ôFGO πµ°T
.É«aÉ°VG É¡£∏N πÑb OÈJ
h áÄaGódG AÉŸG h IÒªÿG ’hCG »£∏NG
»YO .OôØæe AÉYh ‘ ôµ°ùdG ¢†©H
»eƒb h AÉYh ‘ äÉfƒµŸG ™«ªL
h áªYÉf íÑ°üJ ¿CG ¤G áæ«é©dG øé©H
AÉYƒdÉH ¥É°üàd’G øY ∞bƒàJ
.(IóMGh á≤«bO ‹GƒM ∂dP ¥ô¨à°ù«°S)
h ƒ∏©àd á≤«bO 30 IóŸ áæ«é©dG »YO
.(IõgÉL íÑ°üJ
IQGôM äGP ¢†«H ¢VÉ«H »eóîà°SG
¢VÉ«H »eóîà°SG :á¶MÓe .áaô¨dG
.πbC’G ≈∏Y ¿Éà°†«H
Ò°üY øe π«∏≤dG »Ø«°VCG :áë«°üf
Ò«¨J Öæéàd á¡cÉØdG ¤G ¿ƒª«∏dG
πFÉ°ùdG ¢†©H »Ø«°VCG .á¡cÉØdG ¿ƒd
.ºYÉf ¢ùjôg ≈∏Y ∫ƒ°üë∏d
Ò°üY øe π«∏≤dG »Ø«°VCG :áë«°üf
Ò«¨J Öæéàd á¡cÉØdG ¤G ¿ƒª«∏dG
.á¡cÉØdG ¿ƒd
èFÉàædGh äÉfƒµŸG
™«£≤J - ΩƒK
πãe) ÜÉ°ûYCG
- (¢ùfhó≤ÑdG
™«£≤J
ï«£ÑdG ) ôFÉ°üY
¢UÉLC’G , ÉjÉHÉÑdG
§∏N - (áaGƒ÷G hCG
- õ«fƒjÉe
ÜÓëà°SG
Ωôa - (áæ«d) Ωƒ◊
,∑ɪ°SCG ,Ωƒ◊
Ωôa - êÉLO
᫪µdG
iƒ°ü≤dG
Æ 300
Æ50
≈∏Y
πbC’G
Æ 500
᫪µdG)
(á∏eɵdG
3
äÉ°†«H
Æ 500
Æ 400
/≥ë∏ŸG
áYô°ùdG
2
2
2
1
2
2
äÉ≤«Ñ£àdG
,ÚjõJ
äÉ°ü∏°U
h äÉ°ü∏°üdG
,AÉ°ù◊G
IóHR ,ÚjõJ
ÜÉ°ûYC’G
ôFÉ°üY
¬cGƒØdG
,äÉ£∏°S
h ÚjõJ
äÉ°ü∏°U
ƒ«µ«HQÉÑdG
∂«à°ùdG QÉJôJ
,(á°ü∏°üdG)
,ôZÈeÉ¡dG
áªë∏dG äGôc
∂«à°ùdG QÉJôJ
,(á°ü∏°üdG)
,ôZÈeÉ¡dG
áªë∏dG äGôc
á≤jô£dG
ìÉàØe »£¨°VG .ΩƒãdG Ò°û≤àH »eƒb
ΩƒãdG Ωôa Öæéàd äGôe IóY ¢†ÑædG
ΩGôZ 150 »eóîà°SG .GóL GÒ¨°U
.πbC’G ≈∏Y
πÑa É¡Ø«ØŒ h ÜÉ°ûYC’G π°ù¨H »eƒb
.É¡©«£≤J
(…QÉ«àNG) ôNBG πFÉ°S hCG AÉŸG »Ø«°VCG
.ºYÉf Ò°üY ≈∏Y ∫ƒ°üë∏d
äÉfƒµŸG πc IQGôM ¿ƒµJ ¿CG Öéj
»eóîà°SG :á¶MÓe .áaô¨dG IQGôëc
hCG IóMGh IÒÑc á°†«H πbC’G ≈∏Y
QÉØ°U hCG ¿ÉJÒ¨°U ¿Éà°†«H
øe π«∏≤dG h ¢†«ÑdG »©°V .¿Éà°†«H
á£≤f âjõdG »Ø«°VCG h AÉYh ‘ πÿG
.iôNC’G ƒ∏J
»eƒb .QÉJhCG hCG ΩɶY …CG ’hCG »∏jRCG
äGP äÉÑ©µe ¤G áªë∏dG ™«£≤àH
¢†ÑædG ìÉàØe »£¨°VG .º°S 3 ºéM
.á«°SÉb ™«£≤J áé«àf ≈∏Y ∫ƒ°üë∏d
»eƒb .QÉJhCG hCG ΩɶY …CG ’hCG »∏jRCG
äGP äÉÑ©µe ¤G áªë∏dG ™«£≤àH
¢†ÑædG ìÉàØe »£¨°VG .º°S 3 ºéM
.á«°SÉb ™«£≤J áé«àf ≈∏Y ∫ƒ°üë∏d
á«Hô©dG
Page 74

74
Ò°†ëà∏d áÑ∏£àŸG äÉbhC’Gh äÉ«ªµdG
äÉfƒµŸG
èFÉàædGh
h QõL h ìÉØJ
- ∑ÉjÒ∏«°S
∫ƒ£dÉH ™«£≤J
h QõL h ìÉØJ
- ∑ÉjÒ∏«°S
∫ƒ£dÉH ™«£≤J
áæ«éY
- (ôFÉ£ØdG)
≥ØN
- õÑÿG äÉàa
™«£≤J
IóHõdG áÁôc
≥ØN -
áæÑL
- (¿Gõ«eQÉH)
™«£≤J
᫪µdG
iƒ°ü≤dG
Æ 500
Æ 500
πe 750
Ö«∏M
Æ 100
Æ 300
Æ 200
/≥ë∏ŸG
áYô°ùdG
2
1
2
2
2
2
äÉ≤«Ñ£àdG
,äÉ£∏°S
áaÉL äGhGô°†N
,äÉ£∏°S
áaÉL äGhGô°†N
,á≤«bQ ôFÉ£a
πaGƒdG ôFÉ£a
IQƒª¨e ±ÉÑWCG
õÑÿG äÉàØH
äÉaÉ°VG ,äÉjƒ∏M
,AÉ°ù◊G ,ÚjõJ
¥ÉÑWCG ,äÉ°ü∏°üdG
äÉàØH IQƒª¨e
õÑÿG
á≤jô£dG
¤G äGhGô°†ÿG ™«£≤àH »eƒb
…CÓeG .܃ÑfC’G ‘ ™°ùJ ™£b
á«∏ª©H »eƒb h ™£≤dÉH ܃ÑfC’G
≈∏Y §¨°†dG ∫ÓN øe ™«£≤àdG
.áØîH §¨°†dG IGOCG
¤G äGhGô°†ÿG ™«£≤àH »eƒb
…CÓeG .܃ÑfC’G ‘ ™°ùJ ™£b
á«∏ª©H »eƒb h ™£≤dÉH ܃ÑfC’G
≈∏Y §¨°†dG ∫ÓN øe ™«£≤àdG
áØîH §¨°†dG IGOCG
h •ÓÿG ¤G ’hCG Ö«∏◊G …ôjOCG
.áaÉ÷G äÉfƒµŸG »Ø«°VCG ºK øe
á≤«bO IóŸ äÉfƒµŸG »£∏NG
á«∏ª©dG √òg …ó«YCG .ÉÑjô≤J IóMGh
»ØbƒJ .ôeC’G êÉàMG GPG ¿ÉJôe
OÈj RÉ¡÷G »Yóàd ≥FÉbO ™°†Ñd
.ᣫÙG IQGô◊G ¤G π°ü«d
.É°ûeô≤e h ÉaÉL GõÑN »eóîà°SG
áé«àæd áªYÉf IóHR »eóîà°SG
.áØ«ØN
áæÑL øe á©£b »eóîà°SG
ôFGhódG øe á«dÉN ¿Gõ«eQÉÑdG
¤G É¡©«£≤àH »eƒb h á«°SÉ≤dG
.º°S 3*3 ºéM äGP ™£b
äÉfƒµŸG
èFÉàædGh
- (GOƒZ) áæÑL
∫ƒ£dÉH ™«£≤J
- ¬J’ƒcƒ°T
™«£≤J
AÓjRÉH
,áNƒÑ£e
- É«dƒ°UÉa
¢Sôg
h äGhGô°†N
áNƒÑ£e Ωƒ◊
¢Sôg -
™«£≤J - QÉ«N
íFGô°T ¤G
(õÑî∏d) áæ«éY
øéY -
(Gõà«Ñ∏d) áæ«éY
øéY -
᫪µdG
iƒ°ü≤dG
Æ 200
Æ 200
Æ 250
Æ 500
¿ÉJQÉ«N
Æ 500
≥«bO
Æ 1000
≥«bO
/≥ë∏ŸG
áYô°ùdG
?
2
2
2
1
2
2
äÉ≤«Ñ£àdG
,äÉ°ü∏°üdG
¥ÉÑWCG ,Gõà«ÑdG
IQƒª¨e
,õÑÿG äÉàØH
hófƒa
,ÚjõJ
,äÉ°ü∏°üdG
iƒ∏M ,áæ«éY
,¬jQƒÑdG
AÉ°ù◊G
∫ÉØWC’G ΩÉ©W
™°VôdG h
,äÉ£∏°S
ÚjõJ
õÑN
Gõà«H
á≤jô£dG
™°ùJ ™£b ¤G áæÑ÷G ™«£≤àH »eƒb
ᣰSGƒH áØîH »£¨°VG .܃ÑfC’G ‘
.§¨°†dG IGOCG
,IOÉ°S h á«°SÉb ¬J’ƒcƒ°T »eóîà°SG
ºéM äGP ™£b ¤G É¡©«£≤àH »eƒb
.º°S 2
É«dƒ°UÉa hCG AÓjRÉH »eóîà°SG
GPG AÉŸG øe π«∏≤dG »Ø«°VCG .áNƒÑ£e
.èjõŸG ácɪ°S Ú°ùëàd ôeC’G êÉàMG
.πFÉ°ùdG ó©H §≤a »Ø«°VCG ,¢SÉb ¢Sô¡d
πFÉ°ùdG áaÉ°VÉH »©HÉJ ,ºYÉf ¢Sô¡d
.ɪYÉf èjõŸG íÑ°üj ¿CG ¤G
»£¨°VG h ܃ÑfC’G ‘ QÉ«ÿG »©°V
.áØîH ¬«∏Y
h IÒªÿG ™e áÄaGO √É«e »£∏NG
h âjõdG h ≥«bódG »Ø«°VCG .ôµ°ùdG
09 IóŸ áæ«é©dG πÑéH »eƒb í∏ŸG
á«fÉK 03 IóŸ áæ«é©dG »côJG .á«fÉK
.IõgÉL íÑ°üJ h ƒ∏©J »µd
Ò°†ëàd É¡JGP äɪ«∏©àdG »©ÑJG
IóŸ áæ«é©dG »∏ÑLG .õÑÿG áæ«éY
.IóMGh á≤«bO
á«Hô©dG
Page 75

75
IQÉjR ∂æe ƒLôf á∏µ°ûe ájCG »à¡LGh hCG áeóN ájCG ¤G »àéàMG GPG
¿GƒæY â– âfÎf’G ≈∏Y ¢ùÑ«∏«a áëØ°Ucomphilips.www.
∫ƒ°ü◊G ∂æµÁ ) ∑ó∏H ‘ øFÉHõdG áeóÿ ¢ùÑ«∏«a õcôà ∫É°üJ’G hCG
õcôe ∑Éæg øµj ⁄ GPG .(»ŸÉ©dG ¿Éª°†dG ≥ë∏e øe ∞JÉ¡dG ºbQ ≈∏Y
дЙйажe π«cƒH »∏°ьJEG ,¬«a Ъж£≤J …тdG у∏СdG ‘ шFЙHхdG бeуN
ájÉæ©dGh á«dõæŸG äGhOCÓd ¢ùÑ«∏«a áeóN õcôà »∏°üJEG hCG ¢ùÑ«∏«a
.á«°üî°ûdG
áeóÿGh äÉeƒ∏©ŸG
≥ë∏ŸG
P
{
ghjk
¬
ƒ
©
≥«Ñ£àdG äÉbhCG
á«fÉK 60 - 10
á«fÉK 180 - 60
á«fÉK 60 - 10
á«fÉK 60 - 10
᫪µdG ≈∏Y óªà©J
᫪µdG ≈∏Y óªà©J
≥«Ñ£àdG
êõe ,¢Sôg ,™«£≤J
øéY
™«£≤J ,íFGô°T ¤G ™«£≤J
ô°ûH ,∫ƒ£dÉH
íFGô°T ¤G ™«£≤J
äÉ«°†ª◊G ô°üY
¬cGƒØdG Ò°üY ¢UÓîà°SG
äGhGô°†ÿGh
äÉ≤«Ñ£àdGh äÉ≤ë∏ŸG
πcÉ°ûŸG πM π«dO
á∏µ°ûŸG
πª©j ’ RÉ¡÷G
πª©dG øY ICÉéa RÉ¡÷G ∞bƒJ
.QhóJ ’ §∏ÿG hCG øé©dG IGOCG
AÉYh h •ÓÿG AÉYh Ö«côJ ”
•ÓÿG §≤a øµd h ΩÉ©£dG Ωôa
.πª©j
π◊G
¿CG ¤G áYÉ°ùdG √ÉŒÉH AÉ£¨dG hCG/AÉYƒdG …ôjOCG
≈∏Y •É≤ædG ¿CG …ócCÉJ .(∂«∏c) ÉØ«ØN ÉJƒ°U »©ª°ùJ
.¢†©ÑdG É¡°†©H ¬LGƒJ AÉ£¨dG ≈∏Y h AÉYƒdG
ób IQGô◊ÉH »µ«JÉeƒJh’G ∞bƒàdG Ωɶf ¿ƒµj ób
IQGôM IOÉjR ÖÑ°ùH RÉ¡÷G ¤G AÉHô¡µdG π«°UƒJ π£HCG
á«©°Vh) RÉ¡÷G ∞«bƒàH »eƒb .(1 .RÉ¡÷G0(2 .(
RÉ¡÷G »YO .(3 .AÉHô¡µdG øY RÉ¡÷G π°üØH »eƒb
¢ùHÉb ‘ ¢ùÑ≤ŸG »©°V (4 .á≤«bO ¿ƒà°S IóŸ OÈj
.GOó› RÉ¡÷G 𫨰ûàH »eƒb (5 .§FÉ◊G
ÜQÉ≤Y √ÉŒÉH AÉ£¨dG h AÉYƒdG äQOCG ób ∂fCG …ócCÉJ
.''∂«∏c'' 䃰U »©ª°ùJ ¿CG ¤G áYÉ°ùdG
ΩÉ©£dG Ωôa AÉYh h •ÓÿG âÑcQ ób âæc GPG
GPG .𪩫°S §≤a •ÓÿG ¿Éa ,áë«ë°üdG á≤jô£dÉH
»∏°üaG ,ΩÉ©£dG Ωôa AÉYh ΩGóîà°SG øjójôJ âæc
.»Ñdƒ∏dG AÉ£¨dG ᣰSGƒH áëàØdG »≤∏ZCG h •ÓÿG
á«Hô©dG
Page 76

76
B
á©£b ∞«¶æàH AóÑdG πÑb ÉehO AÉHô¡µdG øY RÉ¡÷G π°üØH »eƒb
.∑ôÙG
’ .á∏∏Ñe ¢Tɪb á©£b ᣰSGƒH ∑ôÙG á©£b ∞«¶æàH »eƒb
.É°†jCG ¬«Ø£°ûJ ’ h GóHCG AÉŸÉH ∑ôÙG á©£b …ôª¨J
™e øNÉ°ùdG AÉŸÉH ΩÉ©£dG â°ùe’ »àdG AGõLC’G ∞«¶æàH »eƒb
.ΩGóîà°S’G ó©H GQƒa ∞«¶æàdG πFÉ°S
-h á£ZÉ°†dG IGOC’G h AÉYƒdG AÉ£Z h AÉYƒdG ∞«¶æJ ¿Éµe’ÉH
.¿ƒë°üdG ádÉ°ùZ ‘ (§∏ÿG AÉYh ióY Ée) äÉ≤ë∏ŸG
É≤ah ¿ƒë°üdG ádÉ°ùZ πNGO ΩGóîà°SÓd AGõLC’G √òg ¢üëa ” ó≤d
`d12875DIN EN
!GóHCG ¿ƒë°üdG ádÉ°ùZ ‘ §∏ÿG AÉYh ™°Vh øµÁ ’
äGhOCG h •ÓÿG IôØ°T IGOCG h á«fó©ŸG IôØ°ûdG ∞«¶æàH »eƒb
.GóL IOÉM á°UÉ≤dG º¡aGôWCG ¿CG å«M ójó°T QòëH ∫ÉNO’G
∫ÉNO’G äGhOCG h äGôØ°û∏d á°UÉ≤dG ±GôWC’G ¢ùeÓJ ’ ¿CG …ócCÉJ
.º¡≤≤°ûJ ÖÑ°ùj ób ∂dP ¿CG å«M áÑ∏°U äGhOCG
ôKDƒj ’ Gòg .äÉ≤ë∏ŸG í£°SCG ¿ƒd Ò«¨àH ᪩WC’G ¢†©H ÖÑ°ùJ ób
øe IÎa ó©H ¿ƒ∏dG ‘ Ò«¨àdG Gòg IOÉY ∫hõj .äÉ≤ë∏ŸG á«dÉ©ØH
.øeõdG
IôµÑdG ∫ƒM »FÉHô¡µdG ∂∏°ùdG øe (¢†FÉØdG) ∞∏H »eƒb
.RÉ¡÷G ô¡X ‘ óLGƒàJ »àdG
,
B
•Óî∏d ™jô°ùdG ∞«¶æàdG á«∏ªY
øe ¢†©H h (Ϋd ∞°üf øY ɡ૪c ójõJ ’) IôJÉa AÉe …ôjOCG
.•ÓÿG AÉYh ¤G ∞«¶æàdG πFÉ°S
.AÉ£¨dG »©°V
¤G Ió≤©dG ôjhóJ ∫ÓN øe ¿GƒK á©°†Ñd πª©j RÉ¡÷G »YO
Ò«¨J óæY πª©dG øY RÉ¡÷G ∞bƒà«°S .¢†ÑædG á«©°Vh
á«©°Vh0.(RÉ¡÷G ∞«bƒJ …CG)
.áØ«¶f AÉà ¬«Ø£°TG h •ÓÿG AÉYh »YõfG
èeóŸG øjõîàdG
‘ )∫ÉNO’G äGhOCG áµ°SÉe h IôØ°ûdG) äGQGƒ°ù°ùc’G »©°V
Ée ôNBG .AÉYƒdG πNGO º¡æjõîàH »eƒb h äGhOC’G áµ°SÉe
.∫ÉNO’G äGhOCG áµ°SÉe »g ¬©°Vh Öéj
1
2
3
4
øjõîàdG
B
B
,
á«Hô©dG
Page 77

77
B
¿CG …ócCÉJ h IQÉ°ü©dG ÖdÉb ¤G Ö∏dG πîæe »∏NOCG
.IQÉ°ü©dG ÖdÉb ¿Éæ°SCG ‘ Gó«L ÖcôJ áKÓãdG ¢ù«HÉHódG
.AÉYƒdG ≈∏Y Ò°ü©dG ¢UÓîà°SG IGOCG AÉ£Z »©°V
èFÉàf ≈∏Y ∫ƒ°üë∏d (2 á«©°Vh) iƒ°ü≤dG áYô°ùdG …QÉàNG
.≈∏ãe
πîæŸG ¿Éc GPG Ò°ü©∏d Ωóîà°ùJ »àdG äÉ≤ë∏ŸG »eóîà°ùJ ’
.∞dÉJ ÖdÉ≤dG hCG ÊGQhódG
Ò°ü©dG ¢UÓîà°SG IGOCG ¤G QÉ°†ÿG hCG á¡cÉØdG áÑM »∏NOCG
.᪩WC’G ójhõJ ܃ÑfCG ∫ÓN øe
GPG á£ZÉ°†dG IGOC’G ᣰSGƒH Ió°ûH äÉjƒàÙG »£¨°VG
¤G ᪩WC’G ójhõJ ܃ÑfCG ‘ §¨°†dG IGOCG »YO .ôeC’G êÉàMG
.Ò°ü©dG ôjÉ£J Öæéàd ∂dP h á浇 IÎa ÌcCG
∫ƒ°üë∏d á«aÉ°VG á«fÉK ¿hô°ûY IóŸ πª©j RÉ¡÷G »YO
.QÉ°†ÿG hCG á¡cÉØdG ‘ »≤ÑàŸG Ò°ü©dG ≈∏Y
IGOCG ™e AÉYƒdG »YõfG ,RÉ¡÷G ≈∏Y Ò°ü©dG §bÉ°ùJ Öæéàd
.∫ɪ©à°S’G ó©H Ò°ü©dG ¢UÓîà°SG
6
7
5
4
B
B
B
B
B
8
9
10
íFÉ°üf
:Ò°ü©dG ¢UÓîà°SG IGOCG ΩGóîà°SG πÑb
..ïdG ,¢†«HC’G πéØdG ,Qõ÷G ™«£≤àH »eƒb -
..ïdG ,Ωɪ°ûdG ,¢SÉfÉfC’G ,á«°†ª◊G á¡cÉØdG Ò°û≤àH »eƒb -
..ïdG ,¥GQódG h ¢ûª°ûŸG ,ñƒÿG ,RôµdG -
¢UÓîà°SG IGOCG ‘ á¡cÉØdG ™°Vh πÑb RÉ¡÷G 𫨰ûàH »eƒb
.Ò°ü©dG
πîæŸG øe Ö∏dG ádGR’ ôNBG ¤G ¿BG øe RÉ¡÷G ∞«bƒàH »eƒb
.Ò°ü©dG ÖdÉb h
.óMGh âbh ‘ ΩÉ©£dG øe IÒÑc ᫪c ô°ü©H »eƒ≤J ’
»eƒb h …ƒb πµ°ûH êôdÉH CGóH GPG RÉ¡÷G ∞«bƒàH »eƒb
.RÉ¡÷G 𫨰ûJ IOÉYG πÑb Î∏«ØdG h Ö∏dG πîæe ∞«¶æàH
∞«¶æàH AóÑdG πÑb ÉehO AÉHô¡µdG øY RÉ¡÷G π°üØH »eƒb
.∑ôÙG á©£b
’ .á∏∏Ñe ¢Tɪb á©£b ᣰSGƒH ∑ôÙG á©£b ∞«¶æàH »eƒb
.É°†jCG ¬«Ø£°ûJ ’ h GóHCG AÉŸÉH ∑ôÙG á©£b …ôª¨J
øNÉ°ùdG AÉŸÉH ΩÉ©£dG â°ùe’ »àdG AGõLC’G ∞«¶æàH »eƒb
.ΩGóîà°S’G ó©H GQƒa ∞«¶æàdG πFÉ°S ™e
,
,
,
,
,
∞«¶æàdG
1
2
á«Hô©dG
1
2
2
1
Page 78

78
B
B
.(1 á«©°Vh) áYô°S πbCG …QÉàNG
á«©°Vh ∑QÉ«àNG óæY ∞bƒàJ h ∑GòfBG á«∏ª©dG CGóÑJ0…CG) ,
.(RÉ¡÷G ∞«bƒJ
.QGhódG RƒµdG ≈∏Y ΩɵMÉH á¡cÉØdG ∞°üf »£¨°VG
íFÉ°üf
.πîæŸG øY Ö∏dG ´õæd ôNB’ ¿BG øe §¨°†dG øY »ØbƒJ
™e AÉYƒdG »YõfG h RÉ¡÷G 𫨰ûJ »ØbhCG ,∂dòH ∂eÉ«b óæY
.RƒµdG h πîæŸG
äÉ«°†ª◊G ô°üY äÉ≤ë∏e ™e AÉYƒdG »YõfG ,ΩGóîà°S’G ó©H
.RÉ¡÷G ¤G Ò°ü©dG Üô°ùJ Öæéàd
á≤ØîªdG
iƒ∏ëdG äɪjôch ¢†«ÑdG Üô°†d áÑ°SÉæe á≤ØîªdG ¿EG
.Ió°û≤dGh …QƒØdG ≠æjOƒÑdGh
.∑ôÙG á©£b ≈∏Y AÉYƒdG »©°V
.AÉYƒdG ‘ äGhOC’G áµ°SÉe »©°V
1
2
5
4
B
,
,
B
B
. ôjhóàdG Qƒëe ≈∏Y á≤ØîªdG
. IôédG ≈∏Y AÉ£¨dG âÑKh IôédG »a äÉfƒµªdG πNOCG
.á«dÉãe èFÉàæd 1 áYô°ùdG á«©°Vh …QÉàNG
Ò°ü©dG ¢UÓîà°SG IGOCG
ôFÉ°üY Ò°†ëàd Ò°ü©dG ¢UÓîà°SG IGOCG ΩGóîà°SG øµÁ
h Ö∏dG π°üØH IGOC’G Ωƒ≤à°S .áLRÉ£dG QÉ°†ÿG h ¬cGƒØdG
.ó∏÷G h QhòÑdG
.∑ôÙG á©£b ≈∏Y AÉYƒdG »©°V
.AÉYƒdG ‘ äGhOC’G áµ°SÉe »©°V
.äGhOC’G áµ°SÉe ≈∏Y IQÉ°ü©dG ÖdÉb »ÑcQ
1
2
3
4
5
B
B
3
B
á«Hô©dG
2
1
Page 79

,
79
B
B
íFÉ°üf
áëàØdG ∫ÓN øe §∏ÿG AÉYh ‘ á∏FÉ°ùdG äÉfƒµŸG »©°V
.AÉ£¨dG »Z
.º©fCG §∏ÿG áé«àf âfÉc ɪ∏c ,§∏ÿG Ióe âdÉW ɪ∏c
πÑb IÒ¨°U ™£b ¤G áÑ∏°üdG äÉfƒµŸG ™«£≤àH »eƒb
»eƒb ,IÒÑc ᫪c Ò°†ëàd âéàMG GPG .AÉYƒdG ‘ É¡©°Vh
᫪µdG ™°Vh øe ’óH É«éjQóJ IÒ¨°U äÉ«ªc §∏îH
.óMGh ¿BG ‘ É¡©«ªL
πÑb AÉŸÉH ,Éjƒ°üdG ܃ÑM πãe ,áÑ∏°üdG äÉfƒµŸG ™≤f Öéj
.º¡£∏N
h AÉYƒdG ‘ º¡©°Vh ∫ÓN øe è∏ãdG äÉ«©µe Ò°ùµàH »eƒb
.¢†ÑædG á«dÉ©a ∫ɪ©à°SG h AÉ£¨dG ∫ÉØbG ºK øe
:AÉYƒdG §FÉM ≈∏Y äÉfƒµŸG â≤°üàdG GPG
.AÉHô¡µdG øY ¬∏°üa h RÉ¡÷G ∞«bƒàH »eƒb
.AÉ£¨dG »ëàaG
.πª©j RÉ¡÷G ¿Éc GPG GóHCG AÉ£¨dG »ëàØJ ’
§FÉM ≈∏Y á≤°üà∏ŸG äÉfƒµŸG ádGR’ Ébƒ∏e »eóîà°SG
.AÉYƒdG
.(ÉÑjô≤J º°S 2) äGôØ°ûdG øe Ió«©H áaÉ°ùe ≈∏Y ¥ƒ∏ŸG »YO
IóŸ πª©j RÉ¡÷G »YO ,èFÉàædG øY á«°VGQ ʃµJ ⁄ GPG
¤G äGôe IóY Ió≤©dG ôjhóJ ∫ÓN øe äGôe IóY IÒ°üb
1
2
3
,
,
,
,
¢†ÑædG á«©°Vh (pulse)∫ƒ°ü◊G ádhÉfi É°†jCG ∂fɵeÉH
¥ƒ∏e ᣰSGƒH äÉfƒµŸG ∂jô– ∫ÓN øe π°†aCG èFÉàf ≈∏Y
øe É°†©H ádGRG hCG ,(πª©j •ÓÿG ¿ƒµj ÉeóæY ¢ù«d)
.ô¨°UCG ᫪c §∏ÿ äÉfƒµŸG
âØ°VCG GPG π¡°SCG äÉfƒµŸG §∏N ¿ƒµj ,ä’É◊G ¢†©H ‘
¬cGƒØdG §∏N óæY hCG ¿ƒª«∏dG Ò°üY πãe ,πFÉ°ùdG øe É°†©H
.á∏µ°ûŸG
äÉ«°†ª◊G IQÉ°üY
´GƒfCG ∞∏àı ¢†eGƒ◊G IQÉ°üY ΩGóîà°SG ¿Éµe’ÉH
.äÉ«°†ª◊G
≈∏Y πîæŸG »©°V h ∑ôÙG á©£b ≈∏Y AÉYƒdG »©°V
.AÉYƒdG
»eÉ◊G πØ≤dG Öcôj ¿CG ¤G º¡°ùdG √ÉŒÉH πîæŸG …ôjOCG
.∑ôÙG á©£≤H Gó«L
√ÉŒÉH áØîH ¬£¨°V ∫ÓN øe πîæŸG ≈∏Y RƒµdG »©°V
.πØ°SC’G
1
2
3
,
,
B
B
á«Hô©dG
CLICK
Page 80

80
B
B
øé©dG áØ«≤Y
§∏ÿ hCG õÑÿG áæ«éY πÑ÷ øé©dG áØ«≤Y ∫ɪ©à°SG øµÁ
.äɵ©µdG èjõe hCG áØ∏àıG øFÉé©dG
‘ øé©dG á©£b »ÑcQ h ∑ôÙG á©£b ≈∏Y AÉYƒdG »©°V
.∑ôÙG
»eƒb .√ÓYCG ≈∏Y AÉ£¨dG h AÉYƒdG ‘ äÉfƒµŸG »©°V
Öæéàd ᪩WC’G ójhõJ ܃ÑfCG ‘ á£ZÉ°†dG IGOC’G ™°VƒH
.øé©dG á«∏ªY ∫ÓN äÉfƒµŸG ôjÉ£J
ºµëàdG IGOCG óæY (2 á«©°Vh) iƒ°ü≤dG áYô°ùdG …QÉàN
.áYô°ùdÉH
•ÓÿG
:á«dÉàdG ÜÉÑ°SCÓd •ÓÿG ôjƒ£J ” ó≤d
h дЙ°ь∏°ьdG h б«С«∏◊G дЙйажŸG :πгe ,πFGƒ°щdG §∏N -
∞∏àfl h áLhõªŸG äÉHhô°ûŸG h AÉ°ù◊G h ¬cGƒØdG ôFÉ°üY
.ábƒØıG äÉHhô°ûŸG h …É°ûdG ´GƒfCG
.õ«fƒjÉŸG h ôFÉ£ØdG áæ«éY πãe ,áªYÉædG äÉfƒµŸG §∏N -
.∫ÉØWC’G ΩÉ©W Ò°†– πãe ,áNƒÑ£ŸG äÉfƒµŸG ¢Sôg -
∑ôÙG á©£≤H ∫ƒ°UƒŸG •ÓÿG ™e RÉ¡÷G ΩGóîà°SG øµÁ
¿Éa ,•ÓÿG ¿hO øe RÉ¡÷G âeóîà°SG GPG .¬fhO øe hCG
≈∏Y Gó«L »Ñdƒ∏dG AÉ£¨dG Ö«côJ ” Ée GPG πª©j ød RÉ¡÷G
.∑ôÙG á©£b
1
2
3
B
,
¬æjóéà°S …òdG »Ñdƒ∏dG AÉ£¨dG »YõfG ,§∏ÿG AÉYh π«°Uƒàd
.áYô°ùdÉH ºµëàdG IGOCG ¥ƒa
√ôjhóJ ∫ÓN øe ∑ôÙG á©£b ¥h §∏ÿG AÉYh »ÑcQ
¬LGƒJ ¿CG Öéj .ΩɵMÉH ¬Ñ«côJ ºàj ¿CG ¤G º¡°ùdG √ÉŒÉH
!iô°ù«dG á¡÷G áµ°SÉŸG
.§∏ÿG AÉYh áµ°SÉe ≈∏Y GÒãc »£¨°†J ’
.§∏ÿG AÉYh ‘ äÉfƒµŸG »©°V
.AÉ£¨dG »∏ØbCG
AóÑdG πÑb •ÓÿG AÉ£Z ≈∏Y »bGƒdG AÉ£¨dG ÉehO »©°V
.§∏ÿÉH
RÉ¡÷G π°UGƒ«°S .(2 á«©°Vh) iƒ°ü≤dG áYô°ùdG …QÉàNG
Ò«¨J ∫ÓN øe ¬Ø«bƒJ ºàj ¿CG ¤G áYô°ùdG √òg ≈∏Y πª©dÉH
á«©°Vh ¤G áYô°ùdG0.(RÉ¡÷G ∞«bƒJ …CG) ,
.§∏ÿG á«∏ª©d áÑ°SÉæŸG äÉbhCÓd ∫hó÷G »©LGQ
1
2
6
5
3
4
B
B
B
B
á«Hô©dG
1
2
2
1
Page 81

81
IGOCG §≤°ùJ »µd ∂«ª¡HG ᣰSGƒH ∫ÉNO’G IGOCG ±GôWCG »£¨°VG
.áµ°SÉŸG øe ∫ÉNO’G
ÉWÉ£ÑdG Úµ°S
á∏«£à°ùe ™£b ¤G äÉfƒµŸG ™£≤H ÉWÉ£ÑdG Úµ°S ∂d íª°ùJ
.á«∏≤ŸG á«°ùfôØdG ÉWÉ£ÑdG ™HÉ°UCG :πãe
.GóL IOÉM IôØ°û∏d á°UÉ≤dG ±GôWC’G ¿G :ôjò–
.äGhOC’G áµ°SÉe ≈∏Y ÉWÉ£ÑdG Úµ°S »©°V
.᪩WC’G ójhõJ ܃ÑfCG ‘ äÉfƒµŸG »©°V h AÉ£¨dG »∏ØbCG
.á«dÉãe èFÉàæd 1 áYô°ùdG á«©°Vh …QÉàNG
.á£ZÉ°†dG IGOC’G ᣰSGƒH äÉfƒµŸG »£¨°VG ,ôeC’G êÉàMG GPG
1
2
3
4
B
B
B
B
B
πjó©à∏d á∏HÉ≤dG ™«£≤àdG áfGƒ£°SG
äÉfƒµŸG ™£≤H πjó©à∏d á∏HÉ≤dG ™«£≤àdG áfGƒ£°SG ∂d íª°ùJ
.¬æ«ÑZôJ (¢Vô©dÉH) ºéM ¤G
.GóL IOÉM IôØ°û∏d á°UÉ≤dG ±GôWC’G ¿G :ôjò–
.á∏eÉ◊G IGOC’G ≈∏YCG óæY IôØ°ûdG »©°V
¿CG ¤G É¡jôjOCG I áfGƒ£°SÓd πØ°SC’G ±ô£dG øe Ió≤©dG »ÑqcQ
.ΩɵMÉH áÑqcôe áfGƒ£°S’G ¿ƒµJ Gòµg .•ƒ£ÿG ≥aGƒàJ
™«£≤àd ¬æ«ÑZôJ …òdG ¢Vô©dG QÉ«àN’ πjó©àdG Ió≤Y …ôjOCG
.äÉfƒµŸG
áµ°SÉe ≈∏Y πjó©à∏d á∏HÉ≤dG ™«£≤àdG áfGƒ£°SG »©°V
.äGhOC’G
.᪩WC’G ójhõJ ܃ÑfCG ‘ äÉfƒµŸG »©°V h AÉ£¨dG »∏ØbCG
.á«dÉãe èFÉàæd 1 áYô°ùdG á«©°Vh …QÉàNG
.á£ZÉ°†dG IGOC’G ᣰSGƒH äÉfƒµŸG »£¨°VG ,ôeC’G êÉàMG GPG
1
2
6
5
3
4
7
B
B
B
B
á«Hô©dG
1
2
2
Page 82

82
íFÉ°üf
¢†ÑædG á«dÉ©a »eóîà°SG ,π°üÑdG ΩôØH Úeƒ≤J âæc GPG
.GóL Ò¨°U ºéM ¤G π°üÑdG Ωôa Öæéàd äGôe á©°†H
áæÑL ÚeôØJ âæc GPG á∏jƒW IóŸ ΩôØj RÉ¡÷G »YóJ ’
h ¿ÉHhòdÉH CGóÑJ h GóL áæNÉ°S áæÑ÷G íÑ°üà°S .(á«°SÉb)
.áæ«é©dÉc íÑ°üJ
ÍdG ܃Ñëc GóL áÑ∏°U äÉfƒµe ΩôØd IôØ°ûdG »eóîà°ùJ ’
ób ∂dP ¿CG å«M ,è∏ãdG äÉÑ©µe hCG Ö«£dG IRƒL hCG ºcôµdG hCG
.IôØ°ûdG ≥≤°ûJ ÖÑ°ùj
:πNGódG øe AÉYƒdÉH hCG IôØ°ûdÉH ΩÉ©£dG ≥°üàdG GPG
.RÉ¡÷G ±É≤jÉH »eƒb
.RÉ¡÷G øY AÉ£¨dG »YõfG
ᣰSGƒH AÉYƒdG §FÉM øe hCG IôØ°ûdG øY äÉfƒµŸG »YõfG
.áaô¨ŸG
∫ÉNO’G äGhOCG
äGhOCG ᣰSGƒH è∏ãdG äÉÑ©µªc áÑ∏°U äÉfƒµe ΩôØH »eƒ≤J ’
.∫ÉNO’G
πÑb ∫ÉNO’G IGOCG áµ°SÉe ‘ IQÉàıG ∫ÉNO’G IGOCG »©°V
.äGhGOC’G áµ°SÉe ‘ É¡©°Vh
!É¡°ùŸ »ÑæŒ ∂dòd ,GóL IOÉM á°UÉ≤dG ±GôWC’G ¿G
1
1
2
3
B
B
‘ ∞≤J »àdG äGhOC’G áµ°SÉe ‘ ∫ÉNO’G IGOCG áµ°SÉe »©°V
.AÉYƒdG
.AÉYƒdG ≈∏Y AÉ£¨dG »©°V
™«£≤àH »eƒb .᪩WC’G ójhõJ ܃ÑfCG ‘ äÉfƒµŸG »©°V
ójhõJ ܃ÑfCG ‘ ∫ƒNódÉH º¡d ìɪ°ù∏d É≤Ñ°ùe IÒѵdG ™£≤dG
.᪩WC’G
π°†aC’ óMƒe πµ°ûH ᪩WC’G ójhõJ ܃ÑfCG áÄÑ©àH »eƒb
.èFÉàædG
∂dòH »eƒb ,ΩÉ©£dG øe IÒÑc äÉ«ªc ΩôØd áLÉ◊G óæY
≠jôØàH »eƒb .Iôe πc IÒ¨°U äÉ«ªc Ωôa ∫ÓN øe É«éjQóJ
.IójóL ᫪c πc ÚH AÉYƒdG
óæY (2 á«©°Vh) iƒ°ü≤dG áYô°ùdG …QÉàNG ,™«£≤àdG h ô°ûÑ∏d
.áYô°ùdÉH ºµëàdG IGOCG
¤G áYô°ùdG á«©°Vh Ò«¨J ºàj ¿CG ¤G ΩôØdÉH RÉ¡÷G π°UGƒ«°S
á«©°Vh0.(RÉ¡÷G ∞«bƒJ …CG) ,
∫ÓN áYô°ùdG ∞«Øîàd 1 á«©°Vh ¤G áYô°ùdG Ò«¨àH »eƒb
.ΩôØdG
πNGO äÉfƒµŸG ≈∏Y áØîH á£ZÉ°†dG IGOC’G §¨°†H »eƒb
.᪩WC’G ójhõJ ܃ÑfCG
∂fɵeÉH ,á≤«bQ á¡cÉa hCG äGhGô°†N ô°ûÑH Úeƒ≤J âæc GPG -
¢Sôg Öæéàd ∂dP h 1 á«©°Vh ¤G áYô°ùdG ∞«ØîJ
.ÉeÉ“ á¡cÉØdG h äGhGô°†ÿG
áµ°SÉe »µ°ùeG ,∫ÉNO’G IGOCG áµ°SÉe øe ∫ÉNO’G IGOCG ádGR’
.∂d É¡LGƒe Égô¡X ¿ƒµj ¿CG ≈∏Y ∫ÉNO’G IGOCG
2
3
4
5
6
7
8
B
B
,
,
,
,
B
B
á«Hô©dG
1
2
CLICK
Page 83

83
B
ádB’G ∫ɪ©à°SEG
ΩÉ©£dG Ωôa AÉYh
áµ°SÉŸG ôjhóJ ∫ÓN øe ΩÉ©£dG Ωôa ádBG ≈∏Y AÉYƒdG »©°V
.''∂«∏c'' ÉØ«ØN ÉJƒ°U »©ª°ùJ ¿CG ¤G º¡°ùdG √ÉŒÉH
¤G º¡°ùdG √ÉŒÉH AÉ£¨dG …ôjOCG .AÉYƒdG ≈∏Y AÉ£¨dG »©°V
¢†©H ¤G ∂dP êÉàëj) ''∂«∏c'' ÉØ«ØN ÉJƒ°U »©ª°ùJ ¿CG
.(IIJdG
RÉ¡÷G ¬H OhõŸG »eÉ◊G πØ≤dG
.äGQÉ°TÉH AÉ£¨dG h AÉYƒdG h ∑ôÙG á©£b ójhõJ ” ó≤d
∑ôÙG á©£b ≈∏Y IQÉ°T’G âfÉc GPG §≤a RÉ¡÷G Gòg 𪩫°S
.AÉYƒdG ≈∏Y »àdG IQÉ°TÓd á¡LGƒe
AÉYƒdG ≈∏Y …òdG §ÿG h AÉ£¨dG ≈∏Y …òdG §ÿG ¿CG …ócCÉJ
øe á«LQÉÿG á©£≤dG πªµà°S .É°†©H º¡°†©H Ú¡LGƒe
.ájhó«dG áµ°SÉŸG πµ°T AÉ£¨dG
á£ZÉ°†dG IGOC’G h ᪩WC’G ójhõJ ܃ÑfCG
hCG/h πFGƒ°ùdG áaÉ°V’ ΩÉ©£dG ójhõJ ܃ÑfCG »eóîà°SG
§¨°†d á£ZÉ°†dG IGOC’G »eóîà°SG .áÑ∏°üdG äÉfƒµŸG
.᪩WC’G èjhõJ ܃ÑfCG ∫ÓN øe áÑ∏°üdG äÉfƒµŸG
1
1
1
2
B
B
B
ójhõJ ܃ÑfCG ¥ÓZ’ á£ZÉ°†dG IGOC’G ΩGóîà°SG É°†jCG ∂fɵeÉH
ójhõJ ܃ÑfCG øe äÉfƒµŸG êhôN Öæéàd ∂dP h ᪩WC’G
.᪩WC’G
á«fó©ŸG IôØ°ûdG
h §∏ÿG h êõŸG h ΩôØ∏d á«fó©ŸG IôØ°ûdG ΩGóîà°SG øµÁ -
.¢Sô¡dG
.IôØ°ûdG øe »bGƒdG AÉ£¨dG »YõfG
!É¡°ùŸ »ÑæŒ .GóL IOÉM IôØ°ûdG ±GôWCG ¿G
≈∏Y IôØ°ûdG »©°V h AÉYƒdG ‘ äGhOC’G áµ°SÉe »©°V
.AÉYƒdG ‘ ∞≤J »àdG äGhOC’G áµ°SÉe
øe IÒѵdG §≤dG ¢ü≤H »eƒb .AÉYƒdG ‘ äÉfƒµŸG »©°V
3*3*3 ºéM äGP ™£b ¤G AÉYƒdG ‘ É¡©°Vh πÑb ΩÉ©£dG
.AÉYƒdG ≈∏Y AÉ£¨dG »©°V .º°S
.᪩WC’G ójhõJ ܃ÑfCG ‘ á£ZÉ°†dG IGOC’G »©°V
ºµëàdG IGOCG óæY (2 á«©°Vh) iƒ°ü≤dG áYô°ùdG …QÉàNG
.áYô°ùdÉH
¤G áYô°ùdG á«©°Vh …ó«©J ¿CG ¤G ΩôØdÉH RÉ¡÷G π°UGƒ«°S -
o.(RÉ¡÷G ±É≤jG …CG)
.ΩôØdG ∫ÓN áYô°ùdG ∞«Øîàd 1 á«©°Vh …QÉàNG
2
4
5
1
2
3
B
B
B
B
,
á«Hô©dG
CLICK
1
2
CLICK
1
2
CLICK
Page 84

84
kGóL ΩÉg
πÑb áæ«ÑŸG Qƒ°üdG »©LGQ h Gó«L äɪ«∏©àdG √òg …CGôbG
.RÉ¡÷G ΩGóîà°SG
.πÑ≤à°ùª∏d ™Lôªc äɪ«∏©àdG √òg ≈∏Y »¶aÉM
™e ≥aGƒàj RÉ¡÷G ≈∏Y ¬d ô°TDƒŸG »FÉHô¡µdG QÉ«àdG ¿CG …ócCÉJ
.AÉHô¡µdG ¤G RÉ¡÷G π°Uh πÑb »∏ÙG »FÉHô¡µdG QÉ«àdG
GPG hCG øjôNBG Ú©æ°üe øe RÉ¡é∏d ™£b hCG äÉ≤ë∏e »eóîà°ùJ ’
RÉ¡÷G ≈∏Y ¿Éª°†dG ¿CG å«M ¢ùÑ«∏«a ácô°T º¡H í°üæJ ⁄
.ÓWÉH íÑ°üj
…CG hCG ¢ùHÉ≤dG hCG »FÉHô¡µdG ∂∏°ùdG ¿Éc GPG RÉ¡÷G »eóîà°ùJ ’
.ÚØdÉJ iôNCG ™£b
¢ùÑ«∏«a øe ôNBÉH ¬dGóÑà°SG Öéj ,ÉØdÉJ »FÉHô¡µdG ∂∏°ùdG ¿Éc GPG
çOGƒM Öæéàd ∂dP h ¢ùÑ«∏«a øe óªà©e áeóî∏d õcôe øe hCG
.Iô£N
ΩGóîà°SG πÑb Gó«L ΩÉ©£dG ¢ùeÓà°S »àdG ™£≤dG ∞«¶æàH »eƒb
.¤hC’G Iôª∏d RÉ¡÷G
äÉbhCG »©ÑqàJ hCG Ö«àµdG ‘ QƒcòŸG øe ÌcCG äÉ«ªc »eóîà°ùJ ’
.áëFÓdG ‘ É°†jCG QƒcòŸG ¥ƒØJ Ò°†ëà∏d
’ …CG ,¬«∏Y ¬d ô°TDƒŸG øe AÉYƒdG ‘ ÌcCG äÉ«ªc »©°†J ’
.≈∏YC’G ô°TDƒŸG øY ójõj Éà ¬àÄÑ©àH »eƒ≤J
.RÉ¡÷G ΩGóîà°SG øe AÉ¡àf’G ó©H GQƒa AÉHô¡µdG »∏°üaG
GóHCG (¥ƒ∏ŸG πãe) iôNCG äGhOCG …CG hCG ∂©HÉ°UCG »eóîà°ùJ ’
∂æµÁ .πª©j RÉ¡÷G ¿ƒµj ɪæ«H ܃ÑfC’G ‘ äÉfƒµe §¨°†d
.¢Vô¨dG Gò¡d §≤a á£ZÉ°†dG IGOC’G ΩGóîà°SG
IGOCG …CG hCG ∂©HÉ°UCG ™°Vh πÑb ÉehO AÉHô¡µdG øY RÉ¡÷G »∏°üaG
.•ÓÿG AÉYh ‘ (¥ƒ∏ŸG πãe) iôNCG
.∫ÉØWC’G ∫hÉæàe øY Gó«©H RÉ¡÷G ≈∏Y »¶aÉM
.áÑbGôe ¿hO GóHCG πª©j RÉ¡÷G »YóJ ’
π£Ñj ,Gòµg .áë«ë°üdG á«©°VƒdG ‘ AÉYƒdG ≈∏Y AÉ£¨dG »YO
∂fɵeÉH íÑ°ü«a RÉ¡÷G ¬H OhõŸG »µ«JÉeƒJhC’G ájɪ◊G πØb
»Ñdƒ∏dG AÉ£¨dG h ∑ôÙG á©£b ójhõJ ” ó≤d .RÉ¡÷G 𫨰ûJ
á©£b ≈∏Y IQÉ°T’G âfÉc GPG §≤a RÉ¡÷G 𪩫°S .äGQÉ°TÉH
.»Ñdƒ∏dG AÉ£¨dG ≈∏Y »àdG ∂∏àd á¡LGƒe ∑ôÙG
.äÉ≤ë∏ŸG øe …CG ´õf πÑb RÉ¡÷G ∞«bƒàH »eƒb
¤G áYô°ùdG ∑ôfi ôjhóJ h ∫ÓN øe RÉ¡÷G ∞«bƒàH »eƒb
.0 áYô°ùdG á«©°Vh
øY AÉ£¨dG ´õf πÑb ácôëàŸG ™£≤dG ∞bƒàJ ¿CG ¤G …ô¶àfG
.RÉ¡÷G
AÉYƒdG ≈∏Y AÉ£¨dG øµj ⁄ GPG »Ñdƒ∏dG AÉ£¨dG ´õf §≤a ∂fɵeÉH
.πeɵdÉH AÉYƒdG ´õf ” GPG hCG
’ h ,GóHCG ôNBG πFÉ°S …CG hCG AÉŸÉH ∑ôÙG á©£b …ôª¨J ’
¢Tɪb á©£b §≤a »eóîà°SG .É°†jCG ájQÉ÷G AÉŸG â– ¬«Ø£°ûJ
.∑ôÙG á©£b ∞«¶æàd á∏∏Ñe
.∫ɪ©à°S’G πÑb IôØ°ûdG øe »bGƒdG AÉ£¨dG »YõfG
80 iƒ°ü≤dG IQGô◊G) º¡£∏N πÑb OÈJ áæNÉ°ùdG äÉfƒµŸG »YO
.(âjÉ¡fôa áLQO 175/ájƒÄe áLQO
∫ƒëàj …òdG ´ƒædG øe ÓFÉ°S hCG ÉæNÉ°S ÓFÉ°S Ú£∏îJ âæc GPG
AÉYƒdG ‘ GóMGh GΫd ¥ƒØJ ᫪c »©°†J ’CÉH ∂ë°üæf ,IƒZQ ¤G
.AÉYƒdG øe ¬£bÉ°ùJ Öæéàd ∂dP h
.Ö«àµdG ‘ IOhõŸG ∫hGó÷G á©LGôe AÉLôdG ,≥«Ñ£àdG äÉbhC’
¿ƒµj ɪæ«H AÉYƒdG äÉ«dÉ©a ΩGóîà°SG ¿ÉµeG ΩóY á¶MÓe AÉLôdG
.RÉ¡÷G ¤G ’ƒ°Uƒe •ÓÿG
,
,
,
,
,
,
,
,
,
,
,
,
,
,
,
,
,
,
,
,
,
,
,
,
á«Hô©dG
Page 85

85
äÉ≤ë∏ŸGh ™£≤dG
∑ôÙG á©£b
áYô°ùdÉH ºµëàdG
¢†ÑædG
AÉØW’G
áYô°S πbG
áYô°S ≈∏YCG
(AÉYƒdG äÉ«dÉ©a ΩGóîà°S’ ¬©°Vh Öéj …òdG) »Ñdƒ∏dG AÉ£¨dG
ΩÉ©£dG Ωôa AÉYh
äGhOC’G áµ°SÉe
•ÓÿG AÉYƒdG
•ÓÿG AÉYƒdG AÉ£Z
(ájÉbƒdG ìÉàØe ∞«bƒJ h 𫨰ûàH Ωƒ≤j) AÉ£¨dG §≤∏e
ΩÉ©£dG Ωôa AÉYh AÉ£Z
»bGƒdG AÉ£¨dG
᪩WC’G ójhõJ ܃ÑfCG
§¨°†dG IGOCG
äÉ«°†ª◊G IQÉ°üY πîæe
äÉ«°†ª◊G IQÉ°üY Rƒc
Ò°ü©dG ¢UÓîà°SG IGOCG ÖdÉb
¢SÉb πµ°ûH ∫ƒ£dÉH ™«£≤àdG áfGƒ£°SG
á∏ZÈ∏d ∫ÉNGódG IGOCG
∫ÉNO’G IGOCG áµ°SÉe
ÜÓëà°S’G áfGƒ£°SG
Ò°ü©dG ¢UÓîà°SG IGOC’ Ö∏dG πîæe
Ò°ü©dG ¢UÓîà°SG IGOCG AÉ£Z
Ò°ü©dG ¢UÓîà°SG IOCG á£ZÉ°V
(IQÉæ°üdG) øé©dG IGOCG
»bGƒdG AÉ£¨dG + á«fó©ŸG IôØ°ûdG
πjó©à∏d á∏HÉ≤dG íFGô°T ¤G ™«£≤àdG áfGƒ£°SG
ÉWÉ£ÑdG Úµ°S
ºé◊G ᣰSƒàe ∫ƒ£dÉH ™«≤£à∏d ∫ÉNO’G IGOCG
ºé◊G á©«aQ ∫ƒ£dÉH ™«≤£à∏d ∫ÉNO’G IGOCG
A
B
= P = 0 = 1 = 2 -
C
D
E
F
G
H
I
J
K
L
M
N
O
P
Q
R
S
T
U
V
W
X
Y
Z
a
b
áeó≤e
.É«µ«JÉeƒJhCG ∞bƒàj …QGôM Ωɶf ≈∏Y RÉ¡÷G Gòg …ƒàëj
AÉHô¡µdÉH RÉ¡÷G ójhõJ ∞bƒàj ,ΩɶædG Gòg π°†ØH
.RÉ¡÷G Úî°ùJ IOÉjR Öæéàd É«µ«JÉeƒJhCG
:ICÉéa πª©dG øY RÉ¡÷G ∞bƒJ GPG
.§FÉ◊G ¢ùÑ≤e øY ¢ùHÉ≤dG »∏°üaG
á«©°Vh ¤G ìÉàØŸG …ôjOCG0.RÉ¡÷G 𫨰ûJ ±É≤j’
.á≤«bO ¿ƒà°S IóŸ OÈj RÉ¡÷G »YO
.GOó› §FÉ◊G ¢ùÑ≤e ‘ ¢ùHÉ≤dG »©°V
.RÉ¡÷G 𫨰ûJ …ó«YCG
øe óªà©e áeóN õcôe …CG hCG ¢ùÑ«∏«a π«cƒH ∫É°üJ’G AÉLôdG
É«µ«JÉeƒJhCG ∞bƒàj …òdG IQGô◊G Ωɶf ∞bƒJ GPG ¢ùÑ«∏«a
.πª©dG øY GQGôe
GóHCG RÉ¡÷G Gòg π°Uh ΩóY Öéj ,Iô£N ∞bGƒe Öæéàd :ôjò–
.âbDƒe ìÉàØe ¤G
4
5
1
2
3
á«Hô©dG
Page 86

868788
Page 87

Page 88

Page 89

89
D / 2
{ / 2
P / 2
P / 2
g / 1
D / 2
˚ / 1
Page 90

90
{ / 2
{ / 2
˚ / 1
D / 2
P / 2
P / 2
P / 2
D / 2
˚ / 1
P / 2
P / 2
Page 91

91
P / 2
k / 2
D / 2
P / 2
D / 2
P / 2
k / 2
P / 2
P / 2
P / 2
g / 2
{ / 2
{ / 2
Page 92

929394
Page 93

Page 94

1
2
2
1
Page 95

95
2
1
Page 96

96
CLICK
Page 97

97
1
2
2
1
Page 98

98
1
2
2
Page 99

99
1
2
CLICK
Page 100

100
1
CLICK
CLICK
2
1
2
CLICK
 Loading...