

Page 1

Page 2

English Page 4
• Keep page 3 open when reading these
operating instructions.
Français Page 10
Pour le mode d'emploi: dépliez la page 3.
Deutsch Seite 17
• Schlagen Sie beim Lesen der
Gebrauchsanweisung Seite 3 auf.
Nederlands Pagina 24
• Sla bij het lezen van de gebruiksaanwijzing
pagina 3 op.
Ελληνικά Σελίδα 31
• Ανοίξτε την σελίδα 3 για τισ οδηγίεσ
χρήσεωσ.
2
Page 3
3
1
Note: Items V and R are not included with all versions.
N.B. Les pièces V et R ne sont pas livrées standard avec tous les modèles.
Hinweis: V und R sind nicht bei jeder Ausführung mitgeliefert.
N. B.: Accessoires Ven R worden niet bij elke uitvoering meegeleverd
Σηµείωση: τα αντικείµενα V, R δεν περιλαµβάνονται σε λα τα µοντέλα.
E F G H
L
M
N
C
D
K
J
I
U
T
S
N
B
A
O
P
Q
W
V
HR 6961
X
A
E
M
N
O
L
A
T
N
O
A
C
N
O
L
A
T
I
O
N
C
E
S
O
E
S
T
O
N
A
I
N
I
I
L
E
L
M
A
X
N
I
M
N
Y
L
O
N
R
Page 4

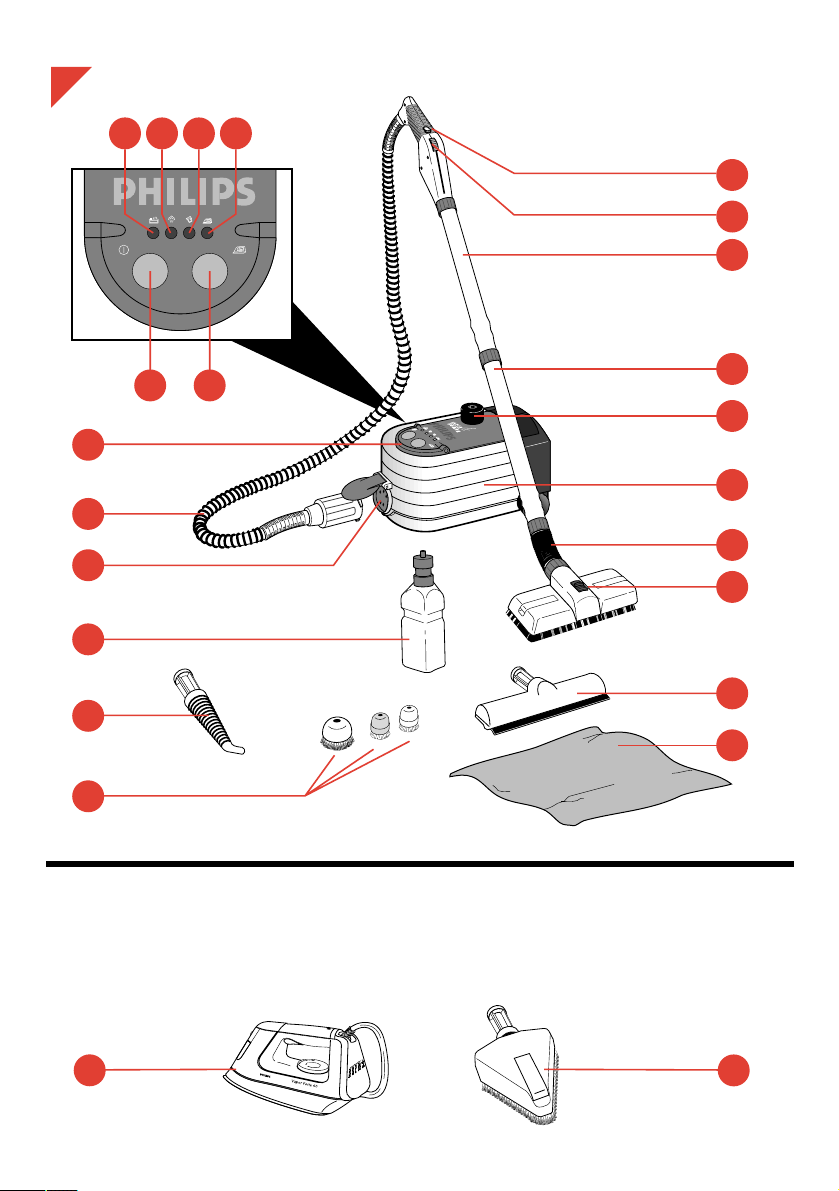
General description (fig. 1 , pag. 3))
A Steam tank
B Filling cap
C On/Off switch I
D Switch “Ironing” ≥
(press only if steam iron accessory V is
connected)
E Pilot light “Heating up” ≤ (orange)
F Pilot light “Steam ready” s (green)
G Warning light “Refill” * (red)
H Pilot light “Ironing” ≥
I Connector for steam hose
J Steam hose
K Handgrip
L Steam switch
1 = no steam
s = steam
M Steam control (steam output)
Minimum ↔ Normal ↔ Maximum
N Tubes (straight)
O Tube (bent)
P Large brush nozzle
Slide forwards: fixed
Slide backwards: swivel
Q Squeegee nozzle
R Triangular nozzle
S Round nozzles
T “Turbo” nozzle
U Filling flask
V Steam iron
W Steam cloth
Steam: efficient and hygienic
You fill the appliance with normal tap water.
The appliance boils the water. This takes approx.
8 minutes.
4
Important
• Read these instructions in conjunction with the illustrations before using the appliance. Also
refer to page 3 (fold-out).
• Always remove the mains plug from the appliance:
- when the appliance is empty;
- when you are going to refill the appliance;
- if the appliance should not work as expected;
- if you are going to swob steam hoses. (E.g. if you are going to iron with steam after steam
cleaning.)
• Never switch the appliance on if it is empty.
• Never aim the steam jet towards people and animals, nor to wall sockets, electrical
connectors or appliances.
Thermostatic taps can be damaged by hot steam. Do not use the appliance for cleaning this
type of taps.
• Prevent the steam jet from coming into contact with materials which are not resistant to
moisture and heat, such as wall paper (unless you wish to remove it!), silk, synthetic fibres,
leather, suede, velvet. When in doubt, try out on a section which does not catch the eye.
• If you unscrew the filling cap while the steam tank is still under pressure, steam will escape
from the special holes in the cap. This is a normal phenomenon.
• If the mains cord of this appliance is damaged, it must only be replaced by Philips or their
service representative, as special tools and/or parts are required.
• Always keep a watchful eye on the appliance when it is switched on. Never give it in the
hands of children. Remember that hot steam can be dangerous if used improperly.
• Fill the steam tank with clean tap water only. Do not add e.g. cleaning agent.
• The appliance is safe against splashing water. However, it is not waterproof. Never immerse
the appliance into water. Do not rinse it either. You can clean the appliance with a damp
cloth, if required with some washing-up agent. Remove the mains plug from the wall socket
before cleaning.
• To enable recycling the plastics of the product have been coded.
• The cardboard packaging has been made of recycled material and is entirely suitable for
recycling.
f
English
Page 5
The steam produced is transported out via the
steam hose and the selected nozzle.
You can use it e.g. to give carpet a hygienic
depth treatment or to remove fat or soot from
smooth surfaces.
The appliance is easy to use due to the controls
on the handgrip (“Remote Steam Control”).
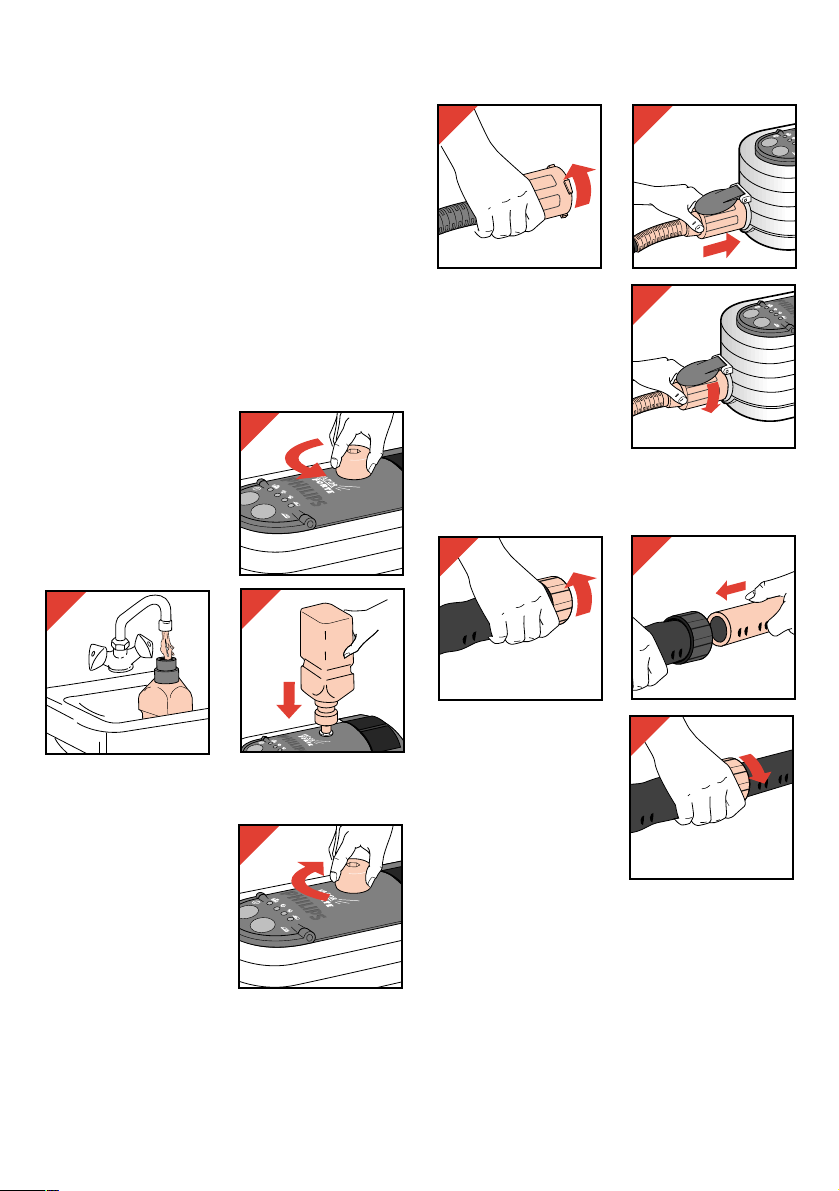
Making the appliance ready for use
Filling the steam tank
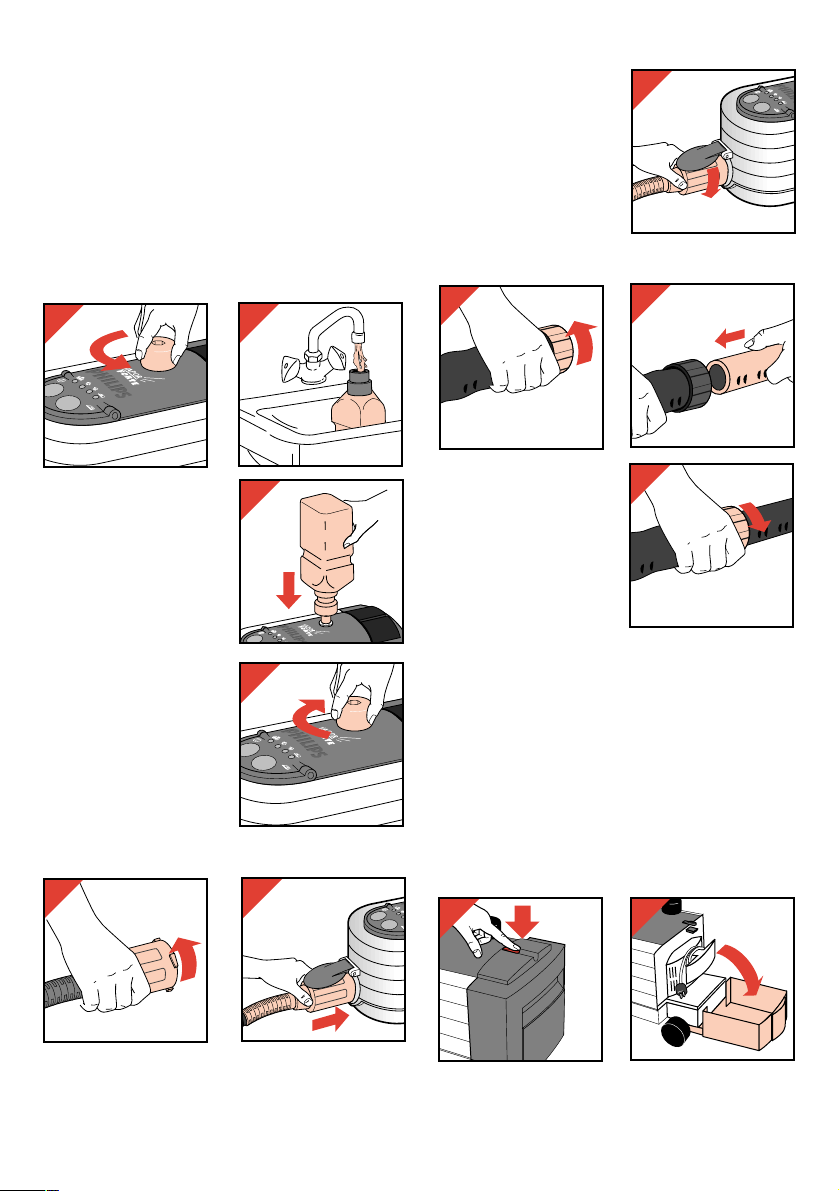
- Unscrew the filling cap
(fig. 2).
- Use the filling flask to
fill up the steam tank
(fig. 3 and 4).
(21⁄2
flaskfuls = full.)
- Screw the filling cap
firmly (fig. 5).
• Do not use any tools for
screwing and
unscrewing the filling
cap.
Connecting the steam
hose
- Rotate the ring in the direction of the arrow (fig. 6).
- Insert the end of the hose into the opening of the
appliance (fig. 7).
- Then rotate the ring into
the opposite direction
(fig. 8).
Check if the hose is well
connected.
Connecting nozzle and tubes
- Rotate the ring in the
direction of the arrow
(fig. 9).
- Insert the narrowed
section of one tube
into the wider section
of the other tube
(fig. 10).
- Then rotate the ring
into the opposite
direction (fig. 11).
• If you wish, you can connect nozzles directly to
the handgrip or mount only the bent tube
between handgrip and nozzle.
The rings secure the steam hose, nozzle and
tube(s), so that they cannot become
disconnected unintentionally.
Apart from this, the rings also ensure that the
steam supply stops if the hose or a nozzle is
disconnected prematurely.
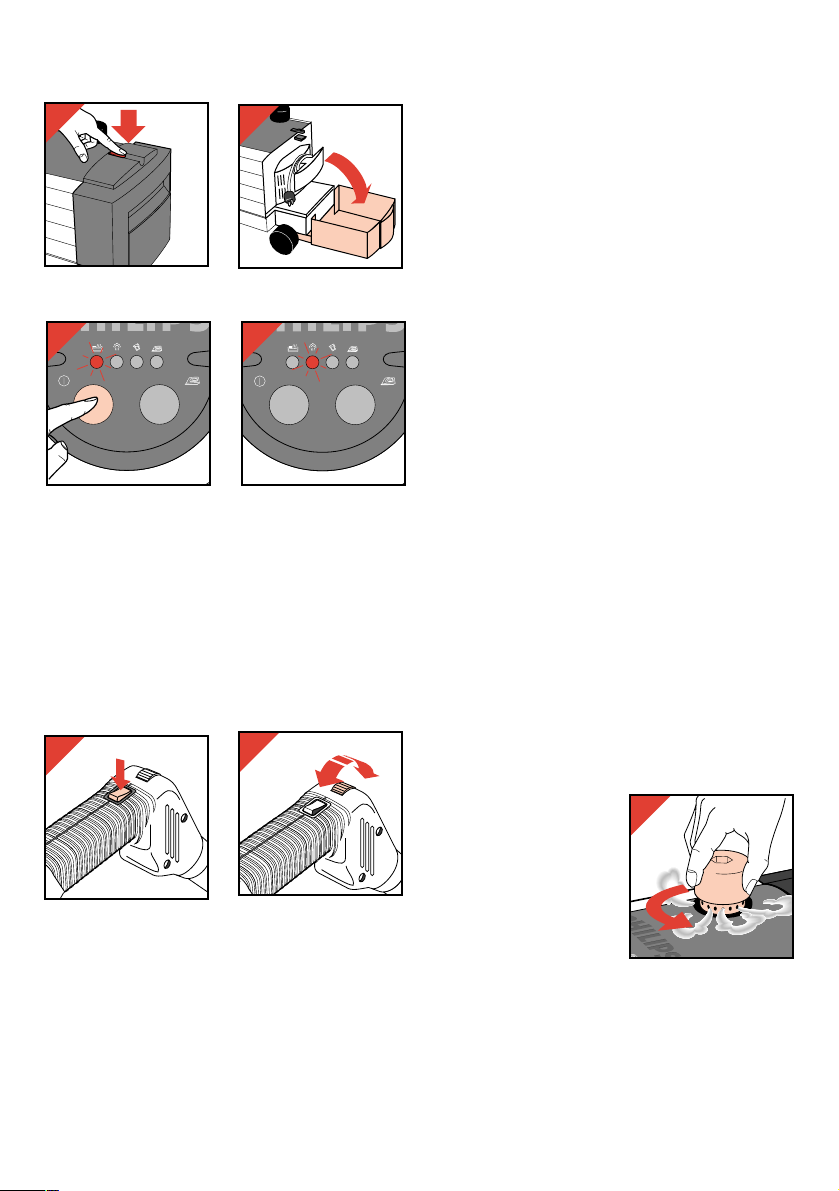
Switching on
- Open the storage compartment and pull out the
full length of mains cord (fig. 12A, 12B).
5
8
2
6
3
4
5
7
9
12A
10
11
12B
Page 6
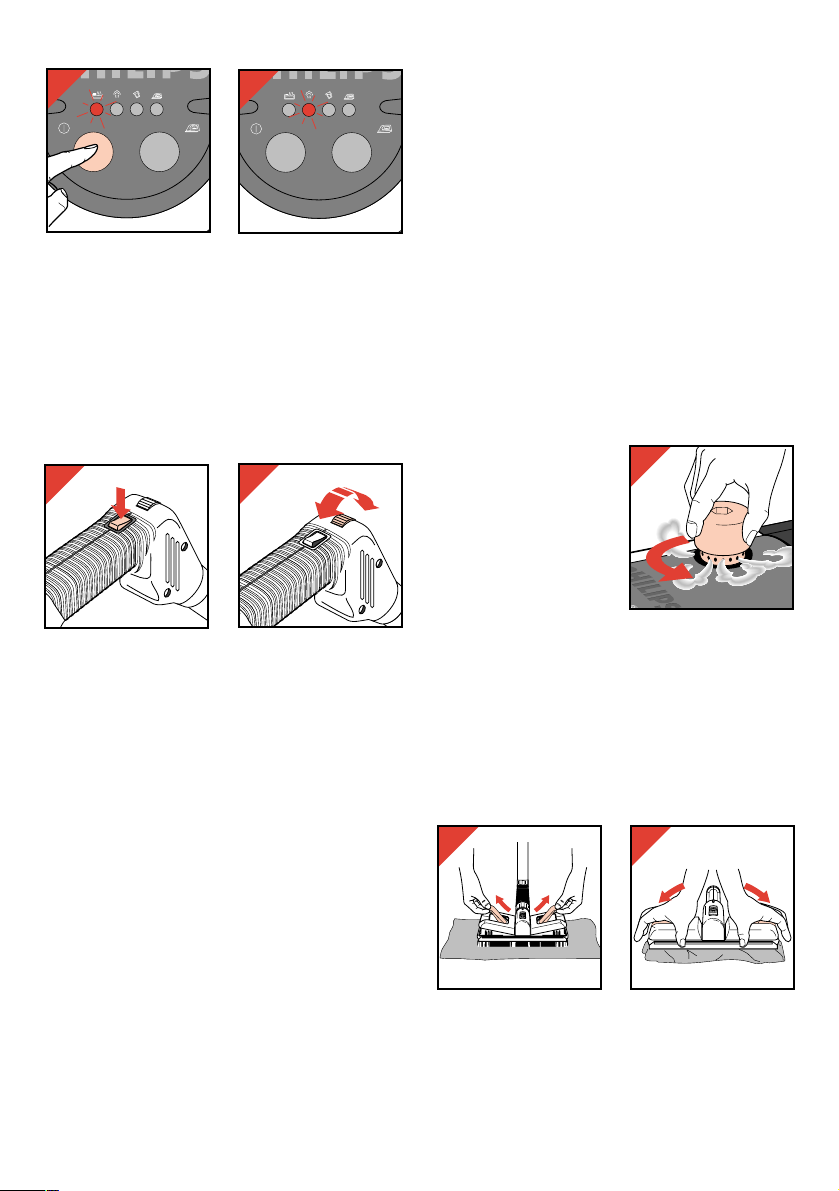
- Insert the mains plug into a wall socket.
- Press the On/Off switch I.
The orange pilot light “Heating up” ≤ will come
on (fig. 13).
- If the appliance is heated up, green pilot light
“Steam ready” s will come on.
The orange pilot light ≤ will go out (fig. 14).
You can now begin steam cleaning.
How to use
- Push the switch on the handgrip forwards
(fig. 15). After a few seconds steam will come
from the nozzle.
- You can adjust steam output using the steam
control (fig. 16).
• Initially there will be some condensation (drops
of water). Let steam escape freely during the
first few seconds until only fine steam is
produced.
• When steam cleaning with maximum steam
output, it is advisable to interrupt steaming from
time to time.
This enables the appliance to regain the
required pressure.
• During operation the steam tank heating
element wil be switched on automatically from
time to time (orange pilot light ≤ comes on),
alhough steam is still available.
You can just continue steam cleaning.
Remote Steam Control
With the steam control on the handgrip you can
select the most suitable steam output for various
applications:
• Maximum steam output: for cleaning from
some distance (hard to reach places!) using
the “Turbo” nozzle, sticking dirt and stubborn
spots.
• Maximum or normal steam output: for
normal cleaning (with steaming cloth) floors
and washable surfaces.
• Normal or minimum steam output: for
cleaning (with steaming cloth) rugs and
carpets.
• Minimum output: for ceramics, glass and
breakable objects.
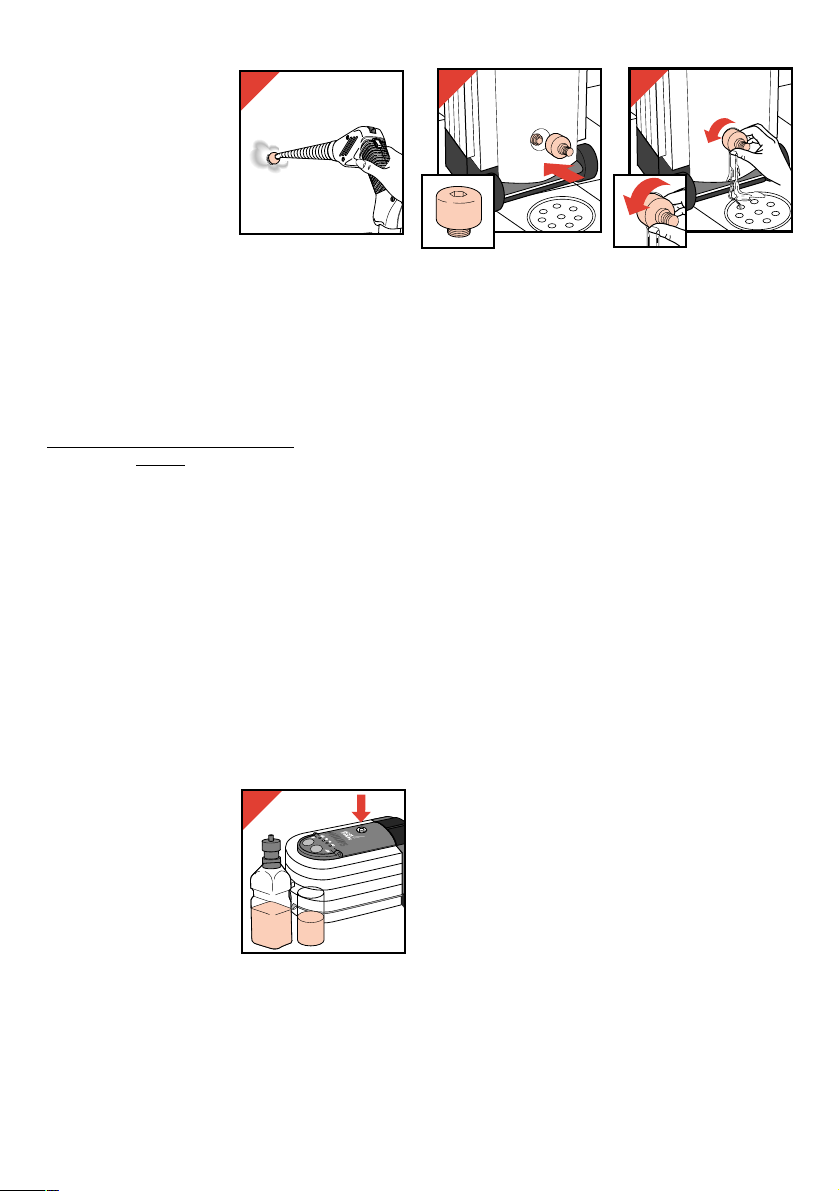
Filling up water
During use red warning light * may come on.
This indicates that the water in the steam tank
has been used up.
To prevent overheating a safety switch will switch
off the steam tank heating element.
- Press On/Off switch I
to switch the appliance
off.
- Remove the mains
plug from the wall
socket.
- Slowly and carefully
unscrew the filling cap,
until steam escapes
through the holes
(fig. 17).
- When steaming stops you can unscrew the
filling cap further.
- Fill the steam tank as described in section
“Filling the steam tank”.
- Switch the appliance on as described in section
“Switching on”.
• Never switch the appliance on if it is empty.
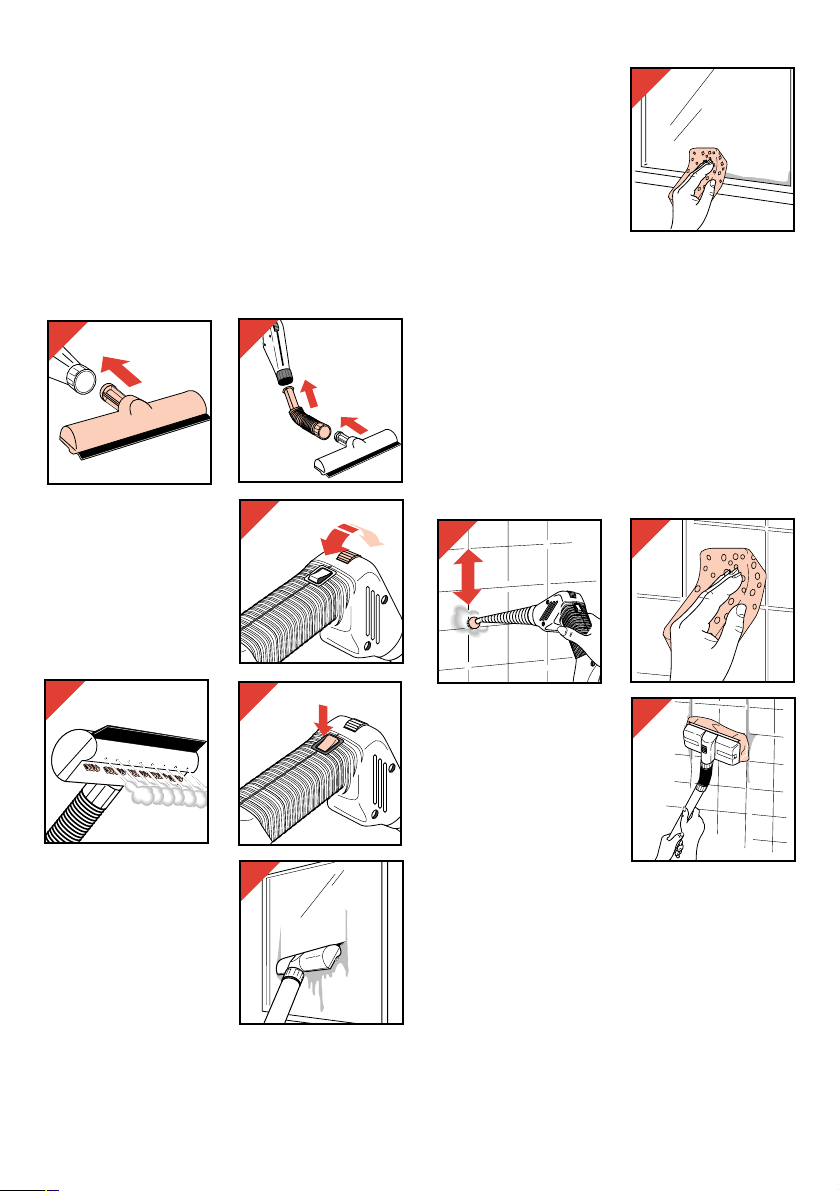
Normal cleaning with a steaming cloth
- Fix a dry and clean cloth to the large brush
nozzle using the special clamps
(fig. 18 and 19).
6
13
14
MIN.
15
16
NOR.
MAX.
17
1918
Page 7
Select a cloth with high absorptive capacity.
- Set the steam control to position “Minimum” or
“Normal” (fig. 20).
- As soon as steam comes out, let the nozzle
with the steaming cloth glide across the surface
you wish to clean (fig. 21). Do not scrub!
The results will be better if you do not crush
down the hairs of the brush.
- Treat vulnerable surfaces lightly and with a
double cloth fixed to the nozzle.
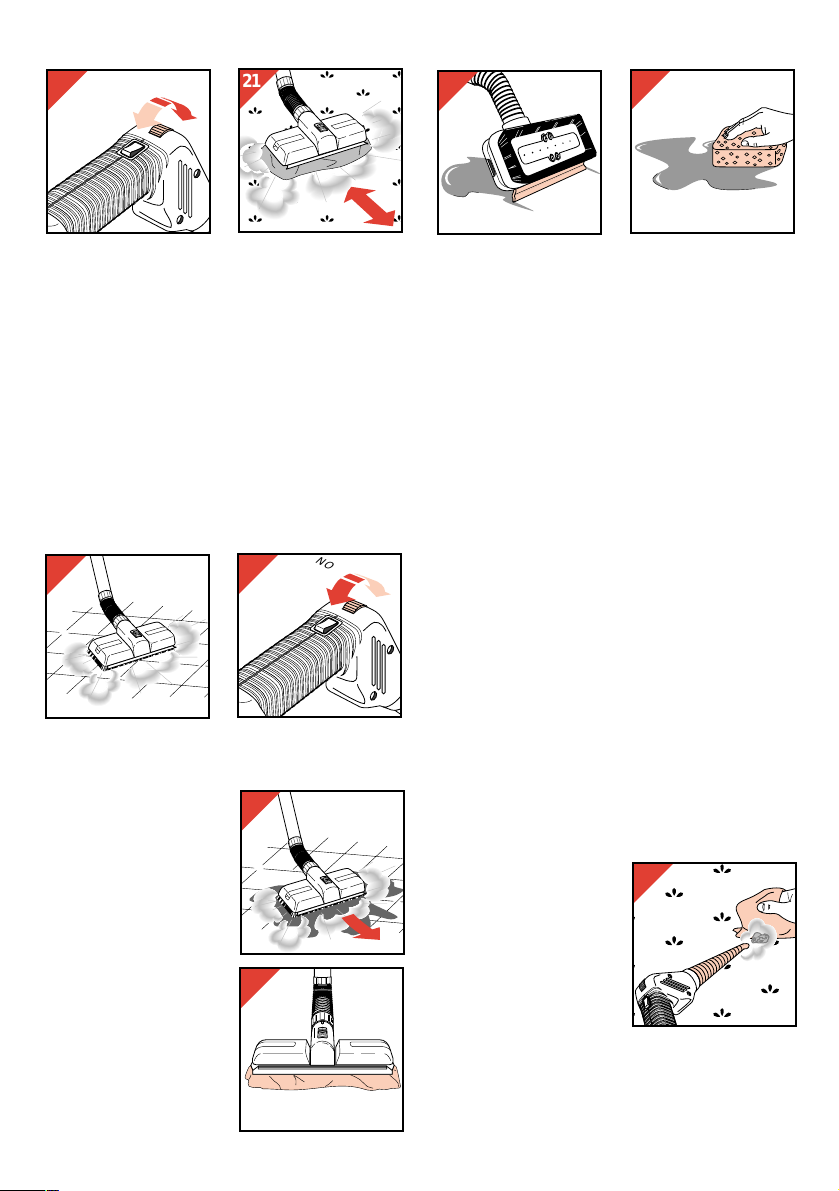
Set the steam control to minimum steam output
for this application.
Thorough cleaning
To clean seriously contaminated surfaces and
remove stubborn spots:
- First place the brush nozzle without steaming
cloth on to the surface you wish to clean, so
that the steam and the
brush have maximum
effect on the dirt
(fig 22).
- Set the steam control
to position “Normal” or
“Maximum” (fig. 23).
- Lightly brush up the
soluted dirt (fig. 24).
Do not scrub!
Removing soluted dirt
To remove soluted dirt
you can:
- fix a steaming cloth to
the brush nozzle
(fig. 25) (refer to
section “Normal
cleaning with a
steaming cloth”);
- collect the dirty water with the rubber strip of
the large nozzle (fig. 26);
- use a separate cloth or sponge (fig. 27).
After use
- Switch the appliance off by pressing the On/Off
switch I .
- Remove the mains plug from the wall socket.
- To prevent corrosion inside the steam
cleaner: make sure that the filling cap is
screwed tightly when storing the appliance.
Various applications
Carpets, rugs, upholstery
• It is advisable to vacuum clean before steam
cleaning.
• First try out the effect of steam cleaning on a
section which does not catch the eye.
• Steam cleaning will make stains disappear
from your carpets and will freshen them up.
• If a carpet is seriously stained, the first steam
cleaning treatment will take some extra time
(and steaming cloths).
However, if you steam clean the carpet
regularly this will prevent the dirt from setting
so that cleaning will be quicker and easier.
- Treat the carpet as described in section
“Normal cleaning with a steaming cloth”.
Make sure that you
always use a clean
section of the steaming
cloth.
- For small stains
(chewing gum, candlegrease, etc.) it is
advisable to use the
“Turbo” nozzle and a
cloth (fig. 28).
The steam will blow the
dirt into the cloth.
Keep the “Turbo” nozzle moving to prevent
overheating of the fibres.
7
20
NOR.
MIN.
21
26
27
22
23
24
25
NOR.
MAX.
28
Page 8
Hard floors: stone, tiles, parquet, synthetic
• See section “Normal cleaning with a steaming
cloth”.
• If a tiled floor is seriously stained, the first
steam cleaning treatment will take some extra
time (and steaming cloths).
However, if you steam clean the floor regularly
this will prevent the dirt from setting so that the
joints will maintain their original colour.
• Remember that the steam will also remove any
floor wax.
Smooth vertical surfaces and window panes
- Fix the special
squeegee nozzle to
the handgrip, if you
wish together with the
bent tube
(fig. 29 and 30).
- Set the steam control
to position “Minimum”
or “Normal” (fig. 31).
- The bristle and the
steam together release
the dirt (fig. 32).
- Switch the steam off by
setting the team switch
on the handgrip to
position 1 (no steam)
(fig. 33).
Collect the dirty water
using the squeegee
(fig. 34).
- Sponge up the dirty
water with an extra
cloth or a sponge
(fig. 35).
• You can also use the
large brush nozzle for
steam cleaning and
use a separate
squeegee and/or a
cloth to remove the dirty water.
• When it is extremely cold, do not steam
clean your window panes (esp. single pane)
as the sudden heating might cause the
glass to break.
• Ceramics (wash basin, tub and other bathroom
fixtures) can also be cleaned as described for
glass.
• Ensure that there are no scratching particles
(e.g. grains of sand) on scratch sensitive
surfaces (e.g. window panes, mirrors) before
steam cleaning.
Joints of tiles
- First clean thoroughly
with one of the round
brushes on the “Turbo”
nozzle. Move the
nozzle to and fro along
the length of the joint
(fig. 36).
- Sponge up the dirty
water with an extra
cloth or a sponge
(fig. 37), or fix a
steaming cloth to the brush nozzle and use this
to absorb the diluted dirt (fig. 38).
Stubborn stains and hard to reach spots
To clean hard to reach spots and to remove
stubborn stains and calcarous deposits select the
“Turbo”nozzle.
This nozzle concentrates the steam jet to one
point.
8
29
30
35
32
31
33
34
MIN.
NOR.
36
37
38
Page 9
You can fix one of the
round brushes to the
“Turbo” nozzle (fig. 39).
• Take precautions with
regard to dirty water
dripping down.
Descaling
From time to time the steam tank needs
descaling.
How often this is necessary will depend on the
hardness of your tapwater and the frequency of
use.
In general, we advise you to descale the
appliance at least every six months.
Preferably use a descaling agent which is
especially suitable for domestic appliances, such
as espresso machines, steam irons, etc.
Warning: Only descale the appliance while the
mains plug is not in the wall socket and when the
appliance is not hot.
Descaling agent (approx. 600 cc)
• Descaling agents which contain sulphuric and
citric acid are most effective and are safe for
the steam tank.
In general, they are available at shops where
electrical domestic appliances are sold and at
druggist stores.
- Follow the instructions on the packaging of the
descaling agent.
Mixture of water (half a litre) and white vinegar
(half a glassful)
• Instead of a descaling agent you can also use
a mixture of half a litre of water and half a
glassful of white vinegar.
Especially in this case ensure that the
appliance is not hot!
- Pour the mixture of
water with vinegar into
the steam tank (fig. 40).
- Shake the appliance
and let the mixture act
for a considerable time
(i.e. at least one hour;
preferably 12 hours).
- Place the appliance over a water outlet (sink,
shower cubicle, tub) and unscrew the outlet
opening.
Use the top section of the filling cap for a
spanner (fig. 41 and 42).
- Rinse the steam tank through with fresh water
until the outcoming water is clear.
Accessories - replacement or extra
Accessories are available to extend the
possibilities with your steam cleaner as well as for
replacement. Please refer to page. 37.
Apply to your dealer and mention the
corresponding type number and/or service
number.
9
39
41
42
40
Page 10

Description générale (fig. 1)
A Réservoir de vapeur
B Bouchon de remplissage
C Interrupteur marche/arrêt I
D Interrupteur “Repassage” ≥
(Ne l’appuyer que si le fer vapeur du type
HR 6961 V est connecté)
E Témoin lumineux “Chauffage” ≤ (oranger)
F Témoin lumineux “Prêt pour vapeur” s
(vert)
G Signal lumineux “Remplissage” * (rouge)
H Témoin lumineux “Repassage” ≥
I Raccordement du tuyau à vapeur
J Tuyau à vapeur
K Poignée
L Interrupteur de vapeur
1 = pas de vapeur
s = vapeur
M Bouton de réglage de vapeur (émission de
vapeur) Minimum ↔ Normal ↔ Maximum
N Tubes (droits)
O Tube (courbé)
P Grand embout
Coulisseau vers l’avant: fixe
Coulisseau vers l’arrière: pivotant
Q Embout-raclette
R Embout triangulaire
S Brosses rondes
T Embout “Turbo”
U Bouteille de remplissage
V Fer à vapeur
W Chiffon de vapeur
10
Important
• Lisez le mode d’emploi et examinez les illustrations avant de mettre l’appareil en marche.
Voir aussi page 3 (page dépliante).
• Débranchez toujours l’appareil:
- quand le réservoir est vide;
- quand vous désirez remplir le réservoir;
- quand l’appareil ne fonctionne pas correctement;
- quand vous désirez changer le tuyau à vapeur. (Par exemple si vous désirez repasser à la
vapeur après le nettoyage à la vapeur).
• Ne mettez jamais l’appareil en marche quand il est vide.
• N’orientez jamais le jet de vapeur sur des personnes ou des animaux, ni sur des prises de
courant, des appareils ou des raccordements électriques.
La vapeur peut endommager les robinets à thermostat. N’utilisez jamais votre appareil pour
nettoyer ce type de robinets.
• Evitez d’utiliser le jet de vapeur au contact de matériaux sensibles à l’humidité et/ou à la
chaleur comme le papier peint (sauf si vous désirez le décoller!), la soie, les fibres synthétiques, le cuir, le daim et le velours. En cas de doute, faites un essai sur une partie cachée.
• Branchez l’appareil sur une prise de terre.
• Si vous ouvrez le bouchon de remplissage alors que le réservoir de vapeur est encore sous
pression, de la vapeur s’échappera des ouvertures prévues à cet effet dans le bouchon.
C’est un phénomène normal.
• Si le cordon secteur de votre appareil est endommagé, il doit impérativement être remplacé
par un réparateur indépendant agréé Philips car des équipements et des composants
spécifiques sont exigés.
• Surveillez toujours l’appareil quand il est en marche. Ne le laissez pas entre les mains des
enfants. La vapeur peut être dangereuse si elle n’est pas utilisée correctement.
• Ne remplissez le réservoir d’eau qu’avec de l’eau claire du robinet. N’y ajoutez aucun additif,
agents chimiques, produits odorisants (lavande, parfums, etc. ...).
• L’appareil est protégé contre les éclaboussures, mais il n’est pas étanche. N’immergez
jamais l’appareil dans l’eau et ne le rincez pas. Vous pouvez nettoyer l’appareil à l’aide d’un
chiffon humide, éventuellement avec un peu de détergent. Mais veillez à débrancher d’abord
l’appareil.
• Pour en faciliter le recyclage, les parties plastiques de l’appareil ont été codées.
• L’emballage a été fabriqué en carton recyclé, il est donc entièrement recyclable.
f
Français
Page 11
La vapeur: pratique et hygiénique
Vous remplissez simplement l’appareil avec de
l’eau du robinet.
L’appareil prépare la vapeur en 8 minutes
environ.
La vapeur ainsi créée est expulsée au moyen du
tuyau à vapeur et de l’embout choisi.
Avec la vapeur, vous pouvez nettoyer un tapis de
manière hygiénique en profondeur ou enlever des
dépôts de graisse ou de suie sur des surfaces
lisses.
Grâce au maniement de la poignée (“Contrôle de
vapeur à distance”), l’appareil est très facile à
utiliser.
Préparation avant l’utilisation
Remplissage
- Dévissez le bouchon
de remplissage (fig. 2).
- Remplissez le réservoir avec de l’eau du
robinet au moyen de la bouteille de
remplissage
(fig. 3 et 4).
(21⁄2 bouteilles
= réservoir plein).
- Revissez bien le
bouchon de
remplissage (fig. 5).
• N’utilisez pas d’outils
pour visser et dévisser
le bouchon de
remplissage.
Raccordement du tuyau
- Tournez la bague dans
le sens de la flèche
(fig. 6).
- Enfoncez l’extrémité du
tuyau dans l’ouverture
de l’appareil (fig. 7).
- Tournez ensuite la
bague dans l’autre sens
(fig. 8). Assurez-vous
que le tuyau est bien
fixé.
Raccordement de l’embout et des tubes
- Tournez la bague dans
le sens de la flèche
(fig. 9).
- Insérez l’extrémité du
tube la plus étroite
dans l’autre partie du
tube (fig. 10).
- Tournez la bague dans
l’autre sens (fig. 11).
• Vous pouvez aussi raccorder l’embout
directement sur la poignée, ou raccorder
seulement le tube courbé entre la poignée et
l’embout.
Les bagues verrouillent le tuyau, l’embout et le(s)
tube(s) pour qu’ils ne se détachent pas
involontairement.
Les bagues servent en outre à stopper l’arrivée
de la vapeur si le tuyau ou l’embout sont
détachés en cours d’utilisation.
11
3
2
4
6
9
7
8
10
5
11
Page 12
Mise en marche
- Ouvrez le compartiment de rangement et
sortez entièrement le cordon (fig. 12A et 12B).
- Branchez l’appareil.
- Appuyez sur l’interrupteur marche/arrêt I.
Le témoin lumineux orange “Chauffage” ≤
s’allume (fig. 13).
- Quand l’appareil est chaud, le témoin lumineux
vert “Prêt pour vapeur” s s’allume.
Le témoin lumineux orange ≤ s’éteint (fig. 14)
et vous pouvez commencer à produire de la
vapeur.
Utilisation
- Poussez l’interrupteur de la poignée vers
l’avant (fig. 15). Au bout de quelques
secondes, de la vapeur s’échappera de
l’embout.
- L’émission de vapeur peut être réglée à l’aide
du bouton de réglage de vapeur (fig. 16).
• Une certaine condensation (gouttes)
surviendra au début. Laissez d’abord la vapeur
s’échapper pendant quelques secondes
jusqu’à ce qu’elle atteigne la qualité voulue.
• Quand vous nettoyez avec l’émission de
vapeur maximum, il est recommandé
d’interrompre la vapeur de temps à autre.
L’appareil pourra alors reconstituer
suffisamment de pression.
• Pendant l’utilisation, l’élément de chauffage du
réservoir de vapeur se mettra
automatiquement en marche de temps à autre
(le témoin orange ≤ s’allume), alors qu’il reste
encore de la vapeur. Vous pouvez continuer à
nettoyer à la vapeur normalement.
Bouton de réglage de vapeur
(“Contrôle de vapeur à distance”)
A l’aide du bouton de réglage de vapeur situé sur
la poignée, vous pouvez sélectionner la force de
vapeur la mieux adaptée aux diverses
applications:
• Production de vapeur maximum: pour le
nettoyage à distance (endroits difficilement
accessibles) avec l’embout “Turbo”, pour la
saleté incrustée et les taches rebelles.
• Production de vapeur maximum ou
normale: pour le nettoyage normal (avec
lavette à vapeur) de sols et de surfaces
lavables.
• Production de vapeur normale ou minimum:
pour le nettoyage (avec lavette à vapeur) de
tapis et moquettes.
• Production de vapeur minimum: pour la
céramique, le verre et les objets fragiles.
Remplissage d’eau en cours d’utilisation
Il peut arriver pendant l’utilisation que le signal
lumineux rouge * s’allume: cela signifie qu’il n’y
a plus d’eau dans le réservoir de vapeur. Afin
d’éviter la surchauffe, un interrupteur de sécurité
arrête automatiquement l’élément de chauffage
du réservoir de vapeur.
- Appuyez sur l’interrupteur marche/arrêt I pour
arrêter l’appareil.
- Débranchez l’appareil.
- Dévissez lentement et
prudemment le
bouchon de
remplissage jusqu’à ce
que de la vapeur
s’échappe des
ouvertures (fig. 17).
- Quand il n’y a plus
d’échappement de
vapeur, vous pouvez dévisser complètement le
bouchon.
- Remplissez le réservoir comme expliqué au
chapitre “Remplissage du réservoir de vapeur”.
- Remettez l’appareil en marche comme
expliqué au chapitre “Mise en marche”.
• Ne mettez jamais l’appareil en marche quand
le réservoir de vapeur est vide.
12
12A
12B
13
15
16
14
MAX.
NOR.
MIN.
17
Page 13

Nettoyage normal avec lavette à vapeur
- Fixez une lavette en tissu propre au grand
embout à l’aide des pinces spéciales
(fig. 18 et 19). Choisissez un tissu bien
absorbant.
- Mettez le bouton de réglage de vapeur en
position “Minimum” ou “Normal” (fig. 20).
- Dès que de la vapeur s’échappe, faites glisser
l’embout et la lavette sur la surface à nettoyer
(fig. 21). Ne frottez pas! Les résultats sont
meilleurs quand les poils ne sont pas écrasés.
- Pour les surfaces fragiles, il est préférable de
nettoyer rapidement avec une double lavette
sur l’embout. Pour cela, mettez le bouton de
réglage de vapeur en position minimum.
Nettoyage à fond
Pour nettoyer à fond les surfaces très sales et les
taches rebelles:
- Placez d’abord l’embout-brosse sans lavette à
vapeur sur la surface à nettoyer, de sorte que
la vapeur et la brosse puissent agir au
maximum sur la saleté (fig. 22).
- Mettez le bouton de réglage de vapeur en
position “Normal” ou “Maximum” (fig. 23).
- Brossez légèrement la
saleté dissoute
(fig. 24).
Ne frottez pas!
Enlever la saleté dissoute
Pour enlever la saleté dissoute, vous pouvez:
- fixer une lavette à
vapeur sur l’emboutbrosse (fig. 25) (voir
section “Nettoyage
normal avec lavette à
vapeur”);
- rassembler l’eau sale à
l’aide de la raclette en
caoutchouc du grand
embout (fig. 26);
- utiliser un autre chiffon
ou une éponge (fig. 27).
Après l’utilisation
- Arrêtez l’appareil en appuyant sur l’interrupteur
marche/arrêt I.
- Débranchez l’appareil.
- Afin d’éviter la formation de rouille dans
l’appareil de nettoyage à la vapeur: assurezvous que le bouchon de remplissage soit
bien fermé quand vous rangez l’appareil.
13
18
MIN.
20
NOR.
19
21
25
24
26
27
22
23
NOR.
MAX.
Page 14

Applications diverses
Tapis, moquettes, meubles recouverts de
tissu
• Il est recommandé de passer l’objet à
l’aspirateur avant de le nettoyer à la vapeur.
• Testez d’abord l’effet du nettoyage à la vapeur
sur une partie cachée.
• Le nettoyage à la vapeur fait disparaître les
taches du tapis et rafraîchit le revêtement de
sol.
• Si le tapis est très sale, le premier traitement à
la vapeur demandera davantage de temps (et
de lavettes à vapeur).
Si cependant vous nettoyez régulièrement
votre tapis à la vapeur, vous éviterez que la
saleté s’incruste et le nettoyage sera plus
rapide et plus facile.
- Traitez le tapis comme décrit au chapitre
“Nettoyage normal avec lavette à vapeur”.
Veillez à toujours utiliser une partie propre de
la lavette.
- Pour les petites taches
(chewing-gum, bougie,
etc), il et préférable
d’utiliser l’embout
“Turbo” et un chiffon
(fig. 28). La vapeur
soufflera la saleté sur le
chiffon.
Gardez toujours
l’embout “Turbo” en
mouvement pour éviter une surchauffe des
fibres.
Sols durs: carrelages, dalles, parquet,
matières synthétiques
• Voir “Nettoyage normal avec lavette à vapeur”.
• Si le carrelage est très sale, le premier
traitement à la vapeur demandera davantage
de temps (et de lavettes à vapeur).
Si cependant vous nettoyez régulièrement le
sol à la vapeur, vous éviterez que la saleté
s’incruste et les joints conserveront leur teinte
originale.
• N’oubliez pas que la vapeur enlèvera
également la cire recouvrant éventuellement le
sol.
Surfaces verticales lisses et fenêtres
- Fixez l’embout-raclette spécial et éventuellement le tube courbé à la poignée (fig. 29
et 30).
- Mettez le bouton de réglage de vapeur en
position “Minimum” ou “Normal” (fig. 31).
- Les poils et la vapeur détachent la saleté
(fig. 32).
- Arrêtez l’émission de
vapeur en mettant le
bouton de réglage de
vapeur de la poignée
en position 1 (pas de
vapeur) (fig. 33).
Rassemblez l’eau sale
au moyen de la
raclette (fig. 34).
- Enlevez l’eau sale
avec un autre chiffon ou une éponge
(fig. 35).
• Vous pouvez également utiliser le grand
embout-brosse pour le nettoyage à la vapeur
et employer une raclette séparée et/ou un
chiffon pour enlever l’eau sale.
14
28
29
31
NOR.
MIN.
33
30
32
34
35
Page 15

• Par temps très froid, il est recommandé de
ne pas nettoyer vos vitres (notamment les
vitrages simples) à la vapeur, car le
chauffage rapide pourrait briser les vitres.
• Avant de commencer le nettoyage à la vapeur,
veillez à ce qu’il ny ait pas de particules
rugueuses (p. ex. graines ou sables) sur des
surfaces sensibles (p. ex. verre à vitres, miroir).
• La céramique (lavabos, baignoires et autres
sanitaires) se nettoie de la même façon que les
fenêtres.
Nettoyage des joints
- D’abord nettoyer à fond
avec l’un des emboutsbrosses ronds placé
sur l’embout “Turbo”.
Déplacez plusieurs fois
l’embout en va-et-vient
dans le sens du joint
(fig. 36).
- Enlevez l’eau sale avec un autre chiffon ou une
éponge (fig. 37), ou fixez une lavette à vapeur
sur l’embout-brosse pour enlever la saleté ainsi
dissoute (fig. 38).
Taches rebelles et endroits difficilement
accessibles
Pour le nettoyage d’endroits difficilement
accessibles, de taches
rebelles et de dépôts
calcaires, l’embout
“Turbo” est le mieux
adapté.
L’embout “Turbo”
concentre le jet de vapeur
en un point précis.
On peut fixer l’une des
brosses rondes sur
l’embout “Turbo” (fig. 39).
• N’oubliez pas que de l’eau sale peut s’égoutter
par terre.
Détartrage
De temps à autre, le réservoir de vapeur doit
être détartré.
La fréquence de cette opération dépend de la
dureté de l’eau de votre réseau et de la
fréquence d’utilisation de l’appareil.
En général, nous recommandons de détartrer
l’appareil au moins tous les six mois.
Utilisez de préférence un produit de détartrage
spécialement conçu pour les appareils
domestiques, comme les machines espresso,
fers vapeurs etc…
• Avertissement:
Ne détartrez l’appareil que s’il est débranché et
qu’il n’est pas chaud.
Produits de détartrage (environ 600 ml)
- Les produits de détartrage qui contiennent de
l’acide sulfurique et citrique sont plus efficaces
et sûr pour le réservoir de vapeur.
Ces produits de détartrage sont généralement
disponibles dans les magasins qui vendent des
appareils électroménagers et dans les
drogueries.
- Suivez les instructions mentionnées sur
l’emballage de ces produits de détartrage.
Mélange d’eau (un demi-litre) et de vinaigre
(un demi-verre)
- Au lieu d’un produit de détartrage, vous pouvez
aussi utiliser un mélange d’un demi-litre d’eau
et d’un demi-verre de vinaigre blanc.
Particulièrement dans
ce cas assurez vous
que l’appareil n’est pas
chaud!
- Versez environ 600 cl
du mélange (eau et
vinaigre) dans le
réservoir de vapeur
(fig. 40).
- Secouez l’appareil et
laissez le mélange agir
longuement
(au minimum une heure; de préférence
pendant 12 heures).
15
37
36
38
39
40
Page 16

- Tenez l’appareil au-dessus d’un tuyau
d’évacuation (évier, douche, baignoire) et
dévissez l’ouverture d’écoulement.
Pour cela, vous pouvez utiliser le haut du
bouchon de remplissage en guise de clef
(fig. 41 et 42).
- Rincez le réservoir jusqu’à ce que l’eau qui
s’en écoule soit claire.
Accessoires: remplacement ou option
Des accessoires sont disponibles pour
augmenter les possibilités de votre nett oyeur
vapeur ou pour un remplacement. Regardez s'il
vous plaît page 37.
Adressez vous à votre Distributeur et indiquez lui
le type concerné et/ou le code sevice.
16
41
42
Page 17

Allgemeine Beschreibung (Abb. 1)
A Dampftank
B Verschluß der Einfüllöffnung
C Ein-/Ausschalter I
D Schalter “Bügeln” ≥
Nur drücken, wenn das Bügeleisen HR 6961
Vangeschlossen ist.
E Orange Kontrollampe “Aufheizen” ≤
F Grüne Kontrollampe “Dampf bereit” s
G Rote Kontrollampe “Nachfüllen” *
H Kontrollampe “Bügeln” ≥
I Anschluß für den Dampfschlauch
J Dampfschlauch
K Griff
L Dampfschalter
1 = kein Dampf
s = Dampf
M Dampfregler
Minimum ↔ Normal ↔ Maximum
N Gerade Rohre
O Gekrümmtes Rohr
P Große Bürstendüse
Vorwärts schieben = fest
Rückwärts schieben = drehbar
Q Schrubberdüse
R Dreiecksdüse
S Runde Düse
T “Turbo-Düse”
U Auffüllflasche
V Dampfbügeleisen
W Dampftuch
17
WICHTIG
• Lesen Sie diese Gebrauchsanweisung sorgfältig durch, und sehen Sie sich dabei die
Abbildungen an, bevor Sie das Gerät zum ersten Mal gebrauchen.
• Schließen Sie das Gerät nur an eine Schuko-Steckdose an.
• Ziehen Sie stets den Stecker aus der Steckdose, ...
- wenn das Gerät leer ist,
- bevor Sie das Gerät füllen,
- wenn das Gerät nicht ordnungsgemäß funktioniert,
- bevor Sie die Schläuche wechseln, um z.B. nach der Dampfreinigung zu bügeln.
• Schalten Sie das Gerät nicht ein, wenn es leer ist.
• Richten Sie den Dampfstrahl niemals auf Menschen, Tiere oder Pflanzen; auch nicht auf
Steckdosen, elektrische Anschlüsse oder Geräte.
Thermostat-Wasserhähne können durch heißen Dampf beschädigt werden.
Reinigen Sie diese Art von Wasserhähnen nicht mit diesem Gerät!
• Achten Sie darauf, daß der Dampfstrahl nicht auf Gegenstände gerichtet wird, die
Feuchtigkeit und Hitze nicht vertragen z.B. Seide, Synthetics, Leder, Wildleder, Samt und
Tapeten - es sei denn, Sie wollten die Tapeten von den Wänden lösen. Prüfen Sie
nötigenfalls das Material an einer Stelle, die nicht ins Auge fällt.
• Wenn Sie den Verschluß der Einfüllöffnung aufschrauben, während der Dampftank noch
unter Druck steht, entweicht aus den Öffnungen des Verschlusses Dampf. Das ist ein
normaler Vorgang.
• Wenn das Netzkabel defekt oder beschädigt ist, muß es von einer durch Philips autorisierten
Werkstatt ersetzt werden, da für die Reparatur Spezial-Werkzeug und/oder spezielle Teile
benötigt werden.
• Behalten Sie das Gerät im Auge, solange es eingeschaltet ist. Lassen Sie niemals Kinder
damit hantieren. Bedenken Sie, daß der Dampfstrahl bei nicht sachgemäßem Gebrauch
Schaden anrichten kann.
• Füllen Sie das Gerät ausschließlich mit klarem Leitungswasser. Verwenden Sie keine
Reinigungsmittel.
• Das Gerät ist gegen Spritzwasser geschützt; es ist aber nicht wasserdicht. Tauchen Sie es
niemals in Wasser, und spülen Sie es auch nicht unter der Wasserleitung ab. Reinigen Sie
es mit einem feuchten Tuch, auf das Sie bei Bedarf ein wenig Spülmittel auftragen können.
Ziehen Sie zuvor den Stecker aus der Steckdose.
• Die Kunststoffe am Gerät sind gekennzeichnet worden, um ihre Wiederverwendung zu ermöglichen.
• Die Verpackung besteht aus Karton mit 90 % Altpapieranteil und ist voll wiederverwertbar.
Deutsch
f
Page 18

Dampf ist wirksam und hygienisch
Füllen Sie das Gerät mit klarem Leitungswasser.
Das Wasser wird im Gerät erhitzt. Das dauert ca.
8 Minuten.
Der dabei erzeugte Dampf wird über den
Dampfschlauch und die gewählte Düse
ausgestoßen.
Sie können den Dampf verwenden, um z.B.
Teppiche einer hygienischen Tiefenbehandlung
zu unterziehen und um Fett oder festsitzenden
Schmutz von glatten Oberflächen zu entfernen.
Die Bedienung wird durch die am Griff
angebrachten Regler (Dampf-Fernbedienung)
erleichtert.
Vor dem Gebrauch
Den Dampftank füllen
- Schrauben Sie den
Verschluß der
Einfüllöffnung ab
(Abb. 2).
- Verwenden Sie die Auffüllflasche, um den
Dampftank mit klarem Leitungswasser zu füllen
(Abb. 3 und 4). 21⁄2 Flaschen = eine
Dampftankfüllung.
- Schrauben Sie den
Verschluß fest zu
(Abb. 5).
• Verwenden Sie keine
Werkzeuge, um den
Verschluß auf- oder
zuzudrehen.
Den Dampfschlauch anschließen
- Drehen Sie den Ring
in Pfeilrichtung los
(Abb. 6).
- Stecken Sie das Ende
des Dampfschlauchs
in den Anschluß (I) am
Gerät (Abb. 7).
- Drehen Sie den Ring
in Pfeilrichtung fest
(Abb. 8). Prüfen Sie
den Sitz des Schlauches.
Rohre und Düsen anschließen
- Drehen Sie den Ring in
Pfeilrichtung los
(Abb. 9).
- Stecken Sie ein Rohr
mit dem dünneren
Ende in das dickere
Ende des anderen
Rohres (Abb. 10).
- Drehen Sie den Ring in
Pfeilrichtung
Gegenrichtung fest (Abb. 11).
• Bei Bedarf können Sie die Düsen direkt am
Griff oder dem gekrümmten Rohr anbringen.
Die Ringe verhindern, daß der Dampfschlauch,
die Rohre oder die Düsen sich versehentlich
lösen.
Außerdem sorgen sie dafür, daß die Dampfzufuhr
unterbrochen wird, wenn Dampfschlauch oder
Düse vorzeitig abgenommen werden.
18
3
2
4
6
9
7
8
10
5
11
Page 19

Einschalten
- Öffnen Sie das Kabelfach, und ziehen Sie das
Netzkabel in ganzer Länge heraus
(Abb. 12A, 12 B).
- Stecken Sie den Stecker in die Steckdose.
- Drücken Sie den Ein-/Ausschalter I.
- Die orange Kontrollampe “Aufheizen” ≤
leuchtet auf (Abb. 13).
- Die grüne Kontrollampe “Dampf bereit” s
leuchtet auf, wenn das Wasser aufgeheizt ist.
Die orange Kontrollampe ≤ erlischt (Abb. 14).
Sie können das Gerät jetzt benutzen.
Gebrauch des Geräts
- Schieben Sie den Dampfschalter im Griff nach
vorn (Abb. 15). Nach einigen Sekunden kommt
Dampf aus der Düse.
- Die erforderliche Dampfmenge stellen Sie mit
dem Dampfregler (Abb. 16) ein.
• Anfangs können einige Tropfen
Kondenswasser austreten. Nach einigen
Sekunden wird dann reiner Dampf erzeugt.
• Wenn Sie mit vollem Dampf - Regler auf
Maximum - arbeiten, empfiehlt es sich, die
Arbeit hin und wieder zu unterbrechen.
Dadurch kann sich wieder der volle Druck
aufbauen.
• Während des Betriebs wird die Heizung des
Dampftanks von Zeit zu Zeit automatisch
eingeschaltet, (die orange Kontrollampe ≤
leuchtet auf) obwohl noch genügend Dampf
verfügbar ist.
Sie können Ihre Arbeit dabei fortsetzen.
Dampf-Fernbedienung
Mit der Fernbedienung am Griff läßt sich die
Dampfzufuhr bei verschiedenen Arbeiten auf das
erforderliche Maß einstellen.
• Maximale Dampfzufuhr: Reinigung schwer
zugänglicher Stellen und von hartnäckigem
Schmutz mit Hilfe der “Turbo-Düse”.
• Maximale oder normale Dampfzufuhr:
Reinigung normal verschmutzter
wasserunempfindlicher Flächen, auch mit Hilfe
eines Dampftuchs.
• Normale oder minimale Dampfzufuhr:
Reinigung von Teppichen und Teppichboden,
auch mit Hilfe eines Dampftuchs.
• Minimale Dampfzufuhr: Reinigung von
Fliesen, Keramik, Glas und anderen
zerbrechlichen Gegenständen.
Wasser nachfüllen
Während der Arbeit kann die rote Kontrollampe
“Nachfüllen” * aufleuchten und damit anzeigen,
daß Wasser aufgefüllt werden muß.
Damit der Dampftank nicht überhitzt wird, werden
die Heizelemente notfalls automatisch
ausgeschaltet.
- Drücken Sie den Ein-/Ausschalter I, um das
Gerät auszuschalten.
- Ziehen Sie den Stecker aus der Steckdose.
- Schrauben Sie langsam und vorsichtig den
Verschluß der Einfüllöffnung auf, und lassen
Sie den austretenden
Dampf durch die
Öffnungen entweichen
(Abb. 17).
- Wenn kein Dampf mehr
austritt, können Sie den
Verschluß ganz
aufdrehen.
- Füllen Sie den
Dampftank, wie im
Abschnitt “Den
Dampftank füllen” beschrieben.
- Schalten Sie das Gerät wieder ein, wie im
Abschnitt “Einschalten” beschrieben.
• WICHTIG: Schalten Sie das Gerät niemals ein,
wenn es leer ist.
19
12A
13
12B
14
MIN.
15
16
NOR.
MAX.
17
Page 20

Einfache Reinigung mit einem Dampftuch
- Bringen Sie mit Hilfe der Klammern an der
großen Bürstendüse ein trockenes und
sauberes Tuch an (Abb. 18 und 19).
Verwenden Sie ein Tuch mit hoher Saugkraft.
- Stellen Sie den Dampfregler auf “Minimum”
oder “Normal” (Abb. 20).
- Sobald Dampf austritt, beginnen Sie, die Düse
mit dem Dampftuch über die zu reinigende
Fläche zu führen (Abb. 21).
Sie erhalten ein gutes Ergebnis, wenn Sie nicht
schrubben und die Borsten der Bürste nicht
aufdrücken!
- Behandeln Sie empfindliche Flächen vorsichtig,
und verwenden Sie eine doppelte Lage
Dampftuch.
Stellen Sie den Dampfregler dabei auf
“Minimum”.
Gründliche Reinigung
Behandeln Sie stark verschmutzte Flächen und
hartnäckige Flecken wie
folgt.
- Stellen Sie die große
Bürstendüse ohne
Dampftuch auf die zu
bearbeitende Stelle, so
daß Dampf und Bürste
gründlich auf den
Schmutz einwirken
können (Abb. 22).
- Stellen Sie den Dampfregler auf “Normal” oder
auf “Maximum” (Abb. 23).
- Bürsten Sie den gelösten Schmutz auf, ohne
zu schrubben (Abb. 24)!
Gelösten Schmutz entfernen
Den gelösten Schmutz
entfernen Sie ...
- indem Sie ein
Dampftuch an der
großen Bürstendüse
anbringen
(Abb. 25, vgl. den
Abschnitt “Einfache
Reinigung mit einem
Dampftuch”),
und damit
- das schmutzige Wasser mit der Gummikante
der großen Bürstendüse ansammeln (Abb. 26)
und dann
- mit einem Schwamm oder einem Wischtuch
aufnehmen (Abb. 27).
Nach dem Gebrauch
- Schalten Sie das Gerät aus, indem Sie den
Ein-/Ausschalter I drücken.
- Ziehen Sie den Stecker aus der Steckdose.
- Vermeiden Sie Korrosion im Dampfreiniger:
Achten Sie darauf, daß der Verschluß der
Einfüllöffnung fest zugedreht ist, wenn Sie
das Gerät fortstellen.
20
18
MIN.
20
NOR.
19
21
22
23
26
NOR.
MAX.
24
25
27
Page 21

Verschiedene Anwendungen
Teppiche, Teppichböden, Polstermöbel
• Es ist ratsam, die Flächen und Gegenstände
vor dem Dampfreinigen abzusaugen.
• Prüfen Sie das Ergebnis der Dampfreinigung
an einer Stelle, die normalerweise nicht
sichtbar ist.
• Durch Dampfreinigen verschwinden stark
verschmutzte Stellen und der Teppich wird
aufgefrischt.
• Bei sehr starker Verschmutzung dauert die
Bearbeitung lange, und viele Dampftücher
werden dabei verbraucht.
Die nächsten Bearbeitungen gehen schneller
und leichter von der Hand, wenn Sie die
Flächen regelmäßig dampfreinigen. Der
Schmutz setzt sich dann nicht fest.
- Behandeln Sie den Teppich so, wie im
Abschnitt “Einfache Reinigung mit einem
Dampftuch” beschrieben.
Verwenden Sie für jeden Abschnitt eine frische
Stelle des Dampftuchs.
- Bei kleinen
Verschmutzungen wie
Kaugummi oder
Kerzenwachs
verwenden Sie am
besten die “TurboDüse” und blasen Sie
(Abb. 28) den Schmutz
in ein separates Tuch.
Bewegen Sie die
Turbo-Düse dabei hin und her, damit die Hitze
sich nicht konzentriert und die Fasern versengt.
Hartböden reinigen
Stein, Fliesen, Parkett, Kunststoffböden
• Vgl. den Abschnitt “Einfache Reinigung mit
einem Dampftuch”.
• Bei sehr starker Verschmutzung dauert die
Bearbeitung eines Hartbodens lange, und viele
Dampftücher werden dabei verbraucht.
Die nächsten Bearbeitungen gehen dann
schneller und leichter von der Hand, wenn Sie
die Böden regelmäßig dampfreinigen. Der
Schmutz setzt sich dann nicht fest, und die
Fugen behalten ihre ursprüngliche Farbe.
• Denken Sie dran, daß die Dampfreinigung
auch jeden Rest von Bohnerwachs entfernt.
Glatte senkrechte Flächen und Fensterscheiben
- Bringen Sie die
Schrubberdüse am
Griff an. Setzen Sie bei
Bedarf das gekrümmte
Rohr dazwischen
(Abb. 29 und 30).
- Stellen Sie den
Dampfregler auf
“Minimum” oder
“Normal” (Abb. 31).
- Borsten und Dampf lösen den Schmutz
(Abb. 32).
- Schalten Sie den Dampf aus, indem Sie den
Dampfschalter im Griff auf 1 (= kein Dampf)
stellen (Abb. 33).
- Schieben Sie das Schmutzwasser mit dem
Gummischrubber herab (Abb. 34), und
- fangen Sie es mit einem gesonderten Tuch
oder einem Schwamm auf (Abb. 35).
21
28
29
32
34
30
35
31
33
NOR.
MIN.
Page 22

• Sie können hierzu auch die große Bürstendüse
zusammen mit einem Gummischrubber oder
einem Tuch verwenden.
• Bei extremer Kälte sollten Sie keine
Fensterscheiben dampfreinigen, denn der
Hitzeschock könnte die Scheiben,
besonders einfaches Fensterglas,
zerspringen lassen.
• Achten Sie darauf, vor dem Dampfreinigen alle
Teilchen, die auf empfindlichen Oberfl¨åchen
Kratzer verursachen können (wie
beispielswiese Sandkörnchen), zu entfernen.
• Die Keramik in Küche und Badezimmer kann
ebenfalls auf die beschriebene Weise gereinigt
werden.
Kachelfugen
- Reinigen Sie die
Fugen zunächst mit der
runden Bürste der
“Turbo-Düse”.
Bewegen Sie die
Bürste auf der ganzen
Länge hin und her
(Abb. 36).
- Saugen Sie das
Schmutzwasser mit
einem Tuch oder einem
Schwamm auf (Abb. 37), oder befestigen Sie
ein Dampftuch an der großen Bürstendüse, mit
dem Sie das Schmutzwasser aufsaugen
(Abb. 38).
Hartnäckige Flecken und schwer erreichbare
Stellen
Mit der “Turbo-Düse”
können Sie schwer
erreichbare Stellen
reinigen und hartnäckige
Flecken, z.B. Kalkstein,
entfernen. Diese Düse
konzentriert den Dampf
auf eine kleine Fläche.
Sie können eine der
runden Bürsten an der
“Turbo-Düse” anbringen
(Abb. 39).
• Achten Sie darauf, daß kein Schmutzwasser
herabtropft.
Entkalken
Von Zeit zu Zeit muß Ihr Dampfreiniger
entkalkt werden.
Wie oft das zu geschehen hat, hängt vom
Härtegrad des verwendeten Leitungswassers und
von der Häufigkeit der Verwendung ab.
Bei normalem Gebrauch sollten Sie das Gerät
alle sechs Monate entkalken.
VORSICHT:
Entkalken Sie das Gerät erst, nachdem Sie den
Stecker aus der Steckdose gezogen haben und
das Gerät völlig abgekühlt ist.
Entkalker (ca. 600 cm3)
Entkalker, die Apfel- oder Zitronensäure
enthalten, sind am wirksamten und sichersten für
den Dampftank. Sie sind in Drogerien und
Geschäften erhältlich, die Elektrohausgeräte
führen.
- Folgen Sie der Gebrauchsanweisung auf der
Verpackung des Entkalkers.
Mit Essig und wasser
- Sie können auch Essig
zum Entkalken
verwenden: Geben Sie
1
⁄2
Glas hellen
Haushaltsessig in
1
⁄2
Liter Wasser.
Geben Sie besonders
in diesem fall darauf
acht, daß das Gerät
nicht heiß ist!
- Gießen Sie diese
Mischung in den Dampftank (Abb. 40).
- Schütteln Sie das Gerät und lassen Sie die
Mischung 12 Stunden, mindestens aber eine
Stunde, einwirken.
22
36
37
38
40
39
Page 23

- Stellen Sie das Gerät auf einen Wasserabfluß
(Badewanne, Spülstein o.ä.) und schrauben
Sie die Auslaßöffnung auf. Verwenden Sie das
obere Ende am Verschluß der Einfüllöffnung
als Öffner (Abb. 41 und 42).
- Spülen Sie den Dampftank gründlich aus, bis
nur noch reines Wasser austritt.
Ersatz- und Zusatzteile
Für Ihren Dampfreiniger sind verschiedene
Ersatz- bzw. Zusatzteile erhältlich. Vgl. hierzu
Seite 37.
Wenden Sie sich an Ihren Philips-Händler und
geben Sie dabei die entsprechende Typenbezeichnung und/oder die Service-Nummer an.
23
41
42
Page 24

Algemene beschrijving (fig. 1, pag. 3)
A Stoomtank
B Vuldop
C Aan/Uit schakelaar I
D Schakelaar “Strijken” ≥
(alleen indrukken als stoomstrijkijzer V is
aangesloten)
E Controlelampje “Opwarmen” ≤ (oranje)
F Controlelampje “Stoom klaar” s (groen)
G Waarschuwingslampje “Bijvullen” *
(rood)
H Controlelampje “Strijken” ≥
I Aansluitpunt voor stoomslang
J Stoomslang
K Handgreep
L Stoomschakelaar
11
= geen stoom
s = stoom
M Stoomregelaar (stoomafgifte)
Minimum ↔ Normaal ↔ Maximum
N Buizen (recht)
O Buis (gebogen)
P Groot borstelmondstuk
Schuifje naar voren: vast
Schuifje naar achteren: zwenken
Q Wissermondstuk
R Driehoekig mondstuk
S Ronde borstels
T “Turbo” mondstuk
U Vulfles
V Stoomstrijkijzer
W Stoomlap
24
Belangrijk
• Lees de gebruiksaanwijzing en bekijk de illustraties voordat u het apparaat in gebruik neemt.
Zie ook pag. 3 (uitklappagina).
• Neem altijd de stekker uit het stopcontact:
- als het apparaat leeg is;
- als u het apparaat opnieuw wilt vullen;
- als het apparaat niet naar wens werkt;
- als u de stoomslang wilt verwisselen. (Bijvoorbeeld wanneer u na stoomreinigen wilt gaan
stoomstrijken.)
• Schakel het apparaat nooit in wanneer het leeg is.
• Richt de stoomstraal nooit op mensen of dieren, en evenmin op stopcontacten, elektrische
aansluitingen of apparaten.
Thermostatische kranen zijn niet bestand tegen hete stoom. Reinig deze dus niet met behulp
van dit apparaat.
• Vermijd dat de stoomstraal in aanraking komt met materialen die niet bestand zijn tegen
vocht en/of warmte, zoals papieren behang (tenzij u het wilt verwijderen!), zijde, kunstvezels,
leer, suède, fluweel. Probeer bij twijfel een gedeelte uit dat niet in het oog valt.
• Sluit het apparaat aan op een geaard stopcontact.
• Als u de vuldop opendraait terwijl de stoomtank nog onder druk staat, zal er stoom
ontsnappen uit de daarvoor bestemde openingen van de dop. Dit is een normaal
verschijnsel.
• Indien het snoer van dit apparaat is beschadigd, dient het uitsluitend te worden vervangen
door een door Philips daartoe aangewezen reparateur, omdat voor de reparatie speciale
gereedschappen en/of onderdelen vereist zijn.
• Houd het apparaat altijd in het oog wanneer het is ingeschakeld. Geef het niet in handen van
kinderen. Hete stoom kan gevaarlijk zijn bij onoordeelkundig gebruik.
• Vul de stoomtank alleen met schoon leidingwater. Voeg er bijvoorbeeld geen schoonmaakmiddel aan toe.
• Het apparaat is beveiligd tegen spatwater. Het is echter niet waterdicht. Dompel het apparaat
nooit in water en spoel het niet af.
U kunt het apparaat schoonmaken met een vochtige doek, zonodig met wat schoonmaakmiddel. Haal dan eerst de stekker uit het stopcontact.
• Voor recycling zijn op de kunststof onderdelen materiaalmerktekens aangebracht.
• De verpakking is vervaardigd van kringloopkarton en is volledig geschikt voor recycling.
f
Nederlands
Page 25

Stoom: handig en hygiënisch
U vult het apparaat met gewoon leidingwater.
Het apparaat brengt het water aan de kook. Dit
vergt ca. 8 minuten.
De hierbij ontstane stoom wordt - via de
stoomslang en het gekozen mondstuk - naar
buiten gevoerd.
U kunt er bijvoorbeeld tapijt een hygiënische
“dieptebehandeling” mee geven, of vet- en
roetaanslag verwijderen van gladde
oppervlakken.
Dankzij de bediening vanaf de handgreep
(“Remote Steam Control”) is het apparaat heel
gemakkelijk in het gebruik.
Voor gebruik gereedmaken
Vullen
- Schroef de vuldop los
(fig. 2).
- Vul de stoomtank
geheel met schoon
leidingwater met behulp
van de vulfles
(fig. 3 en 4).
(21⁄2 fles = vol.)
- Schroef de vuldop
stevig vast (fig. 5).
• Gebruik geen
gereedschap bij het
los- en vastdraaien van de vuldop.
Slang aansluiten
- Draai de ring in de
richting van de pijl
(fig. 6).
- Steek het uiteinde van
de slang in de opening
van het apparaat
(fig. 7).
- Draai vervolgens de
ring terug (fig. 8).
Controleer even of de
slang goed vast zit.
Mondstuk en buizen aansluiten
- Draai de ring in de
richting van de pijl
(fig. 9).
- Schuif de beide
buisdelen in elkaar
(fig. 10).
- Draai vervolgens de
ring terug (fig. 11).
• Desgewenst kunt de
mondstukken direkt
aan de handgreep koppelen, of alleen de
gebogen buis tussen handgreep en mondstuk
bevestigen.
De ringen vergrendelen de slang, het mondstuk
en de buis (buizen), zodat deze niet ongewenst
kunnen losraken.
Bovendien zorgen de ringen ervoor dat de
stoomtoevoer stopt wanneer de slang of een
mondstuk voortijdig wordt losgekoppeld.
25
3
2
4
6
9
7
8
10
5
11
Page 26

Inschakelen
- Open de opbergruimte en trek het snoer er
geheel uit (fig. 12A en 12B).
- Steek de stekker in een stopcontact.
- Druk op de aan/uit schakelaar I.
Het oranje controlelampje “Opwarmen” ≤ gaat
nu branden (fig. 13).
- Als het apparaat is opgewarmd, gaat het
groene controlelampje “Stoom klaar” s
branden.
Het oranje controlelampje ≤ gaat uit (fig. 14).
U kunt nu beginnen met stomen.
Gebruik
- Duw de schakelaar op de handgreep naar
voren (fig. 15). Na enkele seconden komt er
stoom uit het mondstuk.
- Met behulp van de stoomregelaar kunt u de
stoomafgifte regelen (fig. 16).
• In het begin zal enige condensvorming
(druppels) optreden. Laat eerst gedurende
enkele seconden de stoom vrij ontsnappen,
totdat de stoom geheel van goede kwaliteit is.
• Wanneer u met maximum stoomafgifte
schoonmaakt, is het aan te bevelen het stomen
van tijd tot tijd even te onderbreken.
Het apparaat krijgt dan gelegenheid weer
voldoende druk op te bouwen.
• Tijdens het gebruik zal het verwarmingselement van de stoomtank van tijd tot tijd
automatisch ingeschakeld worden (oranje
lampje ≤ brandt), terwijl er nog stoom
beschikbaar is.
U kunt gewoon doorgaan met stoomreinigen.
Stoomregelaar (“Remote Steam Control”)
Met behulp van de stoomregelaar op het handvat
kunt u de meest geschikte stoomkracht kiezen
voor de diverse toepassingen:
• Maximum stoomafgifte: voor reiniging-op-
afstand (moeilijk bereikbare plaatsen!) met
“Turbo”mondstuk, voor vastzittend vuil en
hardnekkige vlekken.
• Maximum of normale stoomafgifte: voor het
normaal schoonmaken (met stoomlap) van
vloeren en afwasbare oppervlakken.
• Normale of minimum stoomafgifte: voor het
schoonmaken (met stoomlap) van kleden en
tapijten..
• Minimum stoomafgifte: voor keramiek, glas
en kwetsbare voorwerpen.
Water bijvullen
Tijdens het gebruik kan het gebeuren dat het
rode waarschuwingslampje * gaat branden.
Dit betekent dat het water in de stoomtank op is.
Om oververhitting te voorkomen, schakelt een
veiligheidsschakelaar het verwarmingselement
van de stoomtank automatisch uit.
- Druk op de aan/uit schakelaar I om het
apparaat uit te schakelen.
- Haal de stekker uit het stopcontact.
- Schroef de vuldop
langzaam en
voorzichtig los, totdat
er stoom ontsnapt via
de openingen (fig. 17).
- Als er geen stoom
meer komt, draait u de
knop geheel los.
- Vul de stoomtank
zoals beschreven in
hoofdstuk “Stoomtank
vullen”.
- Schakel het apparaat weer in zoals beschreven
in hoofdstuk “Inschakelen”.
• Schakel het apparaat nooit in als de stoomtank
leeg is.
26
12A
12B
13
15
14
16
MAX.
NOR.
MIN.
17
Page 27

Normaal schoonmaken met stoomlap
- Bevestig een schone, droge lap stof aan het
grote borstelmondstuk met behulp van de
speciale klemmen (fig. 18 en 19).
Kies hiervoor een lap die goed vocht kan
opnemen.
- Zet de stoomregelaar in stand “Minimum” of
“Normaal” (fig. 20).
- Zodra er stoom komt, laat u het mondstuk met
de lap over het te reinigen oppervlak glijden
(fig. 21). Niet schrobben! De resultaten zijn
beter als de haren niet worden platgedrukt.
- Kwetsbare oppervlakken kunt u het best
vluchtig en met een dubbele lap op het
mondstuk behandelen.
Zet de stoomregelaar hiervoor op minimum
stoomafgifte.
Grondig schoonmaken
Om sterk vervuilde oppervlakken grondig te
reinigen en hardnekkige
vlekken te verwijderen:
- Borstelmondstuk eerst
zonder stoomlap op het
te reinigen oppervlak
plaatsen, zodat de
stoom en de borstel zo
goed mogelijk op het
vuil kunnen inwerken
(fig 22).
- Zet de stoomregelaar in stand “Normaal” of
“Maximum” (fig. 23).
- Borstel het opgeloste vuil luchtig op (fig. 24).
Niet schrobben!
Opgelost vuil verwijderen
Om het opgeloste vuil
te verwijderen kunt u:
- een stoomlap op het
borstelmondstuk
bevestigen (fig. 25)
(zie gedeelte “Normaal
schoonmaken met
stoomlap”);
- het vuile water met behulp van de rubberen
strip van het grote mondstuk bij elkaar vegen
(fig. 26);
- een aparte doek of spons gebruiken (fig. 27).
Na het gebruik
- Schakel het apparaat uit door de aan/uit
schakelaar I in te drukken.
- Haal de stekker uit het stopcontact.
- Om roestvorming in de stoomreiniger te
voorkomen: zorg ervoor dat de dop goed
vastzit als u het apparaat opbergt.
27
18
MIN.
20
NOR.
19
21
23
NOR.
MAX.
24
25
22
26
27
Page 28

Diverse toepassingen
Tapijt, vloerkleden, gestoffeerde meubels
• Stofzuigen vóór het stoomreinigen verdient
aanbeveling.
• Probeer het effect van de stoomreiniger eerst
uit op een gedeelte dat niet in het oog valt.
• Door het reinigen met stoom verdwijnen
vlekken uit het tapijt en wordt de
vloerbedekking weer heerlijk fris.
• Bij een ernstig vervuild tapijt zal de eerste
behandeling met stoom wat extra tijd (èn extra
stoomlappen) vergen.
Als u het tapijt echter regelmatig met stoom
schoonmaakt, voorkomt u dat het vuil zich
vastzet en zal het schoonmaken sneller en
gemakkelijker gaan.
- Behandel het tapijt zoals beschreven in
hoofdstuk “Normaal schoonmaken met
stoomlap”.
Zorg ervoor dat u steeds een schoon gedeelte
van de stoomlap gebruikt.
- Bij kleine vlekken (kauwgum, kaarsvet e.d.)
kunt u ‘t beste het
“Turbo”mondstuk en
een doek gebruiken
(fig. 28). De stoom
blaast het vuil in de
doek.
Houd het “Turbo”mondstuk steeds in
beweging om oververhitting van de vezels
te voorkomen.
Harde vloeren: tegels, plavuizen, parket,
kunststof
• Zie "Normaal schoonmaken met stoomlap".
• Bij een zeer vervuilde tegelvloer zal de eerste
behandeling met stoom wat extra tijd (èn extra
stoomlappen) vergen.
Als u de vloer echter regelmatig met stoom
schoonmaakt, voorkomt u dat het vuil zich
vastzet en behouden de voegen hun
oorspronkelijke tint.
• Houd er rekening mee dat de stoom ook
eventuele vloerwas verwijdert.
Gladde verticale vlakken en vensters
- Bevestig hiervoor het
speciale wissermondstuk en eventueel de gebogen buis
aan de handgreep (fig.
29 en 30).
- Zet de stoomregelaar
in stand “Minimum” of
“Normaal” (fig. 31).
- De haartjes en de stoom maken het vuil los
(fig. 32).
- Schakel de stoom uit door de stoomschakelaar
op de handgreep in stand 1 (geen stoom) te
zetten (fig. 33).
Verzamel het vuile water met behulp van de
wisser (fig. 34).
- Neem het vuile water op met een aparte doek
of spons (fig. 35).
• U kunt ook het grote borstelmondstuk
gebruiken voor het stoomreinigen en een
aparte wisser en/of doek nemen om het vuile
water te verwijderen.
28
28
35
30
31
33
NOR.
MIN.
29
32
34
Page 29

• Het is af te raden bij extreme koude uw
vensterruiten (m.n. van enkellaagsglas) met
stoom te reinigen. De ruiten zouden door de
snelle verhitting kunnen breken.
• Overtuig u ervan dat er zich op krasgevoelige
oppervlakken (bijv. ruiten, spiegels) geen
deeltjes bevinden die krassen kunnen
veroorzaken (bijv. zandkorrels), voordat u
begint met stoomreinigen.
• Keramiek (wasbak, bad en ander sanitair) kunt
u ook op de voor glas beschreven wijze
reinigen.
Voegen schoonmaken
- Eerst grondig
schoonmaken met één
van de ronde
borstelmondstukken op
het Turbo-mondstuk.
Beweeg het mondstuk
enkele keren in de
lengterichting van de
voeg heen en weer
(fig. 36).
- Neem het vuile water op met een aparte doek
of spons (fig. 37), of bevestig een stoomlap op
het borstelmondstuk en neem het opgeloste
vuil daarmee op (fig. 38).
Hardnekkige vlekken en moeilijk bereikbare
plaatsen
Voor het schoonmaken
van moeilijk bereikbare
plaatsen en het
verwijderen van
hardnekkige vlekken en
kalkaanslag is vooral het
“Turbo”mondstuk
geschikt.
De stoomstraal wordt
door het “Turbo”mondstuk op één punt geconcentreerd.
Op het “Turbo”mondstuk kunt een van de ronde
borstels bevestigen (fig. 39).
• Houd rekening met het druipen van vies water.
Ontkalken
Van tijd tot tijd moet de stoomtank ontkalkt
worden.
Hoe vaak dat moet gebeuren, hangt af van de
hardheid van het leidingwater en van de vraag
hoe vaak u het apparaat gebruikt.
In het algemeen adviseren wij het apparaat
tenminste elk half jaar te ontkalken.
Gebruik bij voorkeur een speciaal
ontkalkingsmiddel voor huishoudelijke apparaten,
zoals espresso-apparaten, stoomstrijkijzers.
Waarschuwing: Ontkalk het apparaat alleen
wanneer de stekker niet in het stopcontact is
en wanneer het apparaat niet heet is.
Speciaal ontkalkingsmiddel (ca. 600 cc)
• Ontkalkingsmiddelen die zwavelzuur en
citroenzuur bevatten zijn het meest effectief en
zijn niet schadelijk voor de stoomtank.
Ze zijn veelal verkrijgbaar bij de leveranciers
van elektrische huishoudelijke apparaten en bij
drogisterijen.
Volg de aanwijzingen op de verpakking van het
ontkalkingsmiddel.
Mengsel van water (een halve liter) en azijn
(een half glas)
• In plaats van ontkalkingsmiddel kunt u ook een
mengsel van een halve liter water en een half
glas witte azijn gebruiken.
Let er dan vooral op dat het apparaat niet heet
is!
- Doe het mengsel van
water met azijn in de
stoomtank (fig. 40).
- Schud het apparaat en
laat het mengsel
geruime tijd inwerken
(minimaal een uur; bij
voorkeur 12 uur).
29
37
36
38
39
40
Page 30

- Houd het apparaat boven een afvoer
(gootsteen, douchecabine, bad) en draai de
uitstroomopening open.
Hierbij gebruikt u de bovenzijde van de vuldop
als draaisleutel (fig. 41 en 42).
- Spoel de stoomtank met vers water door totdat
het uitstromende water helder is.
Accessoires nabestellen of bijbestellen?
Voor het uitbreiden van de mogelijkheden met uw
stoomreiniger of voor vervanging zijn accessoires
verkrijgbaar. Zie hiervoor pag. 37.
Wend u tot uw leverancier en vermeld het
betreffende typenummer en/of servicenummer.
30
41
42
Page 31

ΓENIKH ΠEPIΓPAΦH (EIK.1)
A ∆εξαµενή ατµού
B Kαπάκι πλήρωσης
C ∆ιακπτης on/off I
D ∆ιακπτης “Σιδέρωµα” ≥
(πιέστε µνον ταν υπάρχει το σίδερο
ατµού HR 6961)
E Eνδεικτικ λαµπάκι προθέρµανσης
(πορτοκαλί) ≤
F Eνδεικτικ λαµπάκι «ατµς έτοιµος» s
(πράσινο)
G Προειδοποιητικ λαµπάκι ξαναγεµίσµατος
* (κκκινο)
H Eνδεικτικ λαµπάκι σιδερώµατος ≥
I Σύνδεση για το σωλήνα ατµού
J Σωλήνας ατµού
K Xειρολαβή
L ∆ιακπτης ατµού
1 = χωρίσ ατµ
s = µε ατµ
M Έλεγχος ατµού (έξοδοσ ατµού)
Eλάχιστο ↔ Kανονικ ↔ Mέγιστο
N Σωλήνες (άκαµπτοι)
O Σωλήνας (εύκαµπτοσ)
P Mεγάλο ρύγχος
σπρώχνωντασ µπροστά εφαρµζει
σπρώχνωντασ πίσω περιστρέφεται
Q Pύγχος για στράγγισµα
R Tριγωνικ ρύγχος
S Kυκλικ ρύγχος
T Pύγχος “turbo” (υψηλήσ
απορροφητικτητασ)
U ∆οχείο γεµίσµατος
V Σίδερο ατµού
W Πετσέτα
31
Ελληνικά
Σηµαντικ
• ∆ιαβάστε αυτές τις οδηγίες σε σχέση µε τις εικνες πριν χρησιµοποιήσετε την συσκευή.
Eπίσης γυρίστε στη σελ. 3.
Πάντα βγάζετε τη συσκευή απ την πρίζα ταν:
- η συσκευή είναι άδεια
- ταν προκειται να ξαναγεµίσετε τη συσκευή
- ταν η συσκευή δεν λειτουργεί πως αναµένεται
- αν πρκειται να σκουπίσετε τους σωλήνες ατµού. (π.χ. αν πρκειται να σιδερώσετε µε
ατµ µετά απ καθαρισµ µε ατµ.
• Ποτέ µην ανάβετε τη συσκευή ταν είναι άδεια.
• Mη στοχεύετε ποτέ µε το σωλήνα απορρφησης ανθρώπους, ζώα πρίζες ή ηλεκτρικές
συσκευές.
Οι θερµοστατικοί διακπτες µπορεί να καταστραφούν απ τον ατµ. Μην χρησιµοποιείτε τη
συσκευή για να καθαριζετε τέτοιου τύπου διακπτες.
• Aποφεύγετε την επαφή του σωλήνα µε υλικά που δεν είναι ανθεκτικά σε υγρασία ή
θερµτητα πως ταπετσαρία τοίχου, (εκτς και αν θέλετε να τα αποµακρίνετε!), µετάξι,
συνθετικές ίνες, δέρµα, σουέτ, βελούδο. Aν έχετε αµφιβολία δοκιµάστε σε ένα σηµείο που
δεν είναι άµεσα ορατ.
• Aν ξεβιδώσετε το καπάκι πλήρωσης ενώ βρίσκεται ακµα υπ πίεση η δεξαµενή ατµού, ο
ατµς θα βγει απ ειδικές τρύπες στο καπάκι. Aυτ είναι φυσιολογικ.
• Εάν το καλώδιο ρεύµατος της συσκευής υποστεί βλάβη, θα πρέπει να αντικατασταθεί µνο
απ εξουσιοδοτηµένο επισκευαστή της Philips, διτι χρειάζονται ειδικά εργαλεία και
ανταλλακτικά.
• Nα προσέχετε πάντα την συσκευή ταν είναι αναµµένη. Nα µη χρησιµοποιείται απ τα
παιδιά. Θυµίζουµε τι ο καυτς ατµς µπορεί να είναι επικίνδυνος αν χρησιµοποιηθεί
λανθασµένα.
• Γεµίζετε την δεξαµενή ατµού µνο µε καθαρ νερ βρύσης. Mην προσθέτετε πχ
λευκαντικ.
• H συσκευή είναι ασφαλής σε περίπτωση που πέσει πάνω της νερ. Παρ’ λα αυτά δεν είναι
στεγανή. Mη βουτάτε ποτέ τη συσκευή στο νερ, ούτε να τη ραντίζετε. Mπορείτε να
καθαρίζετε την συσκευή µε υγρ πανί, και αν χρειάζεται µε κάποιο απορρυπαντικ. Bγάλτε
την πρίζα πριν καθαρίσετε τη συσκευή.
Tα πλαστικά τµήµατα τησ συσκευήσ φέρουν κωδικ για να διευκολύνεται η ανακύκλωσή τουσ.
H συσκευασία τησ συσκευήσ είναι απ υλικ που προήλθε απ ανακύκλωση και µπορεί πάλι να
ανακυκλωθεί.
f
Page 32

32
ATMOΣ:αποτελεσµατικς και υγιεινς
Γεµίστε τη συσκευή µε νερ βρύσησ. H
συσκευή βράζει το νερ (για περίπου 8 λεπτά)
O παραγµενοσ ατµσ µεταφέρεται µέσω του
σωλήνα ατµού και του επιλεγµένου ρύγχουσ.
Mπορείτε π.χ. να τον χρησιµοποιήσετε για να
δώσετε στο χαλί ένα βαθύ και υγιειν
καθάρισµα ή να αποµακρίνετε λίποσ ή καπνιά
απ λείεσ επιφάνειεσ. H συσκευή είναι
εύκολη στη χρήση λγω του ελέγχου απ τη
χειρολαβή (τηλεχειριζµενοσ έλεγχοσ
ατµού).
Πώς θα ετοιµάσετε την συσκευή για χρήση
Γεµίζοντας τη δεξαµενή ατµού
- Ξεβιδώστε το καπάκι
πλήρωσησ (εικ.2).
- Xρησιµοποιήστε το
δοχείο για να
γεµίσετε την
δεξαµενή ατµού (εικ.
3-4) (δύο δοχεία =
γεµάτο).
- Bιδώστε γερά το
καπάκι πλήρωσησ
(εικ.5).
• Mην χρησιµοποιείτε
κανένα εργαλείο για
να βιδώσετε ή να
ξεβιδώσετε το
καπάκι.
Συνδέοντας το σωλήνα ατµού
- Περιστρέψτε την
άκρη του σωλήνα
κατα την φορά του
βέλουσ (εικ.6).
- Tοποθετήστε το άκρο
του σωλήνα στην
υποδοχή τησ
συσκευήσ (εικ.7).
- Mετά περιστρέψτε
τον δακτύλιο κατά
την αντίθετη φορά (εικ.8) Eλέγξτε αν ο
σωλήνασ είναι καλά τοποθετηµένοσ.
Πώς θα συνδέσετε τα ρύγχη και τους
σωλήνες
- Περιστρέψτε το
δακτύλιο κατά την
φορά του βέλουσ
(εικ.9).
- Tοποθετήστε την
στενή άκρη του ενσ
σωλήνα στην φαρδιά
υποδοχή του άλλου
(εικ.10).
- Mετά περιστρέψτε το
δακτύλιο στην αντίθετη φορά (εικ.11).
• Aν θέλετε µπορείτε να συνδέετε τα ρύγχη
κατ’ευθείαν στη χειρολαβή ή µοντάρετε
µνο τον εύκαµπτο σωλήνα µεταξύ
χειρολαβήσ και ρύγχουσ.
Oι δακτύλιοι ασφαλίζουν τουσ σωλήνεσ και
τα ρύγχη έτσι ωστε να µην αποσυνδέονται
κατά λάθοσ.
2
3
4
5
6
9
7
8
10
11
Page 33

Eκτσ απ αυτ οι δακτύλιοι επιβεβαιώνουν
τι η παροχή ατµού σταµατά ταν ο σωλήνασ
ατµού ή κάποιο ρύγχοσ αποσυνδεθεί πριν την
ώρα του.
Πώς θα θέσετε την συσκευή σε λειτουργία
- Aνοίξτε την θήκη και τραβήξτε το καλώδιο
σε λο του το µάκροσ (εικ. 12A, 12B).
- Bάλτε το φισ στην πρίζα του τοίχου
- Πατήστε τον διακπτη on/off I
To ενδεικτικ πορτοκαλί λαµπάκι
θέρµανσησ θα ανάψει ≤ (εικ 13).
- Oταν η συσκευή θερµανθεί το πράσινο
λαµπάκι s θα ανάψει, το πορτοκαλί
λαµπάκι ≤ θα σβήσει (εικ.14) .
Tώρα µπορείτε να ξεκινήσετε το καθάρισµα
µε ατµ.
Πώς θα χρησιµοποιείσετε τη συσκευή
Ωθείστε µπροστά τον διακπτη στην
χειρολαβή (εικ. 15) Mετά απ λίγα
δευτερλεπτα θα αρχίσει να βγαίνει ατµσ
απ το ρύγχοσ.
- Mπορείτε να ρυθµίσετε την έξοδο ατµού
χρησιµοποιώντασ τον έλεγχο ατµού
(εικ.16).
• Aρχικά θα υπάρχει µια συµπύκνωση
(σταγνεσ νερού). Aφήστε τον ατµ να
φύγει ελεύθερα στα πρώτα δευτερλεπτα
µέχρι να αρχίσει να παράγεται καθαρσ
ατµσ s.
• Oταν επιτευχθεί η µέγιστη παραγωγή
ατµού συνιστούµε να διακπτετε κατά
διαστήµατα τον ατµ. Aυτ επιτρέπει στη
συσκευή να επανακτήσει την απαιτούµενη
πίεση.
• Kατά την διάρκεια λειτουργίασ τησ
συσκευήσ θα ανάβει αυτµατα το στοιχείο
θέρµανσησ κατά διαστήµατα (θα ανάβει το
πορτοκαλί ενδεικτικ λαµπάκι ≤) αν και
ατµσ θα είναι ακµα διαθέσιµοσ.
Mπορείτε να συνεχίσετε το καθάρισµα µε
ατµ.
Tηλεχειριζµενος έλεγχος ατµού
Mε τον έλεγχο ατµού πανω στην χειρολαβή
µπορείτε να διαλέξετε την καταλληλτερη
έξοδο ατµού για τισ διάφορεσ λειτουργίεσ:
• Mέγιστη έξοδος ατµού: Για καθάρισµα απ
κάποια απσταση (δυσπρσιτεσ περιοχέσ!)
χρησιµοποιώντασ το ρύγχοσ “turbo” για
επίµονουσ λεκέδεσ
• Mέγιστη ή κανονική έξοδος ατµού: για
καθάρισµα χαλιών και ταπήτων
• Kανονική ή ελάχιστη έξοδος ατµού: για
καθάρισµα χαλιών και ταπήτων
• Eλάχιστη έξοδος: για κεραµικά, γυάλινα και
εύθραυστα αντικείµενα
Πώς θα γεµίζετε µε νερ
Kατά την διάρκεια τησ χρήσησ µπορεί να
ανάψει το κκκινο λαµπάκι *. Aυτ σηµαίνει
τι χρησιµοποιήθηκε λο το νερ.
Για να αποφευχθεί η υπερθέρµανση υπάρχει
διακπτησ ασφαλείασ για τη δεξαµενή ατµού.
- Πιέστε το διακπτη I
on/off για να κλείσετε
τη συσκευή.
- Bγάλτε την πρίζα
- Ξεβιδώστε το καπάκι
πλήρωσησ αργά και
προσεκτικά έωσ του
ο ατµσ διαφύγει
διαµέσου των ειδικών
τρυπών (εικ.17).
- Oταν σταµατίσει ο ατµσ µπορείτε να
ξεβιδώσετε το καπάκι περαιτέρω.
- Γεµίστε την δεξαµενή ατµού πωσ
περιγράφεται στο ανάλογο κεφάλαιο.
33
12A
12B
13
15
14
16
MAX.
NOR.
MIN.
17
Page 34

- Aνάψτε τη συσκευή ξανά πωσ
περιγράφεται στο σχετικ κεφάλαιο.
• Ποτέ µην ανάβετε την συσκευή ταν είναι
άδεια.
Kανονικς καθαρισµς µε ατµ και πανί
- Στερεώστε ένα στεγν και καθαρ πανί στο
µεγάλο ρύγχοσ µε την βούρτσα
χρησιµοποιώντασ τα ειδικά κλιπσ.
(εικ. 18 και 19). ∆ιαλέξτε ένα πανί µε υψηλή
απορροφητική ικαντητα.
- Bάλτε τον έλεγχο ατµού στην θέση
“Eλάχιστο” ή “Kανονικ” (εικ.20).
- Mλισ βγει ο ατµσ, αφήστε το ρύγχοσ µε
το πανί να γλυστρήσει πάνω στην
επιφάνεια που θέλετε να καθαρίσετε
(εικ.21). Mην τρίβετε! Tα αποτελέσµατα θα
είναι καλύτερα αν δεν πιέσετε κάτω τισ
τρίχεσ τησ βούρτσασ.
- Kαθαρίστε τισ ευαίσθητεσ επιφάνειεσ
ελαφρά και µε διπλ πανί στο ρύγχοσ. Γι’
αυτήν την εφαρµογή βάλτε τον έλεγχο
ατµού στην ελάχιστη έξοδο ατµού.
“Bαθύ καθάρισµα”
Για να καθαρίσετε καλά βρώµικεσ επιφάνειεσ
και επίµονουσ λεκέδεσ:
- Πρώτα χρησιµοποιήστε το ρύχγοσ µε την
βούρτσα χωρίσ πανί
στην επιφάνεια που
θέλετε να καθαρίσετε
κατά τρπον ώστε ο
ατµσ και η βούρτσα
να έχουν το καλύτερο
δυνατ αποτέλεσµα
(εικ.22).
- Bάλτε τον έλεγχο ατµού στην θέση
“Kανονικ” ή “Mέγιστο” (εικ.23).
- Bουρτσίστε ελαφρά το βρώµικο σηµείο
(εικ.24). Mην τρίβετε!
Πώς θα καθαρίσετε διαλυµένους λεκέδεςΓια
να καθαρίσετε διαλυµένουσ λεκέδεσ
µπορείτε:
- Nα στερεώσετε ένα
πανί στο ρύγχοσ µε
την βούρτσα (εικ.25)
(βλ. στο τµήµα
“Kανονικσ
καθαρισµσ µε ατµ
και πανί).
- Mαζέψτε το βρώµικο νερ µε τη λαστιχένια
λωρίδα του µεγάλου ρύγχουσ (εικ. 26).
- χρησιµοποιήστε ξεχωριστ πανί ή
σφουγγάρι (εικ.27)
34
18
MIN.
20
NOR.
19
21
23
NOR.
MAX.
26
22
24
25
27
Page 35

Mετά την χρήση
- Σβήστε τη συσκευή πατώντασ το διακπτη
on/off I.
- Bγάλτε την πρίζα.
- Για να προλάβετε το σκούριασµα µέσα
στην συσκευή: βεβαιωθείτε τι το καπάκι
πλήρωσης είναι βιδωµένο γερά ταν
αποθηκεύετε τη συσκευή.
∆ιάφορες εφαρµογές
Tάπητες, χαλιά, ταπετσαρίες
• Σασ συνιστούµε να σκουπίζετε πρώτα, πριν
χρησιµοποιήσετε τον ατµ.
• Πρώτα δοκιµάστε τα αποτελέσµατα
καθαρισµού µε ατµ σε µια επιφάνεια που
δεν είναι άµεσα ορατή.
• O καθαρισµσ µε ατµ θα εξαφανίσει τουσ
λεκέδεσ απ τα χαλιά σασ και και θα τα
φρεσκάρει θαυµάσια.
• Aν ένα χαλί έχει βρωµίσει πολύ το πρώτο
καθάρισµα µε ατµ θα πάρει περισστερο
χρνο (και πανιά µε ατµ). Πάντωσ εάν
καθαρίζετε σε τακτά χρονικά διαστήµατα
τα χαλιά µε ατµ θα εµποδίσετε τουσ
λεκέδεσ να παραµείνουν και το καθάρισµα
θα γίνεται ευκολτερα και γρηγορτερα.
- Xειριστείτε το χαλί πωσ περιγράφεται στο
τµήµα “Kανονικσ καθαρισµσ µε πανί και
ατµ” Bεβαιωθείτε τι χρησιµοποιήτε
πάντα ένα καθαρ
τµήµα του πανιού.
- Για µικρούσ λεκέδεσ
(τσίχλεσ,κερί κλπ)
σασ συνιστούµε να
χρησιµοποιήτε το
ρύγχοσ turbo και
πανί (εικ. 28). O
ατµσ θα οδηγήσει
τον λεκέ στο πανί.
Mετακινείτε
συνέχεια το ρύγχοσ turbo για να
εµποδίσετε υπερθέρµανση των ινών.
Σκληρά πατώµατα: πέτρα, πλακάκια, παρκέ,
συνθετικά
• Bλέπε τµήµα “Kανονικσ καθαρισµσ µε
πανί και ατµ”.
• Aν το πάτωµα απ πλακάκια είναι πολύ
βρώµικο το πρώτο καθάρισµα µπορεί να
πάρει περισστερο χρνο (και πανιά µε
ατµ). Πάντωσ αν καθαρίζετε το πάτωµα µε
ατµ, εµποδίζετε τουσ λεκέδεσ να
παραµείνουν και έτσι οι ενώσεισ διατηρούν
το αρχικ τουσ χρώµα.
• Σασ θυµίζουµε τι ο ατµσ θα αποµακρίνει
το κερί του πατώµατοσ.
Λείες κάθετες επιφάνειες και παράθυρα
Tοποθετήστε το
ρύγχοσ υψηλήσ
αναρρφησησ στην
χειρολαβή, αν θέλετε
µαζί µε τον εύκαµπτο
σωλήνα
(εικ. 29 και 30).
- Tοποθετήστε τον
έλεγχο ατµού στη
θέση “Eλάχιστο” ή
“Kανονικ” (εικ. 31).
- H βούρτσα και ο
ατµσ µαζί διώχνουν
τουσ λεκέδεσ
(εικ. 32).
- Bγάζετε τον ατµ
βάζοντασ τον
διακπτη τησ
χειρολαβήσ στη θέση
1 (χωρίσ ατµ)
(εικ.33) Mαζέψτε τα
βρώµικα νερά
χρησιµοποιώντασ το
ρύγχοσ υψηλήσ
αναρρφησησ
(εικ.34).
- Σφουγγίστε το
βρώµικο νερ µε
έξτρα πανί ή
σφουγγάρι (εικ. 35).
35
28
29
32
30
31
33
34
35
NOR.
MIN.
Page 36

• Mπορείτε να χρησιµοποιήσετε επίσης το
µεγάλο ρύγχος µε τη βούρτσα για
καθαρισµ µε ατµ και να χρησιµοποιήτε
ένα ξεχωριστ ρύγχος και/ή πανί για να
αποµακρίνετε το βρώµικο νερ.
• Πριν αρχίσετε τον καθαρισµ βεβαιωθείτε
τι δεν υπάρχουν σωµατίδια (πωσ κκκοι
άµµου) που προκαλούν γρατζουνιέσ σε
ευαίσθητεσ επιφάνειεσ (π.χ. τζάµια
παραθύρων, καθρέφτεσ).
• Oταν κάνει πολύ κρύο, µη καθαρίζετε τα
τζάµια µε ατµ (ειδικά µονά τζάµια) καθώσ
η ξαφνική θερµτητα µπορεί να σπάσει το
τζάµι.
• Kεραµικά (νιπτήρασ και άλλα είδη υγιεινήσ)
µπορούν να καθαριστούν πωσ
περιγράφτηκε για τα τζάµια.
Eνώσεις πλακιδίων
- Πρώτα καθαρίσετε
καλά µε την µία απ
τισ στρογγυλέσ
βούρτσεσ του
ρύγχουσ turbo.
Kινείστε το ρύγχοσ
µπρσ και πίσω κατά
µήκοσ του αρµού.
(εικ. 36).
- Σφουγγίστε το βρώµικο νερ µε έξτρα πανί
ή µε σφουγγάρι (εικ. 37) ή στερεώστε στο
ρύγχοσ µε το βουρτσάκι ένα πανί και
χρησιµοποιήστε το για να αποροφήσει τουσ
διαλυµένουσ λεκέδεσ (εικ. 38).
Eπίµονοι λεκέδες και δυσπρσιτα σηµεία
Για να καθαρίσετε
δυσπρσιτα σηµεία και
επίµονουσ λεκέδεσ
επιλέξτε το ρύγχοσ
turbo. Aυτ το ρύγχοσ
επικεντρώνει τον ατµ
σε ένα σηµείο.
Mπορείτε να
στερεώσετε µία απ τισ
στρογγυλέσ βούρτσεσ
στο ρύγχοσ turbo
(εικ. 39).
• Πάρτε προφυλάξεισ σε σχέση µε το
βρώµικο νερ που στάζει.
Aφαίρεση αλάτων
Aπ καιρ σε καιρ η δεξαµενή νερού
χρειάζετε αφαίρεση αλάτων.
Tο πσο συχνά χρειάζεται να γίνεται αυτή η
διαδικασία εξαρτάται απ την σκληρτητα
του νερού και απ την συχντητα τησ
χρήσησ. Γενικά, συνιστάται να γίνεται η
αφαίρεση των αλάτων κάθε έξι µήνεσ.
• Προειδοποίηση
H αφαίρεση αλάτων
πρέπει να γίνεται σο
η συσκευή δεν
βρίσκεται στην πρίζα
και ταν δεν είναι
ζεστή.
- Bάλτε µισ λίτρο
νερού και µισ ποτήρι
λευκ ξύδι στη
δεξαµενή νερού
(εικ. 40).
- Aνακινήστε την συσκευή και αφήστε το
µείγµα να δράσει για αρκετ χρνο (π.χ.
τουλάχιστον µία ώρα, κατά προτίµηση 12
ώρεσ).
- Tοποθετήστε την συσκευή πάνω απ µία
έξοδο νερού (νιπτήρασ, µπανιέρα, βρύση)
και ξεβιδώστε το άνοιγµα χρησιµοποιώντασ
το πάνω τµήµα απ το καπάκι πλήρωσησ
(εικ. 41 και 42).
- Pαντίστε τη δεξαµενή ατµού µέχρι το νερ
που βγαίνει να είναι καθαρ.
Εξαρτήµατα για αντικατάσταση ή εξτρά
Υπάρχουν εξαρτήµατα διαθέσιµα
προκειµένου να επεκτείνετε τισ δυναττητεσ
του ατµοκαθαριστή σασ ή για αντικατάσταση.
παρακαλούµε ανατρέξτε στη σεδ. 37.
Απευθυνθείτε στον προµηθευτή σασ και
αναφέρετε τον αντίστοιχο τύπο και / ή τον
κωδικ Service.
36
37
36
38
41
40
42
39
Page 37

37
Steam iron
Fer à vapeur
Dampfbügeleisen
Stoomstrijkijzer
Σίδερο ατµού
Accessoires - Zubehör - Accessoires - Εξαρτήµατα
HR 6961
3 Round nozzles
3 Brosses rondes
3 Runde Düsen
3 Ronde borstels
3 στρογγυλέσ
βούρτσεσ
4822 479 50054
HR 6962
Triangular nozzle
Brosse triangulaire
Dreiecksdüse
Driehoekig mondstuk
Τριγονικ ρύγχοσ
4822 479 60134
HR 6963
Set of 3 steam cloths.
Sachet de chiffons en
coton (3 pièces)
Satz von 3 Dampftüchern
Set (3 stuks) stoomlapjes
Σετ 3 πετσετών
4822 395 91038
HR 6964
Accessory and type number
Accessoire et type
Zubehör und Typen-Nummer
Accessoire en typenummer
Εξαρτήµατα και τύποσ
Description
Description
Beschreibung
Beschrijving
Περιγπαφή
Service number
Numéro service
Service-Nummer
Servicenummer
Κωδοκσ Service
C
O
N
I
N
I
L
L
X
A
E
M
N
O
L
T
A
N
O
A
N
O
L
A
T
I
O
N
C
E
S
E
S
T
O
A
I
E
M
A
X
IN
M
N
Y
L
O
N
Page 38

38
Page 39

39
Page 40

;
4222 000 45302
Certificate of
purchase
Garantie
Köpbevis
Garanzia
Type HR 6640-49
Dealer stamp
Cachet du commerçant
Händlerstempel
Handelarenstempel
Aterförsäljarens stämpel
Timbro del rivenditore
Sello comercial
Carimbo do revendedor
Date of purchase
Date de la vente
Verkaufsdatum
Datum van verkoop
Inköpsdatum
Data di acquisto
Fecha de compra
Data de compra
✄
 Loading...