

Page 1

2
English Page 4
• Keep page 3 open when reading these operating
instructions.
Dansk Side 18
• Hold side 3 opslået mens De læser
brugsanvisningen.
Norsk Side 32
• Slå opp på side 3 før De leser videre.
Svenska Sid 46
• Ha sidan 3 utvikt när ni läser bruksanvisningen.
Suomi Sivu 60
• Pidä sivu 3 auki samalla kun luet käyttöohjetta.
Page 2

3
11
L
M
3
2
4
5
M
C
D
E
F
G
H
I
P
Q
R
S
T
ONM
K
B
A
J
11
L
M
3
2
4
5
M
C
D
E
F
G
H
I
P
Q
R
S
T
ONM
K
B
A
J
Page 3

4
English
Important
• Read the instructions in conjunction with
the illustrations before using the
appliance.
• Do not allow children to operate the
appliance.
• Care must be taken when handling the
metal blade and the inserts as these are
very sharp.
• Always remove the protective cap from
the metal blade before use. Always click
it back into place after cleaning.
• Let the rotating parts come to a
complete stop before opening the cover.
• Never put your fingers in the food chute,
nor use forks, knives, spatulas, spoons
etc. Only the provided pusher is suited
for this purpose.
• Remove the mains plug from the wall
socket after use.
• If the mains cord of this appliance is
damaged, it must only be replaced by
Philips or their service representative,
as special tools and/or parts are required.
• Prior to initial use, wash all the parts
which come into contact with food.
• Do not place the bowl into a microwave
oven.
• Never immerse the motor unit in water
or any other liquid.
Do not rinse either.
• Please note that 0.75 litre is the
maximum quantity for mixing or
blending fluids.
• Do not exceed the maximum quantities
and processing times indicated in the
table and the recipes.
• Keep these instructions for future
reference.
General description (fig. 1)
A M (“Moment”) button
Press: motor runs.
Release: motor stops.
B Control ring
1 for removing and placing the lid.
The lid release buttons (D) are now retracted
2 O/M for “Off” position and “Moment” position
for pulse operation.
1....5 for continuous operation.
(1 = minimum speed; 5 = maximum speed.)
C Motor unit
D Lid release buttons
E Pusher
F Filling opening
G Lid
H Coupler
I Bowl
J Cord clip (service n°. 4822 290 40369)
K Metal blade £ (service n°. 4822 690 40232)
L Insert holder disc f
(service n°. 4203 065 61521)
M Slicing insert medium g
(service n°. 4203 065 61540)
N Shredding insert fine j
(service n°. 4203 065 61550)
O Shredding insert medium h
(service n°. 4203 065 61560)
P Gear box for kneading hook and whisk
Q Kneading tube (service n°. 4203 065 60011)
R Whisk ß (service n°. 4822 690 10115)
S Kneading hook ™ (service n°. 4822 690 10116)
T Spatula (service n°. 4822 690 40212)
Automatic Safety Shut-Off (resettable)
Please read these instructions carefully before
using the appliance.
To prevent the hazard of damage due to overheating,
your appliance is equipped with an automatic safety
device which will automatically shut-off the mains
power if necessary.
If the instructions below are followed strictly you can
safely switch on again after a one hour cooling-down
period.
If the appliance suddenly stops:
1. First remove the mains plug from the wall
socket.
2. Secondly set the control ring to position O/M.
3. Allow a cooling-down period of min. one hour.
Contact your Philips dealer or an authorised Philips service
centre if the safety shut-off is activated repeatedly.
English
Page 4
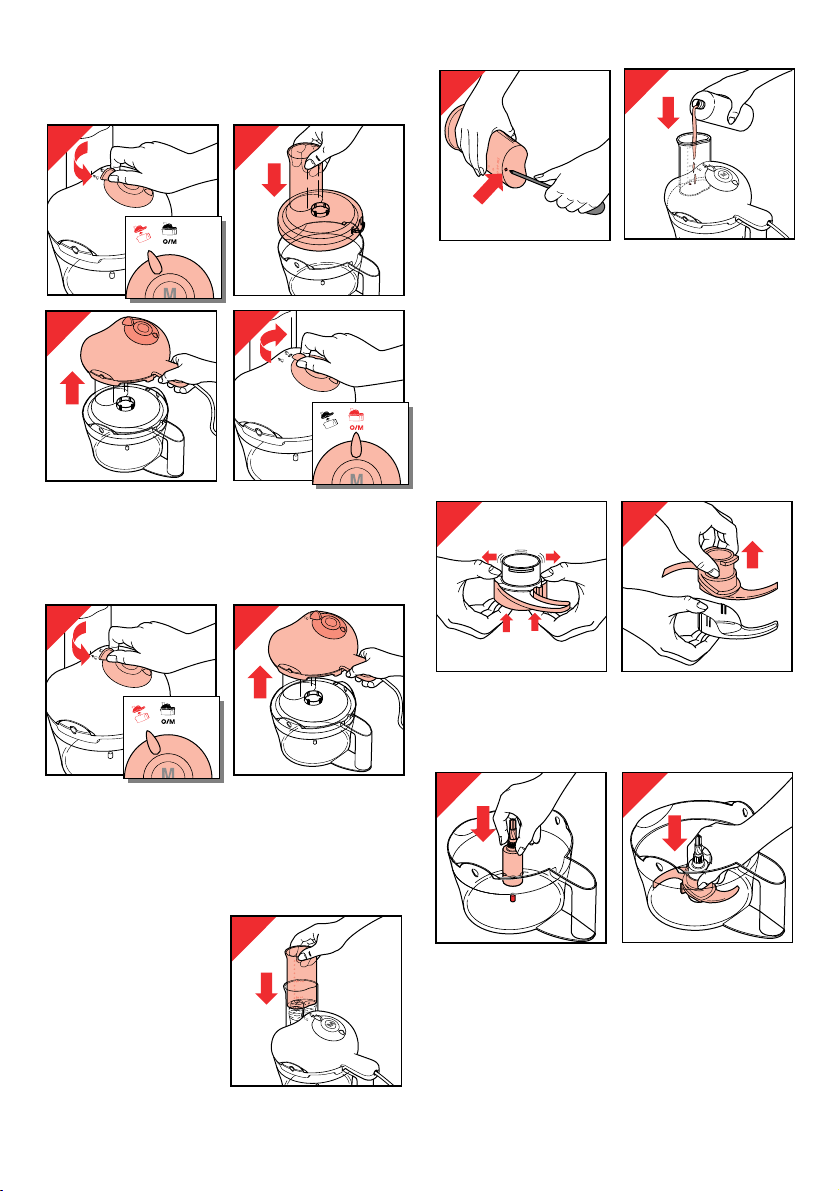
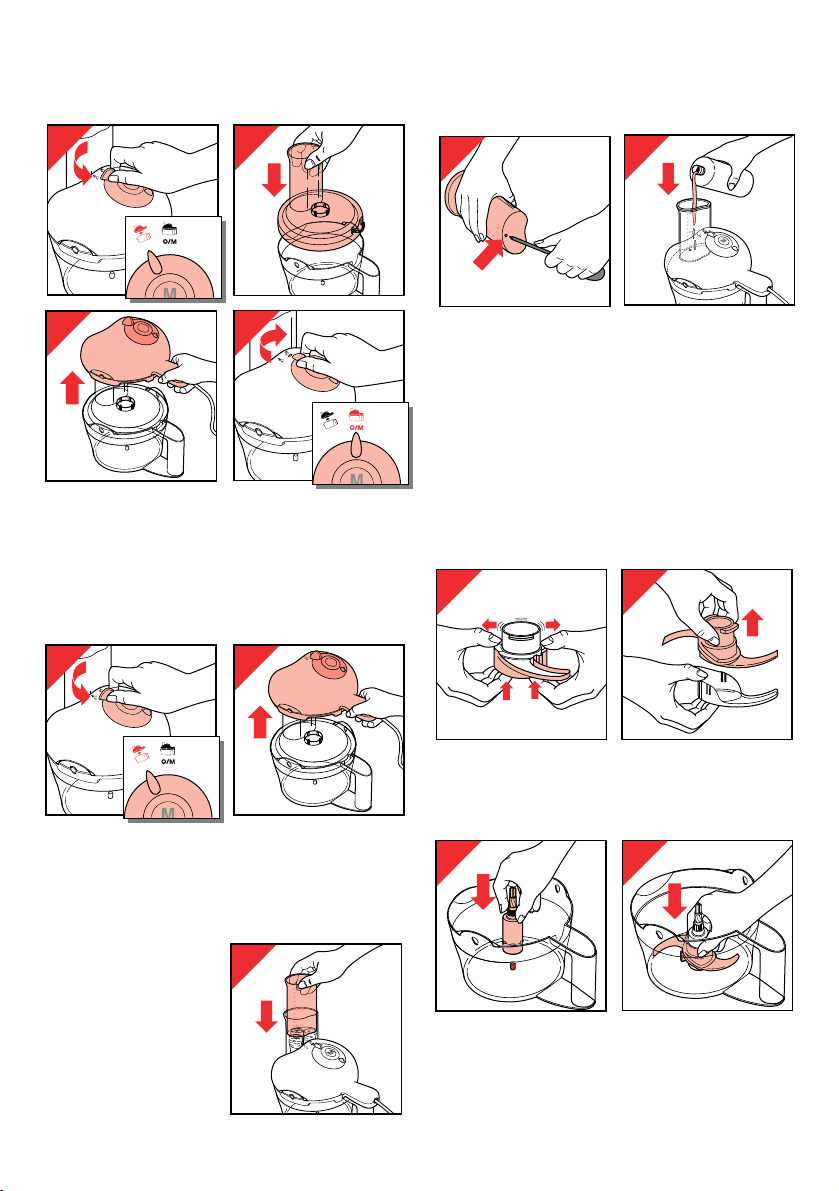
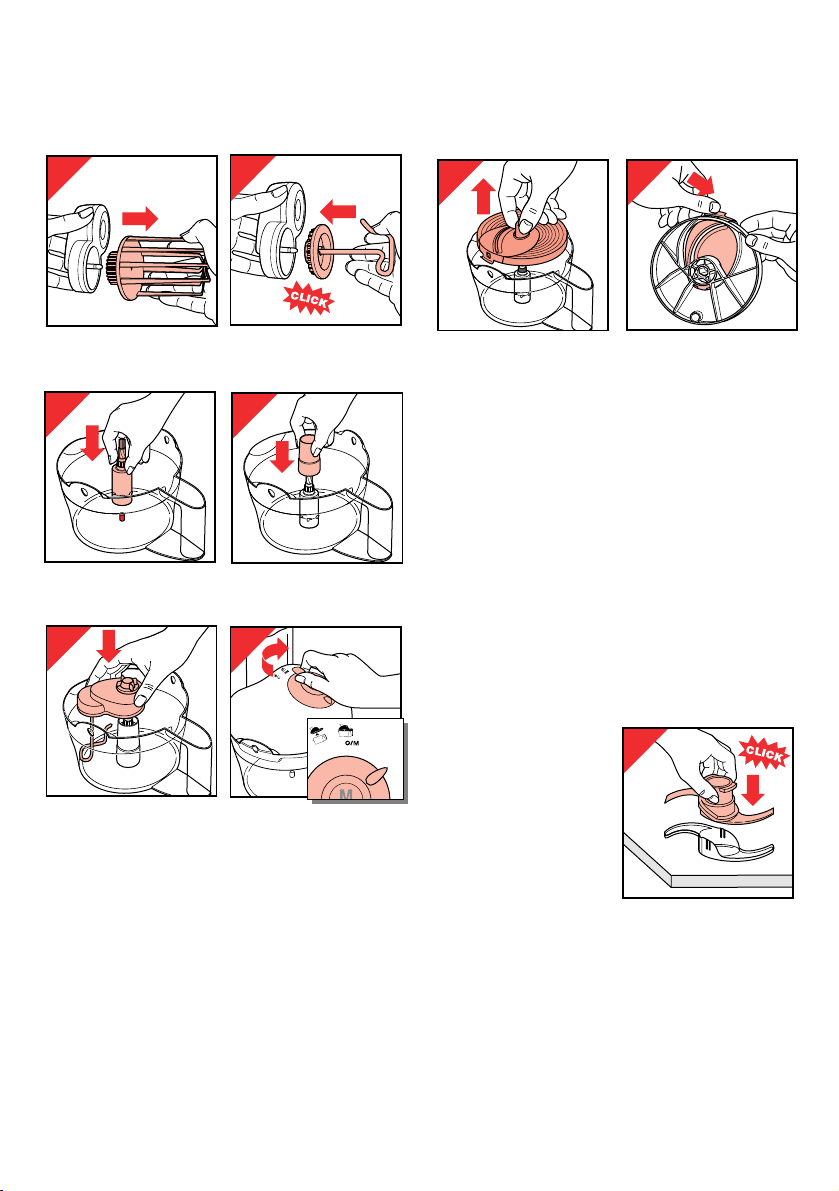
Mounting and unmounting the motor unit and
cover
- Ensure that the control ring is set to position 1 (fig. 2).
Please note: Damage may occur if the control ring is
not in this position while opening or closing.
- Place the lid on the bowl (fig. 3).
- Place the motor unit on the cover (fig. 4).
- Turn the control ring to position 2 O/M (fig. 5).
- To release the motor unit and lid turn the control
ring to position 1 (fig. 6, 7).
Food chute and pusher
• Use the pusher to feed
ingredients through the
food chute (fig. 8).
• You can keep the pusher
in the food chute to serve
as a stopper while
operating. This will
prevent splashing and
making dust.
• During operation you
may remove the pusher from the filling opening to
add ingredients.
5
- At the bottom side of the pusher you will find an
indication where you can pierce a small opening,
using a pointed object (fig. 9). Through this opening
you can from time to time add small quantities of
liquid (e.g oil while making mayonnaise) (fig. 10).
- There are level indications (ml) on the the pushing
guide for measuring liquids.
Chopping, mixing, blending and puréeing
with the metal blade £
• Take care: the cutting edges are very sharp!
- Remove the protective cap from the metal blade
before use (fig. 11, 12).
Always hold the unprotected metal blade by
its handle.
- First position the coupler (fig. 13) and the metal
blade (fig. 14).
9
10
2
1
4
3
•
2
•
3
•
4
•
5
5
1
•
2
•
6
1
7
•
2
•
3
•
4
•
5
M
3
•
4
•
5
11
12
8
13
14
Page 5

- Then put the ingredients
into the bowl (fig. 15).
- Place the lid and the
motor unit (fig. 3-4).
- Put the pusher into the
food chute.
- Switch on by pressing the
“Moment” button (fig. 16)
or by selecting the
required speed (fig. 17).
Tips - chopping
• Pre-cut large pieces into cubes of about 3 x 3 x 3
cm.
• Avoid overprocessing due to excessive operation.
• If food should get caught around the metal blade, or
when particles of food should stick to the inside of
the bowl:
- first switch the appliance off,
- take the cover (with motor unit) from the bowl
- and remove the food from the metal blade or from
the bowl using the spatula.
• Do not chop very hard ingredients, such as coffee
beans, nutmeg, grains, hard dried herbs (e.g.
turmeric, cardamom and ice cubes: these would
blunt the metal blade.
• Process large quantities of dry parsley. Ensure that
the bowl is also dry.
• If you wish to chop just a few cloves of garlic, drop
these through the funnel on the rotating metal blade.
Ensure that the garlic and the bowl are dry.
• Ensure that hard cheese (e.g. matured gouda,
parmesan, pecorino) is at room temperature.
Take care not to keep the motor running too long:
then the cheese could get warm and turn lumpy.
• Ensure that half hard cheese (e.g. new and semi
matured gouda, emmenthaler, gruyère) is as cold as
possible.
• Put sticky candied and dried fruit (e.g. dates, figs,
prunes) into the deep freezer for at least 15 minutes.
Add a tea spoon of flour before chopping.
Tips - mixing / blending
• When mixing or blending fluids always start with
speed 2 or 3. Later you can switch over to speed
4 or 5.
• Do not mix or blend too long to avoid excessive
foam.
• Do not mix or blend more fluid than 0.75 litre.
• Do not mix or blend fluids hotter than 80 °C.
• When making dough for shortbread or for puff
pastry use as little liquid as possible. This will make
the dough easier to roll out. First put the flour into
the bowl and then the other ingredients. Always use
cold hard butter or margarine.
Tips - puréeing
• Vegetables and fruits can be puréed without
additional liquid.
With some extra liquid, however, the results will be
finer.
• First purée hard and tenacious ingredients. Then add
the soft ingredients.
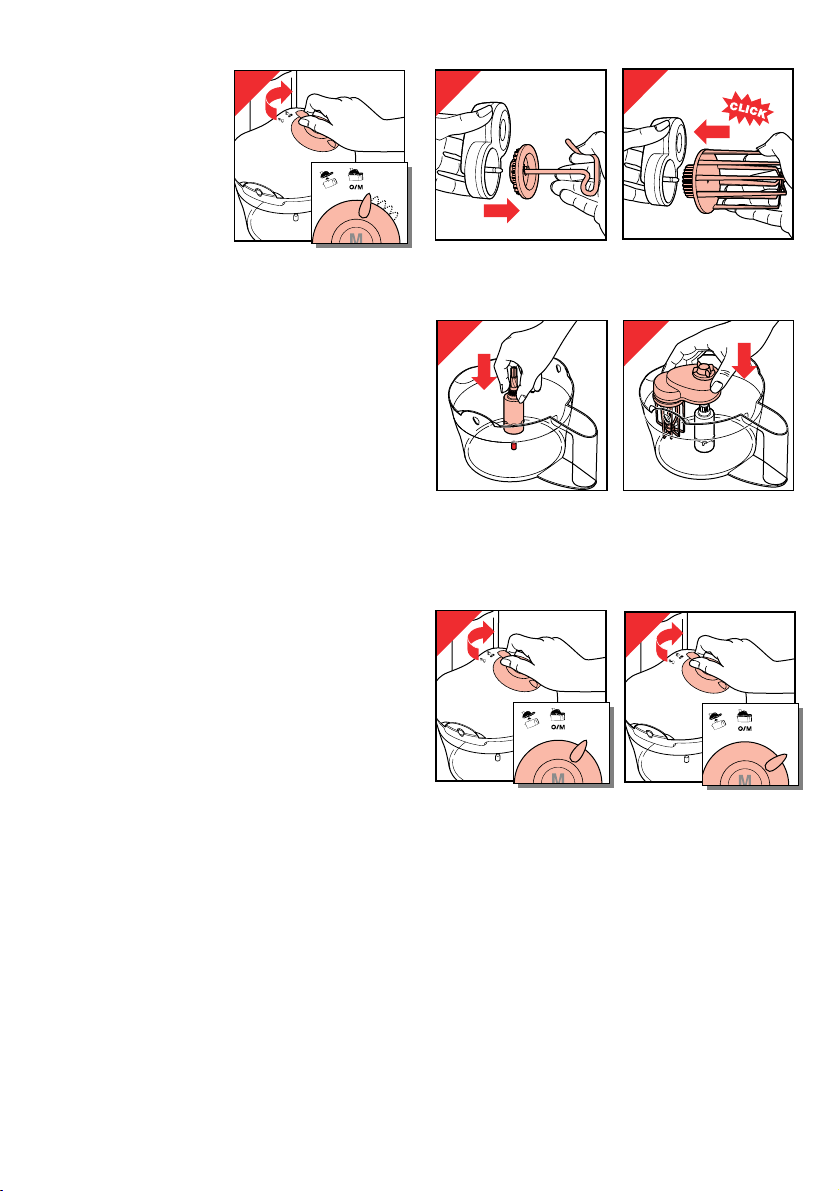
Slicing or shredding with the insert holder disc
f and changeable inserts g h j
• Take care: the cutting edges are very sharp!
- Place the desired insert in the insert holder disc
(“Click!”) (fig. 18).
- Position the coupler and the insert holder disc
(fig. 19).
- Place the cover and the motor unit (fig. 3-4).
- Lift the pusher out of the food chute.
- Feed the ingredients into the food chute (fig. 20).
- Put the pusher on top of the food and press lightly
(fig. 21).
6
15
15
16
17
1
•
1
2
1
•
2
1
–
2
•
–
3
•
3
–
4
4
–
•
5
5
•
3
•
4
–
2
•
–
5
3
–
4
–
5
18
1
19
2
20
21
Page 6
7
- Switch on by selecting the
correct speed (fig. 22).
- Press the ingredients
downwards using the
pusher. Apply steady and
moderate pressure.
• Pre-cut large pieces to
make them feed into the
chute.
• Fill the food chute evenly
for the best results.
• Empty the bowl every now and then when
processing large amounts.
Tips - slicing
g
• Fill the opening completely while the motor is
standing still. Press with the pusher and switch on.
In this manner you prevent the ingredients from
turning over while slicing.
• Use a medium speed (2 or 3) for optimal slicing
results.
Tips - shredding h j
• Before shredding cheese, pre-cut it into small cubes
(approx. 2 cm).
Apply light but steady pressure on to the pusher.
It cannot be helped that the last piece of cheese will
remain between the cover and the disc.
• Ensure that hard cheese (e.g. matured gouda,
parmesan, pecorino) is at room temperature.
• Ensure that half hard cheese (e.g. new and semi
matured gouda, emmenthaler, gruyère) is as cold as
possible.
• For shredding gouda cheese, only use the medium
shredding insert .
• If you wish long strings, place the ingredients
horizontally into the filling opening.
• Use speed 5 for optimal shredding results.
Whipping and whisking egg or double cream
with the whisk ß
• The whisk is suitable for whisking whole eggs, white
of egg, "toppings" for desserts, instant pudding and
double cream.
Please note: Do not use the whisk for making
heavy batter or dough!
- If required: Pull the kneading hook out of the gear
box (fig. 23) and firmly insert the whisk (fig. 24). This
may require some strength.
- First place the coupler (fig. 25), then place the whisk
unit (fig. 26). After that, put the ingredients into the
bowl.
- Place the cover and the motor unit (fig. 3-4).
Put the pusher into the food chute to shut it off.
- Set the control ring to speed 3 for double cream
(fig. 27), or to speed 5 for white of egg (fig. 28).
Tips - whisking and whipping
• For the best results with whipping double cream,
ensure that the cream, the bowl and the whisk are
really cold.
Place the bowl and the whisk into the refrigerator at
least half an hour before whipping. Leave the cream
in the refrigerator for at least one day.
Do not add the sugar until the cream has become
viscous.
The whipping time depends on the type of cream.
• For whisking egg white the bowl and the whisk must
be absolutely free from grease and dry. You will
obtain the best results when the eggs are at room
temperature (approx. 21°C).
22
23
1
•
2
•
3
•
4
1
–
2
•
–
5
3
–
4
–
5
24
CLICK
25
26
27
1
28
•
2
•
3
•
4
1
–
2
•
–
5
3
–
4
–
5
1
•
2
•
1
–
3
•
4
2
•
–
5
3
–
4
–
5
Page 7

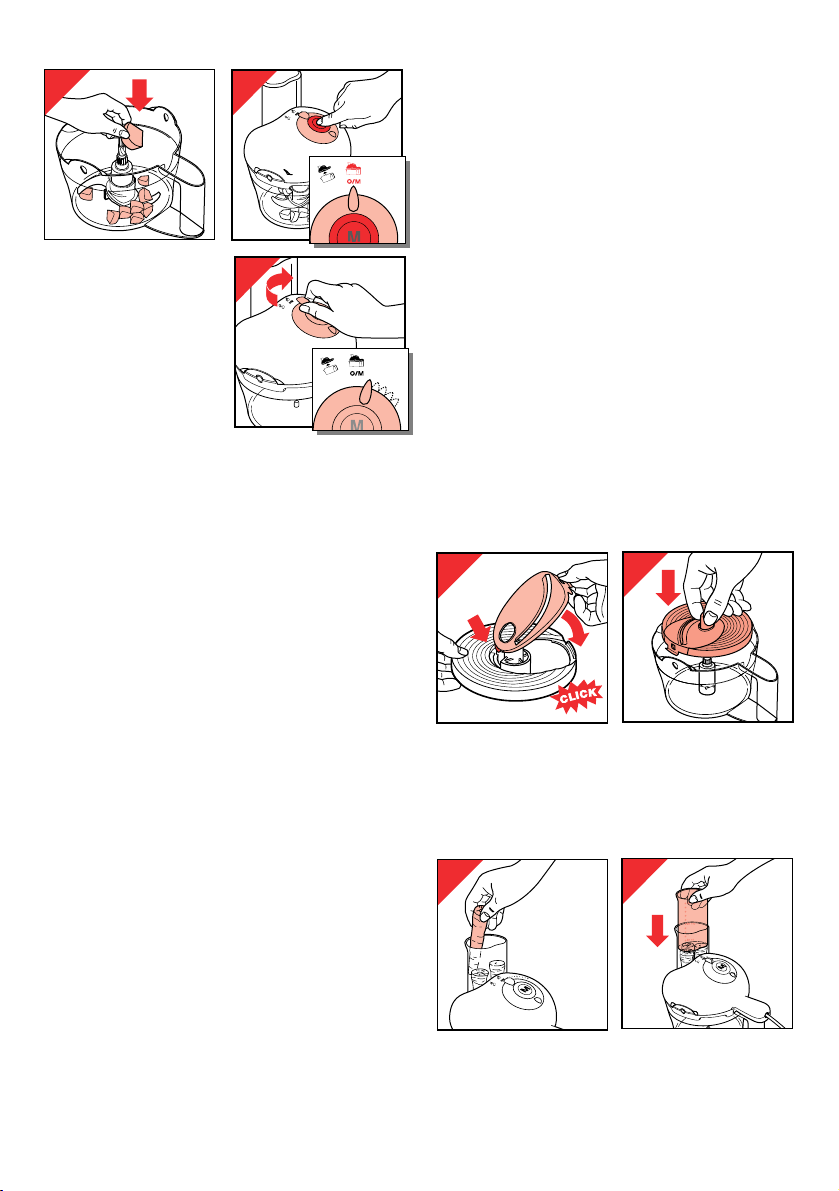
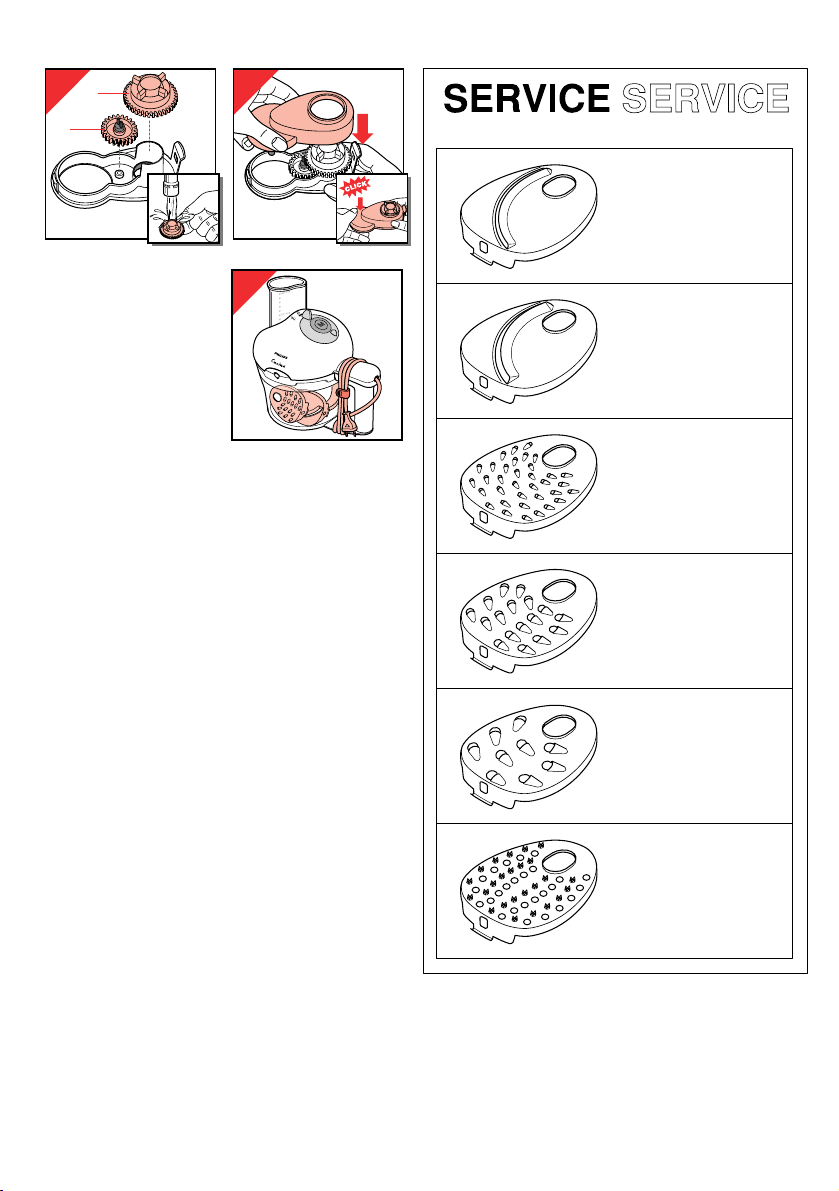
Kneading dough
with the metal kneading hook ™
- Please note: always use the kneading tube
during kneading.
- If required: Pull the whisk out of the gear box
(fig. 29) and firmly insert the kneading hook (fig. 30).
- First place the coupler and the kneading tube
(figs. 31 and 32).
- Place the kneading hook on the coupler (fig. 33).
- Finally, put the ingredients into the bowl.
- Place the cover and the motor unit (fig. 3-4).
Put the pusher into the food chute to shut it off.
- Set the control ring to speed 5 (fig. 34).
Tips - kneading
• Never exceed the maximum quantity indicated for
flour.
• For bread dough and yeast dough first put the water,
yeast and sugar into the bowl. Later add the other
ingredients. The kneading time depends on the type
of bread dough but will be between three and four
minutes.
• Never forget to disassemble and clean the gear box
after kneading.
8
After use
- To release the motor unit and lid turn the control
ring to position 1 (fig. 6, 7).
- Lift the accessory and the coupler from the bowl
(fig. 35).
After that, you can empty the bowl.
- After slicing or shredding: release the insert from the
insert disc holder (fig. 36). Make sure the insert is
not pointing toward you while doing so. Take care:
the cutting edges are very sharp!
Cleaning and storage
• Always remove the mains plug from the wall socket
before cleaning the motor unit.
• The motor unit may be wiped with a damp cloth.
Never immerse the motor unit in water. Never pour
water over it.
• Wash the items which have been in contact with the
food in warm soapy water immediately after use.
• Take care when cleaning the metal blade and slicing
and shredding inserts: the cutting edges are very
sharp! These items can also be cleaned in a
dishwasher.
• Ensure that the cutting edges do not come into
contact with hard objects as this might make them
blunt.
• Place the protective cap
back on to the metal
blade after cleaning
(fig. 37).
29
CLICK
30
35
36
31
32
33
34
1
•
2
•
3
•
4
•
5
37
Page 8

9
• The gear box for the whisk and the kneading hook
can be easily disassembled to enable thorough
cleaning (figs. 38-39).
• After cleaning, you can
store the accessoiries in
the bowl. Place the lid
and wind the cord as
illustrated in fig. 40,
using the cord clip.
Extra accessories
• The following accessories are also available as
optional extras*):
- Slicing insert fine for fine slicing.
(service n°. 4203 065 61530)
- Slicing insert medium
g for thick slicing.
(service n°. 4203 065 61540)
- Shredding insert fine j for preparing raw
vegetables, fruits and potato fritters.
(service n°. 4203 065 61550)
- Shredding insert medium h for medium
shredding.
(service n°. 4203 065 61560)
- Shredding insert coarse for grating potatoes.
(service n°. 4203 065 62310)
- Granulating insert k for granulating Parmesan,
horse radish and potatoes.
(service n°. 4203 065 61570).
*) You can ask your dealer if these accessories are
available in your country.
38
2
1
39
40
4203 065 61530
4203 065 61540
4203 065 61550
4203 065 61560
4203 065 62310
4203 065 61570
Page 9

• salt and pepper
• sprigs of parsley
• crusty bread or crackers, to serve
• Melt the butter in a pan and fry the chicken livers, onion
and garlic for approx. 8 minutes until the chicken livers
are cooked.
• Cool the mixture, put it in the bowl of the food processor.
• Add the cream, the tomato paste and the brandy, and
season to taste.
• Run the appliance at speed 5 until the mixture is smooth
and creamy.
• Turn the pate out onto a dish and garnish it with parsley.
• Serve chilled with crusty bread or crackers.
£ Guacamole
(Mexican avocado dip; serves 2 to 3 people)
• 2 medium-sized, ripe avocados
• 2 medium tomatoes, peeled
• 1 small onion, cut into pieces
• 3 to 4 sprigs offresh parsley
• 1 green chilli, seeded and cut
• salt and pepper
• wholemeal toast or corn chips, to serve
• Peel and stone the avocados, cut the flesh into chunks
and place them into the bowl of the food processor.
• Mix to a smooth puree at speed 5.
• Halve the tomatoes and remove the seeds.
• Add tomatoes, onion, parsley and chilli to the avocado.
Puree and blend until smooth.
• Season to taste with salt and pepper and serve with
wholemeal toast or corn chips.
ß Meringue nests with strawberries
(8 meringue nests)
For the meringue nests:
• 2 egg whites
• 100 g sugar
• 1 tbsp corn flour
• pinch salt
• 8 disposable moulds (aluminium foil)
• greaseproof paper
For the filling:
• 250 ml whipping cream
• 2 tbsp sugar
• 2 sachets vanilla sugar
• 400 g strawberries
Meringue nests:
• Whisk the egg whites with salt at speed 4 until stiff. Mix
sugar and corn flour with a spoon. Add this mixture to
the egg whites spoon by spoon and whisk after each
addition.
• Put the disposable aluminium moulds upside down on a
baking tray lined with greaseproof paper.
Recipes
£ Hummus bi Tahini
(chick pea- sesame puree)
• 250 g chick peas
• 80 g tahini (sesame paste)
• approx. 50 ml lemon juice
• approx. 50 ml water
• 2 cloves garlic
• 1 level tbsp olive or corn oil
•1⁄2 tsp cayenne pepper
• fresh parsley leaves
• Soak the chick peas overnight in plenty of water to which
some salt has been added.
• Cook the peas for approx. 2 hours.
• Put all the ingredients, except the parsley leaves, the
cayenne pepper and the oil, in the bowl of the food
processor.
• Puree the ingredients at speed 5 to get a smooth paste.
• Turn the mixture out into a bowl and garnish with the
parsley leaves, cayenne pepper and oil.
• Serve with flatbread (e.g. pitta bread).
£ Milkshake
(for 2-3 milkshakes)
• 200 g fresh fruit (e.g. strawberries,
raspberries, bananas)
• 1 tsp lemon juice
• sugar or honey to taste
• 200 ml cold milk
• 2 scoops vanilla ice cream
• Puree the fruit with the lemon juice
and the sugar or honey, using the
blade.
• Add the milk and the ice cream and mix at speed 5 until
the mixture is frothy.
Tips:
• Instead of fresh fruit, use 2 level tbsp strong coffee and 2
tbsp cocoa. Substitute mocha or chocolate ice cream for
the vanilla ice cream.
• Substitute 6 level tbsp fruit jam for the fresh fruit, the
lemon juice and the sugar.
£ Chicken liver pate
(serves 4 people)
• 25 g butter
• 250 g chicken livers, well cleaned
• 1 small onion, chopped
• 1 clove garlic, crushed
• 5 tbsp heavy cream
• 2 tbsp tomato paste
• 2 tsp brandy
10
Page 10

11
Pipe the meringue in swirls onto the overturned moulds,
starting at the top and using a piping bag with a plain
nozzle (nozzle size no. 4). Slide the baking tray into the
preheated oven and bake the meringue nests at 100°C
for 60 to 90 minutes until they are dry.
• Leave the meringues to cool in the oven. Remove the
disposable moulds.
The filling:
• Whip the cream with the sugar and the vanilla sugar at
speed 2 until stiff.
• Halve the strawberries.
• Fill the meringue nests with whipped cream and garnish
them with the strawberries.
£ ß Apricot meringue pie
For the pastry base:
• 100 g butter
• 150 g flour
• 50g sugar
• pinch salt
• dried baking beans
• greaseproof paper or aluminium foil
• 20 cm spring-release tin
For the filling:
• 250 g dried apricots
• 75 g preserving sugar
• juice from one lemon
For the meringue:
• 2 egg whites
• 100 g sugar
• pinch salt
• Put the blade in the bowl.
• Dice the cold butter.
• Put flour, sugar, salt and butter in the bowl and add a
dash of ice-cold water and use the blade to mix the
ingredients to create a consistent dough at speed 5.
• Wrap the dough in plastic foil and put it in the
refrigerator for at least one hour.
• To prevent the apricots from sticking to each other, put
the apricots in the freezer (or freezer compartment) for
15 minutes and add 2 tsp of flour before chopping.
• Chop the apricots medium-fine, using the pulse setting
(button M).
• Put the chopped apricots in a pan, add lemon juice and
preserving sugar and boil softly for 4 minutes. Then let
the apricot mixture cool own.
• Roll out the dough on a floured worktop.
• Line the greased spring-release tin with the rolled-out
pastry, creating a raised edge of approx. 3 cm.
• Put a piece of greaseproof paper or aluminium foil on the
pastry and put the dried beans on top. Bake the pastry
blind in a preheated oven at 180 °C for 30 minutes.
Then take the spring-release tin out of the oven and
remove the foil or paper with the beans. Raise the
temperature ofthe oven to 200 °C.
• Spoon the apricot compote into the pastry base.
• Whisk the egg whites with salt at speed 4 until stiff and
gradually add the sugar.
• Pipe the eggwhites onto the apricot compote with a
coarsely fluted nozzle.
• Put the pie in the oven for 15 to 20 minutes until the
meringue is dry and slightly brown.
£ ß Salmon mousse
(serves 3 to 4 people)
• 1 tin of salmon (220 g)
• 2 sheets of gelatine
• a few stalks of chives
• pinch salt
• pinch cayenne pepper
•1⁄2 tbsp lemon juice
• 125 ml whipping cream
• 1 small onion
• watercress for garnishing
• Soak the gelatine in plenty of water.
• Chop the chives and onion in the food processor using
the pulse setting (button M).
• Remove the bones and skin from the salmon.
• Add salt, cayenne pepper, lemon juice, the salmon and
the liquid from the salmon tin to the chopped chives and
onion and puree the ingredients at speed 5.
• Put the puree in a bowl.
• Boil a small quantity of water and dissolve the gelatine in
it.
• Stir the gelatine solution through the salmon puree.
• Put the whisk in the bowl and whip the cream at speed 2
until stiff.
• Fold the whipped cream into the salmon puree with a
wooden spoon.
• Turn the mousse out onto a dish, cover it and chill it in
the refrigerator for a few hours.
• Garnish the mousse with some watercress
™ White bread
• 350 g white flour
• 10 g soft butter or margarine
• 18 g fresh baker's yeast or
• 14 g dried yeast
• 200 ml water (depending on the type of flour)
• 1 tsp salt
•11⁄
2
tsp sugar
• 25-28 cm loaf tin
• Mount the kneading hook in the bowl
• Put water, yeast and sugar in the bowl and mix for
approx. 15 seconds at speed 3. Then add flour, butter or
margarine and salt.
• Mix the dough for 3 to 4 minutes at speed 5.
Page 11

12
• Put the dough in a large bowl. Cover this bowl with a
damp cloth and leave the dough to rise in a warm place
for 30 minutes.
• After rising, flatten the dough and roll it up.
• Put the dough in a greased loaf tin and allow it to rise for
another 45 minutes.
• Then bake the bread in the lower part of the preheated
oven at 225 °C for about 10 minutes.
Tips:
• This method can also be used to get the best results with
a packet mix.
• The dough can also be used for making rolls. The above
amount is enough make 8 to 10 rolls.
• Cut the dough into egg-sized pieces. Flatten these pieces
and shape them into rolls.
• Place the rolls on a greased baking tray.
• Brush the rolls with some water and sprinkle them with
sesame or cumin seeds before putting them in the oven.
£ ™ Yeast dough for plaited bread
• 30 g roasted hazelnuts
• 300 g sieved plain white flour
• 40 g sugar
• pinch salt
• 1 medium-sized egg
• approx. 150 ml milk (35 °C)
• 80 g soft margarine or butter
• 40 g fresh yeast or 1 sachet of dried yeast
• baking tray
• Put the metal blade in the bowl and chop the hazelnuts
medium-fine by briefly pressing the pulse (M) button.
Remove the chopped hazelnuts from the bowl.
• Replace the blade with the kneading hook.
• Put the milk with the yeast and the sugar in the bowl.
Mix the ingredients for approx. 15 seconds at speed 3.
• Add the flour, the salt, the margarine (or butter) and the
egg. Knead the ingredients at speed 5 for approx. 3
minutes. Add the chopped hazelnuts almost at the end of
the process.
• Remove the dough from the food processor bowl and put
it in a larger bowl. Cover this bowl with a damp cloth.
Allow the dough to rise for 30 minutes.
• Divide the dough into three parts and shape these parts
into 30 cm long rolls. Place these rolls side by side and
pinch the ends together. Plait the rolls and then pinch the
other ends together.
• Put the plaited dough on a greased baking tray. Let the
dough rise for another 20 minutes.
• Glaze the dough with some melted butter.
• Place the baking tray in the centre of a preheated oven
and bake at 190 °C for 30 to 35 minutes.
£ Cake
• 150 g soft butter
• 150 g sugar
• 1 sachet vanilla sugar
• pinch salt
• 30 ml milk
• 3 eggs
• 150 g self-raising flour
• 25 cm cake tin
• butter to grease the cake tin
• Heat the oven to 160 °C.
• Dice the butter and put butter, sugar, vanilla sugar and
salt in the bowl and mix the ingredients at speed 5.
• Pour lukewarm milk in small quantities through the chute
while the appliance is running. Keep beating till the
mixture is pale and creamy. If necessary, use a spatula to
move mixture sticking to the side of the bowl to the
middle.
• Add the eggs one by one. Do not mix longer than is
necessary to beat each egg in.
• Divide the flour into three portions and add them one by
one (using speed 2 or 3).
• Spoon the cake mixture into the greased and floured tin
and bake for about 1 hour and 15 minutes.
• Allow the cake to cool a few minutes before turning it out
of the tin. Turn it onto a wire rack and leave it to cool.
Tip:
To make a marbled cake, transfer one half of the cake
mixture to another bowl and stir 1 level tbsp sieved cocoa
powder through it. Put the chocolate cake mixture in the
tin and spoon the plain mixture onto it. Use a fork or
spoon to swirl through the mixture to create the marbled
effect.
™ £ Pizza
(for 2 round pizzas)
• 15 g fresh baker's yeast or 1 sachet dry yeast
• 1 tsp sugar
• approx. 150 ml warm water (approx. 35 °C)
• 300 g plain flour
•1⁄
2
tsp salt
• 2 level tbsp olive oil
• baking tray
For the topping:
• 1 onion
• 1 clove garlic
• 2 level tbsp olive oil
Page 12

13
• 300 ml sieved tomatoes (tinned)
• 1 tsp mixed Italian herbs (dried or fresh)
• salt and pepper
• sugar
• ingredients to be spread on the sauce: olives, salami,
artichokes, mushrooms, anchovies, Mozzarella cheese,
peppers, grated mature cheese and olive oil according to
taste.
• Mount the kneading hook in the bowl.
• Put water, yeast and sugar in the bowl and mix the
ingredients at speed 3 for approx. 15 seconds.
• Add flour, oil and salt and mix the dough at speed 5 for
approx. 3 minutes.
• Knead the dough into a ball and put it in a bowl. Cover
the bowl with a damp cloth and leave the dough to rise
in a warm place for about 45 minutes.
• Use the metal blade to chop the onion and the garlic and
fry them until transparent.
• Add the sieved tomatoes and the herbs and simmer the
sauce for about 10 minutes.
• Season to taste with salt, pepper and sugar.
• Allow the sauce to cool.
• Heat the oven to 250 °C.
• Roll the dough out on a floured worktop and make two
round shapes.
• Place the dough on a greased baking tray.
• Spread the topping on the pizzas, leaving the edges free.
• Spread with the desired ingredients, scatter some grated
cheese over the pizzas and drip some olive oil over them.
• Bake for 12 to 15 minutes
£ Brioche
Important: Use exclusively the metal blade for
making dough for brioche. The kneading hook is not
suitable for this purpose.
• 250 g flour
• 30 g granulated sugar
• 20 g fresh baker’s yeast or 1 sachet dried yeast
• 100 g butter
• 50 ml milk (40 °C)
• 1 tsp salt
• 4 eggs
• brioche mould (or deep round cake tin)
• Mount the metal blade.
• Put the yeast, water and sugar into the bowl.
Mix at speed 4 for 15 sec.
• Put flour, salt and eggs into the bowl and mix at speed 5
for approx. 4 minutes.
• Cover the bowl with a damp cloth and allow the dough to
rise in a warm place for one hour.
• Melt the butter. Put the lid with the motor unit back on.
Switch the appliance on and add the melted butter. Mix
until homogeneous.
• Grease the brioche mould with butter. Put the dough into
the mould and let it rise for another 45 minutes.
• Place the mould into the oven on a low position and bake
at 220 °C for 30 minutes.
h Tzatziki
(cucumber salad; serves 2 to 3 people)
• 1 cucumber
• 200 ml yoghurt
• 1 tbsp olive oil
• 2 cloves garlic
• pinch salt
• 1 tsp finely chopped dill
• a few mint leaves
• Peel the cucumber and shred it at speed 4 or 5.
• Put the shredded cucumber in a colander and let it drain
properly.
• Mix the other ingredients, except for the mint leaves,
through the cucumber.
• Chill the salad by putting it in a covered bowl in the
refrigerator for one hour.
• Sprinkle mint leaves on top before serving.
£ g Coleslaw
• 2 cloves garlic
• 2 apples
• 2 pickled gherkins
• 1 banana
• 3 tbsp mayonnaise
• 3 tbsp yoghurt
•1⁄
2 tbsp cream
• 2 tsp curry powder
• salt and pepper
• 1 small white cabbage
• Put the blade in the bowl and chop the garlic.
• Peel the apples, cut into quarts and remove the core.
• Add the apples and gherkins and chop them fine.
• Add pieces of banana, mayonnaise, yoghurt, curry
powder, cream, salt and pepper and mix the ingredients
at pulse setting (button M). Replace the blade with the
insert holder disc (slicing insert medium). You may leave
the dressing in the bowl. Cut the cabbage and slice it at
speed 3. Turn the ingredients into a dish and mix them
with a spoon. Cover the dish with a lid or a piece of
plastic foil and allow the dressing to soak in.
Page 13

14
£ ß g h Potato-courgette gratin
(serves 3 to 4 people)
• 750 g potatoes
• pinch salt
• 2 courgettes (approx. 500 g)
• 2 cloves garlic, crushed
• approx. 75 g butter + butter to grease the oven dish
• 2-3 tsp Italian or Provençal herbs
• 3 eggs
• 150 ml whipping cream
• 150 ml milk
• pepper
• 100 g semi-matured cheese
• Peel and wash the potatoes.
• Put the insert holder disc (slicing insert medium) in the
bowl and slice the potatoes and the courgettes at
speed 5.
• Boil the potato slices in boiling water with a pinch of salt
until they are almost done.
• Put the slices in a colander and drain them properly.
• Put half of the butter in a frying pan and fry half of the
courgette slices for 3 minutes, while turning them
frequently. Sprinkle the slices with half of the herbs. Fry
the other half of the courgette slices in the same way and
sprinkle them with the rest of the herbs.
• Allow the fried courgette slices to drain on kitchen paper.
• Grease a large, low-sided oven dish and put the courgette
and potato slices in the dish, alternating them and
arranging them in such a way that they partly overlap
like roof tiles.
• Whisk the eggs with the cream and the milk at speed 4.
Add salt and pepper according to taste and pour the
mixture over the potato and courgette slices in the dish.
• Replace the slicing insert with the shredding insert
medium, shred the cheese at speed 5 and sprinkle it over
the dish.
• Put the dish in the centre of a hot oven (200 °C) and
brown it in about 10 minutes.
£ Mayonnaise
• 1 large egg or 2 small eggs
• 2 tsp mustard
• 1 tsp salt
• pepper
• 3 tbsp lemon juice
• 250 ml oil (The quantity of oil depends on the thickness
required)
The ingredients must be at room temperature.
• Put the egg yolks or egg, mustard, salt, pepper and
lemon juice in the bowl.
• Mix with the blade at speed 4 or 5 until the salt is
dissolved and then pour the oil gradually through the
food chute onto the rotating blade.
Tips:
• For tartare sauce: add parsley, gherkins and hard-boiled
eggs.
• For cocktail sauce: add 50 ml creme fralche, a dash of
whisky, 3 tsp tomato paste and a dash of ginger syrup to
100 ml mayonnaise.
£ Fruit cake
• 250 g white flour
• 110 g butter
• 110 g sugar
• 7 g baking powder
• 60 g raisins
• 170 g candied fruit
• 2 eggs
• 25 cm cake tin
• Soak the candied fruits and raisins in fruit tea (approx. 1
hour).
• Put the blade in the bowl.
• Dice the butter with a knife.
• Put flour, sugar, baking powder, diced butter and eggs in
the bowl. Add the raisins and the candied fruit. Mix the
ingredients at speed 5 for max. 15 seconds.
• Pour the mixture into a greased cake tin and bake in the
centre of the oven at a temperature of approx. 170 °C
until firm to the touch (approx. 75 minutes).
Page 14

Ingredients
Baby/infant/
diet food
- puréeing
Batter
(biscuit)
- stirring
Batter (cake)
- stirring
Batter (light)
- stirring
Breadcrumbs
- chopping
Cheese
- chopping
- shredding
Chocolate
- chopping
Creams
Dough
(tart, pie,
dumplings)
Dough (for
bread)
Dough (for
pizza)
Dough (yeast
dough)
Max.
quantity
Switchon &
speed
Accessory
Procedure Applications
300 g
3 eggs
150 g
flour
400 ml
liquid
100 g
200 g
200 g
250 g
250 g
flour
350 g
flour
(bread)
300 g
300 g
M/4-5
4-2
5
3-4
M/5
M/5
5
M/5
5
5
5
5
5
£
ß
£
£
£
h
£
£
£
™
™
™
Coarse: add a little liquid.
Fine: if necessary add some extra
liquid for the smoothest results.
Ingredients at room temperature. Stir
mixture of eggs and sugar at speed 4
until stiff. Then add the sifted flour.
Continue stirring carefully at speed 2.
Ingredients at room temperature.
See recipe on page 12
First put liquid into the bowl. Then add
the dry ingredients.
Use dry, crisp bread
Use rindless cheese (e.g. Parmezan),
pre-cut in cubes of 2 cm. Select pos. M
for coarse results and speed 5 for fine
powder.
Press carefully with the pusher.
Use hard, pure chocolate. Break into
cubes of 2 cm. The first few times use
pos. M. Then speed 5 for a fine chop.
Use soft butter for airy results.
Use cold butter/margarine and cold
water. Put flour into the bowl.
Top with 2 cm large pieces of butter/
margarine. Mix on speed 5 until
mixture resembles bread crumbs. Then
add cold water while mixing. Stop as
soon as dough forms into a ball (about
15 sec.). Cool dough before further
processing.
Please refer to the recipe on
page 11.
Please refer to the recipe on
page 12.
Please refer to the recipe on
page 12.
Infant food.
Baby food.
Cakes, Swiss Roll,
Pastry.
Cakes, etc.
Pancakes, wafers,
crepe, fritters.
Food coated with
breadcrumbs,
gratinated dishes.
Garnishing,
au gratin, soups,
sauces, croquettes.
Sauces, fondue,
pizza, au gratin
dishes.
Garnishing, sauces
pastry, mousse,
pudding.
Pastry, desserts,
toppings.
Fruit tarts, apple
dumplings, pies,
quiche.
Bread.
Pizza, tart.
Luxury bread.
Page 15

16
Dough
(shortbread)
Eggs
- whisking
(egg white)
Fruit (general)
chopping puréeing
Herbs
- chopping
Leek
- slicing
Mayonnaise
Meat, fish,
poultry
- chopping(lean
beef)
- chopping
(streaky meat)
Milkshake
Nuts
- chopping
Potatoes
(cooked)
- puréeing
Pulses
- puréeing
250 g
flour
4 eggs
400 g
500 g
min. 30 g
3 eggs
300 g
200 g
350 ml
liquid
250 g
500 g
400 g
5
4
M/5
5
M/5
M/4-5
4-5
M/5
M/5
M/5
M/5
4-5
5
£
ß
£
£
£
g
£
£
£
£
£
£
£
Use cold butter or margarine, cut into
2 cms pieces. Put all ingre-dients into
bowl simultaneously.
Mix until mixture forms into a ball
(after approx. 30 secs.). Cool the
dough before further processing.
Use eggs on room temperature.
(Note: Use at least two eggs.)
Tip: use a little lemon juice to prevent
discolouring.
Use raw, firm, seedless fruit.
Use cooked or soft fruit.
Wash and dry herbs.
Insert into the food chute heads
upwards. When processing thin leek,
fill the opening completely.
Use ingredients at room
temperature. See the recipe on
page 14.
(Note: Use at least one large egg or
two small eggs.)
First remove sinews, bones, including
fishbones.
Pre-cut into cubes of about 3 cm.
Chop at position M for coarser results.
Please refer to recipe on page 10.
Use pos. M for coarse chopping or
speed 5 for a fine result.
Have the potatoes not overcooked.
The quantity of milk depends on the
kind of potato. Use warm milk (max.
80 °C). Add the milk slowly while the
metal blade is rotating.
Use cooked beans or peas.
You may add some liquid for a better
consistency.
Apple pie, sweet
biscuits, open fruit
flans.
Pudding, soufflé,
meringues, garnishing.
Salads, jam, cakes.
Sauces, jam,
pudding, baby food.
Sauces, soup,
garnishing,seasoned
butter.
Soups, cooked leek,
quiche.
For French fries,
salads, cocktails,
fondue and
barbecue sauces.
Steak tartare,
hamburgers.
Minced meat.
Salads, garnishing,
bread, pastry,
pudding.
Oven dishes, purée.
Purées, soups.
Page 16

17
Soup
Vegetables
(general)
- chopping
- puréeing
Whipped
cream
- whipping
500 ml
liquid
400 g
500 g
400 ml
4-5
M/5
5
3
£
£
£
ß
Use cooked vegetables.
Pre-cut into cubes of 3 cm.
Use cream which has been cooled to
refrigerator temperature. Process at
least 125 ml.
Soup.
Salads, raw food,
soup.
Vegetable purée,
soups.
Garnishing, cream,
ice-cream mixtures,
pastry.
Page 17

18
English
Vigtigt.
• Læs brugsanvisningen igennem og kig på
illustrationerne, før apparatet tages i
brug.
• Lad aldrig børn bruge apparatet.
• Vær forsigtig når kniven og
snitte/riveskiverne benyttes, da disse dele
er meget skarpe.
• Fjern altid beskyttelseskappen på kniven
før den tages i brug og sæt den altid på
igen efter rengøring.
• Fjern ikke låget, før de roterende dele er
standset helt.
• Stik aldrig fingrene ned i
påfyldningstragten og brug aldrig gafler,
knive, spatler, skeer ell. lign. til at stoppe
ingredien-serne ned i tragten. Brug kun
den medleverede nedstopper.
• Træk altid stikket ud af stikkontakten,
når De er færdig med at bruge apparatet.
• Hvis apparatets netledning beskadiges,
må den kun udskiftes med en original
ledning af samme type. Henvend Dem
enten til Deres forhandler eller direkte til
Philips.
• Før apparatet tages i brug første gang
skal alle dele, der kommer i kontakt med
fødevarer, vaskes af.
• Sæt ikke skålen i mikrobølgeovn.
• Nedsænk aldrig motordelen i vand eller
andre væsker. Den må heller ikke skylles
under vandhanen.
• Når De skal mixe eller blende flydende
ting, er max. kvan-titeten 3/4 liter.
• Overhold altid de angivne max.
kvantiteter og anbefalede
tilberedningstider i tabellen og
opskrifterne.
• Gem disse instruktioner til eventuelt
senere brug.
Generel beskrivelse (fig. 1)
A M ("Moment") knap
Tryk: Motoren kører.
Slip: Motoren stopper.
B Kontrolring
1 Når låget tages af/sættes på
Lågets låse-tappe (D) trækkes ind.
2 O/MM for "Off” og ”Moment"
(tænder og slukker).
1....5 for kontinuerlig drift.
(1 = minimum hastighed; 5 = maximum hastighed)
C Motorenhed
D Udløserknapper til låg
E Nedstopper
F Påfyldningsåbning
G Låg
H Koblingsstykke
I Skål
J Lednings-clips (reservedelsnr. 4822 290 40369)
K Knivenhed £ (reservedelsnr. 4822 690 40232)
L Skiveholder f (reservedelsnr. 4203 065 61521)
M Snitteskive/medium g
(reservedelsnr. 4203 065 61540)
N Riveskive/fin j (reservedelsnr. 4203 065 61550)
O Riveskive/medium h
(reservedelsnr. 4203 065 61560)
P Gearenhed til dejkroge og piskeris
Q Ælte-indsats (reservedelsnr. 4203 065 60011)
R Piskeris ß (reservedelsnr. 4822 690 10115)
S Dejkroge ™ (reservedelsnr. 4822 690 10116)
T Spatel (reservedelsnr. 4822 690 40212)
Automatisk sikkerhedsafbryder (kan
genindkobles).
Venligst læs følgende anvisninger inden
apparatet tages i brug
For at undgå fare og beskadigelse som følge af
overophedning er apparatet forsynet med en
sikkerhedsafbryder, der automatisk slukker for
strømmen til apparatet, hvis det er nødvendigt. Hvis
de nedenfor angivne instruktioner følges nøje, kan De
sagtens tænde for apparatet igen, efter det er kølet af i
en times tid.
Hvis apparatet pludselig stopper:
1. Tag først stikket ud af stikkontakten.
2. Sæt derefter kontrolringen i stilling O/M.
3. Lad apparatet afkøle i mindst 1 time.
Henvend Dem til Deres forhandler eller til Philips, hvis
sikker-hedsafbryderen afbryder strømmen til apparatet
flere gange efter hinanden.
Dansk
Page 18
Sådan monteres/afmonteres motorenhed og
låg:
- Sæt kontrolringen i stilling 1 (fig. 2).
Bemærk: Apparatet kan blive beskadiget, hvis
kontrolringen ikke er sat i denne stilling, når
apparatet åbnes og lukkes.
- Sæt låget på skålen (fig. 3).
- Sæt motorenheden på låget (fig. 4).
- Drej kontrolringen til stilling 2 O/M (fig. 5).
- Når motorenhed og låg tages af, sættes
kontrolringen i stilling 1 (fig. 6, 7).
Påfyldningstragt og nedstopper.
• Brug altid nedstopperen,
når ingredienserne
kommes i
påfyldningstragten (fig. 8).
• Lad nedstopperen sidde i
påfyldningstragten,
medens foodprocessoren
kører for at undgå stænk
og sprøjt.
• Nedstopperen kan løftes op for tilsætning af
yderligere ingredienser, mens foodprocessoren
kører.
- I bunden af nedstopperen ses en markering af en lille
åbning, som kan prikkes ud med en spids genstand
(fig. 9). Den lille åbning i nedstopperen bruges til
gradvis påfyldning af væske (f.eks. olie når De laver
mayonnaise) (fig. 10).
- Der er niveaumærker på nedstopperen (ml) til
afmåling af væske.
Knivenheden hakker, mixer, blender
og purerer £
• Advarsel: Kniven er meget skarp!
- Før brug tages beskyttelseskappen af knivenheden
(fig. 11, 12).
Hold kun knivenheden i håndtaget, når
beskyttelseskappen er taget af.
- Sæt først kobling (fig. 13) og derefter knivenhed
(fig. 14) på.
2
1
3
•
2
•
3
•
4
•
5
9
10
4
5
6
1
7
•
2
•
3
•
4
•
5
M
1
•
2
•
3
•
4
•
5
11
12
13
14
8
Page 19
- Derefter kommes
ingredienserne op i skålen
(fig. 15).
- Sæt låg og motorenhed på
(fig. 3-4).
- Sæt nedstopperen ned i
påfyldningstragten.
- Tænd for apparatet ved at
trykke på "Moment"knappen (fig. 16) eller ved
at vælge den ønskede
hastighed (fig. 17).
Gode råd ved hakning
• Skær altid større stykker madvarer ud i tern á
ca. 3 cm.
• Undgå "overtilberedning" ved ikke at bruge apparatet
for længe ad gangen.
• Hvis der sætter sig madvarer fast på kniven eller på
inder-siden af skålen gøres følgende:
- Sluk for apparatet.
- Tag låget (med motorenhed) af skålen.
- Fjern madresterne fra kniven eller indersiden af
skålen ved hjælp af spatlen.
• Hak aldrig meget hårde ingredienser som f.eks.
kaffebønner, muskatnød, korn, hårde tørrede urter
(f.eks. kardemomme) og isterninger, da det gør
kniven sløv.
• Tilbered altid en større portion, når der hakkes
persille. Sørg for at både persille og skål er tørre.
• Hvis De kun ønsker at hakke nogle få fed hvidløg,
kommes disse ned gennem tragten. Sørg for at både
hvidløg og skål er tørre.
• Hård ost (f.eks. lagret gouda, parmesan og pecorino)
skal have stuetemperatur. Lad ikke motoren køre for
længe, da osten kan blive for varm og dermed
klumpet.
• Sørg for at halvhård ost (f.eks. ny og mellemlagret
gouda, emmenthaler og gruyère) er så kold som
mulig.
• Klæbrige og tørrede frugter (f.eks. dadler, figner og
svedsker) kommes i fryseren i mindst 15 minutter og
en teske-fuld mel tilsættes før hakningen.
Gode råd når der mixes/blendes
• Begynd altid med hastighed 2 eller 3, når De skal
mixe eller blende o flydende ingredienser. Senere
kan man skifte til hastighed 4 eller 5.
• Undgå at mixe eller blende for længe, for at undgå
dannelse af meget skum.
• Der må højst mixes eller blendes 3/4 liter væske ad
gangen.
• Mix eller blend aldrig flydende ingredienser der er
varmere end 80 °C.
• Når De laver mørdej eller butterdej, skal der bruges
så lidt væske som muligt. Det gør det nemmere at
rulle dejen ud. Kom først melet op i skålen og
derefter de øvrige ingredienser. Brug altid kun koldt,
hårdt smør eller margarine.
Gode råd ved purering
• Frugt og grøntsager kan pureres uden tilsætning af
yderligere væske.
• Ønskes en tyndere konsistens, tilsættes lidt ekstra
væske.
• Purér først hårde og seje ingredienser. Derefter
tilsættes de mere bløde ingredienser.
Snitning eller rivning med skiveholderen f og
de forskellige skiver g h j
• Forsigtig: Skivernes skærende dele er meget
skarpe!
- Læg den ønskede skive i skiveholderen (”klik”)
(fig. 18).
- Derefter sættes koblingsstykket og skiveholderen på
plads (fig. 19).
- Sæt låget med motorenheden på (fig. 3-4).
- Tag nedstopperen op af tragten.
- Kom ingredienserne ned i påfyldningstragten (fig. 20).
- Sæt nedstopperen i og tryk let ned (fig. 21).
20
15
15
16
17
1
•
1
2
–
2
•
–
3
1
•
2
•
3
1
–
2
3
•
–
4
4
–
•
5
5
•
4
•
–
5
3
–
4
–
5
18
1
19
2
20
21
Page 20

21
- Tænd for apparatet ved at
vælge den korrekte
hastighed (fig. 22).
- Tryk ingredienserne ned
ved hjælp af
nedstopperen. Pres
vedvarende med et
moderat tryk.
• Større stykker skæres i
passende stykker, så de
kan komme ned i tragten.
• Fyld hele tiden påfyldningstragten op i et jævnt
tempo - derved opnås det bedste resultat.
• Ved tilberedning af større kvantiteter tømmes skålen
ind imellem.
Godt råd ved snitning
g
• Medens motoren står stille, fyldes tragten helt op.
Tryk madvarerne ned med nedstopperen og tænd
for apparatet. På den måde undgår man, at
ingredienserne vælter under snitningen.
• Det bedste resultat ved snitning opnås ved
mellemste hastighed (2 eller 3).
Gode råd ved rivning h j
• Skær altid ost i små terninger (á ca. 2 cm) inden
rivning.
Tryk osten let og konstant ned med nedstopperen.
Det kan ikke undgås, at det sidste stykke ost sætter
sig fast mellem låg og riveskive.
• Sørg for at hård ost (f.eks. lagret gouda, parmesan
eller pecorino) har stuetemperatur før rivningen.
• Sørg for at halvhård ost (f.eks. ny eller mellemlagret
gouda, emmenthaler eller gruyère) er så kold som
mulig.
• Brug kun medium riveskiven til rivning af
gouda ost.
• Ønskes længere strimler, anbringes ingredien-serne
vandret i påfyldningsåbningen.
• Det bedste resultat ved rivning opnås ved hastighed 5.
Piskning af æg eller flødeskum med piskeris ß
• Piskeriset er velegnet til at piske æg, æggehvider,
pynt til desserter, budding og flødeskum.
Bemærk: Brug aldrig piskeriset til æltning af
dej!
- Hvis dejkrogen sidder i, tages den ud af gearenheden
(fig. 23), og piskeriset sættes i (tryk til) (fig. 24).
Der skal bruges lidt kræfter.
- Sæt først koblingsstykket på (fig. 25) og derefter
piskeenheden (fig. 26). Til sidst kommes
ingredienserne op i skålen.
- Sæt låget med motorenheden på (fig. 3-4).
Sæt nedstopperen i påfyldningstragten, så der lukkes
for tragten.
- Ved piskning af flødeskum sættes kontrolringen til
hastighed 3 (fig. 27). Ved piskning af æggehvider
vælges hastighed 5 (fig. 28).
Gode råd ved piskning
• Ved piskning af flødeskum opnås det bedste resultat,
hvis både fløde, skål og piskeris er så kold som
muligt.
Sæt skål og piskeris i køleskabet i mindst en halv
time, før piskningen påbegyndes, og brug fløde, der
har stået i køleskabet mindst een dag.
Tilsæt ikke sukker før fløden er blevet til flødeskum.
Hvor lang tid, der skal piskes, afhænger af flødetypen.
Ved piskning af æggehvider skal skål og piskeris være
helt tørre og fri for fedt.
• Det bedste resultat opnås, hvis æggene har
stuetemperatur (ca. 21 °C).
22
1
•
2
•
3
1
–
2
23
•
4
•
–
5
3
–
4
–
5
24
25
26
CLICK
27
28
1
•
2
•
3
•
4
1
–
2
•
–
5
3
–
4
–
5
1
•
2
•
3
1
–
•
4
2
•
–
5
3
–
4
–
5
Page 21
Æltning ad dej med metal-dejkrogen ™
- Venligst bemærk: Brug altid ælte-indsatsen
under æltning
- Hvis piskeriset sidder i tages det ud af gearenheden
(fig. 29), og dejkrogen sættes i (tryk til) (fig. 30).
- Sæt først koblingsstykket på og derefter dejkrogen
(fig. 31 og 32).
- Sæt dejkrogen i koblingsenheden (fig. 33).
- Til sidst kommes ingredienserne op i skålen.
- Sæt låget med motorenheden på (fig. 3-4).
- Sæt nedstopperen i påfyldningstragten, så der lukkes
for tragten.
- Sæt kontrolringen til hastighed 5 (fig. 34).
Gode råd ved æltning
• Overskrid aldrig den angivne max-kvantitet for mel.
• Ved æltning af brød- og gærdej kommes vand, gær og
sukker først op i skålen.
Derefter tilsættes de øvrige ingredien-ser. Æltetiden
vil typisk være mellem 3 og 4 minutter afhængig af
dejtypen.
• Husk at adskille gearenheden og rengøre den, efter
brug.
22
Efter brug
- Motorenhed og låg frigøres ved at sætte
kontrolringen i stilling 1 (fig. 6, 7).
- Tag tilbehøret og koblingsstykket op af skålen
(fig. 35).
Derefter kan skålen tømmes.
- Efter snitning/rivning: Tag snitte/riveskiven ud af
skiveholderen (fig. 36). Sørg for, at skiven ikke
vender ind mod dem selv. Vær meget forsigtig, da de
skærende sider er meget skarpe!
Rengøring og opbevaring
• Tag altid stikket ud af stikkontakten, før rengøring af
motorenheden.
• Motorenheden kan rengøres med en fugtig klud.
• Nedsænk aldrig motorenheden i vand og hæld aldrig
vand over den.
• Vask alle dele, der har været i kontakt med
fødevarer, i varmt sæbevand straks efter brug.
• Vær forsigtig når De rengør kniv og snitte/riveskiver,
da de skærende sider er meget skarpe! - Disse
tilbehørsdele tåler opvaskema-skine.
• Sørg for, at de skærende
dele ikke kommer i
kontakt med hårde ting,
da de derved kan blive
sløve.
• Sæt altid
beskyttelseskappen på
kniven, så snart den er
rengjort (fig. 37).
29
CLICK
30
31
32
33
34
1
•
2
•
3
35
36
•
4
•
5
37
Page 22
23
• Gearenheden til piskeris
og dejkrog skilles nemt
ad, så den kan rengøres
grundigt (fig. 38-39).
• Efter rengøring, kan
tilbehøret opbevares i
skålen. Sæt låget på, rul
ledningen op og brug
lednings-clipsen som vist i
fig. 40.
Ekstra tilbehør
• Følgende dele fås som ekstra tilbehør*):
- Fin snitteskive til tynde skiver.
(Reservedelsnr. 4203 065 61530)
- Medium snitteskive
g til tykke skiver.
(Reservedelsnr. 4203 065 61540)
- Fint rivejern j til rå grøntsager og frugt.
(Reservedelsnr. 4203 065 61550)
- Medium rivejern h til mellemfin rivning.
(Reservedelsnr. 4203 065 61560)
- Grovt rivejern til kartofler.
(Reservedelsnr. 4203 065 62310)
- Granulerings-skive k til Parmesan, hesteradiser
og kartofler.
(Reservedelsnr. 4203 065 61570).
*) Dette apparat overholder de gældende EU-direktiver
vedrørende sikkerhed og radiostøj.
38
2
1
39
4203 065 61530
40
4203 065 61540
4203 065 61550
4203 065 61560
4203 065 62310
4203 065 61570
Page 23

• Salt og peber
• Lidt persillekviste
• Ristet brød eller crackers
• Smelt smøret i en gryde/pande og steg kyllingelever, løg
og hvid-løg i ca. 8 minutter, til kyllingele-veren er
gennemstegt.
• Lad blandingen afkøle og kom den op i foodprocessorens
skål.
• Tilsæt fløde, tomatpuré og cognac og smag til med
krydderi.
• Lad foodprocessoren køre på hastighed 5, indtil
blandingen er blød og cremet.
• Hæld patéen ud på en tallerken og garnér med persille.
• Serveres kold med ristet brød eller crackers.
£ Guacamole
(Meksikansk avocado-dip; 2-3 personer)
• 2 mellemstore, modne avocadofrugter
• 2 mellemstore, flåede tomater
• 1 lille løg, skåret i småstykker
• 3-4 stilke frisk persille
• 1 grøn chilli uden kerner skåret i strimler
• Salt og peber
• Fuldkornsbrød eller chips.
• Skræl avocadoerne og tag stenene ud. Skær frugterne i
mindre stykker og kom dem op i foodprocessorens skål.
• Mixes til en blød puré ved hastighed 5.
• Halvér tomaterne og fjern kernerne.
• Kom tomater, løg, persille og chilli op i skålen.
Blandingen blendes, til den er blevet blød.
• Smag til med salt og peber. Serveres med fuldkornsbrød
eller chips.
ß Marengs-reder med jordbær
(8 stk.)
Ingredienser til Marengs-rederne:
• 2 æggehvider
• 100 g sukker
• 1 spsk. majsmel
• 1 knivspids salt
• 8 éngangsforme (aluminiumsfolie)
• Bagepapir
Ingredienser til fyldet:
•21⁄2
dl piskefløde
• 2 spsk. sukker
• 2 breve vanillesukker
• 400 g jordbær
Marengs-rederne:
• Pisk æggehviderne tilsat salt stive ved hastighed 4. Rør
sukker og majsmel sammen med en ske. Tilsæt en
skefuld ad gangen og pisk blandingen efter hver gang.
• Anbring aluminiumsformene med bagsiden opad på en
Opskrifter
£ Hummus bi Tahini
(Kikærter - Sesampurè)
• 250 g kikærter
• 80 g tahini (sesampasta)
• Ca. 1⁄2 dl citronsaft og 1⁄2 dl vand
• 2 fed hvidløg
• 1 spsk. oliven- eller majsolie
•1⁄2 tsk. cayennepeber
• Frisk persille
• Lad kikæreterne ligge natten over i rigeligt med vand
tilsat lidt salt.
• Kog kikærterne i ca. 2 timer.
• Med undtagelse af persille og cayennepeber kommes alle
ingredienserne op i foodprocessorens skål.
• Ingredienserne pureres ved hastighed 5 til konsistensen
er en blød pasta.
• Hæld blandingen op i en anden skål og pynt med
persilleblade og cayennepeber.
• Serveres på fladbrød eller i pitabrød.
£ Milkshake
(2-3 personer).
• 200 g frisk frugt (jordbær, hindbær,
bananer)
• 1 tsk. citronsaft
• Sukker eller honning efter behag
• 2 dl kold mælk
• 2 kugler vanilleis
• Frugt, citronsaft og sukker (eller
honning) pureres med knivenheden.
• Tilsæt mælk og vanilleis og mix
blandingen ved hastighed 5 indtil den
skummer.
Tips:
• I stedet for frisk frugt kan man bruge 2 spsk. stærk kaffe
og 2 spsk. kakao. Brug mokka- eller chokoladeis i stedet
for vanilleis.
• I stedet for frisk frugt, citronsaft og sukker kan man
bruge 6 spsk frugtmarmelade.
£ Kyllingelever-paté
(4 personer).
• 25 g smør
• 250 g kyllingelever (godt renset)
• Et lille hakket løg
• 1 fed knust hvidløg
• 5 spsk. piskefløde
• 2 spsk. tomatpuré
• 2 tsk. cognac
24
Page 24

25
bageplade med bagepapir. Kom marengsblandingen op i
en sprøjtepose med fladt mundstykke (størrelse nr.4) og
sprøjt den ud over formene. Start foroven på formene og
bevæg sprøj-teposen i hvirvler ned over formene. Sæt
pladen i en forvarmet ovn og bag marengs-rederne ved
100 °C i 60 til 90 minutter, indtil de er tørre.
• Lad dem afkøle i ovnen. Fjern aluminiumsformene.
Fyldet:
• Pisk fløden med sukker og vanillesukker ved hastighed 2
til den er blevet stiv.
• Halvér jordbærrene.
• Fyld flødeskummet i marengs-rederne og pynt med jordbær.
£ ß Abrikos-marengskage
Til tilberedning af kagebunden:
• 100 g smør
• 150 g mel
• 50 g sukker
• 1 knivspids salt
• Tørrede bagebønner.
• Bagepapir eller aluminiumsfolie.
• En 20 cm springform
Til tilberedning af fyldet:
• 250 g tørrede abrikoser
• 75 g henkogningssukker
• Saften af en citron
Til tilberedning af
marengsen:
• 2 æggehvider
• 100 g sukker
• 1 knivspids salt
• Sæt knivenheden i skålen.
• Skær det kolde smør i terninger.
• Kom mel, sukker, salt og smør op i skålen og tilsæt et
stænk iskoldt vand. Mix ingredienserne ved hastighed 5,
til dejen hænger sammen.
• Pak dejen ind i film og kom den i køleskab i mindst 1
time.
• For at forhindre at abrikoserne klæber sig fast til hinanden, kommes de i fryseren i 15 minutter og der tilsættes
2 tsk. mel inden hakningen.
• Abrikoserne hakkes, til de har en mellemfin konsistens.
Brug moment-knappen M.
• Kom de hakkede abrikoser op i en gryde. Tilsæt
citronsaft og henkogningssukker og kog blandingen ved
lavt blus i 4 minut-ter. Lad derefter blandingen afkøle.
• Rul dejen ud på et bord strøet med mel.
• Fordel dejen i en smurt springform, så den når ca. 3 cm
op langs siderne.
• Læg et stykke bagepapir eller aluminiumsfolie over og
læg de tørrede bagebønner oveni. Den tildækkede
kagebund bages i en forvarmet ovn ved 180 °C i
30 minutter. Tag sprin-gformen ud af ovnen og fjern
aluminiumsfolien (eller ba-gepa-piret) med bønner-ne.
Sæt ovntemperaturen op til 200 °C.
• Fyld abrikosblandingen i kagebunden med en ske.
• Pisk æggehviderne med salt på hastighed 4, indtil de er
blevet stive. Tilsæt sukkeret gradvist.
• Kom æggehviderne i en sprøjtepose med groftrillet
mundstyk-ke og sprøjt dem ud over abrikoskompotten.
• Kom kagen i ovnen i 15-20 minutter til marengsen er tør
og lysebrun.
£ ß Lakse mousse
(3-4 personer)
• En dåse laks (220 g)
• 2 blade husblas
• Nogle få stilke purløg
• 1 knivspids salt
• 1 knivspids cayennepeber
• 1⁄2 spsk citronsaft
• 1 1/4 dl piskefløde
• 1 lille løg
• Brøndkarse til pynt
• Opblød husblassen som angivet på emballagen
• Hak purløg og løg i foodprocessoren ved hjælp af
moment-knappen M.
• Fjern ben og skind fra laksekødet.
• Tilsæt salt, cayennepeber, citronsaft, laksekød og væden
fra laksen og purér ingredi-en-serne ved hastighed 5.
• Kom pureen op i en skål.
• Kom husblassen i og rør godt.
• Sæt piskeriset i foodprocessorens skål og pisk fløden ved
hastighed 2 til den er stiv.
• Vend forsigtigt flødeskummet i laksepureen med en
træske.
• Anret moussen på et fad. Dæk den til og stil den i
køleskab i et par timer.
• Serveres med brøndkarse.
™ Franskbrød
• 350 g hvedemel
• 10 g blødt smør eller margarine
• 18 g frisk gær eller
• 14 g tørgær
• 2 dl vand (afhængig af meltype)
• 1 tsk. salt
•11⁄2
tsk. sukker
• En 25-28 cm brød ell. sandkageform
• Montér dejkrogen i skålen.
• Kom vand, gær og sukker op i skålen og mix det i
ca.15 sekunder på hastighed 3. Tilsæt mel, smør eller
margarine og salt.
• Ælt dejen i 3-4 minutter ved hastighed 5.
• Kom dejen over i en stor skål, dæk den til med et fugtigt
viskestykke eller lign. og lad dejen hæve et lunt sted i
30 minutter.
Page 25

26
• Når dejen er hævet, slås den ned og æltes let sammen.
• Kom dejen op i en smurt franskbrødsform og lad den
efterhæve i 45 minutter.
• Bages i den nederste del af en for-varmet ovn ved
225 °C i ca. 35 minutter.
Tips:
• Samme metode kan også bruges med et godt resultat
med fær-digkøbte melblandinger.
• Dejen kan også bruges til rundstykker. Den ovenfor
nævnte portion er nok til 8-10 rundstykker.
• Skær dejen i stykker på størrelse med et æg og form dem
til rundstykker.
• Læg rundstykkerne på en smurt bageplade.
• Rundstykkerne pensles med lidt vand. Drys med
sesamfrø eller birkes, før de sættes i ovnen.
£ ™ Gærdej til fletbrød
• 30 g ristede hasselnødder
• 300 g sigtet hvedemel
• 40 g sukker
• 1 knivspids salt
• 1 mellemstort æg
• Ca. 11⁄2
dl mælk (35 °C)
• 80 g blød margarine eller smør
• 40 g gær
• 1 bageplade
• Sæt knivenheden i foodprocessorens skål og hak
hasselnødderne mellemfint ved kortvarige tryk på
momentknappen M. Tag de hakkede nødder ud af
skålen.
• Udskift knivenheden med dejkrogen.
• Kom mælk, gær og sukker op i skålen og mix
ingredienserne i ca. 15 sekunder ved hastighed 3.
• Tilsæt mel, salt, margarine (eller smør) og æg. Ælt
blandingen i ca. 3 minutter ved hastighed 5. Lige før
æltningen er færdig, tilsættes de hakkede hasselnødder.
• Tag dejen op af foodprocessorskålen og kom den over i
en større skål. Dæk denne til med et fugtigt viskestykke
eller lign. og lad dejen hæve i 30 minutter.
• Del dejen i tre stykker og rul dem ud i 30 cm lange
ruller. Anbring derefter rullerne ved siden af hinanden,
klem enderne sammen og flet dejen. Til sidst klemmes
enderne sammen i den anden ende.
• Læg fletbrødet på en smurt bageplade og lad dejen hæve
i yderligere 20 minutter.
• Dejen pensles med lidt smeltet smør.
• Sæt pladen i midten af en forvarmet ovn og bag
fletbrødet ved 190 °C i 30-35 minutter.
£ Kage
• 150 g blødt smør
• 150 g sukker
• 1 brev vanillesukker
• 1 knivspids salt
• 0,3 dl mælk
• 3 æg
• 150 g selvhævende mel
• En 25 cm kageform
• Lidt smør til pensling af kageformen
• Opvarm ovnen til 160 °C.
• Skær smørret i terninger og kom smør, sukker,
vanillesukker og salt op i foodprocessorskålen og mix
ingredienserne ved hastighed 5.
• Medens apparatet kører, hældes den lunkne mælk
gradvist ned i påfyldningstragten. Fortsæt mixningen til
konsistensen er cremet. Sætter dejen sig fast på skålens
sider, bruges spatlen til at skubbe den ind i midten.
• Tilsæt æggene ét efter ét. Lad ikke foodprocessoren køre
længere end det tager for at mixe æggene ind i
blandingen.
• Tilsæt melet i 3 omgange (ved hastighed 2 eller 3).
• Hæld dejen op i en smurt kageform og bag den i
ca. 1 1/4 time.
• Lad kagen afkøle i nogle få minutter, før den tages ud af
formen. Læg kagen på en trådrist og lad den afkøle helt.
Godt råd:
Man kan lave marmorkage ved at blande 1 spsk.
kakaopulver i halvdelen af dejen. Kom først
chokoladekage-blandingen op i kagefor-men og derefter
resten af dejen oven på. Brug en gaffel eller ske til at røre
lidt rundt i dejen, så der dannes en "marmor-effekt"..
™ £ Pizzadej
(til 2 runde pizzaer)
• 15 g frisk gær eller 1 tsk. tørgær
• 1 tsk sukker
• Ca. 11⁄
2
dl varmt vand (ca. 35 °C)
• 300 g hvedemel
•
1
⁄2
tsk salt
• 2 spsk olivenolie
• En bageplade
Pizza-sovs (fyld):
• 1 løg
• 1 fed hvidløg
• 2 spsk olivenolie
• 3 dl flåede tomater (på dåse)
• 1 tsk blandede italienske krydderier (tørrede eller friske)
• Salt og peber
• Sukker
Page 26

27
• Velegnede ingredienser til at komme over pizzasovsen:
Oliven, salami, artiskokker, champignon, ansjoser,
mozzarellaost, rød/grøn/gul peber, mellemlagret, revet
ost samt olivenolie efter behag.
• Montér dejkrogen i foodprocessor-skålen.
• Kom vand, gær og sukker op i skålen og mix
ingredienserne ved hastighed 3 i ca. 15 sekunder.
• Tilsæt mel, olie og salt og ælt dejen ved hastighed 5 i
ca. 3 minutter.
• Form dejen til en kugle og kom den op i en skål. Dæk
skålen til med et fugtigt viskestykke og lad dejen hæve et
lunt sted i ca. 45 minutter.
• Hak løg og hvidløg med knivenheden og svits dem til de
er klare.
• Tilsæt de flåede tomater og krydderierne og lad sovsen
simre i ca. 10 minutter.
• Smag til med salt, peber og sukker.
• Lad sovsen afkøle.
• Opvarm ovnen til 250 °C.
• Rul dejen ud i 2 runde stykker på et køkkenbord strøet til
med mel.
• Læg dem på en smurt bageplade.
• Hæld pizza-sovsen (fyldet) over, men lad kanterne være
frie.
• Kom de ønskede ingredienser ovenpå. Slut med lidt revet
ost og hæld lidt olivenolie over.
• Bages i 12 til 15 minutter.
£ Brioche
Vigtigt: De skal kun bruge knivenheden til briochedej.
Dejkrogen egner sig ikke til dette.
• 250 g mel
• 30 g stødt melis
• 20 g frisk gær eller et brev tørgær
• 100 g smør
•1⁄
2
dl mælk (40 °C)
• 1 tsk. salt
• 4 æg
• En brioche-form (eller en rund, dyb kageform)
• Monter knivenheden.
• Kom gær, vand og sukker op i foodprocessor-skålen.
• Mix blandingen ved hastighed 4 i 15 sekunder.
• Kom mel, salt og æg op i skålen og mix videre ved
hastighed 5 i ca. 4 minutter.
• Dæk skålen til med et fugtigt viskestykke og lad dejen
hæve på et lunt sted i 1 time.
• Smelt smørret. Sæt låget med motorenheden tilbage på
foodprocessoren. Tænd for apparatet og tilsæt det
smeltede smør. Mix til dejen hænger sammen.
• Brioche-formen pensles med smør, og dejen kommes i.
Stilles til hævning i yderligere 45 minutter.
• Sæt formen i den nederste del af ovnen og bag ved
220 °C i 30 minutter.
h Tzatziki
(Agurkesalat; 2-3 personer).
• 1 agurk
• 2 dl yoghurt
• 1 spsk. olivenolie
• 2 fed hvidløg
• 1 knivspids salt
• 1 tsk. finthakket dild
• Et par mynteblade
• Skræl agurken og riv den ved hastighed 4 eller 5.
• Kom den revne agurk op i et dørslag og lad den dryppe
grundigt af.
• Bland de øvrige ingredienser, med undtagelse af
myntebladene, med den revne agurk.
• Salaten smager bedst kold, så stil den i en skål med låg i
køleskabet i 1 time.
• Før servering pyntes med mynteblade.
£ g Coleslaw
• 2 fed hvidløg
• 2 æbler
• 2 syltede agurker
• 1 banan
• 3 spsk mayonnaise
• 3 spsk yoghurt
•1⁄2
spsk fløde
• 2 tsk karry
• Salt og peber
• 1 lille hvidkålshoved
• Sæt knivenheden i fooodprocessoren og hak de to fed
hvidløg.
• Skræl æblerne, skær dem i kvarter og fjern kærnehusene.
• Kom æbler og agurker op i skålen og finhak dem.
• Tilsæt bananstykker, mayonnaise, yoghurt, karry, fløde,
salt og peber og mix ingredienserne med
momentknappen (M).
• Udskift knivenheden med skiveholderen (isat medium
snitteskiven). De kan lade dressingen blive i skålen. Skær
hvidkålshovedet i passende stykker og snit dem i strimler
ved hastighed 3. Kom ingredienserne op på et fad eller
en skål og bland dem godt med en ske. Dæk
fadet/skålen med et låg eller plastfolie og lad dressingen
trække.
Page 27

28
£ ß g h Kartoffel-courgettes gratin
(3-4 personer).
• 3/4 kg kartofler
• 1 knivspids salt
• 2 courgetter (ca. 500 g)
• 2 knuste fed hvidløg
• Ca. 75 g smør + smør til pensling af det ildfaste fad.
• 2-3 tsk italienske eller Provence krydderier
• 3 æg
•11⁄2 dl piskefløde
•11⁄2 dl mælk
• Peber
• 100 g mellemlagret ost
• Skræl og vask kartoflerne.
• Sæt skiveholderen (isat medium snitteskiven) i skålen og
snit kartofler og courgetter ved hastighed 5.
• Kog kartoffelskiverne i kogende vand tilsat 1 knivspids
salt, til de er næsten møre.
• Kom skiverne op i et dørslag og lad vandet løbe grundigt
af.
• Kom halvdelen af smøret på en stegepande og steg
halvdelen af courgette-skiverne i 3 minutter. Vend dem
hele tiden under stegningen. Drys skiverne med halvdelen
af krydderierne. Steg den anden halvdel af courgetteskiverne på samme måde og drys dem med resten af
krydderierne.
• Lad de stegte courgette-skiver dryppe af på et stykke
køk-kenrulle.
• Pensl et stort, fladt indfast fad med lidt smør og kom
courgette- og kartoffelskiverne op på. Læg dem så de
overlapper hinanden ligesom tagsten.
• Pisk æggene med piskefløde og mælk ved hastighed 4.
Tilsæt salt og peber efter behag og hæld blandingen over
courgette- og kartoffelskiverne.
• Udskift snitteskiven med medium/riveskiven. Riv osten
ved hastighed 5 og fordel den over fadet.
• Sæt fadet i midten af en forvarmet ovn (200 °C) og brun
retten i ca. 10 minutter.
£ Mayonnaise
• 1 stort æg eller 2 små æggeblommer
• 1 tsk sennep
• 1 tsk salt
• Peber
• 3 spsk citronsaft
•21⁄2 dl olie (kvantiteten afhænger af hvor tyk konsistens
man ønsker).
Alle ingredienserne skal have stuetemperatur.
• Kom æg eller æggeblommer, sennep, salt, peber og
citronsaft op i foodprocessor-skålen.
• Mix ingredienserne med knivenheden ved hastighed
4 eller 5 indtil saltet er opløst. Hæld derefter olien
langsomt ned i påfyldningstragten, medens knivenheden
kører.
Godt råd:
• Tilberedning af tartarsauce: Tilsæt persille, agurker og
hårdkogte æg.
• Tilberedning af cocktailsauce: Tilsæt 1⁄4 dl creme fraiche,
et stænk whisky, 3 tsk tomatpuré og et stænk gingersirup pr. dl. mayonnaise.
£ Frugtkage
• 250 g hvedemel
• 110 g smør
• 110 g sukker
• 7 g bagepulver
• 60 g rosiner
• 170 g kandiserede frugter
• 2 æg
• En 25 cm kageform
• Læg den kandiserede frugt og rosinerne i blød i frugtthe
(i ca. 1 time).
• Sæt knivenheden i foodprocessor-skålen.
• Skær smørret i terninger.
• Kom mel, sukker, bagepulver, smørterninger og æg op i
skåen. Tilsæt rosiner og frugter. Mix ingredienserne ved
hastighed 5 i højst 15 sekunder.
• Kom blandingen op i en smurt kageform og bag den i
midten af ovnen ved en temperatur på ca. 170 °C, indtil
kagen føles fast (ca. 75 minutter).
Page 28

29
Ingredienser
Æg
- Piskede
(æggehvider)
Babymad/
børnemad/
diætkost
- Pureret
Bælgfrugter
- Purérede
Bagværk
(småkager)
- Omrøring
Bagværk
(kager)
- Omrøring
Bagværk
(let/flydende
dej)
- Omrøring
Chokolade
- Hakket
Creme
Dej (tærte, pie,
æbleskiver)
Dej (brød)
Dej (pizza)
Maksimum
kvantitet
Start og
hastighedsvælger
Fremgangsmåde Anvendelse
4 æg
300 g
400 g
3 æg
150 g mel
4 dl væske
200 g
250 g
250 g mel
350 g mel
(brød)
300 g
4
M/4-5
5
4-2
5
3-4
M/5
5
5
5
5
ß
£
£
ß
£
£
£
£
™
™
Brug æg med stuetemperatur.
(Bemærk: Brug mindst 2 æg.)
Grov konsistens: Tilsæt kun lidt væde.
Tyndere konsistens: Tilsæt væde til
den ønskede konsistens opnås.
Anvend kogte bønner eller ærter.
Alle ingredienser skal have
stuetemperatur.
Rør æg og sukker stift ved hastighed 4.
Sigt melet i og fortsæt omrøringen ved
hastighed 2.
Alle ingredienser skal have
stuetemperatur.
Se opskriften på side 28
Hæld først de flydende ingredienser op i
skålen. Tilsæt derefter de tørre
ingredienser.
Anvend hård, ren chokolade. Brækkes i
stykker á ca. 2 cm. Begynd med stilling
M. Skift derefter over til hastighed 5 for
finere hakning.
Anvend blødt smør så resultatet bliver
let og luftigt.
Anvend koldt smør/margarine og koldt
vand. Kom mel i skålen. Kom derefter
ca. 2 cm store stykker smør/margarine i
skålen. Mix ved hastighed 5 til
blandingen smuldrer. Tilsæt koldt vand
medens der mixes videre. Stop så snart
dejen har samlet sig til en kugle (efter
ca. 15 sekunder). Lad dejen afkøle,
inden den videreforarbejdes.
Se opskriften på side 25
Se opskriften på side 26
Budding, soufflé,
marengs, garniture.
Børnemad.
Babymad.
Puré, supper.
Kager, roulader,
wienerbrød.
Kager etc.
Pandekager, vafler,
æbleringe.
Garniture,
chokoladesovs,
mousse, budding.
Kager, desserter, pynt.
Frugttærter,
æbleskiver, pie.
Brød.
Pizza, tærter.
Page 29

30
Dej (gærdej)
Dej
(mørdej/butter
dej)
Flødeskum
- Pisket
Frugt
(generelt)
- Hakket
- Pureret
Grøntsager
(generelt)
- Hakkede
- Purerede
Kartofler
(kogte)
- Purerede
Kød, fisk,
fjerkræ
- Hakket
(magert kød)
- Hakket (fedtmarmoreret)
Mayonnaise
Milkshake
Nødder
- Hakkede
300 g
250 g mel
4 dl
400 g
500 g
400 g
500 g
500 g
300 g
200 g
3 æg
3 1⁄2
dl
væske
250 g
5
5
3
M/5
5
M/5
5
4-5
M/5
M/5
4-5
M/5
M/5
™
£
ß
£
£
£
£
£
£
£
£
£
£
Se opskriften på side 26
Anvend koldt smør/margarine i stykker
på ca. 2 cm tykkelse. Kom alle
ingredienser op i skålen. Lad apparatet
køre indtil dejen er formet til en kugle
(efter ca. 30 sekunder). Lad dejen
afkøle, inden den videreforarbejdes.
Brug fløde med køleskabstemperatur.
Tilbered mindst 11⁄4 dl.
Godt råd: Tilsæt lidt citronsaft for at
undgå misfarvning.
Brug rå, frisk frugt uden kerner.
Brug kogt eller blød, moden frugt.
Anvend kogte grøntsager.
Skæres i terninger á ca. 3 cm.
Kog ikke kartoflerne for meget.
Mængden af mælk afhænger af
kartoffelsorten. Brug varm mælk (maks.
80 °C). Tilsæt mælken langsomt medens
knivenheden kører.
Fjern først sener og ben, også fiskeben.
Skær kødet i terninger á ca. 3 cm.
Ønskes grofthakket kød, vælges stilling
M.
Brug kun ingredienser med
stuetemperatur. Se opskriften på
side 28
(Bemærk: Brug mindst 1 æg eller 2
æggeblommer).
Se opskriften på side 24.
Ved grovhakning vælges stilling M. Ved
finhakning vælges hastighed 5.
Finere brød.
Æbletærte, småkager,
frugtkager.
Pynt, kagecreme, is,
kager.
Salater, syltetøj, kager.
Sauce, syltetøj,
budding, babymad.
Salater, råkost, supper.
Grøntsagspuré, supper.
Ovnretter, puré.
Bøftartar, hamburgers.
Hakket kød.
Til pommes frites,
salater, fondue og
barbecue sauce.
-
Salater, garniture,
brød, kager, budding.
Page 30

31
Ost
- Hakket
- Revet
Porrer
- Snittede
Rasp
- Hakket
Suppe
Urter
- Hakkede
200 g
-
100 g
5 dl væske
Min. 30 g
M/5
5
M/4-5
M/5
4-5
M/5
£
h
g
£
£
£
Anvend ost uden skorpe (f.eks.
Parmezan) og skær den i tern á ca. 2
cm. Vælg stilling M til grofthakket ost og
hastighed 5 hvis osten ønskes hakket til
fint pulver.
Tryk nedstopperen ned med let tryk.
Kom porrerne i påfyldningstragten med
hovederne opad. Bruges tynde porrer,
fyldes tragten helt op.
Brug tørt, sprødt brød.
Tilsæt eventuelt lidt væde for at opnå
den ønskede konsistens.
Skyl og tør urterne.
Garniture, gratin,
suppe, sauce,
kroketter.
Sauce, fondue, pizza og
gratinerede retter.
Supper, kogteporrer.
Til panering og
gratinering.
Supper.
Sauce, suppe,
garniture,
kryddersmør.
Page 31

32
English
Viktig
• Les bruksanvisningen sammen med
illustrasjonene før apparatet tas i bruk.
• La ikke barn bruke apparatet.
• Vær forsiktig ved håndtering og
innsetting av kniven og skivene, da de er
meget skarpe.
• Fjern beskyttelseshylstret fra kniven før
bruk.
Sett alltid beskyttelseshylstret tilbake på
plass etter rengjøring.
• La de roterende delene stoppe helt før
lokket åpnes.
• Putt aldri fingrene inn i mateåpningen.
Bruk heller ikke kniver, gafler,
slikkepotter, skjeer etc. Bare den
medfølgende stamperen er egnet til
dette formålet.
• Trekk støpselet ut av stikkontakten etter
bruk.
• Hvis nettledningen på dette apparatet
skulle bli skadet, må den kun erstattes
med original ledning. Vennligst henvend
Dem til Deres Philips forhandler eller
direkte til Philips.
• Før første gangs bruk, skal alle delene
som kommer i kontakt med maten
vaskes.
• Plasser ikke bollen i mikrobølgeovn.
• Dypp aldri motorenheten i vann eller
andre flytende væsker. Den skal heller
ikke skylles.
• Vennligst legg merke til at 0,75 liter er
maksimumsmengden ved miksing eller
blanding av flytende væsker.
• Ikke overskrid maksimumsmengden og
bearbeidingstiden som er beskrevet i
tabellen og i oppskriftene.
• Behold bruksanvisningen for senere bruk.
Beskrivelse (fig. 1)
A M (”Moment ”) knapp
Trykk: motoren går
Slipp: motoren stopper
B Kontrollring
1 For fjerning og påsetting av lokket.
Lokkets utløserknapper (D) er nå tilbaketrukket.
2 O/M For "Off" posisjon og ”Moment” posisjon
for puls drift
1....5 for kontinuerlig kjøring.
C Motorenhet
D Utløserknapper for lokket
E Stamper
F Mateåpning
G Lokk
H Drivaksel
I Bolle
J Ledningsklips (service nr. 4822 290 40369)
K Kniv £ (service nr. 4822 690 40232)
L Holder for innsetnings utstyr f
(service nr. 4203 065 61521)
M Kutteskive medium g
(service nr. 4203 065 61540)
N Raspeskive fin j
(service nr. 4203 065 61550)
O Raspeskive medium h
(service nr. 4203 065 61560)
P Gir boks for eltekroker og visp
Q Eltehylse (service nr. 4203 065 60011)
R Vispß (service nr. 4822 690 10115)
S Eltekrok ™ (service nr. 4822 690 10116)
T Slikkepott (service nr. 4822 690 40212)
Automatisk sikkerhetsbryter (kan tilbakestilles)
Vennligst les bruksanvisningen nøye før
apparatet tas i bruk.
For å hindre skade på grunn av overoppheting er dette
apparatet utstyrt med en automatisk sikkerhetsbryter
som vil slå av nettspenningen hvis det er nødvendig.
Hvis instruksjonene nedenfor følges nøye kan De slå
på apparatet igjen etter en times avkjøling.
Hvis apparatet plutselig stopper
1. Trekk først ut støpselet fra stikkontakten.
2. Sett deretter kontrollringen til posisjon O/M.
3. La apparatet avkjøles i minimum en time.
Ta kontakt med Deres forhandler eller et autorisert Philips
Servicesenter. Hvis sikkerhetsbryteren stadig aktiviseres.
Norsk
Page 32

Montering og demontering av motorenhet og
lokk
- Forsikre Dem om at kontrollringen er satt til posisjon
1 (fig. 2).
NB! Skade kan oppstå hvis kontrollringen ikke står i
denne posisjonen under åpning og lukking.
- Sett lokket på bollen (fig. 3).
- Sett motorenheten på dekslet (fig. 4).
- Vri kontrollringen til posisjon 2 O/M (fig. 5).
- For å frigjøre motorenheten og lokket vri
kontrollringen til posisjon 1 (fig. 6, 7).
Mateåpning og stamper
• Bruk stamperen til å føre
ingredienser ned gjennom
mateåpningen (fig. 8).
• Stamperen kan forbli i
mateåpningen under bruk
for å hindre sprut og søl.
• During operation you
may remove the pusher
from the filling opening to
add ingredients.
33
- Under bruk kan De fjerne stamperen fra
mateåpningen for å tilsette ingredienser.
På undersiden av stamperen er det en markering
hvor De kan lage et lite hull ved hjelp av en spiss
gjenstand (fig. 9). Gjennom dette hullet kan De
tilsette små mengder væske når det er behov for det
(f.eks. olje ved tilberedning av majones) (fig. 10).
- Det er mengdemarkeringer på stamperen for å
kunne måle væske (ml).
Hakke, mikse, blande og lage pureer med
kniven £
• Hakke, mikse, blande og lage pureer med
kniven!
- Fjern beskyttelses hylsteret fra kniven før bruk
(fig. 11, 12).
Hold alltid den ubeskyttede kniven i
håndtaket.
- Sett først i drivakselen (fig. 13) og kniven (fig. 14).
9
10
2
1
4
3
•
2
•
3
•
4
•
5
5
1
•
6
1
7
•
2
•
3
•
4
•
5
M
2
•
3
•
4
•
5
11
13
12
14
8
Page 33

- Ha deretter
ingrediensene i bollen
(fig. 15).
- Sett på lokket og
motorenheten (fig. 3-4).
- Sett stamperen i
mateåpningen.
- Slå på maskinen ved å
trykke på "Moment"knappen (fig. 16) eller ved
å velge posisjon I (fig. 17).
Tips - Hakking
• Store stykker kuttes opp i terninger på ca. 3 cm.
• Unngå overbearbeiding.
• Hvis ingrediensene setter seg fast på kniven eller
matrester
• setter seg fast på innsiden av bollen:
- slå først av apparatet,
- ta lokket av bollen (med motoren)
- fjern maten fra kniven eller bollen ved hjelp av
slikkepotten.
• Kutt aldri svært harde ingredienser som kaffebønner,
muskat, korn eller harde tørkede urter (f.eks.
kardemomme og isbiter), da dette vil gjøre kniven
sløv.
• Ved bearbeiding av store mengder tørr persille
forsikre Dem om at bollen også er tørr.
• Hvis De ønsker å hakke noen få fedd hvitløk, slipp
disse gjennom mateåpningen ned på den roterende
kniven. Forsikre Dem om at hvitløken og bollen er
tørr.
• Forsikre Dem om at hard ost (f.eks. moden gouda,
parmesan, pecorino) har romtemperatur. Vær
forsiktig med å la motoren gå for lenge, da osten kan
bli varm og klumpete.
• Forsikre Dem at halvhard ost (f.eks. fersk og
halvmoden gouda, emmenthaler, gruyere) er så kald
som mulig.
• Legg klissen kandisert og tørket frukt (f.eks. dadler,
fiken, svisker) i dypfryseren i minst
15 minutter.Tilsett en teskje mel rett før hakkingen.
Tips - miksing/blanding
• Ved miksing eller blanding av væsker start alltid med
hastighet 2 eller 3. Senere kan De øke hastigheten til
4 eller 5.
• Ikke miks eller bland for lenge for å unngå at det
danner seg mye skum.
• Bearbeid ikke mer væske enn 0,75 liter.
• Bearbeid ikke væske varmere enn 80 C.
• Under laging av terte-/paideig bruk så lite væske som
mulig. Dette vil gjøre at deigen vil bli lettere å kjevle
ut. Bruk alltid kaldt hardt smør eller margarin.
Tips - pureer
• Man kan lage pureer av frukt og grønnsaker uten å
tilsette ekstra væske. Med litt ekstra væske vil
resultatet bli finere.
• Lag først pure av de harde og seige ingrediensene.
Tilsett deretter de myke ingrediensene.
Kutting eller rasping med skiveholderen f og
de utskiftbare skivene g h j
• Vær forsiktig: Skivene er meget skarpe!
- Plasser den valgte skiven i skiveholderen (” Klikk”)
(fig. 18).
- Plasser drivaksel og skiveholderen (fig. 19)
- Sett på lokket og motorenheten (fig. 3-4).
- Ta ut stamperen fra mateåpningen.
- Ha ingrediensene i mateåpningen (fig. 20).
- Plasser stamperen på toppen av maten og press
sakte nedover (fig. 21).
34
15
15
16
17
1
•
1
2
–
2
•
3
1
•
2
•
1
–
–
•
3
–
4
4
–
•
5
5
3
•
4
2
•
–
5
3
–
4
–
5
18
1
19
2
20
21
Page 34

35
• kru på ved å velge rett
hastighet (fig. 22).
• Press ingrediensene
nedover ved bruk av
stamperen. Bruk et jevnt
og moderat press.
• Store stykker kuttes opp i
biter slik at de passer i
mateåpningen.
• Fyll mateåpningen jevnt
for å oppnå det beste
resultat.
• Tøm bollen av og til ved tillaging av store mengder.
Tips - kutting
g
• Fyll mateåpningen helt mens motoren står stille.
Trykk med stamperen og slå på apparatet. På denne
måten vil De hindre ingrediensene i å snu seg under
kuttingen.
• Bruk medium hastighet (2 eller 3) for optimalt
resultat
Tips – riving h j
• Før riving av ost, kutt osten i små terninger (ca. 2
cm).
• Trykk lett men jevnt på stamperen. Den siste biten
ost vil forbli mellom lokket og skiven. Det er ikke
mulig å hindre dette.
• Forsikre Dem om at hard ost (for eksempel moden
gouda, parmesan, pecorino) har romtemperatur.
• Forsikre Dem at halvhard ost (for eksempel fersk og
halvmoden gouda, emmenthaler, gruyere) er så kald
som mulig.
• For reven gauda ost, bruk kun medium raspeskive.
• Hvis De ønsker lange striper, legg ingrediensene
horisontalt ned i mateåpningen.
• Velg hastighet 5 for optimalt resultat.
Pisking av egg eller krem med vispen ß
• Vispen er anvendelig til å piske hele egg, eggehvitter,
pynt til desserter og krem.
NB! Bruk ikke vispen til å lage rører eller
deiger.
- Hvis nødvendig: Trekk ut eltekroken fra gearboksen
(fig. 23) og sett vispen godt fast til denne (fig. 24).
Til dette kan det trenges litt styrke.
- Sett først i drivakselen (fig. 25)og plasser deretter
vispenheten på plass (fig. 26). Etter dette ha
ingrediensene i bollen.
- Sett på lokket og motorenheten (fig. 3-4).
Sett stamperen i mateåpningen for å stenge denne.
- Sett kontrollringen til hastighet 3 for krem (fig. 27)
eller til hastighet 5 for eggehvitter (fig. 28).
Tips - for pisking
• For de beste resultater ved pisking av krem, forsikre
Dem om at kremen, bollen og vispen er meget kalde.
Sett bollen og vispen i kjøleskapet minst en halv time
før piskingen. La kremen stå i kjøleskapet minst en
dag. Tilsett ikke sukker før kremen har begynt å
tykne. Pisketiden avhenger av hvilken type kremfløte
som brukes.
• For pisking av eggehvitter må bollen og vispen være
tørre og helt fri for fett. De vil oppnå de beste
resultater når eggene har romtemperatur
(ca. 21 C).
22
1
23
•
2
•
3
•
4
1
–
2
•
–
5
3
–
4
–
5
24
CLICK
25
26
27
1
28
•
2
•
3
•
4
1
–
2
•
–
5
3
–
4
–
5
1
•
2
•
1
–
3
•
4
2
•
–
5
3
–
4
–
5
Page 35

Elting av deig med eltekroken ™
- NB: Bruk altid eltehylsen ved elting.
- Hvis nødvendig: Trekk vispen ut av girboksen
(fig. 29) og sett eltekroken godt på plass (fig. 30).
- Sett først i drivakselen og plasser deretter eltehylsen
på plass (fig. 31, 32).
- Sett elteren på drivakselen (fig. 33).
- Etter dette ha ingrediensene i bollen.
- Sett på lokket og motorenheten (fig. 3-4). Sett
stamperen i mateåpningen for å stenge denne.
- Sett kontrollringen til hastighet 5 (fig. 34).
Tips – elting
• Overskrid aldri maksimumsmengden for mel.
• For brøddeiger og gjærdeiger ha først i vannet, gjær
og sukker i bollen. Tilsett senere de andre
ingrediensene. Eltetiden avhenger av hvilken type
brøddeig, men vil være mellom 3-4 minutter.
• Glem aldri å demontere og rengjøre gearboksen
etter elting.
36
Etter bruk
- For å frigjøre motorenheten og lokket, vri
kontrollringen til posisjon 1 (fig. 6, 7).
- Løft utstyret og drivakselen ut av bollen (fig. 35).
Etter dette kan bollen tømmes.
- Etter kutting og rasping: frigjør skivene fra
skiveholderen (fig. 36).forsikre deg om at skivene
ikke mot deg når du gjør dette. Vær forsiktig:
skivene er meget skarpe!
Rengjøring og oppbevaring
• Trekk alltid støpselet ut av stikkontakten før
rengjøring av motorenheten. Motorenheten kan
rengjøres med en fuktig klut.
• Dypp aldri motorenheten i vann. Hell aldri vann over
den.
• Vask delene som har vært i kontakt med maten i
varmt såpevann straks etter bruk.
• Vær forsiktig ved rengjøring av kniven og skivene:
skjæreeggene er meget skarpe! Disse delene kan
også vaskes i en oppvaskmaskin.
• Forviss Dem om at skjæreeggene ikke kommer i
kontakt med harde gjenstander, da dette vil gjøre
dem sløve.
• Sett alltid
beskyttelseshylsteret
tilbake på kniven etter
rengjøring (fig. 37).
29
CLICK
30
31
32
33
34
1
•
2
•
3
•
4
35
36
•
5
37
Page 36

37
• Girboksen for vispen og
eltekroken kan lett tas fra
• hverandre for skikkelig
rengjøring (fig. 38-39).
• Etter rengjøringen, kan
utstyret oppbevares i
bollen. Sett lokket på
plass og vikle opp
nettledningen som vist på
fig. 40 og bruk
ledningsklipset.
Tilleggsutstyr
• Følgende tilleggsutstyr er også tilgjengelig *):
- Fin kutteskive
(service nr. 4203 065 61530)
- Medium kutteskive
g
(service nr. 4203 065 61540)
- Fin raspeskive j for rå grønnsaker, frukt og
friterte poteter
(service nr. 4203 065 61550)
- Medium raspeskive h
(service nr. 4203 065 61560)
- Grov raspeskive for rasping av poteter
(service nr. 4203 065 62310)
- Granuleringsskive k for granulering av Parmesan,
pepperrot og poteter
(service nr. 4203 065 61570).
*) De kan spørre Deres forhandler om dette utstyret er
tilgjengelig i deres land.
38
2
1
39
4203 065 61530
40
4203 065 61540
4203 065 61550
4203 065 61560
4203 065 62310
4203 065 61570
Page 37

• persille
• ristet brød eller kjeks
• Smelt smøret i pannen og stek kyllingleveren, løken og
hvitløken i ca. 8 minutter, til leveren er stekt.
• Avkjøl blandingen og legg den i bollen til foodprocessoren.
• Tilsett kremfløte, tomatpuré og brandy, og krydder etter
smak.
• Kjør apparatet på hastighet 5 til blandingen er jevn og
luftig.
• Ha blandingen på en tallerken og pynt med persille.
• Serveres avkjølt med ristet brød eller kjeks.
£ Guacamole
(meksikansk avocado dip; til 2-3 personer)
• 2 medium modne avocado
• 2 medium tomater, uten skinn
• 1 liten løk i biter
• 3-4 dusker fersk persille
• 1 grønn chilipepper, delt uten frø
• salt og pepper
• toast eller maischips til servering
• Skrell og ta steinen ut av avocadoen. Del den i biter og
legg dem i bollen til foodprocessoren.
• Kjør på hastighet 5 til det blir en jevn pure.
• Del tomatene og ta ut frøene.
• Tilsett tomatene, løken, persillen og chilipepperen til
avocadopureen. Kjør igjen til pureen blir jevn.
• Smak til med salt og pepper og server med toast eller
maischips.
ß Marengsreder med jordbær
(8 marengsreder)
For marengsredene:
• 2 eggehvitter
• 100 g sukker
• 1 ss maismel
• 1 klype salt
• 8 kakeformer (aluminiumsfolie)
• bakepapir
Fyll:
• 250 ml pisket kremfløte
• 2 ss sukker
• vaniljesukker (etter smak)
• 400 g jordbær
Marengsredene:
• Pisk eggehvittene med salt på hastighet 4 til de blir stive.
Bland sukker og maismel med en skje. Tilsett denne
blandingen til eggehvittene en skje ad gangen og pisk
etter hver gang.
• Sett kakeformene opp ned på en stekeplate trukket med
bakepapir. Sprøyt marengsen i sirkler over de snudde
kakeformene. Begynn på toppen og bruk en kakesprøyte
med et glatt munnstykke (størrelse 4).
Oppskrifter
£ Hummus bi Tahini
(erter - sesam pure)
• 250 g erter
• 80 g tahini (sesam pure)
• ca. 50 ml sitronjuice
• ca. 50 ml vann
• 2 fedd hvitløk
• 1 strøken ss olivenolje (maisolje)
•1⁄2 ts cayenne pepper
• friske blader persille
• Bløtlegg ertene over natten i mye vann som er tilsatt litt
salt.
• Kok ertene i ca. 2 timer.
• Ha i alle ingrediensene utenom persillen, cayenne pepper
og olje i foodprocessor-bollen.
• Kjør ingrediensene på hastighet 5 til det blir en jevn pure.
• Ta blandingen ut av bollen og pynt med persille og
cayenne pepper.
• Server med brød (f.eks. pitabrød).
£ Milkshake
(2-3 milkshakes)
• 250 g frisk frukt (f.eks. jordbær,
bringebær, bananer)
• 1 ts sitronjuice
• sukker eller honning etter smak
• 200 ml kald melk
• 2 kuler vaniljeis
• Lag pure av frukten med sitronjuicen
og sukker eller honning, ved hjelp av
kniven.
• Tilsett melken og vaniljeisen og bland
på hastighet 5 til blandingen skummer.
Tips:
• I stedet for frisk frukt bruk 2 strøkne ss sterk kaffe og
2 ss kakao. Bytt ut vaniljeisen med mokka- eller
sjokoladeis.
• Bytt ut den friske frukten, sitronjuicen og sukkeret med
6 strøkne ss med syltetøy.
£ Kyllinglever paté
(til 4 personer)
• 25 g smør
• 250 g kyllinglever, renskåret
• 1 liten løk, hakket
• 1 fedd hvitløk, knust
• 5 ss kremfløte
• 2 ss tomatpuré
• 2 ts brandy
• salt og pepper
38
Page 38

39
Skyv stekeplaten inn i en forhåndsoppvarmet ovn og stek
marengsen ved 100 C i 60-90 minutter, til de er tørre.
• La marengsen avkjøles i ovnen. Fjern kakeformene.
Fyll:
• Pisk kremen med sukker og vaniljesukker på hastighet 2
til den blir stiv.
• Del jordbærene.
• Fyll marengsredene med pisket krem og pynt med jordbær.
£ ß Aprikose-marengs pai
Paibunn:
• 100 g smør
• 150 g mel
• 50 g sukker
• 1 klype salt
• ris
• bakepapir eller aluminiumsfolie
• bakeform 20 cm i diameter
Fyll:
• 250 g tørkede aprikoser
• 75 g sukker
• saften av 1 sitron
Marengs:
• 2 eggehvitter
• 100 g sukker
• litt salt
• Sett kniven i bollen.
• Del smøret i terninger.
• Ha mel, sukker, salt og smør i bollen. Tilsett litt isvann og
bruk kniven til å lage en jevn deig på hastighet 5.
• Pakk deigen inn i plastfolie og la den ligge i kjøleskapet i
minst 1 time.
• For å hindre at aprikosene kleber seg til hverandre, legg
dem i dypfryseren eller frysedelen av kjøleskapet i 15
minutter og tilsett 2 ss mel før de hakkes.
• Hakk aprikosene medium. Bruk "Moment"-knappen (M).
• Legg de hakkede aprikosene i en kjele, tilsett sitronjuicen
og sukkeret. La det småkoke i 4 minutter. La
aprikoseblandingen avkjøles.
• Rull deigen ut på en melet benk.
• Kle den smurte formen med deigen. Lag en kant på ca.
3 cm.
• Legg et stykke bakepapir eller aluminiumsfolie på toppen
av deigen og hell ris på toppen. Stek bunnen i en
forhåndsoppvarmet ovn på 180 C i 30 minutter. Ta ut
kakeformen og fjern papiret eller folien med risen. Øk
temperaturen til 200 C.
• Fyll paibunnen med aprikoseblandingen.
• Pisk eggehvittene med saltet, på hastighet 4, til den blir
stiv. Tilsett gradvis sukker.
• Sprøyt eggehvittene på aprikoseblandingen med et
grovtakket munnstykke.
• Sett paien inn i ovnen igjen i 15-20 minutter, til
marengsen er tørr og lett gylden.
£ ß Lakse-pålegg
(til 3-4 personer)
• 1 boks laks (220 g)
• 2 plater gelatin
• gressløk
• 1 klype salt
• 1 knivsodd cayenne pepper
•1⁄2 ts sitronjuice
• 125 ml kremfløte
• 1 liten løk
• dill til pynt
• Bløtlegg gelatinen i vann.
• Hakk gressløken og løken i foodprocessoren. Bruk
"Moment"-knappen (M).
• Fjern bein og skinn fra laksen.
• Tilsett salt, cayenne pepper, sitronjuice, laksen og væsken
fra boksen til den hakkede løkblandingen. Lag pure av
blandingen på hastighet 5.
• Ha pureen i en bolle.
• Kok opp en liten mengde vann og løs opp gelatinen.
• Rør gelatinblandingen inn i pureen.
• Sett vispen i bollen og pisk fløten på hastighet 2 til den
blir stiv.
• Fold den piskede kremen inn i pureen ved hjelp av en
treskje.
• Snu moussen ut på et fat. Dekk den til og avkjøl den i
kjøleskapet noen timer.
• Pynt moussen med dill.
™ Loff
• 350 g hvetemel
• 10 g mykt smør eller margarin
• 18 g fersk gjær eller
• 14 g tørrgjær
• 200 ml vann (avhengig av typen mel)
• 1 ts salt
•11⁄2
ts sukker
• 25-28 cm lang brødform
• Monter eltekroken i bollen.
• Ha vann, gjær og sukker i bollen og kjør i ca. 15
sekunder på hastighet 3. Tilsett mel, smør eller margarin
og salt.
• Kjør deigen i 3-4 minutter på hastighet 5.
• Ha deigen i en stor bolle. Dekk bollen med en fuktig klut
og la deigen heve på et varmt sted i 30 minutter.
• Etter hevingen elt deigen og rull den opp.
• Ha deigen i en smurt bakeform og la den heve på nytt i
45 minutter.
• Stek loffen i den nedre delen av en forhåndoppvarmet
ovn på 225 C i 30 minutter.
Page 39

40
Tips:
• Denne metoden kan også brukes for å få de beste
resultatene ved ferdigblandede melblandinger.
• Deigen kan også brukes til å lage rundstykker. Den
ovenfor nevnte mengden er nok til 8-10 rundstykker.
• Del deigen i eggestore stykker. Klem de flate og form
dem til rundstykker.
• Sett rundstykkene på en smurt stekeplate.
• Pensle rundstykkene med vann og strø på sesamfrø eller
karve før de settes i ovnen.
£ ™ Gjærdeig for fletter
• 30 g ristede hasselnøtter
• 300 g siktet hvetemel
• 40 g sukker
• litt salt
• 1 egg
• ca. 150 ml melk (lunken)
• 80 g mykt smør eller margarin
• 40 g fersk gjær eller 1 pose tørrgjær
• stekeplate
• Sett kniven i bollen og hakk nøttene middels fine ved å
trykke på "Moment"-knappen i korte øyeblikk. Fjern de
hakkede nøttene fra bollen.
• Bytt ut kniven med eltekroken.
• Ha melk, gjær og sukker i bollen og kjør ingrediensene i
15 sekunder på hastighet 3.
• Tilsett mel, salt, margarin (eller smør) og egget. Elt
ingrediensene på hastighet 5 i ca. 3 minutter. Tilsett de
hakkede nøttene mot slutten av eltingen.
• Ha deigen opp i en større bolle. Dekk denne bollen med
en fuktig klut. La deigen heve i ca. 30 minutter.
• Del deigen i 3 deler og form disse til 30 cm lange pølser.
Legg disse ved siden av hverandre og klem dem sammen
i den ene enden. Flett pølsene sammen og klem sammen
endene på den andre siden.
• Legg fletten på en smurt stekeplate og la den heve i 20
minutter.
• Pensle deigen med litt smeltet smør.
• Stekes i midten av en forhåndsoppvarmet ovn ved 190 C
i 30-35 minutter.
£ Kake
• 150 g mykt smør
• 150 g sukker
• 1 ts vaniljesukker
• litt salt
• 30 ml melk
• 3 egg
• 150 g selvhevende mel
• 25 cm kakeform
• smør til å smøre formen
• Varm opp ovnen til 160 C.
• Del smøre i terninger og ha smør, sukker, vaniljesukker
og salt i bollen og kjør ingrediensene på hastighet 5.
• Hell i den lunkne melken i små porsjoner gjennom
mateåpningen mens apparatet går. Fortsett å kjøre
blandingen til den blir lys og kremete. Hvis nødvendig
bruk en slikkepott for å få blandingen fra sidene til
midten av bollen.
• Tilsett eggene en etter en. Kjør ikke lenger enn nødvendig
for å mikse hvert av eggene inn.
• Del melet i 3 like store deler og tilsett dem en etter en
(ved hastighet 2 eller 3).
• Ta blandingen opp i den smurte og strødde formen og
stek kaken i 1 time 15 minutter.
• La kaken avkjøles i noen minutter før den hvelves på en
rist. La den deretter avkjøles helt.
Tips:
For å lage marmorkake ha halvparten av røren i en annen
bolle og rør inn 1 strøken ss siktet kakao. Ha
sjokoladerøren i formen og tilsett den andre delen av røren.
Bruk en skje eller gaffel for å lage marmor-effekt.
™ £ Pizza
(For 2 runde pizzaer)
• 15 g fersk gjær eller 1 pakke tørrgjær
• 1 ts sukker
• ca. 150 ml varmt vann (lunken)
• 300 g hvetemel
•1⁄2
ts salt
• 2 strøkne ss olivenolje
• stekeplate
Fyll:
• 1 løk
• 1 fedd hvitløk
• 2 ss olivenolje
• 300 g hermetiske tomater (boks)
• 1 ts blandet italiensk krydder (tørket eller ferskt)
• salt, pepper
• sukker
• Ingredienser til pizza: oliven, salami, artisjokker, sopp,
ansjos, mozarellaost, paprika etter smak, reven moden
ost og olivenolje etter smak.
Page 40

41
• Monter eltekroken i bollen.
• Ha vann, gjær og sukker i bollen og kjør ingrediensene på
hastighet 3 i ca. 15 sekunder.
• Tilsett mel, olje og salt og kjør deigen på hastighet 5 i ca.
3 minutter.
• Elt deigen til en ball og legg den i en bolle. Dekk bollen
med en fuktig klut og la den heve på et varmt sted i ca.
45 minutter.
• Bruk kniven til å hakke løken og hvitløken. Stek dem til
de er gjennomsiktige.
• Tilsett tomatene og krydderet og la sausen småkoke i 10
minutter.
• Smak til med salt, pepper og sukker.
• La sausen avkjøles.
• Varm opp ovnen til 250 C.
• Kjevle ut deigen på en melet bakeplate og lag 2 runde
bunner.
• Legg bunnene på en smurt stekeplate.
• Dekk bunnen med sausen. Ha ikke saus på kantene.
• Legg på de ønskede ingredienser. Strø på reven ost og
drypp litt olivenolje over.
• Stekes i 12-15 minutter.
£ Brioche
Viktig: Bruk bare kniven for å lage deig til brioche.
Eltekroken er ikke egnet til dette.
• 250 g mel
• 30 g sukker
• 20 g fersk gjær eller 1 pakke tørrgjær
• 100 g smør
• 50 ml melk (40 C)
• 1 ts salt
• 4 egg
• Brioche-form (eller en dyp rund kakeform)
• Sett i kniven.
• Ha gjær, vann og sukker i bollen. Kjør på hastighet 4 i 15
sekunder.
• Tilsett mel, salt og egg. Kjør på hastighet 5 i 4 minutter.
• Dekk bollen med en fuktig klut og la deigen heve på et
varmt sted i 1 time.
• Smelt smør. Sett på lokket med motorenheten igjen. Slå
på apparatet og tilsett det smeltede smøret og kjør til
blandingen blir homogen.
• Smør formen med smør. Ha deigen i formen og la den
heve i 45 minutter.
• Sett formen nederst i ovnen og stek på 220 C i 30
minutter.
h Tzatziki
(Agurksalat: til 2-3 personer)
• 1 agurk
• 200 ml youghurt
• 1 ss olivenolje
• 2 fedd hvitløk
• litt salt
• 1 ts finhakket dill
• noen minteblader
• Skrell agurken og riv den på hastighet 4 eller 5.
• Ha den revne agurken i et dørslag. La den renne av.
• Bland de andre ingrediensene utenom mintebladene med
agurken.
• Avkjøl salaten ved å sette den i en tildekket bolle 1 time i
kjøleskapet.
• Før servering, dryss på mintebladene.
£ g Kålsalat
• 2 fedd hvitløk
• 2 epler
• 2 sylteagurker
• 1 banan
• 3 ss majones
• 3 ss youghurt
•1⁄2
ss fløte
• 2 ts karri
• salt og pepper
• 1 lite kålhode
• Sett kniven i bollen og hakk hvitløken.
• Skrell eplene. Del de i 4 deler. Fjern kjernehusene.
• Tilsett eplene, agurken, og del de fint opp.
• Tilsett stykker av banan, majones, youghurt, karri, fløte,
salt og pepper, og bland ingrediensene ved hjelp
"Moment"-knappen. Ta ut kniven og sett på kutteskiven
(medium kutteskive). Dressingen kan forbli i bollen. Del
kålen og kutt den på hastighet 3. Hell ut ingrediensene
på et fat og bland disse med en skje. Dekk til fatet med
et lokk eller plastfolie og la dressingen trekke inn.
£ ß g h Gratinert potet/squash
(3-4 porsjoner)
• 750 g poteter
• litt salt
• 2 squash (ca. 500 g)
• 2 fedd knust hvitløk
• ca. 75 g smør + smør til smøring av formen
• 2-3 ts italienskt eller provencialske urter
• 3 egg
• 150 ml kremfløte
• 150 ml melk
• pepper
• 100 g halvmoden ost
Page 41

42
• Rens og vask potetene.
• Sett kutteskiven på plass i bollen og kutt potene og
squashen på hastighet 5.
• Kok potetskivene med litt salt til de er nesten møre.
• Ha skivene i et dørslag og la de renne av.
• Ha halvparten av smøret i en stekepanne og stek
halvparten av squashen under stadig omrøring. Strø
skivene med halvparten av urtene. Stek den andre
halvparten av squashen på samme måten. Strø over
resten av urtene.
• La de stekte skivene renne av på et kjøkkenpapir.
• Smør en langpanne med smør og ha i squash- og
potetskivene annenhver gang, slik at de overlapper
hverandre som takstein.
• Pisk eggene med fløten og melken på hastighet 4. Tilsett
salt og pepper etter smak. Hell blandingen over potetog squash-skivene.
• Erstatt kutteskiven med medium raspeskive, riv ost på
hastighet 5 og strø over retten.
• Sett retten i en varm ovn (200 C) og stek den i
ca. 10 minutter.
£ Majones
• 1 stort egg eller 2 små
• 2 ts sennep
• 1 ts salt
• pepper
• 3 ss sitronsaft
• 250 ml olje (kvaliteten på oljen avhenger av ønsket
konsistens)
Alle ingrediensene må ha romtemperatur.
• Ha egg eller eggeplommer, sennep, salt, pepper,
sitronsaft i bollen.
• Kjør med kniven på hastighet 4 eller 5 til alt saltet er
oppløst. Tilsett deretter oljen gradvis via stamperen i
bollen mens bladet roterer.
Tips:
• For tartar-saus: tilsett persille, agurk og hardkokte egg.
• For coctail-saus: tilsett 50 ml creme fraiche, litt whisky,
3 ts tomatpure og litt ingefær-sirup til 100 ml majones.
£ Fruktkake
• 250 g hvetemel
• 110 g smør
• 110 g sukker
• 7 g bakpulver
• 60 g rosiner
• 170 g kandiserte frukter
• 2 egg
• kakeform 25 cm
• Legg de kandiserte fruktene og rosinene i bløt i fruktte
(ca.1 time).
• Sett kniven i bollen.
• Del smøret i terninger med en kniv.
• Ha mel, sukker, bakepulver, smørterninger og egg i
bollen. Tilsett rosiner og de kandiserte fruktene. Kjør
ingrediensene på hastighet 5 i maks. 15 sekunder.
• Hell blandingen i en smurt kakeform og stek i midten av
ovnen ved ca. 170 C til kaken blir fast (ca. 75 minutter).
Page 42

43
Matvarer
Belgfrukter
- moset
Deig (kjeks)
- røring
Deig (kaker)
- røring
Deig (lett)
- miksing
Deig (terte, pai,
eplekake)
Deig (brød)
Deig (pizza)
Deig (gjærdeig)
Deig
(småkaker)
Egg
- vispet
(eggehvitte)
Frukt
- hakket
- moset
Maks.
Mengde
Bryter
Hastig-
hets-
velger
Utstyr Fremgangsmåte Anvendelse
400 g
3 egg
150 g mel
400 ml
væske
250 g
mel
350 g mel
300 g
300 g
250 g mel
4 egg
400 g
500 g
5
4-2
5
3-4
5
5
5
5
5
4
M/5
5
£
ß
£
£
™
™
™
£
ß
£
£
Bruk kokte bønner eller erter. Det bør
kanskje tilsettes litt væske for å få en
bedre konsistens.
Ingrediensene skal ha romtemperatur.
Rør egg og sukker på hastighet 4 til det
er stivt. Tilsett siktet mel, fortsett
røringen forsiktig på hastighet 2.
Ingrediensene skal ha romtemperatur.
Se oppskrifter på side 40
Ha først væsken i hurtigmikseren. Tilsett de tørre
ingrediensene.
Bruk kaldt smør/margarin og kaldt
vann. Ha mel i bollen. Legg 2 cm store
biter med smør/margarin. Bland på
hastighet 5 til det ligner brødsmuler.
Tilsett vannet, stopp straks deigen er
formet til en ball (etter ca. 15 sek.).
Avkjøl deigen før videre behandling.
Se oppskrift på side 40.
Se oppskrift på side 41.
Se oppskrift på side 40.
Bruk kaldt smør eller margarin. Skjær i
biter på 2 cm. Ha alle ingrediensene i
bollen samtidig. Kna til deigen samler
seg (etter ca. 30 sek.). Avkjøl deigen
før videre bearbeiding.
Eggene skal ha romtemperatur.
(NB! Bruk minst 2 egg).
Tips: Bruk litt sitronsaft for å unngå
misfarging.
Bruk rå, fast, stenfri frukt.
Brukt kokt eller bløt frukt.
Pureer, supper.
Kaker,
Rullader,
Butterdeig.
Kaker etc.
Pannekaker, vafler,
epleskiver.
Fruktterte, eplekake,
paier.
Brød.
Pizza, terte.
Brød.
Eplepai, søte kjeks,
fruktterte.
Pudding, souffle,
marengs, pynt.
Salater, syltetøy,
kaker.
Sauser, puddinger,
barnemat.
Page 43

44
Grønnsaker
(generelt)
- hakket
- moset
Kjøtt, fisk,
fjærkre
- hakket
(magert)
- hakket
(ujevnt kjøtt)
Krem
Krem
- vispet
Krydder
- hakket
Majones
Milkshake
Nøtter
- hakket
Ost
- hakket
- raspet
Poteter
(kokte)
- mos
Purre
- skivet
Sjokolade
- hakket
Spedbarns-/
Barnemat/
diett
- moset
400 g
500 g
300 g
200 g
250 g
400 ml
Min.
30 g
3 egg
350 ml
væske
250 g
200 g
500 g
200 g
300 g
M/5
5
M/5
M/5
5
3
M/5
4-5
M/5
M/5
M/5
5
4-5
M/4-5
M/5
M/4-5
£
£
£
£
£
ß
£
£
£
£
£
h
£
g
£
£
Oppskåret i terninger på 3 cm.
Fjern først sener, ben inkl. fiskeben.
Skjær i terninger på 3 cm.
Hakkes i pos. M for grovere resultat.
Bruk mykt smør for luftig resultat.
Bruk avkjølt kremfløte. Lages av
minimum 125 ml.
Vask og tørk krydderet.
Ingrediensene skal ha romtemperatur.
Se oppskrift på side 42.
(NB! Bruk minst 1 stort eller 2 små
egg).
Se oppskrift på side 38.
Bruk posisjon M for grov hakking eller
hastighet 5 for finere resultat.
Bruk skorpefri ost (f.eks. Parmesan)
oppskåret i terninger på 2 cm. Velg
pos. M for grovt resultat og hastighet 5
for fint resultat. Press forsiktig med
stamperen.
Overkok ikke potetene. Mengden melk
avhenger av typen potet. Bruk varm
melk (maks. 80 C). Tilsett melken sakte
mens kniven går.
Plasseres i mateåpningen med hodet
oppover. Ved behandling av tynn purre
fyll åpningen helt.
Bruk hard, ren sjokolade. Brekk den i
biter på 2 cm. Begynn med pos. M.
Deretter hastighet 5 for finhakking.
Grov: Tilsett litt væske.
Fin: Hvis nødvendig tilsett ekstra
væske.
Salater, råkost, sauser.
Supper, pureer.
Biff, tartar,
hamburgere, hakket
kjøtt.
Terter, desserter.
Pynt, krem,
iskremblanding
butterdeig.
Sauser, supper, pynt,
kryddersmør.
Pommes frites, salater,
coctails, fondue- og
barbecue sauser.
Salater, pynt, brød,
kaker, pudding.
Pynt, supper, sauser,
kroketter.
Fondue, pizza.
Gratinerte
retter.
Ovnsretter, mos.
Supper, kokt purre.
Pynt, sauser, terter,
mousseer, puddinger.
Spedbarnsmat.
Barnemat.
Page 44

45
Strøkavring
Supper
100 g
500 ml
væske
M/5
4-5
£
£
Bruk tørt brød.
Bruk kokte grønnsaker.
Matsorter med
strøkavring, gratinerte
retter.
Supper.
Page 45

46
English
Viktigt
• Läs först hela bruksanvisningen och
studera samtidigt bilderna innan du
använder apparaten.
• Låt inte barn använda maskinen.
• Var försiktig när du hanterar kniv och de
olika skivorna. De är mycket vassa! Du
kan skära dig på dem!
• Kom ihåg att ta av skyddet från kniven
innan du använder den.
• Sätt tillbaka skyddet efter användning.
• Tag inte av locket förrän maskinen
stannat helt.
• Det är farligt att stoppa ner fingrarna i
lockets mataröppning.
• Använd alltid påmataren för att mata ner
ingredienserna, aldrig verktyg som gaffel,
kniv, sked eller skrapa.
• Drag ut stickproppen ur vägguttaget
efter användning.
• Om sladden skadas måste den ersättas
med en specialsladd, vilken tillhandahålls
av Philips serviceombud.
• Diska alla lösa delar innan du tar dem i
bruk första gången.
• Ställ aldrig in skålen i en mikrovågsugn.
• Du får aldrig doppa motorenheten i
vatten eller annan vätska.
• Spola inte heller av den. Du kan torka av
den med en väl urvriden fuktig trasa.
• Observera att 0,75 liter är max-mängden
för att bearbeta flytande ingredienser.
•Överskrid inte de rekommenderade
mängderna och tiderna i tabellen och i
recepten.
Maskinens delar (fig. 1)
A M (“Moment“)-knapp
Tryck: motorn startar.
Släpp: motorn stannar
B Manöver-ring
1 för att lossa och sätta fast locket.
Lockets lossningsknappar (D) är nu infällda.
2 O/M för ”Avstängd” och ”Momentläge”,
pulsning.
1....5 för kontinuerlig körning.
(1 = lägsta hastighet, 5 = högsta hastighet.)
C Motorenhet
D Knappar för att lossa locket
E Påmatare
F Mataröppning
G Lock
H Tillbehörshållare
I Skål
J Sladdhållare (servicenummer 4822 290 40369)
K Kniv £ (servicenummer 4822 690 40232)
L Skivhållare f
(servicenummer 4203 065 61521)
M Skivare, medium g
(servicenummer 4203 065 61540)
N Strimlare, fin j
(servicenummer 4203 065 61550)
O Strimlare, medium h
(servicenummer 4203 065 61560)
P Växel för degkrok och visp
Q Degrör (servicenummer 4203 065 60011)
R Visp ß (servicenummer 4822 690 10115)
S Degkrok ™ (servicenummer 4822 690 10116)
T Skrapa (servicenummer 4822 690 40212)
Automatiskt återgående överbelastningsskydd
Läs hela denna instruktion noggrant innan du
börjar använda maskinen.
Maskinen är försedd med ett överbelastningsskydd,
vilket automatiskt stänger av strömmen om det finns
risk för att den blir för varm. Om maskinen plötsligt
stannar, kan den efter att den kallnat en timma, åter
startas.
Om maskinen plötsligt stannar:
1. Drag först ut stickproppen ur vägguttaget.
2. Ställ sedan manöver-ringen på O/M.
3. Låt sedan maskinen svalna i minst en timma.
Tag kontakt med Philips serviceombud om
överbelastningsskyddet träder i funktion upprepade gånger
i tät följd.
Svenska
Spara bruksanvisningen! Spara köpbevis och kvitto!
Page 46

Hopsättning och isärtagning av motorenhet
och lock.
- Kontrollera att manöver-ringen står i läge 1 (fig. 2).
Obs! Maskinen kan skadas om inte manöver-ringen
är i detta läge vid öppnande eller stängning.
- Placera locket på skålen (fig. 3).
- Placera motorenheten på locket (fig. 4).
- Vrid manöver-ringen till läge 2 O/M (fig. 5).
- För att ta loss motorenhet och lock, vrid manöver-
ringen till läge 1 (fig. 6, 7).
Mataröppning och påmatare
• Använd påmataren för att
försiktigt trycka ner
ingredienserna genom
mataröppningen (fig. 8).
• Du kan ha kvar
påmataren i
mataröppningen som lock
när maskinen är igång, så
undviker du att något
skvätter eller att t ex mjöl
dammar.
47
• Påmataren kan tas ur under bearbetningen för att du
skall kunna fylla på mer ingredienser.
- På undersidan av påmataren ser du en markering där
du kan sticka ett litet hål med hjälp av ett vasst
föremål (fig. 9). Genom detta hål kan du dosera
vätska som skall tillsättas i små mängder, t ex olja till
majonnäs (fig. 10).
- Det finns nivåmarkeringar på påmataren (ml) för att
mäta vätska.
När du hackar, blandar, puréar, och mosar £
• Var försiktig: knivens eggar är mycket vassa!
- Tag av knivskyddet från kniven innan den skall
användas (fig. 11,12).
Håll alltid den oskyddade kniven i dess
handtag.
- Sätt först tillbehörshållaren på plats i skålen (fig. 13)
och sedan kniven (fig. 14).
9
10
2
1
4
3
•
2
•
3
•
4
•
5
5
6
1
7
•
2
•
3
•
4
•
5
M
1
•
2
•
3
•
4
•
5
11
12
8
13
14
Page 47

- Lägg sedan ingredienserna
i skålen (fig. 15).
- Sätt på locket och
motorenheten (fig. 3-4).
- Sätt påmataren i
mataröppningen.
- Starta genom att trycka
på “Moment”-knappen (fig.
16) eller genom att välja
önskad hastighet (fig. 17).
Tips för att hacka
• Skär stora bitar av t ex kött och fisk i tärningar
3x3x3 cm, jämnstora för bästa resultat.
• Undvik överbearbetning beroende på att maskinen
får gå för länge.
• Vid all hackning kan det hända att mat fastnar på
knivbladen eller på skålens insida. Gör då så här:
- Stäng av maskinen.
- Tag av locket och motorenheten från skålen.
- Skrapa rent med den medföljande skrapan.
• Hacka aldrig mycket hårda ingredienser som t ex
kaffebönor, säd, muskotnöt, hårda kryddor
(gurkmeja, kardemumma) eller istärningar. Det kan
förstöra knivseggarna.
• Persilja som skall hackas skall vara torr. Även skål
och kniv skall vara torra.
• Hacka lök så kort tid som möjligt. Den blir lätt besk
annars. Skölj skål, lock, kniv och hållare i kallt vatten
omedelbart efter lökhackningen.
• Några få klyftor vitlök hackas bäst genom att de
släpps ner genom mataröppningen på den roterande
kniven, när maskinen är igång. Skål och vitlök skall
vara torra.
• Hård ost,(mogen gouda, parmesan, pecorina) bör ha
rumstemperatur. Hacka inte för länge. Osten kan bli
varm och smeta.
• Medelhård ost (Färsk eller halvmogen gouda,
emmenthaler, gruyère) bör vara så kall som möjligt
för att kunna hackas.
Lägg kanderad och torkad frukt, som annars lätt
kladdar, i frysen i minst 15 minuter. Sätt till 1 tsk
mjöl innan hackningen.
Tips för att mixa/blanda
• När du mixar eller blandar vätskor; starta alltid med
hastighet 2 eller 3. Sedan kan du gå över till hastighet
4 eller 5.
• Mixa eller blanda inte för länge så undviker du
onödigt skum.
• Mixa eller blanda inte mer vätska än 0,75 liter.
• Mixa eller blanda inte vätskor eller andra
ingredienser varmare än +80°C .
• En mördeg eller pajdeg kan du snabbt hacka ihop
med kniven. Arbeta den så kort tid som möjligt så
att den behåller sin spröda konsistens. Använd så
litet vätska som möjligt för att degen skall vara lätt
att forma. Lägg först mjölet i skålen och sedan de
andra ingredienserna. Smör eller margarin skall vara
kylskåpskallt.
Tips för att mosa/puréa
• Grönsaker och frukt kan mosas utan extra tillsats av
vätska.
• Emellertid blir resultatet finare med litet extra vätska
tillsatt.
• Mosa först hårda och fasta ingredienser. Sätt sedan
till mjuka ingredienser.
När du skivar eller strimlar med skivhållare f
och skivare/strimlare g h j
• Var försiktig. Skivorna är mycket vassa!
- Sätt först tillbehörshållaren på plats i skålen
("Klick")(fig. 18) och sedan en av skivorna (fig. 19).
- Den sida som du vill använda skall vara vänd uppåt.
- Sätt på locket och motorenheten (fig. 3-4).
- Lyft ur påmataren ur mataröppningen.
- Lägg ingredienserna i mataröppningen (fig. 20).
- Täck med påmataren och tryck lätt (fig. 21).
48
15
15
16
17
1
•
1
2
–
•
1
•
2
1
2
–
3
•
3
–
4
4
–
•
5
5
•
3
•
4
–
2
•
–
5
3
–
4
–
5
18
1
19
2
20
21
Page 48

49
- Starta genom att välja
hastighet (fig. 22).
- Tryck ingredienserna
nedåt med påmataren,
jämnt och stadigt.
- Skär först ingredienserna i
bitar som passar i
mataröppningen.
- Packa ingredienserna så
jämnt som möjligt i
mataröppningen. Då blir skivorna lika stora och du
undviker att något glider ner och blir skivat på fel
ledd.
- Töm skålen då och då när du skivar/strimlar större
mängder.
Tips för att skiva
g
• Fyll mataröppningen helt innan maskinen startas.
Tryck med påmataren och starta. På detta sätt
undviker du att ingredienserna vänder sig eller
snurrar vid skivningen.
• Vanligen blir resultatet bäst med hastighet 2-3.
Tips för att strimla h j
• Grovleken kan regleras, dels med hjälp av den skiva
du väljer, dels genom olika hårt tryck med
påmataren. Ju lättare du trycker, desto tunnare eller
mer finstrimlat blir resultatet.
• Skär ost som skall strimlas i mindre kuber, ca 2 cm.
• Tryck lätt men stadigt med påmataren. Det kan inte
undvikas att den sista biten blir kvar mellan skiva och
lock.
• Hård ost,(lagrad gouda, parmesan, pecorina) bör ha
rumstemperatur.
• Medelhård ost (färsk eller medellagrad gouda,
emmenthaler, gruyère) bör vara så kall som möjligt.
• För att få långa strimlor, placera ingredienserna
horisontellt i mataröppningen.
• Välj hastighet 5 för bästa resultat.
När du använder vispen ß
• Vispen är lämplig för att vispa ägg, äggvitor,
vispgrädde, efterrättsgarnering och snabbkrämer.
Obs! Använd inte vispen för att blanda till
tjocka smeter eller deg.
- Om nödvändigt; lossa degkroken från växeln (fig. 23)
och sätt fast vispen stadigt (fig. 24).
- Sätt först tillbehörshållaren (fig. 25) på plats i skålen
och sedan vispen (fig. 26). Lägg sedan ingredienserna
i skålen.
- Sätt på locket och motorenheten (fig. 3-4).
- Sätt påmataren som lock i mataröppningen.
- Starta genom att sätta hastighetsväljaren på hastighet
3 för vispgrädde (fig. 27) eller hastighet 5 för äggvita
(fig. 28).
Tips för vispning
• För bästa resultat vid vispning av vispgrädde, se till
att grädde, skål och visp är riktigt kalla.
Sätt gärna in skål och visp i kylskåpet en halvtimma
före vispningen. Grädden bör alltid förvaras i kylskåp.
Sätt inte till socker förrän grädden börjat tjockna.
Tiden för vispning kan variera, beroende på grädden.
• När du vispar äggvita måste skål och visp vara
absolut torra och fria från fett och eventuella
diskmedelsrester. Bäst resultat får du om äggvitorna
håller rumstemperatur, alltså cirka 21°C .
22
1
•
23
2
•
3
•
4
1
–
2
•
–
5
3
–
4
–
5
24
CLICK
25
26
27
1
28
•
2
•
3
•
4
1
–
2
•
–
5
3
–
4
–
5
1
•
2
•
3
1
–
•
4
2
•
–
5
3
–
4
–
5
Page 49

När du använder degkroken ™
- Obs! Använd alltid degröret när du knådar
deg.
- Om nödvändigt; lossa vispen från växeln (fig. 29) och
sätt fast degkroken stadigt (fig. 30).
- Sätt först tillbehörshållaren och degröret på plats
(fig. 31 och 32).
- Placera degkroken på tillbehörshållaren (fig. 33).
- Lägg ingredienserna i skålen.
- Sätt på locket och motorenheten (fig. 3-4). Sätt
påmataren som lock i mataröppningen.
- Starta genom att sätta hastighetsväljaren på hastighet
5 (fig. 34).
Tips för degknådning
• Överskrid aldrig de angivna max-mängderna för mjöl.
• För jäsdegar; häll först i vätska, jäst, eventuellt
socker och salt. Sätt sedan till övriga ingredienser.
Knådningstiden varierar beroende på brödtyp men
är mellan tre och fyra minuter.
• Glöm inte att ta isär växeln för rengöring efter
degknådningen.
50
Efter användning
- För att ta loss motorenhet och lock; vrid
manöverringen till läge 1 (fig. 6 och 7).
- Lyft ur tillbehöret och tillbehörshållaren ur skålen
(fig. 35).
Töm därefter skålen.
- Lossa skivan från skivhållaren när du skivat eller
strimlat klart (fig. 36). Var försiktig så att skivan inte
ligger mot dig. Skären är mycket vassa!
Rengöring och förvaring
• Drag alltid ut stickproppen ur vägguttaget innan du
gör ren motorenheten.
• Du får aldrig doppa motorenheten i vatten eller
spola av den. Torka av motorenheten med en väl
urvriden fuktig trasa.
• Alla övriga delar, som har varit i kontakt med
födoämnen, bör diskas snarast. Diska skål och lock
för hand. Skivor, kniv och tillbehörshållare kan diskas
för hand eller i maskin.
• Var särskilt försiktig när du diskar kniven och
skivorna. De är mycket vassa.
• Var försiktig med eggarna på kniven och skivorna.
Låt dem inte komma i kontakt med andra
metallföremål så att de blir slöa.
• Förvara kniven i sitt skydd
när den inte används
(fig. 37).
29
CLICK
30
31
32
33
34
1
•
2
•
3
•
4
35
36
•
5
37
Page 50

51
• Växeln för visp och degkrok kan lätt tas isär för
noggrann rengöring (fig. 38-39).
• Efter rengöringen kan du
förvara tillbehören i
skålen. Placera locket och
sladden enligt
illustrationen (fig. 40).
Använd sladdhållaren.
Extra tillbehör
• Följande detaljer kan du köpa som ersättningsdelar
eller för att utöka maskinens möjligheter *).
- skivare, fin för tunnare skivning
(nr 4203 065 61530)
- skivare, medium
g för grövre skivning
(nr 4203 065 61540)
- strimlare, fin j för finstrimling
(nr 4203 065 61550)
- strimlare, medium h lämplig till Janssons
frestelse mm
(nr 4203 065 61560)
- pommes frites-skiva k
(nr 4203 065 61570).
- insats grovstrimling för grov strimling av t.ex.
potatis
(nr 4203 065 62310).
- förvaringslåda för skivor HR 2922
(nr 4822 690 40267).
*) Kontrollera med din handlare vilka av tillbehören som
saluförs i just ditt land.
38
2
1
39
40
4203 065 61530
4203 065 61540
4203 065 61550
4203 065 61560
4203 065 62310
4203 065 61570
Page 51

• salt och peppar
• persilja
• Till servering rostat bröd eller “crackers”.
• Smält smöret i en kastrull och stek den väl rengjorda
kycklinglevern, tillsammans med lök och vitlök i ungefär 8
minuter, tills levern är genomstekt.
• Låt blandningen svalna och häll den i matberedarens skål
där kniven är monterad.
• Sätt till grädde, tomatpuré, konjak, salt och peppar.
• Låt maskinen gå på hastighet 5 tills blandningen blivit
jämn och krämig.
• Häll upp patén i en skål och garnera med persilja.
• Servera väl kyld med rostat bröd eller “crackers”.
£ Guacamole
mexikansk avocadodip, 2-3 port
• 2 medelstora, väl mogna avocadofrukter
• 2 medelstora tomater, skalade
• 1 liten gul lök i bitar
• persilja
• 1 grön chilipepparfrukt, urkärnad och i bitar
• salt och peppar
• Till servering: fullkornsbröd eller grova chips
• Skala avocadofrukterna och tag ur kärnorna. Lägg
avocadoköttet i matberedarens skål där kniven är
monterad.
• Kör till puré på hastighet 5.
• Halvera tomaterna och tag bort kärnorna.
• Sätt till tomater, lök, persilja och chilifrukt till avocadon
och låt maskinen gå tills allt blivit en jämn smet.
• Krydda med salt och peppar och servera med
fullkornsbröd eller chips.
ß Marängformar med jordgubbar
8 formar
Till marängformarna:
• 2 äggvitor
• 1 1/4 dl strösocker, 100 g
• 1 msk maizenamjöl
•1⁄2
krm salt
• 8 aluminiumfolieformar
• bakplåtspapper
Till fyllningen:
•2
1
⁄2
dl vispgrädde
• 2 msk strösocker
• 2 tsk vaniljsocker
• 400 g jordgubbar
Marängformar:
• Montera vispen. Vispa äggvitorna med saltet på hastighet
4 tills de är riktigt styva. Blanda ihop socker och
maizenamjöl och sätt till blandningen skedvis till
äggvitorna. Vispa efter varje sockertillsats.
Recept
£ Kikärts-sesampasta
(Humus bi Tahini)
• 250 g kikärtor
• 80 g sesampasta = tahini
• ca 1⁄2 dl citronsaft
• ca 1⁄2 dl vatten
• 2 vitlöksklyftor
• 1 msk oliv-eller majsolja
•1⁄2 tsk cayennepeppar
• persilja
• Blötlägg kikärterna över natten i rikligt med vatten med
litet salt tillsatt.
• Koka kikärterna mjuka, ca 2 timmar.
• Montera kniven och lägg alla ingredienser, med undantag
av persilja, cayennepeppar och olja i matberedarens skål.
• Låt maskinen gå, på hastighet 5, tills ingredienserna blivit
en slät puré.
• Häll upp blandningen i en skål och garnera med persilja,
cayennepeppar och olja.
• Servera med bröd, t ex pitabröd.
£ Milkshake
2-3 port
• 200 g färska bär eller frukt, t ex
jordgubbar, hallon, bananer
• 1 tsk citronsaft
• socker eller honung efter smak
• 2 dl kall mjölk
• 2 skedar vaniljglass
• Montera kniven och puréa frukten
tillsammans med citronsaft och socker
eller honung.
• Sätt till mjölk och glass och låt maskinen gå på hastighet
5 tills blandningen blivit skummande.
Tips:
• Använd 2 msk starkt kaffe och 2 msk kakao istället för
färsk frukt eller färska bär. Byt ut vaniljglassen mot
mocca- eller chokladglass.
• Byt ut färsk frukt, citronsaft och socker mot 6 msk god
sylt.
£ Kycklingleverpastej
4 port
• 25 g smör
• 250 g kycklinglever
• 1 liten gul lök, hackad
• 1 vitlöksklyfta, krossad
• 5 msk vispgrädde
• 2 msk tomatpuré
• 2 tsk konjak
52
Page 52

53
• Ställ aluminiumfolieformarna upp och nervända på en
plåt klädd med bakplåtspapper. Spritsa marängmassan
på aluminuimformarna, börja upptill och använd en
spritspåse med slätt munstycke. Sätt in plåten i ugnen
och grädda i 100°C , i cirka 60-90 minuter, tills
marängerna är torra.
• Låt marängerna svalna i ugnen. Tag bort
aluminiumformarna.
Fyllningen:
• Vispa grädden med socker och vaniljsocker på hastighet
2, tills den är tjock.
• Dela jordgubbarna i halvor.
• Fyll marängformarna med vispgrädde och garnera med
jordgubbar.
£ ß Aprikos-marängpaj
Till pajskalet:
• 100 g smör
•21⁄2 dl vetemjöl (150g)
•1⁄2 dl strösocker (50 g)
•1⁄2 krm salt
Dessutom behövs:
• bakplåtspapper eller aluminiumfolie
• pajform med löstagbar botten ca 20 cm i diameter
Till fyllningen:
• 250 g torkade aprikoser
• 1 dl strösocker
• saft från 1 citron
Till marängen:
• 2 äggvitor
•11⁄
2 dl strösocker
• krm salt
• Montera kniven.
• Skär det kylskåpskalla smöret i tärningar.
• Lägg mjöl, socker, salt och smör i matberedarens skål.
Kör maskinen på hastighet 5. Sätt till 1 - 2 msk iskallt
vatten när degen börjar bli grynig, så att den formar sig
till en sammanhängande deg.
• Lägg degen i plastfilm och låt den ligga i kylskåp ca 1
timme.
• Lägg in aprikoserna i frysen i 15 minuter för att hindra
att de klibbar ihop. Sätt till 1 - 2 tsk mjöl innan de
hackas.
• Hacka aprikoserna medelfint, använd Moment-knappen
(pulsning).
• Lägg de hackade aprikoserna i en kastrull tillsammans
med citronsaft och socker. Låt sjuda i 4 minuter. Låt
blandningen svalna.
• Kavla ut pajdegen på ett mjölat bakbord.
• Klä pajformen med degen. Kanten bör vara ca 3 cm.
• Täck degen med en bit bakplåtspapper eller
aluminiumfolie. Grädda pajskalet i 180°C i 30 minuter.
Tag ut formen, tag bort folien eller papperet. Öka
ugnsvärmen till 200°C .
• Skeda ut aprikosmassan i pajskalet
• Vispa äggvitorna med saltet på hastighet 4 tills de är
styva. Sätt till sockret skedvis.
• Spritsa ut marängsmeten över aprikosmassan.
• Sätt in pajen i ugnen och låt den gräddas i ytterligare
15-20 minuter tills marängen känns torr och fått en lätt
brun färg.
£ ß Laxmousse
3 - 4 port
• 220 - 250 g kokt, rensad
lax
• 2 gelatinblad
• gräslök
• 1 krm salt
•1⁄2 krm cayennepeppar
•1⁄2 msk citronsaft
•11⁄2 dl vispgrädde
• 1 liten gul lök
• Till garnering: vattenkrasse eller dill
• Blötlägg gelatinbladen i vatten
• Montera kniven och hacka lök och gräslök. Använd
Momentläge.
• Kontrollera att fiskköttet är helt rent från ben och skinn.
• Lägg salt, cayennepeppar, citronsaft och fiskkött i skålen
med lök och gräslök. Kör maskinen på hastighet 5 tills
massan blivit slät.
• Krama ur gelatinbladen och lös upp dem i någon
matsked hett vatten. Häll gelatinet genom
mataröppningen, när maskinen är igång, så att den
blandar sig väl med fiskmassan.
• Häll upp fiskmassan i en skål. Diska och torka
matberedarens skål.
• Montera vispen och vispa grädden till fast skum. Vänd
ner vispgrädden i fiskmoussen och låt den kylas i kylskåp
några timmar.
• Garnera med krasse eller dill.
™ Vitt formbröd
• 2 dl vatten
•1⁄
2
pkt jäst
•1
1
⁄
2
tsk strösocker
• 1 tsk salt
• 10 g mjukt smör eller margarin
•5
1
⁄2
dl vetemjöl (350 g)
• Montera degkroken i matberedarens skål.
• Häll i vatten, jäst och socker och blanda om i ca 15
sekunder på hastighet 3. Sätt sedan till salt, smör och
mjöl.
• Knåda degen i 3 - 4 minuter på hastighet 5.
• Tag ut degen på mjölat bakbord, täck med bakduk och
låt den jäsa till dubbel storlek i ca 30 minuter.
Page 53

54
• Platta till degen och kavla ut den. Rulla ihop den och lägg
den i en smord brödform 25 - 28 cm lång och låt degen
jäsa ytterligare ca 45 minuter.
• Grädda i nedre delen av ugnen, 225°C , i ca 35 minuter.
Tips:
• Samma metod kan användas för att baka bröd av mix.
Se då till att inte mängden överstiger det som
rekommenderas för maskinen.
• Degen kan bakas ut till småbullar, portionsbröd.
Mängden är lagom till 8 - 10 bullar.
• Skär degen i äggstora bitar Platta ut bitarna och rulla
dem sedan till bullar.
• Ställ bullarna på en smord plåt.
• Pensla bullarna med vatten när de är färdigjästa och strö
över sesam- eller kumminfrön innan de gräddas.
£ ™ Vetefläta med hasselnötter
• 30 g skalade hasselnötter
•11⁄2 dl mjölk
•1⁄2
dl strösocker
• 1 pkt jäst
•4
1
⁄2
- 5 dl vetemjöl (300 g)
• 80 g mjukt smör eller margarin
• 1 krm salt
• 1 medelstort ägg
• Montera kniven och hacka hasselnötterna ganska fint.
Använd Momentläge.
• Byt ut kniven mot degkroken.
• Häll i mjölk, socker och jäst i matberedarens skål. Blanda
om med hastighet 3 i ca 15 sekunder.
• Sätt till mjöl, salt, smör eller margarin och ägg. Knåda
degen på hastighet 5 i ca 3 minuter.
• Tag ut degen på mjölat bakbord, täck med bakduk och
låt jäsa i ca 30 minuter.
• Dela degen i 3 lika stora delar och forma dem till längder
ca 30 cm långa. Lägg dem sida vid sida, nyp ihop
ändarna och fläta ihop längderna.
• Lägg flätan på en smord bakplåt och låt den jäsa under
bakduk i 20 minuter.
• Pensla flätan med smält smör.
• Grädda i mitten av ugnen, 190°C i 30-35 minuter.
£ Mjuk kaka
• 150 g mjukt smör
•11⁄2 dl strösocker
• 1 tsk vaniljsocker
•1⁄2 krm salt
• 2 msk mjölk
• 3 ägg
•21⁄2 dl vetemjöl
• 1 tsk bakpulver
• Till formen: smör, ströbröd
• Förvärm ugnen till 160°C .
• Dela smöret i klickar och lägg smör, socker, vaniljsocker
och salt i matberedarens skål, där kniven är monterad,
och blanda ingredienserna på hastighet 5. Häll ljummen
mjölk genom mataröppningen medan maskinen är igång.
Fortsätt att köra maskinen tills blandningen är ljus och
krämig. Om nödvändigt, använd skrapan och skrapa
ingredienserna från kanterna på skålen till mitten.
• Sätt till äggen, ett i sänder. Låt maskinen gå endast den
tid som behövs för att blanda in varje ägg.
• Blanda bakpulvret i mjölet och sätt till det i tre
omgångar. Använd hastighet 2 eller 3.
• Skeda upp kaksmeten i en smord och bröad form, ca 1
1
⁄2 liter, och grädda i ungefär 11⁄2 timma.
• Låt kakan svalna några minuter innan den vänds ur
formen. Låt den svalna på ett galler.
Tips:
För att få en marmorerad kaka, häll hälften av smeten i en
annan skål och rör i 1 msk kakao. Häll chokladsmeten i
formen och skeda i den ljusa smeten. Rör runt med en
gaffel eller sked för att få den marmorerade effekten.
™ £ Pizza
ger 2 st runda pizzor
• 1 1/2 dl vatten, 37°C
• 1/3 pkt jäst
• 1 tsk strösocker
• ca 41⁄
2
dl vetemjöl
• 2 msk olivolja
•
1
⁄2
tsk salt
Fyllning:
• 1 gul lök
• 1 vitlöksklyfta
• 2 msk olivolja
• 1 burk tomater, 300 g, avrunna
• 1 tsk blandade italienska kryddor, torkade eller färska
• salt och peppar
• socker
• Ingredienser att strö på såsen: oliver, salami,
kronärtskockor, svamp, ansjovis, mozzarella ost,
pepparfrukter, riven lagrad ost och olivolja efter smak.
Page 54

55
• Montera degkroken.
• Häll i vatten, jäst och socker i matberedarens skål och
blanda ingredienserna på hastighet 3 i ca 15 sekunder.
• Sätt till mjöl, olja och salt och knåda degen på hastighet
5 i ca 3 minuter.
• Tag ut degen på bakbordet, täck med en lätt fuktad
bakduk och låt den jäsa i ca 45 minuter.
• Montera kniven och hacka lök och vitlök. Låt dem fräsa
mjuka i oljan i en kastrull eller stekpanna, på svag
värme, utan att brynas.
• Sätt till tomater och kryddor och låt såsen sjuda i ca
10 minuter.
• Smaka av med salt, peppar och socker.
• Låt såsen svalna.
• Värm ugnen till 250°C .
• Kavla ut degen och forma två runda pizzor.
• Lägg dem på en smord bakplåt.
• Lägg på fyllningen, men låt den inte gå ända ut till
kanterna.
• Fördela önskade ingredienser över såsen, strö över riven
ost och droppa över litet olivolja.
• Grädda i 12-15 minuter.
£ Brioche
Viktigt! Använd endast kniven till briochedegen.
Degkroken är inte lämplig för denna deg.
•1⁄2
dl mjölk, 37°C
•
1
⁄2
pkt jäst
•2
1
⁄2
msk strösocker
•3
1
⁄
2 dl vetemjöl
• 1 tsk salt
• 4 ägg
• 100 g smör
• Grädda i: briocheform eller djup, rund kakform
• Montera kniven.
• Häll mjölk, jäst och socker i matberedarens skål. Blanda
på hastighet 4 i ca 15 sekunder.
• Lägg i mjöl, salt och ägg och blanda på hastighet 5 i ca 4
minuter.
• Täck skålen med en fuktad duk och låt degen jäsa i 1
timma.
• Smält smöret. Sätt locket och motorenheten tillbaka på
skålen. Starta maskinen och sätt till smöret genom
mataröppningen. Blanda tills allt är slätt.
• Smörj formen. Lägg degen i formen och låt den jäsa i
ytterligare 45 minuter.
• Grädda i nedre delen av ugnen, 220°C i ca 30 minuter.
h Tzatziki
gurksallad
• 1 gurka
• 2 dl naturell yoghurt
• 1 msk olivolja
• 2 vitlöksklyftor
• salt
• 1 tsk finhackad dill
• några myntablad
• Skala gurkan och strimla den på hastighet 4 eller 5.
• Lägg den strimlade gurkan i ett durkslag och låt den
rinna av.
• Blanda de andra ingredienserna, med undantag av
myntabladen, i gurkan.
• Lägg salladen i en skål med lock och låt den stå i kylskåp
minst en timma.
• Strö myntabladen över salladen vid serveringen.
£ g Coleslaw
• 2 vitlöksklyftor
• 2 äpplen
• 2 ättiksgurkor
• 1 banan
• 3 msk majonnäs
• 3 msk naturell yoghurt
•1⁄2
msk grädde
• 2 tsk curry
• salt och peppar
• 1 litet vitkålshuvud
• Montera kniven och hacka vitlöken.
• Skala äpplena, skär dem i klyftor och tag bort kärnhusen.
• Lägg äppelklyftor och gurkor i matberedarens skål och
hacka dem.
• Lägg i bitar av bananen, majonnäs, yoghurt, grädde,
curry, salt och peppar och blanda alltsamman med
Momentläge. Byt ut kniven mot skivhållaren med
medium-skivaren. Skär vitkålen i bitar som passar i
mataröppningen och skiva den ner i dressingen. Använd
hastighet 5. Häll upp salladen i en skål och blanda den
väl med en sked. Täck skålen med lock eller plastfilm
och låt den stå i kylskåpet, så att dressingen dras in.
Page 55

56
£ ß g h Potatis-squash-gratäng
3 - 4 port
• 750 g potatis
• salt
• 2 squash, ca 500 g
• 2 vitlöksklyftor, krossade
• 75 g smör
• 2-3 tsk italienska eller provencalska kryddor
• 3 ägg
•1 1⁄2 dl vispgrädde
•1 1⁄2 dl mjölk
• peppar
• 100 g mellanlagrad ost
• Skala och tvätta potatisen.
• Montera medium-skivaren. Skiva potatis och squash på
hastighet 5.
• Sätt på potatisskivorna i kokande vatten med en aning
salt och låt dem koka nästan mjuka.
• Häll upp potatisskivorna i ett durkslag och låt dem rinna
av.
• Lägg hälften av smöret i en stekpanna och stek hälften
av squashskivorna i ca 3 minuter. Vänd dem ofta. Strö
över hälften av kryddorna. Stek resten av squashskivorna
på samma sätt och strö över resten av kryddorna.
• Lägg ut dem på ett hushållspapper.
• Smörj en stor ugnssäker form som har ca 4-5 cm höga
kanter. Lägg i potatis- och squashskivor omväxlande i
taktegelform.
• Vispa ihop äggen med grädde och mjölk på hastighet 4.
Sätt till salt och peppar efter smak och häll blandningen
över potatis-squashskivorna.
• Byt skivaren mot medium-strimlaren och strimla osten,
hastighet 5 och strö den överst i formen.
• Grädda mitt i ugnen, 200°C ca 10 minuter.
£ Majonnäs
• 1 stort eller 2 små ägg
• 2 tsk senap
• 1 tsk salt
• peppar
• 3 msk citronsaft
•2 1⁄2 dl matolja (mängden olja beror på hur tjock du
önskar majonnäsen)
• Alla ingredienser måste ha rumstemperatur.
• Lägg ägg eller äggula, senap, salt, peppar och citronsaft i
matberedarens skål, där kniven är monterad.
• Blanda om på hastighet 4 eller 5 tills saltet har löst sig.
Sätt sedan till oljan genom mataröppningen ner på den
roterande kniven, medan maskinen är igång.
Tips:
• Till tartarsås: sätt till persilja, ättiksgurka och hårdkokt
ägg.
• Till cocktailsås: sätt till 1⁄2 dl crème fraiche, litet whisky, 3
tsk tomatpuré och litet lag från syltad ingefära per 100 g
majonnäs.
£ Fruktkaka
• 110 g smör
•2 1⁄2
dl vetemjöl
• 1 dl strösocker
•1
1
⁄2
tsk bakpulver
• 2 ägg
• 60 g russin
• 170 g kanderad frukt
• Blötlägg den kanderade frukten och russinen cirka en
timme i vatten.
• Montera kniven.
• Dela smöret i sockerbitsstora bitar.
• Lägg mjöl, socker, bakpulver, smör och ägg i
matberedarens skål. Sätt till russin och kanderad frukt.
Blanda ingredienserna på hastighet 5 i högst 15
sekunder.
• Häll blandningen i en väl smord och bröad kakform, ca
25 cm lång. Grädda mitt i ugnen, 170°C tills kakan
känns fast, ca 75 minuter..
Page 56

57
Matvarer
Belgfrukter
- moset
Deig (kjeks)
- røring
Deig (kaker)
- røring
Deig (lett)
- miksing
Deig (terte, pai,
eplekake)
Deig (brød)
Deig (pizza)
Deig (gjærdeig)
Deig
(småkaker)
Egg
- vispet
(eggehvitte)
Frukt
- hakket
- moset
Maks.
Mengde
Bryter
Hastig-
hets-
velger
Utstyr Fremgangsmåte Anvendelse
400 g
3 egg
150 g mel
400 ml
væske
250 g
mel
350 g mel
300 g
300 g
250 g mel
4 egg
400 g
500 g
5
4-2
5
3-4
5
5
5
5
5
4
M/5
5
£
ß
£
£
™
™
™
£
ß
£
£
Bruk kokte bønner eller erter. Det bør
kanskje tilsettes litt væske for å få en
bedre konsistens.
Ingrediensene skal ha romtemperatur.
Rør egg og sukker på hastighet 4 til det
er stivt. Tilsett siktet mel, fortsett
røringen forsiktig på hastighet 2.
Ingrediensene skal ha romtemperatur.
Se oppskrifter på side 54.
Ha først væsken i hurtigmikseren. Tilsett de tørre
ingrediensene.
Bruk kaldt smør/margarin og kaldt
vann. Ha mel i bollen. Legg 2 cm store
biter med smør/margarin. Bland på
hastighet 5 til det ligner brødsmuler.
Tilsett vannet, stopp straks deigen er
formet til en ball (etter ca. 15 sek.).
Avkjøl deigen før videre behandling.
Se oppskrift på side 54.
Se oppskrift på side 54.
Se oppskrift på side 55.
Bruk kaldt smør eller margarin. Skjær i
biter på 2 cm. Ha alle ingrediensene i
bollen samtidig. Kna til deigen samler
seg (etter ca. 30 sek.). Avkjøl deigen
før videre bearbeiding.
Eggene skal ha romtemperatur.
(NB! Bruk minst 2 egg).
Tips: Bruk litt sitronsaft for å unngå
misfarging.
Bruk rå, fast, stenfri frukt.
Brukt kokt eller bløt frukt.
Pureer, supper.
Kaker,
Rullader,
Butterdeig.
Kaker etc.
Pannekaker, vafler,
epleskiver.
Fruktterte, eplekake,
paier.
Brød.
Pizza, terte.
Brød.
Eplepai, søte kjeks,
fruktterte.
Pudding, souffle,
marengs, pynt.
Salater, syltetøy,
kaker.
Sauser, puddinger,
barnemat.
Page 57

58
Grønnsaker
(generelt)
- hakket
- moset
Kjøtt, fisk,
fjærkre
- hakket
(magert)
- hakket
(ujevnt kjøtt)
Krem
Krem
- vispet
Krydder
- hakket
Majones
Milkshake
Nøtter
- hakket
Ost
- hakket
- raspet
Poteter
(kokte)
- mos
Purre
- skivet
Sjokolade
- hakket
Spedbarns-/
Barnemat/
diett
- moset
400 g
500 g
300 g
200 g
250 g
400 ml
Min.
30 g
3 egg
350 ml
væske
250 g
200 g
500 g
200 g
300 g
M/5
5
M/5
M/5
5
3
M/5
4-5
M/5
M/5
M/5
5
4-5
M/4-5
M/5
M/4-5
£
£
£
£
£
ß
£
£
£
£
£
h
£
g
£
£
Oppskåret i terninger på 3 cm.
Fjern først sener, ben inkl. fiskeben.
Skjær i terninger på 3 cm.
Hakkes i pos. M for grovere resultat.
Bruk mykt smør for luftig resultat.
Bruk avkjølt kremfløte. Lages av
minimum 125 ml.
Vask og tørk krydderet.
Ingrediensene skal ha romtemperatur.
Se oppskrift på side 56.
(NB! Bruk minst 1 stort eller 2 små
egg).
Se oppskrift på side 52.
Bruk posisjon M for grov hakking eller
hastighet 5 for finere resultat.
Bruk skorpefri ost (f.eks. Parmesan)
oppskåret i terninger på 2 cm. Velg
pos. M for grovt resultat og hastighet 5
for fint resultat. Press forsiktig med
stamperen.
Overkok ikke potetene. Mengden melk
avhenger av typen potet. Bruk varm
melk (maks. 80 °C). Tilsett melken
sakte mens kniven går.
Plasseres i mateåpningen med hodet
oppover. Ved behandling av tynn purre
fyll åpningen helt.
Bruk hard, ren sjokolade. Brekk den i
biter på 2 cm. Begynn med pos. M.
Deretter hastighet 5 for finhakking.
Grov: Tilsett litt væske.
Fin: Hvis nødvendig tilsett ekstra
væske.
Salater, råkost, sauser.
Supper, pureer.
Biff, tartar,
hamburgere, hakket
kjøtt.
Terter, desserter.
Pynt, krem,
iskremblanding
butterdeig.
Sauser, supper, pynt,
kryddersmør.
Pommes frites, salater,
coctails, fondue- og
barbecue sauser.
Salater, pynt, brød,
kaker, pudding.
Pynt, supper, sauser,
kroketter.
Fondue, pizza.
Gratinerte
retter.
Ovnsretter, mos.
Supper, kokt purre.
Pynt, sauser, terter,
mousseer, puddinger.
Spedbarnsmat.
Barnemat.
Matsorter med
Page 58

59
Strøkavring
Supper
100 g
500 ml
væske
M/5
4-5
£
£
Bruk tørt brød.
Bruk kokte grønnsaker.
strøkavring, gratinerte
retter.
Supper.
Page 59

60
English
Tärkeää
• Ennen kuin yhdistät laitteen pistorasiaan,
tarkasta, että laitteen arvokilven jännite
ja taajuusmerkintä vastaavat paikallista
verkkojännitettä ja taajuutta.
• Jos laite on pudonnut veteen, irrota ensin
pistotulppa pistorasiasta, ennen kuin
nostat laitteen vedestä.
• Tarkastuta veteen pudonnut laite
huollossa ennen käyttöönottoa.
Lue käyttöohje ja katsele kuvat, ennen
kuin alat käyttää laitetta.
•Älä anna lasten käyttää laitetta.
• Käsittele kaikkia teriä varovasti, sillä
leikkuureunat ovat erittäin teräviä.
• Poista hienonnusterän suojus ennen
käyttöä. Paina suojus takaisin terän päälle
puhdistuksen jälkeen.
• Avaa kansi vasta, kun pyörivät osat ovat
täysin pysähtyneet.
•Älä työnnä syöttösuppiloon sormia tai
esim. haarukkaa, veistä, lusikkaa,
kaavinta moottorin käydessä. Käytä
aineiden painamiseen vain syöttöpaininta.
• Irrota pistotulppa pistorasiasta käytön
jälkeen.
• Tarkasta liitosjohdon kunto
säännöllisesti. Jos tämän laitteen
verkkoliitosjohto vaurioituu, se on
korvattava erikoisjohdolla. Ota yhteys
lähimpään Philips-myyjään tai Philips
Kodinkoneiden valtuuttamaan huoltoon.
• Pese kaikki ruoan kanssa kosketuksiin
joutuvat osat ennen käyttöönottoa.
•Älä käytä kulhoa mikrouunissa.
• Laitteen runkoa ei saa upottaa veteen.
Älä myöskään huuhtele sitä.
• Nesteiden vatkaaminen ja sekoittaminen:
enimmäismäärä kerralla on 0,75 litraa.
•Älä ylitä taulukossa ja ohjeissa annettuja
enimmäismääriä ja aikoja.
• Säilytä tämä käyttöohje.
• Pistotulppaa ei saa irrottaa pistorasiasta
johdosta vetämällä.
• Varo taivuttamasta liitosjohtoa tiukalle
mutkalle.
• Jos laitteen käyttökytkin on viallinen, älä
käytä laitetta.
• Pidä huoli, etteivät terävät kulmat,
kuumuus tai kemikaalit pääse
vahingoittamaan liitosjohtoa.
• Pidä laite lasten ulottumattomissa.
•Älä anna lasten käyttää laitetta ilman
valvontaa.
• Irrota pistotulppa pistorasiasta aina
ennen hoito- ja puhdistustoimenpiteitä.
• Varo ylikuormittamasta laitetta.
Laitteen osat (kuva 1)
A Pitokytkin
Paina: moottori käy.
Vapauta: moottori pysähtyy.
B Control ring
1 kannen irrotus ja paikalleen asettaminen.
Kannen irrotuspainikkeet (D) painuvat nyt sisään.
2 O/M pitokytkimen asento
1....5 jatkuvan toiminnan nopeuden valinta
(1 = pienin nopeus; 5 = suurin nopeus.)
C Runko
D Kannen irrotuspainikkeet
E Syöttöpainin
F Syöttösuppilo
G Kansi
H Teränpidin
I Kulho
J Johdonpidin (varaosanumero 4822 290 40369)
K Hienonnusterä £
(varaosanumero 4822 690 40232)
L Teräalusta f (varaosanumero. 4203 065 61521)
M Viipalointiterä, keskipaksu g
(varaosanumero 4203 065 61540)
N Raastinterä j
(varaosanumero 4203 065 61550)
O Suikalointiterä, puolikarkea h
(varaosanumero 4203 065 61560)
P Vaihteisto taikinakoukulle ja vispilälle
Q Taikinaputki (varaosanumero 4203 065 60011)
R Vispilä ß (varaosanumero 4822 690 10115)
S Taikinakoukku ™
(varaosanumero 4822 690 10116)
T Kaavin (varaosanumero 4822 690 40212)
Automaattinen lämpötilanrajoitin
(itsestään palautuva)
Lue nämä ohjeet huolellisesti ennen laitteen
käyttöönottoa
Ylikuumenemisesta johtuvien vahinkojen välttämiseksi
laitteessa on itsestään palautuva lämpötilanrajoitin, joka
tarvittaessa katkaisee virran automaattisesti.
Jos noudatat seuraavia ohjeita, voit turvallisesti
käynnistää laitteen uudelleen yhden tunnin jäähtymisen
jälkeen.
Jos laite yhtäkkiä pysähtyy
1. Irrota ensin pistotulppa pistorasiasta.
2. Aseta seuraavaksi kytkin asentoon O/M.
3. Anna laitteen jäähtyä vähintään yksi tunti.
Ota yhteys Philipsmyyjään tai Philips Kodinkoneiden
valtuuttamaan huoltoon, jos lämpötilanrajoitin katkaisee
virran toistuvasti.
Suomi
Page 60

Rungon ja kannen kiinnitys ja irrotus
- Varmista, että kytkin on asennossa 1 (kuva 2).
Huomaa: Vaurioiden välttämiseksi kytkimen tulee
olla tässä asennossa aina kannen ja rungon
kiinnityksen ja irrotuksen aikana.
- Aseta kansi kulhon päälle (kuva 3).
- Aseta runko kannen päälle (kuva 4).
- Kierrä kytkin asentoon 2 O/M (kuva 5).
- Kun irrotat rungon ja kannen, kierrä kytkin asentoon
1 (kuvat 6, 7).
Syöttösuppilo ja syöttöpainin
• Paina ruoka-aineita
syöttösuppiloon vain
syöttöpainimella (kuva 8).
• Pidä syöttöpainin
syöttösuppilossa käytön
aikana. Tämä vähentää
roiskumista.
• Syöttöpainin voidaan
poistaa syöttösuppilosta
lisättäessä aineita kulhoon
moottorin käydessä.
61
- Syöttöpainimen pohjassa on merkitty kohta, johon
voidaan terävällä apuvälineellä puhkaista pieni aukko
(kuva 9). Tämän aukon kautta voi lisätä pieniä määriä
nestettä (esim. öljyä majoneesia valmistettaessa)
(kuva 10).
- Syöttöpainimessa on nestemääriä varten
mittaasteikko (ml).
Hienonnusterä £
• Varoitus: terän reunat ovat erittäin terävät !
- Poista suojus hienonnusterästä ennen käyttöä
(kuvat 11, 12).
Tartu paljaaseen hienonnusterään aina
nupista.
- Aseta kulhoon ensin teränpidin (kuva 13) ja
hienonnusterä (kuva 14).
9
10
2
1
4
3
•
2
•
3
•
4
•
5
5
6
1
7
•
2
•
3
•
4
•
5
M
1
•
2
•
3
•
4
•
5
11
12
13
14
8
Page 61

- Mittaa sitten aineet
kulhoon (kuva 15).
- Aseta kansi ja runko
kulhon päälle
(kuvat 3 - 4).
- Laita syöttöpainin
syöttösuppiloon.
- Käynnistä painamalla
pitokytkintä (kuva 16) tai
valitsemalla sopiva nopeus
(kuva 17).
Vihjeitä hienontamiseen
• Leikkaa aineet noin 3 cm:n suuruisiksi paloiksi
• Varo hienontamasta aineita liikaa.
• Jos aineet takertuvat terän ympärille tai tarttuvat
kulhon reunoihin:
- katkaise ensin laitteen toiminta,
- poista kansi (rungon kanssa) kulhon päältä
- ja irrota aineet terän ympäriltä tai kulhon reunoista
kaapimella.
• Älä hienonna kovia aineita, kuten kahvipapuja,
muskottipähkinöitä, jyviä, kovia kuivattuja yrttejä
(esim. kurkuma, kardemumma) tai jääpaloja, sillä
nämä tylsyttävät terää.
• Hienonna esim. kuivattua persiljaa kerralla suurempi
määrä. Varmista että kulho on kuiva.
• Jos haluat hienontaa vain muutaman
valkosipulinkynnen, pudota ne syöttösuppilon kautta
terän pyöriessä valmiiksi. Valkosipulinkynsien ja
kulhon tulee olla kuivat.
• Kovan juuston (esim. kypsä gouda, parmesan,
pecorino) tulee olla huoneenlämpöistä. Älä hienonna
juustoja kovin pitkään, etteivät ne ehdi lämmetä ja
siten paakkuuntua.
• Puolikovien juustojen (esim. tuore/puolikypsä gouda,
emmentalit, gruyére) ovat mahdollisimman kylmät.
• Laita tahmeat kuivatut hedelmät (esim. taatelit,
viikunat, luumut) vähintään 15 minuutiksi
pakastimeen. Lisää teelusikallinen jauhoja ennen
hienontamista.
Vihjeitä sekoittamiseen
• Kun sekoitat nestemäisiä aineita, aloita aina
nopeudella 2 tai 3. Myöhemmin voit vaihtaa
nopeudelle 4 tai 5.
• Älä sekoita liian pitkään, ettei vaahtoa muodostu
liikaa.
• Sekoita kerralla enintään 0,75 litraa nestettä.
• Älä sekoita yli 80 asteen lämpöisiä aineita.
• Käytä paistostaikinoihin mahdollisimman vähän
nestettä. Silloin taikina on helpompi kaulia. Mittaa
ensin jauhot kulhoon ja sitten muut aineet. Käytä
aina kylmää kovaa voita tai margariinia.
Vihjeitä soseuttamiseen
• Kasvikset, hedelmät ja marjat voidaan soseuttaa
lisäämättä nestettä. Lopputulos on hienompi jos
lisätään hieman nestettä..
• Soseuta ensin kovat ja sitkeät aineet. Lisää sitten
pehmeät aineet.
Viipaloiminen, suikaloiminen ja raastaminen
teräalustaan f vaihdettavilla terillä g h j
• Varoitus: leikkuureunat ovat hyvin terävät!
- Aseta terä paikalleen teräalustaan (“Naps!”)
(kuva 18).
- Laita teränpidin ja sitten teräalusta kulhoon
(kuva 19).
- Aseta kansi ja runko paikalleen (kuvat 3 - 4).
- Nosta syöttöpainin pois syöttösuppilosta.
- Täytä syöttösuppilo (kuva 20).
- Aseta syöttöpainin aineiden päälle ja paina kevyesti
(kuva 21).
15
62
15
16
17
1
•
1
2
–
•
1
•
2
•
1
–
2
–
3
•
3
–
4
4
–
•
5
5
3
•
4
2
•
–
5
3
–
4
–
5
18
1
19
2
20
21
Page 62

63
- Käynnistä valitsemalla
sopiva nopeus (kuva 22).
- Paina aineita
syöttösuppilossa alaspäin
syöttöpainimella tasaisesti
eikä liian kovaa.
• Paloittele aineet, niin että
ne mahtuvat
syöttösuppiloon.
• Täytä syöttösuppilo
mahdollisimman tasaisesti.
• Tyhjennä kulho tarvittaessa välillä.
Vihjeitä viipalointiin
g
• Täytä syöttösuppilo kokonaan ennen käynnistämistä.
Aseta syöttöpainin aineiden päälle ja käynnistä laite.
Näin aineet eivät pääse kääntymään.
• Käytä keskinopeutta (2 tai 3) niin viipaleista tulee
tasaisempia.
Vihjeitä raastamiseen/suikaloimiseen h j
• Paina tasaisesti ja kevyesti syöttöpainimella.
Viimeisen juustonpalan jäämistä terän ja kannen väliin
ei voi estää.
• Kovan juuston (esim. kypsä gouda, parmesan,
pecorino) tulee olla huoneenlämpöistä. Älä hienonna
juustoja kovin pitkään, etteivät ne ehdi lämmetä ja
siten paakkuuntua.
• Puolikovien juustojen (esim. tuore/puolikypsä gouda,
emmentalit, gruyére) tulee olla mahdollisimman
kylmät.
• Käytä goudajuustolle vain puolikarkeaa
suikalointiterää (symbol).
• Jos haluat pitkiä suikaleita, laita aineet vaakasuunnassa
syöttösuppiloon.
• Käytä suikaloimiseen/raastamiseen nopeutta 5.
Vispilä ß
• Vispilää voi käyttää mm. munien, munanvalkuaisten,
kuorrutusten, pikavanukkaiden ja kerman
vaahdottamiseen ja vatkaamiseen.
Huomaa: Älä käytä vispilää taikinoiden
tekemiseen!
- Tarvittaessa: Vedä taikinakoukku irti vaihteistosta
(kuva 23) ja paina vispilä paikalle (kuva 24). Tämä
vaatii hieman voimaa.
- Aseta ensin teränpidin paikalleen (kuva 25) ja sen
jälkeen vispilä (kuva 26). Mittaa sen jälkeen aineet
kulhoon.
- Aseta kansi ja runko kulhon päälle (kuvat 3 - 4).
Laita syöttöpainin syöttösuppiloon.
- Valitse kytkimellä kermavaahdolle nopeus 3
(kuva 27) ja munanvalkuaiselle nopeus 5 (kuva 28).
Vihjeitä vatkaamiseen ja vaahdottamiseen
• Kerma vaahdottuu parhaiten, kun kerma, kulho ja
vispilä ovat aloitettaessa hyvin kylmät.
Laita kulho ja vispilä jääkaappiin vähintään puoleksi
tunniksi ennen vatkaamista.
Kerma saa jäähtyä jääkaapissa ainakin vuorokauden.
Lisää sokeri vasta kun kerma on vaahdottunut.
Vatkausaika riippuu kermasta.
• Munanvalkuaisia vaahdotettaessa kulhon ja vispilän
tulee olla ehdottomasti puhtaat ja kuivat.
Lopputulos on parempi kun munat ovat
huoneenlämpöisiä (noin 21ºC).
22
1
•
2
•
3
1
–
2
–
23
•
4
•
5
3
–
4
–
5
24
25
26
27
28
1
•
2
•
3
•
4
1
–
2
•
–
5
3
–
4
–
5
CLICK
1
•
2
•
3
•
4
1
–
2
•
–
5
3
–
4
–
5
Page 63

Taikinakoukku ™
- Huomaa: käytä taikinaa vaivattaessa aina
taikinaputkea.
- Tarvittaessa: Vedä vispilä irti vaihteistosta (kuva 29)
ja paina taikinakoukku tilalle (kuva 30).
- Aseta ensin teränpidin ja taikinaputki paikalleen
(kuvat 31 ja 32).
- Aseta sitten taikinakoukku teränpitimeen (kuva 33).
- Mittaa sen jälkeen aineet kulhoon.
- Aseta kansi ja runko kulhon päälle (kuvat 3 - 4).
- Laita syöttöpainin syöttösuppiloon.
- Valitse nopeus 5 (kuva 34).
Vihjeitä vaivaamiseen
• Älä ylitä jauhoille annettuja enimmäismääriä.
• Mittaa hiivataikinaa varten kulhoon ensin vesi, hiiva ja
sokeri. Lisää muut aineet myöhemmin. Vaivausaika
riippuu taikinasta mutta keskimäärin se on 3 - 4
minuuttia.
• Muista irrottaa ja puhdistaa vaihteisto taikinan
tekemisen jälkeen.
64
Käytön jälkeen
- Käännä kytkin asentoon 1 ennen rungon ja kannen
irrottamista (kuvat 6, 7).
- Nosta lisäosa ja teränpidin kulhosta (kuva 35).
Sen jälkeen voit tyhjentää kulhon.
- Irrota terä teräalustasta viipaloinnin tai
suikaloinnin/raastamisen jälkeen (kuva 36).
Irrota terä niin ettei se osoita itseesipäin.
Varo: leikkuureunat ovat hyvin terävät!
Puhdistus ja säilytys
• Irrota pistotulppa pistorasiasta aina ennen rungon
puhdistusta.
• Pyyhi runko puhtaaksi kostealla liinalla.
Älä kasta runkoa veteen. Älä kaada rungon päälle
vettä.
• Pese ruoan kanssa kosketuksissa olleet osat
lämpimällä pesuvedellä heti käytön jälkeen.
• Ole varovainen, kun peset teriä: leikkuureunat ovat
hyvin terävät! Terät voidaan pestä myös
astianpesukoneessa.
• Käsittele teriä huolellisesti, etteivät ne tylsy.
• Aseta suojus
hienonnusterään heti
puhdistuksen jälkeen
(kuva 37).
29
CLICK
30
31
32
33
34
1
•
2
•
3
35
36
•
4
•
5
37
Page 64

65
• Vispilän ja taikinakoukun
vaihteisto voidaan
helposti irrottaa
puhdistusta varten (kuvat
38 - 39).
• Voit säilyttää puhdistetut
lisäosat kulhossa. Laita
kansi ja kierrä johto
kuvassa 40 näytetyllä
tavalla ja kiinnitä
johdonpitimellä.
Lisäosat
• Erikseen saatavissa olevat lisäosat *):
- viipalointiterä ohuille viipaleille
(varaosanumero 4203 065 61530)
- viipalointiterä keskipaksuille
g viipaleille
(varaosanumero 4203 065 61540)
- suikalointiterä ohuille j suikaleille
(varaosanumero 4203 065 61550
- suikalointiterä puolikarkealle h raasteelle
(varaosanumero 4203 065 61560)
- suikalointiterä paksuja suikaleita varten
(varaosanumero 4203 065 62310)
- hienoraastinterä k parmesanjuuston, raa’an
perunan raastamiseen
(varaosanumero 4203 065 61570).
*) Kysy saatavissa olevista lisäosista tarkemmin myyjältä.
38
2
1
39
4203 065 61530
40
4203 065 61540
4203 065 61550
4203 065 61560
4203 065 62310
4203 065 61570
Page 65

£ Guacamole - meksikolainen dippikastike
2 - 3 annosta
• 2 kypsää avokadoa
• 2 tomaattia
• 1 pieni sipuli
• 3 - 4 persiljanoksaa
• 1 vihreä chilipippuri
• suolaa
• mustapippuria
• Halkaise avokadot ja poista kivet. Koverra hedelmäliha
lusikalla.
• Lohko tomaatit ja kuorittu sipuli.
• Halkaise chili ja poista siitä siemenet.
• Laita avokadot, tomaatit, sipuli, persiljanoksat, chilipippuri
ja mausteet monitoimikoneen
• kulhoon ja soseuta hienonnusterällä nopeudella 5,
kunnes seos on tasaista.
• Tarkista maku ja tarjoa paahtoleivän tai maissilastujen
kanssa.
ß Mansikoilla täytetyt marenkipesät
8 marenkipesää
• Marenkipesät
• 2 munanvalkuaista
• 1 dl sokeria
• hiven suolaa
Täyte
•21⁄2
dl kuohukermaa
• 2 rkl sokeria
•
1
⁄2
tl vanilliinisokeria
• 400 g mansikoita
Marenkipesät
• Vatkaa valkuaiset vispilällä kevyeksi vaahdoksi
nopeudella 4.
• Lisää sokeri ja suola. Jatka vielä vaahdottamista, kunnes
valkuaisvaahto on kovaa.
• Laita 8 alumiinileivosvuokaa ylösalaisin leivinpaperin
päälle pellille. Pursota marenki pyörteinä
• alumiinivuokien päälle aloittaen keskeltä. Käytä sileää
pursotinsuutinta.
• Paista marenkipesiä 100 asteessa 60 - 90 minuuttia tai
kunnes ne ovat täysin kovettuneita
• Anna valmiiden marenkien jäähtyä ja poista
alumiinivuoat.
Täyte
• Vatkaa kerma vaahdoksi sokerin ja vanilliinisokerin
kanssa nopeudella 2.
• Puolita mansikat.
• Täytä marenkipesät kermavaahdolla ja koristele
mansikoilla.
Ruokaohjeita
£ Pirtelö
2 - 3 annosta
• 200 g tuoreita marjoja tai hedelmiä (esim.mansikoita,
vadelmia, banaania)
• 1 tl
sitruunamehua
• 2 - 3 rkl sokeria tai hunajaa
• 2 dl vaniljajäätelöä
• Soseuta marjat tai hedelmät
sitruunamehun ja sokerin kanssa
hienonnusterällä.
• Lisää maito ja jäätelö. Sekoita
nopeudella 5, kunnes pinnalla on
vaahtoa.
£ Broilerinmaksapasteija
4 - 6 annosta
• 250 g broilerinmaksaa hyvin puhdistettuna
• 25 g voita tai margariinia
• 1 pieni sipuli
• 1 - 2 valkosipulinkynttä
• 5 rkl kuohukermaa
• 1 rkl tomaattipyreetä
• 2 tl konjakkia
•1⁄2
tl suolaa
• hiven sokeria
• hiven mustapippuria
• koristeeksi persiljaa
• Hienonna sipuli ja valkosipulinkynnet hienonnusterällä.
• Kuumenna rasva paistinpannussa. Laita maksapalat,
hienonnetut sipulit ja valkosipulinkynnet kuumalle
pannulle ja kypsennä kunnes maksa on kypsää.
• Jäähdytä seos ja laita monitoimikoneen kulhoon.
• Lisää kerma, tomaattipyree, konjakki ja mausteet.
• Sekoita kaikki aineet keskenään nopeudella 5, kunnes
seos on tasaista.
• Laita maksapasteija tarjoiluastiaan ja koristele persiljalla.
• Tarjoa jäähdytettynä paahtoleivän tai voileipäkeksien
kanssa.
Tips:
• Instead of fresh fruit, use 2 level tbsp strong coffee and 2
tbsp cocoa. Substitute mocha or chocolate ice cream for
the vanilla ice cream.
• Substitute 6 level tbsp fruit jam for the fresh fruit, the
lemon juice and the sugar.
66
Page 66

67
£ ß Aprikoosimarenkipiiras
Pohja
• 100 g voita tai margariinia
• 2 dl vehnäjauhoja
•1⁄2 dl sokeria
• hiven suolaa
Täyte
• 200 - 250 g kuivattuja
aprikooseja
• 3 dl vettä
• 1 dl sokeria
•1⁄2 - 1 sitruunan mehu
Marenki
• 2 munanvalkuaista
• 1 dl sokeria
• hiven suolaa
Pohja
• Laita hiennonnusterä kulhoon. Voitele piirasvuoka
(halkaisija noin 27 cm) rasvalla.
• Laita paloiteltu rasva, jauhot, sokeri ja suola kulhoon.
Sekoita aineet keskenään tasaiseksi taikinaksi
nopeudella 5.
• Painele taikina jauhotetuin käsin piirasvuoan pohjalle ja
reunoille.
• Paista pohjaa noin 15 minuuttia 200 asteessa uunin
alatasossa. Valmista sillä välin täyte ja marenki.
Täyte
• Keitä aprikoosit vedessä pehmeiksi ja jäähdytä.
• Laita hienonnusterä kulhoon.
• Laita kulhoon pehmenneet aprikoosit, sokeri ja
sitruunamehu. Sekoita kaikki aineet keskenään
• tasaiseksi seokseksi nopeudella 5.
• Levitä täyte esikypsennetylle piiraspohjalle tasaiseksi
kerrokseksi.
Marenki
• Laita vispilä kulhoon ja vatkaa munanvalkuaiset kevyeksi
vaahdoksi nopeudella 4.
• Lisää sokeri ja suola. Jatka vaahdottamista, kunnes
vaahto on kovaa.
• Levitä tai pursota valkuaisvaahto piiraspohjalle
aprikoositäytteen päälle tasaiseksi kerrokseksi.
• Laita piiras uunin alatasolle 15 - 20 minuutiksi 200
asteeseen, kunnes marenki kovettunut ja hieman
ruskistunut.
• Tarjoa marenkipiiras jäähtyneenä jälkiruokana tai kahvin
kanssa.
£ ß Lohimousse
3 - 4 annosta
• 2 liivatelehteä
• muutama ruohosipulinvarsi
• 1 sipuli
• 1 tlk säilykelohta
(n. 200 g) liemineen
•1⁄2 rkl sitruunamehua
•1⁄2 tl suolaa
• hiven cayennenpippuria
•11⁄2 dl kuohukermaa
• koristeluun vesikrassia
• Laita vispilä kulhoon ja vatkaa kerma vaahdoksi
nopeudella 2. Siirrä kermavaahto kulhosta toiseen
astiaan. Huom. kulhoa ei tarvitse pestä.
• Liuota liivatelehtiä runsaassa vedessä pakkauksen ohjeen
mukaisesti.
• Poista lohesta ruodot ja nahka.
• Laita kulhoon hienonnusterä. Hienonna kuorittu sipuli ja
ruohosipuli käyttäen pitokytkintä (M).
• Lisää sipuleiden joukkoon lohipalat, lohitölkin liemi,
sitruunamehu, suola ja cayennenpippuri.
• Sekoita kaikki aineet keskenään nopeudella 5, kunnes
seos on tasaista.
• Kiehauta tilkka vettä (1⁄2 dl) ja liuota liivatelehdet siihen.
• Kaada liivate-vesiseos monitoimikoneen kulhoon
lohiseoksen päälle. Sekoita kaikki keskenään.
• Lisää kermavaahto lohiseokseen ja sekoita nopeasti
tasaiseksi.
• Kaada mousse tarjoiluastiaan ja jäähdytä jääkaapissa
muutama tunti. Koristele vesikrassilla.
• Tarjoa esimerkiksi alkuruokana.
™ Vuokaleipä
1 leipä
• 2 dl vettä
• 25 g tuoretta hiivaa tai 1⁄2
rkl kuivahiivaa
• 2 rkl sokeria
• 1 tl suolaa
• 1 rkl maitojauhetta
• 3
1
⁄2
dl vehnäjauhoja
•
1
⁄
2 dl kaurahiutaleita
• 2 rkl leseitä
• 1 rkl öljyä
• Laita taikinakoukku kulhoon.
• Mittaa kädenlämpöinen vesi (37 astetta), hiiva, sokeri ja
suola kulhoon. Sekoita noin 15 sekuntia nopeudella 3.
Huom. voit käyttää nesteenä myös 2 dl maitoa, jolloin
maitojauhetta ei tarvitse lisätä.
• Lisää kulhoon maitojauhe, vehnäjauhot, kaurahiutaleet,
leseet ja öljy. Sekoita tasaiseksi taikinaksi.
• Anna laitteen käydä 3 - 4 minuuttia nopeudella 5.
Page 67

68
• Pysäytä laite ja siirrä taikina suurempaan kulhoon ja
peitä liinalla. Anna taikinan kohota lämpimässä paikassa
noin kaksinkertaiseksi.
• Vaivaa taikina jauhotetulla pöydällä tämän jälkeen
nopeasti kokoon ja leivo vuokaan sopivaksi leiväksi.
• Aseta taikina voideltuun vuokaan ja peitä liinalla. Anna
kohota vielä noin 20 minuuttia.
• Paista uunin alatasolla 200 asteessa noin 30 minuuttia.
Vinkki
• Halutessasi voit vaihdella jauholaatuja, jolloin saat
erimakuisia leipiä ja sämpylöitä. Älä kuitenkaan ylitä
jauhojen määrää. Voit käyttää jauhoja 4 - 5 dl
(300 g) riippuen jauhoista.
• Taikinasta voi tehdä myös sämpylöitä. Ylläolevasta
määrästä tulee 8 - 10 sämpylää.
• Paloittele taikina 8 - 10 osaan ja pyörittele sämpylöiksi.
Laita sämpylät pellille leivinpaperin päälle
• kohoamaan. Anna kohota lämpimässä paikassa noin 15
minuuttia.
• Voitele sämpylät vedellä tai maidolla ja ripottele päälle
seesamin- tai pellavansiemeniä.
£ ™ Pullataikina
• 18 - 20 pikkupullaa
•11⁄
2 dl maitoa tai
•1
1
⁄2
dl vettä ja 1 rkl maitojauhetta
• 25 g tuoretta hiivaa
• 1 muna
• 3/4 dl sokeria
• 3/4 tl suolaa
• 1 tl kardemummaa
• 75 g voita tai margariinia sulatettuna
• 4 - 5 dl vehnäjauhoja
• voiteluun kananmunaa
• koristeluun raesokeria
• Laita taikinakoukku kulhoon.
• Mittaa maito, hiiva, muna, sokeri, suola ja
kardemummaa kulhoon. Sekoita noin 15 sekuntia
nopeudella 3.
• Lisää sulatettu ja jäähdytetty rasva ja vehnäjauhot. Anna
laitteen käydä 3 - 4 minuuttia nopeudella 5.
• Pysäytä laite ja siirrä taikina toiseen kulhoon kohoamaan.
Peitä kulho liinalla. Anna taikinan kohota lämpimässä
paikassa noin 30 minuuttia.
• Leivo kohonneesta taikinasta pikkupullia. Anna niiden
kohota pellillä liinan alla noin 20 minuuttia.
• Voitele pullat kananmunalla ja koristele raesokerilla.
• Paista pikkupullat 225 asteessa noin 10 minuuttia uunin
keskitasolla.
£ Murokakku
• 150 g pehmeää voita tai leivontamargariinia
• 1 dl
sokeria
• 2 kananmunaa
• 3 dl vehnäjauhoja
• 1 tl leivinjauhetta
• 1 tl vanilliinisokeria
•1⁄2 dl vettä
• Aseta hienonnusterä kulhoon.
• Sekoita kuivat aineet keskenään.
• Laita pehmeä rasva ja sokeri kulhoon. Sekoita vaahdoksi
nopeudella 5.
• Lisää munat vaahtoon yksitellen syöttösuppilon kautta
koneen käydessä.
• Pysäytä kone ja lisää jauhot ja vesi. Sekoita nopeudella
2 - 3 tasaiseksi taikinaksi.
• Pysäytä kone heti, kun taikina on tasaista.Liiallinen
sekoittaminen sitkistää taikinan.
• Kaada taikina voideltuun ja korppujauhotettuun vuokaan.
Vuoan koko noin 11⁄2 l.
• Paista uunin alatasolla 175 asteessa noin 45 minuuttia.
Vinkki
• Murokakkutaikinaan voit lisätä esim.
- 1 tl kardemummaa tai
- 1⁄2
sitruunan hyvin pestyn raastetun kuoren ja mehun tai
- 50 g taloussuklaata ja 40 g hasselpähkinöitä rouhittuna.
- tiikerikakun valmistat näin: Ota 1/3 taikinasta erilleen.
Lisää siihen 1 rkl kaakaojauhetta. Kaada puolet
vaaleasta taikinasta vuokaan, väliin tumma taikina ja
päälle loppu vaalea taikina. Sekoita taikinaa haarukalla
niin, että kerrokset sekoittuvat osittain.
Page 68

69
™ £ Pizza
2 pyöreää pizzaa
Pohja
•11⁄2 dl kädenlämpöistä vettä (37 astetta)
• 15 g tuoretta hiivaa
•1⁄2 tl suolaa
• 1 tl sokeria
• 2 rkl öljyä
• 3 - 4 dl vehnäjauhoja
Pizzakastike
• 1 sipuli
• 1 - 2 valkosipulinkynttä
• 2 rkl öljyä
•21⁄2 dl tomaattimurskaa
• 2 tl pizzamaustetta
•1⁄2 tl suolaa
•1⁄2 tl paprikajauhetta
•1⁄2 tl pippuria
• Kastikkeen päälle sopivia täytteitä makusi mukaan:
oliiveja, salamia, herkkusieniä, anjovista, paistettua
jauhelihaa, kinkkua, tonnikalaa jne. Sekä juustoraastetta
esim. mozzarellaa.
• Aseta taikinakoukku kulhoon.
• Mittaa vesi, hiiva, sokeri ja suola kulhoon. Sekoita noin
15 sekuntia nopeudella 3.
• Pysäytä kone ja lisää öljy ja jauhot. Sekoita taikinaa noin
3 minuuttia nopeudella 5. Pysäytä kone heti, kun taikina
on tasaista.
• Siirrä taikina toiseen kulhoon kohoamaan ja peitä liinalla.
Anna taikinan kohota lämpimässä paikassa noin puoli
tuntia (30 min.).
• Valmista sillä välin täyte. Laita hienonnusterä kulhoon.
Hienonna sipuli ja valkosipulinkynnet ja paista ne öljyssä
pannulla läpikuultaviksi.
• Lisää pannuun tomaattimurska ja mausteet. Anna kiehua
hiljalleen noin 10 minuuttia.
• Tarkista kastikkeen maku ja anna jäähtyä.
• Kauli taikina kahdeksi pyöreäksi pitsapohjaksi. Nosta
pohjat pellille leivinpaperin päälle.
• Levitä pizzapohjille kastike ja haluamasi täytteet.
Ripottele pinnalle juustoraaste.
• Paista pizzat uunin keskitasolla 250 asteessa noin
12 - 15 minuuttia.
£ Briossi
•1⁄2 dl kädenlämpöistä maitoa (37 astetta)
• 25 g tuoretta hiivaa
•1⁄2 dl sokeria
• 1 tl suolaa
• 4 kananmunaa
•31⁄2 dl vehnäjauhoja
• 100 g voita tai leivontamargariinia sulatettuna
• Aseta hiennonnusterä kulhoon. Huom. Taikinakoukulla ei
voi tehdä briossitaikinaa.
• Mittaa kädenlämpöinen maito, hiiva, sokeri ja suola
kulhoon. Sekoita 15 sekuntia nopeudella 4.
• Pysäytä kone ja lisää kananmunat ja jauhot. Sekoita 3 4 minuuttia nopeudella 5 kunnes taikina on tasaista.
• Jätä taikina kohoamaan lämpimään paikkaan noin
puolen tunnin ajaksi (30 min.).
• Lisää kohonneeseen taikinaan sulatettu, jäähdytetty
rasva. Käynnistä kone ja sekoita tasaiseksi.
• Kaada taikina voideltuun vuokaan (esim. 11⁄2 l:n
kakkuvuokaan).
• Paista uunin alatasolla 200 asteessa noin 30 minuuttia.
• Tarjoa kahvin tai teen kanssa.
h Tzatziki-salaatti
• 2 - 3 annosta
• 1 tuorekurkku
• 2 dl maustamatonta jugurttia
• 1 rkl ruokaöljyä
• 2 valkosipulinkynttä
•1⁄2
tl suolaa
•
1
⁄2
rkl tilliä hienonnettuna
• koristeeksi mintunlehtiä
• Aseta suikalointiterällä varustettu teräalusta kulhoon.
• Kuori kurkku ja suikaloi nopeudella 4 tai 5.
• Nosta kurkkusuikaleet siivilään ja valuta hyvin.
• Sekoita kulhossa kurkun joukkoon muut aineet.
• Kaada salaatti tarjoiluastiaan ja jäähdytä jääkaapissa.
• Koristele mintunlehdillä ennen tarjoamista.
£ g Coleslaw-salaatti
2 - 3 annosta
• 2 valkosipulinkynttä
• 2 omenaa
• 2 maustekurkkua
• 1 banaani
• 3 rkl majoneesia
• 3 rkl maustamatonta jugurttia
•1⁄
2
rkl kermaa
• 2 tl currya
• hiven suolaa
• hiven pippuria
• 1 pieni valkokaali
Page 69

70
• Aseta hienonnusterä kulhoon ja hienonna valkosipuli.
• Kuori omena, leikkaa neljään osaan ja poista
siemenkota.
• Lisää valkosipulin joukkoon omenapalat, maustekurkut
paloiteltuna ja hienonna.
• Lisää paloiteltu banaani, jugurtti, curry, kerma ja
mausteet. Sekoita kaikki aineet keskenään käyttämällä
pitokytkintä (M).
• Vaihda hienonnusterän tilalle teräalusta (viipalointiterä
paikallaan). Anna kastikkeen olla kulhossa.
• Paloittele kaali ja suikaloi nopeudella 3 kastikkeen päälle.
• Pysäytä kone ja avaa kansi. Sekoita salaatin aineet
lusikalla ja kaada tarjoiluastiaan
• Peitä astia ja jäähdytä hyvin jääkaapissa.
• Tarjoa salaatti leivän kanssa esim. iltapalana.
£ ß g h Peruna-kesäkurpitsapaistos
4 - 6 annosta
• 2 valkosipulinkynttä
• 6 - 8 perunaa (Bintje, Sabina, Siikli)
• 1 kesäkurpitsa (n. 500 g)
• 3 munaa
•11⁄2 dl kermaa esim. ruoanvalmistuskermaa
•11⁄2
dl maitoa
• 2 - 3 tl mausteyrttejä hienonnettuna
•
1
⁄2 tl mustapippuria
• 1 tl suolaa
• 100 g juustoa
• Aseta hienonnusterä kulhoon ja hienonna
valkosipulinkynnet.
• Pese ja kuori perunat. Pese kesäkurpitsa. Vaihda
teräalusta (viipalointiterä paikallaan) kulhoon ja viipaloi
perunat ja kesäkurpitsa nopeudella 5.
• Voitele uunivuoka ja kaada peruna- ja
kesäkurpitsaviipaleet ja valkosipulinkynnet vuokaan.
• Vaihda hienonnusterä jälleen kulhoon. Laita kulhoon
munat, kerma, maito ja mausteet. Sekoita nopeudella 4
noin 15 sekuntia. Kaada seos vuokaan.
• Vaihda kulhoon teräalusta (suikalointiterä paikallaan) ja
raasta juusto. Ripottele juustoraaste peruna- ja
kesäkurpitsaviipaleiden päälle.
• Paista uunin keksitasolla 200 asteessa noin tunnin ajan.
£ Majoneesi
• 2 munankeltuaista
• 2 tl sinappia
• 1 tl suolaa
• 1/4 tl valkopippuria
• 3 rkl viinietikkaa
•21⁄2 dl ruokaöljyä
• Huom. Valmistusaineiden tulee olla huoneenlämpöisiä.
• Aseta hienonnusterä kulhoon. Laita keltuaiset, sinappi,
suola, pippuri ja viinietikka kulhoon.
• Sekoita nopeudella 4 tai 5.
• Lisää koneen käydessä öljy ohuena nauhana vähitellen
syöttösuppilon kautta.
• Säilytä valmis majoneesi esim. kannellisessa lasipurkissa
jääkaapissa.
Vinkki
• Jos majoneesi juoksettuu, erota puhtaaseen kulhoon uusi
keltuainen ja sekoita siihen juoksettunutta majoneesia
vähissä erin sekoittaen nopeudella 4 tai 5.
• Tartarkastike: lisää majoneesiin hienonnettua persiljaa,
maustekurkkua ja kovaksi keitettyä hienonnettua
kananmunaa.
• Coctailkastike: lisää 1 dl:aan majoneesia 1⁄2 dl
ranskankermaa, tilkka viskiä, 3 tl tomaattipyreetä ja
ripaus inkivääriä. Sekoita kaikki aineet keskenään.
£ Hedelmäkakku
• 90 g pehmeää voita tai margariinia
•21⁄2
dl vehnäjauhoja
• 1 dl sokeria
• 1 tl leivinjauhetta
•
1
⁄
2 dl rusinoita
• 1 pkt kuivattuja hedelmiä (65 g)
• 2 kananmunaa
• Liota tarvittaessa kuivattuja hedelmiä hedelmäteessä
(noin 1 tunti).
• Voitele ja korppujauhota kakkuvuoka (1
1
⁄
2
l).
• Aseta hienonnusterä kulhoon.
• Paloittele rasva veitsellä ja laita palat kulhoon.
• Mittaa jauhot, sokeri, leivinjauhe, rusinat, kuivatut
hedelmät ja kananmunat kulhoon voipalojen päälle.
• Sulje kansi ja sekoita aineet nopeasti keskenään
tasaiseksi taikinaksi nopeudella 5.
• Kaada taikina voideltuun jauhotettuun vuokaan ja paista
uunin alatasolla 170 asteessa noin tunnin ajan.
Page 70

71
Ruoka-aine
Hedelmät/
marjat
- hienonnettu
- sose
Hiivataikina
- leipä
- pizza
- pulla
Juusto
- hienonnettu
- raaste
Kasvikset
- hienonnettu
- sose
Kerma
- vaahto
Korppujauhot
Liha, kala,
linnut
- paisti
- muu raaka
liha
Majoneesi
Mausteyrtti
- hienonnettu
Munat
- kokonaiset
- valkuaiset
Murokakku
Ohukaistaikina
Enimmäismäärä
Kytkim
en
asento
Lisä-osa Käsittely Käyttötarkoitus
400 g
500 g
300 g
300 g
300 g
200 g
400 g
500 g
4 dl
100 g
300 g
200 g
3 munaa
vähint.
30 g
4 munaa
150 g
jauhoja
4 dl
nestettä
M/5
5
5
5
5
M/5
5
M/5
5
3
M/5
M/5
M/5
4-5
M/5
4
5
3-4
£
£
™
™
™
£
h
£
£
ß
£
£
£
£
£
ß
£
£
Käytä raakoja, kivettömiä hedelmiä.
Käytä keitettyjä tai pehmeitä hedelmiä.
Katso ohjetta sivulta 66
Katso ohjetta sivulta 68
Katso ohjetta sivulta 67
Käytä kovaa juustoa. Leikkaa 2 cm:n
paloiksi. Karkea tulos asennolla M ja
hieno tulos nopeudella 5.
Paloittele.
Jäähdytä kulho, terä ja kerma
jääkaapissa. Vatkaa kerralla vähintään
11⁄4 dl.
Käytä kuivaa leipää.
Poista kalvot, rustot, luut ja ruodot.
Leikkaa n. 3 cm:n kuutioiksi.
Aseta kuutiot tasaisesti kulhon pohjalle.
Käytä aineet huoneenlämpöisinä.
Katso ohjetta sivulta 69. Käytä
vähintään 1 muna tai 2 keltuaista.
Pese ja kuivaa yrtit.
Vatkaa munat huoneenlämpöisinä.
Kulho ja terä eivät saa olla rasvaiset.
Mittaa kaikki aineet huoneenlämpöisinä
kulhoon.
Kaada kulhoon ensin neste ja sen
jälkeen kuivat aineet.
Salaatit, hillot, kakut,
jälkiruoat.
Keitot, hillot,
jälkiruokakastikkeet,
vauvanruoka.
Leivät
Pizzat
Pullat
Kuorrutus, keitot,
kastikkeet.
Salaatit, keitot.
Muhennokset, keitot.
Koristelu, jälkiruoat,
jäätelöseokset
Jauheliharuoat,
kakkuvuokien
jauhotus.
Jauhettu liha,
raakapihvit.
Jauhelihapihvit.
Kastikkeet,
kuorrutukset
Kastikkeet, keitot,
maustevoit.
Munakokkeli,
munakkaat.
Marenki.
Kakut.
Ohukaiset,
pannukakut, vohvelit.
Page 71

72
Pähkinät,
mantelit
- rouhitut
Paistostaikina
Palkokasvit
- sose
Perunat
(keitetyt)
- sose
Pirtelö
Purjosipuli
- viipaleet
Sokerikakku
(kakkupohja)
Sosekeitto
Suklaa
- rouhe
Vauvanruoka/dieettiruoka
- sose
Voikreemi
Voitaikina
250 g
250 g
jauhoja
400 g
500 g
31⁄2 dl
nestettä
3 munaa
5 dl
nestettä
200 g
300 g
250 g
250 g
jauhoja
M/5
5
5
4-5
M/5
M/4-5
4-2
4-5
M/5
M/4-5
5
5
£
£
£
£
£
g
ß
£
£
£
£
£
Karkea rouhe: pitokytkin M
Hieno rouhe: nopeus 5.
Leikkaa kylmä voi 2 cm:n paloiksi. Laita
voi kulhoon jauhojen päälle. Sekoita
nopeudella 5, kunnes taikina on
ryynimäistä. Lisää kylmä vesi. Sekoita
kunnes taikinasta muodostuu pallo (n.
30 s). Jäähdytä taikina ennen kaulimista.
Käytä keitettyjä herneitä tai papuja.
Lisää hieman nestettä.
Älä keitä perunoita liikaa. Maidon
määrä riippuu perunalajista. Lisää
kuuma neste (enintään 80 °C) koneen
käydessä.
Katso ohjetta sivulta 65
Työnnä syöttösuppiloon päät ylöspäin.
Aineet huoneenlämpöisinä. Vatkaa
munat ja sokeri vaahdoksi nopeudella
4. Lisää jauhot siivilän läpi nopeudella 2.
Käytä keitettyjä kasviksia.
Käytä kovaa taloussuklaata. Paloittele 2
cm:n paloiksi. Käytä muutaman kerran
ensin pitokytkintä ja sitten nopeutta 5
hienontamiseen.
Karkea: lisää hieman nestettä.
Hieno: Lisää nestettä tarpeen mukaan.
Käytä pehmeää voita.
Mittaa jauhot kulhoon. Lisää paloiteltu
(2 cm) kylmä voi. Sekoita nopeudella 5,
kunnes taikina on ryynimäistä. Lisää
kylmä vesi ja jatka sekoittamista,
kunnes taikinasta tulee pallo (noin 15
sekuntia). Jäähdytä taikina ennen
kaulimista.
Salaatit, leivonnaiset.
Piirakat, paistokset.
Muhennokset, keitot.
Perunasose.
Keitot, salaatit, yms.
Täytekakut,
kääretortut.
Sosekeitto.
Koristeluun,
kastikkeeksi, mousset,
vanukkaat.
Vauvanruoka.
Leivokset, jälkiruoat.
Piirakat, tortut.
Page 72

73
Page 73

74
 Loading...