

Philips HR2831/60 Operating Instructions Manual

2
English Page 4
• Keep page 3 open when reading these operating
instructions.
Français Page 13
• Pour le mode d’emploi: dépliez la page 3.
Deutsch Seite 24
• Schlagen Sie beim Lesen der Gebrauchsanweisung
Seite 3 auf.
Nederlands Pagina 33
• Sla bij het lezen van de gebruiksaanwijzing
pagina 3 op.
Italiano Pagina 42
• Prima di usare l’apparecchio, aprite la pagina 3 e
leggete attentamente le istruzioni per l’uso.
á«Hô©dGá«Hô©dG62 áëØ°üdG62 áëØ°üdG
••ΩGóîà°S’G π«dO IAGôb óæY áMƒàØe 3 áëØ°üdG »q∏NΩGóîà°S’G π«dO IAGôb óæY áMƒàØe 3 áëØ°üdG »q∏N
53
3
11
L
M
M
C
D
E
F
G
H
I
O
NM
K
B
A
J

4
Important
• Read the instructions in conjunction
with the illustrations before using the
appliance.
• Do not allow children to operate the
appliance.
• Care must be taken when handling the
metal blade and the inserts as these are
very sharp.
• Always remove the protective cap from
the metal blade before use. Always click
it back into place after cleaning.
• Let the rotating parts come to a
complete stop before opening the cover.
• Never put your fingers in the food chute,
nor use forks, knives, spatulas, spoons
etc. Only the provided pusher is suited
for this purpose.
• Remove the mains plug from the wall
socket after use.
• If the mains cord of this appliance is
damaged, it must only be replaced by
Philips or their service representative, as
special tools and/or parts are required.
• Prior to initial use, wash all the parts
which come into contact with food.
• Do not place the bowl into a microwave
oven.
• Never immerse the motor unit in water
or any other liquid.
Do not rinse either.
• Please note that 0.75 litre is the
maximum quantity for mixing or
blending fluids.
• Do not exceed the maximum quantities
and processing times indicated in the
table and the recipes.
• Keep these instructions for future
reference.
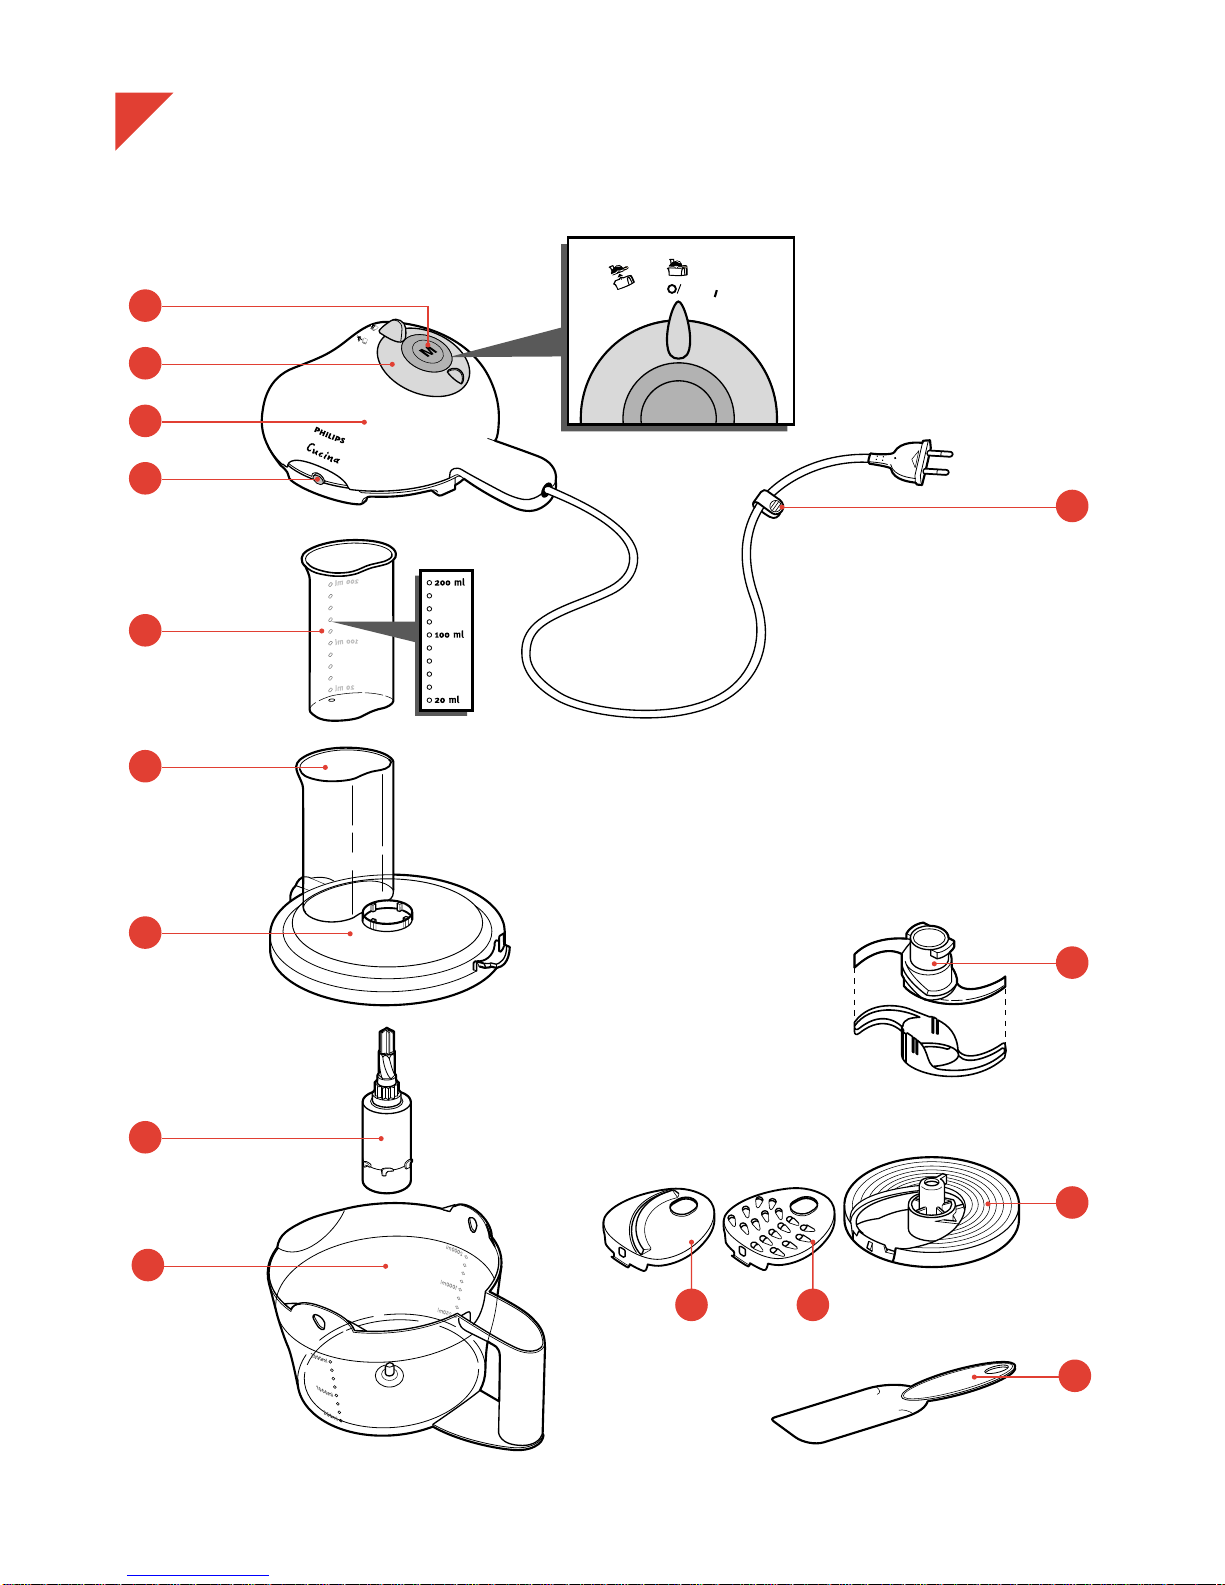
General description (fig. 1)
A M (“Moment”) button
Press: motor runs.
Release: motor stops.
B Control ring
1 for removing and placing the lid.
The lid release buttons (D) are now retracted
2 O/M for “Off” position and “Moment” position
for pulse operation.
I for continuous operation.
C Motor unit
D Lid release buttons
E Pusher
F Filling opening
G Lid
H Coupler
I Bowl
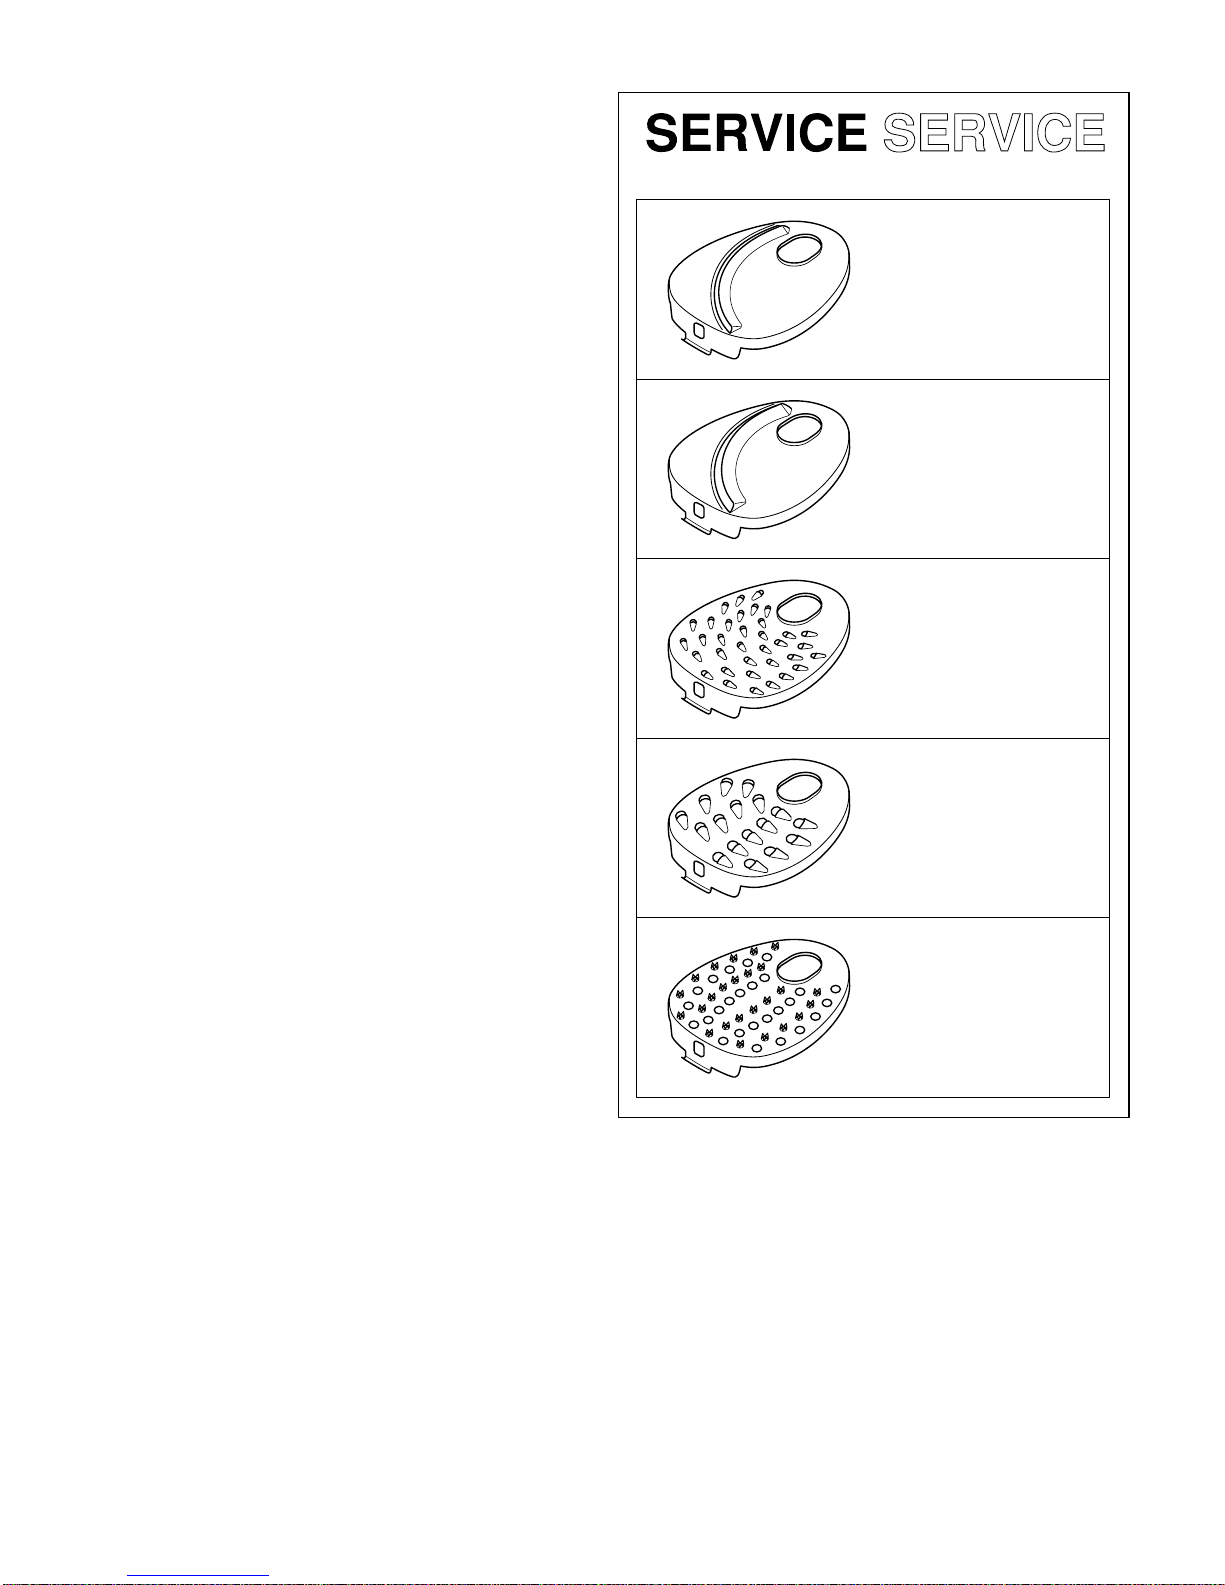
J Cord clip (service n°. 4822 290 40369)
K Metal blade £ (service n°. 4822 690 40232)
L Insert holder disc f
(service n°. 4203 065 61521)
M Slicing insert medium g
(service n°. 4203 065 61541)
N Shredding insert medium h
(service n°. 4203 065 61561)
O Spatula (service n°. 4822 690 40212)
Automatic Safety Shut-Off (resettable)
Please read these instructions carefully before
using the appliance.
To prevent the hazard of damage due to overheating,
your appliance is equipped with an automatic safety
device which will automatically shut-off the mains
power if necessary.
If the instructions below are followed strictly you can
safely switch on again after a one hour cooling-down
period.
If the appliance suddenly stops:
1. First remove the mains plug from the wall
socket.
2. Secondly set the control ring to position O/M.
3. Allow a cooling-down period of min. one hour.
Contact your Philips dealer or an authorised Philips
service centre if the safety shut-off is activated
repeatedly.
English

5
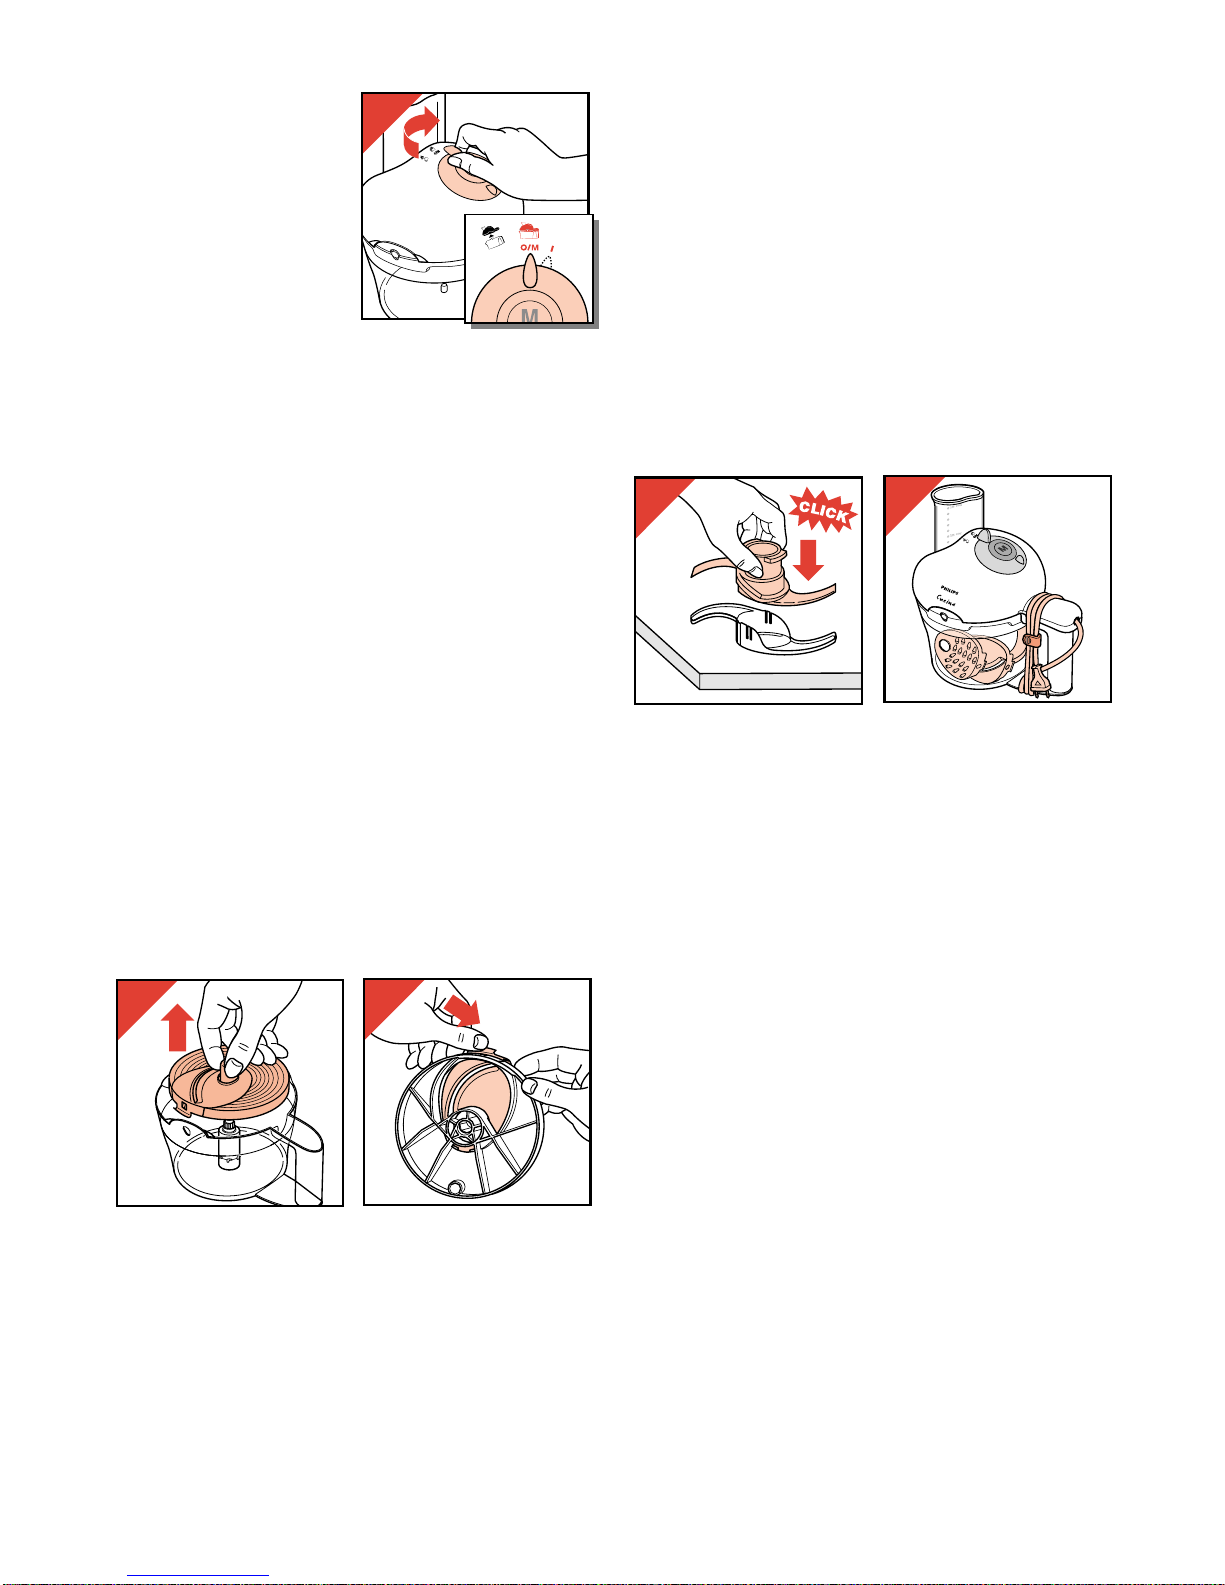
Mounting and unmounting the motor unit
and cover
- Ensure that the control ring is set to position
1 (fig. 2).
Please note: Damage may occur if the control ring is
not in this position while opening or closing.
- Place the lid on the bowl (fig. 3).
- Place the motor unit on the cover (fig. 4).
- Turn the control ring to position 2 O/M (fig. 5).
- To release the motor unit and lid turn the control
ring to position 1 (fig. 6, 7).
Food chute and pusher
• Use the pusher to feed
ingredients through the
food chute (fig. 8).
• You can keep the pusher
in the food chute to
serve as a stopper while
operating. This will
prevent splashing and
making dust.
• During operation you
may remove the pusher from the filling opening to
add ingredients.
- At the bottom side of the pusher you will find an
indication where you can pierce a small opening,
using a pointed object (fig. 9). Through this opening
you can from time to time add small quantities of
liquid (e.g oil while making mayonnaise) (fig. 10).
- There are level indications (ml) on the the pushing
guide for measuring liquids.
Chopping, mixing, blending and puréeing with
the metal blade £
• Take care: the cutting edges are very sharp!
- Remove the protective cap from the metal blade
before use (fig. 11-12).
• Always hold the unprotected metal blade by
its handle.
- First position the coupler (fig. 13) and the metal
blade (fig. 14).
2
1
7
M
6
1
8
9
10
11
12
13
14
3
4
5
1

6
- Then put the ingredients
into the bowl (fig. 15).
- Place the lid and the
motor unit (fig. 3-4).
- Put the pusher into the
food chute.
- Switch on by pressing the
“Moment” button (fig. 16)
or by selecting position I
(fig. 17).
Tips - chopping
• Pre-cut large pieces into cubes of about 3 x 3 x 3 cm.
• Avoid overprocessing due to excessive operation.
• If food should get caught around the metal blade, or
when particles of food should stick to the inside of
the bowl:
- first switch the appliance off,
- take the cover (with motor unit) from the bowl
- and remove the food from the metal blade or from
the bowl using the spatula.
• Do not chop very hard ingredients, such as coffee
beans, nutmeg, grains, hard dried herbs (e.g.
turmeric, cardamom and ice cubes: these would
blunt the metal blade.
• Process large quantities of dry parsley. Ensure that
the bowl is also dry.
• If you wish to chop just a few cloves of garlic, drop
these through the funnel on the rotating metal blade.
Ensure that the garlic and the bowl are dry.
• Ensure that hard cheese (e.g. matured gouda,
parmesan, pecorino) is at room temperature.
Take care not to keep the motor running too long:
then the cheese could get warm and turn lumpy.
• Ensure that half hard cheese (e.g. new and semi
matured gouda, emmenthaler, gruyère is as cold as
possible.
• Put sticky candied and dried fruit (e.g. dates, figs,
prunes) into the deep freezer for at least 15 minutes.
Add a tea spoon of flour before chopping.
Tips - mixing / blending
• Do not mix or blend too long to avoid excessive
foam.
• Do not mix or blend more fluid than 0.75 litre.
• Do not mix or blend fluids hotter than 80 °C.
• When making dough for shortbread or for puff
pastry use as little liquid as possible. This will make
the dough easier to roll out. First put the flour into
the bowl and then the other ingredients. Always use
cold hard butter or margarine.
Tips - puréeing
• Vegetables and fruits can be puréed without
additional liquid.
With some extra liquid, however, the results will be
finer.
• First purée hard and tenacious ingredients. Then add
the soft ingredients.
Slicing or shredding with the insert holder disc
f and changeable inserts g h
• Take care: the cutting edge is very sharp!
- Place the desired insert in the insert holder disc
(“Click!”) (fig. 18).
- Position the coupler and the insert holder disc
(fig. 19).
- Place the cover and the motor unit (fig. 3-4).
- Lift the pusher out of the food chute.
- Feed the ingredients into the food chute (fig. 20).
- Put the pusher on top of the food and press lightly
(fig. 21).
15
16
1
–
2
–
3
–
4
–
5
1
17
1
–
2
–
3
–
4
–
5
1
2
18
19
15
20 21
7
- Switch on (fig. 22).
- Press the ingredients
downwards using the
pusher. Apply steady and
moderate pressure.
• Pre-cut large pieces to
make them feed into the
chute.
• Fill the food chute evenly
for the best results.
• Empty the bowl every now and then when
processing large amounts.
Tips - slicing
g
• Fill the opening completely while the motor is
standing still. Press with the pusher and switch on.
In this manner you prevent the ingredients from
turning over while slicing.
Tips - shredding h
• Before shredding cheese, pre-cut it into small cubes
(approx. 2 cm).
Apply light but steady pressure on to the pusher.
It cannot be helped that the last piece of cheese will
remain between the cover and the disc.
• Ensure that hard cheese (e.g. matured gouda,
parmesan, pecorino) is at room temperature.
• Ensure that half hard cheese (e.g. new and semi
matured gouda, emmenthaler, gruyère) is as cold as
possible.
• If you wish long strings, place the ingredients
horizontally into the filling opening.
• Select I for optimal shredding results.
After use
- To release the motor unit and lid turn the control
ring to position 1 (fig. 6-7).
- Lift the accessory and the coupler from the bowl
(fig. 23).
After that, you can empty the bowl.
- After slicing or shredding: release the insert from the
insert disc holder (fig. 24). Make sure the insert is
not pointing toward you while doing so. Take care:
the cutting edges are very sharp!
Cleaning and storage
• Always remove the mains plug from the wall socket
before cleaning the motor unit. The motor unit may
be wiped with a damp cloth.
Never immerse the motor unit in water. Never pour
water over it.
• Wash the items which have been in contact with the
food in warm soapy water immediately after use.
• Take care when cleaning the metal blade and the
inserts: the cutting edges are very sharp!
These items can also be cleaned in a dishwasher.
• Ensure that the cutting edges do not come into
contact with hard objects as this might make them
blunt.
• Place the protective cap back on to the metal blade
after cleaning (fig. 25).
• After cleaning, you can store the accessoiries in the
bowl. Place the lid and wind the cord as illustrated in
fig. 26, using the cord clip.
26
24
25
22
1
–
2
–
3
–
4
–
5
23

8
Extra accessories
• The following accessories are also available as
optional extras*):
- Slicing insert fine for fine slicing
(service n°. 4203 065 61531).
- Slicing insert medium
g for thick slicing
(service n°. 4203 065 61541).
- Shredding insert fine j for preparing
raw vegetables, fruits and potato fritters
(service n°. 4203 065 61551).
- Shredding insert medium h
for medium shredding
(service n°. 4203 065 61561).
- Granulating insert k for granulating
Parmesan, horse radish and potatoes
(service n°. 4203 065 61571).
*) You can ask your dealer if these accessories are
available in your country.
4203 065 61531
4203 065 61541
4203 065 61551
4203 065 61561
4203 065 61571

9
M Salmon spread (starter for 4-6 persons)
150 g smoked salmon, 75 g softened butter,
1
1
⁄2 tablespoons tomato ketchup, salt and cayennepepper.
Purée the smoked salmon, tomato ketchup and the
butter. Season with salt and cayennepepper. The
mixture can be served as an appetizer with toasted
bread.
M Sandwich spread
2 small carrots in pieces, 2-3
gherkins in pieces, 75 g
cauliflower in pieces, 75 g
celeriac in pieces, green herbs
(parsley, dill, tarragon, celery
stalks in pieces), 100 g
mayonnaise, 100 g curd, salt
and pepper.
Chop the carrots, gherkins, cauliflower, green herbs
and celeriac fine. Mix in the mayonnaise and curd
carefully and season the taste with pepper and salt.
M Broccoli soup (for 4 persons)
50 g ripe Gouda cheese, 300 g cooked broccoli (stems and
heads), water in which broccoli was cooked,
2 boiled potatoes in pieces, 2
stock cubes, 2 tablespoons
unwhipped cream, curry,
salt, pepper, nutmeg.
Shred the cheese. Purée the broccoli with the boiled
potatoes and some water in which the broccoli was
cooked. Put the broccoli purée and the remaining
liquid and stock cubes into a measuring beaker and
make it up to 750 cc. Transfer it to a pan and while
stirring bring it to the boil. Stir in the cheese and
season with curry, salt, pepper and nutmeg and add
the cream.
M Gazpacho (for 2 persons)
250 g tomatoes, 1 clove garlic, 1 tablespoon red wine,
11⁄2 tablespoon olive oil, 1 tablespoon tomato purée,
1 green paprika in pieces, 1 onion in pieces, 1 tablespoon
mayonnaise, 1⁄2 small cucumber in pieces, 250 cc
chicken stock.
Garnish: paprika, tomato and a raw onion in pieces.
Put all the ingredients in the bowl and mix them until
a smooth purée is obtained. Chill the soup in the
refrigerator. Chop the paprika, tomato and onions
for garnishing.
Recipes
M Fruit cake
250 g white flour, 110 g butter, 110 g sugar, 7 g baking
powder, 60 g raisins, 170 g candied fruit, 2 eggs.
Soak the candied fruits and raisins in fruit tea (approx.
1 hour). Place the metal blade into the bowl. Cut the
butter into cubes. Place the flour, sugar, baking
powder, butter and eggs into the bowl. Add the raisins
and the dried fruit. Use position I.
Maximum mixing time: 15 seconds.
M Pizza dough (for 2 round pizza’s)
For the pizza bases: 121⁄2 g
fresh yeast or 1 package dry
yeast, 1 tsp sugar, approx.
125 cc water (35 °C),
250 g plain flour, 5 g salt,
25 cc olive oil.
For the sauce: 1 onion,
2 cloves of garlic, 11⁄2
tbsp olive oil, 2
1
⁄2
dl sieved tomatoes
(tinned), 1 tsp dried or fresh Italian herbs, salt and pepper,
1 tsp sugar.
Spread on the pizza’s: olives, salami, artichokes,
mushrooms, anchovies, Mozzarella cheese, peppers, etc.
Place the metal blade into the bowl. Put the water,
the yeast and the sugar into the bowl.
Select M position and mix the ingredients for approx.
15 seconds. Add the flour, oil and the salt.
Mix the dough for approx. 25-30 seconds.
Keep the appliance by hand to avoid it moving around
on the working surface. Make the dough into a ball,
and leave it in a separate bowl, covered with a damp
cloth, to rise for about 30 minutes.
To make the sauce: Chop the onions and the garlic.
Fry these until they are transparent.
Add the sieved tomatoes and the herbs and simmer
the sauce for about 10 minutes.
Season with salt, pepper and sugar. Allow the sauce
to cool down.
Heat the oven to 250 °C. Roll the dough out on a
floured surface to make two round pizza bases.
Place the pizza bases on a greased baking tray.
Spread the sauce and the desired ingredients on the
pizza bases. Place the baking tray centrally in the oven
and bake for 15-20 minutes.
10
M Mayonnaise
1 large egg or 2 small eggs,
2 tablespoons mustard, salt,
pepper, 3 tablespoons
vinegar or lemon juice,
approx.
250 cc oil (depending on the
required thickness).
Use the ingredients at room temperature. Place the
egg(s), mustard, salt, pepper and lemon juice in the
bowl. Pour the oil via the pusher into the bowl while
the blade is rotating.
M Sour cream Roquefort dressing
250 cc sour cream, 2 drops tabasco, 1 teaspoon wine
vinegar, 1 clove of garlic,
1
⁄2 teaspoon sugar, 1 teaspoon
celery salt, pepper, 75 g crumbled Roquefort or other blue
cheese, 1⁄2 teaspoon mustard.
Put all the ingredients except the cheese into the bowl
and mix well. Add the cheese and continue the
process until desired consistency is reached.
M Yoghurt dressing
150 cc yoghurt, 2 tablespoons lemon juice, 1⁄4
teaspoon
salt, pepper, 2 tablespoons fresh herbs such as parsley,
garden cress, watercress, chive, tarragon, basil.
Put all the ingredients into the bowl and mix well.
M Spanish cabbage salad (4 persons)
1 small red cabbage, 2 red onions, 1 fennel, 1 apple,
juice of one orange, 2 tablespoons red wine vinegar,
1 tablespoon mustard.
Mix the juice, mustard and
vinegar. Slice the cabbage,
onions, fennel and apple.
Combine the ingredients in
a salad bowl.
M Cucumber salad
(2-3 persons)
1 large cucumber, 1 small onion in pieces, 2 stalks dill,
50 g fresh cream cheese, 3 stalks celery, 50 g goat’s
cheese in pieces, 2 tablespoons curd or yoghurt, pepper
and salt,
1
⁄2 tablespoon oil.
Make a smooth sauce of onion, dill, yoghurt or curd,
oil and the fresh cream cheese. Season with pepper
and salt. Peel the cucumber and slice it together with
the celery stalks. Combine the ingredients in a salad
bowl and decorate it with the goat’s cheese.
M Cherry flan
Round baking tin Ø 24 cm, 250 g
chocolate biscuits, approx. 100 g
soft butter, a pinch of cinnamon,
300 g soft cream cheese, 200 g
caster sugar, 2 tablespoons cherry
liqueur or marsala, 600 g cherry
pie filling or fresh fruit such as
250 g strawberry or kiwi.
Crumble the biscuits with melted butter and cinnamon
using the sickle blade. Pressing down gently, spread
the mixture over the base of the tin.
Place the tin in the refrigerator for about one hour.
Mix the cream cheese, sugar and liqueur during max.
40 seconds until smooth.
Spread the mixture over the biscuit base.
Spread the cherry filling over it or decorate with fresh
strawberries or kiwi.
M Milkshake (basic recipe)
250 cc cold milk, 100 g fresh strawberries
(or other fruit), 2 tablespoons strawberry
(or other) syrup, 75 g vanilla
ice-cream.
Mix all the ingredients until the mixture is frothy.
M Meat combi dish for babyfood
125 g cooked lamb, beef, veal or chicken in pieces,
2 tablespoons cooked vegetables (carrots, peas, spinach
or celery) in pieces, 125 cc milk, 50 g cooked rice.
Put all the ingredients into the bowl and process until
very smooth. Refrigerate or freeze in covered
containers and heat only the amount to be used for
serving.
Note: For younger babies, add an extra 50 cc milk.

11
Ingredients
Baby/infant/
diet food
- puréeing
Batter (biscuit)
- stirring
Batter (cake)
- stirring
Batter (light)
- stirring
Breadcrumbs
- chopping
Cheese
- chopping
- shredding
Chocolate
- chopping
Creams
Dough
(tart, pie,
dumplings)
Dough (for
pizza)
Max.
quantity
Switchon
mode
Accessory
Procedure Applications
300 g
3 eggs
150 g
flour
400 g
liquid
100 g
200 g
200 g
250 g
250 g
flour
250 g
flour
M/I
I-M
I
M/I
I
M/I
I
M/I
I
I
I
£
£
£
£
£
£
h
£
£
£
£
Coarse: add a little liquid.
Fine: if necessary add some extra
liquid for the smoothest results.
Ingredients at room temperature.
Stir mixture of eggs and sugar at
position I until stiff. Then add the
sifted flour. Continue stirring carefully
at position M.
Ingredients at room temperature.
First put liquid into the bowl.
Then add the dry ingredients.
Use dry, crisp bread.
Use rindless cheese (e.g. Parmezan),
pre-cut in cubes of 2 cm. Select pos. M
for coarse results and I for fine powder.
Press carefully with the pusher.
Use hard, pure chocolate. Break into
cubes of 2 cm. The first few times
use pos. M. Then position I for a fine
chop.
Use soft butter for airy results.
Use cold butter/margarine and cold
water. Put flour into the bowl. Top with
2 cm large pieces of butter/ margarine.
Mix on pos. I until the mixture
resembles bread crumbs.
Then add cold water while mixing.
Stop as soon as dough forms into a ball
(about 15 sec.). Cool dough before
further processing.
Please refer to the recipe on page 9.
Infant food.
Baby food.
Cakes, Swiss Roll,
Pastry.
Cakes, etc.
Pancakes, wafers,
crepe, fritters.
Food coated with
breadcrumbs,
gratinated dishes.
Garnishing,
au gratin, soups,
sauces, croquettes.
Sauces, fondue,
pizza, au gratin
dishes.
Garnishing, sauces
pastry, mousse,
pudding.
Pastry, desserts,
toppings.
Fruit tarts, apple
dumplings, pies,
quiche.
Pizza, tart.

12
Dough
(shortbread)
Fruit (general)
- chopping
- puréeing
Herbs
- chopping
Leek
- slicing
Mayonnaise
Meat, fish,
poultry
- chopping
(lean beef)
- chopping
(streaky meat)
Milkshake
Nuts
- chopping
Potatoes
(cooked)
- puréeing
Pulses
- puréeing
Vegetables
(general)
- chopping
- puréeing
250 g
flour
400 g
500 g
min. 30 g
3 eggs
300 g
200 g
350 ml
liquid
250 g
500 g
400 g
400 g
500 g
I
M/I
I
I
M/I
I
M/I
M/I
I
M/I
I
I
M/I
I
£
£
£
£
g
£
£
£
£
£
£
£
£
£
Use cold butter or margarine, cut into
2 cms pieces. Put all ingre-dients into
bowl simultaneously.
Mix until mixture forms into a ball (after
approx. 30 secs.). Cool the dough
before further processing.
Tip: use a little lemon juice to prevent
discolouring.
Use raw, firm, seedless fruit.
Use cooked or soft fruit.
Wash and dry herbs.
Insert into the food chute heads
upwards. When processing thin leek,
fill the opening completely.
Use ingredients at room
temperature. (See the recipe on
page 10).
(Note: Use at least one large egg or
two small eggs.)
First remove sinews, bones, including
fishbones.
Pre-cut into cubes of about 3 cm.
Chop at position M for coarser results.
Please refer to recipe on page 10.
Use pos. M for coarse chopping or
pos. I for a fine result.
Have the potatoes not overcooked. The
quantity of milk depends on the kind of
potato. Use warm milk (max. 80 °C).
Add the milk slowly while the metal
blade is rotating.
Use cooked beans or peas.
You may add some liquid for a better
consistency.
Pre-cut into cubes of 3 cm.
Apple pie, sweet
biscuits, open fruit
flans.
Salads, jam, cakes.
Sauces, jam,
pudding, baby food.
Sauces, soup,
garnishing, seasoned
butter.
Soups, cooked leek,
quiche.
For French fries,
salads, cocktails,
fondue and
barbecue sauces.
Steak tartare,
sandwich spreads,
hamburgers.
Minced meat,
sausage.
Salads, garnishing,
bread, pastry,
pudding.
Mashed potatoes.
Purées, soups.
Salads, raw food,
soup.
Vegetable purée,
soups.

13
Important
• Avant d’utiliser l’appareil, lisez les
instructions en vous servant des
illustrations.
• Ne laissez pas les enfants utiliser
l’appareil.
• Attention quand vous manipulez les
couteaux ou les accessoires, ceux-ci étant
très tranchants.
• Avant l’utilisation, retirez toujours les
capuchons de protection et replacez-les
toujours après le nettoyage.
• Laissez les pièces en rotation s’arrêter
entièrement avant d’ouvrir le couvercle.
• Ne mettez jamais les doigts dans la
cheminée de remplissage, n’utilisez pas
non plus de fourchettes, de couteaux, de
spatules, etc.. Le poussoir fourni avec
l’appareil est le seul outil adéquat.
• Débranchez la prise du secteur après
l’utilisation.
• Si le cordon secteur de votre appareil est
endommagé, il doit impérativement être
remplacé par un réparateur indépendant
agréé Philips car des équipements et des
composants spécifiques sont exigés.
• Avant la première utilisation, lavez toutes
les pièces qui entreront en contact avec
les aliments.
• Ne placez pas le bol dans un four à microondes.
• Ne plongez jamais le bloc moteur dans
l’eau ou tout autre liquide. Ne le rincez
pas non plus.
• Veuillez noter que 0.75 litre est la
quantité maximum pour mélanger ou
mixer les liquides.
• Ne dépassez pas les quantités maximum
ni les durées d’opération indiquées dans la
table et les recettes.
• Conservez ces instructions pour vous y
référer ultérieurement.
Description générale
A “M “ Momentané
Pressez : le moteur tourne
Relâchez : le moteur s’arrête
B Sélecteur
1 pour retirer et mettre le couvercle
Les ergots de verrouillage du couvercle (D) sont
maintenant retractés
2 O/M pour positions “Off” (Arrêt) et
“Momentané” (par à-coups
I pour marche en continu
C Bloc moteur
D Ergots de déverrouillage du couvercle
E Poussoir
F Ouverture de remplissage
G Couvercle
H Entraîneur
I Bol
J Clip pour cordon d’alimentation (numéro de
référence 4822 290 40369)
K Couteau £ (numéro de référence 4822 690
40232)
L Disque de maintien des accessoires f
(numéro de référence 4203 065 61521)
M Disque à découper moyen g
(numéro de référence 4203 065 61541)
N Disque à râper moyen h
(service n°. 4203 065 61561)
O Spatule (numéro de référence 4822 690 40212)
Coupe-circuit automatique de sécurité (peut
être réactivé).
Lisez ces instructions avec attention avant
d’utiliser l’appareil.
Afin d’éviter des dommages éventuels par suite de
surchauffe, votre appareil est équipé d’un dispositif de
sécurité automatique qui coupe le courant si
nécessaire. Si vous suivez à la lettre les instructions
suivantes, vous pouvez remettre l’appareil en marche
sans danger après l’avoir laissé refroidir pendant une
heure.
Si l’appareil s’arrête brusquement:
1. Débranchez la fiche de la prise de courant.
2. Positionnez le sélecteur sur la position O/M.
3. Laisser refroidir pendant au moins 1 heure.
Consultez votre revendeur ou Centre Service Agréé
Philips si le coupe-circuit de sécurité s’active de
manière répétitive.
Français
Montage et démontage du bloc moteur et du
couvercle
- Assurez-vous que le sélecteur est sur la position 1
(fig. 2).
Attention : l’appareil peut être endommagé si le
sélecteur n’est pas dans cette position quand vous
ouvrez ou fermez le couvercle.
- Placez le couvercle sur le bol (fig. 3).
- Placez le bloc moteur sur le couvercle (fig. 4).
- Tournez le sélecteur sur la position 2 O/M
(fig. 5).
- Pour libérer le bloc moteur et le couvercle, tournez
le sélecteur sur la position 1 (fig. 6,7).
Cheminée de remplissage et poussoir
• Utilisez le poussoir pour
pousser les aliments dans
la cheminée de
remplissage (fig. 8).
• Le poussoir peut rester
dans la cheminée de
remplissage pendant les
opérations pour servir de
bouchon. Cela évitera les éclaboussures et la
poussière.
• Pendant les opérations, vous pouvez retirer le
poussoir de la cheminée de remplissage pour
ajouter des ingrédients.
- Au bas du poussoir vous verrez une indication de
l’endroit où vous pourrez percer un petit orifice, en
vous servant d’un objet pointu (fig. 9). De temps en
temps, vous pouvez verser de petites quantités de
liquide (par ex. de l’huile lorsque vous faites une
mayonnaise (fig. 10).
- Des indications de niveau (en ml) sur le guide du
poussoir servent à mesurer les liquides.
Comment hacher, malaxer, mélanger et faire
de la purée avec le couteau £
• Attention : les bords extérieurs du couteau
sont très coupants !
- Retirez le capuchon de protection du couteau avant
l’utilisation (fig. 11, 12).
S’il n’est pas protégé, tenez toujours le
couteau par la poignée.
- Commencez d’abord par mettre en place
l’entraîneur (fig. 13) puis le couteau (fig. 14).
2
1
7
M
6
1
8
9
10
11
12
13
14
3
4
5
1
14

15
- Mettez ensuite les
ingrédients dans le bol
(fig. 15).
- Placez le couvercle et le
bloc moteur
(fig. 3-4).
- Mettez le poussoir dans
la cheminée de
remplissage.
- Mettez en marche en
appuyant sur le bouton
"Momentané" (fig. 16) et en choisissant la vitesse
désirée (fig. 17).
Conseils : hacher
• Découpez d’abord les gros morceaux en cubes de 3
cm environ.
• Pour éviter de surcharger l’appareil, évitez de
traiter trop d’aliments à la fois.
• Si des aliments s’enroulent autour du couteau ou si
des particules restent attachées au bol :
- Arrêtez l’appareil d’abord.
- Otez ensuite le couvercle (et le bloc moteur) du
bol et servez vous de la spatule pour retirer les
aliments des couteaux ou du bol.
• Ne hachez pas des ingrédients très durs tels que
des grains de café, des noix de muscade, des
graines, des herbes séchées dures (par ex; du
curcuma, de la graine de cardamome) ou des cubes
de glace ; cela pourrait émousser les couteaux.
• Pour traiter de grandes quantités de persil séché.
Assurez-vous que le bol soit bien sec.
• Si vous ne désirez hacher que quelques gousses
d’ail, laissez-les tomber sur le couteau en rotation
par la cheminée de remplissage. Assurez-vous que
le bol et l’ail soient secs.
• Assurez-vous que le fromage dur (parmesan, gouda
vieux, peccorino) soit à la température ambiante.
Prenez soin de ne pas laisser le moteur tourner
trop longtemps. Le fromage pourrait devenir
grumeleux.
• Par contre assurez-vous que le fromage demi-dur
(par ex. le gouda frais ou semi-vieux, l’emmenthal,
le gruyère) soit aussi froid que possible.
• Mettez les fruits secs ou confits (par ex. les dattes,
les figues, les pruneaux) dans le congélateur pendant
au moins 15 minutes. Avant de les hacher, ajoutez
une cuillère à café de farine.
Conseils : malaxer et mélanger
• Ne malaxez ou mélangez pas trop longtemps pour
éviter trop d’écume.
• Ne malaxez ou mélangez pas plus de 0,75 litre de
liquide.
• Ne malaxez ou mélangez pas de liquides dont la
température dépasse 80˚ C.
• Lorsque vous faites de la pâte pour des sablés ou
des gâteaux feuilletés, utilisez aussi peu d’eau que
possible. La pâte sera plus facile à rouler. Mettez
d’abord la farine dans le bol puis les autres
ingrédients. Utilisez toujours du beurre ou de la
margarine froids et durs.
Conseils : pour faire de la purée
• Pour faire de la purée de légumes ou de fruits, il
n’est pas nécessaire de rajouter du liquide.
• Un ajout de liquide rend cependant la purée plus
fine.
• Commencez par les ingrédients durs et résistants.
Ajoutez ensuite les ingrédients plus malléables.
Emincer ou râper avec le disque de maintien
des accessoires f et les accessoires
interchangeables g h
• Attention : les bords sont tranchants et très
aiguisés !
- Placez l’accessoire désiré dans le disque de maintien
des accessoires (“Clic”) (fig.18)
- Positionnez l’entraîneur et le disque de maintien des
accessoires (fig. 19).
- Mettez en place le couvercle et le bloc moteur (fig.
3-4).
- Retirez le poussoir de la cheminée de remplissage.
15
16
1
–
2
–
3
–
4
–
5
1
17
1
–
2
–
3
–
4
–
5
1
2
18
19
15

16
- Alimentez la cheminée
de remplissage avec les
aliments (fig. 20).
- Posez le poussoir sur les
aliments et appuyez
légèrement (fig. 21).
- Mettez l’appareil en
marche (fig. 22).
- Poussez les ingrédients
vers le bas au moyen du
poussoir avec une
pression ferme et régulière.
• Découpez les gros morceaux pour qu’ils puissent
être introduits dans la cheminée de remplissage.
• Pour obtenir de meilleurs résultats, alimentez la
cheminée de remplissage de façon régulière.
• Videz le bol de temps en temps quand vous traitez
de grandes quantités.
Conseils - Emincer
g
• Remplissez entièrement l’ouverture avec le moteur
arrêté. Appuyez légèrement sur le poussoir et
mettez l’appareil en marche. En maintenant une
pression régulière sur le poussoir vous empêcherez
les aliments de se mettre à tourner pendant que
vous les émincez.
Conseils - Râper h
• Avant de râper du fromage, coupez-le en petits
cubes (environ 2 cm).
• Appuyez légèrement, mais régulièrement sur le
poussoir. Il n’est pas possible d’empêcher que le
dernier morceau de fromage reste entre le
couvercle et le disque.
• Assurez-vous que le fromage dur (parmesan, gouda
vieux, peccorino) soit à la température ambiante.
• Par contre le fromage moins dur (par ex. le gouda
frais ou semi-vieux, l’emmenthal, le gruyère) doit
être aussi froid que possible.
• Si vous désirez de longs filaments, placez les
ingrédients horizontalement dans l’ouverture de
remplissage.
• Choisissez I pour un résultat optimal de râpage.
Après l’utilisation
- Pour retirer le bloc moteur et le couvercle, placez
le sélecteur sur la position 1 (fig. 6 - 7).
- Soulevez l’accessoire et l’entraîneur hors du bol (fig.
23). Après cela, vous pouvez vider le bol.
- Après avoir découpé ou râpé: enlevez l’accessoire
du disque de maintien des accessoires. (fig.24)
Vérifiez que l’accessoire n’est pas orienté dans
votre direction lorsque vous effectuez ceci.
Attention: les bords de coupe sont très tranchants.
Nettoyage et rangement
• Débranchez toujours la fiche de la prise de courant
avant de nettoyer le bloc moteur. Le bloc moteur
peut être essuyé avec un chiffon humide.
• Ne plongez jamais le bloc moteur dans de l’eau et
ne versez jamais d’eau dessus.
• Lavez les éléments qui ont été au contact de la
nourriture dans de l’eau chaude savonneuse,
immédiatement après vous en être servi.
• Attention quand vous nettoyez les couteaux et les
accessoires: les bords de coupe sont tranchants.
Ces accessoires peuvent aussi être lavés au lavevaisselle.
• Veillez à ce que les bords de coupe ne rentrent pas
en contact avec des objets durs ; cela pourrait les
émousser.
• Remettez les capuchons de protection sur les
couteaux après les avoir nettoyés (fig. 25).
• Après nettoyage, vous pouvez ranger les
accessoires dans le bol. Placez le couvercle et
enroulez le cordon d’alimentation comme illustré à
la figure 26, en utilisant le clip pour cordon
d’alimentation.
26
24
25
22
1
–
2
–
3
–
4
–
5
23
20 21
17
Autres accessoires
• Vous pouvez vous procurer les accessoires suivants
en option *) :
- Disque à émincer pour tranches fines
(numéro de référence 4203 065 61531).
- Disque à émincer moyen
g pour tranches
épaisses(numéro de référence 4203 065 61541).
- Disque à râper fin j pour préparer des légumes
râpés, des fruits et des pommes de terre frites
(numéro de référence 4203 065 61551).
- Disque à râper moyen h pour râpage moyen
(numéro de référence 4203 065 61561).
- Accessoire à granuler k pour granuler le
Parmesan, le raifort et les pommes de terre
(numéro de référence 4203 065 61571).
*) Demandez à votre revendeur si ces accessoires
sont disponibles dans votre pays.
4203 065 61531
4203 065 61541
4203 065 61551
4203 065 61561
4203 065 61571
 Loading...