

Page 1

2
English page 3
Français page 11
Deutsch Seite 19
Nederlands pagina 27
Italiano página 35
Page 2

3
English
Important
• Read the instructions in conjunction
with the illustrations before using the
appliance.
• Do not allow children to operate the
appliance.
• Care must be taken when handling the
metal blade and the slicing/grating disc
as these are very sharp.
• Always remove the protective cap from
the metal blade before use. Always click
it back into place after cleaning.
• Let the rotating parts come to a
complete stop before opening the cover.
• Never put your fingers in the food chute,
nor use forks, knives, spatulas, spoons
etc. Only the provided pusher is suited
for this purpose.
• Remove the mains plug from the wall
socket after use.
• If the mains cord of this appliance is
damaged, it must be replaced by the
original type only. Please apply to your
Philips dealer or to the Philips
organization in your country for
replacement.
• Prior to initial use, wash all the parts
which come into contact with food.
• Do not place the bowl into a microwave
oven.
• Never immerse the motor unit in water or
any other liquid. Do not rinse either.
• When mixing or blending fluids, do not
fill above the level indication on the
bowl.
• Do not exceed the maximum quantities
and processing times indicated in the
table and the recipes.
• Place the lid (with motor unit) on the
bowl in the right manner. The built-in
safety lock then becomes unlocked and
the appliance can be switched on.
• Keep these instructions for future
reference.
1
On/Off switch
Press:
motor runs
Release:
motor stops
Motor unit
Release button
Pusher
(service nr. 4822 690 40284)
Use the pusher to feed
ingredients through the food
chute and to shut off the filling
opening.
Cover
(service nr. 4822 441 31204)
Bowl
(service nr.
4822 418 40983)
Coupler
(service nr. 4822 690 40285)
Slicing/grating disc
(service nr. 4822 690 40233)
Metal blade
(service nr. 4822 690 40232)
Spatula
(service nr. 4822 690 40212)
Food chute
Ridge of bowl
(locks and
unlocks the
built-in safety
lock)
Protective cap
Release button
(press to remove
the cover with
motor unit)
Page 3
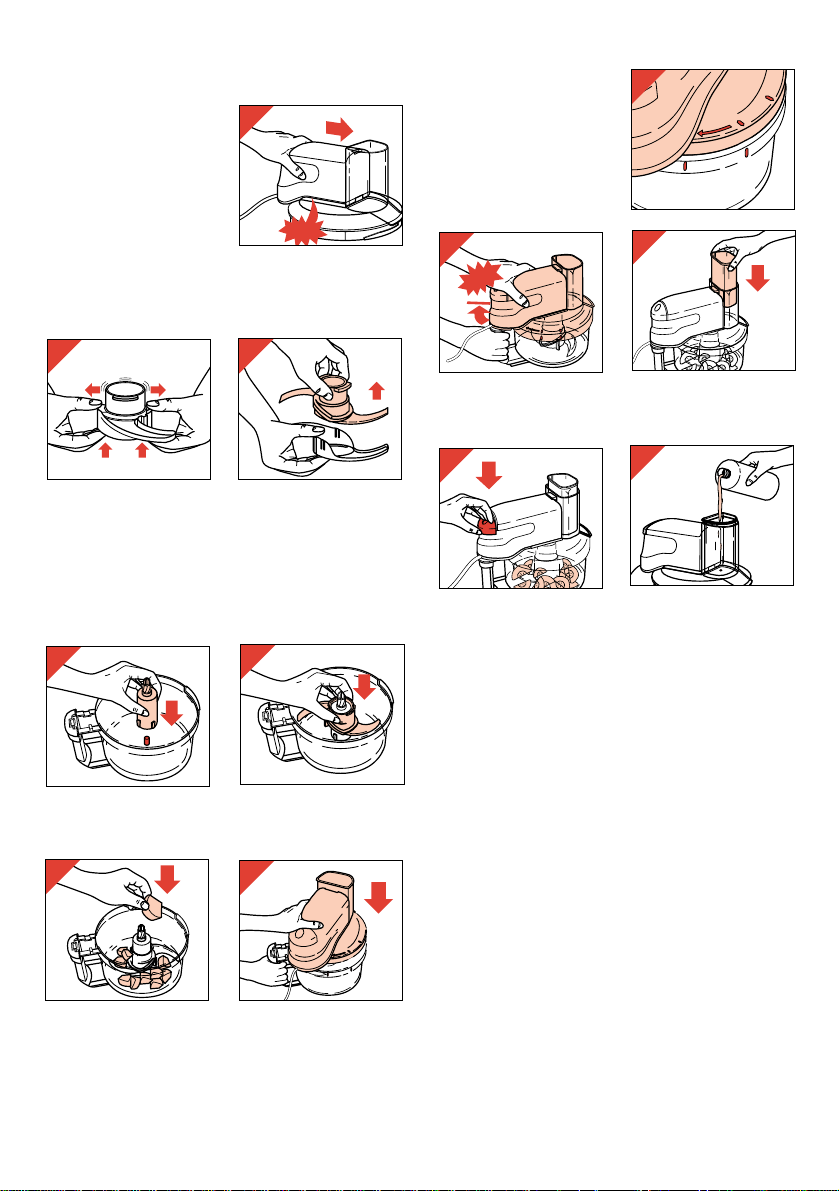
- Ensure that the marks
on the cover correspond
with the marks on the
bowl (fig. 9).
- Fix the cover (with motor unit) by rotating
clockwise until it stops (fig. 10).
- Put the pusher into the food chute (fig. 11).
- Switch on (fig. 12).
• During operation you may remove the pusher
from the filling opening to add ingredients.
• There is a small opening in the pusher through
which from time to time you can add liquid
(e.g. oil while making mayonnaise) (fig. 13).
Tips
• Pre-cut large pieces into cubes of about 3 cm
(or 1”).
• Avoid overprocessing due to excessive
operation.
• When chopping (hard) cheese, take care not to
keep the motor running too long. Then the
cheese could get warm and turn lumpy.
• If food should get caught around the metal
blade, or when particles of food should stick to
the inside of the bowl:
- first switch the appliance off,
- take the cover (with motor unit) from the bowl
- and remove the food from the metal blade or
from the bowl using the spatula.
• Do not chop very hard ingredients, such as
coffee beans, nutmeg and lumps of ice: these
would blunt the metal blade.
Assembling motor unit on to cover
Always fix the motor
unit on to the cover
before screwing the
cover on to the bowl.
- Place the motor unit
on the cover. Note the
correct position (fig. 2).
- Press firmly (“Click!”)
Metal blade
• Take care: the cutting edges are very sharp!
- Remove the protective cap from the metal blade
before use (fig. 3, 4).
Always hold the unprotected metal blade by
its handle.
• The metal blade is suitable for chopping, mixing,
blending and puréeing
.
- First position the coupler (fig. 5) and the metal
blade (fig. 6).
- Then put the ingredients into the bowl (fig. 7).
- Place the cover (with motor unit) on to the bowl
(fig. 8).
4
2
CLICK
10
CLICK
9
11
3
4
5
6
7
8
12
13
Page 4

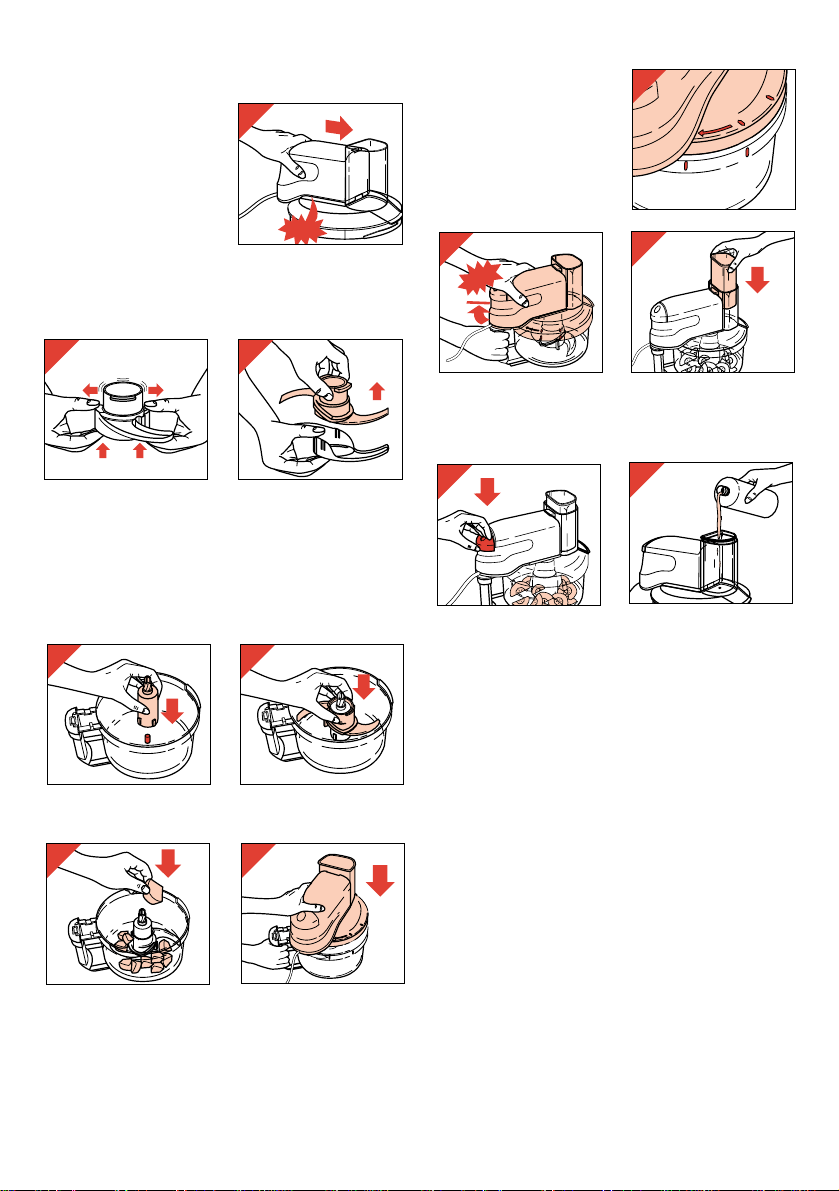
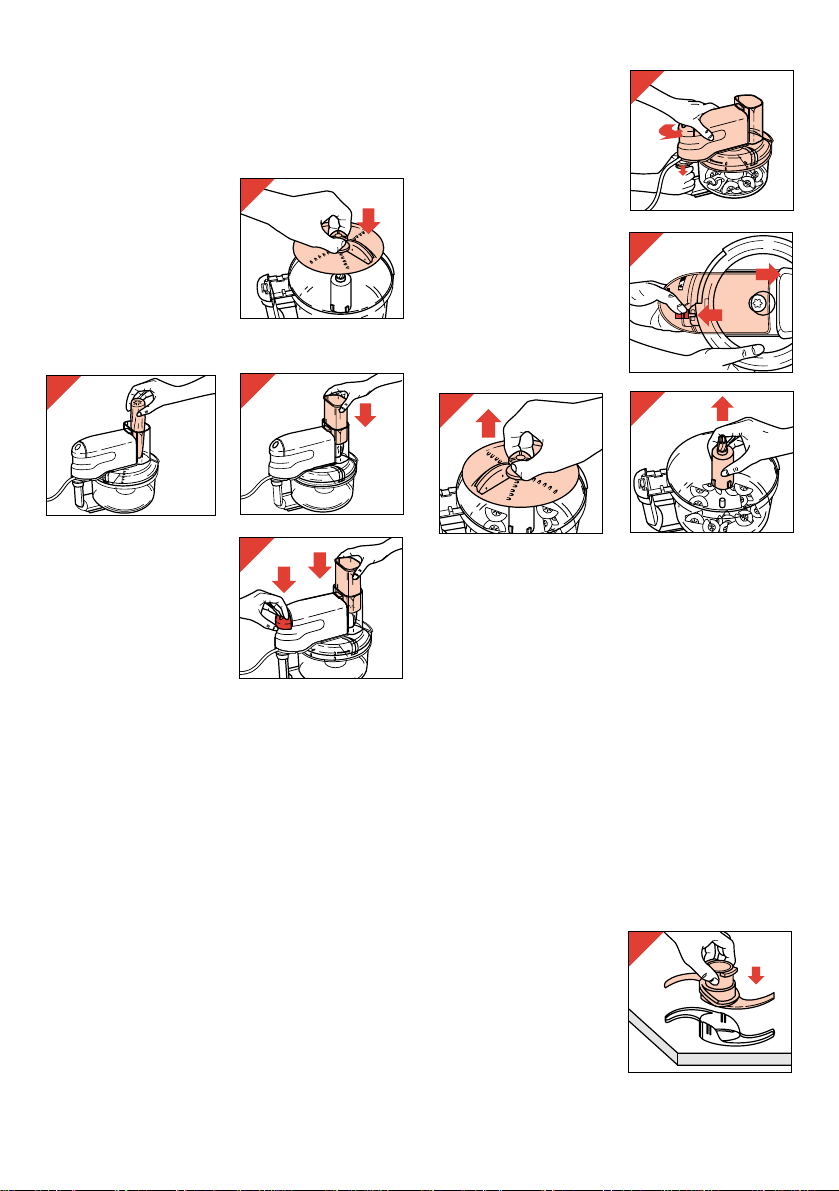
After use
- Press the release
button and move the
cover (with motor unit)
in the direction of the
arrow. Then lift the
upper part from the
bowl (fig. 18).
- Press the release
button (arrow 1) to
release the motor unit
(arrow 2) from the cover
(fig. 19).
- Lift the accessory and the coupler from the bowl
(fig. 20 and 21). After that, you can empty the
bowl.
Cleaning
• Always remove the mains plug from the wall
socket before cleaning the motor unit.
The motor unit may be wiped with a damp cloth.
Never immerse the motor unit in water. Never
pour water over it.
• Always remove the motor unit from the cover
before washing or rinsing the cover! (Fig. 19.)
• Wash the items which have been in contact with
the food in warm soapy water immediately after
use.
• Take care when cleaning the metal blade and
slicing/grating disc: the cutting edges are very
sharp! These items can also be cleaned in a
dishwasher.
• Ensure that the cutting
edges do not come into
contact with hard
objects as this might
make them blunt.
• Place the protective
cap back on to the
metal blade after
cleaning (fig. 22).
Slicing/grating disc
• Take care: the cutting edges are very sharp!
Always hold the disc by its handle.
- First position the coupler
(fig. 5) and the slicing/grating disc (fig. 14).
Ensure that the side
which you wish to use is
pointing upwards.
- Place the cover (with
motor unit) (fig. 8-10).
- Lift the pusher out of the
food chute.
- Feed the ingredients into
the food chute (fig. 15).
- Put the pusher on top of
the food and press
lightly (fig. 16).
- Switch on (fig. 17).
- Press the ingredients
downwards using the
pusher. Apply steady
and moderate pressure.
Tips
• Pre-cut large pieces to make them feed into the
chute.
• Fill the food chute evenly for the best slicing and
grating results.
• Empty the bowl every now and then when
processing large amounts.
Built-in safety lock
Only if you mount the cover (with motor unit) onto
the bowl in the right manner, the built-in safety
lock becomes unlocked and the appliance can be
switched on.
For that reason, please give figs. 8-10 extra
attention!
5
18
14
15
16
17
19
2
1
20
21
22
Page 5

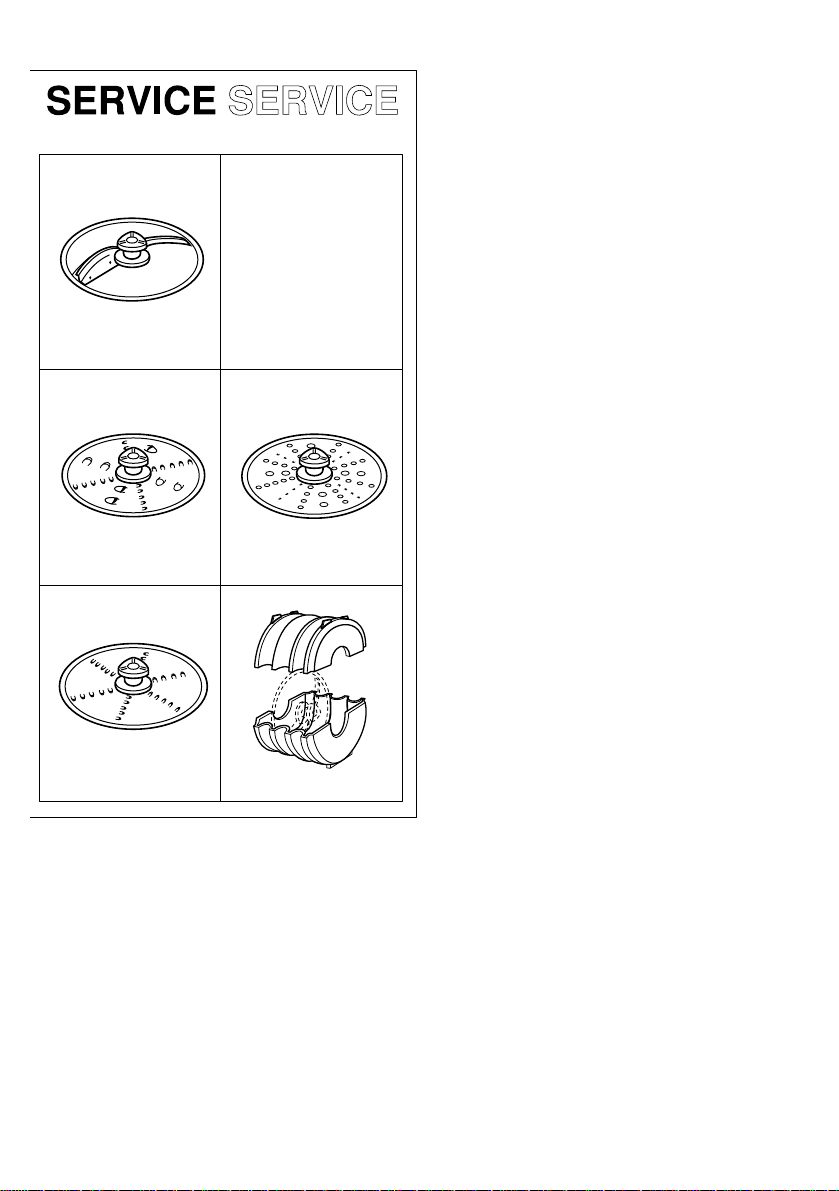
6
Accessories
• The following accessories are also available as
optional extras*):
- double-sided slicing disc for thick and thin
slicing (nr. 4822 690 40181)
- double-sided grating disc for coarse and
medium fine grating (nr. 4822 690 40182)
- double-sided grating disc for fine and extra
fine grating (nr. 4822 690 40183)
- single-sided grating disc for extremely fine
grating (for e.g. "Reibekuchen")
(nr. 4822 690 40185).
- Storage box for discs HR 2922
(nr. 4822 690 40267).
*) You can ask your dealer if these accessories
are available in your country.
4822 690 40181
4822 690 40267
4822 690 40182
4822 690 40183
4822 690 40185
Page 6

Recipes
M Salmon spread
(starter for 4-6 persons)
150 g/5 oz smoked
salmon, 75 g/3 oz
softened butter,
11⁄2 tablespoons tomato
ketchup, salt and
cayennepepper.
Purée the smoked
salmon, tomato ketchup and the butter. Season
with salt and cayennepepper. The mixture can be
served as an appetizer with toasted bread.
M Herb butter
100 g fresh green herbs, 2 cloves garlic, 100 g
soft butter, 4 tablespoons mustard, 4 level
tablespoons crème fraîche, salt and pepper.
Chop the herbs and the garlic fineely in the food
processor, using the blade. Add the butter,
mustard and crème fraîche, and mix until smooth.
Season to taste.
Tip: stir a spoonful of anchovy paste or some
anchovy filets through the mixture and serve the
herb butter in combination with smoked or grilled
fish.
M Sandwich spread
2 small carrots in pieces, 2-3 gherkins in pieces,
75 g/3 oz cauliflower in pieces, 75 g/3 oz celeriac
in pieces, green herbs (parsley, dill, tarragon,
celery stalks in pieces), 100 g/31⁄2
oz mayonnaise,
100 g/3
1
⁄2 oz curd, salt and pepper
Chop the carrots, gherkins, cauliflower, green
herbs and celeriac fine. Mix in the mayonnaise
and curd carefully and season the taste with
pepper and salt.
M Broccoli soup
(for 4 persons)
50 g/2 oz ripe Gouda cheese, 300 g/11 oz cooked
broccoli (stems and heads), water in which
broccoli was cooked, 2 boiled potatoes in pieces,
2 stock cubes, 2 tablespoons unwhipped cream,
curry, salt, pepper, nutmeg
Grate the cheese. Purée the broccoli with the
boiled potatoes and some water in which the
broccoli was cooked. Put the broccoli purée and
the remaining liquid and stock cubes into a
measuring beaker and make it up to
750 cc / 11⁄3 pint. Transfer it to a pan and while
stirring bring it to the boil. Stir in the cheese and
season with curry, salt, pepper and nutmeg and
add the cream.
M Tomato-fennel soup
(for 4 persons)
500 g/1 lb 2 oz tomatoes in pieces, 1 small fennel
in pieces, 1 small onion in pieces, 750 cc /11⁄3 pints
chicken stock, 25 g/1 oz butter, 25 g/1 oz flour,
4 stalks parsley, 4 stalks celery leaves, 2 tablespoons crème fraîche, salt and pepper
Chop the fennel and the onions and purée the
tomatoes. Melt the butter. Add the flour to the
melted butter mixing well. Gradually pour in the
chicken stock. Pour in the puréed tomatoes, the
chopped fennel and onion and bring to boil.
Season with salt and pepper. Boil the mixture for
approx. 5 minutes. Chop the parsley and celery
leaves. Serve the soup with the chopped celery,
parsley and crème fraîche.
M Gazpacho
(for 2 persons)
250 g/9 oz tomatoes, 1 clove garlic, 1 tablespoon
red wine, 11⁄2
tablespoon olive oil, 1 tablespoon
tomato purée, 1 green paprika in pieces, 1 onion
in pieces, 1 tablespoon mayonnaise,
1
⁄2
small
cucumber in pieces, 250 cc/9 fl oz chicken stock
Garnish: paprika, tomato and a raw onion in
pieces.
Put all the ingredients in the bowl and mix them
until a smooth purée is obtained. Chill the soup in
the refrigerator. Chop the paprika, tomato and
onions for garnishing.
7
Page 7

MMayonnaise
1 large egg or 2 egg yolks, 2 tablespoons
mustard, salt, pepper, 3 tablespoons vinegar or
lemon juice, 250 cc/9 fl oz oil
Use the ingredients at room temperature. Place
egg or egg yolks, mustard, salt, pepper and lemon
juice in the bowl. Pour the oil via the pusher into
the bowl while the blade is rotating.
M Dressing (basic recipe)
50 cc/2 fl oz vinegar or lemon juice, 150 cc/5 fl oz
oil, salt, pepper
Mix the lemon juice or vinegar with salt, oil and
pepper until the salt has dissolved.
.
M Thousand islands dressing
250 cc/9 fl oz mayonnaise, 50 cc/2 fl oz chilli
sauce, 1 teaspoonful Worchestershire sauce,
1 onion in pieces, 6 olives (without pips),1 gherkin
in pieces, 1⁄2 red paprika in pieces
Mix all the ingredients until a smooth mixture is
obtained.
M Sour cream Roquefort dressing
250 cc/9 fl oz sour cream, 2 drops tabasco,
1 teaspoon wine vinegar, 1 clove of garlic,
1
⁄2
teaspoon sugar, 1 teaspoon celery salt, pepper,
75 g/3 oz crumbled Roquefort or other blue
cheese,
1
⁄2
teaspoon mustard
Put all the ingredients except the cheese into the
bowl and mix well. Add the cheese and continue
the process until desired consistency is reached.
M Yoghurt dressing
150 cc/5 fl oz yoghurt, 2 tablespoons lemon juice,
1
⁄4 teaspoon salt, pepper, 2 tablespoons fresh
herbs such as parsley, garden cress, watercress,
chive, tarragon, basil
Put all the ingredients into the bowl and mix well.
M Apple celeriac salad
(3-4 persons)
4 stalks of parsley, 40 g/11⁄2 oz walnuts,
150 cc/5 fl oz crème fraîche, 2 teaspoons
mustard, 2 teaspoons lemon juice, 1 large celeriac
(cooked), 2 large sour apples (peeled),
pepper/salt
Chop parsley and set aside. Chop the walnut
coarse and set aside. Put the crème fraîche, the
mustard and the lemon juice into the bowl and mix
until stiff. Season with salt and pepper. Grate the
celeriac and apples. Take a salad bowl and
combine all the ingredients.
MSpanish cabbage salad
(4 persons)
1 small red cabbage, 2 red onions, 1 fennel,
1 apple, juice of one orange, 2 tablespoons red
wine vinegar, 1 tablespoon mustard
Mix the juice, mustard and vinegar. Slice the
cabbage, onions, fennel and apple. Combine the
ingredients in a salad bowl.
M Cabbage salad
(4 persons)
1 small white cabbage, 1⁄4 red paprika, 2 apples,
2 gherkins, 1 banana, 1 small can pine-apple
pieces, 12 halved walnuts, Yoghurt Dressing
Slice the cabbage, apples and gherkins. Slice the
banana with a kitchen knife. Combine all the
ingredients in a salad bowl and mix them with
Yoghurt Dressing and decorate the salad with the
walnuts.
M Cucumber salad
(2-3 persons)
1 large cucumber, 1 small onion in pieces,
2 stalks dill, 50 g/2 oz fresh cream cheese,
3 stalks celery, 50 g/2 oz goat’s cheese in pieces,
2 tablespoons curd or yoghurt, pepper and salt,
1
⁄2 tablespoon oil
Make a smooth sauce of onion, dill, yoghurt or
curd, oil and the fresh cream cheese. Season with
pepper and salt. Peel the cucumber and slice it
together with the celery stalks. Combine the
ingredients in a salad bowl and decorate it with
the goat’s cheese.
M Carrot salad with raisins
(for 4 persons)
1 tablespoon ginger syrup, 1 tablespoon lemon
juice, 1⁄4 teaspoon ginger powder, 3 tablespoons
oil, 300 g/11 oz carrots, 40 g/11⁄2 oz soaked
raisins, salt and pepper
Mix the ginger syrup, lemon juice, ginger powder
and oil. Season to taste with pepper and salt.
Grate the carrots and combine all the ingredients
in a salad bowl including the raisins.
8
Page 8

M Guacamole
(Mexican avocado dip; serves 2 to 3 people)
2 medium-sized, ripe avocados, 2 medium
tomatoes (peeled), 1 small onion (cut into pieces),
3 to 4 sprigs offresh parsley, 1 green chilli
(seeded and cut), salt and pepper. Wholemeal
toast or corn chips, to serve
Peel and stone the avocados, cut the flesh into
chunks and place them into the bowl of the food
processor. Mix to a smooth puree. Halve the
tomatoes and remove the seeds. Add tomatoes,
onion, parsley and chilli to the avocado. Puree
and blend until smooth. Season to taste with salt
and pepper and serve with wholemeal toast or
corn chips.
M Cherry flan
Round baking tin Ø 24 cm/91⁄2
inch, 250 g/9 oz
chocolate biscuits, approx. 100 g/3
1
⁄2
oz soft
butter, a pinch of cinnamon, 300 g/11 oz soft
cream cheese, 200 g/7 oz caster sugar,
2 tablespoons cherry liqueur or marsala,
600 g/1 lb 5 oz cherry pie filling or fresh fruit such
as 250 g/9 oz strawberry or kiwi
Crumble the biscuits
with melted butter
and cinnamon using
the sickle blade.
Pressing down
gently, spread the
mixture over the
base of the tin. Place
the tin in the
refrigerator for about
one hour. Mix the
cream cheese, sugar and liqueur until smooth.
(Max. 40 seconds for optimum results.) Spread
the mixture over the biscuit base. Spread the
cherry filling over it or decorate with fresh
strawberries or kiwi.
M Milkshake
250 cc/9 fl oz cold milk,
100 g/31⁄2 oz fresh strawberries
(or other fruit), 2 tablespoons
strawberry (or other) syrup,
75 g/3 oz vanilla ice-cream
Mix all the ingredients until the
mixture is frothy.
M Coffee milkshake
250 cc/9 fl oz cold milk, 4 teaspoons instant
coffee, sugar or honey to taste, 75 g/3 oz
chocolate or coffee ice-cream
Dissolve the coffee in 1 tablespoon hot water. Mix
all the ingredients until the mixture is frothy.
9
Page 9

10
Some
examples:
Batter (light)
- blending
Cabbage
- slicing
- grating
Carrots
(uncooked)
- slicing
- grating
Cheese
- chopping
- grating
Creams
Cucumber
- slicing
- grating
Endive
- slicing
Fruit
- chopping
- puréeing
- grating
Herbs
- chopping
Fish
- chopping
Nuts
- chopping
Potatoes
(uncooked)
- chopping
- slicing
- grating
Pulses
- puréeing
Tomatoes
- puréeing
Max.
quantity
250 g liquid
75 g
150 g butter
250 g
400 g
Bowl half filled
250 g
150 g
300 g
400 g
250 g
Accessories.
£
≠
≠
≠
≠
£
≠
£
≠
≠
≠
£
£
≠
£
£
£
£
≠
≠
£
≠
Procedure
First put the liquid into the bowl. Then add
the dry ingredients.
Pre-cut.
Insert into the food chute tips downwards.
Use only rindless cheese (e.g. Parmezan),
pre-cut in cubes of 2 cm. Drop the cubes
into the bowl via the feed tube while the
metal blade is rotating.
Press carefully with the pusher.
Use soft butter for airy results.
Pre-cut.
Insert into the chute stalk downwards, filling
the chute completely.
Tip: use a little lemon juice to prevent
discolouring.
Use raw, firm, seedless fruit.
Use cooked or soft fruit.
Wash and dry herbs.
Remove fishbones.
Drop nuts into the bowl via the feed tube
while the metal blade is rotating.
Pre-cut into cubes (3 cm).
Use cooked beans or peas. You may add
some for liquid for a better consistency.
Pre-cut tomatoes into 4 pieces.
Applications
Pancakes, wafers,
crepe, fritters.
Cooked vegetables,
coleslaw.
Raw food salad.
Oven dishes.
Garnishing, raw food.
Garnishing, au gratin,
sauces.
Pizza, oven dishes.
Pastry, desserts.
Salads, raw food.
Salads.
Salads, jam, cakes.
Sauces, pudding.
Baby food.
Sauces, soup, garnishing, seasoned butter.
Pâté.
Salads, garnishing.
Soups, raw food, oven
dishes.
Oven dishes, crisps.
Rösti
Purées, soups.
Sauces, soups.
Page 10

11
Français
Important
• Lisez ces recommandations en même
temps que les illustrations avant
d’utiliser votre appareil.
• Ne laissez pas les enfants utiliser
l’appareil.
• Faites très attention en prenant les
couteaux et les disques tranchants, car
ils sont très aiguisés.
• Enlevez la gaine de protection du
couteau avant utilisation. Remettez-la
après nettoyage.
• Attendez l’arrêt total des parties en
rotation avant d’ouvrir le couvercle.
• Ne mettez jamais vos doigts ou tout
autre objet dans la cheminée de
remplissage.
• Débranchez l’appareil après utilisation.
• Si le cordon d’alimentation de l’appareil
est endommagé, il doit être remplacé par
un cordon équivalent. Adressez-vous à
votre revendeur Philips ou au réparateur
agréé Philips Appareils Domestiques de
votre région.
• Avant la première utilisation, nettoyez
toutes les parties en contact avec les
aliments.
• Ne mettez pas le bol au micro-ondes.
• N’immergez jamais l’ensemble moteur
dans l’eau ni dans aucun autre liquide.
Ne le rincez pas non plus.
• Quand vous mixez ou mélangez des
liquides, ne dépassez pas le repère de
remplissage maximum du bol.
• Ne dépassez pas les quantités maximum
et les temps d’utilisation indiqués dans
les tableaux et les recettes.
• Placez correctement le couvercle du bol
(avec le bloc moteur) pour qu’il
déverrouille l’interrupteur de sécurité,
permettant ainsi la mise en marche du
moteur.
• Gardez ce mode d’emploi pour usage
ultérieur.
1
Interrupteur
marche/arrêt
enfoncé = marche
relâché = arrêt
Bloc moteur
Bouton de
déverrouillage
Poussoir
(no. service 4822 690 40284)
Utilisez le poussoir pour faire
descendre les aliments dans la
cheminée, et fermer l’ouverture
de remplissage.
Couvercle
(n
o
. service 4822 441 31204)
Bol
(no. service
4822 418 40983)
Entraîneur
(n
o
. service 4822 690 40285)
Disque à
émincer/râper
(n
o
. service 4822 690 40233)
Couteau
(n
o
. service 4822 690 40232)
Spatule
(n
o
. service 4822 690 40212)
Cheminée de
remplissage
Ergot du bol
(verrouille et
déverrouille le
système de
sécurité)
Gaine de
protection
Bouton de
vérouillage
(appuyez pour
retirer le
couvercle avec
le bloc moteur)
Page 11
- Assurez-vous de faire
coîncider les repères du
couvercle avec ceux du
bol (fig. 9).
- Fixez le couvercle (avec le bloc moteur) en le
tournant dans le sens horaire jusqu’à blocage
(fig. 10).
- Mettez le poussoir dans la cheminée (fig. 11).
- Mettez en marche (fig. 12).
• Durant le fonctionnement, vous pouvez retirer le
poussoir pour ajouter des ingrédients.
• Le poussoir possède une petite ouverture qui
vous permet de rajouter du liquide (par ex. de
l’huile pour la mayonnaise) (fig. 13).
Conseils
• Précoupez vos aliments en dés de 3 cms de
côté.
• Evitez de trop remplir le bol.
• Lorsque vous hachez du fromage (dur), ne
laissez pas tourner le moteur trop longtemps, car
le fromage pourrait s’échauffer et devenir
grumeleux.
• Si des aliments s’enroulent autour du couteau ou
collent au bol:
- débranchez d’abord l’appareil,
- retirez le couvercle (avec le bloc moteur) du bol,
- et enlevez-les ensuite avec la spatule.
• Ne hachez pas des ingrédients trop durs tels
que des grains de café, des noix de muscade ou
des glaçons: cela pourrait émousser les lames
du couteau.
Montage du bloc moteur sur le couvercle
Montez toujours le bloc
moteur sur le couvercle
avant de visser le
couvercle sur le bol.
- Montez correctement le
bloc moteur sur le
couvercle (fig. 2).
- Appuyez fermement
(“clic”).
Couteau
• Faites attention: les lames sont très
coupantes!
- Enlevez la gaine de protection du couteau avant
utilisation (fig. 3, 4).
Tenez toujours le couteau sans protection
par son extrémité.
• Le couteau vous permet de hacher, mélanger,
mixer, et faire de la purée.
- Mettez d’abord en place l’entraîneur (fig. 5) et le
couteau (fig. 6).
- Mettez les ingrédients dans le bol (fig. 7).
- Placez le couvercle (avec le bloc moteur) sur le
bol (fig. 8).
12
2
CLICK
10
CLICK
9
11
3
4
5
6
7
8
12
13
Page 12
Après utilisation
- Appuyez sur le bouton
de vérouillage et
poussez le couvercle
(avec le bloc moteur)
dans la direction de la
flêche. Soulevez
ensuite la partie
supérieure hors du bol
(fig. 18).
- Appuyez sur le bouton
de déverrouillage
(flèche 1) pour retirer le
bloc moteur (flèche 2)
du couvercle (fig. 19).
- Retirez l’accessoire et l’entraîneur du bol
(fig. 20 et 21). Vous pouvez ensuite vider le bol.
Nettoyage
• Débranchez toujours l’appareil avant de le
nettoyer.
Le bloc moteur peut être nettoyé avec un chiffon
humide.
N’immergez jamais le bloc moteur dans l’eau.
Ne le passez pas sous l’eau.
• Retirez toujours le bloc moteur du couvercle
avant de le nettoyer ou de rincer le couvercle
(fig. 19).
• Lavez immédiatement après utilisation les
accessoires en contact avec les aliments, à
l’eau chaude savonneuse.
• Faites attention en nettoyant le couteau et le
disque: leurs lames sont très coupantes. Vous
pouvez les nettoyer au lave-vaisselle.
• Evitez de cogner les
lames contre des objets
durs car cela les
émousserait.
• Remettez la gaine de
protection sur le
couteau après
nettoyage (fig. 22).
Disque à trancher/râper
• Faites attention: les lames du disque sont
très coupantes! Pour le tenir, prenez-le
toujours par son extrémité centrale.
- Mettez en place
l’entraîneur (fig. 5) et le
disque à trancher/ râper
(fig. 14).
Assurez-vous que la
face à utiliser soit
dirigée vers le haut.
- Mettez le couvercle
(avec le bloc moteur)
(fig. 8-10).
- Retirez le poussoir de la
cheminée.
- Mettez les aliments
dans la cheminée
(fig. 15).
- A l’aide du poussoir,
appuyez légèrement sur
les aliments (fig. 16).
- Mettez en marche
(fig. 17).
- Appuyez de façon régulière et modérée sur le
poussoir.
Conseils
• Coupez les aliments grossièrement pour les
introduire dans la cheminée.
• Remplissez la cheminée de façon régulière pour
obtenir de meilleurs résultats.
• Videz le bol fréquemment lorsque vous traitez
d’importantes quantités d’aliments.
Interrupteur de sécurité intégré
L’interrupteur de sécurité est déverrouillé et
l’appareil peut être mis en marche, uniquement si
le couvercle (avec le bloc moteur) est bien
positionné.
Suivez donc bien les illustrations des fig. 8-10.
13
18
14
15
16
17
19
1
20
21
22
2
Page 13
14
Accessoires
Les accessoires suivants sont également
disponibles en option *)
- disque double pour émincer moyen et fin
(nϒ 4822 690 40181)
- disque double pour râper gros et moyen
(nϒ 4822 690 40182)
- disque double pour râper fin et extra fin
(nϒ 4822 690 40183)
- disque à une face utile pour râper extra fin
(nϒ 4822 690 40185)
- coffret de rangement des disques HR 2922
(nϒ 4822 690 40267)
*) Demandez à votre revendeur si ces
accessoires sont disponibles dans votre pays.
4822 690 40181
4822 690 40267
4822 690 40182
4822 690 40183
4822 690 40185
Page 14

Recettes
M Nappage au saumon
(entrée pour 4-6 personnes)
150 g de saumon fumé, 75 g de beurre doux,
11⁄2 cuillère à soupe de ketchup, sel et poivre de
cayenne
Mixez le saumon fumé, le
ketchup et le beurre.
Ajoutez sel et poivre de
cayenne. Cette
préparation peut être
servie à l’apéritif sur des
toasts grillés.
M Beurre aux aromates
50 g d’aromates vertes fraîches, 1 gousse d’ail
100 g beurre ramolli, 2 c. à c. moutarde
2 c. à s. crème fraîche, sel et poivre
Hachez fin les aromates et l’ail à l’aide du couteau
dans le robot. Ajoutez le beurre, la moutarde et la
crème fraîche et tournez pour obtenir un mélange
lisse. Assaisonnez selon le goût avec du sel et du
poivre.
Conseil:
Incorporez une cuillerée de pâte d’anchois ou 1
ou 2 filets d’anchois dans le beurre aux aromates,
si celui-ci est destiné à être utilisé en conjonction
avec du poisson fumé ou grillé.
M Pâte à tartiner
2 jeunes carottes, 2-3 cornichons, 75 g de choufleur, 75 g de céleri-rave, fines herbes (persil,
fenouil, estragon, branche de céleri), 100 g de
mayonnaise, 100 g de lait caillé, sel et poivre
Hachez finement carottes, cornichons, chou-fleur,
fines herbes et céleri-rave coupés en morceaux.
Mélangez bien avec la mayonnaise et le lait caillé
et assaisonnez à votre goût avec sel et poivre.
M Soupe aux brocolis
50 g de fromage type Gouda, 300 g de brocolis
cuits, eau de cuisson des brocolis, 2 pommes de
terre cuites, 2 cubes de bouillon, 2 cuillères à
soupe de crème non fouettée, curry, sel, poivre,
noix de muscade
Râpez le fromage. Mixez les brocolis et les
pommes de terre avec de l’eau de cuisson des
brocolis. Mettez la purée, le liquide restant et les
cubes de bouillon dans un verre doseur en
remplissant jusqu’à 750 ml. Faites bouillir tout en
remuant. Incorporez le fromage, assaisonnez
avec curry, sel, poivre, noix de muscade et
ajoutez la crème.
M Soupe à la tomate et au fenouil
(pour 4 personnes)
500 g de tomates en morceaux, 1 bulbe de fenouil
coupé en morceaux, 1 petit oignon, 750 ml de
bouillon de volaille, 25 g de beurre, 25 g de farine,
4 branches de persil et de céleri, 2 cuillères à
soupe de crème fraîche, sel, poivre
Hachez le fenouil et l’oignon et mixez les tomates.
Mélangez le beurre. Ajoutez la farine au beurre, le
bouillon de volaille, la purée de tomates, le fenouil
et l’oignon. Amenez à ébullition. Ajoutez sel et
poivre. Remuez sans arrêt pendant 5 minutes.
Servez la soupe en ajoutant le persil et les feuilles
de céleri hachés, et la crème fraîche.
M Gazpacho
(pour 2 personnes)
250 g de tomates, 1 gousse d’ail, 1 cuillère à
soupe de vin rouge,1 1/2
cuillère à soupe d’huile
d’olive, 1 cuillère à soupe de purée de tomate,
1 poivron vert, 1 oignon,
1/2concombre en
rondelles, 250 ml de bouillon de volaille
Garniture: poivron, tomate et oignon en rondelles
Mettez tous les ingrédients dans un grand bol et
mixez jusqu’à obtention d’une purée onctueuse.
Refroidissez la soupe dans le réfrigérateur.
Hachez poivron, tomate et oignon pour la
garniture.
M Mayonnaise
1 gros oeuf ou 2 jaunes, 2 cuillères à soupe de
moutarde, sel, poivre, 3 cuillères à soupe de
vinaigre ou de jus de citron, 250 ml d’huile
Ingrédients à température ambiante. Versez tous
les ingrédients dans le bol. Ajoutez l’huile à l’aide
du poussoir pendant le fonctionnement.
15
Page 15

M Sauce de base
50 ml de vinaigre ou de jus de citron,
150 ml d’huile, sel, poivre
Mélangez tous les ingrédients jusqu’à complète
dissolution.
M Sauce cocktail
250 ml de mayonnaise, 50 ml de sauce Chili,
1 cuillère à café de sauce Worchestershire,
1 oignon, 6 olives dénoyautées, 1 cornichon,
1/2 poivron rouge
Mélangez tous les ingrédients jusqu’à obtenir un
mélange onctueux.
M Sauce au Roquefort
250 cc de crème aigre, 2 gouttes de Tabasco,
1 cuillère à café de vinaigre de vin, 1 gousse d’ail,
1/2 cuillère à café de sucre, 1 cuillère à café de
sel de céleri, poivre, 75 g de Roquefort écrasé ou
autre fromage bleu, 1/2 cuillère à café de
moutarde
Mélangez tous les ingrédients à l’exception du
fromage. Ajoutez le fromage et continuez de
mélanger jusqu’à la consistance désirée.
M Sauce au yaourt
150 ml de yaourt, 2 cuillères à soupe de jus de
citron, 1/4
de cuillère de café de sel, poivre,
2 cuillères à soupe de fines herbes, telles que
persil, cresson, ciboulette, estragon, basilic
Mélangez bien tous les ingrédients ensemble.
M Salade pommes céleri
(3-4 personnes)
4 branches de persil, 40 g de noix, 150 ml de
crème fraîche, 2 cuillères à café de moutarde,
2 cuillères à café de jus de citron, 1 gros céleri
rave (cuit), 2 grosses pommes acides (pelées),
poivre, sel
Hachez le persil et réservez-le. Hachez
grossièrement les noix et réservez-les. Mettez
dans le bol la crème fraîche, la moutarde et le jus
de citron et mélangez. Assaisonnez de sel et
poivre. Râpez le céleri rave et les pommes.
Mélangez le tout dans un saladier.
M Salade de chou d’Espagne
(4 personnes)
1 petit chou rouge, 2 oignons rouges, 1 fenouil,
1 pomme, jus d’une orange, 2 cuillères à soupe
de vinaigre de vin, 1 cuillère à soupe de moutarde
Mélangez le jus, la moutarde et le vinaigre.
Emincez le chou, les oignons, le fenouil et la
pomme. Mettez le tout dans un saladier.
M Salade de chou
(4 personnes)
1 petit chou blanc, 1/4 de poivron rouge, 2
pommes, 2 cornichons, 1 banane, 1 petite boîte
d’ananas en tranches, 12 noix coupées en deux,
sauce au yaourt
Emincez le chou, les pommes et les cornichons.
Emincez la banane au couteau. Mélangez tous
les ingrédients dans un saladier, ajoutez la sauce
au yaourt, et décorez la salade avec les noix.
M Salade de concombres
(2-3 personnes)
1 gros concombre, 1 petit oignon coupé,
2 brins d’aneth, 50 g de crème fraîche,
3 branches de céleri, 50 g de fromage de chèvre,
2 cuillères à soupe de yaourt, poivre et sel,
1
⁄2 cuillère à soupe d’huile
Faites une sauce avec l’oignon, l’aneth, le yaourt,
l’huile et la crème fraîche. Assaisonnez de poivre
et sel. Pelez le concombre et émincez-le avec les
branches de céleri. Mélangez les ingrédients dans
un saladier et décorez avec le fromage de chèvre.
M Salade de carottes et raisins secs
(4 personnes)
1 cuillère à soupe de sirop de gingembre,
1 cuillère à soupe de jus de citron, 1/4 de cuillère à
café de gingembre en poudre, 3 cuillères à soupe
d’huile, 300 g de carottes, 40 g de raisins secs,
sel et poivre
Mélangez le sirop de gingembre, le jus de citron,
le gingembre en poudre et l’huile. Assaisonnez
avec poivre et sel. Râpez les carottes et
mélangez tous les ingrédients dans un saladier en
ajoutant les raisins secs.
16
Page 16

M Guacamole
(purée d’avocats mexicain ; pour 2 à 3 personnes)
2 avocats mûrs, de taille moyenne, 2 tomates
pelées, de taille moyenne, 1 petit oignon coupé en
dés, 3 à 4 branches de persil, 1 piment vert,
égrené et coupé, du sel et du poivre, des toasts
de pain complet ou des galettes de maïs, pour
servir
Pelez les avocats et retirez-en les noyaux, coupez
la chair en morceaux et mettez la dans le bol de
l’appareil.
Mélangez jusqu’à l’obtention d’une purée
onctueuse.
Coupez les tomates en deux et retirez les graines.
Ajoutez les tomates, l’oignon, le persil et le piment
aux avocats. Mélangez les avec les avocats pour
en faire une purée onctueuse.
Assaisonnez à votre goût avec du poivre et du sel
et servez avec le pain complet ou la galette de
maïs.
M Tarte aux cerises
Un moule à gâteau
de 24 cm de
diamètre, 250 g de
biscuits au chocolat,
100 g de beurre
mou, une pincée de
cannelle, 300 g de
fromage crème doux,
200 g de sucre,
2 cuillères à soupe
de liqueur de cherry
ou marsala, 600 g de
cerises au jus, ou fruits frais tels que 250 g de
fraises ou kiwis
Emiettez les biscuits avec le beurre fondu et la
cannelle à l’aide du couteau. Etalez le mélange
dans le moule en appuyant légèrement dessus.
Laissez refroidir au réfrigérateur pendant une
heure. Mixez le fromage crème, le sucre et la
liqueur (40 sec. max. pour des resultats optimum),
et répartissez sur le biscuit. Ajoutez les cerises ou
décorez avec les fraises ou les kiwis.
M Milkshake
250 ml de lait froid, 100 g de
fraises fraîches (ou autres fruits),
2 cuillères à soupe de sirop de
fraise (ou autre), 75 g de glace à
la vanille
Mixez tous les ingrédients
jusqu’à obtenir un mélange
onctueux.
M Milkshake au café
250 ml de lait froid, 4 cuillères à café de café
instantané, sucre ou miel, 75 g de glace au
chocolat ou au café
Faites dissoudre le café dans 1 cuillère à soupe
d’eau chaude. Mixez tous les ingrédients jusqu’à
obtenir un mélange onctueux.
17
Page 17

Ingrédients
Carottes
(crues)
- à émincer
- à râper
Choux
- à couper
- à râper
Concombre
- à couper
- râper
Crèmes
Endives
- à couper
Fines herbes
- à hacher
Fromage
- à hacher
- à râper
Fruits
- en morceaux
- en purée
- à râper
Légumes
- en purée
Noisettes
- à émincer
Oignons
- à émincer
- à hacher
Pâte à crêpe
- à mélanger
Pommes de
terre (crues)
- à hacher
- à couper
- à râper
poissons
- à hacher
Tomates
- en purée
18
Quantité
maximum
150 g de
beurre
Bol à
moitiérempli
75 g
250 g
400 g
400 g
150 g
300 g
250 g de
liquide
300 g
250 g
400 g
Accessoire
≠
≠
≠
≠
≠
≠
£
≠
£
£
≠
£
£
≠
£
£
£
≠
£
£
≠
≠
£
≠
Réalisation
Remplissez la cheminée.
Précoupez.
Précoupez.
Utilisez du beurre mou.
Remplissez la cheminée entièrement avec
les endives, têtes vers le haut.
Lavez et séchez les herbes.
Utilisez seuelement du fromage sans
croûte (par ex. parmesan). Précoupez en
morceaux de 2 cm. Appuyez délicatement
sur le poussoir.
Conseil : Ajoutez un peu de jus de citron
pour empêcher la coloration.
Utilisez des fruits frais et sans pépins.
Utilisez des fruits cuits ou tendres.
Utilisez des haricots ou des pois cuits.
Vous pouvez ajouter du liquide pour une
meilleure consistance.
Précoupez en cubes de 3 cm. Emincez à la
finesse désirée.
Lavez le bol immédiatement après usage.
Mettez le liquide dans le bol. Puis ajoutez
les ingrédients secs.
Précoupez en cubes de 3 cm.
Retirez les arêtes.
Coupez en 4 morceaux.
Application
Gratins.
Garnitures, salades.
Légumes cuits,
salades.
Choucroute.
Salades, garnitures.
Pâtisseries, desserts.
Salades.
Sauces, soupes,
garnitures, beurre
assaisonné.
Garnitures, gratins,
sauces.
Pizza, gratins.
Salades, confitures,
gâteaux.
Sauces, pudding.
Nourriture bébé.
Purées, soupes.
Salades, garnitures.
Salades, sauces,
soupes.
Soupes, gratins
Crêpes, gaufres,
beignets.
Soupes, galettes.
Gratins.
Pommes de terre
rôties.
Pâté.
Sauces, soupes.
Page 18

19
Deutsch
Wichtig
• Lesen Sie die Gebrauchsanweisung
sorgfältig durch und sehen Sie sich
dabei die Abbildungen genau an.
• Lassen Sie keine Kinder mit dem Gerät
hantieren.
• Vorsicht beim Anfassen des Messers
sowie des Schneid- und Raspeleinsatzes;
sie sind sehr scharf!
• Nehmen Sie den Schneidschutz vor
Gebrauch vom Messer ab, und setzen
Sie ihn nach Gebrauch wieder auf!
• Lassen Sie die rotierenden Teile immer
erst zum Stillstand kommen, bevor Sie
den Deckel öffnen.
• Stecken Sie niemals den Finger in die
Einfüllöffnung und verwenden Sie auch
keine Gabeln, Messer, Löffel oder den
Spatel, sondern nur den mitgelieferten
Stopfer.
• Ziehen Sie nach der Benutzung des
Geräts den Stecker aus der Steckdose.
• Wenn das Netzanschlußkabel defekt
oder beschädigt ist, muß dieses durch
ein Original-Netzanschlußkabel ersetzt
werden. Wenden Sie sich an Ihren
Philips Händler oder an die Philips
Service Organisation.
• Spülen Sie vor dem ersten Gebrauch alle
Teile, die mit Lebensmitteln in
Berührung kommen.
• Die Schüssel ist nicht für die
Verwendung in einem Mikrowellengerät
geeignet.
• Tauchen Sie das Motorgehäuse niemals
ins Wasser; spülen Sie es auch nicht
unter fließendem Wasser ab.
• Füllen Sie die Schüssel niemals höher
als bis zur Markierung, wenn Sie
Flüssigkeiten mischen oder rühren.
•Überschreiten Sie nicht die Mengen und
die Zeiten, die in den Tabellen und
Rezepten angegeben sind.
• Setzen Sie den Deckel mit dem
Motorgehäuse richtig auf die Schüssel.
Die Sicherheitsvorrichtung wird dadurch
entriegelt, und das Gerät kann
eingeschaltet werden.
• Bewahren Sie diese Gebrauchsanweisung
zum späteren Einblick sorgfältig auf.
Ein-/Ausschalter
Drücken:
Motor läuft
Loslassen:
Motor steht still
Motorgehäuse
Auslösetaste
Stopfer
(Service-Nr. 4822 690 40284)
Verwenden Sie den Stopfer, um
die Zutaten einzufüllen und zum
Verschließen des
Einfüllstutzens.
Deckel
(Service-Nr. 4822 441 31204)
Schüssel
(Service-Nr.
4822 418 40983)
Antriebsachse
(Service-Nr. 4822 690 40285)
Schneid-/Raspeleinsatz
(Service-Nr. 4822 690 40233)
Messer
(Service-Nr. 4822 690 40232)
Spatel
(Service-Nr. 4822 690 40212)
Einfüllstutzen
Sicherheitsnocken
verriegelt und
entriegelt die
Sicherheitsvorrichtung
Schneidschutz
Auslöser
Drücken, um den
Deckel (mit dem
Motorgehäuse)
abzunehmen
Page 19

- Setzen Sie dann den Deckel mit dem
Motorgehäuse auf die Schüssel (Abb. 8).
- Achten Sie darauf, daß die Markierungen auf
dem Deckel mit den Markierungen auf der
Schüssel übereinstimmen (Abb. 9).
- Befestigen Sie den Deckel durch eine Drehung
im Uhrzeigersinn bis zum Anschlag (Abb. 10).
- Stecken Sie den Stopfer in den Einfüllstutzen
(Abb. 11).
- Schalten Sie das Gerät ein (Abb. 12).
• Während das Gerät läuft, können Sie den
Stopfer herausnehmen und durch den
Einfüllstutzen Zutaten zufügen.
• Im Stopfer ist ein kleines Loch, durch das Sie
von Zeit zu Zeit Flüssigkeiten hinzufügen
können, z.B. Öl für Mayonnaise (Abb. 13).
Hinweise zum Messer
• Schneiden Sie große Stücke in Würfel von
ca. 3 cm Kantenlänge.
• Geben Sie acht, daß Sie die Zutaten nicht zu
lange bearbeiten. Sie könnten zu fein bearbeitet
werden.
• Wenn Sie (Hart-)Käse schnitzeln, dann lassen
Sie den Motor nicht zu lange laufen. Der Käse
könnte sich erhitzen und klumpig werden.
• Wenn Zutaten am Messer kleben oder sich an
der Wand der Schüssel absetzen, dann ...
- schalten Sie zuerst das Gerät aus,
- nehmen Sie den Deckel mit dem Motorgehäuse von der Schüssel ab
- und entfernen Sie das Angesetzte mit Hilfe des
Spatels.
Das Motorgehäuse auf den Deckel aufsetzen
Setzen Sie immer zuerst
das Motorgehäuse auf
den Deckel, bevor Sie
den Deckel auf der
Schüssel befestigen.
- Setzen Sie das
Motorgehäuse auf den
Deckel. Achten Sie auf
die richtige Position
(Abb. 2).
- Drücken Sie es fest in den Deckel (»Klick«).
Das Messer
• VORSICHT: Die Schneiden sind sehr scharf!
- Nehmen Sie vor dem Gebrauch vorsichtig den
Schneidschutz ab (Abb. 3 u. 4).
Fassen Sie das bloße Messer stets nur am
Griff an (Abb. 4).
• Das Messer kann zum Schneiden, Mixen,
Mischen und Pürieren verwendet werden.
- Setzen Sie zuerst die
Antriebsachse ein
(Abb. 5) und dann das
Messer (Abb. 6).
- Geben Sie dann die
Zutaten in die Schüssel
(Abb. 7).
20
8
9
2
CLICK
3
4
5
6
10
CLICK
11
12
13
7
Page 20

Nach dem Gebrauch
- Drücken Sie den
Auslöser und nehmen
Sie den Deckel mit dem
Motorgehäuse in
Pfeilrichtung ab. Heben
Sie dann das Oberteil
von der Schüssel ab
(Abb. 18).
- Drücken Sie den
Auslöseknopf (Pfeil 1),
und nehmen Sie das
Motorgehäuse (Pfeil 2)
vom Deckel ab
(Abb. 19).
- Nehmen Sie zuerst das Zusatzteil und dann die
Antriebsachse aus der Schüssel (Abb. 20
und 21). Jetzt können Sie die Schüssel leeren.
Reinigen
• Ziehen Sie vor der Reinigung des
Motorgehäuses den Stecker aus der Steckdose.
Das Motorgehäuse kann mit einem feuchten
Tuch abgewischt werden. Tauchen Sie das
Motorgehäuse nie in Wasser, und lassen Sie
auch nie fließendes Wasser darüber laufen.
• Nehmen Sie stets das Motorgehäuse vom
Deckel, bevor Sie den Deckel spülen oder
feucht abwischen (Abb. 19)!
• Spülen Sie alle Teile, die mit Lebensmitteln in
Berührung gekommen sind, sofort nach
Gebrauch in warmem Wasser, dem Sie etwas
Spülmittel zugesetzt haben.
• Geben Sie bei der Reinigung des Messers und
des Schneide-/Raspeleinsatzes acht: Die
Schneiden sind sehr scharf!
Sie können diese Teile auch im Geschirrspüler
reinigen.
• Sorgen Sie dafür, daß die Schneiden nicht mit
harten Gegenständen in Berührung kommen;
sie könnten schartig und stumpf werden.
• Mahlen Sie keine zu harten Substanzen wie
Kaffeebohnen, Muskatnüsse oder Eiswürfel;
davon wird das Messer stumpf.
Der Schneid-/Raspeleinsatz
Vorsicht: Die Schneiden sind sehr scharf!
Fassen Sie den Einsatz darum immer am Griff
an.
- Setzen Sie zuerst die
Antriebsachse (Abb. 5),
dann den Schneid/Raspel-einsatz in die
Schüssel (Abb. 14).
- Achten Sie darauf, daß
die Seite, die Sie
verwenden wollen, nach
oben zeigt.
- Setzen Sie den Deckel mit dem Motor-gehäuse
auf (Abb. 8 bis 10).
- Nehmen Sie den Stopfer aus dem Einfüllstutzen.
- Geben Sie die Zutaten
in den Einfüllstutzen
(Abb. 15).
- Setzen Sie den Stopfer
unter leichtem Druck in
den Einfüllstutzen
(Abb. 16).
- Schalten Sie das Gerät
ein (Abb. 17).
- Drücken Sie die Zutaten mit dem Stopfer
langsam und stetig abwärts.
Hinweise für den Schneid-/Raspeleinsatz
• Schneiden Sie große Stücke vor, damit sie gut
in den Einfüllstutzen passen.
• Füllen Sie den Einfüllstutzen gleichmäßig.
• Leeren Sie die Schüssel hin und wieder, wenn
Sie größere Mengen verarbeiten.
Die Sicherheitsvorrichtung
Das Gerät kann nur dann verwendet werden,
wenn der Deckel mit dem Motorgehäuse richtig
auf die Schüssel aufgesetzt wurde. Das Gerät
wird dann entsichert und kann zur Verwendung
eingeschaltet werden. Vgl. Abb. 8 bis 10.
21
18
14
15
16
17
19
1
20
21
2
Page 21

22
4822 690 40181
4822 690 40267
4822 690 40182
4822 690 40183
4822 690 40185
• Setzen Sie nach jeder
Reinigung wieder den
Schneidschutz auf das
Messer (Abb. 22).
Zubehörteile
• Das folgende Zubehör ist auf Wunsch
verfügbar*):
- Zweiseitiger Schneideinsatz, dick und dünn
(Service-Nr. 4822 690 40181)
- Zweiseitiger Raspeleinsatz, grob und
mittelfein (Service-Nr. 4822 690 40182)
- Zweiseitiger Raspeleinsatz, fein und extrafein
(Service-Nr. 4822 690 40183)
- Einseitiger Raspeleinsatz, extrem fein, z.B. für
Reibekuchen (Service-Nr. 4822 690 40185)
- Kassette für die Einsätze HR 2922
(Service-Nr. 4822 690 40267)
*
) Bitte, fragen Sie Ihren Händler, ob diese
Zubehörteile in Ihrem Lande verfügbar sind.
22
Page 22

M Brokkolisuppe
für 4 Personen
50 g abgelagerter Gouda, 300 g gekochter Brokkoli
(Stiele und Röschen), Brokkoli-Sud, 2 gekochte
Kartoffeln, in Stücken, 2 Bouillonwürfel,
2 El ungeschlagene süße Sahne, Curry, Salz,
Pfeffer, Muskatnuß
Reiben Sie den Käse. Pürieren Sie den Brokkoli
mit den gekochten Kartoffeln und etwas BrokkoliSud (d.h. mit dem Wasser, in dem der Brokkoli
gekocht wurde). Geben Sie das Püree mit den
Bouillonwürfeln in den restlichen Sud in einen
Meßbecher und füllen Sie ihn mit Wasser zu
750 ml auf. Geben Sie den Inhalt in einen
Kochtopf, und lassen Sie alles unter ständigem
Rühren aufkochen. Rühren Sie dann den Käse
ein und würzen Sie mit Curry, Salz und Pfeffer.
Fügen Sie dann die Sahne hinzu.
M Gazpacho
für 2 Personen
250 g Tomaten, 1 Zehe Knoblauch, 1 El Rotwein,
11/2 El Olivenöl, 1 El Tomatenpüree,
1 grüne Paprika, in Stücken, 1 El Mayonnaise,
1 Zwiebel, in Stücken,
1/2 kleine Salatgurke,
250 ml Hühnerbrühe.
Für die Garnitur: Paprika, Tomaten, Zwiebeln.
Geben Sie alle Zutaten in eine Schüssel und
rühren Sie die Masse glatt. Kühlen Sie die Suppe
im Kühlschrank.
Für die Garnitur:
Zerkleinern Sie Paprika, Tomaten und Zwiebeln.
M Mayonnaise
1 großes Ei oder 2 Eidotter, 2 El Senf, Pfeffer und
Salz, 3 El Essig oder Zitronensaft,
250 ml Speiseöl
Verarbeiten Sie alle Zutaten bei Zimmertemperatur. Geben Sie das Ei bzw. die Eidotter
mit dem Senf, dem Salz, dem Pfeffer und dem
Essig bzw. Zitronensaft in die Schüssel. Schalten
Sie das Gerät mit dem eingesetzten Messer ein,
und gießen Sie das Öl durch den Stopfer.
Rezepte
M Lachspaste
Vorspeise für 4 bis 6 Personen
150 g geräucherter
Lachs, 75 g weiche
Butter, 1 1/2 El TomatenKetchup, Salz,
Cayennepfeffer
Pürieren Sie den
Räucherlachs, das
Tomaten-Ketchup und
die Butter. Schmecken Sie mit Salz und
Cayennepfeffer ab. Servieren Sie die Lachspaste
als Vorspeise mit Toast.
M Kräuterbutter
50 g frische grüne Kräuter, 1 Knoblauchzehe
100 g weiche Butter, 2 Teelöffel Senf
2 Eßlöffel Crème fraîche, Salz und Pfeffer
Kräuter und Knoblauch mit dem Messer im Gerät
fein zerkleinern. Butter, Senf und Crème fraîche
hinzufügen, Maschine laufenlassen, bis ein glattes
Gemisch entstanden ist. Die Kräuterbutter mit
Salz und Pfeffer abschmecken.
Hinweis:
Wenn die Kräuterbutter zu geräuchertem oder
gegrilltem Fleisch gereicht wird, einige Anchovis
oder 1 Teelöffel Anchovispaste in der Maschine
mit der Kräuterbutter mischen.
M Sandwich-Aufstrich
2 kleine Karotten, in Stücken,
2-3 kleine Gewürzgurken (Cornichons),
75 g Blumenkohl, in Stücken, 75 g Knollensellerie,
in Stücken, Küchenkräuter: Petersilie, Dill, Beifuß,
Stangensellerie, in Stücken, 100 g Mayonnaise,
100 g Quark, Salz und Pfeffer
Zerkleinern Sie die Wurzeln, die Gurken, die
Kräuter und den Sellerie fein. Fügen Sie die
Mayonnaise und den Quark hinzu. Mischen Sie
alles gut durch. Schmecken Sie mit Pfeffer und
Salz ab.
23
Page 23

M Salatdressing (Grundrezept)
50 ml Essig oder Zitronensaft, 150 ml Speiseöl,
Salz und Pfeffer
Mischen Sie alle Zutaten mit dem Messer, bis sich
das Salz aufgelöst hat.
M Thousand Islands
250 ml Mayonnaise, 50 ml Chilisoße,
1 Tl Worcestersoße, 1 Zwiebel, in Stücken,
6 Oliven, ohne Kern, 1 Gewürzgurke,
1/2 rote Paprika, in Stücken
Geben Sie alle Zutaten bis auf die Mayonnaise, in
die Schüssel und zerkleinern Sie sie ein wenig mit
dem Messer. Geben Sie dann die Mayonnaise
hinzu, und verarbeiten Sie alles zu einem glatten
Gemisch.
M Joghurt-Dressing
150 g Joghurt, 2 El Zitronensaft, 1/4 Tl Salz,
Pfeffer, 2 El frische Kräuter, z.B. Petersilie,
Gartenkresse, Schnittlauch, Beifuß, Basilikum
Rühren Sie alle Zutaten in der Schüssel gründlich
durch.
M Apfel-Sellerie-Salat
für 3 bis 4 Personen
4 Stengel Petersilie, 40 g Walnüsse, 150 g Crème
fraîche, 2 Tl Senf, 2 Tl Zitronensaft, 1 große Knolle
Sellerie, gekocht, 2 große, saure Äpfel, geschält,
Pfeffer und Salz
Hacken Sie zuerst die Petersilie mit dem Messer
klein, dann die Walnüsse grob; setzen Sie beides
beiseite. Geben Sie die Crème fraîche, den Senf
und den Zitronensaft in die Schüssel, und rühren
Sie alles mit dem Messer steif. Schmecken Sie
mit Pfeffer und Salz ab. Reiben Sie den Sellerie
und die Äpfel hinein, und mischen Sie alles in
einer Salatschüssel, zusammen mit der Petersilie
und den Walnüssen, gut durch.
M Spanischer Krautsalat
für 4 Personen
1 kleiner Rotkohl, 2 Schalotten, 1 Fenchel,
1 Apfel, Saft einer Orange, 2 El Rotweinessig,
1 El Senf
Mischen Sie den Saft der Orange, den Senf und
den Essig. Schneiden Sie den Rotkohl, den
Fenchel und den Apfel mit dem Schneideinsatz in
Scheiben. Mischen Sie alles in einer
Salatschüssel durch.
24
M Krautsalat
für 4 Personen
1 kleiner Weißkohl, 1/4 rote Paprika, 2 Äpfel,
2 Gewürz- oder Salzgurken, 1 Banane,
1 kleine Dose Ananas in Stücken, 12 halbierte
Walnüsse, Joghurt-Dressing
Schneiden Sie den Weißkohl, den Paprika, die
Äpfel und die Gurken mit dem Schneideinsatz in
Scheiben. Schneiden Sie dann mit einem
Küchenmesser die Banane in Scheiben. Geben
Sie das alles in eine Salatschüssel, vermengen
Sie es mit dem Joghurt-Dressing und garnieren
Sie mit den Walnüssen.
M Gurkensalat
für 2 bis 3 Personen
1 große Salatgurke, 1 kleine Zwiebel, in Stücken,
2 Stengel Dill, 50 g frischer Rahmkäse,
3 Stengel Sellerieblätter, 50 g Ziegenkäse, in
Stücken, 2 El Quark oder Joghurt, 1/2
El Salatöl,
Salz und Pfeffer
Bereiten Sie eine sämige Soße aus den Zwiebeln,
dem Dill, dem Öl und dem Rahmkäse.
Schmecken Sie mit Salz und Pfeffer ab. Schälen
Sie die Gurke und schneiden Sie sie mit dem
Schneideinsatz, samt den Sellerieblättern in
Scheiben. Mischen Sie alles in einer
Salatschüssel und garnieren Sie mit dem
Ziegenkäse.
M Möhrensalat mit Rosinen
für 4 Personen
1 El Ingwersirup, 1 El Zitronensaft,
1/4 Tl Ingwerpulver, 3 El Speiseöl, 300 g Möhren,
40 g eingeweichte Rosinen, Salz und Pfeffer
Mischen Sie den Ingwersirup, den Zitronensaft,
das Ingwerpulver und das Speiseöl. Schmecken
Sie mit Pfeffer und Salz ab. Raspeln Sie die
Möhren mit dem Raspeleinsatz. Vermengen Sie
alles mit den Rosinen in einer Salatschüssel.
Page 24

M Milkshake
250 ml kalte Milch, 100 g frische
Erdbeeren oder anderes Obst,
2 El Erdbeer- oder dem anderen
Obst entsprechenden Sirup, 75 g
Vanille-Sahneeis
Mischen Sie alle Zutaten mit dem
Messer in der Schüssel zu einer
schaumigen Masse.
M Kaffee-Milkshake
250 ml kalte Milch, 4 Tl Instantkaffee, Zucker oder
Honig nach Belieben, 75 g Schokoladen- oder
Mokkaeis
Lösen Sie den Instantkaffee in 1 El heißem
Wasser. Mischen Sie dann alle Zutaten zu einer
schaumigen Masse.
M Guacamole
(Mexikanischer Avocado-Dip) für 2 bis 3 Personen
2 mittelgroße, reife Avocados, 2 mittelgroße
Tomaten, geschält, 1 kleine Zwiebel,
grobgeschnitten, 3 bis 4 Stengel frische Petersilie,
grüner Chili, entkernt und in Stücke geschnitten,
Salz und Pfeffer, Vollkorntoast, Kräcker oder
Tortilla-Chips
Schälen und entkernen Sie die Avocados,
schneiden Sie das Fruchtfleisch in Stücke, und
geben Sie sie in die Schüssel der
Küchenmaschine.
Pürieren Sie sie zu einer glatten Masse.
Halbieren und entkernen Sie die Tomaten.
Geben Sie die Tomaten, die Zwiebeln, die
Petersilie und den Chili hinzu, und pürieren Sie
alles zu einer glatten Masse.
Würzen Sie mit Salz und Pfeffer, und servieren
Sie mit Vollkorntoast, Kräcker oder Tortilla-Chips.
M Kirschkuchen
1 runde Backform (24 cm Ø),
250 g Schokoladenbiskuit, 100 g Butter,
1 Messerspitze Zimt, 300 g weicher
Frischrahmkäse, 200 g Kristallzucker,
2 El Kirschlikör oder Marsala, 600 g Kirschen
oder Kirschfüllung oder anderes Obst, z.B.
Erdbeere, Kiwi usw.
Zerkrümeln Sie die Biskuits mit Hilfe des Messers
in die geschmolzene Butter. Geben Sie den Zimt
hinzu. Breiten Sie diese Masse auf der Backform
aus, und drücken Sie sie leicht an. Stellen Sie die
beschichtete Backform ca. eine Stunde in den
Kühlschrank. Mischen Sie den Käse, den Zucker
und den Likör zu einer glatten Masse (maximal
40 Sekunden, um ein
gutes Ergebnis zu
erzielen). Verteilen Sie
diese Masse auf dem
Tortenboden und
darauf die Kirschfüllung
bzw. anderes Obst.
25
Page 25

Beispiel
Cremes
Endivien
- schneiden
Fisch
- hacken
Gurken
- schneiden
- raspeln
Hülsenfrüchte
- pürieren
Kartoffeln (roh)
- Raspeln
- Schneiden
- Schnitzeln
Käse
- zerkleinern
- reiben
Kohl
- schneiden
- raspeln
Kräuter, frisch
- hacken
Möhren, roh
- schneiden
- raspeln
Nüsse
- zerkleinern
Obst
- zerkleinern
- pürieren
- raspeln
Rührteig, leicht
- Rühren
Tomaten
- pürieren
Zwiebeln
- zerkleiner
- schneiden
26
Zubereitung
Mit weicher Butter erhalten Sie eine luftige
Creme.
Mit der Spitze nach unten in den
Füllstutzen stecken. Ganz füllen!
Vorher alle Gräten entfernen.
Gurken vorschneiden.
Nehmen Sie gekochte Bohnen oder
Erbsen. Sie können Flüssigkeit hinzufügen,
um die Konsistenz zu verbessern.
Zuvor in Würfel von ca. 3 cm Kantenlänge
schneiden.
Nehmen Sie nur Käse ohne Kruste, z.B.
Parmesan.
In Würfel von 2 cm Kantenlänge schneiden. Mit dem Stopfer leicht andrücken.
Kohl vorschneiden.
Kräuter vorher waschen und trocknen.
Mit der Spitze nach unten in den
Füllstutzen einführen.
Hinweis: Fügen Sie etwas Zitronensaft
hinzu, damit sich das Obst nicht verfärbt.
Nehmen Sie rohes, festes, entkerntes bzw.
entsteintes Obst.
Nehmen Sie gekochtes oder weiches Obst.
Zuerst die Flüssigkeit in die Schüssel
geben, dann die trockenen Zutaten.
Tomaten zuvor in vier Teile schneiden.
In Würfel von ca. 3 cm Kantenlänge
vorschneiden und bis zur gewünschten
Feinheit zerkleinern.
Waschen Sie die Schüssel sofort aus.
Zusatzteil
£
≠
£
≠
≠
£
£
≠
≠
£
≠
≠
≠
£
≠
≠
£
£
£
≠
£
≠
£
≠
Höchstmenge
150 g Butter
250 g
400 g
300 g
75 g
Schüssel
halb gefüllt
150 g
250 g
400 g
250 g
Flüssigkeit
250 g
300 g
Anwendung
Gebäck, Desserts.
Salate.
Pastete.
Salat, Rohkost.
Püree, Suppen.
Suppen, Reibekuchen.
Eintopf, Kartoffelchips.
Rösti.
Garnituren, gratinierte
Speisen, Soßen.
Pizza, Eintopf.
Kochgemüse,
Krautsalat. Rohkost.
Soßen, Suppen,
Garnituren,
Kräuterbutter.
Eintopf.
Garnituren.
Rohkost.
Salate, Garnituren.
Salate, Konfitüren,
Gebäck.
Soßen, Pudding.
Babynahrung.
Pfannkuchen, Crêpes,
Waffeln, Schmalzgebäck.
Soßen, Suppen.
Salate, Soßen,
Suppen.
Suppen, Rohkost,
Eintopf.
Page 26

27
Nederlands
Belangrijk
• Lees de gebruiksaanwijzing en bekijk
alle tekeningen voordat u het apparaat in
gebruik neemt.
• Laat kinderen niet het apparaat
bedienen.
• Pas op bij het beetpakken van het
sikkelmes en de snij/raspschijf. Deze zijn
scherp.
• Verwijder altjd de beschermkap van het
sikkelmes voordat u dit gaat gebruiken.
Klik het altijd weer vast na het
schoonmaken.
• Laat de draaiende delen altijd eerst tot
stilstand komen vóórdat u het deksel
opendraait.
• Steek nooit uw hand in de vulopening.
Steek er ook geen keukengerei in (zoals
vorken, messen, lepels, spatels e.d.).
Alleen de meegeleverde stamper is
hiervoor geschikt.
• Haal na gebruik de stekker uit het stopcontact.
• Indien het snoer van dit apparaat is
beschadigd, dient het uitsluitend door
het originele type te worden vervangen.
Wend u daartoe tot uw Philips
leverancier of tot de Philips organisatie
in uw land.
• Was alle delen die met voedsel in
aanraking komen af, voordat u het
apparaat in gebruik neemt.
• De kom is niet geschikt voor de
magnetron.
• Dompel het motorhuis nooit in water of
in een andere vloeistof. Spoel het ook
niet af.
• Als u vloeistoffen klopt of mengt, vul
dan de kom niet hoger dan de maatstreep.
• Overschrijd niet de maximale hoeveelheden en bewerkingstijden, zoals aangegeven in de tabel en de recepten.
• Plaats het deksel (met het
motorgedeelte) op de juiste manier op
de kom. Dan wordt de ingebouwde
beveiliging ontgrendeld en kan het
apparaat worden ingeschakeld.
• Bewaar deze gebruiksaanwijzing.
1
Aan/uit schakelaar
Indrukken:
motor werkt
Loslaten:
motor stopt
Motorgedeelte
Ontgrendelknop
Stamper
(servicenr. 4822 690 40284)
U gebruikt de stamper om
ingrediënten door de vulopening
te voeren en om de vulopening
af te sluiten.
Deksel
(servicenr. 4822 441 31204)
Kom
(servicenr.
4822 418 40983)
Koppelstuk
(servicenr. 4822 690 40285)
Snij/raspschijf
(servicenr. 4822 690 40233)
Sikkelmes
(servicenr. 4822 690 40232)
Spatel
(servicenr. 4822 690 40212)
Vulopening
Nok van kom
(schakelt de
ingebouwde
beveiliging in
en uit)
Beschermkap
Ontgrendelknop
(indrukken om
deksel met
motorgedeelte te
verwijderen)
Page 27

- Let erop dat de
merktekens op het
deksel en die op de kom
tegenover elkaar staan
(fig. 9).
- Zet het deksel (met motorgedeelte) vast door he
zo ver mogelijk rechtsom te draaien (fig. 10).
- Plaats de stamper in de vulopening (fig. 11).
- Schakel het apparaat in (fig. 12).
• U kunt tijdens het werken de stamper uit de vulopening halen om ingrediënten toe te voegen.
• In de stamper is een kleine opening aangebracht. Hierdoor kunt u tijdens het werken
vloeistof toevoegen (bijvoorbeeld olie, bij de
bereiding van mayonaise) (fig. 13).
Tips
• Grote stukken kunt u het best vóórsnijden tot
blokjes van ongeveer 3 cm.
• Het voedsel kan snel tè fijn gehakt worden: laat
het apparaat dus niet te lang achtereen werken!
• Let er bij het hakken van (harde) kaas op, dat u
het apparaat niet te lang achtereen laat draaien.
De kaas wordt dan te warm en gaat klonteren.
• Als voedsel om het sikkelmes is geslingerd, of
wanneer stukjes voedsel tegen de binnenkant
van de kom kleven:
- schakel dan eerst het apparaat uit,
- neem het deksel van de kom,
- verwijder de ingrediënten van het sikkelmes of
van de kom met behulp van de spatel.
• Hak geen zeer harde ingrediënten, zoals
koffiebonen, nootmuskaat en ijsklontjes: deze
zouden het sikkelmes bot maken.
Motorgedeelte aan deksel vastmaken
Maak altijd het
motorgedeelte vast aan
het deksel voordat u het
deksel op de kom
bevestigt.
- Plaats het motorgedeelte in de juiste stand
op de deksel (fig. 2).
Even aandrukken. (“Klik!”)
Sikkelmes
• Pas op: de snijkanten zijn erg scherp!
- Verwijder vóór het gebruik de beschermkap van
het sikkelmes (fig. 3, 4).
Houd het onbeschermde sikkelmes altijd vast
aan het handgreepje.
• Het sikkelmes is geschikt voor hakken, mixen,
mengen en pureren.
- Plaats eerst het koppelstuk (fig. 5) en het
sikkelmes (fig. 6).
- Doe daarna de ingrediënten in de kom (fig. 7).
- Plaats het deksel (met motorgedeelte) (fig. 8).
28
2
CLICK
3
4
9
10
CLICK
11
5
6
7
8
12
13
Page 28

Na het gebruik
- Druk op de
ontgrendelknop en
draai het deksel (met
het motorgedeelte) in
de richting van de pijl.
Til daarna het bovenste
gedeelte van de kom
(fig. 18).
- Druk op de
ontgrendelknop (pijl 1)
om het motorgedeelte
los te maken (pijl 2) van
het deksel (fig. 19).
- Neem het hulpstuk en het koppelstuk uit de
kom (fig. 20 en 21). Vervolgens kunt u de kom
leegmaken.
Schoonmaken
• Haal altijd de stekker uit het stopcontact, voordat
u het motorgedeelte gaat schoonmaken. U kunt
het motorgedeelte schoonmaken met een vochtige doek.
Dompel het motorgedeelte niet in water en spoel
het niet af.
• Neem altijd het motorgedeelte van het deksel
(fig. 19) voordat u het deksel afwast of afspoelt!
• Maak de delen die met voedsel in aanraking zijn
gekomen meteen na gebruik schoon in warm sop.
• Maak het sikkelmes en de snij/raspschijf
voorzichtig schoon: de snijrand is erg scherp!
U kunt deze hulpstukken ook schoonmaken in
de afwasmachine.
• Zorg ervoor dat de snijranden van het sikkelmes
en van de snij/rasp-schijf niet met harde
voorwerpen in aanraking komen: hierdoor
zouden ze bot kunnen
worden.
• Klik na het schoonmaken
altijd de beschermkap
vast op het sikkelmes
(fig. 22).
Snij/raspschijf
• Pas op: de snijrand is erg scherp!
Pak daarom de schijf altijd vast bij het
handgreepje.
- Plaats eerst het
koppelstuk (fig. 5) en
de snij/raspschijf
(fig. 14). Let erop dat
de kant van de schijf
die u wilt gebruiken
naar boven wijst.
- Plaats het deksel (met
motorgedeelte)
(fig. 8-10).
- Haal de stamper uit de vultrechter.
- Doe de ingrediënten in
de vultrechter (fig. 15).
- Plaats de stamper op de
ingrediënten en druk
deze lichtjes aan
(fig. 16).
- Schakel het apparaat in
(fig. 17).
- Druk de ingrediënten
rustig en gelijkmatig omlaag met de stamper.
Tips
• Snijd te grote stukken voedsel vóór, zodat ze in
de vulopening passen.
• Vul de opening gelijkmatig voor de beste
resultaten bij het snijden en raspen.
• Maak de kom regelmatig leeg als u grote
hoeveelheden verwerkt.
Ingebouwde beveiliging
Alleen wanneer u het deksel (met motorgedeelte)
op de juiste manier op de kom zet, wordt de ingebouwde beveiliging ontgrendeld en kunt u het
apparaat inschakelen.
Bekijk fig. 8-10 dus met extra aandacht!
29
18
14
15
16
17
19
2
1
20
21
22
Page 29

30
Extra accessoires
• Als extra accessoires zijn verkrijgbaar*):
- dubbelzijdige snijschijf voor dik en dun
snijden (nr. 4822 690 40181)
- dubbelzijdige raspschijf voor grof en
middelfijn raspen (nr. 4822 690 40182)
- dubbelzijdige raspschijf voor fijn en extra-fijn
raspen (nr. 4822 690 40183)
- enkelzijdige raspschijf voor extreem-fijn
raspen (bijv. voor "Reibekuchen")
(nr. 4822 690 40185).
- opbergdoos voor schijven HR 2922
(nr. 4822 690 40267).
*) Vraag uw leverancier of deze accessoires in uw
land leverbaar zijn.
4822 690 40181
4822 690 40267
4822 690 40182
4822 690 40183
4822 690 40185
Page 30

Recepten
M Zalmpuree
(voorgerecht voor 4-6 personen)
150 g gerookte zalm, 75 g zachte boter, 11⁄2 eet-
lepel tomatenketchup, zout en cayennepeper
Pureer de gerookte zalm
met de boter en de tomatenketchup. Breng dit op
smaak met zout en
cayennepeper. De
zalmpuree kan worden
geserveerd als
voorgerecht op
geroosterd brood of toast.
M Kruidenboter
100 g verse groene kruiden, 2 teentjes knoflook,
100 g zachte boter, 4 eetlepels mosterd, 4
afgestreken eetlepels crème fraîche, zout en
peper.
Hak de kruiden en de knoflook met het mes fijn in
de foodprocessor. Voeg boter, mosterd en crème
fraîche toe en meng tot er een glad mengsel
ontstaat. Voeg zout en peper toe naar smaak.
Tip: meng een eetlepel ansjovispasta of een paar
ansjovisfilets door mengsel en serveer de
kruidenboter met gerookte of gegrilde vis.
M Sandwich spread
2 kleine wortels in stukjes, 2-3 augurken in
stukjes, 75 g bloemkool in stukjes, 75 g knolselderij in stukjes, groene kruiden (peterselie,
dille, dragon, takjes selderij), 100 g mayonaise,
100 g kwark, zout en peper
Hak de worteltjes, augurken, bloemkool, groene
kruiden en knolselderij fijn. Voeg de mayonaise en
kwark toe. Goed mengen. Breng de spread op
smaak met peper en zout.
M Broccolisoep
(voor 4 personen)
50 g belegen Goudse kaas, 300 g gekookte
broccoli (steeltjes en kopjes), water waarin de
broccoli is gekookt, 2 gekookte aardappels in
stukjes,
2 bouillonblokjes, 2 eetlepels ongeklopte
slagroom, kerrie, zout, peper, nootmuskaat
Rasp de kaas. Pureer de broccoli samen met de
gekookte aardappelen in wat water waarin de
broccoli is gekookt. Doe de broccoli-puree met het
overgebleven kookvocht en de bouillonblokjes in
een maatbeker. Voeg water toe tot 750 cc.
Doe het geheel in een pan en breng het al
roerende aan de kook. Roer dan de kaas erdoor,
breng de soep op smaak met kerrie, zout en
peper. Voeg dan de room toe.
M Tomaten-venkelsoep
(voor 4 personen)
500 g tomaten in stukjes, 1 kleine venkel in stukjes, 1 kleine ui in stukjes, 750 cc kippebouillon, 25 g
boter, 25 g meel, 4 takjes peterselie, 4 takjes bladselderij, 2 eetlepels crème fraîche, zout en peper
Hak de venkel en de ui fijn. Pureer de tomaten.
Smelt de boter. Roer het meel goed door de
gesmolten boter. Giet langzaam de kippebouillon
erbij. Voeg de gepureerde tomaten, de gehakte
venkel en de gehakte ui toe en breng het geheel
aan de kook. Breng het op smaak met zout en
peper. Kook het ca. 5 minuten door. Hak de
peterselie en de bladselderij. Voeg vlak voor het
opdienen de crème fraîche toe. Serveer de soep
met de gehakte peterselie en bladselderij.
M Gazpacho
(voor 2 personen)
250 g tomaten, 1 teentje knoflook, 1 eetlepel rode
wijn, 11⁄2 eetlepel olijfolie, 1 eetlepel tomatenpuree,
1 groene paprika in stukjes, 1 ui in stukjes,
1 eetlepel mayonaise, 1⁄2 kleine komkommer in
stukjes, 250 cc kippebouillon
Garnering: paprika, tomaat en een rauwe ui in
stukjes.
Doe alle ingrediënten in de kom en meng tot een
glad mengsel is verkregen. Koel de soep in de
koelkast. Hak de paprika, tomaat en uien voor
garnering.
31
Page 31

M Mayonaise
1 groot ei of 2 eidooiers, 2 eetlepels mosterd,
zout, peper, 3 eetlepels azijn of citroensap,
250 cc olie
Verwerk ingrediënten op kamertemperatuur. Doe
het ei of de eidooiers in de kom, samen met de
mosterd, het zout, de peper en de azijn of het
citroensap. Giet de olie via de stamper in de kom
terwijl het sikkelmes ronddraait.
M Dressing (basisrecept)
50 cc azijn of citroensap, 150 cc olie, zout, peper
Meng het citroensap of de azijn met olie, zout en
peper totdat het zout is opgelost.
M Thousand islands dressing
250 cc mayonaise, 50 cc chilisaus, 1 theelepel
Worchestershiresaus, 1 ui in stukjes, 6 olijven
(zonder pit),1 augurk in stukjes, 1⁄2 rode paprika in
stukjes
Doe alle ingrediënten in de kom en meng tot een
een glad mengsel is verkregen.
M Zure room/Roquefort dressing
250 cc zure room, 2 druppels tabasco, 1 theelepel
wijnazijn, 1 teentje knoflook, 1⁄2
theelepel suiker,
1 theelepel selderijzout, peper, 75 g verkruimelde
Roquefort of andere blauwe (schimmel)kaas,
1
⁄2
theelepel mosterd
Doe alle ingrediënten, behalve de kaas, in de kom
en meng goed. Voeg de kaas toe en meng verder
totdat de dressing smeuïg is.
M Yoghurt dressing
150 cc yoghurt, 2 eetlepels citroensap, 1⁄4 thee-
lepel zout, peper, 2 eetlepels verse kruiden zoals
peterselie, tuinkers, waterkers, bieslook, dragon,
basilicum
Doe alle ingrediënten in de kom. Goed mengen.
M Appel/knolselderij salade
(3-4 personen)
4 takjes peterselie, 40 g walnoten, 150 cc crème
fraîche, 2 theelepels mosterd, 2 theelepels
citroensap, 1 grote knolselderij (gekookt), 2 grote
zure appels (geschild), peper en zout
Hak de peterselie en zet deze apart. Hak de walnoten grof en zet deze ook apart. Doe de crème
fraîche, de mosterd en het citroensap in de kom
en en meng tot het mengsel stijf wordt. Breng het
op smaak met peper en zout. Rasp de knolselderij
en appels. Meng dit alles in een slakom.
M Spaanse koolsalade
(4 personen)
1 kleine rode kool, 2 rode uien, 1 venkel, 1 appel,
sap van één sinaasappel, 2 eetlepels rode wijnazijn, 1 eetlepel mosterd
Meng het sinaasappelsap, de mosterd en de
azijn. Snijd de rode kool, uien, venkel en appel in
plakjes. Meng dit alles in een slakom.
M Koolsalade
(4 personen)
1 kleine witte kool, 1⁄4 rode paprika, 2 appels,
2 augurken, 1 banaan, 1 klein blik ananas
(stukjes), 12 gehalveerde walnoten, Yoghurt
Dressing
Snijd de kool, paprika, appels en augurken in
plakjes. Snijd de banaan in plakjes met behulp
van een keukenmes. Meng dit alles in een slakom
samen met Yoghurt Dressing. Garneer de salade
met de walnoten.
M Komkommersalade
(2-3 personen)
1 grote komkommer, 1 kleine ui in stukjes,
2 takjes dille, 50 g verse roomkaas, 3 takjes selderij, 50 g geitekaas in stukjes, 2 eetlepels kwark
of yoghurt, 1⁄2 eetlepel olie, peper en zout
Maak een smeuïg sausje van de ui, dille, yoghurt
of kwark, olie en verse roomkaas. Breng het
mengsel op smaak met peper en zout. Schil de
komkommer en snijd deze met de selderijtakjes in
plakken. Meng dit alles in een slakom en garneer
met de geitekaas.
M Wortelsalade met rozijnen
(4 personen)
1 eetlepel gemberstroop, 1 eetlepel citroensap,
1
⁄4 theelepel gemberpoeder, 3 eetlepels olie,
300 g wortels, 40 g gewelde rozijnen, zout en
peper
Meng de gemberstroop, het citroensap, de
gemberpoeder en de olie. Breng het mengselop
smaak met peper en zout. Rasp de wortels. Meng
dit alles samen met de rozijnen in een slakom.
32
Page 32

M Guacamole
(Mexicaanse avocado-dipsaus voor 2 of 3
personen)
2 middelgrote, rijpe avocado’s, 2 middelgrote
tomaten (ontveld), 1 kleine ui (in stukjes
gesneden), 3 tot 4 takjes verse peterselie, 1
groene chilipeper (ontdaan van zaadlijsten en in
stukken gesneden), zout en peper. Te serveren
met volkorentoast of tortillachips.
Schil en ontpit de avocado’s. Snijd het vruchtvlees
in stukken en doe deze in de kom van de
foodprocessor. Meng tot een gladde puree.
Halveer de tomaten en verwijder de zaden. Voeg
tomaten, gesneden ui, peterselie en chili toe aan
de avocado. Pureer en meng totdat er een glad
mengsel ontstaat. Voeg zout en peper toe naar
smaak en serveer met volkorentoast of
tortillachips.
M Kersenvlaai
Rond bakblik Ø 24 cm, 250 g chocoladebiscuits,
ca. 100 g zachte boter, een mespuntje kaneel,
300 g zachte roomkaas, 200 g basterdsuiker, 2
eetlepels kersenlikeur of marsala, 600 g
kersenvlaaivulling of verse vruchten (bijv. 250 g
aardbeien of kiwi).
Verkruimel de biscuits met de (gesmolten!) boter
en kaneel met het sikkelmes.
Spreid het mengsel
uit over de bodem
van het bakblik.
Zachtjes
aandrukken.
Zet het bakblik ca.
een uur in de
koelkast. Meng de
roomkaas, suiker en
likeur tot een glad
mengsel. Max. 40
seconden voor een optimaal resultaat.
Spreid dit uit over de vlaaibodem. Spreid hierover
de kersenvulling of garneer de vlaai met verse
aardbeien of kiwi.
M Milkshake
250 cc koude melk, 100 g verse
aardbeien (of andere vruchten),
2 eetlepels aardbeien- (of
andere) siroop, 75 g vanille
roomijs
Meng alle ingrediënten tot een
schuimig mengsel.
M Koffie-milkshake
250 cc koude melk, 4 theelepels oploskoffie,
suiker of honing naar smaak, 75 g/ chocolade- of
koffie-roomijs.
Los de koffie op in 1 eetlepel heet water. Vermeng
dit met de overige ingrediënten tot een schuimig
mengsel.
33
Page 33

34
Enkele
voorbeelden:
Aardappelen
(ongekookt)
- hakken
- snijden
- raspen
Andijvie
- snijden
Beslag
(lichte soorten)
Crèmes
Fruit
- hakken
- pureren
- raspen
Kaas
- hakken
- raspen
Komkommer
- snijden
- raspen
Kool
- snijden
- raspen
Noten
- hakken
Peulvruchten
- pureren
Tomaten
- pureren
Tuinkruiden
- hakken
Uien
- hakken
- snijden
Vis
- hakken
Wortelen
(ongekookt)
- snijden
- raspen
Max.
hoeveelheid
300 g
250 g vocht
150 g boter
250 g
400 g
75 g
150 g
400 g
250 g
kom half
vullen
300 g
250 g
Hulpstuk
£
≠
≠
≠
£
£
£
£
≠
£
≠
≠
≠
≠
≠
£
£
£
£
£
≠
£
≠
≠
Bereidingswijze
Vóórsnijden in stukjes van 3 x 3 x 3 cm.
Steek de groente met de stronk naar boven
in de vulopening. Vul de vul opening
daarbij geheel.
Eerst het vocht in de kom. Vervolgens de
droge ingrediënten.
Gebruik zachte boter voor een luchtig
resultaat.
Tip: Gebruik wat citroensap om verkleuren
te voorkomen.
Gebruik ongekookt, stevig fruit zonder pit.
Gebruik gekookt of zacht fruit.
Gebruik alleen korstloze harde kaas
(bijv. Parmezaanse), in stukken van
2 x 2 x 2 cm. Max.1 minuut hakken.
Voorzichtig met de stamper aandrukken.
Vóórsnijden.
Vóórsnijden.
Gebruik gekookte bonen of erwten. Voeg
vocht toe voor een gelijkmatig resultaat.
Tomaten in vier stukken snijden.
Was en droog de kruiden.
Vóórsnijden in stukjes van 3 x 3 x 3 cm.
Hak tot de gewenste fijnheid.
Verwijder eerst alle graten
Invoeren in de vulopening met de punt naar
beneden.
Toepassingen
Aardappelkoekjes,
soep.
Ovenschotels, chips.
Rösti.
Salades.
Pannekoeken, flensjes,
frituur, wafels.
Gebak, desserts.
Salades, jam, gebak.
Sauzen, pudding,
Babyvoeding.
Garnering, gratineren,
sauzen.
Pizza, ovenschotels.
Salades, rauwkost.
Kookgroente, koolsla.
Rauwkost.
Salades, garnering.
Purees, soepen.
Sauzen, soepen.
Sauzen, soepen,
garnering,
kruidenboter.
Salades, sauzen,
soepen.
Ovenschotels.
Pâté.
Ovenschotels.
Garnering, rauwkost.
Page 34

35
Italiano
Importante
• Prima di usare l’apparecchio, leggete
attentamente le istruzioni per l’uso.
• Non lasciate l’apparecchio alla portata
dei bambini.
• Fate attenzione alla bilama ricurva, al
disco per affettare e al disco per
grattugiare perchè sono affilati.
• Togliete il cappuccio di protezione prima
di usare la lama bicurva di metallo.
Rimettetelo al suo posto subito dopo
averla lavata.
• Non togliete il coperchio fino a quando
le parti rotanti non sono completamente
ferme.
• Non infilate mai la mano nell’apertura di
inserimento, non usate forchette, coltelli,
cucchiai o spatole di nessun tipo.
Utilizzate solo il pestello.
• Togliete la spina dalla rete di alimentazione dopo ogni uso dell’apparecchio.
• Se il cavo di alimentazione di questo
apparecchio si dovesse rovinare,
occorrerà sostituirlo con un cavo
speciale: a questo scopo rivolgetevi al
Vostro rivenditore Philips o ad uno dei
Centri Assistenza Philips del Vostro
paese.
• Prima di usare l’apparecchio per la
prima volta, lavate bene tutte le parti
che andranno a contatto con gli alimenti.
• Non utilizzate il contenitore nel forno a
microonde.
• Non immergete mai il blocco motore
nell’acqua o in altri liquidi, pulitelo solo
con un panno umido.
• Quando amalgamate o frullate i liquidi
non superate l’indicazione del livello
massimo indicato.
• Non superate le quantità massime e i
tempi indicati sulla tabella e nelle ricette.
• Sistemate in modo corretto il coperchio
(con il blocco motore) sul contenitore.
Solo in questo modo il dispositivo di
sicurezza incorporato si sblocca e
l’apparecchio può essere messo in
funzione.
• Conservate queste istruzioni per
ulteriore consultazione.
1
Interruttore on/off
Premuto:
il motore funziona
Rilasciato:
il motore si ferma.
Base motore
Pulsante di
sblocco
Pestello
(codice n° 4822 690 40284)
Usate il pestello per inserire gli
ingredienti dall’apertura di
inserimento e per proteggere
l’apparecchio quando non viene
utilizzato.
Coperchio
(codice n° 4822 441 31204)
Contenitore
(codice n°
4822 418 40983)
Adattatore
(codice n° 4822 690 40285)
Disco per
grattugiare/affettare
(codice n° 4822 690 40233)
Bilama ricurva
(codice n°. 4822 690 40232)
Spatola
(codice n° 4822 690 40212)
Apertura di
inserimento
Linguetta del
contenitore
(per bloccare e
sbloccare il
dispositivo di
sicurezza
incorporato)
Cappuccio di
protezione
Tasto di rilascio
(premere per
staccare il
coperchio dal
blocco motore)
Page 35

- Assicuratevi che le
tacche riportate sul
coperchio corrispondano
a quelle del contenitore
(fig. 9).
- Fissate il coperchio (con il blocco motore)
facendolo ruotare in senso orario fino a quando
si blocca (fig. 10).
- Introducete il pestello nell’apertura di
inserimento (fig. 11).
- Accendete l’apparecchio (fig. 12).
• Durante l’utilizzo, potrete togliere il pestello per
aggiungere gli ingredienti.
• Il pestello presenta una piccola apertura
attraverso la quale si possono introdurre nel
contenitore ingredienti liquidi (ad esempio l’olio
quando preparate la maionese) quando
l’apparecchio è già in funzione (fig. 13).
Consigli
• Tagliate gli ingredienti grossi in cubetti di
circa 3 cm.
• Evitate di far funzionare l’apparecchio troppo a
lungo.
• Quando tritate il formaggio, abbiate cura di non
far funzionare il motore troppo a lungo; il
formaggio potrebbe riscaldarsi e formare dei
grumi.
• Se il cibo dovesse raccogliersi attorno alla
bilama ricurva o alle pareti del contenitore:
- spegnete l’apparecchio
- togliete il coperchio (con il blocco motore)
- togliete il cibo dalle lame e dalle pareti usando
l’apposita spatola.
• Non tritare ingredienti molto duri, come ad
esempio chicchi di caffè, noce moscata e cubetti
di ghiaccio: la bilama ricurva potrebbe
danneggiarsi.
Come montare il blocco motore sul coperchio
Fissare sempre il blocco
motore sul coperchio
prima di avvitare il
coperchio sul
contenitore.
- Mettete il blocco motore
sul coperchio. Notate la
posizione corretta
(fig. 2).
- Premete fino a quando sentirete uno scatto.
Bilama ricurva
• Attenzione: i bordi della bilama ricurva sono
molto taglienti.
- Togliete il cappuccio di protezione dalla bilama
ricurva prima dell’uso (fig. 3 e 4).
Afferrare la bilama ricurva priva di protezione
dall’impugnatura.
• La bilama ricurva è adatta per tritare, mescolare
e preparare il purè.
- Sistemate prima l’adattatore (fig. 5), poi la
bilama ricurva (fig. 6).
- Introducete gli ingredienti nel contenitore (fig. 7).
- Mettete il coperchio (con il blocco motore) sul
contenitore (fig. 8).
36
2
CLICK
10
CLICK
9
11
3
4
5
6
7
8
12
13
Page 36

Dopo l’uso
- Premete il tasto di
rilascio e ruotate il
coperchio (insieme al
blocco motore) nella
direzione della freccia.
Quindi alzate la parte
superiore dal
contenirore (fig. 18).
- Premete il pulsante di
sblocco (freccia 1) per
sganciare il blocco
motore (freccia 2) dal
coperchio (fig. 19).
- Togliete l’accessorio e l’adattatore dal
contenitore (fig. 20 e 21). A questo punto potete
svuotare il contenitore.
Pulizia
• Prima di pulire il motore, togliete sempre la spina
dalla presa di corrente.
Il blocco motore può essere pulito con un panno
umido. Non immergete mai il blocco motore
nell’acqua. Non versate mai acqua sul motore.
• Togliete sempre il blocco motore dal coperchio
prima di lavare o sciacquare il coperchio
(fig. 19).
• Lavate i pezzi che sono venuti a contatto con il
cibo con acqua saponata subito dopo averli
utilizzati.
• Fate attenzione quando pulite la bilama ricurva e
il disco per affettare/grattugiare: le lame sono
molto taglienti! Questi accessori possono essere
lavati anche in lavastoviglie.
• Assicuratevi che i bordi
taglienti della bilama
ricurva non urtino
oggetti duri. Ciò le
potrebbe danneggiare
diminuendo la loro
efficienza.
• Rimettete il cappuccio di
protezione sulla bilama
ricurva subito dopo averla pulita (fig. 22).
Disco per affettare/grattugiare
• Attenzione: i bordi del disco sono molto
taglienti. Afferrate sempre il disco per
l’apposita impugnatura.
- Sistemate prima
l’adattatore (fig. 5) e poi
il disco per affettare/
grattugiare (fig. 14).
Assicuratevi che il lato
che volete utilizzare sia
rivolto verso l’alto.
- Mettete il coperchio
(con il blocco motore)
(fig. 8-10).
- Togliete il pestello dall’apertura di inserimento.
- Introducete gli
ingredienti
dall’apertura di
inserimento (fig. 15).
- Infilate il pestello
nell’apertura di
inserimento e premete
delicatamente (fig. 16).
- Accendete l’apparecchio
(fig. 17).
- Premete gli ingredienti verso il basso usando il
pestello. Esercitate una pressione leggera ma
costante.
Consigli utili:
• Tagliate i pezzi più grossi per facilitarne
l’introduzione.
• Riempite l’apertura di inserimento in modo
uniforme per ottenere risultati migliori.
• Svuotate più volte il contenitore nel caso di
grossi quantitativi di cibo da affettare o
grattugiare.
Dispositivo di sicurezza incorporato
Solo montando il coperchio (con il blocco motore)
sul contenitore in modo corretto, il dispositivo di
sicurezza incorporato verrà sbloccato,
permettendo così di mettere in funzione
l’apparecchio.
37
18
14
15
16
17
19
2
1
20
21
22
Page 37

38
Accessori
• Sono inoltre disponibili i seguenti accessori
(optional*):
• Disco doppio per affettare (fine e grosso)
(n° 4822 690 40181)
• Disco doppio per grattugiare (grana grossa
e medio fine) (n° 4822 690 40182)
• Disco doppio per grattugiare (grana fine ed
extra fine) (n° 4822 690 40183)
• Disco semplice per grattugiare
(grana extra fine) (es. “Reibekuchen”)
(n° 4822 690 40185).
• Scatola per dischi HR 2922
(n° 4822 690 40267)
* Chiedete al vostro rivenditore se questi
accessori sono disponibili nel vostro paese.
4822 690 40181
4822 690 40267
4822 690 40182
4822 690 40183
4822 690 40185
Page 38

Ricette
M Crema al salmone
(antipasto - 4-6 persone)
150 g di salmone
affumicato, 75 g di burro
ammorbidito, 11⁄2 cucchiaio
di ketchup, sale e pepe di
Cayenna
Riducete in purè il salmone
affumicato, aggiungete la
salsa ketchup e il burro e regolate di sale e pepe.
La crema può essere servita con pane tostato,
come antipasto.
M Burro aromatico
50 g di erbe aromatiche fresche, 1 spicchio di
aglio, 100 g di burro da spalmare
2 cucchiaini di senape, 2 cucchiai di panna
sale e pepe
Tritare finemente le erbe e l’aglio nell’apparecchio
con la bilama ricurva. Aggiungere il burro, la
senape e la panna e girare fino ad ottenere una
miscela liscia. Condire con sale e pepe.
Consiglio:
Se il burro aromatico deve essere servito insieme
a pesce affumicato o alla griglia, aggiungerci un
cucchiaino di pasta d’acciughe o qualche filetto di
acciuga.
M Crema per sandwich
2 piccole carote a pezzetti, 2-3 cetriolini, 75 g di
cavolfiore a pezzetti, 75 g di sedano rapa a
pezzetti, erbe aromatiche (prezzemolo, aneto,
dragoncello, gambi di sedano a pezzetti),
100 g di maionese, 100 g di ricotta, sale e pepe
Tritate finemente le carote, i cetriolini, il cavolfiore,
le erbe aromatiche e il sedano. Aggiungete la
maionese e la ricotta e mescolate con cura,
regolando di sale e pepe.
M Zuppa di broccoletti
(per 4 persone)
50 g di formaggio Gouda, 300 g di cime di
broccoletti lessate, l’acqua di cottura dei
broccoletti, 2 patate lessate a pezzetti, 2 dadi,
2 cucchiai di panna liquida, curry, sale, pepe,
noce moscata
Grattugiate il formaggio. Riducete in purè i
broccoletti insieme alle patate e a un po’ di acqua
di cottura della verdura. Aggiungete i dadi e il
liquido necessario per ottenere 750 cc di
minestra. Portate a ebollizione la zuppa
continuando a mescolare. Aggiungete il
formaggio, la panna e il curry, regolate di sale e
pepe e insaporite con un pizzico di noce moscata.
M Zuppa di pomodori e finocchi
(per 4 persone)
500 g di pomodori a pezzetti, 1 piccolo finocchio a
pezzetti, 1 piccola cipolla a pezzetti, 750 g di
brodo di pollo, 25 g di burro, 25 g di farina,
prezzemolo, qualche foglia di sedano, 2 cucchiai
di panna, sale e pepe,
Affettate il finocchio e la cipolla e riducete in purè i
pomodori. Fate sciogliere il burro e aggiungetevi
la farina, mescolando con cura. Aggiungete poco
alla volta il brodo di pollo, il purè di pomodori e il
finocchio e la cipolla tritati. Portate a ebollizione e
regolate di sale e pepe. Fate bollire per
circa 5 minuti. Tritate il prezzemolo e le foglie di
sedano. Servite la zuppa con la panna e le erbe
tritate.
M Gazpacho
(per 2 persone)
250 g di pomodori, 1 spicchio d’aglio, 1 cucchiaio
di vino rosso, 11⁄2 cucchiaio di olio d’oliva,
1 cucchiaio di salsa di pomodoro, 1 peperone
verde a pezzetti, 1 cipolla a pezzetti, 1 cucchiaio
di maionese, 1⁄2 cetriolo a pezzetti, 250 g di brodo
di pollo, per guarnire: cubetti di peperone,
pomodoro e cipolla crudi.
Mettete tutti gli ingredienti nel contenitore e
riducete il tutto in purè. Mettete il gazpacho in
frigorifero. Preparate i cubetti di verdura da servire
con la zuppa fredda.
39
Page 39

M Maionese
1 uovo o 2 tuorli, 2 cucchiai di senape, sale e
pepe, 3 cucchiai di aceto o limone, 250 g di olio
Usate gli ingredienti a temperatura ambiente.
Mettete l’uovo o i tuorli, la senape, il sale, il pepe,
l’aceto o il succo di limone nel contenitore.
Versate l’olio attraverso l’apposita apertura
continuando a frullare fino ad ottenere un
composto omogeneo.
M Salsa (ricetta base)
50 g di aceto o succo di limone, 150 g di olio, sale
e pepe
Mescolate il succo di limone o l’aceto con il sale,
l’olio e il pepe fino a quando il sale è
completamente sciolto.
M Salsa esotica
250 g di maionese, 50 g di salsa al chili,
1 cucchiaino di worcester, 1 cipolla a pezzetti,
6 olive snocciolate, 1 cetriolino a pezzetti,
1
⁄2 peperone rosso a pezzetti
Mescolate tutti gli ingredienti fino ad ottenere un
composto omogeneo.
MSalsa al Roquefort
250 g di panna acida, 2 gocce di tabasco,
1 cucchiaino di aceto, 1 spicchio d’aglio,
1
⁄2
cucchiaino di zucchero, 1 cucchiaino di sale,
pepe, 75 g di Roquefort sbriciolato (o altro
formaggio simile),
1
⁄2
cucchiaino di senape
Mettete tutti gli ingredienti, ad eccezione del
formaggio, nel contenitore e mescolate con cura.
Aggiungete il formaggio e continuate a frullare fino
ad ottenere la consistenza desiderata.
M Salsa allo yogurt
150 g di yogurt, 2 cucchiai di succo di limone,
1
⁄2. cucchiaino di sale, pepe, 2 cucchiai di erbe
aromatiche fresche (prezzemolo, crescione, erba
cipollina, dragoncello, basilico)
Mettete tutti gli ingredienti nel contenitore e
mescolate con cura.
M Insalata di mele e sedano rapa
(per 3-4 persone)
prezzemolo, 40 g di noci, 150 g di panna,
2 cucchiaini di senape, 2 cucchiaini di limone,
1 sedano rapa (cotto), 2 mele verdi (sbucciate),
sale e pepe
Tritate il prezzemolo. Tritate grossolanamente le
noci. Mettete la panna, la senape e il succo di
limone nel contenitore e frullate fino ad ottenere
un composto denso. Regolate di sale e pepe.
Grattugiate il sedano rapa e le mele. Riunite tutti
gli ingredienti in un’insalatiera e servite.
M Insalata di cavolo rosso
(per 4 persone)
1 cavolo rosso, 2 cipolle rosse, 1 finocchio,
1 mela, il succo di un’arancia, 2 cucchiai di aceto
rosso, 1 cucchiaio di senape
Emulsionate il succo d’arancia, la senape e
l’aceto. Affettate il cavolo, le cipolle, il finocchio e
la mela. Riunite gli ingredienti in un’insalatiera e
servite.
M Insalata di cavolo
(per 4 persone)
1 cavolo bianco, 1⁄2
peperone rosso, 2 mele,
2 cetriolini, 1 banana, 1 scatola di ananas
sciroppato, 12 noci divise a metà, salsa allo
yogurt
Affettate il cavolo, le mele e i cetriolini. Tagliate la
banana con un coltello da cucina. Riunite gli
ingredienti in un’insalatiera, condite con la salsa
allo yogurt e guarnite con le noci.
M Insalata di cetrioli
(per 2-3 persone)
1 cetriolo, 1 cipolla a pezzetti, aneto,
50 g di formaggio cremoso, 3 gambi di sedano,
50 g di formaggio di capra, 2 cucchiai di ricotta o
yogurt, sale e pepe, 1⁄2 cucchiaio di olio
Preparate una salsa con la cipolla, l’aneto, lo
yogurt (o ricotta), l’olio e il formaggio cremoso.
Regolate di sale e pepe. Pelate il cetriolo e
affettatelo insieme ai gambi di sedano. Riunite
tutti gli ingredienti in un’insalatiera e guarnite con
il formaggio di capra.
40
Page 40

omogenea con il formaggio, lo zucchero e il
liquore (max. 40 secondi per risultati ottimali).
Distribuite la crema ottenuta
sulla base di biscotto e decorate
con le ciliegie oppure con le
fragole o i kiwi.
M Frappé
250 g di latte freddo, 4 cucchiaini
di caffè solubile, zucchero o
miele, 75 g di gelato al
cioccolato o al caffè
Sciogliete il caffè in 1 cucchiaio di acqua calda.
Mescolate tutti gli ingredienti fino a quando il
frappé risulterà spumoso.
M Insalata di carote con uva passa
(per 4 persone)
1 cucchiaio di sciroppo di zenzero, 1 cucchiaio di
succo di limone, 1⁄4 cucchiaio di polvere di zenzero,
3 cucchiai di olio, 300 g di carote, 40 g di uva
passa (ammorbidire in acqua), sale e pepe
Mescolate lo sciroppo e la polvere di zenzero, il
succo di limone e l’olio. Regolate di sale e pepe.
Grattugiate le carote e riunite tutti gli ingredienti in
un’insalatiera.
M Guacamole
(crema messicana - 2/3 porzioni)
2 avocado ben maturi (medi), 2 pomodori
sbucciati (medi), 1 cipolla piccola e pelata
prezzemolo,,1 peperone verde, privo di semi e
tagliato a pezzi, sale e pepe, fette di pane tostato
o corn chips
Pelate e snocciolate gli avocati, tagliate la polpa a
pezzetti e introducetela nel robot da cucina.
Frullate fino ad ottenere una morbida crema.
Tagliate a metà i pomodori e togliete i semi.
Aggiungete i pomodori, la cipolla, il prezzemolo e
il peperone all’avocado e frullate con cura.
Regolate di sale e pepe e servite con pane tostato
o corn chips.
M Flan di ciliege
Una teglia rotonda (diam. 24 cm), 250 g di biscotti
al cioccolato, 100g di burro ammorbidito, un
pizzico di cannella, 300 g di formaggio cremoso
(Philadelphia), 200 g di zucchero, 2 cucchiai di
sherry o marsala, 600 g di ciliege (oppure fragole
o kiwi)
Riducete i biscotti in
briciole e aggiungete il
burro fuso e la
cannella. Distribuite
uniformemente la
miscela ottenuta sul
fondo della teglia e
mettetela in frigorifero
per circa un’ora.
Preparate una salsa
41
Page 41

42
Ingredienti
Carote (crude)
- affettare
- grattugiare
Cavolo
- affettare
- grattugiare
Cetriolo
- affettare
- grattugiare
Cipolle
- tagliare
- affettare
Crema
Erbe aromatiche
- tritare
Formaggio
- tagliare
- grattugiare
Frutta
- tagliare
- ridurre in purè
- grattugiare
Indivia
- affettare
Legumi
- puree
Noci
- tritare
pesce
- tagliare
Pastella
- fondere
Patate (crude)
- tagliare
- affettare
- grattugiare
Pomodori
- passati
Quantità
massima
300 g
150 g di
burro
Riempite fino
a metà
contenitore
75 g
250 g
400 g
400 g
250 g
150 g
250 g liquido
300 g
250 g
Accessorio
(vedere
simboli)
≠
≠
≠
≠
≠
≠
£
≠
£
£
£
≠
£
£
≠
≠
£
£
£
£
£
≠
≠
≠
Procedura
Infilare dall'apposita apertura con la punta
verso il basso.
Tagliare a pezzi prima dell'uso.
Tagliare a pezzi prima dell'uso.
Tagliate a dadini di 3 cm. Fate funzionare
l'apparecchio fino ad ottenere la
consistenza desiderata.
Lavare il contenitore subito dopo l'uso.
Usate burro ammorbidito per ottenere una
crema più soffice.
Lavate e asciugate le erbe.
Usate formaggio senza crosta (es.
Parmigiano), tagliato a dadini di 2 cm.
Premere delicatamente usando il pestello
Avvertenza: aggiungere un po' di succo di
limone affinché la frutta mantenga
inalterato il suo colore
Infilare nell'apposita apertura con la punta
verso il basso, riempiendo completamente
lo spazio.
Usate fagioli o piselli cotti. Aggiungete un
po' di liquido per avere un risultato
omogeneo.
togliere prima tutte le lische
Mettete prima il liquido nel contenitore e
aggiungete successivamente gli altri
ingredienti.
Tagliate a dadini di 3 cm.
Tagliate i pomodiri in 4 pezzi.
Applicazioni
Piatti al forno.
Guarnizione, piatti
freddi.
Verdure cotte, insalate.
Tagliare
Insalate, salse,
minestre.
Minestre, piatti freddi,
piatti al forno.
Dolci, desserts.
Salse, zuppe,
burro aromatizzato.
Per guarnire o
gratinare. Per
preparare salse, pizza
o piatti al forno.
Insalate, marmellate,
torte.
Creme, budini.
Cibo per bambini
Insalate.
Puree, zuppe.
Paté.
Insalate, guarnizioni.
Pancakes, wafers,
crêpes e frittelle.
Minestre, biscotti.
Piatti al forno,
patatine fritte.
Tortino di patate.
Salse, passati.
 Loading...