

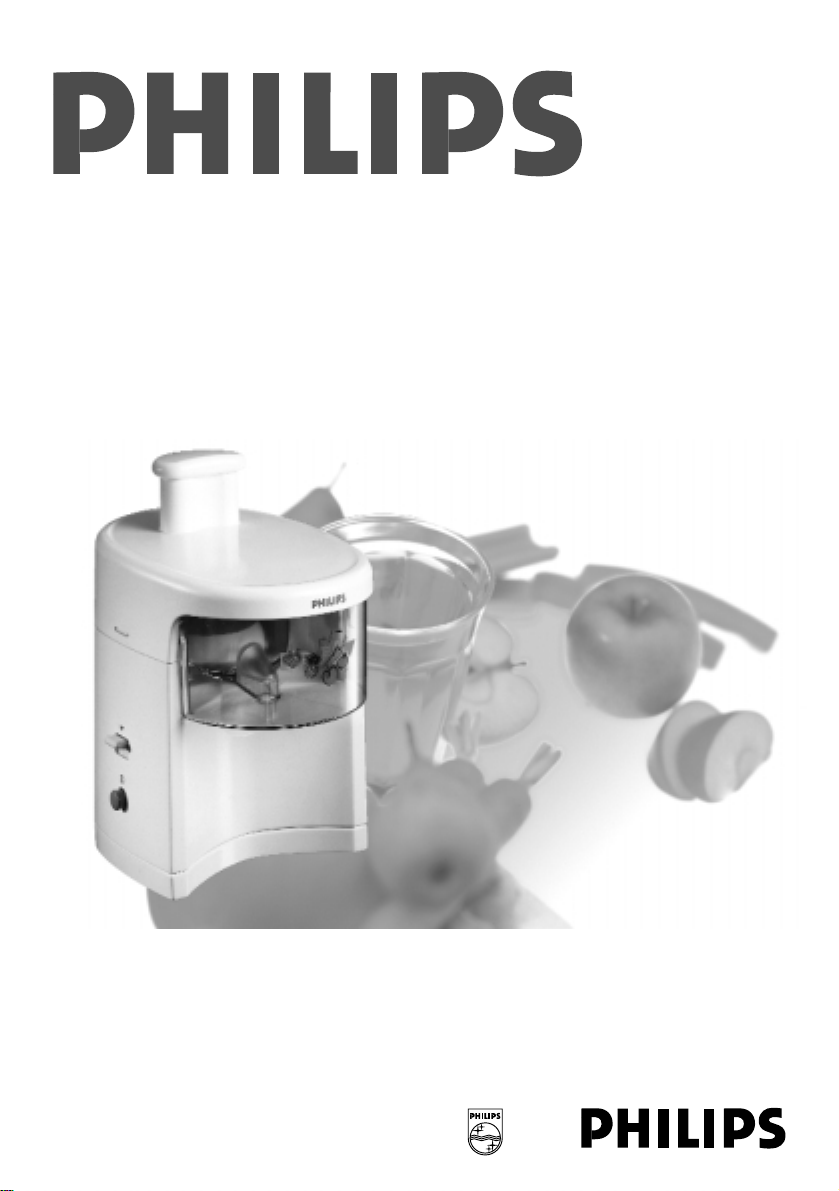
Page 1
HR 2821
Page 2

2
English Page 4
• Keep pages 3 and 30 open when reading
these operating instructions.
Français Page 6
• Pour le mode d'emploi: dépliez les pages 3 et 30.
Deutsch Seite 8
• Schlagen Sie beim Lesen der Gebrauchsanweisung Seiten 3 und 30 auf.
Nederlands Pagina 10
• Sla bij het lezen van de gebruiksaanwijzing de
pagina's 3 en 30 op.
Italiano Pagina 12
• Prima di usare l'apparecchio, aprite le
pagine 3e 30 e leggete attentamente le
istruzioni per l'uso.
Español Página 14
• Desplegar las páginas 3 y 30 al leer las
instrucciones de manejo.
Português Página 16
• Durante a leitura do modo de emprêgo,
desdobre e verifique as pág. 3 e 30.
Dansk Side 18
• Hold side 3 og 30 opslået mens De læser
brugsanvisningen.
Norsk Side 20
• Slå opp på side 3 og 30 før De leser videre.
Svenska Sid 22
• Ha sidan 3 och 30 utvikt när ni läser
bruksanvisningen.
Suomi Sivu 24
• Pidä sivut 3 ja 30 auki samalla kun luet
käyttöohjetta.
Page 3
3
1
A
B
C
D
E
F
G
H
I
Page 4

4
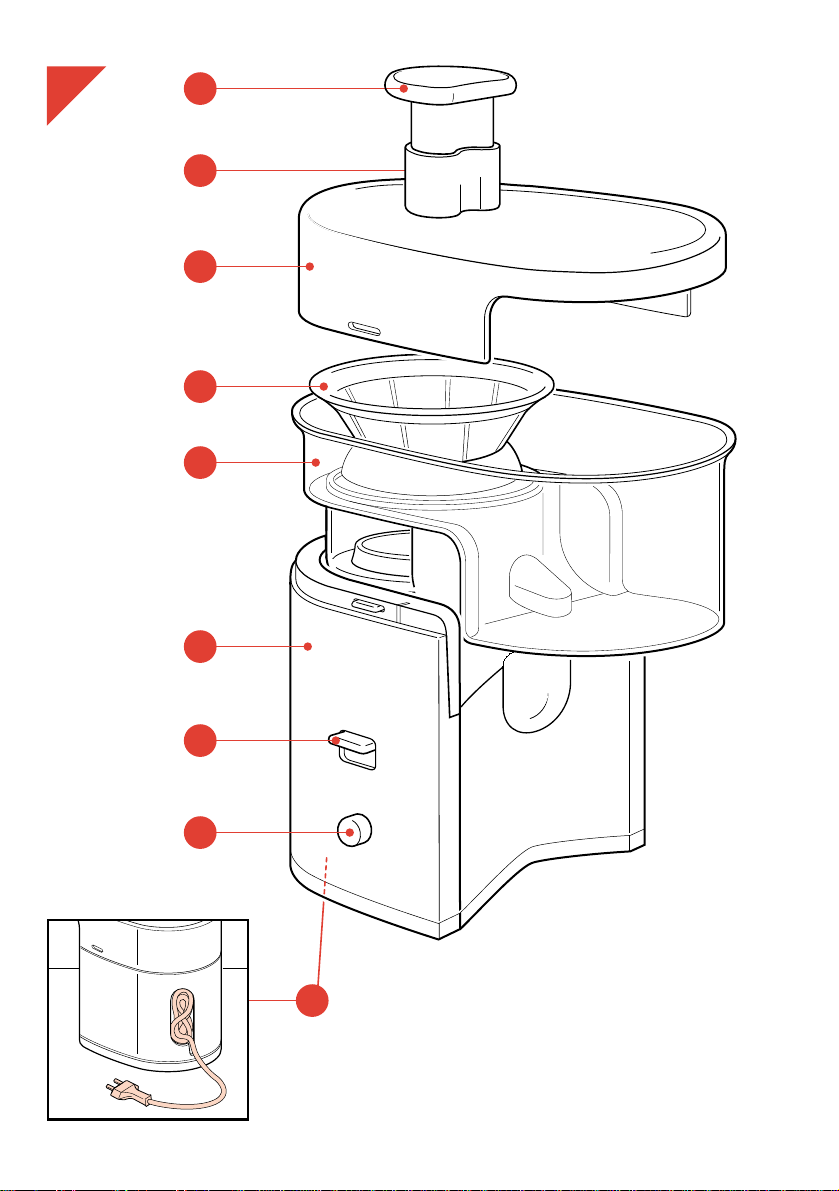
General description (fig. 1, page 3)
A Pusher
B Feeding tube
C Lid
D Sieve
E Pulp container
F Base unit
G Lid release knob
H On/off switch
I Mains cord storage
English
Important
• Read the instructions in conjunction with
the illustrations before using the
appliance.
• Avoid damage. Before connecting please
check if the voltage indicated on the
appliance corresponds to the mains
voltage in your home (110 - 127 V; 220 230 V; 230 - 240 V).
• Do not use the appliance when the
mains cord, the plug or other
components are damaged. If the mains
cord is damaged, it must only be
replaced by Philips or their service
representative, as special tools and/or
parts are required.
• Keep the appliance away from children.
• Do not leave the appliance switched on
unattended.
• Never use any accessories or parts from
other manufacturers or which have not
specifically been advised by Philips.
Your guarantee is void if such
accessories or parts have been used.
• Never put your fingers or cutlery into the
feeding tube. Only the provided pusher
is suited for this purpose.
• Let the sieve come to a complete stop
before pressing the lid release knob and
opening the lid.
Assembling
- Position the pulp container (fig. 2).
- Position the sieve (fig. 3).
- Place the lid and push it downwards until it is
locked (“Click!”) (fig. 4).
- Position your drinking glass carefully (i.e.
against the appliance) (fig. 5).
- Insert the mains plug into the wall socket.
Ingredients
• Always use fresh fruits and vegetables,
because they produce more juice.
• Especially advisable are pineapple, beetroot,
apple, cucumber, carrot, spinach, melon,
tomato, orange and grape.
• Starchy fruits, such as banana, paw-paw,
avocado, fig and mango fruit should not be
processed in this juice extractor.
For these types of fruit use a food processor or
a (bar) blender.
• It is not necessary to remove thin skins and
peels. Only thick ones of e.g. orange,
pineapple, apple, uncooked beetroot must be
removed.
• Leaves and stems of e.g. lettuce can also be
processed in the juice extractor.
• If you wish to make juice from orange, lemon,
mandarin or grape fruit, it is necessary to
unpeel and remove the white fibres as
otherwise the juice will acquire a bitter taste.
• Apple juice may quickly turn brown. A few drops
of lemon juice will slow down this process.
How to use
- Check if the lid is correctly placed.
• For your safety: the appliance can only
operate when the lid has been correctly
mounted on to the base unit.
- Wash the fruits and/or vegetable(s) (fig. 6) and
cut them in pieces (fig. 7) to fit into the feeding
tube.
- Switch the appliance on by pressing the on/off
switch (fig. 8).
- Put the pieces into the feeding tube and press
them gently downwards with the pusher (fig. 9).
• Do not press down with force. This would
give worse results and could even block the
rotating sieve.
• Never put any objects or your fingers in the
feeding tube.
- Take the glass out after the juice has stopped
flowing.
With this juice extractor you can make 100% pure
fruit juice and vegetable juice.
The appliance is simple to use and very easy to
clean.
Page 5

5
- Drink the juice immediately after it has been
extracted, as exposure to the open air for any
length of time will result in the juice losing its
nutritional value and its taste.
However, if you wish to keep the juice, put it
into the refrigerator in a well-closed container
for a maximum of 24 hours.
- When the pulp container is full:
switch off (fig. 10), and wait for the sieve to
come to a complete standstill,
press the release knob downwards to
disassemble the lid (fig. 11),
remove the pulp container (fig. 12),
empty the pulp container (fig. 13).
Reassemble the juice extractor and continue
the process.
Culinary hints
• With tomato juice you can prepare a delicious
Bloody Mary.
• Pulp of e.g. carrots, beetroots, cabbage,
spinach can be used as a basis for soup,
sauce, jam, ice-cream and dessert.
Cook the pulp with some spices. Liquidize the
cooked pulp using a food processor or a (bar)
blender.
Use tomato pulp to make a tomato paste.
• Try these combinations of juices: apple with
carrot, orange with grape, pineapple with
grapefruit, beetroot with carrot, carrot with
melon, apple with orange.
Cleaning
• Switch off and remove the mains plug from the
wall socket before cleaning.
• Disassemble the appliance for washing-up as
indicated in figs. 11-13.
• The base unit may be wiped with a damp cloth,
some detergent may be required.
• Do not use scourers, scouring pads, abrasives,
steel wool, acetone, alcohol etc.
• Wash the parts which have been in contact with
food in warm soapy water immediately after
use.
• Do not clean parts in a dishwasher.
• Use a soft washing-up brush for cleaning the
sieve. Never use pieces of cloth, sponges, steel
wool, abrasive etc. for this purpose.
For U.K. only:
Fitting a different plug
This appliance is fitted with a BS 1363 13 Amp.
plug.
Should you need to replace the plug, connect the
wires as follows:
Brown wire to the Live (L) terminal of the new
plug.
Blue wire to the Neutral (N) terminal of the new
plug.
Always fit the same value of fuse as that originally
supplied with your appliance.
Only use BS 1362 approved fuses.
As a guide only: Appliances under 700 W can
have a 3 Amp. fuse (red) and all others should
have a 13 Amp. fuse (brown).
When disposing of an old plug (particularly the
moulded type which has been cut from the mains
cord) always remove the fuse as the plug could be
dangerous if ever inserted in a live socket.
Page 6

6
Description générale (fig. 1, page 3)
A Poussoir
B Cheminée
C Couvercle
D Tamis
E Séparateur
F Bloc moteur
G Bouton de verrouillage
H Interrupteur marche/arrêt
I Rangement cordon d’alimentation
Français
Important
• Lisez les instructions en regardant les
illustrations avant d’utiliser l’appareil.
• Avant de brancher l’appareil, vérifiez si
la tension indiquée sur celui-ci
correspond bien à celle de votre
logement.
• N’utilisez pas l’appareil si le cordon
secteur, la fiche ou d’autres composants
sont endommagés. Vous devez
impérativement ramener votre appareil
dans un Centre Service Agréé car des
équipements et composants spécifiques
sont exigés.
• Tenez l’appareil hors de portée des
enfants.
• Ne quittez pas l’appareil lorsqu’il est en
marche.
• N’utilisez jamais d’accessoires ou
d’éléments en provenance d’autres
fabricants ou qui n’ont pas été
spécifiquement conseillés par Philips,
car votre garantie deviendrait caduque.
• N’introduisez jamais vos doigts ou un
couteau dans la cheminée. Utilisez
uniquement le poussoir fourni à cet
effet.
• Laissez le tamis s’arrêter complètement
avant de déverrouiller le couvercle.
Assemblage
- Positionnez le séparateur (fig. 2).
- Positionnez le tamis (fig. 3).
- Mettez en place le couvercle et poussez-le vers
le bas jusqu’à ce qu’il soit verrouillé (“clic”)
(fig. 4).
- Placez votre verre correctement (fig. 5).
- Branchez l’appareil.
Ingrédients
• Utilisez toujours des fruits et légumes frais qui
donneront plus de jus.
• Nous vous conseillons particulièrement :
ananas, betteraves, pommes, concombres,
carottes, épinards, melons, tomates, oranges et
raisins.
• Vous ne pouvez pas utiliser : bananes,
papayes, avocats, mangues, qui nécessitent un
robot ou un mixer.
• Il n’est pas nécessaire de retirer les peaux et
pelures, sauf sur les oranges, ananas,
pommes, betteraves crues.
• Les feuilles et tiges de laitue par exemple
peuvent être mis dans la centrifugeuse.
• Si vous désirez préparer des jus d’orange,
citron, mandarine ou pamplemousse, il est
nécessaire de les peler et de retirer les peaux
blanches, qui pourraient donner un goût amer
au jus.
• Le jus de pomme brunit rapidement. Afin de
l’éviter, ajoutez quelques gouttes de jus de
citron.
Utilisation
- Vérifiez si le couvercle est correctement placé.
• Pour votre sécurité : l’appareil ne peut être
mis en marche que si le couvercle est monté
correctement sur le bloc moteur.
- Lavez les fruits et/ou les légumes (fig. 6) et
coupez-les en morceaux (fig. 7) afin de les
introduire dans la cheminée.
- Mettez en marche l’appareil en appuyant sur
l’interrupteur (H) (fig. 8).
- Introduisez les morceaux dans la cheminée et
appuyez légèrement à l'aide du poussoir
(fig. 9), afin d'obtenir de meilleurs résultats et
de ne pas bloquer éventuellement le tamis.
• Ne mettez jamais d’objets ni vos doigts dans la
cheminée.
• Retirez le verre dès qu’il est rempli.
• Buvez le jus immédiatement, car il perd sa
valeur nutritionnelle et son goût si vous le
laissez à l’air libre trop longtemps.
Cette centrifugeuse vous permet de réaliser des
jus de fruits et légumes 100 % naturels.
L’appareil est simple à utiliser et très facile à
nettoyer.
Page 7

7
Néanmoins, vous pourrez conserver le jus
24 heures maximum dans un récipient bien
fermé au réfrigérateur.
- Quand le séparateur de pulpe est plein :
arrêtez l’appareil (fig. 10), attendez que le tamis
s’arrête complètement,
appuyez sur le bouton de verrouillage pour
retirer le couvercle (fig. 11),
retirez le séparateur (fig. 12),
videz-le (fig. 13).
Assemblez l’appareil et continuez la
préparation.
Conseils de préparation
• Vous pouvez préparer un délicieux “Bloody
Mary” avec du jus de tomates.
• La pulpe de carottes, betteraves, choux,
épinards, peut être utilisée comme base pour
les soupes, sauces, confitures, glaces et
desserts.
Faites cuire la pulpe avec quelques épices.
Utilisez un robot ou un mixer pour la rendre
liquide.
Utilisez de la pulpe de tomates pour faire une
pâte à la tomate.
• Essayez ces combinaisons de fruits: pomme et
carotte, orange, ananas et raisin, ananas et
pamplemousse, betterave et carotte, carotte et
melon, pomme et orange.
Nettoyage
• Arrêtez l’appareil et débranchez-le.
• Désassemblez l’appareil comme indiqué fig. 11
à 13.
• Vous pouvez nettoyer le bloc moteur avec un
chiffon humide, et éventuellement un peu de
détergent.
• N’utilisez jamais de produits abrasifs, éponges
métalliques, d’acétone, alcool, etc.
• Nettoyez immédiatement après utilisation les
éléments qui ont été en contact avec des
aliments.
• Aucun élément ne peut être mis au lavevaisselle.
• Nettoyez le tamis à l’aide d’une brosse.
N’utilisez jamais de chiffon, éponge, paille de
fer, abrasif, etc.
Page 8

8
Allgemeine Beschreibung (Abb. 1, Seite 3)
A Stopfer
B Einfüllöffnung
C Deckel
D Raspelsieb
E Tresterbehälter
F Grundgerät
G Deckelentriegelung
H Ein-/Ausschalter
I Kabelfach
Deutsch
Wichtig
• Lesen Sie die Gebrauchsanweisung
sorgfältig durch, und sehen Sie sich
dabei die Abbildungen an, bevor Sie das
Gerät zum ersten Mal benutzen.
• Prüfen Sie, bevor Sie das Gerät in
Betrieb nehmen, ob die
Spannungsangabe auf dem Typenschild
mit der örtlichen Netzspannung
übereinstimmt.
• Wenn das Netzkabel oder der Stecker
defekt oder beschädigt sind, müssen sie
von einer durch Philips autorisierten
Werkstatt ersetzt werden, da für die
Reparatur Spezial-Werkzeug und/oder
spezielle Teile benötigt werden.
• Halten Sie Kinder von dem Gerät fern.
• Lassen Sie das eingeschaltete Gerät
nicht unbeaufsichtigt.
• Verwenden Sie keine Zusatzteile oder geräte, die nicht von Philips
ausdrücklich empfohlen werden.
Anderenfalls erlischt die Garantie.
• Stecken Sie niemals Ihre Finger oder
Besteckteile in die Einfüllöffnung.
Verwenden Sie stets nur den
mitgelieferten Stopfer.
• Lassen Sie das Raspelsieb zum völligen
Stillstand kommen; drücken Sie dann
erst die Deckelentriegelung und öffnen
Sie den Deckel.
Zusammensetzen des Entsafters
- Setzen Sie den Tresterbehälter ein (Abb. 2).
- Setzen Sie das Raspelsieb ein (Abb. 3).
- Setzen Sie den Deckel auf, und drücken Sie ihn
hinunter, bis er (“Klick”) festsitzt (Abb. 4).
- Stellen Sie ein Trinkglas genau unter den
Auslauf, eng gegen das Gerät (Abb. 5).
- Stecken Sie den Stecker in die Steckdose.
Die Zutaten
• Verwenden Sie nur frisches Obst bzw. frisches
Gemüse. Sie erhalten dann mehr Saft.
• Besonders zu empfehlen sind Ananas, Äpfel,
Melonen, Orangen und Grapefruit bzw. Möhren,
rote Rüben, Tomaten, Gurken und Spinat.
• Stärkehaltige Früchte, wie Bananen, Papaya,
Avocado, Mango und Feigen, sollten mit
diesem Gerät nicht entsaftet werden. Sie sind
zu dickflüssig und würden das Gerät
verstopfen.
Verwenden Sie für diese Früchte einen
Stabmixer.
• Sie brauchen nur Früchte mit dicken oder
harten Schalen zu schälen, wie Ananas, Äpfel,
Orangen, Grapefruit und rohe rote Rüben.
• Blätter und Strünke (z.B. vom Kopfsalat)
können in diesem Gerät mitverarbeitet werden.
• Wenn Sie Zitrusfrüchte verarbeiten, sollten Sie
den weißen Anteil der Schalen gründlich
entfernen, weil sie sonst zu einem bitteren
Beigeschmack führen.
• Apfelsaft wird schnell braun. Geben Sie ein
paar Tropfen Zitronensaft hinzu, um diesen
Vorgang zu verzögern.
Der Gebrauch des Entsafters
- Prüfen Sie zunächst, ob der Deckel richtig
aufgesetzt ist.
• Zur Ihrer Sicherheit kann das Gerät nur
arbeiten, wenn der Deckel korrekt aufgesetzt
ist.
- Waschen Sie das Obst/Gemüse gründlich
(Abb. 6). Schneiden Sie das Obst/Gemüse in
Stücke (Abb. 7), die in die Einfüllöffnung
passen.
- Schalten Sie das Gerät am Ein-/Ausschalter ein
(Abb. 8).
- Geben Sie die Stücke in die Einfüllöffnung, und
drücken Sie langsam mit dem Stopfer nach
(Abb. 9).
• Drücken Sie niemals stark nach. Das führt
zu einem schlechten Ergebnis und kann das
Raspelsieb verstopfen.
Mit diesem Entsafter können Sie 100 % reinen
Frucht- oder Gemüsesaft zubereiten.
Das Gerät ist einfach zu bedienen und zu
reinigen.
Page 9

9
- Stecken Sie niemals Ihre Finger oder
irgendwelche Gegenstände in die
Einfüllöffnung.
- Nehmen Sie das Glas erst heraus, wenn kein
Saft mehr aus dem Gerät fließt.
- Trinken Sie den Saft möglichst sofort. Wenn er
längere Zeit der Luft ausgesetzt ist, verliert er
an Geschmack und an Nährwert.
Wenn Sie den Saft aufheben wollen, so gießen
Sie ihn in ein Gefäß und bewahren Sie es
festverschlossen, bis zu 24 Stunden im
Kühlschrank auf.
• Ist der Tresterbehälter voll, so ...
- schalten Sie das Gerät aus (Abb. 10), und
warten Sie bis das Raspelsieb zum völligen
Stillstand gekommen ist,
- drücken Sie die Deckelentriegelung (Abb. 11),
und nehmen Sie den Deckel
- und den Tresterbehälter ab (Abb. 12);
- leeren Sie den Tresterbehälter (Abb. 13).
Setzen Sie danach das Gerät wieder
zusammen. Sie können dann weiterarbeiten.
Hinweise zu den Zutaten
• Mit dem Saft der Tomaten können Sie köstliche
Cocktails, z.B. Bloody Mary, zubereiten.
• Das Fruchtfleisch von Möhren, roten Rüben,
Kohl und Spinat kann als Basis für Suppen und
Saucen dienen. Pürieren Sie das gekochte
Fruchtfleisch in einer Küchenmaschine oder mit
einem Stabmixer. Würzen Sie nach Belieben.
Das Fruchtfleisch von Obst kann zu
Marmeladen, Eiscreme oder Desserts
verwendet werden.
• Versuchen Sie folgende Kombinationen: Äpfel
und Möhren, Apfelsinen mit Trauben, Ananas
mit Grapefruit, rote Beete mit Möhren, Möhren
mit Melonen, Äpfel mit Apfelsinen.
Reinigung
• Schalten Sie vor jeder Reinigung das Gerät
aus, und ziehen Sie den Netzstecker.
• Nehmen Sie das Gerät zum Abwaschen
auseinander, wie in den Abb. 11 bis 13 gezeigt.
• Sie können das Grundgerät mit einem feuchten
Tuch abwischen, auf das Sie bei Bedarf etwas
Spülmittel aufgetragen haben.
• Verwenden Sie keine Scheuermittel,
Lösungsmittel wie Alkohol und Azeton und
keine ätzenden Substanzen.
• Waschen Sie alle Teile, die mit Nahrungsmitteln
in Berührung gekommen sind, nach Gebrauch
mit warmem Wasser ab, dem Sie etwas
Spülmittel zugesetzt haben.
• Spülen Sie die Teile des Geräts nicht im
Geschirrspüler.
• Benutzen Sie eine weiche Spülbürste zum
Säubern des Raspelsiebs. Verwenden Sie
hierzu niemals Lappen, Haushaltsschwämme,
Scheuermittel oder ähnliches.
Page 10

10
Algemene beschrijving (fig. 1, bladzij 3)
A Aandrukhulpje
B Vulbuis
C Deksel
D Zeef
E Opvangbak voor pulp
F Motorgedeelte
G Ontgrendelknop
H Aan/uit schakelaar
I Snoeropbergplaats
Nederlands
Belangrijk
• Bekijk de tekeningen en lees de
gebruiksaanwijzing voordat u het
apparaat in gebruik neemt.
• Voorkom schade. Controleer, voordat u
de stekker in het stopcontact steekt, of
het op het apparaat aangegeven voltage
overeenkomt met de netspanning in uw
huis (110 - 127 V; 220 - 230 V;
230 - 240 V).
• Gebruik het apparaat niet wanneer het
snoer, de stekker of een ander onderdeel
beschadigd is. Indien het snoer is
beschadigd, dient het uitsluitend te
worden vervangen door Philips, of een
door Philips daartoe aangewezen
reparateur, omdat voor de reparatie
speciale gereedschappen en/of
onderdelen vereist zijn.
• Houd het apparaat uit de buurt van
kinderen.
• Laat het apparaat niet zonder toezicht
werken.
• Gebruik nooit accessoires of onderdelen
van andere fabrikanten of die niet
uitdrukkelijk door Philips worden
aanbevolen. Uw garantie vervalt indien
zulke accessoires of onderdelen zijn
gebruikt.
• Steek nooit uw hand in de vulbuis. Steek
er ook geen keukengerei in (zoals
vorken, messen, lepels, spatels e.d.).
Alleen het meegeleverde aandrukhulpje
is hiervoor geschikt.
• Laat de zeef geheel tot stilstand komen
voordat u de ontgrendelknop indrukt en
het deksel opent.
In elkaar zetten
- Zet de opvangbak voor pulp op zijn plaats
(fig. 2).
- Zet de zeef op zijn plaats (fig. 3).
- Zet het deksel op zijn plaats en druk het omlaag
(“Klik!”) (fig. 4).
- Zet uw drinkglas goed op zijn plaats (d.w.z.
tegen de sapcentrifuge) (fig. 5).
- Steek de stekker in het stopcontact.
Ingrediënten
• Gebruik altijd verse vruchten en groenten: deze
geven meer sap.
• Vooral aan te bevelen zijn: ananas, rode biet,
appel, komkommer, wortel (peen), spinazie,
meloen, tomaat, sinaasappel en druif.
• Vruchten die zetmeel bevatten, zoals banaan,
papaja, avocado, vijg en mango zijn niet
geschikt voor de sapcentrifuge.
Gebruik voor deze soorten fruit een
foodprocessor, mengbeker of staafmixer.
• Het is niet nodig dunne schilletjes en vliezen te
verwijderen. Alleen dikke schillen, van bijv.
sinaasappel, ananas, appel, ongekookte rode
biet, moeten worden verwijderd.
• Bladeren en bladstelen van bijv. sla kunnen ook
in de sapcentrifuge worden verwerkt.
• Als u sap van sinaasappel, citroen, mandarijn of
grapefruit wenst, schil de vruchten dan eerst en
verwijder de witte binnenschil: deze geeft een
bittere nasmaak.
• Appelsap kan snel bruin worden. Een paar
druppels citroensap kan dit proces vertragen.
Gebruik
- Controleer of het deksel goed is geplaatst.
• Voor uw veiligheid: het apparaat kan alleen
werken indien het deksel goed op het
motorgedeelte is bevestigd.
- Was de vruchten en/of groente(n) (fig. 6) en
snijd ze in stukjes (fig. 7) die in de vulbuis
passen.
- Schakel het apparaat in door op de aan/uit
schakelaar te drukken (fig. 8).
- Doe de stukjes in de vulbuis en druk ze
zachtjes omlaag met het aandrukhulpje (fig. 9).
• Niet met kracht omlaag drukken. Dit zou tot
minder goede resultaten leiden en kan zelfs de
ronddraaiende zeef tot stilstand brengen.
• Steek nooit voorwerpen of uw vingers in de
vulbuis.
- Verwijder het drinkglas als er geen sap meer uit
het apparaat stroomt.
Met deze sapcentrifuge kunt u 100% zuivere
vruchtesappen en groentesappen bereiden.
Het apparaat is gemakkelijk te gebruiken en heel
eenvoudig schoon te maken.
Page 11

11
- Drink het sap meteen na het centrifugeren. Als
het enige tijd aan de lucht wordt blootgesteld,
verliest het sap zijn voedingswaarde en smaak.
Als u het sap echter wilt bewaren, doe het dan
in een goed afgesloten kan of pot en zet deze
voor max. 24 uur in de koelkast.
- Wanneer de opvangbak voor pulp vol is:
schakel het apparaat uit (fig. 10), en wacht tot
de zeef geheel tot stilstand is gekomen,
druk de ontgrendelknop omlaag om het deksel
los te maken (fig. 11),
verwijder de opvangbak voor pulp (fig. 12),
maak de opvangbak leeg (fig. 13).
Zet de sapcentrifuge weer in elkaar en ga
verder met het centrifugeren.
Culinaire tips
• Met tomatensap kunt u een heerlijke Bloody
Mary maken.
• Pulp van bijv. wortelen, rode bieten, kool of
spinazie kan worden gebruikt als basis voor
soep, saus, jam, dessert, ijs, enz.
Kook de pulp met wat kruiden. Pureer de
gekookte pulp met behulp van een
foodprocessor, mengbeker of staafmixer.
Gebruik de pulp van tomaat om tomatenpasta
te maken.
• Probeer eens deze combinaties van sappen uit:
appel met wortel, sinaasappel met druif, ananas
met grapefruit, rode biet met wortel, wortel met
meloen, appel met sinaasappel.
Schoonmaken
• Schakel het apparaat uit en haal de stekker uit
het stopcontact voordat u het apparaat gaat
schoonmaken.
• Haal het apparaat voor het sfwassen uit elkaar
zoals aangegeven in fig. 11-13.
• U kunt het motorgedeelte schoonmaken met
een vochtige doek, desgewenst met wat
vloeibaar schoonmaakmiddel.
• Gebruik geen krassende of schurende schoonmaakmiddelen, pannesponsen, schuurdoekjes
of -sponsen, staalwol, aceton, alcohol e.d.
• Maak de delen die met het voedsel in aanraking
zijn gekomen meteen na gebruik schoon in
warm sop en spoel ze af met heet water.
• Doe geen onderdelen in de afwasmachine.
• Gebruik een zachte nylon borstel voor het
schoonmaken van de zeef. Gebruik hiervoor
geen doekjes, sponsjes, staalwol, schuurmiddel
e.d.
Page 12

12
Descrizione generale (fig. 1, pag. 3)
A Pestello
B Apertura inserimento cibo
C Coperchio
D Setaccio
E Contenitore polpa
F Base motore
G Pulsante sgancio coperchio
H Interruttore ON/OFF (acceso/spento)
I Scomparto cavo di alimentazione
Italiano
IMPORTANTE
• Leggere attentamente le istruzioni e
osservare le illustrazioni prima di usare
l’apparecchio.
• Per evitare eventuali danni, controllate
che la tensione indicata sull’apparecchio
corrisponda a quella della rete locale
(110-127 V o 220-240 V).
• Non usate l’apparecchio nel caso in cui il
cavo di alimentazione, la spina o altre
parti risultino danneggiate. Nel caso
risulti danneggiato il cavo di
alimentazione, andrà sostituito con un
cavo speciale. In questo caso dovrete
rivolgervi ad un rivenditore autorizzato
Philips oppure ad un Centro di
Assistenza Philips del vostro paese.
• Tenete l’apparecchio fuori dalla portata
dei bambini.
• Non lasciate mai l’apparecchio acceso
nel caso doveste allontanarvi anche solo
per un attimo.
• Non usate mai accessori o parti che non
siano originali Philips o comunque non
specificamente autorizzati dalla Philips.
In questo caso, infatti, la garanzia non
sarebbe valida.
• Non mettete mai le mani o altri oggetti
nell’apertura per l’inserimento di frutta o
verdura. A tale scopo, utilizzate
l’apposito pestello.
• Aspettate che il setaccio sia
completamente fermo prima di premere
il pulsante sgancia coperchio ed aprire il
coperchio stesso.
Come montare l’apparecchio
- Posizionate il contenitore della polpa (fig. 2)
- Inserite il setaccio (fig. 3).
- Mettete il coperchio e premetelo verso il basso
fino a quando sentiret
e un “Click!” (fig. 4).
- Mettete il bicchiere appoggiandolo
delicatamente contro l’apparecchio (fig. 5).
- Inserite la spina nella presa di alimentazione.
Ingredienti
• Usate sempre frutta e verdura fresca per
ottenere una maggiore quantità di succo.
• Vi consigliamo soprattutto: ananas,
barbabietole, mele, cetrioli, carote, spinaci,
meloni, pomodori, arance e uva.
• I frutti ricchi di amido come le banane, gli
avocado, i manghi e i fichi non sono adatti per
l’uso con la centrifuga.
Per questi tipi di frutta vi consigliamo di
utilizzare un robot da cucina o un frullatore a
immersione.
• Non è necessario sbucciare la frutta o la
verdura, tranne nel caso di bucce molto dure o
spesse, come quelle delle arance, dell’ananas,
delle mele e delle barbabietole crude.
• Con la centrifuga è possibile utilizzare anche le
foglie della verdura (ad es. quelle di lattuga).
• Se volete estrarre il succo da arance, limoni,
mandarini o uva, vi consigliamo di sbucciare la
frutta e togliere la pellicina bianca affinché il
succo non assuma un sapore amarognolo.
• Il succo di mela diventa scuro molto
rapidamente. Basterà aggiungere qualche
goccia di limone per ritardare il fenomeno.
Come usare l’apparecchio
- Controllate che il coperchio sia stato
posizionato in modo corretto.
• Per una maggior sicurezza, l’apparecchio
funziona soltanto con il coperchio posizionato in
modo corretto sulla base del motore.
- Lavate la frutta e/o la verdura (fig. 6) e tagliatela
a pezzi (fig. 7) in modo che possano passare
facilmente attraverso l’apposita apertura.
- Accendete l’apparecchio premendo l’interruttore
ON/OFF (fig. 8).
- Inserite i pezzi nell'apposita apertura e premete
delicatamente verso il basso con il pestello
(fig. 9).
• Non premete con forza. Otterreste dei risultati
peggiori e si potrebbe perfino bloccare il
setaccio rotante.
Con questa centrifuga è possibile estrarre
purissimo succo di frutta e di verdura.
L’apparecchio è facile da usare e veloce da pulire.
Page 13

13
• Non inserite le dita e nessun tipo di oggetto
nell’apertura della centrifuga.
- Togliete il bicchiere non appena il succo cessa
di scorrere.
- Bevete immediatamente il succo in quanto
l’esposizione all’aria riduce il valore nutritivo e
rende meno intenso il gusto.
Nel caso tuttavia decideste di conservare il
succo estratto, mettetelo in frigorifero, in un
contenitore ben chiuso, per un massimo di
24 ore.
- Quando il contenitore della polpa è pieno:
spegnete l’apparecchio (fig. 10), ed aspettate
che il setaccio sia completamente fermo.
premete il pulsante di sgancio verso il basso
per togliere il coperchio (fig. 11);
togliete il contenitore della polpa (fig. 12);
svuotate il contenitore della polpa (fig. 13).
Rimettete a posto l’apparecchio e continuate a
centrifugare.
Consigli culinari
• Con il succo di pomodoro potrete preparare un
delizioso Bloody Mary.
• La polpa di carote, barbabietole, cavolo e
spinaci può essere utilizzata come base per
zuppe e salse.
Fate cuocere la polpa insaporendola con
alcune spezie. Riducetela poi in purea più o
meno liquida utilizzando un frullatore a
immersione o un robot da cucina.
Usate la polpa di pomodoro per preparare la
pasta.
• Assaggiate le seguenti combinazioni di succhi:
mela e carota, arancia e uva, ananas e
pompelmo, barbabietola e carota, carota e
melone, mela e arancia.
Pulizia
• Togliete la spina dalla presa di corrente prima
di procedere alle operazioni di pulizia.
• Smontate l’apparecchio come indicato nelle
figure 11-13.
• La base motore può essere pulita con uno
straccio umido ed eventualmente un po’ di
detersivo.
• Non usate sostanze abrasive, paglietta,
acetone, alcool ecc.
• Lavate le parti che sono venute a contatto con il
cibo in acqua tiepida saponata subito dopo
l’uso.
• Non lavate le parti in lavastoviglie.
• Usate una spazzolina morbida per pulire il
setaccio. Non usate assolutamente stracci,
spugne, pagliette, sostanze abrasive ecc.
Page 14

14
Descripción general (fig. 1, página 3)
A Empujador
B Tubo de llenado
C Tapa
D Tamiz
E Depósito de la pulpa
F Unidad básica
G Botón para liberar la tapa
H Interruptor de paro / marcha
I Almacenamiento del cable de red
Español
Importante
• Antes de usar el aparato, lean las
instrucciones junto con las
ilustraciones.
• Eviten los deterioros. Antes de
enchufarlo, comprueben si el voltaje
indicado en el aparato se corresponde
con el de su hogar (110 - 127 V ;
220 - 230 V ; 230 - 240 V).
• No usen el aparato cuando el cable de
red, la clavija u otro componente estén
deteriorados. Si el cable de red está
deteriorado, solo debe ser reemplazado
por Philips o por su Servicio autorizado,
ya que son necesarias herramientas y / o
piezas especiales.
• Mantengan el aparato fuera del alcance
de los niños.
• No dejen el aparato en marcha y sin
vigilancia.
• No usen nunca ningún accesorio o
piezas de otros fabricantes o que no
hayan sido específicamente aconsejadas
por Philips.
Su garantía quedará anulada si se han
usado tales accesorios o piezas.
• No pongan nunca sus dedos o
cuchillería dentro del tubo de llenado.
Para ello, solo es adecuado el
empujador que se suministra.
• Esperen a que el cedazo esté
completamente parado antes de
presionar el botón de liberación de la
tapa y abrirla.
Montaje
- Coloquen el depósito de la pulpa (fig. 2).
- Coloquen el tamiz (fig. 3).
- Coloquen la tapa y presiónenla hacia abajo
hasta que quede fijada (“ Click “)(fig. 4).
- Coloquen cuidadosamente el vaso que vayan a
utilizar (por ejemplo, contra el aparato) (fig. 5).
- Enchufen la clavija para la red en la toma de
corriente.
Ingredientes
• Usen siempre frutas y vegetales frescos, ya
que ellos producen más zumo.
• Especialmente aconsejables son : Piña,
remolacha, manzana, pepino, zanahoria,
espinacas, melón, tomate, naranja y uva.
• Las frutas que tienen fécula, como plátano,
papaya, aguacate, mango, higo, etc, no
deberán ser procesados en esta Licuadora.
Para ese tipo de frutas usen un procesador de
alimentos o una batidora (de varilla).
• No es necesario quitar las pieles y cortezas
finas. Solo deben quitarse las gruesas de, por
ejemplo, naranja, piña, manzana, remolacha
cruda, etc.
• Las hojas y tallos de, por ejemplo, lechuga
también pueden procesarse en la Licuadora.
• Si desean hacer zumo de naranja, limón,
mandarina o toronja, es necesario mondarlas y
quitar las fibras blancas ya que, de otro modo,
el zumo adquirirá un sabor amargo.
• El zumo de manzana puede volverse marrón
con rapidez. Unas pocas gotas de zumo de
limón retardarán este proceso.
Cómo usar la Licuadora
- Comprueben que la tapa esté correctamente
colocada.
• Para su seguridad : El aparato solo puede
funcionar cuando la tapa ha sido
correctamente montada sobre la unidad
básica.
- Laven las frutas y / o vegetales (fig. 6) y
córtenlos a trozos (fig. 7) para ponerlos en el
tubo de llenado.
- Presionando el interruptor paro / marcha
(fig. 8), pongan en marcha el aparato.
- Pongan los trozos en el tubo de llenado y, con
el empujador, presiónenlos suavemente hacia
abajo (fig. 9)
• No presionen con fuerza. Ello dará peores
resultados e, incluso, pueden llegar a bloquear
el tamiz rotativo
• No pongan nunca ni sus dedos ni ningún objeto
Con esta Licuadora pueden hacer un zumo de
frutas y de vegetales 100 % puro.
El aparato tiene un uso simple y es muy fácil de
limpiar.
Page 15

15
dentro del tubo de llenado.
- Saquen el vaso una vez el zumo haya cesado
de fluir.
- Beban el zumo inmediatamente después de ser
extraído, ya que la exposición al aire libre
durante algún período de tiempo dará como
resultado una pérdida de su valor nutricional y
de su sabor.
Sin embargo, si desean guardar el zumo,
pónganlo en el frigorífico en un frasco bien
cerrado y durante un máximo de 24 horas.
- Cuando el depósito de la pulpa esté lleno :
- Paren la Licuadora (fig. 10) y esperen a que el
cedazo esté completamente parado,
- Presionen el botón de liberación hacia abajo
para desmontar la tapa (fig. 11)
- Saquen el depósito de la pulpa (fig. 12)
- Vacíen el depósito de la pulpa (fig. 13)
Vuelvan a montar la Licuadora y sigan el
proceso.
Sugerencias culinarias
• Con el zumo de tomate pueden preparar
deliciosos “Bloody Mary”.
• La pulpa de, por ejemplo, zanahorias,
remolachas, coles, espinacas, puede usarse
como base para sopas, salsas, mermeladas,
helados y postres.
Cuezan la pulpa con algunas especies. Hagan
líquida la pulpa cocida, usando un procesador
de alimentos o una batidora (de varilla).
Usen la pulpa de tomate para hacer pasta de
tomate.
• Prueben estas combinaciones de zumos:
manzana con zanahoria, naranja con uva, piña
con toronja, remolacha con zanahoria,
zanahoria con melón, manzana con naranja.
Limpieza
• Antes de limpiarla, paren la Licuadora y
desenchufen la clavija para la red de la toma de
corriente.
• Para lavarlo, desmonten el aparato tal como se
indica en las figs. 11 - 13.
• La unidad básica puede ser limpiada frotando
con un paño húmedo y un poco de detergente
si es necesario.
• No usen desengrasadores, almohadillas
fregadoras, abrasivos, lana de acero, acetona,
alcohol, etc.
• Las piezas que hayan estado en contacto con
alimentos, lávenlas con agua jabonosa caliente
inmediatamente después del uso.
• No limpien las piezas en un lavavajillas.
• Usen un suave cepillo limpiador para limpiar el
tamiz. No usen nunca trozos de ropa, esponjas,
lana de acero, abrasivos, etc. para limpiarlo.
Page 16

16
Descrição geral (fig. 1, página 3)
A Pressor
B Tubo dos alimentos
C Tampa
D Peneira
E Reservatório da polpa
F Corpo da máquina
G Botão para soltar a tampa
H Comutador “on/off”
I Compartimento para o cabo
Português
Importante
• Leia cuidadosamente as instruções e
observe as ilustrações antes de utilizar o
aparelho pela 1ª vez.
• Evite estragos. Antes de ligar o
aparelho, certifique-se que a voltagem
nele indicada corresponde à voltagem
da sua casa (110-127 V; 220-230 V;
230-240 V).
• Não se sirva do aparelho se o cabo de
alimentação, a ficha ou outro qualquer
componente estiver danificado. Se o
cabo de alimentação estiver estragado,
só deverá ser substituído pela Philips ou
por um seu concessionário, dado haver
necessidade de aplicar peças e/ou
ferramentas especiais.
• Mantenha o aparelho fora do alcance
das crianças.
• Não deixe o aparelho ligado ou a
trabalhar sozinho.
• Nunca utilize acessórios ou peças
doutros fabricantes ou que não tenham
sido recomendados expressamente pela
Philips. A sua garantia cessará se
aplicar acessórios ou peças doutras
origens.
• Nunca ponha a mão ou qualquer objecto
dentro do tubo dos alimentos. Só deverá
ser utilizado o pressor indicado para o
efeito.
• Deixe o crivo parar por completo antes
de premir o botão para abrir a tampa.
Montagem
- Coloque o reservatório da polpa (fig. 2)
- Coloque a peneira (fig. 3)
- Coloque a tampa e empurre-a para baixo até
fechar (“Clique!”) (fig. 4)
- Coloque cuidadosamente o copo da bebida
(bem encostado à máquina) (fig. 5)
- Introduza a ficha na tomada de parede.
Ingredientes
• Utilize sempre fruta e legumes frescos porque
produzem mais sumo.
• Recomenda-se sobretudo: ananás, beterraba,
maçã, pepino, cenoura, espinafres, melão,
tomate, laranja e uvas.
• Frutos com amido, como a banana, a papaia, o
abacate, a manga, o figo, não deverão ser
processados nesta máquina.
Para esse tipo de frutos utilize um robot de
cozinha ou uma liquidificadora.
• Não se torna necessário retirar a pele ou a
casca fina. Só no caso de uma casca mais
grossa, como a laranja, o ananás, a maçã, a
beterraba crua se deverá tirar primeiro a pele.
• As folhas e as sementes, por exemplo da
alface, também podem ser tratadas nesta
centrifugadora.
• Se pretender fazer sumo de laranja, limão,
mandarim ou uva, deverá primeiro tirar-lhes a
pele e as fibras brancas. Caso contrário, o
sumo ficará com um gosto amargo.
• O sumo de maçã escurece muito rapidamente.
Se lhe deitar algumas gotas de sumo de limão
aguentar-se-á mais tempo.
Como utilizar
- Certifique-se que a tampa está correctamente
colocada.
• Para sua própria segurança: o aparelho só
poderá funcionar se a tampa estiver
devidamente colocada sobre o corpo da
máquina.
- Lave as frutas e/ou o(s) legume(s) (fig. 6) e
corte-os em pedaços (fig. 7) por forma a
caberem no tubo dos alimentos.
- Ligue a máquina, carregando no botão “on/off”
(fig. 8)
- Coloque os pedaços no tubo de alimentação e
empurre-os cuidadosamente para baixo com o
auxílio do pressor (fig. 9).
• Não faça força. Os resultados poderiam não
ser os desejados e o crivo poderia bloquear.
• Nunca ponha qualquer objecto ou os dedos
Com esta centrifugadora poderá fazer sumos de
fruta ou de vegetais 100% puros.
O aparelho é simples de utilizar e limpa-se com
muita facilidade.
Page 17

17
dentro do tubo dos alimentos.
- Quando o sumo deixar de sair, retire o copo.
- Beba o sumo imediatamente após ter sido feito,
porque se ficar exposto ao ar durante algum
tempo perderá o seu valor nutritivo e o sabor
natural.
Contudo, se quiser conservar o sumo, poderá
colocá-lo no frigorífico num recipiente bem
fechado, por um período máximo de 24 horas.
- Quando o reservatório da polpa estiver cheio:
desligue a máquina (fig. 10), e aguarde até o
crivo se imobilizar por completo.
carregue no botão para baixo para soltar a
tampa (fig. 11),
retire o depósito da polpa (fig. 12),
esvazie o depósito (fig. 13).
Volte a colocar tudo na máquina e continue o
trabalho.
Sugestões culinárias
• Com sumo de tomate poderá preparar um
delicioso “Bloody Mary”.
• A polpa de, por exemplo, cenouras, beterrabas,
couves, espinafres, poderá ser aproveitada
como base para sopas, molhos, compotas,
gelados e sobremesas.
Cozinhe a polpa com alguns condimentos.
Liquefaça a polpa cozida com um robot de
cozinha ou um liquidificador.
Utilize polpa de tomate para fazer pasta de
tomate.
• Experimente estas combinações de sumos:
maçã com cenoura, laranja com uva, ananás
com toranja, beterraba com cenoura, cenoura
com melão, maçã com laranja.
Limpeza
• Antes de limpar, desligue a máquina e retire a
ficha da tomada de corrente.
• Desmonte o aparelho para a lavagem conforme
indicado nas figs. 11-13.
• O corpo da máquina pode ser limpo com um
pano húmido e, se necessário, com um pouco
de detergente.
• Não utilize desengordurantes, esfregões,
abrasivos, palha de aço, acetona, álcool, etc.
• Lave as peças que estiveram em contacto com
os alimentos numa sabonária de água quente,
imediatamente após a utilização.
• Não lave nada na máquina da loiça.
• Sirva-se duma escova macia para limpar a
peneira. Nunca utilize panos, esponjas, palha
de aço, abrasivos, etc.
Page 18

18
Generel beskrivelse (fig. 1, side 3).
A Nedstopper
B Tragt
C Dæksel
D Rivesi
E Beholder for frugtmos
F Motorenhed
G Udløserknap til dæksel
H Tænd/sluk kontakt
I Rum til opbevaring af ledning
Dansk
Vigtigt
• Læs brugsanvisningen og studér
illustrationerne, før apparatet tages i
brug.
• Undgå beskadigelse af apparatet. Før
der sluttes strøm til, kontrolleres det, at
spændingsangivelsen på apparatet
svarer til den lokale netspænding (220230V).
• Brug ikke apparatet, hvis ledning, stik
eller andre dele er beskadigede. Hvis
ledningen beskadiges, må den kun
udskiftes af Philips, da der kræves
specielt værktøj og/eller reservedele til
udskiftningen.
• Hold børn væk fra apparatet.
• Efterlad aldrig apparatet uden opsyn, når
det er i gang.
• Brug ikke dele eller tilbehør af andre
fabrikater, eller dele og tilbehør, som
ikke er anbefalet af Philips, da garantien
i så fald vil bortfalde.
• Stik aldrig fingre eller f.eks. bestik ned i
tragten. Brug altid kun den medleverede
nedstopper til dette formål.
• Vent altid med at trykke på
udløserknappen og fjerne dækslet, til
rivesien er helt stoppet af sig selv.
Sådan samles apparatet:
- Sæt frugtmos-beholderen på (fig. 2)
- Fastgør rivesien (fig. 3)
- Sæt dækslet på og tryk det ned, til det låses
fast (“klik!”) (fig. 4).
- Anbring Deres saftbæger korrekt (d.v.s. ind
mod apparatet)(fig. 5).
- Sæt stikket i stikkontakten og tænd den.
Ingredienser:
• Anvend så vidt muligt kun friske frugter og
grøntsager, da de er mest saftige.
• Ananas, rødbeder, æbler, agurker, gulerødder,
spinat, meloner, tomater, citrusfrugter og druer
er specielt velegnede.
• Frugt, der indeholder meget stivelse, f.eks.
bananer, papaya, avocado, mango og figner,
egner sig ikke til saftpresning.
I stedet foreslås det, at anvende en
foodprocessor eller (stav)blender til denne type
frugt.
• Det er ikke nødvendigt at fjerne tynde skræller
eller hinder. Kun citrusfrugter, ananas, æbler og
ukogte rødbeder skal skrælles.
• Grøntsagsblade og stilke fra f.eks. salat kan
også kommes i saftpresseren.
• Hvis De vil lave saft af appelsin, citron,
mandarin eller grapefrugt, skal frugterne
skrælles og den hvide hinde fjernes, da denne
ellers giver saften en bitter smag.
• Æblesaft bliver hurtigt brun. Denne proces kan
man forsinke ved tilsætning af nogle få dråber
citronsaft.
Sådan anvendes saftpresseren:
- Kontrollér, at dækslet er sat rigtigt på.
• Af sikkerhedshensyn, kan apparatet kun
køre, når dækslet er korrekt monteret på
motorenheden.
- Grøntsager og/eller frugt skylles (fig. 6) og
skæres i passende stykker (fig. 7).
- Tænd for apparatet på tænd/sluk kontakten
(fig. 8).
- Kom frugt/grøntsags-stykkerne i tragten og pres
dem let ned med nedstopperen (fig. 9).
• Brug aldrig magt. Dette kan give et dårligt
resultat, og man risikerer samtidig at blokere
den roterende rivesi.
- Stik aldrig Deres fingre eller nogen form for
genstande ned i tragten.
- Fjern saftbægeret, når saften stopper med at
løbe.
- Drik saften straks efter presningen, da saft
Med denne saftpresser kan De fremstille 100%
ren frugtjuice og grønsagssaft.
Apparatet er nemt at bruge og utroligt let at
rengøre.
Page 19

19
hurtigt mister næringsværdi og smag, når den
kommer i kontakt med luften.
Ønsker De imidlertid at opbevare saften,
hældes den i en tætsluttende beholder og
sættes i køleskab - dog i højst 24 timer.
- Når beholderen til frugtkød er fuld:
Sluk for apparatet (fig. 10), og vent til rivesien
er helt stoppet af sig selv,
tryk udløserknappen ned og fjern dækslet
(fig. 11),
løft beholderen med frugtkød af (fig. 12),
og tøm den (fig. 13).
Saml saftpresseren igen og fortsæt processen.
Kulinariske tips:
• Prøv en velsmagende “Bloody Mary” med friskpresset tomatjuice.
• Frugt/grøntsagskød fra f.eks. gulerødder,
rødbeder, kål og spinat kan bruges som basis
for supper, sauce, marmelade, flødeis og
desserter. Kog det først med lidt krydderier,
hvorefter det blendes i en foodprocessor eller
med en (stav)blender. Tomatmos anvendes til
tomatpasta.
• Prøv også følgende saftblandinger: Æble med
gulerod, appelsin med druer, ananas med
grapefrugt, rødbede med gulerod, æble med
appelsin.
Rengøring:
• Sluk for apparatet og tag stikket ud af
stikkontakten, før rengøring.
• Adskil apparatet for rengøring som vist i
fig. 11-13.
• Motorenheden kan tørres af med en fugtig klud
eventuelt tilsat lidt opvaskemiddel.
• Der må ikke anvendes skurepulver,
skuresvampe, slibemidler, ståluld, acetone,
sprit eller lignende.
• Dele, der har været i berøring med fødevarer,
vaskes i varmt sæbevand straks efter brugen dog aldrig i opvaskemaskine.
• Brug en blød opvaskebørste til rivesien. Brug
aldrig klude, svampe, ståluld, slibemidler o.l. til
dette formål.
Page 20

20
Generell beskrivelse (fig. 1, side 3).
A Stamper
B Påfyllingsåpning
C Lokk
D Sil
E Frukt/kjøtt oppsamler
F Motorenhet
G Utløserknapp for lokket
H På/Av bryter
I Oppbevaringsplass til nettledning
Norsk
Viktig
• Les bruksanvisningen sammen med
illustrasjonene før apparatet taes i bruk.
• Unngå skade. Før apparatet tilkobles
vennligst kontroller om spenningen på
apparatet stemmer overens med nettspenningen i Deres hjem (110/ 127 V;
220/230 V; 230/240 V).
• Bruk ikke apparatet hvis nettledningen,
pluggen eller andre deler er skadet. Hvis
nettledningen på dette apparatet skulle
bli skadet, må den kun skiftes av Philips
eller Deres service representanter, da
spesielt verktøy og/eller deler er
nødvendig.
• La ikke barn bruke apparatet.
• Forlat ikke apparatet når det er i bruk.
• Bruk ikke utstyr eller deler fra andre
fabrikanter uten at De har blitt anbefalt
av Philips. Deres garanti er ikke gyldig
hvis slikt utstyr eller deler er blitt brukt.
• Putt aldri fingrene eller kjøkkenredskap i
påfyllingsåpningen.
Bare den medfølgende stamperen er
egnet til dette formål.
• La silen stoppe helt før utløserknappen
til lokket trykkes ned og lokket åpnes.
Montering
- Sett fruktkjøtt oppsamleren på plass (fig. 2).
- Sett silen på plass (fig. 3).
- Legg lokket på og skyv det ned til det låses
(“klikk”) (fig. 4).
- Plasser et glass slik at saften vil renne rett i
glasset (med andre ord mot apparatet) (fig. 5).
- Sett støpselet i stikkontakten.
Ingredienser
• Bruk alltid frisk frukt og grønnsaker, fordi de
inneholder mer saft.
• Spesielt anbefales: ananas, rødbeter, eple,
agurk, gulerot, spinat, melon, tomat, appelsin
og grapefrukt.
• Frukt som inneholder mye stivelse slik som
banan, papaya, avokado, mango, fiken, må ikke
behandles i denne saftsentrifugen. For denne
type frukt bruk en foodprocessor, hurtigmikser
eller stavmikser.
• Det er ikke nødvendig å fjerne tynt skinn og
skall. Bare de tykke skallene på f.eks. appelsin,
ananas, eple, ukokte rødbeter må fjernes.
• Blader og stilker fra f.eks. salat kan også
behandles i saftsentrifugen.
• Hvis De ønsker å lage juice fra appelsin, sitron,
mandarin eller grapefrukt er det nødvendig å
skrelle og fjerne de hvite fibrene. Disse vil ellers
gi juicen en bitter smak.
• Eplejuice kan fort bli brun. Noen dråper
sitronsaft vil forsinke denne prosessen.
Bruk
- Kontroller om lokket er satt riktig på plass.
• For Deres sikkerhet: apparatet kan bare brukes
når lokket er riktig montert på motorenheten.
- Vask frukten/grønnsakene godt (fig. 6) og skjær
dem i biter (fig. 7) slik at de passer i
påfyllingsåpningen.
- Slå på apparatet ved å trykke på på/av bryteren
(fig. 8).
- Ta frukten/grønnsakene opp i påfyllingsåpningen og press forsiktig ned ved hjelp av
stamperen (fig. 9).
• Press ikke ned med stor kraft. Dette vil gi
dårligere resultater og kan til og med blokkere
den roterende silen.
• Putt aldri fingre eller andre gjenstander ned i
påfyllingsåpningen.
- Ta glasset ut etter at juicen har sluttet å renne
ned.
- Drikk juicen umiddelbart etter at den er laget,
da kontakt med luft over tid vil føre til at juicen
Med denne saftsentrifugen kan De lage 100 % ren
fruktjuice og grønnsakjuice. Apparatet er enkelt å
bruke og lett å rengjøre.
Page 21

21
mister sin næringsverdi og smak. Men, hvis De
ønsker å oppbevare juicen, plasser den i
kjøleskapet i en tett beholder i maksimalt
24 timer.
- Når fruktoppsamleren er full:
Slå av apparatet (fig. 10), og vent til silen har
stoppet helt; trykk ned frigjøringsknappen for å
frigjøre lokket (fig. 11),
Fjern fruktoppsamlingsbeholderen (fig. 12),
Tøm fruktoppsamlingsbeholderen (fig. 13),
Sett sammen saftsentrifugen igjen og fortsett
prosessen.
Tips
• Med tomatjuice kan De lage en delikat Bloody
Mary.
• Fruktkjøtt fra f.eks. gulerøtter, rødbeter, kål,
spinat, kan brukes som basis for supper,
sauser, syltetøy, iskrem og desserter.
Kok opp fruktkjøttet med noe krydder. Kjør det
kokte fruktkjøttet i en foodprocessor,
hurtigmikser eller stavmikser.
Bruk tomatkjøtt til å lage tomatpure.
• Prøv disse juice-kombinasjonene: eple med
gulrot, appelsin med druer, ananas med
grapefrukt, rødbeter med gulrot, gulrot med
melon, eple med appelsin.
Rengjøring
• Slå av apparatet og trekk støpselet ut av
stikkontakten før rengjøring.
• Demonter apparatet for rengjøring som vist i
figurene 11-13.
• Motorenheten kan tørkes med en fuktig klut.
Noe vaskemiddel kan være nødvendig.
• Bruk ikke børste, skuresvamp, slipemidler,
stålull, aceton, alkohol etc.
• Vask delene som har vært i kontakt med maten
med varmt såpevann rett etter bruk.
• Vask ikke delene i oppvaskmaskin.
• Bruk en myk oppvaskbørste til rengjøring av
silen. Bruk aldri kluter, svamper, stålull,
slipemiddel etc. til dette formål.
Page 22

22
Råsaftcentrifugens delar
A Påmatare.
B Mataröppning.
C Lock.
D Rivare/sil.
E Behållare för restmassa.
F Motorenhet.
G Knapp för att lossa locket.
H Till/från-knapp.
I Förvaringsutrymme för nätsladden.
Svenska
Viktigt
• Före användning, kontrollera att
uppgiften om spänning (V = Volt) på
typskylten stämmer med den spänning
du har i ditt hem. Om det inte står rätt
spänning på typskylten, vänd dig då till
inköpsstället.
• Använd inte apparaten om sladden,
stickproppen eller andra delar är
skadade.
• Om sladden på denna apparat skadas
måste den bytas av Philips eller av deras
serviceombud, eftersom specialverktyg
krävs.
• Låt inte barn hantera apparaten.
• Lämna aldrig apparaten utan uppsikt när
den är igång.
• Använd inga delar eller tillbehör av annat
fabrikat eller som inte uttryckligen
rekommenderas av Philips. Philips
ansvarar inte för skador, som uppstår i
samband med användning av sådana
delar.
• Stoppa aldrig ner fingrarna i
mataröppningen och använd aldrig
något verktyg för att trycka ner
ingredienserna. Använd endast den
medföljande påmataren.
• Vent altid med at trykke på
udløserknappen og fjerne dækslet, til
rivesien er helt stoppet af sig selv.
• Låt rivare/sil stanna fullständigt innan du
trycker på knappen för att lossa och
öppna locket.
Läs först hela bruksanvisningen! Spara den!
Spara köpbevis och kvitto!
Med denna råsaftcentrifug kan du göra 100 % ren
frukt- och grönsaksjuice.
Råsaftcentrifugen är enkel att använda och
mycket lätt att göra ren.
Så här sätter du ihop råsaftcentrifugen
- Sätt behållaren för restmassa (E) på plats, fig 2.
- Sätt i rivaren/silen (D), fig 3.
- Sätt på locket (C) och tryck det nedåt tills det
fäster med ett “klick”, fig 4.
- Ställ ett dricksglas mitt under utloppsöppningen
för saften, fig 5.
- Sätt stickproppen i vägguttaget.
Ingredienser
• Använd alltid färsk frukt eller grönsaker,
eftersom färska råvaror innehåller mest saft.
• Speciellt rekommenderas äpplen, morötter,
gurka, tomat, apelsin, druvor, ananas, melon,
spenat och rödbetor.
• Stärkelserika frukter och grönsaksfrukter som t
ex bananer, papaya, avocado, mango och
fikon, skall inte centrifugeras i denna
råsaftcentrifug.
Använd en matberedare, mixer eller mixerstav
till dessa frukter.
• Det är inte nödvändigt att ta bort tunna skal och
kärnor. Endast tjocka skal på t ex apelsiner,
ananas, äpplen, råa rödbetor måste tas bort.
• Blad och stjälkar från t ex sallat kan
centrifugeras i denna råsaftcentrifug.
• För att undvika att juice från citrusfrukter blir
besk, skala och tag bort den vita hinnan på t ex
apelsiner, citroner, mandariner och grapefrukt.
• Äppelsaft blir fort brunaktig. Några droppar
citronsaft fördröjer denna process.
Användning
- Kontrollera att locket (C) är korrekt påsatt.
• Av säkerhetsskäl: Råsaftcentrifugen kan
startas endast när locket (C) är rätt påsatt på
motorenheten (F).
- Tvätta frukt och/eller grönsaker, fig 6, och skär
dem dem i bitar som passar i (B)en, fig 7.
- Starta råsaftcentrifugen genom att trycka på
Till/från-knappen (H), fig 8.
- Lägg fruktbitarna i mataröppningen och tryck
ner dem försiktigt med påmataren (A), fig 9.
• Använd inte för stor kraft. Det kan ge sämre
resultat och även blockera den roterande
rivare/silen.
• Stoppa aldrig andra redskap eller fingrarna i
mataröppningen.
- Tag bort glaset när saften har slutat att rinna.
- Drick fruktsaften omedelbart. Om den får stå så
att luft kommer åt den, försämras
näringsinnehåll och smak snabbt.
Om du vill spara saften, ställ in den i kylskåp i
Page 23

23
en behållare med tättslutande lock i högst 24
timmar.
- När behållaren för restmassa är full:
Stäng av motorn, fig 10, och vänta till dess att
rivare/sil har slutat rotera och stannat
fullständigt.
Tryck knappen för att lossa locket (G) nedåt, för
att lyfta av locket, fig 11,
Tag bort behållaren för restmassa, fig 12,
Töm behållaren för restmassa, fig 13.
Sätt ihop råsaftcentrifugen igen och fortsätt
centrifugeringen.
Tips
• Av tomatjuice kan du bereda en läcker Bloody
Mary.
• Restmassan av t ex morötter, rödbetor, kål och
spenat kan användas som bas till soppa och
sås.
Koka restmassan med kryddor och buljong.
Mixa den kokta restmassan med hjälp av en
matberedare, mixer eller mixerstav.
Använd tomat-restmassa för att göra
tomatpuré.
• Prøv også følgende saftblandinger: Æble med
gulerod, appelsin med druer, ananas med
grapefrugt, rødbede med gulerod, æble med
appelsin.
• Prova dessa kombinationer av juice, äpple med
morot, apelsin med vindruva, ananas med
grapefrukt, rödbeta med morot, morot med
melon, äpple med apelsin.
Rengöring
• Stäng av motorn och drag stickproppen ur
vägguttaget före rengöringen.
• Tag isär råsaftcentrifugen för rengöring, enligt
fig 11 - 13.
• Doppa aldrig motorenheten (F) i vatten eller
spola den. Den kan torkas av med en väl
urvriden fuktig trasa. Du kan använda
diskmedel om så behövs.
• Använd aldrig skurpulver, skrubbsvamp, stålull
eller liknande och aldrig aceton, sprit eller andra
starka lösningsmedel eller vätskor.
• De delar som varit i kontakt med frukten diskas
snarast i varmt vatten med diskmedel.
• Inga delar får diskas i diskmaskin.
• Använd en mjuk diskborste för att göra ren
rivaren/silen. Använd aldrig disktrasa, svamp,
stålull, skurpulver etc för detta ändamål.
Page 24

24
Laitteen osat (kuva 1, sivu 3)
A Syöttöpainin
B Syöttösuppilo
C Kansi
D Siiviläraastin
E Jäteastia
F Runko
G Irrotuskytkin
H Käynnistyskytkin
I Johtopesä
Suomi
Tärkeää
• Lue käyttöohje ja katsele kuvat ennen
laitteen käyttöönottoa.
• Tarkista ennen käyttöönottoa, että
laitteen jännitemerkintä vastaa
paikallista verkkojännitettä (220-230 V).
• Tarkista liitosjohdon kunto
säännöllisesti. Jos tämän laitteen
verkkoliitosjohto vaurioituu, se on
korvattava erikoisjohdolla. Ota yhteys
lähimpään Philips-myyjään tai Philipshuoltoon.
•Älä anna lasten käyttää laitetta.
•Älä jätä laitetta toimintaan ilman
valvontaa.
•Älä käytä laitteen kanssa muiden
valmistajien tarvikkeita tai osia, ellei
Philips ole näin neuvonut. Takuu lakkaa
olemasta voimassa, jos tällaisia osia
käytetään.
•Älä työnnä sormia tai ruokailuvälineitä
syöttösuppiloon. Paina aineita vain
tähän tarkoitetulla syöttöpainimella.
•Älä upota laitetta veteen.
• Jos laite on pudonnut veteen, irrota
ensin pistotulppa pistorasiasta, ennen
kuin nostat laitteen vedestä.
• Tarkistuta veteen pudonnut laite
huollossa ennen käyttöönottoa.
• Anna siiviläraastimen pysähtyä
kokonaan, ennen kuin painat
irrotuspainiketta ja avaat kannen.
Osien kokoaminen
- Laita jäteastia paikalleen (kuva 2).
- Laita siiviläraastin paikalleen (kuva 3).
- Aseta kansi ja paina alas, niin että se lukkiutuu
(“Naps!”) (kuva 4).
- Laita lasi mehuaukon alle (laitetta vasten)
(kuva 5).
- Työnnä pistotulppa pistorasiaan.
Raaka-aineet
• Käytä aina tuoreita vihanneksia ja kypsiä
hedelmiä, koska niistä tulee enemmän mehua.
• Erityisen suositeltavia ovat ananas, punajuuri,
omena, kurkku, porkkana, pinaatti, meloni,
tomaatti, appelsiini ja greippi.
• Runsaasti tärkkelystä sisältäviä hedelmiä, kuten
banaani, papaya, avokado, mango, viikuna, ei
kannata käsitellä mehulingossa.
Näille sopii monitoimikone, tehosekoitin tai
sauvasekoitin.
• Ohuita kuoria ei tarvitse poistaa. Ainoastaan
esim. appelsiinin, ananaksen, omenan, raa’an
punajuuren paksu kuori on poistettava.
• Esim. salaatin lehdet ja varret kannattaa kiertää
nippuun ennen syöttösuppiloon työntämistä.
• Sitrushedelmistä on syytä poistaa myös kuoren
valkoinen nahka, ettei mehusta tule kitkerää.
• Omenamehu tummuu nopeasti. Muutama
pisara sitruunamehua hidastaa tummumista.
Käyttö
- Tarkista, että kansi on kunnolla kiinni.
• Turvallisuuden takia laite ei käynnisty, ellei
kansi ole kunnolla kiinni rungossa.
- Pese hedelmät ja/tai kasvikset hyvin (kuva 6) ja
leikkaa syöttösuppiloon sopiviksi paloiksi
(kuva 7).
- Käynnistä laite painamalla käynnistyskytkintä
(kuva 8).
- Aseta palat syöttösuppiloon ja paina kevyesti
syöttöpainimella (kuva 9).
• Älä paina kovaa. Tulos on huonompi ja pyörivä
siiviläraastin saattaa jopa juuttua paikalleen.
• Älä koskaan työnnä apuvälineitä tai sormiasi
syöttösuppiloon.
- Kun mehua ei enää valu, nosta mehulasi pois.
- Juo mehu heti kun se on valmista, sillä
pidempiaikainen kosketus ilman kanssa
heikentää mehun ravintoarvoa ja makua.
Jos haluat säilyttää mehua, laita se suljetussa
astiassa heti jääkaappiin enintään 24 tunniksi.
- Kun jäteastia on täynnä:
katkaise laitteen toiminta (kuva 10), että
Tällä mehulingolla voi valmistaa täystuoremehua
hedelmistä ja kasviksista.
Laitteen käyttö ja puhdistus on helppoa.
Page 25

25
siiviläraastin pysähtyy kokonaan,
paina irrotuspainiketta ja poista kansi (kuva 11)
poista jäteastia (kuva 12),
tyhjennä jäteastia (kuva 13).
Kokoa osat takaisin ja jatka käsittelyä.
Vihjeitä
• Tomaattimehusta voi valmistaa herkullisen
Bloody Maryn.
• Jätesosetta voidaan käyttää keittojen,
kastikkeiden, hillojen, jäätelön ja jälkiruokien
valmistuksessa. Keitä jätesose ja hienonna
monitoimikoneella, tehosekoittimella tai
sauvasekoittimella.
Tomaatin jätesosetta voi käyttää pastaruokiin.
• Kokeile erilaisia mehuyhdistelmiä: omenaa ja
porkkanaa, appelsiinia ja viinirypäleitä,
ananasta ja greippiä, punajuurta ja porkkanaa,
porkkanaa ja melonia, omenaa ja appelsiinia.
Puhdistus
• Katkaise toiminta ja irrota pistotulppa
pistorasiasta ennen puhdistusta.
• Pura irrotettavat osat puhdistusta varten
kuvissa 11-13 näytetyllä tavalla.
• Runko puhdistetaan pyyhkimällä kostealla
liinalla. Käytä tarvittaessa hieman pesuainetta.
• Älä käytä naarmuttavia, syövyttäviä, alkoholia
tai asetonia sisältäviä puhdistusaineita.
• Pese ruoan kanssa kostetuksessa olleet osat
lämpimässä pesuvedessä heti käytön jälkeen.
• Älä pese astianpesukoneessa.
• Käytä siiviläraastimen puhdistamiseen
pehmeää harjaa. Älä käytä pesuliinaa, sientä,
teräsvillaa yms.
Oikeus muutoksiin varataan.
Page 26

26
2 3
4
13
5
9
6
10
2
1
7
11
8
12
Page 27

27
Page 28

4222 000 87642
;
 Loading...