

Philips HR2380, HR2382, HR2381 User Manual
1
HR2380, HR2381
HR2382
16 15 13 12
14
11
10
1
9
2
3
8
4
5
7
Open ap
Abrir solapa
Ouvrez le rabat
Specifications are subject to change without notice
Les caractéristiques sont susceptibles d’être modifiées sans préavis
© 2018 Koninklijke Philips N.V.
All rights reserved.
Tous droits réservés.
3000 018 30581 A
EN User manual 5
ES Manual del usuario 16
6
2
1 2 3
FR Guide d’utilisation 27
45
FRANÇAIS
3
LISTED
6
10
4
7
12
14 15 16
1
2
18
22
19
23
20
24
37
5
5
3
4
1
2
Garantie et service
26
27
28
2
29
Garantie limitée d'un an
Philips garantit que ce produit sera exempt de défauts de matériaux, de maind'œuvre et de fabrication, dans des conditions normales d'utilisation, conformément
aux spécifications et aux avertissements, pendant un an à compter de la date
d'achat. La présente garantie s'applique uniquement à l'acheteur d'origine du produit
8
9
1311
17
21
25
et n'est pas cessible. Pour exercer vos droits en vertu de la présente garantie, vous
devez fournir une preuve d'achat sous la forme d'un reçu de caisse original sur lequel
figurent le nom du produit et la date d'achat. Pour communiquer avec le service
à la clientèle ou faire appel au service de garantie, visitez notre site www.philips.
com/support. IL N'EXISTE AUCUNE AUTRE GARANTIE EXPRESSE OU IMPLICITE.
La responsabilité de Philips se limite à la réparation, ou à son entière discrétion, au
remplacement du produit. Philips décline toute responsabilité quant aux dommages
accidentels, spéciaux ou induits, lorsque la loi l'autorise. La présente garantie vous
donne des droits précis reconnus par la loi, auxquels peuvent s'ajouter des droits qui
varient selon les États ou les provinces.
États-Unis seulement
Fabriqué pour :
Santé personnelle Philips
Une division de Philips North America LLC
P.O. 10313
Stamford, CT 06904
États-Unis d’Amérique
Canada seulement
Fabriqué pour :
Philips Electronics Ltd.
281 Hillmount Road
Markham (Ontario) L6C 2S3
Fabriqué pour :
– Colombie : 01 800 700-7445
– Costa Rica : 0800 507-7445
– République dominicaine : 1 800 751-2673
– Équateur : 1 800 10-1045
– El Salvador : 800-6024
– Guatemala : 1 800 299-0007
– Honduras : 8002 791-9273
– Mexique : 01800504 6200
– Nicaragua : 1 800 507-0018
– Panama : 800-8300
PHILIPS et le blason Philips sont des marques déposées de Koninklijke Philips N.V.
© Philips North America LLC, 2018. Tous droits réservés.
30
31
1
32
Ce symbole apparaissant sur la plaque nominale du produit signie
qu'il est enregistré par Underwriter's Laboratories, Inc.

ENGLISH
Table of Contents
IMPORTANT SAFEGUARDS 6
POLARIZED PLUG 7
Introduction 8
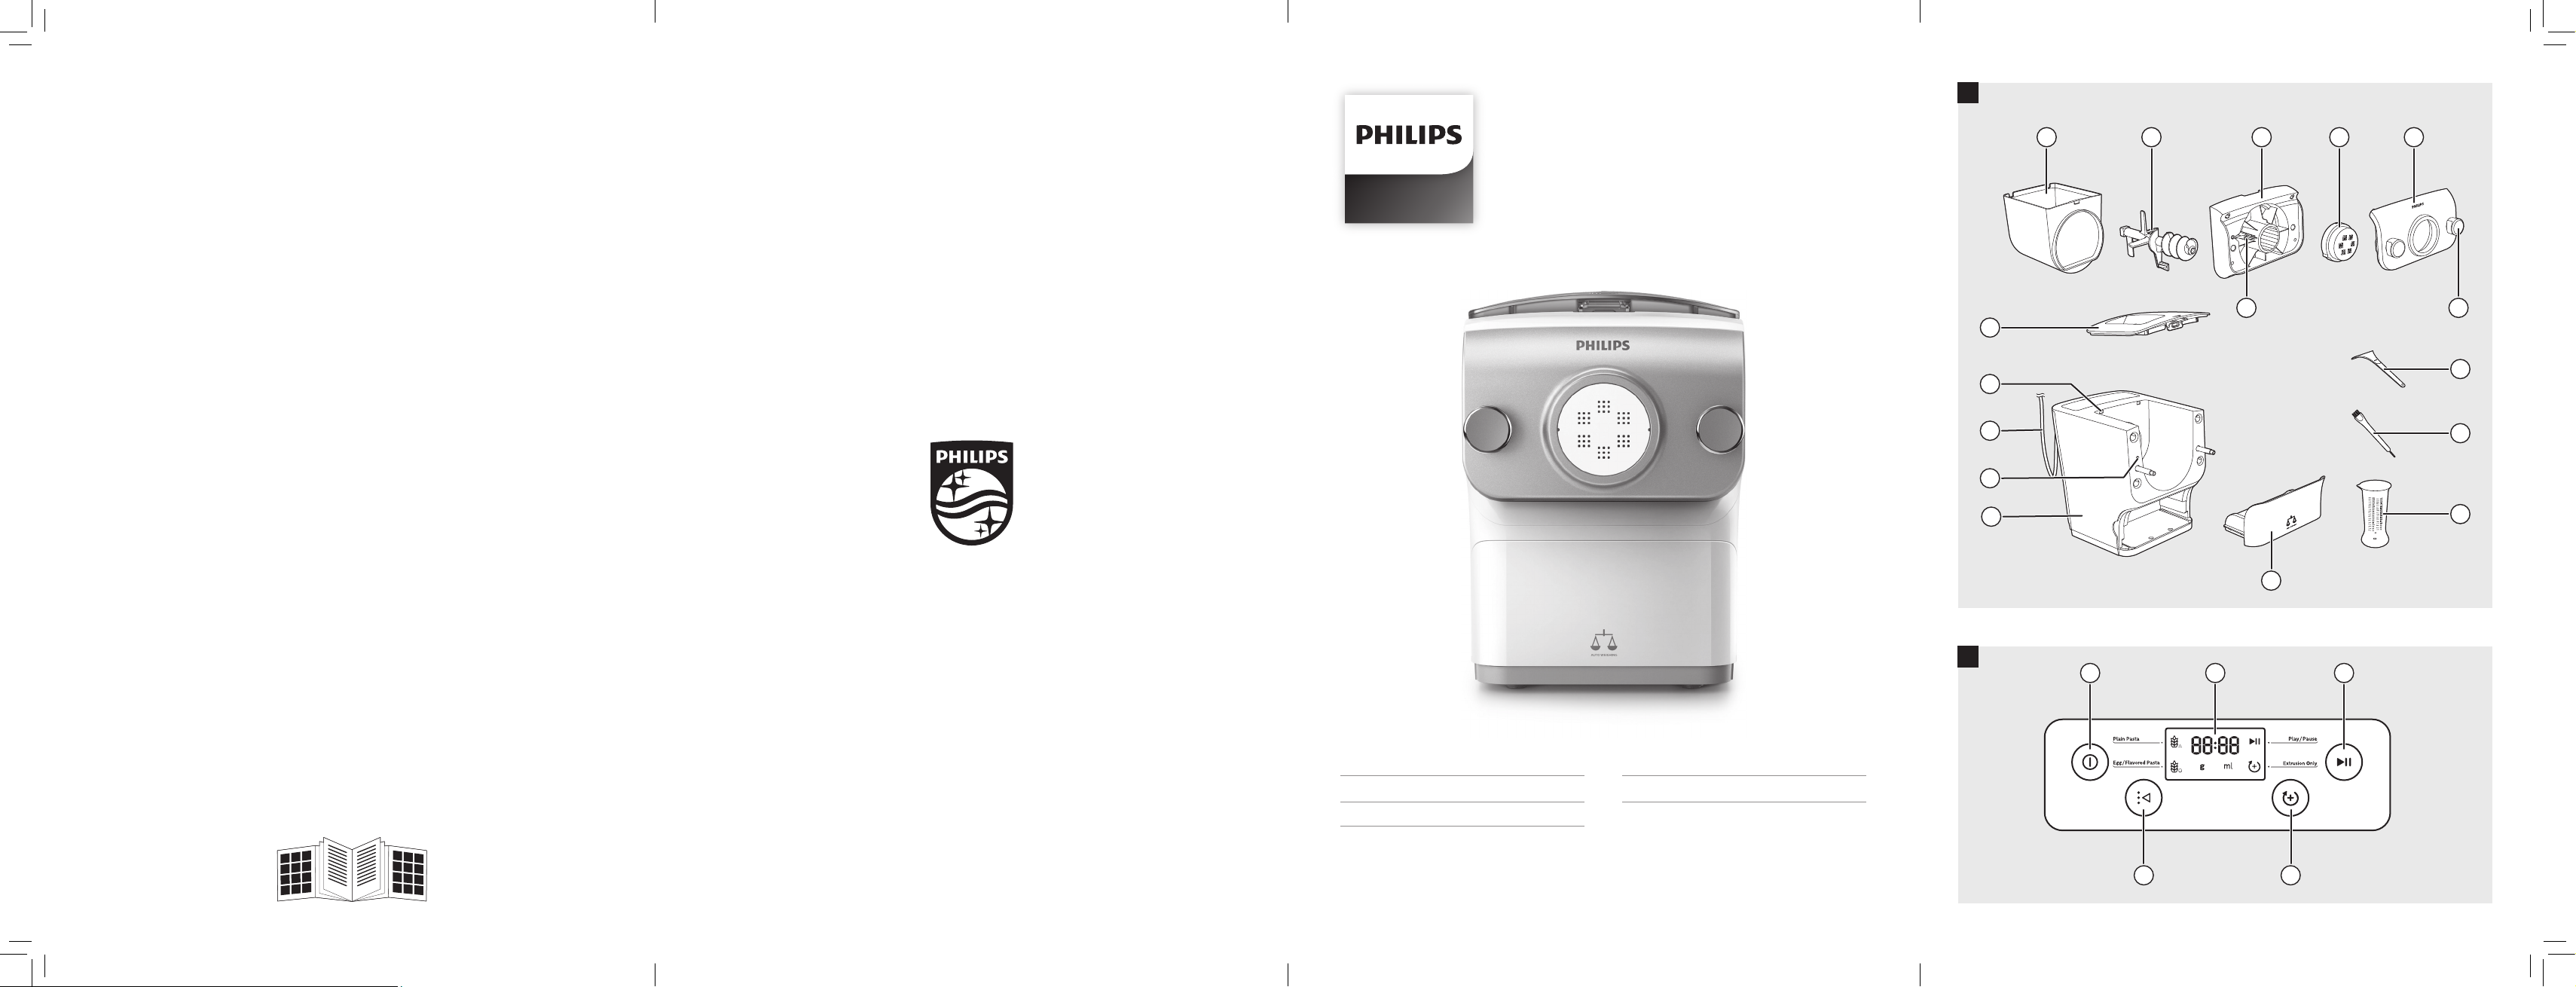
Product overview (Fig. 1) 8
Control panel overview (Fig. 2) 8
Available Accessories 9
Shaping discs 9
Disassembling and cleaning before rst use 9
Assembling 10
Using the Pasta maker 10
Start preparation 10
Starting the pasta making program 11
Important! 12
Cleaning 12
Storage 12
Disposal 13
Troubleshooting 13
Warranty and service 14
5

6
ENGLISH
IMPORTANT SAFEGUARDS
1 Read all instructions.
2 Before you connect the appliance to the power, make sure that the voltage
indicated on the bottom of the appliance corresponds to the local power
voltage.
3 To protect against risk of electrical shock, do not immerse main unit, cord or
plug in water or other liquid. Remove shaping discs from Pasta Maker before
cleaning.
4 Close supervision is necessary when any appliance is used by or near
children. Keep the appliance and its power cord out of the reach of children.
5 This appliance is intended for household use only. Do not use this appliance
for anything other than its intended use as described in this manual.
6 This appliance should not be used by children.
7 Children should be supervised by a responsible person to ensure they do
not play with the appliance.
8 Before using the appliance for the rst time, disassemble and wash the
accessories thoroughly.
9 Do not leave the Pasta Maker unattended when in use.
10 Do not move the Pasta Maker while in operation.
11 Make sure the plug is rmly inserted into the power outlet.
12 Make sure your hands are dry before you insert the plug into the power
outlet.
13 Do not operate any appliance with a damaged cord or plug or after the
appliance malfunctions, or is dropped or damaged in any manner. For
assistance in the U.S. or Canada only, call 1-866-309-8817.
14 Do not place any part of this appliance on, in or near a hot gas, electric,
convection or microwave oven or on a hot gas or electric burner.
15 The use of accessory attachments not recommended or sold by the
appliance manufacturer may cause re, electric shock or injury.
16 Do not use outdoors.
17 Do not let cord hang over edge of table or counter, or touch hot surfaces
including the stove.
18 Do not use this appliance on an unstable or uneven surface, near the
edge of a bench top, counter or table during operation. Make sure that the
surface is level, clean and free of water, our and other substances.
19 Never connect this appliance to a timer switch or separate remote control
system, to avoid a hazardous situation.

7
ENGLISH
20 Make sure the appliance is unplugged when not in use, if left unattended,
before assembling or disassembling, cleaning or storing. Always ensure
the Pasta Maker is completely assembled before inserting plug into power
outlet and operating. The Pasta Maker will not operate unless properly
assembled.
21 Keep hands, hair, clothing, as well as spatulas and other utensils away from
appliance during operation to reduce the risk of injury to persons, and/or
damage to the Pasta Maker.
22 Do not place hands, ngers or utensils in the mixing chamber of the
appliance unless the appliance is unplugged and the motor and mixing
paddle have come to a complete stop.
23 Do not put your ngers or other objects into the Pasta Maker opening while
it is in operation. Avoid contacting moving parts.
24 Do not attempt to defeat the cover interlock mechanism.
25 To prevent a short circuit or an electric shock, do not pour water or any
liquid into the safety switch.
26 The shaping discs and all detachable parts of the appliance are dishwasher
safe. When you clean them in a dishwasher, make sure to set the
temperature below 60C (140F).
27 Do not insert any objects into the device.
28 Do not pour any liquids into the safety switch hole.
29 To better protect the lifetime of the appliance, we recommend to stop the
device for 15 minutes, if it was used for 45 minutes continuously“
30 If you intend to use the appliance continuously, clean the shaping disc with
the supplied cleaning tool each time after use. For cleaning ease, do not
soak the shaping disc into the water directly.
31 Never pour water into the mixing chamber before you place the chamber lid
onto the chamber.
32 Do not select the extrusion only program before the dough mixing is
complete. Otherwise, this will damage the pasta maker.
33 Clean the appliance each time after use, or the appliance might not operate
properly.
SAVE THESE INSTRUCTIONS
POLARIZED PLUG
This appliance has a polarized plug (one blade is wider than the other). To reduce the
risk of electric shock, this plug will t in a polarized outlet only one way. If the plug
does not t fully in the outlet, reverse the plug. If it still does not t, contact a qualied
electrician. Do not modify the plug in any way.

8
ENGLISH
Introduction
Congratulations on your purchase, and welcome to Philips!
To fully benet from the support that Philips oers, register your product at
www.philips.com/welcome.
Product overview (Fig. 1)
a
Mixing chamber lid
Safety switch hole of the mixing
b
chamber lid
c
Power cord
d
Disc holder safety switch
e
Main unit
f
Shaping disc storage
g
Water cup
h
Cleaning brush
i
Pasta cutter
j
Front panel knobs
k
Front panel
l
Shaping disc
m
Disc holder
n
Disc holder safety switch lever
o
Mixing paddle
p
Mixing chamber
Control panel overview (Fig. 2)
a
On/o button
b
Display
c
Start/pause button
This appliance allows you to make the pasta you need in the way you want.
• Default pasta making function
1 Choose a program with the Program selection button, and then press the
Start/pause button.
Applies when making pasta with the scaling function.
• Extrusion only function
1 Press the Extrusion only button, and then the Start/pause button.
Applies when there is leftover dough in the mixing chamber, and you want some extra
extrusion.
• Skip-scaling function
1 Press and hold the Start/pause button for 5 seconds.
Applies when the device jumps into error mode or when you need to skip the scale
function and start the mixing process directly.
d
Extrusion only button
e
Program selection button
9
ENGLISH
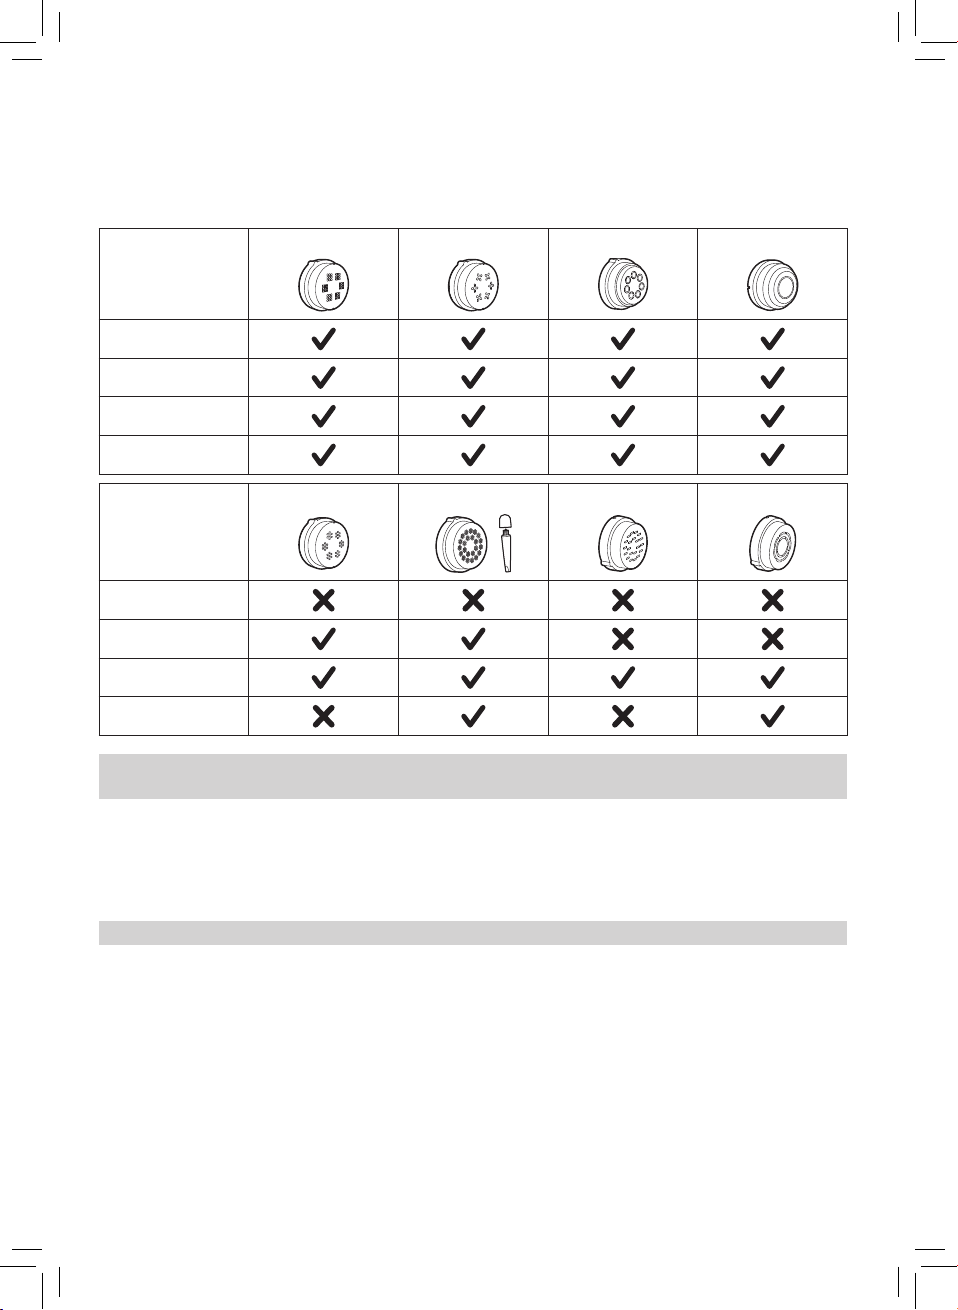
Available Accessories
Shaping discs
Spaghetti
HR2380
HR2381
HR2382
HR2382/13
Thick Spaghetti
HR2380
HR2381
HR2382
HR2382/13
Fettuccine
Angel hair
Penne
Tagliatelle
Lasagna
Pappardelle
Note: Cleaning tool of the angel hair shaping disc is only supplied with the angel hair
shaping disc.
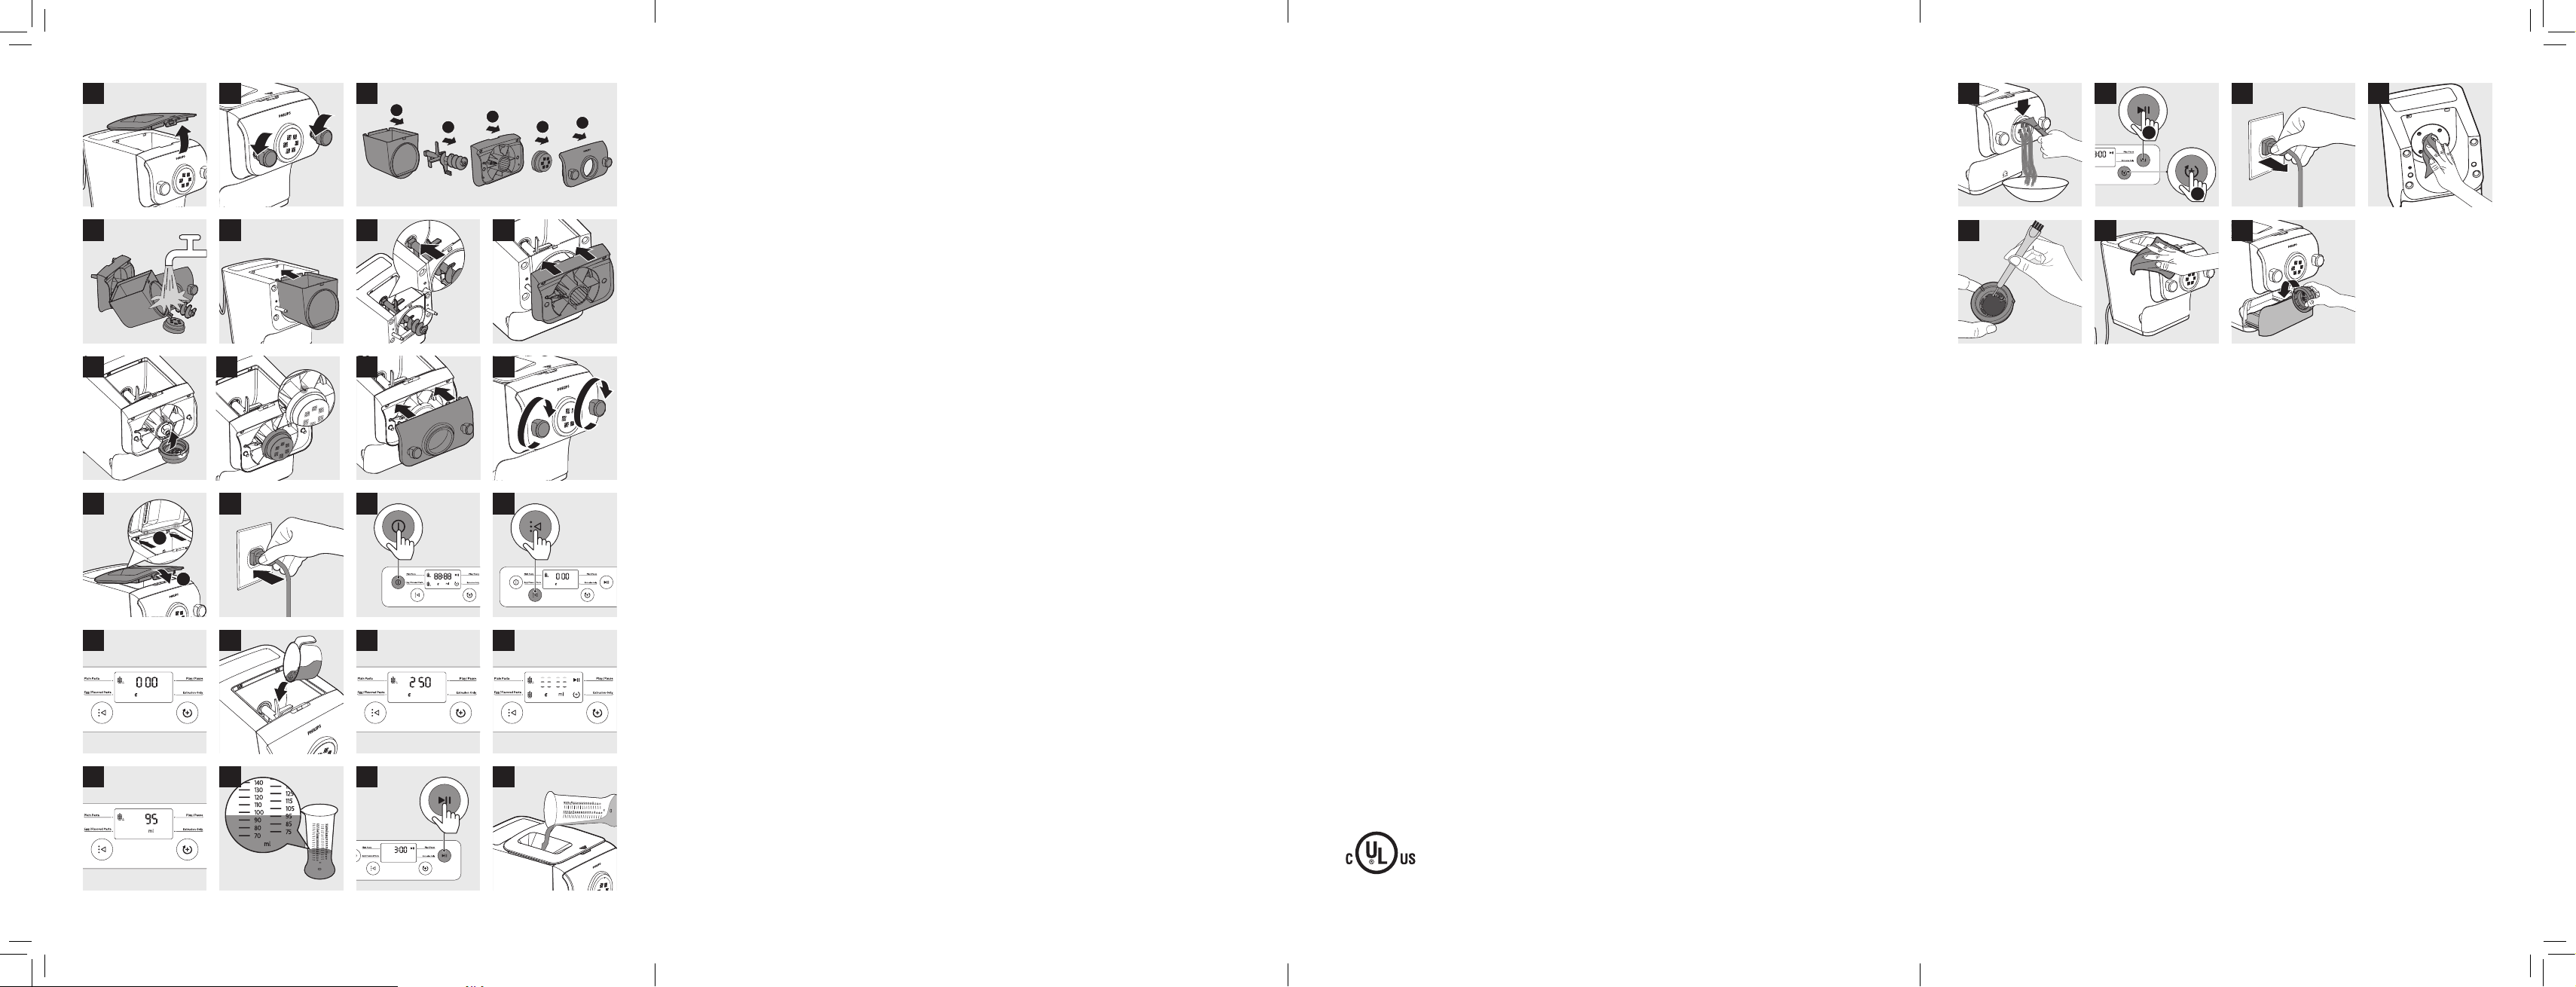
Disassembling and cleaning before rst use
1 Remove the mixing chamber lid. (Fig. 3)
2 Loosen the front panel control knobs. (Fig. 4)
Note: The front panel is heavy. Take extra caution when removing it.
3 Disassemble the front panel, the shaping disc, the shaping disc holder, the mixing
paddle, and the mixing chamber in order. (Fig. 5)
4 Clean all detachable parts, and wipe them dry. (Fig. 6)
10
ENGLISH
Assembling
1 Push the mixing chamber into the appliance. (Fig. 7)
2 Point the mixing paddle to the hole in the main unit. Insert the mixing paddle all the
way into the main unit. (Fig. 8)
3 Attach the disc holder onto the appliance. (Fig. 9)
4 Put the shaping disc onto the disc holder , and make sure it is rmly xed on the disc
holder. (Fig. 10)
Note: Make sure the inner cavity of the shaping disc and disc holder is properly tted.
(Fig. 11)
5 Attach the front panel to the main unit. (Fig. 12)
Note:
y Make sure the front panel is completely fastened before using the appliance.
y The front panel is heavy. Take extra caution when assembling it.
6 Fasten the front panel control knobs. (Fig. 13)
Note: If the front panel or the shaping disc is not properly assembled, a safety switch
will prevent the appliance from working.
7 Close the mixing chamber lid. (Fig. 14)
Note: If the mixing chamber lid is not properly installed, the safety switch will prevent
the appliance from working.
Using the Pasta maker
Start preparation
1 Put the plug in the power socket. The pasta maker sound once, and all indicators ash
once. (Fig. 15)
Note: Make sure that all the parts are well assembled before plugging in.
2 Press the On/o button to turn on the appliance. (Fig. 16)
3 Select the pasta type with the Program selection button. (Fig. 17)
Program Tip Optional recipe
Plain pasta/noodle • Pasta with our and water
only
Egg or avoured
pasta/noodle
Note: For more recipes, refer to the recipe book.
• Pasta with our and egg liquid
• All kinds of avored pasta
• Wheat noodle
• Durum noodle
• Wheat pasta
• Durum pasta
• Carrot pasta/noodle
• Tomato pasta/noodle
• Soba
• Beet pasta/noodle

11
ENGLISH
4 Remove the mixing chamber lid. (Fig. 3)
5 Wait until 0:00 displays on the screen. (Fig. 18)
6 Pour the our into the chamber. (Fig. 19)
Note
y The appliance automatically weighs and displays the amount of our. The weight
measurement will blink until you are in the right range. (Fig. 20)
y Do not put less than 200g or more than 600g of our in the chamber.
y Some recipes (for example cookies, gluten free pasta) require you to skip the
weighing part. In this case, press the Start/pause button for 5 seconds, and the
appliance will start mixing and extruding directly.
7 Close the chamber lid. (Fig. 14)
Note
y If you press a button without closing the lid, the chamber closing sign will appear.
(Fig. 21)
y Insert the two hooks into the appliance rst, and then push the lid against the
main unit.
y The appliance will not start working if the chamber lid is not properly closed.
During the pasta making process, if you open the chamber lid, the appliance will
stop working. Assemble the lid and press the Start/pause button to start the
operation again.
8 When the lid is closed, the needed amount of liquid is displayed. (Fig. 22)
9 Use the supplied water cup to measure the amount of liquid according to the
indication on the display. (Fig. 23)
Note
y Make sure to measure the liquid volume at eye level on a at surface.
y When making the egg mixture, crack the egg into the water cup. Add water up to
the required amount, and then whisk the water and egg to combine.
y If preferred, 2 eggs can be used instead of 1, but make sure that the overall amount
of liquid suggested is not exceeded.
y For a better accuracy please use a kitchen scale to measure the liquid.
Starting the pasta making program
1 Press the Start/pause button to start mixing, and the mixing time starts to count
down. (Fig. 24)
2 After the mixing starts, slowly pour in the liquid along the entire length of the slot in
the lid. (Fig. 25)
Note: During dough mixing, do not add other ingredients after you have poured in
the liquid. Otherwise, it will aect the result of the pasta texture.
3 After the pasta maker nishes mixing, it will beep once and start extruding pasta
after a few seconds. Use the pasta cutter to cut the pasta into the length you need.
(Fig. 26)
Note: If the ratio of liquid and our is not correct, the extrusion will not succeed.
Please refer to the recipe book for more recipes.
4 After the pasta making is complete, if you notice some leftover dough inside
the chamber, you can press the Extrusion only button rst, and then press the
Start/pause button for extra extrusion. (Fig. 27)

12
ENGLISH
Note: The cooking time of the pasta varies depending on personal preferences, pasta
shapes, and number of servings.
Important!
The pasta recipes provided in the recipe book have been tested for success. If you
experiment with or use other pasta recipes, the our and water/egg ratios will need to
be adjusted. The pasta maker will not operate successfully if you do not adjust the new
recipe accordingly.
Note
y To ensure the quality of the pasta, use gluten our to make pasta. Follow the
recommended proportion to add the ingredients.
y Seasonal changes and using ingredients from dierent regions may aect the
our/water ratio. You may adjust based on the recommended proportion.
y When making egg pasta or vegetable pasta, make sure you whisk the egg mixture
or vegetable juice evenly with the water before pouring into the chamber through
the slot in the lid. When adding ingredients, make sure the ingredient is in a liquid
form.
y See the recipe book provided for additional pasta recipe variations.
y When making gluten free pasta/noodles or cookies, do not follow the
recommended liquid amount indicated by the appliance.
Cleaning
1 Disconnect the plug from the power outlet. (Fig. 28)
2 Remove the mixing chamber lid. (Fig. 3)
3 Loosen the front panel control knobs. (Fig. 4)
Note: The front panel is heavy. Take extra caution when removing it.
4 Disassemble the front panel, the shaping disc, the shaping disc holder, the mixing
paddle, and the mixing chamber in order. (Fig. 5)
5 Use a dry cloth to clean our residue on the main unit. (Fig. 29)
6 Clean the shaping disc with the supplied cleaning tool to remove the dough
residues. After that, you can clean it with water. (Fig. 30)
Note: For the spaghetti, thick spaghetti, angel hair and fettuccine shaping discs, let
the discs air-dry 2 to 4 hours. Then use the corresponding cleaning tool to poke out
the dough in the holes.
7 Clean all detachable parts, and wipe them dry. (Fig. 6)
8 Use a dry cloth to clean the control panel, and the exterior of the pasta maker.
(Fig. 31)
Storage
1 Unplug the appliance and let it cool down.
Note: Make sure all parts are clean and dry before storing.
2 You can store the shaping discs in the storage drawer. (Fig. 32)
13
ENGLISH
Disposal
Your product is designed and manufactured with high quality materials and
components, which can be recycled and reused. For recycling information, please
contact your local waste management facilities or visit www.recycle.philips.com
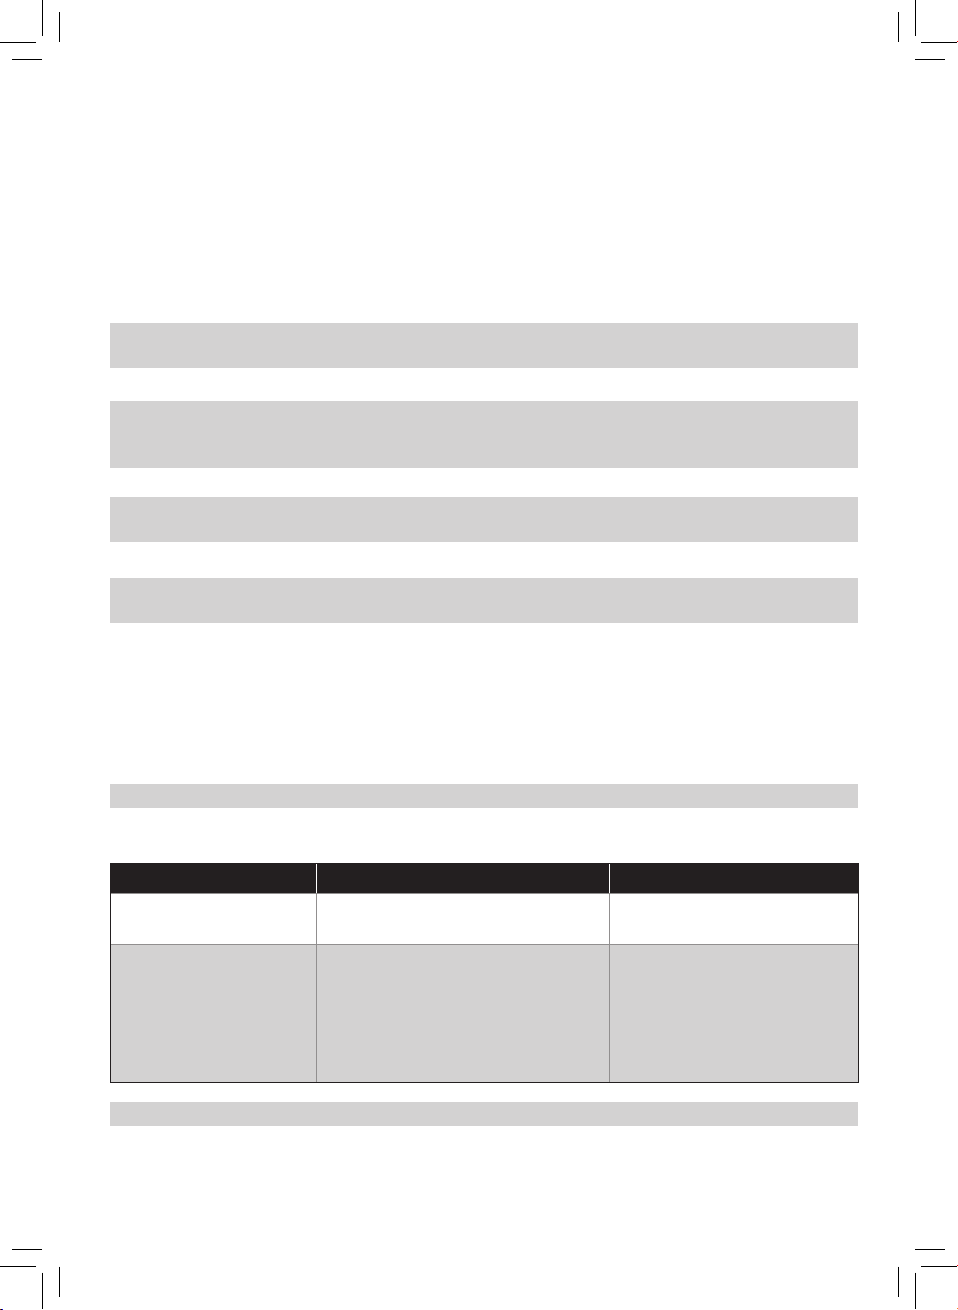
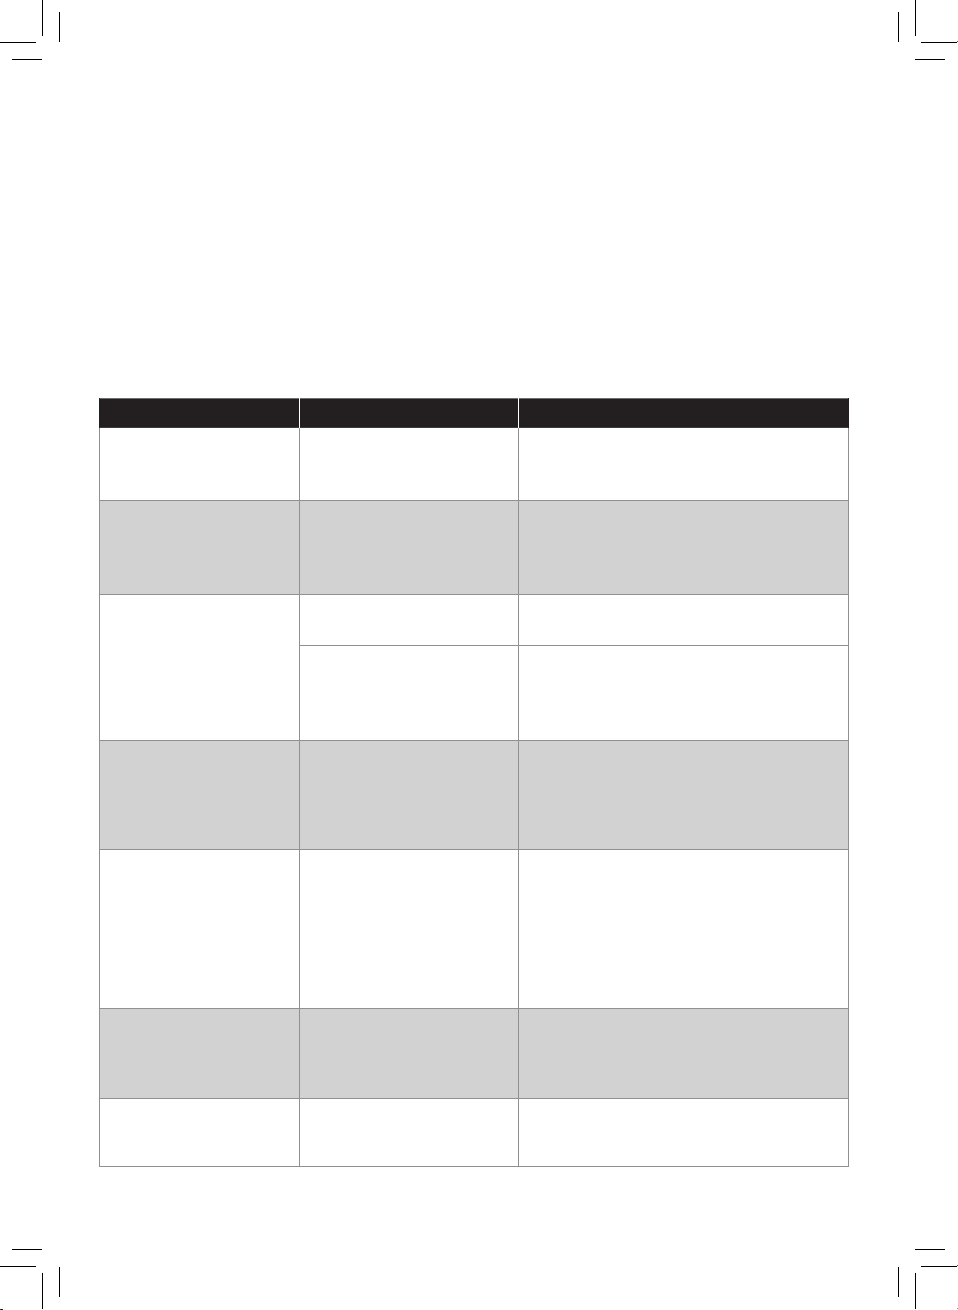
Troubleshooting
This chapter summarizes the most common problems you could encounter with the
appliance. If you are unable to solve the problem with the information below, visit
www.philips.com/support or in the U.S. or Canada only, call 1-866-309-8817 for
assistance.
Problem Cause Solution
The indicators do not
light up.
After pressing the
On/o button the
appliance sounds but
does not work.
The safety switch is
triggered and the
appliance suddenly
stopped or suddenly
restarts during the
processing.
During processing,
the appliance stops
working when you
open the lid.
During processing,
the appliance stops.
There is no alarm
sound or ashes.
When weighing the
our, the weight
shown on the screen
changes all the time.
Small amount of
water is leaking out
from the appliance.
The power plug is not
connected correctly.
The mixing chamber,
the shaping disc, or the
front panel is assembled incorrectly.
The front panel knob is
loose.
Excessive ingredients in
the pasta maker.
For safety reasons,
the appliance always
stops working when
the lid is opened during
processing.
The pasta maker has
overheated due to long
continuous working
time.
You are touching the
appliance or the power
cord.
Water is added before
the program starts.
Check whether the power plug is
plugged correctly and the outlet is
working properly.
Make sure you follow the user
manual to assemble all parts
correctly.
Make sure the front panel is securely
assembled.
The maximum amount of our used
for each batch is 600g. If more than
600g is added, reduce the amount
of our before next batch.
If you need to resume the previous
operation, close the lid properly, and
press the Start/pause button.
Disconnect from the power source,
and allow the pasta maker to cool
down. To better protect the lifetime
of the appliance, the continuous
working time should be less than 45
minutes. You can restart using the
appliance after 15 minutes of rest.
When the appliance is weighing the
our, do not touch the appliance or
the power cord.
Follow the user manual instructions
to add water right after the program
starts.
 Loading...