

Philips HR2365/05 User Manual
Always there to help you
Question?
Contact
Philips
Register your product and get support at
www.philips.com/welcome
HR2365/05
User manual 3 用户手册 24
Congratulations on your purchase, and welcome to Philips!
To fully benet from the support that Philips offers, register your product at
www.Philips.com/welcome.
Read this user manual carefully before you install and use the unit. Save it for
future reference.
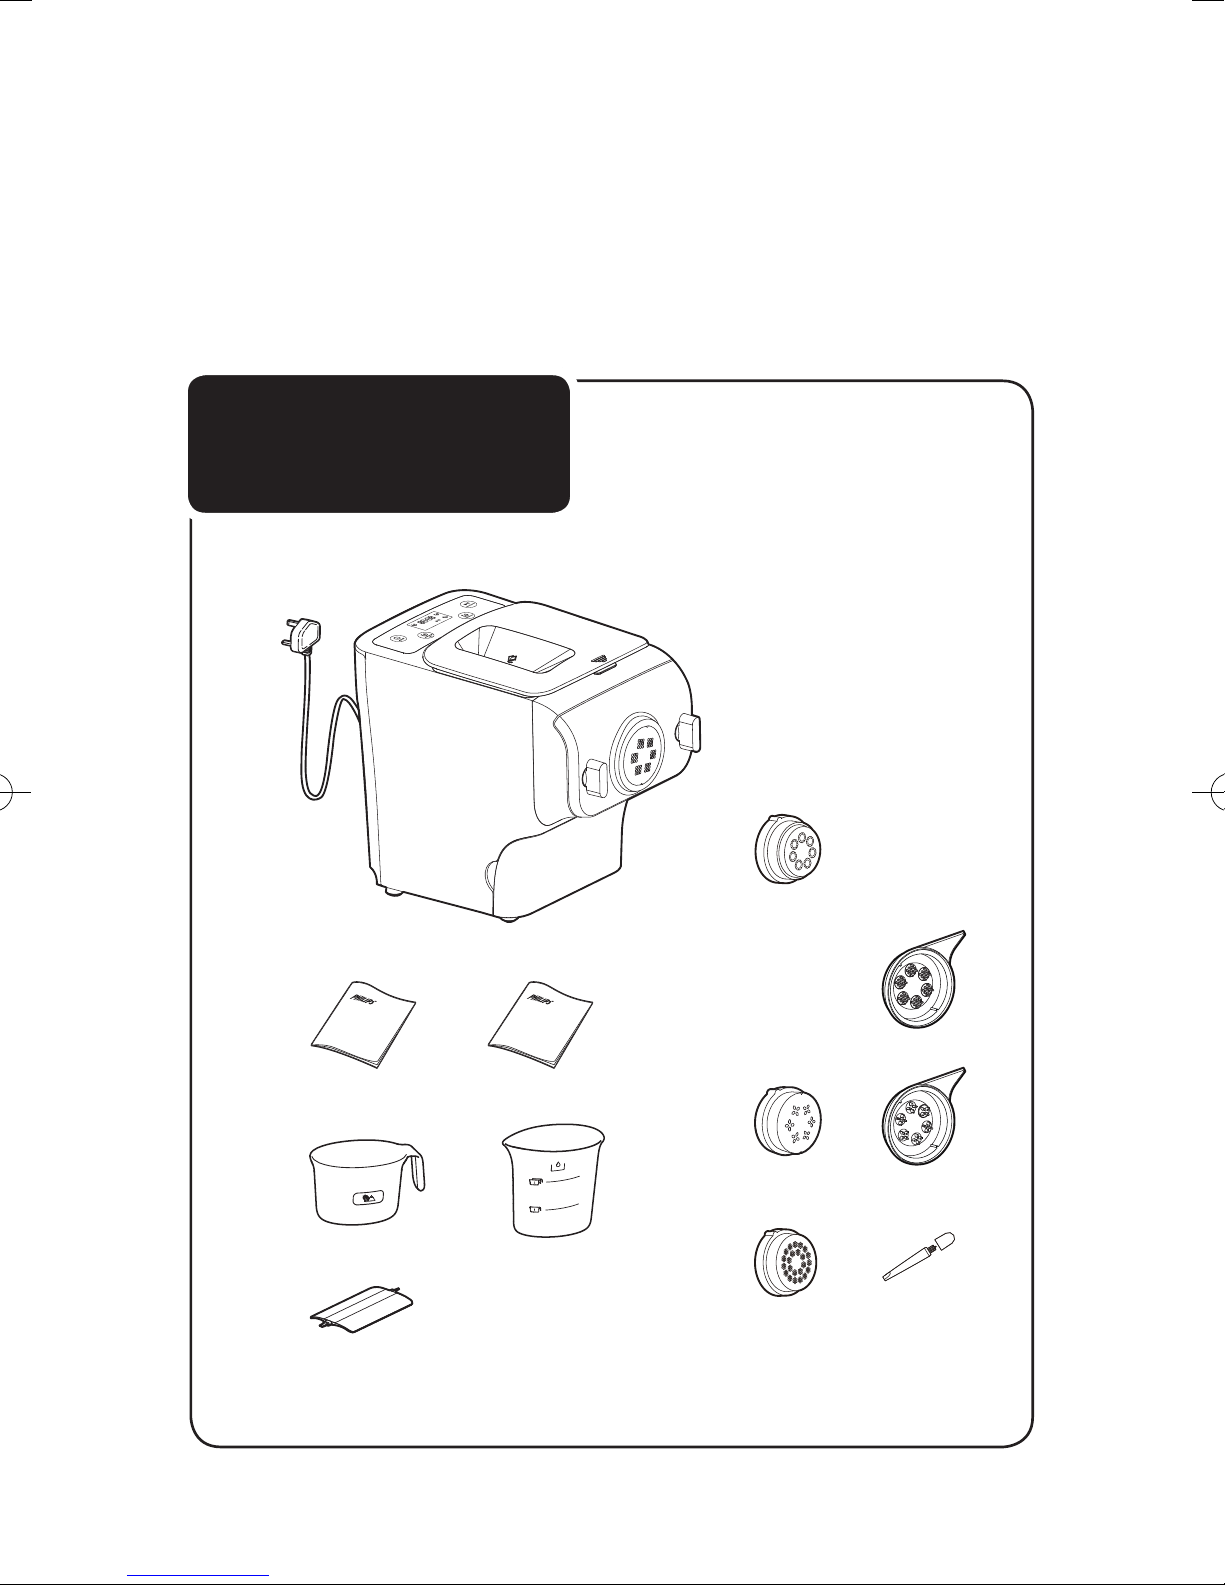
What's in the box
Main unit
User manual
Flour cup
Flat cleaning tool
Recipe book
Water cup
Shaping
discs
Penne
Spaghetti/Yellow
Noodles
(Assembled on
the appliance upon
purchase)
Fettuccine/
Ban Mian
Angel
Hair/
Mee Kia
Disc cleaning
tool
Use the at
cleaning tool
2

Contents
What's in the box ����������� 2
Contents ��������������� 3
Important �������������� 4
Overview ��������������� 6
Disassembling and cleaning
before rst use ������������ 8
Assembling ������������� 10
Using the noodle maker �������� 12
Cleaning �������������� 16
Noodle-making recipe table ������ 19
Troubleshooting ����������� 20
Product information ��������� 22
Recycling �������������� 22
Guarantee and service �������� 22
3
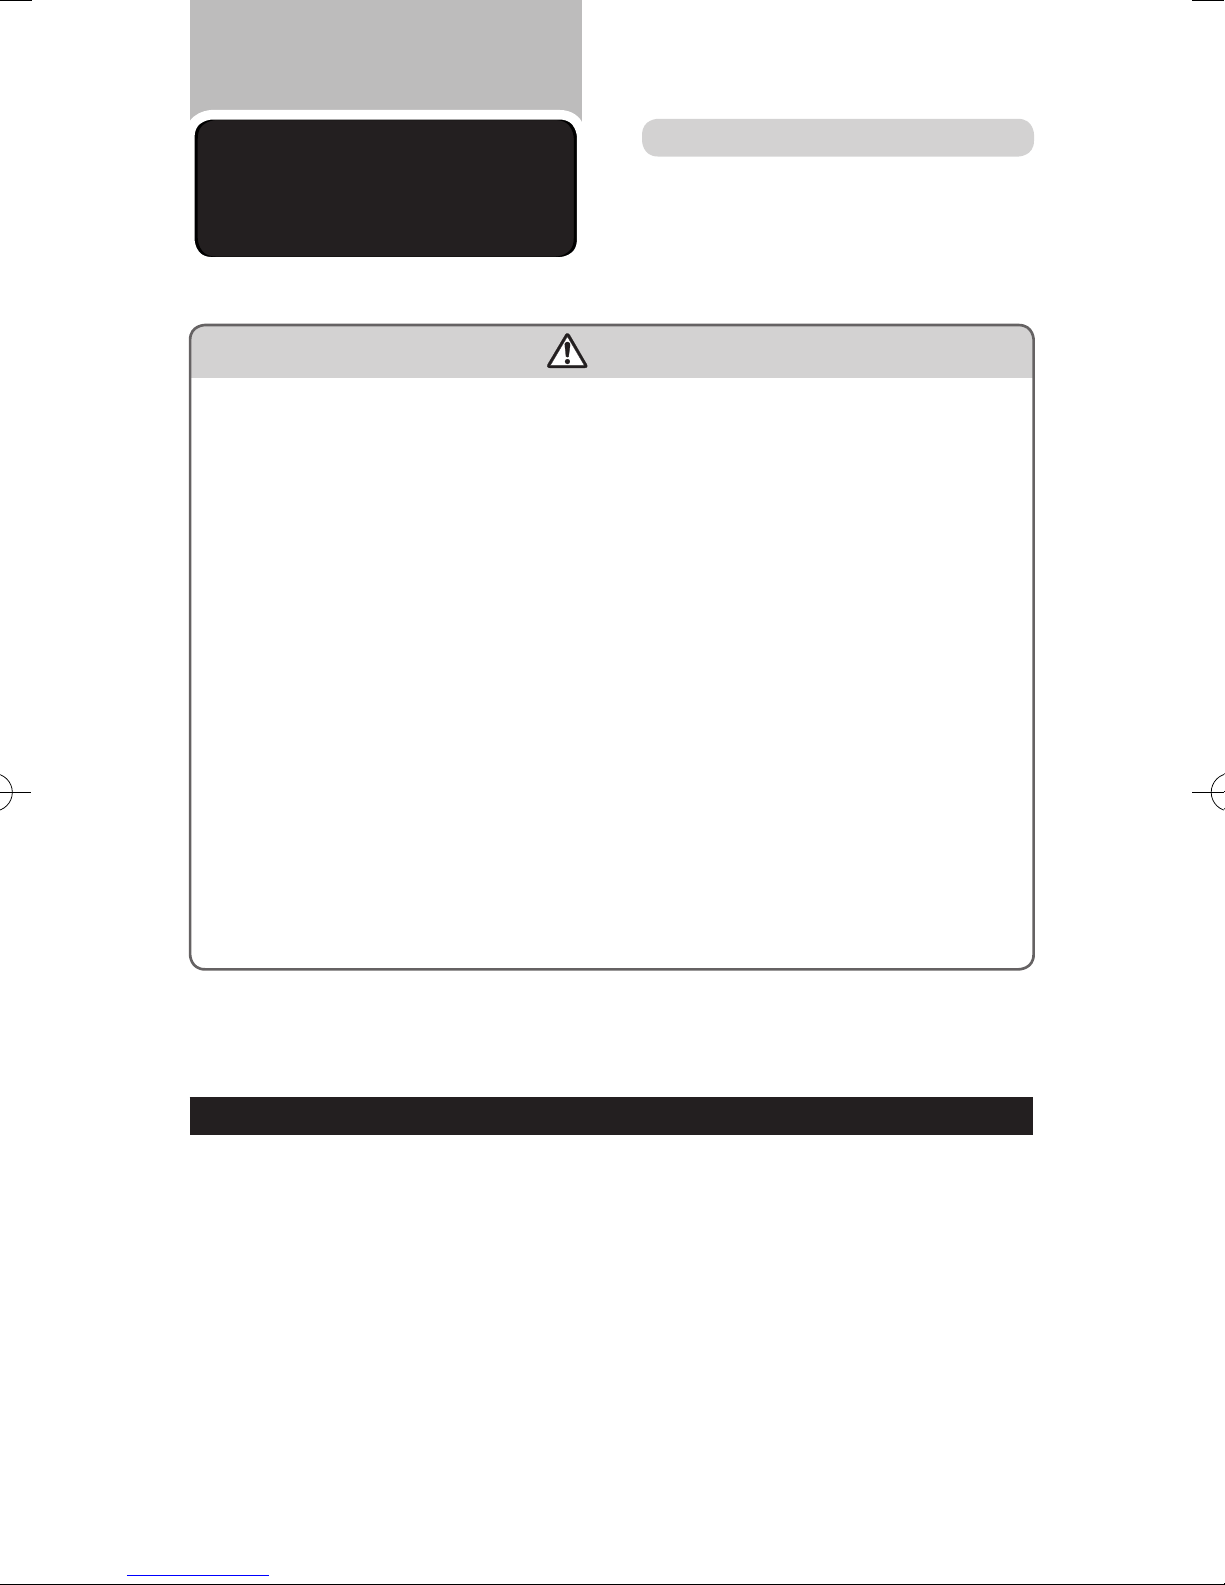
Safety
Important
● Read this user manual carefully before you use
the appliance, and save it for future reference.
Warning
● Before you connect the appliance to the power, make sure that the voltage indicated on the bottom
of the appliance corresponds to the local power voltage.
● Make sure that the plug is firmly inserted into the power outlet.
● Make sure that your hands are dry before you insert the plug into the power outlet.
● Never connect this appliance to a timer switch, to avoid a hazardous situation.
● Before you insert the plug into the power outlet, make sure that the appliance is assembled correctly.
● If the power cord, the plug, or other parts are damaged, do not use the appliance.
● If the power cord is damaged, you must have it replaced by Philips, a service center authorized by
Philips or similarly qualified persons to avoid a hazard.
● Do not replace parts of the appliance yourself.
● This appliance can be used by children aged from 8 years and above and persons with reduced
physical, sensory or mental capabilities or lack of experience and knowledge if they have been given
supervision or instruction concerning use of the appliance in a safe way and understand the hazards
involved. Children shall not play with the appliance. Cleaning and maintenance shall not be made by
children without supervision.
● Keep the appliance and its power cord out of the reach of children.
● To prevent any accidents, do not use the appliance if it is damaged for any reasons.
EMF
This Philips appliance complies with all applicable standards and regulations regarding
exposure to electromagnetic elds.
4
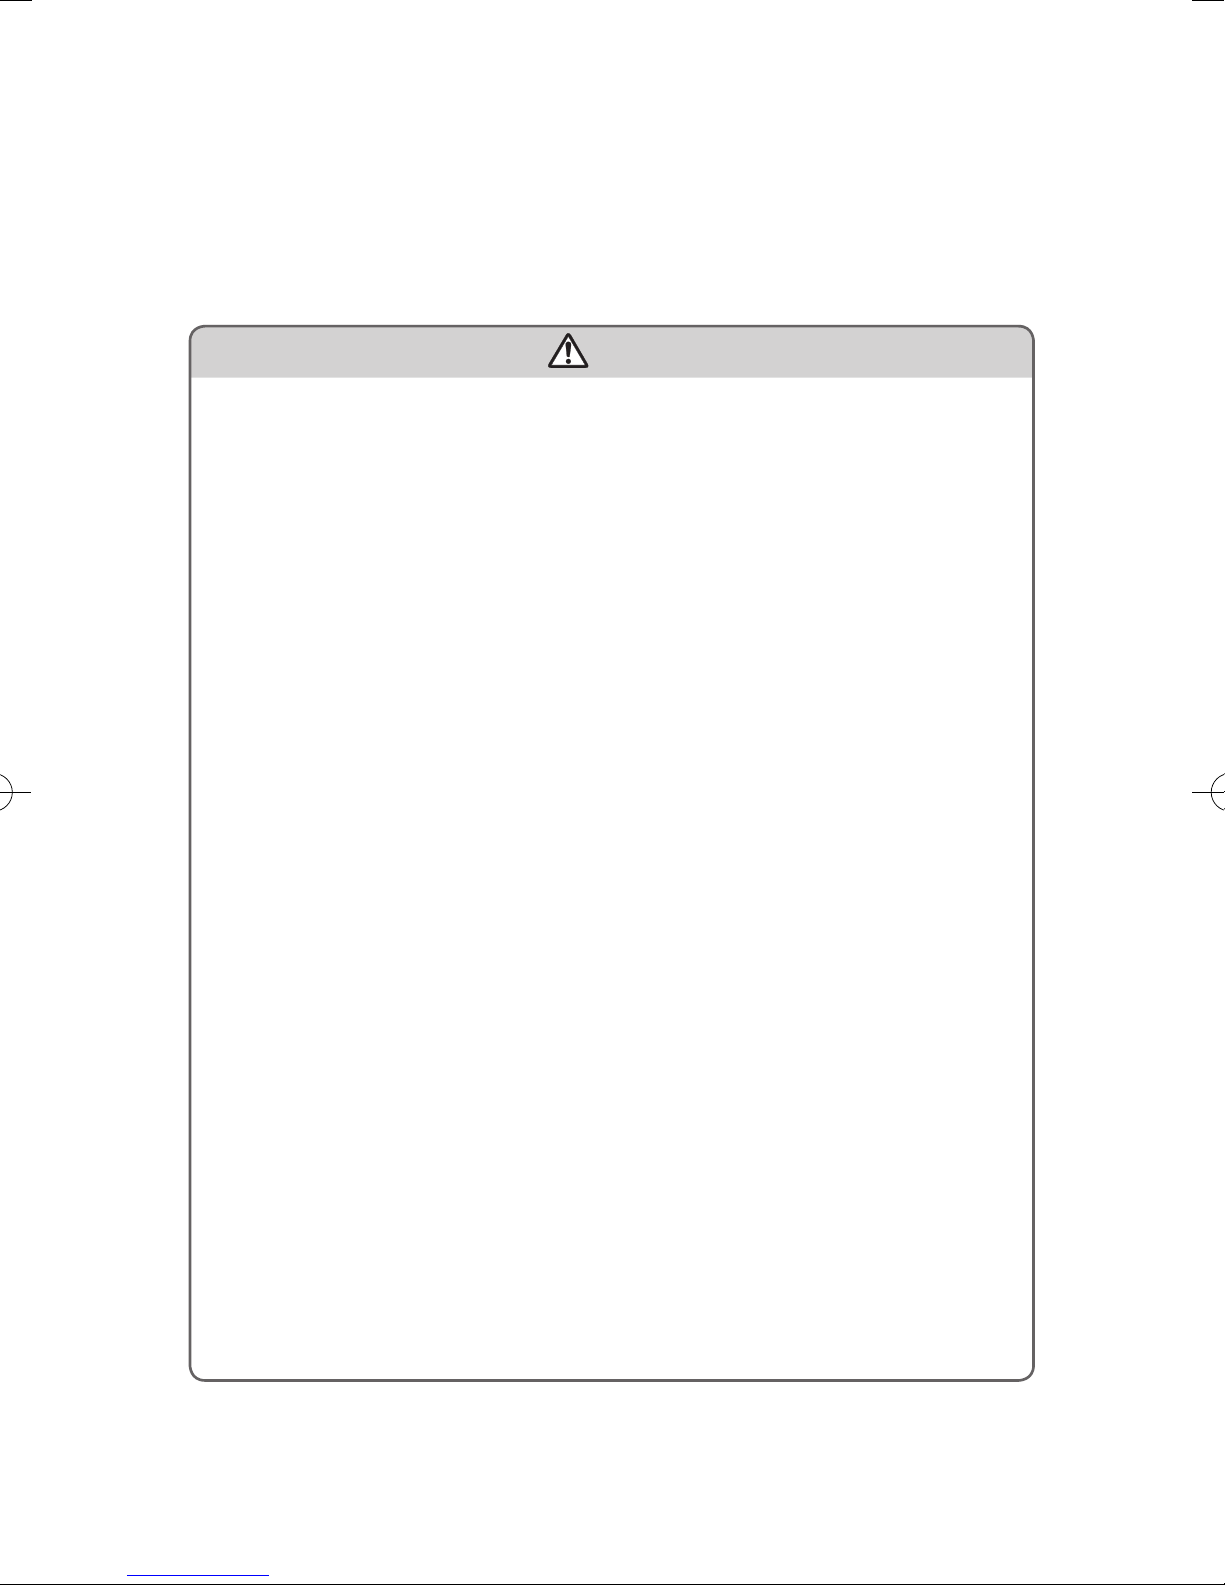
Caution
● Before using the appliance for the first time, disassemble and wash the accessories thoroughly (see
“Disassemble and cleaning before first use” section.)
● The appliance is intended for household use only.
● Do not use this appliance on an unstable or uneven surface.
● Do not disconnect the power cord before the processing is complete. If you have to stop the
processing, disconnect the power cord before you perform other operations.
● To better protect the lifetime of the appliance, the continuous working time should be less than 45
minutes. You can restart using the appliance after 15 minutes of rest.
● If you intend to use the appliance continuously, clean the shaping disc with the supplied cleaning tool
each time after use. For cleaning ease, do not soak the shaping disc into the water directly.
● Do not bent, jerk, twist or bundle the power code forcibly, nor put heavy goods on it.
● When hearing thunder, do not touch the appliance or the power plug.
● Do not put metal or flammable objects in the mixing chamber.
● Plug off the power cord when you are not using the appliance.
● Do not use the appliance near flammable objects such as table cloth or draper.
● Pull out the power plug immediately when you detect smoke.
● When taking off the power cord, do not pull the cable but grab the plug part.
● Keep the power plug clean.
● Do not put heavy objects on the appliance.
● This appliance is designed as consumer kitchen appliance. Do not use for the purpose.
● Do not move the appliance while it is operating.
● Disconnect the power and remove the power cord before cleaning or disassembling this appliance.
● Do not immerse the main unit in water.
● Place the appliance to a dry and well ventilated place after use.
● To prevent a short circuit or an electric shock, do not pour water or any liquid into the safety switch.
● Do not use dishwasher to clean the machine and the accessories.
5
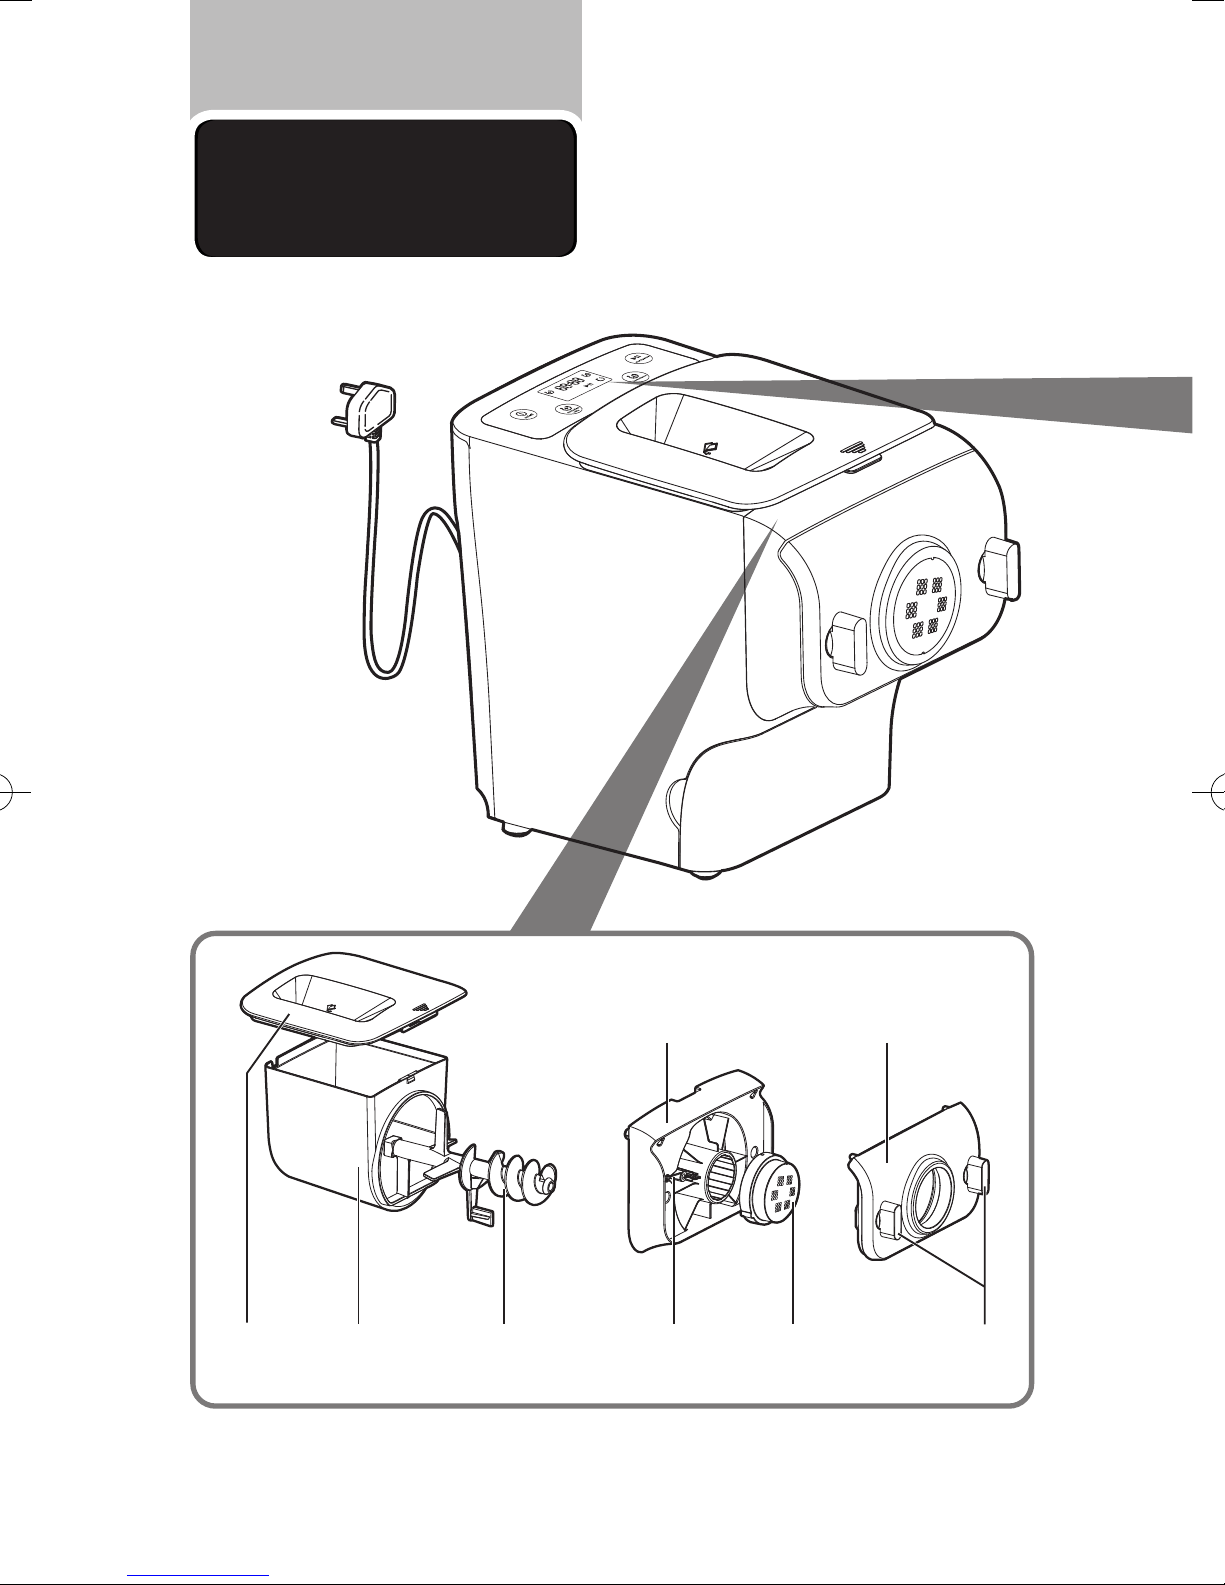
Overview
Mixing
chamber lid
Mixing
chamber
Mixing
paddle
Disc holder Front panel
Shaping discsDisc holder safety
switch lever
6
Front panel
knobs
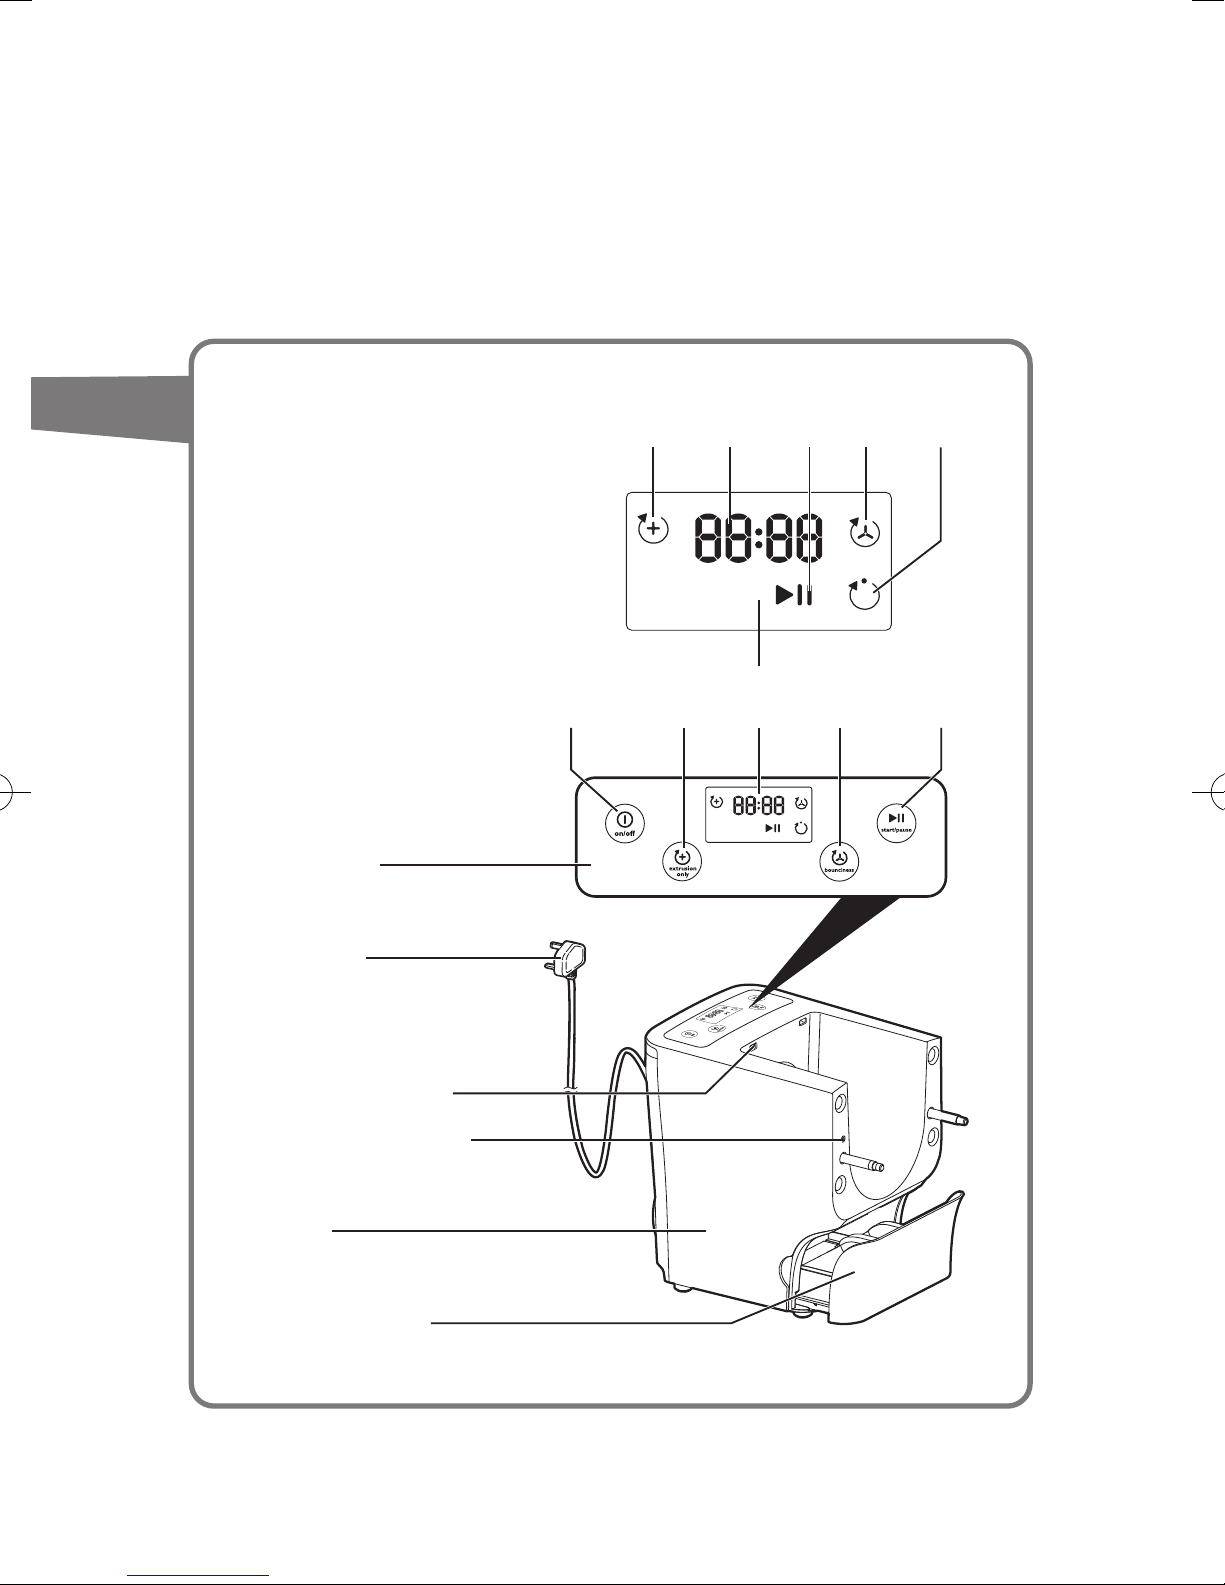
Extra extrusion
indicator
Timer
display
Start/pause
indicator
Kneading
indicator
Extrusion
indicator
Control panel
display
Power cord
Safety switch hole of
the mixing chamber lid
Disc holder safety switch
Main unit
Power on/off
button
Extra extrusion
button
Display
screen
Bounciness
control button
Start/pause
button
Shaping discs storage
7
Disassembling and
cleaning
before rst use
● Do not use water to rinse or soak the main unit.
● Do not use a scourer or similar cleaners as these will scratch the plastic surface and affect
the lifetime of the noodle maker.
● Take extra caution when cleaning the parts to avoid getting cut by the edges.
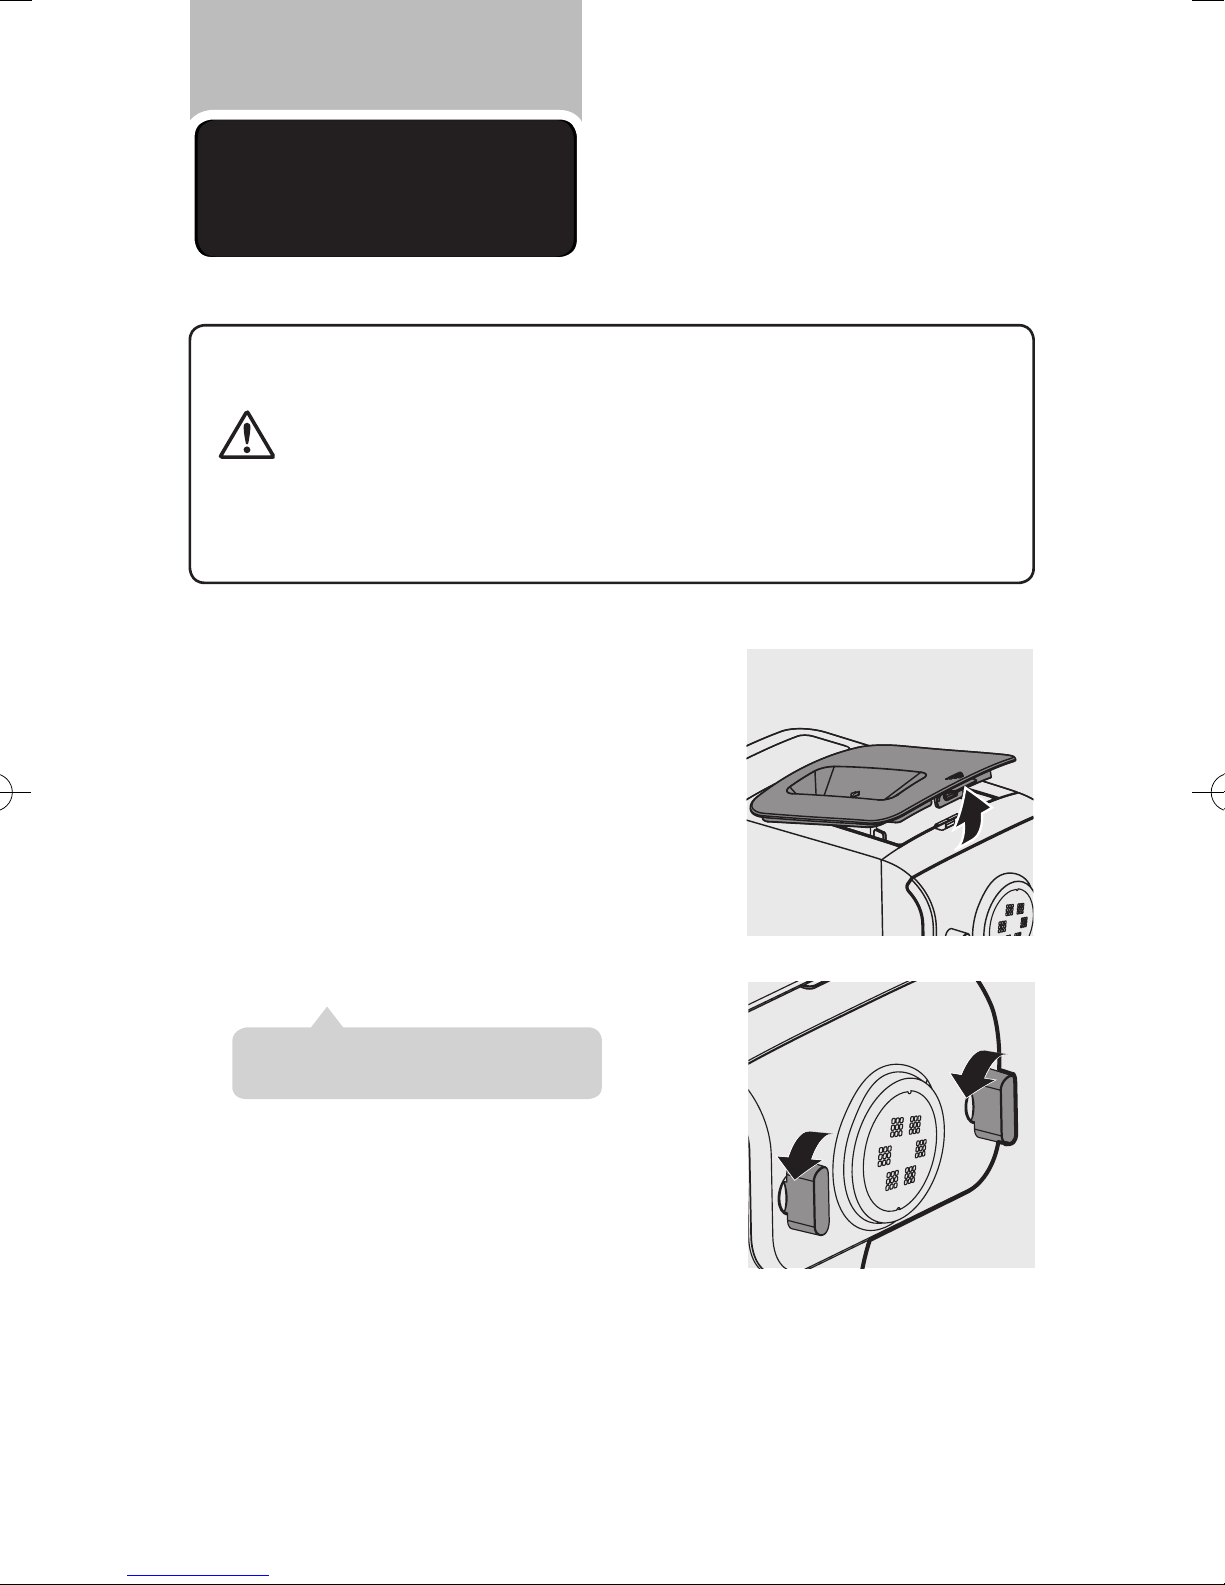
Caution
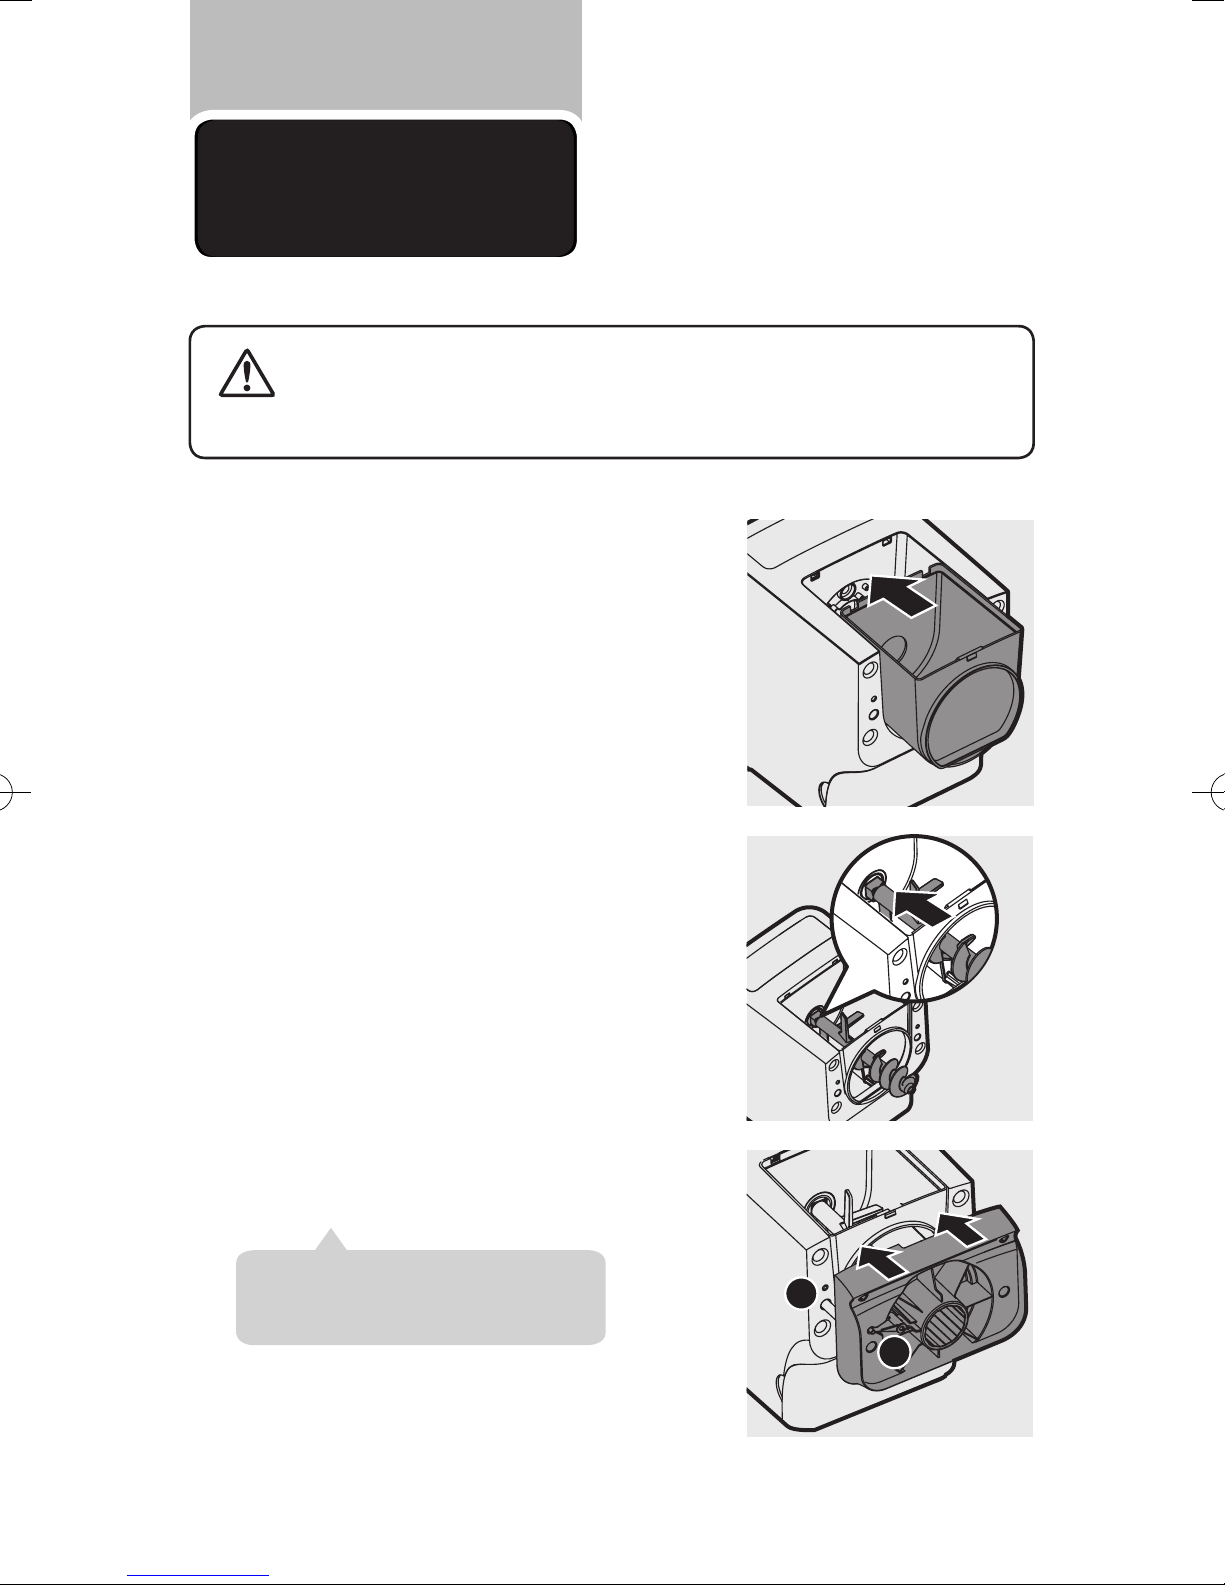
Remove the chamber lid from the appliance.
1
Loosen the front panel control knobs.
2
● Take out all the parts and accessories.
● Clean the parts and accessories before first use (see “Cleaning” section).
● Do not use dishwasher to clean the machine and the accessories.
※The front panel is heavy. Take extra caution
when removing it.
8
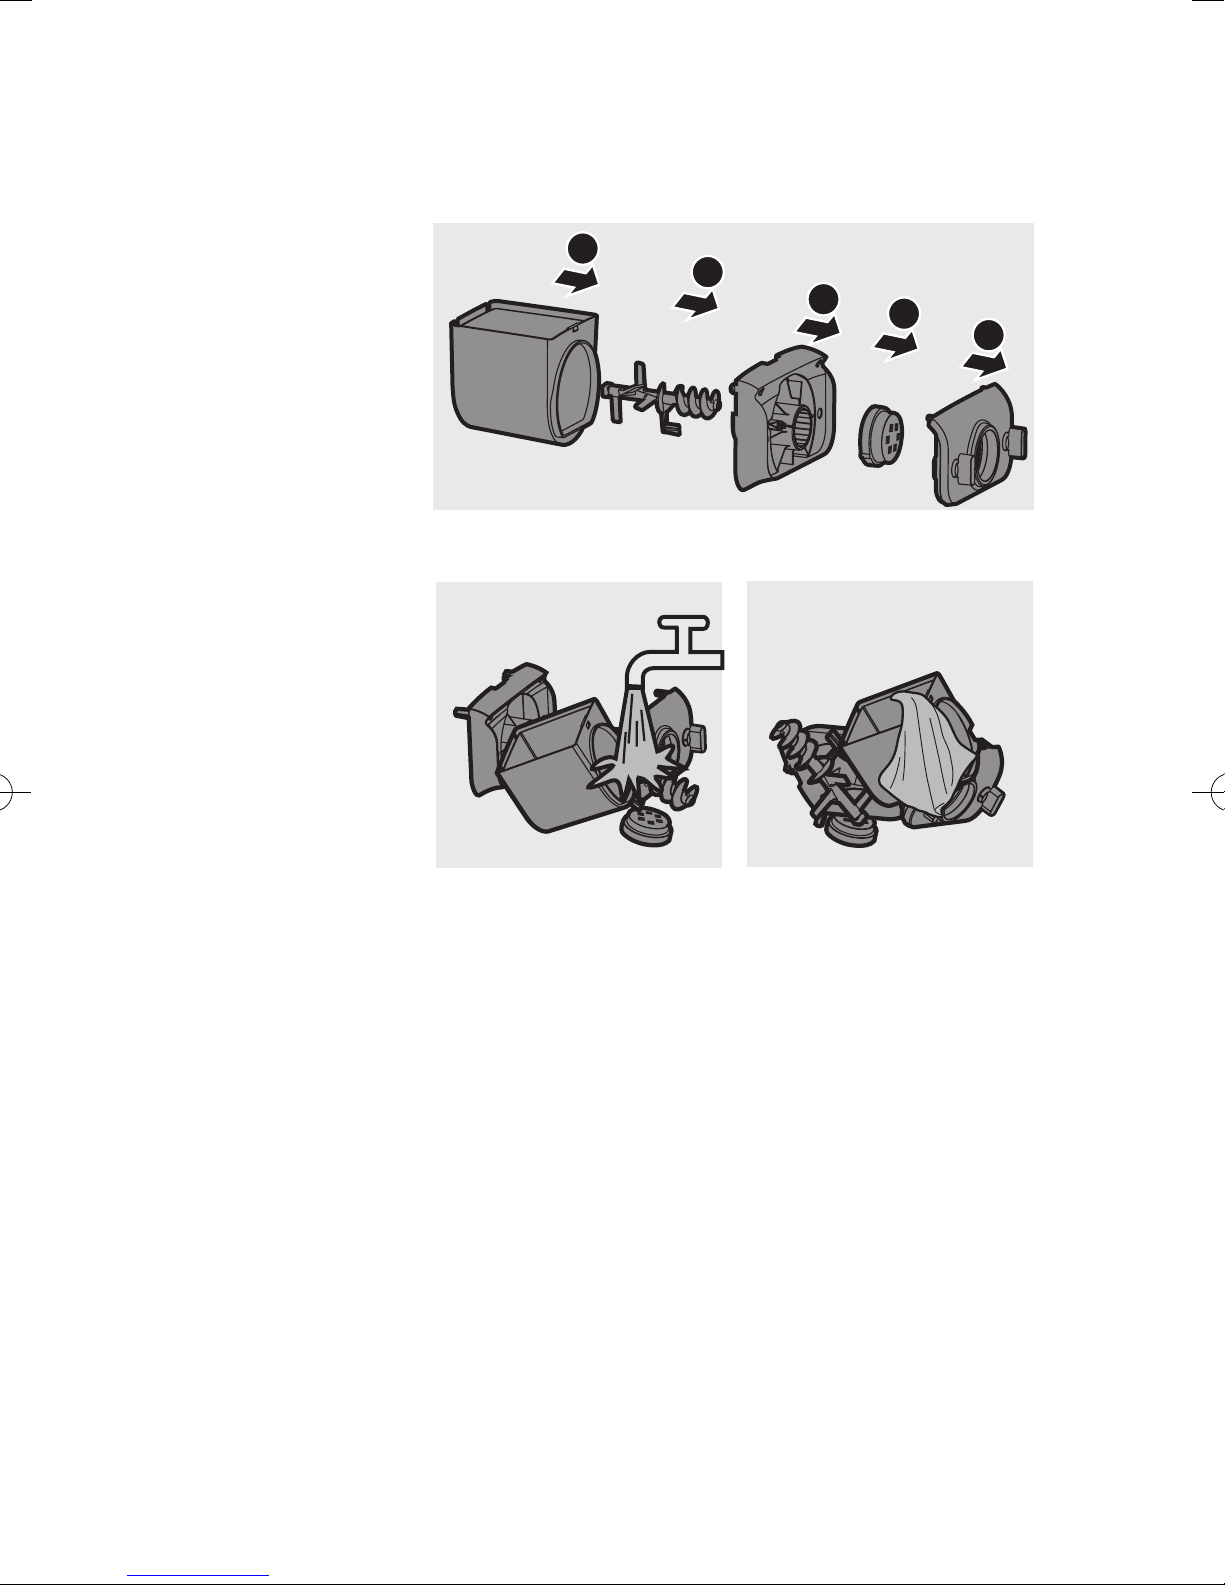
Disassemble the front panel, the shaping disc, the shaping disc holder, the
2
3
4
5
1
3
mixing paddle, and the mixing chamber in order.
Clean all detachable parts, and wipe them dry.
4
9
Assembling
1
2
● Make sure to tighten the front panel knobs during assembly.
● Make sure the appliance is not plugged in when assembling the appliance.
Follow below assembling steps to
install the noodle maker.
Caution
Push the mixing chamber into the appliance.
1
Point the mixing paddle to the hole in the
2
● Before using the noodle maker, make sure all parts and accessories are completely dry.
main unit. Insert the mixing paddle all the
way into the main unit.
Attach the disc holder onto the appliance.
3
Disc holder safety switch
※※
Disc holder safety switch lever
※※
※Check that the safety switch and safety
switch lever are set as shown in the
illustration to the right.
10

Put the shaping disc onto the disc holder , and make sure it is rmly xed
1
1
2
4
on the disc holder .
※Make sure the
inner cavity of the
shaping disc and
the disc holders is
properly fitted.
Attach the front panel to the main unit.
5
Disc holder safety switch lever
※※
※Make sure the front panel is completely
fastened before using the appliance.
※The front panel is heavy. Take extra caution
when assembling it.
1
2
Fasten the front panel control knobs.
6
※If the front panel or the shaping disc is not
properly assembled, the safety switch will
prevent the appliance from working.
Close the chamber lid properly.
7
※If the chamber lid is not properly installed,
the safety switch will prevent the appliance
from working.
11
Using the noodle
maker
● Make sure to follow the right order to add flour and water into the chamber. Put in the flour into the
chamber first, then place the chamber lid onto the chamber. Start the noodle maker, and then slowly pour
water along the entire length of the opening in the lid.
● Do not pour water into the mixing chamber before turning on the noodle maker. Follow the instruction
carefully to enjoy homemade noodles.
● Never put in excessive ingredients in the noodle maker. Otherwise, it will damage the
appliance. The maximum amount of flour used for each batch is 500g.
● Do not put in any ingredients that are 60°C or above to the noodle maker, nor place
the noodle maker in surroundings with high temperature (60°C), for instance in a high
Cautions
※After processing, it is normal to find some leftover dough inside the mixing chamber.
temperature sterilization. This will deform the appliance.
● Never pour in water before you place the chamber lid onto the chamber. Do not pour in
any liquids into the safety switch hole.
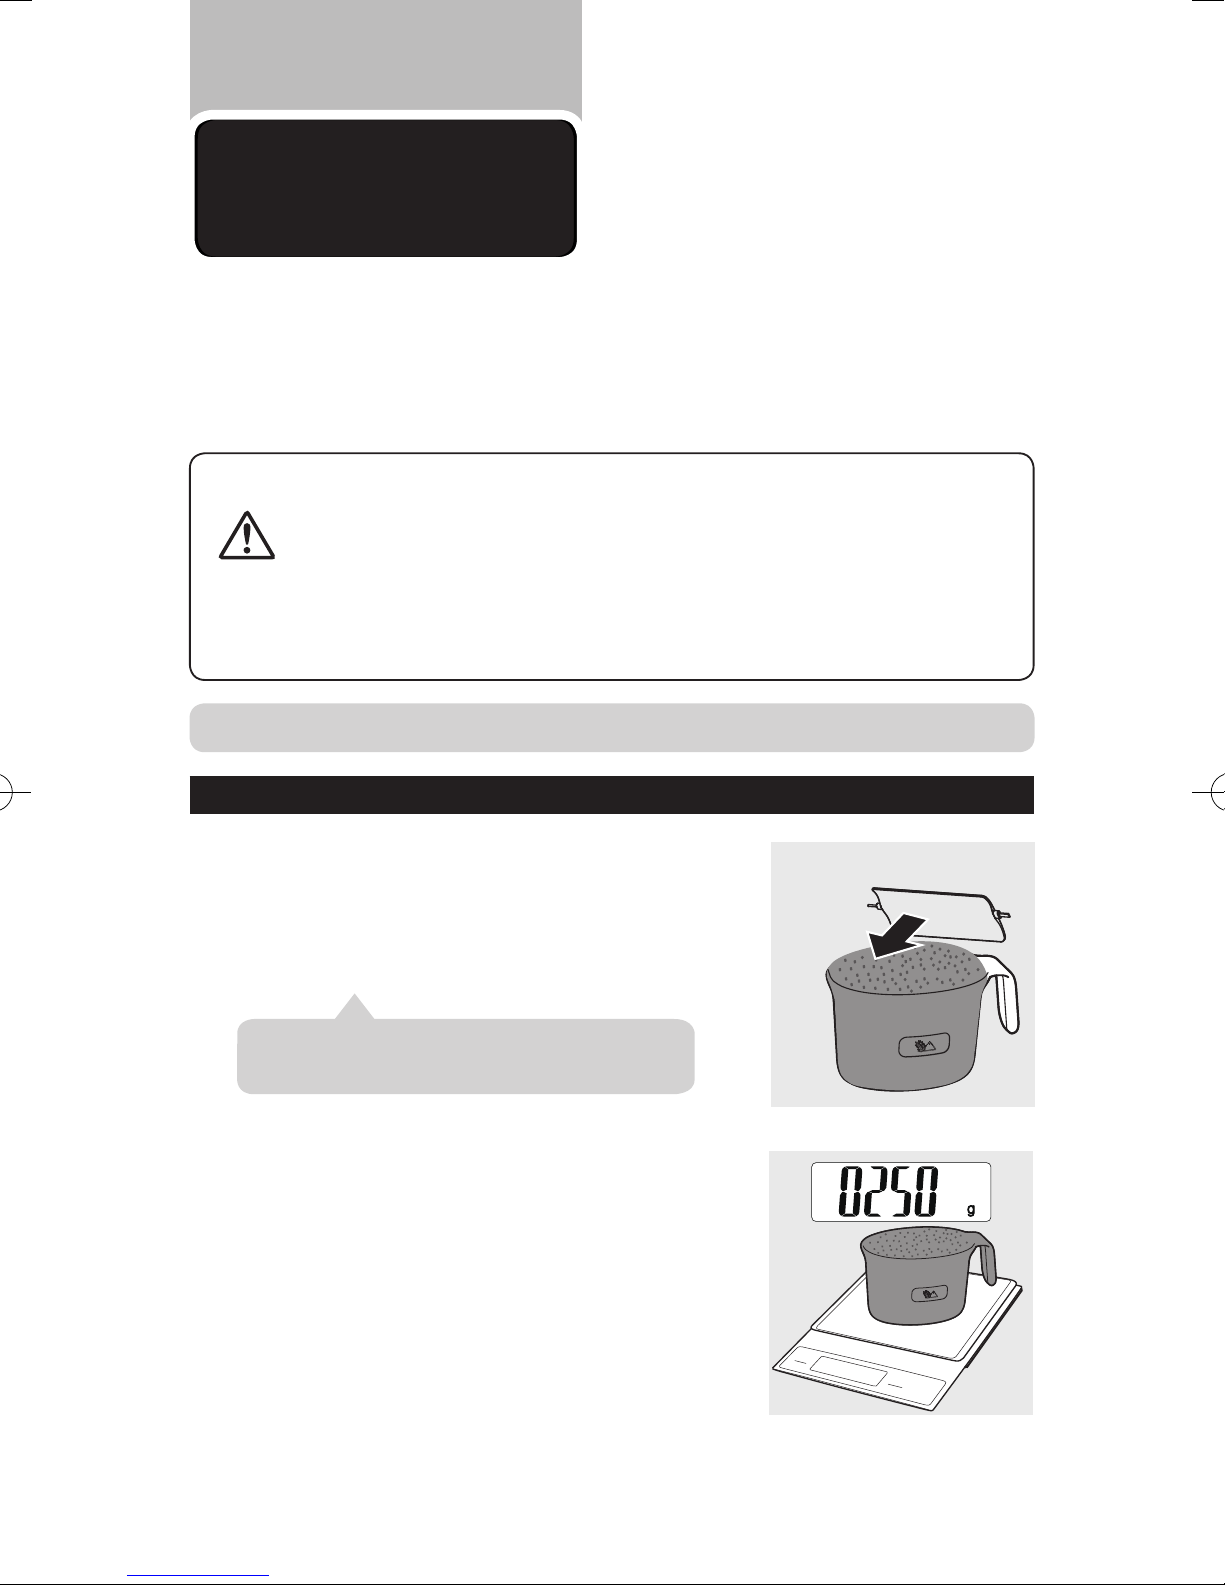
Preparing the ingredients
Measure one full cup of flour. Scrape off any
1
excessive flour from the cup edge with the
supplied flat cleaning tool. One full cup is
equivalent to 1-2 servings.
※Do not shake or hit the flour cup to remove excessive
flour. This will affect the flour weight.
You can also use a kitchen scale to measure
the our. For instance, ~250g our makes
approximately 1-2 servings; ~500g our
makes approximately 3-4 servings of fresh
pasta.
12
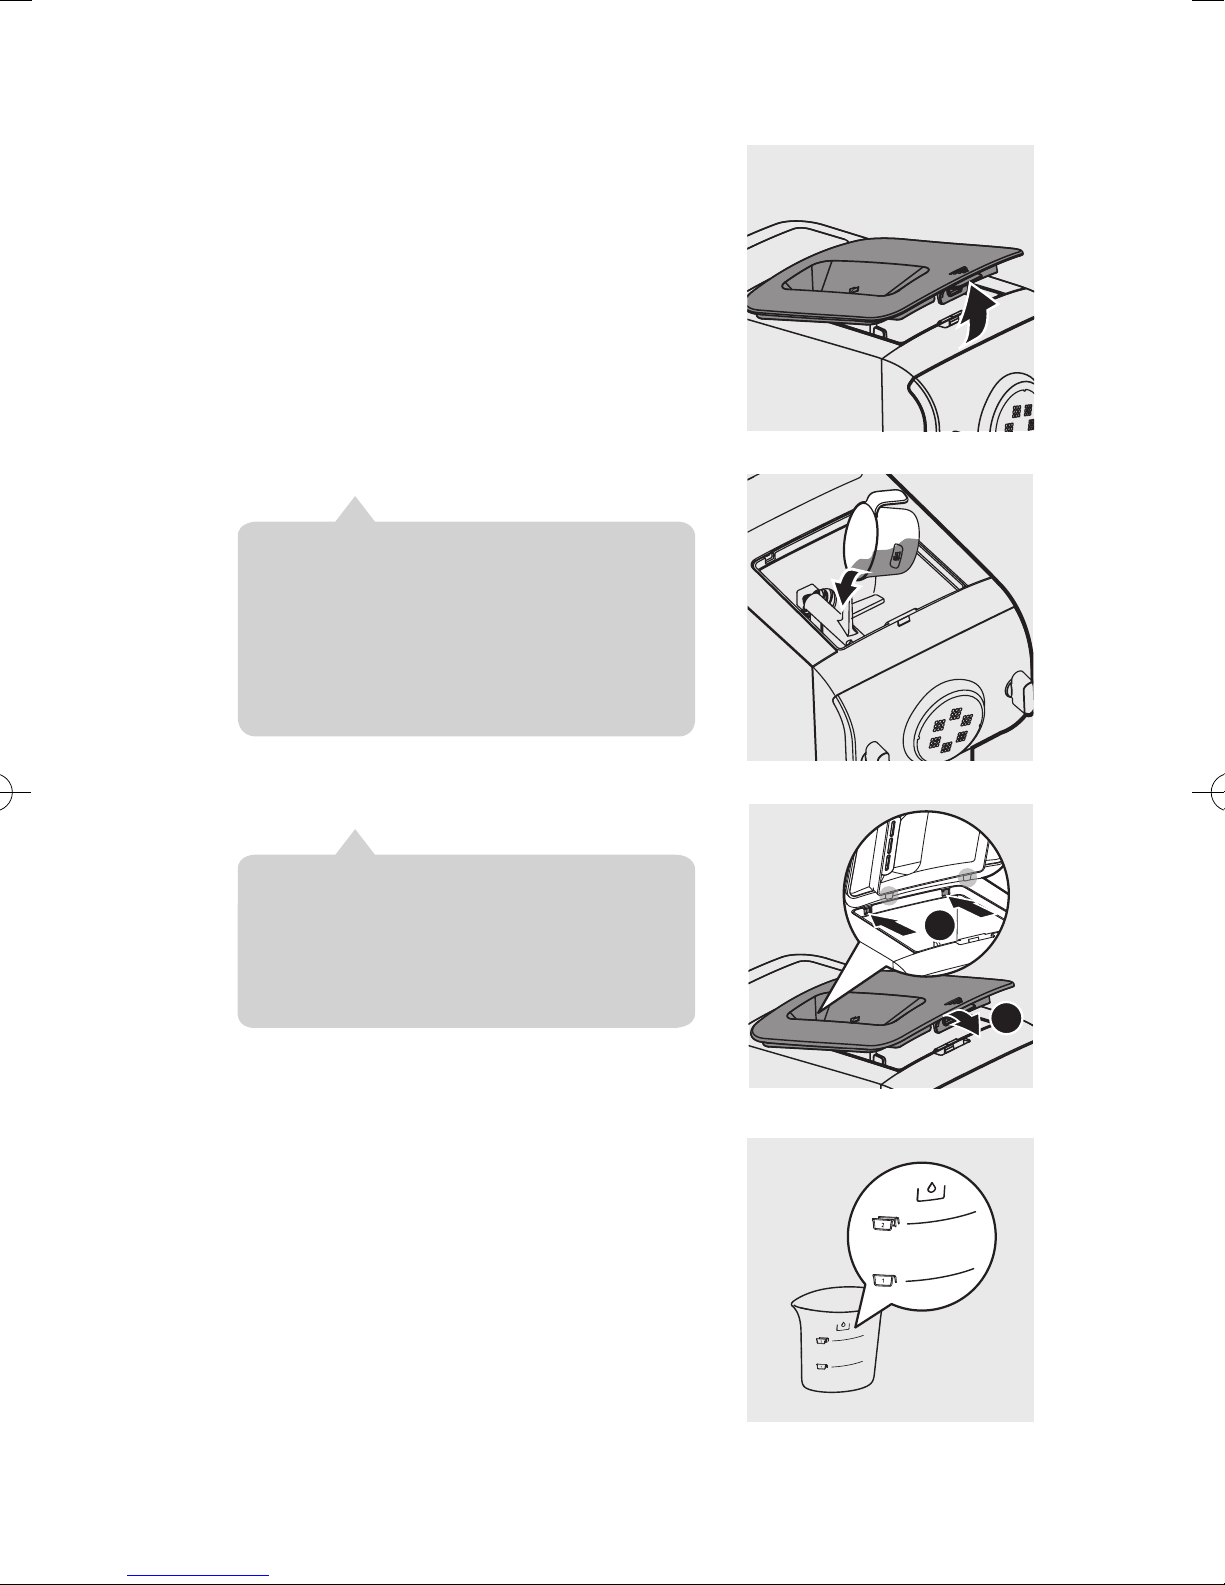
Remove the chamber lid.
1
2
2
Pour the our into the chamber.
3
※If the chamber lid is not closed properly, the appliance
will not start processing. If the chamber lid is open or
loose during processing, the appliance will automatically
pause the processing.
※The appliance will not work if the chamber lid is not
properly closed. During the noodle making process,
if the chamber lid becomes loose, the appliance will
automatically stop working.
Close the chamber lid properly.
4
※Do not pour water into the mixing chamber before
turning on the noodle maker.
※There are 2 sets of water markings on the supplied
water cup. One set is for normal noodle making, and
the other set is for egg noodle and other flavor noodle
making.
Refer to the “Noodle-making recipe table”
5
on page 19 and measure the required
amount of water by using the provided
water cup.
13
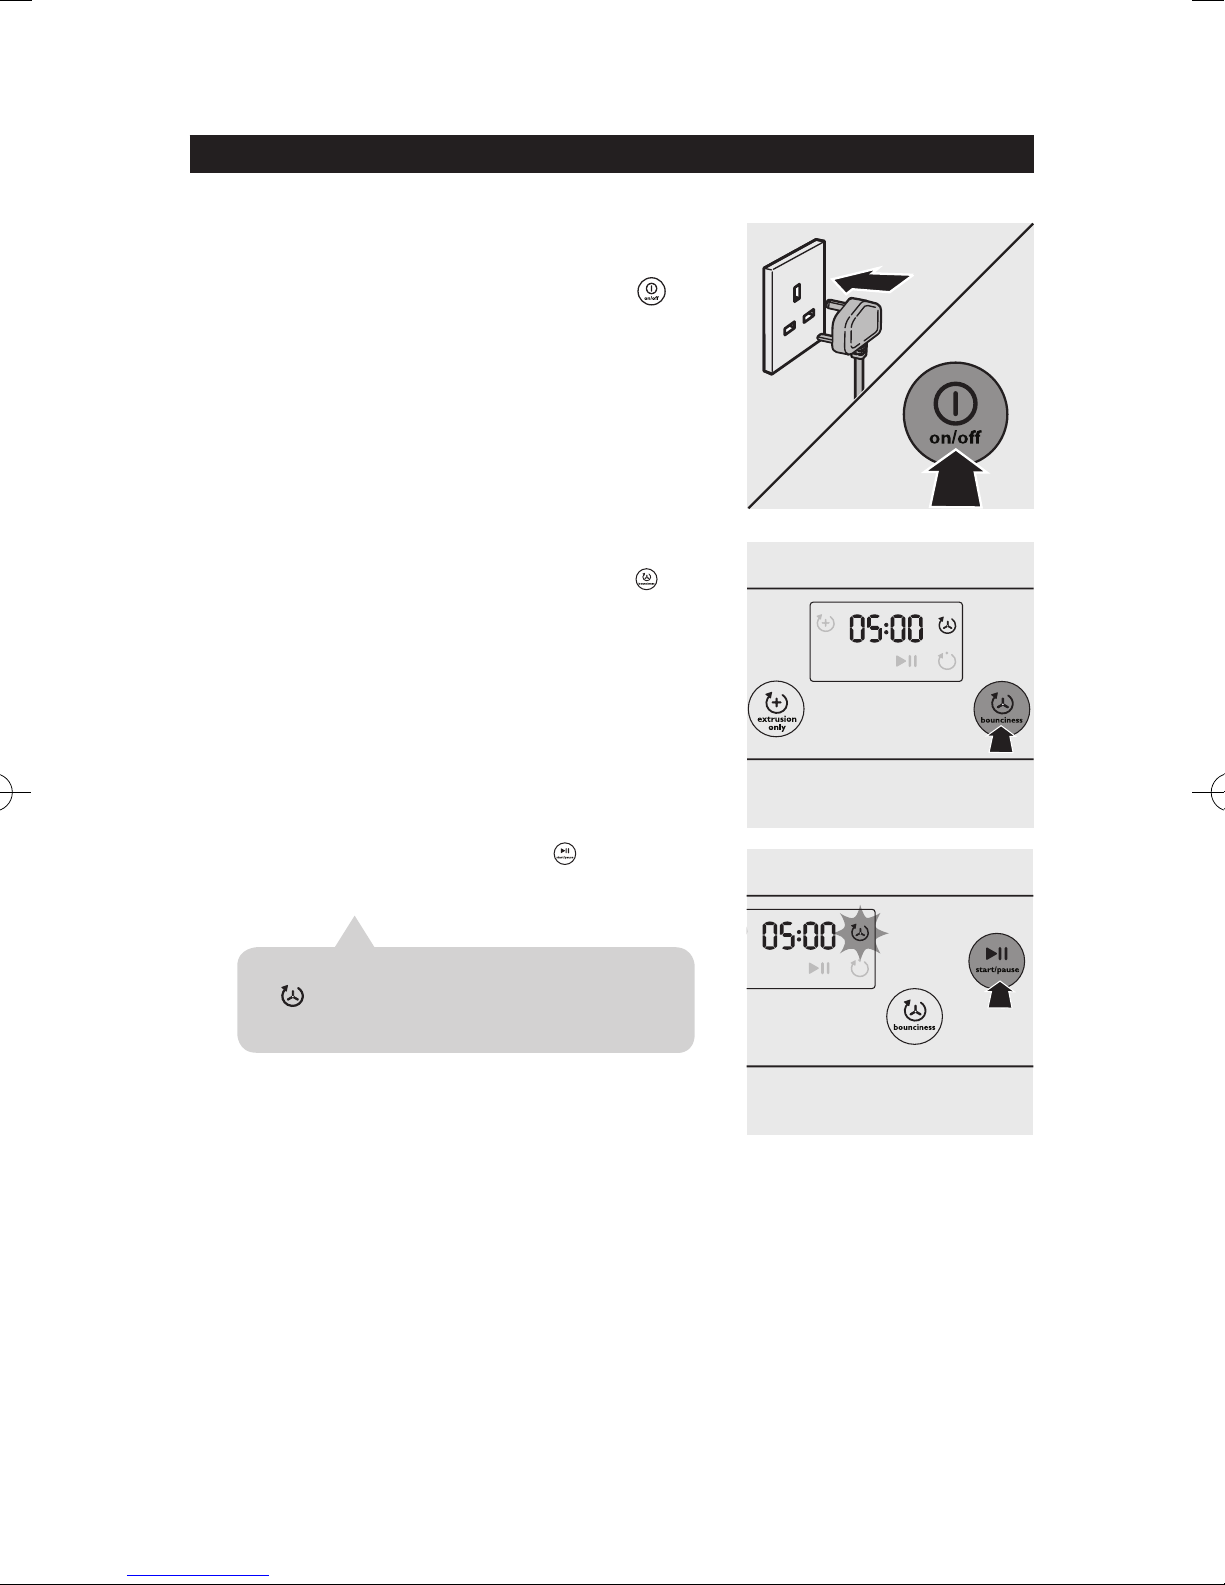
Selecting the noodle making program
Connect to the power. The noodle maker
1
will sound once, and all indicators will flash
once. Press the power on/off button ( )
to switch on the noodle maker. The display
light up.
The default kneading time is 5 minutes.
2
Press the bounciness control button ( )
to set the kneading time from 5 to 8
minutes. You can adjust the kneading time
for different types of noodles and your own
preference.
Press the start/pause button ( ) to start
3
processing.
※The appliance beeps once, and the kneading indicator
( ) starts flashing.
※The selected kneading time starts to count down.
14
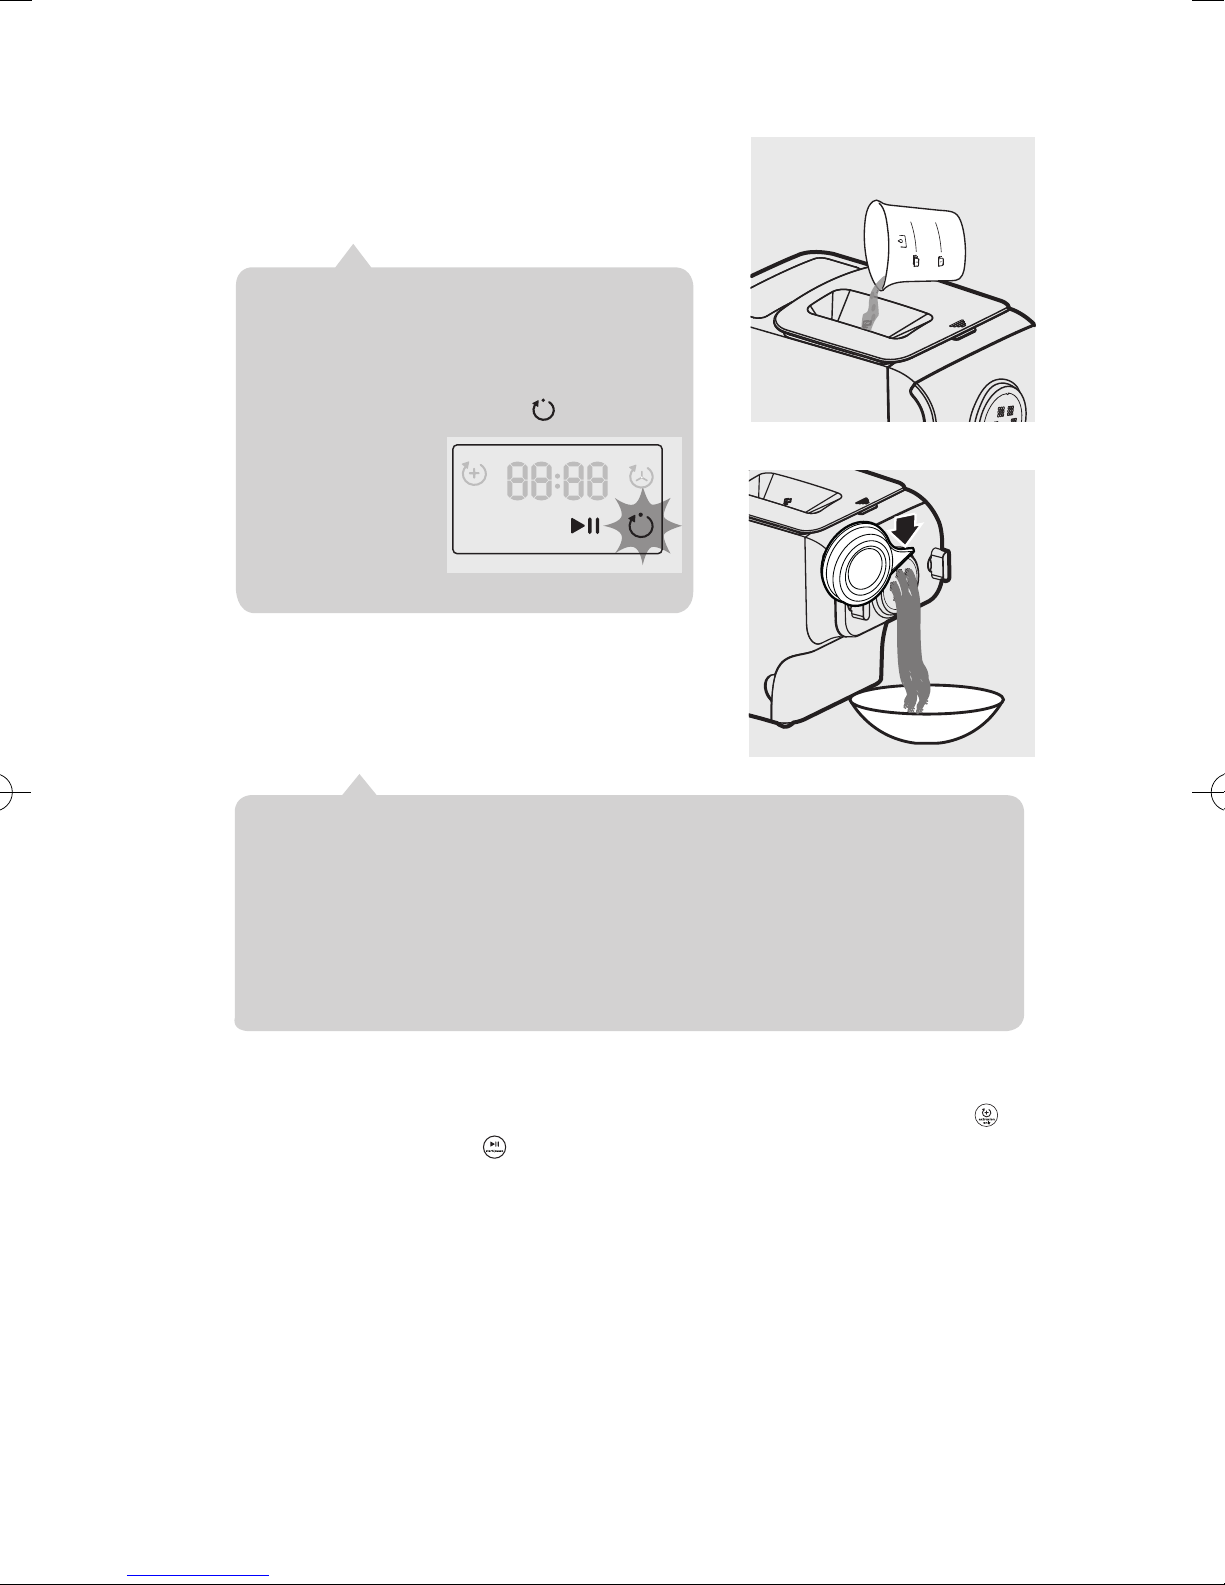
After the kneading starts, slowly pour in the
4
water or water+egg mixture along the
entire length of the slot in the lid.
※Do not add in other ingredients after you have poured
in the water during kneading. Otherwise, it will affect the
result of the noodle texture.
※When the kneading process is finished, the appliance
beeps and pauses for 10 seconds to prepare for
extruding. The extruding indicator ( ) star ts flashing.
After 10 seconds,
the appliance will
automatically start
extruding noodles. Put
the dish or tray under
the shaping disc to
collect the extruded
noodles.
After the program is nished, cut the
5
noodles into the desired length with the
supplied cleaning tool.
※Move the cleaning tool downwards to cut the noodles.
※The extruding time depends on the amount of ingredients in the mixing chamber.
※Due to the auto-sensing technology during extrusion, the total extrusion time varies from 6 mins to
14 mins, and the mixing paddle will be moving backward one to three times to pick up dough for
further extrusion. This is not a machine error.
※You may find some fine noodle threads on the noodle surface. This is normal.
※If the ratio of water and flour is not correct, the extrusion will not succeed. In this case please
prepare the ingredients from scratch.
After the noodle making is complete, if you notice there is some leftover
6
dough inside the chamber, you can press the extra-extruding button ( )
and press start/pause ( ) for extra extrusion. The countdown timer of
the extra-extruding program is 3 minutes.
15
 Loading...