

Page 1
Always there to help you
Question?
Contact
Philips
Register your product and get support at
www.philips.com/welcome
HR2357/06
User manual 3 用户手册 28
Page 2
Congratulations on your purchase, and welcome to Philips!
To fully benet from the support that Philips offers, register your product at
www.Philips.com/welcome.
Read this user manual carefully before you install and use the unit. Save it for future
reference.
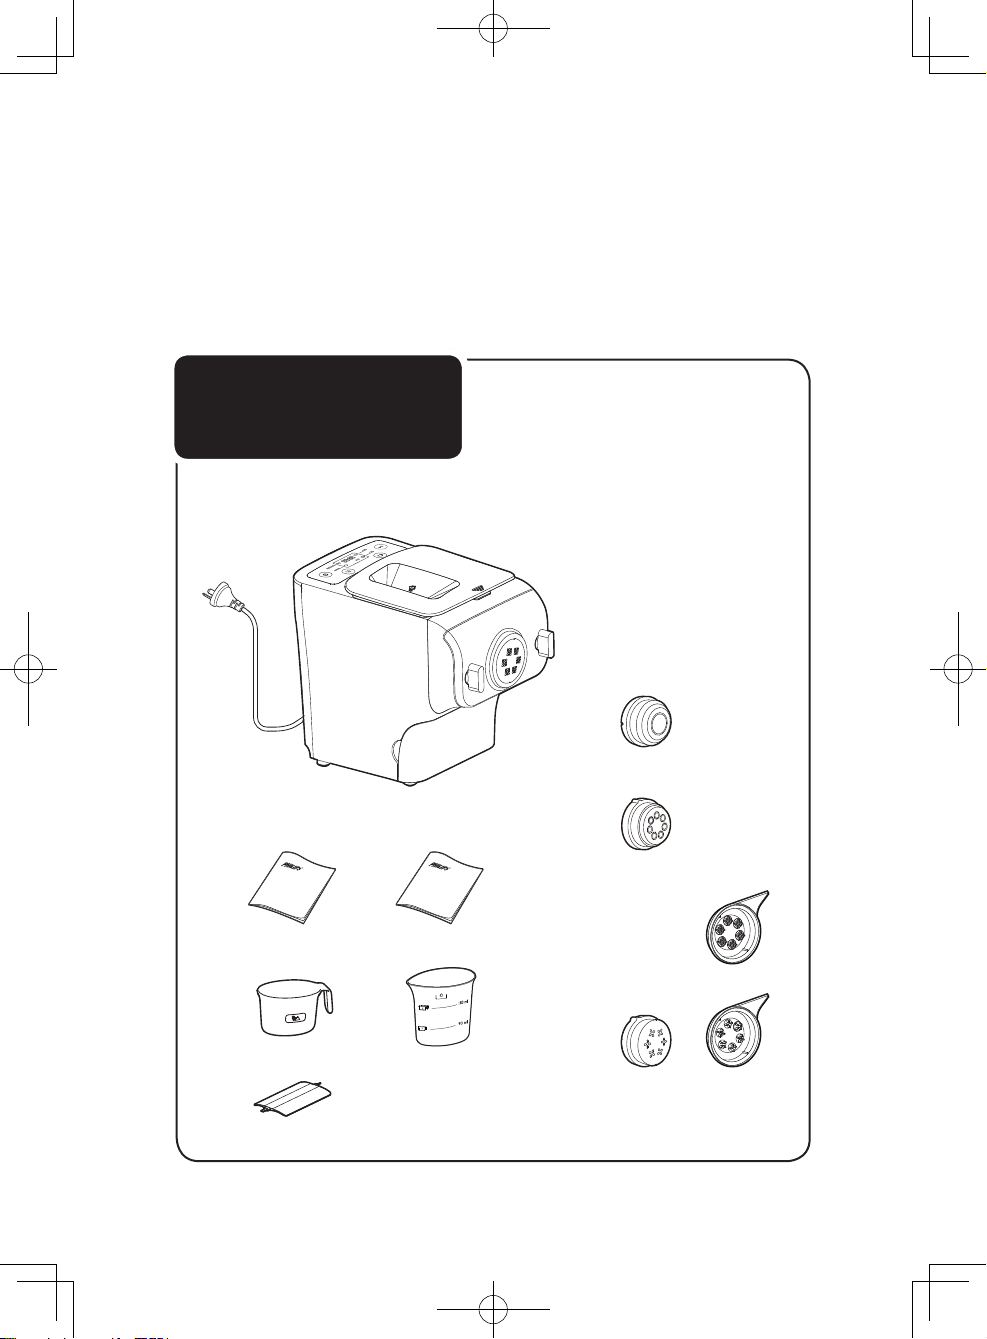
What's in the box
Main unit
2
ENGLISH
User manual Recipe book
Flour cup
Water cup
Flat cleaning tool
Shaping
discs
Lasagna/
Dumpling
Penne
Spaghetti -
Assembled on the
appliance upon
purchanse
Fettuccine
Cleaning tool
Use the at
cleaning tool
Use the at
cleaning tool
Page 3

Contents
What's in the box ����������� 2
Contents ��������������� 3
Important �������������� 4
Overview ��������������� 6
Disassembling and cleaning
before rst use ������������ 8
Assembling ������������� 10
Using the pasta and noodle maker ���� 12
Cleaning �������������� 18
Troubleshooting ����������� 21
Product information ��������� 23
Recycling �������������� 23
Warranty and service ��������� 24
ENGLISH
3
Page 4
Safety
Important
• Before you connect the appliance to the power, make sure that the voltage
indicated on the bottom of the appliance corresponds to the local power
voltage.
• Make sure that your hands are dry before you insert the plug into the power
outlet.
• Make sure that the plug is firmly inserted into the power outlet.
• Never connect this appliance to a timer switch.
• Before you insert the plug into the power outlet, make sure that the appliance
is assembled correctly.
• If the power cord, the plug, or other parts are damaged, do not use the
appliance.
• If the power cord is damaged, you must have it replaced by Philips, a service
center authorized by Philips or similarly qualified persons to avoid a hazard.
• Do not replace parts of the appliance yourself.
• This appliance is not intended for use by persons (including children) with
reduced physical, sensory or mental capabilities, or lack of experience and
knowledge, unless they have been given supervision or instructions concerning
use of the appliance by a person responsible for their safety.
• For their safety, do not allow children to play with the appliance. Keep the
appliance and its power cord out of the reach of children.
• To prevent any accidents, do not use the appliance if it is damaged for any
reason.
• Read this user manual carefully before
you use the appliance, and save it for
future reference.
Warning
EMF
This Philips appliance complies with all applicable standards and regulations regarding
exposure to electromagnetic elds.
4
ENGLISH
Page 5
Caution
• Before using the appliance for the first time, disassemble and wash the
accessories thoroughly (see “Disassemble and cleaning before first use” section.)
• The appliance is intended for household use only.
• Do not use this appliance on an unstable or uneven surface.
• Keep the appliance and its power cord out of the reach of children.
• Do not disconnect the power cord before processing is complete. If you have
to stop processing, disconnect the power cord before you perform other
operations.
• To better protect the lifetime of the appliance, we recommend the continuous
working time to be less than 45 minutes. You can restart using the appliance
after 15 minutes.
• If you intend to use the appliance continuously, clean the shaping disc with the
supplied cleaning tool each time after use. For cleaning ease, do not soak the
shaping disc into the water directly.
• Do not bend the power cord forcibly, jerk, twist, bundle nor put under heavy
items.
• Do not put metal or flammable objects in the mixing chamber.
• Unplug the appliance when not in use.
• Do not use the appliance near flammable objects such as table cloth or drapes.
• Pull out the power plug immediately when you detect smoke.
• When unplugging the power cord, do not pull the cable but grab the plug part.
• Keep the power plug clean.
• Do not put heavy objects on the appliance.
• This appliance is designed as consumer kitchen appliance. Do not use for any
other purpose
• Do not move the appliance while it is operating.
• Disconnect the power and remove the power cord before cleaning or
disassembling this appliance.
• Do not immerse the main unit in water.
• Place the appliance in a dry and well ventilated place after use.
• To prevent a short circuit or an electric shock, do not pour water or any liquid
into the safety switch.
• Do not use a dishwasher to clean the machine or the accessories.
ENGLISH
5
Page 6
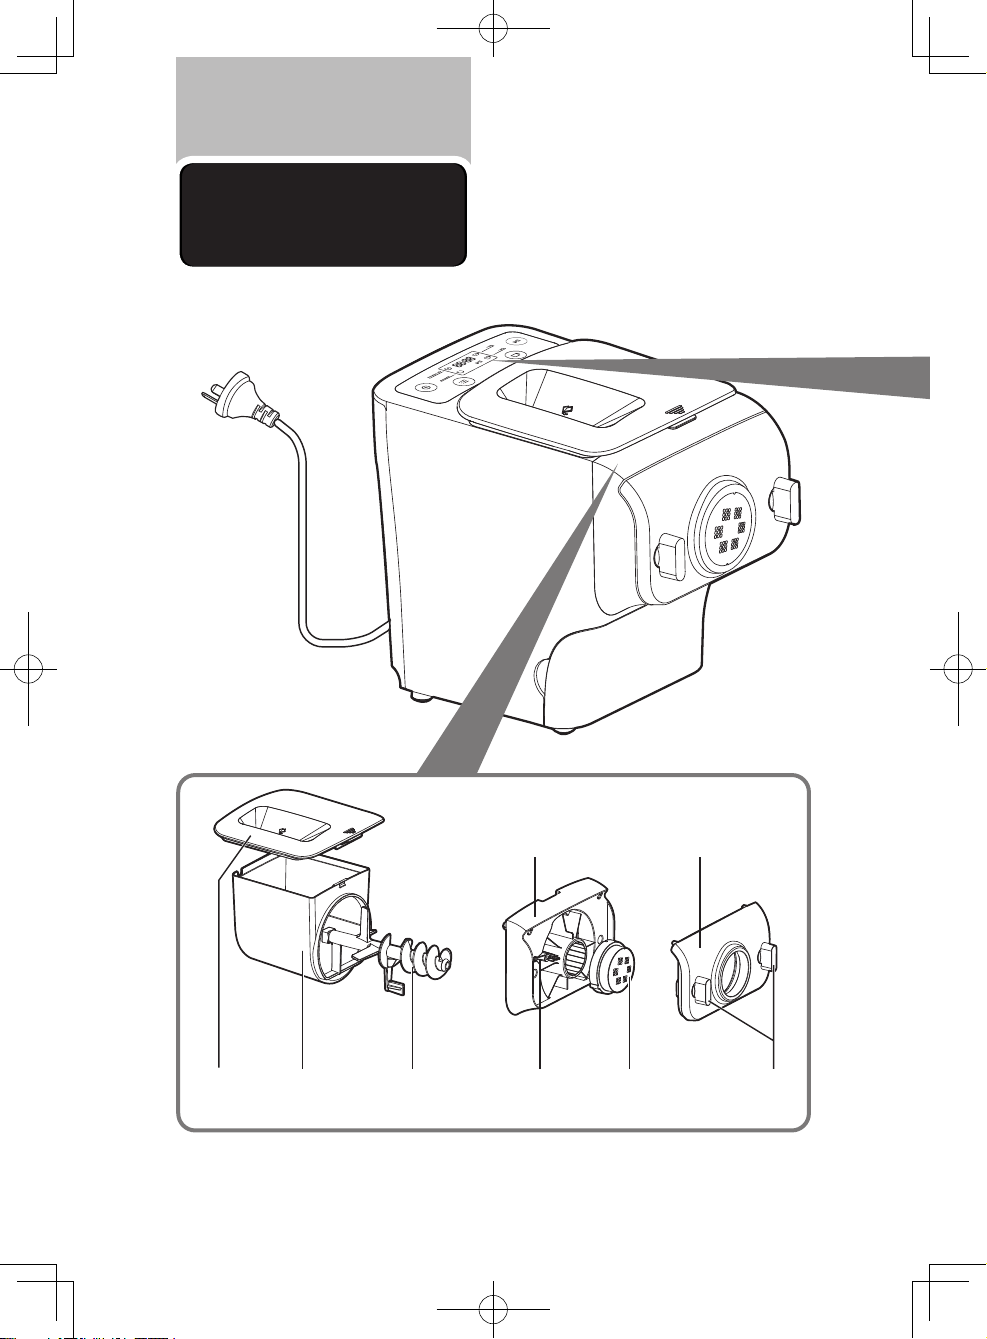
Overview
Mixing
chamber lid
6
ENGLISH
Mixing
chamber
Mixing
paddle
Disc holder Front panel
Shaping discsDisc holder
safety switch lever
Front panel
knobs
Page 7
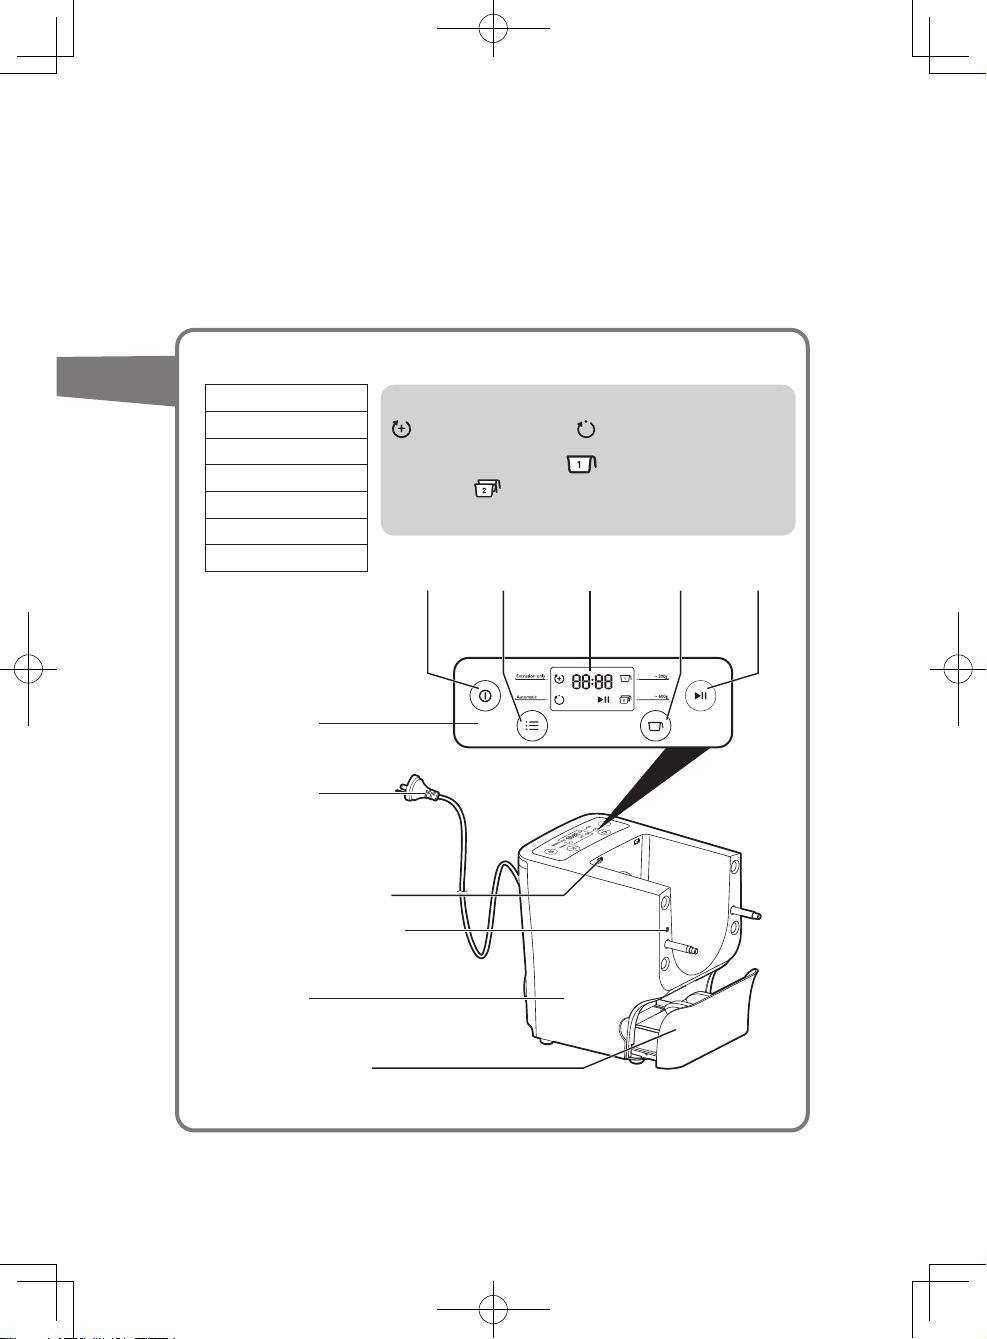
Abbreviations
g = grams
~ = approximately
ml = milliliters
mm = millimeters
kg = kilogram
in = inch
Control panel
display
Power cord
Safety switch hole of
the mixing chamber lid
Disc holder safety switch
Program button - select the extrusion-only program
or automatic program .
Servings button - select to make ~ 300g, 1-2
servings or to make ~ 600g, 3-4 servings of fresh
pasta/noodle.
Power on/
off button
Program
button
Display
screen
Servings
button
Start/pause
button
Main unit
Shaping discs storage
ENGLISH
7
Page 8
Disassembling and
cleaning
before rst use
Important
• Before using the appliance for the first time, remove and safely discard any
packaging material and /or promotional labels.
• Take out all the parts and accessories, wash and thoroughly dry all parts and
accessories (see "Cleaning" section).
• Do not use water to rinse or soak the main unit.
• Do not use a scourer or similar cleaners as these will scratch the plastic surface
and affect the lifetime of the pasta and noodle maker.
• This appliance is intended for household use only.
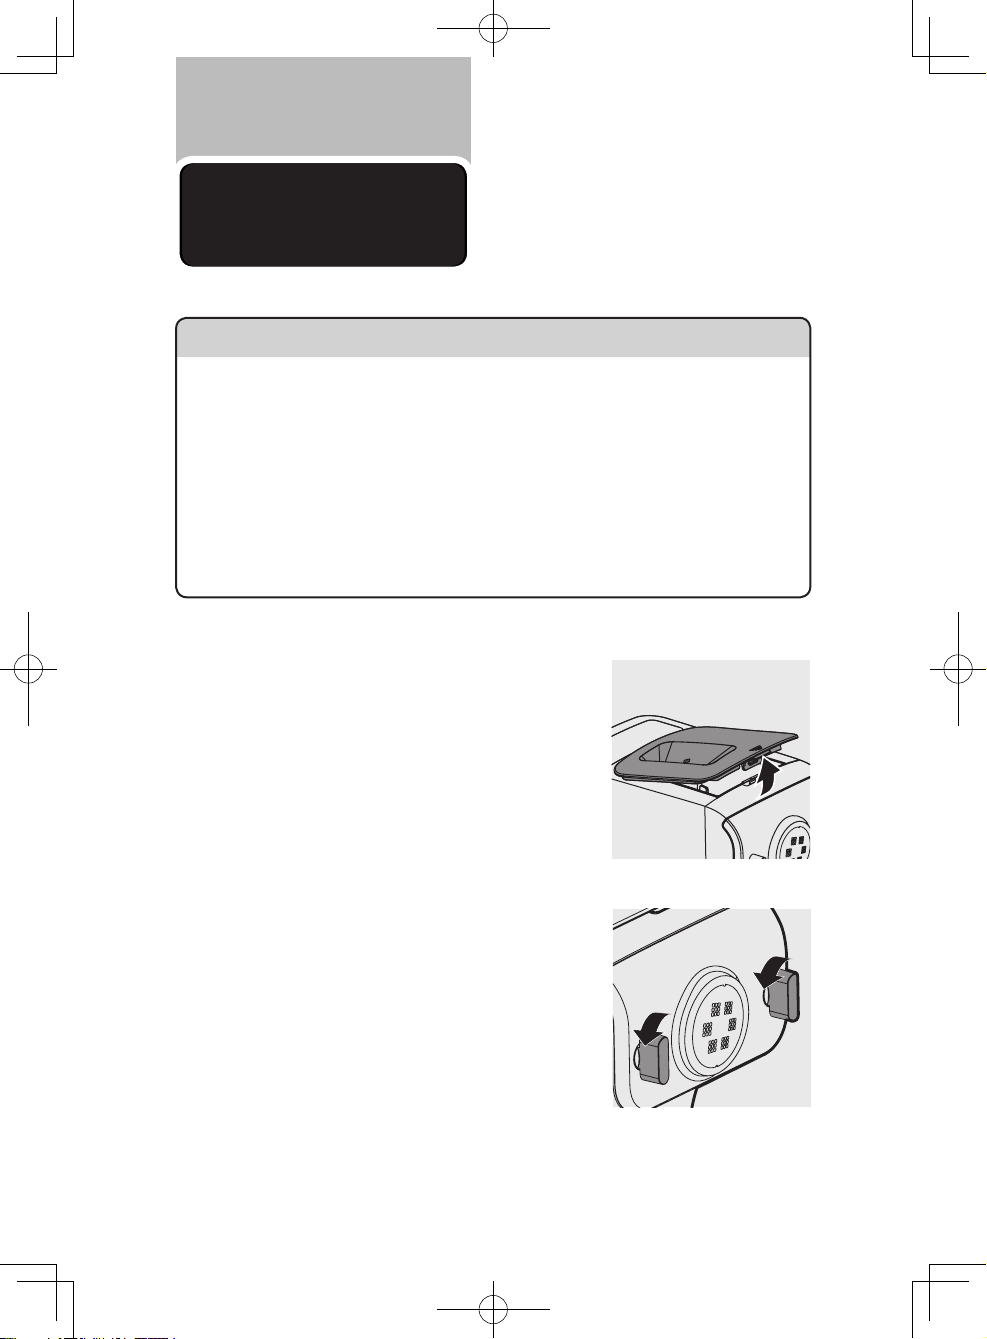
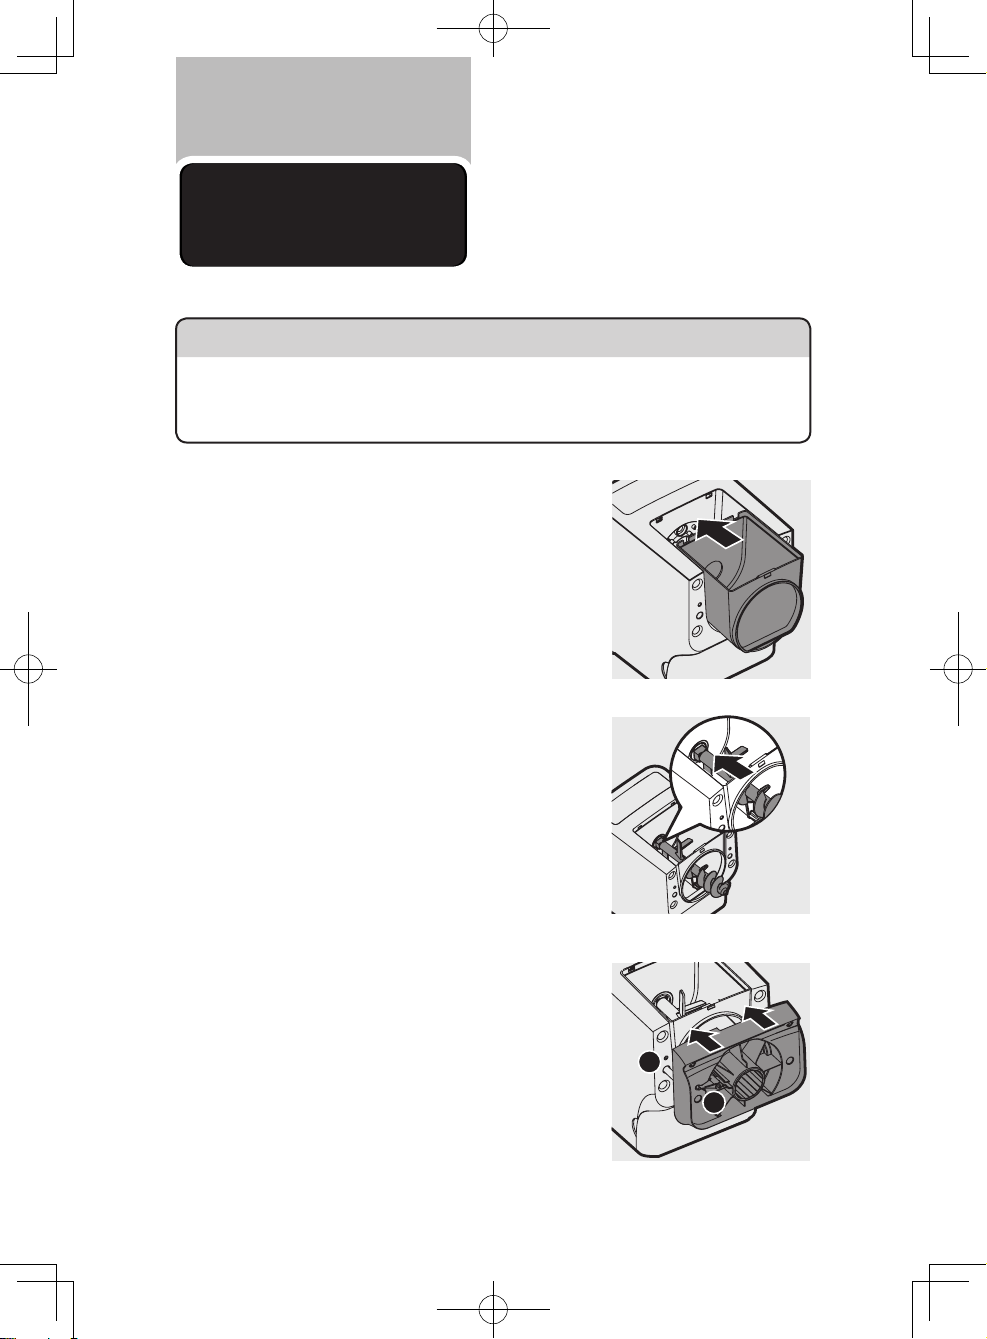
Remove the mixing chamber lid from the
1
appliance.
Loosen the front panel control knobs.
2
Note:
• The front panel is heavy. Take extra caution when
removing it.
8
ENGLISH
Page 9
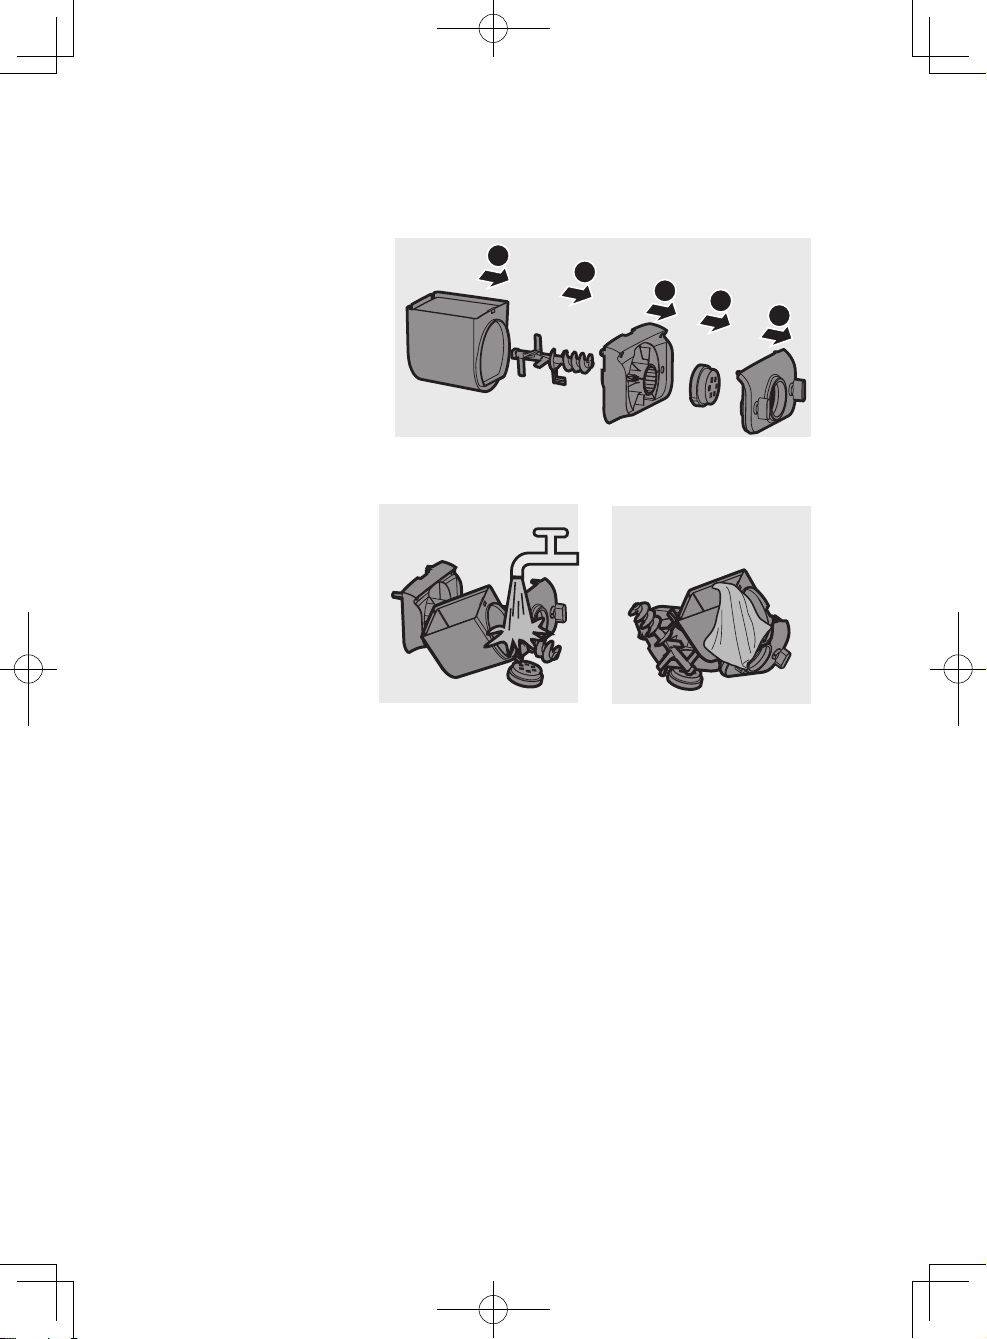
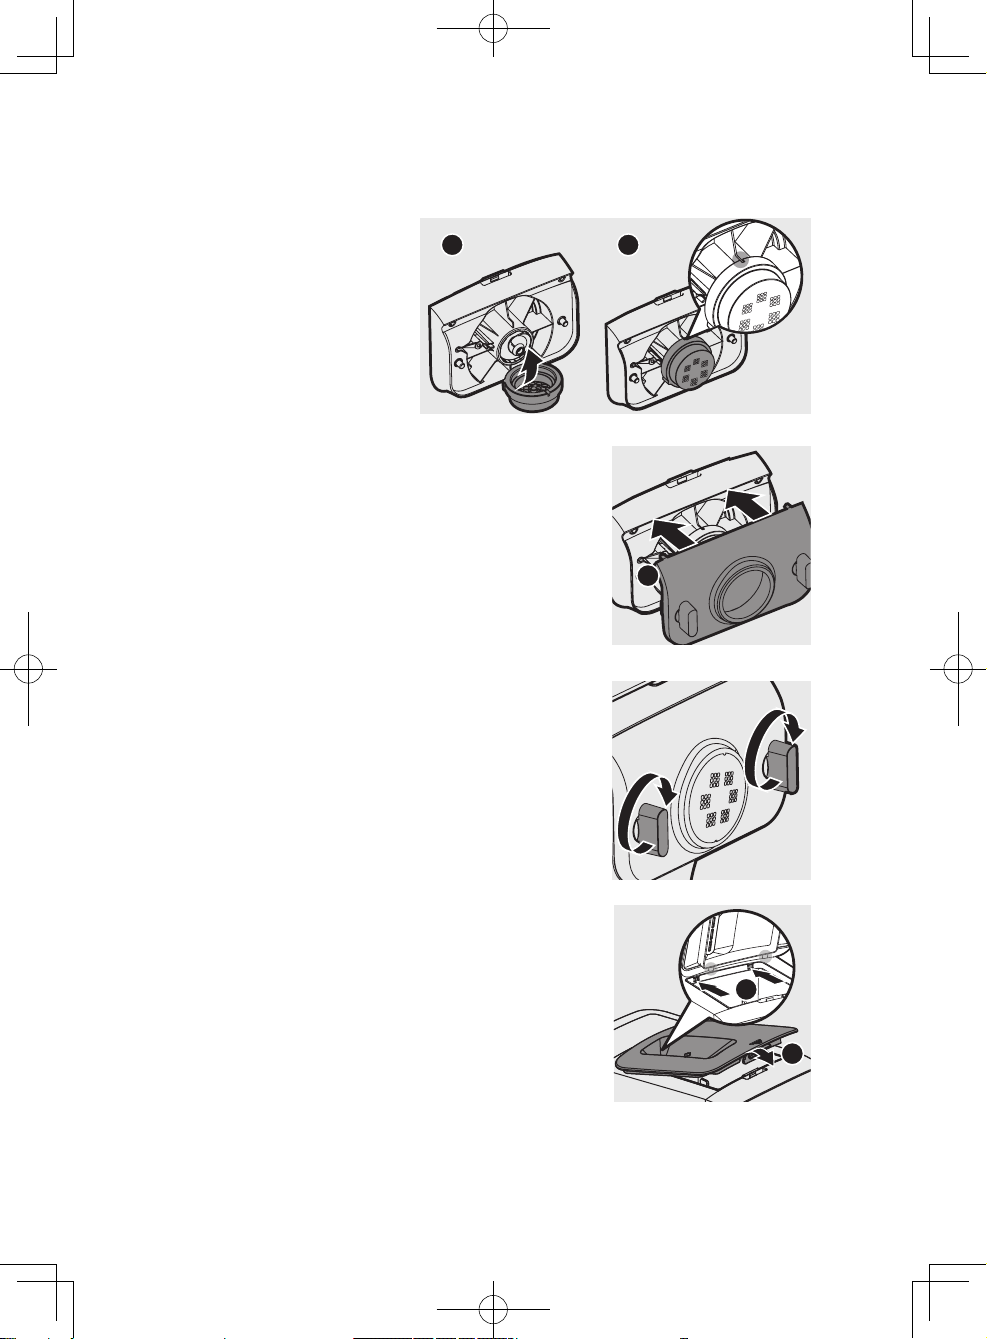
Disassemble the front panel, the shaping disc, the shaping disc holder, the mixing
2
3
4
5
1
3
paddle, and the mixing chamber in order.
Clean all detachable parts, and wipe them dry.
4
ENGLISH
9
Page 10
Assembling
1
2
Follow below assembling steps to install
the pasta and noodle maker.
Important
• Make sure to tighten the front panel knobs during assembly.
• Make sure the appliance is not plugged in when assembling the appliance.
Push the mixing chamber into the appliance.
1
Point the mixing paddle to the hole in the main
2
unit. Inser t the mixing paddle all the way into the
main unit.
Attach the disc holder onto the appliance.
3
Disc holder safety switch
❶
Disc holder safety switch lever
❷
Note:
• Check that the safety switch ❶ and safety
switch lever ❷ are set as shown in the
illustration to the right.
10
ENGLISH
Page 11
Put the shaping disc onto the disc holder ❶ , and make sure it is rmly xed on the
1
1
2
4
disc holder ❷ .
Note:
• Make sure the inner cavity
1
2
of the shaping disc and
disc holder is properly
tted.
Attach the front panel to the main unit.
5
Disc holder safety switch lever
❶
Note:
• Make sure the front panel is completely fastened
before using the appliance.
• The front panel is heavy. Take extra caution when
assembling it.
Fasten the front panel control knobs.
6
Note:
• If the front panel or the shaping disc is not properly
assembled, the safety switch will prevent the
appliance from working.
Close the mixing chamber lid properly.
7
Note:
• If the mixing chamber lid is not properly installed,
the safety switch will prevent the appliance from
working.
ENGLISH
11
Page 12
Using the pasta and
noodle maker
Important
• Make sure to follow the right order to add flour and water into the mixing
chamber. Put the flour into the mixing chamber first, then place the chamber lid
onto the chamber. Start the pasta and noodle maker, and then slowly pour water
along the entire length of the opening in the lid.
• Never put excessive ingredients into the pasta and noodle maker. Otherwise, it will
damage the appliance. The maximum amount of flour used for each batch is 500g.
• Do not put any ingredients that are 60°C / 140°F or above into the pasta and
noodle maker, nor place the pasta and noodle maker in surroundings with high
temperature (60°C / 140°F), for instance in a high temperature sterilization. This
will deform the appliance.
• Never pour water into the mixing chamber before you place the chamber lid onto
the chamber. Do not pour any liquids into the safety switch hole.
• Do not pour water into the mixing chamber before turning on the pasta and
noodle maker. Follow the instruction carefully to enjoy homemade pasta/noodle.
Preparing the ingredients
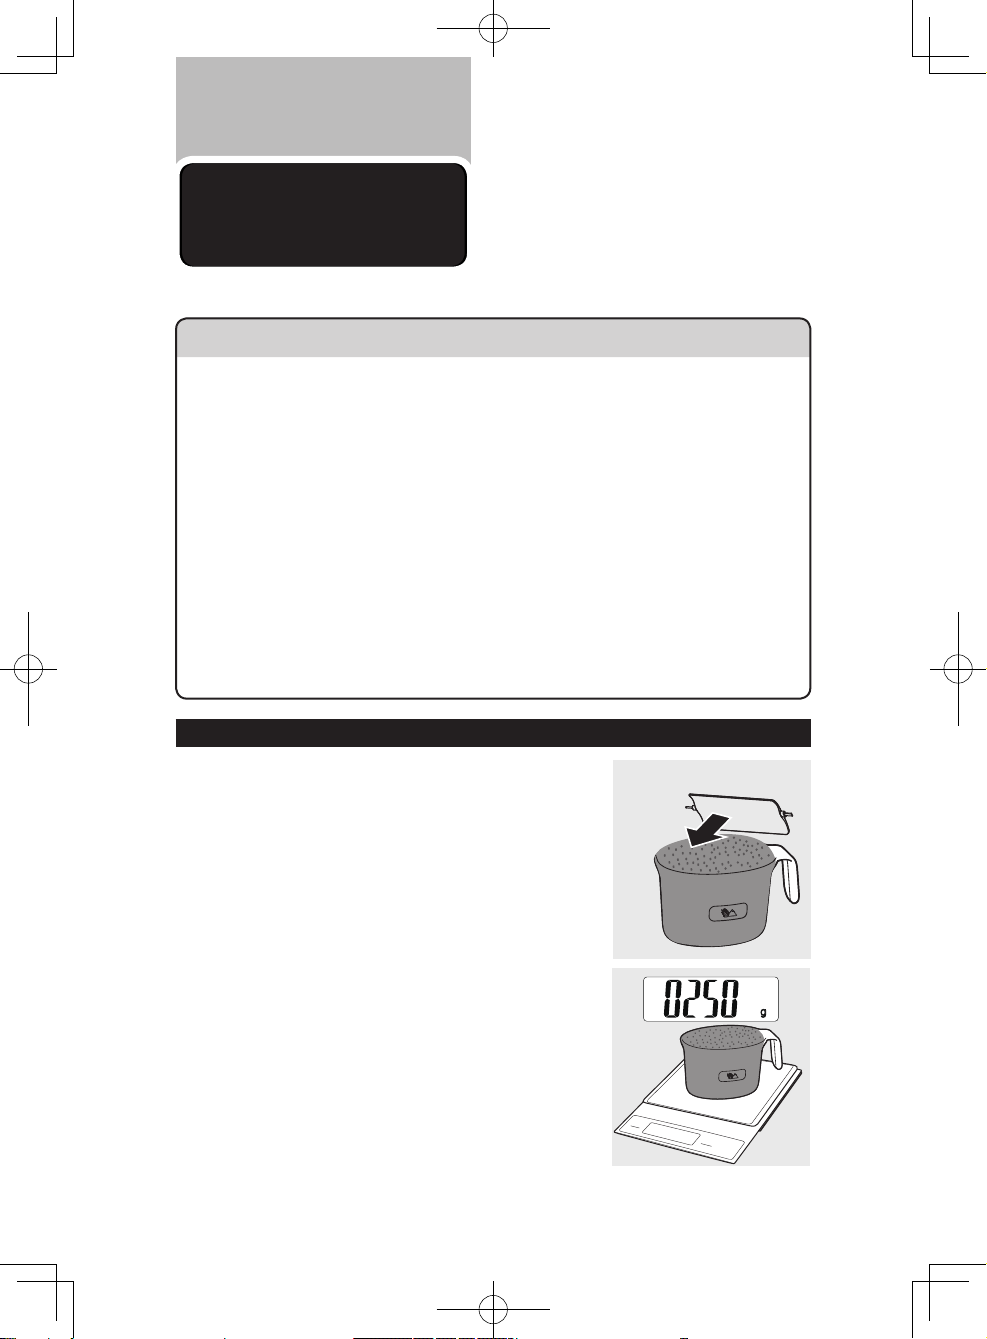
Measure one full cup of flour. Scrape off any
1
excessive flour from the cup edge with the
supplied flat cleaning tool. One full cup is
equivalent to 1-2 servings.
Note:
• Do not shake or hit the our cup to remove
excessive our. This will affect the our weight.
You can also use a kitchen scale to measure the
our. For instance, ~250g our makes
approximately 1-2 servings; ~500g our makes
approximately 3-4 servings of fresh pasta/noodle.
12
ENGLISH
Page 13

Remove the chamber lid.
1
2
2
Pour the our into the chamber. If you want to
3
make 3-4 servings, add a second cup of our as
you will need 2 cups (~500g) of our in total.
Close the chamber lid properly.
4
Note:
• Insert the two hooks into the appliance rst ❶, and
then push the lid against the main unit ❷.
• The appliance will not start working if the chamber
lid is not properly closed. During the pasta/noodle
making process, if the chamber lid becomes loose,
the appliance will automatically stop working.
Use the “Pasta/noodle making recipe table” and
5
measure the required amount of water.
Note:
• Do not pour water into the mixing chamber before
turning on the pasta and noodle maker.
• There are 2 sets of water markings on the supplied
water cup. One set is for normal pasta/noodle
making, and the other set is for egg pasta/noodle and
other avor pasta/noodle making.
ENGLISH
13
Page 14
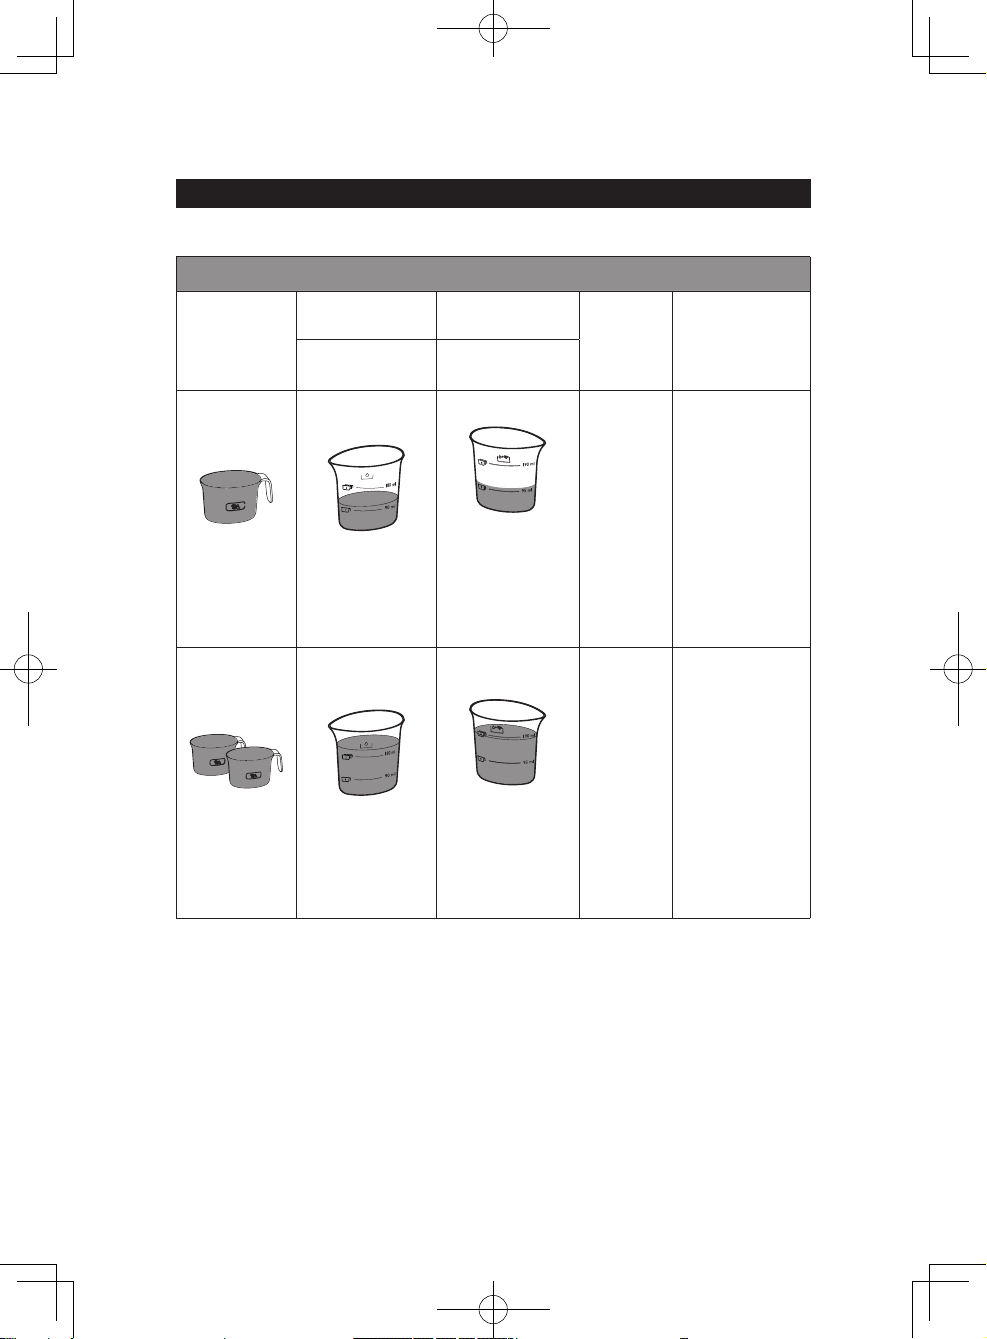
Pasta/noodle making recipe table
For more information, you can visit www.philips.com/kitchen.
Flour/water ratio table
Flour
1 our cup
(~250g)
2 our cups
(~500g)
Normal pasta/
noodle
Water (marking)
Amount of water
needed for a cup
of our (~90ml)
Amount of water
needed for 2 cups
of our (~180ml)
Egg pasta/noodle
Water + egg
mixture (marking)
10 minutes
Amount of water
+ egg mixture
needed for a cup
of our (~95ml)
15 minutes
Amount of water
+ egg mixture
needed for 2 cups
of our (~190ml)
Processing
time
Output
~ 300g fresh
pasta/noodle.
This is sufcient
as a main meal
for 1-2 persons,
or as a side dish
for 4-6 persons.
~ 600g fresh
pasta/noodle.
This is sufcient
as a main meal
for 3-4 people, or
as a side dish for
8-10 people.
14
ENGLISH
Page 15
Important
• The pasta/noodle recipes provided in the user manual and recipe book have been
tested for success. If you experiment with or use other pasta/noodle recipes, the
flour and water/egg ratios will need to be adjusted to the flour and water cup
ratios included with the pasta and noodle maker. The pasta and noodle maker will
not operate successfully without adjusting the new recipe accordingly.
Note:
• To ensure the quality of the pasta/noodle, use gluten our to make pasta/noodle.
Follow the recommended proportion to add the ingredients.
• Seasonal changes and using ingredients from different regions may affect the our/
water ratio. You may adjust based on the recommended proportion.
• When making the egg pasta/noodle or vegetable pasta/noodle, make sure you
whisk the egg mixture or vegetable juice evenly with the water before pouring into
the chamber. When adding ingredients, make sure the ingredient is in a liquid form.
• See the recipe book provided for additional pasta and noodle recipe variations
and many delicious new recipes to try.
ENGLISH
15
Page 16
Selecting the pasta/noodle making program
Important
• Do not select the extrusion-only program before the dough mixing is complete.
Otherwise, this will damage the pasta and noodle maker and its lifetime.
• Do not disconnect the power cord before processing is complete. If you have
to stop processing, press the on/off button to turn off the pasta and noodle
maker and then disconnect the power cord from outlet before performing other
operations.
• To better protect the lifetime of the appliance, it is recommended the continuous
working time be less than 45 minutes. You can restart using the appliance after a
15 minute rest.
• If you intend to use the appliance continuously, clean the shaping disc with the
supplied cleaning tool each time after each pasta/noodle making session. For
cleaning ease, do not soak the shaping disc directly in water.
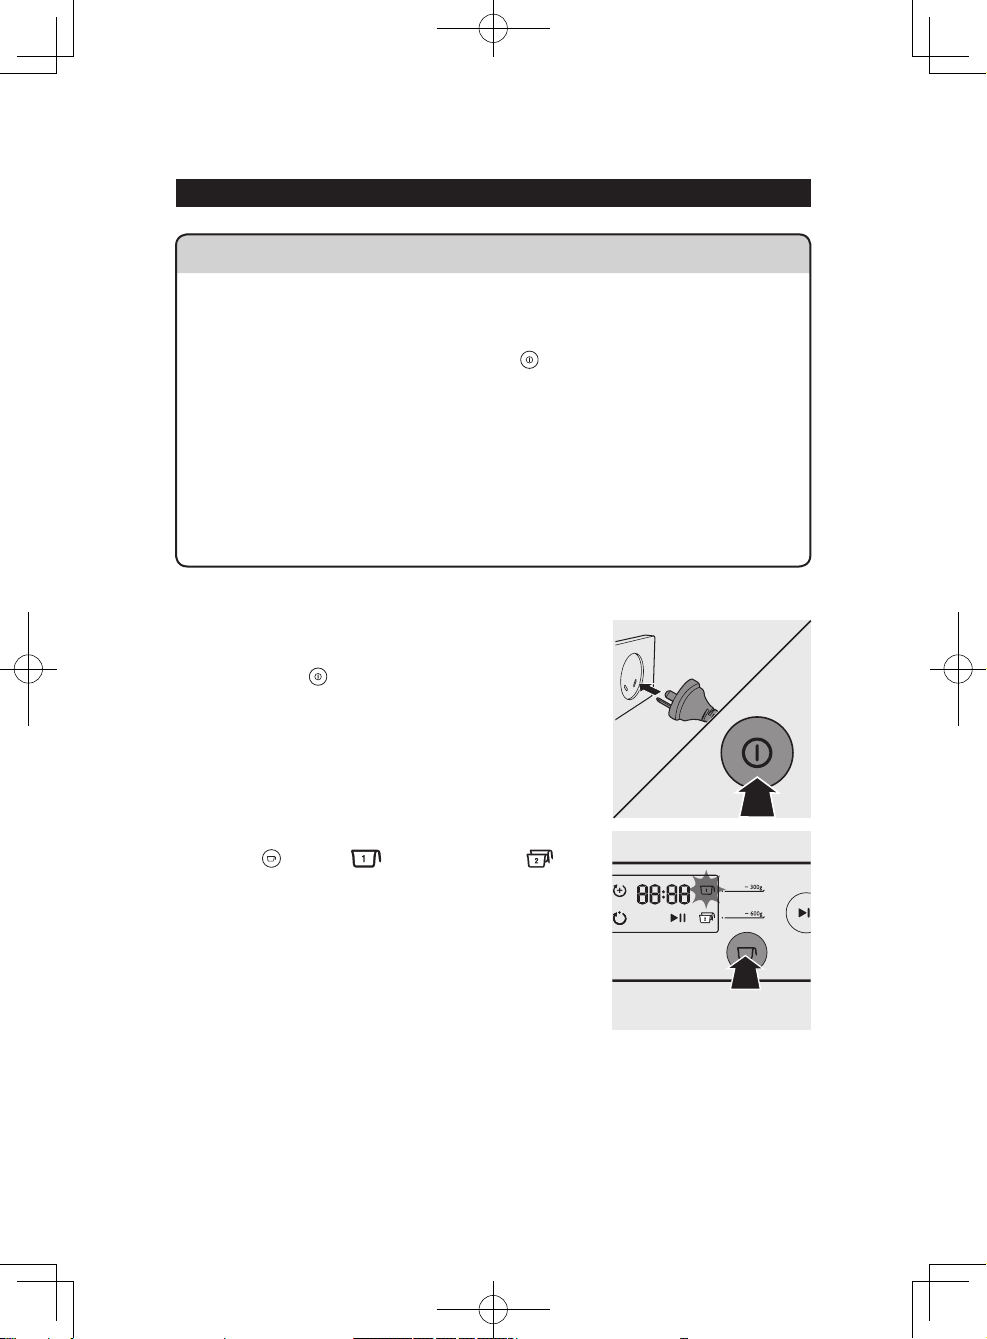
Connect the power plug to any 240V AC outlet.
1
The pasta and noodle maker will sound once,
and all indicators will flash once. Press the power
on/off button to switch on the pasta and
noodle maker.
Based on the amount of our, press the servings
2
button to select to make ~ 300g or
to make ~ 600g of fresh pasta/noodle.
16
ENGLISH
Page 17

Press the start/pause button to start
3
processing, and the processing time star ts to
count down.
Note:
• By default, the program is set as automatic. If this is
not the case, press the program button to reselect.
After the kneading starts, slowly pour in the
4
water or water + egg mixture along the entire
length of the slot in the lid.
Note:
• During dough mixing, do not add other ingredients
after you have poured in the water. Otherwise, it will
affect the results of the pasta/noodle texture.
The pasta/noodle will start extruding out after a
5
few minutes. Place a container right under the
outlet. Cut the pasta/noodle into the desired
length with the supplied cleaning tool.
Note:
• If you notice the program is not set as automatic
while pasta/noodle is extruding, press the start/
pause button to stop the program. Then, press
the power on/off button and disconnect the plug
from the power socket. After cleaning the shaping
discs, you can restart the process.
• If the ratio of liquid and our is not correct, the extrusion will not succeed. In this
case, prepare the ingredients again.
• Move the cleaning tool downwards to cut the pasta/noodle.
After the pasta/noodle making is complete, if you notice there is some leftover
6
dough inside the chamber, you can press the extrusion-only button and press the
start/pause button for extra extrusion.
Note:
• The countdown timer of the extrusion-only program is 3 minutes.
• You may nd some ne pasta/noodle threads on the pasta/noodle surface. This is
normal.
• The cooking time of the pasta/noodle varies depending on personal preferences,
pasta/noodle shapes, and number of servings.
ENGLISH
17
Page 18

Cleaning
Important
• Disconnect the power and remove the power cord before cleaning or
disassembling this appliance.
• Do not immerse the main unit in water.
• Do not use a scourer, caustic cleaners, or abrasive cleaners (for examples,
gasoline, alcohol, and propanol) to clean the appliance.
• Clean the appliance each time after use, or the appliance might not operate properly.
• Take extra caution when cleaning the appliance to avoid getting cut by any sharp
edges.
Press the power on/off button to turn off the
1
pasta and noodle maker, and then disconnect the
plug from the power outlet.
Remove the chamber lid from the appliance.
2
18
ENGLISH
Page 19

Loosen the front panel control knobs.
2
3
4
5
1
3
Note:
• The front panel is heavy. Take extra caution when
removing it.
Disassemble the front panel, the shaping disc, the shaping disc holder, the mixing
4
paddle, and the mixing chamber in order.
Use a dry cloth to clean our residue in the hole
5
❶ where the mixing paddle is placed.
1
Clean the shaping disc with the supplied cleaning
6
tool to remove the dough residues. After that,
you can clean it with water.
Tip:
• For the spaghetti and fettuccine shaping discs, put the
shaping disc into the freezer for 2 hours. Then use the corresponding cleaning tool
to poke out the dough in the holes.
ENGLISH
19
Page 20

Clean all detachable parts.
7
Use a dry cloth to clean the main unit, control
8
panel, and the exterior of the pasta and noodle
maker.
Store the pasta and noodle maker in a dry, well
9
ventilated place after use.
Note:
• After cleaning, make sure all parts and the shaping disc are completely dry before
storing. Assemble the pasta and noodle maker back for next use.
Storing the shaping discs and cleaning tools
Insert the shaping disc ❶ and cleaning tool ❷ together. Put ❶ and ❷ into the
1
storage drawer. Move the sliding bar ❸ to secure the shaping discs and cleaning
tools.
Make sure the cleaning tools and shaping discs are dry before putting them into the
storage drawer.
3
20
ENGLISH
1
2
Page 21

Troubleshooting
This chapter summarizes the most common problems you could encounter with the
appliance. If you are unable to solve the problem with the information below, visit
www.philips.com/support or refer to page 24 for the consumer care number to call for
assistance.
The indicators do not light up.
• The power plug is not connected correctly.
Check whether the power plug is plugged correctly and the outlet is working properly.
• The on/off button is not pressed.
Press the power on/off button .
After pressing the start/pause button the appliance sounds but it does not
work.
• The chamber is assembled incorrectly.
The shaping disc, or the front panel is assembled incorrectly.
Make sure you follow the user manual to assemble all parts correctly.
• The preferred servings is not selected.
Make sure you have selected the servings before pressing the start/pause button.
The safety switch is triggered and the appliance suddenly stopped or suddenly
restarts during the processing.
• The front panel knob is loose.
Make sure the front panel is securely assembled.
• Excessive ingredients in the pasta and noodle maker.
The maximum amount of flour used for each batch is 500g. If more than 500g is added, reduce the
amount of flour before next batch.
During processing, the appliance stops. There is no alarm sound or flashes.
• The pasta and noodle maker has overheated due to long continuous working time.
Disconnect from the power, and allow the pasta and noodle maker to cool down. To better protect the
lifetime of the appliance, the continuous working time should be less than 45 minutes. You can restar t
using the appliance after 15 minutes of rest.
ENGLISH
21
Page 22

The appliance stops during processing, then the indicators are flashing quickly, and
the alarm sounds.
• The mixing paddle may be blocked by some foreign objects.
The dough may be too dry.
The wrong program is selected.
Disconnect from the power, clean the pasta and noodle maker, and follow the user manual again to
restart the pasta/noodle making.
Too much leftover dough inside the chamber.
• The flour is either exposed to moisture before use, or the dough is too wet.
Keep your flour dry during storage. Follow the user manual instructions to restart the pasta/noodle
making.
• The chamber, the mixing paddle, the shaping disc are not cleaned properly before use.
Make sure all parts are clean before use.
• The mixing paddle or the chamber is still wet.
Make sure all parts are completely dr y before use.
• Water is not added in the right order.
The flour type is not suitable.
Incorrect servings was selected.
Follow the user manual instructions to make pasta/noodle.
Small amount of water is leaking out from the appliance.
• Water is added before the program starts.
Follow the user manual instructions to add water right after the program star ts.
The mixing paddle is running idle, and there is no pasta/noodle coming out.
• The ratio of the flour and water is incorrect.
Disconnect the plug from the power socket and discard dough. Clean the pasta and noodle maker, remeasure ingredients correctly and follow the user manual instructions again to restart the pasta/noodle
making.
22
ENGLISH
Page 23

Product
information
Model HR2357/06
Motor power 200W
Rated voltage AC240V (50Hz)
Dimensions (L x W x H) 215mm x 343mm x 300mm /
8.5 in x 13.5 in x 11.8 in
Weight 7.8kg / 17.2 lb
• For rated voltage and frequency information, refer to the typeplate on the product. Product information is
subject to change without prior notice.
Recycling
Do not throw away the appliance with normal household waste at the end of
its life, but hand it in at an ofcial collection point for recycling. By doing this, you
help to preserve the environment.
ENGLISH
23
Page 24

Warranty and
service
2-YEAR
WARRANTY
IMPORTANT:
Please keep this warranty card
together with your proof of
purchase for use when claiming.
AUSTRALIA
Philips Consumer Lifestyle
Consumer Care: 1300 363 391
Website: www.philips.com/support
24
NEW ZEALAND
Philips Consumer Lifestyle
Consumer Care: 0800 658 224
Website: www.philips.com/support
ENGLISH
Page 25

Philips Electronics Australia Limited and
2. We do not have to repair or replace the Goods under this Additional Warranty
if the Goods have been used for a commercial purpose; misused, improperly
or inappropriately installed, operated or repaired; abused; damaged; or not
maintained in accordance with the manufacturer’s instructions.
3. Even when we do not have to repair or replace the Goods, we may decide
to do so anyway. In some cases, we may decide to substitute the Goods with
a similar alternative product of our choosing. All such decisions are at our
absolute discretion.
4. All such repaired, replaced or substituted Goods continue to receive the
benet of this Additional Warranty for the time remaining on the original
Warranty Period.
5. This Additional Warranty is limited to repair, replacement or substitution only.
As far as the law permits, we will not be liable for any loss or damage caused to
property or persons arising from any cause whatsoever.
6. In order to claim under this Additional Warranty you must telephone us
on 1300 363 391 in Australia or 0800 658 224 in New Zealand within the
Warranty Period. You will be asked for details of the Goods, a description of the
defect and your personal details. Upon accepting your claim, we shall assist you
with either returning the Goods to the Supplier for replacement or to the most
convenient Philips Authorised Service Centre for your Goods to be repaired.
In some case we may require that you return to the Goods to us (at the
address below) for repair, replacement or substitution.
* All returned Goods must be accompanied by satisfactory proof of purchase
which clearly indicates the name and address of the Supplier, the date and
place of purchase and identies product. It is best to provide a legible and
unmodied receipt or sales invoice.
* You must bear any expense for return of the Goods or otherwise associated
with making your claim under this Additional Warranty.
7. This warranty is only valid and enforceable in Australia and New Zealand.
Contact us or the place of purchase for further details.
Philips Electronics Australia Limited Philips New Zealand Limited
Level 1, 65 Epping Rd, Level 2, 1 Nugent St,
North Ryde, SYDNEY NSW 2113 Grafton, AUCKLAND, 1023
Consumer Care: 1300 363 391 Consumer Care: 0800 658 224
E-mail: pceinfo.australia@philips.com Email: pceinfo.australia@philips.com
Website: www.philips.com/support Website: www.philips.com/support
Philips New Zealand Limited
Warranty against Defects
In this warranty:
We or us means Philips Electronics Australia Limited ACN 008 445 743 or
Philips New Zealand Limited (Company Number 1723), and our contact details
are set out at the end of this warranty;
Yo u means the purchaser or the original end-user of the Goods;
Supplier means the authorised distributor or retailer of the Goods that sold you
the Goods in Australia or New Zealand; and
Goods means the product or equipment which was accompanied by this warranty
and purchased in Australia or New Zealand.
If you require assistance with the operation of the product, its features or
specications please call the Philips Consumer Care Centre on 1300 363 391 in
Australia or 0800 658 224 in New Zealand.
Australia: Our Goods come with guarantees that cannot be excluded under the
Australian Consumer Law. You are entitled to a replacement or refund for a major
failure and for compensation for any other reasonably foreseeable loss or damage.
You are also entitled to have the Goods repaired or replaced if the goods fail to be
of acceptable quality and the failure does not amount to a major failure. This is not
a complete statement of your legal rights as a consumer.
New Zealand: Our Goods come with guarantees that cannot be excluded under
the Consumer Guarantees Act 1993. This guarantee applies in addition to the
conditions and guarantees implied by that legislation.
Additional Warranty:
In addition to the rights and remedies that you have under the Australian
Consumer Law, Consumer Guarantees Act of New Zealand or any other
applicable law, we provide the following warranty against defects:
1. If, during the rst 2 years from their date of purchase from the Supplier
(Warranty Period), the Goods prove defective by reason of improper
workmanship or materials and none of your statutory rights or remedies
apply, we will repair or replace the Goods without charge.
Page 26

2. We do not have to repair or replace the Goods under this Additional Warranty
if the Goods have been used for a commercial purpose; misused, improperly
or inappropriately installed, operated or repaired; abused; damaged; or not
maintained in accordance with the manufacturer’s instructions.
3. Even when we do not have to repair or replace the Goods, we may decide
to do so anyway. In some cases, we may decide to substitute the Goods with
a similar alternative product of our choosing. All such decisions are at our
absolute discretion.
4. All such repaired, replaced or substituted Goods continue to receive the
benet of this Additional Warranty for the time remaining on the original
Warranty Period.
5. This Additional Warranty is limited to repair, replacement or substitution only.
As far as the law permits, we will not be liable for any loss or damage caused to
property or persons arising from any cause whatsoever.
6. In order to claim under this Additional Warranty you must telephone us
on 1300 363 391 in Australia or 0800 658 224 in New Zealand within the
Warranty Period. You will be asked for details of the Goods, a description of the
defect and your personal details. Upon accepting your claim, we shall assist you
with either returning the Goods to the Supplier for replacement or to the most
convenient Philips Authorised Service Centre for your Goods to be repaired.
In some case we may require that you return to the Goods to us (at the
address below) for repair, replacement or substitution.
* All returned Goods must be accompanied by satisfactory proof of purchase
which clearly indicates the name and address of the Supplier, the date and
place of purchase and identies product. It is best to provide a legible and
unmodied receipt or sales invoice.
* You must bear any expense for return of the Goods or otherwise associated
with making your claim under this Additional Warranty.
7. This warranty is only valid and enforceable in Australia and New Zealand.
Contact us or the place of purchase for further details.
Philips Electronics Australia Limited Philips New Zealand Limited
Level 1, 65 Epping Rd, Level 2, 1 Nugent St,
North Ryde, SYDNEY NSW 2113 Grafton, AUCKLAND, 1023
Consumer Care: 1300 363 391 Consumer Care: 0800 658 224
E-mail: pceinfo.australia@philips.com Email: pceinfo.australia@philips.com
Website: www.philips.com/support Website: www.philips.com/support
26
ENGLISH
Page 27

Page 28

感谢您的惠顾,欢迎光临飞利浦!
为充分享受飞利浦提供的支持,请在 www.philips.com/welcome 注册您的产品。
在安装和使用产品之前,请仔细阅读本用户手册。妥善保管以供日后参考。
包装盒内物品
主装置
塑形模块 清洁工具
28
说明书 食谱
面粉杯
简体中文
水杯
扁平清洁工具
千层面 /
饺子
意式通心粉
意式宽面条
使用扁平
清洁工具
使用扁平
清洁工具
意式细面条 -
购买时组装
在产品上
Page 29

目录
包装盒内物品……………………………… 28
目录………………………………………… 29
重要信息…………………………………… 30
总体说明…………………………………… 32
首次使用前的拆卸和清洁………………… 34
组装………………………………………… 36
使用意面 / 面条机 ………………………… 38
清洁………………………………………… 44
故障检修…………………………………… 47
产品信息…………………………………… 49
回收………………………………………… 49
29
简体中文
Page 30

安全
重要信息
• 在将产品连接到电源之前,确保产品底部上标示的电压与当地的电源电
压相符。
• 将插头插入电源插座之前,双手要保持干燥。
• 确保插头牢固插入电源插座。
• 切勿将本产品连接到定时开关。
• 将插头插入电源插座之前,确保正确组装产品。
• 如果电源线、插头或其他部件受损,请勿再使用本产品。
• 如果电源线损坏,为避免危险,必须由飞利浦或其授权的服务中心,或
类似的专职人员进行更换。
• 请勿自行更换产品部件。
• 本产品不适合由肢体不健全、感觉或精神上有障碍或缺乏相关经验和知
识的人(包括儿童)使用,除非有负责他们安全的人对他们使用本产品
进行监督或指导。
• 使用本产品之前,请仔细阅读本用
户手册,并妥善保管以备日后参考。
警告
• 为安全起见,请不要让儿童玩耍本产品。请将产品和电源线放在儿童接
触不到的地方。
• 为防止发生意外,如果产品因任何原因发生损坏,请勿再使用。
EMF
本飞利浦产品符合所有有关暴露于电磁场的适用标准和法规。
30
简体中文
Page 31

警告
• 首次使用产品之前,拆卸并彻底清洗附件(请参阅“首次使用前的拆卸
和清洁”部分。)
• 本产品仅限于家用。
• 请勿在不稳固或不平坦的表面上使用本产品。
• 请将产品和电源线放在儿童接触不到的地方。
• 加工完成之前,请勿拔掉电源线。如果必须停止加工,请先拔掉电源线
再执行其他操作。
• 为更好地延长使用寿命,我们建议产品的连续工作时间不要超过 45 分钟。
15 分钟后可重新使用产品。
• 如果要连续使用产品,请在每次使用后用随附的清洁工具清洁塑形模块。
为便于清洗,请不要将塑形模块直接浸入水中。
• 请勿强行弯折、猛拉、扭曲或捆扎电源线,也不要在上面放重物。
• 请勿将金属物或易燃物放入搅拌容器中。
• 不用时要拔下产品的插头。
• 请勿在桌布或布帘等易燃物附近使用产品。
• 发现冒烟时请立即拔出电源插头。
• 拔出电源线时不要拉扯线缆,而要抓住插头部分。
• 请保持电源插头洁净。
• 请勿将重物放在产品上。
• 本产品旨在作为厨房用具使用。切勿用于任何其他用途
• 请勿在使用期间移动本产品。
• 清洁或拆卸本产品之前,请断开电源并拔出电源线。
• 请勿将主装置浸入水中。
• 使用后,将产品置于干燥和通风良好的地方。
• 为防止短路或触电,请勿让水或任何液体流入安全开关。
• 请勿使用洗碗机清洗机器或附件。
简体中文
31
Page 32

总体说明
搅拌容器盖
32
简体中文
搅拌容器 搅拌棒
塑形模块支撑架 前面板
前面板旋钮塑形模块塑形模块支撑架
安全开关连杆
Page 33

缩写
g = 克
~ = 大约
ml = 毫升
mm = 毫米
kg = 千克
in = 英寸
控制面板显示屏
电源线
搅拌容器盖的安全开关孔
塑形模块支撑架安全开关
电源开 / 关
程序按钮 -
份量按钮 -
意面 / 面条,或者选择 制作约 600 克,3-4 人份。
按钮 程序按钮 显示屏 份量按钮
选择追加挤面程序 或自动程序 。
选择 制作约 300 克,1-2 人份新鲜
开始 / 暂停
按钮
主装置
塑形模块存储装置
简体中文
33
Page 34

首次使用前的
拆卸和清洁
重要信息
• 第一次使用产品前,请拆下并安全弃置任何包装材料和 / 或促销标签。
• 取出所有部件和附件,清洗并彻底干燥所有部件和附件(请参阅“清洁”部分)。
• 请勿用水冲洗或浸泡主装置。
• 请勿使用钢丝绒或类似的清洁工具,以免刮花意面 / 面条机的塑料表面和影
响使用寿命。
• 本产品仅限于家用。
1
从产品上卸下搅拌容器盖。
2
拧松前面板控制钮。
注意:
• 前面板很重。取下时要加倍小心。
34
简体中文
Page 35

3
2
3
4
5
1
依次卸下前面板、塑形模块、塑形模块支撑架、搅拌棒和搅拌容器。
4
清洁所有可拆卸部件,然后擦干。
简体中文
35
Page 36

组装
1
2
重要信息
• 组装时确保拧紧前面板旋钮。
• 组装时产品不要通电。
1
将搅拌容器推入产品。
2
将搅拌棒对准主装置中的孔。将搅拌棒一直
插入主装置。
按照以下组装步骤安装意面 / 面条机。
3
将塑形模块支撑架安装到产品上。
❶
塑形模块支撑架安全开关
❷
塑形模块支撑架安全开关连杆
注意:
• 检查安全开关 ❶ 和安全开关杆
右图所示设置完毕。
36
简体中文
❷
是否按
Page 37

4
1
1
2
将塑形模块放到塑形模块支撑架上 ❶,确保将其牢固固定到塑形模块支撑架
上 ❷。
注意:
• 确保正确安装塑形模块
1
2
和塑形模块支撑架的内
腔。
5
将前面板安装到主装置上。
❶
塑形模块支撑架安全开关连杆
注意:
• 使用产品之前,确保牢固固定前面板。
• 前面板很重。组装时要加倍小心。
6
拧紧前面板控制钮。
注意:
• 如果前面板或塑形模块组装不正确,安全开关
会阻止产品工作。
7
盖好搅拌容器盖。
注意:
• 如果搅拌容器盖安装不正确,安全开关会阻止
产品工作。
37
简体中文
Page 38

使用意面 / 面条机
重要信息
• 确保依照正确的顺序将面粉和水加入搅拌容器。先将面粉放入搅拌容器,然
后再盖好搅拌容器盖。启动意面 / 面条机,然后沿着盖的整个开口缓慢注水。
• 切勿将过多原料装入意面 / 面条机。否则会损坏产品。每次可用最大面粉量
为 500 克。
• 请勿将 60ºC / 140ºF 或以上温度的原料放入意面 / 面条机,也不要将意面 /
面条机放在高温 (60ºC / 140ºF) 环境中,例如高温消毒。这样会使产品变形。
• 在盖好搅拌容器盖之前,请勿向搅拌容器注水。请勿将任何液体倒入安全开
关孔。
• 打开意面 / 面条机之前,请勿将水倒入搅拌容器。按照说明仔细操作,享受
自制意面 / 面条的乐趣。
准备原料
1
量取一满勺面粉。使用提供的扁平清洁工具,
沿杯缘刮去多余的面粉。一满勺相当于 1-2
人份。
注意:
• 不要晃动或击打面粉杯来去除多余的面粉。这
会影响面粉重量。
也可以使用厨房秤来称取面粉。例如,约
250 克面粉可制作 1-2 人份;约 500 克面粉
可制作大约 3-4 人份的新鲜意面 / 面条。
38
简体中文
Page 39

2
1
2
取下搅拌容器盖。
3
将面粉倒入搅拌容器。如果要制作 3-4 人份,
请再添加一杯面粉,因为总共需要 2 杯
(约 500 克)面粉。
4
盖好搅拌容器盖。
注意:
• 先将两根挂钩插入产品
盖子 ❷。
• 如果搅拌容器盖未盖好,产品不会开始工作。
在意面 / 面条制作期间,如果搅拌容器盖出现松
动,产品会自动停止工作。
❶,然后朝主装置按下
5
使用“意面 / 面条制作食谱表”并量取所需
量的水。
注意:
• 打开意面 / 面条机之前,请勿将水倒入搅拌容器。
• 随附的水杯上有 2 种水位标记。一档标记用于
制作普通意面 / 面条,另一档标记用于制作鸡蛋
意面 / 面条和其他口味的意面 / 面条。
39
简体中文
Page 40

意面 / 面条制作食谱表
有关详细信息,可以访问 www.philips.com/kitchen。
面/水比例表
普通意面 / 面条 鸡蛋意面 / 面条
面粉
1 面粉杯
(约 250 克)
2 面粉杯
(约 500 克)
水(标记)
1 杯面粉所需的
水量
(约 90 毫升)
2 杯面粉所需的
水量(约 180 毫
升)
水蛋混合物
(标记)
1 杯面粉所需的
水蛋混合物量
(约 95 毫升)
2 杯面粉所需的
水蛋混合物量
(约 190 毫升)
加工时间
10 分钟
15 分钟
输出
约 300 克新鲜
意面 / 面条。
这足可作为 1
至 2 人的主餐
或 4 至 6 人的
配菜。
约 600 克新鲜
意面 / 面条。
这足可作为 3
至 4 人的主餐
或 8 至 10 人的
配菜。
40
简体中文
Page 41

重要信息
• 用户手册和食谱中提供的意面 / 面条配方已经过测试,可以成功。如果您试
验或使用其他意面 / 面条配方,那么面粉和水 / 蛋比例需要调整到意面 / 面
条机随附的面粉和水杯比例。若不相应调整新配方,意面 / 面条机将不会成
功运转。
注意:
• 为确保意面 / 面条的品质,请使用高筋粉制作意面 / 面条。按照推荐的比
例添加原料。
• 时令和各地区所用的原料可能会影响面 / 水比例。您可以根据推荐的比例
进行调整。
• 制作鸡蛋意面 / 面条或蔬菜汁意面 / 面条时,确保将蛋糊或蔬菜汁搅拌均
匀后再倒入搅拌容器。添加原料时,请确保原料为流体形态。
• 请参阅提供的食谱,尝试更多变化的意面和面条配方,以及很多美味的新
菜谱。
简体中文
41
Page 42

选择意面 / 面条制作程序
重要信息
• 在和面完成前,请不要选择追加挤面程序。否则,这会损坏意面 / 面条机,
缩短其使用寿命。
• 加工完成之前,请勿拔掉电源线。如果不得不停止加工,请按开 / 关按钮
关闭意面 / 面条机,然后在执行其他操作前,将电源线从插座上拔出。
• 为更好地延长使用寿命,建议产品的连续工作时间不要超过 45 分钟。停机
15 分钟后方可重新开始使用产品。
• 如果要连续使用产品,请在每次制作意面 / 面条后,用随附的清洁工具清洁
塑形模块。为便于清洗,请不要将塑形模块直接浸入水中。
1
将电源插头插入任何 240 伏交流插座。意面
/ 面条机会响一声,所有指示灯会闪烁一次。
按电源开 / 关按钮 打开意面 / 面条机。
2
根据面粉的量,按下份量按钮 选择
制作约 300 克新鲜意面 / 面条,或选择
制作约 600 克。
42
简体中文
Page 43

3
按下开始 / 暂停按钮 开始加工,加工时
间开始倒计时。
注意:
• 默认情况下,程序设置为自动。如果情况不是如
此,请按程序按钮 重新选择。
4
和面开始后,沿着盖中的整个槽沟缓慢倒入
水或水蛋混合物。
注意:
• 和面过程中,注水后就不要再加入其他原料。
否则,会影响最终意面 / 面条质地。
5
几分钟后,意面 / 面条会开始挤出。将容器
放在出口正下方。用提供的清洁工具将意面
/ 面条切至所需的长度。
注意:
• 如果在意面 / 面条挤出时,您注意到程序未设置
为自动,那么请按开始 / 暂停按钮 停止程序。
然后,按电源开 / 关按钮 关闭机器并将插头
从电源插座上拔出。清洁塑形模块后,可以重
新开始该过程。
• 如果液体和面粉的比例不正确,挤出不会成功。这种情况下,请重新准备
原料。
• 向下移动清洁工具可切削意面 / 面条。
6
意面 / 面条制作完成后,如果发现搅拌容器中有一些剩面,您可以按追加挤
面按钮 ,然后按开始 / 暂停 进行追加挤面。
注意:
• 追加挤面程序倒计时器的时间为 3 分钟。
• 意面 / 面条表面可能会有一些意面 / 面条细丝。这是正常的。
• 意面 / 面条的烹饪时间不固定,具体应取决于个人偏好、意面 / 面条形状
以及份量。
简体中文
43
Page 44

清洁
重要信息
• 清洁或拆卸本产品之前,请断开电源并拔出电源线。
• 请勿将主装置浸入水中。
• 请勿使用钢丝绒、碱性洗洁剂或磨蚀性清洁剂(例如汽油、酒精和丙醇)
清洁产品。
• 每次使用后都要清洁产品,否则产品可能无法正常运行。
• 清洁产品时要加倍小心,以免被任何锋利边缘割伤。
1
按电源开 / 关按钮 关闭意面 / 面条机,然
后从电源插座上拔出插头。
2
从产品上卸下搅拌容器盖。
44
简体中文
Page 45

拧松前面板控制钮。
2
3
4
5
1
3
注意:
• 前面板很重。取下时要加倍小心。
4
依次卸下前面板、塑形模块、塑形模块支撑架、搅拌棒和搅拌容器。
5
使用干布清洁放置搅拌棒的孔 ❶ 中残留的
面。
6
使用随附的清洁工具清洁塑形模块,清除残
留的面。之后可以用水进行清洗。
提示:
• 对于意式细面条和宽面条塑形模块,请将塑形模
块放入冷冻室 2 小时。然后,使用对应的清洁工
具捅出孔中的面。
1
简体中文
45
Page 46

7
清洁所有可拆卸部件。
8
使用干布清洁主装置、控制面板以及意面 /
面条机的外表面。
9
使用后,将意面 / 面条机存放在干燥、通风
良好的地方。
注意:
• 清洁后,确保所有部件和塑形模块都完全干燥,然后再存放起来。重新组
装意面 / 面条机以备下次使用。
存储塑形模块和清洁工具
1
将塑形模块 ❶ 和清洁工具 ❷ 插在一起。将 ❶ 和 ❷ 放入存储抽屉中。移动
滑动条 ❸ 固定塑形模块和清洁工具。
确保将清洁工具和塑形模块晾干后再装入存储抽屉。
3
46
简体中文
1
2
Page 47

故障检修
本章归纳了您在使用产品时最常遇到的问题。如果您无法根据以下信息解决问题,
请访问 www.philips.com/support,或参阅第 24 页寻找客服号码,以便呼叫求助。
指示灯未亮起。
• 电源插头未插好。
检查电源插头是否插好,插座是否可以正常使用。
• 开 / 关按钮未按下。
按下电源开 / 关按钮 。
按下开始 / 暂停按钮 后,产品发出声音但不工作。
• 搅拌容器未装好。
塑形模块或前面板未装好。
确保按照用户手册正确组装所有部件。
• 未选择首选份量。
按下开始 / 暂停按钮之前,请确保您已选择了份量。
加工过程中触发了安全开关,产品突然停止或突然重启。
• 前面板旋钮出现松动。
确保牢固组装前面板。
• 意面 / 面条机中装入的原料过多。
每次可用最大面粉量为 500 克。如果加入了 500 克以上的面粉,请减少面粉量再制作下一批面条。
加工过程中,产品停机。没有警报声或闪烁。
• 意面 / 面条机因长时间连续工作而过热。
断开电源,让意面 / 面条机冷却。为更好地延长使用寿命,产品的连续工作时间应不得超过 45
分钟。停机 15 分钟后可重新使用产品。
简体中文
47
Page 48

产品在加工过程中停机,然后指示灯快速闪烁并伴有警报声。
• 搅拌棒可能被一些异物阻塞。
面团可能太干。
选择了错误的程序。
断开电源,清洁意面 / 面条机,再次按照用户手册中的说明重新开始制作意面 / 面条。
搅拌容器中剩面过多。
• 面粉在使用前已受潮或面团太湿。
存储时使面粉保持干燥。按照用户手册中的说明重新开始制作意面 / 面条。
• 使用之前未正确清洁搅拌容器、搅拌棒、塑形模块。
使用之前,确保所有部件洁净。
• 搅拌棒或搅拌容器仍然是湿的。
使用之前,确保所有部件完全干燥。
• 未按正确的顺序加水。
面粉种类不适合。
选择的份量不对。
按照用户手册中的说明制作意面 / 面条。
产品有少量漏水。
• 程序开始之前已经加水。
按照用户手册说明,在程序开始后再加水。
搅拌棒空转,不出意面 / 面条。
• 面 / 水比例不正确。
从电源插座上拔掉插头,弃置面团。清洁意面 / 面条机,重新正确称量原料,再次按照用户手
册中的说明重新开始制作意面 / 面条。
48
简体中文
Page 49

产品信息
型号 HR2357/06
电机功率 200 瓦
电压 交流 240 伏(50 赫兹)
尺寸(长 x 宽 x 高) 215 毫米 x 343 毫米 x 300 毫米 /
8.5 英寸 x 13.5 英寸 x 11.8 英寸
重量 7.8 千克 / 17.2 磅
• 有关额定电压和频率信息,请参阅产品上的铭牌。产品信息如有更改,恕不另行通知。
回收
弃置产品时,请不要将其与一般生活垃圾堆放在一起,应将其交给官方
指定的回收中心。这样做有利于环保。
简体中文
49
Page 50

Page 51

Page 52

Specifications are subject to change without notice
© 2014 Koninklijke Philips N.V.
All rights reserved.
4241 210 18031
 Loading...