

Philips HR2355/09 User Manual
Always there to help you
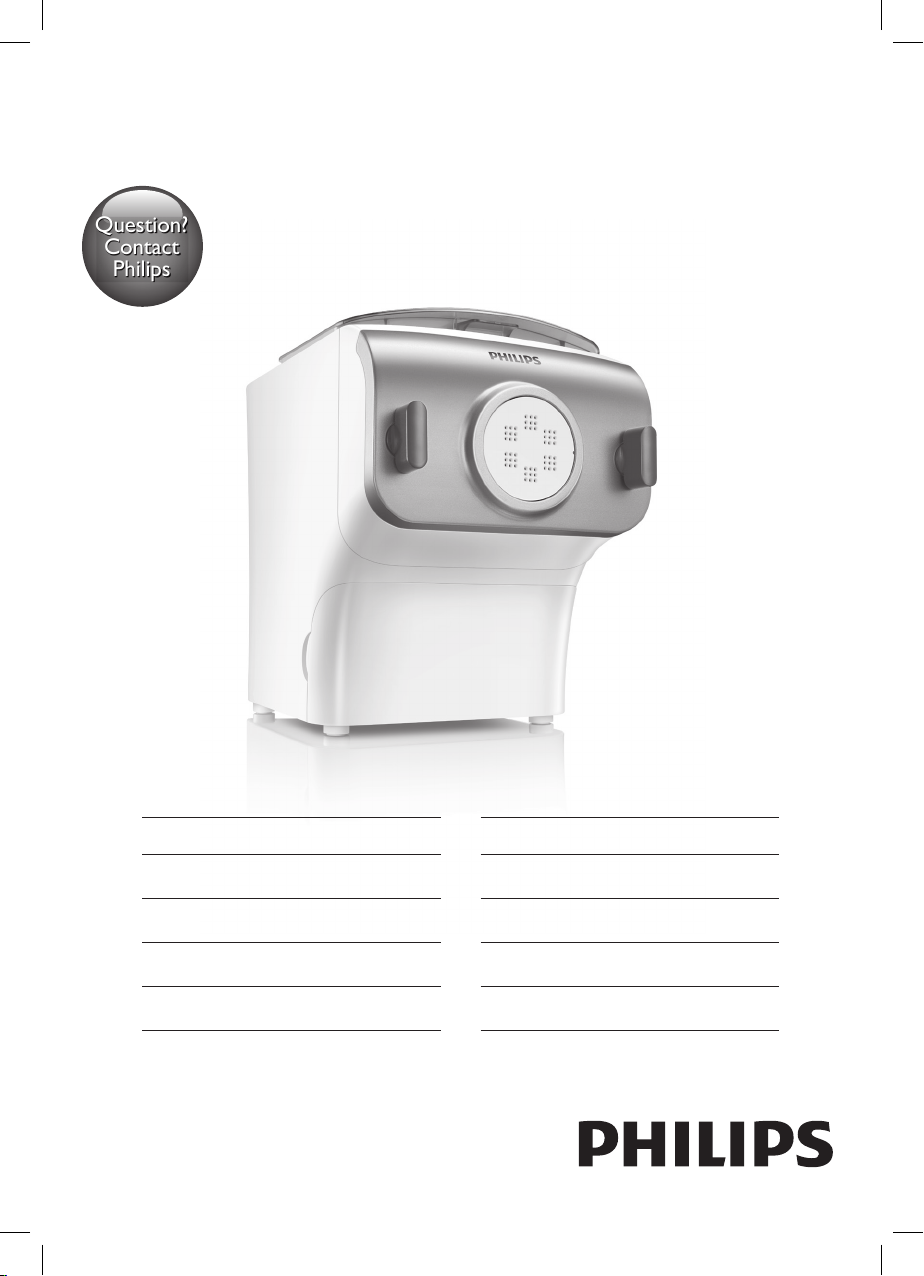
Question?
Contact
Philips
Register your product and get support at
www.philips.com/welcome
HR2355/09
EN User manual 2
CS Příručka pro uživatele 26
EL Εγχειρίδιο χρήσης 50
FR Mode d’emploi 74
HU Felhasználói kézikönyv 98
IT Manuale utente 122
NL Gebruiksaanwijzing 146
RU Руководство пользователя 170
SK Príručka užívateľa 196
TR Kullanım kılavuzu 220
Congratulations on your purchase, and welcome to Philips!
To fully benefit from the support that Philips offers, register your product at
www.philips.com/welcome.
Read this user manual carefully before you install and use the unit. Save it
for future reference.
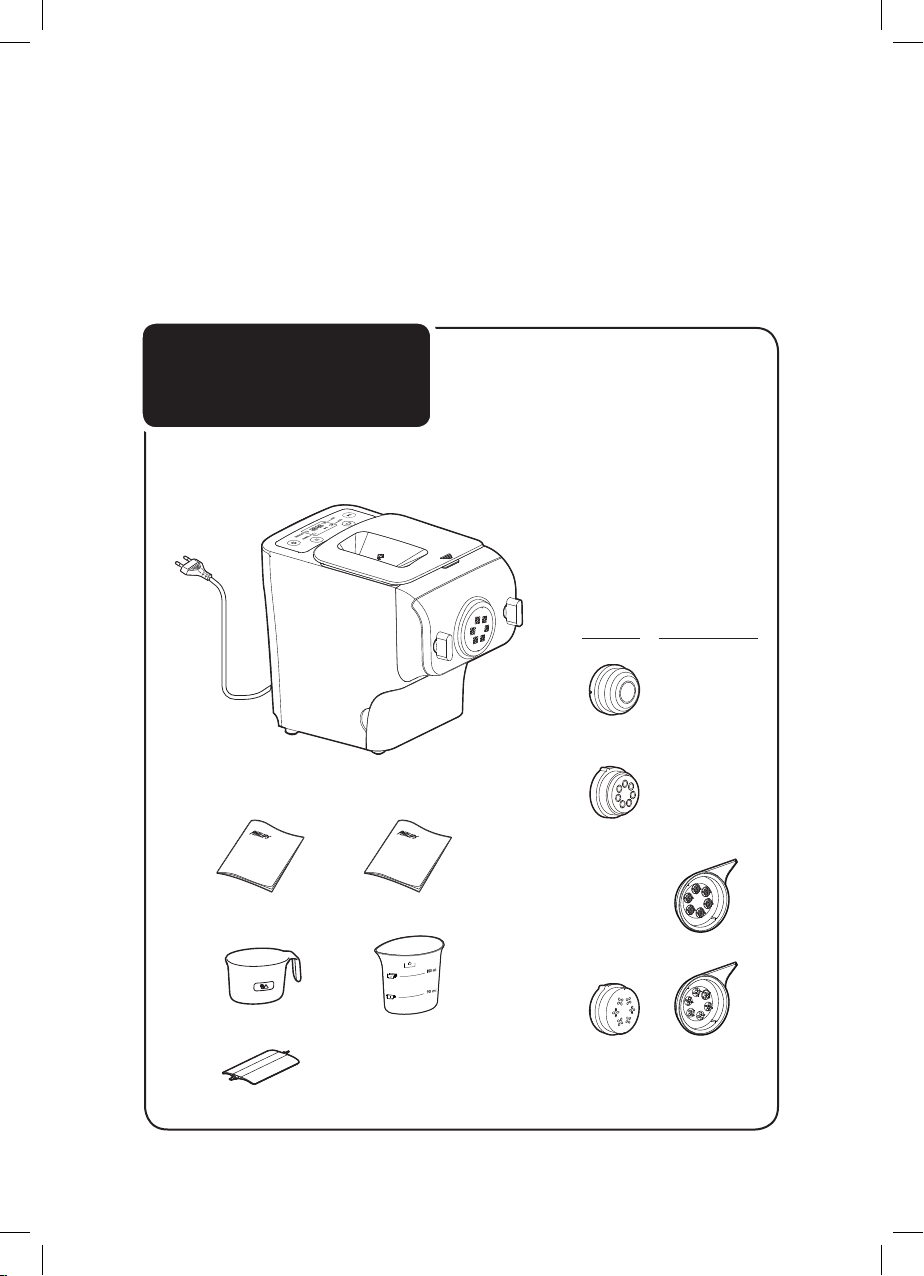
What's in the box
Main unit
User manual Recipe book
Flour cup
2 English
Water cup
Flat cleaning tool
Lasagna/
Dumpling
Penne
Spaghetti
Fettuccine
Shaping
discs
Assembled
on the
appliance
upon
purchase
Cleaning tools
Use the flat
cleaning tool
Use the flat
cleaning tool

Contents
What's in the box ��������������� 2
Important ��������������������� 4
Overview ���������������������8
Disassembling and cleaning before
first use ��������������������� 10
Assembling ������������������ 12
Using the Pasta maker ����������� 14
Cleaning �������������������� 20
Troubleshooting ��������������� 23
Product information ������������ 25
Recycling �������������������� 25
Guarantee and service ���������� 25
English 3

Important
Safety
• Read this user manual carefully before you use the
appliance, and save it for future reference.
Warning
• Before you connect the appliance to the power,
make sure that the voltage indicated on the
bottom of the appliance corresponds to the
local power voltage.
• Make sure that your hands are dry before you
insert the plug into the power outlet.
• Make sure that the plug is firmly inserted into
the power outlet.
• Never connect this appliance to a timer switch.
• Before you insert the plug into the power outlet,
make sure that the appliance is assembled
correctly.
• If the power cord, the plug, or other parts are
damaged, do not use the appliance.
• If the power cord is damaged, you must have it
replaced by Philips, a service center authorized
by Philips or similarly qualified persons to avoid
a hazard.
• Do not replace parts of the appliance yourself.
4 English
Warning
• This appliance shall not be used by children.
Keep the appliance and its cord out of reach of
children.
• This appliance can be used by persons with
reduced physical, sensory or mental capabilities
or lack of experience and knowledge if they
have been given supervision or instruction
concerning use of the appliance in a safe way
and if they understand the hazards involved.
• For their safety, do not allow children to play
with the appliance.
• To prevent any accidents, do not use the
appliance if it is damaged for any reason.
• Always disconnect the appliance from the
supply if it is left unattended and before
assembling, disassembling or cleaning.
• Switch off the appliance and disconnect
from supply before changing accessories or
approaching parts that move in use.
English 5
Caution
• Before using the appliance for the first time,
disassemble and wash the accessories
thoroughly (see “Disassemble and cleaning
before first use” section.)
• The appliance is intended for household use
only.
• Do not use this appliance on an unstable or
uneven surface.
• Do not disconnect the power cord before
processing is complete. If you have to stop
processing, disconnect the power cord before
you perform other operations.
• To better protect the lifetime of the appliance,
we recommend the continuous working time to
be less than 45 minutes. You can restart using
the appliance after 15 minutes.
• If you intend to use the appliance continuously,
clean the shaping disc with the supplied
cleaning tool each time after use. For cleaning
ease, do not soak the shaping disc into the
water directly.
• Do not bend the power cord forcibly, jerk, twist,
bundle nor put under heavy items.
• Do not put metal or flammable objects in the
mixing chamber.
• Unplug the appliance when not in use.
6 English
Caution
• Do not use the appliance near flammable
objects such as table cloth or drapes.
• Pull out the power plug immediately when you
detect smoke.
• When unplugging the power cord, do not pull
the cable but grab the plug part.
• Keep the power plug clean.
• Do not put heavy objects on the appliance.
• This appliance is designed as consumer kitchen
appliance. Do not use for any other purpose
• Do not move the appliance while it is operating.
• Disconnect the power and remove the power
cord before cleaning or disassembling this
appliance.
• Do not immerse the main unit in water.
• Place the appliance in a dry and well ventilated
place after use.
• To prevent a short circuit or an electric shock,
do not pour water or any liquid into the safety
switch.
• Do not use a dishwasher to clean the machine
or the accessories.
EMF
This Philips appliance complies with all applicable standards and
regulations regarding exposure to electromagnetic fields.
English 7
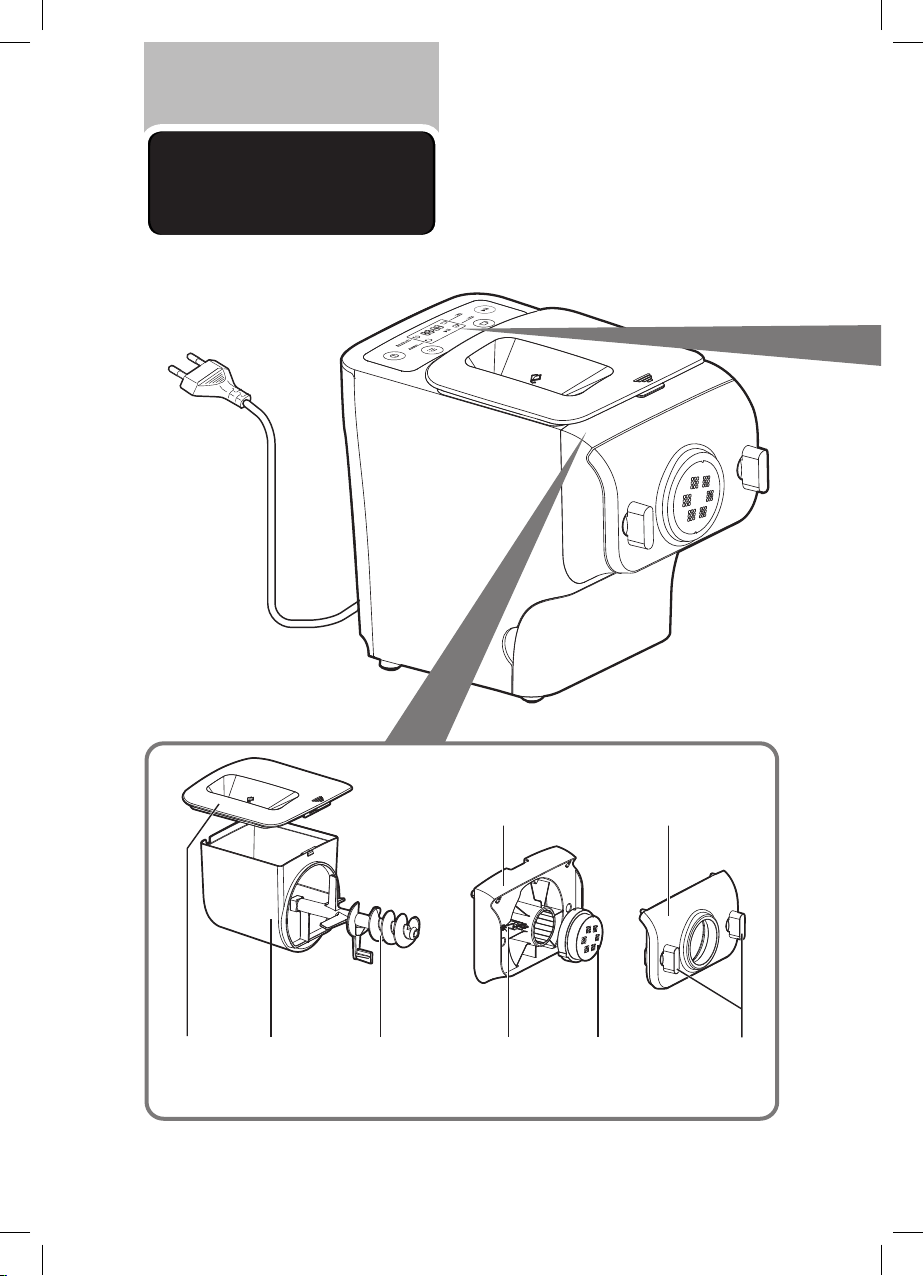
Overview
Mixing
chamber
lid
8 English
Mixing
chamber
Mixing
paddle
Disc holder
Disc holder
safety switch
lever
Front panel
Shaping
discs
Front
panel
knobs

Abbreviations
g = grams
~
= approximately
ml = milliliters
mm = millimeters
kg = kilogram
in = inch
Control panel display
Power cord
Safety switch hole of
the mixing chamber lid
Disc holder safety switch
Program button
- select the extrusion-only
program or automatic program .
Servings button
- select to make ~ 300g, 1-2
servings or to make ~ 600g, 3-4 servings
of fresh pasta.
Power on/
off button
Program
button
Display
screen
Servings
button
Start/
pause
button
Main unit
Shaping discs storage
English 9

Disassembling
and cleaning
before first use
Important
• Before using the appliance for the first time, remove and safely
discard any packaging material and /or promotional labels.
• Take out all the parts and accessories, wash and thoroughly dry all
parts and accessories (see "Cleaning" section).
• Do not use water to rinse or soak the main unit.
• Do not use a scourer or similar cleaners as these will scratch the
plastic surface and affect the lifetime of the Pasta maker.
• This appliance is intended for household use only.
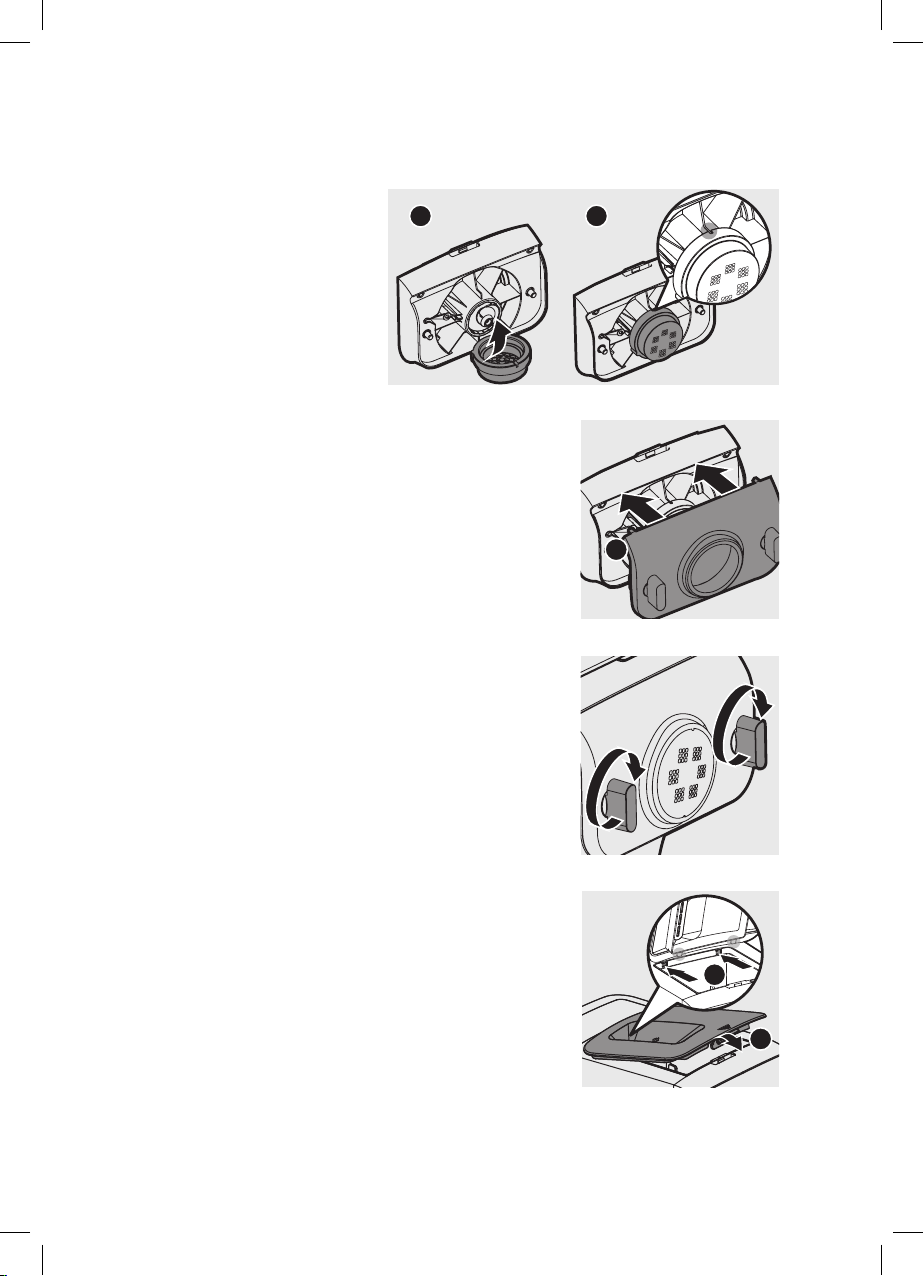
Remove the mixing chamber lid from the
1
appliance.
Loosen the front panel control knobs.
2
Note:
• The front panel is heavy. Take extra caution
when removing it.
10 English
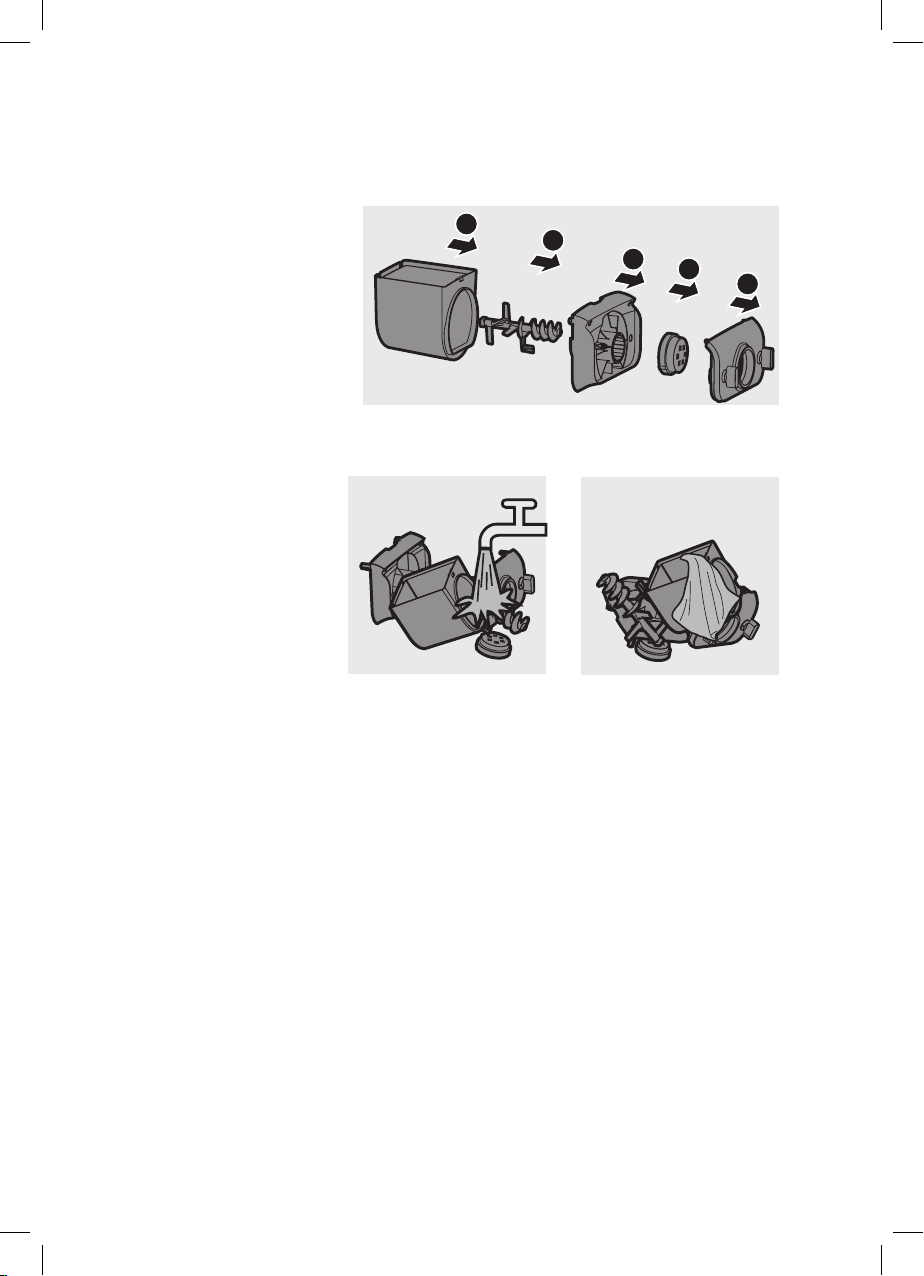
Disassemble the front panel, the shaping disc, the shaping disc holder,
2
3
4
5
1
3
the mixing paddle, and the mixing chamber in order.
Clean all detachable parts, and wipe them dry.
4
English 11
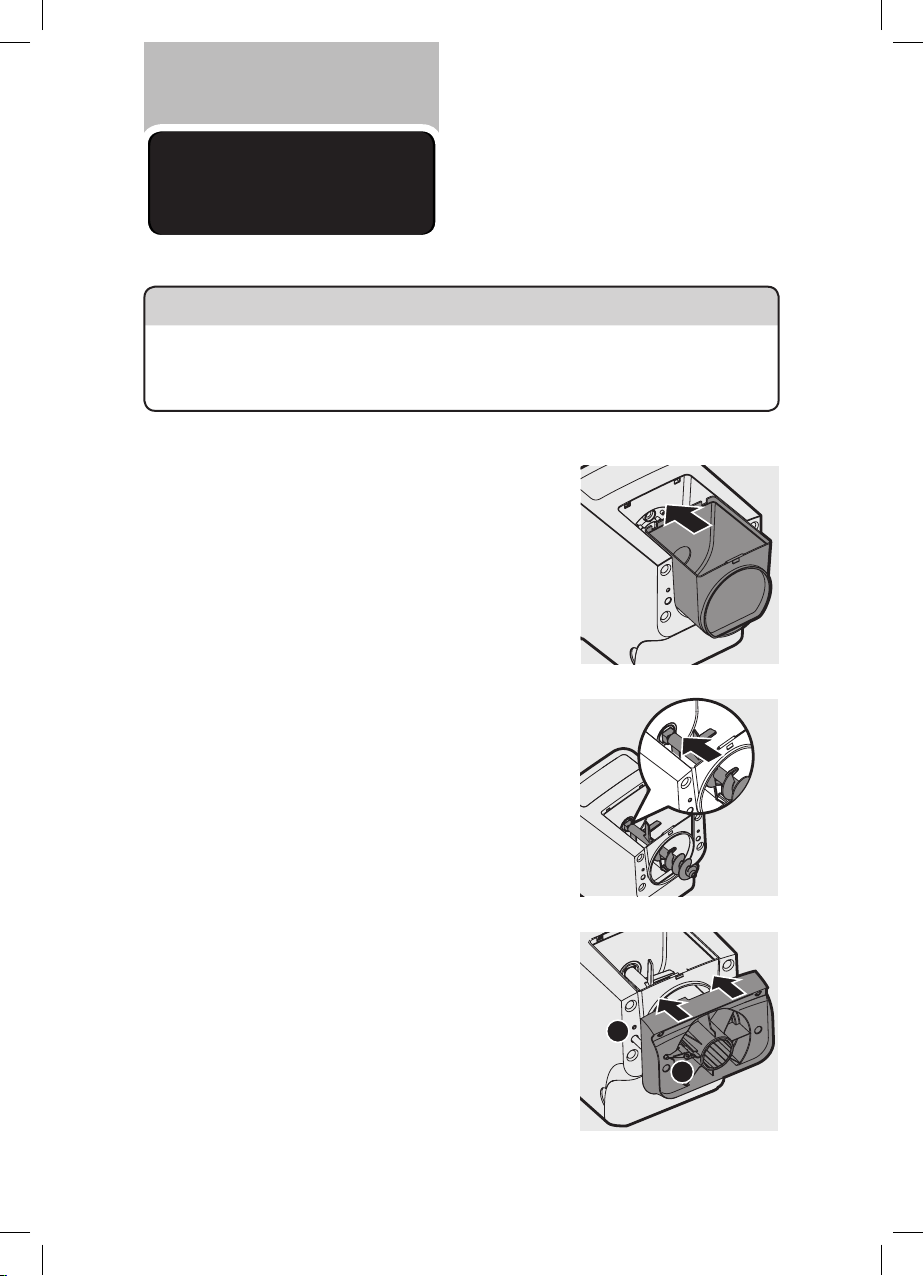
Assembling
1
2
Follow below assembling steps to
install the Pasta maker.
Important
• Make sure to tighten the front panel knobs during assembly.
• Make sure the appliance is not plugged in when assembling the
appliance.
Push the mixing chamber into the
1
appliance.
Point the mixing paddle to the hole in
2
the main unit. Insert the mixing paddle
all the way into the main unit.
Attach the disc holder onto the
3
appliance.
Disc holder safety switch
❶
Disc holder safety switch lever
❷
Note:
• Check that the safety switch ❶ and
safety switch lever ❷ are set as shown
in the illustration to the right.
12 English
Put the shaping disc onto the disc holder ❶ , and make sure it is firmly
1
1
2
4
fixed on the disc holder ❷ .
Note:
• Make sure the inner
1
2
cavity of the shaping
disc and disc holder is
properly tted.
Attach the front panel to the main unit.
5
Disc holder safety switch lever
❶
Note:
• Make sure the front panel is completely
fastened before using the appliance.
• The front panel is heavy. Take extra caution
when assembling it.
Fasten the front panel control knobs.
6
Note:
• If the front panel or the shaping disc is not
properly assembled, the safety switch will
prevent the appliance from working.
Close the mixing chamber lid properly.
7
Note:
• If the mixing chamber lid is not properly
installed, the safety switch will prevent the
appliance from working.
English 13
Using the Pasta
maker
Important
• Make sure to follow the right order to add flour and water into the
mixing chamber. Put the flour into the mixing chamber first, then place
the chamber lid onto the chamber. Start the Pasta maker, and then
slowly pour water along the entire length of the opening in the lid.
• Never put excessive ingredients into the Pasta maker. Otherwise, it will
damage the appliance. The maximum amount of flour used for each
batch is 500g.
• Do not put any ingredients that are 60°C / 140°F or above into the
Pasta maker, nor place the Pasta maker in surroundings with high
temperature (60°C / 140°F), for instance in a high temperature
sterilization. This will deform the appliance.
• Never pour water into the mixing chamber before you place the chamber
lid onto the chamber. Do not pour any liquids into the safety switch hole.
• Do not pour water into the mixing chamber before turning on the Pasta
maker. Follow the instruction carefully to enjoy homemade pasta.
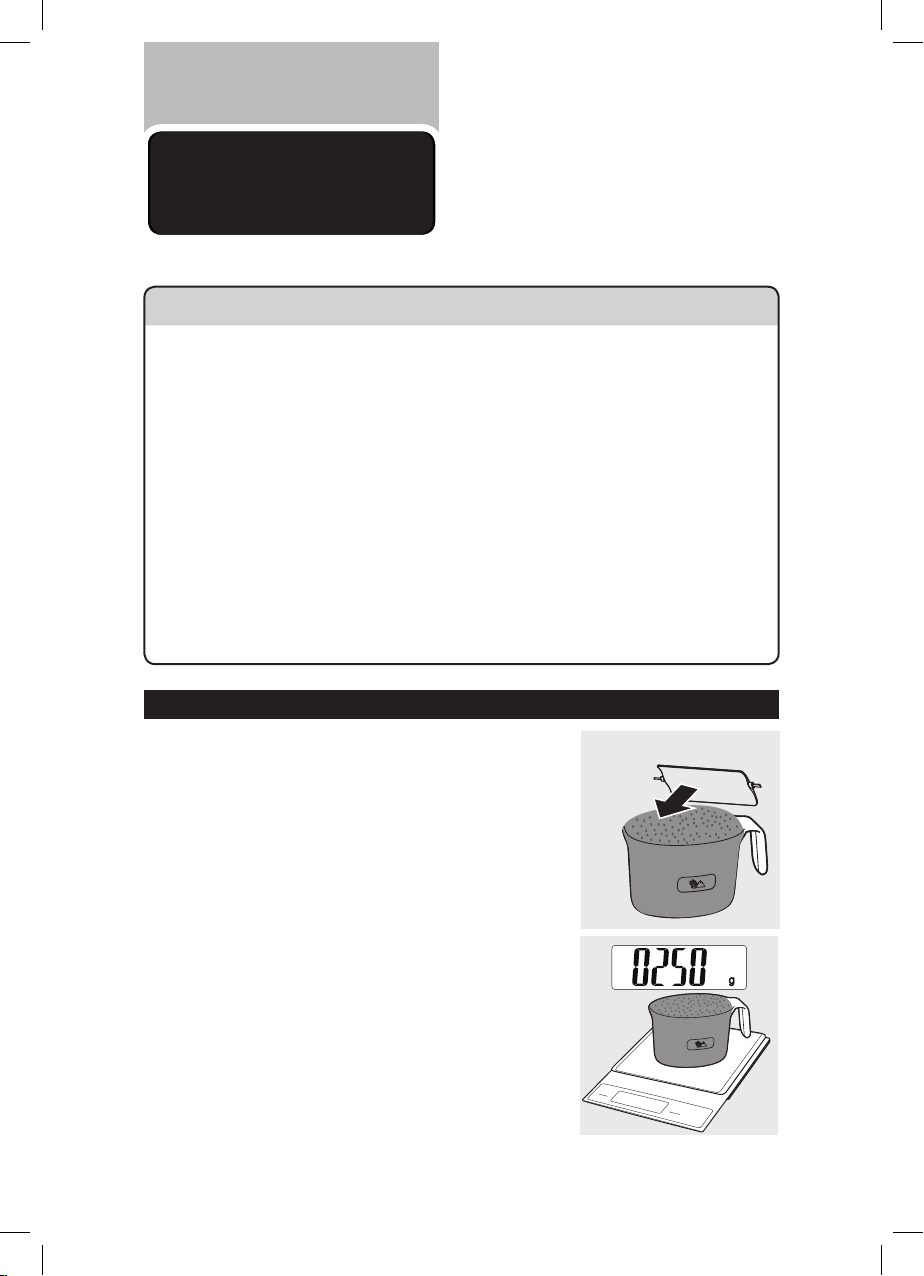
Preparing the ingredients
Measure one full cup of flour. Scrape off
1
any excessive flour from the cup edge
with the supplied flat cleaning tool. One
full cup is equivalent to 1-2 servings.
Note:
• Do not shake or hit the flour cup to remove
excessive flour. This will affect the flour
weight.
You can also use a kitchen scale to
measure the flour. For instance, ~250g
flour makes approximately 1-2 servings;
~
500g flour makes approximately 3-4
servings of fresh pasta.
14 English
Remove the chamber lid.
1
2
2
Pour the flour into the chamber. If you
3
want to make 3-4 servings, add a second
cup of flour as you will need 2 cups
(~500g) of flour in total.
Close the chamber lid properly.
4
Note:
• Insert the two hooks into the appliance first
, and then push the lid against the main
❶
unit ❷.
• The appliance will not start working if the
chamber lid is not properly closed. During
the pasta making process, if the chamber
lid becomes loose, the appliance will
automatically stop working.
Use the “Pasta making recipe table” and
5
measure the required amount of water.
Note:
• Do not pour water into the mixing chamber
before turning on the Pasta maker.
• There are 2 sets of water markings on the
supplied water cup. One set is for normal
pasta making, and the other set is for egg
pasta and other flavor pasta making.
English 15
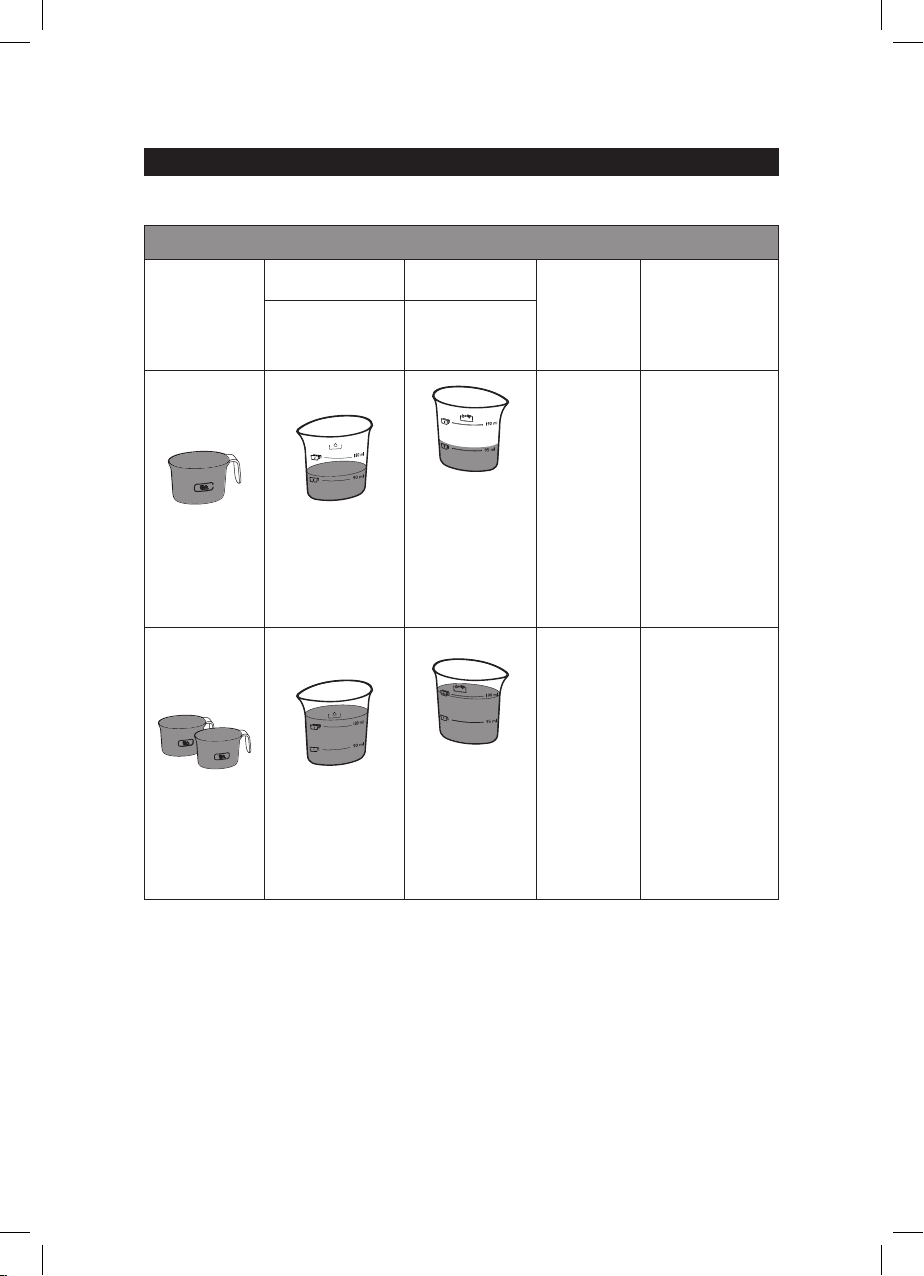
Pasta making recipe table
For more information, you can visit www.philips.com/kitchen.
Flour/water ratio table
Normal pasta Egg pasta
Flour
1 flour cup
(~250g)
2 flour cups
(~500g)
Water
(marking)
Amount of
water needed
for a cup of
flour (~90ml)
Amount of
water needed
for 2 cups of
flour (~180ml)
Water +
egg mixture
(marking)
Amount
of water +
egg mixture
needed for a
cup of flour
(~95ml)
Amount
of water +
egg mixture
needed for 2
cups of flour
(~190ml)
Processing
time
10 minutes
15 minutes
Output
~
300g fresh
pasta.
This is
sufficient as a
main meal for
1-2 persons,
or as a side
dish for 4-6
persons.
~
600g fresh
pasta.
This is
sufficient as a
main meal for
3-4 people,
or as a side
dish for 8-10
people.
16 English

Important
• The pasta recipes provided in the user manual and recipe book have
been tested for success. If you experiment with or use other pasta
recipes, the flour and water/egg ratios will need to be adjusted to the
flour and water cup ratios included with the Pasta maker. The Pasta
maker will not operate successfully without adjusting the new recipe
accordingly.
Note:
• To ensure the quality of the pasta, use gluten flour to make pasta.
Follow the recommended proportion to add the ingredients.
• Seasonal changes and using ingredients from different regions
may affect the flour/water ratio. You may adjust based on the
recommended proportion.
• When making the egg pasta or vegetable pasta, make sure you
whisk the egg mixture or vegetable juice evenly with the water before
pouring into the chamber through the slot in the lid. When adding
ingredients, make sure the ingredient is in a liquid form.
• See the recipe book provided for additional pasta recipe variations
and many delicious new recipes to try.
English 17
Selecting the pasta making program
Important
• Do not select the extrusion-only program before the dough mixing
is complete. Otherwise, this will damage the Pasta maker and its
lifetime.
• Do not disconnect the power cord before processing is complete. If
you have to stop processing, press the on/off button to turn off
the Pasta maker and then disconnect the power cord from outlet
before performing other operations.
• To better protect the lifetime of the appliance, it is recommended
the continuous working time be less than 45 minutes. You can restart
using the appliance after a 15 minute rest.
• If you intend to use the appliance continuously, clean the shaping
disc with the supplied cleaning tool each time after each pasta
making session. For cleaning ease, do not soak the shaping disc
directly in water.
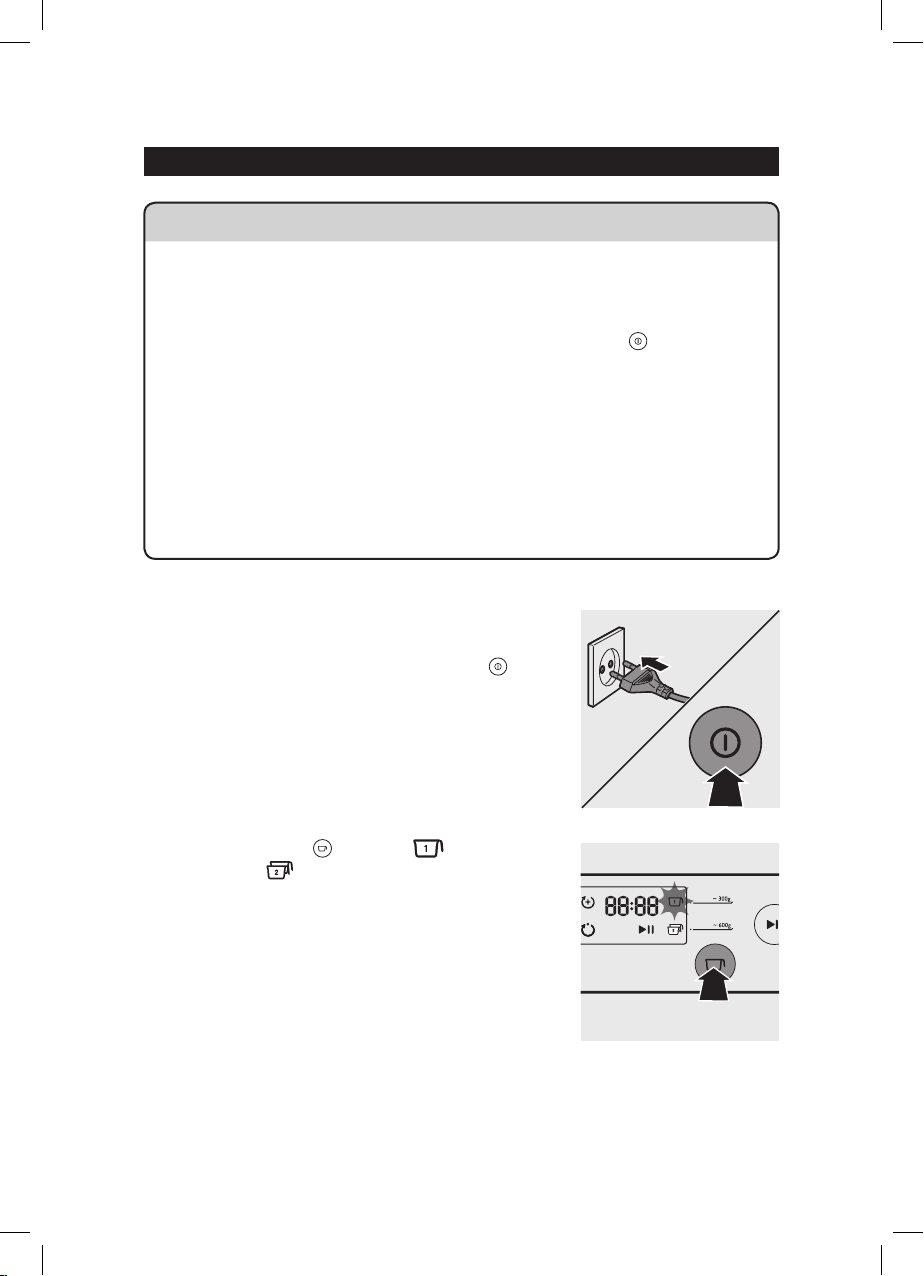
Connect the power plug to any 220-
1
240V AC outlet. The Pasta maker will
sound once, and all indicators will flash
once. Press the power on/off button
to switch on the Pasta maker.
Based on the amount of flour, press the
2
servings button to select to make
~ 300g or to make ~ 600g of fresh
pasta.
18 English
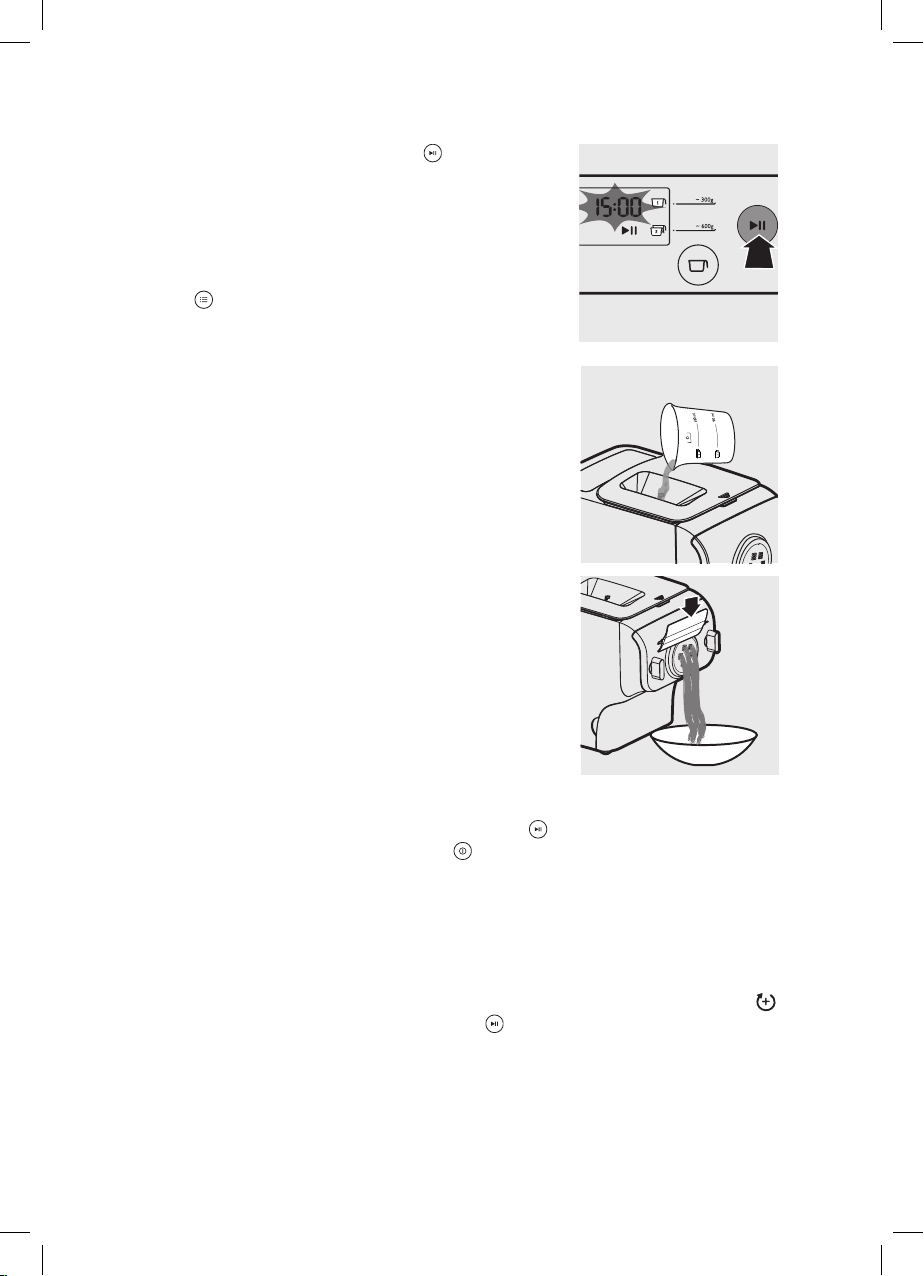
Press the start/pause button to start
3
processing, and the processing time
starts to count down.
Note:
• By default, the program is set as automatic. If
this is not the case, press the program button
to re-select.
After the kneading starts, slowly pour in
4
the water or water + egg mixture along
the entire length of the slot in the lid.
Note:
• During dough mixing, do not add other
ingredients after you have poured in the
water. Otherwise, it will affect the results of
the pasta texture.
The pasta will start extruding out after a
5
few minutes. Place a container right
under the outlet. Cut the pasta into the
desired length with the supplied cleaning
tool.
Note:
• You may find some fine pasta threads on the
pasta surface, especially at the beginning
and the end of the extrusion.
• If you notice the program is not set as automatic while pasta is
extruding, press the start/pause button to stop the program. Then,
press the power on/off button and disconnect the plug from the
power socket. After cleaning the shaping discs, you can restart the
process.
• If the ratio of liquid and flour is not correct, the extrusion will not
succeed. In this case, prepare the ingredients again.
• Move the cleaning tool downwards to cut the pasta.
After the pasta making is complete, if you notice there is some leftover
6
dough inside the chamber, you can press the extrusion-only button
❶ and press the start/pause button ❷ for extra extrusion.
Note:
• The countdown timer of the extrusion-only program is 3 minutes.
• The cooking time of the pasta varies depending on personal
preferences, pasta shapes, and number of servings.
English 19
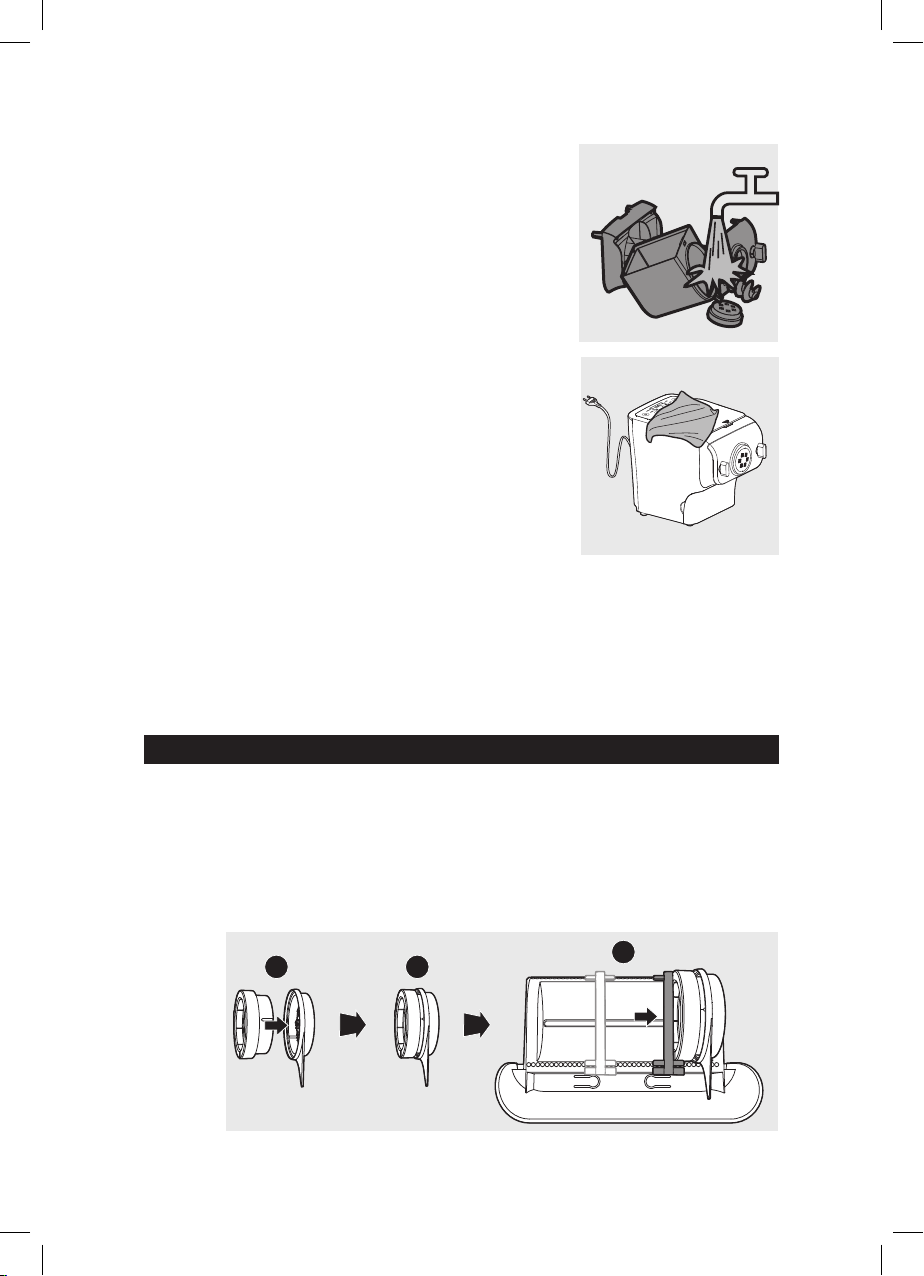
Cleaning
Important
• Disconnect the power and remove the power cord before cleaning or
disassembling this appliance.
• Do not immerse the main unit in water.
• Do not use a scourer, caustic cleaners, or abrasive cleaners (for
examples, gasoline, alcohol, and propanol) to clean the appliance.
• Clean the appliance each time after use, or the appliance might not
operate properly.
• Take extra caution when cleaning the appliance to avoid getting cut
by any sharp edges.
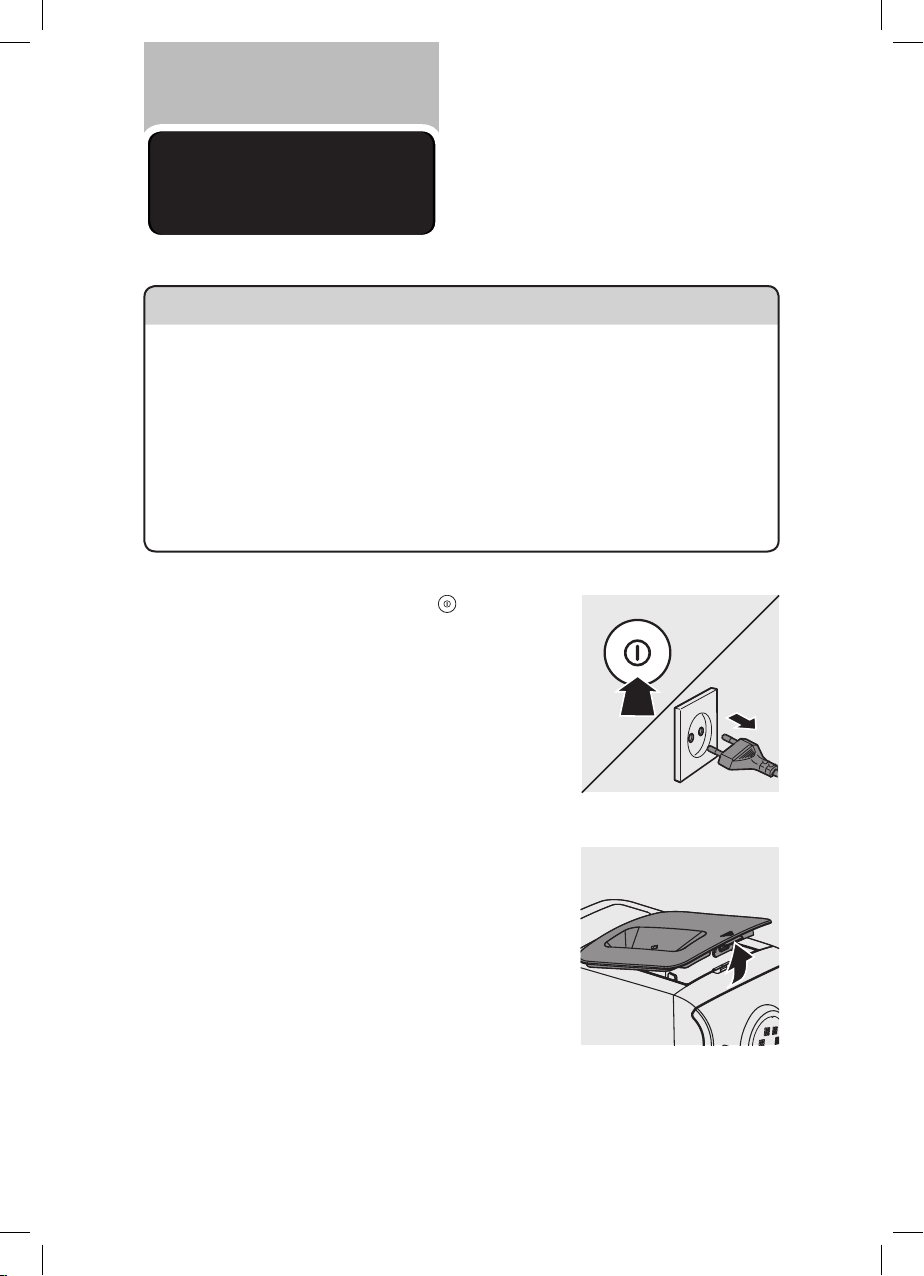
Press the power on/off button to turn
1
off the Pasta maker, and then disconnect
the plug from the power outlet.
Remove the chamber lid from the
2
appliance.
20 English
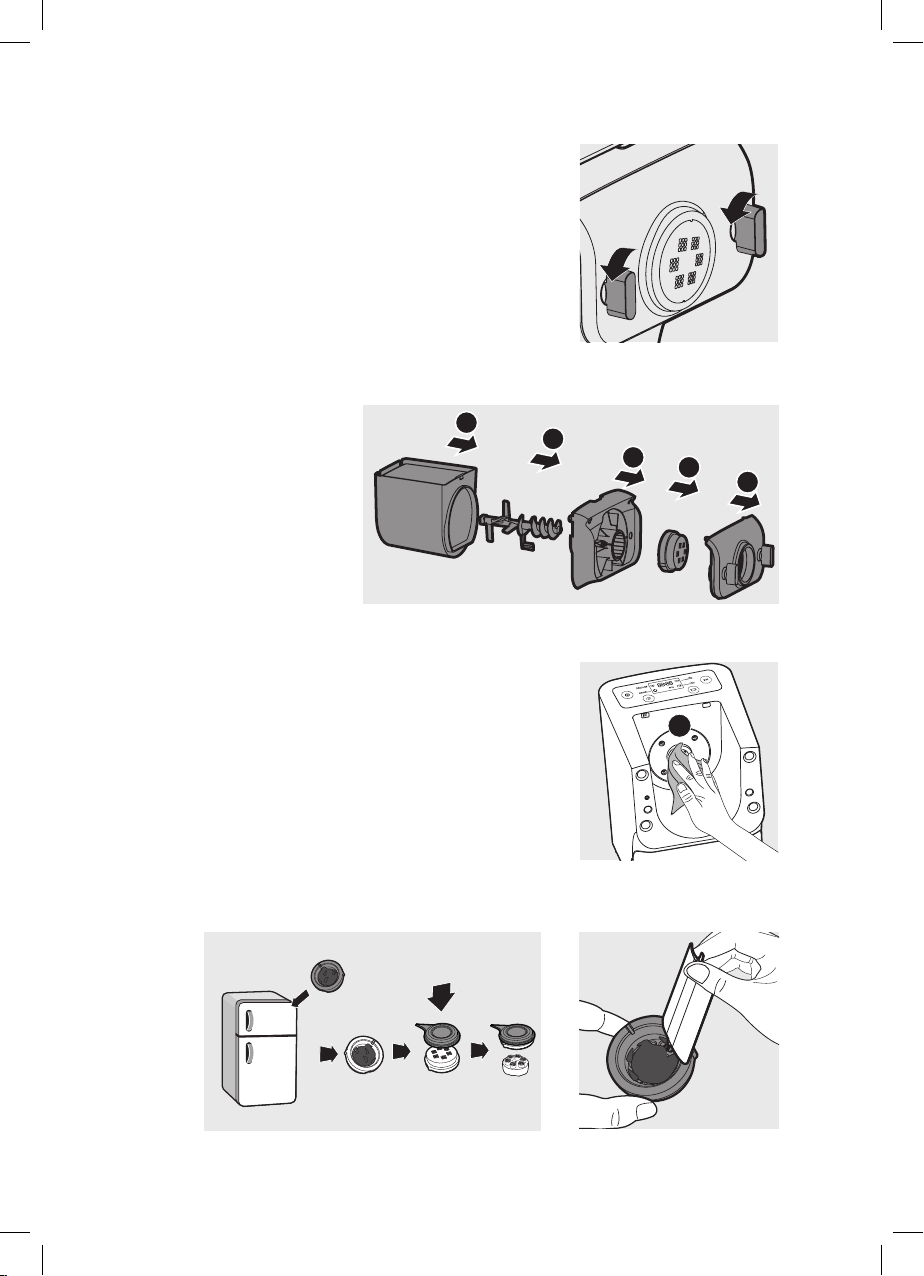
Loosen the front panel control knobs.
2
3
4
5
1
3
Note:
• The front panel is heavy. Take extra caution
when removing it.
Disassemble the front panel, the shaping disc, the shaping disc holder,
4
the mixing paddle, and the mixing chamber in order.
Use a dry cloth to clean flour residue in
5
the hole ❶ where the mixing paddle is
placed.
Clean the shaping disc with the supplied
6
cleaning tool to remove the dough
1
residues. After that, you can clean it with
water.
Tip:
• For the spaghetti and fettuccine shaping
discs, put the shaping disc into the freezer
for 2 hours. Then use the corresponding
cleaning tool to poke out the dough in the holes.
English 21
Clean all detachable parts.
7
Use a dry cloth to clean the main unit,
8
control panel, and the exterior of the
Pasta maker.
Store the Pasta maker in a dry, well
9
ventilated place after use.
Note:
• After cleaning, make sure all parts and the shaping disc are
completely dry before storing. Assemble the Pasta maker back for
next use.
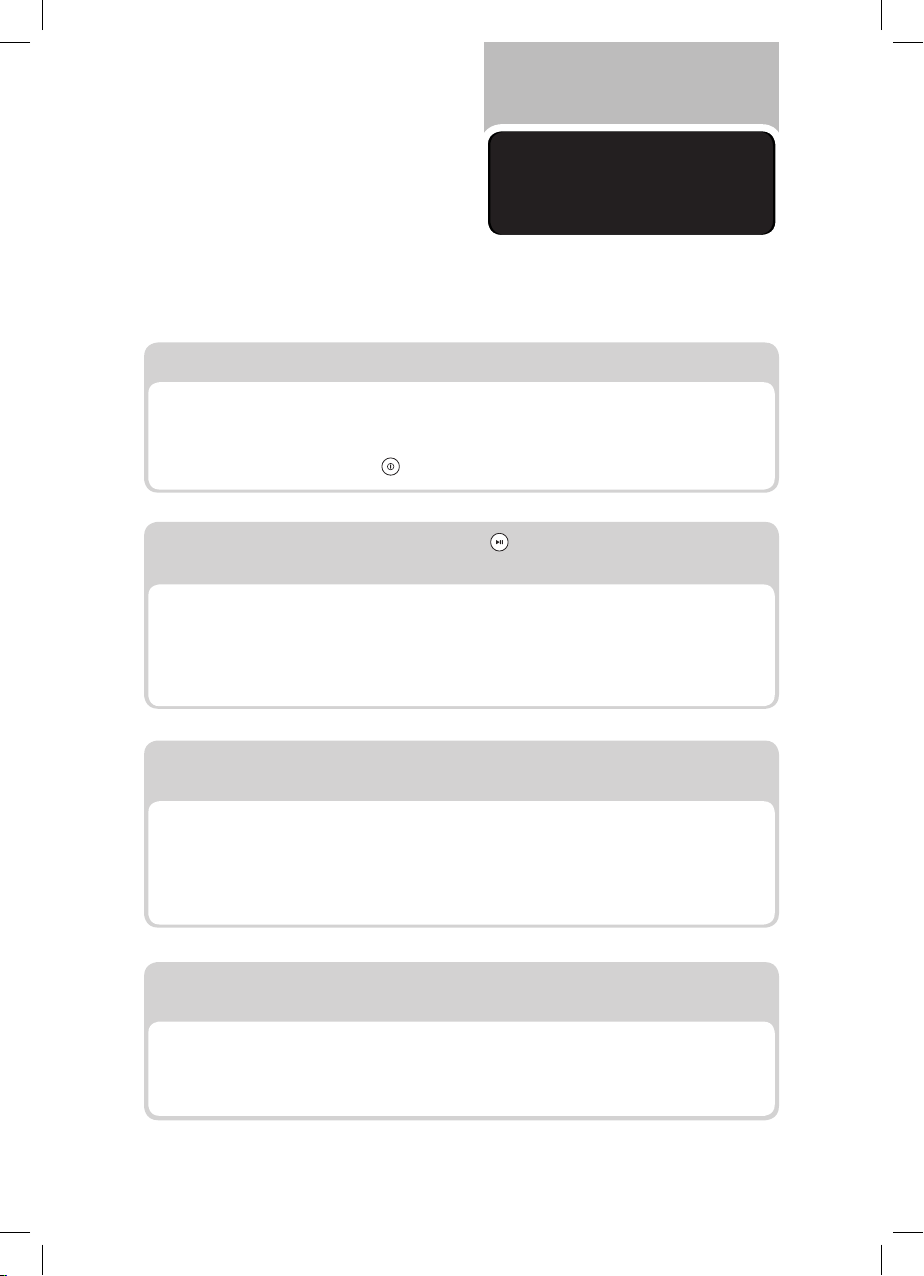
Storing the shaping discs and cleaning tools
Insert the shaping disc ❶ and cleaning tool ❷ together. Put ❶ and ❷
1
into the storage drawer. Move the sliding bar ❸ to secure the shaping
discs and cleaning tools.
Make sure the cleaning tools and shaping discs are dry before putting
them into the storage drawer.
1
2
3
22 English
Troubleshooting
This chapter summarizes the most common problems you could encounter
with the appliance. If you are unable to solve the problem with the
information below, visit www.philips.com/support.
The indicators do not light up.
• The power plug is not connected correctly.
Check whether the power plug is plugged correctly and the outlet is working properly.
• The on/off button is not pressed.
Press the power on/off button .
After pressing the start/pause button the appliance sounds but
it does not work.
• The chamber is assembled incorrectly.
The shaping disc, or the front panel is assembled incorrectly.
Make sure you follow the user manual to assemble all parts correctly.
• The preferred servings is not selected.
Make sure you have selected the servings before pressing the start/pause button.
The safety switch is triggered and the appliance suddenly stopped or
suddenly restarts during the processing.
• The front panel knob is loose.
Make sure the front panel is securely assembled.
• Excessive ingredients in the Pasta maker.
The maximum amount of flour used for each batch is 500g. If more than 500g is added,
reduce the amount of flour before next batch.
During processing, the appliance stops. There is no alarm sound or
flashes.
• The Pasta maker has overheated due to long continuous working time.
Disconnect from the power, and allow the Pasta maker to cool down. To better protect
the lifetime of the appliance, the continuous working time should be less than 45
minutes. You can restart using the appliance after 15 minutes of rest.
English 23

The appliance stops during processing, then the indicators are
flashing quickly, and the alarm sounds.
• The mixing paddle may be blocked by some foreign objects.
The dough may be too dry.
The wrong program is selected.
Disconnect from the power, clean the Pasta maker, and follow the user manual again to
restart the pasta making.
Too much leftover dough inside the chamber.
• The flour is either exposed to moisture before use, or the dough is too wet.
Keep your flour dry during storage. Follow the user manual instructions to restart the
pasta making.
• The chamber, the mixing paddle, the shaping disc are not cleaned properly before use.
Make sure all parts are clean before use.
• The mixing paddle or the chamber is still wet.
Make sure all parts are completely dry before use.
• Water is not added in the right order.
The flour type is not suitable.
Incorrect servings was selected.
Follow the user manual instructions to make pasta.
Small amount of water is leaking out from the appliance.
• Water is added before the program starts.
Follow the user manual instructions to add water right after the program starts.
The mixing paddle is running idle, and there is no pasta coming out.
• The ratio of the flour and water is incorrect.
Disconnect the plug from the power socket and discard dough. Clean the Pasta maker,
re-measure ingredients correctly and follow the user manual instructions again to restart
the pasta making.
24 English
Product
information
Model HR2355/09
Motor power 200W
Rated voltage AC220-240V (50Hz)
Dimensions (L x W x H) 215mm x 343mm x 300mm /
8.5 in x 13.5 in x 11.8 in
Net weight 6.9kg / 15.2 lb
• For rated voltage and frequency information, refer to the typeplate on the product. Product
information is subject to change without prior notice.
Recycling
- This symbol means that this product shall not be disposed of
with normal household waste (2012/19/EU).
- Follow your country’s rules for the separate collection of
electrical and electronic products. Correct disposal helps
prevent negative consequences for the environment and human
health.
Guarantee and
service
If you have a problem, need service or need information,
see www.philips.com/support or contact the Philips Consumer Care Center
in your country.
English 25

Gratulujeme k nákupu a vítáme vás mezi uživateli výrobků společnosti
Philips!
Chcete-li plně využívat výhod, které nabízí podpora společnosti Philips,
zaregistrujte svůj výrobek na adrese www.Philips.com/welcome.
Před použitím výrobku si pozorně přečtěte tuto uživatelskou příručku.
Uschovejte ji pro budoucí použití.
Obsah balení
Hlavní jednotka
Uživatelská příručka Kniha receptů
Šálek na mouku
Šálek na vodu
Plochý čisticí nástroj
26 Čeština
Lasagna/
knedlík
Penne
Špagety
Fettuccine
Tvarovací
kotouče
Při nákupu
připevněno
k přístroji
Čisticí nástroje
Použijte
plochý čisticí
nástroj
Použijte
plochý čisticí
nástroj

Obsah
Obsah balení ����������������� 26
Důležité ��������������������� 28
Přehled ��������������������� 32
Rozebrání a čištění před
prvním použitím ��������������� 34
Sestavení �������������������� 36
Používání přístroje na výrobu těstovin 38
Čištění ���������������������� 44
Odstraňování problémů ��������� 47
Informace o výrobcích �����������49
Recyklace ������������������� 49
Záruka a servis ���������������� 49
Čeština 27
Důležité
Bezpečnost
• Před použitím přístroje si pozorně přečtěte tuto
uživatelskou příručku a uschovejte ji pro budoucí
použití.
Varování
• Než přístroj připojíte do elektrické sítě,
přesvědčte se, zda napětí uvedené v dolní části
přístroje odpovídá napětí ve vaší elektrické síti.
• Přesvědčte se, že máte před zasunutím zástrčky
do zásuvky suché ruce.
• Přesvědčte se, že je zástrčka pevně zasunutá
do zásuvky.
• Nikdy nepřipojujte tento přístroj k časovému
spínači.
• Než zapojíte zástrčku do napájecí zásuvky,
ujistěte se, že je přístroj správně sestavený.
• Pokud dojde k poškození napájecího kabelu,
zástrčky nebo jiné části přístroje, přestaňte
přístroj používat.
• Je-li poškozen napájecí kabel, musí
jeho výměnu provést společnost Philips,
autorizovaný servis společnosti Philips nebo
obdobně kvalifikovaní pracovníci, aby se
předešlo možnému nebezpečí.
28 Čeština
Varování
• Nevyměňujte součásti přístroje sami.
• Přístroj nesmějí používat děti. Přístroj a napájecí
kabel udržujte mimo dosah dětí.
• Přístroj mohou používat osoby se sníženými
fyzickými, smyslovými nebo duševními
schopnostmi nebo nedostatkem zkušeností a
znalostí, pokud jsou pod dohledem nebo byly
poučeny o bezpečném používání přístroje a
rozumí všem rizikům spojeným s používáním
přístroje.
• Z důvodu bezpečnosti nedovolte, aby si
s přístrojem hrály děti.
• Aby se zabránilo nehodám, nepoužívejte
přístroj, pokud je z libovolného důvodu
poškozený.
• Před ponecháním přístroje bez dozoru a před
nasazením příslušenství, jeho odnímáním,
úpravami nebo čištěním vždy odpojte od
napájení.
• Před výměnou příslušenství, nebo než se
přiblížíte k dílům, které se během provozu
pohybují, vypněte přístroj a odpojte napájení.
Čeština 29

Upozornění
• Před prvním použitím přístroje ho rozeberte
a příslušenství důkladně omyjte (viz část
„Rozebrání a čištění před prvním použitím“).
• Přístroj je určen výhradně pro použití
v domácnosti.
• Nepoužívejte tento přístroj na nestabilním nebo
nerovném povrchu.
• Neodpojujte napájecí kabel, dokud není
zpracování dokončeno. Pokud musíte
zpracování zastavit, odpojte před prováděním
dalších úkonů napájecí kabel.
• Aby se nenarušila životnost přístroje,
doporučujeme, aby doba nepřetržitého
fungování nepřesáhla 45 minut. Přístroj je
možné znovu spustit po 15 minutách.
• Pokud máte v úmyslu používat přístroj
průběžně, vyčistěte po každém použití
tvarovací kotouč pomocí dodaného čisticího
nástroje. Kvůli snadnějšímu čištění nenamáčejte
tvarovací kotouč přímo do vody.
• Neohýbejte napájecí kabel silou, neškubejte
s ním, nekruťte, nesmotávejte ho ani na něj
nepokládejte těžké předměty.
• Do míchací komory nevkládejte kovové nebo
hořlavé předměty.
• Pokud se přístroj nepoužívá, odpojte jej ze
zásuvky.
30 Čeština
 Loading...