

Philips HR2342-06 User Manual
User manual / 2
HR2342
用户手册
/ 37
Always here to help you
Register your product and get support at
www.philips.com/welcome

Quick Start Guide/
快速入门指南
Disassembling and
cleaning before first use
首次使用前的拆卸和清洁
1
1
2
2
4 5
1
2
3
3
English
3

1
2
1
1
Assembling
组装
1
2
3
Using the Pasta
and noodle
maker
/
使用意面
面条机
4
6
1
4
2
1
2
5
5
7
2
3
6
2
7
1
2
4
English
8
9

Table of Contents
Important ……………………………………………………… 6
What's in the box ………………………………………11
Overview …………………………………………………… 12
Disassembling and cleaning before
first use ……………………………………………………… 14
Assembling ……………………………………………… 16
Using the Pasta and noodle maker …… 19
Cleaning …………………………………………………… 26
Storage ……………………………………………………… 29
Troubleshooting ………………………………………30
Product information ……………………………… 33
Recycling …………………………………………………… 33
Warranty …………………………………………………… 34
English
5
Safety
Important
Read this user manual carefully
before you use the appliance, and
save it for future reference.
Warning
• Before you connect the appliance to the power,
make sure that the voltage indicated on the bottom
of the appliance corresponds to the local power
voltage.
• Make sure that your hands are dry before you insert
the plug into the power outlet.
• Do not immerse the main unit in water or rinse it with
water or other liquid.
• To prevent a short circuit or an electric shock, do not
pour water or any liquid on the appliance.
• Make sure that the plug is firmly inserted into the
power outlet.
• Never connect this appliance to a timer switch or
separate remote control system.
• Make sure that the appliance is assembled correctly
before you insert the plug into the power outlet.
• If the power cord, the plug, or other parts are
damaged, do not use the appliance.
• Make sure the control knob is in the OFF position
and the appliance is unplugged when not in use,
left unattended, before assembling, disassembling,
cleaning or storing. Always make sure the appliance
is properly assembled before putting the plug
into the wall outlet and operating the appliance.
6
English

Warning
The appliance will not operate unless it is properly
assembled.
• Do not place hands, fingers or utensils in the mixing
chamber of the appliance unless the control knob
is in the OFF position, the appliance is unplugged
and the motor and mixing paddle have come
to a complete stop. Ensure the motor and the
mixing paddle have completely stopped before
disassembling, cleaning or storing.
• If the power cord is damaged, you must have it
replaced by Philips, a service center authorized
by Philips or similarly qualified persons to avoid a
hazard.
• Do not replace parts of the appliance by yourself.
• This appliance shall not be used by children. Keep
the appliance and its power cord out of reach of
children.
• This appliance is not intended for use by persons
with reduced physical, sensory or mental
capabilities, or lack of experience and knowledge,
unless they have been given supervision or
instruction concerning use of the appliance by a
person responsible for their safety.
• Children should be supervised to ensure that they
do not play with the appliance.
• To prevent any accidents, do not use the appliance
if it is damaged for any reason.
English
7

Caution
• Before using the appliance for the first time,
disassemble and wash the accessories thoroughly
(refer to the chapter “Disassemble and cleaning
before first use”).
• This appliance is intended for household use only.
• Never use any accessories or parts from other
manufacturers or that Philips does not specifically
reommend. If you use such accessories or parts, your
guarantee becomes invalid.
• Do not use this appliance on an unstable or uneven
surface.
• Do not disconnect the power cord before the
processing is complete. If you have to stop processing,
disconnect the power cord before you perform other
operations.
• Do not exceed the maximum operation cycle of
2 cycles continuously at all applications. To better
protect the lifetime of the appliance, you can
restart using the appliance after 30 minutes upon 2
continuous operation cycles.
• If you intend to use the appliance continuously, clean
the shaping disc with the supplied cleaning tool each
time after use.
• Do not bend, jerk, twist, or bundle the power cord
forcibly, nor put it under heavy objects.
• Unplug the appliance when not in use.
• Do not use the appliance near flammable objects
such as table cloth or drapes.
8
English

Caution
• Pull out the power plug immediately after you detect
smoke.
• When unplugging the power cord, do not pull the
cable but grab the plug part.
• Keep the power plug clean.
• Do not put heavy objects on the appliance.
• This appliance is designed as consumer kitchen
appliance. Do not use for any other purpose.
• Do not move the appliance while it is operating.
• Disconnect the power cord if the appliance is left
unattended and before assembling, disassembling or
cleaning.
• Place the appliance in a dry and well ventilated place
after use.
• Do not hold and move the appliance by grabbing the
shaping disc holder. Hold the main unit to do so.
• Make sure the shaping disc hole is unblocked each
time before using.
• Keep hands, hair, clothing, as well as spatulas and
other utensils away from appliance during operation
to reduce the risk of injury to persons, and/or damage
to the appliance.
• Do not put your fingers or other objects into the Pasta
and noodle maker opening while it is in operation.
Avoid contact with moving parts.
• Do not attempt to defeat the cover interlock
mechanism.
English
9
Caution
• The shaping discs and all detachable parts of the
appliance are dishwasher safe. When you clean
them in dishwasher, make sure to select the proper
program which has a maximum temperature at no
higher than 60°C (140°F).
• Use only on properly grounded outlet.
Electromagnetic fields (EMF)
This Philips appliance complies with all applicable standards and regulations
regarding exposure to electromagnetic fields.
10
English
Congratulations on your purchase, and welcome to Philips!
To fully benefit from the support that Philips offers, register your product at
www.philips.com/welcome.
Read this user manual carefully before you install and use the appliance. Save it
for future reference.
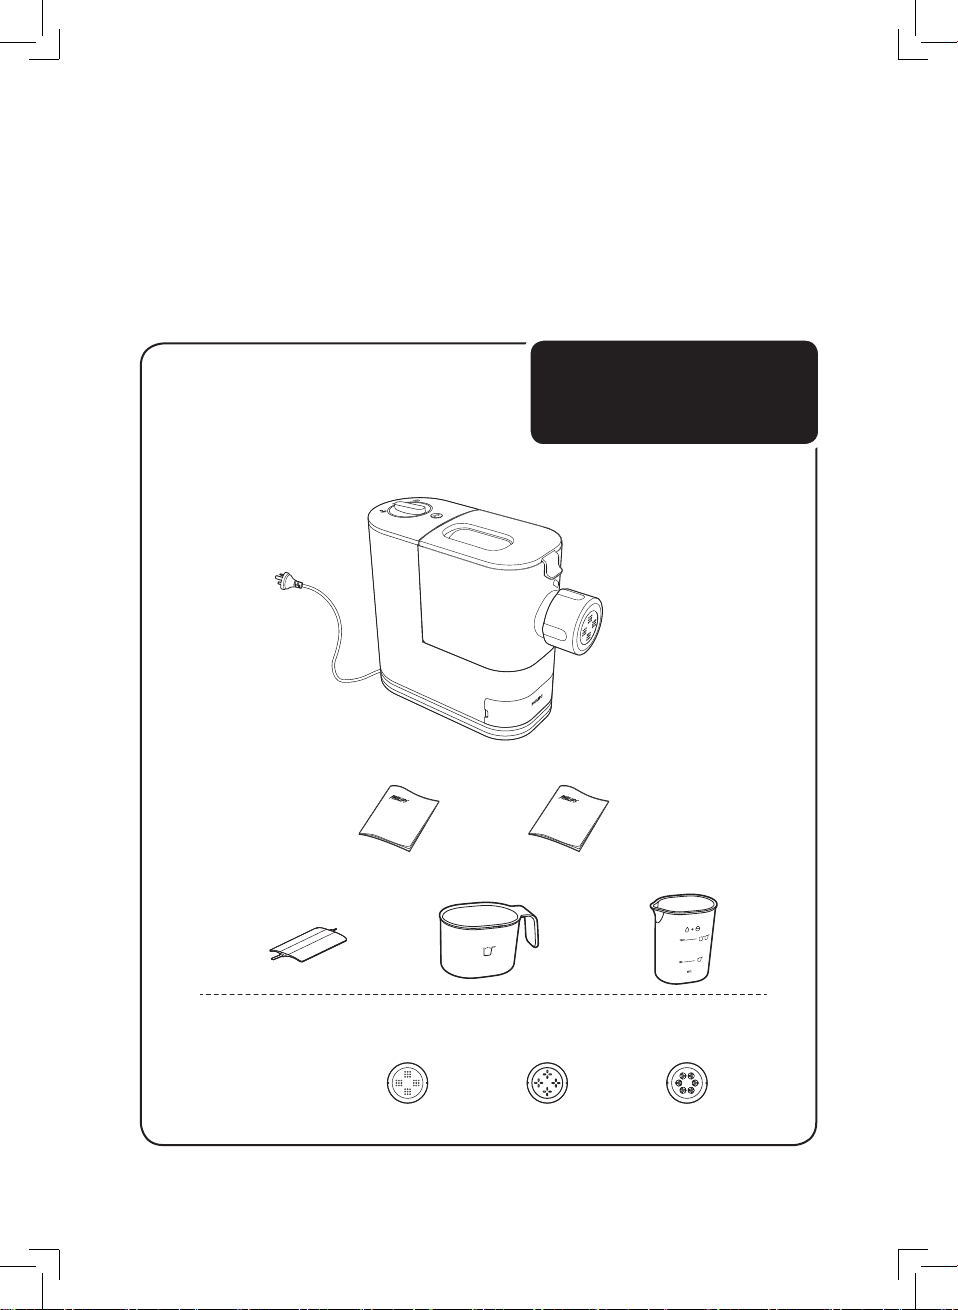
What's in the box
Main unit
User manual
Flat cleaning
tool
Spaghetti/
Thin noodle*
Shaping discs:
* The spaghetti/thin noodle shaping disc is assembled on the appliance upon purchase.
Flour cup
Recipe book
Fettuccine/
Ban Mian noodle
Water cup
Penne
English
11
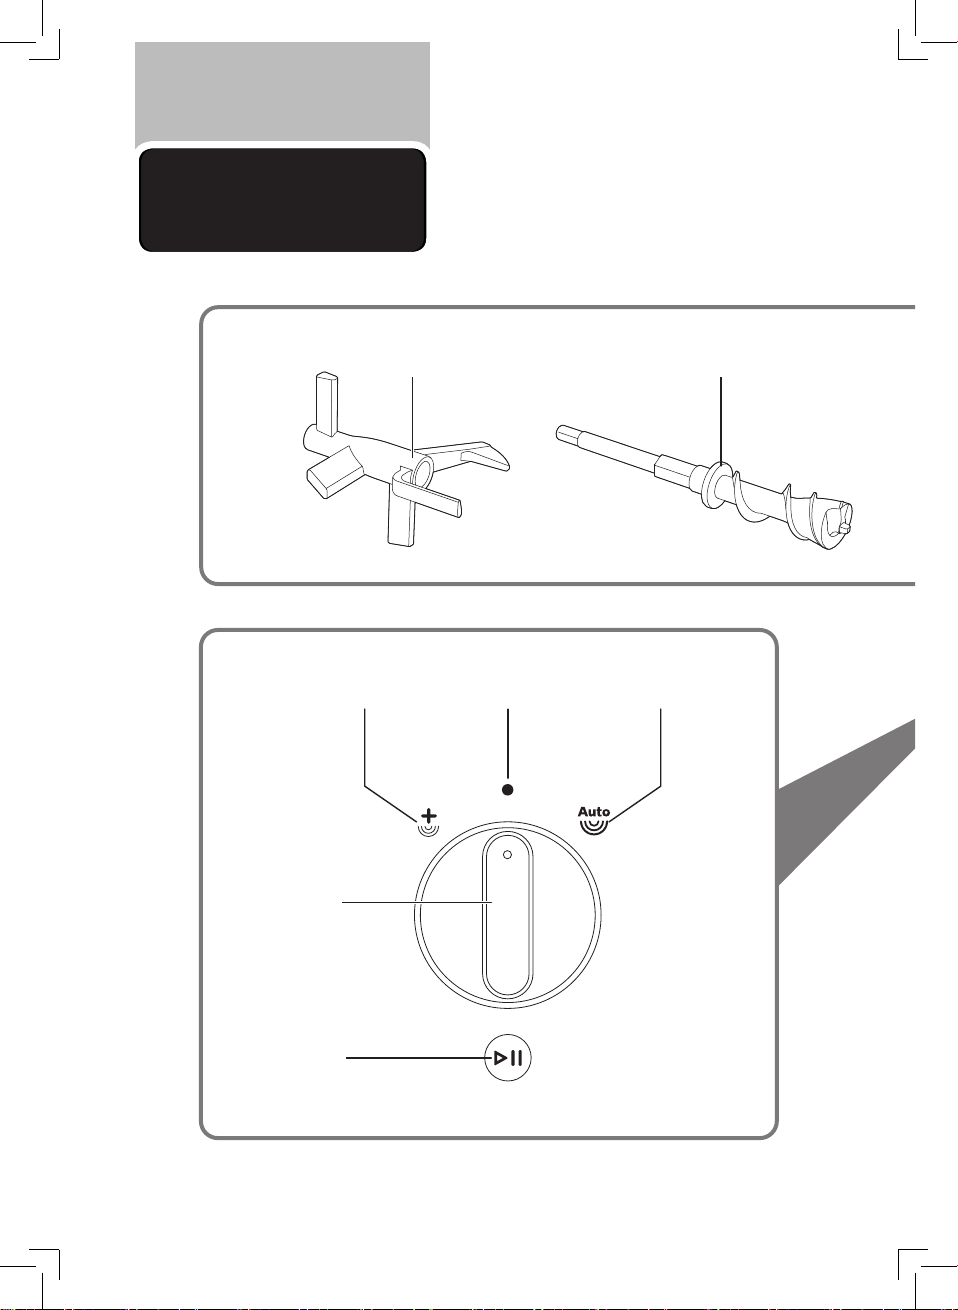
Overview
Main unit
Mixing paddle Squeezing bar
12
English
Extra-extrusion
Control knob
Start/pause
button
Auto operationOFF
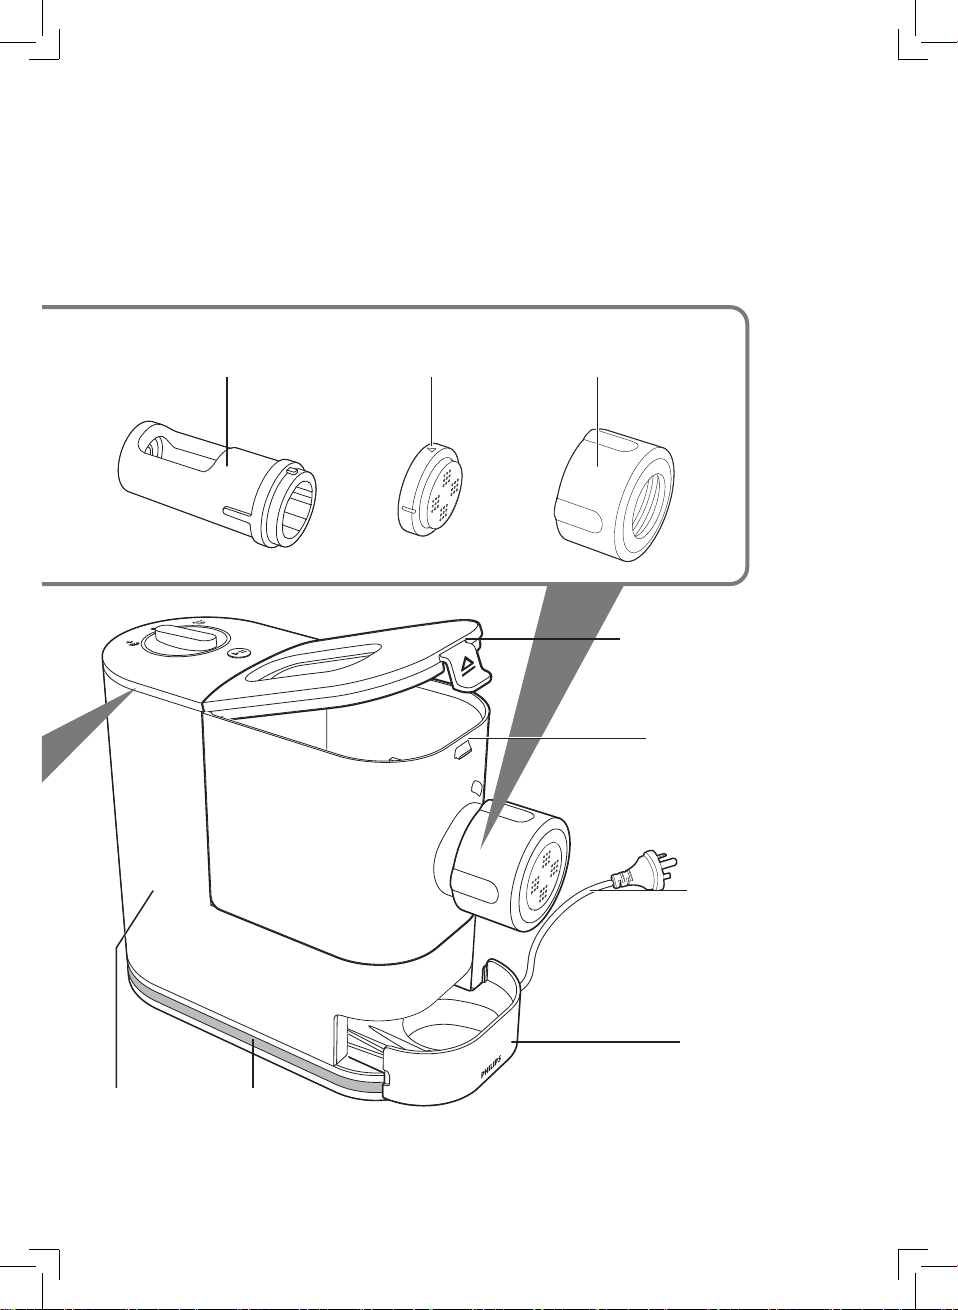
Squeezing tube Shaping disc Shaping disc holder
Mixing chamber lid
Mixing chamber
Power cord
Main unit Cord storage
wrap
Storage box
English
13

1
2
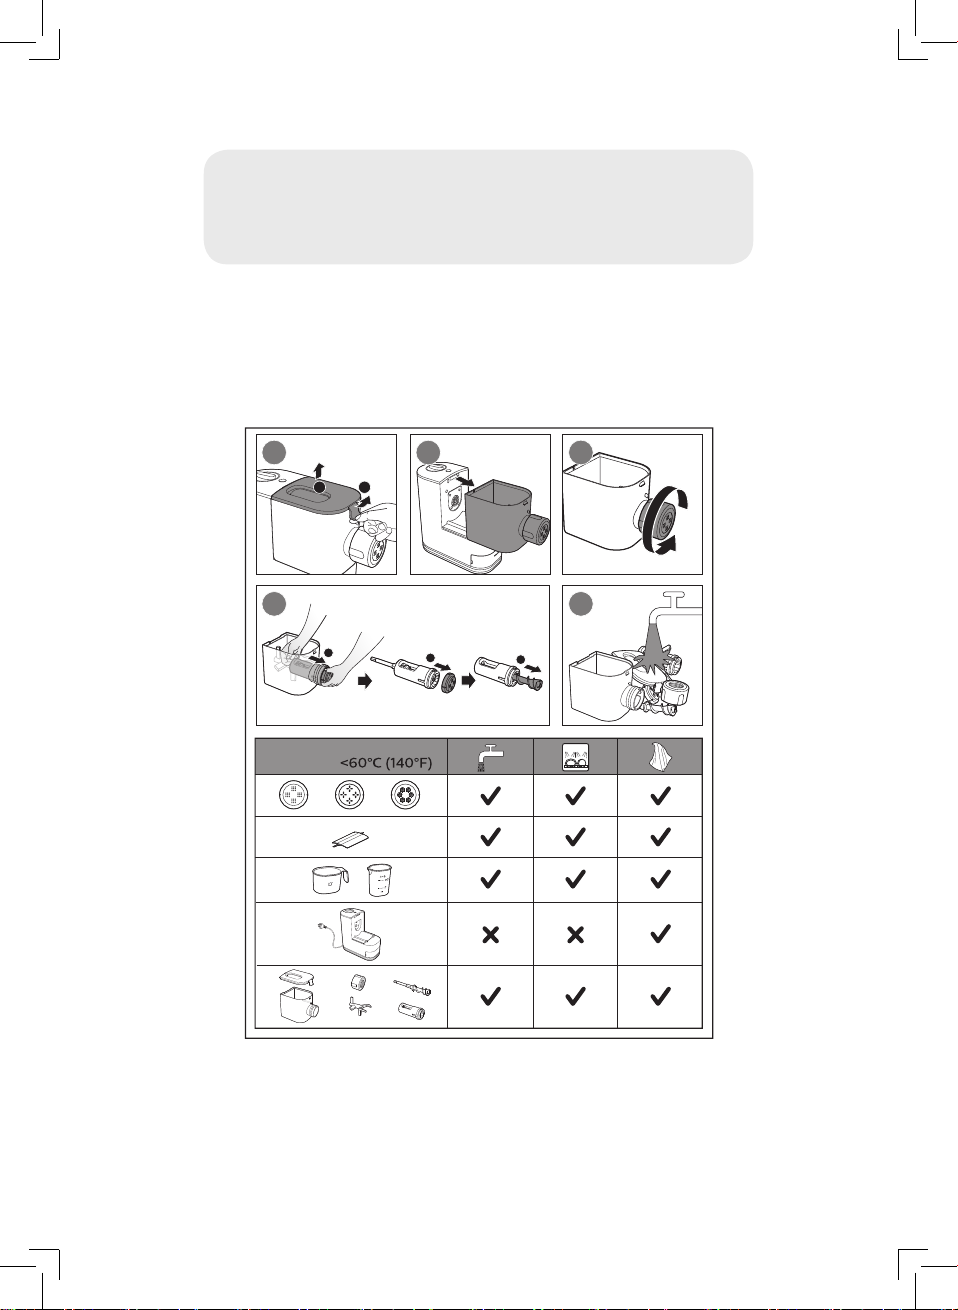
Disassembling
and cleaning
before first use
Important
• Before using the appliance for the first time, remove and safely discard any
packing material and /or promotional labels.
• Take out all detachable parts and accessories, wash and thoroughly dry all
parts and accessories (refer to the chapter "Cleaning").
• Do not use water to rinse or soak the main unit, the power cord, or the
power plug.
• Do not use a scouring pad or similar cleaners as these will scratch the
plastic surface and affect the lifetime of the Pasta and noodle maker.
• The shaping discs and all detachable parts of the appliance are dishwasher
safe. When you clean them in a dishwasher, make sure to select the proper
program which has a maximum temperature at no higher than 60°C (140°F).
• This appliance is intended for household use only.
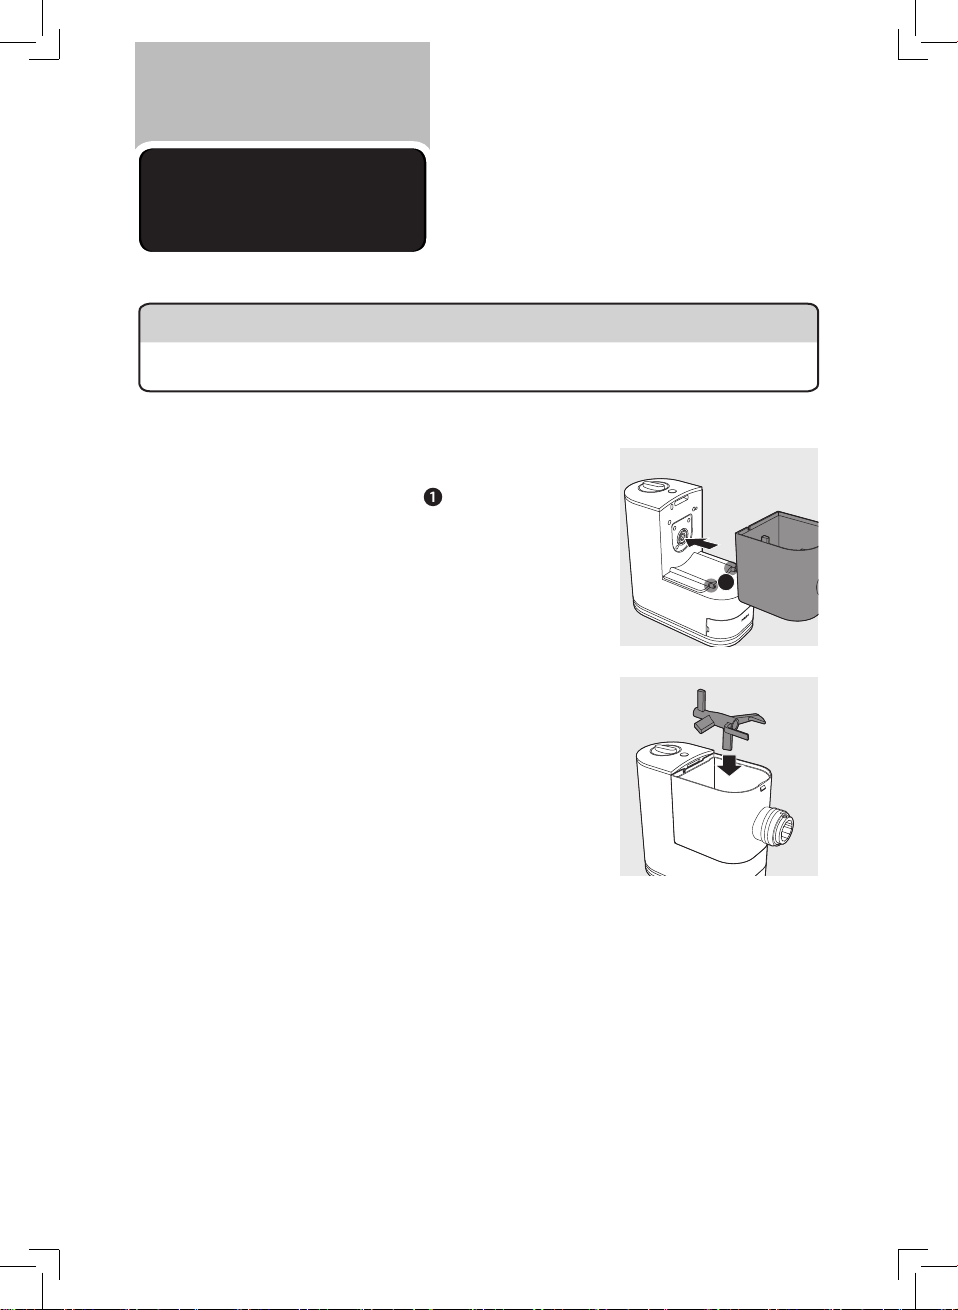
1
Pull the lid to unlock it and then remove the
lid from the mixing chamber.
2 Slide the mixing chamber off the main unit.
14
English
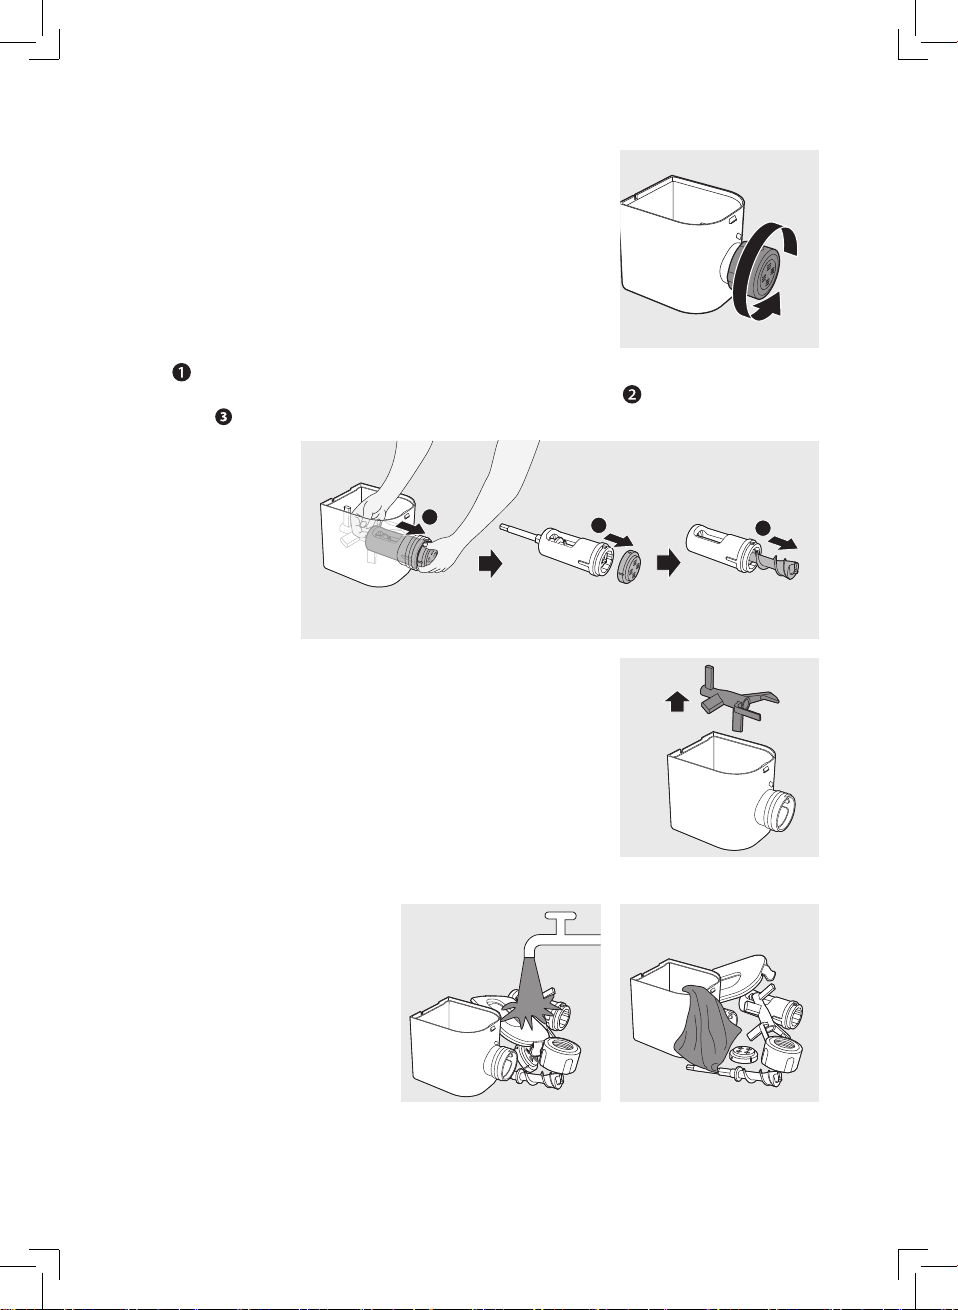
3 Turn the shaping disc holder counterclockwise to
remove it from the mixing chamber outlet.
4
Put your finger in the mixing chamber and push the squeezing tube
outwards to slide it out of the mixing chamber outlet. Detach the shaping
disc, and then pull the squeezing bar out of the squeezing tube.
1
2
5 Take the mixing paddle out of the mixing
chamber.
6 Clean all detachable parts and accessories, and then wipe them dry.
3
English
15
Assembling
1
Follow below assembling steps to install
the Pasta and noodle maker.
Important
• Make sure the appliance is not plugged in during assembly.
1 Slide the mixing chamber onto the main unit.
Note:
• Make sure the fixing levers
unit are fitted with the openings on the
bottom of the mixing chamber.
2 Put the mixing paddle in the mixing chamber as
shown in the illustration.
on the main
16
English
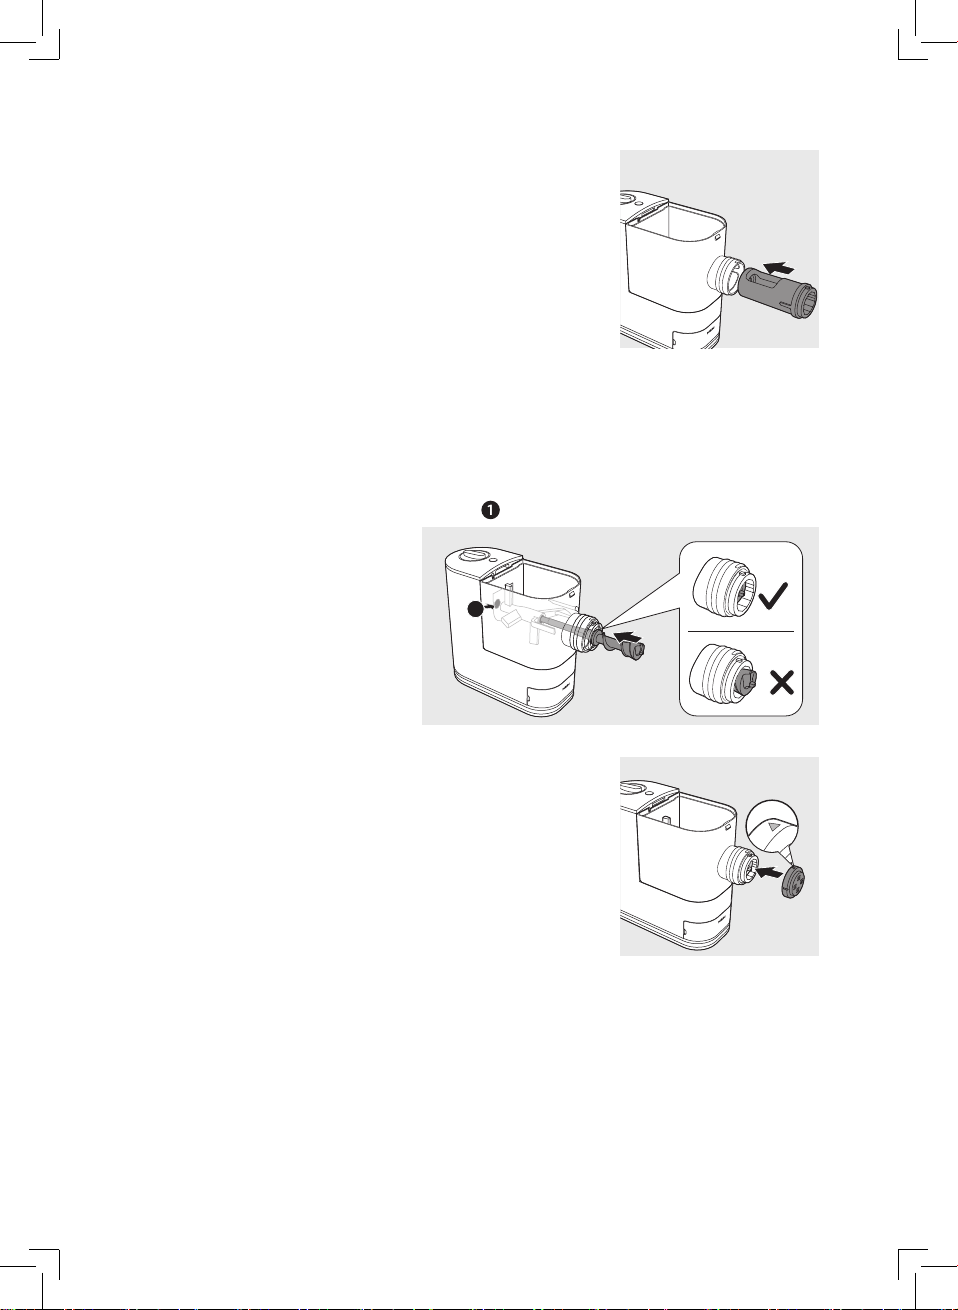
3 Insert the squeezing tube into the mixing
chamber.
Note:
• Make sure the big opening on the squeezing
tube faces up when you insert the tube into the
chamber.
4 Insert the squeezing bar into the mixing chamber. Make sure the squeezing
bar slides all the way through both the squeezing tube and the mixing
paddle and into the shaft in the main unit.
Note:
• Slightly turn the mixing paddle to make sure the squeezing bar is
connected correctly with the shaft
in the main unit.
1
5 Attach the shaping disc on the mixing chamber
outlet.
Note:
• Make sure the flat side of the shaping disc is
facing out.
• Make sure the shaping disc fits into the fixing
point on the squeezing bar.
• Make sure the arrow on the shaping disc face
upwards when you attach it on the mixing
chamber outlet.
English
17
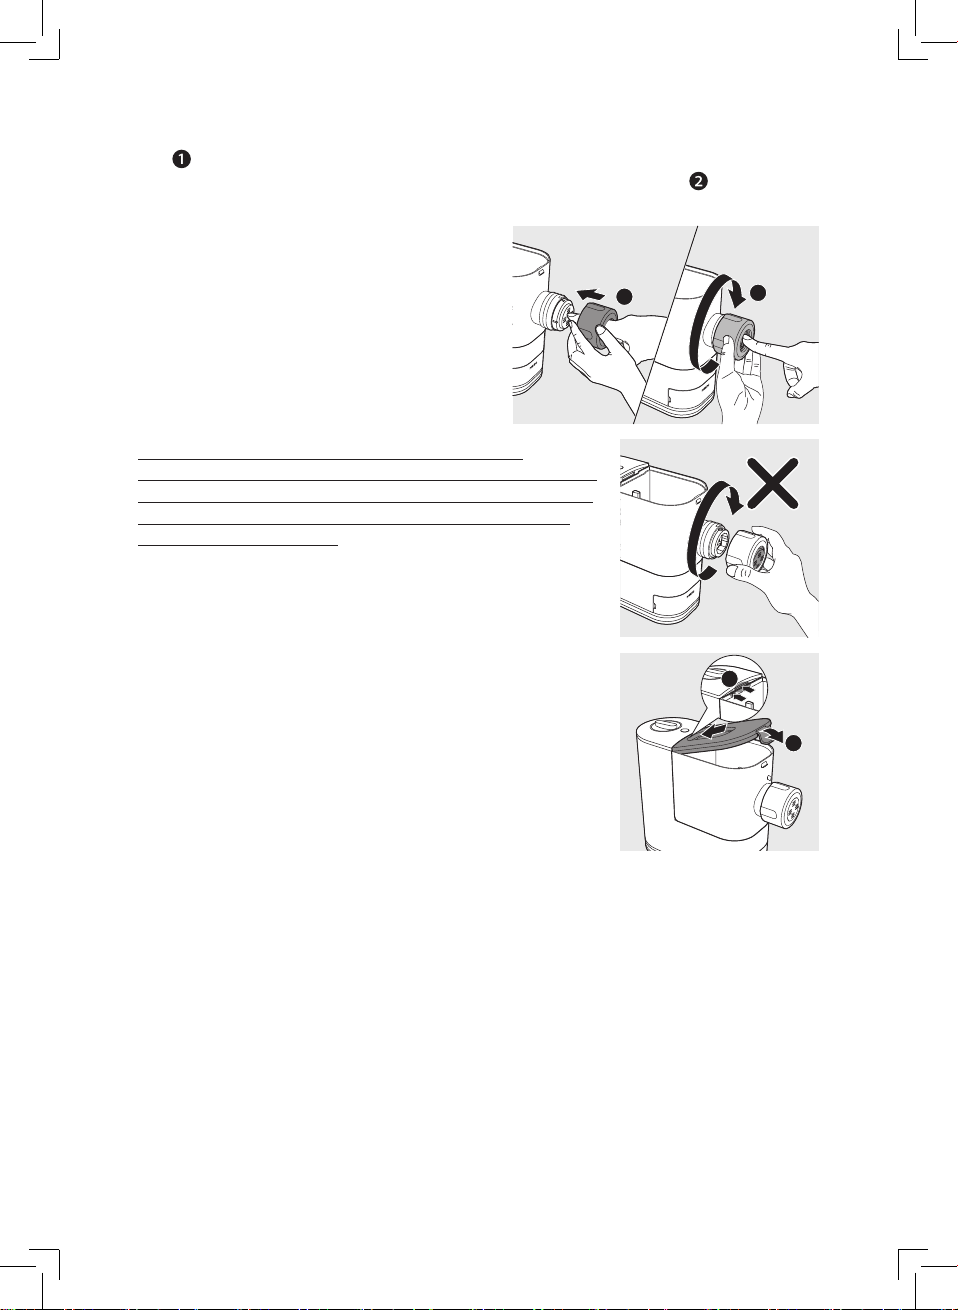
6
1
2
2
1
Press the shaping disc through the opening of the shaping disc holder,
and then assemble the holder on the mixing chamber outlet. Turn the
holder clockwise to firmly lock it in place.
Always attach the shaping disc on the mixing
chamber outlet before you assemble the shaping disc
holder. Never put the shaping disc in the shaping disc
holder and assemble them on the mixing chamber
outlet at the same time.
7 Attach the lid onto the mixing chamber.
Note:
• If the mixing chamber lid is not properly installed,
the safety switch will prevent the appliance from
working.
18
English
Using the Pasta
and noodle
maker
Important
• Place the product on a flat surface and prevent table shaking or vibration.
• Make sure all the parts are well assembled before plugging in.
• Do not put less than 200g (1 flour cup) or more than 400g (2 flour cups) of
flour in the chamber.
• Pour in the liquid slowly through the water slot after the appliance starts
kneading.
• If you want to dispose of the weighed flour before processing with the next
batch, empty the chamber and restart the appliance by unplugging and
plugging in again.
• Do not put any ingredients that are 60°C / 140°F or above into the Pasta and
noodle maker, or place the Pasta and noodle maker in surroundings at high
temperature (60°C / 140°F), for instance in a high temperature sterilization
environment. This will deform the appliance.
• Never pour water into the mixing chamber before you place the chamber lid
onto the chamber.
• Make sure the shaping disc and shaping disc holder are assembled properly
before plugging in the appliance.
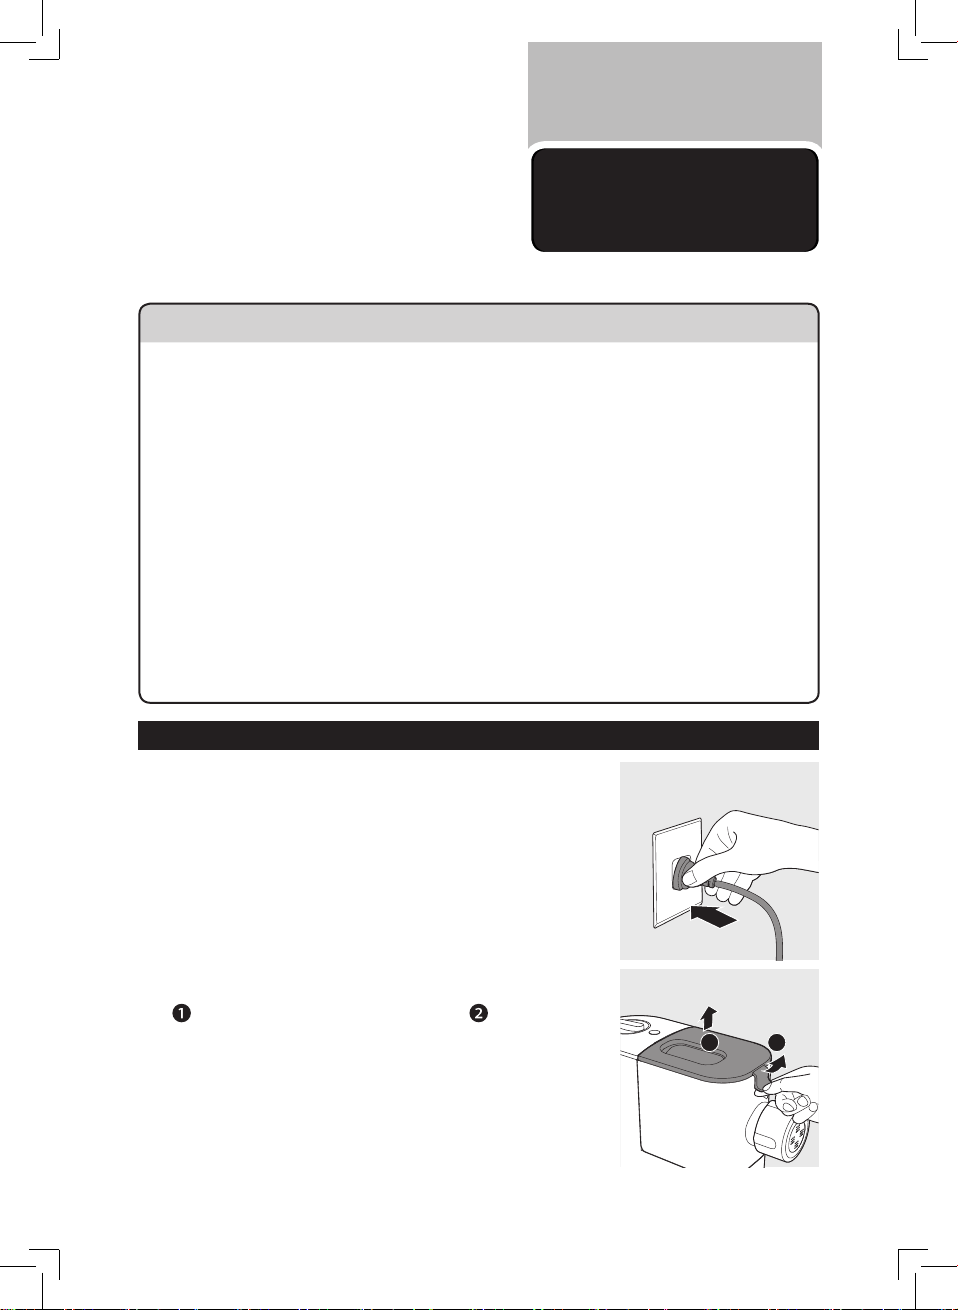
Preparing the ingredients
1 Put the plug of the appliance into the power
outlet. The Pasta and noodle maker will sound
once.
Note:
• Make sure all the parts are well assembled before
plugging in.
2
Pull the lid to unlock it and then
remove the lid from the mixing chamber.
2
English
1
19
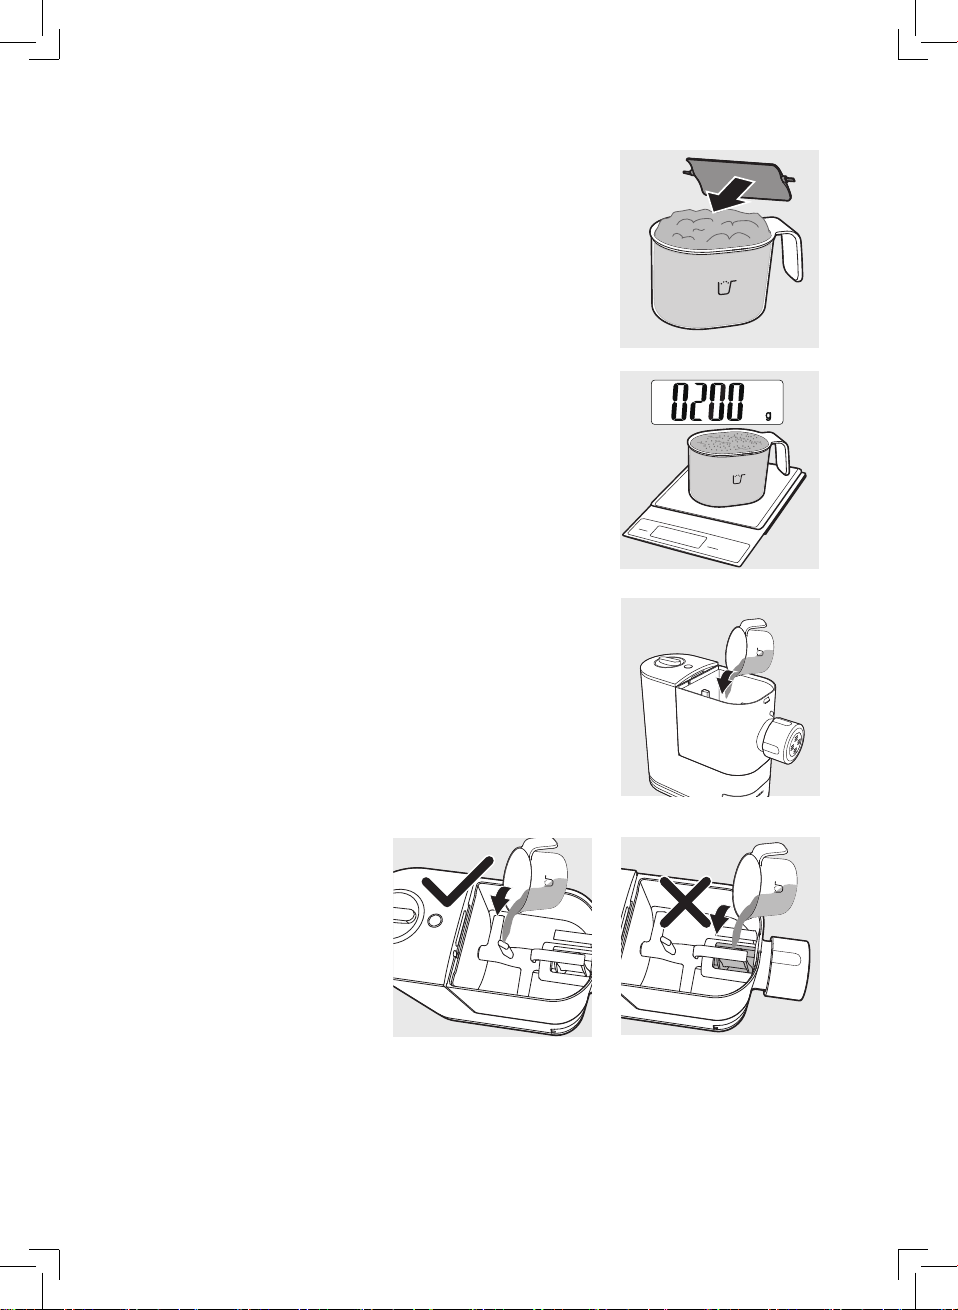
3 Scoop one full cup of flour using the flour cup.
Scrape off any excessive flour from the cup edge
with the supplied flat cleaning tool. One full cup
of flour weighs around 200 grams, and is
equivalent to 1-2 servings.
Note:
• Do not shake or hit the flour cup to remove
excessive flour. This will affect the flour weight.
• Use a kitchen scale to measure the weight more
accurately.
4 Pour the flour into the chamber. If you want to
make 2-3 servings, add a second cup of flour as
you will need 2 cups (~400g) of flour in total.
Note:
• For best result, do not put less than 200 g or more
than 400 g of flour in the chamber.
• Do not pour the flour into the opening of the
squeezing tube, otherwise the flour in the
squeezing tube will not be mixed evenly.
20
English
 Loading...