

Page 1
HR1799, HR1797, HR1791
4206 100 33950 18-05-2005 16:32 Page 1
Page 2

2
4206 100 33950 18-05-2005 16:32 Page 2
Page 3

ENGLISH 4
BAHASA INDONESIA 20
HR1799, HR1797, HR1791
4206 100 33950 18-05-2005 16:32 Page 3
Page 4

Introduction
The appliance is equipped with a motor protection
device that will SWITCH OFF the motor in case of
a motor jam (which might occur during heavy
processing jobs or if the appliance is not used in
accordance wih the instructions). If this happens,
SWITCH OFF and UNPLUG the appliance first,
then check if the quantity of ingredients you are
processing does not exceed the quantity
mentioned in the directions for use, or if something
is blocking the blades.Then press the button at the
bottom of the appliance and continue processing.
We advise you to process large quantities of
ingredients in a series of smaller batches. DO NOT
exceed the processing time indicated in the
directions for use when processing a batch.
Safety notice
Always unplug the appliance from the mains
before assembling, disassembling or making
adjustments to any of the accessories.
Keep the appliance out of the reach of children.
The motor only starts if the blender jar or the mill
attachment has been correctly assembled onto
the motor unit.
Make sure the blade unit is securely fastened onto
the mill beaker before you screw the mill
attachment onto the motor unit.
Never touch the blade unit when it is assembled
on the appliance and the appliance is plugged in.
Avoid touching the cutting edges of the blade
units when cleaning them.They are very sharp
and you could easily cut your fingers on them.
ENGLISH4
4206 100 33950 18-05-2005 16:32 Page 4
Page 5

Important
◗ Read these instructions for use carefully and
look at the illustrations before using the
appliance.
◗ Keep these instructions for future reference.
◗ Check if the voltage indicated on the
appliance corresponds to the local mains
voltage (110-127V or 220-240V) before you
connect the appliance.
◗ Never use any accessories or parts from
other manufacturers or that have not been
specifically advised by Philips.Your guarantee
will become invalid if such accessories or
parts have been used.
◗ Do not exceed the maximum level indicated
on the accessories.
◗ Do not exceed the quantities and preparation
times indicated in the table.
◗ Never remove accessories or parts from the
motor unit while the appliance is running.
Always unplug the appliance first.
◗ Never use the accessories to switch the
appliance on and off!
◗ Never let the appliance run unattended.
◗ Do not use the appliance if the mains cord,
the plug or other parts are damaged.
◗ If the mains cord of this appliance is damaged,
it must always be replaced by Philips or a
service centre authorised by Philips in order
to avoid hazardous situations.
◗ Let hot ingredients cool down before
chopping them or pouring them into the jar
(max. temperature 80cC/175cF), especially for
recipes that require large quantities of oil or fat.
ENGLISH 5
4206 100 33950 18-05-2005 16:32 Page 5
Page 6
◗ To avoid spillage, never fill the jar beyond the
maximum level indication (1.5 litres),
particularly not if you are blending hot liquids
(maximum 1.1 litres).
◗ To avoid spillage, always insert the stopper
into the lid before you start processing.
◗ Never reach into the jar with your fingers or
an object while the appliance is running or
when the appliance is connected to the mains.
◗ If the ingredients stick to the wall of the
blender, switch the appliance off, unplug the
appliance and loosen the ingredients from the
wall by adding liquid or using a spatula.
Preparing the appliance for use
Wash all accessories and detachable parts (see
'Cleaning').
C
◗ Wind excess mains cord round the base of
the appliance.
Using the appliance
Blender
◗ The blender is intended for:
- Blending fluids, e.g. dairy products, sauces, fruit
juices, soups, mixed drinks, shakes.
- Mixing soft ingredients, e.g. pancake batter or
mayonnaise.
- Pureeing cooked ingredients, e.g. for making
baby food.
ENGLISH6
4206 100 33950 18-05-2005 16:32 Page 6
Page 7
C
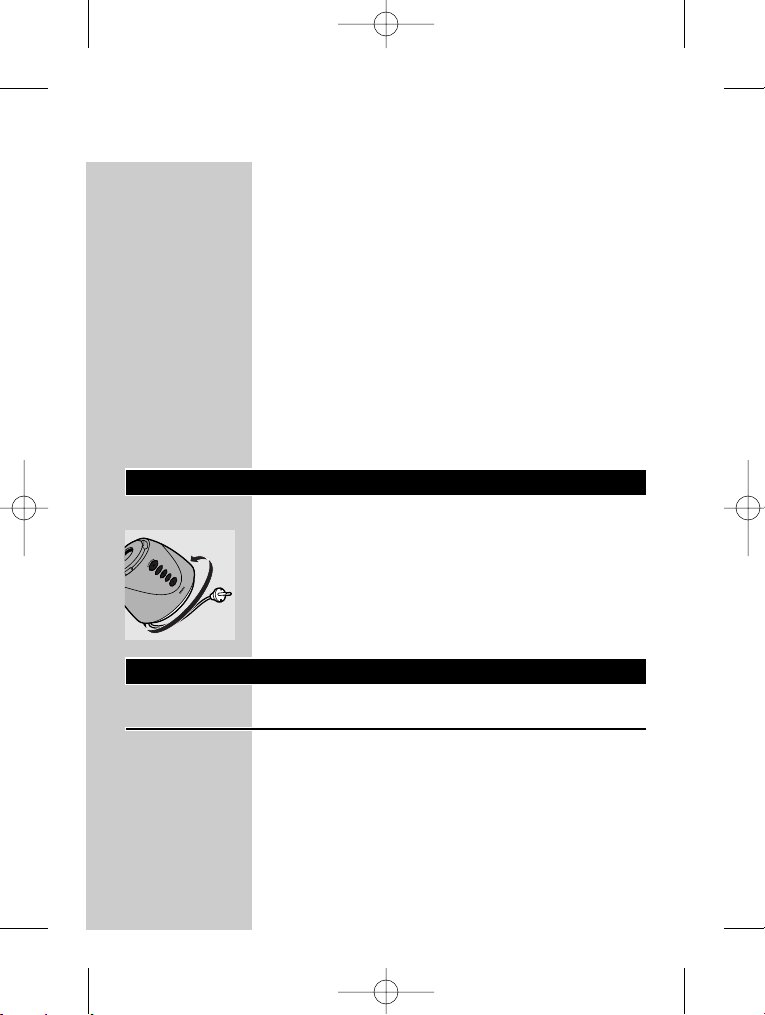
1 Place the rubber sealing ring on the rim of
the blade unit.
C
2 Mount the blade unit onto the jar by
turning it firmly in the direction of the
arrow.
C
3 Mount the jar onto the motor unit. Fasten
it by turning it in the direction of the
arrow.The jar is properly fixed when the
notch in its lower rim is in line with the
line above the buttons on the motor
housing.
Do not exert too much pressure on the handle
of the jar.
4 Open the lid by pressing the projection on
the side of the handle.
C
◗ To remove the lid, open it and then pull it
upwards.
Only remove the lid for cleaning purposes.
5 Put the ingredients in the jar.
Never fill the jar with ingredients that have a
temperature of over 80cC.
ENGLISH 7
4206 100 33950 18-05-2005 16:32 Page 7
1
2
Page 8
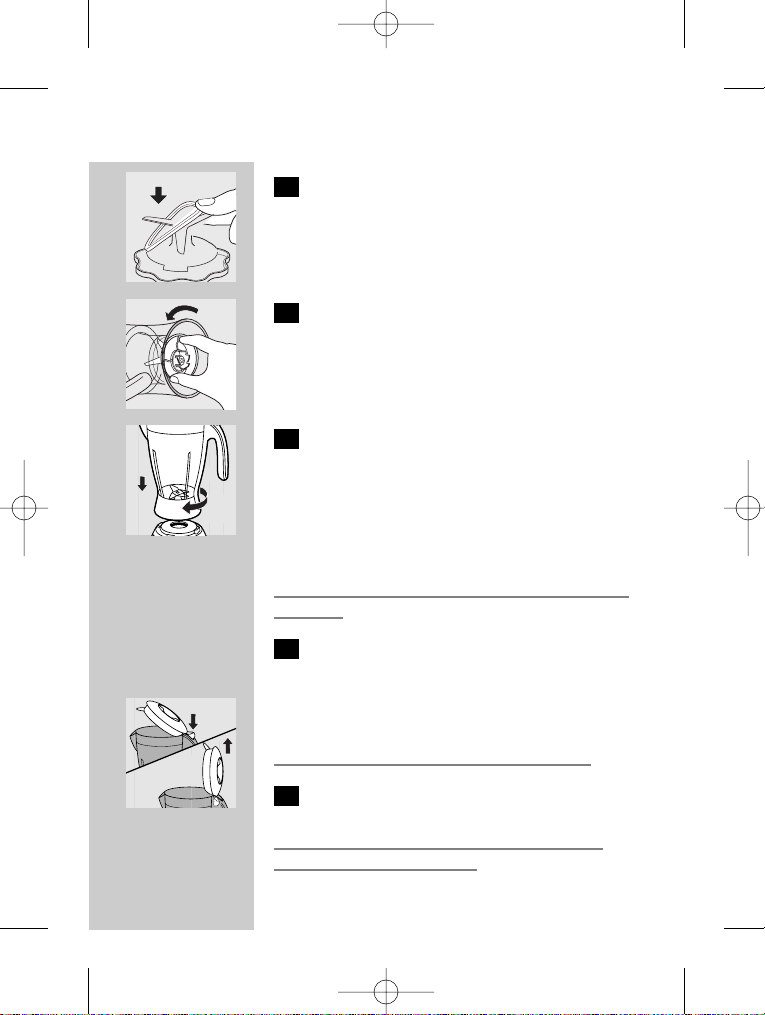
6 Close the lid
C
7 Insert the stopper into the lid.
To avoid spillage, always insert the stopper into
the lid before you start processing.
8 Put the mains plug in the wall socket.
C
9 Select the required setting by pressing the
appropriate button and the appliance will
switch on automatically.
◗ The speed buttons allow you to choose the
right speed to obtain optimal results. See the
table for the recommended speeds.
C
◗ Press the pulse button (M-button) a few times
to let the appliance run for only a few econds
at a time.The appliance will stop when you
release the button. Press the pulse button as
often as is necessary.
ENGLISH8
Speed
speed 1
speed 2
speed 3
Ingredients
liquid ingredients (e.g. chocolate milk,
milk with fruit, mayonnaise)
heavier ingredients e.g. a combination of
liquid and solid ingredients (e.g. tomato
sauce or pate)
heavy, mainly solid ingredients (e.g. ice
cubes, soups, beans, etc.)
4206 100 33950 18-05-2005 16:32 Page 8
Page 9
Always switch the appliance off before you open
the lid.
10 Press the 0-switch to switch the appliance
off.
Never switch the appliance on or off by turning
the jar.
Recipes can be found in the 'Recipes' chapter below.
Tips
To avoid spillage, never fill the jar above the
maximum level indication (1.5 litres), particularly
not if you are blending hot liquids (maximum 1.1
litres).
◗ If you are blending foaming liquids, never fill
the jar beyond the 1.2 l indication.
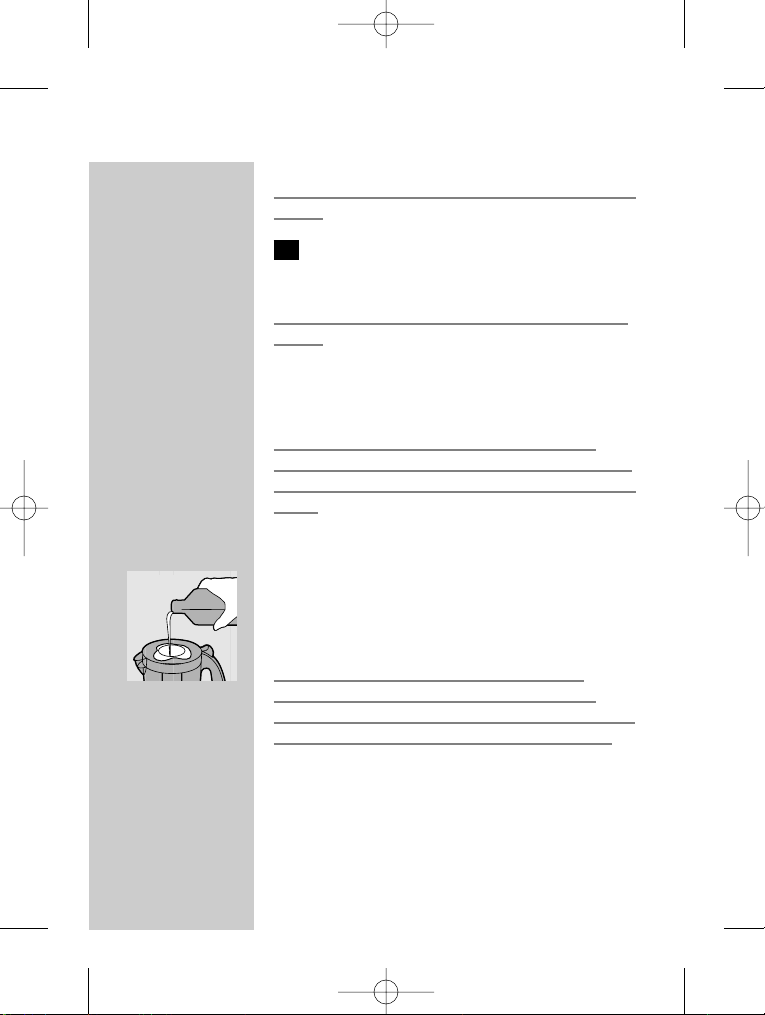
C
◗ Liquid ingredients (e.g. oil) can be poured into
the blender jar through the opening in the lid
while the appliance is running.
Do not let the blender run for more than
3 minutes at a time. If you have not finished
blending after 3 minutes, switch the appliance off
for one minute before you continue blending.
◗ Dry ingredients must not be processed for
more than 1 minute.
ENGLISH 9
4206 100 33950 18-05-2005 16:32 Page 9
Page 10

◗ Cut solid ingredients into smaller pieces
before putting them in the blender jar. Do not
process a large quantity of solid ingredients at
the same time. Process these ingredients in a
series of small batches instead.
◗ If you are not satisfied with the result when
blending solid ingredients, switch the blender
off and press the pulse button (M-button) a
few times to let the blender run briefly.You
can also stir the ingredients with a spatula
(not while the blender is running!) or pour
out some of the contents of the jar and
process smaller amounts.
◗ To crush ice cubes, drop max. 5 cubes per
batch through the opening in the lid onto the
rotating blades.
◗ To make tomato juice, cut the tomatoes in
four and drop the pieces through the opening
in the lid onto the rotating blades.
Never reach into the jar with your fingers or an
object (e.g. a spatula) while the blender is running.
◗ If you are processing solid and liquid
ingredients at the same time, pour the liquid
ingredients in the jar before switching the
appliance on.Add the solid ingredients while
the appliance is running.
Filter (HR1797 only)
◗ You can use the filter accessory to obtain
extra finely blended sauces, fresh fruit juices
or cocktails.All pips and skins will be caught in
the filter.
ENGLISH10
4206 100 33950 18-05-2005 16:32 Page 10
Page 11
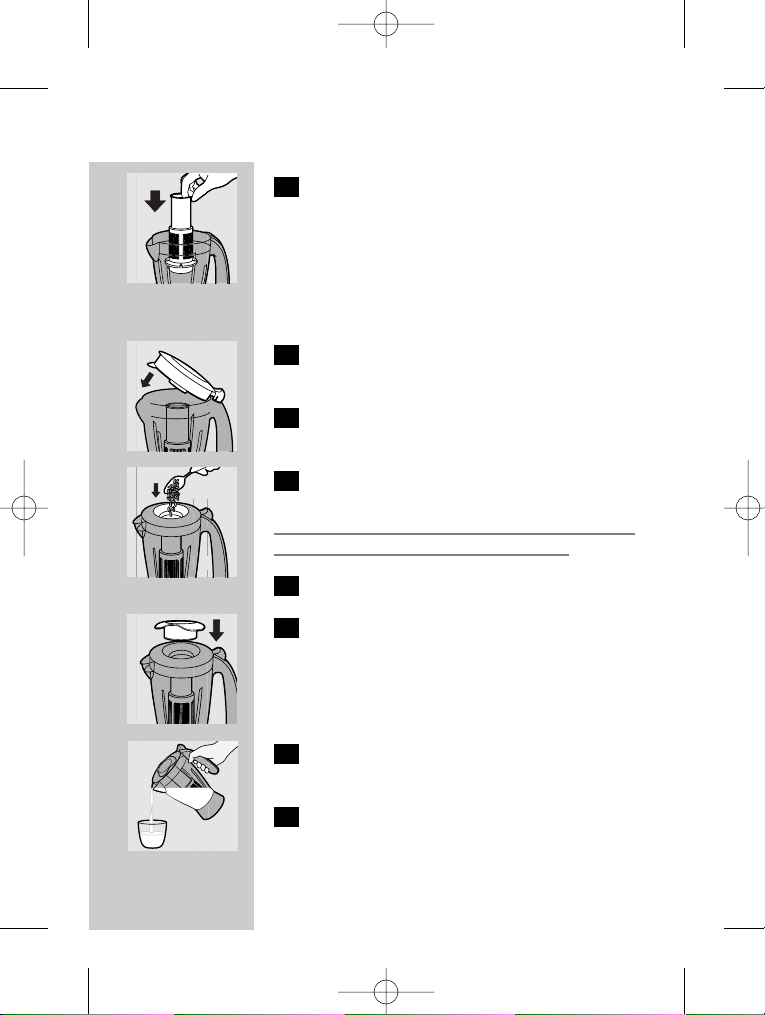
C
1 Make sure the appliance is unplugged.
Remove the blender jar from the appliance
and put the filter in the blender jar.
Make sure the filter is properly fitted onto the
bottom of the jar.The grooves of the filter and the
ribs inside the blender jar will help you put the
filter in the right position.
C
2 Put the lid on the jar to fix the filter in its
proper position.
3 Put the blender jar back on the motor unit
and insert the plug into the wallsocket.
C
4 Put the ingredients in the filter through the
opening in the lid.
Never fill the filter beyond its metal par t. Do not
use the filter to process hot ingredients.
5 Add water or another liquid.
C
6 Insert the stopper into the opening in the
lid and switch the appliance on. Select the
highest speed and let the appliance run for
max. 40 seconds.
C
7 Switch the appliance off. Pour out the
drink through the spout of the blender jar.
8 For optimal results, put the jar with the
remaining ingredients back onto the
appliance and let it run for a few more
seconds.
ENGLISH 11
4206 100 33950 18-05-2005 16:32 Page 11
Page 12

9 Pour out the rest of the drink.
Tips
◗ Particularly when you are processing large
quantities, we advise you not to put all the
ingredients in the filter at the same time. Start
processing a small quantity, let the appliance
run for a moment, switch it off and then add
another small quantity. Repeat this procedure
until you have processed all the ingredients.
◗ For making soy milk:
Soak soy beans for 4 hours before processing
them.You can process max. 50 g. of dry soy beans
with max. 500 ml. water at a time.
Do not process this recipe more than 2 times. If
you want to proces more, the appliance has to
cool down first.
◗ For making fruit juices and cocktails:
For the best results, add approx. 300 ml water (or
another liquid if you are making e.g. cocktails, etc.)
to 150 g fruit.
Mill
◗ The mill attachment can be used for grinding
and chopping ingredients such as
peppercorns, sesame seeds, rice, wheat,
coconut flesh, nuts (shelled), coffee beans, soy
beans, dried peas, cheese, breadcrumbs, etc.
Always process cloves, star anise and aniseed
together with other ingredients. If processed
separately, these ingredients may attack the
plastic materials of the appliance.
ENGLISH12
4206 100 33950 18-05-2005 16:32 Page 12
Page 13

The mill is not suitable for chopping very hard
ingredients like nutmeg and ice cubes.
C
1 Put the ingredients in the beaker.
Process only dry ingredients. Do not fill the
beaker beyond the 'MAX' indication.
See the table for the advised quantities.
C
2 Make sure the rubber ring on the blade
unit is properly placed.
ENGLISH 13
Quantities
5-25 g
10-50 g
25-75 g
25-75 g
25-75 g
25-75 g
25-50 g
25-75 g
20-40 g
25-50 g
25-75 g
Ingredients
pepper corns
sesame seed
rice, wheat
soy beans
dried peas
coconut flesh
coffee beans
cheese
bread crumbs
sugar cubes
nuts (shelled)
4206 100 33950 18-05-2005 16:32 Page 13
Page 14

C
3 Screw the blade unit onto the beaker.
If this requires some effort, moisten the rubber
ring with a drop of water.
C
4 Turn the assembled mill upside down and
screw it onto the motor unit in the
direction of the arrow.
C
5 We advise you to operate the mill by
means of the pulse button (M-button).
Never use the mill for more than 30 seconds
without interruption.
C
◗ After processing, you can use the shaker lid to
sprinkle the ingredients evenly onto a dish.
Cleaning
Cleaning of the appliance, its parts and the
accessories is easiest immediately after use.
Never clean the accessories or parts of the
appliance in the dishwasher.
Clean the motor unit with a moist cloth.
ENGLISH14
4206 100 33950 18-05-2005 16:33 Page 14
Page 15

Do not use abrasives, scourers, alcohol, etc.
1 Unplug the appliance, detach the
accessories and parts you have used and
clean them in warm, soapy water.
2 Then rinse them under the tap to wash
away soap residues.
Quick cleaning of the blender jar
1 Pour lukewarm water and some washing-
up liquid into the blender jar, up to the
Quick Clean level indication (500 ml) on
the jar. Do not exceed this level when
using the Quick Clean function.
2 Close the lid. Insert the stopper into the
lid.
C
3 Press the Quick Clean button and let the
appliance run for a few moments. Stop as
soon as the jar is clean.
4 Detach the blender jar and rinse it with
clean water.
C
5 Only remove the lid (by pulling it off the
blender jar) for cleaning purposes!
ENGLISH 15
4206 100 33950 18-05-2005 16:33 Page 15
Page 16

Cleaning the filter
1 Ta ke the filter out of the blender jar.
2 Hold the filter over a waste bin and gently
shake out its contents.
3 Rinse the filter under the tap.
Information & service
If you need information or if you have a problem,
please visit the Philips Web site at
www.philips.com or contact the Philips Customer
Care Centre in your country (you will find its
phone number in the worldwide guarantee
leaflet). If there is no Customer Care Centre in
your country, turn to your local Philips dealer or
contact the Service Depar tment of Philips
Domestic Appliances and Personal Care BV.
ENGLISH16
4206 100 33950 18-05-2005 16:33 Page 16
Page 17

Recipes
The hole in the lid can be used to add drops of
liquid to the ingredients in the jar in order to
obtain the required level of consistency.
Mayonnaise (about 300 ml)
-2 egg yolks or 1 whole egg
-1 tsp mustard powder
-1 tsp salt
- 1/2 tsp pepper
-1 tsp sugar
- 30 ml vinegar or lemon juice
- 300 ml oil
B
All the ingredients have to be at room temperature.
B
Put the egg or egg yolks in the blender jar, add
salt, pepper and mustard powder and half of the
vinegar or lemon juice and blend at average
speed. Pour oil through the hole in the lid until the
mayonnaise becomes thick.Then add the
remaining vinegar or lemon juice and season
according to taste.
B
Store in the refrigerator.
Carrot cake
-4 eggs
- 200 g sliced carrot
- 200 ml milk
- 100 g condensed milk
- 300 g sugar
- 300 g wheat flour
- 150 g oil
-1 tsp dried yeast
ENGLISH 17
4206 100 33950 18-05-2005 16:33 Page 17
Page 18

B
Put the eggs, the sliced carrots, the milk, the
condensed milk and the sugar in the blender jar
and process it for approx. 15 seconds at max.
speed.
B
Add the wheat flour spoon by spoon and oil during
the next 45 seconds and then continue mixing for
another 30 sec. to get a good mixture.Total
processing time is 90 seconds.
B
Do not process this recipe more than 2 times. If
you want to process more, the appliance has to
cool down first.
B
Put the mixture in a baking tin and bake it at
180c for approx. 40 minutes.
Salad dressing
-1 part vinegar or lemon
-3 parts oil
- salt, pepper
B
Pour vinegar or lemon juice into the blender jar,
add salt and pepper and switch the appliance on.
Process until the salt and pepper have dissolved.
Then add the oil through the hole in the lid until a
homogeneous dressing has formed.
B
You can also prepare a larger quantity of this
basic dressing and store it in the refrigerator.
Always shake before use to mix the ingredients.
ENGLISH18
4206 100 33950 18-05-2005 16:33 Page 18
Page 19

ENGLISH 19
Tr ouble shooting guide
Solution
The appliance is provided with a safety system.The
appliance will not work if the accessories have not
been assembled properly on the motor unit or have
not been assembled at all. Check whether the
accessories have been assembled properly (see
various sections of these direction for use). Switch off
the appliance first!
Switch off the appliance and process a smaller
quantity.
This is normal. If the appliance continues to give off
this smell after you have used it a few times, check
whether the quantity you are processing, the
processing time or the processing speed are correct.
Switch off the appliance and unplug it. Contact the
nearest Philips service or take the appliance to your
dealer.
Check whether the blade unit has been properly
assembled onto the beaker.
Check whether the rubber ring has been properly
assembled.
Make sure the rubber ring has been assembled
properly.The ring should lie flat round the interface.
Note: a small amount of leakage is normal.
Make sure that the filter has been assembled properly
in the blender jar.
Problem
The appliance does not
work
The blade unit or motor
unit is blocked.
The motor unit gives off
an unpleasant smell the
first few times the
appliance is used.
The appliance makes a
lot of noise, smells, feels
hot to touch, emits
smoke, etc.
The mill vibrates strongly,
produces a lot of noise
or the blade unit is out of
alignment.
Powder leaks from the
mill
Although the filter has
been assembled, the fruit
juice or soy milk contains
pulp.
* If problems persist or if other problems occur, please contact the Philips
Customer Care Centre or the nearest Philips service centre.
4206 100 33950 18-05-2005 16:33 Page 19
Page 20

BAHASA INDONESIA20
Pengantar
Alat ini dilengkapi dengan pelindung motor
dimana motor akan mati secara otomatis bila
motor macet (hal ini dapat terjadi bila beban kerja
terlalu berat atau jika menggunakan alat tidak
sesuai petunjuk). Bila terjadi demikian, MATIKAN
dan CABUT STEKER, lalu periksalah bahan-bahan
yang sedang diproses apakah melebihi jumlah yang
disarankan dalam petunjuk penggunaan, atau
apakah ada sesuatu yang menghambat pisau. Lalu
tekan tombol pada bagian bawah alat dan
lanjutkan memproses. Kami sarankan untuk
memproses bahan-bahan dalam jumlah besar
secara bertahap dalam jumlah sedikit. Jangan
melebihi waktu memproses yang disarankan dalam
petunjuk penggunaan.
Perhatian
Cabut steker dari stopkontak sebelum memasang,
melepaskan atau mengganti perlengkapan alat.
Jauhkan alat dari jangkauan anak.anak.
Motor hanya akan bekerja bila gelas blender atau
mill (penggiling) dipasang dengan benar pada
motor.
Pastikan bahwa unit pisau dipasang dengan benar
pada gelas mill sebelum mill dipasang pada motor.
Jangan sentuh unit pisau ketika dipasang pada alat
dan ketika alat dihubungkan dengan listrik.
Hindari menyentuh bagian yang tajam dari unit
pisau ketika membersihkannya. Pisau itu sangat
tajam dan jari anda sangat mudah terpotong.
4206 100 33950 18-05-2005 16:33 Page 20
Page 21

BAHASA INDONESIA 21
Penting
◗ Bacalah instruksi penggunaandenganteliti dan
lihat gambar-gambar ilustrasi sebelum
menggunakan alat ini.
◗ Simpan instruksi ini untuk referensi lebih
lanjut
◗ Periksa apakah voltase yang ditunjukkan pada
alat sesuai dengan voltase listrik setempat
(110-127V atau 220-240V) sebelum anda
menghubungkan alat tersebut dengan listrik.
◗ Jangan sekali-kali menggunakan
perlengkapanatau suku cadang dari
perusahaan lain atau yang tidak disarankan
secara khusus oleh Philips. Garansi yang
diberikan kepada anda akan tidak berlaku jika
anda menggunakan perlengkapan atau suku
cadang seperti itu.
◗ Jangan melebihi batas maksimum yang tertera
pada assesori.
◗ Jangan melebihi jumlah dan waktu penyiapan
yang dicantumkan dalam tabel.
◗ Jangan melepaskan assesori atau bagian-bagian
dari motor ketika alat sedang bekerja.
Pertama-tama cabutlah steker dari
stopkontak.
◗ Jangan menggunakan assesori untuk
menyalakan atau mematikan alat.
◗ Jangan sekali-kali meninggalkan alat yang
sedang bekerja tanpa pengawasan.
◗ Jangan menggunakan alat jika kabel, steker
atau bagian lain ada yang rusak.
◗ Jika kabel alat rusak, maka hanya dapat diganti
oleh philips atau authorised servis Philips
untuk mencegah situasi yang membahayakan.
4206 100 33950 18-05-2005 16:33 Page 21
Page 22

22
◗ Biarkan bahan-bahan mendingin dulu sebelum
memotongnya atau memasukkannya ke dalam
gelas blender (suhu max 80cC/175cF),
terutama untuk resep-resep yang memerlukan
minyak atau lemak dalam jumlah banyak.
◗ Agar tidak tumpah, jangan mengisi gelas
blender melebihi batas maksimum (1,5 liter),
khusus untuk memblender cairan yang panas
maksimum 1.1 liter.
◗ Untuk menghindari tumpahan, selalu
masukkan penyumbat dalam penutup sebelum
Anda mulai memproses.
◗ Jangan memasukkan tangan atau benda lain ke
dalam gelas blender pada saat alat sedang
bekerja atau sudah disambung ke listrik.
◗ Bila bahan-bahan menempel di dinding gelas
blender, matikan alat, cabut steker dari
stopkontak dan lepaskan bahan-bahan yang
menempel itu dengan menambah cairan atau
dengan menggunakan sudip.
Menyiapkan alat
Cuci semua assesori atau bagian yang dapat
dilepas (lihat 'Membersihkan').
C
◗ Gulung kelebihan kabel disekeliling bagian
bawah alat.
BAHASA INDONESIA
4206 100 33950 18-05-2005 16:33 Page 22
Page 23

23
Menggunakan alat
Blender
◗ Blender digunakan untuk:
- Memblender bahan cair seperti susu, saos, jus,
sup, minuman, shakes.
- Mencampur bahan-bahan lunak seperti misalnya
adonan tepung untuk kue panekuk atau
mayones.
- Membuat pure/bubur dari bahan-bahan yang
telah dimasak, misalnya untuk membuat
makanan bayi.
C
1 Pasang karet blender pada unit pisau.
C
2 Pasang unit pisau pada gelas blender dan
putarlah sesuai tanda panah sampai
terkunci.
C
3 Pasang gelas blender pada motor. Putarlah
sesuai tanda panah sampai terkunci. Gelas
blender sudah terpasang dengan benar bila
tanda di bagian bawah gelas sejajar dengan
garis di atas tombol pada motor.
Gagang gelas blender jangan ditekan terlalu kuat.
4 Buka penutup dengan menekannya ke arah
gagang gelas blender.
BAHASA INDONESIA
4206 100 33950 18-05-2005 16:33 Page 23
1
2
Page 24

24
C
◗ Untuk melepaskan penutup, buka dan tarik ke
atas.
Penutup hanya dilepaskan bila akan dibersihkan.
5 Taruh bahan-bahan di dalam gelas blender.
Jangan mengisi gelas dengan bahan-bahan yang
bersuhu di atas 80cC.
6 Pasang penutup.
C
7 Masukkan tutup kecil ke dalam penutup.
Untuk menghindari tumpahan, selalu masukkan
penyumbat dalam penutup sebelum Anda mulai
memproses.
8 Pasang steker pada stopkontak.
C
9 Pilih pengatur yang diinginkan dengan
menekan tombol yang tepat dan alat akan
menyala secara otomatis.
◗ Tombol kecepatan memungkinkan anda untuk
memilih kecepatan yang tepat untuk
memperoleh hasil yang optimal. Lihat tabel
untuk kecepatan yang disarankan.
BAHASA INDONESIA
4206 100 33950 18-05-2005 16:33 Page 24
Page 25

C
◗ Tekan tombol pulse (tombol M) beberapa kali
sehingga alat setiap kali bekerja hanya untuk
beberapa detik. Alat akan berhenti bila anda
melepaskan tombol. Tekan tombol pulse bila
diperlukan.
Selalu matikan alat sebelum anda membuka
penutup.
10 Tekan tombol 0 untuk mematikan alat.
Jangan menyalakan atau mematikan alat dengan
memutar gelas blender.
Resep-resep dapat dilihat pada bagian 'Resep"
dibawah ini.
Tip
Agar tidak tumpah, jangan mengisi gelas blender
melebihi batas maksimum (1,5 liter), khusus untuk
mengolah bahan cair yang panas maksimum 1,1
liter.
25BAHASA INDONESIA
Kecepatan
kecepatan 1
kecepatan 2
kecepatan 3
Bahan-bahan
bahan cair (misalnya susu coklat, susu
dengan buah, mayones)
bahan-bahan agak berat misalnya
kombinasi bahan cair dan padat
(misalnya saus tomat)
keras, terutama bahan padat (misalnya es
batu, sup, kacang-kacangan, dll)
4206 100 33950 18-05-2005 16:33 Page 25
Page 26

26
◗ Jika anda mengolah bahan cair yang berbusa,
jangan mengisi gelas blender melebihi batas
1,2 liter.
C
◗ Bahan-bahan cair (spt. minyak) dapat
dituangkan ke dalam gelas blender melalui
lubang pada tutup saat alat sedang bekerja.
Jangan biarkan blender bekerja lebih dari 3 menit
setiap kali dijalankan. Jika proses belum selesai
setelah 3 menit, matikan alat selama 1 menit
sebelum anda melanjutkan kembali.
◗ Bahan-bahan kering jangan diproses lebih dari
1 menit.
◗ Potong kecil-kecil bahan yang padat sebelum
menaruhnya ke dalam gelas blender. Jangan
memproses jumlah besar dalam waktu yang
sama. Proses bahan ini sedikit-sedikit.
◗ Jika anda tidak puas dengan hasilnya, matikan
alat dan tekan tombol pulse (tombol M)
beberapa kali. Anda juga dapat mengaduknya
dengan sudip (blender dalam keadaan tidak
bekerja) atau menuangkannya sebagian dan
memprosesnya dalam jumlah sedikit.
◗ Untuk menghancurkan es batu, masukkan
maksimum 5 buah melalui lubang di penutup
ke dalam pisau yang berputar.
◗ Untuk membuat jus tomat, potong tomat
menjadi empat dan masukkan melalui lubang
di penutup ke dalam pisau yang berputar.
Jangan memasukkan jari atau benda lainnya
(misalnya sudip) pada saat blender sedang bekerja.
BAHASA INDONESIA
4206 100 33950 18-05-2005 16:33 Page 26
Page 27

27
◗ Jika anda memproses bahan padat dan cair
sekaligus, tuangkan bahan cair ke dalam gelas
blender sebelum alat dinyalakan. Tambahan
bahan padat ketika alat sedang bekerja.
Filter (Untuk HR1779)
◗ Anda dapat menggunakan filter untuk
mendapatkan hasil terbaik dalam membuat
saus, jus buah segar atau coktail. Semua biji
dan kulit akan berada di dalam filter.
C
1 Pastikan steker alat dicabut dari
stopkontak. Lepaskan gelas blender dari
alat dan pasang filter pada gelas blender.
Pastikan filter benar-benar terpasang dengan baik
pada bagian bawah gelas blender. Alur pada filter
dan sirip didalam gelas blender akan membantu
anda memasang filter pada posisi yang tepat.
C
2 Pasang penutup pada gelas blender untuk
mengunci filter pada posisi yang tepat.
3 Pasang gelas blender pada motor dan
pasang steker pada stopkontak.
C
4 Masukkan bahan-bahan ke dalam filter
melalui lubang pada penutup.
Jangan mengisi filter melebihi bagian yang terbuat
dari baja. Jangan menggunakan filter untuk
memproses bahan-bahan yang panas.
BAHASA INDONESIA
4206 100 33950 18-05-2005 16:33 Page 27
Page 28

28
5 Tambahan air atau bahan cair lainnya.
C
6 Masukan tutup kecil ke dalam penutup
kemudian nyalakan alat. Pilih kecepatan
tertinggi dan biarkan alat bekerja maksimal
40 detik.
C
7 Matikan alat. Tuangkan minuman melalui
cerat.
8 Untuk hasil optimal, taruh kembali gelas
dengan bahan yang tersisa pada alat dan
biarkan bekerja selama beberapa detik lagi.
9 Tuangkan sisa minuman.
Tip
◗ Khusus untuk memproses dalam jumlah besar,
kami sarankan agar tidak menaruh semua
bahan ke dalam filter sekaligus. Mulailah
memproses dalam jumlah sedikit, biarkan alat
bekerja beberapa saat, matikan kemudian
tambahkan lagi dalam jumlah sedikit. Ulangi
prosedur ini sampai anda sudah memproses
semuanya.
◗ Untuk membuat susu kacang kedelai:
Rendam kacang kedelai selama 4 jam sebelum
memprosesnya.
Setiap kali anda dapat memproses maksimum
50 g kacang kedelai kering dengan air maksimum
500 ml
Jangan membuat resep ini lebih dari 2 kali. Bila
Anda ingin membuat lebih, peralatan harus
dibiarkan dingin terlebih dulu.
BAHASA INDONESIA
4206 100 33950 18-05-2005 16:33 Page 28
Page 29

29
◗ Untuk membuat jus buah dan cocktail:
Untuk hasil terbaik, tambahkan air kira-kira 300 ml
(atau bahan cair lainnya jika anda membuat
cocktail, dll) ke dalam 150 g buah.
Mill
◗ Mill dapat digunakan untuk menggiling dan
mencacah bahan-bahan seperti biji lada, biji
wijen, beras, gandum, kelapa, biji-bijian
(berkulit), biji kopi,kacang kedelai, kacang
polong kering, keju, bubuk roti, dll.
Selalu memproses cengkeh, adas bintang dan adas
manis bersamaan dengan bahan lainnya. Jika
diproses terpisah, bahan-bahan ini dapat merusak
bagian plastik dari alat.
Mill tidak cocok untuk mencacah bahan-bahan
keras seper ti biji pala dan es batu.
C
1 Masukkan bahan-bahan ke dalam gelas mill.
Hanya untuk memproses bahan-bahan kering saja
Jangan mengisi gelas mill melebihi batas MAX.
C
2 Pastikan karet dipasang pada unit pisau
dengan benar.
BAHASA INDONESIA
4206 100 33950 18-05-2005 16:33 Page 29
Page 30

30
C
3 Pasang unit pisau pada gelas mill.
Jika agak sulit, lembabkan karet dengan setetas air.
C
4 Balikkan mill dan pasang pada unit motor
sesuai tanda panah.
C
5 Kami sarankan anda untuk mengoperasikan
mill ini dengan tombol pulse (tombol M).
Jangan sekali-kali menggunakan mill lebih dari 30
detik tanpa berhenti.
BAHASA INDONESIA
Jumlah
5-25 g
10-50g
25-75g
25-75g
25-75g
25-75g
25-50g
25-75g
20-40g
25-50g
25-75g
Bahan-bahan
biji lada
biji wijen
beras, gandum
kacang kedelai
kacang polong kering
daging buah kelapa
biji kopi
keju
bubuk roti
gula batu
biji-bijian (berkulit keras)
4206 100 33950 18-05-2005 16:33 Page 30
Page 31

31
C
◗ Setelah proses, anda dapat menggunakan tutup
berlubang kecil-kecil untuk menaburkan
bahan-bahan itu secara merata pada masakan.
Membersihkan
Alat, bagian-bagian dan asesorinya paling mudah
dibersihkan segera setelah digunakan.
Jangan membersihkan assesori atau bagian-bagian
alat dengan mesin cuci piring.
Bersihkan motor dengan lap basah.
Jangan gunakan pengosok, alkohol, dll.
1 Cabut steker dari stopkontak, lepaskan
assesori dan bagian-bagian yang sudah
digunakan dan bersihkan dengan air sabun
hangat.
2 Bilas dengan air keran untuk
menghilangkan sisa-sisa sabun.
3 Ketika menggunakan chopper, gunakan air
sabun panas untuk membersihkannya.
4 Bersihkan gelas, tutup,filter,mangkuk
chopper dan unit pisau dengan air sabun
hangat.
5 Disarankan untuk melepaskan karet dari
chopper sebelum dibersihkan.
BAHASA INDONESIA
4206 100 33950 18-05-2005 16:33 Page 31
Page 32

32 BAHASA INDONESIA
6 Unit pisau blender dapat juga dibersihkan
dengan merendamnya dalam air sabun
hangat dan biarkan alat bekerja sebentar.
7 Sekalah motor dengan kain basah. Jangan
merendamnya dalam air.
Membersihkan gelas blender dengan cepat.
1 Tuangkan air suam-suam kuku dan sedikit
sabun cair ke dalam gelas blender, sampai
batas pembersih cepat (500 ml) pada gelas
jar. Jangan melebihi batas ini bila
menggunakan fungsi pembersih cepat.
2 Pasang penutup. Masukkan tutup kecil ke
dalam penutup.
C
3 Tekan tombol pembersih cepat dan biarkan
alat bekerja beberapa saat. Hentikan
segera setelah gelas blender bersih.
4 Lepaskan gelas blender dan bilaslah dengan
air bersih.
C
5 Lepaskan tutup (dengan menariknya dari
gelas blender) hanya pada saat dibersihkan.
Membersihkan filter
1 Keluarkan filter dari gelas blender.
2 Pegang filter diatas tempat sampah dan
guncangkan dengan lembut untuk
mengeluarkan ampasnya.
4206 100 33950 18-05-2005 16:33 Page 32
Page 33

33
3 Bilas filter di bawah air keran.
Informasi & service
Jika anda memerlukan informasi atau jika anda
menghadapi masalah, silahkan mengunjungi Web
Site Philips di www.philips.com atau hubungi Pusat
Pelayanan Pelanggan Philips di negara anda (anda
dapat melihat nomor teleponnya di leaflet
garansi). Jika tidak ada Pusat Pelayanan Pelanggan
di negara anda, hubungi dealer Philips setempat
atau Departemen Servis Philips DAP.
BAHASA INDONESIA
4206 100 33950 18-05-2005 16:33 Page 33
Page 34

Resep
Lubang pada tutup dapat digunakan untuk
menambahkan bahan cair ke dalam gelas agar
menghasilkan tingkat kekentalan yang diinginkan.
Mayones (kira-kira 300 ml)
-2 kuning telur atau 1 butir telur
-1 sendok teh tepung mustard
-1 sendok teh garam
- 1/2 sendok teh merica
-1 sendok teh gula
- 30 ml cuka atau jeruk lemon
- 300 ml minyak
B
Semua bahan harus bersuhu kamar.
B
Masukkan telur atau kuning telur ke dalam gelas
blender, tambahkan garam, merica dan bubuk
mustard serta cuka atau jus lemon lalu aduk
pada kecepatan sedang.Tuangkan minyak melalui
lubang pada tutup hingga mayonnaise menjadi
kental. Kemudian tambahkan sisa cuka atau jus
lemon lalu berikan bumbu menurut selera..
B
Simpan di dalam lemari es.
Kue wortel
-4 butir telur
- 200 g wortel yang sudah di iris-iris
- 200 ml susu cair
- 100 g susu kental
- 300 g gula
- 300 g tepung terigu
34 BAHASA INDONESIA
4206 100 33950 18-05-2005 16:33 Page 34
Page 35

35
- 150 g minyak
-1 sendok teh ragi
B
Masukkan telur, wortel, susu cair, susu kental dan
gula ke dalam gelas blender dan proses selama
kira-kira 15 detik dengan kecepatan tinggi.
B
Tambahkan tepung terigu, sendok demi sendok
dan minyak selama 45 detik berikutnya,
kemudian terus aduk selama 30 detik untuk
mendapatkan campuran yang baik.Waktu
pemrosesan total adalah 90 detik.
B
Jangan membuat resep ini lebih dari 2 kali. Bila
Anda ingin membuat lebih, peralatan harus
dibiarkan dingin terlebih dulu.
B
Masukkan adonan ke dalam loyang dan
panggang dengan suhu 180c sekitar 40 menit.
Bumbu salad
-1 bagian cuka atau lemon
-3 bagian minyak
- garam, merica
B
Tuangkan cuka atau jus lemon ke dalam gelas
blender, tambahkan garam dan merica lalu
nyalakan alat. Giling hingga garam dan merica
larut. Kemudian tambahkan minyak melalui
lubang pada tutup hingga terbentuk campuran
yang merata.
B
Anda juga dapat menyiapkan dalam jumlah besar
dan menaruhnya di lemari es. Kocoklah terlebih
dulu sebelum digunakan.
BAHASA INDONESIA
4206 100 33950 18-05-2005 16:33 Page 35
Page 36

36 BAHASA INDONESIA
Petunjuk Pemecahan masalah
Solusi
Alat ini dilengkapi dengan sistem pengaman. Alat
tidak akan bekerja bila ada assesori yang dipasang
tidak sempurna pada motor atau belum dipasang
sama sekali. Periksalah apakah asessori sudah
dipasang dengan sempurna (lihat beberapa bagian
pada petunjuk penggunaan ini). Matikan alat terlebih
dulu.
Matikan alat dan proseslah dalam jumlah kecil.
Ini normal. Bila alat terus memberikan bau setelah
beberapa kali digunakan, periksalah apakah jumlah
yang diproses, waktu pengolahan atau kecepatan
sudah tepat.
Matikan alat, cabut steker. Hubungi servis Philips
terdekat atau bawa alat ke dealer anda.
Per iksalah apakah unit pisau sudah dipasang dengan
benar pada gelas mill.
Per iksalah apakah karet sudah dipasang dengan benar.
Pastikan karet sudah dipasang dengan benar. Karet
harus datar mengelilingi penghubung. Catatan: masih
normal bila ada bocor sedikit.
Pastikan bahwa filter sudah dipasang dengan benar
pada gelas blender.
Masalah
Alat tidak mau bekerja
Unit pisau atau motor
terhalang.
Motor mengeluarkan bau
tidak enak pertama kali
digunakan.
Alat berisik, bau, panas
bila dipegang, berasap, dll.
Mill bergetar keras, berisik
atau unit pisau tidak
sejajar.
Tepung bocor dari mill
Walaupun filter sudah
dipasang, jus buah atau
susu kacang kedelai masih
ada ampasnya.
* Bila masalah berlanjut atau bila masalah lain timbul, hubungi Pusat Pelayanan
Pelanggan Philips atau pusat servis Philips terdekat.
4206 100 33950 18-05-2005 16:33 Page 36
Page 37

37
4206 100 33950 18-05-2005 16:33 Page 37
Page 38

38
4206 100 33950 18-05-2005 16:33 Page 38
Page 39

39
4206 100 33950 18-05-2005 16:33 Page 39
Page 40

www.philips.com
u
4206 100 33950
4206 100 33950 18-05-2005 16:34 Page 40
 Loading...