

Philips HR1757/80, HR1757/60, HR1757/16, HR1751/60, HR1751/16 User Manual [ar]

HR1757, HR1751

2

ENGLISH 4
FRANÇAIS 20
50
67
HR1757, HR1751
áá««HHôô©©ddGG

Safety notice
Always unplug the appliance from the mains
before assembling, disassembling or making
adjustments to any of the accessories.
Keep the appliance out of the reach of children.
The motor only starts if the blender jar or the mill
attachment has been correctly assembled onto
the motor unit.
Make sure the blade unit is securely fastened onto
the mill beaker before you screw the mill
attachment onto the motor unit.
Never touch the blade unit when it is assembled
on the appliance and the appliance is plugged in.
Avoid touching the cutting edges of the blade
units when cleaning them.They are very sharp
and you could easily cut your fingers on them.
Important
◗ Read these instructions for use carefully and
look at the illustrations before using the
appliance.
◗ Keep these instructions for future reference.
◗ Check if the voltage indicated on the
appliance corresponds to the local mains
voltage (110-127V or 220-240V) before you
connect the appliance.
◗ Never use any accessories or parts from
ENGLISH4

other manufacturers or that have not been
specifically advised by Philips.Your guarantee
will become invalid if such accessories or
parts have been used.
◗ Do not exceed the maximum level indicated
on the accessories.
◗ Do not exceed the quantities and preparation
times indicated in the table.
◗ Never remove accessories or parts from the
motor unit while the appliance is running.
Always unplug the appliance first.
◗ Never use the accessories to switch the
appliance on and off!
◗ Never let the appliance run unattended.
◗ Do not use the appliance if the mains cord,
the plug or other parts are damaged.
◗ If the mains cord is damaged, it must be
replaced by Philips, a service centre
authorised by Philips or similarly qualified
persons in order to avoid a hazard.
◗ Let hot ingredients cool down before
chopping them or pouring them into the jar
(max. temperature 80cC/175cF), especially for
recipes that require large quantities of oil or
fat.
◗ To avoid spillage, never fill the jar beyond the
maximum level indication (1.5 litres),
particularly not if you are blending hot liquids
(maximum 1.1 litres).
◗ To avoid spillage, always insert the stopper
into the lid before you start processing.
ENGLISH 5

◗ Never reach into the jar with your fingers or
an object while the appliance is running or
when the appliance is connected to the mains.
◗ If the ingredients stick to the wall of the
blender, switch the appliance off,unplug the
appliance and loosen the ingredients from the
wall by adding liquid or using a spatula.
Preparing the appliance for use
Wash all accessories and detachable parts (see
'Cleaning').
C
◗ Wind excess mains cord round the base of
the appliance.
Using the appliance
Blender
◗ The blender is intended for:
- Blending fluids, e.g. dairy products, sauces, fruit
juices, soups, mixed drinks, shakes.
- Mixing soft ingredients, e.g. pancake batter or
mayonnaise.
- Pureeing cooked ingredients, e.g. for making
baby food.
C
1 Mount the jar onto the motor unit. Fasten
it by turning it in the direction of the
arrow.The jar is properly fixed when the
notch in its lower rim is in line with the
line above the buttons on the motor
housing.
ENGLISH6
1
2
Do not exert too much pressure on the handle
of the jar.
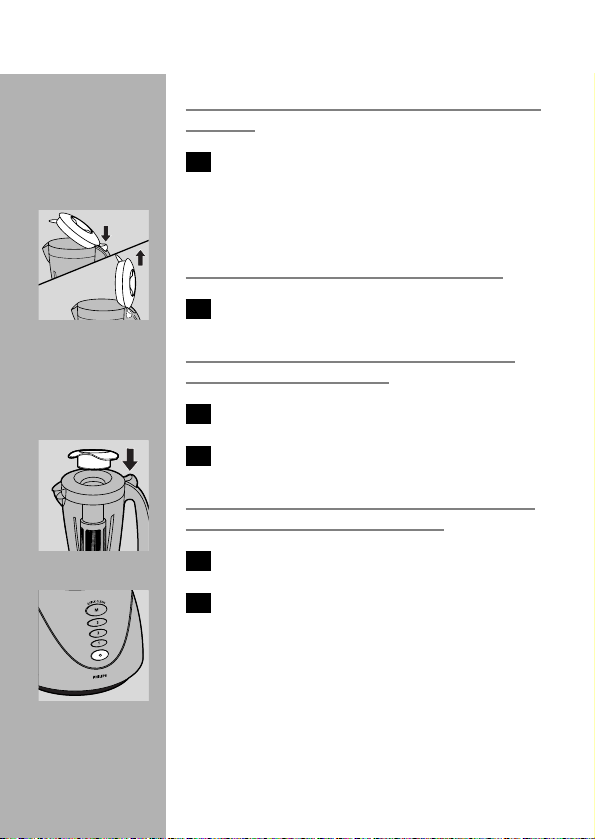
2 Open the lid by pressing the projection on
the side of the handle.
C
◗ To remove the lid, open it and then pull it
upwards.
Only remove the lid for cleaning purposes.
3 Put the ingredients in the jar.
Never fill the jar with ingredients that have a
temperature of over 80cC.
4 Close the lid.
C
5 Insert the stopper into the lid.
To avoid spillage, always insert the stopper into
the lid before you start processing.
6 Put the mains plug in the wall socket.
C
7 Select the required setting by pressing the
appropriate button and the appliance will
switch on automatically.
◗ The speed buttons allow you to choose the
right speed to obtain optimal results. See the
table for the recommended speeds.
ENGLISH 7

C
◗ Press the pulse button (M-button) a few times
to let the appliance run for only a few
seconds at a time.The appliance will stop
when you release the button. Press the pulse
button as often as is necessary.
Always switch the appliance off before you open
the lid.
8 Press the 0-switch to switch the appliance
off.
Never switch the appliance on or off by turning
the jar.
Recipes can be found in the 'Recipes' chapter
below.
Tips
To avoid spillage, never fill the jar above the
maximum level indication (1.5 litres), particularly
not if you are blending hot liquids (maximum
1.1litres).
ENGLISH8
Speed
speed 1
speed 2
speed 3
Ingredients
liquid ingredients (e.g. chocolate milk,
milk with fruit, mayonnaise)
heavier ingredients e.g. a combination of
liquid and solid ingredients (e.g. tomato
sauce or pate)
heavy, mainly solid ingredients (e.g. ice
cubes, soups, beans, etc.)

◗ If you are blending foaming liquids, never fill
the jar beyond the 1.2 l indication.
C
◗ Liquid ingredients (e.g. oil) can be poured into
the blender jar through the opening in the lid
while the appliance is running.
Do not let the blender run for more than
3 minutes at a time. If you have not finished
blending after 3 minutes, switch the appliance off
for one minute before you continue blending.
◗ Dry ingredients must not be processed for
more than 1 minute.
◗ Cut solid ingredients into smaller pieces
before putting them in the blender jar. Do not
process a large quantity of solid ingredients at
the same time. Process these ingredients in a
series of small batches instead.
◗ If you are not satisfied with the result when
blending solid ingredients, switch the blender
off and press the pulse button (M-button) a
few times to let the blender run briefly.You
can also stir the ingredients with a spatula
(not while the blender is running!) or pour
out some of the contents of the jar and
process smaller amounts.
◗ To crush ice cubes,drop max. 5 cubes per
batch through the opening in the lid onto the
rotating blades.
◗ To make tomato juice, cut the tomatoes in
four and drop the pieces through the opening
in the lid onto the rotating blades.
ENGLISH 9
Never reach into the jar with your fingers or an
object (e.g. a spatula) while the blender is running.
◗ If you are processing solid and liquid
ingredients at the same time, pour the liquid
ingredients in the jar before switching the
appliance on.Add the solid ingredients while
the appliance is running.
Filter (HR1757 only)
◗ You can use the filter accessory to obtain
extra finely blended sauces, fresh fruit juices
or cocktails.All pips and skins will be caught in
the filter.
C
1 Make sure the appliance is unplugged.
Remove the blender jar from the appliance
and put the filter in the blender jar.
Make sure the filter is properly fitted onto the
bottom of the jar.The grooves of the filter and the
ribs inside the blender jar will help you put the
filter in the right position.
C
2 Put the lid on the jar to fix the filter in its
proper position.
3 Put the blender jar back on the motor unit
and insert the plug into the wallsocket.
ENGLISH10

C
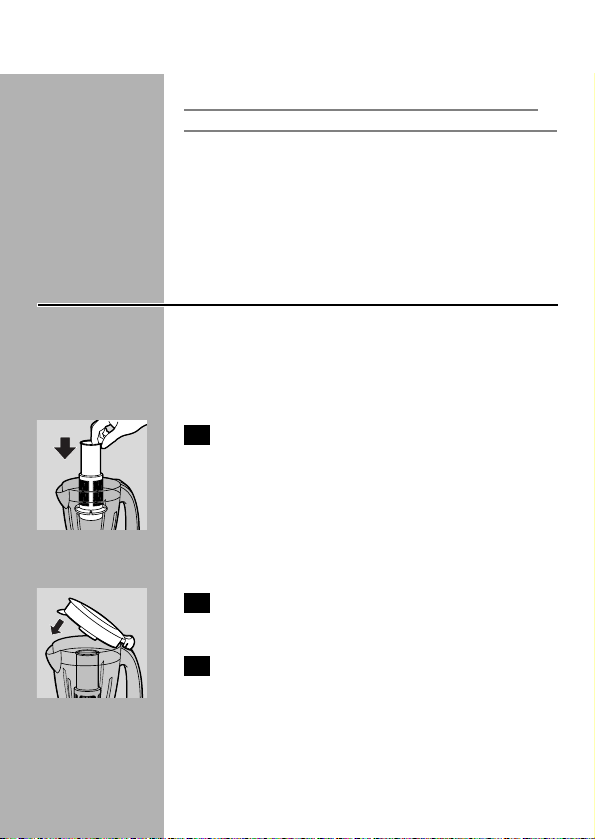
4 Put the ingredients in the filter through the
opening in the lid.
Never fill the filter beyond its metal part. Do not
use the filter to process hot ingredients.
5 Add water or another liquid.
C
6 Insert the stopper into the opening in the
lid and switch the appliance on. Select the
highest speed and let the appliance run for
max. 40 seconds.
C
7 Switch the appliance off. Pour out the
drink through the spout of the blender jar.
8 For optimal results, put the jar with the
remaining ingredients back onto the
appliance and let it run for a few more
seconds.
9 Pour out the rest of the drink.
Tips
◗ Particularly when you are processing large
quantities, we advise you not to put all the
ingredients in the filter at the same time. Start
processing a small quantity, let the appliance
run for a moment, switch it off and then add
another small quantity. Repeat this procedure
until you have processed all the ingredients.
ENGLISH 11

◗ For making soy milk:
Soak soy beans for 4 hours before processing
them.
You can process max. 50 g. of dr y soy beans with
max. 500 ml. water at a time.
◗ For making fruit juices and cocktails:
For the best results, add approx. 300 ml water (or
another liquid if you are making e.g. cocktails, etc.)
to 150 g fruit.
Mill
◗ The mill attachment can be used for grinding
and chopping ingredients such as
peppercorns, sesame seeds, rice, wheat,
coconut flesh, nuts (shelled), coffee beans, soy
beans, dried peas, cheese, breadcrumbs, etc.
Always process cloves, star anise and aniseed
together with other ingredients. If processed
separately, these ingredients may attack the
plastic materials of the appliance.
The mill is not suitable for chopping very hard
ingredients like nutmeg and ice cubes.
C
1 Put the ingredients in the beaker.
Process only dry ingredients. Do not fill the
beaker beyond the 'MAX' indication.
See the table for the advised quantities.
ENGLISH12
Quantities and preparation times
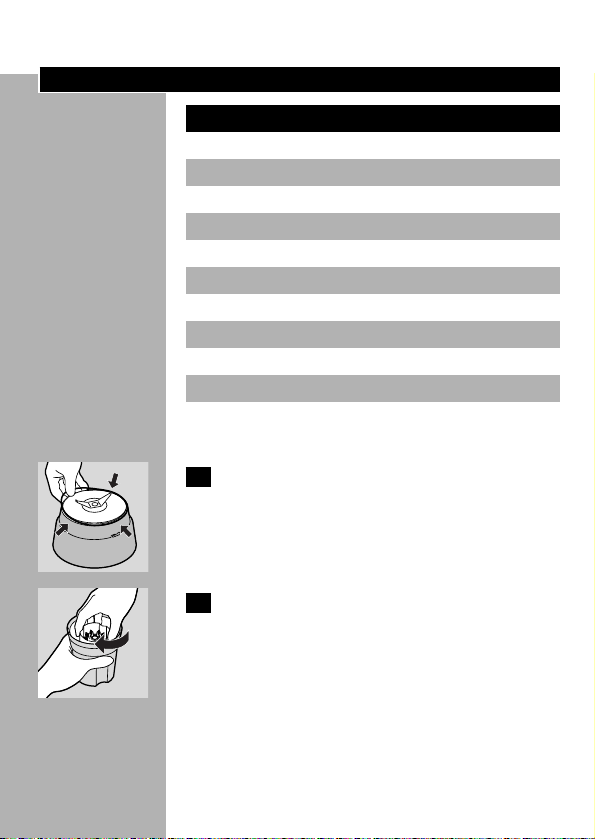
C
2 Make sure the rubber ring on the blade
unit is properly placed.
C
3 Screw the blade unit onto the beaker.
If this requires some effort, moisten the rubber
ring with a drop of water.
ENGLISH 13
Quantities
5-25 g
10-50 g
25-75 g
25-75 g
25-75 g
25-75 g
25-50 g
25-75 g
20-40 g
25-50 g
25-75 g
Ingredients
pepper corns
sesame seed
rice, wheat
soy beans
dried peas
coconut flesh
coffee beans
cheese
bread crumbs
sugar cubes
nuts (shelled)
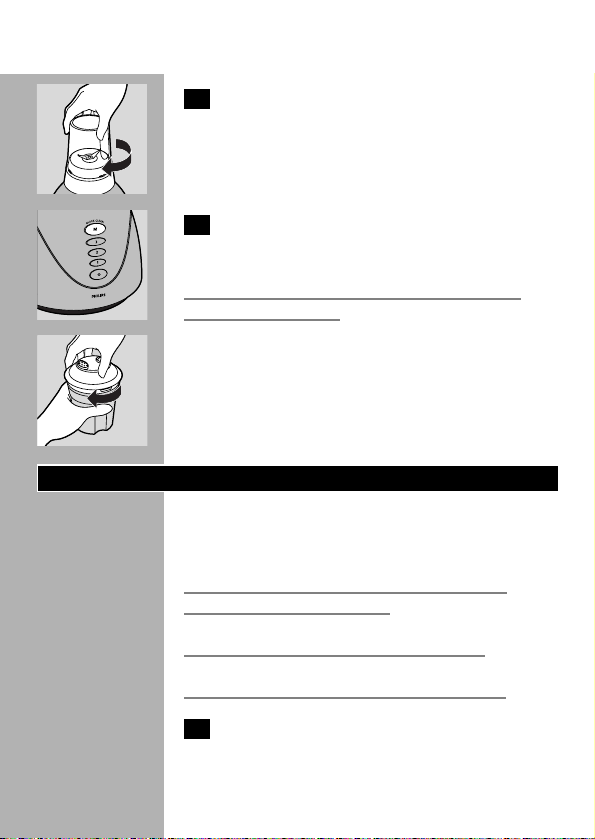
C
4 Turn the assembled mill upside down and
screw it onto the motor unit in the
direction of the arrow.
C
5 We advise you to operate the mill by
means of the pulse button (M-button).
Never use the mill for more than 30 seconds
without interruption.
C
◗ After processing, you can use the shaker lid to
sprinkle the ingredients evenly onto a dish.
Cleaning
Cleaning of the appliance, its parts and the
accessories is easiest immediately after use.
Never clean the accessories or parts of the
appliance in the dishwasher.
Clean the motor unit with a moist cloth.
Do not use abrasives, scourers, alcohol, etc.
1 Unplug the appliance, detach the
accessories and parts you have used and
clean them in warm, soapy water.
ENGLISH14

2 Then rinse them under the tap to wash
away soap residues.
Quick cleaning of the blender jar
1 Pour lukewarm water and some washing-
up liquid into the blender jar, up to the
Quick Clean level indication (500 ml) on
the jar. Do not exceed this level when
using the Quick Clean function.
2 Close the lid and insert the stopper into
the lid.
C
3 Press the Quick Clean button and let the
appliance run for a few moments. Stop as
soon as the jar is clean.
4 Detach the blender jar and rinse it with
clean water.
C
5 Only remove the lid (by pulling it off the
blender jar) for cleaning purposes!
Cleaning the filter (HR1757 only)
1 Take the filter out of the blender jar.
2 Hold the filter over a waste bin and gently
shake out its contents.
3 Rinse the filter under the tap.
ENGLISH 15

Information & service
If you need information or if you have a problem,
please visit the Philips Web site at
www.philips.com or contact the Philips Customer
Care Centre in your country (you will find its
phone number in the worldwide guarantee
leaflet). If there is no Customer Care Centre in
your country, turn to your local Philips dealer or
contact the Service Depar tment of Philips
Domestic Appliances and Personal Care BV.
Recipes
The hole in the lid can be used to add drops of
liquid to the ingredients in the jar in order to
obtain the required level of consistency.
Mayonnaise (about 300 ml)
- 2 egg yolks or 1 whole egg
- 1 tsp mustard powder
- 1 tsp salt
- 1/2 tsp pepper
- 1 tsp sugar
- 30 ml vinegar or lemon juice
- 300 ml oil
B
All the ingredients have to be at room
temperature.
B
Put the egg or egg yolks in the blender jar, add
salt, pepper and mustard powder and half of the
vinegar or lemon juice and blend at average
speed. Pour oil through the hole in the lid until the
mayonnaise becomes thick.Then add the
remaining vinegar or lemon juice and season
according to taste.
ENGLISH16

B
Store in the refrigerator.
Carrot cake
- 4 eggs
- 200 g sliced carrot
- 200 ml milk
- 100 g condensed milk
- 300 g sugar
- 300 g wheat flour
- 150 g oil
- 1 tsp dried yeast
B
Put the eggs, the sliced carrots, the milk, the
condensed milk and the sugar in the blender jar
and process it for approx. 15 seconds at max.
speed.
B
Add the wheat flour spoon by spoon.When the
mixture has become homogeneous, gradually add
the oil through the small hole in the safety lock.
Finally add the dried yeast and let the appliance
run for another 5 seconds.
B
Put the mixture in a baking tin and bake it at
180c for approx. 40 minutes.
Salad dressing
- 1 part vinegar or lemon
- 3 parts oil
- salt, pepper
B
Pour vinegar or lemon juice into the blender jar,
add salt and pepper and switch the appliance on.
Process until the salt and pepper have dissolved.
Then add the oil through the hole in the lid until a
homogeneous dressing has formed.
ENGLISH 17

B
You can also prepare a larger quantity of this
basic dressing and store it in the refrigerator.
Always shake before use to mix the ingredients.
Cheese cake
- 4 eggs
- 525 ml milk
- 75g margarine
- 90g Parmesan cheese cut into 1-cm cubes
- 440g sugar
- 290g corn flour
- 250g wheat flour
- 1 tsp baking powder
B
Put the eggs, milk, margarine, Parmesan cheese
and sugar in the jar. Let the appliance run at
maximum speed for 10 seconds.
B
Add the corn flour spoon by spoon and let the
appliance run for 20 seconds at maximum speed.
Then add the wheat flour spoon by spoon and let
the appliance run for another 30 seconds at
maximum speed. Add the baking powder and let
the appliance run for 10 more seconds. Then turn
the appliance off. Put the mixture in a baking tin
that has been greased with oil or margarine and
then floured. Bake the cheese cake in the oven at
200 - 210cC for approximately 35-40 minutes.
ENGLISH18

Troubleshooting guide
* If problems persist or if other problems occur, please contact the Philips
Customer Care Centre or the nearest Philips service centre.
Solution
The appliance is provided with a safety system.The
appliance will not work if the accessories have not
been assembled properly on the motor unit or have
not been assembled at all. Check whether the
accessories have been assembled properly (see
various sections of these direction for use). Switch off
the appliance first!
Switch off the appliance and process a smaller
quantity.
This is normal. If the appliance continues to give off
this smell after you have used it a few times, check
whether the quantity you are processing, the
processing time or the processing speed are correct.
Switch off the appliance and unplug it. Contact the
nearest Philips service or take the appliance to your
dealer.
Check whether the blade unit has been properly
assembled onto the beaker.
Check whether the rubber ring has been properly
assembled.
Make sure the rubber ring has been assembled
properly.The ring should lie flat round the interface.
Note: a small amount of leakage is normal.
Make sure that the filter has been assembled properly
in the blender jar.
Problem
The appliance does not
work
The blade unit or motor
unit is blocked.
The motor unit gives off
an unpleasant smell the
first few times the
appliance is used.
The appliance makes a
lot of noise, smells, feels
hot to touch, emits
smoke, etc.
The mill vibrates strongly,
produces a lot of noise
or the blade unit is out of
alignment.
Powder leaks from the
mill
Although the filter has
been assembled, the fruit
juice or soy milk contains
pulp.
ENGLISH 19

Mesures de sécurité
Débranchez toujours l'appareil avant d'assembler,
désassembler ou de retirer les accessoires.
Tenez l'appareil hors de portée des enfants.
Le moteur ne fonctionne pas si le bol mixer ou le
moulin n'ont pas été correctement fixés sur le
bloc moteur.
Assurez-vous que l'ensemble couteaux est
correctement fixé sur le moulin avant de visser le
moulin sur le bloc moteur.
Ne touchez jamais l'ensemble couteaux s'il est
assemblé sur l'appareil branché.
Faites attention à ne jamais toucher les lames de
l'ensemble couteau pendant le nettoyage.Vous
pourriez vous couper les doigts.
Important
◗ Lisez ces recommandations ainsi que les
illustrations avant d'utiliser votre appareil.
◗ Conservez ce mode d'emploi pour usage
ultérieur.
◗ Avant de brancher l'appareil, vérifiez que la
tension indiquée sur l'appareil correspond à la
tension du secteur de votre logement (110127V ou 220-240V).
◗ N'utilisez jamais des accessoires ou des
composants autres que ceux d'origine et
FRANÇAIS20

recommandés par Philips. Philips décline toute
résponsabilité si ce n'était pas le cas et la
garantie ne serait pas considérée comme
valable.
◗ Ne dépassez pas le repère de remplissage
maximum indiqué sur les accessoires.
◗ Ne dépassez pas les quantités maximums et
les temps d'utilisation indiqués dans le tableau.
◗ N'ôtez jamais les accessoires ou les
composants du bloc moteur pendant que
l'appareil fonctionne. Débranchez toujours
l'appareil.
◗ N'utilisez jamais les accessoires pour mettre
en marche ou pour arrêter l'appareil!
◗ Ne laissez jamais l'appareil fonctionner sans
surveillance.
◗ N'utilisez pas l'appareil si le cordon
d'alimentation, la fiche ou d'autres pièces sont
détériorés.
◗ Si le cordon d'alimentation est endommagé, il
ne doit être remplacé que par Philips, par un
Centre Service Agréé Philips ou par des
personnes qualifiées pour éviter tout
accident.
◗ Laissez les aliments cuits refroidir avant de les
hacher ou de les verser dans le bol
(température maximale 80cC/175cF), surtout
si les recettes nécessitent une grande quantité
d'huile ou de graisse.
◗ Pour éviter tout débordement, ne dépassez
jamais le niveau maximum (1,5 l), surtout si
vous préparez des ingrédients liquides chauds
(dans ce cas le niveau max. est 1,2 l).
FRANÇAIS 21
 Loading...