

Philips HR1754/80, HR1754/60 User Manual [uk]
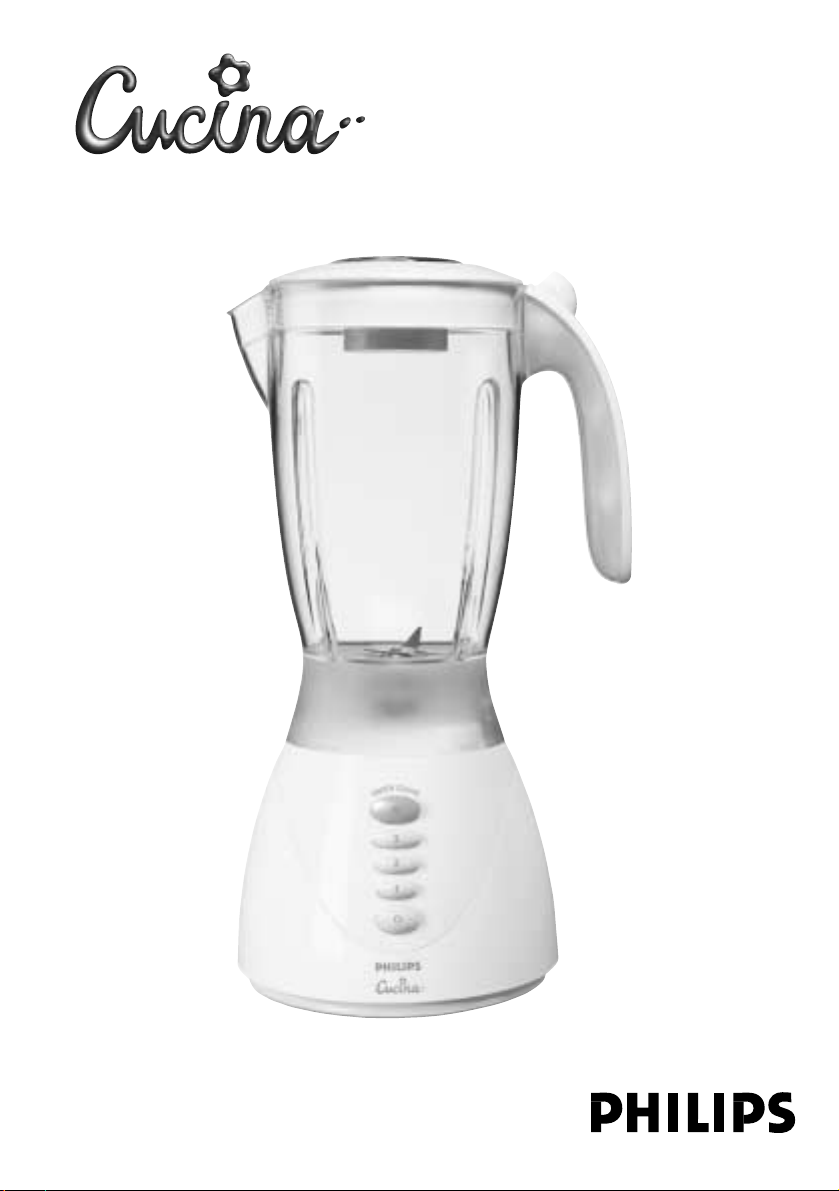
HR1757, HR1754

2

ENGLISH 4
POLSKI 14
ROMÂNĂ 24
РУССКИЙ 34
ČEŠTINA 45
MAGYAR 55
SLOVAK 65
УКРАЇНСЬКА 75
HRVATSKI 85
EESTI 95
LATVIEŠU 105
LIETUVIŠKAI 115
SLOVENŠČINA 125
БЪЛГАРСКИ 135
SRPSKI 146
156
HR1757, HR1754

Safety notice
Always unplug the appliance from the mains before assembling,
disassembling or making adjustments to any of the accessories.
Keep the appliance out of the reach of children.
The motor only starts if the blender jar or the mill attachment
(HR1757 only) has been correctly assembled onto the motor unit.
HR1757 only: Make sure the blade unit is securely fastened onto the
mill beaker before you screw the mill attachment onto the motor unit.
Avoid touching the cutting edges of the blade units when cleaning
them.They are very sharp and you could easily cut your fingers on
them.
To avoid spillage, especially when you are processing hot ingredients,
make sure that the lid is closed and the stopper is fastened properly.
Always switch the appliance on or off by pressing the off button
(O-button). Never try to switch the appliance off by turning the
blender jar or the beaker of the mill (HR1757 only).
Important
Read these instructions for use carefully before using the appliance and
save them for future reference.
◗ Check if the voltage indicated on the appliance corresponds to
the local mains voltage before you connect the appliance.
◗ Do not use the appliance if the mains cord, the plug or other
parts are damaged.
◗ If the mains cord is damaged, it must be replaced by Philips,a
service centre authorised by Philips or similarly qualified persons
in order to avoid a hazard.
◗ Always unplug the appliance from the mains before assembling or
disassembling accessories or cleaning the appliance
◗ Never immerse the motor unit in water or any other liquid, nor
rinse it under the tap. Use only a moist cloth to clean the motor
unit.
◗ Unplug the appliance immediately after use.
◗ Keep the appliance out of the reach of children.
◗ Never let the appliance run unattended.
◗ Do not exceed the maximum quantities and processing times
indicated in the table.
◗ Let hot ingredients cool down before pouring them into the
blender jar (max. temperature 80cC/175cF).
◗ To prevent spillage, do not fill the jar beyond the maximum level
indication (i.e. 1.5 litres).When you are blending a hot liquid, do
not put more than 1.1 litres in the jar.
ENGLISH4
When you are blending a foaming liquid, do not fill the jar beyond
the 1.2-litre indication.
◗ The motor only starts if the blender jar or the mill attachment
(HR1757 only) has been correctly assembled onto the motor
unit.
◗ HR1757 only: Make sure the blade unit is securely fastened onto
the mill beaker before you screw the mill attachment onto the
motor unit.
◗ Never reach into the jar with your fingers or an object while the
appliance is running.
◗ If the blades get stuck, unplug the appliance before removing the
ingredients that are blocking the blades.
◗ Never use the accessories to switch the appliance on and off!
◗ Never use any accessories or parts from other manufacturers or
that have not been specifically advised by Philips.Your guarantee
will become invalid if such accessories or parts have been used.
◗ Noise level: Lc = 86 dB(A)
Before first use
Thoroughly clean the parts that come into contact with food before
you use the appliance for the first time (see chapter 'Cleaning').
Preparing for use
C
◗ Wind excess mains cord round the base of the appliance.
Using the appliance
Blender
The blender is intended for:
- Blending fluids, e.g. dairy products, sauces, fruit juices, soups, mixed
drinks, shakes.
- Mixing soft ingredients, e.g. pancake batter or mayonnaise.
- Pureeing cooked ingredients, e.g. for making baby food.
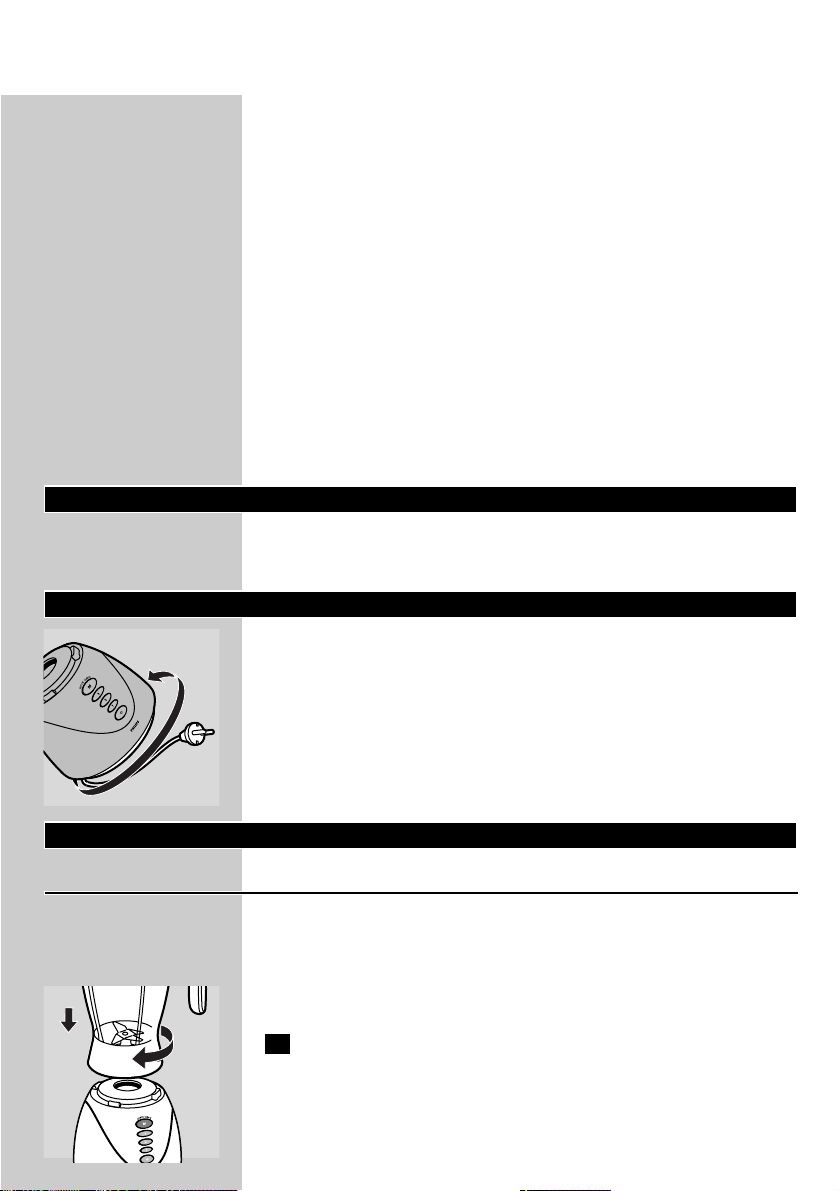
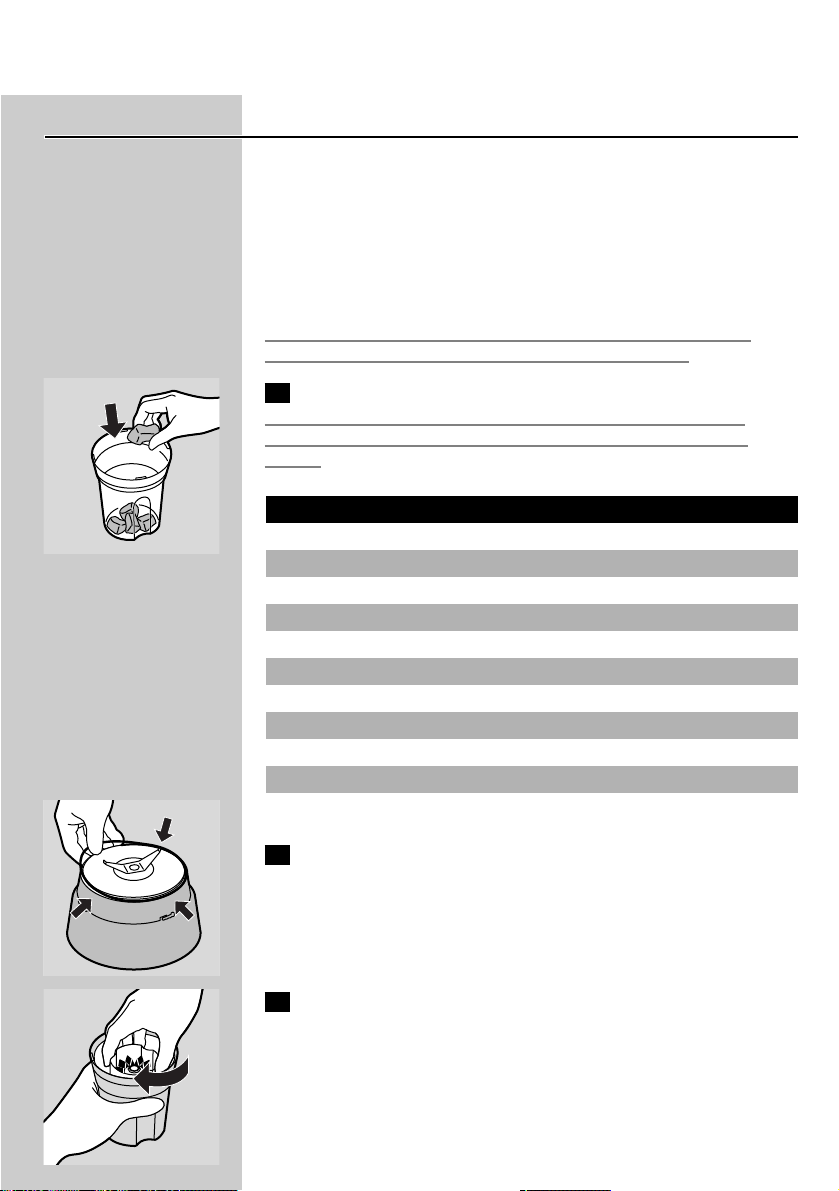
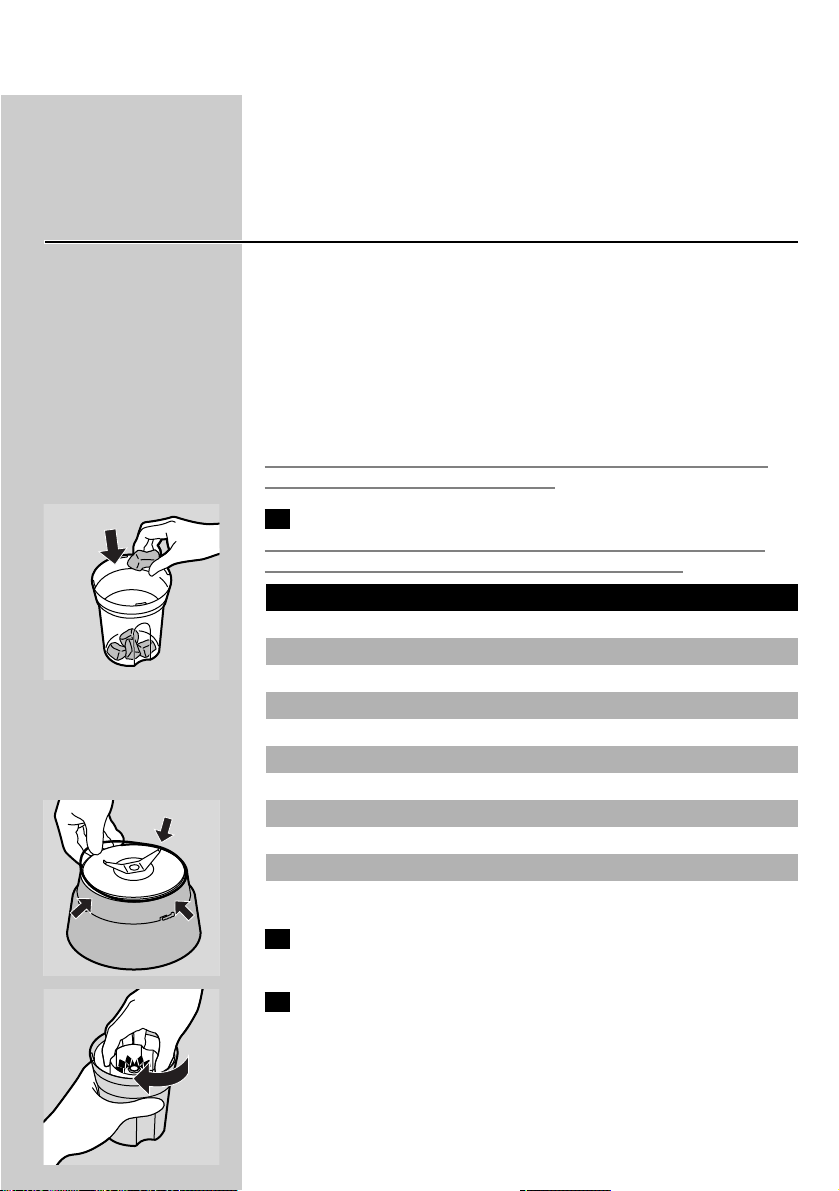
C
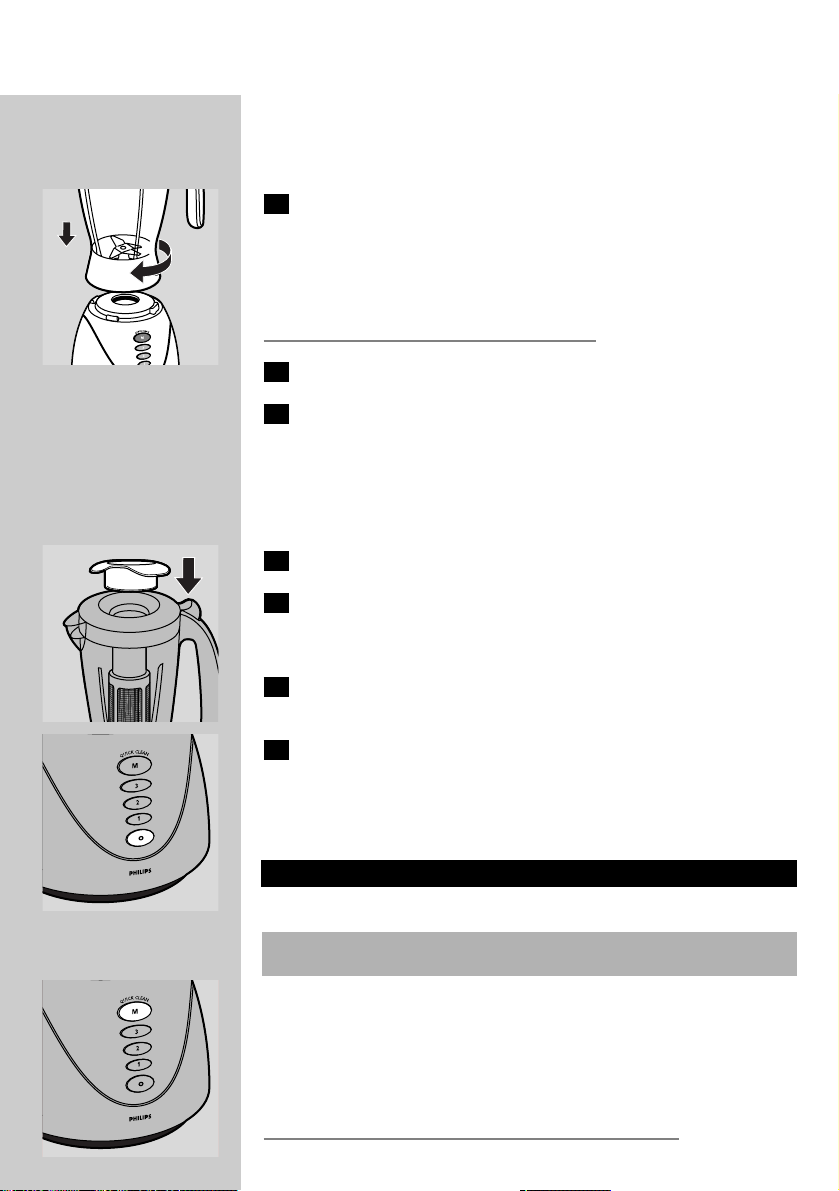
1 Mount the jar onto the motor unit. Fasten it by turning it in the
direction of the arrow.
The jar is properly fixed when the notch in its lower rim is in line with
the indications on the buttons on the motor unit.
ENGLISH 5
1
2
Do not exert too much pressure on the handle of the jar.
2 Open the lid by pressing the projection on the handle with
your thumb.
3 Put the ingredients in the jar.
Never fill the jar beyond the maximum level indication (1.5 litres),
particularly not if you are blending hot liquids (maximum 1.1 litres).
When you are blending foaming liquids, do not fill the jar beyond the
1.2-litre indication.
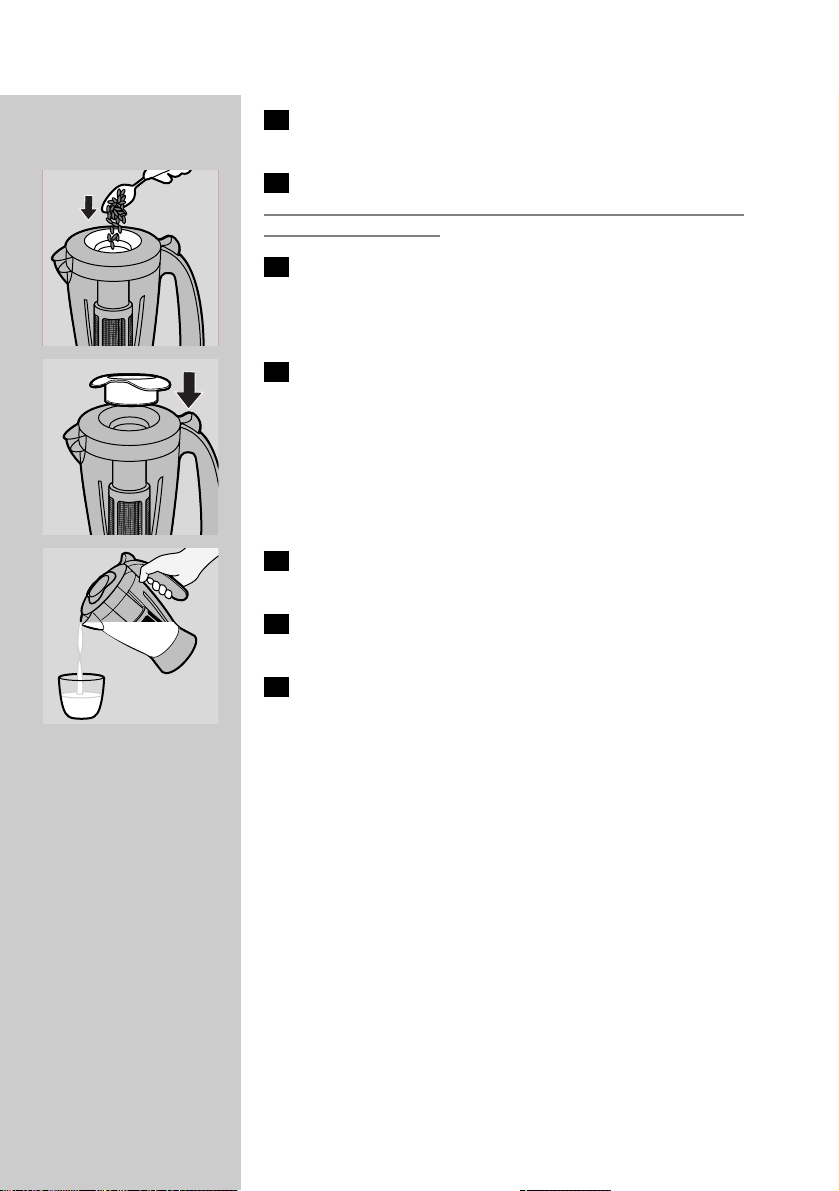
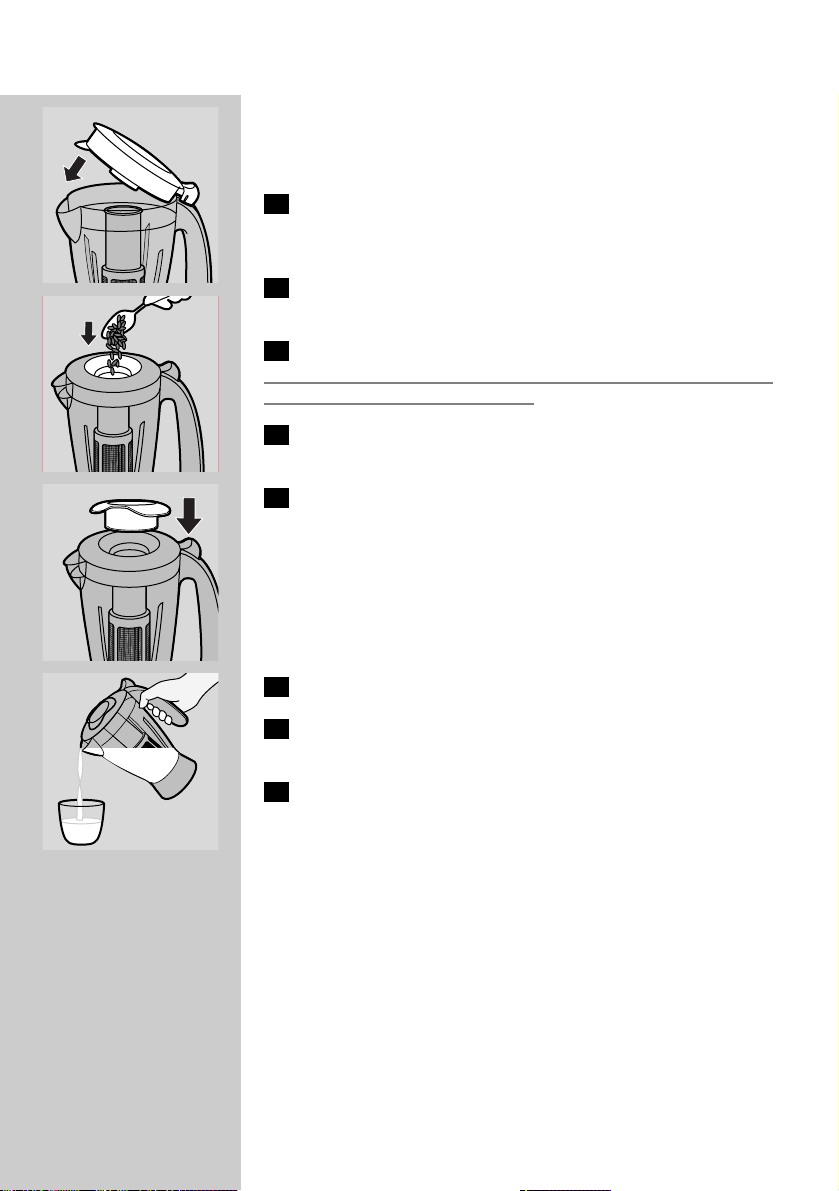
4 Close the lid.
C
5 Insert the stopper into the opening in the lid.
To avoid spillage, always insert the stopper into the opening in the lid
before you start processing.
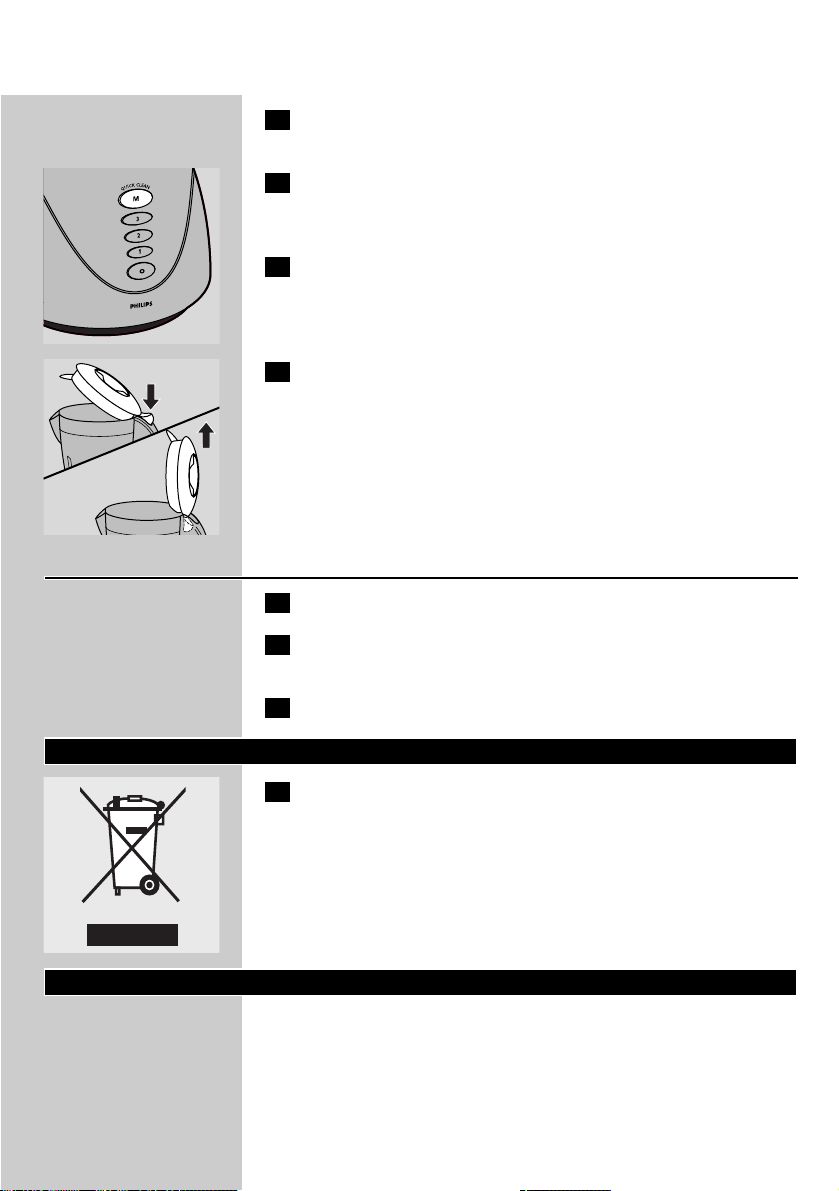
6 Put the mains plug in the wall socket.
C
7 Press the appropriate speed button to switch the appliance on.
The speed buttons allow you to choose the right speed to obtain
optimal results. See the table for the recommended speeds.
C
◗ Press the pulse button (M-button) a few times to let the appliance
run for only a few seconds at a time.The appliance will stop when
you release the button. Press the pulse button as often as is
necessary.
Always switch the appliance off before you open the lid.
8 Switch the appliance off by pressing the O-button.
Never switch the appliance on or off by turning the jar.
Recipes can be found in the 'Recipes' chapter below.
Tips
To avoid spillage, never fill the jar above the maximum level indication
(1.5 litres), particularly not if you are blending hot liquids (maximum
1.1 litres).
ENGLISH6
Speed
speed 1
speed 2
speed 3
Ingredients
liquid ingredients (e.g. chocolate milk, milk with fruit, mayonnaise)
heavier ingredients e.g. a combination of liquid and solid ingredients
(e.g. tomato sauce or pate)
heavy, mainly solid ingredients (e.g. ice cubes, soups, beans, etc.)
◗ If you are blending foaming liquids, never fill the jar beyond the
1.2 l indication.
◗ Liquid ingredients (e.g. oil) can be poured into the blender jar
through the opening in the lid while the appliance is running.
Do not let the blender run for more than 3 minutes at a time. If you
have not finished blending after 3 minutes, switch the appliance off for
one minute before you continue blending.
◗ Dry ingredients must not be processed for more than 1 minute.
◗ Cut solid ingredients into smaller pieces before putting them in
the blender jar. Do not process a large quantity of solid
ingredients at the same time. Process these ingredients in a series
of small batches instead.
◗ If you are not satisfied with the result when blending solid
ingredients, switch the blender off and press the pulse button
(M-button) a few times to let the blender run briefly.You can also
stir the ingredients with a spatula (not while the blender is
running!) or pour out some of the contents of the jar and process
smaller amounts.
◗ To crush ice cubes, drop them through the opening in the lid onto
the rotating blades.
◗ To make tomato juice, cut the tomatoes in four and drop the
pieces through the opening in the lid onto the rotating blades.
Never reach into the jar with your fingers or an object (e.g. a spatula
while the blender is running.
◗ If you are processing solid and liquid ingredients at the same time,
pour the liquid ingredients in the jar before switching the
appliance on.Add the solid ingredients while the appliance is
running.
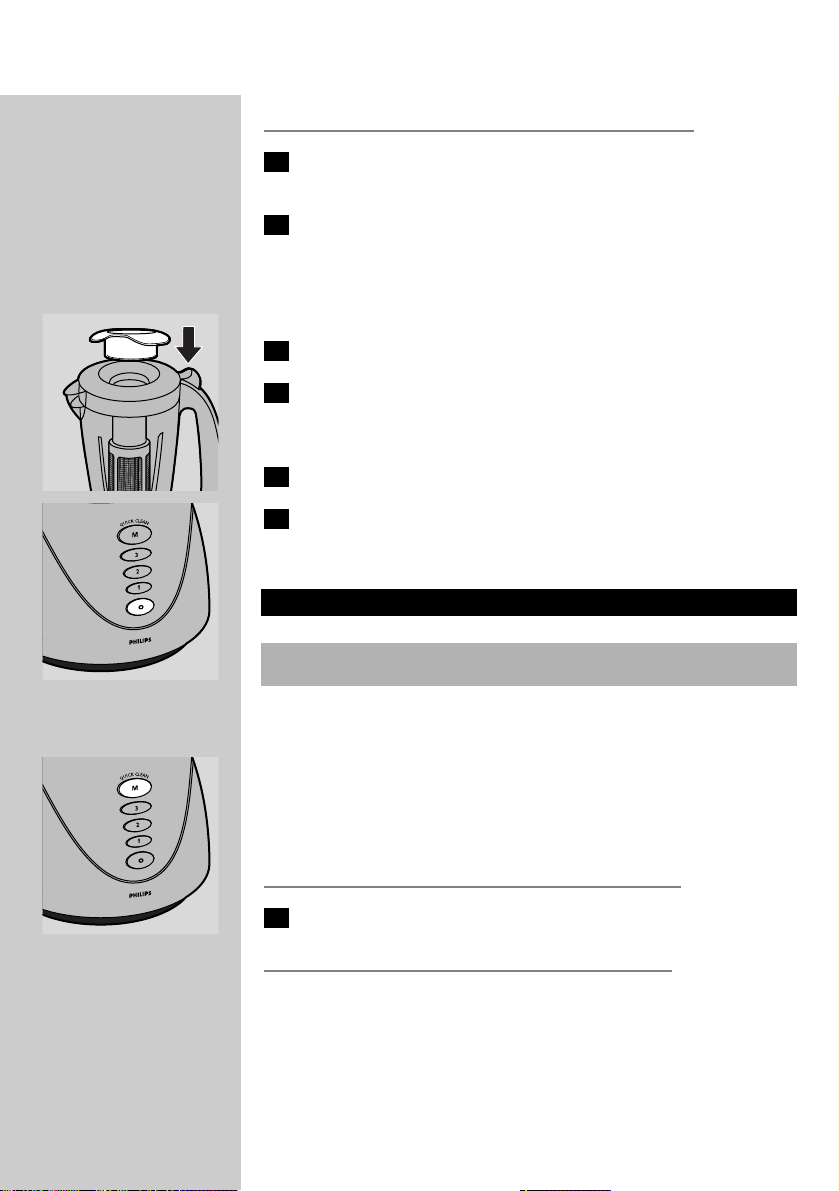
Filter
You can use the filter accessory to obtain extra finely blended sauces,
fresh fruit juices or cocktails. All pips and skins will be caught in the
filter.
1 Make sure the appliance is unplugged. remove the blender jar
from the appliance and out the filter in the blaender jar.
Make sure the filter is properly fitted onto the bottom of the jar.The
grooves of the filter and the ribs inside the blender jar will help you put
the filter in the right position.
C
2 Put the lid on the jar to fix the filter in its proper position.
ENGLISH 7
3 Put the blender jar back on the motor unit and insert the plug
into the wall socket.
C
4 Put the ingredients in the filter through the opening in the lid.
Never fill the filter beyond its metal part. Do not use the filter to
process hot ingredients.
5 Add water or another liquid.
C
6 Insert the stopper into the opening in the lid and press the
button for the highest speed to switch the appliance on. Let
the appliance run for max. 40 seconds.
C
7 Switch the appliance off. Pour out the drink through the
pouring lip of the blender jar.
8 For optimal results, put the jar with the remaining ingredients
back onto the appliance and let it run for a few more seconds.
9 Pour out the rest of the drink.
Tips
◗ Particularly when you are processing large quantities, we advise
you not to put all the ingredients in the filter at the same time.
Start processing a small quantity, let the appliance run for a
moment, switch it off and then add another small quantity. Repeat
this procedure until you have processed all the ingredients.
◗ For making soy milk:
Soak soy beans for 4 hours before processing them.You can process
max. 50 g of dry soy beans with max. 500 ml water at a time.
◗ For making fruit juices and cocktails:
For the best results, add approx. 300 ml water (or another liquid if you
are making e.g. cocktails, etc.) to 150 g fruit.
ENGLISH8

Mill (only type HR1757)
The mill attachment can be used for grinding and chopping ingredients
such as peppercorns, sesame seeds, rice, wheat, coconut flesh, nuts
(shelled), coffee beans, soy beans, dried peas, cheese, breadcrumbs, etc.
Always process cloves, star anise and aniseed together with other
ingredients. If processed separately, these ingredients may attack the
plastic materials of the appliance.
The mill is not suitable for chopping very hard ingredients like nutmeg
and ice cubes.
C
1 Put the ingredients in the beaker.
Process only dry ingredients. Do not fill the beaker beyond the 'MAX'
indication. See the table for the advised quantities.
C
2 Make sure the rubber ring on the blade unit is properly placed.
C
3 Screw the blade unit onto the beaker.
If this requires some effort, moisten the rubber ring with a drop of
water.
ENGLISH 9
Quantities
5-25 g
10-50 g
25-75 g
25-75 g
25-75 g
25-75 g
25-50 g
25-75 g
20-40 g
25-50 g
25-75 g
Ingredients
peppercorns
sesame seed
rice, wheat
soy beans
dried peas
coconut flesh
coffee beans
cheese
breadcrumbs
sugar cubes
nuts (shelled)

C
4 Turn the assembled mill upside down and screw it onto the
motor unit in the direction of the arrow.
C
5 We advise you to operate the mill by means of the pulse
button (M-button).
Never use the mill for more than 30 seconds without interruption.
C
◗ After processing, you can use the shaker lid to sprinkle the
ingredients evenly onto a dish.
Cleaning
Cleaning of the appliance, its parts and the accessories is easiest
immediately after use.
Never clean the accessories or parts of the appliance in the
dishwasher.
Do not use abrasives, scourers, alcohol, etc.
1 Unplug the appliance, detach the accessoiries and parts you
have used and clean them in warm soapy water.
2 Then rinse these parts under the tap.
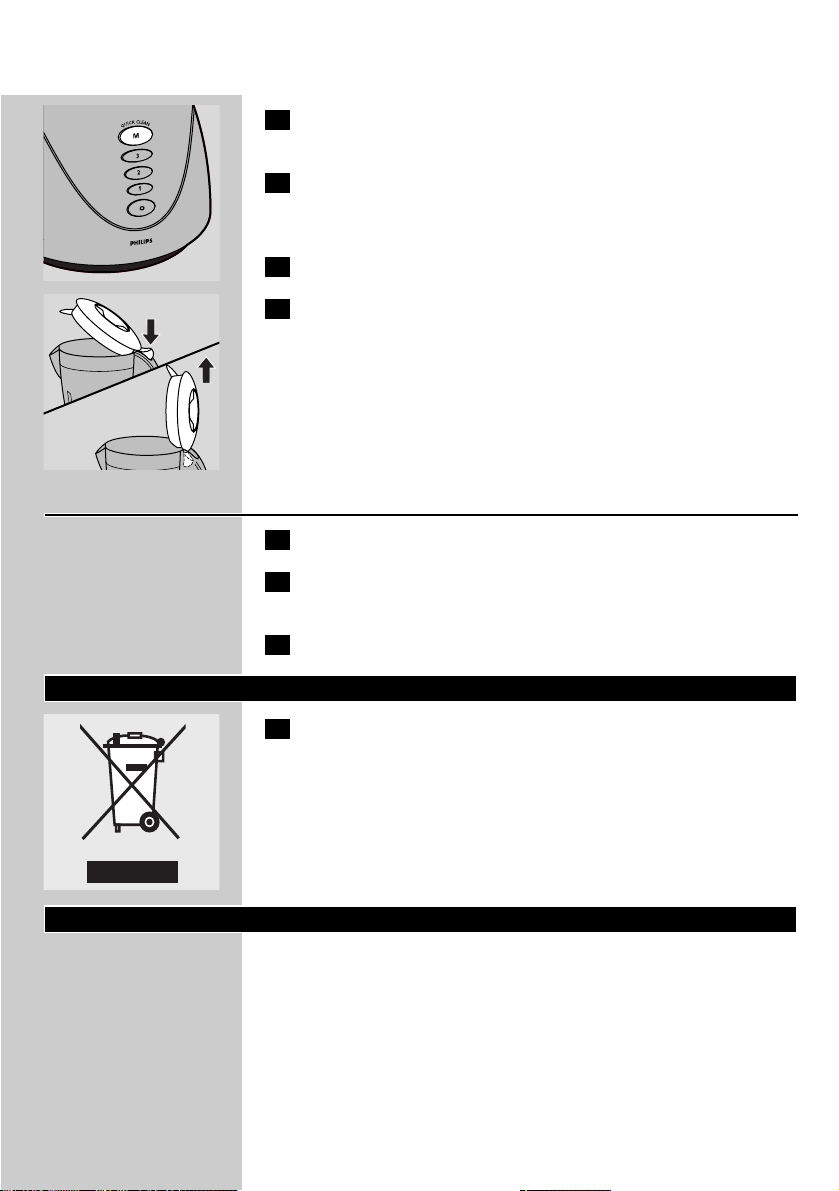
Quick cleaning of the blender jar
1 Pour lukewarm water and some washing-up liquid into the
blender jar, up to the Quick Clean level indication (500 ml) on
the jar. Do not exceed this level when using the Quick Clean
function.
ENGLISH10
2 Close the lid and insert the stopper into the opening in the lid.
Put the plug in the wall socket.
C
3 Press the Quick Clean button (M) and let the appliance run for
a few moments. Release the button as soon as the jar is clean
and unplug the appliance.
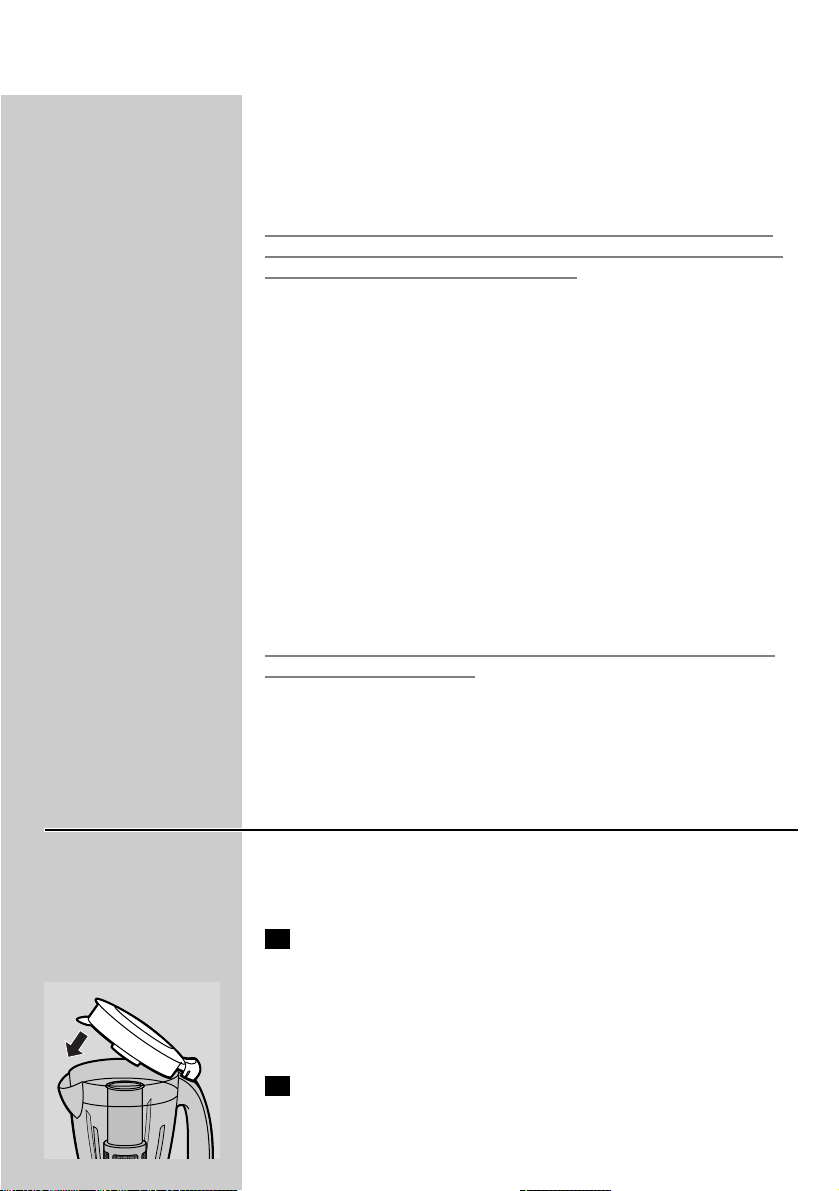
4 Detach the blender jar and rinse it with clean water.
C
5 Only remove the lid (by pulling it off the blender jar) for
cleaning purposes!
Cleaning the filter
1 Take the filter out of the blender jar.
2 Hold the filter over a waste bin and gently shake out its
contents.
3 Rinse the filter under the tap.
Environment
C
1 Do not throw the appliance away with the normal household
waste at the end of its life, but hand it in at an official collection
point for recycling. By doing this you will help to preserve the
environment.
Guarantee & service
If you need information or if you have a problem, please visit the Philips
Web site at www.philips.com or contact the Philips Customer Care
Centre in your country (you will find its phone number in the
worldwide guarantee leaflet). If there is no Customer Care Centre in
your country, turn to your local Philips dealer or contact the Service
Department of Philips Domestic Appliances and Personal Care BV.
ENGLISH 11

Recipes
The hole in the lid can be used to add drops of liquid to the
ingredients in the jar in order to obtain the required level of
consistency.
Mayonnaise (about 300 ml)
- 2 egg yolks or 1 whole egg
- 1 tsp mustard powder
- 1 tsp salt
- 1/2 tsp pepper
- 1 tsp sugar
- 30 ml vinegar or lemon juice
- 300 ml oil
B
All the ingredients have to be at room temperature.
B
Put the egg or egg yolks in the blender jar, add salt, pepper and mustard
powder and half of the vinegar or lemon juice and blend at average
speed. Pour oil through the hole in the lid until the mayonnaise becomes
thick.Then add the remaining vinegar or lemon juice and season
according to taste.
B
Store in the refrigerator.
Carrot cake
- 4 eggs
- 200 g sliced carrot
- 200 ml milk
- 100 g condensed milk
- 300 g sugar
- 300 g wheat flour
- 150 g oil
- 1 tsp dried yeast
B
Put the eggs, the sliced carrots, the milk, the condensed milk and the
sugar in the blender jar and process it for approx. 15 seconds at max.
speed.
B
Add the wheat flour spoon by spoon.When the mixture has become
homogeneous, gradually add the oil through the hole in the lid. Finally
add the dried yeast and let the appliance run for another 5 seconds.
B
Put the mixture in a baking tin and bake it at 180c for approx. 40
minutes.
Salad dressing
- 1 part vinegar or lemon
- 3 parts oil
- salt, pepper
B
Pour vinegar or lemon juice into the blender jar, add salt and pepper and
switch the appliance on. Process until the salt and pepper have dissolved.
Then add the oil through the hole in the lid until a homogeneous dressing
has formed.
B
You can also prepare a larger quantity of this basic dressing and store it
in the refrigerator.Always shake before use to mix the ingredients.
ENGLISH12

Cheese cake
- 4 eggs
- 525 ml milk
- 75 g margarine
- 90 g Parmesan cheese cut into 1-cm cubes
- 440 g sugar
- 290 g cornflour
- 250 g wheatflour
- 1 tbsp baking powder
B
Put the eggs, milk, margarine, Parmesan cheese and sugar in the jar. Let
the appliance run at maximum speed for 10 seconds.
B
Add the cornflour spoon by spoon and let the appliance run for 20
seconds at maximum speed.Then add the wheatflour spoon by spoon
and let the appliance run for another 30 seconds at maximum speed.
Add the baking powder and let the appliance run for 10 more seconds.
Then turn the appliance off. Put the mixture in a baking tin that has
been greased with oil or margarine and then floured. Bake the cheese
cake in the oven at 200 - 210cC for approximately 35-40 minutes.
Troubleshooting
ENGLISH 13
Solution
The appliance is provided with a safety system.The appliance will not work if
the accessories have not been assembled properly on the motor unit or have
not been assembled at all. Check whether the accessories have been
assembled properly (see various sections of these direction for use). Switch off
the appliance first!
Switch off the appliance and process a smaller quantity.
This is normal. If the appliance continues to give off this smell after you have
used it a few times, check whether the quantity you are processing, the
processing time or the processing speed are correct.
Switch off the appliance and unplug it. Contact the nearest Philips service
centre or take the appliance to your dealer.
Check whether the blade unit has been properly assembled onto the beaker.
Check whether the rubber ring has been properly assembled.
Make sure the rubber ring has been assembled properly.The ring should lie flat
round the interface. Note: a small amount of leakage is normal.
Make sure that the filter has been assembled properly in the blender jar.
Problem
The appliance does not work.
The blade unit or motor unit is
blocked.
The motor unit gives off an
unpleasant smell the first few times
the appliance is used.
The appliance makes a lot of noise,
smells, feels hot to the touch, emits
smoke, etc.
The mill vibrates strongly, produces a
lot of noise or the blade unit is out of
alignment.
Powder leaks from the mill
Although the filter has been
assembled, the fruit juice or soy milk
contains pulp.
* If problems persist or if other problems occur, please contact the Philips Customer Care Centre or the nearest
Philips service centre.

Uwagi dotyczące bezpieczeństwa
Przed składaniem i rozkładaniem urządzenia oraz zmianą akcesoriów
zawsze wyjmij wtyczkę urządzenia z gniazdka elektrycznego.
Przechowuj urządzenie w miejscu niedostępnym dla dzieci.
Silnik uruchamia się tylko wtedy,gdy dzbanek blendera lub nasadka
młynka (tylko z modelem HR1757) zostały prawidłowo zamontowane
na części silnikowej.
Tylko model HR1757: Przed założeniem nasadki młynka na część
silnikową upewnij się, że część tnąca jest dobrze przymocowana do
naczynia młynka.
Nie dotykaj ostrzy części tnącej podczas czyszczenia. Są one bardzo
ostre i można się nimi łatwo skaleczyć.
Aby uniknąć rozlania, zwłaszcza gorących składników,upewnij się, że
pokrywka jest zamknięta a zatyczka jest dobrze zamocowana.
Zawsze włączaj i wyłączaj urządzenie przez naciśnięcie przycisku O.
Nigdy nie próbuj wyłączać urządzenia przez przekręcenie dzbanka
blendera lub naczynia młynka (tylko z modelem HR1757).
Ważne
Przed pierwszym użyciem urządzenia zapoznaj się dokładnie z jego
instrukcją obsługi i zachowaj ją na wypadek konieczności użycia w
przyszłości.
◗ Przed podłączeniem urządzenia upewnij się, czy napięcie podane
na urządzeniu jest zgodne z napięciem w sieci elektrycznej.
◗ Nie używaj urządzenia, jeśli przewód sieciowy, wtyczka lub inne
części są uszkodzone.
◗ Ze względów bezpieczeństwa oddaj uszkodzony przewód
sieciowy do wymiany do autoryzowanego centrum serwisowego
firmy Philips lub odpowiednio wykwalifikowanej osobie.
◗ Przed montowaniem lub wyjmowaniem akcesoriów oraz myciem
urządzenia zawsze wyjmij wtyczkę urządzenia z gniazdka
elektrycznego.
◗ Nigdy nie zanurzaj części silnikowej w wodzie ani innym płynie ani
nie spłukuj jej pod bieżącą wodą. Do czyszczenia części silnikowej
używaj tylko wilgotnej szmatki.
◗ Zaraz po zakończeniu korzystania z urządzenia wyjmij wtyczkę z
gniazdka elektrycznego.
◗ Przechowuj urządzenie w miejscu niedostępnym dla dzieci.
◗ Nigdy nie pozostawiaj włączonego urządzenia bez nadzoru.
◗ Nie przekraczaj maksymalnej ilości składników ani czasów
przygotowania podanych w tabeli.
POLSKI14

◗ W przypadku gorących składników poczekaj, aż wystygną i przelej
je do dzbanka blendera (maksymalna temperatura to 80cC).
◗ Aby uniknąć rozlania, nie napełniaj dzbanka blendera powyżej
wskaźnika maksymalnego napełnienia (tj. powyżej 1,5 litra).W
przypadku miksowania gorącego płynu nie wlewaj do dzbanka
więcej niż 1,1 litra płynu. Natomiast w przypadku miksowania
płynu wytwarzającego dużo piany nie wlewaj więcej niż 1,2 litra
płynu.
◗ Silnik uruchamia się tylko wtedy, gdy dzbanek blendera lub
nasadka młynka (tylko z modelem HR1757) zostały prawidłowo
zamontowane na części silnikowej.
◗ Tylko model HR1757: Przed założeniem nasadki młynka na część
silnikową upewnij się,że część tnąca jest dobrze przymocowana
do naczynia młynka.
◗ Nigdy nie wkładaj palców ani innych przedmiotów do dzbanka,
gdy urządzenie jest włączone.
◗ W przypadku zablokowania ostrzy wyjmij wtyczkę urządzenia z
gniazdka elektrycznego przed usunięciem składników,które
blokują ostrza.
◗ Nigdy nie używaj akcesoriów do włączania lub wyłączania
urządzenia!
◗ Nigdy nie używaj akcesoriów ani części zamiennych innych
producentów ani takich, które nie są zalecane przez firmę Philips.
W przypadku użycia takich akcesoriów lub części, gwarancja traci
ważność.
◗ Poziom hałasu: Lc = 86 dB (A)
Przed pierwszym użyciem
Przed pierwszym użyciem dokładnie umyj wszystkie części urządzenia,
które będą się stykały z żywnością (patrz rozdział „Czyszczenie”).
Przygotowanie do użycia
C
◗ Nawiń zbędny odcinek przewodu sieciowego wokół podstawy
urządzenia.
Zasady używania
Blender
Blender jest przeznaczony do:
- Mieszania płynów, np. produktów mlecznych, sosów, soków
owocowych, zup, koktajli i drinków.
POLSKI 15
16
- Mieszania miękkich składników, np. składników na ciasto na naleśniki
lub majonez.
- Ucierania gotowanych składników, np. do jedzenia dla niemowląt.
C
1 Umieść dzbanek blendera na części silnikowej.Zamocuj go,
obracając nim w kierunku wskazanym strzałką.
Dzbanek jest prawidłowo zamocowany, gdy nacięcie na jego dolnej
krawędzi znajduje się w jednej linii z oznaczeniami przycisków
umieszczonych na części silnikowej.
Nie naciskaj zbyt mocno na uchwyt dzbanka.
2 Otwórz pokrywkę, naciskając kciukiem występ na uchwycie.
3 Włóż składniki do dzbanka.
Nigdy nie napełniaj dzbanka powyżej wskaźnika maksymalnego
napełnienia (1,5 litra), zwłaszcza w przypadku miksowania gorących
płynów (maksymalnie 1,1 litra).
Natomiast w przypadku miksowania płynu wytwarzającego dużo piany
nie wlewaj do dzbanka więcej niż 1,2 litra płynu.
4 Zamknij pokrywkę.
C
5 Umieść zatyczkę w otworze pokrywki.
Aby uniknąć rozlania, zawsze umieszczaj zatyczkę w otworze pokrywki
przed uruchomieniem urządzenia.
6 Włóż wtyczkę przewodu sieciowego do gniazdka
elektrycznego.
C
7 Aby włączyć urządzenie, naciśnij odpowiedni przycisk
szybkości.
Przyciski szybkości służą do wybierania szybkości pozwalających uzyskać
optymalne rezultaty. Zalecane szybkości miksowania podane są w
tabeli.
C
◗ Naciśnij kilka razy przycisk M (pulsacji), aby uruchomić urządzenie
na kilka sekund. Urządzenie zatrzyma się po każdym zwolnieniu
przycisku. Naciskaj przycisk pulsacji tyle razy, ile potrzeba.
Zawsze wyłączaj urządzenie przed otwarciem pokrywki.
POLSKI
Szybkość
szybkość 1
szybkość 2
szybkość 3
Składniki
składniki płynne (np. mleko czekoladowe, mleko z owocami,
majonez)
składniki twardsze np. mieszanina płynu ze składnikami stałymi (np.
sos pomidorowy lub pasty)
składniki twarde, głównie stałe (np.lód w kostkach, zupy, ziarno itp.)
1
2

17
8 Zawsze wyłączaj urządzenie, naciskając przycisk O.
Nigdy nie włączaj ani nie wyłączaj urządzenia przez przekręcenie
dzbanka.
Propozycje dań można znaleźć w rozdziale „Przepisy” poniżej.
Wskazówki
Aby uniknąć rozlania, nigdy nie napełniaj dzbanka powyżej wskaźnika
maksymalnego napełnienia (1,5 litra), zwłaszcza w przypadku
miksowania gorących płynów (maksymalnie 1,1 litra).
◗ Natomiast w przypadku miksowania płynu wytwarzającego dużo
piany nie wlewaj do dzbanka więcej niż 1,2 litra płynu.
◗ Płynne składniki (np. olej) można wlewać do dzbanka blendera
przez otwór w pokrywce podczas pracy urządzenia.
Blender nie powinien pracować dłużej niż 3 minuty bez przerwy. Jeśli w
ciągu 3 minut nie skończysz miksowania, wyłącz urządzenie na minutę i
kontynuuj po przerwie.
◗ Nie miksuj suchych składników dłużej niż minutę.
◗ Potnij składniki stałe na mniejsze kawałki przed włożeniem ich do
dzbanka. Nie miksuj zbyt dużej ilości składników stałych naraz.
Podziel je na mniejsze porcje.
◗ Jeśli składniki stałe nie zostały dostatecznie dobrze zmiksowane,
wyłącz blender i kilkakrotnie naciśnij przycisk M (pulsacji), by na
krótko włączyć urządzenie. Możesz też wymieszać składniki
łopatką (nie podczas pracy urządzenia!) lub wylać część
zawartości blendera i miksować mniejszą ilość składników.
◗ Aby pokruszyć kostki lodu, wrzuć je przez otwór w pokrywce na
obracające się ostrza.
◗ Aby przyrządzić sok pomidorowy, pokrój pomidory na ćwiartki i
wrzuć je przez otwór w pokrywce na obracające się ostrza.
Nigdy nie wkładaj do dzbanka palców ani żadnych przedmiotów
(np łopatki) podczas pracy blendera.
◗ Jeśli miksujesz składniki stałe i płynne razem, wlej płynne składniki
do dzbanka przed włączeniem urządzenia. Następnie dodaj stałe
składniki podczas pracy urządzenia.
Filtr
Filtr wychwytuje pestki i skórki, co pozwala przyrządzić dobrze
zmiksowane sosy, koktajle i soki ze świeżych owoców.
1 Upewnij się, że urządzenie jest wyłączone. Zdejmij dzbanek i
włóż do niego filtr.
POLSKI
18
Sprawdź, czy filtr jest prawidłowo przymocowany do dna dzbanka.
Rowki w filtrze i żeberka wewnątrz dzbanka ułatwiają ustawienie filtra
we właściwej pozycji.
C
2 Załóż pokrywkę na dzbanek, aby zamocować filtr w
odpowiednim miejscu.
3 Umieść dzbanek blendera na części silnikowej i włóż wtyczkę
do gniazdka elektrycznego.
C
4 Włóż składniki do filtra przez otwór w pokrywce.
Nie należy napełniać filtra powyżej metalowej części ani używać filtra
do miksowania gorących składników.
5 Dodaj wody lub innego płynu.
C
6 Włóż zatyczkę do otworu w pokrywce i naciśnij przycisk
odpowiadający największej szybkości.Włącz urządzenie na
maksymalnie 40 sekund.
C
7 Wyłącz urządzenie. Nalej napój przez dziobek dzbanka.
8 Aby uzyskać lepsze rezultaty, ponownie umieść dzbanek z
resztą składników w urządzeniu i włącz je na kilka sekund.
9 Odlej resztę napoju.
Wskazówki
◗ Jeśli chcesz zmiksować duże ilości składników, nie wkładaj ich do
filtra wszystkich naraz. Zacznij od małej ilości, włącz na chwilę
urządzenie i wyłącz je, a następnie dodaj kolejną niewielką porcję
składników.Powtarzaj czynność, aż zmiksujesz wszystkie składniki.
◗ Przygotowywanie mleka sojowego:
Przez zmiksowaniem namocz ziarna soi na 4 godziny. Urządzenie może
miksować maksymalnie 50 g suchej soi łącznie z nie więcej niż 500 ml
wody.
◗ Przygotowywanie soków owocowych i koktajli:
Aby uzyskać najlepsze rezultaty, na 150 g owoców dodaj około 300 ml
wody (lub innego płynu, jeśli przyrządzasz koktajl).
POLSKI
19
Młynek (tylko z modelem HR1757)
Młynek służy do mielenia i rozdrabniania produktów, takich jak pieprz,
ziarna sezamowe, ryż, pszenica, miąższ kokosa, orzechy (łuskane), ziarna
kawy, ziarna soi, suszony groszek, ser, bułka tarta itp.
Należy zawsze zmielić ząbki czosnku, anyż gwiazdkowaty i nasiona
anyżu wraz z innymi produktami. Jeśli są one mielone oddzielnie, mogą
uszkodzić plastikowe ścianki urządzenia.
Młynek nie jest przystosowany do rozdrabniania bardzo twardych
składników, takich jak gałka muszkatołowa lub kostki lodu.
C
1 Włóż składniki do naczynia młynka.
Miel tylko suche składniki. Nie napełniaj naczynia młynka powyżej
wskaźnika „MAX”. Zalecane ilości produktów podane są w tabeli
poniżej.
C
2 Upewnij się, że gumowa uszczelka znajdująca się na części
tnącej jest prawidłowo założona.
C
3 Przymocuj część tnącą do naczynia młynka.
Jeśli czynność ta wymaga użycia większej siły, zwilż uszczelkę kroplą
wody.
POLSKI
Ilość
5–25 g
10–50 g
25–75 g
25–75 g
25–75 g
25–75 g
25–50 g
25–75 g
20–40 g
25–50 g
25–75 g
Składniki
Pieprz ziarnisty
Nasiona sezamu
Ryż, ziarna pszenicy
Ziarna soi
Suszony groch
Miąższ orzecha kokosowego
Ziarna kawy
Ser
Bułka tarta
Cukier w kostkach
Orzechy (łuskane)

20
C
4 Obróć zmontowany młynek do góry dnem i przymocuj go do
części silnikowej,obracając młynek w kierunku wskazanym
przez strzałkę.
C
5 Zalecamy obsługę młynka przy użyciu przycisku M (pulsacji).
Nigdy nie używaj młynka dłużej niż 30 sekund bez przerwy.
C
◗ Po zakończeniu miksowania możesz użyć pokrywki shakera do
równomiernego posypania potrawy.
Czyszczenie
Urządzenie, jego części oraz akcesoria najłatwiej jest umyć
bezpośrednio po użyciu.
Części urządzenia i akcesoriów nie wolno myć w zmywarce.
Nie używaj żadnych środków szorujących, żrących,alkoholu itp.
1 Wyjmij wtyczkę urządzenia z gniazdka elektrycznego,odłącz
akcesoria oraz używane części i umyj je w ciepłej wodzie z
dodatkiem płynu do mycia naczyń.
2 Następnie wypłucz te części pod bieżącą wodą.
Szybkie mycie dzbanka blendera
1 Nalej letniej wody z dodatkiem płynu do mycia naczyń do
dzbanka blendera do wskaźnika poziomu „Quick Clean” (500
ml). Nie przekraczaj tego poziomu, jeśli korzystasz z funkcji
szybkiego czyszczenia.
POLSKI
21
2 Załóż pokrywkę i umieść w jej otworze zatyczkę.Włóż
wtyczkę do gniazdka elektrycznego.
C
3 Naciśnij przycisk Quick Clean (M), aby uruchomić urządzenie
na kilka sekund. Gdy dzbanek jest już czysty, zwolnij przycisk i
wyjmij wtyczkę urządzenia z gniazdka elektrycznego.
4 Zdejmij dzbanek blendera i wypłucz go czystą wodą.
C
5 W celu umycia zdejmij tylko pokrywkę (pociągając za nią)!
Czyszczenie filtra
1 Wyjmij filtr z dzbanka blendera.
2 Trzymaj filtr nad koszem na śmieci i delikatnie nim potrząsaj,
aby go opróżnić.
3 Wypłucz filtr pod bieżącą wodą.
Ochrona środowiska
C
1 Zużytego urządzenia nie należy wyrzucać wraz z normalnymi
odpadami gospodarstwa domowego — należy oddać je do
punktu zbiórki surowców wtórnych w celu utylizacji.
Stosowanie się do tego zalecenia pomaga w ochronie
środowiska.
Gwarancja i serwis
W razie jakichkolwiek pytań lub problemów prosimy odwiedzić naszą
stronę internetową www.philips.com lub skontaktować się z Centrum
Obsługi Klienta firmy Philips (numer telefonu znajduje się w ulotce
gwarancyjnej). Jeśli w kraju zamieszkania nie ma takiego Centrum, o
pomoc należy zwrócić się do sprzedawcy produktów firmy Philips lub
do Działu Obsługi Klienta firmy Philips Domestic Appliances and
Personal Care BV.
POLSKI

Przepisy
Otwór w pokrywce można używać do dodawania płynów do
miksowanych składników w celu uzyskania wymaganej konsystencji.
Majonez (ok. 300 ml)
- 2 żółtka lub 1 całe jajko
- 1 łyżeczka musztardy w proszku
- 1 łyżeczka soli
- 1/2 łyżeczki pieprzu
- 1 łyżeczka cukru
- 30 ml octu lub soku z cytryny
- 300 ml oleju
B
Wszystkie składniki muszą mieć temperaturę pokojową.
B
Wrzuć jajko lub żółtka do dzbanka blendera, dodaj soli, pieprzu,
musztardy w proszku oraz połowę przygotowanego octu lub soku z
cytryny i zmiksuj te składniki ze średnią szybkością. Dolewaj oleju przez
otwór w pokrywce, aż majonez zacznie gęstnieć.Wtedy dodaj pozostałą
część octu lub soku z cytryny i przypraw do smaku.
B
Przechowuj w lodówce.
Ciasto marchwiowe
- 4 jajka
- 200 g pokrojonej w plasterki marchwi
- 200 ml mleka
- 100 g skondensowanego mleka
- 300 g cukru
- 300 g mąki pszennej
- 150 g oleju
- 1 łyżeczka suszonych drożdży
B
Wrzuć do dzbanka blendera jajka, pokrojoną marchewkę, cukier,mleko
zwykłe oraz skondensowane i miksuj składniki przez ok. 15 sekund przy
maksymalnej szybkości.
B
Dodawaj mąki pszennej po jednej łyżeczce. Gdy masa stanie się
jednorodna, stopniowo dodawaj olej przez otwór w pokrywce. Na koniec
dodaj suszone drożdże i miksuj jeszcze przez 5 sekund.
B
Przełóż masę do formy i piecz przez ok. 40 minut w temperaturze
180c.
Sos do sałatek
- 1 część octu lub soku z cytryny
- 3 części oleju
- sól, pieprz
B
Wlej ocet lub sok z cytryny do dzbanka blendera, dodaj sól oraz pieprz i
włącz urządzenie. Miksuj składniki, aż do rozpuszczenia się soli i pieprzu.
Dodawaj oleju przez otwór w pokrywce do uzyskania jednorodnej masy.
B
Można przygotować większą ilość takiej bazy sosu i przechowywać ją w
lodówce. Przed użyciem zawsze ją wstrząśnij, aby wymieszać składniki.
22 POLSKI

23
Ciasto serowe
- 4 jajka
- 525 ml mleka
- 75 g margaryny
- 90 g sera Parmezan pokrojonego w kostki (1 cm)
- 440 g cukru
- 290 g mąki kukurydzianej
- 250 g mąki pszennej
- 1 łyżeczka proszku do pieczenia
B
Wrzuć jajka, mleko, margarynę, ser Parmezan i cukier do dzbanka.
Miksuj składniki przy najwyższej szybkości przez 10 sekund.
B
Dodawaj mąki kukurydzianej po jednej łyżeczce i miksuj przez 20
sekund przy maksymalnej szybkości. Następnie dodawaj mąki pszennej
po jednej łyżeczce i miksuj przez 30 sekund przy maksymalnej
szybkości. Dodaj proszku do pieczenia i miksuj przez kolejne 10 sekund.
Wyłącz urządzenie. Przełóż masę do formy do pieczenia posmarowanej
olejem lub margaryną i posypanej mąką. Piecz ciasto w piekarniku przez
ok. 35–40 minut w temperaturze 200–210cC.
Rozwiązywanie problemów
POLSKI
Rozwiązanie
Urządzenie jest wyposażone w system bezpieczeństwa. Jeśli akcesoria nie
zostały prawidłowo podłączone do części silnikowej lub w ogóle nie zostały
podłączone, urządzenie nie będzie działać.Sprawdź, czy akcesoria zostały
właściwie zamocowane (patrz odpowiednie części tej instrukcji). Jednak
najpierw wyłącz urządzenie!
Wyłącz urządzenie i miksuj mniejszą ilość składników.
Jest to zjawisko normalne. Jeśli urządzenie nadal wydziela niemiły zapach nawet
po kilkukrotnym użyciu, sprawdź, czy ilość i czas miksowania składników są
prawidłowe.
Wyłącz urządzenie i odłącz je od zasilania. Skontaktuj się z najbliższym centrum
serwisowym firmy Philips lub odnieś urządzenie do sprzedawcy.
Sprawdź, czy część tnąca jest prawidłowo zamocowana w naczyniu młynka.
Sprawdź, czy gumowa uszczelka jest prawidłowo założona.
Upewnij się, że gumowa uszczelka jest prawidłowo założona. Powinna leżeć
płasko wzdłuż połączenia. Uwaga — drobna nieszczelność jest zjawiskiem
normalnym.
Upewnij się, że filtr jest prawidłowo zamontowany w dzbanku blendera.
Problem
Urządzenie nie działa.
Część tnąca / część silnikowa jest
zablokowana.
Na początku używania część silnikowa
wydziela nieprzyjemny zapach.
Urządzenie pracuje bardzo głośno,
wydziela nieprzyjemny zapach,
nagrzewa się, dymi itp.
Młynek silnie wibruje, bardzo głośno
pracuje lub część tnąca nie jest równo
ustawiona.
Młynek jest nieszczelny.
Sok z owoców i mleko sojowe
zawiera miąższ, pomimo założonego
filtru..
* Jeśli nie można rozwiązać problemów lub wystąpią inne, należy skontaktować się z najbliższym centrum serwisowym
lub Centrum Obsługi Klienta firmy Philips

Notă privitoare la siguranţă
Scoateţi întotdeauna aparatul din priză înainte de a monta, demonta
sau regla vreun accesoriu.
Nu lăsaţi aparatul la îndemâna copiilor.
Motorul porneşte numai dacă vasul blenderului sau accesoriul pentru
măcinare (numai HR1757) a fost montat corect pe blocul motor.
Numai HR1757: Asiguraţi-vă că blocul motor este bine strâns pe bolul
de măcinare înainte de a înşuruba accesoriul pentru măcinare pe blocul
motor.
Evitaţi să atingeţi lamele cuţitului când le curăţaţi. Acestea sunt foar te
ascuţite si vă puteţi tăia cu uşurinţă la degete.
Pentru a evita stropirea, în special atunci când procesaţi ingrediente
fierbinţi, asiguraţi-vă că aţi închis capacul şi că opritorul este strâns
corect.
Porniţi sau opriţi aparatul întotdeauna apăsând pe butonul de oprire
(butonul O). Nu încercaţi niciodată să opriţi aparatul răsucind vasul
blenderului sau bolul de măcinare (numai HR1757).
Important
Citiţi aceste instrucţiuni de utilizare cu atenţie înainte de a folosi
aparatul şi păstraţi-le pentru consultare ulterioară.
◗ Înainte de a conecta aparatul, verificaţi dacă tensiunea indicată pe
aparat corespunde tensiunii de alimentare locale.
◗ Nu folosiţi aparatul dacă ştecherul, cablul de alimentare sau alte
componente sunt deteriorate.
◗ În cazul în care cablul de alimentare este deteriorat, acesta trebuie
înlocuit de Philips, de un centru de service autorizat de Philips sau
de personal calificat în domeniu pentru a evita orice accident.
◗ Scoateţi întotdeauna aparatul din priză înainte de a monta sau
demonta vreun accesoriu sau curăţa aparatul.
◗ Nu introduceţi blocul motor în apă sau în alt lichid şi nici nu-l
clătiţi sub jet de apă. Utilizaţi numai o cârpă umedă pentru a-l
curăţa.
◗ Scoateţi aparatul din priză imediat după utilizare.
◗ Nu lăsaţi aparatul la îndemâna copiilor.
◗ Nu lăsaţi aparatul să funcţioneze nesupravegheat.
◗ Nu depăşiţi cantităţile maxime şi timpii de preparare indicaţi în
tabel.
◗ Lăsaţi ingredientele fierbinţi să se răcească înainte de a le turna în
vasul blenderului (temperatura maximă 80cC/175cF).
◗ Pentru a evita stropirea, nu umpleţi vasul peste gradaţia maximă
ROMÂNĂ24

(adică 1,5 litri). Când amestecaţi un lichid fierbinte, nu puneţi în
vas mai mult de 1,1 litri. Când amestecaţi un lichid care face
spumă, nu umpleţi vasul peste gradaţia de 1,2 litri.
◗ Motorul porneşte numai dacă vasul blenderului sau accesoriul
pentru măcinare (numai HR1757) a fost montat corect pe blocul
motor.
◗ Numai HR1757:Asiguraţi-vă că blocul motor este bine strâns pe
bolul de măcinare înainte de a înşuruba accesoriul pentru
măcinare pe blocul motor.
◗ Nu introduceţi niciodată degetele sau un obiect în aparat în
timpul funcţionării acestuia.
◗ Dacă lamele cuţitului se blochează, scoateţi ştecherul din priză
înainte de a îndepărta ingredientele care blochează cuţitul.
◗ Nu utilizaţi niciodată accesoriile pentru a porni sau opri aparatul.
◗ Nu folosiţi accesorii sau componente de la alţi producători sau
care nu au fost recomandate de Philips.În caz contrar,garanţia nu
va mai fi valabilă.
◗ Nivel de zgomot: Lc = 86 dB (A)
Înainte de prima utilizare
Curăţaţi bine componentele care vin în contact cu alimentele înainte
de prima utilizare a aparatului (a se vedea capitolul Curăţarea).
Pregătirea pentru utilizare
C
◗ Înfăşuraţi cablul de alimentare în exces în jurul bazei aparatului.
Utilizarea aparatului
Blender
Blenderul este proiectat pentru:
- Amestecarea lichidelor, de exemplu lactate, sosuri, sucuri de fructe,
supe, cocktailuri, shake-uri.
- Amestecarea ingredientelor moi, de exemplu aluat de prăjituri sau
maioneză.
- Pasarea ingredientelor pentru gătit, de exemplu prepararea mâncării
pentru copii mici.
C
1 Montaţi vasul pe blocul motor. Strângeţi-l răsucindu-l în direcţia
indicată de săgeată.
ROMÂNĂ 25
1
2

Vasul este bine fixat atunci când crestătura de pe marginea inferioară
este aliniată cu indicaţiile de pe butoanele blocului motor.
Nu exercitaţi o presiune prea mare asupra mânerului vasului.
2 Deschideţi capacul apăsând cu degetul mare pe protuberanţa
de pe mâner.
3 Puneţi ingredientele în vas.
Nu umpleţi niciodată vasul peste gradaţia maximă (1,5 litri), în special
atunci când amestecaţi lichide fierbinţi (maxim 1,1 litri).
Când amestecaţi lichide care fac spumă, nu umpleţi vasul peste gradaţia
de 1,2 litri.
4 Închideţi capacul.
C
5 Introduceţi opritorul în deschizătura capacului.
Pentru a evita stropirea, introduceţi întotdeauna opritorul în
deschizătura capacului înainte de a începe procesarea.
6 Introduceţi ştecherul în priză.
C
7 Pentru a porni aparatul, apăsaţi butonul pentru viteză
corespunzător.
Butoanele pentru viteză vă permit să selectaţi viteza potrivită pentru a
obţine rezultate optime. Pentru vitezele recomandate, consultaţi
tabelul.
C
◗ Apăsaţi butonul pentru impuls (butonul M) de câteva ori pentru a
permite aparatului să funcţioneze numai câteva secunde o dată.
Aparatul se va opri când eliberaţi butonul.Apăsaţi butonul pentru
impuls de câte ori este necesar.
Opriţi întotdeauna aparatul înainte de a deschide capacul.
8 Opriţi aparatul apăsând butonul O.
Nu porniţi sau opriţi niciodată aparatul răsucind vasul.
Puteţi găsi reţete în capitolul Reţete de mai jos.
ROMÂNĂ26
Viteză
viteza 1
viteza 2
viteza 3
Ingrediente
ingrediente lichide (de exemplu lapte cu ciocolată, lapte cu fructe,
maioneză)
ingrediente mai grele, de exemplu o combinaţie de ingrediente
lichide şi solide (de exemplu sos de roşii sau pateu)
ingrediente grele, predominant solide (de exemplu cuburi de gheaţă,
creme, boabe etc.)
Sugestii
Pentru a evita stropirea, nu umpleţi niciodată vasul peste gradaţia
maximă (1,5 litri), în special atunci când amestecaţi lichide fierbinţi
(maxim 1,1 litri).
◗ Dacă amestecaţi lichide care fac spumă, nu umpleţi niciodată vasul
peste gradaţia de 1,2 litri.
◗ Ingredientele lichide (de ex. uleiul) pot fi turnate în vasul
blenderului prin orificiul din capac, în timpul funcţionării
aparatului.
Nu lăsaţi aparatul să funcţioneze mai mult de 3 minute o dată. Dac
după 3 minute, nu aţi terminat de preparat, opriţi aparatul timp de un
minut înainte de a-l porni din nou.
◗ Ingredientele uscate nu trebuie procesate mai mult de 1minut.
◗ Tăiaţi ingredientele solide în bucăţi mai mici înainte de a le pune în
vasul blenderului. Nu preparaţi o cantitate mare de ingrediente
solide în acelaşi timp. În schimb,procesaţi aceste ingrediente în
tranşe mici.
◗ Dacă nu sunteţi mulţumiţi de rezultate atunci când amestecaţi
ingrediente solide, opriţi blenderul şi apăsaţi butonul pentru impuls
(butonul M) de câteva ori pentru a face blenderul să funcţioneze
scurt. De asemenea, puteţi amesteca ingredientele cu o spatulă (nu
în timpul funcţionării blenderului!) sau puteţi îndepărta o parte din
conţinutul vasului şi prepara cantităţi mai mici.
◗ Pentru a sparge cuburi de gheaţă, lăsaţi-le să cadă prin
deschizătura capacului peste lamele rotative.
◗ Pentru a face suc de roşii,tăiaţi roşiile în patru şi introduceţi
bucăţile prin orificiul din capac în timp ce cuţitul se roteşte.
Nu introduceţi niciodată în vas degetele sau un obiect (de exemplu o
spatulă) în timpul funcţionării blenderului.
◗ Dacă procesaţi în acelaşi timp ingrediente solide şi lichide, turnaţi
ingredientele lichide în vas înainte de a porni aparatul.Adăugaţi
ingredientele solide în timp ce aparatul funcţionează.
Filtru
Puteţi utiliza filtrul pentru a obţine sosuri foarte fine, sucuri de fructe
proaspete sau cocktailuri.Toţi sâmburii şi pieliţele vor fi oprite în filtru.
1 Asiguraţi-vă că aparatul este scos din priză. Îndepărtaţi de pe
aparat vasul blenderului şi puneţi filtrul în vas.
Asiguraţi-vă că filtrul este montat corect pe fundul vasului. crestăturile
filtrului şi nervurile din interiorul vasului blenderului vă vor ajuta să
puneţi filtrul în poziţia corectă.
ROMÂNĂ 27

C
2 Puneţi capacul pe vas pentru a fixa filtrul în poziţia corectă.
3 Puneţi vasul blenderului înapoi pe blocul motor şi introduceţi
ştecherul în priză.
C
4 Puneţi ingredientele în filtru prin deschizătura din capac.
Nu umpleţi niciodată filtrul mai sus de componenta metalică. Nu
utilizaţi filtrul pentru a procesa ingrediente fierbinţi.
5 Adăugaţi apă sau un alt lichid.
C
6 Introduceţi opritorul în deschizătura din capac şi apăsaţi
butonul corespunzător celei mai ridicate viteze pentru a porni
aparatul. Lăsaţi aparatul să funcţioneze cel mult 40 de secunde.
C
7 Opriţi aparatul.Turnaţi băutura prin buza de turnare a vasului
blenderului.
8 Pentru rezultate optime, puneţi vasul cu ingredientele rămase
înapoi în aparat şi lăsaţi-l să mai funcţioneze încă câteva
secunde.
9 Turnaţi restul de băutură.
Sugestii
◗ În special atunci când procesaţi cantităţi mari de alimente, vă sfătuim
să nu puneţi toate ingredientele în filtru în acelaşi timp.Începeţi prin
a procesa o cantitate mică, lăsaţi aparatul să funcţioneze un
moment, opriţi-l şi apoi adăugaţi o altă cantitate mică. Repetaţi
această procedură până când procesaţi întreaga cantitate.
◗ Pentru a prepara lapte de soia:
Muiaţi boabele de soia timp de 4 ore înainte de a le procesa. Puteţi
procesa simultan cel mult 50 g de boabe de soia uscate cu cel mult
500 ml de apă.
ROMÂNĂ28
◗ Pentru prepararea sucurilor de fructe şi a cocktail-urilor:
Pentru a obţine cele mai bune rezultate, adăugaţi aproximativ 300 ml
de apă (sau un alt lichid dacă preparaţi de exemplu cocktail-uri etc.) la
150 g de fructe.
Râşniţă (numai tipul HR1757)
Râşniţa poate fi utilizată pentru măcinarea şi tocarea ingredientelor
precum boabe de piper, seminţe de susan, orez, grâu, coajă de nucă de
cocos, nuci (în coajă), boabe de cafea, boabe de soia, mazăre
deshidratată, brânză, pesmet etc.
Procesaţi întotdeauna cuişoarele, anasonul-stea şi anasonul obişnuit
împreună cu alte ingrediente. Dacă sunt procesate separat, aceste
ingrediente pot ataca materialele plastice ale aparatului.
Râşniţa nu este potrivită pentru măcinarea ingredientelor foar te tari
precum nucşoara şi cuburile de gheaţă.
C
1 Puneţi ingredientele în cupă.
Procesaţi numai ingrediente uscate. Nu umpleţi cupa peste gradaţia
'MAX'. Pentru cantităţile recomandate consultaţi tabelul.
C
2 Asiguraţi-vă că inelul de cauciuc de pe blocul tăietor este
poziţionat corect.
C
3 Înşurubaţi blocul tăietor pe cupă.
Dacă acest lucru este prea dificil, umeziţi inelul de cauciuc cu o picătură
de apă.
ROMÂNĂ 29
Cantităţi
5-25 g
10-50 g
25-75 g
25-75 g
25-75 g
25-75 g
25-50 g
25-75 g
20-40 g
25-50 g
25-75 g
Ingrediente
boabe de piper
seminţe de susan
orez, grâu
boabe de soia
mazăre deshidratată
coajă de nucă de cocos
boabe de cafea
brânză
pesmet
zahăr cubic
nuci (în coajă)

C
4 Întoarceţi râşniţa asamblată cu capul în jos şi înşurubaţi-o pe
blocul motor în direcţia indicată de săgeată.
C
5 Vă sfătuim să acţionaţi râşniţa cu butonul de impuls (butonul
M).
Nu utilizaţi râşniţa niciodată mai mult de 30 de secunde neîntrerupt.
C
◗ După procesare, puteţi utiliza capacul cu găurele pentru a distribui
egal ingredientele pe o farfurie.
Curăţarea
Curăţarea aparatului, a componentelor şi a accesoriilor sale este mai
uşoară dacă se face imediat după utilizare.
Nu curăţaţi niciodată accesoriile sau componentele aparatului în maşina
de spălat.
Nu utilizaţi agenţi abrazivi, bureţi de sârmă, alcool etc.
1 Scoateţi aparatul din priză, detaşaţi accesoriile şi componentele
utilizate şi curăţaţi-le în apă călduţă cu săpun.
2 Apoi clătiţi aceste componente la robinet.
Curăţarea rapidă a vasului blenderului
1 Turnaţi apă călduţă şi detergent lichid în vasul blenderului, până
la gradaţia Quick Clean (Curăţare rapidă) (500 ml) de pe vas.
Nu depăşiţi acest nivel când utilizaţi funcţia de curăţare rapidă.
ROMÂNĂ30
 Loading...