

Philips HR1734/60, HR1734/13, HR1734/06, HR1734/01 User Manual

HR 1734/37

2
English Page 4
• Keep pages 3 and 38 open when reading
these operating instructions.
Français Page 8
• Pour le mode d'emploi: dépliez les page 3 et
38.
Deutsch Seite 12
• Schlagen Sie beim Lesen der
Gebrauchsanweisung Seite 3 und Seite 38
auf.
Nederlands Pagina 16
• Sla bij het lezen van de gebruiksaanwijzing de
pagina’s 3 en 38 op.
Italiano Pagina 20
• Prima di usare l'apparecchio, aprite le pagina 3
e 38 e leggete attentamente le istruzioni per
l'uso.
Español Página 24
• Desplegar las páginas 3 y 38 al leer las
instrucciones de manejo.
Português Página 28
• Durante a leitura do modo de emprêgo,
desdobre e verifique as pág. 3 e 38.
Ελληνικά Σελίδα 32
• Για τις οδηγίες χρήσεως, ανοίξτε τις
σελίδες 3 και 38.
N
O
M
1
H
I
L
J
K
G
C
A
B
5
0
0
7
5
0
1
0
0
0
1
2
5
0
1
5
0
0
m
l
2
3
4
5
6
s
p
u
c
D
E
F
Q
P

Important
• Read the instructions carefully and look at
the illustrations before you start using the
appliance.
• To avoid damage, check if the voltage
indicated on the appliance corresponds to
the mains voltage in your home (110-127 V
or 220-240 V) before you connect the
appliance.
• Never use any accessories or parts from
other manufacturers or which have not been
specifically advised by Philips. Your
guarantee will become invalid if such
accessories or parts have been used.
• For optimal results and to prevent damage
to the appliance, follow the instructions with
regard to the maximum and minimum
processing quantities.
• Never remove accessories or parts from the
motor unit while the appliance is running.
Always unplug the appliance first.
• Keep the appliance out of the reach of
children.
• Never let the appliance run unattended.
• Do not use the appliance when the mains
cord, the plug or other components are
damaged.
• If the mains cord of this appliance is
damaged, it may only be replaced by a cord
of the original type. Turn to your Philips
dealer or the Philips organisation in your
country for replacement.
Blender
• Do not fill the blender jar with ingredients
that are hotter than 80 °C.
• To avoid spillage, do not fill the jar above the
maximum level indication (i.e. 1.5 litres),
particularly not when you are blending
liquids. Always insert the stopper into the lid
before you start processing.
• Never put your hand or any other object in
the blender jar while the appliance is
switched on. If necessary, use a spatula to
remove food from the wall of the jar after
you have switched the blender off.
• Before you start using the blender, make
sure that the blade unit is securely fitted to
the blender jar (see ‘Preparing the blender
for use’).
• Always make sure that the lid is in “closed
position” when processing ingredients.
Mill (only type HR 1737)
• The cutting edges of the blade unit are very
sharp: avoid touching them!
• Never let the mill accessory run for more
than 30 seconds without interruption.
• Always make sure that the rubber sealing
ring has been correctly placed before you
start using the appliance.
• Do not use the mill accessory to process
liquid ingredients.
• The mill accessory is not suitable for
grinding very hard ingredients, such as
nutmeg and ice cubes.
• Always process cloves, star anise and
aniseed together with other ingredients. If
they are processed separately, they may
attack the plastic parts of the mill.
Filter
• Do not use the filter to process hot
ingredients.
• Make sure the filter has been properly
inserted before you switch the appliance on.
English
4

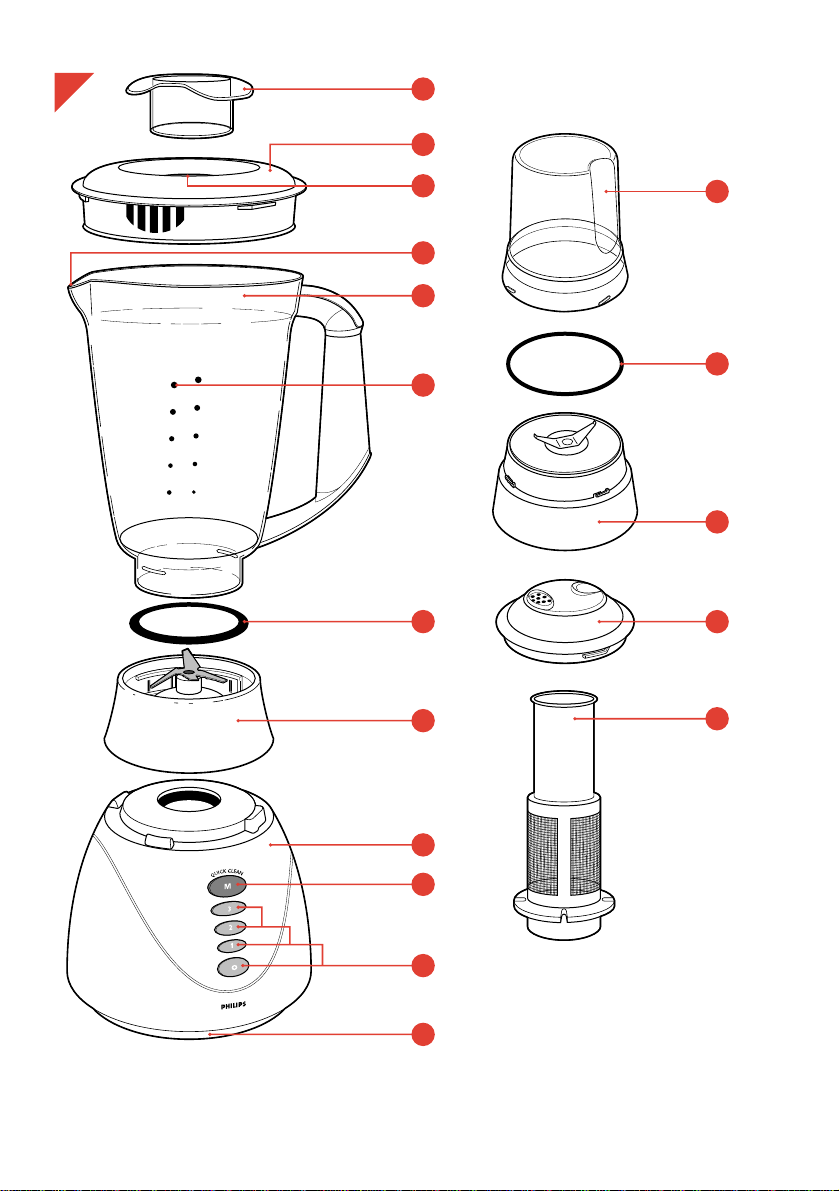
General description (fig. 1)
Blender
A Stopper
B Lid
C Opening in the lid
D Spout
E Blender jar
F Level indications
G Rubber sealing ring
H Blade unit
I Motor unit
J M = pulse position (‘Moment’) / Quick
Clean button
K Speed buttons
3 = high speed
2 = normal speed
1 = low speed
0 = off
L Cord storage facility
Mill (only type HR 1737)
M Beaker
N Rubber sealing ring
O Mill blade unit
P Lid with reclosable sprinkling hole
Filter
Q Filter
Cord storage
You can store excess mains cord by winding it
around the base of the appliance (fig. 2).
Built-in safety lock
The appliance has been equipped with a built-in
safety lock that prevents it from functioning if the
accessories have been assembled incorrectly or
have not been assembled at all.
Note: never use the accessories to turn the
appliance on and off!
Blender
Preparing the blender for use
- Wash all detachable parts (see section
‘Cleaning’).
- Put the rubber sealing ring on the inner edge of
the blade unit (fig. 3).
- Mount the blender jar onto the blade unit and
turn it in the direction of the arrow until it is
fixed (fig. 4).
- Mount the jar with blade unit onto the motor
unit and turn in the direction of the arrow until it
is fixed (fig. 5).
- After putting the ingredients in the jar, fix the lid
onto the jar by pressing it down (fig. 6).
- Insert the stopper into the opening in the lid
(fig. 7).
To disassemble the blender, proceed in reverse
order and opposite direction.
Speed selection
- Make sure that the appliance is plugged in and
the blender jar has been properly attached
before you switch the appliance on.
- Select the speed that is most suitable for the
ingredients you want to process (fig. 8):
1 light processing of mainly liquid ingredients,
e.g. chocolate milk.
2 heavier processing of e.g. a combination of
liquid and solid ingredients.
3 heavy processing of mainly solid ingredients.
• If you are not sure which speed to select, you
can always use the highest speed (speed 3).
• To let the appliance run for only a few
moments at a time, press the M button and
release it straightaway (fig. 9).
- To switch the motor off, press the O button
(fig. 10).
Tips
• Put the stopper upside down in the lid to use it
as a dosing device (fig. 11).
• The opening in the lid can be used for adding
ingredients while the motor is running (fig. 12).
• Do not let the appliance run for longer than 3
minutes at a time. If you have not finished
processing after 3 minutes, switch the
appliance off for one minute before you let it
run again.
• Precut meat and other solid ingredients into
smaller pieces before putting them into the
blender jar.
• For optimal blending of solid ingredients, feed a
series of small amounts into the jar rather than
processing a large quantity at once.
• If you are not satisfied with the performance of
the appliance, switch it off and
- let it run briefly a number of times by means
of pulse position M, or
- stir the ingredients with a spatula (not while
the blender is running!), or
- reduce the contents of the jar and process
smaller amounts at a time.
5

• To crush ice cubes, drop them onto the blades
through the opening in the lid while the motor is
running.
• If you are processing solid and liquid
ingredients at the same time, first put the liquid
ingredients in the jar. Add the solid ingredients
while the appliance is running.
Mill (only type HR 1737)
Preparing the mill for use
- Put the ingredients in the beaker (fig. 13).
Process only dry ingredients. Do not fill the
beaker beyond the “MAX” indication.
- Place the rubber ring on the blade unit (fig. 14).
- Screw the blade unit onto the beaker (fig. 15).
If this requires some effort, moisten the rubber
ring with a drop of water.
- Turn the assembled mill upside down and
screw it onto the motor unit (fig. 16).
- Preferably use the mill at pulse position M.
What to use the mill for?
The mill is suitable for grinding and chopping e.g.:
Ingredients Quantities
- peppercorns 25-75 g
- sesame seeds 25-75 g
- rice, wheat 25-75 g
- soy beans 25-75 g
- dried peas 25-75 g
- coconut flesh 25-75 g
- coffee beans 25-75 g
- cheese 25-75 g
- breadcrumbs one dried slice of bread
- sugar cubes 50 g
- nuts (shelled) 25-75 g
(Optimal results are achieved if you process the
quantities mentioned)
Storage and sprinkling facilities
After you have processed the ingredients, you
can unscrew the mill from the appliance.
If you remove the blade unit and replace it with
the lid (fig. 17), you can store the ingredients, for
instance in the refrigerator. You can also sprinkle
the ingredients onto a dish via the reclosable
sprinkling hole in the lid. Handy for on the table!
Filter
With this filter you will make delicious fresh fruit
juices and cocktails in next to no time. All pips
and skins will remain behind in the filter.
Preparing the filter for use
- Assemble the blender jar.
- Put the filter in the assembled blender jar
(fig. 18). Make sure that the grooves of the filter
fit exactly onto the ribs inside the blender jar.
- Put the lid in place and turn it to fix the filter
(fig. 19).
- Put the ingredients in the filter (fig. 20).
Note: the filter should never be filled beyond its
metal part!
- Add water or another liquid (e.g. for cocktails).
- Put the stopper in place and switch the
appliance on. Select the highest speed. Let the
appliance run for 40 seconds.
- Switch the appliance off. Pour out the drink
through the spout of the blender jar (fig. 21).
- For optimal results, put the jar with the
remaining ingredients back onto the appliance
and let it run for a few more seconds.
- Pour out the rest of the drink.
Tips
Particularly when you are processing large
quantities, we advise you not to put all the
ingredients in the filter at the same time. Start
processing a small quantity, let the appliance run
for a moment, switch it off and then add another
small quantity. Repeat this procedure until you
have processed all the ingredients.
For soy milk
- Soak soy beans for 4 hours before processing
them.
- Max. 50 g of dry soy beans can be processed
with max. 500 ml water.
For fruit juices and cocktails
- For the best results, add approximately 300 ml
water (or other liquid for cocktails, etc.) to
150 g fruit.
Cleaning
• Cleaning of the appliance, its parts and the
accessories is easiest immediately after use.
• Never clean the accessories or the parts in the
dishwasher.
- The motor unit can be cleaned with a moist
cloth. Do not use abrasives, scourers, alcohol
etc.
Blender
- Quick cleaning: assemble the blender jar and
pour lukewarm water and some washing-up
liquid into the blender jar.
- Assemble the lid and the stopper.
6

7
- Let the appliance run for a few moments by
pressing the Quick Clean button (fig. 9), then
release this button.
- Unplug the appliance.
- Remove the blender jar and rinse it with clean
water.
- Thorough cleaning: remove the blade unit and
clean all parts separately. Be careful with the
sharp edges of the blade unit!
Mill
- Unplug the appliance
- Detach the mill from the motor unit
- Clean the beaker, the lid and the blade unit in
luke warm water with some washing-up liquid.
- After washing up the parts, rinse them with
clean water and dry them thoroughly
Filter
- Take the filter out of the blender jar.
- Hold the filter over a waste bin and gently
shake out the contents of the filter.
- Rinse the filter under the tap.

Important
• Lisez ces recommandations en vous aidant
des illustrations avant d'utiliser votre
appareil.
• Pour éviter de détériorer l'appareil, vérifiez,
avant de le brancher, que la tension indiquée
sur l'appareil correspond bien à la tension de
votre secteur (110-127V ou 220-240V).
• N'utilisez jamais d'accessoires ou de pièces
de remplacement qui ne sont pas d'origine.
Si cela était, vous perdriez le bénéfice de
votre garantie.
• Pour de meilleurs résultats et éviter de
détériorer l'appareil, respectez les quantités
maximum et minimum d'aliments à utiliser.
• Débranchez toujours l'appareil avant de
retirer le bol ou accessoire. N'essayez jamais
de retirez les accessoires ou les pièces du
bloc moteur lorsque celui-ci est en marche.
• Ne laissez pas l'appareil à la portée des
enfants.
• Ne laissez jamais l'appareil en marche sans
surveillance.
• N'utilisez pas l'appareil si le cordon
d'alimentation, la prise de courant ou
d'autres composants sont endommagés.
• Si le cordon d'alimentation de cet appareil
est endommagé, il doit être remplacé par un
cordon équivalent.
Adressez-vous à votre revendeur ou à un
Centre Service Agréé Philips.
Le bol mélangeur
• Ne remplissez pas le bol du mélangeur avec
des ingrédients dont la température est
supérieure à 60°C.
• Pour éviter de détériorer l'appareil, ne
remplissez pas le récipient au-delà du
niveau maximum indiqué (c'est à dire 1,5
litre), tout spécialement lorsque vous mixez
des ingrédients liquides. Obturez le
couvercle avec le bouchon avant de
commencer à mixer.
• Ne mettez jamais vos doigts ou tout autre
objet dans le récipient du bol mélangeur
lorsque l'appareil est en marche. Si
nécessaire, utilisez une spatule pour retirer
les aliments des parois, après avoir arrêté
l'appareil.
• Avant de vous servir du bol mélangeur,
assurez-vous que l'ensemble couteaux est
fixé au récipient (voir "Mise en place du bol
mélangeur").
• Assurez-vous systématiquement que le
couvercle est en position fermée pendant
que vous opérez
Le hachoir (type HR 1737 uniquement)
• Faites très attention en prenant l'ensemble
couteaux car les lames sont tranchantes !
• Ne faites jamais tourner le hachoir pendant
plus de 30 secondes.
• Positionnez toujours correctement le joint
d'étanchéité avant d'utiliser l'appareil.
• N'utilisez pas le hachoir pour traiter des
ingrédients liquides.
• Cet accessoire n'est pas adapté au broyage
d'ingrédients très durs tels que des cubes
de glace ou de la noix muscade.
Le filtre
• N'utilisez pas le filtre lorsque vous traitez
des ingrédients très chauds.
Assurez-vous que vous avez bien
positionné le filtre avant de mettre en
marche.
Français
8

Description générale (fig. 1)
Le bol mélangeur
A Bouchon /verseur
B Couvercle
C Orifice de remplissage du couvercle
D Bec verseur
E Récipient du bol mélangeur
F Graduations
G Joint d'étanchéité
H Ensemble couteaux du bol mélangeur
I Bloc moteur
J M = "Momentané" Marche par impulsions/
bouton de nettoyage rapide
K Sélection des vitesses
3 = grande vitesse
2 = vitesse normale
1 = vitesse lente
0 = arrêt
L Emplacement de rangement du cordon
Le hachoir (uniquement type HR1737)
M Gobelet
N Joint d'étanchéité
O Ensemble couteaux du hachoir
P Couvercle obturable avec orifice pour
liquides
Le filtre
Q Filtre
Rangement du cordon d'alimentation
Vous pouvez ranger le cordon d'alimentation en
excédent en l'enroulant autour de la base de
l'appareil (fig. 2).
Verrou de sécurité incorporé
Cet appareil est équipé d'un verrou de sécurité
qui empêche son fonctionnement si les
accessoires n'ont pas été assemblés
correctement ou s'ils sont manquants.
Remarque : N'utilisez jamais les accessoires
pour mettre en marche ou pour arrêter l'appareil!
Le bol mélangeur
Mise en place du bol mélangeur
- Débranchez toujours la fiche de la prise de
courant pour cette opération.
- Lavez toutes les parties démontables (voir la
section "Nettoyage).
- Positionnez le joint d'étanchéité en caoutchouc
sur le rebord intérieur de l'ensemble couteaux
(fig. 3).
- Montez le bol du mélangeur sur l'ensemble
couteaux et tournez-le dans le sens de la
flèche jusqu'à ce qu'il soit bien en place (fig. 4).
- Remontez l'ensemble sur le bloc moteur et
tournez-le dans le sens de la flèche jusqu'à
serrage complet (fig. 5).
- Après avoir mis les ingrédients dans le
récipient, mettez le couvercle sur le récipient
en appuyant dessus (fig. 6).
- Introduisez le bouchon dans l'ouverture du
couvercle (fig. 7).
Pour désassembler le bol mélangeur, procédez
en sens inverse.
Choix de la vitesse
- Avant de mettre en marche, assurez-vous que
le récipient a été bien serré sur le bol
mélangeur.
- Choisissez la vitesse qui correspond le mieux
aux aliments à traiter (fig. 8):
1 mixage léger d'ingrédients à prédominance
liquide, par ex. du chocolat au lait.
2 mixage d'un mélange d'ingrédients liquides et
solides.
3 mixage d'aliments à prédominance solide.
• Si vous hésitez sur la vitesse à utiliser, vous
pouvez toujours choisir la vitesse la plus
élevée (vitesse 3).
• Pour faire fonctionner l'appareil par impulsions,
appuyez sur le bouton M et relâchez-le
immédiatement (fig. 9).
- Pour arrêter le moteur, appuyez sur O
(fig. 10).
Conseils
• Placez le bouchon (A) à l'envers sur le
couvercle (B) : il vous sert alors au dosage
(fig. 11).
• Vous pouvez utiliser également l'ouverture
dans le couvercle pour y ajouter des
ingrédients pendant que l'appareil est en
marche (fig. 12).
• Ne faites pas fonctionner l'appareil pendant
plus de 3 minutes sans interruption. Si vous
n'avez pas terminé le mixage au bout de trois
minutes, arrêtez l'appareil et laissez-le refroidir
pendant une minute avant de le remettre en
marche.
• Précoupez la viande ou autres ingrédients
solides en petits morceaux avant de les
introduire dans le récipient.
• Pour un mixage optimum des ingrédients
solides, alimentez le récipient en petites
quantités.
9

• Si vous n'êtes pas satisfait du résultat obtenu,
arrêtez l'appareil et
- remuez les ingrédients avec une spatule ou
- faites-le fonctionner un certain nombre de fois
au moyen du bouton à impulsions M ou
- réduisez le contenu du récipient et traitez des
quantités moins importantes.
• Si vous traitez en même temps des solides et
des liquides, commencez par verser les
aliments liquides dans le récipient. Ajoutez les
aliments solides pendant que l'appareil est en
marche.
Le hachoir (type HR 1737 seulement)
Mise en place du hachoir.
- Mettez les ingrédients dans le gobelet (fig. 13).
Ne traitez que des aliments secs. Ne
remplissez pas le gobelet au-delà du repère
"MAX".
- Débranchez la fiche de la prise de courant
ensuite seulement positionnez le joint
d'étanchéité en caoutchouc sur le rebord
intérieur du bloc moteur (fig. 14).
- Vissez l'ensemble couteau (O) sur le gobelet
(fig. 15). Si vous rencontrez des difficultés pour
le faire, humectez le joint en caoutchouc avec
un peu d'eau.
- Retournez l'ensemble hachoir ainsi réalisé et
vissez-le sur le bloc moteur (fig. 16).
- Il est préférable de faire fonctionner le hachoir
sur la position M (impulsions).
Pour quelles préparations faut-il se servir du
hachoir ?
Le hachoir sert à broyer et hacher des aliments
tels que :
Ingrédients Quantités
- Grains de poivre 25-75 g
- Graines de sésame 25-75 g
- Riz, blé 25-75 g
- Graines de soja 25-75 g
- Pois cassés 25-75 g
- Pulpe de noix de coco 25-75 g
- Grains de café 25-75 g
- Fromage 25-75 g
- Miettes de pain une tranche de pain sec
- Morceaux de sucre 50 g
- Noix (sans la coquille) 25-75 g
(C'est en traitant les quantités mentionnées que
vous obtiendrez les meilleurs résultats)
Possibilité de conservation et de
saupoudrage
Lorsque vous avez traité des ingrédients, vous
pouvez séparer le hachoir de l'appareil en le
dévissant. Si vous retirez l'ensemble couteaux
(O) et que vous le remplacez par le couvercle (P)
(fig. 17), vous pouvez conserver les aliments
(dans le réfrigérateur par exemple). Vous pouvez
également saupoudrer les ingrédients sur un plat
à l'aide de l'orifice obturable de saupoudrage du
couvercle. C'est utile sur une table !
Le filtre
Le filtre vous permet de préparer en un rien de
temps de délicieux jus de fruits et cocktails. Tous
les pépins et la peau sont retenus par le filtre.
Mise en place du filtre
- Montez le récipient du bol mélangeur.
- Placez le filtre dans le récipient que vous
venez de monter (fig.18). Les rainures du filtre
doivent se positionner exactement sur les
nervures intérieures du bol.
- Placez le couvercle et serrez-le pour fixer le
filtre (fig. 19).
- Placez les ingrédients dans le filtre (fig. 20).
Remarque : ne remplissez jamais le filtre audelà de sa partie métallique.
- Ajoutez de l'eau ou tout autre liquide (pour des
cocktails par exemple).
- Placez le bouchon et mettez l'appareil en
marche. Utilisez la vitesse la plus élevée et
laissez tourner pendant 40 secondes.
- Arrêtez l'appareil. Versez la boisson par le bec
verseur du récipient (fig. 21).
- Pour obtenir un résultat optimum, replacez le
récipient sur l'appareil avec le restant
d'ingrédients et laissez tourner à nouveau
pendant quelques secondes.
- Versez le reste de la boisson.
Conseils
Nous vous conseillons de ne pas introduire tous
les ingrédients dans le filtre en même temps,
spécialement lorsque vous traitez des quantités
importantes. Traitez d'abord une petite quantité,
laissez l'appareil tourner un instant, arrêtez-le
puis rajoutez à nouveau une petite quantité.
Répétez l'opération jusqu'à complet traitement
des ingrédients.
10

11
Pour du lait de soja
- Faites tremper les graines de soja pendant 4
heures avant de les traiter.
- Un maximum de 50 grammes de pousses de
soja peut être travaillé avec 500 ml d'eau.
Pour des jus de fruits et des cocktails
- Pour obtenir les meilleurs résultats, ajoutez
environ 300ml d'eau (ou d'autres liquides pour
les cocktails par ex.) à 150g de fruits.
Nettoyage
• Le nettoyage de l'appareil, de ses pièces et de
ses accessoires est le plus aisé
immédiatement après utilisation.
• Ne lavez jamais les pièces ou les accessoires
dans le lave-vaisselle.
- Vous pouvez nettoyer le bloc moteur avec un
chiffon humide. N'utilisez pas de produits
abrasifs, de tampons recurants, d'alcool etc.
Ne plongez jamais le bloc moteur dans l'eau.
Le bol mélangeur
- Nettoyage rapide : assemblez le récipient et
versez dedans de l'eau tiède additionnée de
produit pour vaisselle.
- Placez le couvercle et le bouchon.
- Faites fonctionner l'appareil quelques instants
en appuyant sur le bouton de nettoyage rapide
(fig.9). Relâchez ensuite ce bouton.
- Débranchez l'appareil.
- Retirez le récipient et rincez-le à l'eau
courante.
- Nettoyage complet : retirez l'ensemble
couteaux. Attention : les lames des couteaux
sont très tranchantes !
Le hachoir
- Débranchez l'appareil.
- Séparez le hachoir du bloc moteur.
- Nettoyez le gobelet, le couvercle et le couteau
dans de l'eau chaude additionnée de produit
vaisselle.
- Lorsque vous avez nettoyé les accessoires,
rincez-les à l'eau courante et essuyez-les
soigneusement.
Le filtre
- Extrayez avec précaution le filtre du récipient.
- Tenez le filtre au-dessus de la poubelle et
secouez pour en vider le contenu.
- Rincez le filtre à l'eau courante.

Wichtig
• Lesen Sie diese Gebrauchsanweisung
sorgfältig durch, und sehen Sie sich dabei
die Abbildungen an, bevor Sie das Gerät
zum ersten Mal benutzen.
• Prüfen Sie vor Inbetriebnahme, ob die
Spannungsangabe auf dem Gerät mit der
örtlichen Netzspannung (110-127 V bzw.
220.240 V) übereinstimmt.
• Versuchen Sie niemals, an diesem Gerät
Teile anderer Herstel ler zu verwenden, die
nicht ausdrücklich von Philips empfohlen
werden. Die Garantie wird dadurch hinfällig.
• Halten Sie sich an die angegebenen Höchstund Mindestmengen, um Ärger und
Beschädigungen zu vermeiden.
• Schalten Sie das Gerät stets aus, bevor Sie
Zusatzteile ab nehmen oder aufsetzen.
• Halten Sie Kinder von dem Gerät fern.
• Lassen Sie das Gerät während des Betriebs
nie unbeaufsich tigt.
• Verwenden Sie das Gerät nicht, wenn das
Kabel, der Stecker oder andere Teile
beschädigt sind.
• Wenn das Netzkabel defekt oder beschädigt
ist, muß es durch ein original PhilipsNetzkabel ersetzt werden. Wenden Sie sich
an Ihren Händler oder das Philips Service
Center in Ihrem Lande.
Zum Mixer-Aufsatz:
• Füllen Sie keine Zutaten in den Mixbecher,
die heißer sind als 80° C.
• Füllen Sie den Mixbecher niemals höher als
bis zur maximalen Markierung = 1500 ml.
Das ist besonders bei der Verarbeitung von
Flüssigkeiten wichtig. Setzen Sie stets den
Sicherheitsverschluß in den Deckel, bevor
Sie das Gerät einschalten.
• Stecken Sie niemals Ihre Finger oder
irgendwelche Kücheng eräte in den
Mixbecher, solange das Gerät eingeschaltet
ist. Benutzen Sie, falls nötig, einen Spatel.
Schalten Sie vorher das Gerät aus.
• Achten Sie darauf, daß die Messereinheit
fest und richtig am Mixbecher aufgeschraubt
ist. Vgl. den Abschnitt „Der Mixer- Aufsatz,
Vorbereitung zum Gebrauch“.
• Achten Sie bitte stets darauf, daß der Deckel
fest verschlossen ist, wenn Sie die Zutaten
verarbeiten.
Zum Zerkleinerer-Aufsatz (nur Type HR 1737):
• Die Schneiden der Messer sind sehr scharf.
Vermeiden Sie jede Berührung!
• Betreiben Sie den Zerkleinerer nie länger als
30 Sekunden ohne Unterbrechung.
• Achten Sie vor dem Einschalten darauf, daß
der Dichtungsring korrekt plaziert ist.
• Verwenden Sie den Zerkleinerer nicht, bei
Verarbeitung flüssiger Zutaten.
• Der Zerkleinerer ist nicht für die
Verarbeitung sehr harter Zutaten wie
Muskatnüsse oder Eiswürfel geeignet.
• Nelken und Anis sollten nur zusammen mit
anderen Zutaten verarbeitet werden. Alleine
bearbeitet können diese Gewürze die
Kunststoffteile angreifen.
Zum Filter:
• Verwenden Sie den Filter nicht bei der
Verarbeitung heißer Zutaten.
• Achten Sie vor dem Einschalten darauf, daß
der Filter fest und dicht eingesetzt ist.
Deutsch
12
 Loading...