

Page 1

DIRECTIONS FOR USE
ENGLISH 4
FRANÇAIS 10
21
27
STYLING BOOKLET
ENGLISH 30
FRANÇAIS 36
47
53
HQC888
3
áá««HHôô©©ddGG
áá««HHôô©©ddGG
Page 2

Introduction
◗ Dear customer, you have made the right choice! Your new Philips
3D Hair Clipper adapts to the contours of your head and enables
comfortable use.
◗ To enjoy using the Philips 3D Hairclipper for a long time, we advise
you to read the following information.
◗ In the enclosed booklet 'Modelling and Styling' and on the
interactive instruction CD-ROM you can find instructions and
many useful tips on how to achieve the haircut you want.
Important
Appliance
◗ Check if the voltage indicated on the mains plug corresponds to
the mains voltage in your home before you connect the appliance.
C
◗ Make sure the appliance and the adapter do not get wet.
◗ Use, charge and store the appliance at a temperature between
15c and 35c.
CD-ROM
C
◗ Protect the instruction CD-ROM from dust, humidity and from
extremely high or low temperatures.
C
◗ Do not put the CD-ROM in direct sunlight for a prolonged
period.
◗ Do not scratch the surface of the CD-ROM.
◗ Only write on the CD-ROM with a special marker.
◗ If the CD-ROM is stored in a cold environment, do not use it until
it has reached room temperature.
◗ Insert the CD-ROM with the printed side facing upwards.
Charging
Charge the appliance for 12 hours before you start using it for the first
time.
1 Make sure the appliance is switched off while charging.
ENGLISH4
Page 3
C
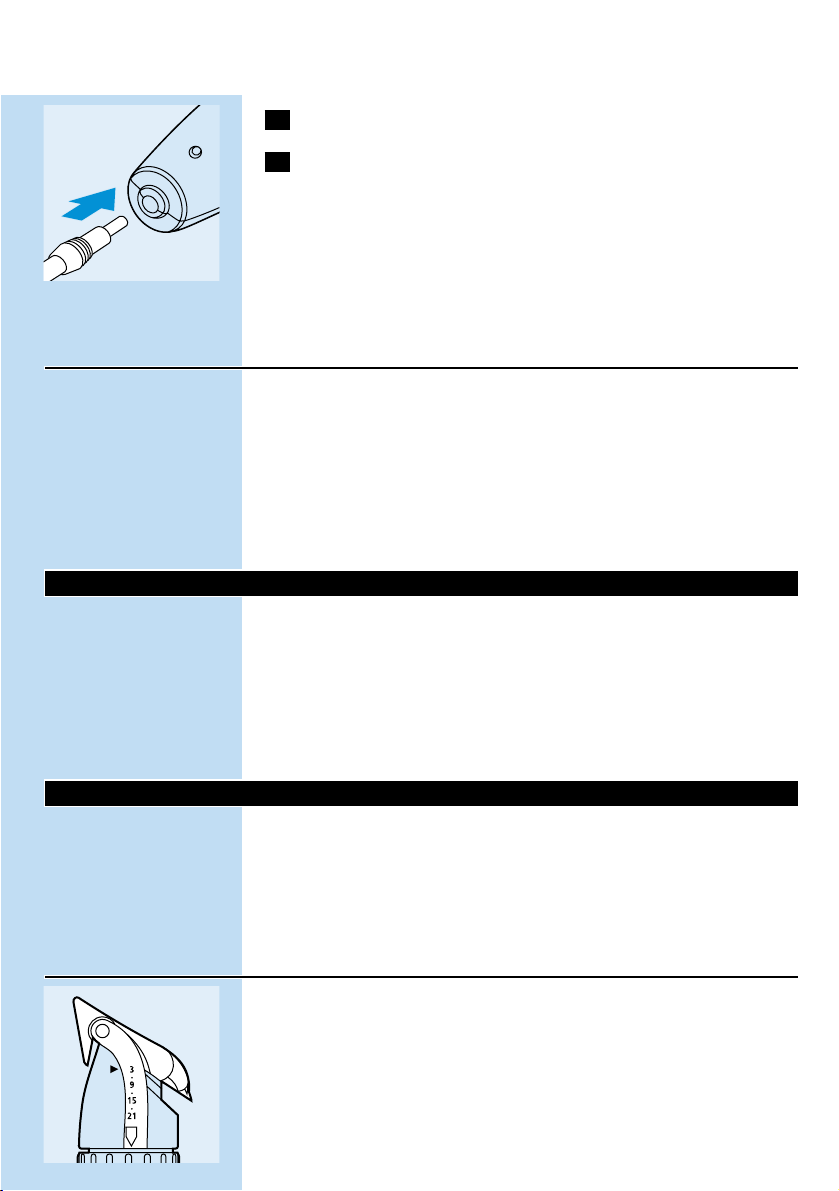
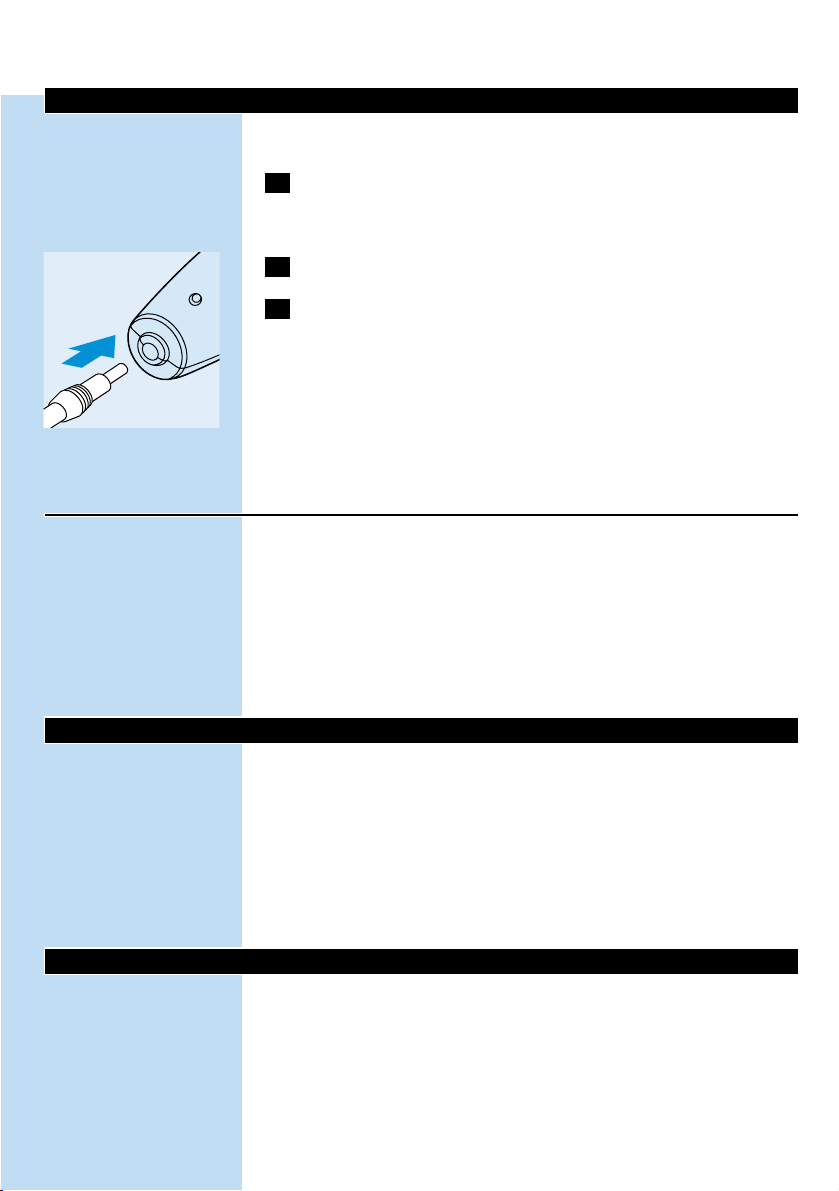
2 Insert the appliance plug into the appliance.
3 Insert the mains plug into the wall socket.
B
The pilot light will go on to indicate that the appliance is charging.
B
This appliance is suitable for a mains voltage of 230V.
B
Only use the cord supplied with the appliance.
Do not charge the appliance for more than 24 hours.
A fully charged appliance has a cordless operating time of up to
50 minutes.
Optimising the lifetime of the battery
- After the appliance has been charged for the first time, do not
recharge it between clipping sessions. Continue using it and recharge
it only when the battery is (almost) empty.
- Discharge the battery completely twice a year by letting the motor
run until it stops.
- Do not keep the cord plugged into a wall socket all the time.
- If the appliance has not been used for a long period of time, it must
be recharged for 12 hours.
Corded clipping
◗ To use the hair clipper connected to the mains:
Switch the hair clipper off, connect it to the mains and wait a few
seconds before switching it on.
If the battery is completely empty, wait a few minutes before switching
the appliance on.
Do not run the appliance from the mains when the battery is fully
charged.
Preparing for clipping
◗ Also see the interactive instruction CD-ROM.
Clipping with comb attachment:
Select the small or large comb attachment, depending on the desired
hair length.
Hair length settings
C
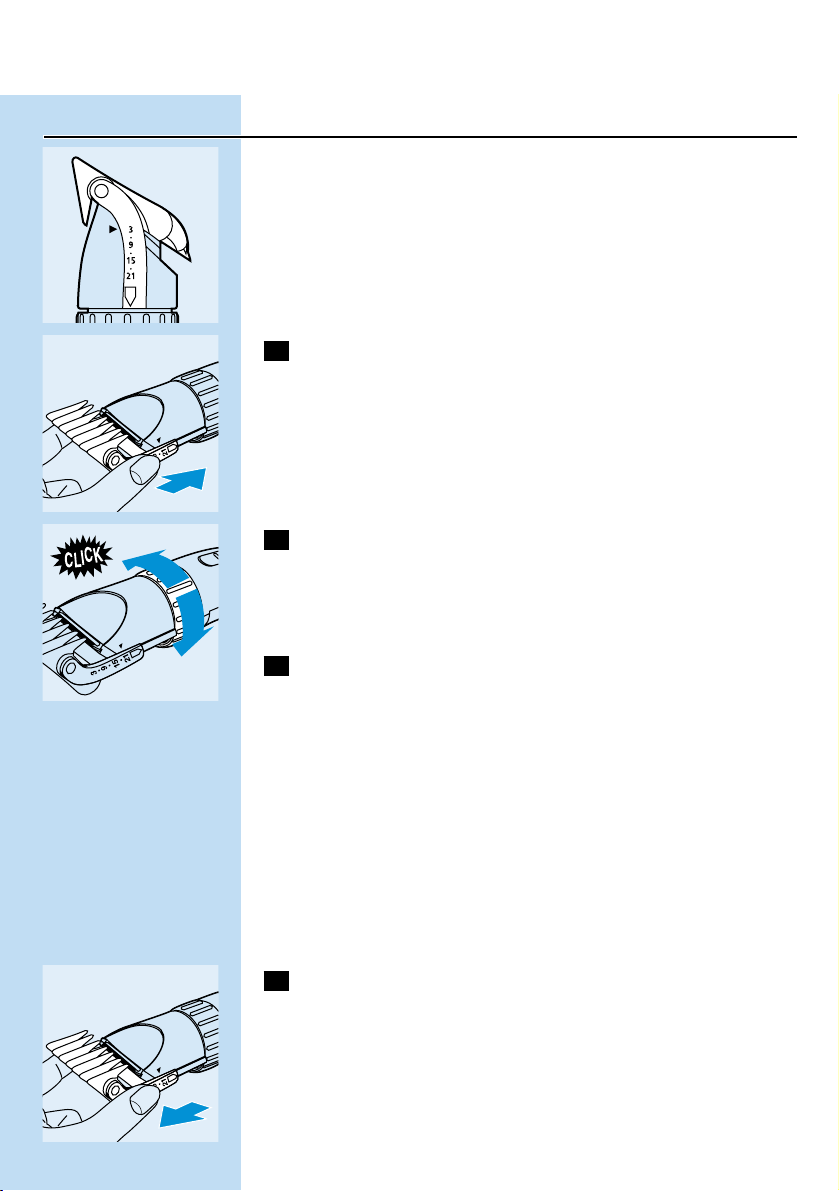
◗ The hair length settings are indicated in millimetres on the comb
sleeve.The settings correspond to the remaining hair length after
cutting.
- The small comb cuts hair to a length of 3 mm, 6 mm, 9 mm, 12 mm,
15 mm, 18 mm or 21 mm.
- The large comb cuts the hair to a length of 23 mm, 26 mm, 29 mm,
32 mm, 35 mm, 38 mm or 41 mm.
ENGLISH 5
Page 4
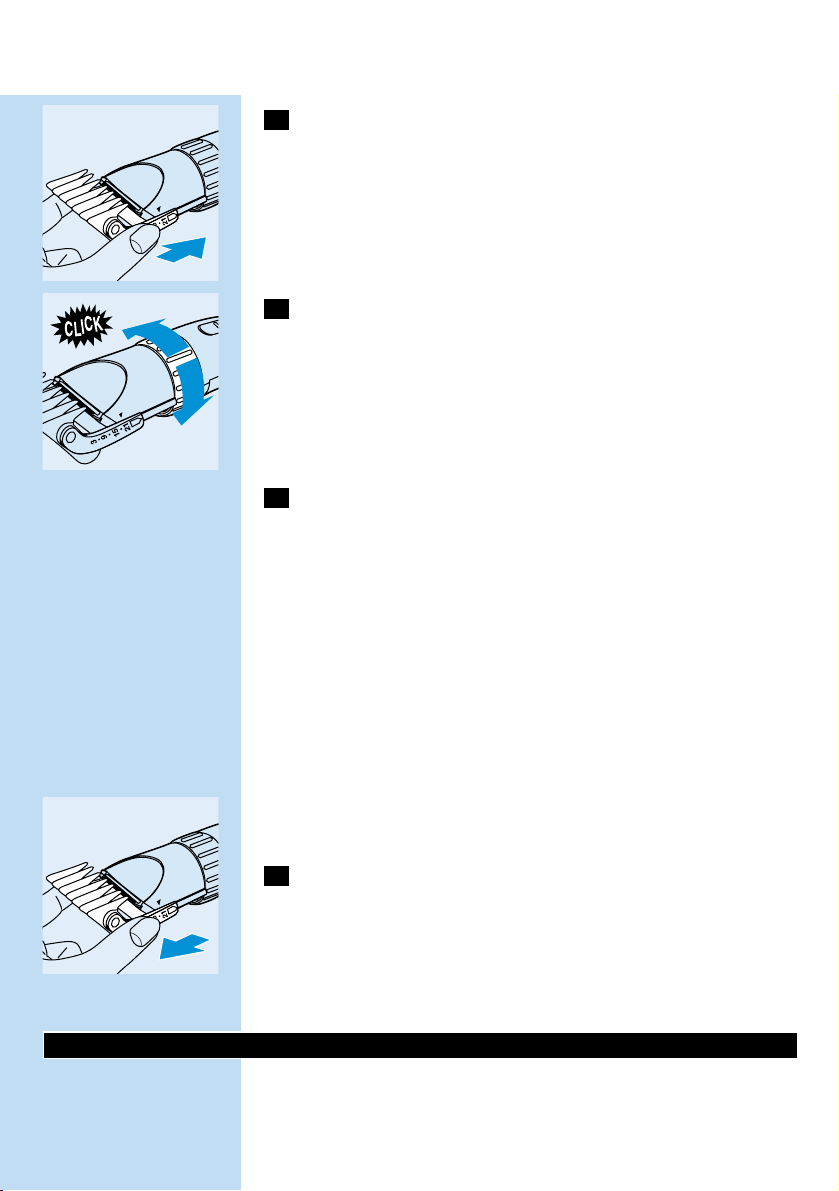
C
1 Slide the comb holder into the guiding grooves of the appliance
until you hear a click.
Make sure that the holder is fully slotted into the grooves on both
sides.
C
2 Set the comb to the desired hair length by turning the hair
length adjustment ring (Precision Zoom Lock`) to the right or
to the left until the comb has been set to the desired hair
length.
◗ We advise you to start clipping at the highest setting (large comb)
and to reduce the hair length setting in small steps until you reach
the desired hair length.
3 Switch the appliance on.
◗ Choose the appropriate hair cutting method from the booklet
'Modelling and Styling' or consult the interactive instruction CDROM.
Tip: If a lot of hair has accumulated in the comb, remove the comb
attachment and blow and/or shake the hair from the comb. Removing
the comb does not change the hair length setting.
Tip:Write down the hair length settings selected to create a certain
hairstyle as a reminder for future clipping sessions.
Clipping without comb attachment
you can use the clipper without comb attachment to contour the
neckline and the area around the ears.You can also find instructions
and tips on the instruction CD-ROM.
C
1 Remove the comb attachment by pulling it off the appliance.
Never pull at the flexible top of the comb attachment.Always pull at
the sleeve.
The comb attachment keeps the cutting unit at a certain distance from
your head.This means that, if you use the clipper without the comb
attachment, your hair will be cut off very close to the skin.
Cleaning
Clean the appliance every time you have used it.
Do not use abrasives, scourers or liquids such as alcohol, petrol or
acetone to clean the appliance.
ENGLISH6
Page 5
The appliance and the adapter may only be cleaned with the brush
supplied.
1 Make sure the appliance is switched off and disconnected from
the mains before you start cleaning it.
2 Remove the comb attachment.
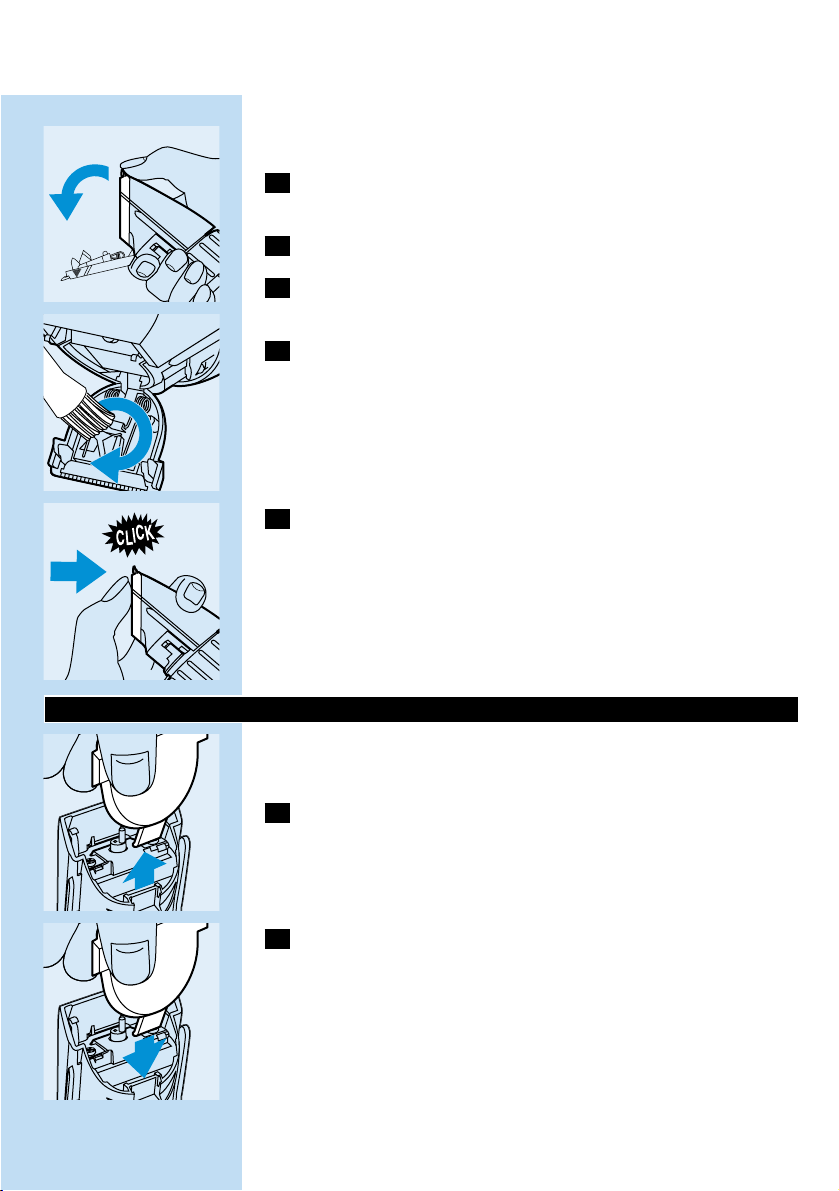
C
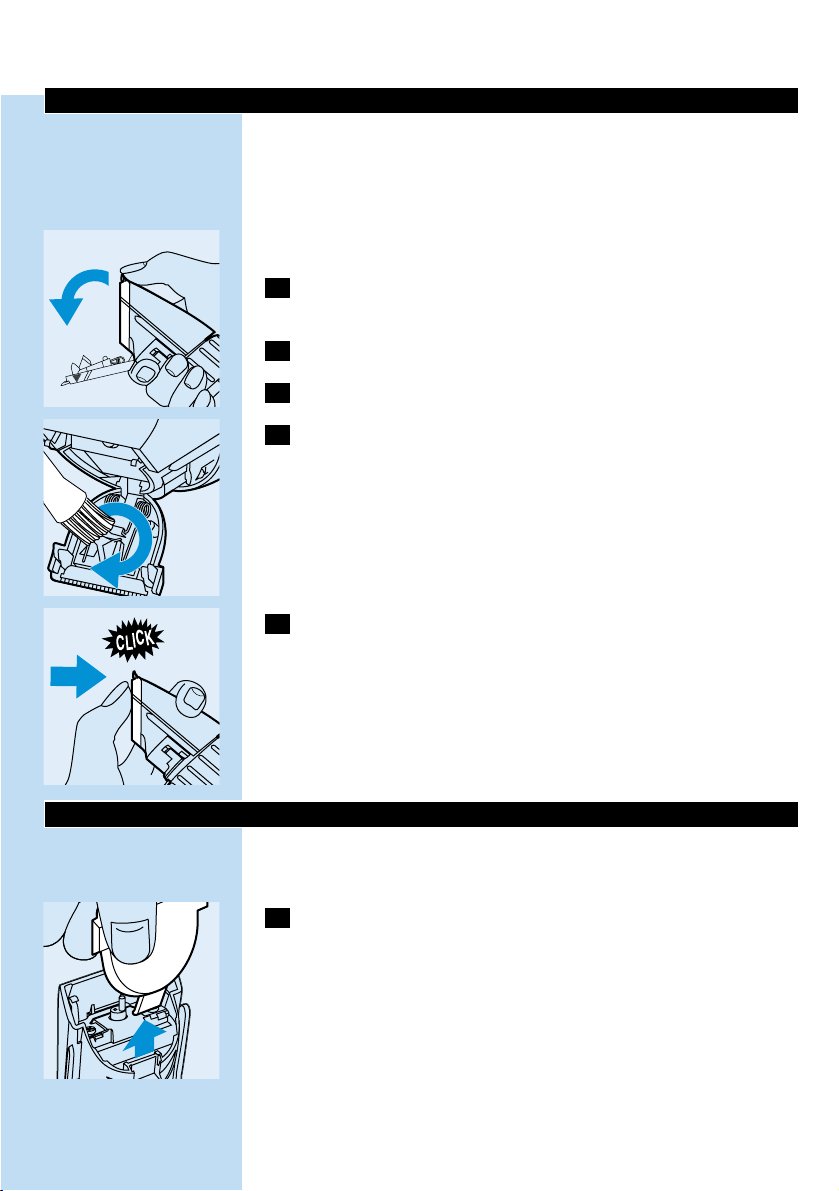
3 Open the cutting unit by applying pressure to the centre of the
unit.
C
4 Clean the cutting unit and the inside of the appliance with the
brush supplied.
C
5 Close the cutting unit by pushing it back onto the appliance
until you hear a click.
The appliance does not need any lubrication.
Replacement
A worn or damaged cutting unit should only be replaced with an
original Philips cutting unit.
C
1 Open the cutting unit by applying pressure in the centre and
then remove it by pulling it upwards.
C
2 Place the two lugs of the new cutting unit into the guiding slots
and push the unit back onto the appliance.
ENGLISH 7
Page 6
Environment
The built-in rechargeable battery contains substances which may
pollute the environment.
Remove the rechargeable battery when you discard the appliance.
Do not throw the battery away with the normal household waste but
dispose of it at an official collection point.
You can also take the appliance to a Philips service centre, where staff
will be happy to help you remove the battery and dispose of it in an
environmentally safe way.
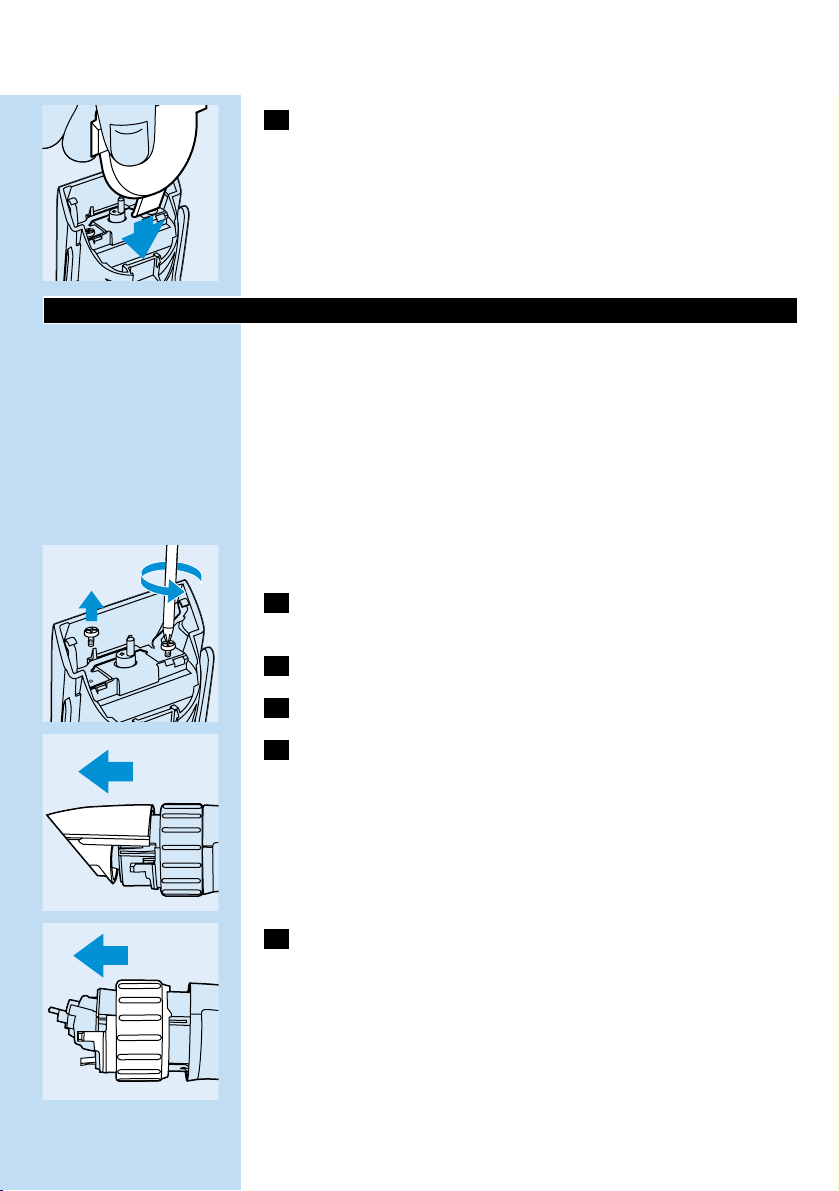
1 Disconnect the appliance from the mains and let the appliance
run until the motor stops.
2 Open and remove the cutting unit.
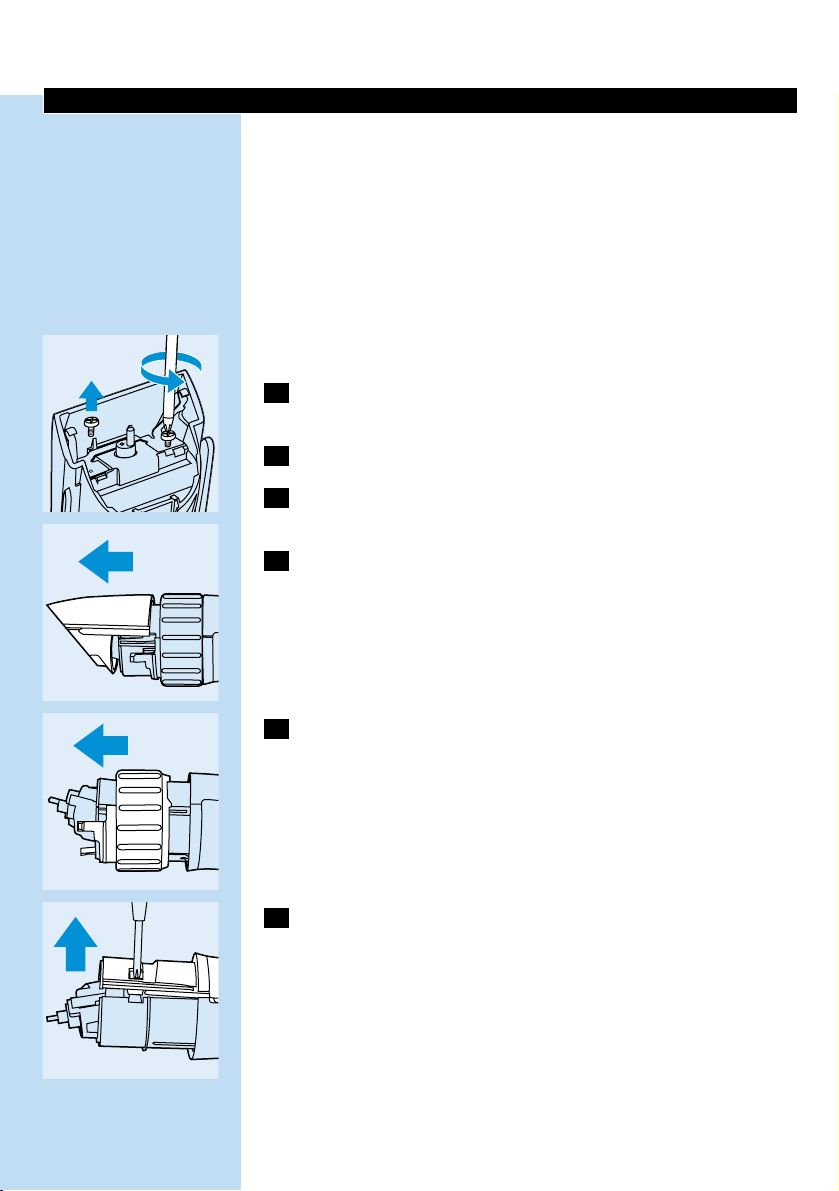
C
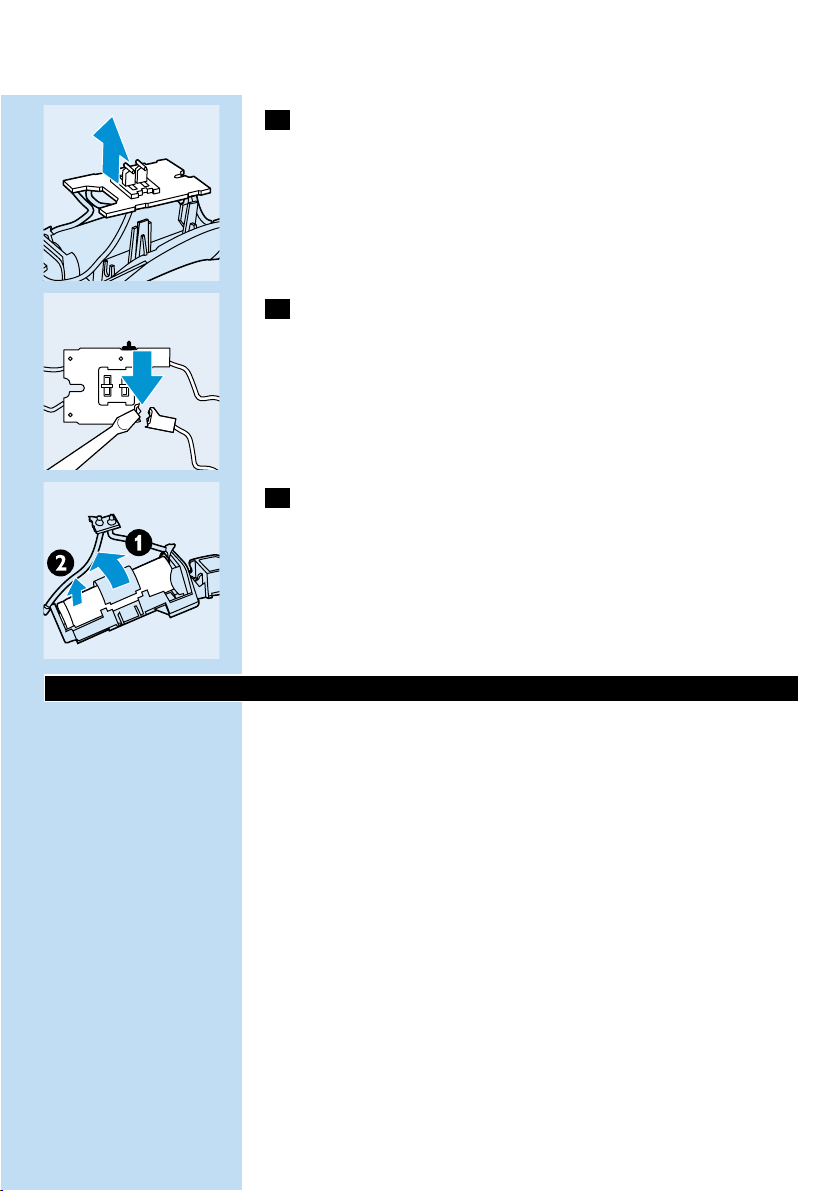
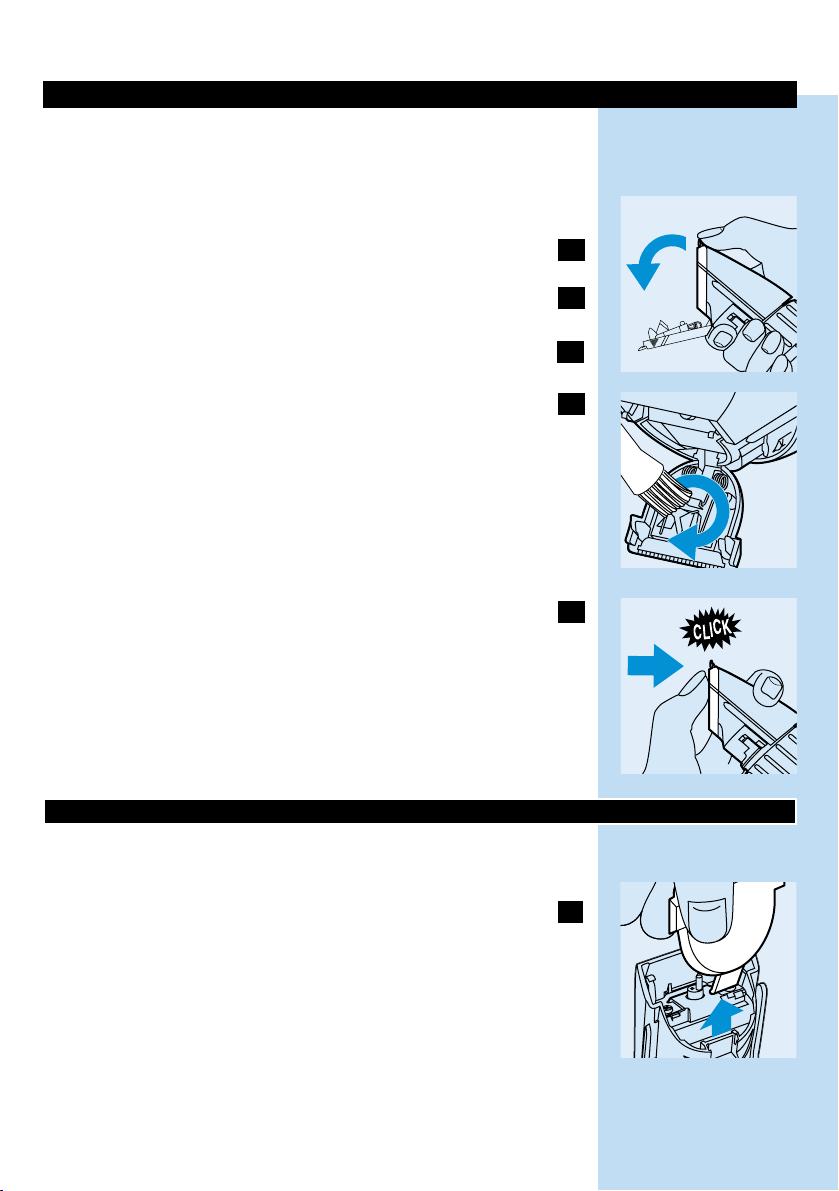
3 Undo the screws and remove the metal clip by means of a
screwdriver.
C
4 Remove the front part by pulling it upwards.
C
5 Remove the hair length adjustment ring (Precision Zoom
Lock`) by pushing in the snap lugs on the cover and the
housing and pulling the ring off the appliance.
C
6 Separate the two housing parts by means of a screwdriver.
ENGLISH8
Page 7
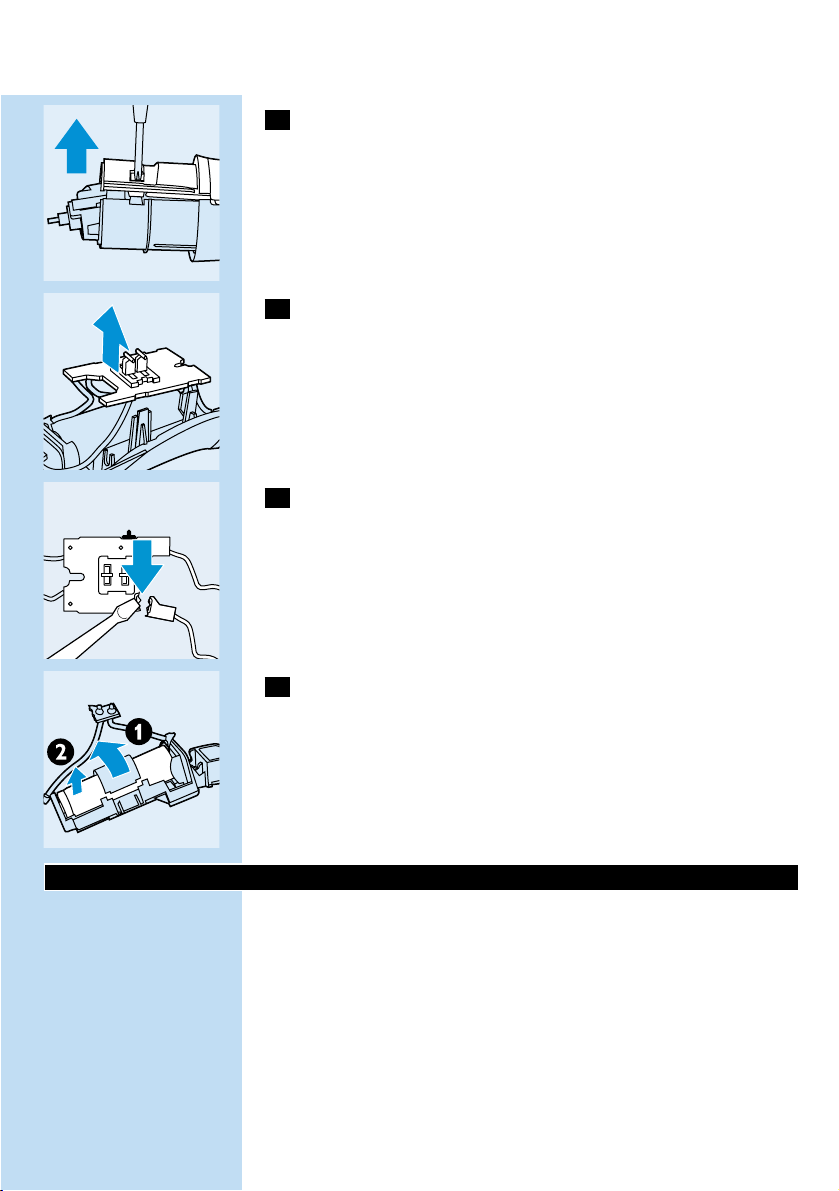
C
7 Pull out the printed circuit board.
C
8 Insert a screwdriver into the small slot in the printed circuit
board marked with an arrow. Push the screwdriver down until
part of the printed circuit board breaks off.
C
9 Open the plastic battery holder and take out the rechargeable
battery.
Do not connect the appliance to the mains again after it has been
opened!
Information & service
If you need information or if you have a problem, please visit the Philips
Web site at www.philips.com or contact the Philips Customer Care
Centre in your country (you will find its phone number in the
worldwide guarantee leaflet). If there is no Customer Care Centre in
your country, turn to your local Philips dealer or contact the Service
Department of Philips Domestic Appliances and Personal Care BV.
ENGLISH 9
Page 8

Introduction
◗ Cher consommateur, vous avez fait le bon choix! Votre nouvelle
tondeuse Philips 3D s'adapte aux contours de votre coiffure en
facilitant ainsi son utilisation.
◗ Afin de pouvoir utiliser au mieux votre tondeuse Philips 3D, nous
vous conseillons de suivre les instructions qui suivent.
◗ Pour réaliser la coupe que vous souhaitez, vous trouverez les
instructions ainsi que les conseils nécessaires dans le livret conseils
et sur le CD-ROM joints.
Important
Tondeuse
◗ Avant de brancher l'appareil,vérifiez que la tension indiquée sur la
fiche correspond à la tension du secteur de votre logement.
C
◗ Assurez vous que l'appareil et son adaptateur ne soient pas en
contact avec de l'eau.
◗ Utilisez, chargez et rangez l'appareil à une température comprise
entre 15c et 35c.
CD-ROM
C
◗ Protégez le CD-Rom de la poussière, de l'humidité et des fortes
températures
C
◗ Ne laissez pas le CD-Rom exposé aux rayons directs du soleil.
◗ Faite attention à ne pas rayer le CD-Rom.
◗ N'écrivez sur le CD-Rom qu'avec un feutre approprié.
◗ Si le CD-Rom a été stocké à une température trop basse, ne
l'utilisez pas avant qu'il n'ait atteint la température ambiante.
◗ Insérez le CD-Rom dans le lecteur face imprimée vers le haut.
FRANÇAIS10
Page 9
Charge
Chargez l'appareil 12 heures au moins avant la première utilisation.
1 Assurez-vous que l'appareil soit éteint lors de la charge.
C
2 Insérez le connecteur dans l'appareil.
3 Insérez la fiche dans la prise de courant.
B
Le témoin lumineux s'allumera pour indiquer que l'appareil est en
charge.
B
Tension d'utilisation: 230V.
B
Utilisez uniquement le cordon fourni avec l'appareil.
Ne chargez pas l'appareil pendant plus de 24 heures.
Une charge complète vous autorise une utilisation de 50 min environ.
Durée des accumulateurs
- Après la première charge, utilisez l'appareil jusqu'à épuisement des
batteries.
- Déchargez les batteries complètement deux fois par an en laissant
tourner le moteur jusqu'à l'arrêt.
- Ne laissez pas le cordon d'alimentation branché sur le secteur
pendant ce temps.
- Si l'appareil n'a pas été utilisé pendant une longue période, rechargez
le pendant 12 heures au moins.
Utilisation sur secteur
◗ Vous pouvez utiliser l'appareil directement sur le secteur.
Arrêtez l'appareil à l'aide du bouton M/A. Branchez la fiche dans la
prise de courant et attendez quelques secondes avant de mettre
l'appareil en Marche.
Si les batteries sont complètement déchargées : attendez quelques
minutes.
Vous ne devez pas utiliser l'appareil directement sur secteur si la
batterie est complètement chargée.
Préparation à l'emploi
◗ Consultez également les instructions du CD-Rom
Taille avec guide de coupe
Choisissez un guide de coupe, petit ou large en fonction de la coupe
désirée.
FRANÇAIS 11
Page 10
Réglages de la hauteur de coupe
C
◗ La hauteur de coupe est indiquée en millimètres sur le guide de
coupe. Hauteur des cheveux restant après la coupe.
- Le petit guide de coupe correspond à une hauteur de 3 mm, 6 mm,
9 mm, 12 mm, 15 mm, 18 mm or 21 mm.
- Le plus grand correspond à une hauteur 23 mm, 26 mm, 29 mm,
32 mm, 35 mm, 38 mm or 41 mm.
C
1 Faites glisser le support du peigne dans les rainures de
l'appareil jusqu'à ce que vous entendiez un clic.
Assurez vous que les deux guides soient bien positionnés dans les
glissières.
C
2 Choisissez la hauteur de coupe en faisant tourner la bague
(Precision Zoom Lock`) jusqu'à la hauteur désirée.
◗ Nous vous conseillons de commencer par la hauteur la plus élevée
et de réduire au fur et à mesure.
3 Mettez l'appareil en marche.
◗ Choisissez la méthode la plus appropriée dans le livret conseils ou
consultez les instructions sur le CD-Rom.
Conseils: Si des cheveux se sont accumulés dans guide de coupe,
retirez le guide de coupe et soufflez dessus. Cela ne change en rien la
hauteur de coupe choisie.
Conseils: Notez la hauteur de coupe choisie pour une taille ultérieure.
Taille sans guide de coupe
Vous pouvez également utiliser la tondeuse sans le guide de coupe.Voir
instructions dans le CD-Rom.
C
1 Retirez le guide de coupe de l'appareil.
Ne prenez pas le guide de coupe par le peigne (flexible) mais par sa
base rigide.
Le guide de coupe permet de maintenir le couteau toujours à la bonne
distance. Sans guide de coupe vous devez donc rester le plus près
possible de la base du crâne.
FRANÇAIS12
Page 11
Nettoyage
Nettoyez l'appareil après chaque utilisation.
N'utilisez pas de produits abrasifs, de tampons à récurer ou des
substances telles que l'alcool ou l'acétone pour nettoyer l'appareil.
Nettoyez l'appareil à l'aide de la brosse de nettoyage.
1 Avant de commencer à nettoyer l'appareil, assurez-vous de
l'avoir éteint et débranché.
2 Retirez le guide de coupe.
C
3 Retirez le couteau en poussant dessus, au centre.
C
4 Nettoyez l'unité de coupe et l'intérieur de l'appareil avec la
brosse de nettoyage.
C
5 Remontez le couteau en le replacant sur la tête jusqu'à
entendre un "click".
Il n'est pas nécessaire de lubrifier le couteau.
Remplacement
Utilisez uniquement une unité de rasage Philips d'origine pour
remplacer la votre, si elle est usée ou endommagée.
C
1 Retirez le couteau en poussant dessus, au centre.
FRANÇAIS 13
Page 12
C
2 Placez les deux bras de la nouvelle unité de rasage dans les
rainures et repoussez l'unité dans l'appareil.
Environnement
La batterie rechargeable intégrée contient des substances susceptibles
de nuire à l'environnement.
Lorsque vous vous séparerez de votre appareil en fin de vie, retirez la
batterie.
Ne jetez pas la batterie avec les ordures ménagères habituelles, mais
déposez la dans un lieu assigné à cet effet.
Vous pouvez également déposer votre appareil dans un Centre Service
Agréé Philips, où l'on s'en chargera avec plaisir.
1 Débranchez l'appareil de la prise de courant, et laissez le
fonctionner jusqu'à qu'à l'arrêt complet du moteur.
2 Ouvrez et retirez l'unité de rasage.
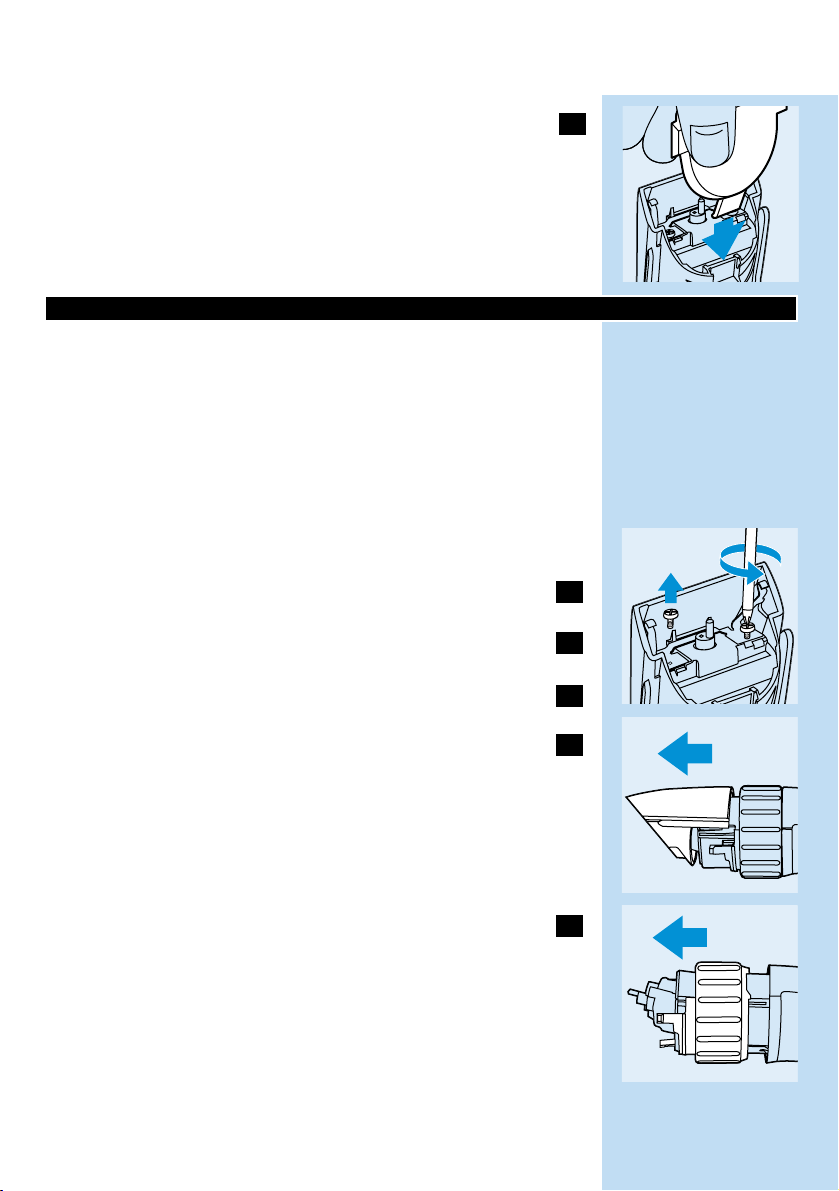
C
3 Dévissez et retirez la partie métallique à l'aide du tournevis.
C
4 Retirez la partie supérieure.
C
5 Retirez le guide de coupe et le couteau.
FRANÇAIS14
Page 13
C
6 Ouvrez le corps de l'appareil en deux, à l'aide du tournevis.
C
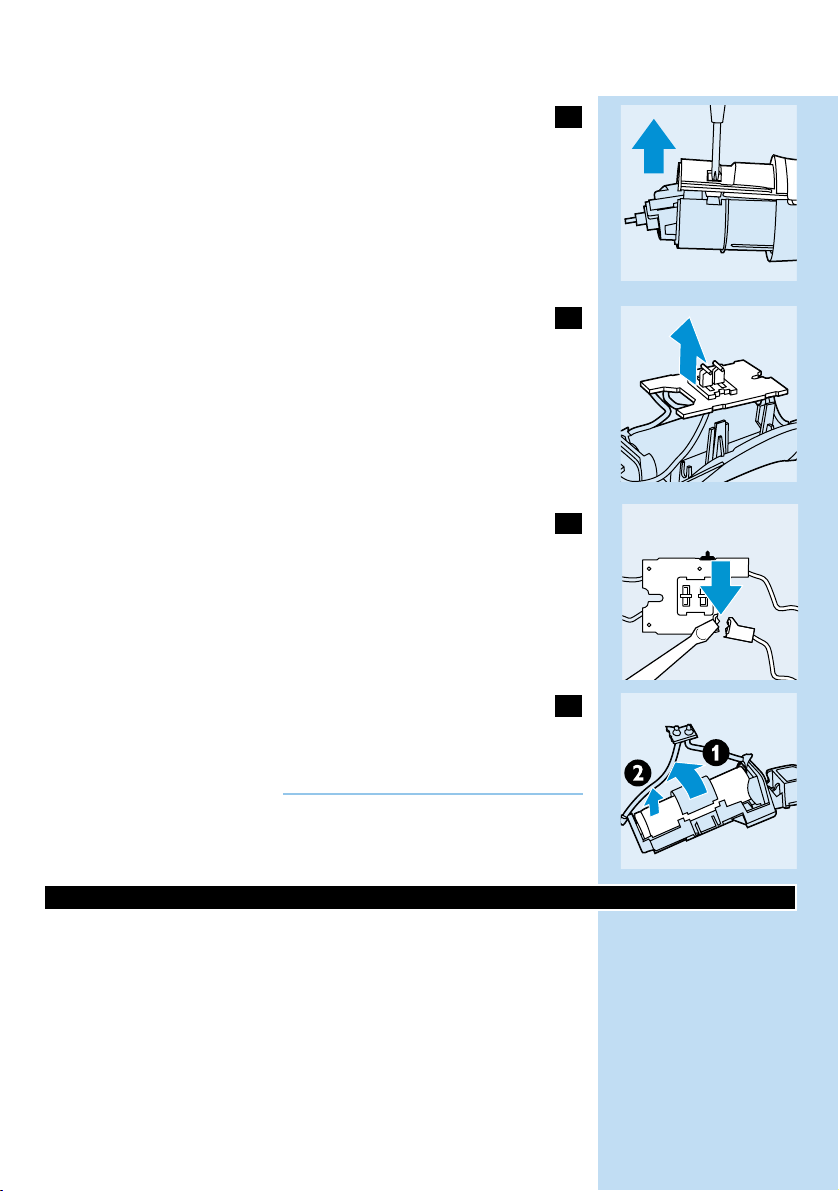
7 Otez le circuit imprimé.
C
8 Insérez un tournevis dans la fente du circuit marquée d'une
flèche. Poussez le tournevis jusqu'à rompre une partie du
circuit.
C
9 Ouvrez le support, en plastique, des accumulateurs et ôtez-les.
Ne branchez pas l'appareil sur le secteur après l'avoir ouvert.
Informations & Service
Pour toute réparation/information, ou en cas de problème, visitez notre
website: www.philips.com. Ou veuillez contacter le Service
Consommateurs Philips de votre pays (vous trouverez le numéro de
téléphone dans le dépliant sur la garantie internationale). S'il n'y a
aucun Service Consommateurs Philips dans votre pays, contactez votre
distributeur ou le Service Department de Philips Domestic Appliances
and Personal Care BV.
FRANÇAIS 15
Page 14
16
B
B
B
..»»ZZGGÈÈddGG ∂∂ØØee áᣣ°°SSGGƒƒHH ∞∞««∏∏¨¨ààddGG ÉÉàà©©££bb ππ°°üüaaGG
..¬¬««∏∏YY ´´ƒƒÑÑ££ŸŸGG áá««FFÉÉHHôô¡¡µµddGG ááMMƒƒ∏∏ddGG ÖÖëë°°SSGG
áá««FFÉÉHHôô¡¡µµddGG ááMMƒƒ∏∏ddGG ‘‘ ÉÉ¡¡««ddGG ôô°°TTDDƒƒŸŸGG øøccÉÉeeCC’’GG ¤¤GG »»ZZGGÈÈ∏∏dd ∂∂ØØee ππNNOOCCGGººbb ..¬¬««∏∏YY ´´ƒƒÑÑ££ŸŸGG
áá««FFÉÉHHôô¡¡µµddGG ááMMƒƒ∏∏ddGG øøee áá©©££bb ôô°°ùùµµææJJ ¿¿CCGG ¤¤GG ππØØ°°SSCC’’GG ¤¤GG »»ZZGGÈÈddGG ∂∂ØØee óó°°ûûHH..ÉÉ¡¡««∏∏YY ´´ƒƒÑÑ££ŸŸGG
IIOOÉÉYYGG øøµµÁÁ »»ààddGG áájjQQÉÉ££ÑÑddGG ´´õõffGG hh ∂∂««àà°°SSÓÓÑÑddGG øøee ááYYƒƒææ°°üüŸŸGG áájjQQÉÉ££ÑÑddGG ááµµ°°SSÉÉee ííààaaGG
..ÉÉ¡¡ææëë°°TT
!¬ëàa ó©H AÉHô¡µdG ¤G RÉ¡÷G π°Uh IOÉYÉH º≤J ’
9
6
7
8
≈∏Y ¢ùÑ«∏«a áëØ°U IQÉjR ∂æe ƒLôf á∏µ°ûe ájCG â¡LGh hCG áeóN ájCG ¤G âéàMG GPG
¿GƒæY â– âfÎf’G www.philips.comáeóÿ ¢ùÑ«∏«a õcôà ∫É°üJ’G hCG
∑ó∏H ‘ øFÉHõdG
áeóN õcôe ∑Éæg øµj ⁄ GPG .(»ŸÉ©dG ¿Éª°†dG ≥ë∏e øe ∞JÉ¡dG ºbQ ≈∏Y ∫ƒ°ü◊G ∂æµÁ )
бeуN хcфГ π°ьJEG hCG ¢щС«∏«a дЙйажe π«cƒH π°ьJEG ,¬«a ш£≤J …тdG у∏СdG ‘ шFЙHхdG
.á«°üî°ûdG ájÉæ©dGh á«dõæŸG äGhOCÓd ¢ùÑ«∏«a
ááeeóóÿÿGGhh ääÉÉeeƒƒ∏∏©©ŸŸGG
B
áá««HHôô©©ddGG
Page 15
17
Éɪª¡¡ææccÉÉeeCCGG ‘‘ IIóójjóó÷÷GG ¢¢üü≤≤ddGG IIóóMMhh øøee ((ºº°°SSôôddGG ‘‘ ááææ««ÑÑŸŸÉÉcc)) ¿¿ÉÉàà©©££≤≤ddGG ™™°°VVƒƒHH ººbb
..RRÉÉ¡¡÷÷GG ¤¤GG áá©©££≤≤ddGG §§¨¨°°VV óóYYCCGG ººKK øøeehh áá°°üü°°üüııGG
ááÄÄ««ÑÑddGG
.áÄ«ÑdG …PDƒJ ób OGƒÃ IOhõŸG äÉjQÉ£ÑdG …ƒà–
.RÉ¡÷G øe ¢ü∏îàdG óæY ájQÉ£ÑdG ´õæH ºb
.¢Vô¨dG Gò¡d »ª°SQ õcôe óæY É¡æe ¢ü∏îJ πH ,∫õæŸG äÉjÉØf ™e ájQÉ£ÑdG »eôJ ’
AGó©°S ¿ƒØXƒŸG ¿ƒµ«°S å«M äÉeóî∏d ¢ùÑ«∏«a õcôe …CG ¤G RÉ¡÷G òNCG É°†jCG ∂fɵeÉH
.áÄ«Ñ∏d áæeBG á≤jô£H É¡æe ¢ü∏îàdG h ájQÉ£ÑdG ´õæd ∂JóYÉ°ùÃ
..∑∑ôôÙÙGG ∞∞bbƒƒààjj ¿¿CCGG ¤¤GG π𪪩©jj RRÉÉ¡¡÷÷GG ´´OO hh AAÉÉHHôô¡¡µµddGG øøYY RRÉÉ¡¡÷÷GG ππ°°üüaaGG
..¢¢üü≤≤ddGG IIóóMMhh ´´õõffGG hh ííààaaGG
..»»ZZGGÈÈ∏∏dd ∂∂ØØee áᣣ°°SSGGƒƒHH ÊÊóó©©ŸŸGG §§bbÓÓddGG ´´õõff hh »»ZZGGÈÈddGG ∂∂ØØHH ººbb
..≈≈∏∏YYCC’’GG ¤¤GG ¬¬ÑÑëë°°SS ∫∫ÓÓNN øøee »»eeÉÉeeCC’’GG AAõõ÷÷GG ´´õõffGG
((ΩΩhhhhõõddGG IIGGOOCC’’ áábbóóddGG ππØØbb)) ôô©©°°ûûddGG ∫∫ƒƒWW ππjjóó©©JJ áá≤≤∏∏MM ´´õõffGG‘‘ ááØØbbÉÉææddGG ™™££≤≤ddGG óó°°TT ∫∫ÓÓNN øøee
..RRÉÉ¡¡÷÷GG øøee áá≤≤∏∏◊◊GG ÖÖëë°°SS hh ±±ÓÓ¨¨ddGGhh AAÉÉ££¨¨ddGG
3
2
1
5
4
2
B
B
B
B
áá««HHôô©©ddGG
Page 16
18
∞∞««¶¶ææààddGG
.ΩGóîà°SG πc ó©H RÉ¡÷G ∞«¶æàH ºb
.RÉ¡÷G ∞«¶æàd ¿ƒà«°SC’G hCG ∫hÎÑdG hCG ∫ƒëµdÉc πFGƒ°S hCG ᣰTÉc OGƒe Ωóîà°ùJ ’
.§≤a IOhõŸG IÉ°TôØdG ᣰSGƒH »FÉHô¡µdG ∫ƒÙG h RÉ¡÷G ∞«¶æJ Öéj
..¬¬ØØ««¶¶ææààHH AAóóÑÑddGG ππÑÑbb AAÉÉHHôô¡¡µµddGG ¤¤GG ∫∫ƒƒ°°UUƒƒee ÒÒZZ ¬¬ffCCGG hh π𪪩©jj ’’ RRÉÉ¡¡÷÷GG ¿¿CCGG óóccCCÉÉJJ
..IIOOhhõõŸŸGG IIÉÉ°°TTôôØØddGG áá©©££bb ´´õõææHH ººbb
..áá©©££≤≤ddGG §§°°SShh ≈≈∏∏YY §§¨¨°°††ddGG ∫∫ÓÓNN øøee ¢¢üü≤≤ddGG IIóóMMhh ííààaaGG
..IIOOhhõõŸŸGG IIÉÉ°°TTôôØØddGG áᣣ°°SSGGƒƒHH RRÉÉ¡¡÷÷GG ππNNGGOO hh ¢¢üü≤≤ddGG IIóóMMhh ∞∞««¶¶ææààHH ººbb
..''''∂∂««∏∏cc'''' ä䃃°°UU ™™ªª°°ùùJJ ¿¿CCGG ¤¤GG RRÉÉ¡¡÷÷GG ¤¤GG ÉÉ¡¡££¨¨°°VV ∫∫ÓÓNN øøee ¢¢üü≤≤ddGG IIóóMMhh ¥¥ÓÓZZÉÉHH ººbb
.º«ë°ûJ …C’ RÉ¡÷G êÉàëj ’
3
2
1
5
4
∫∫GGóóÑÑàà°°SS’’GG
.¢ùÑ«∏«a øe á«∏°UCG iôNCÉH ᵡæe hCG áØdÉJ âfÉc GPG ¢ü≤dG IóMh ∫GóÑà°SG Öéj
..≈≈∏∏YYCC’’GG ¤¤GG ÉÉ¡¡ÑÑëë°°SS ∫∫ÓÓNN øøee ÉÉ¡¡YYõõff hh ÉÉ¡¡££°°SShh ≈≈∏∏YY §§¨¨°°††ddGG ∫∫ÓÓNN øøee ¢¢üü≤≤ddGG IIóóMMhh ííààaaGG
1
B
B
B
B
áá««HHôô©©ddGG
Page 17

19
..''''∂∂««∏∏cc'''' ä䃃°°UU ™™ªª°°ùùJJ ¿¿CCGG ¤¤GG RRÉÉ¡¡÷÷GG ‘‘ ÉÉ¡¡dd ¢¢üü°°üüııGG ¿¿ÉɵµŸŸGG ‘‘ IIÉÉ°°TTôôØØddGG ááµµ°°SSÉÉee ππNNOOCCGG
.Úà¡÷G øe ΩɵMÉH ádƒ°Uƒe áµ°SÉŸG ¿ƒµJ ¿CG ócCÉJ
∫∫ƒƒWW ππjjóó©©JJ áá≤≤∏∏MM ôôjjhhóóJJ ∫∫ÓÓNN øøee ∂∂ddPP hh ôô©©°°ûûddGG ∫∫ƒƒ££dd ááHHƒƒZZôôŸŸGG áá««©©°°VVƒƒddGG QQÉÉ««ààNNÉÉHH ººbb
((ΩΩhhhhõõddGG IIGGOOCC’’ áábbóóddGG ππØØbb)) ôô©©°°ûûddGGáá««©©°°VVhh ââ««ÑÑããJJ ººààjj ¿¿CCGG ¤¤GG iiôô°°ùù««ddGG hhCCGG ≈≈æ檪««ddGG áá¡¡÷÷GG ¤¤GG
..Ü܃ƒZZôôŸŸGG ôô©©°°ûûddGG ∫∫ƒƒ££dd ÉÉ≤≤aahh IIÉÉ°°TTôôØØddGG
¢¢††««ØØîîJJ ººKK øøeehh ((ÒÒÑѵµddGG §§°°ûûŸŸGG)) ÖÖjjòò°°ûûJJ ááLLQQOO ≈≈∏∏YYCCÉÉHH ôô©©°°ûûddGG ÖÖjjòò°°ûûJJ áá««∏∏ªªYY AAóóÑÑHH ∂∂ëë°°üüææff
..∂∂jjóódd ππ°°††ØØŸŸGG ôô©©°°ûûddGG iiƒƒàà°°ùùee ¤¤GG ππ°°üüJJ ¿¿CCGG ¤¤GG IIÒÒ¨¨°°UU áá««ddÉÉààààee IIGGƒƒ££îîHH ôô©©°°ûûddGG ∫∫ƒƒWW ääÉÉLLQQOO
..RRÉÉ¡¡÷÷GG π𫫨¨°°ûûààHH ººbb
™™LLGGQQ hhCCGG ''''ííjjôô°°ùùààddGGhh ºº««ªª°°üüààddGG'''' ääÉɪª««∏∏©©ààddGG ÖÖqq««à൵dd ÉÉ≤≤aahh ááÑÑ°°SSÉÉæ柟GG ¢¢üü≤≤ddGG áá≤≤jjôôWW QQÉÉ««ààNNÉÉHH ººbb
``ddGG
CD-Rom
..ääÉɪª««∏∏©©àà∏∏dd ππYYÉÉØØààŸŸGG
ºb hCG /h ïØfG h IÉ°TôØdG á©£b ´õæH ºb ,IÉ°TôØdG ‘ ô©°ûdG øe ÒãµdG ™qªŒ ” GPG :áë«°üf
IQÉàıG ô©°ûdG ∫ƒW á«©°Vh Ò¨j ’ IÉ°TôØdG ´õf á«∏ªY ¿G .IÉ°TôØdG øe ô©°ûdG ∂jôëàH
.É≤Ñ°ùe
É¡JGP ô©°ûdG á°üb ≈∏Y ®ÉØë∏d ∂dP h ¬JÎNG …òdG ô©°ûdG ∫ƒW á«©°Vh π«é°ùàH ºb :áë«°üf
.á«∏Ñ≤à°ùŸG äÉ°ü≤∏d
IIOOhhõõŸŸGG IIÉÉ°°TTôôØØddGG ΩΩGGóóîîàà°°SSGG ¿¿hhOO §§≤≤∏∏ddGG
»àdG á≤£æŸG h áÑbôdG §N ójóëàd ∂dP h IOhõŸG IÉ°TôØdG ¿hO §≤∏dG RÉ¡L ΩGóîà°SG ∂æµÁ
.ÚfPC’ÉH §«–
`dG ‘ íFÉ°üædG h äÉeƒ∏©ŸG øe ójõŸG OÉéjG É°†jCG ∂fɵeÉH CD-Rom.äɪ«∏©àdG
..RRÉÉ¡¡÷÷GG øøee ÉÉ¡¡ÑÑëë°°SS ∫∫ÓÓNN øøee IIOOhhõõŸŸGG IIÉÉ°°TTôôØØddGG áá©©££bb ´´õõææHH ººbb
.±GôWC’G øe IÉ°TôØdG Öë°ùH ºb .GóHCG IÉ°TôØdG øe áfôŸG É«∏©dG á©£≤dG Öë°ùJ ’
¿CG »æ©j Gòg .RÉ¡é∏d ¢UÉ≤dG Aõ÷G h ¢SCGôdG ÚH áæ«©e áaÉ°ùe ≈∏Y IÉ°TôØdG á©£b ßaÉ–
Iô°ûH øe GóL ÉÑjôb h GóL GÒ°üb ô©°ûdG ¢üb ¤G …ODƒ«°S IÉ°TôØdG ¿hO RÉ¡÷G ΩGóîà°SG
.¢SCGôdG
3
2
1
1
B
B
B
,
,
áá««HHôô©©ddGG
Page 18

20
..RRÉÉ¡¡÷÷GG ¤¤GG RRÉÉ¡¡÷÷GG ¢¢ùùÑÑ≤≤ee ππ°°UUhhCCGG
..¢¢ùùHHÉÉ≤≤ddGG ‘‘ »»°°SSÉÉ°°SSCC’’GG ¢¢ùùÑÑ≤≤ŸŸGG ππ°°UUhhCCGG
.øë°ûdG Ωƒ≤j RÉ¡÷G ¿CÉH ó«cCÉà∏d IAÉ°V’ÉH Ò°TCÉàdG Aƒ°V Ωƒ≤«°S
.âdƒa 230 hP »FÉHô¡µdG QÉ«àdG RÉ¡÷G Gòg Ö°SÉæj
.RÉ¡÷ÉH OhõŸG ∂∏°ùdG §≤a Ωóîà°SG
.áYÉ°S 24 øY ójõJ IÎØd RÉ¡÷G øë°ûJ ’
50 IóŸ ,∂∏°ùdG ΩGóîà°SG ¿hO ,𫨰ûà∏d âbh ≈∏Y πeɵdÉH ¿ƒë°ûŸG RÉ¡÷G …ƒàëj
.á≤«bO
áájjQQÉÉ££ÑÑddGG IIÉÉ««MM ááddÉÉWWGG
-∫hGR πH ,ábôØàŸG äÉeGóîà°S’G ÚH ¬æë°ûH º≤J ’ ,¤hC’G Iôª∏d RÉ¡÷G øë°T ó©H
.AÉ¡àf’G ≈∏Y ájQÉ£ÑdG ∂°TƒJ ÉeóæY §≤a ¬æë°T IOÉYÉH ºb h ¬eGóîà°SG ≈∏Y
-¿CG ¤G πª©j ∑ôÙG ∑ôJ ∫ÓN ºc áæ°ùdG ‘ ¿ÉJôe πeɵdÉH ájQÉ£ÑdG ≠jôØàH ºb
.∞bƒàj
.âbƒdG ∫GƒW ¢ùHÉ≤dG ¤G ’ƒ°Uƒe ∂∏°ùdG ∑ÎJ ’ -
.áYÉ°S 12 IóŸ ¬æë°T IOÉYG Öéj ,á∏jƒW IóŸ RÉ¡÷G ΩGóîà°SG ºàj ⁄ PG -
3
2
»»FFÉÉHHôô¡¡µµddGG ∂∂∏∏°°ùùddGG ΩΩGGóóîîàà°°SSÉÉHH ôô©©°°ûûddGG ÖÖjjòò°°ûûJJ
ôô©©°°ûûddGG ÖÖjjòò°°ûûààdd õõ««¡¡ééààddGG
`dG É°†jCG ™LGQ CD-Rom.äɪ«∏©à∏d πYÉØàŸG
::IIOOhhõõŸŸGG IIÉÉ°°TTôôØØddGG ΩΩGGóóîîàà°°SSÉÉHH ôô©©°°ûûddGG ÖÖjjòò°°ûûJJ
.¬H ܃ZôŸG ô©°ûdG ∫ƒ£d É≤ah IÒѵdG hCG IÒ¨°üdG IÉ°TôØdG QÉàNG
ôô©©°°ûûddGG ∫∫ƒƒWW áá««©©°°VVhh QQÉÉ««ààNNGG
hhCCGG ääÉÉ««©©°°VVƒƒddGG ≥≥aaGGƒƒààJJ ..IIÉÉ°°TTôôØØddGG ±±ôôWW óóææYY ääGGÎΪª««∏∏ŸŸÉÉHH ÉÉ¡¡««ddGG ôô°°TTDDƒƒee ôô©©°°ûûddGG ∫∫ƒƒWW ääÉÉ««©©°°VVhh
..¢¢üü≤≤ddGG óó©©HH »»≤≤ÑÑààŸŸGG ôô©©°°ûûddGG ∫∫ƒƒWW ™™ee √√òògg ääÉÉ°°SSÉÉ≤≤ŸŸGG
-hCG º∏e 12 hCG º∏e9 hCG º∏e6 hCG º∏e 3 ÉeG ¬dƒW íÑ°ü«d ô©°ûdG ¢ü≤H IÒ¨°üdG IÉ°TôØdG Ωƒ≤J
.º∏e 21 hCG º∏e 18 hCG º∏e 15
-º∏e 32 hCG º∏e 29 hCG º∏e 26 hCG º∏e23 ÉeG ¬dƒW íÑ°ü«d ô©°ûdG ¢ü≤H IÒѵdG IÉ°TôØdG Ωƒ≤J
.º∏e 41 hCG º∏e 38 hCG º∏e 35 hCG
B
,
::»»FFÉÉHHôô¡¡µµddGG ∂∂∏∏°°ùùddGG ™™ee ôô©©°°ûûddGG áᣣbb’’ ΩΩGGóóîîàà°°SS’’
.¬∏«¨°ûJ IOÉYG πÑb ¿GƒK ™°†Ñd Qɶàf’G ºK øe h ¢ùHÉ≤dÉH ¬∏°Uh ºK øe h RÉ¡÷G ∞«bƒàH ºb
.RÉ¡÷G 𫨰ûJ πÑb ≥FÉbO ™°†H ô¶àfG ,ÉeÉ“ áZQÉa ájQÉ£ÑdG âfÉc GPG
.πeɵdÉH ICÉÑ©e ájQÉ£ÑdG âfÉc GPG ∫ƒ°Uƒe ƒg h RÉ¡÷G 𫨰ûàH º≤J ’
,
B
,
áá««HHôô©©ddGG
Page 19

21
ááeeóó≤≤ee
øe ójó÷G OÉ©HC’G »KÓãdG ô©°ûdG Üò°ûe ¿EÉa !í«ë°üdG QGô≤dG äòîJG ó≤d ,…ΰûŸG ÉfõjõY
.íjôe ΩGóîà°SG ∂ë檫d ∂°SCGQ OhóM ™e ∞q«µàj ¢ùÑ«∏«a
,á∏jƒW IóŸ ¢ùÑ«∏«a øe ójó÷G OÉ©HC’G »KÓãdG ô©°ûdG Üò°ûe ΩGóîà°SÉH ´Éàªà°SÓd
.á«dÉàdG äÉeƒ∏©ŸG IAGô≤H ∂ë°üæf
`dG äɪ«∏©J ‘ h ''íjô°ùàdG h π«µ°ûàdG'' èàæŸG πNGO OhõŸG Ö
q
«àµdG ‘CD-Rom,
.É¡ÑZôJ »àdG á°ü≤dG ≈∏Y ∫ƒ°üë∏d Ió«Øe íFÉ°üf h äɪ«∏©J OÉéjG ∂fɵeÉH
kkGGóóLL ºº¡¡ee
RRÉÉ¡¡÷÷GG
»FÉHô¡µdG QÉ«àdG ™e ≥aGƒàj »°SÉ°SC’G ¢ùÑ≤ŸG ‘ ¬«dG ô°TDƒŸG »FÉHô¡µdG QÉ«àdG ¿CG ócCÉJ
.RÉ¡÷G π«°UƒJ πÑb ∂dõæe ‘ »°SÉ°SC’G
.AÉŸÉH ÓàÑj ’ »FÉHô¡µdG ∫ƒÙG h RÉ¡÷G ¿CG ócCÉJ
.ájƒÄe áLQO 35h 15 ÚH Ée IQGôM ‘ RÉ¡÷G øjõîàH ºb h øë°TG h Ωóîà°SG
CR-Rom
`dG ≈∏Y ßaÉM CD-Romiƒ°ü≤dG á«dÉ©dG IQGô◊G øeh áHƒWôdG h QÉѨdG øe äɪ«∏©àdG
.á«fóàŸG hCG
`dG ™°†J ’ CD-Rom.á∏jƒW IÎØd Iô°TÉÑŸG ¢ùª°ûdG á©°TCG É¡«dG π°üJ »àdG øcÉeC’G ‘
`dG í£°S ¢TóîH º≤J ’CD-Rom
`dG ≈∏Y ÖàµJ ’ CD-Rom.¢UÉN ∂«ª°S º∏≤H ’G
`dG ¿Éc GPG CD-Romπ°üJ ¿CG ¤G ’G ¬eGóîà°SÉH º≤J ’ ,OQÉH ¿Éµe ‘ ÉXƒØfi
.áaô¨dG IQGôM ¤G ¬JQGôM
`dG ∫ÉNOÉH ºb CD-Rom√ÉŒÉH É¡«∏Y ´ƒÑ£ŸG á¡÷G ¿ƒµJ ¿CG ≈∏Y ¢Uô◊G ™e
.≈∏YC’G
»»FFÉÉHHôô¡¡µµddGG øøëë°°ûûddGG
.∫hC’G ΩGóîà°S’G πÑb áYÉ°S 12 IóŸ RÉ¡÷G øë°ûH ºb-
..øøëë°°ûûddGG áá««∏∏ªªYY ∫∫ÓÓNN π𪪩©jj ’’ RRÉÉ¡¡÷÷GG ¿¿CCGG óóccCCÉÉJJ
1
B
,
B
,
,
,
,
,
,
,
,
B
áá««HHôô©©ddGG
,
,
,
Page 20

22232425262728
Page 21

Page 22

Page 23

Page 24

Page 25

Page 26

Page 27

STYLING BOOKLET
Page 28

Introduction
Creating different hairstyles has become very easy with Philishave's
new line of hair clippers. Forget those expensive and time-consuming
appointments at the barber's. Create your own hairstyle at home,
whenever you want! In the directions for use you can read how to
charge, use, clean and store your clipper. In this booklet we show you
the basic clipping techniques and how to use them to obtain the
haircut you like.You've never done this before? No problem! Read
these instructions and you will be able to create a neat, fashionable
hairstyle straightaway.
Before you start clipping
Before you start clipping, it is important to familiarise yourself with the
Philishave hair clipper by reading the directions for use.To get the best
results, stick to the following procedure during clipping.
Before you start clipping we recommend that you do the following.
1 First, find a comfortable place in front of a mirror where the
person whose hair you are going to cut can sit down.
2 Make sure that the person's head is at the same level as your
chest so that all parts of the head are clearly visible and within
easy reach.
3 Comb the hair in the direction of growth. Now you are ready
to start clipping.
Tip: to get the best results, only use the hair clipper on dry hair. Do not
use it on freshly washed hair.
Basic clipping techniques
Start clipping
C
1 Always start clipping the hair at the nape at the longest setting
to establish whether you have set the comb attachment to the
correct length setting.Adjust the setting, if necessary.When
you have used the hair clipper before, start clipping at the
longest setting you have previously selected to create the same
hairstyle. Use this length setting to clip the whole head.
ENGLISH30
Page 29

C
2 Then use a shorter length setting to clip the areas near the
temple and at the nape.
C
3 Finally, contour the hairline round the ears and at the nape.
Tip: regularly remove cut hair from the comb while clipping.
Clipping with comb attachment
The comb has been specially designed to always keep the cutting
element at the same distance from the scalp.The flexible comb easily
follows the contours of the head.
If you use the hair clipper with a comb attachment, you can obtain
different hair lengths of up to 41 mm.The appliance comes with two
comb attachments, offering 14 different hair length settings altogether
(see table).
The hair length settings are indicated in millimetres on the arms of the
comb attachment.
You can simply slide a comb attachment onto the appliance and
choose the desired hair length setting.
Cutting length settings
Small Comb Large Comb
setting hair length setting hair length
1 3 mm 8 23 mm
2 6 mm 9 26 mm
3 9 mm 10 29 mm
4 12 mm 11 32 mm
5 15 mm 12 35 mm
6 8 mm 13 38 mm
7 21 mm 14 41 mm
Please note that with certain hair types the resulting hair length may
deviate from the length indicated.
ENGLISH 31
Page 30

Clipping without comb attachment
You can obtain hair lengths of over 4 cm by using a styling comb or
your fingers together with the hair clipper without comb attachment.
C
1 Comb a small section of hair upwards against the direction of
growth.
2 Lift the hair with the comb or hold it between your fingers
until only the length that needs to be cut sticks out.
C
3 Use the clipper without the comb attachment to cut the hair
protruding from the comb or fingers.
The right cutting techniques
C
◗ Always move the hair clipper AGAINST the direction of hair
growth, otherwise it will not cut the hair properly.
◗ Make sure the comb attachment is always fully in contact with the
scalp to obtain an even cutting result.
◗ Make slow and smooth movements and carefully follow the
contours of the head.
◗ Comb the hair frequently to remove cut hair.
◗ When clipping the crown, pass the clipper slowly over the crown
from different directions to achieve an even cutting result.
◗ Make overlapping passes over the head to ensure that the clipper
catches all the hairs that need to be cut.
◗ Comb the hair in the direction of hair growth from time to time
so that the clipper can catch the hair more easily.
◗ To achieve a good result with curly, sparse or long and thin hair,
use a comb to guide the hair towards the clipper.
Graduation
The Philishave hair clipper not only allows you to cut hair evenly at the
same length all over the head, it also enables you to achieve a smooth
transition from longer hair on top of the head to shorter hair on the
back and sides of the head.
1 First clip all the hair at the longest setting.
2 Then choose a shorter setting and cut the hair on all parts of
the head except the top, where you want the hair to be longer.
ENGLISH32
Page 31

3 You can repeat this procedure until the hair on every part of
the head has the desired length and a smooth transition
between the long hair on the top and the shorter hair on the
back and sides of the head has been achieved.
Precise contouring without comb attachment
To contour the hairline round the ears and at the nape, remove the
comb attachment by pulling it off the clipper.
Be careful when you are clipping without comb attachment, for the
clipper will remove every hair it touches.
Contouring the hairline round the ears
1 First comb the hair ends over the ear.
C
2 If necessary, bend the person's ear to get it out of the way.
C
3 Hold the clipper without comb attachment with the cutter
pointing downwards.
4 Place one edge of the cutter onto the skin and then slowly and
carefully shape the desired outline.
Always keep the teeth of the clipper at a safe distance from the ears.
Tilt the clipper in such a way that only one edge of the cutting element
touches the hair ends.
Trimming the sideburns
C
5 Turn the clipper and hold it with the cutter pointing
downwards.
6 Cut only the hair ends.The hairline should be close to the ear.
Contouring the nape hairline
C
7 Use the clipper without the comb attachment and hold it with
the cutter pointing downwards.
8 Make slow and steady downward strokes.
9 Do not place the clipper too high up on the back of the head.
Follow the natural hairline.
10 Do not try to comb the hair downwards with the clipper,as
the appliance will remove all the hair it touches.
ENGLISH 33
Page 32

Create your favourite haircut!
The Philishave hair clipper has been designed to give you optimum
freedom when cutting hair at home. With its 14 different hair length
settings and a styling comb the possibilities are nearly endless. Of
course, the results depend on the type of hair, your own personal taste
and creativity.To make sure you get good results right from the start,
we have selected a few hairstyles.The following hairstyles give you an
idea of what can be achieved with a Philishave hair clipper.The
numbers indicated in the picture are the settings used to create each
particular style.
Short and simple
Use the small comb.
C
◗ Hair length settings:
sides: 9 mm
top: 18 mm
Long on top and short on the sides of the head
C
◗ Hair length settings:
lower part of back and sides: 9 mm
upper part of back and sides: 18 mm
top: 41 mm
Fashionably short
C
◗ Hair length settings:
nape: 9 mm
lower part of back and sides: 12 mm
upper part of back and sides: 18 mm
top: 32 mm
ENGLISH34
32
18
12
9
41
18
9
18
9
Page 33

Curly hair
C
◗ Hair length settings:
nape: 6 mm
lower part of back and sides: 15 mm
upper part of back and sides: 21 mm
top: with clipper over fingers
Remember your personal settings!
Clipping with the Philishave hair clipper is much easier than it looks.
After a few haircuts you can experiment with other settings than the
ones mentioned above.You will see that there are many possibilities.To
help you remember the settings you have used for yourself and others,
simply fill in the Personal Setting Table at the end of this booklet.
Personal Setting Table
Name:
nape:
lower part of back and sides:
upper part of back and sides:
top:
Name:
nape:
lower part of back and sides:
upper part of back and sides:
top:
Name:
nape:
lower part of back and sides:
upper part of back and sides:
top:
ENGLISH 35
> 41
21
15
6
Page 34

Introduction
La nouvelle gamme de tondeuses à cheveux Philishave vous permet de
réaliser très facilement différentes coiffures. Ne perdez plus de temps
ni d'argent chez le coiffeur. Créez votre propre coiffure chez vous,
quand vous le souhaitez! Ce mode d'emploi vous indique comment
recharger, utiliser, nettoyer et conserver votre tondeuse. Cette
brochure vous montre comment utiliser les techniques de coupes
basiques pour réaliser la coupe que vous désirez. C'est la première fois?
Pas de problème! Lisez ces instructions et vous pourrez alors créer une
coupe soignée, et à la mode.
Avant la première utilisation
Avant de commencer, il est important de se familiariser avec la
tondeuse Philishave.Veuillez lire et suivre les instructions du mode
d'emploi pour obtenir les meilleurs résultats.
Avant la première utilisation, nous vous conseillons de suivre les
instructions qui suivent.
1 Tout d'abord,vous devez installer confortablement la personne
à qui vous allez couper les cheveux devant un miroir.
2 Assurez-vous que la tête est au même niveau que votre
poitrine, de manière à avoir une large vue d'ensemble.
3 Peignez les cheveux dans le sens de la pousse.Vous êtes prêt à
commencer.
Suggestion: pour obtenir les meilleurs résultats, n'utilisez la tondeuse
que sur cheveux secs. Ne l'utilisez pas sur des cheveux qui viennent
d'être lavés.
Techniques de coupes basiques
Commencer la taille
C
1 Commencez toujours par la nuque et utilisez le réglage
maximum de hauteur de coupe pour établir si vous avez réglé
correctement le guide de coupe.Ajustez le réglage, si
nécessaire, à la longueur de coupe désirée. Coupez les cheveux
en utilisant d'abord ce réglage.
FRANÇAIS36
Page 35

C
2 Ensuite utilisez un réglage inférieur pour couper les pattes et la
nuque.
C
3 A la fin, dessinez le contour de la nuque et des oreilles.
Suggestion: retirez à intervalles réguliers les mèches coupées.
Taille avec guide de coupe
Le guide de coupe a été conçu pour maintenir toujours le couteau à la
même distance du cuir chevelu. Le guide flexible suit facilement les
contours de la tête.
Si vous utilisez la tondeuse avec guide de coupe, vous obtenez
différentes longueurs de coupe jusqu'à 41 mm. L'appareil est fourni
avec deux guides de coupe, offrant au total 14 positions différentes de
hauteur de coupe (voir tableau).
Les réglages de hauteur de coupe sont indiqués en millimètres sur le
guide de coupe.
Coulissez simplement un des guides de coupe dans l'appareil et
choisissez la position désirée.
Réglages de hauteur de coupe
Petit guide de coupe Grand guide de coupe
réglage hauteur de coupe réglage hauteur de coupe
1 3 mm 8 23 mm
2 6 mm 9 26 mm
3 9 mm 10 29 mm
4 12 mm 11 32 mm
5 15 mm 12 35 mm
6 8 mm 13 38 mm
7 21 mm 14 41 mm
Veuillez noter que pour certains types des cheveux la longueur
obtenue peut être différente de celle indiquée.
FRANÇAIS 37
Page 36

Taille sans guide de coupe
Vous pouvez obtenir une longueur des cheveux supérieure à 4 cm en
utilisant un peigne ou vos doigts et la tondeuse sans guide de coupe.
C
1 Peignez une mèche de cheveux vers le haut dans le sens
inverse de la pousse.
2 Soulevez la mèche à l'aide du peigne ou saisissez-la entre vos
doigts jusqu'à ce que la longueur de cheveux que vous voulez
couper dépasse.
C
3 Utilisez la tondeuse sans le guide de coupe pour couper les
mèches qui dépassent du peigne ou des doigts.
Techniques de coupes
C
◗ Déplacez toujours la tondeuse dans le sens inverse de la pousse
des cheveux, pour obtenir une coupe uniforme.
◗ Assurez-vous que le guide de coupe est toujours bien en contact
avec le cuir chevelu.
◗ Faites des mouvements lents et réguliers et dessinez
soigneusement les contours de la tête.
◗ Peignez les cheveux à intervalles réguliers pour retirer les mèches
coupées.
◗ Lorsque vous coupez les cheveux de la calotte, déplacez la
tondeuse lentement par-dessus la calotte, en partant de la nuque
vers le dessus de la tête.
◗ Donnez de petits coups de tondeuse supplémentaires pour vous
assurer que la tondeuse a coupé les poils rebelles.
◗ De temps en temps, peignez les cheveux dans le sens de la pousse
pour que la tondeuse attrape mieux les mèches.
◗ Pour obtenir des résultats optimaux sur cheveux ondulés, rares ou
longs et fins, utilisez le peigne pour guider les cheveux vers la
tondeuse.
Gradation
La tondeuse Philishave vous permet de couper les cheveux de façon
régulière mais elle vous aide également d'obtenir une coupe nette en
commençant par le haut de la tête où les cheveux sont plus longs vers
la nuque et les côtés où les cheveux sont plus courts.
1 Tout d'abord,tondez en sélectionnant le réglage maximum de
hauteur de coupe.
FRANÇAIS38
Page 37

2 Ensuite choisissez un réglage inférieur et coupez les cheveux à
l'arrière de la tête, sauf le sommet.
3 Vous pouvez répéter cette procédure jusqu'à ce que les
cheveux de la nuque et des côtés aient la longueur désirée et
que vous ayez effectué une transition uniforme entre les
cheveux du haut et de l'arrière.
Dessiner un contour précis sans guide de coupe
Pour dessiner le contour de la nuque et des oreilles, retirez le guide de
coupe de la tondeuse.
Faites attention lorsque vous utilisez la tondeuse sans guide de coupe,
car elle coupe chaque cheveu touché.
Dessiner le contour des oreilles
1 Tout d'abord,peignez les bouts des cheveux vers l'oreille.
C
2 Si nécessaire, penchez l'oreille pour faciliter l'opération.
C
3 Tenez la tondeuse sans le guide de coupe avec le couteau dirigé
vers le bas.
4 Posez la tondeuse délicatement sur la peau et dessinez
lentement le contour désiré.
Assurez-vous que les dents de la tondeuse sont à une distance
suffisante des oreilles.
Inclinez la tondeuse de telle manière que seulement un des bords du
couteau touche les cheveux.
Tailler les pattes
C
5 Tournez la tondeuse et tenez-la avec le couteau dirigé vers le
bas.
6 Coupez uniquement les bouts des cheveux en suivant le
contour naturel de la racine des cheveux.
Désinner le contour de la nuque
C
7 Utilisez la tondeuse sans le guide de coupe et tenez-la avec le
couteau dirigé vers le bas.
8 Faites des mouvements lents et uniformes vers le bas.
9 Ne placez pas la tondeuse trop haut à l'arrière de la tête.
Suivez le contour naturel de la racine des cheveux.
FRANÇAIS 39
Page 38

10 Ne peignez pas les cheveux avec la tondeuse car l'appareil
coupe tous les cheveux qu'il touche.
Réalisez votre coupe de cheveux préférée!
La tondeuse Philishave a été spécialement conçue pour vous permettre
de couper les cheveux avec une entière liberté. Grâce aux 14 positions
différentes de hauteur de coupe et au peigne, les possibilités offertes
sont presque infinies. Les résultats dépendent du type de cheveux, de
votre goût personnel et votre créativité. Pour vous aider à obtenir de
bons résultats dès le début, nous avons sélectionné quelques coiffures.
Les coiffures suivantes vous donnent une idée de ce que vous pouvez
réaliser avec la tondeuse Philishave. Les numéros indiqués dans les
images correspondent aux réglages utilisés pour réaliser chaque
coiffure.
Court et simple
Utilisez le petit guide de coupe
C
◗ Réglages de la hauteur de coupe:
côtés: 9 mm
sommet: 18 mm
Long au sommet de la tête et court aux côtés
C
◗ Réglages de la hauteur de coupe:
partie inférieure de la nuque et des côtés: 9 mm
partie supérieure de la nuque et des côtés: 18 mm
sommet: 41 mm
Coiffure courte à la mode
C
◗ Réglages de la hauteur de coupe:
nuque: 9 mm
partie inférieure de la nuque et des côtés: 12 mm
partie supérieure de la nuque et des côtés: 18 mm
sommet: 32 mm
FRANÇAIS40
32
18
12
9
41
18
9
18
9
Page 39

Cheveux bouclés
C
◗ Réglages de la hauteur de coupe:
nuque: 6 mm
partie inférieure de la nuque et des côtés: 15 mm
partie supérieure de la nuque et des côtés: 21 mm
sommet: avec tondeuse par-dessus les doigts
N'oubliez pas les positions utilisées!
Tondre les cheveux avec la tondeuse Philishave est beaucoup plus facile
qu'il n'y parait. Après quelques coupes vous pouvez essayer d'autres
positions que les six mentionnées ci-dessus.Vous vous apercevrez qu'il
existe de nombreuses possibilités. Pour vous aider à vous souvenir des
positions précédentes, que ce soit pour vous ou pour les autres,
remplissez simplement le Tableau des Régalges Personnels à la fin de
cette brochure.
Tableau des Réglages Personnels
Nom:
nuque:
partie inférieure de la nuque et des côtés:
partie supérieure de la nuque et des côtés:
sommet:
Nom:
nuque:
partie inférieure de la nuque et des côtés:
partie supérieure de la nuque et des côtés:
sommet:
Nom:
nuque:
partie inférieure de la nuque et des côtés:
partie supérieure de la nuque et des côtés:
sommet:
FRANÇAIS 41
> 41
21
15
6
Page 40

42
êꃃªªŸŸGG ôô©©°°ûûddGG
::ôô©©°°ûûddGG ∫∫ƒƒWW áá««©©°°VVhh
º∏e 6 :≥æ©dG ôNDƒe
º∏e 15 :¬aGôWCG h ¢SCGôdG ôNDƒŸ πØ°SC’G Aõ÷G
º∏e 21 :¬aGôWCG h ¢SCGôdG ôNDƒŸ ≈∏YC’G Aõ÷G
.™HÉ°UC’G ¥ƒa Öjò°ûàdG RÉ¡L ΩGóîà°SÉH :≈∏YC’G
!!∂∂HH áá°°UUÉÉÿÿGG ∫∫ƒƒ££ddGG ääÉÉ««©©°°VVhh ôôccòòJJ
ΩÉ«≤dG ó©H .¬«∏Y hóÑj ɇ ÒãµH π¡°SCG ô©°ûdG Öjò°ûàd ∞°û«∏«a RÉ¡L ΩGóîà°SÉH ô©°ûdG Öjò°ûJ ¿G
‘ º¡«dG ô°TDƒŸG áà°ù∏d áØ∏àfl ∫ƒW á«©°Vh ΩGóîà°SÉH QÉÑàN’G ∂æµÁ ,ô©°û∏d äÉ°üb ¢†©ÑH
á°UÉÿG ∫ƒ£dG á«©°Vh ôcòJ ≈∏Y ∂JóYÉ°ùŸ .ä’ɪàM’G øe ójó©dG ∑Éæg ¿CG iôJ ±ƒ°S .≈∏YC’G
.Ö«àµdG Gòg ájÉ¡f óæY ‹ÉàdG »°üî°ûdG äÉ«©°VƒdG ∫hóL áÄÑ©àH ºb ,øjôNBÉH h ∂H
áá««°°üüîî°°ûûddGG ääÉÉ««©©°°VVƒƒddGG ∫∫hhóóLL
:º°S’G
:≥æ©dG ôNDƒe
:¬aGôWCG h ¢SCGôdG ôNDƒŸ πØ°SC’G Aõ÷G
:¬aGôWCG h ¢SCGôdG ôNDƒŸ ≈∏YC’G Aõ÷G
:≈∏YC’G
:º°S’G
:≥æ©dG ôNDƒe
:¬aGôWCG h ¢SCGôdG ôNDƒŸ πØ°SC’G Aõ÷G
:¬aGôWCG h ¢SCGôdG ôNDƒŸ ≈∏YC’G Aõ÷G
:≈∏YC’G
:º°S’G
:≥æ©dG ôNDƒe
:¬aGôWCG h ¢SCGôdG ôNDƒŸ πØ°SC’G Aõ÷G
:¬aGôWCG h ¢SCGôdG ôNDƒŸ ≈∏YC’G Aõ÷G
:≈∏YC’G
B
,
> 41
21
15
6
áá««HHôô©©ddGG
Page 41

43
!!áá∏∏°°††ØØŸŸGG ∑∑ôô©©°°TT ááëëjjôô°°ùùJJ QQÉɵµààHHÉÉHH ººbb
‘ ∑ô©°T ¢ü≤H ∂eÉ«b óæY á∏eɵdG ájô◊G ∂d ôaƒ«d ô©°ûdG Öjò°ûàd ∞°û«∏«a RÉ¡L º«ª°üJ ” ó≤d
‘ IôaƒàŸG áØ∏àıG 14`dG ô©°ûdG ∫GƒWCG á«©°Vh ™e IójóY ä’ɪàM’Gh äGQÉ«ÿG ¿G .∫õæŸG
∂bhP h ô©°ûdG á«Yƒf ≈∏Y óªà©J áé«àædG ¿Éa ,™Ñ£dÉH .íjô°ùàdG IÉ°Tôa ¤G áaÉ°V’ÉH RÉ¡÷G
¢†©H QÉ«àNÉH Éæªb ,ájGóÑdG øe Ió«L èFÉàf ≈∏Y ∫ƒ°ü◊G ¿Éª°†d .∂YGóHG h »°üî°ûdG
∞«°û«∏«a RÉ¡L ™e ¬«∏Y ∫ƒ°ü◊G ∂fɵeÉH ɪY Iôµa ∂ëæ“ á«dÉàdG äÉëjô°ùàdG ¿G .äÉëjô°ùàdG
πc QɵàH’ áeóîà°ùŸG á«©°VƒdG »g IQƒ°üdG ‘ É¡«dG ô°TDƒŸG ΩÉbQC’G ¿G .ô©°ûdG Öjò°ûàd
.áëjô°ùJ
§§««°°ùùHH hh ÒÒ°°üübb
.IÒ¨°üdG IÉ°TôØdG Ωóîà°SG
::ôô©©°°ûûddGG ∫∫ƒƒWW áá««©©°°VVhh
º∏e 9 :±GôWC’G
º∏e 18 :≈∏YC’G
¢¢SSCCGGôôddGG ±±GGôôWWCCGG óóææYY ÒÒ°°üübb hh ≈≈∏∏YYCC’’GG óóææYY ππjjƒƒWW
::ôô©©°°ûûddGG ∫∫ƒƒWW áá««©©°°VVhh
º∏e 9 :¬aGôWCG h ¢SCGôdG ôNDƒŸ πØ°SC’G Aõ÷G
º∏e 18 :¬aGôWCG h ¢SCGôdG ôNDƒŸ ≈∏YC’G Aõ÷G
º∏e 41 :≈∏YC’G
ääÉÉëë««°°üüddGG ççóóMMCC’’ ÉÉ≤≤aahh ÒÒ°°üübb
::ôô©©°°ûûddGG ∫∫ƒƒWW áá««©©°°VVhh
º∏e 9 :≥æ©dG ôNDƒe
º∏e 12 :¬aGôWCG h ¢SCGôdG ôNDƒŸ πØ°SC’G Aõ÷G
º∏e 18 :¬aGôWCG h ¢SCGôdG ôNDƒŸ ≈∏YC’G Aõ÷G
º∏e 32 :≈∏YC’G
B
18
9
B
41
18
9
B
32
18
12
9
,
,
,
áá««HHôô©©ddGG
Page 42

44
IIÉÉ°°TTôôØØddGG IIGGOOCCGG ΩΩGGóóîîàà°°SSGG ¿¿hhOO ≥≥««bbOO óójjóó––
RÉ¡L øY É¡Ñë°S ∫ÓN øe IÉ°TôØdG IGOCG ´õfG ,≥æ©dG ôNDƒe h ÚfPC’G ∫ƒM ô©°ûdG §N ójóëàd
.Öjò°ûàdG
πc ´õæH Ωƒ≤«°S Öjò°ûàdG RÉ¡L ¿C’ IÉ°TôØdG IGOCG ΩGóîà°SG ¿hO Öjò°ûàdÉH ∂eÉ«b óæY GQòM øc
.¬°ùeÓj …òdG ô©°ûdG
ÚfPC’G ∫ƒM ô©°ûdG ójó–
..ÚÚffPPCC’’GG ¥¥ƒƒaa ôô©©°°ûûddGG ±±GGôôWWCCGG §§««°°ûûªªààHH ººbb ’’hhCCGG
..≥≥jjôô££ddGG GGƒƒ≤≤««©©jj ’’ »»µµdd ¢¢üüîî°°ûûddGG ÊÊPPCCGG »»ææKKGG ,,ôôeeCC’’GG êêÉÉààMMGG GGPPGG
..ππØØ°°SSCC’’GG ¤¤GG áá¡¡ééààee ¢¢üü≤≤ddGG IIGGOOCCGG ¿¿ƒƒµµJJ åå««ëëHH IIÉÉ°°TTôôØØddGG IIGGOOCCGG ¿¿hhOO ÖÖjjòò°°ûûààddGG RRÉÉ¡¡LL ∂∂°°ùùeeGG
hh AA§§ÑÑHH ááHHƒƒZZôôŸŸGG áá≤≤jjôô££ddÉÉHH óójjóóëëààddÉÉHH ººbb ººKK øøee hh IIôô°°ûûÑÑddGG ≈≈∏∏YY ¢¢üü≤≤ddGG IIGGOOCCGG ±±GGôôWWCCGG iióóMMGG ™™°°VV
..áájjÉÉææ©©HH
RÉ¡L »æKG .ÚfPC’G øY øeBG πµ°ûH Ió«©H Öjò°ûàdG RÉ¡L ¿Éæ°SCG ¿ƒµJ ¿CG ≈∏Y ÉehO ßaÉM
.ô©°ûdG ±GôWCG ¢ü≤dG IGOCG øe GóMGh ÉaôW §≤a ¢ùeÓj å«ëH Öjò°ûàdG
∞dGƒ°ùdG Öjò°ûJ
..ππØØ°°SSCC’’GG √√ÉÉŒŒÉÉHH ¢¢üü≤≤ddGGIIGGOOCCGG ¿¿ƒƒµµJJ åå««ëëHH ¬¬µµ°°ùùeeGG hh ÖÖjjòò°°ûûààddGG RRÉÉ¡¡LL QQOOCCGG
..¿¿PPCC’’GG øøee ÉÉÑÑjjôôbb ôô©©°°ûûddGG §§NN ¿¿ƒƒµµjj ¿¿CCGG ÖÖééjj ..§§≤≤aa ôô©©°°ûûddGG ±±GGôôWWCCGG ¢¢üü≤≤HH ººbb
≥æ©dG ôNDƒe §N ójó–
√√ÉÉŒŒÉÉHH ¢¢üü≤≤ddGG IIGGOOCCGG ¿¿ƒƒµµJJ åå««ëëHH ¬¬µµ°°ùùeeGG hh IIÉÉ°°TTôôØØddGG IIGGOOCCGG ¿¿hhOO øøee ÖÖjjòò°°ûûààddGG RRÉÉ¡¡LL ΩΩóóîîàà°°SSGG
..ππØØ°°SSCC’’GG
..ππØØ°°SSCC’’GG √√ÉÉŒŒÉÉHH ááààHHÉÉKK hh ááÄÄ««££HH ääÉÉccôôMM ´´ÉÉÑÑJJÉÉHH ººbb
..»»©©««ÑÑ££ddGG ôô©©°°ûûddGG §§NN ™™ÑÑJJGG ..¢¢SSCCGGôôddGG ôôNNDDƒƒee óóææYY GGÒÒããcc ÉÉ««ddÉÉYY ÖÖjjòò°°ûûààddGG RRÉÉ¡¡LL ™™°°††JJ ’’
´´õõææHH ΩΩƒƒ≤≤««°°SS RRÉÉ¡¡÷÷GG ¿¿CCGG åå««MM ÖÖjjòò°°ûûààddGG RRÉÉ¡¡LL áᣣ°°SSGGƒƒHH ππØØ°°SSCC’’GG √√ÉÉŒŒÉÉHH ôô©©°°ûûddGG §§««°°ûû““ ∫∫hhÉÉ–– ’’
..¬¬°°ùùeeÓÓ««°°SS ……òòddGG ôô©©°°ûûddGG ππcc
B
B
B
9
10
4
5
6
7
8
3
2
1
B
áá««HHôô©©ddGG
Page 43

45
B
,
IIÉÉ°°TTôôØØddGG IIGGOOCCGG ΩΩGGóóîîàà°°SSGG ¿¿hhOO øøee ÖÖjjòò°°ûûààddGG
∂©HÉ°UCG hCG íjô°ùàdG IÉ°Tôa ΩGóîà°SG ∫ÓN øe º°S á©HQC’G ¥ƒØj ô©°û∏d ∫ƒW ≈∏Y ∫ƒ°ü◊G ∂æµÁ
.IÉ°TôØdG IGOCG ¿hO h Öjò°ûàdG RÉ¡L ™e
..ôô©©°°ûûddGG ƒƒ‰‰ √√ÉÉŒŒGG ¢¢ùùµµYY ,,≈≈∏∏YYCC’’GG √√ÉÉŒŒÉÉHH ôô©©°°ûûddGG øøee ÒÒ¨¨°°UU AAõõLL §§««°°ûûªªààHH ººbb
¬¬°°üü≤≤HH ÖÖZZôôJJ ……òòddGG AAõõ÷÷GG ≈≈≤≤ÑÑjj ¿¿CCGG ¤¤GG ∂∂©©HHÉÉ°°UUCCGG ÚÚHH ¬¬µµ°°ùùeeGG hhCCGG IIÉÉ°°TTôôØØddGG áᣣ°°SSGGƒƒHH ôô©©°°ûûddGG ™™aaôôHH ººbb
..∂∂©©HHÉÉ°°UUCCGG óó©©HH ÉÉee
..∂∂©©HHÉÉ°°UUCCGG hhCCGG IIÉÉ°°TTôôØØddGG øøee ‹‹óóààŸŸGG ôô©©°°ûûddGG ¢¢üü≤≤dd IIÉÉ°°TTôôØØddGG IIGGOOCCGG ¿¿hhOO ÖÖjjòò°°ûûààddGG RRÉÉ¡¡LL ΩΩGGóóîîàà°°SSÉÉHH ººbb
ááëë««ëë°°üüddGG ¢¢üü≤≤ddGG ÖÖ««ddÉÉ°°SSCCGG
ôô©©°°ûûddGG ¢¢üü≤≤HH RRÉÉ¡¡÷÷GG ΩΩƒƒ≤≤jj øø∏∏aa ’’GG hh ôô©©°°ûûddGG ƒƒ‰‰ √√ÉÉŒŒGG ™™ee ÉÉeehhOO ÖÖjjòò°°ûûààddGG RRÉÉ¡¡LL ∂∂jjôôëëààHH ººbb
..á᪪««∏∏°°ùùddGG áá≤≤jjôô££ddÉÉHH
..IIóóMMƒƒee ¢¢üübb ááéé««ààff ≈≈∏∏YY ∫∫ƒƒ°°üüëë∏∏dd ππeeÉɵµddÉÉHH ¢¢SSCCGGôôddGG IIóó∏∏LL ÉÉeehhOO ¢¢ùùeeÓÓJJ IIÉÉ°°TTôôØØddGG IIGGOOCCGG ΩΩCCGG óóccCCÉÉJJ
..QQòòëëHH ¢¢SSCCGGôôddGG OOhhóóMM ™™ÑÑqqJJGG hh ááØØ««££dd hh ááÄÄ««££HH ääÉÉccôôMM ´´ÉÉÑÑJJÉÉHH ººbb
..¢¢UUƒƒ°°üü≤≤ŸŸGG ôô©©°°ûûddGG ááddGGRR’’ GGóó««LL ôô©©°°ûûddGG §§««°°ûûªªààHH ººbb
ááØØ∏∏ààflfl ääÉÉggÉÉŒŒGG øøee êêÉÉààddGG ¥¥ƒƒaa AA§§ÑÑHH ÖÖjjòò°°ûûààddGG RRÉÉ¡¡LL ôôjjôôªªààHH ººbb ,,¢¢SSCCGGôôddGG êêÉÉJJ ÖÖjjòò°°ûûJJ óóææYY
..IIóóMMƒƒee ¢¢üübb ááéé««ààff ≈≈∏∏YY ∫∫ƒƒ°°üüëë∏∏dd
..¬¬°°üübb ÖÖééjj ……òòddGG ôô©©°°ûûddGG ππµµdd RRÉÉ¡¡÷÷GG ••ÉÉ≤≤ààddGG øøee óóccCCÉÉàà∏∏dd ÉÉ¡¡JJGGPP áá≤≤££æ柟GG ≈≈∏∏YY GGQQGGôôee RRÉÉ¡¡÷÷GG ôôjjôôªªààHH ººbb
ôô©©°°ûûddGG ••ÉÉ≤≤ààddGG øøee RRÉÉ¡¡÷÷GG øøµµªªààjj »»µµdd ôôNNBBGG ¤¤GG ââbbhh øøee ôô©©°°ûûddGG ƒƒ‰‰ √√ÉÉŒŒÉÉHH ôô©©°°ûûddGG §§««°°ûûªªààHH ººbb
..ÌÌccCCGG ááddƒƒ¡¡°°ùùHH
ΩΩGGóóîîàà°°SSÉÉHH ººbb ,,ººYYÉÉææddGG hhCCGG ππjjƒƒ££ddGG hhCCGG ∞∞««ØØÿÿGG hhCCGG êꃃªªŸŸGG ôô©©°°ûûddGG ™™ee IIóó««LL èèFFÉÉààff ≈≈∏∏YY ∫∫ƒƒ°°üüëë∏∏dd
..ÖÖjjòò°°ûûààddGG RRÉÉ¡¡LL ¤¤GG ôô©©°°ûûddGG ¬¬LLƒƒààdd IIÉÉ°°TTôôaa
êêqqQQóóààddGG
≈∏Y ∫ƒ°üë∏d IóMƒe á≤jô£H ô©°ûdG ¢ü≤H §≤a ∂d íª°ùj ’ ô©°ûdG Öjò°ûàd ∞«°û«∏«a RÉ¡L ¿G
óæY πjƒW ô©°T øe Ö°SÉæe èjQóJ ≈∏Y ∫ƒ°ü◊G ∂d íª°ùj ƒ¡a πH ,¢SCGôdG πeɵd ¬JGP ô©°ûdG ∫ƒW
.¢SCGôdG ±GôWCG h IôNDƒe óæY ô°übCG ô©°T ¤G ¢SCGôdG ≈∏YCG
..áá««©©°°VVhh ∫∫ƒƒWWCCGG ΩΩGGóóîîàà°°SSÉÉHH ôô©©°°ûûddGG ÖÖjjòò°°ûûààHH ººbb ’’hhCCGG
..∫∫ƒƒWWCCGG ¿¿ƒƒµµjj ¿¿CCGG √√óójjôôJJ åå««MM ≈≈∏∏YYCC’’GG óóææYY ’’GG ôô©©°°ûûddGG ππcc ¢¢üü≤≤HH ººbb hh ôô°°üübbCCGG áá««©©°°VVhh ΩΩóóîîàà°°SSGG ººKK
hh ¢¢SSCCGGôôddGG øøee AAõõLL ππcc ‘‘ ¬¬HH Ü܃ƒZZôôŸŸGG ∫∫ƒƒ££ddGG ≈≈∏∏YY ππ°°üü–– ≈≈ààMM IIƒƒ££ÿÿGG √√òògg IIOOÉÉYYGG ∂∂ææµµÁÁ
..¬¬aaGGôôWWCCGG hh ¢¢SSCCGGôôddGG IIôôNNDDƒƒee óóææYY ôô°°üübbCC’’GG ôô©©°°ûûddGG hh ≈≈∏∏YYCC’’GG óóææYY ππjjƒƒ££ddGG ôô©©°°ûûddGG ÚÚHH ÖÖ°°SSÉÉæ柟GG êêQQóóààddGG
2
1
3
2
1
B
,
,
,
,
,
,
,
B
3
áá««HHôô©©ddGG
Page 44

46
..≥≥ææ©©ddGG ôôNNDDƒƒee hh ÚÚZZóó°°üüddGG ÜÜôôbb ≥≥WWÉÉæ柟GG ÖÖjjòò°°ûûààdd ôô°°üübbCCGG ∫∫ƒƒWW áá««©©°°VVhh ΩΩóóîîàà°°SSGG ººKK
ôô©©°°ûûddGG ´´õõææHH ººbb ::ááëë««°°üüff ..≥≥ææ©©ddGG ôôNNDDƒƒee hh ÚÚffPPCC’’GG ∫∫ƒƒMM ôô©©°°ûûddGG §§NN óójjóóëëààHH ººbb ,,GGÒÒNNCCGG
..ÖÖjjòò°°ûûààddGG ∫∫ÓÓNN IIÉÉ°°TTôôØØddGG øøee ΩΩÉɶ¶ààffÉÉHH
IIÉÉ°°TTôôØØddGG IIGGOOCCGG ΩΩGGóóîîàà°°SSÉÉHH ÖÖjjòò°°ûûààddGG
Ωƒ≤J .¢SCGôdG øe ¬JGP ó©ÑdG ≈∏Y ¢ü≤dG IGOCG ≈≤ÑJ »µd É°Uƒ°üN IÉ°TôØdG º«ª°üJ ” ó≤d
.ádƒ¡°ùH ô©°ûdG OhóM ´ÉÑqJÉH áfôŸG IÉ°TôØdG
ô©°T ∫GƒWCG ≈∏Y ∫ƒ°ü◊G ∂æµÁ ,IÉ°TôØdG IGOCG ™e ô©°ûdG Öjò°ûJ RÉ¡L Ωóîà°ùJ âæc GPG
áØ∏àfl ∫ƒW á«©°Vh 41 Éjƒ°S ôaƒJ ÚJÉ°Tôa ™e RÉ¡÷G ôaƒàj .· 14 ÉgÉ°übCG áØ∏àfl
.(∫hó÷G ™LGQ)
.IÉ°TôØdG IGOCG áYQPCG ≈∏Y äGΪ«∏«ŸÉH É¡«dG ô°TDƒe ô©°ûdG ∫ƒW á«©°Vh ¿G
܃ZôŸG ô©°ûdG ∫ƒW á«©°Vh QÉ«àNG h RÉ¡÷G ¤G IÉ°TôØdG IGOCG Ö«côJ áWÉ°ùÑH ∂æµÁ
.É¡H
¢¢üü≤≤ddGG ∫∫ƒƒWW áá««©©°°VVhh
3
2
B
B
á«©°VƒdG
1
2
3
4
5
6
7
ô©°ûdG ∫ƒW
·3
·6
·9
·12
·15
·18
·21
á«©°VƒdG
8
9
10
11
12
13
14
IÒ¨°U IÉ°TôaIÒÑc IÉ°Tôa
ô©°ûdG ∫ƒW
·23
·26
·29
·32
·35
·38
·41
∫ƒ£dG øY Ó«∏b áØ∏àfl ô©°ûdG ∫ƒW áé«àf ¿ƒµJ ób ô©°ûdG ´GƒfCG ¢†©H ™e ¬fCG á¶MÓŸG AÉLôdG
¬«dG ô°TDƒŸG
áá««HHôô©©ddGG
Page 45

47
ááeeóó≤≤ee
Iõ¡LCG áYƒªfi ™e ádƒ¡°ùdG ájÉZ ‘ GôeCG áØ∏àfl ô©°T äÉëjô°ùJ QɵàHG íÑ°UCG ó≤d
.GÒãc Éàbh h ’Ée ¿ƒØ∏µj øjòdG ÚbÓ◊G ∂ÄdhCG πc ôeCG ≈°ùfG .ô©°ûdG Öjò°ûàd ∞Ñ°û«∏«a
äɪ«∏©àdG Iô≤a ‘ !âÄ°T Ée ≈àe ,∂dõæe ‘ ∂H á°UÉÿG ∑ô©°T áëjô°ùJ ôµàHG
.Öjò°ûàdG RÉ¡L øjõîJ h ∞«¶æJ h ΩGóîà°SG h øë°T á«Ø«c øY IAGôb ∂æµÁ ,ΩGóîà°S’G
∫ƒ°üë∏d É¡eGóîà°SG á«Ø«c h Öjò°ûà∏d á«°SÉ°SC’G Ö«dÉ°SC’G ≈∏Y ∂©∏£f ,Öq«àµdG Gòg ‘
äɪ«∏©àdG √òg IAGôb ™HÉJ !≥∏≤J ’ ?πÑb øe ∂dòH º≤J ⁄CG .∂Ñé©J »àdG ô©°ûdG á°üb ≈∏Y
.GQƒa ájô°üY h á∏«ªL áëjô°ùJ QɵàHG ∂fɵeÉH ¿ƒµ«°S h
ÖÖjjòò°°ûûààddGG áá««∏∏ªª©©HH AAóóÑÑddGG ππÑÑbb
ô©°ûdG Öjò°ûàd ∞«°û«∏«a RÉ¡L ≈∏Y Gó«L ±ô©àJ ¿CG …Qhô°†dG øe ,Öjò°ûàdÉH AóÑdG πÑb
á«dÉàdG äGƒ£ÿG ™ÑJG ,èFÉàædG π°†aCG ≈∏Y ∫ƒ°üë∏d .ΩGóîà°S’G äɪ«∏©J IAGôb ∫ÓN øe
.Öjò°ûàdG á«∏ªY ∫ÓN
:‹ÉàdÉH ΩÉ«≤dÉH ∂ë°üæf ,AóÑdG πÑb
¢¢üü≤≤HH ΩΩƒƒ≤≤àà°°SS ……òòddGG ¢¢üüîî°°ûû∏∏dd øøµµÁÁ åå««MM IIBBGGôôee ππHHÉÉ≤≤ee ÉÉëëjjôôee ÉÉffÉɵµee OOÉÉééjjGG ÖÖééjj ,,’’hhCCGGGG
..¢¢SSƒƒ∏∏÷÷GG √√ôô©©°°TT
ááëë°°VVGGhh ¢¢SSCCGGôôddGG AAGGõõLLCCGG ππcc ¿¿ƒƒµµJJ »»µµdd ∑∑QQóó°°UU iiƒƒàà°°ùùee ≈≈∏∏YY ¢¢üüîî°°ûûddGG ∂∂ddPP ¢¢SSCCGGQQ ¿¿CCGG óóccCCÉÉJJ
..ÉÉ¡¡««ddGG ∫∫ƒƒ°°UUƒƒddGG áá∏∏¡¡°°SS hh
..ôô©©°°ûûddGG ÖÖjjòò°°ûûààdd GGóó©©àà°°ùùee ¿¿BB’’GG ââëëÑÑ°°UUCCGG ..√√ƒƒ‰‰ √√ÉÉŒŒÉÉHH ôô©©°°ûûddGG §§««°°ûûªªààHH ººbb
’ .±ÉL ô©°T ≈∏Y ô©°ûdG Öjò°ûJ RÉ¡L Ωóîà°SG ,èFÉàædG π°†aCG ≈∏Y ∫ƒ°üë∏d :áë«°üf
.Iõ«Lh IÎa òæe ∫ƒ°ù¨e ô©°T ≈∏Y ¬eóîà°ùJ
3
2
1
áá««°°SSÉÉ°°SSCCGG ÖÖjjòò°°ûûJJ ÖÖ««ddÉÉ°°SSCCGG
ÖÖjjòò°°ûûààddÉÉHH CCGGóóHHGG
¿¿GG óóccCCÉÉàà∏∏dd ∂∂ddPP hh ∫∫ƒƒWWCC’’GG áá««©©°°VVƒƒddGG ΩΩGGóóîîàà°°SSÉÉHH ≥≥ææ©©ddGG ôôNNDDƒƒee óóææYY ÖÖjjòò°°ûûààddÉÉHH CCGGóóHHGG ÉÉeehhOO
áá««©©°°VVƒƒddGG íí««ëë°°üüààHH ººbb ..ááëë««ëë°°üüddGG ∫∫ƒƒ££ddGG áá««©©°°VVƒƒHH IIÉÉ°°TTôôØØddGG áá©©££bb ââÑÑqqccQQ óóbb ââææcc
ÖÖjjòò°°ûûààddÉÉHH ººbb ,,ππÑÑbb øøee ôô©©°°ûûddGG ÖÖjjòò°°ûûJJ RRÉÉ¡¡LL ââeeóóîîàà°°SSGG óóbb ¿¿ƒƒµµJJ ÉÉeeóóææYY.. ôôeeCC’’GG êêÉÉààMMGG
..ÉÉ¡¡JJGGPP ááëëjjôô°°ùùààddGG ≈≈∏∏YY ∫∫ƒƒ°°üüëë∏∏dd ∂∂ddPP hh ÉÉ≤≤HHÉÉ°°SS ÉÉ¡¡ààeeóóîîàà°°SSGG »»ààddGG ∫∫ƒƒWWCC’’GG áá««©©°°VVƒƒddÉÉHH
..¢¢SSCCGGôôddGG ππcc ÖÖjjòò°°ûûààdd √√òògg ∫∫ƒƒ££ddGG áá««©©°°VVhh ΩΩóóîîàà°°SSGG
1
B
áá««HHôô©©ddGG
Page 46

48
> 41
21
15
6
Page 47

49
32
18
12
9
41
18
9
18
9
Page 48

5051525354
Page 49

Page 50

Page 51

Page 52

4203 000 51981
 Loading...