

Page 1

ENGLISH 4
DEUTSCH 10
NORSK 16
SVENSKA 22
SUOMI 28
DANSK 34
HQ C484
3
Page 2

Important
◗ Check if the voltage indicated on the mains
plug corresponds to the mains voltage in your
home before you connect the appliance.
◗ Make sure the appliance does not get wet.
◗ Charge and store the appliance at a
temperature between 15cC and 35cC.
Charging
Charge the appliance fully before you start using
it for the first time.
Make sure the appliance is switched off while
charging.
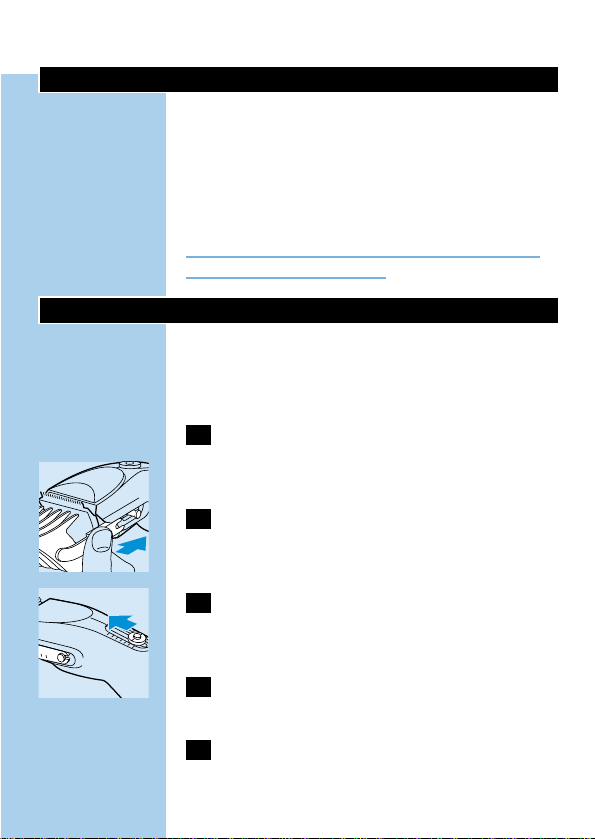
C
1 Insert the appliance plug into the
appliance.
2 Insert the mains plug into the wall socket.
B
The pilot light will go on to indicate that the
appliance is charging.
It will take approx.12 hours to fully charge the
battery.
Do not charge the appliance for more than
24 hours.
A fully charged appliance has a cordless clipping
time of up to 40 minutes.
ENGLISH4
Page 3
Corded clipping
◗ To clip with the hair clipper connected to the
mains:
Switch the hair clipper off,connect it to the mains
and wait a few seconds before switching it on.If
the battery is completely empty: wait a few
minutes before switching the appliance on.
Do not run the appliance from the mains when
the battery is fully charged.
Preparing for clipping
◗ See also the booklet 'Modelling and styling'.
Clipping with comb attachment:
1 Select the small or large comb attachment,
depending on the desired hair length (see
table).
C
2 Slide the arms carefully into the guiding
grooves of the appliance until you hear a
click.
C
3 Keep the adjustment button pressed in
and slide the comb attachment to the
desired position (see table).
4 Release the adjustment button to lock the
comb.
5 Switch the appliance on.
ENGLISH 5
Page 4
If a lot of hair has accumulated in the comb,
remove the comb attachment and blow and/or
shake the hair out of the comb.
Cutting length settings
Small comb Large comb
setting hair length setting hair length
1 4 mm 8 24 mm
2 7 mm 9 27 mm
3 10 mm 10 30 mm
4 13 mm 11 33 mm
5 16 mm 12 35 mm
6 19 mm 13 38 mm
7 21 mm 14 40 mm
Clipping without comb attachment
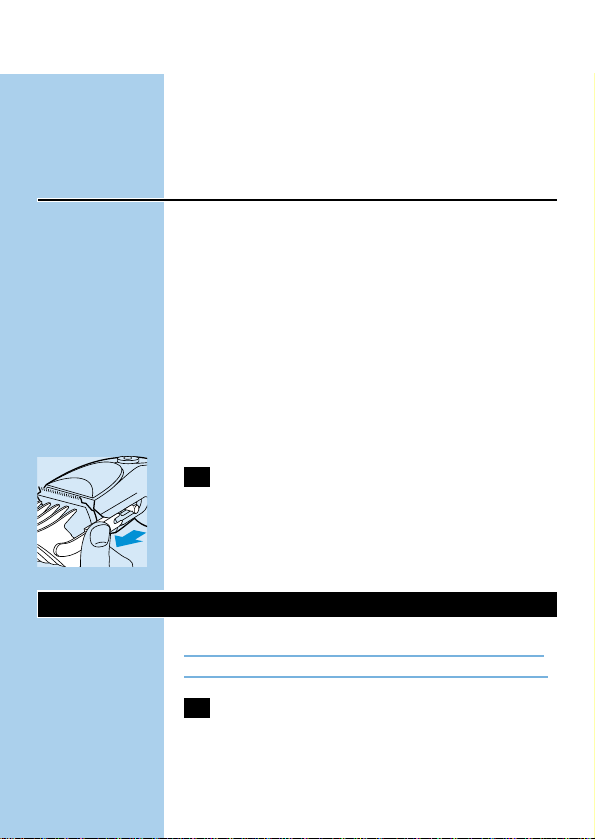
C
1 Pull the comb attachment off the appliance
to remove it.
Clean and recharge the appliance every time you
have used it.
Cleaning
Do not use abrasives,scourers or liquids such as
alcohol,petrol or acetone to clean the appliance.
1 Make sure the appliance is switched off
and disconnected from the mains before
you start cleaning it.
ENGLISH6
Page 5
2 Remove the comb attachment.
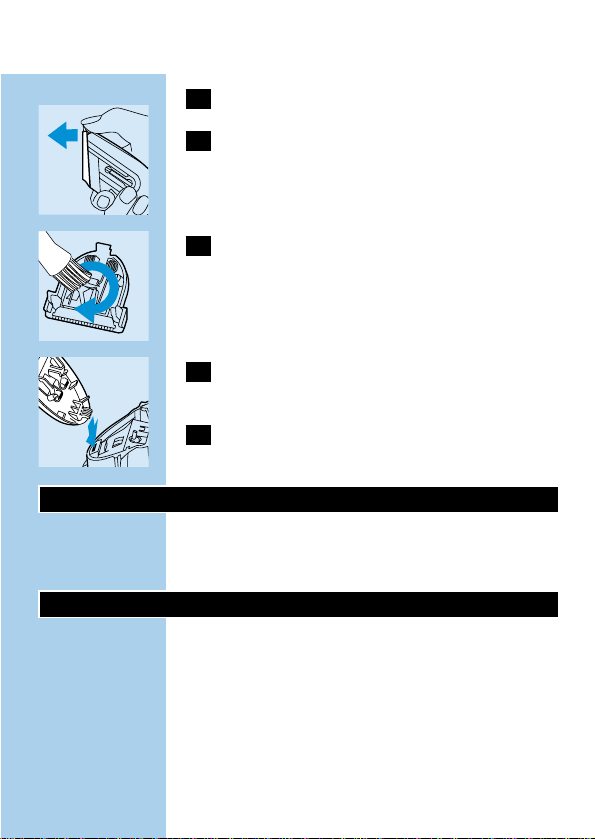
C
3 Remove the cutting unit.
C
4 Clean the cutting unit and the inside of the
appliance with the brush supplied.
C
5 To reassemble the clipper,insert the hook
of the cutting unit into the housing.
6 Push the cutting unit until you hear a click.
Replacement
A worn or damaged cutting unit should only be
replaced with an original Philips cutting unit.
Environment
The built-in rechargeable battery contains
substances which may pollute the environment.
Remove the rechargeable battery when you
discard the appliance.
ENGLISH 7
Page 6

Do not throw the battery away with the normal
household waste but dispose of it at an official
collection point.
You can also take the appliance to a Philips
service centre, where staff will be happy to help
you remove the battery and dispose of it in an
environmentally safe way.
1 Disconnect the appliance from the mains
and let the appliance run until the motor
stops.
C
2 Remove the cutting unit.
C
3 Remove the metal clip by means of a
screwdriver.
C
4 Open the housing.
C
5 Pull the battery holder out of the
appliance.
ENGLISH8
Page 7
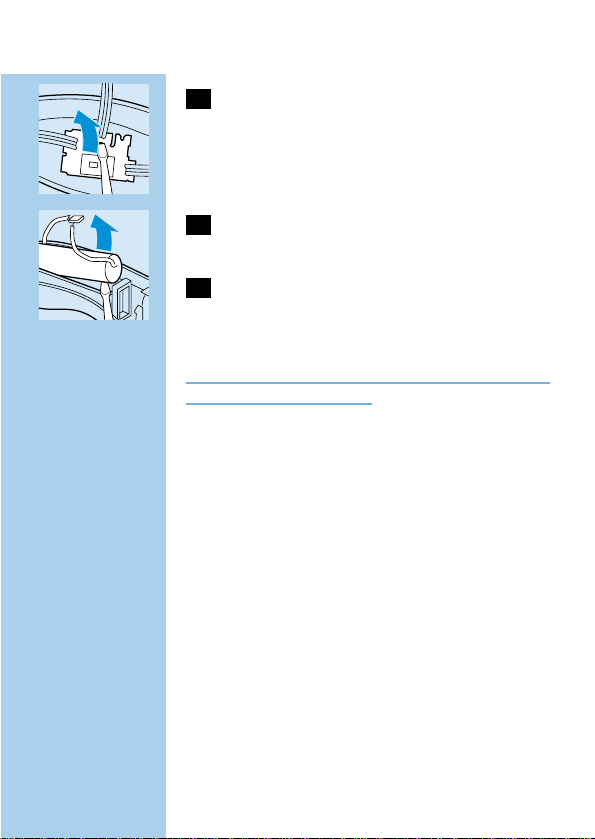
C
6 Insert a screwdriver into the small slot in
the printed circuit board.Push the
screwdriver down until part of the printed
circuit board breaks off.
C
7 Separate the battery from the plastic part
by means of a screwdriver.
8 Dispose of the battery and the other
components in an environmentally safe
way.
Do not connect the appliance to the mains again
after it has been opened!
For telephone numbers of the Philips Helpdesk,
see the Worldwide Guarantee leaflet.
ENGLISH 9
Page 8

Wichtig
◗ Prüfen Sie,bevor Sie das Gerät in Betrieb
nehmen,ob die Spannungsangabe auf dem
Netzstecker mit der örtliche Netzspannung
übereinstimmt.
◗ Achten Sie darauf,daß das Gerät nicht naß
wird.
◗ Laden und lagern Sie das Gerät bei
Temperaturen zwischen 15 °C und 35 °C.
Den Akku aufladen
Laden Sie den Akku voll auf,bevor Sie das Gerät
zum ersten Mal benutzen.
Achten Sie darauf, daß das Gerät während des
Aufladens ausgeschaltet ist.
C
1 Stecken Sie den Gerätestecker in das
Gerät.
2 Stecken Sie dann den Netzstecker in die
Steckdose.
B
Die Kontrollampe leuchtet auf und zeigt an,daß
der Akku geladen wird.
Nach ca.12 Stunden ist der Akku voll aufgeladen.
Lassen Sie das Gerät nicht länger als 24 Stunden
am Netz.
Mit voll aufgeladenem Akku können Sie das Gerät
ca.40 Minuten kabelfrei verwenden.
DEUTSCH10
Page 9

Das Gerät am Netz betreiben
◗ So schneiden Sie die Haare mit dem Kabel am
Netz:
Schalten Sie das Gerät aus.Verbinden Sie es durch
das Kabel mit dem Netz.Warten Sie einige
Sekunden,bevor Sie das Gerät einschalten. Sollte
der Akku leer sein,so müssen sie einige Minuten
warten,bevor Sie das Gerät einschalten.
Betreiben Sie das Gerät nicht am Netz,wenn der
Akku voll aufgeladen ist.
Vor dem Gebrauch
◗ Vgl.auch das Heft "Modelling and styling".
Haare mit dem Kamm-Aufsatz
schneiden
1 Verwenden Sie, je nach der gewünschten
Haarlänge,den kleinen oder den großen
Kamm-Aufsatz.- Vgl.die T abelle.
C
2 Schieben Sie die Arme des Kamm-
Aufsatzes in die Führungsschlitze,bis er
hörbar einrastet.
C
3 Halten Sie die Arretierung gedrückt,und
schieben Sie den Kamm-Aufsatz auf die
gewünschte Position.- Vgl die Tabelle.
4 Lassen Sie die Arretierung los,um die
eingestellte Schnittlänge beizubehalten.
5 Schalten Sie das Gerät ein.
DEUTSCH 11
Page 10

Hat sich viel Haar in dem Kamm angesammelt,so
nehmen Sie den Kamm-Aufsatz ab,und blasen
oder schütteln Sie ihn leer.
Schnittlängen-Einstellung
Kleiner Kamm Großer Kamm
Position Schnittlänge Position Schnittlänge
1 4 mm 8 24 mm
2 7 mm 9 27 mm
3 10 mm 10 30 mm
4 13 mm 11 33 mm
5 16 mm 12 35 mm
6 19 mm 13 38 mm
7 21 mm 14 40 mm
Haare ohne Kamm-Aufsatz schneiden
C
1 Ziehen Sie den Kamm-Aufsatz vom Gerät.
Reinigen Sie das Gerät nach jedem Gebrauch, und
laden Sie den Akku auf.
Reinigung
Verwenden Sie zum Reinigen keine Scheuermittel
oder Lösungsmittel wie Alkohol,Benzin oder
Azeton.
1 Achten Sie darauf,daß das Gerät
ausgeschaltet und nicht am Netz
angeschlossen ist.
DEUTSCH12
Page 11

2 Nehmen Sie den Kamm-Aufsatz vom
Gerät.
C
3 Nehmen Sie die Schneideeinheit ab.
C
4 Reinigen Sie die Schneideeinheit und die
Innenwand des Gehäuses mit der
beiliegenden Bürste.
C
5 Setzen Sie den Haken der Schneideeinheit
in das Gerätegehäuse ein.
6 Drücken Sie die Schneideeinheit fest an,bis
sie hörbar einrastet.
Ersatz der Schneideeinheit
Eine verbrauchte oder beschädigte
Schneideeinheit darf nur durch eine original
Philips Schneideeinheit ersetzt werden.
Umweltschutz
Der eingebaute Akku enthält Substanzen,welche
die Umwelt gefährden können.Batterien und
Akkus gehören nicht in den Hausmüll.
Entfernen Sie die wiederaufladbaren Batterien
wenn Sie das Gerät wegwerfen
DEUTSCH 13
Page 12

Sie sind als Verbraucher gesetzlich dazu
verpflichtet,gebrauchte Batterien und Akkus der
Wiederverwertung zuzuführen. Geben Sie sie bei
einer öffentlichen Sammelstelle Ihrer Gemeinde
oder an einer Verkaufsstelle für entsprechende
Geräte bzw.für Batterien und Akkus ab.
Sie können das Gerät auch dem Philips Service
Center zuführen.Wir kümmern uns dann gern
um eine ordnungsgemäße Entsorgung.
Falls Sie den Akku selbst entnehmen wollen,so
gehen Sie bitte wie folgt vor:
1 Ziehen Sie den Stecker aus der Steckdose,
und lassen Sie den Motor solange laufen,
bis er anhält.
C
2 Nehmen Sie die Schneideeinheit ab.
C
3 Entfernen Sie die Metallklammer mit einem
Schraubendreher.
C
4 Öffnen Sie das Gehäuse.
DEUTSCH14
Page 13

C
5 Nehmen Sie den Akkuhalter aus dem
Gerät.
C
6 Stecken Sie einen Schraubendreher in den
Spalt auf der Platine.Drücken Sie den
Schraubendreher weiter ein,bis ein Teil
der Platine abbricht.
C
7 Trennen Sie den Akku mit Hilfe eines
Schraubenziehers von dem Kunststoffteil.
8 Entsorgen Sie den Akku in der oben
geschilderten,gesetzlich vorgeschriebenen
Weise.
Wenn der Akku entfernt worden ist, darf das
Gerät nicht mehr benutzt werden!
Die Telefonnummern des Philips Service Centers
entnehmen Sie bitte der beiliegenden
Garantieschrift.
DEUTSCH 15
Page 14

Viktig
◗ Før apparatet kobles til strømnettet,
kontroller at spenningen på transformatoren
stemmer overens med nettspenningen i Deres
hjem.
◗ Sørg for at apparatet ikke blir vått.
◗ Lad og oppbevar apparatet i temperaturer
mellom 15cC og 35cC.
Lading
Fullad maskinen før De begynner å bruke den for
første gang.
Sørg for at maskinen er slått av før De starter
oppladningen.
C
1 Koble apparatets ledning til apparatet.
2 Koble ledningen til stikkontakten.
B
Lampen på maskinen vil tennes for å indikere at
maskinen lades.
Det vil ta omtrent 12 timer før batteriet er
fulladet.
Ikke la maskinen lades i mer enn 24 timer.
En fulladet maskin har en ledningsløs klippetid på
opptil 40 minutter.
Klipping med ledning
◗ For å klippe med hårklipperen koblet til
strømnettet:
NORSK16
Page 15

Slå av hårklipperen, koble den til strømnettet og
vent et par sekunder før De slår den på.Hvis
batteriet er helt tomt: vent et par minutter før De
slår på maskinen.
Ikke bruk maskinen over strømnettet når batteriet
er fulladet.
Forberedelser før klipping
◗ Se også vedlagte hefte 'Modelling and styling'.
Klipping med frisørkam
1 Velg den store eller lille frisørkammen,
avhengig av ønsket hårlengde (se tabell).
C
2 Skyv tappene på kammen inn i sporene på
maskinen til De hører et klikk.
C
3 Press og hold inne justeringsknappen og
skyv kammen til den ønskede posisjon (se
tabell).
4 Slipp justeringsknappen for å låse kammen.
5 Slå på maskinen.
Hvis det har samlet seg mye hår i kammen,fjern
kammen og blås og/eller rist håret av kammen.
NORSK 17
Page 16

Innstillinger for kuttelengder
Liten kam Stor kam
innstilling hårlengde innstilling hårlengde
1 4 mm 8 24 mm
2 7 mm 9 27 mm
3 10 mm 10 30 mm
4 13 mm 11 33 mm
5 16 mm 12 35 mm
6 19 mm 13 38 mm
7 21 mm 14 40 mm
Klipping uten frisørkam
C
1 Dra av kammen fra maskinen
Rengjør og lad opp maskinen hver gang De har
brukt den.
Rengjøring
Bruk ikke slipemidler,avfettingsmidler eller væsker
som alkohol,bensin eller aceton for å rengjøre
maskinen.
NORSK18
Page 17

1 Forsikre Dem om at maskinen er slått av
og koblet fra stikkontakten før De
begynner å rengjøre den.
2 Fjern kammen fra maskinen.
C
3 Fjern kutteenheten.
C
4 Rengjør kutteenheten og innsiden av
maskinen med den medfølgende børsten.
C
5 For å sette sammen maskinen igjen,sett
kutteenheten inn i kabinettet.
6 Press kutteenheten til De hører et klikk.
Utskiftning av deler
En slitt eller skadet kutteenhet må kun byttes med
en original Philips kutteenhet.
Miljø
Det innebygde oppladbare batteriet inneholder
substanser som kan forurense miljøet.
Fjern det oppladbare batteriet når De kvitter
Dem med produktet.
NORSK 19
Page 18

Ikke kast batteriet sammen med det vanlige
husholdningsavfallet,men på et offentlig anvist
innsamlingssted.
De kan også ta med Dem apparatet til et Philips
Service Senter,hvor personalet gladelig vil hjelpe
Dem å fjerne batteriet samt kvitte seg med det
på en miljømessig sikker måte.
1 Koble apparatet fra stikkontakten og la det
gå til motoren stopper.
C
2 Fjern kutteenheten.
C
3 Fjern metallklemmen med en skrutrekker.
C
4 Åpne kabinettet.
C
5 Trekk batteriholderen ut av maskinen.
NORSK20
Page 19

C
6 Plasser en skrutrekker inn i det lille sporet
på kretskortet.Press skrutrekker ned inntil
en del av kretskortet brekkes av.
C
7 Få løsnet batteriet fra plastikkdelen ved
hjelp av en skrutrekker.
8 Kvitt Dem med batteriet og de andre
komponentene på en miljømessig sikker
måte.
Ikke koble apparatet til stikkontakten igjen etter at
det har blitt åpnet!
For telefonnummer til Philips Helpdesk,se
Verdensgarantiheftet.
NORSK 21
Page 20

Viktigt
◗ Innan du ansluter apparaten,kontrollera att
den spänning som anges på stickproppen
överensstämmer med den aktuella
nätspänningen i ditt hem.
◗ Se till att apparaten inte blir våt.
◗ Ladda och förvara apparaten vid en
temperatur mellan 15cC och 35cC.
Laddning
Före första användning ska batterierna laddas helt.
Se till att apparaten är frånkopplad när den laddas.
C
1 Sätt anslutningskontakten i apparaten.
2 Anslut stickproppen till vägguttaget.
B
Signallampan kommer nu att indikera att
apparaten laddas.
Det tar ungefär 12 timmar att ladda upp batteriet
Ladda inte apparaten längre än 24 timmar.
Med en fulladdad apparat kan du klippa sladdlöst i
Klippning med nätsladd
◗ Att klippa med hårklipparen ansluten till
elnätet.
Stäng av hårklipparen, anslut den till vägguttaget
och vänta några sekunder innan du startar den.
Om batteriet är helt tomt, vänta några minuter
innan du startar apparaten.
SVENSKA22
Page 21

Använd inte apparaten ansluten till elnätet om
batteriet är fulladdat.
Förberedelser före klippning
◗ Studera även broschyren 'Modelling and
styling'.
Klippning med kamtillsats
1 Välj den lilla eller stora kamtillsatsen,
beroende på önskad hårlängd (se översikt).
C
2 Skjut stöden försiktigt in i ledskårorna på
apparaten tills du hör ett klick.
C
3 Håll inställningsknappen intryckt och skjut
in kamtillsatsen till önskat läge (se
översikt).
4 Släpp upp inställningsknappen för att låsa
kammen.
5 Starta apparaten.
Om det samlats mycket hår i kammen,tar du av
kamtillsatsen och blåser den ren och/eller skakar
ut håret ur kammen.
SVENSKA 23
Page 22

Inställningar för klippningslängder
Liten kam Stor kam
inställninghårlängd inställning hårlängd
1 4 mm 8 24 mm
2 7 mm 9 27 mm
3 10 mm 10 30 mm
4 13 mm 11 33 mm
5 16 mm 12 35 mm
6 19 mm 13 38 mm
7 21 mm 14 40 mm
Klippning utan kamtillsats
C
1 Drag av kamtillsatsen från apparaten.
Rengör och ladda apparaten efter varje
användning.
Rengöring
Använd inga slipmedel,skurmedel eller vätskor
som sprit, bensin eller aceton för att rengöra
apparaten.
1 Se till att apparaten är avstängd och inte
ansluten till elnätet innan du påbörjar
rengöringen.
2 Tag av kamtillsatsen.
C
3 Tag av trimsaxen.
SVENSKA24
Page 23

C
4 Rengör
C
5 För att sätta ihop hårklipparen sticker du
in trimsaxens hake i höljet.
6 Tryck fast trimsaxen tills du hör ett klick.
Byte
En sliten eller skadad trimsax skall endast bytas
mot en original Philips reservtrimsax.
Miljön
Det inbyggda uppladdbara batteriet innehåller
ämnen som kan förorena miljön.
Den dag du kasserar apparaten skall du ta ut
batteriet.
Deponera batteriet enligt gällande lokala
föreskrifter.Batteriet får inte ingå i eller förvaras
med hushållsavfall.
Du kan vända dig till Philips serviceombud där
man avyttrar batteriet på ett för miljön säkert sätt.
1 Koppla apparaten från elnätet och låt den
gå tills motorn stannar.
C
2 Tag av trimsaxen.
SVENSKA 25
Page 24

C
3 Avlägsna metallklämman med hjälp av en
skruvmejsel.
C
4 Öppna höljet.
C
5 Drag ut batterihållaren ur apparaten.
C
6 Stick in en skruvmejsel i den lilla skåran i
kretskortet.Skjut skruvmejseln nedåt tills
en del av kretskortet bryts av.
C
7 Skilj batteriet från plastdelen med hjälp av
skruvmejseln.
8 Deponera batteriet och andra
komponenter på ett för miljön säkert sätt.
Anslut inte apparaten till elnätet igen efter det att
den har varit öppen.
SVENSKA26
Page 25

Rätt telefonnummer till Philips kundtjänst finner
du i världsgarantibroschyren.
SVENSKA 27
Page 26

Tärkeää
◗ Ennen kuin yhdistät laitteen pistorasiaan,
tarkasta että laitteen jännitemerkintä vastaa
paikallista verkkojännitettä.
◗ Varo kastamasta laitetta.
◗ Käytä laitetta kuiviin hiuksiin.
◗ Älä käytä laitetta kylvyssä,suihkussa,suihkun
läheisyydessä tai ulkona sateessa.
◗ Jos laite on pudonnut veteen,irrota ensin
pistotulppa pistorasiasta,ennen kuin nostat
laitteen vedestä.
◗ Tarkastuta veteen pudonnut laite huollossa
ennen käyttöönottoa.
◗ Älä käytä laitteen puhdistamiseen vettä.
◗ Lataa ja säilytä laite 15cC - 35cC:n
lämpötilassa.
◗ Pistotulppaa ei saa irrottaa pistorasiasta
johdosta vetämällä.
◗ Pidä huoli,etteivät terävät kulmat,kuumuus tai
kemikaalit pääse vahingoittamaan liitosjohtoa.
◗ Älä taivuta liitosjohtoa tiukalle mutkalle.
◗ Pidä laite poissa lasten ulottuvilta.
◗ Älä kanna laitetta johdosta
◗ Irrota pistotulppa pistorasiasta,aina kun
laitetta ei käytetä.
◗ Varo laitteen terää, puristuskohtia ja liikkuvia
osia,jotka voivat aiheuttaa vammoja tai joihin
hiukset tai vaatteet voivat tarttua.
◗ Laitetta ei ole tarkoitettu kotieläinten
trimmaukseen.
SUOMI28
Page 27

Lataus
Lataa akku täyteen ennen kuin alat ensimmäisen
kerran käyttää laitetta.
Varmista että laitteen toiminta on katkaistu
ladattaessa.
C
1 Työnnä pistoke laitteeseen.
2 Työnnä pistotulppa pistorasiaan.
B
Merkkivalo syttyy osoitukseksi laitteen
lataamisesta.
Akun lataaminen täyteen kestää noin 12 tuntia.
Älä lataa laitetta yli 24 tuntia.
Täyteen ladatulla laitteella voi leikata hiuksia ilman
johtoa enimmillään 40 minuuttia.
Hiusten leikkaaminen
verkkojännitettä käyttäen
◗ Hiusten leikkaaminen pistorasiaan yhdistetyllä
laitteella:
Katkaise laitteen toiminta,liitä laite
verkkojännitteeseen ja odota muutama sekunti
ennen käynnistystä.Jos akku on aivan tyhjä, odota
muutama minuutti ennen kuin käynnistät laitteen.
Älä käytä laitetta verkkojännitteellä silloin kun akku
on ladattu täyteen.
SUOMI 29
Page 28

Valmistautuminen hiusten
leikkuuseen
◗ Katso myös vihkosta 'Modelling and styling'.
Leikkaaminen ohjauskamman kanssa:
1 Valitse pieni tai suuri ohjauskampa
haluamasi hiuspituuden mukaan (katso
taulukko).
C
2 Työnnä varret varovasti laitteen
ohjausuriin,niin että kuulet napsahduksen.
C
3 Pidä säätönuppia painettuna ja työnnä
ohjauskampa haluamaasi asentoon (katso
taulukko).
4 Vapauta säätönuppi niin ohjauskampa
lukkiutuu paikalleen.
5 Käynnistä laite.
Jos ohjauskampaan on kertynyt paljon hiuksia,
irrota ohjauskampa ja puhalla ja/tai ravista hiukset
pois.
SUOMI30
Page 29

Leikkuupituudet
Pieni ohjauskampa Suuri ohjauskampa
asento hiusten pituus asento hiusten pituus
1 4 mm 8 24 mm
2 7 mm 9 27 mm
3 10 mm 10 30 mm
4 13 mm 11 33 mm
5 16 mm 12 35 mm
6 19 mm 13 38 mm
7 21 mm 14 40 mm
Leikkaaminen ilman ohjauskampaa
C
1 Vedä ohjauskampa irti laitteesta.
Puhdista ja lataa laite aina käytön jälkeen.
Puhdistus
Älä käytä laitteen puhdistamiseen syövyttäviä
naarmuttavia tai alkoholia,bensiiniä,asetonia yms
sisältäviä puhdistusaineita.
1 Varmista että laitteen toiminta on katkaistu
ja irrota pistotulppa pistorasiasta,ennen
kuin aloitat puhdistamisen.
2 Irrota ohjauskampa.
C
3 Irrota terä.
SUOMI 31
Page 30

C
4 Puhdista terä ja laitteen sisäpuoli mukana
olevalla harjalla.
C
5 Kokoaminen: työnnä terän koukku
runkoon.
6 Paina terä paikalleen,niin että kuulet
napsahduksen.
Varaosat
Kuluneen tai vioittuneen terän tilalle saa vaihtaa
vain alkuperäisen Philips-terän.
Ympäristönsuojelu
Sisäänrakennettu akku sisältää ympäristölle
haitallisia aineita.
Poista akku ennen kuin hävität laitteen.
Älä hävitä akkua normaalin talousjätteen mukana,
vaan toimita se asianmukaiseen keräyspisteeseen.
Voit myös viedä laitteen Philips Kodinkoneiden
valtuuttamaan huoltoliikkeeseen,jossa akku voidaan
irrottaa ja hävittää ympäristön kannalta turvallisesti.
1 Irrota laite pistorasiasta ja anna laitteen
käydä,kunnes moottori pysähtyy.
C
2 Irrota terä.
SUOMI32
Page 31

C
3 Irrota metallipidike ruuvitaltalla.
C
4 Avaa kotelo.
C
5 Vedä akunpidin ulos laitteesta.
C
6 Työnnä ruuvitaltta piirilevyssä olevaan
pieneen rakoon.Paina ruuvitalttaa, kunnes
osa piirilevystä murtuu.
C
7 Irrota akku muoviosasta ruuvitaltalla.
8 Hävitä akku ja muut osat ympäristön
kannalta turvallisesti.
Älä yhdistä laitetta pistorasiaan avaamisen jälkeen!
Philipsin asiakaspalvelun puhelinnumerot löytyvät
takuulehtisestä.Oikeus muutoksiin varataan.
SUOMI 33
Page 32

Vigtigt
◗ Før der sluttes strøm til apparatet,
kontrolleres det,at spændingsangivelsen på
netstikket svarer til den lokale netspænding.
◗ Sørg for at apparatet ikke bliver vådt.
◗ Oplad og opbevar apparatet ved
temperaturer mellem 15cC og 35cC.
Opladning
Før apparatet tages i brug første gang, skal det
være fuldt opladet.
Sørg for,at apparatet er slukket, når det oplades.
C
1 Sæt det lille stik på ledningen ind i
hårklipperen.
2 Sæt netstikket i en stikkontakt som
tændes.
B
Kontrollampen tænder,og det betyder,at
apparatet oplades.
Det tager ca.12 timer at lade batteriet helt op.
Lad aldrig apparatet oplade i mere end højst 24
timer.
Når apparatet er helt opladet, giver det mulighed
for op til 40 minutters ledningsfri klipning.
Klipning med ledning
◗ Sådan klipper man håret med apparatet
tilsluttet lysnettet:
DANSK34
Page 33

Sluk for hårklipperen og sæt stikket i en
stikkontakt (som tændes). Vent nogle få sekunder
før hårklipperen tændes. Hvis batteriet er helt
tomt,ventes et par minutter, før apparatet
tændes.
Lad ikke hårklipperen køre direkte fra lysnettet
hvis batteriet er helt opladet.
Sådan gøres hårklipperen klar til
brug.
◗ Se også det lille hæfte "Modelling and styling".
Klipning med påsat kam.
1 Vælg den lille eller den store kam,afhængig
af den ønskede hårlængde (se tabellen).
C
2 Skyd forsigtigt kammens "arme" ned i
slidserne på apparatet,til der høres et
"klik".
C
3 Tryk ned på knappen og skyd kammen på
plads i den ønskede stilling (se tabellen).
4 Slip derefter knappen så kammen fastlåses.
5 Tænd for apparatet.
Hvis der har samlet sig meget hår i kammen,tages
den af,og hårene fjernes ved at ryste kammen
og/eller puste det væk.
DANSK 35
Page 34

Indstilling af klippelængder.
Lille kam Stor kam
Indstilling Hårlængde Indstilling Hårlængde
1 4 mm 8 24 mm
2 7 mm 9 27 mm
3 10 mm 10 30 mm
4 13 mm 11 33 mm
5 16 mm 12 35 mm
6 19 mm 13 38 mm
7 21 mm 14 40 mm
Klipning uden kam.
C
1 Fjern kammen ved at trække den af
hårklipperen.
Rengør og oplad hårklipperen hver gang den har
været brugt.
Rengøring
Brug aldrig skrappe rengørings- og skuremidler
eller væsker som f.eks.sprit, benzin eller acetone
til rengøringen.
DANSK36
Page 35

1 Før rengøringen skal hårklipperen være
slukket og stikket taget ud af
stikkontakten.
2 Tag kammen af.
C
3 Tag skærhovedet af.
C
4 Rens skærhovedet og apparatets inderside
med den medleverede børste.
C
5 Apparatet samles igen ved at sætte
skærhovedets "krog" ind i hårklipperen.
6 Tryk skærhovedet på plads til der høres et
"klik".
Udskiftning af skærhovedet
Hvis skærhovedet er slidt eller beskadiget,må det
kun udskiftes med et nyt originalt Philips
skærhoved.
Beskyttelse af miljøet
Det indbyggede genopladelige batteri indeholder
substanser, der kan skade miljøet.
Inden apparatet til sin tid kasseres, skal det
genopladelige batteri tages ud.
DANSK 37
Page 36

Bortkast ikke batteriet sammen med det normale
husholdningsaffald men aflevér det på et officielt
sted for indsamling af brugte batterier.
De kan også aflevere apparatet til Philips,hvor
man gerne hjælper Dem med at tage batteriet ud
og aflevere det på en miljømæssig forsvarlig
måde.
1 Tag stikket ud af stikkontakten og lad
hårklipperen køre til den stopper af sig
selv.
C
2 Tag skærhovedet af.
C
3 Fjern metalklipsen med en skruetrækker.
C
4 Luk hårklipperen op.
C
5 Tag batteriholderen ud af apparatet.
DANSK38
Page 37

C
6 Sæt en skruetrækker ned i den lille slidse
på printpladen.Tryk ned på
skruetrækkeren til noget af printpladen
brækker af.
C
7 Tag batteriet ud af plastikholderen ved
hjælp af en skruetrækker.
8 Kassér batteriet og de øvrige dele på en
miljømæssig sikker måde.
Slut aldrig strøm til apparatet igen efter det har
været åbnet.
Telefonnumre til Philips' kundecentre findes i den
lille verdensomspændende garantifolder. Dette
apparat overholder de gældende EU-direktiver
vedrørende sikkerhed og radiostøj.
DANSK 39
Page 38

Page 39

Page 40

4203 000 46693
 Loading...