

Page 1

ENGLISH 4
ROMÂNĂ 15
РУССКИЙ 26
ČESKY 38
MAGYAR 49
SLOVENSKY 60
УКРАЇНСЬКА 71
HRVATSKI 82
SLOVENŠČINA 92
HQC483, HQC482, HQC440
3
Page 2

Introduction
◗ Dear customer, you have made the right
choice! Your new Philips hair clipper adapts to
the contours of the head and enables
comfortable use.
◗ To enjoy using the hair clipper for a long time,
we advise you to read the following
information.
Important
Read these instructions for use carefully before
using the appliance and save them for future
reference.
◗ Check if the voltage indicated on the adapter
corresponds to the mains voltage in your
home before you connect the appliance.
◗ This appliance is suitable for mains voltages
from 220 to 240 volts.
◗ Only use the adapter supplied.
◗ The adapter contains a transformer. Do not
cut off the adapter to replace it with another
plug, as this will cause a hazardous situation.
◗ Do not use a damaged adapter.
◗ If the adapter is damaged, always have it
replaced by one of the original type in order
to avoid a hazard.
C
◗ Keep the appliance and the adapter dry.
◗ Keep the appliance out of the reach of
children.
ENGLISH4
Page 3
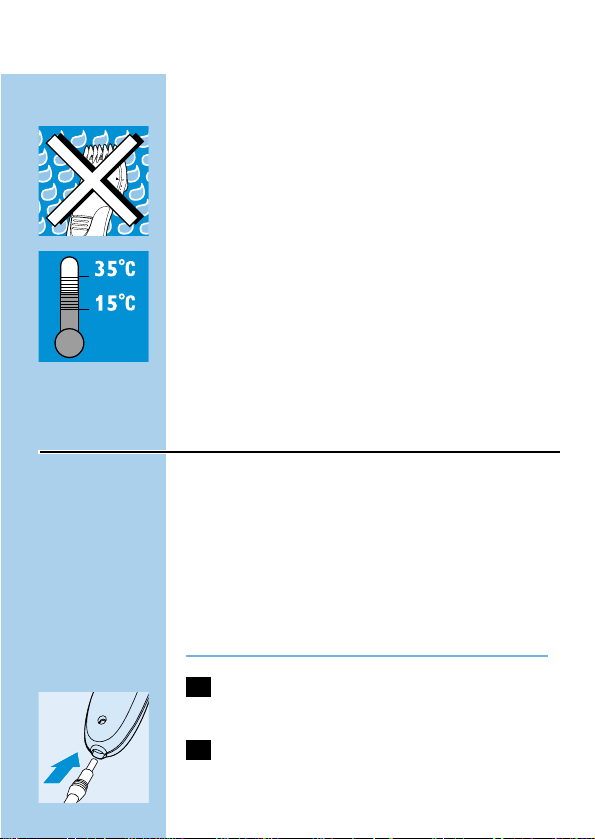
C
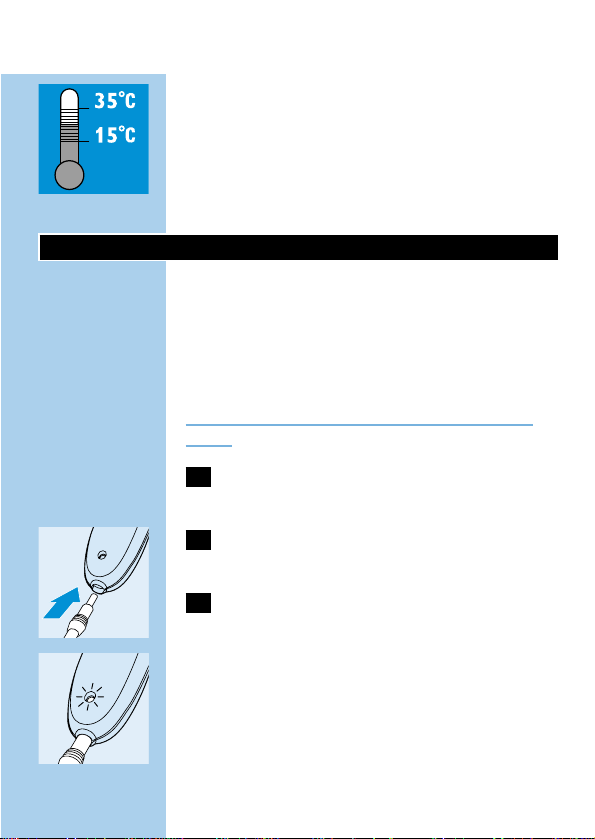
◗ Use, charge and store the appliance at a
temperature between 15c and 35c.
◗ This appliance is only intended for clipping
human hair. Do not use it for any other
purpose.
◗ Noise level: Lc= 69 dB [A].
Charging (HQC482 and HQC483 only)
Charge the appliance for at least 12 hours before
you start using it for the first time.
A fully charged appliance has a cordless operating
time of up to 35 minutes.
Do not charge the appliance for more than 24
hours.
1 Make sure the appliance is switched off
while charging.
C
2 Insert the appliance plug into the
appliance.
3 Insert the adapter plug into the wall
socket.
C
◗ The pilot light will go on to indicate that the
appliance is charging.
ENGLISH 5
Page 4
Optimising the lifetime of the battery
- Discharge the battery completely twice a year
by letting the motor run until it stops.
- Remove the adapter plug from the wall socket
when the battery is fully charged.
- If the appliance has not been used for a long
time, it must be recharged for at least 12 hours.
Corded clipping
HQC482, HQC483:
Do not run the appliance from the mains when
the battery is fully charged.
◗ To use the hair clipper connected to the
mains:
Switch the hair clipper off, connect it to the mains
and wait a few seconds before switching it on.
If the battery is completely empty, wait a few
minutes before switching the appliance on.
HQC440:
◗ Insert the apliance plug into the apliance and
put the adapter in the wall socket.
ENGLISH6
Page 5
Preparing for use
Clipping with comb attachment
C
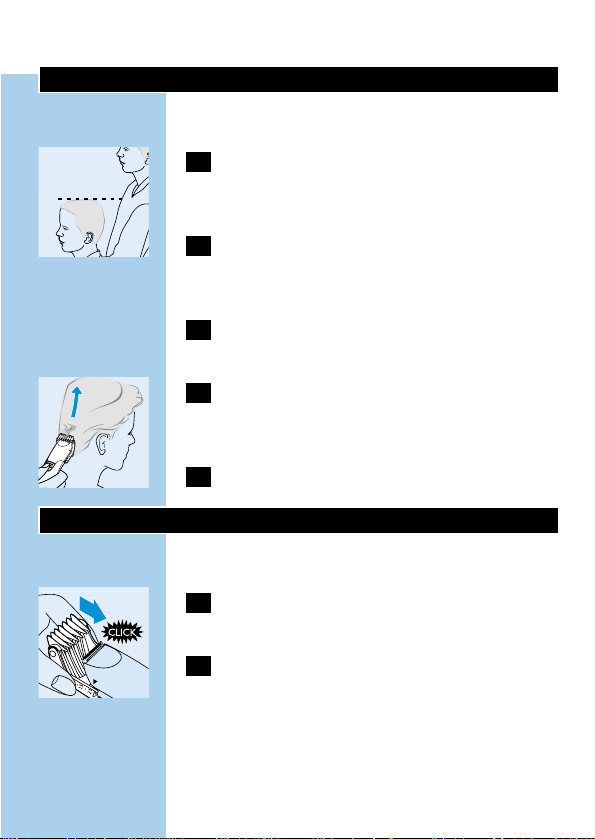
1 Before you start clipping, make sure the
head of the person whose hair you are
cutting is at the same level as your chest.
2 To get the best results, use the hair clipper
only on dry hair. Do not use it on freshly
washed hair.
3 First comb the hair into the direction of
hair growth.
C
4 Always move the clipper against the
direction of hair growth,otherwise it will
not cut the hair properly.
5 Move the clipper through the hair slowly.
Using the appliance
Clipping with comb attachment
C
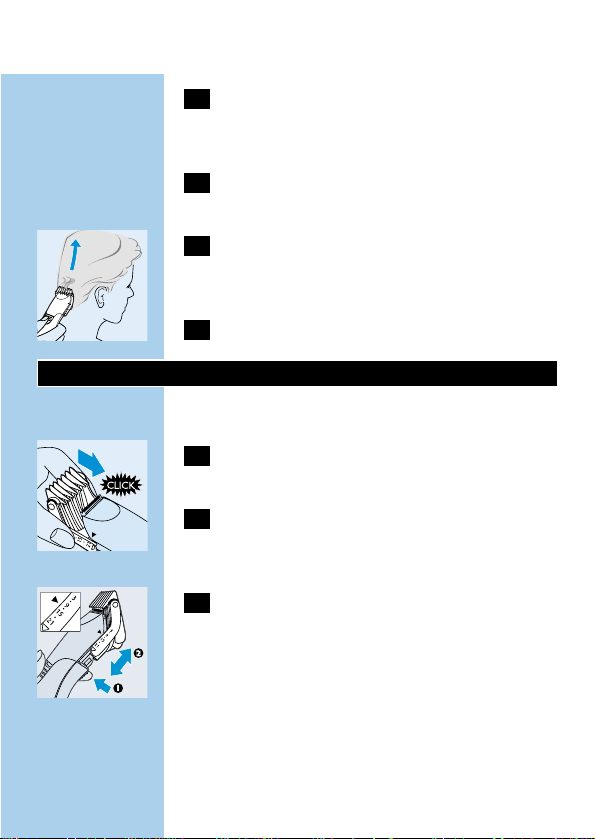
1 Slide the comb attachment onto the rails
on the appliance until you hear a click.
2 Make sure that the arms of the comb
attachment have been properly slid onto
the rails on both sides.
ENGLISH 7
Page 6

C
3 Choose the appropriate hair length
setting.
Press the adjustment button on the back of the
appliance and slide the comb attachment to the
desired position.
The clipper has 7 different hair length settings:
-3 mm
-6 mm
-9 mm
- 12 mm
- 15 mm
- 18 mm
- 21 mm
Start at the setting for maximum hair length
(21 mm) to familiarise yourself with the clipper.
4 Make sure that the flat part of the comb
attachment is always fully in contact with
the scalp to obtain an even cutting result.
5 Pass the clipper slowly over the crown
from different directions to achieve an
even cutting result.
6 Make overlapping passes over the head to
ensure that the clipper catches all the hairs
that need to be cut.
7 Comb the hair in the direction of hair
growth from time to time so that the
clipper can catch the hair more easily.
ENGLISH8
Page 7

8 To achieve a good result with curly, sparse
or long hair, you can use a comb to guide
the hair towards the clipper.
9 We advise you to regularly remove clipped
hair from the comb while clipping.
Graduation
The Philishave hair clipper not only allows you to
cut the hair evenly at the same length all over the
head, it also enables you to achieve a smooth
transition from longer hair on top of the head to
shorter hair on the back and sides of the head.
1 Start clipping at the setting for maximum
hair length (i.e. position 21 mm).
2 Then choose a shorter setting and cut the
hair on all parts of the head except the
top, where you want the hair to be longer.
3 You can repeat this procedure until the
hair on every part of the head has the
desired length.
Precise contouring without comb
attachment
You can use the clipper without comb attachment
to contour the neckline and the area around the
ears.
Be careful when you are clipping without comb
attachment, for the clipper will remove every hair
it touches.
ENGLISH 9
Page 8
1 Remove the comb attachment by pulling it
off the clipper.
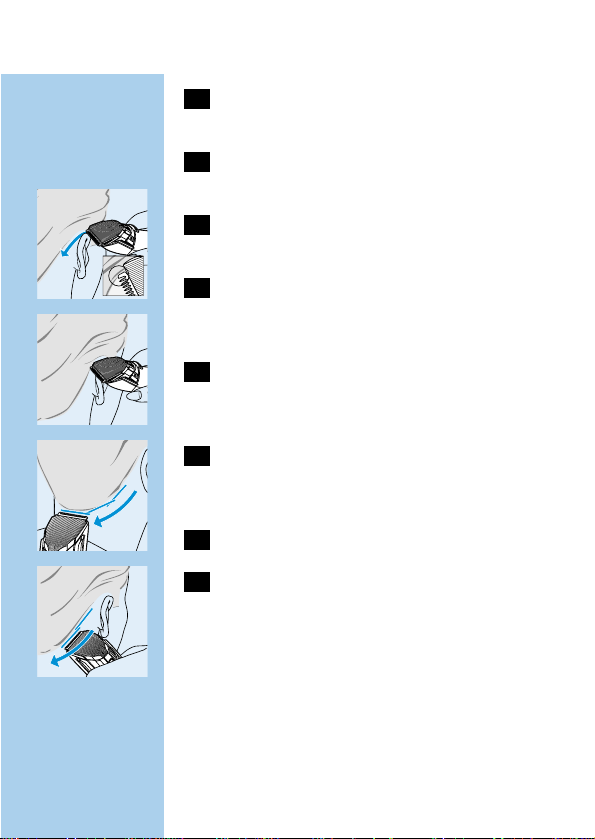
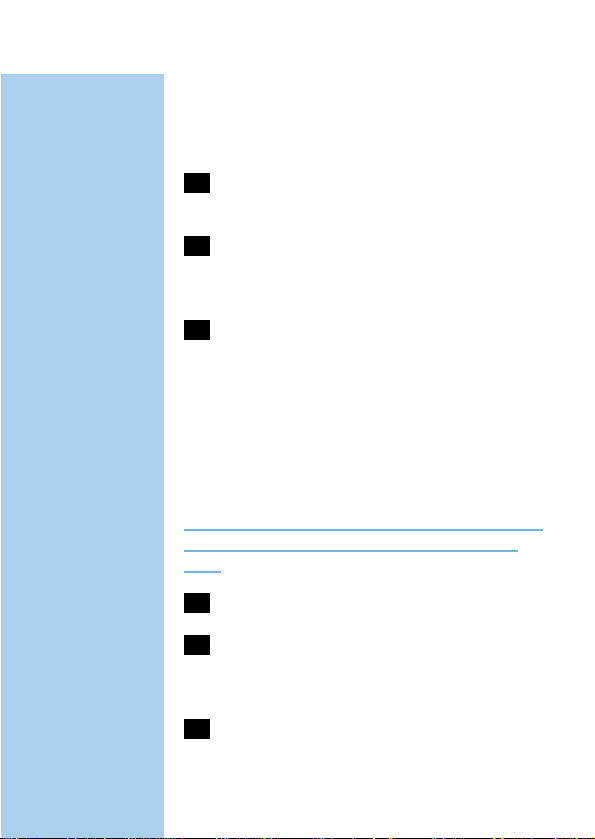
2 Before contouring the hairline round the
ears, comb the hair ends over the ear.
3 Bend the person's ear to get it out of the
way.
C
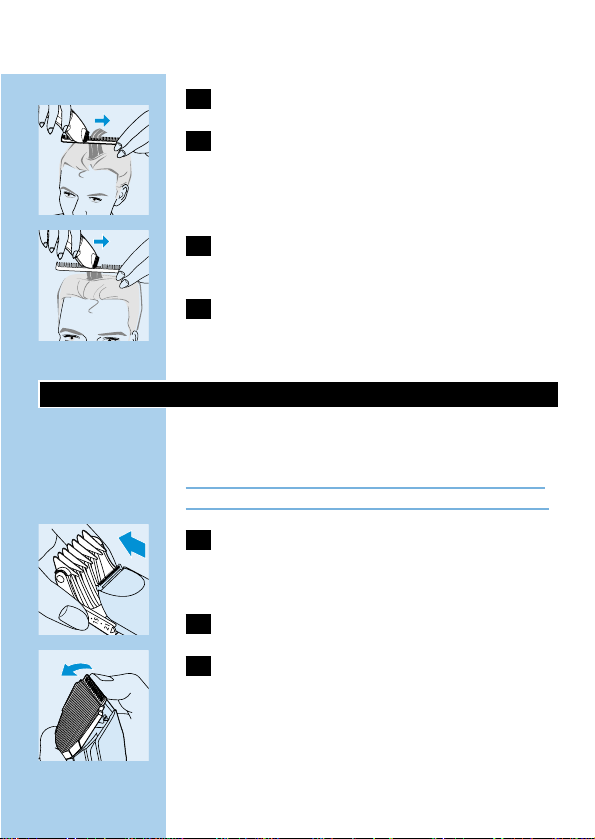
4 Tilt the clipper in such a way that only one
edge of the cutting element touches the
hair ends.
C
5 Only cut the hair ends.The hairline should
be close to the ear.
C
6 To contour the nape hairline and the
sideburns, turn the clipper and make
downward strokes.
7 Move slowly and smoothly.
C
8 Just follow the natural hairline.
Cutting over styling comb or fingers
This technique can be used to obtain hair lengths
over 21 mm. Bear in mind that this technique is
difficult to master and should only be applied by
experienced users.
ENGLISH10
Page 9
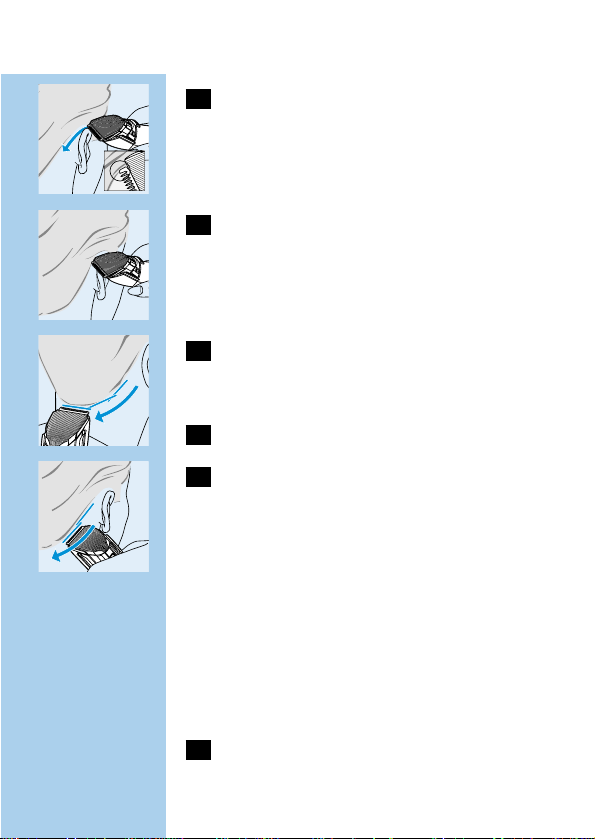
1 Remove the comb attachment.
C
2 Comb a small section of hair upwards. Lift
the hair with a styling comb or hold it
between your fingers until only the length
that needs to be cut sticks out.
C
3 Cut the hair protruding from the comb or
fingers.
4 Continue this procedure and comb
frequently to remove cut hair and to check
for unevenly cut sections.
Cleaning
Clean the appliance every time you have used it.
Do not use abrasives, scourers or liquids such as
alcohol, petrol or acetone to clean the appliance.
1 Make sure the appliance is switched off
and disconnected from the mains before
you start cleaning it.
C
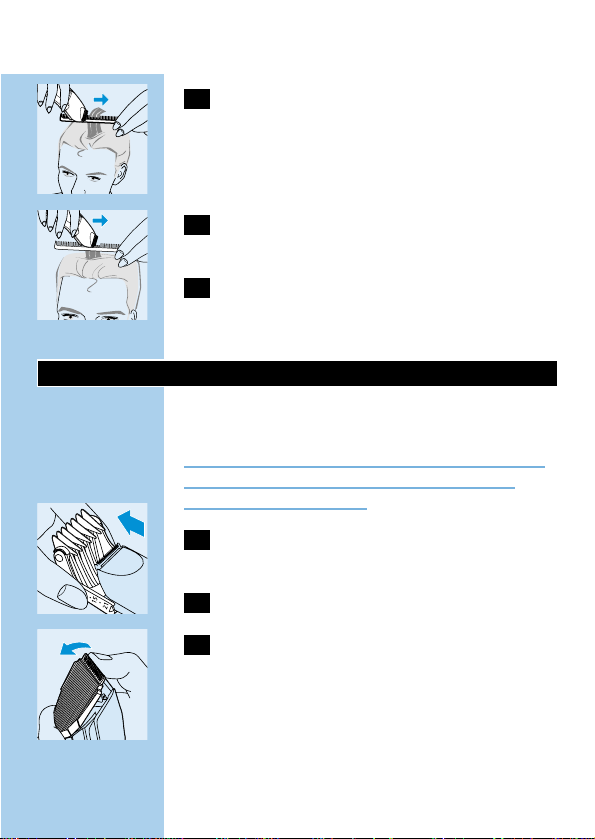
2 Remove the comb attachment.
C
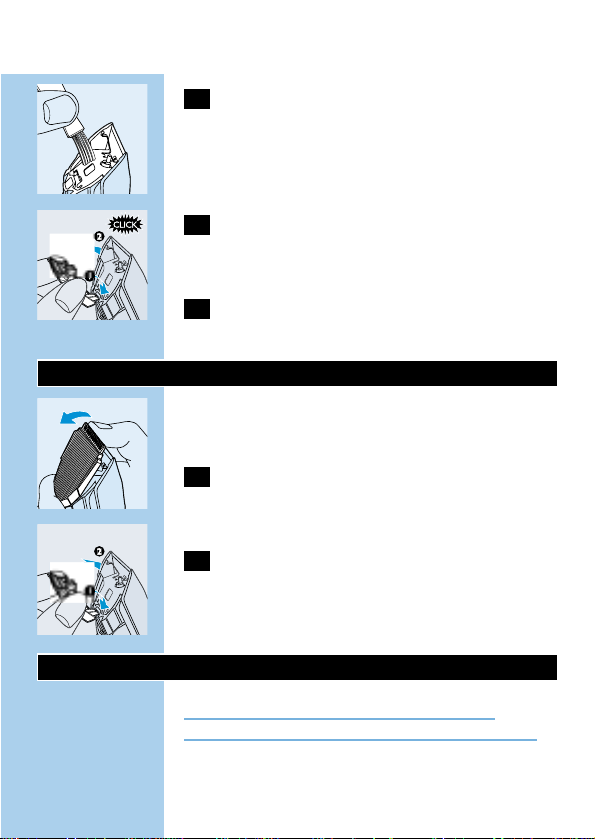
3 Push the middle part of the cutting unit
upwards with your thumb until it opens
and then pull it off the appliance.
Be careful that the cutting unit does not fall to the
floor.
ENGLISH 11
Page 10
C
4 Clean the cutting unit and the inside of the
appliance with the brush supplied.
C
5 Place the lug of the cutting unit into the
slot and push the unit back onto the
appliance.
6 Make sure you push the cutting unit back
until you hear a click.
Replacement
A worn or damaged cutting unit should only be
replaced with an original Philips cutting unit.
C
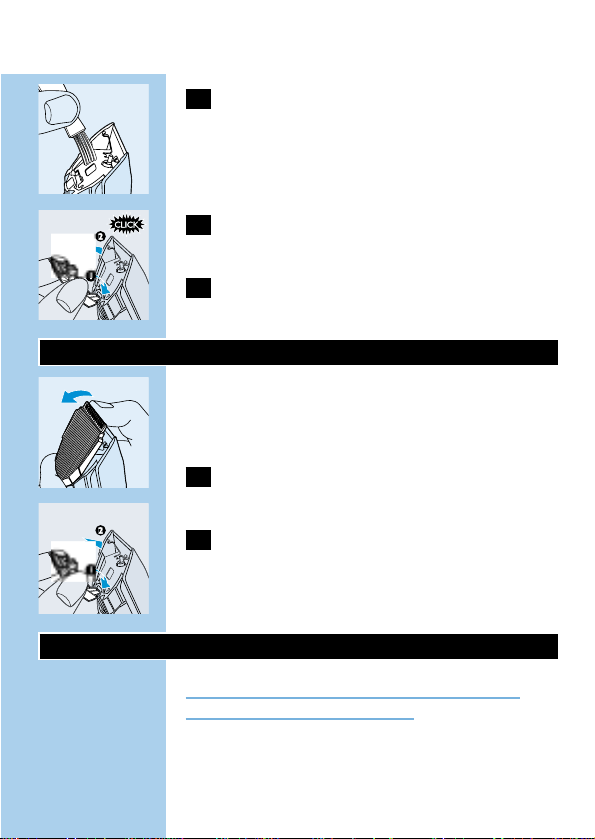
1 Push the middle part of the cutting unit
upwards with your thumb until it opens
and then pull it off the appliance.
C
2 Place the lug of the cutting unit into the
slot and push the cutting unit back until
you hear a click.
Environment (HQC482 and HQC483 only)
The built-in rechargeable battery contains
substances which may pollute the environment.
Remove the rechargeable battery when you
discard the appliance.
ENGLISH12
Page 11
Do not throw the battery away with the normal
household waste but hand it in at an official
collection point.
You can also take the appliance to a Philips
service centre, which will remove the battery for
you and will dispose of it in an environmentally
safe way.
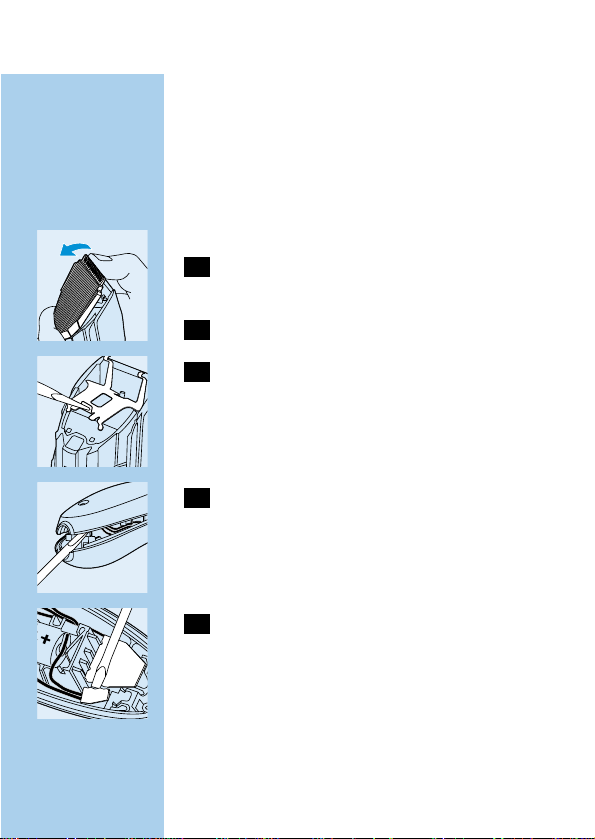
1 Disconnect the appliance from the mains
and let the appliance run until the motor
stops.
C
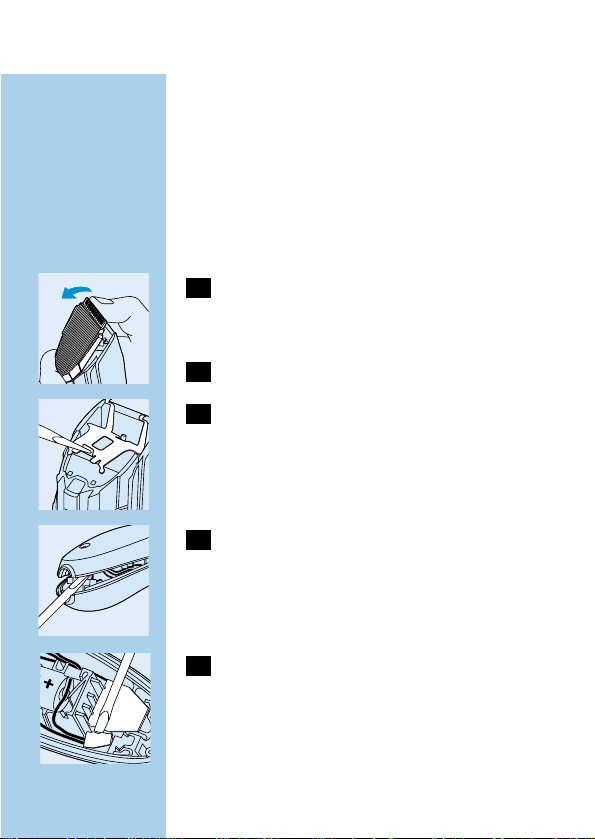
2 Open and remove the cutting unit.
C
3 Remove the metal clip by means of a
screwdriver.
C
4 Open the housing.
Insert a screwdriver into one of the grooves next
to the socket for the appliance plug.Turn the
screwdriver to separate the two housing halves.
C
5 Insert a screwdriver into the small slot in
the printed circuit board marked with an
arrow. Push the screwdriver down until
part of the printed circuit board breaks
off.
ENGLISH 13
Page 12

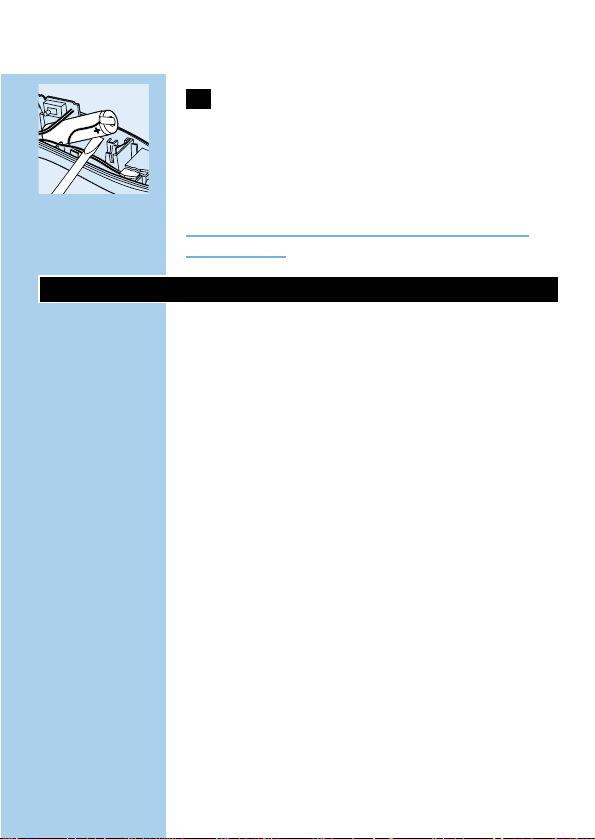
C
6 Pull the battery out of the appliance.
Dispose of the battery and the other
components in an environmentally safe way.
Do not connect the appliance to the mains again
after the battery has been removed!
Guarantee & service
If you need information or if you have a problem,
please visit the Philips website at www.philips.com
or contact the Philips Customer Care Centre in
your country (you will find its phone number in
the worldwide guarantee leaflet). If there is no
Customer Care Centre in your country, turn to
your local Philips dealer or contact the Service
Department of Philips Domestic Appliances and
Personal Care BV.
ENGLISH14
Page 13

Introducere
◗ Stimate client, aţi făcut o alegere corectă!
Noua dumneavoastră maşină de tuns Philips
se adaptează conturului capului şi favorizează
o utilizare confortabilă.
◗ Pentru a vă bucura mult timp de utilizarea
maşinii de tuns, vă sfătuim să citiţi informaţiile
de mai jos.
Important
Citiţi cu atenţie aceste instrucţiuni înainte de a
utiliza aparatul şi păstraţi-le pentru consultări
ulterioare.
◗ Înainte de a conecta aparatul, verificaţi ca
tensiunea indicată pe adaptor să corespundă
tensiunii locale.
◗ Acest aparat trebuie folosit la o tensiune între
220 şi 240 volţi.
◗ Folosiţi doar adaptorul furnizat.
◗ Adaptorul conţine un transformator. Nu
încercaţi să înlocuiţi ştecherul adaptorului
întrucât ar putea fi foarte periculos.
◗ Nu folosiţi un adaptor deteriorat.
◗ Dacă adaptorul este deteriorat, înlocuiţi-l
întotdeauna cu unul original pentru a evita
orice accident.
C
◗ Evitaţi contactul aparatului şi al adaptorului cu
apa.
◗ Nu lăsaţi aparatul la îndemâna copiilor.
ROMÂNĂ 15
Page 14

C
◗ Folosiţi, încărcaţi şi depozitaţi aparatul la o
temperatură între 15c şi 35c.
◗ Acest aparat a fost conceput pentru tunderea
părului uman. Nu-l folosiţi în alte scopuri.
◗ Nivel de zgomot: Lc= 69 dB [A].
Încărcare (doar HQC482 şi HQC483)
Înainte de prima utilizare, încărcaţi aparatul timp
de cel puţin 12 ore.
Un aparat complet încărcat asigură o durată de
utilizare fără cablu de până la 35 de minute.
Nu lăsaţi aparatul să se încarce mai mult de 24 de
ore.
1 Asiguraţi-vă că aparatul este oprit în timp
ce îl încărcaţi.
C
2 Introduceţi fişa de conectare în aparat.
3 Introduceţi adaptorul în priză.
C
◗ Ledul se va aprinde pentru a indica faptul că
aparatul se încarcă.
Optimizarea duratei de funcţionare a
acumulatorului
- Descărcaţi complet acumulatorul de două ori
pe an lăsând motorul să funcţioneze până se
opreşte.
ROMÂNĂ16
Page 15

- Scoateţi adaptorul din priză când acumulatorul
este complet încărcat.
- Dacă aparatul nu a fost folosit timp îndelungat,
trebuie reîncărcat cel puţin 12 ore.
Tundere cu aparatul conectat la priză
HQC482, HQC483:
Nu lăsaţi aparatul să funcţioneze conectat la priz
când acumulatorul este complet încărcat.
◗ Utilizarea maşinii de tuns conectate la priză:
Opriţi maşina de tuns, introduceţi ştecherul în
priză şi aşteptaţi câteva secunde înainte de a
porni aparatul.
Dacă acumulatorul este complet descărcat,
aşteptaţi câteva minute înainte de a porni
aparatul.
HQC440:
◗ Introduceţi fişa de conectare în aparat şi
puneţi adaptorul în priză.
Pregătire de utilizare
Tundere cu pieptenele de frezat
C
1 Înainte de a începe tunderea, capul
persoanei pe care urmează s-o tundeţi
trebuie să fie la înălţimea pieptului
dumneavoastră.
ROMÂNĂ 17
Page 16
2 Folosiţi maşina de tuns doar pe părul uscat
pentru a obţine cele mai bune rezultate.
A nu se folosi pe un păr proaspăt spălat.
3 Mai întâi pieptănaţi părul în direcţia
creşterii.
C
4 Deplasaţi întotdeauna maşina de tuns în
sens invers creşterii părului,altfel nu veţi
tunde uniform.
5 Deplasaţi încet maşina de tuns prin păr.
Utilizarea aparatului
Tundere cu pieptenele de frezat
C
1 Culisaţi pieptenele de frezat în glisierele
aparatului până ce auziţi un clic.
2 Asiguraţi-vă că cele două ghidaje ale
pieptenelui de frezat sunt bine poziţionate
pe glisiere.
C
3 Alegeţi reglajul potrivit lungimii dorite.
Apăsaţi pe butonul de reglare din spatele
aparatului şi culisaţi pieptenele de frezat pe poziţia
dorită.
Maşina de tuns are 7 reglaje diferite:
-3 mm
-6 mm
-9 mm
- 12 mm
- 15 mm
ROMÂNĂ18
Page 17

- 18 mm
- 21 mm
Începeţi cu reglajul pentru lungimea maximă
(21 mm) pentru a vă familiariza cu maşina de
tuns.
4 Asiguraţi-vă că porţiunea plată a
pieptenelui de frezat rămâne tot timpul în
contact cu pielea capului pentru a obţine
un rezultat uniform.
5 Deplasaţi încet maşina de tuns înspre
calotă pornind din direcţii diferite, pentru
obţinerea unor rezultate egale.
6 Faceţi mişcări repetate de întretăiere
pentru a vă asigura că maşina de tuns
prinde toate firele ce trebuie îndepărtate.
7 Din când în când, pieptănaţi în direcţia
creşterii firelor de păr pentru ca maşina de
tuns să prindă firele mai uşor.
8 Pentru a obţine rezultate mai bune pe
părul buclat, rar sau lung, folosiţi un
pieptene obişnuit pentru a direcţiona părul
spre maşina de tuns.
9 Îndepărtaţi la intervale regulate de timp
părul tuns din pieptene.
Gradare
Maşina de tuns Philishave vă permite nu numai să
tăiaţi părul uniform la aceeaşi lungime, dar vă
ROMÂNĂ 19
Page 18
permite, de asemenea, să faceţi o trecere
uniformă de la părul lung din creştet la cel scurt
din părţi şi de la spate.
1 Începeţi să tundeţi părul folosind reglajul
setat pe lungimea maximă (21 mm).
2 Apoi alegeţi un reglaj inferior şi tăiaţi părul
din toate părţile cu excepţia creştetului,
unde doriţi ca părul să fie mai lung.
3 Puteţi repeta această procedură până ce
părul din părţi ajunge la lungimea dorită.
Conturare precisă fără pieptene de
frezat
Puteţi folosi maşina de tuns fără pieptene de
frezat pentru conturarea cefei şi zonei după
urechi.
Aveţi grijă când tundeţi fără pieptenele de frezat
deoarece maşina de tuns taie orice fir de păr
atins.
1 Scoateţi pieptenele de frezat.
2 Mai întâi pieptănaţi părul peste ureche
înainte de a începe conturarea zonei după
urechi.
3 Înclinaţi urechea persoanei pe care o
tundeţi pentru a nu vă incomoda.
ROMÂNĂ20
Page 19
C
4 Înclinaţi maşina de tuns în aşa fel încât
doar o margine a dispozitivului de tăiere să
atingă vârfurile firelor de păr.
C
5 Tăiaţi vârfurile foarte aproape de ureche.
C
6 Pentru conturarea liniei cefei şi a
perciunilor, întoarceţi maşina de tuns şi
deplasaţi-o în jos.
7 Faceţi mişcări ferme şi precise.
C
8 Urmaţi linia naturală a părului.
Tundere cu ajutorul pieptenului de
frezat sau peste degete
Cu ajutorul acestei tehnici obţineţi o lungime a
părului de peste 21 mm. Nu uitaţi că această
tehnică e greu de stăpânit şi ar trebui folosită doar
de utilizatori experimentaţi.
1 Scoateţi pieptenele de frezat.
ROMÂNĂ 21
Page 20
C
2 Pieptănaţi o şuviţă mică de păr în sus.
Ridicaţi şuviţa cu pieptenele sau ţineţi-o
între degete în aşa fel încât lungimea care
trebuie tăiată să iasă în afară.
C
3 Tăiaţi şuviţele ce trec de degete sau de
pieptene.
4 Continuaţi această procedură şi pieptănaţi
des părul pentru a îndepărta şuviţele tunse
şi a uniformiza zonele tunse greşit.
Curăţare
Curăţaţi aparatul după fiecare utilizare.
Nu folosiţi substanţe abrazive, bureţi abrazivi sau
substanţe precum alcool, benzină sau aceton
pentru a curăţa aparatul.
1 Înainte de a curăţa aparatul, asiguraţi-vă că
este oprit şi scos din priză.
C
2 Scoateţi pieptenele de frezat.
C
3 Împingeţi partea centrală a unităţii de
tăiere în sus până se deschide şi scoateţi-o.
Aveţi grijă să nu scăpaţi unitatea de tăiere pe jos.
ROMÂNĂ22
Page 21
C
4 Curăţaţi unitatea de tăiere şi interiorul
aparatului folosind periuţa furnizată.
C
5 Fixaţi cârligul unităţii de tăiere în fantă şi
împingeţi-o înapoi în aparat.
6 Împingeţi unitatea până auziţi clic.
Înlocuire
O unitate de tăiere veche sau deteriorată, poate fi
înlocuită doar cu o unitate de tăiere Philips
originală.
C
1 Împingeţi partea centrală a unităţii de
tăiere în sus până se deschide şi scoateţi-o.
C
2 Fixaţi cârligul unităţii de tăiere în fantă şi
împingeţi-o înapoi în aparat.
Mediu (doar HQC482 şi HQC483)
Acumulatorul reîncărcabil încorporat conţine
substanţe ce pot polua mediul.
Când aruncaţi aparatul, scoateţi acumulatorul
reîncărcabil.
ROMÂNĂ 23
Page 22
Nu aruncaţi acumulatorul în gunoiul menajer, ci
duceţi-l la un centru de colectare.
Puteţi duce aparatul la un centru service Philips,
unde personalul va scoate acumulatorul în locul
dumneavoastră şi îl va arunca respectând normele
de protejare a mediului.
1 Scoateţi aparatul din priză şi lăsaţi-l să
funcţioneze până ce se opreşte motorul.
C
2 Scoateţi unitatea de tăiere.
C
3 Scoateţi clema de metal cu ajutorul unei
şurubelniţe.
C
4 Deschideţi carcasa.
Introduceţi şurubelniţa în una din nişele de lângă
mufa aparatului. Răsuciţi şurubelniţa şi separaţi în
două corpul aparatului.
C
5 Introduceţi şurubelniţa în orificiul plăcii de
circuit imprimat marcată cu o săgeată.
Împingeţi şurubelniţa până ce o parte a
plăcii de circuit imprimat se rupe.
ROMÂNĂ24
Page 23
C
6 Scoateţi acumulatorul.
Aruncaţi acumulatorul şi celelalte componente în
conformitate cu regulile privind protejarea
mediului.
Nu conectaţi aparatul la priză după ce aţi scos
acumulatorul!
Garanţie şi service
Pentru informaţii suplimentare sau în cazul altor
probleme, vă rugăm să vizitaţi site-ul Philips
www.philips.com sau să contactaţi Departamentul
Clienţi din ţara dumneavoastră (veţi găsi numărul
de telefon în garanţia internaţională). Dacă în ţara
dumneavoastră nu există un astfel de
departament, contactaţi furnizorul dumneavoastră
Philips sau Departamentul Service pentru
Aparate Electrocasnice şi Produse de Îngrijire
Personală Philips.
ROMÂNĂ 25
Page 24

Введение
◗ Уважаемый покупатель, вы сделали
правильный выбор! Повторяя форму
головы, ваша новая машинка для стрижки
волос Philips прекрасно стрижет и удобна в
использовании.
◗ Для того чтобы увеличить срок службы
машинки для стрижки волос, мы
рекомендуем вам ознакомиться со
следующей информацией.
Внимание
Прежде чем начать пользоваться прибором,
внимательно ознакомьтесь с настоящим
руководством и сохраните настоящее
руководство по эксплуатации в качестве
справочного материала.
◗ Перед подключением прибора убедитесь,
что номинальное напряжение,указанное на
адаптере, соответствует напряжению
электросети у вас дома.
◗ Электроприбор подходит для напряжения
в электросети от 220 до 240 вольт.
◗ Пользуйтесь только входящим в комплект
поставки сетевым адаптером.
◗ В адаптере имеется трансформатор. Не
производите замену оригинального
адаптера на какой-либо другой адаптер, так
как это может привести к опасным
последствиям.
◗ Запрещено использование неисправного
адаптера.
РУССКИЙ26
Page 25
◗ При повреждении адаптера всегда
заменяйте его оригинальным адаптером,
чтобы обеспечить безопасную
эксплуатацию прибора.
C
◗ Избегайте попадания воды на прибор и
сетевой адаптер.
◗ Храните прибор в недоступном для детей
месте.
C
◗ Пользуйтесь прибором, заряжайте и
храните его при температуре от 15cдо 35c.
◗ Данный прибор предназначен только для
стрижки волос. Запрещается использовать
его для других целей.
◗ Уровень шума: Lc= 69 дБ [A].
Зарядка аккумуляторов (только для моделей
HQC482 и HQC483)
Перед первым применением электроприбора,
заряжайте батареи в течение как минимум
12 часов.
Продолжительность работы полностью
заряженного прибора без подключения к
электросети составляет максимум 35 минут.
Не заряжайте прибор более 24 часов подряд.
1 Следите за тем, чтобы во время зарядки
прибор был выключен.
C
2 Вставьте штекер шнура питания в
прибор.
РУССКИЙ 27
Page 26

3 Вставьте вилку сетевого адаптера в
розетку электросети.
C
◗ Загорится сигнальный индикатор,
показывая, что прибор заряжается.
Для того чтобы максимально увеличить
срок службы батареи.
- Два раза в год полностью разряжайте
батарею, оставляя прибор включенным до
остановки двигателя.
- Выньте вилку сетевого адаптера из розетки
электросети, когда аккумуляторная батарея
полностью зарядится.
- Если прибором не пользовались в течение
длительного времени, его следует заряжать
не менее 12 часов.
Стрижка с подключением к электросети
Модели HQC482, HQC483:
Не пользуйтесь прибором с подключением к
электросети при полностью заряженной
аккумуляторной батарее.
◗ Для стрижки волос машинкой,
подключенной к электросети:
Выключите машинку, подсоедините ее к сети
электропитания и подождите несколько
секунд перед повторным включением.
РУССКИЙ28
Page 27

При полностью разряженной аккумуляторной
батарее, подождите несколько минут, прежде
чем включить прибор.
Модель HQC440:
◗ Вставьте штекер в прибор, а вилку сетевого
адаптера вставьте в розетку электросети.
Подготовка прибора к работе
Стрижка с гребенчатой насадкой
C
1 До того, как приступить к стрижке,
убедитесь, что голова человека,
которого вы подстригаете, находится на
уровне вашей груди.
2 Для достижения наилучших результатов,
подстригайте сухие волосы. Не стригите
только что вымытые волосы.
3 Сначала расчешите волосы в
направлении их роста.
C
4 Всегда перемещайте машинку для
стрижки против направления роста
волос, иначе волосы не будут
подстрижены должным образом.
5 Подстригая волосы, перемещайте
машинку медленно.
РУССКИЙ 29
Page 28

Как пользоваться прибором
Стрижка с гребенчатой насадкой
C
1 Продвиньте гребенчатую насадку по
направляющим линиям на корпусе
прибора до щелчка.
2 Убедитесь в том, что насадка
установлена правильно.
C
3 Установите регулятор в положение,
соответствующее желаемой длине
волос.
Нажмите регулировочную кнопку,
расположенную на задней части прибора, и
сдвигайте гребенчатую насадку в нужное вам
положение.
Машинка имеет 7 различных установок длины
волос
-3 мм
-6 мм
-9 мм
- 12 мм
- 15 мм
- 18 мм
- 21 мм
Начинайте стричь при установке максимальной
длины волос (21 мм), чтобы освоиться с
машинкой.
4 Проверьте, чтобы плоская сторона
гребенчатой насадки полностью
прилегала к голове для получения
ровной стрижки.
РУССКИЙ30
Page 29

5 Медленно ведите машинку повер волос,
перемещая ее в разных направлениях
для получения ровной стрижки.
6 Делайте машинкой перекрывающие
движения, чтобы быть уверенными, что
подстрижены все нужные вам участки
головы.
7 Время от времени расчесывайте волосы
по направлению их роста чтобы они
легче захватывались машинкой во время
стрижки.
8 Для получения хорошей стрижки
вьющихся волос, редких волос, или
длинных волос, пользуйтесь расческой
для направления волос на режущий блок
машинки.
9 Мы советуем вам во время стрижки
удалять попадающие на гребень волосы.
Завершение
Машинка для стрижки волос Philishave
позволяет не только получать ровную стрижку
с одинаковой длиной волос по всей голове, но
также сделать плавный переход от длинных
волос в верхней части головы к более
коротким волосам сзади и по бокам.
1 Начинайте стричь при установке
максимальной длины волос (21 мм).
РУССКИЙ 31
Page 30

2 После этого установите насадку на
меньшую длину волос и подстригите их
в остальных местах, кроме верхней
части головы, в которой вы хотите
оставить волосы более длинными.
3 Вы можете повторять эту процедуру до
тех пор, пока волосы не будут иметь
нужную длину по всей голове.
Точное подравнивание контура
стрижки без использования
гребенчатой насадки
Вы может пользоваться машинкой, не
устанавливая на нее гребенчатую насадку, для
формирования контуров на шее и в области
ушей.
При стрижке без гребенчатой насадки
соблюдайте меры предосторожности, так как
при любом прикосновении режущего блок
машинки к волосам они будут срезаны.
1 Для того чтобы снять гребенчатую
насадку, потяните ее на себя.
2 Прежде чем создать контур, расчешите
кончики волос над ушами.
3 Слегка отогните ухо человека, которого
вы стрижете, чтобы оно не мешало
стрижке.
РУССКИЙ32
Page 31

C
4 Наклоните машинку таким образом,
чтобы только один край режущего
элемента касался концов волос.
C
5 Срезайте только кончики волос. Граница
стрижки должна быть рядом с ухом.
C
6 При создании контура на шее и висках,
поверните машинку и совершайте
направленные вниз движения.
7 Совершайте медленные и плавные
движения.
C
8 Ведите машинку по естественной
границе волос.
Стрижка поверх расчески или
пальцев
Этот прием используется для получения
стрижки с длиной волос более 21 мм. Имейте
в виду, что этот прием технически сложен, и
его лучше использовать опытному
пользователю.
1 Снимите гребенчатую насадку.
РУССКИЙ 33
Page 32

C
2 Расчешите вверх небольшую прядь
волос. Поднимите волосы с помощью
расчески или удерживая их между
пальцев до нужной длины стрижки.
C
3 Подстригите волосы, пропущенные
через зубья расчески или пальцы.
4 Продолжайте стричь, таким образом,
часто расчесывая голову для удаления
состриженных волосков и чтобы
проверить ровность стрижки.
Очистка
Каждый раз после пользования прибором
производите его очистку.
Не используйте для очистки прибо
абразивные чистящие средства, металлические
щетки или растворители типа спирта, бензин
или ацетона.
1 Прежде чем приступить к очистке,
убедитесь, что прибор выключен и
отключен от электросети.
C
2 Снимите гребенчатую насадку.
РУССКИЙ34
Page 33

C
3 Сдвиньте вверх большим пальцем
среднюю часть режущего блока, пока
он не откроется, и затем снимите его с
прибора.
Соблюдайте меры предосторожности, чтобы
не уронить режущий блок на пол.
C
4 Очистите с помощью прилагаемой
кисточки режущий блок и внутреннюю
поверхность прибора.
C
5 Установите выступ режущего блока в
выемку и вставьте блок в прибор.
6 При правильной установке режущего
блока вы должны услышать щелчок.
Замена
Изношенный или поврежденный режущий
блок можно заменить только на режущий блок
такого же типа производства компании
«Филипс».
C
1 Сдвиньте вверх большим пальцем
среднюю часть режущего блока, пока
он не откроется, и затем снимите его с
прибора.
C
2 Установите выступ режущего блока в
выемку и вставьте блок в прибор до
щелчка.
РУССКИЙ 35
Page 34

Защита окружающей среды (только для
моделей HQC482 и HQC483)
Встроенная аккумуляторная батарея содержит
компоненты, способные загрязнит
окружающую среду.
Перед утилизацией прибора удалите
аккумуляторную батарею.
Не выбрасывайте аккумуляторную батарею с
обычными бытовыми отходами, а сдавайте ее
в официальный приемный пункт.
Вы можете также отнести машинку для
стрижки волос в сервисный центр компании
«Филипс», где из нее удалят и безопасным для
окружающей среды способом утилизируют
батарею.
1 Отключите прибор от электросети,
включите и подождите, пока двигатель
не остановится.
C
2 Откройте, а затем снимите режущий
блок.
C
3 Снимите металлический фиксатор с
помощью отвертки.
РУССКИЙ36
Page 35

C
4 Откройте корпус прибора.
Вставьте отвертку в одно из углублений рядом
с гнездом для штекера. Поверните отвертку,
чтобы разделить две половинки корпуса.
C
5 Вставьте отвертку в небольшой паз в
печатной плате, отмеченный стрелкой.
Нажмите на отвертку так, чтобы часть
печатной платы отломилась.
C
6 Выньте аккумуляторную батарею.
Утилизируйте аккумуляторную батарею и другие
детали без ущерба для окружающей среды.
Запрещается включать прибор без
аккумуляторных батарей в электросеть!
Гарантия и обслуживание
По поводу дополнительной информации или в
случае возникновения каких-либо проблем
обращайтесь на веб-сайт компании «Филипс»
по адресу www. philips.com, или в центр
компании «Филипс» по обслуживанию
потребителей в вашей стране (вы найдете его
номер телефона на международном
гарантийном талоне). Если подобный центр в
вашей стране отсутствует, обратитесь в вашу
местную торговую организацию компании
«Филипс» или сервисное отделение компании
Philips Domestic Appliancesand Personal Care BV
РУССКИЙ 37
Page 36

Úvod
◗ Vážený zákazníku, zvolil jste správně! Váš nový
přístroj Philips pro stříhání vlasů se přizpůsobí
povrchu vaší hlavy a zajistí vám tak perfektní
úpravu účesu.
◗ Aby vám přístroj Philips pro stříhání vlasů
sloužil co nejdéle, věnujte pozornost
následujícím informacím.
Důležité
Před použitím přístroje pročtěte pečlivě tento
návod a uschovejte ho pro případně pozdější
nahlédnutí.
◗ Dříve než přístroj použijete, zkontrolujte, zda
údaj o napětí na síťovém adaptéru souhlasí s
napětím ve vaší světelné síti.
◗ Přístroj lze připojit do sítě o napětí v rozmezí
220 až 240 V.
◗ Používejte pouze dodaný síťový adaptér.
◗ Síťový adaptér obsahuje transformátor. Proto
tento adaptér nikdy nenahrazujte jiným
adaptérem, protože by mohla vzniknout
nebezpečná situace.
◗ Nepoužívejte poškozený síťový adaptér.
◗ Pokud je originální síťový adaptér poškozen,
vždy musí být nahrazen pouze shodným
originálním adaptérem aby nevznikla
nebezpečná situace.
C
◗ Přístroj i adaptér udržujte vždy v suchu.
◗ Přístroj vždy ukládejte mimo dosah dětí.
38 ČESKY
Page 37

39
C
◗ Používejte, nabíjejte a uchovávejte přístroj při
teplotě mezi 15c a 35c.
◗ Přístroj je vhodný výhradně pro stříhání
lidských vlasů. Nepoužívejte ho k jiným
účelům.
◗ Hladina hluku: Lc = 69 dB (A).
Nabíjení (pouze typy HQC482 a HQC483)
Pokud použijete přístroj poprvé, nabíjejte jeho
akumulátor 12 hodin.
Plně nabitý akumulátor umožní až 35 minut
provozu přístroje bez připojení sítě.
Nenabíjejte akumulátor déle než asi 24 hodin.
1 Dbejte na to, aby byl přístroj během
nabíjení akumulátoru ve vypnutém stavu.
C
2 Zasuňte zástrčku síťového přívodu do
přístroje.
3 Zasuňte zástrčku adaptéru do síťové
zásuvky.
C
◗ Kontrolka na přístroji se rozsvítí a indikuje
nabíjení akumulátoru.
ČESKY
Page 38

40
Zajištění dlouhé životnosti akumulátoru
- Dvakrát ročně nechte akumulátor přístroje
zcela vybít tak, že ponecháte motorek v chodu
tak dlouho, až se zcela zastaví.
- Když je akumulátor plně nabitý, vyjměte
zástrčku adaptéru ze síťové zásuvky.
- Pokud nebyl přístroj delší dobu používán,
nabíjejte jeho akumulátor nejméně 12 hodin.
Provoz ze sítě
HQC482, HQC483:
Nedoporučujeme přístroj provozovat ze sítě
pokud je akumulátor plně nabit.
◗ Použití přístroje připojeného adaptérem do
sítě:
Přístroj vypněte. Pak připojte adaptér do sítě a
vyčkejte několik sekund než přístroj zapnete.
Pokud byl ale akumulátor přístroje zcela vybit,
vyčkejte několik minut než přístroj zapnete.
HQC440:
◗ Zasuňte přístrojovou zástrčku do zásuvky na
přístroji a zástrčku adaptéru do síťové
zásuvky.
ČESKY
Page 39

Příprava k použití
Stříhání s hřebenovým nástavcem
C
1 Než začnete stříhat, přesvědčte se, že hlava
stříhané osoby je asi ve výšce vaší hrudi.
2 Nejlepších výsledků dosáhete, když budete
stříhat suché vlasy.Nestříhejte čerstvě
umyté vlasy.
3 Nejprve vlasy učešte ve směru jejich růstu.
C
4 Přístrojem vždy pohybujte proti směru
růstu vlasů, jinak neostříháte vlasy správně.
5 Přístrojem pohybujte ve vlasech zvolna.
Použití přístroje
Stříhání s hřebenovým nástavcem
C
1 Nasuňte hřebenový nástavec do kolejniček
na přístroji a zasuňte ho až uslyšíte
klapnutí.
2 Přesvědčte se, že se raménka hřebenového
nástavce správně zasunuly do kolejniček na
obou stranách.
C
3 Zvolte požadovanou délku střihu.
Stiskněte zajišťovací tlačítko na zadní straně
přístroje a posuňte hřebenový nástavec do
požadované polohy.
41ČESKY
Page 40

42
Přístroj má sedm poloh nastavení délky vlasů:
-3 mm
-6 mm
-9 mm
- 12 mm
- 15 mm
- 18 mm
- 21 mm
Začněte nastavením největší délky vlasů (21 mm)
abyste se s přístrojem seznámili.
4 Dbejte na to, aby byla plochá část
hřebenového nástavce vždy v přímém
kontaktu s pokožkou hlavy.To zajišťuje
dobrý výsledek stříhání.
5 Pohybujte přístrojem zvolna po temeni
hlavy různými směry abyste dosáhli
shodného výsledku stříhání.
6 Jednotlivé tahy přístroje opakujte tak,
abyste odstříhli i ty vlasy, které jste při
předešlých tazích nezachytili.
7 Čas od času vlasy pročešte ve směru jejich
růstu aby je mohl přístroj snadněji zachytit.
8 Abyste dosáhli dobrých výsledků u
kadeřavých, řídších nebo dlouhých vlasů
můžete zkusit vést vlasy hřebenem
směrem k přístroji.
9 Doporučujeme pravidelně odstraňovat
během stříhání odstřižené vlasy z hřebenu.
ČESKY
Page 41

43
Dokončení práce
Zastřihovač vlasů Philishave vám nejen zajistí
ostříhání vlasů na celé hlavě na shodnou délku, ale
umožní vám též přechod od delších vlasů na
temeni hlavy ke kratším vlasům vzadu a na
spáncích.
1 Začněte stříhat s nastavenou největší
délkou vlasů (tzn. 21 mm).
2 Pak teprve nastavení zmenšete a ostříhejte
vlasy na všech částech hlavy, kromě vlasů
na temeni, pokud si je tam přejete mít
delší.
3 Tuto práci opakujte tak dlouho, až budou
mít vlasy na všech partiích hlavy
požadovanou délku.
Přesné zarovnání účesu pomocí
hřebenového nástavce
Můžete stříhat též bez hřebenového nástavce,
například k zarovnání obrysů na krku a v oblasti
kolem uší.
Pokud stříháte bez hřebenového nástavce buďte
opatrní protože přístroj odstřihne všechny vlasy
jichž se dotknete.
1 Hřebenový nástavec sejmete z přístroje
pouhým stažením.
2 Před zarovnáním linie vlasů okolo uší
učešte konce vlasů přes uši.
ČESKY
Page 42

44
3 Překážejí-li uši stříhané osoby,ohněte je.
C
4 Nakloňte přístroj tak, aby se konců vlasů
dotýkala vždy jen jedna strana stříhací
jednotky.
C
5 Stříhejte pouze konce vlasů. Linie vlasů má
být těsně kolem uší.
C
6 K zarovnání linie vlasů na zátylku a po
stranách, otočte zastřihovač a posouvejte
ho směrem dolů.
7 Pracujte pomalu a opatrně.
C
8 Sledujte pouze přirozenou linii vlasů.
Stříhání přes hřeben nebo přes prsty
Tuto techniku použijte, pokud požadujete delší
vlasy než 21 mm. Pamatuje na to, že tato technika
není snadno zvládnutelná a vyžaduje velkou
zkušenost.
1 Sejměte hřebenový nástavec.
C
2 Učešte malou část vlasů směrem nahoru.
Vlasy nazvedněte hřebenem nebo je
ČESKY
Page 43

45
podržte mezi prsty tak, abyste dosáhli
požadované délky, která má být odstřižena.
C
3 Vlasy, které hřeben nebo prsty přesahují,
odstřihněte.
4 V této práci pokračujte a vlasy často
pročešte abyste odstranili odstřižené
zbytky vlasů.
Čištění
Přístroj vyčistěte po každém použití.
Pro čištění nepoužívejte žádné abrasívní čisticí
prostředky ani chemikálie jako líh, benzín nebo
acetón.
1 Před každým čištěním se přesvědčte, že je
přístroj vypnut a odpojen od sítě.
C
2 Sejměte hřebenový nástavec.
C
3 Zatlačte střední část stříhací jednotky
palcem směrem nahoru až se otevře a pak
ji stáhněte z přístroje.
Stříhací jednotku a vnitřek přístroje vyčistěte
přiloženým kartáčkem.
C
4 Stříhací jednotku i její vnitřek vyčistěte
kartáčkem, který je v příslušenství.
ČESKY
Page 44

46
C
5 Umístěte výstupek na stříhací jednotce do
zářezu a zatlačte ji zpět do přístroje.
6 Stříhací jednotku zasuňte tak daleko až
slyšitelně zaklapne.
Výměna dílů
Opotřebená nebo poškozená stříhací jednotka
smí být nahražena jen origínálním náhradním
dílem Philips.
C
1 Zatlačte střední část stříhací jednotky
palcem směrem nahoru až se otevře a pak
ji stáhněte z přístroje.
C
2 Umístěte výstupek na stříhací jednotce do
zářezu a zatlačte ji zpět do přístroje.
Ochrana životního prostředí (pouze
HQC482 a HQC483)
Vestavěný akumulátor obsahuje substance, které
po jeho likvidaci, mohou ohrožovat životní
prostředí.
Když vám jednoho dne přístroj doslouží,
akumulátor z něj vyjměte.
Akumulátor nezahazujte do běžného domovního
odpadu, ale odevzdejte ho do příslušné sběrny.
ČESKY
Page 45

47
Přístroj můžete též odevzdat v servisu firmy
Philips, kde sami vyjmou akumulátor a postarají se
o ekologické zlikvidování přístroje.
1 Odpojte přístroj od sítě a nechte motorek
v chodu dokud se sám nezastaví.
C
2 Otevřte a odejměte stříhací jednotku.
C
3 Vhodným šroubovákem sejměte kovovou
sponu.
C
4 Otevřte přístroj.
Zasuňte šroubovák do jedné z drážek blízko
zásuvky pro přístrojovou zástrčku. Otočením
šroubováku obě části od sebe oddělte.
C
5 Vložte šroubovák do malé štěrbiny v desce
s plošnými spoji v místě, naznačeném
šipkou. Zasuňte šroubovák tak daleko až se
část desky odlomí.
C
6 Vyjměte akumulátor z přístroje.
Vyjměte akumulátor i ostatní díly a likvidujte je
vhodným způsobem.
Když jste vyjmuli akumulátor, nesmíte již připojit
přístroj do sítě.
ČESKY
Page 46

Záruka & servis
Pokud byste potřebovali jakoukoli informaci nebo
měli nějaký problém, nahlédněte na internetovou
stránku www.philips.com.Můžete se též spojit s
Informačním střediskem firmy Philips, jehož
adresu, telefonní číslo i další možnosti
kontaktování najdete na letáčku s celosvětovou
zárukou.
48 ČESKY
Page 47

Bevezető
◗ Kedves Vásárlónk, Ön jól választott, amikor az
új fejformakövető, kényelmesen használható
Philips hajvágó mellett döntött!
◗ Érdemes elolvasnia az itt leírt tudnivalókat,
hogy minél hosszabb ideig lelje örömét a
készüléket a készülék használatában.
Fontos
A készülék használata előtt olvassa el a használati
útmutatót. Őrizze meg az útmutatót későbbi
használatra.
◗ Mielőtt csatlakoztatná a készüléket,
ellenőrizze, hogy a hálózati adapteren
feltüntetett feszültség megegyezik-e lakása
hálózati feszültségével.
◗ Ez a készülék 220-240 Volt hálózati
feszültségen használható.
◗ Csak a mellékelt hálózati adaptert használja.
◗ A hálózati adapter transzformátort tartalmaz.
Ne vágja le a csatlakozó vezetéket a hálózati
adapterről és ne csatlakoztassa a hajvágót
másik hálózati adapterhez, mert ez veszélyes
lehet.
◗ Ne használjon meghibásodott hálózati
adaptert.
◗ Ha a hálózati adapter hibás, veszély elkerülése
céljából csak eredeti típussal cserélje ki.
C
◗ Tartsa a készüléket és a hálózati adaptert
szárazon.
◗ A készüléket tartsa távol a gyerekektől.
49MAGYAR
Page 48

50
C
◗ A készüléket 15c és 35c közötti
hőmérsékleten használja, töltse és tárolja.
◗ Ez a készülék csak emberi haj vágására
alkalmas. Ne használja semilyen más célra.
◗ Zajszint: Lc = 69 dB [A].
Töltés (csak HQC482 és HQC483)
Előső használat előtt legalább 12 órán át töltse a
készüléket.
A teljesen feltöltött készülék vezeték nélkül
35 percig is használhatja.
Ne töltse a készüléket 24 óránál tovább.
1 Győződjön meg róla, hogy töltés közben
kikapcsolta-e a készüléket.
C
2 Csatlakoztassa a készülék csatlakozó
dugóját a készülékbe.
3 Csatlakoztassa a hálózati adaptert a fali
konnektorba.
C
◗ A jelző LED világít a készülék töltésekor.
Az akkumulátor élettartamának
optimalizálása
- Évente két alkalommal süsse ki teljesen az
akkumulátort: járassa a motort, amíg meg nem
áll.
MAGYAR
Page 49

51
- Ha az akkumulátor teljesen feltöltött, húzza ki a
hálózati adaptert a fali konnektorból.
- Ha a készüléket hosszú ideig nem használta,
legalább 12 órán át töltse.
Vágás a hálózathoz csatlakoztatott készülékkel
HQC482, HQC483:
Ne működtesse a készüléket hálózatról, ha az
akkumulátort teljesen feltöltötte.
◗ A hajvágó készülék használata hálózathoz
csatlakoztatva:
Kapcsolja ki a készüléket, és csatlakoztassa a
hálózathoz.Várjon néhány másodpercet, mielőtt
bekapcsolná.
Ha az akkumulátor teljesen lemerült, akkor csak
néhány perc elteltével kapcsolja be a készüléket.
HQC440:
◗ Csatlakoztassa a készülék csatlakozó dugóját a
készülékbe és az adaptert a fali konektorba.
Előkészület a használathoz
Vágás fésűtartozékkal
C
1 A vágás megkezdése előtt, úgy ültesse le a
személyt, kinek vágja a haját, hogy a feje az
Ön mellkasával egy magasságban legyen.
MAGYAR
Page 50

52
2 A legjobb, ha száraz hajat vág a készülékkel.
Ne használja a hajvágó készüléket frissen
mosott haj vágásához.
3 Először is fésülje ki a hajat a növekedés
irányába.
C
4 A készüléket mindig a haj növekedési
irányával szemben mozgassa, különben
nem vágája a hajat megfelelően.
5 Lassan mozgassa a hajvágót.
A készülék használata
Nyírás fésűtartozékkal
C
1 Csúsztassa a fésűtartozék csapjait a
készülék vezetősíneibe, amíg kattanást nem
hall.
2 Gondoskodjon róla, hogy a fésűtartozék
csapjai kétoldalt tökéletesen illeszkedjenek
a hornyokba.
C
3 Válassza ki a megfelelő hajhosszúság
beállítást.
Nyomja meg a készülék hátulján lévő
beállítógombot, és tolja a fésűt a kívánt helyzetbe.
A készüléken 7 különböző hajhosszúság állítható
be:
-3 mm
-6 mm
-9 mm
MAGYAR
Page 51

53
- 12 mm
- 15 mm
- 18 mm
- 21 mm
Először a legnagyobb beállítást (21 mm) használja,
hogy közben megismerkedjen a hajnyíró
használatával.
4 A fésűtartozék sima alja mindig
tökéletesen érintkezzen a fejbőrrel,hogy a
nyírás egyenletes legyen.
5 A készüléket különböző irányokban lassan
húzza át a fejtetőn, hogy a nyírás
egyenletes legyen.
6 Többször is menjen végig a nyírt
területeken a készülékkel,hogy biztosan ne
maradjon lenyíratlan hajszál.
7 Időnként fésülje ki a hajat a növekedés
irányába, hogy a készülék könnyebben
kapja el a lenyírandó szálakat.
8 A göndör, ritkás vagy hosszú hajat fésűvel
fésülje a készülék felé, hogy a nyírás
eredményes legyen.
9 Javasoljuk, hogy nyírás közben
rendszeresen távolítsa el a hajat a fésűből.
MAGYAR
Page 52

54
Átmenetek
A Philishave hajnyíró készülék nemcsak arra
képes, hogy az egész fejen azonos hosszúságúra
nyírja a hajat, hanem az egyenletes átmenet is
megoldható vele a hosszabb fejtetői haj és a
rövidebb hátsó és oldalsó haj között.
1 Először vágja le a hajat a leghosszabb
(21 mm-es) beállítással.
2 Ez után vágjon egy rövidebb beállítással,
kihagyva a fejtetőt, ahol hosszabb hajat
szeretne hagyni.
3 Ismételje ezt az eljárást mindaddig, amíg a
fej minden részén el nem éri a kívánt
hajhosszúságot.
Pontos formázás fésűtartozék nélkül
A hajvágó készüléket fésű tartozék nélkül is
használhatja a nyakvonal és a fülek körülötti
terület formázására.
Legyen óvatos a fésűtartozék nélküli készülékkel
mert az levág minden hajszálat ami az útjába
kerül.
1 Vegye le a fésűtartozékot úgy, hogy kihúzza
a hajvágóból.
2 A fül körüli hajformázás előtt fésülje a
hajvégeket a fülre.
MAGYAR
Page 53

55
3 Tartsa el a készülék útjából a nyírt személy
fülét.
C
4 Úgy döntse meg a hajvágó gépet, hogy a
vágóegységnek csak egy éle érje a
hajvégeket.
C
5 Csak a hajvégeket vágja le.A haj
körvonalának a fül közelében kell lennie.
C
6 A nyakszirti haj és az oldalszakáll
formázásakor fordítsa lefelé a készüléket,
és lefelé irányuló mozdulatokkal vágjon.
7 Lassan, finoman mozgassa a hajvágót.
C
8 A haj természetes vonalát kövesse.
A formázó fésűn vagy az ujjai fölött
nyírjon.
Ezzel a módszerrel 21 mm-nél hosszabbra is
nyírható a haj. Ezt a technikát azonban nem
könnyű elsajátítani, ezért csak gyakorlott
felhasználóknak javasoljuk.
1 Vegye le a fésűtartozékot.
MAGYAR
Page 54

56
C
2 Fésülje a hajat egy kisebb területen fölfelé,
majd emelje fel a formázófésűvel, vagy
tartsa az ujjai között úgy, hogy csak a
levágandó rész nyúljon ki.
C
3 Vágja le a fésűből vagy az ujjai közül kiálló
hajat.
4 Folytassa ezt az eljárást; gyakran fésülje át
a hajat, hogy eltávolítsa a lenyírt szálakat, és
megtalálja az egyenletlen részeket.
Tisztítás
Használat után mindig tisztítsa meg a készüléket.
Ne használjon dörzsölő, súroló vagy folyékony
tisztítószereket (pl. alkoholt, benzint vagy acetont
a készülék tisztításához.
1 Tisztítás előtt győződjön meg róla, hogy a
készüléket kikapcsolta és kihúzta a hálózati
csatlakozó dugót a fali konnektorból.
C
2 Vegye le a fésűtartozékot.
C
3 Hüvelykujjával nyomja felfele a vágóegység
középső részét, míg ki nem nyílik, majd
húzza ki a vágóegységet.
Ügyeljen rá, nehogy leejtse a vágóegységet.
MAGYAR
Page 55

57
C
4 Tisztítsa meg a vágóegységet és a készülék
belsejét a készülékhez tartozó kefével.
C
5 Helyezze a vágóegység csapját a résbe és
nyomja vissza a készülékbe.
6 Amikor a vágóegységet a helyére nyomta,
kattanás hallható.
Csere
A hibás vagy sérült vágóegységet csak eredeti
Philips vágóegységgel helyettesítheti.
C
1 Hüvelykujjával nyomja a vágóegység
középső részét felfelé, míg kinyílik és húzza
ki a készülékből a vágóegységet.
C
2 Helyezze a vágóegység csapjait a résbe és
nyomja vissza, míg nem kattan.
Környezetvédelem (csak HQC482 és
HQC483)
A beépített újratölthető akkumulátor a
környezetre veszélyes anyagokat tartalmazhat.
A készülék selejtezésekor vegye ki a készülékből
az újratölthető akkumulátort.
MAGYAR
Page 56

58
Az akkumulátort ne dobja a normál háztartási
hulladékba, hanem vigye hivatalos gyűjtőhelyre.
Philips szakszervizbe is elviheti a készüléket, ahol
eltávolítják belőle az akkumulátort, és
gondoskodnak annak környezetbarát
kiselejtezéséről.
1 Húzza ki a készülék hálózati csatlakozó
dugóját a fali konnektorból, és hagyja
működni a készüléket, míg meg nem áll.
C
2 Nyissa ki és vegye ki a vágóegységet.
C
3 Vegye ki a fémkapcsot csavarhúzó
segítségével.
C
4 Nyissa fel a burkolatot.
Illesszen egy csavarhúzót a készülék
csatlakozóaljzata melletti vájatba, majd a
szerszámot elfordítva válassza szét a burkolat két
részét.
C
5 Tegye a csavarhúzót a kis nyílásba a nyíllal
jelzett nyomtatott áramkörű lapra.Addig
nyomja a csavarhúzót, míg a nyomtatott
áramkörű lap eltörik.
MAGYAR
Page 57

59
C
6 Húzza ki az akkumulátort a készülékből.
Az akkumulátort és egyéb alkatrészeket a
környezetet nem veszélyeztető helyen tartsa.
Miután az akkumulátort kivette, ne csatlakoztassa
a készüléket a hálózathoz!
Jótállás és javítás
Javíttatás, tájékozódás vagy bármilyen probléma
esetén látogasson el a www.philips.com Philips
Web-lapra, vagy lépjen érintkezésbe a helyi Philips
Vevőszolgálattal (a telefonszámot megtalálja a világ
minden részére kiterjedő garancialevélen). Ha
lakóhelyén nincs Vevőszolgálat, forduljon a helyi
Philips szaküzlethez vagy lépjen érintkezésbe a
Philips háztartási kisgépek és szépségápolási
termékek üzletág képviselőivel.
MAGYAR
Page 58

Úvod
◗ Vážený zákazník, vybral ste si správne! Váš
nový strojček na strihanie vlasov Philishave sa
prispôsobí kontúram hlavy a preto je jeho
použitie veľmi pohodlné.
◗ Aby ste mohli používať strojček na vlasy čo
najdlhšie, odporúčame Vám, aby ste si prečítali
nasledujúce informácie.
Dôležité upozornenie
Pred použitím zariadenie si pozorne prečítajte
nasledujúce pokyny a návod si odložte na
neskoršie použitie.
◗ Pred zapojením zariadenia skontrolujte, či
napätie uvedené na adaptére súhlasí s napätím
v sieti vo Vašom dome.
◗ Toto zariadenie je určené na pripojenie do
siete s napätím 220 až 240 V.
◗ Používajte len adaptér dodaný spolu so
zariadením.
◗ Súčasťou adaptéra je transformátor.Adaptér
nesmiete oddeliť a vymeniť za inú zástrčku,
lebo by ste mohli spôsobiť nebezpečnú
situáciu.
◗ Nepoužívajte poškodený adaptér.
◗ Ak je adaptér poškodený, smiete ho nahradiť
jedine originálnym adaptérom,aby ste predišli
nebezpečenstvu.
C
◗ Zariadenie a adaptér udržiavajte v suchu.
◗ Zariadenie odkladajte mimo dosahu detí.
60 SLOVENSKY
Page 59

61
C
◗ Zariadenie používajte, nabíjajte a odkladajte
pri teplotách 15c až 35c.
◗ Toto zariadenie je určené len na strihanie
ľudských vlasov.Nepoužívajte ho na iné účely.
◗ Deklarovaná hodnota emisie hluku tohto
spotrebiča je 69 dB(A), čo predstavuje hladinu
A akustického výkonu vzhľadom na
referenčný akustický výkon 1 pW.
Nabíjanie (len modely HQC482 a HQC483)
Pred prvým použitím zariadenia nechajte batériu
nabíjať 12 hodín.
Zariadenie s úplne nabitou batériou umožňuje až
35 minút strihania bez toho, aby ste ho museli
pripojiť do siete.
Zariadenie nenabíjajte dlhšie ako 24 hodín.
1 Uistite sa, že počas nabíjania je zariadenie
vypnuté.
C
2 Koncovku zasuňte do zariadenia.
3 Adaptér pripojte do siete.
C
◗ Rozsvietené kontrolné svetlo znamená
nabíjanie batérie zariadenia.
SLOVENSKY
Page 60

62
Optimalizácia životnosti batérie
- Dvakrát ročne nechajte motor zariadenia
pracovať až kým sa nezastaví (vybije batéria).
- Akonáhle je batérie úplne nabitá, odpojte
adaptér zo siete.
- Ak ste zariadenie dlhšie nepoužívali, musíte
nechať batériu dobiť 12 hodín.
Strihanie so zariadením pripojeným do siete
HQC482, HQC483:
Ak je batéria úplne nabitá, nepripájajte zariadenie
do siete.
◗ Použitie strojčeka na vlasy pripojeného do
siete:
Vypnite strojček, pripojte ho do siete a počkajte
niekoľko sekúnd, kým ho zapnete.
Ak je batéria vybitá, pred zapnutím zariadenia
počkajte niekoľko minút.
HQC440:
◗ Koncovku zasuňte do zariadenia a adaptér
pripojte do siete.
SLOVENSKY
Page 61

Príprava na použitie
Strihanie s hrebeňovým nástavcom
C
1 Pred strihaním sa postarajte, aby sa hlava
osoby, ktorej vlasy idete strihať, nachádzala
vo výške Vašej hrude.
2 Najlepšie výsledky dosiahnete, ak budete
strihať suché vlasy.Strojček na vlasy
nepoužívajte na strihanie práve umytých
vlasov.
3 Najskôr učešte vlasy v smere ich rastu.
C
4 Strojčekom pohybujte vždy proti smeru, v
ktorom rastú vlasy, inak nedosiahnete
správny strih.
5 Pri strihaní robte pomalé pohyby
strojčekom.
Použitie zariadenia
Strihanie s hrebeňovým nástavcom
C
1 Držiak nástavca zasuňte do vodiacich
drážok zariadenia až nadoraz (začujete
kliknutie).
2 Uistite sa, že držiak je na oboch stranách
riadne umiestnený vo vodiacich drážkach.
63SLOVENSKY
Page 62

64
C
3 Vyberte si vhodné nastavenie dĺžky strihu.
Stlačte tlačidlo na zadnej časti zariadenia a
posuňte hrebeňový nástavec do žiadanej polohy.
Strojček na vlasy ma k dispozícii 7 nastavení dĺžky
strihu:
-3 mm
-6 mm
-9 mm
- 12 mm
- 15 mm
- 18 mm
- 21 mm
Začnite pri maximálnej dĺžke strihu (21 mm), aby
ste privykli na použitie strojčeka.
4 Plochá strana nástavca sa musí neustále
dotýkať povrchu pokožky,inak
nedosiahnete rovnakú dĺžku strihu.
5 Pri strihaní vlasov na temene hlavy
postupujte pomaly a z rôznych smerov, aby
bol strih rovnomerný.
6 Vlasy strihajte v prekrývajúcich sa pásoch,
aby strojček zachytil všetky vlasy, ktoré
treba ostrihať.
7 Občas prečešte vlasy v smere ich rastu,
aby ich strojček dokázal lepšie zachytiť.
8 Pri strihaní kučeravých, riedkych alebo
dlhých vlasov použite hrebeň, pomocou
ktorého ich nasmerujete ku strojčeku na
vlasy.
SLOVENSKY
Page 63

65
9 Počas strihania Vám odporúčame z
nástavca pravidelne odstraňovať ostrihané
vlasy.
Postupná zmena dĺžky strihu
Strojček na strihanie vlasov Philishave Vám
umožňuje ostrihať vlasy nielen na rovnakú dĺžku,
ale dáva tiež možnosť dosiahnuť hladký prechod
od dlhších vlasov na temene ku kratším na zátylku
a bokoch hlavy.
1 Najskôr vlasy ostrihajte pri nastavení
najväčšej dĺžky strihu (napr. 21 mm).
2 Potom nastavte kratší strih a ostrihajte
všetky vlasy okrem tých, ktoré rastú na
temene a majú zostať dlhšie.
3 Postup môžete opakovať dovtedy, kým
dosiahnete požadovanú dĺžku strihu.
Presné zastrihnutie bez nástavca
Strojček môžete použiť aj bez nasadeného
nástavca na zastrihnutie línie vlasov na krku a
okolo uší.
Pri strihaní bez nástavca dávajte pozor, pretože
strojček odstrihne všetky vlasy,ktoré mu prídu do
cesty.
1 Potiahnite za hrebeňový nástavec a
oddeľte ho od zariadenia.
SLOVENSKY
Page 64

66
2 Pred zastrihnutím vlasov okolo uší,
odstrihnite konce vlasov, ktoré rastú nad
uchom.
3 Ohnite ušnicu, aby Vám nezavadzala pri
strihaní.
C
4 Strojček natočte tak, aby končeky vlasov
boli v kontakte len s jednou hranou
strihacieho mechanizmu.
C
5 Ostrihajte len konce vlasov. Línia vlasov má
ležať v blízkosti ušnice.
C
6 Pri zastrihávaní bokombriad a línie vlasov
na zátylku otočte strojček a robte ním
priame ťahy nadol.
7 Postupujte pomaly a plynule.
C
8 Sledujte prirodzenú líniu vlasov.
Zastrihávanie cez tvarovací hrebeň
alebo prsty.
Táto technika sa používa, ak chcete dosiahnuť
strih s dĺžkou vlasov väčšou ako 21 mm. Je to
relatívne komplikovaný postup, preto by ho mali
používať len skúsenejšie osoby.
SLOVENSKY
Page 65

67
1 Dajte dole hrebeňový nástavec.
C
2 Vyčešte malú plochu vlasov smerom nahor.
Pomocou hrebeňa alebo prstov zodvihnite
vlasy a nechajte vyčnievať len tú časť,
ktorú chcete ostrihať.
C
3 Ostrihajte prečnievajúce vlasy.
4 Pokračujte uvedeným spôsobom,ostrihané
vlasy pravidelne vyčešte a sledujte, či nie je
niektorá plocha nerovnomerne ostrihaná.
Čistenie
Zariadenie vyčistite po každom použití.
Na čistenie prístroja nepoužívajte abrazívne
prípravky, drôtenky ani tekutiny ako alkohol
benzín alebo acetón.
1 Dbajte, aby bolo zariadenie pred čistením
vypnuté a odpojené zo siete.
C
2 Odpojte hrebeňový nástavec.
C
3 Strednú časť strihacej jednotky potlačte
palcom smerom nahor, aby sa otvorila a
potom ju odpojte od zariadenia.
Dajte pozor, aby strihacia jednotka nespadla na
zem.
SLOVENSKY
Page 66

68
C
4 Priloženou kefkou vyčistite strihaciu
jednotku a vnútro zariadenia.
C
5 Výstupok strihacej jednotky vložte späť do
drážky a strihaciu jednotku zatlačte späť
na zariadenie.
6 Strihaciu jednotku zatlačte až nadoraz, kým
nezačujete kliknutie.
Výmena
Opotrebovanú alebo poškodenú strihaciu
jednotku môžete vymeniť len za originálnu
strihaciu jednotku Philips.
C
1 Strednú časť strihacej jednotky potlačte
palcom smerom nahor, aby sa otvorila a
potom ju odpojte od zariadenia.
C
2 Výstupok strihacej jednotky vložte späť do
drážky a strihaciu jednotku zatlačte späť
na zariadenie tak, aby ste začuli kliknutie.
Îivotné prostredie (len modely HQC482 a
HQC483)
Zabudované batérie obsahujú zložky,ktoré by
mohli znečistiť životné prostredie.
SLOVENSKY
Page 67

69
Skôr, ako zneškodníte zariadenie, vyberte
dobíjateľnú batériu.
Batériu neodhoďte do bežného kuchynského
odpadu, ale odneste ju do zberne.
Zariadenie môžete odniesť aj do servisného
centra spoločnosti Philips, kde Vám ochotne
pomôžu batériu vybrať a zneškodniť spôsobom
bezpečným pre životné prostredie.
1 Zariadenie odpojte zo siete a motor
nechajte pracovať, až kým nezastane.
C
2 Otvorte a vyberte strihaciu jednotku.
C
3 Kovovú sponu odstráňte pomocu
skrutkovača.
C
4 Otvorte kryt.
Do jednej z drážok v blízkosti zástrčky na
pripojenie kábla vložte hrot skrutkovača. Otočte
skrutkovačom a oddeľte polovice krytu zariadenia.
C
5 Skrutkovač vložte do malej drážky
plošného obvodu označenej šipkou.
Zatlačte skrutkovačom,až kým sa plošný
obvod nezlomí.
SLOVENSKY
Page 68

70
C
6 Vyberte dobíjateľnú batériu zo zariadenia.
Batériu a ostatné súčiastky odstráňte spôsobom
bezpečným pre životné prostredie.
Po odstránení batérie už zariadenie nepripájajte
do siete!
Záruka a servis
Ak potrebujete informácie, alebo máte problém,
prosíme Vás, aby ste navštívili www stránku
spoločnosti Philips - www.philips.com,alebo sa
obrátili na Centrum služieb zákazníkom
spoločnosti Philips vo Vašej krajine (telefónne číslo
Centra nájdete v priloženom celosvetovo
platnom záručnom liste). Ak sa vo Vašej krajine
toto Centrum nenachádza, obráťte sa na
miestneho predajcu výrobkov Philips, alebo
kontaktujte Oddelenie služieb Philips - divízia
domáce spotrebiče a osobná starostlivosť.
SLOVENSKY
Page 69

Вступ
◗ Шановні покупці! Ви зробили правильний
вибір! Нова машинка для стрижки,
виробництва фірми Philips, налаштовується
на контур голови та забезпечує зручність у
користуванні.
◗ Щоб зберегти машинку для стрижки у
відмінному стані впродовж довгого часу,
радимо Вам прочитати нижченаведену
інформацію.
Увага!
Прочитайте цю інструкцію уважно перед
використанням пристрою та зберігайте для
подальшого використання.
◗ Перед тим, як вмикати пристрій, перевірте,
чи відповідає напруга, вказана на адаптері,
напрузі в мережі вашого будинку.
◗ Цей пристрій може працювати з напругою
від 220 до 240 В.
◗ Використовуйте лише адаптер,що
додається.
◗ В адаптері міститься трансформатор.Не
від'єднуйте адаптер, щоб замінити його
іншим штепселем, оскільки це може
призвести до небезпечної ситуації.
◗ Не використовуйте пошкоджений адаптер.
◗ Якщо блок живлення пошкоджено, його
обов'язково треба замінити оригінальним
блоком живленням, щоб уникнути
небезпеки.
C
◗ Тримайте пристрій та адаптер сухими.
71УКРАЇНСЬКА
Page 70

72
◗ Тримайте пристрій подалі від дітей.
C
◗ Користуйтеся приладом, заряджайте та
зберігайте його при температурі не нижче
15c та не вище 35c.
◗ Цей пристрій призначений лише для
підстригання людського волосся.Не
застосовуйте його для іншої мети.
◗ Рівень шуму: Lc= 69 dB [A].
Підзарядка (тільки HQC482 та HQC483
)
Перед першим використанням заряджайте
прилад впродовж щонайменше 12 годин.
Повна зарядка приладу повинна забезпечити
до 35 хвилин автономної роботи.
Ніколи не заряджайте прилад довше, ніж
24 години.
1 Перед зарядкою приладу
пересвідчиться, що він виключений.
C
2 Під'єднайте до приладу з'єднувальний
штекер.
3 Вставте штепсель адаптера у розетку.
C
◗ Про заряджання приладу Вам буде
нагадувати свічення контрольної лампочки.
УКРАЇНСЬКА
Page 71

73
Оптимізація терміну служби акумулятора.
- Два рази на рік повністю розряджайте
акумулятор давши двигуну працювати до
повної зупинки.
- Витягніть штепсель із розетки, коли
акумулятор повністю зарядиться.
- Якщо пристрій не використовується
протягом тривалого часу, його треба під
заряджати щонайменше 12 годин.
Стрижка при живленні від електромережі.
HQC482, HQC483:
Не підключайте машинку до електромереж
коли акумулятор повністю заряджений.
◗ Для того, щоб користуватися машинкою
при живленні від електромережі:
Вимкніть машинку, під'єднайте ії до
електромережі і заждіть/зачекайте кілька
секунд перед повторним вмиканням
перемикача.
Якщо акумулятор повністю розряджений,
зачекайте кілька хвилин перед вмиканням
приладу.
HQC440:
◗ Вставте штекер у пристрій і адаптер - у
розетку.
УКРАЇНСЬКА
Page 72

Підготовка до використання
Стрижка з використанням насадки
з гребінцем
C
1 Перед початком стрижки голова особи,
яку ви стрижете, повинна бути на рівні
Ваших грудей.
2 Для досягнення кращих результатів,
застосовуйте машинку для стрижки
лише сухого волосся. Не застосовуйте її
до щойно помитого волосся.
3 Перед початком стрижки зачешіть
волосся в напрямі його росту.
C
4 Завжди пересувайте машинку в напрямі,
протилежному до росту волосся,
оскільки в іншому випадку вона не буде
належно стригти.
5 Пересувайте машинку вздовж волосся
повільно.
Експлуатація приладу
Стрижка з використанням насадки
з гребінцем
C
1 Вставте насадку по напрямних приладу
до звуку клік.
2 Переконайтесь чи насадка була належно
встановлена на напрямних з обох сторін.
74 УКРАЇНСЬКА
Page 73

75
C
3 Виберіть бажану довжину волосся.
Натисніть кнопку настройки, що на задній
частині приладу, і перемістіть насадку у
необхідне положення.
Машинка має 7 настройок на різну довжину
волосся :
-3 мм
-6 мм
-9 мм
- 12 мм
- 15 мм
- 18 мм
- 21 мм
Для того, щоб пристосуватись до машинки,
розпочніть стрижку при настройці на
максимальну довжину волосся (21 мм).
4 Для рівномірної стрижки, стежте, щоб
плоска ділянка насадки завжди
дотикалась до голови.
5 Пересувайте машинку по маківці з
різних боків, щоб забезпечити
рівномірну стрижку волосся.
6 Робіть додаткові переміщення машинки
щоб упевнитись, що машинка захопила
все волосся, яке необхідно було
відрізати.
7 Час від часу розчісуйте волосся за
напрямком його росту, тоді пристрою
буде легше його захопити.
УКРАЇНСЬКА
Page 74

76
8 Для досягнення кращих результатів під
час стрижки кучерявого, рідкого або
довгого волосся, користуйтесь
гребінцем, щоб спрямовувати волосся в
напрямі до машинки.
9 Радимо Вам регулярно очищувати
насадку від обстриженого волосся.
Різна довжина
Машинка для стрижки Philishave дозволяє Вам
не тільки стригти волосся на однакову
довжину вздовж усієї голови, а також дає Вам
змогу отримувати плавний перехід від довшого
волосся на маківці до коротшого з боків та
тилу голови.
1 Розпочніть стрижку з настройки на
максимальну довжину волосся (21 мм).
2 Потім оберіть меншу довжину та
обріжте волосся всюди, крім верхньої
частини голови, де ви хочете лишити
більш довге волосся.
3 Повторюйте цю процедуру доти, доки
Ви не отримаєте на кожній ділянці
голови бажану довжину волосся.
Отримання точного контуру волосся
без насадки-гребінця
Ви можете застосовувати машинку без
насадки-гребінця для оконтурювання волосся
на потилиці та навколо вух.
УКРАЇНСЬКА
Page 75

77
Будьте дуже обережними при використанні
пристою без насадки, оскільки машинка буде
видаляти все волосся, якого торкається.
1 Зніміть насадку-гребінець, стягнувши її з
пристрою.
2 Перед контируванням лінії волосся
навколо вух, зачешіть кінчики волосся на
вуха.
3 Відхиліть вухо.
C
4 Нахиляйте пристрій таким чином, аби
лише одна сторона ріжучого елементу
торкалася кінчиків волосся.
C
5 Зістрижіть лише кінчики волосся. Лінія
волосся повинна відповідати контуру
вуха.
C
6 Для контирування лінії волосся на
потилиці та бачках, поверніть машинку і
зробіть паси донизу.
7 Пересувайте машинку повільно.
C
8 Слідуйте за природною лінією волосся.
УКРАЇНСЬКА
Page 76

78
Підстригання над гребінцем для
моделювання або над пальцями
Дана техніка може бути використана для
підстригання волосся довжиною понад 21 мм.
Пам'ятайте, що ця техніка є досить складною і
може застосовуватись лише досвідченими
користувачами.
1 Зніміть насадку-гребінець.
C
2 Зачешіть невелику частину волосся
угору.Підніміть волосся за допомогою
спеціального гребінця або утримуйте
його між пальцями, поки над ними не
залишиться довжина волосся, яку
потрібно зістригти.
C
3 Зістрижіть волосся, яке випинається над
гребінцем або пальцями.
4 Продовжуйте цю процедуру.
Періодично зачісуйте волосся щоб
зняти зрізане волосся та знайти
нерівномірно обстрижені ділянки.
Чищення
Чистіть прилад після кожного користування
ним.
Не користуйтесь для чищення приладу
абразивними речовинами чи металевими
мочалками, або рідинами на зразок спирту
бензину чи ацетону.
УКРАЇНСЬКА
Page 77

79
1 Перед початком чищення впевніться,
що прилад вимкнено та від`єднано від
електромережі.
C
2 Зніміть насадку-гребінець.
C
3 Натисніть середню частину ріжучого
блоку догори великим пальцем, щоб
відкрити його, та витягніть його з
пристрою.
Будьте обережні, щоб не випустити його з рук.
C
4 Почистіть ріжучий блок та всередині
приладу за допомогою щітки, що
додається.
C
5 Вставте виступ на ріжучому блоці у паз
та затисніть його назад у пристрій.
6 Належне встановлення ріжучого вузла у
прилад супроводжується звуком клік.
Заміна
Для заміни спрацьованого чи пошкодженого
ріжучого блоку користуйтесь лише
оригінальними змінними ріжуючими блоками
компанії Philips.
C
1 Натисніть середню частину ріжучого
блоку догори великим пальцем, щоб
відкрити його, та витягніть його з
пристрою.
УКРАЇНСЬКА
Page 78

80
C
2 Вставте виступ на ріжучому блоці у паз
та натискайте ріжучий блок, поки не
почуєте клацання.
Екологічні вимоги (тільки HQC482 та
HQC483)
Вмонтований акумулятор вміщує речовини, що
можуть забруднювати довкілля.
Коли цей прилад відслужить свій термін, з
нього необхідно вийняти акумулятор.
Не викидайте акумулятор у звичайні смітники.
Здайте його у спеціальні пункти прийому.
Ви також можете віднести пристрій до
сервісного центру "Philips", де витягнуть
акумулятор та ліквідують його безпечним для
середовища чином.
1 Від'єднайте машинку від електромережі
і дайте їй попрацювати до повної
зупинки двигуна.
C
2 Відкрийте і витягніть ріжучий блок.
C
3 Вийміть металевий затискач за
допомогою викрутки.
УКРАЇНСЬКА
Page 79

81
C
4 Відкрийте корпус.
Вставте викрутку в один з пазів поблизу гнізда
для шнура зарядки.Поверніть викрутку, щоб
роз'єднати половинки корпуса.
C
5 Встроміть викрутку у малий паз на
друкованій монтажній платі,позначеній
стрілкою. Натискайте викруткою до тих
пір, аж поки частина друкованої
монтажної плати не трісне.
C
6 Вийміть акумулятор з приладу.
Утилізуйте акумулятор та інші компоненти, не
забруднюючи навколишнього середовища.
Не під'єднуйте пристрій до мережі післ
видалення акумулятора.
Гарантія та сервіс
Якщо Вам необхідна інформація або у Вас
виникли проблеми, зверніться до веб-сторінки
компанії "Philips" - www.philips.com, або
зверніться до Центру обслуговування клієнтів
компанії "Philips" у Вашій країні (телефон
Виможете знайти на гарантійному талоні).Якщо
у Вашій країні немає Центру обслуговування
клієнтів, зверніться до місцевого ділера або
зв'яжіться з Сервісним відділом "Philips Domestic
Appliаnces аnd Personаl Cаre BV".
УКРАЇНСЬКА
Page 80

Uvod
◗ Poštovani, napravili ste dobar izbor! Vaš novi
Philips aparat za šišanje se prilagođava
konturama glave i omogućuje laku i
jednostavnu uporabu.
◗ Da biste mogli dugo koristiti aparat za šišanje,
savjetujemo Vam da pročitate sljedeće
informacije.
Važno
Pažljivo pročitajte ove upute za uporabu prije
korištenja te ih sačuvajte za kasniju uporabu.
◗ Provjerite da li voltaža naznačena na napajaču
odgovara voltaži Vaše lokalne el. mreže.
◗ Ovaj aparat je pogodan za rad na naponima
od 220-240 V.
◗ Koristite aparat jedino s isporučenim
napajačem.
◗ Napajač sadrži transformator. Nikada ne
zamjenjujte napajač s nekim drugim, to može
izazvati opasne posljedice.
◗ Ne koristite aparat ako je napajač oštećen.
◗ Ako se napajač ošteti, zamijenijte ga jedino s
istim takvim originalnim napajačem.
C
◗ Aparat i napajač držite suhim.
◗ Aparat držite izvan dohvata djece.
C
◗ Koristite,punite i pohranite aparat na
temperaturi između 15c i 35c.
◗ Aparat je namijenjen šišanju ljudske kose, ne
koristite ga za druge svrhe.
◗ Razina buke: Lc= 69 dB [A]
HRVATSKI82
Page 81

Punjenje ( samo HQC4822 i HQC483)
Prije nego što ga upotrijebite po prvi puta, punite
aparat najmanje 12 sati.
Potpuno napunjeni aparat može bez kabela raditi
do 35 minuta.
Ne punite aparat dulje od 24 sata.
1 Tijekom punjenja aparat mora biti
isključen.
C
2 Utaknite utikač u aparat.
3 Utaknite napajač u zidnu utičnicu.
C
◗ Upalit će se kontrolna žaruljica,znak da se
aparat puni.
Najbolja iskorištenost životnog vijeka
baterije
- Dva puta godišnje potpuno izpraznite bateriju
tako da ostavite motor da radi dok se ne
zaustavi.
- Izvucite napajač iz zidne utičnice kada se
baterija potpuno napuni.
- Ako aparat nije koršten duži vremenski period,
mora se puniti barem 12 sati.
83HRVATSKI
Page 82

Šišanje pod mrežnim napajanjem
HQC482, HQC483
Ne priključujte aparat na napajanje kada je
baterija sasvim napunjena.
◗ Za uporabu aparata za šišanje uključenog u
struju:
Isključite aparat za šišanje, priključite ga na struju i
pričekajte nekoliko sekundi prije nego što ga
uključite.
Ako je baterija potpuno prazna, pričekajte
nekoliko minuta prije nego što uključite aparat.
HQC440
◗ Umetnite utikač u aparat te napajač u zidnu
utičnicu.
Priprema za uporabu
Šišanje s češljem
C
1 Prije nego počnete šišati, provjerite da li je
glava osobe koju šišate u ravnini s Vašim
prsima.
2 Za najbolje rezultate, aparat za šišanje
koristite samo za šišanje suhe kose.Ne
koristite ga za šišanje svježe oprane kose.
3 Prvo počešljajte kosu u smjeru rasta.
84 HRVATSKI
Page 83

85
C
4 Uvijek pomičite aparat za šišanje u smjeru
suprotnom od rasta kose, jer inače neće
pravilno šišati.
5 Aparat polako pomičite kroz kosu.
Uporaba aparata
Šišanje s češljem
C
1 Gurajte nastavak s češljem na vodilice
aparata dok ne začujete "klik".
2 Provjerite da li su ručice nastavka s češljem
pravilno sjele na vodilice s obje strane.
C
3 Izaberite potrebnu dužinu šišanja kose.
Pritisnite gumb za prilagođavanje na poleđini
aparata i gurnite nastavak s češljem na željenu
poziciju.
Aparat za šišanje ima 7 različitih duljina kose:
-3 mm
-6 mm
-9 mm
- 12 mm
- 15 mm
- 18 mm
- 21 mm
Počnite s postavom na maksimalnoj duljini kose
(21 mm) da biste se upoznali s aparatom za
šišanje.
HRVATSKI
Page 84

86
4 Provjerite da li je ravni dio nastavka s
češljem uvijek priljubljen uz tjeme, da biste
šišali ravnomjerno.
5 Polako prelazite aparatom za šišanje
vrhom glave iz različitih smjerova da biste
šišali ravnomjerno.
6 Prelažanjem aparatom za šišanje više puta
po istom mjestu provjerite da li je aparat
uhvatio svaku vlas koju je trebalo ošišati.
7 S vremena na vrijeme počešljajte kosu u
smjeru rasta, kako bi ju aparat za šišanje
lakše uhvatio.
8 Za najbolje rezultate kod šišanja kovrčave,
rijetke ili duge kose, možete upotrijebiti
češalj za prinošenje kose aparatu za
šišanje.
9 Savjetujemo Vam da redovito uklanjate
ošišanu kosu s češlja dok šišate.
Stupnjevanje
Philishave aparat za šišanje Vam omogućuje
jednoliko šišanje kose iste duljine na cijeloj glavi, a
omogućuje Vam i neprimjetan prijelaz iz dulje
kose na vrhu glave u kraću kosu na zatiljku i sa
strane.
1 Počnite šišati na postavi za maksimalnu
duljinu kose (tj. pozicija 21 mm).
HRVATSKI
Page 85

87
2 Zatim odaberite kraću postavu i ošišajte
kosu na svim dijelovima glave, osim na
vrhu, gdje želite da kosa bude malo dulja.
3 Ovaj postupak možete ponavljati sve dok
kosa na svakom dijelu glave nije željene
duljine.
Precizno oblikovanje bez nastavka s
češljem
Možete koristiti šišač i bez nastavka s češljem kako
bi ošišali vrat te područja oko ušiju.
Kod šišanja bez nastavka s češljem budite oprezni
jer će aparat odrezati svaku vlas koju dotakne.
1 Odvojite nastavak s češljem izvlačenjem s
šišača.
2 Prije oblikovanja linije kose oko ušiju,
počešljajte vrhove kose preko uha.
3 Savijte uho osobe koju šišate da Vam ne
smeta.
C
4 Nagnite aparat za šišanje tako da samo
jedan rub jedinice za rezanje dotiče vrhove
kose.
C
5 Ošišajte samo vrhove kose. Linija kose bi
trebala biti blizu uha.
HRVATSKI
Page 86

88
C
6 Za oblikovanje linije kose na zatiljku i
zaliscima, okrenite aparat za šišanje i
povlačite ga prema dolje.
7 Radite spore i ravnomjerne pokrete.
C
8 Slijedite prirodnu liniju kose.
Šišanje i oblikovanje češljem ili
prstima
Ova tehnika se može koristiti za duljinu kose
preko 21 mm. Imajte na umu da je ovu tehniku
teško savladati i da bi ju trebali primijenjivati samo
iskusni korisnici.
1 Skinite češalj.
C
2 Počešljajte mali pramen kose prema gore.
Podignite kosu češljem za stiliziranje i
držite među prstima tako da samo duljina
kose koju treba ošišati viri prema van.
C
3 Odrežite kosu koja viri iz češlja ili prstiju.
4 Nastavite s ovim postupkom i često
češljajte da biste uklonili kosu i provjerili
da li ima nejednakih pramenova.
HRVATSKI
Page 87

Čišćenje
Očistite aparat nakon svake uporabe.
Za čišćenje ne koristite abrazivna sredstva, kao ni
sredstva poput alkohola, benzina ili acetona.
1 Prije čišćenja aparat mora biti isključen i
odspojen iz napajanja.
C
2 Skinite češalj.
C
3 Pritisnite srednji dio rezaće jedinice prema
gore sve dok se ne otvori te ga izcucite sa
aparata.
Pazite da Vam rezna jedinica ne padne na pod.
C
4 Očistite reznu jedinicu i unutrašnjost
aparata isporučenom četkicom.
C
5 Stavite jezičac rezaće jedinice u utor
epritisnite jedinicu nazad u aparat.
6 Gurajte reznu jeidnicu unazad sve dok ne
začujete "klik".
Zamjena dijelova
Istrošena ili oštećena rezna jedinica se smije
zamijeniti samo originalnom Philips reznom
jedinicom.
89HRVATSKI
Page 88

90
C
1 Pritisnite srednji dio rezaće jedinice prema
gore sve dok se ne otvori te ga izcucite sa
aparata.
C
2 Stavite jezičac rezaće jedinice u utor
epritisnite jedinicu nazad u aparat.
Zaštita okoliša (HQC482 i HQC483)
Ugrađena akumulatorska baterija sadrži tvari
štetne za okoliš.
Kada odbacujete aparat, izvadite akumulatorsku
bateriju.
Ne bacajte bateriju s kućnim otpadom, već ju
odnesite na za to namijenjeno odlagalište.
Aparat možete odnijeti i u Philipsov servisni
centar, gdje će osoblje izvaditi bateriju umjesto Vas
i odložiti ju na za to namijenjeno odlagalište.
1 Isključite aparat iz napajanja i pustite da
radi dok se motor ne zaustavi.
C
2 Otvorite i skinite reznu jedinicu.
HRVATSKI
Page 89

91
C
3 Odvijačem skinite metalnu hvataljku.
C
4 Otvorite kućište.
Stavite odvijač u utore pored utičnice za utikač
aparata. Okrenite odvijač da biste odvojili dvije
polovice kućišta.
C
5 Umetnite odvijač u mali utor ploče s
kontaktima označen strelicom.Pritisnite
odvijač dok se dio ploče s kontaktima ne
polomi.
C
6 Izvucite bateriju iz aparata.
Odbacite bateriju i druge dijelove u skladu sa
zaštitom okoliša.
Na spajajte aparat na mrežni napon nakon što ste
izvadili baterije.
Jamstvo i servis
Trebate li informaciju ili imate problem, molimo
Vas da posjetite PHILIPS website na
www.philips.com ili da kontaktirate PHILIPS
predstavništvo u Vašoj zemlji. Brojeve telefona
možete pronaći u priloženom jamstvenom listu.
HRVATSKI
Page 90

Predstavitev
◗ Spoštovani kupec, pravilno ste se odločili! Vaš
novi Philipsov strižni aparat se prilagaja obliki
glave in omogoča udobno uporabo.
◗ Da boste lahko dolgo uživali v uporabi tega
strižnega aparata vam svetujemo,da si
preberete naslednje napotke.
Pomembno
Skrbno preberite ta navodila in jih shranite tudi za
kasnejšo uporabo.
◗ Preden aparat priključite na električno
omrežje, preverite, če napetost označena na
adapterju, ustreza napetosti v lokalnem
električnem omrežju.
◗ Ta aparat je primeren za omrežne napetosti
od 220 do 240 voltov.
◗ Uporabljajte le priloženi adapter.
◗ Adapter vsebuje pretvornik.Ne režite stran
adapterja, da bi ga zamenjali z drugim
vtikačem, ker boste povzročili nevarno
situacijo.
◗ Ne uporabljajte poškodovanega adapterja.
◗ Če je adapter poškodovan,ga smete zamenjati
le z istovrstnim originalnim adapterjem, da se
izognete nevarnosti.
C
◗ Pazite, da aparata in adapterja ne zmočite.
◗ Hranite aparat izven dosega otrok.
SLOVENŠČINA92
Page 91

93
C
◗ Aparat uporabljajte, polnite in hranite na
temperaturi med 15c in 35c.
◗ Ta aparat je namenjen le za striženje ljudi. Ne
uporabljajte ga za nobene druge namene.
◗ Stopnja hrupa: Lc=69 dB [A]
Polnjenje (samo modela HQC482 in
HQC483)
Pred prvo uporabo polnite aparat najmanj 12 ur.
Polno napolnjen aparat zadostuje za do 35 minut
brezvrvičnega delovanja.
Aparata ne polnite več kot 24 ur.
1 Pazite, da bo aparat med polnjenjem
izklopljen.
C
2 Vstavite vtikač aparata v aparat.
3 Vstavite vtikač adapterja v omrežno
vtičnico.
C
◗ Zasvetila bo kontrolna lučka, ki ponazarja, da
se aparat polni.
Optimiranje življenjske dobe baterije
- Dvakrat na leto popolnoma izpraznite baterijo,
tako da pustite motor delovati, dokler se sam
ne zaustavi.
- Odstranite vtikač adapterja iz omrežne vtičnice,
ko se baterija napolni do konca.
SLOVENŠČINA
Page 92

94
- Če aparat dlje časa ni bil v uporabi, ga morate
zopet polniti najmanj 12 ur.
Striženje s priključno vrvico oz. kablom
HQC482, HQC483:
Ko je baterija polno napolnjena, aparat ne sme
delovati priključen na električno omrežje.
◗ Uporaba strižnega aparata priključenega na
električno omrežje:
Izklopite aparat, ga priključite na električno
omrežje in počakajte nekaj sekund, preden ga
vklopite.
Če je baterija popolnoma prazna, počakajte nekaj
minut, preden aparat vklopite.
HQC440:
◗ Vstavite vtikač aparata v aparat in adapter v
omrežno vtičnico.
Priprava za uporabo
Striženje z nastavkom za striženje v
obliki glavnika
C
1 Pred striženjem poskrbite za to,da bo
glava osebe, ki jo strižete, v ravnini z vašimi
prsmi.
SLOVENŠČINA
Page 93

95
2 Najboljši učinek bo, če boste strigli suhe
lase. Ne uporabljajte aparata na sveže
opranih laseh.
3 Najprej počesite lase v smeri njihove rasti.
C
4 Vedno premikajte aparat v nasprotni smeri
rasti las, drugače las ne boste pravilno
postrigli.
5 Aparat premikajte počasi skozi lase.
Uporaba aparata
Striženje z nastavkom za striženje v
obliki glavnika
C
1 Potisnite nastavek za striženje v vodila na
aparatu, dokler ne zaslišite klika.
2 Pazite, da bosta ročki nastavka za striženje
pravilno vstavljeni v vodila na obeh straneh.
C
3 Izberite primerno nastavitev dolžine
striženja.
Pritisnite prilagoditveni gumb na zadnji strani
aparata in potisnite nastavek v želeni položaj.
Aparat ima 7 različnih nastavitev dolžin striženja:
-3 mm
-6 mm
-9 mm
- 12 mm
- 15 mm
- 18 mm
- 21 mm
SLOVENŠČINA
Page 94

96
Začnite z maksimalno nastavitvijo (21 mm), da se
na aparat privadite.
4 Pazite, da bo ploski del nastavka vedno v
stiku z lasiščem, tako da bodo lasje
enakomerno postriženi.
5 Z aparatom počasi drsite preko temena iz
različnih smeri, da lase enakomerno
postrižete.
6 Delajte prekrivajoče poteze preko glave, da
aparat zagotovo postriže vse lase.
7 Od časa do časa počesite lase v smeri
njihove rasti, da jih lahko rezilo lažje
zajame.
8 Za boljše striženje kodrastih, redkih ali
dolgih las lahko s pomočjo glavnika vodite
lase proti strižni enoti.
9 Svetujemo vam, da med striženjem redno
odstranjujete ostrižene lase z glavnika.
Stopnjevanje
Philishave strižni aparat ne omogoča le
enakomernega striženje las po celi glavi, temveč
tudi mehak prehod od dolgih las na vrhu glave do
krajših las na zadnji strani glave in ob straneh.
SLOVENŠČINA
Page 95

97
1 Začnite s striženjem na maksimalni
nastavitvi dolžine las ( to je položaj 21 mm).
2 Nato izberite krajšo nastavitev in
postrižite lase po vsej glavi, razen na vrhu,
kjer želite daljše lase.
3 Ta postopek lahko ponavljate, dokler lasje
nimajo želene dolžine po celi glavi.
Natančno oblikovanje zunanje linije
pričeske brez nastavka
Strižni aparat lahko uporabljate tudi brez nastavka,
in sicer za oblikovanje linije pričeske na tilniku in
okrog ušes.
Pazite, ko strižete brez nastavka, saj bo rezilo
odrezalo vse lase, ki se jih bo dotaknilo.
1 Nastavek odstranite tako, da ga izpulite iz
aparata.
2 Pred očrtanjem linije las okoli ušes, si
počesite konice las preko ušes.
3 Upognite uho, da vam ne bo v napoto.
C
4 Nagnite aparat tako,da se bo le en rob
strižnega rezila dotikal konic las.
SLOVENŠČINA
Page 96

98
C
5 Porežite le konice las. Linija las naj bo blizu
ušes.
C
6 Da očrtate liniji na tilniku in zalizcev,
obrnite aparat in premikajte aparat
navzdol.
7 Premikajte aparat počasi in mehko.
C
8 Samo sledite naravni liniji rasti las.
Striženje čez glavnik ali prste
S to tehniko lahko postrižete lase tako, da bodo
dolgi več kot 21 mm. Ne pozabite, da je ta
tehnika zelo zahtevna, zato naj jo raje izvaja oseba
z izkušnjami na tem področju.
1 Odstranite nastavek za striženje.
C
2 Počesite manjši šop las navzgor. Dvignite
lase z glavnikom ali jih pridržite med prsti,
dokler ne štrli ven le dolžina, ki jo
nameravate odrezati.
C
3 Odrežite lase, ki štrlijo iz glavnika oz.
prstov.
SLOVENŠČINA
Page 97

99
4 Nadaljujte s tem postopkom in pogosto
česite lase, da odstranite odrezane in
preverite enakomerno striženje.
Čiščenje
Po vsaki uporabi aparat očistite.
Za čiščenje aparata ne uporabljajte jedkih in
agresivnih sredstev in tekočin, kot so npr. alkohol
bencin ali aceton.
1 Pred čiščenjem vedno izklopite aparat in ga
izključite iz električnega omrežja.
C
2 Odstranite nastavek za striženje.
C
3 S palcem potisnite srednji del strižne enote
navzgor, da se odpre in jo nato izpulite iz
aparata.
Pazite, da vam strižna enota ne pade na tla.
C
4 S priloženo krtačko očistite rezilno enoto
in notranjost aparata.
C
5 Vstavite zatič brivne enote v zarezo in jo
potisnite nazaj na aparat.
SLOVENŠČINA
Page 98

100
6 Pazite, da boste strižno enoto dovolj
dobro potisnili nazaj, tako da boste zaslišali
klik.
Zamenjava
Izrabljeno ali poškodovano rezilno enoto lahko
zamenjate le z originalno, Philipsovo rezilno enoto.
C
1 S palcem potisnite srednji del strižne enote
navzgor, da se odpre in jo izpulite iz
aparata.
C
2 Vstavite zatič brivne enote v zarezo in jo
potisnite nazaj na aparat, dokler ne zaslišite
klika.
Okolje (samo modela HQC482 in HQC483)
Vgrajena napolnjiva baterija vsebuje snovi, ki lahko
onesnažijo okolje.
Ko boste aparat zavrgli, baterijo odstranite.
Baterije ne odvrzite skupaj z ostalimi
gospodinjskimi odpadki, ampak jo odvrzite na
uradno določeno mesto za zbiranje tovrstnih
odpadkov.
Aparat lahko odnesete tudi na Philipsov servisni
center, kjer vam bo osebje z veseljem pomagalo
baterijo odstraniti in odvreči na okolju prijazen
način.
SLOVENŠČINA
Page 99

101
1 Aparat izključite iz električnega omrežja in
ga pustite delovati, dokler se sam ne
zaustavi.
C
2 Odprite in odstranite strižno enoto.
C
3 Z izvijačem odstranite kovinski zatič.
C
4 Odprite pokrov ohišja.
Vstavite izvijač v enega od utorov zraven vtičnice
za vtikač aparata. Obrnite izvijač, da ločite obe
polovici ohišja.
C
5 Vstavite izvijač v majhno režo na plošči s
tiskanim vezjem, ki je označena s puščico.
Pritisnite izvijač navzdol, tako da se del
tiskanega vezja odlomi.
C
6 Potegnite baterijo iz aparata.
Odvrzite baterijo in ostale komponente na okolju
prijazen način.
Potem, ko ste baterijo odstranili iz aparata, ga ne
smete več priključiti na električno omrežje!
SLOVENŠČINA
Page 100

Garancija in servis
Če potrebujete servis ali informacijo, ali če imate
težave, obiščite Philipsovo spletno stran na
internetu www.philips.com ali pokličite Philipsov
storitveni center v vaši državi (telefonske številke
najdete na mednarodnem garancijskem listu). Če
v vaši državi ni Philipsovega storitvenega centra, se
obrnite na vašega trgovca ali na servisno
organizacijo za male gospodinjske aparate in
aparate za osebno nego (www.ntt.si). Pozor:Ta
aparat je namenjen izključno za domačo uporabo.
Če se aparat nepravilno uporablja ali se uporablja
v (pol-)profesionalne namene, ter na način,ki ni v
skladu s temi navodili za uporabo, postane
garancija neveljavna in Philips ne sprejema nobene
odgovornosti za kakršnokoli povzročeno škodo.
Izdajatelj navodil za uporabo:
Philips Slovenija, d.o.o. Knezov štradon 94, 1000
Ljubljana Tel: +386 1 280 9500
102 SLOVENŠČINA
4203 000 52282
 Loading...