

Page 1

ENGLISH 4
FRANCAIS 15
34
44
HQC483, HQC482, HQC440
3
á«Hô©dG
Page 2

Introduction
◗ Dear customer, you have made the right
choice! Your new Philips hair clipper adapts to
the contours of the head and enables
comfortable use.
◗ To enjoy using the hair clipper for a long time,
we advise you to read the following
information.
Important
Read these instructions for use carefully before
using the appliance and save them for future
reference.
◗ Check if the voltage indicated on the adapter
corresponds to the mains voltage in your
home before you connect the appliance.
◗ This appliance is suitable for mains voltages
from 220 to 240 volts.
◗ Only use the adapter supplied.
◗ The adapter contains a transformer. Do not
cut off the adapter to replace it with another
plug, as this will cause a hazardous situation.
◗ Do not use a damaged adapter.
◗ If the adapter is damaged, always have it
replaced by one of the original type in order
to avoid a hazard.
C
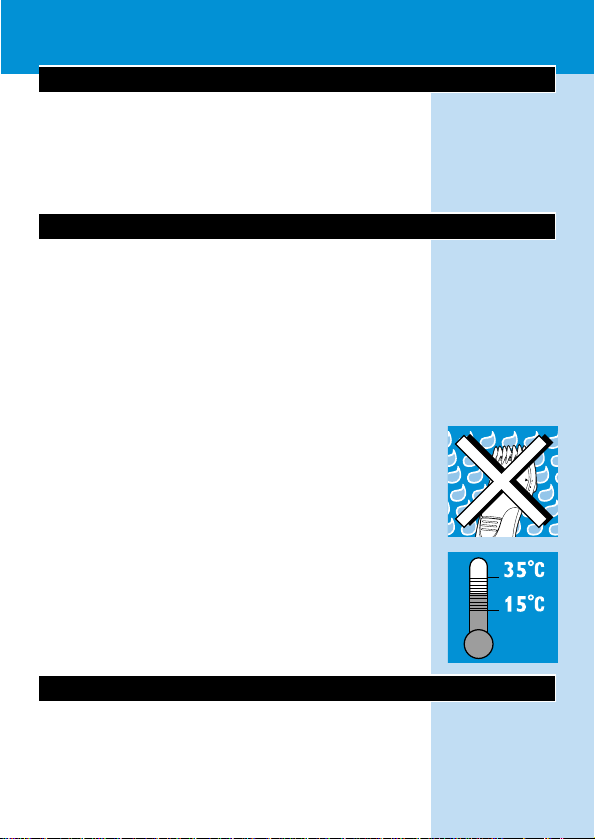
◗ Keep the appliance and the adapter dry.
◗ Keep the appliance out of the reach of
children.
ENGLISH4
Page 3
C
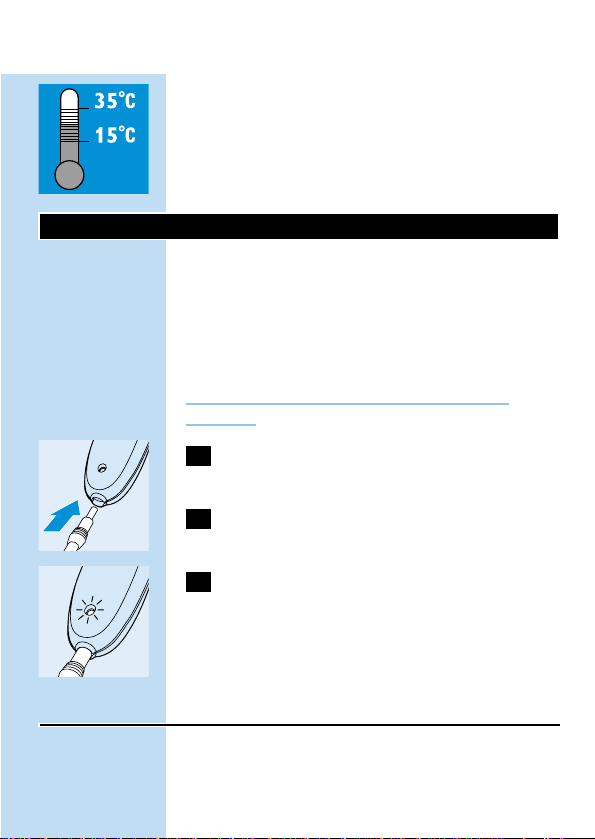
◗ Use, charge and store the appliance at a
temperature between 15c and 35c.
◗ This appliance is only intended for clipping
human hair. Do not use it for any other
purpose.
Charging (HQC482 and HQC483 only)
Charge the appliance for at least 12 hours before
you start using it for the first time.
A fully charged appliance has a cordless operating
time of up to 35 minutes.
Do not charge the appliance for more than
24 hours.
1 Make sure the appliance is switched off
while charging.
C
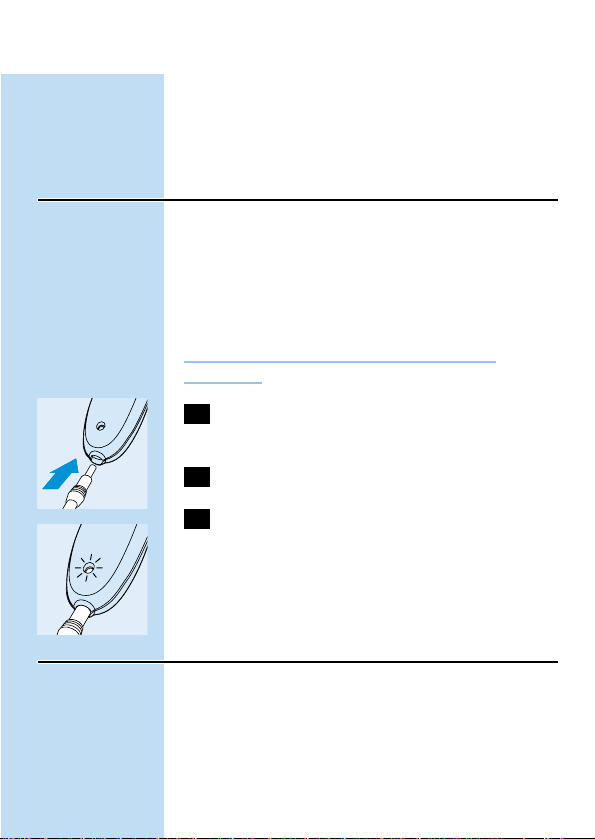
2 Insert the appliance plug into the
appliance.
3 Insert the adapter plug into the wall
socket.
C
◗ The pilot light will go on to indicate that the
appliance is charging.
Optimising the lifetime of the battery
- Discharge the batter y completely twice a year
by letting the motor run until it stops.
ENGLISH 5
Page 4

- Remove the adapter plug from the wall socket
when the battery is fully charged.
- If the appliance has not been used for a long
time, it must be recharged for at least 12 hours.
Corded clipping
HQC482, HQC483:
Do not run the appliance from the mains when
the battery is fully charged.
◗ To use the hair clipper connected to the
mains:
Switch the hair clipper off, connect it to the mains
and wait a few seconds before switching it on.
If the battery is completely empty, wait a few
minutes before switching the appliance on.
HQC440:
◗ Insert the apliance plug into the apliance and
put the adapter in the wall socket.
Preparing for use
Clipping with comb attachment
C
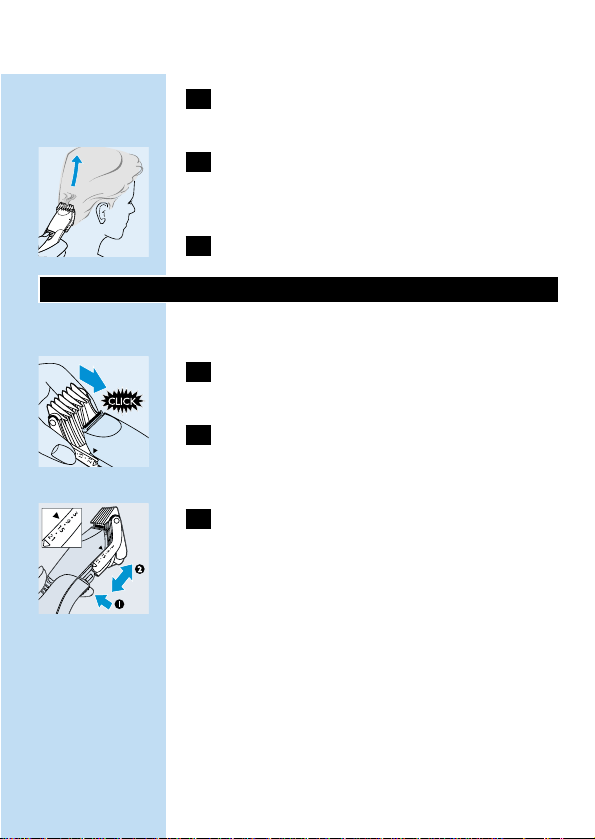
1 Before you start clipping, make sure the
head of the person whose hair you are
cutting is at the same level as your chest.
2 To get the best results, use the hair clipper
only on dry hair. Do not use it on freshly
washed hair.
ENGLISH6
Page 5
3 First comb the hair into the direction of
hair growth.
C
4 Always move the clipper against the
direction of hair growth, otherwise it will
not cut the hair properly.
5 Move the clipper through the hair slowly.
Using the appliance
Clipping with comb attachment
C
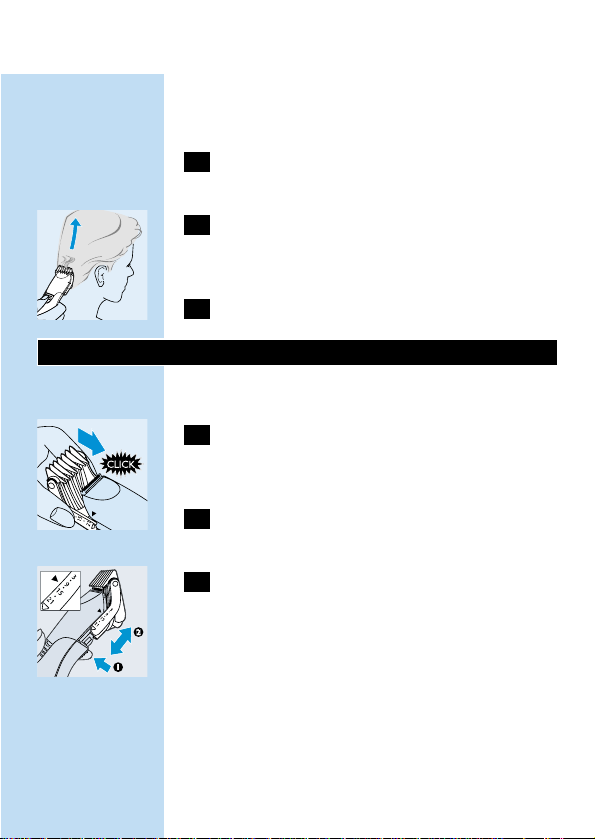
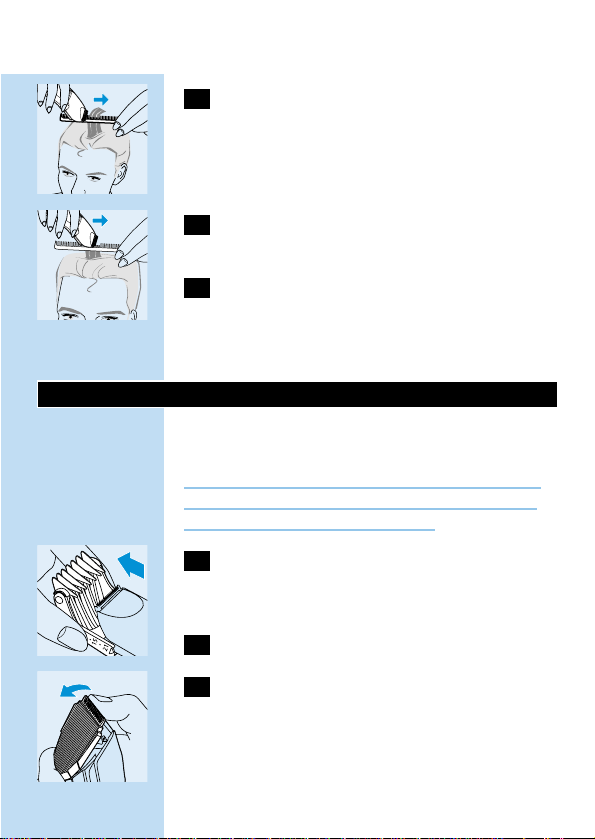
1 Slide the comb attachment onto the rails
on the appliance until you hear a click.
2 Make sure that the arms of the comb
attachment have been properly slid onto
the rails on both sides.
C
3 Choose the appropriate hair length
setting.
Press the adjustment button on the back of the
appliance and slide the comb attachment to the
desired position.
The clipper has 7 different hair length settings:
-3 mm
-6 mm
-9 mm
- 12 mm
- 15 mm
- 18 mm
- 21 mm
ENGLISH 7
Page 6

Start at the setting for maximum hair length
(21 mm) to familiarise yourself with the clipper.
4 Make sure that the flat part of the comb
attachment is always fully in contact with
the scalp to obtain an even cutting result.
5 Pass the clipper slowly over the crown
from different directions to achieve an
even cutting result.
6 Make overlapping passes over the head to
ensure that the clipper catches all the hairs
that need to be cut.
7 Comb the hair in the direction of hair
growth from time to time so that the
clipper can catch the hair more easily.
8 To achieve a good result with curly, sparse
or long hair, you can use a comb to guide
the hair towards the clipper.
9 We advise you to regularly remove clipped
hair from the comb while clipping.
Graduation
The Philishave hair clipper not only allows you to
cut the hair evenly at the same length all over the
head, it also enables you to achieve a smooth
transition from longer hair on top of the head to
shorter hair on the back and sides of the head.
ENGLISH8
Page 7

1 Start clipping at the setting for maximum
hair length (i.e. position 21 mm).
2 Then choose a shorter setting and cut the
hair on all parts of the head except the
top, where you want the hair to be longer.
3 You can repeat this procedure until the
hair on every part of the head has the
desired length.
Precise contouring without comb
attachment
You can use the clipper without comb attachment
to contour the neckline and the area around the
ears.
Be careful when you are clipping without comb
attachment, for the clipper will remove every hair
it touches.
1 Remove the comb attachment by pulling it
off the clipper.
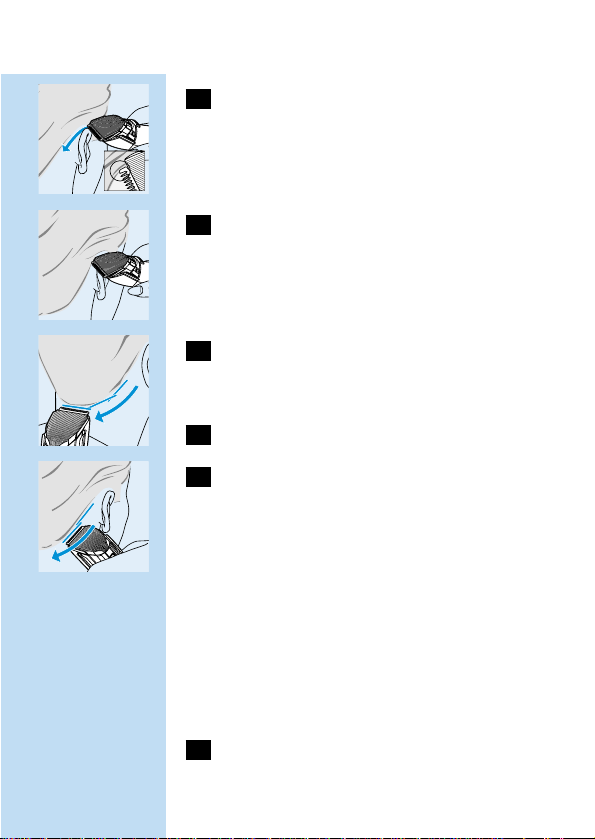
2 Before contouring the hairline round the
ears, comb the hair ends over the ear.
3 Bend the person's ear to get it out of the
way.
C
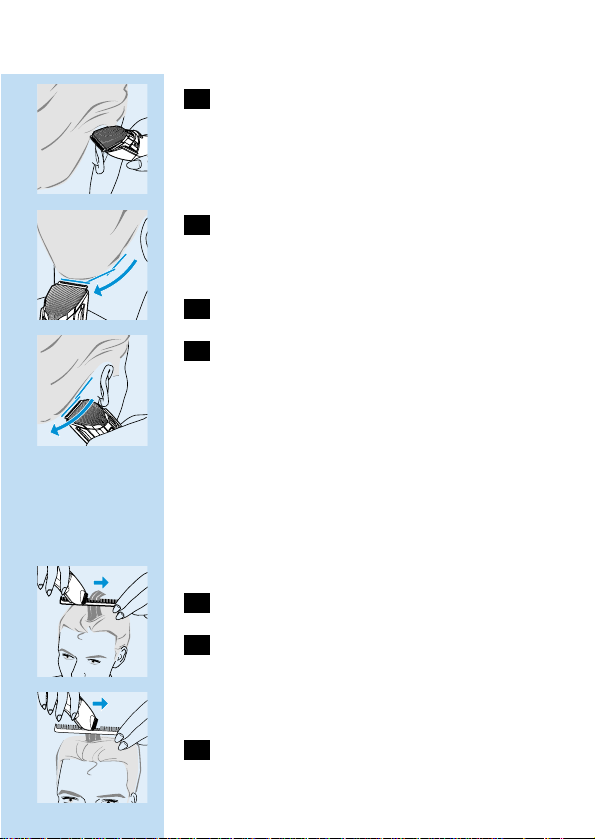
4 Tilt the clipper in such a way that only one
edge of the cutting element touches the
hair ends.
ENGLISH 9
Page 8
C
5 Only cut the hair ends.The hairline should
be close to the ear.
C
6 To contour the nape hairline and the
sideburns, turn the clipper and make
downward strokes.
7 Move slowly and smoothly.
C
8 Just follow the natural hairline.
Cutting over styling comb or fingers
This technique can be used to obtain hair lengths
over 21 mm. Bear in mind that this technique is
difficult to master and should only be applied by
experienced users.
1 Remove the comb attachment.
C
2 Comb a small section of hair upwards. Lift
the hair with a styling comb or hold it
between your fingers until only the length
that needs to be cut sticks out.
C
3 Cut the hair protruding from the comb or
fingers.
ENGLISH10
Page 9
4 Continue this procedure and comb
frequently to remove cut hair and to check
for unevenly cut sections.
Cleaning
Clean the appliance every time you have used it.
Do not use abrasives, scourers or liquids such as
alcohol, petrol or acetone to clean the appliance.
1 Make sure the appliance is switched off
and disconnected from the mains before
you start cleaning it.
C
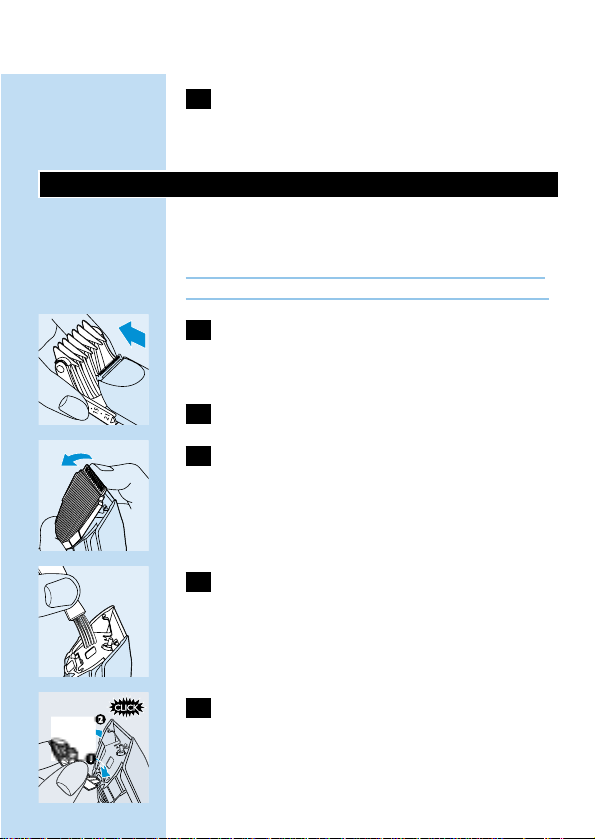
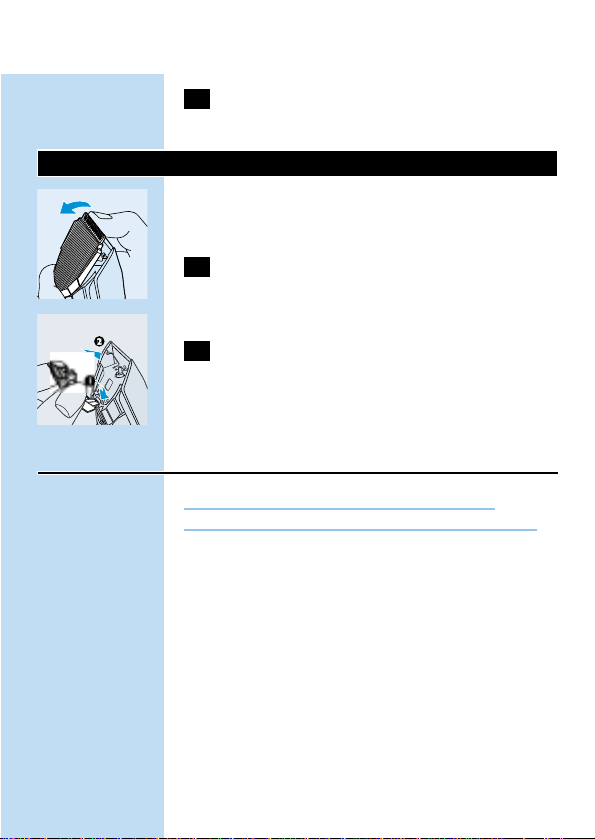
2 Remove the comb attachment.
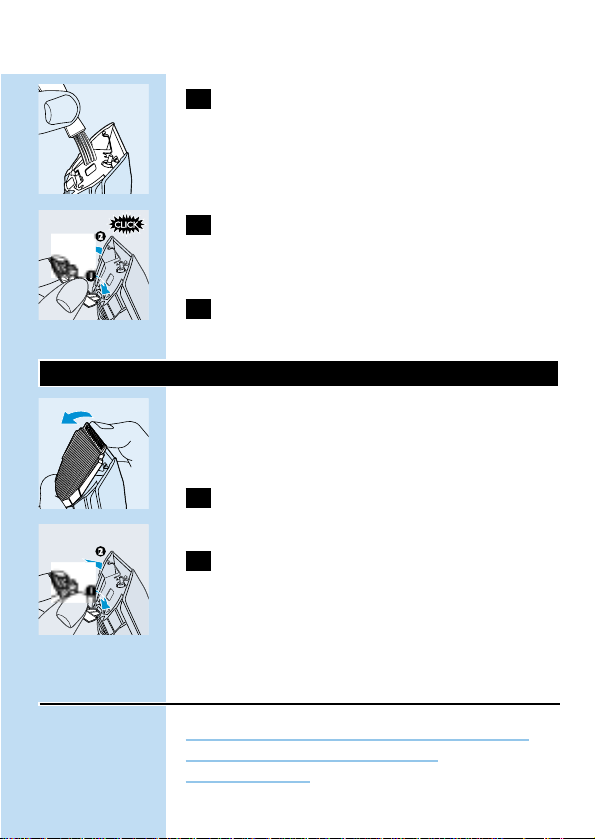
C
3 Push the middle part of the cutting unit
upwards with your thumb until it opens
and then pull it off the appliance.
Be careful that the cutting unit does not fall to the
floor.
C
4 Clean the cutting unit and the inside of the
appliance with the brush supplied.
C
5 Place the lug of the cutting unit into the
slot and push the unit back onto the
appliance.
ENGLISH 11
Page 10
6 Make sure you push the cutting unit back
until you hear a click.
Replacement
A worn or damaged cutting unit should only be
replaced with an original Philips cutting unit.
C
1 Push the middle part of the cutting unit
upwards with your thumb until it opens
and then pull it off the appliance.
C
2 Place the lug of the cutting unit into the
slot and push the cutting unit back until
you hear a click.
Environment (HQC482 and HQC483 only)
The built-in rechargeable battery contains
substances which may pollute the environment.
Remove the rechargeable battery when you
discard the appliance.
Do not throw the battery away with the normal
household waste but hand it in at an official
collection point.
You can also take the appliance to a Philips
service centre, which will remove the battery for
you and will dispose of it in an environmentally
safe way.
ENGLISH12
Page 11
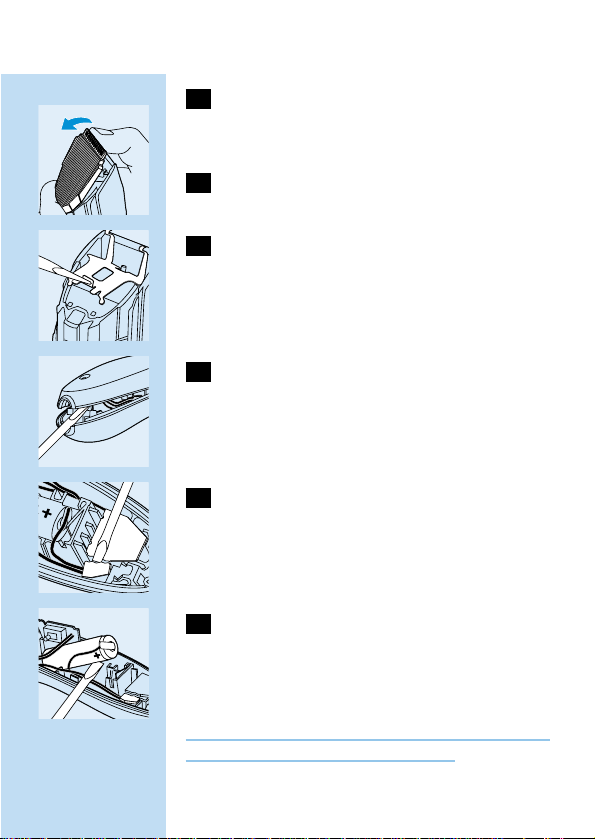
1 Disconnect the appliance from the mains
and let the appliance run until the motor
stops.
C
2 Open and remove the cutting unit.
C
3 Remove the metal clip by means of a
screwdriver.
C
4 Open the housing.
Insert a screwdriver into one of the grooves next
to the socket for the appliance plug.Turn the
screwdriver to separate the two housing halves.
C
5 Insert a screwdriver into the small slot in
the printed circuit board marked with an
arrow. Push the screwdriver down until
part of the printed circuit board breaks off.
C
6 Pull the battery out of the appliance.
Dispose of the battery and the other
components in an environmentally safe way.
Do not connect the appliance to the mains again
after the battery has been removed!
ENGLISH 13
Page 12

Guarantee & service
If you need information or if you have a problem,
please visit the Philips website at www.philips.com
or contact the Philips Customer Care Centre in
your country (you will find its phone number in
the worldwide guarantee leaflet). If there is no
Customer Care Centre in your country, turn to
your local Philips dealer or contact the Service
Department of Philips Domestic Appliances and
Personal Care BV.
ENGLISH14
Page 13

Introduction
◗ Cher consommateur, vous avez fait le bon
choix! Votre nouvelle tondeuse Philips
s'adapte aux contours de votre coiffure en
facilitant ainsi son utilisation.
◗ Afin de pouvoir utiliser au mieux votre
tondeuse, nous vous conseillons de suivre les
instructions qui suivent.
Important
Avant d'utiliser l'appareil, lisez les instructions cidessous et conservez ce mode d'emploi pour un
usage ultérieur.
◗ Avant de brancher l'appareil, vérifiez que la
tension indiquée sur l'adaptateur correspond
à la tension du secteur de votre logement.
◗ Tension d'utilisation: 220V à 240V.
◗ Utilisez exclusivement l'adaptateur fourni.
◗ L'adaptateur est doté d'un transformateur.
N'essayez pas de remplacer la fiche de
l'adaptateur pour éviter tout accident.
◗ N'utilisez pas un adaptateur endommagé.
◗ Lorsque le chargeur est endommagé,
remplacez-le par un adaptateur d'origine pour
éviter tout accident.
C
◗ Evitez le contact de l'appareil et de
l'adaptateur avec de l'eau.
◗ Tenez l'appareil hors de portée des enfants.
C
◗ Utilisez, chargez et rangez l'appareil à une
température comprise entre 15c et 35c.
FRANÇAIS 15
Page 14
◗ Cet appareil a été conçu pour tailler les
cheveux exclusivement.Toute autre utilisation
en est interdite.
Charge (HQC482 et HQC483 uniquement)
Chargez l'appareil 12 heures au moins avant la
première utilisation.
Une charge complète vous autorise une utilisation
de 35 min environ.
Ne chargez pas l'appareil pendant plus de
24 heures.
1 Assurez-vous que l'appareil est éteint lors
de la charge.
C
2 Insérez le connecteur dans l'appareil.
3 Insérez l'adaptateur dans la prise murale.
C
◗ Le témoin lumineux s'allumera pour indiquer
que l'appareil est en charge.
Durée des accumulateurs
- Déchargez les batteries complètement deux
fois par an en laissant tourner le moteur jusqu'à
l'arrêt.
- Retirez l'adaptateur de la prise murale lorsque
les batteries sont complètement chargées.
- Si l'appareil n'a pas été utilisé pendant une
FRANÇAIS16
Page 15

longue période, rechargez-le pendant 12 heures
au moins.
Utilisation sur secteur
HQC482, HQC483:
N'utilisez pas l'appareil directement sur secteur si
les batteries sont complètement chargées.
◗ Vous pouvez utiliser l'appareil directement sur
le secteur.
Arrêtez l'appareil, branchez la fiche dans la prise
de courant et attendez quelques secondes avant
de mettre l'appareil en marche.
Si les batteries sont complètement déchargées :
attendez quelques minutes.
HQC440:
◗ Insérez la petite fiche dans l'appareil et mettez
l'adaptateur dans la prise murale.
Préparation à l'emploi
Taille avec guide de coupe
C
1 Avant de commencer, assurez-vous que la
tête de la personne à qui vous allez couper
les cheveux est au même niveau que votre
poitrine.
2 Pour obtenir les meilleurs résultats,
n'utilisez la tondeuse que sur cheveux secs.
FRANÇAIS 17
Page 16
Ne l'utilisez pas sur des cheveux qui
viennent d'être lavés.
3 Peignez les cheveux dans le sens de la
pousse.
C
4 Déplacez toujours la tondeuse dans le
sens inverse de la pousse des cheveux
pour une coupe soignée.
5 Déplacez la tondeuse lentement.
Utilisation de l'appareil
Taille avec guide de coupe
C
1 Faites glisser le guide de coupe sur les
glissières de l'appareil jusqu'à ce que vous
entendiez un clic.
2 Assurez-vous que les deux guides sont
bien positionnés dans les glissières.
C
3 Choisissez le réglage approprié.
Appuyez sur le bouton de réglage à l'arrière de
l'appareil et faites glisser le guide de coupe sur la
position désirée.
La tondeuse est dotée de 7 positions différentes:
-3 mm
-6 mm
-9 mm
- 12 mm
- 15 mm
- 18 mm
- 21 mm
FRANÇAIS18
Page 17

Commencez par la hauteur la plus élevée
(21 mm) pour vous familiariser avec la tondeuse.
4 Assurez-vous que le guide de coupe est
toujours bien en contact avec le cuir
chevelu.
5 Déplacez la tondeuse lentement par-
dessus la calotte, en partant de la nuque
vers le dessus de la tête.
6 Donnez de petits coups de tondeuse
supplémentaires pour vous assurer que la
tondeuse a coupé les poils rebelles.
7 De temps en temps, peignez les cheveux
dans le sens de la pousse pour que la
tondeuse attrape mieux les mèches.
8 Pour obtenir des résultats optimaux sur
cheveux ondulés, rares ou longs, utilisez un
peigne pour guider les cheveux vers la
tondeuse.
9 Il est conseillé de retirer à intervalles
réguliers les mèches coupées.
Gradation
La tondeuse Philishave vous permet de couper les
cheveux de façon régulière mais elle vous aide
également d'obtenir une coupe nette en
commençant par le haut de la tête où les
FRANÇAIS 19
Page 18

cheveux sont plus longs vers la nuque et les côtés
où les cheveux sont plus courts.
1 Commencez à tondre en utilisant le
réglage maximum de hauteur de coupe
(position 21 mm).
2 Ensuite choisissez un réglage inférieur et
coupez les cheveux à l'arrière de la tête,
sauf le sommet.
3 Vous pouvez répéter cette procédure
jusqu'à ce que les cheveux de la nuque et
des côtés aient la longueur désirée.
Dessiner un contour précis sans guide
de coupe
Vous pouvez utiliser la tondeuse sans guide de
coupe pour dessiner le contour de la nuque et
des oreilles.
Faites attention lorsque vous utilisez la tondeuse
sans guide de coupe, car elle coupe chaque
cheveu touché.
1 Retirez le guide de coupe de l'appareil.
2 Avant de dessiner le contour des oreilles,
peignez les bouts des cheveux vers
l'oreille.
3 Penchez l'oreille pour faciliter l'opération.
FRANÇAIS20
Page 19
C
4 Inclinez la tondeuse de telle manière que
seulement un des bords du couteau
touche les cheveux.
C
5 Coupez uniquement les bouts des cheveux
en suivant le contour naturel de la racine
des cheveux.
C
6 Pour dessiner le contour de la nuque et
des pattes, tournez la tondeuse et
déplacez-la vers le bas.
7 Faites des mouvements lents et uniformes.
C
8 Suivez le contour naturel de la racine des
cheveux.
Coupe au peigne ou avec les doigts
En utilisant cette technique vous pouvez obtenir
une longueur de cheveux supérieure à 21 mm.
N'oubliez pas que cette technique est difficile à
maîtriser et devrait être utilisée par les utilisateurs
expérimentés.
1 Retirez le guide de coupe.
FRANÇAIS 21
Page 20
C
2 Peignez une mèche de cheveux vers le
haut. Soulevez la mèche à l'aide du peigne
ou saisissez-la entre les doigts jusqu'à ce
que la longueur de cheveux que vous
désirez couper dépasse.
C
3 Coupez les mèches qui dépassent du
peigne ou des doigts.
4 Continuez cette procédure et peignez à
intervalles réguliers pour retirer les
mèches coupées et pour uniformiser les
zones irrégulières.
Nettoyage
Nettoyez l'appareil après chaque utilisation.
N'utilisez pas de produits abrasifs, de tampons à
récurer ou des substances telles que l'alcool ou
l'acétone pour nettoyer l'appareil.
1 Avant de commencer à nettoyer l'appareil,
assurez-vous de l'avoir éteint et
débranché.
C
2 Retirez le guide de coupe.
C
3 Retirez le couteau en poussant dessus, au
centre jusqu'à ce qu'il se détache.
Faites attention à ne pas tomber par terre.
FRANÇAIS22
Page 21
C
4 Nettoyez l'unité de coupe et l'intérieur de
l'appareil avec la brosse de nettoyage.
C
5 Fixez le crochet de l'unité de coupe dans la
fente et repoussez l'unité dans l'appareil
(clic).
6 Repoussez l'unité de coupe jusqu'à
entendre un clic.
Remplacement
Utilisez uniquement une unité de coupe Philips
d'origine pour remplacer la votre, si elle est usée
ou endommagée.
C
1 Retirez le couteau en poussant dessus, au
centre jusqu'à ce qu'il se détache.
C
2 Placez le crochet de la nouvelle unité de
coupe dans la fente et poussez l'unité dans
l'appareil (clic).
Environnement (HQC482 et HQC483
uniquement)
La batterie rechargeable intégrée contient des
substances susceptibles de nuire à
l'environnement.
FRANÇAIS 23
Page 22

Lorsque vous vous séparerez de votre appareil en
fin de vie, retirez la batterie.
Ne jetez pas la batterie avec les ordures
ménagères habituelles, mais déposez-la dans un
lieu assigné à cet effet.
Vous pouvez également déposer votre appareil
dans un Centre Service Agréé Philips, où l'on s'en
chargera avec plaisir.
1 Débranchez l'appareil de la prise de
courant, et laissez-le fonctionner jusqu'à
qu'à l'arrêt complet du moteur.
C
2 Ouvrez et retirez l'unité de coupe.
C
3 Retirez le couvercle en métal à l'aide d'un
tournevis.
C
4 Ouvrez le corps de l'appareil.
Insérez un tournevis dans l'une des fentes près de
la prise pour la petite fiche.Tournez le tournevis
pour séparer en deux le corps de l'appareil.
C
5 Insérez un tournevis dans la fente du
circuit marquée d'une flèche. Poussez le
tournevis jusqu'à rompre une partie du
circuit.
FRANÇAIS24
Page 23

C
6 Otez la batterie.
Déposez la batterie et les autres composants
dans un lieu assigné à cet effet.
Ne branchez pas l'appareil sur le secteur après
l'avoir ouvert.
Garantie et service
Pour toute réparation/information, ou en cas de
problème, visitez notre website: www.philips.com.
Ou veuillez contacter le Service Consommateurs
Philips de votre pays (vous trouverez le numéro
de téléphone dans le dépliant sur la garantie
internationale). S'il n'y a aucun Service
Consommateurs Philips dans votre pays,
contactez votre distributeur ou le Service
Department de Philips Domestic Appliances and
Personal Care BV.
FRANÇAIS 25
Page 24

á«Hô©dG
B
4.»LQÉÿG AÉ£¨dG íàaG
.RЙ¡чG ¢щС≤e ¢щHЙ≤d бjRGƒŸG дЙлаШdG iуMG ‘ »ZGИdG ∂Шe πNOCG
ɪ¡°†©H øY »LQÉÿG AÉ£¨dG »à©£b π°üØd »ZGÈdG ∂Øe ∞∏H ºb
.ôNB’G
B
5º¡°ùdÉH É¡«dG QÉ°ûŸG IÒ¨°üdG áëàØdG ‘ »ZGÈdG ∂Øe πNOCG
¤G »ZGÈdG ∂Øe §¨°VG .áYƒÑ£ŸG á«fhεd’G áMƒ∏dG ≈∏Y
.áYƒÑ£ŸG á«fhεd’G áMƒ∏dG ô°ùµæJ ¿CG ¤G πØ°SC’G
B
6.RÉ¡÷G êQÉN ¤G ájQÉ£ÑdG Öë°SG
.áæeBG á«Ä«H á≤jô£H iôNC’G ô°UÉæ©dG h ájQÉ£ÑdG øe ¢ü∏îJ
ájQÉ£ÑdG ´õf ó©H GOó› ô°TÉÑŸG »FÉHô¡µdG QÉ«àdÉH RÉ¡÷G π°UƒJ ’
!¾e
áeóÿG h ¿Éª°†dG
¿GƒæY IQÉjR AÉLôdG ,á∏µ°ûe ∂jód âfÉc hCG äÉeƒ∏©e ájC’ âéàMG GPG
¢ùÑ«∏«a ácô°ûH ¢UÉÿG âfÎf’G
comphilips.www.π°üJG hCG
¿hóe ∞JÉ¡dG ºbQ óŒ ±ƒ°S) ∑ó∏H ‘ AÓª©dG áeóÿ ¢ùÑ«∏«a õcôÃ
,∑ó∏H ‘ AÓª©dG áeóÿ õcôe óLGƒàj ⁄ GPG .(»ŸÉ©dG ¿Éª°†dG Iô°ûf ‘
ácô°ûd ™HÉàdG áeóÿG õcôà π°üJG hCG ¢ùÑ«∏«a π«ch á©LGôe AÉLôdG
.á«°üî°ûdG ájÉæ©dG h á«dõæŸG äGhOCÓd ¢ùÑ«∏«a
26
Page 25

á«Hô©dG
B
2RÉ¡÷G πNGO ¤G É¡£¨°VG ºK áëàØdG ‘ ¢ü≤dG IóMh ™°V
.∂«∏c 䃰U ™ª°ùJ ¿CG ¤G GOó›
…RGôW §≤a) áÄ«ÑdG
HQC483
h
HQC482
(
ÇÉHô¡µdG øë°ûdG IOÉY’ á∏HÉ≤dG RÉ¡÷G πNGO IOhõŸG ájQÉ£ÑdG …ƒà–
.áÄ«ÑdG çƒ∏J ¿CG øµÁ OGƒe ≈∏Y
øe ¢ü∏îàdG Qô≤J ÉeóæY »FÉHô¡µdG øë°û∏d á∏HÉ≤dG ájQÉ£ÑdG ´õfG
.RÉ¡÷G
á£≤f ¤G É¡ª«∏°ùàH ºb πH ájOÉ©dG ∫õæŸG äÉjÉØf ‘ ájQÉ£ÑdG »eôJ ’
.᫪°SQ º«∏°ùJ
Ωƒ≤«°S å«M ¢ùÑ«∏«a áeóN õcôe ¤G RÉ¡÷G º«∏°ùJ É°†jCG ∂æµÁ
.áæeBG á«Ä«H á≤jô£H ájQÉ£ÑdG øe ¢ü∏îàdG h RÉ¡÷G ∂ØH ¿ƒØXƒŸG
1¿CG ¤G πª©j RÉ¡÷G ´O h ô°TÉÑŸG QÉ«àdG øe RÉ¡÷G π°üØH ºb
.∑ôÙG ∞bƒàj
B
2.¢ü≤dG IóMh ´õfG h RÉ¡÷G íàaG
B
3.»ZGôH ∂Øe ᣰSGƒH Êó©ŸG §≤∏ŸG ´õfG
27
Page 26

á«Hô©dG
1QÉ«àdG øe ÉHƒë°ùe h πª©dG øY ∞bƒàe RÉ¡÷G ¿CÉH ócCÉJ
.¬Ø«¶æàH AóÑdG πÑb ô°TÉÑŸG »FÉHô¡µdG
B
2.§°ûŸG ≥ë∏e ´õfG
B
3ᣰSGƒH ≈∏YC’G ¤G ¢ü≤dG IóMƒd ᣰSƒàŸG á©£≤dG §¨°VG
.RÉ¡÷G êQÉN ¤G É¡Ñë°SG ºK íàØJ ¿CG ¤G ∂eÉ¡HG
.¢VQC’G ≈∏Y ¢ü≤dG IóMh ™≤J ’ ¿CÉH GQòM øc
B
4IÉ°TôØdG ᣰSGƒH πNGódG øe RÉ¡÷G h ¢ü≤dG IóMh ∞«¶æàH ºb
.IOhõŸG
B
5RÉ¡÷G πNGO ¤G É¡£¨°VG ºK áëàØdG ‘ ¢ü≤dG IóMh ™°V
.GOó›
6.∂«∏c 䃰U ™ª°ùJ ¿CG ¤G ¢ü≤dG IóMh §¨°†J ¿CÉH ócCÉJ
∫GóÑà°S’G
øe á«∏°UCG ábÓM IóMƒH §≤a áØdÉàdG ábÓ◊G IóMh ∫GóÑà°SG Öéj
.¢ùÑ«∏«a
B
1ᣰSGƒH ≈∏YC’G ¤G ¢ü≤dG IóMƒd ᣰSƒàŸG á©£≤dG §¨°VG
.RÉ¡÷G êQÉN ¤G É¡Ñë°SG ºK íàØJ ¿CG ¤G ∂eÉ¡HG
28
Page 27

á«Hô©dG
B
6¤G √ôjô“ h RÉ¡÷G ∞∏H ºb ,∞dGƒ°ùdG h ô©°ûdG §N ójóëàd
.πØ°SC’G
7.ábQ h A§ÑH ¬côM
B
8.»©«Ñ£dG ô©°ûdG §N ´ÉÑJÉH ºb
™HÉ°UC’G hCG º«ª°üàdG §°ûe ¥ƒa ¢ü≤dG
.º∏e 12 øY ójõj ô©°T ∫ƒW ≈∏Y ∫ƒ°üë∏d ܃∏°S’G Gòg ´ÉÑJG øµÁ
πÑb øe §≤a ¬≤«Ñ£J Öéj h á°SQɪŸG Ö©°U ܃∏°SC’G Gòg ¿CÉH ôcòJ
.ÚaÎfi
1.§°ûŸG ≥ë∏e ´õfG
B
2ô©°ûdG ™aQG .≈∏YC’G √ÉŒÉH ô©°ûdG øe Ò¨°U AõL §«°ûªàH ºb
§≤a RÈJ ¿CG ¤G ∂©HÉ°UCG ᣰSGƒH hCG º«ª°üàdG §°ûe ᣰùdƒH øe
.É¡°üb OGôŸG äGÒ©°ûdG
B
3.™HÉ°UC’G hCG §°ûŸG øe QOÉ°üdG ô©°ûdG ¢ü≤H ºb
4ô©°ûdG ádGR’ ΩɶàfÉH ô©°ûdG §«°ûªàH ºb h á«∏ª©dÉgòg ™HÉJ
.hÉ°ùàe ô©°ûdG ∫ƒW ¿CÉH ócCÉà∏d h ¢Uƒ°ü≤ŸG
∞«¶æàdG
.ΩGóîà°SG πc ó©H RÉ¡÷G ∞«¶æàH ºb
∫hÎÑdG h ¿ƒà«°S’G h ∫ƒëµdG πãe ᣰTÉc πFGƒ°S hCG OGƒe Ωóîà°ùJ ’
.RÉ¡÷G ∞«¶æàd
29
Page 28

á«Hô©dG
ô©°ûdG êQóJ
…hÉ°ùàdÉH ¢Uƒ°ü≤e ô©°T ≈∏Y ∫ƒ°üë∏d ∞«°û«∏«a ô©°ûdG Üò°ûe ∂dƒîj
Aõ÷G óæY Ò°üb ¤G πjƒW øe ∑ô©°ûd êQóJ ≈∏Y ∫ƒ°üë∏d áaÉ°V’ÉH
.∞dGƒ°ùdG ¥ƒa h ¢SCGô∏d »Ø∏ÿG
1.(º∏e 12 ) ô©°ûdG ∫ƒ£d iƒ°ü≤dG á«©°VƒdÉH ô©°ûdG Öjò°ûàH CGóHG
2ÖfGƒL ™«ªL øe ô©°ûdG ¢ü≤H ºb h ô°übCG ∫ƒW á«©°Vh ÎNG ºK
.∫ƒWCG ¿ƒµj ¿CG ô©°ûdG ójôJ å«M ≈∏YC’G ÖfÉ÷G GóY Ée ¢SCGôdG
3ô©°ûdG ∫ƒW ≈∏Y π°ü– ¿CG ¤G á«∏ª©dG √òg IOÉYG ∂æµÁ
.¢SCGôdG ÖfGƒL πc ‘ ¬H ܃ZôŸG
§°ûŸG ≥ë∏e ¿hóH ≥«bO ójó–
h áÑbôdG OhóM ójóëàd §°ûŸG ≥ë∏e ¿hóH ô©°ûdG Üò°ûe ΩGóîà°SG ∂æµÁ
.ÚfPC’G ∞∏N ≥WÉæŸG
Ωƒ≤«°S RÉ¡÷G ¿CG å«M §°ûe ≥ë∏e ¿hóH Öjò°ûàdG óæY GQòM øc
.É¡à°ùeÓÃ Ωƒ≤j Iô©°T πc ´ÓàbÉH
1.RÉ¡÷G øe ¬Ñë°S ∫ÓN øe §°ûŸG ≥ë∏e ´õfG
2ô©°ûdG ±GôWCG §«°ûªàH ºb ,ÚfPC’G ∫ƒM ô©°ûdG §N ójó– πÑb
.ÚfPC’G ¥ƒa
3.RÉ¡÷G øY ÉgOÉ©H’ ¢üî°ûdG ¿PCG …ƒWCG
B
4øe óMGh ±ôW ¿ƒµj å«M áæ«©e á≤jô£H RÉ¡÷G ∞∏H ºb
.ô©°ûdG ±GôWC’ É°ùeÓe ¢ü≤dG ô°üæY
B
5øe ÉÑjôb ô©°ûdG §N ¿ƒµj ¿CG Öéj .§≤a ô©°ûdG ±GôWCG ™£≤H ºb
.¿PC’G
30
Page 29

B
3.áªFÓŸG ô©°ûdG ∫ƒW á«©°Vh ÎNG
ºb h RÉ¡÷G øe »Ø∏ÿG Aõ÷G ‘ óLGƒàŸG §Ñ°†dG ìÉàØe ≈∏Y §¨°VG
.܃ZôŸG ™°VƒdG ‘ §°ûŸG ≥ë∏e Ö«cÎH
:ô©°ûdG ∫ƒ£d áØ∏àfl äÉ«©°Vh 7 ≈∏Y RÉ¡÷G …ƒàëj
-º∏e 3
-º∏e 6
-º∏e 9
-º∏e 21
-º∏e 51
-º∏e 81
-º∏e 12
.RÉ¡÷G ™e º∏bCÉààd (º∏e 12 ) ô©°ûdG ∫ƒ£d iƒ°ü≤dG á«©°VƒdÉH CGóHG
4Iô°ûÑd ÉehO É°ùeÓe §°ûŸG ≥ë∏e øe í£°ùŸG Aõ÷G ¿CÉH ócCÉJ
.ájhÉ°ùàŸG ¢ü≤dG èFÉàf π°†aCG ≈∏Y ∫ƒ°ü◊G πLCG øe ô©°ûdG
5∫ƒ°üë∏d ÖfGƒL IóY øe ¢SCGôdG ¥ƒa A§ÑH RÉ¡÷G ôjôªàH ºb
.ájhÉ°ùàe ¢üb èFÉàf ≈∏Y
6äGÒ©°ûdG πc §≤à∏j RÉ¡÷G ¿CÉH ócCÉà∏d ¢SCGôdG ¥ƒa äGôjôªàH ºb
.É¡°üb OGôŸG
7≈æ°ùà«d ôNB’ âbh øe ô©°ûdG ƒ‰ √ÉŒÉH ô©°ûdG §«°ûªàH ºb
.ÌcCG ádƒ¡°ùH ô©°ûdG •É≤àdG RÉ¡é∏d
8∂æµÁ ,πjƒW hCG ó©› ô©°T ™e Ió«L èFÉàf ≈∏Y ∫ƒ°üë∏d
.RÉ¡÷G √ÉŒÉH ô©°ûdG OÉ°TQ’ §°ûŸG ΩGóîà°SG
9á«∏ªY ∫ÓN ¬«∏Y ºcGΟG ô©°ûdG øe §°ûŸG ∞«¶æàH ∂ë°üæf
.¢ü≤dG
á«Hô©dG 31
Page 30

á«Hô©dG
𫨰ûJ πÑb ≥FÉbO á©°†Ñd ô¶àfG ,πeɵdÉH áZQÉa ájQÉ£ÑdG âfÉc GPG
.RÉ¡÷G
HQC440:
æ¢ùHÉb ‘ »FÉHô¡µdG ¢ùÑ≤ŸG πNOCG h RÉ¡÷G ‘ RÉ¡÷G ¢ùÑ≤e πNOCG
.§FÉ◊G
ΩGóîà°SÓd Ò°†ëàdG
§°ûŸG ≥ë∏e ᣰSGƒH Öjò°ûàdG
B
1…òdG ¢üî°ûdG ¢SCGQ ¿ƒµj ¿CÉH ócCÉJ ,ô©°ûdG Öjò°ûàH AóÑdG πÑb
.∑Qó°U iƒà°ùe ≈∏Y √ô©°T Öjò°ûJ OƒJ
2h ±ÉL ô©°T ≈∏Y RÉ¡÷G Ωóîà°SG ,èFÉàædG π°†aCG ≈∏Y ∫ƒ°üë∏d
.GôNDƒe ¬∏°ùZ ” ô©°T ≈∏Y ¬eóîà°ùJ ’
3.ô©°ûdG ƒ‰ √ÉŒÉH ô©°ûdG §«°ûªàH ’hCG ºb
B
4Ωƒ≤j ø∏a ’G h ,ô©°ûdG ƒ‰ √ÉŒG ¢ùµ©H RÉ¡÷G ÉehO ∑ôM
.áë«ë°üdG á≤jô£dÉH ô©°ûdG ¢ü≤H RÉ¡÷G
5.ô©°ûdG ∫ÓN øe A§ÑH RÉ¡÷G ∂jôëàH ºb
RÉ¡÷G ΩGóîà°SG
§°ûŸG ≥ë∏e ΩGóîà°SÉH Öjò°ûàdG
B
1䃰U ™ª°ùJ ¿CG ¤G RÉ¡÷G ±GôWCG ≈∏Y §°ûŸG ≥ë∏e πNOCG
.∂«∏c
2≈∏Y ΩɵMÉH ɪ¡Ñ«côJ ” ób §°ûŸG ≥ë∏e áYQPCG ¿CÉH ócCÉJ
.RÉ¡÷G ‘ôW
30
Page 31

á«Hô©dG
53 ájɨd ᫵∏°S’ Öjò°ûJ á«∏ªY ôaƒj πeɵdÉH ¿ƒë°ûŸG RÉ¡÷G ¿G
.á≤«bO
.áYÉ°S 42 øe ÌcC’ RÉ¡÷G øë°ûJ ’
1.øë°ûdG á«∏ªY ∫ÓN πª©dG øY ∞bƒàe RÉ¡÷G ¿CÉH ócCÉJ
B
2.RÉ¡÷G ‘ RÉ¡÷G ¢ùÑ≤e πNOCG
3.§FÉ◊G ¢ùHÉb ‘ »FÉHô¡µdG ¢ùÑ≤ŸG πNOCG
B
æ.øë°ûdG ó«b RÉ¡÷G ¿CÉH GÒ°ûe ô°TDƒŸG Aƒ°†dG A»°†j ±ƒ°S
ájQÉ£ÑdG ôªY ádÉWG
-𫨰ûJ ∫ÓN øe áæ°ùdG ‘ ÚJôe πeɵdÉH ájQÉ£ÑdG ábÉW ÆôaCG
.∞bƒàj ¿CG ¤G π°UGƒàH ∑ôÙG
-ájQÉ£ÑdG øë°T ΩÉ“G óæY §FÉ◊G ¢ùHÉb øe AÉHô¡µdG ¢ùÑ≤e ´õfG
.πeɵdÉH
-21 IóŸ ¬æë°T IOÉYG Öéj ,á∏jƒW IÎØd RÉ¡÷G ΩGóîà°SG ºàj ⁄ GPG
.πbC’G ≈∏Y áYÉ°S
»µ∏°ùdG Öjò°ûàdG
HQC483 ,HQC482:
ä ÉeóæY ô°TÉÑŸG »FÉHô¡µdG QÉ«àdG ᣰSGƒH RÉ¡÷G 𫨰ûàH º≤J ’
.πeɵdÉH áfƒë°ûe ájQÉ£ÑdG
æ:ô°TÉÑŸG QÉ«àdÉH ∫ƒ°UƒŸG ô©°ûdG Üò°ûe ΩGóîà°S’
¿GƒK á©°†Ñd ô¶àfG ºK ô°TÉÑŸG QÉ«àdG ¤G ¬∏«°UƒJ h RÉ¡÷G ±É≤jÉH ºb
.ójóL øe ¬∏«¨°ûJ πÑb
33
Page 32
á«Hô©dG
áeó≤e
æÖjò°ûàd ¢ùÑ«∏«a RÉ¡L ¿G !í«ë°üdG QGô≤dG äòîJG ó≤d ,õjõ©dG Éæ∏«ªY
.Ó¡°S ÉeGóîà°SG ∂d ôaƒj h ∂°SCGQ º«°SÉ≤J ™e º∏bCÉàj ójó÷G ô©°ûdG
æIAGô≤H ∂ë°üæf ,á∏jƒW IÎØd ô©°ûdG Üò°ûe ΩGóîà°SÉH ´Éàªà°SÓd
.á«dÉàdG äÉeƒ∏©ŸG
GóL º¡e
‘ ™Lôªc º¡H ßØàMG h RÉ¡÷G ΩGóîà°SG πÑb Gó«L äGOÉ°TQ’G √òg CGôbG
.πÑ≤à°ùŸG
æºFÓj »FÉHô¡µdG ¢ùÑ≤ŸG ‘ ¬«dG QÉ°ûŸG »FÉHô¡µdG QÉ«àdG ¿CÉH ócCÉJ
.RÉ¡÷G π«°UƒJ πÑb ∂dõæe ‘ ôaƒàŸG »FÉHô¡µdG QÉ«àdG
æ.âdƒa 042 h 022 ÚH ìRGÎj »FÉHô¡c QÉ«àd ºFÓe RÉ¡÷G Gòg
æ.OhõŸG »FÉHô¡µdG ¢ùÑ≤ŸG §≤a Ωóîà°SG
æ¢ùÑ≤ŸG ™£≤J ’ .»FÉHô¡c ∫ƒfi ≈∏Y »FÉHô¡µdG ¢ùÑ≤ŸG …ƒàëj
.ìOÉa ô£ÿ ∂°Vô©«°S ∂dP ¿ƒc ôNBG ¢ùÑ≤à ¬dGóÑà°S’ »FÉHô¡µdG
æ.∞dÉJ »FÉHô¡c ∞«µe Ωóîà°ùJ ’
æRGôW øe ôNBG ¢ùÑ≤à ¬dGóÑà°SÉH ºb ,»FÉHô¡µdG ¢ùÑ≤ŸG ∞∏J GPG
.QÉ£NCG çhóM Öæéàd »∏°UCG
B
æ.±ÉL ¿Éµe ‘ »FÉHô¡µdG ¢ùÑ≤ŸGh RÉ¡÷G ´O
æ.∫ÉØWC’G ∫hÉæàe øY Gó«©H RÉ¡÷G ´O
B
æÚH ìhGÎJ IQGôM áLQO ‘ ¬æjõîJh ¬æë°ûH ºbh RÉ¡÷G Ωóîà°SG
.ájƒÄe áLQO 53 h 51
æ…C’ ¬eóîà°ùJ ’ .¿É°ùf’G ô©°T Öjò°ûàd ¬eGóîà°S’ RÉ¡÷G Gòg ºª°U
.ôNBG ¢VôZ
…RGôW) »FÉHô¡µdG øë°ûdG
HQC483
h
HQC482
(§≤a
Iôª∏d ¬eGóîà°SÉH AóÑdG πÑb áYÉ°S 21 IóŸ πbC’G ≈∏Y RÉ¡÷G øë°ûH ºb
.¤hC’G
343536
Page 33

Page 34

Page 35

37383940414243
HQC482
HQC483
Page 36

Page 37

Page 38

Page 39

Page 40

Page 41

HQC482
HQC483
Page 42

44
Page 43

45
Page 44

46
4203 000 52702
 Loading...