

Page 1

ENGLISH 4
DEUTSCH 14
NORSK 24
SVENSKA 33
SUOMI 42
DANSK 52
HQ C281
3
Page 2
Important
◗ Check if the voltage indicated on the mains
plug corresponds to the mains voltage in your
home before you connect the appliance.
◗ Make sure that the appliance does not get
wet.
◗ Charge and store the appliance at a
temperature between 15c and 35cC.
Charging
Charge the appliance fully before you use it for
the first time.
Make sure the appliance is switched off while
charging.
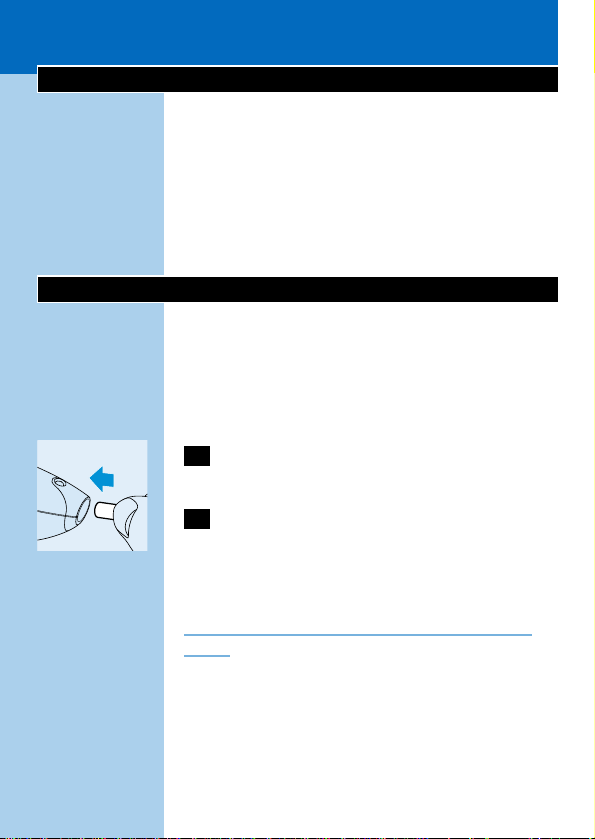
C
1 Insert the appliance plug into the
appliance.
2 Insert the mains plug into the wall socket.
B
The pilot light will go on to indicate that the
appliance is charging.
It will take approx.12 hours to fully charge the
battery.
Do not charge the appliance for more than 24
hours.
A fully charged appliance has a cordless clipping
time of up to 35 minutes.
ENGLISH4
Page 3
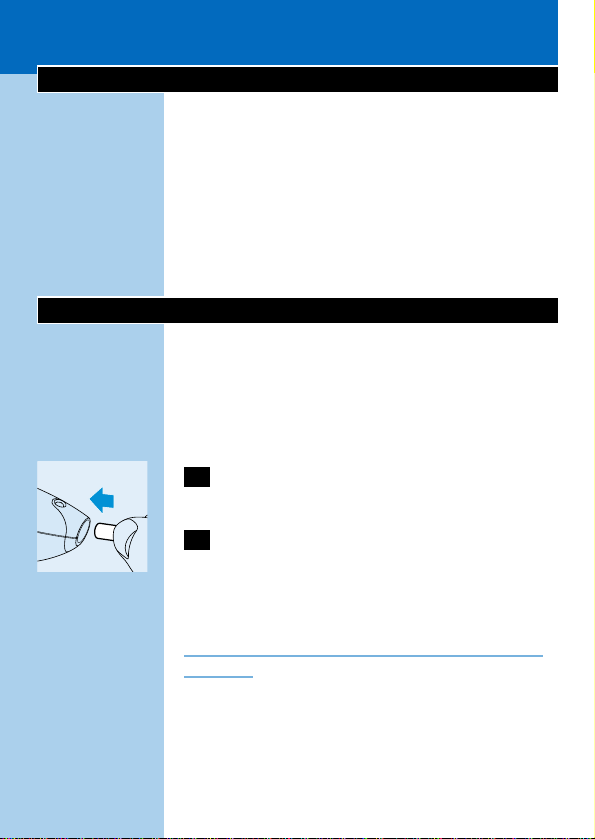
Corded clipping
◗ To clip with the hair clipper connected to the
mains:
Switch the hair clipper off,connect it to the mains
and wait a few seconds before switching it back
on.If the battery is completely empty: wait a few
minutes before switching the appliance on.
Do not run the appliance from the mains when
the battery is fully charged.
Preparing for clipping
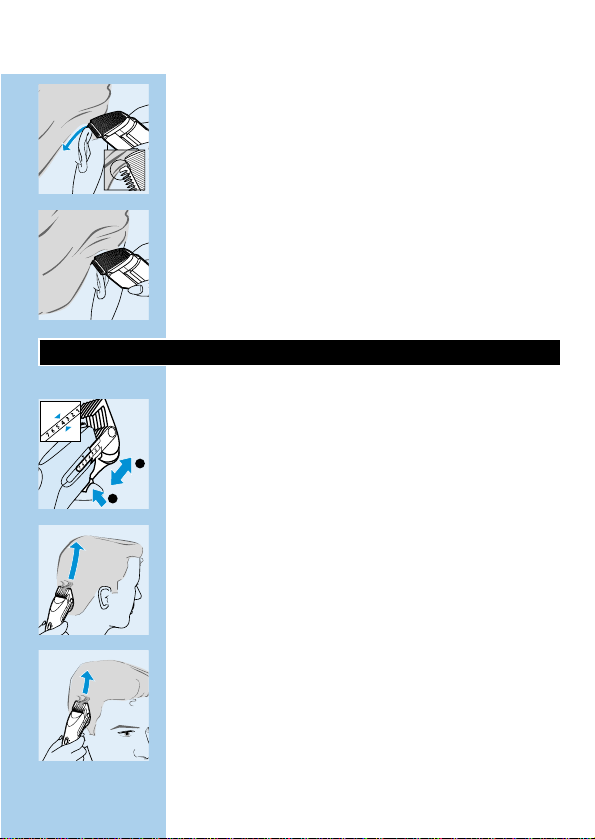
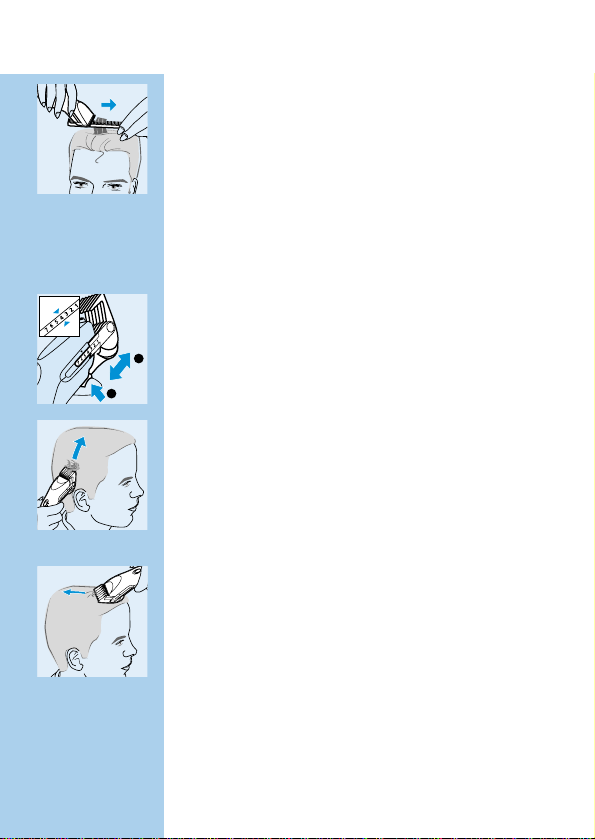
Clipping with comb attachment:
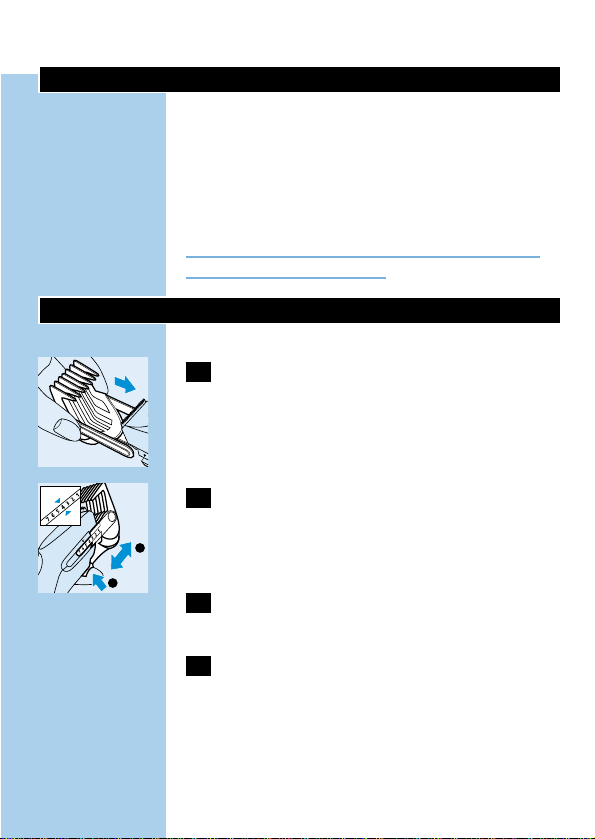
C
1 Slide the arms and the adjustment button
of the comb attachment into the guiding
grooves of the appliance.
C
2 Press the adjustment button on the back
of the appliance and slide the comb
attachment to the desired position (see
table).
3 Release the adjustment button to lock the
comb.
4 Switch the appliance on.
If a lot of hair has accumulated in the comb,
remove the comb attachment and blow and/or
shake the hair out of the comb.
ENGLISH 5
2
1
Page 4
Cutting length settings
comb setting hair length
1 4 mm
2 7 mm
3 10 mm
4 13 mm
5 15 mm
6 18 mm
7 21 mm
Clipping without comb attachment
C
1 To remove the comb attachment,press the
adjustment button on the back of the
appliance and slide the comb attachment
to its final position.
C
2 Pull the comb attachment off the appliance
with your other hand.
Clean and recharge the appliance every time you
have used it.
Clipping techniques
Always comb the hair in the direction of growth
before clipping.
ENGLISH6
2
1
Page 5
Clipping with comb attachment
The comb attachment can be used to obtain hair
lengths up to 21 mm.
◗ Start at the setting for maximum hair length
(i.e.position 7) to familiarise yourself with the
clipper.
Always move against the direction of hair growth.
C
◗ Hold the clipper so that the flat side of the
comb attachment is parallel to the head.Move
it slowly through the hair and then away from
the head,cutting only a small amount at a
time.
◗ Change the length setting (see table) to obtain
different lengths on different parts of the
head.
Cutting over styling comb or fingers
This technique can be used to obtain hair lengths
over 21 mm.
◗ Remove the comb attachment.
C
◗ Lift a small section of hair with a styling comb
or grasp it between two fingers.
C
◗ Lift the hair with the comb or fingers hair so
that only the length that needs to be cut
sticks out.
◗ Trim the hair protruding from the comb or
fingers.
◗ Continue this procedure working against the
growth direction of the hair.
ENGLISH 7
Page 6
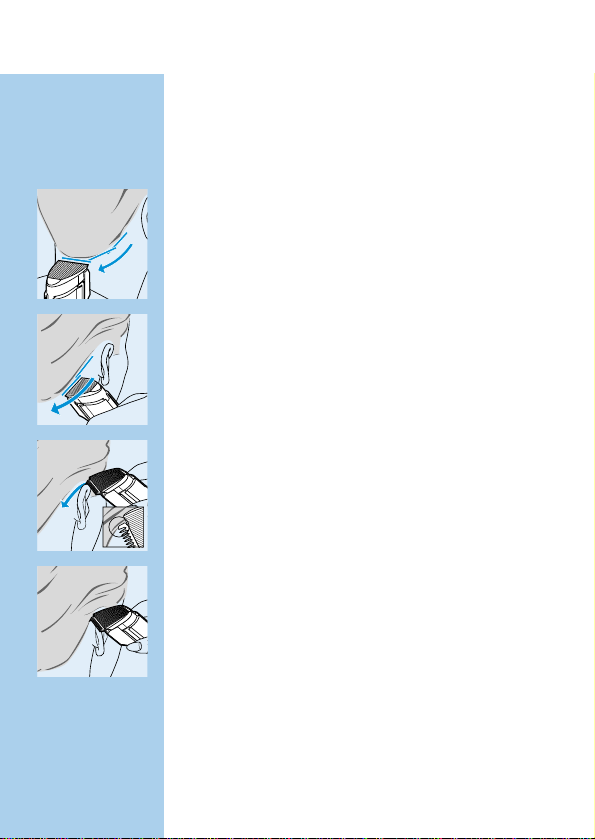
◗ Comb frequently to remove cut hair and
check for unevenly cut sections.
Outlining
◗ Remove the comb attachment.
C
◗ Hold the clipper with the cutter pointing
downwards.
C
◗ Make overlapping strokes for clear outlining of
the neck and sideburns.
C
◗ For cutting the hair around the ears,put one
edge of the cutter on the skin.Make sure the
teeth are kept at a safe distance from the
ears.
C
◗ Shape the desired outline slowly and carefully.
ENGLISH8
Page 7

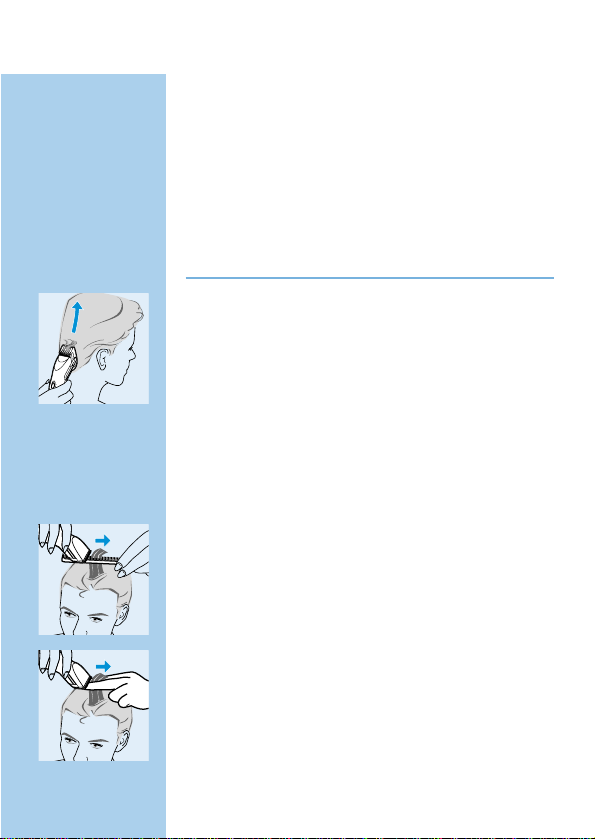
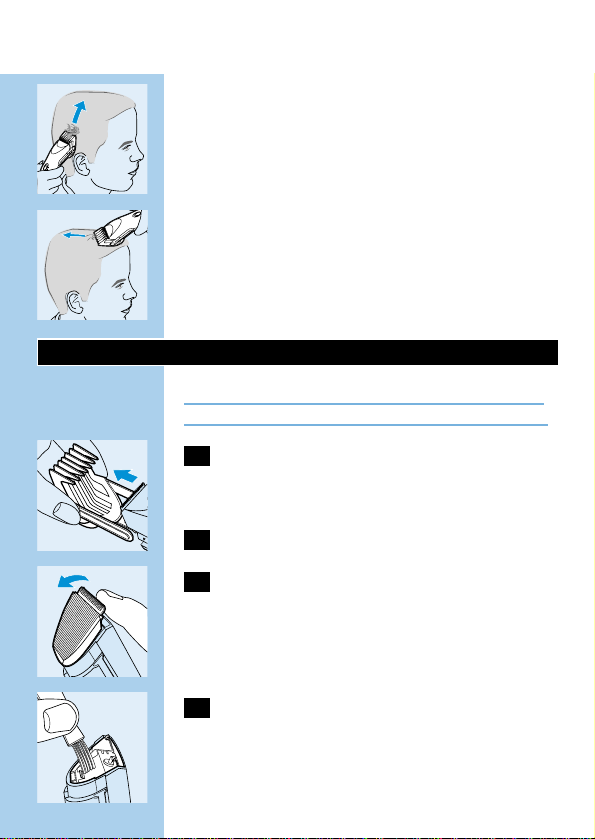
Creating different haircuts
Crew cut
C
◗ Select the desired hair length for the neck
area.
C
◗ Clip the neck area using the "Clipping with
comb attachment" technique.
◗ Adjust the length setting to the desired hair
length for the back and sides of the head.
C
◗ Clip the sides and back of the head leaving the
hair on top of the head uncut.
C
◗ For a flat top look,cut the hair on top of the
head using the "Cutting over styling comb or
fingers" technique.
◗ Finish the haircut by outlining the neckline,
sideburns and the area around the ears using
the "Outlining" technique.
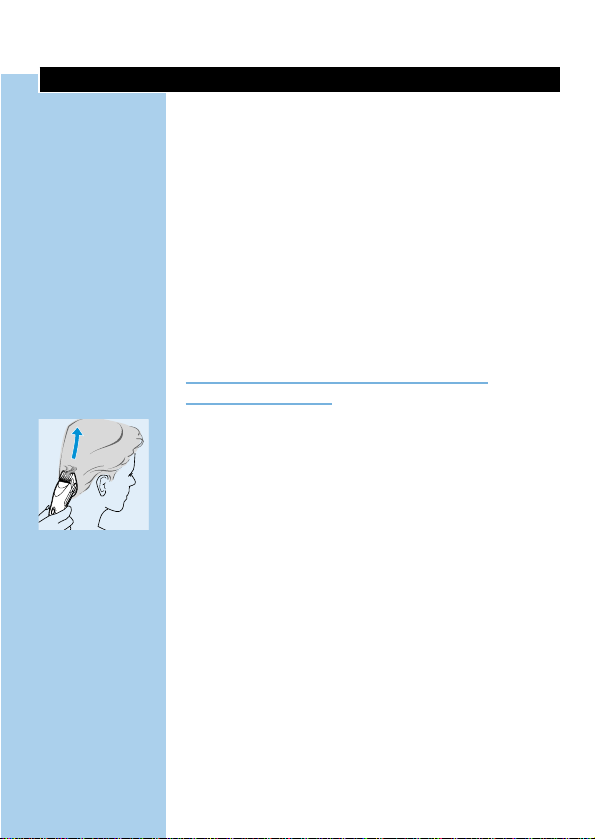
Short cut
C
◗ Select the desired hair length for the back and
the sides of the head.
ENGLISH 9
2
1
2
1
Page 8
C
◗ Clip the back and the sides of the head using
the "Clipping with comb attachment"
technique.
◗ Leave the hair on top of the head uncut.
◗ Select the desired hair length for the top of
the head.
C
◗ Clip the top of the head using the "Clipping
with comb attachment" technique.
◗ Finish the haircut by outlining the neck,
sideburns and area around the ears.
Cleaning
Do not use abrasives,scourers or liquids such as
alcohol,petrol or acetone to clean the appliance.
1 Make sure the appliance is switched off
and disconnected from the mains before
you start cleaning it.
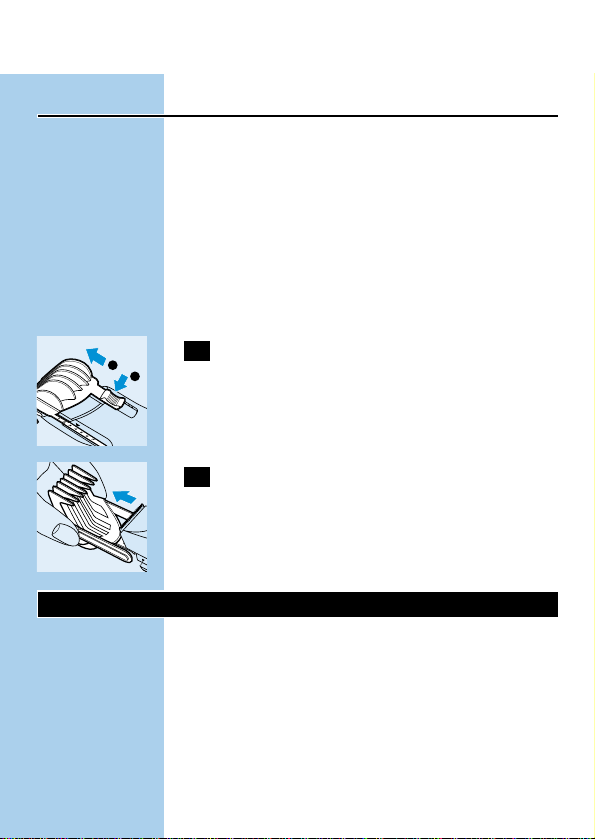
C
2 Remove the comb attachment.
C
3 Remove the cutting unit.
C
4 Clean the cutting unit and the inside of the
appliance with the brush supplied.
ENGLISH10
Page 9

C
5 To reassemble the clipper,insert the hook
of the cutting unit into the housing.
6 Push it back until you hear a click.
Replacement
A worn or damaged cutting unit should only be
replaced with an original Philips cutting unit.
Environment
The built-in rechargeable battery contains
substances which may pollute the environment.
Remove the rechargeable battery when you
discard the appliance.
Do not throw the battery away with the normal
household waste but dispose of it at an official
collection point.
You can also take the appliance to a Philips
Service Centre, where staff will be happy to help
you remove the battery and dispose of it in an
environmentally safe way.
1 Disconnect the appliance from the mains
and let the appliance run until the motor
stops.
C
2 Remove the cutting unit.
ENGLISH 11
2
1
Page 10

C
3 Remove the metal clip by means of a
screwdriver.
C
4 Open the housing.
C
5 Pull the battery holder out of the
appliance.
C
6 Insert a screwdriver into the small slot in
the printed circuit board marked with an
arrow. Push the screwdriver down until
part of the printed circuit board breaks
off.
C
7 Separate the battery from the plastic part
by means of a screwdriver.
8 Dispose of the battery and the other
components in an environmentally safe
way.
Do not connect the appliance to the mains again
after it has been opened!
ENGLISH12
Page 11

For telephone numbers of the Philips Helpdesk,
see the worldwide guarantee leaflet.
ENGLISH 13
Page 12
Wichtig
◗ Prüfen Sie,bevor Sie das Gerät in Betrieb
nehmen,ob die Spannungsangabe auf dem
Steckernetzgerät mit der örtlichen
Netzspannung übereinstimmt,
◗ Achten Sie darauf,daß das Gerät nicht naß
wird.
◗ Laden und lagern Sie das Gerät bei
Temperaturen zwischen 15 °C und 35 °C.
Den Akku aufladen
Laden Sie den Akku voll auf,bevor Sie das Gerät
zum ersten Mal benutzen.
Achten Sie darauf, daß das Gerät während des
Aufladens ausgeschaltet ist.
C
1 Stecken Sie den Gerätestecker in das
Gerät.
2 Stecken Sie dann das Steckernetzgerät in
die Steckdose.
B
Die Kontrollampe leuchtet auf und zeigt an,daß
der Akku geladen wird.
Nach ca.12 Stunden ist der Akku voll aufgeladen.
Lassen Sie das Gerät nicht länger als 24 Stunden
am Netz.
Mit voll aufgeladenem Akku können Sie das Gerät
ca.35 Minuten kabelfrei benutzen.
DEUTSCH14
Page 13

Das Gerät am Netz betreiben
◗ So schneiden Sie das Haar mit dem Kabel am
Netz:
Schalten Sie das Gerät aus,verbinden Sie es durch
das Kabel mit dem Netz.Warten Sie einige
Sekunden,bevor Sie das Gerät einschalten. Sollte
der Akku leer sein,so müssen Sie einige Minuten
warten,bevor Sie das Gerät einschalten.
Betreiben Sie das Gerät nicht am Netz,wenn der
Akku voll aufgeladen ist.
Vor dem Gebrauch
Haare mit dem Kamm-Aufsatz
schneiden
C
1 Schieben Sie die Seitenteile und die
Schnittlängenarretierung des KammAufsatzes in die Führungsschlitze des
Geräts.
C
2 Drücken Sie die Schnittlängenarretierung
an der Rückseite des Geräts,und schieben
Sie den Kamm-Aufsatz auf die gewünschte
Position.-Vgl. die T abelle.
3 Lassen Sie die Schnittlängenarretierung los,
um die Einstellung zu fixieren.
4 Schalten Sie das Gerät ein.
DEUTSCH 15
2
1
Page 14

Hat sich viel Haar in dem Kamm angesammelt,so
nehmen Sie den Kamm-Aufsatz ab,und blasen
oder schütteln Sie ihn leer.
Schnittlängen-Einstellung
Position Schnittlänge
1 4 mm
2 7 mm
3 10 mm
4 13 mm
5 15 mm
6 18 mm
7 21 mm
Haare ohne den Kamm-Aufsatz
schneiden
C
1 Drücken Sie die Schnittlängenarretierung
an der Rückseite des Geräts,und schieben
Sie den Kamm-Aufsatz auf die
letztmögliche Position heraus.
C
2 Halten Sie die Schnittlängenarretierung
gedrückt,und ziehen Sie den KammAufsatz mit der anderen Hand vom Gerät.
Reinigen Sie das Gerät nach jedem Gebrauch, und
laden Sie den Akku auf.
DEUTSCH16
2
1
Page 15
Die V orgehensweisen
Kämmen Sie vor dem Gebrauch das Haar in
Haarwuchsrichtung.
Haare mit dem Kamm-Aufsatz
schneiden.
Der Kamm-Aufsatz kann für Haarlängen bis zu
21 mm verwendet werden.
◗ Beginnen Sie zunächst mit der größten
Haarschnittlänge,also mit Position 7,um sich
mit dem Gerät vertraut zu machen.
Führen Sie das Gerät stets nur gegen die
Haarwuchsrichtung.
C
◗ Halten Sie den Haarschneider so,daß die
flache Seite des Kamm-Aufsatzes dem Kopf
zugewandt ist.Führen Sie den Kamm-Aufsatz
langsam durch das Haar,und heben Sie das
Gerät dann vom Kopf ab.Erfassen Sie immer
nur wenig Haar auf einmal.
◗ Wechseln Sie die Schnittlängen, um in
verschiedenen Bereichen des Kopfes
unterschiedliche Schnittlängen zu erzielen.Vgl.die T abelle.
Haare über einen Frisierkamm oder
die Finger schneiden
Dieses Vorgehen ist bei Schnittlängen über
21 mm angebracht.
◗ Nehmen Sie den Kamm-Aufsatz vom Gerät.
DEUTSCH 17
Page 16

C
◗ Fassen Sie eine Strähne Haar mit dem
Frisierkamm oder zwischen zwei Fingern.
C
◗ Heben Sie den Kamm oder die Finger so weit
an,daß nur die Enden hervorschauen,die
abgeschnitten werden sollen.
◗ Schneiden Sie diese Enden mit dem Gerät ab.
◗ Fahren Sie auf diese Weise gegen die
Haarwuchsrichtung fort.
◗ Kämmen Sie das Haar immer wieder durch,
um die angeschnittenen Enden auszukämmen
und ungleich geschnittene Haarparttien zu
erkennen.
Konturen schneiden
◗ Nehmen Sie den Kamm-Aufsatz vom Gerät.
C
◗ Halten Sie den Haarschneider dabei so,daß
die Schneiden abwärts zeigen.
C
◗ Arbeiten Sie sich in überlappenden Zügen
voran,um den Partien an Hals und Koteletten
eine saubere Kontur zu geben.
DEUTSCH18
Page 17
C
◗ Rund um die Ohren setzen Sie die Schneiden
mit einer Kante auf die Haut.Achten Sie
darauf,daß Sie sicheren Abstand zu den
Ohren halten.
C
◗ Formen Sie die Konturen langsam und
sorgfältig.
Verschiedene Haarschnitte
Bürstenschnitt
C
◗ Stellen Sie die gewünschte Schnittlänge ein.
C
◗ Schneiden Sie die Partie am Hals wie im
Abschnitt "Haare mit dem Kamm-Aufsatz
schneiden" beschrieben.
◗ Stellen Sie die Schnittlängen für die Seiten und
den Nacken ein.
C
◗ Schneiden Sie die Seiten und den Nacken,
nicht aber das Haar oben auf dem Kopf.
DEUTSCH 19
2
1
Page 18
C
◗ Das Haar auf dem Kopf wird so wie im
Abschnitt "Haare über einen Frisierkamm
oder über die Finger schneiden" beschrieben,
so daß gleich lange Haarspitzen eine ebene
Fläche bilden.
◗ Schließen Sie die Arbeit ab, indem Sie den
Hals,den Nacken und die Partie um die
Ohren konturieren.
Kurzschnitt
C
◗ Wählen Sie eine Schnittlänge für den
Hinterkopf und die Seiten.
C
◗ Schneiden Sie Hinterkopf und Seiten wie im
Abschnitt "Haare mit dem Kamm-Aufsatz
schneiden" beschrieben.
◗ Lassen Sie das Haar oben auf dem Kopf noch
unberührt.
◗ Wählen Sie dann eine Schnittlänge für das
Haar auf dem Kopf,...
C
◗ und schneiden Sie das Haar auf dem Kopf wie
im Abschnitt "Haare mit dem Kamm-Aufsatz
schneiden" beschrieben.
◗ Schließen Sie die Arbeit ab, indem Sie den
Hals,den Nacken und die Partie um die
Ohren konturieren.
DEUTSCH20
2
1
Page 19

Reinigung
Verwenden Sie zum Reinigen keine Scheuermittel
und keine Lösungsmittel wie Alkohol,Benzin und
Azeton.
1 Achten Sie darauf,daß das Gerät
ausgeschaltet und nicht am Netz
angeschlossen ist
C
2 Nehmen Sie den Kamm-Aufsatz vom
Gerät.
C
3 Nehmen Sie die Schneideeinheit vom
Gerät.
C
4 Reinigen Sie die Schneideeinheit und die
Innenwand des Gehäuses mit der
beiliegenden Bürste.
C
5 Stecken Sie die Fahnen der
Schneideeinheit in das Gerät zurück.
6 Drücken Sie auf die Schneideeinheit,bis Sie
hörbar einrastet.
Ersatz der Schneideeinheit
Eine verbrauchte oder beschädigte
Schneideeinheit darf nur durch eine original
Philips Schneideeinheit ersetzt werden.
DEUTSCH 21
2
1
Page 20

Umweltschutz
Der eingebaute Akku enthält Substanzen,welche
die Umwelt gefährden können.Batterien und
Akkus gehören nicht in den normalen Hausmüll.
Entfernen Sie die wiederaufladbaren Batterien
wenn Sie das Gerät wegwerfen.
Sie sind als Verbraucher gesetzlich dazu
verpflichtet,gebrauchte Batterien und Akkus der
Wiederverwertung zuzuführen. Geben Sie sie bei
einer der öffentlichen Sammelstellen Ihrer
Gemeinde oder an einer Verkaufsstelle für
entsprechende Geräte bzw.für Batterien und
Akkus ab.
Sie können das Gerät auch dem Philips Service
Center zuführen,Wir kümmern uns dann gern
um eine ordnungsgemäße Entsorgung.
Falls Sie den Akku selbst entnehmen wollen,so
gehen Sie bitte wie folgt vor:
1 Ziehen Sie den Stecker aus der Steckdose,
und lassen Sie den Motor so lange laufen,
bis er anhält.
C
2 Nehmen Sie die Schneideeinheit vom
Gerät.
C
3 Entfernen Sie die Metallzunge mit einem
Schraubendreher.
DEUTSCH22
Page 21

C
4 Öffnen Sie das Gehäuse.
C
5 Ziehen Sie den Akkuhalter aus dem Gerät.
C
6 Stecken Sie einen Schraubendreher in den
kleinen Spalt in der Platine,der mit einem
Pfeil gekennzeichnet ist.Drücken Sie den
Schaubendreher weiter ein,bis ein Teil der
Platine abbricht.
C
7 Trennen Sie mit dem Schraubendreher den
Akku von dem Kunststoffteil.
8 Entsorgen Sie den Akku in der oben
geschilderten,gesetzlich vorgeschriebenen
Weise.
Wenn der Akku entfernt worden ist, darf das
Gerät nicht mehr am Netz betrieben werden!
Die Telefonnummern des Philips Service Centres
entnehmen Sie bitte der beiliegenden
Garantieschrift.
DEUTSCH 23
Page 22

Viktig
◗ Før apparatet kobles til strømnettet,
kontroller at spenningen på transformatoren
stemmer overens med nettspenningen i Deres
hjem.
◗ Sørg for at apparatet ikke blir vått.
◗ Lad og oppbevar maskinen i temperaturer
mellom 15c og 35cC.
Lading
Lad apparatet helt opp før De bruker det for
første gang.
Sørg for at maskinen er slått av før De starter
oppladningen.
C
1 Koble apparatets ledning til apparatet.
2 Koble ledningen i stikkontakten.
B
Lampen på maskinen vil tennes for å indikere at
maskinen lades.
Det vil ta omtrent 12 timer å fullade batteriet.
Ikke la maskinen lades i mer enn 24 timer.
Et fulladet apparat har en ledningsløs klippetid på
opptil 35 minutter.
Klipping med ledning
◗ For å klippe med hårklipperen koblet til
strømnettet:
Slå av hårklipperen, koble den til strømnettet og
vent et par sekunder før De slår på maskinen.
NORSK24
Page 23

Ikke bruk maskinen over strømnettet når batteriet
er fulladet.
Forberedelser før klipping
Klipping med frisørkam:
C
1 Skyv tappene og justeringsknappen på
kammen inn i sporene på apparatet.
C
2 Press og hold inne justeringsknappen på
baksiden av apparatet og skyv kammen til
den ønskede posisjon (se tabell).
3 Slipp justeringsknappen for å låse kammen.
4 Slå på maskinen.
Hvis det har samlet seg mye hår i kammen,fjern
kammen og blås og/eller rist håret av kammen.
Innstillinger for kuttelengder
innstilling hårlengde
1 4 mm
2 7 mm
3 10 mm
4 13 mm
5 15 mm
6 18 mm
7 21 mm
NORSK 25
2
1
Page 24

Klipping uten frisørkam
C
1 For å fjerne kammen,press og hold inne
justeringsknappen på baksiden av
apparatet,og skyv kammen til dens siste
posisjon.
C
2 Trekk kammen av apparatet med den
andre hånden Deres.
Rengjør og lad opp maskinen hver gang De har
brukt den.
Klippeteknikker
Kjem alltid håret med vekstretningen før klipping.
Klipping med frisørkam
Kammen kan brukes for å få hårlengder opptil
21 mm.
◗ Start med å stille inn maskinen på maksimum
hårlengde (f.eks posisjon 7) for å gjøre Dem
kjent med hårklipperen.
Beveg alltid maskinen mot hårets vekstretning.
C
◗ Hold klipperen slik at den flate siden av
kammen er i parallell med hodet.Beveg den
sakte gjennom håret og deretter vekk fra
hodet,slik at De kutter bare en liten mengde
av gangen.
NORSK26
2
1
Page 25

◗ Skift lengdeinnstillingen (se tabell) for å få
forskjellige lengder på ulike deler av hodet.
Klipping over kam eller fingrene
Denne teknikken kan brukes for å klippe håret til
en lengde som er mer enn 21 mm.
◗ Fjern kammen fra maskinen.
C
◗ Løft opp en liten del av håret med en
frisørkam eller ta håret mellom to fingre.
C
◗ Løft håret med en kam eller fingrene slik at
bare den lengden De ønsker å klippe av,
stikker ut.
◗ Klipp håret som stikker frem mellom kammen
eller fingrene.
◗ Fortsett denne prosedyren ved å jobbe Dem
mot hårets vekstretning.
◗ Kjem håret jevnlig for å fjerne løst hår og for
å se etter områder som er ujevnt klippet.
Kantklipping
◗ Fjern kammen fra maskinen.
C
◗ Hold klipperen med kutteren pekende
nedover.
C
◗ Kutt med overlappende strykninger for
kutting av kanter i nakken og kinnskjegget.
NORSK 27
Page 26

C
◗ For å kutte håret ved ørene,sett kanten av
klipperen mot huden.Sørg for at tennene på
hårklipperen holdes i trygg avstand fra øret.
C
◗ Form den ønskede linjen rolig og varsomt.
Å lage ulike hårklipper
"Crew cut"
C
◗ Velg den ønskede hårlengden for
nakkeområdet.
C
◗ Klipp nakkeområdet ved å bruke "klipping
med frisørkam"-teknikken.
◗ Juster lengdeinnstillingen til den ønskede
hårlengden for håret i nakken og sidene av
hodet.
C
◗ Klipp sidene og håret i nakken,og la håret på
toppen av hodet være uklippet.
NORSK28
2
1
Page 27

C
◗ For å få et flatt utseende på toppen,kutt håret
på toppen av hodet ved å bruke "kutting over
kam eller fingrene"-teknikken.
◗ Avslutt hårklippen med kantklipping av
nakken,kinnskjegget og området ved ørene,
ved å bruke "kantklipp"-teknikken.
Kort klipp
C
◗ Velg ønsket hårlengde for håret i nakken og på
sidene.
C
◗ Klipp håret i nakken og på sidene av hodet
ved å bruke "klipping med frisørkamteknikken".
◗ La håret på toppen av hodet forbli uklippet.
◗ Velg den ønskede hårlengden for toppen av
hodet.
C
◗ Klipp håret på toppen av hodet ved å bruke
"klipping med frisørkam"-teknikken.
◗ Avslutt hårklippen med å kantklippe hårene i
nakken,kinnskjegget og området ved ørene.
Rengjøring
Bruk ikke slipemidler,avfettingsmidler eller væsker
som alkohol,bensin eller aceton for å rengjøre
maskinen.
NORSK 29
2
1
Page 28

1 Forsikre Dem om at maskinen er slått av
og koblet fra stikkontakten før De
begynner å rengjøre den.
C
2 Fjern kammen fra maskinen.
C
3 Fjern kutteenheten.
C
4 Rengjør kutteenheten og innsiden av
maskinen med den medfølgende børsten.
C
5 For å sette sammen maskinen igjen,sett
kutteenheten inn i kabinettet.
6 Press den bakover til De hører et klikk.
Utskifting av deler
En slitt eller skadet kutteenhet må kun byttes med
en original Philips kutteenhet.
Miljø
Det innebygde oppladbare batteriet inneholder
substanser som kan forurense miljøet.
NORSK30
2
1
Page 29

Fjern det oppladbare batteriet når De kvitter
Dem med produktet.
Ikke kast batteriet sammen med det vanlige
husholdningsavfallet,men på et offentlig anvist
innsamlingssted.
De kan også ta med apparatet til et Philips
servicesenter,hvor de ansatte gladelig vil hjelpe
Dem med å fjerne batteriet og kaste det på en
miljømessig sikker måte.
1 Koble apparatet fra stikkontakten og la det
gå til motoren stopper.
C
2 Fjern kutteenheten.
C
3 Fjern metallklemmen ved hjelp av en
skrutrekker.
C
4 Åpne kabinettet.
C
5 Trekk batteriholderen ut av apparatet.
NORSK 31
Page 30

C
6 Plasser en skrutrekker inn i det lille sporet
merket med en pil på kretskortet.Press
skrutrekkeren ned inntil en del av
kretskortet brekkes av.
C
7 Separer batteriet fra plastikkdelen ved å
bruke en skrutrekker.
8 Kvitt Dem med batteriet og andre
komponenter på en miljømessig sikker
måte.
Ikke koble til apparatet til stikkontakten igjen etter
at det har blitt åpnet!
For telefonnummer til Philips Helpdesk,se
verdensgarantiheftet.
NORSK32
Page 31

Viktigt
◗ Innan du ansluter apparaten,kontrollera att
den spänning som anges på stickproppen
överensstämmer med den aktuella
nätspänningen i ditt hem.
◗ Se till att apparaten inte blir våt.
◗ Ladda och förvara apparaten vid en
temperatur mellan 15c och 35c.
Laddning
Före första användningen ska batteriet laddas helt.
Se till att apparaten är avstängd när den laddas.
C
1 Sätt anslutningskontakten i apparaten.
2 Anslut stickproppen till vägguttaget.
B
Signallampan tänds och indikerar att apparaten
laddas.
Det tar ungefär 12 timmar att ladda upp batteriet.
Ladda inte apparaten längre än 24 timmar.
Med en fulladdad apparat kan du klippa sladdlöst i
ca 35 minuter.
Klippning med nätsladd
◗ Att klippa med hårklipparen ansluten till
elnätet.
Stäng av hårklipparen, anslut den till vägguttaget
och vänta några sekunder innan du startar den.
Om batteriet är helt tomt, vänta några minuter
innan du startar apparaten.
SVENSKA 33
Page 32

Använd inte apparaten ansluten till elnätet om
batteriet är fulladdat.
Förberedelser före klippning.
Klippning med kamtillsats.
C
1 Skjut in stöden och inställningsknappen för
kamtillsatsen i apparatens ledskåror.
C
2 Tryck på inställningsknappen baktill på
apparaten och skjut in kamtillsatsen i
önskat läge (se översikt).
3 Släpp upp inställningsknappen för att låsa
kammen.
4 Starta apparaten.
Om det har samlat sig mycket hår i kammen,tar
du av kamtillsatsen och blåser den ren och/eller
skakar ut håret ur kammen.
Inställningar för klippningslängder
kaminställning hårlängd
1 4 mm
2 7 mm
3 10 mm
4 13 mm
5 15 mm
6 18 mm
7 21 mm
SVENSKA34
2
1
Page 33

Klippning utan kamtillsats
C
1 För att dra av kamtillsatsen från apparaten,
trycker du in inställningsknappen baktill på
apparaten och skjuter kamtillsatsen till sitt
viloläge.
C
2 Drag av kamtillsatsen från apparaten med
den fria handen medan du håller knappen
intryckt.
Rengör och ladda apparaten efter varje
användning.
Klippningstekniker
Kamma alltid håret före klippningen i den riktning
som det växer.
Klippning med kamtillsats
Kamtillsatsen kan användas för hårlängder upp till
21 mm.
◗ Börja med maximuminställning för hårlängd
(t.ex.läge 7) för att vänja dig vid hårklipparen.
För alltid hårklipparen i riktning mot hårväxten.
C
◗ Håll hårklipparen så att den flata sidan på
kamtillsatsen är parallell med huvudet.För
den långsamt genom håret och sen bort från
huvudet så att du bara klipper en liten del åt
gången.
SVENSKA 35
2
1
Page 34

◗ Ändra längdinställning (se översikt) för att få
olika hårlängder på olika delar av håret.
Klippning med läggningskam eller
fingrarna
Den här tekniken kan användas för att få
hårlängder över 21 mm.
◗ Tag av kamtillsatsen.
C
◗ Lyft upp en liten del av håret med
läggningskammen eller grip den mellan två
fingrar.
C
◗ Lyft upp håret med kammen eller fingrarna så
att bara den längd som behöver klippas av
sticker ut.
◗ Klipp det hår som sticker ut från kammen
eller mellan fingrarna.
◗ Fortsätt på samma sätt med klippning mot
hårets tillväxt.
◗ Kamma regelbundet för att få bort avklippt
hår och kontroll av ojämnt klippta delar.
Hårlinjer
◗ Tag av kamtillsatsen.
C
◗ Håll hårklipparen med saxen riktad nedåt.
C
◗ Gör överlappande strykningar för tydliga
hårlinjer i nacke och vid tinningarna.
SVENSKA36
Page 35

C
◗ För att klippa av håret runt öronen sätter du
trimsaxens egg mot huden.Se till att saxens
tänder hålls på säkert avstånd från öronen.
C
◗ Klipp önskad hårlinje långsamt och noggrant.
Olika hårfrisyrer
Snaggning
C
◗ Välj önskad hårlängd för nacken.
C
◗ Klipp i nacken med tekniken "Klippning med
kamtillsats".
◗ Ställ in längdinställningen på önskad hårlängd
för nacke och sidor av huvudet.
C
◗ Klipp sidorna och nacke av huvudet men
lämna hjässan oklippt.
SVENSKA 37
2
1
Page 36

C
◗ För att få en rak klippning på hjässan,klipper
du håret med tekniken "Klippning med
läggningskam eller fingrarna".
◗ Avsluta klippningen med hårlinjerna i nacke,
vid tinningen och runt öronen.
Kort hår
C
◗ Välj önskad hårlängd för nacke och
sidor/tinningar.
C
◗ Klipp nacke och sidorna av huvudet med
tekniken "Klippning med kamtillsats".
◗ Lämna håret på hjässan oklippt.
◗ Välj önskad hårlängd för håret på hjässan.
C
◗ Klipp håret på hjässan med tekniken
"Klippning med kamtillsats".
◗ Avsluta klippningen med hårlinjen i nacken,vid
tinningen och runt öronen med tekniken
"Hårlinjer".
SVENSKA38
2
1
Page 37

Rengöring
Använd inte slipmedel,skurmedel eller vätskor
som sprit, bensin eller aceton för att rengöra
apparaten.
1 Se till att apparaten är avstängd och inte
ansluten till elnätet innan du påbörjar
rengöringen.
C
2 Tag av kamtillsatsen.
C
3 Tag av trimsaxen.
C
4 Rengör trimsaxen och apparatens insida
med den medlevererade borsten.
C
5 För att sätta ihop hårklipparen,sticker du
trimsaxens hake i höljet.
6 Skjut den bakåt tills det klickar.
Byte
En sliten eller skadad trimsax skall endast bytas
mot en original Philips reservtrimsax.
SVENSKA 39
2
1
Page 38

Miljön
Det inbyggda uppladdbara batteriet innehåller
ämnen som kan förorena miljön.
Den dag du kasserar apparaten skall du ta ut
batteriet.
Deponera batteriet enligt gällande lokala
föreskrifter.Batteriet får inte ingå i eller förvaras
med hushållsavfall.
Du kan också vända dig till Philips serviceombud
där personalen gärna hjälper till att avlägsna
batteriet samt avyttrar detta på ett för miljön
säkert sätt.
1 Koppla apparaten från elnätet och låt den
gå tills motorn stannar.
C
2 Tag bort trimsaxen.
C
3 Avlägsna metallklämman med hjälp av en
skruvmejsel.
C
4 Öppna höljet.
SVENSKA40
Page 39

C
5 Drag ut batterihållaren ur apparaten.
C
6 Stick in en skruvmejsel i den lilla skåran i
kretskortet som markerats med en pil.
Tryck skruvmejseln nedåt tills en del av
kretskortet bryts av.
C
7 Skilj batteriet från plastdelen med en
skruvmejsel.
8 Deponera batteriet och andra
komponenter på ett för miljön säkert sätt.
Anslut inte apparaten till elnätet igen efter det att
den har varit öppen.
Rätt telefonnummer till Philips kundtjänst finner
du i världsgarantibroschyren.
SVENSKA 41
Page 40

Tärkeää
◗ Ennen kuin yhdistät laitteen pistorasiaan,
tarkasta että laitteen jännitemerkintä vastaa
paikallista verkkojännitettä.
◗ Varo kastamasta laitetta.
◗ Jos laite on pudonnut veteen,irrota ensin
pistotulppa pistorasiasta,ennen kuin nostat
laitteen vedestä.
◗ Tarkastuta veteen pudonnut laite huollossa
ennen käyttöönottoa.
◗ Lataa ja säilytä laite 15cC - 35cC:n
lämpötilassa.
◗ Tarkasta laitteen liitosjohdon kunto
säännöllisesti.
◗ Varo taivuttamasta liitosjohtoa tiukalle
mutkalle.Pidä huoli,etteivät terävät kulmat,
kuumuus tai kemikaalit pääse vahingoittamaan
liitosjohtoa.
◗ Säilytä laite poissa lasten ulottuvilta.
◗ Älä anna lasten käyttää laitetta.
◗ Varo laitteen terää ja puristuskohtia, jotka
voivat aiheuttaa vammoja ja joihin esim.
hiukset tai vaatteet voivat tarttua.
Lataus
Lataa laite täyteen ennen ensimmäistä
käyttökertaa.
Varmista että laitteen toiminta on katkaistu
ladattaessa.
C
1 Työnnä pistoke laitteeseen.
SUOMI42
Page 41

2 Työnnä pistotulppa pistorasiaan.
B
Merkkivalo syttyy osoitukseksi laitteen
lataamisesta.
Akun lataaminen täyteen kestää noin 12 tuntia.
Älä lataa laitetta yli 24 tuntia.
Täyteen ladatulla laitteella voi leikata hiuksia
enimmillään 35 minuuttia ilman johtoa.
Hiusten leikkaaminen
verkkojännitettä käyttäen
◗ Hiusten leikkaaminen pistorasiaan yhdistetyllä
laitteella:
Katkaise laitteen toiminta,yhdistä pistotulppa
pistorasiaan ja odota muutama sekunti,ennen kuin
käynnistät laitteen uudelleen.Jos akku on aivan
tyhjä,odota muutama minuutti ennen kuin
käynnistät laitteen.
Älä käytä laitetta verkkojännitteellä silloin kun akku
on ladattu täyteen.
Valmistautuminen hiusten
leikkuuseen
Leikkaaminen ohjauskamman kanssa:
C
1 Työnnä ohjauskamman varret ja
säätöpainike laitteen ohjausuriin.
SUOMI 43
Page 42

C
2 Paina laitteen takana olevaa säätöpainiketta
ja työnnä ohjauskampa sopivaan asentoon
(katso taulukko).
3 Vapauta säätöpainike,niin ohjauskampa
lukkiutuu paikalleen.
4 Käynnistä laite.
Jos ohjauskampaan on kertynyt paljon hiuksia,
irrota ohjauskampa ja puhalla ja/tai ravista hiukset
pois.
Leikkuupituudet
ohjauskampa hiusten pituus
1 4 mm
2 7 mm
3 10 mm
4 13 mm
5 15 mm
6 18 mm
7 21 mm
Leikkaaminen ilman ohjauskampaa
C
1 Ohjauskampa irrotetaan painamalla laitteen
takana olevaa säätöpainiketta samalla kun
ohjauskampa vedetään viimeiseen
asentoon.
SUOMI44
2
1
2
1
Page 43

C
2 Vedä ohjauskampa irti laitteesta toisella
kädellä.
Puhdista ja lataa laite aina käytön jälkeen.
Leikkuumenetelmät
Kampaa hiukset aina kasvusuuntaan ennen
leikkaamista.
Leikkaaminen ohjauskamman kanssa
Ohjauskampaa käytettäessä hiusten pituudeksi
tulee enimmillään 21 mm.
◗ Totuttele laitteeseen valitsemalla aluksi suurin
hiusten pituus (eli asento 7).
Liikuta laitetta aina hiusten kasvusuuntaa vastaan.
C
◗ Pidä laitetta kädessä siten että ohjauskamman
litteä puoli on koko ajan pään suuntaisesti.
Liikuta sitä hitaasti hiusten läpi ja sitten
poispäin päästä,niin että leikkaat kerralla vain
vähän hiuksia.
◗ Muuttamalla pituusasetusta (katso taulukko)
saat eripituiset hiukset eri puolille päätä.
Leikkaaminen ohjauskamman tai
sormien päältä
Tämä menetelmä sopii silloin kun hiusten
pituudeksi halutaan yli 21 mm.
◗ Irrota ohjauskampa.
SUOMI 45
Page 44

C
◗ Nosta hiustupsu kammalla ylös tai ota se
kahden sormen väliin.
C
◗ Nosta kampaa tai sormia ylöspäin,kunnes
hiuksista on näkyvissä vain poisleikattava osa.
◗ Leikkaa hiukset kamman tai sormien päältä.
◗ Jatka samalla tavalla edeten hiusten
kasvusuuntaa vastaan.
◗ Kampaa aina välillä irtohiukset pois ja
tarkastele,näkyykö epätasaisia kohtia.
Rajaus
◗ Irrota ohjauskampa.
C
◗ Pidä laitetta kädessä terä käännettynä alaspäin.
C
◗ Tee vedot hieman toistensa päälle,niin niskan
ja poskiparran rajoista tulee siistit.
C
◗ Kun leikkaat hiukset korvien ympäriltä,aseta
terän toinen reuna ihoon kiinni. Pidä terä
riittävän kaukana korvista.
SUOMI46
Page 45

C
◗ Muotoile raja hitaasti ja huolellisesti.
Erilaisten hiustyylien kehittäminen
Pystytukka
C
◗ Valitse niskan alueen hiusten pituus.
C
◗ Leikkaa niskan alue käyttäen "Leikkaaminen
ohjauskamman kanssa"-menetelmää.
◗ Säädä pituusasetus sopivaksi pään takaosaa ja
sivuja varten.
C
◗ Leikkaa pään sivut ja takaosa mutta jätä
leikkaamatta pään päältä.
C
◗ Saat pystytukan päältä tasaiseksi käyttämällä
"Leikkaaminen ohjauskamman tai sormien
päältä"-menetelmää.
◗ Viimeistele hiustenleikkuu siistimällä niskan,
poskiparran ja korvien ympäristön hiusrajat.
SUOMI 47
2
1
Page 46

Lyhyt tukka
C
◗ Valitse pään takaosan ja sivujen hiusten pituus.
C
◗ Leikkaa pään takaosa ja sivut käyttäen
"Leikkaaminen ohjauskamman kanssa"menetelmää.
◗ Jätä päälaen hiukset leikkaamatta.
◗ Valitse päälaen hiusten pituus.
C
◗ Leikkaa päälaen hiukset käyttäen
"Leikkaaminen ohjauskamman kanssa"menetelmää.
◗ Viimeistele hiustenleikkuu siistimällä niskan,
poskiparran ja korvien ympäristön hiusrajat
käyttäen "Rajaus"-menetelmää.
Puhdistus
Älä käytä laitteen puhdistamiseen syövyttäviä
naarmuttavia tai alkoholia,bensiiniä,asetonia yms
sisältäviä puhdistusaineita.
1 Varmista että laitteen toiminta on katkaistu
ja irrota pistotulppa pistorasiasta,ennen
kuin aloitat puhdistamisen.
C
2 Irrota ohjauskampa.
SUOMI48
2
1
Page 47

C
3 Irrota terä.
C
4 Puhdista terä ja laitteen sisäpuoli mukana
olevalla harjalla.
C
5 Kokoaminen: työnnä terän koukku
runkoon.
6 Paina terä paikalleen,niin että kuulet
napsahduksen.
Huolto
Kuluneen tai vioittuneen terän tilalle saa vaihtaa
vain alkuperäisen Philips-terän.
Ympäristöasiaa
Sisäänrakennettu akku sisältää ympäristölle
haitallisia aineita.
Poista akku ennen kuin hävität laitteen.
Älä hävitä akkua normaalin talousjätteen mukana,
vaan toimita se asianmukaiseen keräyspisteeseen.
SUOMI 49
2
1
Page 48

Voit myös viedä laitteen Philips Kodinkoneiden
valtuuttamaan huoltoliikkeeseen,jossa akku
voidaan irrottaa ja hävittää ympäristön kannalta
turvallisesti.
1 Irrota laite pistorasiasta ja anna laitteen
käydä,kunnes moottori pysähtyy.
C
2 Irrota terä.
C
3 Irrota metallipidike ruuvitaltalla.
C
4 Avaa kotelo.
C
5 Vedä akunpidin ulos laitteesta.
C
6 Työnnä ruuvitaltta piirilevyssä nuolella
merkittyyn pieneen rakoon.Paina
ruuvitalttaa,kunnes osa piirilevystä
murtuu.
SUOMI50
Page 49

C
7 Irrota akku muoviosasta ruuvitaltalla.
8 Hävitä akku ja muut osat ympäristön
kannalta turvallisesti.
Älä yhdistä laitetta pistorasiaan avaamisen jälkeen!
Philipsin asiakaspalvelun puhelinnumerot löytyvät
takuulehtisestä.
Oikeus muutoksiin varataan.
SUOMI 51
Page 50

Vigtigt
◗ Før der sluttes strøm til apparatet,
kontrolleres det,at spændingsangivelsen på
netstikket svarer til den lokale netspænding.
◗ Apparatet må ikke blive vådt.
◗ Oplad og opbevar apparatet ved
temperaturer mellem 15c og 35c.
Opladning
Før apparatet bruges første gang, skal det være
helt opladet.
Sørg for at hårklipperen er slukket, medens den
oplades.
C
1 Sæt det lille stik på ledningen ind i
hårklipperen.
2 Sæt netstikket i en stikkontakt som
tændes.
B
Kontrollampen tænder,og dette betyder,at
apparatet oplades.
Hårklipperen er fuldt opladet efter ca. 12 timer.
Lad aldrig apparatet oplade i mere end højst 24
timer.
Et fuldt opladet apparat giver mulighed for op til
35 minutters ledningsfri brug af hårklipperen.
DANSK52
Page 51

Klipning med ledning
◗ Klipning med apparatet tilsluttet lysnettet:
Sluk for hårklipperen, slut den til lysnettet og vent
et par sekunder, inden den tændes igen. Er
batteriet helt tomt, ventes et par minutter,inden
hårklipperen tændes.
Lad ikke hårklipperen køre direkte fra lysnettet
hvis batteriet er helt opladet.
Sådan gøres hårklipperen klar til brug
Klipning med påsat kam:
C
1 Skyd kammens "arme" og udløserknap ind
i slidserne på apparatet.
C
2 Tryk på udløserknappen på bagsiden af
hårklipperen og skub kammen til den
ønskede stilling (se tabellen).
3 Slip derefter knappen,så kammen fastlåses.
4 Tænd for apparatet.
Hvis der under klipningen samler sig meget hår i
kammen,tages den af, og hårene pustes og/eller
rystes væk.
DANSK 53
2
1
Page 52

Indstilling af klippelængder.
Kamindstilling Hårlængde
1 4 mm
2 7 mm
3 10 mm
4 13 mm
5 15 mm
6 18 mm
7 21 mm
Klipning uden kam
C
1 Kammen tages af ved først at trykke på
udløserknappen på bagsiden af apparatet
og skubbe kammen til yderste stilling.
C
2 Hold knappen indtrykket og træk derefter
kammen af hårklipperen med den anden
hånd.
Rengør og oplad hårklipperen hver gang den har
været brugt.
Klippeteknikker
Red altid håret godt igennem før hårklipningen
begyndes.
DANSK54
2
1
Page 53

Klipning med påsat kam
Kammen kan bruges til hårlængder på op til
21 mm.
◗ Start med at sætte hårklipperen til maksimal
hårlængde (d.v.s.stilling 7),sfor at lære
apparatet at kende.
Bevæg altid hårklipperen imod hårets
vækstretning.
C
◗ Hold hårklipperen således,at den flade side af
kamstykket er parallelt med hovedbunden.
Bevæg den langsomt igennem håret og
derefter væk fra hovedet således,at der kun
klippes et lille stykke ad gangen.
◗ Klippelængden kan indstilles (se tabellen) til
forskellige hårlængder efter ønske.
Hårklipning over stylerkam eller
fingre
Denne klippeteknik kan bruges til hårlængder
over 21 mm.
◗ Tag kammen af.
C
◗ Løft en lille tot hår ad gangen med en
stylerkam eller saml hårtotten mellem to
fingre.
C
◗ Træk kam eller fingre gennem hårlokken,til
der kun stikker det hår ud,der skal klippes af.
◗ Klip så håret af.
◗ Fortsæt denne procedure imod hårets
vækstretning.
DANSK 55
Page 54

◗ Red med jævne mellemrum en kam igennem
håret for at fjerne afklippet hår og kontrollere
det foreløbige resultat.
Tilretning af kanter
◗ Tag kammen af.
C
◗ Hold hårklipperen med skæret pegende
nedad.
C
◗ Lav overlappende strygebevægelser ved
klipning i nakke og i sider.
C
◗ Ved tilretning omkring ørerne,holdes kun det
ene hjørne af skæret ind mod huden. Sørg
for, at hårklipperens tænder er i sikker afstand
fra øret.
C
◗ Form langsomt og forsigtigt håret i den
ønskede facon.
DANSK56
Page 55

Eksempler på forskellige klipninger
"American Look"
C
◗ Vælg den ønskede hårlængde i nakken.
C
◗ Klip håret i nakken ved at bruge teknikken
"Klipning med påsat kam".
◗ Vælg den ønskede hårlængde til baghoved og
sider.
C
◗ Klip så håret på bagsiden af hovedet og i
siderne.Undlad klipning af håret på
hovedtoppen.
C
◗ For at få et fladt "toplook" klippes håret oven
på hovedet ved at bruge teknikken "Klipning
over stylerkam eller fingre".
◗ Afslut klipningen med at tilrette nakke,
bakkenbarter og rundt om ørerne ved at
bruge teknikken "Tilretning af kanter".
Kort klip
C
◗ Vælg den ønskede hårlængde til nakke og
sider.
DANSK 57
2
1
2
1
Page 56

C
◗ Klip så håret i nakke og i sider ved at bruge
teknikken "Klipning med påsat kam".
◗ Undlad klipning af håret på hovedtoppen.
◗ Vælg den ønskede længde til håret på
hovedtoppen.
C
◗ Klip så håret oven på hovedet ved at bruge
teknikken "Klipning med påsat kam".
◗ Afslut klipningen med at tilrette nakke,
bakkenbarter og rundt om ørerne ved at
bruge teknikken "Tilretning af kanter".
Rengøring
Brug aldrig skrappe rengørings- og skuremidler
eller væsker som f.eks.sprit, benzin eller acetone
til rengøringen.
1 Før rengøringen skal hårklipperen være
slukket og stikket taget ud af
stikkontakten.
C
2 Tag kammen af.
C
3 Tag skærhovedet af.
DANSK58
Page 57

C
4 Rens skærhovedet og apparatets inderside
med den medleverede børste.
C
5 Saml hårklipperen igen ved at sætte hakket
på skærhovedet ind i apparatet.
6 Tryk skærhovedet ind på plads til der
høres et "klik".
Udskiftning
Et slidt eller beskadiget skærhoved,må det kun
udskiftes med et nyt originalt Philips skærhoved.
Beskyttelse af miljøet
Det indbyggede genopladelige batteri indeholder
substanser, der kan skade miljøet.
Inden apparatet til sin tid kasseres, skal det
genopladelige batteri tages ud.
Bortkast ikke batteriet sammen med det normale
husholdningsaffald men aflevér det på et officielt
sted for indsamling af brugte batterier.
De kan også aflevere hele apparatet til Philips,der
gerne hjælper Dem med at tage batteriet ud og
bortkaste det på en miljømæssig forsvarlig måde.
DANSK 59
2
1
Page 58

1 Tag stikket ud af stikkontakten og lad
hårklipperen køre til den stopper af sig
selv.
C
2 Tag skærhovedet af.
C
3 Fjern metalklipsen med en skruetrækker.
C
4 Luk apparatet op.
C
5 Tag batteriholderen ud.
C
6 Sæt en skruetrækker ned i den lille slidse
mærket med en pil på printpladen.Tryk
ned på skruetrækkeren til noget af
printpladen brækker af.
DANSK60
Page 59

C
7 Adskil batteriet fra plastikdelen ved hjælp
af en skrutrækker.
8 Bortkast batteriet og de øvrige dele på en
miljømæssig forsvarlig måde.
Slut aldrig strøm til apparatet igen efter det har
været åbnet.
Telefonnumre til Philips' kundecentre findes i den
lille, verdensomspændende garantifolder.
Dette apparat overholder de gældende EUdirektiver vedrørende sikkerhed og radiostøj.
DANSK 61
Page 60

4203 000 46993
 Loading...