

Page 1

ENGLISH 4
ROMÂNĂ 14
РУССКИЙ 24
ČESKY 35
MAGYAR 45
SLOVENSKY 55
УКРАЇНСЬКІЙ 65
HRVATSKI 76
SLOVENŠČINA 86
HQ C281
3
Page 2

Important
Read these instructions for use carefully before
using the appliance and save them for future
reference.
◗ Check if the voltage indicated on the mains
plug corresponds to the local mains voltage
before you connect the appliance.
◗ Make sure that the appliance does not get
wet.
◗ Charge and store the appliance at a
temperature between 15c and 35c.
◗ Noise level: Lc= 69 dB [A]
Charging
Charge the appliance fully before you use it for
the first time.
Make sure the appliance is switched off while
charging.
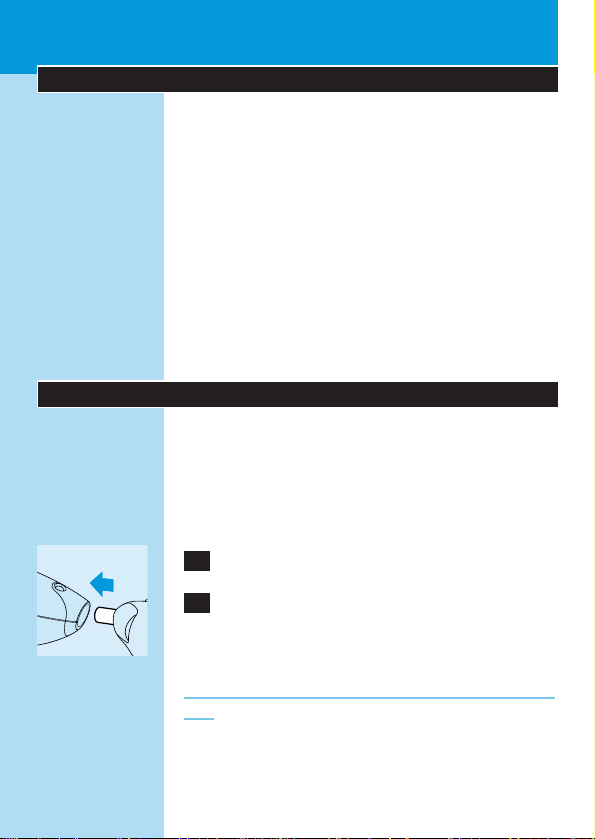
C
1 Insert the appliance plug into the
appliance.
2 Insert the mains plug into the wall socket.
B
The pilot light goes on to indicate that the
appliance is charging.
It will take approx.12 hours to fully charge the
battery.
Do not charge the appliance for more than 24
hours.
ENGLISH4
Page 3

A fully charged appliance has a cordless clipping
time of up to 35 minutes.
Corded clipping
◗ To clip with the hair clipper connected to the
mains:
Switch the hair clipper off, connect it to the mains
and wait a few seconds before switching it back
on. If the batter y is completely empty: wait a few
minutes before switching the appliance on.
Do not run the appliance from the mains when
the battery is fully charged.
Preparing for clipping
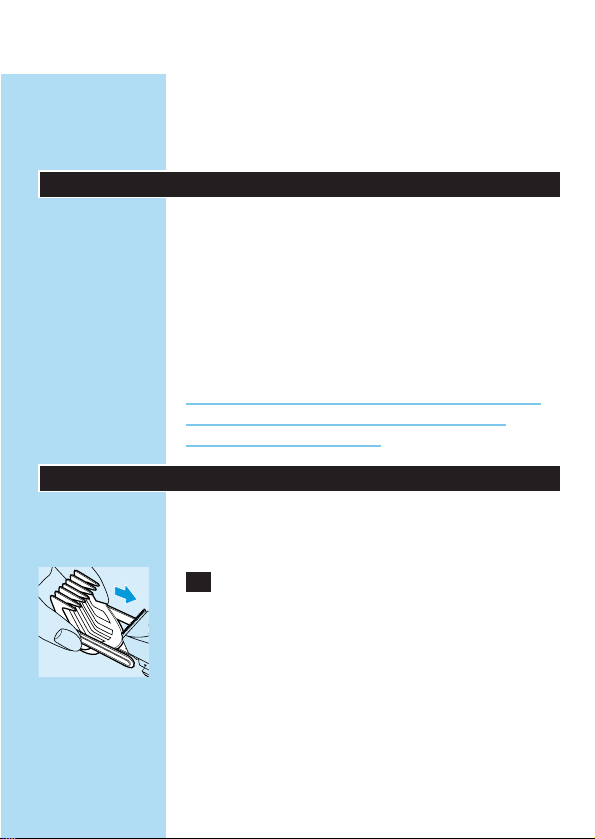
Clipping with comb attachment:
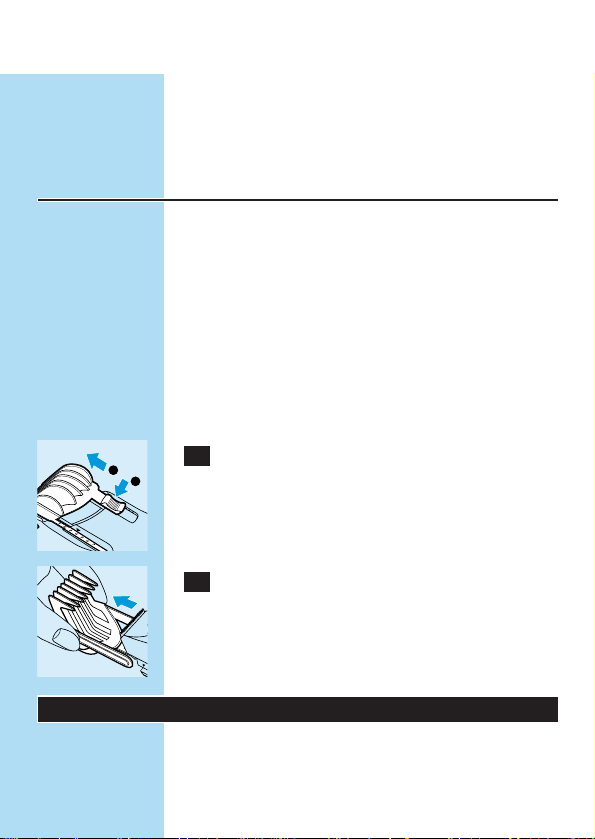
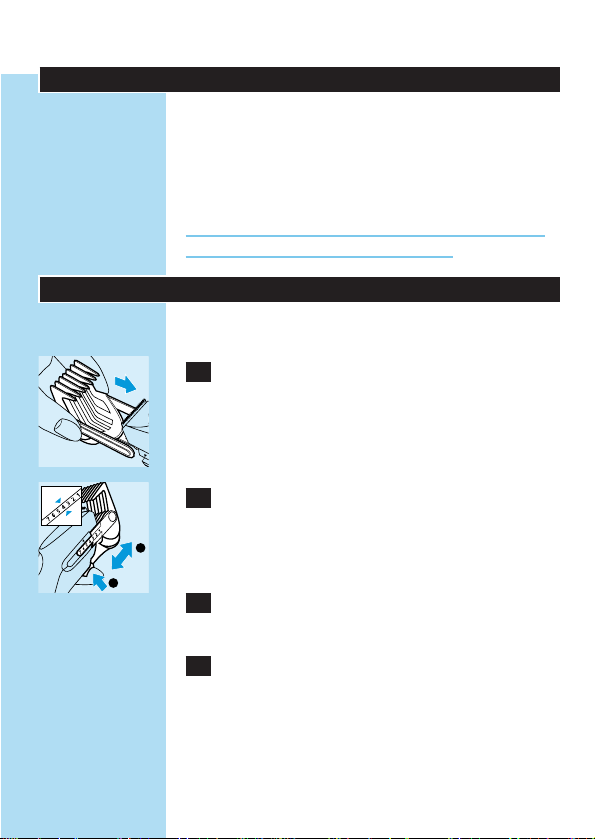
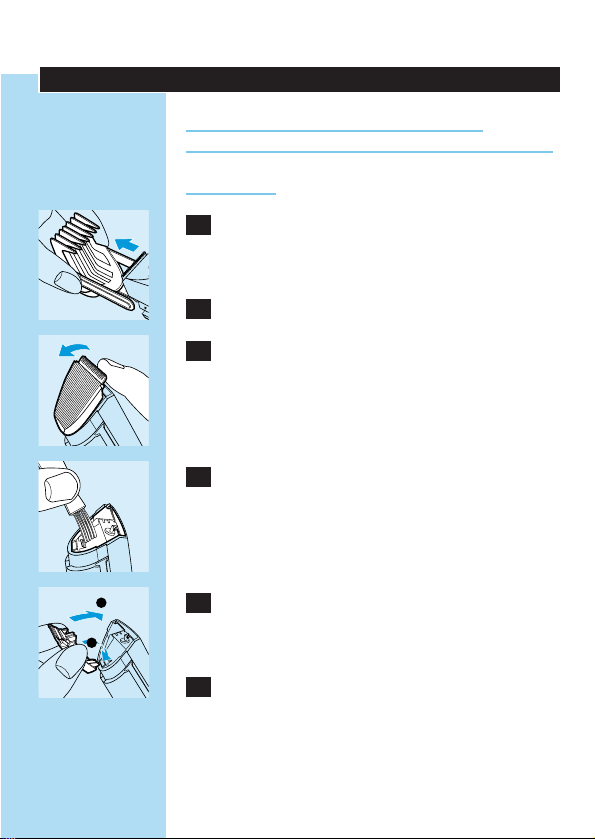
C
1 Slide the arms and the adjustment button
of the comb attachment into the guiding
grooves of the appliance.
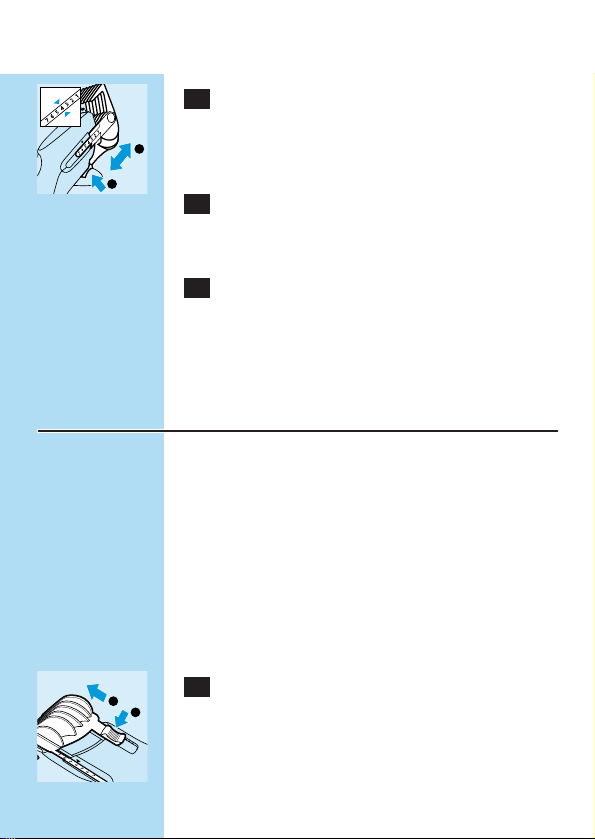
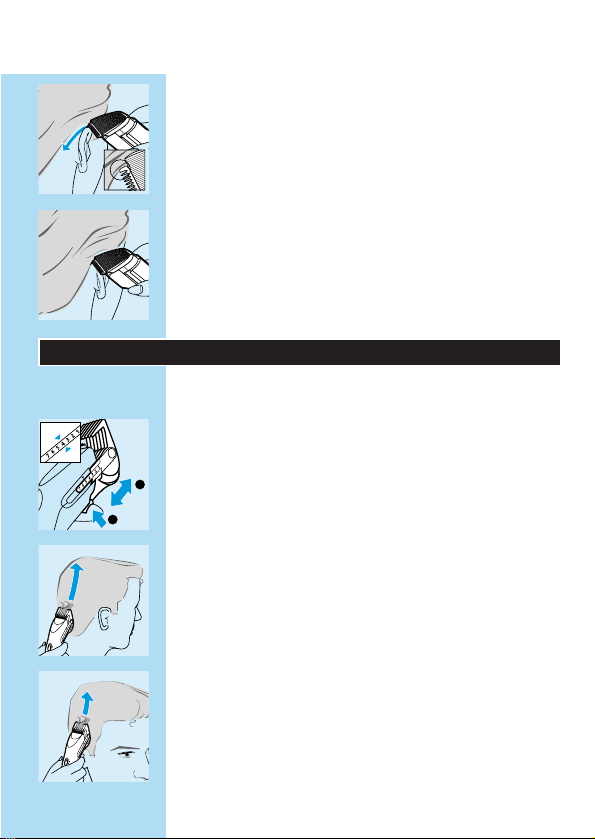
C
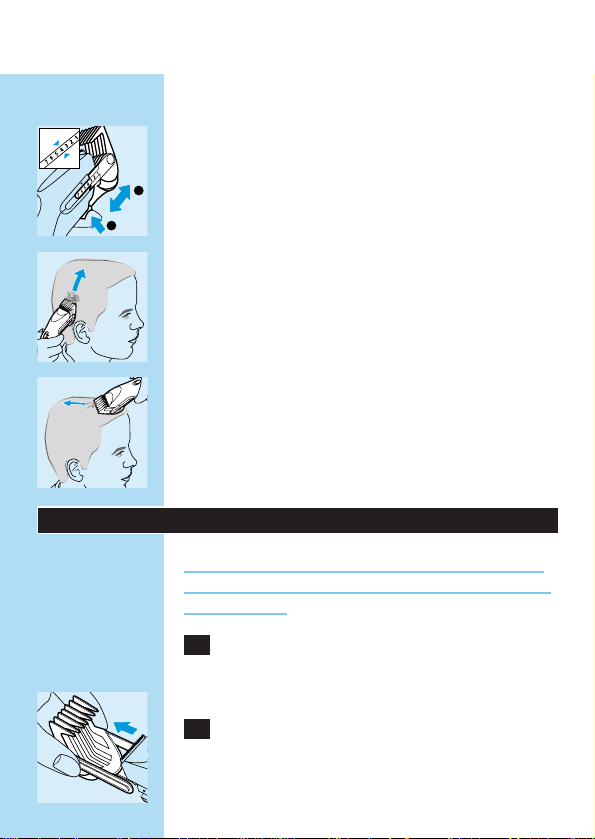
2 Press the adjustment button on the back
of the appliance and slide the comb
attachment to the desired position (see
table).
3 Release the adjustment button to lock the
comb.
4 Switch the appliance on.
ENGLISH 5
2
1
Page 4
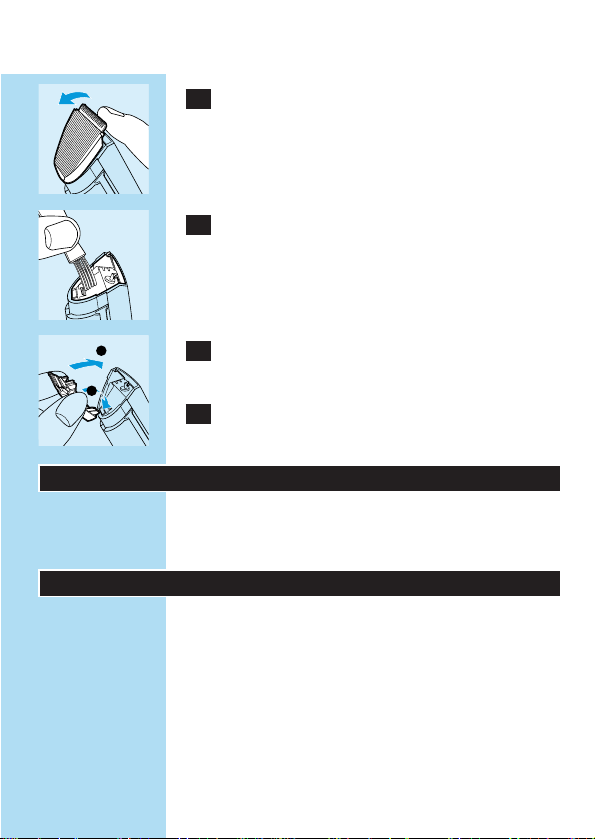
If a lot of hair has accumulated in the comb,
remove the comb attachment and blow and/or
shake the hair out of the comb.
Cutting length settings
comb setting hair length
1 4 mm
2 7 mm
3 10 mm
4 13 mm
5 15 mm
6 18 mm
7 21 mm
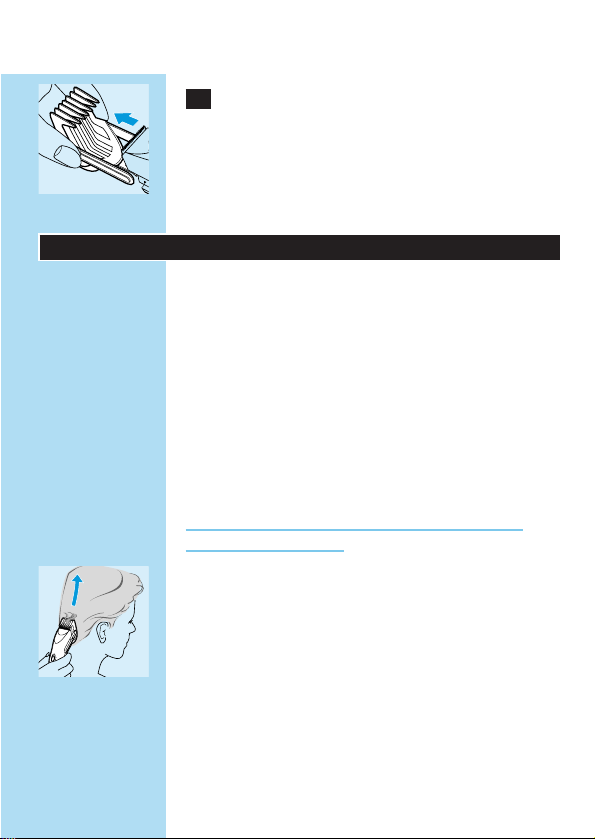
Clipping without comb attachment
C
1 To remove the comb attachment, press the
adjustment button on the back of the
appliance and slide the comb attachment
to its final position.
C
2 Pull the comb attachment off the appliance
with your other hand.
Clean and recharge the appliance every time you
have used it.
Clipping techniques
Always comb the hair in the direction of growth
before clipping.
ENGLISH6
2
1
Page 5
Clipping with comb attachment
The comb attachment can be used to obtain hair
lengths up to 21 mm.
◗ Start clipping at the setting for maximum hair
length (i.e. position 7) to familiarise yourself
with the clipper.
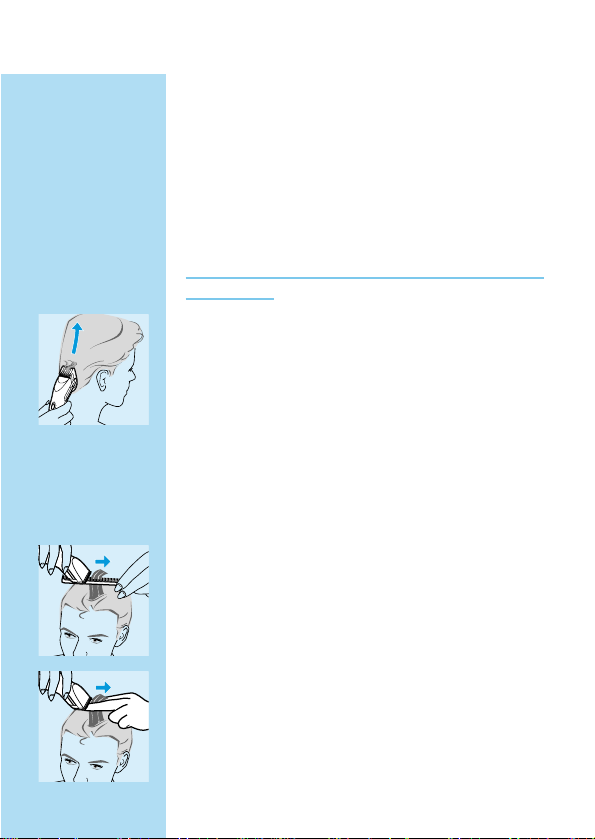
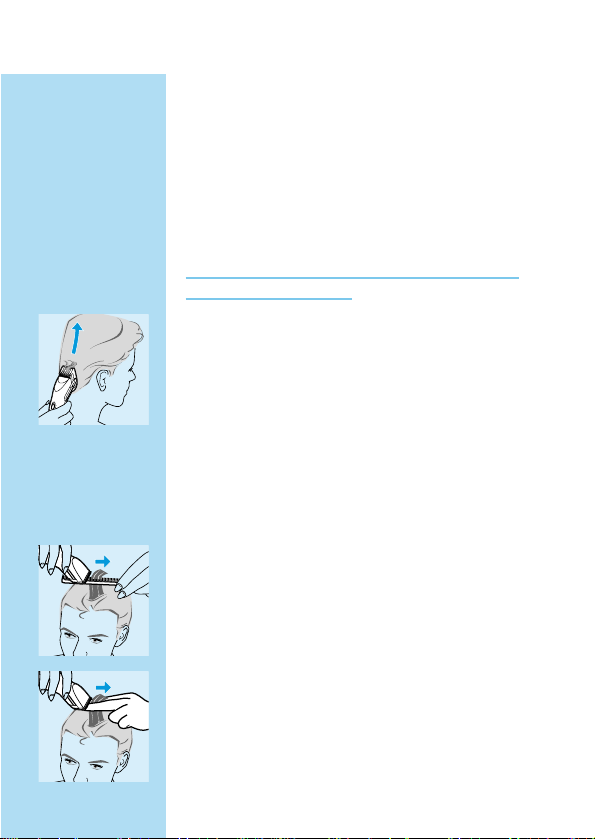
Always move the clipper against the direction of
hair growth.
C
◗ Hold the clipper so that the flat side of the
comb attachment is parallel to the head. Move
it slowly through the hair and then away from
the head, cutting only a small amount at a
time.
◗ Change the length setting (see table) to obtain
different lengths on different parts of the
head.
Cutting over styling comb or fingers
This technique can be used to obtain hair lengths
over 21 mm.
◗ Remove the comb attachment.
C
◗ Lift a small section of hair with a styling comb
or grasp it between two fingers.
C
◗ Lift the hair with the comb or fingers so that
only the length that needs to be cut off sticks
out.
◗ Trim the hair protruding from the comb or
fingers.
ENGLISH 7
Page 6
◗ Continue this procedure working against the
direction of hair growth.
◗ Comb frequently to remove cut hair and to
check for unevenly cut sections.
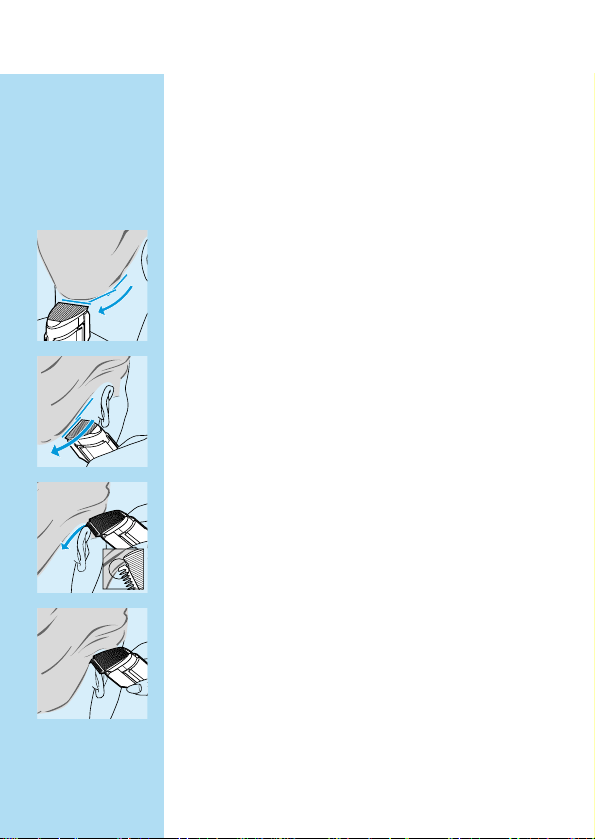
Outlining
◗ Remove the comb attachment.
C
◗ Hold the clipper with the cutter pointing
downwards.
C
◗ Make overlapping strokes for clear outlining of
the neck and sideburns.
C
◗ To cut the hair around the ears, put one edge
of the cutter on the skin. Make sure the teeth
are kept at a safe distance from the ears.
C
◗ Shape the desired outline slowly and carefully.
ENGLISH8
Page 7
Creating different haircuts
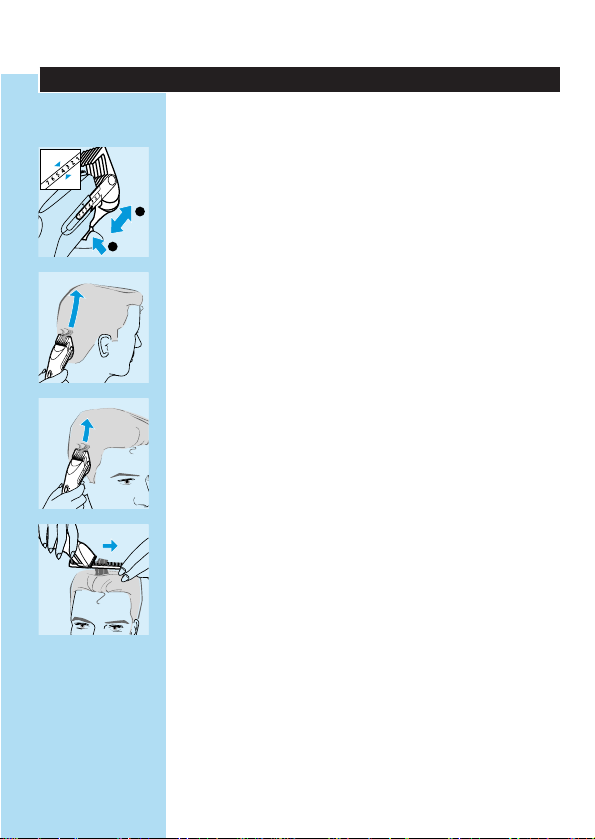
Crew cut
C
◗ Select the desired hair length for the neck
area.
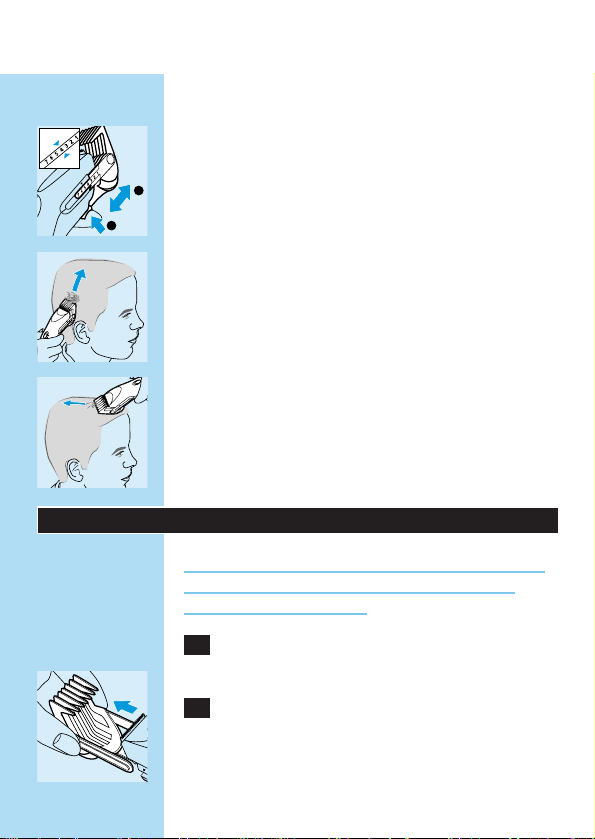
C
◗ Clip the neck area using the 'Clipping with
comb attachment' technique.
◗ Adjust the length setting to the desired hair
length for the back and sides of the head.
C
◗ Clip the sides and back of the head leaving the
hair on top of the head uncut.
C
◗ For a flat top look, cut the hair on top of the
head using the 'Cutting over styling comb or
fingers' technique.
◗ Finish the haircut by clipping the neckline,
sideburns and the area around the ears using
the 'Outlining' technique.
ENGLISH 9
2
1
Page 8
Short cut
C
◗ Select the desired hair length for the back and
the sides of the head.
C
◗ Clip the back and the sides of the head using
the 'Clipping with comb attachment'
technique.
◗ Leave the hair on top of the head uncut.
◗ Select the desired hair length for the top of
the head.
C
◗ Clip the top of the head using the 'Clipping
with comb attachment' technique.
◗ Finish the haircut by clipping the neck,
sideburns and area around the ears using the
'Outlining' technique.
Cleaning
Do not use abrasive cleaning agents, scourers or
liquids such as alcohol, petrol or acetone to clean
the appliance.
1 Make sure the appliance is switched off
and disconnected from the mains before
you start cleaning it.
C
2 Remove the comb attachment.
ENGLISH10
2
1
Page 9
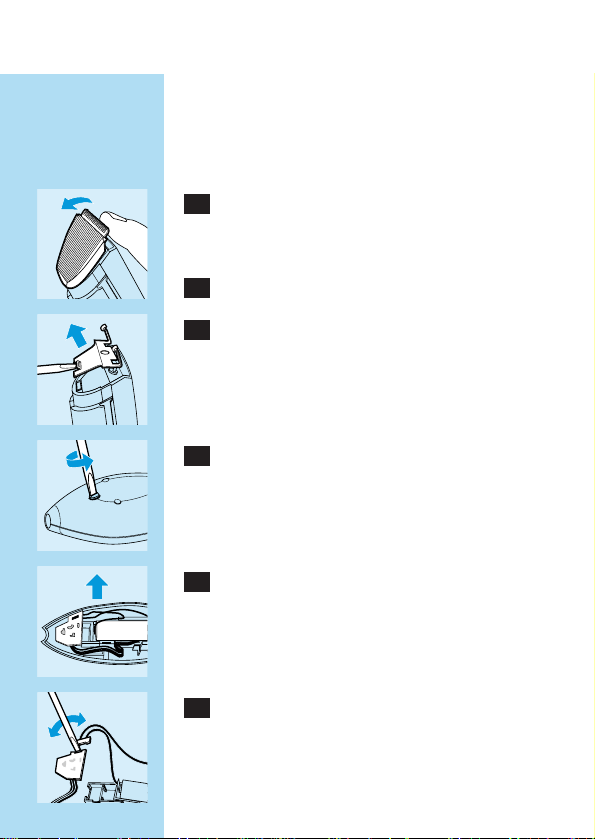
C
3 Remove the cutting unit.
C
4 Clean the cutting unit and the inside of the
appliance with the brush supplied.
C
5 To reassemble the clipper, insert the hook
of the cutting unit into the housing.
6 Push the cutting unit back until you hear a
click.
Replacement
A worn or damaged cutting unit should only be
replaced with an original Philips cutting unit.
Environment
The built-in rechargeable battery contains
substances which may pollute the environment.
Remove the rechargeable battery when you
discard the appliance.
Do not throw the battery away with the normal
household waste but dispose of it at an official
collection point.
ENGLISH 11
2
1
Page 10
You can also take the appliance to a Philips
service centre, which will remove the battery for
you and will dispose of it in an environmentally
safe way.
1 Disconnect the appliance from the mains
and let the appliance run until the motor
stops.
C
2 Remove the cutting unit.
C
3 Remove the metal clip by means of a
screwdriver.
C
4 Open the housing.
C
5 Pull the battery holder out of the
appliance.
C
6 Insert a screwdriver into the small slot in
the printed circuit board marked with an
arrow. Push the screwdriver down until
part of the printed circuit board breaks
off.
ENGLISH12
Page 11
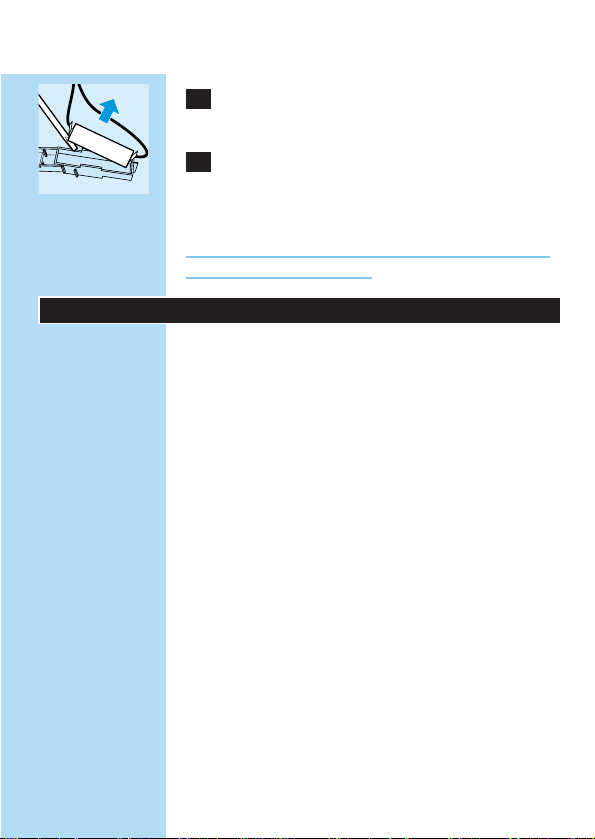
C
7 Separate the battery from the plastic part
by means of a screwdriver.
8 Dispose of the battery and the other
components in an environmentally safe
way.
Do not connect the appliance to the mains again
after it has been opened!
Guarantee & service
If you need information or if you have a
problem, please visit the Philips Web site at
www.philips.com or contact the Philips Customer
Care Centre in your country (you will find its
phone number in the worldwide guarantee
leaflet). If there is no Customer Care Centre in
your country, turn to your local Philips dealer or
contact the Service Depar tment of Philips
Domestic Appliances and Personal Care BV.
ENGLISH 13
Page 12
Important
Citiţi cu atenţie aceste instrucţiuni înainte de a
utiliza aparatul şi păstraţi-le pentru consultări
ulterioare.
◗ Înainte de a conecta aparatul, verificaţi ca
tensiunea indicată pe ştecherul cablului să
corespundă tensiunii locale.
◗ Asiguraţi-vă că aparatul nu vine în contact cu
apa.
◗ Încărcaţi şi depozitaţi aparatul la temperaturi
între 15c şi 35c.
◗ Nivel de zgomot: Lc= 69 dB [A]
Încărcare
Încărcaţi complet aparatul înainte de prima
utilizare.
Asiguraţi-vă că aparatul este oprit în timp ce îl
încărcaţi.
C
1 Introduceţi fişa cablului în aparat.
2 Introduceţi ştecherul în priză.
B
Ledul se va aprinde pentru a indica faptul că
aparatul se încarcă.
Bateriile se încarcă complet în aprox. 12 ore.
Nu lăsaţi aparatul să se încarce mai mult de 24 de
ore.
Un aparat complet încărcat are o perioadă de
funcţionare fără cablu de până la 35 de minute.
ROMÂNĂ14
Page 13
Tundere cu aparatul conectat la priză
◗ Pentru tundere cu aparatul conectat la priză:
Opriţi aparatul, conectaţi-l la priză şi aşteptaţi
câteva secunde înainte de a-l reporni. Dacă
bateria este complet descărcată: aşteptaţi câteva
minute înainte de a reporni aparatul.
Nu lăsaţi aparatul să funcţioneze conectat la priz
când bateria este complet încărcată.
Pregătirea aparatului pentru tuns
Tunderea cu pieptenele de frezat:
C
1 Culisaţi marginile şi butonul de reglare a
pieptenelui de frezat în nişele aparatului.
C
2 Apăsaţi butonul de reglare din spatele
aparatului şi poziţionaţi pieptenele de
frezat pe poziţia dorită (a se vedea
tabelul).
3 Daţi drumul butonului de reglare pentru a
fixa pieptenele de frezat.
4 Porniţi aparatul.
Dacă s-a acumulat mult păr în pieptenele de
frezat, scoateţi-l, apoi suflaţi şi/sau scuturaţi părul
din accesoriu.
ROMÂNĂ 15
2
1
Page 14

Reglaje lungime de tăiere
Reglaje ale pieptenelui de frezat Lungimea părului
1 4 mm
2 7 mm
3 10 mm
4 13 mm
5 15 mm
6 18 mm
7 21 mm
Tundere fără pieptenele de frezat
C
1 Pentru a scoate pieptenele de frezat,
apăsaţi butonul de reglare din spatele
aparatului şi fixaţi pieptenele pe poziţia
finală.
C
2 Scoateţi pieptenele din aparat cu cealaltă
mână.
Curăţaţi şi reîncărcaţi aparatul după fiecare
utilizare.
Tehnici de tundere
Pieptănaţi întotdeauna părul în sensul creşterii
înainte de tundere.
ROMÂNĂ16
2
1
Page 15
Tundere cu pieptenele de frezat
Pieptenele de frezat poate fi folosit pentru
tunderea părului până la o lungime de 21 mm.
◗ Vă sfătuim să începeţi tunderea cu reglajul
pentru lungimea maximă (poziţia 7) pentru a
vă familiariza cu aparatul.
Deplasaţi întotdeauna maşina de tuns în sens
invers creşterii părului.
C
◗ Ţineţi maşina de tuns în aşa fel încât porţiunea
plană a pieptenelui de frezat să fie paralelă cu
capul. Mişcaţi pieptenele de frezat încet prin
păr şi apoi îndepărtaţi-l, tăind câte puţin.
◗ Schimbaţi reglajul pentru lungimea părului (a
se vedea tabelul) pentru a obţine lungimi de
păr diferite din zone diferite ale capului.
Tundere cu ajutorul pieptenelui de
frezat sau peste degete
Această tehnică poate fi utilizată pentru a obţine
o lungime a părului de peste 21 mm.
◗ Scoateţi pieptenele de frezat.
C
◗ Ridicaţi o şuviţă mică de păr cu ajutorul unui
pieptene de coafat sau prindeţi-o între două
degete.
C
◗ Ridicaţi părul cu pieptenele sau cu degetele în
aşa fel încât doar lungimea de păr care trebuie
tăiată să iasă în afară.
◗ Tundeţi părul ieşit în afara pieptenelui sau a
degetelor.
ROMÂNĂ 17
Page 16

◗ Continuaţi procedura tunzând în sens invers
creşterii părului.
◗ Pieptănaţi frecvent părul pentru a îndepărta
firele tăiate şi pentru a verifica rezultatele
obţinute.
Conturare
◗ Scoateţi pieptenele de frezat.
C
◗ Ţineţi aparatul cu unitatea de tăiere în jos.
C
◗ Faceţi mişcări neîntrerupte cu aparatul pentru
a realiza un bun contur al cefei şi al
perciunilor.
C
◗ Pentru a tăia părul din spatele urechilor,
poziţionaţi o margine a dispozitivului de tăiere
pe piele. Dinţii cuţitului trebuie să fie la o
distanţă sigură de ureche.
C
◗ Realizaţi conturul dorit încet şi cu atenţie.
ROMÂNĂ18
Page 17

Realizarea unor tunsori diverse
Tunsoare periuţă
C
◗ Selectaţi lungimea dorită a părului din zona
cefei.
C
◗ Tundeţi zona cefei folosind tehnica pentru
"Tunderea cu pieptenele de frezat".
◗ Selectaţi reglajul pentru lungimea de păr
dorită pentru zona cefei şi a tâmplelor.
C
◗ Tăiaţi părul din zona cefei şi a tâmplelor
lăsând restul părului netuns.
C
◗ Pentru o tundere plană a părului din creştetul
capului, folosiţi tehnica pentru "Tunderea cu
ajutorul pieptenelui de frezat sau peste
degete".
◗ Finisaţi tunzând părul de la ceafă, perciuni şi
zona din spatele urechilor folosind tehnica
pentru "Conturare".
ROMÂNĂ 19
2
1
Page 18
Tunsoare scurtă
C
◗ Selectaţi lungimea de păr dorită pentru zona
cefei şi a tâmplelor.
C
◗ Tundeţi zona cefei şi a perciunilor folosind
tehnica pentru "Tunderea cu pieptenele de
frezat".
◗ Nu tundeţi părul din creştetul capului.
◗ Selectaţi lungimea de păr dorită pentru zona
calotei.
C
◗ Tundeţi părul din creştet folosind tehnica
pentru "Tunderea cu pieptenele de frezat".
◗ Finisaţi tunzând părul de la ceafă, perciuni şi
zona din spatele urechilor folosind tehnica
pentru "Conturare".
Curăţare
Nu folosiţi substanţe abrazive, bureţi abrazivi sau
substanţe precum alcool, benzină sau aceton
pentru a curăţa aparatul.
1 Înainte de a curăţa aparatul, asiguraţi-vă că
este oprit şi scos din priză.
C
2 Scoateţi pieptenele de frezat.
ROMÂNĂ20
2
1
Page 19

C
3 Scoateţi unitatea de tăiere.
C
4 Curăţaţi unitatea de tăiere şi interiorul
aparatului folosind periuţa furnizată.
C
5 Pentru a reasambla maşina de tuns,
introduceţi clema unităţii de tăiere în
carcasă.
6 Reintroduceţi unitatea de tăierea
împingând-o până auziţi clic.
Înlocuire
O unitate de tăiere veche sau deteriorată, poate fi
înlocuită doar cu o unitate de tăiere Philips
originală.
Protejarea mediului înconjurător
Acumulatorul reîncărcabil conţine substanţe ce
pot polua mediul.
Când aruncaţi aparatul, scoateţi acumulatorul
reîncărcabil.
ROMÂNĂ 21
2
1
Page 20

Nu aruncaţi acumulatorul în gunoiul menajer, ci la
un centru de colectare.
Puteţi duce aparatul la un centru service Philips,
unde personalul va scoate acumulatorul în locul
dumneavoastră şi îl va arunca respectând normele
de protejare a mediului.
1 Scoateţi aparatul din priză şi lăsaţi-l să
funcţioneze până ce se opreşte motorul.
C
2 Scoateţi unitatea de tăiere.
C
3 Scoateţi clema de metal cu ajutorul unei
şurubelniţe.
C
4 Deschideţi carcasa.
C
5 Scoateţi suportul pentru acumulator din
aparat.
ROMÂNĂ22
Page 21

C
6 Introduceţi şurubelniţa în orificiul plăcii de
circuit imprimat marcată cu o săgeată.
Împingeţi şurubelniţa până ce o parte a
plăcii de circuit imprimat se rupe.
C
7 Separaţi acumulatorul de componenta din
plastic cu ajutorul unei şurubelniţe.
8 Aruncaţi acumulatorul şi celelalte
componente în conformitate cu regulile
privind protejarea mediului înconjurător.
Nu conectaţi aparatul după ce acesta a fost
deschis!
Garanţie şi service
Dacă aveţi nevoie de service sau informaţii, sau
dacă aveţi vreo problemă, vă rugăm să ne vizitaţi
la www.philips.com sau să contactaţi Biroul de
Relaţii Clienţi din ţara dumneavoastră (veţi găsi
numărul de telefon în garanţia internaţională).
Dacă în ţara dumneavoastră nu există un Birou de
Relaţii Clienţi, adresaţi-vă furnizorului
dumneavoastră sau contactaţi Departamentul
Service Philips pentru Electrocasnice şi Produse
de Îngrijire Personală.
ROMÂNĂ 23
Page 22

Внимание
Прежде чем начать пользоваться прибором,
внимательно ознакомьтесь с настоящим
руководством и сохраните настоящее
руководство по эксплуатации в качестве
справочного материала.
◗ Перед включением прибора убедитесь, что
номинальное напряжение, указанное на
вилке прибора, соответствует напряжению
электросети у вас дома.
◗ Избегайте попадания воды в прибор.
◗ Храните и заряжайте прибор при
температуре от 15° до 35°.
◗ Уровень шума: Lc= 69 дБ [A]
Зарядка
Прежде чем пользоваться прибором,
полностью зарядите аккумуляторную батарею.
Следите за тем, чтобы во время зарядки
прибор был выключен.
C
1 Вставьте штекер шнура питания в
прибор.
2 Вставьте вилку шнура питания в розетку
электросети.
B
Световой индикатор сигнализирует о том,
что прибор заряжается.
Для полной зарядки аккумуляторов требуется
около 12 часов.
Не заряжайте прибор более 24 часов подряд.
РУССКИЙ24
Page 23
Полностью заряженным прибором можно
пользоваться до 35 минут без подключения к
электросети.
Стрижка с подключением к электросети
◗ Для того чтобы произвести стрижку с
подключением к электросети:
Выключите машинку для стрижки волос,
подключите ее к электросети и подождите
несколько секунд, прежде чем включить ее
снова. Если аккумуляторная батарея полностью
разряжена: подождите несколько минут,
прежде чем включать прибор.
Не пользуйтесь прибором с подключением к
электросети при полностью заряженной
аккумуляторной батарее.
Подготовка к стрижке
Стрижка с использованием
гребенчатой насадки:
C
1 Вставьте выступы и кнопку фиксатора
гребенчатой насадки в направляющие
пазы на корпусе прибора.
РУССКИЙ 25
Page 24
C
2 Нажмите кнопку фиксатора на тыльной
стороне прибора и установите
гребенчатую насадку в требуемое
положение (см. таблицу).
3 Отпустите кнопку для фиксации
гребенчатой насадки в выбранном
положении.
4 Включите прибор.
Если в гребенчатой насадке застряло большое
количество волос, снимите ее, а затем сдуйте
и/или вытряхните волосы.
Установки для различной длины волос
положение насадки длина волос
1 4 мм
2 7 мм
3 10 мм
4 13 мм
5 15 мм
6 18 мм
7 21 мм
Стрижка без гребенчатой насадки
C
1 Для того чтобы снять гребенчатую
насадку, нажмите кнопку фиксатора на
тыльной стороне прибора и продвиньте
гребенчатую насадку в крайнее
положение.
РУССКИЙ26
2
1
2
1
Page 25
C
2 Другой рукой снимите гребенчатую
насадку с прибора.
Каждый раз после пользования прибором
производите его очистку и заряжайте
аккумуляторную батарею.
Техника стрижки
Перед стрижкой всегда расчесывайте волосы в
направлении их роста.
Стрижка с гребенчатой насадкой
Гребенчатая насадка может быть использована
для получения волос длиной до 21 мм.
◗ Начинайте стрижку, установив
максимальную длину волоса (т.е. в позиции
7), для того чтобы привыкнуть к машинке.
Всегда перемещайте машинку для стрижки
против роста волос.
C
◗ Держите машинку для стрижки волос так,
чтобы плоская часть гребенчатой насадки
была параллельна поверхности головы.
Срезайте волосы небольшими прядями,
медленно проводя машинкой по волосам, а
затем отводя ее от головы.
◗ Для получения волос различной длины на
разных участках головы устанавливайте
гребенчатую насадку в соответствующее
положение (см. таблицу).
РУССКИЙ 27
Page 26

Стрижка поверх расчески или
пальцев
Данный метод может быть использован для
получения длины волос более 21 мм.
◗ Снимите гребенчатую насадку.
C
◗ Приподнимите небольшую прядь волос с
помощью расчески или зажмите ее между
двух пальцев.
C
◗ Приподнимите волосы таким образом,
чтобы они выступали над расческой или
пальцами на ту длину, которую необходимо
срезать.
◗ Срежьте прядь волос, выступающую
поверх расчески или пальцев.
◗ Повторяйте процедуру, перемещая
машинку для стрижки против роста волос.
◗ Необходимо часто причесывать волосы,
для того чтобы удалять срезанные волоски
и проверять правильность стрижки.
Окантовка
◗ Снимите гребенчатую насадку.
C
◗ Возьмите машинку для стрижки волос так,
чтобы режущий блок был обращен вниз.
C
◗ Чистая окантовка затылка и бакенбардов
производится перекрывающимися
движениями.
РУССКИЙ28
Page 27
C
◗ При подстригании волос вокруг ушей
касайтесь одним краем насадки
поверхности головы. Убедитесь в том, что
зубцы гребенки машинки находятся на
безопасном расстоянии от ушей.
C
◗ При выполнении требуемой линии
окантовки будьте внимательны, не
торопитесь.
Создание различных причесок
Стрижка «ежик»
C
◗ Установите требуемую длину волос для
затылочной зоны.
C
◗ Для подстригания волос в зоне шеи
используйте технику «Стрижка с
насадкой».
◗ Выберите требуемую длину волос для
затылочной и височной зон головы.
C
◗ Постригите затылочную и височные зоны
головы, оставив волосы на макушке
нестрижеными.
РУССКИЙ 29
2
1
Page 28

C
◗ Для получения ровной длины волос
теменной зоны подстригайте сверху с
использованием техники «Стрижка через
фасонную расческу или через пальцы».
◗ Закончите стрижку, подровняв линию шеи,
виски и зону вокруг ушей с помощью
техники «Окантовка».
Короткая стрижка
C
◗ Выберите требуемую длину волос для
затылочной и височных зон головы.
C
◗ Волосы сзади и по бокам головы
подстригайте с использованием техники
«Стрижка с насадкой».
◗ Оставьте волосы на макушке
нестрижеными.
◗ Выберите требуемую длину волос для
макушки.
C
◗ Для подстригания волос на макушке
используйте технику «Стрижка с
насадкой».
◗ Закончите стрижку, подровняв линию шеи,
виски и зону вокруг ушей с помощью
техники «Окантовка».
РУССКИЙ30
2
1
Page 29
Очистка
Не используйте для очистки машинки
абразивные чистящие средства, металлические
мочалки или такие жидкости, как спирт, бензин
или ацетон.
1 Прежде чем приступить к очистке,
убедитесь, что прибор выключен и
отключен от электросети.
C
2 Снимите гребенчатую насадку.
C
3 Снимите режущий блок.
C
4 Очистите с помощью прилагаемой
кисточки режущий блок и внутреннюю
поверхность прибора.
C
5 Для того чтобы собрать машинку для
стрижки волос, вставьте крючок
режущего блока в корпус прибора.
6 Потяните за режущий блок до щелчка.
РУССКИЙ 31
2
1
Page 30

Замена
Изношенный или поврежденный режущий
блок можно заменить только на режущий блок
такого же типа производства компании
«Филипс».
Охрана окружающей среды
Встроенная аккумуляторная батарея содержит
компоненты, способные загрязнить
окружающую среду.
Перед утилизацией прибора удалите
аккумуляторную батарею.
Не выбрасывайте аккумуляторную батарею с
обычными бытовыми отходами, а сдавайте ее
в официальный приемный пункт.
Вы можете также отнести машинку для
стрижки волос в сервисный центр компании
«Филипс», где из нее удалят и безопасным для
окружающей среды способом утилизируют
батарею.
1 Отключите прибор от электросети,
включите и подождите, пока двигатель
не остановится.
C
2 Снимите режущий блок.
РУССКИЙ32
Page 31

C
3 Снимите металлический фиксатор с
помощью отвертки.
C
4 Откройте корпус прибора.
C
5 Выньте держатель батареи из прибора.
C
6 Вставьте отвертку в небольшой паз в
печатной плате,отмеченный стрелкой.
Нажмите на отвертку так, чтобы часть
печатной платы отломилась.
C
7 Отделите аккумуляторную батарею от
пластмассовой детали с помощью
отвертки.
8 Утилизируйте аккумуляторную батарею
и другие детали без ущерба для
окружающей среды.
Не подключайте прибор к электросети после
вскрытия корпуса!
РУССКИЙ 33
Page 32

Гарантия и обслуживание
По поводу дополнительной информации или в
случае возникновения каких-либо проблем
обращайтесь на Web-сайт компании «Филипс»
по адресу www. philips.comили в центр
компании «Филипс» по обслуживанию
потребителей в вашей стране (вы найдете его
номер телефона на международном
гарантийном талоне). Если подобный центр в
вашей стране отсутствует, обратитесь в вашу
местную торговую организацию компании
«Филипс» или сервисное отделение компании
Philips Domestic Appliancesand Personal Care BV.
РУССКИЙ34
Page 33

Důležité
Následující návod pečlivě přečtěte a uschovejte jej
pro případná pozdější nahlédnutí.
◗ Dříve než přístroj zapojíte do sítě,přesvědčte
se, že údaj napětí na transformátorové
zástrčce souhlasí s napětím ve vaší světelné
síti.
◗ Dbejte na to, aby přístroj nepřišel do styku s
vodou.
◗ Přístroj uchovávejte a jeho akumulátor
nabíjejte při teplotě okolí v rozmezí 15c až
35c.
◗ Hladina hluku: Lc = 69 dB (A)
Nabíjení akumulátoru
Před prvním uvedením do provozu nabijte zcela
jeho akumulátor.
Dbejte na to, aby byl přístroj během nabíjení
akumulátoru ve vypnutém stavu.
C
1 Zasuňte zástrčku síťového přívodu do
přístroje.
2 Zasuňte zástrčku do síťové zásuvky.
B
Kontrolka se rozsvítí což indikuje, že se
akumulátor přístroje nabíjí.
Akumulátor je plně nabit asi za 12 hodin.
Nenabíjejte akumulátor déle než asi 24 hodin.
Plně nabitý akumulátor umožňuje provoz přístroje
po dobu delší než asi 35 minut.
ČESKY 35
Page 34

Provoz ze sítě
◗ Stříhání při napájení ze sítě:
Vypněte přístroj, připojte ho do sítě a vyčkejte
několik sekund než ho znovu zapnete. Pokud by
byl akumulátor zcela vybitý: v takovém případě
postupujte shodně, ale vyčkejte několik minut než
přístroj znovu zapnete.
Nedoporučujeme přístroj provozovat ze sítě
pokud je akumulátor plně nabit.
Příprava ke stříhání:
Stříhání s hřebenovým nástavcem:
C
1 Zasuňte ramena a zajišťovací tlačítko
hřebenového nástavce do vodicích drážek
přístroje.
C
2 Stiskněte zajišťovací tlačítko na zadní stěně
přístroje a hřebenový nástavec zasuňte do
požadované polohy (viz tabulku).
3 Uvolněním zajišťovacího tlačítka
hřebenový nástavec ve zvolené poloze
zajistíte.
4 Zapněte přístroj.
Pokud se v hřebenu nashromáždí mnoho vlasů,
sejměte hřebenový nástavec a vlasy z hřebenu
vyfoukejte nebo vytřepte.
ČESKY36
2
1
Page 35

Nastavení délky střihu
Nastavení Délka vlasů
1 4 mm
2 7 mm
3 10 mm
4 13 mm
5 15 mm
6 18 mm
7 21 mm
Stříhání bez hřebenového nástavce
C
1 Hřebenový nástavec sejmete tak,že
stisknete zajišťovací tlačítko na zadní stěně
přístroje a nástavec posunete do jeho
koncové polohy.
C
2 Nástavec volnou rukou vysuňte.
Vyčistěte přístroj a nabijte akumulátor po každém
použití přístroje.
Technika stříhání
Před stříháním vždy učešte vlasy ve směru jejich
růstu.
ČESKY 37
2
1
Page 36

Stříhání s hřebenovým nástavcem
Hřebenový nástavec lze použít pro stříhání vlasů
až do délky 21 mm.
◗ Dokud se s přístrojem důvěrně neseznámíte,
začněte stříhat s nastavením nejdelší délky
vlasů (poloha 7).
Přístrojem vždy pohybujte proti směru růstu vlasů.
C
◗ Přístroj držte tak, aby plochá strana
hřebenového nástavce byla rovnoběžná s
povrchem hlavy. Přístrojem pohybujte pomalu
a při ukončení pohybu ho zvedejte od hlavy.
Stříhejte vždy jen menší množství vlasů.
◗ Měňte nastavení délky střihu (viz tabulku)
abyste na různých místech hlavy vytvořili
různou délku vlasů.
Stříhání přes hřeben nebo přes prsty
Tento způsob lze použít při stříhání vlasů delších
než 21 mm.
◗ Sejměte hřebenový nástavec.
C
◗ Zvedněte hřebenem malou část vlasů nebo
malou část vlasů uchopte mezi prsty.
C
◗ Zvedněte vlasy hřebenem nebo prsty tak,
abyste odstřihovali pouze tu jejich část, kterou
požadujete odstřihnout.
◗ Odstřihujte vlasy, které přesahují hřeben nebo
prsty.
◗ Pokračujte v práci a stříhejte vždy proti směru
růstu vlasů.
ČESKY38
Page 37

◗ Pročešte častěji vlasy hřebenem, abyste
zkontrolovali jejich jednotnou výšku.
Začištění
◗ Sejměte hřebenový nástavec.
C
◗ Podržte přístroj tak,aby stříhací jednotka
směřovala dolů.
C
◗ Překrývajícími se tahy začistěte partie na krku
a po stranách.
C
◗ Pro ostříhání vlasů kolem uší přiložte jednu
hranu stříhací lišty na pokožku. Dbejte však na
to, aby zuby zastřihovače byly v bezpečné
vzdálenosti od uší.
C
◗ Požadované začištění vytvarujte pomalu a
opatrně.
ČESKY 39
Page 38

Vytváření různých účesů
Střih "Crew"
C
◗ Nejprve zvolte délku vlasů na krku.
C
◗ Oblast zátylku stříhejte technikou popsanou v
odstavci "Stříhání s hřebenovým nástavcem".
◗ Zvolte délku střihu pro požadovanou délku
vlasů na vzadu a po stranách hlavy.
C
◗ Ostříhejte vlasy na zadní části hlavy a po
stranách, ale vlasy na vrcholu hlavy ponechte
neostříhané.
C
◗ Pro získání "plochého dojmu" účesu na horní
části hlavy použijte techniku, popsanou v
odstavci "Stříhání přes hřeben nebo přes
prsty".
◗ Nakonec zastřihněte linii zátylku, kotlety a
oblast kolem uší technikou,popsanou v
odstavci "Začištění".
ČESKY40
2
1
Page 39

Krátký sestřih
C
◗ Zvolte požadovanou délku vlasů pro zadní
část hlavy a pro postranní části.
C
◗ Vlasy po stranách a na zadní části hlavy
stříhejte technikou, popsanou v odstavci
"Stříhání s hřebenovým nástavcem".
◗ Vlasy na vrcholu hlavy ponechte neostříhané.
◗ Zvolte vhodnou délku pro vlasy na vrcholu
hlavy.
C
◗ Vlasy na temeni hlavy stříhejte technikou
"Stříhání s hřebenovým nástavcem".
◗ Práci ukončete ostříháním vlasů na zátylku,
zarovnáním kotlet a oblasti kolem uší
technikou, popsanou v odstavci "Začištění".
Čištění
Nepoužívejte k čištění abrasívní prostředky jako
jsou kovové žínky nebo chemikálie jako líh, benzín
nebo acetón.
1 Před každým čištěním se přesvědčte, že je
přístroj vypnut a odpojen od sítě.
C
2 Sejměte hřebenový nástavec.
ČESKY 41
2
1
Page 40

C
3 Sejměte stříhací jednotku.
C
4 Stříhací jednotku i její vnitřek vyčistěte
kartáčkem, který je v příslušenství.
C
5 Přístroj složíte tak, že do přístroje vložíte
zpět stříhací jednotku.
6 Zasuňte stříhací jednotku zpět až zaklapne.
Výměna dílů
Opotřebená nebo poškozená stříhací jednotka
smí být nahražena jen originálním náhradním
dílem Philips.
Ochrana životního prostředí
Vestavěný akumulátor obsahuje substance, které,
po jeho likvidaci, mohou ohrožovat životní
prostředí.
Když vám jednoho dne přístroj doslouží,
akumulátor z něj vyjměte.
ČESKY42
2
1
Page 41

Akumulátor nezahazujte do běžného domovního
odpadu, ale odevzdejte ho do příslušné sběrny.
Přístroj můžete též odevzdat v servisu firmy
Philips, kde sami vyjmou akumulátor a postarají se
o ekologické zlikvidování přístroje.
1 Odpojte přístroj od sítě a nechte motorek
v chodu dokud se sám nezastaví.
C
2 Sejměte stříhací jednotku.
C
3 Vhodným šroubovákem sejměte kovovou
sponu.
C
4 Otevřte přístroj.
C
5 Vysuňte z přístroje držák akumulátoru.
ČESKY 43
Page 42

C
6 Vložte šroubovák do malé štěrbiny v desce
s plošnými spoji v místě, naznačeném
šipkou. Zasuňte šroubovák tak daleko až se
část desky odlomí.
C
7 Vhodným šroubovákem oddělte
akumulátor od plastových dílů.
8 Vyjměte akumulátor i ostatní díly a
likvidujte je vhodným způsobem.
Po vyjmutí akumulátoru již nesmíte přístroj připojit
k síti!
Záruka & servis
Pokud byste potřebovali jakoukoli informaci nebo
měli nějaký problém, nahlédněte na internetovou
stránku www.philips.com. Můžete se též spojit s
Informačním střediskem firmy Philips, jehož
adresu, telefonní číslo i další možnosti
kontaktování najdete na letáčku s celosvětovou
zárukou.
ČESKY44
Page 43

Fontos
A készülék használatba vétele előtt olvassa el a
használati útmutatót. Őrizze meg az útmutatót
későbbi használatra.
◗ A készülék csatlakoztatása előtt ellenőrizze,
hogy a hálózati csatlakozódugón feltüntetett
feszültségérték megegyezik-e a helyi hálózati
feszültséggel.
◗ Vigyázzon, hogy a készüléket ne érje
nedvesség.
◗ A készüléket 15c és 35c°C közötti
hőmérsékleten töltse és tárolja.
◗ Zajszint: Lc = 69 dB [A]
Töltés
Mielőtt először használná a készüléket, teljesen
töltse fel.
Győződjön meg róla, hogy töltés közben
kikapcsolta-e a készüléket.
C
1 Dugja a készülék csatlakozó dugóját a
készülékbe.
2 Dugja be a hálózati csatlakozó dugót a fali
konnektorba.
B
A készülék töltését egy világító lámpa jelzi.
Az akkumulátor teljes feltöltése kb. 12 órát vesz
igénybe.
Ne töltse a készüléket 24 óránál tovább.
MAGYAR 45
Page 44

A teljesen feltöltött készüléket vezeték nélküli
használat esetén 35 percig használhatja.
Nyírás hálózathoz csatlakoztatott
készülékkel
◗ Nyírás a hálózathoz csatlakoztatott
hajnyíróval:
Kapcsolja ki a hajnyírót, csatlakoztassa a hálózati
csatlakozó dugót a fali konnektorba és várjon
néhány másodpercet, mielőtt ismét bekapcsolná.
Ha az akkumulátor teljesen lemerült: a készülék
bekapcsolása előtt várjon néhány percet.
Ne működtesse a készüléket hálózatról, ha az
akkumulátort teljesen feltöltötte.
Előkészítés a nyíráshoz
Nyírás a fésű tartozékkal:
C
1 Csúsztassa a fésű tartozék karjait és
szabályozó gombját a készülék
vezetősíneibe.
C
2 Nyomja meg a készülék hátlapján lévő
szabályozó gombot és csúsztassa a fésű
tartozékot a kívánt pozícióba (lásd a
táblázatot).
3 Engedje el a szabályozó gombot a fésű
rögzítéséhez.
MAGYAR46
2
1
Page 45

4 Kapcsolja be a készüléket.
Ha túl sok haj gyűlt össze a fésűn, vegye le a
fésűtartozékot és fújja ki és/vagy rázza ki a hajat a
fésűből.
Hajhosszúság-beállítások
fésű fokozathajhosszúság
1 4 mm
2 7 mm
3 10 mm
4 13 mm
5 15 mm
6 18 mm
7 21 mm
Nyírás fésűtartozék nélkül
C
1 A fésűtartozék kivételéhez nyomja meg a
készülék hátlapján lévő szabályozó gombot
és csúsztassa a fésűtartozékot az utolsó
pozícióba.
C
2 Húzza ki a fésű tartozékot a készülékből a
másik kezével.
Használat után mindig tisztítsa ki és töltse fel újra
a készüléket.
MAGYAR 47
2
1
Page 46

A hajnyírás módjai
Nyírás előtt a haját mindig a hajnövekedés
irányába fésülje ki.
Nyírás fésűtartozékkal
A fésűtartozékot maximum 21 mm-es hosszúságú
hajhoz használhatja.
◗ A legnagyobb beállítással (7-es állás) kezdje a
nyírást, hogy közben megismerkedjen a
hajnyíróval.
A készüléket mindig a haj növekedési irányával
szemben mozgassa.
C
◗ Úgy tartsa a hajnyírót, hogy a fésűtartozék
lapos oldala párhuzamosan álljon a fejével.
Lassan mozgassa a hajban és tartsa távol a
fejétől, egyszerre csak kis mennyiséget nyírjon.
◗ Fejének különböző részein változtassa a
hosszúságfokozat beállítást (lásd a táblázatot).
A formázó fésűn vagy az ujjain
keresztül nyírjon
Ezt a módszert 21 mm-nél hosszabb
hajhosszúságnál használja.
◗ Vegye ki a fésűtartozékot.
C
◗ Emeljen fel kevés hajat a formázó fésű
segítségével vagy fogja két ujja közé.
MAGYAR48
Page 47

C
◗ Emelje fel a hajat a fésű vagy az ujjai
segítségével, így csak a szükséges mennyiséget
tudja lenyírni.
◗ Nyírja le a fésűből vagy az ujjai közül kiálló
hajat.
◗ Ismételje ezt az eljárást a haj növekedési
irányával szemben mozgatva a készüléket.
◗ Gyakran fésülje át a hajat, hogy eltávolítsa a
lenyírt szálakat, és megtalálja az egyenetlen
részeket.
Kontúrvonal
◗ Vegye ki a fésűtartozékot.
C
◗ Tartsa a hajnyírót a vágócsúccsal lefelé.
C
◗ A nyak és az oldalszakáll kontúrvonalának
kiegyenlítéséhez átlapoló mozdulatokat
végezzen.
C
◗ A fül körüli nyíráshoz támassza a készülék
szélét a bőrhöz. Ügyeljen rá, hogy a fogazást
biztonságos távolságban tartsa a fültől.
MAGYAR 49
Page 48

C
◗ Lassan és óvatosan alakítsa ki a kívánt
kontúrvonalat.
Különböző hajformák készítése
Kefefrizura készítés
C
◗ Válassza ki a kívánt hajhosszúság fokozatot a
tarkón történő nyíráshoz.
C
◗ Nyírjon a tarkón a 'Nyírás fésűtartozékkal'
című részben leírt módon.
◗ Hátul és oldalt szabályozza a
hosszúságfokozatot a kívánt hajhosszúságnak
megfelelően.
C
◗ A fej oldalán és hátulján nyírjon, a feje tetején
lévő hajat hagyja nyíratlanul.
C
◗ Ha a fejtetőn lapos hajformát szeretne, akkor
a 'Nyírás formázófésű vagy az ujjai
használatával' című részben leírt technikával
nyírja a fejtetői hajat.
◗ Végül alakítsa ki a nyak, az oldalszakáll,
MAGYAR50
2
1
Page 49

valamint a fülek körüli részek vonalát a
'Kontúrvonal' című részben ismertetett
módszerrel.
Rövid haj
C
◗ Hátul és oldalt történő nyíráshoz válassza ki a
kívánt hajhosszúság fokozatot.
C
◗ Nyírjon a fej hátsó és oldalsó részein a 'Nyírás
fésűtartozékkal' című részben leírt módon.
◗ A feje tetején lévő hajat hagyja levágatlanul.
◗ A feje tetején lévő haj nyírásához válassza ki a
kívánt hajhosszúság fokozatot.
C
◗ Nyírjon a fejtetőn a 'Nyírás fésűtartozékkal'
című részben ismertetett technikával.
◗ Végül alakítsa ki a nyak, az oldalszakáll,
valamint a fülek körüli részek vonalát a
'Kontúrvonal' című részben olvasható
módszerrel.
Tisztítás
Ne használjon dörzsölő tisztítószereket
súrolókefét vagy folyékony szereket (pl. alkoholt
benzint vagy acetont) a készülék tisztításához.
1 Tisztítás előtt győződjön meg róla, hogy a
készüléket kikapcsolta-e és kihúzta-e a
MAGYAR 51
2
1
Page 50

hálózati csatlakozó dugót a fali
konnektorból.
C
2 Vegye ki a fésűtartozékot.
C
3 Vegye le a vágóegységet.
C
4 Tisztítsa meg a vágóegységet és a készülék
belsejét a hozzávaló kefével.
C
5 A hajnyíró összeszerelésénél akassza a
vágóegység kapcsait a burkolatba.
6 Kattintsa vissza a helyére a vágóegységet.
Cserelehetőség
A hibás vagy sérült vágóegységet csak az eredeti
Philips vágóegységgel helyettesítheti.
Környezetvédelem
A beépített újratölthető akkumulátor a
környezetre veszélyes anyagokat tartalmaz.
MAGYAR52
2
1
Page 51

A készülék selejtezésekor vegye ki a készülékből
az újratölthető akkumulátort.
Az akkumulátort ne dobja a normál háztartási
szemétbe, vigye el a hivatalos gyűjtőhelyre.
Egy Philips szakszervizbe is elviheti a készüléket,
ahol eltávolítják belőle az akkumulátort, és
gondoskodnak annak környezetbarát
kiselejtezéséről.
1 Húzza ki a készülék hálózati csatlakozó
dugóját a fali konnektorból, és hagyja
működni a készüléket, míg meg nem áll.
C
2 Vegye le a vágóegységet.
C
3 Vegye ki a fémkapcsot csavarhúzó
segítségével.
C
4 Nyissa fel a burkolatot.
C
5 Húzza ki az akkumulátortartót a
készülékből.
MAGYAR 53
Page 52

C
6 Tegye a csavarhúzót a kis nyílásba a nyíllal
jelzett nyomtatott áramkörű lapra.Addig
nyomja a csavarhúzót, míg a nyomtatott
áramkörű lap eltörik.
C
7 A csavarhúzó segítségével válassza szét az
akkumulátort a műanyag részektől.
8 Az akkumulátort és egyéb alkatrészeket a
környezetet nem veszélyeztető helyen
tartsa.
Felnyitás után ne csatlakoztassa a készüléket a
hálózathoz!
Jótállás és szerviz
Ha valamilyen információra van szüksége, vagy
valamilyen probléma merült fel,akkor látogasson
el a Philips honlapjára (www.philips.com), vagy
forduljon országa Philips vevőszolgálatához (a
telefonszámot megtalálja a világ minden részére
kiterjedő garancialevélen). Ha lakóhelyén nincs
vevőszolgálat, forduljon a Philips helyi
szaküzletéhez vagy a Philips háztartási kisgépek és
szépségápolási termékek üzletágának
vevőszolgálatához.
MAGYAR54
Page 53

Dôležité upozornenie
Pred použitím zariadenia si pozorne prečítajte
tento návod a odložte si ho na neskoršie použitie.
◗ Pred pripojením zariadenia do siete
skontrolujte, či napätie uvedené na zástrčke
kábla súhlasí s napätím v sieti.
◗ Uistite sa, že zariadenie nemôže prísť do
styku s vodou.
◗ Zariadenie nabíjajte a odkladajte pri teplote
15c až 35c.
◗ Deklarovaná hodnota emisie hluku tohto
spotrebiča je 69 dB(A), čo predstavuje hladinu
A akustického výkonu vzhľadom na
referenčný akustický výkon 1 pW.
Nabíjanie
Pred prvým použitím zariadenia nechajte batériu
úplne nabiť.
Uistite sa, že počas nabíjania je zariadenie vypnuté.
C
1 Koncovku kábla zasuňte do zariadenia.
2 Sieťovú zástrčku zasuňte do zásuvky
elektrického rozvodu.
B
Rozsvietené kontrolné svetlo znamená nabíjanie
zariadenia.
Úplné nabitie batérie trvá približne 12 hodín.
Zariadenie nenabíjajte dlhšie ako 24 hodín.
SLOVENSKY 55
Page 54

Zariadenie s úplne nabitou batériou umožňuje až
35 minút strihania bez toho, aby ste ho museli
pripojiť do siete.
Strihanie so zariadením pripojeným
do siete
◗ Strihanie vlasov so zariadením pripojeným do
siete:
Strojček na vlasy vypnite, pripojte ho do siete,
počkajte niekoľko sekúnd a potom ho znovu
zapnite. Ak je batéria vybitá: počkajte niekoľko
minút a potom zariadenie zapnite.
Ak je batéria úplne nabitá, nepripájajte zariadenie
do siete.
Príprava na strihanie
Strihanie s hrebeňovým nástavcom:
C
1 Ramená a gombík nastavenia hrebeňového
nástavca zasuňte do vodiacich drážok
zariadenia.
C
2 Stlačte gombík na zadnej strane zariadenia
a nastavte požadovanú polohu
hrebeňového nástavca (viď tabuľka).
3 Uvoľnite gombík nastavenia čím zaistíte
hrebeň.
4 Zapnite zariadenie.
SLOVENSKY56
2
1
Page 55

Ak sa v nástavci nahromadí väčšie množstvo
vlasov,odpojte nástavec a vyfúknite a/alebo
vytraste z neho vlasy.
Nastavenia dĺžky strihu
nastavenie hrebeňa dĺžka vlasov
1 4 mm
2 7 mm
3 10 mm
4 13 mm
5 15 mm
6 18 mm
7 21 mm
Strihanie bez hrebeňového nástavca
C
1 Hrebeňový nástavec odpojíte tak, že
stlačíte gombík nastavenia na zadnej strane
zariadenia a nástavec posuniete do jeho
krajnej polohy.
C
2 Gombík držte stlačený a voľnou rukou
odpojte hrebeňový nástavec zo zariadenia.
Zariadenie vyčistite a nabite po každom použití.
Techniky strihania
Pred strihaním vlasy vždy prečešte v smere ich
rastu.
SLOVENSKY 57
2
1
Page 56

Strihanie s hrebeňovým nástavcom
Hrebeňový nástavec môžete použiť na ostrihanie
vlasov na dĺžku do 21 mm.
◗ Aby ste sa zoznámili so strojčekom,strihať
začnite pri nastavení maximálnej dĺžky vlasov
(t.j. poloha 7).
Strojčekom pohybujte vždy proti smeru rastu
vlasov.
C
◗ Strojček držte tak, aby plochá strana
hrebeňového nástavca bola paralelne s hlavou.
Pomaly ním prechádzajte cez vlasy a potom
smerom preč od hlavy, strihajúc naraz len
malé množstvo vlasov.
◗ Zmeňte dĺžku nastavenia (viď tabuľka),aby ste
dosiahli rôznu dĺžku vlasov na rôznych
častiach hlavy.
Strihanie pomocou hrebeňa alebo
prstov
Táto technika sa používa, ak chcete dosiahnuť
strih s dĺžkou vlasov väčšou ako 21 mm.
◗ Odpojte hrebeňový nástavec.
C
◗ Hrebeňom alebo prstami zodvihnite malý
prameň vlasov.
C
◗ Pomocou hrebeňa alebo prstov zodvihnite
vlasy a nechajte vyčnievať len tú časť, ktorú
chcete ostrihať.
◗ Ostrihajte vlasy vyčnievajúce nad hrebeň
alebo prsty.
SLOVENSKY58
Page 57

◗ Pokračujte rovnakým spôsobom proti smeru
rastu vlasov.
◗ Ostrihané vlasy pravidelne prečešte a sledujte,
či je strih rovnomerný.
Zarovnávanie
◗ Odpojte hrebeňový nástavec.
C
◗ Strojček držte tak, aby strihacia hlava
smerovala nadol.
C
◗ Prekrývajúcimi sa ťahmi strojčeka zvýraznite
líniu krku a bokombriad.
C
◗ Pri strihaní vlasov okolo uší oprite hranu
strihacej hlavy o pokožku. Uistite sa, že je v
dostatočnej vzdialenosti od ušnice.
C
◗ Pri zarovnaní postupujte pomaly a opatrne.
SLOVENSKY 59
Page 58

Tvarovanie účesov
Vojenský strih
C
◗ Zvoľte nastavenie dĺžky vlasov vhodné pre
oblasť krku.
C
◗ Pri strihaní oblasti krku použite postup
uvedený v časti "Strihanie s hrebeňovým
nástavcom".
◗ Nastavenie dĺžky strihu prispôsobte
požadovanej dĺžke vlasov vzadu a na bokoch
hlavy.
C
◗ Ostrihajte len boky a zad hlavy, vlasy na
temene nestrihajte.
C
◗ Aby na temene hlavy vlasy vytvorili rovnú
plochu, použite postup uvedený v časti
"Strihanie pomocou hrebeňa alebo prstov".
◗ Strih ukočite tak, že zarovnáte líniu krku,
bokombriad a okolie uší podľa postupu
uvedeného v časti "Zarovnávanie".
SLOVENSKY60
2
1
Page 59

Krátky strih
C
◗ Zvoľte nastavenie dĺžky vlasov vhodné pre
zadnú a bočné strany hlavy.
C
◗ Pri strihaní zadnej a bočných strán hlavy
použite postup uvedený v časti "Strihanie s
hrebeňovým nástavcom".
◗ Vlasy na temene nestrihajte.
◗ Zvoľte nastavenie dĺžky vlasov vhodné pre
temeno.
C
◗ Pri strihaní temena použite postup uvedený v
časti "Strihanie s hrebeňovým nástavcom".
◗ Strih ukočite tak, že zarovnáte líniu krku,
bokombriad a okolie uší podľa postupu
uvedeného v časti "Zarovnávanie".
Čistenie
Na čistenie zariadenia nepoužívajte abrazívne
prípravky ani tekutiny ako alkohol, benzín alebo
acetón.
1 Uistite sa, že pred čistením ste zariadenie
vypli a odpojili ho zo siete.
C
2 Odpojte hrebeňový nástavec.
SLOVENSKY 61
2
1
Page 60

C
3 Odpojte strihaciu jednotku.
C
4 Priloženou kefkou vyčistite strihaciu
jednotku a vnútro zariadenia.
C
5 Aby ste zmontovali zariadenie, vložte háčik
strihacej jednotky na pôvodné miesto v
zariadení.
6 Strihaciu jednotku zatlačte do zariadenia až
začujete kliknutie.
Výmena
Opotrebovanú alebo poškodenú strihaciu
jednotku môžete vymeniť len za originálnu
strihaciu jednotku Philips.
Životné prostredie
Zabudovaná dobíjateľná batéria obsahujú zložky,
ktoré by mohli znečistiť životné prostredie.
Skôr, ako zneškodníte zariadenie, vyberte
dobíjateľnú batériu.
SLOVENSKY62
2
1
Page 61

Batériu neodhadzujte do bežného kuchynského
odpadu, ale odneste ju do zberne.
Zariadenie môžete odniesť aj do servisného
centra spoločnosti Philips, kde Vám ochotne
pomôžu batériu vybrať a zneškodniť spôsobom
bezpečným pre životné prostredie.
1 Zariadenie odpojte zo siete a motor
nechajte pracovať, až kým nezastane.
C
2 Odpojte strihaciu jednotku.
C
3 Pomocou skrutkovača odstráňte kovové
spony.
C
4 Otvorte kryt.
C
5 Zo zariadenia vyberte schránku s batériou.
SLOVENSKY 63
Page 62

C
6 Skrutkovač vložte do malej drážky
plošného obvodu označenej šipkou.
Zatlačte skrutkovačom,až kým sa plošný
obvod nezlomí.
C
7 Skrutkovačom oddeľte batériu od plastu.
8 Batériu a ostatné súčiastky zneškodnite
spôsobom bezpečným pre životné
prostredie.
Po rozobratí už zariadenie nepripájajte do siete!
Záruka a servis
Ak potrebujete informácie, alebo máte problém,
prosíme Vás, aby ste navštívili www stránku
spoločnosti Philips - www.philips.com, alebo sa
obrátili na Centrum služieb zákazníkom
spoločnosti Philips vo Vašej krajine (telefónne číslo
Centra nájdete v priloženom celosvetovo
platnom záručnom liste). Ak sa vo Vašej krajine
toto Centrum nenachádza, obráťte sa na
miestneho predajcu výrobkov Philips, alebo
kontaktujte Oddelenie služieb Philips - divízia
domáce spotrebiče a osobná starostlivosť.
SLOVENSKY64
Page 63

Увага!
Прочитайте цю інструкцію уважно перед
використанням пристрою та зберігайте для
подальшого використання.
◗ Перевірте, чи збігається напруга, зазначена
на блоку живлення, з напругою у мережі
вашого будинку, перед тим, як вмикати
пристрій.
◗ Не дозволяйте приладові намокнути.
◗ Заряджайте та зберігайте пристрій при
температурі від 15c до 35c.
◗ Рівень шуму: Lc= 69 dB [A]
Зарядка приладу
Заряджайте пристрій повністю перед першим
використанням.
Перед зарядкою приладу пересвідчиться, що
він виключений.
C
1 Під'єднайте до приладу з'єднувальний
штекер.
2 Вставте вилку шнура живлення у розетку
електромережі.
B
Сигнальна лампа загорається, показуючи, що
пристрій заряджається.
Для повного заряду акумулятора потрібно
прибл. 12 годин.
Ніколи не заряджайте прилад довше, ніж 24
години.
УКРАЇНСЬКІЙ 65
Page 64

Повністю заряджений пристрій забезпечує до
35 хвилин підстригання без приєднання до
мережі.
Стрижка при живленні від
електромережі
◗ Для підстригання волосся пристроєм,
приєднаним до мережі:
Вимкніть машинку, приєднайте її до мережі та
зачекайте декілька секунд перед тим, як
вмикати її знову. Якщо акумулятор повністю
розряджений: зачекайте декілька хвилин перед
тим, як вмикати пристрій знову.
Не підключайте машинку до електромереж
коли акумулятор повністю заряджений.
Підготовка до підстригання
Підстригання з насадкою-гребінцем
C
1 Посуньте важелі та кнопку регулювання
насадки-гребінця вздовж спрямовуючих
пазів приладу.
C
2 Натисніть кнопку регулювання на задній
частині приладу і зсуньте насадкугребінець у бажане положення (див.
таблицю).
3 Відпустіть кнопку регулювання, фіксуючи
гребінець.
УКРАЇНСЬКІЙ66
2
1
Page 65

4 Ввімкніть прилад.
Якщо у зоні гребінця зібралося багато волосся,
зніміть насадку-гребінець і видаліть волосся
струшуванням та / чи здуванням.
Установки довжини волосся
установка гребінця довжиною волосся
1 4 мм
2 7 мм
3 10 мм
4 13 мм
5 15 мм
6 18 мм
7 21 мм
Стрижка без насадки-гребінця
C
1 Щоб зняти насадку-гребінець, натисніть
кнопку регулювання на задній частині
приладу та зсуньте насадку-гребінець у її
кінцеве положення.
C
2 Витягніть насадку з гребінцем з
пристрою іншою рукою.
Чистіть та підзаряджайте пристрій кожного
разу після використання.
УКРАЇНСЬКІЙ 67
2
1
Page 66

Техніка підстригання
Перед підстриганням завжди зачісуйте волосся
у напрямку його росту.
Стрижка з використанням насадки
з гребінцем
Підстригаючи з насадкою-гребінцем, можна
одержати довжину волосся до 21 мм.
◗ Починайте підстригання при установці на
максимальну довжину волосся (наприклад,
положення 7) для ознайомлення з дією
машинки.
Завжди просувайте машинку у напрямку росту
волосся.
C
◗ Тримайте машинку так, щоб пласка сторона
насадки-гребінця була паралельною
поверхні голови. Повільно рухайте машинку
спочатку крізь волосся, а потім від голови,
підстригаючи за один раз невелику
кількість волосся.
◗ Щоб одержати різну довжину волосся на
різних ділянках голови, змінюйте
положення насадки-гребінця (див.
таблицю).
Підстригання над гребінцем для
моделювання або над пальцями
Цей спосіб застосовується тоді, коли треба
одержати довжину волосся понад 21 мм.
◗ Зніміть насадку-гребінець.
УКРАЇНСЬКІЙ68
Page 67

C
◗ Підніміть за один раз невелику кількість
волосся гребінцем для моделювання чи
затисніть частину волосся між двома
пальцями.
C
◗ Піднімайте волосся гребінцем чи пальцями
так, щоб над ними залишилась лише та
довжина волосся, яку ви хочете зрізати.
◗ Зріжте волосся, що виступає над гребінцем
чи пальцями.
◗ Продовжуйте цю процедуру проти
напрямку росту волосся.
◗ Часто розчісуйте волосся, щоб усувати
відрізане волосся та для перевірки рівності
підстригання.
Створення контуру
◗ Зніміть насадку-гребінець.
C
◗ Тримайте машинку для підстригання
різальним блоком донизу.
C
◗ Щоб одержати чіткі обриси волосся на шиї
та баках, робіть машинкою проходи, що
перекриваються.
УКРАЇНСЬКІЙ 69
Page 68

C
◗ Для підстригання волосся навколо вух
покладіть край ріжучого блоку на шкіру.
Переконайтеся, що зубці знаходяться на
безпечній відстані від вух.
C
◗ Повільно та обережно виробіть бажаний
контур волосся.
Створення різноманітних зачісок
Чоловіча коротка стрижка "їжак"
C
◗ Виберіть бажану довжину волосся для
ділянки коло шиї.
C
◗ Підстригайте волосся на потилиці за
допомогою методу "підстригання з
насадкою-гребінцем".
◗ Відрегулюйте положення насадки для
бажаної довжини волосся на потилиці та
боках голови.
C
◗ Підстрижіть боки голови та потилицю,
залишаючи волосся на маківці
нестриженим.
УКРАЇНСЬКІЙ70
2
1
Page 69

C
◗ Для того, щоб верхівка виглядала рівною,
підстригайте волосся на маківці за методом
"підстригання через гребінець або пальці".
◗ Закінчуйте зачіску підстриганням лінії шиї,
скронь та області навколо вух за методом
"контурного підстригання".
Коротка стрижка
C
◗ Виберіть бажану довжину волосся на
потилиці та боках голови.
C
◗ Підстригайте волосся ззаду та по боках
голови за методом "підстригання з
насадкою-гребінцем".
◗ Залишіть волосся на маківці нестриженим.
◗ Виберіть бажану довжину волосся на
маківці.
C
◗ Підстригайте маківку за методом
"підстригання з насадкою-гребінцем".
◗ Закінчуйте зачіску підстриганням шиї,
скронь та області навколо вух за методом
"контурного підстригання".
Чищення
Не застосовуйте абразивних миючих засо
металевих мийок чи такі рідини, як спирт
бензин, ацетон, для чищення цього пристрою.
УКРАЇНСЬКІЙ 71
2
1
Page 70

1 Перед початком чищення впевніться,
що прилад вимкнено та від`єднано від
електромережі.
C
2 Зніміть насадку-гребінець.
C
3 Зніміть ріжучий блок.
C
4 Почистіть ріжучий блок та всередині
приладу за допомогою щітки, що
додається.
C
5 Щоб знову скласти машинку, вставте
гачок ріжучого блоку у корпус.
6 Зсувайте ріжучий блок назад, поки не
почуєте клацання.
Заміна
Для заміни спрацьованого чи пошкодженого
ріжучого блоку користуйтесь лише
оригінальними змінними ріжуючими блоками
компанії Philips.
УКРАЇНСЬКІЙ72
2
1
Page 71

Охорона довкілля
Вмонтований акумулятор вміщує речовини, що
можуть забруднювати довкілля.
Коли цей прилад відслужить свій термін, з
нього необхідно вийняти акумулятор.
Не кидайте акумулятор до звичайного сміття, а
віднесіть його до спеціального пункту їх збору.
Ви також можете віднести пристрій до
сервісного центру "Philips", де витягнуть
акумулятор та ліквідують його безпечним для
середовища чином.
1 Від'єднайте машинку від електромережі
і дайте їй попрацювати до повної
зупинки двигуна.
C
2 Зніміть ріжучий блок.
C
3 Вийміть металевий затискач за
допомогою викрутки.
C
4 Відкрийте корпус.
УКРАЇНСЬКІЙ 73
Page 72

C
5 Витягніть тримач акумулятора з
пристрою.
C
6 Встроміть викрутку у малий паз на
друкованій монтажній платі,позначеній
стрілкою. Натискайте викруткою до тих
пір, аж поки частина друкованої
монтажної плати не трісне.
C
7 Від'єднайте акумулятор від пластмасової
частини блоку живлення викруткою.
8 Утилізуйте акумулятор та інші
компоненти, не забруднюючи
навколишнього середовища.
Не під'єднуйте знову до електромереж
відкритий прилад!
Гарантія та сервіс
Якщо Вам потрібна інформація або у Вас
виникли проблеми з приладом, будь ласка,
завітайте до веб-сайту фірми Philips (aдреса в
Інтернеті: www.philips.com) або зв'яжіться з
найближчим центром Philips по
обслуговуванню клієнтів Philips Customer Care
Centreу Вашій країні (Ви можете знайти його
номер телефону у єдиному гарантійному
талоні, дійсному в усьому світі). Якщо у Вашій
УКРАЇНСЬКІЙ74
Page 73

країні немає центру Philips по обслуговуванню
клієнтів Philips Customer Care Centre,
зверніться до Вашого місцевого торгового
представникафірми Philips або зв'яжіться з
департаментом обслуговування Service
Department відділення Philips Domestic
Appliances and Personal CareBV.
УКРАЇНСЬКІЙ 75
Page 74

Važno
Prije priključenja na napajanje provjerite je li
napon označen na utikaču adaptera istovjetan
naponu Vaše mreže.
◗ Prije nego što uključite aparat, provjerite da li
napon na mrežnom utikaču odgovara naponu
lokalne mreže.
◗ Pazite da se aparat ne smoči.
◗ Punite i držite aparat na temperaturi između
15c and 35c.
◗ Razina buke: Lc= 69 dB [A]
Punjenje
Prije prve uporabe, do kraja napunite aparat.
Tijekom punjenja aparat mora biti isključen.
C
1 Utaknite utikač u aparat.
2 Utaknite mrežni kabel u zidnu utičnicu.
B
Kontrolna žaruljica se pali pokazujući da se
aparat puni.
Za potpuno punjenje baterije potrebno je
približno 12 sati.
Ne punite aparat dulje od 24 sata.
Potpuno napunjenim aparatom moguće je šišanje
do 35 minuta bez priključenja na mrežu.
HRVATSKI76
Page 75

Mrežno napajanje
◗ Šišanje aparatom priključenim na mrežno
napajanje:
Isključite aparat, priključite ga na mrežu i prije
ponovnog uključenja pričekajte nekoliko sekundi.
Ako je baterija potpuno prazna: prije uključenja
pričekajte nekoliko minuta.
Ne priključujte aparat na napajanje kada je
baterija sasvim napunjena.
Priprema za šišanje
Šišanje sa češljem
C
1 Postavite ručice i tipku za podešavanje
češlja u vodilice aparata.
C
2 Pritisnite tipku za podešavanje na stražnjoj
strani aparata i pomaknite češalj na željeni
položaj (pogledajte tablicu).
3 Otpustite tipku za podešavanje kako bi
blokirali češalj.
4 Uključite aparat.
Ako se u češlju nakupilo mnogo kose, skinite
češalj i otpuhnite i otpuhnite i/ili otresite kosu sa
češlja.
HRVATSKI 77
2
1
Page 76

Tablica podešenja i duljine kose
položaj češlja duljina kose
1 4 mm
2 7 mm
3 10 mm
4 13 mm
5 15 mm
6 18 mm
7 21 mm
Šišanje bez češlja
C
1 Za skidanje češlja, pritisnite tipku za
podešavanje na stražnjoj strani aparata i
pomaknite češalj na krajnji položaj.
C
2 Drugom rukom izvucite češalj s aparata.
Nakon svake uporabe očistite i napunite aparat.
Tehnike šišanja
Prije šišanja uvijek počešljajte kosu u smjeru rasta.
HRVATSKI78
2
1
Page 77

Šišanje s češljem
Češalj se koristi za šišanje kose do 21 mm.
◗ Pošnite šišati na postavi za maksimalnu duljinu
kose (to jest, na položaju 7) kako biste se
upoznali s radom aparata za šišanje.
Uvijek pomičite aparat za šišanje u smjeru
suprotnom od rasta kose.
C
◗ Držite aparat tako da je ravna strana češlja u
ravnini s glavom.Polako ga pomičite kroz kosu
i zatim od glave, šišajući samo malo kose u
jednom potezu.
◗ Promijenite podešenje (pogledajte tablicu) za
postizanje različitih duljina na različitim
dijelovima glave.
Šišanje i oblikovanje češljem ili
prstima
Ova tehnika se koristi za šišanje kose preko 21
mm duljine.
◗ Skinite češalj.
C
◗ Češljem odignite malo kose ili je zahvatite
između dva prsta.
C
◗ Podignite kosu češljem ili prstima tako da viri
samo onoliko kose koliko je potrebno
odrezati.
◗ Odrežite kosu koja viri iznad češlja ili prstiju.
◗ Nastavite s radnjom u smjeru suprotnom od
rasta kose.
HRVATSKI 79
Page 78

◗ Često češljajte kako biste odstranili ošišanu
kosu i provjerili postoje li nejednako ošišani
dijelovi.
Poravnavanje
◗ Skinite češalj.
C
◗ Držite aparat s rezačem usmjerenim prema
dolje.
C
◗ Preklapajućim pokretima aparata jasno
poravnajte kosu na vratu i zaliske.
C
◗ Da biste ošišali kosu oko ušiju,stavite rub
aparata za šišanje na kožu. Pazite da se zupci
nalaze na sigurnoj udaljenosti od ušiju.
C
◗ Polako i pažljivo oblikujte željenu liniju.
HRVATSKI80
Page 79

Izrada raznih frizura
Sportska frizura
C
◗ Odaberite željenu duljinu kose na vratu.
C
◗ Tehnikom "Šišanja s češljem" ošišajte kosu na
vratu.
◗ Podesite željenu duljinu za stražnju i bočne
strane glave.
C
◗ Ošišajte kosu na bočnim i stražnjoj strani
glave ostavljajući kosu na vrhu glave netaknutu.
C
◗ Za frizuru s plosnatim vrhom glave, kosu na
vrhu glave šišajte tehnikom "Šišanja preko
češlja za oblikovanje ili prstiju".
◗ Frizuru završite šišanjem kose na vratu,
zalizaka i područja oko ušiju tehnikom
"Vanjskih rubova".
Kratka kosa
C
◗ Odaberite željenu duljinu kose na stražnjoj i
bočnim stranama glave.
HRVATSKI 81
2
1
2
1
Page 80

C
◗ Stražnju stranu glave i kosu sa strane šišajte
tehnikom "Šišanja s češljem".
◗ Ostavite kosu na vrhu glave netaknutu.
◗ Odaberite željenu duljinu kose na vrhu glave.
C
◗ Kosu na vrhu glave šišajte tehnikom "Šišanje s
češljem".
◗ Frizuru završite šišanjem kose na vratu,
zalizaka i područja oko ušiju tehnikom
"Vanjskih rubova".
Čišćenje
Za čišćenje aparata nemojte rabiti abrazivna
sredstva, sredstva za ribanje ili tekućine kao što su
alkohol, benzin ili aceton.
1 Prije čišćenja aparat mora biti isključen i
odspojen iz napajanja.
C
2 Skinite češalj.
C
3 Skinite reznu jedinicu.
C
4 Očistite reznu jedinicu i unutrašnjost
aparata isporučenom četkicom.
HRVATSKI82
Page 81

C
5 Za sastavljanje aparata,umetnite kukicu
rezne jedinice u kućište.
6 Gurajte reznu jedinicu natrag na aparat
dok ne začujete "klik".
Zamjena dijelova
Istrošena ili oštećena rezna jedinica se mora
zamijeniti isključivo originalnom Philips reznom
jedinicom.
Napomene o zaštiti okoliša
Ugrađena akumulatorska baterija sadrži tvari
štetne za okoliš.
Kada odbacujete aparat, izvadite akumulatorsku
bateriju.
Ne odbacujte bateriju sa kućnim otpadom, već je
odnesite na za to namijenjeno odlagalište.
Aparat možete odnijeti i u Philipsov servisni
centar, gdje će osoblje izvaditi bateriju umjesto Vas
i odložiti ju na za to namijenjeno odlagalište.
1 Isključite aparat iz napajanja i pustite da
radi dok se motor ne zaustavi.
C
2 Skinite reznu jedinicu.
HRVATSKI 83
2
1
Page 82

C
3 Odvijačem skinite metalnu hvataljku.
C
4 Otvorite kućište.
C
5 Izvucite držač baterije iz aparata.
C
6 Umetnite odvijač u mali utor ploče s
kontaktima označen strelicom. Pritisnite
odvijač dok se dio ploče s kontaktima ne
polomi.
C
7 Odvijačem odvojite bateriju od plastičnog
dijela.
8 Odbacite bateriju i druge dijelove u skladu
sa zaštitom okoliša.
Ne priključujte aparat u napajanje nakon
otvaranja!
HRVATSKI84
Page 83

Jamstvo i servis
Ako su Vam potrebne određene informacije ili
ako imate problem, posjetite Philipsove Web
stranice na www.philips.com ili kontaktirajte
Philipsov korisnički centar u svojoj zemlji
(telefonski broj ćete naći na globalnom
jamstvenom listu).Ako u Vašoj zamlji ne postoji
korisnički centar, obratite se lokalnom dobavljaču
Philipsovih proizvoda ili kontaktirajte servis
Philipsovih kućanskih aparata i aparata za osobnu
njegu (Service Depar tment of Philips Domestic
Appliances and Personal Care BV).
HRVATSKI 85
Page 84

Pomembno
Skrbno preberite ta navodila in jih shranite tudi za
kasnejšo uporabo.
◗ Preden aparat priključite na omrežje,
preverite, če napetost označena na omrežnem
vtikaču, ustreza napetosti v lokalnem
električnem omrežju.
◗ Pazite, da aparata ne zmočite.
◗ Aparat polnite in hranite na temperaturi med
15c in 35c. stopinjami Celzija.
◗ Stopnja hrupa: Lc = 69 dB [A]
Polnjenje
Pred prvo uporabo morate aparat napolniti do
konca.
Pazite, da aparat bo aparat med polnjenjem
izklopljen.
C
1 Vstavite vtikač aparata v aparat.
2 Vstavite vtikač v omrežno vtičnico.
B
Kontrolna lučka zasveti in s tem ponazori, da se
aparat polni.
Da se baterije napolnijo do konca, je potrebno
približno 12 ur polnjenja.
Aparata ne polnite več kot 24 ur.
Polno napolnjen aparat zdrži približno 35 minut
brezžičnega striženja.
SLOVENŠČINA86
Page 85

Striženje s priključno vrvico oz. kablom
◗ Striženje z aparatom, priključenim na
električno omrežje:
Izklopite aparat, priključite ga na električno
omrežje in počakajte nekaj sekund, preden ga
znova vklopite. Če je baterija popolnoma prazna:
počakajte nekaj minut, preden vklopite aparat.
Ko je baterija polno napolnjena, aparat ne sme
delovati priključen na električno omrežje.
Priprava na striženje
Striženje z nastavkom za striženje:
C
1 Namestite ročice in nastavitveni gumb
nastavka v vodila na aparatu.
C
2 Pritisnite nastavitveni gumb na hrbtni
strani aparata in potisnite nastavek na
želeni položaj (glej tabelo).
3 Spustite nastavitveni gumb,da blokirate
nastavek.
4 Vklopite aparat.
Če se je na glavniku nabralo veliko las, ga
odstranite in spihajte ali stresite lase z njega.
SLOVENŠČINA 87
2
1
Page 86

Nastavitve dolžine striženja
Nastavitev glavnika dolžina las
1 4 mm
2 7 mm
3 10 mm
4 13 mm
5 15 mm
6 18 mm
7 21 mm
Striženje brez nastavka (glavnička)
C
1 Nastavek odstranite tako, da pritisnete
nastavitveni gumb na hrbtni strani aparata
in nastavek potisnete do končnega
položaja.
C
2 Z drugo roko odstranite nastavek iz vodil
aparata.
Po vsaki uporabi aparat očistite in napolnite.
Tehnike striženja
Pred striženjem lase vedno počešite v smeri
njihove rasti.
Striženje z nastavkom za striženje v
obliki glavnika
S tem nastavkom lahko ostrižete lase do dolžine
21 mm.
SLOVENŠČINA88
2
1
Page 87

◗ Začnite s striženjem na nastavitvi za
maksimalno dolžino las (to je položaj 7), da se
navadite na aparat.
Aparat premikajte vedno v nasprotni smeri rasti
las.
C
◗ Aparat držite tako,da bo ravna ploskev
glavnika vzporedno z glavo.Premikajte aparat
skozi lase in nato stran od glave in pri tem
ostrižite naenkrat le majhno količino las.
◗ Spreminjajte nastavitev dolžine (glej tabelo),da
boste na različnih mestih glave ostrigli lase na
različno dolžino.
Striženje čez glavnik ali prste
S to tehniko lahko strižete lase na dolžino preko
21 mm.
◗ Odstranite nastavek za striženje.
C
◗ Dvignite manjšo količino las z glavnikom ali jih
pridržite med dvema prstoma.
C
◗ Dvignite lase z glavnikom ali prsti,tako da
gleda ven le dožina las, ki jo želite ostriči.
◗ Odrežite lase, ki štrlijo iz glavnika oz. med
prsti.
◗ Nadaljujte s tem postopkom v nasprotni
smeri smeri rasti las.
◗ Lase pogosto počešite, da odstranite odrezane
lase in preverite neravno odrezane predele.
SLOVENŠČINA 89
Page 88

Oblikovanje zunanje linije pričeske
◗ Odstranite nastavek za striženje.
C
◗ Držite aparat, tako da je rezilo usmerjeno
navzdol.
C
◗ Delajte prekrivajoče poteze za čisto linijo na
vratu in zalizcih.
C
◗ Da ostrižete lase okoli ušes, položite konico
rezila na kožo.Pazite, da bodo zobci rezila na
varni razdalji od ušes.
C
◗ Željeno zunanjo linijo oblikujte počasi in
pazljivo.
SLOVENŠČINA90
Page 89

Ustvarjanje različnih pričesk
Ploska pričeska
C
◗ Nastavite željeno dolžino za predel vratu.
C
◗ Predel vratu si postrižite s tehniko striženja z
nastavkom.
◗ Nastavite dolžino striženja na željeno dolžino
las na temenu in ob straneh.
C
◗ Ostrižite lase ob straneh in na temenu, vrhnji
del glave pa pustite nepostrižen.
C
◗ Za ploski izgled pričeske na vrhu glave, si lase
postrižite s tehniko striženja preko glavnika ali
prstov.
◗ Striženje las končajte s striženjem linije vratu,
zalizcev in predela okoli ušes s pomočjo
tehnike striženja zunanje linije.
Striženje na kratko
C
◗ Nastavite željeno dolžino striženja za lase na
temenu in ob straneh.
SLOVENŠČINA 91
2
1
2
1
Page 90

C
◗ S pomočjo tehnike striženja z nastavkom si
ostrižite lase na temenu in ob straneh.
◗ Pustite lase na vrhu glave nepostrižene.
◗ Nastavite željeno dolžino striženja za lase na
vrhu glave.
C
◗ S tehniko striženja z nastavkom si postrižite
lase na vrhu glave.
◗ Striženje las končajte s striženjem linije vratu,
zalizcev in predela okoli ušes s pomočjo
tehnike striženja zunanje linije.
Čiščenje
Za čiščenje aparata ne uporabljajte jedkih in
agresivnih sredstev in tekočin, kot so npr. alkohol
bencin ali aceton.
1 Pred čiščenjem vedno izklopite aparat in ga
izključite iz električnega omrežja.
C
2 Odstranite nastavek za striženje.
C
3 Odstranite rezilno enoto.
C
4 S priloženo krtačko očistite rezilno enoto
in notranjost aparata.
SLOVENŠČINA92
Page 91

C
5 Da ponovno sestavite aparat,vstavite
kaveljček rezilne enote v ohišje.
6 Potisnite rezilno enoto nazaj na aparat,
dokler ne zaslišite klika.
Zamenjava
Izrabljeno ali poškodovano rezilno enoto lahko
zamenjate le z originalno, Philipsovo rezilno enoto.
Okolje
Vgrajena napolnjiva baterija vsebuje snovi, ki lahko
onesnažijo okolje.
Ko boste aparat zavrgli, baterijo odstranite.
Baterije ne odvržite skupaj z ostalimi
gospodinjskimi odpadki, ampak jo odvržite na
uradno določeno mesto za zbiranje tovrstnih
odpadkov.
Aparat lahko odnesete tudi na Philipsov servisni
center, kjer vam bo osebje z veseljem pomagalo
baterijo odstraniti in odvreči na okolju prijazen
način.
1 Aparat izključite iz električnega omrežja in
ga pustite delovati, dokler se sam ne
zaustavi.
C
2 Odstranite rezilno enoto.
SLOVENŠČINA 93
2
1
Page 92

C
3 Z izvijačem odstranite kovinski zatič.
C
4 Odprite pokrov ohišja.
C
5 Odstranite nosilec baterije iz aparata.
C
6 Vstavite izvijač v majhno režo na plošči s
tiskanim vezjem, ki je označena s puščico.
Pritisnite izvijač navzdol, tako da se del
tiskanega vezja odlomi.
C
7 Z izvijačem ločite baterijo od plastičnega
dela.
8 Odvrzite baterijo in ostale komponente na
okolju prijazen način.
Potem, ko enkrat aparat odprete, ga ne smete več
priključiti na električno omrežje!
SLOVENŠČINA94
Page 93

Garancija in servis
Če potrebujete servis ali informacijo, ali če imate z
delovanjem aparata težave, obiščite Philipsovo
spletno stran na internetu www.philips.com ali pa
pokličite Philipsov servisni center v vaši državi
(telefonske številke najdete na mednarodnem
garancijskem listu). Če v vaši državi ni Philipsovega
storitvenega centra, se obrnite na vašega trgovca
ali na servisno organizacijo za male gospodinjske
aparate in aparate za osebno nego (www.ntt.si).
Izdajatelj navodil za uporabo: Philips
Slovenija,d.o.o.Tržaška 132, 1000 Ljubljana, tel:
+386 1 477 88 23.
SLOVENŠČINA 95
Page 94

969798
Page 95

Page 96

4203 000 47023
 Loading...