

Page 1

Shaver
HQ8894
SENSOTEC
Philips Domestic Appliances and Personal Care
Service Manual
PRODUCT INFORMATION
General:
- Rechargeable / Main shaver
- Constant motor voltage
- Electronic push on/off
- Washable
Safety information
- This product meets the requirements regarding
interference suppression on radio and TV.
- After the product has been repaired, it should function
properly and has to meet the safety requirements as
officially laid down at this moment.
TECHNICAL INFORMATION
- Voltage : 100 - 240 Volt 50 - 60 Hz
- Motor voltage : 3,6 Volt
- Speed of cutters : > 2100 r.p.m.
- Shaving heads : HQ8 - 4222 036 05820
- Battery capacity indication : Polymer LED
- Battery full indication : Polymer LED
- Battery low indication : Polymer LED
- Charge indication : Polymer LED
- Battery : Li-ion
- SAP coding : HQ8894
DISASSEMBLY- AND RE-ASSEMBLY ADVISE
Disassembly:
- Remove shaving unit, to prevent damages during
repairing.
- Remove screws A1 (2x).
- Take cover from housing (trimmer must be opened).
- Remove bracket large (17).
(see figure 1)
- The PCB-board can now be
removed out of the housing.
- Remove the connecting strip
from the motor by
dis soldering.
- Remove screws B1 (2 x), now
the motor and hairchamber
can be removed out of the
housing.
- Detach the motor springs (14) from the gearwheel unit
with a small screwdriver.
Assembly:
- Think by assembly on the
hooks from the connecting
strip assy. (see figure 2)
REPAIR INSTRUCTION
- No specific issues
OPTIONAL (accessories)
- No specific issues
figure 1
figure 2
Published by Philips Domestic Appliances and Personal Care Printed in the Netherlands © Copyright reserved Subject to modification
04/05
Page 2
FAST SOLUTION FOR THE NEXT PROBLEM:
- The shaver stops while the the batteries are just recharged.
- No signal that the shaver has to be recharged.
- Stops during shave.
- Still minutes left on the display
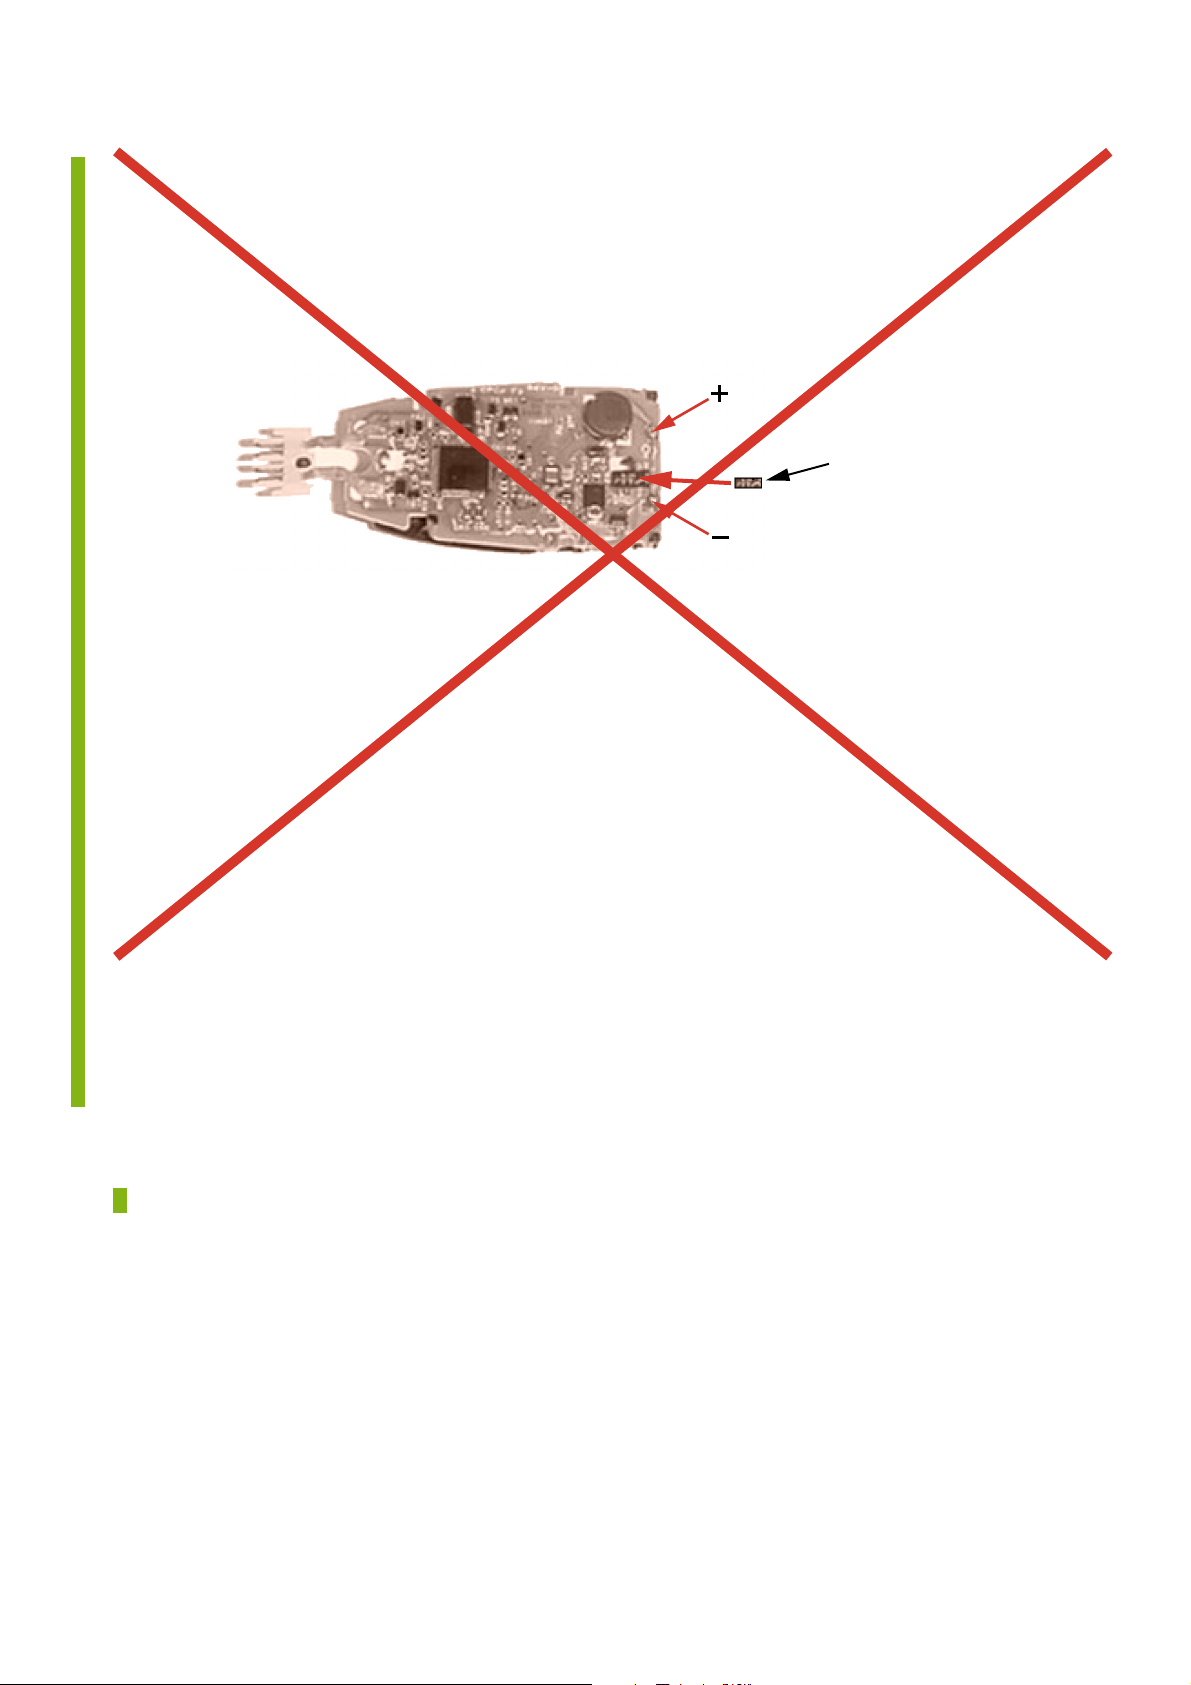
Note:
Capacitor provided may deviate from type shown.
HQ8894
Service code number
4222 036 10460
Warning:
While soldering, be careful not to make a short circuit between the battery (
This may cause permanent damage to the battery and electronics
Mounting:
Mount the capacitor as shown (see picture) on the solder points of the connecting strip assy.Be sure to connect the (-) terminal of
the capacitor (-) (see silkscreen mark on top of the PCB) and the (+) terminal to the (+)Reversed mounting may cause permanent
damage to the shaver.
Use only the new mains from Euroservice Eindhoven.
= changed
-
) terminal coil and motor (+) terminal.
Page 3

PARTS LIST & EXPLODED VIEW
1
HQ8894
10 1211
4
5
13
2
6
14
7
15
8
16
B1
9
17
19
3
18
Pos Service code Description
1
4222 036 05770
2
4222 036 06380
3
4222 036 06790
4222 036 06810
4222 036 04020
4222 036 03970
4222 036 04010
4222 036 04030
4222 036 04000
4222 036 03990
4222 036 04040
4
4222 036 05800
cleaning brush
housing
power plug EUR
power plug NOR
power plug AUS
power plug GBR
power plug Can/Row/Taiw
power plug MEX
power plug KOR
power plug JAP
power plug PRC
protecting cap
Pos Service code Description
5
4222 036 05810
6
4222 036 05820
7
4222 036 05840
8
4222 036 06450
9
4222 036 05410
10
4222 036 06460
11
4222 036 06470
12
4222 036 06480
13
4222 036 05870
14
4222 036 05880
15
4222 036 06390
16
4222 036 05910
bracket
HQ6 shaving heads
holder assy
hair chamber
driving unit
poly-led refl ector
poly-led bracket
poly-led assy
trimmer assy
bracket large
mains
rubber seal
Pos Service code Description
17
4222 036 06420
18
19
4222 036 06410
A
4222 036 08470
B
4222 036 05930
4222 036 06430
4222 036 06530
4222 036 06440
cover
cover Battery
Li-ion Batt
screw J1-6
screw 1ADU
pouch
pouch NOR
stand
 Loading...