

Page 1

ENGLISH 4
POLSKI 18
ROMÂNĂ 32
РУССКИЙ 46
ČESKY 62
MAGYAR 75
SLOVENSKY 89
УКРАЇНСЬКІЙ 102
HRVATSKI 116
EESTI 129
LATVISKI 141
LIETUVIŠKAI 155
SLOVENŠČINA 168
БЪЛГАРСКИ 182
SRPSKI 197
HQ8893, HQ8890
3
Page 2
Important
Read these instructions for use carefully before
using the appliance and save them for future
reference.
◗ Only use the powerplug supplied.
◗ The powerplug transforms 100-240 volts to a
safe low voltage of less than 24 volts.
◗ The powerplug contains a transformer. Do
not cut off the powerplug to replace it with
another plug, as this will cause a hazardous
situation.
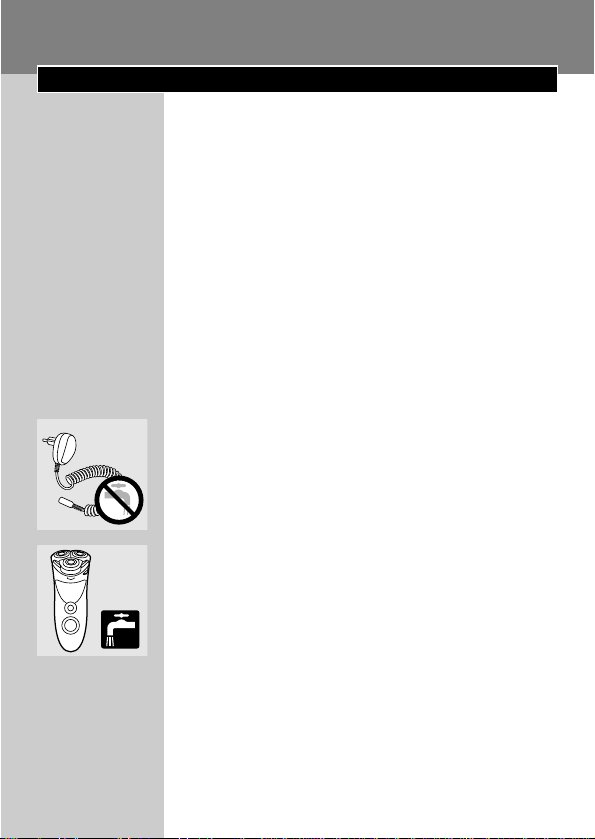
◗ Do not use a damaged powerplug.
◗ If the powerplug is damaged, always have it
replaced by one of the original type in order
to avoid a hazard.
◗ Charge, store and use the appliance at a
temperature between 5cC and 35cC.
◗ Do not recharge the shaver in a closed pouch.
C
◗ Make sure the powerplug does not get wet.
◗ Always unplug the shaver before cleaning it
under the tap.
C
◗ The appliance complies with the
internationally approved IEC safety regulations
and can be safely cleaned under the tap.
Be careful with hot water. Always check if the
water is not too hot, to prevent your hands from
getting burnt.
◗ Noise level: Lc= 62 dB [A]
ENGLISH4
Page 3

The display
The display provides the following information:
Charging
C
◗ As soon as you connect the appliance to the
mains, the display lights up, the plug symbol
appears and the minute indication starts
blinking.
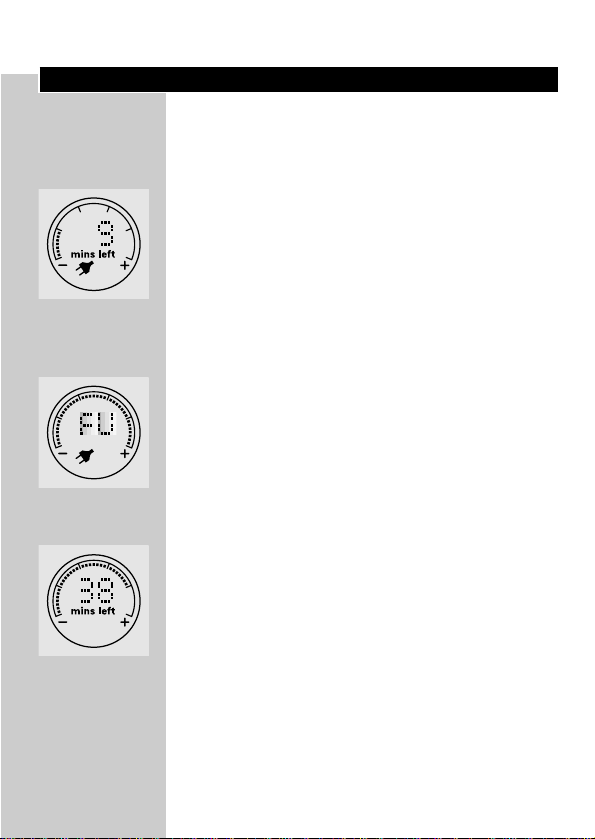
Batteries fully charged
C
◗ As soon as the batteries have been fully
charged, the word 'FULL' runs across the
display and the display light starts blinking.
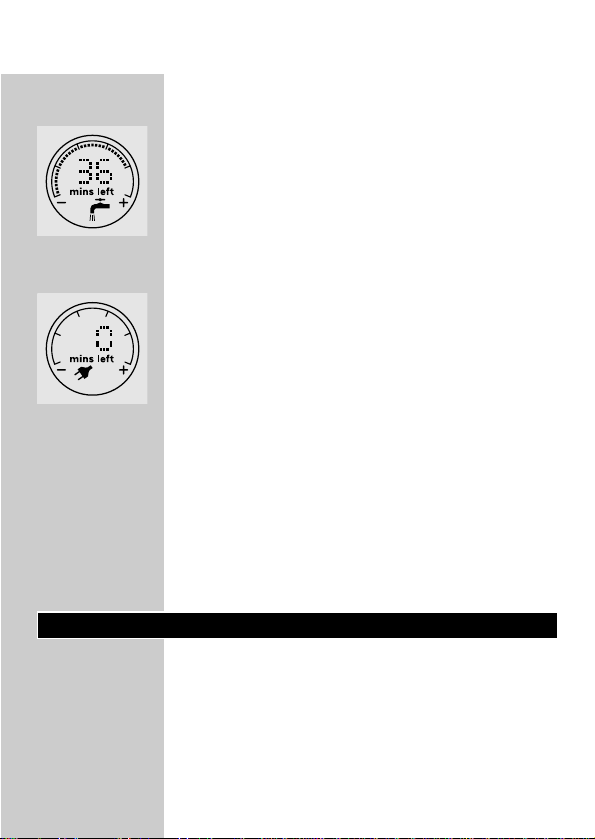
Remaining shaving time
C
◗ The number on the display indicates the
remaining shaving time in minutes.The black
segments indicate how much energy there is
still left in the batteries.The shaving time of a
fully charged shaver can range from 55 to
70 minutes, depending on your type of beard
and your shaving behaviour, and is calculated
by the built-in computer.
During the first few charges, the shaving time
indicated is a conservative estimate, which will be
adjusted automatically to the actual shaving time
once the shaver has determined your shaving
behaviour.
ENGLISH 5
Page 4
Cleaning reminder
C
◗ To remind you that the shaver is due to be
cleaned, which will be about once a week in
case of normal use, the tap symbol with
blinking water drops appears on the display.
Batteries running low
C
◗ When you switch the shaver off while the
batteries are running low, the plug symbol
starts blinking and you will hear a few beeps.
When you switch the shaver on or off, the display
lights up for approx. 10 seconds.
Demonstration program
◗ The appliance has a unique 1-minute
demonstration program. Press the on/off
button a few seconds until all symbols appear
on the display. During the demonstration, the
appliance will automatically be switched on
three times.You can interrupt the
demonstration by pressing the on/off button.
Charging
Make sure the appliance is switched off before
you start charging it.
When you charge the shaver for the first time or
after a long period of disuse, let it charge
continuously for 4 hours. Charging normally takes
approx. 1 hour.
ENGLISH6
Page 5
You can also shave without charging by
connecting the shaver to the mains.
Do not leave the appliance connected to the
mains for more than 24 hours.
Charging the appliance
Charge the appliance when the plug symbol starts
blinking and you hear a few beeps.
Do not recharge the shaver in a closed pouch.
C
1 Put the appliance plug in the shaver.
2 Put the powerplug in the wall socket.
3 Remove the powerplug from the wall
socket and pull the appliance plug out of
the shaver when the batteries have been
fully charged.
Cordless shaving time
A fully charged shaver has a cordless shaving time
of up to 70 minutes.
ENGLISH 7
Page 6

Using the appliance
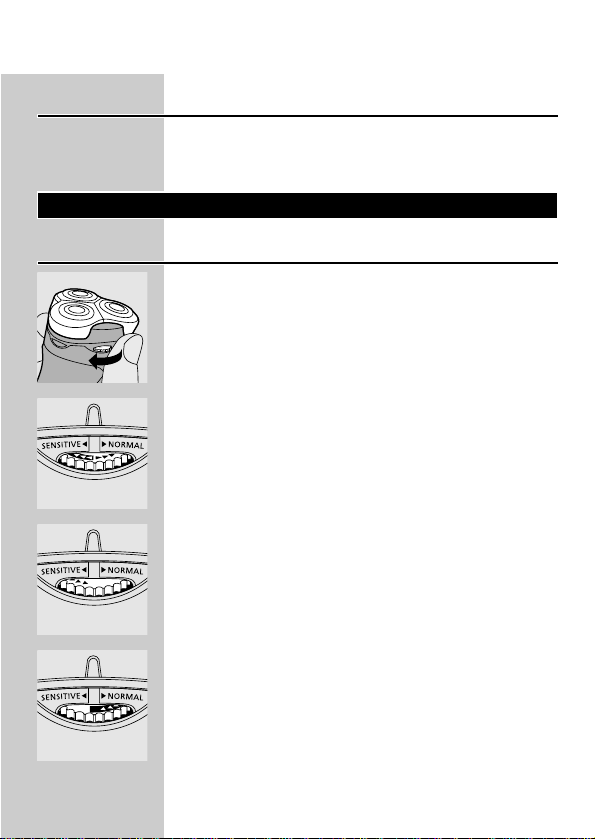
Personal Comfort Control
C
◗ The Personal Comfort Control system allows
you to adapt the shaver to your skin type.
- You can set the shaver to 'Normal' for a fast
and comfortable close shave.
- You can set the shaver to 'Sensitive' for a
comfortable close shave with optimal skin
comfort.
C
◗ The … position is the neutral position.
C
◗ The 'S' position is best suited for sensitive
skin.
C
◗ The 'N' position is best suited for normal
skin.
Shaving
1 Switch the shaver on by pressing the on/off
button once.
ENGLISH8
S
N
Page 7

C
2 Move the shaving heads quickly over your
skin, making both straight and circular
movements.
Shaving on a dry face gives the best results.
Your skin may need 2 or 3 weeks to get
accustomed to the Philishave system.
3 Switch the shaver off by pressing the on/off
button once.
C
4 Put the protection cap on the shaver every
time you have used it, to prevent damage.
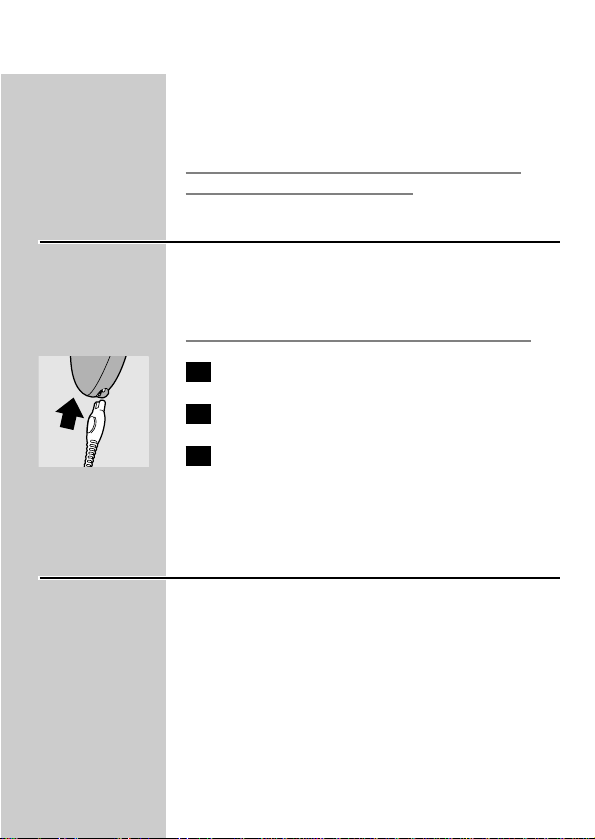
Trimming
For grooming sideburns and moustache.
C
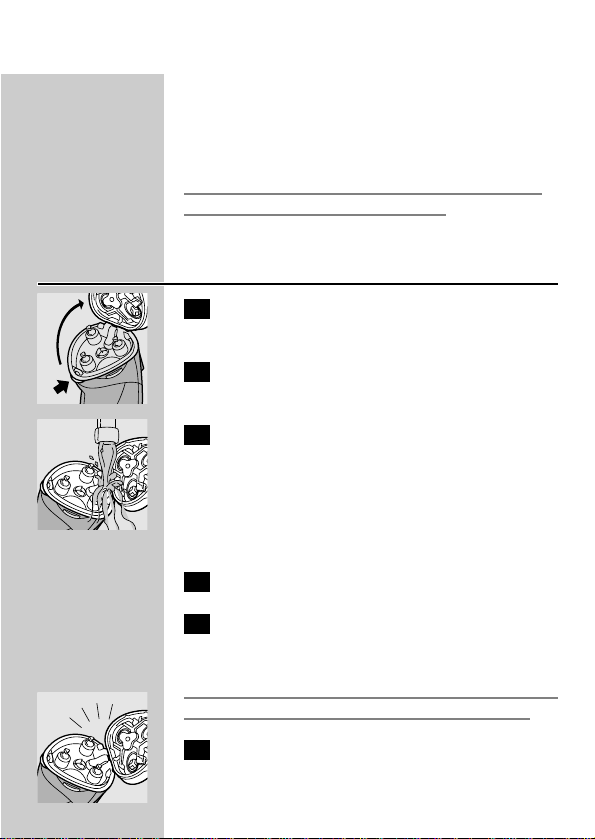
1 Open the trimmer by pushing the slide
upwards.
The trimmer can be activated while the motor is
running.
Cleaning and maintenance
Regular cleaning guarantees better shaving
performance.
The easiest and most hygienic way to clean the
appliance is to rinse the shaving unit and the hair
chamber with hot water every time you have
used the appliance.
Be careful with hot water. Always check if the
water is not too hot to prevent your hands from
getting burnt.
ENGLISH 9
Page 8

Every day: shaving unit and hair chamber
1 Switch the shaver off, remove the
powerplug from the wall socket and pull
the appliance plug out of the shaver.
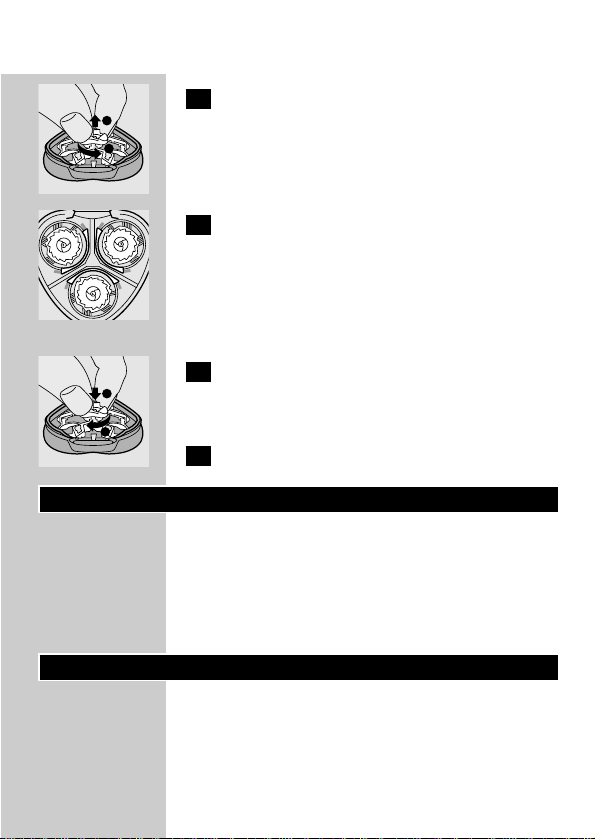
C
2 Press the release button (1) and open the
shaving unit (2).
C
3 Clean the shaving unit and the hair
chamber by rinsing them under a hot tap
for some time.
Make sure the inside of the shaving unit and the
hair chamber have been cleaned properly.
4 Rinse the outside of the appliance.
5 Close the shaving unit and shake off excess
water.
Never dry the shaving unit with a towel or tissue
as this may damage the shaving heads.
C
6 Open the shaving unit again and leave it
open to let the appliance dry completely.
You can also clean the hair chamber without
water by using the brush supplied.
ENGLISH10
Page 9
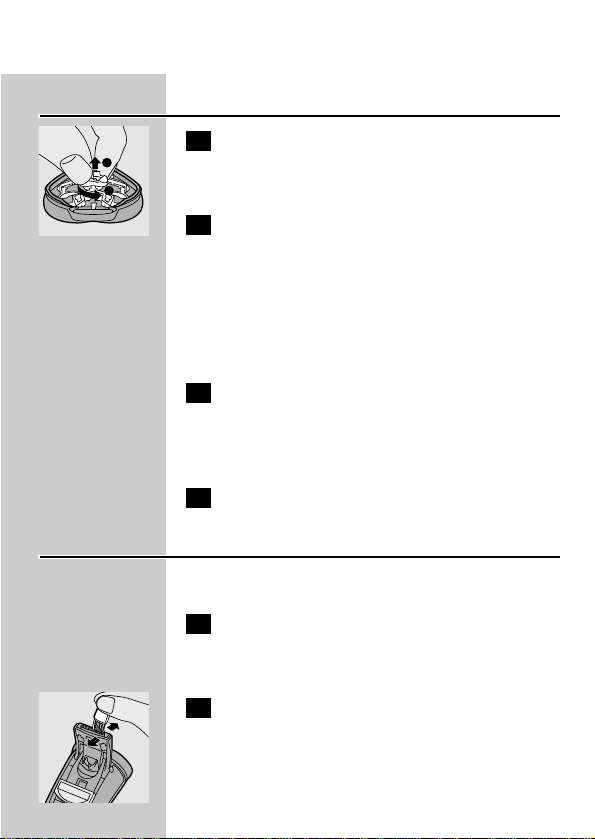
Every six months: shaving heads
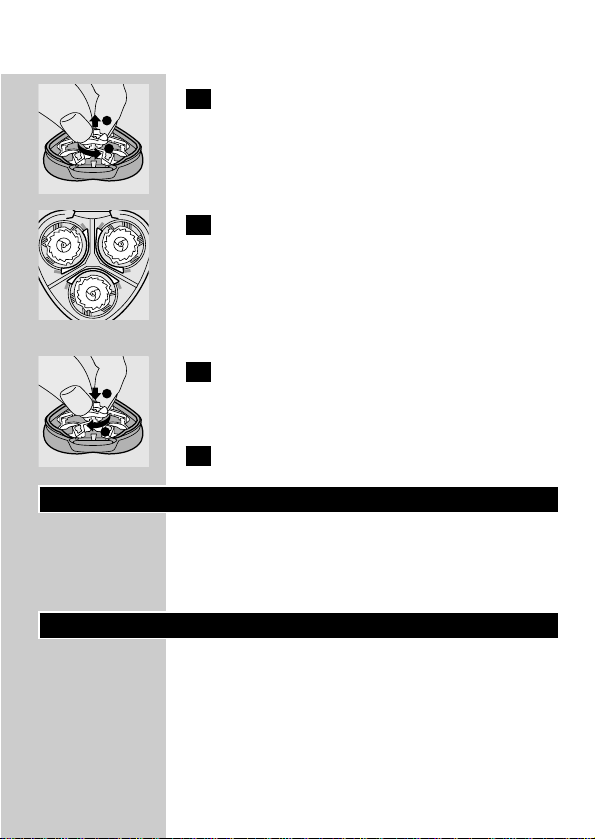
C
1 Open the shaving unit, turn the wheel
anticlockwise (1) and remove the retaining
frame (2).
2 Clean the cutters and guards with the
brush supplied.
Do not clean more than one cutter and guard at
a time, since they are all matching sets. If you
accidentally mix up the cutters and guards, it may
take several weeks before optimal shaving
performance is restored.
3 Put the shaving heads back into the shaving
unit. Put the retaining frame back into the
shaving unit, press the wheel (1) and turn it
clockwise (2).
4 Close the shaving unit.
Trimmer
Clean the trimmer every time you have used it.
1 Switch the shaver off, remove the
powerplug from the wall socket and pull
the appliance plug out of the shaver.
C
2 Clean the trimmer with the brush
supplied.
ENGLISH 11
2
1
Page 10

C
3 Lubricate the trimmer teeth with a drop
of sewing machine oil every six months.
Storage
C
◗ Put the protection cap on the shaver to
prevent damage.
C
◗ Store the appliance in the luxury pouch or
place the appliance in the stand to dry.
Replacement
Replace the shaving heads every two years for
optimal shaving results.
Replace damaged or worn shaving heads with
HQ8 Philishave Sensotec shaving heads only.
1 Switch the shaver off, remove the
powerplug from the wall socket and pull
the appliance plug out of the shaver.
C
2 Press the release button (1) and open the
shaving unit (2).
ENGLISH12
Page 11
C
3 Turn the wheel anticlockwise (1) and
remove the retaining frame (2).
C
4 Remove the shaving heads and place new
ones in the shaving unit in such a way that
the parts with the small holes point
towards the centre of the shaving unit.
Make sure that the projections of the shaving
heads fit exactly into the recesses.
C
5 Put the retaining frame back into the
shaving unit, press the wheel (1) and turn it
clockwise (2).
6 Close the shaving unit.
Accessories
The following accessories are available:
- HQ8000 powerplug.
- HQ8 Philishave Sensotec shaving heads.
- HQ110 Philishave shaving head cleaner
(shaving head cleaning spray).
Environment
The built-in rechargeable batteries contain
substances that may pollute the environment.
ENGLISH 13
2
1
1
2
Page 12
Disposal of the batteries
Remove the batteries when you discard the
appliance. Do not throw the batteries away with
the normal household waste, but hand them in at
an official collection point.You can also take the
appliance to a Philips service centre, which will
remove the batteries for you and will dispose of
them in an environmentally safe way.
Only remove the batteries if they are completely
empty.
1 Remove the powerplug from the wall
socket and pull the appliance plug out of
the shaver.
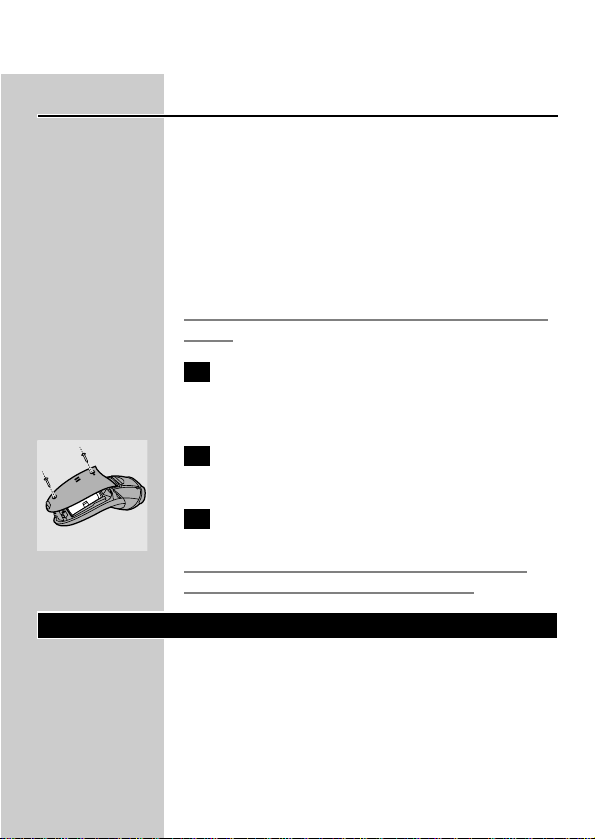
C
2 Let the shaver run until it stops, undo the
screws and open the shaver.
3 Remove the batteries.
Do not connect the shaver to the mains again
after the batteries have been removed.
Guarantee & service
If you need information or if you have a problem,
please visit the Philips Web site at
www.philips.com or contact the Philips Customer
Care Centre in your country (you will find its
phone number in the worldwide guarantee
leaflet). If there is no Customer Care Centre in
ENGLISH14
Page 13

your country, turn to your local Philips dealer or
contact the Service Department of Philips
Domestic Appliances and Personal Care BV.
Troubleshooting
1 Reduced shaving performance
B
Cause 1: the shaving heads are dirty.
B
The shaver has not been rinsed long enough or
the water used was not hot enough.
◗ Clean the shaver thoroughly before you
continue shaving. See chapter 'Cleaning and
maintenance'.
B
Cause 2: long hairs are obstructing the shaving
heads.
◗ Clean the cutters and guards with the brush
supplied. See chapter 'Cleaning and
maintenance', section 'Every six months:
shaving heads'.
B
Cause 3: the shaving heads are damaged or worn.
◗ Replace the shaving heads. See chapter
'Replacement'.
2 The shaver does not work when the on/off
button is pressed
B
Cause 1: the batteries are empty.
ENGLISH 15
Page 14

◗ Recharge the batteries. See chapter 'Charging'.
B
Cause 2: the shaver is not connected to the mains.
◗ Put the powerplug in the wall socket.
3 There is scale on the metal housing of the
appliance
B
Cause: water stays behind on the metal parts of
the appliance after cleaning.
◗ To prevent scale deposits on the metal parts
of the appliance, wipe the shaver dry with a
towel or tissue after rinsing.
Never wipe the shaving unit with a towel or a
tissue, as this could damage the shaving heads.
◗ If the scale proves to be persistent, it can
easily be removed by using some descaler. Rub
some descaler onto the metal parts, leave it
to do its work and wipe the metal parts dry.
4 The shaving unit has come off the shaver.
B
Cause: the shaving unit has not been placed
correctly.
◗ If the shaving unit becomes detached from the
shaver, check whether the hinge spring is still
properly attached, i.e. has not come loose and
does not show any cracks or damage. If the
hinge spring is still properly attached, the
ENGLISH16
Page 15

shaving unit can be easily put back on the
shaver again. However, if the hinge spring has
come loose, is cracked or damaged, please
contact your Philips dealer or the nearest
Philips service centre to avoid damage to your
shaver.
ENGLISH 17
Page 16

Ważne
Przed pierwszym użyciem urządzenia zapoznaj się
dokładnie z instrukcją jego obsługi i zachowaj ją na
przyszłość, do ewentualnej konsultacji.
◗ W celu naładowania akumulatorów używaj
wyłącznie załączonej do urządzenia ładowarki.
◗ Zasilacz przekształca napięcie 100-240 V na
bezpieczne niskie napięcie niższe niż 24 V.
◗ Wtyczka zasilacza zawiera transformator.
Odcięcie wtyczki celem wymiany jej na nową
może spowodować niebezpieczeństwo.
◗ Nie używaj uszkodzonego zasilacza.
◗ Jeśli uszkodzona jest wtyczka przewodu
zasilającego, wówczas, aby uniknąć
niebezpieczeństwa należy zawsze zastąpić ją
wtyczką oryginalną
◗ Ładuj, przechowuj i używaj urządzenie w
temperaturze pomiędzy 5c a 35cC.
◗ Nie ładuj golarki w zamkniętej saszetce.
C
◗ Sprawdź, czy zasilacz jest zupełnie suchy.
◗ Zanim zaczniesz czyścić golarkę pod kranem,
zawsze wyjmij wtyczkę z gniazdka sieciowego.
C
◗ Niniejsze urządzenie spełnia międzynarodowe,
zatwierdzone normy bezpieczeństwa IEC i
można je myć pod kranem.
Postępuj ostrożnie z gorącą wodą. Zawsze
sprawdzaj, czy jej temperatura jest odpowiednia
dla kontaktu z rękami.
◗ Poziom hałasu: Lc= 62 dB [A]
POLSKI18
Page 17
Wyświetlacz
Wyświetlacz dostarcza następujących informacji:
Ładowanie
C
◗ Z chwilą podłączenia urządzenia do sieci
zaświeci się ekran, pojawi się na nim symbol
wtyczki i zaczną migotać symbole minut.
Akumulatory są całkowicie
naładowane.
C
◗ Z chwilą całkowitego naładowania
akumulatorów na wyświetlaczu pojawi się
napis "FULL" (naładowane) i wyświetlacz
zaczyna migotać.
Czas pracy wyładowanej golarki.
C
◗ Liczba ukazująca się na wyświetlaczu
pokazuje, na ile minut golenia wystarczą
akumulatory w ich bieżącym stanie
naładowania. Czarne paski informują o ilości
energii pozostałej w akumulatorach. Czas
golenia całkowicie naładowanej golarki może
wahać się od 55 do 70 minut, zależnie od typu
zarostu i przyzwyczajeń użytkownika,czas
wylicza wbudowany procesor.
Podczas pierwszych kilku ładowań wskazywany
czas pracy szacowany jest z dużym przybliżeniem,
POLSKI 19
Page 18

jest on automatycznie uaktualniany i przybliżany
do rzeczywistej wartości - po ustaleniu przez
procesor golarki średniego czasu golenia.
Przypomnienie o czyszczeniu
C
◗ Aby przypomnieć użytkownikowi o
konieczności oczyszczenia golarki, w
przypadku normalnego używania - co najmniej
raz w tygodniu, na wyświetlaczu pojawi się
symbol kranu z migoczącymi kroplami wody.
Akumulatory się wyczerpują.
C
◗ Gdy akumulatory są niemal rozładowane, po
wyłączeniu golarki zacznie migotać symbol
wtyczki i usłyszysz kilka sygnałów
dźwiękowych.
Bezpośrednio po włączeniu lub wyłączeniu golarki
zaświeci się ekran.
Program demonstracyjny
◗ Urządzenie dysponuje unikalnym 1-
minutowym programem demonstracyjnym.
Wciśnij i przytrzymaj przez kilka sekund
włącznik do chwili, w której na wyświetlaczu
pojawią się wszystkie symbole. Podczas
demonstracji urządzenie zostanie trzykrotnie
automatycznie włączone.Wciskając przycisk
włącznika możesz przerwać demonstrację.
POLSKI20
Page 19

Ładowanie
Przed rozpoczęciem ładowania należy sprawdzić,
czy urządzenie jest wyłączone.
Zanim zaczniesz korzystać z golarki lub jeśli przez
długi czas nie była ona używana, musisz ładować ją
nieprzerwanie przez 4 godziny. Pełne ładowanie
zajmie około 1 godziny.
Możesz także używać golarki bez ładowania,
podłączając ją bezpośrednio do sieci.
Nie zostawiaj urządzenia podłączonego do sieci
na dłużej, niż 24 godziny.
Ładowanie urządzenia
Kiedy symbol wtyczki zacznie migać i usłyszysz
kilka sygnałów, podłącz urządzenie do ładowania.
Nie ładuj golarki zamkniętej w saszetce.
C
1 Włóż małą wtyczkę przewodu zasilającego
do golarki.
2 Podłącz ładowarkę do sieci.
3 Po całkowitym naładowaniu akumulatorów
należy wyjąć wtyczkę zasilania z gniazdka
ściennego oraz wyjąć małą wtyczkę z
golarki.
POLSKI 21
Page 20
Czas bezprzewodowej pracy
W pełni naładowana golarka gwarantuje do
70 minut bezprzewodowej pracy.
Korzystanie z urządzenia
Regulacja komfortu golenia
C
◗ System Personal Comfort Control
dopasowuje golarkę do rodzaju skóry.
- Możesz ustawić golarkę w pozycji "Normal" w
celu szybkiego, dokładnego i wygodnego
golenia.
- Możesz ustawić golarkę w pozycji "Sensitive", co
zapewni ci wygodne, dokładne golenie z
zachowaniem optymalnego komfortu dla skóry.
C
◗ Ustawieniem neutralnym jest pozycja ….
C
◗ Najlepszym ustawieniem dla skóry wrażliwej
jest pozycja "S".
C
◗ Najlepszym ustawieniem dla skóry mniej
wrażliwej jest pozycja "N".
POLSKI22
S
N
Page 21

Golenie
1 Wyłącz golarkę przez jednokrotne
wciśnięcie przycisku off/on.
C
2 Przesuwaj głowice po skórze, wykonując
zarówno proste, jak i okrężne ruchy.
Najlepsze efekty golenia osiąga się na skórze
suchej.
Skóra Twojej twarzy potrzebuje pewnego czasu
(2-3 tygodni), by przyzwyczaić się do nowego
systemu golenia.
3 Wyłącz golarkę przez jednokrotne
wciśnięcie przycisku off/on.
C
4 Po każdym użyciu załóż na golarkę
ochronną osłonkę, zabezpieczającą głowice
golące przed uszkodzeniem mechanicznym.
Trymer
Służy do przystrzygania wąsów i bokobrodów.
C
1 Otwórz trymer przesuwając suwak do
góry.
Trymer może być używany po uprzednim
włączeniu urządzenia.
Czyszczenie i konserwacja
Regularne oczyszczanie golarki gwarantuje lepsze
efekty golenia.
POLSKI 23
Page 22
Najprostszym i najbardziej higienicznym
sposobem czyszczenia urządzenia jest opłukanie
gorącą wodą modułu golącego i komory na ścięte
włosy - po każdym użyciu golarki.
Sprawdzaj temperaturę wody. Uważaj, żeby zbyt
gorącą wodą nie oparzyć sobie rąk.
Codziennie: część goląca i komora na ścięty
zarost
1 Wyłącz golarkę, wyjmij ładowarkę z
gniazdka ściennego oraz wtyczkę z golarki.
C
2 Wciśnij przycisk blokujący (1) i otwórz
moduł golący (2).
C
3 Przez jakiś czas płucz moduł golący i
komorę na ścięty zarost pod gorącą
bieżącą wodą.
Upewnij się, czy wnętrze części golącej oraz
komora na ścięty zarost zostały dobrze
wypłukane.
4 Spłucz zewnętrzną powierzchnię golarki.
5 Zamknij moduł golący i strząśnij pozostałą
wodę.
Nidy nie wycieraj modułu golącego ręcznikiem lub
chusteczką - możesz uszkodzić głowice golące.
C
6 Otwórz ponownie część golącą i pozostaw
ją tak do wyschnięcia.
POLSKI24
Page 23

Komorę na ścięty zarost można też czyścić na
sucho, używając specjalnej załączonej szczoteczki.
Co sześć miesięcy: głowice golące
C
1 Otwórz moduł golący, obróć kółkiem w
kierunku przeciwnym do ruchu
wskazówek zegara (1) i wyjmij obsadę (2).
2 Za pomocą dołączonej szczoteczki oczyść
nożyki i osłonki.
Nie myj jednorazowo więcej niż jednego ostrza i
jednej głowicy, ponieważ tworzą one dopasowane
zestawy. Jeśli przypadkowo pomieszasz ostrza i
głowice, potrwa kilka tygodni,zanim ponownie
przywrócisz optymalną skuteczność golenia.
3 Ponownie załóż głowice golące na moduł
golący. Następnie załóż obsadę na moduł
golący, wciśnij kółko (1) i obróć nim w
kierunku zgodnym z kierunkiem ruchu
wskazówek zegara (2).
4 Zamknij część golącą.
Trymer
Oczyszczaj trymer po każdym użyciu.
1 Wyłącz golarkę, wyjmij ładowarkę z
gniazdka ściennego oraz wtyczkę z golarki.
C
2 Trymer oczyść dołączoną do golarki
szczoteczką.
POLSKI 25
2
1
Page 24

C
3 Co 6 miesięcy należy naoliwić ząbki
trymera kroplą oleju maszynowego.
Przechowywanie
C
◗ Załóż na golarkę ochronną pokrywę, by
uniknąć uszkodzenia.
C
◗ Golarkę przechowuj w pokrowcu lub w
podstawce do suszenia.
Wymiana
Aby zapewnić optymalne funkcjonowanie
urządzenia, co dwa lata wymieniaj głowice golące.
Uszkodzone lub zużyte głowice golące wymieniaj
jedynie na oryginalne głowice golące HQ8
Philishave Sensotec.
1 Wyłącz golarkę, wyjmij zasilacz z gniazda
ściennego oraz wtyczkę z golarki.
C
2 Wciśnij przycisk blokujący (1) i otwórz
moduł golący (2).
POLSKI26
Page 25
C
3 Obróć kółkiem w kierunku przeciwnym
do ruchu wskazówek zegara (1) i wyjmij
obsadę (2).
C
4 Zdejmij zużyte głowice golące i na część
golącą załóż nowe, tak aby elementy
zawierające małe otwory skierowane były
w kierunku środka części golącej.
Upewnij się, czy części wystające głowic pasują
dokładnie w zagłębienia.
C
5 Załóż obsadę na moduł golący, wciśnij
kółko (1) i obróć nim w kierunku zgodnym
z kierunkiem ruchu wskazówek zegara (2).
6 Zamknij część golącą.
Akcesoria
Dostępne są następujące akcesoria:
- HQ8000 Ładowarka
- Głowice golące HQ8 Philishave Sensotec.
Ochrona środowiska
Wbudowane akumulatory zawierają substancje,
które mogą zanieczyszczać środowisko.
POLSKI 27
2
1
1
2
Page 26

Usuwanie akumulatorów
Przed wyrzuceniem urządzenia wyjmij z niego
akumulatory. Nie wyrzucaj zużytych
akumulatorów razem z innymi odpadami
gospodarstwa domowego, lecz oddaj je do
punktu skupu przyjmującego tego typu odpady.
Możesz również zanieść urządzenie do serwisu
Philipsa, gdzie personel pomoże ci wyjąć
akumulatory i pozbyć się ich w sposób przyjazny
dla środowiska naturalnego.
Wyrzucaj tylko zupełnie wyczerpane akumulatory.
1 Wyjmij wtyczkę z gniazdka sieciowego i
odłącz małą wtyczkę od golarki.
C
2 Uruchom golarkę i poczekaj, aż przestanie
pracować, odkręć śrubki i otwórz golarkę.
3 Wyjmij akumulatory.
Po wyjęciu akumulatorów nie podłączaj golarki do
sieci.
Gwarancja i serwis
Jeśli potrzebne Ci są informacje lub napotykasz
jakiś problem, skontaktuj się z Biurem Obsługi
Klienta (numer telefonu znajdziesz w Karcie
Gwarancyjnej), lub też z najbliższym punktem
serwisowym sprzętu AGD, autoryzowanym przez
firmę Philips.
POLSKI28
Page 27

Rozwiązywanie problemów
1 Zmniejszona wydajność golenia
B
Przyczyna 1: głowice golące są zanieczyszczone.
B
Golarka nie była dostatecznie długo płukana lub
woda nie była wystarczająco ciepła.
◗ Zanim przystąpisz do golenia, dokładnie
oczyść golarkę. Patrz: rozdział "Czyszczenie i
konserwacja".
B
Przyczyna 2: długie włoski blokują głowice golące.
◗ Za pomocą dołączonej szczoteczki oczyść
nożyki i osłonki. Patrz: rozdział "Czyszczenie i
konserwacja", punkt "Co sześć miesięcy:
głowice golące".
B
Przyczyna 3: głowice golące są uszkodzone lub
zużyte.
◗ Wymień głowice golące. Patrz: rozdział
"Wymiana".
2 Po wciśnięciu włącznika golarka nie działa.
B
Przyczyna 1: akumulatorki są nienaładowane.
◗ Naładuj akumulatory.Patrz: rozdział
"Ładowanie".
B
Przyczyna 2: Golarka nie jest dołączona do sieci.
◗ Podłącz ładowarkę do sieci.
POLSKI 29
Page 28

3 Na metalowej obudowie urządzenia zebrał
się kamień.
B
Przyczyna: Po czyszczeniu woda pozostaje na
metalowych częściach urządzenia.
◗ Aby nie dopuścić do tworzenia się osadu na
metalowych częściach urządzenia, wytrzyj po
opłukaniu golarkę ręcznikiem lub chusteczką.
Nigdy nie wycieraj ręcznikiem lub chusteczką
modułu golącego, gdyż mogą one uszkodzi
głowice golące.
◗ Jeśli osad nadal pozostaje, wówczas można go
usunąć używając niewielkiej ilości środka
usuwającego kamień. Natrzyj tym środkiem
części metalowe, pozostaw na pewien czas,
aby zadziałał, po czym wytrzyj do sucha
wyczyszczone powierzchnie.
4 Moduł golący zsunął się z golarki.
B
Przyczyna: Nie został założony prawidłowo moduł
golący.
◗ Jeśli część goląca odłączyła się od golarki,
sprawdź czy sprężyna jest odpowiednio
zamontowana, na przykład czy nie poluzowała
się i czy nie widać na niej pęknięć lub
uszkodzeń. Jeśli sprężyna jest odpowiednio
zamocowana, część golącą można łatwo
ponownie założyć na golarkę. Jeśli jednak
sprężyna poluzowała się, jest pęknięta lub
POLSKI30
Page 29

uszkodzona, grozi uszkodzeniem całej golarki.
W takim przypadku powinieneś skontaktować
się ze swoim sprzedawcą lub najbliższym
punktem serwisowym firmy Phililps.
POLSKI 31
Page 30

Important
Citiţi aceste instrucţiuni cu atenţie înainte de
utilizarea aparatului şi păstraţi-le pentru consultări
ulterioare.
◗ Folosiţi doar încărcătorul furnizat.
◗ Încărcătorul transformă o tensiune de 100-
240 volţi într-o tensiune sigură sub 24 volţi.
◗ Încărcătorul este dotat cu un transformator.
Nu încercaţi să înlocuiţi fişa de conectare
pentru a evita provocarea unor accidente.
◗ Nu folosiţi un încărcător deteriorat.
◗ Dacă încărcătorul se deteriorează,înlocuiţi-l
întotdeauna cu unul original pentru a evita
orice accident.
◗ Încărcaţi, depozitaţi şi utilizaţi aparatul la o
temperatură între 5cC şi 35cC.
◗ Nu încărcaţi aparatul într-un etui închis.
C
◗ Evitaţi contactul încărcătorului cu apa.
◗ Scoateţi întotdeauna ştecherul din priză
înainte de a curăţa aparatul.
C
◗ Aparatul corespunde normelor de securitate
internaţionale IEC şi poate fi curăţat sub jet
de apă.
Aveţi grijă ca apa să nu fie foarte fierbinte pentru
a nu vă arde.
◗ Nivel de zgomot: Lc = 62 dB [A]
ROMÂNĂ32
Page 31

Afişaj
Afişajul vă oferă următoarele informaţii:
Încărcare
C
◗ Imediat ce conectaţi aparatul, ecranul se
aprinde, simbolul ştecher este afişat, iar
numărul de minute începe să clipească
intermitent.
Acumulator complet încărcat
C
◗ După ce acumulatorul s-a încărcat complet,
cuvântul "FULL" parcurge ecranul, iar lumina
ecranului începe să clipească intermitent.
Timp de bărbierire rămas
C
◗ Numărul de pe ecran indică în minute timpul
de bărbierire rămas. Segmentele negre indică
nivelul de încărcare al acumulatorului. Un
aparat de bărbierit complet încărcat asigură o
durată de bărbierire de la 55 până la 70 de
minute, în funcţie de tipul de barbă şi de
comportamentul de bărbierire al fiecăruia.
Durata este calculată de computerul
încorporat.
În timpul primelor încărcări, durata de bărbierire
indicată reprezintă o estimare minimă, care va fi
ajustată automat la durata de bărbierie reală
imediat ce aparatul de ras determină
comportamentul dumneavoastră de bărbierire.
ROMÂNĂ 33
Page 32

Avertizor de curăţare
C
◗ Pentru a vă reaminti că trebuie să curăţaţi
aparatul de ras, o dată pe săptămână în cazul
unei utilizări normale, simbolul robinet cu
picăturile care clipesc intermitent va fi afişat
pe ecran.
Acumulator descărcat
C
◗ Când opriţi aparatul de ras, iar acumulatorul
este aproape descărcat,simbolul ştecher va
începe să clipească intermitent şi veţi auzi
câteva bip-uri.
Când porniţi sau opriţi aparatul, lumina ecranului
rămâne aprinsă aprox. 10 secunde.
Program demonstrativ
◗ Aparatul are un program demonstrativ unic
de 1 minut.Apăsaţi butonul pornire/oprire
câteva secunde până ce apar pe ecran toate
simbolurile. În timpul demonstraţiei, aparatul
va porni automat de trei ori. Puteţi întrerupe
demonstraţia apăsând butonul pornire/oprire.
Încărcare
Aparatul trebuie să fie închis înainte de a începe
încărcarea.
Când încărcaţi aparatul pentru prima oară sau
după o perioadă lungă de neutilizare, lăsaţi-l să se
încarce continuu timp de 4 ore. În mod normal,
încărcarea durează 1 oră. Puteţi folosi aparatul
fără să-l încărcaţi, conectându-l la priză.
ROMÂNĂ34
Page 33

Nu lăsaţi aparatul conectat la priză mai mult de
24 de ore.
Încărcarea aparatului
Încărcaţi aparatul când simbolul ştecher începe să
clipească intermitent şi auziţi câteva bipuri.
Nu reîncărcaţi aparatul într-o borsetă închisă.
C
1 Introduceţi fişa în aparatul de bărbierit.
2 Puneţi încărcătorul în priză.
3 Scoateţi încărcătorul din priză şi fişa din
aparat când acumulatorul este complet
încărcat.
Perioadă de funcţionare fără cablu
Un aparat de ras complet încărcat oferă o
autonomie de funcţionare de până la 70 de
minute.
Utilizarea aparatului
Personal Comfort Control
C
◗ Sistemul Personal Comfort Control adaptează
aparatul de ras la tipul dumneavoastră de
piele.
ROMÂNĂ 35
Page 34

- Puteţi regla aparatul de ras pe "Normal" pentru
o bărbierire netedă, rapidă şi confortabilă.
- Puteţi regla aparatul de ras pe "Sensibil" pentru
o bărbierire netedă, cu un confort optim al
pielii.
C
◗ Poziţia … este o poziţie neutră.
C
◗ Poziţia "S" este poziţia potrivită pentru pielea
sensibilă.
C
◗ Poziţia "N" este poziţia potrivită pentru pielea
normală.
Bărbierire
1 Opriţi aparatul de ras apăsând butonul
pornire/oprire o dată.
C
2 Faceţi rapid mişcări drepte şi circulare cu
capetele de bărbierire pe suprafaţa pielii.
ROMÂNĂ36
S
N
Page 35

Bărbierirea pe o piele uscată asigură cele mai
bune rezultate.
Pielea dumneavoastră ar putea necesita 2-3
săptămâni până să se obişnuiască cu sistemul
Philishave.
3 Opriţi aparatul de ras apăsând butonul
pornire/oprire o dată.
C
4 Pentru a preveni deteriorarea aparatului,
puneţi întotdeauna capacul după utilizare.
Dispozitiv de tundere
Pentru îngrijirea perciunilor şi a mustăţii.
C
1 Deschideţi dispozitivul de tundere
împingând în sus butonul culisant.
Dispozitivul de tundere poate fi activat în timp ce
motorul funcţionează.
Curăţare şi întreţinere
O curăţare regulată asigură cele mai bune
rezultate de bărbierire.
Modul cel mai simplu şi mai igienic de a curăţa
aparatul este să clătiţi unitatea de bărbierire şi
compartimentul de colectare a părului cu apă
fierbinte după fiecare utilizare.
Aveţi grijă ca apa să nu fie prea fierbinte pentru a
nu vă arde.
ROMÂNĂ 37
Page 36

În fiecare zi: unitatea de bărbierire şi
compartimentul pentru păr
1 Opriţi aparatul, scoateţi încărcătorul din
priză şi fişa din aparat.
C
2 Apăsaţi butonul de decuplare (1) pentru a
deschide unitatea de bărbierire (2).
C
3 Curăţaţi unitatea de bărbierire şi
compartimentul de colectare a părului
clătindu-le cu apă fierbinte de la robinet.
Curăţaţi interiorul unităţii de bărbierire şi
compartimentul de colectare a părului.
4 Clătiţi cu apă aparatul de ras în exterior.
5 Închideţi unitatea şi scuturaţi excesul de
apă.
Nu ştergeţi niciodată unitatea cu un prosop sau
un şerveţel deoarece aţi putea deteriora capetele.
C
6 Deschideţi din nou unitatea de bărbierire
şi lăsaţi-o deschisă pentru a se usca
complet.
Puteţi curăţa compartimentul pentru păr fără apă
folosind peria furnizată.
ROMÂNĂ38
Page 37

O dată la şase săptămâni: capete de
bărbierire
C
1 Deschideţi unitatea de bărbierire, răsuciţi
rotiţa în sens invers acelor de ceasornic
(1) şi scoateţi cadrul de susţinere (2).
2 Curăţaţi cuţitele şi sitele de protecţie cu
periuţa furnizată.
Lamele şi sitele de protecţie sunt pereche, de
aceea curăţaţi pe rând câte un set. Dacă
amestecaţi din greşeală lamele cu sitele, s-ar putea
să dureze câteva săptămâni până ce aparatul va
tăia din nou la performanţa optimă anterioară.
3 Remontaţi capetele de bărbierire. Puneţi
cadrul de susţinere pe unitate, apăsaţi
rotiţa (1) şi răsuciţi în sensul acelor de
ceasornic (2).
4 Închideţi unitatea de bărbierire.
Dispozitiv de tundere
Curăţaţi dispozitivul de tundere de fiecare dată
când îl folosiţi.
1 Opriţi aparatul, scoateţi încărcătorul din
priză şi fişa din aparat.
C
2 Curăţaţi dispozitivul de tundere cu
ajutorul periuţei furnizate.
ROMÂNĂ 39
2
1
Page 38

C
3 Ungeţi dinţii dispozitivului de tundere cu
puţin ulei pentru maşina de cusut o dată la
şase luni.
Depozitare
C
◗ Acoperiţi aparatul de ras cu capacul de
protecţie pentru a preveni deteriorarea.
C
◗ Depozitaţi aparatul în borseta de lux sau
poziţionaţi aparatul pe suport pentru a se
usca.
Înlocuire
Înlocuiţi capetele de bărbierire o dată la doi ani
pentru rezultate optime.
Înlocuiţi capetele de bărbierire deteriorate sau
uzate doar cu capetele de bărbierire Philishave
Sensotec HQ8.
1 Opriţi aparatul, scoateţi încărcătorul din
priză şi fişa din aparat.
C
2 Apăsaţi butonul de decuplare (1) pentru a
deschide unitatea de bărbierire (2).
ROMÂNĂ40
Page 39

C
3 Răsuciţi rotiţa în sens invers acelor de
ceasornic (1) şi scoateţi cadrul de
susţinere (2).
C
4 Scoateţi capetele de bărbierire şi
poziţionaţi-le pe cele noi în unitatea de
bărbierire, în aşa fel încât zonele cu orificii
să fie îndreptate spre centrul unităţii.
Aveţi grijă să potriviţi corect capetele de
bărbierire în nişele corespunzătoare.
C
5 Repoziţionaţi cadrul de susţinere în
unitatea de bărbierire.Apăsaţi rotiţa (1) şi
răsuciţi-o în sensul acelor de ceasornic (2).
6 Închideţi unitatea de bărbierire.
Accesorii
Următoarele accesorii sunt disponibile:
- Încărcător HQ8000.
- Capete de bărbierire Philishave Sensotec HQ8.
- Curăţător cap de bărbierire Philishave HQ110
(spray de curăţare cap de bărbierire).
Protejarea mediului
Acumulatorul reîncărcabil conţine substanţe ce
pot polua mediul.
ROMÂNĂ 41
2
1
1
2
Page 40

Aruncarea acumulatorului
Scoateţi acumulatorul când aruncaţi aparatul. Nu
aruncaţi acumulatorul în gunoiul menajer, ci la un
punct de colectare oficial. Puteţi să-l duceţi la un
centru service Philips care le va arunca în
conformitate cu normele privind protejarea
mediului înconjurător.
Scoateţi acumulatorul doar dacă este complet
descărcat.
1 Scoateţi încărcătorul din priză şi fişa din
aparat.
C
2 Lăsaţi aparatul să funcţioneze până ce se
opreşte, desfaceţi şuruburile şi deschideţi-l.
3 Scoateţi acumulatorul.
Aparatul nu trebuie conectat la priză după ce aţi
scos acumulatorul.
Garanţie şi service
Pentru informaţii suplimentare sau în cazul altor
probleme, vă rugăm să vizitaţi site-ul Philips
www.philips.com sau să contactaţi
Departamentul Clienţi din ţara dumneavoastră
(veţi găsi numărul de telefon în garanţia
internaţională). Dacă în ţara dumneavoastră nu
există un astfel de departament, contactaţi
furnizorul dumneavoastră Philips sau
Departamentul Service pentru
ROMÂNĂ42
Page 41

Aparate Electrocasnice şi Produse de Îngrijire
Personală Philips.
Depanare
1 Performanţe scăzute de bărbierire
B
Cauza 1: capetele de bărbierire sunt murdare.
B
Aparatul de ras nu a fost clătit suficient de mult
timp sau apa folosită nu a fost suficient de
fierbinte.
◗ Curăţaţi bine aparatul înainte de a continua
bărbierirea.A se vedea capitolul "Curăţare şi
întreţinere".
B
Cauza 2: fire lungi de păr blochează capetele de
bărbierire.
◗ Curăţaţi cuţitele şi sitele de protecţie cu
periuţa furnizată.A se vedea capitolul
"Curăţare şi întreţinere",secţiunea "O dată la
şase săptămâni: capete de bărbierire".
B
Cauza 3: capetele de bărbierire sunt deteriorate
sau uzate.
◗ Înlocuiţi capetele de bărbierire.A se vedea
capitolul "Înlocuire".
2 Aparatul de ras nu funcţionează când
butonul pornire/oprire este apăsat.
B
Cauza 1: acumulatorul este descărcat.
ROMÂNĂ 43
Page 42

◗ Reîncărcaţi acumulatorul. Consultaţi capitolul
"Încărcare".
B
Cauza 2: aparatul de ras nu este conectat.
◗ Puneţi încărcătorul în priză.
3 Sunt depuneri de calcar pe carcasa
metalică a aparatului.
B
Cauză: după curăţare, rămân picături de apă pe
părţile metalice ale aparatului.
◗ Pentru a evita depunerile de calcar de pe
suprafeţele metalice, ştergeţi aparatul de ras
cu un prosop sau un şerveţel după clătire.
Nu ştergeţi niciodată unitatea de bărbierire cu un
prosop sau un şerveţel, întrucât aţi putea
deteriora capetele de bărbierire.
◗ Dacă au mai rămas depuneri de calcar, folosiţi
un produs special de îndepărtare a acestora.
Frecaţi părţile metalice, lăsaţi produsul să
acţioneze şi ştergeţi.
4 Unitatea de bărbierire s-a desprins.
B
Cauză: nu aţi montat corect unitatea de
bărbierire.
◗ Dacă unitatea de radere se desprinde din
aparat, verificaţi dacă arcul balamalei este încă
bine fixat sau dacă s-a desprins, rupt sau
ROMÂNĂ44
Page 43

îndoit. Dacă arcul balamalei este încă bine
prins, unitatea de radere poate fi uşor
remontată. Dar dacă arcul s-a desprins, este
rupt sau îndoit, vă rugăm să apelaţi la
furnizorul dumneavoastră sau la cel mai
apropiat centru service Philips pentru a evita
deteriorarea aparatului de ras.
ROMÂNĂ 45
Page 44

Внимание
Прежде чем начать пользоваться прибором,
внимательно ознакомьтесь с настоящим
руководством и сохраните его в качестве
справочного материала.
◗ Используйте только сетевую вилку,
поставляемую в комплекте.
◗ Блок питания преобразует сетевое
напряжение 100-240 вольт в напряжение
питания прибора 24 вольт.
◗ Вилка шнура электропитания содержит
адаптер. Не производите замену
оригинальной вилки на какую-либо другую.
Это может привести к опасным
последствиям.
◗ Не пользуйтесь поврежденной вилкой
сетевого шнура.
◗ При повреждении блока питания всегда
заменяйте его оригинальным блоком
питания, чтобы обеспечить безопасную
эксплуатацию прибора.
◗ Заряжайте, храните и используйте прибор
при температуре 5cC до 35cC.
◗ Не подзаряжайте электробритву в
закрытом футляре.
C
◗ Убедитесь в том, что блок питания сухой.
◗ Прежде чем промыть электробритву под
струей воды,отключите ее от электросети.
C
◗ Электробритва соответствует принятому
международному стандарту по технике
безопасности IEC(МЕЖДУНАРОДНОЙ
ЭЛЕКТРОТЕХНИЧЕСКОЙ КОМИССИИ),
РУССКИЙ46
Page 45

и ее можно промывать водопроводной
водой.
Будьте осторожны с горячей водой. Всегда
проверяйте, не слишком ли горяча вода, чтобы
уберечь ваши руки от получения ожога.
◗ Уровень шума Lc= 62 dB [A]
Дисплей
На дисплей выводится следующая информация:
Зарядка
C
◗ При подключении электробритвы к
электросети, дисплей начнет светиться, на
нем появляется символ штепселя, и
начинает мигать отсчет минут.
Аккумуляторы полностью
заряжены
C
◗ Как только батареи полностью зарядятся,
на дисплее появится бегущее слово 'FULL',
и подсветка дисплея начинает мигать.
РУССКИЙ 47
Page 46

Оставшееся время автономного
бритья
C
◗ Число на дисплее означает время бритья в
минутах, оставшееся до подзарядки
бритвы. Черные сегменты указывают
степень зарядки батарей.Время, в течение
которого можно бриться после полной
зарядки бритвы, отсчитывается с помощью
встроенного компьютера и зависит от типа
растительности на лице и манеры бритья.
Во время нескольких первых зарядок, на
дисплее отображается среднестатистическая
оценка времени, , в течение которого можно
бриться после полной зарядки бритвы, которая
впоследствии автоматически уточняется в
зависимости от определяемой встроенным
компьютером манеры бритья.
Напоминание об очистке
C
◗ Для напоминания вам о том, что требуется
выполнить очистку электробритвы (это
будет иметь место приблизительно раз в
неделю при нормальном использовании
электробритвы) на дисплее появляется
символ водопроводного крана с мигающей
зеленой струей воды.
РУССКИЙ48
Page 47

Разрядка аккумуляторов
C
◗ Когда вы выключаете бритву,а батарея
разряжена,начинают мигать символ
штекера и вы слышите несколько коротких
звуковых сигналов.
При включении или выключении
электробритвы, дисплей будет светиться в
течение прибл. 10 секунд.
Демонстрационная программа
◗ Прибор имеет уникальную 1-минутную
программу демонстрации. Нажмите и
удерживайте в течение нескольких секунд
кнопку вкл./выкл., пока все символы не
появятся на дисплее. В течение
демонстрации, прибор автоматически
включится три раза. Вы можете прерывать
демонстрацию, нажимая кнопку вкл/выкл.
Зарядка
Перед тем как зарядить прибор, убедитесь,
что он выключен.
Если вы заряжаете аккумуляторную батарею
электробритвы в первый раз или если вы
долгое время не пользовались прибором,
производите зарядку аккумуляторной батареи
бритвы непрерывно в течение 4 часов.
Вы можете также бриться без зарядки
аккумуляторов, подключая электробритву
непосредственно к электросети.
Не оставляйте прибор подключенным к
электросети более, чем на 24 часа.
РУССКИЙ 49
Page 48

Зарядка аккумуляторов электробритвы
Заряжайте электробритву, когда на экране
начнет мигать символ штекера и раздадутся
звуковые сигналы
Не подзаряжайте электробритву в закрытом
футляре.
C
1 Вставьте штекер шнура сетевого
адаптера в электробритву.
2 Вставьте сетевую вилку в розетку
электросети.
3 Выньте сетевую вилку из розетки и
отсоедините штекер шнура сетевого
адаптера от электробритвы, как только
аккумуляторные батареи полностью
зарядятся.
Время бритья без подключения к
электросети
Полностью заряженная бритва обеспечивает
время бритья без подключения к электросети
до 70 минут.
РУССКИЙ50
Page 49

Как пользоваться прибором
Удобное персональное управление
C
◗ Система Personal Comfort Control
позволяет приспособить электробритву к
вашему типу кожи.
- Вы можете установить положение 'Normal'
для быстрого, комфортного, чистого бритья.
- Вы можете установить положение 'Sensitive'
для чистого бритья при оптимальном
комфорте для кожи.
C
◗ Положение … нейтральное положение.
C
◗ Положение 'S' наиболее подходит для
чувствительной кожи.
C
◗ Положение 'N' наиболее подходит для
нормальной кожи.
Бритье
1 Выключите электробритву, нажав один
раз кнопку вкл./выкл.
C
2 Быстро перемещайте бритвенные
головки по коже, совершая
РУССКИЙ 51
S
N
Page 50

одновременно возвратнопоступательные и вращательные
движения.
Наилучшие результаты бритья достигаются в
том случае, когда ваша кожа сухая.
Вашей коже может потребоваться 2-3 недели
для того, чтобы привыкнуть к бритвенной
системе Philishave.
3 Выключите электробритву, нажав один
раз кнопку вкл./выкл.
C
4 Во избежание поломки, после
использования наденьте на бритву
защитную крышку.
Подравниватель.
Для подравнивания висков и ухода за усами.
C
1 Откройте подравниватель, передвинув
ползунковый переключатель вверх.
Подравнивателем можно пользоваться только
при включенном электродвигателе.
Очистка и уход
Регулярная очистка гарантирует наилучшие
результаты бритья.
Наиболее простой и гигиеничный способ
очистки электробритвы заключается в
промывании бритвенного блока и камеры
волососборника горячей водой после каждого
пользования бритвой.
РУССКИЙ52
Page 51

Будьте осторожны с горячей водой. Всегда
проверяйте, не слишком ли горяча вода, чтобы
уберечь ваши руки от получения ожога.
Каждый день: бритвенный блок и камера
волососборника
1 Выключите бритву, выньте сетевую вилку
из розетки и отсоедините штекер шнура
сетевого адаптера от электробритвы.
C
2 Нажмите кнопку фиксатора (1) и
откройте бритвенный блок (2).
C
3 Очистите бритвенный блок и камеру
волососборника, промывая их под
горячей водопроводной водой.
Внутренняя часть бритвенного блока и камера
волососборника должны быть очищены
надлежащим образом.
4 Промойте бритву снаружи.
5 Закройте бритвенный блок и стряхните
воду.
Запрещается сушить бритвенный блок с
помощью полотенца или салфетки, так как
можно повредить бритвенные головки.
C
6 Снова откройте бритвенный блок и
оставьте его открытым, чтобы дать
бритве полностью высохнуть.
РУССКИЙ 53
Page 52

Вы также можете очистить камеру
волососборника без воды, пользуясь
кисточкой, входящей в комплект поставки.
Через каждые 6 месяцев: бреющие
головки
C
1 Откройте бритвенный блок, поверните
колесико против часовой стрелки (1) и
снимите фиксирующую рамку (2).
2 Очистите вращающиеся и неподвижные
ножи с помощью поставляемой в
комплекте щеточки.
Не очищайте одновременно более одной
пары ножей, поскольку вращающийся и
неподвижный ножи каждой пары пригнаны
друг к другу. Если вы случайно перепутаете
ножи, то может потребоваться несколько
недель для того, чтобы восстановить
оптимальные характеристики бритья.
3 Установите бреющие головки в
бритвенный блок. Установите
фиксирующую рамку в бритвенный блок,
нажмите на колесико (1) и поверните
его по часовой стрелке (2).
4 Закройте бритвенный блок.
Подравниватель
Очищайте подравниватель после каждого
использования.
РУССКИЙ54
2
1
Page 53

1 Выключите бритву, выньте сетевую вилку
из розетки и отсоедините штекер шнура
сетевого адаптера от электробритвы.
C
2 Очищайте подравниватель с помощью
кисточки, входящей в комплект
поставки.
C
3 Смазывайте зубцы подравнивателя
каждые шесть месяцев каплей
машинного масла для швейных машин.
Хранение
C
◗ Во избежание повреждений наденьте на
электробритву защитный колпачок.
C
◗ Храните бритву в футляре или на подставке
Замена бритвенных головок
Для достижения оптимальных результатов
бритья производите замену бритвенных
головок каждые два года.
РУССКИЙ 55
Page 54

Заменяйте поврежденные или изношенные
бритвенные головки только бритвенными
головками HQ8 Philishave Sensotec.
1 Выключите бритву, выньте сетевую вилку
из розетки электросети и отсоедините
штекер шнура сетевого адаптера от
электробритвы.
C
2 Нажмите кнопку освобождения (1) и
откройте бритвенный блок (2).
C
3 Поверните колесико против часовой
стрелки (1) и снимите фиксирующую
рамку (2).
C
4 Извлеките бритвенные головки из
бритвенного блока и установите новые
таким образом, чтобы боковые стороны
с мелкими отверстиями были
направлены в центр бритвенного блока.
Убедитесь, что выступы бритвенных головок
точно совпадают с соответствующими пазами.
C
5 Установите фиксирующую рамку в
бритвенный блок, нажмите на колесико
(1) и поверните его по часовой стрелке
(2).
6 Закройте бритвенный блок.
РУССКИЙ56
2
1
1
2
Page 55

Принадлежности
В продаже имеются следующие
принадлежности:
- Блок питания HQ8000.
- Бритвенные головки HQ8 Sensotec Philishave.
- Очиститель бритвенных головок HQ110
Philishave (спрей для очистки бритвенных
головок).
Забота об окружающей среде
Встроенная аккумуляторная батарея содержит
вещества, которые могут представлять
опасность для окружающей среды.
Утилизация аккумуляторов
Извлеките аккумуляторы, если вы собираетесь
выбрасывать бритву. Не выкидывайте
аккумуляторы вместе с бытовым мусором, а
сдайте их в официальный пункт приема. Вы
также можете сдать аккумуляторы в сервисный
центр компании «Филипс», где они будут
утилизированы безопасным для окружающей
среды способом.
Перед удалением аккумуляторы должны быт
полностью разряжены.
1 Выньте вилку сетевого адаптера из
розетки сети электропитания и
отсоедините штекер его шнура от
электробритвы.
РУССКИЙ 57
Page 56

C
2 Оставьте электробритву во включенном
состоянии до остановки
электродвигателя, отверните винты и
откройте электробритву.
3 Извлеките аккумуляторы.
Не подключайте бритву к электросети после
извлечения из нее аккумуляторов.
Информация и сервисное обслуживание
По поводу дополнительной информации или в
случае возникновения каких-либо проблем
обращайтесь на Web-сайт компании «Филипс»
по адресу www.philips.comили в центр
компании «Филипс» по обслуживанию
потребителей в вашей стране (вы найдете его
номер телефона на международном
гарантийном талоне). Если подобный центр в
вашей стране отсутствует, обратитесь в вашу
местную торговую организацию компании
«Филипс» или сервисное отделение компании
Philips Domestic Appliancesand Personal Care BV.
Поиск и устранение неисправностей
1 Плохое качество бритья
B
Причина 1: загрязнились бритвенные головки.
B
Бритва промывалась недостаточно долго
или недостаточно горячей водой.
РУССКИЙ58
Page 57

◗ Перед тем как продолжить бритье,
тщательно очистите электробритву. См.
раздел «Очистка и уход».
B
Причина 2: бритвенные головки забиты
длинными волосами.
◗ Очистите вращающиеся и неподвижные
ножи с помощью поставляемой в
комплекте щеточки.См. раздел «Через
каждые 6 месяцев: бреющие головки»
B
Причина 3: бритвенные головки повреждены
или изношены.
◗ Замените бреющие головки. См. раздел
«Замена».
2 При нажатии кнопки вкл./выкл.
электробритва не работает.
B
Причина 1: батарейки на заряжены
◗ Зарядите аккумуляторные батареи.См.
раздел «Зарядка».
B
Причина 2: электробритва не подключена к
электросети.
◗ Вставьте сетевую вилку в розетку
электросети.
3 Образование отложений на
металлическом корпусе электробритвы
РУССКИЙ 59
Page 58

B
Причина: после очистки на металлических
деталях электробритвы остается вода.
◗ Для предотвращения образования налета
на металлических частях бритвы вытирайте
ее насухо полотенцем или салфеткой после
промывания.
Не следует вытирать бритвенный блок
полотенцем или другой тканью, так как это
может привести к повреждению бреющи
головок.
◗ Если налет все-таки образовался, его можно
легко удалить специальным чистящим
средством. Нанесите немного этого
средства на металлические части, оставьте
его на некоторое время,а затем вытрите
насухо.
4 Бритвенный блок отсоединился от
бритвы.
B
Причина: бритвенный блокне был правильно
установлен.
◗ Если произошло отсоединение
бритвенного блока от электробритвы,
проверьте надежность крепления
пружинной петли, т.е.не ослабла ли
пружинная петля, нет ли на ней трещин или
иных повреждений. Если пружинная петля
закреплена надлежащим образом,
бритвенный блок может быть легко
РУССКИЙ60
Page 59

установлен на место. Если же пружинная
петля ослабла или на ней имеются трещины
или повреждения, обратитесь в
представительство компании "Филипс" или
в ближайший сервисный центр компании
"Филипс" для устранения неисправности
вашего прибора.
РУССКИЙ 61
Page 60

Důležité
Následující návod pečlivě přečtěte a uschovejte jej
pro případná pozdější nahlédnutí.
◗ Používejte přístroj výhradně s
transformátorovou zástrčkou.
◗ Transformátorová zástrčka transformuje 100
až 240 V na bezpečné napětí menší než 24 V.
◗ Síťová zástrčka obsahuje transformátor. Proto
ji nikdy nesmíte zaměnit za jinou zástrčku, což
by mohlo způsobit vážnou poruchu.
◗ Nepoužívejte přístroj pokud je jeho
transformátorová zástrčka poškozena.
◗ Pokud by byla transformátorová zástrčka
poškozena, z bezpečnostních důvodů ji
vyměňte za originální typ.
◗ Akumulátor přístroje nabíjejte a přístroj
používejte při teplotě mezi 5cC a 35cC.
◗ Nenabíjejte akumulátory pokud je přístroj
uložen v obalu.
C
◗ Dbejte na to, aby transformátorová zástrčka
nenavlhla.
◗ Holicí přístroj před čištěním vždy odpojte od
sítě.
C
◗ Přístroj odpovídá mezinárodně schváleným
bezpečnostním předpisům IEC a může být bez
obav čištěn pod tekoucí vodou.
Buďte opatrní při použití horké vody.Vždy
předem zkontrolujte, zda není voda nadměrně
horká, abyste si neopařili prsty.
◗ Hladina hluku: Lc = 62 dB (A)
ČESKY62
Page 61

Displej
Na displeji se zobrazují následující informace:
Nabíjení akumulátoru
C
◗ Jakmile přístroj připojíte k síti, rozsvítí se
displej, zobrazí se symbol zástrčky a indikace
minut začne blikat.
Akumulátory jsou plně nabité
C
◗ Jakmile jsou akumulátory plně nabité, začne se
přes displej posouvat slovo "FULL" a osvětlení
displeje začne blikat.
Zbývající doba holení
C
◗ Počet zbývajících minut holení indikovaných
na displeji. Černý segment zobrazuje,kolik
energie ještě v akumulátorech zbývá. Pokud
jsou akumulátory plně nabité, lze se holit
55 až 70 minut, podle toho, jak tvrdé máte
vousy a jaký je váš způsob holení, což vypočítá
vestavěný computer.
Během několika prvních nabíjení je doba holení
indikována přibližným odhadem, ta se později
automaticky upraví podle vašeho způsobu holení.
ČESKY 63
Page 62

Upozornění na nutnost čištění
C
◗ Při běžném používání se přibližně jednou
týdně objeví na displeji upozornění na nutnost
vyčištění. Zobrazí se symbol vodního
kohoutku s blikajícími kapkami vody.
Akumulátory na pokraji vybití
C
◗ Pokud vypnete holicí přístroj v okamžiku,kdy
je již indikována malá energie v
akumulátorech, symbol zástrčky bliká a ozve
se několik akustických signálů.
Když přístroj zapnete nebo vypnete, displej se
rozsvítí asi na 10 sekund.
Demonstrační program
◗ Přístroj má jedinečný jednominutový
demonstrační program. Stiskněte tlačítko
on/off několik sekund, až se na displeji zobrazí
všechny symboly. Během demonstrace se
přístroj automaticky třikrát zapne.
Demonstraci lze přerušit stisknutím tlačítka
on/off.
Nabíjení akumulátoru
Než začnete akumulátor nabíjet, přesvědčte se, že
je přístroj vypnut.
Když nabíjíte akumulátor přístroje poprvé nebo
po delší době kdy jste ho nepoužívali, nabíjejte ho
po dobu asi 4 hodin. Nabíjení v běžném provozu
pak trvá asi 1 hodinu.
ČESKY64
Page 63

Můžete se samozřejmě též oholit i při vybitých
akumulátorech tak, že přístroj připojíte do sítě.
Nenechávejte přístroj připojený k síti déle než 24
hodin.
Nabíjení akumulátorů
Akumulátory přístroje nabíjejte, když začne blikat
symbol zástrčky a když se ozve několik
akustických signálů.
Nenabíjejte akumulátory, pokud je přístroj uzavřen
v pouzdru.
C
1 Zástrčku síťového přívodu zasuňte do
přístroje.
2 Síťovou zástrčku zasuňte do zásuvky.
3 Když jsou akumulátory plně nabity,
vytáhněte transformátorovou zástrčku ze
síťové zásuvky a přístrojovou zástrčku z
přístroje.
Doba holení bez sítě
S plně nabitými akumulátory se lze holit až
70 minut.
ČESKY 65
Page 64

Použití přístroje
Personal Comfort Control
C
◗ Personal Comfort Control přizpůsobuje holicí
přístroj typu vaší pokožky.
- Pro běžné a rychlé oholení nastavte na holicím
přístroji polohu "Normal".
- Pro komfortní oholení s maximální péčí o pleť
nastavte na holicím přístroji polohu "Sensitive".
C
◗ Poloha … je neutrální nastavení.
C
◗ Poloha "S" je nejvhodnější nastavení pro
citlivou pokožku.
C
◗ Poloha "N" je nejvhodnější nastavení pro
méně citlivou pokožku.
Holení
1 Holicí přístroj vypněte jedním stisknutím
tlačítka on/off.
C
2 Holicím přístrojem pohybujte po pokožce
rychle přímými i krouživými pohyby.
ČESKY66
S
N
Page 65

Pokud je pokožka suchá,dosáhnete při holení
nejlepších výsledků.
Pamatujte, že pokožka potřebuje 2 až 3 týdny na
to, aby si novému způsobu holení přivykla.
3 Holicí přístroj vypněte jedním stisknutím
tlačítka on/off.
C
4 Vždy po použití nasaďte na holicí přístroj
ochranný kryt, abyste předešli poškození
holicích hlav.
Zastřihovač
Zastřihovač slouží k úpravě kotlet nebo knírku.
C
1 Zastřihovač zapnete posunutím jeho
spínače směrem nahoru.
Zastřihovač lze zapojit i když je motor v chodu.
Čištění a údržba
Pravidelné čištění zajistí nejlepší výsledky při
holení.
Nejsnažším a nejhygieničtějším čištěním je
opláchnout holicí jednotku a komoru pro
odstřižené vousy horkou vodou po každém
použití přístroje.
Buďte opatrní při použití horké vody.Vždy
zkontrolujte zda není voda nadměrně horká
abyste si neopařili ruce.
ČESKY 67
Page 66

Denně: holicí jednotka a komora pro
odstřižené vousy
1 Vypněte přístroj, vyjměte zástrčku nabíječe
ze zásuvky a vyjměte též zástrčku z
přístroje.
C
2 Stiskněte uvolňovací tlačítko a otevřte
holicí jednotku.
C
3 Umyjte občas holicí jednotku a prostor
pro odstřižené vousy tekoucí horkou
vodou.
Dbejte na to, aby vnitřní část holicí jednotky a
prostor pro odstřižené vousy byly řádně vyčištěny.
4 Vypláchněte vnitřek přístroje.
5 Holicí jednotku uzavřete a vytřepejte
přebytečnou vodu.
Holicí jednotku nikdy nesušte ručníkem nebo
jinou tkaninou, vyvarujete se tak poškození
holicích hlav.
C
6 Opět otevřete holicí jednotku a nechte
přístroj v otevřeném stavu zcela uschnout.
Prostor pro odstřižené vousy můžete též vyčistit
bez použití vody přiloženým kartáčkem.
ČESKY68
Page 67

Každých šest měsíců: holicí hlavy
C
1 Otevřte holicí jednotku, otočte kolečkem
proti směru pohybu hodinových ruček (1)
a vyjměte zajišťovací rámeček (2).
2 Vyčistěte korunky i nožové věnce holicích
hlav přiloženým kartáčkem.
Čistěte vždy pouze jednu holicí hlavu (korunku a
nožový věnec) a vložte oboje zpět do holicí
hlavice dříve, než vyjmete další holicí hlavu. Pokud
byste do některé korunky vložili jiný nožový
věnec, trvalo by týdny než by se nožový věnec v
jiné korunce zaběhl a v té době by výsledek
holení nebyl uspokojivý.
3 Holicí hlavy vložte zpět do holicí hlavice.
Vraťte na původní místo zajišťovací
rámeček, stiskněte kolečko (1) a otočte jím
ve směru pohybu hodinových ruček (2).
4 Holicí jednotku uzavřete.
Zastřihovač
Zastřihovač vyčistěte po každém použití.
1 Vypněte přístroj, vyjměte zástrčku nabíječe
ze zásuvky a vyjměte též zástrčku z
přístroje.
C
2 Zastřihovač čistěte přiloženým kartáčkem.
ČESKY 69
2
1
Page 68

C
3 Na lišty zastřihovače kápněte každých šest
měsíců kapku oleje na šicí stroje.
Uchovávání
C
◗ Nasaďte na přístroj ochraný kryt abyste
předešli poškození holicích hlav.
C
◗ Přístroj uložte do luxusního pouzdra nebo ho
postavte do podstavce aby uschnul.
Výměna dílů
Pro optimální výsledky holení vyměňte holicí hlavy
každé dva roky.
Poškozené nebo opotřebené holicí hlavy nahraďte
vždy holicími hlavami Philishave HQ8 Sensotec.
1 Vypněte přístroj, vyjměte zástrčku nabíječe
ze zásuvky a vyjměte též zástrčku z
přístroje.
C
2 Stiskněte uvolňovací tlačítko a (1) a
otevřte holicí jednotku (2).
ČESKY70
Page 69

C
3 Otočte kolečkem proti směru pohybu
hodinových ruček (1) a odejměte
zajišťovací rámeček (2).
C
4 Vyjímejte holicí hlavy a nové vkládejte do
holicí jednotky vždy tak, aby část s malými
otvory směřovala do středu holicí
jednotky.
Přesvědčte se, že holicí hlavy přesně zapadly na
svá místa.
C
5 Vložte zajišťovací rámeček zpět do holicí
jednotky, stiskněte kolečko (1) a otočte jím
ve směru pohybu hodinových ruček (2).
6 Holicí jednotku uzavřete.
Příslušenství
Lze zakoupit následující příslušenství:
- HQ8000 síťová zástrčka.
- HQ8 holicí hlava Philishave Sensotec.
- HQ110 čisticí sprej pro holicí hlavy Philishave
shaving head cleaner.
Ochrana životního prostředí
Vestavěné akumulátory obsahují substance, které,
po jejich rozpadu, mohou škodit životnímu
prostředí.
ČESKY 71
2
1
1
2
Page 70

Likvidace akumulátorů
Pokud jednoho dne přístroj likvidujete, vyjměte z
něj akumulátory. Akumulátory nezahazujte do
běžného domovního odpadu, ale odevzdejte je
do sběrny,k tomu určené. Akumulátory můžete
též odevzdat v servisním středisku firmy Philips,
kde se již postarají o jejich optimální likvidaci.
Akumulátory vyjměte až když jsou zcela vybité.
1 Vypněte přístroj, vytáhněte zástrčku
síťového přívodu ze zásuvky a přívod
odpojte též od přístroje.
C
2 Motorek ponechte v chodu dokud se sám
nezastaví, pak povolte příslušné šroubky a
přístroj otevřte.
3 Vyjměte akumulátory.
Když jste z přístroje vyjmuli akumulátory, nesmíte
ho již připojit do sítě!
Záruka & servis
Pokud byste potřebovali jakoukoli informaci nebo
měli nějaký problém, nahlédněte na internetovou
stránku www.philips.com.Můžete se též spojit s
Informačním střediskem firmy Philips, jehož
adresu, telefonní číslo i další možnosti
kontaktování najdete na letáčku s celosvětovou
zárukou.
ČESKY72
Page 71

Odstranění případných poruch
1 Zhoršené výsledky holení
B
Příčina 1: holicí hlavy jsou zašpiněné.
B
Přístroj nebyl důkladně vyčištěn nebo voda při
čištění nebyla dostatečně horká.
◗ Než budete pokračovat v holení, přístroj
důkladně vyčistěte (viz odstavec "Čištění a
údržba").
B
Příčina 2: holicí hlavy jsou blokovány dlouhými vousy.
◗ Korunky a nožové věnce holicích hlav
vyčistěte přiloženým kartáčkem.Viz odstavec
"Čištění a údržba", oddíl "Každých šest
měsíců: holicí hlavy".
B
Příčina 3: holicí hlavy jsou opotřebeny nebo
poškozeny.
◗ Vyměňte holicí hlavy (viz odstavec "Výměna
dílů").
2 Přístroj po stisknutí tlačítka on/off nepracuje
B
Příčina 1: akumulátory jsou vybité.
◗ Nabijte akumulátory přístroje.Viz odstavec
"Nabíjení akumulátorů".
B
Příčina 2: přístroj není připojen k síti.
◗ Síťovou zástrčku zasuňte do zásuvky.
ČESKY 73
Page 72

3 Na kovovém těle přístroje je vodní kámen.
B
Příčina: na přístroji zůstala po vyčištění neotřená
voda.
◗ Abyste vytvoření skvrn na povrchu kovových
částí přístroje předešli, vytřete po opláchnutí
jeho povrch pečlivě ručníkem nebo vhodnou
tkaninou.
Nikdy přístroj neutírejte ručníkem nebo jinou
tkaninou, která pouští vlákna, aby tato vlákna
nepoškodila holicí hlavy.
◗ Kdyby tyto skvrny zůstávaly nadále viditelné,
můžete se jich zbavit použitím vhodného
prostředku pro odstranění vodního kamene.
Potřete kovové díly tímto prostředkem,
nechte ho chvíli působit a pak povrch do
sucha vytřete.
4 Holicí jednotka nedrží na přístroji.
B
Příčina: holicí jednotka nebyla řádně nasazena.
◗ V takovém případě zkontrolujte, zda závěsné
pružiny mají dostatečnou sílu udržet jednotku
na přístroji. Pokud jsou pružiny v pořádku, lze
holicí jednotku na přístroj znovu nasadit.
Pokud by ale jejich síla nestačila, nebo byly
jakkoli poškozené,kontaktujte servis firmy
Philips abyste zabránili případnému poškození
vašeho přístroje.
ČESKY74
Page 73

MAGYAR 75
Tudnivalók
A készülék használata előtt olvassa el a használati
útmutatót. Őrizze meg az útmutatót későbbi
használatra.
◗ Csak az készülékhez mellékelt hálózati
adaptert használja.
◗ A hálózati adapter a 100-240 Volt feszültséget
biztonságos 24 Volt feszültségre alakítja át.
◗ A hálózati adapter transzformátort tartalmaz.
Ne vágja le a csatlakozó vezetéket a hálózati
adapterről és ne csatlakoztassa a borotvát
másik hálózati adapterhez, mert ez veszélyes
lehet.
◗ Ne használjon sérült hálózati adaptert.
◗ Ha a hálózati adapter meghibásodott a
kockázatok elkerülése érdekében mindig
eredeti típusúra cserélje ki.
◗ A készüléket 5cC és 35cC közötti
hőmérsékleten töltse, tárolja és használja.
◗ Ne töltse a borotvát zárt táskában.
C
◗ Vigyázzon, hogy a hálózati adapter ne érjen
víz.
◗ Folyóvizes tisztítás előtt mindig bontsa meg a
készülék elektromos csatlakozását.
C
◗ A készülék megfelel a nemzetközileg
jóváhagyott IEC biztonsági előírásoknak és
biztonságosan tisztítható vízcsap alatt.
Óvatosan bánjon a meleg vízzel. Mindig
ellenőrizze, hogy a víz ne legyen túl meleg,nehogy
leforrázza a kezét.
◗ Zajszint: Lc = 62 dB (A)
Page 74

A kijelző
A kijelző a következő információkat szolgáltatja:
Töltés
C
◗ Amint az elektromos hálózatra csatlakoztatja
a készüléket, bekapcsol a kijelző háttérmegvilágítása, megjelenik a hálózati
csatlakozódugó rajza, és villogni kezd a
percjelzés.
Az akkumulátor teljesen feltöltve.
C
◗ Az akkumulátor teljes feltöltődése után a
„FULL” (teli) szó szalad át a kijelzőn, melynek
háttér-megvilágítása ki-be kapcsol.
Hátralévő borotválkozási idő
C
◗ A kijelzőn látható szám a hátralévő
borotválkozási időt jelzi percekben.A fekete
részek az akkumulátor még meglévő
energiájának mennyiségéről tájékoztatnak.A
teljesen feltöltött készülék borotválkozási
ideje 55 és 70 perc között lehet, az Ön
szakállának típusától és egyéni borotválkozási
szokásaitól függően.Az időt a beépített
számítógép határozza meg.
Az első néhány feltöltéskor jelzett borotválkozási
idő csupán óvatos becslés, ennek helyébe
azonban valós érték lép, amint a készülék
megismerkedett az Ön borotválkozási szokásaival.
76 MAGYAR
Page 75

77
Tisztítási emlékeztető
C
◗ Ne felejtse el, hogy a borotvát megfelelően
tisztítani kell, ami átlagos használat esetén heti
egyszeri alkalmat jelent, a kijelzőn vízcsap jel
villógó vízcseppekkel jelenik meg.
Az akkumulátor töltöttségi szintje
alacsony.
C
◗ Lemerülőben lévő akkumulátor esetén a
borotva kikapcsolásakor villogni kezd a
hálózati csatlakozódugó rajza, s hangjelzés
hallható.
A készülék be- vagy kikapcsolásakor körülbelül
10 másodpercre bekapcsol a kijelző világítása.
Bemutató program
◗ A készüléken egyedülálló egyperces
bemutatóprogram futtatható: tartsa lenyomva
a be-ki kapcsoló gombot, amíg a kijelző
valamennyi jelzése meg nem jelenik.A
bemutatóprogram alatt a készülék háromszor
automatikusan bekapcsolódik.A bemutató a
be-ki kapcsoló gomb megnyomásával
megszakítható.
Töltés
Mielőtt elkezdi a töltést, ellenőrizze hogy a
készülék ki legyen kapcsolva.
Ha először tölti fel a borotvát vagy ha hosszabb
MAGYAR
Page 76

78
ideig nem használta, hagyja folyamatosan 4 óra át
töltődni. Normális esetben a töltés körülbelül
1 órát vesz igénybe.
Töltés nélkül is borotválkozhat, ha a készüléket a
hálózathoz csatlakoztatja.
Ne hagyja a borotvát a hálózathoz csatlakoztatva
24 óránál hosszabb ideig.
A készülék feltöltése
Töltse fel a készüléket ha a csatlakozó ikon villogni
kezd és néhány hangjelzést hall
Ne töltse a borotvát zárt tokban.
C
1 Csatlakoztassa a hálózati adapter
csatlakozó dugóját a borotvába.
2 Csatlakoztassa a hálózati adaptert a fali
konnektorba.
3 Húzza ki a hálózati adaptert a fali
konnektorból és húzza ki a készülék
csatlakozó dugóját, mikor az akkumulátor
teljesen feltöltődött.
Hálózati csatlakozó kábel nélküli
borotválkozási idő
A teljesen feltöltött borotvát hálózati csatlakozó
kábel nélkül kb. 70 percig használhatja.
MAGYAR
Page 77

A készülék használata
Personal Comfort Control
C
◗ A Personal Comfort Control rendszer
bőrtípusához igazítja a borotvát.
- "Normál" beállítás esetén a gyorsan, kellemesen
simára borotválhatja bőrét.
- Ha a "Sensitive" (érzékeny) beállítást választja, a
készülék bőrkímélő üzemmódban borotválja
arcát kellemesen simára.
C
◗ A … állás semleges beállítást jelez.
C
◗ Érzékeny bőrhöz az "S" állás a legmegfelelőbb.
C
◗ Normál bőrhöz az "N" állás a legmegfelelőbb.
Borotválkozás
1 Kapcsolja ki a borotvát a be-/kikapcsoló
gomb egyszeri megnyomásával.
79MAGYAR
S
N
Page 78

80
C
2 Gyorsan mozgassa a borotvafejeket a
bőrén, egyenes és körkörös mozdulatokat
végezve.
Borotválkozáskor legjobb, ha száraz a bőre.
Bőrének 2-3 hétre is szüksége lehet ahhoz, hogy a
Philishave rendszerhez hozzászokjon.
3 Kapcsolja ki a borotvát a be-/kikapcsoló
gomb egyszeri megnyomásával.
C
4 Használat után mindig tegye fel a
készülékre a védősapkát, hogy megvédje a
sérüléstől.
Pajeszvágó
Az oldalszakáll és a bajusz ápolásához.
C
1 Kapcsolja be a pajeszvágót a kapcsoló
felfelé nyomásával.
A pajeszvágót a borotva működése közben is
bekapcsolhatja.
Tisztítás és karbantartás
A rendszeres tisztítás garantálja a legjobb
borotválkozási eredményt.
A készülék tisztításának legegyszerűbb és
leghigiénikusabb módja az, ha a borotvaegységet
és a szőrgyűjtő kamrát a készülék minden
használata után meleg vízzel kiöblíti.
MAGYAR
Page 79

81
A meleg vízzel legyen óvatos. Mindig ellenőrizze
hogy a víz ne legyen túl forró, nehogy leforrázza a
kezét.
Minden nap: borotvaegység és szőrgyűjtő
kamra
1 Kapcsolja ki a borotvát, húzza ki a hálózati
adaptert a fali konnektorból és húzza ki a
hálózati adapter csatlakozóját a
borotvából.
C
2 Nyomja meg a kioldó gombot (1) és nyissa
ki a borotvaegységet (2).
C
3 A borotvaegységet és a szőrgyűjtő kamrát
melegviz alatt öblítse le néhányszor.
Győződjön meg róla, hogy a borotvaegység és a
szőrgyűjtő kamra belsejét teljesen kitisztította-e.
4 Öblítse le a készülék külsejét is.
5 Zárja le a borotvaegységet, és rázza ki a
felesleges vizet.
Soha ne szárítsa a borotvaegységet törülközővel
vagy papírzsebkendővel, mivel ezek megsérthetik
a borotvafejeket.
C
6 Nyissa ki ismét a borotvaegységet, és
hagyja, hogy a készülék teljesen
megszáradjon.
A szőrgyűjtő kamrát nem csak vízzel, hanem a
készülékhez tartozó kefe segítségével is tisztíthatja.
MAGYAR
Page 80

82
Minden félévben: borotvafejek tisztítása
C
1 Nyissa ki a borotvaegységet, forgassa a
tengelyt (1) az óramutató járásával
ellenkező irányba és vegye ki a
tartókeretet (2).
2 Tisztítsa meg egyenként a körkéseket és a
szitákat a készülékhez mellékelt kefével.
Egyszerre csak egy kést és szitát tisztítson, mert
ezek egymáshoz tartoznak. Ha véletlenül
összekeveri a késeket és a szitákat, eltarthat
néhány hétig, míg helyreáll az optimális
borotválkozási eredményt.
3 Tegye vissza a borotvafejeket a
borotvaegységbe.Tegye vissza a
tartókeretet a borotvaegységbe, nyomja
meg a tengelyt (1) és forgassa az
óramutató járásával megfelelő irányba (2).
4 Zárja le a borotvaegységet.
Pajeszvágó
Minden használat után tisztítsa meg a pajeszvágót.
1 Kapcsolja ki a borotvát, húzza ki a hálózati
adaptert a fali konnektorból és húzza ki a
hálózati adapter csatlakozóját a
borotvából.
C
2 A pajeszvágót a készüléhez mellékelt
kefével tisztítsa meg.
MAGYAR
2
1
Page 81

83
C
3 Hat havonta olajozza meg a pajeszvágó
fogait egy csepp varrógép olajjal.
Tárolás
C
◗ Tegye fel a borotvára a védősapkát, hogy az
óvja a sérüléstől.
C
◗ A borotvát a tartótokjában tárolja vagy
helyezze az állványra hogy megszáradjon.
Csere
Az optimális borotválás érdekében kétévente
cserélje ki a borotvafejeket.
A sérült vagy kopott borotvafejeket csakis HQ8
Philishave Sensotec borotvafejekkel cserélje ki.
1 Kapcsolja ki a borotvát, húzza ki a hálózati
adaptert a konnektorból és húzza ki a
hálózati adapter csatlakozóját a
borotvából.
MAGYAR
Page 82

84
C
2 Nyomja meg a kioldógombot (1) és nyissa
ki a borotvaegységet (2).
C
3 Forgassa a tengelyt az óramutató járásával
ellenkező irányba (1) és vegye ki a
tartókeretet (2).
C
4 Vegye ki a borotvafejeket és helyezze be az
újakat úgy,hogy a kis lyukakkal rendelkező
részek a borotvaegység közepe felé
mutassanak.
Ügyeljen rá, hogy a borotvafejek csapjai pontosan
illeszkedjenek a lyukakba.
C
5 A tartókeretet tegye vissza a
borotvaegységbe, nyomja meg a tengelyt
(1) és forgassa óra járásával megegyező
irányba (2).
6 Zárja le a borotvaegységet.
Tartozékok
A következő tartozékok vásárolhatók a
készülékhez:
- HQ8000 hálózati adapter
- HQ8 Sensotec Philishave borotvafejek
- HQ110 Philishave Shaving Head Cleaner
(borotvafej-tisztító spray)
MAGYAR
2
1
1
2
Page 83

Környezetvédelem
A beépített újratölthető akkumulátor olyan
anyagokat tartalmaz, melyek szennyezhetik a
környezetet.
Az akkumulátor kiselejtezése
Ha kiselejtezi a készüléket, vegye ki belőle az
akkumulátort. Ezt ne dobja a háztar tási
hulladékba, hanem juttassa el hivatalos
gyűjtőhelyre. Philips szakszervizbe is elviheti a
készüléket, ahol eltávolítják belőle az
akkumulátort, és gondoskodnak annak
környezetbarát kiselejtezéséről.
Csak akkor vegye ki az akkumulátort, ha az
teljesen lemerült.
1 Kapcsolja ki a készüléket, húzza ki a
hálózati csatlakozó dugót a fali
konnektorból és húzza ki a készülék
csatlakozó dugóját a borotvából is.
C
2 Hagyja megállásig működni a készüléket,
majd lazítsa meg a csavarokat,és nyissa ki a
borotvát.
3 Vegye ki az akkumulátorokat.
Az akkumulátorok eltávolítása után már ne
csatlakoztassa a borotvát a hálózathoz.
85MAGYAR
Page 84

Garancia és javítás
Ha valamilyen információra van szüksége, vagy
valamilyen probléma merült fel,akkor látogasson
el a Philips honlapjára (www.philips.com), vagy
forduljon országa Philips vevőszolgálatához (a
telefonszámot megtalálja a világ minden részére
kiterjedő garancialevélen). Ha lakóhelyén nincs
vevőszolgálat, forduljon a Philips helyi
szaküzletéhez vagy a Philips háztartási kisgépek és
szépségápolási termékek üzletágának
vevőszolgálatához.
Hibaelhárítás
1 Gyengén borotvál a készülék.
B
1. ok: szennyezettek a borotvafejek.
B
Nem öblítette le alaposan a borotvát, vagy a víz
nem volt elég meleg.
◗ Alaposan tisztítsa meg a borotvát, mielőtt
folytatná a borotválkozást. Lásd még a
"Tisztítás és karbantartás" c. részt.
B
2. ok: a hosszú szőrszálak eltömték a
borotvafejeket.
◗ Tisztítsa meg a körkéseket és a szitákat a
készülékhez mellékelt kefével. Lásd a "Tisztítás
és karbantartás, Minden félévben: borotvafejek
tisztítása" c. részt .
B
3. ok: a borotvafejek sérültek vagy kopottak.
86 MAGYAR
Page 85

87
◗ Cserélje ki a borotvafejeket.Lásd a "Csere" c.
részt.
2 A be-/kikapcsoló gomb megnyomásakor a
borotva nem kapcsol be
B
1. ok: az akkumulátor lemerült
◗ Töltse fel az akkumulátort. Lásd a "A készülék
töltése" c. részt.
B
2. ok: a borotva nem csatlakozik a hálózati
adapteren keresztül a fali konnektorhoz.
◗ Csatlakoztassa a hálózati adaptert a fali
konnektorba.
3 A készülék fémháza vízköves.
B
Ok: víz marad a készülék belső fém részein a
tisztítás után.
◗ A borotva leöblítése után a vízkőlerakódás
megelőzése érdekében törölje szárazra a
készülék burkolatát törölközővel vagy
papírzsebkendővel.
Soha ne törölje a borotvaegységet törölközővel
vagy papírzsebkendővel, mivel az megsértheti a
borotvafejeket.
◗ A makacs vízkőlerakódás is könnyen
eltávolítható valamilyen vízkőoldó szer
segítségével. Dörzsöljön keveset a fém
MAGYAR
Page 86

88
részekre, hagyja a szert hatni, majd törölje
szárazra a fém részeket.
4 A borotvaegység kijött a borotvából.
B
Ok: a borotvaegység nem megfelelően lett
visszahelyezve.
◗ Ha a borotvaegységet leszerelte a borotváról,
ellenőrizze, hogy a záró rugó megfelelően a
készülékhez kapcsolódik, vagyis nem lazult-e
ki, és nem látható bármilyen törés vagy
sérülés. Ha a záró rugó megfelelően
kapcsolódik a készülékhez, akkor a
borotvaegység ismét könnyen
visszahelyezhető a borotvára.Ha a záró rugó
meglazult, törött vagy megsérült,kérem
keresse fel Philips kereskedőjét vagy a
legközelebbi Philips szakszervizt, hogy
elkerülje a borotva megrongálását.
MAGYAR
Page 87

Dôležité upozornenie
Pred použitím zariadenie si pozorne prečítajte
nasledujúce pokyny a návod si odložte na
neskoršie použitie.
◗ Používajte len dodaný adaptér.
◗ Adaptér mení napätie 100-240 voltov na
bezpečné napätie menej ako 24 voltov.
◗ Súčasťou adaptéra je transformátor.
Neoddeľte adaptér, aby ste ho nahradili iným
typom zástrčky, lebo spôsobíte nebezpečnú
situáciu.
◗ Nepoužívajte poškodený adaptér.
◗ Ak je adaptér poškodený, vymeňte ho za
niektorý z originálnych adaptérov, aby ste
predišli nebezpečným situáciám.
◗ Zariadenie nabíjajte, odkladajte a používajte
pri teplote medzi 5cC a 35cC.
◗ Zariadenie nenabíjajte v zatvorenom puzdre.
C
◗ Dbajte, aby sa adaptér nedostal do styku s
vodou.
◗ Pred čistením pod tečúcou vodou odpojte
holiaci strojček zo siete.
C
◗ Zariadenie vyhovuje bezpečnostným
predpisom IEC a môžete ho bezpečne čistiť
pod tečúcou vodou.
Dajte pozor na horúcu vodu. Skontrolujte, či voda
nie je horúca, aby ste si nepopálili ruky.
◗ Deklarovaná hodnota emisie hluku tohto
spotrebiča je 62 dB(A), čo predstavuje hladinu
A akustického výkonu vzhľadom na
referenčný akustický výkon 1 pW.
SLOVENSKY 89
Page 88

Displej
Dispej Vám poskytuje nasledujúce informácie:
Nabíjanie
C
◗ Okamžite po pripojení zariadenia do siete sa
rozsvieti displej, zobrazí sa symbol zástrčky a
začne blikať ukazovateľ času.
Úplné nabité batérie
C
◗ Akonáhle sa batérie dobijú na plnú kapacitu,
po displej sa začne pohybovať nápis "FULL" a
displej začne blikať.
Zostávajúci čas holenia.
C
◗ Číslo na displeji označuje zostávajúci čas
holenia v minútach. Čierne polia označujú
disponibilné množstvo energie v batériách.
Strojček s plne nabitými batériami umožňuje
55 až 70 minút holenia. Zostávajúci čas,
odhadnutý zabudovaným počítačom, závisí od
typu brady a spôsobu holenia.
Počas niekoľko prvých nabití batérií, zobrazený čas
predstavuje konzervatívny odhad, ktorý sa
automaticky prispôsobí Vášmu spôsobu holenia,
hneď ako ho počítač zaregistruje.
90 SLOVENSKY
Page 89

91
Indikátor čistenia
C
◗ Pri bežnom používaní Vám približne raz
týždenne blikajúci kohútik s kvapkami vody
pripomenie, aby ste holiaci strojček vyčistili.
Vybité batérie
C
◗ Ak zariadenie zapnete keď sú batérie takmer
vybité, začne blikať symbol zástrčky a budete
počuť niekoľko pípnutí.
Ak strojček zapnete, alebo vypnete, osvetlí jeho sa
displej na asi 10 sekúnd.
Demonštračný program
◗ Zariadenie poskytuje unikátny demonštračný
program, ktorý trvá 1 minútu. Stlačte na
niekoľko sekúnd vypínač on/off,kým sa na
displeji zobrazia všetky symboly.V priebehu
predvádzania sa strojček trikrát automaticky
zapne. Demonštráciu môžete kedykoľvek
prerušiť stlačením vypínača.
Nabíjanie
Predtým, ako začnete s nabíjaním, vypnite
zariadenie.
Prvé nabíjanie, alebo nabíjanie batérie po dlhšom
čase, keď ste holiaci strojček nepoužívali,má trvať
približne 4 hodiny. Nabíjanie bežne trvá asi 1
hodinu. Môžete sa holiť aj bez nabitých batérií,
stačí pripojiť zariadenie do siete.
SLOVENSKY
Page 90

92
Zariadenie nenabíjajte dlhšie ako 24 hodín.
Nabíjanie zariadenia
Zariadenie nabíjajte vtedy,keď začne blikať
symbol zástrčky a počujete niekoľko pípnutí.
Holiaci strojček nedobíjajte v zatvorenom puzdre.
C
1 Koncovku zasuňte do holiaceho strojčeka.
2 Adaptér pripojte do siete.
3 Akonáhle sú batérie úplne nabité, odpojte
adaptér zo siete a jeho koncovku odpojte
z holiaceho strojčeka.
Holenie bez pripojenia do siete
Holiaci strojček s plne nabitými batériami
umožňuje až 70 minút holenia bez potreby
pripojenia do siete.
Použitie zariadenia
Systém Personal Comfort Control
C
◗ Systém Personal Comfort Control umožňuje
prispôsobiť holiaci strojček Vášmu typu
pokožky.
- Nastavenie "Normal" Vám umožní rýchle a
pohodlné hladké holenie.
SLOVENSKY
Page 91

- Nastavenie "Sensitive" je určené na hladké
holenie poskytujúce Vašej pokožke optimálne
pohodlie.
C
◗ Nastavenie … je neutrálna pozícia.
C
◗ Nastavenie "S" je najvhodnejšie pre citlivú
pokožku.
C
◗ Nastavenie "N" je určené pre bežný typ
pokožky.
Holenie
1 Holiaci strojček vypnete jedným stlačením
hlavného vypínača.
C
2 Rýchlo pohybujte holiacimi hlavami po
pokožke, robte rovné aj krúživé pohyby.
Holením suchej pokožky dosiahnete najlepšie
výsledky.
Môže trvať 2-3 týždne, kým si Vaša pokožka
zvykne na holiaci systém Philishave.
3 Holiaci strojček vypnete jedným stlačením
hlavného vypínača.
93SLOVENSKY
S
N
Page 92

94
C
4 Aby ste predišli poškodeniu,po každom
použití nasaďte na holiaci strojček
ochranný kryt.
Zastrihovač
Na strihanie bokombrady a fúzov.
C
1 Zastrihovač zapnete tak, že posuniete
vypínač nahor.
Zastrihovač môžete aktivovať aj počas chodu
motora.
Čistenie a údržba
Pravidelné čistenie zabezpečuje lepšie výsledky
holenia.
Najjednoduchšií a hygienicky najvhodnejší spôsob
čistenia zariadenia je opláchnutie holiacej jednotky
a komory na chlpy horúcou vodou po každom
použití holiaceho strojčeka.
Dajte pozor na horúcu vodu.Vždy vyskúšajte, či
voda nie je horúca, aby ste predišli popáleniu
pokožky rúk.
Každý deň: holiaca jednotka a komôrka na
chĺpky
1 Vypnite zariadenie, adaptér odpojte zo
siete a koncovku kábla odpojte z holiaceho
strojčeka.
SLOVENSKY
Page 93

95
C
2 Stlačte uvoľňovacie tlačidlo (1) a otvorte
holiacu jednotku (2).
C
3 Holiacu jednotku a komoru na chĺpky
očistite opláchnutím pod prúdom horúcej
vody.
Uistite sa, že ste holiacu jednotku a komôrku na
chĺpky riadne vyčistili.
4 Opláchnite vonkajšok zariadenia vodou.
5 Uzatvorte holiacu jednotku a otraste z nej
prebytočnú vodu.
Holiacu jednotku nesmiete sušiť pomocou
uteráka ani inej tkaniny, pretože by ste mohli
poškodiť holiacu hlavu.
C
6 Holiacu jednotku znovu otvorte a nechajte
celé zariadenie úplne osušiť.
Komoru na chĺpky môžete vyčistiť aj bez vody,
pomocou priloženej kefky.
Každých šesť mesiacov: holiace hlavy
C
1 Otvorte holiacu jednotku, otočte
kolieskom proti smeru pohybu hodinových
ručičiek (1) a vyberte zachytávací rám (2).
SLOVENSKY
2
1
Page 94

96
2 Rezače a zdvíhače očistite dodanou
kefkou.
Nečistite viac ako jeden rezač a zdvíhač naraz,
nakoľko predstavujú sadu.Ak ich omylom
pomiešate, môže trvať niekoľko týždňov,kým
opäť dosiahnu optimálny výkon.
3 Holiace hlavy vložte späť do holiacej
jednotky. Zachytávací rám vložte späť do
holiacej jednotky, stlačte koliesko (1) a
otočte ním v smere pohybu hodinových
ručičiek (2).
4 Zatvorte holiacu jednotku.
Zastrihovač
Zastrihovač vyčistite po každom použití.
1 Vypnite zariadenie, adaptér odpojte zo
siete a koncovku kábla odpojte z holiaceho
strojčeka.
C
2 Zastrihovač očistite pomocou priloženej
kefky.
C
3 Každých šesť mesiacov namažte zúbky
zastrihovača kvapkou oleja na šijacie
stroje.
SLOVENSKY
Page 95

97
Odkladanie
C
◗ Aby ste zabránili poškodeniu, dajte na holiaci
strojček ochranný kryt.
C
◗ Zariadenie odkladajte do priloženého vrecka,
alebo na stojan, aby sa osušilo.
Výmena
Aby ste dosiahli optimálne výsledky holenia,
vymeňte raz za dva roky holiace hlavy.
Poškodené alebo opotrebované holiace hlavy
nahraďte jedine holiacimi hlavami Philishave HQ8
Sensotec.
1 Vypnite zariadenie, odpojte adaptér zo
siete a kábel z holiaceho strojčeka.
C
2 Stlačte uvoľňovacie tlačidlo (1) a otvorte
holiacu jednotku (2).
C
3 Koliesko otočte proti smeru pohybu
hodinových ručičiek (1) a vyberte
zachytávací rám (2).
SLOVENSKY
2
1
Page 96

98
C
4 Vo vnútri holiacej jednotky vymeňte
opotrebované holiace hlavy za nové tak,
aby súčiastky s malými dierkami smerovali
do stredu holiacej jednotky.
Dbajte, aby výčnelky holiacich hláv zapadli presne
do zodpovedajúcich otvorov.
C
5 Zachytávací rám vložte späť do holiacej
jednotky. Stlačte koliesko (1) a otočte ním
v smere pohybu hodinových ručičiek (2).
6 Zatvorte holiacu jednotku.
Príslušenstvo
K dispozícii máte nasledujúce príslušenstvo:
- Adaptér HQ8000.
- Holiace hlavy HQ8 Philishave Sensotec.
- Sprej na čistenie holiacich hláv HQ110
Philishave Head Cleaner.
Životné prostredie
Zabudované dobíjateľné batérie obsahujú látky,
ktoré by mohli znečistiť životné prostredie.
Odstránenie batérií
Batérie odstráňte spolu so zariadením.
Neodhadzujte ich do domového odpadu, ale
odneste ich do príslušnej zberne. Môžete ich
odniesť aj do servisného centra Philips vo Vašej
krajine, kde ich odstránia spôsobom bezpečným
pre životné prostredie.
SLOVENSKY
1
2
Page 97

99
Batérie odstráňte až keď sú úplne vybité.
1 Odpojte adaptér zo siete a kábel z otvoru
v holiacom strojčeku.
C
2 Zariadenie nechajte v činnosti kým
nezastane, odskrutkujte skrutky a otvorte
holiaci strojček.
3 Vyberte batérie.
Akonáhle vyberiete batérie, holiaci strojček už
nepripájajte do siete.
Záruka a servis
Ak potrebujete informácie, alebo máte problém,
prosíme Vás, aby ste navštívili www stránku
spoločnosti Philips - www.philips.com,alebo sa
obrátili na Centrum služieb zákazníkom
spoločnosti Philips vo Vašej krajine (telefónne číslo
Centra nájdete v priloženom celosvetovo
platnom záručnom liste).Ak sa vo Vašej krajine
toto Centrum nenachádza, obráťte sa na
miestneho predajcu výrobkov Philips, alebo
kontaktujte Oddelenie služieb Philips - divízia
domáce spotrebiče a osobná starostlivosť.
Odstraňovanie porúch
1 Znížený výkon holenia
B
Príčina 1: holiace hlavy sú znečistené.
B
Holiaci strojček ste riadne neopláchli, alebo ste ho
SLOVENSKY
Page 98

100
opláchli pod vodou, ktorá nemala dostatočnú
teplotu.
◗ Riadne očistite holiaci strojček a až potom
pokračujte v holení.Viď kapitola "Čistenie a
údržba".
B
Príčina 2: dlhé chlpy zavadzajú holiacim hlavám.
◗ Rezače a zdvíhače očistite dodanou kefkou.
Viď kapitola "Čistenie a údržba", časť
"Každých šesť mesiacov: holiace hlavy".
B
Príčina 3: holiace hlavy sú poškodené, alebo
opotrebované.
◗ Vymeňte holiace hlavy.Viď kapitola "Výmena".
2 Po stlačení vypínača holiaci strojček
nepracuje
B
Príčina 1: batérie sú vybité.
◗ Nabite batérie.Viď "Nabíjanie".
B
Príčina 2: holiaci strojček nie je pripojený do siete.
◗ Adaptér pripojte do siete.
3 Na kovovom obale zariadenia je usadený
vodný kameň
B
Príčina: po čistení zostáva voda na kovových
súčiastkach zariadenia.
SLOVENSKY
Page 99

101
◗ Aby ste predišli usadeniu vodného kameňa na
kovových súčiastkach zariadenia,po opláchnutí
holiaci strojček osušte uterákom alebo inou
tkaninou.
Holiacu jednotku nesmiete nikdy sušiť pomocou
uteráka, ani inej tkaniny, lebo by ste mohli
poškodiť holiace hlavy.
◗ Ak aj po očistení zostane na kovových
súčiastkách zariadenia vodný kameň, môžete
ho odstrániť pomocou niektorého
prostriedku na odstránenie vodného kameňa.
Naneste malé množstvo prostriedku na
kovové súčiastky, nechajte ho chvíľu pôsobiť a
potom kovové súčiastky utrite dosucha.
4 Holiaca jednotka sa odpojila od strojčeka.
B
Príčina: nenasadili ste správne holiacu jednotku.
◗ Ak sa holiaca jednotka oddelí od zariadenia,
skontrolujte, či je upínacia pružina riadne
upevnená na svojom mieste, prípadne, či nie je
voľná, alebo na nej nie sú viditeľné známky
poškodenia.Ak je pružina stále riadne
upevnená, holiacu jednotku môžete ku
holiacenu strojčeku veľmi jednoducho pripojiť
späť.V prípade, že pružina je voľná, zlomená,
alebo inak poškodená, prosíme kontaktujte
predajcu výrobkov Philips, alebo najbližšie
servisné centrum spoločnosti Philips, aby ste
predišli poškodeniu holiaceho strojčeka.
SLOVENSKY
Page 100

Увага
Прочитайте цю інструкцію уважно перед
використанням пристрою та зберігайте для
подальшого використання.
◗ Використовуйте лише блок живлення, що
додається.
◗ Блок живлення перетворює напругу 100-240
В у безпечну низьку напругу менше 24 В.
◗ У блоку живлення знаходиться
трансформатор.Не від'єднуйте блок
живлення для заміни іншим, оскільки це
може спричинити небезпечну ситуацію.
◗ Не використовуйте пошкоджений блок
живлення.
◗ Якщо блок живлення пошкоджено, його
обов'язково треба замінити оригінальним
блоком живленням,щоб уникнути
небезпеки.
◗ Заряджайте, використовуйте та зберігайте
пристрій при температурі між 5cC та 35cC.
◗ Не заряджайте бритву у закритому пакунку
C
◗ Переконайтеся, що блок живлення не
намок.
◗ Завжди від'єднуйте бритву від мережі
перед промиванням під краном.
C
◗ Пристрій відповідає міжнародним
нормативним актам із безпеки IEC, і його
можна безпечно мити під краном.
Будьте обережні з гарячою водою. Завжди
перевіряйте, чи не надто гаряча вода, щоб не
допустити опіків рук.
◗ Рівень шуму: Lc= 62 dB [A]
УКРАЇНСЬКІЙ102
 Loading...