

Philips HQ8160CC User Manual

HQ8160CC
ENGLISH 4
INDONESIA 19
한국어 36
BAHASA MELAYU 52
ภาษาไทย 69
TIẾNG VIỆT 82
繁體中文 97
简体中文 111

4
Important
Read these instructions for use carefully before
you use the appliances and save them for future
reference.
Only use the powerplug supplied.
The powerplug transforms 100-240 volts to a
safe low voltage of less than 24 volts.
The powerplug contains a transformer. Do not
cut off the powerplug to replace it with another
plug, as this causes a hazardous situation.
Do not use a damaged powerplug.
If the powerplug is damaged, always have it
replaced by one of the original type in order to
avoid a hazard.
Make sure the powerplug does not get wet.
Charge, use and store the shaver at a
temperature between 5°C and 35°C.
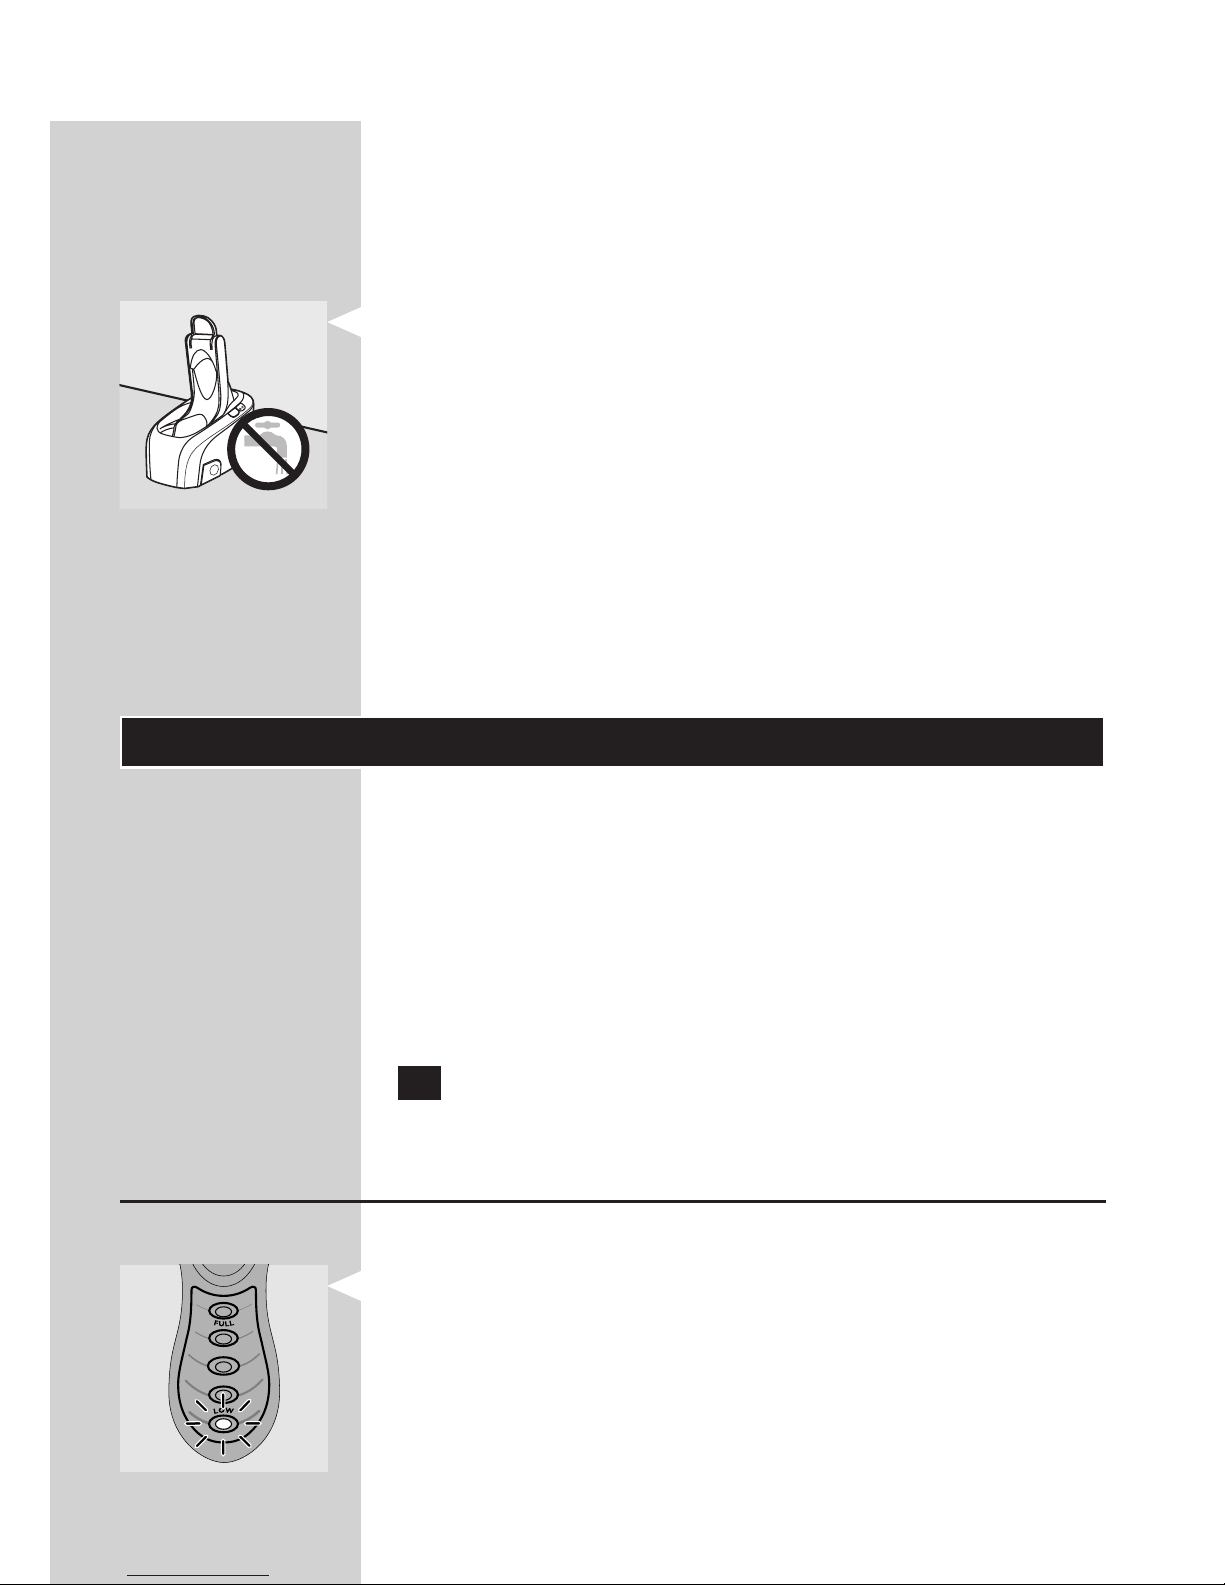
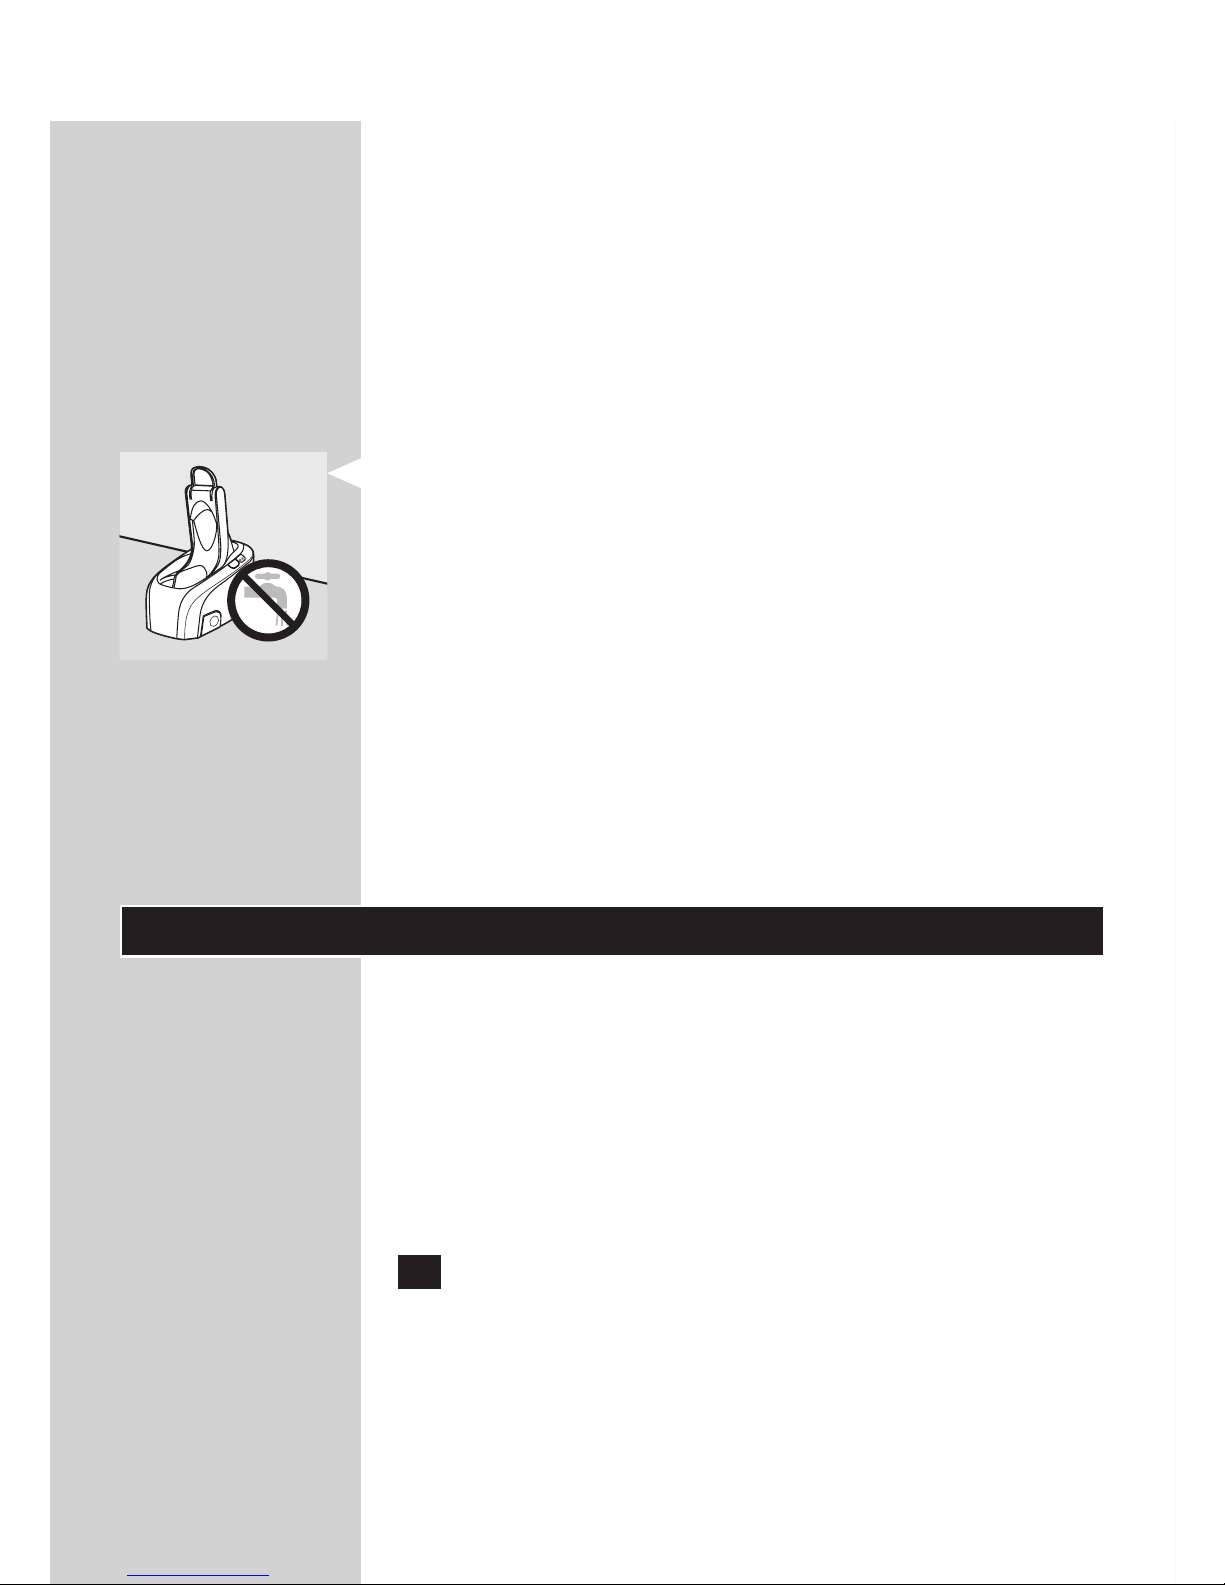
Do not recharge the shaver in a closed pouch.
Always unplug the shaver before you clean it
under the tap.
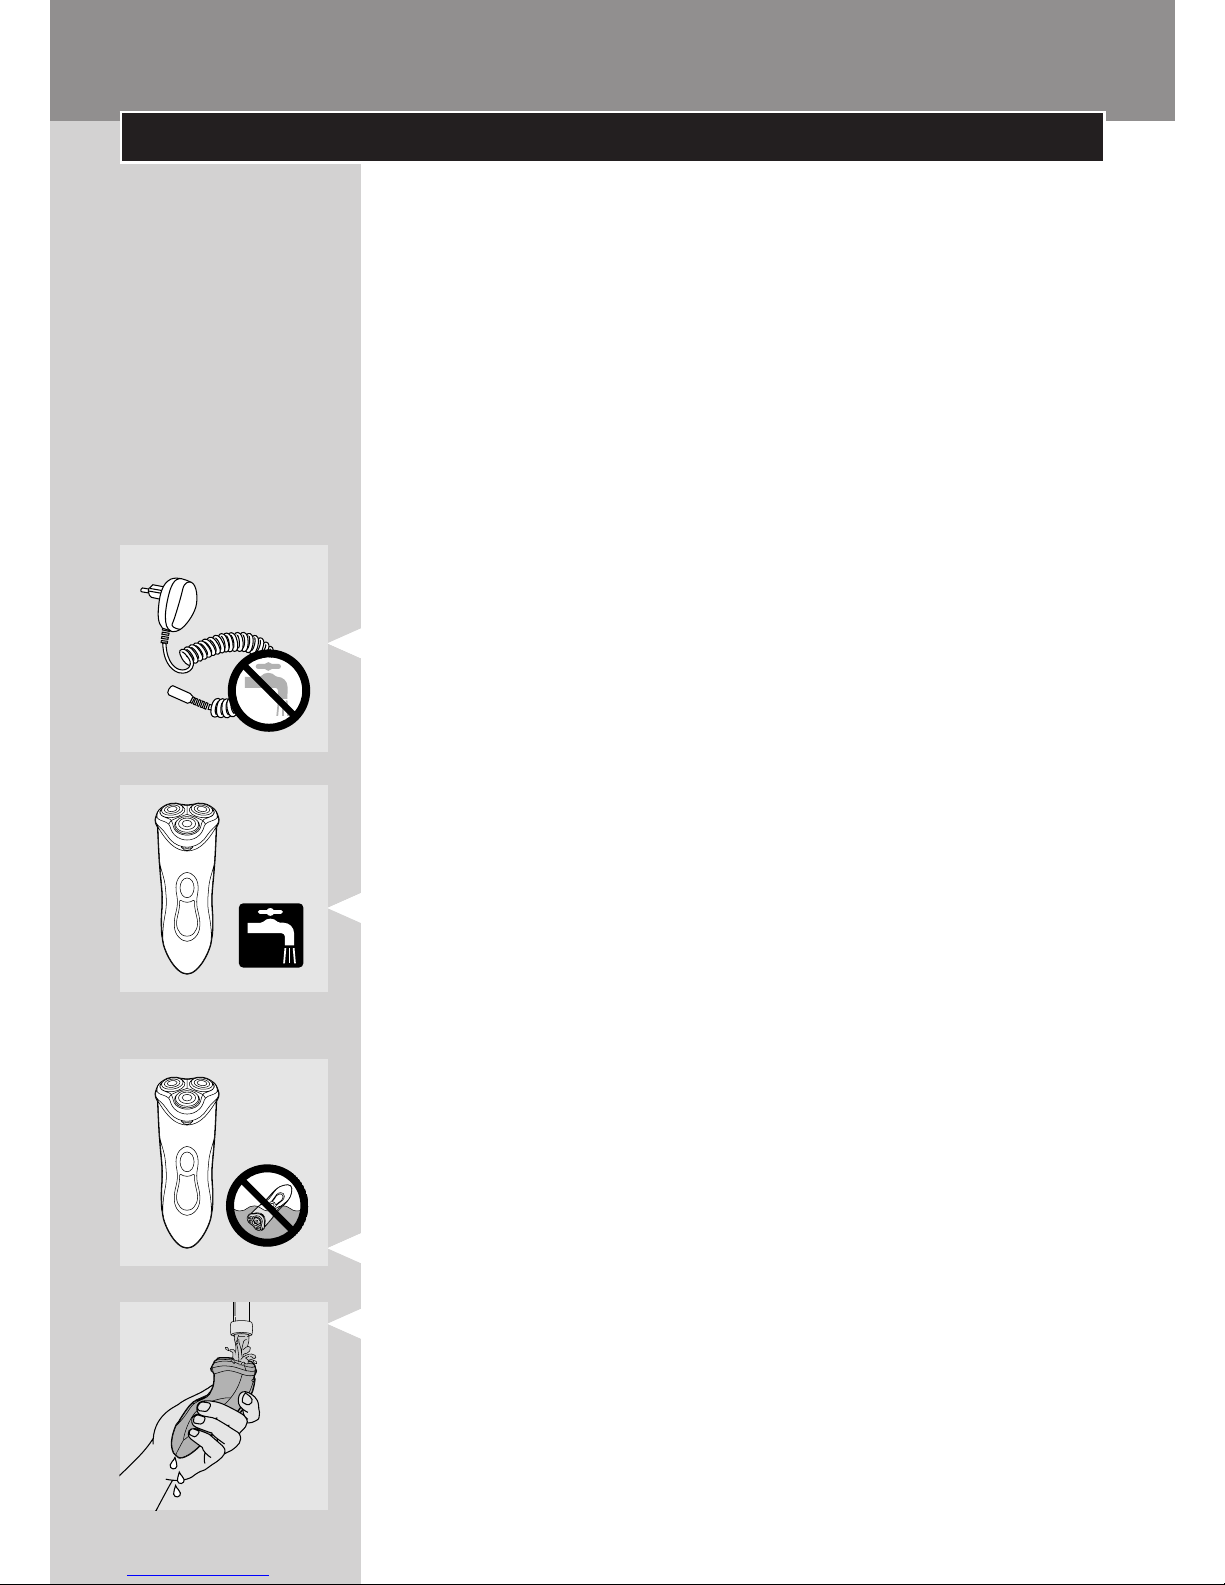
The shaver complies with the internationally
approved IEC safety regulations and can be safely
cleaned under the tap.
Be careful with hot water. Always check if the
water is not too hot, to prevent your hands
from getting burnt.
This washable shaver is not suitable for shaving
in the shower.
Do not immerse the shaver in water.
Water may leak from the socket at the bottom
of the shaver when you rinse it. This is normal
and not dangerous because all electronics are
enclosed in a sealed power unit inside the shaver.
Only use the washing machine with the original
HQ200 Cleaning Fluid.
,
,
,
,
,
,
,
,
,
,
,
,
,
,
,
ENGLISH
Empty the cleaning chamber and rinse it
thoroughly with hot tap water every 15 days.
The washing machine thoroughly cleans but does
not disinfect your shaver, therefore do not share
the shaver with others.
Never immerse the washing machine in water
nor rinse it under the tap.
Keep the washing machine out of the reach of
children.
Use and store the washing machine at a
temperature between 5°C and 35°C.
Always place the washing machine on a stable,
level and horizontal surface to prevent leakage.
When the washing machine is ready for use, do
not move it to prevent leakage of cleaning fl uid.
Charging
Make sure the shaver is switched off before
you charge it.
Charging takes approx. 1 hour.
You can also shave without charging by connecting
the shaver to the mains.
A fully charged shaver has a cordless shaving time of
up to 55 minutes.
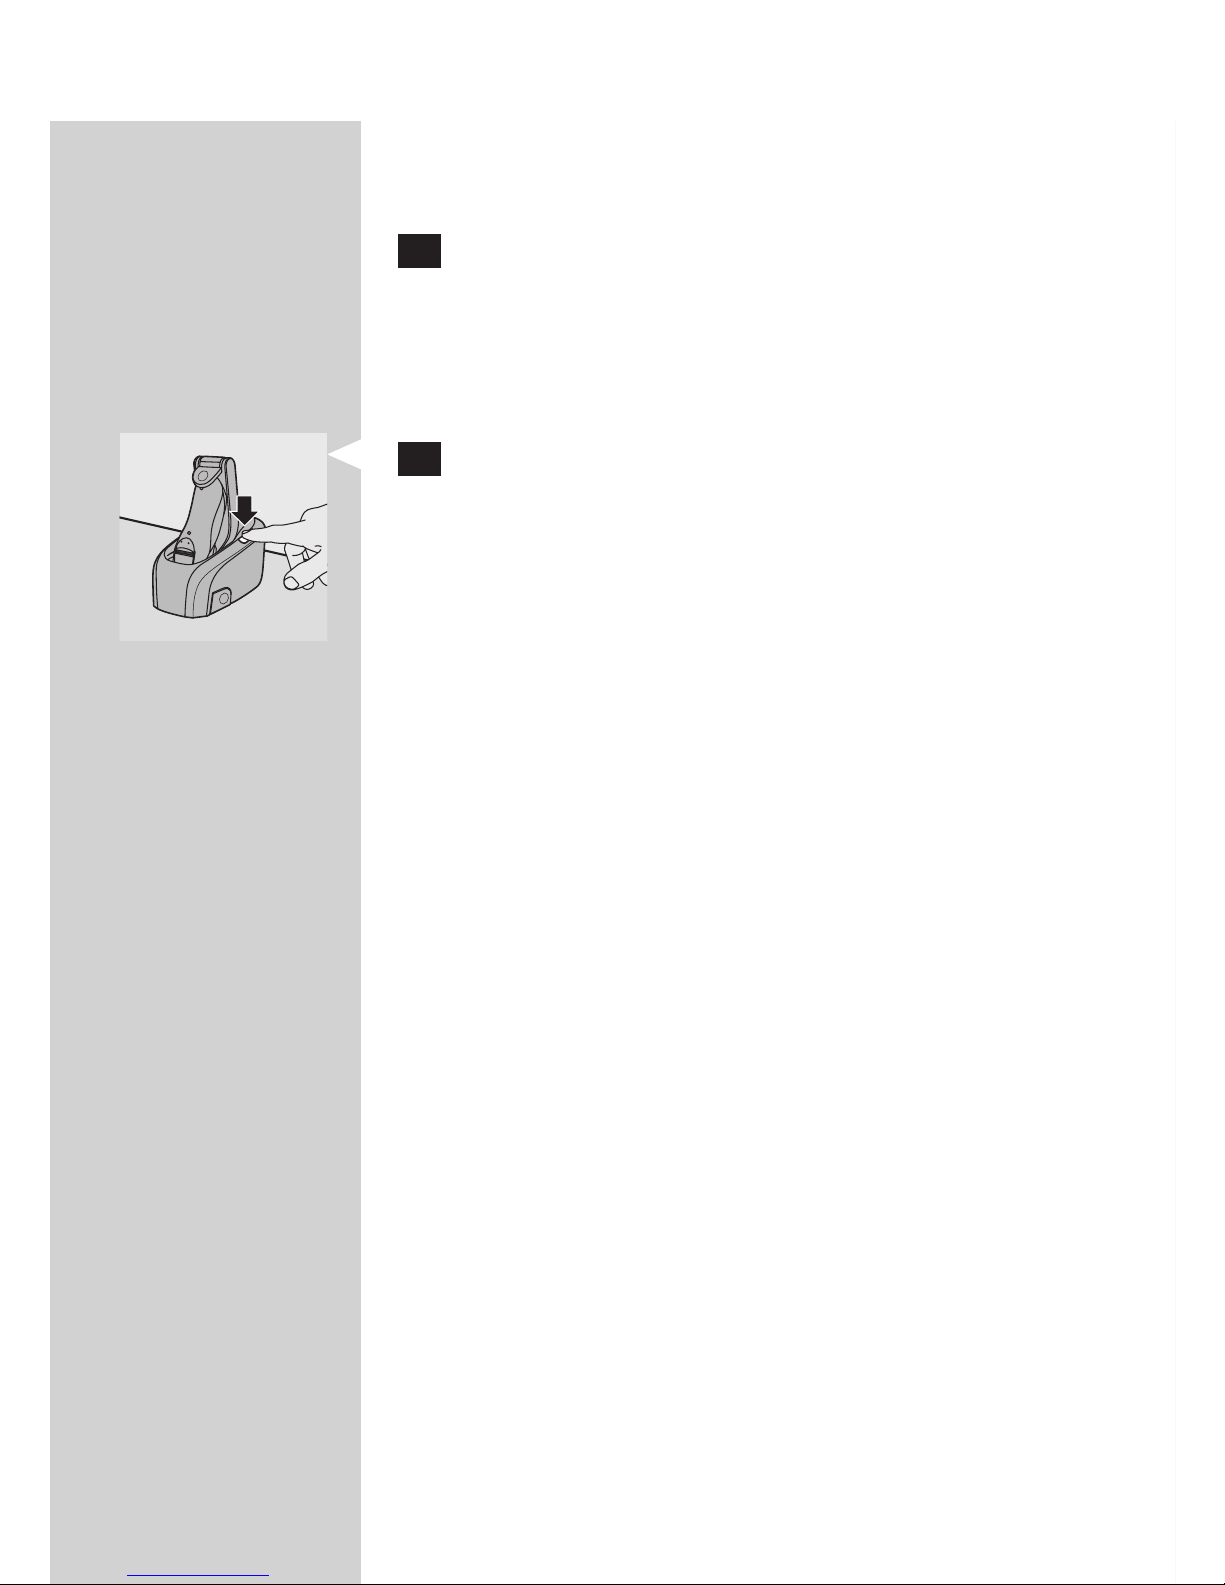
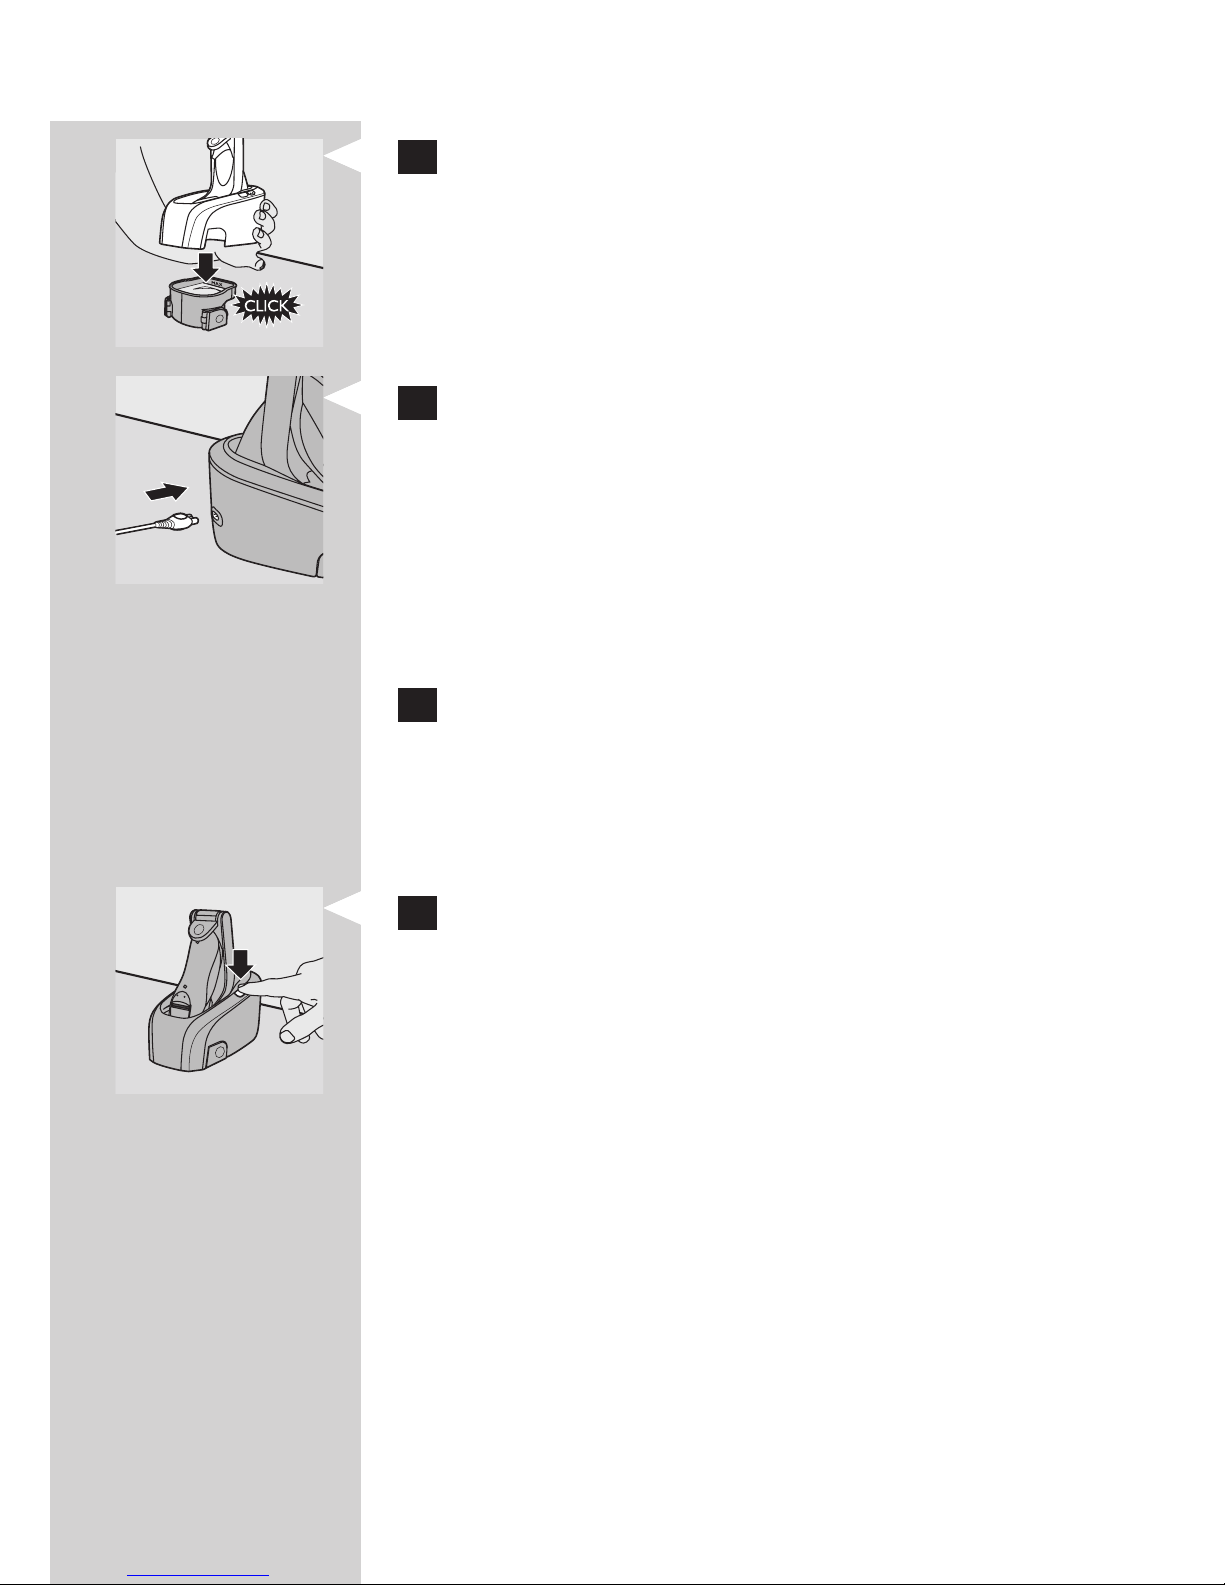
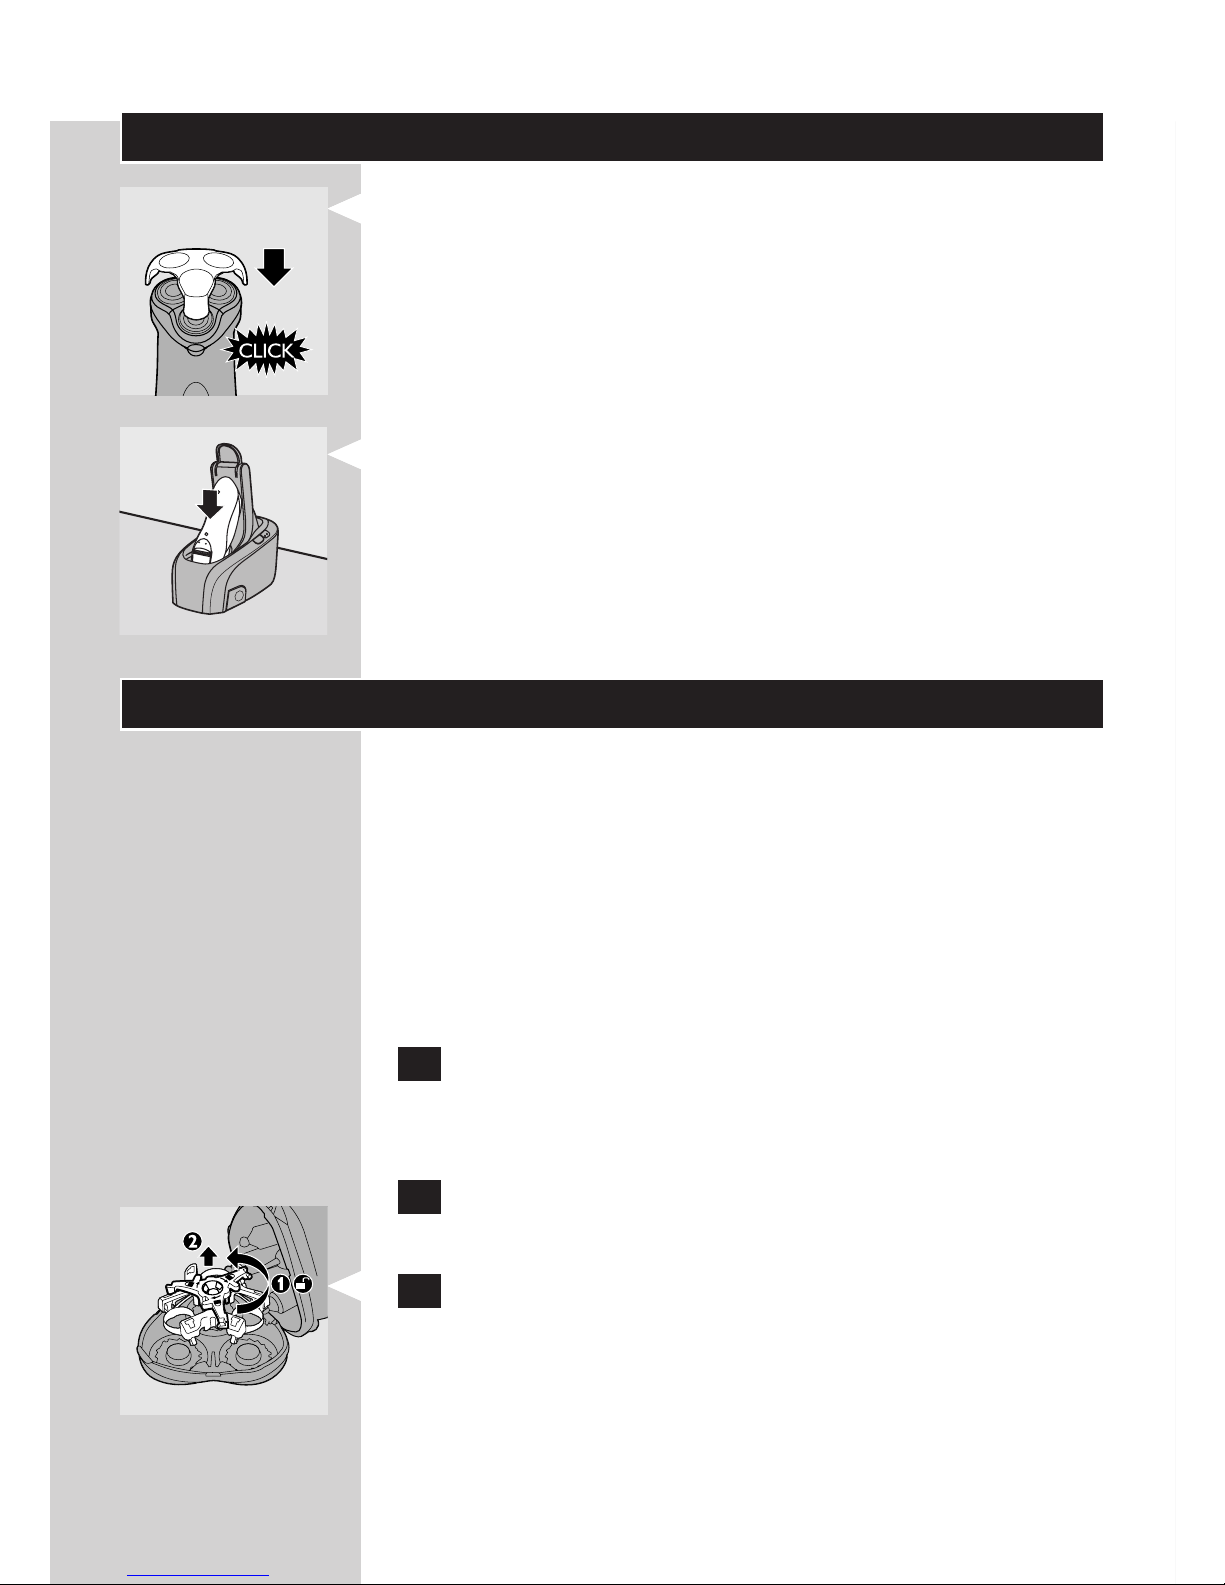
1 Charge the shaver when the bottom light
burns or blinks red.
Charge indications
Charging
When you start to charge the empty shaver,
the bottom light blinks red. When the battery
contains enough power for one shave, all lights
blink green sequentially.
,
,
,
,
,
,
,
,
ENGLISH 5
Battery fully charged
When the battery is fully charged, all lights burn
green.
A few hours after charging, all lights go out.
Remaining battery capacity
The number of lights that are on show how
much power is left in the battery. The battery
capacity is only shown when you switch the
shaver on or off.
When all lights burn green, the battery is 100%
charged.
When the bottom light burns green, 20% of the
battery capacity is left.
Battery running low
When the battery is running low, the bottom
light turns red.
When you switch off the shaver, this light blinks a
few times.
Charging with the powerplug
Do not recharge the shaver in a closed pouch.
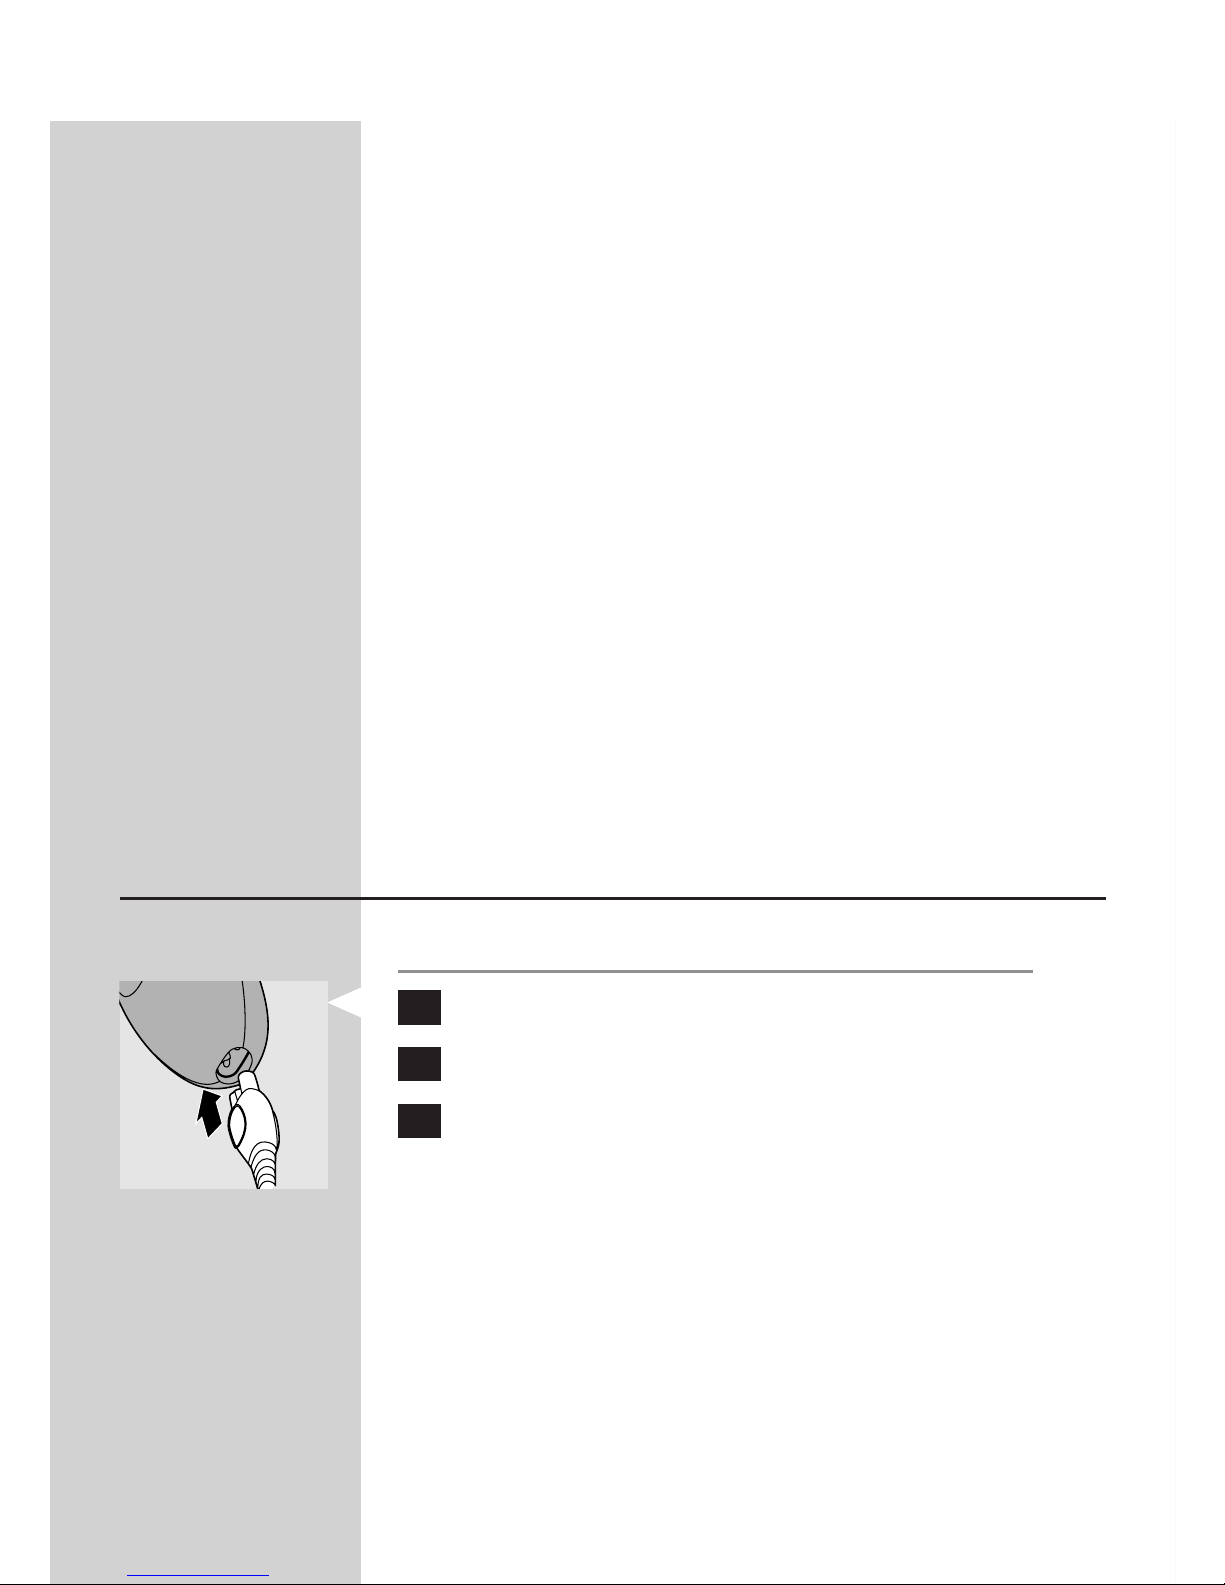
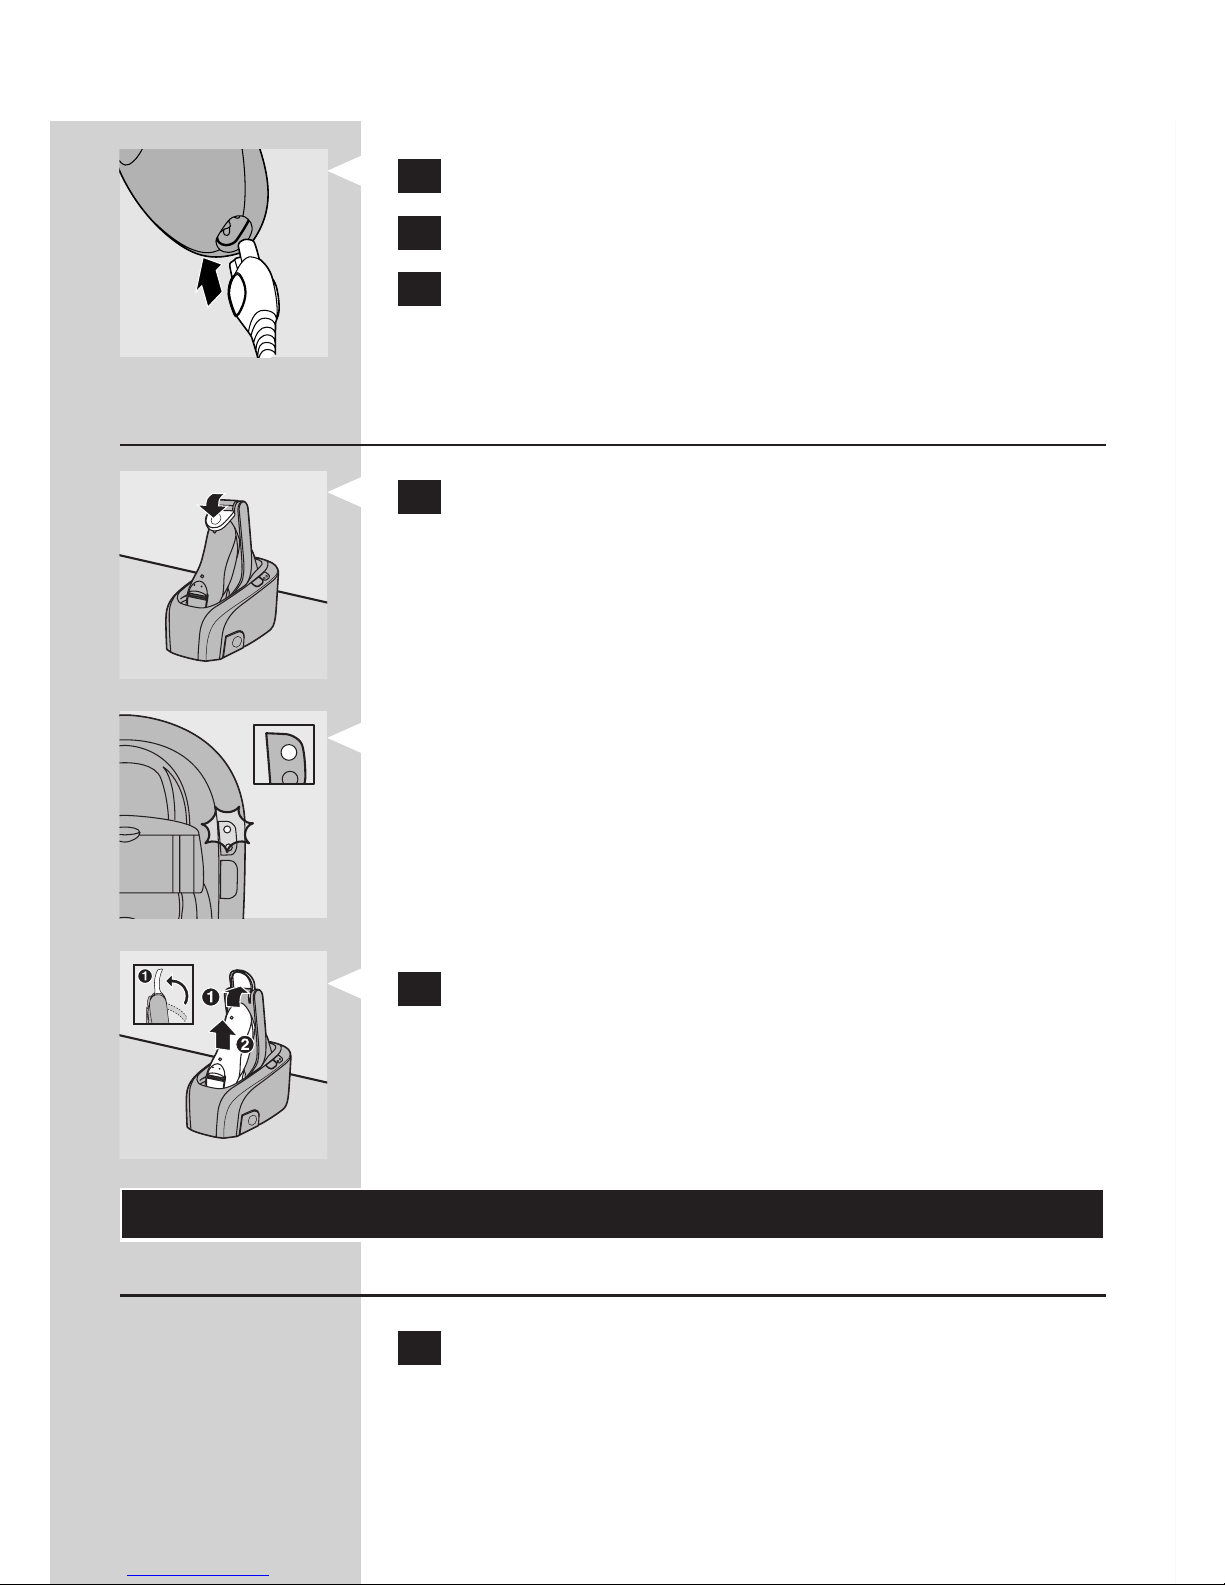
1 Put the appliance plug in the shaver.
2 Put the powerplug in the wall socket.
3 Remove the powerplug from the wall socket
and pull the appliance plug out of the shaver
when the battery is fully charged.
,
,
-
-
,
ENGLISH6
Charging in the washing machine
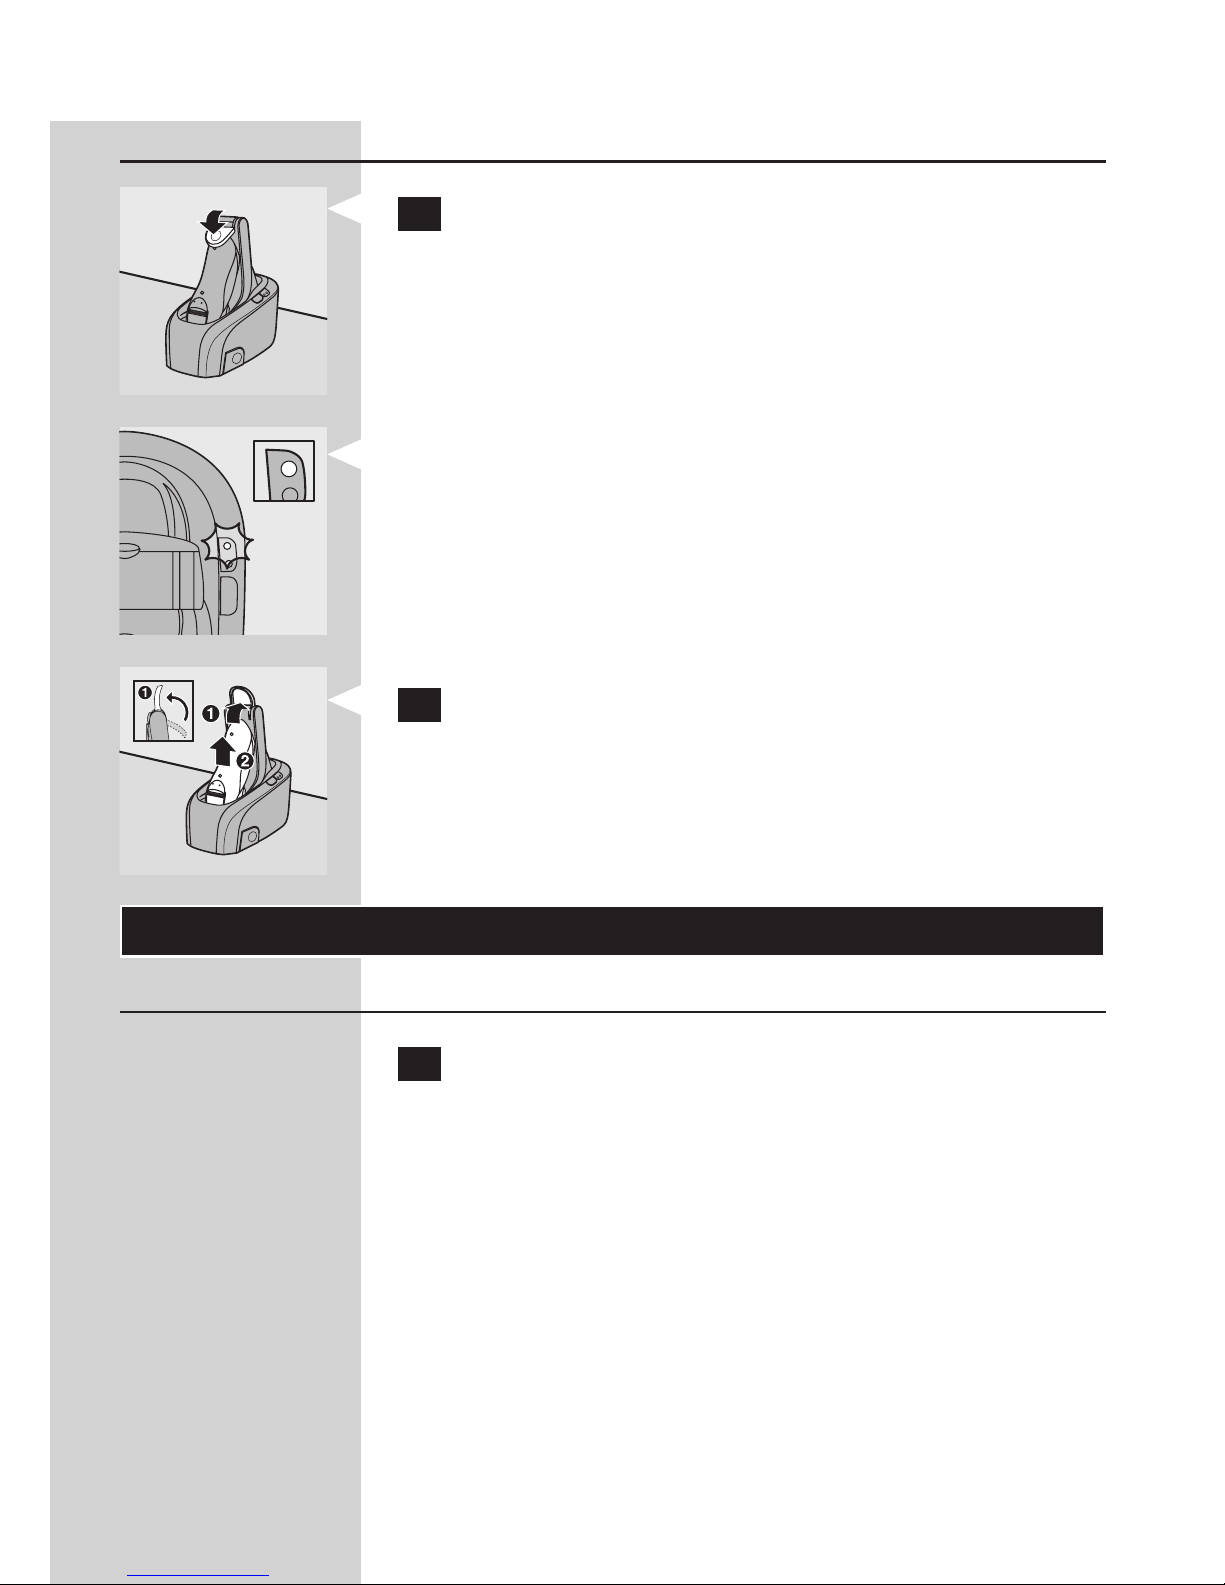
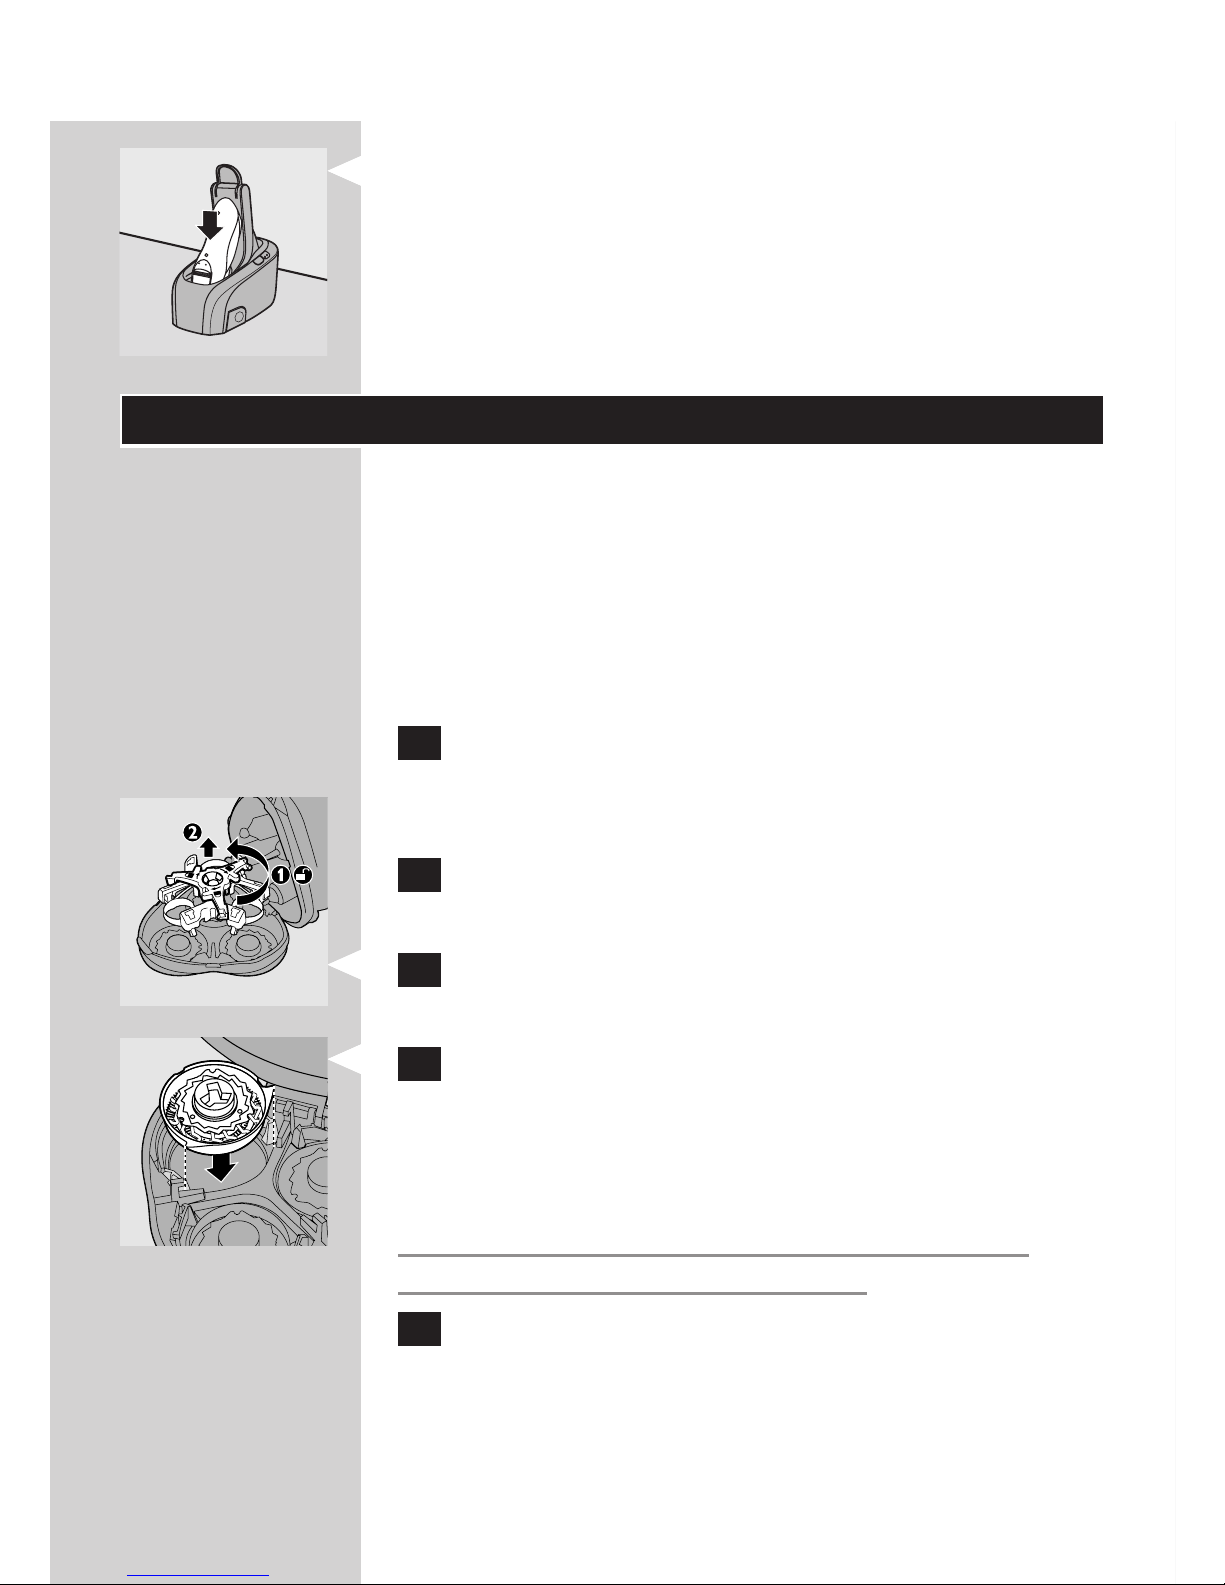
1 Place the shaver in the holder and push the
lever down completely to lock the shaver into
place.
The charging light on the washing machine blinks to
indicate that the shaver is charging.
When the charging light starts to burn
continuously (after approx. 1 hour), the shaver is
fully charged.
2 Move the lever upwards until it does not go
any further (1) and remove the shaver from the
washing machine (2).
The charging light goes out.
Using the appliance
Shaving
1 Press the on/off button once to switch on the
shaver.
The blue light ring round the on/off button goes on
to indicate that the motor is running.
Note: When you switch on the shaver, all lights go on
and then the remaining battery capacity is shown for a
few seconds.
,
ENGLISH 7
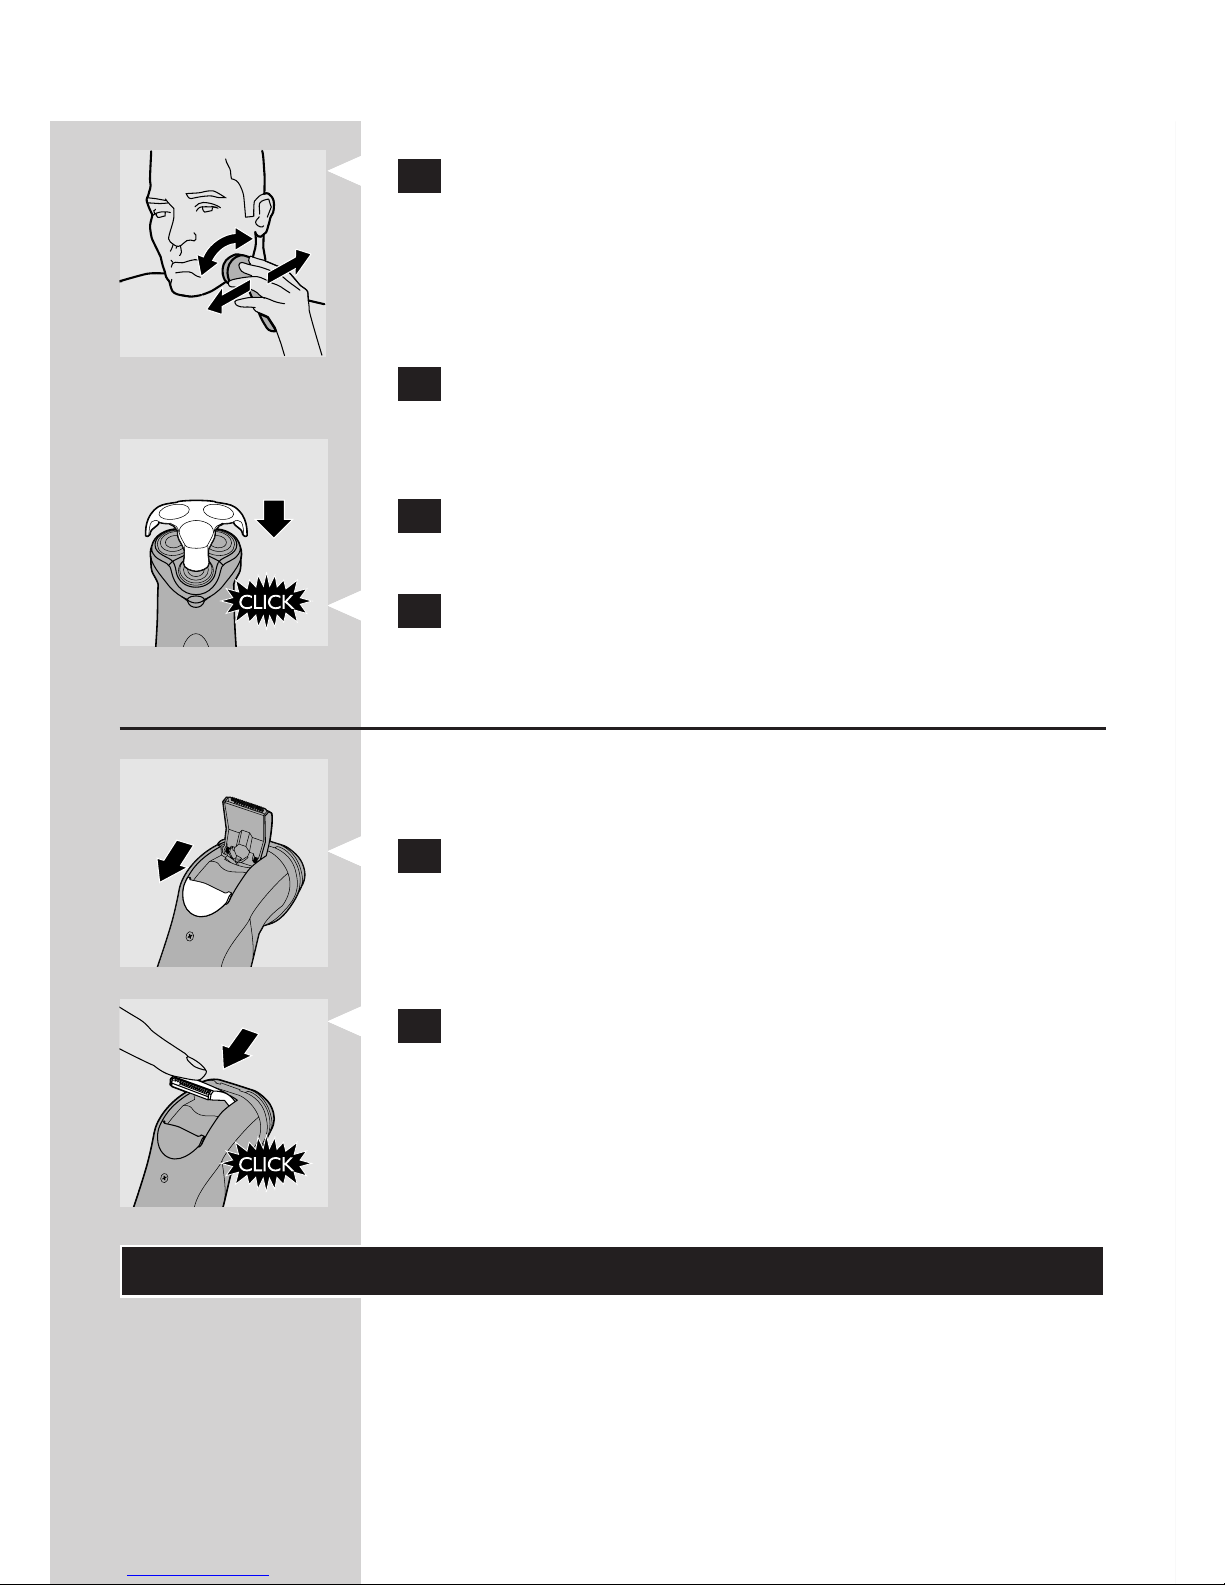
2 Move the shaving heads quickly over your skin.
Make both straight and circular movements.
Shaving on a dry face gives the best results.
Your skin may need 2 or 3 weeks to get
accustomed to the Philips shaving system.
3 Press the on/off button once to switch off the
shaver.
The blue light ring round the on/off button goes out.
4 Clean the shaver (see chapter ‘Cleaning and
maintenance’).
5 Put the protection cap on the shaver every
time you have used it, to prevent damage.
Trimming
You can use the trimmer to groom your sideburns
and moustache.
1 Push the slide downwards to open the
trimmer.
You can activate the trimmer while the motor is
running.
2 Close the trimmer (‘click’).
Cleaning and maintenance
The best and most hygienic way to clean the
shaver is in the washing machine. You can also
clean the shaver by rinsing it under the tap or
with the brush supplied.
-
-
,
ENGLISH8

Regular cleaning guarantees better shaving
performance.
Cleaning the shaver in the washing machine
supplied
Preparing the washing machine for use
Fill the cleaning chamber before fi rst use and when
the cleaning light blinks to indicate that the fl uid
level is too low. When the fl uid level drops below
the minimum level, the cleaning light starts to blink
with intervals and the holder returns to its starting
position.
If you use the washing machine to clean the shaver
every day, refi ll the cleaning chamber approx. every
15 days.
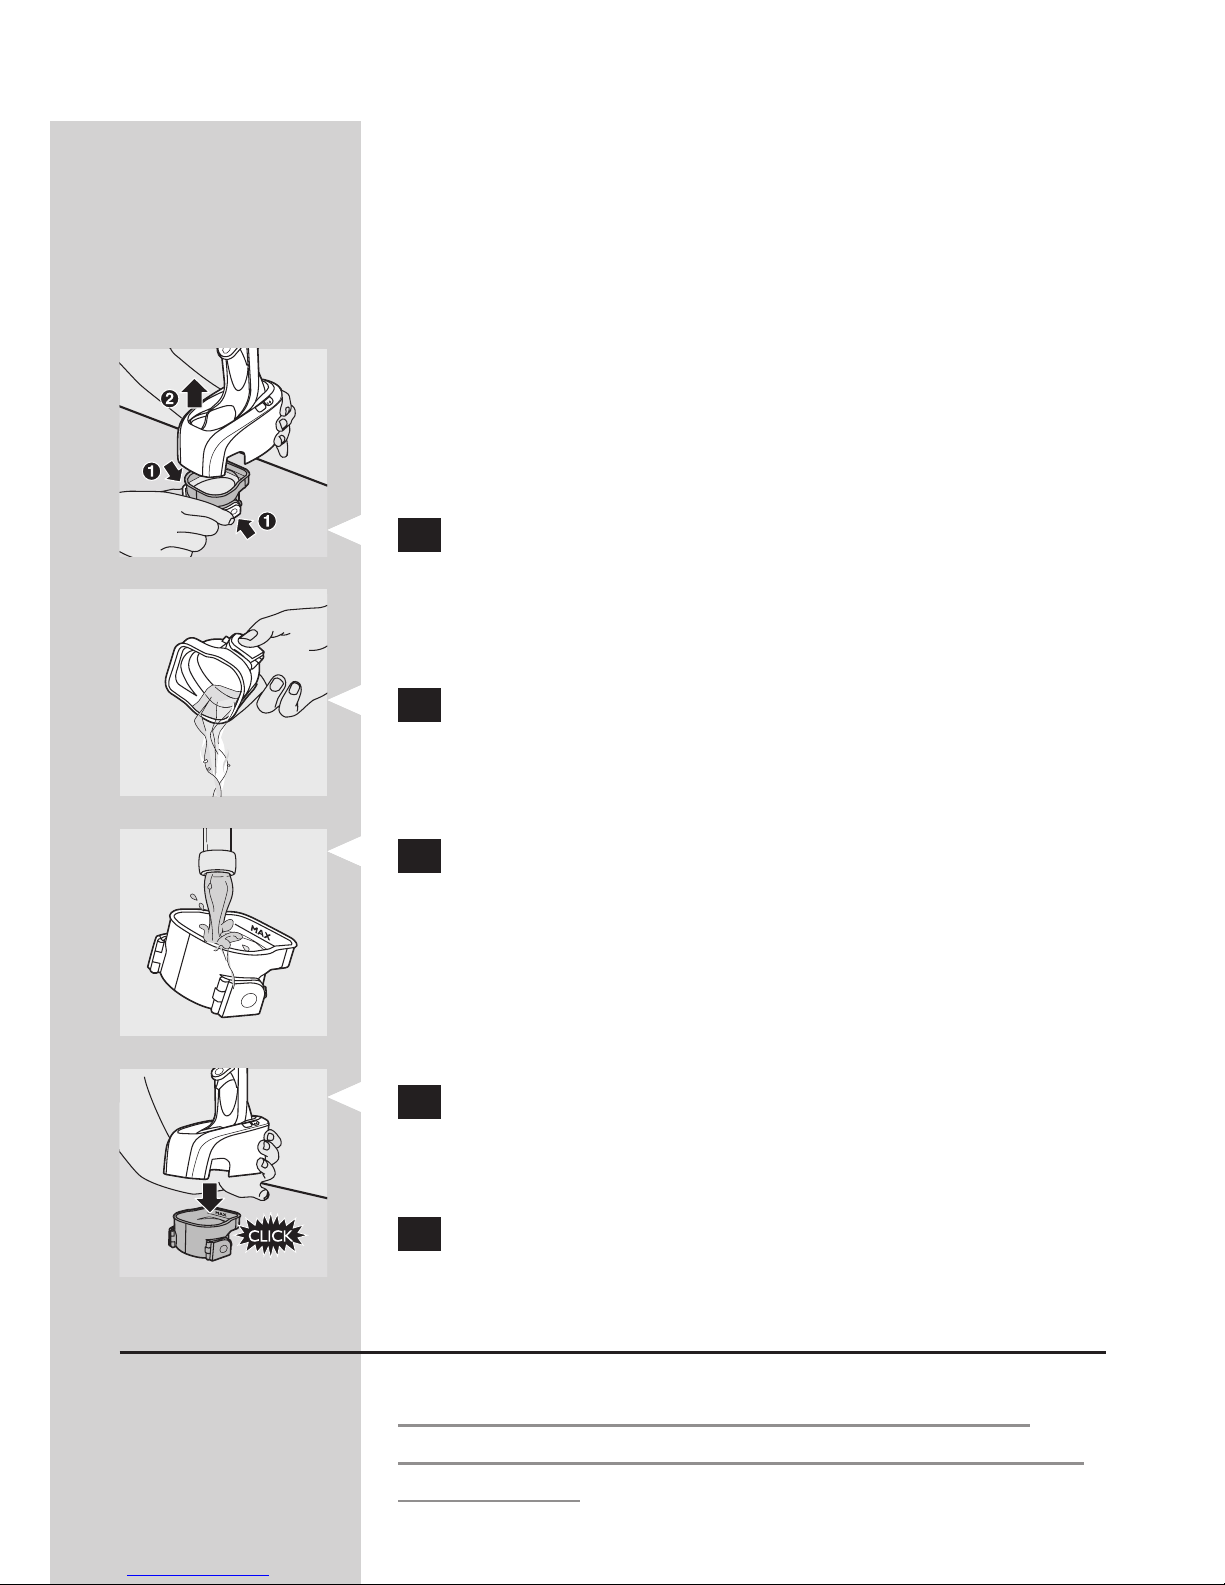
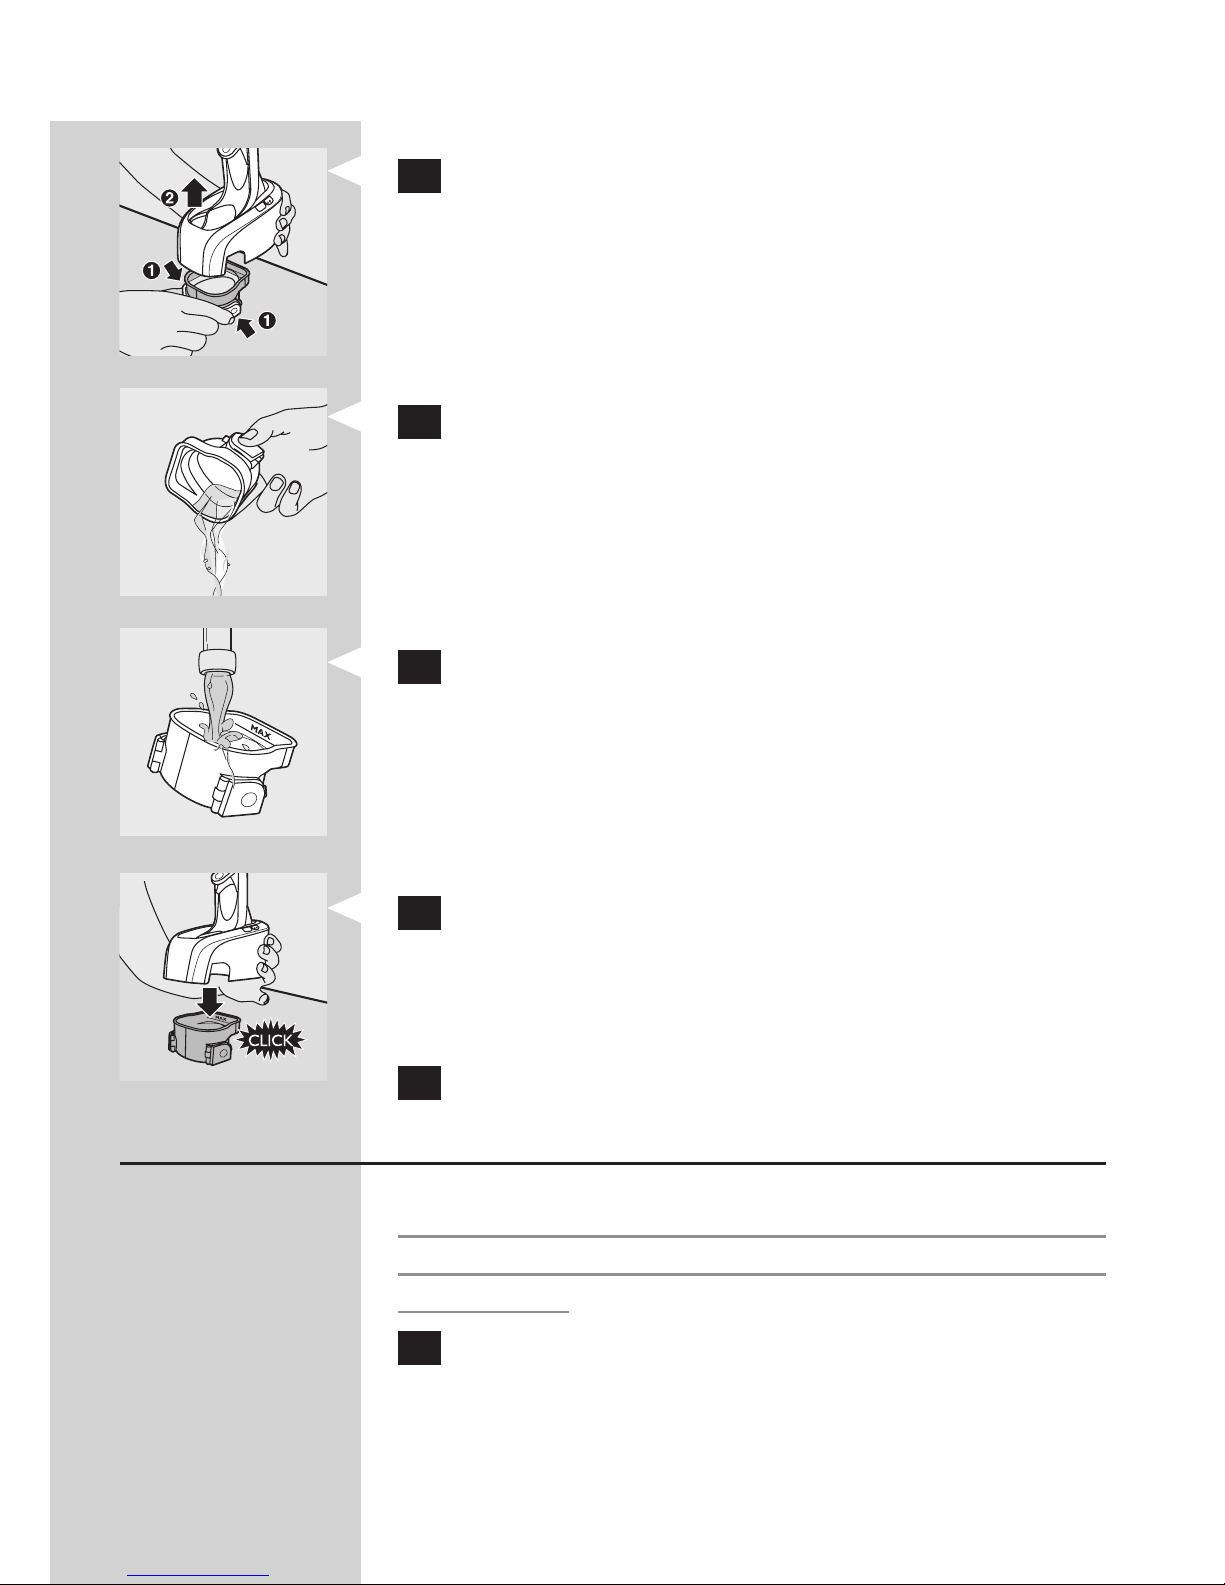
1 Simultaneously press the release buttons on
both sides of the cleaning chamber (1) and lift
the washing machine off the cleaning chamber
(2).
The cleaning chamber remains behind.
2 Unscrew the dosing cap from the bottle with
HQ200 Cleaning Fluid and remove the airtight
seal.
3 Fill the cleaning chamber with cleaning fl uid up
to the MAX indication.
4 Place the washing machine back onto the
cleaning chamber.
Make sure the release buttons snap back into place.
5 Put the appliance plug in the washing machine
and put the powerplug in the wall socket.
The holder automatically moves to the highest
position.
ENGLISH 9
The washing machine is now ready for use.
Using the washing machine
1 Place the shaver in the holder and push the
lever down completely to lock the shaver into
place.
The charging light on the washing machine blinks to
indicate that the shaver is being charged.
2 Press the start button to start the cleaning
program.
The cleaning light starts to blink and the shaver is
automatically lowered into the cleaning fl uid.
During the cleaning program, which takes
approx. 1 hour, the cleaning light blinks
continuously.
During the fi rst phase of the cleaning program,
the shaver automatically switches on and off
several times and is put in different positions.
During the second phase of the cleaning
program, the shaver is placed in the drying
position. It stays in this position until the
end of the program. The cleaning light burns
continuously.
After the cleaning program, the shaver
automatically returns to its starting position and
the charging program is started. The charging
light blinks.
Note: If you press the start button or open the lever
during cleaning, the cleaning program is aborted and
reset. In this case, the cleaning light stops blinking and
the holder returns to its starting position.
Note: If the powerplug is removed from the wall socket
during cleaning, the cleaning program is aborted.
The holder remains in its current position. When
,
,
,
,
ENGLISH10
the powerplug is put back into the wall socket, the
holder moves to the highest position.
Note: If the fl uid volume in the cleaning chamber drops
below the minimum level during the cleaning program,
the program is aborted. The cleaning light blinks with
intervals and the holder returns to its starting position.
Cleaning the washing machine
The cleaning chamber is not dishwasher-proof.
Clean the cleaning chamber every two weeks.
1 Simultaneously press the buttons on both sides
of the washing machine (1) and lift the washing
machine off the cleaning chamber (2).
The cleaning chamber remains behind.
2 Pour any remaining cleaning fl uid out of the
cleaning chamber.
You can simply pour the cleaning fl uid down the sink.
3 Rinse the cleaning chamber under the tap.
4 Place the washing machine back onto the
cleaning chamber.
Make sure the release buttons snap back into place.
5 Clean the washing machine with a moist cloth.
Cleaning the shaver under the tap
Be careful with hot water. Always check if the
water is not too hot, to prevent your hands from
getting burnt.
,
,
ENGLISH 11
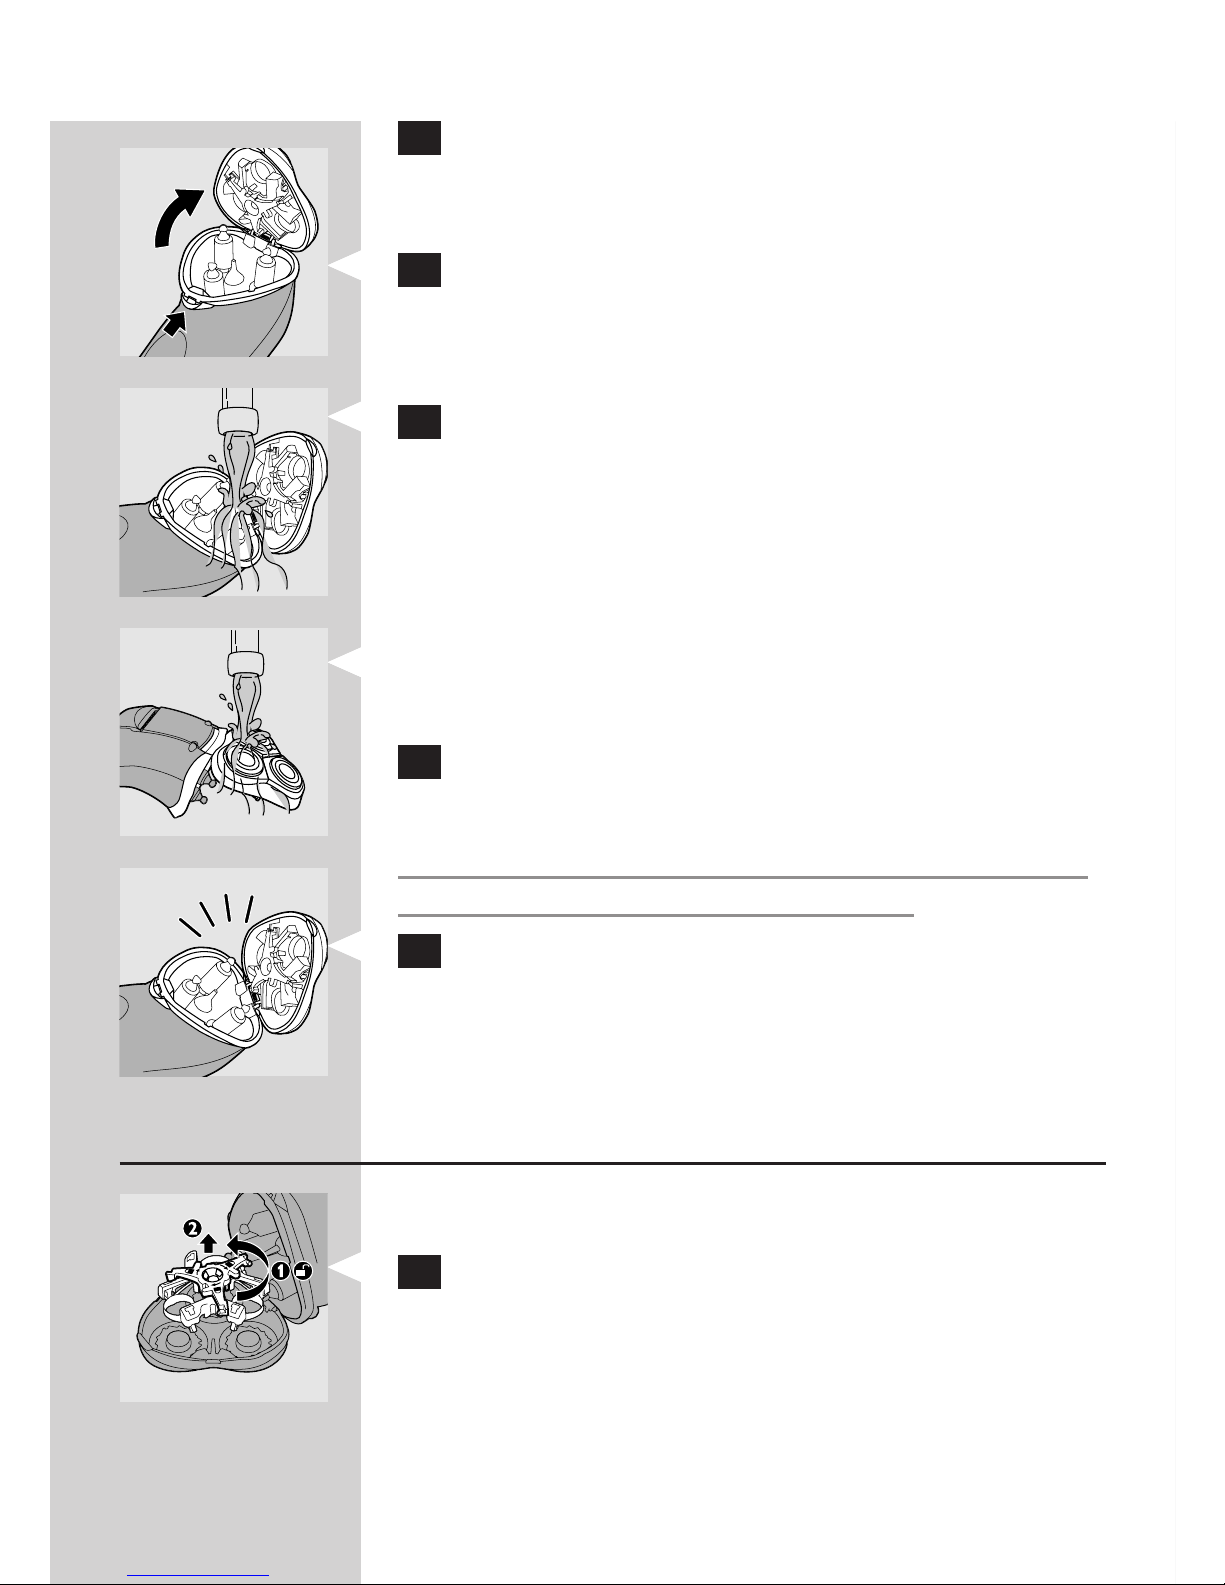
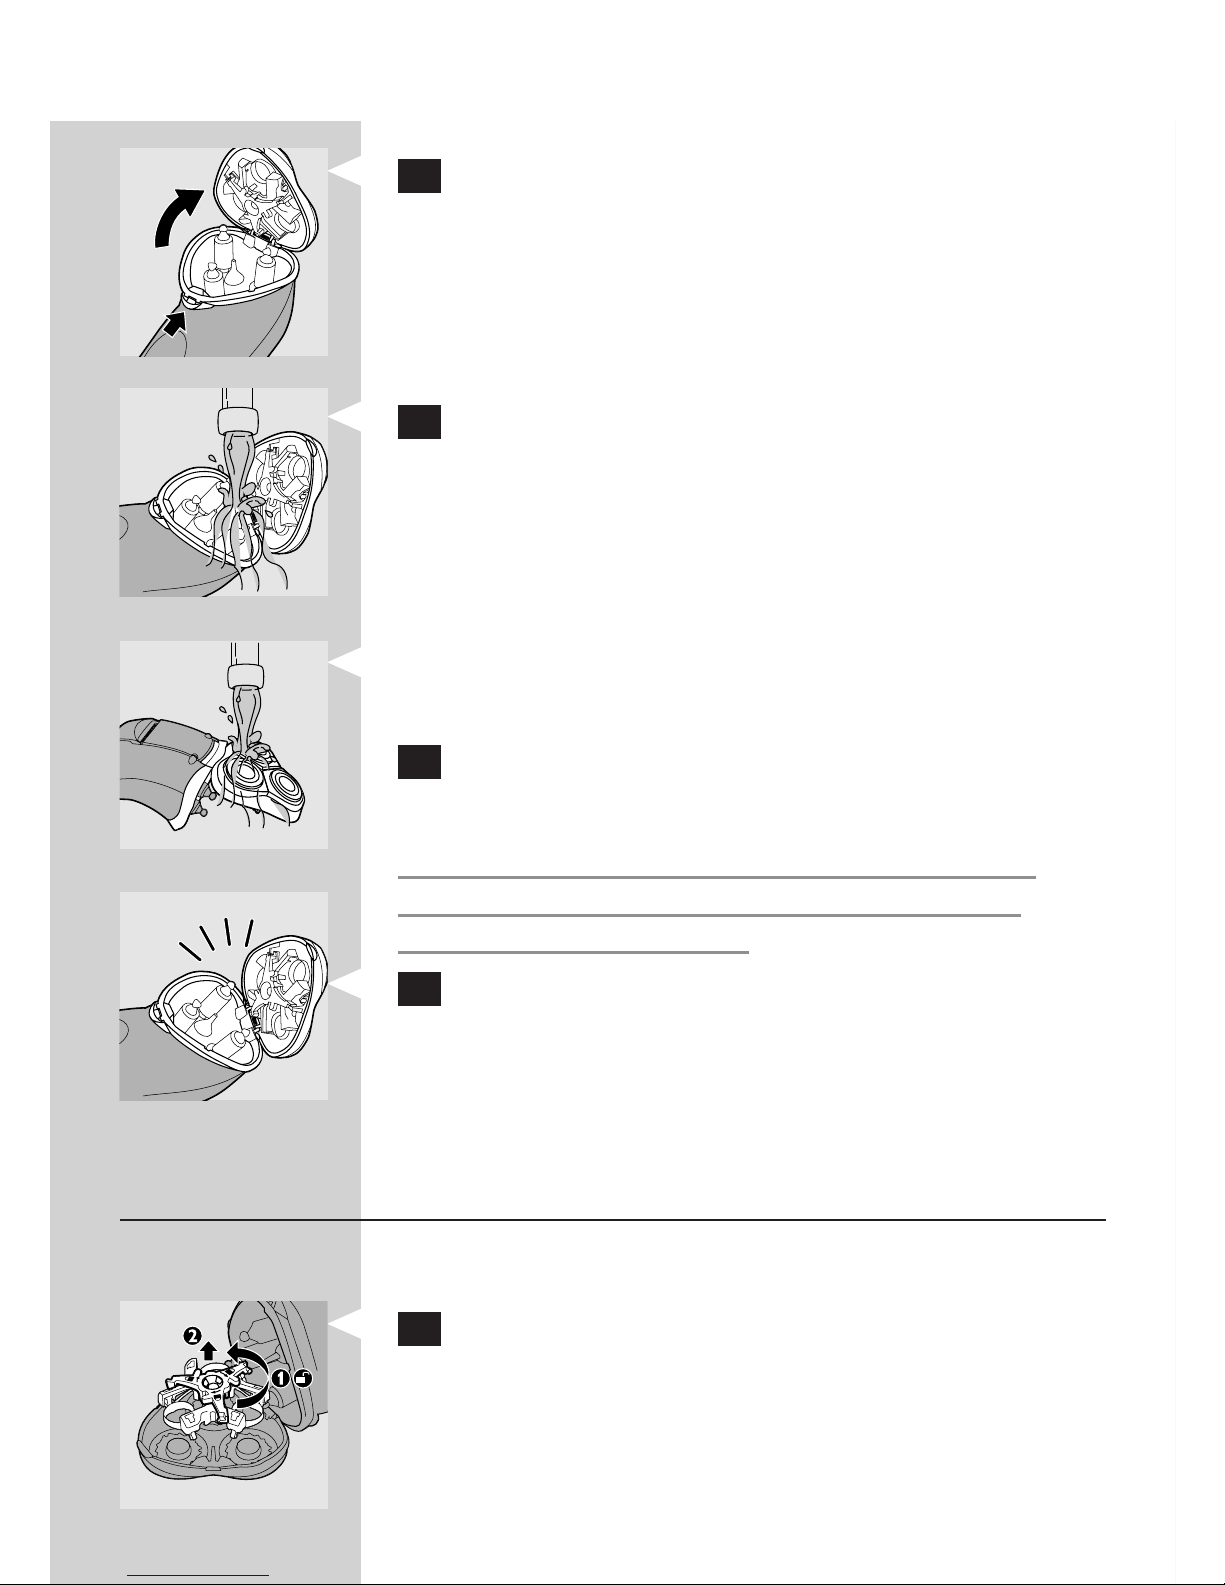
1 Switch off the shaver, remove the powerplug
from the wall socket and pull the appliance plug
out of the shaver.
2 Press the release button to open the shaving
unit.
3 Rinse the shaving unit and the hair
chamber under a hot tap for some time.
Make sure you clean the inside as well as the
outside of the shaving unit.
4 Close the shaving unit and shake off excess
water.
Never dry the shaving unit with a towel or tissue,
as this may damage the shaving heads.
5 Open the shaving unit again and leave it open
to let the appliance dry completely.
You can also clean the hair chamber without water
with the brush supplied.
Cleaning the shaver with the brush supplied
Shaving heads
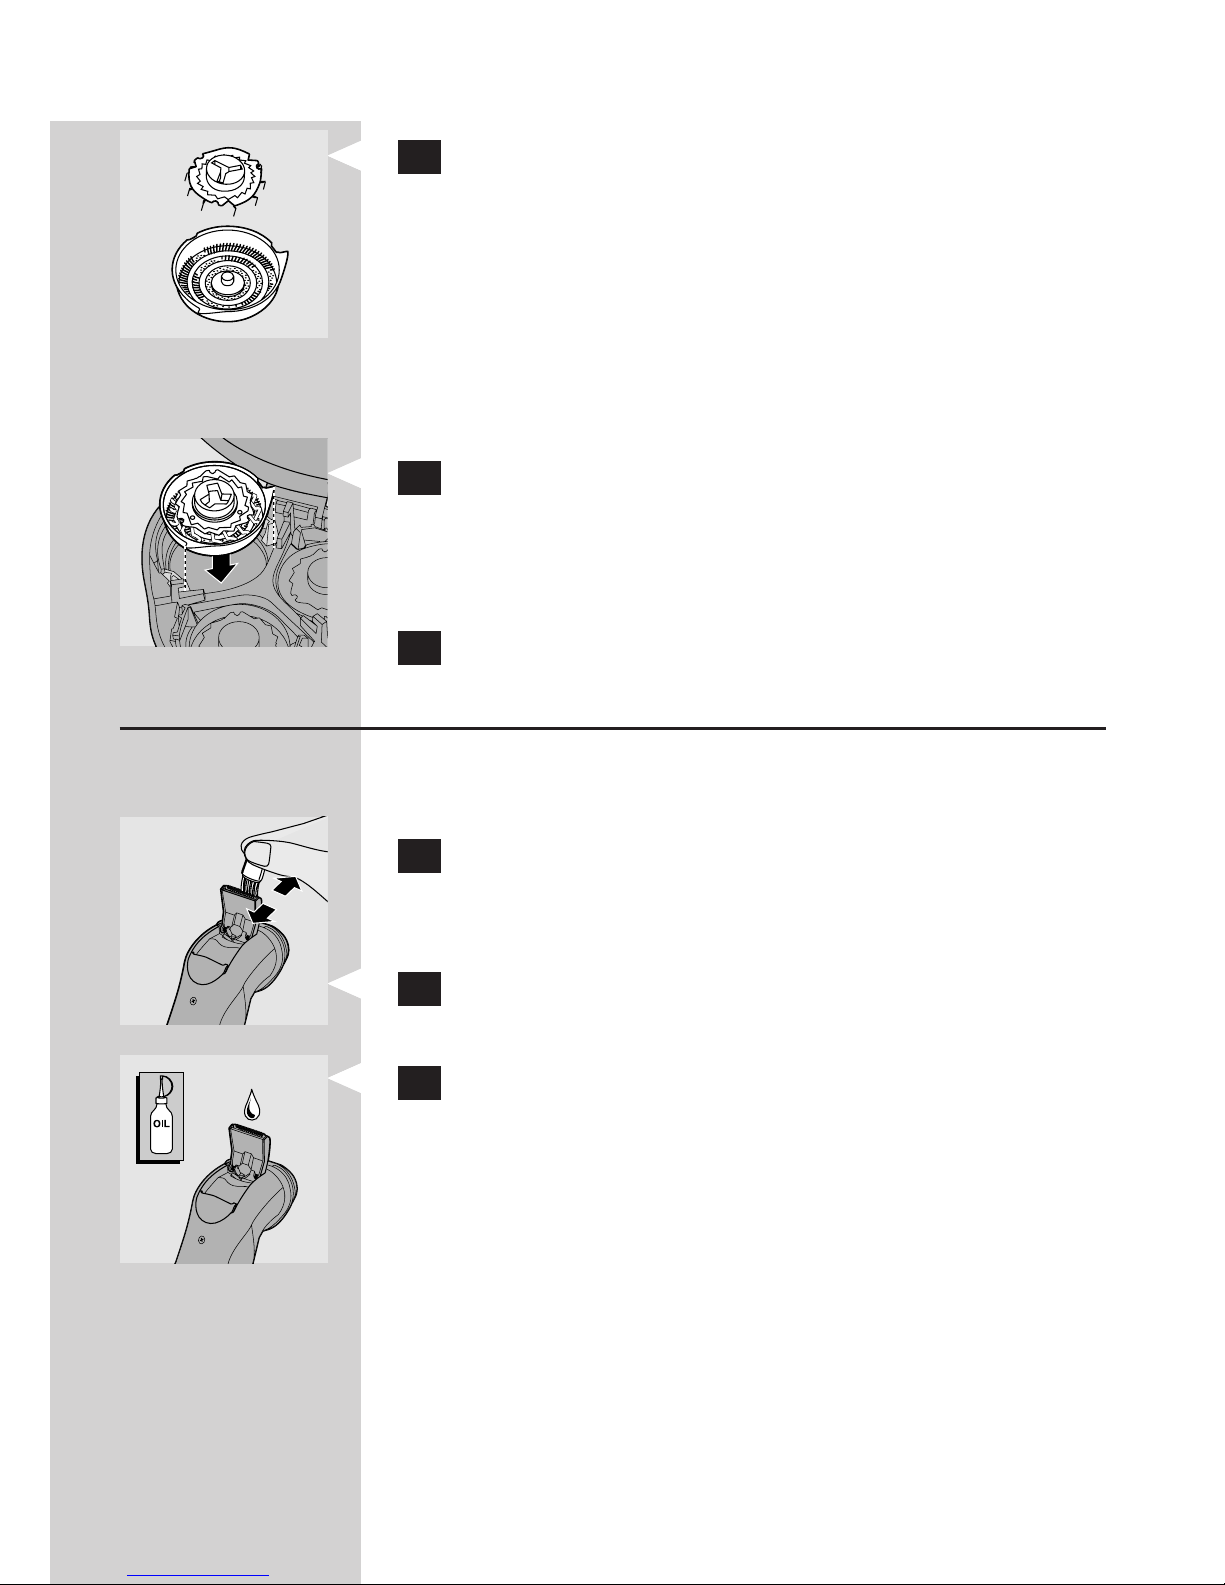
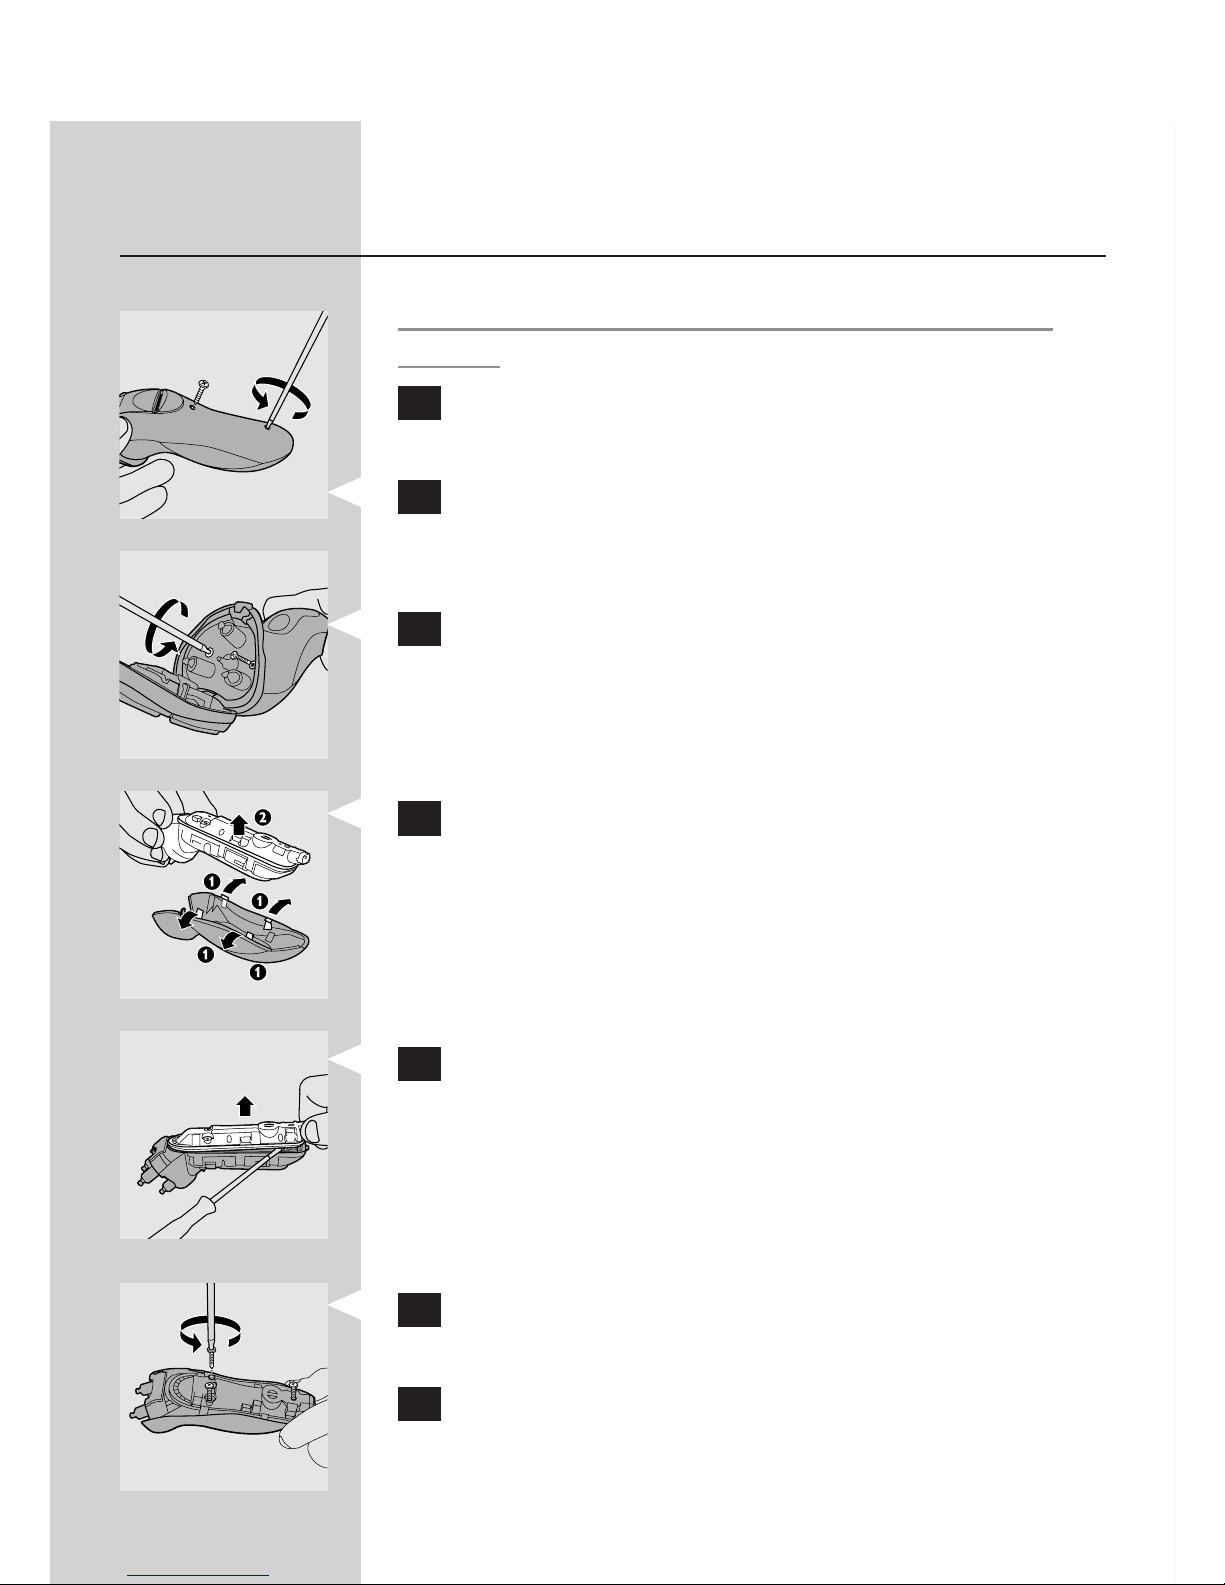
1 Open the shaving unit, turn the lock
anticlockwise (1) and remove the retaining
frame (2).
,
ENGLISH12

2 Clean the cutters and guards with the brush
supplied.
Do not clean more than one cutter and guard
at a time, since they are all matching sets. If you
accidentally mix up the cutters and guards, it
may take several weeks before optimal shaving
performance is restored.
3 Put the shaving heads back into the shaving
unit. Put the retaining frame back into the
shaving unit and turn the lock clockwise.
4 Close the shaving unit.
Trimmer
Clean the trimmer every time you have used it.
1 Switch off the shaver, remove the powerplug
from the wall socket and pull the appliance plug
out of the shaver.
2 Clean the trimmer with the brush supplied.
3 Lubricate the trimmer teeth with a drop of
sewing machine oil every six months.
Storage
Put the protection cap on the shaver to prevent
damage.
,
ENGLISH 13
Store the shaver in the pouch or place it in the
washing machine.
Replacement
Replace the shaving heads every two years for
optimal shaving results.
Replace damaged or worn shaving heads with HQ9
Philips Shaving Heads only.
Note: Do not mix up the cutters and the guards to
guarantee optimal shaving performance.
1 Switch off the shaver, remove the powerplug
from the wall socket and pull the appliance plug
out of the shaver.
2 Press the release button to open the shaving
unit.
3 Turn the lock anticlockwise (1) and remove the
retaining frame (2).
4 Remove the shaving heads and place new ones
in the shaving unit. Put the retaining frame
back into the shaving unit and turn the lock
clockwise.
Make sure that the projections of the shaving
heads fi t exactly into the recesses.
5 Close the shaving unit.
,
ENGLISH14
Accessories
The following accessories are available:
HQ8000 Powerplug.
HQ9 Philips Shaving Heads.
HQ110 Philips Shaving Head Cleaning Spray.
HQ8010 Car Cord.
HQ200 Philips Cleaning Fluid.
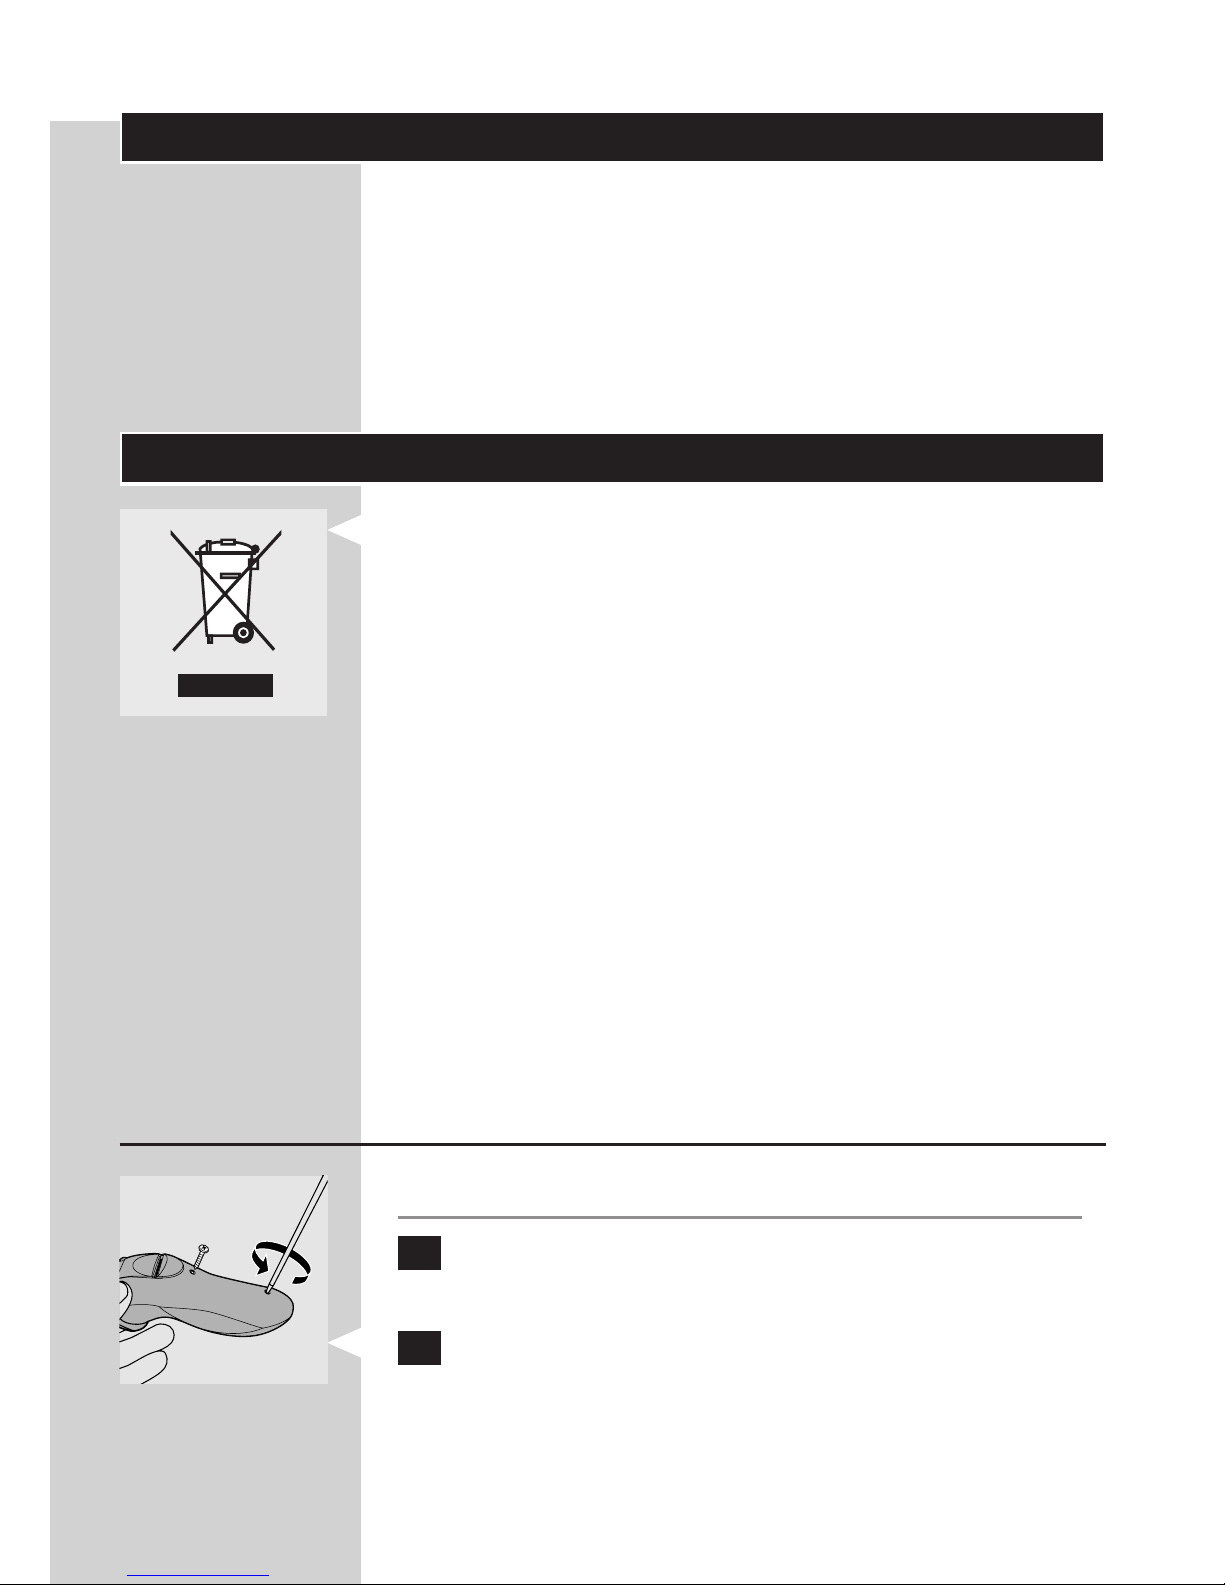
Environment
Do not throw away the appliances with the
normal household waste at the end of their life,
but hand them in at an offi cial collection point
for recycling. By doing this, you help to preserve
the environment.
The built-in rechargeable shaver battery contains
substances that may pollute the environment.
Always remove the battery before you discard
and hand in the shaver at an offi cial collection
point. Dispose of the battery at an offi cial
collection point for batteries. If you have trouble
removing the battery, you can also take the
shaver to a Philips service centre. The staff of
this centre will remove the battery for you and
will dispose of it in an environmentally safe way.
Disposal of the shaver battery
Only remove the battery if it is completely empty.
1 Remove the powerplug from the wall socket
and pull the appliance plug out of the shaver.
2 Let the shaver run until it stops and undo the
two screws in the back of the shaver.
-
-
-
-
-
,
,
ENGLISH 15

3 Undo the two screws in the hair chamber.
4 Undo the three screws in the power unit.
5 Bend the 4 hooks aside (1) to take out the
power unit (2).
Be careful, the hooks are very sharp.
6 Remove the power unit cover with a
screwdriver.
7 Remove the battery.
Be careful, the battery strips are very sharp.
Do not connect the shaver to the mains again after
you have removed the battery.
Guarantee & service
If you need information or if you have a
problem, please visit the Philips website at
www.philips.com or contact the Philips Customer
Care Centre in your country (you fi nd its phone
number in the worldwide guarantee leafl et). If there
is no Customer Care Centre in your country, turn
ENGLISH16

to your local Philips dealer or contact the Service
Department of Philips Domestic Appliances and
Personal Care BV.
Frequently asked questions
1 Why does the shaver not shave as well as it
used to?
The washing machine may not have cleaned the
shaver properly, because the cleaning fl uid in the
cleaning chamber is soiled or the cleaning fl uid
level is too low. Clean the shaver thoroughly
before you continue shaving. If necessary, clean
and refi ll the cleaning chamber (see chapter
‘Cleaning and maintenance’).
Long hairs may obstruct the shaving heads. Clean
the cutters and guards with the brush supplied
(see chapter ‘Cleaning and maintenance’).
The shaving heads may be damaged or
worn. Replace the shaving heads (see chapter
‘Replacement’).
2 Why does the shaver not work when I press
the on/off button?
The battery may be empty. Recharge the battery
(see chapter ‘Charging’).
The shaver may not be connected to the mains.
Put the appliance plug in the shaver and put the
powerplug in the wall socket.
3 Why does the shaving unit come off the
shaver?
The shaving unit may not be placed correctly.
Put the shaving unit back onto the shaver by
inserting the hinge into the slot in the rim of the
hair chamber. Then push the shaving unit home
until it locks into place (‘click’).
,
,
,
,
,
,
ENGLISH 17

4 Why is the shaver not entirely clean after I
have cleaned it in the washing machine?
The cleaning fl uid in the cleaning chamber may
be soiled. Empty and rinse the cleaning chamber.
The cleaning fl uid level may be too low. If
the fl uid volume in the cleaning chamber
drops below the minimum level during the
cleaning program, the program is aborted.
The cleaning light blinks with intervals and the
holder returns to its starting position. Refi ll
the cleaning chamber with cleaning fl uid up to
the MAX indication (see chapter ‘Cleaning and
maintenance’).
5 Why does the washing machine not work
when I press the start button?
The washing machine may not be connected to
the mains. Put the appliance plug in the washing
machine and put the powerplug in the wall
socket.
There may not be an electrical connection
between the washing machine and the shaver.
Open the lever and close it again until the
charging light on the washing machine starts to
blink.
,
,
,
,
ENGLISH18
19
Penting
Bacalah petunjuk penggunaan ini dengan saksama
sebelum menggunakan alat dan simpanlah untuk
referensi jika dibutuhkan kelak.
Gunakan hanya steker listrik yang disertakan.
Steker mengubah tegangan 100-240 volt menjadi
tegangan rendah yang aman di bawah 24 volt.
Steker listrik berisi trafo. Jangan memotong
steker listrik dan menggantinya dengan steker
lain, karena ini dapat membahayakan.
Jangan gunakan steker listrik yang rusak.
Jika steker listrik rusak, harus selalu diganti
dengan tipe yang asli agar terhindar dari bahaya.
Pastikan steker listrik tidak basah.
Gunakan dan simpan alat pada suhu antara 5°C
dan 35°C.
Jangan mengisi ulang pencukur di dalam kantong
tertutup.
Selalu mencabut steker dari pencukur sebelum
membersihkannya di bawah keran.
Alat cukur ini memenuhi peraturan keselamatan
IEC yang disepakati secara internasional dan
dapat dengan aman dibersihkan di bawah keran
air.
Hati-hati dengan air panas. Selalu periksa apakah
air tidak terlalu panas untuk mencegah luka
bakar pada tangan Anda.
Pencukur yang dapat dicuci ini tidak sesuai untuk
mencukur di bawah pancuran.
Jangan mencelupkan pencukur ke dalam air.
Air mungkin merembes keluar dari soket di
bagian bawah pencukur saat Anda membilasnya.
Ini normal dan tidak berbahaya karena semua
komponen elektronik tersimpan dalam unit daya
yang tertutup rapat di dalam pencukur.
,
,
,
,
,
,
,
,
,
,
,
,
,
,
INDONESIA
Hanya gunakan alat pencuci dengan HQ200
Cleaning Fluid yang asli.
Kosongkan wadah pencucian dan bersihkan
dengan membilas seluruhnya dengan air keran
panas setiap 15 hari.
Alat pencuci dapat membersihkan tuntas tetapi
tidak dapat menyuci-hamakan alat cukur Anda,
oleh sebab itu jangan berbagi pakai pencukur ini
dengan orang lain.
Jangan merendam alat pencuci di dalam air atau
membilasnya di bawah keran.
Jauhkan alat pencuci dari jangkauan anak-anak.
Gunakan dan simpan alat pencuci pada suhu
antara 5°C dan 35°C.
Selalu letakkan alat pencuci pada permukaan
horisontal yang stabil dan rata untuk mencegah
kebocoran.
Saat alat pencuci siap digunakan, alat ini tidak
boleh dipindahkan untuk mencegah kebocoran
cairan pembersih.
Pengisian daya
Pastikan pencukur dimatikan sebelum Anda mulai
mengisi daya.
Waktu pengisian daya kurang lebih 1 jam.
Anda juga dapat mencukur tanpa mengisi daya
dengan menghubungkan pencukur ke listrik.
Pencukur yang terisi penuh dapat digunakan tanpa
kabel hingga 50 menit.
1 Isi daya pencukur apabila lampu pada alas
menyala atau berkedip merah.
,
,
,
,
,
,
,
,
INDONESIA20

Indikator daya
Pengisian daya
Ketika Anda mulai mengisi pencukur yang
kosong , lampu pada alas berkedip merah.
Apabila baterai terisi cukup daya untuk satu kali
pencukuran, semua lampu menyala hijau secara
berurutan.
Baterai terisi penuh
Apabila baterai terisi penuh, semua lampu
menyala hijau.
Beberapa jam setelah pengisian, semua lampu mati.
Kapasitas baterai yang tersisa
Jumlah lampu yang menyala, menunjukkan
berapa banyak daya yang tersisa dalam baterai.
Kapasitas baterai hanya ditunjukkan saat Anda
menghidupkan atau mematikan pencukur.
Apabila semua lampu menyala hijau, baterai terisi
100%.
Apabila lampu pada alas menyala hijau, kapasitas
baterai tersisa 20%.
Baterai hampir habis
Apabila daya baterai hampir habis, lampu pada
alas menyala merah.
Apabila Anda mematikan pencukur, lampu ini
berkedip beberapa kali.
Mengisi baterai melalui steker listrik
Jangan mengisi ulang pencukur di dalam kantong
tertutup.
,
,
,
-
-
,
INDONESIA 21
1 Pasang steker alat pada pencukur.
2 Masukkan steker listrik ke stopkontak.
3 Setelah baterai terisi penuh, cabut steker listrik
dari stopkontak dan lepaskan steker alat dari
pencukur.
Mengisi daya baterai dalam alat pencuci
1 Taruh pencukur dalam dudukannya lalu tekan
tuas ke bawah seluruhnya untuk mengunci
pencukur di dalam tempatnya.
Lampu pengisian pada alat pencuci berkedip untuk
menandakan, bahwa baterai pencukur sedang diisi.
Apabila lampu pengisian mulai menyala terusmenerus (setelah sekitar 1 jam), berarti baterai
pencukur terisi penuh.
2 Gerakkan tuas ke atas sampai tidak bisa maju
lagi (1) dan keluarkan pencukur dari alat
pencuci (2).
Lampu pengisian akan padam.
Menggunakan alat
Mencukur
1 Tekan tombol on/off satu kali untuk
menghidupkan pencukur.
Cincin lampu biru di sekitar tombol on/off menyala
untuk menunjukkan bahwa motor bekerja.
,
INDONESIA22

Catatan: Apabila Anda menghidupkan pencukur, semua
lampu menyala dan kapasitas baterai yang tersisa
akan ditampilkan selama beberapa detik.
2 Gerakkan kepala pencukur dengan cepat pada
kulit Anda. Lakukan gerakan lurus maupun
memutar.
Mencukur pada kulit yang kering memberikan hasil
terbaik.
Kulit Anda mungkin memerlukan 2 atau 3 minggu
agar terbiasa dengan sistem pencukuran Philips.
3 Tekan tombol on/off satu kali untuk
menghidupkan pencukur.
Cincin lampu biru di sekitar tombol on/off akan
padam.
4 Bersihkan pencukur (lihat bab ‘Pembersihan
dan Perawatan’).
5 Pasang tutup pelindung pada pencukur setiap
kali Anda selesai menggunakannya, agar tidak
rusak.
Memangkas
Anda dapat menggunakan pemangkas untuk
merapikan janggut dan kumis.
1 Sorong penggeser ke bawah untuk membuka
pemangkas.
Anda dapat mengaktifkan pemangkas sewaktu motor
sedang berjalan.
2 Tutup pemangkas (terdengar bunyi ‘klik’).
-
-
INDONESIA 23

Pembersihan dan perawatan
Cara terbaik dan paling higienis untuk
membersihkan pencukur adalah dalam alat
pencuci. Anda juga bisa membersihkan pencukur
dengan membilasnya di bawah keran atau dengan
sikat yang disertakan.
Membersihkan secara teratur akan menjamin hasil
cukur yang lebih baik.
Membersihkan alat cukur dalam alat
pencuci yang disediakan
Menyiapkan alat pencuci untuk digunakan
Isilah ruang pembersihan sebelum pertama kali
digunakan apabila lampu pembersih berkedip, yang
menandakan, bahwa level cairan terlalu rendah .
Apabila level cairan turun hingga di bawah level
minimum, lampu pembersih mulai berkedip pada
selangan waktu dan unit dudukan alat cukur kembali
ke posisi awal.
Jika menggunakan alat pencuci untuk membersihkan
pencukur setiap hari, Anda harus mengisi ulang
ruang pembersihan kira-kira setiap 15 hari sekali.
1 Secara bersamaan, tekan tombol pelepas pada
kedua samping ruang pembersihan (1) lalu
angkat alat pencuci hingga keluar dari ruang
pembersihan (2).
Ruang pembersihan tetap di tempatnya.
2 Buka tutup botol HQ200 Cleaning Fluid dan
lepaskan segel kedap air.
3 Isilah ruang pembersihan dengan cairan
pembersih hingga garis MAX.
,
INDONESIA24
4 Tempatkan kembali alat pencuci pada ruang
pembersihan.
Pastikan tombol pelepas menghentak kembali di
tempatnya.
5 Pasangkan steker pencukur dalam alat
pencuci dan colokkan steker listrik ke dalam
stopkontak di dinding..
Pegangan secara otomatis bergerak ke posisi
tertinggi.
Alat pencuci sekarang siap digunakan.
Menggunakan alat pencuci
1 Taruh pencukur dalam dudukannya lalu tekan
tuas ke bawah seluruhnya untuk mengunci
pencukur di dalam tempatnya.
Lampu pengisian pada alat pencuci berkedip untuk
menandakan, bahwa baterai pencukur sedang diisi.
2 Tekan tombol start [mulai] untuk menjalankan
program pencucian.
Lampu pembersihan mulai berkedip-kedip dan
pencukur secara otomatis diturunkan ke dalam
cairan pembersih.
Selama program pembersihan, yang berlangsung
sekitar 1 jam, lampu pembersihan terus
berkedip-kedip.
Selama tahap pertama program pembersihan,
alat cukur secara otomatis menyala dan
mati beberapa kali dan disetel ke posisi yang
berbeda-beda.
,
,
INDONESIA 25

Selama tahap kedua program pembersihan, alat
cukur ditempatkan dalam posisi pengeringan.
Alat cukur akan tetap berada pada posisi ini
sampai akhir program. Lampu pembersihan mulai
menyala terus-menerus.
Setelah selesai program pembersihan, alat cukur
secara otomatis kembali ke posisi awal dan
program pengisian dimulai. Lampu pengisian daya
mulai berkedip-kedip.
Catatan: Jika Anda menekan tombol start [mulai] atau
membuka tuas sewaktu mencuci, program pencucian
dibatalkan dan disetel ulang. Dalam hal ini, lampu
pembersihan berhenti berkedip dan pegangannya
kembali ke posisi awal.
Catatan: Jika steker listrik dicabut dari stopkontak di
dinding sewaktu program pembersihan berlangsung,
program pembersihan akan dibatalkan.Pegangan
akan tetap pada posisinya saat itu. Apabila steker
listrik dipasang kembali ke stopkontak di dinding,
pegangan akan bergerak ke posisi tertinggi.
Catatan: Jika isi cairan dalam ruang pembersihan
menyusut hingga di bawah level minimum sewaktu
program pembersihan sedang berlangsung, program
akan dibatalkan. Lampu pembersih berkedip dengan
selangan waktu dan unit dudukan pencukur akan
kembali ke posisi awal.
Membersihkan alat pencuci
Ruang pembersihan tidak dapat dicuci dalam
mesin cuci piring.
Bersihkan ruang pembersihan setiap dua minggu.
,
,
,
,
INDONESIA26
1 Tekan tombol pada kedua samping alat pencuci
secara serempak (1) dan angkat alat pencuci
dari ruang pencucian (2).
Ruang pembersihan tetap di tempatnya.
2 Keluarkan sisa cairan pembersih dari ruang
pembersihan.
Anda tinggal menuangkan cairan pembersih ke bak
cuci.
3 Bilas ruang pembersih di bawah keran.
4 Tempatkan kembali alat pencuci pada ruang
pembersihan.
Pastikan tombol pelepas menghentak kembali di
tempatnya.
5 Bersihkan alat pencuci dengan kain lembab.
Membersihkan alat cukur di bawah keran
Hati-hati dengan air panas. Selalu periksa apakah air
tidak terlalu panas untuk mencegah luka bakar pada
tangan Anda.
1 Matikan pencukur, cabut steker listrik dari
stopkontak di dinding lalu lepaskan steker alat
dari pencukur.
INDONESIA 27
2 Tekan tombol pelepas untuk membuka unit
cukur.
3 Bersihkan unit pencukur dan penampung
rambut dengan membilasnya selama beberapa
saat dengan air panas dari keran.
Pastikan Anda juga membersihkan bagian dalam
di samping bagian luar unit pencukur.
4 Tutup unit pencukur dan kibaskan untuk
membuang air yang tertinggal.
Jangan sekali-kali mengeringkan unit pencukur
dengan handuk atau kertas tisu, karena dapat
merusak kepala pencukur.
5 Buka lagi unit pencukur dan biarkan terbuka
agar kering sama sekali.
Anda juga dapat membersihkan ruang rambut tanpa
air dengan menggunakan sikat yang disertakan.
Membersihkan alat cukur dengan sikat yang
disertakan
Kepala pencukur
1 Buka unit pencukur, putar kunci berlawanan
arah jarum jam (1) lalu lepaskan bingkainya (2).
,
INDONESIA28
2 Bersihkan pemotong dan pelindung dengan
sikat yang disertakan.
Jangan membersihkan lebih dari satu pemotong
dan pelindung sekaligus, karena keduanya
merupakan pasangan. Jika secara tidak sengaja Anda
mencampuradukkan pemotong dan pelindung, akan
dibutuhkan beberapa minggu sebelum pencukuran
dapat kembali optimal.
3 Pasang kembali kepala pencukur ke dalam unit
pencukur. Pasang kembali bingkainya ke dalam
unit pencukur lalu putar searah dengan jarum
jam.
4 Tutup unit pencukur.
Pemangkas
Bersihkan pemangkas setiap kali Anda selesai
menggunakannya.
1 Matikan pencukur, cabut steker listrik dari
stopkontak di dinding lalu lepaskan steker alat
dari pencukur.
2 Bersihkan pemangkas dengan sikat yang
disertakan.
3 Lumasi gigi pemangkas dengan satu tetes
minyak mesin jahit setiap enam bulan.
INDONESIA 29
Penyimpanan
Pasang penutup pada pencukur untuk mencegah
kerusakan.
Simpan alat cukur di dalam kantung atau
tempatkan di alat pencuci.
Penggantian
Ganti kepala pencukur setiap dua tahun untuk hasil
pencukuran yang optimal.
Ganti kepala pencukur yang rusak atau aus hanya
dengan HQ9 Philips Shaving Heads.
Catatan: Jangan mencampuradukkan pemotong dan
pelindung untuk menjamin kinerja pencukuran yang
optimal.
1 Matikan pencukur, cabut steker listrik dari
stopkontak di dinding lalu lepaskan steker alat
dari pencukur.
2 Tekan tombol pelepas untuk membuka unit
cukur.
3 Putar kunci berlawanan dengan arah jarum jam
(1) lalu lepaskan bingkai penahannya (2).
,
,
INDONESIA30

4 Lepaskan kepala pencukur dan pasang yang
baru ke dalam unit pencukur. Pasang kembali
bingkai penahan ke unit cukur lalu putar searah
jarum jam.
Pastikan bahwa kepala pencukur tepat masuk ke
dalam wadahnya.
5 Tutup unit pencukur.
Aksesori
Tersedia aksesori berikut:
Steker listrik HQ8000.
Kepala pencukur Philips HQ9 .
HQ110 Philips Shaving Head Cleaning Spray
Kabel mobil HQ8010.
Cairan pembersih Philips HQ200 .
Lingkungan
Jangan membuang alat bersama limbah
rumahtangga biasa jika alat sudah tidak
bisa dipakai lagi, tetapi serahkan di tempat
pengumpulan barang bekas yang resmi untuk
didaur ulang. Dengan melakukan hal ini, Anda
ikut membantu melestarikan lingkungan.
Baterai isi-ulang pencukur yang terpasang
mengandung bahan yang dapat mencemari
lingkungan. Selalu keluarkan baterai sebelum
membuang pencukur atau membawanya ke
tempat pengumpulan resmi. Buang baterai bekas
di tempat pengumpulan resmi untuk baterai. Jika
Anda sulit mengeluarkan baterai, Anda pun dapat
membawa pencukur tersebut ke pusat servis
Philips yang akan membantu Anda mengeluarkan
-
-
-
-
-
,
,
INDONESIA 31
baterai dan membuangnya dengan cara yang
ramah lingkungan.
Pembuangan baterai alat cukur
Keluarkan baterai hanya jika sudah benar-benar
kosong.
1 Cabut steker listrik dari stopkontak lalu
lepaskan steker alat dari pencukur.
2 Biarkan pencukur bekerja sampai berhenti
sendiri, lalu lepaskan dua sekrup di bagian
belakang pencukur.
3 Lepaskan dua sekrup di ruang rambut.
4 Lepaskan tiga sekrup pada unit daya.
5 Tekuk 4 kait ke samping (1) untuk
mengeluarkan unit daya (2).
Berhati-hatilah, kait ini sangat tajam.
6 Lepaskan tutup unit daya dengan menggunakan
obeng.
7 Keluarkan baterai.
Berhati-hatilah, strip baterai sangat tajam.
INDONESIA32
 Loading...